extension manual - tadep
TRANSCRIPT
PNG Cocoa and Coconut Institute, Tavilo, East New Britain Province,Papua New Guinea
Compiled by Philip Keane and edited by Eremas Tade, Alfred Nongkas, Josephine Saul-Maora, Paul Gende, David Yinil and Jeffrie Marfu
PAPUA NEW GUINEA
COCOA EXTENSION
MANUAL
PREFACE
This manual has two parts: (1) a practical guide to the knowledge, skills and methods needed to produce cocoa as a profitable family business, and (2) an appendix with detailed background information on the history, botany, ecology, pests, diseases, and breeding of cocoa, with special reference to Papua New Guinea. The manual is intended as a summary of the most
up-to-date technical information developed over many years in Papua New Guinea and elsewhere. Papua New Guinea has a proud history of excellent cocoa research and development and this work is summarised here. The manual supports the farmer training modules and programs and the school curriculum already developed for use in Papua New Guinea.
Initially just growing large cocoa trees with minimal management, harvesting the pods occasionally and selling the beans has been profitable (the initial ‘boom’ in production), but has always led in many countries (in the Americas, West Africa, Malaysia, Indonesia, Papua New Guinea) to decline in production following a build-up of pests and diseases and loss of soil fertility (the ‘bust’), causing social disruption. Cocoa planting has then shifted to new areas of forest (within a country or in other countries) where the boom and bust cycle has been repeated (Malaysia had a cocoa boom and bust from 1960 to 1990; Sulawesi has been the latest cocoa ‘boom’ area beginning in 1980, but it has been declining since about 2000). Because of the social disruption involved in the boom and bust cycle, the need to protect rainforest, and the population pressures on existing cleared land, cocoa farming has to be made sustainable on existing farms. The global demand for cocoa is increasing as more people around the world can afford to consume chocolate, and this also requires the development of more sustainable and profitable farming practices. The simple management methods needed to avoid the decline in cocoa production due to pests and diseases and declining soil fertility are well known and have been developed for Papua New Guinea over many years. The spread of the Cocoa Pod Borer Moth through Malaysia and Sulawesi and more recently into Papua New Guinea has accentuated the fact that cocoa requires constant good management in order to obtain good yields.
P A P U A N E W G U I N E A C O C O A E X T E N S I O N M A N U A Lii
Why is the average cocoa production on farms less than about 200 kg per ha when we know that more than 2000 kg per ha is possible with simple good management? High yielding cocoa varieties and the basic knowledge of how to grow the trees well and produce high yields of good quality cocoa beans have been developed over many years at CCIL, Tavilo. The problem is that this knowledge has not been widely applied on farms. There are many possible reasons for this, including that the knowledge has not been provided to all farmers in a way they can understand and use (by personal contact), the infrastructure, land tenure and social conditions have not encouraged farming families to fully use the available land and knowledge to make a good living from cocoa, the institutions charged with governing cocoa production and promoting good farming practices have not been functioning strongly to support farmers, financial institutions have not supported farming families to develop new methods and farming businesses, and the economic returns from growing cocoa have not encouraged farmers to put a lot of effort and resources into getting the maximum return from their cocoa. The cocoa supply chain and final consumers (the chocolate eaters) have to begin to respect the knowledge, skill, investment, risks and hard work required to grow cocoa, and ensure that farmers are paid enough to enable them to invest the time and money needed to grow it sustainably on existing farms and break the exploitative boom and bust cycle. The financial return from cocoa growing has to be great enough to encourage educated and energetic young people to become involved in cocoa growing.
The aim of this manual is to document the well-proven technical knowledge and methods, many of them developed in Papua New Guinea, needed for farming families to successfully manage a cocoa growing business, and to provide a resource for extension workers and teachers to allow them to enthusiastically and successfully educate farmers and young people in productive cocoa growing. Recent developments in research at CCIL are producing types of cocoa and management methods that encourage the integration of cocoa into traditional farming systems. These cocoa types and methods have the potential to transform the current unproductive ‘bush’ cocoa into highly productive smallholder cocoa businesses.
Eremas Tade
CEO
PNG Cocoa and Coconut Institute
P A P U A N E W G U I N E A C O C O A E X T E N S I O N M A N U A L iii

ACKNOWLEDGEMENTS
PNG Cocoa and Coconut Institute staff and associates who in recent times helped develop the ideas presented in this book (in alphabetical order of second name)
Peter Bapiwai, James Butubu, Trevor Clarke, George Curry, Yoel Efron, Peter Epaina, Chris Fidelis, Kenny Francis, Paul Gende, David Guest, Fidelis Hela, Neil Hollywood, Urban Kabala, Anthon Kamuso, Philip Keane, Gina Koczberski, Otto Koimba, John Konam, Noel Kuman, Kiteni Kurika, Louis Kurika, Samson Laup, Gade Ling, Otto Liran, Joachim Lummani, James Maora, Jeffrie Marfu, Graham McNally, John Moxon, Yak Namaliu, Tio Nevenimo, Alfred Nongkas, Eric Omuru, Martin Powell, Jane Ravusiro, Jose-phine Saul-Maora, Eremas Tade, Barnabas Toreu, Hosea Turbarat, Anton Varvaliu, Ricky Wenani, David Yinil. All who contributed in earlier times are acknowledged in Appendix 5.
J. Moxon, C. Prior and R. Roe took the photos of insects and cocoa beans used here and also as used in CCIL extension bulletins and posters except where otherwise acknowledged. All other photos by Philip Keane unless otherwise acknowledged.
Trevor Clarke and David Loh compiled the original CCIL Cocoa Technical Manual from which this Exten-sion Manual is derived. Arnold Parapi reviewed several drafts of the manual.
The insect pest control recommendations, except CPB, are based on those published by J Moxon in a series of Technical Bulletins of the PNG Department of Agriculture and Livestock and later reproduced in CCIL Information bulletins.
This publication is produced by the Productive Partnerships in Agriculture Project (PPAP) for the PNG Cocoa and Coconut Institute Limited and cocoa growers in Papua New Guinea. The PPAP is an agri-cultural development initiative of the Government of Papua New Guinea for the improvement of the livelihoods of PNG cocoa and coffee households. It is implemented by the Cocoa Board of PNG, Coffee Industry Corporation and Department of Agriculture and Livestock. The PPAP is concessionary loan financed by the World Bank and International Fund for Agricultural Development together with a grant from the European Union.
World Bank/Productive Partnerships in Agriculture Project (PPAP)
© PNG Cocoa and Coconut Institute 2017.
Layout & Design by Koko Siga Fiji.
Printed by Quality Printers, Fiji - 2017
P A P U A N E W G U I N E A C O C O A E X T E N S I O N M A N U A Liv
TABLE OF CONTENTS
GROWING HEALTHY COCOA PAGES
Chapter 1 Cocoa Growing as a Profitable Family Business ................................................... 2
Chapter 2 Where Can Cocoa Be Grown Successfully in Papua New Guinea? ................... 14
Chapter 3 Cocoa Planting Material: Clones, Hybrid Seedlings, Budwood Gardens and Nursery Management ...................................................... 24
Chapter 4 Rejuvenating a Cocoa Block ...................................................................................... 46
Chapter 5 Establishing a New Cocoa Block .............................................................................. 52
Chapter 6 Maintaining a Cocoa Block ....................................................................................... 66
Chapter 7 Integrated Pest and Disease Management of Cocoa .......................................... 96
Chapter 8 Diversification on Cocoa Farms ................................................................................ 112
Chapter 9 Health and Safety on a Cocoa Farm ........................................................................ 120
Chapter 10 Use of Pesticides and Knapsack Sprayers ............................................................. 122
Chapter 11 Harvesting and Breaking Cocoa Pods ..................................................................... 140
Chapter 12 Fermentation, Drying and Marketing of Cocoa ..................................................... 146
Chapter 13 Teaching and Learning about Cocoa ....................................................................... 176
APPENDICES
THE HISTORY AND BIOLOGY OF COCOA (with emphasis on PNG)
Appendix 1 Botanical and Social History of Cocoa and Chocolate ....................................... 182
Appendix 2 History and Importance of Cocoa Growing in Papua New Guinea ................... 188
Appendix 3 The Cocoa Tree – Structure, Growth and Production .......................................... 200
Appendix 4 Environment Conditions Needed for Cocoa Growing ........................................... 212
Appendix 5 History of Cocoa Research and Improvement in Papua New Guinea .............. 216
Appendix 6 New Generation Cocoa Varieties in Papua New Guinea ...................................... 232
Appendix 7 Insect Pests of Cocoa in Papua New Guinea ........................................................ 252
Appendix 8 Diseases of Cocoa in Papua New Guinea ............................................................. 290
P A P U A N E W G U I N E A C O C O A E X T E N S I O N M A N U A L 1
1
COCOA GROWING AS A
PROFITABLE FAMILY
BUSINESS Alfred Nongkas, Hosea Turbarat , Anton Varvaliu, Otto Liran, Joachim Lummani, and David Yinil
AIM OF THIS CHAPTER:
To present the background ideas that will help farmers to see cocoa as a profit-able family business (as described in the training carried out by the PNG Univer-sity of Natural Resources and Environment IATP Kairak Training Centre, Vudal in the Sustainable Livelihood Module)
Introduction – a change in thinking is needed to improve cocoa farming • The problem of degeneration of cocoa plantings
General observation and surveys (e.g. P.A. Nelson, M.J. Webb, S. Berthelsen, G. Curry, D. Yinil, C. Fidelis, 2011, Nutritional status of cocoa in Papua New Guinea, ACIAR Technical Reports 76, Australian Centre for International Agricultural Research, Canberra, 67pp.) have shown that smallholder cocoa plantings usually go through three stages of management and productivity:
o Stage 1. High level of management during establishment when the young cocoa plants are growing along with food crops leading up to first pod bearing
o Stage 2. Moderate level of management for the initial 2 – 8 years of highest pod bear-ing when the trees are young and healthy
o Stage 3. Low level of management and very low productivity when the cocoa and shade trees have become too big and overgrown, and pests and diseases have built up as a result of neglect of management during Stage 2
o Since the spread of Cocoa Pod Borer, the decline in productivity and management at-tention has occurred even earlier, during Stage 2.
o The aim of this manual is to promote a new way of thinking about and managing cocoa to prevent this decline.
• To be profitable, cocoa growing has to be changed from foraging of pods on ‘bush’ trees into a more intensive, productive family business.
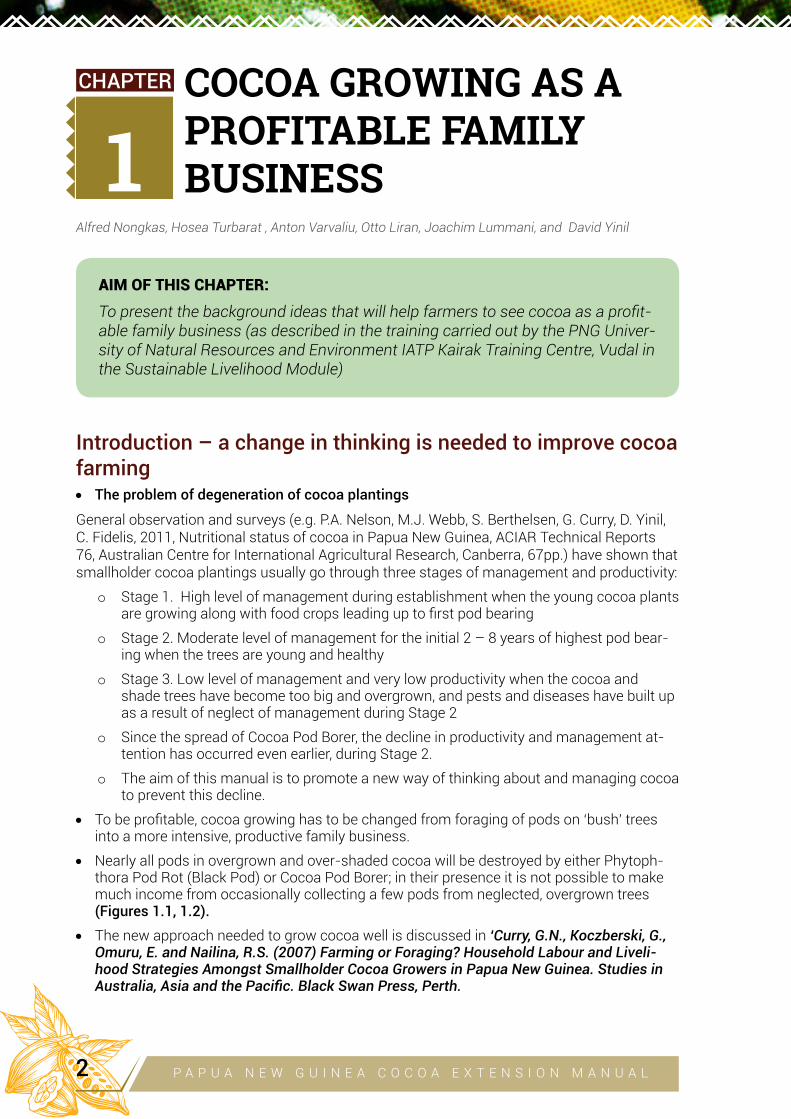
• Nearly all pods in overgrown and over-shaded cocoa will be destroyed by either Phytoph-thora Pod Rot (Black Pod) or Cocoa Pod Borer; in their presence it is not possible to make much income from occasionally collecting a few pods from neglected, overgrown trees (Figures 1.1, 1.2).
• The new approach needed to grow cocoa well is discussed in ‘Curry, G.N., Koczberski, G., Omuru, E. and Nailina, R.S. (2007) Farming or Foraging? Household Labour and Liveli-hood Strategies Amongst Smallholder Cocoa Growers in Papua New Guinea. Studies in Australia, Asia and the Pacific. Black Swan Press, Perth.
CHAPTER
P A P U A N E W G U I N E A C O C O A E X T E N S I O N M A N U A L2
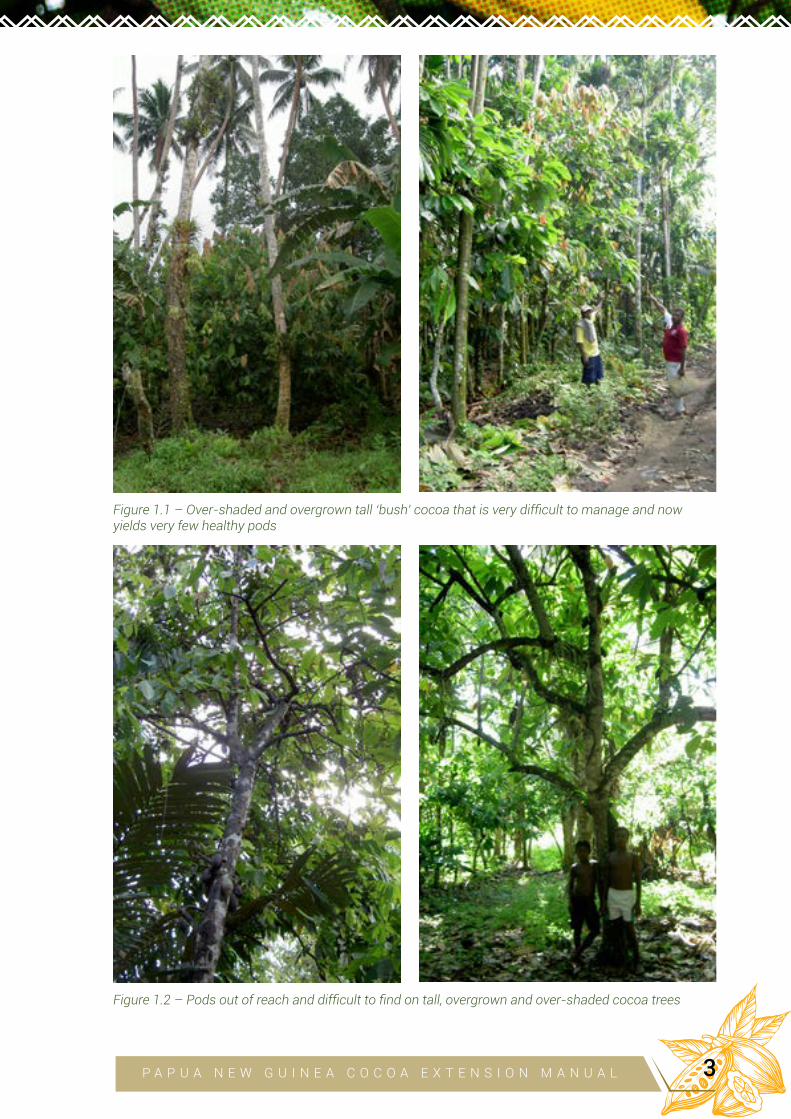
Figure 1.1 – Over-shaded and overgrown tall ‘bush’ cocoa that is very difficult to manage and now yields very few healthy pods
Figure 1.2 – Pods out of reach and difficult to find on tall, overgrown and over-shaded cocoa trees
P A P U A N E W G U I N E A C O C O A E X T E N S I O N M A N U A L 3
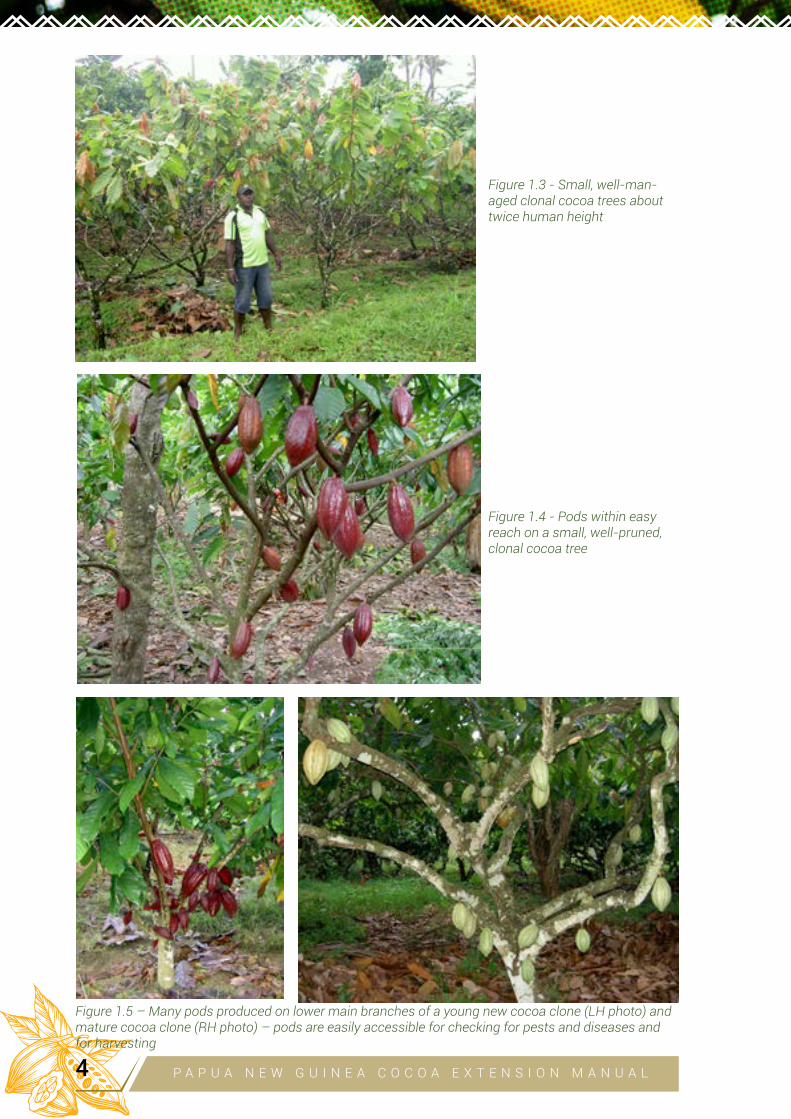
Figure 1.3 - Small, well-man-aged clonal cocoa trees about twice human height
Figure 1.4 - Pods within easy reach on a small, well-pruned, clonal cocoa tree
Figure 1.5 – Many pods produced on lower main branches of a young new cocoa clone (LH photo) and mature cocoa clone (RH photo) – pods are easily accessible for checking for pests and diseases and for harvesting
P A P U A N E W G U I N E A C O C O A E X T E N S I O N M A N U A L4
• Using the most recently developed cocoa types and management methods, aimed at grow-ing smaller, more open and accessible trees (Figures 1.3, 1.4, 1.5) with light shade, the present unproductive cocoa can be changed into a highly profitable family business.
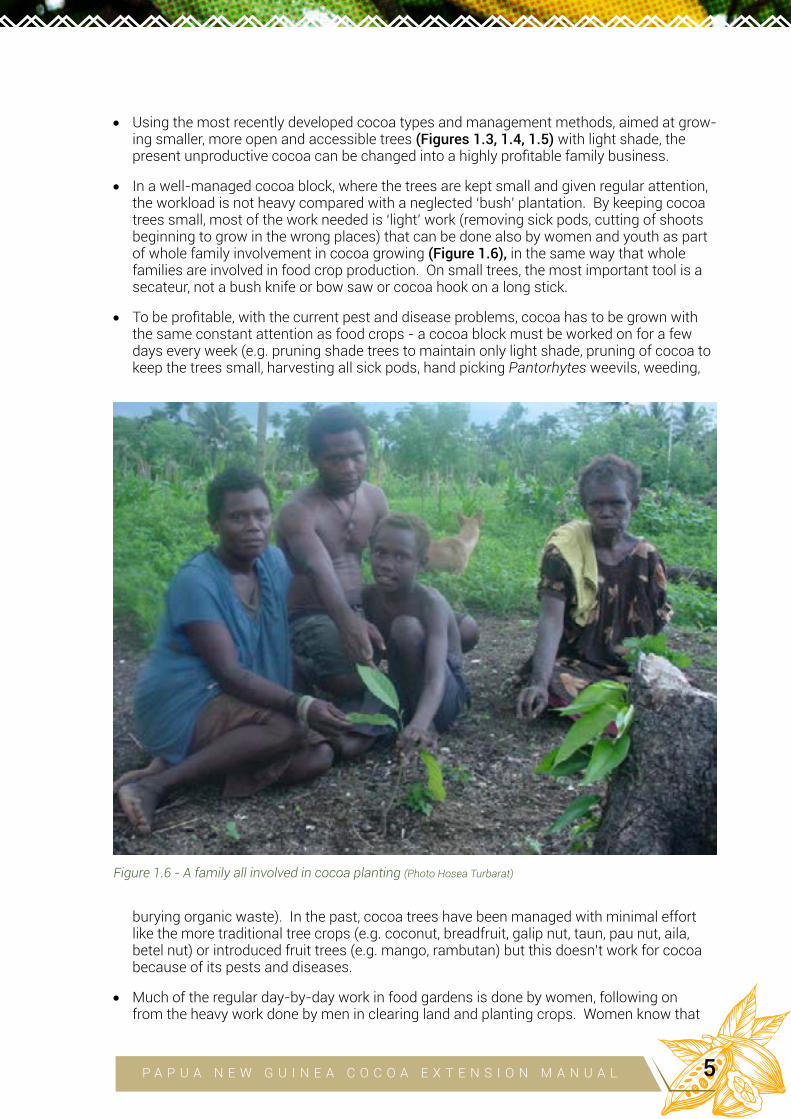
• In a well-managed cocoa block, where the trees are kept small and given regular attention, the workload is not heavy compared with a neglected ‘bush’ plantation. By keeping cocoa trees small, most of the work needed is ‘light’ work (removing sick pods, cutting of shoots beginning to grow in the wrong places) that can be done also by women and youth as part of whole family involvement in cocoa growing (Figure 1.6), in the same way that whole families are involved in food crop production. On small trees, the most important tool is a secateur, not a bush knife or bow saw or cocoa hook on a long stick.
• To be profitable, with the current pest and disease problems, cocoa has to be grown with the same constant attention as food crops - a cocoa block must be worked on for a few days every week (e.g. pruning shade trees to maintain only light shade, pruning of cocoa to keep the trees small, harvesting all sick pods, hand picking Pantorhytes weevils, weeding,
burying organic waste). In the past, cocoa trees have been managed with minimal effort like the more traditional tree crops (e.g. coconut, breadfruit, galip nut, taun, pau nut, aila, betel nut) or introduced fruit trees (e.g. mango, rambutan) but this doesn’t work for cocoa because of its pests and diseases.
• Much of the regular day-by-day work in food gardens is done by women, following on from the heavy work done by men in clearing land and planting crops. Women know that
Figure 1.6 - A family all involved in cocoa planting (Photo Hosea Turbarat)
P A P U A N E W G U I N E A C O C O A E X T E N S I O N M A N U A L 5
constant day-by-day management is needed to grow food crops successfully. If women are involved more in cocoa farming they will apply the same skills and constant attention to cocoa as to their food crops – therefore cocoa farming is best thought of as a ‘family business’.
• It is better to integrate cocoa with food crops and fruit and nut trees, as is now done on many farms, rather than treating it as a separate ‘plantation’ crop.
o This will maximise the use of land and increase the number of food producing and cash earning crops that can be attended at the same time.
o It gives more reasons for farmers to be in the field every day - if people are visiting their food gardens every day they are likely to also tend their cocoa every day.
o The cultivation of food crops in this “cocoa –food crops mix” should begin immediate-ly after planting cocoa as has been traditionally done by smallholders, but can extend beyond the sixth year or the peak cocoa production period.
o Adopting a long term cocoa-food crops mixed cropping system will mean that farms may have fewer trees than in cocoa plantations, but because the trees will be well man-aged, yield per ha should be greater than in a bigger block of poorly managed cocoa.
o This system of farming also provides food security for communities and avoids the problem of displacement of food crops by an export commodity crop.
o At present, unproductive large cocoa trees and neglected shade trees over-shade ev-erything else and make the land unproductive.
• Use of high value trees such as coconut, betel nut, galip nut or fruit trees as shade for cocoa can give an added income and also reduces the labour needed to prune shade trees like the fast growing Gliricidia.
• The breeding of smaller trees and the use of improved pruning methods to keep trees small (less than twice human height), as recently developed at CCIL, should help farmers to treat them more like garden trees than ‘bush’ or ‘plantation’ trees.
• The serious pest and disease problems that have greatly discouraged farmers (Cocoa Pod Borer, Pantorhytes and Longicorn Stem Borers, Phytophthora Pod Rot or Black Pod and Bark Canker, and Vascular Streak Dieback) can all be controlled by good farming practice and regular tending of cocoa.
A business-like approach to cocoa growing involves the same way of thinking as for any town work or profession: • Young people can grow cocoa (along with other crops) as a good business and earn an
income equal to or better than a town job. Good cocoa farming uses complex knowledge and skills and deserves as much respect as any town job and can provide as much per-sonal satisfaction (farmers are their own boss and remain part of their traditional com-munity).
• Farming cocoa as a business involves giving consistent attention to a manageable num-ber of trees in the block – observing and working on the cocoa several days every week. It involves paying attention to detail - learning the skills of every aspect of growing the trees and producing a good product, and giving attention to every tree on a farm. It in-volves thinking and planning ahead - understanding the longer-term effects of the things done on the farm today (e.g. leaving sick pods hanging in the tree, neglecting formation pruning of young clones, leaving cocoa and shade overgrown – all these things will result in more work in the future).
• It involves understanding the finances of the business – the amount of money expended and the amount of income earned from selling the cocoa beans, the difference being the farmer’s profit or pay (see the Book Keeping Module of the University of Natural Resourc-es and Environment IATP Kairak Training Centre, Vudal). It involves understanding the value of time and work, as in a town job.
P A P U A N E W G U I N E A C O C O A E X T E N S I O N M A N U A L6
• It involves being able to think up better ways of doing things to cut costs, reduce labour, increase production, increase cocoa quality and increase profit.
• It means being passionate about your work, taking care with everything you do, and doing a job to the best of your ability.
Learning about cocoa• A cocoa extension specialist or farmer has to learn about the structure and growth of
the cocoa tree and its flowers, fruits (pods) and seeds, and the methods of managing the crop.
• This should begin in primary and secondary schools in the cocoa growing regions be-cause many young people who become cocoa farmers will not do any formal study be-yond their schooling. This is supported by the new Cocoa Curriculum prepared by CCIL.
• For young people likely to return to village life, learning about cocoa (and other crops the students encounter in daily life) can be a stimulating way of learning other important skills such as literacy, numeracy and science.
o The best way to learn is to closely observe growing plants, from germination of the seed (or growth of a budded seedling) through to flowering, pod production and har-vest, and then fermentation, drying and sale of beans; students can be shown plants in all these various stages or can plant seeds and observe their development.
o Students can also be introduced to the production of chocolate and the economic supply chain of which Papua New Guinea farmers are the first step (or first three steps – growing wet beans, fermenting and drying – if they ferment and dry their cocoa) – they will then understand the importance of cocoa growing and feel that they play an important part.
o In cocoa growing regions, cocoa is often growing near the schools and so it should be possible to teach the basic growth and production of cocoa and simple management methods in a very practical way.
• This manual is intended as a support for teaching and learning about cocoa in schools as well as through the provision of extension services on farms.
Income that can be obtained from a cocoa business• An important thing a person asks when thinking about taking up a job or starting a busi-
ness is “what is my take-home pay?”
• For a cocoa business this can be estimated from what we know about cocoa growing and the current price of cocoa.
• You can look up the current world price of cocoa on-line (www.icco.org/statistics/cocoa-
prices.html).
• You can find the current buying price of cocoa in Papua New Guinea at [email protected] or by enquiring at the Economics Section of the Cocoa Board of Papua New Guinea who monitor cocoa prices every day.
• Table 1.1 show calculations to estimate the money that can be made from a cocoa grow-ing business, with various levels of input. Table 1.2 shows the establishment costs of a cocoa block. Tables 1.3 to 1.5 allow you to calculate the costs of rehabilitating and main-taining a cocoa block and preparing dry beans, using Table 1.2 as an example.
P A P U A N E W G U I N E A C O C O A E X T E N S I O N M A N U A L 7
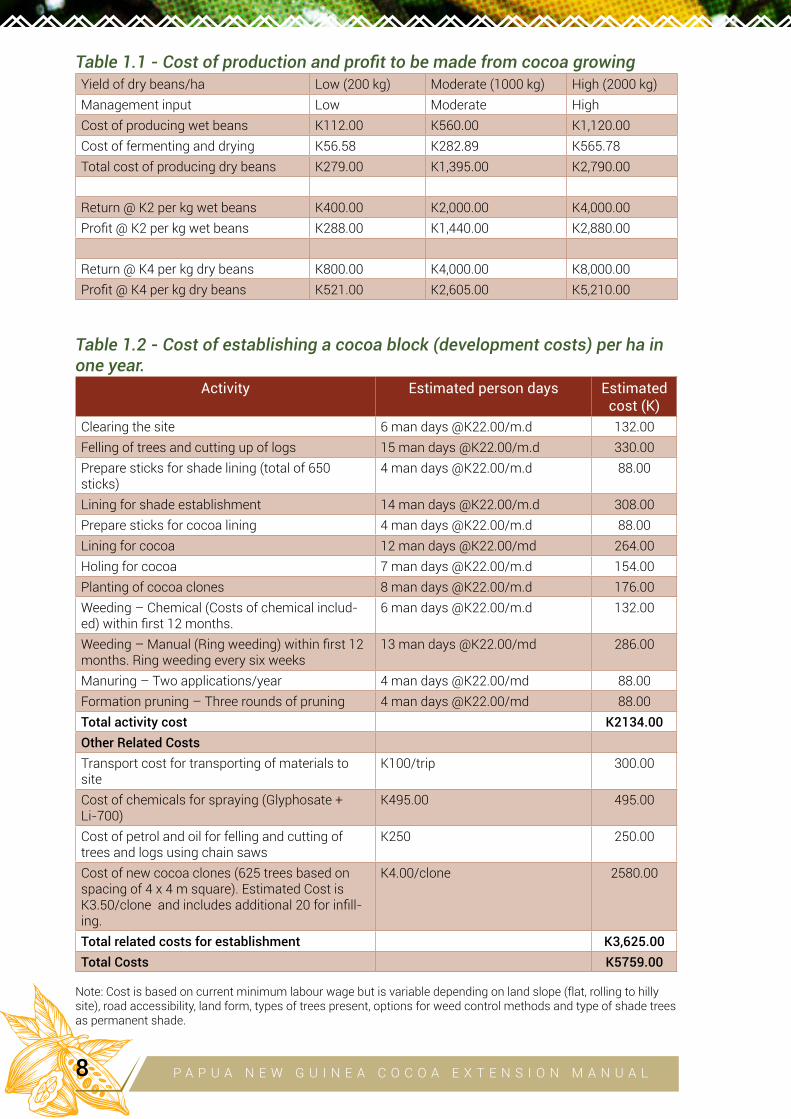
Table 1.1 - Cost of production and profit to be made from cocoa growingYield of dry beans/ha Low (200 kg) Moderate (1000 kg) High (2000 kg)Management input Low Moderate HighCost of producing wet beans K112.00 K560.00 K1,120.00Cost of fermenting and drying K56.58 K282.89 K565.78Total cost of producing dry beans K279.00 K1,395.00 K2,790.00
Return @ K2 per kg wet beans K400.00 K2,000.00 K4,000.00Profit @ K2 per kg wet beans K288.00 K1,440.00 K2,880.00
Return @ K4 per kg dry beans K800.00 K4,000.00 K8,000.00Profit @ K4 per kg dry beans K521.00 K2,605.00 K5,210.00
Table 1.2 - Cost of establishing a cocoa block (development costs) per ha in one year.
Activity Estimated person days Estimated cost (K)
Clearing the site 6 man days @K22.00/m.d 132.00Felling of trees and cutting up of logs 15 man days @K22.00/m.d 330.00Prepare sticks for shade lining (total of 650 sticks)
4 man days @K22.00/m.d 88.00
Lining for shade establishment 14 man days @K22.00/m.d 308.00Prepare sticks for cocoa lining 4 man days @K22.00/m.d 88.00Lining for cocoa 12 man days @K22.00/md 264.00Holing for cocoa 7 man days @K22.00/m.d 154.00Planting of cocoa clones 8 man days @K22.00/m.d 176.00Weeding – Chemical (Costs of chemical includ-ed) within first 12 months.
6 man days @K22.00/m.d 132.00
Weeding – Manual (Ring weeding) within first 12 months. Ring weeding every six weeks
13 man days @K22.00/md 286.00
Manuring – Two applications/year 4 man days @K22.00/md 88.00Formation pruning – Three rounds of pruning 4 man days @K22.00/md 88.00Total activity cost K2134.00
Other Related Costs
Transport cost for transporting of materials to site
K100/trip 300.00
Cost of chemicals for spraying (Glyphosate + Li-700)
K495.00 495.00
Cost of petrol and oil for felling and cutting of trees and logs using chain saws
K250 250.00
Cost of new cocoa clones (625 trees based on spacing of 4 x 4 m square). Estimated Cost is K3.50/clone and includes additional 20 for infill-ing.
K4.00/clone 2580.00
Total related costs for establishment K3,625.00
Total Costs K5759.00
Note: Cost is based on current minimum labour wage but is variable depending on land slope (flat, rolling to hilly site), road accessibility, land form, types of trees present, options for weed control methods and type of shade trees as permanent shade.
P A P U A N E W G U I N E A C O C O A E X T E N S I O N M A N U A L8
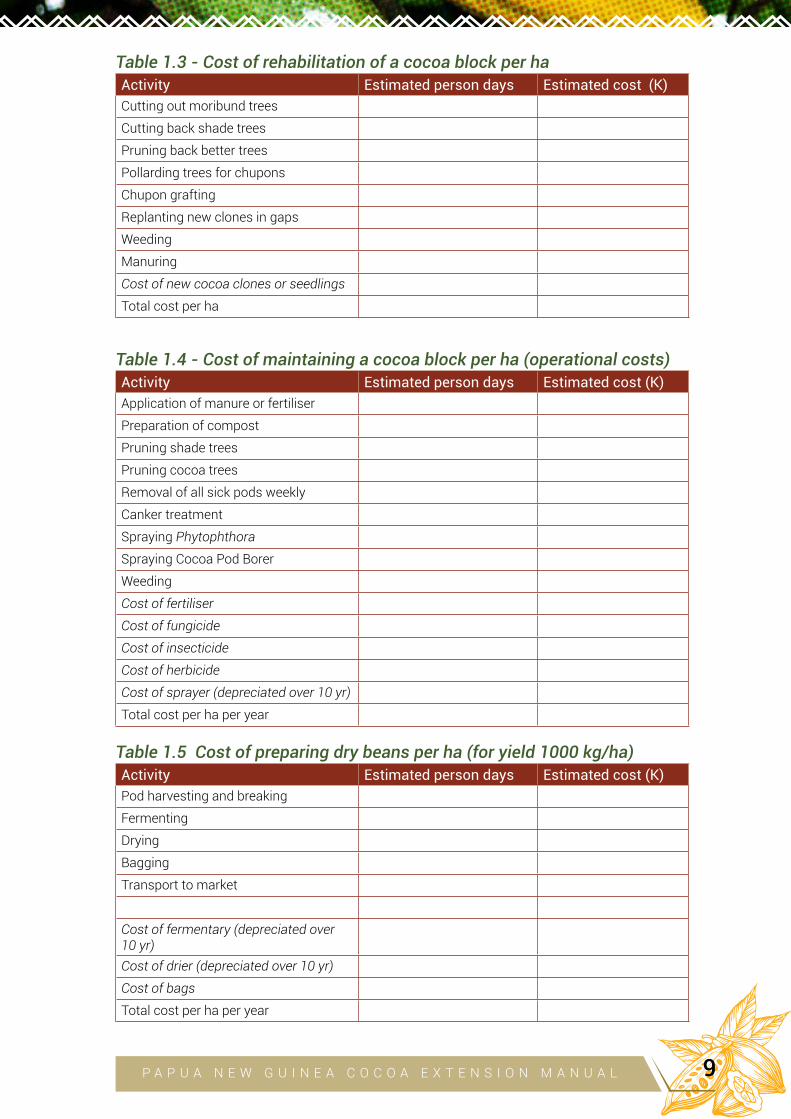
Table 1.3 - Cost of rehabilitation of a cocoa block per ha
Activity Estimated person days Estimated cost (K)
Cutting out moribund trees
Cutting back shade trees
Pruning back better trees
Pollarding trees for chupons
Chupon grafting
Replanting new clones in gaps
Weeding
Manuring
Cost of new cocoa clones or seedlings
Total cost per ha
Table 1.4 - Cost of maintaining a cocoa block per ha (operational costs)
Activity Estimated person days Estimated cost (K)
Application of manure or fertiliser
Preparation of compost
Pruning shade trees
Pruning cocoa trees
Removal of all sick pods weekly
Canker treatment
Spraying Phytophthora
Spraying Cocoa Pod Borer
Weeding
Cost of fertiliser
Cost of fungicide
Cost of insecticide
Cost of herbicide
Cost of sprayer (depreciated over 10 yr)
Total cost per ha per year
Table 1.5 Cost of preparing dry beans per ha (for yield 1000 kg/ha)
Activity Estimated person days Estimated cost (K)
Pod harvesting and breaking
Fermenting
Drying
Bagging
Transport to market
Cost of fermentary (depreciated over 10 yr)
Cost of drier (depreciated over 10 yr)
Cost of bags
Total cost per ha per year
P A P U A N E W G U I N E A C O C O A E X T E N S I O N M A N U A L 9
Business opportunities linked to cocoa production • In addition to the business of cocoa growing, there are many other businesses that
can be developed to service cocoa farming or that can grow out of the skills learned by being a good cocoa farmer - some businesses could be conducted by farmers as well as running their own farms. They could include any aspect of cocoa farming that requires special knowledge and skill (such as block rehabilitation; establishment prun-ing; production of planting material in a nursery; seedling budding, chupon budding or side-grafting; cocoa fermenting and drying), or specialised and expensive equipment such as fermentaries, driers, chain saws or trucks.
• Worldwide, farming is tending to use contractors to do specialised jobs with expensive, labour-saving equipment. The business model is based on investment in expensive equipment which is beyond the purchasing power of an individual farmer, and which would be a poor investment for a single farmer because it would not be used regularly.
• These businesses also usually require specialised knowledge and training, especially in the safe use of equipment like chainsaws (occupational health and safety), or special-ised business knowledge to borrow money from a bank to buy equipment, and to keep it running profitably to repay the bank loan.
• An example is the use of small tractors for cultivating rice fields in Indonesia, replacing the use of water buffalo or cattle -
o A person with a small amount of money to invest (borrowed from a bank or ac-cumulated from other work) can buy a small tractor and then run it as a business contracting it out to cultivate farmers’ fields.
o The business model is that the payment from the farmer for the work is divided three ways (1/3 goes to the person operating the tractor on the farms, 1/3 goes to maintaining the tractor and for fuel, and 1/3 goes to the person who owns the tractor and runs the business – i.e. the profit on the investment and repayment of the bank loan).
• The business skills developed for cocoa can also be applied to other crops such as coconut (e.g. for selling dry nuts or copra), galip nut or food crops.
Cocoa tree pruning, rehabilitation or replanting business (Chapters 4, 5)
Such a business would be based on the special knowledge described in Chapters 4 and 5 and use of chain saws or hydraulic pruning shears. Mechanical mulching machines could be used to chip the tree waste and speed up its recycling as compost. The business would require the training of operators in safe use of dangerous equipment such as chain saws and in safe felling of trees – cutting down big trees or cutting off large branches is dangerous work. The contractors would be paid by farmers to rehabilitate overgrown cocoa.
Clone garden and nursery supplying superior cocoa clones (Chapter 3)
Such a business can be based on the specialised knowledge and equipment described in Chapter 3. It would involve registering, establishing and maintaining a garden of the clones currently recommended by CCIL and a nursery for growing seedlings, budding and supplying clonal plants; it could also involve investment in a truck to distribute plants to customers.
Field budding and grafting business (Chapter 3)
A farmer who has become very skilled at budding seedlings, top grafting chupons or side grafting mature trees in the field could establish a business to do this for other farmers and be paid for each successfully established grafted plant.
Extension and research business
Extension workers, researchers and farmers who have built up a lot of knowledge about grow-ing cocoa well can develop a business based on providing that knowledge to farmers. This is now the main way in which farming knowledge is passed on to farmers worldwide. Groups of farmers often band together to employ an extension worker or agronomist to advise them on
P A P U A N E W G U I N E A C O C O A E X T E N S I O N M A N U A L10
all the specialist knowledge needed to farm successfully (e.g. to advise on how to get produce like cocoa certified, or certified as ‘organic’).
Accounting businesses advising farmers on finances, book keeping and record keeping for the purposes of certification of cocoaFor example someone in a community who has completed the Book Keeping Module of the University of Natural Resources and Environment IATP Kairak Training Centre, Vudal, or training through a business college can apply this knowledge to help cocoa farmers and other cocoa-re-lated businesses run successfully and be paid a fee-for-service.
Labour supply business
Lack of labour is often seen as a reason why cocoa plantings are poorly maintained, and this is a particular problem as farmers become older. A labour supply business may enable the knowl-edge and skills accumulated by older farmers to continue to be useful into old age by employing the labour of younger people. For example, sporting clubs are currently adopting this business approach by organising for club members to provide labour to farmers as a way of raising money for the club. Groups of youths could form a business like this to assist older farmers, on a fee-for-service basis.
Cocoa fermentation and drying business (Chapter 12)
Fermentation and drying, as emphasised in Chapter 12, are highly specialised operations, involv-ing registration with the Cocoa Board of Papua New Guinea, much compliance with regulations, and substantial investment in buildings, fermentation boxes and driers. At present Papua New Guinea’s reputation for high quality cocoa in the world market is being affected by poor fermenta-tion and drying of the cocoa, especially by smoking of the beans because of leaky wood-fired kiln pipes. This is because farmers often do not understand the specialised skills needed for good fermentation and drying of cocoa. A central or village-cluster based fermentary and drier, pro-cessing wet beans bought from farmers, would make an ideal business, relieving individual farm-ers of the responsibility to produce a high quality product to satisfy all the export requirements.
Cocoa buying or trading business (Chapter 12)
This could be done as an agent for an established larger cocoa exporting business by obtaining a dry bean dealer’s licence from the Cocoa Board of Papua New Guinea or, at a lower level, a wet bean dealer’s licence for farmers who own fermentaries. It would involve specialised knowledge to advise farmers of the quality requirements for export cocoa beans.
Trade store to provide farming inputs
A community-based business could act as an agency for a larger business to supply all the inputs (e.g. tools, fertilisers, pesticides, safety equipment) for cocoa and other farming, along with agronomic advice, on the same business model as a trade store.
Compost and fertiliser production (Chapter 6)
A profitable business could be developed from the collection and composting of organic waste to produce a valuable local fertiliser. The business can receive payment for collecting organic waste (e.g. pod husks, or organic waste from markets or town garbage collection) and also through selling the final product. This requires special equipment such as trucks and tractors to handle large quantities of waste and compost, and specialised knowledge about how to make compost and health and safety aspects.
Wood production and sale
Prunings and thinnings from cocoa and shade trees can be bundled up and sold for firewood in towns as a small, value-adding business linked to cocoa farming.
P A P U A N E W G U I N E A C O C O A E X T E N S I O N M A N U A L 11
Pest and disease control (Chapters 7, 10, Appendix 7, 8)
Spraying to control outbreaks of particular pests and diseases is a specialised job that can use motorised equipment that is normally beyond the purchasing power of an individual farmer. It also requires special knowledge about where to get the chemicals, how to mix them to give the right concentrations, special safety equipment and attention to detail for the safe use of toxic chemicals. At present, very few farmers apply pesticides in a safe manner and this is a job that, worldwide, is increasingly being done by specialists who have received special training and certi-
fication.
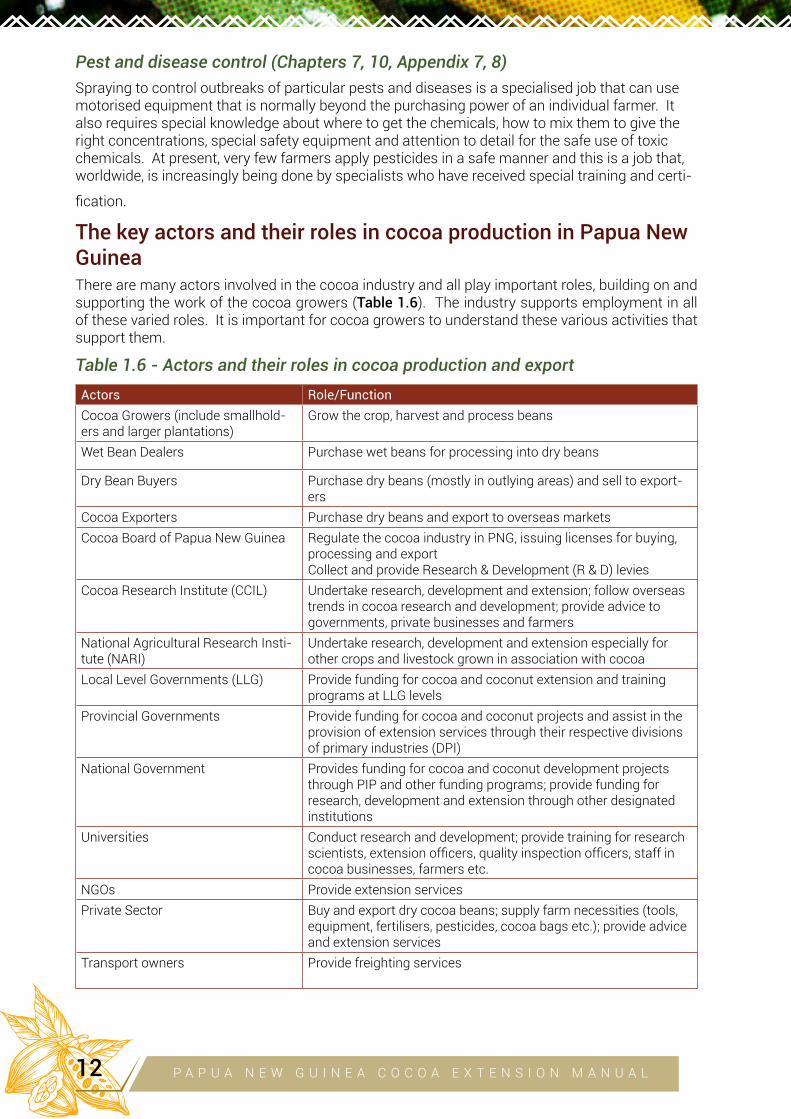
The key actors and their roles in cocoa production in Papua New GuineaThere are many actors involved in the cocoa industry and all play important roles, building on and supporting the work of the cocoa growers (Table 1.6). The industry supports employment in all of these varied roles. It is important for cocoa growers to understand these various activities that support them.
Table 1.6 - Actors and their roles in cocoa production and export
Actors Role/Function
Cocoa Growers (include smallhold-ers and larger plantations)
Grow the crop, harvest and process beans
Wet Bean Dealers Purchase wet beans for processing into dry beans
Dry Bean Buyers Purchase dry beans (mostly in outlying areas) and sell to export-ers
Cocoa Exporters Purchase dry beans and export to overseas marketsCocoa Board of Papua New Guinea Regulate the cocoa industry in PNG, issuing licenses for buying,
processing and exportCollect and provide Research & Development (R & D) levies
Cocoa Research Institute (CCIL) Undertake research, development and extension; follow overseas trends in cocoa research and development; provide advice to governments, private businesses and farmers
National Agricultural Research Insti-tute (NARI)
Undertake research, development and extension especially for other crops and livestock grown in association with cocoa
Local Level Governments (LLG) Provide funding for cocoa and coconut extension and training programs at LLG levels
Provincial Governments Provide funding for cocoa and coconut projects and assist in the provision of extension services through their respective divisions of primary industries (DPI)
National Government Provides funding for cocoa and coconut development projects through PIP and other funding programs; provide funding for research, development and extension through other designated institutions
Universities Conduct research and development; provide training for research scientists, extension officers, quality inspection officers, staff in cocoa businesses, farmers etc.
NGOs Provide extension services
Private Sector Buy and export dry cocoa beans; supply farm necessities (tools, equipment, fertilisers, pesticides, cocoa bags etc.); provide advice and extension services
Transport owners Provide freighting services
P A P U A N E W G U I N E A C O C O A E X T E N S I O N M A N U A L12
The key extension services in Papua New Guinea• CCIL has a key role in extension services in Papua New Guinea because it undertakes re-
search and development to provide the latest knowledge of cocoa growing technologies, accumulating knowledge from their own research conducted in Papua New Guinea but also keeping themselves aware of knowledge from throughout the cocoa growing world. CCIL has extension officers based in nearly all of the cocoa and coconut growing provinces.
• CCIL’s extension partners include DPI officers in most of these provinces, officers in the Co-coa Board and KIK, and those working in a number of NGOs.
• Most recently, CCI has commenced working closely with organisations from the private sec-tor as partners in service delivery.
• Many other organisations including all three levels of government, statutory agencies, the private sector and some NGOs are involved in service delivery of cocoa and coconut technol-ogies.
• Expertise on how to grow cocoa is available and is not a problem. There is, however, a need to improve the education of farmers in these methods and to increase their application by farmers.
• To improve service delivery, a number of strategies need to be incorporated into the current cocoa and coconut extension system. These include:
o Strengthening partnerships with provincial governments and private industry stakehold-ers.
o Strengthening partnerships with farmers and working towards adoption of a participatory extension approach.
o Facilitating delivery of extension advice through more networking with private companies, NGOs, DPIs, churches etc.
o Developing a business model to support extension workers based in villages and linked to CCIL, DPIs and private cocoa companies. This will involve recruiting good cocoa farmers, preferably husband/wife teams, giving them intensive hands-on training, and support-ing them to return to their home villages as ‘Village Extension Workers’ or ‘Cocoa Model Farmer-Trainers’ to set up budwood gardens and nurseries, and to train and advise their fellow farmers.
P A P U A N E W G U I N E A C O C O A E X T E N S I O N M A N U A L 13
2
WHERE CAN COCOA BE
GROWN SUCCESSFULLY
IN PAPUA NEW GUINEA? David Yinil, Eremas Tade, Peter Bapiwai and Chris Fidelis
AIM OF THIS CHAPTER:
To present the latest information on where cocoa can be grown in Papua New Guinea, in order to encourage more widespread planting (largely condensed from L.W. Hanson, R.M. Bourke and D.S. Yinil, 1998, Cocoa and Coconut Growing Environments in Papua New Guinea. A Guide for Research and Extension Activi-ties. Australian Agency for International Development, Canberra)
INTRODUCTION• Some places in Papua New Guinea are better for growing cocoa than others (see Appendix
4 for a discussion of the general environmental conditions required for cocoa) but all 14 provinces of Papua New Guinea have land that is suitable for growing cocoa. Even some highland valleys have a climate suitable for growing cocoa, as shown by the success of experimental plantings in the Karamui area in Simbu Province.
• To date the main proven cocoa producing areas have been the coastal areas of East New Britain, Bougainville, New Ireland, Oro, Madang and West and East Sepik, but cocoa could be grown in many other places and production is now being extended into new areas such as Central, the Gulf and some highland valleys.
• Papua New Guinea is ideally placed to produce more cocoa in a sustainable way to supply the increasing world demand.
o It has much land that is suitable for growing cocoa and has already been used for agriculture.
o It has a good history of cocoa research and development (see Appendix 5) and much knowledge about how to grow cocoa.
o Through the breeding program at CCIL it has developed a range of excellent, well-adapted types of cocoa it can use.
• If Papua New Guinea is to become a more important cocoa producing country, cocoa growing will have to be expanded into new areas as well as being greatly increased on existing farms.
• The main environmental requirements for growing cocoa are:
o A wet tropical equatorial climate, within about 10 degrees of the equator (this includes all of Papua New Guinea)
o Altitude up to 1000 metres above sea level (masl) - this excludes many upland areas of the highlands but not some highland valleys; cocoa has been grown successfully up to 1400masl at Karamui
o No prolonged dry season (unless irrigation is possible)
o Moderate but not excessively high and uninterrupted rainfall - areas with more than 3000mm annual rainfall with few dry periods are likely to have significant problems with Vascular Streak Dieback and Phytophthora Pod Rot and Canker
CHAPTER
P A P U A N E W G U I N E A C O C O A E X T E N S I O N M A N U A L14
o A good depth of loam or sandy-loam soil
o Well drained soil with no prolonged waterlogging, although swampy areas can be drained to grow cocoa as has occurred in parts of Indonesia
o Flat or undulating land, although with special precautions and terracing, cocoa can be grown on steep land as seen in parts of Indonesia
• Suitable road or sea access for transporting cocoa from farms is essential, although mo-torbikes can be used to carry produce along narrow tracks to main roads.
• To consider conservation of primary tropical rainforest, of which Papua New Guinea is one of the prime custodians globally, it is preferable to convert secondary regrowth forest rather than primary forest for cocoa production.
• Old food garden land can be used for cocoa and bananas can provide temporary shade for the cocoa; food crop and other tree crop production can be combined with cocoa farming.
• As salt will damage cocoa leaves, the crop should not be planted right adjacent to a coast where it will be exposed to salt spray, or it should be protected from salt spray by a barrier of other trees.
• See the map below showing the areas suggested as having potential for growing cocoa.
• Many areas shown on the map have no history of cocoa production and so initial test plantings would have to be made to determine their suitability for growing cocoa.
• In some new areas, a lot of land preparation such as making drains may be needed to be-gin cocoa planting.
• Hanson et al. (1998) concluded that the environmental conditions suitable for cocoa in Papua New Guinea were:
o Rainfall between 1800 and 5000mm per year; at the high end cocoa production is limit-ed by Phytophthora diseases
o Land slope less than 30 degrees
o Altitude less than 600m above sea level (cocoa has been grown up to this altitude in Indonesia)
o Absence of seasonal flooding
P A P U A N E W G U I N E A C O C O A E X T E N S I O N M A N U A L 15
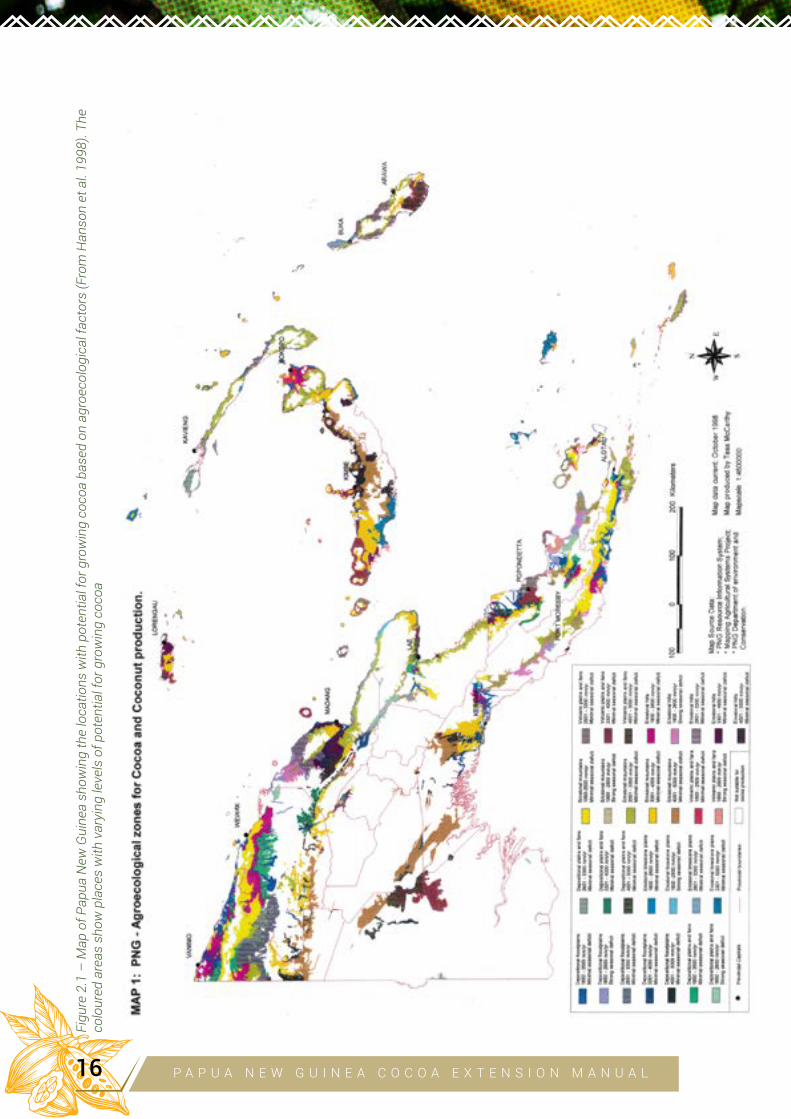
Fig
ure
2.1
– M
ap
of
Pa
pu
a N
ew
Gu
ine
a s
ho
win
g t
he
loc
ati
on
s w
ith
po
ten
tia
l fo
r g
row
ing
co
co
a b
ase
d o
n a
gro
ec
olo
gic
al f
ac
tors
(F
rom
Ha
nso
n e
t a
l. 1
99
8).
Th
e
co
lou
red
are
as
sho
w p
lac
es
wit
h v
ary
ing
leve
ls o
f p
ote
nti
al f
or
gro
win
g c
oc
oa
P A P U A N E W G U I N E A C O C O A E X T E N S I O N M A N U A L16
• While there are exceptions to each of these conditions, they are a good guide for establish-ing the broad environmental limits for growing cocoa.
• Hanson et al. (1998) defined 29 agroecological zones (AEZ) based on environmental fac-tors that affect growth and production of cocoa.
• Slope and soil type determine natural site drainage, important for cocoa that requires well-drained soil and does not tolerate waterlogging for any long period. Soil type also deter-mines natural soil fertility.
• Annual rainfall affects growth and cropping of cocoa – cocoa does not tolerate drought but if rainfall is too high and persistent, Phytophthora diseases and, in some locations Vascular Streak Dieback, can severely limit cocoa production.
• Seasonal distribution of rainfall can be more important than total rainfall – cocoa can grow well in areas with lower mean annual rainfall as long as there is not a long dry period.
• Altitude affects temperature that in turn affects growth and production of cocoa and the incidence of pests and diseases.
o It is generally thought that 600 masl is an upper limit for cocoa but there are many places where it has been grown successfully above this limit, determined by local cli-matic factors.
o Recently cocoa has been grown at up to 1400 masl in the Karamui Valley, Simbu Prov-ince (below). At this altitude the vegetative growth of cocoa is slower, but initial pro-duction of pods has been equal to that in the lowlands. This requires further study.
• Of course all of these factors can be altered by management practices. For example -
o Irrigation can allow cocoa to be grown in drier areas (e.g. in Java).
o Use of organic and inorganic fertilisers can support cocoa production on poorer soils.
o Digging of drains allows cocoa production on soils subject to waterlogging (a highly productive new cocoa growing area was opened up on swampy land in South East Sulawesi by digging drains).
o Development of cocoa clones with higher levels of resistance to Phytophthora diseas-es and Vascular Streak Dieback, and implementation of IPDM practices can reduce the impact of these diseases in wetter areas.
• But the broad criteria used by Hanson et al. (1998) help establish the areas in Papua New Guinea that can be considered potentially suitable for cocoa production for smallholders with limited ability to alter these environmental factors.
P A P U A N E W G U I N E A C O C O A E X T E N S I O N M A N U A L 17
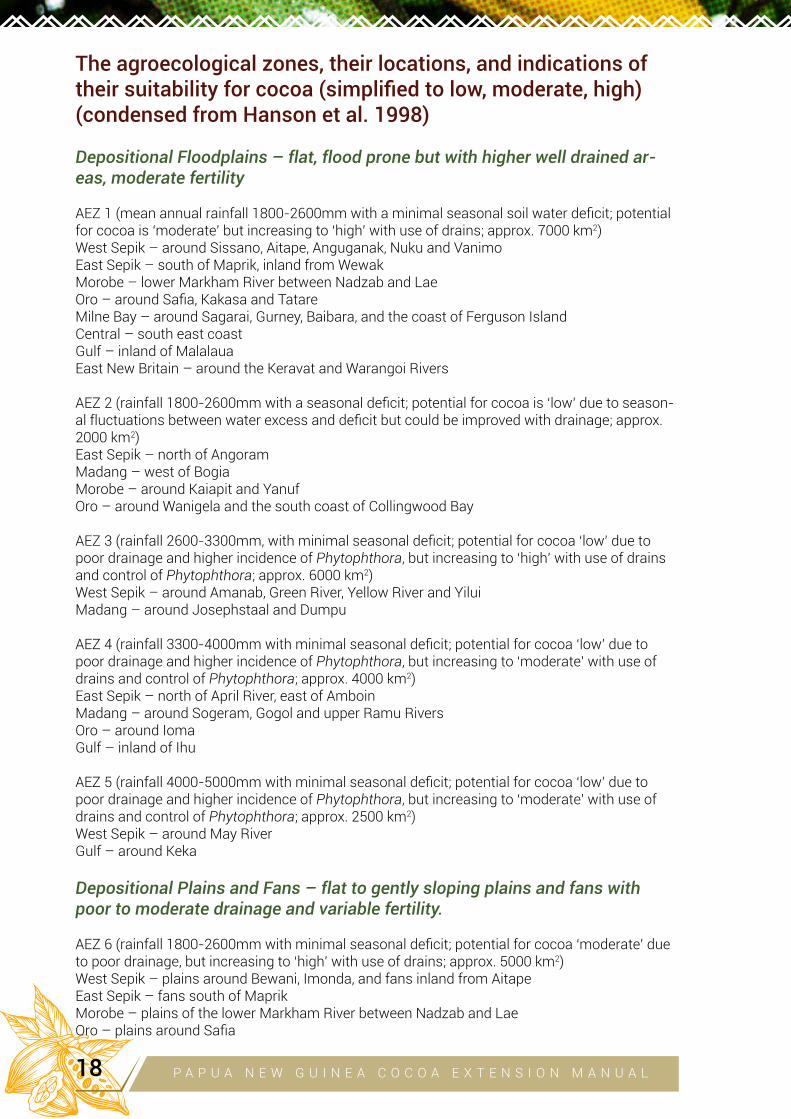
The agroecological zones, their locations, and indications of their suitability for cocoa (simplified to low, moderate, high)(condensed from Hanson et al. 1998)
Depositional Floodplains – flat, flood prone but with higher well drained ar-eas, moderate fertility
AEZ 1 (mean annual rainfall 1800-2600mm with a minimal seasonal soil water deficit; potential for cocoa is ‘moderate’ but increasing to ‘high’ with use of drains; approx. 7000 km2)West Sepik – around Sissano, Aitape, Anguganak, Nuku and VanimoEast Sepik – south of Maprik, inland from WewakMorobe – lower Markham River between Nadzab and LaeOro – around Safia, Kakasa and TatareMilne Bay – around Sagarai, Gurney, Baibara, and the coast of Ferguson IslandCentral – south east coastGulf – inland of MalalauaEast New Britain – around the Keravat and Warangoi Rivers
AEZ 2 (rainfall 1800-2600mm with a seasonal deficit; potential for cocoa is ‘low’ due to season-al fluctuations between water excess and deficit but could be improved with drainage; approx. 2000 km2)East Sepik – north of AngoramMadang – west of BogiaMorobe – around Kaiapit and YanufOro – around Wanigela and the south coast of Collingwood Bay
AEZ 3 (rainfall 2600-3300mm, with minimal seasonal deficit; potential for cocoa ‘low’ due to poor drainage and higher incidence of Phytophthora, but increasing to ‘high’ with use of drains and control of Phytophthora; approx. 6000 km2)West Sepik – around Amanab, Green River, Yellow River and YiluiMadang – around Josephstaal and Dumpu
AEZ 4 (rainfall 3300-4000mm with minimal seasonal deficit; potential for cocoa ‘low’ due to poor drainage and higher incidence of Phytophthora, but increasing to ‘moderate’ with use of drains and control of Phytophthora; approx. 4000 km2)East Sepik – north of April River, east of AmboinMadang – around Sogeram, Gogol and upper Ramu RiversOro – around Ioma Gulf – inland of Ihu
AEZ 5 (rainfall 4000-5000mm with minimal seasonal deficit; potential for cocoa ‘low’ due to poor drainage and higher incidence of Phytophthora, but increasing to ‘moderate’ with use of drains and control of Phytophthora; approx. 2500 km2)West Sepik – around May RiverGulf – around Keka
Depositional Plains and Fans – flat to gently sloping plains and fans with poor to moderate drainage and variable fertility.
AEZ 6 (rainfall 1800-2600mm with minimal seasonal deficit; potential for cocoa ‘moderate’ due to poor drainage, but increasing to ‘high’ with use of drains; approx. 5000 km2)West Sepik – plains around Bewani, Imonda, and fans inland from AitapeEast Sepik – fans south of MaprikMorobe – plains of the lower Markham River between Nadzab and LaeOro – plains around Safia
P A P U A N E W G U I N E A C O C O A E X T E N S I O N M A N U A L18
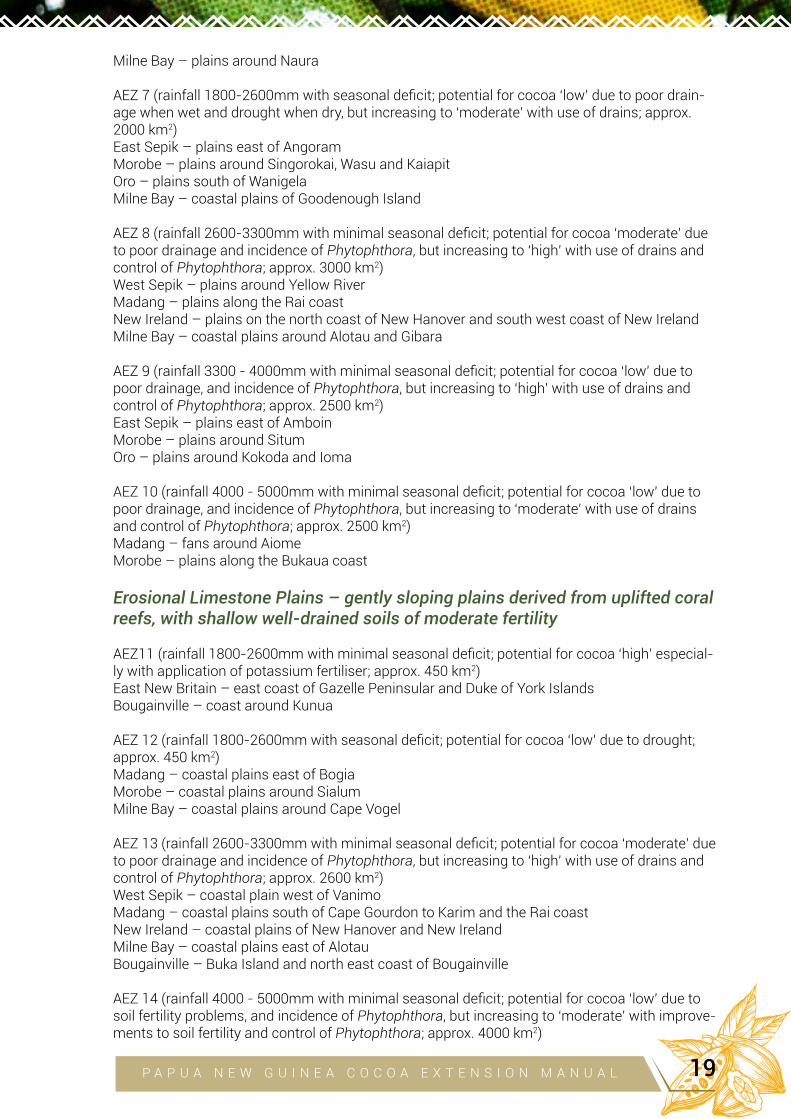
Milne Bay – plains around Naura
AEZ 7 (rainfall 1800-2600mm with seasonal deficit; potential for cocoa ‘low’ due to poor drain-age when wet and drought when dry, but increasing to ‘moderate’ with use of drains; approx. 2000 km2)East Sepik – plains east of AngoramMorobe – plains around Singorokai, Wasu and KaiapitOro – plains south of WanigelaMilne Bay – coastal plains of Goodenough Island
AEZ 8 (rainfall 2600-3300mm with minimal seasonal deficit; potential for cocoa ‘moderate’ due to poor drainage and incidence of Phytophthora, but increasing to ‘high’ with use of drains and control of Phytophthora; approx. 3000 km2)West Sepik – plains around Yellow RiverMadang – plains along the Rai coastNew Ireland – plains on the north coast of New Hanover and south west coast of New IrelandMilne Bay – coastal plains around Alotau and Gibara
AEZ 9 (rainfall 3300 - 4000mm with minimal seasonal deficit; potential for cocoa ‘low’ due to poor drainage, and incidence of Phytophthora, but increasing to ‘high’ with use of drains and control of Phytophthora; approx. 2500 km2)East Sepik – plains east of AmboinMorobe – plains around SitumOro – plains around Kokoda and Ioma
AEZ 10 (rainfall 4000 - 5000mm with minimal seasonal deficit; potential for cocoa ‘low’ due to poor drainage, and incidence of Phytophthora, but increasing to ‘moderate’ with use of drains and control of Phytophthora; approx. 2500 km2)Madang – fans around AiomeMorobe – plains along the Bukaua coast
Erosional Limestone Plains – gently sloping plains derived from uplifted coral reefs, with shallow well-drained soils of moderate fertility
AEZ11 (rainfall 1800-2600mm with minimal seasonal deficit; potential for cocoa ‘high’ especial-ly with application of potassium fertiliser; approx. 450 km2)East New Britain – east coast of Gazelle Peninsular and Duke of York IslandsBougainville – coast around Kunua
AEZ 12 (rainfall 1800-2600mm with seasonal deficit; potential for cocoa ‘low’ due to drought; approx. 450 km2)Madang – coastal plains east of BogiaMorobe – coastal plains around SialumMilne Bay – coastal plains around Cape Vogel
AEZ 13 (rainfall 2600-3300mm with minimal seasonal deficit; potential for cocoa ‘moderate’ due to poor drainage and incidence of Phytophthora, but increasing to ‘high’ with use of drains and control of Phytophthora; approx. 2600 km2)West Sepik – coastal plain west of VanimoMadang – coastal plains south of Cape Gourdon to Karim and the Rai coastNew Ireland – coastal plains of New Hanover and New IrelandMilne Bay – coastal plains east of Alotau Bougainville – Buka Island and north east coast of Bougainville
AEZ 14 (rainfall 4000 - 5000mm with minimal seasonal deficit; potential for cocoa ‘low’ due to soil fertility problems, and incidence of Phytophthora, but increasing to ‘moderate’ with improve-ments to soil fertility and control of Phytophthora; approx. 4000 km2)
P A P U A N E W G U I N E A C O C O A E X T E N S I O N M A N U A L 19
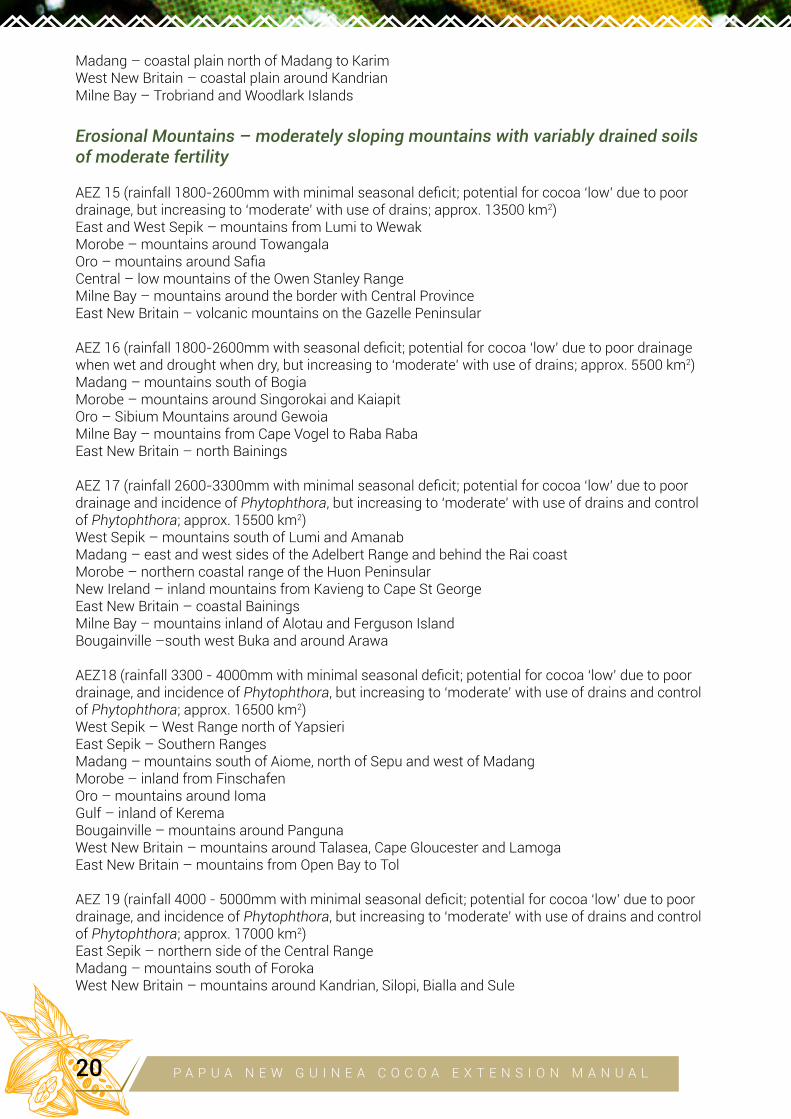
Madang – coastal plain north of Madang to KarimWest New Britain – coastal plain around KandrianMilne Bay – Trobriand and Woodlark Islands
Erosional Mountains – moderately sloping mountains with variably drained soils of moderate fertility
AEZ 15 (rainfall 1800-2600mm with minimal seasonal deficit; potential for cocoa ‘low’ due to poor drainage, but increasing to ‘moderate’ with use of drains; approx. 13500 km2)East and West Sepik – mountains from Lumi to WewakMorobe – mountains around TowangalaOro – mountains around SafiaCentral – low mountains of the Owen Stanley RangeMilne Bay – mountains around the border with Central ProvinceEast New Britain – volcanic mountains on the Gazelle Peninsular
AEZ 16 (rainfall 1800-2600mm with seasonal deficit; potential for cocoa ‘low’ due to poor drainage when wet and drought when dry, but increasing to ‘moderate’ with use of drains; approx. 5500 km2)Madang – mountains south of BogiaMorobe – mountains around Singorokai and KaiapitOro – Sibium Mountains around GewoiaMilne Bay – mountains from Cape Vogel to Raba RabaEast New Britain – north Bainings
AEZ 17 (rainfall 2600-3300mm with minimal seasonal deficit; potential for cocoa ‘low’ due to poor drainage and incidence of Phytophthora, but increasing to ‘moderate’ with use of drains and control of Phytophthora; approx. 15500 km2)West Sepik – mountains south of Lumi and AmanabMadang – east and west sides of the Adelbert Range and behind the Rai coastMorobe – northern coastal range of the Huon PeninsularNew Ireland – inland mountains from Kavieng to Cape St GeorgeEast New Britain – coastal BainingsMilne Bay – mountains inland of Alotau and Ferguson IslandBougainville –south west Buka and around Arawa
AEZ18 (rainfall 3300 - 4000mm with minimal seasonal deficit; potential for cocoa ‘low’ due to poor drainage, and incidence of Phytophthora, but increasing to ‘moderate’ with use of drains and control of Phytophthora; approx. 16500 km2)West Sepik – West Range north of YapsieriEast Sepik – Southern RangesMadang – mountains south of Aiome, north of Sepu and west of MadangMorobe – inland from FinschafenOro – mountains around IomaGulf – inland of KeremaBougainville – mountains around PangunaWest New Britain – mountains around Talasea, Cape Gloucester and LamogaEast New Britain – mountains from Open Bay to Tol
AEZ 19 (rainfall 4000 - 5000mm with minimal seasonal deficit; potential for cocoa ‘low’ due to poor drainage, and incidence of Phytophthora, but increasing to ‘moderate’ with use of drains and control of Phytophthora; approx. 17000 km2)East Sepik – northern side of the Central RangeMadang – mountains south of ForokaWest New Britain – mountains around Kandrian, Silopi, Bialla and Sule
P A P U A N E W G U I N E A C O C O A E X T E N S I O N M A N U A L20
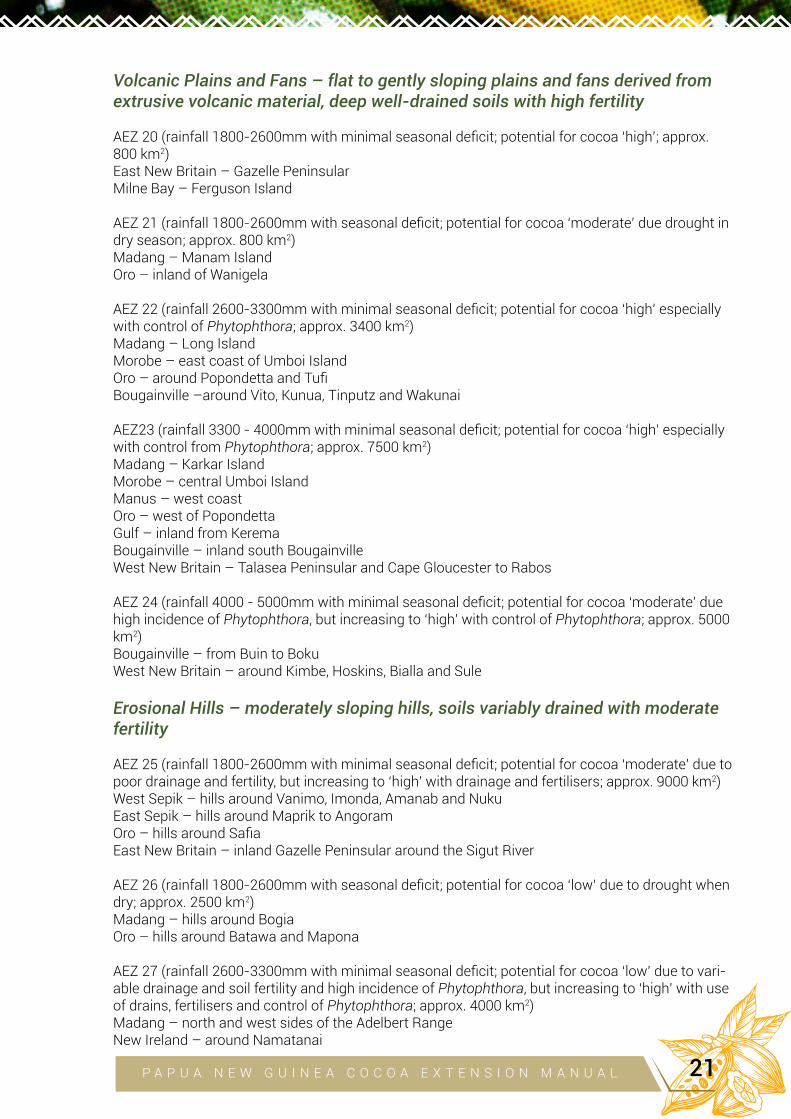
Volcanic Plains and Fans – flat to gently sloping plains and fans derived from extrusive volcanic material, deep well-drained soils with high fertility
AEZ 20 (rainfall 1800-2600mm with minimal seasonal deficit; potential for cocoa ‘high’; approx. 800 km2)East New Britain – Gazelle PeninsularMilne Bay – Ferguson Island
AEZ 21 (rainfall 1800-2600mm with seasonal deficit; potential for cocoa ‘moderate’ due drought in dry season; approx. 800 km2)Madang – Manam IslandOro – inland of Wanigela
AEZ 22 (rainfall 2600-3300mm with minimal seasonal deficit; potential for cocoa ‘high’ especially with control of Phytophthora; approx. 3400 km2)Madang – Long IslandMorobe – east coast of Umboi IslandOro – around Popondetta and TufiBougainville –around Vito, Kunua, Tinputz and Wakunai
AEZ23 (rainfall 3300 - 4000mm with minimal seasonal deficit; potential for cocoa ‘high’ especially with control from Phytophthora; approx. 7500 km2)Madang – Karkar IslandMorobe – central Umboi IslandManus – west coastOro – west of PopondettaGulf – inland from KeremaBougainville – inland south BougainvilleWest New Britain – Talasea Peninsular and Cape Gloucester to Rabos
AEZ 24 (rainfall 4000 - 5000mm with minimal seasonal deficit; potential for cocoa ‘moderate’ due high incidence of Phytophthora, but increasing to ‘high’ with control of Phytophthora; approx. 5000 km2)Bougainville – from Buin to BokuWest New Britain – around Kimbe, Hoskins, Bialla and Sule
Erosional Hills – moderately sloping hills, soils variably drained with moderate fertility
AEZ 25 (rainfall 1800-2600mm with minimal seasonal deficit; potential for cocoa ‘moderate’ due to poor drainage and fertility, but increasing to ‘high’ with drainage and fertilisers; approx. 9000 km2)West Sepik – hills around Vanimo, Imonda, Amanab and NukuEast Sepik – hills around Maprik to AngoramOro – hills around SafiaEast New Britain – inland Gazelle Peninsular around the Sigut River
AEZ 26 (rainfall 1800-2600mm with seasonal deficit; potential for cocoa ‘low’ due to drought when dry; approx. 2500 km2)Madang – hills around BogiaOro – hills around Batawa and Mapona
AEZ 27 (rainfall 2600-3300mm with minimal seasonal deficit; potential for cocoa ‘low’ due to vari-able drainage and soil fertility and high incidence of Phytophthora, but increasing to ‘high’ with use of drains, fertilisers and control of Phytophthora; approx. 4000 km2)Madang – north and west sides of the Adelbert Range New Ireland – around Namatanai
P A P U A N E W G U I N E A C O C O A E X T E N S I O N M A N U A L 21
AEZ28 (rainfall 3300 - 4000mm with minimal seasonal deficit; potential for cocoa ‘low’ due to variable drainage and soil fertility and high incidence of Phytophthora, but increasing to ‘high’ with use of drains, fertilisers and control of Phytophthora; approx. 4000 km2)Madang – hills of the north coast hinterland to Karim and around Sogeram and Gogol valleysMorobe – inland of Bukaua coastManus – east coastOro – hills north of IomaWest New Britain – south coast hinterland west of Aumo
AEZ 29 (rainfall 4000 - 5000mm with minimal seasonal deficit; potential for cocoa ‘low’ due to variable drainage and soil fertility and high incidence of Phytophthora, but increasing to ‘moderate’ with use of drains, fertilisers and control of Phytophthora; approx. 3500 km2)Madang – hills between the Sogeram and Ramu valleysWest New Britain – inland of Kandrian, Bialla and Sule
Infrastructure and social requirements for cocoa growingWhile the above locations indicate where cocoa can be grown based on environmental suitabil-ity, this may not be enough to begin establishing a cocoa industry. Factors like market access (roads, shipping) and social factors such as availability of land and the interest of the communi-ty in growing the crop have to be considered also.
Agronomic testing is needed to show that a new area is suitable for cocoa
Before cocoa can be recommended for growing on a wide scale in a new area, small test plant-ings should be made to determine if the area is good for cocoa and to enable prediction of the problems that may be encountered, as was done for cocoa planting on Karamui Plateau (see below). For example, aspects of soil fertility can easily be overlooked or poorly understood, with the result that while the climate may be good for cocoa, soil nutrient deficiencies may not allow the trees to grow well. New insect pests may occur in particular areas and the effect of these has to be considered.
Use of cocoa and Gliricidia to rehabilitate kunai (Imperata cylindrica) grassland While Gliricidia is referred to as ‘madre de cacao’ (‘the mother of cocoa’ in Spanish) it is also sometimes called ‘the killer of Imperata cylindrica’ - there has been much research on its use to reclaim kunai grassland for productive agriculture in many tropical countries, and CCIL is pres-ently conducting research into this in Papua New Guinea. It has been shown that cocoa and the shade tree Gliricidia can be used to rehabilitate land dominated by kunai grass, if the environ-mental conditions are suitable. For example, the Markham Valley is suitable for growing cocoa but the kunai areas have to be rehabilitated for cocoa.
Growing hybrid cocoa seedlings at higher altitude in the Highlands of Papua New Guinea
Globally, cocoa has been grown in coastal areas from sea level up to an altitude of 600 metres above sea level (Wood, G.A.R. and Lass, R.A. 1985. Cocoa 4th Edition. Tropical Agriculture Series. Longmans. London). However, due to the effect of climate change accompanied by some unique topography and micro climatic conditions in the Highlands of Papua New Guinea, it was consid-ered that cocoa may be grown successfully at higher altitudes in this country. The new areas with demonstrated potential for cocoa in the highlands region in the latest classification were Karamui in Simbu Province, Jimmy Valley in Jiwaka Province, parts of Gusap, Yonki in the Eastern High-lands, and parts of Enga and Southern Highlands provinces (Hanson et al 1998).
P A P U A N E W G U I N E A C O C O A E X T E N S I O N M A N U A L22

Agronomists at CCIL set up a study (planted in April/May 2009 on land formerly supporting veg-etable gardens and coffee) to test the performances of cocoa hybrid seedling offspring from 10 crosses (between two locally adapted Trinitario male parents, K82 and KA2-106, and six Upper Amazonian female parents, KEE5, KEE12, KEE23, KEE42, KEE43 and KEE47) planted at four dif-ferent planting densities (4 m x 2.5, 3.0, 3.5 or 4.0 m) under Gliricidia shade at an altitude of 1,200 meters above sea level at Karamui, Simbu Province. The soils are highly fertile, young volcanic ash derived from basalt. In this location, the average annual rainfall ranges between 2700 and 4000 mm with average relative humidity of 90% and mean sunshine hours of 5.6 h/day. Daily temperature ranges from 20 °C at night to 28.5 °C during the day.Five of these crosses produce offspring with vigorous growth habit (SG2-B) and the other five with less vigorous growth habit (SG2-S)(see Appendix 6). The traits observed were yield components, vegetative parameters and quality attributes. The first flowering of the cocoa was recorded in June 2011, about two years after field planting. In 2012, three years after field planting, most of the cocoa trees were fully bearing. Although the vegetative growth of the cocoa trees was reduced, the yield performances of both SG2-S and SG2-B were very similar to cocoa grown in the coastal provinces. The growth of Glir-icidia sepium shade trees was also reduced compared with that in coastal areas. The vegetative growth of SG2-S seedlings was more greatly reduced than that of SG2-B seedlings, with the trees having more compact growth, shorter internodes and reduced tree height and shorter stems to the jorquette (Figure 2.2). However, the number of pods per tree, number of beans per pod, bean size and quality attributes of both crosses were not reduced compared with those expected in the lowlands.
It is likely that the lower average temperatures, especially at night, suppressed vegetative growth and promoted flowering and increased pod production. Because of the reduced vegetative growth at higher altitude, it will be possible to increase planting densities to give higher yields per hect-are. Moreover, it is anticipated that costs for cocoa and shade tree pruning may be much reduced due to the slow vegetative growth of the trees. Also, the degree of shading required for optimum yield at these altitudes may have to be adjusted. Preliminary results also show that the incidence of pests and diseases (especially Cocoa Pod Borer, Phytophthora diseases and Vascular Streak Dieback) is likely to be much less at higher altitude. In this preliminary study, no pests or diseas-es have been recorded so far. It is anticipated that farmers in this region will be able to apply for organic certification or single origin cocoa as an incentive for smallholder farmers to increase profitability and improve their livelihoods. While the results are preliminary, they indicate great po-tential for growing cocoa in certain highland areas of Papua New Guinea and these test genotypes constitute an important genetic resource for further selection and breeding of cocoa adapted to these high altitude regions.
Figure 2.2 – Three-year-old SG2 Big cocoa tree (left) with higher jorquette and SG2 Small cocoa tree (right) with lower jorquette height and compact growth habit due to cooler temperatures at Karamui
P A P U A N E W G U I N E A C O C O A E X T E N S I O N M A N U A L 23
3
COCOA PLANTING MATE-
RIAL: CLONES, HYBRID
SEEDLINGS, BUDWOOD
GARDENS AND NURSERY
MANAGEMENT Jeffrie Marfu, James Butubu, Yoel Efron , and Peter Epaina (For further details see ‘Guide to establish commercial cocoa bud-wood garden in Papua New Guinea’, CCI of PNG, and ‘Guidelines and Procedures for Commercial Cocoa Nursery Establishment, Operation and Management’, CCI of PNG)
AIM OF THIS CHAPTER:
To describe how to produce the best cocoa planting material for farms, and the management of budwood gardens and nurseries
Types of planting material (hybrid seedlings and clones) and their supply• The best available cocoa planting material must be used on farms to get the highest yields.
This has been developed at CCIL for high yield, good bean quality and some resistance to the main pests and diseases (see Appendix 5 for the history of development of cocoa planting material in Papua New Guinea and Appendix 6 for a description of the new genera-tion of planting material).
• Two types of planting material are recommended and produced by CCIL:
(1) seedlings grown from hybrid seeds produced by hand pollination of selected par-ents – seedlings are easier to grow initially but tend to produce taller trees (Figures 3.1, 3.3).
(2) clones that have been grown from buds or grafts onto seedlings and are identical to the special mother tree that has been tested at CCIL and shown to be very good – clones require special formation pruning for a year after planting to give a well-shaped tree (Figure 3.2).
CHAPTER
P A P U A N E W G U I N E A C O C O A E X T E N S I O N M A N U A L24
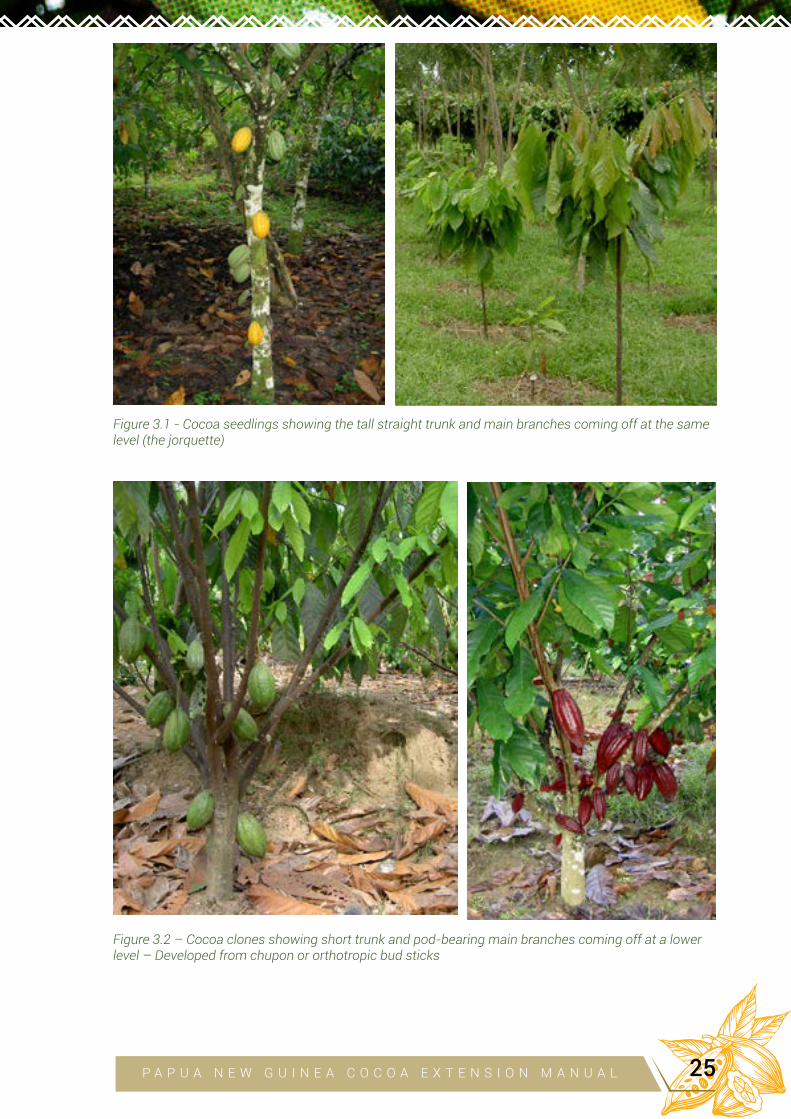
Figure 3.1 - Cocoa seedlings showing the tall straight trunk and main branches coming off at the same level (the jorquette)
Figure 3.2 – Cocoa clones showing short trunk and pod-bearing main branches coming off at a lower level – Developed from chupon or orthotropic bud sticks
P A P U A N E W G U I N E A C O C O A E X T E N S I O N M A N U A L 25
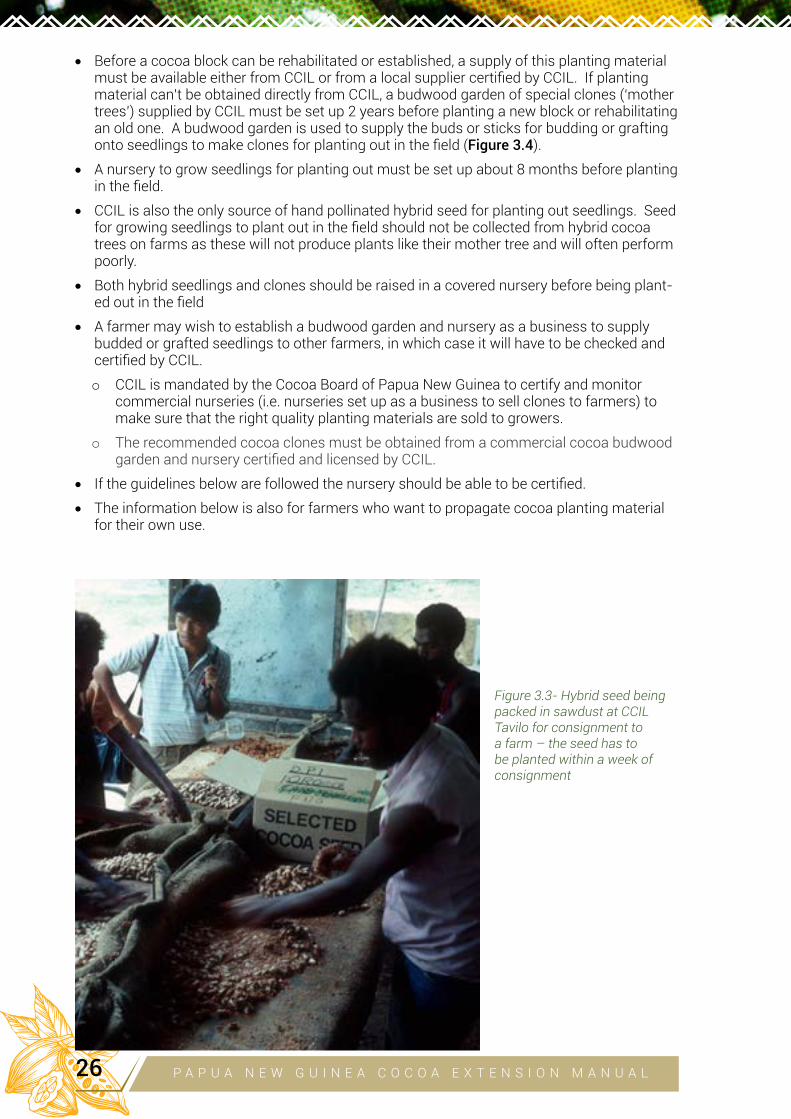
• Before a cocoa block can be rehabilitated or established, a supply of this planting material must be available either from CCIL or from a local supplier certified by CCIL. If planting material can’t be obtained directly from CCIL, a budwood garden of special clones (‘mother trees’) supplied by CCIL must be set up 2 years before planting a new block or rehabilitating an old one. A budwood garden is used to supply the buds or sticks for budding or grafting onto seedlings to make clones for planting out in the field (Figure 3.4).
• A nursery to grow seedlings for planting out must be set up about 8 months before planting in the field.
• CCIL is also the only source of hand pollinated hybrid seed for planting out seedlings. Seed for growing seedlings to plant out in the field should not be collected from hybrid cocoa trees on farms as these will not produce plants like their mother tree and will often perform poorly.
• Both hybrid seedlings and clones should be raised in a covered nursery before being plant-ed out in the field
• A farmer may wish to establish a budwood garden and nursery as a business to supply budded or grafted seedlings to other farmers, in which case it will have to be checked and certified by CCIL.
o CCIL is mandated by the Cocoa Board of Papua New Guinea to certify and monitor commercial nurseries (i.e. nurseries set up as a business to sell clones to farmers) to make sure that the right quality planting materials are sold to growers.
o The recommended cocoa clones must be obtained from a commercial cocoa budwood garden and nursery certified and licensed by CCIL.
• If the guidelines below are followed the nursery should be able to be certified.
• The information below is also for farmers who want to propagate cocoa planting material for their own use.
Figure 3.3- Hybrid seed being packed in sawdust at CCIL Tavilo for consignment to a farm – the seed has to be planted within a week of consignment
P A P U A N E W G U I N E A C O C O A E X T E N S I O N M A N U A L26

Cocoa clones• Clones are made by taking a piece of stem (top grafting) or bark containing a bud (patch
budding) from a special mother tree (selected to be high yielding, produce good quality beans and have some degree of resistance to the main pests and diseases) and inserting it into the stem of a small seedling (Figure 3.32).
• When the inserted bud or bud stick begins to grow strongly the seedling shoot is cut off and the shoot from the inserted cocoa takes over as the top of the plant (this is known as the ‘scion’). The seedling forms the root system (and is known as the ‘rootstock’).
• Because the top of the plant determines the production of pods and resistance to the most serious pests and diseases, this ensures that every tree taken from the mother tree has the same potential to yield as well as the mother tree.
• However, several selected clones should be planted in a mixture so that the block is not completely uniform, to avoid problems associated with poor pollination and monocultures in the tropics.
Establishing a budwood garden• A budwood garden is a set of selected clonal cocoa trees (mother trees) obtained from
CCIL that can be used as a source of budwood for budding or grafting onto seedlings in a nursery to produce clones for planting out or for grafting onto chupons on existing trees in the field. The garden can be established from budded seedlings obtained from CCIL or by grafting from budwood sticks obtained from CCIL onto chupons formed by cutting back existing trees.
• Usually budded seedlings must be obtained from CCIL to establish a budwood garden; they will ensure that several different clones are supplied to give a mixed clonal garden.
• If farmers have a favourite tree that has always yielded well and doesn’t appear too sus-ceptible to pests and diseases, they may want to use this as a source of budwood in order to try a larger planting of this particular mother tree.
Figure 3.4 – Budwood garden in Poro, West Sepik. Photo courtesy of Wilson Miroi
P A P U A N E W G U I N E A C O C O A E X T E N S I O N M A N U A L 27
o This is a way of improving a cocoa block when it is not possible to get the recom-mended clones or hybrid seedlings from CCIL.
o If the tree proves to be very good, CCIL may be interested in collecting it and testing it further.
o The farmer selected clones should not be sold to other farmers until tested and rec-ommended by CCIL.
• The planting and maintenance of clonal trees for a budwood garden is the same as for a normal cocoa block, except for some important differences due to the fact that the ‘harvest’ is budwood sticks (i.e. pieces of branch) not pods:
o Budwood gardens are planted at a closer spacing (3-4m between rows and 2m be-tween trees in a row) and big clones can be planted near small ones because the regu-lar cutting out of young shoots for budsticks keeps the trees small.
o Every tree is labeled to indicate the identity of the clone and a map of the garden is drawn to indicate the clones - this is crucial for identifying the clones established in the nursery, to ensure that a suitable mixture is planted, and is especially important in a nursery business, where the customers need to know what clones they are buying (it is required for certification of the budwood garden and nursery by CCIL).
o Formation pruning is the same as in a commercial planting, but when cutting of bud-wood sticks begins in the third year, the trees are pruned more severely every 4 months to stimulate shoot growth and ensure a continuous supply of budwood; this reduces the production of hardened branches on which pods are usually formed.
o Where soil fertility is low, clones in a budwood garden may need fertiliser (e.g. organ-ic manure or N:P:K:Mg, 12:12:17:2, 80g per tree every 3 months) to maintain vigorous vegetative growth.
• The size of the budwood garden depends on the number of seedlings to be budded for planting a new block or supplying other farmers.
o Cutting of budwood sticks can begin on 2-3 year old trees, with each tree yielding about 20 sticks (each with about 6 buds) every three months, giving a total of about 480 buds per tree per year.
o A good budder will have a 90% success rate, but allowing an 80% rate gives about 380 successfully budded clonal plants from each mother tree per year - therefore, to plant a hectare of new cocoa (about 1000 trees) over a year would require the budwood from 3-4 mother trees.
o These trees have to be a mixture of 4 or 5 clones to give a polyclonal planting (i.e. con-sisting of 4 or 5 different clones); therefore a minimum sized budwood garden should consist of 4 trees of each of 4 or 5 clones (i.e. 20 trees).
RULES FOR OBTAINING A ‘LICENSE TO OPERATE A COMMERCIAL BUDWOOD
GARDEN’ UNDER COCOA ACT 1981
The budwood garden must contain ONLY CCIL recommended hybrid cocoa clones
The budwood garden must be not less than 0.22ha or 180 trees (i.e. 10 trees x 18 clones)
Clones must be clearly labeled and there must be a map showing the field layout of clones
Clones must be healthy
The owner/manager must maintain good records of bud sticks supplied to clients
The physical and financial records must be available for inspection
Registration is renewed annually following inspection
P A P U A N E W G U I N E A C O C O A E X T E N S I O N M A N U A L28
Establishing a nursery• The growth and performance of the young plants in the field is greatly affected by how well
they are raised in the nursery.
• Selecting a good site for a nursery:
o It should be on a slight slope to ensure good drainage of water away from the nursery floor, otherwise drains have to be dug to take water away. Puddling of water favours Phytophthora Leaf Blight which is the main disease problem in nurseries.
o It should have a good water supply to enable hand watering of plants.
o It should be located at some distance from older cocoa so that there is less chance of the seedlings being infected by Vascular Streak Dieback or Phytophthora.
o It should be near a good supply of friable topsoil for filling polybags (but not soil collect-ed from under old cocoa trees, which will most likely be infested by Phytophthora).
o It should have some protection from strong winds (e.g. Gliricidia hedge), although good air flow through the nursery is also important for disease control.
o It should have good road access if budded seedlings are being sold to other farmers, have easy access for supervision, and must be well protected from animals and theft.
• Site preparation involves:
o clearing and levelling (allowing for some slope to improve drainage),
o digging drains to ensure that water drains down slope and doesn’t pool around the seedlings (cocoa seedlings are sensitive to waterlogging, and splash from pools of wa-ter can spread Phytophthora, causing seedling blight – see Addendix 8).
• Nursery construction
o This will depend on whether it is to be temporary (to supply one block) or permanent (as the basis of a nursery business, supplying many farmers).
o Calculate the nursery size needed as follows: estimate the number of trees needed (say 625 for planting a hectare), add 40% (250) to allow for rejection of poorly grown plants, and divide this number (875) by 20 to give the nursery size in m2 (about 45 m2 = 9m x 5m).
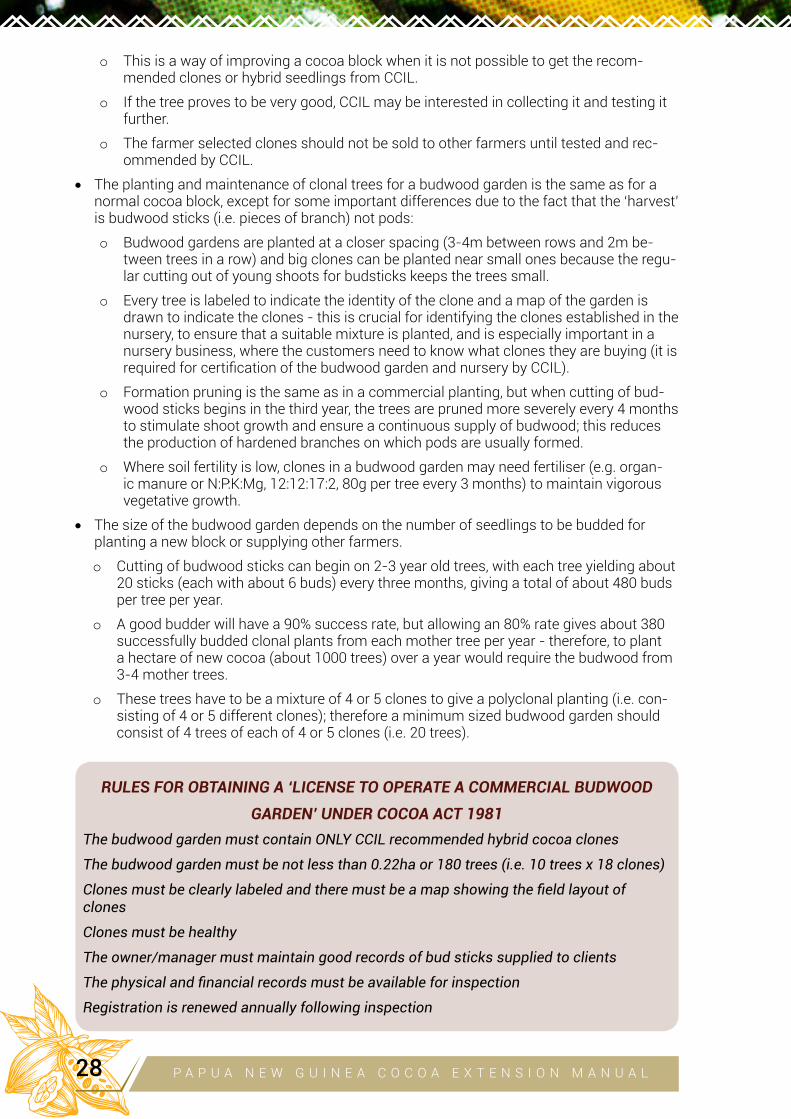
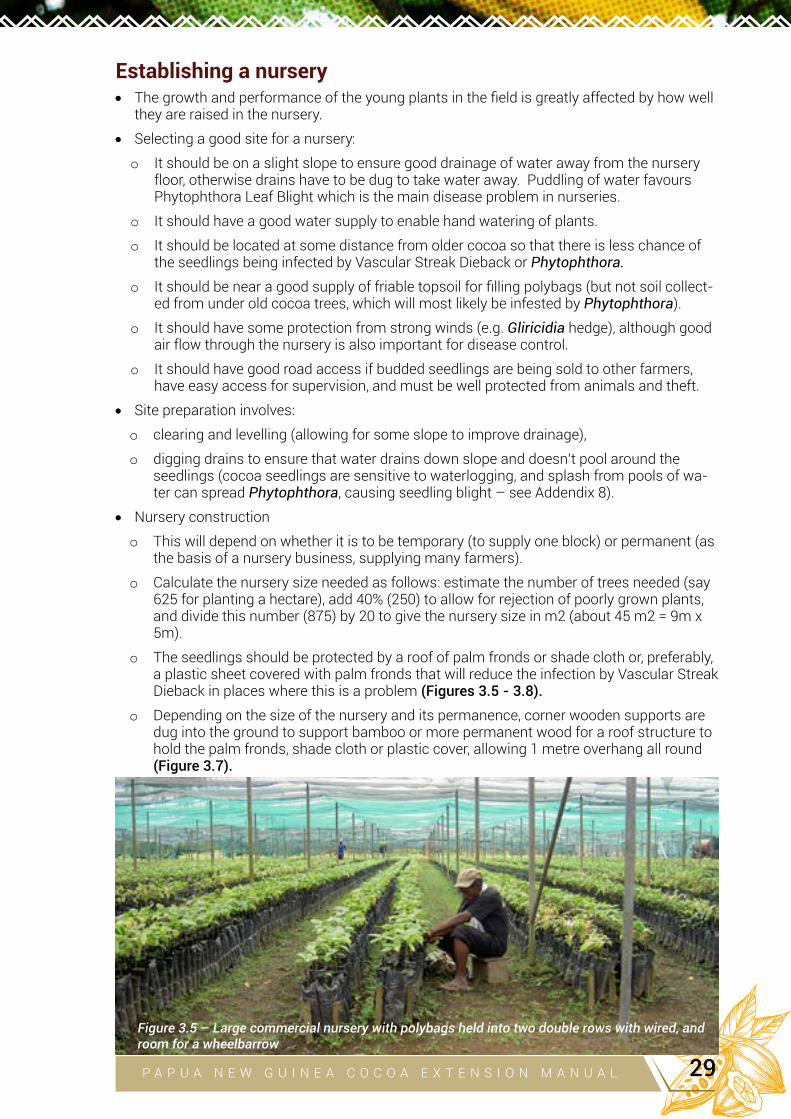
o The seedlings should be protected by a roof of palm fronds or shade cloth or, preferably, a plastic sheet covered with palm fronds that will reduce the infection by Vascular Streak Dieback in places where this is a problem (Figures 3.5 - 3.8).
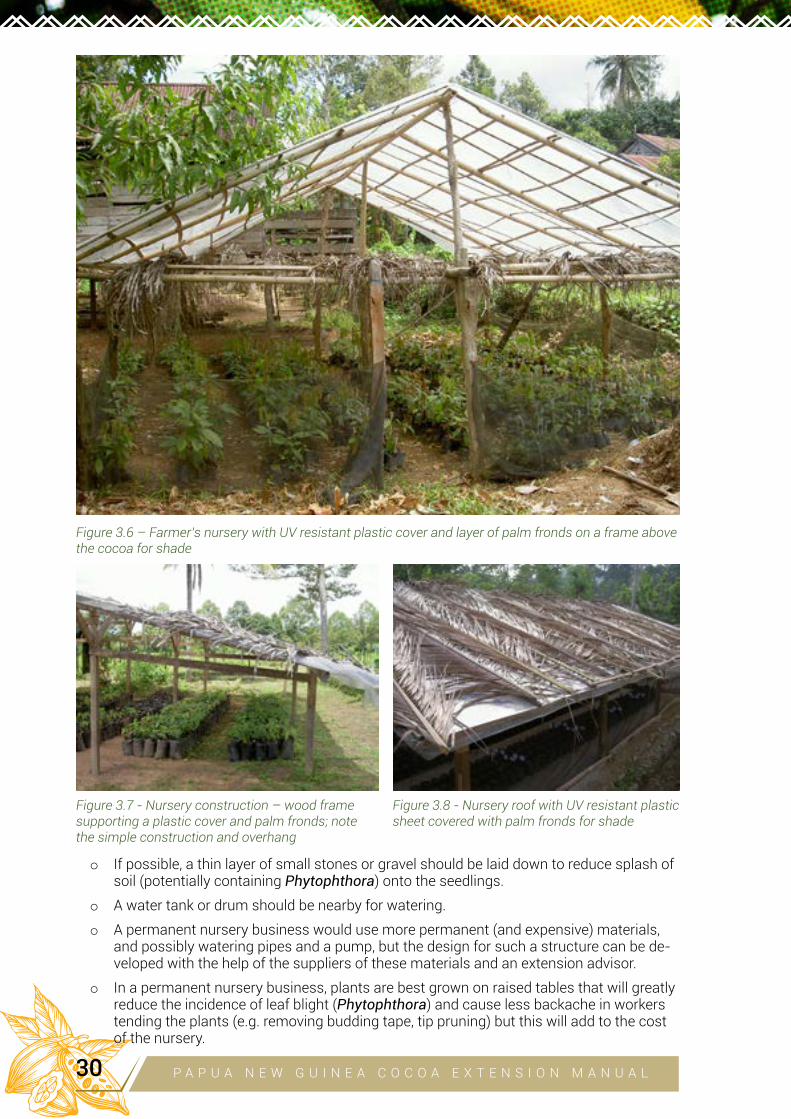
o Depending on the size of the nursery and its permanence, corner wooden supports are dug into the ground to support bamboo or more permanent wood for a roof structure to hold the palm fronds, shade cloth or plastic cover, allowing 1 metre overhang all round (Figure 3.7).
Figure 3.5 – Large commercial nursery with polybags held into two double rows with wired, and room for a wheelbarrow
P A P U A N E W G U I N E A C O C O A E X T E N S I O N M A N U A L 29
o If possible, a thin layer of small stones or gravel should be laid down to reduce splash of soil (potentially containing Phytophthora) onto the seedlings.
o A water tank or drum should be nearby for watering.
o A permanent nursery business would use more permanent (and expensive) materials, and possibly watering pipes and a pump, but the design for such a structure can be de-veloped with the help of the suppliers of these materials and an extension advisor.
o In a permanent nursery business, plants are best grown on raised tables that will greatly reduce the incidence of leaf blight (Phytophthora) and cause less backache in workers tending the plants (e.g. removing budding tape, tip pruning) but this will add to the cost of the nursery.
Figure 3.6 – Farmer’s nursery with UV resistant plastic cover and layer of palm fronds on a frame above the cocoa for shade
Figure 3.7 - Nursery construction – wood frame supporting a plastic cover and palm fronds; note the simple construction and overhang
Figure 3.8 - Nursery roof with UV resistant plastic sheet covered with palm fronds for shade
P A P U A N E W G U I N E A C O C O A E X T E N S I O N M A N U A L30
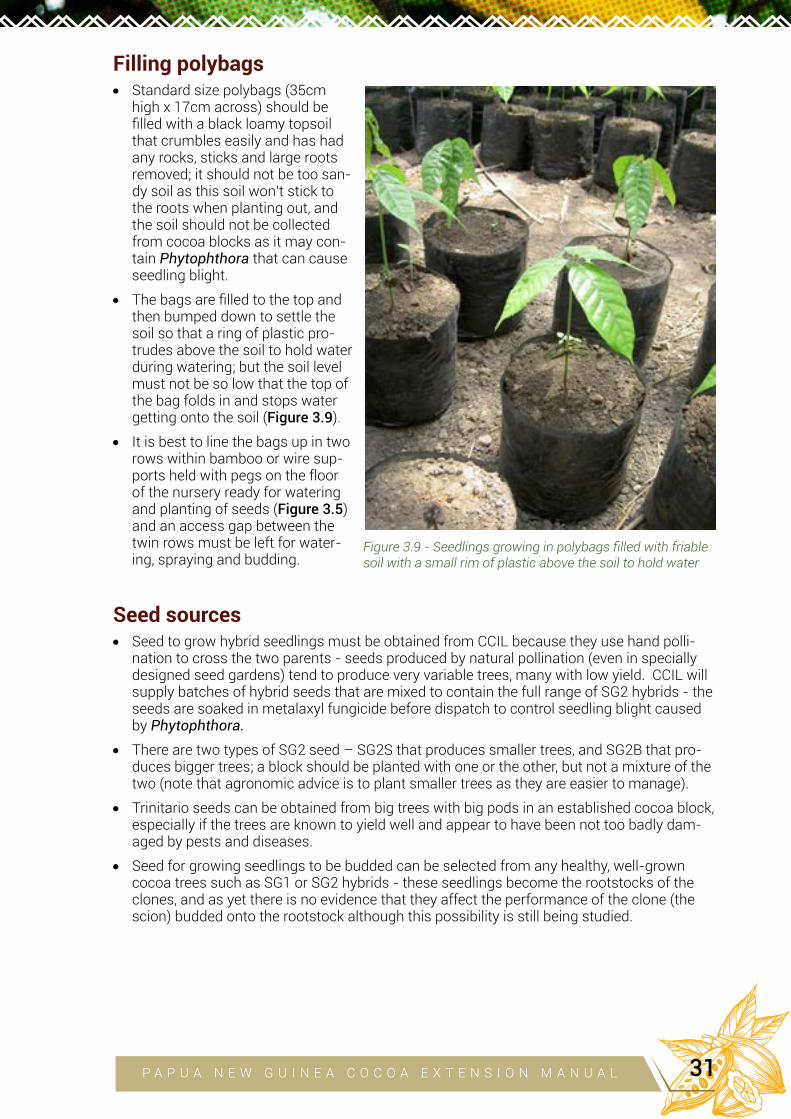
Filling polybags
• Standard size polybags (35cm high x 17cm across) should be filled with a black loamy topsoil that crumbles easily and has had any rocks, sticks and large roots removed; it should not be too san-dy soil as this soil won’t stick to the roots when planting out, and the soil should not be collected from cocoa blocks as it may con-tain Phytophthora that can cause seedling blight.
• The bags are filled to the top and then bumped down to settle the soil so that a ring of plastic pro-trudes above the soil to hold water during watering; but the soil level must not be so low that the top of the bag folds in and stops water getting onto the soil (Figure 3.9).
• It is best to line the bags up in two rows within bamboo or wire sup-ports held with pegs on the floor of the nursery ready for watering and planting of seeds (Figure 3.5) and an access gap between the twin rows must be left for water-ing, spraying and budding.
Seed sources• Seed to grow hybrid seedlings must be obtained from CCIL because they use hand polli-
nation to cross the two parents - seeds produced by natural pollination (even in specially designed seed gardens) tend to produce very variable trees, many with low yield. CCIL will supply batches of hybrid seeds that are mixed to contain the full range of SG2 hybrids - the seeds are soaked in metalaxyl fungicide before dispatch to control seedling blight caused by Phytophthora.
• There are two types of SG2 seed – SG2S that produces smaller trees, and SG2B that pro-duces bigger trees; a block should be planted with one or the other, but not a mixture of the two (note that agronomic advice is to plant smaller trees as they are easier to manage).
• Trinitario seeds can be obtained from big trees with big pods in an established cocoa block, especially if the trees are known to yield well and appear to have been not too badly dam-aged by pests and diseases.
• Seed for growing seedlings to be budded can be selected from any healthy, well-grown cocoa trees such as SG1 or SG2 hybrids - these seedlings become the rootstocks of the clones, and as yet there is no evidence that they affect the performance of the clone (the scion) budded onto the rootstock although this possibility is still being studied.
Figure 3.9 - Seedlings growing in polybags filled with friable soil with a small rim of plastic above the soil to hold water
P A P U A N E W G U I N E A C O C O A E X T E N S I O N M A N U A L 31
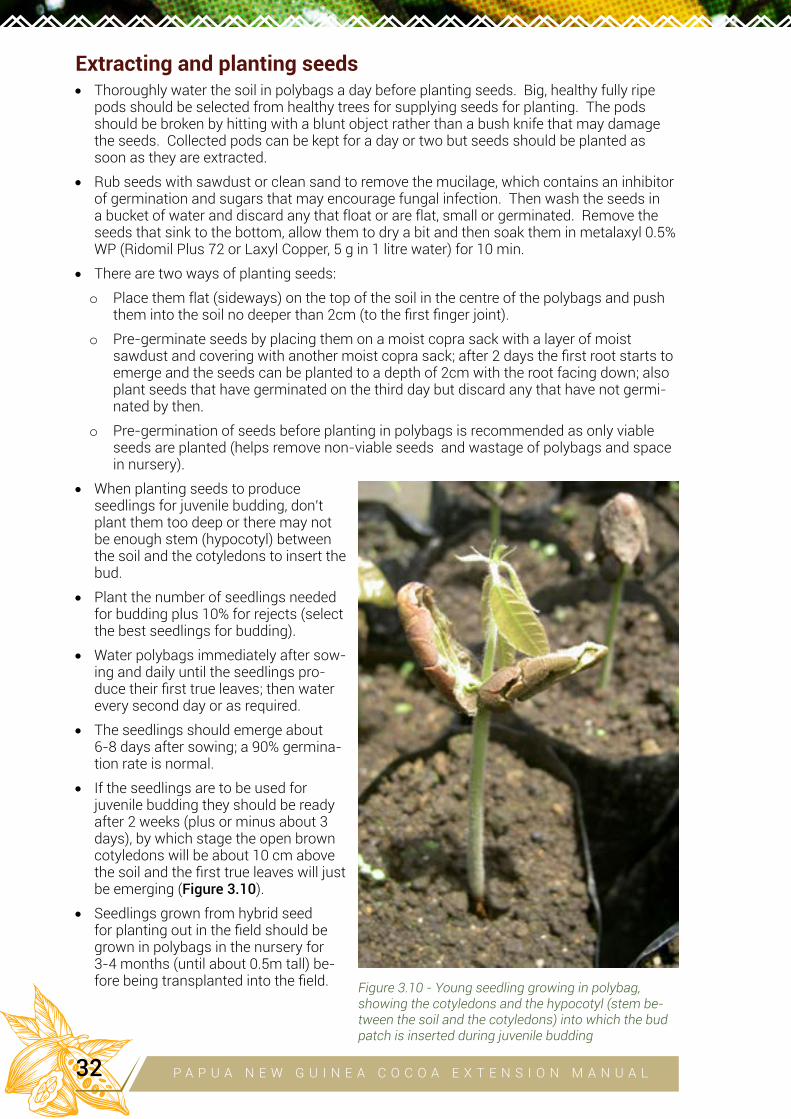
Extracting and planting seeds• Thoroughly water the soil in polybags a day before planting seeds. Big, healthy fully ripe
pods should be selected from healthy trees for supplying seeds for planting. The pods should be broken by hitting with a blunt object rather than a bush knife that may damage the seeds. Collected pods can be kept for a day or two but seeds should be planted as soon as they are extracted.
• Rub seeds with sawdust or clean sand to remove the mucilage, which contains an inhibitor of germination and sugars that may encourage fungal infection. Then wash the seeds in a bucket of water and discard any that float or are flat, small or germinated. Remove the seeds that sink to the bottom, allow them to dry a bit and then soak them in metalaxyl 0.5% WP (Ridomil Plus 72 or Laxyl Copper, 5 g in 1 litre water) for 10 min.
• There are two ways of planting seeds:
o Place them flat (sideways) on the top of the soil in the centre of the polybags and push them into the soil no deeper than 2cm (to the first finger joint).
o Pre-germinate seeds by placing them on a moist copra sack with a layer of moist sawdust and covering with another moist copra sack; after 2 days the first root starts to emerge and the seeds can be planted to a depth of 2cm with the root facing down; also plant seeds that have germinated on the third day but discard any that have not germi-nated by then.
o Pre-germination of seeds before planting in polybags is recommended as only viable seeds are planted (helps remove non-viable seeds and wastage of polybags and space in nursery).
• When planting seeds to produce seedlings for juvenile budding, don’t plant them too deep or there may not be enough stem (hypocotyl) between the soil and the cotyledons to insert the bud.
• Plant the number of seedlings needed for budding plus 10% for rejects (select the best seedlings for budding).
• Water polybags immediately after sow-ing and daily until the seedlings pro-duce their first true leaves; then water every second day or as required.
• The seedlings should emerge about 6-8 days after sowing; a 90% germina-tion rate is normal.
• If the seedlings are to be used for juvenile budding they should be ready after 2 weeks (plus or minus about 3 days), by which stage the open brown cotyledons will be about 10 cm above the soil and the first true leaves will just be emerging (Figure 3.10).
• Seedlings grown from hybrid seed for planting out in the field should be grown in polybags in the nursery for 3-4 months (until about 0.5m tall) be-fore being transplanted into the field. Figure 3.10 - Young seedling growing in polybag,
showing the cotyledons and the hypocotyl (stem be-tween the soil and the cotyledons) into which the bud patch is inserted during juvenile budding
P A P U A N E W G U I N E A C O C O A E X T E N S I O N M A N U A L32
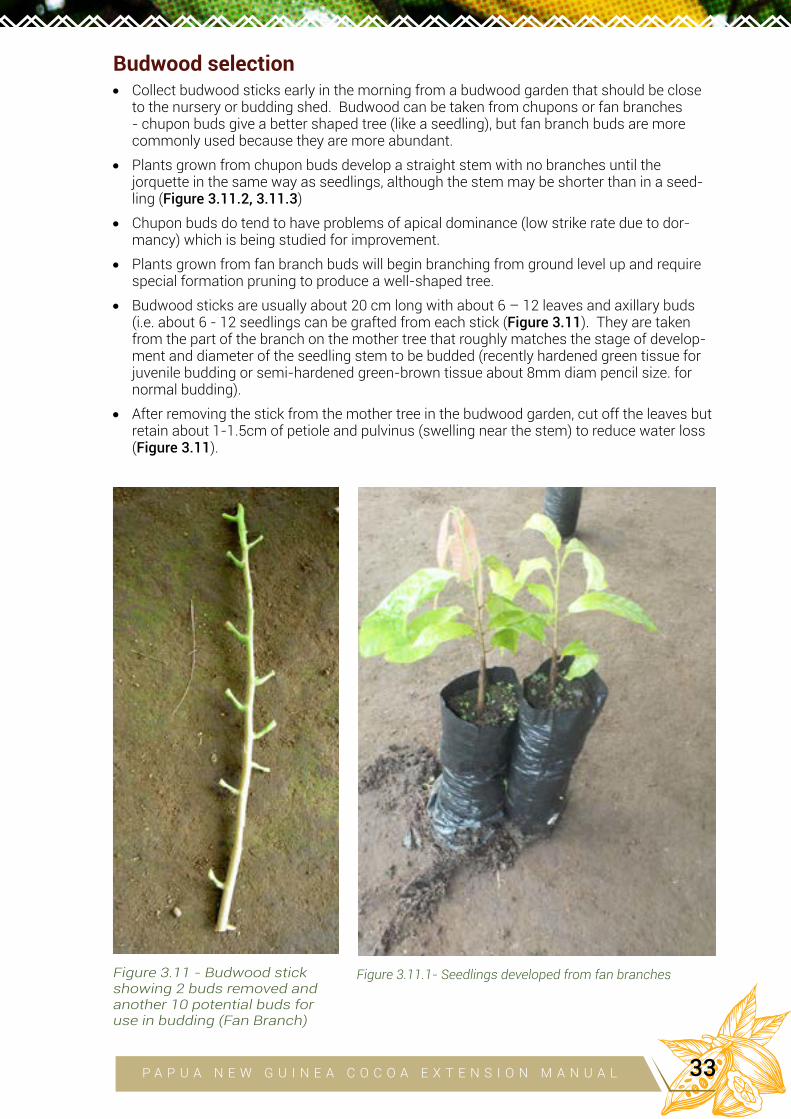
Budwood selection• Collect budwood sticks early in the morning from a budwood garden that should be close
to the nursery or budding shed. Budwood can be taken from chupons or fan branches - chupon buds give a better shaped tree (like a seedling), but fan branch buds are more commonly used because they are more abundant.
• Plants grown from chupon buds develop a straight stem with no branches until the jorquette in the same way as seedlings, although the stem may be shorter than in a seed-ling (Figure 3.11.2, 3.11.3)
• Chupon buds do tend to have problems of apical dominance (low strike rate due to dor-mancy) which is being studied for improvement.
• Plants grown from fan branch buds will begin branching from ground level up and require special formation pruning to produce a well-shaped tree.
• Budwood sticks are usually about 20 cm long with about 6 – 12 leaves and axillary buds (i.e. about 6 - 12 seedlings can be grafted from each stick (Figure 3.11). They are taken from the part of the branch on the mother tree that roughly matches the stage of develop-ment and diameter of the seedling stem to be budded (recently hardened green tissue for juvenile budding or semi-hardened green-brown tissue about 8mm diam pencil size. for normal budding).
• After removing the stick from the mother tree in the budwood garden, cut off the leaves but retain about 1-1.5cm of petiole and pulvinus (swelling near the stem) to reduce water loss (Figure 3.11).
Figure 3.11.1- Seedlings developed from fan branchesFigure 3.11 - Budwood stick showing 2 buds removed and another 10 potential buds for use in budding (Fan Branch)
P A P U A N E W G U I N E A C O C O A E X T E N S I O N M A N U A L 33
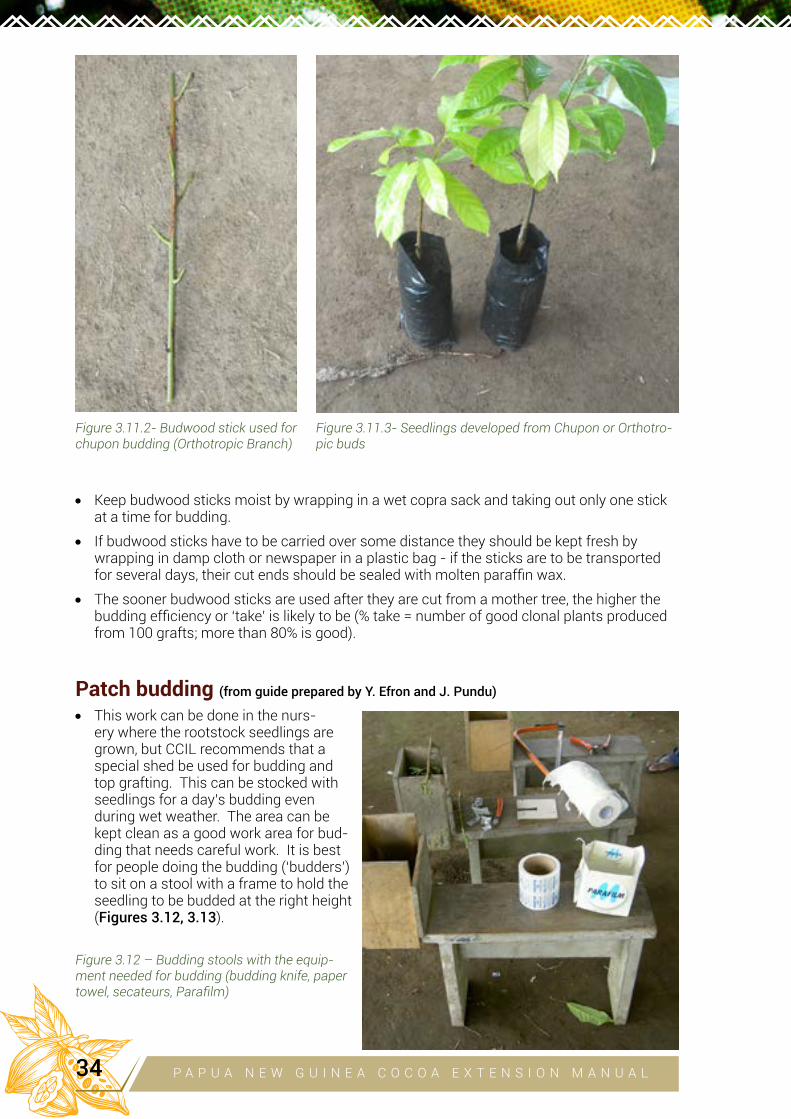
• Keep budwood sticks moist by wrapping in a wet copra sack and taking out only one stick at a time for budding.
• If budwood sticks have to be carried over some distance they should be kept fresh by wrapping in damp cloth or newspaper in a plastic bag - if the sticks are to be transported for several days, their cut ends should be sealed with molten paraffin wax.
• The sooner budwood sticks are used after they are cut from a mother tree, the higher the budding efficiency or ‘take’ is likely to be (% take = number of good clonal plants produced from 100 grafts; more than 80% is good).
Patch budding (from guide prepared by Y. Efron and J. Pundu)
• This work can be done in the nurs-ery where the rootstock seedlings are grown, but CCIL recommends that a special shed be used for budding and top grafting. This can be stocked with seedlings for a day’s budding even during wet weather. The area can be kept clean as a good work area for bud-ding that needs careful work. It is best for people doing the budding (‘budders’) to sit on a stool with a frame to hold the seedling to be budded at the right height (Figures 3.12, 3.13).
Figure 3.11.2- Budwood stick used for chupon budding (Orthotropic Branch)
Figure 3.11.3- Seedlings developed from Chupon or Orthotro-pic buds
Figure 3.12 – Budding stools with the equip-ment needed for budding (budding knife, paper towel, secateurs, Parafilm)
P A P U A N E W G U I N E A C O C O A E X T E N S I O N M A N U A L34
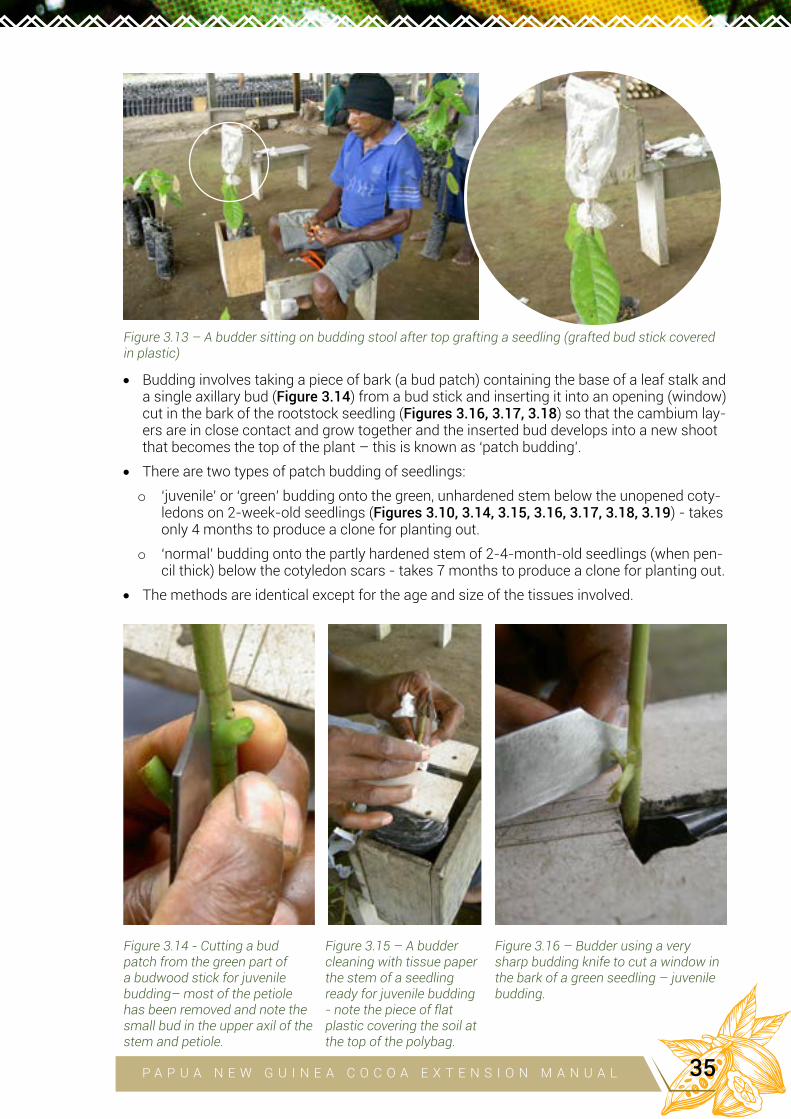
• Budding involves taking a piece of bark (a bud patch) containing the base of a leaf stalk and a single axillary bud (Figure 3.14) from a bud stick and inserting it into an opening (window) cut in the bark of the rootstock seedling (Figures 3.16, 3.17, 3.18) so that the cambium lay-ers are in close contact and grow together and the inserted bud develops into a new shoot that becomes the top of the plant – this is known as ‘patch budding’.
• There are two types of patch budding of seedlings:
o ‘juvenile’ or ‘green’ budding onto the green, unhardened stem below the unopened coty-ledons on 2-week-old seedlings (Figures 3.10, 3.14, 3.15, 3.16, 3.17, 3.18, 3.19) - takes only 4 months to produce a clone for planting out.
o ‘normal’ budding onto the partly hardened stem of 2-4-month-old seedlings (when pen-cil thick) below the cotyledon scars - takes 7 months to produce a clone for planting out.
• The methods are identical except for the age and size of the tissues involved.
Figure 3.14 - Cutting a bud patch from the green part of a budwood stick for juvenile budding– most of the petiole has been removed and note the small bud in the upper axil of the stem and petiole.
Figure 3.15 – A budder cleaning with tissue paper the stem of a seedling ready for juvenile budding - note the piece of flat plastic covering the soil at the top of the polybag.
Figure 3.16 – Budder using a very sharp budding knife to cut a window in the bark of a green seedling – juvenile budding.
Figure 3.13 – A budder sitting on budding stool after top grafting a seedling (grafted bud stick covered in plastic)
P A P U A N E W G U I N E A C O C O A E X T E N S I O N M A N U A L 35
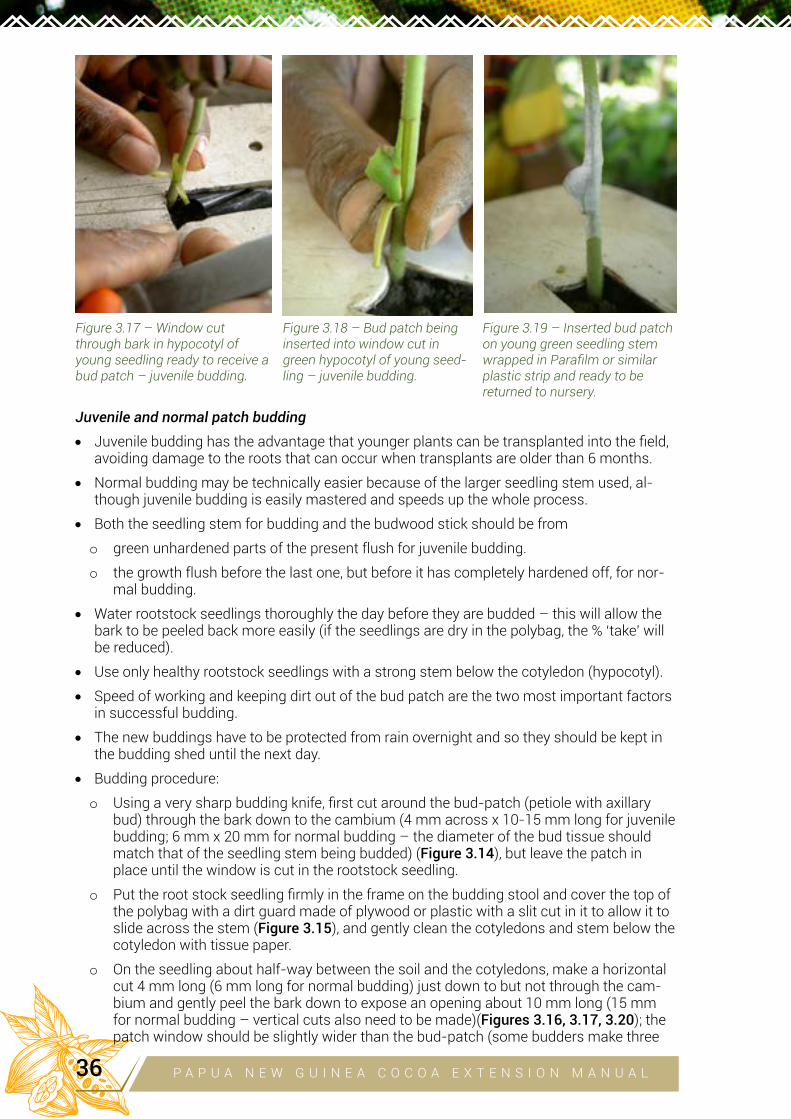
Figure 3.17 – Window cut through bark in hypocotyl of young seedling ready to receive a bud patch – juvenile budding.
Figure 3.18 – Bud patch being inserted into window cut in green hypocotyl of young seed-ling – juvenile budding.
Figure 3.19 – Inserted bud patch on young green seedling stem wrapped in Parafilm or similar plastic strip and ready to be returned to nursery.
Juvenile and normal patch budding
• Juvenile budding has the advantage that younger plants can be transplanted into the field, avoiding damage to the roots that can occur when transplants are older than 6 months.
• Normal budding may be technically easier because of the larger seedling stem used, al-though juvenile budding is easily mastered and speeds up the whole process.
• Both the seedling stem for budding and the budwood stick should be from
o green unhardened parts of the present flush for juvenile budding.
o the growth flush before the last one, but before it has completely hardened off, for nor-mal budding.
• Water rootstock seedlings thoroughly the day before they are budded – this will allow the bark to be peeled back more easily (if the seedlings are dry in the polybag, the % ‘take’ will be reduced).
• Use only healthy rootstock seedlings with a strong stem below the cotyledon (hypocotyl).
• Speed of working and keeping dirt out of the bud patch are the two most important factors in successful budding.
• The new buddings have to be protected from rain overnight and so they should be kept in the budding shed until the next day.
• Budding procedure:
o Using a very sharp budding knife, first cut around the bud-patch (petiole with axillary bud) through the bark down to the cambium (4 mm across x 10-15 mm long for juvenile budding; 6 mm x 20 mm for normal budding – the diameter of the bud tissue should match that of the seedling stem being budded) (Figure 3.14), but leave the patch in place until the window is cut in the rootstock seedling.
o Put the root stock seedling firmly in the frame on the budding stool and cover the top of the polybag with a dirt guard made of plywood or plastic with a slit cut in it to allow it to slide across the stem (Figure 3.15), and gently clean the cotyledons and stem below the cotyledon with tissue paper.
o On the seedling about half-way between the soil and the cotyledons, make a horizontal cut 4 mm long (6 mm long for normal budding) just down to but not through the cam-bium and gently peel the bark down to expose an opening about 10 mm long (15 mm for normal budding – vertical cuts also need to be made)(Figures 3.16, 3.17, 3.20); the patch window should be slightly wider than the bud-patch (some budders make three
P A P U A N E W G U I N E A C O C O A E X T E N S I O N M A N U A L36
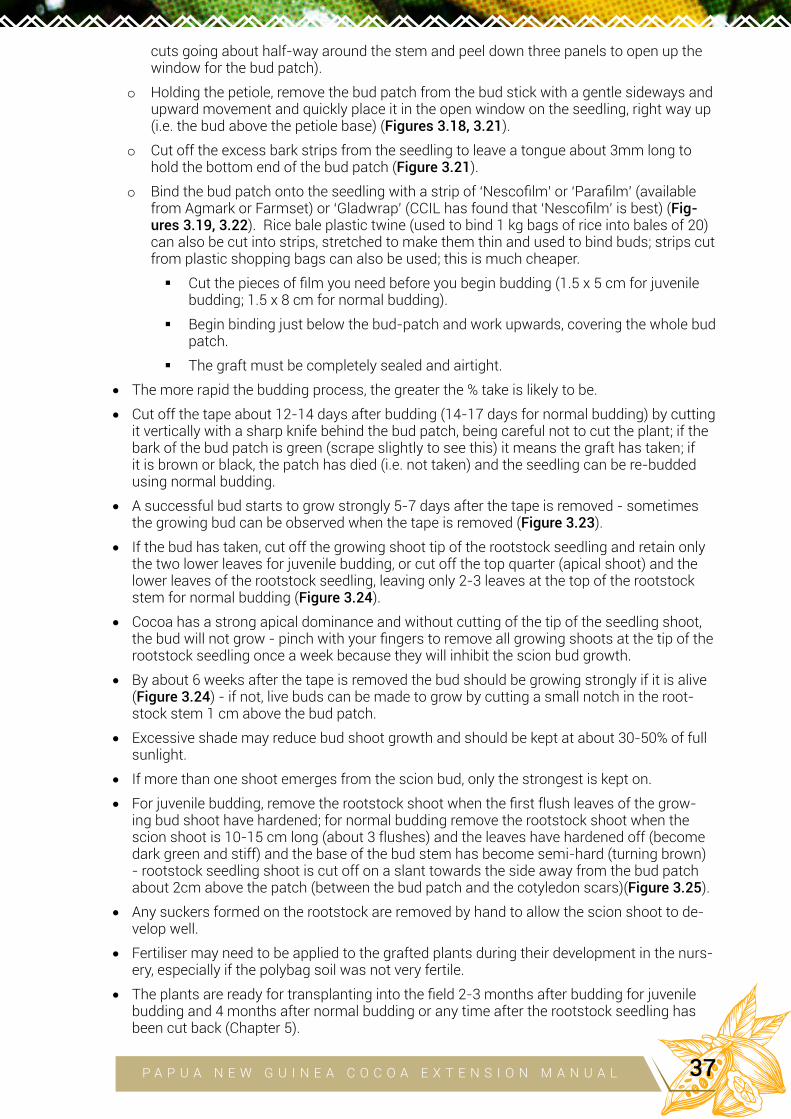
cuts going about half-way around the stem and peel down three panels to open up the window for the bud patch).
o Holding the petiole, remove the bud patch from the bud stick with a gentle sideways and upward movement and quickly place it in the open window on the seedling, right way up (i.e. the bud above the petiole base) (Figures 3.18, 3.21).
o Cut off the excess bark strips from the seedling to leave a tongue about 3mm long to hold the bottom end of the bud patch (Figure 3.21).
o Bind the bud patch onto the seedling with a strip of ‘Nescofilm’ or ‘Parafilm’ (available from Agmark or Farmset) or ‘Gladwrap’ (CCIL has found that ‘Nescofilm’ is best) (Fig-ures 3.19, 3.22). Rice bale plastic twine (used to bind 1 kg bags of rice into bales of 20) can also be cut into strips, stretched to make them thin and used to bind buds; strips cut from plastic shopping bags can also be used; this is much cheaper.
Cut the pieces of film you need before you begin budding (1.5 x 5 cm for juvenile budding; 1.5 x 8 cm for normal budding).
Begin binding just below the bud-patch and work upwards, covering the whole bud patch.
The graft must be completely sealed and airtight.
• The more rapid the budding process, the greater the % take is likely to be.
• Cut off the tape about 12-14 days after budding (14-17 days for normal budding) by cutting it vertically with a sharp knife behind the bud patch, being careful not to cut the plant; if the bark of the bud patch is green (scrape slightly to see this) it means the graft has taken; if it is brown or black, the patch has died (i.e. not taken) and the seedling can be re-budded using normal budding.
• A successful bud starts to grow strongly 5-7 days after the tape is removed - sometimes the growing bud can be observed when the tape is removed (Figure 3.23).
• If the bud has taken, cut off the growing shoot tip of the rootstock seedling and retain only the two lower leaves for juvenile budding, or cut off the top quarter (apical shoot) and the lower leaves of the rootstock seedling, leaving only 2-3 leaves at the top of the rootstock stem for normal budding (Figure 3.24).
• Cocoa has a strong apical dominance and without cutting of the tip of the seedling shoot, the bud will not grow - pinch with your fingers to remove all growing shoots at the tip of the rootstock seedling once a week because they will inhibit the scion bud growth.
• By about 6 weeks after the tape is removed the bud should be growing strongly if it is alive (Figure 3.24) - if not, live buds can be made to grow by cutting a small notch in the root-stock stem 1 cm above the bud patch.
• Excessive shade may reduce bud shoot growth and should be kept at about 30-50% of full sunlight.
• If more than one shoot emerges from the scion bud, only the strongest is kept on.
• For juvenile budding, remove the rootstock shoot when the first flush leaves of the grow-ing bud shoot have hardened; for normal budding remove the rootstock shoot when the scion shoot is 10-15 cm long (about 3 flushes) and the leaves have hardened off (become dark green and stiff) and the base of the bud stem has become semi-hard (turning brown) - rootstock seedling shoot is cut off on a slant towards the side away from the bud patch about 2cm above the patch (between the bud patch and the cotyledon scars)(Figure 3.25).
• Any suckers formed on the rootstock are removed by hand to allow the scion shoot to de-velop well.
• Fertiliser may need to be applied to the grafted plants during their development in the nurs-ery, especially if the polybag soil was not very fertile.
• The plants are ready for transplanting into the field 2-3 months after budding for juvenile budding and 4 months after normal budding or any time after the rootstock seedling has been cut back (Chapter 5).
P A P U A N E W G U I N E A C O C O A E X T E N S I O N M A N U A L 37
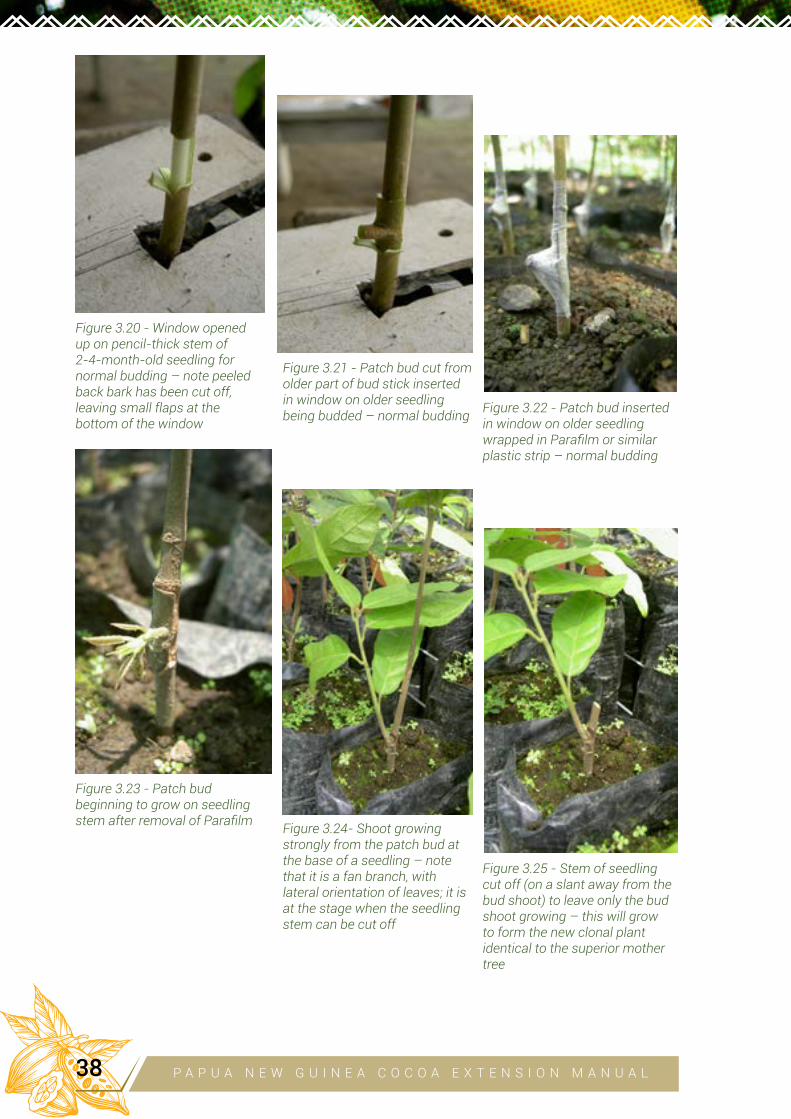
Figure 3.20 - Window opened up on pencil-thick stem of 2-4-month-old seedling for normal budding – note peeled back bark has been cut off, leaving small flaps at the bottom of the window
Figure 3.21 - Patch bud cut from older part of bud stick inserted in window on older seedling being budded – normal budding
Figure 3.22 - Patch bud inserted in window on older seedling wrapped in Parafilm or similar plastic strip – normal budding
Figure 3.23 - Patch bud beginning to grow on seedling stem after removal of Parafilm
Figure 3.24- Shoot growing strongly from the patch bud at the base of a seedling – note that it is a fan branch, with lateral orientation of leaves; it is at the stage when the seedling stem can be cut off
Figure 3.25 - Stem of seedling cut off (on a slant away from the bud shoot) to leave only the bud shoot growing – this will grow to form the new clonal plant identical to the superior mother tree
P A P U A N E W G U I N E A C O C O A E X T E N S I O N M A N U A L38
Top grafting• Top grafting of seedlings in a nursery is easier to do than patch budding, but it is usually
done with a budstick with two buds (Figures 3.31, 3.32), and so not as many clonal plants can be produced from a given amount of budwood. It can be done on plants of various ages, but usually at CCIL seedlings similar to those used for normal patch budding are used (2-4-month old).
• The budwood stick is usually selected to match the stem of the seedling to be grafted in size and maturity.
• A budwood stick with two buds (i.e. two leaf stalks with buds in the axils) is prepared by cutting off the leaf blades to leave most of the petiole on the stick, and then with two quick cuts on either side of the lower end, the stick is cut to a sharp flat taper (Figure 3.26).
• The top is cut off from the seedling to be budded, at a point where the maturity of the seedling bark is similar to that of the budwood stick, although as evident in Figures 3.31, 3.32, this is not absolutely necessary – usually the two lower leaves are left on the seedling (Figures 3.30).
• A slit is then made in the top of the seedling stem, about 2 cm deep and the budwood stick is pushed into the slit (Figures 3.27, 3.28).
• The join is sealed with Parafilm (or Nescofilm or Gladwrap or rice bale plastic twine), start-ing the binding from the bottom and working up (Figure 3.29).
• The grafted stick and join are covered with a small plastic bag sealed loosely around the stem with a rubber band (Figures 3.30).
• The plastic bag is removed when the buds begin to grow (Figures 3.31, 3.32).
• If two buds grow on the scion, the resulting plant will be more balanced – early pruning, before or just after planting out in the field is needed to ensure a well-shaped tree (Figure 3.33).
Figure 3.26- Budwood stick cut to a sharp flat taper ready for inserting into the seedling
Figure 3.27 - Budwood stick being inserted into a slit in the top of the seedling stem
Figure 3.28 - Budwood stick inserted into a slit in the top of the seedling stem – note the budwood and seedling stem are of similar size and maturity (this is ideal). The bark and underlying cambium of the budstick and seedling must be flush on at least one side.
P A P U A N E W G U I N E A C O C O A E X T E N S I O N M A N U A L 39
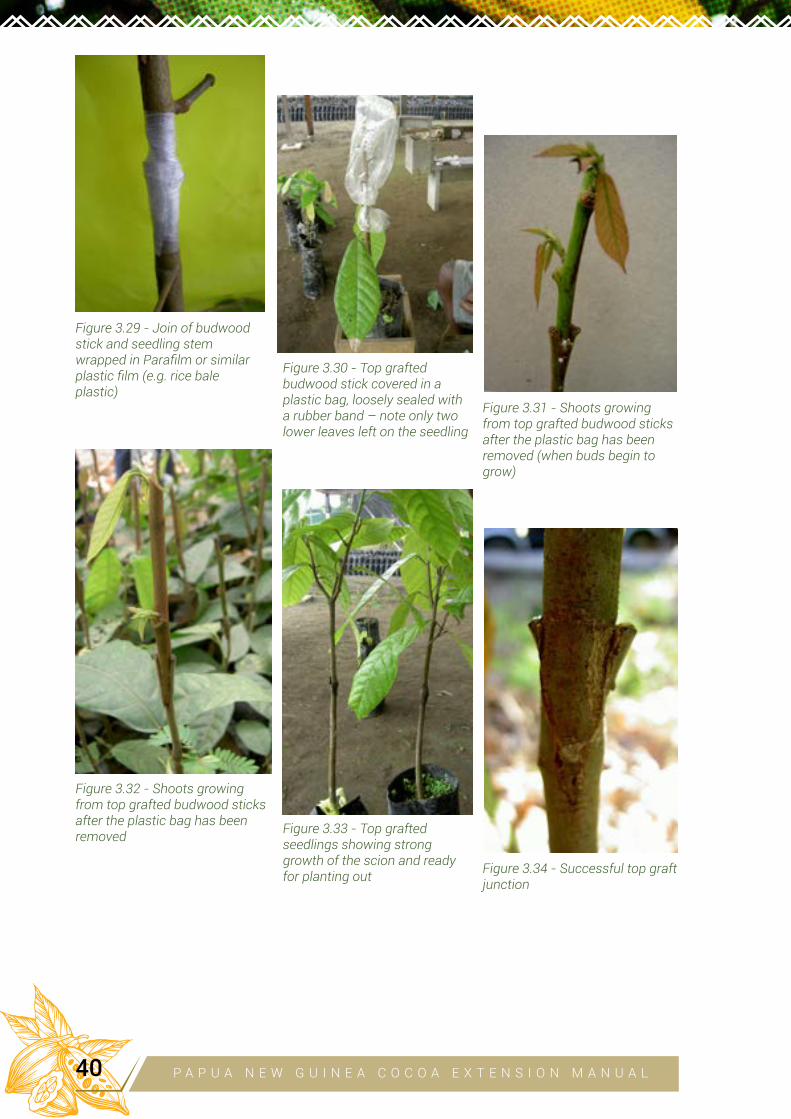
Figure 3.29 - Join of budwood stick and seedling stem wrapped in Parafilm or similar plastic film (e.g. rice bale plastic)
Figure 3.30 - Top grafted budwood stick covered in a plastic bag, loosely sealed with a rubber band – note only two lower leaves left on the seedling
Figure 3.31 - Shoots growing from top grafted budwood sticks after the plastic bag has been removed (when buds begin to grow)
Figure 3.32 - Shoots growing from top grafted budwood sticks after the plastic bag has been removed
Figure 3.33 - Top grafted seedlings showing strong growth of the scion and ready for planting out
Figure 3.34 - Successful top graft junction
P A P U A N E W G U I N E A C O C O A E X T E N S I O N M A N U A L40
General nursery management• Record keeping:
o It is important that records are kept of the planting and budding dates and the clones used so that the clone of the developing plants can be identified - this will apply espe-cially for running a nursery business for selling plants to farmers.
o Records in a notebook should match tagging of batches of plants in the nursery so that there is no doubt about the identity of the plants.
o Tags can be made of squares of aluminium cut out of drink cans with scissors - if writ-ten on in a strong pencil, the letters become indented and can’t be washed off.
• Watering, fertilising and weed control:
o If Gliricidia is used as shade, it must be pruned regularly to allow correct shade levels of 30-50% of full sunlight. If palm fronds are used as shade they must be checked to ensure they continue to give the right shade levels. Accumulated leaves may have to be removed from shade cloth to ensure the right amount of shade.
o A month before the budded plants are to be transplanted into the field, the shade lev-els should be reduced, a little bit at a time - this allows the plants to harden off so that transplanting into the field will not be such a shock and their survival rate will be high.
o Regular watering is crucial as the rapidly growing plants tend to dry out the soil in the polybags faster as they get larger; it is important to make sure that every plant is wa-tered - avoid watering in a way that splashes soil up onto the plants (it may carry Phy-tophthora spores).
o Fertilising of the developing plants may be necessary if the initial soil was not very fertile; as with water, the developing plants grow fast and use up nutrients in the polybags. Af-ter the leaves and stems of the budded plants have hardened, apply 20 g (one matchbox full) of NPK fertiliser to the soil surface in each polybag.
o Weeds must be removed by hand from the polybags – herbicides can’t be used or they may kill the cocoa plants. Weeds compete strongly with the young plants and can at-tract leaf eating insects such as grey weevils that can damage the cocoa plants.
P A P U A N E W G U I N E A C O C O A E X T E N S I O N M A N U A L 41
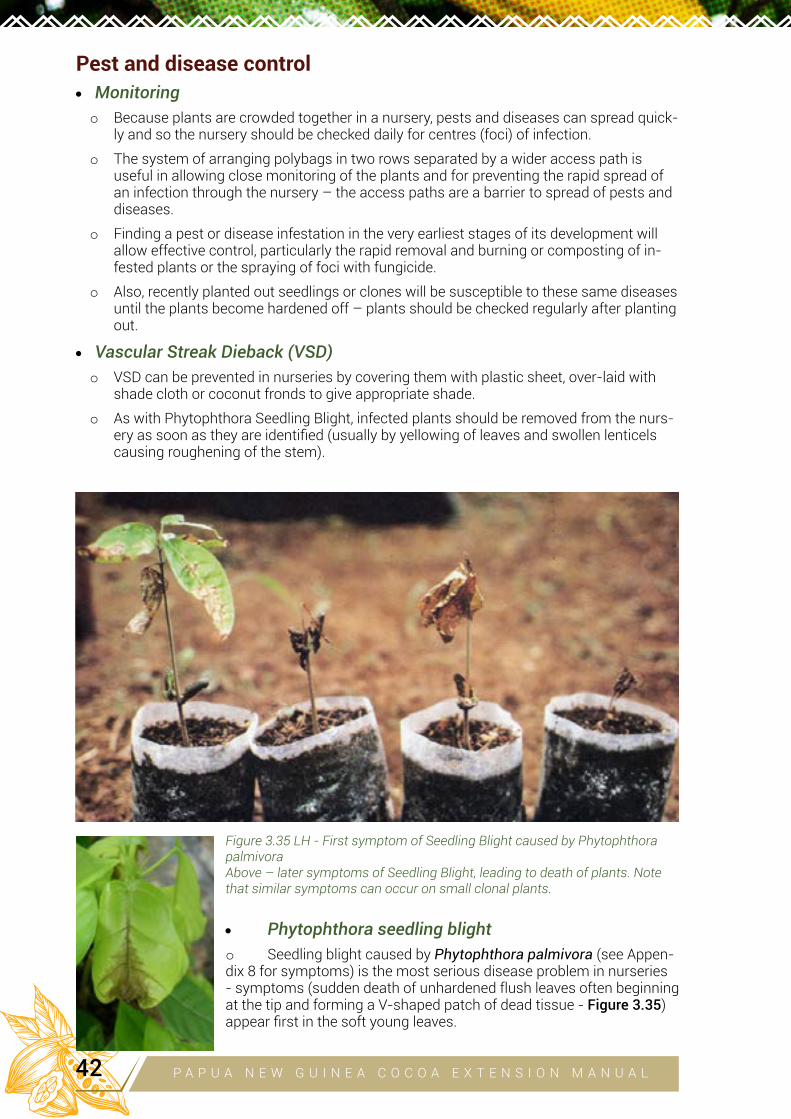
Pest and disease control
• Monitoring
o Because plants are crowded together in a nursery, pests and diseases can spread quick-ly and so the nursery should be checked daily for centres (foci) of infection.
o The system of arranging polybags in two rows separated by a wider access path is useful in allowing close monitoring of the plants and for preventing the rapid spread of an infection through the nursery – the access paths are a barrier to spread of pests and diseases.
o Finding a pest or disease infestation in the very earliest stages of its development will allow effective control, particularly the rapid removal and burning or composting of in-fested plants or the spraying of foci with fungicide.
o Also, recently planted out seedlings or clones will be susceptible to these same diseases until the plants become hardened off – plants should be checked regularly after planting out.
• Vascular Streak Dieback (VSD)
o VSD can be prevented in nurseries by covering them with plastic sheet, over-laid with shade cloth or coconut fronds to give appropriate shade.
o As with Phytophthora Seedling Blight, infected plants should be removed from the nurs-ery as soon as they are identified (usually by yellowing of leaves and swollen lenticels causing roughening of the stem).
Figure 3.35 LH - First symptom of Seedling Blight caused by Phytophthora palmivoraAbove – later symptoms of Seedling Blight, leading to death of plants. Note that similar symptoms can occur on small clonal plants.
• Phytophthora seedling blight
o Seedling blight caused by Phytophthora palmivora (see Appen-dix 8 for symptoms) is the most serious disease problem in nurseries - symptoms (sudden death of unhardened flush leaves often beginning at the tip and forming a V-shaped patch of dead tissue - Figure 3.35) appear first in the soft young leaves.
P A P U A N E W G U I N E A C O C O A E X T E N S I O N M A N U A L42
o This can be a big problem with juvenile budding if the soil is already infested with Phy-tophthora because the first flush leaves of the bud shoot can touch or grow very close to the soil in the polybag.
o Cultural control measures include not siting the nursery near a source of infection (infected older trees, pod heaps), filling polybags with soil obtained from outside cocoa plantings and therefore less likely to contain Phytophthora, reducing rain splash of soil onto the plants, having good drainage so that water is not pooled around the plants, and having good aeration of the nursery so that leaves do not stay wet for long periods.
o A commercial nursery business should grow seedlings on elevated platforms to avoid problems with Phytophthora (it can splash up about 75cm above the soil) and also to make it less backbreaking to work with the seedlings.
o Watering should be done in the early morning so that leaves dry out by midday and remain dry all afternoon and through most of the night - this will also help reduce the chance of infection by VSD.
o Sprays of metalaxyl 0.5% WP (Ridomil Plus 72 or Laxyl Copper, 5 g per litre water) may be necessary, applied with a knapsack sprayer that has not been also used for herbi-cides - this is the same mixture used to spray Phytophthora Pod Rot in the field.
o Seedlings grown from seeds soaked in metalaxyl prior to sowing need to be sprayed at about 6 weeks of age for continued protection - after this time the lower leaves harden off and seedling blight should be rare.
o If a serious outbreak occurs and kills plants, these should be removed from the nursery and burnt to prevent further spread of the infection, although plants should be removed as soon as they show the above symptom.
• Rhizoctonia
o Infection of plants beginning at the base of the stem or on lower leaves is likely to be caused by a soil-borne fungus, Rhizoctonia.
o It can be controlled by removing infected plants before the fungus can spread by myce-lium contact (it doesn’t form spores) - if serious it may require spraying with a different fungicide (benomyl or oxyquinoline) since metalaxyl is effective only against Phytoph-thora.
• Insect pests
o The main pests are leaf eating insects such as caterpillars.
o Mealybugs can sometimes be a problem but can be controlled with spot sprays of mal-athion and white oil (30 ml Malathion 50, 0.15%, 100ml white oil, 2 ml surfactant, 50ml sticker, 10 litre water).
o Pests of cocoa seedlings in the field can also cause problems in nurseries, especially if the nurseries are located close to old cocoa plantings - these include grey weevil and cocoa root chafer.
o Grey weevils chew the half-hardened bark of cocoa shoots as well as petioles, and they can also cause ‘shot-hole’ damage to leaves - location of nurseries well away from old cocoa and control of weeds in and around the nursery will reduce their damage in nurs-ery stock.
o Caterpillars and psyllids can be sprayed with 40 g Orthene 75 and 2 ml surfactant in 10 litres water, while grey weevils can be sprayed with a pyrethroid insecticide such as Karate, Decis or Fastac (28 ml, 2 ml surfactant, 50 ml sticker in 10 litres of water) in a knapsack sprayer (see Chapter 10).
P A P U A N E W G U I N E A C O C O A E X T E N S I O N M A N U A L 43
Planting out in the field• Only well-grown hybrid seedlings or clones should be transplanted into the field; plants that
are stunted or distorted should be discarded.
• Plants should be transplanted into the field when they are about 0.5 m tall (knee height) and as thick as a pencil at the base; they should not be left much longer in the polybags or they will become ‘pot-bound’ (the root system becomes too big for the polybag and begins to get distorted, causing the plants to grow poorly when transplanted).
• Cocoa root chafer (Dermolepida spp.) is a serious pest of young cocoa throughout Papua New Guinea, feeding on the roots and often being associated with old food gardens (es-pecially taro) - a granular insecticide, Chlorpyrephos (Suscon Blue, 2 g per plant), can be applied in the planting hole if damage from root chafer is expected.
Running a cocoa budwood garden and nursery as a business• Everything needing to be done in a small farmer’s nursery is also done in a larger commer-
cial nursery, except that the nursery structure will generally be more substantial and per-manent, a drip irrigation system and pump may be necessary, and very accurate forward planning and record keeping is essential so that customers can be supplied with the ap-propriate numbers of the particular clones or hybrid seedlings they order – these things are necessary for the nursery to be registered by CCIL (see rules above).
• The cost of the materials, equipment and labour needed to set up and run the nursery must be properly recorded so that the profit (‘return’ on selling planting material minus ‘expen-diture’ or ‘costs’) can be accurately determined as an indicator of how well the business is running. This will be essential to repay any bank loan used to establish the business.
Quarantine protocol for moving planting material between provinces• The demand for new planting materials requires the shipping of cocoa seedlings, budded
or grafted plants, and budwood across the country. There is a risk that pests and diseases, including VSD, CPB and Phytophthora, could be inadvertently spread with planting mate-rials to areas currently free of these problems. In particular, New Ireland, Bougainville and Karamui are currently free of VSD. The following guidelines for transporting planting mate-rial are designed to minimise the risk of spreading pests and diseases, especially VSD that can infect young shoots and budwood, and provide for the safe movement of cocoa plant-ing materials within Papua New Guinea.
1. Transfer of bare-rooted clones
1.1. Rootstock seedlings must be grown in a clean, plastic-roofed nursery free of VSD and other pests and diseases such as Phytophthora Seedling Blight.
1.2. Budwood must be collected from blocks that are relatively free of VSD and certainly from branches that show no signs of VSD. Budded or grafted plants should be kept for 2 months in the nursery for observation for development of VSD symptoms (swollen lenticels, yellow or necrotic leaves, leaf shedding with characteristic 3 necrotic vascular traces visible on the leaf scar when scraped with a fingernail, and shoot tip death). Any plant with suspected symptoms of VSD or Phytophthora Seedling Blight must be destroyed by burning.
1.3. Remove healthy plants from their poly bag, wash the roots free of soil and pack with roots in moist sawdust and wrap the plants in plastic for transport. Check that seedlings are free of VSD symptoms (see 1.2), and have a Phytosanitary Inspection Certificate issued by NAQIA attached to the package.
P A P U A N E W G U I N E A C O C O A E X T E N S I O N M A N U A L44
1.4. At the destination, unwrap the plants in a temporary quarantine house (see 1.5 below) and inspect them and plant healthy ones in fresh soil in poly bags and maintain in the quarantine house. Destroy any unhealthy plants by burning.
1.5. The quarantine house must be enclosed on all sides and roofed with clear plastic (with shade cloth or palm fronds on the roof to provide shade), be located at least 200 m away from existing cocoa, be near a clean water source for hand watering of the plants, have a concrete or gravel base to prevent water ponding, and have restricted access (one lockable door) with disinfectant foot washes at the en-trance.
1.6. Workers must wear enclosed footwear upon entry and walk through the disinfec-tant foot wash on entering and leaving.
1.7. Plants should be watered by hand in mid-morning so that their tops dry out rap-idly. This reduces the period for which plant surfaces remain moist and so will reduce the chance of sporulation of the VSD fungus in the unlikely event that any plants are infected.
1.8. Observe the plants every week for VSD and other symptoms and continue this for 4 months, and burn any suspect plants. If any of the plants are infected by the VSD fungus, they should show obvious symptoms by 4 months.
1.9. Plant healthy plants in the field and continue observing for VSD symptoms for another 2 months.
1.10. The quarantine house must be cleaned with disinfectant between shipments.
2. Transfer of cocoa clones by budwood
2.1. Budwood must be collected from healthy clones that are free of VSD or other pests and diseases. Certainly the branches from which budwood is taken must be free of VSD symptoms.
2.2. Budwood pieces must be dipped in fresh 10% bleach for 2 minutes, rinsed in clean water and then wrapped in wet hessian bag and enclosed in a plastic bag for transport to the destination.
2.3. The budwood must be received and unwrapped in a clean quarantine house as described in 1.5 above. Seedlings are raised in this quarantine house ready for budding immediately on the arrival of the budwood.
2.4. Plants should be watered in mid-morning to prevent moisture buildup.
2.5. Observe the budded plants every week for VSD and other symptoms for 6 months, and destroy any suspect seedlings by burning, before planting healthy budded plants in the field
2.6. The quarantine house must be cleaned immediately after the budded plants are planted out.
3. Transfer of seed
3.1. Seed must be extracted from the pods, rubbed free of mucilage using sawdust, and treated with fungicide and insecticide before being packed in sawdust and wrapped in hessian and boxed for transport (Figure 3.3). At its destination it should be planted in polybags in a nursery and grown for 3 – 4 months before being planted out in the field. During the time in the nursery, seedlings should be inspected for any abnormalities and any unhealthy plants destroyed by burning.
P A P U A N E W G U I N E A C O C O A E X T E N S I O N M A N U A L 45
4
REJUVENATING
A COCOA BLOCK
Eremas Tade, David Yinil, Godfrey Hannett and Yoel Efron
AIM OF THIS CHAPTER:
To describe how to rejuvenate an overgrown, overshaded, unproductive cocoa block
Introduction• Many existing cocoa blocks have become overgrown and over-shaded, and the few pods
produced are mostly infected by Phytophthora or CPB (see Chapter 1). The first step in increasing cocoa production is to rejuvenate old overgrown cocoa or replace it with new plantings (Chapter 5) on existing farms.
• The starting point is to decide what is possible with an old cocoa block –
o can old cocoa be rejuvenated by (1) cutting back big branches to give smaller more manageable trees (height control to about 3.5 m)(Figure 4.1), and (2) cutting back and opening up the shade to allow 70% sunlight penetration, and (3) infilling gaps with young clonal plants from a nursery?
o or have the trees become so tall, old, overgrown and damaged that it is too difficult to save them? In this case there are two alternatives:
cut off some main branches to induce chupons at the base of the stem and bud or top graft these to replace the old top with a new improved clone (Figure 4.5), or
clear the cocoa trees and replace them with a new planting of young clones from a nursery (Figure 4.2, see Chapters 3, 5).
• Restoring the productivity of existing mature trees may allow some income flow from the cocoa to pay for clearing and replanting of other parts of the block (a business decision).
• Chupon budding or grafting has an advantage over complete clearing because it allows some harvest of pods while the new grafted clone is becoming established.
• In all methods, the aim is to establish a mixture of several clones (a polyclonal garden) to ensure adequate pollination and reduce the impact of pests and diseases.
CHAPTER
P A P U A N E W G U I N E A C O C O A E X T E N S I O N M A N U A L46
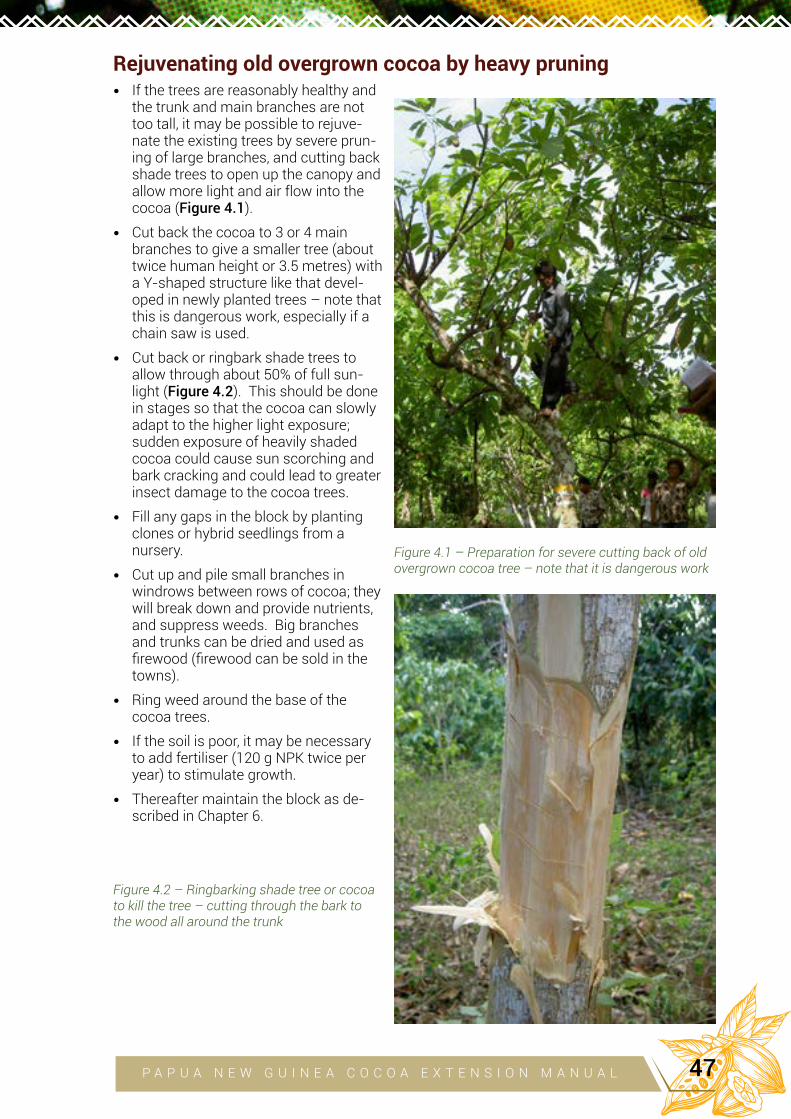
Rejuvenating old overgrown cocoa by heavy pruning• If the trees are reasonably healthy and
the trunk and main branches are not too tall, it may be possible to rejuve-nate the existing trees by severe prun-ing of large branches, and cutting back shade trees to open up the canopy and allow more light and air flow into the cocoa (Figure 4.1).
• Cut back the cocoa to 3 or 4 main branches to give a smaller tree (about twice human height or 3.5 metres) with a Y-shaped structure like that devel-oped in newly planted trees – note that this is dangerous work, especially if a chain saw is used.
• Cut back or ringbark shade trees to allow through about 50% of full sun-light (Figure 4.2). This should be done in stages so that the cocoa can slowly adapt to the higher light exposure; sudden exposure of heavily shaded cocoa could cause sun scorching and bark cracking and could lead to greater insect damage to the cocoa trees.
• Fill any gaps in the block by planting clones or hybrid seedlings from a nursery.
• Cut up and pile small branches in windrows between rows of cocoa; they will break down and provide nutrients, and suppress weeds. Big branches and trunks can be dried and used as firewood (firewood can be sold in the towns).
• Ring weed around the base of the cocoa trees.
• If the soil is poor, it may be necessary to add fertiliser (120 g NPK twice per year) to stimulate growth.
• Thereafter maintain the block as de-scribed in Chapter 6.
Figure 4.2 – Ringbarking shade tree or cocoa to kill the tree – cutting through the bark to the wood all around the trunk
Figure 4.1 – Preparation for severe cutting back of old overgrown cocoa tree – note that it is dangerous work
P A P U A N E W G U I N E A C O C O A E X T E N S I O N M A N U A L 47
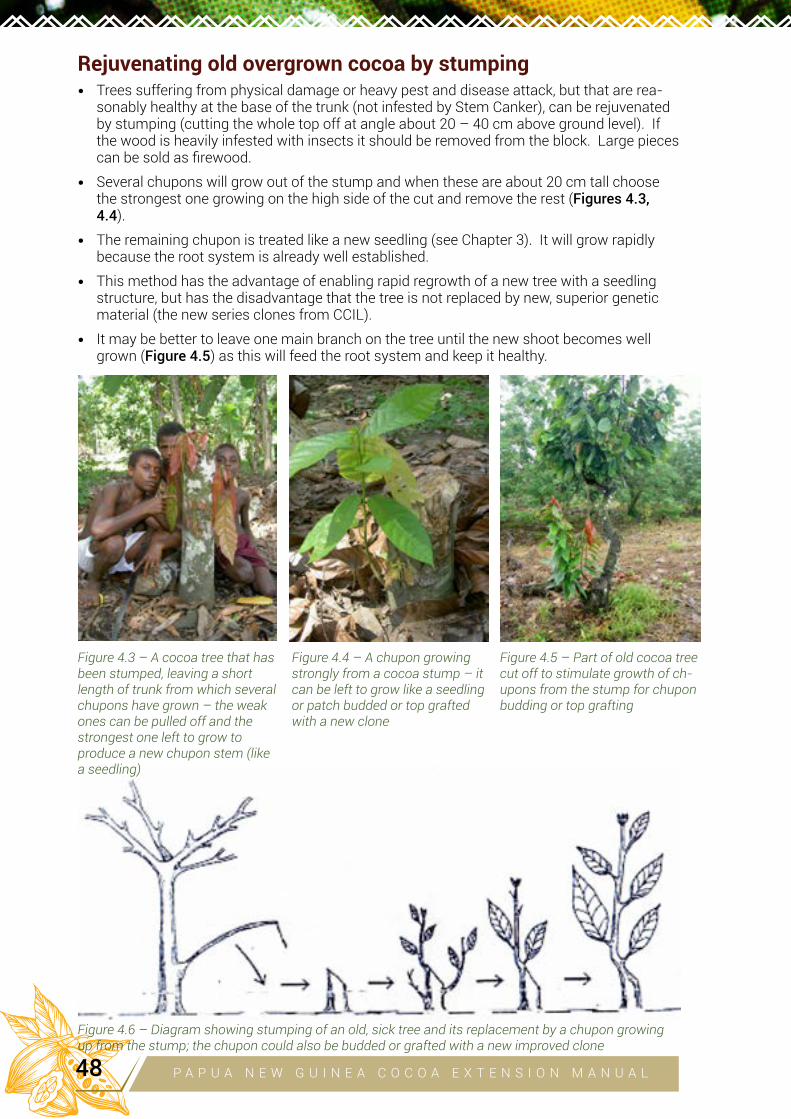
Rejuvenating old overgrown cocoa by stumping• Trees suffering from physical damage or heavy pest and disease attack, but that are rea-
sonably healthy at the base of the trunk (not infested by Stem Canker), can be rejuvenated by stumping (cutting the whole top off at angle about 20 – 40 cm above ground level). If the wood is heavily infested with insects it should be removed from the block. Large pieces can be sold as firewood.
• Several chupons will grow out of the stump and when these are about 20 cm tall choose the strongest one growing on the high side of the cut and remove the rest (Figures 4.3, 4.4).
• The remaining chupon is treated like a new seedling (see Chapter 3). It will grow rapidly because the root system is already well established.
• This method has the advantage of enabling rapid regrowth of a new tree with a seedling structure, but has the disadvantage that the tree is not replaced by new, superior genetic material (the new series clones from CCIL).
• It may be better to leave one main branch on the tree until the new shoot becomes well grown (Figure 4.5) as this will feed the root system and keep it healthy.
Figure 4.3 – A cocoa tree that has been stumped, leaving a short length of trunk from which several chupons have grown – the weak ones can be pulled off and the strongest one left to grow to produce a new chupon stem (like a seedling)
Figure 4.6 – Diagram showing stumping of an old, sick tree and its replacement by a chupon growing up from the stump; the chupon could also be budded or grafted with a new improved clone
Figure 4.4 – A chupon growing strongly from a cocoa stump – it can be left to grow like a seedling or patch budded or top grafted with a new clone
Figure 4.5 – Part of old cocoa tree cut off to stimulate growth of ch-upons from the stump for chupon budding or top grafting
P A P U A N E W G U I N E A C O C O A E X T E N S I O N M A N U A L48
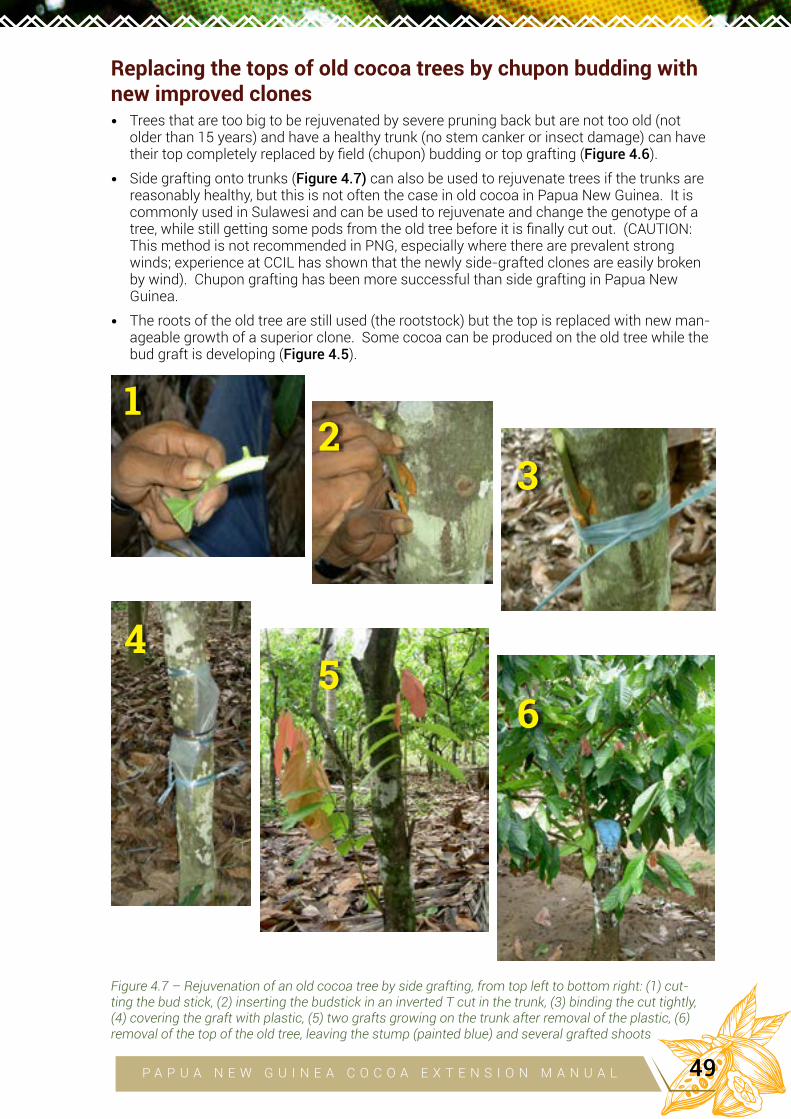
Replacing the tops of old cocoa trees by chupon budding with new improved clones • Trees that are too big to be rejuvenated by severe pruning back but are not too old (not
older than 15 years) and have a healthy trunk (no stem canker or insect damage) can have their top completely replaced by field (chupon) budding or top grafting (Figure 4.6).
• Side grafting onto trunks (Figure 4.7) can also be used to rejuvenate trees if the trunks are reasonably healthy, but this is not often the case in old cocoa in Papua New Guinea. It is commonly used in Sulawesi and can be used to rejuvenate and change the genotype of a tree, while still getting some pods from the old tree before it is finally cut out. (CAUTION: This method is not recommended in PNG, especially where there are prevalent strong winds; experience at CCIL has shown that the newly side-grafted clones are easily broken by wind). Chupon grafting has been more successful than side grafting in Papua New Guinea.
• The roots of the old tree are still used (the rootstock) but the top is replaced with new man-ageable growth of a superior clone. Some cocoa can be produced on the old tree while the bud graft is developing (Figure 4.5).
Figure 4.7 – Rejuvenation of an old cocoa tree by side grafting, from top left to bottom right: (1) cut-ting the bud stick, (2) inserting the budstick in an inverted T cut in the trunk, (3) binding the cut tightly, (4) covering the graft with plastic, (5) two grafts growing on the trunk after removal of the plastic, (6) removal of the top of the old tree, leaving the stump (painted blue) and several grafted shoots
1
4
2
5
3
6
P A P U A N E W G U I N E A C O C O A E X T E N S I O N M A N U A L 49
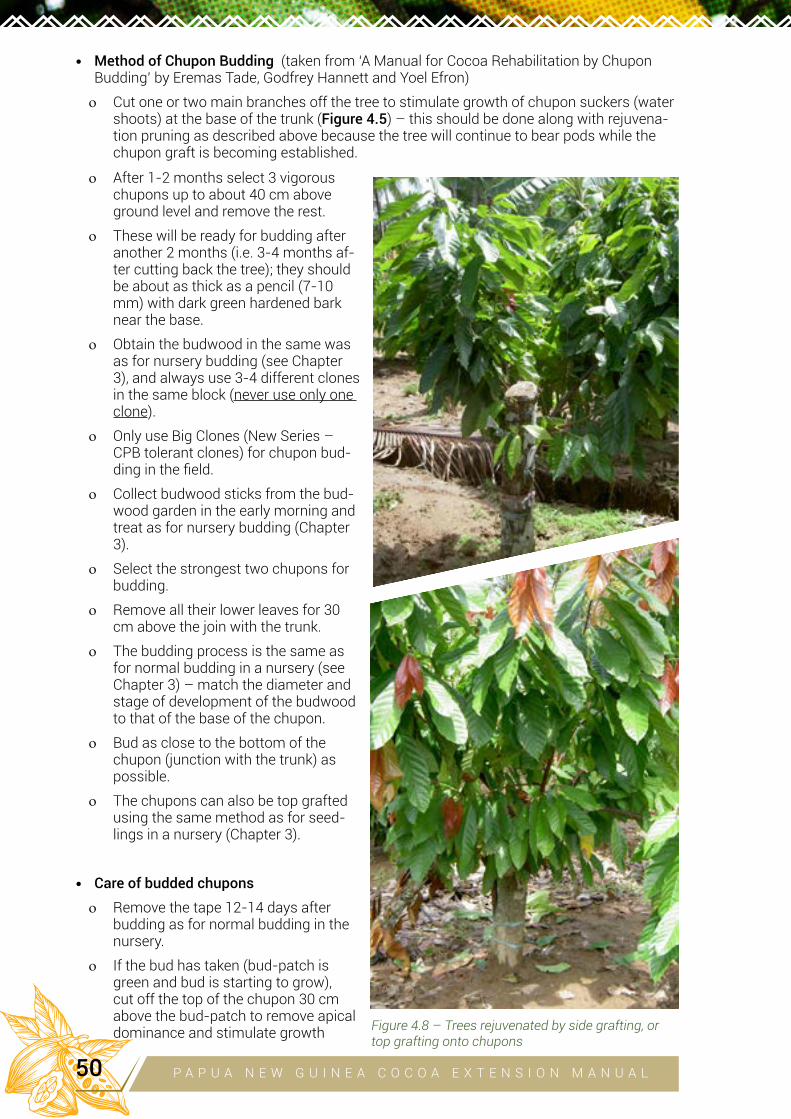
• Method of Chupon Budding (taken from ‘A Manual for Cocoa Rehabilitation by Chupon Budding’ by Eremas Tade, Godfrey Hannett and Yoel Efron)
o Cut one or two main branches off the tree to stimulate growth of chupon suckers (water shoots) at the base of the trunk (Figure 4.5) – this should be done along with rejuvena-tion pruning as described above because the tree will continue to bear pods while the chupon graft is becoming established.
o After 1-2 months select 3 vigorous chupons up to about 40 cm above ground level and remove the rest.
o These will be ready for budding after another 2 months (i.e. 3-4 months af-ter cutting back the tree); they should be about as thick as a pencil (7-10 mm) with dark green hardened bark near the base.
o Obtain the budwood in the same was as for nursery budding (see Chapter 3), and always use 3-4 different clones in the same block (never use only one clone).
o Only use Big Clones (New Series – CPB tolerant clones) for chupon bud-ding in the field.
o Collect budwood sticks from the bud-wood garden in the early morning and treat as for nursery budding (Chapter 3).
o Select the strongest two chupons for budding.
o Remove all their lower leaves for 30 cm above the join with the trunk.
o The budding process is the same as for normal budding in a nursery (see Chapter 3) – match the diameter and stage of development of the budwood to that of the base of the chupon.
o Bud as close to the bottom of the chupon (junction with the trunk) as possible.
o The chupons can also be top grafted using the same method as for seed-lings in a nursery (Chapter 3).
• Care of budded chupons
o Remove the tape 12-14 days after budding as for normal budding in the nursery.
o If the bud has taken (bud-patch is green and bud is starting to grow), cut off the top of the chupon 30 cm above the bud-patch to remove apical dominance and stimulate growth
Figure 4.8 – Trees rejuvenated by side grafting, or top grafting onto chupons
P A P U A N E W G U I N E A C O C O A E X T E N S I O N M A N U A L50
of the bud. Check after 2 weeks – if the bud is still dormant (not growing) cut a notch just above the bud-patch to break dormancy. Visit the site weekly and remove any new shoots from the trunk or budded chupon to ensure only the budded shoot (clone) grows.
o If two grafts have taken on the same trunk, select the strongest one and tie it back to the trunk with raffia to make it grow upright; remove the other one.
o Three months after budding (when the graft has developed into a strong shoot), cut off the chupon at an angle away from the trunk above 2-3 cm above the graft.
o Four months after budding (when the grafted clone is about 50 cm long) cut off the tip of the graft to induce lateral branching. Start formation pruning as for plants from the nursery when the grafts are 6 months old.
o In windy areas, tie the graft to the main trunk to prevent breakage.
o Initial removal of two main branches and cutting back the rest of the old tree will stim-ulate flowering and pod formation, allowing some crop to be harvested from the old branches while the chupon graft is developing.
o Maintain the remaining branches on the tree and manage regularly as described in Chapter 6, but starting at six months after budding and every six months thereafter cut back the tree as the clonal grafted shoot grows and eventually replaces the old tree.
o Finally cut the main trunk back at an angle away from the graft stem at a point 60-80 cm above the graft junction (similar to the tree shown in Figures 4.7, 4.8).
o Paint the fresh cut with acrylic paint to which has been added 30 g copper sulphate and 30 ml Karate insecticide per 4 litres of paint, and paint again as necessary (as in Figure 4.7).
o Manage the grafted tree as described in Chapter 6.
o Fill any gaps in the planting with clones from a nursery so that every position in the block has a productive cocoa tree.
P A P U A N E W G U I N E A C O C O A E X T E N S I O N M A N U A L 51
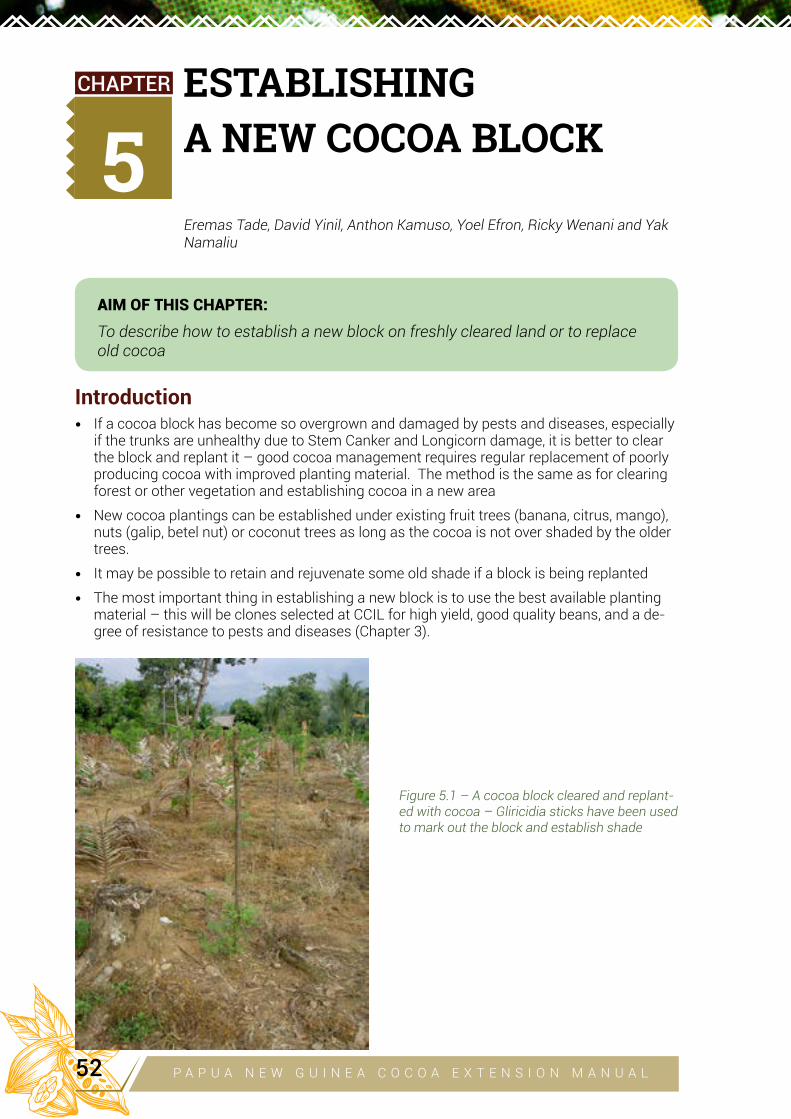
5
ESTABLISHING
A NEW COCOA BLOCK
Eremas Tade, David Yinil, Anthon Kamuso, Yoel Efron, Ricky Wenani and Yak Namaliu
AIM OF THIS CHAPTER:
To describe how to establish a new block on freshly cleared land or to replace old cocoa
Introduction• If a cocoa block has become so overgrown and damaged by pests and diseases, especially
if the trunks are unhealthy due to Stem Canker and Longicorn damage, it is better to clear the block and replant it – good cocoa management requires regular replacement of poorly producing cocoa with improved planting material. The method is the same as for clearing forest or other vegetation and establishing cocoa in a new area
• New cocoa plantings can be established under existing fruit trees (banana, citrus, mango), nuts (galip, betel nut) or coconut trees as long as the cocoa is not over shaded by the older trees.
• It may be possible to retain and rejuvenate some old shade if a block is being replanted
• The most important thing in establishing a new block is to use the best available planting material – this will be clones selected at CCIL for high yield, good quality beans, and a de-gree of resistance to pests and diseases (Chapter 3).
CHAPTER
Figure 5.1 – A cocoa block cleared and replant-ed with cocoa – Gliricidia sticks have been used to mark out the block and establish shade
P A P U A N E W G U I N E A C O C O A E X T E N S I O N M A N U A L52
Planting material• Before planting out a new block, a supply of the best planting material has to be arranged,
either through a licensed commercial nursery or by establishing a budwood garden and nursery on site with the help of CCIL (Chapter 3). A budwood garden has to be established at least 2 years and a nursery one year before planting begins.
Removing old cocoa trees• Cut off old trees as close as possible to the ground with an axe or chainsaw. Kill the stump
and root system on the same day to prevent the build-up of root rotting fungi that could infect the replanted cocoa (see Appendix 8) – paint the cut surface of the stump with a mixture of Garlon and diesel (1:80).
• Ring-barking a tree is another way of killing the roots to prevent the build-up of root rot-ting fungi. Cut through the bark and slightly into the wood right around the circumference of the trunk about 30 cm above the ground. This prevents sugars produced in the leaves from passing down through the phloem into the roots, which slowly die as their reserves of starch and sugars are used up - in this way the roots are depleted of the sugars and starch that are required for the growth of wood rotting fungi which are then not able to grow and spread to infect neighboring trees. The death of the roots stops the flow of water from the roots to the top, which then dies. The tops can be cut up and removed soon after they have died (while the wood is still soft).
• Remove the larger pieces of wood from the block for firewood, and chop up smaller branches and leave these on the ground as mulch.
Surveying the block• If the block has not been planted previously with cocoa or other crops, the boundary will
have to be surveyed and marked out using a tape measure and compass to draw up a map:
o Put tall straight pegs in the corners of the block, making sure you have a line of sight from one to the next – you may have to clear grass and other vegetation in a line be-tween the pegs.
o Using a compass, determine the bearing from one peg to the next.
o Using a tape measure (preferably 100m) measure the distance between each peg.
o Using the bearings and the distances, draw up a map on paper, indicating north and the bearings and distances between the corners.
• If there is uncertainty about ownership of the land, the block will have to be surveyed accu-rately by a registered surveyor, land tenure problems sorted out, and the block registered.
• If young cocoa plants are to be planted on a block cleared of old cocoa or on land previous-ly used for other gardens, it is still good to measure out the site and mark the boundaries and trees (e.g. betel nut, coconut, galip, bananas) you want to keep for shade so that you can calculate the number of shade trees and clones to be used.
• Access roads and tracks may have to be constructed or cleared.
• Open drains may have to be constructed in low lying coastal areas subject to water logging (Figure 5.3).
• Clearing of land is best done at the beginning of the dry season so that the cut vegetation can be dried and burnt if necessary.
• If Gliricidia is going to be used as shade it can be planted as tall sticks (1.5 metres) that can be used to sight along the rows for planting (Figure 5.1).
• To get the maximum yield, shade trees and cocoa must be planted at the right spacing, both between and within rows.
P A P U A N E W G U I N E A C O C O A E X T E N S I O N M A N U A L 53

• Mark a convenient baseline (e.g. along a road, or creek or line of coconuts) and mark a right angle from this using the ‘3, 4, 5 method’ (pieces of bamboo 3 m, 4 m and 5 m long when joined to form a triangle make a 90o angle where the 3 m and 4 m lengths join) – this gives the straight line of the first row to which all other rows are parallel. Set the baseline and right angle to give the orientation of the rows you want.
• In Malaysia where they are promoting the growth of many other commercially useful trees with cocoa, the rows are orientated east-west to reduce the shading of cocoa by the other trees
• The common spacing for hybrid seedlings, seedlings from old Trinitario cocoa, and big clones is 4 m x 4 m in a square (i.e. 4 m between rows and 4 m spacing within rows) giving a density of 625 trees per ha.
• Small clones are planted at 4 m between rows and 3 m within rows, giving 833 trees per ha.
• The spacings between and within rows can be marked out with pieces of bamboo cut to 3 m or 4 m lengths.
Figure 5.3 – A drain dug prior to planting out a cocoa block where occasional water logging might be expected
Figure 5.2 – Planting out of a new cocoa block - temporary shade is provided by palm fronds stuck into the ground until Gliricidia is established
Drainage• Cocoa is very sensitive to water logging in poorly drained, low-lying soils. Drains may have
to be made when developing a new block where there is a high water table in a low-lying area or where the physical condition of the soil impedes the drainage of surface water to a depth below the root zone (Figure 5.3).
• The main effect of installing drains is to improve the aeration of the soil around the roots
• In parts of Sulawesi, productive cocoa plantings have been established on swampy areas by making a network of open drains.
P A P U A N E W G U I N E A C O C O A E X T E N S I O N M A N U A L54
• To make a poorly drained area of land suitable for cocoa planting, a carefully designed system of drains sloping down into a main drain must be dug. The main drain must slope down to an outlet (e.g. a creek) that will eventually allow the water to flow away from the land.
• An extension service provider with knowledge of the use of a dumpy level and other sur-veyor’s equipment would be able to provide a valuable service in designing a functioning drainage system.
• The slope of drains must be steep enough to allow water to flow away from the site but not so steep that the drains become eroded by fast water flow.
• Regular weed control in open drains is required to maintain their water flow, but some weed growth will protect them from erosion.
Soil erosion control on sloping land• Soil erosion in the wet tropics is usually due to the washing away of topsoil on slopes by
rapid flow of water over the soil surface following heavy rains. It is important to prevent soil erosion on sloping land following the removal of rainforest or mixed gardens that tend to protect the soil.
• An established cocoa grove and shade trees with an accumulated mulch of leaf litter usual-ly provides good protection of soil from erosion, but sloping land is liable to erosion during the establishment of the cocoa and shade trees - the steeper the slope the greater the risk of erosion. Leaving logs and branches of cleared trees lying on the ground across the slopes (i.e. around the contours) can provide some protection of soil during establishment of cocoa and shade trees.
• Cocoa can be planted on quite steep land but this requires special measures to prevent soil erosion. On sloping land the rows of cocoa must follow the land contours (i.e. be on rough-ly the same level around the hill side). Banks or terraces have to be established around the contours of steeper land to slow down the flow of water, trap leaf litter, and provide a flat platform for working on the cocoa. Remains of slashed weeds can help protect the soil on sloping land and weeds or a cover crop on the contour banks and fronts of terraces can help prevent their erosion.
Planting cocoa on old grassland or regrowth dominated by grassy weeds• Weed control is critically important in the pre-planting stage of developing a new cocoa
planting – if weeds are not controlled at this stage they will be difficult to control later, and will greatly inhibit the establishment of shade trees and cocoa (see Chapter 10). The ef-fects on growth and yield of cocoa of poor weed control during cocoa establishment can be seen even 6 years later.
• Many areas of land have degenerated into dense grassland (e.g. kunai). This land can be restored to productive use by planting Gliricidia and cocoa. In fact, in some countries Gliri-cidia is referred to as ‘killer of Imperata cylindrica (kunai, alang alang)’(see Chapter 2).
• The initial preparation of the land involves slashing of the tall grass and then spraying any regrowth with herbicides to clear the land, then hand weeding around the trees and repeat-ed spraying between the trees with herbicides until the Gliricidia and cocoa have grown enough to shade out the grass and other weeds (Figures 5.4 – 5.8).
• For spraying methods and use of herbicides in preparing land for planting see Chapter 10.
P A P U A N E W G U I N E A C O C O A E X T E N S I O N M A N U A L 55
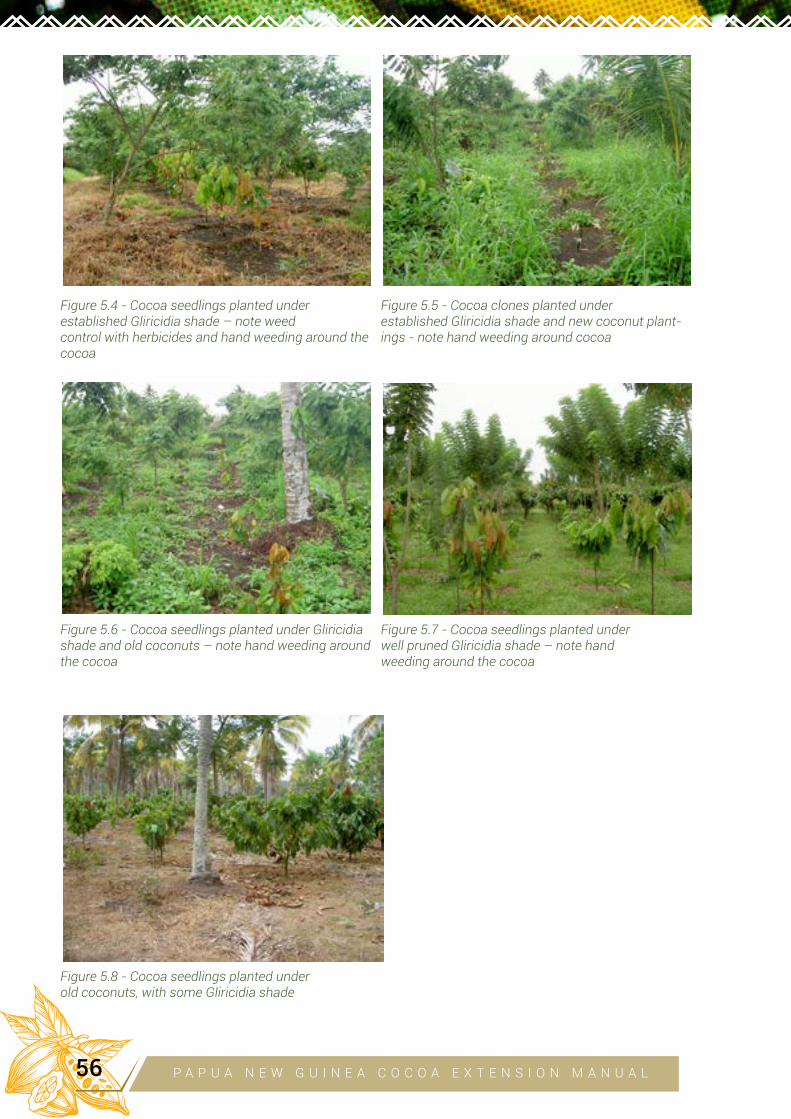
Figure 5.5 - Cocoa clones planted underestablished Gliricidia shade and new coconut plant-ings - note hand weeding around cocoa
Figure 5.7 - Cocoa seedlings planted underwell pruned Gliricidia shade – note handweeding around the cocoa
Figure 5.4 - Cocoa seedlings planted underestablished Gliricidia shade – note weed control with herbicides and hand weeding around the cocoa
Figure 5.6 - Cocoa seedlings planted under Gliricidia shade and old coconuts – note hand weeding around the cocoa
Figure 5.8 - Cocoa seedlings planted underold coconuts, with some Gliricidia shade
P A P U A N E W G U I N E A C O C O A E X T E N S I O N M A N U A L56
Planting shade trees• Some shade is critical for the early establishment of cocoa, especially to reduce water
stress and sunburn of soft tissues as the plants develop a deeper root system to take up water. Temporary shade will have to be planted if there are no permanent shade trees (e.g. coconuts, bananas, galip nut, betel nut, fruit trees) already on the block – palm fronds can be used for temporary shade (Figure 5.2).
• Bananas can be used for temporary shade by planting 4-6 month old suckers 2 m apart between the cocoa rows, with their removal beginning when the cocoa is 6 months old.
• The most common shade is Gliricidia sepium (marmar) which is planted by cutting sticks 1.5 m long and planting them about 20 – 30 cm deep, mid-way between the cocoa at the same spacing (4 m x 4 m); by 6-9 months after planting, Gliricidia will have developed suffi-cient shade for planting cocoa.
• Coconuts provide excellent shade for cocoa but they take much longer to establish than Gliricidia. Local tall coconuts such as Raulawat, Gazelle, Markham and Karkar are more suitable for cocoa shade than hybrids or dwarf coconuts, which are more susceptible to attack by Rhinoceros Beetles (Scapanes australis, Oryctes centaurus) and Black Weevil (Rhycophorus bilineatus). If the emphasis is on dry nut or copra production rather than just cocoa shade, hybrid palms should be planted as their yield is about twice that of talls.
• Coconuts used as shade for cocoa are planted at a spacing of 12 m square (in every 4th row of cocoa), giving 69 palms per ha. They are raised in a nursery for 12 months before being planted out, preferably at the start of the wet season, as follows:
o To stimulate germination, nuts are buried up to their stalk-end 25 cm apart in rows 35 cm apart in nursery beds under about 50% shade and kept moist for 3 months.
o When shoots are about 30 cm long and the first roots are beginning to emerge from the husk, the best-grown healthy seedlings are transplanted into friable topsoil in polybags (38 cm x 52 cm) and placed in a 70 cm x 70 cm triangular spacing in a nursery.
The bags are half-filled with soil, the nuts stood upright, and more soil is packed around them to fill the bags.
The top of the nut should be at most 3 cm below the top of the bag and just cov-ered with soil.
Poorly grown seedlings should be culled when being planted into polybags, then 3 months later, and again just before field planting.
Figure 5.9 - Cocoa clones established under light Gliricidia shade
P A P U A N E W G U I N E A C O C O A E X T E N S I O N M A N U A L 57
o About 60% of local talls and 85% of hybrid nuts planted in polybags should give good seedlings for field planting.
o Coconut seedlings are planted out in holes 50 cm diam. so that the top of the nut is 30 cm below the soil surface.
o Young palms must be kept weed free to maximize their early growth and establishment.
o Gliricidia can be used as temporary shade while coconuts are being established (Figure 5.5).
• Galip nut trees are now recommended for shading cocoa as they are economically valuable and provide excellent shade for cocoa at a density of about 40 trees per ha (16m spacing in every 5th cocoa row).
• Shade trees are planted in the same rows as the cocoa.
• Shade control is important for cocoa establishment - up to 12 months of age, cocoa should have 50% shade, this being reduced gradually to 20% by 4 years of age when each tree has a lot of self-shading and cocoa trees also shade their neighbours (Figure 5.9).
• If there is too much shade, growth and development of young cocoa will be greatly reduced:
o Fewer shoots will be produced and branches will be long and spindly, making it harder to grow a well-shaped tree.
o Flowering and bearing will be delayed.
o Once the young cocoa plants are established, shade must be reduced to minimise ex-cessive extension growth of branches which will require more pruning.
Planting out budded clones or seedlings• Plants should be transplanted into the field when they are about 50 cm tall (knee height)
and as thick as a pencil at the base; they should not be left much longer in the polybags or they become ‘pot-bound’ (the root system becomes too big for the polybag and begins to get distorted, causing the plants to grow poorly when transplanted).
• Only the well-grown hybrid seedlings or clones are transplanted into the field; plants that are stunted or distorted should be discarded. Don’t shake the polybags too much during transport or this may disturb or break the roots.
• The temporary or permanent shade should be properly established before transplanting.
• Planting out is best done at the start of the wet season and on a cloudy or rainy day so that the transplants are not suddenly stressed - never plant out during hot dry weather or expose plants to hot dry or windy conditions during transport or while they are waiting to be planted.
• Water the plants well before removing them from the nursery.
• Planting holes 45 cm deep are dug before the plants in polybags are transported to the field; separate the topsoil from the subsoil.
• Place some loose topsoil in the planting hole, along with 15-20 g of triple superphosphate if the soil is low in phosphorus.
• Lay the polybag on its side alongside the hole and slice the bottom 3 cm off the bag, soil and plant roots – this cuts off any distorted roots at the bottom of the bag and helps the plant to grow straight.
• Next cut the polybag a few cm up each side from the bottom and place the bag and seed-ling in the hole, making sure the top of the soil in the bag is at ground level. Don’t force the bag into the hole; if the hole is too shallow, remove the bag and dig the hole a bit deeper. If the root system is crammed down into the hole or if leaves and debris get into the hole, the roots may be forced to grow sideways, causing ‘bench root’ and poor plant growth.
• When the bag is fitting correctly into the hole, pack some topsoil around the base in the hole and then pull the bag up a bit and pack some more topsoil around the roots and con-
P A P U A N E W G U I N E A C O C O A E X T E N S I O N M A N U A L58

tinue like this until the bag is fully removed and topsoil has been packed around the whole root system. Finally compress the soil around the plant to make sure the hole is completely filled and the root system makes good contact with the soil.
• If the plants are too exposed, temporary shade consisting of a piece of palm frond stuck into the soil may be used to partly shade the plant (Figure 5.2).
Partial block replacement• The most damaged trees in a block can be removed (stumped back and poisoned) and
replaced by budded clones while the remaining trees and shade trees are pruned back and managed as an ongoing plantation. Existing gaps in a planting can be also be replanted with new clones. This enables income to be derived from the planting while it is progres-sively replaced.
• A potential problem with this method in areas with Pantorhytes is that the weevil can trans-fer easily from the old to young cocoa (Appendix 7).
• Also, in some areas Vascular Streak Dieback and Phytophthora can spread from the old to the young cocoa, although good management of the old cocoa (sanitary pruning and removal of diseased pods) can greatly reduce this.
Weeding• The most important time for weeding is during the early establishment of shade trees and
cocoa, before the ground is heavily shaded.
• General slashing or spraying of weeds may be required, but hand weeding should be done in a ring around the young cocoa plants to avoid any damage to them with grass-knives or herbicides.
• Spraying with herbicides must be done very carefully to avoid damaging the young plants with spray drift.
• Once the shade trees and cocoa are well established, with the cocoa canopies touching, less weeding should be required.
Figure 5.10 – Ideal structures of a cocoa tree – LH photo young clone with shorter trunk; RH photo an older seedling with a taller trunk but pods still easily accessible on a few main branches
P A P U A N E W G U I N E A C O C O A E X T E N S I O N M A N U A L 59
Formation pruning (taken from ‘Formation Pruning of Cocoa Clones’ by Yoel Efron, Jagadish Ayyamani and Eremas Tade)
• During its early development it is important to establish the ideal shape of a cocoa tree (a single trunk up to about 0.5 – 1 metre high (for a clone) or 1 - 1.2 metre high (for a seed-ling), then ideally 5 main lateral branches of equal strength growing outwards and upwards at about 45o angle – see Figure 5.10)
• Such a tree structure will:
o make later management pruning a lot easier,
o maximise flowering and pod production (that occurs mainly on the trunk and main later-al branches, and is stimulated by some exposure to sunlight),
o make sanitary pod removal and healthy pod harvesting a lot easier,
o improve access for spraying pods and main branches,
o improve air movement along the rows and sunlight penetration into the trees (especially around the pods and main pod-bearing branches), thus drying moisture from the trunk and main branches and so reducing Cocoa Pod Borer, Phytophthora Pod Rot and Can-ker, and damage by trunk-attacking insect pests (Longicorns and Pantorhytes).
• It is also important to prune out any branches showing symptoms of Vascular Streak Die-back as this disease can kill young plants if infection occurs in the primary stem or main branches.
Seedlings
• Seedlings form a single stem up to a height of about 1.2m and then a whorl of about 5 lateral fan branches at a jorquette and so develop into a balanced, well-shaped (Y-shaped) tree with minimal pruning in the first year (see Figure A3.5).
• After most seedlings have formed jorquettes at about 9 months of age, rounds of ‘5-branch and chupon pruning’ are needed every month to
o Prune out any chupons that emerge from the main trunk below the jorquette – cut as close to the trunk as possible;
o Ensure that only one main stem develops - sometimes the apical shoot of the first stem (trunk) gets damaged, allowing more than one stem to develop – as soon as possible cut off the weaker stem;
o Ensure that only 5 main lateral branches develop at the jorquette – prune out the weak-est of any excess fan branches growing from the jorquett;
o If only 4 fan branches are growing from the jorquette, cut off the tip of one branch to develop two lateral shoots from this branch, eventually giving 5 main lateral branches;
o Remove any branches growing on the 5 main lateral branches within 60 cm of the jorquette;
o Remove fan shoots that tend to overlap or interlock with others in the early stages of growth;
o Keep 5 strong lateral branches that grow outwards and upwards at about 45o - prune out any weak lateral branches, and any branches that tend to hang down (common in some genotypes e.g. KEE22) – cut them back to an upward growing shoot to make them grow upwards;
o Prune out some branches that grow back towards the centre of the tree and excessively shade the main branches;
o Cut out any branches infected with Pink Disease or Vascular Streak Dieback, cutting 30 cm below the symptoms closest to the jorquette.
• Aim to develop a Y-shaped canopy with a somewhat open (but not completely open) centre (a wine-glass shape) - if the centre of the tree is too open, excessive sunlight might stimu-late chupon growth and scorch the branches.
P A P U A N E W G U I N E A C O C O A E X T E N S I O N M A N U A L60
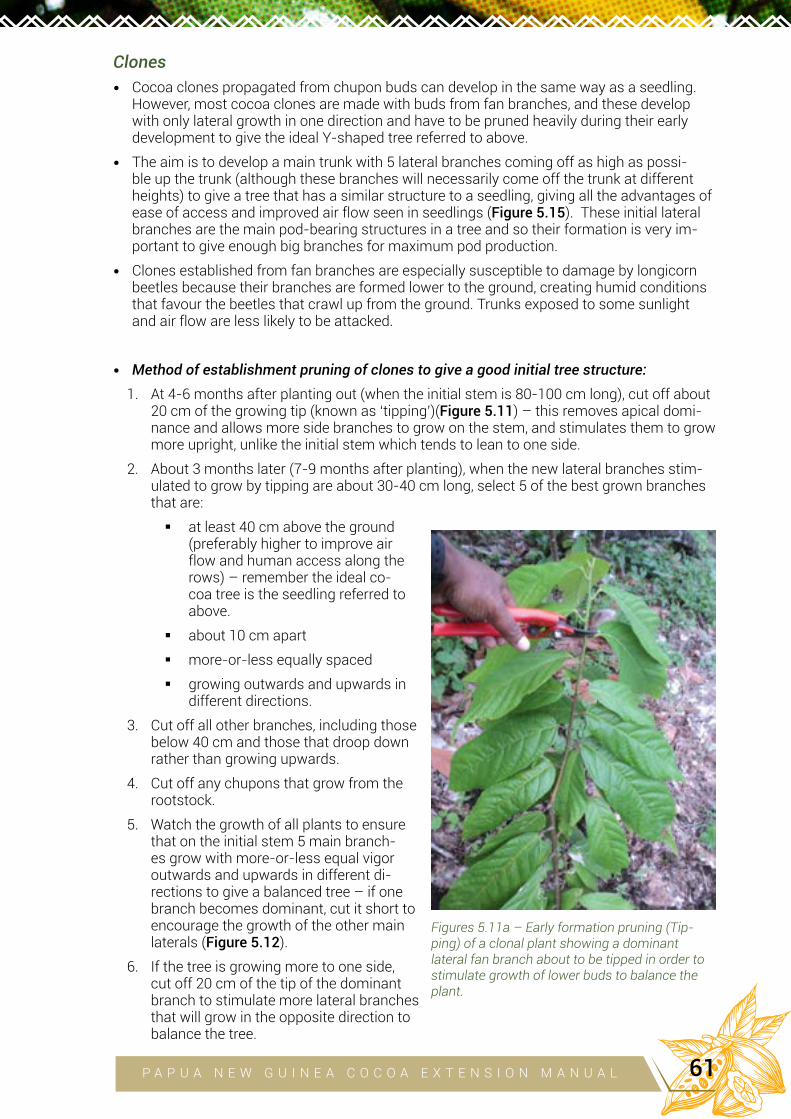
Clones
• Cocoa clones propagated from chupon buds can develop in the same way as a seedling. However, most cocoa clones are made with buds from fan branches, and these develop with only lateral growth in one direction and have to be pruned heavily during their early development to give the ideal Y-shaped tree referred to above.
• The aim is to develop a main trunk with 5 lateral branches coming off as high as possi-ble up the trunk (although these branches will necessarily come off the trunk at different heights) to give a tree that has a similar structure to a seedling, giving all the advantages of ease of access and improved air flow seen in seedlings (Figure 5.15). These initial lateral branches are the main pod-bearing structures in a tree and so their formation is very im-portant to give enough big branches for maximum pod production.
• Clones established from fan branches are especially susceptible to damage by longicorn beetles because their branches are formed lower to the ground, creating humid conditions that favour the beetles that crawl up from the ground. Trunks exposed to some sunlight and air flow are less likely to be attacked.
• Method of establishment pruning of clones to give a good initial tree structure:
1. At 4-6 months after planting out (when the initial stem is 80-100 cm long), cut off about 20 cm of the growing tip (known as ‘tipping’)(Figure 5.11) – this removes apical domi-nance and allows more side branches to grow on the stem, and stimulates them to grow more upright, unlike the initial stem which tends to lean to one side.
2. About 3 months later (7-9 months after planting), when the new lateral branches stim-ulated to grow by tipping are about 30-40 cm long, select 5 of the best grown branches that are:
at least 40 cm above the ground (preferably higher to improve air flow and human access along the rows) – remember the ideal co-coa tree is the seedling referred to above.
about 10 cm apart
more-or-less equally spaced
growing outwards and upwards in different directions.
3. Cut off all other branches, including those below 40 cm and those that droop down rather than growing upwards.
4. Cut off any chupons that grow from the rootstock.
5. Watch the growth of all plants to ensure that on the initial stem 5 main branch-es grow with more-or-less equal vigor outwards and upwards in different di-rections to give a balanced tree – if one branch becomes dominant, cut it short to encourage the growth of the other main laterals (Figure 5.12).
6. If the tree is growing more to one side, cut off 20 cm of the tip of the dominant branch to stimulate more lateral branches that will grow in the opposite direction to balance the tree.
Figures 5.11a – Early formation pruning (Tip-ping) of a clonal plant showing a dominant lateral fan branch about to be tipped in order to stimulate growth of lower buds to balance the plant.
P A P U A N E W G U I N E A C O C O A E X T E N S I O N M A N U A L 61
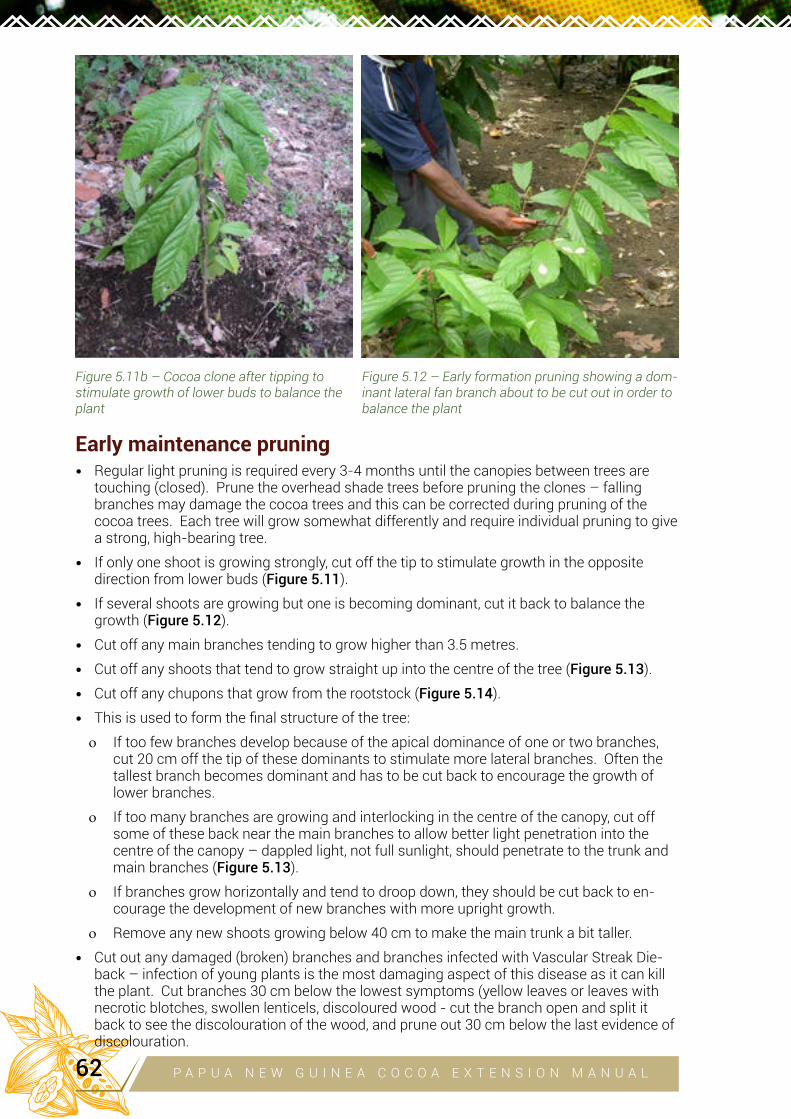
Early maintenance pruning• Regular light pruning is required every 3-4 months until the canopies between trees are
touching (closed). Prune the overhead shade trees before pruning the clones – falling branches may damage the cocoa trees and this can be corrected during pruning of the cocoa trees. Each tree will grow somewhat differently and require individual pruning to give a strong, high-bearing tree.
• If only one shoot is growing strongly, cut off the tip to stimulate growth in the opposite direction from lower buds (Figure 5.11).
• If several shoots are growing but one is becoming dominant, cut it back to balance the growth (Figure 5.12).
• Cut off any main branches tending to grow higher than 3.5 metres.
• Cut off any shoots that tend to grow straight up into the centre of the tree (Figure 5.13).
• Cut off any chupons that grow from the rootstock (Figure 5.14).
• This is used to form the final structure of the tree:
o If too few branches develop because of the apical dominance of one or two branches, cut 20 cm off the tip of these dominants to stimulate more lateral branches. Often the tallest branch becomes dominant and has to be cut back to encourage the growth of lower branches.
o If too many branches are growing and interlocking in the centre of the canopy, cut off some of these back near the main branches to allow better light penetration into the centre of the canopy – dappled light, not full sunlight, should penetrate to the trunk and main branches (Figure 5.13).
o If branches grow horizontally and tend to droop down, they should be cut back to en-courage the development of new branches with more upright growth.
o Remove any new shoots growing below 40 cm to make the main trunk a bit taller.
• Cut out any damaged (broken) branches and branches infected with Vascular Streak Die-back – infection of young plants is the most damaging aspect of this disease as it can kill the plant. Cut branches 30 cm below the lowest symptoms (yellow leaves or leaves with necrotic blotches, swollen lenticels, discoloured wood - cut the branch open and split it back to see the discolouration of the wood, and prune out 30 cm below the last evidence of discolouration.
Figure 5.11b – Cocoa clone after tipping to stimulate growth of lower buds to balance the plant
Figure 5.12 – Early formation pruning showing a dom-inant lateral fan branch about to be cut out in order to balance the plant
P A P U A N E W G U I N E A C O C O A E X T E N S I O N M A N U A L62
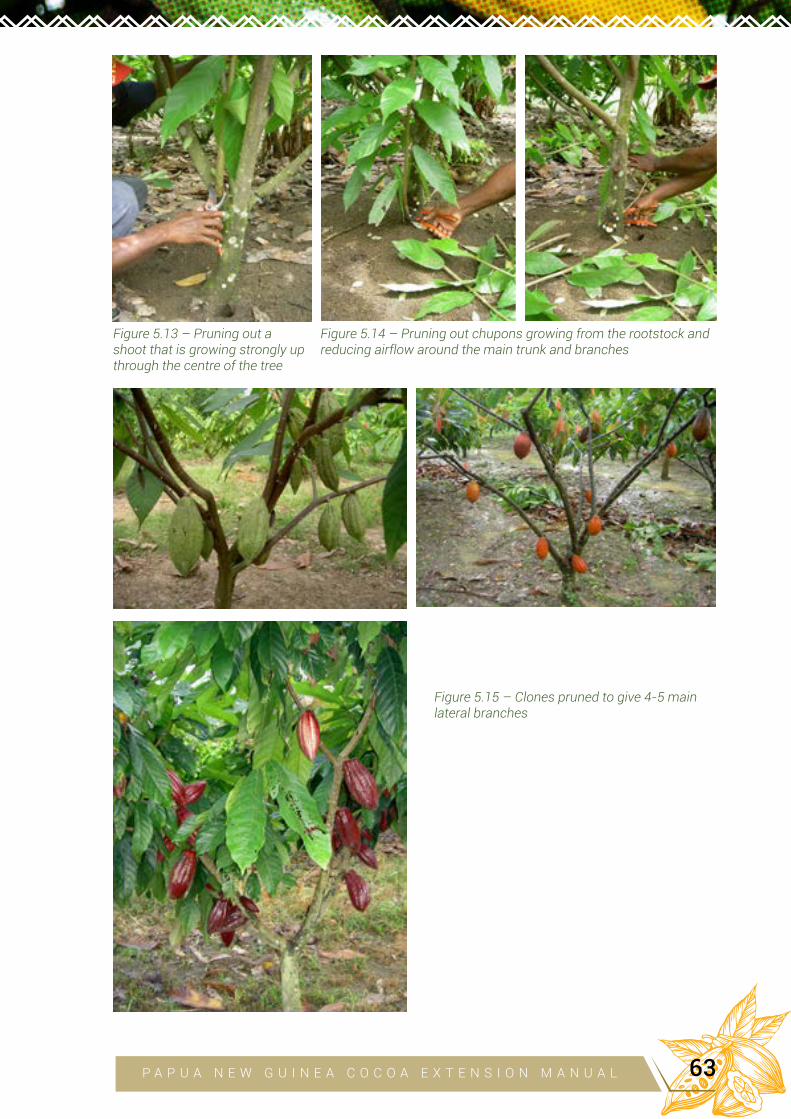
Figure 5.14 – Pruning out chupons growing from the rootstock and reducing airflow around the main trunk and branches
Figure 5.13 – Pruning out a shoot that is growing strongly up through the centre of the tree
Figure 5.15 – Clones pruned to give 4-5 main lateral branches
P A P U A N E W G U I N E A C O C O A E X T E N S I O N M A N U A L 63
Fertilisation of young plants in the field• Fertilisation is usually not necessary in the first year after clearing of forest because of the
natural soil fertility that builds up under forest, but fertilisers in the first year may be nec-essary on ex-grassland, bush/grass and weedy sites or food gardens (depending on the natural fertility of the site).
• Fertilisation (especially application of urea) during cocoa establishment must be careful-ly controlled to avoid giving excessive extension growth of branches, leading to branch cracking and the need for heavy pruning - this is linked to shade management as the trees develop.
• The initial shade needed for cocoa establishment should be cut back and linked to applica-tion of minimum nitrogenous fertiliser to keep the plants growing well without giving long spindly branch growth.
• Weeds must be controlled in order to get the best benefit from any fertiliser applications – fast growing weeds will rapidly use applied mineral fertilisers, resulting in a greater weed problem.
• Although compound fertiliser (e.g. NPKMg) is expensive, its use may be justified when re-planting old cocoa sites where a range of nutrients may have been depleted (Table 5.1).
Table 5.1 - Recommended fertiliser applications per tree for cocoa in the first 12 months after field planting (for blocks with good management, especially weeding and shade control).
Option Period after planting
0 months 3 months 6 months 9 months
1 50 g NPKMg (12:12:17:2) 50 g NPKMg 50 g NPKMg 50 g NPKMg2 150 g rock phosphate +
15 g urea or 30g ammoni-um sulphate
15 g urea or 30 g ammonium sulphate
15 g urea 15 g urea or 30 g am-monium sulphate
3 30 g triple superphos-phate
+ 15 g urea or 30 g am-monium sulphate
15 g urea or 30 g ammonium sulphate
30 g triple su-perphosphate
+ 15 g urea or 30g ammonium sulphate
15 g urea or 30 g am-monium sulphate
4 No application 30 g Diammoni-um phosphate
30 g Diammoni-um phosphate
30 g Diammonium phosphate
Rock phosphate 25-39% P2O5
• Ammonium sulphate 21% N
• Urea 46% N
• Diammonium phosphate 48% P2O5, 21% N
• Triple superphosphate 43-52% P2O5
P A P U A N E W G U I N E A C O C O A E X T E N S I O N M A N U A L64
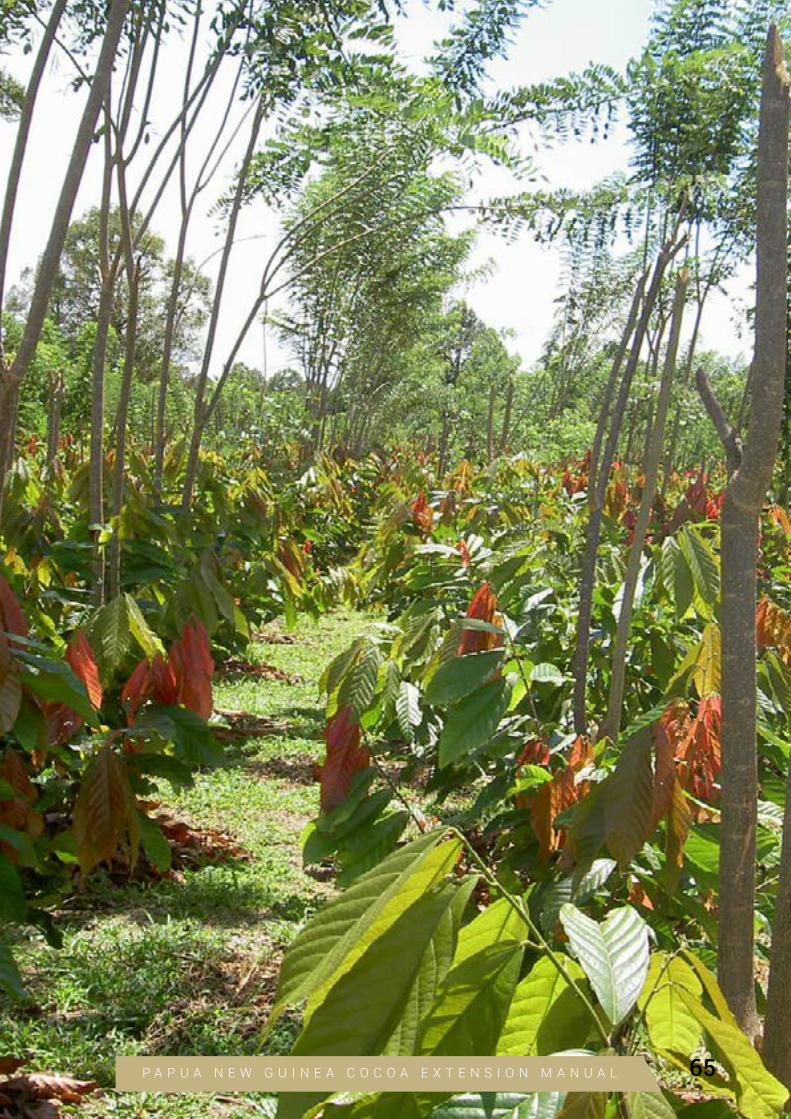
P A P U A N E W G U I N E A C O C O A E X T E N S I O N M A N U A L 65
6
MAINTAINING A
COCOA BLOCK
David Yinil, Eremas Tade, Peter Bapiwai, Chris Fidelis and Martin Powell
AIM OF THIS CHAPTER:
To describe the work needed to maintain a cocoa planting in order to get maxi-mum production
Good farming practice – ‘light work done regularly’• The aim is to apply the same level of regular (daily) management to cocoa blocks as is
applied to food gardens, involving mainly ‘light work done regularly’.
o Farmers know that it is not good to let weeds accumulate and grow in a food garden for weeks and then try to control them in one round of heavy work in slashing or pulling out big weeds – this involves harder work but also results in lost food production.
o In the same way, it is bad to let weeds accumulate, or shade get overgrown, or sick pods remain hanging on cocoa trees for weeks or months and then try to correct the problem, which will then involve heavy work and lost production of healthy pods.
• After a block has been established with the best recommended planting material, the most important management activities are:
o Monthly pruning of each shade tree to let about 80% of full sunlight through to the cocoa – most cocoa blocks are too heavily shaded, especially as Gliricidia grows fast.
o Monthly pruning of each cocoa tree to
maintain a manageable tree size (not more than about twice human height),
maintain a balanced tree with about 5 main pod-bearing branches,
keep the canopy open for sunlight penetration and air flow down to the trunk and main branches,
remove branches infested by Vascular Streak Dieback, Pink Disease or Pansepta.
o Weekly weed control by hand pulling or slashing to
reduce competition with the cocoa,
reduce humidity in the cocoa canopy,
keep the trunk free of weeds that allow longicorn attack,
facilitate access to the branches and pods for sanitation and harvesting.
o Weekly rounds of complete removal of all Phytophthora or Cocoa Pod Borer infested pods at any stage of pod development, as well as harvesting any healthy mature pods - these should be counted and numbers entered into a monitoring/record book.
o Monthly checking for occurrence of and treatment of Phytophthora Stem Cankers, and Pantorhytes weevil and longicorn beetle channels - these should be counted and num-bers entered into a monitoring/record book.
CHAPTER
P A P U A N E W G U I N E A C O C O A E X T E N S I O N M A N U A L66

o Weekly monitoring of Mirid damage on cherelles, pods and shoots to determine if spray-ing is necessary - again these data should be entered into a monitoring/record book.
o Effective burial of infested pod waste in pits or trenches (covered with 10 cm depth of soil) so that it doesn’t spread Phytophthora or Cocoa Pod Borer.
o Maintenance of soil structure and fertility through
erosion control on slopes, allowing natural leaf litter accumulation,
application of organic manures and mulches (and inorganic fertilisers where need-ed) – all organic wastes from a cocoa farm (e.g. slashed weeds, infested pods, pod husks, prunings) should be returned to the cocoa soil in some form, through use as mulch (for prunings), direct burial of pod husks and diseased pods, or via composting with added animal manure (e.g. chicken, pig or goat manure).
• Traditional recommendations were that activities like weeding, pruning of cocoa and shade trees, and harvesting be conducted on a fixed schedule of ‘rounds’ (‘weeding rounds’, ‘pruning rounds’, ‘harvesting rounds’) in relation to the cropping cycle of the cocoa. These recommendations were complicated, and varied between districts and types of cocoa, and, because they involved intermittent activity, were often neglected. The occurrence of Cocoa Pod Borer has meant that, to obtain any crop at all, harvesting of infested pods has to be done weekly – i.e. the crop demands more constant work and attention, and this can be extended also to weeding, pruning, manuring and general pest/disease control. It is better to think of ‘constant attention’, or of ‘doing things when they are needed’ rather than a fixed schedule of ‘rounds’.
• If these activities are done regularly, they do not involve heavy work – e.g. if branches are pruned before they get too big, less work is required to prune them than when they have grown big, and the prunings can be disposed of more productively as mulch or for com-posting than is possible with big branches that just become obstructions in the farm. This approach will allow all members of a family to contribute to block management, as occurs with food gardens.
• The effects of all of these activities are linked or integrated into an ecological system – all activities help increase crop production, hence the term ‘Integrated Crop Management’; all help reduce pests and diseases, hence the term ‘Integrated Pest and Disease Manage-ment’.
• Figure 6.1 shows the linking of all these activities. These activities can be put into a Check List of all the things that have to be done to obtain good cocoa production (Table 6.1).
• The effects of these activities can be ‘synergistic’ – i.e. they don’t just add to one another but they often multiply the benefits of one another – for example:
o Pod removal is not just for obtaining cocoa beans for sale, but removal of diseased pods is crucial for breaking the life cycles of Cocoa Pod Borer and Phytophthora Pod Rot that can destroy any pods that are produced - this is called ‘sanitation pod removal’.
o Excessive shading and crowded growth of cocoa trees directly reduces yield (which is determined by the amount of sunlight penetrating to all the cocoa leaves) and also indi-rectly reduces yield by prolonging leaf and pod wetness after rain or dew, favouring the build-up of pests and diseases.
• Thus, the keys to block management are:
o understanding that all these operations are part of an integrated, whole, ecological sys-tem – neglect any one aspect and the block will tend to degenerate and become unpro-ductive.
o understanding that, ideally, all these operations have to be applied regularly (weekly for some, monthly for others), and that this involves less work than trying to occasionally manage a neglected ‘bush’ block.
P A P U A N E W G U I N E A C O C O A E X T E N S I O N M A N U A L 67
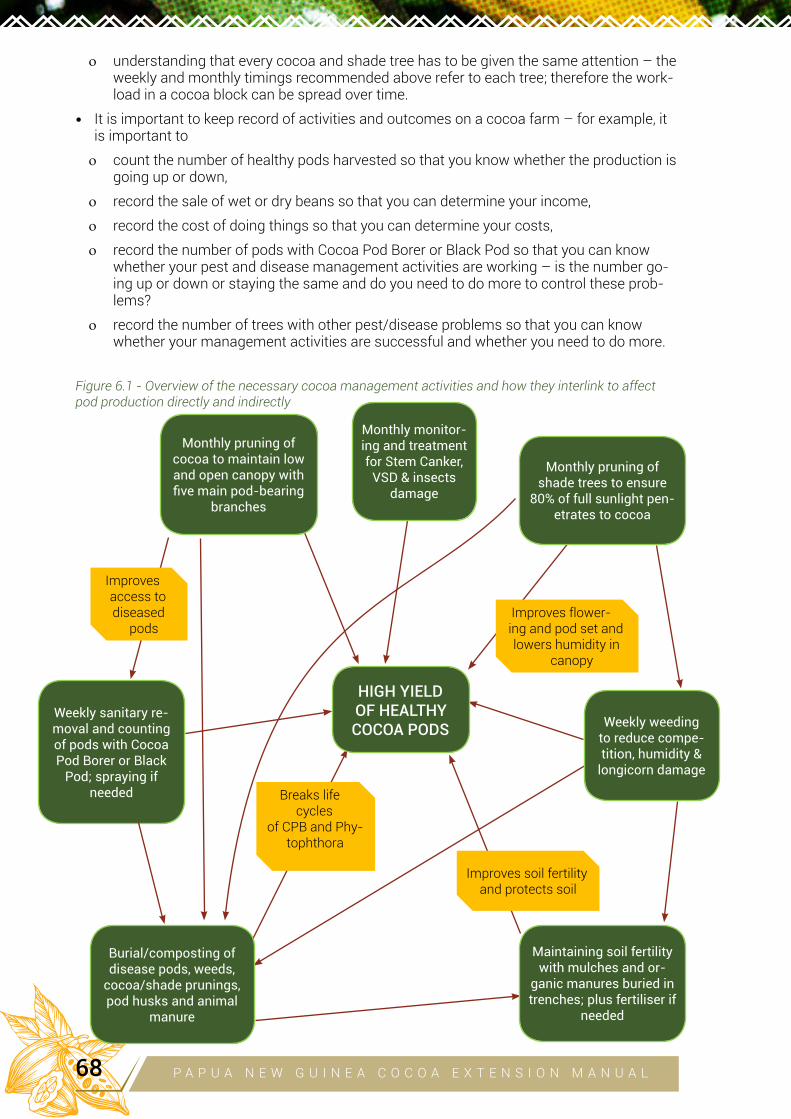
o understanding that every cocoa and shade tree has to be given the same attention – the weekly and monthly timings recommended above refer to each tree; therefore the work-load in a cocoa block can be spread over time.
• It is important to keep record of activities and outcomes on a cocoa farm – for example, it is important to
o count the number of healthy pods harvested so that you know whether the production is going up or down,
o record the sale of wet or dry beans so that you can determine your income,
o record the cost of doing things so that you can determine your costs,
o record the number of pods with Cocoa Pod Borer or Black Pod so that you can know whether your pest and disease management activities are working – is the number go-ing up or down or staying the same and do you need to do more to control these prob-lems?
o record the number of trees with other pest/disease problems so that you can know whether your management activities are successful and whether you need to do more.
Figure 6.1 - Overview of the necessary cocoa management activities and how they interlink to affect pod production directly and indirectly
Monthly pruning of cocoa to maintain low and open canopy with five main pod-bearing
branches
Monthly pruning of shade trees to ensure
80% of full sunlight pen-etrates to cocoa
HIGH YIELD OF HEALTHY COCOA PODS
Weekly sanitary re-moval and counting of pods with Cocoa Pod Borer or Black
Pod; spraying if needed
Weekly weeding to reduce compe-tition, humidity &
longicorn damage
Burial/composting of disease pods, weeds,
cocoa/shade prunings, pod husks and animal
manure
Maintaining soil fertility with mulches and or-
ganic manures buried in trenches; plus fertiliser if
needed
Monthly monitor-ing and treatment for Stem Canker,
VSD & insects damage
Improves access to diseased
pods
Breaks life cycles
of CPB and Phy-tophthora
Improves flower-ing and pod set and lowers humidity in
canopy
Improves soil fertility and protects soil
P A P U A N E W G U I N E A C O C O A E X T E N S I O N M A N U A L68
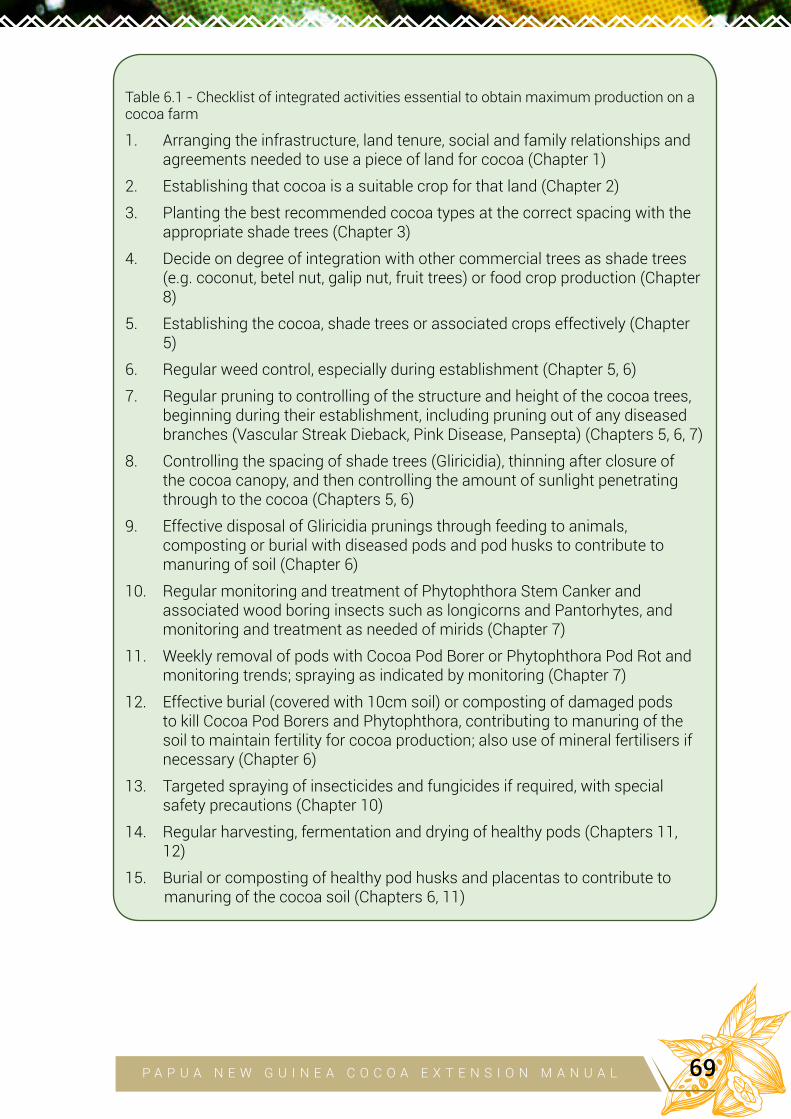
Table 6.1 - Checklist of integrated activities essential to obtain maximum production on a cocoa farm
1. Arranging the infrastructure, land tenure, social and family relationships and agreements needed to use a piece of land for cocoa (Chapter 1)
2. Establishing that cocoa is a suitable crop for that land (Chapter 2)
3. Planting the best recommended cocoa types at the correct spacing with the appropriate shade trees (Chapter 3)
4. Decide on degree of integration with other commercial trees as shade trees (e.g. coconut, betel nut, galip nut, fruit trees) or food crop production (Chapter 8)
5. Establishing the cocoa, shade trees or associated crops effectively (Chapter 5)
6. Regular weed control, especially during establishment (Chapter 5, 6)
7. Regular pruning to controlling of the structure and height of the cocoa trees, beginning during their establishment, including pruning out of any diseased branches (Vascular Streak Dieback, Pink Disease, Pansepta) (Chapters 5, 6, 7)
8. Controlling the spacing of shade trees (Gliricidia), thinning after closure of the cocoa canopy, and then controlling the amount of sunlight penetrating through to the cocoa (Chapters 5, 6)
9. Effective disposal of Gliricidia prunings through feeding to animals, composting or burial with diseased pods and pod husks to contribute to manuring of soil (Chapter 6)
10. Regular monitoring and treatment of Phytophthora Stem Canker and associated wood boring insects such as longicorns and Pantorhytes, and monitoring and treatment as needed of mirids (Chapter 7)
11. Weekly removal of pods with Cocoa Pod Borer or Phytophthora Pod Rot and monitoring trends; spraying as indicated by monitoring (Chapter 7)
12. Effective burial (covered with 10cm soil) or composting of damaged pods to kill Cocoa Pod Borers and Phytophthora, contributing to manuring of the soil to maintain fertility for cocoa production; also use of mineral fertilisers if necessary (Chapter 6)
13. Targeted spraying of insecticides and fungicides if required, with special safety precautions (Chapter 10)
14. Regular harvesting, fermentation and drying of healthy pods (Chapters 11, 12)
15. Burial or composting of healthy pod husks and placentas to contribute to manuring of the cocoa soil (Chapters 6, 11)
P A P U A N E W G U I N E A C O C O A E X T E N S I O N M A N U A L 69
Weed control (see Chapter 10 for use of herbicides)• Weeds compete with cocoa for nutrients and water (and sunlight during the establishment
phase), and also increase humidity under the cocoa canopy, increasing the chance of fun-gus infection especially Phytophthora Pod Rot, and some insect infestations. Weeds also make it harder to move through the block and carry out good management (Figure 6.2).
• Weed control is especially important during the establishment of a cocoa block, before the cocoa canopy is closed (Figures 6.4, 6.5).
• In a well-pruned shade tree and cocoa canopy, some dappled light should get through to the ground and allow weak growth of weeds that have to be removed regularly – this is a sign that pruning of both the shade trees and cocoa is adequate. If the plantation floor is so dark that absolutely no weeds can grow, this is a sign that the plantation is heavily over-shaded and the cocoa canopy poorly pruned with the result that the cocoa will not be reaching its full productive potential.
• A few small herbaceous weeds may be beneficial in contributing to the survival of beneficial insects (pollinators, and predators or parasitoids of pests), an idea promoted by a former entomologist at CCIL, Bob Pryor, although flowering weeds may also provide nectar for the adult moths of the Cocoa Pod Borer.
• Regular removal by hand of small developing weeds on the ground and climbers develop-ing on the trunks is much easier than occasional removal of well-established weeds – and so weeding should be another part of regular (weekly) cocoa block maintenance.
• Removal of climbing weeds such as Monstera and Mikania micrantha (‘mile-a-minute’) and other weeds such as grasses growing around the trunk (Figure 6.3) will allow more sunlight and air flow around the trunks, thus discouraging attack by longicorn beetles and Grey Weevils (see Appendix 7).
• Weeds will grow prolifically in gaps, and these should be replanted with cocoa or other trees, or used to grow food crops to get maximum production from the block and reduce weed growth.
• Mulching of the soil surface with uniformly spread leaves from cocoa and shade trees will help suppress weeds, but mulch should be kept about 30 cm away from the trunk of the cocoa.
• Ring weeding around new cocoa plants has to be done carefully by hand so as not to dam-age the small plants with slashing or chemicals (Figures 6.4, 6.5). Ring weeding by hand should be done routinely in a 1 metre radius around the trunks of established cocoa.
• Slashing does not kill weeds but only prunes them back – it must be done regularly (monthly).
o Slashing is an ideal form of weed control in situations where the weeds are useful in preventing erosion on sloping land (e.g. on the front of contour banks or terraces).
o During slashing, damage to the trunk of cocoa must be avoided as trunk wounds can provide entry points for termites or especially Phytophthora that can cause cankers.
• Chemical control usually kills the weeds and has a longer lasting effect (Chapter 10).
o Chemical control is quicker and easier than slashing, thus reducing labour costs, but it has special health and safety requirements (all herbicides must be considered potential-ly poisonous to humans, and potentially damaging to the cocoa and shade trees if not targeted just on the weeds).
o Knapsack sprayers and safety equipment are needed for application of herbicides (Chapter 10).
o The identity of the weeds is important for chemical control (at least to the level of whether the weeds are broad-leaved or grasses - Chapter 10) but not so important for manual control.
P A P U A N E W G U I N E A C O C O A E X T E N S I O N M A N U A L70
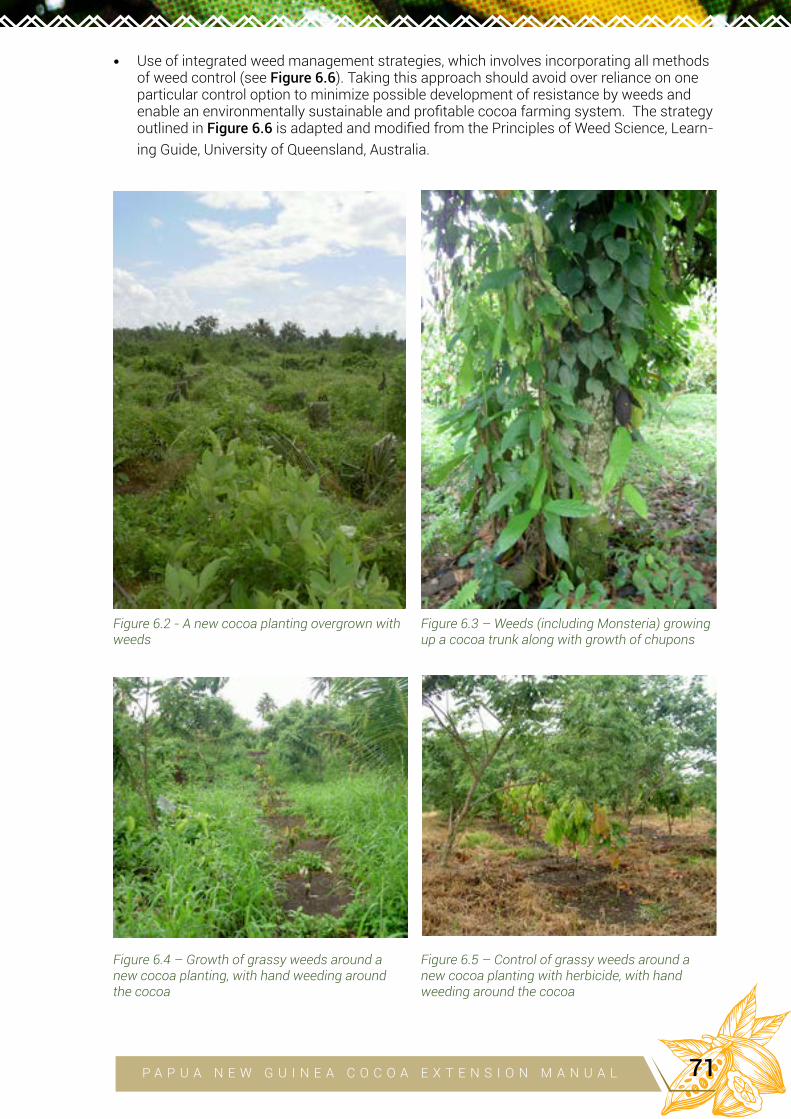
• Use of integrated weed management strategies, which involves incorporating all methods of weed control (see Figure 6.6). Taking this approach should avoid over reliance on one particular control option to minimize possible development of resistance by weeds and enable an environmentally sustainable and profitable cocoa farming system. The strategy outlined in Figure 6.6 is adapted and modified from the Principles of Weed Science, Learn-
ing Guide, University of Queensland, Australia.
Figure 6.2 - A new cocoa planting overgrown with weeds
Figure 6.4 – Growth of grassy weeds around a new cocoa planting, with hand weeding around the cocoa
Figure 6.3 – Weeds (including Monsteria) growing up a cocoa trunk along with growth of chupons
Figure 6.5 – Control of grassy weeds around a new cocoa planting with herbicide, with hand weeding around the cocoa
P A P U A N E W G U I N E A C O C O A E X T E N S I O N M A N U A L 71
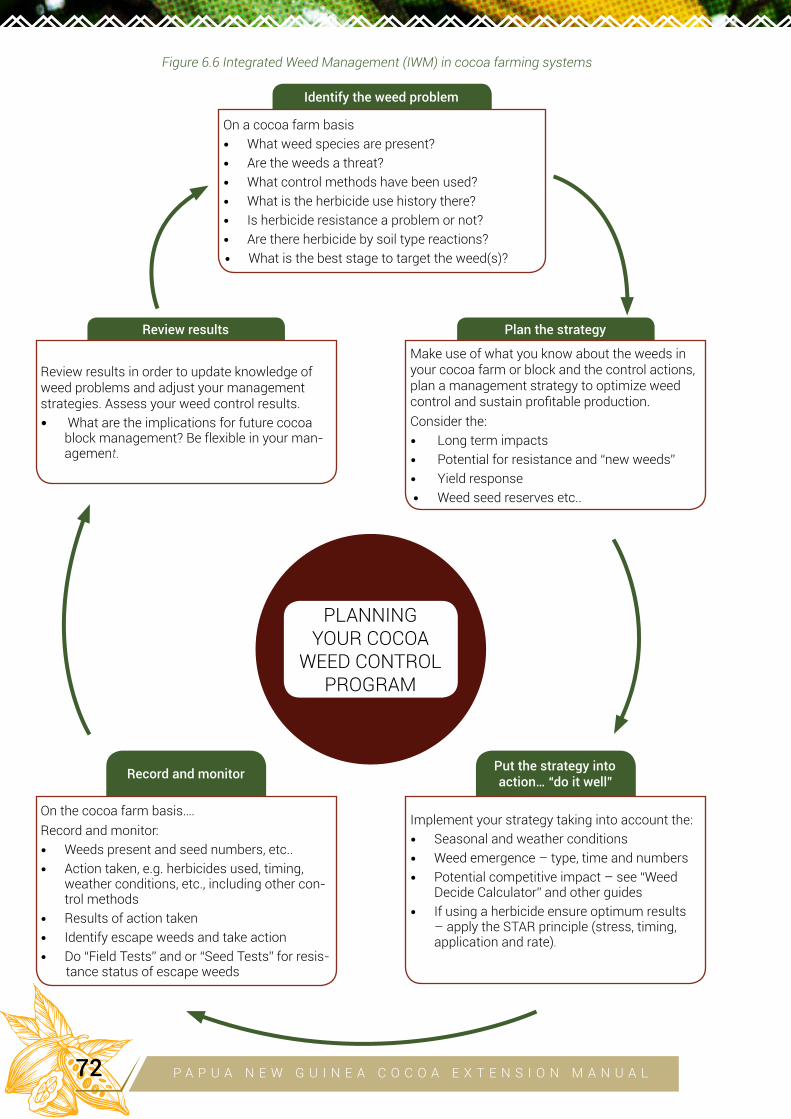
Figure 6.6 Integrated Weed Management (IWM) in cocoa farming systems
Identify the weed problem
Review results
Record and monitor
Plan the strategy
Put the strategy into action… “do it well”
PLANNING YOUR COCOA
WEED CONTROL PROGRAM
On a cocoa farm basis• What weed species are present?• Are the weeds a threat?• What control methods have been used?• What is the herbicide use history there?• Is herbicide resistance a problem or not?• Are there herbicide by soil type reactions?• What is the best stage to target the weed(s)?
Review results in order to update knowledge of weed problems and adjust your management strategies. Assess your weed control results.• What are the implications for future cocoa
block management? Be flexible in your man-agement.
On the cocoa farm basis….Record and monitor:
• Weeds present and seed numbers, etc..• Action taken, e.g. herbicides used, timing,
weather conditions, etc., including other con-trol methods
• Results of action taken
• Identify escape weeds and take action
• Do “Field Tests” and or “Seed Tests” for resis-tance status of escape weeds
Make use of what you know about the weeds in your cocoa farm or block and the control actions, plan a management strategy to optimize weed control and sustain profitable production.Consider the:
• Long term impacts• Potential for resistance and “new weeds”• Yield response• Weed seed reserves etc..
Implement your strategy taking into account the:
• Seasonal and weather conditions• Weed emergence – type, time and numbers• Potential competitive impact – see “Weed
Decide Calculator” and other guides• If using a herbicide ensure optimum results
– apply the STAR principle (stress, timing, application and rate).
P A P U A N E W G U I N E A C O C O A E X T E N S I O N M A N U A L72
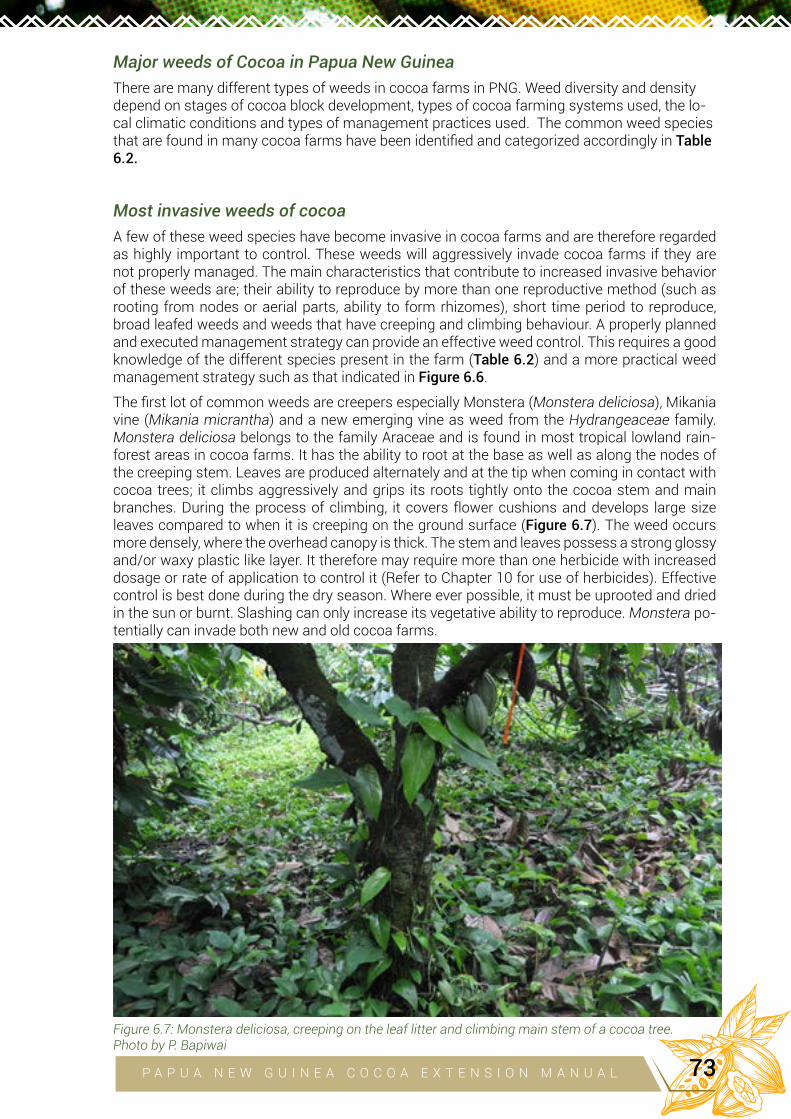
Major weeds of Cocoa in Papua New Guinea
There are many different types of weeds in cocoa farms in PNG. Weed diversity and density depend on stages of cocoa block development, types of cocoa farming systems used, the lo-cal climatic conditions and types of management practices used. The common weed species that are found in many cocoa farms have been identified and categorized accordingly in Table 6.2.
Most invasive weeds of cocoa
A few of these weed species have become invasive in cocoa farms and are therefore regarded as highly important to control. These weeds will aggressively invade cocoa farms if they are not properly managed. The main characteristics that contribute to increased invasive behavior of these weeds are; their ability to reproduce by more than one reproductive method (such as rooting from nodes or aerial parts, ability to form rhizomes), short time period to reproduce, broad leafed weeds and weeds that have creeping and climbing behaviour. A properly planned and executed management strategy can provide an effective weed control. This requires a good knowledge of the different species present in the farm (Table 6.2) and a more practical weed management strategy such as that indicated in Figure 6.6.
The first lot of common weeds are creepers especially Monstera (Monstera deliciosa), Mikania vine (Mikania micrantha) and a new emerging vine as weed from the Hydrangeaceae family. Monstera deliciosa belongs to the family Araceae and is found in most tropical lowland rain-forest areas in cocoa farms. It has the ability to root at the base as well as along the nodes of the creeping stem. Leaves are produced alternately and at the tip when coming in contact with cocoa trees; it climbs aggressively and grips its roots tightly onto the cocoa stem and main branches. During the process of climbing, it covers flower cushions and develops large size leaves compared to when it is creeping on the ground surface (Figure 6.7). The weed occurs more densely, where the overhead canopy is thick. The stem and leaves possess a strong glossy and/or waxy plastic like layer. It therefore may require more than one herbicide with increased dosage or rate of application to control it (Refer to Chapter 10 for use of herbicides). Effective control is best done during the dry season. Where ever possible, it must be uprooted and dried in the sun or burnt. Slashing can only increase its vegetative ability to reproduce. Monstera po-tentially can invade both new and old cocoa farms.
Figure 6.7: Monstera deliciosa, creeping on the leaf litter and climbing main stem of a cocoa tree. Photo by P. Bapiwai
P A P U A N E W G U I N E A C O C O A E X T E N S I O N M A N U A L 73

Mikania micrantha or mile-a-minute, belongs to the family Asteraceae and is native of South and Central America. It is an invasive weed species of cocoa which grows rapidly and vigor-ously covering large areas in many cocoa farms. It is a creeper, climber and a scrambler. When in contact with a support such as a cocoa or shade tree, it coils around it and establishes very fast. Mikania reproduces by both the creeping stems that develop roots at the nodes vegeta-tively and via windblown seeds. As it climbs the cocoa trees (Figures 6.8a & b), it covers flower cushions, branches, leaves, and even the entire cocoa trees. Mikania potentially can invade both new and old cocoa farms (Figure 6.8 b).
Figure 6.8 a.: Mikania micran-tha climbing a cocoa trunk.
Figure 6.8 b: Mikania micran-tha covering canopy of cocoa trees. Photo by P. Bapiwai
The tropical vine belonging to the Hydrangeaceae family is very much related to the species Hydrangea petiolaris. It is a potential new emerging invasive weed in some cocoa farms in PNG. This vine is a very aggressive climber. It coils and puts out aerial roots over cocoa and other trees at heights of 8 to 10 meters or higher. Stems of new growth of this vine are smooth, round and hairless. Leaves are heart-shaped with many branched flower heads (See Figures 6.9 a, b and c). The vine dominates rapidly by covering cocoa trees, shade trees and other vegetation including fruit and forest trees that are within its vicinity.
P A P U A N E W G U I N E A C O C O A E X T E N S I O N M A N U A L74
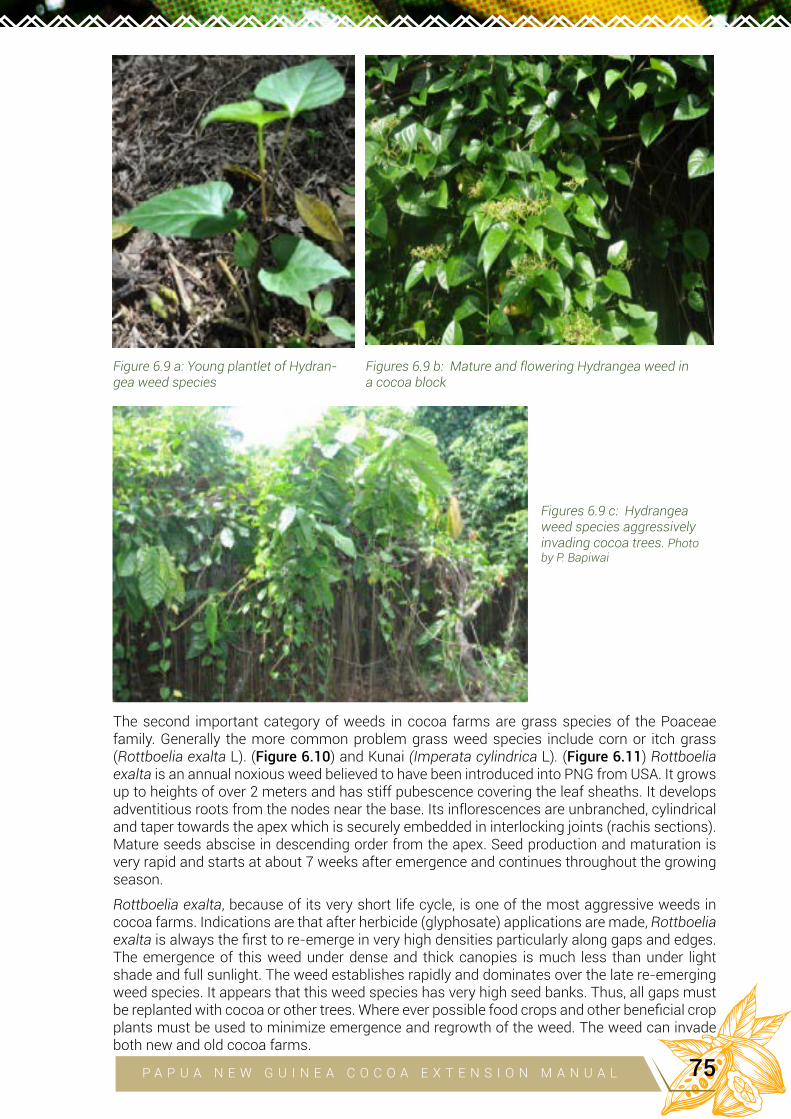
The second important category of weeds in cocoa farms are grass species of the Poaceae family. Generally the more common problem grass weed species include corn or itch grass (Rottboelia exalta L). (Figure 6.10) and Kunai (Imperata cylindrica L). (Figure 6.11) Rottboelia exalta is an annual noxious weed believed to have been introduced into PNG from USA. It grows up to heights of over 2 meters and has stiff pubescence covering the leaf sheaths. It develops adventitious roots from the nodes near the base. Its inflorescences are unbranched, cylindrical and taper towards the apex which is securely embedded in interlocking joints (rachis sections). Mature seeds abscise in descending order from the apex. Seed production and maturation is very rapid and starts at about 7 weeks after emergence and continues throughout the growing season.
Rottboelia exalta, because of its very short life cycle, is one of the most aggressive weeds in cocoa farms. Indications are that after herbicide (glyphosate) applications are made, Rottboelia exalta is always the first to re-emerge in very high densities particularly along gaps and edges. The emergence of this weed under dense and thick canopies is much less than under light shade and full sunlight. The weed establishes rapidly and dominates over the late re-emerging weed species. It appears that this weed species has very high seed banks. Thus, all gaps must be replanted with cocoa or other trees. Where ever possible food crops and other beneficial crop plants must be used to minimize emergence and regrowth of the weed. The weed can invade both new and old cocoa farms.
Figure 6.9 a: Young plantlet of Hydran-gea weed species
Figures 6.9 b: Mature and flowering Hydrangea weed in a cocoa block
Figures 6.9 c: Hydrangea weed species aggressively invading cocoa trees. Photo by P. Bapiwai
P A P U A N E W G U I N E A C O C O A E X T E N S I O N M A N U A L 75
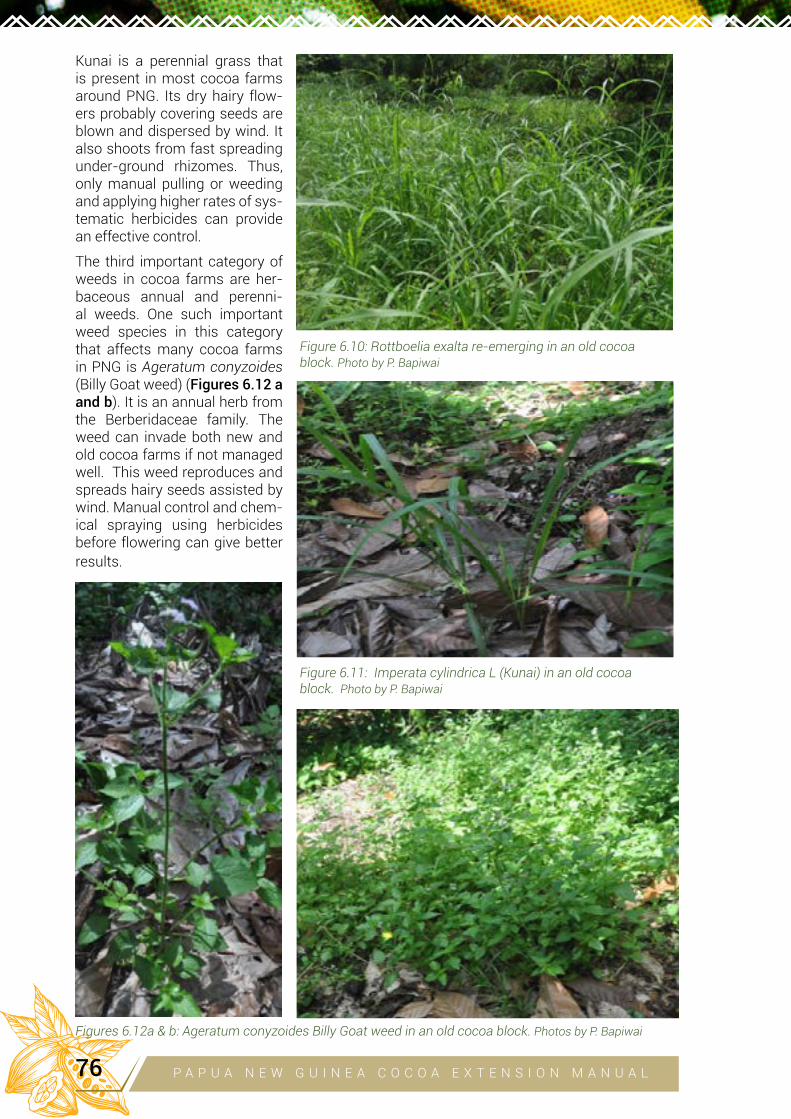
Kunai is a perennial grass that is present in most cocoa farms around PNG. Its dry hairy flow-ers probably covering seeds are blown and dispersed by wind. It also shoots from fast spreading under-ground rhizomes. Thus, only manual pulling or weeding and applying higher rates of sys-tematic herbicides can provide an effective control.
The third important category of weeds in cocoa farms are her-baceous annual and perenni-al weeds. One such important weed species in this category that affects many cocoa farms in PNG is Ageratum conyzoides (Billy Goat weed) (Figures 6.12 a and b). It is an annual herb from the Berberidaceae family. The weed can invade both new and old cocoa farms if not managed well. This weed reproduces and spreads hairy seeds assisted by wind. Manual control and chem-ical spraying using herbicides before flowering can give better results.
Figure 6.10: Rottboelia exalta re-emerging in an old cocoa block. Photo by P. Bapiwai
Figure 6.11: Imperata cylindrica L (Kunai) in an old cocoa block. Photo by P. Bapiwai
Figures 6.12a & b: Ageratum conyzoides Billy Goat weed in an old cocoa block. Photos by P. Bapiwai
P A P U A N E W G U I N E A C O C O A E X T E N S I O N M A N U A L76
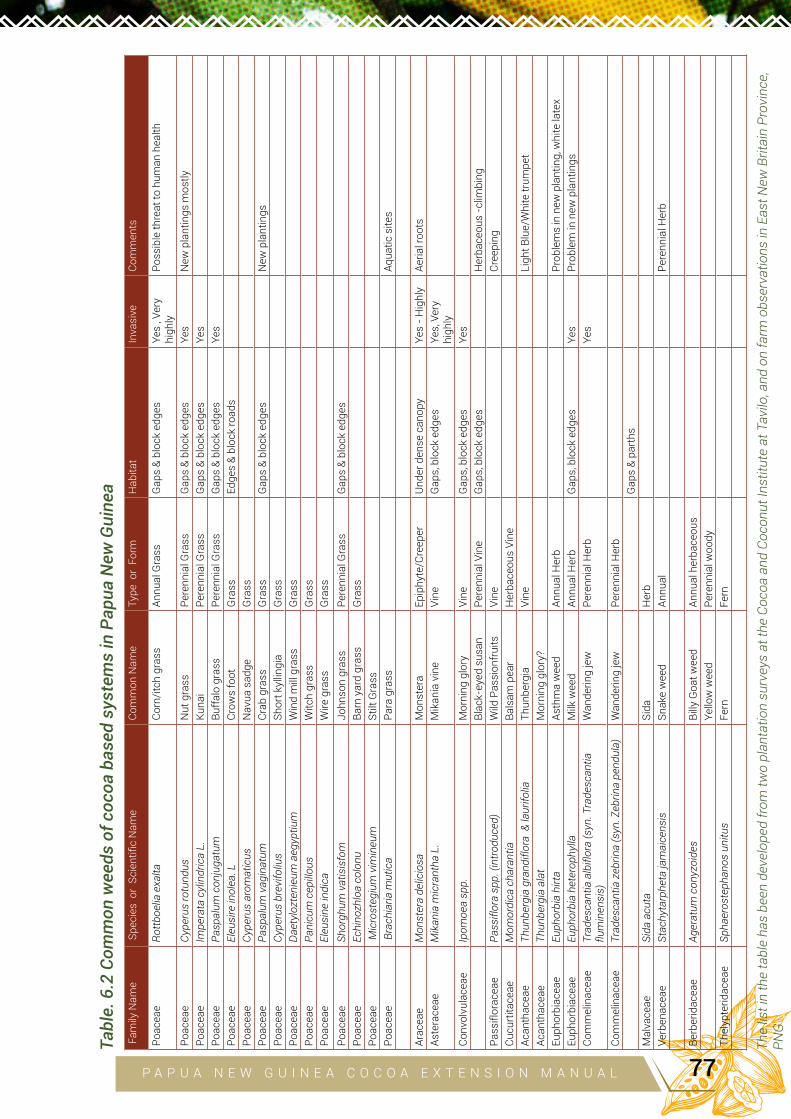
Ta
ble
. 6
.2 C
om
mo
n w
ee
ds
of
co
co
a b
as
ed
sys
tem
s i
n P
ap
ua
Ne
w G
uin
ea
Fam
ily N
ame
Spec
ies
or
Scie
ntifi
c N
ame
Co
mm
on
Na
me
Type
or
Form
Hab
itat
Inva
sive
Co
mm
ents
Po
ace
ae
Ro
ttb
oe
lia e
xalt
aCo
rn/it
ch g
rass
Annu
al G
rass
Gap
s &
bloc
k ed
ges
Yes
, Ver
y h
igh
lyPo
ssib
le th
reat
to h
uman
hea
lth
Po
ace
ae
Cyp
eru
s ro
tun
du
sN
ut
gra
ssP
eren
nia
l Gra
ssG
aps
& bl
ock
edge
sYe
s N
ew p
lan
tin
gs
mo
stly
Po
ace
ae
Imp
era
ta c
ylin
dri
ca
L.
Kuna
iP
eren
nia
l Gra
ssG
aps
& bl
ock
edge
sYe
sP
oa
cea
eP
asp
alu
m c
on
jug
atu
mBu
ffalo
gra
ssP
eren
nia
l Gra
ss
Gap
s &
bloc
k ed
ges
Yes
Po
ace
ae
Ele
usi
re in
ole
a. L
Cro
ws
foo
tG
rass
Edge
s &
bloc
k ro
ads
Po
ace
ae
Cyp
eru
s a
rom
ati
cu
sN
avu
a s
ad
ge
Gra
ss
Po
ace
ae
Pa
spa
lum
va
gin
atu
mCr
ab g
rass
Gra
ss
Gap
s &
bloc
k ed
ges
New
pla
nti
ng
s
Po
ace
ae
Cyp
eru
s b
revi
foliu
sSh
ort k
yllin
gia
Gra
ss
Po
ace
ae
Da
ety
lozt
en
ieu
m a
eg
ypti
um
Win
d m
ill g
rass
Gra
ss
Po
ace
ae
Pa
nic
um
ce
pill
ou
sW
itch
gras
sG
rass
Po
ace
ae
Ele
usi
ne
ind
ica
W
ire g
rass
Gra
ss
Po
ace
ae
Sh
org
hu
m v
ati
sisf
om
John
son
gras
sP
eren
nia
l Gra
ssG
aps
& bl
ock
edge
sP
oa
cea
eE
ch
ino
zhlo
a c
olo
nu
Barn
yar
d gr
ass
Gra
ss
Po
ace
ae
Mic
rost
eg
ium
vim
ine
um
Stilt
Gra
ssP
oa
cea
e B
rac
hia
ria
mu
tic
aP
ara
gra
ssAq
uatic
site
s
Arac
eae
Mo
nst
era
de
licio
saM
onst
era
Epip
hyte
/Cre
eper
Und
er d
ense
can
opy
Yes
- H
ighl
yAe
rial r
oots
Aste
race
aeM
ika
nia
mic
ran
tha
L.
Mik
ania
vin
eVi
neG
aps,
blo
ck e
dges
Yes,
Ver
y h
igh
ly
Co
nvo
lvu
lace
ae
Ipo
mo
ea
sp
p.
Mor
ning
glo
ryVi
ne
Gap
s, b
lock
edg
esYe
sBl
ack-
eyed
sus
anPe
renn
ial V
ine
Gap
s, b
lock
edg
esH
erba
ceou
s -c
limbi
ngP
ass
iflo
race
ae
Pa
ssif
lora
sp
p. (
intr
od
uc
ed
)W
ild P
assi
onfr
uits
Vine
Cre
epin
g
Cu
curt
ita
cea
eM
om
ord
ica
ch
ara
nti
aBa
lsam
pea
rH
erba
ceou
s Vi
neAc
anth
acea
eT
hu
nb
erg
ia g
ran
dif
lora
& la
uri
folia
Thun
berg
ia
Vine
Ligh
t Blu
e/W
hite
trum
pet
Acan
thac
eae
Th
un
be
rgia
ala
tM
orni
ng g
lory
?Eu
phor
biac
eae
Eu
ph
orb
ia h
irta
Asth
ma
wee
dAn
nual
Her
bPr
oble
ms
in n
ew p
lant
ing,
whi
te la
tex
Euph
orbi
acea
eE
up
ho
rbia
he
tero
ph
ylla
Milk
wee
dAn
nual
Her
bG
aps,
blo
ck e
dges
Yes
Prob
lem
in n
ew p
lant
ings
Co
mm
elin
ace
ae
Tra
de
sca
nti
a a
lbif
lora
(sy
n. T
rad
esc
an
tia
fl
um
ine
nsi
s)W
ande
ring
jew
Pere
nnia
l Her
bYe
s
Co
mm
elin
ace
ae
Tra
de
sca
nti
a z
eb
rin
a (
syn
. Ze
bri
na
pe
nd
ula
)W
ande
ring
jew
Pere
nnia
l Her
bG
ap
s &
pa
rth
s
Mal
vace
ae
Sid
a a
cu
ta
Sida
H
erb
Verb
enac
eae
Sta
ch
yta
rph
eta
jam
aic
en
sis
Snak
e w
eed
Annu
alPe
renn
ial H
erb
Berb
erid
acea
eA
ge
ratu
m c
on
yzo
ide
sBi
lly G
oat w
eed
Annu
al h
erba
ceou
sYe
llow
wee
dP
eren
nia
l wo
od
y
Th
elyp
teri
da
cea
eS
ph
ae
rost
ep
ha
no
s u
nit
us
Fern
Fe
rn
Th
e li
st in
th
e t
ab
le h
as
be
en
dev
elo
pe
d f
rom
tw
o p
lan
tati
on
su
rvey
s a
t th
e C
oc
oa
an
d C
oc
on
ut
Inst
itu
te a
t T
avi
lo, a
nd
on
fa
rm o
bse
rva
tio
ns
in E
ast
Ne
w B
rita
in P
rovi
nc
e,
PN
G
P A P U A N E W G U I N E A C O C O A E X T E N S I O N M A N U A L 77
Structural and sanitary pruning of cocoa trees
General principles
• Maintenance pruning of cocoa trees is one of the most important operations in cocoa growing – both cocoa and shade trees tend to become overgrown, directly reducing cocoa yield and increasing humidity in the canopy and so favoring pest and disease build-up (see Chapter 1, Figures 1.1 – 1.5).
• Exposure of the cocoa tree to sunlight is required to stimulate flowering and fruiting.
• The same principles apply as for formation pruning and early maintenance pruning (Chap-ter 5).
• The aim is to maintain an ideal cocoa tree shape and size – a single trunk up to about a metre high, with about 5 main lateral branches growing outwards and upwards and equal-ly spaced around the trunk, with no foliage above about 3.5 metres high. Seedlings tend to develop this structure naturally but clones need heavy pruning to give something ap-proaching an ideal structure (Chapter 5).
• The ideal is to keep an open lower canopy around the main branches (see Chapter 5, Fig-ure 5.15) to allow:
o easy spotting and access to pods for both sanitation removal of diseased pods, harvest-ing of healthy pods and monitoring of pod damage by Mirids,
o good through-flow of air to rapidly dry out the trunk, main branches and pods after rain or overnight dew, helping to reduce Phytophthora Pod Rot and Stem Canker.
• Thorough pruning of cocoa will tend automatically to remove branches infected with Vas-cular Streak Dieback or Pink Disease, but a knowledgeable pruner will also target infected branches - such pruning, combined with the planting of resistant clones, will effectively control VSD.
Timing of pruning
• Pruning should be conducted regularly (little and often) so that:
o branches are cut off while they are small and easily cut (less work),
o branches are cut off before they can produce flowers and pods to compete with the main branches,
o cutting of large branches is avoided which could greatly check production.
• Pruning just before a usual flowering period can stimulate flowering.
• Pruning should not be conducted during flowering or cherelle set.
• Shade trees should be pruned before the underlying cocoa so that any damage to the co-coa by falling branches can be corrected by later pruning of the cocoa - if shade trees are pruned regularly to maintain light shade, large branches should not have to be cut off and this will reduce the chance of damaging the cocoa trees.
Maintenance and sanitary pruning
• Regular pruning rounds should remove:
o any major branches extending above about 3.5 metres high (i.e. more than twice human height),
o larger branches encroaching into the centre of the tree (try to maintain an open Y-shaped branch structure)(see Chapter 5, Figure 5.13),
o shoots growing from the trunk and main branches that may obstruct air flow and ac-cess along the rows,
o any branches that tend to hang down and obstruct air-flow and access along the rows – cut back to an upward pointing shoot,
P A P U A N E W G U I N E A C O C O A E X T E N S I O N M A N U A L78
o any water shoots growing up from the main trunk (especially chupons growing on the trunk of the rootstock of a clone)(see Chapter 5, Figure 5.14),
o any dead or damaged branches (e.g. broken branches with Pantorhytes or longicorn larvae, branches with Vascular Streak Dieback or Pink Disease or damaged by insects like Pansepta)
Damaged branches should be cut off about 30 cm below the obvious signs of damage to be sure of removing any fungus or insect larvae growing in the stem beyond the damaged parts.
Diseased branches should be cut up and buried with diseased pods in trenches dug between rows.
• Main fan branches 1.5 – 2 metres long that have not produced any side branches by about 2 years after planting should be cut back to a node 1 metre from the main trunk.
• Cut back branches of adjacent trees that are overlapping to give every tree about equal growing space and to improve access along the rows.
• Cut back any main branches that do not produce many pods, and allow a branch of a more productive lateral shoot to take over the space.
o These may be lower branches that are over shaded.
o Their removal will open up the under-canopy.
• Pruning of cocoa and shade trees should be done regularly - pruning out small soft branch-es just beginning to develop in the wrong places is much less work than cutting big branch-es out of trees that have become overgrown. This involves understanding how the tree will develop and the final desired tree shape.
• The correct amount of pruning should allow a small amount of dappled sunlight onto the ground beneath the canopy at midday in full sun.
P A P U A N E W G U I N E A C O C O A E X T E N S I O N M A N U A L 79
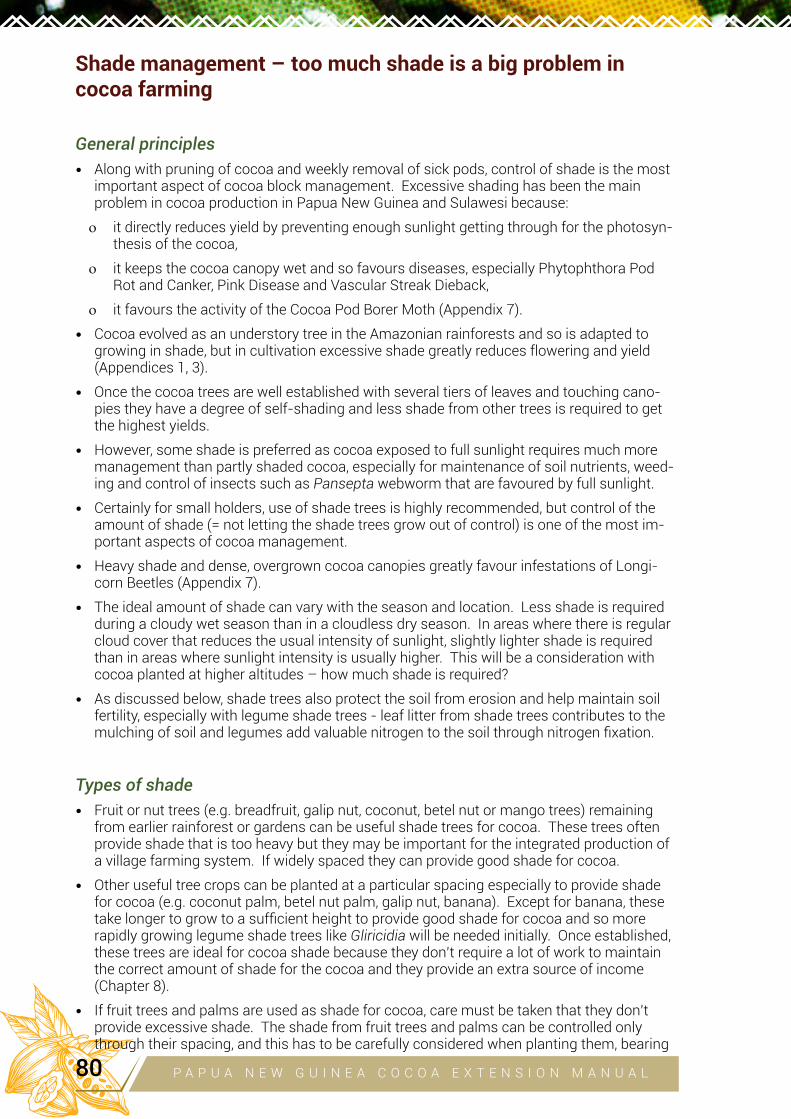
Shade management – too much shade is a big problem in cocoa farming
General principles
• Along with pruning of cocoa and weekly removal of sick pods, control of shade is the most important aspect of cocoa block management. Excessive shading has been the main problem in cocoa production in Papua New Guinea and Sulawesi because:
o it directly reduces yield by preventing enough sunlight getting through for the photosyn-thesis of the cocoa,
o it keeps the cocoa canopy wet and so favours diseases, especially Phytophthora Pod Rot and Canker, Pink Disease and Vascular Streak Dieback,
o it favours the activity of the Cocoa Pod Borer Moth (Appendix 7).
• Cocoa evolved as an understory tree in the Amazonian rainforests and so is adapted to growing in shade, but in cultivation excessive shade greatly reduces flowering and yield (Appendices 1, 3).
• Once the cocoa trees are well established with several tiers of leaves and touching cano-pies they have a degree of self-shading and less shade from other trees is required to get the highest yields.
• However, some shade is preferred as cocoa exposed to full sunlight requires much more management than partly shaded cocoa, especially for maintenance of soil nutrients, weed-ing and control of insects such as Pansepta webworm that are favoured by full sunlight.
• Certainly for small holders, use of shade trees is highly recommended, but control of the amount of shade (= not letting the shade trees grow out of control) is one of the most im-portant aspects of cocoa management.
• Heavy shade and dense, overgrown cocoa canopies greatly favour infestations of Longi-corn Beetles (Appendix 7).
• The ideal amount of shade can vary with the season and location. Less shade is required during a cloudy wet season than in a cloudless dry season. In areas where there is regular cloud cover that reduces the usual intensity of sunlight, slightly lighter shade is required than in areas where sunlight intensity is usually higher. This will be a consideration with cocoa planted at higher altitudes – how much shade is required?
• As discussed below, shade trees also protect the soil from erosion and help maintain soil fertility, especially with legume shade trees - leaf litter from shade trees contributes to the mulching of soil and legumes add valuable nitrogen to the soil through nitrogen fixation.
Types of shade
• Fruit or nut trees (e.g. breadfruit, galip nut, coconut, betel nut or mango trees) remaining from earlier rainforest or gardens can be useful shade trees for cocoa. These trees often provide shade that is too heavy but they may be important for the integrated production of a village farming system. If widely spaced they can provide good shade for cocoa.
• Other useful tree crops can be planted at a particular spacing especially to provide shade for cocoa (e.g. coconut palm, betel nut palm, galip nut, banana). Except for banana, these take longer to grow to a sufficient height to provide good shade for cocoa and so more rapidly growing legume shade trees like Gliricidia will be needed initially. Once established, these trees are ideal for cocoa shade because they don’t require a lot of work to maintain the correct amount of shade for the cocoa and they provide an extra source of income (Chapter 8).
• If fruit trees and palms are used as shade for cocoa, care must be taken that they don’t provide excessive shade. The shade from fruit trees and palms can be controlled only through their spacing, and this has to be carefully considered when planting them, bearing
P A P U A N E W G U I N E A C O C O A E X T E N S I O N M A N U A L80
in mind that they may become very large trees with dense foliage (e.g. galip nut, breadfruit, mango) and may compete with the cocoa for soil resources (water, nutrients).
• Fast-growing leguminous trees (mainly Gliricidia sepium and Leucaena leucocephala in Papua New Guinea) are planted especially as shade for cocoa. Gliricidia has become much more commonly used than Leucaena, partly because of the seeding habit of Leucaena that tended to produce weedy growth and its susceptibility to defoliation by psyllids. In Indone-sia seedless types of Leucaena and types resistant to psyllids have been developed, allow-ing its wider use as shade. Gliricidia requires a lot more work in regular pruning than Leu-caena, and fruit and nut trees to maintain the right amount of shade for cocoa – it tends to become overgrown.
• An important role of an extension officer is to be able to help a farmer judge the correct amount of shade required, and this will depend on the individual circumstance of the cocoa block (i.e. local climate, weather patterns, soil conditions, type of shade trees). For exam-ple, where rainfall is highly seasonal, such as in parts of the Markham Valley, more shade is required than in an area where rainfall is more evenly distributed throughout the year, and more shade may be required during the dry season than during the wet season and more shade may be required where soils are poor than in areas with fertile soils.
Importance of Nitrogen Fixation in shade trees and ground cover• Legumes such as Gliricidia or Leucaena shade trees or cover crops such as Pueraria are import-
ant because they fix atmospheric nitrogen in their root nodules with Rhizobium bacteria, and so contribute directly to soil fertility
• Biological nitrogen fixation, involving conversion by the nitrogenase enzyme in the bacteria of biologically unavailable N
2 gas in the atmosphere to biologically available NH
4+ ions, is one of the
most important chemical conversions in agriculture
• It is carried out only by bacteria such as Rhizobium and several free-living bacterial genera in soil
• While N2 is the most common gas in the atmosphere, biologically available N in the form of wa-
ter-soluble ammonium (NH4
+) or nitrate (NO3) ions, is often the most limiting nutrient in agricul-
ture
Management of Gliricidia shade trees
• A major problem in Papua New Guinea and elsewhere with the use of Gliricidia shade is that it requires as much labour for management as for management of the cocoa tree
• This has been very discouraging for farmers, resulting in degeneration of the plantations
• This problem can be addressed by:
o Planting as shade useful trees that don’t require constant pruning – e.g. coconut, betel nut, garlip nut, banana, fruit trees
o Using prunings from fast-growing leguminous shade (Gliricidia, Leucaena) as fodder for livestock such as cattle and goats, providing a strong incentive for regular prun-ing and adding value to the farm activities
These trees were originally developed as fodder trees and so can be used as fodder when grown with cocoa
This trend is now becoming evident in Sulawesi, where many cocoa farms now incorporate production of goats, which help improve farm management (through regular strong pruning of cocoa and leguminous shade trees to pro-vide feed for the animals, and through use of their manure to make compost) as well as diversifying and adding greatly to farm income
In Papua New Guinea this role could be filled by pig husbandry involving enclosure and feeding of the pigs. However, goats, being ruminants, are able to thrive on lower quality food (i.e. material with higher cellulose content) than pigs (e.g. they will eat the leaves of Gliricidia and cocoa prunings as well as diseased pods and pod husks)
P A P U A N E W G U I N E A C O C O A E X T E N S I O N M A N U A L 81
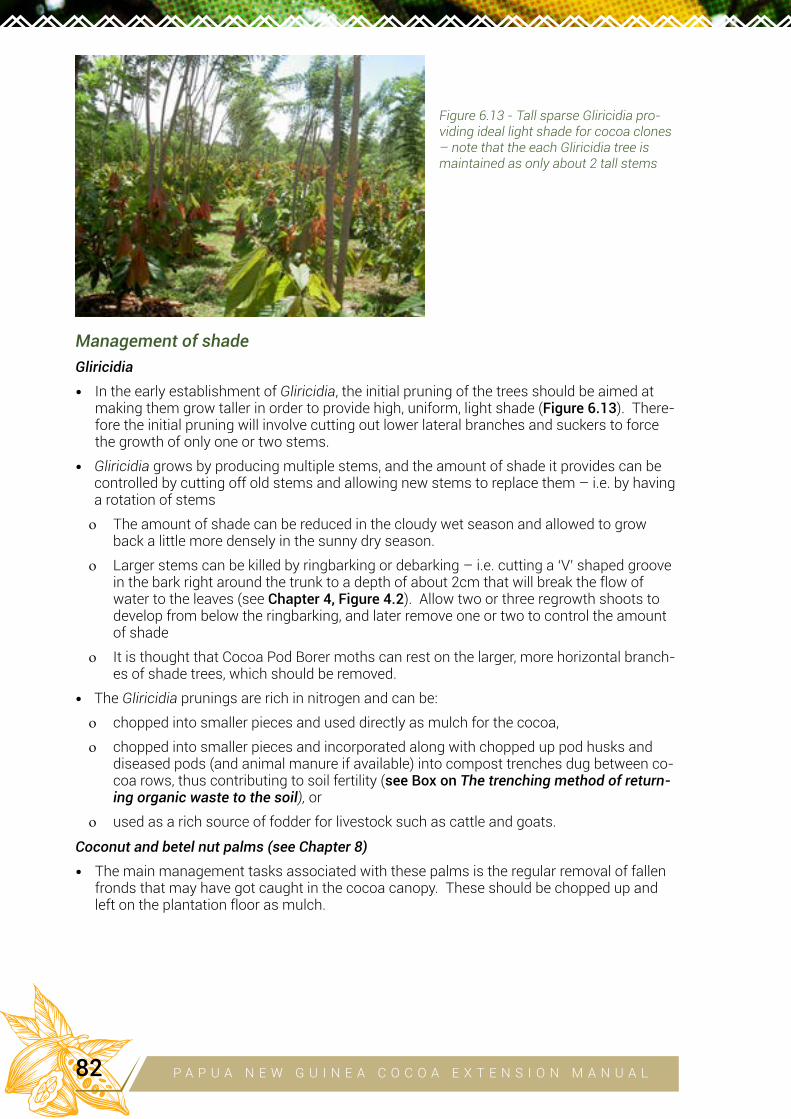
Management of shade
Gliricidia
• In the early establishment of Gliricidia, the initial pruning of the trees should be aimed at making them grow taller in order to provide high, uniform, light shade (Figure 6.13). There-fore the initial pruning will involve cutting out lower lateral branches and suckers to force the growth of only one or two stems.
• Gliricidia grows by producing multiple stems, and the amount of shade it provides can be controlled by cutting off old stems and allowing new stems to replace them – i.e. by having a rotation of stems
o The amount of shade can be reduced in the cloudy wet season and allowed to grow back a little more densely in the sunny dry season.
o Larger stems can be killed by ringbarking or debarking – i.e. cutting a ‘V’ shaped groove in the bark right around the trunk to a depth of about 2cm that will break the flow of water to the leaves (see Chapter 4, Figure 4.2). Allow two or three regrowth shoots to develop from below the ringbarking, and later remove one or two to control the amount of shade
o It is thought that Cocoa Pod Borer moths can rest on the larger, more horizontal branch-es of shade trees, which should be removed.
• The Gliricidia prunings are rich in nitrogen and can be:
o chopped into smaller pieces and used directly as mulch for the cocoa,
o chopped into smaller pieces and incorporated along with chopped up pod husks and diseased pods (and animal manure if available) into compost trenches dug between co-coa rows, thus contributing to soil fertility (see Box on The trenching method of return-ing organic waste to the soil), or
o used as a rich source of fodder for livestock such as cattle and goats.
Coconut and betel nut palms (see Chapter 8)
• The main management tasks associated with these palms is the regular removal of fallen fronds that may have got caught in the cocoa canopy. These should be chopped up and left on the plantation floor as mulch.
Figure 6.13 - Tall sparse Gliricidia pro-viding ideal light shade for cocoa clones – note that the each Gliricidia tree is maintained as only about 2 tall stems
P A P U A N E W G U I N E A C O C O A E X T E N S I O N M A N U A L82
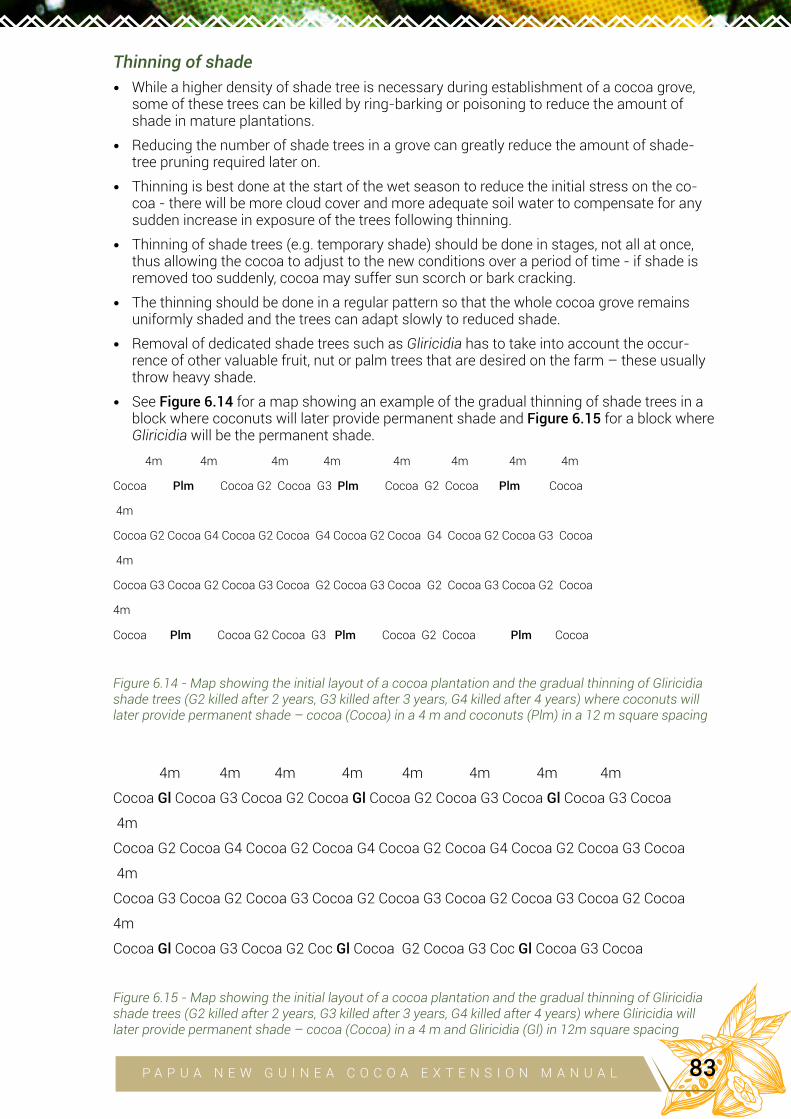
Thinning of shade
• While a higher density of shade tree is necessary during establishment of a cocoa grove, some of these trees can be killed by ring-barking or poisoning to reduce the amount of shade in mature plantations.
• Reducing the number of shade trees in a grove can greatly reduce the amount of shade-tree pruning required later on.
• Thinning is best done at the start of the wet season to reduce the initial stress on the co-coa - there will be more cloud cover and more adequate soil water to compensate for any sudden increase in exposure of the trees following thinning.
• Thinning of shade trees (e.g. temporary shade) should be done in stages, not all at once, thus allowing the cocoa to adjust to the new conditions over a period of time - if shade is removed too suddenly, cocoa may suffer sun scorch or bark cracking.
• The thinning should be done in a regular pattern so that the whole cocoa grove remains uniformly shaded and the trees can adapt slowly to reduced shade.
• Removal of dedicated shade trees such as Gliricidia has to take into account the occur-rence of other valuable fruit, nut or palm trees that are desired on the farm – these usually throw heavy shade.
• See Figure 6.14 for a map showing an example of the gradual thinning of shade trees in a block where coconuts will later provide permanent shade and Figure 6.15 for a block where Gliricidia will be the permanent shade.
4m 4m 4m 4m 4m 4m 4m 4m
Cocoa Plm Cocoa G2 Cocoa G3 Plm Cocoa G2 Cocoa Plm Cocoa
4m
Cocoa G2 Cocoa G4 Cocoa G2 Cocoa G4 Cocoa G2 Cocoa G4 Cocoa G2 Cocoa G3 Cocoa
4m
Cocoa G3 Cocoa G2 Cocoa G3 Cocoa G2 Cocoa G3 Cocoa G2 Cocoa G3 Cocoa G2 Cocoa
4m
Cocoa Plm Cocoa G2 Cocoa G3 Plm Cocoa G2 Cocoa Plm Cocoa
Figure 6.14 - Map showing the initial layout of a cocoa plantation and the gradual thinning of Gliricidia shade trees (G2 killed after 2 years, G3 killed after 3 years, G4 killed after 4 years) where coconuts will later provide permanent shade – cocoa (Cocoa) in a 4 m and coconuts (Plm) in a 12 m square spacing
4m 4m 4m 4m 4m 4m 4m 4m
Cocoa Gl Cocoa G3 Cocoa G2 Cocoa Gl Cocoa G2 Cocoa G3 Cocoa Gl Cocoa G3 Cocoa
4m
Cocoa G2 Cocoa G4 Cocoa G2 Cocoa G4 Cocoa G2 Cocoa G4 Cocoa G2 Cocoa G3 Cocoa
4m
Cocoa G3 Cocoa G2 Cocoa G3 Cocoa G2 Cocoa G3 Cocoa G2 Cocoa G3 Cocoa G2 Cocoa
4m
Cocoa Gl Cocoa G3 Cocoa G2 Coc Gl Cocoa G2 Cocoa G3 Coc Gl Cocoa G3 Cocoa
Figure 6.15 - Map showing the initial layout of a cocoa plantation and the gradual thinning of Gliricidia shade trees (G2 killed after 2 years, G3 killed after 3 years, G4 killed after 4 years) where Gliricidia will later provide permanent shade – cocoa (Cocoa) in a 4 m and Gliricidia (Gl) in 12m square spacing
P A P U A N E W G U I N E A C O C O A E X T E N S I O N M A N U A L 83
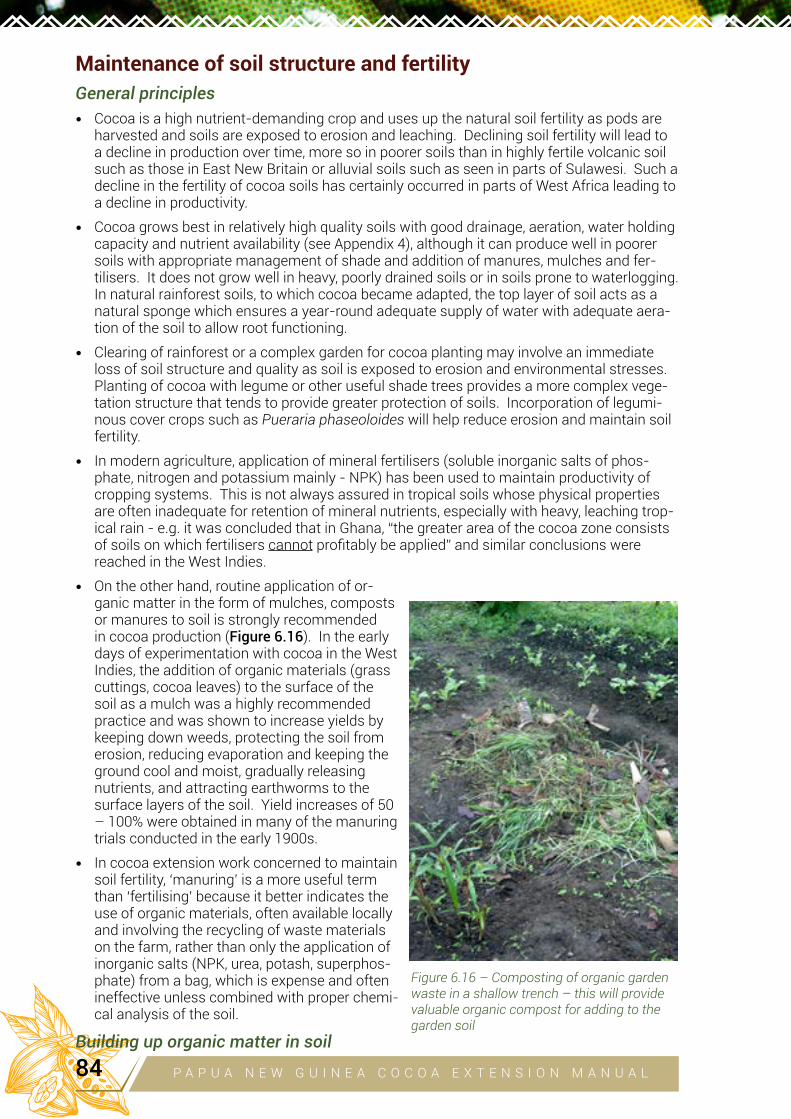
Maintenance of soil structure and fertility
General principles
• Cocoa is a high nutrient-demanding crop and uses up the natural soil fertility as pods are harvested and soils are exposed to erosion and leaching. Declining soil fertility will lead to a decline in production over time, more so in poorer soils than in highly fertile volcanic soil such as those in East New Britain or alluvial soils such as seen in parts of Sulawesi. Such a decline in the fertility of cocoa soils has certainly occurred in parts of West Africa leading to a decline in productivity.
• Cocoa grows best in relatively high quality soils with good drainage, aeration, water holding capacity and nutrient availability (see Appendix 4), although it can produce well in poorer soils with appropriate management of shade and addition of manures, mulches and fer-tilisers. It does not grow well in heavy, poorly drained soils or in soils prone to waterlogging. In natural rainforest soils, to which cocoa became adapted, the top layer of soil acts as a natural sponge which ensures a year-round adequate supply of water with adequate aera-tion of the soil to allow root functioning.
• Clearing of rainforest or a complex garden for cocoa planting may involve an immediate loss of soil structure and quality as soil is exposed to erosion and environmental stresses. Planting of cocoa with legume or other useful shade trees provides a more complex vege-tation structure that tends to provide greater protection of soils. Incorporation of legumi-nous cover crops such as Pueraria phaseoloides will help reduce erosion and maintain soil fertility.
• In modern agriculture, application of mineral fertilisers (soluble inorganic salts of phos-phate, nitrogen and potassium mainly - NPK) has been used to maintain productivity of cropping systems. This is not always assured in tropical soils whose physical properties are often inadequate for retention of mineral nutrients, especially with heavy, leaching trop-ical rain - e.g. it was concluded that in Ghana, “the greater area of the cocoa zone consists of soils on which fertilisers cannot profitably be applied” and similar conclusions were reached in the West Indies.
• On the other hand, routine application of or-ganic matter in the form of mulches, composts or manures to soil is strongly recommended in cocoa production (Figure 6.16). In the early days of experimentation with cocoa in the West Indies, the addition of organic materials (grass cuttings, cocoa leaves) to the surface of the soil as a mulch was a highly recommended practice and was shown to increase yields by keeping down weeds, protecting the soil from erosion, reducing evaporation and keeping the ground cool and moist, gradually releasing nutrients, and attracting earthworms to the surface layers of the soil. Yield increases of 50 – 100% were obtained in many of the manuring trials conducted in the early 1900s.
• In cocoa extension work concerned to maintain soil fertility, ‘manuring’ is a more useful term than ‘fertilising’ because it better indicates the use of organic materials, often available locally and involving the recycling of waste materials on the farm, rather than only the application of inorganic salts (NPK, urea, potash, superphos-phate) from a bag, which is expense and often ineffective unless combined with proper chemi-cal analysis of the soil.
Building up organic matter in soil
Figure 6.16 – Composting of organic garden waste in a shallow trench – this will provide valuable organic compost for adding to the garden soil
P A P U A N E W G U I N E A C O C O A E X T E N S I O N M A N U A L84
The trenching method for disposing of organic waste • In Indonesia, cocoa technologists have developed a method of burying organic waste including
chopped up prunings from cocoa and shade trees, pod waste (chopped up diseased pods, pod husks), along with goat and chicken manure in shallow trenches (about the depth of a spade) dug between rows of cocoa trees
• The organic material undergoes decomposition and composting in the trenches and eventually becomes a focus for root growth and earthworm activity
• This is an effective way of disposing of waste material in the plantation while enhancing soil fertility
• It saves the labour involved in carting harvested or sick pods to a central location, and then cart-ing the organic composted manure back to the cocoa plantings
• Addition of manure or inorganic nitrogen fertilizer (e.g. urea) to the trenches speeds up the com-posting of the organic wastes by improving the C/N ratio.
• Concoctions of microbes have been developed to add to the trenches (and central compost heaps - Figure 6.17) to promote the decay of organic wastes in the trenches
• These trenches are easier to dig and distribute the organic matter better than the deep pits that are usually dug to bury pod husks
• Leaf litter falling naturally from the cocoa and shade trees should not be scooped into these trenches but should be left as a uniform layer of mulch in the plantings, especially directly under the cocoa canopy
• In the very early days of cocoa research in Papua New Guinea, E.C.D. Green (1938, Cacao Culti-vation and its Application to the Mandated Territory of New Guinea, New Guinea Agric. Gazette, 4 (4)) suggested a similar method (see Appendix 5)
• The trenches are dug in rotation between different rows of cocoa and between different orienta-tions (N – S, E – W)
• Organic matter is fundamental for protecting and sustaining fertility of soil through its ability to help maintain soil structure and biological activity, and to hold nutrients in the soil (through increasing the cation exchange capacity of the soil).
• Leaf litter (from cocoa and shade trees) should be allowed to accumulate uniformly over the surface of the soil to provide an effective mulch to protect the upper layer of the mineral soil from erosion. It should not be scooped into heaps or added to compost trenches. It gradually breaks down to add humus to the soil, but importantly protects the roots of cocoa that grow near the soil surface. It also reduces rain splash of Phytophthora from the soil up onto pods on the lower trunk where infections of Pod Rot and Canker often begin.
• If pruned branches from cocoa and shade trees are not fed to animals or used in compost-ing, they can be cut up and contribute to the leaf litter layer. This is easier if pruning is done regularly so that only small branches have to be cut out (small branches also break down more rapidly than large branches). Larger branches may have to be arranged in a windrow between the rows of cocoa as occurs at present with very irregular pruning.
• All organic waste material (pod husks, placentas, diseased pods, weeds, pruned branches) produced on a cocoa farm should eventually end up being applied back to the soil to help maintain its organic matter content and fertility.
• This can be done using the trenching method (see box above) which is effectively com-posting in situ or by applying special compost mixtures prepared at a central point (Figure 6.17)
• Weeds are removed by hand in a radius of about 1 metre from the trunk of the cocoa, and manures and composts should be spread over the surface of the soil in this zone and slightly dug in (mixed with the surface layer of soil).
P A P U A N E W G U I N E A C O C O A E X T E N S I O N M A N U A L 85
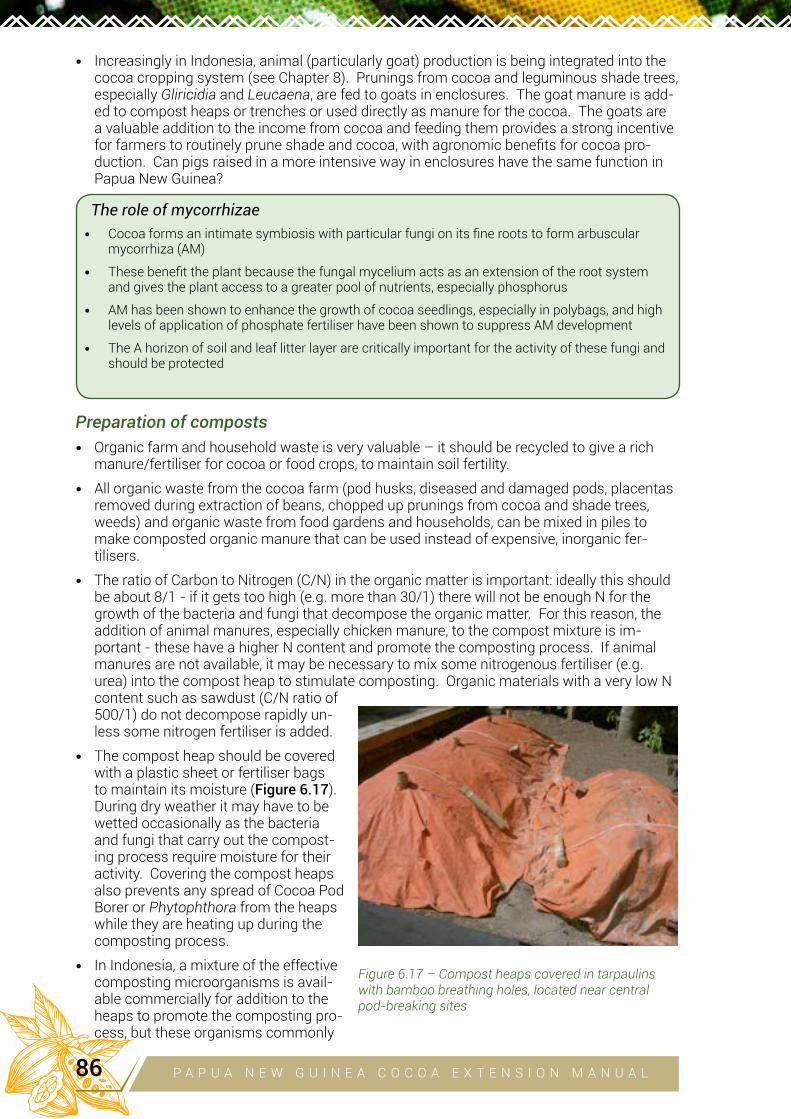
• Increasingly in Indonesia, animal (particularly goat) production is being integrated into the cocoa cropping system (see Chapter 8). Prunings from cocoa and leguminous shade trees, especially Gliricidia and Leucaena, are fed to goats in enclosures. The goat manure is add-ed to compost heaps or trenches or used directly as manure for the cocoa. The goats are a valuable addition to the income from cocoa and feeding them provides a strong incentive for farmers to routinely prune shade and cocoa, with agronomic benefits for cocoa pro-duction. Can pigs raised in a more intensive way in enclosures have the same function in Papua New Guinea?
The role of mycorrhizae • Cocoa forms an intimate symbiosis with particular fungi on its fine roots to form arbuscular
mycorrhiza (AM)
• These benefit the plant because the fungal mycelium acts as an extension of the root system and gives the plant access to a greater pool of nutrients, especially phosphorus
• AM has been shown to enhance the growth of cocoa seedlings, especially in polybags, and high levels of application of phosphate fertiliser have been shown to suppress AM development
• The A horizon of soil and leaf litter layer are critically important for the activity of these fungi and should be protected
Preparation of composts
• Organic farm and household waste is very valuable – it should be recycled to give a rich manure/fertiliser for cocoa or food crops, to maintain soil fertility.
• All organic waste from the cocoa farm (pod husks, diseased and damaged pods, placentas removed during extraction of beans, chopped up prunings from cocoa and shade trees, weeds) and organic waste from food gardens and households, can be mixed in piles to make composted organic manure that can be used instead of expensive, inorganic fer-tilisers.
• The ratio of Carbon to Nitrogen (C/N) in the organic matter is important: ideally this should be about 8/1 - if it gets too high (e.g. more than 30/1) there will not be enough N for the growth of the bacteria and fungi that decompose the organic matter. For this reason, the addition of animal manures, especially chicken manure, to the compost mixture is im-portant - these have a higher N content and promote the composting process. If animal manures are not available, it may be necessary to mix some nitrogenous fertiliser (e.g. urea) into the compost heap to stimulate composting. Organic materials with a very low N content such as sawdust (C/N ratio of 500/1) do not decompose rapidly un-less some nitrogen fertiliser is added.
• The compost heap should be covered with a plastic sheet or fertiliser bags to maintain its moisture (Figure 6.17). During dry weather it may have to be wetted occasionally as the bacteria and fungi that carry out the compost-ing process require moisture for their activity. Covering the compost heaps also prevents any spread of Cocoa Pod Borer or Phytophthora from the heaps while they are heating up during the composting process.
• In Indonesia, a mixture of the effective composting microorganisms is avail-able commercially for addition to the heaps to promote the composting pro-cess, but these organisms commonly
Figure 6.17 – Compost heaps covered in tarpaulins with bamboo breathing holes, located near central pod-breaking sites
P A P U A N E W G U I N E A C O C O A E X T E N S I O N M A N U A L86
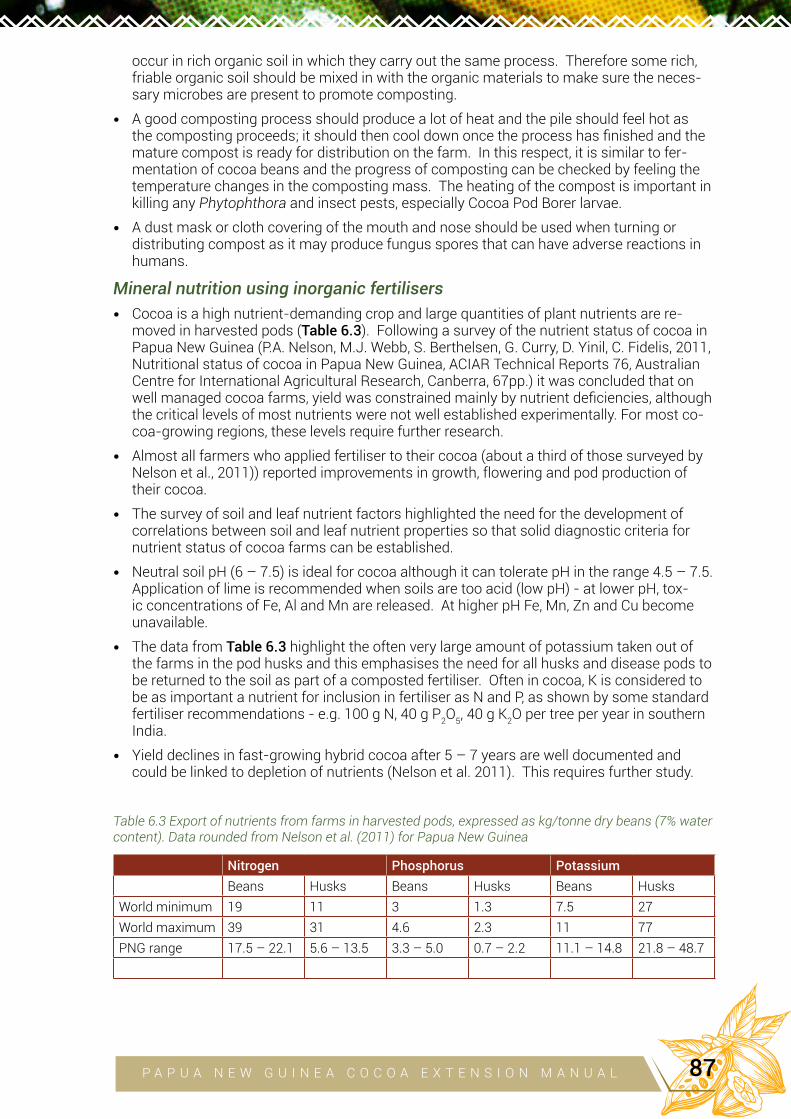
occur in rich organic soil in which they carry out the same process. Therefore some rich, friable organic soil should be mixed in with the organic materials to make sure the neces-sary microbes are present to promote composting.
• A good composting process should produce a lot of heat and the pile should feel hot as the composting proceeds; it should then cool down once the process has finished and the mature compost is ready for distribution on the farm. In this respect, it is similar to fer-mentation of cocoa beans and the progress of composting can be checked by feeling the temperature changes in the composting mass. The heating of the compost is important in killing any Phytophthora and insect pests, especially Cocoa Pod Borer larvae.
• A dust mask or cloth covering of the mouth and nose should be used when turning or distributing compost as it may produce fungus spores that can have adverse reactions in humans.
Mineral nutrition using inorganic fertilisers
• Cocoa is a high nutrient-demanding crop and large quantities of plant nutrients are re-moved in harvested pods (Table 6.3). Following a survey of the nutrient status of cocoa in Papua New Guinea (P.A. Nelson, M.J. Webb, S. Berthelsen, G. Curry, D. Yinil, C. Fidelis, 2011, Nutritional status of cocoa in Papua New Guinea, ACIAR Technical Reports 76, Australian Centre for International Agricultural Research, Canberra, 67pp.) it was concluded that on well managed cocoa farms, yield was constrained mainly by nutrient deficiencies, although the critical levels of most nutrients were not well established experimentally. For most co-coa-growing regions, these levels require further research.
• Almost all farmers who applied fertiliser to their cocoa (about a third of those surveyed by Nelson et al., 2011)) reported improvements in growth, flowering and pod production of their cocoa.
• The survey of soil and leaf nutrient factors highlighted the need for the development of correlations between soil and leaf nutrient properties so that solid diagnostic criteria for nutrient status of cocoa farms can be established.
• Neutral soil pH (6 – 7.5) is ideal for cocoa although it can tolerate pH in the range 4.5 – 7.5. Application of lime is recommended when soils are too acid (low pH) - at lower pH, tox-ic concentrations of Fe, Al and Mn are released. At higher pH Fe, Mn, Zn and Cu become unavailable.
• The data from Table 6.3 highlight the often very large amount of potassium taken out of the farms in the pod husks and this emphasises the need for all husks and disease pods to be returned to the soil as part of a composted fertiliser. Often in cocoa, K is considered to be as important a nutrient for inclusion in fertiliser as N and P, as shown by some standard fertiliser recommendations - e.g. 100 g N, 40 g P
2O5, 40 g K
2O per tree per year in southern
India.
• Yield declines in fast-growing hybrid cocoa after 5 – 7 years are well documented and could be linked to depletion of nutrients (Nelson et al. 2011). This requires further study.
Table 6.3 Export of nutrients from farms in harvested pods, expressed as kg/tonne dry beans (7% water content). Data rounded from Nelson et al. (2011) for Papua New Guinea
Nitrogen Phosphorus Potassium
Beans Husks Beans Husks Beans HusksWorld minimum 19 11 3 1.3 7.5 27World maximum 39 31 4.6 2.3 11 77PNG range 17.5 – 22.1 5.6 – 13.5 3.3 – 5.0 0.7 – 2.2 11.1 – 14.8 21.8 – 48.7
P A P U A N E W G U I N E A C O C O A E X T E N S I O N M A N U A L 87
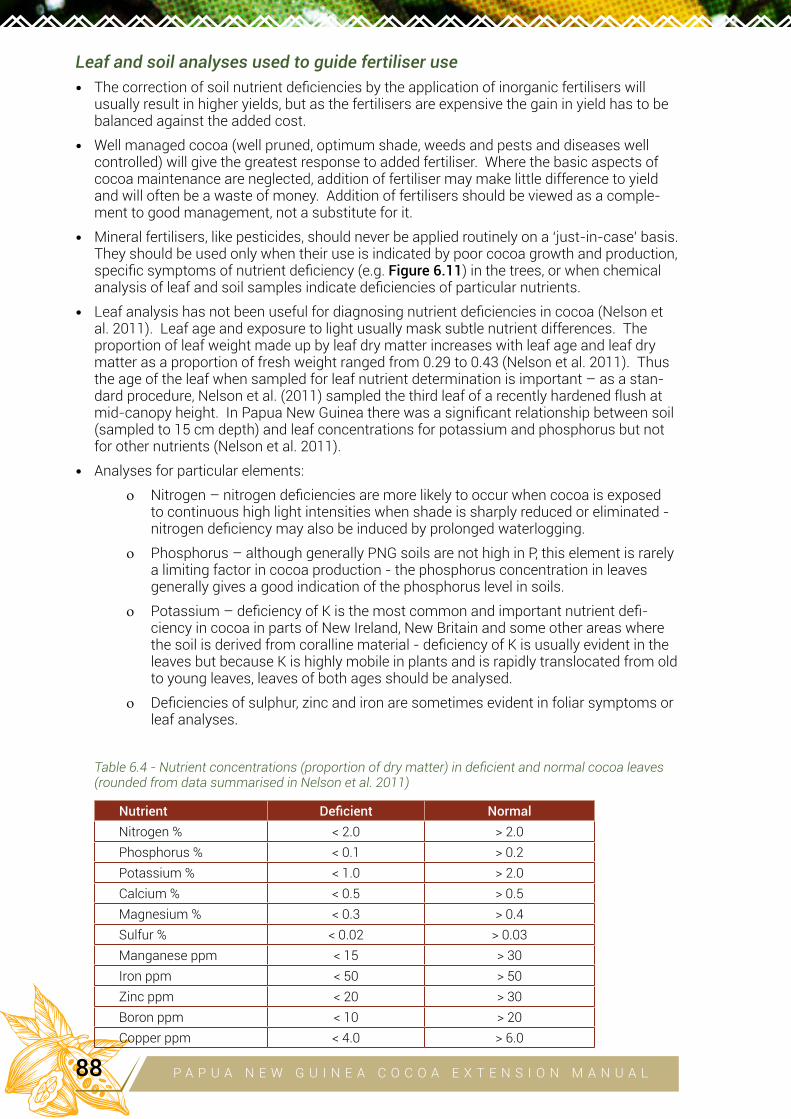
Leaf and soil analyses used to guide fertiliser use
• The correction of soil nutrient deficiencies by the application of inorganic fertilisers will usually result in higher yields, but as the fertilisers are expensive the gain in yield has to be balanced against the added cost.
• Well managed cocoa (well pruned, optimum shade, weeds and pests and diseases well controlled) will give the greatest response to added fertiliser. Where the basic aspects of cocoa maintenance are neglected, addition of fertiliser may make little difference to yield and will often be a waste of money. Addition of fertilisers should be viewed as a comple-ment to good management, not a substitute for it.
• Mineral fertilisers, like pesticides, should never be applied routinely on a ‘just-in-case’ basis. They should be used only when their use is indicated by poor cocoa growth and production, specific symptoms of nutrient deficiency (e.g. Figure 6.11) in the trees, or when chemical analysis of leaf and soil samples indicate deficiencies of particular nutrients.
• Leaf analysis has not been useful for diagnosing nutrient deficiencies in cocoa (Nelson et al. 2011). Leaf age and exposure to light usually mask subtle nutrient differences. The proportion of leaf weight made up by leaf dry matter increases with leaf age and leaf dry matter as a proportion of fresh weight ranged from 0.29 to 0.43 (Nelson et al. 2011). Thus the age of the leaf when sampled for leaf nutrient determination is important – as a stan-dard procedure, Nelson et al. (2011) sampled the third leaf of a recently hardened flush at mid-canopy height. In Papua New Guinea there was a significant relationship between soil (sampled to 15 cm depth) and leaf concentrations for potassium and phosphorus but not for other nutrients (Nelson et al. 2011).
• Analyses for particular elements:
o Nitrogen – nitrogen deficiencies are more likely to occur when cocoa is exposed to continuous high light intensities when shade is sharply reduced or eliminated - nitrogen deficiency may also be induced by prolonged waterlogging.
o Phosphorus – although generally PNG soils are not high in P, this element is rarely a limiting factor in cocoa production - the phosphorus concentration in leaves generally gives a good indication of the phosphorus level in soils.
o Potassium – deficiency of K is the most common and important nutrient defi-ciency in cocoa in parts of New Ireland, New Britain and some other areas where the soil is derived from coralline material - deficiency of K is usually evident in the leaves but because K is highly mobile in plants and is rapidly translocated from old to young leaves, leaves of both ages should be analysed.
o Deficiencies of sulphur, zinc and iron are sometimes evident in foliar symptoms or leaf analyses.
Table 6.4 - Nutrient concentrations (proportion of dry matter) in deficient and normal cocoa leaves (rounded from data summarised in Nelson et al. 2011)
Nutrient Deficient Normal
Nitrogen % < 2.0 > 2.0Phosphorus % < 0.1 > 0.2Potassium % < 1.0 > 2.0Calcium % < 0.5 > 0.5Magnesium % < 0.3 > 0.4Sulfur % < 0.02 > 0.03Manganese ppm < 15 > 30Iron ppm < 50 > 50Zinc ppm < 20 > 30Boron ppm < 10 > 20Copper ppm < 4.0 > 6.0
P A P U A N E W G U I N E A C O C O A E X T E N S I O N M A N U A L88
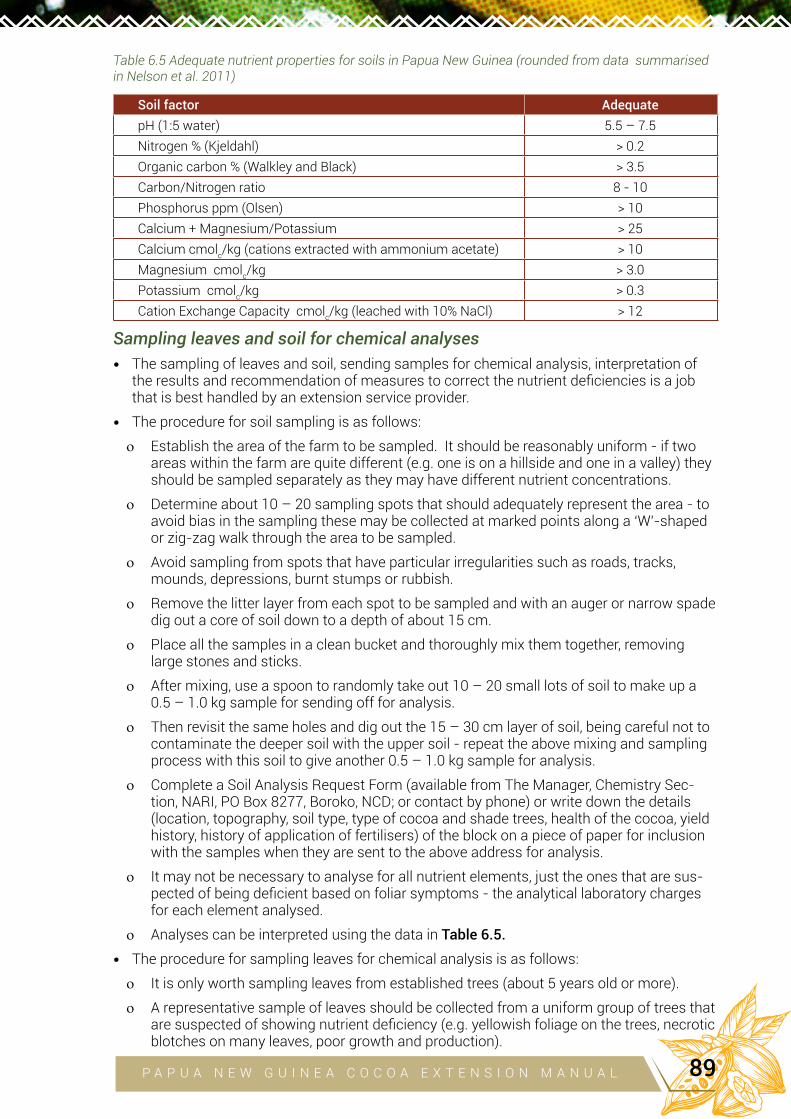
Table 6.5 Adequate nutrient properties for soils in Papua New Guinea (rounded from data summarised in Nelson et al. 2011)
Soil factor Adequate
pH (1:5 water) 5.5 – 7.5Nitrogen % (Kjeldahl) > 0.2Organic carbon % (Walkley and Black) > 3.5Carbon/Nitrogen ratio 8 - 10Phosphorus ppm (Olsen) > 10Calcium + Magnesium/Potassium > 25Calcium cmol
c/kg (cations extracted with ammonium acetate) > 10
Magnesium cmolc/kg > 3.0
Potassium cmolc/kg > 0.3
Cation Exchange Capacity cmolc/kg (leached with 10% NaCl) > 12
Sampling leaves and soil for chemical analyses
• The sampling of leaves and soil, sending samples for chemical analysis, interpretation of the results and recommendation of measures to correct the nutrient deficiencies is a job that is best handled by an extension service provider.
• The procedure for soil sampling is as follows:
o Establish the area of the farm to be sampled. It should be reasonably uniform - if two areas within the farm are quite different (e.g. one is on a hillside and one in a valley) they should be sampled separately as they may have different nutrient concentrations.
o Determine about 10 – 20 sampling spots that should adequately represent the area - to avoid bias in the sampling these may be collected at marked points along a ‘W’-shaped or zig-zag walk through the area to be sampled.
o Avoid sampling from spots that have particular irregularities such as roads, tracks, mounds, depressions, burnt stumps or rubbish.
o Remove the litter layer from each spot to be sampled and with an auger or narrow spade dig out a core of soil down to a depth of about 15 cm.
o Place all the samples in a clean bucket and thoroughly mix them together, removing large stones and sticks.
o After mixing, use a spoon to randomly take out 10 – 20 small lots of soil to make up a 0.5 – 1.0 kg sample for sending off for analysis.
o Then revisit the same holes and dig out the 15 – 30 cm layer of soil, being careful not to contaminate the deeper soil with the upper soil - repeat the above mixing and sampling process with this soil to give another 0.5 – 1.0 kg sample for analysis.
o Complete a Soil Analysis Request Form (available from The Manager, Chemistry Sec-tion, NARI, PO Box 8277, Boroko, NCD; or contact by phone) or write down the details (location, topography, soil type, type of cocoa and shade trees, health of the cocoa, yield history, history of application of fertilisers) of the block on a piece of paper for inclusion with the samples when they are sent to the above address for analysis.
o It may not be necessary to analyse for all nutrient elements, just the ones that are sus-pected of being deficient based on foliar symptoms - the analytical laboratory charges for each element analysed.
o Analyses can be interpreted using the data in Table 6.5.
• The procedure for sampling leaves for chemical analysis is as follows:
o It is only worth sampling leaves from established trees (about 5 years old or more).
o A representative sample of leaves should be collected from a uniform group of trees that are suspected of showing nutrient deficiency (e.g. yellowish foliage on the trees, necrotic blotches on many leaves, poor growth and production).
P A P U A N E W G U I N E A C O C O A E X T E N S I O N M A N U A L 89
o If there is a suspected area of cocoa with a nutrient deficiency problem, a sample should be collected from that area and also from a nearby area that appears healthy for com-parison.
o If cocoa is interplanted with coconuts, a frond sample should be collected also from the coconuts
o The accuracy of leaf analysis depends on following a standard method of collecting leaf samples because the concentration of nutrients in the leaves changes with leaf age and their degree of exposure to sunlight:
• For cocoa:
◊ take the third leaf on a branch on which a new flush is just about to emerge; these leaves will be completely hardened but not too old (Nelson et al. sam-pled the third leaf of a recently hardened flush at mid-canopy height),
◊ select leaves from exposed, actively growing branches not from more slowly growing branches under the canopy,
◊ about 40 trees should be sampled to give a sample of 40 – 80 leaves, and
◊ petioles should be removed.
• For coconuts:
◊ take six pinnae (leaflets) from the midsection of fourth and ninth fronds for palms up to 4 years old (or fourth and fourteenth fronds for older bearing palms) then cut out and collect the middle thirds of these pinnae as the tissue to be sent off for analysis,
◊ keep the leaf tissue for the two frond ages separate (they will be analysed separately), and
◊ ten to twenty five palms should be sampled to give a final sample of 60 to 150 “middle thirds” for each of the two frond positions.
o The leaf samples should be air-dried or oven-dried (at less than 60oC), packed in a paper bag (not plastic) and sent with a Leaf Tissue Analysis Request Form (or full written de-scription of the location and state of the crop) and a list of the nutrients to be analyses to the Chemistry Section, NARI as for soil samples. If undried leaves are sent (again in paper bags not plastic) they have to reach the analytical laboratory within three days.
o Analyses of leaf nutrients can be interpreted using the data in Table 6.4.
Interpretation and use of chemical analyses – correcting particular nutrient deficiencies
• The interpretation and response to chemical analyses is very complicated because it depends on the origin and history of the soil and also on the balance of nutrients - this will require the help of an experienced extension service provider.
• The best indicator of a deficiency is the actual growth and appearance of the cocoa trees and so if application of a particular fertiliser is recommended, it should be tried out first on part of the block (say 20 trees) and the response compared with the growth and production of adjacent untreated trees.
• Because nitrogen is the most mobile nutrient in soil and can easily be denitrified by bac-teria, volatilised, or dissolved and leached from the root zone, it is the nutrient most com-monly needing supplementation by application of fertilisers (either urea, ammonium sul-phate or NPK). Nitrogen deficient cocoa tends to be stunted and yellow overall. Urea is the cheapest form of N, but application of ammonium sulphate can also supply sulphur which is commonly deficient in soils in Papua New Guinea. Urea is prone to loss by volatilisation and leaching and so should be applied in split doses (four per year) during wet weather to ensure that it is dissolved and becomes available to cocoa straight away.
• Although there is no experimental evidence of a response to phosphate fertiliser in most soils in Papua New Guinea, it stimulates root development and so may assist with the
P A P U A N E W G U I N E A C O C O A E X T E N S I O N M A N U A L90
uptake of nitrogen and is therefore recommended for inclusion in fertiliser applications (in NPK mixtures).
• Potassium deficiency is common in coralline soil (clay or clay-loam over limestone, e.g. on the east coast of New Ireland) or on alluvial clay-loams. Leaves with potassium deficiency have a burnt appearance with a yellow boundary between the necrotic and green tissue. Muriate of potash should be applied at a rate of 200 g (10 matchboxes full) per tree straight after planting, then another 200 g at a year old, then 400 g per tree once per year thereafter.
• Zinc deficiency is common in the Markham Valley and on some other alluvial soils. The co-coa leaves become narrow and sickle shaped with yellow mottling between the veins. The deficiency can be corrected by spraying with Zinc Chelate as a foliar fertiliser.
• Iron, calcium and magnesium deficiencies have been reported in Bougainville. These can be corrected by application of NPK Mg or a compound foliar fertiliser.
• Timing the application of chemical fertilisers:
o The timing of fertiliser application should be coordinated with weeding so that it does not just stimulate weed growth. Weeds are fast growing and so can rapidly take up added soluble fertilisers, thus reducing their effectiveness on the cocoa. Hand weeding or killing of weeds with herbicides in a zone 1 – 1.5 metres around the trunk, one week before and one and two months after applying fertiliser will help maximise its effective-ness on the cocoa. Fertilisers applied to a weedy block will be largely wasted.
o Applications should start with the onset of rains so that the soluble fertiliser is washed into the soil and is available for the burst of vegetative growth and flowering of the co-coa trees that soon follows.
o The main aim of adding fertilisers to bearing trees is to stimulate flowering, and then support the carrying of the cherelles and developing pods through to maturity, reducing cherelle wilt (Appendix 8) and maximizing pod yield.
• Appropriate dosage rates for fertilisers depend on:
o The growth stage of the trees (rates increase with age up to a plateau at about 3 years),
o The types of shade or ground cover (legume shade trees or ground covers will add nitro-gen to the soil),
o The amount of shade (unshaded cocoa is more nutrient demanding; heavily shaded co-coa may show little response to fertiliser as exposure to sunlight, not nutrient availability, will be the factor limiting growth and production),
o The natural fertility of the soil (volcanic and alluvial soils are more fertile than eroded hill soils, and soil recently cleared of rainforest is much more fertile than soils that have long been cleared); fertilisers may be essential on ex-grass or grass/bush sites or on soils with a long history of food cropping.
o A matchbox is a useful measure for fertililser (1 matchbox full = about 20 grams)
• Many fertiliser trials conducted at CCIL Tavilo have given no significant responses because the volcanic soil of the Gazelle Peninsular is naturally very fertile - this will not apply to all parts of Papua New Guinea, which has very varied geology and soil types (see Chapter 2).
• Fertiliser application to different growth stages of cocoa:
o Nursery plants
• No fertilisers should be added to nursery soil because young plants are very sensitive to nutrient imbalances and toxicities.
• The best approach is to use a fertile potting soil derived from a forested area or with added composted organic matter.
• Heavily shaded young plants in a nursery will not usually have a high nutrient de-mand.
P A P U A N E W G U I N E A C O C O A E X T E N S I O N M A N U A L 91
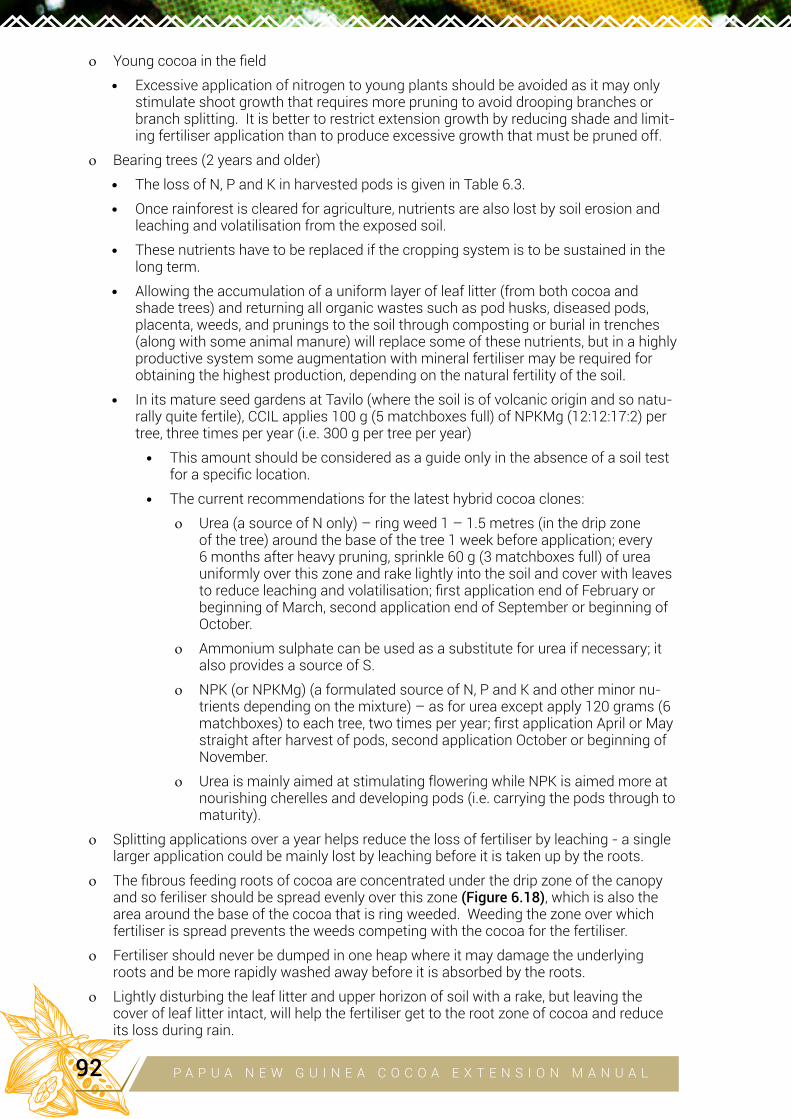
o Young cocoa in the field
• Excessive application of nitrogen to young plants should be avoided as it may only stimulate shoot growth that requires more pruning to avoid drooping branches or branch splitting. It is better to restrict extension growth by reducing shade and limit-ing fertiliser application than to produce excessive growth that must be pruned off.
o Bearing trees (2 years and older)
• The loss of N, P and K in harvested pods is given in Table 6.3.
• Once rainforest is cleared for agriculture, nutrients are also lost by soil erosion and leaching and volatilisation from the exposed soil.
• These nutrients have to be replaced if the cropping system is to be sustained in the long term.
• Allowing the accumulation of a uniform layer of leaf litter (from both cocoa and shade trees) and returning all organic wastes such as pod husks, diseased pods, placenta, weeds, and prunings to the soil through composting or burial in trenches (along with some animal manure) will replace some of these nutrients, but in a highly productive system some augmentation with mineral fertiliser may be required for obtaining the highest production, depending on the natural fertility of the soil.
• In its mature seed gardens at Tavilo (where the soil is of volcanic origin and so natu-rally quite fertile), CCIL applies 100 g (5 matchboxes full) of NPKMg (12:12:17:2) per tree, three times per year (i.e. 300 g per tree per year)
• This amount should be considered as a guide only in the absence of a soil test for a specific location.
• The current recommendations for the latest hybrid cocoa clones:
o Urea (a source of N only) – ring weed 1 – 1.5 metres (in the drip zone of the tree) around the base of the tree 1 week before application; every 6 months after heavy pruning, sprinkle 60 g (3 matchboxes full) of urea uniformly over this zone and rake lightly into the soil and cover with leaves to reduce leaching and volatilisation; first application end of February or beginning of March, second application end of September or beginning of October.
o Ammonium sulphate can be used as a substitute for urea if necessary; it also provides a source of S.
o NPK (or NPKMg) (a formulated source of N, P and K and other minor nu-trients depending on the mixture) – as for urea except apply 120 grams (6 matchboxes) to each tree, two times per year; first application April or May straight after harvest of pods, second application October or beginning of November.
o Urea is mainly aimed at stimulating flowering while NPK is aimed more at nourishing cherelles and developing pods (i.e. carrying the pods through to maturity).
o Splitting applications over a year helps reduce the loss of fertiliser by leaching - a single larger application could be mainly lost by leaching before it is taken up by the roots.
o The fibrous feeding roots of cocoa are concentrated under the drip zone of the canopy and so feriliser should be spread evenly over this zone (Figure 6.18), which is also the area around the base of the cocoa that is ring weeded. Weeding the zone over which fertiliser is spread prevents the weeds competing with the cocoa for the fertiliser.
o Fertiliser should never be dumped in one heap where it may damage the underlying roots and be more rapidly washed away before it is absorbed by the roots.
o Lightly disturbing the leaf litter and upper horizon of soil with a rake, but leaving the cover of leaf litter intact, will help the fertiliser get to the root zone of cocoa and reduce its loss during rain.
P A P U A N E W G U I N E A C O C O A E X T E N S I O N M A N U A L92
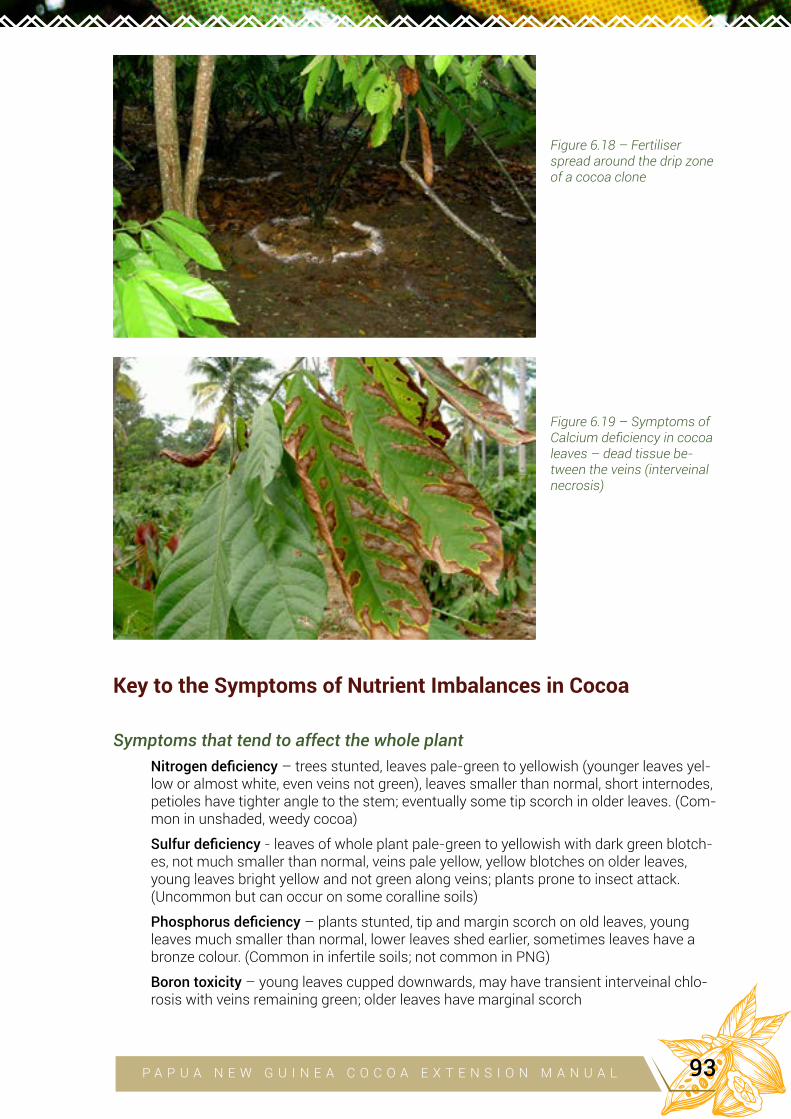
Figure 6.18 – Fertiliser spread around the drip zone of a cocoa clone
Figure 6.19 – Symptoms of Calcium deficiency in cocoa leaves – dead tissue be-tween the veins (interveinal necrosis)
Key to the Symptoms of Nutrient Imbalances in Cocoa
Symptoms that tend to affect the whole plant
Nitrogen deficiency – trees stunted, leaves pale-green to yellowish (younger leaves yel-low or almost white, even veins not green), leaves smaller than normal, short internodes, petioles have tighter angle to the stem; eventually some tip scorch in older leaves. (Com-mon in unshaded, weedy cocoa)
Sulfur deficiency - leaves of whole plant pale-green to yellowish with dark green blotch-es, not much smaller than normal, veins pale yellow, yellow blotches on older leaves, young leaves bright yellow and not green along veins; plants prone to insect attack. (Uncommon but can occur on some coralline soils)
Phosphorus deficiency – plants stunted, tip and margin scorch on old leaves, young leaves much smaller than normal, lower leaves shed earlier, sometimes leaves have a bronze colour. (Common in infertile soils; not common in PNG)
Boron toxicity – young leaves cupped downwards, may have transient interveinal chlo-rosis with veins remaining green; older leaves have marginal scorch
P A P U A N E W G U I N E A C O C O A E X T E N S I O N M A N U A L 93

Symptoms more pronounced in older mature leaves
Potassium deficiency – older leaves with interveinal yellowing beginning at margins, soon fusing and becoming necrotic to give marginal necrotic areas with wavy margins, but necrosis progressing inwards more rapidly between veins; yellow margin between green and necrotic tissue. (Common in coralline soils and in highly leached acid sandy soils)
Calcium deficiency – leaves with symmetrical interveinal necrosis beginning at the margins and extending towards the main vein (giving an ‘oak leaf’ pattern of green tis-sue)(Figure 6.19), can occur in young flush leaves (especially in branches with Vascu-lar Streak Dieback) but symptoms remain in older leaves; premature leaf fall
Magnesium deficiency – interveinal necrosis in old leaves, rapidly joining up to give continuous area of marginal necrosis with a yellow band between necrotic and green tissue; islands of necrotic tissue often occur in advance of the marginal necrosis; young leaves pale green to yellow with veins remaining green, followed by marginal and tip necrosis. (Common in acid soils and in nursery seedlings)
Aluminium toxicity – Yellowing of tissue between veins near the tip, scorch progress-ing slowly from the tip
Iron toxicity – leaves with pale yellow to white tissue each side of the midrib, no mar-ginal or tip necrosis
Chlorine toxicity – pale yellow interveinal areas fusing to form a continuous scorch, like Ca deficiency
Symptoms more pronounced in younger leaves
Iron deficiency – only new leaves yellowish, dark green veins with pale background, normal size; sometimes young leaves very pale to completely white with greenish veins; old leaves still green but may have narrow marginal or tip necrosis. (Common in highly alkaline or poorly aerated soils)
Boron deficiency – margin scorch on older leaves, young leaves smaller, folded down-wards or spiral, smaller than normal, brittle with interveinal chlorosis. (Occasionally occurs in leached acid soils)
Manganese deficiency – young leaves only pale green in interveinal areas and mar-gins, with veins mainly green, finally some scorch at the tip and tip margins
Copper deficiency – new leaves smaller and closer together near the apex, second-ary veins reduced in number and irregularly distributed, necrotic apices; young leaves tending to wilt; tips can die suddently while still green. (Uncommon in the field)
Zinc deficiency – young leaves narrow with wavy margins, sickle shaped, chlorotic be-tween secondary veins, red veins; old leaves with chlorotic spots in a row beside main veins. (Common in alkaline soils)
Zinc toxicity – young leaves have scattered pale green patches
Manganese toxicity – new leaves develop pale green angular patches, some necrosis around veins; no tip or marginal scorch and no symptoms on older leaves
Copper toxicity – young leaves darker with raised secondary veins and puckered along midrib; maturing leaves with pale green random patches. (Symptoms may occur with excessive spraying of copper fungicides over a long period)
P A P U A N E W G U I N E A C O C O A E X T E N S I O N M A N U A L94
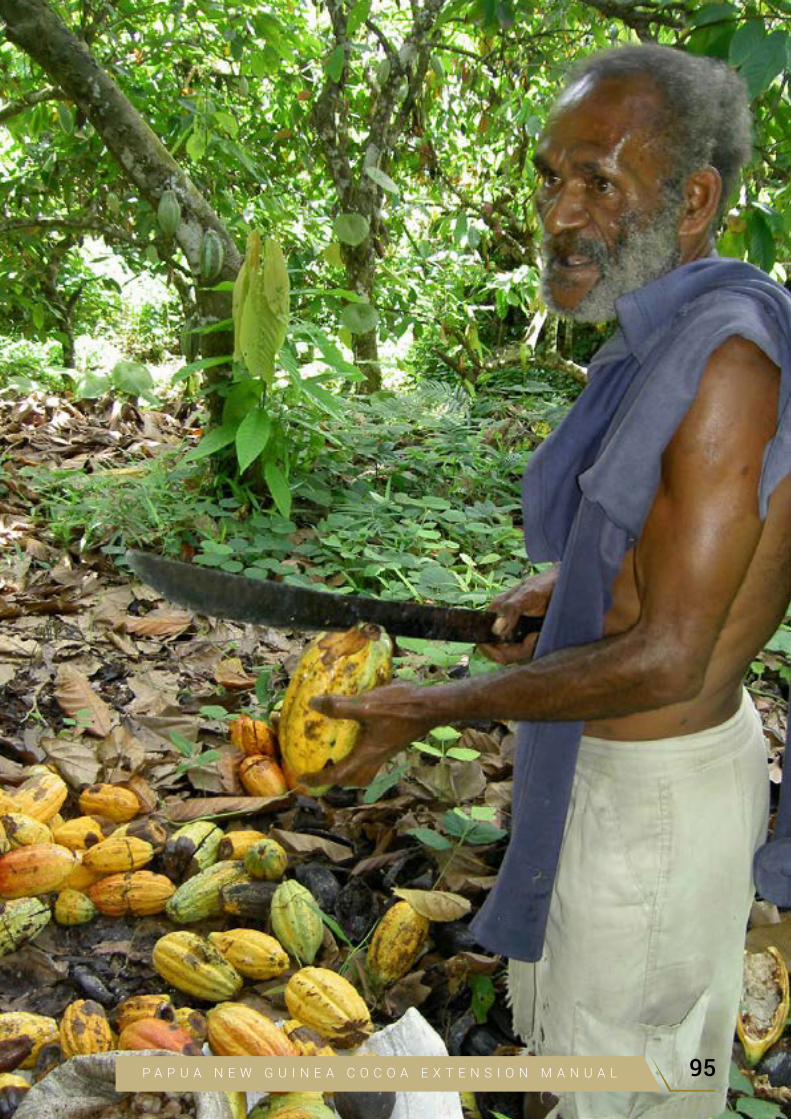
P A P U A N E W G U I N E A C O C O A E X T E N S I O N M A N U A L 95
7
INTEGRATED PEST AND
DISEASE MANAGEMENT
OF COCOA Josephine Saul-Maora, Paul Gende, John Konam, Yak Namaliu, Anthon
Kamuso, Ricky Wenani, Anton Varvaliu, Eremas Tade and David Yinil
AIM OF THIS CHAPTER:
To describe the integrated management of pests and diseases in cocoa in Pap-ua New Guinea
General principles of pest and disease management• All the management tasks (weeding, pruning of cocoa, pruning of Gliricidia, maintenance of
soil fertility) discussed in Chapter 6 contribute greatly to the control of pests and diseases that are strongly affected by the microenvironment within the cocoa canopy and the gener-al health of the trees.
o Poorly grown, overshaded cocoa will be more prone to pest and disease problems.
o The canopy of over-shaded cocoa tends to remain wetter for longer after rain or overnight dew, and this greatly favours infection by Phytophthora diseases, Pink Dis-ease and Vascular Streak Dieback.
o Overshaded, dense canopies are known to favour Cocoa Pod Borer and Longicorns, and make it easier for Pantorhytes and Grey Weevils to crawl through the canopy.
o Vigorous, well managed cocoa tends to outgrow Vascular Streak Dieback and Pink Disease infections.
o Open, accessible canopies make it easier to observe pest and disease problems and treat them
• The particular pests and diseases that can affect cocoa in Papua New Guinea and their particular control measures are described in Appendix 7 (Insect Pests) and Appendix 8 (Diseases) and summarized in Table 7.2 below but here their collective management is discussed under the heading Integrated Pest and Disease Management (IPDM) – see the ACIAR Booklet ‘Integrated Pest and Disease Management for Sustainable Cocoa Produc-tion’ by John Konam, Yak Namaliu, Rosalie Daniel and David Guest, 2008.
o The term ‘Integrated’ refers to the ‘integrated’ treatment of all the main pests and dis-eases as a group, and also to the ‘integration’ of all the methods (genetic resistance, cultural, biocontrol and chemical) used to treat them.
o The emphasis is placed on genetic resistance (i.e. planting the best recommended cocoa clones that have been selected because they have some resistance to the main pests and diseases – see Chapter 3 and Appendix 6) and cultural methods that are part of normal good farming practice (Chapters 5, 6).
Separately these approaches will reduce pest and disease problems but they also interact to multiply the benefits of each approach (i.e. they have a synergis-tic effect, as also implied by the term ‘Integrated’).
If a cocoa clone tends to have less of a pest or disease problem because it has some resistance, cultural methods will have a greater effect than on a clone that is very susceptible.
CHAPTER
P A P U A N E W G U I N E A C O C O A E X T E N S I O N M A N U A L96

Cultural methods (such as normal good management practice as described in Chapter 6) will reduce the pest/disease pressure on a partly resistant clone and ensure that only a partial degree of resistance is adequate. For example, regular pruning of cocoa, as well as managing air-flow and tree structure, will tend to re-move branches infested (and sources of infestation) by Vascular Streak Dieback, Pink Disease and Pansepta, especially if any damaged branches are targeted for removal by a knowledgeable farmer.
• Biological control also often results from normal good farming practice – this is often not evident until it is disrupted by inappropriate use of pesticides.
o A cocoa farm contains many beneficial insects, fungi and bacteria that act as antag-onists of the pests and pathogens - the use of pesticide chemicals tends to reduce these beneficial populations, sometimes then allowing a flare-up of pest or disease problems.
o It is thought that most of the pest problems in modern agriculture have been caused directly by the use of pesticides that kill off the predators and parasitoids that former-ly controlled the pests.
o Black Ants (Dolicoderus), Crazy Ants (Anoplolepis longipes) and Kurukum Ants (Oecophylla smaragdina) are thought to deter some insect pests and many cocoa farmers encourage these ants.
o There is evidence that coconut shade encourages Kurukum Ants that help to con-trol Pantorhytes weevils in cocoa - in general pest problems in cocoa are less under coconut than under leguminous shade trees.
o In Indonesia, farmers commonly stuff bundles of leaves into plastic bags or short lengths of bamboo and leave them to be colonised by ants in areas where they are common, and then transfer these colonies to new plantings to spread the ants (Fig-ure 7.1, 7.2; see Appendix 7)
o A population of Crazy Ants in a cocoa tree will drive out Mirids and help to control Pantorhytes and Pansepta webworms.
Figure 7.1 – Plastic bag stuffed with leaves used to transfer an ant colony into a cocoa block
Figure 7.2 – Bamboo containing leaves used to transfer ants for biocontrol of insect pests in a cocoa block
P A P U A N E W G U I N E A C O C O A E X T E N S I O N M A N U A L 97
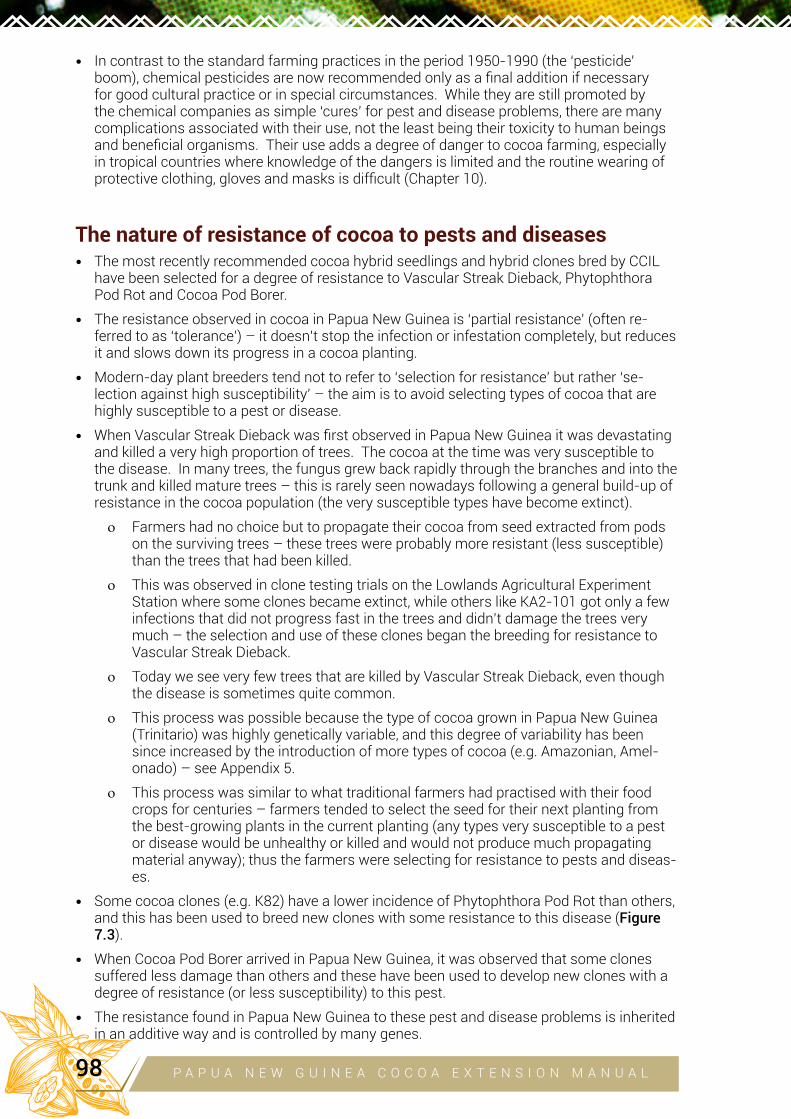
• In contrast to the standard farming practices in the period 1950-1990 (the ‘pesticide’ boom), chemical pesticides are now recommended only as a final addition if necessary for good cultural practice or in special circumstances. While they are still promoted by the chemical companies as simple ‘cures’ for pest and disease problems, there are many complications associated with their use, not the least being their toxicity to human beings and beneficial organisms. Their use adds a degree of danger to cocoa farming, especially in tropical countries where knowledge of the dangers is limited and the routine wearing of protective clothing, gloves and masks is difficult (Chapter 10).
The nature of resistance of cocoa to pests and diseases• The most recently recommended cocoa hybrid seedlings and hybrid clones bred by CCIL
have been selected for a degree of resistance to Vascular Streak Dieback, Phytophthora Pod Rot and Cocoa Pod Borer.
• The resistance observed in cocoa in Papua New Guinea is ‘partial resistance’ (often re-ferred to as ‘tolerance’) – it doesn’t stop the infection or infestation completely, but reduces it and slows down its progress in a cocoa planting.
• Modern-day plant breeders tend not to refer to ‘selection for resistance’ but rather ‘se-lection against high susceptibility’ – the aim is to avoid selecting types of cocoa that are highly susceptible to a pest or disease.
• When Vascular Streak Dieback was first observed in Papua New Guinea it was devastating and killed a very high proportion of trees. The cocoa at the time was very susceptible to the disease. In many trees, the fungus grew back rapidly through the branches and into the trunk and killed mature trees – this is rarely seen nowadays following a general build-up of resistance in the cocoa population (the very susceptible types have become extinct).
o Farmers had no choice but to propagate their cocoa from seed extracted from pods on the surviving trees – these trees were probably more resistant (less susceptible) than the trees that had been killed.
o This was observed in clone testing trials on the Lowlands Agricultural Experiment Station where some clones became extinct, while others like KA2-101 got only a few infections that did not progress fast in the trees and didn’t damage the trees very much – the selection and use of these clones began the breeding for resistance to Vascular Streak Dieback.
o Today we see very few trees that are killed by Vascular Streak Dieback, even though the disease is sometimes quite common.
o This process was possible because the type of cocoa grown in Papua New Guinea (Trinitario) was highly genetically variable, and this degree of variability has been since increased by the introduction of more types of cocoa (e.g. Amazonian, Amel-onado) – see Appendix 5.
o This process was similar to what traditional farmers had practised with their food crops for centuries – farmers tended to select the seed for their next planting from the best-growing plants in the current planting (any types very susceptible to a pest or disease would be unhealthy or killed and would not produce much propagating material anyway); thus the farmers were selecting for resistance to pests and diseas-es.
• Some cocoa clones (e.g. K82) have a lower incidence of Phytophthora Pod Rot than others, and this has been used to breed new clones with some resistance to this disease (Figure 7.3).
• When Cocoa Pod Borer arrived in Papua New Guinea, it was observed that some clones suffered less damage than others and these have been used to develop new clones with a degree of resistance (or less susceptibility) to this pest.
• The resistance found in Papua New Guinea to these pest and disease problems is inherited in an additive way and is controlled by many genes.
P A P U A N E W G U I N E A C O C O A E X T E N S I O N M A N U A L98
• Because they have been selected from cocoa types that have survived well in various envi-ronments in Papua New Guinea for over a hundred years, they have probably been naturally selected to survive other pests and diseases that we consider ‘minor’ problems.
• The partial resistance of cocoa to pests and diseases that has been selected and bred in Papua New Guinea is often sufficient to protect the cocoa crop as long as it is grown well with good cultural methods of control.
Monitoring of pests and diseases• An important part of IPDM is the regular monitoring of pest and disease problems, which is
required for deciding whether anything has to be done to control them and for getting good timing of any interventions. This applies especially to the use of pesticide sprays, which should be used only when indicated by monitoring. For example, cocoa trees should be checked for Mirid damage regularly – it has been determined that if more than 10 live adult Mirids are found in 100 trees, control measures are needed. Similarly Pantorhytes adults can be monitored as they are picked off the trees and this will indicate whether they are a problem that needs further control measures such as spraying.
• Beneficial Crazy Ant populations can be monitored as an indication of their likely effect on Pantorhytes and Mirids.
• During weekly complete removal of pods affected by Cocoa Pod Borer or Phytophthora Pod Rot, counts of the removed pods should be kept in a monitoring book or diary so that the trends in the pest and disease can be observed. If the problems are brought under control, there may come a time when such intensive sanitation is no longer required, thus saving labour costs.
• On some plantations the losses from Cocoa Pod Borer and Phytophthora Pod Rot are mon-itored as follows (calculation provided by G. McNally) :
o The numbers of healthy and diseased pods harvested each month are counted and compared with the wet weight of commercially useful beans extracted.
o It is assumed that 10 completely healthy pods (i.e. with no losses from CPB clumping or Phytophthora rotting) should give 1 kg wet beans.
o Therefore % yield of good beans from a batch of pods (healthy and damaged) = (Wet weight beans (kg) x 10/Number pods)
The short cut calculation is to divide (kg wet beans) by (number of pods/10)
o % losses due to CPB and Black Pod = 100 - %yield of good beans
Figure 7.3 – Percent pods per tree infected by Phytophthora Pod Rot in four cocoa clones (K82, RJ2, K20, K24-102) in a trial at Keravat from 1981 to 1992. From J.Y. Saul, Resistance of Cocoa Genotypes to Phytophthora palmivora in Papua New Guinea, M.Sc. Thesis, LaTrobe University, 1993
P A P U A N E W G U I N E A C O C O A E X T E N S I O N M A N U A L 99
o They keep track of this figure and so can monitor the trends in losses from Cocoa Pod Borer and Black Pod, and decide whether more frequent sanitation rounds or spraying are necessary.
• Regular monitoring and record keeping can help a farmer in giving constant attention to small details in managing a cocoa block - it is part of managing cocoa farming as a busi-ness.
Management of pests and diseases of young cocoa - Phytoph-thora Leaf Blight, Vascular Streak Dieback, Pink Disease, Cof-fee Stem Borer, Grey Weevils and Root Chafers• Management of Phytophthora Leaf Blight and Vascular Streak Dieback in nurseries is
described in Chapter 3. The key management activity is to detect the infections as soon as possible and remove the infected plants from the nursery.
• Infestations of Phytophthora Leaf Blight, Vascular Streak Dieback, Pink Disease and Coffee Stem Borer in young plants in the field can be pruned out by cutting about 30 cm below the lowest symptoms. Again, a key to their control is to monitor young plantings closely and detect and remove infected branches as soon as possible.
• Ensuring that young cocoa is well (but not excessively) shaded and well weeded and mulched will reduce damage by Grey Weevils. Grey Weevils prefer sunny exposed places. Spraying weeds with herbicides that kill their roots deprive the weevils of roots on which they feed.
• If cocoa is planted on or near old food gardens, Root Chafers can be a problem. Young cocoa plants can be protected from the larvae of Root Chafers by place 2 g Chlorpyrephos (Suscon Blue – 6 mg/granule) in the soil around the roots when planting out.
Management of Cocoa Pod Borer and Phytophthora Pod Rot – the two big problems• The arrival of Cocoa Pod Borer (Conopomorpha cramerella) in Papua New Guinea has
caused so much pod loss that very serious control measures are required to get any profit-able yield from cocoa. However, the control measures that are required for Cocoa Pod Bor-er (weekly sanitary removal and burial or composting of affected pods) will also control the main disease problem that has for many years reduced production of cocoa pods, namely Phytophthora Pod Rot caused by the fungus Phytophthora palmivora.
• Pods longer than about 10cm are most likely to show symptoms of Cocoa Pod Borer or Phytophthora Pod Rot and symptoms will become more obvious as the pods near matu-rity (Figure 7.4 – 7.7), but even the smallest affected pods and dead cherelles should be removed.
Figure 7.4 – Pods infested by Cocoa Pod Borer, showing premature ripening and slight distortion
Figure 7.5 – Pods infected by Phytophthora Pod Rot showing black rot spreading on pods
P A P U A N E W G U I N E A C O C O A E X T E N S I O N M A N U A L100
o Cocoa Pod Borer – pods begin to ripen prema-turely and become a little distorted (Figure 7.4); small black pin-prick like wounds are visible where the larvae exit the pods. When pods are broken open they are seen to have brown frass trails in the placenta and the beans are clumped together (Figure 7.6).
o Phytophthora Pod Rot – the surface of the pod develops brown circular patches that spread until the whole pod may be covered (Figures 7.5, 7.7). During wet weather fluffy white sporulation may be seen on the surface and small beetles may eventually bore into the dead husk.
• It is important that sanitary pod removal be conduct-ed weekly because for every minute an infested pod remains hanging in the canopy it can spread infes-tations to healthy pods. The removal and effective disposal of infested pods completely breaks the life cycle of the insect Conopomorpha and greatly dis-rupts it for Phytophthora.
o Unfortunately Phytophthora can also survive on the stems and in soil, although its build-up on infected pods greatly affects these other reservoirs of inoculum.
o A benefit of rapidly removing any Phytophthora-affected pods at the earliest possible stage is to reduce the likelihood of the pathogen infecting the flower cushions, which can be killed by developing cankers.
• Maintenance of cocoa trees to a low and open structure is crucial in ensuring that all de-veloping pods are easily observed and accessible for sanitary removal if necessary (and ultimately for harvest of healthy pods).
Figure 7.6 – Harvested cocoa pods with a high proportion infested by Cocoa Pod Borer; damage to beans evident in broken pods
Figure 7.7 – Clump of cocoa pods infected by Phytophthora Pod Rot
P A P U A N E W G U I N E A C O C O A E X T E N S I O N M A N U A L 101
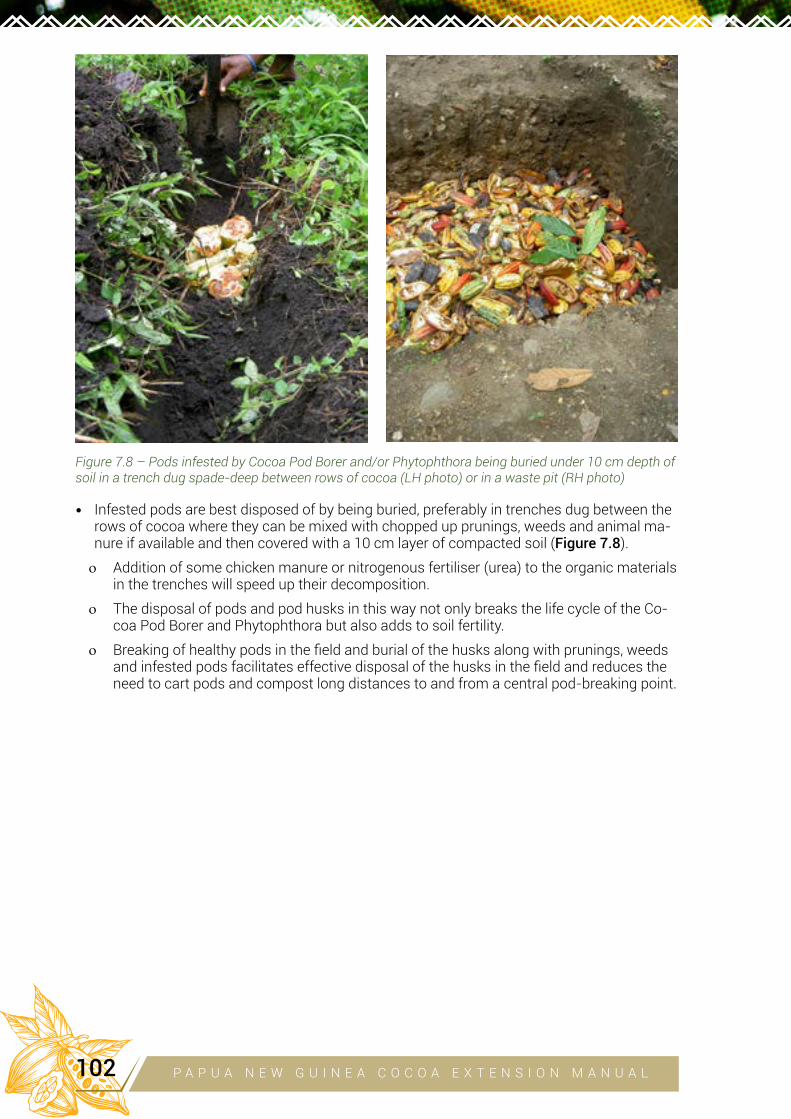
• Infested pods are best disposed of by being buried, preferably in trenches dug between the rows of cocoa where they can be mixed with chopped up prunings, weeds and animal ma-nure if available and then covered with a 10 cm layer of compacted soil (Figure 7.8).
o Addition of some chicken manure or nitrogenous fertiliser (urea) to the organic materials in the trenches will speed up their decomposition.
o The disposal of pods and pod husks in this way not only breaks the life cycle of the Co-coa Pod Borer and Phytophthora but also adds to soil fertility.
o Breaking of healthy pods in the field and burial of the husks along with prunings, weeds and infested pods facilitates effective disposal of the husks in the field and reduces the need to cart pods and compost long distances to and from a central pod-breaking point.
Figure 7.8 – Pods infested by Cocoa Pod Borer and/or Phytophthora being buried under 10 cm depth of soil in a trench dug spade-deep between rows of cocoa (LH photo) or in a waste pit (RH photo)
P A P U A N E W G U I N E A C O C O A E X T E N S I O N M A N U A L102
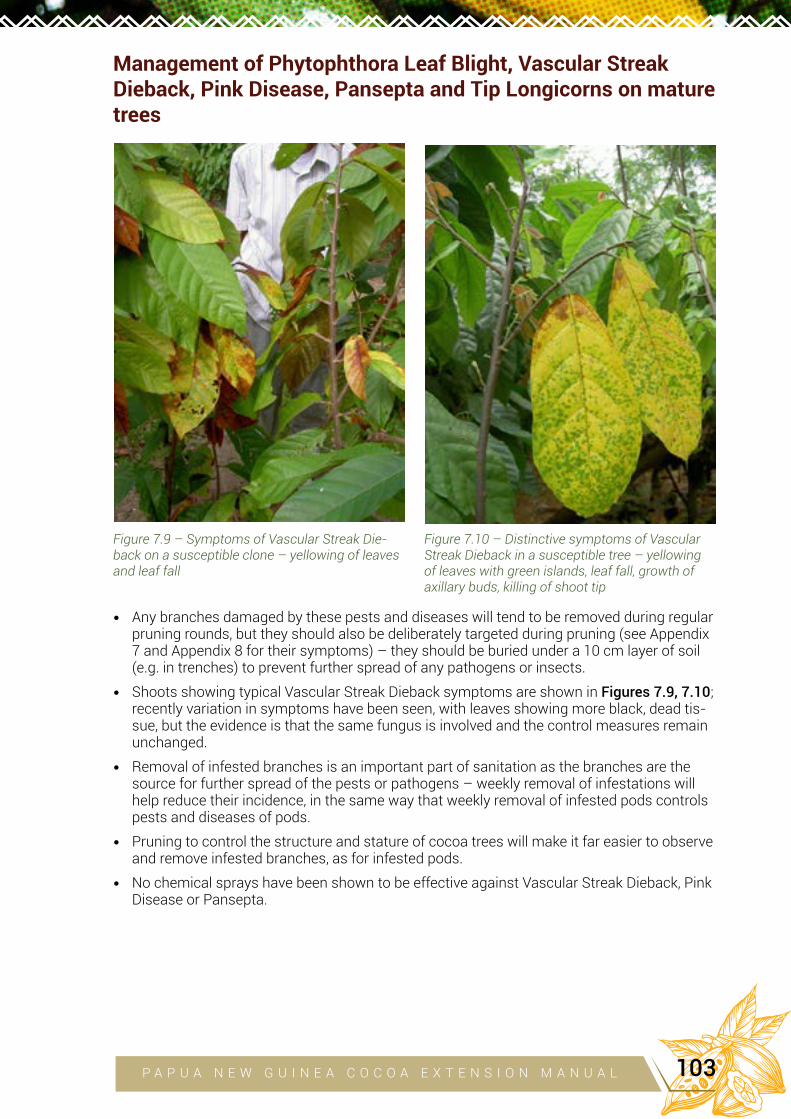
Management of Phytophthora Leaf Blight, Vascular Streak Dieback, Pink Disease, Pansepta and Tip Longicorns on mature trees
• Any branches damaged by these pests and diseases will tend to be removed during regular pruning rounds, but they should also be deliberately targeted during pruning (see Appendix 7 and Appendix 8 for their symptoms) – they should be buried under a 10 cm layer of soil (e.g. in trenches) to prevent further spread of any pathogens or insects.
• Shoots showing typical Vascular Streak Dieback symptoms are shown in Figures 7.9, 7.10; recently variation in symptoms have been seen, with leaves showing more black, dead tis-sue, but the evidence is that the same fungus is involved and the control measures remain unchanged.
• Removal of infested branches is an important part of sanitation as the branches are the source for further spread of the pests or pathogens – weekly removal of infestations will help reduce their incidence, in the same way that weekly removal of infested pods controls pests and diseases of pods.
• Pruning to control the structure and stature of cocoa trees will make it far easier to observe and remove infested branches, as for infested pods.
• No chemical sprays have been shown to be effective against Vascular Streak Dieback, Pink Disease or Pansepta.
Figure 7.9 – Symptoms of Vascular Streak Die-back on a susceptible clone – yellowing of leaves and leaf fall
Figure 7.10 – Distinctive symptoms of Vascular Streak Dieback in a susceptible tree – yellowing of leaves with green islands, leaf fall, growth of axillary buds, killing of shoot tip
P A P U A N E W G U I N E A C O C O A E X T E N S I O N M A N U A L 103
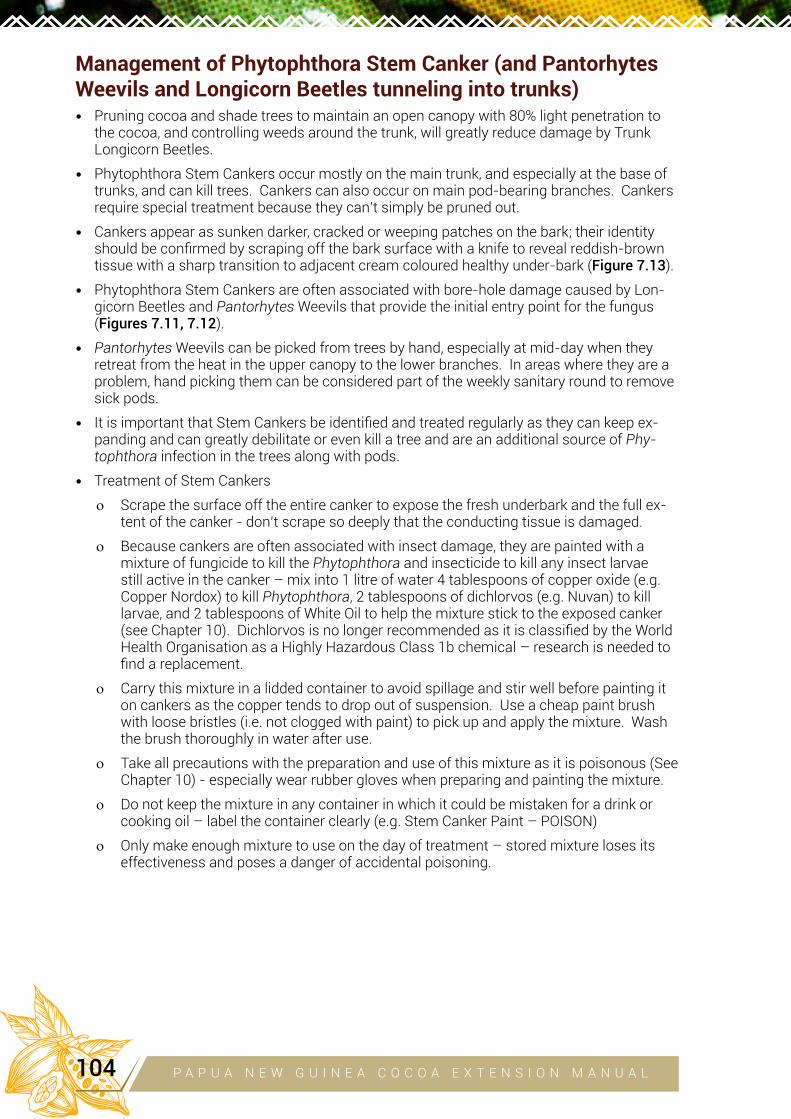
Management of Phytophthora Stem Canker (and Pantorhytes Weevils and Longicorn Beetles tunneling into trunks) • Pruning cocoa and shade trees to maintain an open canopy with 80% light penetration to
the cocoa, and controlling weeds around the trunk, will greatly reduce damage by Trunk Longicorn Beetles.
• Phytophthora Stem Cankers occur mostly on the main trunk, and especially at the base of trunks, and can kill trees. Cankers can also occur on main pod-bearing branches. Cankers require special treatment because they can’t simply be pruned out.
• Cankers appear as sunken darker, cracked or weeping patches on the bark; their identity should be confirmed by scraping off the bark surface with a knife to reveal reddish-brown tissue with a sharp transition to adjacent cream coloured healthy under-bark (Figure 7.13).
• Phytophthora Stem Cankers are often associated with bore-hole damage caused by Lon-gicorn Beetles and Pantorhytes Weevils that provide the initial entry point for the fungus (Figures 7.11, 7.12).
• Pantorhytes Weevils can be picked from trees by hand, especially at mid-day when they retreat from the heat in the upper canopy to the lower branches. In areas where they are a problem, hand picking them can be considered part of the weekly sanitary round to remove sick pods.
• It is important that Stem Cankers be identified and treated regularly as they can keep ex-panding and can greatly debilitate or even kill a tree and are an additional source of Phy-tophthora infection in the trees along with pods.
• Treatment of Stem Cankers
o Scrape the surface off the entire canker to expose the fresh underbark and the full ex-tent of the canker - don’t scrape so deeply that the conducting tissue is damaged.
o Because cankers are often associated with insect damage, they are painted with a mixture of fungicide to kill the Phytophthora and insecticide to kill any insect larvae still active in the canker – mix into 1 litre of water 4 tablespoons of copper oxide (e.g. Copper Nordox) to kill Phytophthora, 2 tablespoons of dichlorvos (e.g. Nuvan) to kill larvae, and 2 tablespoons of White Oil to help the mixture stick to the exposed canker (see Chapter 10). Dichlorvos is no longer recommended as it is classified by the World Health Organisation as a Highly Hazardous Class 1b chemical – research is needed to find a replacement.
o Carry this mixture in a lidded container to avoid spillage and stir well before painting it on cankers as the copper tends to drop out of suspension. Use a cheap paint brush with loose bristles (i.e. not clogged with paint) to pick up and apply the mixture. Wash the brush thoroughly in water after use.
o Take all precautions with the preparation and use of this mixture as it is poisonous (See Chapter 10) - especially wear rubber gloves when preparing and painting the mixture.
o Do not keep the mixture in any container in which it could be mistaken for a drink or cooking oil – label the container clearly (e.g. Stem Canker Paint – POISON)
o Only make enough mixture to use on the day of treatment – stored mixture loses its effectiveness and poses a danger of accidental poisoning.
P A P U A N E W G U I N E A C O C O A E X T E N S I O N M A N U A L104
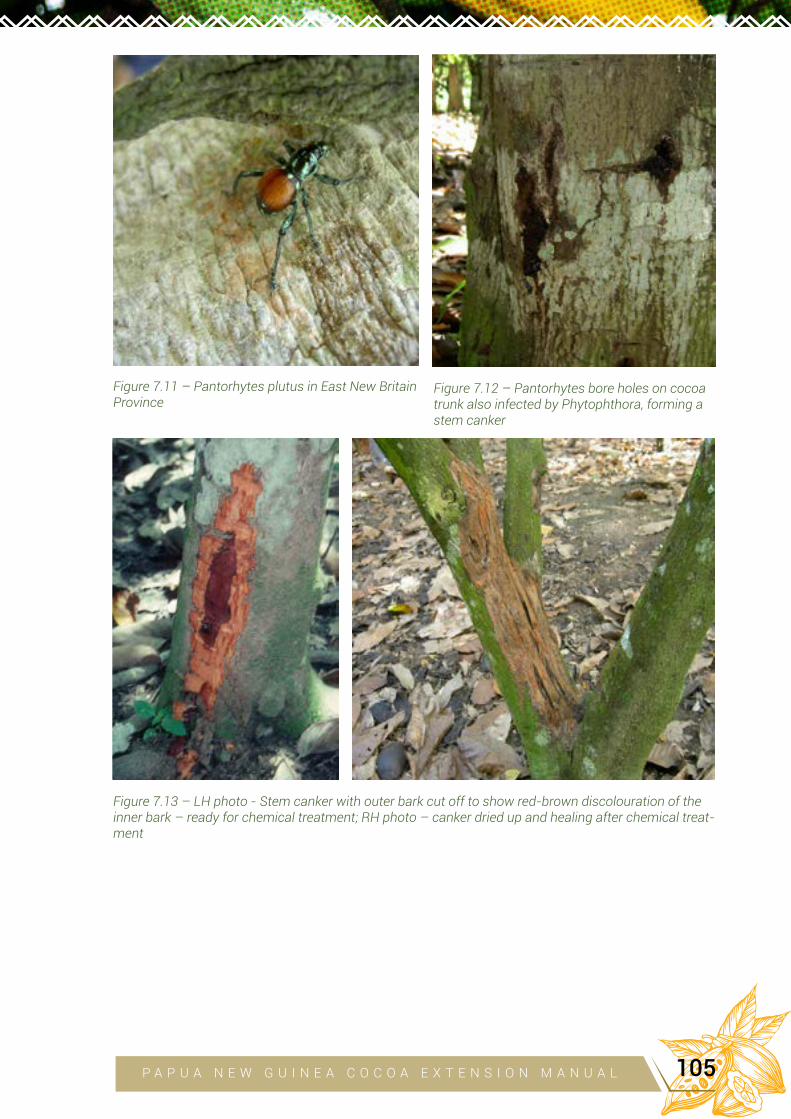
Figure 7.11 – Pantorhytes plutus in East New Britain Province
Figure 7.13 – LH photo - Stem canker with outer bark cut off to show red-brown discolouration of the inner bark – ready for chemical treatment; RH photo – canker dried up and healing after chemical treat-ment
Figure 7.12 – Pantorhytes bore holes on cocoa trunk also infected by Phytophthora, forming a stem canker
P A P U A N E W G U I N E A C O C O A E X T E N S I O N M A N U A L 105
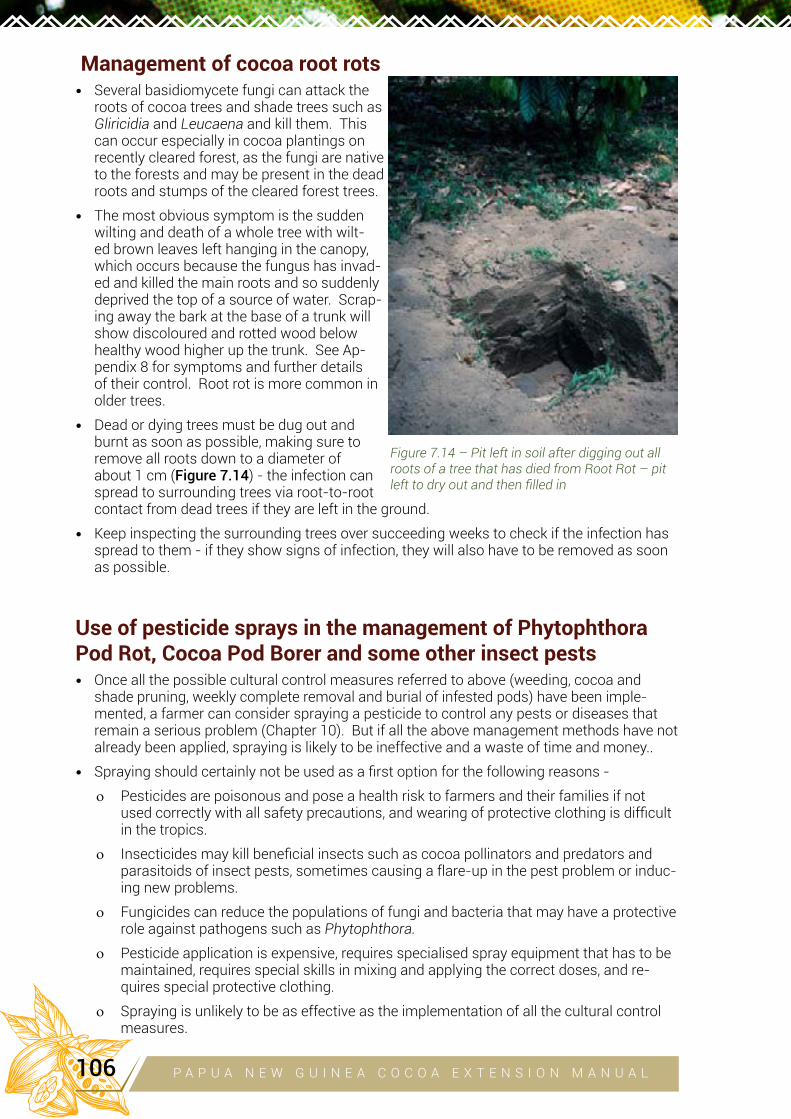
Management of cocoa root rots• Several basidiomycete fungi can attack the
roots of cocoa trees and shade trees such as Gliricidia and Leucaena and kill them. This can occur especially in cocoa plantings on recently cleared forest, as the fungi are native to the forests and may be present in the dead roots and stumps of the cleared forest trees.
• The most obvious symptom is the sudden wilting and death of a whole tree with wilt-ed brown leaves left hanging in the canopy, which occurs because the fungus has invad-ed and killed the main roots and so suddenly deprived the top of a source of water. Scrap-ing away the bark at the base of a trunk will show discoloured and rotted wood below healthy wood higher up the trunk. See Ap-pendix 8 for symptoms and further details of their control. Root rot is more common in older trees.
• Dead or dying trees must be dug out and burnt as soon as possible, making sure to remove all roots down to a diameter of about 1 cm (Figure 7.14) - the infection can spread to surrounding trees via root-to-root contact from dead trees if they are left in the ground.
• Keep inspecting the surrounding trees over succeeding weeks to check if the infection has spread to them - if they show signs of infection, they will also have to be removed as soon as possible.
Use of pesticide sprays in the management of Phytophthora Pod Rot, Cocoa Pod Borer and some other insect pests • Once all the possible cultural control measures referred to above (weeding, cocoa and
shade pruning, weekly complete removal and burial of infested pods) have been imple-mented, a farmer can consider spraying a pesticide to control any pests or diseases that remain a serious problem (Chapter 10). But if all the above management methods have not already been applied, spraying is likely to be ineffective and a waste of time and money..
• Spraying should certainly not be used as a first option for the following reasons -
o Pesticides are poisonous and pose a health risk to farmers and their families if not used correctly with all safety precautions, and wearing of protective clothing is difficult in the tropics.
o Insecticides may kill beneficial insects such as cocoa pollinators and predators and parasitoids of insect pests, sometimes causing a flare-up in the pest problem or induc-ing new problems.
o Fungicides can reduce the populations of fungi and bacteria that may have a protective role against pathogens such as Phytophthora.
o Pesticide application is expensive, requires specialised spray equipment that has to be maintained, requires special skills in mixing and applying the correct doses, and re-quires special protective clothing.
o Spraying is unlikely to be as effective as the implementation of all the cultural control measures.
Figure 7.14 – Pit left in soil after digging out all roots of a tree that has died from Root Rot – pit left to dry out and then filled in
P A P U A N E W G U I N E A C O C O A E X T E N S I O N M A N U A L106
• Spraying for Phytophthora Pod Rot
o Using a knapsack sprayer, spray the whole of the pod-bearing part of the canopy with copper oxide (Copper Nordox or Copper Sandoz) at a dosage of 200 g plus 5 ml stick-er in 10 litres of water or Ridomil Plus 72 at a dosage of 40 g plus 5 ml sticker in 10 litres of water (see Chapter 10, Table 10.7). These two chemicals should be applied in alternate rounds to reduce the chance of Phytophthora developing resistance to the Ridomil.
• Spraying for Cocoa Pod Borer
o Using a knapsack sprayer, target spray pods (10 cm long and bigger) and the underside of larger horizontal branches with a synthetic pyrethroid (Karate, Decis or Bifenthrin) at a dosage of 28 ml plus 2 ml surfactant plus 50 ml sticker in 10 litres of water (see Chapter 10, Table 10.6). ‘Provisional Release of Second Series of Hybrid Cocoa Clone Varieties, Tolerant to Cocoa Pod Borer, March 2013’, p.27, states only 10 ml of insecti-cide in 10 litres water.
Spraying of pods may deter adult females from laying eggs on the pods and will kill eggs and hatching larvae before they penetrate into the pods.
Spraying the underside of larger (>4 cm diameter) horizontal branches targets the adult moths that tend to rest on the underside of these branches during the day.
o It is recommended that target spraying be conducted for 3 rounds at 10 day intervals leading up to the two main cropping periods.
o Spray only after 9am and before 3pm to reduce the chance of killing beneficial insects that are more active in the early morning and late afternoon.
o With good cultural management, it may be possible to reduce spraying if monitoring shows that the incidence of Cocoa Pod Borer has been reduced to a low level.
• Spraying for other insects
o The above synthetic pyrethroid sprays at the same dosage may also help to control Pantorhytes adults, Mirids, some leaf-eating caterpillars, Grey Weevils, Rhyparid beetles, husk borers and thrips.
Integrated Pest and Disease Management Options• The above activities that all contribute to IPDM can be applied by farmers to different ex-
tents, depending on their resources. Farmers are encouraged to try different options (Table 7.1 below), involving different levels of input, to compare the results. Once they see the results they can decide how they want to treat their whole farm. In this way, farmers can function as their own researchers – they are conducting experiments on their own land, relevant to their own situation (see Chapter 13).
P A P U A N E W G U I N E A C O C O A E X T E N S I O N M A N U A L 107
Table 7.1 IPDM Options involving different levels of input by farmers (from ‘Integrated Pest and Dis-ease Management for Sustainable Cocoa Production’ by John Konam, Yak Namaliu, Rosalie Daniel and
David Guest, 2008, ACIAR)
Option Level of Input Required Activity
1. Low Current farm practice
2. (the minimum for control of Cocoa Pod Borer and Black Pod)
Medium (regular labour only, but not necessarily more work than required for over-grown bush cocoa)
• Regular pruning of cocoa and shade trees to main-tain sparse shade and low open cocoa tree
• Removal of VSD, Pink Disease, Pansepta and Tip Longicorn damaged shoots while pruning
• Manual weeding around cocoa
• Weekly removal and burial of all pods damaged by Cocoa Pod Borer or Black Pod
3. (expected to give higher yield of pods)
High (as for 2. but more labour to prepare compost or money to buy bag fertiliser)
Option 2. plus application of fertiliser or manure
4. (expected to give the high-est yield of healthy pods, but requiring more costs)
Maximum (as for 3. but extra cost for pesticides and their application)
Option 3. plus use of herbi-cides, fungicides for Black Pod and Stem Canker, and insecticides for Cocoa Pod Borer and Mirids
P A P U A N E W G U I N E A C O C O A E X T E N S I O N M A N U A L108
Summary of the Integrated Pest and Disease Management activities required to grow cocoa profitably:
• Plant the latest recommended CCIL hybrid clones that have some resistance to CPB, VSD and Black Pod (avoid planting cocoa that is highly susceptible to the main pests and diseases)
• Plant cocoa at the appropriate spacing and under shade that can be maintained to allow 80% light penetration to established cocoa – excessive shading creates pest/disease problems
• Identify any pest and disease problems using Table 7.2
• Use foundation and maintenance pruning to keep cocoa trees lower than twice human height with an open lower canopy and with most pods borne on the lower branches
o This allows pods and growing branches to be easily seen for sanitation pod removal (CPB, Black Pod), branch pruning (VSD, Pink Disease, Pansepta) and hand picking of Pantorhytes
o Prune out any VSD, Pink Disease, Pansepta and Tip Longicorn infested branches during pruning rounds
• Prune Gliricidia shade regularly to maintain about 80% of full sunlight hitting the cocoa canopy
o This gives more flowering and pod production
o It helps dry out the cocoa trees after rain and reduces infection by Phytophthora and VSD
o It helps reduce CPB moth activity, which is favoured by heavy shade
o It reduces trunk longicorn damage
o It also improves access to the cocoa trees for sanitation
• Control weeds
o This reduces humidity in the canopy and reduces access of Trunk Longicorns and Grey Weevils to the cocoa
o It also improves human access for sanitation activities
• Remove all CPB and Phytophthora infested pods from every tree, at least weekly
o Remove ‘every sick pod, from every tree, every week’
• Dispose of the infested pods by burying them in trenches dug between rows of cocoa or in central pits, or by composting them with other organic waste under a plastic cover
o Don’t leave infested pods uncovered in piles
CPB larvae can emerge from pod heaps, pupate and produce adult moths than can fly to infest healthy pods
Phytophthora can sporulate on pods and be dispersed by water splash or pod boring insects
• Inspect lower trunks for Stem Canker during regular maintenance rounds and treat with a fungicide/insecticide paint (as described above) if needed
• Once all the above cultural management activities have been done, targeted spraying of pod-bearing parts of the canopy (for CPB and Black Pod) and underside of larger branches (for CPB) may be necessary to bring outbreaks under control
• Monitoring of occurrence of pests and diseases will enable judgements about whether the IPDM is working or whether adjustments have to be made
P A P U A N E W G U I N E A C O C O A E X T E N S I O N M A N U A L 109
Table 7.2 - Main pests and diseases damaging cocoa and main management options
(see Appendix 7 for full descriptions of insect pests, Appendix 8 for full descriptions of diseases)
Symptoms Likely cause Management options
Damage to woody trunks and branches of mature trees
Vertical tunnels or channels in main trunk under the bark, gum exuded onto bark
Pantorhytes Weevil Collect weevils by hand; encourage Cra-zy Ants; paint channels with insecticide/fungicide mixture
Horizontal tunnels in trunk or main branches; large quan-tities of fibrous rusty brown frass pushed out onto bark
Trunk Longicorn (Glenea) Maintain only light shade; remove climbers and weeds touching trunk; paint larval channels with insecticide/fungicide mixture
Unthrifty tree with interlocking mass of fine channels in wood under dark water soaked patch on trunk
Giant Cocoa Termites Open up trunk above nest and pour in insecticide solution
Water soaked patches on bark on lower part of main trunk; bark a red-brown colour instead of creamy white when outer bark scraped off
Phytophthora Canker (sometimes associated with insect larval tunnels, especially Pantorhytes)
Scrape off outer bark and paint with insecticide/fungicide mixture
Damage to main stem of young plants – will affect plant establishment
Chewing damage to the semi-hardened bark and peti-oles of young shoots
Grey Weevils Ensure cocoa has some shade and is well weeded and mulched
Tips of shoots killed in young cocoa up to 2 years old, exit holes in the stem
Longicorn Tip Borer (Oxymagis) Cut out the infected stem 30 cm below the lowest symptoms (i.e. pollarding) and encourage growth of a new shoot
Unthrifty branch with tip dieback and occasional bore holes with reddish-yellow frass along the stem
Coffee Stem Borer (Zeuzera) Cut out the infected stem 30 cm below the lowest symptoms (i.e. pollarding) and encourage growth of a new shoot
Yellow leaves with green spots plus swollen lenticels on the main stem
Vascular Streak Dieback Cut out the infected stem 30 cm below the lowest symptoms (i.e. pollarding) and encourage growth of a new shoot
Dieback of outer branches of mature trees
Dieback of outer shoots, with wood frass attached to web-like covering of bore holes in the stems
Cocoa Webworm (Pansepta) Cut out infected branches 30cm below lowermost symptoms; ensure that the cocoa has adequate shade; encourage Crazy Ants
Dieback of branches with leaves behind the tip turning yellow with green spots; swol-len lenticels, discolouration of wood; leaf fall
Vascular Streak Dieback Cut out infected branches 30cm below lowermost symptoms
Damage to very young plants or chupons
Blight of young soft leaves and shoot tips, often beginning at the tip of leaves
Phytophthora Shoot Blight Use potting soil free of Phytophthora; immediately remove infected seedlings from nursery
Yellowing of leaves and swol-len lenticels on stem
Vascular Streak Dieback Grow seedlings in a nursery under a plastic roof
White powdery masses of insects often at shoot tip
Mealybugs Can be sprayed with insecticide if serious
P A P U A N E W G U I N E A C O C O A E X T E N S I O N M A N U A L110
Damage to cocoa pods
Pod begin to turn black in patches, with the patches expanding until whole pod is black; fuzzy white growth of fungus on surface of black tissue
Phytophthora Pod Rot (Black Pod) Infected pods should be removed and buried or composted as soon as they are seen on the tree
Pods begin to ripen premature-ly and unevenly; there may be slight distortion of pods
Cocoa Pod Borer Infested pods should be removed and buried or composted as soon as they are seen on the tree
Many small black, blister-like spots on the pod surface
Mirids Encourage Crazy Ants, but spraying may be needed if the infestation is serious
Holes bored in ripe pods with frass pushed out onto the surface of the pod
Husk Borer Harvest pods as soon as they are ripe; encourage Crazy Ants
Large holes eaten in pods Rats, flying foxes, parrots Harvest pods as soon as they are ripe
Damage to leaves
Many tiny ‘shot holes’ eaten in soft flush leaves, remaining as holes in hardened leaves
Rhyparid Beetles Severe outbreaks can be sprayed with insecticides
Uneven eating of soft young leaves
Caterpillars Severe outbreaks can be sprayed with insecticides
Bronzing and wilting of leaves Thrips Ensure adequate shade, plants not stressed
Sudden death of whole plants
Young plants collapse and die suddenly due to larvae eating through tap roots
Root Chafers If a severe problem near old food gardens, can be treated with insecticide granules
Whole mature tree dies sud-denly with all dead leaves left hanging on the tree; crusty fungus growth or bracket-like spore-forming bodies at the base of the trunk
Fungal root rots Whole tree has to be dug out and all the roots down to about pencil size dug out and burned
P A P U A N E W G U I N E A C O C O A E X T E N S I O N M A N U A L 111
8
DIVERSIFICATION ON
COCOA FARMSAlfred Nongkas, Eremas Tade, David Yinil, John Moxon, Anthon Kamuso, Yak Namaliu, Ricky Wenani, Gade Ling, Louis Kurika and Tio Nevenimo
AIM OF THIS CHAPTER:
To describe the possibilities for integrating cocoa production into diversified farming systems
Introduction• Cocoa evolved as an understory tree in rainforest and so is adapted to growing in the shade
of other taller trees, allowing diversification in the cropping system.
• Commonly, leguminous trees such as Leucaena leucocephala and Gliricidia sepium (mar-mar) are used as shade because they can be established rapidly and easily, and fix atmo-spheric nitrogen in their root nodules and so add to soil fertility. For this reason, in South America Gliricidia is referred to as ‘madre de cacao’ (‘mother of cocoa’).
• However, Gliricidia is very fast growing and tends to over shade the cocoa if it is not reg-ularly cut back. Overshading with Gliricidia has been one of the most important causes of yield decline in cocoa - it reduces the photosynthetic output and flowering of cocoa, it favours the activity of Cocoa Pod Borer moth, and it also favours the build-up of Phytoph-thora diseases by slowing down the rate of drying of the canopy after rain or dew.
• Pruning of Gliricidia can take about 10% of the labour input required for growing cocoa and so use of other tree crops that can provide an extra income and require less pruning would be an advantage.
Coconut shade• Coconuts have always been an important shade tree for cocoa in Papua New Guinea
(Figures 8.1 – 8.4); the initial plantings of cocoa were made under the shade of established coconuts, resulting in a highly productive farming system.
• When fully established at the correct spacing (12 metres square; Chapter 5) coconuts pro-vide ideal shade for cocoa - tall, sparse, and not tending to over-shade the cocoa as occurs with Gliricidia.
• They also provide valuable extra farm income in the form of dry nuts and copra, which is now of increasing importance especially as coconut oil regains its importance as a quality product in world trade and as the local demand for dry nuts is increasing in the towns and highlands.
• There is evidence that interplanting with coconuts has important benefits for cocoa pro-duction because they harbour Kurukum Ants that control some pests of cocoa (see Appen-dix 7 and Smith ESC, 1981, An integrated control scheme for cocoa pests and diseases in Papua New Guinea. Tropical Pest Management 27, 351-359).
• In some areas it is difficult to establish new coconuts because of the damage done by the coconut beetle pests, Scapanes australis and Rhyncophorus bilineatus.
CHAPTER
P A P U A N E W G U I N E A C O C O A E X T E N S I O N M A N U A L112
Figure 8.1 – An exceptional cocoa plan-tation under coconut shade (Raulawat Plantation 1970; now part of CCIL)
Figure 8.2 – Cocoa growing under old, tall coconuts at CCIL Tavilo – note that the cocoa is about twice human height
Figure 8.3 – Shorter well pruned cocoa growing under a mixture of old tall and younger coconuts providing ideal levels of shade
Figure 8.4 – Well managed cocoa grow-ing under a mixture of old tall and young-er coconuts
P A P U A N E W G U I N E A C O C O A E X T E N S I O N M A N U A L 113
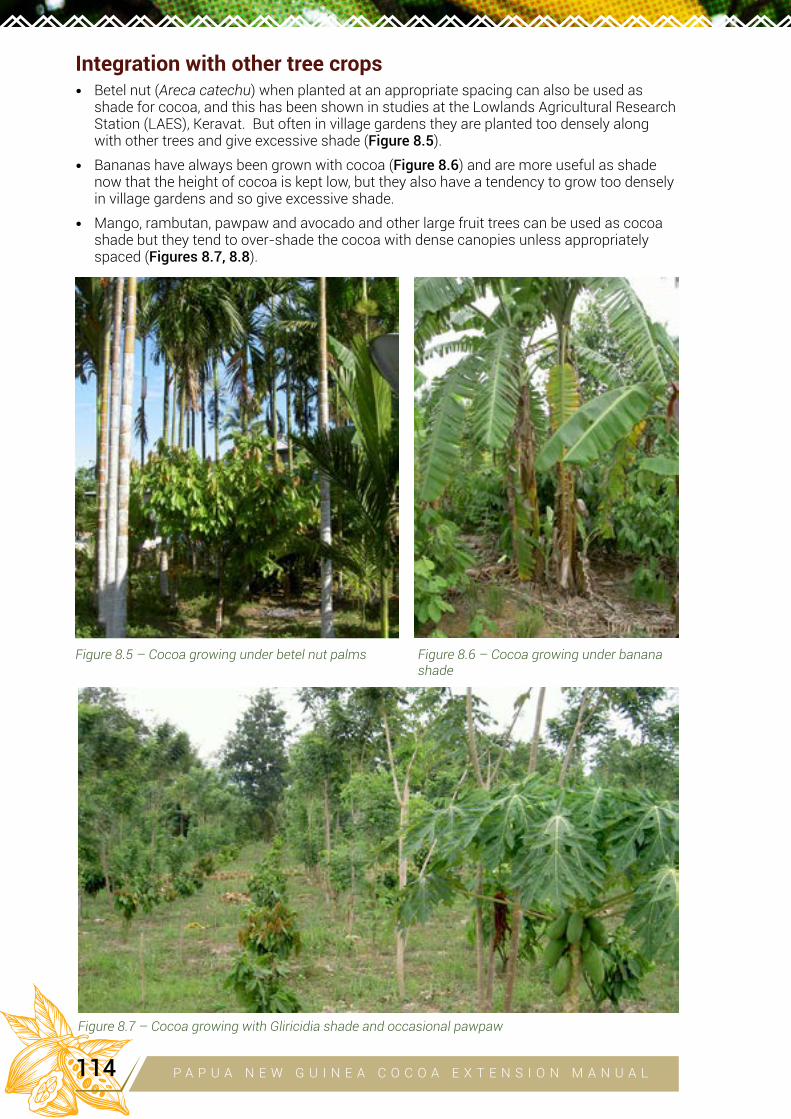
Figure 8.5 – Cocoa growing under betel nut palms
Integration with other tree crops• Betel nut (Areca catechu) when planted at an appropriate spacing can also be used as
shade for cocoa, and this has been shown in studies at the Lowlands Agricultural Research Station (LAES), Keravat. But often in village gardens they are planted too densely along with other trees and give excessive shade (Figure 8.5).
• Bananas have always been grown with cocoa (Figure 8.6) and are more useful as shade now that the height of cocoa is kept low, but they also have a tendency to grow too densely in village gardens and so give excessive shade.
• Mango, rambutan, pawpaw and avocado and other large fruit trees can be used as cocoa shade but they tend to over-shade the cocoa with dense canopies unless appropriately spaced (Figures 8.7, 8.8).
Figure 8.6 – Cocoa growing under banana shade
Figure 8.7 – Cocoa growing with Gliricidia shade and occasional pawpaw
P A P U A N E W G U I N E A C O C O A E X T E N S I O N M A N U A L114
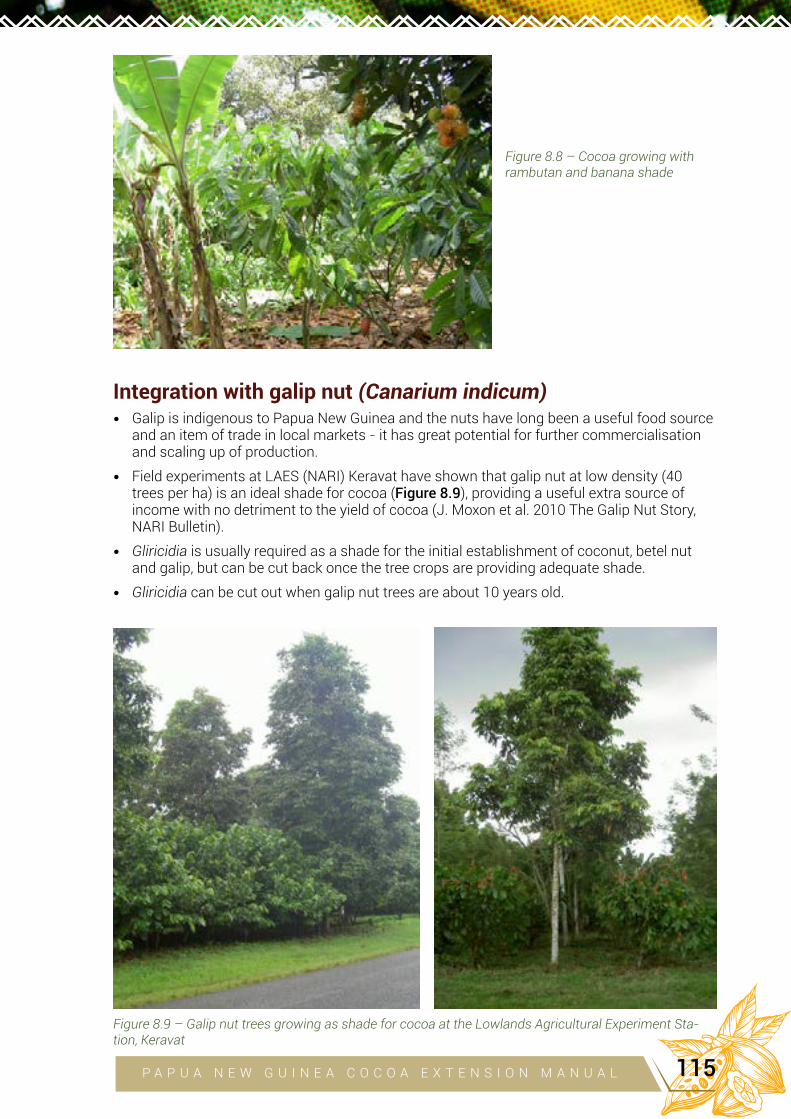
Integration with galip nut (Canarium indicum)• Galip is indigenous to Papua New Guinea and the nuts have long been a useful food source
and an item of trade in local markets - it has great potential for further commercialisation and scaling up of production.
• Field experiments at LAES (NARI) Keravat have shown that galip nut at low density (40 trees per ha) is an ideal shade for cocoa (Figure 8.9), providing a useful extra source of income with no detriment to the yield of cocoa (J. Moxon et al. 2010 The Galip Nut Story, NARI Bulletin).
• Gliricidia is usually required as a shade for the initial establishment of coconut, betel nut and galip, but can be cut back once the tree crops are providing adequate shade.
• Gliricidia can be cut out when galip nut trees are about 10 years old.
Figure 8.8 – Cocoa growing with rambutan and banana shade
Figure 8.9 – Galip nut trees growing as shade for cocoa at the Lowlands Agricultural Experiment Sta-tion, Keravat
P A P U A N E W G U I N E A C O C O A E X T E N S I O N M A N U A L 115
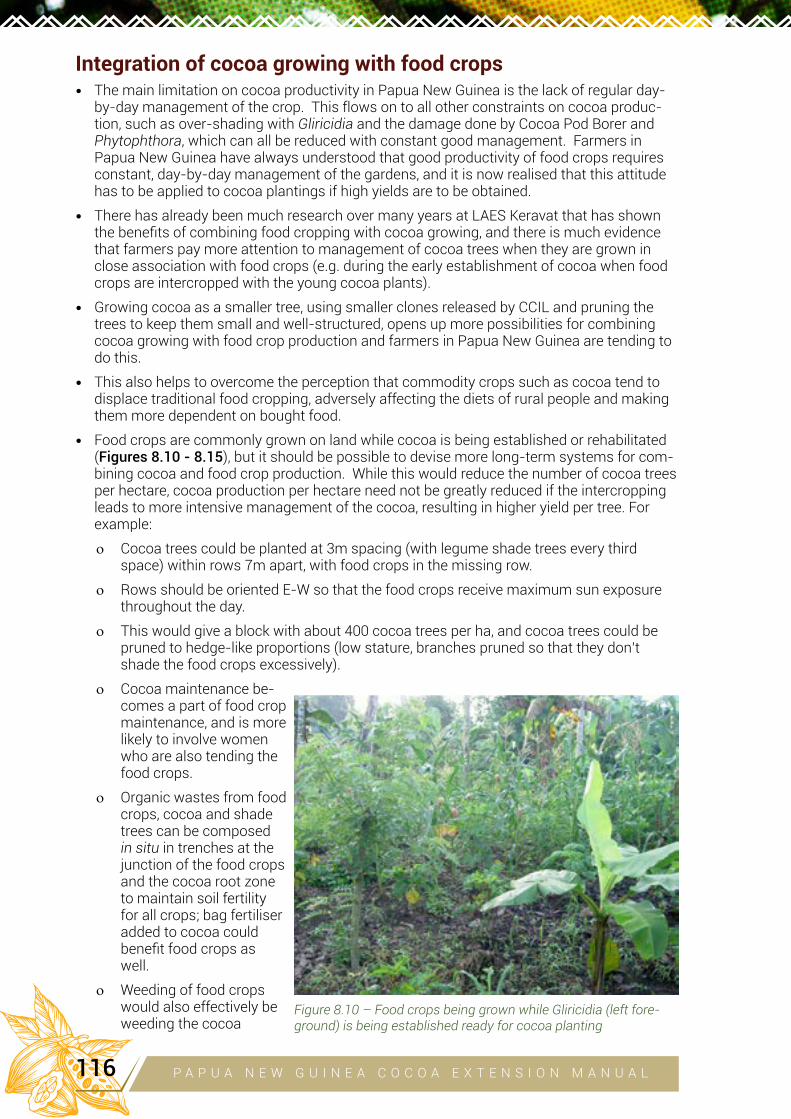
Integration of cocoa growing with food crops• The main limitation on cocoa productivity in Papua New Guinea is the lack of regular day-
by-day management of the crop. This flows on to all other constraints on cocoa produc-tion, such as over-shading with Gliricidia and the damage done by Cocoa Pod Borer and Phytophthora, which can all be reduced with constant good management. Farmers in Papua New Guinea have always understood that good productivity of food crops requires constant, day-by-day management of the gardens, and it is now realised that this attitude has to be applied to cocoa plantings if high yields are to be obtained.
• There has already been much research over many years at LAES Keravat that has shown the benefits of combining food cropping with cocoa growing, and there is much evidence that farmers pay more attention to management of cocoa trees when they are grown in close association with food crops (e.g. during the early establishment of cocoa when food crops are intercropped with the young cocoa plants).
• Growing cocoa as a smaller tree, using smaller clones released by CCIL and pruning the trees to keep them small and well-structured, opens up more possibilities for combining cocoa growing with food crop production and farmers in Papua New Guinea are tending to do this.
• This also helps to overcome the perception that commodity crops such as cocoa tend to displace traditional food cropping, adversely affecting the diets of rural people and making them more dependent on bought food.
• Food crops are commonly grown on land while cocoa is being established or rehabilitated (Figures 8.10 - 8.15), but it should be possible to devise more long-term systems for com-bining cocoa and food crop production. While this would reduce the number of cocoa trees per hectare, cocoa production per hectare need not be greatly reduced if the intercropping leads to more intensive management of the cocoa, resulting in higher yield per tree. For example:
o Cocoa trees could be planted at 3m spacing (with legume shade trees every third space) within rows 7m apart, with food crops in the missing row.
o Rows should be oriented E-W so that the food crops receive maximum sun exposure throughout the day.
o This would give a block with about 400 cocoa trees per ha, and cocoa trees could be pruned to hedge-like proportions (low stature, branches pruned so that they don’t shade the food crops excessively).
o Cocoa maintenance be-comes a part of food crop maintenance, and is more likely to involve women who are also tending the food crops.
o Organic wastes from food crops, cocoa and shade trees can be composed in situ in trenches at the junction of the food crops and the cocoa root zone to maintain soil fertility for all crops; bag fertiliser added to cocoa could benefit food crops as well.
o Weeding of food crops would also effectively be weeding the cocoa
Figure 8.10 – Food crops being grown while Gliricidia (left fore-ground) is being established ready for cocoa planting
P A P U A N E W G U I N E A C O C O A E X T E N S I O N M A N U A L116
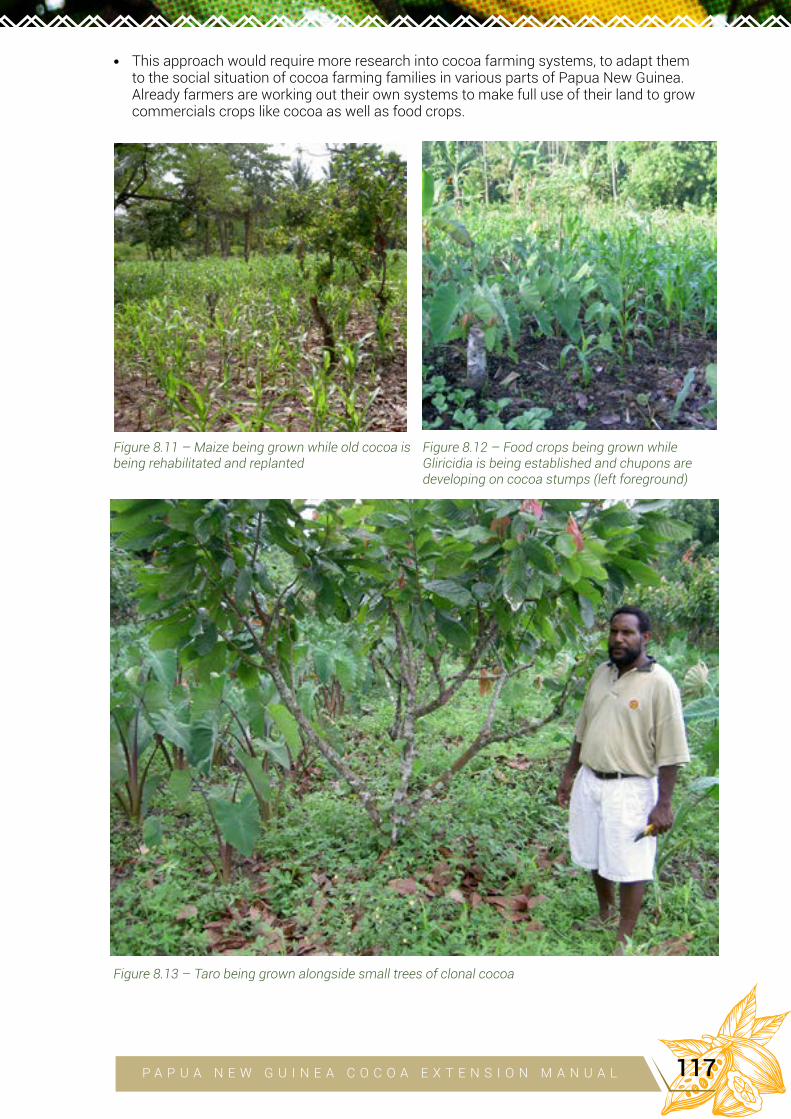
• This approach would require more research into cocoa farming systems, to adapt them to the social situation of cocoa farming families in various parts of Papua New Guinea. Already farmers are working out their own systems to make full use of their land to grow commercials crops like cocoa as well as food crops.
Figure 8.12 – Food crops being grown while Gliricidia is being established and chupons are developing on cocoa stumps (left foreground)
Figure 8.11 – Maize being grown while old cocoa is being rehabilitated and replanted
Figure 8.13 – Taro being grown alongside small trees of clonal cocoa
P A P U A N E W G U I N E A C O C O A E X T E N S I O N M A N U A L 117
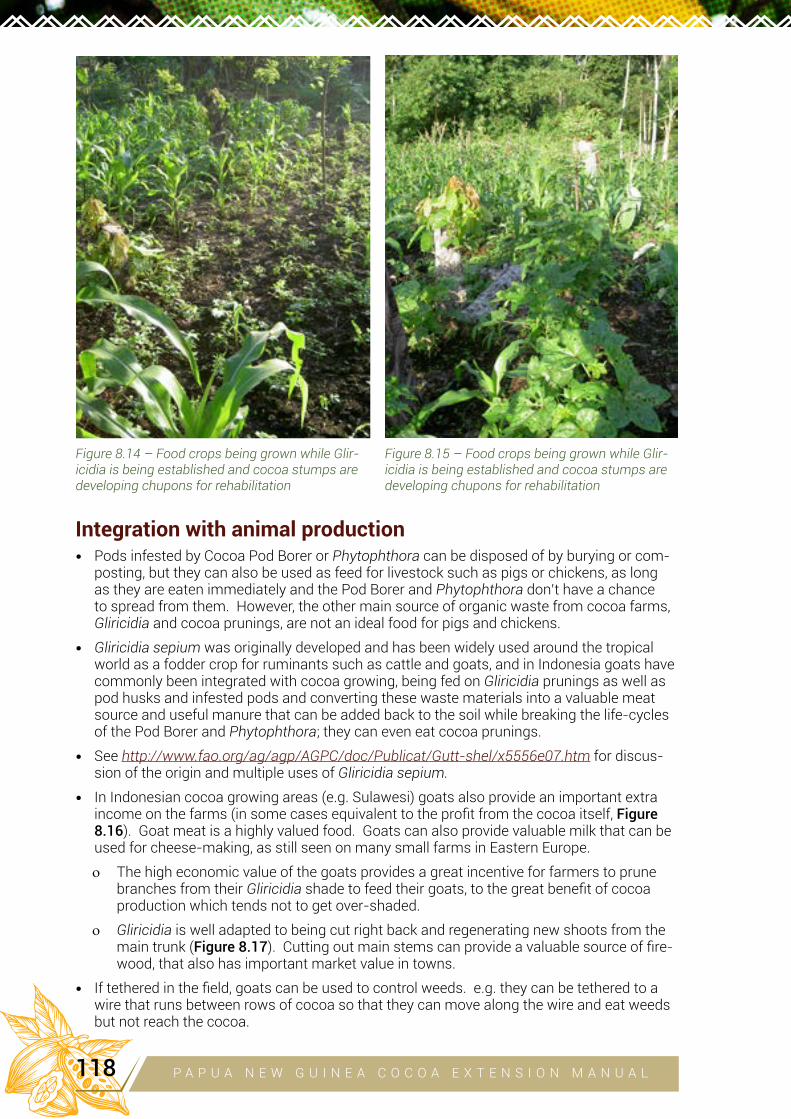
Integration with animal production• Pods infested by Cocoa Pod Borer or Phytophthora can be disposed of by burying or com-
posting, but they can also be used as feed for livestock such as pigs or chickens, as long as they are eaten immediately and the Pod Borer and Phytophthora don’t have a chance to spread from them. However, the other main source of organic waste from cocoa farms, Gliricidia and cocoa prunings, are not an ideal food for pigs and chickens.
• Gliricidia sepium was originally developed and has been widely used around the tropical world as a fodder crop for ruminants such as cattle and goats, and in Indonesia goats have commonly been integrated with cocoa growing, being fed on Gliricidia prunings as well as pod husks and infested pods and converting these waste materials into a valuable meat source and useful manure that can be added back to the soil while breaking the life-cycles of the Pod Borer and Phytophthora; they can even eat cocoa prunings.
• See http://www.fao.org/ag/agp/AGPC/doc/Publicat/Gutt-shel/x5556e07.htm for discus-sion of the origin and multiple uses of Gliricidia sepium.
• In Indonesian cocoa growing areas (e.g. Sulawesi) goats also provide an important extra income on the farms (in some cases equivalent to the profit from the cocoa itself, Figure 8.16). Goat meat is a highly valued food. Goats can also provide valuable milk that can be used for cheese-making, as still seen on many small farms in Eastern Europe.
o The high economic value of the goats provides a great incentive for farmers to prune branches from their Gliricidia shade to feed their goats, to the great benefit of cocoa production which tends not to get over-shaded.
o Gliricidia is well adapted to being cut right back and regenerating new shoots from the main trunk (Figure 8.17). Cutting out main stems can provide a valuable source of fire-wood, that also has important market value in towns.
• If tethered in the field, goats can be used to control weeds. e.g. they can be tethered to a wire that runs between rows of cocoa so that they can move along the wire and eat weeds but not reach the cocoa.
Figure 8.15 – Food crops being grown while Glir-icidia is being established and cocoa stumps are developing chupons for rehabilitation
Figure 8.14 – Food crops being grown while Glir-icidia is being established and cocoa stumps are developing chupons for rehabilitation
P A P U A N E W G U I N E A C O C O A E X T E N S I O N M A N U A L118
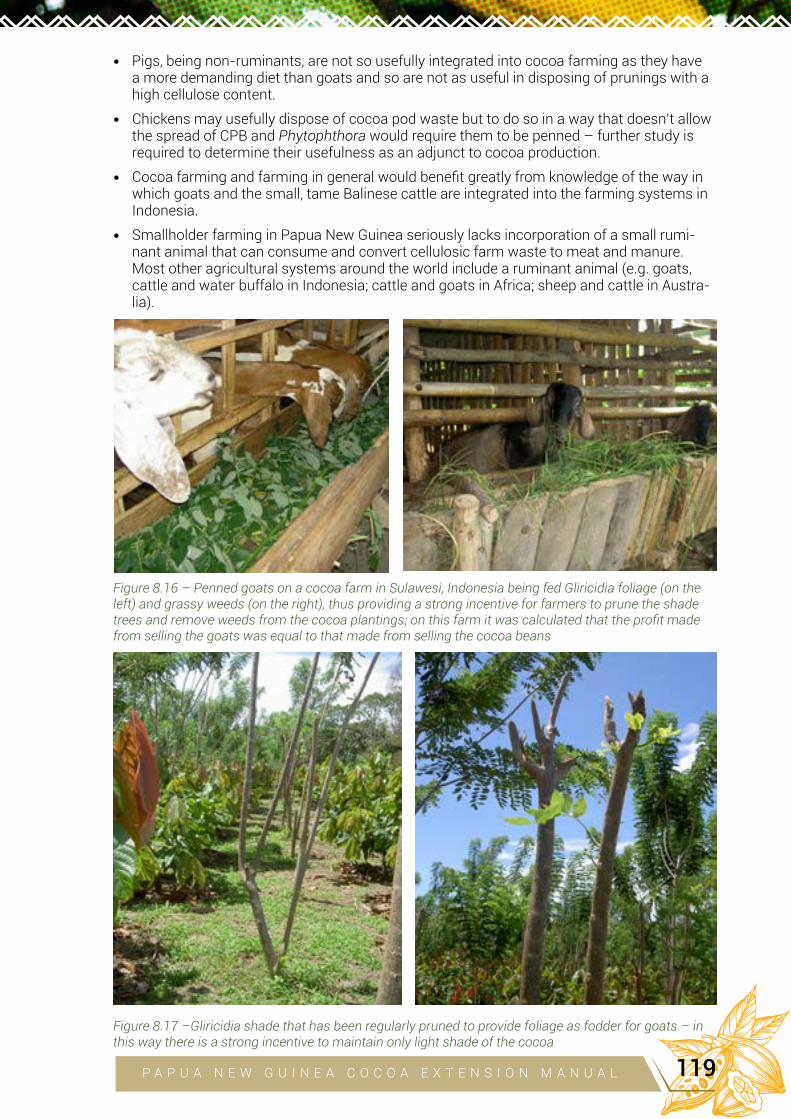
• Pigs, being non-ruminants, are not so usefully integrated into cocoa farming as they have a more demanding diet than goats and so are not as useful in disposing of prunings with a high cellulose content.
• Chickens may usefully dispose of cocoa pod waste but to do so in a way that doesn’t allow the spread of CPB and Phytophthora would require them to be penned – further study is required to determine their usefulness as an adjunct to cocoa production.
• Cocoa farming and farming in general would benefit greatly from knowledge of the way in which goats and the small, tame Balinese cattle are integrated into the farming systems in Indonesia.
• Smallholder farming in Papua New Guinea seriously lacks incorporation of a small rumi-nant animal that can consume and convert cellulosic farm waste to meat and manure. Most other agricultural systems around the world include a ruminant animal (e.g. goats, cattle and water buffalo in Indonesia; cattle and goats in Africa; sheep and cattle in Austra-lia).
Figure 8.16 – Penned goats on a cocoa farm in Sulawesi, Indonesia being fed Gliricidia foliage (on the left) and grassy weeds (on the right), thus providing a strong incentive for farmers to prune the shade trees and remove weeds from the cocoa plantings; on this farm it was calculated that the profit made from selling the goats was equal to that made from selling the cocoa beans
Figure 8.17 –Gliricidia shade that has been regularly pruned to provide foliage as fodder for goats – in this way there is a strong incentive to maintain only light shade of the cocoa
P A P U A N E W G U I N E A C O C O A E X T E N S I O N M A N U A L 119
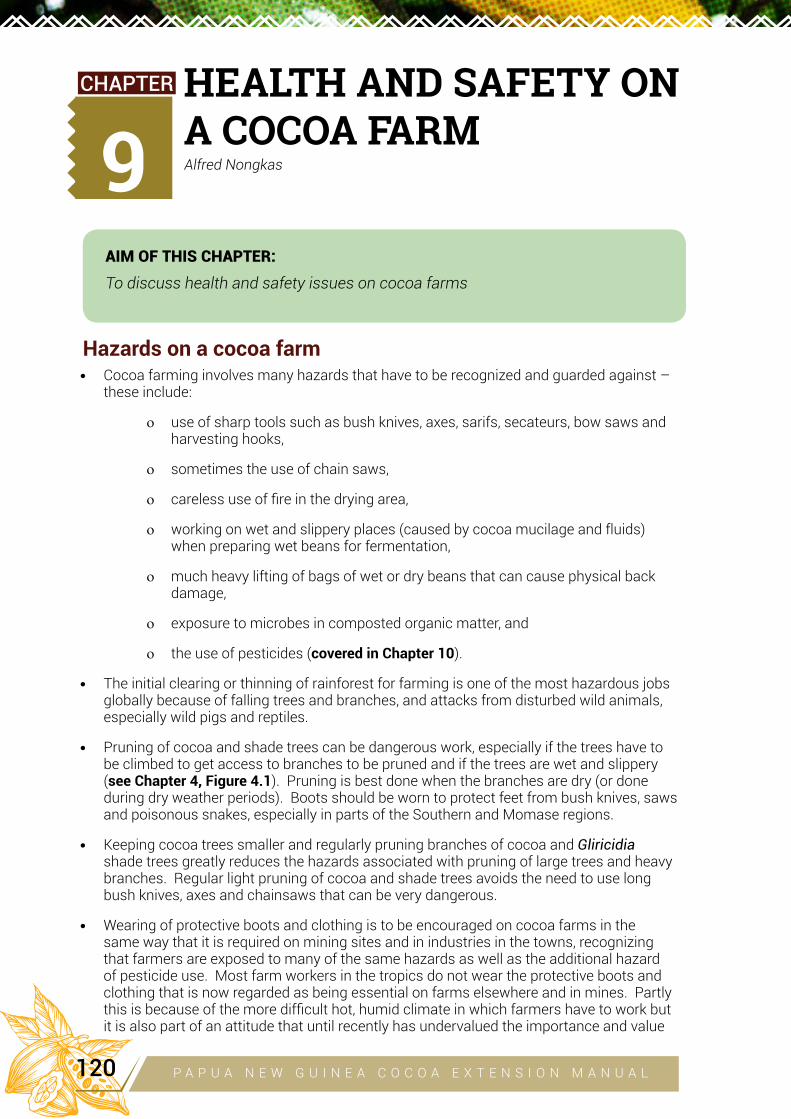
9
HEALTH AND SAFETY ON
A COCOA FARMAlfred Nongkas
AIM OF THIS CHAPTER:
To discuss health and safety issues on cocoa farms
Hazards on a cocoa farm• Cocoa farming involves many hazards that have to be recognized and guarded against –
these include:
o use of sharp tools such as bush knives, axes, sarifs, secateurs, bow saws and harvesting hooks,
o sometimes the use of chain saws,
o careless use of fire in the drying area,
o working on wet and slippery places (caused by cocoa mucilage and fluids) when preparing wet beans for fermentation,
o much heavy lifting of bags of wet or dry beans that can cause physical back damage,
o exposure to microbes in composted organic matter, and
o the use of pesticides (covered in Chapter 10).
• The initial clearing or thinning of rainforest for farming is one of the most hazardous jobs globally because of falling trees and branches, and attacks from disturbed wild animals, especially wild pigs and reptiles.
• Pruning of cocoa and shade trees can be dangerous work, especially if the trees have to be climbed to get access to branches to be pruned and if the trees are wet and slippery (see Chapter 4, Figure 4.1). Pruning is best done when the branches are dry (or done during dry weather periods). Boots should be worn to protect feet from bush knives, saws and poisonous snakes, especially in parts of the Southern and Momase regions.
• Keeping cocoa trees smaller and regularly pruning branches of cocoa and Gliricidia shade trees greatly reduces the hazards associated with pruning of large trees and heavy branches. Regular light pruning of cocoa and shade trees avoids the need to use long bush knives, axes and chainsaws that can be very dangerous.
• Wearing of protective boots and clothing is to be encouraged on cocoa farms in the same way that it is required on mining sites and in industries in the towns, recognizing that farmers are exposed to many of the same hazards as well as the additional hazard of pesticide use. Most farm workers in the tropics do not wear the protective boots and clothing that is now regarded as being essential on farms elsewhere and in mines. Partly this is because of the more difficult hot, humid climate in which farmers have to work but it is also part of an attitude that until recently has undervalued the importance and value
CHAPTER
P A P U A N E W G U I N E A C O C O A E X T E N S I O N M A N U A L120
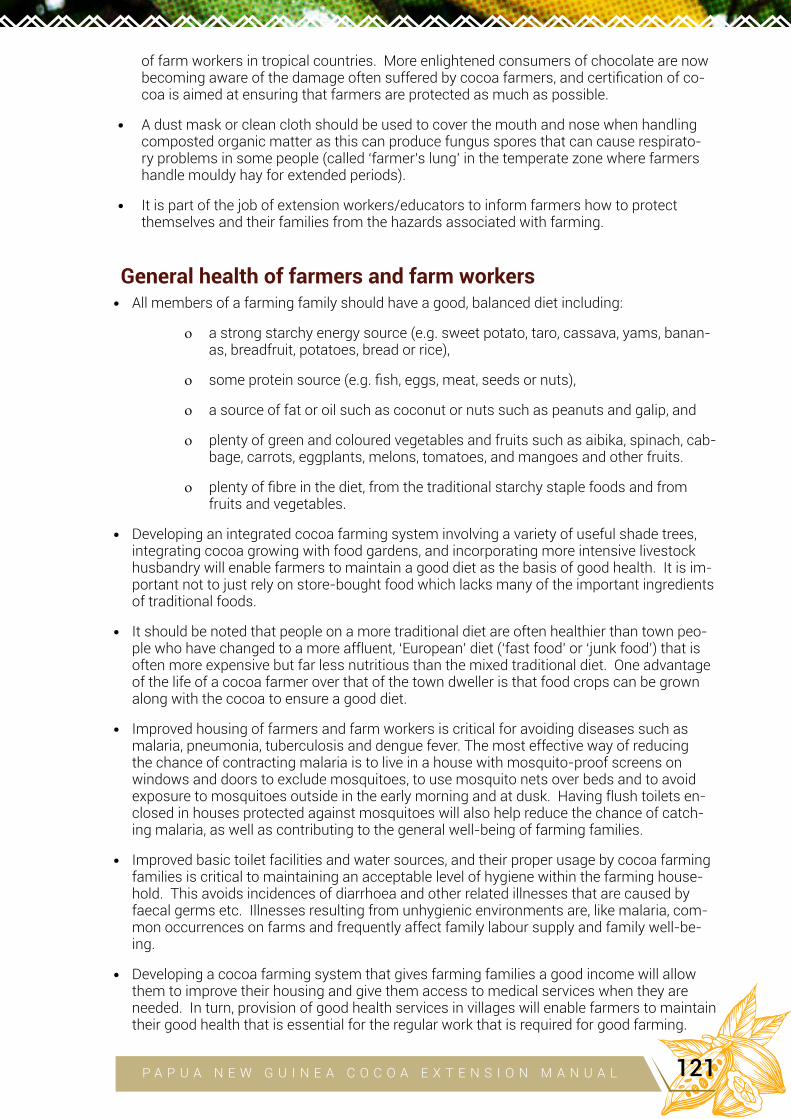
of farm workers in tropical countries. More enlightened consumers of chocolate are now becoming aware of the damage often suffered by cocoa farmers, and certification of co-coa is aimed at ensuring that farmers are protected as much as possible.
• A dust mask or clean cloth should be used to cover the mouth and nose when handling composted organic matter as this can produce fungus spores that can cause respirato-ry problems in some people (called ‘farmer’s lung’ in the temperate zone where farmers handle mouldy hay for extended periods).
• It is part of the job of extension workers/educators to inform farmers how to protect themselves and their families from the hazards associated with farming.
General health of farmers and farm workers• All members of a farming family should have a good, balanced diet including:
o a strong starchy energy source (e.g. sweet potato, taro, cassava, yams, banan-as, breadfruit, potatoes, bread or rice),
o some protein source (e.g. fish, eggs, meat, seeds or nuts),
o a source of fat or oil such as coconut or nuts such as peanuts and galip, and
o plenty of green and coloured vegetables and fruits such as aibika, spinach, cab-bage, carrots, eggplants, melons, tomatoes, and mangoes and other fruits.
o plenty of fibre in the diet, from the traditional starchy staple foods and from fruits and vegetables.
• Developing an integrated cocoa farming system involving a variety of useful shade trees, integrating cocoa growing with food gardens, and incorporating more intensive livestock husbandry will enable farmers to maintain a good diet as the basis of good health. It is im-portant not to just rely on store-bought food which lacks many of the important ingredients of traditional foods.
• It should be noted that people on a more traditional diet are often healthier than town peo-ple who have changed to a more affluent, ‘European’ diet (‘fast food’ or ‘junk food’) that is often more expensive but far less nutritious than the mixed traditional diet. One advantage of the life of a cocoa farmer over that of the town dweller is that food crops can be grown along with the cocoa to ensure a good diet.
• Improved housing of farmers and farm workers is critical for avoiding diseases such as malaria, pneumonia, tuberculosis and dengue fever. The most effective way of reducing the chance of contracting malaria is to live in a house with mosquito-proof screens on windows and doors to exclude mosquitoes, to use mosquito nets over beds and to avoid exposure to mosquitoes outside in the early morning and at dusk. Having flush toilets en-closed in houses protected against mosquitoes will also help reduce the chance of catch-ing malaria, as well as contributing to the general well-being of farming families.
• Improved basic toilet facilities and water sources, and their proper usage by cocoa farming families is critical to maintaining an acceptable level of hygiene within the farming house-hold. This avoids incidences of diarrhoea and other related illnesses that are caused by faecal germs etc. Illnesses resulting from unhygienic environments are, like malaria, com-mon occurrences on farms and frequently affect family labour supply and family well-be-ing.
• Developing a cocoa farming system that gives farming families a good income will allow them to improve their housing and give them access to medical services when they are needed. In turn, provision of good health services in villages will enable farmers to maintain their good health that is essential for the regular work that is required for good farming.
P A P U A N E W G U I N E A C O C O A E X T E N S I O N M A N U A L 121
10
USE OF PESTICIDES AND
KNAPSACK SPRAYERS Steve Woodhouse and Paul Gende
AIM OF THIS CHAPTER:
To describe the control of weeds, pests and diseases by chemicals applied with knapsack sprayers, the associated hazards and how to reduce them
Introduction• Pesticide chemicals can be used to support management of weeds (weedicides or her-
bicides), insect pests (insecticides) and fungus diseases (fungicides) but they should be used only after good cultural practices contributing to good cocoa management (Chapter 6) and Integrated Pest and Disease Management (Chapter 7) have been applied, rather than as an alternative to good management or as a quick fix for weed, pest or disease problems.
• Use of pesticides is the most dangerous part of cocoa farming and is the aspect of most concern for certification of cocoa in Papua New Guinea.
• Pesticides are generally toxic to humans and so great care and special training are need-ed for their safe use.
• This is an aspect of cocoa farming where the help and advice of a trained extension worker is very important – e.g. in reading labels, mixing the chemicals correctly, and making sure the farmer understands all the dangers and the safety precautions that should be taken.
• Use of pesticides by smallholders in the tropics requires special attention and education because:
o wearing of the required protective clothing is difficult in hot, humid climates,
o smallholders often can’t afford the protective clothing and often don’t understand the toxicity and precautions needed to use the chemicals,
o some chemicals banned in Europe and North America because of human toxicity or environmental effects are still sold in tropical countries,
o many pesticides are used inefficiently and can negatively affect beneficial organ-isms,
o due to lack of knowledge, pesticides registered for one crop may be used inappropri-ately on another crop.
• Papua New Guinea has legislation that prohibits the importation of a range of chemicals, and the industry as a whole has to be responsible in its use of these chemicals.
• With sustainability and certification becoming increasingly important in crop production, hazards for farmers and occurrence of chemical residues in the exported products such as cocoa beans have to be considered.
o Papua New Guinea wishes to maintain a reputation for high quality products, and an important aspect of this is to have minimal chemical residues in the products.
o Assessment of cocoa bean quality by buyers in North America, Europe and Japan include measurement of residues of chemicals that may have been used in produc-ing the cocoa – these can be detected at very low levels using the latest equipment.
CHAPTER
P A P U A N E W G U I N E A C O C O A E X T E N S I O N M A N U A L122
o Organic cocoa production will not use any pesticides - even use of copper fungi-cides is no longer acceptable in some countries.
• Spray drift is another important consideration when using these chemicals.
o In using spray equipment such as knapsack sprayers, spray can drift beyond the target problem, causing damage to the crop, nearby gardens and human beings.
o To avoid or minimise this problem the correct nozzles, correct pressure settings and the safest product must be used for the task.
o A buffer zone should be left between areas where chemicals are being applied and waterways or areas that may be affected by drift.
• Insecticides tend to be toxic to people as well as insects (e.g. acetylcholinesterase inhib-itors affect both insect and human nerve systems) and they are also toxic to beneficial insects such as pollinators, bees, and predators and parasites of insect pests, and so they must be used with great care and knowledge of their effect in the cocoa farm.
• Weed, insect and fungus populations are able to develop resistance to pesticide chemi-cals, which renders the chemicals ineffective; therefore they have to be used only as part of an ecologically sound IPDM program.
• Pesticides and the equipment needed to apply them are expensive, and so they have to be used efficiently (only when cultural control measures have been fully applied) – e.g. on weeds that have already been slashed back, or in cocoa trees that have been kept pruned to a small, open structure that makes pods easily accessible for targeted spraying (often it is not necessary to spray the whole tree, only the pods).
• In a well-managed cocoa block, only spot spraying of insecticides or fungicides targeted at particular problems in restricted parts of the block should be necessary following close observation of the nature of the problem (e.g. monitoring of the occurrence of pests and diseases).
o Routine, thoughtless blanket spraying of insecticides over the whole block will only create pest problems by killing beneficial insects.
o Most of the world’s most serious insect pests have been created by spraying of insecticides that killed off the predator and parasitic insects that had kept the pest species under control.
o In a cocoa block, most potential insect pests (minor pests) are kept under control for most of the time by predators and parasites (beneficial insects) of the potential pest. Sprays that kill these beneficial insects could allow a minor pest to become a major problem.
• An extension advisor should never recommend regular blanket spraying of a pesticide without first identifying a particular pest problem that requires such treatment.
• There are several main principles of pesticide use
(see Bateman, 2010 www.icco.org/sites/sps/documents/manual_icco_2nded_final_pdf):o Establish whether use of a pesticide is appropriate - has the cause of the problem
been identified, have all cultural control measures been applied?o Use the correct chemical for the problem - is the chemical likely to be effective, is it
allowed for cocoa, is it safe to use, is it the cheapest option?o Apply the chemical in the correct way at the correct dosage - e.g. using the recom-
mended concentration in the sprayer and the right sprayer and nozzle, targeted at the right part of the plant.
o Apply the chemical at the right time to achieve the best result - often it is too late to spray after much damage has been done (it is just a waste of chemical and will only do damage by killing beneficial insects).
• Always evaluate the effectiveness of a pesticide application by comparing the result of spraying with an area that was not treated with the pesticide. If the application does not appear to make any difference, try to evaluate what went wrong – was it the wrong chemi-cal or poor application?
P A P U A N E W G U I N E A C O C O A E X T E N S I O N M A N U A L 123
Safe handling and use of pesticide chemicals
• All the precautions for the safe use of chemicals should be checked with the supplier of the chemical – check these when you buy the chemical.
• Make sure that the chemical you plan to use is appropriate for the job (herbicide for weed control, insecticide for Cocoa Pod Borer, fungicide for Phytophthora Pod Rot) and is the least toxic option while still being effective - e.g. Glyphosate or other less toxic herbicides should be used instead of Gramoxone, which is highly toxic to humans and should not be used.
• Read the label and understand the toxicity of the chemical to humans and the precautions that have to be taken – if you are unable to read the label get someone to explain it to you. See a website like the following one that fully explains pesticide labels: http://www.dpi.nsw.gov.au/__data/assets/pdf_file/0010/186382/Spray-Sense-No-9-Reading-and-un-derstanding-labels.pdf
• Ensure you have a copy of the Material Safety Data Sheet (M.S.D.S.) which is relevant to the chemical being used - these are available from the pesticide supplier.
• It is the job of extension workers to explain labels and M.S.D.S. to farmers and contractors using these chemicals – this is a crucial role for a cocoa extension service provider.
• Store chemicals in their original containers in a special place, protected from sun and rain, outside the home.
o Keep them in a lockable cupboard so that children can never get access to them and they can’t be stolen.
o Never transfer chemicals into other containers in which they could be confused with drinks or cooking oil – some mass poisonings of people have occurred in other countries because of this.
o Make sure the labels remain on the containers and clearly indicate any poisons.
• Make sure you understand the dose rate and can calculate the amount of bought chemical to mix with water in the spray tank – making too strong a mixture can be dangerous.
• Protective clothing must be worn for mixing and spraying the chemicals (Figure 10.1).
o An eye shield, or full face protection and rubber gloves should be worn while mixing the chemicals into the tank. It is also recommended that a spray apron be worn, that protects the mixer against spillage to the abdominal area.
o Rubber gloves, boots, overalls, and face mask should be worn while spraying herbi-cides, and a hat and goggles used as well when spraying insecticides or fungicides into the cocoa canopy.
• Insecticides and fungicides are applied as finer sprays than herbicides and are directed more into the elevated canopy, and so require special protection against being inhaled or contacting eyes and skin.
• Don’t mix or spray chemicals in the vicinity of children or women, especially pregnant women.
• Never eat, drink or smoke while mixing and spraying chemicals.
• If any chemicals or spray get on the skin, immediately wash it off with soap and water.
• Don’t spray during windy weather – calm early mornings are the best time, not only be-cause of the lack of wind but also because the chemicals are likely to have longer contact with the targets before the onset of afternoon rains.
• Spray in an orderly sequence so that you are never walking through already sprayed trees or weeds.
• Never try to clear blockages in spray equipment by blowing with your mouth.• Fix any leaks immediately and wash any chemical spills off clothing and skin with soap
and water.
P A P U A N E W G U I N E A C O C O A E X T E N S I O N M A N U A L124

• Use all the chemical in a tank, then thoroughly wash out the tank and spray lines with several changes of clean water; never dispose of washout water near water sources such as rivers or wells.
• Dispose of empty containers properly.
o Don’t leave them lying around or use them for any other purpose.
o It is better to crush them or break them before placing them in a rubbish tip so that they can never be used to contain anything else.
• Remove and clean protective clothing, washing it in soapy water separately from normal clothing.
• Keep accurate records of the date of spraying, the chemicals used, and the concentrations sprayed (Litres per Ha); these records will be needed for certification of the cocoa.
• If you feel sick (develop a headache or feel like vomiting) after spraying a pesticide, go straight to an aid post or doctor.
Use of knapsack sprayers
• Hand operated knapsack spray-ers are an important item of equipment for weed and pest and disease control in cocoa (Figure 10.1).
• They are much cheaper and eas-ier to operate and maintain than motorised sprayers, and also allow more controlled (targeted) use of the chemicals.
• The sprayers have an adjustable pressure valve that enables a con-stant spray rate to be maintained regardless of the hand pumping rate (within limits).
o Sprayers with a low pressure setting (15 psi) are required for herbicides, while higher pressures are used for insec-ticides and fungicides.
o The use of a spray man-agement valve is also rec-ommended for all pesticide applications.
o Ask your supplier to give you further technical information on this, as it can greatly re-duce the cost of spraying.
• A lance leading to the nozzle en-ables a 0.5 – 2.0 metre swath (depending on the nozzle) of weeds to be sprayed and also enables pods to be easily reached for spot spraying of fungicides and insecticides.
Figure 10.1 – Protective clothing, boots, cap, face mask and gloves required for spraying pesticides(From PNG UNRE Kairak CPB Training Workbook, 2014)
P A P U A N E W G U I N E A C O C O A E X T E N S I O N M A N U A L 125
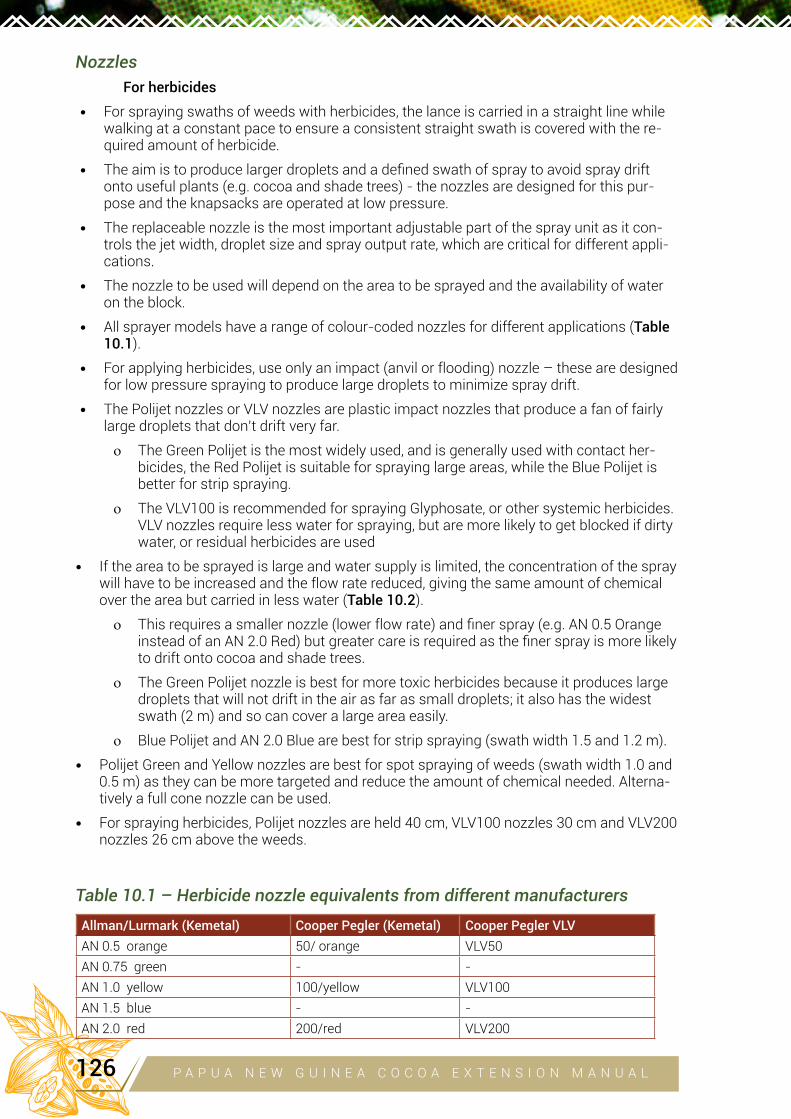
Nozzles
For herbicides
• For spraying swaths of weeds with herbicides, the lance is carried in a straight line while walking at a constant pace to ensure a consistent straight swath is covered with the re-quired amount of herbicide.
• The aim is to produce larger droplets and a defined swath of spray to avoid spray drift onto useful plants (e.g. cocoa and shade trees) - the nozzles are designed for this pur-pose and the knapsacks are operated at low pressure.
• The replaceable nozzle is the most important adjustable part of the spray unit as it con-trols the jet width, droplet size and spray output rate, which are critical for different appli-cations.
• The nozzle to be used will depend on the area to be sprayed and the availability of water on the block.
• All sprayer models have a range of colour-coded nozzles for different applications (Table 10.1).
• For applying herbicides, use only an impact (anvil or flooding) nozzle – these are designed for low pressure spraying to produce large droplets to minimize spray drift.
• The Polijet nozzles or VLV nozzles are plastic impact nozzles that produce a fan of fairly large droplets that don’t drift very far.
o The Green Polijet is the most widely used, and is generally used with contact her-bicides, the Red Polijet is suitable for spraying large areas, while the Blue Polijet is better for strip spraying.
o The VLV100 is recommended for spraying Glyphosate, or other systemic herbicides. VLV nozzles require less water for spraying, but are more likely to get blocked if dirty water, or residual herbicides are used
• If the area to be sprayed is large and water supply is limited, the concentration of the spray will have to be increased and the flow rate reduced, giving the same amount of chemical over the area but carried in less water (Table 10.2).
o This requires a smaller nozzle (lower flow rate) and finer spray (e.g. AN 0.5 Orange instead of an AN 2.0 Red) but greater care is required as the finer spray is more likely to drift onto cocoa and shade trees.
o The Green Polijet nozzle is best for more toxic herbicides because it produces large droplets that will not drift in the air as far as small droplets; it also has the widest swath (2 m) and so can cover a large area easily.
o Blue Polijet and AN 2.0 Blue are best for strip spraying (swath width 1.5 and 1.2 m).
• Polijet Green and Yellow nozzles are best for spot spraying of weeds (swath width 1.0 and 0.5 m) as they can be more targeted and reduce the amount of chemical needed. Alterna-tively a full cone nozzle can be used.
• For spraying herbicides, Polijet nozzles are held 40 cm, VLV100 nozzles 30 cm and VLV200 nozzles 26 cm above the weeds.
Table 10.1 – Herbicide nozzle equivalents from different manufacturers
Allman/Lurmark (Kemetal) Cooper Pegler (Kemetal) Cooper Pegler VLV
AN 0.5 orange 50/ orange VLV50AN 0.75 green - -
AN 1.0 yellow 100/yellow VLV100AN 1.5 blue - -
AN 2.0 red 200/red VLV200
P A P U A N E W G U I N E A C O C O A E X T E N S I O N M A N U A L126
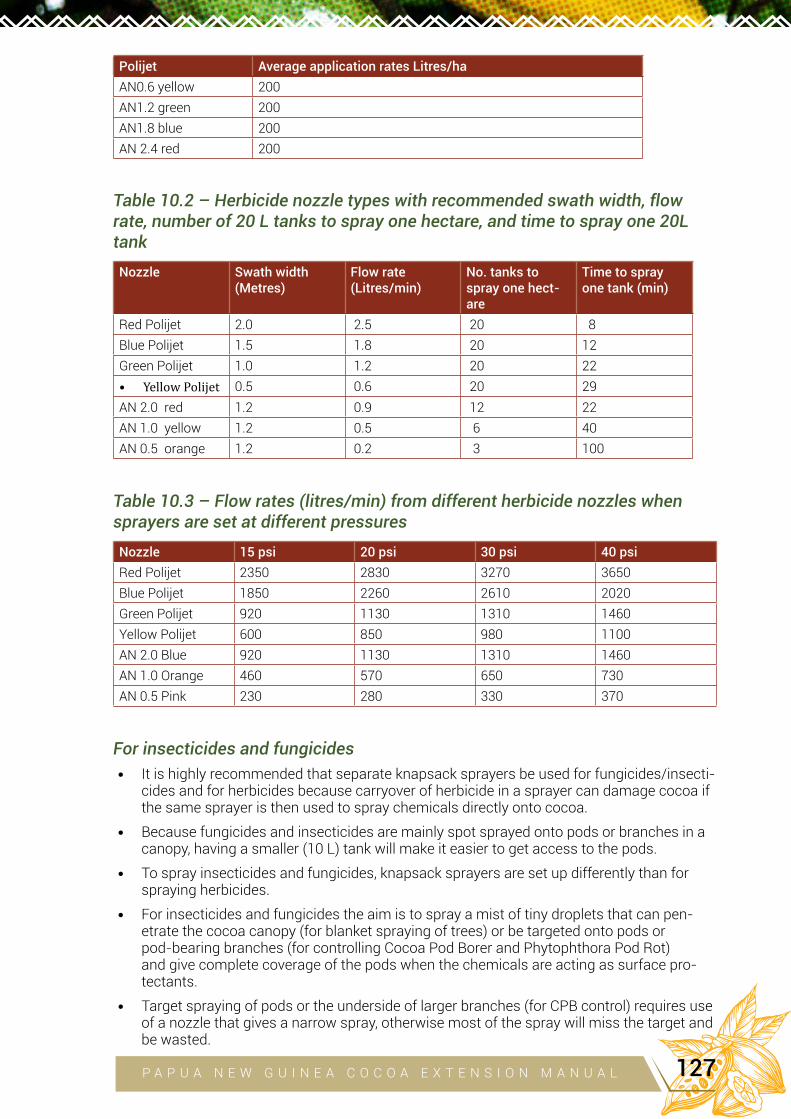
Polijet Average application rates Litres/ha
AN0.6 yellow 200AN1.2 green 200AN1.8 blue 200AN 2.4 red 200
Table 10.2 – Herbicide nozzle types with recommended swath width, flow rate, number of 20 L tanks to spray one hectare, and time to spray one 20L tank
Nozzle Swath width (Metres)
Flow rate (Litres/min)
No. tanks to spray one hect-are
Time to spray one tank (min)
Red Polijet 2.0 2.5 20 8Blue Polijet 1.5 1.8 20 12
Green Polijet 1.0 1.2 20 22
• Yellow Polijet 0.5 0.6 20 29AN 2.0 red 1.2 0.9 12 22
AN 1.0 yellow 1.2 0.5 6 40AN 0.5 orange 1.2 0.2 3 100
Table 10.3 – Flow rates (litres/min) from different herbicide nozzles when sprayers are set at different pressures
Nozzle 15 psi 20 psi 30 psi 40 psi
Red Polijet 2350 2830 3270 3650Blue Polijet 1850 2260 2610 2020Green Polijet 920 1130 1310 1460Yellow Polijet 600 850 980 1100AN 2.0 Blue 920 1130 1310 1460AN 1.0 Orange 460 570 650 730AN 0.5 Pink 230 280 330 370
For insecticides and fungicides
• It is highly recommended that separate knapsack sprayers be used for fungicides/insecti-cides and for herbicides because carryover of herbicide in a sprayer can damage cocoa if the same sprayer is then used to spray chemicals directly onto cocoa.
• Because fungicides and insecticides are mainly spot sprayed onto pods or branches in a canopy, having a smaller (10 L) tank will make it easier to get access to the pods.
• To spray insecticides and fungicides, knapsack sprayers are set up differently than for spraying herbicides.
• For insecticides and fungicides the aim is to spray a mist of tiny droplets that can pen-etrate the cocoa canopy (for blanket spraying of trees) or be targeted onto pods or pod-bearing branches (for controlling Cocoa Pod Borer and Phytophthora Pod Rot) and give complete coverage of the pods when the chemicals are acting as surface pro-tectants.
• Target spraying of pods or the underside of larger branches (for CPB control) requires use of a nozzle that gives a narrow spray, otherwise most of the spray will miss the target and be wasted.
P A P U A N E W G U I N E A C O C O A E X T E N S I O N M A N U A L 127
• To achieve tiny droplets, special smaller-gauge nozzles are used and the knapsack is op-erated at higher pressure - the pressure valve on the knapsack is set at ‘high’ (60 psi) and the handle is pumped continuously to maintain high pressure (Table 10.4).
• The cone nozzles are now the standard for spraying insecticides and fungicides because they use less water and spray a lot more trees per tankful (65 L/Ha and 56 trees).
• The TX2 nozzle uses even less water but is not recommended because it is more prone to blockage (this is a particular problem with wettable powders that produce suspensions of chemical rather than true solutions).
Maintenance
• A knapsack sprayer will last a long time only if it is properly maintained.
• After use, clean the sprayer and flush out the tank and spray lines with clean water (sev-eral changes) as the pesticides can be very corrosive. This is especially important if the sprayer is used for herbicides as well as insecticides and fungicides – any carryover of herbicide can damage cocoa when spayed. Dispose of the washing water carefully, and never in a place where it can contaminate household water supplies or creeks.
• Regularly check filters – any clogging will slow down the flow rate.
• Regularly check that the nozzle holes are not clogged – don’t clean with wire, which could enlarge the hole and increase the flow rate. Never try to blow out blockages by mouth.
• Check the tank and spray lines for leaks, which could be dangerous for the operator - these can be fixed with plumber’s tape or rubber seals (return to the original equipment supplier for spare parts).
• Store the sprayer in a clean, dry storeroom – don’t leave it out in the sun and rain or it will deteriorate (e.g. direct sunlight can cause deterioration of rubber or plastic parts).
• Regularly oil and grease any moving parts – carefully follow the manufacturer’s instruc-tions for regular maintenance
Calibration – calculating how much of the bought chemical to put in each 20L tank (for herbicides)
• Calibration of the amount of spray produced with a given nozzle and pressure is import-ant to ensure the correct amount of chemical is being applied to the target weeds, trees or pods – applying more than is necessary is wasteful and potentially damaging to the environment, and applying too little will reduce the effectiveness of the treatment and encourage development of resistance to the chemical.
• Variables that have to be controlled and measured:
o Flow rate (FR – Litres per minute) from the nozzle, which depends on the nozzle type (Tables 10.1, 10.2) and the pump pressure (adjustable – Table 10.3). To measure flow rate, fill the spray tank with water and spray into a bucket for I minute, using the chosen nozzle and spray pressure; measure the number of litres sprayed using a 1 L bottle.
o Width (W - Metres) of the swath (Table 10.2) – while walking along, spray water onto a dry path, holding the nozzle at the recommended height above the ground and mea-sure the width of the sprayed area.
o Walking speed (WS – Metres per minute) for herbicide application. This is measured as the distance walked in 1 minute. It is the hardest variable to control (it is affected by the terrain, weather, and endurance of the operator). Walk for 1 minute at a steady pace while spraying and measure the distance walked (pace it out or use a 50 m tape); 45 m per minute is a good speed for spraying herbicide. Calculate the amount of spray delivered for a certain time of walking.
P A P U A N E W G U I N E A C O C O A E X T E N S I O N M A N U A L128
o Time for each pod or tree for insecticides and fungicides – these are normally sprayed to near run-off and the time to achieve this can be measured (e.g. spray all the pods on a tree to near-run-off and measure how long it takes).
o Concentration (C – Litres of chemical per 20 L tank) of chemical in the tank mixture.
• Calculate the Total Volume Application Rate (Litres of spray mixture applied per hectare) = 10,000 m2 in one hectare/W x WS (area in m2 covered in 1 minute) x FR (No. litres sprayed in 1 min) = (FR x10,000)/(W x WS).
• For a sprayer set at 15 psi, with a Red Polijet nozzle (W=2.0 m, FR = 2.5 L/min – Table 8.3; but checked in the field as described above), assuming a walking speed of 45 metres/min, the Total Volume Application Rate = (2.5 x 10,000)/2.0 x 45 = 278 L/Ha.
• The Total Volume Application Rate (TVAR) can also be calculated without a watch by filling a tank with water (20 L) and then spraying a flat area (mark out an area 20m wide with sticks and walk back and forth without overlapping the swaths) using a given nozzle, pump pressure, swath width and walking speed until the tank is empty; then measure the area covered by one tank full.
o Calculate the TVAR = (10,000 x 20 L)/Area sprayed with one tank (M2)
• Therefore how much bought chemical is mixed in each spray tank of water = Volume of tank (20 L) multiplied by Recommended application rate on label (Glyphosate 1.85 L/Ha) divided by Total Volume Application Rate = (20 x 1.85)/278 = 0.13 Litres of bought chemi-cal per tank.
• Extension workers should help farmers with these calibrations when they are first under-taking pesticide spraying.
Table 10.4 – Insecticide and fungicide nozzles. (These nozzles are not used for blanket spraying, only for spot or target spraying)
Nozzle type Code Flow rate L/min L/Ha AT 4Km/hr
Yellow hollow cone HCX3 0.2 15Yellow full cone FCX2 1.29 90Blue full cone FCX3 1.93 135
Herbicides
• Herbicides provide longer control of weeds (up to 3 months) than slashing and their application with a knapsack sprayer is easier and quicker than slashing, saving on labour costs, which may justify the expense of the chemical and the knapsack sprayer. This is a business decision.
• Herbicides are much more effective when applied to soft regrowth after slashing than when applied to masses of tall, hardened mature weeds.
• Herbicides can be toxic to cocoa and shade trees (e.g. Gliricidia) as well as to weeds, and so special care has to be taken with their use, especially during block establishment when cocoa foliage is nearer ground level (see Chapters 5, 6).
• There are three main types of herbicides that differ in their mode of action:
o Contact herbicides that act by killing only the plant tissue (usually leaves) with which they come in direct contact. Complete coverage of a weed by spraying is necessary for full control. Weed tissues are killed within a day or two of spraying. They are usu-ally not effective against established large perennial weeds such as kunai, Centrose-ma or Monstera that can regrow from underground organs that are not killed.
o Systemic herbicides that are absorbed into leaves and are translocated within the plants and eventually kill the whole plant including the roots and other tissues not sprayed. It is not necessary to cover the whole plant when spraying. They may take many days to kill the weeds – their effect is not immediate. They are generally more effective than contact herbicides against perennial weeds and larger weeds.
P A P U A N E W G U I N E A C O C O A E X T E N S I O N M A N U A L 129
o Pre-emergence or residual herbicides – these are applied to soil and are absorbed into germinating weeds.
• Herbicides can also be ‘selective’ (specific for a few types of weeds – e.g. grasses or broad leaved weeds, annuals or perennials) or ‘non-selective’ (able to kill most plants).
• Spraying should be done in the early morning on calm, dry days because this will result in better absorption of the chemicals into leaves (some are best absorbed while the plants are photosynthesizing strongly) and will reduce the chance of drift of herbicides onto non-target plants (because air movement is less than later in the day); it will also reduce the chance of rain washing the herbicides off leaves before they have been absorbed.
• The need for additives to the basic herbicide chemical should be discussed with a supplier; these include:
o Wetting agents (also called ‘surfactants’) that help the sprays wet the leaves (e.g. to penetrate a waxy covering) and reduce the amount of spray needed to kill a given area of weeds.
o Some other additives (adjuvants) work to increase the effectiveness of a herbicide (e.g. by increasing the acidity of the solution in which Glyphosate works).
• Before planting shade trees or cocoa, especially on old kunai land or land overgrown by perennial weedy grasses, slashing followed by spraying with herbicides is essential to give the trees a good start (see Chapter 5).
• It is important to select the correct herbicide for the weed population to be controlled.
o Glyphosate (the most commonly used herbicide) is suitable for grasses, but is not particularly effective against broadleaf weeds, or woody weeds. As a result some of the more tolerant weeds can predominate in cocoa blocks where Glyphosate is used regularly.
o As with most pesticides a rotation of different products achieves a better level of control in the long term and reduces the chance of a particular weed developing resis-tance to a chemical.
o Consult you supplier or an extension officer for further advice.
• Most growers are familiar with Gramoxone (paraquat), however this product is no longer recommended or allowed due to its high level of human toxicity.
Table 10.5 Herbicide chemicals currently available and recommended for co-coa growing
Trade Name Applica-tion Rate
Active Ingre-dient
Type of Action
Target Weeds Precautions for co-coa or special uses
Roundup, 1.84 L/ha
Glyphosate Systemic Annual and perennial grasses and broad leaved weeds
Avoid contact with leaves and young stems
Basta0.8 L/ha
Glufosinate ammonium
Contact, slightly systemic across leaves
Annual grasses and broad leaved weeds; perennials to some extent
Avoid contact with leaves and young stems; more danger-ous to humans than Glyphosate
Diuron Diuron Systemic Annual grasses and broad leaved weeds
Avoid contact with leaves and young stems
Fusilade Fluazi-fop-p-butyl
Systemic Annual and perennial grasses
Relatively safe unless leaves thoroughly wetted
P A P U A N E W G U I N E A C O C O A E X T E N S I O N M A N U A L130
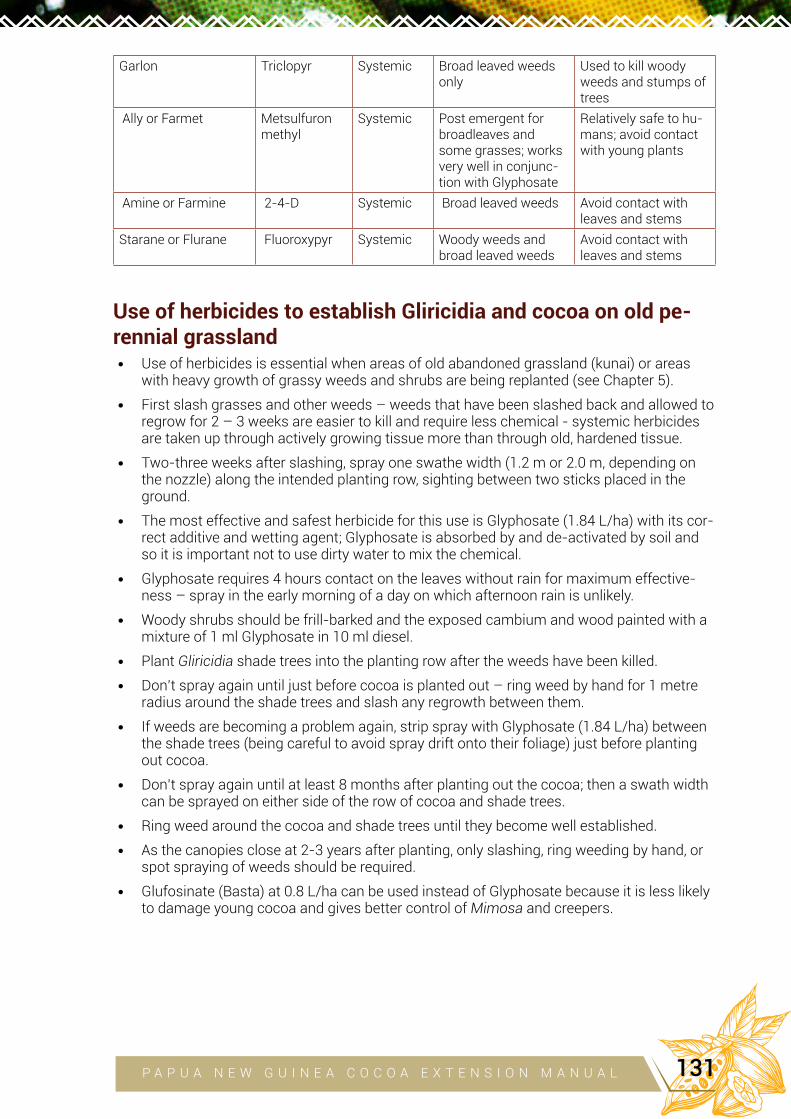
Garlon Triclopyr Systemic Broad leaved weeds only
Used to kill woody weeds and stumps of trees
Ally or Farmet Metsulfuron methyl
Systemic Post emergent for broadleaves and some grasses; works very well in conjunc-tion with Glyphosate
Relatively safe to hu-mans; avoid contact with young plants
Amine or Farmine 2-4-D Systemic Broad leaved weeds Avoid contact with leaves and stems
Starane or Flurane Fluoroxypyr Systemic Woody weeds and broad leaved weeds
Avoid contact with leaves and stems
Use of herbicides to establish Gliricidia and cocoa on old pe-rennial grassland• Use of herbicides is essential when areas of old abandoned grassland (kunai) or areas
with heavy growth of grassy weeds and shrubs are being replanted (see Chapter 5).
• First slash grasses and other weeds – weeds that have been slashed back and allowed to regrow for 2 – 3 weeks are easier to kill and require less chemical - systemic herbicides are taken up through actively growing tissue more than through old, hardened tissue.
• Two-three weeks after slashing, spray one swathe width (1.2 m or 2.0 m, depending on the nozzle) along the intended planting row, sighting between two sticks placed in the ground.
• The most effective and safest herbicide for this use is Glyphosate (1.84 L/ha) with its cor-rect additive and wetting agent; Glyphosate is absorbed by and de-activated by soil and so it is important not to use dirty water to mix the chemical.
• Glyphosate requires 4 hours contact on the leaves without rain for maximum effective-ness – spray in the early morning of a day on which afternoon rain is unlikely.
• Woody shrubs should be frill-barked and the exposed cambium and wood painted with a mixture of 1 ml Glyphosate in 10 ml diesel.
• Plant Gliricidia shade trees into the planting row after the weeds have been killed.
• Don’t spray again until just before cocoa is planted out – ring weed by hand for 1 metre radius around the shade trees and slash any regrowth between them.
• If weeds are becoming a problem again, strip spray with Glyphosate (1.84 L/ha) between the shade trees (being careful to avoid spray drift onto their foliage) just before planting out cocoa.
• Don’t spray again until at least 8 months after planting out the cocoa; then a swath width can be sprayed on either side of the row of cocoa and shade trees.
• Ring weed around the cocoa and shade trees until they become well established.
• As the canopies close at 2-3 years after planting, only slashing, ring weeding by hand, or spot spraying of weeds should be required.
• Glufosinate (Basta) at 0.8 L/ha can be used instead of Glyphosate because it is less likely to damage young cocoa and gives better control of Mimosa and creepers.
P A P U A N E W G U I N E A C O C O A E X T E N S I O N M A N U A L 131
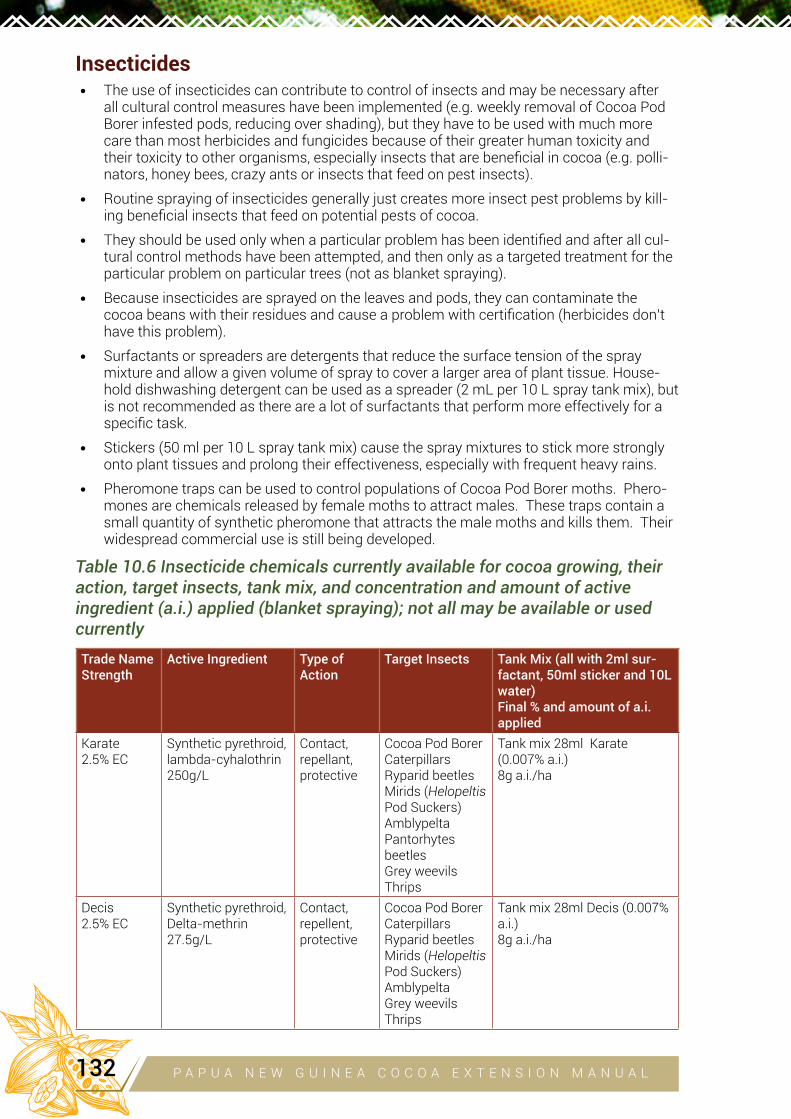
Insecticides• The use of insecticides can contribute to control of insects and may be necessary after
all cultural control measures have been implemented (e.g. weekly removal of Cocoa Pod Borer infested pods, reducing over shading), but they have to be used with much more care than most herbicides and fungicides because of their greater human toxicity and their toxicity to other organisms, especially insects that are beneficial in cocoa (e.g. polli-nators, honey bees, crazy ants or insects that feed on pest insects).
• Routine spraying of insecticides generally just creates more insect pest problems by kill-ing beneficial insects that feed on potential pests of cocoa.
• They should be used only when a particular problem has been identified and after all cul-tural control methods have been attempted, and then only as a targeted treatment for the particular problem on particular trees (not as blanket spraying).
• Because insecticides are sprayed on the leaves and pods, they can contaminate the cocoa beans with their residues and cause a problem with certification (herbicides don’t have this problem).
• Surfactants or spreaders are detergents that reduce the surface tension of the spray mixture and allow a given volume of spray to cover a larger area of plant tissue. House-hold dishwashing detergent can be used as a spreader (2 mL per 10 L spray tank mix), but is not recommended as there are a lot of surfactants that perform more effectively for a specific task.
• Stickers (50 ml per 10 L spray tank mix) cause the spray mixtures to stick more strongly onto plant tissues and prolong their effectiveness, especially with frequent heavy rains.
• Pheromone traps can be used to control populations of Cocoa Pod Borer moths. Phero-mones are chemicals released by female moths to attract males. These traps contain a small quantity of synthetic pheromone that attracts the male moths and kills them. Their widespread commercial use is still being developed.
Table 10.6 Insecticide chemicals currently available for cocoa growing, their action, target insects, tank mix, and concentration and amount of active ingredient (a.i.) applied (blanket spraying); not all may be available or used currently
Trade NameStrength
Active Ingredient Type of Action
Target Insects Tank Mix (all with 2ml sur-factant, 50ml sticker and 10L water)Final % and amount of a.i. applied
Karate 2.5% EC
Synthetic pyrethroid, lambda-cyhalothrin250g/L
Contact, repellant, protective
Cocoa Pod BorerCaterpillarsRyparid beetlesMirids (Helopeltis Pod Suckers)AmblypeltaPantorhytes beetlesGrey weevilsThrips
Tank mix 28ml Karate (0.007% a.i.)8g a.i./ha
Decis 2.5% EC
Synthetic pyrethroid,Delta-methrin 27.5g/L
Contact, repellent, protective
Cocoa Pod BorerCaterpillarsRyparid beetlesMirids (Helopeltis Pod Suckers)AmblypeltaGrey weevilsThrips
Tank mix 28ml Decis (0.007% a.i.)8g a.i./ha
P A P U A N E W G U I N E A C O C O A E X T E N S I O N M A N U A L132
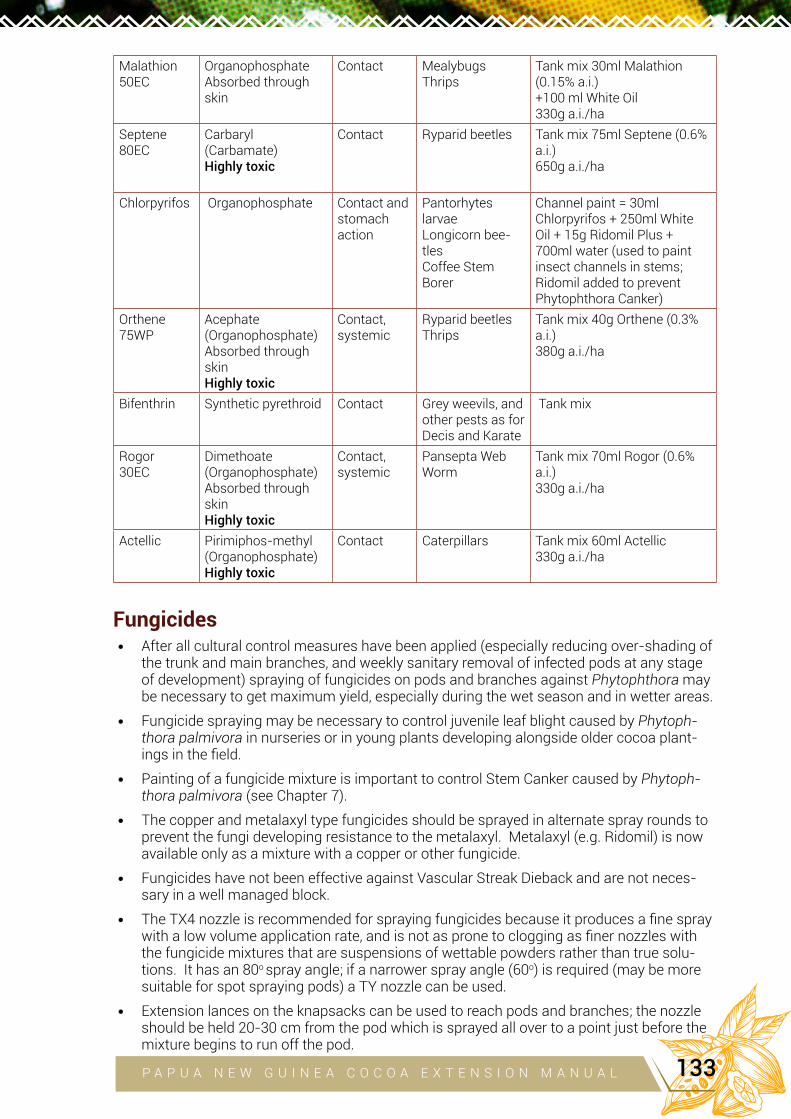
Malathion 50EC
Organophosphate Absorbed through skin
Contact MealybugsThrips
Tank mix 30ml Malathion (0.15% a.i.)+100 ml White Oil330g a.i./ha
Septene 80EC
Carbaryl(Carbamate)Highly toxic
Contact Ryparid beetles Tank mix 75ml Septene (0.6% a.i.)650g a.i./ha
Chlorpyrifos Organophosphate Contact and stomach action
Pantorhytes larvaeLongicorn bee-tlesCoffee Stem Borer
Channel paint = 30ml Chlorpyrifos + 250ml White Oil + 15g Ridomil Plus + 700ml water (used to paint insect channels in stems; Ridomil added to prevent Phytophthora Canker)
Orthene 75WP
Acephate(Organophosphate)Absorbed through skinHighly toxic
Contact, systemic
Ryparid beetlesThrips
Tank mix 40g Orthene (0.3% a.i.)380g a.i./ha
Bifenthrin Synthetic pyrethroid Contact Grey weevils, and other pests as for Decis and Karate
Tank mix
Rogor 30EC
Dimethoate(Organophosphate)Absorbed through skinHighly toxic
Contact,systemic
Pansepta Web Worm
Tank mix 70ml Rogor (0.6% a.i.)330g a.i./ha
Actellic Pirimiphos-methyl(Organophosphate)Highly toxic
Contact Caterpillars Tank mix 60ml Actellic330g a.i./ha
Fungicides• After all cultural control measures have been applied (especially reducing over-shading of
the trunk and main branches, and weekly sanitary removal of infected pods at any stage of development) spraying of fungicides on pods and branches against Phytophthora may be necessary to get maximum yield, especially during the wet season and in wetter areas.
• Fungicide spraying may be necessary to control juvenile leaf blight caused by Phytoph-thora palmivora in nurseries or in young plants developing alongside older cocoa plant-ings in the field.
• Painting of a fungicide mixture is important to control Stem Canker caused by Phytoph-thora palmivora (see Chapter 7).
• The copper and metalaxyl type fungicides should be sprayed in alternate spray rounds to prevent the fungi developing resistance to the metalaxyl. Metalaxyl (e.g. Ridomil) is now available only as a mixture with a copper or other fungicide.
• Fungicides have not been effective against Vascular Streak Dieback and are not neces-sary in a well managed block.
• The TX4 nozzle is recommended for spraying fungicides because it produces a fine spray with a low volume application rate, and is not as prone to clogging as finer nozzles with the fungicide mixtures that are suspensions of wettable powders rather than true solu-tions. It has an 80o spray angle; if a narrower spray angle (60o) is required (may be more suitable for spot spraying pods) a TY nozzle can be used.
• Extension lances on the knapsacks can be used to reach pods and branches; the nozzle should be held 20-30 cm from the pod which is sprayed all over to a point just before the mixture begins to run off the pod.
P A P U A N E W G U I N E A C O C O A E X T E N S I O N M A N U A L 133
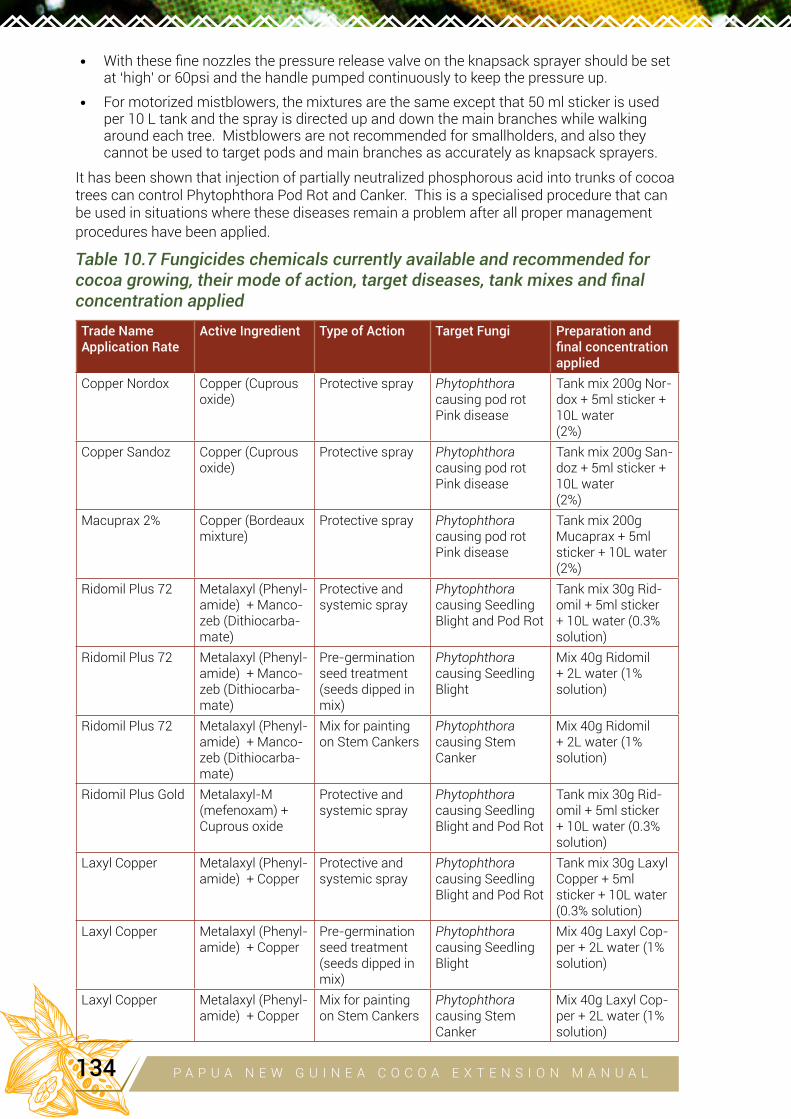
• With these fine nozzles the pressure release valve on the knapsack sprayer should be set at ‘high’ or 60psi and the handle pumped continuously to keep the pressure up.
• For motorized mistblowers, the mixtures are the same except that 50 ml sticker is used per 10 L tank and the spray is directed up and down the main branches while walking around each tree. Mistblowers are not recommended for smallholders, and also they cannot be used to target pods and main branches as accurately as knapsack sprayers.
It has been shown that injection of partially neutralized phosphorous acid into trunks of cocoa trees can control Phytophthora Pod Rot and Canker. This is a specialised procedure that can be used in situations where these diseases remain a problem after all proper management procedures have been applied.
Table 10.7 Fungicides chemicals currently available and recommended for cocoa growing, their mode of action, target diseases, tank mixes and final concentration applied
Trade NameApplication Rate
Active Ingredient Type of Action Target Fungi Preparation and final concentration applied
Copper Nordox Copper (Cuprous oxide)
Protective spray Phytophthora causing pod rotPink disease
Tank mix 200g Nor-dox + 5ml sticker + 10L water(2%)
Copper Sandoz Copper (Cuprous oxide)
Protective spray Phytophthora causing pod rotPink disease
Tank mix 200g San-doz + 5ml sticker + 10L water(2%)
Macuprax 2% Copper (Bordeaux mixture)
Protective spray Phytophthora causing pod rotPink disease
Tank mix 200g Mucaprax + 5ml sticker + 10L water(2%)
Ridomil Plus 72 Metalaxyl (Phenyl-amide) + Manco-zeb (Dithiocarba-mate)
Protective and systemic spray
Phytophthora causing Seedling Blight and Pod Rot
Tank mix 30g Rid-omil + 5ml sticker + 10L water (0.3% solution)
Ridomil Plus 72 Metalaxyl (Phenyl-amide) + Manco-zeb (Dithiocarba-mate)
Pre-germination seed treatment(seeds dipped in mix)
Phytophthora causing Seedling Blight
Mix 40g Ridomil + 2L water (1% solution)
Ridomil Plus 72 Metalaxyl (Phenyl-amide) + Manco-zeb (Dithiocarba-mate)
Mix for painting on Stem Cankers
Phytophthora causing Stem Canker
Mix 40g Ridomil + 2L water (1% solution)
Ridomil Plus Gold Metalaxyl-M (mefenoxam) + Cuprous oxide
Protective and systemic spray
Phytophthora causing Seedling Blight and Pod Rot
Tank mix 30g Rid-omil + 5ml sticker + 10L water (0.3% solution)
Laxyl Copper Metalaxyl (Phenyl-amide) + Copper
Protective and systemic spray
Phytophthora causing Seedling Blight and Pod Rot
Tank mix 30g Laxyl Copper + 5ml sticker + 10L water (0.3% solution)
Laxyl Copper Metalaxyl (Phenyl-amide) + Copper
Pre-germination seed treatment(seeds dipped in mix)
Phytophthora causing Seedling Blight
Mix 40g Laxyl Cop-per + 2L water (1% solution)
Laxyl Copper Metalaxyl (Phenyl-amide) + Copper
Mix for painting on Stem Cankers
Phytophthora causing Stem Canker
Mix 40g Laxyl Cop-per + 2L water (1% solution)
P A P U A N E W G U I N E A C O C O A E X T E N S I O N M A N U A L134
Foli-R-Fos, Aliette Phosphonate Systemic Phytophthora causing pod rot
Garlon plus Cop-per
Triclopyr plus copper
Protective mix-ture for painting on freshly cut stumps
Root rotting basid-iomycetes
One part Garlon and 2 parts Sandoz in 60 parts diesel or old engine oil.
Use of pesticides on stored cocoa• A number of insects (mainly moths, weevils and beetles) and rodents (mainly rats and
mice) can cause serious damage to stored dry cocoa.
• The first line of defense against these is good storeroom or whare house sanitation and management.
• If cocoa beans are not adequately dried (to below 8% water content) they are more prone to insect damage and mould fungus contamination.
• Fumigation of whare houses using a fumigant such as phosphine (phostaoxin) released among stored bags of cocoa covered with a tarpaulin may be necessary. The once pre-ferred chemical for this application, methyl bromide, is now being phased out worldwide because of damage to the earth’s ozone layer.
Pesticide resistance• Each pesticide has a particular mode of biochemical action in killing the target pest (e.g.
organophosphate insecticides interfere with the acteylcholine esterase enzyme involved in nerve functioning; atrazine kills weeds by inhibiting photosynthesis). Many pesticides with slightly different active ingredients, and similar chemicals sold under different com-mercial names have the same mode of action.
• Weeds, insects and fungi can evolve resistance to chemicals with a particular mode of action. This occurs because the pest populations are genetically variable (they are out-breeding and reproduce at very high rates) and often include variants that are not affected by the pesticide.
o Initially these variants may be a very small proportion of the pest population, but with repeated use of the chemical the proportion of resistant individuals in the population builds up (they are selected for while the susceptible individuals are selected against) until the farmer sees that the chemical is having no effect on the weed or pest. Then we say that the weed or pest has developed resistance to the pesticide, which is then useless.
o To reduce the chance of this happening, it is strongly recommended that farmers rotate different pesticides that have different modes of action – if a pest begins to de-velop resistance to chemicals with one mode of action, use of a chemical that attacks another aspect of the pest’s metabolism will kill those organisms and thus reduce the development of resistant types.
• Most pesticide labels now include a mode of action of the active chemical ingredient - a farmer should not repeatedly use products from the same group, but rotate applications using products from different groups.
• For herbicides the activity groups are indicated by the letters A to N (Table 10.8). For her-bicides the lettering system also indicates the likelihood of weeds developing resistance. The principal for preventing the development of resistance of weeds to particular herbi-cides is to use group A herbicides once a year, group B herbicides once per season, and group C herbicides not in consecutive years.
• Similarly, insecticides have lettering of activity groups from 1A-24 (Table 10.9).
• For fungicides the activity groups are indicated by a number (1-40) or letter M, depending on how the fungicide acts in killing fungi (Table 10.10).
P A P U A N E W G U I N E A C O C O A E X T E N S I O N M A N U A L 135
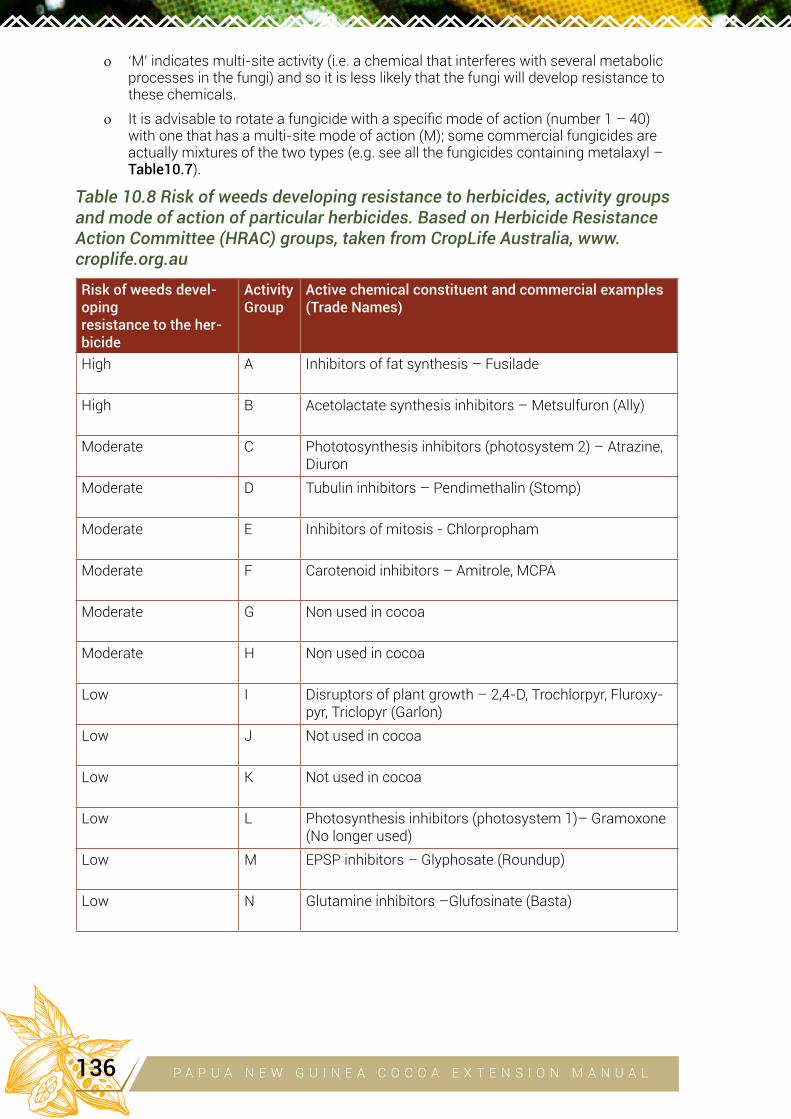
o ‘M’ indicates multi-site activity (i.e. a chemical that interferes with several metabolic processes in the fungi) and so it is less likely that the fungi will develop resistance to these chemicals.
o It is advisable to rotate a fungicide with a specific mode of action (number 1 – 40) with one that has a multi-site mode of action (M); some commercial fungicides are actually mixtures of the two types (e.g. see all the fungicides containing metalaxyl – Table10.7).
Table 10.8 Risk of weeds developing resistance to herbicides, activity groups and mode of action of particular herbicides. Based on Herbicide Resistance Action Committee (HRAC) groups, taken from CropLife Australia, www.croplife.org.au
Risk of weeds devel-opingresistance to the her-bicide
ActivityGroup
Active chemical constituent and commercial examples (Trade Names)
High A Inhibitors of fat synthesis – Fusilade
High B Acetolactate synthesis inhibitors – Metsulfuron (Ally)
Moderate C Phototosynthesis inhibitors (photosystem 2) – Atrazine, Diuron
Moderate D Tubulin inhibitors – Pendimethalin (Stomp)
Moderate E Inhibitors of mitosis - Chlorpropham
Moderate F Carotenoid inhibitors – Amitrole, MCPA
Moderate G Non used in cocoa
Moderate H Non used in cocoa
Low I Disruptors of plant growth – 2,4-D, Trochlorpyr, Fluroxy-pyr, Triclopyr (Garlon)
Low J Not used in cocoa
Low K Not used in cocoa
Low L Photosynthesis inhibitors (photosystem 1)– Gramoxone (No longer used)
Low M EPSP inhibitors – Glyphosate (Roundup)
Low N Glutamine inhibitors –Glufosinate (Basta)
P A P U A N E W G U I N E A C O C O A E X T E N S I O N M A N U A L136
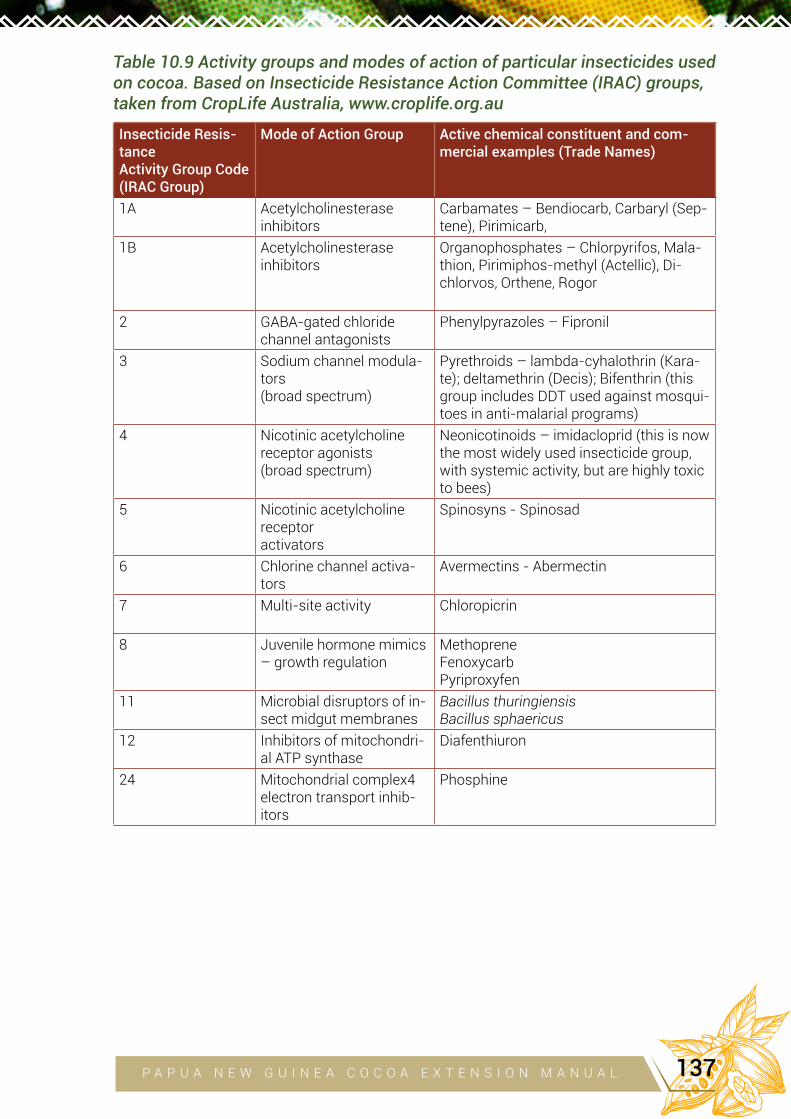
Table 10.9 Activity groups and modes of action of particular insecticides used on cocoa. Based on Insecticide Resistance Action Committee (IRAC) groups, taken from CropLife Australia, www.croplife.org.au
Insecticide Resis-tanceActivity Group Code(IRAC Group)
Mode of Action Group Active chemical constituent and com-mercial examples (Trade Names)
1A Acetylcholinesteraseinhibitors
Carbamates – Bendiocarb, Carbaryl (Sep-tene), Pirimicarb,
1B Acetylcholinesteraseinhibitors
Organophosphates – Chlorpyrifos, Mala-thion, Pirimiphos-methyl (Actellic), Di-chlorvos, Orthene, Rogor
2 GABA-gated chloride channel antagonists
Phenylpyrazoles – Fipronil
3 Sodium channel modula-tors (broad spectrum)
Pyrethroids – lambda-cyhalothrin (Kara-te); deltamethrin (Decis); Bifenthrin (this group includes DDT used against mosqui-toes in anti-malarial programs)
4 Nicotinic acetylcholine receptor agonists (broad spectrum)
Neonicotinoids – imidacloprid (this is now the most widely used insecticide group, with systemic activity, but are highly toxic to bees)
5 Nicotinic acetylcholine receptoractivators
Spinosyns - Spinosad
6 Chlorine channel activa-tors
Avermectins - Abermectin
7 Multi-site activity Chloropicrin
8 Juvenile hormone mimics – growth regulation
MethopreneFenoxycarbPyriproxyfen
11 Microbial disruptors of in-sect midgut membranes
Bacillus thuringiensisBacillus sphaericus
12 Inhibitors of mitochondri-al ATP synthase
Diafenthiuron
24 Mitochondrial complex4 electron transport inhib-itors
Phosphine
P A P U A N E W G U I N E A C O C O A E X T E N S I O N M A N U A L 137
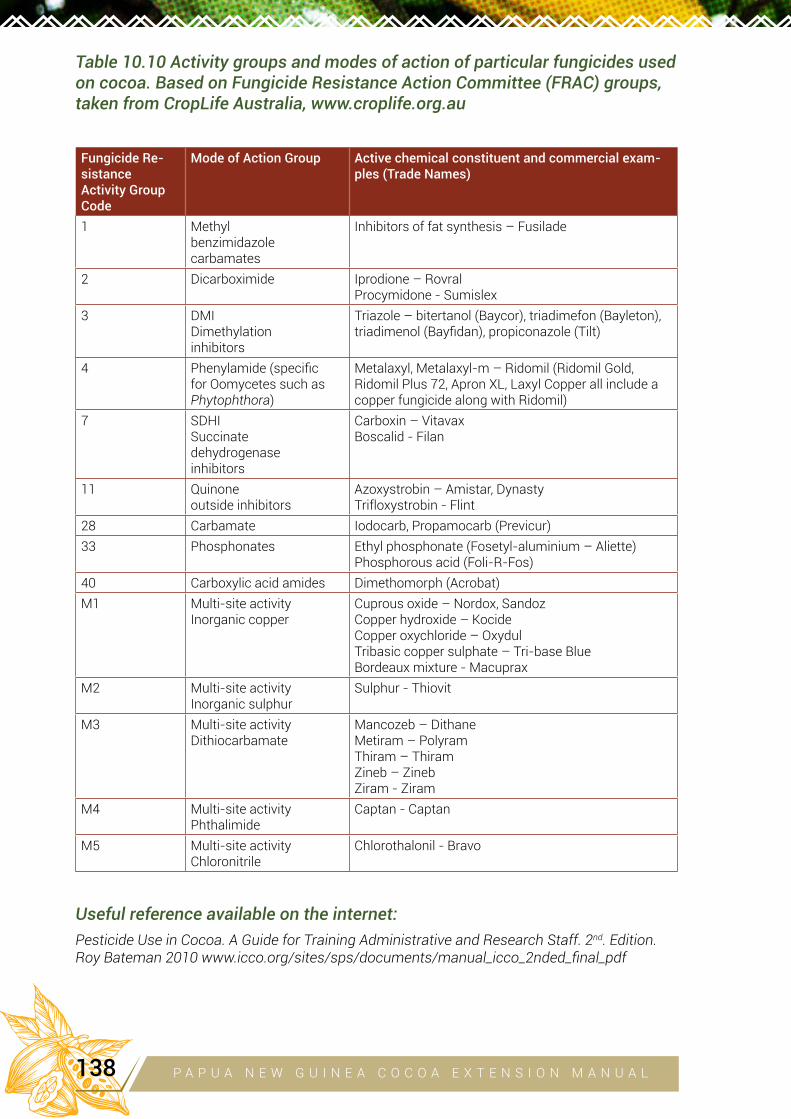
Table 10.10 Activity groups and modes of action of particular fungicides used on cocoa. Based on Fungicide Resistance Action Committee (FRAC) groups, taken from CropLife Australia, www.croplife.org.au
Fungicide Re-sistanceActivity Group Code
Mode of Action Group Active chemical constituent and commercial exam-ples (Trade Names)
1 Methyl benzimidazole carbamates
Inhibitors of fat synthesis – Fusilade
2 Dicarboximide Iprodione – RovralProcymidone - Sumislex
3 DMI Dimethylation inhibitors
Triazole – bitertanol (Baycor), triadimefon (Bayleton), triadimenol (Bayfidan), propiconazole (Tilt)
4 Phenylamide (specific for Oomycetes such as Phytophthora)
Metalaxyl, Metalaxyl-m – Ridomil (Ridomil Gold, Ridomil Plus 72, Apron XL, Laxyl Copper all include a copper fungicide along with Ridomil)
7 SDHISuccinatedehydrogenaseinhibitors
Carboxin – VitavaxBoscalid - Filan
11 Quinoneoutside inhibitors
Azoxystrobin – Amistar, DynastyTrifloxystrobin - Flint
28 Carbamate Iodocarb, Propamocarb (Previcur)33 Phosphonates Ethyl phosphonate (Fosetyl-aluminium – Aliette)
Phosphorous acid (Foli-R-Fos)40 Carboxylic acid amides Dimethomorph (Acrobat)M1 Multi-site activity
Inorganic copperCuprous oxide – Nordox, SandozCopper hydroxide – KocideCopper oxychloride – OxydulTribasic copper sulphate – Tri-base BlueBordeaux mixture - Macuprax
M2 Multi-site activityInorganic sulphur
Sulphur - Thiovit
M3 Multi-site activityDithiocarbamate
Mancozeb – DithaneMetiram – PolyramThiram – ThiramZineb – ZinebZiram - Ziram
M4 Multi-site activityPhthalimide
Captan - Captan
M5 Multi-site activityChloronitrile
Chlorothalonil - Bravo
Useful reference available on the internet:
Pesticide Use in Cocoa. A Guide for Training Administrative and Research Staff. 2nd. Edition. Roy Bateman 2010 www.icco.org/sites/sps/documents/manual_icco_2nded_final_pdf
P A P U A N E W G U I N E A C O C O A E X T E N S I O N M A N U A L138
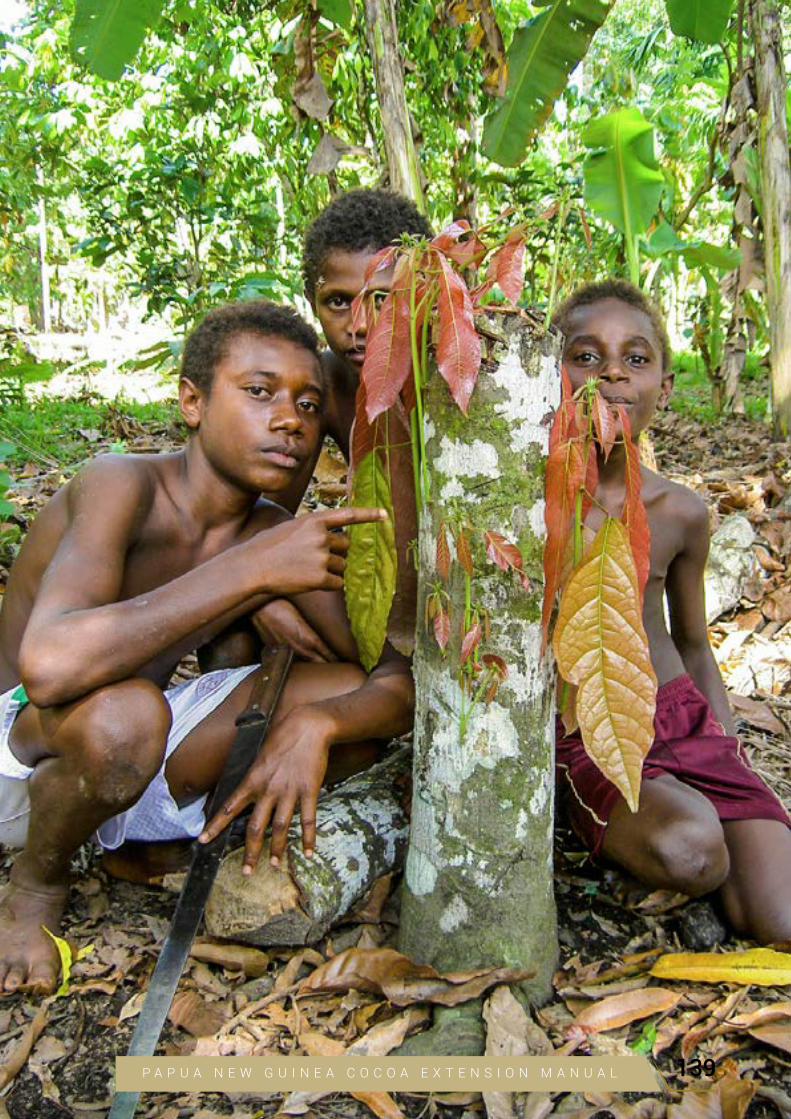
P A P U A N E W G U I N E A C O C O A E X T E N S I O N M A N U A L 139
11
HARVESTING AND
BREAKING COCOA PODS Kenny Francis, David Yinil and Eremas Tade
AIM OF THIS CHAPTER:
To describe methods for the harvesting and breaking of pods to obtain wet beans
Introduction• Having produced a good crop of healthy pods, another crucial stage of cocoa farming
begins - harvesting of healthy pods, extracting the wet beans and fermenting them to remove mucilage and begin the development of chocolate flavor, followed by drying of the beans and their bagging and sale.
• This requires just as much attention to detail and skill as growing the trees and pods.
Harvesting of podsTiming and sanitation to prevent spread of Cocoa Pod Borer and Phytophthora
• Healthy pods should be harvested as soon as they are ripe - green pods turn yellow, red-purple pods turn orange or reddish-orange when ripe.
• During the peak periods of pod ripening, harvesting should be done every week.
• During the off-peak times, harvesting should be done every two weeks; however, the prob-lem is to get enough wet beans to allow a good fermentation. In the low season, accu-mulating the beans from several farms may be needed to get the bean mass necessary for fermentation.
• It is essential that sufficient beans to fill a fermentation box be extracted on the same day. It is not acceptable to harvest enough beans to fill a box halfway and top it up with the beans from the following day’s harvest as the fermentation will not be good.
• If a farmer is selling wet beans, the pods should be harvested on the morning they are picked up for delivery to the fermentary.
• If necessary, pods can be harvested and collected, and broken the following day along with that day’s harvest to give enough beans to fill a fermentation box or sell to a fermen-tary. Storage of pods for longer than 5 days before breaking is not advisable due to fungal contamination that can adversely affect cocoa quality; also Cocoa Pod Borer larvae can emerge from harvested pods, pupate and produce adult moths that can infest developing pods.
• Over-ripe pods left in the canopy may become infected by Phytophthora Pod Rot or dam-aged by rats, flying foxes or birds.
• If Cocoa Pod Borer infested pods are left in the canopy the larvae can emerge and pupate, allowing the insect to spread further – the insect can even pupate on ripe pods, contribut-ing to the infection cycle (Figure 11.1).
• Beans may also germinate inside over-ripe pods, reducing their quality (see Chapter 12, Figure 12.28).
• Healthy ripe pods should not be harvested at the same time as Phytophthora-infected
CHAPTER
P A P U A N E W G U I N E A C O C O A E X T E N S I O N M A N U A L140
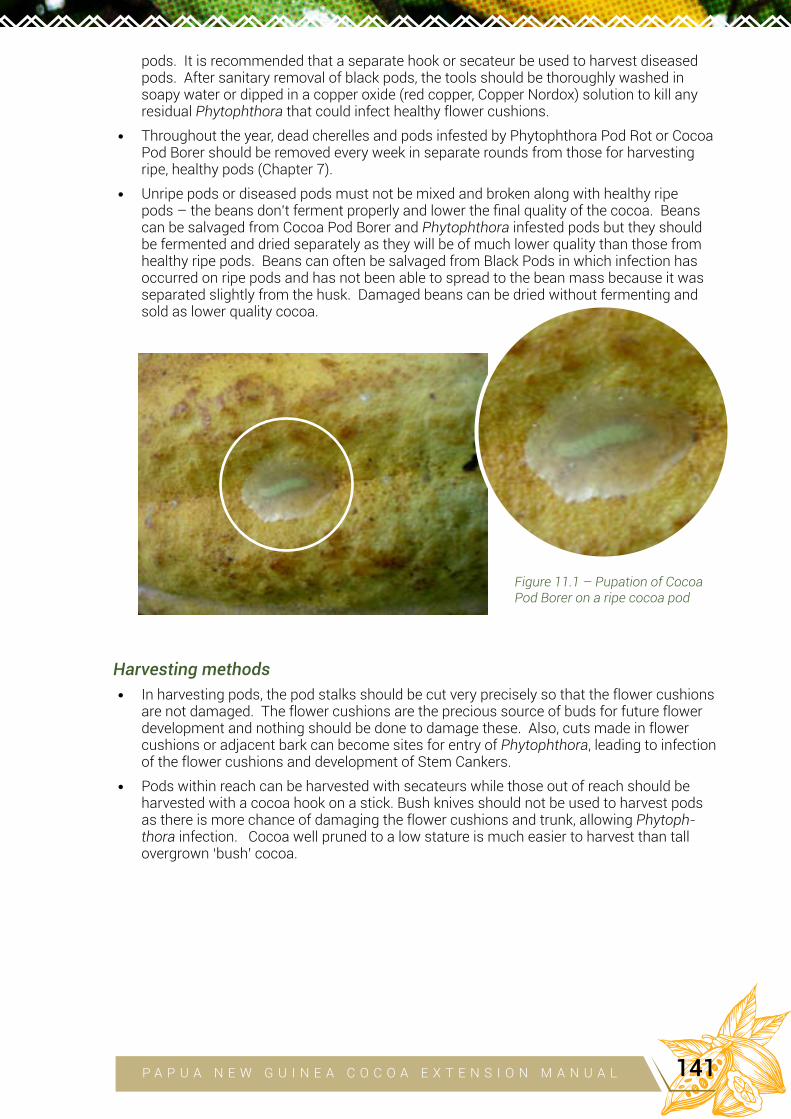
pods. It is recommended that a separate hook or secateur be used to harvest diseased pods. After sanitary removal of black pods, the tools should be thoroughly washed in soapy water or dipped in a copper oxide (red copper, Copper Nordox) solution to kill any residual Phytophthora that could infect healthy flower cushions.
• Throughout the year, dead cherelles and pods infested by Phytophthora Pod Rot or Cocoa Pod Borer should be removed every week in separate rounds from those for harvesting ripe, healthy pods (Chapter 7).
• Unripe pods or diseased pods must not be mixed and broken along with healthy ripe pods – the beans don’t ferment properly and lower the final quality of the cocoa. Beans can be salvaged from Cocoa Pod Borer and Phytophthora infested pods but they should be fermented and dried separately as they will be of much lower quality than those from healthy ripe pods. Beans can often be salvaged from Black Pods in which infection has occurred on ripe pods and has not been able to spread to the bean mass because it was separated slightly from the husk. Damaged beans can be dried without fermenting and sold as lower quality cocoa.
Harvesting methods
• In harvesting pods, the pod stalks should be cut very precisely so that the flower cushions are not damaged. The flower cushions are the precious source of buds for future flower development and nothing should be done to damage these. Also, cuts made in flower cushions or adjacent bark can become sites for entry of Phytophthora, leading to infection of the flower cushions and development of Stem Cankers.
• Pods within reach can be harvested with secateurs while those out of reach should be harvested with a cocoa hook on a stick. Bush knives should not be used to harvest pods as there is more chance of damaging the flower cushions and trunk, allowing Phytoph-thora infection. Cocoa well pruned to a low stature is much easier to harvest than tall overgrown ‘bush’ cocoa.
Figure 11.1 – Pupation of Cocoa Pod Borer on a ripe cocoa pod
P A P U A N E W G U I N E A C O C O A E X T E N S I O N M A N U A L 141

Figure 11.2 - Breaking pods in a plantation and col-lecting wet beans in a sack; it is better to use a blunt stick rather than a bush knife to break pods
Figure 11.3 - Wet beans collected in a sack in the field, ready to be carted back to a fermentary – note the sweatings dripping out of the sack
Pod breaking• Fermentation requires a minimum mass of cocoa beans and so the first step is to accu-
mulate a large enough quantity of pods to break and develop a fermentable mass…To do this, pods may have to be accumulated over several days. While it is not ideal, pods can be accumulated for up to 5 days before breaking to give a sufficient mass of beans for fermenting.
• Harvested pods should not be stored for more than 5 days before breaking to prevent diseases, especially Phytophthora Pod Rot, from damaging beans or spreading from the pods. If the harvested pods are infested by Cocoa Pod Borer, they should not be left for long before being broken or disposed of to avoid the emergence and pupation of mature larvae. If pods have to be kept for a day or so before being broken they should be kept in a bag or covered with plastic sheet to prevent the larvae emerging and pupating, or to prevent Phytophthora spores being dispersed by rain splash.
• Growers may ferment and dry their own beans, which is adding value to their product and is certainly recommended as part of a cocoa business. However, they may not wish to go to the extra expense of processing their own beans and so may sell wet beans to a dealer or a central fermentary (both must be licensed by the PNG Cocoa Board).
• If beans are to be fermented and dried on the farm, it is best to break them in the after-noon and let the juice drain from the beans in a basket or permeable bag in the field or at the fermentary overnight before starting fermentation in boxes the following morning.
• It is more efficient to break beans in the field where they are harvested so that the pod husks and placenta can be buried, along with chopped up diseased pods and chopped-up prunings in manure tranches dug between every second row of cocoa. Carrying just the wet beans back to a central fermentary, especially after they have been allowed to drain overnight, is less work than carrying whole pods. Bags of wet beans can be transport-ed from the field back to the fermentary in a wheel barrow. As the farm business grows, small tractors could be used to reduce the labour required in carting beans, fertilisers, manure, water etc. around the farm. There must be no chemical contamination of the
P A P U A N E W G U I N E A C O C O A E X T E N S I O N M A N U A L142
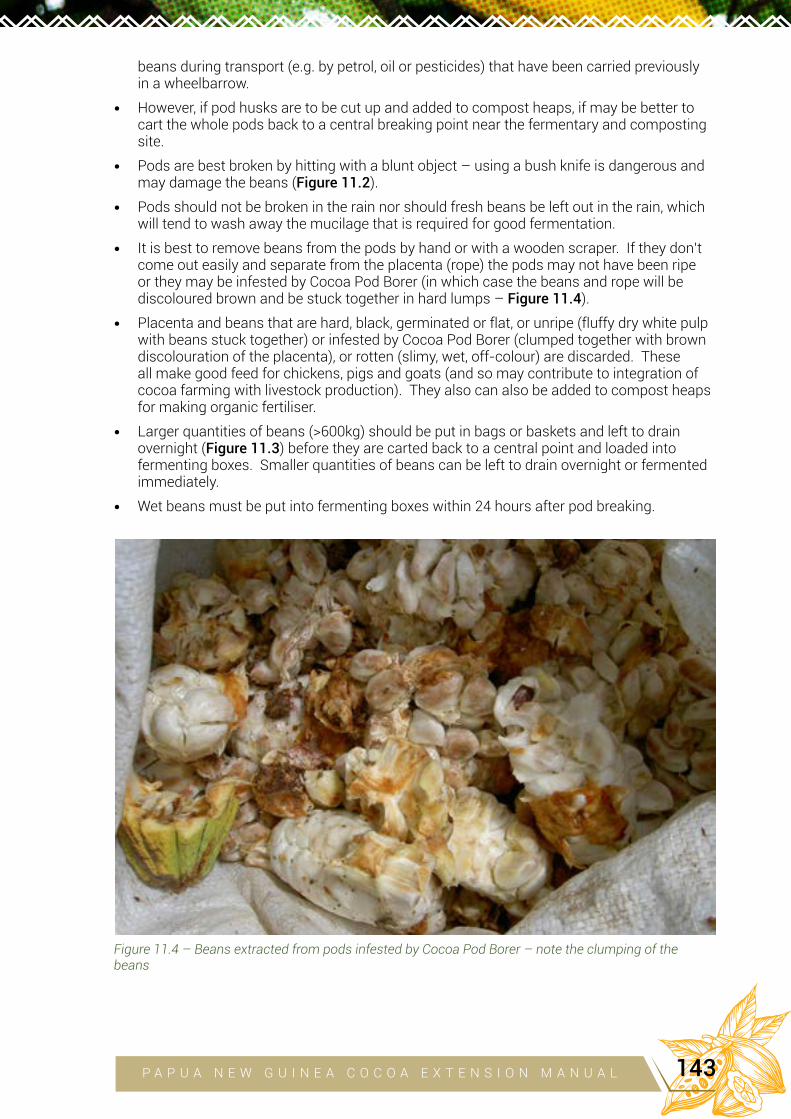
beans during transport (e.g. by petrol, oil or pesticides) that have been carried previously in a wheelbarrow.
• However, if pod husks are to be cut up and added to compost heaps, if may be better to cart the whole pods back to a central breaking point near the fermentary and composting site.
• Pods are best broken by hitting with a blunt object – using a bush knife is dangerous and may damage the beans (Figure 11.2).
• Pods should not be broken in the rain nor should fresh beans be left out in the rain, which will tend to wash away the mucilage that is required for good fermentation.
• It is best to remove beans from the pods by hand or with a wooden scraper. If they don’t come out easily and separate from the placenta (rope) the pods may not have been ripe or they may be infested by Cocoa Pod Borer (in which case the beans and rope will be discoloured brown and be stuck together in hard lumps – Figure 11.4).
• Placenta and beans that are hard, black, germinated or flat, or unripe (fluffy dry white pulp with beans stuck together) or infested by Cocoa Pod Borer (clumped together with brown discolouration of the placenta), or rotten (slimy, wet, off-colour) are discarded. These all make good feed for chickens, pigs and goats (and so may contribute to integration of cocoa farming with livestock production). They also can also be added to compost heaps for making organic fertiliser.
• Larger quantities of beans (>600kg) should be put in bags or baskets and left to drain overnight (Figure 11.3) before they are carted back to a central point and loaded into fermenting boxes. Smaller quantities of beans can be left to drain overnight or fermented immediately.
• Wet beans must be put into fermenting boxes within 24 hours after pod breaking.
Figure 11.4 – Beans extracted from pods infested by Cocoa Pod Borer – note the clumping of the beans
P A P U A N E W G U I N E A C O C O A E X T E N S I O N M A N U A L 143
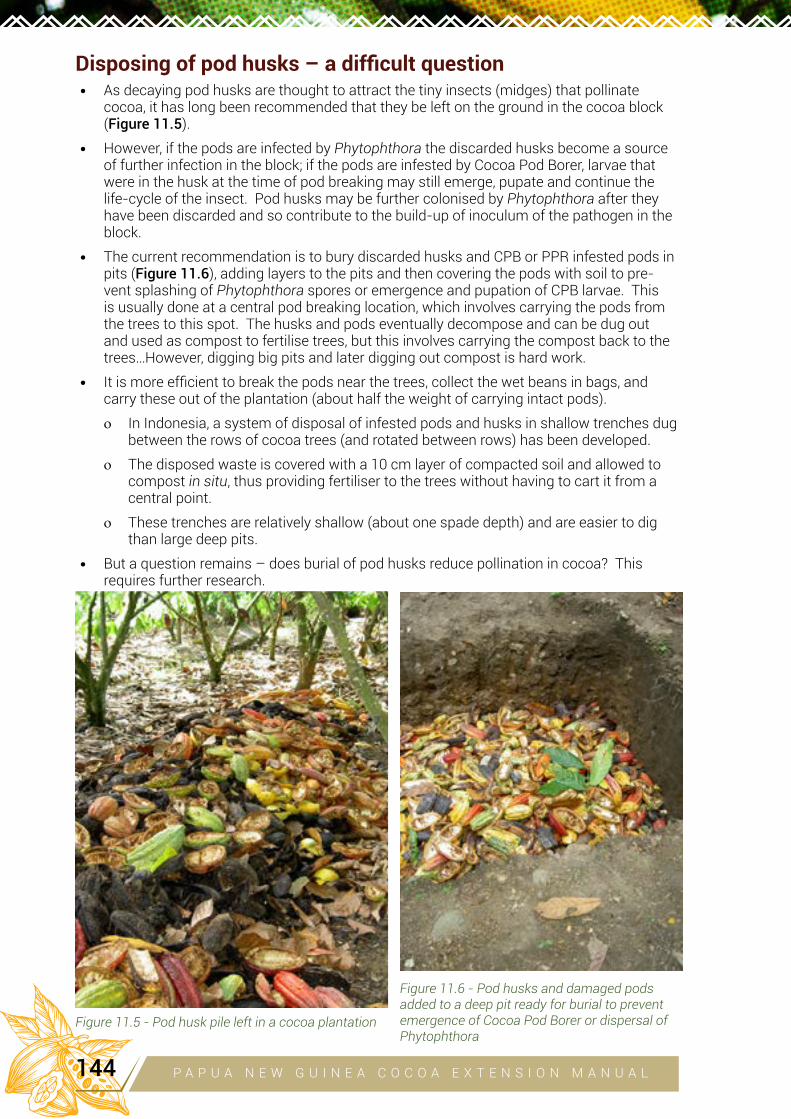
Disposing of pod husks – a difficult question• As decaying pod husks are thought to attract the tiny insects (midges) that pollinate
cocoa, it has long been recommended that they be left on the ground in the cocoa block (Figure 11.5).
• However, if the pods are infected by Phytophthora the discarded husks become a source of further infection in the block; if the pods are infested by Cocoa Pod Borer, larvae that were in the husk at the time of pod breaking may still emerge, pupate and continue the life-cycle of the insect. Pod husks may be further colonised by Phytophthora after they have been discarded and so contribute to the build-up of inoculum of the pathogen in the block.
• The current recommendation is to bury discarded husks and CPB or PPR infested pods in pits (Figure 11.6), adding layers to the pits and then covering the pods with soil to pre-vent splashing of Phytophthora spores or emergence and pupation of CPB larvae. This is usually done at a central pod breaking location, which involves carrying the pods from the trees to this spot. The husks and pods eventually decompose and can be dug out and used as compost to fertilise trees, but this involves carrying the compost back to the trees…However, digging big pits and later digging out compost is hard work.
• It is more efficient to break the pods near the trees, collect the wet beans in bags, and carry these out of the plantation (about half the weight of carrying intact pods).
o In Indonesia, a system of disposal of infested pods and husks in shallow trenches dug between the rows of cocoa trees (and rotated between rows) has been developed.
o The disposed waste is covered with a 10 cm layer of compacted soil and allowed to compost in situ, thus providing fertiliser to the trees without having to cart it from a central point.
o These trenches are relatively shallow (about one spade depth) and are easier to dig than large deep pits.
• But a question remains – does burial of pod husks reduce pollination in cocoa? This requires further research.
Figure 11.6 - Pod husks and damaged pods added to a deep pit ready for burial to prevent emergence of Cocoa Pod Borer or dispersal of Phytophthora
Figure 11.5 - Pod husk pile left in a cocoa plantation
P A P U A N E W G U I N E A C O C O A E X T E N S I O N M A N U A L144
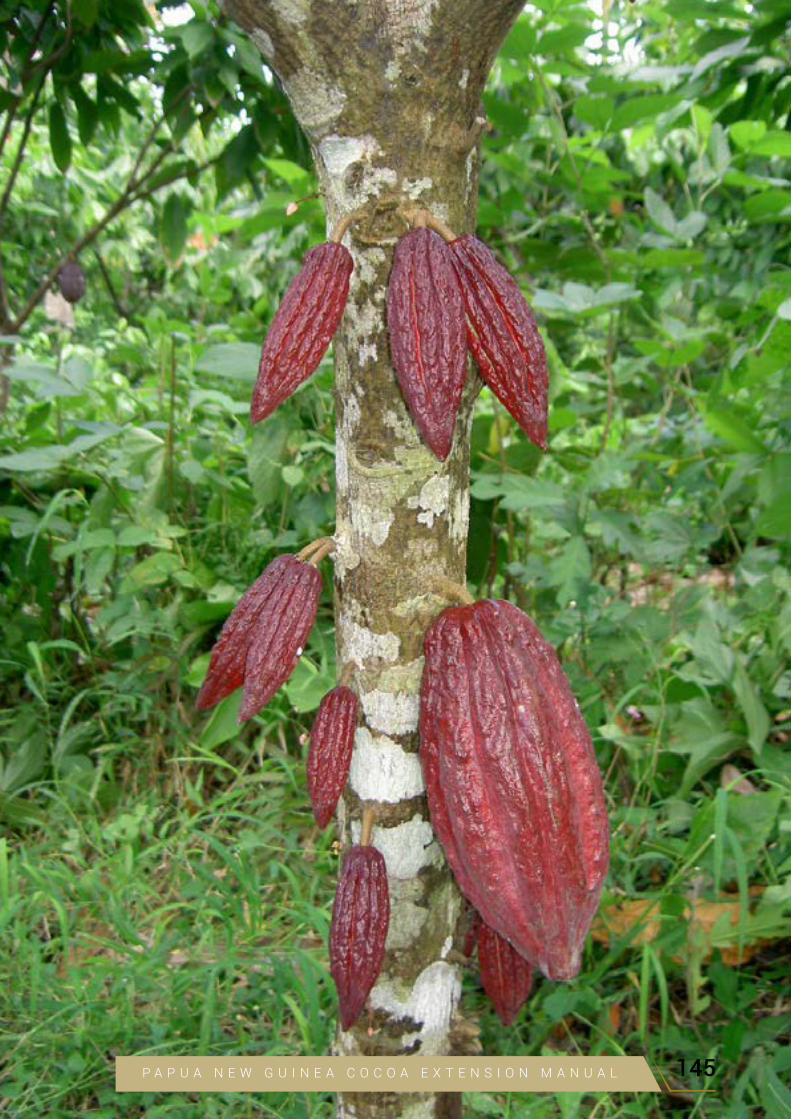
P A P U A N E W G U I N E A C O C O A E X T E N S I O N M A N U A L 145
12
FERMENTATION, DRY-
ING AND MARKETING
OF COCOA Kenny Francis, Jane Ravusiro, Neil Hollywood, Noel Kuman, Barnabas To-
reu, James Maora and Urban Kabala
(Summarised from ‘Solar & Kiln Combination Cocoa Dryer Manual’, Cocoa Quality Section, PNG Cocoa and Coconut Institute Ltd. 2010; photos of cocoa beans taken from posters pre-pared for PNG Cocoa and Coconut Institute Ltd. by C. Benton and L. Bridgland, photos by R. Roe)
AIM OF THIS CHAPTER:
To describe the methods of fermentation and drying for obtaining high quality cocoa beans for export
Introduction• The cotyledons (nibs) of cocoa beans must undergo many biochemical changes if they
are to develop a full chocolate flavor for the cocoa market, and this is very important for Papua New Guinea to sell at a premium into the fine flavor market.
• Fermentation and drying (carried out on or near the farms, or in local commercial prem-ises if a company is buying wet beans) and roasting of the dry beans (carried out by the cocoa grinders or chocolate manufacturers) all contribute to the development of the full chocolate flavor and quality.
• Fermentation also helps remove the mucilaginous sugary coating of the beans and facili-tates their drying, which is crucial if the moisture content is to be reduced to a level (6-7%) that prevents mouldy fungi growing on them and destroying their flavour during storage and shipping.
• The fermenting and drying processes (known as curing of the beans) are critical in deter-mining the final cocoa quality (and therefore price) on the market.
• Unfortunately in Papua New Guinea much cocoa is downgraded as a result of tainted flavours developing during these processes, especially smoke tainting from leaky wood-fired driers and mouldiness due to slow drying in wet weather. It is important that during fermentation, drying and storage of the beans that every attempt is made to isolate the cocoa from smoke contamination
• In Ghana a straightforward method of fermenting and drying beans is used to produce a uniformly high quality of beans that are regarded as the international standard for quality and basic chocolate flavour -
o Fermentation is carried out for just 3 or 4 days in approx. 1 metre-wide heaps on ba-nana leaves placed on the ground and covered with more banana leaves.
o Sun drying is carried out on bamboo slats supported on wooden platforms raised off the ground and bound together with rope so that small, pencil-wide gaps remain between the slats.
o It is thought that the success of these simple procedures is possible because in Gha-na the main harvest occurs during a predictable dry season, which is not so in Papua New Guinea.
o Slow sun drying helps reduce the acidity of beans.
CHAPTER
P A P U A N E W G U I N E A C O C O A E X T E N S I O N M A N U A L146
o The shorter drying period is suitable for the dominant Forastero (West African Amel-onado or Amazonian) types of cocoa grown in Ghana.
• Fermentation is a biological process involving microbes and has to be as carefully man-aged as the biological process of growing the trees and pods.
• Drying of beans is as important as fermentation and also contributes to the develop-ment of chocolate flavour and removal of excess acidity from the beans. Excess acidity in beans has been a problem in cocoa grown in Papua New Guinea and Malaysia using larger-scale, industrial drying by forced heat.
• Fermentation and drying of the harvested beans is a part of the process of cocoa produc-tion in Papua New Guinea (and many other places, e.g. Sulawesi) that has to be improved if farmers are to obtain the best prices for their cocoa.
• Producing poorly fermented, poorly dried and smoke tainted beans can undo all the hard work of growing the pods. There are very strict quality requirements for export of cocoa and substandard cocoa may be rejected for sale or bring a lower price on the export mar-ket.
• In Papua New Guinea effective methods of fermentation and drying to produce uniformly high quality beans still have to be applied throughout the industry and much more training of farmers is needed to achieve this.
• Since the incursion of Cocoa Pod Borer and the development of Integrated Pest and Dis-ease Management (IPDM) methods, the need to ferment and dry small batches of beans resulting from more regular harvesting of healthy pods, and weekly harvesting of Cocoa Pod Borer or Phytophthora infested pods, has increased. The Postharvest Section at CCIL has been developing small-scale fermenting and drying methods over a long period and these are described here.
Weighing wet and dry beans – conversion rate• It is useful to weigh batches of wet beans before they are put into the fermentation box,
and then again after they are dried, in order to work out the wet bean to dry bean conver-sion rate. This should be about 40% with a range of 35 – 45%. i.e. with a 40% conversion rate 10 kg of wet beans should give 4 kg of dry beans.
• If a farmer has a wet bean dealer’s licence, then he or she will have to weigh the beans with a scale that is “legal for trade”.
Fermentation of cocoa beans• Beans freshly extracted from the pod consist of the embryonic plant (mainly the two
cotyledons – see Appendix 3), surrounded by the seed coat (testa) and some sugary wet mucilage (approx. composition: water 84%, glucose/fructose 10%, pentosan 3%, sucrose 1%, protein 1%, organic acids 1%).
• Fermentation is a process in which the microbes that occur on the walls of the fermenta-tion boxes and in the air invade and live in the mass of wet beans and convert the sugars in the mucilage to alcohol and then into organic acids (mostly acetic acid) that leak out of the fermentation mass. Some of the organic acids penetrate into the beans and cause the biochemical reactions that give rise to the development of chocolate flavour. Fermen-tation also reduces the water content of the beans ready for drying. Organic acids that remain within the beans are volatilised during drying.
• The process of fermentation gives off heat and so the fermentation mass feels hot – the heating of the mass is an indication that fermentation is going well.
• Without fermentation the beans are of lower quality (and valuable only for their cocoa butter content, not their chocolate flavor)(Figure 12.30).
• Because Papua New Guinea is aiming to produce premium cocoa with strong Trinitario flavour, full fermentation of the beans is important.
P A P U A N E W G U I N E A C O C O A E X T E N S I O N M A N U A L 147
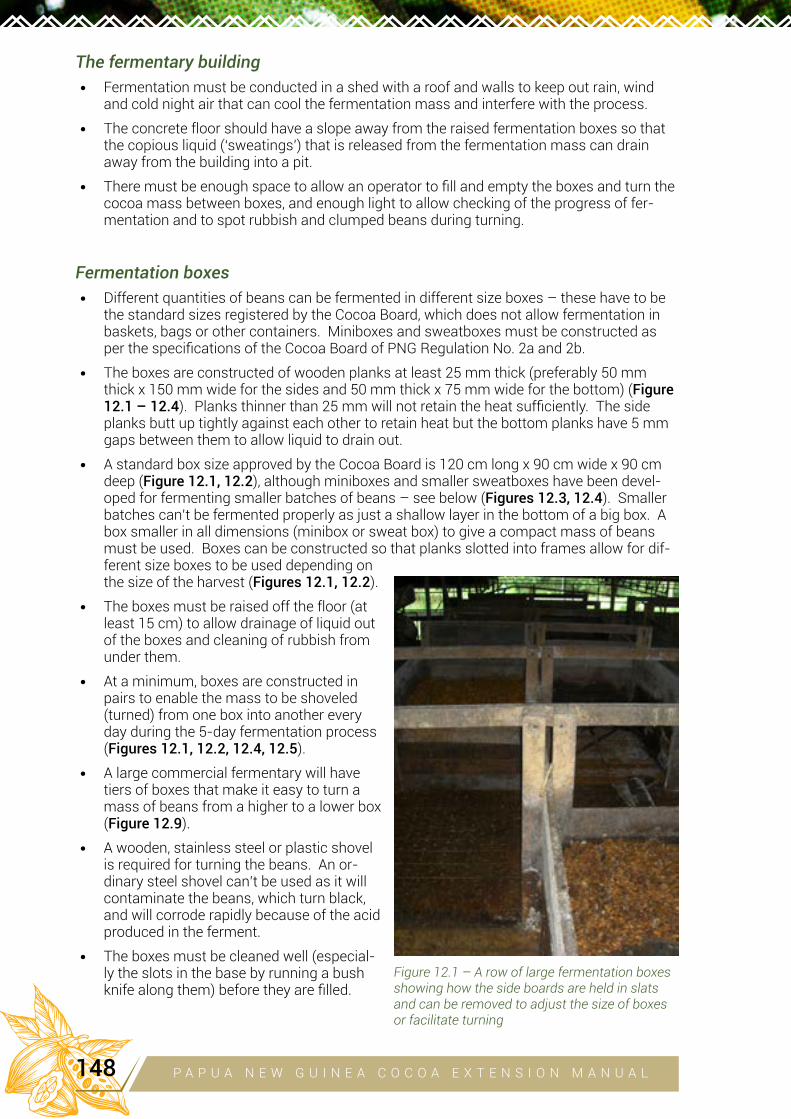
The fermentary building
• Fermentation must be conducted in a shed with a roof and walls to keep out rain, wind and cold night air that can cool the fermentation mass and interfere with the process.
• The concrete floor should have a slope away from the raised fermentation boxes so that the copious liquid (‘sweatings’) that is released from the fermentation mass can drain away from the building into a pit.
• There must be enough space to allow an operator to fill and empty the boxes and turn the cocoa mass between boxes, and enough light to allow checking of the progress of fer-mentation and to spot rubbish and clumped beans during turning.
Fermentation boxes
• Different quantities of beans can be fermented in different size boxes – these have to be the standard sizes registered by the Cocoa Board, which does not allow fermentation in baskets, bags or other containers. Miniboxes and sweatboxes must be constructed as per the specifications of the Cocoa Board of PNG Regulation No. 2a and 2b.
• The boxes are constructed of wooden planks at least 25 mm thick (preferably 50 mm thick x 150 mm wide for the sides and 50 mm thick x 75 mm wide for the bottom) (Figure 12.1 – 12.4). Planks thinner than 25 mm will not retain the heat sufficiently. The side planks butt up tightly against each other to retain heat but the bottom planks have 5 mm gaps between them to allow liquid to drain out.
• A standard box size approved by the Cocoa Board is 120 cm long x 90 cm wide x 90 cm deep (Figure 12.1, 12.2), although miniboxes and smaller sweatboxes have been devel-oped for fermenting smaller batches of beans – see below (Figures 12.3, 12.4). Smaller batches can’t be fermented properly as just a shallow layer in the bottom of a big box. A box smaller in all dimensions (minibox or sweat box) to give a compact mass of beans must be used. Boxes can be constructed so that planks slotted into frames allow for dif-ferent size boxes to be used depending on the size of the harvest (Figures 12.1, 12.2).
• The boxes must be raised off the floor (at least 15 cm) to allow drainage of liquid out of the boxes and cleaning of rubbish from under them.
• At a minimum, boxes are constructed in pairs to enable the mass to be shoveled (turned) from one box into another every day during the 5-day fermentation process (Figures 12.1, 12.2, 12.4, 12.5).
• A large commercial fermentary will have tiers of boxes that make it easy to turn a mass of beans from a higher to a lower box (Figure 12.9).
• A wooden, stainless steel or plastic shovel is required for turning the beans. An or-dinary steel shovel can’t be used as it will contaminate the beans, which turn black, and will corrode rapidly because of the acid produced in the ferment.
• The boxes must be cleaned well (especial-ly the slots in the base by running a bush knife along them) before they are filled.
Figure 12.1 – A row of large fermentation boxes showing how the side boards are held in slats and can be removed to adjust the size of boxes or facilitate turning
P A P U A N E W G U I N E A C O C O A E X T E N S I O N M A N U A L148
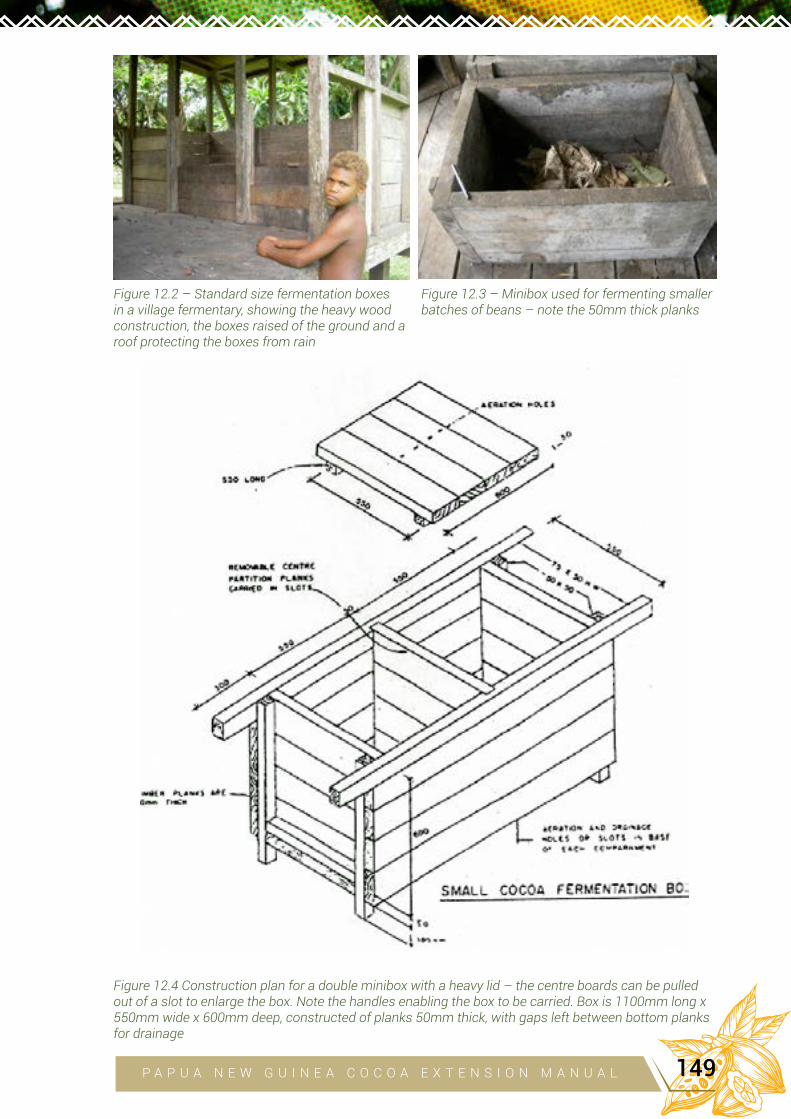
Figure 12.2 – Standard size fermentation boxes in a village fermentary, showing the heavy wood construction, the boxes raised of the ground and a roof protecting the boxes from rain
Figure 12.3 – Minibox used for fermenting smaller batches of beans – note the 50mm thick planks
Figure 12.4 Construction plan for a double minibox with a heavy lid – the centre boards can be pulled out of a slot to enlarge the box. Note the handles enabling the box to be carried. Box is 1100mm long x 550mm wide x 600mm deep, constructed of planks 50mm thick, with gaps left between bottom planks for drainage
P A P U A N E W G U I N E A C O C O A E X T E N S I O N M A N U A L 149
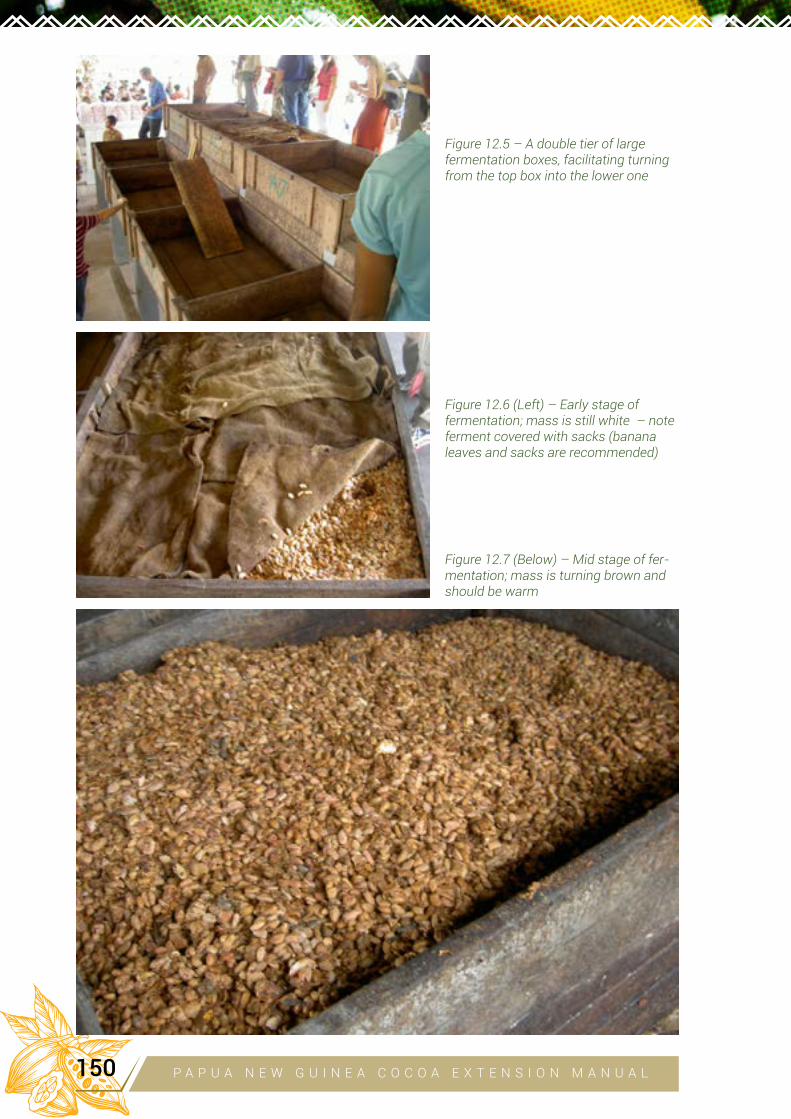
Figure 12.5 – A double tier of large fermentation boxes, facilitating turning from the top box into the lower one
Figure 12.6 (Left) – Early stage of fermentation; mass is still white – note ferment covered with sacks (banana leaves and sacks are recommended)
Figure 12.7 (Below) – Mid stage of fer-mentation; mass is turning brown and should be warm
P A P U A N E W G U I N E A C O C O A E X T E N S I O N M A N U A L150
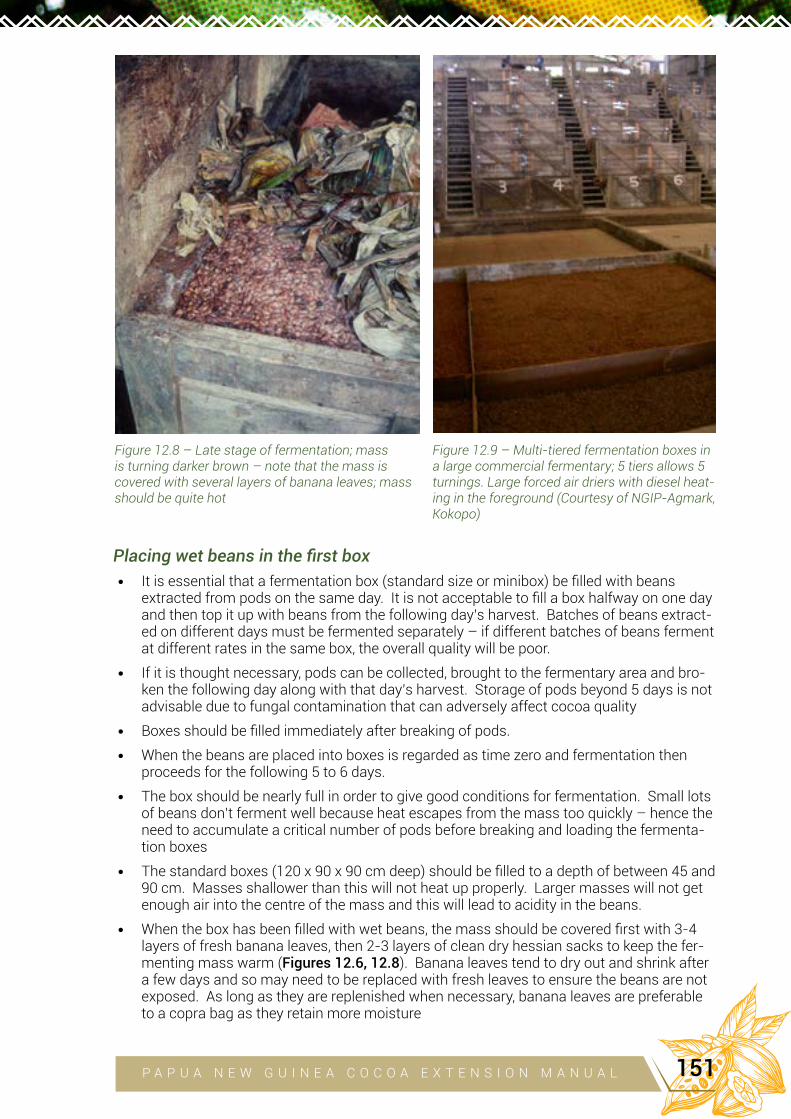
Placing wet beans in the first box• It is essential that a fermentation box (standard size or minibox) be filled with beans
extracted from pods on the same day. It is not acceptable to fill a box halfway on one day and then top it up with beans from the following day’s harvest. Batches of beans extract-ed on different days must be fermented separately – if different batches of beans ferment at different rates in the same box, the overall quality will be poor.
• If it is thought necessary, pods can be collected, brought to the fermentary area and bro-ken the following day along with that day’s harvest. Storage of pods beyond 5 days is not advisable due to fungal contamination that can adversely affect cocoa quality
• Boxes should be filled immediately after breaking of pods.
• When the beans are placed into boxes is regarded as time zero and fermentation then proceeds for the following 5 to 6 days.
• The box should be nearly full in order to give good conditions for fermentation. Small lots of beans don’t ferment well because heat escapes from the mass too quickly – hence the need to accumulate a critical number of pods before breaking and loading the fermenta-tion boxes
• The standard boxes (120 x 90 x 90 cm deep) should be filled to a depth of between 45 and 90 cm. Masses shallower than this will not heat up properly. Larger masses will not get enough air into the centre of the mass and this will lead to acidity in the beans.
• When the box has been filled with wet beans, the mass should be covered first with 3-4 layers of fresh banana leaves, then 2-3 layers of clean dry hessian sacks to keep the fer-menting mass warm (Figures 12.6, 12.8). Banana leaves tend to dry out and shrink after a few days and so may need to be replaced with fresh leaves to ensure the beans are not exposed. As long as they are replenished when necessary, banana leaves are preferable to a copra bag as they retain more moisture
Figure 12.8 – Late stage of fermentation; mass is turning darker brown – note that the mass is covered with several layers of banana leaves; mass should be quite hot
Figure 12.9 – Multi-tiered fermentation boxes in a large commercial fermentary; 5 tiers allows 5 turnings. Large forced air driers with diesel heat-ing in the foreground (Courtesy of NGIP-Agmark, Kokopo)
P A P U A N E W G U I N E A C O C O A E X T E N S I O N M A N U A L 151
o Old copra sack should not be used as the smell of copra will spoil the beans.
o Plastic should not be used as it stops air getting to the beans and leads to excess acidity.
• At this stage the bean mass is pale in colour and feels cool (Figure 12.6). When cut open the beans (cotyledons) may vary from dark purple (Forastero character – Figure 12.35) to white (Criollo character – Figure 12.34); this is typical of the currently recommended Pap-ua New Guinea cocoa clones that have some Trinitario (hybrid of Forastero and Criollo) background.
Turning the beans
• ‘Turning’ is the word used to describe shoveling the beans from a full box into an empty one during which they are stirred and mixed to ensure good aeration and even heating of the beans. It must be done daily during the fermentation process (i.e. 5 turns during a 5-6 day fermentation). If beans are not turned they may become anaerobic and rotten and bad smelling.
• During turning the operator should spot clumps and break them up and also remove any unwanted matter (e.g. placenta, damaged beans, stones, sticks).
• It must be done as quickly as possible to ensure that the mass does not become cool. As soon as the mass has been shoveled into the new box, the banana leaves and hessian sacks must be replaced on top of the beans as before. If the bean mass is exposed to the air for too long it can dry out, the temperature will drop and it may become contaminated with mould, which is undesirable - mould contamination will give undesirable flavors.
• The emptied box, especially the slots and corners in the base, must be scraped out before being filled the following day otherwise the ferment may be spoiled.
• After the first day (i.e. by the first turn) a lot of excess liquid will have drained away through the base of the box; the beans at the top may be starting to get warm.
• By the second turn the mass will be more sticky and the beans will be warmer, especially at the top (Figure 12.7).
Length of fermentation
• Fermented beans should be taken out of the fermenting box and placed on the drier on either day 5 or 6 after fermentation begins (when the beans are first placed in the box). Generally, the beans should not be fermented for less than 5 days or more than 6 days, although this may vary with the type of cocoa.
• Less than 5 days fermentation results in under-fermented beans with a bitter taste and they may be rejected (Figure 12.30).
• Fermenting for more than 6 days can produce beans that are over-fermented and have become almost black and have started to putrefy with foul smells, again leading to rejec-tion by the exporter (Figure 12.31).
• On days 3 and 4 of the fermentation, several physical changes that indicate that fermen-tation has been going well should be closely monitored:
o The outer coat of the beans should be reddish-brown (Figure 12.8).
o The bean mass should feel warm (push a hand into it).
o The mass should have an acidic smell (like vinegar – the most common acid is acetic acid) rather than a bad off-putting smell (putrification if the mass has become anaer-obic).
o Air spaces should be evident between the beans as they become dry-sticky and more easily separated.
P A P U A N E W G U I N E A C O C O A E X T E N S I O N M A N U A L152
• If any of these changes are not right the ferment must be turned out and immediately dried for selling as sub-standard beans.
• By the last day the acid smell should be much less evident or even absent, and the beans should have a dry stickiness; if beans are over-fermented the most obvious sign is their black colour and a foul smell and they may be downgraded.
Fermenting cocoa in miniboxes
• The Postharvest Section at CCIL has developed wooden fermenting miniboxes (66 x 66 x 60 cm) suitable for smallholders with about 2.5 ha of cocoa (Figure 12.3, 12.4).
o At a bean mass depth of 50 cm, these boxes hold approximately 250 kg of wet cocoa (2000 pods) at a conversion rate of 8 pods per kg wet beans.
• The recommended miniboxes are designed to be used with a minimum gap width be-tween boards on the bottom of boxes – this gap should be about 3-5 mm after the boxes have been used for a while and the boards have expanded or contracted with use.
• Boxes must be filled to a minimum of 50 cm depth of bean mass. A marked piece of wood can be used to check that the depth is sufficient. In a field study it was found that many smalholders fermented inadequate quantities of beans especially in off-peak seasons (e.g. filling boxes to only 30 or 40 cm depth). This practice was noted in approx-imately half of the several hundred fermentations observed. Beans start to putrefy under these conditions and pH values become elevated.
• The problem would be greatly alleviated by issuing good farmers with a wet bean buyers license; this would enable them to buy beans from other farmers and so accumulate suf-ficient beans for good fermentation.
• Beans have to be given a daily turn from one compartment to the next on each day of fermentation, as for the big boxes.
• The method for measuring time of fermentation is as follows; time zero, pods broken and beans place into the box; day 1, 24 hour after beans have been put into box, and so on until day 5 or day 6.
• Fermented beans can be placed on the drier on either day 5 or 6 of fermentation as for larger boxes.
• During fermentation, the beans must be covered with a clean copra sack or, preferably, banana leaves, or both to prevent excess drying of the fermentation mass as in the larger boxes.
Fermenting cocoa in sweatboxes
• An important part of Integrated Pest and Disease Management is to harvest all pods as soon as they are ripe (as well as weekly harvesting and disposal of all pods infested with Cocoa Pod Borer or Phytophthora Pod Rot). As a result, small batches of beans will have to be fermented. Also, small batches may have to be fermented during the non–peak periods.
• Fermentation of partial loads in a larger box can cause poor fermentation in which the beans turning black, with an adverse effect on the quality of the final product.
• For small batches of beans, smaller sweatboxes should be used to get good fermentation. The recommended sweatboxes are designed so that there are no gaps between boards and no holes at the bottom of the boxes when they are made.
o After several uses the heat from the fermentation in the boxes will create gaps of up to 5 mm between the bottom boards, which is acceptable to allow draining of sweat-ings.
• There are four different sizes of sweatboxes that have the capacity to hold 100 kg, 50 kg, 25 kg or 10 kg of wet beans.
P A P U A N E W G U I N E A C O C O A E X T E N S I O N M A N U A L 153

o To fill a sweatbox with a capacity of 100 kg, it is necessary to harvest around 800 pods for each fermentation.
o To fill a sweatbox with a capacity of 50 kg, about 400 pods are needed.
o To fill a sweatbox with a capacity of 25 kg, about 200 pods are needed.
o To fill a sweatbox with a capacity of 10 kg, about 80 pods are needed.
• Boxes should be filled immediately after breaking of pods.
• Boxes must be filled to near full capacity.
• There should be two sweatboxes so that beans can be turned from one to the other as for larger boxes.
• Turning using one box is still satisfactory, as a wooden paddle or hands can be used to stir a small mass of beans.
• Beans should be turned or mixed on each day of fermentation.
• Fermentation then proceeds for 5 days following the filling of the boxes (day zero).
Checking for correct fermentation of beans
• This is checked by cutting the beans open along their length and looking at the colour of the cotyledons and the skin.
• Properly fermented beans are brown on the outside and either chocolate-brown (Foraste-ro) or light creamy brown (Criollo) on the inside (Figures 12.34, 12.35).
• Slightly under-fermented beans are light purple (‘slaty’) inside (Figure 12.30).
• Over-fermented beans are nearly black on the outside and browny-black on the inside when cut open lengthways (Figure 12.31).
• Beans that did not ferment at all are a slaty grey colour inside (Figure 12.30).
Drying of cocoa beans• Correct drying is as important as correct fermenting. The main complaint about Papua
New Guinea cocoa on the world market is smoke contamination or ‘smoke tainting’ of the beans caused by use of faulty drier kiln pipes. This problem affects price and demand for the product. Manufacturers cannot remove the taint and the cocoa is down-graded. It is important that during drying and storage of the beans they are isolated from smoke contamination.
• If drying takes too long, the beans can become mouldy also reducing final quality (Figure 12.32).
• Beans develop the correct brown colour inside only if dried properly.
o Well fermented and dried Forastero beans develop a dark-brown or brown-purple inside (Figures 12.33, 12.35)
o Criollo types develop a lighter orange-brown or pale brown inside (Figure 12.34).
o These variations are expected in Papua New Guinea cocoa which includes both Forastero and Criollo ancestry.
• When fully fermented after 5 or 6 days, the bean mass is turned out and spread on a drying table in specially constructed driers. These must not be the same as copra driers because the copra smell will spoil the cocoa.
o To avoid contamination and bad odours developing in the beans, drying beds must be thoroughly cleaned of debris before spreading the beans
o Drying must begin straight away or else the beans will keep fermenting and become over-fermented, black and spoiled – this can be a problem for solar drying if the 5th or 6th day of fermentation coincides with wet weather.
P A P U A N E W G U I N E A C O C O A E X T E N S I O N M A N U A L154
• In many cocoa growing countries (Ghana, Indonesia) simple solar drying is done on bam-boo platforms, about 1 metre above the ground, on which the beans are spread out, with provision to cover them with a tarpaulin or clear plastic sheet during rain (Figures 12.10 -12.13).
o If a plastic roof is held above the beans on a frame, some drying can still occur during damp weather through the glasshouse effect (Figures 12.11, 12.12).
o Worldwide, solar drying produces the best quality cocoa from small farm-based oper-ations (e.g. in Ghana).
o Figures 12.14, 12.15 show low-cost solar driers constructed of plastic film over wooden frames. These use the glasshouse effect to dry cocoa and protect the beans from rain. Vents at the top allow warm moist air to escape (warm air rises) and so draw air up through the drying beds. If the vent at the top is facing away from the di-rection of the prevailing wind, the wind further tends to draw air up through the struc-ture (the Venturi effect).
• However, in many places in Papua New Guinea a harvest peak occurs during the wet sea-son and field studies have shown that simple solar drying is not effective during prolong rainy periods and in wetter areas (i.e. areas with more than 3000mm rainfall per annum), resulting in beans becoming mouldy because they take too long to dry. In response, wood-fired kiln driers have been developed to speed up the drying process and several types of combination solar/wood fired kiln driers have been developed (Figures 12.16 – 12.21).
• Driers must be approved by the Cocoa Board. Various designs have been developed at CCIL and these are shown in the accompanying figures.
o The most common type involves passive solar drying (beans on a rack exposed to the direct rays of the sun) plus a wood-fired kiln and a roof that can be moved on rails to fully expose the beans to the sun or cover them during rain (Figures 12.19 – 12.21).
o More recently CCI has developed an active solar drier that involves allowing air to flow over black rocks and up through the drying rack to speed up the solar drying process (Figures 12.16, 12.17)(see section below).
• Solar driers should be located where they are exposed to full sunlight all day long and should be loaded in the early morning to get most of the daily sunshine on the first day of drying.
• For solar drying, the layer of beans on the drying bed should not be more than 50 mm deep (ideally 25 mm). For wood-fired kiln driers the layer of beans can be up to 100 mm deep, although this creates a problem when alternating sun drying and wood heating, and so keeping a depth of 50 mm is preferred.
• No matter what the drying method, the beans must be regularly raked and turned to en-sure uniform and rapid drying.
o During the first 12 hours of drying, the beans should be raked every hour until they become ‘skin dry’.
o After the first day, they should be raked at least twice per day.
o During raking, unwanted material such as pieces of placenta should be removed and beans joined together (doubles) can also be separated.
• When drying using solar and/or application of heat, beans must be allowed to rest for 12 hours after the first 12 hours of continuous drying, otherwise they develop a hard shell that traps organic acids in the cotyledons, resulting in excessive acidity and lower quality.
o During resting, moisture and organic acids move from the inside to the outside of the beans, resulting in fatter beans with lower acidity (high acidity has been another prob-lem with Papua New Guinea beans on the world market).
• After the first rest period, the beans should be dried only during the day (by solar or ap-plied heat) and rested during the night.
P A P U A N E W G U I N E A C O C O A E X T E N S I O N M A N U A L 155
o Wood-fired kiln pipes should be used no more than 6 – 8 hours per day if there is little sun.
o Drying temperature using wood heating should be about 60oC.
• Good slow solar drying should take 4 to 10 days depending on the weather and the use of extra wood heating when necessary (it can take only 3 to 4 days using the CCIL Active Solar/Kiln Drier – see below)
• The most important task in ensuring that beans are properly dried after 4 days is the turn-ing of the beans.
o If the beans are constantly turned then they won’t take long to dry and this also has the advantage of removing the acetic acid that contributes to the bitter taste of the cocoa, therefore improving flavor and quality.
• There are several common mistakes when drying cocoa beans:
o No resting period, resulting in acidic beans.
o Drying too fast at too high a temperature, again resulting in acidic beans.
o Insufficient raking and turning resulting in uneven drying (e.g. because of cool spots on the drying bed).
o Slow drying and insufficient drying resulting in mould developing on beans.
Problems with wood-fired driers leading to smoke tainting of beans include:
o The fire chambers made of steel kiln pipe tend to rust out very quickly (due to a com-bination of heat and dampness) and allow smoke to pass up through the drying beds instead of going only up the chimney pipe.
o Chimney pipes are not high enough to take smoke away from the drying beds and so allow smoke to blow back onto the cocoa beans.
o Fermenting boxes are too close to the kiln drier and so smoke from the fire can pass over the boxes and causing smoke tainting of the beans - the surface of the beans is very sticky and able to absorbe smoke, especially through fermentation and the initial stage of drying.
o Allowing debris (e.g. cocoa beans, placenta) to fall onto the kiln pipes and burn, cre-ating smoke that can pass up through the drying bed and taint the beans. This can occur if the drying bed has big gaps in it.
• Large business-scale processors (fermentary/driers) can afford to set up and run diesel powered driers or efficient wood-fired driers that will avoid the problem of contamination of beans while allowing them to handle larger quantities of beans.
Testing for the correct final dryness of beans• Beans should have 5% water content at the end of drying – the practical field test for this
is to pick up a handful of beans that have been allowed to cool overnight and squeeze them. If a crackling sound is heard the beans are sufficiently dry. Testing warm beans is not good as their skin my crackle while the inside is still moist.
• Another test is to crush a few beans by rubbing between fingers and thumb. If the beans are properly dried, the inside of the beans (the cotyledons or nibs) will break into pieces while the skin will not break so much.
• Whether the beans are dry enough can also be determined by breaking a few beans - if they are fully dried they will break with a snap. If they are under-dried, the beans will bend but not snap, showing that they need more drying time. If the insides of the beans (nibs or cotyledons) are rubbery and do not break easily, the beans are not sufficiently dry.
• If the skin breaks too much, the beans have been over-dried on the outside.
• If beans look scorched with black skins, or are flat or mouldy, they have not been dried properly.
P A P U A N E W G U I N E A C O C O A E X T E N S I O N M A N U A L156
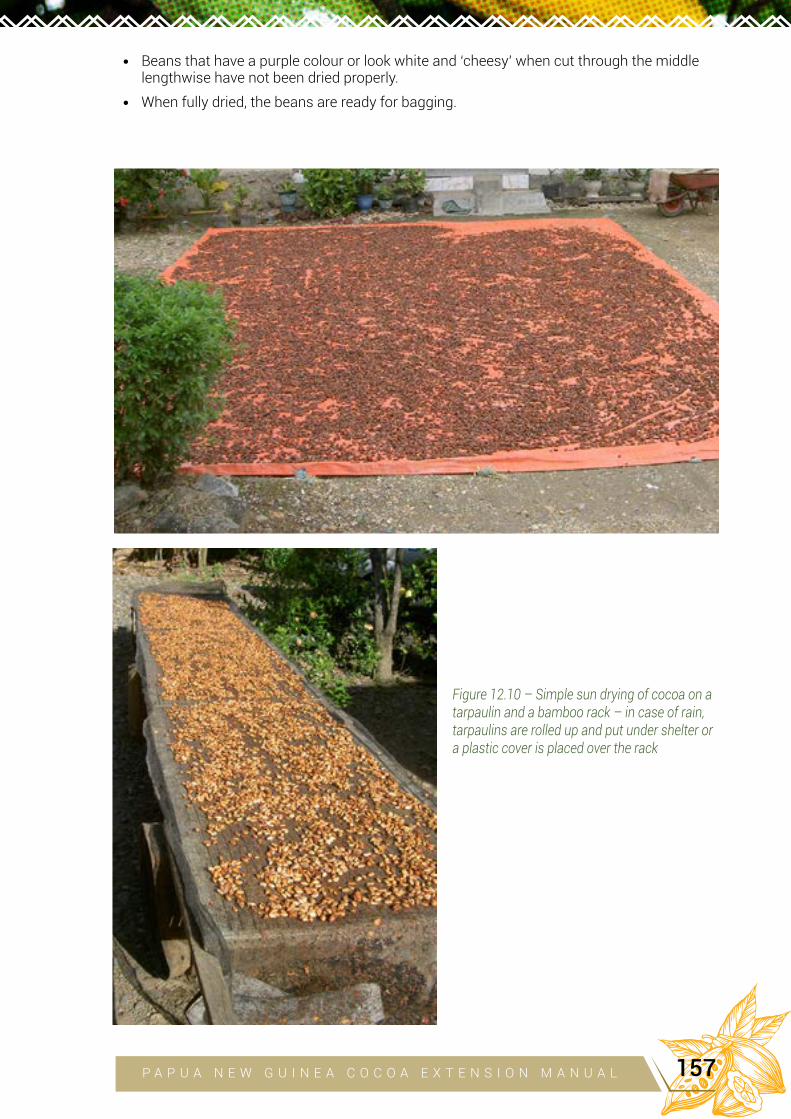
• Beans that have a purple colour or look white and ‘cheesy’ when cut through the middle lengthwise have not been dried properly.
• When fully dried, the beans are ready for bagging.
Figure 12.10 – Simple sun drying of cocoa on a tarpaulin and a bamboo rack – in case of rain, tarpaulins are rolled up and put under shelter or a plastic cover is placed over the rack
P A P U A N E W G U I N E A C O C O A E X T E N S I O N M A N U A L 157
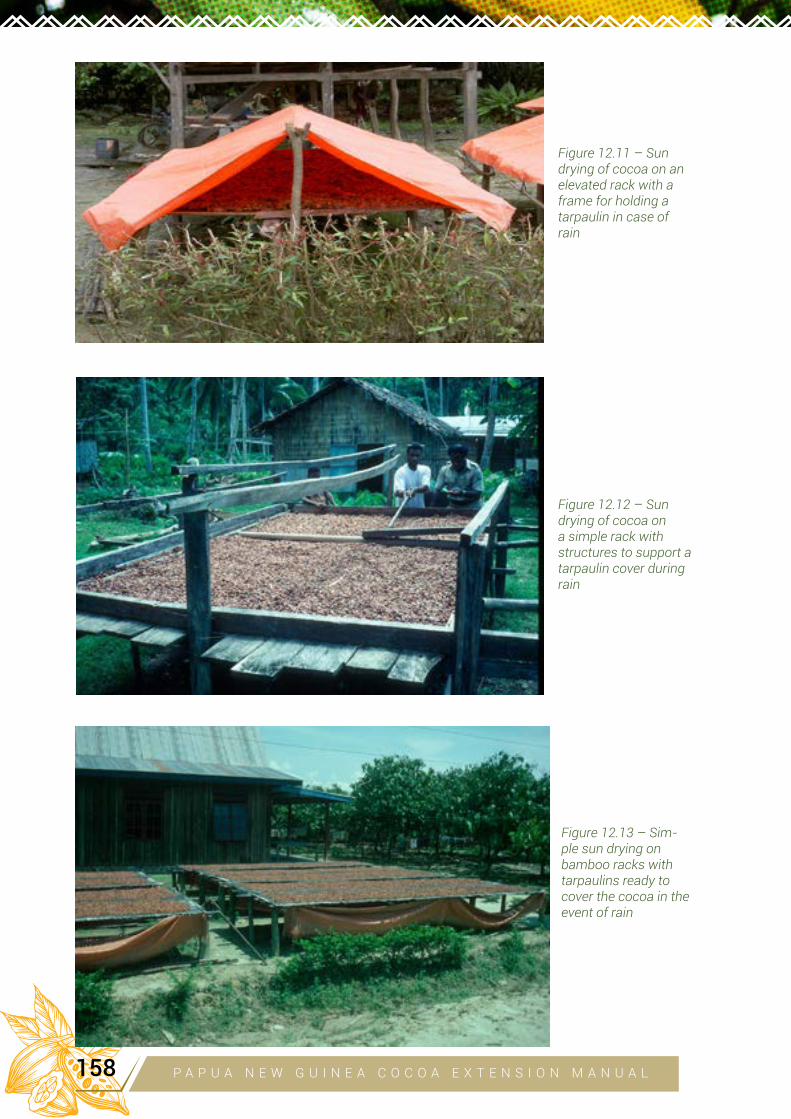
Figure 12.12 – Sun drying of cocoa on a simple rack with structures to support a tarpaulin cover during rain
Figure 12.11 – Sun drying of cocoa on an elevated rack with a frame for holding a tarpaulin in case of rain
Figure 12.13 – Sim-ple sun drying on bamboo racks with tarpaulins ready to cover the cocoa in the event of rain
P A P U A N E W G U I N E A C O C O A E X T E N S I O N M A N U A L158
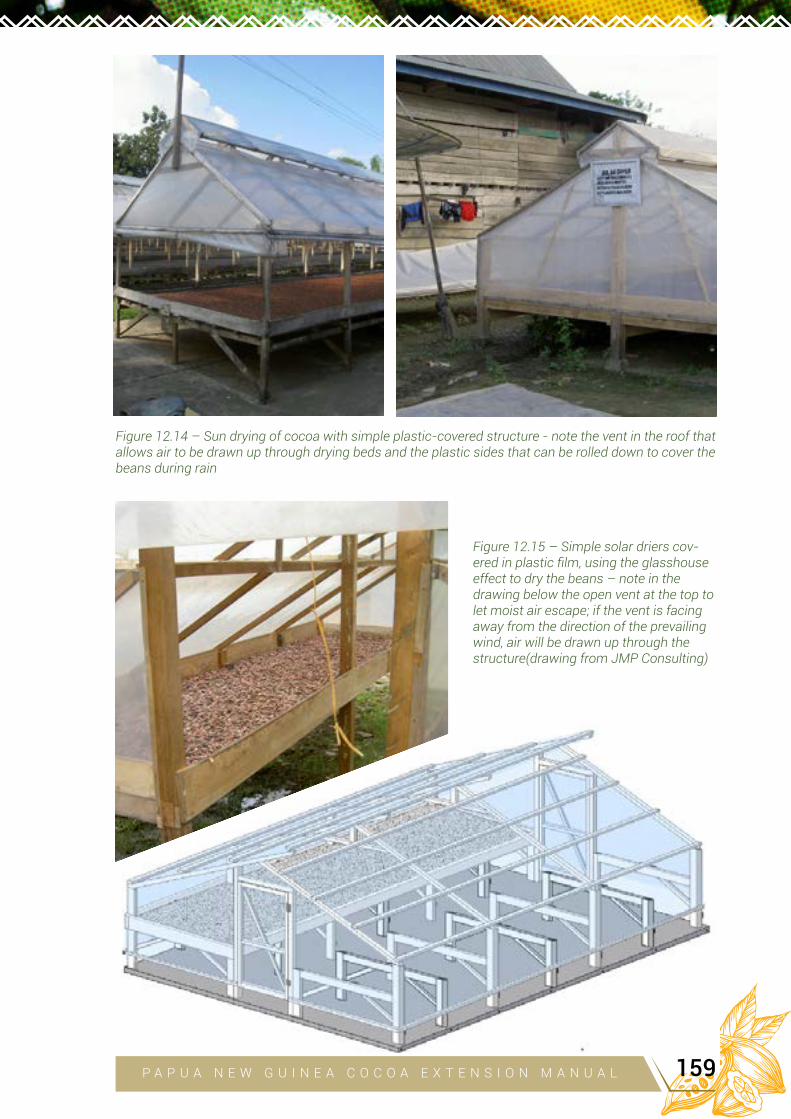
Figure 12.15 – Simple solar driers cov-ered in plastic film, using the glasshouse effect to dry the beans – note in the drawing below the open vent at the top to let moist air escape; if the vent is facing away from the direction of the prevailing wind, air will be drawn up through the structure(drawing from JMP Consulting)
Figure 12.14 – Sun drying of cocoa with simple plastic-covered structure - note the vent in the roof that allows air to be drawn up through drying beds and the plastic sides that can be rolled down to cover the beans during rain
P A P U A N E W G U I N E A C O C O A E X T E N S I O N M A N U A L 159
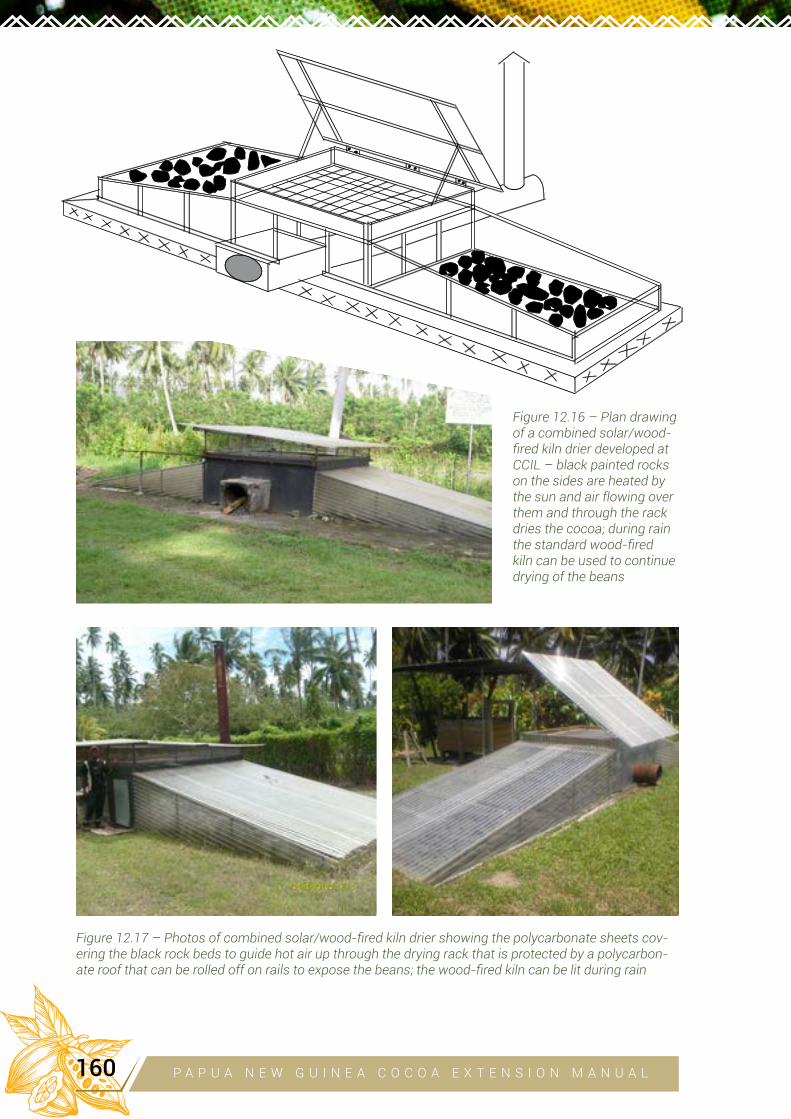
Figure 12.17 – Photos of combined solar/wood-fired kiln drier showing the polycarbonate sheets cov-ering the black rock beds to guide hot air up through the drying rack that is protected by a polycarbon-ate roof that can be rolled off on rails to expose the beans; the wood-fired kiln can be lit during rain
Figure 12.16 – Plan drawing of a combined solar/wood-fired kiln drier developed at CCIL – black painted rocks on the sides are heated by the sun and air flowing over them and through the rack dries the cocoa; during rain the standard wood-fired kiln can be used to continue drying of the beans
P A P U A N E W G U I N E A C O C O A E X T E N S I O N M A N U A L160
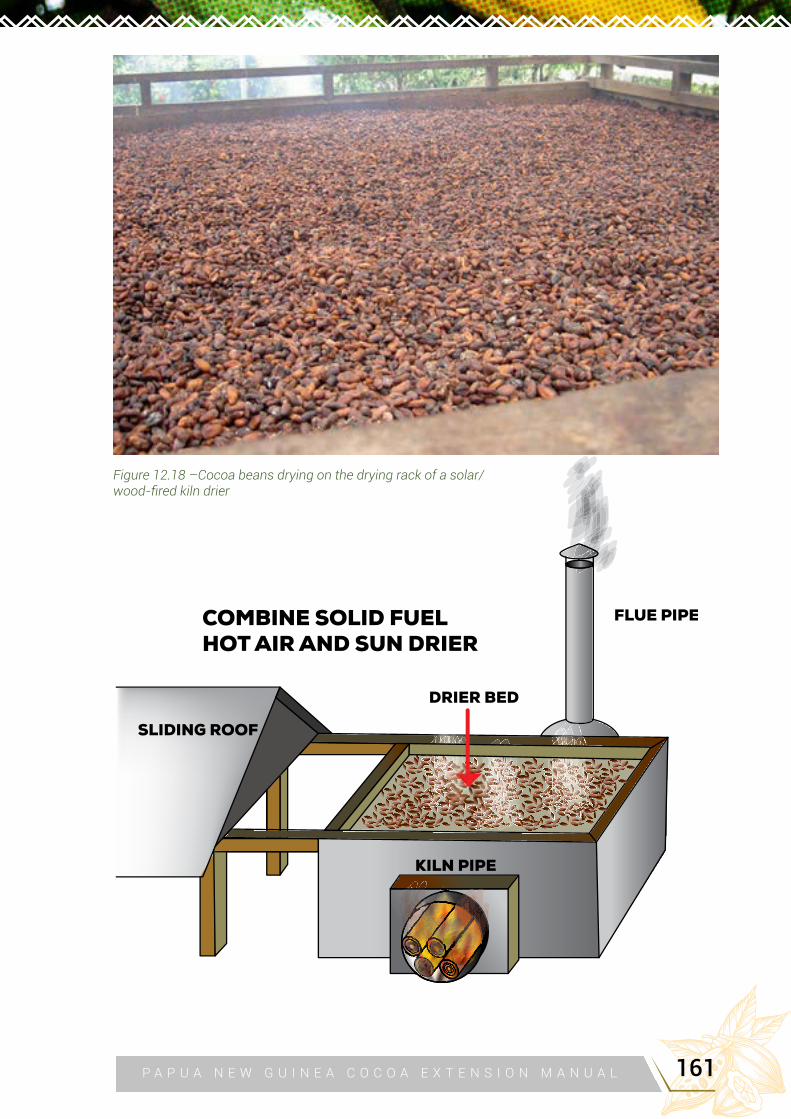
Figure 12.18 –Cocoa beans drying on the drying rack of a solar/wood-fired kiln drier
P A P U A N E W G U I N E A C O C O A E X T E N S I O N M A N U A L 161
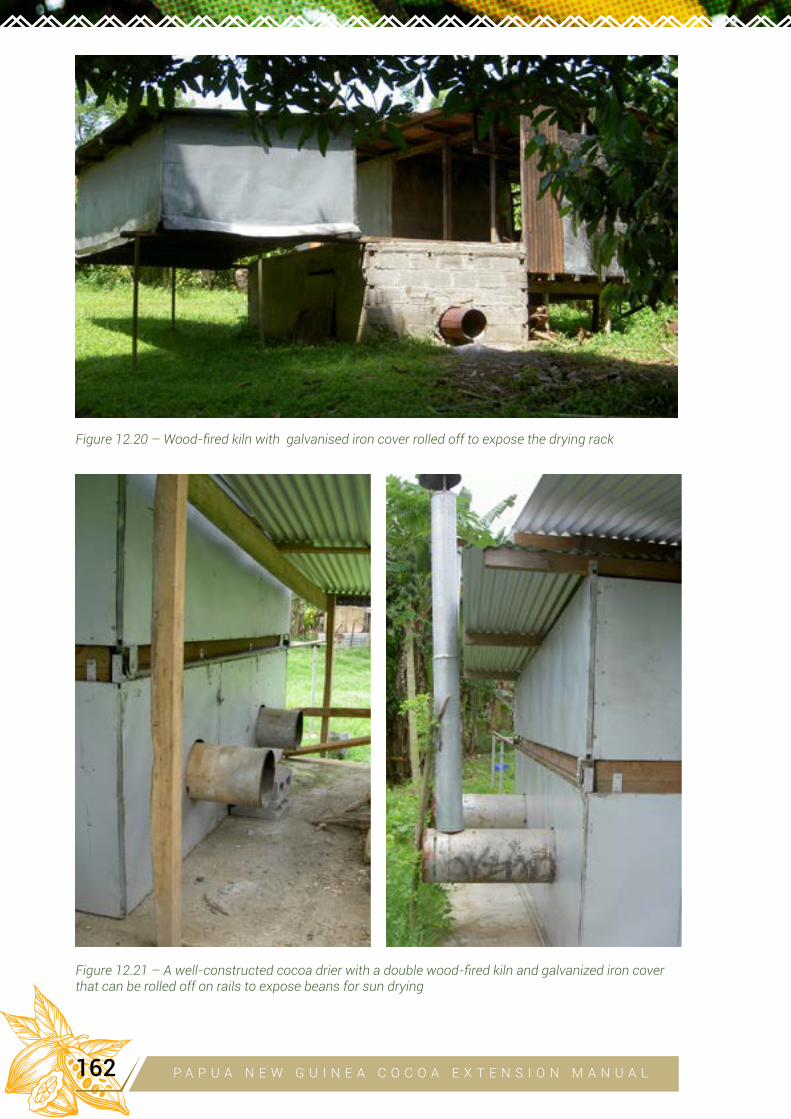
Figure 12.20 – Wood-fired kiln with galvanised iron cover rolled off to expose the drying rack
Figure 12.21 – A well-constructed cocoa drier with a double wood-fired kiln and galvanized iron cover that can be rolled off on rails to expose beans for sun drying
P A P U A N E W G U I N E A C O C O A E X T E N S I O N M A N U A L162
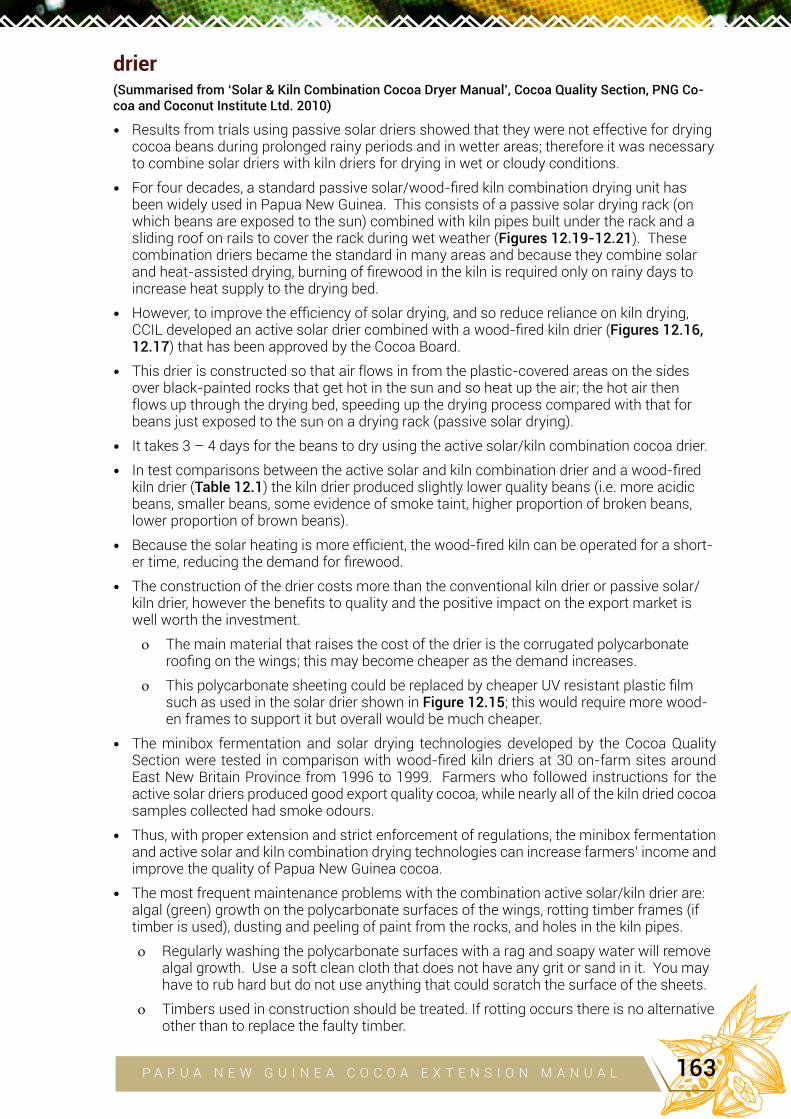
drier(Summarised from ‘Solar & Kiln Combination Cocoa Dryer Manual’, Cocoa Quality Section, PNG Co-coa and Coconut Institute Ltd. 2010)
• Results from trials using passive solar driers showed that they were not effective for drying cocoa beans during prolonged rainy periods and in wetter areas; therefore it was necessary to combine solar driers with kiln driers for drying in wet or cloudy conditions.
• For four decades, a standard passive solar/wood-fired kiln combination drying unit has been widely used in Papua New Guinea. This consists of a passive solar drying rack (on which beans are exposed to the sun) combined with kiln pipes built under the rack and a sliding roof on rails to cover the rack during wet weather (Figures 12.19-12.21). These combination driers became the standard in many areas and because they combine solar and heat-assisted drying, burning of firewood in the kiln is required only on rainy days to increase heat supply to the drying bed.
• However, to improve the efficiency of solar drying, and so reduce reliance on kiln drying, CCIL developed an active solar drier combined with a wood-fired kiln drier (Figures 12.16, 12.17) that has been approved by the Cocoa Board.
• This drier is constructed so that air flows in from the plastic-covered areas on the sides over black-painted rocks that get hot in the sun and so heat up the air; the hot air then flows up through the drying bed, speeding up the drying process compared with that for beans just exposed to the sun on a drying rack (passive solar drying).
• It takes 3 – 4 days for the beans to dry using the active solar/kiln combination cocoa drier.
• In test comparisons between the active solar and kiln combination drier and a wood-fired kiln drier (Table 12.1) the kiln drier produced slightly lower quality beans (i.e. more acidic beans, smaller beans, some evidence of smoke taint, higher proportion of broken beans, lower proportion of brown beans).
• Because the solar heating is more efficient, the wood-fired kiln can be operated for a short-er time, reducing the demand for firewood.
• The construction of the drier costs more than the conventional kiln drier or passive solar/kiln drier, however the benefits to quality and the positive impact on the export market is well worth the investment.
o The main material that raises the cost of the drier is the corrugated polycarbonate roofing on the wings; this may become cheaper as the demand increases.
o This polycarbonate sheeting could be replaced by cheaper UV resistant plastic film such as used in the solar drier shown in Figure 12.15; this would require more wood-en frames to support it but overall would be much cheaper.
• The minibox fermentation and solar drying technologies developed by the Cocoa Quality Section were tested in comparison with wood-fired kiln driers at 30 on-farm sites around East New Britain Province from 1996 to 1999. Farmers who followed instructions for the active solar driers produced good export quality cocoa, while nearly all of the kiln dried cocoa samples collected had smoke odours.
• Thus, with proper extension and strict enforcement of regulations, the minibox fermentation and active solar and kiln combination drying technologies can increase farmers’ income and improve the quality of Papua New Guinea cocoa.
• The most frequent maintenance problems with the combination active solar/kiln drier are: algal (green) growth on the polycarbonate surfaces of the wings, rotting timber frames (if timber is used), dusting and peeling of paint from the rocks, and holes in the kiln pipes.
o Regularly washing the polycarbonate surfaces with a rag and soapy water will remove algal growth. Use a soft clean cloth that does not have any grit or sand in it. You may have to rub hard but do not use anything that could scratch the surface of the sheets.
o Timbers used in construction should be treated. If rotting occurs there is no alternative other than to replace the faulty timber.
P A P U A N E W G U I N E A C O C O A E X T E N S I O N M A N U A L 163
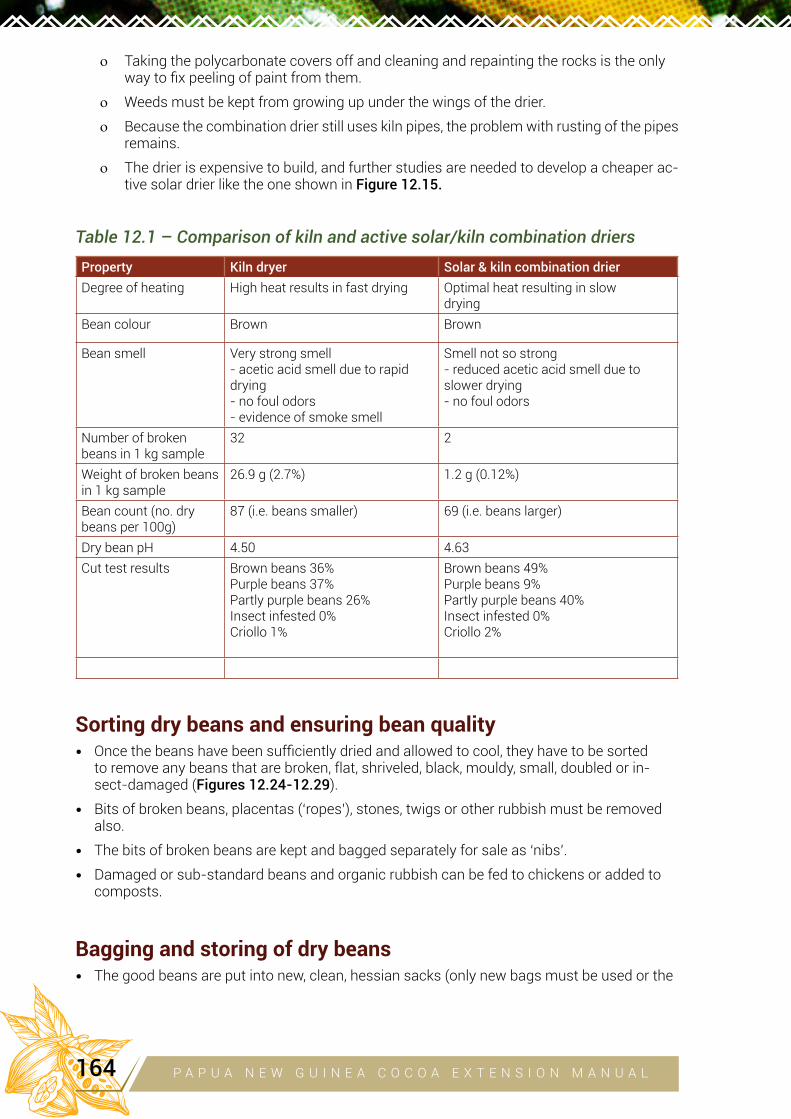
o Taking the polycarbonate covers off and cleaning and repainting the rocks is the only way to fix peeling of paint from them.
o Weeds must be kept from growing up under the wings of the drier.
o Because the combination drier still uses kiln pipes, the problem with rusting of the pipes remains.
o The drier is expensive to build, and further studies are needed to develop a cheaper ac-tive solar drier like the one shown in Figure 12.15.
Table 12.1 – Comparison of kiln and active solar/kiln combination driers
Property Kiln dryer Solar & kiln combination drier
Degree of heating High heat results in fast drying Optimal heat resulting in slow drying
Bean colour Brown Brown
Bean smell Very strong smell - acetic acid smell due to rapid drying- no foul odors- evidence of smoke smell
Smell not so strong - reduced acetic acid smell due to slower drying - no foul odors
Number of broken beans in 1 kg sample
32 2
Weight of broken beans in 1 kg sample
26.9 g (2.7%) 1.2 g (0.12%)
Bean count (no. dry beans per 100g)
87 (i.e. beans smaller) 69 (i.e. beans larger)
Dry bean pH 4.50 4.63Cut test results Brown beans 36%
Purple beans 37% Partly purple beans 26%Insect infested 0%Criollo 1%
Brown beans 49%Purple beans 9% Partly purple beans 40%Insect infested 0%Criollo 2%
Sorting dry beans and ensuring bean quality• Once the beans have been sufficiently dried and allowed to cool, they have to be sorted
to remove any beans that are broken, flat, shriveled, black, mouldy, small, doubled or in-sect-damaged (Figures 12.24-12.29).
• Bits of broken beans, placentas (‘ropes’), stones, twigs or other rubbish must be removed also.
• The bits of broken beans are kept and bagged separately for sale as ‘nibs’.
• Damaged or sub-standard beans and organic rubbish can be fed to chickens or added to composts.
Bagging and storing of dry beans• The good beans are put into new, clean, hessian sacks (only new bags must be used or the
P A P U A N E W G U I N E A C O C O A E X T E N S I O N M A N U A L164
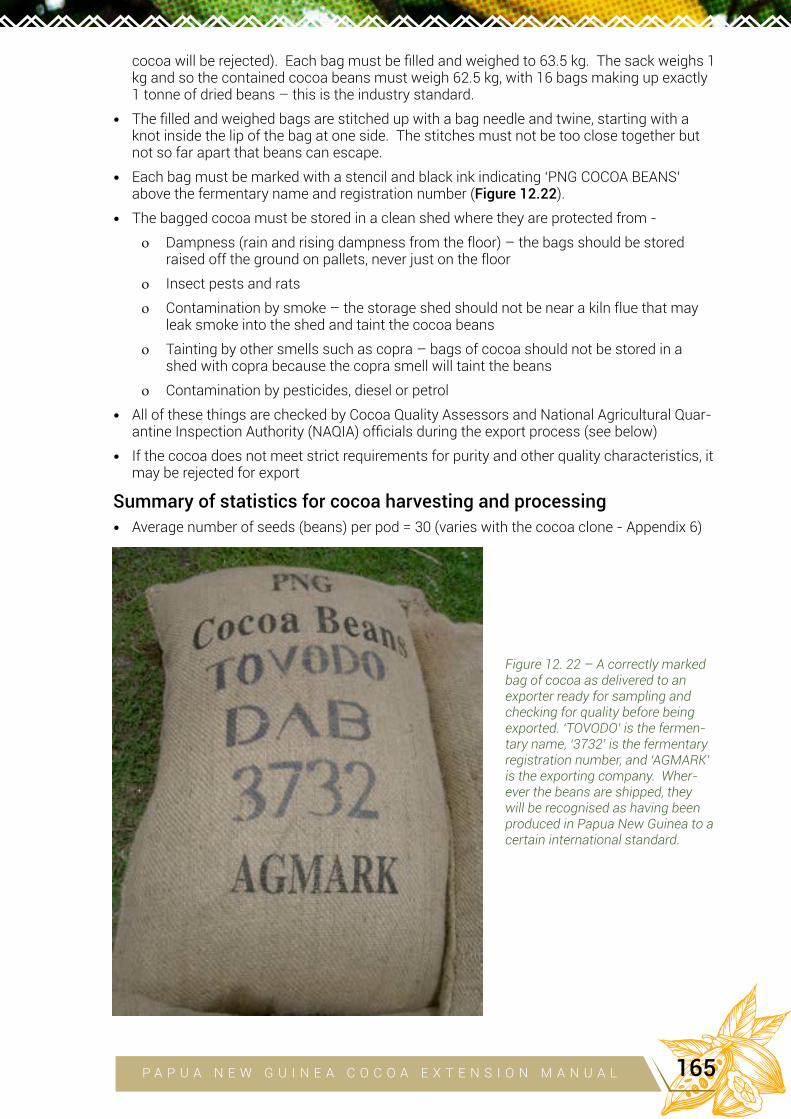
cocoa will be rejected). Each bag must be filled and weighed to 63.5 kg. The sack weighs 1 kg and so the contained cocoa beans must weigh 62.5 kg, with 16 bags making up exactly 1 tonne of dried beans – this is the industry standard.
• The filled and weighed bags are stitched up with a bag needle and twine, starting with a knot inside the lip of the bag at one side. The stitches must not be too close together but not so far apart that beans can escape.
• Each bag must be marked with a stencil and black ink indicating ‘PNG COCOA BEANS’ above the fermentary name and registration number (Figure 12.22).
• The bagged cocoa must be stored in a clean shed where they are protected from -
o Dampness (rain and rising dampness from the floor) – the bags should be stored raised off the ground on pallets, never just on the floor
o Insect pests and rats
o Contamination by smoke – the storage shed should not be near a kiln flue that may leak smoke into the shed and taint the cocoa beans
o Tainting by other smells such as copra – bags of cocoa should not be stored in a shed with copra because the copra smell will taint the beans
o Contamination by pesticides, diesel or petrol
• All of these things are checked by Cocoa Quality Assessors and National Agricultural Quar-antine Inspection Authority (NAQIA) officials during the export process (see below)
• If the cocoa does not meet strict requirements for purity and other quality characteristics, it may be rejected for export
Summary of statistics for cocoa harvesting and processing
• Average number of seeds (beans) per pod = 30 (varies with the cocoa clone - Appendix 6)
Figure 12. 22 – A correctly marked bag of cocoa as delivered to an exporter ready for sampling and checking for quality before being exported. ‘TOVODO’ is the fermen-tary name, ‘3732’ is the fermentary registration number, and ‘AGMARK’ is the exporting company. Wher-ever the beans are shipped, they will be recognised as having been produced in Papua New Guinea to a certain international standard.
P A P U A N E W G U I N E A C O C O A E X T E N S I O N M A N U A L 165
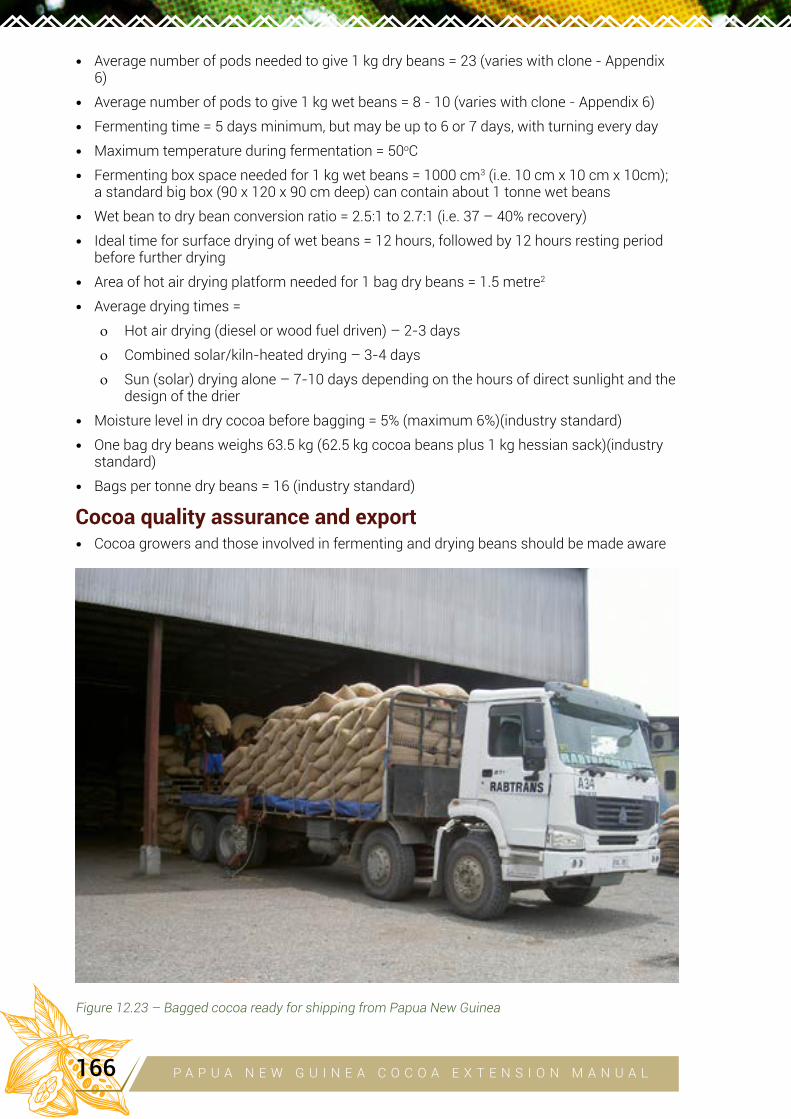
• Average number of pods needed to give 1 kg dry beans = 23 (varies with clone - Appendix 6)
• Average number of pods to give 1 kg wet beans = 8 - 10 (varies with clone - Appendix 6)
• Fermenting time = 5 days minimum, but may be up to 6 or 7 days, with turning every day
• Maximum temperature during fermentation = 50oC
• Fermenting box space needed for 1 kg wet beans = 1000 cm3 (i.e. 10 cm x 10 cm x 10cm); a standard big box (90 x 120 x 90 cm deep) can contain about 1 tonne wet beans
• Wet bean to dry bean conversion ratio = 2.5:1 to 2.7:1 (i.e. 37 – 40% recovery)
• Ideal time for surface drying of wet beans = 12 hours, followed by 12 hours resting period before further drying
• Area of hot air drying platform needed for 1 bag dry beans = 1.5 metre2
• Average drying times =
o Hot air drying (diesel or wood fuel driven) – 2-3 days
o Combined solar/kiln-heated drying – 3-4 days
o Sun (solar) drying alone – 7-10 days depending on the hours of direct sunlight and the design of the drier
• Moisture level in dry cocoa before bagging = 5% (maximum 6%)(industry standard)
• One bag dry beans weighs 63.5 kg (62.5 kg cocoa beans plus 1 kg hessian sack)(industry standard)
• Bags per tonne dry beans = 16 (industry standard)
Cocoa quality assurance and export• Cocoa growers and those involved in fermenting and drying beans should be made aware
Figure 12.23 – Bagged cocoa ready for shipping from Papua New Guinea
P A P U A N E W G U I N E A C O C O A E X T E N S I O N M A N U A L166

Figure 12.24 – Broken beans; beans with parts missing but shell still attachedPhoto of CCI
Figure 12.26 – Foreign matter – any substance that is not whole sound cocoa beans (includes stones, dirt, rat hair, sacking, twine, insects, pla-centa)
Figure 12.25 – Doubles – two or more beans stuck together; results from insufficient turning and breaking of clumps; clumping of beans com-mon in Cocoa Pod Borer infested podsPhoto of CCI
Figure 12.27 – Flats – cotyledons too thin to cut in the cut test to show the inner surface of nibPhotos of CCI
P A P U A N E W G U I N E A C O C O A E X T E N S I O N M A N U A L 167
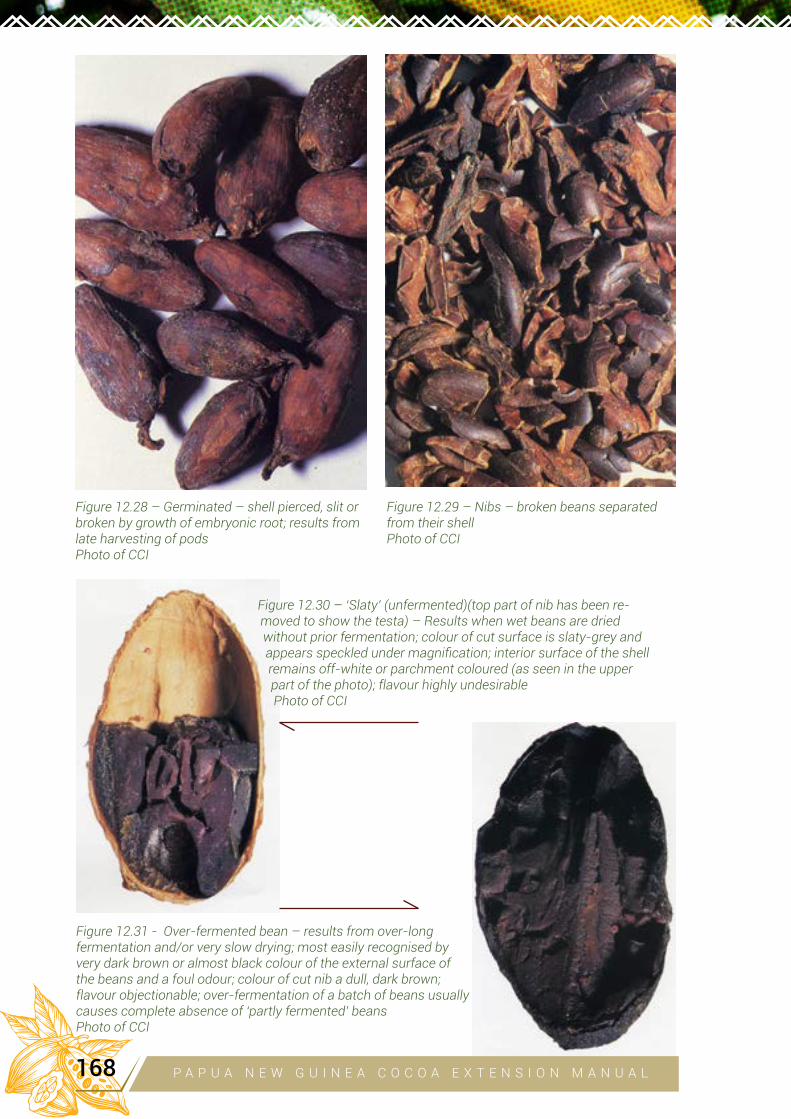
Figure 12.28 – Germinated – shell pierced, slit or broken by growth of embryonic root; results from late harvesting of podsPhoto of CCI
Figure 12.29 – Nibs – broken beans separated from their shellPhoto of CCI
Figure 12.31 - Over-fermented bean – results from over-long fermentation and/or very slow drying; most easily recognised by very dark brown or almost black colour of the external surface of the beans and a foul odour; colour of cut nib a dull, dark brown; flavour objectionable; over-fermentation of a batch of beans usually causes complete absence of ‘partly fermented’ beansPhoto of CCI
Figure 12.30 – ‘Slaty’ (unfermented)(top part of nib has been re-moved to show the testa) – Results when wet beans are dried without prior fermentation; colour of cut surface is slaty-grey and appears speckled under magnification; interior surface of the shell remains off-white or parchment coloured (as seen in the upper part of the photo); flavour highly undesirablePhoto of CCI
P A P U A N E W G U I N E A C O C O A E X T E N S I O N M A N U A L168
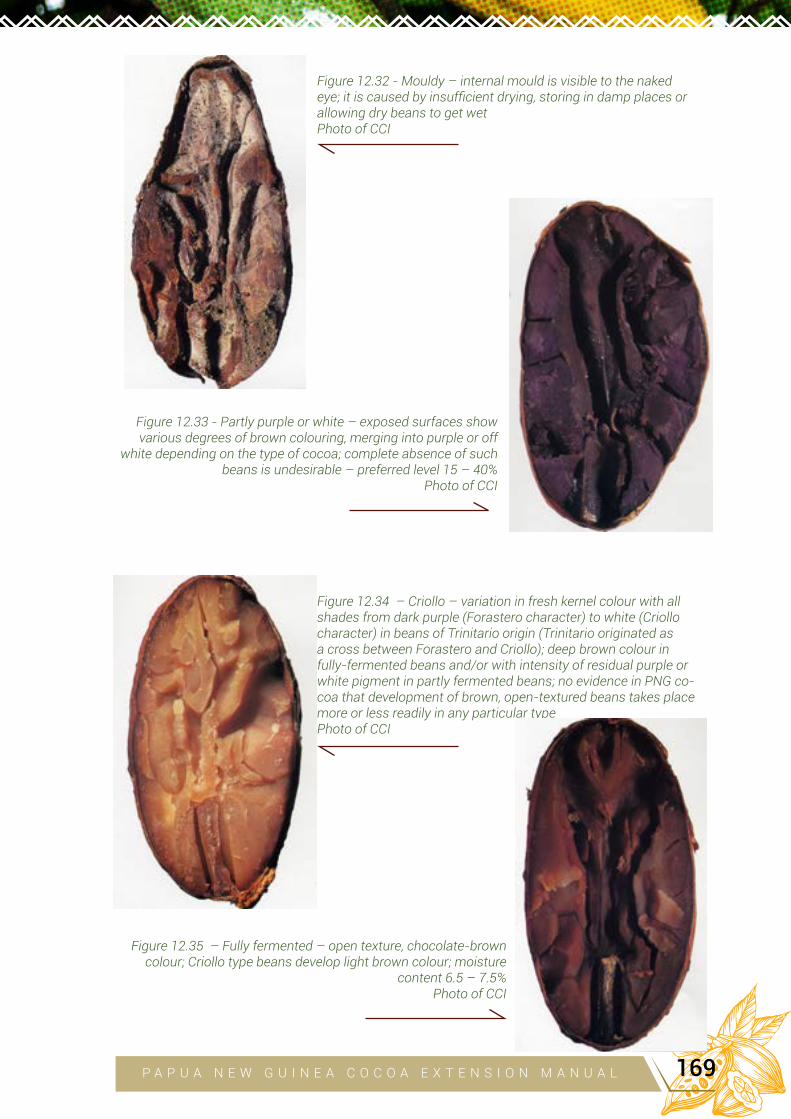
Figure 12.32 - Mouldy – internal mould is visible to the naked eye; it is caused by insufficient drying, storing in damp places or allowing dry beans to get wetPhoto of CCI
Figure 12.34 – Criollo – variation in fresh kernel colour with all shades from dark purple (Forastero character) to white (Criollo character) in beans of Trinitario origin (Trinitario originated as a cross between Forastero and Criollo); deep brown colour in fully-fermented beans and/or with intensity of residual purple or white pigment in partly fermented beans; no evidence in PNG co-coa that development of brown, open-textured beans takes place more or less readily in any particular typePhoto of CCI
Figure 12.33 - Partly purple or white – exposed surfaces show various degrees of brown colouring, merging into purple or off
white depending on the type of cocoa; complete absence of such beans is undesirable – preferred level 15 – 40%
Photo of CCI
Figure 12.35 – Fully fermented – open texture, chocolate-brown colour; Criollo type beans develop light brown colour; moisture
content 6.5 – 7.5% Photo of CCI
P A P U A N E W G U I N E A C O C O A E X T E N S I O N M A N U A L 169
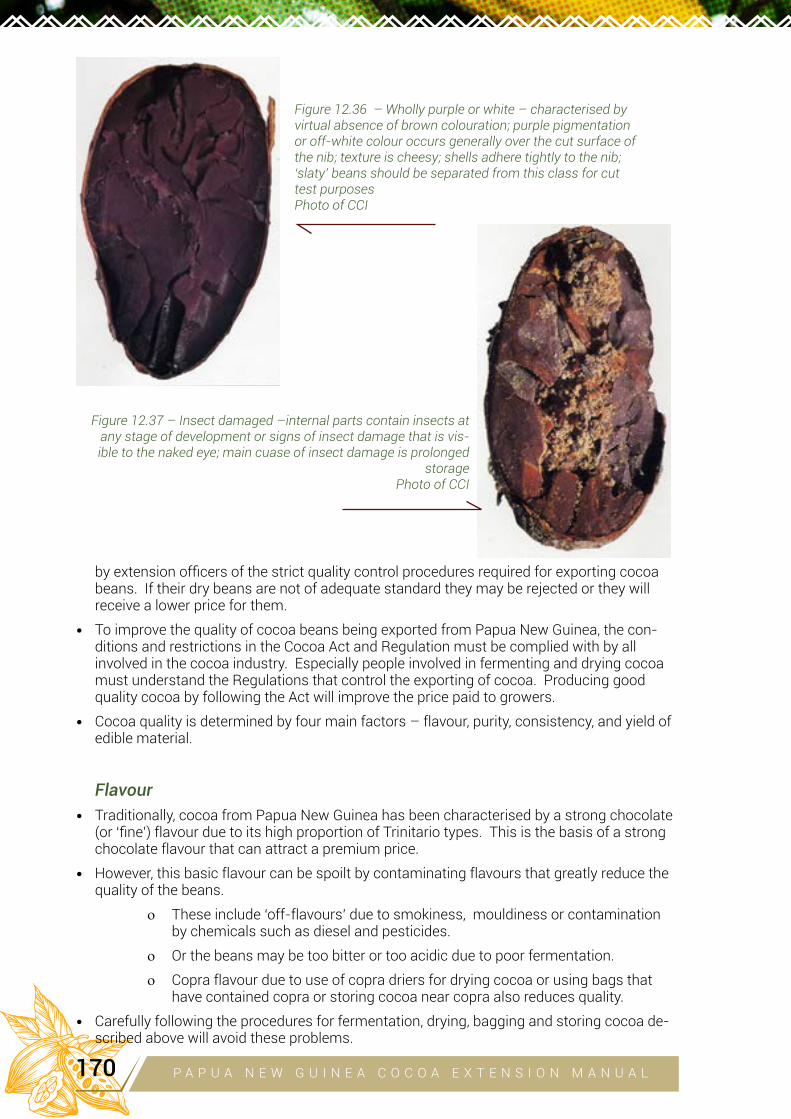
by extension officers of the strict quality control procedures required for exporting cocoa beans. If their dry beans are not of adequate standard they may be rejected or they will receive a lower price for them.
• To improve the quality of cocoa beans being exported from Papua New Guinea, the con-ditions and restrictions in the Cocoa Act and Regulation must be complied with by all involved in the cocoa industry. Especially people involved in fermenting and drying cocoa must understand the Regulations that control the exporting of cocoa. Producing good quality cocoa by following the Act will improve the price paid to growers.
• Cocoa quality is determined by four main factors – flavour, purity, consistency, and yield of edible material.
Flavour
• Traditionally, cocoa from Papua New Guinea has been characterised by a strong chocolate (or ‘fine’) flavour due to its high proportion of Trinitario types. This is the basis of a strong chocolate flavour that can attract a premium price.
• However, this basic flavour can be spoilt by contaminating flavours that greatly reduce the quality of the beans.
o These include ‘off-flavours’ due to smokiness, mouldiness or contamination by chemicals such as diesel and pesticides.
o Or the beans may be too bitter or too acidic due to poor fermentation.
o Copra flavour due to use of copra driers for drying cocoa or using bags that have contained copra or storing cocoa near copra also reduces quality.
• Carefully following the procedures for fermentation, drying, bagging and storing cocoa de-scribed above will avoid these problems.
Figure 12.36 – Wholly purple or white – characterised by virtual absence of brown colouration; purple pigmentation or off-white colour occurs generally over the cut surface of the nib; texture is cheesy; shells adhere tightly to the nib; ‘slaty’ beans should be separated from this class for cut test purposesPhoto of CCI
Figure 12.37 – Insect damaged –internal parts contain insects at any stage of development or signs of insect damage that is vis-ible to the naked eye; main cuase of insect damage is prolonged
storagePhoto of CCI
P A P U A N E W G U I N E A C O C O A E X T E N S I O N M A N U A L170
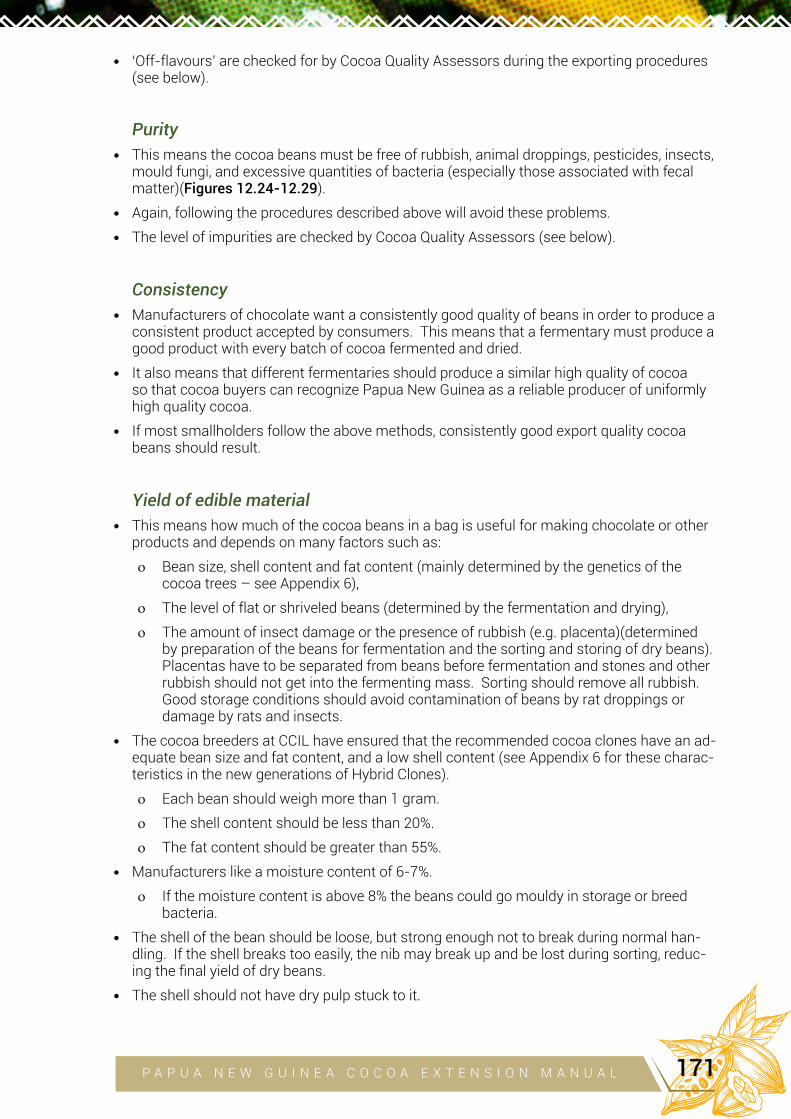
• ‘Off-flavours’ are checked for by Cocoa Quality Assessors during the exporting procedures (see below).
Purity
• This means the cocoa beans must be free of rubbish, animal droppings, pesticides, insects, mould fungi, and excessive quantities of bacteria (especially those associated with fecal matter)(Figures 12.24-12.29).
• Again, following the procedures described above will avoid these problems.
• The level of impurities are checked by Cocoa Quality Assessors (see below).
Consistency
• Manufacturers of chocolate want a consistently good quality of beans in order to produce a consistent product accepted by consumers. This means that a fermentary must produce a good product with every batch of cocoa fermented and dried.
• It also means that different fermentaries should produce a similar high quality of cocoa so that cocoa buyers can recognize Papua New Guinea as a reliable producer of uniformly high quality cocoa.
• If most smallholders follow the above methods, consistently good export quality cocoa beans should result.
Yield of edible material
• This means how much of the cocoa beans in a bag is useful for making chocolate or other products and depends on many factors such as:
o Bean size, shell content and fat content (mainly determined by the genetics of the cocoa trees – see Appendix 6),
o The level of flat or shriveled beans (determined by the fermentation and drying),
o The amount of insect damage or the presence of rubbish (e.g. placenta)(determined by preparation of the beans for fermentation and the sorting and storing of dry beans). Placentas have to be separated from beans before fermentation and stones and other rubbish should not get into the fermenting mass. Sorting should remove all rubbish. Good storage conditions should avoid contamination of beans by rat droppings or damage by rats and insects.
• The cocoa breeders at CCIL have ensured that the recommended cocoa clones have an ad-equate bean size and fat content, and a low shell content (see Appendix 6 for these charac-teristics in the new generations of Hybrid Clones).
o Each bean should weigh more than 1 gram.
o The shell content should be less than 20%.
o The fat content should be greater than 55%.
• Manufacturers like a moisture content of 6-7%.
o If the moisture content is above 8% the beans could go mouldy in storage or breed bacteria.
• The shell of the bean should be loose, but strong enough not to break during normal han-dling. If the shell breaks too easily, the nib may break up and be lost during sorting, reduc-ing the final yield of dry beans.
• The shell should not have dry pulp stuck to it.
P A P U A N E W G U I N E A C O C O A E X T E N S I O N M A N U A L 171

Final preparation of cocoa for export• The bags of dry and sorted beans are taken to a cocoa exporter for sale. It is illegal to sell
dry beans to anyone but an exporter licensed by the Cocoa Board.
• The exporter has contact with cocoa buyers overseas who offer a price for certain quanti-ties of cocoa; this is used to set the D.I.S. (delivery-in-store) price that can be offered to the grower.
• To ensure that the quality standards for export cocoa are maintained, the cocoa is inspect-ed twice, first by the exporters own Cocoa Quality Assessors and then by an officer from the National Agricultural Quarantine Inspection Authority (NAQIA).
• The Cocoa Quality Assessor (QA) checks:
o That the bags are new, clean, insect-free and undamaged,
o Each bag weighs at least 63.5 kg,
o Each bag is correctly stamped with ‘PNG COCOA BEANS’ and the fermentary name and number underneath (Figure 12.22), and
o Each bag is correctly sewn so that beans can’t fall out.
• The QA then takes a sample of beans from each consignment with a stabber; the sample size depends on the size of the consignment. The following checks are then carried out:
o Part of the sample is ground to a powder that is smelled for unwanted odours such as smoke or a rotten smell associated with over-fermentation.
o Beans are checked for even drying and their water content is measured (must be be-tween 5.5 and 7.5% by weight).
o Samples of intact beans are checked to determine the percent of foreign matter (must be less than 1% by weight), and bean size (there must not be more than 1000 beans per kg).
o A cut test is done on 100 beans selected at random. This is done with a special tray that holds the beans while a blade is passed through their centre lengthwise (Figure 12.38). The cut surfaces of each bean is examined and a count is made of any beans that:
• Are slaty (a slate grey colour on the cut surface) – must be less than 1%,
• Have internal mould or insect damage – must be less than 5%,
• Are flat, double, broken or germinated - must be less than 5%.
• Beans can also be sorted into the various categories shown in Figures 12.30 – 12.37.
o If the exporter’s QA considers that the consignment meets export standard, he or she will issue a ‘Quality Assessor’s Report: Exporter’s Acceptance’ in triplicate. One copy goes to the grower or fermentary manager who can then collect payment for the beans from the exporter.
• The NAQIA officer collects samples, does the same tests as above, and can make the fol-lowing determinations:
o Accept the consignment as being of export quality – each bag is stamped with a red triangle just below the mouth and the bag is sealed with a metal tag with ‘PNG’ stamped on it. An inspection certificate is issued and the cocoa must be exported within 3 months or it has to be re-inspected (storage of cocoa for a long time can re-sult in deterioration of the cocoa or damage by insect pests or vermin).
o Reject the consignment as of non-export quality, indicated by painting a green stripe across the mouth of each bag (indicating permanent rejection). This cocoa can be sold only within Papua New Guinea. Faults that lead to permanent rejection and can-not be fixed are insects in the cocoa, smoky beans, slaty beans, bad-smelling beans, and under/over-fermented beans above the allowable limits.
P A P U A N E W G U I N E A C O C O A E X T E N S I O N M A N U A L172
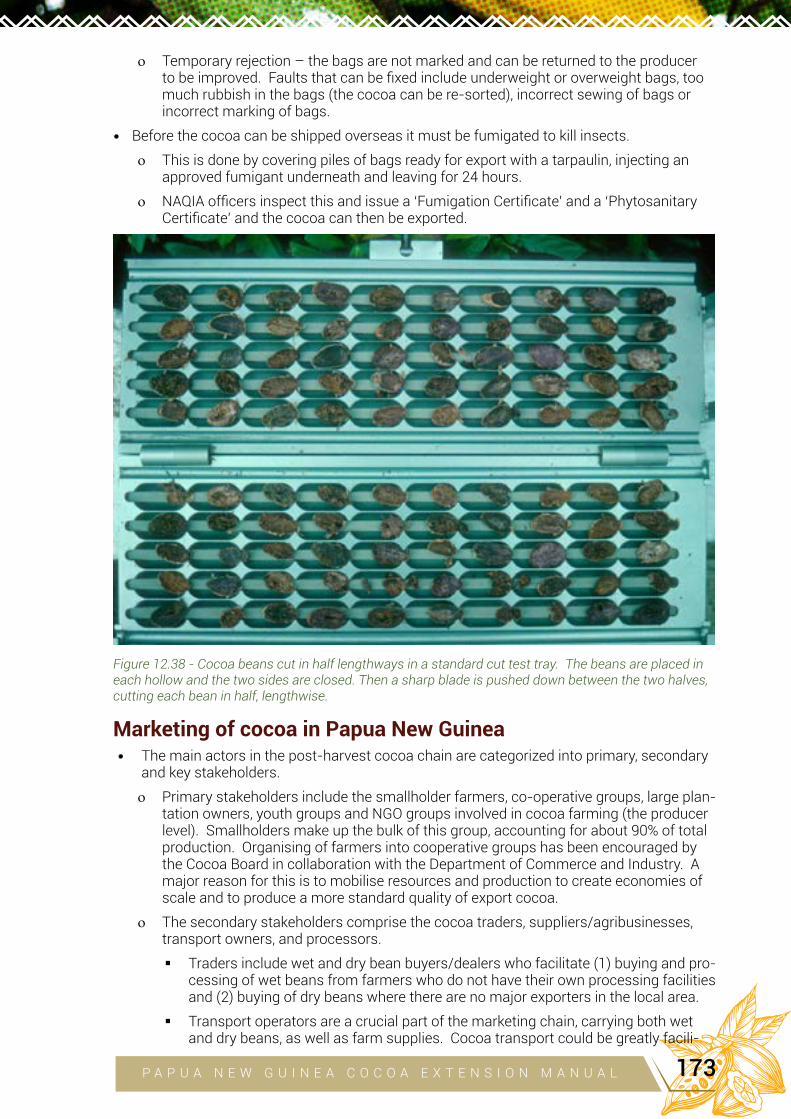
o Temporary rejection – the bags are not marked and can be returned to the producer to be improved. Faults that can be fixed include underweight or overweight bags, too much rubbish in the bags (the cocoa can be re-sorted), incorrect sewing of bags or incorrect marking of bags.
• Before the cocoa can be shipped overseas it must be fumigated to kill insects.
o This is done by covering piles of bags ready for export with a tarpaulin, injecting an approved fumigant underneath and leaving for 24 hours.
o NAQIA officers inspect this and issue a ‘Fumigation Certificate’ and a ‘Phytosanitary Certificate’ and the cocoa can then be exported.
Figure 12.38 - Cocoa beans cut in half lengthways in a standard cut test tray. The beans are placed in each hollow and the two sides are closed. Then a sharp blade is pushed down between the two halves, cutting each bean in half, lengthwise.
Marketing of cocoa in Papua New Guinea• The main actors in the post-harvest cocoa chain are categorized into primary, secondary
and key stakeholders.
o Primary stakeholders include the smallholder farmers, co-operative groups, large plan-tation owners, youth groups and NGO groups involved in cocoa farming (the producer level). Smallholders make up the bulk of this group, accounting for about 90% of total production. Organising of farmers into cooperative groups has been encouraged by the Cocoa Board in collaboration with the Department of Commerce and Industry. A major reason for this is to mobilise resources and production to create economies of scale and to produce a more standard quality of export cocoa.
o The secondary stakeholders comprise the cocoa traders, suppliers/agribusinesses, transport owners, and processors.
Traders include wet and dry bean buyers/dealers who facilitate (1) buying and pro-cessing of wet beans from farmers who do not have their own processing facilities and (2) buying of dry beans where there are no major exporters in the local area.
Transport operators are a crucial part of the marketing chain, carrying both wet and dry beans, as well as farm supplies. Cocoa transport could be greatly facili-
P A P U A N E W G U I N E A C O C O A E X T E N S I O N M A N U A L 173
tated by improving road access to cocoa growing areas.
Farm supply businesses are important in making sure all the necessities to grow cocoa well (e.g. tools, polybags, budding and grafting equipment, pruning equip-ment, fertilisers, pesticides, cocoa sacks) are widely available in the cocoa growing areas.
The exporting companies are fundamental to the international marketing of the final dry beans. They have to locate markets and try to get the best international price for Papua New Guinea cocoa, then handle the shipping of the cocoa to vari-ous parts of the world.
• The key stakeholders include Cocoa Board of PNG, National and Provincial Governments, LLGs and Research and Extension providers (e.g. CCIL).
• The processing of cocoa beans in PNG is covered by various laws and regulations.
o These are administered by the Cocoa Board of PNG.
o The Cocoa Board issues licenses to approved fermentary operators and keeps records on the cocoa produced in these fermentaries to ensure that high standards are main-tained.
o It is illegal to process cocoa without receiving permission from the board.
• There are two tiers in the domestic cocoa market:
o The first is the wet bean market where smallholder farmers who do not have a fer-mentary sell wet bean to wet bean buyers registered with the Cocoa Board. Most smallholders participate in this market. Cocoa farmers who have dealers’ licenses for buying wet beans usually buy them at the farm gate.
o The second tier is the dry bean market. Growers can either sell wet beans to dealers registered with the Cocoa Board or process their cocoa into dry beans and sell them to either registered dry bean buyers and/or exporters. Almost all larger plantations have fermentaries and sell only dried beans to exporters, but smallholders are encouraged to do this also, especially through cooperatives.
• It is reported that smallholders have increasingly been processing their own cocoa for sale as dry beans over the years (Lummani, J. 2003. Economic Aspects of the Cocoa Industry in Papua New Guinea, PNG CCRI, Kerevat). This should be encouraged as it represents value adding to the raw product, produces a product that is easier to transport and store, and encourages farmers to be more business-minded.
• In the 2007/08 cocoa year, there were 66 wet bean dealers mostly based in East New Britain Province, and 41 dry bean dealers in Papua New Guinea, with 15 (37%) in East New Britain Province and 12 (29%) in Bougainville.
• The Cocoa Board issues two types of export licenses, namely: restrictive and unrestrictive export licenses.
o Companies with a restrictive export license are allowed to process (using their own fermentaries) and export cocoa from their own farms or plantations only.
o Those with an unrestrictive export license are allowed to buy and process cocoa pur-chased from mostly smallholder farmers for export.
o Presently there are 2 export companies with restricted licenses and 16 companies with unrestricted export licenses.
• Small farmers are able to sell their dry beans direct to a chocolate manufacturer if they can arrange the contact, regularly produce a sufficient quantity of high quality dry beans of interest to the manufacturer, obtain Cocoa Board approval and support, and arrange shipping.
P A P U A N E W G U I N E A C O C O A E X T E N S I O N M A N U A L174
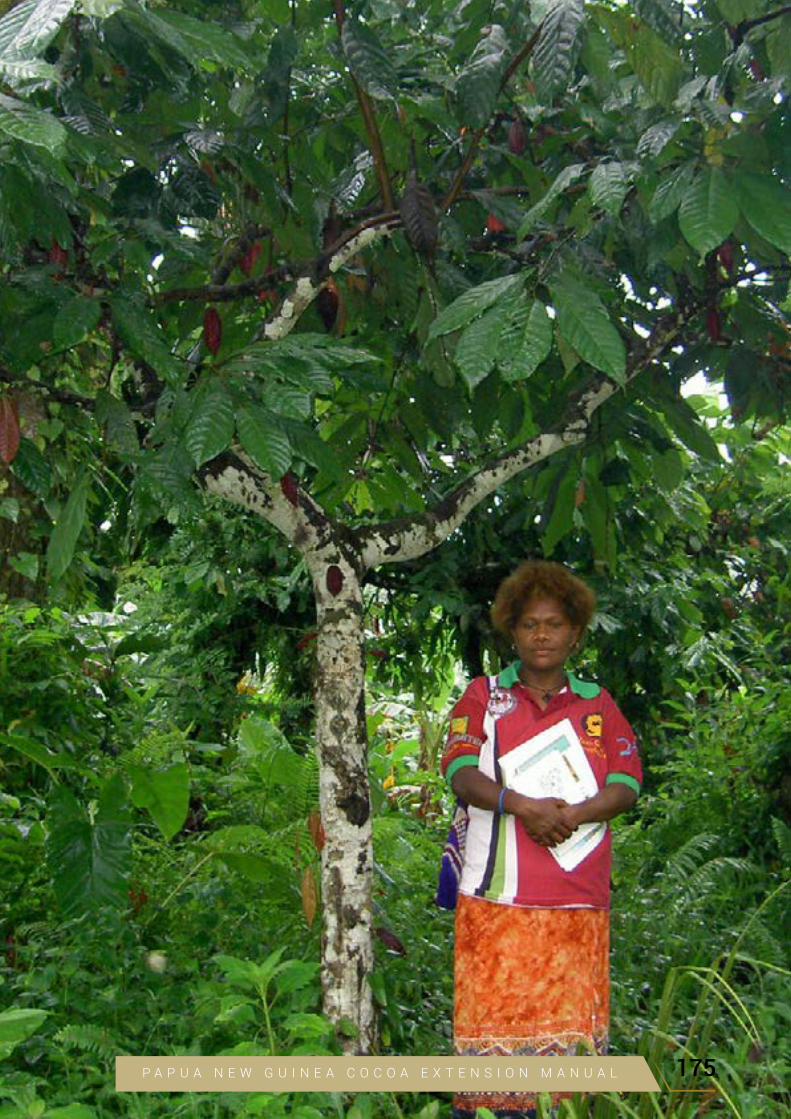
P A P U A N E W G U I N E A C O C O A E X T E N S I O N M A N U A L 175
13
TEACHING AND LEARN-
ING ABOUT COCOA Alfred Nongkas, Anton Varvaliu, Otto Liran, Arnold Parapi and Hosea Tur-barat
AIM OF THIS CHAPTER:
To discuss methods for teaching and learning about growing cocoa, linked to the Cocoa Curriculum developed at CCIL and the national and provincial govern-ment research and development agencies
“I hear – I forget I see - I remember
I do - I understand” Chinese Proverb
“Tell me and I forget Show me and I remember
Involve me and I understand” Carl Orff
CHAPTER
Educating cocoa farmers• For a person to learn how to grow cocoa profitably they must be involved in actually
doing the work of good farming practice and seeing the good results for themselves.
• We learn by seeing and doing, and in this way good farmers can become their own researchers and experimenters – trying out new methods and planting material and seeing for themselves how they compare with their older practices.
• Learning about cocoa or any other subject at an early age permanently prepares young people for their adult life - they will grow up with knowledge and skills, even teaching others along the way when the opportunity arises.
The incentive to learn how to grow cocoa well• As discussed in Chapter 1, this must come from a desire or necessity to make a good
living from a cocoa farming business, especially to support a healthy family.
• It can also come from a desire to do a job well, to use one’s time and resources (e.g. customary land or a cocoa block) well, perhaps even to follow national or religious guidance to use one’s life resources well, and to be a good custodian of the land, the environment and the country.
Learning by observing and comparing
• People learn a lesson by comparing the results of two ways of doing something (e.g. eating cooked or uncooked food, eating ripe or unripe fruit, using a mosquito net or not, fishing over a reef or not) – this is the way we usually learn. This is the basis of all scientific experimentation but it is also how most people learn how to do things effec-tively.
• In formal science, the experimentation is just a little more sophisticated, using several
P A P U A N E W G U I N E A C O C O A E X T E N S I O N M A N U A L176
treatments (ways of doing things), carefully designed experiments to avoid bias, repli-cation to account for the natural variation always present in living systems, and sta-tistical analysis to compare treatments (e.g. on a research station such as at CCIL, the researchers compare the growth and yield of several types of cocoa and from these experiments they learn a lesson about the best type of cocoa to grow in Papua New Guinea).
• Farmers will learn a lesson if they can compare the results of two ways of doing things – e.g. if they can see with their own eyes the results of poor, negligent farming practice alongside good farming practice, or if they can compare various IPDM Options (Chap-ter 7).
The Agmark training system (based on discussions with Gra-ham McNally and Otto Koimba)
• Farmers driving past an Agmark farm can see healthy cocoa trees of a manageable height and low shade density bearing many healthy pods, and think this looks better than their own cocoa farm.
• If such farmers approach Agmark and ask about the difference they see, they are ad-vised to get together a group of farmers from their home area to undertake a training program.
• The farmers are then taken to their own farms where the group, under the guidance of an Agmark extension officer, does a harvest round of ripe pods from a few hundred trees (say 0.5 ha).
• The harvested pods are then laid out and separated into two piles of healthy and dam-aged pods (rejects – e.g. Cocoa Pod Borer affected, Black Pod affected) and the pods are counted – often the result would be perhaps 10% healthy and 90% rejects.
• The group then goes to the Agmark farm and the exercise is repeated, except that here the two piles are often about 90% healthy and only 10% rejects.
• The comparison is stark and the farmers can see it with their own eyes – they have harvested, sorted and counted the pods.
• This then motivates them to learn the good farming methods applied on the Agmark farm.
• Over two weeks, these methods are then shown to the farmers who apply them under the initial guidance of an extension worker on their own farms. The farmers have been involved in applying the good management practices and after six months they should see good results on their own farms. They have done the work themselves and so they will understand what has been done and be able to apply it in future.
• A good extension worker will also explain the theory behind the methods as they are put into practice, and the personal experience will help the theory make sense to the farmers - e.g. as they cut back the overgrown cocoa and shade trees, they will see the planting being opened up, allowing more access to the branches and allowing more air-flow that will dry pods after rain or dew and more sunlight penetration for pho-tosynthesis in the leaves. It can be explained to them that allowing more sunlight in to the cocoa will increase the production of sugars to grow the pods, and dry out the pods to reduce Phytophthora infection. It can be explained to them that frequent re-moval of infested pods from the canopy and burial of the pods will break the life-cycle of the Cocoa pod Borer and Phytophthora.
• Once the trees start to show the results of their own work in the form of increased flowering and pod production, they can compare their results with a nearby block that has not been well managed.
• As a result of weekly complete removal of diseased pods, over time they will see a decrease in the incidence of Cocoa Pod Borer and Phytophthora Pod Rot.
The IPDM training system (CCIL and ACIAR)P A P U A N E W G U I N E A C O C O A E X T E N S I O N M A N U A L 177
• This is based on the same model as the Agmark model (learning by comparative ob-servation of plots of cocoa with different levels of management).
• It involves a farmer or farmer group setting up several (usually 4) different levels of management in plots side-by-side in which the farmers can see the results of the different levels of management and then decide which level is most suited to their own situation (see Chapter 7, Table 7.1, and the ACIAR Booklet ‘Integrated Pest and Dis-ease Management for Sustainable Cocoa Production’ by John Konam, Yak Namaliu, Rosalie Daniel and David Guest, 2008).
o First level – standard practice (usually not much management of the cocoa except for harvesting healthy pods)
o Second level – reducing shade and pruning cocoa to open up the canopy and let in more light, hand weeding, and weekly harvesting and burial of any pods with Cocoa Pod Borer or Phytophthora Pod Rot (requiring additional labour only)
o Third level – everything done as in the second level, plus application of ma-nures or fertilisers to increase pod production (requiring additional labour plus expenditure on manures or fertilisers)
o Fourth level - everything done as in the third level, plus use of herbicides to control weeds, pesticide sprays against Cocoa Pod Borer and Phytophthora Pod Rot, and chemical treatment of Phytophthora Stem Cankers (requiring additional labour plus expenditure on fertilisers, herbicides and pesticides, with the added hazard of pesticide use)
• This is a training method that enables the farmers to compare four different ways of growing cocoa (requiring different levels of input – labour and/or money) – it involves setting up a simple experiment with four ‘treatments’.
• The farmers observe the differences in yield and pest and disease incidence over the subsequent months as they do the harvesting themselves, have meetings to discuss the differences and the reasons for them (perhaps with the support of an extension worker), and then they can make educated decisions about how they want to manage their own farms – they are learning by doing and seeing, and by being involved in set-ting up and observing the experiment.
The Village Extension Worker (VEW) or Cocoa Model Farm-er-Trainer (CMFT) system of building up capacity of farmers
• In this extension system, keen farmers (both men and women) with an entrepreneurial outlook are recruited from cocoa-growing villages and given a short, intensive, hands-on training in the new cocoa varieties (the ‘Hybrid Clones’ and new ‘Hybrid Seeds’) and management methods developed by CCIL.
• They are then able to return to their home villages to train their fellow farmers. These people are called ‘Village Extension Workers’, although the term ‘Cocoa Model Farm-er-Trainers’ is preferred by some Provincial Government agriculture staff who see it as being a more concrete description of their work, avoiding the term ’extension’ which has a particular old-fashioned meaning. These CMFTs do not have to have tertiary qualifications, although they should be able to read and write. Their main qualifica-tions are that they are already keen farmers, with a desire to learn more and improve their own lives and those of their fellow farmers.
• The aim is for CMFTs to become self-sufficient as advisors in their home villages. Their self-sufficiency, which should ensure their permanent function well beyond any development project involved in setting them up, can be established in various ways – e.g.
o The CMFT may recruit about 20 fellow farmers who agree to work with them to improve their methods and plant new cocoa varieties. Fellow farmers may
P A P U A N E W G U I N E A C O C O A E X T E N S I O N M A N U A L178
pay them a fee for advice, especially if this advice is given while the CMFT actually works for these client farmers, for example helping them prune back their shade and cocoa to lower and open up the canopy. One possibility is that the CMFT works with their clients for a ½-day each month (taking 10 days per month for 20 client farmers). This method of sustaining a permanent source of advice in villages could be supported by loans obtained from financial institu-tions by farmers, where the loans are earmarked for payment for advice, farm inputs (new cocoa clones, fertilisers, tools etc.), or construction of fermentaries and driers.
o The client farmers may pay the CMFT a percentage of any increase in produc-tion arising from their change in management practice.
o The CMFT may become an agent for a company involved in selling farm sup-plies (tools, fertilisers, polybags, herbicides) or involved in buying dry cocoa beans, or they may establish a fermentary and ferment and dry wet beans on behalf of their client farmers or they may run a nursery business.
o The production on the CMFT’s own farm is likely to increase substantially if they apply the new methods they have learned through their training.
• The CMFTs become a permanent source of good advice in their home areas. They also become a permanent, self-sustaining link back to the national and provincial agricultural research and development services, and can be involved in monitoring the industry and any problems that arise.
• In an ACIAR Project in 2016-2017, the CMFTs have nearly all been husband/wife teams and have initially set up budwood gardens of the 18 latest release CCIL hybrid clones and nurseries in which they and their farmer group (called ‘disciples’) learn to bud cocoa seedlings and produce as many clones as they need. They then advise the farmers on rehabilitating blocks and planting new blocks with hybrid clones, and on management of current blocks. By learning to bud cocoa, the CMFTs and farmers have developed a new skill that contributes to their self-sufficiency (e.g. they can try using budwood taken from the best tree on their own farm).
Learning about cocoa in schools• As a cocoa extension specialist, research worker or farmer, it is important to learn
about the structure and growth of the cocoa tree and its flowers, fruits (pods) and seeds, which are highly unusual in many ways (see Appendix 3). The best way to learn is to observe and study plants as they grow, from planting and germination of the seed (or the initial growth of a budded seedling) through to flowering, pod production and harvest.
• Because many young people who grow up to become cocoa farmers may not have any formal education beyond their schooling, it is important that they learn something about cocoa growth and production, and the cocoa industry, in school. This should be done in a practical way by observing cocoa trees in the field, and this is possible in most cocoa growing areas because cocoa is often growing in the vicinity of the schools. The practical education related to agriculture can provide a practical and in-teresting framework through which to teach all the more academic aspects of school-ing such as counting, measuring, arithmetic, drawing, reading, writing, geography and science.
• The curriculum should not be too theoretical – it should just encourage the students to observe and measure the growth, production and marketing of cocoa. Any theory that is taught can be based on the practical observations of the students, using the same principles as for teaching farmers. Observation of the growth of the plants can be linked to teaching about the history and geography of cocoa production, cocoa mar-keting, and the manufacture of chocolate. Student can learn about other cocoa grow-ing countries and world trade and the place of Papua New Guinea in it.
P A P U A N E W G U I N E A C O C O A E X T E N S I O N M A N U A L 179
• Students could undertake some simple observational, measuring and counting stud-ies with cocoa, using these as a basis for developing general skills in measurement, counting, arithmetic, observation, drawing, botany and book keeping to measure as-pects of cocoa growth, and writing reports to describe what they have seen.
o Students could plant seeds and record and measure their germination and growth – learning some arithmetic and graphing of growth rates.
o Seed could be stored for different lengths of time to observe the effect of stor-age on germination - how long can seeds be stored and still retain their viabili-ty?
o They could draw a graph of Height of Seedling (Y axis) against Time Since Planting (X axis) or Viability of Seed (Y axis) against Storage Time (X axis).
o Students could observe the way a cocoa seedling grows, forming a joquette, and compare it with some other trees.
o They could tag branches on existing trees and record and measure their devel-opment. They could measure the growth from a tag tied on the branch. They could count leaves, flowers, pods and seeds developing on the trunk of a tree – helping with counting and arithmetic as well as understanding cocoa growth and development.
o Students could write reports and make drawings, helping with education in literacy, description and drawing.
o They could do simple science experiments to learn about science. For example
They could plant seeds in plastic polybags and shade some and leave others unshaded and compare their growth rates.
In a nearby over-shaded block of cocoa, they could reduce shade on part of the block and count flushes, flowers and pods on the heavily shaded and less shaded trees.
Students could draw bar graphs to summarise the results and then draw conclusions.
They would be learning about science and the scientific method.
o They could observe, identify and name, and count the pests and diseases of cocoa as part of ‘Nature Studies’ (using Appendices 7 and 8).
• Students could undertake economic studies of cocoa production to support their stud-ies in arithmetic.
o For example, they could find the current local price of dry beans for export, and look up the world market price and calculate the difference.
o They could calculate how much money the cocoa farmer gets from the sale of a 200 gram block of chocolate in the store in town, and discuss the co-coa-chocolate value chain.
o They could make projections on production by using the pod value of the hybrid clones, and this would help in managing expenditure so that profits are maxi-mised.
o They can calculate the profit that can be made from growing and selling cocoa for a particular farm size (say 1 hectare).
P A P U A N E W G U I N E A C O C O A E X T E N S I O N M A N U A L180
APPENDIX
P A P U A N E W G U I N E A C O C O A E X T E N S I O N M A N U A L 181
01
BOTANICAL AND SOCIAL
HISTORY OF COCOA AND
CHOCOLATE Philip Keane
AIM OF THIS CHAPTER:
To describe the history of cocoa cultivation and chocolate manufacture
The origin, naming and types of cultivated cocoaThe cultivated cocoa tree (genus and species Theobroma cacao, Family Malvaceae) evolved as an understorey tree in the tropical rainforests of the Amazon and Orinoco River basins in the northern part of South America. It has great genetic diversity in the upper reaches of the Amazon River at the junction of Colombia, Peru, Ecuador and Brazil, where several expe-ditions have gone to collect cocoa varieties (e.g. the Upper Amazon types) for use in cocoa breeding programs (Appendix 5). There is now thought to be another region of diversity in the lower Amazon and Orinoco River plains of Brazil, Venezuela and Guyana. There are many species of Theobroma in the region, but only Theobroma cacao is cultivated as the source of cocoa beans for chocolate manufacture. Cocoa was first widely planted and domesticated by the Mayan people living to the north of this region in Central America.
The scientific name was given to the plant in 1753 by the Swedish botanist, Carl Linnaeus, referring to the ‘godly food’ (‘Theo-broma’ in ancient Greek) and the original Central American words for the plant and its product, ‘kakawa’ (Maya) and ‘cacahuatl’ (Aztec), interpreted in Spanish (and botanical Latin) as ‘cacao’. In Spanish and French the common name for the tree is ‘cacao’ (and ‘cacau’ in Portuguese, e.g. in Brazil). In English the tree was often referred to as ‘cacao’ (e.g. in the early writings in West Africa and Papua New Guinea) while the prod-uct was referred to as ‘cocoa’ – now in English ‘cocoa’ is generally used to refer to both the tree and its product. The species used to be classified in the plant family Sterculiaceae, Order Malvales, but following recent DNA analysis is now classified in the sub-family Sterculiacaea in the large family Malvaceae, which also includes hibiscus, cotton and durian.
Initially two subgroups of Theobroma cacao were distinguished, Criollo (meaning ‘native’ in Spanish) and Forastero (meaning ‘outsider‘ in Spanish). Criollo (characterised by soft skinned, elongate pods with white or only slightly coloured cotyledons in the beans ) be-came established as the common cultivated type north of Panama in Pre-Columban times, while Forastero (characterised by hard, green, more rounded pods, with purple cotyledons) developed further south and was not taken into cultivation until after the Spanish conquest. See Figures A1.1, A1.2. Overwhelmingly, the cocoa now found growing wild in the region of genetic diversity in the Amazon and Orinoco River basins is Forastero.
Cocoa was taken from this region of evolution to Central America, where it had become important to the Mayan people at least as early as about 500 AD, when its use was depicted in their stone art. Criollo appears to have been the first type of cocoa cultivated because its white-centred beans give a palatable drink with little or no fermentation before being dried, whereas the purple Forastero beans must be fermented to develop a good chocolate flavour. Criollo cocoa appears to have been very susceptible to damage by pests (possibly mirids) and diseases (possibly what we now call Phytophthora Pod Rot and Canker, or perhaps Ceratocystis Wilt), whereas Forastero types were more hardy and pest and disease resistant, and so easier to grow; this accounts for the fact that Forastero types have become the most
APPENDIX
P A P U A N E W G U I N E A C O C O A E X T E N S I O N M A N U A L182
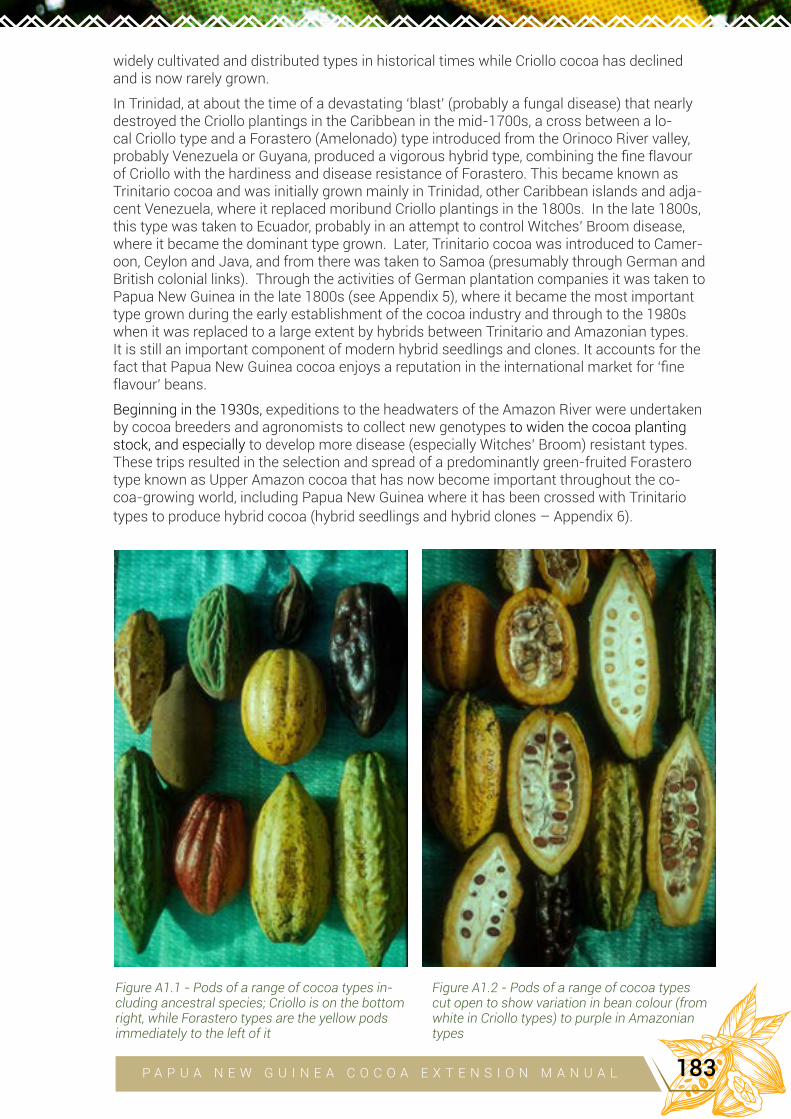
widely cultivated and distributed types in historical times while Criollo cocoa has declined and is now rarely grown.
In Trinidad, at about the time of a devastating ‘blast’ (probably a fungal disease) that nearly destroyed the Criollo plantings in the Caribbean in the mid-1700s, a cross between a lo-cal Criollo type and a Forastero (Amelonado) type introduced from the Orinoco River valley, probably Venezuela or Guyana, produced a vigorous hybrid type, combining the fine flavour of Criollo with the hardiness and disease resistance of Forastero. This became known as Trinitario cocoa and was initially grown mainly in Trinidad, other Caribbean islands and adja-cent Venezuela, where it replaced moribund Criollo plantings in the 1800s. In the late 1800s, this type was taken to Ecuador, probably in an attempt to control Witches’ Broom disease, where it became the dominant type grown. Later, Trinitario cocoa was introduced to Camer-oon, Ceylon and Java, and from there was taken to Samoa (presumably through German and British colonial links). Through the activities of German plantation companies it was taken to Papua New Guinea in the late 1800s (see Appendix 5), where it became the most important type grown during the early establishment of the cocoa industry and through to the 1980s when it was replaced to a large extent by hybrids between Trinitario and Amazonian types. It is still an important component of modern hybrid seedlings and clones. It accounts for the fact that Papua New Guinea cocoa enjoys a reputation in the international market for ‘fine flavour’ beans.
Beginning in the 1930s, expeditions to the headwaters of the Amazon River were undertaken by cocoa breeders and agronomists to collect new genotypes to widen the cocoa planting stock, and especially to develop more disease (especially Witches’ Broom) resistant types. These trips resulted in the selection and spread of a predominantly green-fruited Forastero type known as Upper Amazon cocoa that has now become important throughout the co-coa-growing world, including Papua New Guinea where it has been crossed with Trinitario types to produce hybrid cocoa (hybrid seedlings and hybrid clones – Appendix 6).
Figure A1.2 - Pods of a range of cocoa types cut open to show variation in bean colour (from white in Criollo types) to purple in Amazonian types
Figure A1.1 - Pods of a range of cocoa types in-cluding ancestral species; Criollo is on the bottom right, while Forastero types are the yellow pods immediately to the left of it
P A P U A N E W G U I N E A C O C O A E X T E N S I O N M A N U A L 183
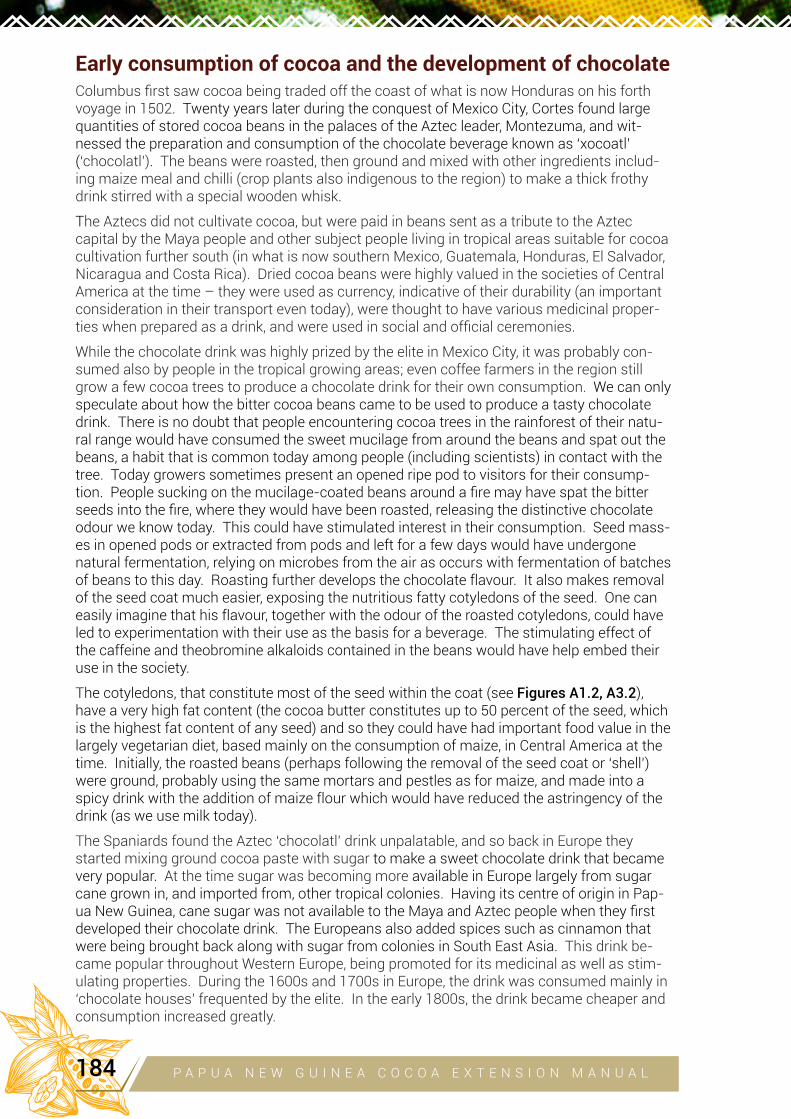
Early consumption of cocoa and the development of chocolateColumbus first saw cocoa being traded off the coast of what is now Honduras on his forth voyage in 1502. Twenty years later during the conquest of Mexico City, Cortes found large quantities of stored cocoa beans in the palaces of the Aztec leader, Montezuma, and wit-nessed the preparation and consumption of the chocolate beverage known as ‘xocoatl’ (‘chocolatl’). The beans were roasted, then ground and mixed with other ingredients includ-ing maize meal and chilli (crop plants also indigenous to the region) to make a thick frothy drink stirred with a special wooden whisk.
The Aztecs did not cultivate cocoa, but were paid in beans sent as a tribute to the Aztec capital by the Maya people and other subject people living in tropical areas suitable for cocoa cultivation further south (in what is now southern Mexico, Guatemala, Honduras, El Salvador, Nicaragua and Costa Rica). Dried cocoa beans were highly valued in the societies of Central America at the time – they were used as currency, indicative of their durability (an important consideration in their transport even today), were thought to have various medicinal proper-ties when prepared as a drink, and were used in social and official ceremonies.
While the chocolate drink was highly prized by the elite in Mexico City, it was probably con-sumed also by people in the tropical growing areas; even coffee farmers in the region still grow a few cocoa trees to produce a chocolate drink for their own consumption. We can only speculate about how the bitter cocoa beans came to be used to produce a tasty chocolate drink. There is no doubt that people encountering cocoa trees in the rainforest of their natu-ral range would have consumed the sweet mucilage from around the beans and spat out the beans, a habit that is common today among people (including scientists) in contact with the tree. Today growers sometimes present an opened ripe pod to visitors for their consump-tion. People sucking on the mucilage-coated beans around a fire may have spat the bitter seeds into the fire, where they would have been roasted, releasing the distinctive chocolate odour we know today. This could have stimulated interest in their consumption. Seed mass-es in opened pods or extracted from pods and left for a few days would have undergone natural fermentation, relying on microbes from the air as occurs with fermentation of batches of beans to this day. Roasting further develops the chocolate flavour. It also makes removal of the seed coat much easier, exposing the nutritious fatty cotyledons of the seed. One can easily imagine that his flavour, together with the odour of the roasted cotyledons, could have led to experimentation with their use as the basis for a beverage. The stimulating effect of the caffeine and theobromine alkaloids contained in the beans would have help embed their use in the society.
The cotyledons, that constitute most of the seed within the coat (see Figures A1.2, A3.2), have a very high fat content (the cocoa butter constitutes up to 50 percent of the seed, which is the highest fat content of any seed) and so they could have had important food value in the largely vegetarian diet, based mainly on the consumption of maize, in Central America at the time. Initially, the roasted beans (perhaps following the removal of the seed coat or ‘shell’) were ground, probably using the same mortars and pestles as for maize, and made into a spicy drink with the addition of maize flour which would have reduced the astringency of the drink (as we use milk today).
The Spaniards found the Aztec ‘chocolatl’ drink unpalatable, and so back in Europe they started mixing ground cocoa paste with sugar to make a sweet chocolate drink that became very popular. At the time sugar was becoming more available in Europe largely from sugar cane grown in, and imported from, other tropical colonies. Having its centre of origin in Pap-ua New Guinea, cane sugar was not available to the Maya and Aztec people when they first developed their chocolate drink. The Europeans also added spices such as cinnamon that were being brought back along with sugar from colonies in South East Asia. This drink be-came popular throughout Western Europe, being promoted for its medicinal as well as stim-ulating properties. During the 1600s and 1700s in Europe, the drink was consumed mainly in ‘chocolate houses’ frequented by the elite. In the early 1800s, the drink became cheaper and consumption increased greatly.
P A P U A N E W G U I N E A C O C O A E X T E N S I O N M A N U A L184
Dried cocoa beans contain roughly equal proportions of two essential ingredients for choco-late - the brown cocoa solids (cocoa powder) that include the flavour and odour compounds and stimulants, and the ‘cocoa butter’, which is a solid cream-white fat that melts at hu-man body temperature (giving chocolate its creamy smoothness in the mouth). In 1828 a Dutchman, Van Houten, used a press to extract most of the cocoa butter from the ground raw cocoa paste, producing a less fatty cocoa powder that made a drink that was easier to prepare and digest. The extraction of the cocoa fat or ‘butter’ led to the development of the solid chocolate we consume today, made by adding extra extracted cocoa butter to the ground raw cocoa paste and sugar used originally for the production of the cocoa beverage. This results in a solid fatty material (chocolate) that can be formed into bars or blocks. The invention of the solid chocolate bar was also aided by the availability in Europe of mechanical grinders that could grind the roasted and de-shelled cocoa beans much more finely than is possible in a mortar and pestle. By the mid-1800s the famous English chocolate companies, Fry’s and Cadbury, were manufacturing and selling dark chocolate bars.
Milk chocolate was first developed in 1875 in Switzerland by Daniel Peter, using condensed milk made by his friend Henri Nestle. In England, Cadbury’s Dairy Milk chocolate was first sold in 1904, and remains popular to this day, being promoted as a food on the basis of its
How to make a delicious chocolate drink from dried cocoa beans
In Central American countries and a few others such as the Philippines and Samoa, the original form of enjoyment of chocolate as a beverage involving minimal preparation using locally grown beans, still survives.
Recipe:
• Take a batch of well fermented and dried cocoa beans and roast in an oven or on a hot plate until the shells become loose and almost black – fermentation, drying and roasting are required to develop the full chocolate flavour.
• Rub the shells off the hot beans while they are hot and collect the oily cotyledons (‘nibs’).
• Pound and grind the nibs in a stone mortar and pestle (like the ones used to prepare spices for Asian cooking) or just use a hollow stone as the mortar and a rounded one as the pestle.
• For the Central American recipe, add sugar and keep grinding to make a smooth sweet paste (the cocoa nibs are rich in cocoa fat and so the paste should become fatty or oily with prolonged grinding).
o Make the paste into tablets each containing about a tablespoon of paste.
o Dry the tablets in the sun so that they can be stored.
o To make a delicious and nutritious drink place a tablet in water in a saucepan and boil and stir for a while until the cocoa and sugar are dissolved or suspended.
o Milk can be added if desired.
• In Samoa, where they make a drink called ‘Koko Samoa’, the roasted beans are ground without adding sugar and the cocoa mass is eventually solidified in a plastic cup.
o To make a drink, a table spoon of mass is sliced or grated off this block, added to boiling water in a saucepan with sugar, boiled for a bit and then poured into a cup for drinking.
• These drinks are probably similar to the ones consumed in the first ‘chocolate houses’ in Europe and that are now becoming very popular again with discriminating consumers.
o They are different from the drink consumed by the Mayan and Aztec people, who didn’t have access to cane sugar and mixed the cocoa with maize flour and chile.
P A P U A N E W G U I N E A C O C O A E X T E N S I O N M A N U A L 185
milk and sugar as well as its cocoa content. Milk chocolate products (consisting of about 20% cocoa, 50% sugar and 30% milk solids) make up the bulk of the current chocolate trade, but there is an increasing appreciation of more ‘pure’ dark chocolate, without milk and with a much higher cocoa and lower sugar content (e.g. 70% or even 85% cocoa content). Cheap-er ‘chocolate’ is now made by adding vegetable fats other than cocoa butter, but in many countries it is not legal to call this product ‘chocolate’ unless it contains a certain percentage of cocoa butter. In some countries this product is called ‘cooking chocolate’. This product, if made with a fat that has a higher melting point than cocoa butter, has an advantage in warmer tropical climates in which true chocolate tends to melt on the shelf.
Coffee farmers in Central America maintain a tradition of growing a few cocoa trees in order to make their own chocolate drink, and cocoa growers in the Philippines and Samoa prepare raw chocolate for making a popular drink, but in West Africa and most of South East Asia and Papua New Guinea, the preparation of a chocolate drink by the farmers themselves is not common. Efforts by agricultural extension services to encourage it in Papua New Guinea have met with little success. It requires roasting and deshelling of the dried fermented beans followed by grinding of the nibs with sugar in a mortar and pestle (made of a round and hol-lowed stone). The resulting paste can be formed into pellets that can be sun dried and stored and later stirred with boiling water to make a delicious, nutritious and stimulating drink. The fact that most cocoa farmers never consume their own product leads them to think of it as a somewhat remote commodity, requiring less attention than their food crops, which are seen as an essential part of daily life and are grown with great care.
Since its first development in Europe, chocolate consumption either as beverages, milk chocolate bars, milk chocolate coated confectionery (e.g. ‘Mars Bars’), dark chocolate with reduced sugar content and special flavours (e.g. with designated origins in particular coun-tries), or as cocoa powder for manufacture (e.g. cakes and biscuits) has increased rapidly as countries attain a certain level of affluence, driving the demand for cocoa beans. While consumption was always high in Western Europe and North America, it has increased rapidly over the last 50 years in countries like Japan, Taiwan and South Korea. Now as China and In-dia develop an increasingly large, affluent middle class, the demand for cocoa beans is again increasing rapidly.
Chocolate consumption has never been as popular in tropical countries as in the colder countries, leading to the anomaly that the people who grow the cocoa beans tend not to consume the end product of their labours. It is likely that the cold climate in temperate coun-tries makes a fatty snack like chocolate more attractive but the relative affluence and buying power in the various countries also affects its consumption.
The spread of cocoa cultivationAfter the Spanish colonisation of Central America beginning in 1492, cultivation of Criollo cocoa was commenced in Venezuela (in the 1500s) and parts of the Caribbean such as Ja-maica and Trinidad in the late 1600s. In about 1600 Criollo cocoa was taken by the Spanish from Mexico across the Pacific Ocean to the Philippines, from where it spread to the nearby Indonesian provinces of Sulawesi and Maluku, and from there to Java where it was cultivated in plantations during the Dutch colonial times, and probably from there to Ceylon (Sri Lanka) and India (along the very active trading routes operated by Islamic people in the region). All cultivated cocoa in the 1500s and 1600s was probably Criollo.
In the 1700s, Forastero cocoa (derived initially from wild trees in the Amazon basin) began to be planted in Brazil and Ecuador in sufficient quantities for export of beans. In 1746, a distinctive Forastero type was taken from the Amazon region to the Brazilian state of Bahia 2000 km further south on the Atlantic coast and this area eventually became the main centre of cocoa production in Brazil based on this uniform type of Amelonado cocoa called Comum.
In 1822 this Amelonado cocoa was taken from Bahia to Sao Tome and Principe, islands off the south coast of West Africa that were Portuguese colonies and so linked to Brazil. In 1855 it was taken from there to Fernando Po (now called Bioko), another island just off the coast of Cameroon in West Africa. Later in the century it spread to the then British colonies of Gha-
P A P U A N E W G U I N E A C O C O A E X T E N S I O N M A N U A L186
na and then to Nigeria on mainland West Africa, leading to the development of the world’s major region of cocoa production in West Africa. A very small quantity of seed (reputedly a single cocoa pod) was introduced to Ghana in 1878 by Tetteh Quarshie when he returned home from working on cocoa plantations on Ferndando Po. A district officer wrote to the governor in 1890 to say that Quarshie had a successful cocoa plantation of about 300 trees in Mampong, Akwapim. Neighbouring farmers bought seeds from him and established their own plantations, and the Aburi Botanical Gardens took over production of seeds in 1890. The economic report of 1889 stated: “The culture is cheap, and the preparation simple, so that it should receive the attention of the small cultivators.” By 1895, cocoa cultivation had caught on throughout southern Ghana, with farmers seeking larger areas of land, stimulating move-ment into central Ashanti and the eastern areas of the country.
The Germans introduced a collection of cocoa from Venezuela and the Caribbean to Cam-eroon (West Cameroon) in the late 1890s; this must have included a high proportion of Trinitario material as red podded Trinitario types with great variability came to dominate the plantings in the former German West Cameroon, in contrast to the Amelonado plantings in East Cameroon derived originally from Fernando Po and similar to the vast Amelonado cocoa plantings in Ghana and Nigeria under British influence.
Through the connections to German trading companies in the Pacific region, this type was taken to Samoa. British planters in Samoa also brought in cocoa from Java and Ceylon (Appendix 2). This was also Trinitario cocoa, or possible Criollo cocoa related to the type that had originally been introduced to the region from Central America in the 1600s. A Criollo type (known as ‘Java Red’) and hybrids with an introduced Trinitario plant whose progeny be-came available in Java after 1892 were the most common types in Java at the time. It is well documented that in the late 1800s Trinitario cocoa was taken from Samoa to German New Guinea centred on Rabaul and Madang through the activities of German trading and planta-tion companies.
The cocoa market - ‘fine flavour’ versus ‘bulk’ cocoaThe European and North American cocoa bean markets have traditionally distinguished two types of commercial cocoa, the larger proportion being ‘bulk’ cocoa derived mainly from Forastero types (overwhelmingly Amelonado cocoa from Brazil and West Africa, but lately in-cluding Upper Amazon cocoa), and a much smaller market of ‘fine flavour’ cocoa (called ‘idel’ cocoa in Indonesia), consisting mainly of Trinitario cocoa (and the Ecuadorian Cacau Nacio-nal which is thought to be a Forastero type with a special flavour, possibly resulting from a cross with an early introduction of Trinitario).
Trinitario cocoa inherited some of the finer fruity flavour characteristics of Criollo, although it also produces a strong chocolate flavour when fully fermented. Java, some of the Caribbean countries and Papua New Guinea were acknowledged as the main producers of ‘fine flavour’ cocoa, based on the high proportion of Trinitario cocoa in their plantings. However, Foraste-ro cocoa, when fully fermented, also produces a good chocolate flavour and, based on its uniformly high quality of fermentation and drying, Ghanaian cocoa became established as a global standard for chocolate beans, especially for the dominant milk chocolate market.
For manufacture of the highest quality chocolate for the much smaller ‘connoisseur’ mar-ket, ultimate cocoa quality characters such as those inherent in Trinitario are still based on genetic differences between the cocoa types, but the cocoa-growing environment and the quality of fermentation and drying also play a big part in the final quality and flavour. Al-though hybrids between Trinitario and Forastero (Upper Amazon) types are now dominant in cultivation in Papua New Guinea (initially as hybrid seedlings but now as clones selected from the hybrid seedling progeny, known as ‘Hybrid Clones’ – Appendix 6), cocoa from Papua New Guinea is still considered to be ‘fine flavour’ cocoa because it retains many Trinitario flavour characteristics.
Main source referenceWood, G.A.R. and Lass, R.A. 1985. Cocoa 4th Edition. Tropical Agriculture Series. Longmans. London
P A P U A N E W G U I N E A C O C O A E X T E N S I O N M A N U A L 187
02
HISTORY AND
IMPORTANCE OF
COCOA GROWING IN
PAPUA NEW GUINEAGrant Vinning, Philip Keane and David Loh
AIM OF THIS CHAPTER:
To document the history of cocoa introduction and production in Papua New Guinea
A short history of cocoa growing in Papua New Guinea Cocoa production in the Pacific evolved from the English settlers in Samoa, Fiji, and the New Hebrides experimenting with cotton in the 1870s. Cotton prices soared in England following the interruptions to supply that followed the American Civil War. When American cotton pro-duction resumed in the 1870s, cotton prices plummeted. Consequently, the settlers looked to other high-priced crops such as cocoa, coffee, rubber and sisal. Cocoa was favoured be-cause as long as it was processed and stored correctly it would not deteriorate. Further, by this stage cocoa and chocolate were very popular in Europe. By the 1870s, Cadbury, Rown-tree and Fry in England, Droste and van Houten in the Netherlands, and Peter, Lindt and Nes-tle in Switzerland were household names. With cocoa having a ready market, English settlers in the New Hebrides, Fiji and Samoa turned from cotton to cocoa. Through their empire-wide connections, the English settlers in Samoa brought in planting material from Ceylon (now Sri Lanka). Material was also brought in from Java. This may have been the original Criollo type (Java Red) that was the most common type in Java at the time or it may have been the product of hybridisation between Java Red and an introduced Trinitario plant whose progeny became available in Java after 1892. At that stage cocoa from Ceylon and Java were con-sidered by the chocolate companies to be the best in the world. The cocoa that was brought to Samoa from Ceylon and Java was Trinitario, which is generally regarded as a ‘fine flavour’ cocoa (Appendix 1). German traders and planters in Samoa are likely to have brought in cocoa planting material from Cameroon which was a German colony at the time, and this would also have been Trinitario.
The early English settlers in Samoa found getting labour to work their plantations to be a challenge. English law at that stage restricted their recruitment techniques. Gradually they abandoned their plantations. German settlers, not limited by such restrictions, pursued cocoa production with energy and innovation. For example, by 1884, Kurt Hufnagel was using his copra driers to dry his cocoa, a practice certainly not recommended now. Seeking new ter-ritory to pursue new opportunities, settlers moved from Samoa to New Guinea following its annexation by Germany. Richard Parkinson, the brother-in-law of the remarkable Emma Coe, popularly known as Queen Emma, introduced cocoa from Samoa to Gorima in the Madang District in 1889. He was responsible for establishing Emma’s coconut plantations in what is now the Kokopo area of the Gazelle Peninsula in East New Britain and there is a mention in his book (‘Thirty Years in the South Seas’) that he introduced cocoa, although he clearly did not promote it. The early planters were mainly interested in coconuts. Cocoa spread through New Guinea through two routes. One was through the activities of the New Guinea Kompagnie
APPENDIX
P A P U A N E W G U I N E A C O C O A E X T E N S I O N M A N U A L188
in its chartered domains of Kaiser Wilhemsland, the Bismark Archipelago, and the Northern Solomons. The other route was through labourers recruited to work the different plantations. An intricate patchwork emerged – there were Fijians working in New Guinea, and Solomon Islanders, New Guineans and ni-Vanuatu working in Samoa. It was the movement of repatri-ated plantation workers back to Solomon Islands and Bougainville that helped the introduction of cocoa into their regions. Direct introduction of cocoa from Venezuela occurred until 1907 and this was again likely to have been Trinitario
Development was slow. Only in 1905 was it considered that cocoa production in New Guin-ea had reached a level of significance. By 1911 production reached 40 tonnes of dry cocoa beans. Between 1913 and 1923, exports varied between 112 and 186 tonnes. Some trees were lost during the First World War (1914-18). It was during this period that Australia took over from Germany as the administrator of New Guinea. Production slumped after the war and by 1923 it was just 34 tonnes. To encourage production, the Australian Government enacted the Papua and New Guinea Bounties Act of 1926 and the Customs Tariff (Papua and New Guinea Preference) Act of 1926 to provide a subsidy that covered all expenses associated with picking, fermenting, curing, and bagging cocoa for export.
Many coconut plantations survived the war relatively intact (some of these tall slender palms are still seen today), and interplanting cocoa under coconuts became widespread in the 1920s and 1930s; 1200 hectares of cocoa under coconuts had been established by the end of the 1930s. This was a feature unique to New Guinea cocoa production and has been of world-wide significance, followed in Malaysia and Indonesia and now being adopted in the Philip-pines. Research and experience in Papua New Guinea have shown that coconuts provide ideal shade for cocoa and also benefit pest control in the cocoa.
In 1913 the Germans planned a research station at Keravat. In 1928, the Australian adminis-tration formalised these plans when it developed the ‘Native Agricultural School and Demon-stration Plantation’ or ‘Government Demonstration Plantation’. Two years later the site was renamed the Lowlands Agricultural Experiment Station (LAES). Cocoa was one of the prime crops of interest. A section at the Botanic Gardens in Rabaul was dedicated to the continua-tion of some plantings of Criollo cocoa. The research station selected superior types of cocoa from the Trinitario types existing on plantations and provided to growers advice and seed from these selected trees. Some of the plantations were very large – by the outbreak of the Sec-ond World War, Kabaira Plantation had expanded to nearly 250 ha. Even so, very few of the plantations were sole cocoa producers. New material from Java, again presumably Trinitario was imported in 1932. Little research work was published before the beginning of the Second World War (1939-45), although In 1938, E.C.D. Green, who was then the Superintendent of LAES, published a booklet ‘Cacao Cultivation and its Application to the Mandated Territory of New Guinea’, reprinted from the New Guinea Agricultural Gazette, Vol.4(4). This booklet in-cludes some of the earliest documentation of cocoa cultivation in Papua New Guinea, and in it Green describes the introduction of cocoa to the former German New Guinea from Ceylon and Java, via Samoa, citing C.J.J. van Hall (‘Cacao’ 2nd Edn, 1933) who stated that Criollo cocoa was imported into Samoa from Java and Ceylon in 1883 and Forastero hybrids (=Trinitario) from Ceylon in 1889. Green considered it highly likely that the German trading companies that were getting labour for their plantations from New Guinea would have brought this cocoa into New Guinea. The first recorded exports of cocoa from Samoa and New Guinea occurred at about the same time, in 1905. Green cites Australian chocolate manufacturers who consid-ered New Guinea cocoa to be very similar to that from Java, Ceylon and the West Indies, all known for their fine flavour Trinitario cocoa at the time.
During the Second World War most of the cocoa plantings as well as most of the notes of research done to date were destroyed. The Keravat research station was a centre of Japanese occupation during the war and many of the experimental cocoa plantings were destroyed for food gardens and the area was heavily bombed.
P A P U A N E W G U I N E A C O C O A E X T E N S I O N M A N U A L 189
Many writers up to ten years after the war saluted the efforts of F.C. Henderson in preserving then developing the 10 mother trees that survived the war and became the Keravat (K clones) that, along with some selections from Asalingi Plantation in the Bainings (KA clones), became the foundation of the future work in cocoa improvement at LAES.
Exports of cocoa from Papua and New Guinea in the 1936-40 period averaged about 200 tonnes per year, but immediately after the war in 1946-47 only 48 tonnes of dry beans were exported. During the 1940s Australia was the market of choice: “it is obvious that there is a substantial market for cocoa in Australia” (Bureau of Agriculture Economics 1947). Optimism for the industry in Papua New Guinea was substantial - “On present indications it does appear that expansion of cocoa production in the Territories can be justified and it is considered that field investigations into the suitability of areas for cocoa production should be given a high priority in the planning procedures by the Resources Survey Sub-Committee” (Urqhuart DH and Dwyer REP 1951 Report on the prospects of extending the growing of cocoa in the Terri-tory of New Guinea). Exports sent “abroad” at the time (sadly, Urquhart did not specify where) obtained prices “very much higher” than West African beans. It is evident that from its earliest development, Papua New Guinea cocoa had an excellent reputation for high quality.
Exports increased gradually to 730 tonnes in 1953-54. However rapid expansion occurred after that. Within five years exports were 2,577 tonnes. Large-scale plantings, mainly in East New Britain, Bougainville, Northern District (now Oro Province) and Madang then followed, with the result that exports increased to 10,000 tonnes in 1961-62 and to 20,000 tonnes in 1964-65. A peak export year was 1989, when 48,000 tonnes of dry beans were exported; this would have been exceeded in 1990 had not the Bougainville crisis destroyed production there (Figure A2.2). Production began increasing again from the late 1990s and reached more than 50,000 tonnes in 2006-7.
Prior to the Second World War, virtually all cocoa was grown on larger company or expatriate family-owned plantations (averaging 50 ha or more), but from the early 1950s it developed as a smallholder crop as well.
Cocoa-based smallholder land settlement schemes were established at Vudal in East New Britain and Popondetta. In contrast, village plantings were officially discouraged by the Cocoa Ordinance of 1951. The rationale behind the Ordinance was to prevent random and scattered production as a means of controlling pests and diseases, and to encourage the development of central processing facilities as a means of ensuring better quality beans.
The Tolai of East New Britain actively planted cocoa, and the Administration developed a mar-keting organisation, backed by the Department of Primary Industries and working through the Local Government Council system. This became known as the Tolai Cocoa Project, later to become the New Guinea Islands Produce Company (NGIP). This company has now developed into NGIP-Agmark, a publically owned company listed on the Port Moresby Stock Exchange and the largest cocoa buying company in Papua New Guinea.
In the mid-1970s, the Papua New Guinea Cocoa Board started to regulate the expanding indus-try and administer a price stabilisation scheme.
A peak export of 59,400 t was achieved in 2010 (Figure A2.1). Cocoa production by Province over the period 2000 to 2007 is shown in Table A2.1.
P A P U A N E W G U I N E A C O C O A E X T E N S I O N M A N U A L190
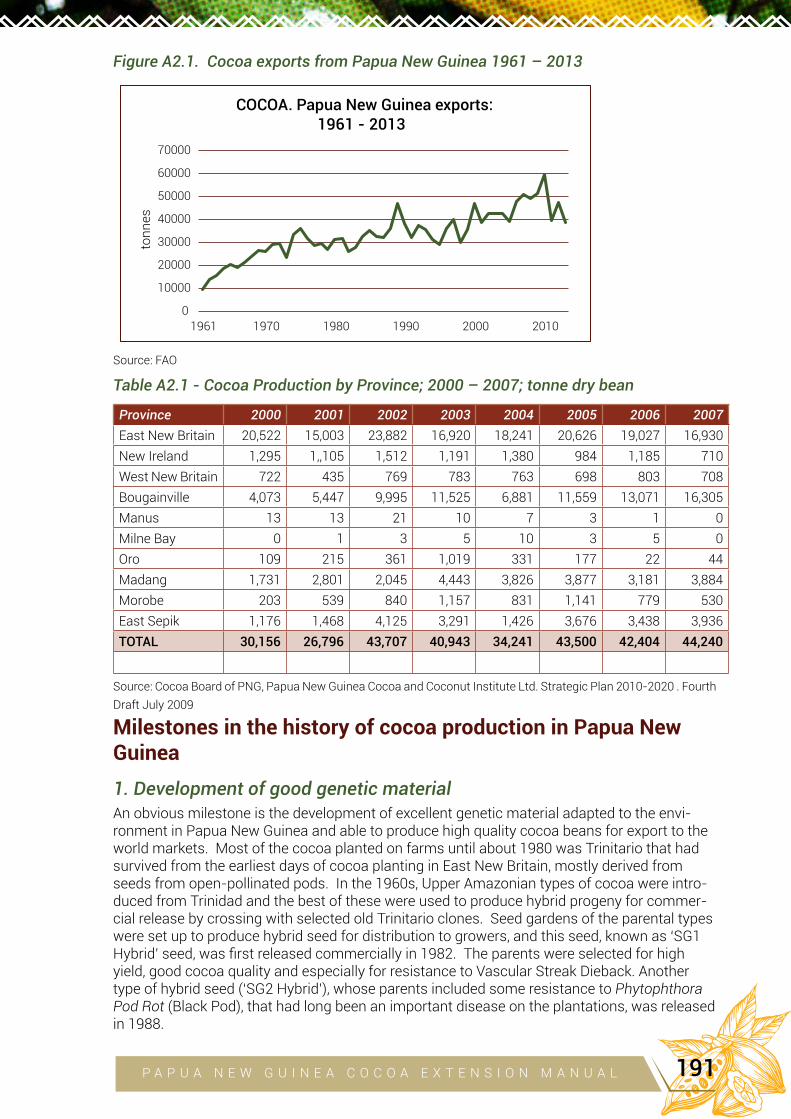
Figure A2.1. Cocoa exports from Papua New Guinea 1961 – 2013
Source: FAO
Table A2.1 - Cocoa Production by Province; 2000 – 2007; tonne dry bean
Province 2000 2001 2002 2003 2004 2005 2006 2007
East New Britain 20,522 15,003 23,882 16,920 18,241 20,626 19,027 16,930New Ireland 1,295 1,,105 1,512 1,191 1,380 984 1,185 710West New Britain 722 435 769 783 763 698 803 708Bougainville 4,073 5,447 9,995 11,525 6,881 11,559 13,071 16,305Manus 13 13 21 10 7 3 1 0Milne Bay 0 1 3 5 10 3 5 0Oro 109 215 361 1,019 331 177 22 44
Madang 1,731 2,801 2,045 4,443 3,826 3,877 3,181 3,884Morobe 203 539 840 1,157 831 1,141 779 530East Sepik 1,176 1,468 4,125 3,291 1,426 3,676 3,438 3,936TOTAL 30,156 26,796 43,707 40,943 34,241 43,500 42,404 44,240
Source: Cocoa Board of PNG, Papua New Guinea Cocoa and Coconut Institute Ltd. Strategic Plan 2010-2020 . Fourth Draft July 2009
Milestones in the history of cocoa production in Papua New Guinea
1. Development of good genetic materialAn obvious milestone is the development of excellent genetic material adapted to the envi-ronment in Papua New Guinea and able to produce high quality cocoa beans for export to the world markets. Most of the cocoa planted on farms until about 1980 was Trinitario that had survived from the earliest days of cocoa planting in East New Britain, mostly derived from seeds from open-pollinated pods. In the 1960s, Upper Amazonian types of cocoa were intro-duced from Trinidad and the best of these were used to produce hybrid progeny for commer-cial release by crossing with selected old Trinitario clones. Seed gardens of the parental types were set up to produce hybrid seed for distribution to growers, and this seed, known as ‘SG1 Hybrid’ seed, was first released commercially in 1982. The parents were selected for high yield, good cocoa quality and especially for resistance to Vascular Streak Dieback. Another type of hybrid seed (‘SG2 Hybrid’), whose parents included some resistance to Phytophthora Pod Rot (Black Pod), that had long been an important disease on the plantations, was released in 1988.
P A P U A N E W G U I N E A C O C O A E X T E N S I O N M A N U A L 191
The experimental results, combined with high cocoa prices at the time and aggressive pro-motion of the hybrid seedlings, led to a high adoption rate for the hybrid seeds on plantations, with the result that a lot of the cocoa now being grown on farms consists of SG1 or SG2 hybrid seedlings that replaced the old Trinitario cocoa. An unfortunate characteristic of these hybrids was that they were very fast growing, and so tended to become massive, overgrown trees if not heavily pruned, creating management problems for smallholders. The hybrid seedlings also tended to be highly variable in their performance, with some trees giving very high yields while many yielded very poorly. As a result, the increased cocoa production promised by these hy-brid seedlings was not as great as expected and was not sustained, especially as the plantings became overgrown. A review of the cocoa breeding program in 1992 led in 1994 to a new, more conventional ap-proach to cocoa improvement, involving the selection of the very best of the progeny of the SG hybrids and releasing these as clones, known as ‘Hybrid Clones” (Appendix 5 and 6), offering potential for uniformly high yields among populations of cocoa on farms. Selections were also made for less precocious clones (small clones) that were more suitable for smallholders.
2. Impact of serious pests and diseasesPeriodic outbreaks of pests and diseases have occurred over the past 80 years, some with devastating consequences. In the early 1960s a very destructive epidemic of a previously un-recognised disease devastated plantations and small holdings on the Gazelle Peninsula and in Madang, and even the cocoa trials at LAES. Initially the disease was known as ‘Cocoa Dieback’. This was changed to “Vascular Streak Dieback” (Appendix 8) to distinguish it from dieback symptoms associated with environmental stress or insect damage. The disease completely disrupted the developing industry and the research work. Farmers had to propagate cocoa from the survivors of the epidemic and in so doing selected for a degree of resistance (often referred to as ‘tolerance’) to the disease that also was recognised among the Trinitario clones being developed on LAES (Appendix 5). Planting of this material enabled the industry to recover and continue expanding.
Cocoa Pod Borer (Conopomorpha cramerella)(Appendix 7) was detected near Keravat on the Gazelle Peninsula, East New Britain Province in March 2006, then later at Poro, West Sepik Prov-ince (June 2006) and at Bogia, Madang Province in April 2008. From 2006 to January 2007, an eradication programme was conducted in East New Britain but the Pod Borer was found within the eradication zone in late February 2007. Since then, the pest has spread rapidly in the prov-ince and the response has switched from attempted eradication to implementing management of the pest following recommendations arising from experience in Malaysia and Indonesia that have long lived with the problem (Chapter 7). East New Britain was the largest cocoa producer in 2005 with nearly 21,000 tonnes per annum (about half of national production), but by 2012 after the failed attempt to eradicate Cocoa Pod Borer, annual production from the province had fallen to only about 4,000 tonnes. East Sepik and Bougainville then became the leading cocoa produc-ers, but Pod Borer has now spread widely in these areas as well, greatly reducing production.Experience in Malaysia and Indonesia, where much of the initial research on Cocoa Pod Borer and its control was conducted (Appendix 7), has shown that the pest can be managed to allow cocoa production to recover to the highest yields obtained before the incursion of the pest. This has been demonstrated also in research at the PNG Cocoa and Coconut Institute Ltd (CCIL), supported by the Australian Centre for International Agricultural Research (ACIAR), leading to the development of the methods of Integrated Pest and Disease Management for cocoa (Chapter 7) – see Konam J, Namaliu Y, Daniel R, Guest DI 2008 Integrated Pest and Disease Management for Sustainable Cocoa Production, ACIAR, Canberra.
3. Natural destruction
Cocoa has been subjected to natural destruction. The volcanic eruptions in Rabaul in the 1940s adversely affected the Keravat research station. Less commonly mentioned is the fact that the 1951 Mount Lamington eruption devasted cocoa production around Poppendetta.
P A P U A N E W G U I N E A C O C O A E X T E N S I O N M A N U A L192
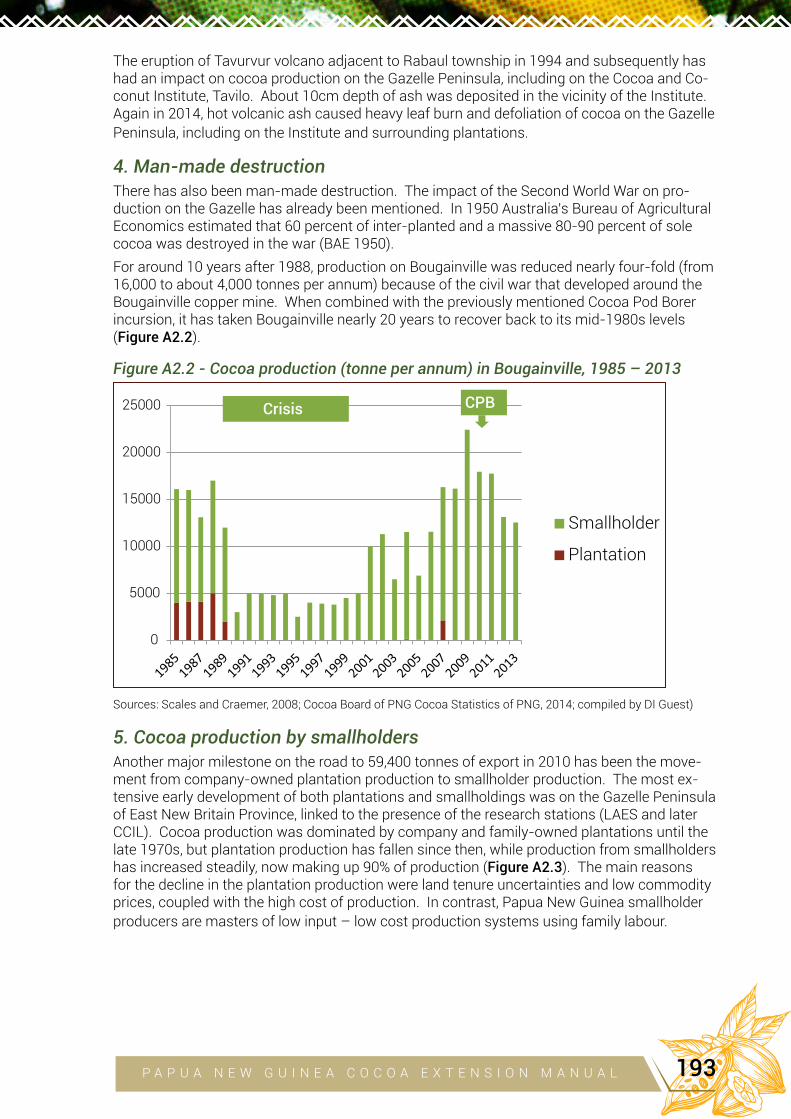
The eruption of Tavurvur volcano adjacent to Rabaul township in 1994 and subsequently has had an impact on cocoa production on the Gazelle Peninsula, including on the Cocoa and Co-conut Institute, Tavilo. About 10cm depth of ash was deposited in the vicinity of the Institute. Again in 2014, hot volcanic ash caused heavy leaf burn and defoliation of cocoa on the Gazelle Peninsula, including on the Institute and surrounding plantations.
4. Man-made destructionThere has also been man-made destruction. The impact of the Second World War on pro-duction on the Gazelle has already been mentioned. In 1950 Australia’s Bureau of Agricultural Economics estimated that 60 percent of inter-planted and a massive 80-90 percent of sole cocoa was destroyed in the war (BAE 1950). For around 10 years after 1988, production on Bougainville was reduced nearly four-fold (from 16,000 to about 4,000 tonnes per annum) because of the civil war that developed around the Bougainville copper mine. When combined with the previously mentioned Cocoa Pod Borer incursion, it has taken Bougainville nearly 20 years to recover back to its mid-1980s levels (Figure A2.2).
Figure A2.2 - Cocoa production (tonne per annum) in Bougainville, 1985 – 2013
Sources: Scales and Craemer, 2008; Cocoa Board of PNG Cocoa Statistics of PNG, 2014; compiled by DI Guest)
5. Cocoa production by smallholdersAnother major milestone on the road to 59,400 tonnes of export in 2010 has been the move-ment from company-owned plantation production to smallholder production. The most ex-tensive early development of both plantations and smallholdings was on the Gazelle Peninsula of East New Britain Province, linked to the presence of the research stations (LAES and later CCIL). Cocoa production was dominated by company and family-owned plantations until the late 1970s, but plantation production has fallen since then, while production from smallholders has increased steadily, now making up 90% of production (Figure A2.3). The main reasons for the decline in the plantation production were land tenure uncertainties and low commodity prices, coupled with the high cost of production. In contrast, Papua New Guinea smallholder
producers are masters of low input – low cost production systems using family labour.
P A P U A N E W G U I N E A C O C O A E X T E N S I O N M A N U A L 193
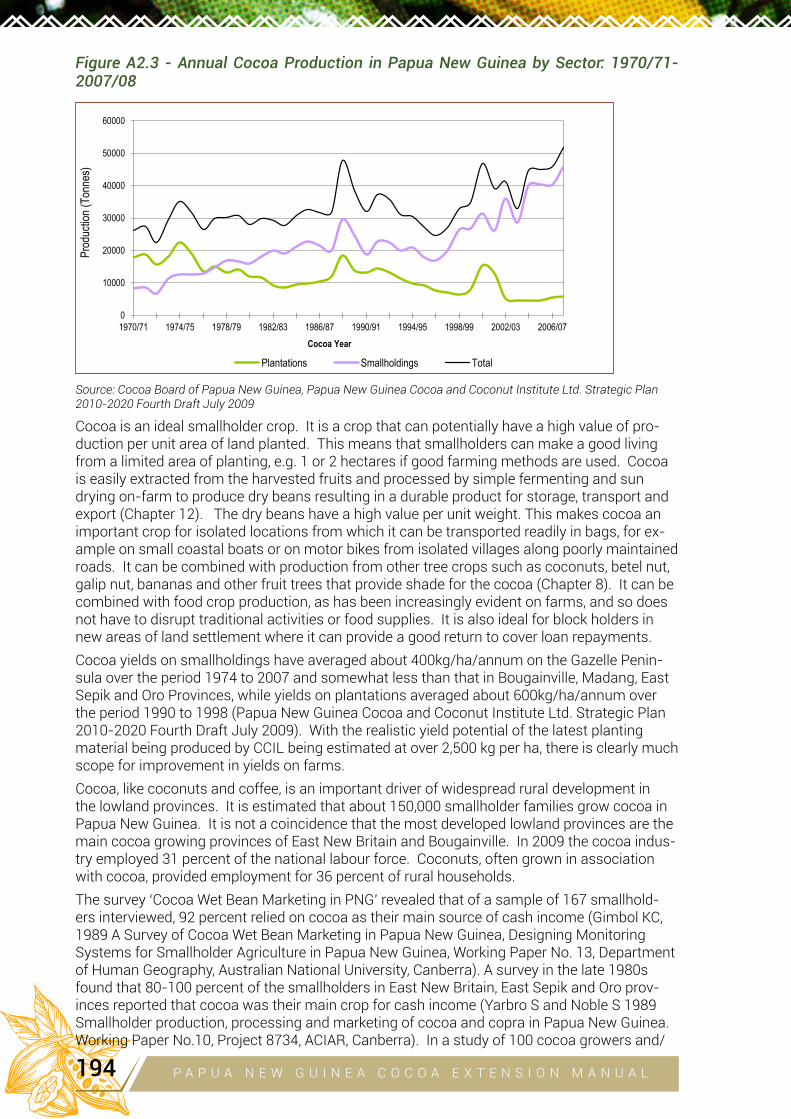
Figure A2.3 - Annual Cocoa Production in Papua New Guinea by Sector: 1970/71-2007/08
Source: Cocoa Board of Papua New Guinea, Papua New Guinea Cocoa and Coconut Institute Ltd. Strategic Plan 2010-2020 Fourth Draft July 2009
Cocoa is an ideal smallholder crop. It is a crop that can potentially have a high value of pro-duction per unit area of land planted. This means that smallholders can make a good living from a limited area of planting, e.g. 1 or 2 hectares if good farming methods are used. Cocoa is easily extracted from the harvested fruits and processed by simple fermenting and sun drying on-farm to produce dry beans resulting in a durable product for storage, transport and export (Chapter 12). The dry beans have a high value per unit weight. This makes cocoa an important crop for isolated locations from which it can be transported readily in bags, for ex-ample on small coastal boats or on motor bikes from isolated villages along poorly maintained roads. It can be combined with production from other tree crops such as coconuts, betel nut, galip nut, bananas and other fruit trees that provide shade for the cocoa (Chapter 8). It can be combined with food crop production, as has been increasingly evident on farms, and so does not have to disrupt traditional activities or food supplies. It is also ideal for block holders in new areas of land settlement where it can provide a good return to cover loan repayments.
Cocoa yields on smallholdings have averaged about 400kg/ha/annum on the Gazelle Penin-sula over the period 1974 to 2007 and somewhat less than that in Bougainville, Madang, East Sepik and Oro Provinces, while yields on plantations averaged about 600kg/ha/annum over the period 1990 to 1998 (Papua New Guinea Cocoa and Coconut Institute Ltd. Strategic Plan 2010-2020 Fourth Draft July 2009). With the realistic yield potential of the latest planting material being produced by CCIL being estimated at over 2,500 kg per ha, there is clearly much scope for improvement in yields on farms.
Cocoa, like coconuts and coffee, is an important driver of widespread rural development in the lowland provinces. It is estimated that about 150,000 smallholder families grow cocoa in Papua New Guinea. It is not a coincidence that the most developed lowland provinces are the main cocoa growing provinces of East New Britain and Bougainville. In 2009 the cocoa indus-try employed 31 percent of the national labour force. Coconuts, often grown in association with cocoa, provided employment for 36 percent of rural households. The survey ‘Cocoa Wet Bean Marketing in PNG’ revealed that of a sample of 167 smallhold-ers interviewed, 92 percent relied on cocoa as their main source of cash income (Gimbol KC, 1989 A Survey of Cocoa Wet Bean Marketing in Papua New Guinea, Designing Monitoring Systems for Smallholder Agriculture in Papua New Guinea, Working Paper No. 13, Department of Human Geography, Australian National University, Canberra). A survey in the late 1980s found that 80-100 percent of the smallholders in East New Britain, East Sepik and Oro prov-inces reported that cocoa was their main crop for cash income (Yarbro S and Noble S 1989 Smallholder production, processing and marketing of cocoa and copra in Papua New Guinea. Working Paper No.10, Project 8734, ACIAR, Canberra). In a study of 100 cocoa growers and/
P A P U A N E W G U I N E A C O C O A E X T E N S I O N M A N U A L194
or producers in East New Britain, the average annual income from cocoa production and sale was reported to be K2,867 per smallholder household (Omuru, E 2001 Estimates of smallhold-er cocoa and copra yield profiles and cost of production in Papua New Guinea, Occasional Pa-per 3, Understanding the Smallholder Cocoa and Coconut Sector in Papua New Guinea, Cocoa & Coconut Research Institute, PNG, University of New England, Australia, Kerevat/Armidale). The transition to smallholder production was associated with the development of the Rural Progress Societies scheme. These were set up on co-operative lines in the areas that first planted village cocoa. Examples of such Societies were the Siwai Cooperative on Bougain-ville, Karkar Company on Karkar Island near Madang, the Akua Society near Finschhafen, and Lamington United Cocoa Limited at Popondetta. Government Field Officers managed these societies initially. Whilst in some areas the societies are still important buyers of wet beans, and fermenters and driers of cocoa, business group and family group fermentaries have since become the most important outlets for village-produced wet beans, especially in the two larg-est smallholder production provinces of Bougainville and East New Britain. There is now encouragement for particular cocoa growing groups to market their beans directly to overseas niche markets. It is noted with pride that the Lower Watut Cooperative Society in the Markham Valley achieved a Cocoa of Excellence award at the 2015 Salon du Chocolat at Paris, one of the world’s leading exhibitions for cocoa and chocolate.
6. Development of cocoa researchPrior to the 1980, most cocoa and coconut research was undertaken by the Department of Agriculture then the Department of Agriculture and Livestock at the Lowlands Agricultural Experiment Station (LAES). In the 1980s, it became government policy that the major agricul-tural export industries such as cocoa, coconut, coffee and oil palm should be responsible for their own research and development needs. In 1981, the Cocoa Board of Papua New Guinea established the Cocoa Industry Company Limited and the Tavilo Plantation in East New Britain Province near LAES was purchased to provide land for field trials and a hybrid seed garden. The Cocoa Industry Company’s activities were funded by an increase in the levy on exported cocoa.
In 1986, the company changed its name to the PNG Cocoa and Coconut Research Institute (CCRI), with the Cocoa Board and Copra Marketing Board (CMB) as equal shareholders. This was followed a few years later by the acquisition of Kervera Plantation, which adjoined Tavilo Plantation, to provide land for coconut research. Kervera Plantation was run down when it was bought and an Agriculture Bank loan was obtained to redevelop it. Cocoa had to be plant-ed to generate enough income to meet the loan repayments and so cocoa field trials were also conducted on Kervera. A more serious constraint to the use of Kervera for coconut trials was the devastating effect of the Rhinoceros Beetle Scapanes australis and the Black Palm Weevil Rhynchophorus bilineatus on plantings of young coconut palms.
Therefore, in late 1992, two semi-derelict copra plantations, Murnas and Kaile, in Madang Province were identified as being suitable for coconut research. These were bought and subsequently developed into what is now the Stewart Research Station (SRS), with most of the funding provided by the Copra Marketing Board. The Stewart Research Station was also useful for screening breeding materials for resistance to VSD, which is common there.By 1989, CCRI had established the Duncan Research Station at Mabiri in Central Bougainville. This became the major cocoa quarantine station for introduction of planting material to the province and planting material was distributed from a hybrid seed garden there. However, due to the civil crisis that occurred in the province, the station was forced to close and most of its assets were destroyed.
The PNG Cocoa and Coconut Institute Limited was established in August 2003 by the merger of the PNG Cocoa and Coconut Research Institute and the PNG Cocoa and Coconut Exten-sion Agency (CCEA). The Cocoa Board (CB) and the Kokonas Indastri Koporesen (KIK) are the shareholding boards, each with equal shares in CCIL. The merger was designed to enable extension and research to work more closely together. CCIL’s mandate was research and de-
velopment (R&D) in cocoa and coconut production, processing and marketing.
P A P U A N E W G U I N E A C O C O A E X T E N S I O N M A N U A L 195
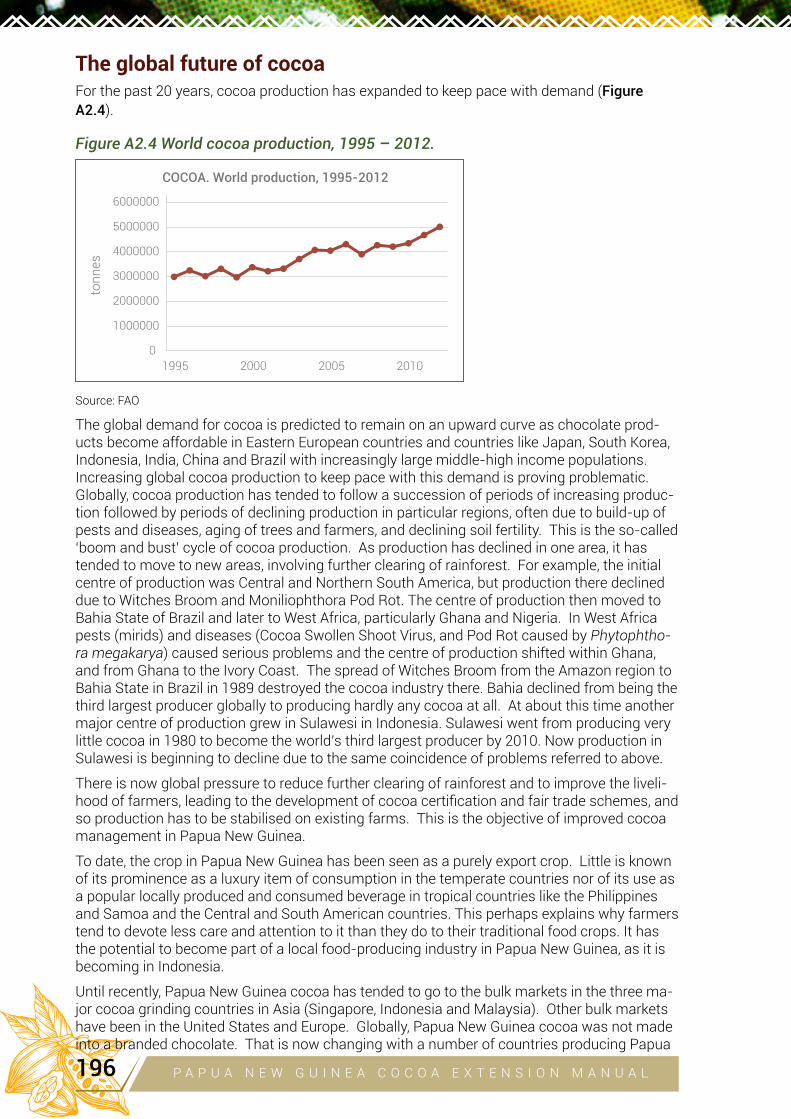
The global future of cocoa For the past 20 years, cocoa production has expanded to keep pace with demand (Figure
A2.4).
Figure A2.4 World cocoa production, 1995 – 2012.
0
1000000
2000000
3000000
4000000
5000000
6000000
1995 2000 2005 2010
ton
nes
COCOA. World production, 1995-2012
Source: FAO
The global demand for cocoa is predicted to remain on an upward curve as chocolate prod-ucts become affordable in Eastern European countries and countries like Japan, South Korea, Indonesia, India, China and Brazil with increasingly large middle-high income populations. Increasing global cocoa production to keep pace with this demand is proving problematic. Globally, cocoa production has tended to follow a succession of periods of increasing produc-tion followed by periods of declining production in particular regions, often due to build-up of pests and diseases, aging of trees and farmers, and declining soil fertility. This is the so-called ‘boom and bust’ cycle of cocoa production. As production has declined in one area, it has tended to move to new areas, involving further clearing of rainforest. For example, the initial centre of production was Central and Northern South America, but production there declined due to Witches Broom and Moniliophthora Pod Rot. The centre of production then moved to Bahia State of Brazil and later to West Africa, particularly Ghana and Nigeria. In West Africa pests (mirids) and diseases (Cocoa Swollen Shoot Virus, and Pod Rot caused by Phytophtho-ra megakarya) caused serious problems and the centre of production shifted within Ghana, and from Ghana to the Ivory Coast. The spread of Witches Broom from the Amazon region to Bahia State in Brazil in 1989 destroyed the cocoa industry there. Bahia declined from being the third largest producer globally to producing hardly any cocoa at all. At about this time another major centre of production grew in Sulawesi in Indonesia. Sulawesi went from producing very little cocoa in 1980 to become the world’s third largest producer by 2010. Now production in Sulawesi is beginning to decline due to the same coincidence of problems referred to above.
There is now global pressure to reduce further clearing of rainforest and to improve the liveli-hood of farmers, leading to the development of cocoa certification and fair trade schemes, and so production has to be stabilised on existing farms. This is the objective of improved cocoa management in Papua New Guinea.
To date, the crop in Papua New Guinea has been seen as a purely export crop. Little is known of its prominence as a luxury item of consumption in the temperate countries nor of its use as a popular locally produced and consumed beverage in tropical countries like the Philippines and Samoa and the Central and South American countries. This perhaps explains why farmers tend to devote less care and attention to it than they do to their traditional food crops. It has the potential to become part of a local food-producing industry in Papua New Guinea, as it is becoming in Indonesia.
Until recently, Papua New Guinea cocoa has tended to go to the bulk markets in the three ma-jor cocoa grinding countries in Asia (Singapore, Indonesia and Malaysia). Other bulk markets have been in the United States and Europe. Globally, Papua New Guinea cocoa was not made into a branded chocolate. That is now changing with a number of countries producing Papua
P A P U A N E W G U I N E A C O C O A E X T E N S I O N M A N U A L196
New Guinea chocolate. Chocolate makers in Germany, the United States, Australia, and New Zealand now market a generic “Papua New Guinea” chocolate as well as specific “Bougain-
ville” and “Markham Valley” chocolates. There is great scope to expand this niche.
The future of cocoa in Papua New GuineaThe consistently increasing global demand for cocoa when coupled with the global challenges in production bodes well for Papua New Guinea where the current thrust is to improve man-agement on cocoa farms to give stable high yields. Papua New Guinea has the proven tech-nology to achieve this. Much of this technology has been developed and adapted at the PNG Cocoa and Coconut Institute Ltd. The future of cocoa in Papua New Guinea lies very much with the research and extension work of this Institute.
The PNG Cocoa and Coconut Institute Strategic Plan 2010-2020, published in 2009, identi-fied major constraints on current cocoa production as:
• Incursion of Cocoa Pod Borer.
• Old and senile blocks of overgrown, overshaded cocoa (much cocoa older than 15-20 years).
• Concerns about cocoa quality due to smoke tainting of beans associated with poor main-tenance of wood-fired driers (Chapter 12).
• Poor post-harvest handling equipment such as fermentaries and driers (Chapter 12).
• Acidity and high shell content of beans.
• Limited market access in some areas.
• High transport costs and poor road infrastructure.
• Farmers not treating cocoa and coconut farming as a business (see Chapter 1)
• Shortage of skilled manpower, linked to -
Lack of extension of knowledge of new cocoa varieties and cocoa growing methods to farmers and lack of uptake of these methods on the farms.
Lack of farm management, record-keeping and book-keeping expertise (that eventu-ally will be required for cocoa certification).
Lack of marketing expertise.
• Impact of poor health due to lack of primary health care in villages.
• Lack of finance for tools, fermenting and drying facilities, farm improvement and rehabili-tation; poor access to credit facilities for smallholder farmers.
The Strategic Plan identified the following strategies needed to improve cocoa production:
• Increased uptake of methods of Integrated Pest and Disease Management as developed by CCIL.
• Increased planting of the new and improved cocoa clones and hybrid seed being produced by CCIL.
• Improved coverage of extension and training programs to ensure a wider and effective delivery of information and technology.
• Improved funding of extension teams needed to improve regular contact and training at the village level.
• Increased partnerships with private enterprise to mobilise growers to improve productivity and production.
• Increased collaboration with international donor agencies.
P A P U A N E W G U I N E A C O C O A E X T E N S I O N M A N U A L 197
• Improved attention to socio-economic issues that influence production decisions, includ-ing incorporation of more livelihood programs to begin the process of an “attitude change” towards cocoa and coconut farming, and farming for cash in general (i.e. to encourage farmers to be more ‘business’ oriented in managing cocoa and coconut production more intensively).
In addition to all the agro-socio-economic constraints on cocoa production, the Strategic Plan 2010-2020 identified the limitation posed by a lack of primary health care in the rural commu-nities:
• Infectious diseases are claiming many lives, and there are serious public health risks from endemic diseases such as malaria, tubercolisis and dengue fever, and introduced diseases such as HIV/AIDS.
• Poor rural health outcomes have serious implications for the labour required to grow co-coa and coconut well.
• Improvements in primary health care in villages could contribute to improved labour pro-ductivity on farms.
Women are known to contribute almost the same amount of time as men to cocoa production in Papua New Guinea (Omuru E, Nailina R and Fleming E 2001. A Socio-economic Baseline Survey of Cocoa and Copra Smallholders in East New Britain, Occasional Paper 1, Understand-ing the Smallholder Cocoa and Coconut Sector in Papua New Guinea, Keravat and Armidale: PNG Cocoa and Coconut Research Institute/University of New England; Curry G, Koczberski G, Omuru E and Nailina, R. 2007. Farming or Foraging? Household Labour and Livelihood Strate-gies amongst Smallholder Cocoa Growers in Papua New Guinea. Studies in Australia, Asia and the Pacific, Curtin University of Technology) and so the health of women, their involvement in cocoa production and the direction of extension and training activities to improve their exper-tise along with that of men is important in improving cocoa productivity and production.
CCIL has built up over many years a body of highly trained and internationally recognised scientists, technologists, economists and extension specialists who are capable of addressing these problems and implementing new strategies to greatly improve cocoa productivity on farms and the overall production of high quality cocoa in Papua New Guinea.
Papua New Guinea has built up a reputation for its “fine or flavour” cocoa based on the high proportion of Trinitario cocoa on farms (see Appendix 1). This has allowed it to fetch premium prices in the world market. However, in recent years this has been threatened by the lack of attention to post-harvest processing of wet beans and smoke tainting of cocoa due to poor drying practices.
The production and release of hybrid clones selected at CCIL from the very best hybrid prog-eny of crosses between Trinitario and Amazonian clones from the 1970s and 1980s offers a new era of cocoa production based on the very best planting material available for either plantation style farming or development of more diverse farming systems.
The challenge now is to greatly increase the uptake of the technology and new cocoa varieties on farms and to develop cocoa growing and related activities as productive businesses to give cocoa farmers productive and stable livelihoods (Chapter 1).
With the latest methods of cocoa growing, the new cocoa varieties available for planting, and improved understanding of the socio-economic aspects of cocoa growing, it should be pos-sible to reach the aim expressed in the Papua New Guinea Cocoa and Coconut Institute Ltd. Strategic Plan 2010-2020 of cocoa exports of 100,000 tonnes per annum, which would place Papua New Guinea as one of the main cocoa producing countries, and certainly one of the main producers of ‘fine flavour’ cocoa.
P A P U A N E W G U I N E A C O C O A E X T E N S I O N M A N U A L198
The peak production of 59,400 tonnes in 2010 is a remarkable tribute to the industry that has survived the Second World War, a civil war in the main producing province of Bougainville, volcanic eruptions in Rabual and Popendeatta , and various outbreaks of destructive pests and diseases.
The research and development capacity based largely at CCIL, along with private companies like NGIP-Agmark, the Provincial DPIs and universities, and the existing new cocoa clones and management methods, make a cocoa export target of 100,000 tonnes per annum an eminent-ly achievable goal in the near future.
P A P U A N E W G U I N E A C O C O A E X T E N S I O N M A N U A L 199
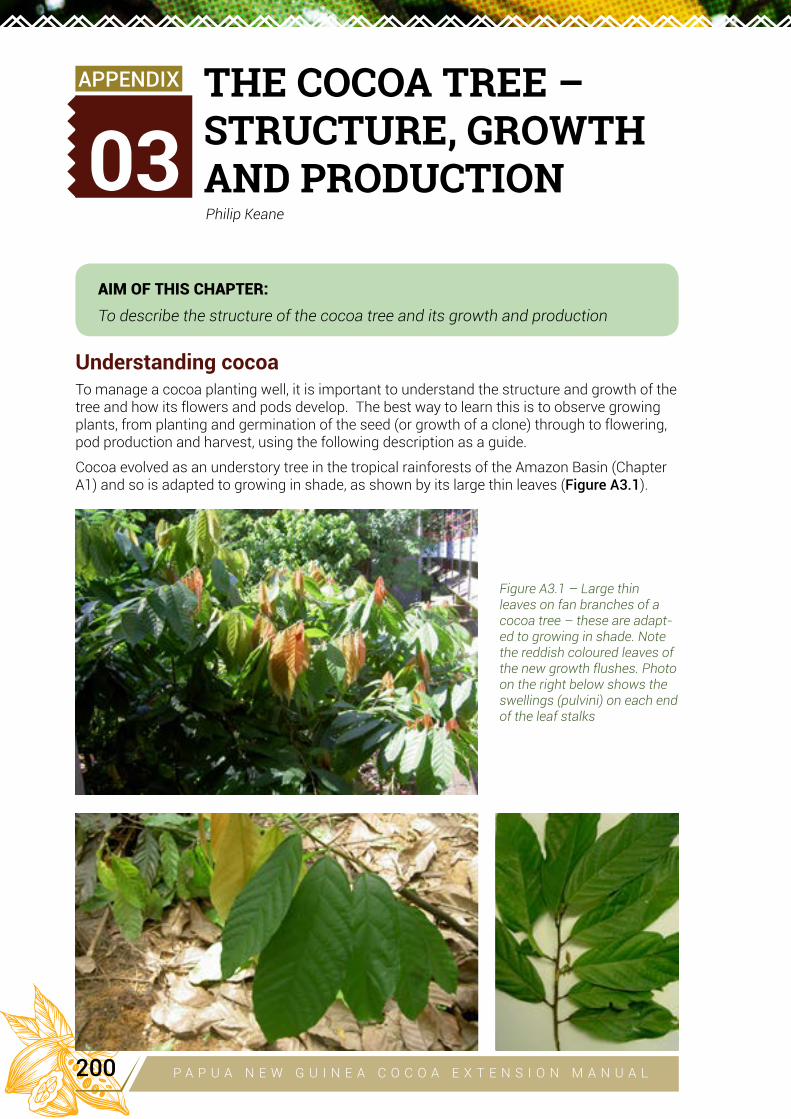
03
THE COCOA TREE –
STRUCTURE, GROWTH
AND PRODUCTIONPhilip Keane
AIM OF THIS CHAPTER:
To describe the structure of the cocoa tree and its growth and production
Understanding cocoaTo manage a cocoa planting well, it is important to understand the structure and growth of the tree and how its flowers and pods develop. The best way to learn this is to observe growing plants, from planting and germination of the seed (or growth of a clone) through to flowering, pod production and harvest, using the following description as a guide.
Cocoa evolved as an understory tree in the tropical rainforests of the Amazon Basin (Chapter A1) and so is adapted to growing in shade, as shown by its large thin leaves (Figure A3.1).
APPENDIX
Figure A3.1 – Large thin leaves on fan branches of a cocoa tree – these are adapt-ed to growing in shade. Note the reddish coloured leaves of the new growth flushes. Photo on the right below shows the swellings (pulvini) on each end of the leaf stalks
P A P U A N E W G U I N E A C O C O A E X T E N S I O N M A N U A L200
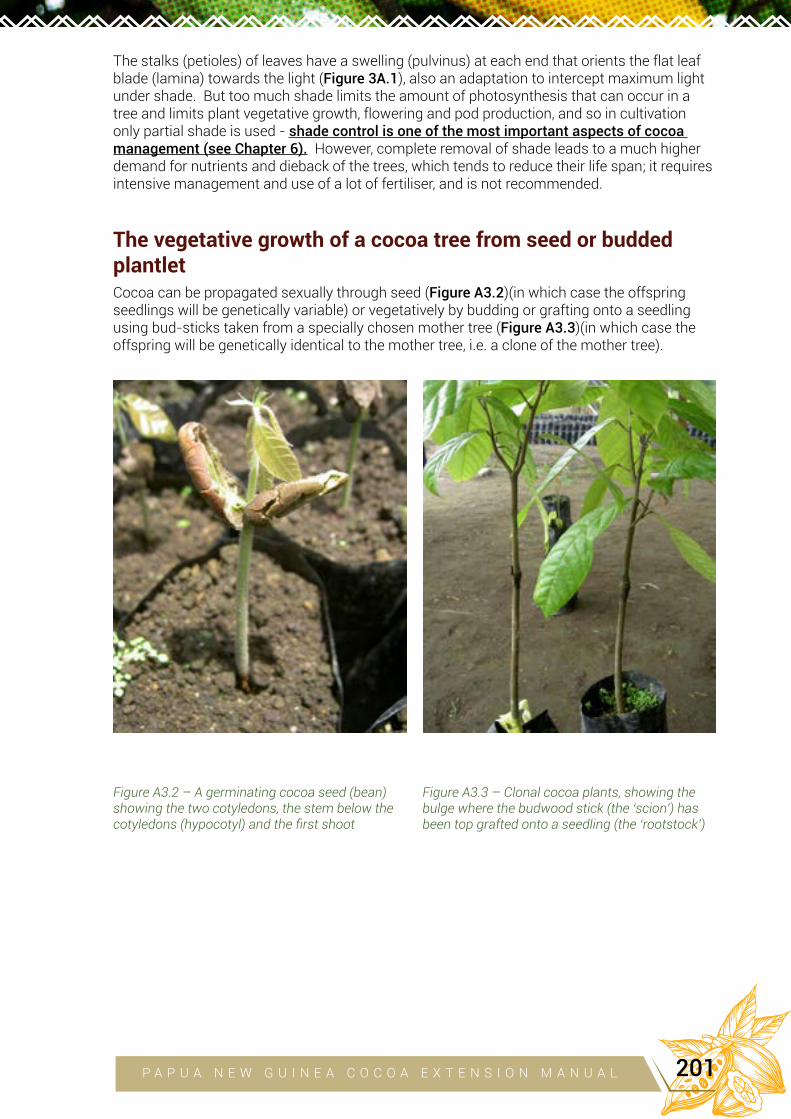
The stalks (petioles) of leaves have a swelling (pulvinus) at each end that orients the flat leaf blade (lamina) towards the light (Figure 3A.1), also an adaptation to intercept maximum light under shade. But too much shade limits the amount of photosynthesis that can occur in a tree and limits plant vegetative growth, flowering and pod production, and so in cultivation only partial shade is used - shade control is one of the most important aspects of cocoa management (see Chapter 6). However, complete removal of shade leads to a much higher demand for nutrients and dieback of the trees, which tends to reduce their life span; it requires intensive management and use of a lot of fertiliser, and is not recommended.
The vegetative growth of a cocoa tree from seed or budded plantletCocoa can be propagated sexually through seed (Figure A3.2)(in which case the offspring seedlings will be genetically variable) or vegetatively by budding or grafting onto a seedling using bud-sticks taken from a specially chosen mother tree (Figure A3.3)(in which case the offspring will be genetically identical to the mother tree, i.e. a clone of the mother tree).
Figure A3.2 – A germinating cocoa seed (bean) showing the two cotyledons, the stem below the cotyledons (hypocotyl) and the first shoot
Figure A3.3 – Clonal cocoa plants, showing the bulge where the budwood stick (the ‘scion’) has been top grafted onto a seedling (the ‘rootstock’)
P A P U A N E W G U I N E A C O C O A E X T E N S I O N M A N U A L 201
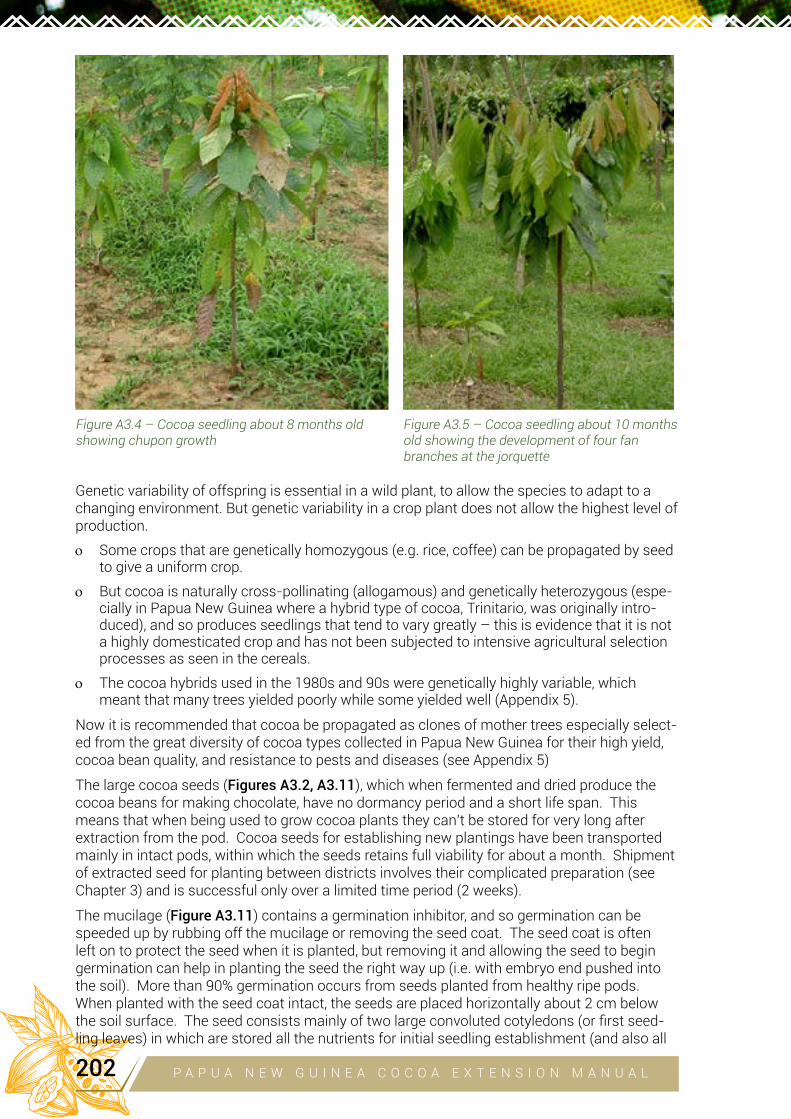
Genetic variability of offspring is essential in a wild plant, to allow the species to adapt to a changing environment. But genetic variability in a crop plant does not allow the highest level of production.
o Some crops that are genetically homozygous (e.g. rice, coffee) can be propagated by seed to give a uniform crop.
o But cocoa is naturally cross-pollinating (allogamous) and genetically heterozygous (espe-cially in Papua New Guinea where a hybrid type of cocoa, Trinitario, was originally intro-duced), and so produces seedlings that tend to vary greatly – this is evidence that it is not a highly domesticated crop and has not been subjected to intensive agricultural selection processes as seen in the cereals.
o The cocoa hybrids used in the 1980s and 90s were genetically highly variable, which meant that many trees yielded poorly while some yielded well (Appendix 5).
Now it is recommended that cocoa be propagated as clones of mother trees especially select-ed from the great diversity of cocoa types collected in Papua New Guinea for their high yield, cocoa bean quality, and resistance to pests and diseases (see Appendix 5)
The large cocoa seeds (Figures A3.2, A3.11), which when fermented and dried produce the cocoa beans for making chocolate, have no dormancy period and a short life span. This means that when being used to grow cocoa plants they can’t be stored for very long after extraction from the pod. Cocoa seeds for establishing new plantings have been transported mainly in intact pods, within which the seeds retains full viability for about a month. Shipment of extracted seed for planting between districts involves their complicated preparation (see Chapter 3) and is successful only over a limited time period (2 weeks).
The mucilage (Figure A3.11) contains a germination inhibitor, and so germination can be speeded up by rubbing off the mucilage or removing the seed coat. The seed coat is often left on to protect the seed when it is planted, but removing it and allowing the seed to begin germination can help in planting the seed the right way up (i.e. with embryo end pushed into the soil). More than 90% germination occurs from seeds planted from healthy ripe pods. When planted with the seed coat intact, the seeds are placed horizontally about 2 cm below the soil surface. The seed consists mainly of two large convoluted cotyledons (or first seed-ling leaves) in which are stored all the nutrients for initial seedling establishment (and also all
Figure A3.4 – Cocoa seedling about 8 months old showing chupon growth
Figure A3.5 – Cocoa seedling about 10 months old showing the development of four fan branches at the jorquette
P A P U A N E W G U I N E A C O C O A E X T E N S I O N M A N U A L202
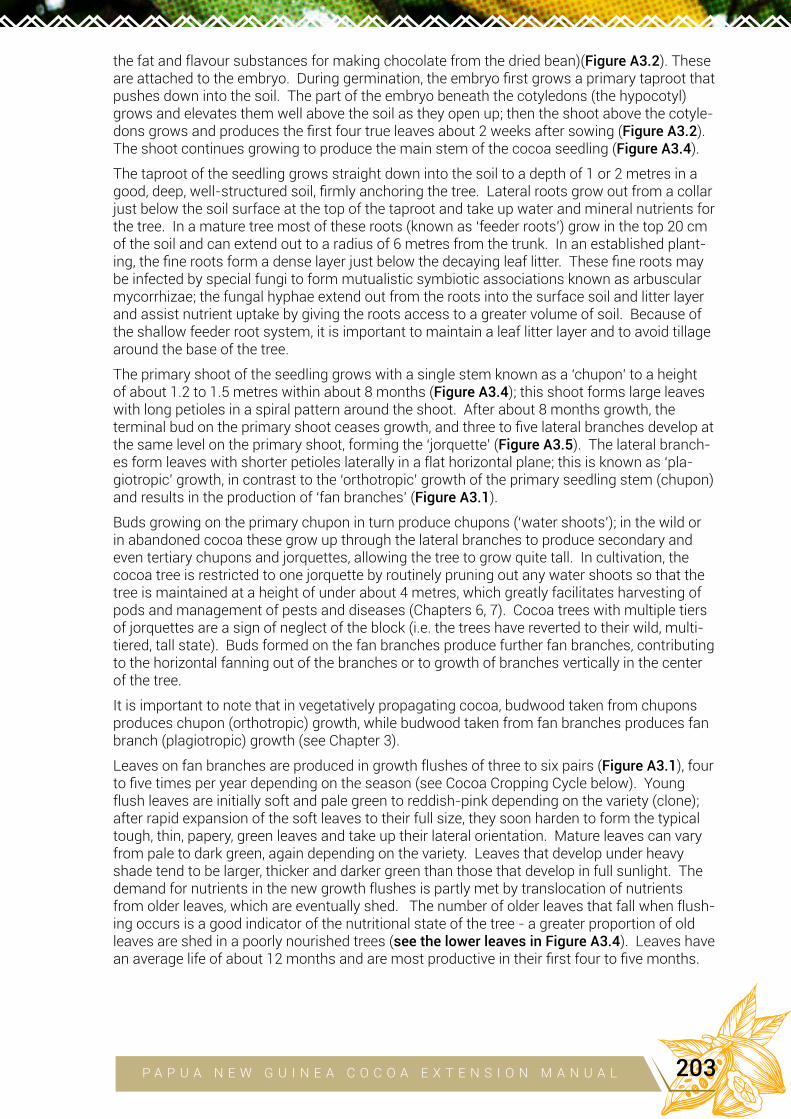
the fat and flavour substances for making chocolate from the dried bean)(Figure A3.2). These are attached to the embryo. During germination, the embryo first grows a primary taproot that pushes down into the soil. The part of the embryo beneath the cotyledons (the hypocotyl) grows and elevates them well above the soil as they open up; then the shoot above the cotyle-dons grows and produces the first four true leaves about 2 weeks after sowing (Figure A3.2). The shoot continues growing to produce the main stem of the cocoa seedling (Figure A3.4).
The taproot of the seedling grows straight down into the soil to a depth of 1 or 2 metres in a good, deep, well-structured soil, firmly anchoring the tree. Lateral roots grow out from a collar just below the soil surface at the top of the taproot and take up water and mineral nutrients for the tree. In a mature tree most of these roots (known as ‘feeder roots’) grow in the top 20 cm of the soil and can extend out to a radius of 6 metres from the trunk. In an established plant-ing, the fine roots form a dense layer just below the decaying leaf litter. These fine roots may be infected by special fungi to form mutualistic symbiotic associations known as arbuscular mycorrhizae; the fungal hyphae extend out from the roots into the surface soil and litter layer and assist nutrient uptake by giving the roots access to a greater volume of soil. Because of the shallow feeder root system, it is important to maintain a leaf litter layer and to avoid tillage around the base of the tree.
The primary shoot of the seedling grows with a single stem known as a ‘chupon’ to a height of about 1.2 to 1.5 metres within about 8 months (Figure A3.4); this shoot forms large leaves with long petioles in a spiral pattern around the shoot. After about 8 months growth, the terminal bud on the primary shoot ceases growth, and three to five lateral branches develop at the same level on the primary shoot, forming the ‘jorquette’ (Figure A3.5). The lateral branch-es form leaves with shorter petioles laterally in a flat horizontal plane; this is known as ‘pla-giotropic’ growth, in contrast to the ‘orthotropic’ growth of the primary seedling stem (chupon) and results in the production of ‘fan branches’ (Figure A3.1).
Buds growing on the primary chupon in turn produce chupons (‘water shoots’); in the wild or in abandoned cocoa these grow up through the lateral branches to produce secondary and even tertiary chupons and jorquettes, allowing the tree to grow quite tall. In cultivation, the cocoa tree is restricted to one jorquette by routinely pruning out any water shoots so that the tree is maintained at a height of under about 4 metres, which greatly facilitates harvesting of pods and management of pests and diseases (Chapters 6, 7). Cocoa trees with multiple tiers of jorquettes are a sign of neglect of the block (i.e. the trees have reverted to their wild, multi-tiered, tall state). Buds formed on the fan branches produce further fan branches, contributing to the horizontal fanning out of the branches or to growth of branches vertically in the center of the tree.
It is important to note that in vegetatively propagating cocoa, budwood taken from chupons produces chupon (orthotropic) growth, while budwood taken from fan branches produces fan branch (plagiotropic) growth (see Chapter 3).
Leaves on fan branches are produced in growth flushes of three to six pairs (Figure A3.1), four to five times per year depending on the season (see Cocoa Cropping Cycle below). Young flush leaves are initially soft and pale green to reddish-pink depending on the variety (clone); after rapid expansion of the soft leaves to their full size, they soon harden to form the typical tough, thin, papery, green leaves and take up their lateral orientation. Mature leaves can vary from pale to dark green, again depending on the variety. Leaves that develop under heavy shade tend to be larger, thicker and darker green than those that develop in full sunlight. The demand for nutrients in the new growth flushes is partly met by translocation of nutrients from older leaves, which are eventually shed. The number of older leaves that fall when flush-ing occurs is a good indicator of the nutritional state of the tree - a greater proportion of old leaves are shed in a poorly nourished trees (see the lower leaves in Figure A3.4). Leaves have an average life of about 12 months and are most productive in their first four to five months.
P A P U A N E W G U I N E A C O C O A E X T E N S I O N M A N U A L 203
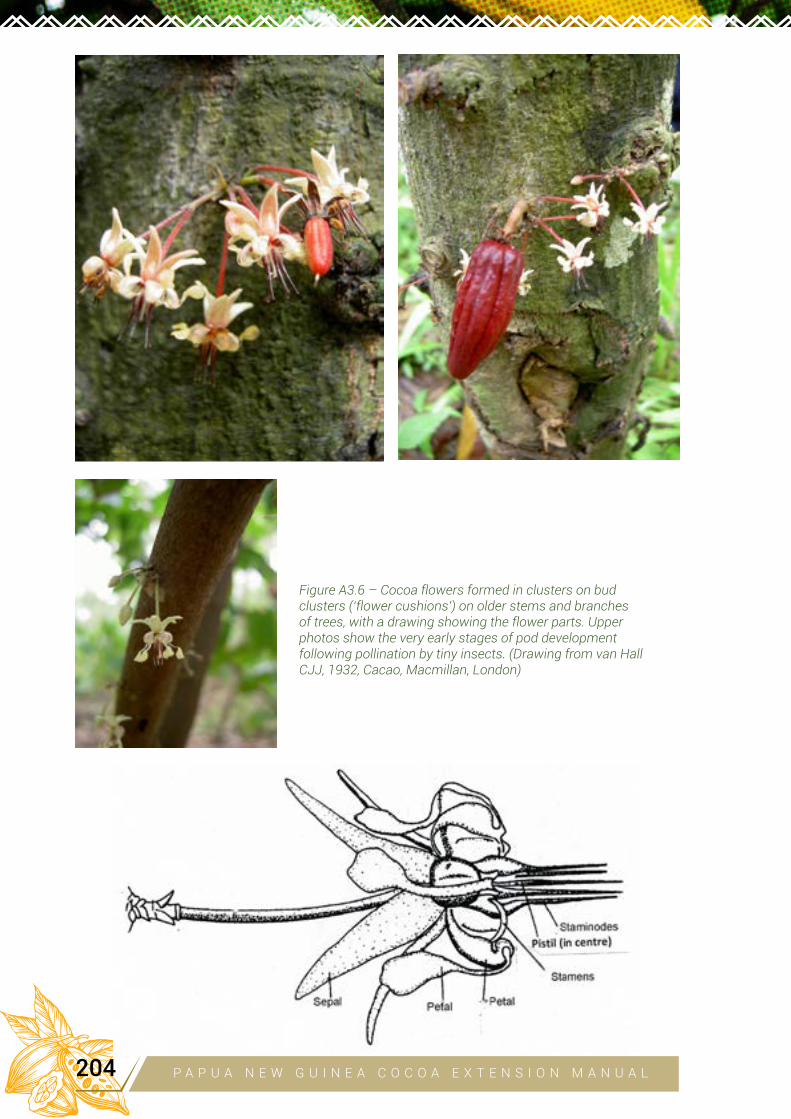
Figure A3.6 – Cocoa flowers formed in clusters on bud clusters (‘flower cushions’) on older stems and branches of trees, with a drawing showing the flower parts. Upper photos show the very early stages of pod development following pollination by tiny insects. (Drawing from van Hall CJJ, 1932, Cacao, Macmillan, London)
P A P U A N E W G U I N E A C O C O A E X T E N S I O N M A N U A L204
Flowering, pollination and pod productionFlowers and pods develop from old leaf axillary buds on trunks and larger lateral branches (Figure A3.6), displaying the cauliflory (formation of flowers on the main trunk) and ramiflo-ry (formation of flowers on the main branches) characteristic of many tropical trees that are adapted for seed dispersal by large arboreal animals such as primates and sloths. Well-man-aged high yielding genotypes of cocoa start producing flowers at about 2 years of age, while unselected cocoa will take longer.
The buds that produce a succession of flowers and pods over several years become thick-ened, protruding ‘flower cushions’ consisting of many flower-forming buds. These are pre-cious structures that must not be damaged by poor methods of pod harvest (Chapter 12).
As with the leaves, cocoa tends to produce flowers in flushes at certain times of the year, depending on seasonal environment and the variety and condition of the tree (see Cocoa Cropping Cycle below). Some varieties produce many flowers in two distinct flushes, follow-ing leaf flushing, while others produce a few flowers more-or-less continuously through the year. In most parts of Papua New Guinea there are two main periods of growth flush (leaves followed by flowers), one in March-April at the end of the wet season, and one in November at the beginning of the wet season. The relative size of these flushes varies with the local environment and seasonal distribution of rainfall, which has been variable in recent years. A sudden reduction in shade in an over-shaded, neglected block usually results in a flush of new leaves followed by flowering leading to a sharp increase in production (see Chapters 6, 7). In a shade/fertiliser trial in Ghana, unshaded trees had more than twice the number of flowers than shaded trees.
The tiny flowers have a characteristic structure (Figure A3.6) that defines the species; an understanding of this is of critical importance for carrying out hand pollination. Cocoa flow-ers are among the most complicated flowers known - it is worth dissecting one under a low power dissector microscope to see the parts. The flowers are produced, usually several on each cushion, on long stalks (that enlarge greatly to become the pod stalk or peduncle after pollination) and consist of –
o five pinkish-white sepals that initially envelop and protect the inner floral parts, o five cream-coloured petals each consisting of a lower cupped ‘petal pouch’, a thin stalk
and an outer expanded flat rounded part that hangs down on the outside of the flower,
o ten stamens produced in two whorls connected by a basal ring, an outer whorl of five infertile, pointed, often reddish staminodes that project well above a ring of five fertile sta-mens that curve outward so that the anthers (the parts that produce the male pollen) are cupped in a petal pouches,
o the female pistil (in the centre) consisting at the base of an ovary with five compartments containing the ovules that develop into the seeds after pollination, connected to a single elongate stigma and style on which the pollen is deposited.
Figure A3.7 – A plastic tube with a fine gauze end placed over a flower following hand pollination used to produce hybrid seed; the tube is held with plastercine and prevents the flower being pollinated naturally by insects (tiny midges)
P A P U A N E W G U I N E A C O C O A E X T E N S I O N M A N U A L 205
A flower bud that is about to open can be identified by its rounded shape and the clear lines between the sepals that enclose the flower. The flower starts to open in the late afternoon and is fully open and the pollen is ripe and being released 12 hours later (i.e. in the very early morn-ing, when it should be collected for hand pollination – Figure A3.7). Pollen remains viable for about 48 hours. The stigma matures a little later than the pollen on the same day, and this day is the best day for pollination – if pollination and fertilisation don’t occur on this day, the flower will drop off the tree on the following day.
An important aspect of the reproductive cycle of cocoa is that while a tree may produce a huge number of flowers, with many on each flower cushion, only about 5% are ever pollinated and only a tiny proportion of pollinated flowers develop into mature pods. Only one in ev-ery 100-200 flowers produces a ripe pod under natural conditions, and it has been observed (Young AM, 1986, Cocoa pollination. Cocoa Growers’ Bulletin 37, 5-23) that greater numbers of pods develop when flowers are hand pollinated than when they are pollinated naturally. Researchers have worked hard to try to understand the biology of pollination and early pod development, and why so few flowers develop into pods. If we understood the limiting factors, it may be possible to substantially increase the pod yield of a tree.
Cocoa flowers are normally pollinated by tiny flying insects that are attracted to them. These are mostly midges in the Order Diptera, Family Ceratopogonidae (known as ‘ceratopogonid midges’), genus Forcipomyia, which flourish in cool, dark, moist places like the rotting vege-tative matter on the ground in a well-managed cocoa block. They have been shown to breed in rotting banana trunks and heaps of cocoa pod husks. They are more common under moist than dry conditions on the plantation floor. Their small size (0.5 – 2mm long) and fast move-ment make them hard to see, and in the Caribbean they are aptly called ‘no see-ems’. Midges have been observed crawling into the petal pouches where pollen grains from anthers break-ing open in the early morning become attached to their body; they fly off to other flowers and, in crawling down between the ring of projecting staminodes, deposit pollen on the stigma and style.
The pollen grains germinate to form pollen tubes that grow down inside the style to fertilise the egg cells in the ovules. The cocoa flower is very unusual in that pollen can germinate and penetrate at any point on the pistil, and not just on the stigma at the top. Each fertilised ovule eventually develops into a seed (or cocoa bean); the ovary wall develops into the cocoa pod, showing the five compartments of the original ovary in the five pairs of ridges on the pod (Figure A3.8).
The Mystery of Cocoa Pollination
There is still much to be learned about the pollination of cocoa. It has been fortunate that various spe-cies of ceratopogonid midges occur throughout the tropical world, allowing successful pollination of cocoa wherever it has been taken and planted outside its centre of evolution. The chemical and visual cues that attract the midges to the flowers are poorly understood, but fragrance and nectar secretions are thought to play a role, along with the subtle visual cues of the complex and delicate flowers. A few other types of insect are known to pollinate cocoa, including ants in the genus Crematogaster, flies in the family Ceciomyiidae, thrips and leafhoppers. Because of doubt that the tiny midges can carry enough pollen to ensure fertilisation of all the ovules in a flower, people have also suggested that tiny bees may be involved. None of these potential pollinators travel far and so natural pollination occurs only between near neighbouring trees. If populations of pollinators are low (e.g. because of heavy spraying of insecticides or exposure and desiccation of the litter layer), cocoa production may be limited. Young (1986, Cocoa pollination. Cocoa Growers’ Bulletin 37, 5-23), working in Costa Rica, studied ways of increasing the abundance of pollinators by placing rotting vegetable matter such as cut banana trunks on the floor of plantations. Leaving pod husks in cocoa plantings as a breeding ground for midge pollinators has to be balanced against the fact that pod husks can also be a source of Cocoa Pod Borer and Phytophthora palmivora. Higher rates of pollination are thought to occur in plantations with a thick layer of moist decomposing leaf litter than in those with minimal accumulation of rotting plant matter on the ground or excessive growth of herbaceous weeds. In situ composting of plantation waste (pod husks, cut weeds and prunings) in trenches between the rows may provide breeding sites for midges (Chapter 6). Also, a diversity of shade and adjacent vegetation, including natural forest, is likely to favour the build-up of populations of pollinators.
P A P U A N E W G U I N E A C O C O A E X T E N S I O N M A N U A L206
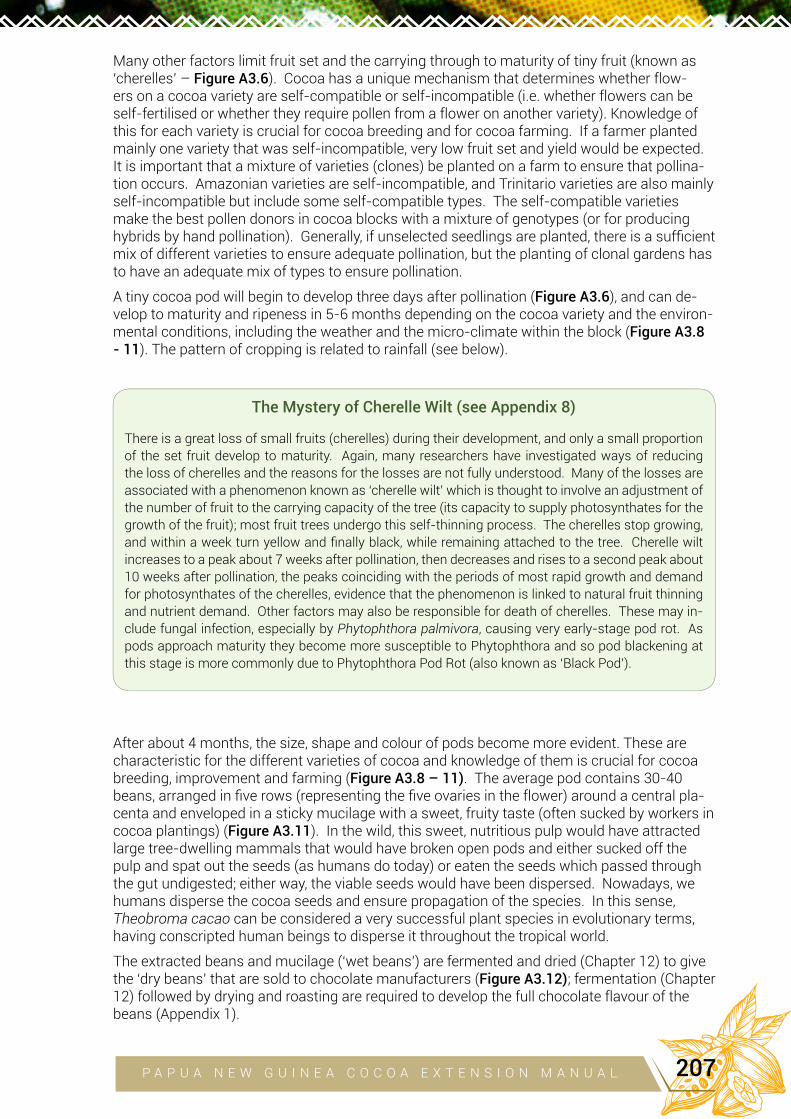
Many other factors limit fruit set and the carrying through to maturity of tiny fruit (known as ‘cherelles’ – Figure A3.6). Cocoa has a unique mechanism that determines whether flow-ers on a cocoa variety are self-compatible or self-incompatible (i.e. whether flowers can be self-fertilised or whether they require pollen from a flower on another variety). Knowledge of this for each variety is crucial for cocoa breeding and for cocoa farming. If a farmer planted mainly one variety that was self-incompatible, very low fruit set and yield would be expected. It is important that a mixture of varieties (clones) be planted on a farm to ensure that pollina-tion occurs. Amazonian varieties are self-incompatible, and Trinitario varieties are also mainly self-incompatible but include some self-compatible types. The self-compatible varieties make the best pollen donors in cocoa blocks with a mixture of genotypes (or for producing hybrids by hand pollination). Generally, if unselected seedlings are planted, there is a sufficient mix of different varieties to ensure adequate pollination, but the planting of clonal gardens has to have an adequate mix of types to ensure pollination.
A tiny cocoa pod will begin to develop three days after pollination (Figure A3.6), and can de-velop to maturity and ripeness in 5-6 months depending on the cocoa variety and the environ-mental conditions, including the weather and the micro-climate within the block (Figure A3.8 - 11). The pattern of cropping is related to rainfall (see below).
After about 4 months, the size, shape and colour of pods become more evident. These are characteristic for the different varieties of cocoa and knowledge of them is crucial for cocoa breeding, improvement and farming (Figure A3.8 – 11). The average pod contains 30-40 beans, arranged in five rows (representing the five ovaries in the flower) around a central pla-centa and enveloped in a sticky mucilage with a sweet, fruity taste (often sucked by workers in cocoa plantings) (Figure A3.11). In the wild, this sweet, nutritious pulp would have attracted large tree-dwelling mammals that would have broken open pods and either sucked off the pulp and spat out the seeds (as humans do today) or eaten the seeds which passed through the gut undigested; either way, the viable seeds would have been dispersed. Nowadays, we humans disperse the cocoa seeds and ensure propagation of the species. In this sense, Theobroma cacao can be considered a very successful plant species in evolutionary terms, having conscripted human beings to disperse it throughout the tropical world.
The extracted beans and mucilage (‘wet beans’) are fermented and dried (Chapter 12) to give the ‘dry beans’ that are sold to chocolate manufacturers (Figure A3.12); fermentation (Chapter 12) followed by drying and roasting are required to develop the full chocolate flavour of the beans (Appendix 1).
The Mystery of Cherelle Wilt (see Appendix 8)
There is a great loss of small fruits (cherelles) during their development, and only a small proportion
of the set fruit develop to maturity. Again, many researchers have investigated ways of reducing the loss of cherelles and the reasons for the losses are not fully understood. Many of the losses are associated with a phenomenon known as ‘cherelle wilt’ which is thought to involve an adjustment of the number of fruit to the carrying capacity of the tree (its capacity to supply photosynthates for the growth of the fruit); most fruit trees undergo this self-thinning process. The cherelles stop growing, and within a week turn yellow and finally black, while remaining attached to the tree. Cherelle wilt increases to a peak about 7 weeks after pollination, then decreases and rises to a second peak about 10 weeks after pollination, the peaks coinciding with the periods of most rapid growth and demand for photosynthates of the cherelles, evidence that the phenomenon is linked to natural fruit thinning
and nutrient demand. Other factors may also be responsible for death of cherelles. These may in-
clude fungal infection, especially by Phytophthora palmivora, causing very early-stage pod rot. As pods approach maturity they become more susceptible to Phytophthora and so pod blackening at this stage is more commonly due to Phytophthora Pod Rot (also known as ‘Black Pod’).
P A P U A N E W G U I N E A C O C O A E X T E N S I O N M A N U A L 207

Figure A3.8 - Cocoa pods of four different clones developing on the trunk and lower branches. Bright orange pods in the bottom LH photo are ripe and ready for harvesting
P A P U A N E W G U I N E A C O C O A E X T E N S I O N M A N U A L208
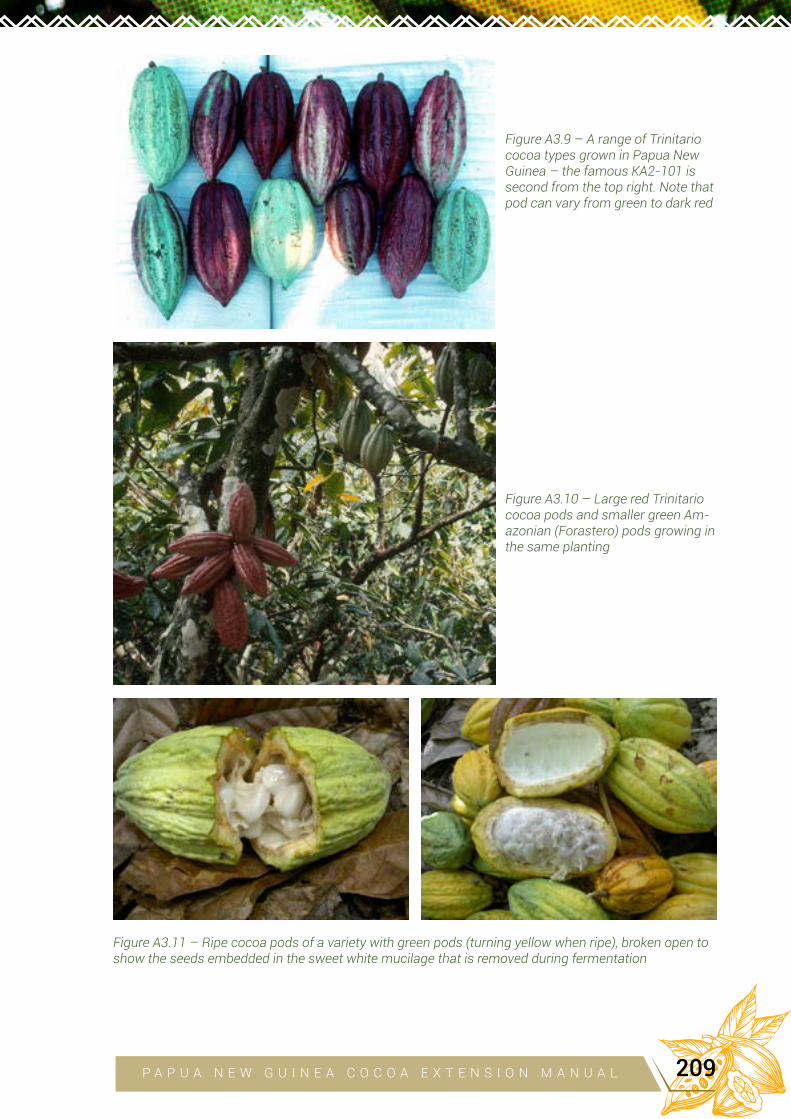
Figure A3.11 – Ripe cocoa pods of a variety with green pods (turning yellow when ripe), broken open to show the seeds embedded in the sweet white mucilage that is removed during fermentation
Figure A3.10 – Large red Trinitario cocoa pods and smaller green Am-azonian (Forastero) pods growing in the same planting
Figure A3.9 – A range of Trinitario cocoa types grown in Papua New Guinea – the famous KA2-101 is second from the top right. Note that pod can vary from green to dark red
P A P U A N E W G U I N E A C O C O A E X T E N S I O N M A N U A L 209
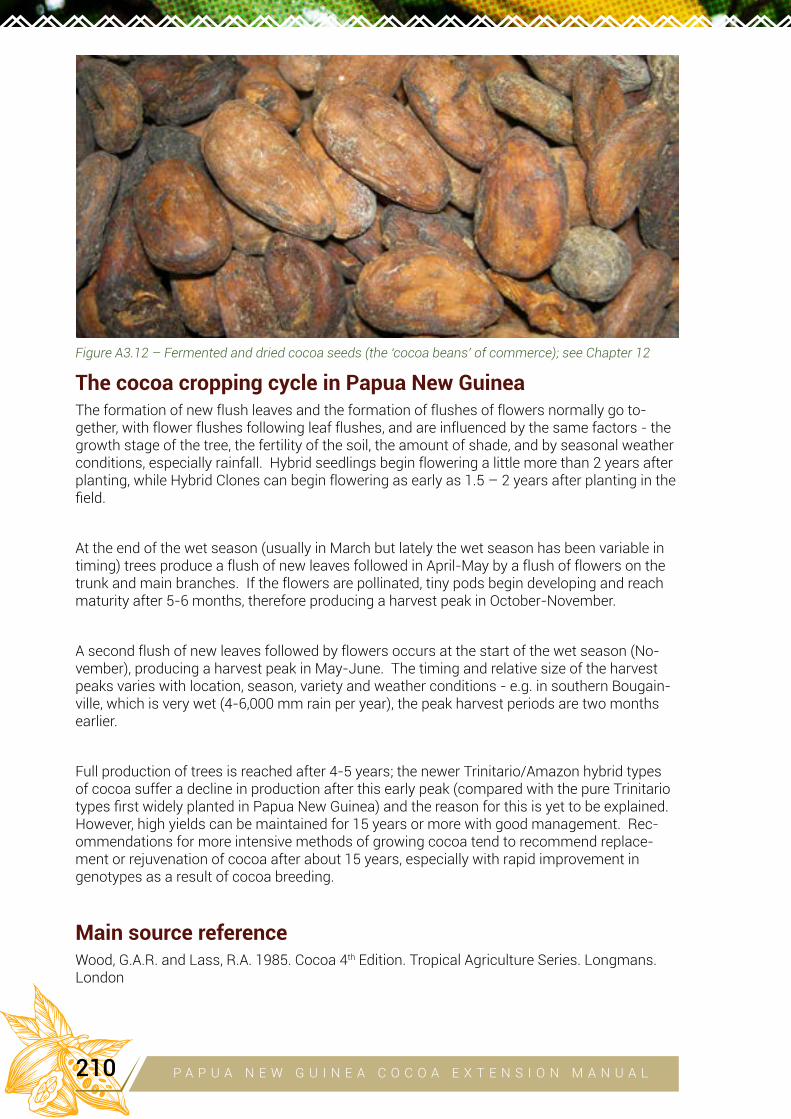
The cocoa cropping cycle in Papua New GuineaThe formation of new flush leaves and the formation of flushes of flowers normally go to-gether, with flower flushes following leaf flushes, and are influenced by the same factors - the growth stage of the tree, the fertility of the soil, the amount of shade, and by seasonal weather conditions, especially rainfall. Hybrid seedlings begin flowering a little more than 2 years after planting, while Hybrid Clones can begin flowering as early as 1.5 – 2 years after planting in the field.
At the end of the wet season (usually in March but lately the wet season has been variable in timing) trees produce a flush of new leaves followed in April-May by a flush of flowers on the trunk and main branches. If the flowers are pollinated, tiny pods begin developing and reach maturity after 5-6 months, therefore producing a harvest peak in October-November.
A second flush of new leaves followed by flowers occurs at the start of the wet season (No-vember), producing a harvest peak in May-June. The timing and relative size of the harvest peaks varies with location, season, variety and weather conditions - e.g. in southern Bougain-ville, which is very wet (4-6,000 mm rain per year), the peak harvest periods are two months earlier.
Full production of trees is reached after 4-5 years; the newer Trinitario/Amazon hybrid types of cocoa suffer a decline in production after this early peak (compared with the pure Trinitario types first widely planted in Papua New Guinea) and the reason for this is yet to be explained. However, high yields can be maintained for 15 years or more with good management. Rec-ommendations for more intensive methods of growing cocoa tend to recommend replace-ment or rejuvenation of cocoa after about 15 years, especially with rapid improvement in genotypes as a result of cocoa breeding.
Main source referenceWood, G.A.R. and Lass, R.A. 1985. Cocoa 4th Edition. Tropical Agriculture Series. Longmans. London
Figure A3.12 – Fermented and dried cocoa seeds (the ‘cocoa beans’ of commerce); see Chapter 12
P A P U A N E W G U I N E A C O C O A E X T E N S I O N M A N U A L210
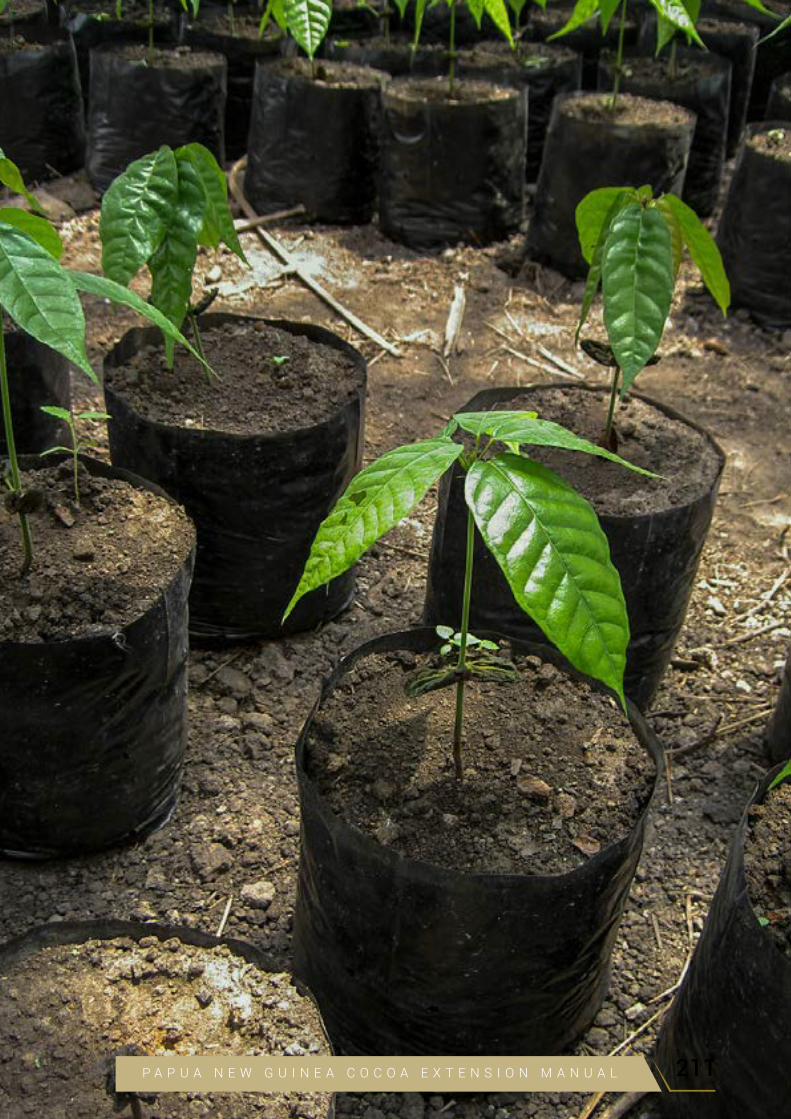
P A P U A N E W G U I N E A C O C O A E X T E N S I O N M A N U A L 211

04
ENVIRONMENTAL
CONDITIONS NEEDED
FOR GROWING COCOA David Yinil, Eremas Tade, Peter Bapiwai and Chris Fidelis (partly adapted from L.W. Hanson, R.M. Bourke and D.S. Yinil, 1998, Cocoa and Coconut Growing Environments in Papua New Guinea. A Guide for Research and Extension Activities. Australian Agency for International Development, Canberra)
AIM OF THIS CHAPTER:
To describe the environmental conditions suitable for growing cocoa
IntroductionThe first step in producing a healthy cocoa crop is to ensure that all the physical conditions (local climate, soil conditions, nutrition and shade) of the site are suitable for growing cocoa. Compared with most crops, cocoa is especially sensitive to environmental stress. For exam-ple, even allowing for the impact of pests and diseases such as Mirids and Cocoa Swollen Shoot Virus, the main cause of cocoa tree decline in West Africa is thought to be drought during the prolonged dry season, and exhaustion of soil fertility due to neglect of soil during prolonged cocoa cropping.
Before planting large areas of cocoa in a new area, it is advisable to plant small test blocks to determine whether the crop can grow well in the new environment and to give an indication of possible problems due to the physical environment. This is important advice for an extension worker considering introducing cocoa to a new area to stimulate economic development. In a cocoa block established in an area basically suitable for the crop, the growth and productivity of the trees is determined mainly by the rainfall, and the shading and nutrition of the trees.
Climate and weatherCocoa evolved as an understory species in the Amazon rainforests (Appendix 1) where the mean annual rainfall is more than 2000 mm and is relatively evenly distributed throughout the year with no dry period. Thus as a crop it is adapted to the lowland wet, humid tropics, and is grown mainly between latitudes 10o north and south of the Equator, which includes all of Papua New Guinea.
Cocoa is normally grown in places where the mean minimum temperature is not less than 21oC in any month and the mean maximum is not more than 32oC in any month; all coastal areas of Papua New Guinea satisfy these requirements. A daily temperature range of about 9 degrees is needed to initiate bud-burst. Temperature decreases at a rate of about 0.6 – 1.0oC for every 100 metres increase in altitude and so temperature affects the altitude at which cocoa can be grown successfully. It is normally considered that cocoa can be grown from sea level up to about 600 m above sea level, but recently in Papua New Guinea cocoa has been grown successfully on a highland plateau at Karamui in Simbu Province at an altitude of 1200 metres above sea level where the typical daily temperature range is from 28.5 °C during the day to 20 °C at night. In this location it has been found that while vegetative growth is slowed down, pod production is still very good and yields have not been very different from those in the lowlands (see Chapter 2). The cooler night temperatures at this altitude suppressed vegetative growth and most probably promoted flowering and increased pod production. Vegetative growth of cocoa declines at lower temperatures and may cease below a mean temperature of 14 °C (Hadley, P. and Pearson, S. 1994. A Physiologist’s view of cocoa yield.
APPENDIX
P A P U A N E W G U I N E A C O C O A E X T E N S I O N M A N U A L212
Proceedings of the Malaysian International Cocoa Conference: 20-21 October 1994, Kuala Lumpur, Malaysia). The optimum mean daily temperature for vegetative growth of cocoa has been reported as 26 - 28 °C (Hadley, P., End, M., Taylor, S.J., and Pettipher, G.L. 1991. Environ-mental regulation of vegetative and reproductive growth in cocoa grown in controlled glass-house conditions. Proceedings of the Malaysian International Cocoa Conference: Challenges in the 90s, 25-28th September 1991, Kuala Lumpur, Malaysia). Studies by these authors in semi-controlled environment glasshouses indicated that increased vegetative growth at high-er temperatures is accompanied by a decline in pod set, an increase in incidence of cherelle wilt, and a decline in overall pod numbers; it is also accompanied by a decline in pod and seed weight compared with cooler conditions. The implication of this is that cocoa yield potential may be greater at the cooler end of the production temperature range and this is borne out by experience at Karamui. Generally it has been considered that temperature is less critical than water availability in determining the growth of cocoa within the tropical zone.
Within the wet tropical zone, the most important climatic factors that affect growth and production of cocoa are total annual rainfall, rainfall distribution, and the relative dryness and duration of the dry season. Of all the tree crops grown in the wet tropics, cocoa is one of the most sensitive to water stress. As most of the cocoa root mass active in uptake of water and nutrients occurs in the soil just below the litter layer, it is important that drought conditions are not prolonged enough to dry out this zone. Ideally, cocoa is grown in areas with mean annual rainfall of 1500-2500 mm, with rainfall evenly distributed throughout the year (no month with less than 100mm).
o The total annual rainfall is not as important as the distribution throughout the year, es-pecially the length of the ‘dry’ season.
o Change in water availability is thought to be the most important factor controlling leaf flushing and flowering through the year. A main flush of leaf growth followed by flower-ing tends to occur at the end of the wet season (Appendix 3).
o During a prolonged dry season, water deficit will limit tree growth.
o In Papua New Guinea, areas where there are regularly 3 or more consecutive months with less than 100mm are considered unsuitable for cocoa.
o Very wet areas with over 3000mm mean annual rainfall and extended periods of very wet weather are considered unsuitable for cocoa in Papua New Guinea because of the high incidence of Phytophthora Pod Rot and Canker, and Vascular Streak Dieback.
o Such very wet areas are also likely to have much greater leaching of nutrients from soil, resulting in generally poorer soils.
An ideal cocoa growing area in Papua New Guinea would have about 2000mm rainfall per year, fairly evenly distributed throughout the year, with only a short dry season. However, a definite dry season can assist cocoa production in certain areas – e.g. in West Africa the main crop is harvested, fermented and sun dried during the dry season (4 months November to February with less than 100mm), resulting in the production of very high quality beans by smallholders. A shorter dry period in August in many parts of West Africa reduces the build-up of Phytophthora Pod Rot in the following wet months. However, one of the main causes of tree death in West Africa is lack of soil water during the dry periods.
In areas where dry periods are prolonged and cocoa is under mild water stress, irrigation can be used to greatly increase yield. In some such places in Peninsular Malaysia irrigation in-creased pod production by about 40-50%. Nowadays, efficient drip irrigation can be used for cocoa, as seen at the Mars Cocoa Development Centre in Tarengge, South Sulawesi. In fact, using drip irrigation on cocoa in a drier region could allow cocoa production while greatly re-ducing the incidence and severity of Phytophthora Pod Rot and Canker. It has been suggested that in areas with a mean annual rainfall of less than 1250mm, cocoa should not be grown unless it can be irrigated.
P A P U A N E W G U I N E A C O C O A E X T E N S I O N M A N U A L 213
Areas with regular strong winds are not suitable for cocoa, especially if these occur during the dry season. Shade trees, as well as providing shade, also reduce the amount of wind in a planting and in some windy locations shade trees and shelter belts may have to be planted to reduce the impact of wind. Strong winds can also carry salt spray in coastal areas and this can damage cocoa, which should be protected by wind breaks of natural bush or more salt tolerant coconut palms.
Another aspect of the environment that strongly affects cocoa growth and production is exposure to sunlight and the degree of shading of the trees. It has been shown that individual cocoa leaves reach their maximum rate of assimilation of CO
2 at about 25-30% of full sun-
light, depending on whether they have initially developed in shade or full sunlight. Leaves from young plants actually show a decrease in assimilation rate at sunlight levels above this. How-ever, because of the amount of self-shading that occurs in a cocoa tree, such data for individ-ual leaves are not really helpful except to emphasize that cocoa is adapted to growing in shade and that young plants, in which there is little self-shading, certainly require shade (Chapter 5). In fact productivity of a mature cocoa block has been shown to increase as shade is reduced, due to increased production of leaves and, more important, increased flowering. But complete removal of shade creates management problems, especially for maintenance of plant nutrition and prevention of ‘exposure dieback’ and is not recommended, except with the very highest standard of management (Chapter 6). Shading not only reduces light incidence, but also the solar heating of the leaves and ground, thus reducing transpiration from leaves and evapo-ration from the litter layer and soil. Thus complete removal of shade can reduce growth and productivity by increasing water stress in drier months and drier locations.
SoilsIn its soil requirements, cocoa is a very demanding crop; it grows best in relatively high quality soils with good drainage, aeration, water holding capacity and nutrient availability, although it can adapt to and give moderate yields in poorer soils with appropriate management, es-pecially of shade and manuring. Rapid expansion of cocoa planting has usually occurred on land recently cleared of rainforest, and has therefore relied on the soil fertility that has built up under the forest, and on nutrients released in the ash following the clearing and burning of the forest vegetation. Following opening up of rainforest, nutrients can be rapidly lost from soil by leaching and many nutrients are removed in harvested pods; therefore maintenance of soil fertility is a major concern in cocoa farming (see Chapter 6). In natural rainforest soils, to which cocoa became adapted, the top layer of organic soil acts as a natural sponge that ensures a year-round supply of water and nutrients with adequate aeration of the soil to allow root functioning. Clearing of rainforest for cocoa planting often involves an immediate loss of soil structure and quality and increased exposure to seasonal environmental fluctuations. An aim in cocoa planting is to retain as much of the original environmental buffering charac-teristics of the forest soil as possible. For this, the role of shade trees in protecting soil from environmental stress and maintaining a degree of complexity in the vegetation is important. The role of leguminous shade trees such as Leucaena and Gliricidia in helping to maintain soil
fertility, especially nitrogen levels, is very important.
The history of cocoa cultivation, as exemplified in Trinidad and probably West Africa, has involved extensive planting wherever the climate, and especially rainfall, has been suitable, regardless of the suitability of the soil, followed by long-term sustainability of the crop on the best soils and its decline on the less suitable soils. Early on in the scientific study of cocoa in West Africa, sound fertiliser experiments were almost impossible to conduct because of the damage caused by mirids and other insect pests and so planting was not much guided by considerations of soil fertility.
Especially on the less suitable soils, cocoa is sensitive to localised variations in soil conditions. This is an important factor contributing to variation in performance within a region or even within a farm, and must be considered in single-tree selection on farms for crop improvement.
Cocoa grows poorly in heavy, poorly drained soils or in soils prone to waterlogging, which rap-idly kills the roots. Cocoa can tolerate flooding for only very short periods, and should not be
P A P U A N E W G U I N E A C O C O A E X T E N S I O N M A N U A L214
grown in areas prone to flooding and water logging unless adequate drains can be installed. This was necessary in parts of Southeast Sulawesi where productive cocoa farms were estab-lished on land that originally carried swamp forest. While the soil must be well drained, it must also retain sufficient water to tide plants over any dry periods.
For good productivity, cocoa is generally considered to require deep, well-structured, well-drained, fertile soils. Cocoa grows poorly in any soil in which downward penetration of the taproot is restricted in any way (e.g. by a high water table, compacted clay horizon, shallow bed rock or a concreted layer). These factors can be determined easily by digging a pit. Pre-vious experience of growing food crops on the land can indicate its general fertility. As with climatic requirements, if cocoa is being introduced to a new area, several small test blocks should be planted to first determine the suitability of the soils for growing cocoa.
Cocoa grows poorly on acidic soils, which partly explains its relative absence as a major commercial crop from the Congo and Amazon Basins, where soils are mostly Ferralitic with low pH. In Malaysia and Indonesia, cocoa is planted mainly on rich, deep alluvial soils in river deltas. While these are well drained, they are prone to occasional flooding from nearby rivers, especially following excessive clearing of rainforest vegetation in the catchment areas, some-times for cocoa planting. Some planted areas are swampy and have been drained to plant cocoa. Unlike the situation in West Africa, where soils and environmental conditions are often not ideal for cocoa, soils in the main cocoa growing areas in Papua New Guinea and Indonesia are often of volcanic (e.g. in East and West New Britain, North Solomons, Java, Bali) or alluvial origin (e.g. the Sepik, much of Sulawesi) and so are relatively nutrient rich (certainly by West African standards). Thus recommendations for maintenance of soil fertility deriving from West Africa may not applicable here.
Cocoa plantings on old food-crop gardens, old moribund cocoa plantations, or under estab-lished shade trees such as coconuts will require more attention to soil fertility from the outset. Cocoa should not normally be planted on land where the previous vegetation or crops were not growing well. The deep soils derived from volcanic ash in New Britain, Bougainville and the Madang area are ideal for cocoa, as are deep alluvial soils on river plains such as those of the Sepik River and Fly River. The calcarious coastal soils of New Ireland have also proved suitable.
Most cocoa is grown on flat coastal country, but it can be grown on slopes where a degree of terracing may be required to trap water, leaf litter and nutrients, reduce runoff, and facilitate access to the trees.
Cocoa is grown in a wide variety of soils, and it is difficult to be too prescriptive about the suitability of soils. Poorer soils can grow cocoa profitably if sufficient attention is paid to es-tablishing drains, terraces, good shade, and maintaining soil fertility with fertilisers or compost (see Chapter 6). All but the most fertile soils will eventually require measures to maintain soil fertility such as growth of leguminous shade trees, ensuring that all organic residues such as pod husks and prunings are returned to the soil, and the addition of organic manures, compost
and inorganic fertilisers.
Main source referenceWood, G.A.R. and Lass, R.A. 1985. Cocoa 4th Edition. Tropical Agriculture Series. Longmans. London
P A P U A N E W G U I N E A C O C O A E X T E N S I O N M A N U A L 215
05
HISTORY OF COCOA
RESEARCH AND
IMPROVEMENT IN
PAPUA NEW GUINEA Philip Keane, John Moxon, Josephine Saul-Maora, Trevor Clarke, Eremas
Tade, Grant Vinning and David Loh
AIM OF THIS CHAPTER:
To summarise the main activities and achievements in cocoa research and de-velopment and cocoa genotype improvement in Papua New Guinea
The history of the introduction of cocoa into Papua and New Guinea and its subsequent devel-opment as an important crop is given in Appendix 2. This Appendix concentrates on the histo-ry and role of cocoa research and improvement that was undertaken initially at the Lowlands Agricultural Experiment Station (LAES), Keravat, East New Britain Province, and subsequently at the cocoa industry-supported research institutes that developed into the current PNG Co-coa and Coconut Institute Limited (CCIL), at nearby Tavilo.
1900sIt is likely that the earliest introductions of cocoa to Papua New Guinea occurred between 1884 and 1900 into German New Guinea from Samoa, some of these introductions being in the vicinity of Rabaul through the connections of German trading companies to Samoa (Ap-pendix 2). As described in Appendix 2, there is strong evidence that these introductions were mainly Trinitario cocoa that had originated in Ceylon, Cameroon and Java. There is some evi-dence of a direct introduction from Venezuela that would also most likely have been a Trinitar-io type (Bridgland LA, 1960, cited below). The fact that the type of cocoa first widely planted in Papua New Guinea was Trinitario has been of great importance for the success of the cocoa improvement program in this country right through to the present day. Even now, the cocoa breeders at CCIL are exploring the diversity of Trinitario cocoa on farms throughout the coun-try for well-adapted types.
Because of its great genetic variability, based on its hybrid (Criollo x Forastero) origin and its high degree of self-incompatibility ensuring out-crossing, Trinitario cocoa has been of fundamental importance in the development of the cocoa industries in Papua New Guinea and Indonesia. In particular, it has allowed selection of superior types of cocoa (e.g. disease resistant and higher yielding types with excellent bean quality), which was not possible with the very uniform West African Amelonado cocoa on which the industry in Ghana and Nigeria was based; this cocoa originated from the introduction of only one or a few pods and was inbreeding and so gave rise to a very uniform cocoa population.
APPENDIX
P A P U A N E W G U I N E A C O C O A E X T E N S I O N M A N U A L216
1920s and 30sCocoa was one of the first crops to be planted when the Government Demonstration Planta-tion was opened at Keravat in 1928. In 1930 the Demonstration Plantation was renamed the Lowlands Agricultural Experiment Station (LAES). This played a role in the industry’s expan-sion by advising growers on methods of cocoa management and supplying seed from selected trees that appeared to have good traits. Two years later, in 1932, LAES introduced cocoa from Java, and, again, this was undoubtedly Trinitario cocoa (Djati Roengo clones), which was the dominant type in Java at the time, having originally come from Venezuela. The common cocoa in Java in the late 1800s was a Criollo type known as ‘Java Red’ that may have contributed to the Trinitario cocoa types (the K and KA clones) that were selected and tested at LAES, Ker-avat and widely planted in Papua New Guinea after the Second World War (see Bridgland LA, 1960, ‘Cacao improvement programme, Keravat’. The Papua New Guinea Agricultural Journal 12, 149). Red-podded Trinitario types are common in Papua New Guinea and these may trace their origin back to the type that was introduced from Java in 1932. Also a collection of Criollo cocoa was reported to occur in the Botanic Gardens in Rabaul up until the Second World War and this was probably derived from the cocoa introduced from Java.
In 1938, E.C.D. (Clive) Green, the Superintendent of LAES, published ‘Cacao Cultivation and its Application to the Mandated Territory of New Guinea’ (New Guinea Agricultural Gazette 4/4). This included recommendations for the layout of plantations and mixed cropping with coconuts (as shade), coffee, bananas or foodcrops. Green appreciated that soil fertility had to be main-tained under cocoa and advised that all prunings and organic waste be returned to the soil in a system of shallow trenches dug between rows of cocoa so that over time all the cocoa was manured in this way. He also recommended composting of weeds with the addition of nitro-gen-rich animal manure. These recommendations still apply.
Green was well aware of the genetic heterogeneity of the Trinitario cocoa in Papua New Guinea and strongly recommended selection of improved types from the available plantings throughout the country. This approach still contributes to the cocoa breeding program at CCIL.
Most of the research work undertaken before the Pacific War (1941-45) was concerned with seed selection and vegetative propagation. A simple spacing trial was planted in September 1935, but few results had been collected when the war intervened. Even in the 1930s, the cocoa weevil Pantorhytes was a problem, as reported by the government entomologist J.L. Froggatt in 1938 (‘Weevil pests of cacao’. New Guinea Agricultural Gazelle, 4/3, 6); it has continued to be a major problem in certain areas up to the present time. Spraying and banding trials were initiat-ed, but were discontinued because of unfavourable weather.
By the time of the Japanese invasion of Rabaul during the Pacific War (January 1942), Keravat was supplying seed that produced high yielding trees resulting from three generations of se-lection, presumably from crosses within Trinitario as recommended by Green. This was clearly excellent cocoa as beans sent to the United Kingdom, America, Germany and Australia achieved the same price as beans from Trinidad and a higher price than those from Ghana. The outbreak of the war halted all work at LAES, which became a major base and centre of food gardens for the Japanese forces. The superintendent, Clive Green, remained at his post right up until the arrival on the station of Japanese troops, escaping into the surrounding rainforest where he survived for several months before surrendering to the Japanese commander at Keravat. He died in the sinking by an American submarine of the ‘Montevideo Maru’ near the Philippines as it was taking prisoners-of-war from Rabaul to Japan. Most of the experimental cocoa and all the research records were destroyed during the war. The cocoa collection at the Rabaul Botanic Garden also suffered major damage.
The Lucker family was closely involved with the establishment and on-going history of LAES. Hans Lucker was the field overseer and a close friend of Clive Green, and gave him shelter during the Japanese invasion. After the war, his son Paul Lucker worked as an assistant to Leon Bridgland from 1950 to 1960, and another son Dick Lucker was the station mechanic from 1957 to 1972 (see Anon. ‘Lowlands Agricultural Experiment Station, Keravat, Papua New Guinea, 1928 – 1978’, compiled by David Loh on the 50th anniversary of the station).
P A P U A N E W G U I N E A C O C O A E X T E N S I O N M A N U A L 217
1940sR.E.P. Dwyer (Economic Botanist from 1946, later Chief of Division of Agricultural Extension, and Director of the Department of Agriculture, Stock and Fisheries from 1952 to 1957), in the Preface written for the reissue of Green’s booklet after the war, bemoaned the loss of much of the superior planting material selected before the war. D.H. Urquhart, who had been the Director of Agriculture in the Gold Coast (Ghana) and was sent to report on cocoa in the Pa-cific on behalf of Cadbury Bros, the South Pacific Commission and the Australian Minister for Territories, recommended that the Solomon Islands use seed from Keravat, declaring that the cocoa he had seen at Keravat was “the best I have encountered anywhere to date” (Urquhart DH, 1951, ‘Prospects of growing cacao in the British Solomon Islands, with notes on Malaya, Ceylon, and Java’ A report, Bournville, Cadbury Bros). Later Urquhart published the definitive book on cocoa at the time (‘Cocoa’, Longmans, Green and Co., London, 1955).
Cocoa was one of the first crops re-established in Papua New Guinea after the war. By this stage, planting cocoa under coconuts was standard practice in many areas of Papua New Guinea. This was based on trials conducted at LAES and in New Ireland and later became common throughout Southeast Asia. Many outstanding plantations in Papua New Guinea were based on this system and planting cocoa under existing coconuts (and other long-stand-ing trees such as breadfruit, galip and betelnut) later became common in smallholdings.
After the war (1946), F.C. (Frank) Henderson was appointed government Economic Botanist and Agronomist-in-Charge at LAES, and began selecting promising trees from the remains of the pre-war cocoa at Keravat and the Rabaul Botanic Gardens. In an article ‘Cacao as a crop for the owner-manager in Papua and New Guinea’ (1954, The Papua and New Guinea Agri-cultural Journal 9/2), he considered that the deep, well-drained pumice soils of New Britain and adjacent islands were excellent for cocoa. Henderson’s original parent trees were select-ed on the basis of vigour, pest and disease resistance, apparent yielding ability, and pod and bean characteristics. Leon Bridgland, Henderson’s successor as the Agronomist-in-Charge at LAES (from 1952), made the point that “indeed, anything that survived the War must have possessed remarkable vigour” (Bridgland LA, 1960, cited above). Henderson’s selections from Keravat were designated as K (Keravat) clones (e.g. K5, K20, K82). In an attempt to recover the high yielding types that had been selected and distributed to plantations before the war, material was sourced from trees thought to be from the mother trees on a plantation near Lae and on Asalingi Plantation in the Bainings region in East New Britain. The Asalingi selec-tions were designated KA (Keravat Asalingi) clones and included the famous KA2-101. These clones were all Trinitario cocoa, the dominant if not the only type surviving in Papua New Guinea after the war. Many of the clones selected immediately after the war are still used as the Trinitario parents in the current breeding program. Pure Criollo types are generally regard-ed as being less robust than Trinitario, and have not survived in most countries to which they were introduced, including Papua New Guinea, Java (Indonesia) and Ceylon (Sri Lanka). Their use is not mentioned in literature published after the war in Papua New Guinea. Pods from the selected trees were used to plant up a number of progeny trials on LAES. These blocks pro-vided a valuable source of genetic material for later selection and breeding work. One of the blocks (Block 405) is still producing well and remains a source of breeding material, although only 40 percent of the original trees are still standing, the remainder being replacements of various ages.
Henderson noted that Phytophthora Pod Rot (Black Pod) was the most serious disease, and Pantorhytes weevils and Glenea longicorn beetles were the most serious pests. All remain problems to this day. It is evident that the rapid adaptation of indigenous insect pests to the introduced cocoa caused serious problems, as shown by the fact that the entomologists B.A. O’Connor (1946-47) followed in 1947 by G.S. (Gordon) Dun were the earliest scientists appointed along with Henderson after the war, with Dun continuing to work at Keravat for 20 years until 1967.
P A P U A N E W G U I N E A C O C O A E X T E N S I O N M A N U A L218
1950sFrom 1946 to 1952 the cocoa research programme expanded rapidly under the leadership of Henderson at LAES. In the mid to late 1950s and through into the 1960s, A.E. (Arthur) Charles, Peter Byrne and Leon Bridgland carried on the work on cocoa improvement which was sum-marised in 1960 in the above-mentioned paper by Bridgland. This work included clonal selec-tions and early studies of hybrid seed development. Progeny trials of K and KA clones were initiated. As discussed above, Papua New Guinea Trinitario cocoa was very heterogenous. It included a high degree of self-incompatibility that ensured out-crossing. This, along with the several likely sources of introduction of cocoa to Papua New Guinea (from Cameroon, Ceylon and Java via Samoa, and directly from Java and possibly Venezuela) ensured that a wide va-riety of types occurred, including green- and red-podded types (see Appendix 3, Figure A3.9). The first crossing programme in 1958 looked at the possibility of obtaining improved material by crossing extreme Trinitario types, the selection of parents being based on pod and bean characteristics. This was, however, only partly successful. Vegetative propagation by rooted cuttings was tested and developed in the nursery by R.J. (Reg) Harris and I.L. (Ian) Edward (Edward IL, 1960, ‘Clonal cacao at Keravat - Part I’. The Papua and New Guinea Agricultural Journal 13; 1961, ‘Clonal cacao at Keravat - Part II’. The Papua and New Guinea Agricultur-al Journal 14, 16). Arthur Charles summarised the studies on shade and spacing in a paper published in 1961 (‘Spacing and Shade Trials with Cacao’, 1961, The Papua and New Guinea Agricultural Journal 14, 1).
From the early 1950s and through into the 1960s Leon Bridgland, with Ken Newton, R.J. Friend and later with John O’Donohue, conducted trials on the most appropriate methods of ferment-ing and drying cocoa under the particular climate in the main cocoa growing areas of Papua New Guinea. This work resulted in recommendations to growers on commercial and efficient methods of processing cocoa for export (Bridgland LA, 1959, ‘Cacao processing – history and principles’. The Papua and New Guinea Agricultural Journal 12, 49; Bridgland LA, 1959, ‘Pro-cessing methods for cacao growers in Papua and New Guinea’. The Papua and New Guinea Agricultural Journal 12, 87).
The pioneering agronomists at LAES, Frank Henderson, Leon Bridgland, John Richardson, Peter Byrne, Ken Newton, Ron Carne and John O’Donohue (from 1959), continued through the 1950s a wide ranging series of studies of all aspects of cocoa growing, including genotype development, propagation, spacing, shade, and pest and disease control.
Through the 1950s Gordon Dun continued important studies of the insect pests of cocoa, including stem borers (Pantorhytes, Glenea), mirids and flush defoliating caterpillars. Mirids (Cocoa Capsids) caused heavy losses of pods at all stages of development, especially during wet periods. J.L. Gressitt studied longicorn beetles and Pantorhytes weevil on cocoa through the 1950s and into the 1960s. From 1954 J.J.H. (Joe) Szent-Ivany worked as an entomologist with Gordon Dun and they did much to document and describe the full range of insect pest species attacking cocoa (see Appendix 7).
Dorothy Shaw was appointed to establish the first plant pathology section at the headquar-ters of the Department of Agriculture, Stock and Fisheries in Port Moresby (Konedobu) in 1955 and in a long career until 1976 documented the diseases of cocoa (among many other crops), identified diseases, and advised on their research and control. The first plant patholo-gists appointed at LAES were R.J. Friend (1955-57) and Peter Thrower (1956-57) who began research on the biology and control of Phytophthora Pod Rot (commonly known as Black Pod, caused by Phytophthora palmivora), which was the most serious disease, regularly destroying a significant proportion of the pods especially during wet weather.
A chemistry section was initiated at LAES in 1954 with the appointment of Don Murty and Stan Baseden, early studies being directed at the serious decline in coconuts on New Ireland, which was shown to be caused by potassium deficiency in the coralline soils.
P A P U A N E W G U I N E A C O C O A E X T E N S I O N M A N U A L 219
1960sEntomological work was continued strongly through the 1960s by Gordon Dun, Joe Szent-Iva-ny, Lance Smee and Ted Fenner, and through into the 1970s by Erol Hassan, Dermott O’Sulli-van, Remigius Berena, and Peter Bailey who especially studied the ecology and management of the Pantorhytes weevil, Pansepta bag moth, and Glenea longicorn beetles among many other insect problems. Pantoryhtes was identified as the major insect pest of cocoa in many provinces. Control methods, included biological control using Crazy Ants, were developed. The research on the biological control of cocoa pests using ants was summarised in 1973 by P.M. Room (‘Control by ants of pest situations in tropical tree crops; a strategy for research and development’. The Papua New Guinea Agricultural Journal 24,98). Early studies of the Gi-ant African Snail, accidentally introduced by the Japanese during the war and a pest of cocoa nurseries and young cocoa plantings, resulted in the adaptation of a Gonaxis snail for biolog-ical control (Dun GS, 1967, ‘The giant snail’. The Papua and New Guinea Agricultural Journal, 18, 123).
Studies on Black Pod and other diseases were taken up by Peter Hicks from 1962 to 1978. The virologist, Rip van Velsen, working at LAES from 1958 to 1966, mainly on diseases of food crops, was unable to detect any significant virus diseases of cocoa but studied a virus disease of larvae of a defoliating insect pest of cocoa.
The chemistry section continued at LAES with the appointment of Colin Levy (1962-65) and Austin Puddy (1966-68), and later Ron Polhill (1970-71) and Jon Vilkki (1971-73), who con-ducted leaf and soil nutrient analyses linked to fertiliser trials with many crops, including cocoa.
Influenced by the cocoa genotype development activities of the Cocoa Research Unit at the University of Trinidad and the availability of new cocoa collections from the Upper Amazon, in 1962 the agronomists John O’Donohue and Ken Newton introduced from Trinidad seed of Upper Amazonian material, comprising progeny of several crosses of clones from within the Nanay, Parinari, Scavina and IAC groups (e.g. Na32 x Pa35, Na33 x Na 34, Sca6 x Sca9). The seed was planted out on LAES and selected trees became the Amazonian parents (KEE clones) of the ‘hybrid’ cocoa seedlings released in the 1980s. Open pollinated seed from ICS (Imperial College Selections) clones from Trinidad and seed of West African Amelonado from Malaysia was also introduced. In 1962-64, progenies of the Upper Amazonian types intro-duced from Trinidad were evaluated and useful types were selected, producing clones desig-nated KEE (e.g. KEE2, KEE5, KEE12, KEE22, KEE42, KEE43, KEE52), several of which are parents of the current Hybrid Clones. A new crossing programme was begun in which seven Amazo-nian parents and seven Trinitario parents were hand crossed in 21 combinations to provide seed for progeny testing.
The breeding programme proceeded smoothly until the outbreak of a destructive epidemic of a dieback disease in many parts of the country. The disease killed many trees on plantations in East New Britain, Talasea in West New Britain, and in the Madang, Lae and Morobe areas on the mainland and threatened the existence of the expanding cocoa industry. The disease was first recorded on LAES in clone K1-102 in clone Testing Series III in early 1961. Dorothy Shaw, and the former LAES agronomists Leon Bridgland, Ian Edward and John Richardson, who were then working in the private plantation industry, first described the unique symptoms of the disease in detail and concluded that it was different from dieback conditions caused by insects or exposure that had long been known to be a problem in cocoa (e.g. in West Africa).
The dieback disease caused havoc in the cocoa research program at Keravat. It was so damaging that most trials were terminated and the proposed hybrid breeding programme was postponed. The disease killed many trees on the research station and many trees were stumped in an attempt to control it and rehabilitate the cocoa. Several years were spent on research into this disease and, as a result, much agronomic and breeding work was not resumed until 1969. Farmers propagated cocoa from the survivors of the epidemic and in doing so undoubtedly selected for a degree of resistance to the disease (often called ‘tolerance’ in Papua New Guinea). The agronomist John O’Donohue, working with John
P A P U A N E W G U I N E A C O C O A E X T E N S I O N M A N U A L220
Thompson, assessed the disease incidence in particular clones and determined that there was a wide range of reaction to the disease, ranging from the highly susceptible response of K1-102 (which was eventually driven to extinction by the disease) to a highly resistant response in several clones, most notably KA2-101. These differences were clearly evident in the clone testing trials that had been set up prior to the epidemic. Planting of this partially resistant material enabled the industry to recover and continue expanding. O’Donohue also conducted field trials in which he raised cocoa seedlings under plastic shelters in plantings with high levels of infection and showed that these protected the plants from infection, providing evidence that the disease was caused by a wind-borne pathogen (for a summary of these studies see Department of Agriculture, Stock and Fisheries, Annual Report 1967-69, Port Moresby, 1972, pp.34-40). The agronomists and some growers had also observed that steep gradients of disease incidence occurred in young cocoa blocks planted adjacent to old infected cocoa, again providing evidence that the disease was caused by a wind-borne pathogen.
1970sThe Planters Association of New Guinea (later the Cocoa Growers Association) raised funds for the recently established University of Papua New Guinea (UPNG) to undertake research into the cause of the disease. Don Drover, of the Chemistry Department, found no evidence of a nutritional cause, and subsequently (1969-1972) a post-graduate student, Philip Keane, was employed to work at LAES with the support of the Agronomist-in-Charge, Peter Byrne, and supervision by Ken Lamb of UPNG and Noel Flentje of the University of Adelaide, to study possible microbial causes (initially a virus cause was considered, following the history of Cocoa Swollen Shoot Virus in West Africa). Eventually Keane found strong evidence that the cause was an indigenous wind-borne basidiomycete fungus, a new species that was named Oncobasidium theobromae, that grew only in the xylem vessels of infected branches (Appen-dix 8). In order to distinguish the disease from the common dieback caused by exposure or insect damage, it was called ‘Vascular Streak Dieback’ or VSD. The disease was later found to be a serious problem in cocoa in Malaysia, Indonesia and elsewhere in South East Asia, but does not occur naturally in New Ireland, Bougainville, the Solomon Islands or further east in the Pacific. It is thought that this distribution of the disease in cocoa reflects the distribution of the fungus in its original indigenous host, which is still unknown. These studies were later supported financially by Cadbury-Fry-Pascall Pty. Ltd., The New Guinea Biological Founda-tions and the Reserve Bank of Australia.
Chris Prior continued studies on the biology and control of VSD from 1973 until 1984 at LAES. He also studied the nature of resistance to the disease, and developed a method of growing the fungus on cocoa tissue culture. He also developed methods for screening cocoa for resis-tance, and developed and applied a strict quarantine protocol for transferring planting material from Keravat to VSD-free areas such as Bougainville and New Ireland. Later Jason Dennis, while enrolled as a Ph.D. student in LaTrobe University (1988–1991) with supervision from Philip Keane and supported by the Biscuit, Cake, Chocolate and Confectionary Alliance (UK) and the Cocoa Board of PNG, continued studies at Keravat on the epidemiology and manage-ment of the disease and showed its close association with wet weather and over-shading.
With the knowledge that there was strong partial resistance to VSD in certain cocoa geno-types and that the disease could be controlled by cultural means including raising plants in a covered nursery, preventing over-shading, and regularly pruning out infections in the field, the agronomy and breeding studies were recommenced in 1972 under the leadership of the long-serving agronomists Peter Byrne and John O’Donohue, supported by Anthea Putter, who arrived from South Africa in 1971, and new graduates from UPNG, Ted Sitapai who took up his position in 1975 and Tore Ovasuru in 1976. The assessment of clonal trials was continued. Hand-crossing of Amazonian and Trinitario clones was carried out in 1972 and the progenies were field-planted in November 1973. The progenies of the Amazonian x Trinitario crosses were tested from 1975 to 1980 for yield and quality characteristics as well as for resistance to VSD and Black Pod (which had long been a serious disease).
P A P U A N E W G U I N E A C O C O A E X T E N S I O N M A N U A L 221
A study of vegetative propagation techniques, started in the 1930s using cuttings, was con-tinued through the 1960s and 70s. Much effort was put into developing methods of mass propagation of clones using cuttings, and special gardens of selected clones were planted to provide large numbers of cuttings for striking in the LAES nursery, under the direction of Jelta Hofman (1962-67), Bernie Kamp (1966-69), Hans Allaries (1970-74) and Henri Bruyn (1969-1972) who had prior experience of cocoa in Indonesia. This work was continued by Rod Saunders (1973-74) and Mirivari Areori (1974-78). The change from striking rooted cuttings to bud grafting of seedling rootstocks as a more effective method of clonal propagation gave rise in 1976 to a program of bud grafting to produce commercial quantities of clonal planting material, and the transition from the distribution of cuttings was completed by late 1977. At that time LAES distributed selected Trinitario clones (the self-compatible KA2-101, KA5-201 and K82, and the self-incompatible KA2-106, K24-106, K21, K20 and K13 clones).
To further increase the genetic diversity of cocoa available for breeding, selections from Puer-to Rico and Ghana were introduced in the early 1970s. Introductions of material from cocoa collections at Kew Gardens, the University of Reading, and USDA Miami commenced in 1975 and continued for some time.
Through the 1970s, E.S.C. (Stuart) Smith published a series of papers on a wide range of insect pests of cocoa, including mirids, Pantorhytes and longicorns, and on integrated pest management and the effect of shade on cocoa pests. He and Chris Prior published a particu-larly significant paper on the link between Phytophthora Bark Canker and stem boring insects (Prior C and Smith ESC, 1981, ‘Association of Phytophthora bark canker and insect damage in cocoa in Papua New Guinea’. Annals of Applied Biology 97, 27). In 1981 Smith completed an M.Sc. through UPNG on the biology, ecology and control of the mirid Helopeltis clavifer and developed a practical census and control method for this important pest (see Appendix 7).
1980sIn the early 1980s at LAES the spray technology specialist, Peter Jollands, developed improved spraying techniques for cocoa, especially for weed and Black Pod control. The work begun by Dorothy Shaw, Peter Thrower and Peter Hicks in the 1950s and 60s on the epidemiology and control of Phytophthora palmivora was continued strongly through the 1980s by Alastair McGregor, Philippa Jollands and Ted Sitapai. Phillipa Jollands recruited Yak Namaliu and Josephine Saul-Maora to the pathology section of LAES in early 1984, and Josephine remains the head of that section at the present time. Philippa Jollands also studied root diseases of cocoa. As well as developing spraying methods and researching methods of cultural control of Black Pod, they screened cocoa clones and progenies for resistance to the disease, and de-veloped effective methods of screening to support the breeding program, including methods of inoculation of attached and detached pods (Appendix 8). From 1986, Mark Holderness led the research on Black Pod and, with Yak Nalamiu and Josephine Saul-Maora, conducted re-search into the use of trunk injection with phosphonate to control Black Pod and Stem Canker, with William Waine, Erica Simogun and Sotutu Tamasan as technical assistants. Ted Sitapai studied the resistance of cocoa to Phytophthora Pod Rot and Canker and completed a Mas-ters degree on this topic in 1989 at the University of the West Indies in Trinidad. He returned to continue research at Keravat, eventually becoming the Agronomist-in-Charge of LAES.
Through this period, Stuart Smith (until 1982), followed by Marcus Arura and John Moxon (assisted mainly by Fidelis Hela and Kiteni Kurika) in the LAES entomology section, continued the studies of the many serious insect pests of cocoa and coconuts and collaborated with the pathologists on the control of stem cankers associated with insect damage. The biolog-ical control of Pantorhytes weevils, longicorns, mirids and other cocoa pests by Crazy Ants (Anoplolepis) and Kurukum Ants (Oecophylla) was studied by Moxon assisted by Hela and K. Kusunan. Many new insecticide formulations were evaluated in field trials against a wide variety of cocoa pests. Smith demonstrated that there was considerable biological control of insect pests by natural enemies, and that coconut shade benefited biological control of insect pests in cocoa. Resistance of cocoa to several insect pests was confirmed in a series of trials by Moxon, and early screening techniques for resistance using cocoa seedlings were developed. Descriptions of the most important insect pests and recommendations for their
P A P U A N E W G U I N E A C O C O A E X T E N S I O N M A N U A L222
biological, cultural and chemical control had been developed by the LAES entomologists over the years and these were updated and summarised by Moxon in a series of papers in Harvest Vol. 9 in 1983 and later in a series of well-illustrated LAES Information Bulletins (Nos. 42-55) in 1992 (Appendix 7). This whole issue of Harvest (Vol. 9, nos. 3 and 4, pp. 111-204) consisted of a series of papers on all aspects of cocoa production by David Kidd, Arthur Charles, Ted Sitapai, John Perkins, Stuart Smith, John Moxon, JE VanS Greve, Alastair McGregor and Chris Prior. John Moxon was the Officer-in-Charge of LAES from 1986 to 1993.
Following a decision by the PNG Government that research and development for the main agricultural commodities should be funded by the respective industries, in 1981 the Cocoa Board of PNG established the Cocoa Industry Company Limited to be funded by a levy on ex-ported cocoa. Tavilo Plantation near LAES was purchased to provide land for cocoa research. Until about 1993, cocoa research continued to be conducted at LAES Keravat, alongside the on-going research on other crops that was eventually taken over by the National Agricultural Research Institute (NARI). Some LAES (NARI) scientists such as Gade Ling and Tio Neveni-mo continued to conduct research on cocoa in mixed cropping systems. The Cocoa Industry Company’s activities were funded by an increase in the levy on exported cocoa. In 1986, the Cocoa and Coconut Research Institute (CCRI) was formed from the Cocoa Industry Company (with the Cocoa Board and Copra Marketing Board as equal shareholders) and assumed re-sponsibility for cocoa and coconut research under the direction of a board composed of cocoa and coconut industry leaders. The first Institute Director was Dr Peter Turner who gave out-standing scientific leadership to the institute until 1990, based on his long experience in cocoa research and development in West Africa and Malaysia. Kervera Plantation, adjacent to Tavilo, was purchased to provide land for coconut research, however, the damage done by Rhinoceros Beetle (Scapanes australis) and the Black Palm Weevil (Rhynchophorus bilineatus) on plant-ings of young palms limited coconut research and Kervera was also used for expanding cocoa research. In 1989 CCRI established the Duncan Research Station at Mabiri in Central Bou-gainville especially for the introduction of new hybrid planting material and establishment of a seed garden to serve the important cocoa industry in that province. However, during the de-cade-long civil crisis in Bougainville during the 1990s the station became inoperable and cocoa production in Bougainville declined sharply. In late 1992 two plantations, Murunas and Kaile, were purchased to establish the Stewart Research Station for coconut research in Madang Province where Scapanes and Rhynchphorus were less destructive. Some cocoa research, especially on resistance to VSD, which was common there, was conducted also.
In the pathology section at LAES and later CCRI, Chris Prior in collaboration with Stuart Smith studied the biological control of insects such as Pantorhytes with fungal pathogens of the insects. This was the basis of his later highly-acclaimed work, after leaving Keravat, on biologi-cal control of plague locusts in Africa by spraying mineral oil suspensions of spores of a patho-genic fungus.
An epidemic of a psyllid that defoliated the shade tree Leucaena leucocephala resulted in much damage to cocoa due to the lack of shade. A Mexican variety of Leuceana showed good tol-erance to the psyllid. The entomology section led by John Moxon was responsible for intro-ducing a biocontrol agent to control the psyllid and restore shade. Also, there was evidence of biocontrol of the psyllid by fungal pathogens under humid conditions. This episode gave a boost to the general replacement of Leucaena leucocephala by Gliricidia sepium as shade for cocoa in most regions of Papua New Guinea.
Until the 1980s, most of the cocoa being grown on farms was Trinitario seedlings derived from open-pollinated pods produced on farms (i.e. farmers propagating from their own trees) or distributed from LAES, along with limited distribution of thirteen clones selected for yield and resistance to VSD. Since the early 1970s, these had been propagated by cuttings at LAES. Clones propagated from cuttings were difficult to grow, often having lop-sided growth and shallow root systems causing instability of the mature trees. A method was therefore devel-oped by John O’Donohue, Ted Sitapai and the LAES nurseryman John Hewitt to produce clones by bud or patch grafting onto seedling rootstocks. These clones were much more robust, being developed on seedlings with a normal deep taproot. Distribution of the elite Trinitario clones by budding and grafting started in the late 1970s and continued in the early 1980s. In
P A P U A N E W G U I N E A C O C O A E X T E N S I O N M A N U A L 223
the late 1980s Leon Bridgland, working in collaboration with CCRI, made a large collection on Bougainville of Trinitario trees field selected for yield and resistance to Black Pod. These were established as a clone collection at Kurwina Plantation and are believed to remain there.
Hybrid seedlings from crosses of selected parent clones were to be the next development in cocoa planting material. It had been observed in several countries that crosses between widely different cocoa genotypes (e.g. Trinitario x Upper Amazonian) gave very vigorous offspring and this was assumed to be similar to the hybrid vigour or heterosis observed in crosses between inbred lines of maize that had given great increases in maize yields. Around the cocoa-growing world at that time there was great enthusiasm for developing and planting hybrid seedlings based on the fact that the crossing of genetically widely different types such as Amazonian Forastero and Trinitario gave a degree of hybrid vigour, with the result that a proportion of the progeny grew faster and gave higher yields than either parent. The plant-ing of hybrid seed was also favoured by the fact that seeds are much easier to transport, and seedlings are much easier to manage, than clonal plants.
Accordingly, testing of the progeny of crosses between Trinitario (K or KA) and Upper Amazo-nian (KEE) clones, begun in the 1960s, was pursues with greater vigour. Clones were select-ed on the basis of yield, cocoa bean quality and disease resistance. In 1982 Ted Sitapai and David Kidd published a seminal paper on ‘Hybrid cocoa in Papua New Guinea’ (Harvest 8, 6).
Led by Ted Sitapai, David Kidd, Gade Ling and later by Trevor Clarke, seed gardens to produce hybrid seed were established at several locations and hybrid seed (Seed Garden 1 - SG1) production commenced commercially in 1982 under the direction of the Cocoa Industry. This work was taken up by Geok-Yong Tan, who was employed as a specialist cocoa breeder by the Cocoa Board in 1980, building upon the clone testing work carried out by the LAES agron-omists through the 1960s and 1970s. As well as continuing progeny testing of the Trinitario x Amazonian crosses, Tan, supported by the statistitian Wai-Koon Tan, conducted several detailed field trials on the inheritance of important traits (including resistance to VSD and Phy-tophthora Pod Rot) in diallele crosses, and demonstrated that resistance to both diseases was inherited additively. In collaboration with John Moxon, he also demonstrated in breeding trials inheritance of resistance of cocoa to several insect pests.
In the seed gardens, three Amazonian parent clones (KEE2, KEE5, and KEE52) were crossed in all combinations with three Trinitario parent clones (KA2-101, KA5-201, K20 or K24-102) selected mainly for VSD resistance and yield. Unfortunately several of the clones selected as parents for the SG1 hybrids were very susceptible to Phytophthora Pod Rot (e.g. KA2-101, KA5-201) and this disease became more common and destructive in the field plantings of the SG1 hybrid seedlings.
In an attempt to widen the genetic base of material available for breeding, especially for resis-tance to Black Pod, further introductions of ICS clones and Amelonado material from Malaysia via the Solomon Islands were made in the mid-1980s and these were evaluated.
Improved hybrid seed gardens were established in the period 1982-87, and new hybrid seed (SG2 seed produced in Seed Garden 2) became available to growers in 1988. In these gardens KEE22 and KEE23 were crossed with KA2-106 and KA2-101; KEE43 with KA2-106, KA2-101 and K82; KEE12, KEE42 and KEE47 with K82 and KA2-106. Growers were supplied with a mix-ture of the progeny of these crosses. These parent clones placed more emphasis on resis-tance to Black Pod (K82 had been shown to have a consistently lower incidence of Black Pod over many years – see Chapter 7, Figure 7.3), although the inclusion of KA2-101 also ensured some resistance to VSD in the mix. The crosses with KA2-101 were later removed because KA2-101 was too susceptible to Phytophthora Pod Rot; interestingly, K82 has a high level of resistance to Black Pod but is susceptible to VSD.
The SG1 and SG2 hybrid seedlings distributed in Papua New Guinea were faster growing, gave more precocious early yield, and were thought to be higher yielding than the Trinitario cocoa that had been widely planted in Papua New Guinea, although the two were never compared under the same conditions in properly designed field trials. However, there were many prob-lems with these hybrid seedlings when they were used on farms:
P A P U A N E W G U I N E A C O C O A E X T E N S I O N M A N U A L224

They were not the uniform progeny of homozygous, inbred parent lines as in hybrid maize, but rather the progeny of highly heterozygous parents, and so they had great genetic variability (there was evidence that in field plantings only 10% of the trees pro-duced 90% of the yield, while 60% of the trees produced very little).
The design of the seed gardens, in which cross-pollination relied on natural pollination, did not ensure that the crosses were as intended, contributing to the genetic variability of the hybrid progeny.
The progeny did not perform on the plantations as well as they had on the experiment station, perhaps because the test hybrids were obtained by hand pollination while the commercial hybrids were produced in seed gardens.
The trees were precocious, growing rapidly to give large trees and early yields, but they required much pruning and were especially difficult for smallholders to manage. They were selected on vigour rather than Harvest Index.
Their precocious early yield tended to decline sharply after 5 or 6 years, compared with the old Trinitario trees that tended to maintain their yield over many years.
These problems led to a critical review of the breeding program in the early 1990s.
The need to use land more efficiently and to promote the growing of cocoa by smallholders and traditional farmers led to much research, beginning in the 1980s under the direction of Gadi Ling, Louis Kurika, Tio Nevenimo and John Moxon at LAES, and supported by David Loh, on combining food crops with cocoa and on diversification of shade trees, including the use of betel nut, fruit trees, bananas and galip nut. This work included alley-cropping of cocoa with food crops or legume hedgerows which increased aeration of the cocoa and reduced incidence of Black Pod. Studies of the most appropriate shade, spacing and fertiliser applications that had started in the late 1950s continued through the 1980s led by the agronomist Tom Laven, especially as different recommendations were required for Trinitario clones and hybrid seed-lings. Kana Aburu, following an outstanding record as a student at Vudal Agricultural College and later at UPNG, worked as an agronomist concerned mainly with development of spice and food crops at LAES until his early death in 1982.
In the late 1980s through into the 1990s, research on Karkar Island, Madang Province, led by David Guest from the University of Melbourne and funded by a private research organisation (the Cocoa Black Pod Research Trust established by the Roger and John Middleton families), developed a successful method of trunk injection of cocoa with neutralised phosphorous acid (phosphonate) for control of Black Pod and Phytophthora Stem Canker (summarised in Guest DI, Anderson RD, Foard HJ, Phillips D, Worboys S and Middleton RM, 1994 ‘Long term control of Phytophthora diseases of cocoa using trunk-injected phosphonate’. Plant Pathology 43, 479). Several young researchers supported by the Trust (listed in the above publication, and including James Dean) conducted research on the diseases of cocoa, especially Black Pod and Vascular Streak Dieback, on the island. While working in this program, Ross Anderson discov-ered infection of avocado by the VSD pathogen that had previously been found only on cocoa, work later confirmed by Jason Dennis at CCRI Tavilo.
The first cocoa extension officer, or National Crop Advisor (Cocoa), based at LAES, was J.D. (Dick) Rotscheid in 1977, followed by David Kidd (1981-82), and Trevor Clarke in 1985-87, and then by Alfred Nongkas who managed the Smallholder Cocoa Rehabilitation and Extension Program (SCREP) with Luke Blansjarr and Fred Dori. Trevor Clarke collated and edited the first Cocoa Technical Manual produced by CCRI and wrote the first handbook for smallholder cocoa farmers, ‘Torubat I Wokim Bisnis Long Kakao’ (1980) that was developed later by Colin Benton and Jane Belfield as ‘Josip I Planim Kakao’ (1993), and still later as ‘Joseph and Lucy Grow Cocoa’ by Martin Powell (2005). David Kidd continued as a senior extension officer and later publications and training officer through to 1996, and was joined by John Duigu in this role in 1994. John Perkins was the Department of Agriculture and Livestock Regional Econ-omist based in Rabaul, with interests in smallholder cocoa processing; he spent 6 months at LAES in 1983 helping to develop small scale post-harvest processing of cocoa. Following publication of LAES Information Bulletin No. 30 (Perkins, J and Kidd, D, 1982, ‘Simple ways to
P A P U A N E W G U I N E A C O C O A E X T E N S I O N M A N U A L 225
improve cocoa processing’) and presentation of a paper ‘Alternative Policy for Cocoa in Pap-ua New Guinea’ by Clarke and Perkins to stakeholders in East New Britain Province in 1983, studies were commenced of small scale fermenting and drying of cocoa, leading to the devel-opment of smaller fermentation boxes and the small passive solar/kiln driers that eventually became common among smallholders. Through the late 1980s and into the 1990s Scott Yarbro, followed in 1994 by Eric Omuru and 1999 by Joachim Lummani, studied and advised on the economic aspects of cocoa development in Papua New Guinea.
1990s and 2000sFollowing a critical review of the breeding program (Lass RA, Mossu G, Sitapai EC and Keane PJ, 1992, ‘Mission to Review the Past and Future Cocoa Breeding Program at CCRI, Papua New Guinea’, unpublished report, PNG Cocoa and Coconut Research Institute), Yoel Efron was recruited as cocoa breeder in December 1993. John Moxon was appointed Institute Director of CCRI in June 1993 and remained until 2000. He, along with Uron Salum and Tony Lass, was responsible for appointing Yoel Efron and strongly advocated a breeding program based on development of clones selected from the best performing hybrids (‘hybrid clones’). He sourced substantial funds from the European Union to construct a new office/laborato-ry complex at Tavilo and oversaw construction of the building based on the elevated LAES/Queenslander design surrounded by verandahs. Funds for a 400,000 capacity nursery and staff housing were included. He also secured European Union funding to support the breed-ing, agronomy and pathology research programs for many years. Following the earlier pur-chases of Tavilo and Kervera Plantations for cocoa research, three further plantations (Ralau-wat, Kulon and Londip) were purchased with a loan from the Copra Marketing Board in order to help fund the research and development activities of the Institute. The loan was repaid within 10 months from the profits from the plantations due to outstanding management led by Ayyamani Jagadish, who developed a highly productive block management system where labourers were given a block of cocoa to manage and were paid a proportion of the cocoa pro-duction from their block. From 1993 onwards CCRI pursued a vigorous policy of sending staff for overseas higher degree training, based on research on a topic of industry priority within Papua New Guinea and part-time residence at an overseas university for literature reviewing, specialist laboratory research and thesis writing.
In August 2003, in order to link research and industry development more closely, the PNG Co-coa and Coconut Institute Limited (CCIL) was established by merging the CCRI and the PNG Cocoa and Coconut Extension Agency (CCEA), with the Cocoa Board and the Kokonas Indastri Koporesen (KIK) as equal shareholding boards and the mandate of research and development in cocoa and coconut production, processing and marketing.
Yoel Efron and his colleagues Peter Epaina, Jeffrie Marfu, Mathias Faure and James Butu-bu, redirected the cocoa breeding program with an emphasis on selecting and propagating clones from the best hybrid progeny (SG1 and SG2) trees and producing trees more suitable for smallholders (see Efron Y, Epaina P and Marfu J 2003 ‘Breeding strategies to improve cocoa production in Papua New Guinea’, Paper for International Workshop on Cocoa Breeding for Improved Production Systems, October 2003, Accra, Ghana). The best progeny from the hybrid crosses were developed as ‘Hybrid Clones’ that were further tested before the first new types were released in 2003. They also selected less precocious trees suitable for smallhold-ers, and developed methods of juvenile budding on the hypocotyls of 2-week-old seedlings, which speeded up the budding process and distribution of clones.
The substantial cocoa breeding and selection trials were severely disrupted by the catastroph-ic eruption of Tavurvur volcano in Rabaul on 19 September 1994, which covered the research station with ash and defoliated most of the trees. This disruption led to the establishment of new trials in 1995 with the aims to:
increase yield potential,
improve production uniformity and stability (to avoid the tree-to-tree variation ob-served with SG hybrid seedlings),
increase resistance levels to major diseases (this was extended to include resistance
P A P U A N E W G U I N E A C O C O A E X T E N S I O N M A N U A L226
to Cocoa Pod Borer after its incursion in 2006),
reduce management costs (by producing smaller trees that required less pruning and facilitated harvesting),
improve quality characteristics, and
develop ecologically targeted varieties (suited to different environments in Papua New Guinea).
The Hybrid Clones were tested extensively in Genotype x Environment trials in several loca-tions around Papua New Guinea before being released commercially in 2003. A second series of Hybrid Clones, which included both Small and Big types, was released in 2013 (Appendix 6). The aim was to provide planting material for poly-cross hybrid seedlings or poly-clonal mix-tures for planting on farms, to avoid the problem of genetic uniformity and vulnerability while ensuring that all trees were highly productive. The Hybrid Clones have performed outstand-ingly well in trials in many locations and they are now the recommended planting material (Ap-pendix 6). While the clones needed more pruning to shape them in the early stages, their early yield convinced farmers to try them on their farms.
Much agronomic research was conducted to support the development of the new Hybrid Clones. The agronomists led by Martin Powell, Eremas Tade and David Yinil, and supported by Godfrey Hannett, and later by Chris Fidelis and Peter Bapiwai, developed methods of pruning to ensure the growth of well-structured clonal trees and produced a manual on ‘Formation Pruning of Cocoa Clones’ (Efron Y, Ayyamani J and Tade E, PNG Cocoa and Coconut Research Institute), based on on-station and on-farm studies in collaboration with the breeding section. They tested the new clonal material on station and in many locations where the performance of the clones could be observed under farm conditions and farmers could see for themselves the difference between the clones and the older hybrid seedlings. They also continued trials on spacing, shade, pruning and fertiliser treatments. In 2009 Eremas Tade completed a Ph.D. study on the agronomy, physiology and genetics of a dwarf mutant of cocoa through the Uni-versity of Queensland. The agronomy and breeding sections developed a successful method of rehabilitation of old, overgrown cocoa by chupon budding using the new Hybrid Clones (Tade E, Hannett G and Efron Y, ‘A Manual for Cocoa Rehabilitation by Chupon Budding’. Cocoa and Coconut Institute of PNG).
The work of the agronomists, in collaboration with the extension workers, John Duigu, Alfred Nongkas, Otto Liran and Anton Varvaliu, and their extension teams in various provinces, in doing multi-location testing of clones on farms, was a departure from the previous tendency to test materials only on the experiment station in East New Britain, and was a model that was later taken up in the work on Integrated Pest and Disease Management (IPDM).
Hybrid seed continued to be distributed, but this was produced only by stringent hand polli-nation to ensure that the crosses were as intended. Distribution was targeted especially at growers in remote areas with less developed management skills.
New hybrid crosses continued to be made between various selected parents to produce more hybrid progeny available for further selection as clones. The combining ability of crosses within Upper Amazonian and Trinitario types was also explored.
Further cocoa introductions were made to expand the genetic resources available for breeding in Papua New Guinea – several of the recent introductions from The University of Reading or CIRAD Montpellier have been identified as promising (AMAZ15-15, EET308, IMC85, IMC105, MAN15-2, Pound7, PA107, PA150, SIAL339, T85/599). Many of the introduced clones are be-ing tested as part of an International Clone Trial or Local Clone Trials. New hybrid clones were selected from the progeny of crosses between local (KEE) and introduced clones and prelim-inary tests gave some outstanding results in 2000-2002 - e.g. AK56-1-4 (pedigree KEE43 x SIAL93) and AK57-1-9 (pedigree KEE43 x Pound5C) gave yields of about 5900 Kg/Ha; while 16-2/3 (C)(pedigree KEE42 x K82) and 73-14/1 (C) (pedigree KEE12 x K24-102) yielded about 4700 Kg/Ha. These results indicate the potential yields that can be obtained from the new generation of Hybrid Clones.
P A P U A N E W G U I N E A C O C O A E X T E N S I O N M A N U A L 227
A further aim of the new breeding program was to prospect on farms throughout Papua New Guinea for Trinitario selections that had become well adapted to local conditions of envi-ronment, management, and pests and diseases. Since the early 1900s, Trinitario had been propagated from seed taken from open-pollinated pods harvested from the best trees on farms, following the long tradition of food crop propagation in the traditional farming societ-ies of Papua New Guinea. Trinitario cocoa, being mostly cross-pollinated and heterozygous, had given rise to great genetic diversity of cocoa on the farms, and this diversity was ideal for selecting well-adapted types of cocoa. Unfortunately much of this germplasm on farms was lost in the enthusiasm for planting SG hybrids. However, pockets of the old Trinitario material remain because farmers continued to see them as useful trees and these are being collected for future breeding work. Collection of budwood from these trees was begun in 1995 and the selection of trees was guided by advice from farmers on their long experience with particular trees on their farms. Budwood was collected from about 400 trees and clones were estab-lished in an observation trial, giving some highly encouraging results, with some of these clones (designated ‘Old Trinitarios’ or ‘OT’ clones) giving very high yields.
A problem with the disease resistance of the parents used in the breeding program was that certain clones such as KA2-101 were highly resistant to VSD but very susceptible to Black Pod, while others such as K82 were partly resistant to Black Pod but very susceptible to VSD. In a Ph.D. study by Peter Epaina, while enrolled at the University of Sydney under the super-vision of David Guest and Robert Park, the progeny of crosses between these two valuable parent clones were studied to determine the inheritance of their respective resistances and to combine these. Molecular studies on the progeny of the crosses were carried out at the Unit-ed States Department of Agriculture and demonstrated that resistance to the diseases was controlled by many genes on several chromosomes. There appeared to be no impediment to combining resistance to the two diseases and several progeny appeared to have a degree of resistance to both Black Pod and VSD. These await further field testing and development.
Through the period of development of new cocoa planting material in the late 1980s and 1990s, Neil Hollywood, Barnabas Toreu, Noel Kuman, James Maora, Colin Benton, Jane Bel-field, and Leon Bridgeland as a consultant, supported by a long-term AusAID Cocoa Quality Improvement Project, further developed and promoted the improved small-scale fermentation and drying methods suitable for smallholders first developed by John Perkins, David Kidd and Trevor Clarke in the early 1980s. This program was continued by Jane Ravusiro and Kenny Francis in the 2000s. These methods included the use of smaller fermentation boxes to han-dle smaller batches of cocoa, small combination wood fired and passive solar driers, and ul-timately active solar driers that more rapidly dry cocoa than occurs when it is simply exposed to the sun on a drying rack. The work on fermentation and drying methods was supported by the development at CCIL of small-scale chocolate manufacturing methods that were used to test the ultimate taste quality of the cocoa beans from the breeding and processing programs. Staff of CCIL Tavilo and LAES (NARI) Keravat were trained as chocolate tasters to assess the ultimate cocoa quality. On-going research is aimed at avoiding smoke contamination of cocoa beans during drying, a problem that was reported in the very early days of the cocoa in-dustry (Green, cited above) and continues to affect the reputation of Papua New Guinea cocoa on the world market.
Following completion of his Ph.D. studies in 1991, Jason Dennis continued working as a gen-eral cocoa pathologist and became the head of the pathology section of CCRI. In 1993 Jo-sephine Saul-Maora completed a Masters study on the resistance of cocoa to Phytophthora palmivora, working at LaTrobe University with supervision from Philip Keane. In the 1994 Julie Flood worked with Josephine Saul-Maora in conducting studies on the control of Black Pod until their work was disrupted by the eruption of Tavurvur volcano. John Konam and Anthon Kamuso joined the pathology section in 1992, becoming long-term research workers through to the present time. In the mid to late 1990s, George Blaha, on secondment from CIRAD, worked with the pathology section to develop and apply a leaf disc method for determining resistance of clones to Phytophthora palmivora. Josephine Saul-Maora continued studies on the inoculation of attached and detached pods to determine resistance and developed a rapid field inoculation method using Band Aids to protect the zoospore inoculum. The use of
P A P U A N E W G U I N E A C O C O A E X T E N S I O N M A N U A L228
detached pods was later adopted as the standard method for screening new breeding mate-rial for resistance to Black Pod. Later John Konam studied the epidemiology of Phytophthora diseases of cocoa for his Ph.D. through the University of Melbourne under the supervision of David Guest, and developed a better understanding of the cultural control of the disease and also found evidence for the involvement of flying insects in spreading Phytophthora (1999). With the departure of George Blaha, John Konam became the leader of the pathology sec-tion. Studying at the University of Sydney under the supervision of David Guest, Josephine Saul-Maora in 2008 completed a Ph.D. study on the diversity of Phytophthora palmivora in Papua New Guinea and showed that only this one species was involved in causing Black Pod and Stem Canker.
Through the 1990s Bob Prior and Samson Laup led the entomology research at CCRI, with support from L. (Lawrence) Ollivier on secondment from CIRAD. They continued the work of documenting and studying the numerous insect pests of cocoa and coconuts and their bio-logical, cultural and chemical control. Paul Gende joined the section in 2000 and has contin-ued entomological studies with Samson Laup through to the present time.
In a project that began in 2004, supported by the Australian Centre for International Agricultur-al Research (ACIAR), David Guest and Rosalie Daniel of the University of Sydney, John Konam and Yak Namaliu developed methods of integrated pest and disease management (IPDM) in cocoa (see Konam J, Namaliu Y, Daniel R. and Guest DI 2008, Integrated Pest and Disease Management for Sustainable Cocoa Production, ACIAR, Canberra). They were ably helped by the entomology, breeding, pathology and agronomy sections of CCIL. This project developed and formalised methods for cultural control of Black Pod that had been implemented by Yak Namaliu and his wife Susanna on their family cocoa blocks in East New Britain. These meth-ods involved planting of new types of cocoa with a degree of disease resistance developed by the breeding section, severely cutting back existing overgrown shade and cocoa, growing the trees with light shade and appropriate manuring to promote flowering and pod set, and the frequent removal and burial of diseased pods. While this work was initially directed mainly at management of Phytophthora Pod Rot and Canker, with the arrival of Cocoa Pod Borer it also proved to be very effective at managing this pest – the main cultural control measure for Black Pod of frequently removing from the canopy and composting or burying all infected pods was precisely the measure needed to control Cocoa Pod Borer in infested pods, as had been shown previously in Malaysia.
Cocoa Pod Borer Conopomorpha cramerella (Appendix 7) was first detected in Papua New Guinea at LAES Keravat in March 2006. Gade Ling brought a pod with unusual symptoms, collected by labourers from block 205, to John Moxon (then Officer-in-Charge of LAES) who had seen Cocoa Pod Borer on a study tour to Sabah in 1982 and was immediately alarmed. John Bokosu, in the LAES entomology section, reared moths from the pod and the presence of Conopomorpha cramerella was confirmed. Later occurrence of the pest was confirmed at Poro, West Sepik Province (June 2006) and at Bogia, Madang Province (April 2008). The insect had probably spread into West Sepik from the adjacent Indonesian province of Papua, and then been spread within Papua New Guinea by the transport of infested pods. In the pre-vious three decades it had spread inexorably from North Sulawesi to Sabah and then Peninsu-lar Malaysia, and from North Sulawesi to South and Southeast Sulawesi, then through Maluku into West Papua and Papua. The Indonesian entomologist Endang Sulistyowati, who had long experience with the pest in Sulawesi, visited CCIL to offer advice. From 2006 to January 2007, a vigorous eradication campaign, involving heavy pruning of all trees and removal of all pods within the exclusion zone, was conducted around the epicentre of the outbreak in East New Britain. This zone included all the cocoa research trials at CCIL Tavilo, and, as with the VSD epidemic in the 1960s, this severely disrupted the on-going research program. Despite the massive effort put into the attempted eradication, the Pod Borer was found on the out-skirts of the eradication zone in late February 2007. Since then, the pest has spread rapidly in and beyond the province and is now found in all the main cocoa growing areas of Papua New Guinea. The response has switched to implementation of management of the pest follow-ing recommendations arising from experience in Malaysia and Indonesia that have long lived with the problem (Chapter 7) and the development of IPDM for cocoa in the above-mentioned
P A P U A N E W G U I N E A C O C O A E X T E N S I O N M A N U A L 229
ACIAR project. Intensive studies of the biology and ecology of the insect under the direction of Samson Laup (until 2015) and Paul Gende have continued. Experience in Malaysia and Indonesia has shown that the pest can be managed to allow cocoa production to recover to the highest yields obtained before the incursion. This has been demonstrated commercially by Graham McNally and Otto Koimba at NGIP-Agmark’s Tokiala Plantation in East New Brit-ain Province and also in research at CCIL, including that done under further ACIAR projects on Integrated Pest and Disease Management. Resistance to the insect was screened for by the breeding section in the existing Genotype x Environment trials in East New Britain and Madang, and selections for partial resistance (or tolerance) were made and incorporated into a later Hybrid Clone release (see Marfu J, Butubu J, Epaina P, Varvaliu A, Francis K and Ravusiro J, 2013, ‘Provisional Release of Second Series Hybrid Cocoa Clone Varieties, Tolerant to Cocoa Pod Borer’. PNG CCocoa and Coconut Institute Ltd.).
The aim of reducing the height of trees to make them more manageable, especially since the arrival of Cocoa Pod Borer, has led to studies by the agronomy section, involving David Yin-il, Eremas Tade, Chris Fidelis and Peter Bapiwai, to develop and promote improved pruning methods. David Yinil and Chris Fidelis were involved in an ACIAR project led by Paul Nelson on the nutrition of cocoa (Nelson PN, Webb MJ, Bethelsen S, Curry G, Yinil D and Fidelis C, 2011, ‘Nutritional status of cocoa in Papua New Guinea’, ACIAR, Canberra).
Following a review of the agro-ecological zones in Papua New Guinea suitable for cocoa (Han-son LW, Bourke RM and Yinil DS, 1998, ‘Cocoa and Coconut Growing Environments in Papua New Guinea. A Guide for Research and Extension Activities’. Australian Agency for Interna-tional Development, Canberra) the agronomy section began test plantings of cocoa at higher altitude (1200 metres above sea level) in Karamui Valley, Simbu Province, and showed the potential for cocoa planting to be extended into higher altitude environments. While the trees tended to grow more slowly and remained smaller, their yield of pods was found to be as high as in the lowlands. The interesting physiology of this situation remains to be studied. This result opens up the prospect that certain highland valleys may be able to support commercial cocoa production.
There is optimism that the new generation of Hybrid Clones, representing the culmination of a long and well planned and executed breeding program initiated in 1994 and building on the earlier work of the pioneering agronomists at LAES and the plant breeder Geok-Yong Tan, and the new methods of growing cocoa as a smaller tree with more intensive management, es-pecially weekly removal and burial of Phytophthora and Cocoa Pod Borer infested pods, offer great hope for a sharp increase in cocoa production on farms in Papua New Guinea.
The major challenge, as always, is to have these research outputs taken up widely on farms, following the aims set out in the Strategic Plan (Appendix 2). Through the 2000s, Joachim Lummani, Eric Omuru, George Curry and Gina Koczberski, supported by ACIAR, have under-taken socio-economic studies of cocoa farming, including methods of improving uptake of new methods by farmers, the effect of, and response to, the incursion of Cocoa Pod Borer on farms, and development of new extension methods. They have concluded that collaboration with private enterprise is an effective way of helping farmers to adopt new methods, and have been able to demonstrate that the new methods of growing cocoa do not necessarily in-volve more labour. The initial parts of this work have been summarised in the book Curry GN, Koczberski G, Omuru E and Nailina RS, 2007, ‘Farming or Foraging? Household Labour and Livelihood Strategies Amongst Smallholder Cocoa Growers in Papua New Guinea’, Black Swan Press.
While most of the cocoa research in recent decades has been conducted at the CCIL Tavilo, some cocoa research, especially on cocoa farming systems, continued under NARI at LAES Keravat for about 15 years after the establishment of the Tavilo complex. It is sad to re-cord that the old timber office/laboratory complex at LAES, initially constructed in 1946, was completely destroyed by fire in April 2011. This destroyed the library that housed many of the research reports and original documents accumulated over the long history of the station and, in the entomology section, an extensive and valuable insect reference collection, including the pests of cocoa that had been accumulated since 1946. A new complex has been built and
P A P U A N E W G U I N E A C O C O A E X T E N S I O N M A N U A L230
named after the long-serving cocoa agronomist and administrator, David Loh, who first took up appointment at LAES in 1970 and served there until becoming the administrator of the Cocoa Growers’ Association in Kokopo in 1986.
The future The economic benefits of cocoa research conducted from 1965 to 1980 were analysed in an ACIAR-supported study (Antony G, Kauzin G, Loh D, Anderson J, 1988, ‘Returns to Cocoa Re-search 1965 to 1980 in Papua New Guinea’. Australian Centre for International Agricultural Re-search – ISNAR). It was estimated that the national benefit from the research was 8.3 times the cost of the research and that the effective earnings on funds expended was an enormous 22 percent. The history of cocoa research in Papua New Guinea is one of steady, largely con-tinuous progress from the 1920s to the present day, contributed to by the collaborative and accumulative efforts of a large number of highly dedicated people over that time, and leading to the development of new methods of growing cocoa and new high yielding cocoa varieties that can form the basis of an expanding and productive cocoa industry in this country. The continuation of this research effort is crucial for the future development of a productive cocoa industry that is able to continue to support rural development and give valuable export earn-ings in Papua New Guinea.
P A P U A N E W G U I N E A C O C O A E X T E N S I O N M A N U A L 231
06
NEW GENERATION
COCOA VARIETIES IN
PAPUA NEW GUINEA
Jeffrie Marfu, James Butubu Yoel Efron and Peter Epaina
(From Jeffrie Marfu, James Butubu and Peter Epaina ‘Second Series of Ten Hybrid Cocoa Clonal Varieties, Tolerant to Cocoa Pod Borer’ PNG Cocoa and Coconut Institute Ltd. 2013, and Yoel Efron ‘Final Release of Two Varieties of Hybrid Clones PNG Cocoa and Coconut Insti-tute Ltd. 2003)
AIM OF THIS CHAPTER:
To describe the new generation of improved cocoa varieties recommended for planting in Papua New Guinea
IntroductionImproved cocoa planting material is one of the most important factors contributing to an increase in cocoa productivity. In Papua New Guinea, cocoa production was originally based on open pollinated Trinitario cocoa first introduced in the late 1800s - early 1900s. This cocoa was largely out-crossing and heterozygous and gave rise to great genetic diversity on farms that enabled farmers and agronomists to select well-adapted types and enabled the commencement of cocoa breeding for improved varieties. However, since the early 1980s, the Trinitario cocoa on farms has largely been replaced by hybrid seedlings (SG1 and SG2 hybrids) produced by crossing some of the original Trinitario clones with Amazonian clones derived from introductions of genetic material from Trinidad in the early 1960s (Appendix 5).
Cocoa hybrid seedlings (SG1 and SG2) produce well under good growing conditions, but an inherent issue with the hybrids has been the high tree to variability for yield within progeny crosses. Some individual progenies produced very high yields while others produced very few pods. While they grew rapidly and yielded early, they showed a sharp decline in production after only about 5 years (Appendix 2). To address the problem of yield variability CCIL made several changes to its current stock of planting materials by;
1) Phasing out the production of SG1 hybrids.
2) Modified the SG2 hybrids in 1994 by removing Black pod (ppr) susceptible male parents like KA2-101 from the crossing program. Only two males are maintained in the current production of the SG2 hybrids which are sub divided into big and small hybrids.
3) Embarking on the development of hybrid derived clones by taking advantage of the ge-netic uniformity in clones as compared to the genetically variable hybrids.
Hybrid clones developed by CCIL are produced vegetatively by bud-grafting (patch budding) or top grafting onto seedlings. The best performing hybrids are selected for cloning and testing before release to farmers. Most of the hybrid clones have the same genetic background as the SG1 & SG2 hybrids. Vegetatively propagated clones are genetically identical and therefore are expected to grow and produce relatively uniformly on farms (unlike the SG1 and SG2 hybrid seedlings).
APPENDIX
P A P U A N E W G U I N E A C O C O A E X T E N S I O N M A N U A L232
The First Series of hybrid clones (HC1-B and HC1-S) was released in 2003 and a Second Series (HC2-S and HC2-B) in 2013. These clones are intended to be planted as poly-clonal varieties on farms. A mixture of clones with equal proportions of each clone is recommended for planting on farms so that while all trees are high yielding, there is still a degree of genet-ic variability on farms to reduce the vulnerability of the plantings to pests and diseases and possible lack of effective pollination due to self-incompatibility that may be associated with individual clones.
The propagation of Hybrid Clones requires the establishment of bud wood gardens (i.e. collec-tions of the clones that can then provide bud wood for producing more clones), nurseries to produce and raise the clones and expertise in budding and grafting (see Chapter 3).
CCIL is responsible for developing and testing new improved cocoa planting material before it is released to farmers. As a prerequisite before release of new planting material, especially clones, the materials must be tested for possible genotype x environment (GxE) interaction (i.e. for possible different performance of the clones in different environments). Neither the First or Second Series of Hybrid Clones showed any evidence of G x E interaction during the advanced stage of testing. Therefore the selected clones can be planted in any of the cocoa growing areas in Papua New Guinea. Release of the Second Series of hybrid clones (HC2-B and HC2-S) in addition to the first series (HC1-B and HC1-S), released in March 2003, in-creased the number of hybrid clones available to cocoa farmers. The Second Series of hybrid cocoa clones were released on a Provisional Release basis with final release to be made at a later date.
During their first year of growth Hybrid Clones require special management, different from that applied to seedlings. Weed control and correct pruning during the first and second year of establishment (see Chapter 5) are particularly important for structure and shape of the clones. In particular they have to be pruned to give a balanced tree.
Trees of the same clone are genetically identical and uniform but each clone is unique and may differ from other clones in size or potential vigor. Clones with similar vigor or size are rec-ommended for planting together as a polyclonal variety in an optimal planting density to avoid competition between big and small trees. For that reason, both the First and Second Series of hybrid cocoa clones were released in two size categories based on the potential tree vigor: HC1-B and HC2-B (big trees), and HC1-S and HC2-S (small trees).
The Hybrid Clones will perform well under adequate management including IPDM option 2 (i.e. weekly removal and burial of pods infested by Cocoa Pod Borer or Black Pod; pruning of cocoa and shade trees to maintain a low open and lightly shaded canopy; manual weeding around the cocoa trunk) but will perform poorly with lack of good management inputs.
The various Hybrid Clones differ in their degree of resistance to Cocoa Pod Borer, Phytoph-thora Pod Rot and Vascular Streak Dieback. Note that for all pests and diseases, resistance is partial resistance, not complete resistance or immunity; it is better to think of ‘lack of high susceptibility’ rather than ‘resistance’. The First Series of clones, released in 2003 before the incursion of Cocoa Pod Borer, was not selected for resistance/tolerance to CPB. The Second Series was selected for a degree of partial resistance to Cocoa Pod Borer evident in the G x E trials during the testing of the clones. All clones have some resistance to Vascular Streak Dieback (they are more resistant than the susceptible clone K82) but some are more resistant than others. It is recommended that only the more resistant clones are planted in high VSD risk areas such as Karkar Island. All clones have a degree of resistance to Phytophthora Pod Rot – i.e. clones with known high susceptibility to Pod Rot were not released.
P A P U A N E W G U I N E A C O C O A E X T E N S I O N M A N U A L 233
Summary of Key Characteristics and Criteria for Selection of Hybrid Clones
Yield The clones were tested against common controls which included several clones released from the First Series of Hybrid Clones. Clones which yielded higher than the common controls were selected.
Pod Value
Pod value is the number of pods required to make one kilogram (1kg) of dry beans. If beans are small, a high number of pods is required to give 1 kg dry beans. Clones with a lower Pod Value were selected (acceptably low Pod Value = 15-25 pods).
Average Bean Weight (g) Clones with an Average Bean Weight of more than 1 gram were selected. Manufac-turers prefer larger beans that have a lower proportion of shell for kg dry beans than small beans.
Butter Fat Content The standard Butter Fat Content in cocoa beans is 55%. Clones with more than 55% fat content were selected.
Shell Content and Flat BeanClones with a low percent (%) of flat beans and shell content were selected.
Compatibility
Self-pollinations were done to determine if the clones were self-pollinating (SC) or cross-pollinated (SI)
Phytophthora Pod Rot (Ppr)
The hybrid clones were classified into 5 categories as Highly Susceptible, Suscepti-ble, Moderately Resistant, Resistant or Highly Resistant based on detached pod tests for Phytophthora Pod Rot, carried out by the Pathology section at CCIL. Clones with resistant reactions were selected.
Vascular Streak Dieback (VSD)
Five categories as Highly Resistant, Resistant, Moderately Resistant, Susceptible or Highly Susceptible were used to classify the clones for their reaction to VSD. Clones with resistant reactions were selected.
Cocoa Pod Borer (CPB) – Second Series of Hybrid Clones onlyCocoa Pod Borer Infestation on the clones was assessed and measured using an Average Damage Severity Index (ADSI) method. Clones were classified as Highly Susceptible, Susceptible, Moderately Resistant or Highly Resistant based on the index scores where 1 = Highly Resistant, 4 = Highly Susceptible. Tolerance is the ability of a plant to yield well despite a certain level of infestation by a pest or disease; resistance is the ability of a plant to restrict the invasion by a pest or disease (i.e. to reduce the level of infestation). Sometimes the term ‘tolerance’ is used correctly to refer to ‘par-tial resistance’.
P A P U A N E W G U I N E A C O C O A E X T E N S I O N M A N U A L234
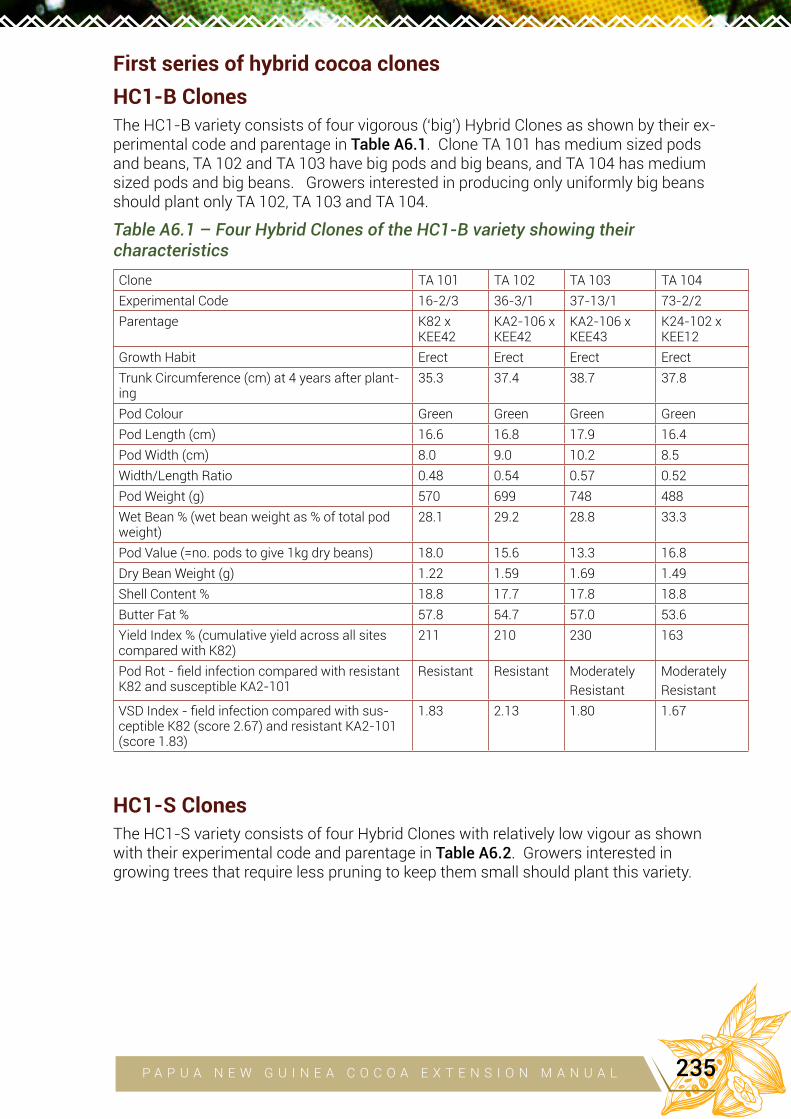
First series of hybrid cocoa clones
HC1-B ClonesThe HC1-B variety consists of four vigorous (‘big’) Hybrid Clones as shown by their ex-perimental code and parentage in Table A6.1. Clone TA 101 has medium sized pods and beans, TA 102 and TA 103 have big pods and big beans, and TA 104 has medium sized pods and big beans. Growers interested in producing only uniformly big beans should plant only TA 102, TA 103 and TA 104.
Table A6.1 – Four Hybrid Clones of the HC1-B variety showing their characteristics
Clone TA 101 TA 102 TA 103 TA 104Experimental Code 16-2/3 36-3/1 37-13/1 73-2/2Parentage K82 x
KEE42KA2-106 x KEE42
KA2-106 x KEE43
K24-102 x KEE12
Growth Habit Erect Erect Erect ErectTrunk Circumference (cm) at 4 years after plant-ing
35.3 37.4 38.7 37.8
Pod Colour Green Green Green Green
Pod Length (cm) 16.6 16.8 17.9 16.4Pod Width (cm) 8.0 9.0 10.2 8.5Width/Length Ratio 0.48 0.54 0.57 0.52Pod Weight (g) 570 699 748 488Wet Bean % (wet bean weight as % of total pod weight)
28.1 29.2 28.8 33.3
Pod Value (=no. pods to give 1kg dry beans) 18.0 15.6 13.3 16.8Dry Bean Weight (g) 1.22 1.59 1.69 1.49Shell Content % 18.8 17.7 17.8 18.8Butter Fat % 57.8 54.7 57.0 53.6Yield Index % (cumulative yield across all sites compared with K82)
211 210 230 163
Pod Rot - field infection compared with resistant K82 and susceptible KA2-101
Resistant Resistant ModeratelyResistant
ModeratelyResistant
VSD Index - field infection compared with sus-ceptible K82 (score 2.67) and resistant KA2-101 (score 1.83)
1.83 2.13 1.80 1.67
HC1-S ClonesThe HC1-S variety consists of four Hybrid Clones with relatively low vigour as shown with their experimental code and parentage in Table A6.2. Growers interested in growing trees that require less pruning to keep them small should plant this variety.
P A P U A N E W G U I N E A C O C O A E X T E N S I O N M A N U A L 235
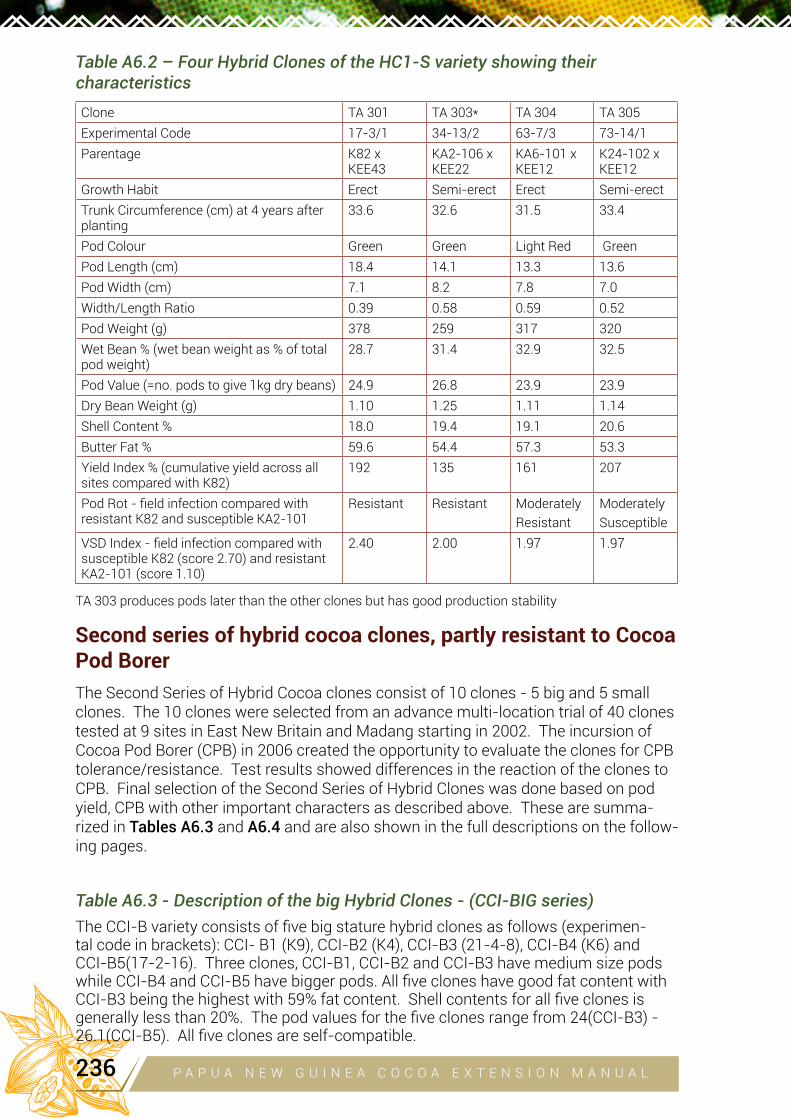
Table A6.2 – Four Hybrid Clones of the HC1-S variety showing their characteristics
Clone TA 301 TA 303* TA 304 TA 305Experimental Code 17-3/1 34-13/2 63-7/3 73-14/1Parentage K82 x
KEE43KA2-106 x KEE22
KA6-101 x KEE12
K24-102 x KEE12
Growth Habit Erect Semi-erect Erect Semi-erectTrunk Circumference (cm) at 4 years after planting
33.6 32.6 31.5 33.4
Pod Colour Green Green Light Red Green
Pod Length (cm) 18.4 14.1 13.3 13.6Pod Width (cm) 7.1 8.2 7.8 7.0Width/Length Ratio 0.39 0.58 0.59 0.52Pod Weight (g) 378 259 317 320Wet Bean % (wet bean weight as % of total pod weight)
28.7 31.4 32.9 32.5
Pod Value (=no. pods to give 1kg dry beans) 24.9 26.8 23.9 23.9Dry Bean Weight (g) 1.10 1.25 1.11 1.14
Shell Content % 18.0 19.4 19.1 20.6Butter Fat % 59.6 54.4 57.3 53.3Yield Index % (cumulative yield across all sites compared with K82)
192 135 161 207
Pod Rot - field infection compared with resistant K82 and susceptible KA2-101
Resistant Resistant ModeratelyResistant
ModeratelySusceptible
VSD Index - field infection compared with susceptible K82 (score 2.70) and resistant KA2-101 (score 1.10)
2.40 2.00 1.97 1.97
TA 303 produces pods later than the other clones but has good production stability
Second series of hybrid cocoa clones, partly resistant to Cocoa Pod Borer
The Second Series of Hybrid Cocoa clones consist of 10 clones - 5 big and 5 small clones. The 10 clones were selected from an advance multi-location trial of 40 clones tested at 9 sites in East New Britain and Madang starting in 2002. The incursion of Cocoa Pod Borer (CPB) in 2006 created the opportunity to evaluate the clones for CPB tolerance/resistance. Test results showed differences in the reaction of the clones to CPB. Final selection of the Second Series of Hybrid Clones was done based on pod yield, CPB with other important characters as described above. These are summa-rized in Tables A6.3 and A6.4 and are also shown in the full descriptions on the follow-ing pages.
Table A6.3 - Description of the big Hybrid Clones - (CCI-BIG series)The CCI-B variety consists of five big stature hybrid clones as follows (experimen-tal code in brackets): CCI- B1 (K9), CCI-B2 (K4), CCI-B3 (21-4-8), CCI-B4 (K6) and CCI-B5(17-2-16). Three clones, CCI-B1, CCI-B2 and CCI-B3 have medium size pods while CCI-B4 and CCI-B5 have bigger pods. All five clones have good fat content with CCI-B3 being the highest with 59% fat content. Shell contents for all five clones is generally less than 20%. The pod values for the five clones range from 24(CCI-B3) - 26.1(CCI-B5). All five clones are self-compatible.
P A P U A N E W G U I N E A C O C O A E X T E N S I O N M A N U A L236
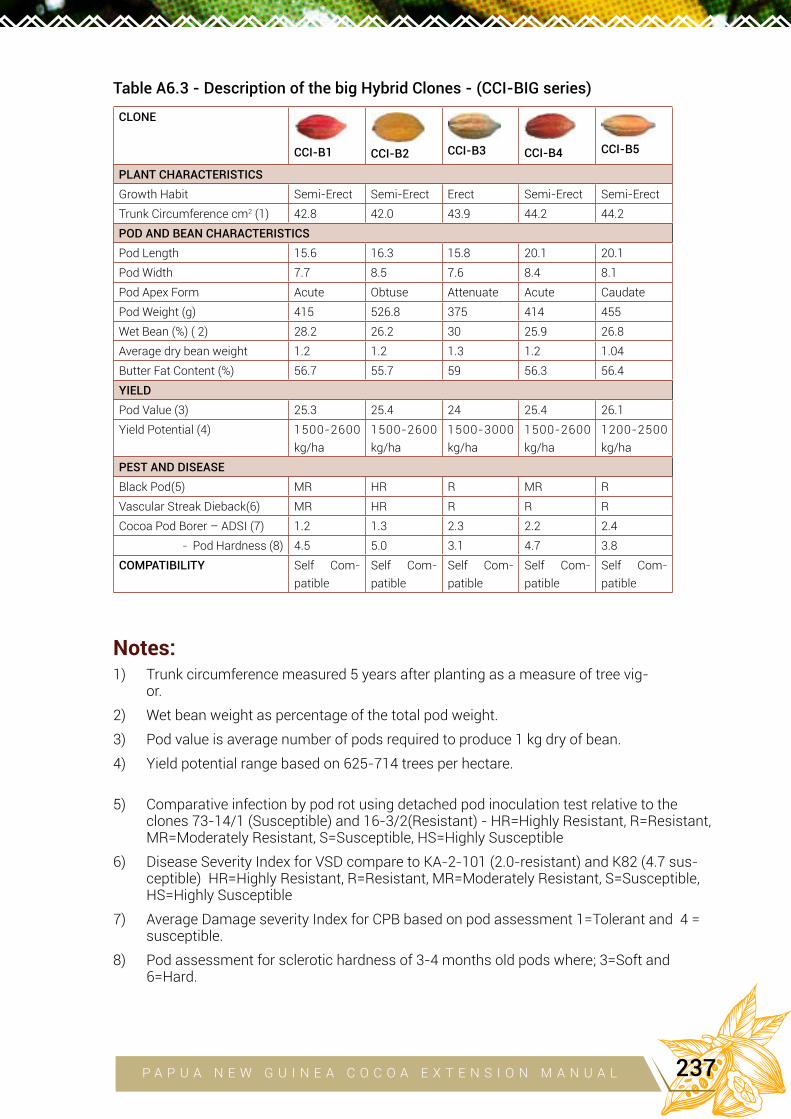
Table A6.3 - Description of the big Hybrid Clones - (CCI-BIG series)
CLONE
CCI-B1 CCI-B2 CCI-B3 CCI-B4 CCI-B5
PLANT CHARACTERISTICS
Growth Habit Semi-Erect Semi-Erect Erect Semi-Erect Semi-ErectTrunk Circumference cm2 (1) 42.8 42.0 43.9 44.2 44.2
POD AND BEAN CHARACTERISTICS
Pod Length 15.6 16.3 15.8 20.1 20.1Pod Width 7.7 8.5 7.6 8.4 8.1Pod Apex Form Acute Obtuse Attenuate Acute Caudate
Pod Weight (g) 415 526.8 375 414 455Wet Bean (%) ( 2) 28.2 26.2 30 25.9 26.8Average dry bean weight 1.2 1.2 1.3 1.2 1.04Butter Fat Content (%) 56.7 55.7 59 56.3 56.4YIELD
Pod Value (3) 25.3 25.4 24 25.4 26.1Yield Potential (4) 1500-2600
kg/ha1500-2600 kg/ha
1500-3000 kg/ha
1500-2600 kg/ha
1200-2500 kg/ha
PEST AND DISEASE
Black Pod(5) MR HR R MR R
Vascular Streak Dieback(6) MR HR R R R
Cocoa Pod Borer – ADSI (7) 1.2 1.3 2.3 2.2 2.4
- Pod Hardness (8) 4.5 5.0 3.1 4.7 3.8COMPATIBILITY Self Com-
patibleSelf Com-
patibleSelf Com-
patibleSelf Com-
patibleSelf Com-
patible
Notes: 1) Trunk circumference measured 5 years after planting as a measure of tree vig-
or.
2) Wet bean weight as percentage of the total pod weight.
3) Pod value is average number of pods required to produce 1 kg dry of bean.
4) Yield potential range based on 625-714 trees per hectare.
5) Comparative infection by pod rot using detached pod inoculation test relative to the clones 73-14/1 (Susceptible) and 16-3/2(Resistant) - HR=Highly Resistant, R=Resistant, MR=Moderately Resistant, S=Susceptible, HS=Highly Susceptible
6) Disease Severity Index for VSD compare to KA-2-101 (2.0-resistant) and K82 (4.7 sus-ceptible) HR=Highly Resistant, R=Resistant, MR=Moderately Resistant, S=Susceptible, HS=Highly Susceptible
7) Average Damage severity Index for CPB based on pod assessment 1=Tolerant and 4 = susceptible.
8) Pod assessment for sclerotic hardness of 3-4 months old pods where; 3=Soft and 6=Hard.
P A P U A N E W G U I N E A C O C O A E X T E N S I O N M A N U A L 237
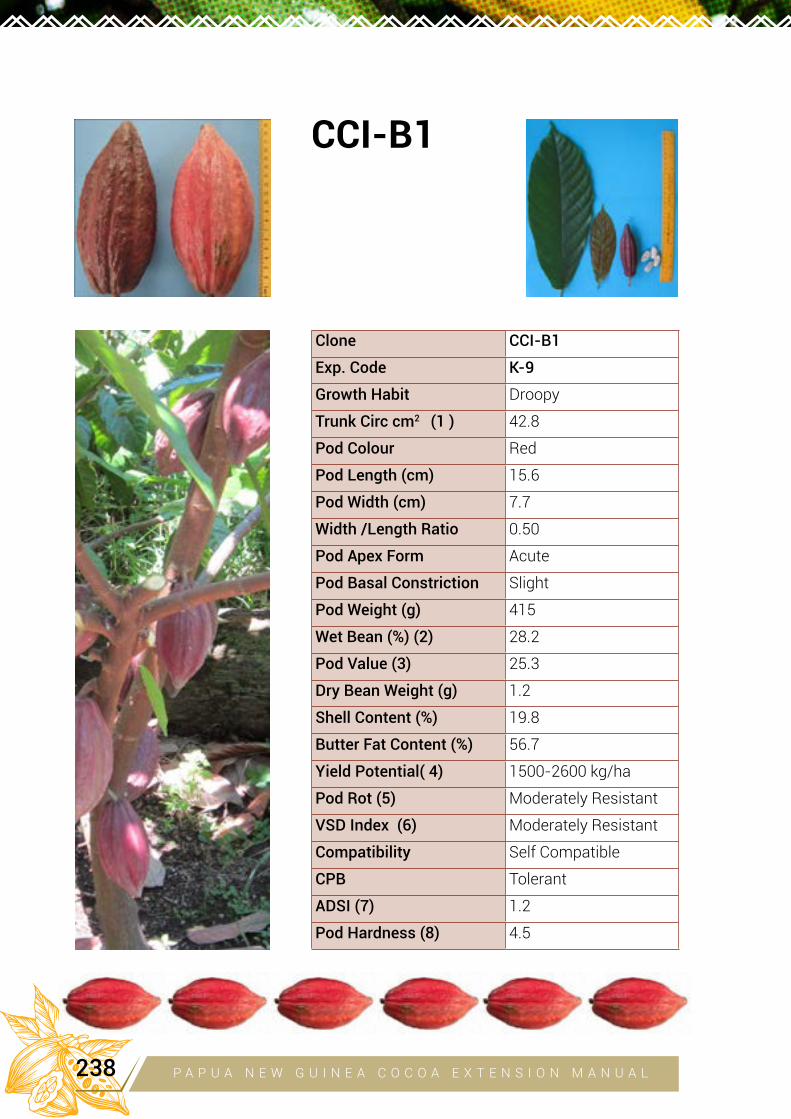
Clone CCI-B1
Exp. Code K-9
Growth Habit Droopy
Trunk Circ cm2 (1 ) 42.8
Pod Colour Red
Pod Length (cm) 15.6
Pod Width (cm) 7.7
Width /Length Ratio 0.50
Pod Apex Form Acute
Pod Basal Constriction Slight
Pod Weight (g) 415
Wet Bean (%) (2) 28.2
Pod Value (3) 25.3
Dry Bean Weight (g) 1.2
Shell Content (%) 19.8
Butter Fat Content (%) 56.7
Yield Potential( 4) 1500-2600 kg/ha
Pod Rot (5) Moderately Resistant
VSD Index (6) Moderately Resistant
Compatibility Self Compatible
CPB Tolerant
ADSI (7) 1.2
Pod Hardness (8) 4.5
CCI-B1
P A P U A N E W G U I N E A C O C O A E X T E N S I O N M A N U A L238
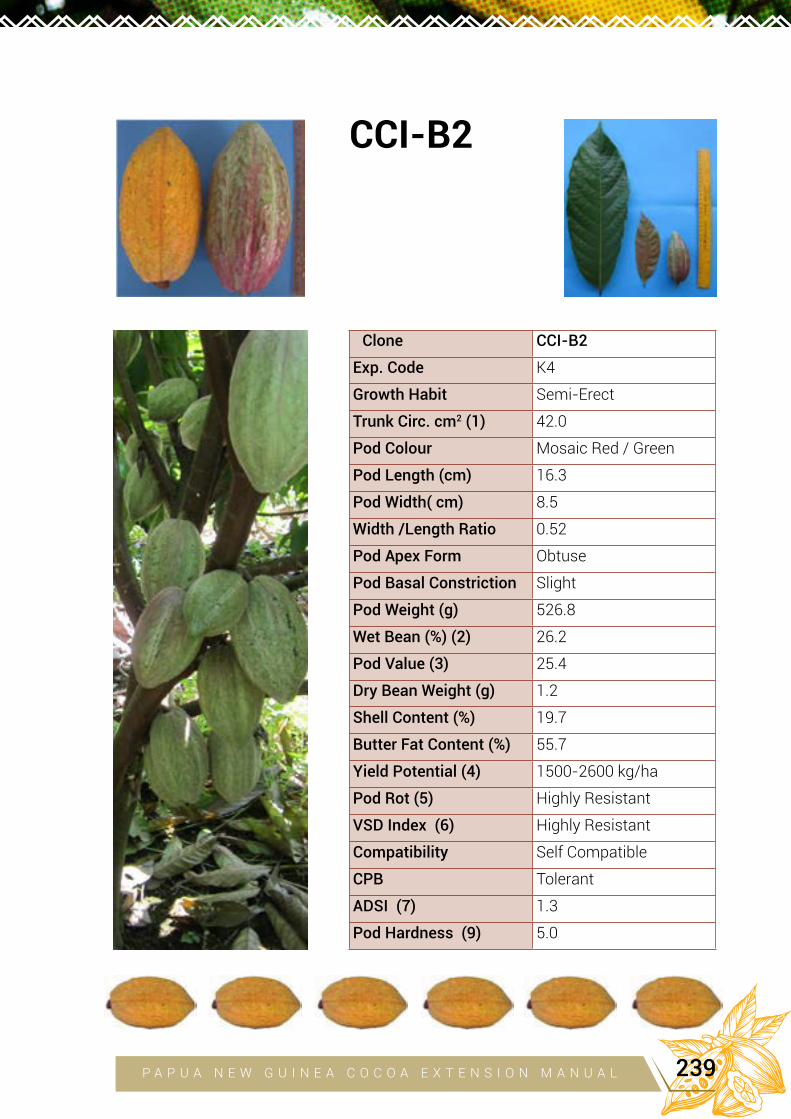
CCI-B2
Clone CCI-B2
Exp. Code K4
Growth Habit Semi-Erect
Trunk Circ. cm2 (1)
42.0
Pod Colour Mosaic Red / Green
Pod Length (cm) 16.3
Pod Width( cm) 8.5
Width /Length Ratio 0.52
Pod Apex Form Obtuse
Pod Basal Constriction Slight
Pod Weight (g) 526.8
Wet Bean (%) (2) 26.2
Pod Value (3) 25.4
Dry Bean Weight (g) 1.2
Shell Content (%) 19.7
Butter Fat Content (%) 55.7
Yield Potential (4) 1500-2600 kg/ha
Pod Rot (5) Highly Resistant
VSD Index (6) Highly Resistant
Compatibility Self Compatible
CPB Tolerant
ADSI (7) 1.3
Pod Hardness (9) 5.0
P A P U A N E W G U I N E A C O C O A E X T E N S I O N M A N U A L 239
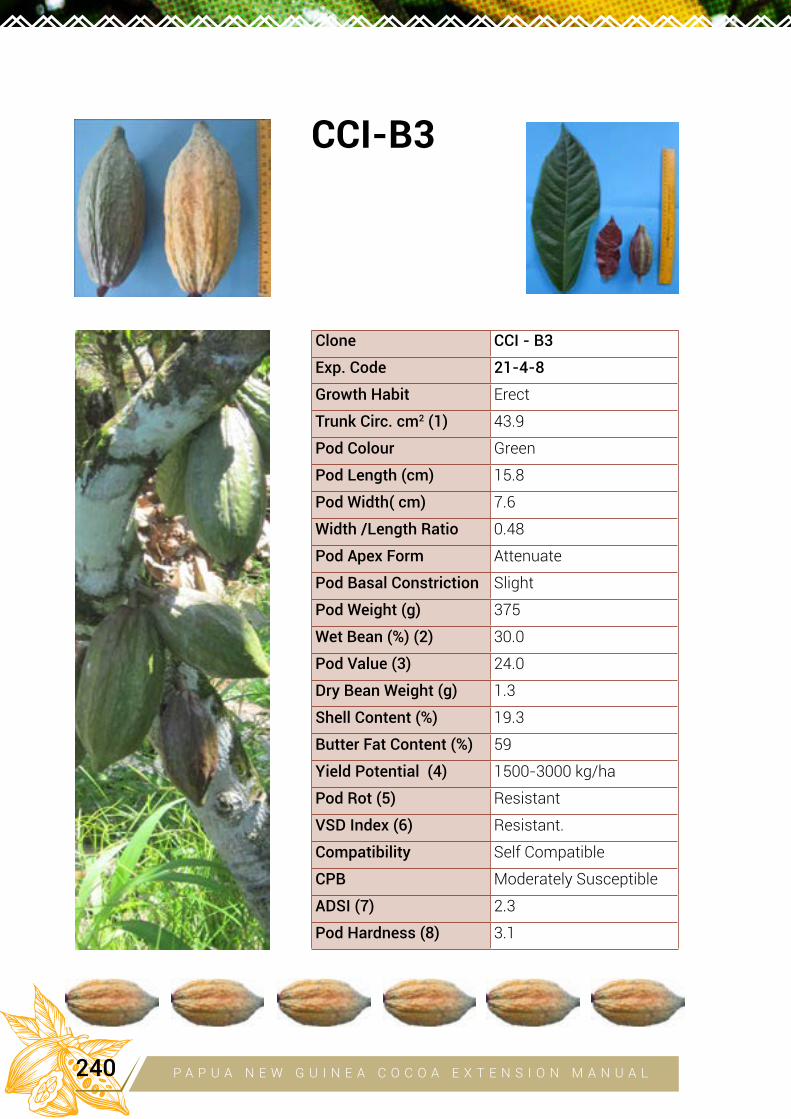
Clone CCI - B3
Exp. Code 21-4-8
Growth Habit Erect
Trunk Circ. cm2 (1) 43.9
Pod Colour Green
Pod Length (cm) 15.8
Pod Width( cm) 7.6
Width /Length Ratio 0.48
Pod Apex Form Attenuate
Pod Basal Constriction Slight
Pod Weight (g) 375
Wet Bean (%) (2) 30.0
Pod Value (3) 24.0
Dry Bean Weight (g) 1.3
Shell Content (%) 19.3
Butter Fat Content (%) 59
Yield Potential (4) 1500-3000 kg/ha
Pod Rot (5) Resistant
VSD Index (6) Resistant.
Compatibility Self Compatible
CPB Moderately Susceptible
ADSI (7) 2.3
Pod Hardness (8) 3.1
CCI-B3
P A P U A N E W G U I N E A C O C O A E X T E N S I O N M A N U A L240

CCI-B4
CLONE CCI-B4
Exp. Code K6
Growth Habit Semi Erect
Trunk Circ.cm2 (1) 44.2
Pod Colour Dark Red
Pod Length (cm ) 20.1
Pod width (cm) 8.4
Width/Length Ratio 0.40
Pod Apex Form Acute
Pod Basal Constriction Slight
Pod Weight (g) 414
Wet Bean (%) (2) 25.9
Pod Value (3) 25.4
Dry Bean weight (g) 1.2
Shell Content (%) 16.2
Butter Fat Content (%) 56.3
Yield Potential (4) 1500-2600 kg/ha
Pod Rot (5) Moderately Resistant
VSD Index (6) Resistant
Compatibility Self Compatible
CPB Tolerant
ADSI (7) 2.2
Pod Hardness (8) 4.7
P A P U A N E W G U I N E A C O C O A E X T E N S I O N M A N U A L 241

CLONE CCI-B5
Exp. Code 17-2-16
Growth Habit Droopy
Trunk Circ.cm2 (1) 44.2
Pod Colour Green
Pod Length (cm ) 20.1
Pod width (cm) 8.1
Width/Length Ratio 0.40
Pod Apex Form Caudate
Pod Basal Constriction Slight
Pod Weight (g) 455
Wet Bean (%) (2) 26.8
Pod Value 25
Dry Bean weight (g) 1.04
Shell Content (%) 15
Butter Fat Content (%) 56.4
Yield Potential (4) 1200-2500 kg/ha
Pod Rot (5) Resistant
VSD Index (6) Resistant
Compatibility Self Compatible
CPB Moderately Susceptible
ADSI (7) 2.4
Pod Hardness (8) 3.8
CCI-B5
P A P U A N E W G U I N E A C O C O A E X T E N S I O N M A N U A L242
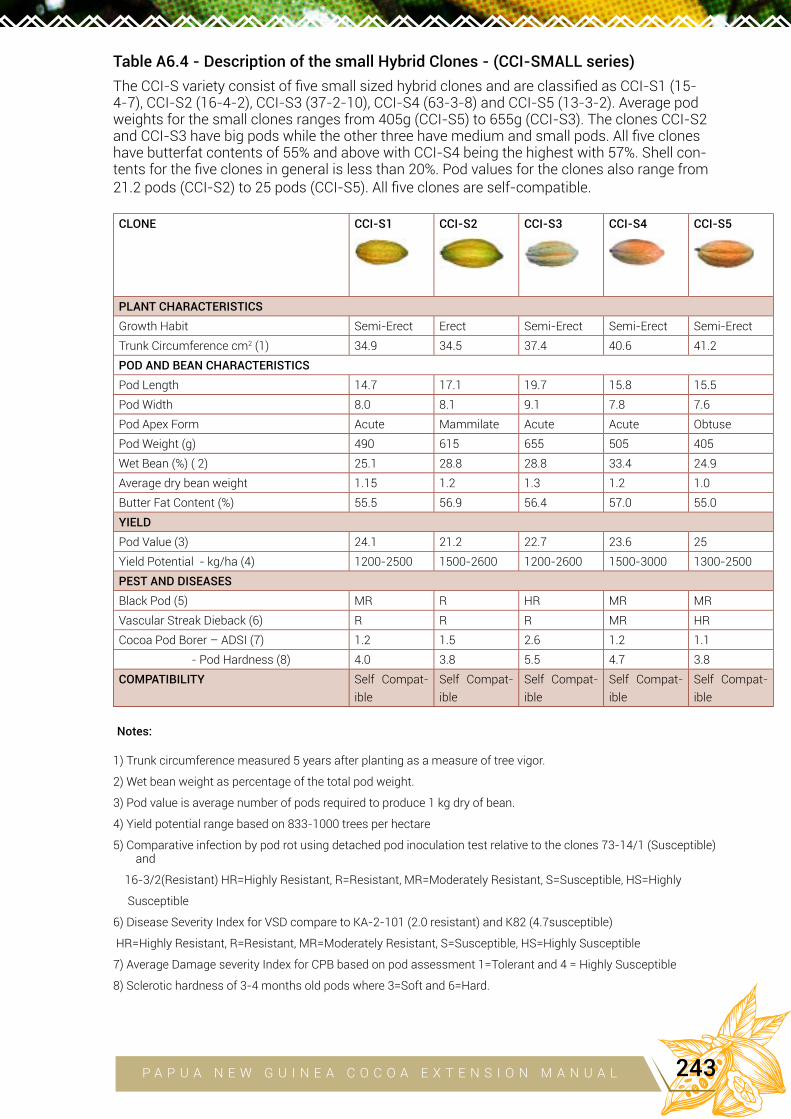
Table A6.4 - Description of the small Hybrid Clones - (CCI-SMALL series)
The CCI-S variety consist of five small sized hybrid clones and are classified as CCI-S1 (15-4-7), CCI-S2 (16-4-2), CCI-S3 (37-2-10), CCI-S4 (63-3-8) and CCI-S5 (13-3-2). Average pod weights for the small clones ranges from 405g (CCI-S5) to 655g (CCI-S3). The clones CCI-S2 and CCI-S3 have big pods while the other three have medium and small pods. All five clones have butterfat contents of 55% and above with CCI-S4 being the highest with 57%. Shell con-tents for the five clones in general is less than 20%. Pod values for the clones also range from 21.2 pods (CCI-S2) to 25 pods (CCI-S5). All five clones are self-compatible.
CLONE CCI-S1 CCI-S2 CCI-S3 CCI-S4 CCI-S5
PLANT CHARACTERISTICS
Growth Habit Semi-Erect Erect Semi-Erect Semi-Erect Semi-ErectTrunk Circumference cm2 (1) 34.9 34.5 37.4 40.6 41.2
POD AND BEAN CHARACTERISTICS
Pod Length 14.7 17.1 19.7 15.8 15.5Pod Width 8.0 8.1 9.1 7.8 7.6Pod Apex Form Acute Mammilate Acute Acute ObtusePod Weight (g) 490 615 655 505 405Wet Bean (%) ( 2) 25.1 28.8 28.8 33.4 24.9Average dry bean weight 1.15 1.2 1.3 1.2 1.0Butter Fat Content (%) 55.5 56.9 56.4 57.0 55.0YIELD
Pod Value (3) 24.1 21.2 22.7 23.6 25Yield Potential - kg/ha (4) 1200-2500 1500-2600 1200-2600 1500-3000 1300-2500 PEST AND DISEASES
Black Pod (5) MR R HR MR MRVascular Streak Dieback (6) R R R MR HRCocoa Pod Borer – ADSI (7) 1.2 1.5 2.6 1.2 1.1
- Pod Hardness (8) 4.0 3.8 5.5 4.7 3.8COMPATIBILITY Self Compat-
ibleSelf Compat-ible
Self Compat-ible
Self Compat-ible
Self Compat-ible
Notes:
1) Trunk circumference measured 5 years after planting as a measure of tree vigor.
2) Wet bean weight as percentage of the total pod weight.
3) Pod value is average number of pods required to produce 1 kg dry of bean.
4) Yield potential range based on 833-1000 trees per hectare
5) Comparative infection by pod rot using detached pod inoculation test relative to the clones 73-14/1 (Susceptible) and
16-3/2(Resistant) HR=Highly Resistant, R=Resistant, MR=Moderately Resistant, S=Susceptible, HS=Highly
Susceptible
6) Disease Severity Index for VSD compare to KA-2-101 (2.0 resistant) and K82 (4.7susceptible)
HR=Highly Resistant, R=Resistant, MR=Moderately Resistant, S=Susceptible, HS=Highly Susceptible
7) Average Damage severity Index for CPB based on pod assessment 1=Tolerant and 4 = Highly Susceptible
8) Sclerotic hardness of 3-4 months old pods where 3=Soft and 6=Hard.
P A P U A N E W G U I N E A C O C O A E X T E N S I O N M A N U A L 243
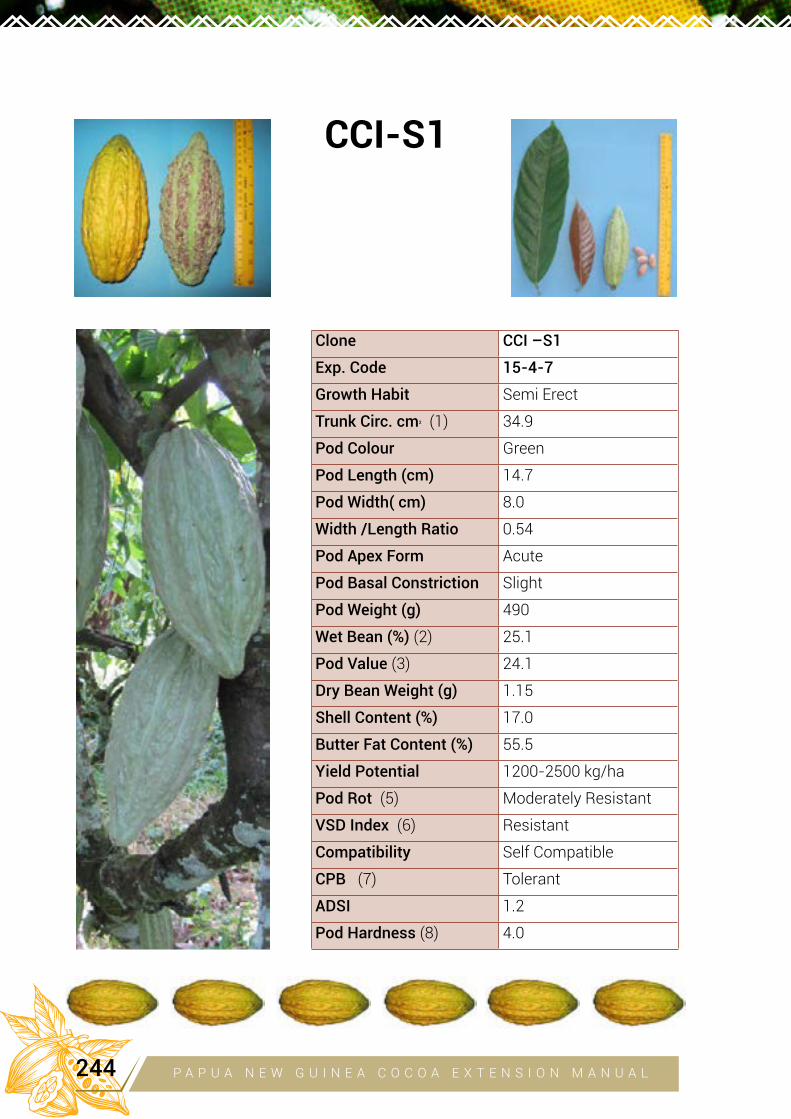
Clone CCI –S1
Exp. Code 15-4-7
Growth Habit Semi Erect
Trunk Circ. cm2 (1) 34.9
Pod Colour Green
Pod Length (cm) 14.7
Pod Width( cm) 8.0
Width /Length Ratio 0.54
Pod Apex Form Acute
Pod Basal Constriction Slight
Pod Weight (g) 490
Wet Bean (%) (2) 25.1
Pod Value (3) 24.1
Dry Bean Weight (g) 1.15
Shell Content (%) 17.0
Butter Fat Content (%) 55.5
Yield Potential 1200-2500 kg/ha
Pod Rot (5) Moderately Resistant
VSD Index (6) Resistant
Compatibility Self Compatible
CPB (7) Tolerant
ADSI 1.2
Pod Hardness (8) 4.0
CCI-S1
P A P U A N E W G U I N E A C O C O A E X T E N S I O N M A N U A L244
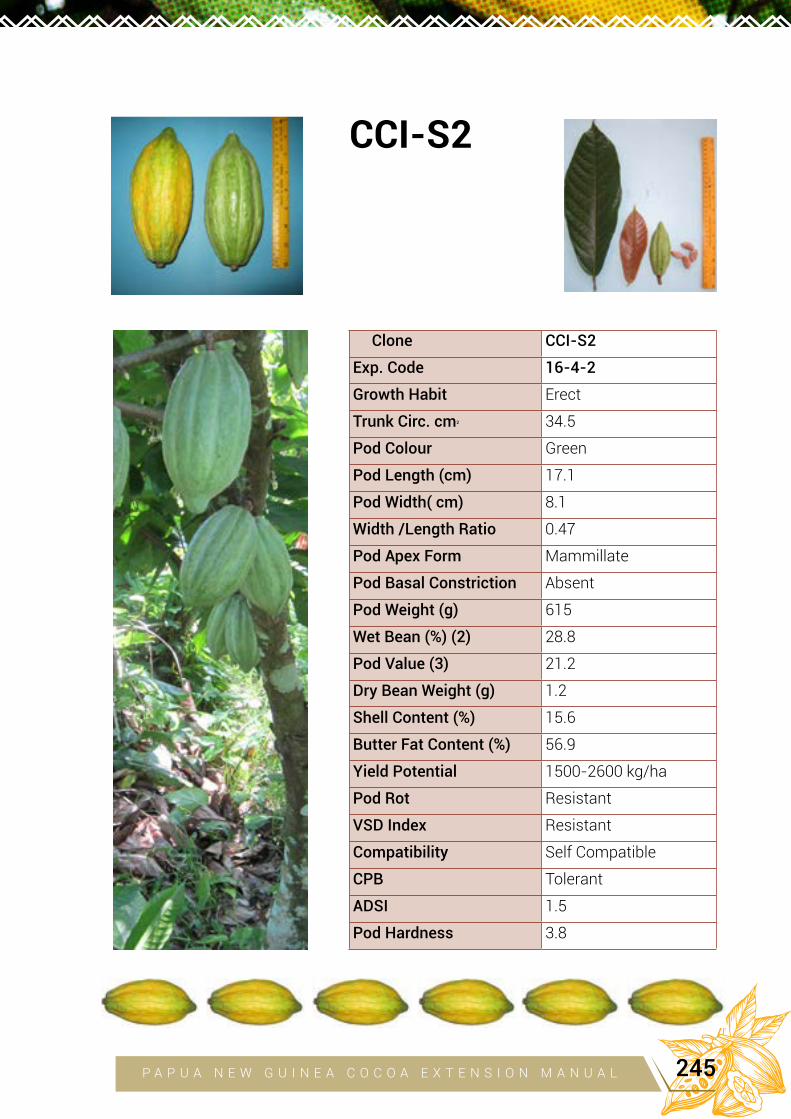
CCI-S2
Clone CCI-S2
Exp. Code 16-4-2
Growth Habit Erect
Trunk Circ. cm2 34.5
Pod Colour Green
Pod Length (cm) 17.1
Pod Width( cm) 8.1
Width /Length Ratio 0.47
Pod Apex Form Mammillate
Pod Basal Constriction Absent
Pod Weight (g) 615
Wet Bean (%) (2) 28.8
Pod Value (3) 21.2
Dry Bean Weight (g) 1.2
Shell Content (%) 15.6
Butter Fat Content (%) 56.9
Yield Potential 1500-2600 kg/ha
Pod Rot Resistant
VSD Index Resistant
Compatibility Self Compatible
CPB Tolerant
ADSI 1.5
Pod Hardness 3.8
P A P U A N E W G U I N E A C O C O A E X T E N S I O N M A N U A L 245
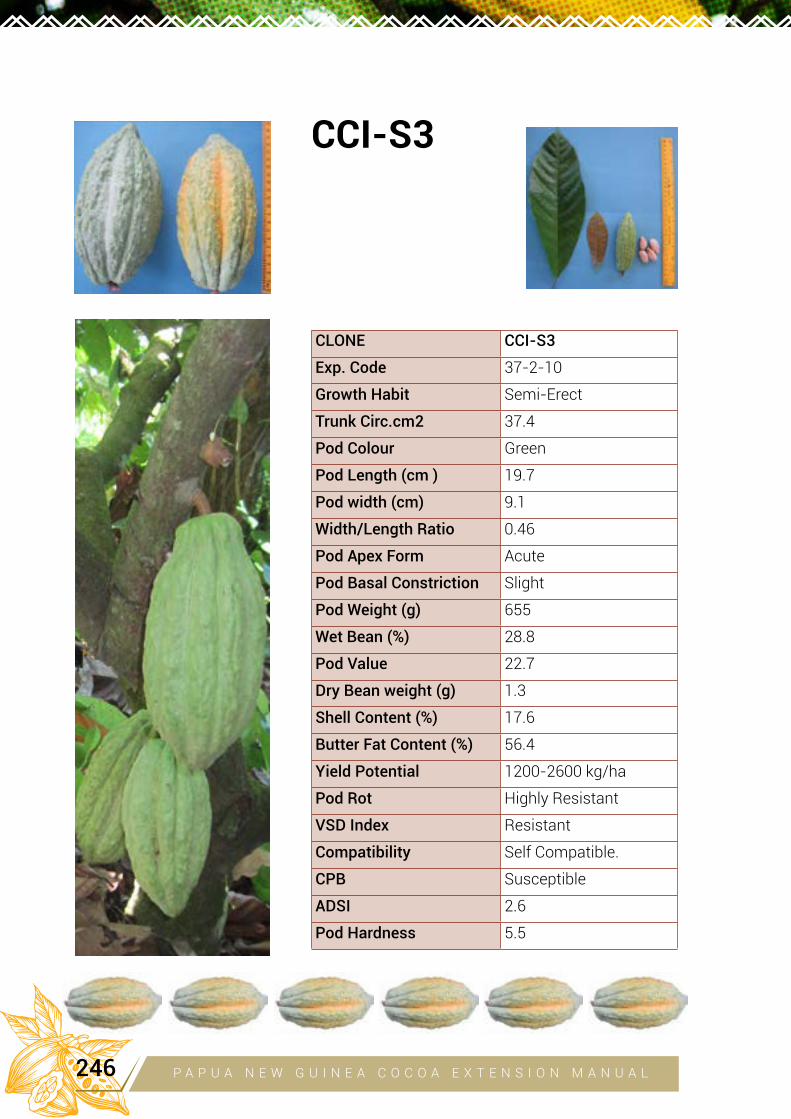
CLONE CCI-S3
Exp. Code 37-2-10
Growth Habit Semi-Erect
Trunk Circ.cm2 37.4
Pod Colour Green
Pod Length (cm ) 19.7
Pod width (cm) 9.1
Width/Length Ratio 0.46
Pod Apex Form Acute
Pod Basal Constriction Slight
Pod Weight (g) 655
Wet Bean (%) 28.8
Pod Value 22.7
Dry Bean weight (g) 1.3
Shell Content (%) 17.6
Butter Fat Content (%) 56.4
Yield Potential 1200-2600 kg/ha
Pod Rot Highly Resistant
VSD Index Resistant
Compatibility Self Compatible.
CPB Susceptible
ADSI 2.6
Pod Hardness 5.5
CCI-S3
P A P U A N E W G U I N E A C O C O A E X T E N S I O N M A N U A L246
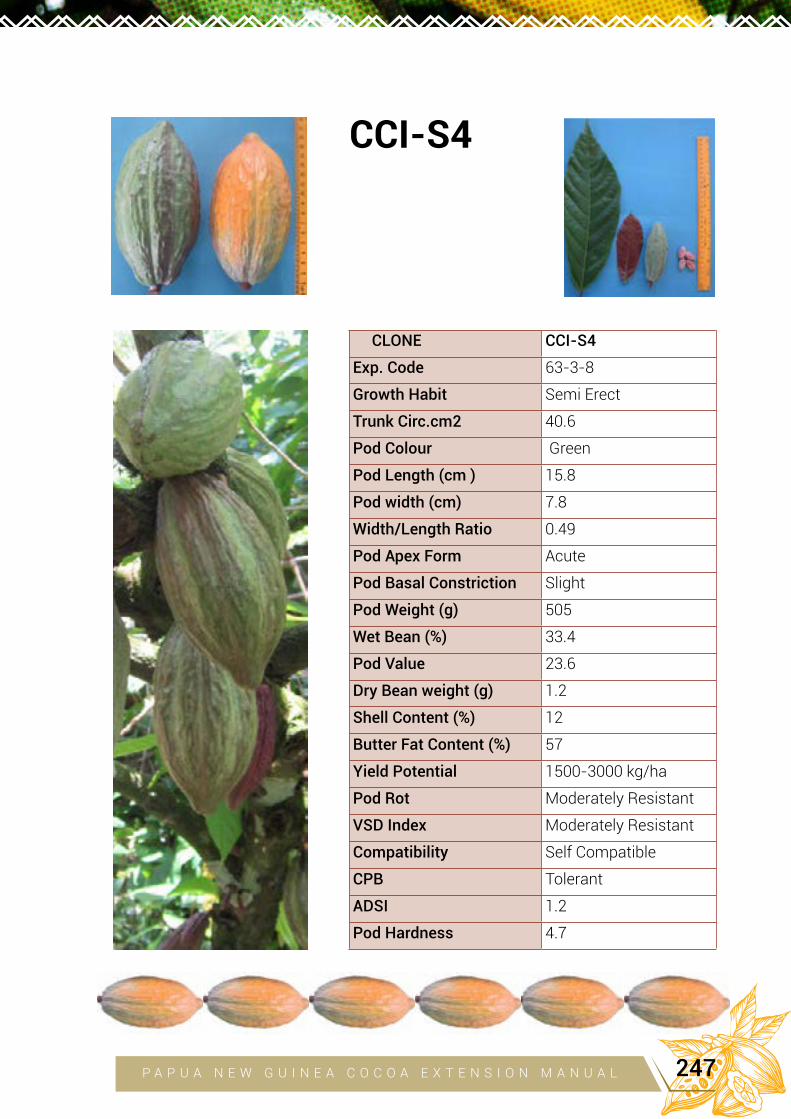
CCI-S4
CLONE CCI-S4
Exp. Code 63-3-8
Growth Habit Semi Erect
Trunk Circ.cm2 40.6
Pod Colour Green
Pod Length (cm ) 15.8
Pod width (cm) 7.8
Width/Length Ratio 0.49
Pod Apex Form Acute
Pod Basal Constriction Slight
Pod Weight (g) 505
Wet Bean (%) 33.4
Pod Value 23.6
Dry Bean weight (g) 1.2
Shell Content (%) 12
Butter Fat Content (%) 57
Yield Potential 1500-3000 kg/ha
Pod Rot Moderately Resistant
VSD Index Moderately Resistant
Compatibility Self Compatible
CPB Tolerant
ADSI 1.2
Pod Hardness 4.7
P A P U A N E W G U I N E A C O C O A E X T E N S I O N M A N U A L 247
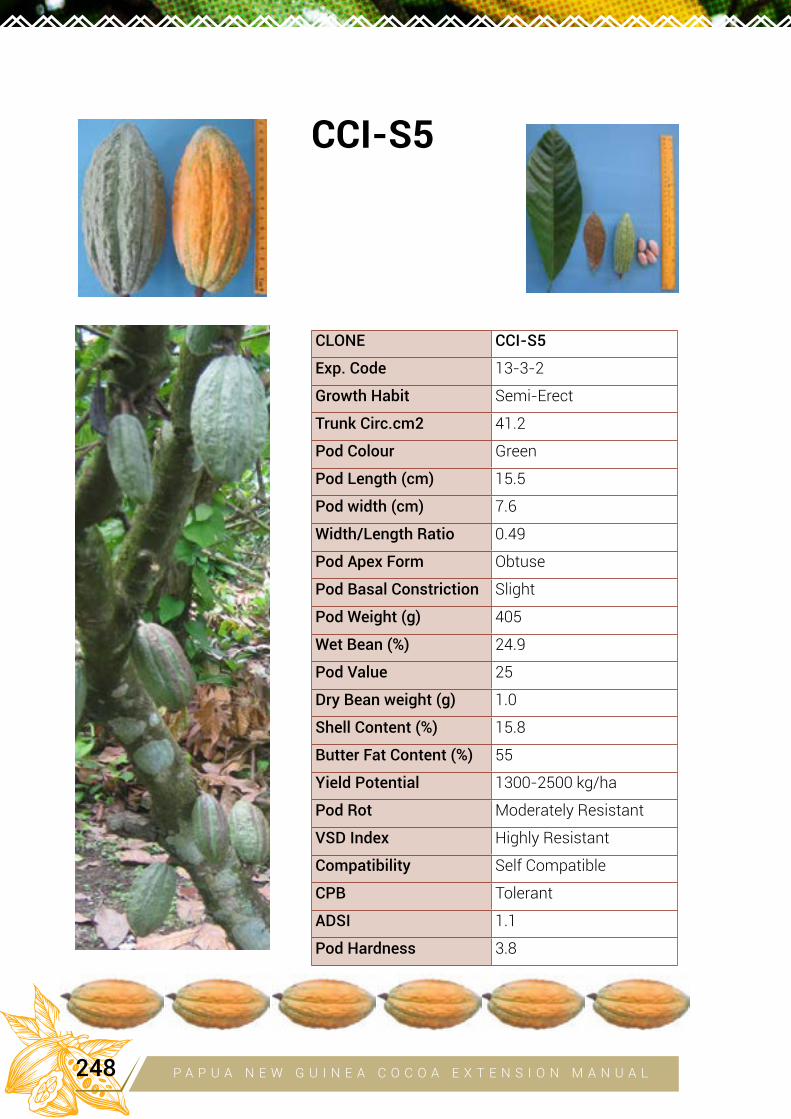
CLONE CCI-S5
Exp. Code 13-3-2
Growth Habit Semi-Erect
Trunk Circ.cm2 41.2
Pod Colour Green
Pod Length (cm) 15.5
Pod width (cm) 7.6
Width/Length Ratio 0.49
Pod Apex Form Obtuse
Pod Basal Constriction Slight
Pod Weight (g) 405
Wet Bean (%) 24.9
Pod Value 25
Dry Bean weight (g) 1.0
Shell Content (%) 15.8
Butter Fat Content (%) 55
Yield Potential 1300-2500 kg/ha
Pod Rot Moderately Resistant
VSD Index Highly Resistant
Compatibility Self Compatible
CPB Tolerant
ADSI 1.1
Pod Hardness 3.8
CCI-S5
P A P U A N E W G U I N E A C O C O A E X T E N S I O N M A N U A L248
General recommendations for planting Hybrid Clones
Planting Group
Each of the hybrid clone varieties should be planted with an equal proportion (20%) of all the five hybrid clones (25% for the four clones in Series One).
Clones of similar plant types (small or big) from the first series of hybrid clones (released in 2003) can be mixed with the second series of clones but also in equal proportions.
Planting Pattern
Clones of the same plant type should be planted in alternating pattern of 2-4 rows per clone. It is not recommended to plant more than 4 rows of the same clone next to each other.
Planting Densities
Recommendations for planting densities are as follows;o HC1-B; CCI-B (Big Clones): 625-714 trees per hectare
o HC1-S; CCI-S (Small Clones): 833-1000 trees per hectare
Choice of Variety
When planted at the recommended planting densities the two varieties (small or big) will produce similar yields.
The small clones are not recommended for poor, infertile and water logged soils.
The small clones tend to produce earlier and may require less pruning.
Rootstocks for BuddingSeeds from trees with big pods and big beans can be used as rootstocks for budding the clones (Chapter 3).
Fertilising During Establishment
Only healthy and well-developed budded or grafted clones should be field planted 3-4 months after budding. In poor soils it is advisable to apply 25g of NPK/tree at planting and 50g/tree at 3-month intervals during the first year to ensure good development of the trees.
Formation Pruning
Formation pruning is required to ensure an upright growth habit and sufficient branching (see Chapter 5).
Rehabilitation
For rehabilitation of existing cocoa stands by chupon budding or top grafting, only the big clones should be used (see Chapter 4)
P A P U A N E W G U I N E A C O C O A E X T E N S I O N M A N U A L 249
Shade and Weed Control During Establishment
Clones require good care during the first 6-12 months after planting to ensure they develop well. Good weed and shade control can reduce insect damage from Grey Weevils - a serious pest of young hybrid seedlings and Hybrid Clones.
Cocoa Pod Borer There is no complete Resistance/Tolerance to Cocoa Pod Borer, nor to Vascular Streak Die-back or Phytophthora Pod Rot – there is only partial resistance (or a lower degree of suscep-tibility) but this is often adequate when combined with Integrated Pest and Disease Manage-ment (Chapter 7).
Release of the Second Series of clones in 2013 in addition to the First series in 2003 was aimed at providing farmers with a greater choice of clones based on specific characteristics.
The small clones are generally being encouraged as part of the overall management strategy for the control of Cocoa Pod Borer because they are small and easy to manage – they require less pruning. Some clones in the Second Series show good levels of tolerance (partial resis-tance) to Cocoa Pod Borer.
The level of tolerance/resistance (for the clones) to Cocoa Pod Borer (CPB) will have no ma-jor effect on the control of CPB without good management. Therefore, good management including IPDM options 2-4 is still required for good yields. Without good management (Chapter 7), even the clones with a degree of resistance or tolerance can become complete-
ly infested and have their yield significantly reduced by Cocoa Pod Borer.
P A P U A N E W G U I N E A C O C O A E X T E N S I O N M A N U A L250
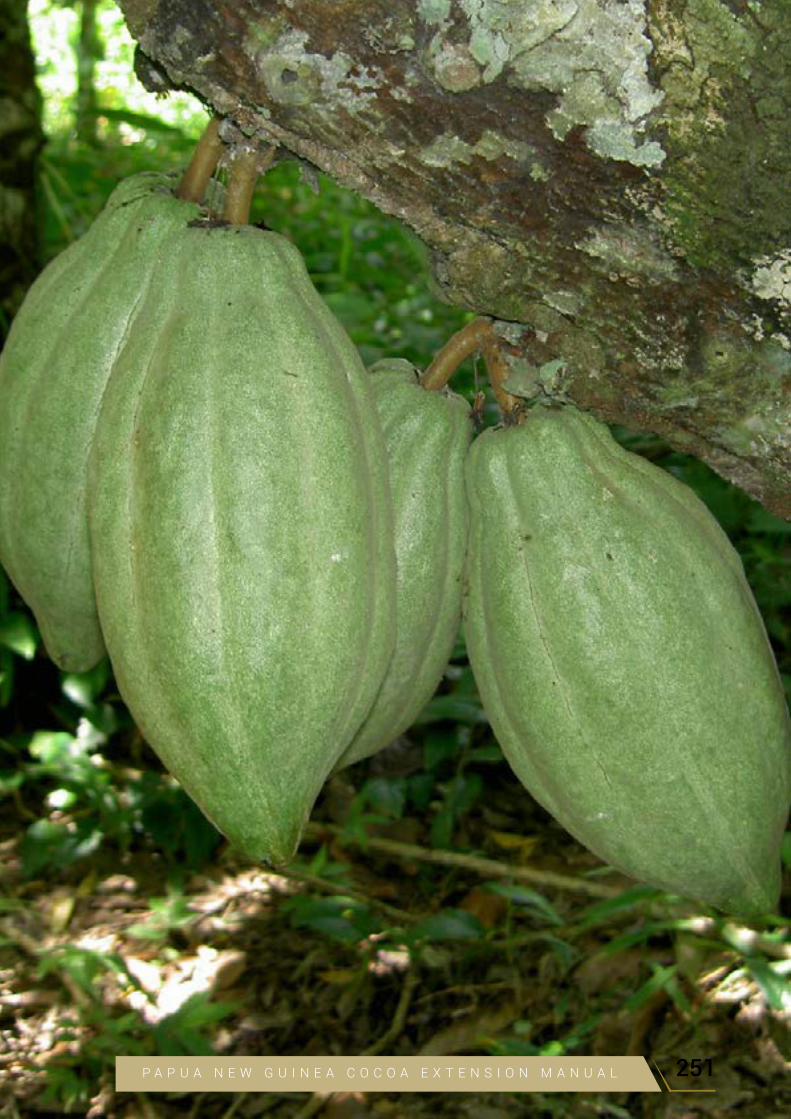
P A P U A N E W G U I N E A C O C O A E X T E N S I O N M A N U A L 251
07
INSECT PESTS OF
COCOA IN PAPUA NEW
GUINEA John Moxon, Paul Gende, Fidelis Hela, Samson Laup, Stuart Smith and Kiteni Kurika
(largely taken from J.E. Moxon, ‘Pests of Cocoa’, LAES Bulletin, photos by R. Roe and C. Prior)
AIM OF THIS CHAPTER:
To describe the main insect pests of cocoa in Papua New Guinea and the main features of their biology and management, as a basis for Integrated Pest and Disease Management
IntroductionMore than 300 species of insect have been associated with cocoa in Papua New Guinea but only about 20 are regarded as serious or potentially serious pests. Some species are pests in some areas of the country but not in others – e.g. Pantorhytes and Mirids are not a problem in Bougainville, while Longicorn Tip Borer (Oxymagis) is a problem in Bougainville but nowhere else in Papua New Guinea. The amount of damage done by insects will vary from area to area because of variation in the climate, stage of development of cocoa plantings, and level of management. Flightless pests like Pantorhytes and Grey Weevils may be abundant on one farm but absent from another just a short distance away because they move slowly.
Different pests attack different parts of the tree and different growth stages (some are more important as pests of young cocoa, while others are more important on older trees). Pests of young plants may stunt or distort the trees and so have a long-lasting effect, while pests that attack the wood of older trees may shorten their life. In this chapter, the pests have been categorised by the plant parts they attack.
The most important pests include some that have been a problem in Papua New Guinea for many decades (wood-boring larvae of the genera Pantorhytes and Glenea, pod-damaging Mirids, and various leaf-eating caterpillars) and the Cocoa Pod Borer Moth (Conopomorpha cramerella) that was first found in Papua New Guinea in 2006; the second most important group includes Grey Weevils that chew the shoots of young trees, larvae of Pansepta moths that feed on terminal branches of young and mature trees, and wood-eating termites that can reduce the longevity of trees; the third most important group are the Rhyparida leaf-eating beetles, Root Chafers, Oxymagis beetle tip borers, Amblypelta bug pod-suckers, Zeuzera moth stem borers, and mealybugs.
Pest problems will be reduced greatly by application of good management and the standard recommendations for IPDM as described in this Manual - maintaining cocoa trees at a man-ageable height, having some shade but not too much (some insects are favored by lack of shade, some are favored by too much shade), frequent complete harvesting and burying of infested pods (especially important for Cocoa Pod Borer), regular pruning out of damaged branches in the course of regular structural pruning (important for Pansepta and longicorns), regular hand picking of Pantorhytes, and regular painting of larva tunnels and stem cankers with an insecticide/fungicide mix. These measures also help control important diseases such as Phytophthora Pod Rot and Stem Canker, Vascular Streak Dieback and Pink Disease.
APPENDIX
P A P U A N E W G U I N E A C O C O A E X T E N S I O N M A N U A L252

Beneficial Organisms – Management of Crazy Ants (Anoplole-pis longipes) and Kurukum Ants (Oecophylla smaragdina)In any crop, especially a long-term tree crop, there will be populations of insects and other arthropods (e.g. mites, spiders) that parasitise, predate or antagonise the main insect pests. Some pests that we regard as ‘minor’ may be kept under control by parasites or predators. These beneficial insects should be encouraged to develop in the crop and nothing should be done to decrease their populations. This is why great care has to be taken with the use of pesticides – they have to be chosen and used in a restricted and targeted way so that popula-tions of beneficial insects are not damaged. In general, spiders and small lizards are likely to be beneficial in a crop like cocoa because they eat the common insects in the crop that are the most likely to be pests.
Populations of Crazy Ants (Anoplolepis longipes)(Figures A7.1), so called because the workers run around rapidly when disturbed, and Kurukum Ants (Oecophylla smaragdina) (Figures A7.2, A7.3) can provide good biological control of several insect pests in cocoa, especially two of the most serious pests, Pantorhytes and Mirids, by feeding on the eggs, interfering with feed-ing and egg-laying of the adults, and killing adults. They may also disturb Cocoa Pod Borer moths but this needs further study.
The ants occur throughout the country in cash and food crops gardens, and in secondary forest. The build-up of Crazy Ant populations in cocoa blocks should be encouraged, although sometimes their populations fluctuate depending on the availability of food. The worker ants are the most obvious and are normally seen outside the nest collecting food. They are light brown, about 4 mm long, with long legs and feelers (antennae). The males are smaller, darker and thinner with long wings; the females (queens) are easily recognised by their much larger
Figure A7.1 - Crazy Ants killing an adult Panto-rhytes plutus
Figure A7.2 - Kurukum Ants tending scale insects on a cocoa pod – they will deter Mirids
Figure A7.3 Kurukum (Weaver) Ants living on a cocoa leaf and stem
P A P U A N E W G U I N E A C O C O A E X T E N S I O N M A N U A L 253
size (8 mm long) and their swollen abdomen. The ants live close together in a dense, contin-uous population and build nests close together to form a colony, with each nest having thou-sands of workers with only one to several queens; each colony may have thousands of nests. The queens usually remain inside the nest where their main function is to lay eggs. The small cream-coloured eggs are nursed in clutches and hatch out after 5 days to form cream-co-loured larvae about 3mm long that are tended by the worker ants for 2-3 weeks. The larvae then pupate for 14 days before emerging as adult workers. Pupae are about 4 mm long and are formed in a fawn, sack-shaped cocoon. A worker may live for several months. At certain times of the year, usually at the beginning of the wet season, winged queens and males are produced; the males die soon after mating while the queens chew off their wings and either stay in the nest or leave with a small group of workers to found a new colony nearby.
Crazy Ants, unlike most other ant species, are poor nest-builders; they usually live on the ground beneath or inside anything that will give them shelter – e.g. leaf litter, palm fronds, stones, logs or coconut husks. They are a general predator and scavenger, feeding on any kind of insect they encounter on the ground or in trees, including several cocoa pests. They can control both Pantorhytes and Mirids in cocoa. The number of ant nests in a given area can be used to predict the degree of control. If there are 1 or more nests per square metre, there is likely to be no Mirid or Pantorhytes damage in the cocoa; if one nest every 5 square metres damage could be moderate, while if there are no nests there may be a lot of damage.
Crazy Ants can be transferred from a heavily infested to a lightly or uninfested block, or to a new block, by placing pieces of giant bamboo, with one closed node and one open end, stuffed with cocoa leaves, about a metre apart near a nest in a heavily infested block. The bamboos are best placed on a slope with the open end facing downhill so that they don’t fill up with water. The ants will soon build a nest in each bamboo. Then a piece of plastic or banana leaf is tied over the end and and the colonized bamboo sections are taken to the new cocoa block. There they are placed about a metre apart, again facing downhill on a slope, in a sunny, well-drained area under cocoa or shade trees near the centre of the block. If the block is not yet pest-infested, the bamboo nests are placed on the perimeter where the ants could stop insect pests spreading from old cocoa or bush into the block. The ants should not be introduced during very wet or very dry weather.
Several other ants (e.g. Pheidole, Iridiomirmex, Crematogaster, Oecophylla) are antagonistic to Crazy Ants and will drive them out of a block; these could be poisoned with ant baits before the Crazy Ants are introduced.
Shade tree and cocoa prunings placed in windrows between the rows of cocoa provide an ide-al place for the Crazy Ants to build their nests and shelter. Weeds should not be slashed too close to the ground or else Crazy Ant nests may be disturbed. Spot spraying with insecticides to control pests will not greatly affect the ants, and herbicides and fungicides will not affect them.
Crazy ants also feed on honeydew secreted by sap sucking insects, especially Mealy Bugs (Planococcus pacificus), Scales (Coccus viridis), Membracids (Mauriya spp.) and Aphids (Toxoptera auranti). The ants protect these insects from predators and their populations can build up and become a pest on the shoots of young cocoa.
Cocoa pests such as Pantorhytes are generally less of a problem under coconut shade than under shade trees like Leucaena and Gliricidia. This is believed to be due to the Kurukum Ant (Weaver Ant, Green Ant, Oecophylla smaragdina) that lives in the coconut palms and, like the Crazy Ant, attacks adults and eats the eggs. When there are many Crazy Ants in a block with coconut shade, some coconut pests such as Tirathaba, Axiagastus and Amblypelta can be-come a problem because the Crazy Ants drive away the Kurukums that live on palms and feed on these pests.
P A P U A N E W G U I N E A C O C O A E X T E N S I O N M A N U A L254
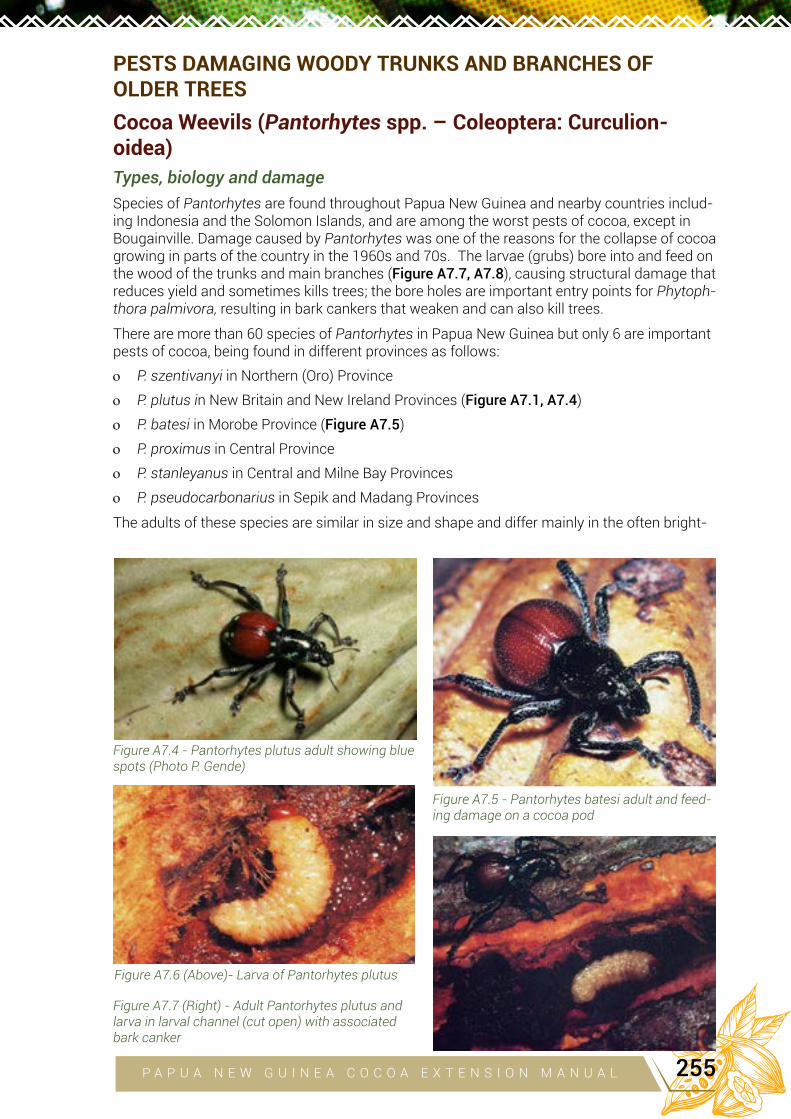
PESTS DAMAGING WOODY TRUNKS AND BRANCHES OF OLDER TREES
Cocoa Weevils (Pantorhytes spp. – Coleoptera: Curculion-oidea)
Types, biology and damage
Species of Pantorhytes are found throughout Papua New Guinea and nearby countries includ-ing Indonesia and the Solomon Islands, and are among the worst pests of cocoa, except in Bougainville. Damage caused by Pantorhytes was one of the reasons for the collapse of cocoa growing in parts of the country in the 1960s and 70s. The larvae (grubs) bore into and feed on the wood of the trunks and main branches (Figure A7.7, A7.8), causing structural damage that reduces yield and sometimes kills trees; the bore holes are important entry points for Phytoph-thora palmivora, resulting in bark cankers that weaken and can also kill trees.
There are more than 60 species of Pantorhytes in Papua New Guinea but only 6 are important pests of cocoa, being found in different provinces as follows:
o P. szentivanyi in Northern (Oro) Province
o P. plutus in New Britain and New Ireland Provinces (Figure A7.1, A7.4)
o P. batesi in Morobe Province (Figure A7.5)
o P. proximus in Central Province
o P. stanleyanus in Central and Milne Bay Provinces
o P. pseudocarbonarius in Sepik and Madang Provinces
The adults of these species are similar in size and shape and differ mainly in the often bright-
Figure A7.4 - Pantorhytes plutus adult showing blue spots (Photo P. Gende)
Figure A7.5 - Pantorhytes batesi adult and feed-ing damage on a cocoa pod
Figure A7.6 (Above)- Larva of Pantorhytes plutus
Figure A7.7 (Right) - Adult Pantorhytes plutus and larva in larval channel (cut open) with associated bark canker
P A P U A N E W G U I N E A C O C O A E X T E N S I O N M A N U A L 255
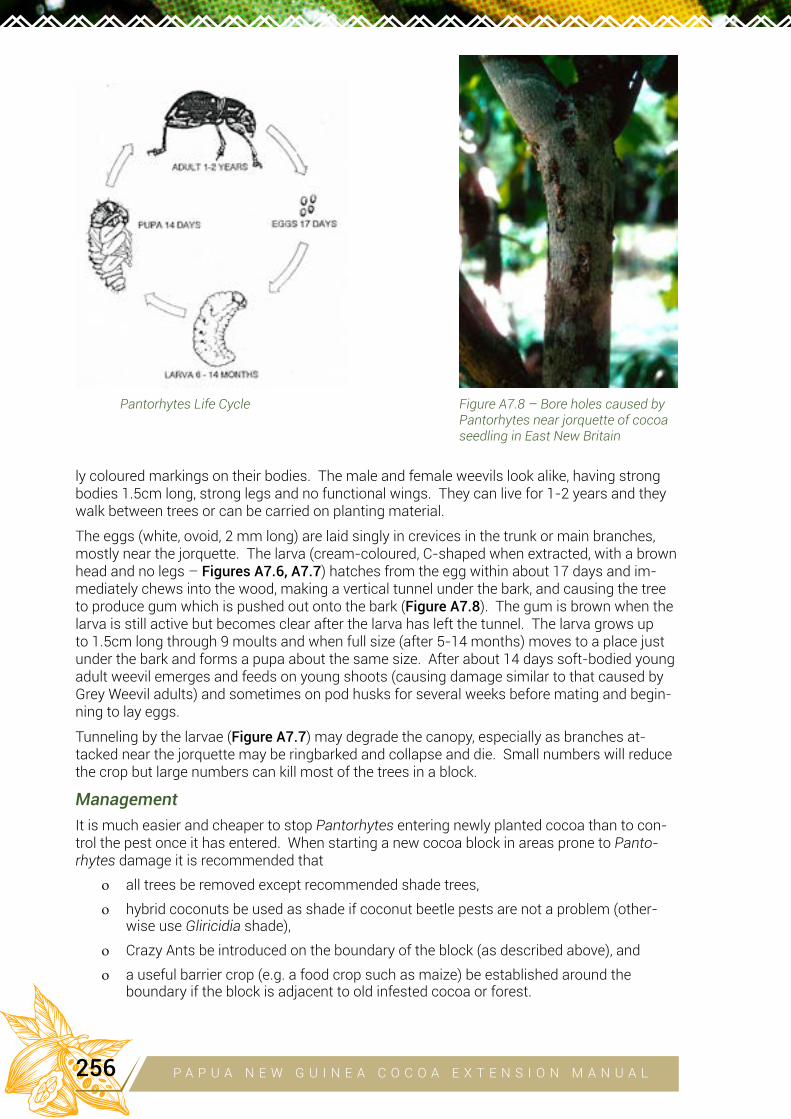
ly coloured markings on their bodies. The male and female weevils look alike, having strong bodies 1.5cm long, strong legs and no functional wings. They can live for 1-2 years and they walk between trees or can be carried on planting material.
The eggs (white, ovoid, 2 mm long) are laid singly in crevices in the trunk or main branches, mostly near the jorquette. The larva (cream-coloured, C-shaped when extracted, with a brown head and no legs – Figures A7.6, A7.7) hatches from the egg within about 17 days and im-mediately chews into the wood, making a vertical tunnel under the bark, and causing the tree to produce gum which is pushed out onto the bark (Figure A7.8). The gum is brown when the larva is still active but becomes clear after the larva has left the tunnel. The larva grows up to 1.5cm long through 9 moults and when full size (after 5-14 months) moves to a place just under the bark and forms a pupa about the same size. After about 14 days soft-bodied young adult weevil emerges and feeds on young shoots (causing damage similar to that caused by Grey Weevil adults) and sometimes on pod husks for several weeks before mating and begin-ning to lay eggs.
Tunneling by the larvae (Figure A7.7) may degrade the canopy, especially as branches at-tacked near the jorquette may be ringbarked and collapse and die. Small numbers will reduce the crop but large numbers can kill most of the trees in a block.
Management
It is much easier and cheaper to stop Pantorhytes entering newly planted cocoa than to con-trol the pest once it has entered. When starting a new cocoa block in areas prone to Panto-rhytes damage it is recommended that
o all trees be removed except recommended shade trees,
o hybrid coconuts be used as shade if coconut beetle pests are not a problem (other-wise use Gliricidia shade),
o Crazy Ants be introduced on the boundary of the block (as described above), and
o a useful barrier crop (e.g. a food crop such as maize) be established around the boundary if the block is adjacent to old infested cocoa or forest.
Figure A7.8 – Bore holes caused by Pantorhytes near jorquette of cocoa seedling in East New Britain
Pantorhytes Life Cycle
P A P U A N E W G U I N E A C O C O A E X T E N S I O N M A N U A L256
Pantorhytes can be controlled by collecting the adults by hand and killing them, mainly at mid-day when the heat drives them down from the upper canopy to the lower branches. This should be done as a weekly round for serious infestations. This is easier to do if the trees are kept smaller with open lower branches, and is one of the jobs in cocoa growing that needs constant attention if the weevil is a problem.
The Trinitario clones K24-102 and K24-103 show some resistance to Pantorhytes and can be planted in areas where the weevil is a serious problem.
Large populations of Crazy Ants (Anoplolepis longipes) can drive out Pantorhytes and some other pests from cocoa, attacking the adults and eating their eggs (see above). They can’t get access to the larvae in the wood, which require insecticidal channel paints that don’t harm the ants. The weevil is often not a big problem in cocoa under the shade of coconut palms because the Kurukum Ant (Oecophylla smaragdina) that lives in the palms attacks adults and eats their eggs.
Because the weevil can’t fly, its movement can be disrupted by barriers such as rivers, grass, other crops or bush plants on which it can’t feed; it can be a problem in one block but be ab-sent from a nearby block if it is protected by a barrier. Pantorhytes can feed on the following plants that are therefore not good in barriers – Pipterus argenteus, Trema cannabina, Cananga adorata, Casuarina oligodon, Schuumansia henningsii, Hibiscus sp., Macaranga spp., Melochia odorata, Trichospermum psyclocladium, Ochroma lagopus, Ficus spp.
Larvae in tunnels and any associated Phytophthora Bark Canker can be killed by painting channels and adjacent bark with the following insecticide/fungicide mixture as recommended in the IPDM package: 30 ml Nuvan (Dichlorvos 50EC) to kill Pantorhytes larvae, 30 ml white oil as a sticker, 60 g Copper Nordox to control Phytophthora, 940 ml water (to make 1 L mixture). This is sufficient to treat 10 mature trees (6 years or older) or 20 smaller trees. Just enough mixture is made up for use on the day (the mixture doesn’t keep). A 2.5 cm wide brush is used to paint 3 ml of the mixture onto the larva tunnels after brushing off the frass with a nylon bristle brush. The treatment is repeated every 2 weeks until the weevil numbers are reduced to an acceptably low level. The frass should not be scraped off with a harsh wire brush or larvae dug out with a knife as this further wounds the bark and may allow entry of Phytoph-thora, causing stem cankers. In recent times, it is recommended that Dichlorvos not be used as it is classified by the World Health Organisation as a Highly Hazardous Class 1b chemical. Research is needed to develop an alternative chemical for treating trunk boring larvae such as Pantorhytes and longicorns.
Adult weevils should be sprayed with a synthetic pyrethroid at the same time as the tunnels are treated with channel paint. The spray mix consists of 28 ml Decis (delta methrin) or Ka-rate (lambda cyhalothrin) or Cymbush (cypermethrin) 2.5% EC (or equivalent products from other suppliers), 2 ml surfactant, 50 ml sticker, 10 litres water (0.007% pyrethroid) and is ap-plied with a knapsack sprayer onto the trunk, main branches and canopy (40 sec for a mature tree) at a rate of 8 g a.i. per ha. Spraying should be done monthly in conjunction with channel painting. See Chapter 10 for more detail on the safe use of pesticides.
P A P U A N E W G U I N E A C O C O A E X T E N S I O N M A N U A L 257
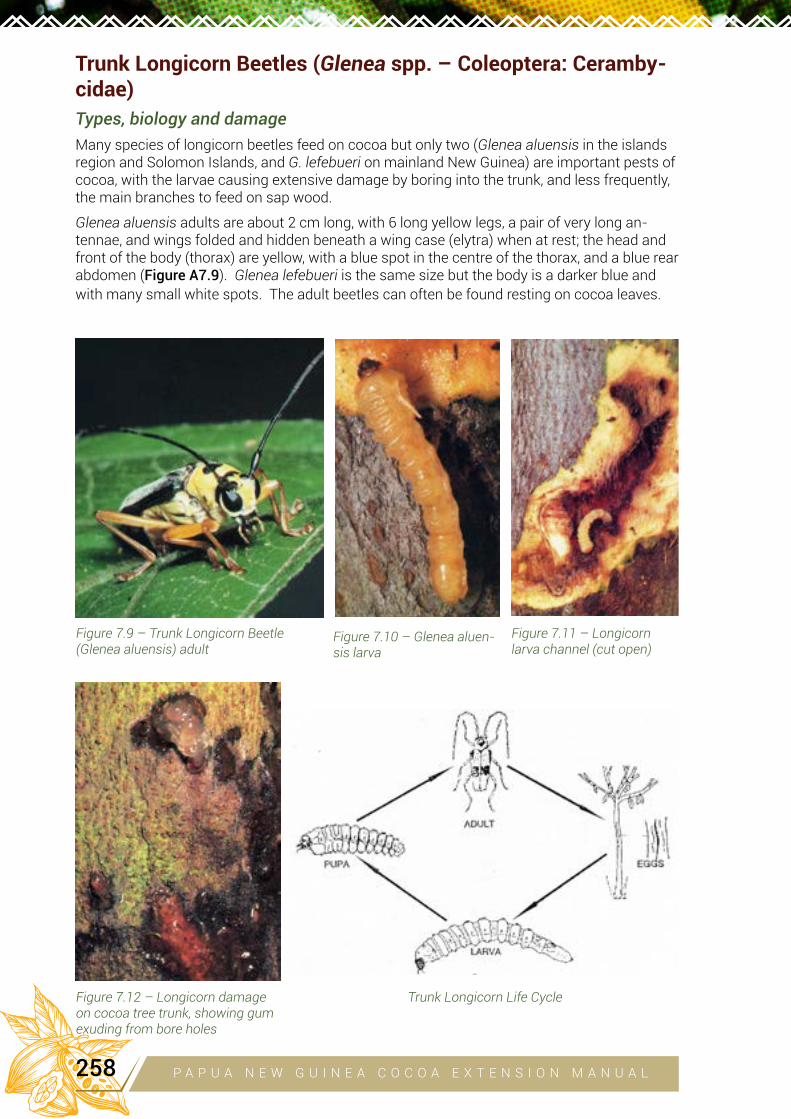
Trunk Longicorn Beetles (Glenea spp. – Coleoptera: Ceramby-cidae)
Types, biology and damage
Many species of longicorn beetles feed on cocoa but only two (Glenea aluensis in the islands region and Solomon Islands, and G. lefebueri on mainland New Guinea) are important pests of cocoa, with the larvae causing extensive damage by boring into the trunk, and less frequently, the main branches to feed on sap wood.
Glenea aluensis adults are about 2 cm long, with 6 long yellow legs, a pair of very long an-tennae, and wings folded and hidden beneath a wing case (elytra) when at rest; the head and front of the body (thorax) are yellow, with a blue spot in the centre of the thorax, and a blue rear abdomen (Figure A7.9). Glenea lefebueri is the same size but the body is a darker blue and with many small white spots. The adult beetles can often be found resting on cocoa leaves.
Figure 7.9 – Trunk Longicorn Beetle(Glenea aluensis) adult
Figure 7.10 – Glenea aluen-sis larva
Figure 7.11 – Longicornlarva channel (cut open)
Figure 7.12 – Longicorn damage on cocoa tree trunk, showing gum exuding from bore holes
Trunk Longicorn Life Cycle
P A P U A N E W G U I N E A C O C O A E X T E N S I O N M A N U A L258
The larvae of both species are similar (creamy-yellow segmented body and large light to me-dium brown head with strong jaws – Figure A7.10, A7.11) and grow to about 3 cm long and 5 mm wide after hatching out of eggs laid singly in crevices in the bark of the trunk (or more rarely the main branches) by the adult female and boring into and feeding on young wood for about 6 weeks, causing damage to the trunk and main branches. Then the larvae bore deeper into the wood and become pre-pupae for 4 weeks and then take another week to pupate fully. The cream-coloured pupae are 17 mm long and 5 mm wide and are naked (the antennae, legs and wings are visible). The adults emerge after a week. The life cycle from egg to adult takes about 12 weeks.
Larval tunnels are similar to those caused by Pantorhytes, but are longer and run in a more horizontal rather than vertical direction in the trunks and branches, and the frass is produced in greater quantities and has a more fibrous, rusty, foamy appearance (Figure A7.12) than that of Pantorhytes. They are often found at the base of the trunk protected by tall grass or at the junction of branches and the jorquette. A single longicorn beetle can cause consid-erable damage to a tree by partially or totally ring barking the trunk or a main branch, killing them; weakened branches may break, and larva channels are a major point of entry for the Bark Canker pathogen Phytophthora palmivora, which can also seriously damage or kill trees suddenly (see Appendix 8).
Management
Glenea longicorns prefer heavily shaded conditions and so are a particular problem in over-shaded, poorly managed cocoa and cocoa adjacent to forest. Cultural control involves pruning cocoa and shade trees to maintain only light shade, and removing climbers and other weeds touching the trunk and lower branches, thus removing favoured places for longicorn attack. Longicorns are a particular problem on Trinitario cocoa and hybrid clones struck from fan branch buds that both tend to have branches close to the ground, facilitating longicorn at-tack. Good formation pruning should make sure branches come off higher up the main trunk, and that enough sunlight penetrates to the base of the tree to reduce shade and humidity so that longicorns can’t thrive.
Larva channels can be painted with an insecticide/white oil/Ridomil mixture as described for Pantorhytes (above), treating every 6 weeks until pest numbers are reduced to an acceptably low level. Again, frass should not be scraped off with a harsh wire brush or larvae dug out with a knife as this only further wounds the bark and may allow entry of Phytophthora.
Termites
Types, biology and damage
Two main types of termite attack cocoa in Papua New Guinea. The Giant Cocoa Termite (Neotermes papuana, Isoptera: Kalotermitidae) is the most important as a pest of cocoa and shade trees throughout the Islands Region, being a primitive, damp wood species that feeds on living wood inside the trunk and main branches. Nasutitermes princeps (Isoptera: Termitidae) can occasionally attack and kill young cocoa on the mainland, especially in the Madang Region. Many other kinds of small termites are often present on cocoa and shade trees – their large nests and soil-covered runways are often seen on the outside of trunks and branches or dead wood in the gardens, but they feed mainly on dead wood and are of little economic importance.
Giant Cocoa Termites live inside the tree, which must be cut open in order to find them living in a network of channels in the wood (Figure A7.13). A colony consists of a reproductive queen and male, eggs, nymphs and soldiers (Figures A7.14, A7.15). Most of the termites in a nest are cream-coloured nymphs about 9 mm long. About 5% are soldiers that are also cream-co-loured, about 10 mm long, and can be distinguished by their large dark brown head and jaws that are adapted for fighting and defence, mainly against ants. The queen is also cream-co-loured, larger (about 14 mm long) with a large swollen abdomen. The male is slimmer than the female and about 12 mm long.
P A P U A N E W G U I N E A C O C O A E X T E N S I O N M A N U A L 259
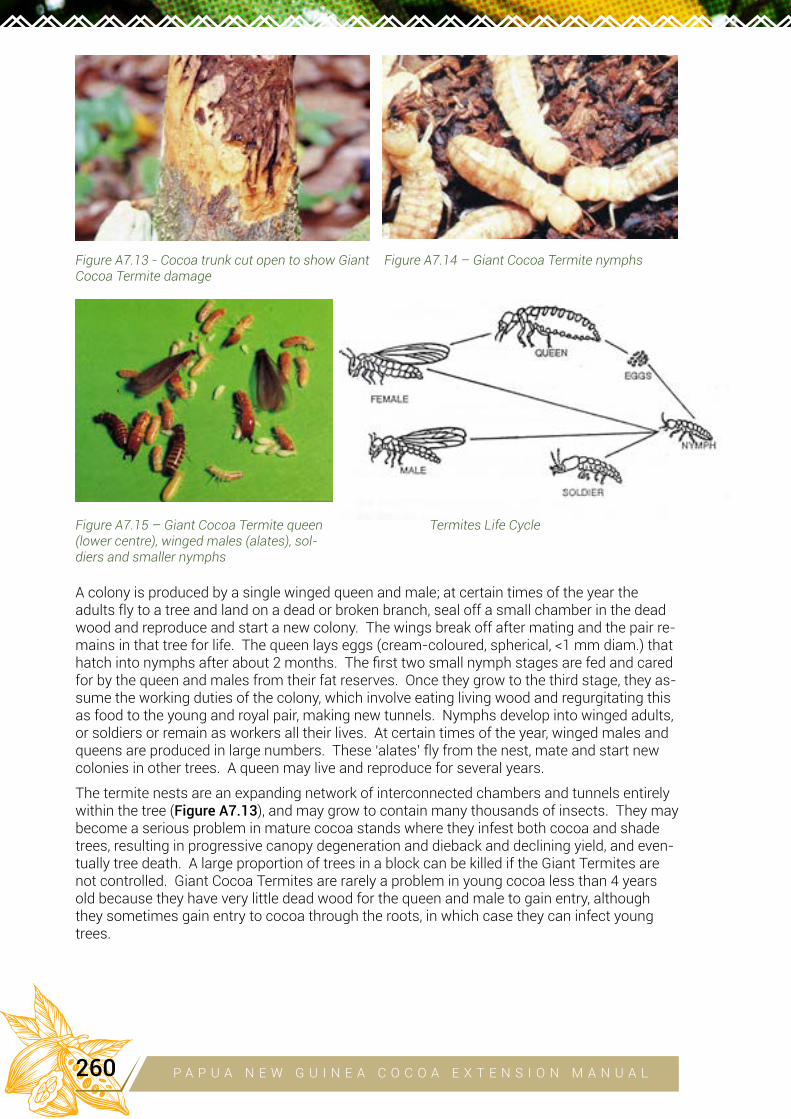
A colony is produced by a single winged queen and male; at certain times of the year the adults fly to a tree and land on a dead or broken branch, seal off a small chamber in the dead wood and reproduce and start a new colony. The wings break off after mating and the pair re-mains in that tree for life. The queen lays eggs (cream-coloured, spherical, <1 mm diam.) that hatch into nymphs after about 2 months. The first two small nymph stages are fed and cared for by the queen and males from their fat reserves. Once they grow to the third stage, they as-sume the working duties of the colony, which involve eating living wood and regurgitating this as food to the young and royal pair, making new tunnels. Nymphs develop into winged adults, or soldiers or remain as workers all their lives. At certain times of the year, winged males and queens are produced in large numbers. These ‘alates’ fly from the nest, mate and start new colonies in other trees. A queen may live and reproduce for several years.
The termite nests are an expanding network of interconnected chambers and tunnels entirely within the tree (Figure A7.13), and may grow to contain many thousands of insects. They may become a serious problem in mature cocoa stands where they infest both cocoa and shade trees, resulting in progressive canopy degeneration and dieback and declining yield, and even-tually tree death. A large proportion of trees in a block can be killed if the Giant Termites are not controlled. Giant Cocoa Termites are rarely a problem in young cocoa less than 4 years old because they have very little dead wood for the queen and male to gain entry, although they sometimes gain entry to cocoa through the roots, in which case they can infect young trees.
Figure A7.13 - Cocoa trunk cut open to show Giant Cocoa Termite damage
Figure A7.15 – Giant Cocoa Termite queen (lower centre), winged males (alates), sol-diers and smaller nymphs
Figure A7.14 – Giant Cocoa Termite nymphs
Termites Life Cycle
P A P U A N E W G U I N E A C O C O A E X T E N S I O N M A N U A L260
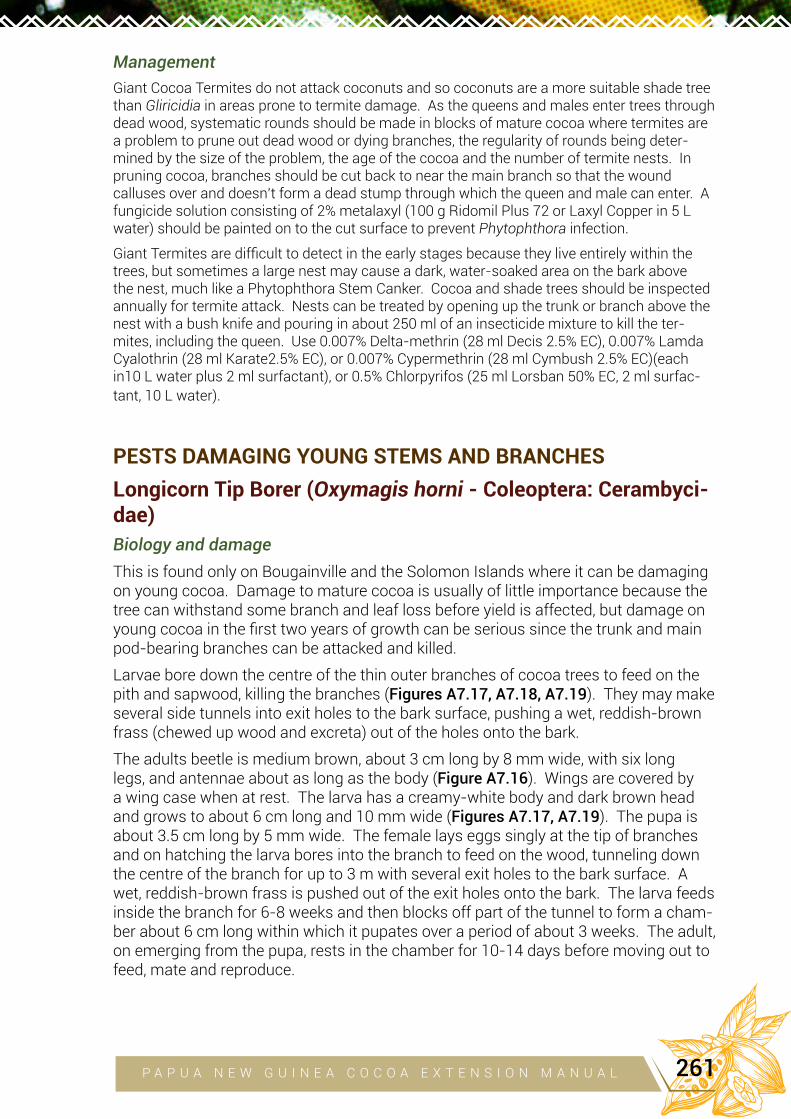
Management
Giant Cocoa Termites do not attack coconuts and so coconuts are a more suitable shade tree than Gliricidia in areas prone to termite damage. As the queens and males enter trees through dead wood, systematic rounds should be made in blocks of mature cocoa where termites are a problem to prune out dead wood or dying branches, the regularity of rounds being deter-mined by the size of the problem, the age of the cocoa and the number of termite nests. In pruning cocoa, branches should be cut back to near the main branch so that the wound calluses over and doesn’t form a dead stump through which the queen and male can enter. A fungicide solution consisting of 2% metalaxyl (100 g Ridomil Plus 72 or Laxyl Copper in 5 L water) should be painted on to the cut surface to prevent Phytophthora infection.
Giant Termites are difficult to detect in the early stages because they live entirely within the trees, but sometimes a large nest may cause a dark, water-soaked area on the bark above the nest, much like a Phytophthora Stem Canker. Cocoa and shade trees should be inspected annually for termite attack. Nests can be treated by opening up the trunk or branch above the nest with a bush knife and pouring in about 250 ml of an insecticide mixture to kill the ter-mites, including the queen. Use 0.007% Delta-methrin (28 ml Decis 2.5% EC), 0.007% Lamda Cyalothrin (28 ml Karate2.5% EC), or 0.007% Cypermethrin (28 ml Cymbush 2.5% EC)(each in10 L water plus 2 ml surfactant), or 0.5% Chlorpyrifos (25 ml Lorsban 50% EC, 2 ml surfac-
tant, 10 L water).
PESTS DAMAGING YOUNG STEMS AND BRANCHES
Longicorn Tip Borer (Oxymagis horni - Coleoptera: Cerambyci-dae)
Biology and damageThis is found only on Bougainville and the Solomon Islands where it can be damaging on young cocoa. Damage to mature cocoa is usually of little importance because the tree can withstand some branch and leaf loss before yield is affected, but damage on young cocoa in the first two years of growth can be serious since the trunk and main pod-bearing branches can be attacked and killed.
Larvae bore down the centre of the thin outer branches of cocoa trees to feed on the pith and sapwood, killing the branches (Figures A7.17, A7.18, A7.19). They may make several side tunnels into exit holes to the bark surface, pushing a wet, reddish-brown frass (chewed up wood and excreta) out of the holes onto the bark.
The adults beetle is medium brown, about 3 cm long by 8 mm wide, with six long legs, and antennae about as long as the body (Figure A7.16). Wings are covered by a wing case when at rest. The larva has a creamy-white body and dark brown head and grows to about 6 cm long and 10 mm wide (Figures A7.17, A7.19). The pupa is about 3.5 cm long by 5 mm wide. The female lays eggs singly at the tip of branches and on hatching the larva bores into the branch to feed on the wood, tunneling down the centre of the branch for up to 3 m with several exit holes to the bark surface. A wet, reddish-brown frass is pushed out of the exit holes onto the bark. The larva feeds inside the branch for 6-8 weeks and then blocks off part of the tunnel to form a cham-ber about 6 cm long within which it pupates over a period of about 3 weeks. The adult, on emerging from the pupa, rests in the chamber for 10-14 days before moving out to feed, mate and reproduce.
P A P U A N E W G U I N E A C O C O A E X T E N S I O N M A N U A L 261
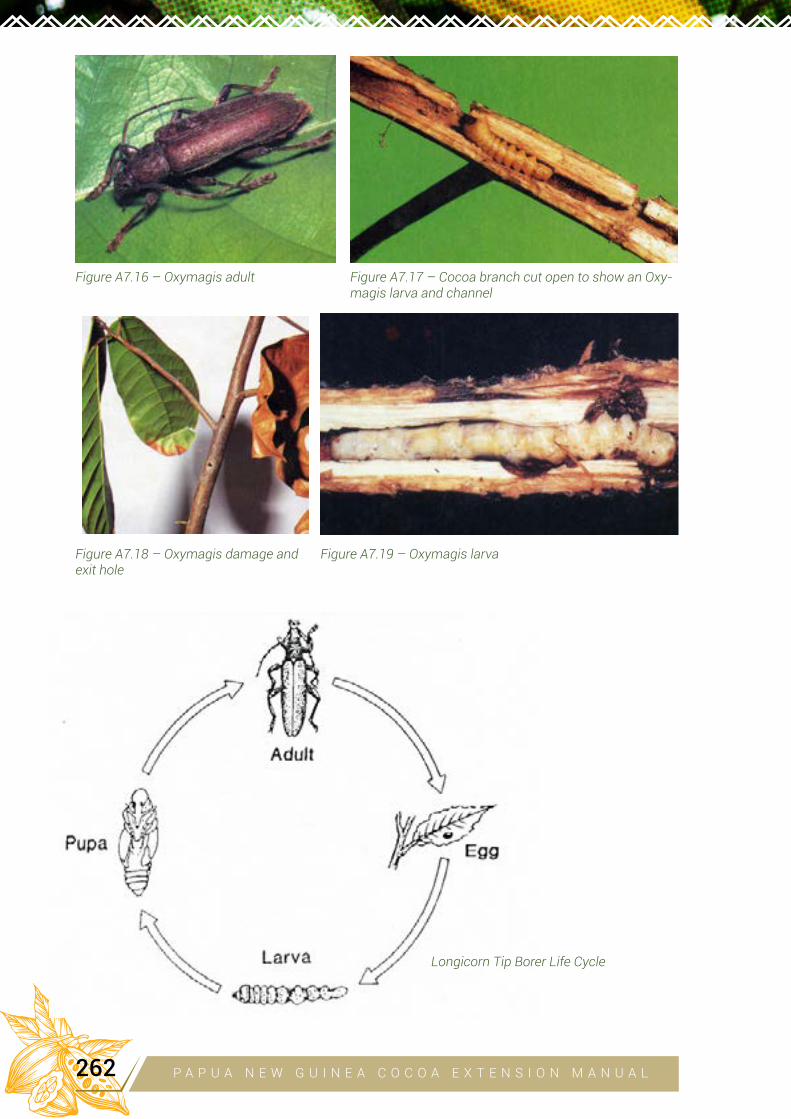
Figure A7.17 – Cocoa branch cut open to show an Oxy-magis larva and channel
Figure A7.19 – Oxymagis larva
Figure A7.16 – Oxymagis adult
Figure A7.18 – Oxymagis damage and exit hole
Longicorn Tip Borer Life Cycle
P A P U A N E W G U I N E A C O C O A E X T E N S I O N M A N U A L262
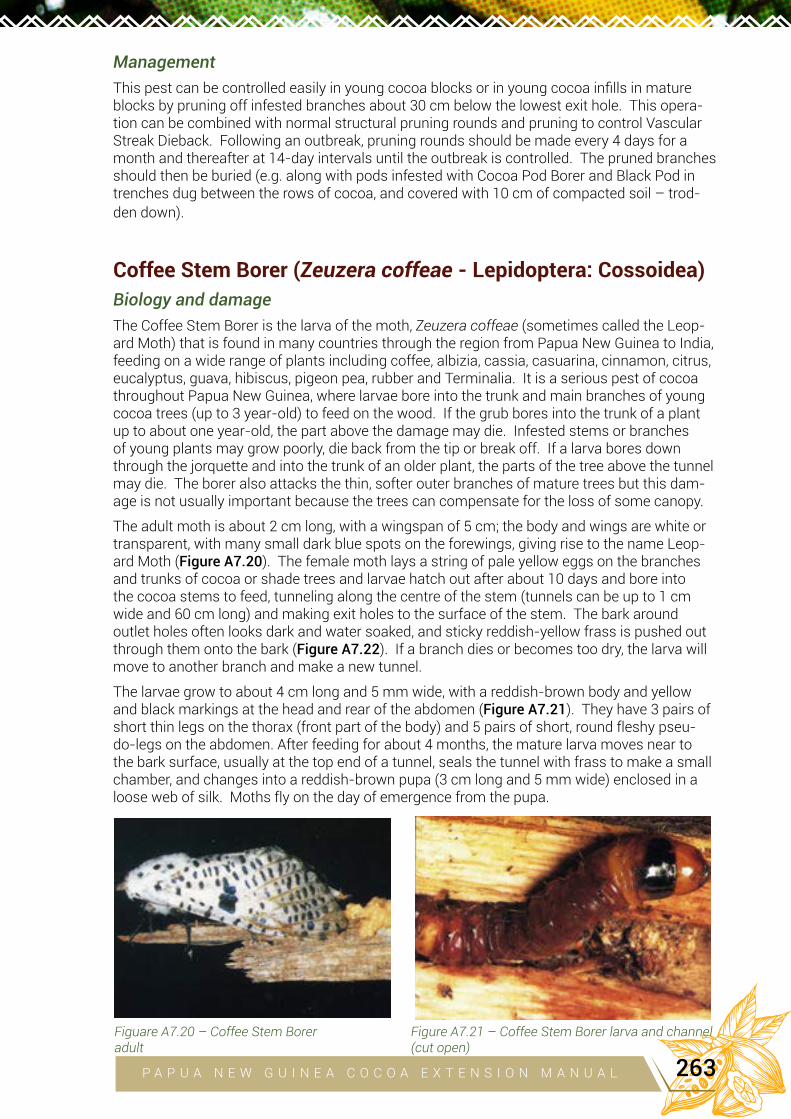
Management
This pest can be controlled easily in young cocoa blocks or in young cocoa infills in mature blocks by pruning off infested branches about 30 cm below the lowest exit hole. This opera-tion can be combined with normal structural pruning rounds and pruning to control Vascular Streak Dieback. Following an outbreak, pruning rounds should be made every 4 days for a month and thereafter at 14-day intervals until the outbreak is controlled. The pruned branches should then be buried (e.g. along with pods infested with Cocoa Pod Borer and Black Pod in trenches dug between the rows of cocoa, and covered with 10 cm of compacted soil – trod-
den down).
Coffee Stem Borer (Zeuzera coffeae - Lepidoptera: Cossoidea)
Biology and damageThe Coffee Stem Borer is the larva of the moth, Zeuzera coffeae (sometimes called the Leop-ard Moth) that is found in many countries through the region from Papua New Guinea to India, feeding on a wide range of plants including coffee, albizia, cassia, casuarina, cinnamon, citrus, eucalyptus, guava, hibiscus, pigeon pea, rubber and Terminalia. It is a serious pest of cocoa throughout Papua New Guinea, where larvae bore into the trunk and main branches of young cocoa trees (up to 3 year-old) to feed on the wood. If the grub bores into the trunk of a plant up to about one year-old, the part above the damage may die. Infested stems or branches of young plants may grow poorly, die back from the tip or break off. If a larva bores down through the jorquette and into the trunk of an older plant, the parts of the tree above the tunnel may die. The borer also attacks the thin, softer outer branches of mature trees but this dam-age is not usually important because the trees can compensate for the loss of some canopy.
The adult moth is about 2 cm long, with a wingspan of 5 cm; the body and wings are white or transparent, with many small dark blue spots on the forewings, giving rise to the name Leop-ard Moth (Figure A7.20). The female moth lays a string of pale yellow eggs on the branches and trunks of cocoa or shade trees and larvae hatch out after about 10 days and bore into the cocoa stems to feed, tunneling along the centre of the stem (tunnels can be up to 1 cm wide and 60 cm long) and making exit holes to the surface of the stem. The bark around outlet holes often looks dark and water soaked, and sticky reddish-yellow frass is pushed out through them onto the bark (Figure A7.22). If a branch dies or becomes too dry, the larva will move to another branch and make a new tunnel.
The larvae grow to about 4 cm long and 5 mm wide, with a reddish-brown body and yellow and black markings at the head and rear of the abdomen (Figure A7.21). They have 3 pairs of short thin legs on the thorax (front part of the body) and 5 pairs of short, round fleshy pseu-do-legs on the abdomen. After feeding for about 4 months, the mature larva moves near to the bark surface, usually at the top end of a tunnel, seals the tunnel with frass to make a small chamber, and changes into a reddish-brown pupa (3 cm long and 5 mm wide) enclosed in a loose web of silk. Moths fly on the day of emergence from the pupa.
Figuare A7.20 – Coffee Stem Boreradult
Figure A7.21 – Coffee Stem Borer larva and channel (cut open)
P A P U A N E W G U I N E A C O C O A E X T E N S I O N M A N U A L 263
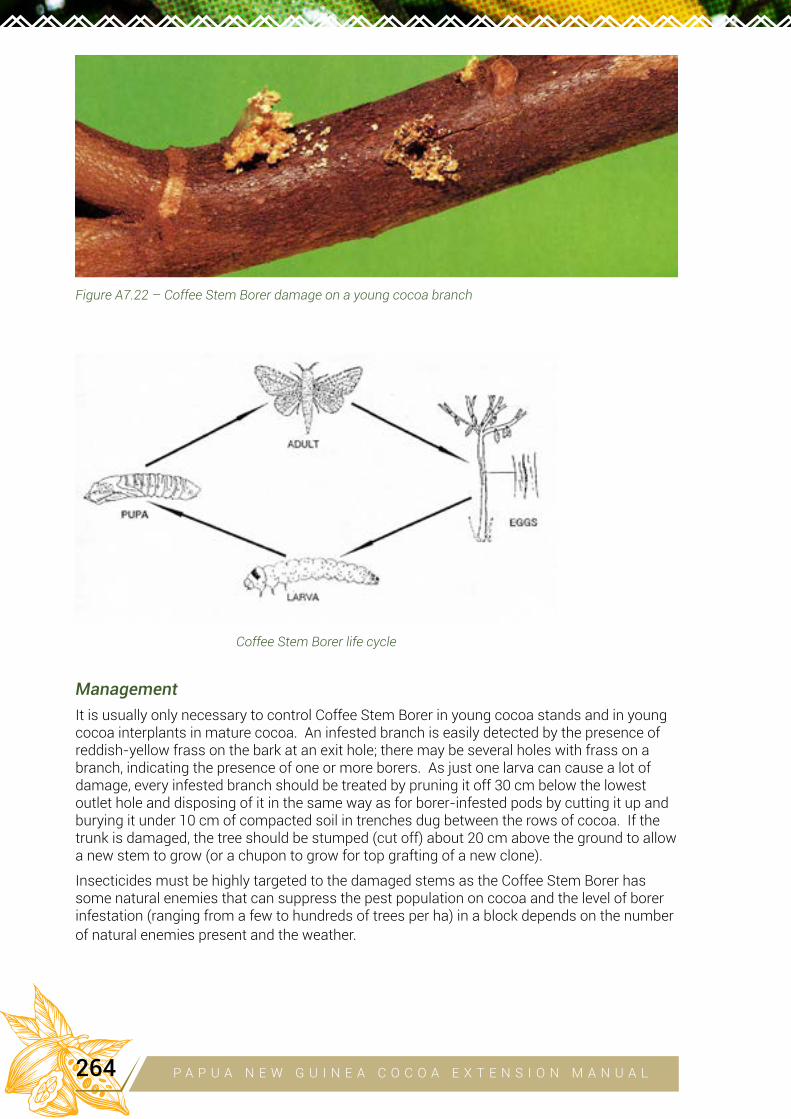
Management
It is usually only necessary to control Coffee Stem Borer in young cocoa stands and in young cocoa interplants in mature cocoa. An infested branch is easily detected by the presence of reddish-yellow frass on the bark at an exit hole; there may be several holes with frass on a branch, indicating the presence of one or more borers. As just one larva can cause a lot of damage, every infested branch should be treated by pruning it off 30 cm below the lowest outlet hole and disposing of it in the same way as for borer-infested pods by cutting it up and burying it under 10 cm of compacted soil in trenches dug between the rows of cocoa. If the trunk is damaged, the tree should be stumped (cut off) about 20 cm above the ground to allow a new stem to grow (or a chupon to grow for top grafting of a new clone).
Insecticides must be highly targeted to the damaged stems as the Coffee Stem Borer has some natural enemies that can suppress the pest population on cocoa and the level of borer infestation (ranging from a few to hundreds of trees per ha) in a block depends on the number of natural enemies present and the weather.
Figure A7.22 – Coffee Stem Borer damage on a young cocoa branch
Coffee Stem Borer life cycle
P A P U A N E W G U I N E A C O C O A E X T E N S I O N M A N U A L264
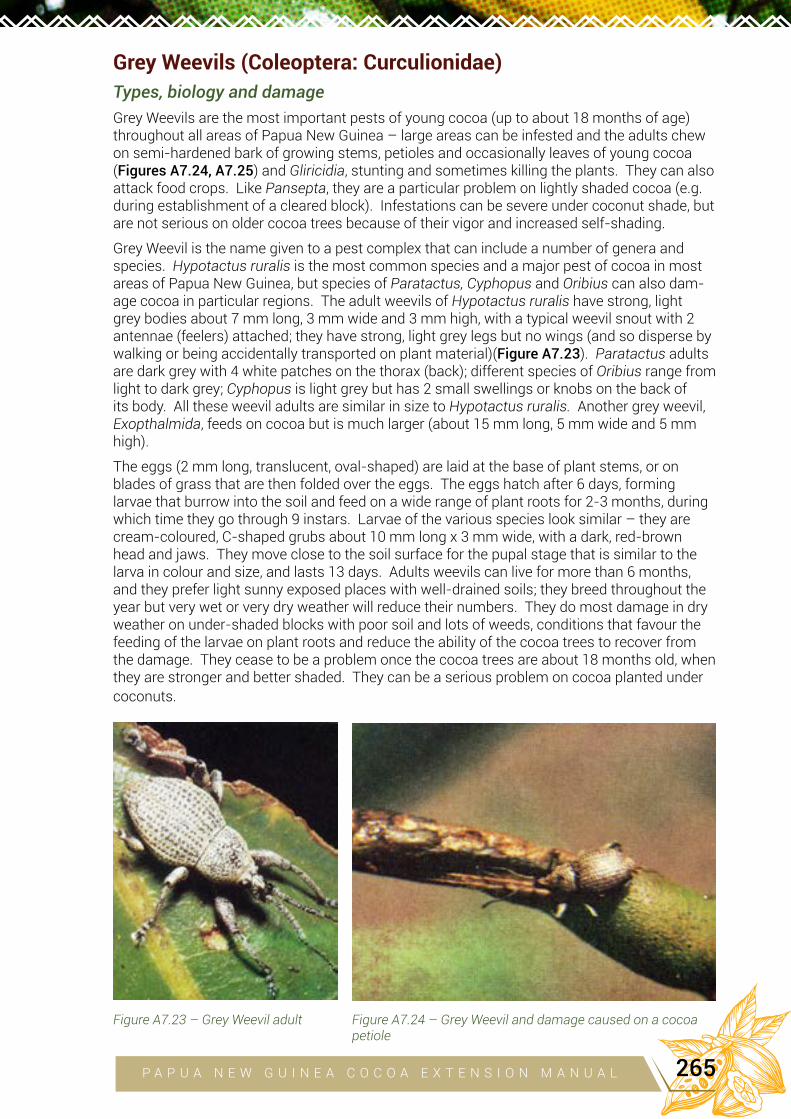
Grey Weevils (Coleoptera: Curculionidae)
Types, biology and damage
Grey Weevils are the most important pests of young cocoa (up to about 18 months of age) throughout all areas of Papua New Guinea – large areas can be infested and the adults chew on semi-hardened bark of growing stems, petioles and occasionally leaves of young cocoa (Figures A7.24, A7.25) and Gliricidia, stunting and sometimes killing the plants. They can also attack food crops. Like Pansepta, they are a particular problem on lightly shaded cocoa (e.g. during establishment of a cleared block). Infestations can be severe under coconut shade, but are not serious on older cocoa trees because of their vigor and increased self-shading.
Grey Weevil is the name given to a pest complex that can include a number of genera and species. Hypotactus ruralis is the most common species and a major pest of cocoa in most areas of Papua New Guinea, but species of Paratactus, Cyphopus and Oribius can also dam-age cocoa in particular regions. The adult weevils of Hypotactus ruralis have strong, light grey bodies about 7 mm long, 3 mm wide and 3 mm high, with a typical weevil snout with 2 antennae (feelers) attached; they have strong, light grey legs but no wings (and so disperse by walking or being accidentally transported on plant material)(Figure A7.23). Paratactus adults are dark grey with 4 white patches on the thorax (back); different species of Oribius range from light to dark grey; Cyphopus is light grey but has 2 small swellings or knobs on the back of its body. All these weevil adults are similar in size to Hypotactus ruralis. Another grey weevil, Exopthalmida, feeds on cocoa but is much larger (about 15 mm long, 5 mm wide and 5 mm high).
The eggs (2 mm long, translucent, oval-shaped) are laid at the base of plant stems, or on blades of grass that are then folded over the eggs. The eggs hatch after 6 days, forming larvae that burrow into the soil and feed on a wide range of plant roots for 2-3 months, during which time they go through 9 instars. Larvae of the various species look similar – they are cream-coloured, C-shaped grubs about 10 mm long x 3 mm wide, with a dark, red-brown head and jaws. They move close to the soil surface for the pupal stage that is similar to the larva in colour and size, and lasts 13 days. Adults weevils can live for more than 6 months, and they prefer light sunny exposed places with well-drained soils; they breed throughout the year but very wet or very dry weather will reduce their numbers. They do most damage in dry weather on under-shaded blocks with poor soil and lots of weeds, conditions that favour the feeding of the larvae on plant roots and reduce the ability of the cocoa trees to recover from the damage. They cease to be a problem once the cocoa trees are about 18 months old, when they are stronger and better shaded. They can be a serious problem on cocoa planted under coconuts.
Figure A7.24 – Grey Weevil and damage caused on a cocoa petiole
Figure A7.23 – Grey Weevil adult
P A P U A N E W G U I N E A C O C O A E X T E N S I O N M A N U A L 265
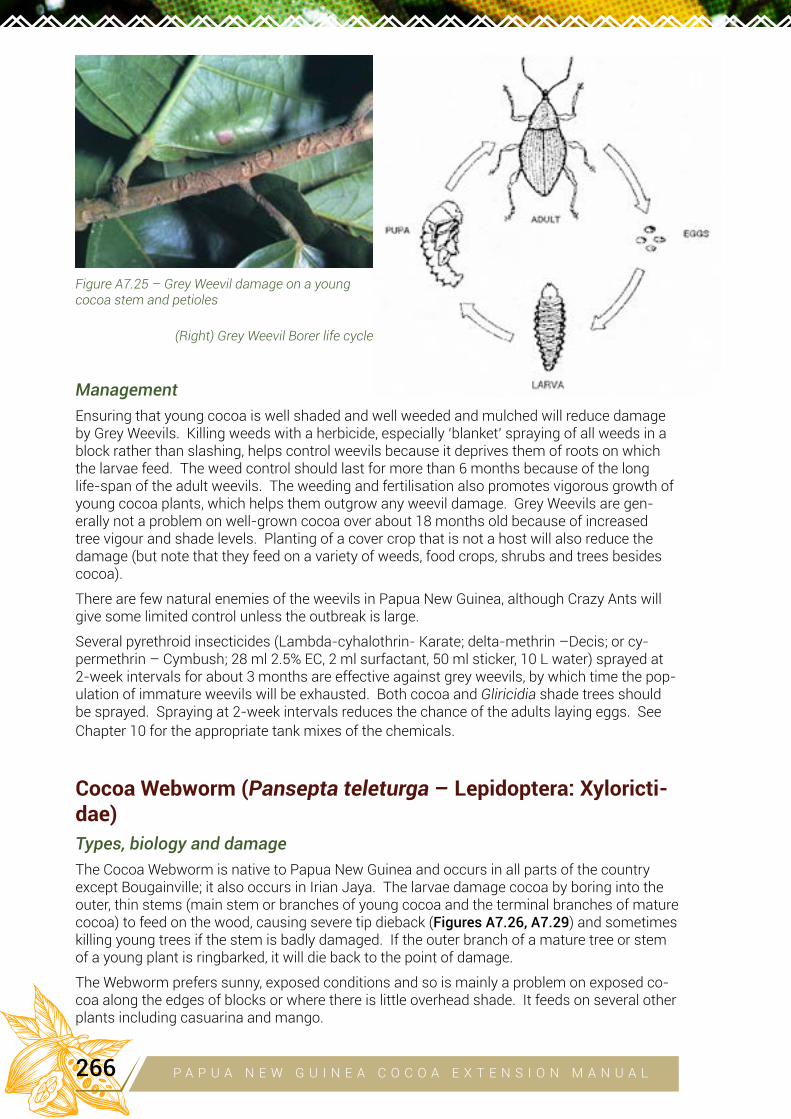
Management
Ensuring that young cocoa is well shaded and well weeded and mulched will reduce damage by Grey Weevils. Killing weeds with a herbicide, especially ‘blanket’ spraying of all weeds in a block rather than slashing, helps control weevils because it deprives them of roots on which the larvae feed. The weed control should last for more than 6 months because of the long life-span of the adult weevils. The weeding and fertilisation also promotes vigorous growth of young cocoa plants, which helps them outgrow any weevil damage. Grey Weevils are gen-erally not a problem on well-grown cocoa over about 18 months old because of increased tree vigour and shade levels. Planting of a cover crop that is not a host will also reduce the damage (but note that they feed on a variety of weeds, food crops, shrubs and trees besides cocoa).
There are few natural enemies of the weevils in Papua New Guinea, although Crazy Ants will give some limited control unless the outbreak is large.
Several pyrethroid insecticides (Lambda-cyhalothrin- Karate; delta-methrin –Decis; or cy-permethrin – Cymbush; 28 ml 2.5% EC, 2 ml surfactant, 50 ml sticker, 10 L water) sprayed at 2-week intervals for about 3 months are effective against grey weevils, by which time the pop-ulation of immature weevils will be exhausted. Both cocoa and Gliricidia shade trees should be sprayed. Spraying at 2-week intervals reduces the chance of the adults laying eggs. See Chapter 10 for the appropriate tank mixes of the chemicals.
Cocoa Webworm (Pansepta teleturga – Lepidoptera: Xyloricti-dae)
Types, biology and damage
The Cocoa Webworm is native to Papua New Guinea and occurs in all parts of the country except Bougainville; it also occurs in Irian Jaya. The larvae damage cocoa by boring into the outer, thin stems (main stem or branches of young cocoa and the terminal branches of mature cocoa) to feed on the wood, causing severe tip dieback (Figures A7.26, A7.29) and sometimes killing young trees if the stem is badly damaged. If the outer branch of a mature tree or stem of a young plant is ringbarked, it will die back to the point of damage.
The Webworm prefers sunny, exposed conditions and so is mainly a problem on exposed co-coa along the edges of blocks or where there is little overhead shade. It feeds on several other plants including casuarina and mango.
Figure A7.25 – Grey Weevil damage on a young cocoa stem and petioles
(Right) Grey Weevil Borer life cycle
P A P U A N E W G U I N E A C O C O A E X T E N S I O N M A N U A L266
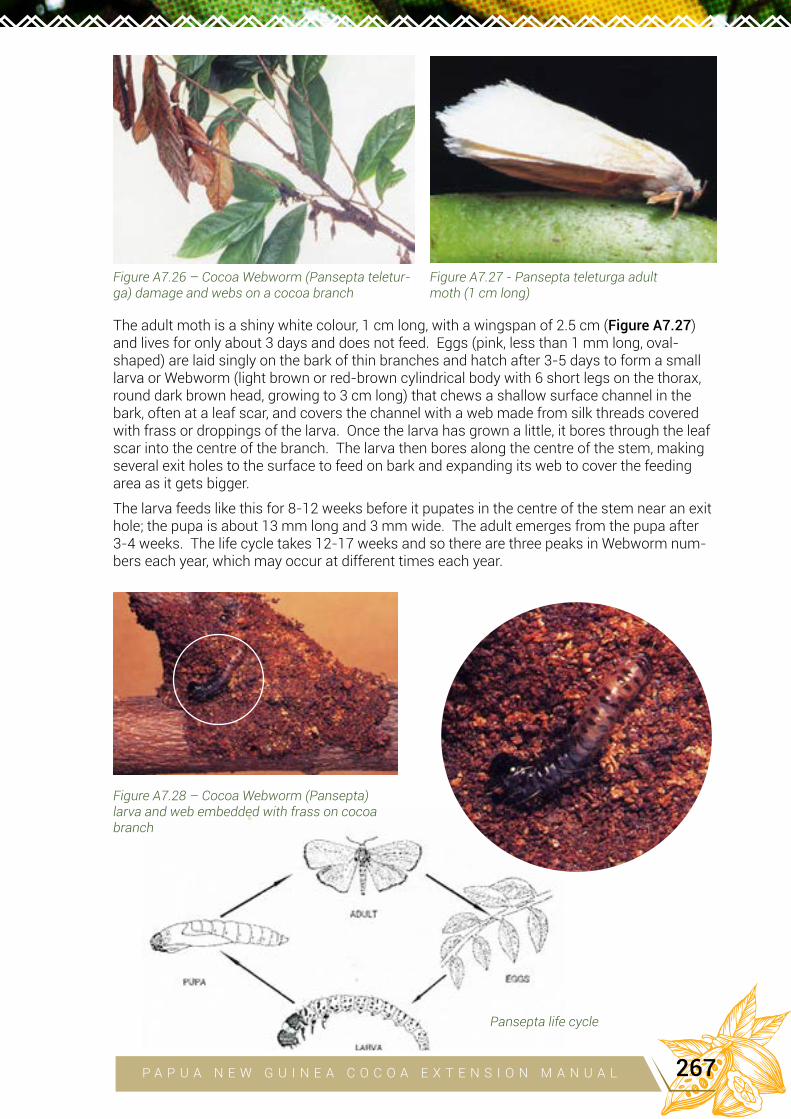
The adult moth is a shiny white colour, 1 cm long, with a wingspan of 2.5 cm (Figure A7.27) and lives for only about 3 days and does not feed. Eggs (pink, less than 1 mm long, oval-shaped) are laid singly on the bark of thin branches and hatch after 3-5 days to form a small larva or Webworm (light brown or red-brown cylindrical body with 6 short legs on the thorax, round dark brown head, growing to 3 cm long) that chews a shallow surface channel in the bark, often at a leaf scar, and covers the channel with a web made from silk threads covered with frass or droppings of the larva. Once the larva has grown a little, it bores through the leaf scar into the centre of the branch. The larva then bores along the centre of the stem, making several exit holes to the surface to feed on bark and expanding its web to cover the feeding area as it gets bigger.
The larva feeds like this for 8-12 weeks before it pupates in the centre of the stem near an exit hole; the pupa is about 13 mm long and 3 mm wide. The adult emerges from the pupa after 3-4 weeks. The life cycle takes 12-17 weeks and so there are three peaks in Webworm num-bers each year, which may occur at different times each year.
Figure A7.27 - Pansepta teleturga adultmoth (1 cm long)
Figure A7.26 – Cocoa Webworm (Pansepta teletur-ga) damage and webs on a cocoa branch
Figure A7.28 – Cocoa Webworm (Pansepta) larva and web embedded with frass on cocoa branch
Pansepta life cycle
P A P U A N E W G U I N E A C O C O A E X T E N S I O N M A N U A L 267
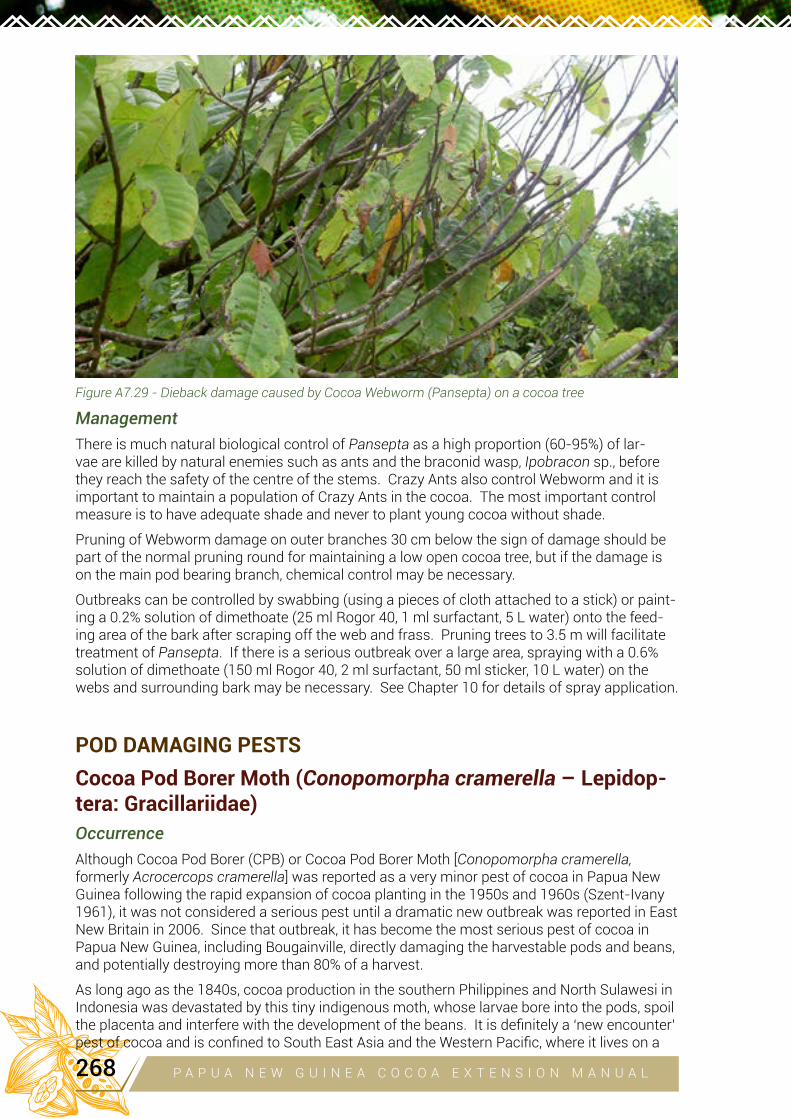
Management
There is much natural biological control of Pansepta as a high proportion (60-95%) of lar-vae are killed by natural enemies such as ants and the braconid wasp, Ipobracon sp., before they reach the safety of the centre of the stems. Crazy Ants also control Webworm and it is important to maintain a population of Crazy Ants in the cocoa. The most important control measure is to have adequate shade and never to plant young cocoa without shade.
Pruning of Webworm damage on outer branches 30 cm below the sign of damage should be part of the normal pruning round for maintaining a low open cocoa tree, but if the damage is on the main pod bearing branch, chemical control may be necessary.
Outbreaks can be controlled by swabbing (using a pieces of cloth attached to a stick) or paint-ing a 0.2% solution of dimethoate (25 ml Rogor 40, 1 ml surfactant, 5 L water) onto the feed-ing area of the bark after scraping off the web and frass. Pruning trees to 3.5 m will facilitate treatment of Pansepta. If there is a serious outbreak over a large area, spraying with a 0.6% solution of dimethoate (150 ml Rogor 40, 2 ml surfactant, 50 ml sticker, 10 L water) on the webs and surrounding bark may be necessary. See Chapter 10 for details of spray application.
POD DAMAGING PESTS
Cocoa Pod Borer Moth (Conopomorpha cramerella – Lepidop-tera: Gracillariidae)
Occurrence
Although Cocoa Pod Borer (CPB) or Cocoa Pod Borer Moth [Conopomorpha cramerella, formerly Acrocercops cramerella] was reported as a very minor pest of cocoa in Papua New Guinea following the rapid expansion of cocoa planting in the 1950s and 1960s (Szent-Ivany 1961), it was not considered a serious pest until a dramatic new outbreak was reported in East New Britain in 2006. Since that outbreak, it has become the most serious pest of cocoa in Papua New Guinea, including Bougainville, directly damaging the harvestable pods and beans, and potentially destroying more than 80% of a harvest.
As long ago as the 1840s, cocoa production in the southern Philippines and North Sulawesi in Indonesia was devastated by this tiny indigenous moth, whose larvae bore into the pods, spoil the placenta and interfere with the development of the beans. It is definitely a ‘new encounter’ pest of cocoa and is confined to South East Asia and the Western Pacific, where it lives on a
Figure A7.29 - Dieback damage caused by Cocoa Webworm (Pansepta) on a cocoa tree
P A P U A N E W G U I N E A C O C O A E X T E N S I O N M A N U A L268
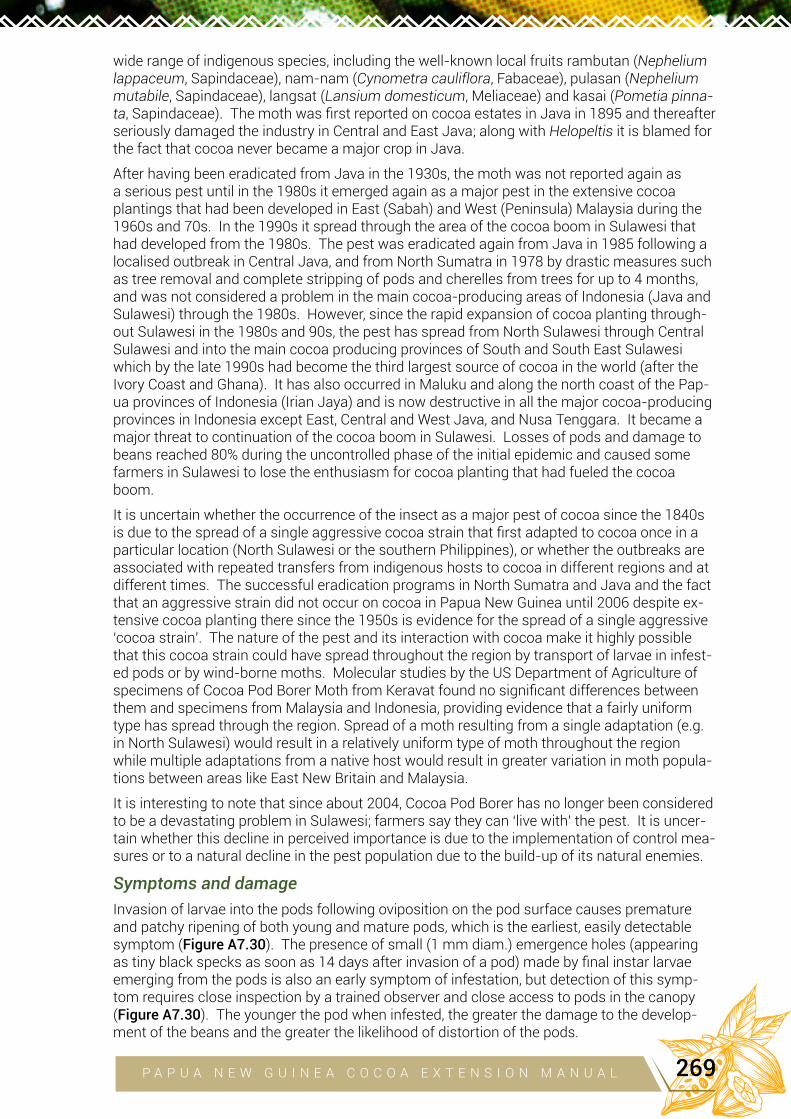
wide range of indigenous species, including the well-known local fruits rambutan (Nephelium lappaceum, Sapindaceae), nam-nam (Cynometra cauliflora, Fabaceae), pulasan (Nephelium mutabile, Sapindaceae), langsat (Lansium domesticum, Meliaceae) and kasai (Pometia pinna-ta, Sapindaceae). The moth was first reported on cocoa estates in Java in 1895 and thereafter seriously damaged the industry in Central and East Java; along with Helopeltis it is blamed for the fact that cocoa never became a major crop in Java.
After having been eradicated from Java in the 1930s, the moth was not reported again as a serious pest until in the 1980s it emerged again as a major pest in the extensive cocoa plantings that had been developed in East (Sabah) and West (Peninsula) Malaysia during the 1960s and 70s. In the 1990s it spread through the area of the cocoa boom in Sulawesi that had developed from the 1980s. The pest was eradicated again from Java in 1985 following a localised outbreak in Central Java, and from North Sumatra in 1978 by drastic measures such as tree removal and complete stripping of pods and cherelles from trees for up to 4 months, and was not considered a problem in the main cocoa-producing areas of Indonesia (Java and Sulawesi) through the 1980s. However, since the rapid expansion of cocoa planting through-out Sulawesi in the 1980s and 90s, the pest has spread from North Sulawesi through Central Sulawesi and into the main cocoa producing provinces of South and South East Sulawesi which by the late 1990s had become the third largest source of cocoa in the world (after the Ivory Coast and Ghana). It has also occurred in Maluku and along the north coast of the Pap-ua provinces of Indonesia (Irian Jaya) and is now destructive in all the major cocoa-producing provinces in Indonesia except East, Central and West Java, and Nusa Tenggara. It became a major threat to continuation of the cocoa boom in Sulawesi. Losses of pods and damage to beans reached 80% during the uncontrolled phase of the initial epidemic and caused some farmers in Sulawesi to lose the enthusiasm for cocoa planting that had fueled the cocoa boom.
It is uncertain whether the occurrence of the insect as a major pest of cocoa since the 1840s is due to the spread of a single aggressive cocoa strain that first adapted to cocoa once in a particular location (North Sulawesi or the southern Philippines), or whether the outbreaks are associated with repeated transfers from indigenous hosts to cocoa in different regions and at different times. The successful eradication programs in North Sumatra and Java and the fact that an aggressive strain did not occur on cocoa in Papua New Guinea until 2006 despite ex-tensive cocoa planting there since the 1950s is evidence for the spread of a single aggressive ‘cocoa strain’. The nature of the pest and its interaction with cocoa make it highly possible that this cocoa strain could have spread throughout the region by transport of larvae in infest-ed pods or by wind-borne moths. Molecular studies by the US Department of Agriculture of specimens of Cocoa Pod Borer Moth from Keravat found no significant differences between them and specimens from Malaysia and Indonesia, providing evidence that a fairly uniform type has spread through the region. Spread of a moth resulting from a single adaptation (e.g. in North Sulawesi) would result in a relatively uniform type of moth throughout the region while multiple adaptations from a native host would result in greater variation in moth popula-tions between areas like East New Britain and Malaysia.
It is interesting to note that since about 2004, Cocoa Pod Borer has no longer been considered to be a devastating problem in Sulawesi; farmers say they can ‘live with’ the pest. It is uncer-tain whether this decline in perceived importance is due to the implementation of control mea-sures or to a natural decline in the pest population due to the build-up of its natural enemies.
Symptoms and damage
Invasion of larvae into the pods following oviposition on the pod surface causes premature and patchy ripening of both young and mature pods, which is the earliest, easily detectable symptom (Figure A7.30). The presence of small (1 mm diam.) emergence holes (appearing as tiny black specks as soon as 14 days after invasion of a pod) made by final instar larvae emerging from the pods is also an early symptom of infestation, but detection of this symp-tom requires close inspection by a trained observer and close access to pods in the canopy (Figure A7.30). The younger the pod when infested, the greater the damage to the develop-ment of the beans and the greater the likelihood of distortion of the pods.
P A P U A N E W G U I N E A C O C O A E X T E N S I O N M A N U A L 269

Ultimately, infestation is diagnosed by the browning (to blackening) and presence of brown frass in the placenta and pulp and the clumping of beans inside pods caused by tunneling and feeding of larvae on the placenta (Figure A7.31); this occurs especially when young pods are invaded and the larvae interfere with the development of beans by feeding on the placenta. By this time it is likely that pods are showing the external symptoms of premature and irreg-ular ripening and can be detected, allowing the infested pods to be removed during sanitation rounds. When near-ripe pods are attacked, damage is limited. Part of the yield loss is caused by the fact that the clumping of the beans caused by infestation of immature pods makes them difficult to extract from the broken pods.
Yield loss increases exponentially with the proportion of pods infested – in one study pod infestations below 50% caused yield losses of less than 5%, 62% pod infestation caused 25% yield loss, and 99% pod infestation caused 93% yield losses (Lim and Phua 1986, Day 1983). This work in Malaysia tended to set an economic threshold of damage at about 50% of pods infested, with yield losses increasing rapidly above 60% of pods infested. Such a high thresh-old for economic yield loss allows much scope for the development of cultural methods to control the pest damage and avoidance of any destructive, ‘scorched earth’ policy to reduce infestation to zero; i.e. it allows ample scope for managing and ‘living with’ the pest. However, this threshold should be determined for each particular farming system and location.
Figure A7.30 – Cocoa Pod Borer symptoms – premature ripening of cocoa pods. Note the small black larva emergence holes on the pods in the RH photo
Figure A7.31 – Damage to beans and pulp caused by Cocoa Pod Borer
P A P U A N E W G U I N E A C O C O A E X T E N S I O N M A N U A L270
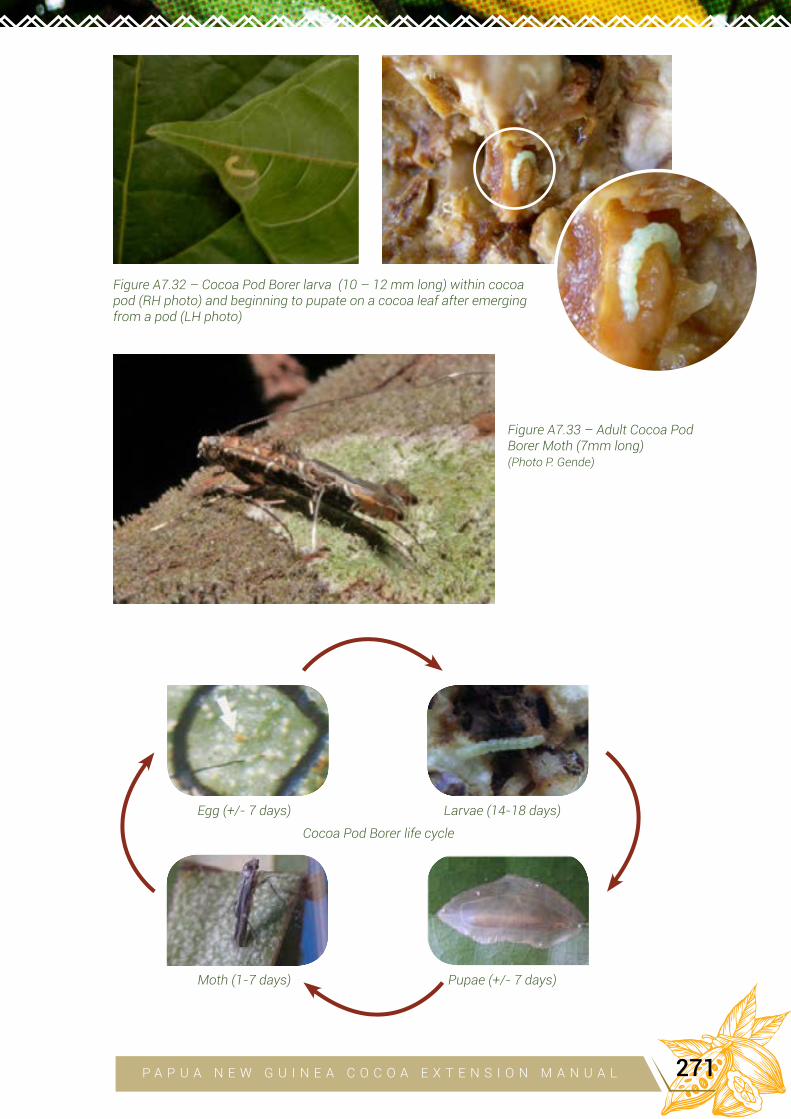
Figure A7.32 – Cocoa Pod Borer larva (10 – 12 mm long) within cocoa pod (RH photo) and beginning to pupate on a cocoa leaf after emerging from a pod (LH photo)
Figure A7.33 – Adult Cocoa Pod Borer Moth (7mm long)(Photo P. Gende)
Cocoa Pod Borer life cycle
Egg (+/- 7 days)
Moth (1-7 days)
Larvae (14-18 days)
Pupae (+/- 7 days)
P A P U A N E W G U I N E A C O C O A E X T E N S I O N M A N U A L 271
Morphology and life-cycle of the insect
The moth is 7 mm long in the body with a wingspan of 12 mm, generally brown, with a white stripe on the forewings and a bright yellow patch at their tip (Figure A7.33). The antennae slope backwards when the moth is at rest and extend well beyond the body and folded wings. In flight the moth looks like a large, slow flying mosquito (Mumford 1988).
The average female lives for up to about 7 days and lays about 100 eggs on the surface of cocoa pods, preferentially in grooves or depressions in the pod surface. The eggs are flat, yellow-orange, about 0.5 mm long and 0.3 mm wide (just visible), with numerous longitudinal and transverse ribs on the shell (visible under a dissector microscope); the larvae hatch from the eggs after (3)-6-7 days and bore into the pod directly under the shell. Newly hatched larvae are about 1 mm long and white in colour, while the mature final instar larvae that emerge from the pods after 14-27 days are 10-12 mm long and off-white when inside the pod (Figure A7.32), becoming light green after emergence (especially if emerging through green pods).
The emergent larvae mostly make their way to the leaf litter layer (or on rare occasions to the pods, stems or attached leaves) where they spin a flat, oval-shaped (13–18 mm long x 6–9 mm wide), orange-yellowish, silken membrane (cocoon), often over a slight concavity in a fallen leaf (Figure A7.32); the larvae pupate within this cocoon, forming a brown (6–7 mm long and 1.0–1.5 mm wide) pupa that develops for 6–9 days before the moth hatches out. The whole life-cycle takes 3-6 weeks.
Behaviour of the insectThe newly hatched larva bores from under the egg into the epidermis of the pod, leaving a fine grey line, until it reaches the sclerotic layer along which it tunnels apparently until it reaches a hole or a weaker or thinner part to penetrate. This behavior indicates that the sclerotic layer in the pod is the main barrier to invasion into the endocarp (placenta and pulp tissues around the developing seeds, which are apparently the main food of the larvae, not the pod wall). Once through the sclerotic layer, the larva feeds unimpeded on the placenta or pulp without invading the beans, leaving winding tunnels of brown frass, until it has passed through all instars (report-ed variously as 3-5, Lim 1992). Infection of developing pods can indirectly damage develop-ment of the beans as a result of damage to the placenta. A pod can be infested by many larvae, although a single larva can be as damaging as many (Lim 1984). The mature larvae mostly emerge from the pods at or just after dusk. Far fewer larvae emerge from the pod than enter, and the ratio of exit to entry holes has been used as a measure of the inherent resistance of pods to invasion; if the sclerotic layer appears to be a barrier to invasion of the tiny first instar larvae, it should be a stronger barrier to the emergence of the much larger final instar larvae, especially as the layer will have developed and strengthened somewhat in the intervening period (unless their larger size gives them greater ability to chew their way through the layer). These are all points for study in observing resistance of cocoa genotypes.
The Cocoa Pod Borer Moth is a nocturnal insect and during the day most moths rest under larg-er (2-5 cm diam.), horizontal (less than 20o from horizontal) branches of cocoa trees (reviewed by Lim 1992). Mating occurs mainly at night, on the third night after emergence. While early reports described the moth as a weak flier, males have been found to fly hundreds of metres, indicating that they could cover long distances with wind assistance (Lim 1992). They certainly fly into the upper canopy and above the canopy, where they could be dispersed by winds.
Oviposition occurs mostly in the furrow of the upper part of pods more than 10 cm long (Lim et al. 1982). Heavy shade was found to greatly favour Cocoa Pod Borer infestation in the planta-tions on Java during the initial outbreak there in the early 1900s. This is an area of research that requires more attention in the development of a management strategy for the pest. It is likely that the heavy over-shading of unpruned cocoa in Papua New Guinea favoured the damaging build-up of the pest in 2006. In early studies, moths were reported to obtain their food mostly from the honey dew secretions of mealybugs, aphids and scale insects on cocoa farms; they are not attracted to cocoa flowers; this appears to be an area of research neglected in recent times. The main source of food for moths in cocoa farms is yet to be determined (Ooi 1986).
P A P U A N E W G U I N E A C O C O A E X T E N S I O N M A N U A L272
Management
Very early studies of Cocoa Pod Borer in Java found that the Trinitario (Djati Roenggo) clones were more resistant than Criollo types; it was considered that this was due to their smoother pod surface (since the moths tended to lay their eggs in hollows) and harder shells (which restricted the penetration, both in and out, of the larvae). More recently in Sabah hard shelled cocoa types have been observed to have a degree of resistance to the pest (Mumford 1988).
As eggs are most commonly laid in the furrows on pods, it has been hypothesised that smoother pods may be less attractive for oviposition than pods with a more furrowed, rougher surface, but Azhar and Lim (1987) found that the surface texture and colour of pods did not affect oviposition preference in the types they tested. The thickness and hardness of the pod wall differ greatly between cocoa genotypes, the hardness usually being determined by the hardness of the sclerotic layer. The proportion of entry to exit holes can differ greatly between genotypes, and higher larva mortality has been shown to occur in pods with either a thicker or harder endocarp. Azhar and Lim (1987) showed that the nature of the sclerotic layer was the main cause of differential mortality in first instar larvae invading the pods, and it was also shown that most of the final instar larvae emerging from the pod died because of pod lignifi-cation. A degree of resistance to the insect has been shown to occur in certain individuals among the great genetic diversity of cocoa planted in Sulawesi, and resistant types have been selected and included in cocoa improvement programs in Indonesia. More recently, the Hybrid Clones selected by CCIL in Papua New Guinea have been shown to vary in their resistance to Cocoa Pod Borer.
Cocoa Pod Borer has proved to be a serious problem in poorly managed, overgrown, over-shaded farms where cocoa is harvested irregularly. The fact that yield loss is minimal when infestation level is less than about 50% of pods indicates ample scope for managing this pest by cultural measures. These include pruning the cocoa canopy to an open, relatively low (<3.5 m high), accessible structure and maintaining a minimum of relatively tall shade.
Most larvae emerge from ripe pods just before and after harvest, while very few emerge from unripe pods, especially during the peak harvest period (Mumford 1988). Almost 90% of the larvae will still be inside pods picked at the earliest stage of ripeness. Ripe pods left in the canopy are the main source of infestation and so regular complete harvesting of all pods as soon as they show signs of infestation should reduce the pest population greatly.
The two practices (pruning cocoa to a low stature and regular complete removal of infested pods) go together - the maintenance of a low, open canopy facilitates the complete harvest-ing of all pods, including the ones that are prematurely ripening due to Pod Borer infestation. Regular complete harvesting will also reduce damage due to Phytophthora Pod Rot and verte-brates.
As larvae continue to emerge from harvested pods to pupate and produce adult moths (in fact this is the easiest way of collecting moths for research purposes), the post-harvest treatment of pods is also important – they should be kept bagged after harvest and broken as soon as possible, with the placenta, husks and damaged pods being disposed of in a way that kills any larvae within them. Unbroken pods can be kept in sealed bags or under plastic sheets for several days, either to contain emerging larvae and prevent them from pupating or to kill them through solar heating of the bags or heaps. Burial of pod remains under a 10 cm depth of tamped down soil is recommended. Burial of a mass of pods in deep pits is labour inten-sive and is also wasteful of a resource that can contribute to compost for use on the farms. Shredding and composting of pod remains in covered heaps is an ideal way of disposing of them and killing larvae, but the shredders are expensive and require central breaking of pods.
A new method being developed in Indonesia involves burying infested pods and pod remains along with prunings, weeds and manure in shallow (one spade-depth) trenches dug between the rows of cocoa; this is effectively in situ composting and helps maintain soil fertility as well as breaking the life cycle of the Cocoa Pod Borer (and also Phytophthora palmivora). Burial of organic waste in such trenches was recommended by E.C.D. Green in Papua New Guinea in the 1930s.
P A P U A N E W G U I N E A C O C O A E X T E N S I O N M A N U A L 273
Pod sleeving with thin (0.2 mm thick) plastic bags (about 30 cm long x 15 cm wide) has been shown to reduce invasion of pods by Cocoa Pod Borer from 80 to 1%. The sleeves are cut from rolls of plastic cylinder used to bag produce like sugar. Each sleeve is attached around the pedicel (with a rubber band, a bamboo pin or by tying the top) and the sleeve is left open at the bottom. Pods are sleeved when they are about 8–10 cm long and the sleeves are left in place until harvest. However, the method is labour intensive. It was thought that the lack of ventilation around pods may result in increased incidence of Phytophthora pod rot although trials in Sabah showed no such increase. A control method developed by the early Dutch researchers in Java and which proved effective in controlling the pest on plantations, and even in eradicating it from certain areas, involved complete stripping of all cherelles (longer than 5-6 cm) and pods from the trees for a period of at least 6 weeks. The method was known as ‘rampasan’. This drastic treatment breaks the life cycle of the insect by removing sites for egg-laying (pods) for a period longer than the life of the adult moths (about 7 days). It is most applicable to cocoa varieties with a distinct high and low pattern of cropping; complete removal of the low crop can eradicate the pest with-out grossly reducing the overall production of a plantation. It is less applicable to Amazonian types that have a more uniform cropping pattern. This method, along with tree removal, was used to eradicate the pest from localised areas in North Sumatra and Central Java. Howev-er, the main limitation of rampasan is the likelihood that some pods are not removed in older, overgrown cocoa, and migration of female moths from nearby cocoa on which the treatment has not been applied; for it to be effective, action must be taken thoroughly over a large area. Also, a combination of sleeving of readily accessible lower pods and rampasan of higher pods using cocoa hooks could be effective in breaking the life-cycle of the pest. A wide range of predators and parasites of Cocoa Pod Borer has been reported, as would be expected for an insect native to this region. A total of 15 parasitoids are listed in a review by Lim (1992), including pupal parasitoids and egg parasitoids (such as the wasp Trichogramma-toidea bactrae fumata). Numerous predators have been recorded on larvae or adults, includ-ing at least 8 species of ant (5 species of the black ant Dolichoderus were recorded in Sabah), 5 species of spider, 5 species of reduviid stink bugs, 11 species of preying mantid, 4 species of lacewing, 13 species of dragonfly, 5 species of carabid beetle and 1 species of staphylinid beetle (Lim 1992); these numbers emphasise the point that this pest is likely to suffers great natural mortality due to natural enemies in the cocoa farm (Mumford 1986) and uncontrolled spraying of insecticides may reduce this natural control.
The black ant (Dolichoderus thoraxicus) and the weaver ant (Oecophylla smaragdina) have been used to reduce Cocoa Pod Borer infestations in Malaysia and Indonesia. Black ants prey on larvae after their emergence from the pod and on pupae, and disturb adults; they are transferred between plantations in nests of leaves rolled up and stuffed into short lengths of bamboo or plastic bags and hung up in trees. The effect of Crazy Ants (Anoplolepis longipes) on Cocoa Pod Borer is yet to be determined. Small ‘sugar’ ants (Iridomyrmex spp.), which are much more difficult to augment or manipulate, have also been implicated in control of Cocoa Pod Borer. Of the wandering final instar larvae that emerged from pods, 18% were killed by ants and 7% by spiders, while 59% of cocoon larvae or pupae were preyed upon by ants (Lim and Pan 1986).In Malaysia much research effort was put into the augmentative use of the parasitic wasp T. bactrae fumata to control Cocoa Pod Borer (Lim 1992). Natural parasitism of moths by this wasp can reach 60% in Sabah. It proved possible to raise large quantities of the wasp on another host (the rice moth Corcyra cephalonica) and release them in cocoa plantings. The method provided effective control of the pest but the cost has prevented its widespread application. It does, however, show the potential value of naturally occurring biological control against this pest.
Six genera of fungi (Beauveria, Penicillium, Verticillium, Fusarium, Acrostalagmus and Spicaria) have also been found to infect larvae and pupae; the most effective potential biological control agent was shown to be Beauveria bassiana, which caused 100% death during pupation when larvae were exposed to the fungus after their emergence from the pod. However, the method is difficult to implement on a large scale.
P A P U A N E W G U I N E A C O C O A E X T E N S I O N M A N U A L274
Traps baited with synthetic pheromones (chemicals produced by female moths to attract males) or female Pod Borer moths have been used to monitor male moths for quarantine and popu-lation studies. Theoretically, trapping of a large proportion of male moths could greatly reduce the pest population; in trials, pod losses were reduced by about 30% in trapped compared with untreated areas. The pheromone traps were shown to catch moths as far as 800 metres from infested cocoa. However, the effectiveness of the pheromones varies with different populations of moths and the method is not widely used for Cocoa Pod Borer control on farms. In Java and the Philippines use in the early 1950s of the first generation of toxic chlorinated hydrocarbon insecticides (DDT, dieldrin, endrin, aldrin and gamma-HCH) to control Cocoa Pod Borer resulted in upsurges in formerly minor pests such as the stem borers, Glenea novemgut-tata and Zeuzera coffeae, and the bagworm, Clania spp. (Mumford 1986, 1988). However, spray-ing of pyrethroid (delta-methrin at 25 ppm, 100 L per ha has become a standard) or carbamate insecticides targeted at the underside of the larger (lower), more horizontal branches on which the moths tend to rest during the day, and at pods to discourage oviposition, can be effective while causing minimal disruption of beneficial insect populations (Day 1983). In well-pruned cocoa the larger branches are all low in the canopy and can be sprayed with a knapsack sprayer with a handheld lance, which allows better targeting than a motorised mist blower. Day recom-mended spraying during the low crop period to reduce moth populations just before the devel-opment of the main crop, to reduce the chance of interference with pollinators that are most active during the main crop period, and when other labour demands are least. Clearly, effective targeted spraying is possible only in well-pruned cocoa. Given the cost (labour, equipment and chemicals) and the effectiveness of alternative methods, spraying of pesticides should be a low priority for smallholders.
Quarantine restriction on the movement of pods from infested to non-infested areas is critical in restricting the spread of the pest. Any transported vegetative planting material should be checked for the occurrence of pupae.
See Chapter 7 for the current recommendations for controlling Cocoa Pod Borer in Papua New Guinea.
ReferencesAzhar I, Lim DHK (1987) An investigation on the use of host plant resistance and crop manipulation in the management
of the cocoa podborer. pp.83-101, in Management of the Cocoa Podborer. Ooi PAC (ed.), The Malaysian Plant Pro-tection Society, Kuala Lumpur.
Day RK (1983) Progress towards an integrated control programme for the cocoa podborer Acrocercops cramerella (Snellen) in Sabah. MAPPS Newsletter 7 (Suppl.), 6-7.
Lim GT, Tay EB, Pang TC, Pan KY (1982) The biology of cocoa podborer Acrocercops cramerella (Snellen) and its control in Sabah Malaysia. pp.275-287, in Proceedings of International Conference on Plant Protection in the Tropics. Ma-laysian Plant Protection Society, Kuala Lumpur.
Lim GT (1984) Behavioural studies on cocoa podborer Acrocercops cramerella (Snellen). pp.539-542 in Proceedings of Nineth International Cocoa Research Conference, Togo,.
Lim GT, Pan KY (1986) Observations on the survival of mature larvae and pupae of cocoa podborer Acrocercops cra-merella (Snellen). pp.293-297, in Cocoa and Coconuts: Progress and Outlook. Pushparaja E, Chew PS (ed.) Incorporat-ed Society of Planters, Kuala Lumpur.Lim GT, Phua PK (1986) Effect of cocoa podborer Acrocercops cramerella (Snellen) on yield and bean size. pp.325-336,
in Cocoa and Coconuts: Progress and Outlook. Pushparaja E, Chew PS (eds.). Incorporated Society of Planters, Kuala Lumpur.
Lim GT (1992) Biology, ecology and control of cocoa podborer Conopomorpha cramerella (Snellen). pp.85-100, in Co-coa Pest and Disease Management in Southeast Asia and Australasia. Keane PJ, Putter CAJ (ed.), FAO Plant Pro-duction and Protection Paper No. 112. FAO, Rome, Italy.
Mumford JD (1986) Control of the Cocoa Pod Borer (Acrocercops cramerella): a critical review. pp.277-286, in Cocoa and Coconuts: Progress and Outlook. Pushparaja E, Chew PS (eds.) Incorporated Society of Planters, Kuala Lumpur.Mumford JD (1988) Control of the cocoa pod borer (Conopomorpha cramerella). Cocoa Growers’ Bulletin 40, 19-29.Ooi APC (1986) Food plants of Conopomorpha cramerella (Snellen). MAPPS Newsletter 10, 5-6.Szent-Ivany JJH (1961) Insect pests of Theobroma cacao in the Territory of Papua New Guinea. Papua and New Guinea Agric. J. 13, 127-147.Wardojo S (1992) Major pests and diseases of cocoa in Indonesia. pp.63-67, in Cocoa Pest and Disease Management
in Southeast Asia and Australasia. Keane PJ, Putter CAJ (ed.), FAO Plant Production and Protection Paper No. 112, FAO, Rome, Italy.
P A P U A N E W G U I N E A C O C O A E X T E N S I O N M A N U A L 275
Mirids or Pod Suckers (Helopeltis clavifer, Pseudodoniella spp. – Hemiptera: Miridae)Types, biology and damage
Mirids, also known as capsids or pod suckers, are major pests of cocoa throughout the world, with different species occurring in the different cocoa growing regions. They are the main pest of cocoa in West Africa where they are part of a serious die-back complex. They cause extensive crop losses in all areas of Papua New Guinea except Bougainville, where they don’t occur on cocoa. Four species of mirid common-ly attack cocoa in Papua New Guinea. Helopeltis clavifer and Pseudodoniella laensis are widespread on the mainland, while P. typica and P. pacifica are found mainly in the Islands Region.
The different mirid species cause similar damage, feeding on cocoa cherelles, pods and shoots by inserting their needle-like mouthpart into the phloem sap and caus-ing a round wet spot about 4 mm wide that turns brown and then black after a few hours (Figures A7.36, A7.38). Many feeding marks can be made on one structure, leading to their distortion or death (e.g. of cherelles or shoots). If more than one fifth of a cherelle (up to 11 weeks old) is damaged, it will be killed, remaining attached as a black cherelle indistinguishable from those killed by Phytophthora or natural attrition (cherelle wilt). When partly grown pods (11-16 weeks) are severely attacked they will have fewer and smaller beans. Severe levels of damage on cherelles and young pods can cause up to 80% crop loss. Mirid attack has no effect on the yield of larger pods older than 16 weeks. Young trees (up to 4 years) can be stunted from severe tip die-back caused by mirids feeding on the sap of young shoots, but once the cocoa canopy has closed, shoot damage caused by Helopeltis is much less, although Pseudodoniella can still cause damage under a heavy cocoa canopy.
Adults of the Pseudodoniella species are similar in size and shape, being 8 mm long and 4 mm wide, with a round hump on their back, prominent eyes, and strong wings that enable them to fly from one area to another, but they differ in colour – P. laensis and P. pacifica are bright orange with two dark brown spots on their backs, while P. typica is dark brown (Figure A7.35).
Adults of Helopeltis look very different – they are smaller and slimmer (6 mm x 1 mm), with long slender legs and antennae, straight-sided wings that are longer than the body, and a knob on a long thin spine rising up from the middle of their back. They have an orange head and thorax (body) when young but become dark brown when mature (Figure A7.34). The adult females lay 1-4 whitish, oval-shaped eggs under the skin of the cocoa pod or stem; Helopeltis eggs hatch after 7 days and Pseudodoniella after 14 days to produce nymphs (Figure A7.37) that feed for about 14 days and moult five times before they become adults. Helopeltis adults live for 6 weeks but Pseudodo-niella adults live for only 2 weeks. Both nymphs and adults feed on the sap of cocoa pods and stems, usually at night or in the early morning or late evening.
Helopeltis has many other hosts, including tea, coffee, cotton, cashew, mango, sour-sop, guava. avocado and sweet potato, but Pseudodoniella is usually found only on cocoa and Ficus (fig) trees.
P A P U A N E W G U I N E A C O C O A E X T E N S I O N M A N U A L276
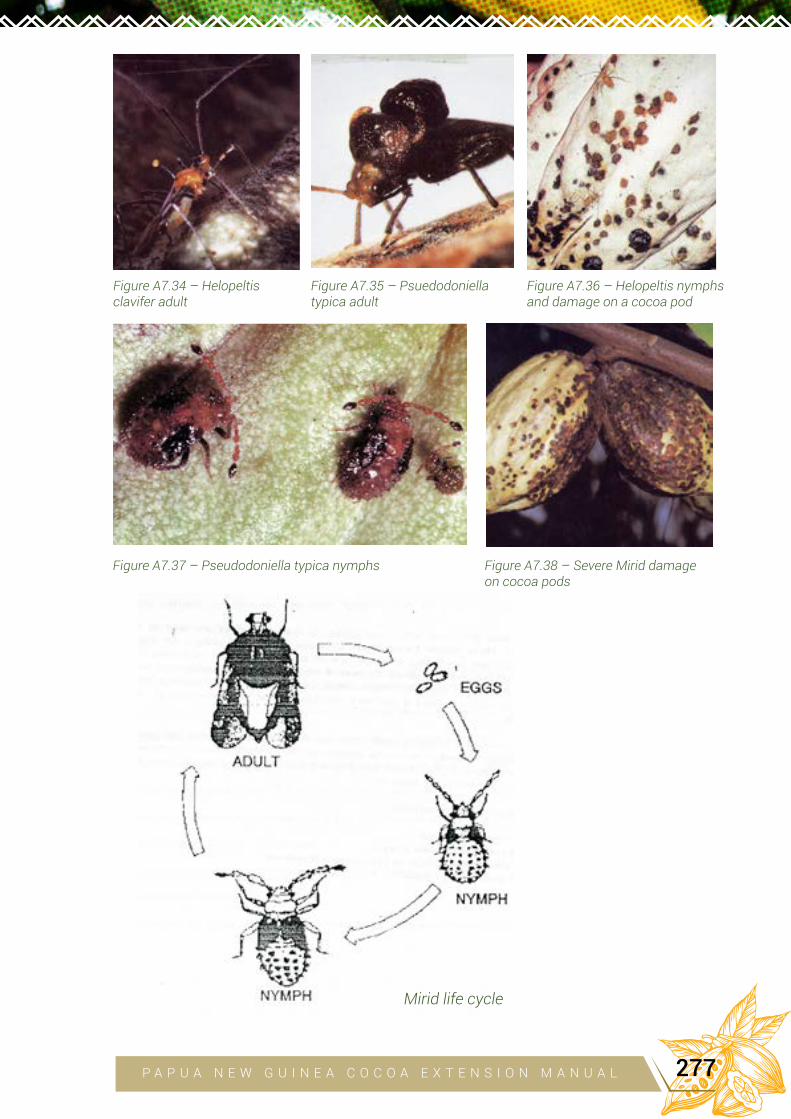
Figure A7.34 – Helopeltis clavifer adult
Figure A7.36 – Helopeltis nymphs and damage on a cocoa pod
Figure A7.35 – Psuedodoniella typica adult
Figure A7.37 – Pseudodoniella typica nymphs Figure A7.38 – Severe Mirid damage on cocoa pods
Mirid life cycle
P A P U A N E W G U I N E A C O C O A E X T E N S I O N M A N U A L 277
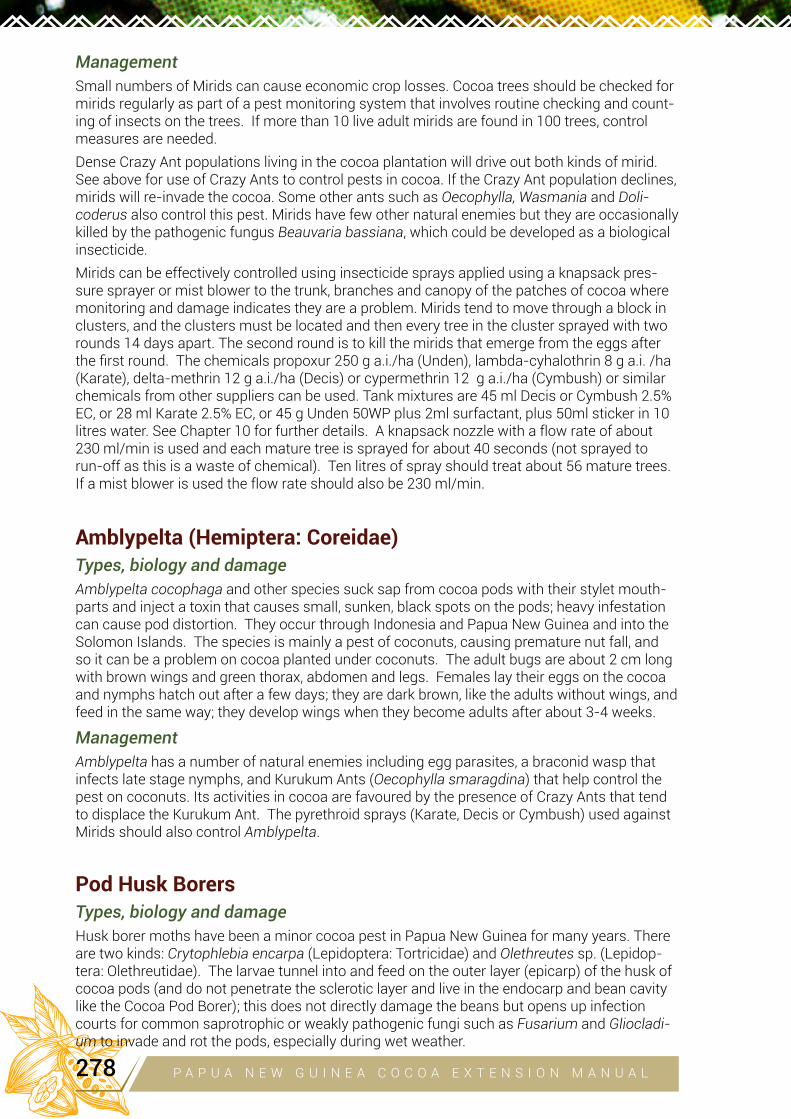
Management
Small numbers of Mirids can cause economic crop losses. Cocoa trees should be checked for mirids regularly as part of a pest monitoring system that involves routine checking and count-ing of insects on the trees. If more than 10 live adult mirids are found in 100 trees, control measures are needed.
Dense Crazy Ant populations living in the cocoa plantation will drive out both kinds of mirid. See above for use of Crazy Ants to control pests in cocoa. If the Crazy Ant population declines, mirids will re-invade the cocoa. Some other ants such as Oecophylla, Wasmania and Doli-coderus also control this pest. Mirids have few other natural enemies but they are occasionally killed by the pathogenic fungus Beauvaria bassiana, which could be developed as a biological insecticide.
Mirids can be effectively controlled using insecticide sprays applied using a knapsack pres-sure sprayer or mist blower to the trunk, branches and canopy of the patches of cocoa where monitoring and damage indicates they are a problem. Mirids tend to move through a block in clusters, and the clusters must be located and then every tree in the cluster sprayed with two rounds 14 days apart. The second round is to kill the mirids that emerge from the eggs after the first round. The chemicals propoxur 250 g a.i./ha (Unden), lambda-cyhalothrin 8 g a.i. /ha (Karate), delta-methrin 12 g a.i./ha (Decis) or cypermethrin 12 g a.i./ha (Cymbush) or similar chemicals from other suppliers can be used. Tank mixtures are 45 ml Decis or Cymbush 2.5% EC, or 28 ml Karate 2.5% EC, or 45 g Unden 50WP plus 2ml surfactant, plus 50ml sticker in 10 litres water. See Chapter 10 for further details. A knapsack nozzle with a flow rate of about 230 ml/min is used and each mature tree is sprayed for about 40 seconds (not sprayed to run-off as this is a waste of chemical). Ten litres of spray should treat about 56 mature trees. If a mist blower is used the flow rate should also be 230 ml/min.
Amblypelta (Hemiptera: Coreidae)Types, biology and damage
Amblypelta cocophaga and other species suck sap from cocoa pods with their stylet mouth-parts and inject a toxin that causes small, sunken, black spots on the pods; heavy infestation can cause pod distortion. They occur through Indonesia and Papua New Guinea and into the Solomon Islands. The species is mainly a pest of coconuts, causing premature nut fall, and so it can be a problem on cocoa planted under coconuts. The adult bugs are about 2 cm long with brown wings and green thorax, abdomen and legs. Females lay their eggs on the cocoa and nymphs hatch out after a few days; they are dark brown, like the adults without wings, and feed in the same way; they develop wings when they become adults after about 3-4 weeks.
Management
Amblypelta has a number of natural enemies including egg parasites, a braconid wasp that infects late stage nymphs, and Kurukum Ants (Oecophylla smaragdina) that help control the pest on coconuts. Its activities in cocoa are favoured by the presence of Crazy Ants that tend to displace the Kurukum Ant. The pyrethroid sprays (Karate, Decis or Cymbush) used against Mirids should also control Amblypelta.
Pod Husk Borers Types, biology and damage
Husk borer moths have been a minor cocoa pest in Papua New Guinea for many years. There are two kinds: Crytophlebia encarpa (Lepidoptera: Tortricidae) and Olethreutes sp. (Lepidop-tera: Olethreutidae). The larvae tunnel into and feed on the outer layer (epicarp) of the husk of cocoa pods (and do not penetrate the sclerotic layer and live in the endocarp and bean cavity like the Cocoa Pod Borer); this does not directly damage the beans but opens up infection courts for common saprotrophic or weakly pathogenic fungi such as Fusarium and Gliocladi-um to invade and rot the pods, especially during wet weather.
P A P U A N E W G U I N E A C O C O A E X T E N S I O N M A N U A L278
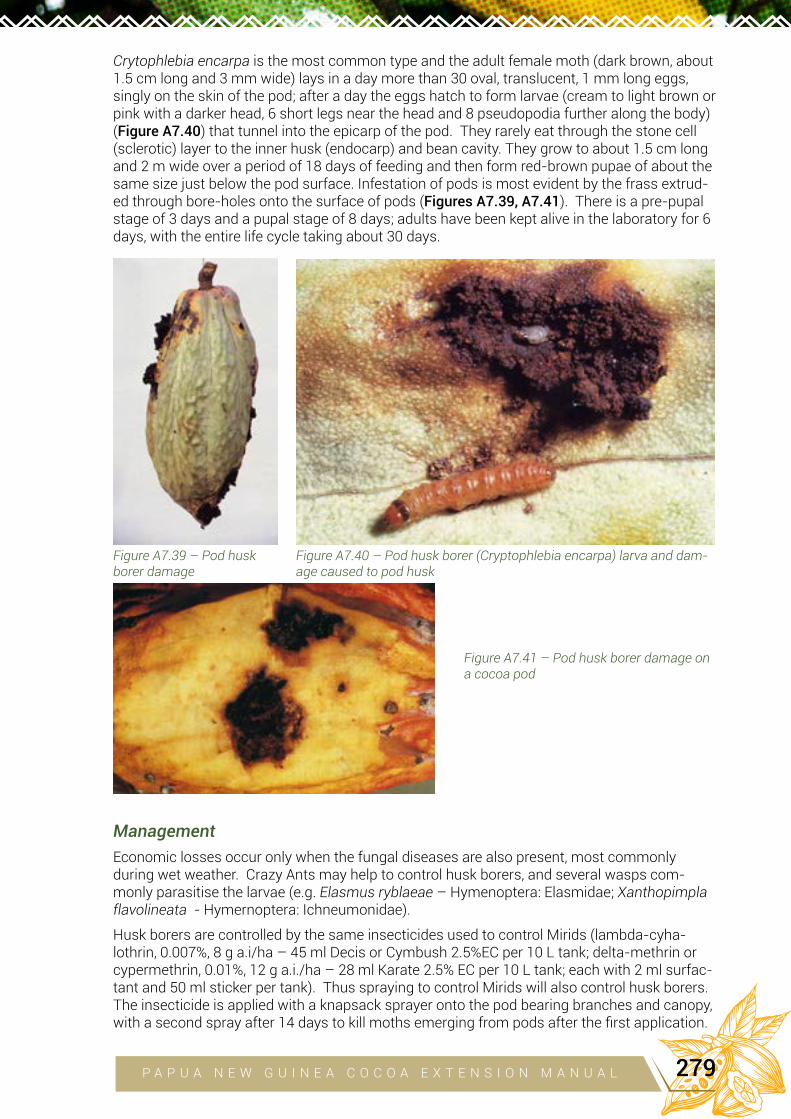
Crytophlebia encarpa is the most common type and the adult female moth (dark brown, about 1.5 cm long and 3 mm wide) lays in a day more than 30 oval, translucent, 1 mm long eggs, singly on the skin of the pod; after a day the eggs hatch to form larvae (cream to light brown or pink with a darker head, 6 short legs near the head and 8 pseudopodia further along the body)(Figure A7.40) that tunnel into the epicarp of the pod. They rarely eat through the stone cell (sclerotic) layer to the inner husk (endocarp) and bean cavity. They grow to about 1.5 cm long and 2 m wide over a period of 18 days of feeding and then form red-brown pupae of about the same size just below the pod surface. Infestation of pods is most evident by the frass extrud-ed through bore-holes onto the surface of pods (Figures A7.39, A7.41). There is a pre-pupal stage of 3 days and a pupal stage of 8 days; adults have been kept alive in the laboratory for 6 days, with the entire life cycle taking about 30 days.
Figure A7.39 – Pod huskborer damage
Figure A7.40 – Pod husk borer (Cryptophlebia encarpa) larva and dam-age caused to pod husk
Figure A7.41 – Pod husk borer damage on a cocoa pod
Management
Economic losses occur only when the fungal diseases are also present, most commonly during wet weather. Crazy Ants may help to control husk borers, and several wasps com-monly parasitise the larvae (e.g. Elasmus ryblaeae – Hymenoptera: Elasmidae; Xanthopimpla flavolineata - Hymernoptera: Ichneumonidae).
Husk borers are controlled by the same insecticides used to control Mirids (lambda-cyha-lothrin, 0.007%, 8 g a.i/ha – 45 ml Decis or Cymbush 2.5%EC per 10 L tank; delta-methrin or cypermethrin, 0.01%, 12 g a.i./ha – 28 ml Karate 2.5% EC per 10 L tank; each with 2 ml surfac-tant and 50 ml sticker per tank). Thus spraying to control Mirids will also control husk borers. The insecticide is applied with a knapsack sprayer onto the pod bearing branches and canopy, with a second spray after 14 days to kill moths emerging from pods after the first application.
P A P U A N E W G U I N E A C O C O A E X T E N S I O N M A N U A L 279
FOLIAR PESTS
Leaf Eating Caterpillars (Loopers, Army Worms, Cup Moths, Bagworms, Leaf Rollers)
Types, biology and damage
Moth caterpillars are important pests of cocoa throughout Papua New Guinea, eating soft flush leaves and occasionally shoots. Some also eat hardened leaves. Severe defoliation by caterpillars slows growth of young trees and causes yield decline in mature trees. Different types are a problem in different areas of the country. The most important pest families are Noctuidae (Achaea janata, Tiracola plagiata), Lymocodidae (Pinzulenza kikusch, Parasa lepida, Mambara inconspicua) and Geometridae (Ectropis sabulosa, Hyposidra talca). Caterpillar outbreaks are often associated with Leucaena shade throughout the country, whereas they are usually not a problem under Gliricidia. Coconuts provide a pest-free environment for cocoa in the islands region, but are sometimes associated with severe cup moth infestations in parts of the mainland such as Madang.
Caterpillars are normally present in cocoa in low numbers due to biological control by a range of naturally occurring parasites, predators and diseases. Viruses sometimes control caterpil-lars naturally (e.g. cup moths in Madang). If outbreaks occur, they usually last for only a few weeks before their natural enemies bring them under control. However, Crazy Ants do not control caterpillars, which are foul-tasting or have irritant body hairs. Prolonged outbreaks (several months or even years) are usually due to abnormal weather or misuse of insecticides (e.g. regular, indiscriminate, broadscale spraying) both of which disrupt the natural enemies.
Frequent, extensive or prolonged defoliation of immature cocoa retards growth or causes malformation or death, and control measures may be necessary. Mature trees can withstand some defoliation before yield is reduced greatly but prolonged and extensive defoliation will reduce yield and should be controlled.
Caterpillars can be controlled readily by spraying a range of relatively safe insecticides (acephate 0.3%, 350 g a.i./ha; carbaryl 0.6%, 650 g a.i./ha; pyrethroid 0.007%, 8 g a.i./ha; pirimi-phos-methyl 0.3%, 330 g a.i./ha) with a knapsack sprayer (see Chapter 10 for tank mixes).
LoopersThese caterpillars are easily recognized by the looping movement of their long slender body, that has prolegs near the front and rear (Figure A7.43). Three kinds are pests of cocoa in Papua New Guinea. The adult Castor or Semi-looper (Achaea) is a mottled white, grey and brown colour, and about 2.5 cm long with a wingspan of 5 cm. The caterpillar grows to about 2.5 cm long and is grey-blue, black of brown with black and white markings. The Ectopis adult is white, 1.5cm long with a wingspan of 3.5cm; its caterpillar is yellow brown with a black spot on each side of the abdomen. The adult of the third kind, Hyposidra, is mottled grey-brown and cream, 1 cm long with a wingspan of 3 cm. Both Ectopis and Hyposidra are common in East New Britain but rare on the mainland. The adult females lay their eggs on Leucaena shade trees and when the caterpillars hatch they descend on threads to the cocoa beneath and eat the young flush leaves (Figure A7.44).
Achaea occurs from India to Australia and is a pest of cocoa throughout Papua New Guinea. The female lays up to 600 pale green (becoming blue) eggs in batches at random on cocoa leaves and stems; the eggs hatch and the caterpillars feed on soft flush leaves for 11-17 days, then pupate in soil or in a sheltered place in the tree. The pupa has a loose cocoon made from leaves or other debris spun together. The moth emerges after 9-14 days and lives for about 21 days. The caterpillars feed on many other plant species. Achaea has several natural enemies – over 90% of its eggs are parasitised by Sceiionid (Tefenomus sp.), Trichgrammid (Trichogramma japonicus) or Ichneumonid (Eshthromorpha insidiator) parasitoids. Caterpil-
lars are commonly parasitise by the Tachinids Exorista fallax and Winthermia diversa.
P A P U A N E W G U I N E A C O C O A E X T E N S I O N M A N U A L280

Figure A7.42 – Adult moth (Achaea)
Figure A7.44 – Looper caterpillar damageto young flush leaves
Looper life cycle
Figure A7.43 – Looper caterpillar
Army wormsThe cocoa army worm, Tiracola sp., is a white moth, 1.5 cm long with a wingspan of 3.5 cm; the caterpillar is dark grey with a yellow strip along each side of the abdomen. It is found from India to Australia and occurs in all areas of Papua New Guinea; it is rarely found in East New Britain and Bougainville and is an important pest on cocoa only in some areas of the main-land. It also feeds on Leucaena shade trees.
The female lays a batch of eggs on the underside of cocoa and other leaves; the hatched caterpillars feed on the soft flush leaves for 15-17 days and then change into a pre-pupa and pupa. The adult female that hatches out doesn’t lay eggs for 14 days. It has more than 12 known natural enemies; two (an Ichneumonid wasp, Esthromorpha insidiator, and a Tachinid,
Exorista fallax) are found on cocoa.
P A P U A N E W G U I N E A C O C O A E X T E N S I O N M A N U A L 281
Cup Moths (also known as Nettle or Slug Caterpillars)These can be important pests of cocoa, feeding on mature as well as soft leaves, at particular times in particular areas. The caterpillars are short and fat, with short legs hidden under the body. Pinzulenza caterpillars are grey-green with several short hairs on the body. They prefer to eat older cocoa leaves and can be a serious pest in the Madang region, including Kar Kar Island, where outbreaks of complete defoliation of trees can spread over large areas within a few months and persist for several years. Such outbreaks occur during prolonged periods of dry weather and where cocoa lacks sufficient shade, presumably because these conditions reduce the effectiveness of the natural enemies (such as the Chalcidid Brachymeria salomo-nis) that usually control the pest. The adult moth is believed to be associated with coconuts but little is known of the biology of the species.
The Parasa caterpillar, known also as the Green-striped Nettle Grub, is slug-like and has strong irritant hairs all over its body. While it occurs widely in South and South East Asia, in Papua New Guinea it is a problem only on the mainland. The caterpillars may defoliate a co-coa tree before moving on to another one, and they feed on many other plants including tea, coffee, coconut, nipa palm and mango. The female lays about 600 scale-like eggs in clusters on the leaves and the life cycle lasts about 10 weeks but pupae, formed in cocoons clustered together on the bark, may remain dormant during dry weather. The main parasite is the Braco-nid wasp Apanteles parasae, but the fungus pathogen Cordyceps coccinia can kill the caterpil-lars.
Mambara is also a pest on mainland Papua New Guinea, especially in the Morobe region where the caterpillars skeletonise cocoa leaves. It has two known natural enemies, the Pen-
tatomid bug, Platynopus melacanthios, and a Pyrrhocorid, Diadymus pyrochrous.
BagwormsCaterpillars of different species of bagworm are often a dark brown colour similar to the dead vegetation on their bag, and have a round prominent head and three pairs of strong legs on the thorax close to the head. The male is a typical moth, but the female lacks wings and legs, has few hairs or scales on the body, and stays inside the bag all her life and attracts males with her odour. She lays several hundred eggs in the bag and then crawls out, falls to the ground and dies. The small caterpillars, on hatching and in fine weather, leave the bag and disperse rap-idly by spinning a silk thread by which they hang down from the leaf and are carried away by the wind. On landing on a cocoa leaf the caterpillar starts to feed and construct a silken tube or bag into which it places cut up pieces of leaf, small twigs etc. for protection from enemies, making larger bags periodically to accommodate its increasing size. Eventually it pupates inside the bag that is usually attached to a cocoa leaf or branch.
Leaf RollersCaterpillars of several kinds of leaf roller moths (Pyralid) damage cocoa; they are easily de-tected as they roll up flush leaves or sometimes stick two leaves together with silk threads and hide in the cavity formed. Species vary in colour from green to yellow; some have smooth bodies while others have hairs. The caterpillars feed inside the rolled leaf for about 2 weeks before pupating. The female moth lays its eggs on cocoa flush leaves and stems
P A P U A N E W G U I N E A C O C O A E X T E N S I O N M A N U A L282
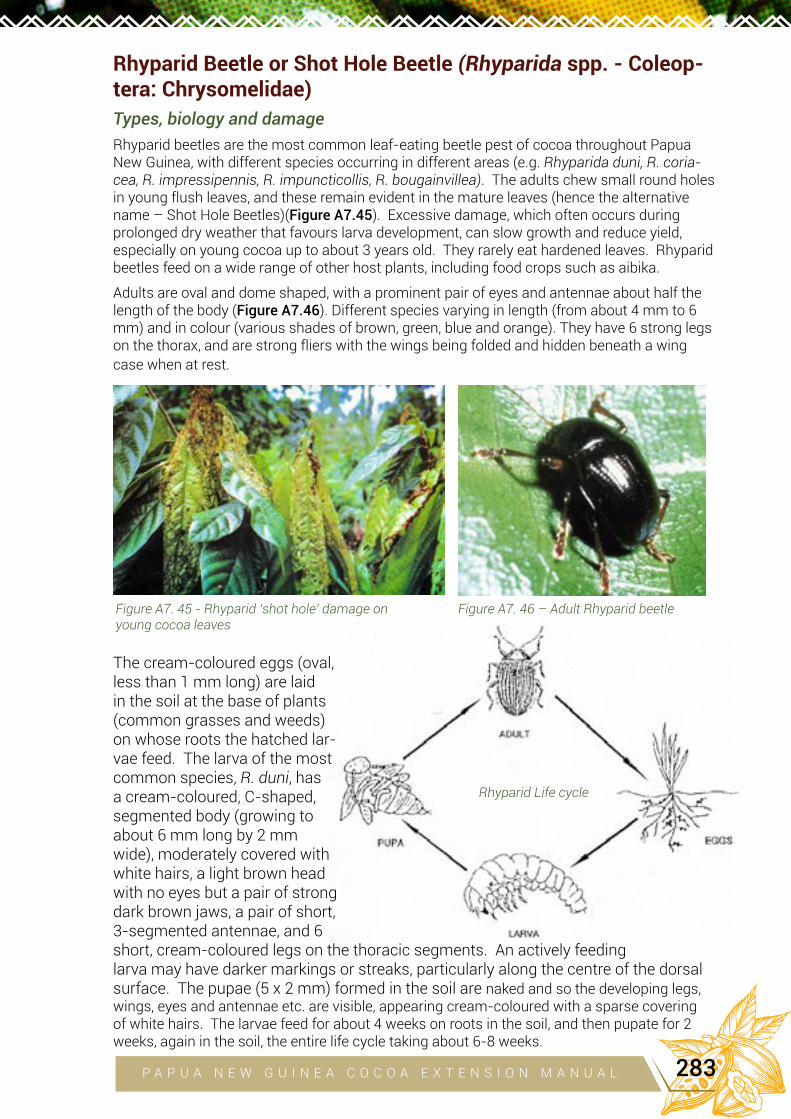
Rhyparid Beetle or Shot Hole Beetle (Rhyparida spp. - Coleop-tera: Chrysomelidae)
Types, biology and damage
Rhyparid beetles are the most common leaf-eating beetle pest of cocoa throughout Papua New Guinea, with different species occurring in different areas (e.g. Rhyparida duni, R. coria-cea, R. impressipennis, R. impuncticollis, R. bougainvillea). The adults chew small round holes in young flush leaves, and these remain evident in the mature leaves (hence the alternative name – Shot Hole Beetles)(Figure A7.45). Excessive damage, which often occurs during prolonged dry weather that favours larva development, can slow growth and reduce yield, especially on young cocoa up to about 3 years old. They rarely eat hardened leaves. Rhyparid beetles feed on a wide range of other host plants, including food crops such as aibika.
Adults are oval and dome shaped, with a prominent pair of eyes and antennae about half the length of the body (Figure A7.46). Different species varying in length (from about 4 mm to 6 mm) and in colour (various shades of brown, green, blue and orange). They have 6 strong legs on the thorax, and are strong fliers with the wings being folded and hidden beneath a wing case when at rest.
Figure A7. 45 - Rhyparid ‘shot hole’ damage on young cocoa leaves
Rhyparid Life cycle
Figure A7. 46 – Adult Rhyparid beetle
The cream-coloured eggs (oval, less than 1 mm long) are laid in the soil at the base of plants (common grasses and weeds) on whose roots the hatched lar-vae feed. The larva of the most common species, R. duni, has a cream-coloured, C-shaped, segmented body (growing to about 6 mm long by 2 mm wide), moderately covered with white hairs, a light brown head with no eyes but a pair of strong dark brown jaws, a pair of short, 3-segmented antennae, and 6 short, cream-coloured legs on the thoracic segments. An actively feeding larva may have darker markings or streaks, particularly along the centre of the dorsal surface. The pupae (5 x 2 mm) formed in the soil are naked and so the developing legs, wings, eyes and antennae etc. are visible, appearing cream-coloured with a sparse covering of white hairs. The larvae feed for about 4 weeks on roots in the soil, and then pupate for 2 weeks, again in the soil, the entire life cycle taking about 6-8 weeks.
P A P U A N E W G U I N E A C O C O A E X T E N S I O N M A N U A L 283
Management
Rhyparids have few known natural enemies. Crazy Ants exert some control but they are limit-ed because they live on the branches while the rhyparid beetles feed on the young leaves.
Some Trinitario clones (K24-102, K24-103, K82) show a degree of resistance to rhyparid attack and can be planted in areas where the beetles are a serious problem. Interestingly, the first two also show a degree of resistance to other pests such as Pantorhytes.
Adult beetles can be controlled by selectively spraying with a knapsack sprayer (230 ml/min flow rate, C.P. TX4 nozzle or similar) the soft flush leaves that are being attacked using one of several insecticides (e.g. 0.3% acephate at 380 g a.i./ha – 40g Orthene 75; 0.6% carbaryl at 650 g a.i./ha – 75 ml Septene 80; 0.007% pyrethroid at 8 g a.i./ha – 28 ml Decis or Karate 2.5% EC; or 0.3% pirimiphos-methyl ay 330 g a.i./ha – 60ml Actellic; each with 2 ml surfactant and 50 ml sticker in 10 L water).
PESTS OF ROOTS
Cocoa Root Chafers (Dermolepida spp. - Coleoptera: Scarabaeidae)
Types, biology and damage
Cocoa root chafers are an important pest of young cocoa, up to 2 years old, throughout Papua New Guinea. Larvae feed on the roots and can kill young plants if they chew through the tap root (Figure A7.49)(a large grub can chew through a taproot of a young plant in a few days and a heavy infestation can kill every plant in a newly planted block). While the larvae can feed on the roots of mature plants, they do little damage to them.
There are different species in different regions although some areas may have more than one species. The main species found are Dermolepida uniforme – light brown adults, East New Britain; D. meeki – grey adults, Oro; D. undatum – light brown, Madang and Sepik; D. noxium – medium brown, Milne Bay; D. nigrum – black, Papua. Adult beetles of the different species are similar in size and shape - generally dome-shaped, 2-3.5 cm long, 1.5 cm wide and 1 cm high, with 6 strong legs, short antennae, prominent eyes and wings covered by wing cases when at rest (Figure A7.47). They feed on the leaves of a range of plants, including cocoa and banana, but do little damage. They are most active and fly at dusk, and females lay their eggs near to where they emerged from the pupae, allowing populations to persist in a given area.
Figure A7.47 – Root Chafer adult (2 – 3.5 cm long)
Figure A7.48 – Root Chafer larva (up to 4 cm long)
P A P U A N E W G U I N E A C O C O A E X T E N S I O N M A N U A L284
The female beetle lays her eggs (white, oval shaped, about 4mm long) 10-20 cm deep in soil near the root of a cocoa or other food plant. After 2-3 weeks the eggs hatch to form larvae that feed initially on small fibrous roots and as they grow begin to feed on larger roots. A large grub can eat an entire taproot of a young cocoa plant, killing it. They grow to about 4 cm long through 3 instars, with soft, C-shaped, cream-coloured bodies (with blue patches on the swol-len abdomen indicating the gut contents of an actively feeding larva), with 6 long, dark brown legs and a few hairs, and a dark red-brown head with strong jaws (Figure A7.48). The larvae pupate in smooth-walled, earthen cells at a depth of 5-20 cm. Pupae are about 3.5 cm long and medium brown in colour.
Management
Root Chafer grubs feed readily on a number of other plants, including common food crops such as banana, sweet potato, taro, Singapore taro and sugar cane, and so damage is often more serious when cocoa is planted on or near old food gardens which support large numbers of the chafer grubs. For this reason, Root Chafers are a particular problem for smallholders combining cocoa planting with food cropping. An entire block of newly planted cocoa plant-ed on old food gardens can be killed. Old food gardens, especially of crops the chafers like to feed on, should be removed several months before planting cocoa, and any larvae, pupae or adult chafers destroyed. Populations are reduced by very dry or very wet conditions.
Root Chafers have a range of enemies, including a scoliid wasp (Campsomeris sp.) that is an ectoparasite of the larvae, some fungal and protozoan pathogens, nematodes in the soil, and birds.
If there is evidence that Root Chafers are in a newly planted cocoa block or nearby food gar-dens, young cocoa plants can be protected from the first and second stage larvae with the insecticide Chlorpyrephos. Place 2 g Chlorpyrephos (Suscon Blue – 6 mg/granule) in the soil around the roots when planting out.
Figure A7.49 (Left) – Cocoa seedling roots damaged by Root Chafer larvae
Root Chafer Life cycle
P A P U A N E W G U I N E A C O C O A E X T E N S I O N M A N U A L 285
MINOR PESTS OF COCOA
Mealy Bug (Planococcus pacificus – Hemiptera: Pseudococci-dae)
Types, biology and damage
This mealy bug is a minor pest of cocoa in Papua New Guinea, and adults and nymphs can often be seen in small numbers feeding on shoots, pods and flower cushions (Figures A7.50, A7.51) as well as on other plants such as Gliricidia and Leucaena shade trees. Like mirids, they penetrate the phloem, drawing out sap with their stylet (needle-like) mouthparts. Mealy bugs are a serious problem in West Africa as the vector of Cocoa Swollen Shoot Virus, which does not occur in South East Asia and Papua New Guinea. They also vector viruses in Trini-dad and Sri Lanka. When favoured by dry weather, their numbers can sometimes increase to damaging levels, causing distortion of (or even killing) the growing shoot of young plants or deforming heavily infested young pods.
The adult female has a dome-shaped, oval body, about 3 mm long, with a pair of small eyes, short antennae, and 6 short legs that are hidden beneath the body. The fawn to yellow body looks white and ‘mealy’ because of a thick covering of white wax threads (Figure A7.51). The adult male looks very different, with a thin body in which the head, thorax and abdomen can be clearly distinguished, a pair of prominent compound eyes, long antennae, and a pair of large wings and 6 long legs on the thorax. Nymphs are similar in colour and shape to the female, growing to about 2 mm long; the antennae are short but the legs are much longer than those of the adult female and extend out from the body.
The adult female lays eggs (ovoid, pale yellow and less than 1 mm long) in small clusters covered with a protective layer of white wax threads on the underside of cocoa leaves, on pods and on flower cushions. After a few days nymphs hatch out and feed in the same way as the adults and grow through three stages (instars), becoming adults after about 6 weeks.
Mealy bugs, like aphids, secrete excess sugary sap (known as ‘honeydew’) onto the surface of the plants, and this is fed on by many kinds of ants, including Crazy Ants, which in turn protect the mealy bugs from enemy insects in a mutualistic relationship. This can allow mealy bug numbers to build up to damaging levels. Honeydew also allows the growth of a black fungus referred to as ‘sooty mould’, which may interfere with plant growth if it becomes too dense.
Figure A7.50 – Mealybugs feeding on a cocoa pod
Figure A7.51 – Mealybugs feeding on a young cocoa stem
P A P U A N E W G U I N E A C O C O A E X T E N S I O N M A N U A L286
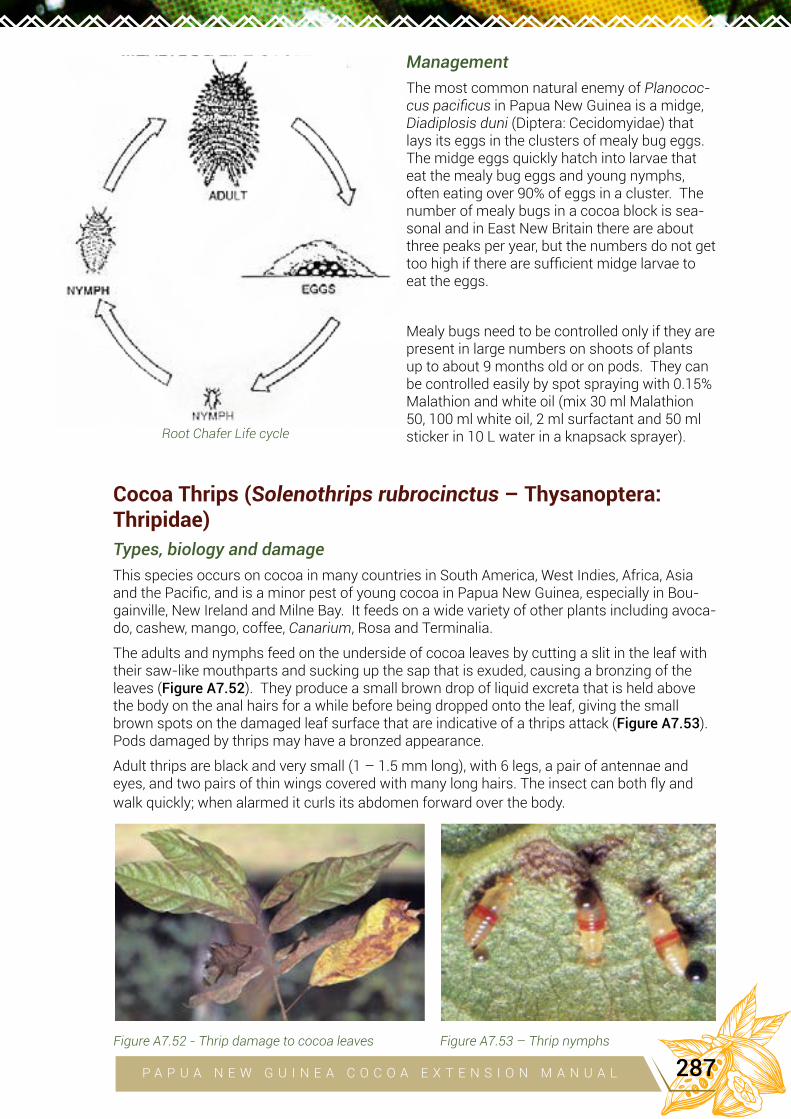
Management
The most common natural enemy of Planococ-cus pacificus in Papua New Guinea is a midge, Diadiplosis duni (Diptera: Cecidomyidae) that lays its eggs in the clusters of mealy bug eggs. The midge eggs quickly hatch into larvae that eat the mealy bug eggs and young nymphs, often eating over 90% of eggs in a cluster. The number of mealy bugs in a cocoa block is sea-sonal and in East New Britain there are about three peaks per year, but the numbers do not get too high if there are sufficient midge larvae to eat the eggs.
Mealy bugs need to be controlled only if they are present in large numbers on shoots of plants up to about 9 months old or on pods. They can be controlled easily by spot spraying with 0.15% Malathion and white oil (mix 30 ml Malathion 50, 100 ml white oil, 2 ml surfactant and 50 ml sticker in 10 L water in a knapsack sprayer).
Cocoa Thrips (Solenothrips rubrocinctus – Thysanoptera: Thripidae)
Types, biology and damage
This species occurs on cocoa in many countries in South America, West Indies, Africa, Asia and the Pacific, and is a minor pest of young cocoa in Papua New Guinea, especially in Bou-gainville, New Ireland and Milne Bay. It feeds on a wide variety of other plants including avoca-do, cashew, mango, coffee, Canarium, Rosa and Terminalia.
The adults and nymphs feed on the underside of cocoa leaves by cutting a slit in the leaf with their saw-like mouthparts and sucking up the sap that is exuded, causing a bronzing of the leaves (Figure A7.52). They produce a small brown drop of liquid excreta that is held above the body on the anal hairs for a while before being dropped onto the leaf, giving the small brown spots on the damaged leaf surface that are indicative of a thrips attack (Figure A7.53). Pods damaged by thrips may have a bronzed appearance.
Adult thrips are black and very small (1 – 1.5 mm long), with 6 legs, a pair of antennae and eyes, and two pairs of thin wings covered with many long hairs. The insect can both fly and walk quickly; when alarmed it curls its abdomen forward over the body.
Root Chafer Life cycle
Figure A7.52 - Thrip damage to cocoa leaves Figure A7.53 – Thrip nymphs
P A P U A N E W G U I N E A C O C O A E X T E N S I O N M A N U A L 287
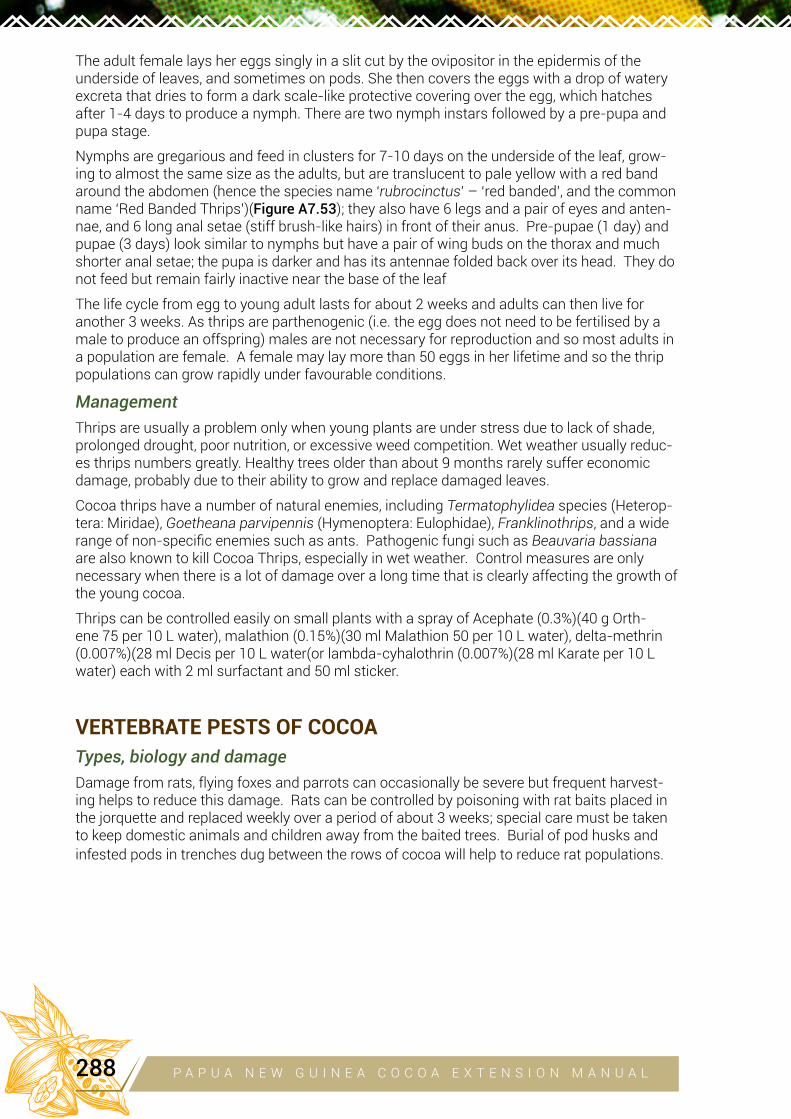
The adult female lays her eggs singly in a slit cut by the ovipositor in the epidermis of the underside of leaves, and sometimes on pods. She then covers the eggs with a drop of watery excreta that dries to form a dark scale-like protective covering over the egg, which hatches after 1-4 days to produce a nymph. There are two nymph instars followed by a pre-pupa and pupa stage.
Nymphs are gregarious and feed in clusters for 7-10 days on the underside of the leaf, grow-ing to almost the same size as the adults, but are translucent to pale yellow with a red band around the abdomen (hence the species name ‘rubrocinctus’ – ‘red banded’, and the common name ‘Red Banded Thrips’)(Figure A7.53); they also have 6 legs and a pair of eyes and anten-nae, and 6 long anal setae (stiff brush-like hairs) in front of their anus. Pre-pupae (1 day) and pupae (3 days) look similar to nymphs but have a pair of wing buds on the thorax and much shorter anal setae; the pupa is darker and has its antennae folded back over its head. They do not feed but remain fairly inactive near the base of the leaf
The life cycle from egg to young adult lasts for about 2 weeks and adults can then live for another 3 weeks. As thrips are parthenogenic (i.e. the egg does not need to be fertilised by a male to produce an offspring) males are not necessary for reproduction and so most adults in a population are female. A female may lay more than 50 eggs in her lifetime and so the thrip populations can grow rapidly under favourable conditions.
Management
Thrips are usually a problem only when young plants are under stress due to lack of shade, prolonged drought, poor nutrition, or excessive weed competition. Wet weather usually reduc-es thrips numbers greatly. Healthy trees older than about 9 months rarely suffer economic damage, probably due to their ability to grow and replace damaged leaves.
Cocoa thrips have a number of natural enemies, including Termatophylidea species (Heterop-tera: Miridae), Goetheana parvipennis (Hymenoptera: Eulophidae), Franklinothrips, and a wide range of non-specific enemies such as ants. Pathogenic fungi such as Beauvaria bassiana are also known to kill Cocoa Thrips, especially in wet weather. Control measures are only necessary when there is a lot of damage over a long time that is clearly affecting the growth of the young cocoa.
Thrips can be controlled easily on small plants with a spray of Acephate (0.3%)(40 g Orth-ene 75 per 10 L water), malathion (0.15%)(30 ml Malathion 50 per 10 L water), delta-methrin (0.007%)(28 ml Decis per 10 L water(or lambda-cyhalothrin (0.007%)(28 ml Karate per 10 L water) each with 2 ml surfactant and 50 ml sticker.
VERTEBRATE PESTS OF COCOA
Types, biology and damage
Damage from rats, flying foxes and parrots can occasionally be severe but frequent harvest-ing helps to reduce this damage. Rats can be controlled by poisoning with rat baits placed in the jorquette and replaced weekly over a period of about 3 weeks; special care must be taken to keep domestic animals and children away from the baited trees. Burial of pod husks and infested pods in trenches dug between the rows of cocoa will help to reduce rat populations.
P A P U A N E W G U I N E A C O C O A E X T E N S I O N M A N U A L288
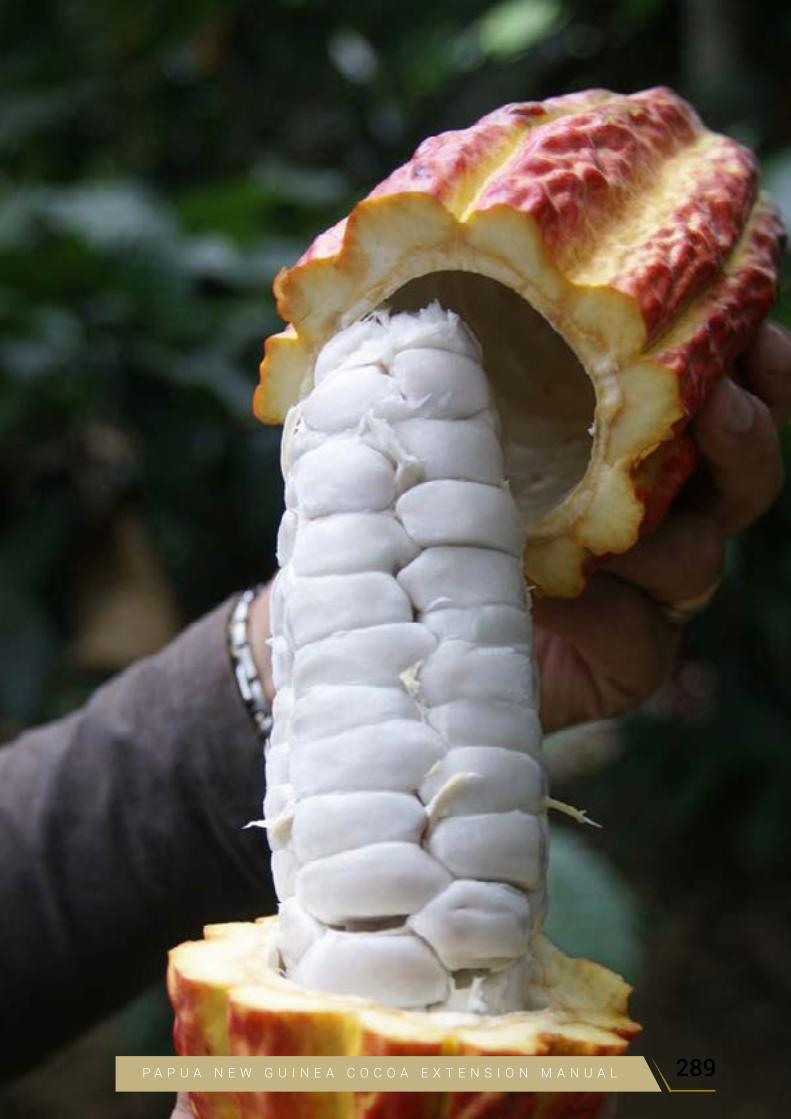
P A P U A N E W G U I N E A C O C O A E X T E N S I O N M A N U A L 289
08
DISEASES OF COCOA IN
PAPUA NEW GUINEA Josephine Saul-Maora, John Konam, Yak Namaliu, Anthon Kamuso and Ricky Wenani
(based on CCRI Information Bulletins 1 – 11)
AIM OF THIS CHAPTER:
To describe the main diseases of cocoa in Papua New Guinea and their causes, biology and management, as a basis for their management
Overview of cocoa diseases in Papua New GuineaThe two main diseases, Vascular Streak Dieback (VSD) caused by the basidiomycete fun-gus Oncobasidium (now named Ceratobasidium) theobromae, and diseases of pods, trunks, chupons and young clonal and seedling plants caused by the oomycete fungus, Phytophthora palmivora (commonly referred to as ‘Phytophthora’) have been the most serious problems for cocoa growing in Papua New Guinea since the expansion of the industry in the 1950s. VSD nearly destroyed the cocoa industry in the 1960s during its initial phase of expansion in Papua New Guinea, while Phytophthora diseases still often cause losses estimated at up to 40% of production. Since 2006, they have been joined by Cocoa Pod Borer (see Appendix 7) as the main causes of crop loss. Reducing the damage done by these diseases, other less important diseases, and by pests through Integrated Pest and Disease Management (IPDM) is a large part of good cocoa management (Chapters 7).
Phytophthora palmivora is the most destructive pathogen of cocoa worldwide. While it is a fungus in the ecological sense in which the term is used here, it is now classified in a new Kingdom (Stramenopila), based on biochemical and fine structural differences from the organ-isms in the Kingdom Fungi (including the VSD, Pink Disease and Root Rot pathogens).
Particular diseases mostly affect cocoa trees at certain stages of the tree’s life cycle:
o In nurseries the main problem is Phytophthora Leaf Blight of seedlings or budded plants (Seedling Blight or Budding Blight), especially if the soil used to fill polybags is taken from under old cocoa trees. VSD can sometimes be a problem in nurseries, especially if they are not covered with plastic or shade cloth or located near old cocoa infested with VSD.
o After field planting, VSD is the main threat as infection in the stem usually kills young plants. Phytophthora Seedling or Budding Blight may be a problem where seedlings or clones are planted near older Phytophthora-infected trees or the infection is car-ried over from the nursery. Pink Disease occurs mainly in plants from 18 months to 5 years of age, and is becoming increasingly common in some areas.
o On bearing trees, Phytophthora Stem Canker and Phytophthora Pod Rot (Black Pod) are the main disease problems, while VSD, Pink Disease and, to a lesser extent, Thread Blight and Horse Hair Blight, may kill branches. In the early stages of the VSD epidem-ic in the 1960s, VSD killed many trees but now this is rare since the elimination of the very susceptible types of cocoa.
o Finally, root diseases caused by basidiomycete bracket fungi (Family Polyporaceae) can kill mature trees.
APPENDIX
P A P U A N E W G U I N E A C O C O A E X T E N S I O N M A N U A L290

Phytophthora Seedling, Budding and Chupon Blight (Leaf Blight)(caused by Phytophthora palmivora)Symptoms, damage and biology
The most serious disease risk for young cocoa plants in the nursery and immediately after planting out in the field is Seedling or Budding Blight caused by Phytophthora palmivora. This pathogen also causes Chupon Blight, which has similar symptoms. Young, soft plant tissues are especially susceptible to infection by Phytophthora (the fungus hyphae or threads can grow more easily into soft tissue) and so young leaves and stems of cocoa seedlings, bud-dings, and chupon shoots growing on the lower trunk of mature trees are very vulnerable. In very wet conditions, older hardened leaves can also be infected. The pathogen requires wet conditions to infect and is spread by rain splash and so the disease can be especially serious in the wet season.
The pathogen resides in the soil and its motile spores (known as zoospores) are splashed up from the soil (e.g. contaminated soil in sowing bags) onto plants, another factor that makes seedlings and chupons, with their soft tissues very close to the soil surface, very vulnerable to infection. The disease appears first on soft leaves as spots of brown, dead tissue that spread outwards and often spread quickly to the growing tip of the seedling, the final result being a dry wilted appearance and death of the shoot and whole plant or chupon (Figures A8.2, A8.3).
• Infections often begin at the leaf tip and spread back to give a distinctive ‘V’-shaped area of dead tissue on young leaves (Figure A8.2).
• Eventually the pathogen forms white mealy sporulation on the surface of the dead tissue.
• This disease can be especially serious during wet weather, which favours the spread of, and infection by, the fungus.
• In a nursery, infections spread by splash of spores from a first infected plant and damage a group of surrounding plants, creating a distinct patch of infected plants (Figure A8.1).
Figure A8.1 – Seedlings damaged by Phytophthora Seedling Blight in a nursery. Photo from CCRI Bulletin 3
P A P U A N E W G U I N E A C O C O A E X T E N S I O N M A N U A L 291
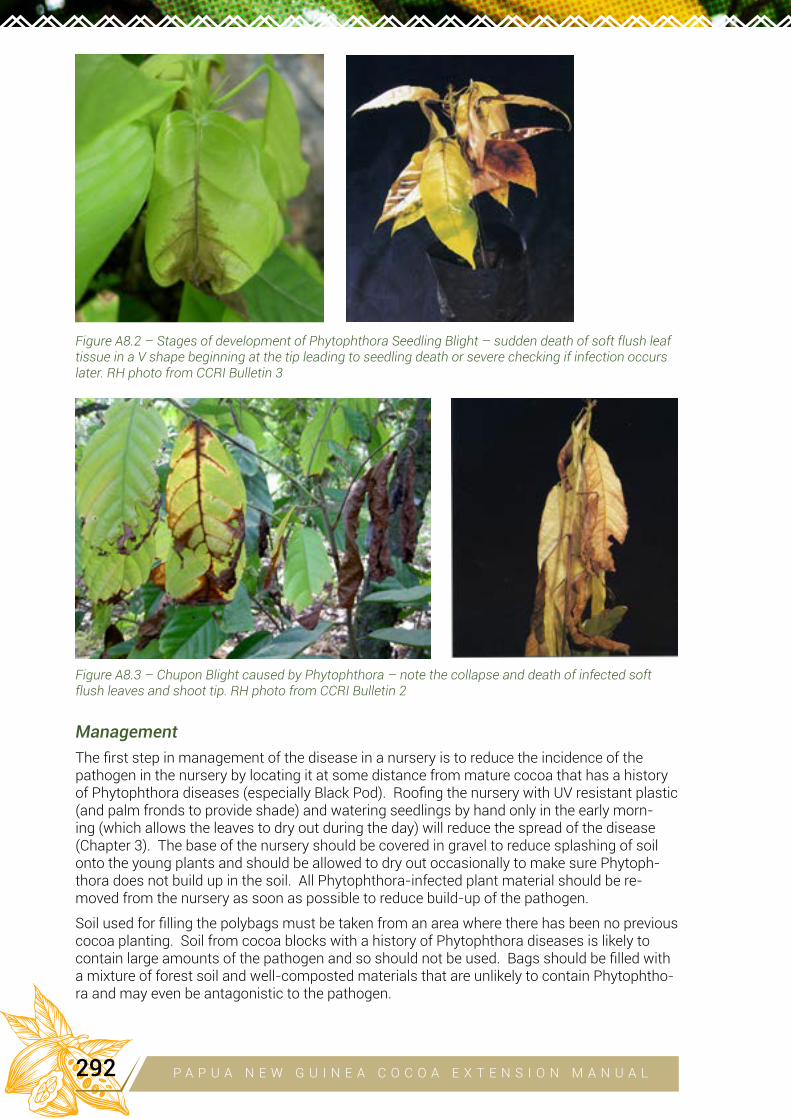
Management
The first step in management of the disease in a nursery is to reduce the incidence of the pathogen in the nursery by locating it at some distance from mature cocoa that has a history of Phytophthora diseases (especially Black Pod). Roofing the nursery with UV resistant plastic (and palm fronds to provide shade) and watering seedlings by hand only in the early morn-ing (which allows the leaves to dry out during the day) will reduce the spread of the disease (Chapter 3). The base of the nursery should be covered in gravel to reduce splashing of soil onto the young plants and should be allowed to dry out occasionally to make sure Phytoph-thora does not build up in the soil. All Phytophthora-infected plant material should be re-moved from the nursery as soon as possible to reduce build-up of the pathogen.
Soil used for filling the polybags must be taken from an area where there has been no previous cocoa planting. Soil from cocoa blocks with a history of Phytophthora diseases is likely to contain large amounts of the pathogen and so should not be used. Bags should be filled with a mixture of forest soil and well-composted materials that are unlikely to contain Phytophtho-ra and may even be antagonistic to the pathogen.
Figure A8.2 – Stages of development of Phytophthora Seedling Blight – sudden death of soft flush leaf tissue in a V shape beginning at the tip leading to seedling death or severe checking if infection occurs later. RH photo from CCRI Bulletin 3
Figure A8.3 – Chupon Blight caused by Phytophthora – note the collapse and death of infected soft flush leaves and shoot tip. RH photo from CCRI Bulletin 2
P A P U A N E W G U I N E A C O C O A E X T E N S I O N M A N U A L292
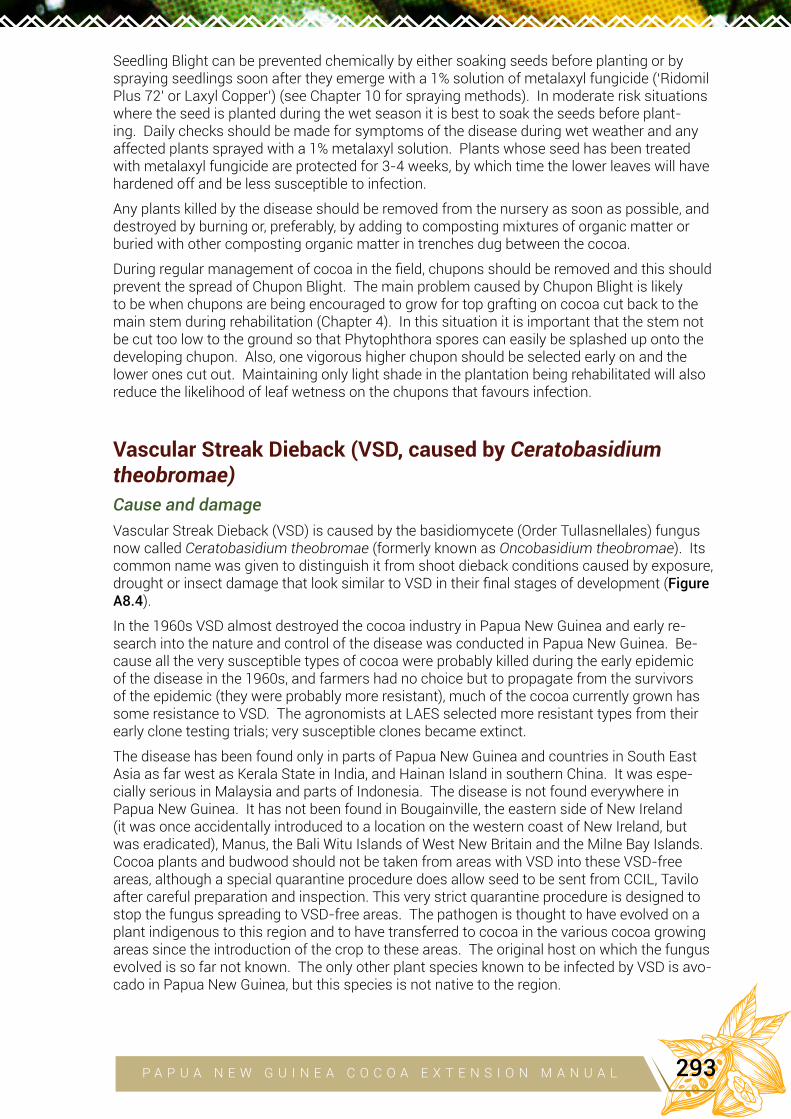
Seedling Blight can be prevented chemically by either soaking seeds before planting or by spraying seedlings soon after they emerge with a 1% solution of metalaxyl fungicide (‘Ridomil Plus 72’ or Laxyl Copper’) (see Chapter 10 for spraying methods). In moderate risk situations where the seed is planted during the wet season it is best to soak the seeds before plant-ing. Daily checks should be made for symptoms of the disease during wet weather and any affected plants sprayed with a 1% metalaxyl solution. Plants whose seed has been treated with metalaxyl fungicide are protected for 3-4 weeks, by which time the lower leaves will have hardened off and be less susceptible to infection.
Any plants killed by the disease should be removed from the nursery as soon as possible, and destroyed by burning or, preferably, by adding to composting mixtures of organic matter or buried with other composting organic matter in trenches dug between the cocoa.
During regular management of cocoa in the field, chupons should be removed and this should prevent the spread of Chupon Blight. The main problem caused by Chupon Blight is likely to be when chupons are being encouraged to grow for top grafting on cocoa cut back to the main stem during rehabilitation (Chapter 4). In this situation it is important that the stem not be cut too low to the ground so that Phytophthora spores can easily be splashed up onto the developing chupon. Also, one vigorous higher chupon should be selected early on and the lower ones cut out. Maintaining only light shade in the plantation being rehabilitated will also reduce the likelihood of leaf wetness on the chupons that favours infection.
Vascular Streak Dieback (VSD, caused by Ceratobasidium theobromae)
Cause and damage
Vascular Streak Dieback (VSD) is caused by the basidiomycete (Order Tullasnellales) fungus now called Ceratobasidium theobromae (formerly known as Oncobasidium theobromae). Its common name was given to distinguish it from shoot dieback conditions caused by exposure, drought or insect damage that look similar to VSD in their final stages of development (Figure A8.4).
In the 1960s VSD almost destroyed the cocoa industry in Papua New Guinea and early re-search into the nature and control of the disease was conducted in Papua New Guinea. Be-cause all the very susceptible types of cocoa were probably killed during the early epidemic of the disease in the 1960s, and farmers had no choice but to propagate from the survivors of the epidemic (they were probably more resistant), much of the cocoa currently grown has some resistance to VSD. The agronomists at LAES selected more resistant types from their early clone testing trials; very susceptible clones became extinct.
The disease has been found only in parts of Papua New Guinea and countries in South East Asia as far west as Kerala State in India, and Hainan Island in southern China. It was espe-cially serious in Malaysia and parts of Indonesia. The disease is not found everywhere in Papua New Guinea. It has not been found in Bougainville, the eastern side of New Ireland (it was once accidentally introduced to a location on the western coast of New Ireland, but was eradicated), Manus, the Bali Witu Islands of West New Britain and the Milne Bay Islands. Cocoa plants and budwood should not be taken from areas with VSD into these VSD-free areas, although a special quarantine procedure does allow seed to be sent from CCIL, Tavilo after careful preparation and inspection. This very strict quarantine procedure is designed to stop the fungus spreading to VSD-free areas. The pathogen is thought to have evolved on a plant indigenous to this region and to have transferred to cocoa in the various cocoa growing areas since the introduction of the crop to these areas. The original host on which the fungus evolved is so far not known. The only other plant species known to be infected by VSD is avo-cado in Papua New Guinea, but this species is not native to the region.
P A P U A N E W G U I N E A C O C O A E X T E N S I O N M A N U A L 293
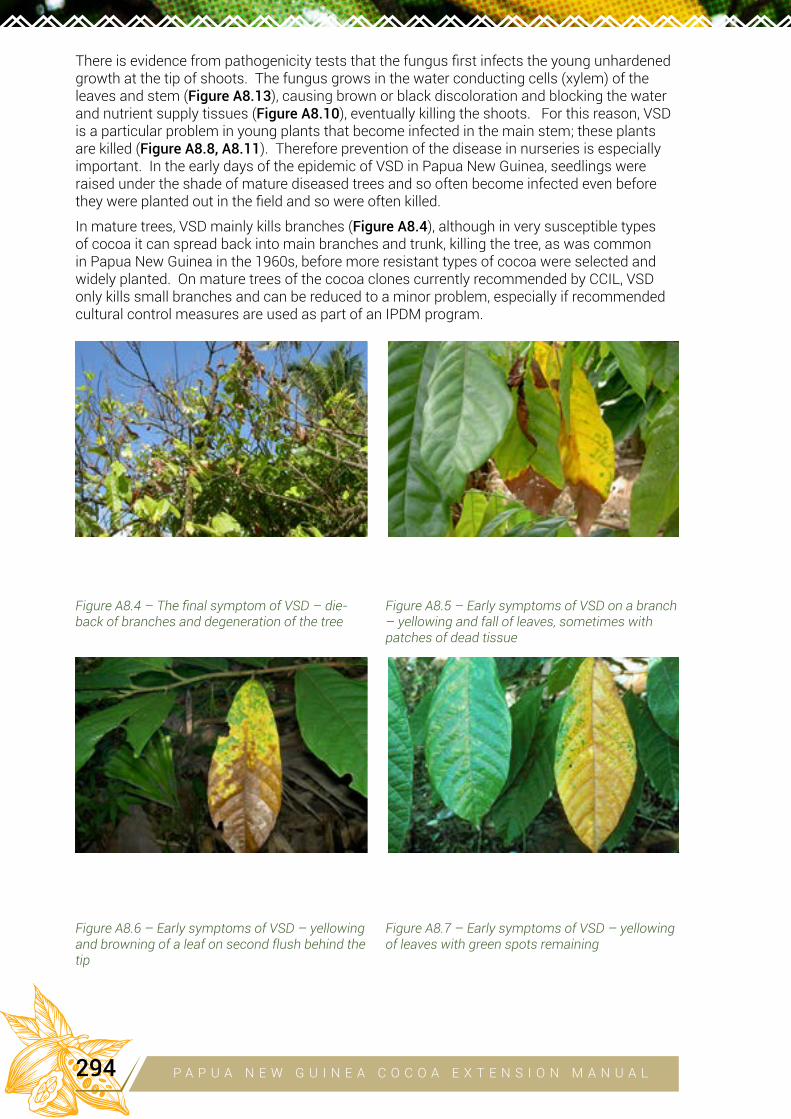
There is evidence from pathogenicity tests that the fungus first infects the young unhardened growth at the tip of shoots. The fungus grows in the water conducting cells (xylem) of the leaves and stem (Figure A8.13), causing brown or black discoloration and blocking the water and nutrient supply tissues (Figure A8.10), eventually killing the shoots. For this reason, VSD is a particular problem in young plants that become infected in the main stem; these plants are killed (Figure A8.8, A8.11). Therefore prevention of the disease in nurseries is especially important. In the early days of the epidemic of VSD in Papua New Guinea, seedlings were raised under the shade of mature diseased trees and so often become infected even before they were planted out in the field and so were often killed.
In mature trees, VSD mainly kills branches (Figure A8.4), although in very susceptible types of cocoa it can spread back into main branches and trunk, killing the tree, as was common in Papua New Guinea in the 1960s, before more resistant types of cocoa were selected and widely planted. On mature trees of the cocoa clones currently recommended by CCIL, VSD only kills small branches and can be reduced to a minor problem, especially if recommended cultural control measures are used as part of an IPDM program.
Figure A8.4 – The final symptom of VSD – die-back of branches and degeneration of the tree
Figure A8.6 – Early symptoms of VSD – yellowing and browning of a leaf on second flush behind the tip
Figure A8.5 – Early symptoms of VSD on a branch – yellowing and fall of leaves, sometimes with patches of dead tissue
Figure A8.7 – Early symptoms of VSD – yellowing of leaves with green spots remaining
P A P U A N E W G U I N E A C O C O A E X T E N S I O N M A N U A L294
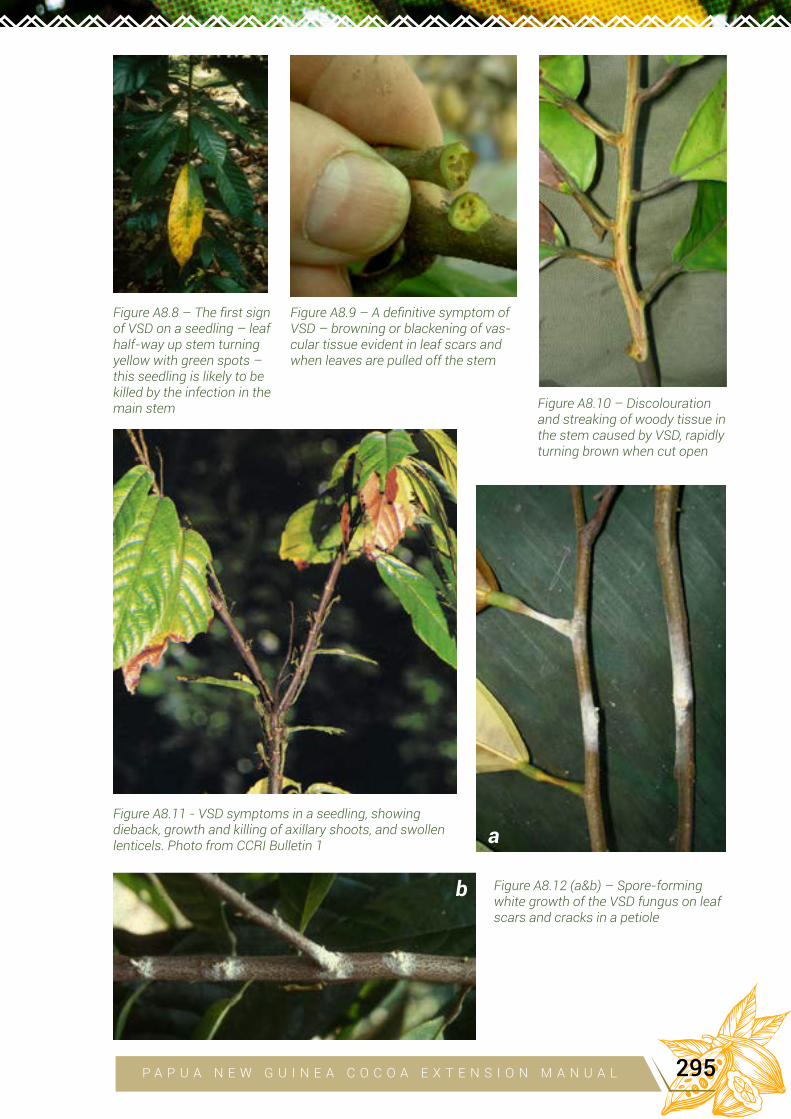
Figure A8.8 – The first sign of VSD on a seedling – leaf half-way up stem turning yellow with green spots – this seedling is likely to be killed by the infection in the main stem
Figure A8.9 – A definitive symptom of VSD – browning or blackening of vas-cular tissue evident in leaf scars and when leaves are pulled off the stem
Figure A8.10 – Discolouration and streaking of woody tissue in the stem caused by VSD, rapidly turning brown when cut open
Figure A8.11 - VSD symptoms in a seedling, showing dieback, growth and killing of axillary shoots, and swollen lenticels. Photo from CCRI Bulletin 1
Figure A8.12 (a&b) – Spore-forming white growth of the VSD fungus on leaf scars and cracks in a petiole
a
b
P A P U A N E W G U I N E A C O C O A E X T E N S I O N M A N U A L 295
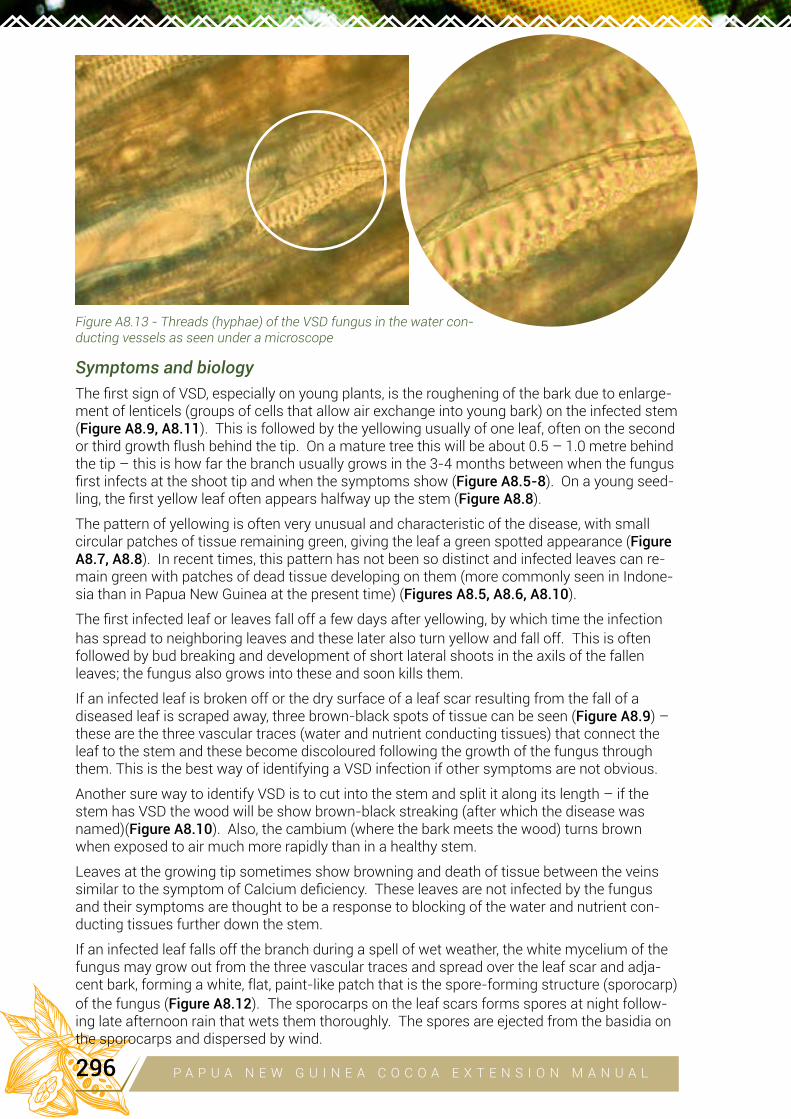
Symptoms and biology
The first sign of VSD, especially on young plants, is the roughening of the bark due to enlarge-ment of lenticels (groups of cells that allow air exchange into young bark) on the infected stem (Figure A8.9, A8.11). This is followed by the yellowing usually of one leaf, often on the second or third growth flush behind the tip. On a mature tree this will be about 0.5 – 1.0 metre behind the tip – this is how far the branch usually grows in the 3-4 months between when the fungus first infects at the shoot tip and when the symptoms show (Figure A8.5-8). On a young seed-ling, the first yellow leaf often appears halfway up the stem (Figure A8.8).
The pattern of yellowing is often very unusual and characteristic of the disease, with small circular patches of tissue remaining green, giving the leaf a green spotted appearance (Figure A8.7, A8.8). In recent times, this pattern has not been so distinct and infected leaves can re-main green with patches of dead tissue developing on them (more commonly seen in Indone-sia than in Papua New Guinea at the present time) (Figures A8.5, A8.6, A8.10).
The first infected leaf or leaves fall off a few days after yellowing, by which time the infection has spread to neighboring leaves and these later also turn yellow and fall off. This is often followed by bud breaking and development of short lateral shoots in the axils of the fallen leaves; the fungus also grows into these and soon kills them.
If an infected leaf is broken off or the dry surface of a leaf scar resulting from the fall of a diseased leaf is scraped away, three brown-black spots of tissue can be seen (Figure A8.9) – these are the three vascular traces (water and nutrient conducting tissues) that connect the leaf to the stem and these become discoloured following the growth of the fungus through them. This is the best way of identifying a VSD infection if other symptoms are not obvious.
Another sure way to identify VSD is to cut into the stem and split it along its length – if the stem has VSD the wood will be show brown-black streaking (after which the disease was named)(Figure A8.10). Also, the cambium (where the bark meets the wood) turns brown when exposed to air much more rapidly than in a healthy stem.
Leaves at the growing tip sometimes show browning and death of tissue between the veins similar to the symptom of Calcium deficiency. These leaves are not infected by the fungus and their symptoms are thought to be a response to blocking of the water and nutrient con-ducting tissues further down the stem.
If an infected leaf falls off the branch during a spell of wet weather, the white mycelium of the fungus may grow out from the three vascular traces and spread over the leaf scar and adja-cent bark, forming a white, flat, paint-like patch that is the spore-forming structure (sporocarp) of the fungus (Figure A8.12). The sporocarps on the leaf scars forms spores at night follow-ing late afternoon rain that wets them thoroughly. The spores are ejected from the basidia on the sporocarps and dispersed by wind.
Figure A8.13 - Threads (hyphae) of the VSD fungus in the water con-ducting vessels as seen under a microscope
P A P U A N E W G U I N E A C O C O A E X T E N S I O N M A N U A L296
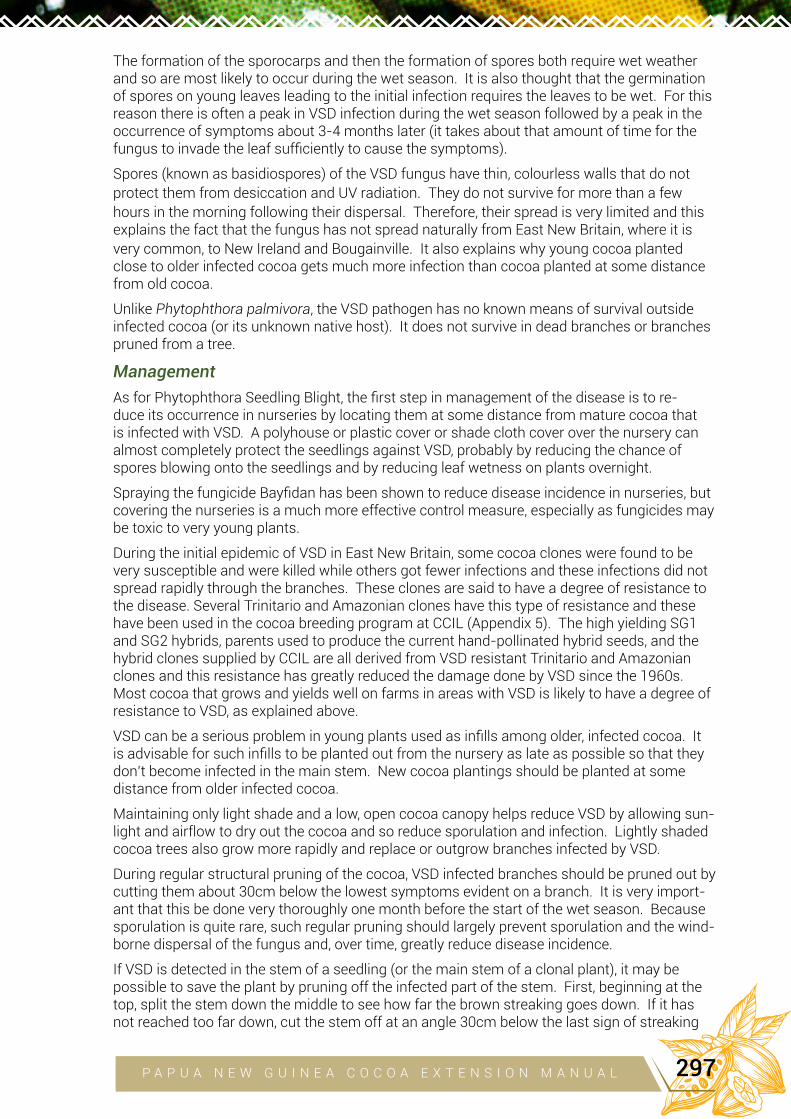
The formation of the sporocarps and then the formation of spores both require wet weather and so are most likely to occur during the wet season. It is also thought that the germination of spores on young leaves leading to the initial infection requires the leaves to be wet. For this reason there is often a peak in VSD infection during the wet season followed by a peak in the occurrence of symptoms about 3-4 months later (it takes about that amount of time for the fungus to invade the leaf sufficiently to cause the symptoms).
Spores (known as basidiospores) of the VSD fungus have thin, colourless walls that do not protect them from desiccation and UV radiation. They do not survive for more than a few
hours in the morning following their dispersal. Therefore, their spread is very limited and this explains the fact that the fungus has not spread naturally from East New Britain, where it is very common, to New Ireland and Bougainville. It also explains why young cocoa planted close to older infected cocoa gets much more infection than cocoa planted at some distance from old cocoa.
Unlike Phytophthora palmivora, the VSD pathogen has no known means of survival outside infected cocoa (or its unknown native host). It does not survive in dead branches or branches pruned from a tree.
Management
As for Phytophthora Seedling Blight, the first step in management of the disease is to re-duce its occurrence in nurseries by locating them at some distance from mature cocoa that is infected with VSD. A polyhouse or plastic cover or shade cloth cover over the nursery can almost completely protect the seedlings against VSD, probably by reducing the chance of spores blowing onto the seedlings and by reducing leaf wetness on plants overnight.
Spraying the fungicide Bayfidan has been shown to reduce disease incidence in nurseries, but covering the nurseries is a much more effective control measure, especially as fungicides may be toxic to very young plants.
During the initial epidemic of VSD in East New Britain, some cocoa clones were found to be very susceptible and were killed while others got fewer infections and these infections did not spread rapidly through the branches. These clones are said to have a degree of resistance to the disease. Several Trinitario and Amazonian clones have this type of resistance and these have been used in the cocoa breeding program at CCIL (Appendix 5). The high yielding SG1 and SG2 hybrids, parents used to produce the current hand-pollinated hybrid seeds, and the hybrid clones supplied by CCIL are all derived from VSD resistant Trinitario and Amazonian clones and this resistance has greatly reduced the damage done by VSD since the 1960s. Most cocoa that grows and yields well on farms in areas with VSD is likely to have a degree of resistance to VSD, as explained above.
VSD can be a serious problem in young plants used as infills among older, infected cocoa. It is advisable for such infills to be planted out from the nursery as late as possible so that they don’t become infected in the main stem. New cocoa plantings should be planted at some distance from older infected cocoa.
Maintaining only light shade and a low, open cocoa canopy helps reduce VSD by allowing sun-light and airflow to dry out the cocoa and so reduce sporulation and infection. Lightly shaded cocoa trees also grow more rapidly and replace or outgrow branches infected by VSD.
During regular structural pruning of the cocoa, VSD infected branches should be pruned out by cutting them about 30cm below the lowest symptoms evident on a branch. It is very import-ant that this be done very thoroughly one month before the start of the wet season. Because sporulation is quite rare, such regular pruning should largely prevent sporulation and the wind-borne dispersal of the fungus and, over time, greatly reduce disease incidence.
If VSD is detected in the stem of a seedling (or the main stem of a clonal plant), it may be possible to save the plant by pruning off the infected part of the stem. First, beginning at the top, split the stem down the middle to see how far the brown streaking goes down. If it has not reached too far down, cut the stem off at an angle 30cm below the last sign of streaking
P A P U A N E W G U I N E A C O C O A E X T E N S I O N M A N U A L 297
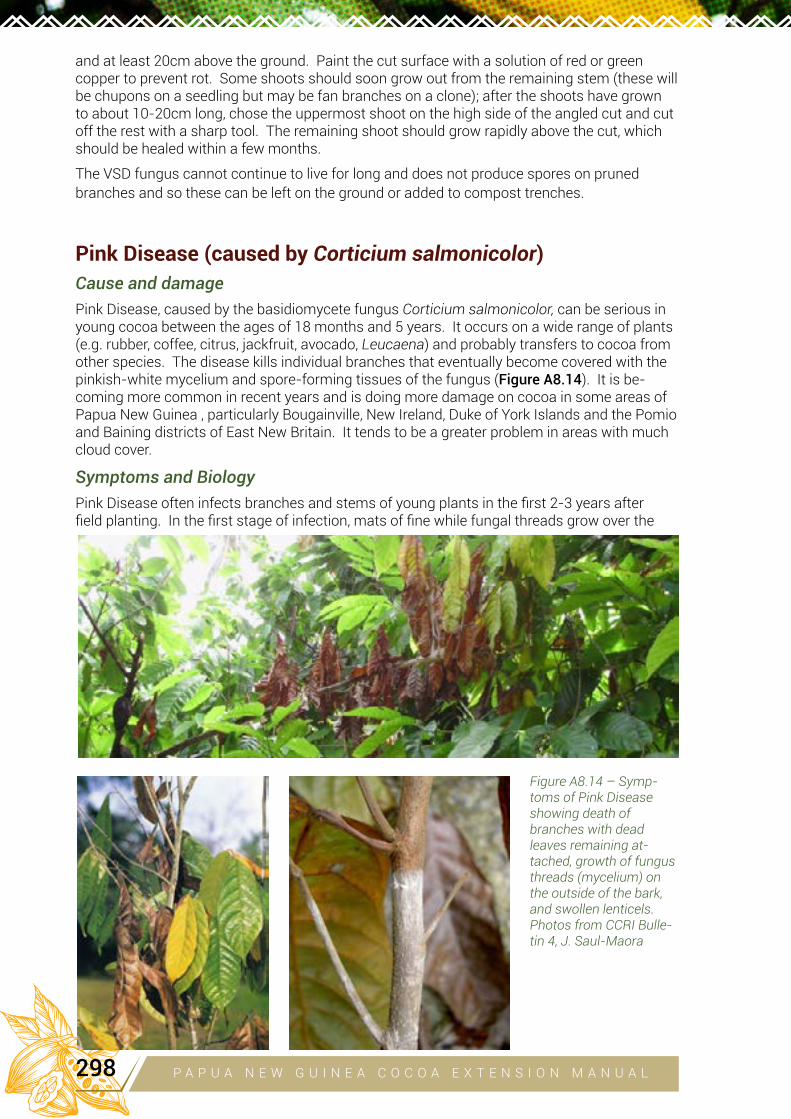
and at least 20cm above the ground. Paint the cut surface with a solution of red or green copper to prevent rot. Some shoots should soon grow out from the remaining stem (these will be chupons on a seedling but may be fan branches on a clone); after the shoots have grown to about 10-20cm long, chose the uppermost shoot on the high side of the angled cut and cut off the rest with a sharp tool. The remaining shoot should grow rapidly above the cut, which should be healed within a few months.
The VSD fungus cannot continue to live for long and does not produce spores on pruned branches and so these can be left on the ground or added to compost trenches.
Pink Disease (caused by Corticium salmonicolor)
Cause and damage
Pink Disease, caused by the basidiomycete fungus Corticium salmonicolor, can be serious in young cocoa between the ages of 18 months and 5 years. It occurs on a wide range of plants (e.g. rubber, coffee, citrus, jackfruit, avocado, Leucaena) and probably transfers to cocoa from other species. The disease kills individual branches that eventually become covered with the pinkish-white mycelium and spore-forming tissues of the fungus (Figure A8.14). It is be-coming more common in recent years and is doing more damage on cocoa in some areas of Papua New Guinea , particularly Bougainville, New Ireland, Duke of York Islands and the Pomio and Baining districts of East New Britain. It tends to be a greater problem in areas with much cloud cover.
Symptoms and BiologyPink Disease often infects branches and stems of young plants in the first 2-3 years after field planting. In the first stage of infection, mats of fine while fungal threads grow over the
Figure A8.14 – Symp-toms of Pink Disease showing death of branches with dead leaves remaining at-tached, growth of fungus threads (mycelium) on the outside of the bark, and swollen lenticels. Photos from CCRI Bulle-tin 4, J. Saul-Maora
P A P U A N E W G U I N E A C O C O A E X T E N S I O N M A N U A L298

surface of the bark like a spider’s web (Figures A8.14, A8.15 – LH photo). In the second stage of infection the fungus forms pinkish-white growths that erupt through the bark in lines along cracks in the bark or through lenticels (Figure A8.15 – centre photo). There is no spore formation at this stage but the fungus grows deeper into the woody tissues of the stem, and leaves at the end of the branch start wilting but often do not fall off. At a more advanced third stage the fungus produces pinkish-orange or pinkish-white spore-forming crusts towards the underside of the branch (Figure A8.15 – RH photo). When wetted, these crusts produce basidiospores (like those of the VSD pathogen) that are dispersed by wind. After a peak in sporulation the crusts grow paler and become cracked. The fungus penetrates right through the infected branch and can kill even larger branches. Under dry conditions the infection is slowed and the infected branch may survive; the bark may crack through to the wood but also form a thick callus tissue that protects the rest of the branch.
Like the VSD fungus, the Pink Disease fungus has no known means of long-term survival oth-er than as infections on cocoa.
Management
Young cocoa plants are more susceptible than older plants and so it is important that control strategies are applied immediately after field planting of young cocoa. These strategies are the same as for VSD. Pink Disease is favoured by overshading and lack of pruning that cre-ates high humidity in the cocoa canopy. Like VSD, penetration of sunlight and airflow through the plantation will more rapidly dry out the cocoa and reduce the incidence of Pink Disease.
With low levels of infection the disease can be controlled by the same pruning regime as used for VSD. During regular structural pruning, branches with Pink Disease should be cut off about 30cm below the last evidence of the disease on the branch. If a young plant is infected in the main stem, the plant may be saved by applying the same pruning and recovery procedure as for VSD (see above).
Prunings with Pink Disease should be disposed of by burning or, preferably, burial in compost trenches; this is more important than for VSD prunings because the Pink Disease fungus can continue to sporulate for some time on dead branches.
Currently there is no chemical recommended for spraying or painting to control Pink Disease in cocoa although some have been used for controlling the disease in rubber.
Figure A8.15 – Symptoms of pink disease on the stems showing growth of fungus threads (mycelium) on the outside of the bark (LH - stage 1), growth of fungus in swollen lenticels (centre - stage 2), and formation of a dense crust of spore-forming fungus tissue (RH – stage 3) Photos from CCRI Bulletin 4
P A P U A N E W G U I N E A C O C O A E X T E N S I O N M A N U A L 299
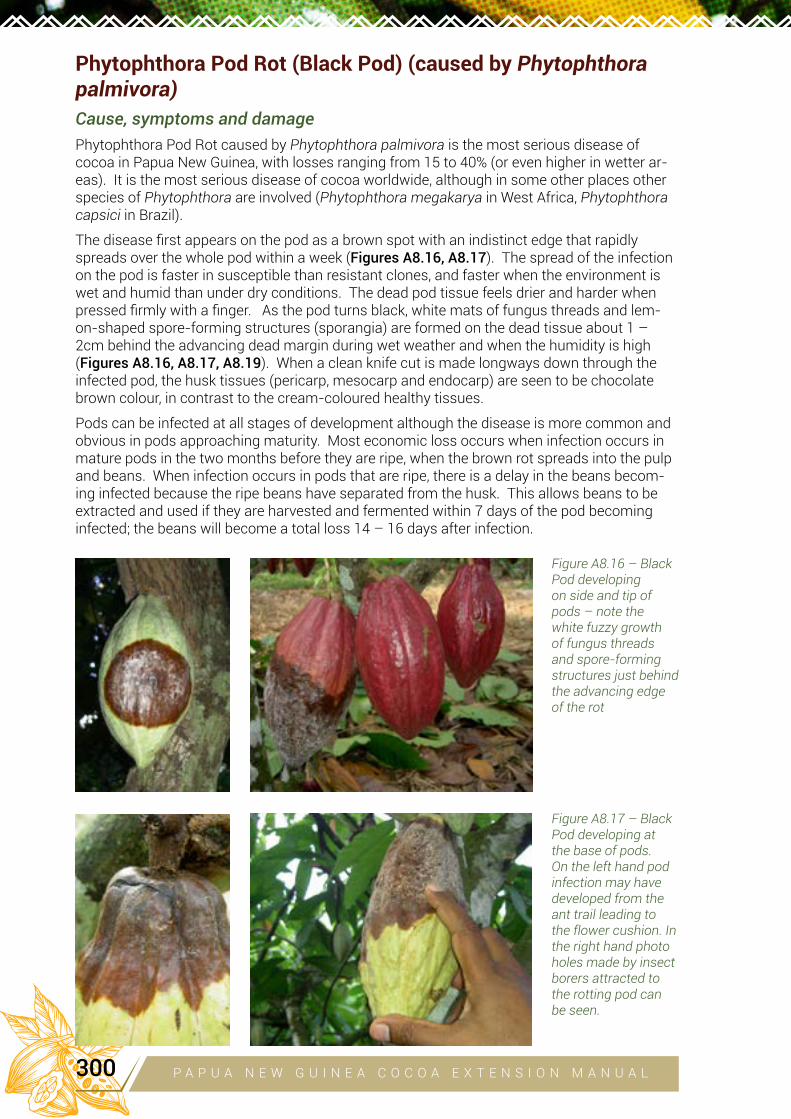
Phytophthora Pod Rot (Black Pod) (caused by Phytophthora palmivora)
Cause, symptoms and damage
Phytophthora Pod Rot caused by Phytophthora palmivora is the most serious disease of cocoa in Papua New Guinea, with losses ranging from 15 to 40% (or even higher in wetter ar-eas). It is the most serious disease of cocoa worldwide, although in some other places other species of Phytophthora are involved (Phytophthora megakarya in West Africa, Phytophthora capsici in Brazil).
The disease first appears on the pod as a brown spot with an indistinct edge that rapidly spreads over the whole pod within a week (Figures A8.16, A8.17). The spread of the infection on the pod is faster in susceptible than resistant clones, and faster when the environment is wet and humid than under dry conditions. The dead pod tissue feels drier and harder when pressed firmly with a finger. As the pod turns black, white mats of fungus threads and lem-on-shaped spore-forming structures (sporangia) are formed on the dead tissue about 1 – 2cm behind the advancing dead margin during wet weather and when the humidity is high (Figures A8.16, A8.17, A8.19). When a clean knife cut is made longways down through the infected pod, the husk tissues (pericarp, mesocarp and endocarp) are seen to be chocolate brown colour, in contrast to the cream-coloured healthy tissues.
Pods can be infected at all stages of development although the disease is more common and obvious in pods approaching maturity. Most economic loss occurs when infection occurs in mature pods in the two months before they are ripe, when the brown rot spreads into the pulp and beans. When infection occurs in pods that are ripe, there is a delay in the beans becom-ing infected because the ripe beans have separated from the husk. This allows beans to be extracted and used if they are harvested and fermented within 7 days of the pod becoming infected; the beans will become a total loss 14 – 16 days after infection.
Figure A8.16 – Black Pod developing on side and tip of pods – note the white fuzzy growth of fungus threads and spore-forming structures just behind the advancing edge of the rot
Figure A8.17 – Black Pod developing at the base of pods. On the left hand pod infection may have developed from the ant trail leading to the flower cushion. In the right hand photo holes made by insect borers attracted to the rotting pod can be seen.
P A P U A N E W G U I N E A C O C O A E X T E N S I O N M A N U A L300
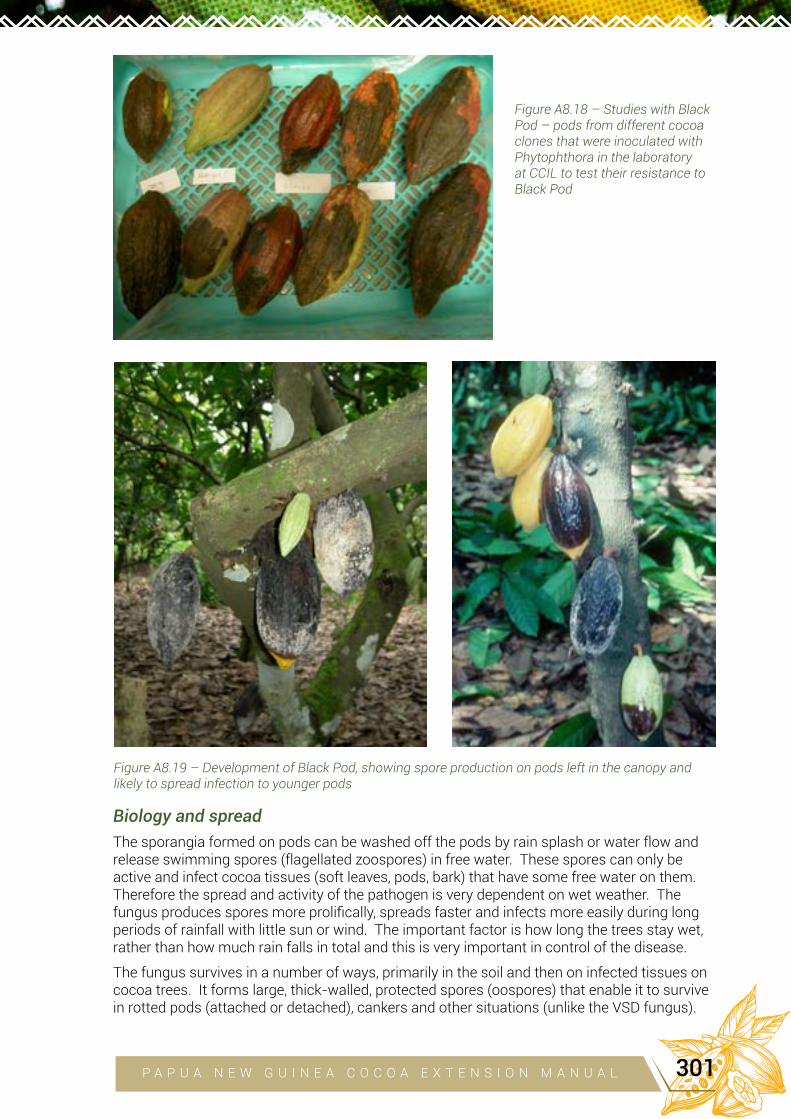
Biology and spreadThe sporangia formed on pods can be washed off the pods by rain splash or water flow and release swimming spores (flagellated zoospores) in free water. These spores can only be active and infect cocoa tissues (soft leaves, pods, bark) that have some free water on them. Therefore the spread and activity of the pathogen is very dependent on wet weather. The fungus produces spores more prolifically, spreads faster and infects more easily during long periods of rainfall with little sun or wind. The important factor is how long the trees stay wet, rather than how much rain falls in total and this is very important in control of the disease.
The fungus survives in a number of ways, primarily in the soil and then on infected tissues on cocoa trees. It forms large, thick-walled, protected spores (oospores) that enable it to survive in rotted pods (attached or detached), cankers and other situations (unlike the VSD fungus).
Figure A8.18 – Studies with Black Pod – pods from different cocoa clones that were inoculated with Phytophthora in the laboratory at CCIL to test their resistance to Black Pod
Figure A8.19 – Development of Black Pod, showing spore production on pods left in the canopy and likely to spread infection to younger pods
P A P U A N E W G U I N E A C O C O A E X T E N S I O N M A N U A L 301
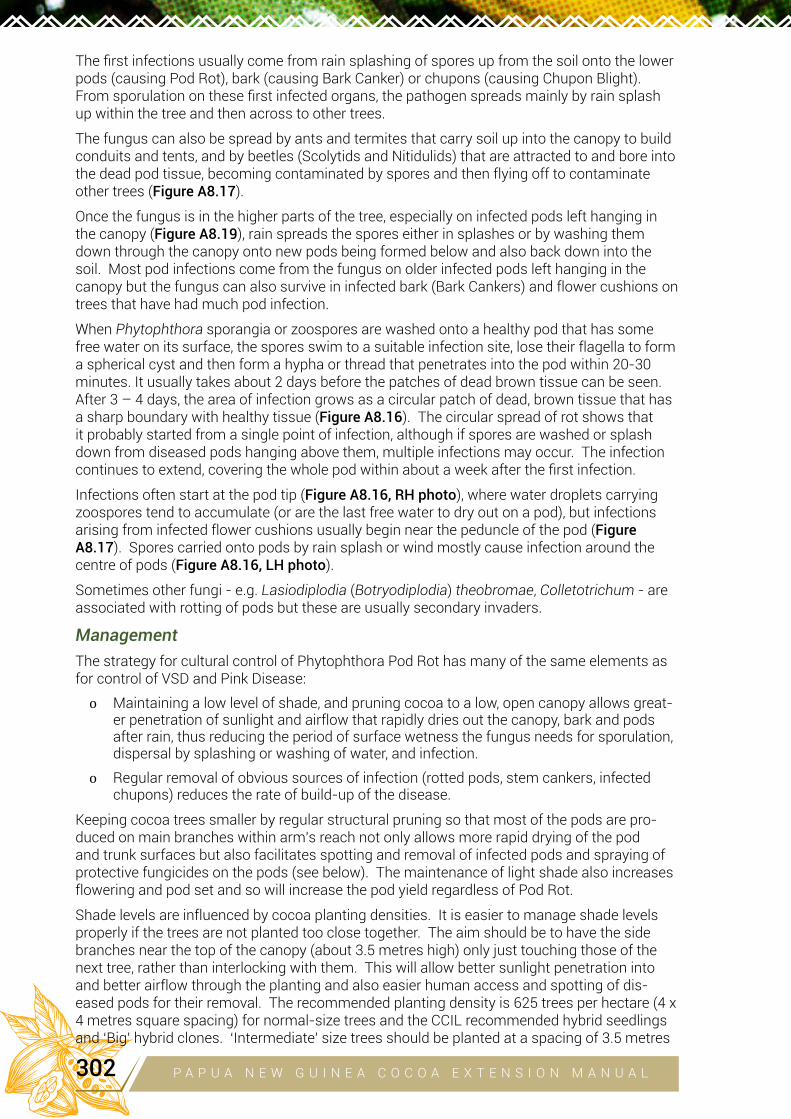
The first infections usually come from rain splashing of spores up from the soil onto the lower pods (causing Pod Rot), bark (causing Bark Canker) or chupons (causing Chupon Blight). From sporulation on these first infected organs, the pathogen spreads mainly by rain splash up within the tree and then across to other trees.
The fungus can also be spread by ants and termites that carry soil up into the canopy to build conduits and tents, and by beetles (Scolytids and Nitidulids) that are attracted to and bore into the dead pod tissue, becoming contaminated by spores and then flying off to contaminate other trees (Figure A8.17).
Once the fungus is in the higher parts of the tree, especially on infected pods left hanging in the canopy (Figure A8.19), rain spreads the spores either in splashes or by washing them down through the canopy onto new pods being formed below and also back down into the soil. Most pod infections come from the fungus on older infected pods left hanging in the canopy but the fungus can also survive in infected bark (Bark Cankers) and flower cushions on trees that have had much pod infection.
When Phytophthora sporangia or zoospores are washed onto a healthy pod that has some free water on its surface, the spores swim to a suitable infection site, lose their flagella to form a spherical cyst and then form a hypha or thread that penetrates into the pod within 20-30 minutes. It usually takes about 2 days before the patches of dead brown tissue can be seen. After 3 – 4 days, the area of infection grows as a circular patch of dead, brown tissue that has a sharp boundary with healthy tissue (Figure A8.16). The circular spread of rot shows that it probably started from a single point of infection, although if spores are washed or splash down from diseased pods hanging above them, multiple infections may occur. The infection continues to extend, covering the whole pod within about a week after the first infection.
Infections often start at the pod tip (Figure A8.16, RH photo), where water droplets carrying zoospores tend to accumulate (or are the last free water to dry out on a pod), but infections arising from infected flower cushions usually begin near the peduncle of the pod (Figure A8.17). Spores carried onto pods by rain splash or wind mostly cause infection around the centre of pods (Figure A8.16, LH photo).
Sometimes other fungi - e.g. Lasiodiplodia (Botryodiplodia) theobromae, Colletotrichum - are associated with rotting of pods but these are usually secondary invaders.
Management
The strategy for cultural control of Phytophthora Pod Rot has many of the same elements as for control of VSD and Pink Disease:
o Maintaining a low level of shade, and pruning cocoa to a low, open canopy allows great-er penetration of sunlight and airflow that rapidly dries out the canopy, bark and pods after rain, thus reducing the period of surface wetness the fungus needs for sporulation, dispersal by splashing or washing of water, and infection.
o Regular removal of obvious sources of infection (rotted pods, stem cankers, infected chupons) reduces the rate of build-up of the disease.
Keeping cocoa trees smaller by regular structural pruning so that most of the pods are pro-duced on main branches within arm’s reach not only allows more rapid drying of the pod and trunk surfaces but also facilitates spotting and removal of infected pods and spraying of protective fungicides on the pods (see below). The maintenance of light shade also increases flowering and pod set and so will increase the pod yield regardless of Pod Rot.
Shade levels are influenced by cocoa planting densities. It is easier to manage shade levels properly if the trees are not planted too close together. The aim should be to have the side branches near the top of the canopy (about 3.5 metres high) only just touching those of the next tree, rather than interlocking with them. This will allow better sunlight penetration into and better airflow through the planting and also easier human access and spotting of dis-eased pods for their removal. The recommended planting density is 625 trees per hectare (4 x 4 metres square spacing) for normal-size trees and the CCIL recommended hybrid seedlings and ‘Big’ hybrid clones. ‘Intermediate’ size trees should be planted at a spacing of 3.5 metres
P A P U A N E W G U I N E A C O C O A E X T E N S I O N M A N U A L302
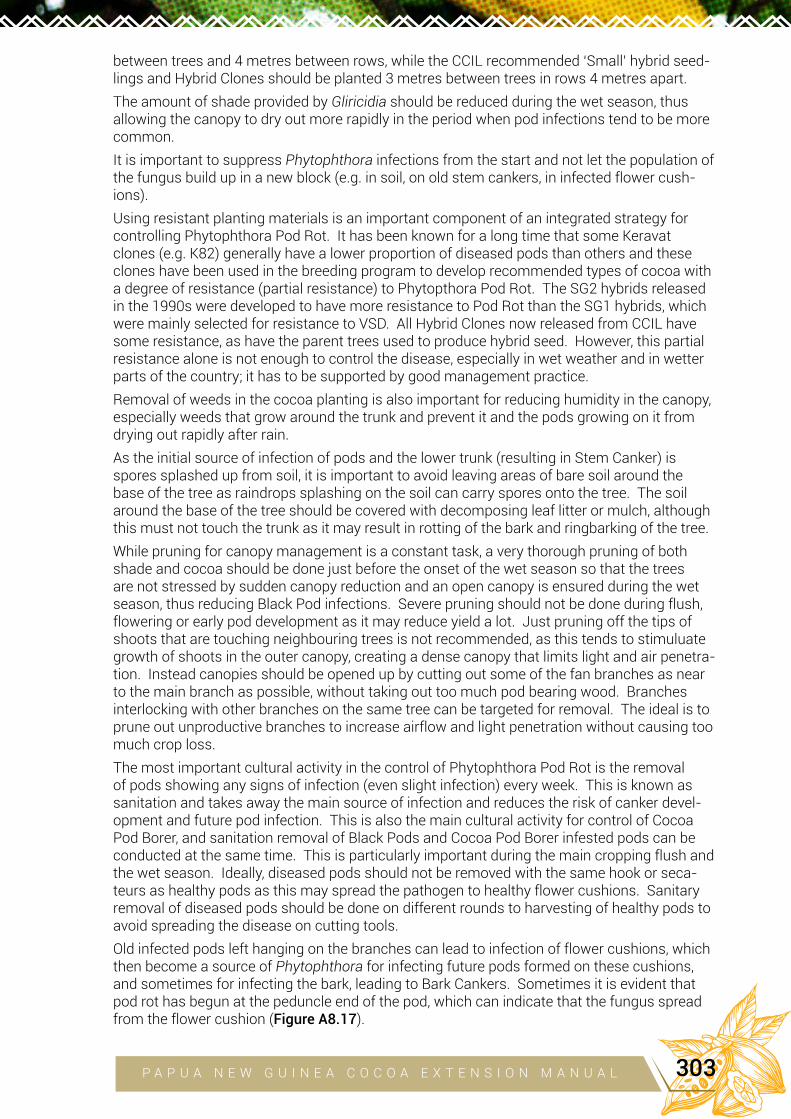
between trees and 4 metres between rows, while the CCIL recommended ‘Small’ hybrid seed-lings and Hybrid Clones should be planted 3 metres between trees in rows 4 metres apart.The amount of shade provided by Gliricidia should be reduced during the wet season, thus allowing the canopy to dry out more rapidly in the period when pod infections tend to be more common.
It is important to suppress Phytophthora infections from the start and not let the population of the fungus build up in a new block (e.g. in soil, on old stem cankers, in infected flower cush-ions).
Using resistant planting materials is an important component of an integrated strategy for controlling Phytophthora Pod Rot. It has been known for a long time that some Keravat clones (e.g. K82) generally have a lower proportion of diseased pods than others and these clones have been used in the breeding program to develop recommended types of cocoa with a degree of resistance (partial resistance) to Phytopthora Pod Rot. The SG2 hybrids released in the 1990s were developed to have more resistance to Pod Rot than the SG1 hybrids, which were mainly selected for resistance to VSD. All Hybrid Clones now released from CCIL have some resistance, as have the parent trees used to produce hybrid seed. However, this partial resistance alone is not enough to control the disease, especially in wet weather and in wetter parts of the country; it has to be supported by good management practice. Removal of weeds in the cocoa planting is also important for reducing humidity in the canopy, especially weeds that grow around the trunk and prevent it and the pods growing on it from drying out rapidly after rain.
As the initial source of infection of pods and the lower trunk (resulting in Stem Canker) is spores splashed up from soil, it is important to avoid leaving areas of bare soil around the base of the tree as raindrops splashing on the soil can carry spores onto the tree. The soil around the base of the tree should be covered with decomposing leaf litter or mulch, although this must not touch the trunk as it may result in rotting of the bark and ringbarking of the tree.While pruning for canopy management is a constant task, a very thorough pruning of both shade and cocoa should be done just before the onset of the wet season so that the trees are not stressed by sudden canopy reduction and an open canopy is ensured during the wet season, thus reducing Black Pod infections. Severe pruning should not be done during flush, flowering or early pod development as it may reduce yield a lot. Just pruning off the tips of shoots that are touching neighbouring trees is not recommended, as this tends to stimuluate growth of shoots in the outer canopy, creating a dense canopy that limits light and air penetra-tion. Instead canopies should be opened up by cutting out some of the fan branches as near to the main branch as possible, without taking out too much pod bearing wood. Branches interlocking with other branches on the same tree can be targeted for removal. The ideal is to prune out unproductive branches to increase airflow and light penetration without causing too much crop loss.
The most important cultural activity in the control of Phytophthora Pod Rot is the removal of pods showing any signs of infection (even slight infection) every week. This is known as sanitation and takes away the main source of infection and reduces the risk of canker devel-opment and future pod infection. This is also the main cultural activity for control of Cocoa Pod Borer, and sanitation removal of Black Pods and Cocoa Pod Borer infested pods can be conducted at the same time. This is particularly important during the main cropping flush and the wet season. Ideally, diseased pods should not be removed with the same hook or seca-teurs as healthy pods as this may spread the pathogen to healthy flower cushions. Sanitary removal of diseased pods should be done on different rounds to harvesting of healthy pods to avoid spreading the disease on cutting tools.
Old infected pods left hanging on the branches can lead to infection of flower cushions, which then become a source of Phytophthora for infecting future pods formed on these cushions, and sometimes for infecting the bark, leading to Bark Cankers. Sometimes it is evident that pod rot has begun at the peduncle end of the pod, which can indicate that the fungus spread from the flower cushion (Figure A8.17).
P A P U A N E W G U I N E A C O C O A E X T E N S I O N M A N U A L 303
The disposal of infected pods removed during sanitiation rounds is very important as these can become a source of infection if left lying on the ground, and they will contribute to the population of Phytophthora in the soil. There are two possibilities for disposal of diseased pods:
o They can be collected and removed from the vicinity of the cocoa planting and buried in a pit or chopped up and added to a compost heap away from the cocoa (Chapter 6)
o They can be chopped up in the field and buried along with other organic waste (weeds, CPB infested pods, chopped up prunings) and animal manure in shallow composting trenches dug between the rows of cocoa. Healthy pod husks and cocoa prunings can be chopped up and disposed of in the same way. This in situ composting provides a good source of nutrients for the cocoa. It is more practical to dispose of cocoa waste in the field than to cart it to a central processing facility and then cart it back to the field to distribute around the cocoa trees.
Disposal of healthy pod husks requires more research to determine if they are important breed-ing sites for the midges that pollinate cocoa – it is possible that burying them may reduce the populations of pollinator midges in the plantings.
It is possible to extract beans from pods infected late in their development if the infection has not penetrated through to the beans. Ideally, these beans should be fermented separately from the beans extracted from healthy pods.Chemical control of Phytophthora Pod Rot by canopy spraying of fungicides is more feasible than for VSD or Pink Disease, but is expensive (for the chemicals, spray equipment and labour involved) and has some hazards for farmer health. It should not be viewed as a substitute for the cultural control measures discussed above, but it can be recommended as part of an inte-grated management strategy that uses all control measures, or as a last resort where very wet weather in wet locations means that pod infection is common despite implementation of all the best cultural methods. Pruning trees to keep them small will allow more effective spraying than in big, overgrown trees. For smallholders, hand operated knapsack pressure sprayers are more cost effective than motorised mist sprayers. (see Chapter 10 for details of the chemicals used and safe spray application).
Introduction of Crazy Ants can contribute to control of Phytophthora Pod Rot because they tend to drive away the tent-building ants that can carry Phytophthora spores up into the canopy in contaminated soil.
Cherelle Wilt
Cause and symptoms
It is well known that many of the small pods (cherelles, less than 8 cm long) formed on cocoa trees turn brown and die before they can develop into larger pods (Appendix 3). This is referred to as Cherelle Wilt. It is probably mostly a physiological thinning out of fruits so that the pod bearing matches the photosynthetic capacity of the tree, but Phytophthora can infect cherelles and may be responsible for some rotting of cherelles. Phytophthora infection can be distin-guished from physiological cherelle wilt as follows -
o In the very early stages of infection by Phytophthora, a spreading patch of brown, dead tissue, not associated with any yellowing of the cherelle, can be seen - this can start at the stalk (peduncle), side or tip of the cherelle, depending on where the Phytophthora spore first lands and infects (Figure A8.20, LH photo).
o With physiological Cherelle Wilt there is a general yellowing of the cherelle or the presence of a yellow band of tissue in front of any browning of the tissue before the cherelle be-comes completely necrotic (Figure A8.20, RH photo).
o Once the cherelles are completely dead it is difficult to tell from their appearance whether they have been killed by natural Cherelle Wilt or Phytophthora infection, but those killed by Cherelle Wilt will drop off easily when knocked while those killed by Phytophthora cannot be knocked off so easily.
P A P U A N E W G U I N E A C O C O A E X T E N S I O N M A N U A L304
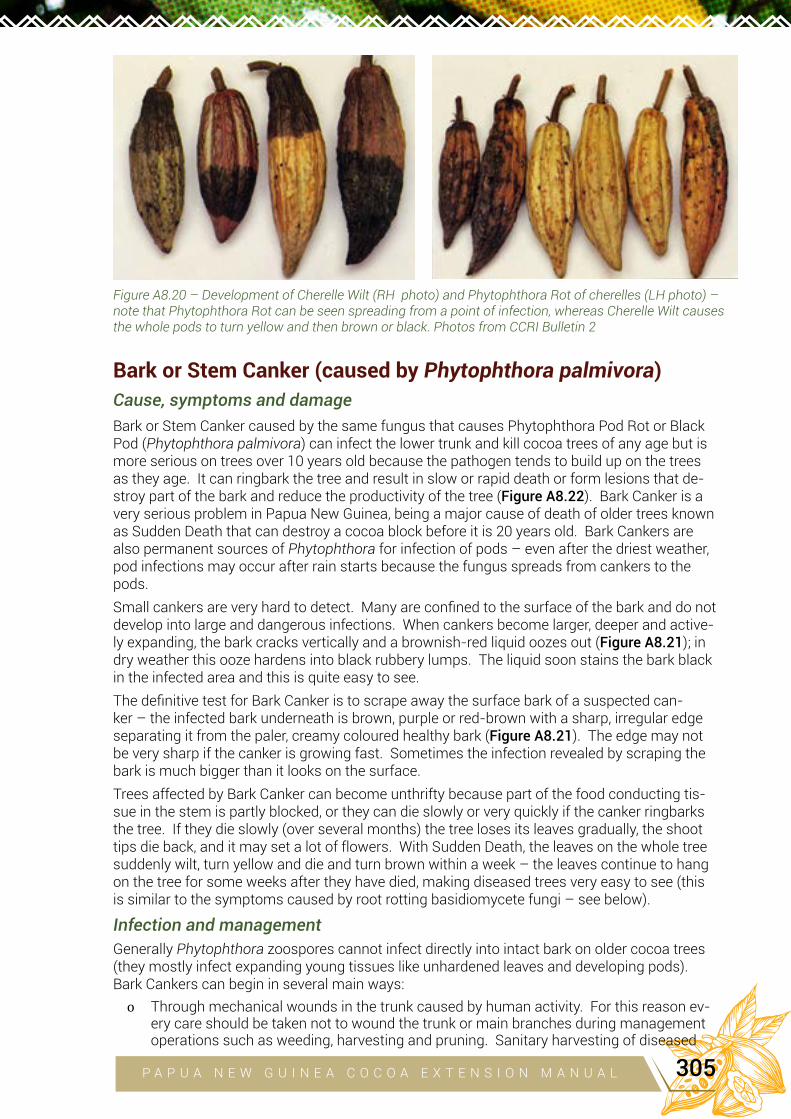
Bark or Stem Canker (caused by Phytophthora palmivora)
Cause, symptoms and damage
Bark or Stem Canker caused by the same fungus that causes Phytophthora Pod Rot or Black Pod (Phytophthora palmivora) can infect the lower trunk and kill cocoa trees of any age but is more serious on trees over 10 years old because the pathogen tends to build up on the trees as they age. It can ringbark the tree and result in slow or rapid death or form lesions that de-stroy part of the bark and reduce the productivity of the tree (Figure A8.22). Bark Canker is a very serious problem in Papua New Guinea, being a major cause of death of older trees known as Sudden Death that can destroy a cocoa block before it is 20 years old. Bark Cankers are also permanent sources of Phytophthora for infection of pods – even after the driest weather, pod infections may occur after rain starts because the fungus spreads from cankers to the pods.
Small cankers are very hard to detect. Many are confined to the surface of the bark and do not develop into large and dangerous infections. When cankers become larger, deeper and active-ly expanding, the bark cracks vertically and a brownish-red liquid oozes out (Figure A8.21); in dry weather this ooze hardens into black rubbery lumps. The liquid soon stains the bark black in the infected area and this is quite easy to see.
The definitive test for Bark Canker is to scrape away the surface bark of a suspected can-ker – the infected bark underneath is brown, purple or red-brown with a sharp, irregular edge separating it from the paler, creamy coloured healthy bark (Figure A8.21). The edge may not be very sharp if the canker is growing fast. Sometimes the infection revealed by scraping the bark is much bigger than it looks on the surface.Trees affected by Bark Canker can become unthrifty because part of the food conducting tis-sue in the stem is partly blocked, or they can die slowly or very quickly if the canker ringbarks the tree. If they die slowly (over several months) the tree loses its leaves gradually, the shoot tips die back, and it may set a lot of flowers. With Sudden Death, the leaves on the whole tree suddenly wilt, turn yellow and die and turn brown within a week – the leaves continue to hang on the tree for some weeks after they have died, making diseased trees very easy to see (this is similar to the symptoms caused by root rotting basidiomycete fungi – see below).
Infection and management
Generally Phytophthora zoospores cannot infect directly into intact bark on older cocoa trees (they mostly infect expanding young tissues like unhardened leaves and developing pods). Bark Cankers can begin in several main ways:
o Through mechanical wounds in the trunk caused by human activity. For this reason ev-ery care should be taken not to wound the trunk or main branches during management operations such as weeding, harvesting and pruning. Sanitary harvesting of diseased
Figure A8.20 – Development of Cherelle Wilt (RH photo) and Phytophthora Rot of cherelles (LH photo) – note that Phytophthora Rot can be seen spreading from a point of infection, whereas Cherelle Wilt causes the whole pods to turn yellow and then brown or black. Photos from CCRI Bulletin 2
P A P U A N E W G U I N E A C O C O A E X T E N S I O N M A N U A L 305
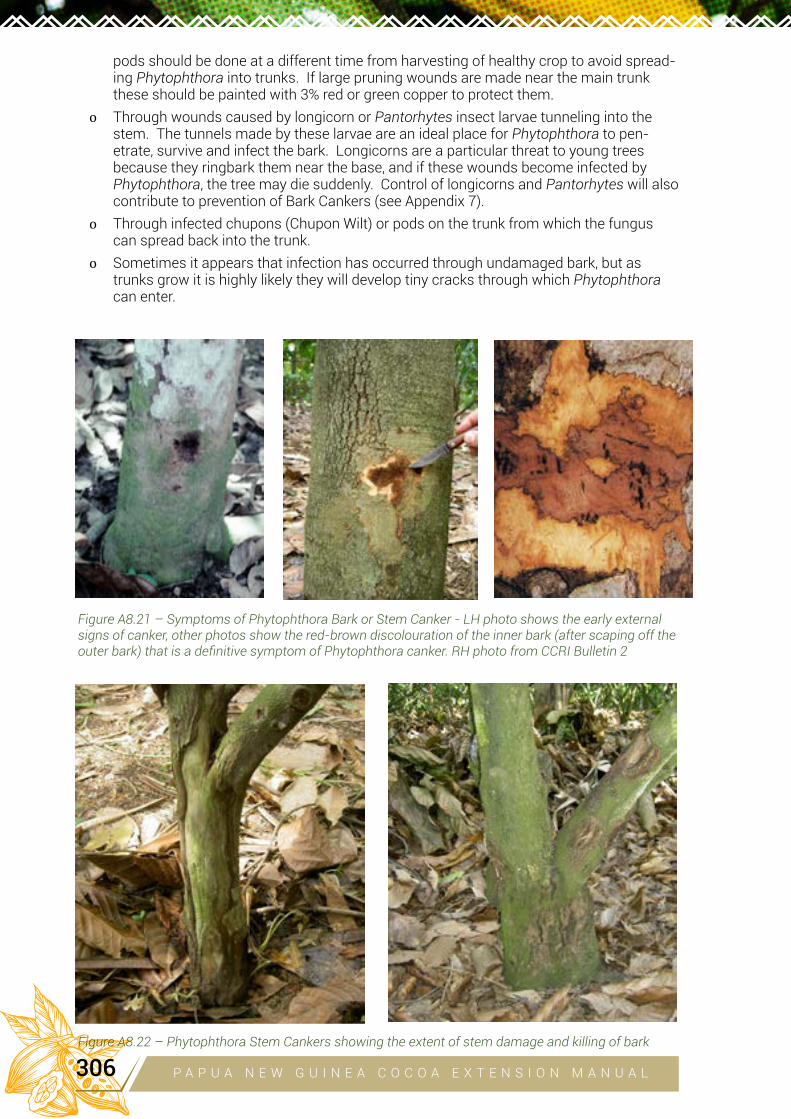
pods should be done at a different time from harvesting of healthy crop to avoid spread-ing Phytophthora into trunks. If large pruning wounds are made near the main trunk these should be painted with 3% red or green copper to protect them.
o Through wounds caused by longicorn or Pantorhytes insect larvae tunneling into the stem. The tunnels made by these larvae are an ideal place for Phytophthora to pen-etrate, survive and infect the bark. Longicorns are a particular threat to young trees because they ringbark them near the base, and if these wounds become infected by Phytophthora, the tree may die suddenly. Control of longicorns and Pantorhytes will also contribute to prevention of Bark Cankers (see Appendix 7).
o Through infected chupons (Chupon Wilt) or pods on the trunk from which the fungus can spread back into the trunk.
o Sometimes it appears that infection has occurred through undamaged bark, but as trunks grow it is highly likely they will develop tiny cracks through which Phytophthora can enter.
Figure A8.21 – Symptoms of Phytophthora Bark or Stem Canker - LH photo shows the early external signs of canker, other photos show the red-brown discolouration of the inner bark (after scaping off the outer bark) that is a definitive symptom of Phytophthora canker. RH photo from CCRI Bulletin 2
Figure A8.22 – Phytophthora Stem Cankers showing the extent of stem damage and killing of bark
P A P U A N E W G U I N E A C O C O A E X T E N S I O N M A N U A L306
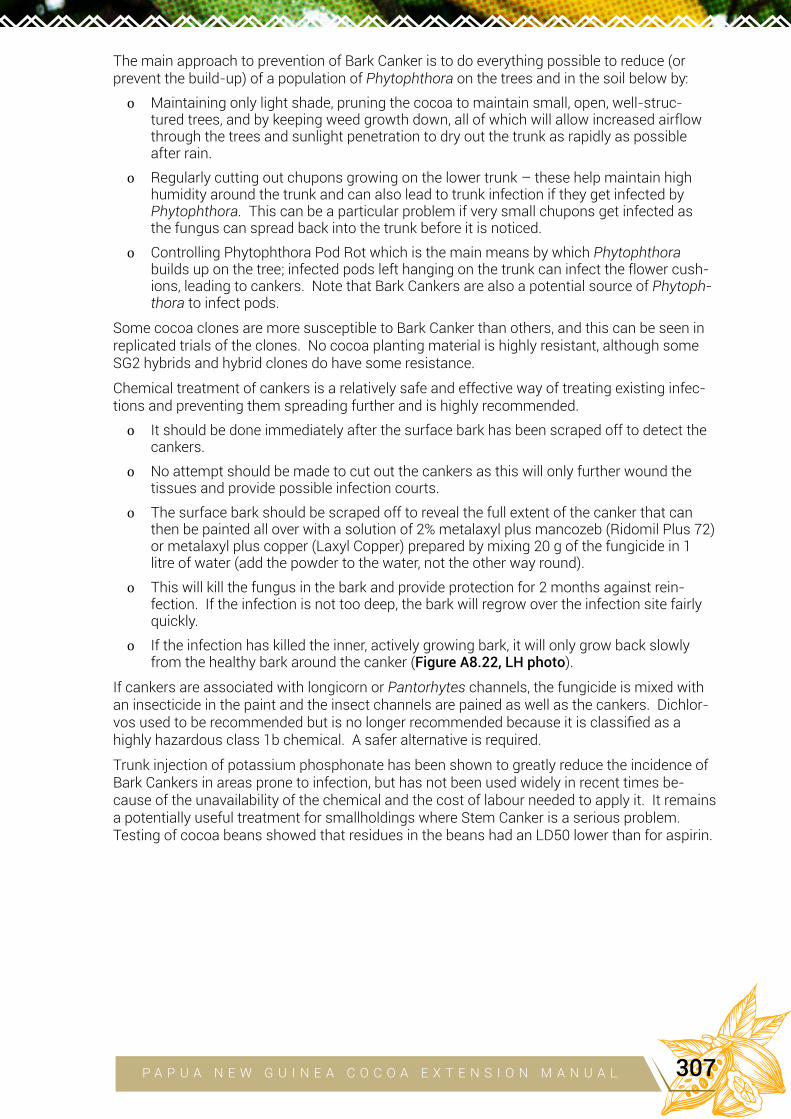
The main approach to prevention of Bark Canker is to do everything possible to reduce (or prevent the build-up) of a population of Phytophthora on the trees and in the soil below by:
o Maintaining only light shade, pruning the cocoa to maintain small, open, well-struc-tured trees, and by keeping weed growth down, all of which will allow increased airflow through the trees and sunlight penetration to dry out the trunk as rapidly as possible after rain.
o Regularly cutting out chupons growing on the lower trunk – these help maintain high humidity around the trunk and can also lead to trunk infection if they get infected by Phytophthora. This can be a particular problem if very small chupons get infected as the fungus can spread back into the trunk before it is noticed.
o Controlling Phytophthora Pod Rot which is the main means by which Phytophthora builds up on the tree; infected pods left hanging on the trunk can infect the flower cush-ions, leading to cankers. Note that Bark Cankers are also a potential source of Phytoph-thora to infect pods.
Some cocoa clones are more susceptible to Bark Canker than others, and this can be seen in replicated trials of the clones. No cocoa planting material is highly resistant, although some SG2 hybrids and hybrid clones do have some resistance.
Chemical treatment of cankers is a relatively safe and effective way of treating existing infec-tions and preventing them spreading further and is highly recommended.
o It should be done immediately after the surface bark has been scraped off to detect the cankers.
o No attempt should be made to cut out the cankers as this will only further wound the tissues and provide possible infection courts.
o The surface bark should be scraped off to reveal the full extent of the canker that can then be painted all over with a solution of 2% metalaxyl plus mancozeb (Ridomil Plus 72) or metalaxyl plus copper (Laxyl Copper) prepared by mixing 20 g of the fungicide in 1 litre of water (add the powder to the water, not the other way round).
o This will kill the fungus in the bark and provide protection for 2 months against rein-fection. If the infection is not too deep, the bark will regrow over the infection site fairly quickly.
o If the infection has killed the inner, actively growing bark, it will only grow back slowly from the healthy bark around the canker (Figure A8.22, LH photo).
If cankers are associated with longicorn or Pantorhytes channels, the fungicide is mixed with an insecticide in the paint and the insect channels are pained as well as the cankers. Dichlor-vos used to be recommended but is no longer recommended because it is classified as a highly hazardous class 1b chemical. A safer alternative is required.
Trunk injection of potassium phosphonate has been shown to greatly reduce the incidence of Bark Cankers in areas prone to infection, but has not been used widely in recent times be-cause of the unavailability of the chemical and the cost of labour needed to apply it. It remains a potentially useful treatment for smallholdings where Stem Canker is a serious problem. Testing of cocoa beans showed that residues in the beans had an LD50 lower than for aspirin.
P A P U A N E W G U I N E A C O C O A E X T E N S I O N M A N U A L 307
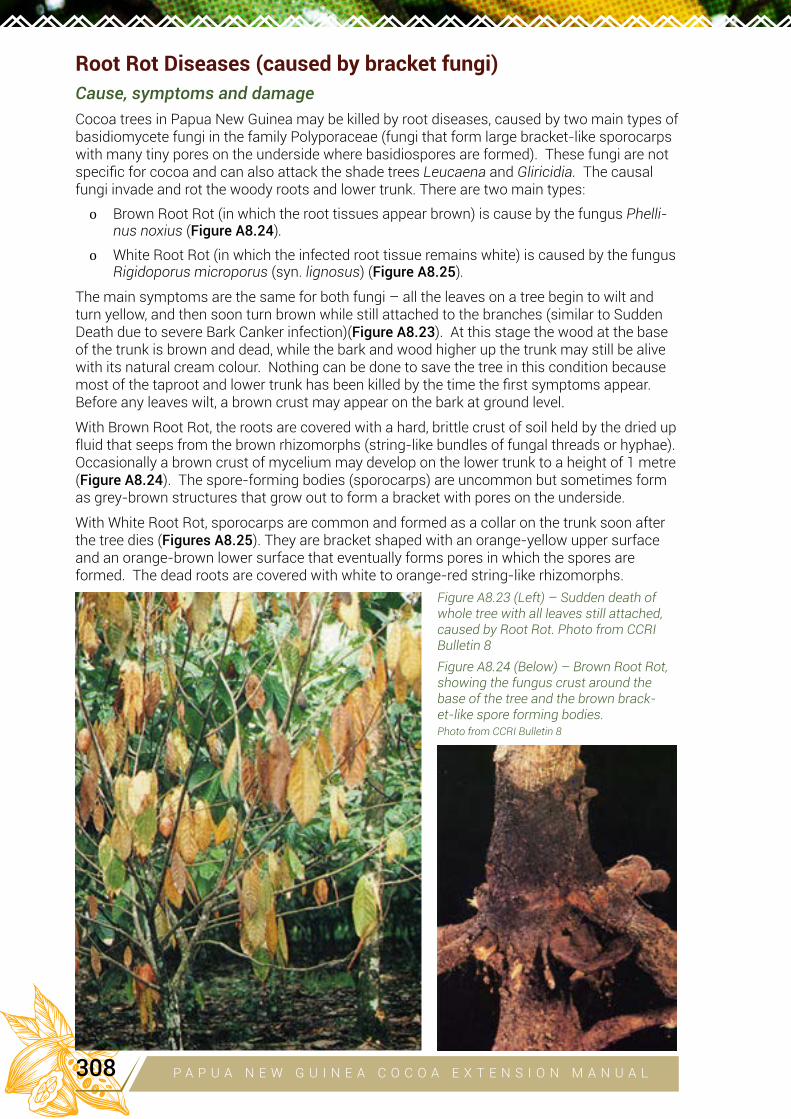
Root Rot Diseases (caused by bracket fungi)
Cause, symptoms and damage
Cocoa trees in Papua New Guinea may be killed by root diseases, caused by two main types of basidiomycete fungi in the family Polyporaceae (fungi that form large bracket-like sporocarps with many tiny pores on the underside where basidiospores are formed). These fungi are not specific for cocoa and can also attack the shade trees Leucaena and Gliricidia. The causal fungi invade and rot the woody roots and lower trunk. There are two main types:
o Brown Root Rot (in which the root tissues appear brown) is cause by the fungus Phelli-nus noxius (Figure A8.24).
o White Root Rot (in which the infected root tissue remains white) is caused by the fungus Rigidoporus microporus (syn. lignosus) (Figure A8.25).
The main symptoms are the same for both fungi – all the leaves on a tree begin to wilt and turn yellow, and then soon turn brown while still attached to the branches (similar to Sudden Death due to severe Bark Canker infection)(Figure A8.23). At this stage the wood at the base of the trunk is brown and dead, while the bark and wood higher up the trunk may still be alive with its natural cream colour. Nothing can be done to save the tree in this condition because most of the taproot and lower trunk has been killed by the time the first symptoms appear. Before any leaves wilt, a brown crust may appear on the bark at ground level.
With Brown Root Rot, the roots are covered with a hard, brittle crust of soil held by the dried up fluid that seeps from the brown rhizomorphs (string-like bundles of fungal threads or hyphae). Occasionally a brown crust of mycelium may develop on the lower trunk to a height of 1 metre (Figure A8.24). The spore-forming bodies (sporocarps) are uncommon but sometimes form as grey-brown structures that grow out to form a bracket with pores on the underside.
With White Root Rot, sporocarps are common and formed as a collar on the trunk soon after the tree dies (Figures A8.25). They are bracket shaped with an orange-yellow upper surface and an orange-brown lower surface that eventually forms pores in which the spores are formed. The dead roots are covered with white to orange-red string-like rhizomorphs.
Figure A8.23 (Left) – Sudden death of whole tree with all leaves still attached, caused by Root Rot. Photo from CCRI Bulletin 8
Figure A8.24 (Below) – Brown Root Rot, showing the fungus crust around the base of the tree and the brown brack-et-like spore forming bodies.Photo from CCRI Bulletin 8
P A P U A N E W G U I N E A C O C O A E X T E N S I O N M A N U A L308
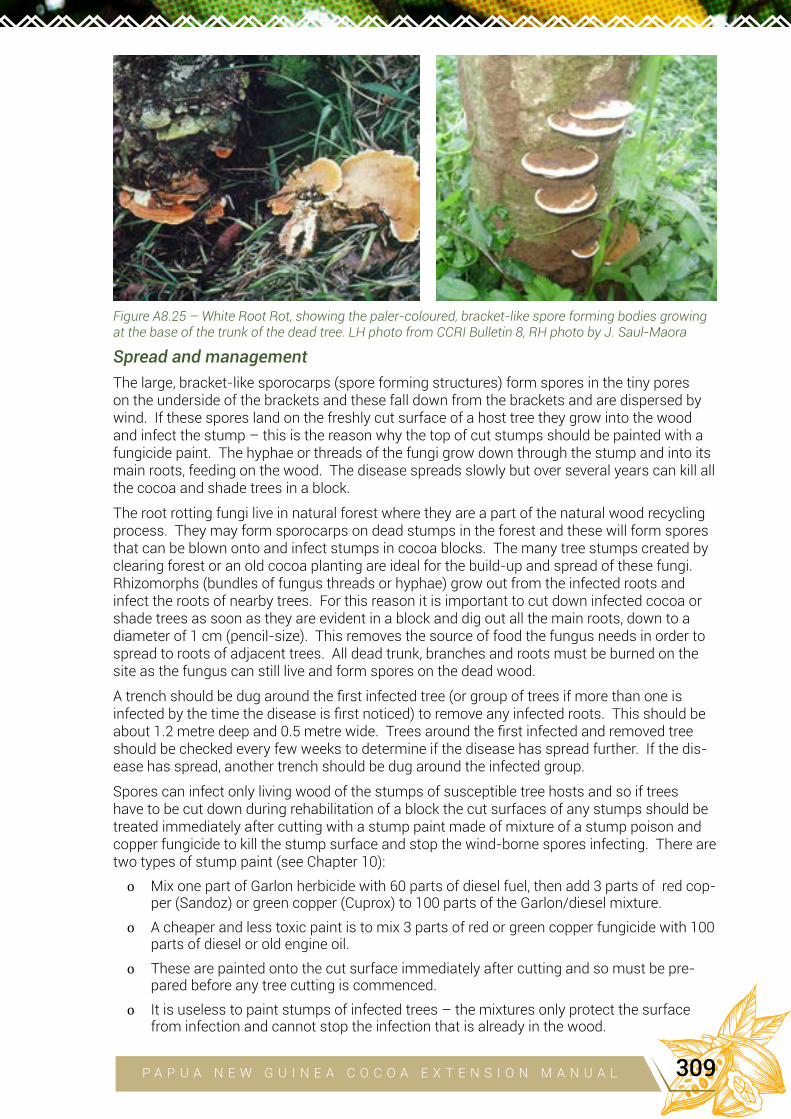
Spread and management
The large, bracket-like sporocarps (spore forming structures) form spores in the tiny pores on the underside of the brackets and these fall down from the brackets and are dispersed by wind. If these spores land on the freshly cut surface of a host tree they grow into the wood and infect the stump – this is the reason why the top of cut stumps should be painted with a fungicide paint. The hyphae or threads of the fungi grow down through the stump and into its main roots, feeding on the wood. The disease spreads slowly but over several years can kill all the cocoa and shade trees in a block.
The root rotting fungi live in natural forest where they are a part of the natural wood recycling process. They may form sporocarps on dead stumps in the forest and these will form spores that can be blown onto and infect stumps in cocoa blocks. The many tree stumps created by clearing forest or an old cocoa planting are ideal for the build-up and spread of these fungi. Rhizomorphs (bundles of fungus threads or hyphae) grow out from the infected roots and infect the roots of nearby trees. For this reason it is important to cut down infected cocoa or shade trees as soon as they are evident in a block and dig out all the main roots, down to a diameter of 1 cm (pencil-size). This removes the source of food the fungus needs in order to spread to roots of adjacent trees. All dead trunk, branches and roots must be burned on the site as the fungus can still live and form spores on the dead wood.
A trench should be dug around the first infected tree (or group of trees if more than one is infected by the time the disease is first noticed) to remove any infected roots. This should be about 1.2 metre deep and 0.5 metre wide. Trees around the first infected and removed tree should be checked every few weeks to determine if the disease has spread further. If the dis-ease has spread, another trench should be dug around the infected group.
Spores can infect only living wood of the stumps of susceptible tree hosts and so if trees have to be cut down during rehabilitation of a block the cut surfaces of any stumps should be treated immediately after cutting with a stump paint made of mixture of a stump poison and copper fungicide to kill the stump surface and stop the wind-borne spores infecting. There are two types of stump paint (see Chapter 10):
o Mix one part of Garlon herbicide with 60 parts of diesel fuel, then add 3 parts of red cop-per (Sandoz) or green copper (Cuprox) to 100 parts of the Garlon/diesel mixture.
o A cheaper and less toxic paint is to mix 3 parts of red or green copper fungicide with 100 parts of diesel or old engine oil.
o These are painted onto the cut surface immediately after cutting and so must be pre-pared before any tree cutting is commenced.
o It is useless to paint stumps of infected trees – the mixtures only protect the surface from infection and cannot stop the infection that is already in the wood.
Figure A8.25 – White Root Rot, showing the paler-coloured, bracket-like spore forming bodies growing at the base of the trunk of the dead tree. LH photo from CCRI Bulletin 8, RH photo by J. Saul-Maora
P A P U A N E W G U I N E A C O C O A E X T E N S I O N M A N U A L 309
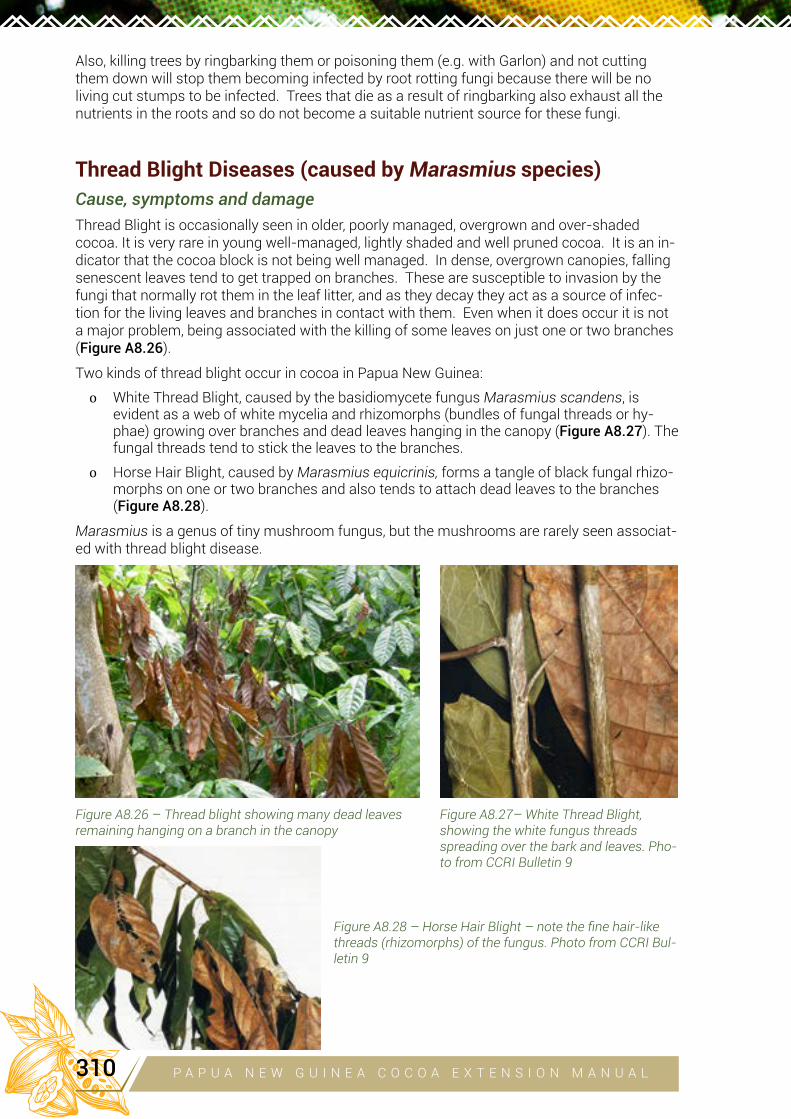
Also, killing trees by ringbarking them or poisoning them (e.g. with Garlon) and not cutting them down will stop them becoming infected by root rotting fungi because there will be no living cut stumps to be infected. Trees that die as a result of ringbarking also exhaust all the nutrients in the roots and so do not become a suitable nutrient source for these fungi.
Thread Blight Diseases (caused by Marasmius species)
Cause, symptoms and damage
Thread Blight is occasionally seen in older, poorly managed, overgrown and over-shaded cocoa. It is very rare in young well-managed, lightly shaded and well pruned cocoa. It is an in-dicator that the cocoa block is not being well managed. In dense, overgrown canopies, falling senescent leaves tend to get trapped on branches. These are susceptible to invasion by the fungi that normally rot them in the leaf litter, and as they decay they act as a source of infec-tion for the living leaves and branches in contact with them. Even when it does occur it is not a major problem, being associated with the killing of some leaves on just one or two branches (Figure A8.26).
Two kinds of thread blight occur in cocoa in Papua New Guinea:
o White Thread Blight, caused by the basidiomycete fungus Marasmius scandens, is evident as a web of white mycelia and rhizomorphs (bundles of fungal threads or hy-phae) growing over branches and dead leaves hanging in the canopy (Figure A8.27). The fungal threads tend to stick the leaves to the branches.
o Horse Hair Blight, caused by Marasmius equicrinis, forms a tangle of black fungal rhizo-morphs on one or two branches and also tends to attach dead leaves to the branches (Figure A8.28).
Marasmius is a genus of tiny mushroom fungus, but the mushrooms are rarely seen associat-ed with thread blight disease.
Figure A8.26 – Thread blight showing many dead leaves remaining hanging on a branch in the canopy
Figure A8.27– White Thread Blight, showing the white fungus threads spreading over the bark and leaves. Pho-to from CCRI Bulletin 9
Figure A8.28 – Horse Hair Blight – note the fine hair-like threads (rhizomorphs) of the fungus. Photo from CCRI Bul-letin 9
P A P U A N E W G U I N E A C O C O A E X T E N S I O N M A N U A L310
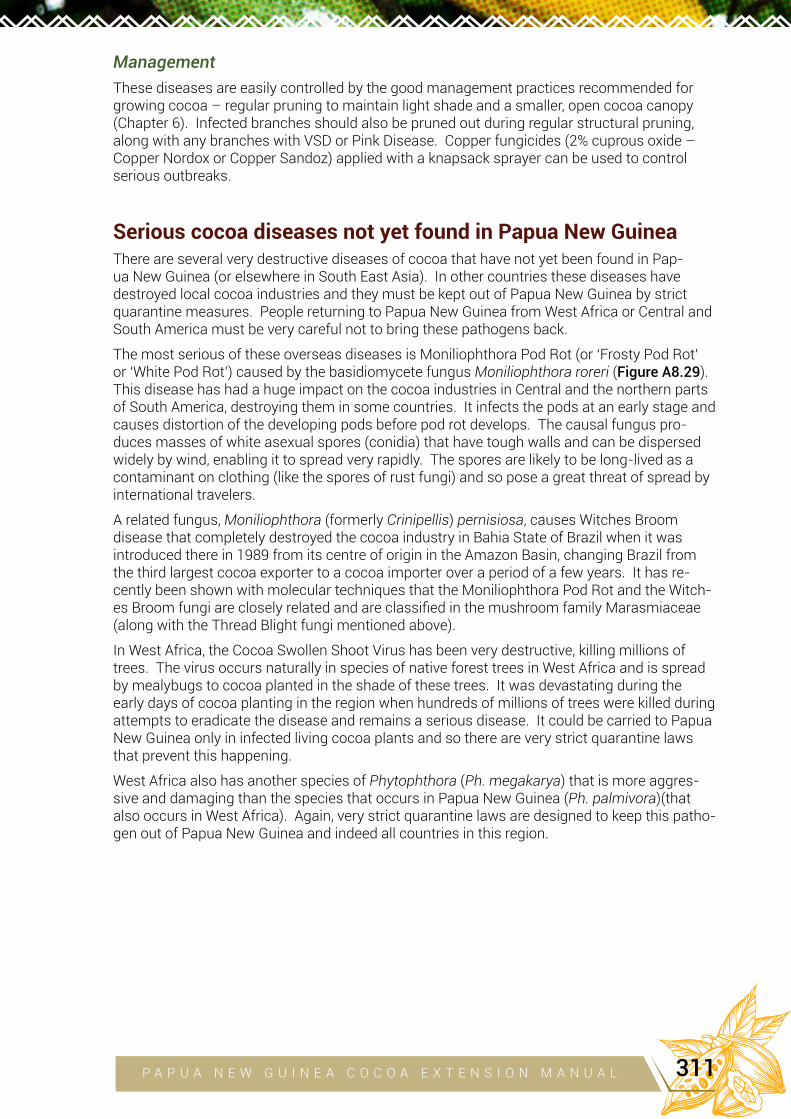
Management
These diseases are easily controlled by the good management practices recommended for growing cocoa – regular pruning to maintain light shade and a smaller, open cocoa canopy (Chapter 6). Infected branches should also be pruned out during regular structural pruning, along with any branches with VSD or Pink Disease. Copper fungicides (2% cuprous oxide – Copper Nordox or Copper Sandoz) applied with a knapsack sprayer can be used to control serious outbreaks.
Serious cocoa diseases not yet found in Papua New GuineaThere are several very destructive diseases of cocoa that have not yet been found in Pap-ua New Guinea (or elsewhere in South East Asia). In other countries these diseases have destroyed local cocoa industries and they must be kept out of Papua New Guinea by strict quarantine measures. People returning to Papua New Guinea from West Africa or Central and South America must be very careful not to bring these pathogens back.
The most serious of these overseas diseases is Moniliophthora Pod Rot (or ‘Frosty Pod Rot’ or ‘White Pod Rot’) caused by the basidiomycete fungus Moniliophthora roreri (Figure A8.29). This disease has had a huge impact on the cocoa industries in Central and the northern parts of South America, destroying them in some countries. It infects the pods at an early stage and causes distortion of the developing pods before pod rot develops. The causal fungus pro-duces masses of white asexual spores (conidia) that have tough walls and can be dispersed widely by wind, enabling it to spread very rapidly. The spores are likely to be long-lived as a contaminant on clothing (like the spores of rust fungi) and so pose a great threat of spread by international travelers.
A related fungus, Moniliophthora (formerly Crinipellis) pernisiosa, causes Witches Broom disease that completely destroyed the cocoa industry in Bahia State of Brazil when it was introduced there in 1989 from its centre of origin in the Amazon Basin, changing Brazil from the third largest cocoa exporter to a cocoa importer over a period of a few years. It has re-cently been shown with molecular techniques that the Moniliophthora Pod Rot and the Witch-es Broom fungi are closely related and are classified in the mushroom family Marasmiaceae (along with the Thread Blight fungi mentioned above).
In West Africa, the Cocoa Swollen Shoot Virus has been very destructive, killing millions of trees. The virus occurs naturally in species of native forest trees in West Africa and is spread by mealybugs to cocoa planted in the shade of these trees. It was devastating during the early days of cocoa planting in the region when hundreds of millions of trees were killed during attempts to eradicate the disease and remains a serious disease. It could be carried to Papua New Guinea only in infected living cocoa plants and so there are very strict quarantine laws that prevent this happening.
West Africa also has another species of Phytophthora (Ph. megakarya) that is more aggres-sive and damaging than the species that occurs in Papua New Guinea (Ph. palmivora)(that also occurs in West Africa). Again, very strict quarantine laws are designed to keep this patho-gen out of Papua New Guinea and indeed all countries in this region.
P A P U A N E W G U I N E A C O C O A E X T E N S I O N M A N U A L 311

Figure A8.29 - Symptoms of Moniliophthora Pod Rot (‘Frosty Pod Rot’) showing black rotting of pods, prolific production of powdery white spores, and distortion of pods especially when infected at early stages of development (photos taken in Panama and Costa Rica) (top LH photo by John West)
P A P U A N E W G U I N E A C O C O A E X T E N S I O N M A N U A L312