d.t1.1.3-4 bioinf12s - interreg alpine space
TRANSCRIPT
Eco-AlpsWater
Innovative Ecological Assessment and Water Management Strategy for the Protection of
Ecosystem Services in Alpine Lakes and Rivers
Priority 3: Liveable Alpine Space. SO3.2 - Enhance the protection, the conservation and
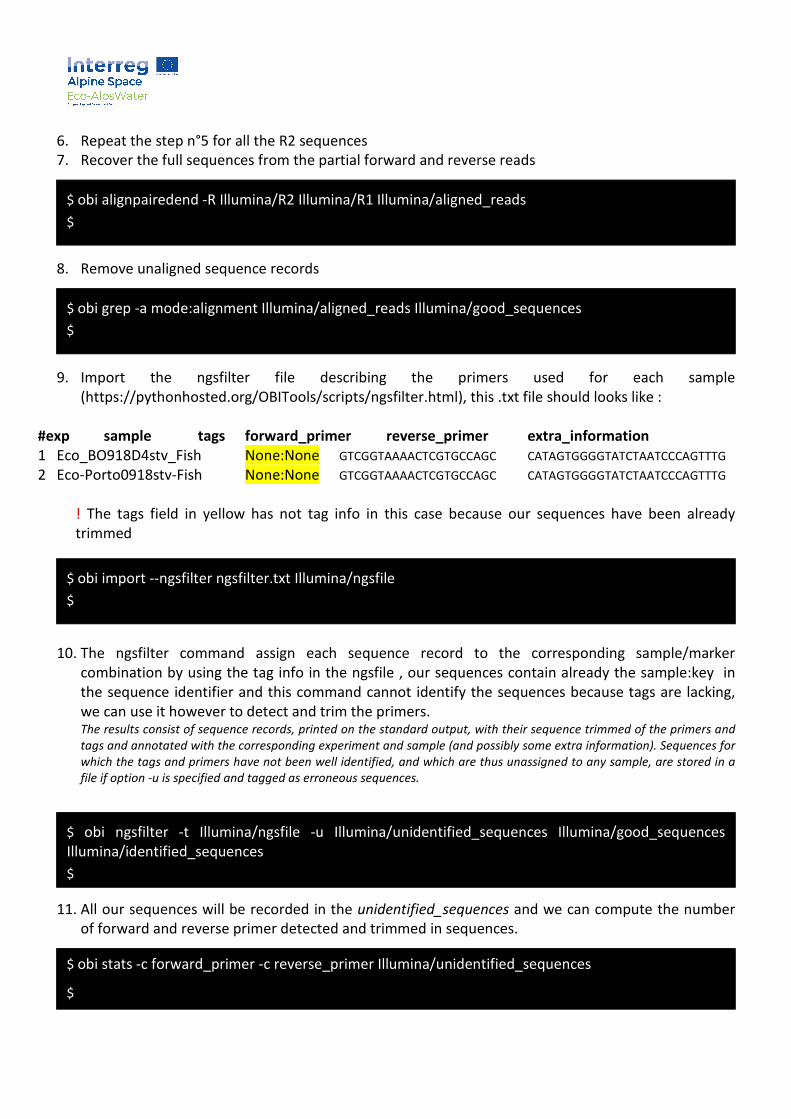
the ecological connectivity of Alpine Space
Project Eco-AlpsWater
Work Package WPT1
Activity A.T1.1
Deliverable D.T1.1.3-4. Bioinf12S
Version 2.0
Date October 2020
Coordination of the WP1: I Domaizon
Deliverable D.T1.1.3-4 Bioinf12S
Bio-informatic pipeline for the analyses of eDNA metabarcoding
data for fish communities
OBITOOLS3 software, MiSeq, 12S MiFish
Interreg Alpine Space - Eco-AlpsWater project – WP1
Giulia Riccioni1, Isabelle Domaizon2, Hans Rund3, Nico Salmaso1, Josef Wanzenböck3, Valentin Vasselon2, Jonas
Bylemans4* 1
Edmund Mach Foundation(FEM), San Michele all’Adige, Trento, Italy 2
Office français de la biodiversité (OFB), Thonon les Bains, France 3 Leopold Franzes University of Innsbruck (LFUI), Innsbruck, Austria
4 Department of Ecology and Evolution, Biophore, University of Lausanne, Lausanne, Switzerland
* Formerly involved in the EAW project at the FEM institute
I. TABLE OF CONTENT
I. TABLE OF CONTENT ................................................................................................................................ 2
II. ABSTRACT ............................................................................................................................................... 3
III. SYSTEM REQUIREMENTS .................................................................................................................... 3
IV. WORKING ON AN EXTERNAL SERVER ................................................................................................. 5
IV.1 Connecting to the external server .................................................................................................. 5
IV.2 Transferring files ............................................................................................................................. 6
V. ILLUMINA MISEQ DATASET ....................................................................................................................... 7
VI. DOWNLOAD AND FORMAT THE REFERENCE DATABASE ......................................................................... 8
VI.1 Creating a custom reference database (optional) ........................................................................ 10
VII. MERGE AND TRIM THE SEQUENCES ................................................................................................. 10
VIII. GENERATING A TAXONOMIC TABLE ................................................................................................. 14
II. ABSTRACT
The objective of this protocol is to provide a detailed description of the main steps of the bio-informatics
pipeline for the processing of high-throughput sequencing data. In particular, this protocol focusses on
the bio-informatics processing of the eDNA metabarcoding data obtained with the MiFish-U primers
(Miya et al., 2015) using the OBITOOLS3 software (Boyer et al., 2016, Céline Mercier et al. in press).
III. SYSTEM REQUIREMENTS
The following protocol primarily uses the OBITOOLS3 software (Boyer et al., 2016, (Boyer et al., 2016,
Céline Mercier et al. in press) for the processing of raw high-throughput sequencing reads from the
MiSeq platform. The final output of the analyses is a tab-delimited table with taxonomic inventories. A
workflow example is available online (see https://git.metabarcoding.org/obitools/obitools3/wikis/Wolf-
tutorial-with-the-OBITools3) and detailed descriptions of the individual commands can be found as well
(https://git.metabarcoding.org/obitools/obitools3/wikis/The-OBITools3-syntax).
In order to run the OBITOOLS3 commands a LINUX or MacOSX based operating system is needed. Given
that most of the times you will be working with multiple large data files and the analyses might slow
down your personal device, it would be recommended (but not required) to use an external server to
run all commands. To set-up an external server with all the required software, contact the IT
department within your organization which should be able to help you.
Software to be installed on your personal device (Windows operating system) when working on an
external server to securely transfer computer files:
• PuTTY:
Application to connect to the external server.
https://www.chiark.greenend.org.uk/~sgtatham/putty/latest.html
• FileZilla client:
Application to transfer files between your personal device and the external server.
https://filezilla-project.org/
Protocol to remotely access a server in Linux environment:
• SSH protocol (Secure Socket Shell)
Protocol installation
$ sudo apt-get install openssh-client #to install the client
$ sudo apt-get install openssh-server ii #to install the SSH server
$ sudo service ssh status #to check if the SSH server is running
How to connect
$ ssh your_username@host_ip_address
Ex: ssh [email protected] [email protected]’s password:….
Program to securely transfer computer files between a local host (Linux environment) and a remote
host on a network:
• Scp protocol (remote file copy program)
usage from prompt
$ scp SourceFile user@host:directory/TargetFile (copying file to host)
$ scp user@host:directory/SourceFile TargetFile (copying file from host)
Software installed on the external server or your personal device (Linux-MacOSX operating system):
• OBITOOLS3 and all its dependencies (Python 3, git, CMake):
https://pythonhosted.org/OBITools/welcome.html
III.1 Installing obitools3
Once installed, you will need to be in the virtual environment to run commands (source obi3-
env/bin/activate), or add the obi command to your PATH.
In case some of the required programs (python3-venv, git, CMake) are not installed yet use :
$ sudo apt-get install program
# Test the installation to verify that everything is working well:
$ obi test
#To use the program activate the virtual environment with the command:
$ source obi3-env/bin/activate
Obitools3 syntax:
obi [obi command] options
IV. WORKING ON AN EXTERNAL SERVER (WINDOWS ENVIRONMENT)
First let’s go through some of the basics of setting up a connection between your personal device in a
Windows environment and the external server and transferring files between the two systems. Again, IT
staff within your organization should be able to assist you with this if you encounter issues. Of course
when you are working directly on your personal device in a Linux environment then these steps are not
required.
IV.1 Connecting to the external server
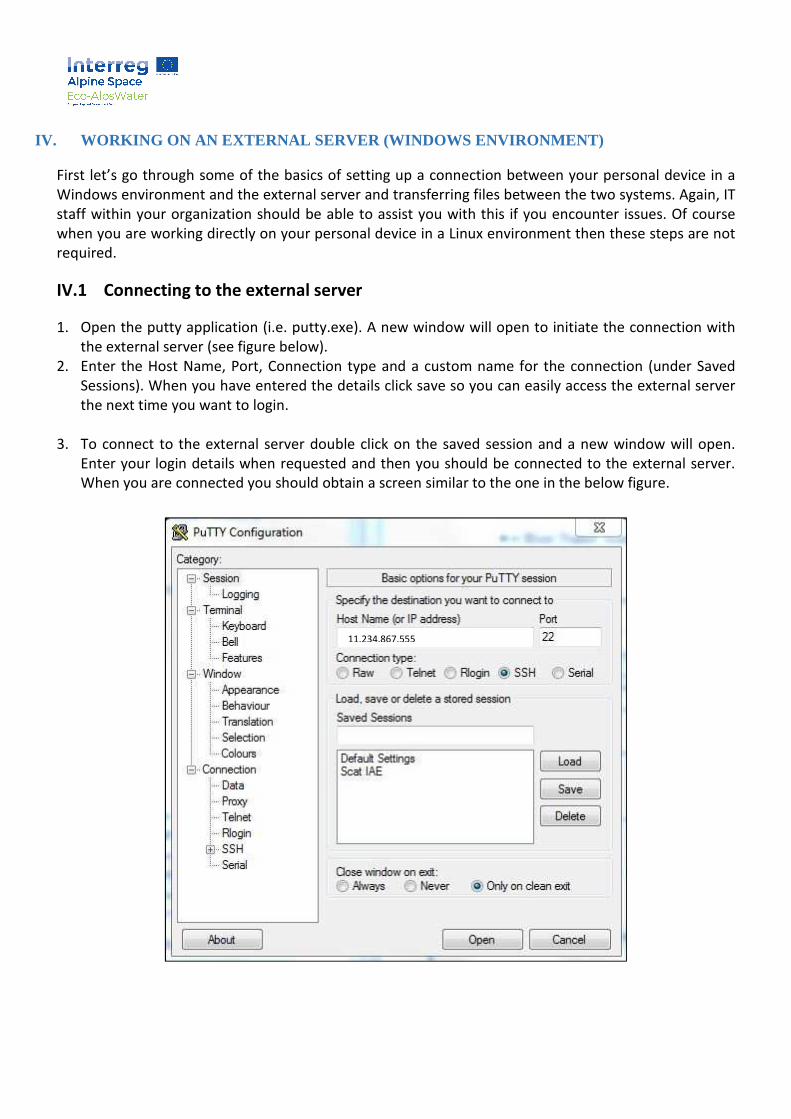
1. Open the putty application (i.e. putty.exe). A new window will open to initiate the connection with
the external server (see figure below).
2. Enter the Host Name, Port, Connection type and a custom name for the connection (under Saved
Sessions). When you have entered the details click save so you can easily access the external server
the next time you want to login.
3. To connect to the external server double click on the saved session and a new window will open.
Enter your login details when requested and then you should be connected to the external server.
When you are connected you should obtain a screen similar to the one in the below figure.
11.234.867.555

4. To disconnect from the server just enter exit and the console will close.
IV.2 Transferring files
1. To be able to transfer files from your personal device to the external server and vice versa we need a
cross-platform FTP application. Here we use FileZilla client but other applications are also available.
2. Once installed open the FileZilla application (i.e. FileZilla.exe). A window will open in which the left
side represents your personal device with all different folders and documents stored there. The right
side is empty but will show the directories and documents stored on the external server once you
are connected.
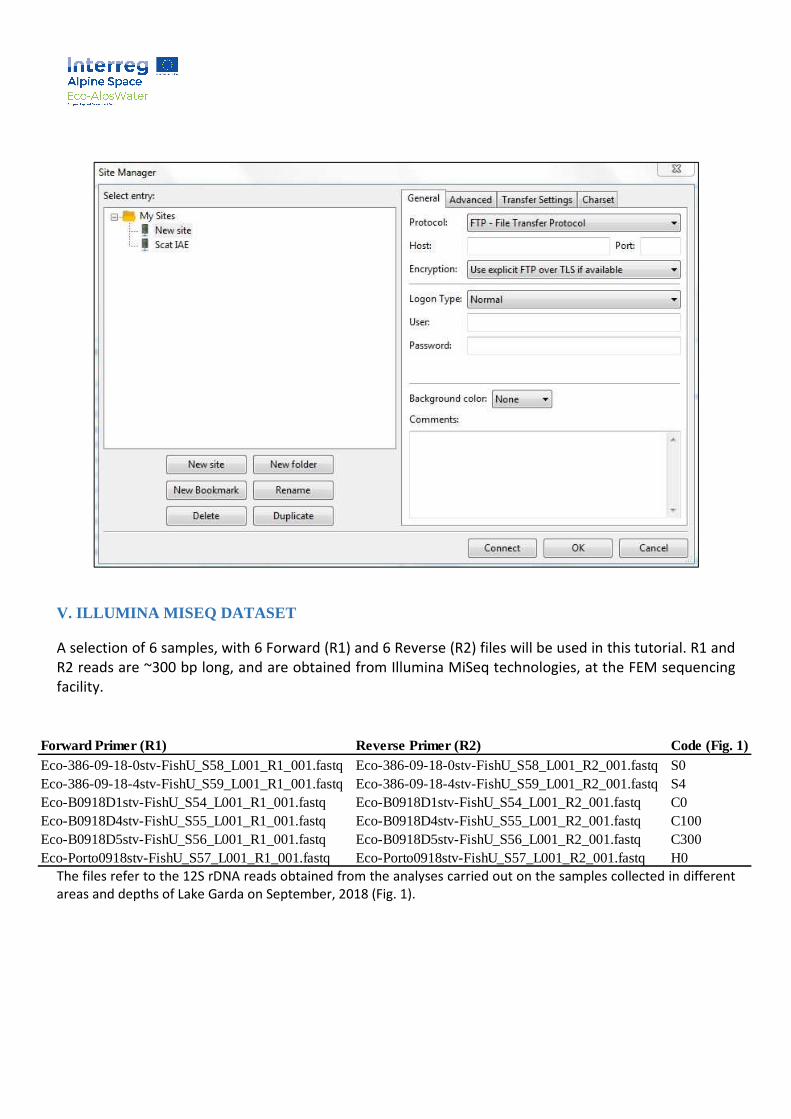
3. To setup the connection to the server go to File – Site Manager. A new popup window will appear
(see below). Click New Site and give a name to the connection that you are setting up. Next, entire
the connection details under the General tab of the newly created site and press OK when done.
4. Now in FileZilla click on the dropdown arrow next to the Site Manager icon (most left icon on the
toolbar). In the dropdown list you should now see your newly created connection. To start the
connection with the external server, just click on the newly created site.
5. Once the connection is established you can now transfer files between your personal device to the
external server simply by navigating to the right directories and dragging and dropping the files you
wish to transfer.
V. ILLUMINA MISEQ DATASET
A selection of 6 samples, with 6 Forward (R1) and 6 Reverse (R2) files will be used in this tutorial. R1 and
R2 reads are ~300 bp long, and are obtained from Illumina MiSeq technologies, at the FEM sequencing
facility.
The files refer to the 12S rDNA reads obtained from the analyses carried out on the samples collected in different
areas and depths of Lake Garda on September, 2018 (Fig. 1).
Forward Primer (R1) Reverse Primer (R2) Code (Fig. 1)Eco-386-09-18-0stv-FishU_S58_L001_R1_001.fastq Eco-386-09-18-0stv-FishU_S58_L001_R2_001.fastq S0Eco-386-09-18-4stv-FishU_S59_L001_R1_001.fastq Eco-386-09-18-4stv-FishU_S59_L001_R2_001.fastq S4Eco-B0918D1stv-FishU_S54_L001_R1_001.fastq Eco-B0918D1stv-FishU_S54_L001_R2_001.fastq C0Eco-B0918D4stv-FishU_S55_L001_R1_001.fastq Eco-B0918D4stv-FishU_S55_L001_R2_001.fastq C100Eco-B0918D5stv-FishU_S56_L001_R1_001.fastq Eco-B0918D5stv-FishU_S56_L001_R2_001.fastq C300Eco-Porto0918stv-FishU_S57_L001_R1_001.fastq Eco-Porto0918stv-FishU_S57_L001_R2_001.fastq H0
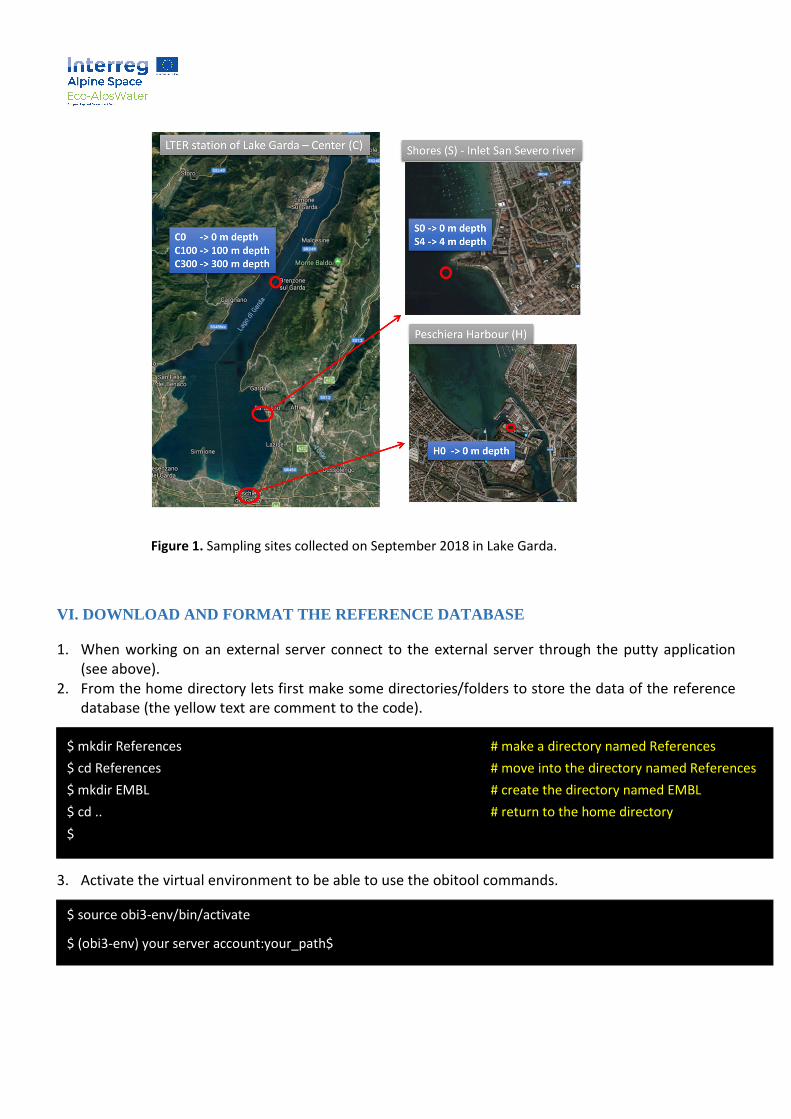
Figure 1. Sampling sites collected on September 2018 in Lake Garda.
VI. DOWNLOAD AND FORMAT THE REFERENCE DATABASE
1. When working on an external server connect to the external server through the putty application
(see above).
2. From the home directory lets first make some directories/folders to store the data of the reference
database (the yellow text are comment to the code).
3. Activate the virtual environment to be able to use the obitool commands.
$ mkdir References # make a directory named References
$ cd References # move into the directory named References
$ mkdir EMBL # create the directory named EMBL
$ cd .. # return to the home directory
$ �
$ source obi3-env/bin/activate
$ (obi3-env) your server account:your_path$
4. Download and import the NCBI taxonomy.
5. Download the sequence records.
6. Import the sequence records in the DMS (database management system).
7. Use ecoPCR to simulate an in silico PCR with the Mifish primers and create a reference database.
8. Filter sequences so that they have a good taxonomic description at the species, genus, and family l
9. Dereplicate identical sequences.
10. Ensure that the dereplicated sequences have a taxid at the family level
11. Build the reference database specifically used by the OBITools3 to make ecotag efficient
$ cd ~/References/ # move to the References directory
$ wget ftp://ftp.ncbi.nih.gov/pub/taxonomy/taxdump.tar.gz # download the taxonomy
$ obi import --taxdump taxdump.tar.gz Illumina/taxonomy/Taxo # import the taxonomy in the DMS
$ rm taxdump.tar.gz # remove the zip file
$ cd ~/References/EMBL # move to the EMBL directory
$ wget -nH --cut-dirs=1 ftp://ftp.ebi.ac.uk/pub/databases/embl/release/std/rel_std_vrt*.dat.gz
$ cd ..
$ obi import --embl EMBL Illumina/Refseq
$ obi ecopcr -e 3 -l 80 -L 250 –F GTCGGTAAAACTCGTGCCAG#C# -R CATAGTGGGGTATCTAATCCCAGTTT#G# --
taxonomy Illumina/taxonomy/Taxo Illumina/Refseq Illumina/ecodb
$ obi grep --require-rank=species --require-rank=genus --require-rank=family --taxonomy Illumina/taxonomy/Taxo
Illumina/ecodb Illumina/ecodb_clean
$ obi uniq --taxonomy Illumina/taxonomy/Taxo Illumina/ecodb_clean Illumina/ecodb_clean_uniq
$ obi grep --require-rank=family --taxonomy Illumina/taxonomy/Taxo Illumina/ecodb_clean_uniq
Illumina/ecodb_clean_uniq_clean
$ obi build_ref_db -t 0.97 --taxonomy Illumina/taxonomy/Taxo Illumina/ecodb_clean_uniq_clean
Illumina/ecodb_clean_uniq_clean97

VI.1 Creating a custom reference database (optional)
Customizing the reference databases may improve the eventual taxonomic assignments. For example,
when analysing samples from a lake known to contain only Salmo trutta, Salvelinus alpinus, Tinca tinca
and Cyprinus carpio a customized reference database can be used. However, it is important to not
exclusively rely on this custom reference database as you won’t be able to detect ‘novel’ species. When
using a custom reference database it would thus be recommended to:
I. Perform the first assignment using the custom reference database.
II. Perform a second assignment using the general reference database.
III. Compare both taxonomic lists to create a consensus.
The code below can be used to create a customized reference database. The below example will select
all reference sequences for the four species mentioned above and store them a custom database (here
named “LAKE1_MIFISH_RefDB.fasta”).
The above code could thus be used to generate customized reference databases for each lake/river
within the EAW project to refine the taxonomic assignments.
VII. MERGE AND TRIM THE SEQUENCES
Before starting the actual analyses we need to get the data into the right format. In this case this would
be a single fastq file for each sample/replicate containing the forward and reverse reads in separated
.fastq files with the forward and reverse MiFish-U primer sequences. Additionally, the sequence
identifier should contain a key:value attribute that can be used to link each sequence to its
sample/replicate. For example the first four lines of the fastq file should look something like:
@M02082:563:000000000-CPB2T sample=0400111320000001314_F_12S_ rep2;
tcagcctaccctgtgaagaacccatagtaagcaaaattggcaaagcccaaaacgtca …
+
IIIIIIIIIIII[SObglje`Ygb[_`ggdbXXb``iglbbd^Ob[kkell\hlelllll …
Here we assume that all sequences have been fully demultiplexed and MiFish-U primer sequences need
to be trimmed. If the sequences have not been demultiplexed see the instruction below in section IX.
For each sample/replicate we thus start with two fastq files containing the forward (i.e. R1) and reverse
(i.e. R2) sequence reads. An example of the naming of the fastq files could be:
• Eco-B0918D5stv-FishU_S54_L001_R1_001.fastq.gz
• Eco-B0918D5stv-FishU_S54_L001_R2_001.fastq.gz
$ obi grep -p ‘species_name in “Salmo trutta, Salvelinus alpinus, Tinca tinca, Cyprinus carpio”’
Illumina/ecodb_clean_uniq_clean97 Illumina/ LAKE1_MIFISH_RefDB.fasta
$ �

1. Import all files R1 in an Illumina DMS, all the fastq.gz files are stored in the EAW_12S_6_samples
directory
2. Import all files R2 in an Illumina DMS
3. Annotate each imported R1 file with its name as sample tag
4. Annotate each imported R2 file with its name as sample tag
5. Concatenate all annotated imported files into one view called R1
$ for file in EAW_12S_6_samples/*_R1_*.fastq.gz # iteratively select the forward reads
> do obi import --fastq-input $file Illumina/R1_$(basename $file .fastq.gz) # import the R1 reads
> done
$ �
$ for file in EAW_12S_6_samples/*_R2_*.fastq.gz # iteratively select the reverse reads
> do obi import --fastq-input $file Illumina/R2_$(basename $file .fastq.gz) # import the R2 reads
> done
$ �
$ for file in EAW_12S_6_samples/*_R1_*.fastq.gz # iteratively select the forward reads
> do obi annotate --set-tag sample:$(basename $file .fastq.gz) Illumina/R1_$(basename $file
.fastq.gz) Illumina/R1_$(basename $file .fastq.gz)_tagged # insert the sample:key in the sequence
identifier
> done
$ �
$ for file in EAW_12S_6_samples/*_R2_*.fastq.gz # iteratively select the reverse reads
> do obi annotate --set-tag sample:$(basename $file .fastq.gz) Illumina/R1_$(basename $file
.fastq.gz) Illumina/R1_$(basename $file .fastq.gz)_tagged #insert the sample:key in the sequence
identifier
> done
$ �
$ catcmd='obi cat ' # create a variable with the command ‘obi cat’
> for file in EAW_12S_6_samples/*_R1_*.fastq.gz # select all the R1 sequences
> do catcmd="$catcmd-c Illumina/R1_$(basename $file .fastq.gz)_tagged " #concatenate all the R1 sequences
> done
$ catcmd="$catcmd Illumina/R1"
$ echo $catcmd
$ $catcmd
6. Repeat the step n°5 for all the R2 sequences
7. Recover the full sequences from the partial forward and reverse reads
8. Remove unaligned sequence records
9. Import the ngsfilter file describing the primers used for each sample
(https://pythonhosted.org/OBITools/scripts/ngsfilter.html), this .txt file should looks like :
#exp sample tags forward_primer reverse_primer extra_information
1 Eco_BO918D4stv_Fish None:None GTCGGTAAAACTCGTGCCAGC CATAGTGGGGTATCTAATCCCAGTTTG
2 Eco-Porto0918stv-Fish None:None GTCGGTAAAACTCGTGCCAGC CATAGTGGGGTATCTAATCCCAGTTTG
! The tags field in yellow has not tag info in this case because our sequences have been already
trimmed
10. The ngsfilter command assign each sequence record to the corresponding sample/marker
combination by using the tag info in the ngsfile , our sequences contain already the sample:key in
the sequence identifier and this command cannot identify the sequences because tags are lacking,
we can use it however to detect and trim the primers. The results consist of sequence records, printed on the standard output, with their sequence trimmed of the primers and
tags and annotated with the corresponding experiment and sample (and possibly some extra information). Sequences for
which the tags and primers have not been well identified, and which are thus unassigned to any sample, are stored in a
file if option -u is specified and tagged as erroneous sequences.
11. All our sequences will be recorded in the unidentified_sequences and we can compute the number
of forward and reverse primer detected and trimmed in sequences.
$ obi alignpairedend -R Illumina/R2 Illumina/R1 Illumina/aligned_reads
$ �
$ obi grep -a mode:alignment Illumina/aligned_reads Illumina/good_sequences
$ �
$ obi import --ngsfilter ngsfilter.txt Illumina/ngsfile
$ �
$ obi ngsfilter -t Illumina/ngsfile -u Illumina/unidentified_sequences Illumina/good_sequences
Illumina/identified_sequences
$ �
$ obi stats -c forward_primer -c reverse_primer Illumina/unidentified_sequences
$ �
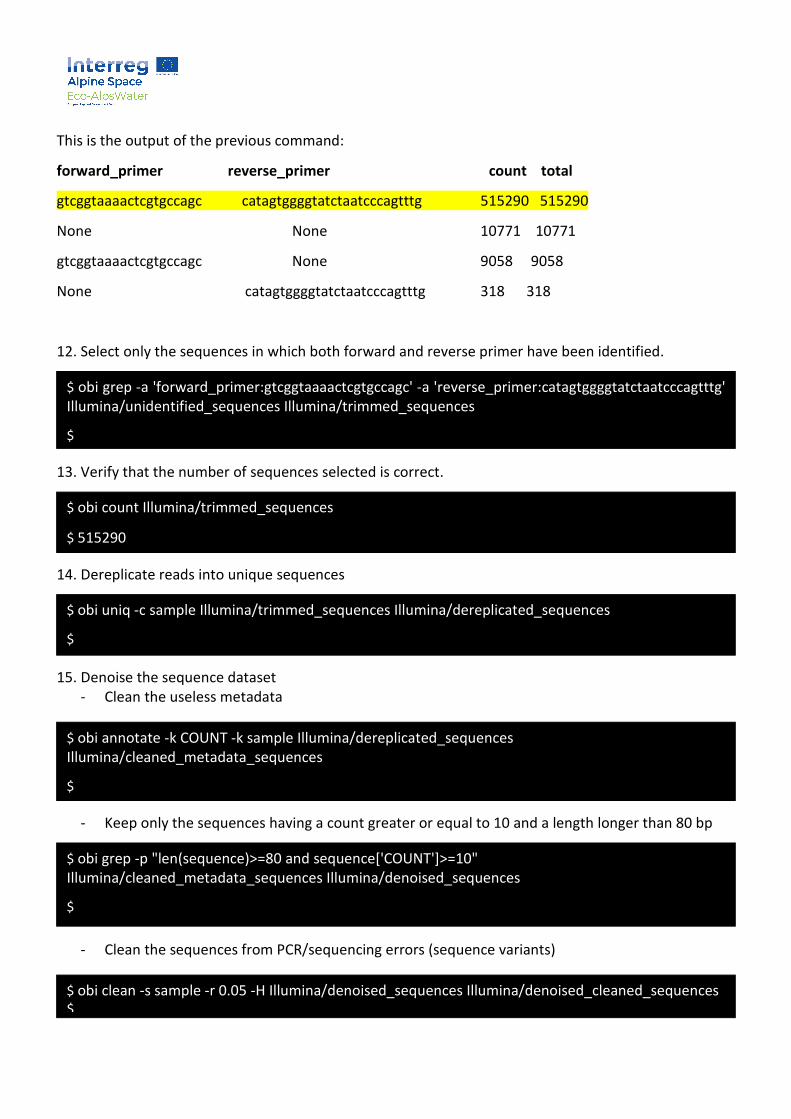
This is the output of the previous command:
forward_primer reverse_primer count total
gtcggtaaaactcgtgccagc catagtggggtatctaatcccagtttg 515290 515290
None None 10771 10771
gtcggtaaaactcgtgccagc None 9058 9058
None catagtggggtatctaatcccagtttg 318 318
12. Select only the sequences in which both forward and reverse primer have been identified.
13. Verify that the number of sequences selected is correct.
14. Dereplicate reads into unique sequences
15. Denoise the sequence dataset
- Clean the useless metadata
- Keep only the sequences having a count greater or equal to 10 and a length longer than 80 bp
- Clean the sequences from PCR/sequencing errors (sequence variants)
$ obi grep -a 'forward_primer:gtcggtaaaactcgtgccagc' -a 'reverse_primer:catagtggggtatctaatcccagtttg'
Illumina/unidentified_sequences Illumina/trimmed_sequences
$ �
$ obi count Illumina/trimmed_sequences
$ 515290
$ obi uniq -c sample Illumina/trimmed_sequences Illumina/dereplicated_sequences
$ �
$ obi annotate -k COUNT -k sample Illumina/dereplicated_sequences
Illumina/cleaned_metadata_sequences
$ �
$ obi grep -p "len(sequence)>=80 and sequence['COUNT']>=10"
Illumina/cleaned_metadata_sequences Illumina/denoised_sequences
$ �
$ obi clean -s sample -r 0.05 -H Illumina/denoised_sequences Illumina/denoised_cleaned_sequences
$ �
VIII. GENERATING A TAXONOMIC TABLE
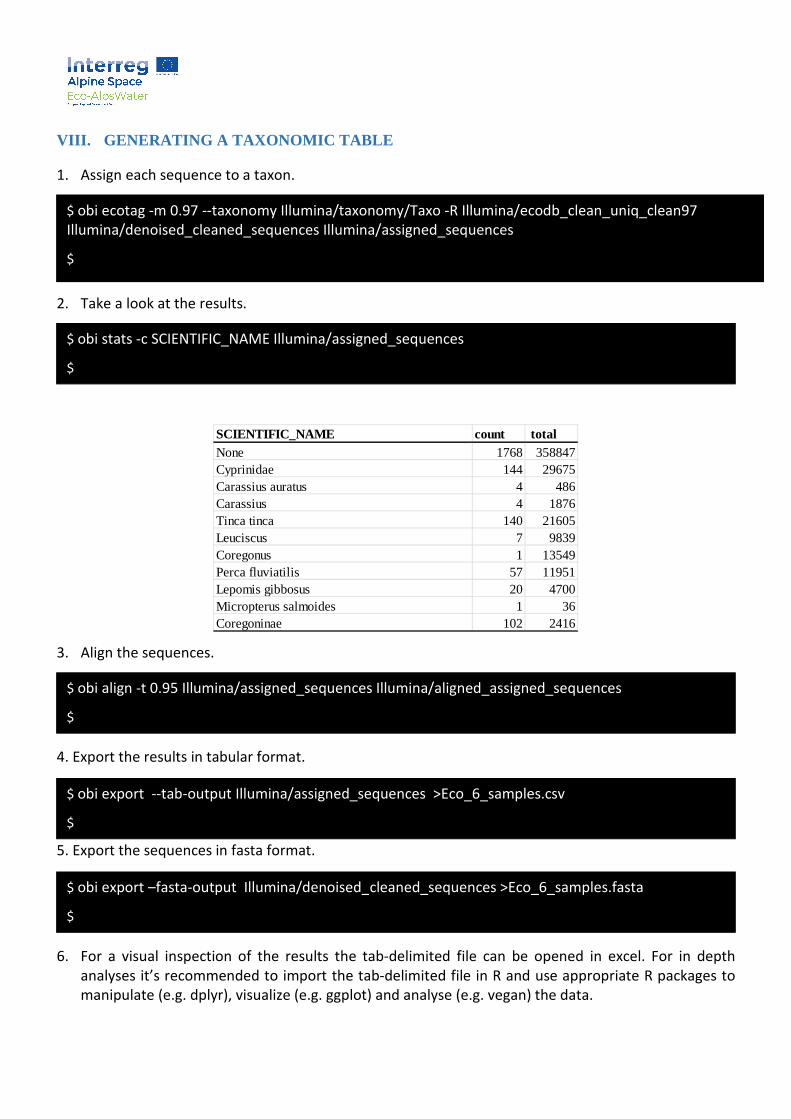
1. Assign each sequence to a taxon.
2. Take a look at the results.
3. Align the sequences.
4. Export the results in tabular format.
5. Export the sequences in fasta format.
6. For a visual inspection of the results the tab-delimited file can be opened in excel. For in depth
analyses it’s recommended to import the tab-delimited file in R and use appropriate R packages to
manipulate (e.g. dplyr), visualize (e.g. ggplot) and analyse (e.g. vegan) the data.
SCIENTIFIC_NAME count totalNone 1768 358847Cyprinidae 144 29675Carassius auratus 4 486Carassius 4 1876Tinca tinca 140 21605Leuciscus 7 9839Coregonus 1 13549Perca fluviatilis 57 11951Lepomis gibbosus 20 4700Micropterus salmoides 1 36Coregoninae 102 2416
$ obi ecotag -m 0.97 --taxonomy Illumina/taxonomy/Taxo -R Illumina/ecodb_clean_uniq_clean97
Illumina/denoised_cleaned_sequences Illumina/assigned_sequences
$ �
$ obi stats -c SCIENTIFIC_NAME Illumina/assigned_sequences
$ �
$ obi align -t 0.95 Illumina/assigned_sequences Illumina/aligned_assigned_sequences
$ �
$ obi export --tab-output Illumina/assigned_sequences >Eco_6_samples.csv
$ �
$ obi export –fasta-output Illumina/denoised_cleaned_sequences >Eco_6_samples.fasta
$ �
IX. MERGE AND TRIM NOT-DEMULTIPLEXED SEQUENCES
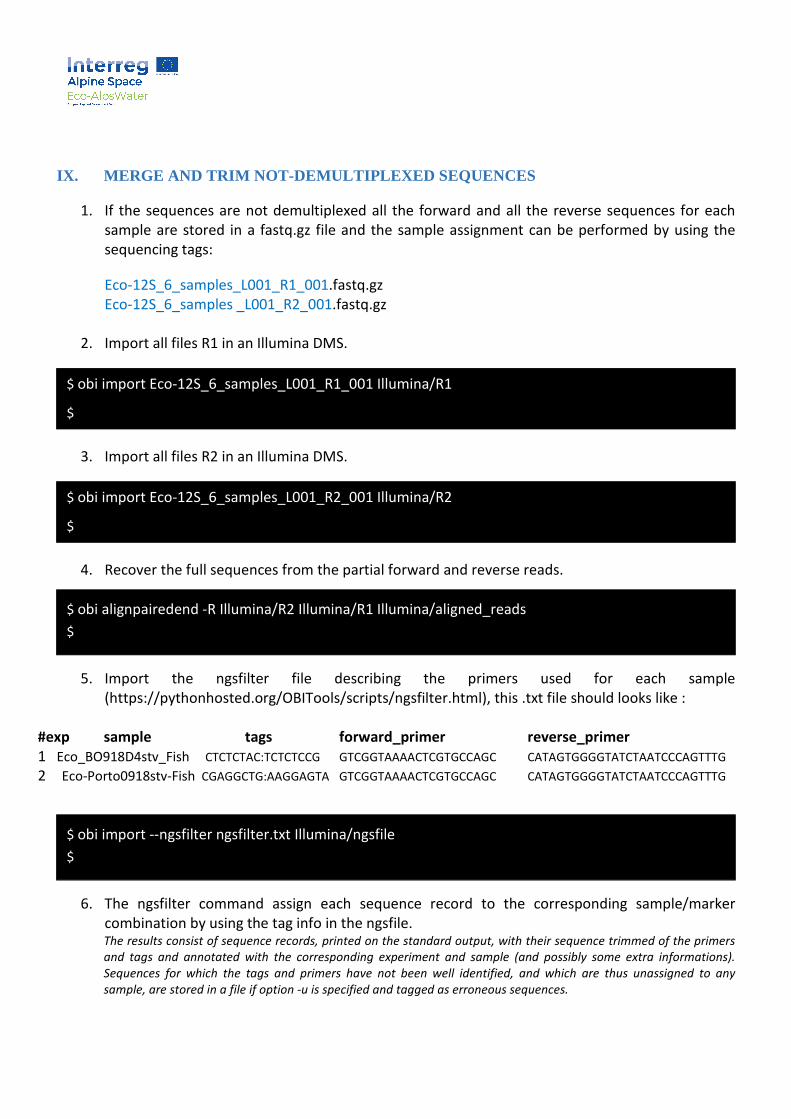
1. If the sequences are not demultiplexed all the forward and all the reverse sequences for each
sample are stored in a fastq.gz file and the sample assignment can be performed by using the
sequencing tags:
Eco-12S_6_samples_L001_R1_001.fastq.gz
Eco-12S_6_samples _L001_R2_001.fastq.gz
2. Import all files R1 in an Illumina DMS.
3. Import all files R2 in an Illumina DMS.
4. Recover the full sequences from the partial forward and reverse reads.
5. Import the ngsfilter file describing the primers used for each sample
(https://pythonhosted.org/OBITools/scripts/ngsfilter.html), this .txt file should looks like :
#exp sample tags forward_primer reverse_primer
1 Eco_BO918D4stv_Fish CTCTCTAC:TCTCTCCG GTCGGTAAAACTCGTGCCAGC CATAGTGGGGTATCTAATCCCAGTTTG
2 Eco-Porto0918stv-Fish CGAGGCTG:AAGGAGTA GTCGGTAAAACTCGTGCCAGC CATAGTGGGGTATCTAATCCCAGTTTG
6. The ngsfilter command assign each sequence record to the corresponding sample/marker
combination by using the tag info in the ngsfile. The results consist of sequence records, printed on the standard output, with their sequence trimmed of the primers
and tags and annotated with the corresponding experiment and sample (and possibly some extra informations).
Sequences for which the tags and primers have not been well identified, and which are thus unassigned to any
sample, are stored in a file if option -u is specified and tagged as erroneous sequences.
$ obi import Eco-12S_6_samples_L001_R1_001 Illumina/R1
$ �
$ obi import Eco-12S_6_samples_L001_R2_001 Illumina/R2
$ �
$ obi alignpairedend -R Illumina/R2 Illumina/R1 Illumina/aligned_reads
$ �
$ obi import --ngsfilter ngsfilter.txt Illumina/ngsfile
$ �
7. All correctly identified sequences will be recorded in the identified_sequences and we can
compute the number of forward and reverse tags and primer detected and trimmed in
sequences.
8. Dereplicate reads into unique sequences.
9. Denoise the sequence dataset
o Clean the useless metadata
- Keep only the sequences having a count greater or equal to 10 and a length longer than 80 bp
- Clean the sequences from PCR/sequencing errors (sequence variants)
The sequences are now ready for taxonomic assignment following section VIII.
IMPORTANT
THE MAIN OBJECTIVE OF THE BIO-INFORMATICS PIPELINE IS TO TRANSFORM THE MASSIVE SEQUENCING FILES
INTO A MORE COMPACT AND MANAGABLE FORMAT. WHILE THE PROPOSED PROTOCOL WILL REMOVE MOST
ARTIFACTUAL SEQUENCES (i.e. PCR ERRORS, SEQUENCING ERRORS, CHIMERA’S) SOME ERRORNEOUS SEQUENCES
MAY STILL BE PRESENT. A CAREFUL VALIDATION AND INTERPRETATION OF THE DATA IS THUS NEEDED.
$ obi ngsfilter -t Illumina/ngsfile -u Illumina/unidentified_sequences Illumina/good_sequences
Illumina/identified_sequences
$ �
$ obi stats –c forward_tag –c reverse_tag -c forward_primer -c reverse_primer
Illumina/identified_sequences
$ �
$ obi uniq -c sample Illumina/identified_sequences Illumina/dereplicated_sequences
$ �
$ obi annotate -k COUNT -k sample Illumina/dereplicated_sequences
Illumina/cleaned_metadata_sequences
$ �
$ obi grep -p "len(sequence)>=80 and sequence['COUNT']>=10"
Illumina/cleaned_metadata_sequences Illumina/denoised_sequences
$ �
$ obi clean -s sample -r 0.05 -H Illumina/denoised_sequences Illumina/denoised_cleaned_sequences
$ �
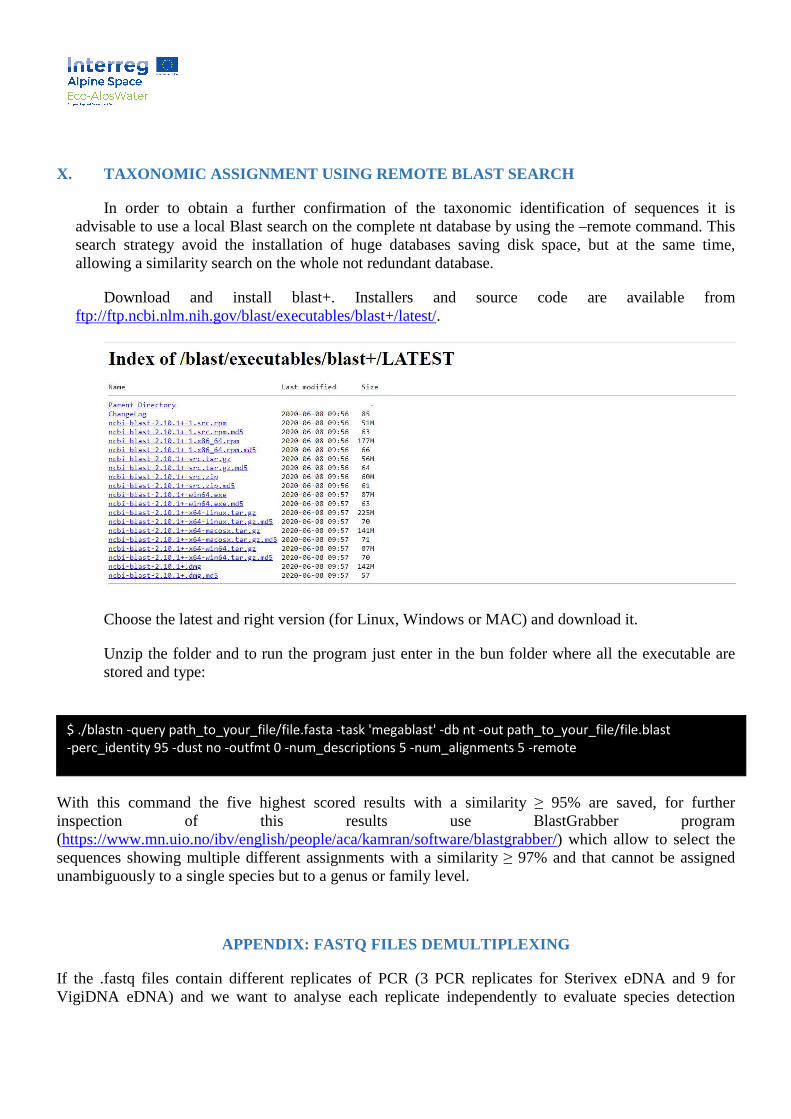
X. TAXONOMIC ASSIGNMENT USING REMOTE BLAST SEARCH
In order to obtain a further confirmation of the taxonomic identification of sequences it is advisable to use a local Blast search on the complete nt database by using the –remote command. This search strategy avoid the installation of huge databases saving disk space, but at the same time, allowing a similarity search on the whole not redundant database.
Download and install blast+. Installers and source code are available from ftp://ftp.ncbi.nlm.nih.gov/blast/executables/blast+/latest/.
Choose the latest and right version (for Linux, Windows or MAC) and download it.
Unzip the folder and to run the program just enter in the bun folder where all the executable are stored and type:
With this command the five highest scored results with a similarity ≥ 95% are saved, for further inspection of this results use BlastGrabber program (https://www.mn.uio.no/ibv/english/people/aca/kamran/software/blastgrabber/) which allow to select the sequences showing multiple different assignments with a similarity ≥ 97% and that cannot be assigned unambiguously to a single species but to a genus or family level.
APPENDIX: FASTQ FILES DEMULTIPLEXING
If the .fastq files contain different replicates of PCR (3 PCR replicates for Sterivex eDNA and 9 for VigiDNA eDNA) and we want to analyse each replicate independently to evaluate species detection
$ ./blastn -query path_to_your_file/file.fasta -task 'megablast' -db nt -out path_to_your_file/file.blast
-perc_identity 95 -dust no -outfmt 0 -num_descriptions 5 -num_alignments 5 -remote
variability and efficiency we can demultiplex the .fastq files by using a list of barcodes with the software demultiplex (https://demultiplex.readthedocs.io/en/latest/installation.html)
The demultiplex program provides several ways to demultiplex any number of FASTA or a FASTQ files based on a list of barcodes. This list can either be provided via a file or guessed from the data. The demultiplexer can be set to search for the barcodes in the header, or in the read itself. To allow for mismatches, two distance functions (edit distance and Hamming distance) are available.
INSTALLATION COMMAND
USAGE
The –r command allows to search for the barcode in the reads, the barcodes.txt is the file with the list of barcodes and the .fastq.gz are the files we want to demultiplex.
Below an example of the barcode file:
index_1.1 CTACTAC
index_1.2 GTAGAGT
index_1.3 CCTTAGA
Barcodes are detected in both R1 and R2 files and the command will generate three files:
file_1_index1.1.fq
file_1_index1.2.fq
file_1_index1.3.fq
file_1_UNKNOWN.fq
The first three files will contain records assigned to index1.1, index1.2 and index1.3, the last file will contain anything the reads which cannot be assigned.
$ git clone https://github.com/jfjlaros/demultiplex
$ cd demultiplex
$ pip install .
$ demultiplex demux -r /home/riccionig/obitools3/References/barcodes.txt
/home/riccionig/obitools3/References/EAW_Fish_res/T2-Mifish-U-1_S38_L001_R1_001.fastq.gz
/home/riccionig/obitools3/References/EAW_Fish_res/T2-Mifish-U-1_S38_L001_R2_001.fastq.gz