customizable microprocessor design on nexys 3 spartan fpga board
TRANSCRIPT

The University of Texas at Dallas
Department of Electrical Engineering
“UTD CUSTOMIZABLE
MICROPROCESSOR”
Fall 2014
Prepared by,
Aalay Kapadia (adk130330)
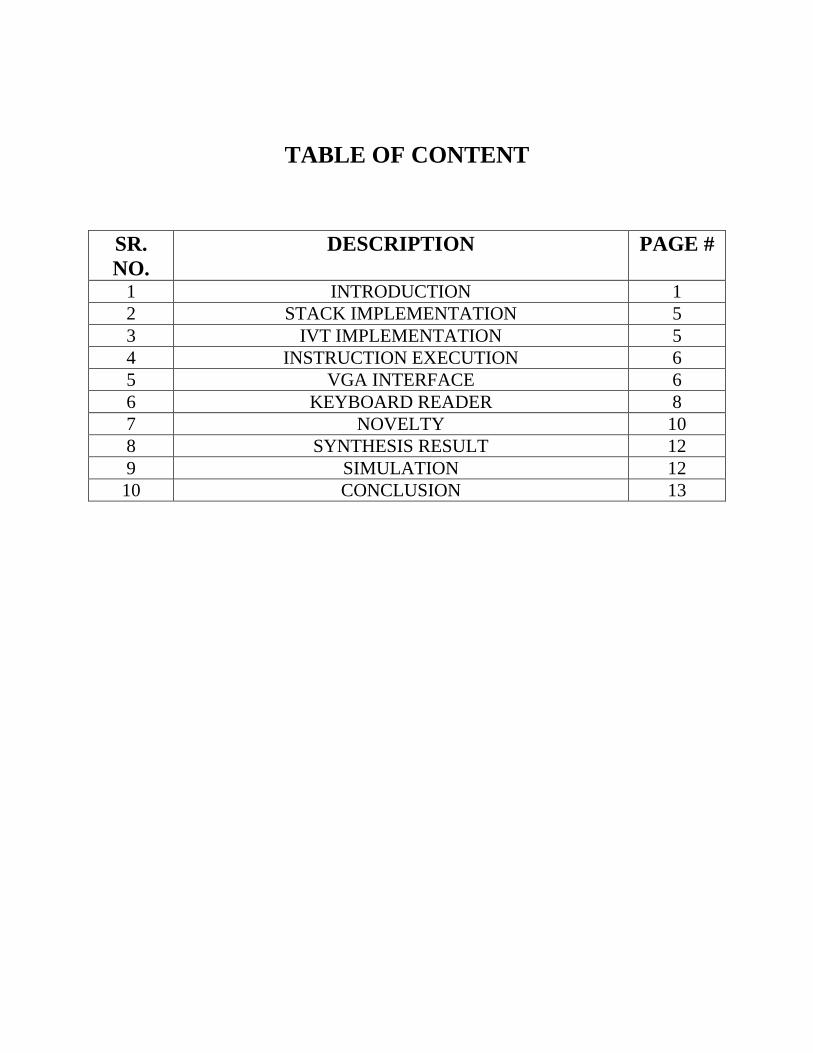
TABLE OF CONTENT
SR.
NO.
DESCRIPTION PAGE #
1 INTRODUCTION 1
2 STACK IMPLEMENTATION 5
3 IVT IMPLEMENTATION 5
4 INSTRUCTION EXECUTION 6
5 VGA INTERFACE 6
6 KEYBOARD READER 8
7 NOVELTY 10
8 SYNTHESIS RESULT 12
9 SIMULATION 12
10 CONCLUSION 13
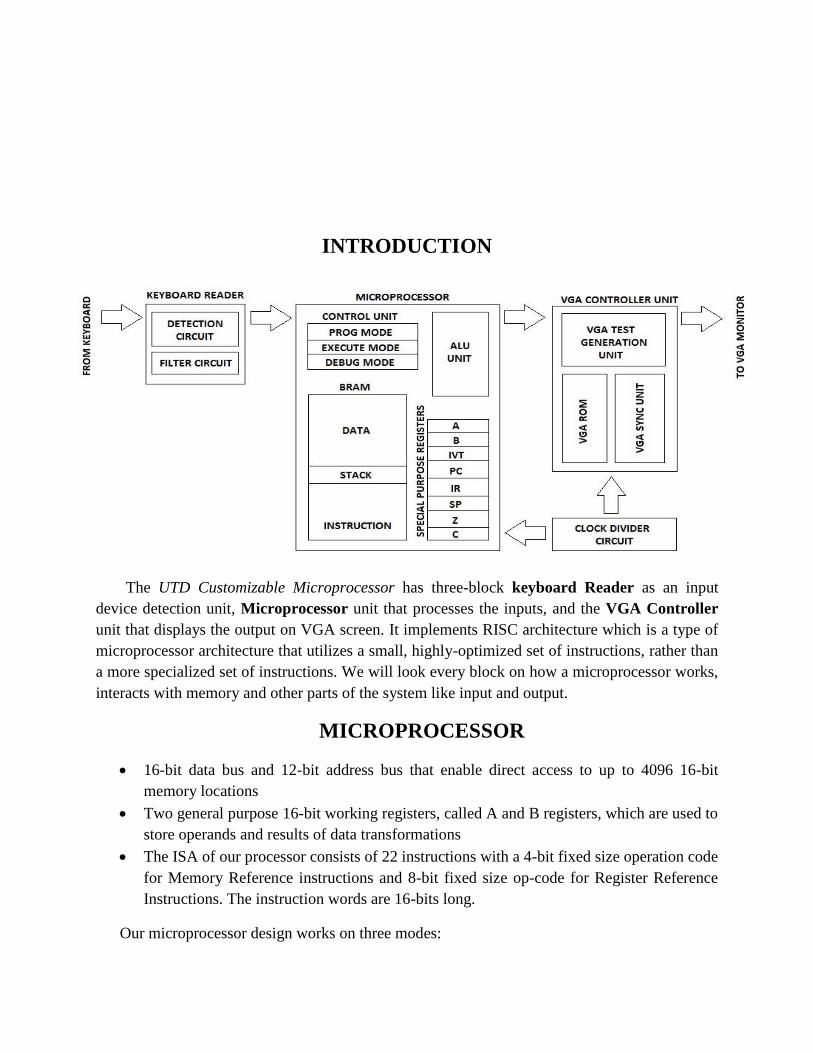
INTRODUCTION
The UTD Customizable Microprocessor has three-block keyboard Reader as an input
device detection unit, Microprocessor unit that processes the inputs, and the VGA Controller
unit that displays the output on VGA screen. It implements RISC architecture which is a type of
microprocessor architecture that utilizes a small, highly-optimized set of instructions, rather than
a more specialized set of instructions. We will look every block on how a microprocessor works,
interacts with memory and other parts of the system like input and output.
MICROPROCESSOR
16-bit data bus and 12-bit address bus that enable direct access to up to 4096 16-bit
memory locations
Two general purpose 16-bit working registers, called A and B registers, which are used to
store operands and results of data transformations
The ISA of our processor consists of 22 instructions with a 4-bit fixed size operation code
for Memory Reference instructions and 8-bit fixed size op-code for Register Reference
Instructions. The instruction words are 16-bits long.
Our microprocessor design works on three modes:
PROG mode: In this mode, we can provide our assembly language code in hexadecimal format
to the microprocessor.
Executing mode: This mode is an execution mode where the microprocessor will run the
assembly language code provided by you in the part 1.
DEBUG mode: In this mode, you can freeze the microprocessor’s EXECUTION mode after
every instruction completion. This will help you to detect the errors and flaws in your design or
human errors usually happen in writing the code.
Steps to activate PROG mode:
Step 1: Make “T5”, “M11” switches to “1”, keep rest all switches to zero.
Step 2: Burn your .bit file onto your board.
Step 3: Make switch “T5” to “0”. Keeping rest switches to original state. You will be able to see the VGA
display. PC values is by default at 0th location of memory
Step 4: Enter 4 keys from 0 to F keys denoting 16 bit data in hex format that user want to load into the
memory.
Step 5: Press “Enter” button, this will load the data into memory & PC automatically got incremented.
Step 6: Repeat the steps from 4 until user put all the data in the memory.
In order to avoid human error, we put a Seven-Segment display so that user can see how many
times he has entered the key. After the 3rd
key press user will be able to see the display as 3 and after the
4th key also still it will display 3. The Seven-Segment display will become zero as soon as user hits the
“enter” key. If it is not and the counter is at three only then user haven’t entered the 4th key. Press it again
and then press “enter”, you data will get loaded. User can use a backspace key to erase the last pressed
key data until and unless he user hasn’t pushed “enter”.
Steps to activate Normal mode:
Step 1: “T5” is already ‘0’, “M11” switches is at “1”, keep rest all switches to zero.
Step 2: Make switch “M11” to “0”. Keeping rest switches to original state.
User will be able to see the VGA display showing the Result of your program in A, B, Z, C
register. PC value should display the next location of halt instruction. User will also be able to see the
clock cycle count on it.
Steps to activate DEBUG mode:
Step 1: “T5” is already ‘0’, “M11” switch is at “1”, Make “T10” switches to “1”, keep rest all to zero.
Step 2: Make switch “M11” to “0”. Keeping rest switches to original state.
Step 3: Press “C4” push button, User will be able to see the VGA display showing the result of the
program in A, B, Z, C register after every instruction. PC value displays the current instruction location.
Step 4: Repeat the step 4 again and again until the halt instruction comes.
STACK IMPLEMENTATION
We have put the stack pointer (SP) to 100000000000th
location in the BRAM, so when
ever JSR instruction gets executed, the current value of PC gets stored in above mentioned
location and SP gets decremented.
In case of Stack overflow, we have assigned a condition saying always compare the SP
base value before incrementing the SP. Hence if the SP value violates the above condition in any
case, then SP value will stay on 100000000000th
location, it will never increase beyond the base
value. At the same time it will lit up the “T11” LED showing stack over condition occurred and
value in A might be incorrect depending upon the program. As Stack operation only affect
Register A.
SIGN HANDLING
We have used “std_logic_unsigned.all” library in our code, which makes all the data
unsigned in our microprocessor. So whenever a condition occurs where program tries to
decrement the Register B value beyond x0000, or tries to incremented the same beyond xffff,
then microprocessor will assign the value in Register B as xffff and x0000 correspondingly. For
the second case Z flag will also become 1.
IVT IMPLEMATATION
An interrupt vector is a point where Interrupt Service Routine (ISR) is stored in memory.
In our Microprocessor design we have serviced the interrupts by implementing the Interrupt
Vector Table (IVT). The purpose of the IVT is to redirect the microprocessor to the right place
when an interrupt arrives.
Here, basically the interrupt is mapped to a memory area called the Interrupt Vector Table
(IVT). The steps which our design performs when it is interrupted are given below:
The interrupt process should be enabled using the ION instruction.
The Microprocessor will be checking for any interrupt during the execution of every
instruction.
Upon reception of the interrupt microprocessor completes the executing instruction, saves
the memory location of the next instruction on stack and the program is transferred to the
location as specified by the IVT, which is 0x64 location in our design.
Microprocessor performs the Interrupt Service Routine.
Once it encounters the RET instruction microprocessor retrieves the return address from
the stack and the program is transferred back to where the program was interrupted.
INSTRUCTION EXECUTION
Our design takes four clock cycles to execution an instruction which are stated as follows -
1. Instruction Fetch: Copy the value of Program Counter (PC) into address (addra). Fetch
the instruction or data (douta) from the memory location specified by the address (addra)
and put it in instruction register (IR) Increment the program counter (PC) to the address
of the next location. This is performed in two machine cycles s0 and s1.
2. Instruction Decode: The Instruction in stored within the instruction register (IR) is
decoded. It recognizes which opcode have to be used, and what operations are to be
performed in order to execute the instruction. This takes in one machine cycle s3.
3. Instruction Execution: During this stage actual action specified by the opcode is carried
out. It depends on both the instruction as well as the address, which will specify the data
that may be required. This is done in the fourth machine cycle s4. Go back to step 1 and
perform the same process until the encounter of halt instruction (i.e opcode is
“1111000000000000”). In case it is halt instruction, it won’t perform the step 1, rather it
will go out of the loop and free the result.
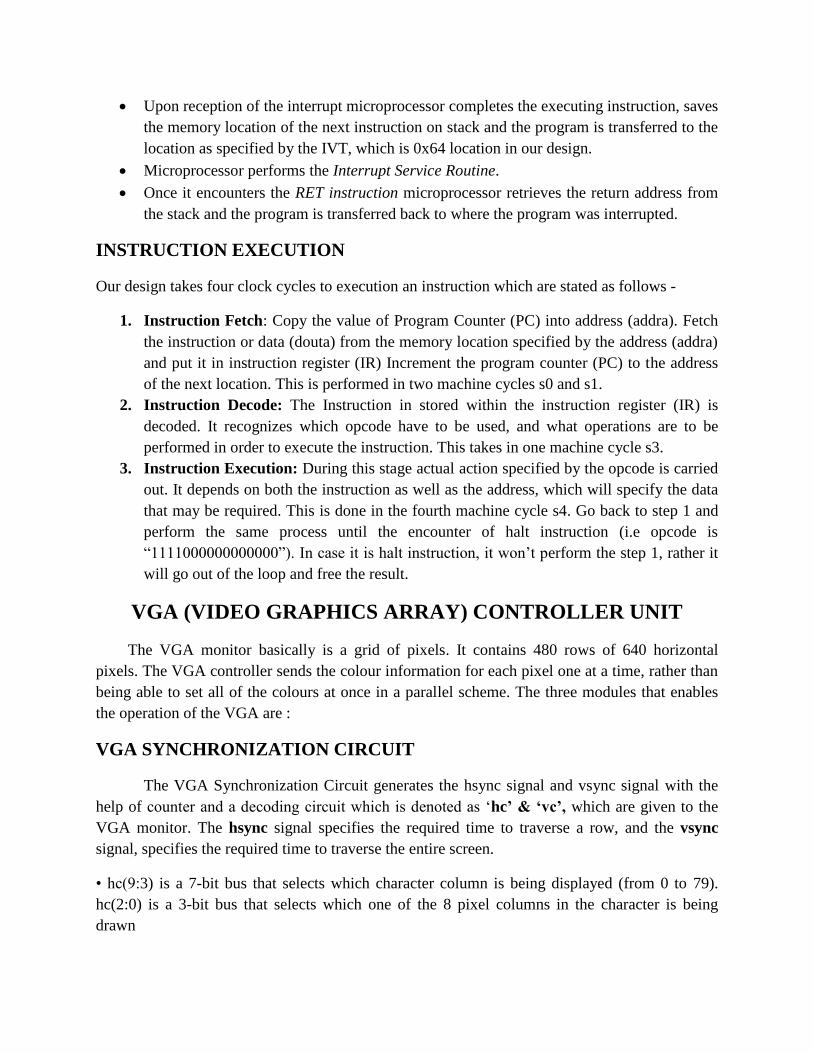
VGA (VIDEO GRAPHICS ARRAY) CONTROLLER UNIT
The VGA monitor basically is a grid of pixels. It contains 480 rows of 640 horizontal
pixels. The VGA controller sends the colour information for each pixel one at a time, rather than
being able to set all of the colours at once in a parallel scheme. The three modules that enables
the operation of the VGA are :
VGA SYNCHRONIZATION CIRCUIT
The VGA Synchronization Circuit generates the hsync signal and vsync signal with the
help of counter and a decoding circuit which is denoted as ‘hc’ & ‘vc’, which are given to the
VGA monitor. The hsync signal specifies the required time to traverse a row, and the vsync
signal, specifies the required time to traverse the entire screen.
• hc(9:3) is a 7-bit bus that selects which character column is being displayed (from 0 to 79).
hc(2:0) is a 3-bit bus that selects which one of the 8 pixel columns in the character is being
drawn

• vc(8:3) is a 6-bit bus that selects which character row is being displayed (from 0 to 59). vc(2:0)
is a 3-bit bus that selects which one of the 8 pixel rows in the character is being drawn
• Video_on is to indicate whether to enable or disable the display.
FONT ROM MODULE
The font set consists of the character patterns of the ASCII values that are required.
Here, seven MSB of the 11 bits denotes the character and the four LSB bits are used to identify
the row within a character pattern.
It takes the address (row_addr) of a character from FONT GENERATION UNIT and
sends the correspoding charater pattern back to the FONT GENERATION UNIT (font_word).
The address and ROM content for the letter “A” are shown as follows
CLOCK DIVISION UNIT
The Nexys 3 Spartan 6 FPGA Board works on 100Mhz clock. In order to display data in 640 by
480 pixels we require a 50MHz clock. So we use Clock Division Unit (CDU) which generates
50MHz clock. CDU is also used by the Microprocessor block to read the data from the keyboard.
PIXEL GENERATION MODULE
The pixel generation circuit basically generates the pixel values depending upon the
pixel_x and pixel_y (pixel coordinates), the data and the control signals. The pixel_x and pixel_y
denotes the location of the current pixel.
The Pixel Generation Unit(PGU) takes data from register ‘A’, ’B’, ‘PC’, ’C’, ’Z’,
‘Instruction’, ‘N’ (number of clock cycles) from the Microprocessor module as a input.
Let suppose if we have to display “P” on the VGA monitor at (1, 4) co-ordinates,
whenever hc(pixel_y) and hv(pixel_x) counter comes to (1, 4) location while scanning the whole
screen the address location of that character passed to the FONT ROM Module. Once it finds a
match in the set of available charater patterns, it sends back the pattern of “P” to the PGU to be
displayed on VGA monitor.
The output RGB (Red, Green, Blue) triplet provides the colour information for each
pixel. Three analog signals are used to represent relative amounts of red, green, and blue that
compose the colour.
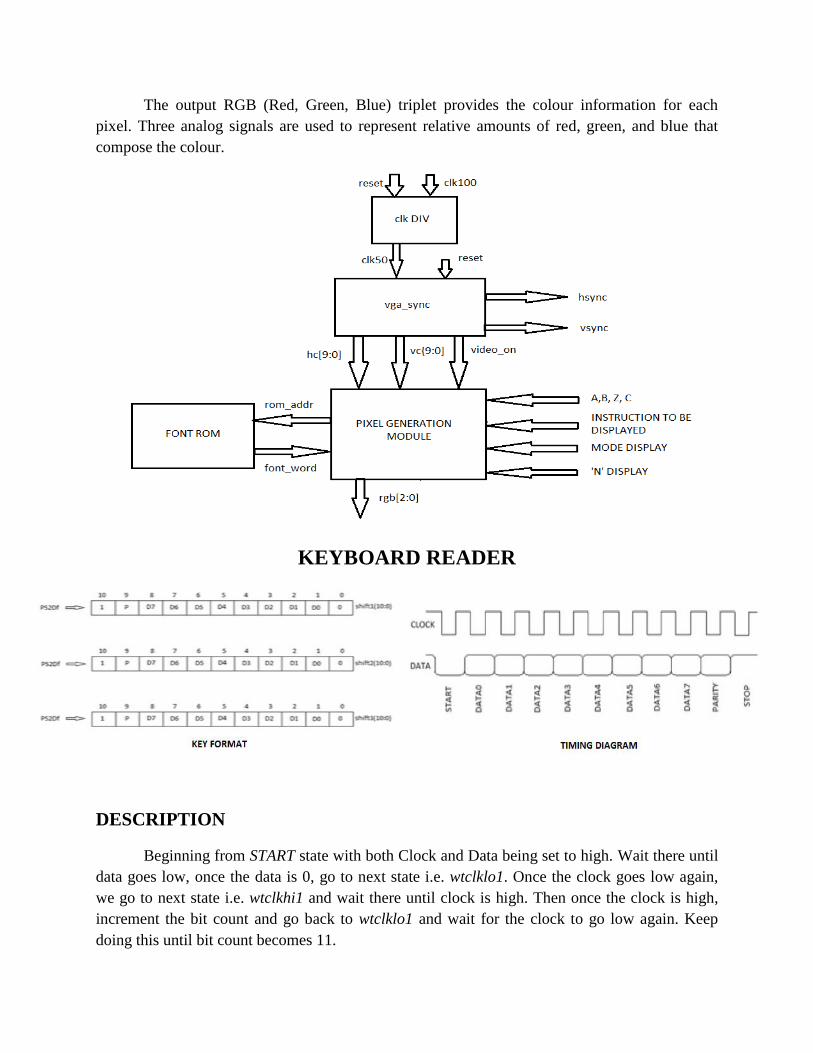
KEYBOARD READER
DESCRIPTION
Beginning from START state with both Clock and Data being set to high. Wait there until
data goes low, once the data is 0, go to next state i.e. wtclklo1. Once the clock goes low again,
we go to next state i.e. wtclkhi1 and wait there until clock is high. Then once the clock is high,
increment the bit count and go back to wtclklo1 and wait for the clock to go low again. Keep
doing this until bit count becomes 11.
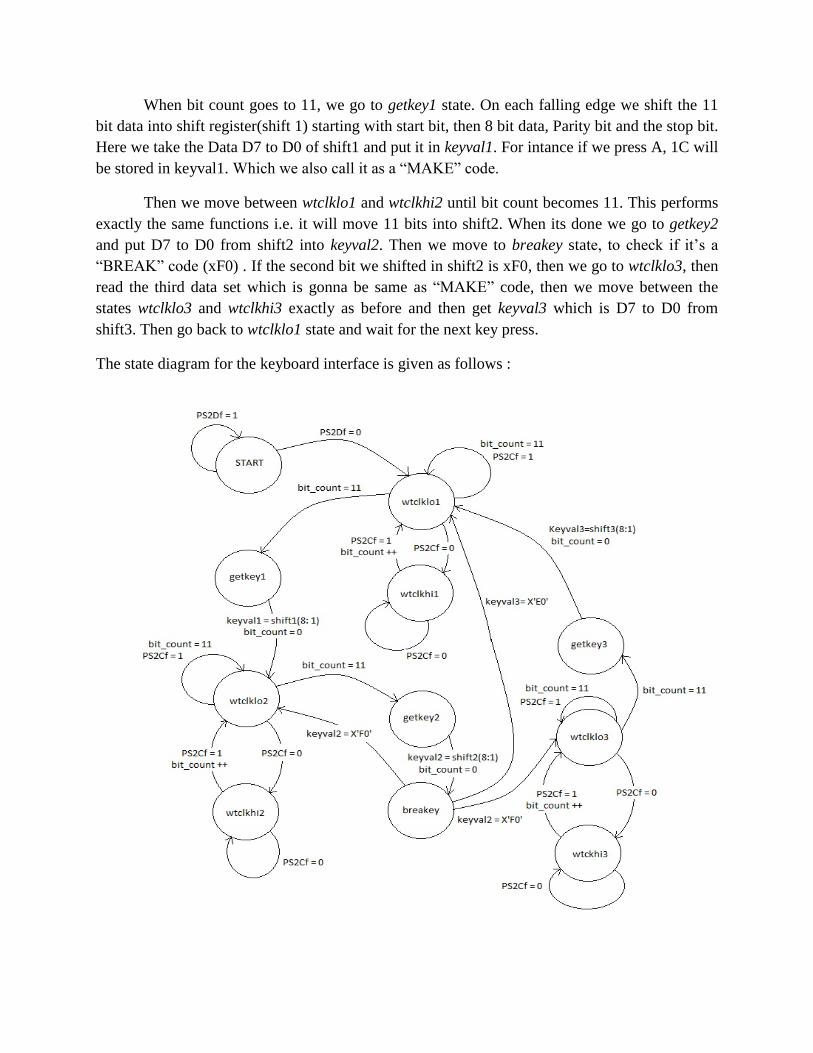
When bit count goes to 11, we go to getkey1 state. On each falling edge we shift the 11
bit data into shift register(shift 1) starting with start bit, then 8 bit data, Parity bit and the stop bit.
Here we take the Data D7 to D0 of shift1 and put it in keyval1. For intance if we press A, 1C will
be stored in keyval1. Which we also call it as a “MAKE” code.
Then we move between wtclklo1 and wtclkhi2 until bit count becomes 11. This performs
exactly the same functions i.e. it will move 11 bits into shift2. When its done we go to getkey2
and put D7 to D0 from shift2 into keyval2. Then we move to breakey state, to check if it’s a
“BREAK” code (xF0) . If the second bit we shifted in shift2 is xF0, then we go to wtclklo3, then
read the third data set which is gonna be same as “MAKE” code, then we move between the
states wtclklo3 and wtclkhi3 exactly as before and then get keyval3 which is D7 to D0 from
shift3. Then go back to wtclklo1 state and wait for the next key press.
The state diagram for the keyboard interface is given as follows :
In our design, opcode of instructions/data can be passed to Microprocessor using Keyboard via:
Direct Method: In this mode a single key press denotes the 16 bit opcode of any instruction. The
table below shows the Instruction and its corresponding key which can be used in direct mode in
our Microprocessor.
Instrcution Key
Instruction Key
Instruction Key
Instruction Key
ADD N
INCB S
CMB R
SC L
AND T
DECB G
RET W
SZ M
CLA P
CLC H
ION J
END X
CLB Q
CLZ I
IOF K
PUSHA U
POPA V
ENTER Key : It loads the data into the memory location pointed by program counter (PC) and
at the same time it automatically increments the PC value.
BACKSPACE Key: If in case while keying in the instruction we go wrong, backspace key can
be used to erase it and type the instruction again.
HEX Method: Enter the 16-bit value you want to put in PC location in hexadecimal format.
User will press only 4 keys out of 0 to F, which will denote the 16 bit data. Note that the value
you enter is from 15 to 0 (e.g. if user enters first key as “F” then that means (15:12) bits are
“1111”).
NOVELTY
Our microprocessor design works in three different modes - PROG, EXECUTE & DEBUG
mode.
Real time display on VGA for Instructions, PC, A, B, C & Z flag, Mode of working & clock
cycle count - While running the code in EXECUTE mode or DEBUG mode, above mentioned
values displayed on the screen will change dynamically i.e. on Real time basis and NOT at the
end of the program, hence this feature gives user a clear picture of how data flow and instruction
flow is going in the backend and how the microprocessor is handling the running code. Moreover
the clock cycle count display can help user to improve the performance of microprocessor.
Provision of writing to any memory location - Loading the data in COREGEN generated
BRAM using .COE file restrict user from loading the data in any desired memory location
because it loads data sequentially into the memory (user only provides data no address), which
doesn’t give user control to take the use of microprocessor’s memory efficiently from
programming as well as execution point of view. But with our microprocessor, user can put the
data in any desired location, which not only creates a user-friendly environment but also gives
user an opportunity to take use of all the memory location effectively. Hence this feature
provides FLEXIBILITY to our Microprocessor. We have achieved this by assigning a
“FLUSH” switch (T9), which when put to ‘0’, works normally i.e. putting the data in memory in
sequential order but when put to ‘1’, gives user facility to enter the data in any location. After
switching it to FLUSH mode, user have to provide the 12 bit address of the location where he
wants to put the data and then the 16 bit data which he wants to put in that address. Until and
unless the FLUSH switch is high, user will be able to access any desired memory location.
Program ONCE, use FOREVER - We have seen so far that user have to load microprocessor
.bit file into the FPGA whenever user want to perform some assembly language operation, but
once the operation is done user has to burn the same .bit file again into FPGA for another
operation, this happens because the same .bit file cannot overwrite itself and a lot of users
precious time. But with our design, we have put a feature into our microprocessor so that burned
.bit file can reprogram itself; hence the same loaded .bit file can be used again and again, as
many number times as user wants. This helps user to save a lot of time, plus this saves a lot of
resources like no need for adept tool and Laptop. User has to program it once and he can use it
like forever. We have achieved this by a push button (D9), which takes the PC value to zero,
clears all the registers and can behave as if nothing has been done on it before. This novelty of
PORTABILITY not only makes our microprocessor different but also makes use of the FPGA
easy to use.
SYNTHESIZED RESULTS
Area: 1 BRAM, 1 ROM
LUT usage: 15%
Maximum achievable frequency: 178 MHz
SIMULATION
1) TEST VECTOR:
IOF //Interrupt Disabled
CLA //Clear contents of A Register
CLB //Clear contents of B Register
LDA 0x0100 //Load A=0x03 from 9th Location
LDB 0x0200 //B=0x01 from 10th
location
ADD // Add contents of A and B
STA 0x0300 // Store the contents of A register at 11th
location
LDB 0x0300 // Load B from 11th
location
HALT //End of the Program
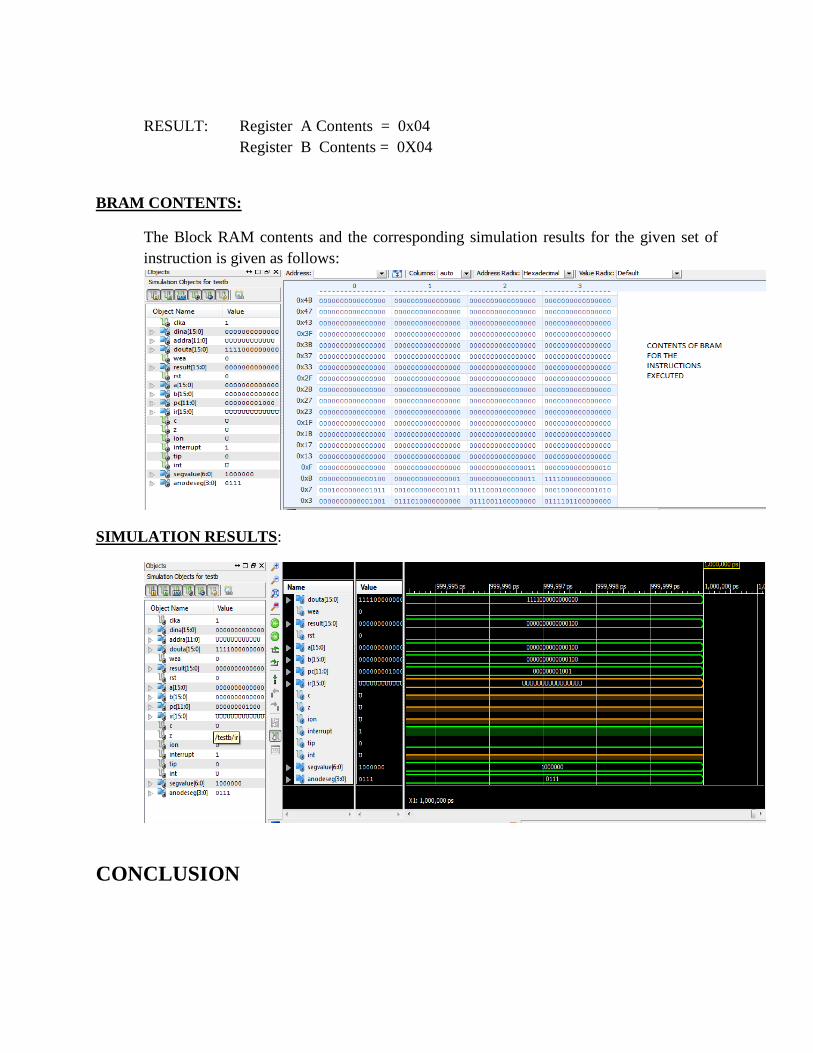
RESULT: Register A Contents = 0x04
Register B Contents = 0X04
BRAM CONTENTS:
The Block RAM contents and the corresponding simulation results for the given set of
instruction is given as follows:
SIMULATION RESULTS:
CONCLUSION
A customizable microprocessor with RISC architecture was designed. The design
supports features that are more user friendly and flexible. The design also requires limited
resources and hence being very cost effective.
REFERENCES
FPGA prototyping using VHDL Examples
http://www.youtube.com/watch?v=EtJBqvk1ZZw
www.wikipedia.com