construction guide - hard as rocks
TRANSCRIPT

CONSTRUCTION GUIDE
ELDORADO STONE™ VENEER AND HARD AS ROCKS APPLICATION SYSTEM
VERSION 1.1 February 2016
FOR YOUR LOCAL LICENSED APPLICATOR AND HARD AS ROCKS DISTRIBUTOR PLEASE PHONE
0800 353 672

2 Hard as Rocks Construction Guide – Version 1.1/ February 2016
PRODUCT DESCRIPTION
Eldorado Stone™ veneer and Hard as Rocks Application System is a simulated stone veneer cladding system designed to
imitate the look of natural stone. The materials used in the manufacture of Eldorado Stone™ veneer are lightweight
aggregates, Portland cement and iron oxide pigments that are cast to mimic different styles of stone. The weight of the
cladding system in total does not exceed 80kg/m2.
Hard as Rocks New Zealand’s installation procedure of this stone veneer cladding is generally over conventional timber
framing with studs at not more than 400 mm centres, a nominal 20mm drained and ventilated cavity and a fibre-cement
backing sheet sealed with a proprietary moisture resistant coating. Proprietary stainless steel ties are used as a
mechanical fixing between the timber framing and the mortar/stone veneer. This cast stone veneer and its New Zealand
installation system can be used on domestic and light commercial buildings where domestic construction techniques are
used as well as solid construction buildings as detailed below.
SCOPE OF USE
No substitutions are permitted for Eldorado Stone Veneer & Hard as Rocks Application System.
The Eldorado Stone™ veneer and Hard as Rocks Application System has been appraised as an external wall cladding
system for buildings within the following scope:
• the scope limitations of NZBC Acceptable Solution E2/AS1, Paragraph 1.1; and,
• constructed with timber framing complying with the NZBC; and,
• with a risk score of 0-20, calculated in accordance with NZBC Acceptable Solution E2/AS1, Table 2; and,
• situated in NZS 3604 Wind Zones up to, and including, Extra High.
The Eldorado Stone™ veneer and Hard as Rocks Application System must only be installed on vertical surfaces (except
for sills which must have a minimum 10º slope and be waterproofed in accordance with the Technical Literature)
RESPONSIBILITIES
a. Hard as Rocks is responsible for the quality of Eldorado Stone™ veneer and its installation system.
b. Quality of installation on site is the responsibility of Hard as Rocks licensed applicators.
c. Building designers are responsible for all components of the building and substrate design, to comply with NZBC, and
for the incorporation of the Hard as Rocks Application System into their design in accordance with the instructions of
Hard as Rocks technical literature.
d. Builders are responsible for the supply and installation of the fibre cement board with Hard as Rocks Tags, all
relevant watertight flashings behind all fibre cement board sheet joints, sealant over the top of the sheet joints and
sealing around joinery and all workmanship and installation of the substrate to meet Hard as Rocks Technical
Literature and the NZBC.
e. Installation of the stone veneer and the stone veneer accessories supplied by Hard as Rocks and approved installers
must be carried out only by Hard as Rocks licensed applicators.
f. Building owners are responsible for the maintenance of Eldorado Stone™ veneer and Hard as Rocks Application
System in accordance with the instructions of Hard as Rocks literature.
•
• Weathertightness and flashings are the sole responsibility of the
builder and Hard as Rocks Ltd accepts no liability for incorrect or
inadequate installation.
3 Hard as Rocks Construction Guide – Version 1.1/ February 2016
SUBSTRATES
Concrete Masonry/Brickwork or Concrete Panels
Eldorado Stone™ veneer can be direct fixed to many masonry surfaces. Each application should consider many aspects
including weather tightness (where applicable), footing loading (particularly over brick applications where brick tie
loadings need to also be factored and calculated) and returns into window and door rebates. The BRANZ appraised
Eldorado Stone™ veneer and Hard as Rocks Application System does not cover these applications so it is up to designers
and engineers to incorporate the system to meet the NZ building code.
In general applications, the surface must be totally free of oil, grease, paint, curing compounds, sealers, mould release
agents, dust or other loose contaminating materials. If any of these materials are present the surface must be cleaned
back to the original surface by sandblasting, water blasting, acid etching or wire brushing.
Prior to stone application the surface must be waterproofed using a water proofing slurry which is brushed or rolled on to
a depth of not more than 2mm.
FIBRE CEMENT BOARD
The most common and cost-effective form of application is over an approved fibre cement board substrate. We use and
recommend BGC Stonesheet 7.5mm and 9mm sheets.
Installation of the fibre cement board and relevant flashings is the responsibility of the builder and must be carried out in
accordance with the manufacturer’s technical instructions to ensure compliance with the requirements set out in E2
External Moisture of the New Zealand Building Code.
All flashings must be installed in accordance with building code requirements. To maintain the weather-resistance of the
exterior wall on which the stone products are installed, rigid, corrosion-resistant flashings and a means of drainage shall
be installed at all penetrations and terminations of the stone cladding. Flashing type and locations shall be in accordance
with the requirements of the applicable code.
The cavity vent strip must be in accordance with NZBC Acceptable Solution E2/AS1, Paragraph 9.1.8.3. The vent strip must
be manufactured from PVC, aluminium or stainless steel, and be punched with 3 - 5 mm holes or slots which provide a
minimum ventilation opening area of 1000 mm2 per lineal meter of wall. The selected cavity vent strip must be installed
with the bottom of the vent strip flush with the underside of the cavity battens. Note: A minimum 15 mm drip edge to the
bottom of the fibre cement sheet must be maintained at all times.
Minimum 45 mm wide x 18 mm thick H3.1 treated timber cavity battens, or proprietary cavity battens covered by a valid
BRANZ Appraisal must be installed over the building underlay to the studs at maximum 400 mm centres. The battens
must be fixed in place with 30 x 2.5 mm hot-dipped galvanised flat head nails at maximum 800 mm centres.
7.5 mm and 9mm thick fibre cement sheets complying with AS/NZS 2908 Part 2 may be installed vertically or horizontally.
All vertical sheet edges must be supported and fixed through the cavity battens to the wall framing. At the base of the
wall, the sheets must hang 50 mm below the supporting framing.
Where to purchase BGC Fibre cement Board
Placemakers Bunnings Carters
Code SKU # Code SKU # Product Code
7.5mm Stonesheet DSS73012 3100354 DSS73012 163617 PPSS 753012
9mm Stonesheet DSS93012 3100355 DSS93012 163631
Joint tape 780 3100356 780 163637
Edge sealer 846 3100351 846 163644
4 Hard as Rocks Construction Guide – Version 1.1/ February 2016
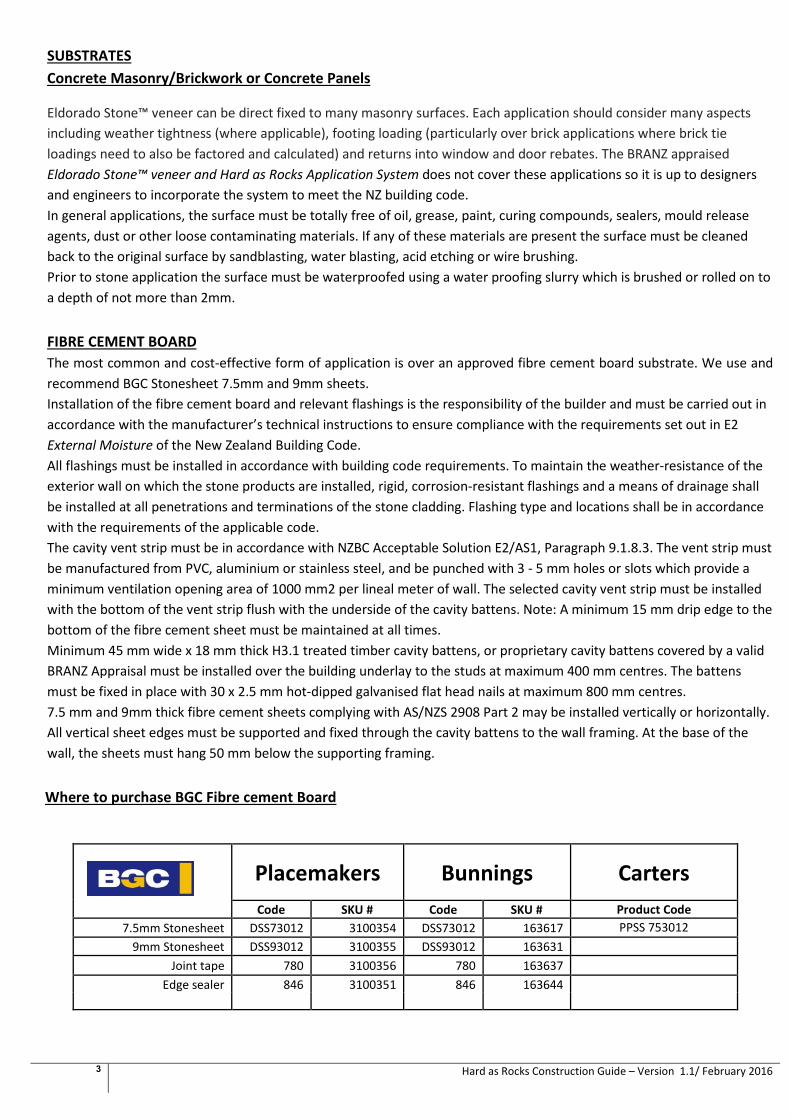
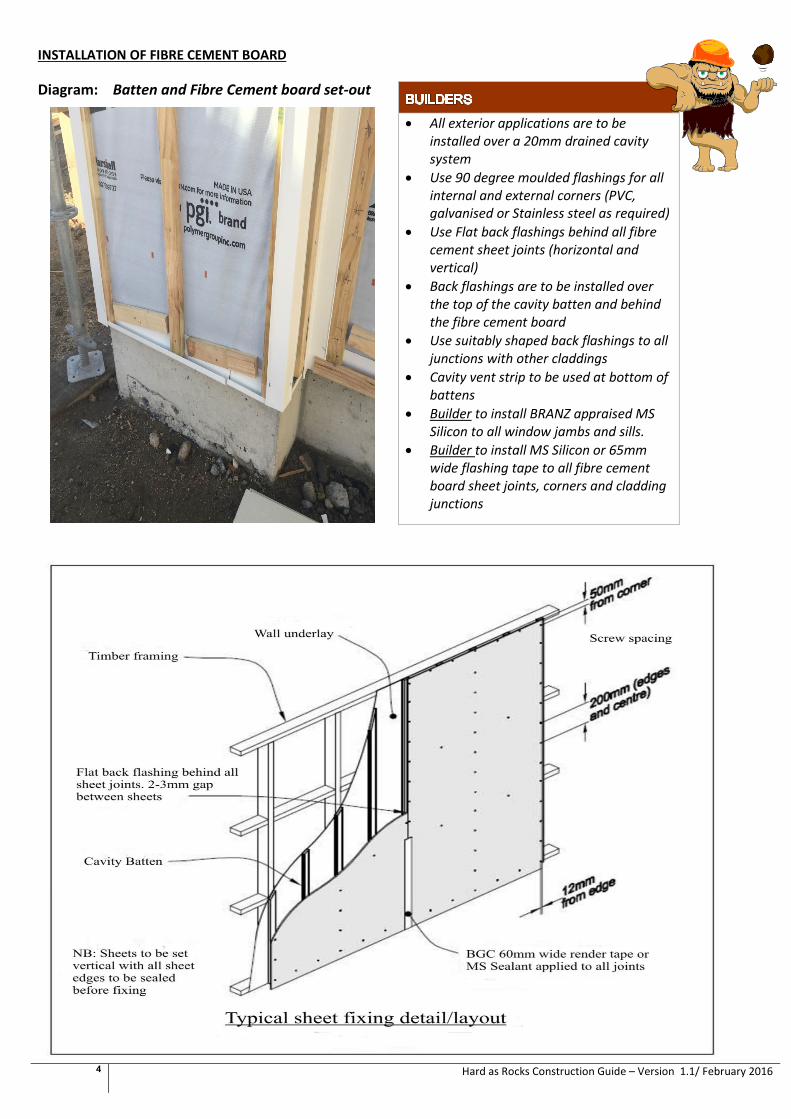
INSTALLATION OF FIBRE CEMENT BOARD
Diagram: Batten and Fibre Cement board set-out
• All exterior applications are to be
installed over a 20mm drained cavity
system
• Use 90 degree moulded flashings for all
internal and external corners (PVC,
galvanised or Stainless steel as required)
• Use Flat back flashings behind all fibre
cement sheet joints (horizontal and
vertical)
• Back flashings are to be installed over
the top of the cavity batten and behind
the fibre cement board
• Use suitably shaped back flashings to all
junctions with other claddings
• Cavity vent strip to be used at bottom of
battens
• Builder to install BRANZ appraised MS
Silicon to all window jambs and sills.
• Builder to install MS Silicon or 65mm
wide flashing tape to all fibre cement
board sheet joints, corners and cladding
junctions

5 Hard as Rocks Construction Guide – Version 1.1/ February 2016
HARD AS ROCKS SCREW & TAG FIXING
All exterior fibre cement board fixing must use 10g x 65mm Stainless Steel Screws with either M6x19mm x1.6mm Stainless
steel Washers or 60mm Stainless Steel Hard as Rocks Tags where applicable.
Interior work can be fixed with the same 65mm screws and washers @ 200mm centres or min 50mm galvanised flat head
clouts @ 150mm centres
Fixing requirements table Up to 3m High
Vertical spacings
Above 3m High
Vertical spacings
Wind zones Low, medium and High and Earthquake
Zone 1 and 2 Use 7.5mm BGC Stone sheet
Max. 200mm
Tags & Washers to alternate
Max. 200mm
Tags only
Wind zones Very high, and Earthquake zones 3 and 4
9mm stonesheet required
Max. 200mm
Tags only
Max. 150mm
Tags only
Extra High and Specific Design 2.5 kPa Wind zones, 9mm
stonesheet required
Max. 180mm
Tags only
Max. 120mm
Tags only
Note: For standard application, the maximum vertical fixing spacing is 200mm. The maximum horizontal fixing spacing
to studs is 400mm.
Diagram: Alternating positions of screws and washers with Hard as Rocks Tags both fixed using 10g x 65mm
Stainless steel screws

6 Hard as Rocks Construction Guide – Version 1.1/ February 2016
FIBRE CEMENT BOARD JOINTS – Corners
Vertical and Horizontal Control Joints
Vertical control joints to be formed at maximum 5.4m centres, aligned with any control joint in the structural framing, or
where the Eldorado Stone Veneer System abuts to different cladding types. Confirm the location of all control joints prior
to installation.
Horizontal control joints to be formed on cavity batten framing at maximum 5.4m or at inter-storey floor levels in
accordance with Hard as Stone requirements and as shown on plans.
• All corners to have a 90 degree flashing behind the fibre cement board and over the cavity
batten.
• All corners to have 60mm flashing tape or MS Silicone sealant applied to sheet joint.
• All vertical and horizontal sheet joints to have flat back flashing and 60mm flashing tape or MS
silicone sealant to exterior sheet joint.
• Control joints to be fixed over double stud and double cavity batten.
• Builders are to make sure substrate has no gaps and is watertight with flashings and sealant

7 Hard as Rocks Construction Guide – Version 1.1/ February 2016
Head flashings and sill trays must be used at all joinery
penetrations, and jambs must be sealed as per the
relevant instructions in Acceptable Solution E2/AS1 third
edition.
C la u se F2 H a za rd o u s Bu i l d i n g
Ma t e r i a l s
BGC fibre cement is not considered a health hazard to
people and therefore meet the performance F2.3.1.
She e t C u t t i n g a n d P re p a ra t i o n
BGC fibre cement sheets may be cut to size on site. If using
power tools for cutting, drilling or sanding they must be fitted
with appropriate dust collection devices or alternatively an
approved (P1 or P2) dust mask shall be worn.
It is recommended that work always be carried out in a
well-ventilated location. If a cut edge is to be flush-joined
it must be prepared with a recessed edge.
Cu t t i n g
The most suitable cutting methods are:
Score and snap
Using a straight edge, score the sheet face 4 or 5
times with a tungsten tipped
‘score and
snap’ knife.
While supporting
the scored edge with
the straight edge snap the sheet
upward for a clean break.
Hand Guillotine
A fibre cement hand guillotine produces
clean straight edges and is ideal for
cutting BGC fibre cement
sheets.
Make the
guillotining cut on the
off-cut side of the line to
allow for the blade thickness.
Notching
Notches can be made by cutting two sides of the
notch with a hand saw or guillotine. Score along the
third side with a ‘score and snap’ knife, then snap
upwards while supporting the scored edge to remove
the notch.
New Ze a la n d Bu i l d i n g C o de
C omp l i a n ce (N ZBC )
BGC fibre cement sheets must be used, installed and
maintained in accordance with this Technical Literature
to meet the following provisions of the New Zealand
Building Code (NZBC).
C la u se B1 S t ru c t u re
BGC fibre cement sheets will meet performance B1.3.1,
B1.3.2 and B1.3.4. Relevant information on the physical
conditions pertaining to B1.3.3 is included in this literature.
Bra c in g
BGC fibre cement sheets can be used to provide
racking resistance to timber framed walls against
wind and earthquake loads in accordance with NZBC,
when applied directly to studs. Cavity battens and an
additional fibre cement outer cladding is required.
C la u se B2 D u ra b i l i ty
When used as an external substrate for an applied
coating system BGC fibre cement will meet the
following provisions of the NZBC.
• B2.3.1(a) - 50 years for structural (bracing)
applications. Stainless steel fxings must be used for
all bracing sheets.
• B2.3.2(b) - 15 years for general applications.
Stainless steel fxings must be used in corrosive
conditions such as geothermal hot spots or coastal
zones (within 500m of the sea).
Coating systems, seals and flashings must be maintained
to ensure moisture does not penetrate the cladding
system and sheets and that fxings remain dry at all times.
The homeowner should follow the BRANZ Homeowner’s
Manual to maintain their dwelling. this manual provides a
recommended maintenance check list.
BGC fibre cement is expected to have the service life of
at least 50 years.
C la u se E2 E x t e rn a l M o i s t u re
BGC fibre cement when used in conjunction with an
external applied finishing system (jointing and coating) that
meets NZBC B2, E2 and F2, will meet performance E2.3.2.
Genera l B G C F i b r e C e m e n t Te c h n i c a l I n f o r m a t i o n J u n e 2 0 0 7
Score along straight edge then lift sheet upwards to form clean break

8 Hard as Rocks Construction Guide – Version 1.1/ February 2016
F ram in gFraming must be constructed to comply with the
New Zealand Building Code (NZBC). Compliance
with the NZBC can be met by timber framing
designed and constructed in accordance with NZS
3604 for non-specific design, or in accordance with
NZS 3603 and NZS 4203/4251 for specific design.
The framing must be set to a true plane to ensure a
straight finish to the wall.
The moisture content of timber framing must
be less than 16% when the cladding sheets are
fixed. If sheets are fixed to ‘wet’ framing problems
may occur at a later date due to excessive timber
shrinkage. It is strongly recommended that kiln dried
framing is used.
Timber framing, for sheet joints, must have a
minimum face width of 45 mm (nominal 50 mm).
Intermediate studs with a minimum face width of 35
mm (nominal 40 mm) may be used.
Studs must be spaced at maximum 400 mm centres.
Noggings need to align with sheet joints when used
for horizontal fixing. BGC fibre cement sheets must
not be joined off the framing.
I m p a c t R e s i s t a n ce
BGC Fibre Cement has good resistance to hard and soft
body impacts likely to occur in residential and light
commercial use. When used in commercial or industrial
situations, or other high impact situations, the designer
should consider protection measures such as the
installation of barriers or bollards to vulnerable areas.
W in d F a ce L o a d sBGC Fibre Cement sheets may be used in all Building
Wind Zones of NZS 3604, including Very High.
General
Hand Sawing
Hand sawing is suitable for general cutting
operations, small cuts, notches and small
penetrations.
For accuracy and neatness, mark out the cut lines on
the face side of
the sheet prior to
sawing.
When sawing,
the back of the
sheet should be
supported close to the cut. A fne toothed saw can
be used. A quick jabbing action gives best results.
Ho le s a n d Pe n e t ra t i o n s
Drilling
BGC fibre cement sheets can be drilled using normal
high-speed drill bits, do not use the drill’s hammer
function.
Small rectangular
or circular
penetrations
can be made
by drilling a
series of small
holes around
the perimeter of
the cut out, then tapping out the waste piece from
the sheet face. Tap carefully with a hammer while
supporting the underside of the opening to avoid
damage. Clean up any rough edges with a rasp if
necessary.
Large
rectangular
openings
such as for air
conditioners,
are formed by
deeply scoring
the perimeter of the opening with a ‘score and snap’
knife. Next form a hole in the centre of the opening
(see method above) then saw cut from the hole to
the corners of the opening.
Finally snap out the four triangular segments to
form the opening. Clean rough edges with a rasp if
necessary.
B G C F i b r e C e m e n t Te c h n i c a l I n f o r m a t i o n J u n e 2 0 0 7
Score between cuts, support edge and snap offcut upwards.
Saw Cut
F ix i n g I n s t ru c t i o n s
BGC fibre cement sheets must be dry before fixing to
the framing structure. Sheet edges must be joined over
a stud or continuous line of nogging. Sheet cuts, which
are to be flush jointed, must be recessed on site. The
Hitachi ‘Easy Bevel’ (Model EBCOMBO) is specifically
designed for this purpose.

9 Hard as Rocks Construction Guide – Version 1.1/ February 2016
Half high pillars with central Full height pillars under a flat or raking soffit
post with cap framed at 300x300mm (note flashing to raked soffit)
PILLARS
• The optimum framing size for stone pillars is 400mm square. This is the timber framing and
fibre cement board. As most stone profiles are individual pieces this does not have to be exact
(except Stacked stone profile) however making the pillar wider may increase the cost as most
quoting/costings are based on 400x400 unless otherwise stated.
• Remember that the stone will add approximately 100mm to the finished size (50mm thick)
• When framing a pillar for our Stacked Stone profile please frame the pillar to 300mm square
exact or 400mm square exact including fibre cement board. This gives the best visual finish and
is economical price wise.
• Always use H3.2 timber for all pillar framing. Framing structure is to be rigid and strong as any
movement in structure may cause cracking to corners. There is no warranty for cracked corners
as a result of substrate movement.
• Use building wrap or builder’s paper behind the fibre cement board.
• All corners must be back flashed and have either 60mm flashing tape or MS silicone sealant
applied to exterior sheet joint
• 50mm flat head galvanised clouts at 150mm centres can be used on pillars where the fibre
cement board is direct fixed to framing. Hard as Rocks 65mm SS screws and washers must be
used where a 20mm cavity batten has been specified.

10 Hard as Rocks Construction Guide – Version 1.1/ February 2016
Internal stonework to fireplaces and feature walls
When installing stone to an interior feature wall or fireplace you have a couple of options to consider depending on the
space you have available and the look you are wanting to achieve. If you are restricted by space or other complications
and just want a flat feature say behind a fireplace you can direct
fix the fibre cement board to the wall or over the gib. This is an
economical option as it saves on the cost of corner stones
however consideration should be given to hiding the edge of the
fibre cement board and stone by using a number of trim options
including timber facing or scriber, or a tile trim or similar.
Diagram: Substrate direct-fixed
The second option is to pack out the area off the wall using
45mm thick timber framing and install the fibre cement
board over the top. When the stone is applied your installer
will add a corner stone up each side which will make the
whole wall look like it is approx. 100mm thick giving a sense
of depth and dimension.
Diagram: Substrate packed off the wall for a sense of depth
11 Hard as Rocks Construction Guide – Version 1.1/ February 2016
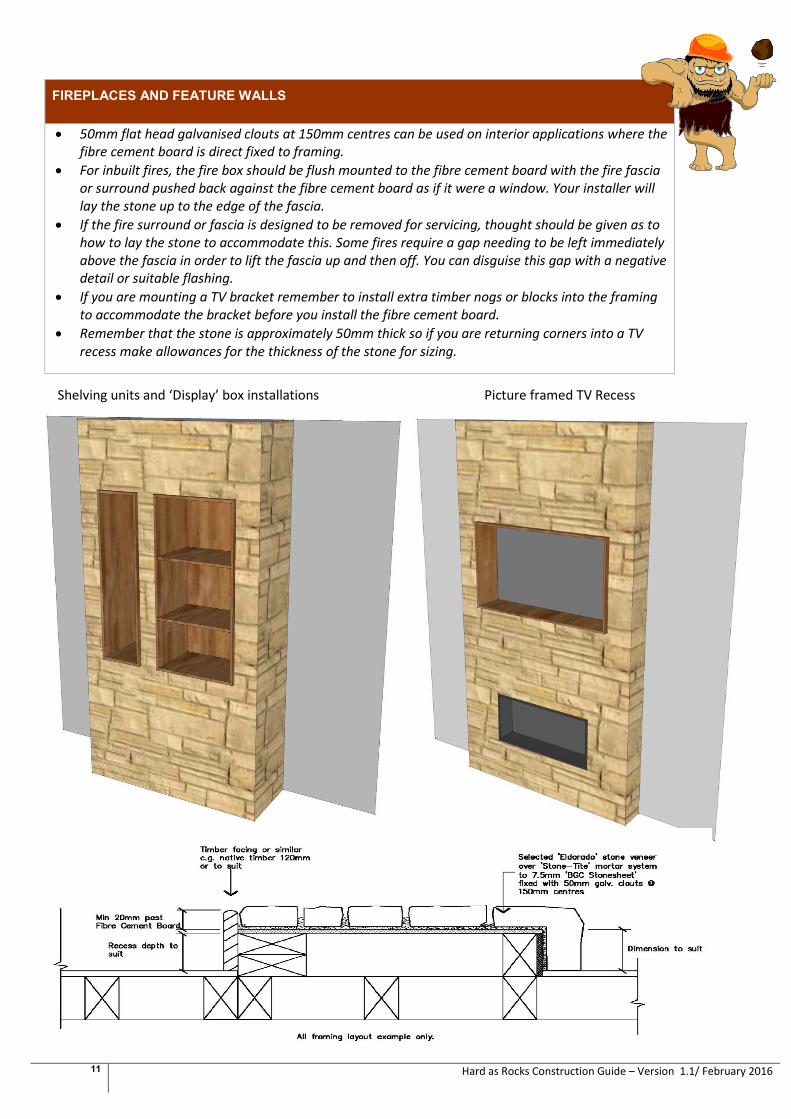
Shelving units and ‘Display’ box installations Picture framed TV Recess
FIREPLACES AND FEATURE WALLS
• 50mm flat head galvanised clouts at 150mm centres can be used on interior applications where the
fibre cement board is direct fixed to framing.
• For inbuilt fires, the fire box should be flush mounted to the fibre cement board with the fire fascia
or surround pushed back against the fibre cement board as if it were a window. Your installer will
lay the stone up to the edge of the fascia.
• If the fire surround or fascia is designed to be removed for servicing, thought should be given as to
how to lay the stone to accommodate this. Some fires require a gap needing to be left immediately
above the fascia in order to lift the fascia up and then off. You can disguise this gap with a negative
detail or suitable flashing.
• If you are mounting a TV bracket remember to install extra timber nogs or blocks into the framing
to accommodate the bracket before you install the fibre cement board.
• Remember that the stone is approximately 50mm thick so if you are returning corners into a TV
recess make allowances for the thickness of the stone for sizing.

12 Hard as Rocks Construction Guide – Version 1.1/ February 2016
(1a) Standard Slab Edge
(1b) Rebated Slab Edge
HARD AS ROCKS SUGGESTED DETAILS ONLY – DETAILS TO BE APPROVED BY LOCAL AUTHORITY & COMPLY WITH NZBC Builders are
responsible for the supply and installation of the fibre cement board with Hard as Rocks Tags, all relevant watertight flashings behind
all fibre cement board sheet joints, sealant over the top of the sheet joints and sealing around joinery and all workmanship and
installation of the substrate to meet Hard as Rocks Technical Literature and NZBC.

13 Hard as Rocks Construction Guide – Version 1.1/ February 2016
HARD AS ROCKS SUGGESTED DETAILS ONLY – DETAILS TO BE APPROVED BY LOCAL AUTHORITY & COMPLY WITH NZBC
Builders are responsible for the supply and installation of the fibre cement board with Hard as Rocks Tags, all relevant watertight
flashings behind all fibre cement board sheet joints, sealant over the top of the sheet joints and sealing around joinery and all
workmanship and installation of the substrate to meet Hard as Rocks Technical Literature and NZBC.
(1g) Soffit Detail
(1j) Garage Jamb Detail

14 Hard as Rocks Construction Guide – Version 1.1/ February 2016
(5d) Window Sill
HARD AS ROCKS SUGGESTED DETAILS ONLY – DETAILS TO BE APPROVED BY LOCAL AUTHORITY & COMPLY WITH NZBC
Builders are responsible for the supply and installation of the fibre cement board with Hard as Rocks Tags, all relevant watertight
flashings behind all fibre cement board sheet joints, sealant over the top of the sheet joints and sealing around joinery and all
workmanship and installation of the substrate to meet Hard as Rocks Technical Literature and NZBC.
(5a) Window Head

15 Hard as Rocks Construction Guide – Version 1.1/ February 2016
HARD AS ROCKS SUGGESTED
DETAILS ONLY – DETAILS TO BE
APPROVED BY LOCAL AUTHORITY
& COMPLY WITH NZBC
Builders are responsible for the
supply and installation of the fibre
cement board with Hard as Rocks
Tags, all relevant watertight
flashings behind all fibre cement
board sheet joints, sealant over the
top of the sheet joints and sealing
around joinery and all workmanship
and installation of the substrate to
meet Hard as Rocks Technical
Literature and NZBC.
(5c) Window Jamb
(5h) Internal Corner with Aluminium Joinery

16 Hard as Rocks Construction Guide – Version 1.1/ February 2016
HARD AS ROCKS SUGGESTED DETAILS ONLY – DETAILS TO BE APPROVED BY LOCAL AUTHORITY & COMPLY WITH NZBC
Builders are responsible for the supply and installation of the fibre cement board with Hard as Rocks Tags, all relevant watertight
flashings behind all fibre cement board sheet joints, sealant over the top of the sheet joints and sealing around joinery and all
workmanship and installation of the substrate to meet Hard as Rocks Technical Literature and NZBC.
(2d) Internal Corner with W/B’s
(2g) External Corner with W/B’s

17 Hard as Rocks Construction Guide – Version 1.1/ February 2016
HARD AS ROCKS SUGGESTED DETAILS ONLY – DETAILS TO BE APPROVED BY LOCAL AUTHORITY & COMPLY WITH NZBC
Builders are responsible for the supply and installation of the fibre cement board with Hard as Rocks Tags, all relevant watertight
flashings behind all fibre cement board sheet joints, sealant over the top of the sheet joints and sealing around joinery and all
workmanship and installation of the substrate to meet Hard as Rocks Technical Literature and NZBC.
(3f) Horizontal transition with W/B’s
(3b) Vertical transition with W/B’s

18 Hard as Rocks Construction Guide – Version 1.1/ February 2016
(2f) Internal Corner with Ply
(2i) External Corner with Ply - Facing
HARD AS ROCKS SUGGESTED DETAILS ONLY – DETAILS TO BE APPROVED BY LOCAL AUTHORITY & COMPLY WITH NZBC
Builders are responsible for the supply and installation of the fibre cement board with Hard as Rocks Tags, all relevant watertight
flashings behind all fibre cement board sheet joints, sealant over the top of the sheet joints and sealing around joinery and all
workmanship and installation of the substrate to meet Hard as Rocks Technical Literature and NZBC.

19 Hard as Rocks Construction Guide – Version 1.1/ February 2016
HARD AS ROCKS SUGGESTED DETAILS ONLY – DETAILS TO BE APPROVED BY LOCAL AUTHORITY & COMPLY WITH NZBC
Builders are responsible for the supply and installation of the fibre cement board with Hard as Rocks Tags, all relevant watertight
flashings behind all fibre cement board sheet joints, sealant over the top of the sheet joints and sealing around joinery and all
workmanship and installation of the substrate to meet Hard as Rocks Technical Literature and NZBC.
(3p) Horizontal Transition with Ply
(3d) Vertical Transition with Ply

20 Hard as Rocks Construction Guide – Version 1.1/ February 2016
(2l) Internal Corner with EIFS or AAC Panel
HARD AS ROCKS SUGGESTED DETAILS ONLY – DETAILS TO BE APPROVED BY LOCAL AUTHORITY & COMPLY WITH NZBC
Builders are responsible for the supply and installation of the fibre cement board with Hard as Rocks Tags, all relevant watertight
flashings behind all fibre cement board sheet joints, sealant over the top of the sheet joints and sealing around joinery and all
workmanship and installation of the substrate to meet Hard as Rocks Technical Literature and NZBC.
(2k) External Corner with EIFS or AAC Panel

21 Hard as Rocks Construction Guide – Version 1.1/ February 2016
HARD AS ROCKS SUGGESTED DETAILS ONLY – DETAILS TO BE APPROVED BY LOCAL AUTHORITY & COMPLY WITH NZBC
Builders are responsible for the supply and installation of the fibre cement board with Hard as Rocks Tags, all relevant watertight
flashings behind all fibre cement board sheet joints, sealant over the top of the sheet joints and sealing around joinery and all
workmanship and installation of the substrate to meet Hard as Rocks Technical Literature and NZBC.
(3e) Vertical Transition with EIFS or AAC Panel
(3i) Horizontal transition with EIFS or AAC Panel

22 Hard as Rocks Construction Guide – Version 1.1/ February 2016
HARD AS ROCKS SUGGESTED DETAILS ONLY – DETAILS TO BE APPROVED BY LOCAL AUTHORITY & COMPLY WITH NZBC
Builders are responsible for the supply and installation of the fibre cement board with Hard as Rocks Tags, all relevant watertight
flashings behind all fibre cement board sheet joints, sealant over the top of the sheet joints and sealing around joinery and all
workmanship and installation of the substrate to meet Hard as Rocks Technical Literature and NZBC.
(4a) Chimney Cap Detail
(4c) Roof Abutment - Longrun

23 Hard as Rocks Construction Guide – Version 1.1/ February 2016
HARD AS ROCKS SUGGESTED DETAILS ONLY – DETAILS TO BE APPROVED BY LOCAL AUTHORITY & COMPLY WITH NZBC
Builders are responsible for the supply and installation of the fibre cement board with Hard as Rocks Tags, all relevant watertight
flashings behind all fibre cement board sheet joints, sealant over the top of the sheet joints and sealing around joinery and all
workmanship and installation of the substrate to meet Hard as Rocks Technical Literature and NZBC.
(4f) Roof Abutment Metal Tile
(4h) Parapet detail

24 Hard as Rocks Construction Guide – Version 1.1/ February 2016
For product selection and colour choices please refer to the website or call 0800 353 672 to
contact your local Hard as Rocks Ltd distributor and arrange to see samples or displays.
Do you have a technical question?? Please contact us
Hard as Rocks Ltd, PO Box 1706, Taupo
P: 07 3789926 F: 0800 353 672
W: www.hardasrocks.co.nz E: [email protected]
For updates and a full set of suggested detail drawings please refer to
the Technical Information section on the website.
© 2016 HARD AS ROCKS
ALL INFORMATION AND IMAGES CONTAINED IN THIS CONSTRUCTION GUIDE ARE THE COPYRIGHT OF HARD AS ROCKS
Manawatu - [email protected]
Wellington/Wairarapa - [email protected]
Nelson - [email protected]
West Coast - [email protected]
Canterbury - [email protected]
Otago/Queenstown-Lakes - [email protected]
Southland - [email protected]
Northland - [email protected]
Auckland - [email protected]
Waikato/Coromandel - [email protected]
Hawkes Bay - [email protected]
Gisborne - [email protected]
Bay of Plenty - [email protected]
Taupo/Rotorua/Ohakune - [email protected]