configuration and setup - kyocera document solutions
TRANSCRIPT

Fiery® E300 Color Server
Configuration and Setup

© 2016 Electronics For Imaging, Inc. The information in this publication is covered under Legal Notices for thisproduct.
4514001211 May 2016 *45140012*

Contents
Introduction . . . . . . . . . . . . . . . . . . . . . . . . . . . . . . . . . . . . . . . . . . . . . . . . . . . . . . . . . . . . . . . . . . . . . . . . . . . . . . . . . 7
Terminology, conventions, and documentation resources . . . . . . . . . . . . . . . . . . . . . . . . . . . . . . . . . . . . . . . . . . . . . . . 7
General precautions for working with the E300 . . . . . . . . . . . . . . . . . . . . . . . . . . . . . . . . . . . . . . . . . . . . . . . . . . . . . . . . 8
Battery information for the European Union and EEA . . . . . . . . . . . . . . . . . . . . . . . . . . . . . . . . . . . . . . . . . . . . . . . . . . . 8
Requirements . . . . . . . . . . . . . . . . . . . . . . . . . . . . . . . . . . . . . . . . . . . . . . . . . . . . . . . . . . . . . . . . . . . . . . . . . . . . . . 10
Ethernet connection requirements . . . . . . . . . . . . . . . . . . . . . . . . . . . . . . . . . . . . . . . . . . . . . . . . . . . . . . . . . . . . . . . . . 10
Network requirements . . . . . . . . . . . . . . . . . . . . . . . . . . . . . . . . . . . . . . . . . . . . . . . . . . . . . . . . . . . . . . . . . . . . . . . . . . . 10
Supported network protocols . . . . . . . . . . . . . . . . . . . . . . . . . . . . . . . . . . . . . . . . . . . . . . . . . . . . . . . . . . . . . . . . . . . 10
Internet Protocol (IP) requirements . . . . . . . . . . . . . . . . . . . . . . . . . . . . . . . . . . . . . . . . . . . . . . . . . . . . . . . . . . . . . . . 11
Client computer requirements . . . . . . . . . . . . . . . . . . . . . . . . . . . . . . . . . . . . . . . . . . . . . . . . . . . . . . . . . . . . . . . . . . . . 11
Installing and configuring printer drivers . . . . . . . . . . . . . . . . . . . . . . . . . . . . . . . . . . . . . . . . . . . . . . . . . . . . . . . . . . 11
Requirements for Windows client computers . . . . . . . . . . . . . . . . . . . . . . . . . . . . . . . . . . . . . . . . . . . . . . . . . . . . . . 11
Requirements for Mac client computers . . . . . . . . . . . . . . . . . . . . . . . . . . . . . . . . . . . . . . . . . . . . . . . . . . . . . . . . . . . 12
System requirements for Command WorkStation and WebTools . . . . . . . . . . . . . . . . . . . . . . . . . . . . . . . . . . . . . . . 13
Fiery JobMaster, Fiery Impose, and Fiery Compose requirements . . . . . . . . . . . . . . . . . . . . . . . . . . . . . . . . . . . . . . 14
Mobile device requirements . . . . . . . . . . . . . . . . . . . . . . . . . . . . . . . . . . . . . . . . . . . . . . . . . . . . . . . . . . . . . . . . . . . . . . 14
Integrating the E300 into your network . . . . . . . . . . . . . . . . . . . . . . . . . . . . . . . . . . . . . . . . . . . . . . . . . . . 15
Steps to integrate the E300 into your network . . . . . . . . . . . . . . . . . . . . . . . . . . . . . . . . . . . . . . . . . . . . . . . . . . . . . . . . 15
E300 front and back panels . . . . . . . . . . . . . . . . . . . . . . . . . . . . . . . . . . . . . . . . . . . . . . . . . . . . . . . . . . . . . . . . . . . . . . . 16
Powering the E300 on or off . . . . . . . . . . . . . . . . . . . . . . . . . . . . . . . . . . . . . . . . . . . . . . . . . . . . . . . . . . . . . . . . . . . . . . 17
Power on the E300 . . . . . . . . . . . . . . . . . . . . . . . . . . . . . . . . . . . . . . . . . . . . . . . . . . . . . . . . . . . . . . . . . . . . . . . . . . . . 17
Restart, Reboot, or Shut Down the E300 . . . . . . . . . . . . . . . . . . . . . . . . . . . . . . . . . . . . . . . . . . . . . . . . . . . . . . . . . . . 17
Accessing the E300 . . . . . . . . . . . . . . . . . . . . . . . . . . . . . . . . . . . . . . . . . . . . . . . . . . . . . . . . . . . . . . . . . . . . . . . . . 20
Command WorkStation . . . . . . . . . . . . . . . . . . . . . . . . . . . . . . . . . . . . . . . . . . . . . . . . . . . . . . . . . . . . . . . . . . . . . . . . . . 20
WebTools . . . . . . . . . . . . . . . . . . . . . . . . . . . . . . . . . . . . . . . . . . . . . . . . . . . . . . . . . . . . . . . . . . . . . . . . . . . . . . . . . . . . . 20
Start WebTools . . . . . . . . . . . . . . . . . . . . . . . . . . . . . . . . . . . . . . . . . . . . . . . . . . . . . . . . . . . . . . . . . . . . . . . . . . . . . . . 21
Performing initial setup with the Fiery Setup Wizard . . . . . . . . . . . . . . . . . . . . . . . . . . . . . . . . . . . . . . 22
Factory default settings on the E300 . . . . . . . . . . . . . . . . . . . . . . . . . . . . . . . . . . . . . . . . . . . . . . . . . . . . . . . . . . . . . . . . 22
Fiery Setup Wizard workflow . . . . . . . . . . . . . . . . . . . . . . . . . . . . . . . . . . . . . . . . . . . . . . . . . . . . . . . . . . . . . . . . . . . . . . 22
Predefined configurations . . . . . . . . . . . . . . . . . . . . . . . . . . . . . . . . . . . . . . . . . . . . . . . . . . . . . . . . . . . . . . . . . . . . . . . . 22
Default predefined configuration . . . . . . . . . . . . . . . . . . . . . . . . . . . . . . . . . . . . . . . . . . . . . . . . . . . . . . . . . . . . . . . . 23
Configuration and Setup
Contents
3

Access Fiery Setup Wizard from WebTools . . . . . . . . . . . . . . . . . . . . . . . . . . . . . . . . . . . . . . . . . . . . . . . . . . . . . . . . . . . 23
Access Fiery Setup Wizard from Command WorkStation . . . . . . . . . . . . . . . . . . . . . . . . . . . . . . . . . . . . . . . . . . . . . . . . 23
Complete Fiery Setup Wizard . . . . . . . . . . . . . . . . . . . . . . . . . . . . . . . . . . . . . . . . . . . . . . . . . . . . . . . . . . . . . . . . . . . . . 24
Accessing the configuration settings . . . . . . . . . . . . . . . . . . . . . . . . . . . . . . . . . . . . . . . . . . . . . . . . . . . . . . 25
When to review the configuration settings . . . . . . . . . . . . . . . . . . . . . . . . . . . . . . . . . . . . . . . . . . . . . . . . . . . . . . . . . . 25
Viewing and modifying the configuration settings . . . . . . . . . . . . . . . . . . . . . . . . . . . . . . . . . . . . . . . . . . . . . . . . . . . . 25
Access Configure from Command WorkStation . . . . . . . . . . . . . . . . . . . . . . . . . . . . . . . . . . . . . . . . . . . . . . . . . . . . . . . 25
Access Configure from WebTools . . . . . . . . . . . . . . . . . . . . . . . . . . . . . . . . . . . . . . . . . . . . . . . . . . . . . . . . . . . . . . . . . . 26
Stop untrusted connection messages from appearing in WebTools . . . . . . . . . . . . . . . . . . . . . . . . . . . . . . . . . . . . 26
Print the Configuration page . . . . . . . . . . . . . . . . . . . . . . . . . . . . . . . . . . . . . . . . . . . . . . . . . . . . . . . . . . . . . . . . . . . . . . 27
Accessing E300 options through the printer control panel . . . . . . . . . . . . . . . . . . . . . . . . . . . . . . . . 28
Access PrintMe from the printer control panel . . . . . . . . . . . . . . . . . . . . . . . . . . . . . . . . . . . . . . . . . . . . . . . . . . . . . . . . 28
Access Fiery tabs from the printer control panel . . . . . . . . . . . . . . . . . . . . . . . . . . . . . . . . . . . . . . . . . . . . . . . . . . . . . . 28
Jobs tab . . . . . . . . . . . . . . . . . . . . . . . . . . . . . . . . . . . . . . . . . . . . . . . . . . . . . . . . . . . . . . . . . . . . . . . . . . . . . . . . . . . . . 29
Info tab . . . . . . . . . . . . . . . . . . . . . . . . . . . . . . . . . . . . . . . . . . . . . . . . . . . . . . . . . . . . . . . . . . . . . . . . . . . . . . . . . . . . . 29
Tools tab . . . . . . . . . . . . . . . . . . . . . . . . . . . . . . . . . . . . . . . . . . . . . . . . . . . . . . . . . . . . . . . . . . . . . . . . . . . . . . . . . . . . 30
Access E300 Setup options from the printer control panel . . . . . . . . . . . . . . . . . . . . . . . . . . . . . . . . . . . . . . . . . . . . . . 30
Server Name . . . . . . . . . . . . . . . . . . . . . . . . . . . . . . . . . . . . . . . . . . . . . . . . . . . . . . . . . . . . . . . . . . . . . . . . . . . . . . . . . 30
IPv4 Address Type . . . . . . . . . . . . . . . . . . . . . . . . . . . . . . . . . . . . . . . . . . . . . . . . . . . . . . . . . . . . . . . . . . . . . . . . . . . . 30
Gateway Type . . . . . . . . . . . . . . . . . . . . . . . . . . . . . . . . . . . . . . . . . . . . . . . . . . . . . . . . . . . . . . . . . . . . . . . . . . . . . . . . 31
Enable Web Services . . . . . . . . . . . . . . . . . . . . . . . . . . . . . . . . . . . . . . . . . . . . . . . . . . . . . . . . . . . . . . . . . . . . . . . . . . 31
Network Security . . . . . . . . . . . . . . . . . . . . . . . . . . . . . . . . . . . . . . . . . . . . . . . . . . . . . . . . . . . . . . . . . . . . . . . . . . . . . 31
Ethernet Speed . . . . . . . . . . . . . . . . . . . . . . . . . . . . . . . . . . . . . . . . . . . . . . . . . . . . . . . . . . . . . . . . . . . . . . . . . . . . . . . 31
IP Address . . . . . . . . . . . . . . . . . . . . . . . . . . . . . . . . . . . . . . . . . . . . . . . . . . . . . . . . . . . . . . . . . . . . . . . . . . . . . . . . . . . 32
Subnet Mask . . . . . . . . . . . . . . . . . . . . . . . . . . . . . . . . . . . . . . . . . . . . . . . . . . . . . . . . . . . . . . . . . . . . . . . . . . . . . . . . . 32
Gateway Address . . . . . . . . . . . . . . . . . . . . . . . . . . . . . . . . . . . . . . . . . . . . . . . . . . . . . . . . . . . . . . . . . . . . . . . . . . . . . 32
Login timeout . . . . . . . . . . . . . . . . . . . . . . . . . . . . . . . . . . . . . . . . . . . . . . . . . . . . . . . . . . . . . . . . . . . . . . . . . . . . . . . . 32
LAN Security (802.1x) . . . . . . . . . . . . . . . . . . . . . . . . . . . . . . . . . . . . . . . . . . . . . . . . . . . . . . . . . . . . . . . . . . . . . . . . . . 32
Configuring the E300 for your network and print environment . . . . . . . . . . . . . . . . . . . . . . . . . . . 35
Networking with client computers . . . . . . . . . . . . . . . . . . . . . . . . . . . . . . . . . . . . . . . . . . . . . . . . . . . . . . . . . . . . . . . . . 35
Enabling printing from Windows computers . . . . . . . . . . . . . . . . . . . . . . . . . . . . . . . . . . . . . . . . . . . . . . . . . . . . . . . 35
Enabling printing from Mac computers . . . . . . . . . . . . . . . . . . . . . . . . . . . . . . . . . . . . . . . . . . . . . . . . . . . . . . . . . . . 35
Enabling printing from UNIX and UNIX-like workstations . . . . . . . . . . . . . . . . . . . . . . . . . . . . . . . . . . . . . . . . . . . . . 35
Configure user access . . . . . . . . . . . . . . . . . . . . . . . . . . . . . . . . . . . . . . . . . . . . . . . . . . . . . . . . . . . . . . . . . . . . . . . . . . . 36
Users and groups . . . . . . . . . . . . . . . . . . . . . . . . . . . . . . . . . . . . . . . . . . . . . . . . . . . . . . . . . . . . . . . . . . . . . . . . . . . . . 36
Configuring security features . . . . . . . . . . . . . . . . . . . . . . . . . . . . . . . . . . . . . . . . . . . . . . . . . . . . . . . . . . . . . . . . . . . . . 38
Configuration and Setup
Contents
4

Restricting IP addresses and ports . . . . . . . . . . . . . . . . . . . . . . . . . . . . . . . . . . . . . . . . . . . . . . . . . . . . . . . . . . . . . . . . 38
Controlling email access to the E300 . . . . . . . . . . . . . . . . . . . . . . . . . . . . . . . . . . . . . . . . . . . . . . . . . . . . . . . . . . . . . 38
LDAP authentication . . . . . . . . . . . . . . . . . . . . . . . . . . . . . . . . . . . . . . . . . . . . . . . . . . . . . . . . . . . . . . . . . . . . . . . . . . 38
Secure Printing . . . . . . . . . . . . . . . . . . . . . . . . . . . . . . . . . . . . . . . . . . . . . . . . . . . . . . . . . . . . . . . . . . . . . . . . . . . . . . . 38
Securely clearing job data . . . . . . . . . . . . . . . . . . . . . . . . . . . . . . . . . . . . . . . . . . . . . . . . . . . . . . . . . . . . . . . . . . . . . . 39
Configuring print connections . . . . . . . . . . . . . . . . . . . . . . . . . . . . . . . . . . . . . . . . . . . . . . . . . . . . . . . . . . . . . . . . . . . . 40
Print queue . . . . . . . . . . . . . . . . . . . . . . . . . . . . . . . . . . . . . . . . . . . . . . . . . . . . . . . . . . . . . . . . . . . . . . . . . . . . . . . . . . 41
Hold queue . . . . . . . . . . . . . . . . . . . . . . . . . . . . . . . . . . . . . . . . . . . . . . . . . . . . . . . . . . . . . . . . . . . . . . . . . . . . . . . . . . 41
Direct connection . . . . . . . . . . . . . . . . . . . . . . . . . . . . . . . . . . . . . . . . . . . . . . . . . . . . . . . . . . . . . . . . . . . . . . . . . . . . . 41
Mobile device printing . . . . . . . . . . . . . . . . . . . . . . . . . . . . . . . . . . . . . . . . . . . . . . . . . . . . . . . . . . . . . . . . . . . . . . . . . . . 41
Configure Direct Mobile Printing . . . . . . . . . . . . . . . . . . . . . . . . . . . . . . . . . . . . . . . . . . . . . . . . . . . . . . . . . . . . . . . . 42
Configuring print job processing settings . . . . . . . . . . . . . . . . . . . . . . . . . . . . . . . . . . . . . . . . . . . . . . . . . 43
PS settings . . . . . . . . . . . . . . . . . . . . . . . . . . . . . . . . . . . . . . . . . . . . . . . . . . . . . . . . . . . . . . . . . . . . . . . . . . . . . . . . . . . . 43
Allow Courier Substitution . . . . . . . . . . . . . . . . . . . . . . . . . . . . . . . . . . . . . . . . . . . . . . . . . . . . . . . . . . . . . . . . . . . . . . 43
Print to PS Error . . . . . . . . . . . . . . . . . . . . . . . . . . . . . . . . . . . . . . . . . . . . . . . . . . . . . . . . . . . . . . . . . . . . . . . . . . . . . . 43
Default Paper Sizes . . . . . . . . . . . . . . . . . . . . . . . . . . . . . . . . . . . . . . . . . . . . . . . . . . . . . . . . . . . . . . . . . . . . . . . . . . . . 43
Convert Paper Sizes . . . . . . . . . . . . . . . . . . . . . . . . . . . . . . . . . . . . . . . . . . . . . . . . . . . . . . . . . . . . . . . . . . . . . . . . . . . 44
Brightness . . . . . . . . . . . . . . . . . . . . . . . . . . . . . . . . . . . . . . . . . . . . . . . . . . . . . . . . . . . . . . . . . . . . . . . . . . . . . . . . . . . 44
Printer Screen Mode . . . . . . . . . . . . . . . . . . . . . . . . . . . . . . . . . . . . . . . . . . . . . . . . . . . . . . . . . . . . . . . . . . . . . . . . . . . 44
Screen type . . . . . . . . . . . . . . . . . . . . . . . . . . . . . . . . . . . . . . . . . . . . . . . . . . . . . . . . . . . . . . . . . . . . . . . . . . . . . . . . . . 44
Offset Jobs . . . . . . . . . . . . . . . . . . . . . . . . . . . . . . . . . . . . . . . . . . . . . . . . . . . . . . . . . . . . . . . . . . . . . . . . . . . . . . . . . . 45
Cover Page . . . . . . . . . . . . . . . . . . . . . . . . . . . . . . . . . . . . . . . . . . . . . . . . . . . . . . . . . . . . . . . . . . . . . . . . . . . . . . . . . . 45
Offset within job . . . . . . . . . . . . . . . . . . . . . . . . . . . . . . . . . . . . . . . . . . . . . . . . . . . . . . . . . . . . . . . . . . . . . . . . . . . . . . 45
Print Master . . . . . . . . . . . . . . . . . . . . . . . . . . . . . . . . . . . . . . . . . . . . . . . . . . . . . . . . . . . . . . . . . . . . . . . . . . . . . . . . . 45
Cache PDF and PS Objects . . . . . . . . . . . . . . . . . . . . . . . . . . . . . . . . . . . . . . . . . . . . . . . . . . . . . . . . . . . . . . . . . . . . . . 45
PCL settings . . . . . . . . . . . . . . . . . . . . . . . . . . . . . . . . . . . . . . . . . . . . . . . . . . . . . . . . . . . . . . . . . . . . . . . . . . . . . . . . . . . 45
Default Orientation . . . . . . . . . . . . . . . . . . . . . . . . . . . . . . . . . . . . . . . . . . . . . . . . . . . . . . . . . . . . . . . . . . . . . . . . . . . 46
Form Length . . . . . . . . . . . . . . . . . . . . . . . . . . . . . . . . . . . . . . . . . . . . . . . . . . . . . . . . . . . . . . . . . . . . . . . . . . . . . . . . . 46
Font Size (pt) . . . . . . . . . . . . . . . . . . . . . . . . . . . . . . . . . . . . . . . . . . . . . . . . . . . . . . . . . . . . . . . . . . . . . . . . . . . . . . . . . 46
Font Pitch (char/in) . . . . . . . . . . . . . . . . . . . . . . . . . . . . . . . . . . . . . . . . . . . . . . . . . . . . . . . . . . . . . . . . . . . . . . . . . . . . 46
Symbol Set . . . . . . . . . . . . . . . . . . . . . . . . . . . . . . . . . . . . . . . . . . . . . . . . . . . . . . . . . . . . . . . . . . . . . . . . . . . . . . . . . . 46
Font Source . . . . . . . . . . . . . . . . . . . . . . . . . . . . . . . . . . . . . . . . . . . . . . . . . . . . . . . . . . . . . . . . . . . . . . . . . . . . . . . . . 46
Font Number . . . . . . . . . . . . . . . . . . . . . . . . . . . . . . . . . . . . . . . . . . . . . . . . . . . . . . . . . . . . . . . . . . . . . . . . . . . . . . . . 47
Append CR to LF . . . . . . . . . . . . . . . . . . . . . . . . . . . . . . . . . . . . . . . . . . . . . . . . . . . . . . . . . . . . . . . . . . . . . . . . . . . . . . 47
Paper Size for System Pages . . . . . . . . . . . . . . . . . . . . . . . . . . . . . . . . . . . . . . . . . . . . . . . . . . . . . . . . . . . . . . . . . . . . 47
Printer Default Personality . . . . . . . . . . . . . . . . . . . . . . . . . . . . . . . . . . . . . . . . . . . . . . . . . . . . . . . . . . . . . . . . . . . . . . . . 47
Variable Data Printing (VDP) settings . . . . . . . . . . . . . . . . . . . . . . . . . . . . . . . . . . . . . . . . . . . . . . . . . . . . . . . . . . . . . . . 47
FreeForm 1 Record Length . . . . . . . . . . . . . . . . . . . . . . . . . . . . . . . . . . . . . . . . . . . . . . . . . . . . . . . . . . . . . . . . . . . . . 47
Configuration and Setup
Contents
5

Native Document settings . . . . . . . . . . . . . . . . . . . . . . . . . . . . . . . . . . . . . . . . . . . . . . . . . . . . . . . . . . . . . . . . . . . . . . . . 48
Enable Native Document Conversion Using PrintMe . . . . . . . . . . . . . . . . . . . . . . . . . . . . . . . . . . . . . . . . . . . . . . . . . 48
Configuring print job management settings . . . . . . . . . . . . . . . . . . . . . . . . . . . . . . . . . . . . . . . . . . . . . . 49
Managing email address books . . . . . . . . . . . . . . . . . . . . . . . . . . . . . . . . . . . . . . . . . . . . . . . . . . . . . . . . . . . . . . . . . . . . 49
Types of address books . . . . . . . . . . . . . . . . . . . . . . . . . . . . . . . . . . . . . . . . . . . . . . . . . . . . . . . . . . . . . . . . . . . . . . . . 49
Restore address books . . . . . . . . . . . . . . . . . . . . . . . . . . . . . . . . . . . . . . . . . . . . . . . . . . . . . . . . . . . . . . . . . . . . . . . . . 49
Administrator commands for managing address books . . . . . . . . . . . . . . . . . . . . . . . . . . . . . . . . . . . . . . . . . . . . . . 50
PrintMe cloud printing . . . . . . . . . . . . . . . . . . . . . . . . . . . . . . . . . . . . . . . . . . . . . . . . . . . . . . . . . . . . . . . . . . . . . . . . . . . 51
Configure PrintMe cloud printing . . . . . . . . . . . . . . . . . . . . . . . . . . . . . . . . . . . . . . . . . . . . . . . . . . . . . . . . . . . . . . . . 52
Job mismatch settings . . . . . . . . . . . . . . . . . . . . . . . . . . . . . . . . . . . . . . . . . . . . . . . . . . . . . . . . . . . . . . . . . . . . . . . . . . . 52
Administering the E300 . . . . . . . . . . . . . . . . . . . . . . . . . . . . . . . . . . . . . . . . . . . . . . . . . . . . . . . . . . . . . . . . . . . . 54
Maintaining optimal E300 performance . . . . . . . . . . . . . . . . . . . . . . . . . . . . . . . . . . . . . . . . . . . . . . . . . . . . . . . . . . . . . 54
VDP search path . . . . . . . . . . . . . . . . . . . . . . . . . . . . . . . . . . . . . . . . . . . . . . . . . . . . . . . . . . . . . . . . . . . . . . . . . . . . . . . . 55
User-defined search paths for a single job . . . . . . . . . . . . . . . . . . . . . . . . . . . . . . . . . . . . . . . . . . . . . . . . . . . . . . . . . 55
Clearing the server . . . . . . . . . . . . . . . . . . . . . . . . . . . . . . . . . . . . . . . . . . . . . . . . . . . . . . . . . . . . . . . . . . . . . . . . . . . . . . 55
Software updates . . . . . . . . . . . . . . . . . . . . . . . . . . . . . . . . . . . . . . . . . . . . . . . . . . . . . . . . . . . . . . . . . . . . . . . . . . . . . . . 56
Managing firewalls . . . . . . . . . . . . . . . . . . . . . . . . . . . . . . . . . . . . . . . . . . . . . . . . . . . . . . . . . . . . . . . . . . . . . . . . . . . . 56
Configure System Updates . . . . . . . . . . . . . . . . . . . . . . . . . . . . . . . . . . . . . . . . . . . . . . . . . . . . . . . . . . . . . . . . . . . . . 56
User software . . . . . . . . . . . . . . . . . . . . . . . . . . . . . . . . . . . . . . . . . . . . . . . . . . . . . . . . . . . . . . . . . . . . . . . . . . . . . . . . 57
Backing up and restoring the E300 . . . . . . . . . . . . . . . . . . . . . . . . . . . . . . . . . . . . . . . . . . . . . . . . . . . . . . . . . . . . . . . . . 57
Recommendations to preserve data . . . . . . . . . . . . . . . . . . . . . . . . . . . . . . . . . . . . . . . . . . . . . . . . . . . . . . . . . . . . . . 57
Back up and restore settings with Configure . . . . . . . . . . . . . . . . . . . . . . . . . . . . . . . . . . . . . . . . . . . . . . . . . . . . . . . 58
Reset the E300 to factory defaults . . . . . . . . . . . . . . . . . . . . . . . . . . . . . . . . . . . . . . . . . . . . . . . . . . . . . . . . . . . . . . . . . . 58
Troubleshooting . . . . . . . . . . . . . . . . . . . . . . . . . . . . . . . . . . . . . . . . . . . . . . . . . . . . . . . . . . . . . . . . . . . . . . . . . . . 60
Perform basic troubleshooting . . . . . . . . . . . . . . . . . . . . . . . . . . . . . . . . . . . . . . . . . . . . . . . . . . . . . . . . . . . . . . . . . . . . 60
Collect troubleshooting information . . . . . . . . . . . . . . . . . . . . . . . . . . . . . . . . . . . . . . . . . . . . . . . . . . . . . . . . . . . . . . . 61
Create job error reports . . . . . . . . . . . . . . . . . . . . . . . . . . . . . . . . . . . . . . . . . . . . . . . . . . . . . . . . . . . . . . . . . . . . . . . . 61
Resolve runtime errors . . . . . . . . . . . . . . . . . . . . . . . . . . . . . . . . . . . . . . . . . . . . . . . . . . . . . . . . . . . . . . . . . . . . . . . . . . . 62
Printer not found . . . . . . . . . . . . . . . . . . . . . . . . . . . . . . . . . . . . . . . . . . . . . . . . . . . . . . . . . . . . . . . . . . . . . . . . . . . . . 63
Cannot connect to the E300 with utilities . . . . . . . . . . . . . . . . . . . . . . . . . . . . . . . . . . . . . . . . . . . . . . . . . . . . . . . . . . 63
Cannot connect to the E300 with Command WorkStation . . . . . . . . . . . . . . . . . . . . . . . . . . . . . . . . . . . . . . . . . . . . 63
Index . . . . . . . . . . . . . . . . . . . . . . . . . . . . . . . . . . . . . . . . . . . . . . . . . . . . . . . . . . . . . . . . . . . . . . . . . . . . . . . . . . . . . . . 65
Configuration and Setup
Contents
6

Introduction
This document describes tasks that must be completed or coordinated by the administrator of the Fiery® E300 ColorServer.The procedures in this document require the following conditions:
• The E300 is installed at the site and confirmed as operational by the service technician.
• The E300 is connected to the network, a power source, and the printer.
• The printer is powered and operational.
Note: For information about how to configure the printer, see the documentation accompanying the printer.
Terminology, conventions, and documentation resources
This document uses the following terminology and conventions to refer to the Fiery® E300 Color Server, printer, andsupported operating systems.
Term or convention Refers to
Aero E300 (in illustrations and examples)
Command WorkStation Fiery Command WorkStation
Printer xx52ci
E300 Fiery® E300 Color Server
Mac OS All supported Mac operating systems. For a complete list, see System Requirements inConfiguration and Setup.
Windows All supported Windows operating systems. For a complete list, see System Requirements inConfiguration and Setup.
Warning: A warning concerning operations that may lead to death or injury to persons if not performedcorrectly. To use the equipment safely, always pay attention to these warnings.
Caution: A caution concerning operations that may lead to injury to persons if not performed correctly. Touse the equipment safely, always pay attention to these cautions.
Important: Operational requirements and restrictions. Be sure to read these items carefully to operate theequipment correctly, and avoid damage to the equipment or property.
Configuration and Setup
Introduction
7

The following documentation resources are available for the Fiery® E300 Color Server.
Resource Description
User documentation Documents in this set: Color Printing, Configuration and Setup, Fiery Productivity Package,Printing, Utilities
Online help • Help can be accessed directly from each Fiery application or by going to help.efi.com.
• Each help system is available as a printable PDF, accessed from the PDF icon in the upper rightcorner of the Help window.
Additional referencematerial • Fiery Color Reference - help.efi.com/ref/colorref/en-us/
• Variable Data Printing - help.efi.com/ref/vdp/en-us/
• Workflow Examples - help.efi.com/ref/workflows/en-us/
• Configure Help - help.efi.com/configure/3.0/en-us/
General precautions for working with the E300
Always observe the following general precautions to assist with personnel safety and prevent data loss or equipmentdamage.
Warning: Do not store or use flammable sprays or solvents near the E300 or the printer. Components withinthese machines can operate at a high enough temperature to provide an ignition source. Storing or usingflammable items near these machines could cause the items to catch fire or explode.
Warning: Never set any liquid on or near the E300 or the printer. Spilling liquids into either machine couldresult in electric shock and damage the machine. If liquid is spilled on or underneath either machine, or anyobject falls into either machine, disconnect the corresponding power cable immediately, if safe to do so.
Warning: Do not remove the covers or otherwise open the E300 hardware. Cables and parts inside the chassisare intended to be serviced by technical support only.
Warning: Ensure that the power cabling remains as configured by the service technician. The designated powercable and a grounded, correctly rated outlet must be used. If required, the cable should be protected by a surgesuppressor, line conditioner, or uninterruptible power supply (UPS).
Warning: Do not allow the power cords or cables to be compressed or bent at a sharp angle. Arrange them sothat no one might accidentally step on or trip over them.
Caution: Do not block the vents on the E300 or otherwise restrict airflow. Leave clearance around all vents andensure that nothing falls into the vents.
Caution: Do not make mechanical modifications to the system. The safety and regulatory compliance ofmodified equipment cannot be guaranteed.
Configuration and Setup
Introduction
8

Battery information for the European Union and EEA
Important: The trash symbol indicates that the batteries and accumulators used in this product must bedisposed of separately from household waste in accordance with EU Directive 2006/66/EC (“Directive”) andlocal requirements.
If a chemical symbol is printed beneath the trash symbol, in accordance with the Directive, this indicates that a heavymetal (Hg = Mercury, Cd = Cadmium, Pb = Lead) is present in this battery or accumulator at a concentration higherthan an applicable threshold specified in the Directive.Batteries and accumulators must not be disposed of as unsorted municipal waste. Users of batteries andaccumulators must use the available collection framework for the return, recycling, and treatment of batteries andaccumulators.If your product contains non-removable batteries, the entire product is already covered by the EU WEEE (WasteElectrical and Electronic Equipment) Directive and should be handed over to an authorized collection site for WEEE.The collection site will take appropriate measures for the recycling and treatment of the product, including thebatteries.Customer participation in the collection and recycling of batteries and accumulators is important to minimize anypotential effects of batteries and accumulators on the environment and human health due to substances used inbatteries and accumulators.In the EU, there are separate collection and recycling schemes for batteries and accumulators. To find out moreabout recycling schemes for batteries and accumulators available in your area, contact your local city office, wasteauthority, or waste disposal facility.
Configuration and Setup
Introduction
9

Requirements
We recommend that you review the E300 requirements before you begin using the E300.The operating system on the E300 is Linux.
Ethernet connection requirements
The E300 network port supports straight-through cable and the standard Ethernet network speeds and cablecategories.The supported network speeds and cable categories are listed in the following table. This information is providedonly as a reference. Contact your authorized service/support center for resolution of any connection issues.
Network speed Cable category
10BaseT Category 3 or later
100BaseTX Category 5 or later (4‑pair/8‑wire, short‑length)
1000BaseT Category 5e or later (4‑pair/8‑wire, short‑length)
The network port supports the following Ethernet cable specifications:
• Unhielded Twisted Pair (UTP) cable
• Straight-through cable (patch cable)
Network requirements
When the E300 is connected to a network, it behaves as a networked printer. Connecting to a live network allows theE300 to query the network for zones, servers, and server-based queues.Supported network protocols
The E300 supports printing over the following protocols. These protocols can run concurrently over the sameconnection. The E300 automatically switches to the correct protocol, and handles connections simultaneously.
Note: Client computers that do not have any of the supported protocols can send print jobs through a print serverthat has a supported protocol.The E300 supports TCP/IP and UDP/IP (IPv4 or IPv6), including: Bonjour, DHCP, FTP, HTTP, IMAP, IPP, LDAP,LPD, LPR, NetBios over TCP/IP (NBT), POP3, Port 9100, SMB, SMTP, SNMP, SNTP, SSL/TLS, WSD.
Configuration and Setup
Requirements
10
Note: Bonjour allows the E300 to act as a Bonjour printer when communicating with Mac computers.
AppleTalk (supported for fontdownloads only, not fornetworking)
Enabling this setting allows Mac computers to use AppleTalk to downloadfonts to the E300. This setting is disabled by default.Note: For technical support, the E300 utility software is only supported forMac OS X v10.7 and later.
Internet Protocol (IP) requirements
To be available as a network printer, the E300 requires the following:
• Unique IP address (IPv4 or IPv6)
• Subnet mask
• Gateway address
You can enter these items manually or use DHCP protocol to assign them dynamically. Make sure the E300 nameand address are listed in the domain name server (DNS) or host name database used by your system.
Note: To ensure proper communication between the printer and the E300, we recommend configuring the IPsettings on the printer for DHCP. For information about configuring the printer, refer to the printer documentation.
Client computer requirements
The E300 utilities software, printer drivers, and online help are supported for Windows and Mac client computers.
Installing and configuring printer drivers
Before you can print from a client computer to the E300, you must first install a printer driver on each clientcomputer and then configure them to include E300 and printer installed options.After you install and configure printer drivers, you can print from any application on a client computer to the E300.For more information about installing printer drivers, including installing printer drivers on other operating systems,see Printing, which is part of the user documentation set.
Requirements for Windows client computers
The E300 utilities and printer drivers support the standard Windows operating systems and system specifications.
Supported operating systems for Windows client computers
The E300 utility applications and printer drivers are supported for the following Windows operating systems.
Note: Support for Windows OS versions is based upon the latest service pack. Both 32 and 64-bit versions aresupported unless otherwise noted.
• Windows Vista: Home Basic Edition, Home Premium Edition, Ultimate Edition, Business Edition, EnterpriseEdition
• Windows 7: Home Premium, Professional, Ultimate
Configuration and Setup
Requirements
11

• Windows 8: Windows 8, Windows 8 Pro, Windows 8 Enterprise
• Windows 8.1: Windows 8.1, Windows 8.1 Pro, Windows 8.1 Enterprise
• Windows 10: Windows 10 Home, Windows 10 Pro, Windows 10 Enterprise, Windows 10 Education, Windows10 Mobile, Windows 10 Mobile Enterprise, Windows 10 IoT Core
• Windows Server 2008: Standard, Enterprise, Datacenter, Web Server
• Windows Server 2008 R2 (64-bit only): Foundation, Standard, Enterprise, Datacenter, Web Server, Itanium-Based
• Windows Server 2012 (64-bit only): Foundation, Essentials, Standard, Datacenter
• Windows Server 2012 R2 (64-bit only): Foundation, Essentials, Standard, Datacenter
System requirements for Windows client computers
The following table lists the system specifications required to install and use E300 utility applications and printerdrivers on Windows client computers.
System requirement Description
Processor Pentium 4, 1.0 GHz or faster
Memory (except for Command WorkStation) 500MB (2GB recommended)
Hard disk space (except for Command WorkStation) 1GB (2GB recommended)
Requirements for Mac client computers
The E300 utilities and printer drivers support the standard Mac operating systems and system specifications.
Supported operating systems for Mac client computers
The E300 utility applications and printer drivers are supported for the following Mac operating systems.
Note: Support for Mac OS versions requires Intel-based Mac computers.
• Mac OS X v10.7
• Mac OS X v10.8
• Mac OS X v10.9
• Mac OS X v10.10
• Mac OS X v10.11
Configuration and Setup
Requirements
12
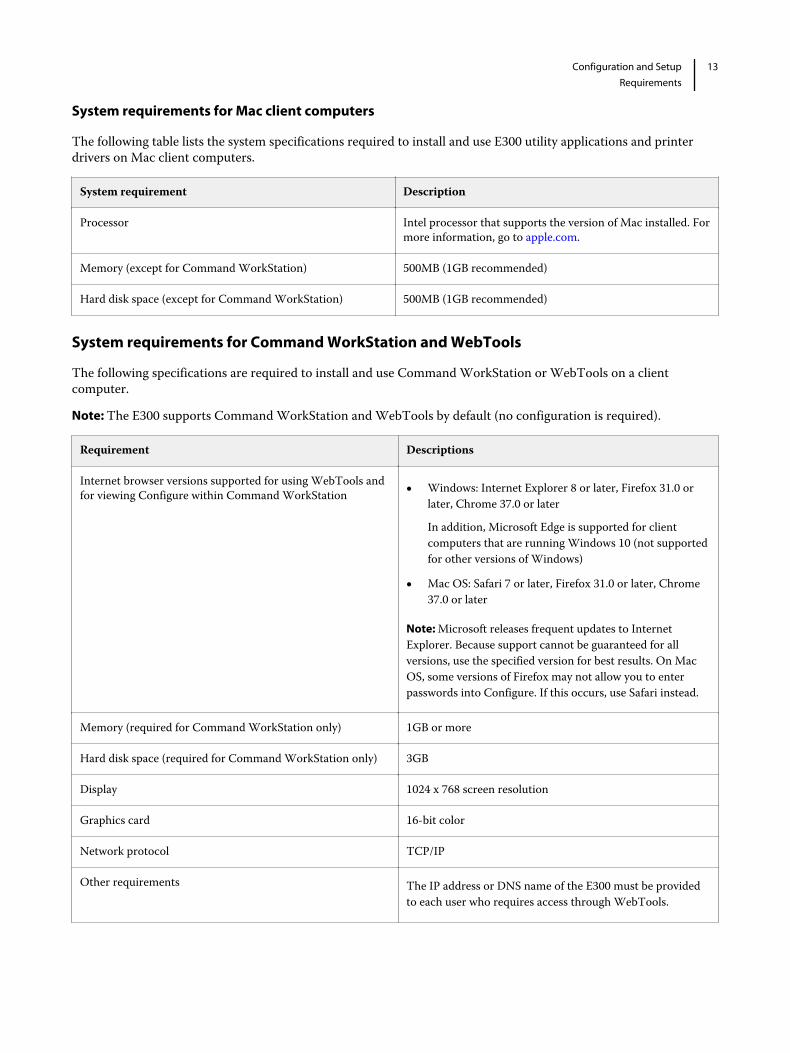
System requirements for Mac client computers
The following table lists the system specifications required to install and use E300 utility applications and printerdrivers on Mac client computers.
System requirement Description
Processor Intel processor that supports the version of Mac installed. Formore information, go to apple.com.
Memory (except for Command WorkStation) 500MB (1GB recommended)
Hard disk space (except for Command WorkStation) 500MB (1GB recommended)
System requirements for Command WorkStation and WebTools
The following specifications are required to install and use Command WorkStation or WebTools on a clientcomputer.
Note: The E300 supports Command WorkStation and WebTools by default (no configuration is required).
Requirement Descriptions
Internet browser versions supported for using WebTools andfor viewing Configure within Command WorkStation • Windows: Internet Explorer 8 or later, Firefox 31.0 or
later, Chrome 37.0 or later
In addition, Microsoft Edge is supported for clientcomputers that are running Windows 10 (not supportedfor other versions of Windows)
• Mac OS: Safari 7 or later, Firefox 31.0 or later, Chrome37.0 or later
Note: Microsoft releases frequent updates to InternetExplorer. Because support cannot be guaranteed for allversions, use the specified version for best results. On MacOS, some versions of Firefox may not allow you to enterpasswords into Configure. If this occurs, use Safari instead.
Memory (required for Command WorkStation only) 1GB or more
Hard disk space (required for Command WorkStation only) 3GB
Display 1024 x 768 screen resolution
Graphics card 16-bit color
Network protocol TCP/IP
Other requirements The IP address or DNS name of the E300 must be providedto each user who requires access through WebTools.
Configuration and Setup
Requirements
13

Fiery JobMaster, Fiery Impose, and Fiery Compose requirements
To use Fiery JobMaster, Fiery Impose, or Fiery Compose, each client computer requires the following:
• Command WorkStation
• An activated license for the relevant utilities
• Adobe Acrobat/Enfocus PitStop software (included with the Fiery JobMaster, Fiery Impose, and Fiery Composesoftware kit)
Mobile device requirements
You can print directly from a wireless mobile device to the E300, using the E300 Direct Mobile Printing feature. Theprinter default paper size is used for all Direct Mobile Printing jobs.Mobile devices must be on the same wireless subnet as the E300.If Secure Printing is enabled, you can use Secure Printing when printing from a mobile device.The E300 supports Direct Mobile Printing from the following mobile devices that have iOS 4.2 (with printingfunctionality) or later:
• iPad
• iPhone (4 or later)
• iPod touch (3rd generation or later)
Configuration and Setup
Requirements
14

Integrating the E300 into your network
Your service technician ensures that the E300 is correctly installed at your site, the power supply and cooling areadequate, and the required cables are connected.
Steps to integrate the E300 into your network
This procedure provides an overview of the steps required to integrate the E300 into your network and printenvironment.
Warning: Ensure all cables remain routed to prevent trip hazards and to prevent accidental disconnection ordamage. Ensure that the cables are not compressed, pinched, or bent at a sharp angle. Damaged cables canresult in electric shock to personnel, in addition to faulty operation of the equipment.
Caution: Use caution and correct ergonomic procedures if it is necessary to lift or move the E300 or connectedequipment.
Note: As an option, you can configure a Windows computer to act as a print server between the E300 and the clientWindows computers. The client computers then print to the E300 by printing to the print server, and you canmonitor and control printing at the network server.To configure a Windows print server, install the E300 printer driver on the Windows server, then share the queueswith network users. Make sure that the printer driver is updated as required. For information about configuring aWindows print server, see the Windows documentation.
1 Review the E300 requirements information to ensure the client computer requirements and other requirementsare met.
2 Confirm the E300 network port (RJ-45 connector) is connected to a live network node.
3 Make sure all the E300 cables are firmly seated.
4 Make sure that the E300 is connected to the network in the same subnet as the printer.
5 Use the Fiery Setup Wizard to perform initial setup of the E300.
Note: If the settings are reset to factory defaults at any point, the server automatically reboots to identify theprinter model. During this process, the Fiery logo on the printer control panel briefly disappears and reappears.
6 Plan the levels of user access and set up the required accounts.
7 Review the server and network settings and customize as required for compatibility with your network andprinting environment.
Note: If the local workflow or network environment changes after the E300 set up is complete, we recommendreviewing the E300 configuration settings again.
Configuration and Setup
Integrating the E300 into your network
15

8 Review the E300 job processing and printing settings and customize as required.
9 Plan the management of software updates and system backups.
10 Prepare the client computers by installing the E300 printer driver and the E300 utilities (including CommandWorkStation).For information about installing the E300 printer driver, see Printing. For information about installing the E300utilities, see Utilities.
11 Print a variety of test pages to confirm that printing is working as expected.
E300 front and back panels
Following are illustrations of the connector and LED panels.
Figure 1: E300 connector panel
1 USB 2.0 ports (x2)
2 Printer interface connector (data port)
3 Network port (10/100/1000 BaseT)
4 Printer connector (Ethernet 10/100/1000 BaseT)
5 Power button
6 Power connector
7 Power switch
I: Power ON
O: Power OFF
Configuration and Setup
Integrating the E300 into your network
16

Figure 2: E300 LED panel
1 Service switches (for service use only)
2 LEDs (2-digit diagnostic display)
Powering the E300 on or off
Generally, you can leave the E300 and the printer operating continuously. However, configuration changes mayrequire a reboot of the E300.
Warning: Ensure that the power cable remains as configured by the service technician. The designated powercable and a grounded, correctly rated outlet must be used. If required, the cable should be protected by a surgesuppressor, line conditioner, or uninterruptible power supply (UPS).
You can restart the E300 system software without rebooting the E300. Network access to the E300 is temporarilyinterrupted and all processing jobs are terminated.If you use a USB flash drive, remove it before rebooting. Otherwise, the E300 does not reboot.
Power on the E300
1 Make sure that the E300 power cable is correctly connected.
2 Make sure the E300 power switch is in the ON (|) position.
3 Press the E300 power button once.The power supply automatically senses the correct voltage. Allow startup to proceed without interruption.
4 If the printer is off, press the main power switch on the printer.
5 Wait for the E300 to power on and reach Idle.
Restart, Reboot, or Shut Down the E300
Configuration and Setup
Integrating the E300 into your network
17

1 Make sure that the E300 is not receiving, processing, or printing any files.If the system has just finished processing, wait at least five seconds after the system reaches Idle before youproceed.
2 You can now do any of the following:
• Restart or reboot through Command WorkStation.
• Restart, reboot, or shut down through the printer control panel.
Important: Avoid using the power button to shut down the E300, as doing so may cause the system tooperate unpredictably. If you need to shut down the E300, we recommend shutting down through theprinter control panel. Use the power button only if the printer is off or the system is unresponsive tokeyboard or mouse actions. In this case, briefly press and release the power button.
Shut down, restart, or reboot from the printer control panel
1 Make sure the E300 is not receiving, processing, or printing any files. If the system has just finished processing,wait at least five seconds after the system reaches Idle before you proceed.
2 On the printer control panel, press the Home button then the Fiery logo.
3 Press Info > Server.
4 Press Restart Fiery.
5 If prompted, log on as Administrator or Operator.The default password is Fiery.1 (case-sensitive).
6 Select one of the following:
• Restart Fiery
Restarts the E300 system software without rebooting the operating system software on the E300.
• Reboot Server
Reboots the E300.
• Shut Down
Shuts down the E300.
Restart or reboot from Command WorkStation
1 In Command WorkStation, click the Server menu.
Configuration and Setup
Integrating the E300 into your network
18

2 Select one of the following:
• Restart Fiery
Restarts the E300 system software without rebooting the operating system on the E300.
• Reboot Server
Reboots the E300.
Configuration and Setup
Integrating the E300 into your network
19
Accessing the E300
You can access the E300 through the following methods:
• Use the printer control panel to access selected E300 print server features. For details, see Accessing E300options through the printer control panel on page 28.
• Use Command WorkStation on a client computer to access E300 print server features.
• Use WebTools on a client computer to access E300 print server features.
For information about installing the E300 utilities, including Command WorkStation, see Utilities.
Command WorkStation
You can use Command WorkStation to configure the E300, prepare and manage print jobs, and manage serverresources. Command WorkStation can connect to multiple E300 at the same time.You can run Command WorkStation on a client computer.For more information about Command WorkStation, see Utilities or Command WorkStation Help.
WebTools
You can use WebTools to manage the E300 remotely over your company network or over the Internet.WebTools can be used on Windows and Mac computers.
Note: WebTools can be used with HTTP or HTTPS.
Home Home provides you with current information about installed options andthe jobs processing and printing on the E300. You do not need a E300Administrator account to use this feature. For more information, seeUtilities.
Downloads Downloads allows users to download installers for software and printerdrivers directly from the E300. You do not need a E300 Administratoraccount to use this feature. For more information, see Printing and Utilities.
Docs Docs allows users to access, manage, and modify jobs in their mailboxes onthe E300, and submit jobs to the E300. You do not need a E300Administrator account to use this feature.
Configuration and Setup
Accessing the E300
20

Configure Configure allows you to view and modify E300 configuration settings. AE300 Administrator account is required to use this feature.
For more information, see Utilities and Command WorkStation Help.
Start WebTools
To start WebTools, you need to use a supported Internet browser and have the IP address or DNS name of the E300available.• Start an Internet browser and type the IP address or DNS name of the E300.
Configuration and Setup
Accessing the E300
21

Performing initial setup with the Fiery SetupWizard
Fiery Setup Wizard provides a quick, easy way to perform initial setup of the E300.You can use the wizard to select a predefined configuration based upon your print environment.
Factory default settings on the E300
The E300 ships with factory default settings. These settings remain in effect until the Fiery Setup Wizard is used toselect a predefined print environment, or until the settings are modified through Configure.To see the factory default settings, review the configuration settings before you complete the Fiery Setup Wizard.The settings described in this document are listed with the factory default values.
Fiery Setup Wizard workflow
The selected predefined configuration is implemented only when you click Finish at the end of the wizard. You canalso choose to skip selecting a predefined configuration, which retains the factory default settings.Once you click Finish, the wizard is no longer available in either Command WorkStation or WebTools. The wizardbecomes available again only if you reinstall the system software.Selecting a predefined configuration may change user access or modify how print functions work. If you seeunexpected results, review the settings in Configure.Using the Fiery Setup Wizard does not affect your ability to use Configure. After completing the wizard, you can stillview and customize individual settings in Configure or through the Setup feature on the printer control panel.
Predefined configurations
Each predefined configuration includes settings that are typically required for a specific type of printingenvironment.Since the list of settings is extensive, Fiery Setup Wizard does not list the settings included in each predefinedconfiguration. To review individual settings, access Configure as described in this document.
Configuration and Setup
Performing initial setup with the Fiery Setup Wizard
22

• Graphic Arts & Proofing
Use if your users require advanced proofing capabilities, superior image quality, rendering styles, and expertcalibration setting of the printer.
• Production
Use if the priority is to take full advantage of complex variable data handling, fast speed, continuous throughput,and advanced paper handling.
• Office & Workgroup
Use to maximize the scanning and security of your printer while controlling user access.
• Transactional
Use to optimize E300 processing speed while maintaining superior image quality with features such as variabledata printing.
Default predefined configuration
The Fiery Setup Wizard has the following print environment selected by default. This is the recommendedpredefined configuration.
• Office & Workgroup
Access Fiery Setup Wizard from WebTools
1 Open an Internet browser and type the IP address or DNS name of the E300.
2 On the Home tab, next to the Fiery controller initial setup is not complete message, click the Click here tocontinue link.Fiery Setup Wizard opens.
3 Enter the E300 Administrator password and click Log In.The Fiery Setup Wizard Welcome screen displays.
Access Fiery Setup Wizard from Command WorkStation
1 Log into Command WorkStation as Administrator.
2 Access Configure through one of the following methods:
• In the Server menu, click Configure.
• In Device Center on the General or Users tabs, click Configure.
3 In the Fiery Setup dialog box, click Fiery Setup Wizard.The Fiery Setup Wizard Welcome screen displays.
Configuration and Setup
Performing initial setup with the Fiery Setup Wizard
23

Complete Fiery Setup Wizard
1 On the Welcome screen, choose a default language, select I agree to the Terms and Conditions, and then clickNext.
2 On the Regional screen, specify the regional settings and then click Next.
3 Complete the information on the Server screen:a) Specify the server settings including the server name, administrator password, IPv4 address, and IPv6 address.
To ensure security, we recommend changing the default administrator password during initial setup.
b) Click Next.
4 On the Select your printing environment screen, choose a print environment and then click Next.Alternatively, you can select Skip this step.
• If you want to use the selected print environment, click Next.
• If you want to keep the factory default settings, click Skip this step.
• If you want to finish the Wizard later, click Cancel. In this case, none of the selected settings are applied andFiery Setup Wizard closes.
5 If you select a print environment, a screen that is named for the print environment provides the opportunity torefine some of the settings.
6 Click Finish.
7 To print the current configuration settings, click the configuration sheet link. To restart the E300, click Restart.The new settings are not applied until the E300 is restarted.
Configuration and Setup
Performing initial setup with the Fiery Setup Wizard
24

Accessing the configuration settings
After initial setup with the Fiery Setup Wizard, we recommend that you review the E300 configuration to make surethe settings are optimized for your network and print environment.
When to review the configuration settings
We recommend reviewing the E300 settings in the following situations:
• After initial setup with the Fiery Setup Wizard
• If the E300 system software is installed or re-installed
• If the network or print environment changes
Viewing and modifying the configuration settings
You can view and modify the E300 configuration settings through the following methods:
• The E300 Setup feature on the printer control panelThe Setup feature provides access to a partial set of the configuration settings.
• Configure in Command WorkStationCommand WorkStation can be accessed from a client computer.
• Configure in WebToolsWebTools can be accessed from a client computer.
In Configure, you can find settings quickly by typing keywords into the Search bar at the top.You can also view the configuration settings in two additional ways:
• By saving the configuration settings as a file (see Configure Help).
• By printing the configuration settings (see Print the Configuration page on page 27).
For a description of all the configuration settings, see Configure Help.
Configuration and Setup
Accessing the configuration settings
25

Access Configure from Command WorkStation
1 Log into Command WorkStation as Administrator.
2 Access Configure through either of the following methods:
• Select Server > Configure.
• In Device Center, on the General or Users tab, click Configure.
3 If the Fiery Setup dialog box displays, click Configure.If you have not completed initial setup, you may want to click Fiery Setup Wizard instead. For more information,see Performing initial setup with the Fiery Setup Wizard on page 22.If you use the Fiery Setup Wizard (from Command WorkStation or WebTools) and click Finish at the end of thewizard, the Fiery Setup dialog box does not display again in any location.
Access Configure from WebTools
1 Open an Internet browser and type the IP address of the E300.
2 In WebTools, on the Configure tab, click Launch Configure.
Note: If a message about an untrusted connection appears or you are asked whether you want to proceed, youcan safely ignore the message and proceed by clicking Continue to website.
3 Log on with Administrator privileges.
Stop untrusted connection messages from appearing in WebTools
Actual steps may vary depending upon the computer operating system and the browser version. This procedure is anexample for a Windows 7 computer with Internet Explorer 11.1 In Configure, click Security > Server Certificate.
2 Click the Create Self Signed Certificate button.
3 In the Self Signed Certificate dialog box:a) In the Common Name field, enter the hostname.
b) In the Organization field, enter the name of your organization.
c) In the Country field, enter the name of your country (for example, use a two-letter country code).
d) Click Save.
e) Reboot the E300.
4 On the computer where you want to prevent untrusted connection messages, open Internet Explorer and enterthe hostname of the E300. For example, https://hostname.
5 At the top of the browser, click Certificate error then click View certificates.
Configuration and Setup
Accessing the configuration settings
26

6 In the Certificate dialog box, on the General tab, click the Install Certificate button.
7 In the Certificate Import Wizard dialog box, click Next and then do the following:a) Select Place all certificates in the following store and click Browse.
b) In the Select Certificate Store dialog box, select Trusted Root Certification Authorities then click OK.
8 Click Next.
9 If a security warning displays, click Yes.
10 Click Finish.A pop-up displays and lets you know that the import was successful.
11 Reopen WebTools using the hostname of the E300. For example, https://hostname.
Note: If you use the IP address rather than the hostname, the untrusted connection messages still appear. Youmust use the hostname name.The URL now begins with https, the lock icon is green rather than red, and the lock icon is not crossed out.
Print the Configuration page
The Configuration page lists the settings currently used by the E300.After you set up the E300, print the Configuration page to confirm your settings. Post the current Configurationpage near the E300 for quick reference. Users need the information on this page, such as the current printer defaultsettings.You can print the Configuration page the following ways:
• In Command WorkStation, click File > Print > Server Configuration.
Configuration and Setup
Accessing the configuration settings
27

Accessing E300 options through the printercontrol panel
You can access some of the E300 options through the printer control panel, including many of the configurationoptions.
Access PrintMe from the printer control panel
The PrintMe feature allows you to submit print jobs from a mobile device over a wireless network to any networkedprinter that has PrintMe enabled. The E300 includes a free PrintMe subscription. When you submit a job throughPrintMe, a document number is automatically mailed to you, and you can use it to retrieve the job. For the PrintMefeature to display in the printer control panel, PrintMe cloud printing must be enabled in Configure.With PrintMe, you can send documents to print in the following ways:
• Send the document to the printer over a wireless network.
• Install the PrintMe driver on a computer and follow the common print workflow.
• Email the document to the printer.
• Upload the document to the PrintMe.com website.
1 On the printer control panel, press the Home button.
2 Press PrintMe.
3 Enter the Document ID and press Next.
4 Set print options as preferred, then press Print.
Access Fiery tabs from the printer control panel
The Fiery tabs provide access to the job lists, server settings, and tools.
1 On the printer control panel, press the Home button.
2 Press Fiery.
Configuration and Setup
Accessing E300 options through the printer control panel
28

Jobs tab
This tab provides access to jobs according to the status of the job, similar to the Active and Printed Jobs windows inCommand WorkStation.
Active Jobs currently waiting to print.
Held Held jobs.
Printed Printed jobs.
Secure Allows you to log on to display secure print jobs.
To view a list, press the related tab. On each of these lists, you can press the arrow buttons to scroll up and down oneline at a time, or to advance to the top or bottom of the list.On the Active, Held, Printed, and Secure tabs, you can select a job and press a button to print, print and hold (Activeand Held tabs only), or delete a job. You can also view the print properties for the job, where you can change thenumber of copies. Other print properties cannot be changed at this point.
Info tab
The Info tab provides access to the basic administrative features.
Server subtab
This tab provides:
• Information about the current configuration of the E300.
• Access to the Setup feature. Click Server Setup to view or change Setup option settings.
• The option to reboot the E300. This option shuts down all E300 activity in the correct manner and then restarts.
Print Pages subtab
You can print the following system pages from this tab:
PS Test Page Confirms that the E300 is properly connected to the printer, and providescolor and grayscale samples to troubleshoot problems with the printer orthe E300. Settings on the Test Page may include: Server Name, colorsettings, printer model, and date and time the Test Page was printed.
PCL Test Page Confirms that the E300 is properly connected to the printer, and providescolor and grayscale samples to troubleshoot problems with the printer orthe E300. Settings on the Test Page may include: Server Name, colorsettings, printer model, and date and time the Test Page was printed.
PS Font List Prints a list of all fonts currently on the E300 hard disk drive.
PCL Font List Prints a list of all fonts currently on the E300 hard disk drive.
Configuration Provides general information about the hardware and softwareconfiguration of the E300, the current Setup options, the current calibration,and the IP address of the E300.
Job Log Prints a list of the last 55 jobs.
Configuration and Setup
Accessing E300 options through the printer control panel
29

E-mail Log Prints a list of recent e-mail activity.
Note: To print the E-mail Log, you must first enable the service.
Tools tab
The Tools tab allows you to perform tray alignment, perform calibration, and view the print instructions.
Access E300 Setup options from the printer control panel
You can use the Setup feature on the printer control panel to perform initial setup.
1 On the printer control panel, press the Home button.
2 Press the Fiery logo.The E300 tabs appear.
3 Press the Info tab.
4 To access the configuration options, press Server Setup.
5 If you have not already logged in, log on with Administrator privileges: Select Administrator, enter the password,and click Login.The default Administrator password is Fiery.1 (case-sensitive).
Note: The Administrator login automatically times out after the time interval specified in setup. If the timeoutmessage displays, press OK.After viewing or changing any settings on the tabs you can return to the main screen by pressing Cancel or SaveChanges.Pressing Save Changes displays a dialog asking if you want to reboot the E300 or return to Setup. If preferred, youcan return to setup and reboot later. Changes are not implemented until the system is rebooted.
Server Name
Sets the name of the E300 on the network (15 characters maximum).
Note: If you set up more than one E300, do not assign them the same name.
IPv4 Address Type
Choose whether to allow the E300 to obtain its Ethernet IP address automatically by searching the network.
Settings: Automatic (default)
Manual
Configuration and Setup
Accessing E300 options through the printer control panel
30

Gateway Type
Choose the method for obtaining the gateway address for printing with TCP/IP.
Settings: Automatic (default)
Manual
Enable Web Services
Select to enable web services for the E300. This feature must be enabled to allow the following:
• Access to the E300 functions through the printer control panel
• Access to WebTools from client computers
• The option to submit print jobs using IPP network protocols
Important: We recommend leaving this option selected. If it is disabled, the above functions are not available.
Settings: On (default)
Off
Network Security
Turn this setting off if you inadvertently closed a port and must access the E300.If this option is off, the following features are disabled:
• IP Filtering
• Port Filtering
• IPSec
These features can be enabled again through Configure > Security.
Settings: On (default)
Off
Ethernet Speed
Choose the appropriate speed of the network.
• The network speed is unknown.
• The network environment is mixed.
• The network uses 1 Gbps.
Settings: 10 Mbps Half-Duplex
100 Mbps Half-Duplex
Auto (default)
Configuration and Setup
Accessing E300 options through the printer control panel
31

10 Mbps Full-Duplex
100 Mbps Full-Duplex
IP Address
Enter the E300 IP address for Ethernet.This IP address, unlike an IP address set automatically, remains the same if you restart the E300. You must changethe default to a valid address for your network.
Settings: 127.0.0.1 (default)
Subnet Mask
Set the subnet mask for printing with TCP/IP on your network.
Note: This option is available when the IPv4 Address Type is set to Manual.
Note: Before proceeding, confirm the subnet mask setting with your network administrator.
Settings: 255.255.255.0 (default)
Gateway Address
Set the gateway address for printing with TCP/IP on your network.Login timeout
Specify when the E300 times out after you log on.When you finish making changes, save the changes. The E300 requires a reboot in order for any Setup changes totake effect.
Settings: 45 seconds (default)
5 minutes
10 minutes
15 minutes
30 minutes
Never
LAN Security (802.1x)
The E300 can seek authentication from an 802.1x authentication server (such as a RADIUS server), often through anintermediate access point (an authenticator).The E300 seeks this authentication at startup, or when the Ethernet cable is disconnected and reconnected. If theE300 is successfully authenticated, it is allowed access to the network.
Configuration and Setup
Accessing E300 options through the printer control panel
32

Enable 802.1x Authentication
Select to allow the E300 to seek authentication from an 802.1x authentication server.
Settings: Off (default)
On
Select EAP Type
Choose the type of EAP (Extensible Authentication Protocol).
Settings: MD5-Challenge
PEAP-MSCHAPv2 (default)
Username
The E300 uses this information to request authentication from an 802.1x authentication server.Use ASCII code characters (63 characters maximum). It is possible to enter more, but the supported length is 63characters maximum. Although you can enter characters other than ASCII code characters, only ASCII codecharacters are guaranteed for authentication.
Settings: User name (default is product or site-specific)
Password
The E300 uses this information to request authentication from an 802.1x authentication server.
Note: This option is only available when Enable 802.1x Authentication on page 33 is selected.Use ASCII code characters (63 characters maximum). It is possible to enter more, but the supported length is 63characters maximum. Although you can enter characters other than ASCII code characters, only ASCII codecharacters are guaranteed for authentication.
Settings: Password (default is product or site-specific)
Validate Server Certificate
Select this option if you set Select EAP Type to PEAP-MSCHAPv2 and want the E300 to use a trusted root certificatewhen communicating with the authentication server. If you want the E300 to validate the server certificate, place thecertificate in the list of trusted certificates of the E300.
Configuration and Setup
Accessing E300 options through the printer control panel
33

Note: This option is only available when Enable 802.1x Authentication on page 33 is selected.
Settings: On
Off (default)
Configuration and Setup
Accessing E300 options through the printer control panel
34

Configuring the E300 for your network and printenvironment
The E300 provides configuration settings for the printer connection, client computer connections, user access levels,security features, and print queues.For a description of the configuration settings not described in this document, see Configure Help.
Networking with client computers
The E300 can receive print jobs from the following types of client computers:
• Windows client computers
• Mac client computers
• UNIX (and UNIX-like) workstations
Enabling printing from Windows computers
Windows client computers can connect to the E300 using TCP/IP or UDP/IP over IPv4 or IPv6.To configure the E300 Windows domain name, open Configure and click Fiery Server > Server Name.Configuring the domain name is required for Windows printing, known as Server Message Block (SMB) printing.To use Microsoft Active Directory, assign the E300 to a Windows domain (Microsoft Active Directory is notcompatible with a workgroup).
Enabling printing from Mac computers
Mac client computers can connect to the E300 using TCP/IP or UDP/IP over IPv4 or IPv6.In addition, the E300 can act as a Bonjour printer. The Bonjour protocol setting is enabled by default and is availablein Configure at Network > Bonjour.As an option, you can use AppleTalk to download Mac fonts to the E300. Font downloads are the only functionsupported over AppleTalk. This setting is disabled by default and is available in Configure at Network > AppleTalk.
Enabling printing from UNIX and UNIX-like workstations
You can print directly to the E300 from any workstation that meets the standard specifications for UNIX and UNIX-like workstations.To create the printer connections, follow the procedures provided in the documentation for your UNIX or UNIX-like distribution.
Configuration and Setup
Configuring the E300 for your network and print environment
35
The E300 supports the standard UNIX printing options. For example, from the UNIX shell, you can use the lprcommand to send the job, specifying the E300 remote printer name as a destination.The E300 supports the following remote printer names:
• hold
• name of virtual printer (virtual printers display as printer name : virtual printer name)
As an option, you can set the E300 printer name listed above as the default printer (requires an administratoraccount with root privileges). On BSD workstations, edit the /etc/printcap file to specify the E300 as the remoteprinter (rp). On Solaris workstations, use the lpadmin command to configure the queuename.
Configure user access
You can configure user accounts and user groups through Configure.Users and groups
Use Configure to create users, assign passwords to users, create groups with specific privileges, and assign users tothe groups.Several groups are provided by default, and you can create new groups. All users in a group have the same privileges.In addition to assigning the users to a group, you can add users from your organization’s global address list if youenable LDAP services on the E300. The following topics are an overview designed to help you prepare a securitystrategy. You can view detailed information about users and groups in Command WorkStation.For more information, see Command WorkStation Help.
User authentication
The E300 uses user authentication to verify that the user who is sending a job belongs to a group that has printingprivileges.You can control user authentication on the E300 from Configure in Security > Printing Privileges.
• By default, Allow printing from is set to All users, meaning authentication is not required and anyone can sendjobs to the E300. Even if you assign passwords to users and assign users to groups, authentication is not required.
• If you set Allow printing from to Authorized users, users must enter their user name and password in the printerdriver when they print. Users must specify their user name and password if they create files from the printerdriver for printing later (such as an email attachment that is sent to the E300).
Because jobs that are sent through FTP do not require a printer driver, you can specify that FTP jobs areauthenticated. In Configure, see Job Submission > FTP Printing > Require Password for Printing.
Configuration and Setup
Configuring the E300 for your network and print environment
36

Fiery passwords
Use Configure to manage passwords.You can set passwords for users in Configure > User Accounts. You can set passwords for the Administrator (defaultuser in the Administrators group) and Operator (default user in the Operators group) in Configure > Security.You can also set a password for the Administrator during initial setup with the Fiery Setup Wizard.
Administrator privileges
Users in the Administrators group have the highest level of control.Administrator privileges include:
• Configuring the E300 from Configure or printer control panel
• Adding and deleting users and groups
• Setting and changing passwords for users
• Deleting, printing, exporting, and viewing the Job Log
• Deleting, viewing, and modifying users’ print jobs
• Clearing the E300 of all job data
• Printing black-and-white or color jobs
• Publishing print connections
• Adding and deleting fonts
• Controlling print jobs from the job management tools
• Overriding job settings
• Setting default settings for print options
• Saving, editing, publishing, and deleting Server Presets and Virtual Printers
• Calibrating the E300
Operator privileges
Users in the Operators groups can control print jobs from job management applications.Operator privileges include:
• Printing, exporting, and viewing the Job Log
• Deleting, viewing, and modifying other users’ print jobs
• Printing black-and-white or color jobs
• Clearing the E300 of all job data
• Calibrating the E300 (if allowed by the administrator)
Configuration and Setup
Configuring the E300 for your network and print environment
37

Guest privileges (no password)
Users do not need a password to log on as a Guest from job management applications.Guests can view the status of active jobs but cannot make changes to jobs or to the E300 state.
Configuring security features
The E300 includes the following security settings:
• Restrictions on the allowed IP addresses and ports
• Controlled email access
• LDAP authentication
• Secure Printing
• Secure Erase
Note: You can protect the E300 against viruses by using antivirus software to scan it periodically.
Restricting IP addresses and ports
To restrict unauthorized connections to the E300, you can permit only users whose IP addresses are within a definedrange.You can also close unnecessary ports to reject inbound access from the network. Commands or jobs sent fromunauthorized IP addresses or ports are ignored by the E300.
Controlling email access to the E300
Because you can allow users to print file attachments in email messages sent to the E300, the E300 accepts only validattachments (for example, PostScript or PDF files).Typically, viruses transmitted via email require execution by the receiver. Attachments that are not valid files arediscarded by the E300. Because file types such as .BAT, .VBS, and .EXE can cause virus activity, the E300 does notprocess these file types. The E300 also ignores emails in RTF (Rich Text Format) or HTML (Hypertext MarkupLanguage) format, and any included JavaScript code.You can define lists of authorized email addresses on the E300. Any email that the E300 receives from an emailaddress that is not in the authorized list is deleted. For more information, see Managing email address books on page49.
LDAP authentication
When LDAP communication is enabled to retrieve names and other information for people at your site, you canspecify the type of authentication.For more information, see Command WorkStation Help.
Secure Printing
This option allows the printing of highly sensitive or confidential files.A user printing a file with the printer driver assigns a password to the job. The user must then enter the password toprint the job.
Configuration and Setup
Configuring the E300 for your network and print environment
38

For more information about Secure Printing, see Printing.
Securely clearing job data
The Secure Erase feature provides a high level of document security by clearing job data from the E300 hard diskdrive after a job is deleted.Each job data file is overwritten three times, which prevents recovery with disk recovery tools. The algorithm foroverwriting data is based on the DoD specification US DoD5220.22M.
How Secure Erase works
When a job is deleted from the E300, the job cannot be viewed or retrieved using software provided with the E300.However, if the job was spooled to the E300 hard disk drive, elements of the job may remain on the hard disk driveand can possibly be recovered with disk recovery tools.Secure Erase clears job data securely from the hard disk drive by overwriting each job file three times. Secure Eraseapplies only to deleted jobs.We recommend leaving Secure Erase enabled at all times to ensure that data security is properly enforced.
Job deletion
A job can be deleted in the following ways:
• A job is automatically deleted from the Printed queue after the queue is full.
• A user deletes the job from the Hold queue.
• A user deletes the job from the Printed queue.
• A scan job is deleted based on Scan Setup.
• A job is deleted when the user performs any of the Clear Server functions.
• A user prints or deletes a Secure Print job.
Jobs not affected by Secure Erase
Secure Erase does not apply to the following types of jobs:
• Jobs deleted before Secure Erase is turned on
• Jobs located in systems other than the E300:
• Copies of a job that are sent to another E300 (such as load balancing)
• Copies of a job that are archived to media or network drives
• Copies of a job that are located on user computers
• Pages of a job that are merged or copied entirely into another job (for example, PDFs that are otherwisemerged)
Configuration and Setup
Configuring the E300 for your network and print environment
39

• Jobs submitted through the following methods:
• FTP server
• SMB connection
• Portions of a job that are written to disk because of disk swapping and disk caching
Additionally, note the following about Secure Erase:
• Job Log entries are not deleted unless the administrator uses the Clear Server feature to delete the entire Job Log.
• If the E300 is manually powered off before the deletion of a job is finished, the job may not be fully deleted. Todetermine whether job deletion has finished, verify the status in Command WorkStation.
Configure Secure Erase
Before enabling Secure Erase, verify that the E300 is not receiving, processing, or printing files. If the system has justfinished processing, wait at least five seconds after the system reaches Idle before you proceed.
1 Log into WebTools orCommand WorkStation as Administrator and access Configure.
2 Select the Operational Mode.
• Idle Time Deleted jobs are designated for Secure Erase and then erased when the E300 is idle (provides the bestperformance).
• Run Time Job data is erased securely every time a job is deleted (provides the highest security).
3 Click Save. The E300 must be rebooted for configuration changes to take effect.
Configuring print connections
The E300 supports several print connections, which determine how users can submit jobs to the E300 andsubsequently the printer.To use utilities and WebTools, you must enable at least one print connection.The following print connections can be configured:
• Print queue on page 41
• Hold queue on page 41
• Direct connection on page 41
To turn print connections on or off, open Configure and select Job Submission > Queues.All published print connections are constantly checked for the presence of jobs.If more than one E300 print connection is published, it may be useful to create separate printer instances on theclient computers. For example, if both the Hold queue and Print queue are published, then each user could create aHold printer and a Print printer on their client computer. This allows users to print directly to each printconnection.
Configuration and Setup
Configuring the E300 for your network and print environment
40

Print queue
The Print queue is the standard E300 queue. Jobs sent to the Print queue are processed and printed in the order inwhich they are received.Hold queue
Jobs sent to the Hold queue are spooled to the E300 hard disk drive for printing at a later time, or for reprinting.Because the Hold queue is a storage area, jobs sent to it cannot proceed through the printing process until theoperator intervenes using the job management tools.
Direct connection
The Direct connection transmits jobs directly to the E300, but only when the E300 is idle.If the E300 is busy, the job remains at the user’s computer until the E300 is ready. The job is then processed as soonas the previous job is finished and before the next queued job is processed. The Direct connection is intended fordownloading fonts and for use with test applications that require back channel information from the E300.Generally, we do not recommend using Direct connection to print jobs.
Note: To download fonts to the E300, you must first publish the Direct connection.
Important: In most cases, jobs sent to the Direct connection are not stored on the E300 and cannot be selectedfor reprinting, moving, or deletion. Therefore, the Direct connection provides a measure of security forsensitive files. However, jobs sent to the Direct connection do appear in the Job Log for accounting purposes.For full security, we recommend using Secure Erase.
Some jobs sent to the Direct connection cause temporary files to be stored on the E300. This may occur with thefollowing types of jobs:
• PDF jobs are redirected to the Print queue. However, PDF jobs sent to the Direct connection by LPR can beprinted directly.
• TIFF jobs
• VDP jobs (including Free Form Jobs)
• Jobs with the following settings:
• Reverse order printing (for large jobs)
• Booklet Maker
• Mixed Media
• Combine Separations
• Gang-up printing
• N-up printing
• Pages per sheet
Configuration and Setup
Configuring the E300 for your network and print environment
41

Mobile device printing
Direct Mobile Printing allows direct wireless printing to the E300 from supported mobile devices.Supported mobile devices must be connected to the same wireless-network subnet as the E300 to print using DirectMobile Printing.
Configure Direct Mobile Printing
1 In Configure, click Security > TCP/IP Port Filtering.
2 Select Enable TCP/IP Port Filter and make sure the following ports are enabled:
• 80 (HTTP)
• 631 (IPP)
• 5353 (Multicast DNS)
• 6310 (Direct Mobile Printing)
3 Click Job Submission and make sure the following settings are enabled:a) Click Queues and select Publish Print Queue.
b) Select IPP.
c) Click Web Services for Devices (WSD) and select Enable WSD.
d) Click Direct Mobile Printing and select Enable Direct Mobile Printing (disabled by default).
4 Click Network > Bonjour and make sure the following setting is enabled: Enable Bonjour.
Configuration and Setup
Configuring the E300 for your network and print environment
42

Configuring print job processing settings
The configuration settings that relate to how print jobs are processed are also referred to as raster image processing(RIP) settings.
PS settings
To access the PS settings:
• From Configure, select RIP > PS settings.
Allow Courier Substitution
Select to substitute Courier for fonts that are unavailable when you download files to the E300, or when you print adocument for which you do not have the corresponding printer font. If this setting is set to No, jobs with fonts thatare unavailable on the E300 hard disk generate a PostScript error and do not print. This setting does not apply toPDF files; font substitution occurs automatically in PDF files.
Settings: Yes (default)
No
Print to PS Error
Specify whether the E300 prints the available portion of a print job when it encounters a PostScript error. Select Yesto print the portion of the job that was processed before the error occurred. Select No to cancel the print job entirelywhen a PostScript error is encountered. Leave this setting at No unless you encounter printing problems.
Settings: No (default)
Yes
Default Paper Sizes
Select the default set of paper sizes. If no page size is defined within a PostScript file, jobs are printed on Letter paperif you select US, or on A4 paper if you select Metric.
Settings: US (for example, Letter, Legal, 11x17) (default in US)
Metric (for example, A4 or A3) (default in all other countries)
Configuration and Setup
Configuring print job processing settings
43

Convert Paper Sizes
Select to automatically convert document paper sizes to the specified default paper sizes.For example, if you select Letter/11x17->A4/A3, a letter size document is automatically printed on A4 paper.This setting works in conjunction with Default Paper Sizes, as shown in the following two examples.
• If Convert Paper Sizes is set to Letter/11x17->A4/A3, and Default Paper Sizes is set to US, jobs are printed A4/A3size.
• If Convert Paper Sizes is set to A4/A3->Letter/11x17, and Default Paper Sizes is set to Metric, jobs are printedLetter/11x17 size.
This also includes E300 system pages such as the Start Page, Test Page, and Job Log.
Settings: No (default)
Letter/11x17->A4/A3
A4/A3->Letter/11x17
Brightness
Use this setting to specify the image brightness for the print job.
Settings: 85% lightest
90% lighter
95% light
100% normal (default)
105% dark
110% darker
115% darkest
Printer Screen Mode
Select a screen mode to apply to pixel-based images (for example, an image from Adobe Photoshop)
Settings: Resolution
Gradation (default)
Off
Screen type
Use this setting to specify a halftone screening method when printing graphics.
Settings: Dot (default)
Line
Configuration and Setup
Configuring print job processing settings
44

Offset Jobs
Specify whether to have jobs offset after they are printed. You must have a finisher installed. If you set this option toOff, all offset functions are disabled, including those that occur between jobs.
Settings: Off (default)
On
Cover Page
Specify whether to print a cover page (job summary) containing the name of the user who sent the job, documentname, E300 name, time the job was printed, the number of pages printed, and the job status. If a PostScript erroroccurs and the Print to PS Error option is set to Yes, the cover page lists the PostScript error message instead of thejob status.
Note: The user can enable/disable this option for each job.
Settings: No (default)
After job
Offset within job
Use Offset within job to offset print jobs (shift the paper in the output tray) that are multiple-page/multiple-copyjobs.
Settings: No (default)
Yes
Print Master
Select Yes to print a FreeForm master when created and printed to the E300. The master is retained on the E300after printing unless deleted later. Select No only to process and hold a FreeForm master on the E300.
Settings: No (default)
Yes
Cache PDF and PS Objects
Specify whether images in PDF and PS files are cached to reprocess the same image in a file.
Settings: Off
On (default)
Configuration and Setup
Configuring print job processing settings
45

PCL settings
To access the PCL settings:
• Choose Configure > RIP > PCL settings.
Default Orientation
Determine whether the text or image is oriented along the short edge of the paper (Portrait) or the long edge of thepaper (Landscape).
Settings: Portrait (default)
Landscape
Form Length
Set the number of lines to be printed per page in PCL jobs.
Settings: 5-128 (default is 60)
Font Size (pt)
If the default PCL font selected in Font Number represents a proportionally spaced scalable font, determine the pointsize (height) of the font.
Settings: 4.0-999.75 (default is 12.00)
Font Pitch (char/in)
If the default PCL font selected in Font Number represents a fixed pitch scalable font, determine the width ofscalable type. Pitch is measured by characters per inch, so 10-pitch type fits 10 characters per inch.
Settings: 0.44-99.99 (default is 10)
Symbol Set
Choose the PCL symbol set that best matches the needs of users printing to the E300.
Settings: See the user interface for a complete list.
Font Source
Specify the PCL font source to be enabled.
Settings: Internal (default)
Softfont
Configuration and Setup
Configuring print job processing settings
46

Font Number
Designates the default font for the E300. To determine font numbers, print the PCL Font list. The standard fonts arelisted in order. The font numbers, however, are not displayed.
Settings: 0-999 (default is 0)
Append CR to LF
Specify whether to append a carriage return to each line feed.
Settings: No (default)
Yes
Paper Size for System Pages
Specify the default set of paper sizes on which PCL system pages are printed.
Settings: US (default in the United States)
Metric (default in all other countries)
Printer Default Personality
Sets the personality of the printer. To access this option, choose Configure > RIP > Printer Default Personality.
• If set to Auto, the PDL type of incoming jobs is automatically detected and sent to the appropriate interpreter.
• If set to PCL, incoming jobs are sent to the PCL interpreter. If set to PS, incoming jobs are sent to the PSinterpreter.
Settings: Auto (default)
PCL
PS
Variable Data Printing (VDP) settings
To access VDP settings, choose Configure > RIP > VDP.For information about configuring VDP search paths, see VDP search path on page 55.
FreeForm 1 Record Length
Defines the length of each record, either based on the number of pages in the variable job, or the number of pages inthe FreeForm Master.
Configuration and Setup
Configuring print job processing settings
47

Native Document settings
To access the Native Document settings:
• Choose Configure > RIP > Native Documents.
Enable Native Document Conversion Using PrintMe
Enables the E300 to process native document file formats through the PrintMe Cloud Service.
Settings: On
Off (default)
Send Licensing Updates to the Fiery Administrator Email Address
Enables the E300 to send licensing updates to the administrator email address. E-mail Service must be enabled, andan administrator email address must be configured.
Note: This option is only available through Configure. It is not available through the printer control panel.
Note: This option is only available when Enable Native Document Conversion using PrintMe is selected.
Settings: On
Off (default)
Configuration and Setup
Configuring print job processing settings
48

Configuring print job management settings
The E300 supports several configuration settings for submitting and managing print jobs. This section describes themost frequently used settings.For a description of additional configuration settings, see Configure Help.
Managing email address books
The email address books are used to verify users when they submit print jobs by emailing attached files to the E300.You can retrieve an address book, add an address, delete an address, or clear the entire book. You can manage theemail address books by sending an email message in a particular format to the E300 (see Administrator commandsfor managing address books on page 50).The E300 supports a maximum of 1,000 entries in each address book.
Important: Email messages to manage the address books can be sent only from an administrator account.
Types of address books
The E300 supports different types of address books that allow control over sending emails and files to recipients, andprint jobs.
Admin Members of the Admin book can modify the address book, get the currentaddress book from the E300, cancel a job, or receive the status of a job.However, membership in this address book does not provide the sameprivileges as the Administrator password.
Print Includes users who have print access. Members of the Print book can submitjobs by email to the E300. Unauthorized users receive an email reply thattheir job was not accepted by the E300 for printing.
When a print job is submitted via email, the E300 first checks the Print address book. If the user’s email address doesnot match any entry in the Print address book, the job does not print. Instead, the user receives an email stating thatthe print job was not accepted.The default wildcard character @ is stored in the Print address book. This allows any user to print to the E300 untilthe administrator adds the first entry in the Print address book.
Restore address books
You can manage address books by sending an email to the E300 with commands in the Subject and Message fields.The E300 responds by email with information about each request. To add or remove more than one address at atime, list the addresses on separate lines in the message field of the email message. To restore address books foryourself or users, use an email client to restore them from the E300.
Configuration and Setup
Configuring print job management settings
49

Retrieve an address book from the E300
1 Start your email application.
2 Open a new message window.
3 Type the email address of the E300 in the To line.
4 Type the command and the address book name in the Subject line.For example, to retrieve the Print address book, type #GetAddressBook Print.
5 Send the message.The return message includes the addresses of the specified address book.
6 Copy the addresses to a text file or save the message for your records.
Restore an address book to the E300
Use an email application to restore an address book from the E300.1 Start your email application.
2 Open a new message window.
3 Type the email address of the E300 in the To line.
4 Type the command and the address book name in the Subject line.For example, to restore the User address book, type #GetAddressTo User.
5 Copy the addresses to the body of the email, with each address on a separate line.You can include nicknames. However, when a nickname or address is longer than one line, edit it to fit on oneline.
6 Send the message.
7 In the return email message, confirm that the addresses were restored correctly.
Administrator commands for managing address books
You can use an email client to manage the address books that are stored on the E300.
Task Administratorsubject field
Administrator message field Email responsesubject field
Email responsemessage field
To retrieve aspecificaddress book
#GetAddressBook nameof address book
For example:#GetAddressBookAdmin
N/A Address Book nameof address book
For example:Address BookAdmin
List of addresses inthe specified addressbook
Configuration and Setup
Configuring print job management settings
50

Task Administratorsubject field
Administrator message field Email responsesubject field
Email responsemessage field
To add anaddress to anaddress book
#AddAddressTo nameof address book
For example:#AddAddressTo Print
name@domain or “displayname” <name@domain>
Added to AddressBook name ofaddress book
For example: Addedto Address BookPrint
List of addressesadded to the addressbook
The E300 also listsany addresses thatcannot be added andincludes the reason.
To clear anaddress book
#ClearAddressBookname of address book
For example:#ClearAddressBookUser
N/A • Address Bookname of addressbook cleared
• Address Bookname of addressbook not cleared
For example:Address Book Usercleared
If the address book isnot cleared, thereason is given.
To delete anaddress froman addressbook
#DeleteAddressFromname of address book
For example:#DeleteAddressFromUser
name@domain or “displayname” <name@domain>
Removed fromAddress Book nameof address book
For example:Removed fromAddress Book User
Deleted Address 1Deleted Address 2
The E300 also listsany addresses thatcannot be deletedand includes thereason.
To receive helpfor E-mailService
#Help N/A RE: Help Providestroubleshootingemail syntax
PrintMe cloud printing
Users with a PrintMe subscription can upload a document to the PrintMe cloud service and then print the documentfrom the E300.
• The PrintMe feature on the E300 requires a subscription to the PrintMe cloud service.
• Contact Electronics For Imaging for PrintMe cloud service issues, or send an e-mail to PrintMe support [email protected].
• PrintMe availability may vary, depending on the country or region.
For more information about using PrintMe cloud printing, see Printing, which is part of the user documentation set.
Configuration and Setup
Configuring print job management settings
51

Configure PrintMe cloud printing
You must set up the E300 through Configure to enable PrintMe cloud printing.1 In Configure, as Administrator, click Job Submission > PrintMe and then select Enable PrintMe.
2 Optional: If you need PrintMe cloud printing to connect to the E300 through a proxy server, click the Managelink next to Proxy Settings.a) In the Proxy dialog box, enter the required information about the proxy server.
3 Click Save.
Job mismatch settings
This section provides some examples of the expected behavior of various combinations of the job mismatch settings.The mismatch settings are available in Configure, under Job Management > Job Mismatch. For more informationabout the mismatch function, see Command WorkStation Help.
Workflow example 1
Assumptions:
• Enable Job Mismatch is On.
• Mismatch Action is set to Cancel.
• Timeout is set to 5 minutes.
If a mismatch job occurs, the following happens:
1 An error message about the mismatch appears in Command WorkStation.
2 You have the timeout period (default is 5 minutes) to correct the mismatch, for example, by loading the correctsize of paper.
3 If no action is taken, after the timeout period (default is 5 minutes) the message disappears and the job iscanceled.
Note: If you look at the Job Log in Command WorkStation, the job appears as canceled.
Workflow example 2
Assumptions:
• Enable Job Mismatch is On.
• Mismatch Action is set to Suspend.
• Timeout is set to 5 minutes.
If a mismatch job occurs, the following happens:
1 An error message about the mismatch appears in Command WorkStation.
2 You have 5 minutes (the timeout period) to correct the mismatch, for example, by loading the correct size ofpaper.
Configuration and Setup
Configuring print job management settings
52

3 If no action is taken, then the job is suspended after 5 minutes (the timeout period).
4 When the job is suspended, it remains in the Printing queue until the user takes action. For example, the user canchoose Print, Hold, Cancel, Delete, or can change the job properties.
Workflow example 3
Assumptions:
• Enable Job Mismatch is Off.
Note: When this setting is Off, the related fields are disabled.If a mismatch job occurs, the following happens:
1 The job is sent to the printer.
2 An error message about the mismatch appears in Command WorkStation.
3 The message remains until you take action.
Configuration and Setup
Configuring print job management settings
53

Administering the E300
The E300 includes features to assist with software updates, back up and restore, and other items.
Maintaining optimal E300 performance
The E300 is designed to require no maintenance. In addition, the E300 supports multiple methods for optimizingperformance.Reduce network traffic:
• Only publish the print connections that are being used.The E300 constantly checks all published connections, even if they are inactive. It is easy to re-establishconnections if required.The related settings can be found in Configure > Job Submission.
• Schedule less-urgent and recurring print jobs for low-traffic periods.Move jobs that are not urgent to the Held queue. At low-traffic periods, a E300 Administrator or Operator canmove jobs between queues.
• Schedule less-urgent network communication for low-traffic periods.Large numbers of users running E300 utilities, especially with frequent updates, may impact E300 performance.Schedule E300 software updates and non-critical network usage for low-traffic periods.
Manage print jobs for greatest efficiency:
• If using Fiery Central, confirm the Printer Groups are optimized for your print environment.The load balancing options can be configured to use the fastest engine.The rerouting options can be configured for shorter time outs and fewer reroutes.
• Confirm job mismatch settings are optimized for your print environment.The timeout period can be reduced.Jobs can be set to be canceled after the timeout expires.The settings can be found in Configure > Job Management > Job Mismatch.
• Disable the ability to preview jobs while the jobs are processing.This setting can be found in Configure > Job Management.
• Allow print jobs to process while they are being received.This setting can be found in Configure > Job Management.
Configuration and Setup
Administering the E300
54

Make sure there is adequate disk space on the E300:
• Confirm that only essential files are stored on the E300.Do not store unnecessary files on the E300, and do not install third-party software.
• Reduce the number of jobs retained in the Printed queue.This setting can be found in Configure > Job Management > Printed Queue.
• Remove inactive jobs from the queues.When you remove inactive jobs, new jobs are spooled and printed more quickly.Periodically review the jobs in the Held queue and other queues.
• If disk space on the E300 is frequently low, it may help to disable the Printed Queue.This setting can be found in Configure > Job Management > Printed Queue.
VDP search path
Note: Paths for common global objects are used by Fiery JDF, and any change in these settings will change the filepaths for JDF printing.
User-defined search paths for a single job
A user can enter a single search path when they send the job from a Windows printer driver, or if they override thejob to include a search path.The path must be fewer than 256 characters, and in the format of a mapped drive (for example, Z:\folder) or a UNC(for example, \\computer name\folder).
Clearing the server
The Clear Server command allows you to clear print jobs, VDP resources, and logs from the E300.
Note: Before clearing the server, confirm that print jobs are backed up onto your own media as required.
Note: Jobs can also be deleted by right-clicking on the jobs in the lists in Command WorkStation.In Command WorkStation, click Clear Server from the Server menu. Command WorkStation displays a list of whichdata can be cleared.The following types of data can be cleared:
• Held jobs
• Active jobs
• Printed jobs
• Archived jobs that are stored on the server
• Archived network links to jobs
Configuration and Setup
Administering the E300
55

• Scan jobs
• Secure print jobs
• VDP resources
• Job log
• FTP log
• Email log
Software updates
The E300 includes multiple update options.
Managing firewalls
If the E300 is behind a firewall, configure a proxy server to allow the E300 access to the internet for automaticupdates.To configure a proxy server, in Configure select Network > Proxy, then select Enable HTTP Proxy and enter therequired information about the proxy server.In addition, if your network includes a firewall, make sure that the firewall is configured to enable communicationbetween the E300 and the client computers.
Configure System Updates
You can use the System Updates feature to schedule updates of the system software.Plan system updates for when the E300 is not in use, such as nights or weekends.While system updates are being installed, print jobs cannot be sent to the E300.The E300 automatically reboots during the system update process. It may need to reboot several times.
1 In Configure, sign in with Administrator privileges, then click Fiery Server > System Updates and select EnableSystem Updates.
2 Specify how frequently the E300 contacts the Update Server.This feature sets a schedule for downloading updates.
Note: The system updates are performed only when there are no jobs in process. If the system updates might notoccur due to extensive printer usage, increase the frequency of updates (such as daily instead of weekly).
3 If you use a proxy server to connect through a firewall to the Update Server, click the HTTP Proxy Settings link. Inthe Proxy dialog box, select Enable HTTP Proxy, enter the following information, and then click Save.
• Address: proxy server IP address
• Port: port used by the proxy server
• User Name: user name for accessing the proxy server
• Password: password for accessing the proxy server
Configuration and Setup
Administering the E300
56

4 Click Save.
Note: To confirm all outstanding updates are installed, check for product updates (for example, click Check forProduct Updates on the Configure tab in WebTools).
User software
The user software applications and printer drivers are available through the following methods:
• Download using WebTools
• Updates through Fiery Software Manager (for more information, see Utilities)
Backing up and restoring the E300
You can back up and restore the entire E300 configuration or selected settings. Backing up the settings creates aconfiguration file containing the current settings. Restoring the settings does not require reinstalling any software.You can back up and restore in the following ways:
• Use the Command WorkStation backup and restore features under Server to back up the E300 settings.
• Use the Configure backup and restore features under Fiery Server to back up and restore the E300 settings.
For detailed information about how to use Command WorkStation to back up and restore settings, see CommandWorkStation Help.
Recommendations to preserve data
To preserve your data, we recommend the following:
• Do not turn off the system while accessing the hard disk.
• Back up your original data on your own media when you store and save data on the E300 hard disk.
• Never reset the E300 hard disk.
• Never do anything that might damage the E300 hard disk.
If the E300 hard disk or system software has any technical difficulties, data stored and saved on the E300 hard diskmay be irretrievably lost. If problems with the hard disk occur, we cannot assure extended storage of the followingdata:
• Third-party fonts
• Print jobs
• Color profiles, including profiles downloaded or edited using Spot-On
• Job notes and instructions
• Scanned image data
• Jobs edited using Impose
• Variable data documents
• Address books
Configuration and Setup
Administering the E300
57

• E300 configuration information (list of all the settings currently in effect)
• Information about virtual printers
Back up and restore settings with Configure
You can back up and restore the following E300 settings through Configure:
• Fiery System Settings
• Color Settings
• Scan Settings
• VDP Resources (including FreeForm)
• Virtual Printers
• Server Presets
• Fonts
• Job Log
Back up settings with Configure
When you back up settings, you can specify which settings you want to save.1 In Configure, select Fiery Server > Backup.
2 Follow the on-screen instructions to select the settings.
3 Click Backup to back up the selected settings.
Restore settings with Configure
If you have backed up your settings, you can recover them in Configure after a system crash. You can only recoverthe settings that were selected for back up.1 In Configure, select Fiery Server > Restore.
2 Select the backup reference file and the backup data file and click Next.
3 Follow the on-screen instructions to restore your settings and click Finish.
Reset the E300 to factory defaults
If you reset the E300 to factory defaults, the Held and Printed lists clear, but jobs in the Archived list remain.1 Record any configuration settings that you would like to re-enter after resetting the E300 to factory defaults.
Configuration and Setup
Administering the E300
58

2 In Configure, click Fiery Server > Restore Default Fiery Settings.
3 Click the Restore Default Fiery Settings button.
Configuration and Setup
Administering the E300
59

Troubleshooting
If the troubleshooting steps described here do not resolve the issue, collect the related information and contacttechnical support.
Perform basic troubleshooting
These troubleshooting steps can help to resolve the most common issues.1 Confirm that all the cables required for the E300 are intact and firmly seated in the correct ports.
The most common cause of an issue is a faulty or loose cable.
Warning: Do not remove the covers or otherwise open the E300 hardware. The parts inside the chassis andinternal cables are intended to be serviced by authorized service technicians only.
2 If the E300 cannot power on, confirm that the power cord is intact and adequate power is available at the poweroutlet.
3 If the E300 is not visible on the network, confirm that the correct type of Ethernet cable is connected to thecorrect network port.
4 Confirm that the Fiery logo is showing on the printer control panel. If not, check the status of the E300 and thecable connection to the printer.
5 Review any messages showing on the printer control panel.
6 If one or more client computers cannot print to the E300, confirm that the client computers have the correctversion of the E300 printer driver and utilities installed.For information about installing the printer driver, see Printing. For information about installing the utilities, seeUtilities.
7 If the E300 is printing slowly or is not managing jobs as expected, review the E300 configuration to confirm thesettings are optimal for your network and print environment.Any changes to your network environment or workflow may require changes to the E300 configuration.
8 Confirm that the operating system settings on the E300 are not modified and the operating system is notupgraded (unless approved by technical support).Changes to the operating system settings or version can cause system problems.
9 Review any error messages showing in the Command WorkStation Servers list.
10 Take a screenshot of the Command WorkStation display and any error messages, then close and reopenCommand WorkStation. If any error messages display when it restarts, contact technical support.
Configuration and Setup
Troubleshooting
60

11 Reboot the E300. If the E300 does not reach the Idle state or any other issues remain, collect the relatedinformation and contact technical support.
Collect troubleshooting information
Collecting the following information can help technical support provide efficient solutions.1 Record or photograph the current status showing on the printer control panel.
2 If applicable, take a screenshot of the WebTools display.
3 If applicable, take a screenshot of the Command WorkStation display and any error messages.
4 Close and reopen Command WorkStation and take a screenshot of any error messages that display when itrestarts.
5 Record any error codes displayed on the two-digit LED in the E300 connector panel (back panel).
6 Make a list of the actions taken immediately prior to the issue and after the issue was discovered.
7 If the issue is relating to a specific job, create a job error report.
Create job error reports
When you create a job error report, Command WorkStation creates a zip file of the current job files, logs, andinformation about the E300. You can generate a job error report even if the print job is not in an error state.
Note: The error log entries are overwritten after a period of time. To ensure the error logs contain the relevantinformation, create the job error report as soon as possible after the error is observed. Create the job error reportbefore rebooting the E300 and if possible, before any additional print jobs are processed or printed.You can create a job error report for any jobs in the Held or Printed lists.
1 In Command WorkStation, select a job in the Printed or Held list.Only one job error report can be created at a time. If multiple jobs are selected in Job Center, the Create ErrorReport button is not available.
2 If accessing from a Windows client computer, press Ctrl and right-click the job. If accessing from a Mac clientcomputer, press Command and right-click the job.
3 In the shortcut menu, click Create Error Report.
4 Enter information about the job error.a) Enter any comments and additional details in the text field.
We recommend including the following information:
• Date and time error occurred
• Observed error codes, if any
• Description of expected result
• Description of incorrect result
Configuration and Setup
Troubleshooting
61

• Steps for how error occurred
• Frequency of error (such as single event, rarely, sometimes, frequently, always)
• Whether the error has occurred with more than one file
• Whether the file selected for the report is the same file that had the error
• Operating system version, if the print job was sent from a client computer
• Version of E300 user software installed
• Description of any other actions performed on the E300 during the same time period
b) Optional: To include the raster in the report, select Rasters.The raster can be useful to include if the file is not processed correctly. However, it may exceed the allowedsize of the report. In this case, it may be useful to provide it separately.
c) Optional: To include color profiles in the report, select Color Profiles.Color profiles can be useful to include if they are custom profiles and the print colors are incorrect.
d) Optional: To include the email log in the report, select Email log.The email log can be useful to include if the file was submitted by email.
e) Optional: To include the native source file in the report, click Add +.The native source file can be useful to include if the job does not process or print. However, it may exceed theallowed size of the report. In this case, it may be useful to provide it separately.
5 Attach any additional related files to the report.The job error report has a maximum file size of 2GB. If the selections and attachments result in a report largerthan 2GB, the report must be reduced in order to be completed.
6 Optionally, if any print jobs are considered confidential, remove the job files before sending the zip file totechnical support.
7 Save the job error report.
Configuration and Setup
Troubleshooting
62

Resolve runtime errors
Most runtime errors are related to connection issues and can be easily resolved using the tips provided in thissection.Printer not found
Most failures to find a printer on the network are due to a missing or conflicting name or IP address for the E300.On the E300:
• Make sure that the host name (DNS name) is entered at Configure > Fiery Server > Server Name. For moreinformation, see Command WorkStation Help.
On each Windows or Mac client computer:
• Ping the E300 from the client computer, and perform standard troubleshooting of any connection issues.
• If standard troubleshooting does not resolve the issue, then you can specify the E300 host name (DNS name) inthe hosts file.
Note: Once you specify the host name on the client computer, it must be updated each time the name changes.
• To allow Command WorkStation and other Command WorkStation utilities on the client computer to connectto the E300, the E300 IP address or DNS name must be configured in the server list. For more information, seeUtilities.
On each UNIX or UNIX-like workstation:
• Ping the E300 from the workstation, and perform standard troubleshooting of any connection issues.
• As an option, you can configure the E300 as the default printer.
Cannot connect to the E300 with utilities
If the utilities on the client computers cannot connect to the E300, check the network connectivity and verify thatthe users are entering the correct IP address or DNS name in each of the utilities.If the issue applies to all the client computers, check the following configuration settings on the E300:
• In Configure > Job Submission > Queues, confirm that the Print queue, Hold queue, or both are published.
• In Configure > Fiery Server, check the setting for Server Name.
• In Configure > Network, check the IPv4 Address, IPv6 Address, and other network settings.
• On the client computer, confirm that the required network protocols are loaded.
Cannot connect to the E300 with Command WorkStation
If a problem occurs while you are connecting to the E300, an error message is displayed.The problem can occur when:
• The E300 is initially turned on.
• The E300 restarts.
• You have changed settings affecting the server address and have not reconfigured the connection to the server.
Configuration and Setup
Troubleshooting
63

If you experience this problem, try the following solutions, in this order:
• A remote computer running utilities or WebTools may be interfering by obtaining status information. Ifpossible, close the remote application, and try to connect again.
• Restart the Command WorkStation software and try to connect again.
• Reboot the E300.
Configuration and Setup
Troubleshooting
64

Configuration and Setup
Index
65
Index
Aadministrator privileges 37Administrator privileges 37
Bbacking up 57Brightness 44
Ccable specifications 10clearing print jobs 55Command WorkStation
problems connecting to server 63connector panel 16
DDirect connection 41
EEnable Auto IP Configuration option 30Ethernet
Port Setup 31speed 31
FFiery Setup Wizard 22font substitution 43
Ggateway, assigning address automatically 31Gateway Type option 31
HHold queue, described 41
IIP address
assigning automatically 30assigning manually 32for Ethernet Setup 32static 32
Jjob error reports 61
MMac network requirements 35mobile device requirements 14
Nnaming the server 30network protocols 10
OOffset within job 45Operator privileges 37
Ppasswords 37Port Setup, Ethernet Setup 31printer not found 63Print queue, described 41
Rrestoring 57runtime errors 63
SScreen type 44server
naming 30Server Name option
Server Setup 30software updates 56Subnet Mask option 32
TTCP/IP
Ethernet Setup 30troubleshooting

Command WorkStation connection problems 63
UUNIX workstation network requirements 35
VVDP search paths, user-defined 55
WWindows network requirements 35
Configuration and Setup
Index
66