chapter 6 getting started with impress
TRANSCRIPT
Getting Started Guide
Chapter 6Getting Started with ImpressPresentations in LibreOffice
Copyright
This document is Copyright © 2020 by the LibreOffice Documentation Team. Contributors are listedbelow. You may distribute it and/or modify it under the terms of either the GNU General Public License (http://www.gnu.org/licenses/gpl.html), version 3 or later, or the Creative Commons Attribution License (http://creativecommons.org/licenses/by/4.0/), version 4.0 or later.
All trademarks within this guide belong to their legitimate owners.
ContributorsThis chapter is updated from Getting Started with LibreOffice 6.0.
To this editionJean Hollis Weber Peter Schofield Claire Wood
To previous editionsDave Barton Amanda M Labby Jorge RodríguezDrew Jensen Peter Schofield Hazel RussmanKevin O’Brien Ron Faile Jr. Olivier Hallot
FeedbackPlease direct any comments or suggestions about this document to the Documentation Team’s mailing list: [email protected]
Note
Everything you send to a mailing list, including your email address and any other personal information that is written in the message, is publicly archived and cannot be deleted.
Publication date and software versionPublished September 2020. Based on LibreOffice 6.4.
Using LibreOffice on macOSSome keystrokes and menu items are different on macOS from those used in Windows and Linux. The table below gives some common substitutions for the instructions in this chapter. For a more detailed list, see the application Help.
Windows or Linux macOS equivalent Effect
Tools > Options LibreOffice > Preferences Access setup options
Right-click Control+click or right-click depending on computer setup
Opens a context menu
Ctrl (Control) (Command)⌘ Used with other keys
F5 Shift+ +F5⌘ Open the Navigator
F11 +T⌘ Open the sidebar Styles deck
Documentation for LibreOffice is available at https://documentation.libreoffice.org/en/
ContentsCopyright..............................................................................................................................2
Contributors.................................................................................................................................2To this edition..........................................................................................................................2To previous editions................................................................................................................2
Feedback.....................................................................................................................................2
Publication date and software version.........................................................................................2
Using LibreOffice on macOS........................................................................................................2
What is Impress?.................................................................................................................5
Starting Impress...................................................................................................................5
Main Impress window..........................................................................................................6Workspace...................................................................................................................................6
Menu bar.....................................................................................................................................6
Slides pane..................................................................................................................................7
Sidebar........................................................................................................................................7
Toolbars.......................................................................................................................................8
Status bar....................................................................................................................................8
Workspace views.................................................................................................................9Normal view.................................................................................................................................9
Outline view.................................................................................................................................9
Notes view.................................................................................................................................11
Slide Sorter view........................................................................................................................11Customizing Slide Sorter view...............................................................................................11Moving a slide using Slide Sorter..........................................................................................11Selecting and moving groups of slides..................................................................................12Working in Slide Sorter view.................................................................................................12
Formatting a presentation.................................................................................................12Inserting slides...........................................................................................................................12
New slide..............................................................................................................................12Duplicate slide.......................................................................................................................12
Selecting slide layout.................................................................................................................13
Modifying slide elements............................................................................................................14
Adding text.................................................................................................................................15
Adding objects...........................................................................................................................15
Modifying the appearance of all slides.......................................................................................15
Adding and formatting text...............................................................................................16Using AutoLayout text boxes.....................................................................................................16
Using text boxes........................................................................................................................16
Vertical text................................................................................................................................17
Quick font resizing.....................................................................................................................17
Pasting text................................................................................................................................17Pasting unformatted text.......................................................................................................17Formatting pasted text..........................................................................................................17
Creating bulleted and numbered lists.........................................................................................19
Chapter 6 Getting Started with Impress | 3
AutoLayout text boxes...........................................................................................................19Text boxes.............................................................................................................................19Creating a new outline level..................................................................................................19Changing list appearance.....................................................................................................20
Adding pictures, tables, charts, and media....................................................................21Adding pictures..........................................................................................................................21
Adding tables.............................................................................................................................21
Adding charts.............................................................................................................................22
Adding media files.....................................................................................................................22
Adding graphics, spreadsheets, and other objects.....................................................................23
Working with master slides and styles............................................................................23Styles......................................................................................................................................... 23
Master slides..............................................................................................................................24
Creating a master slide..............................................................................................................24
Applying a master slide..............................................................................................................25
Loading additional master slides................................................................................................25
Modifying a master slide............................................................................................................27
Adding text, footers, and fields to all slides................................................................................28Text....................................................................................................................................... 28Footers..................................................................................................................................29Fields....................................................................................................................................29
Adding comments to a presentation...............................................................................31
Creating handouts.............................................................................................................31
Creating a photo album.....................................................................................................32
Setting up a slide show.....................................................................................................33One slide set – multiple presentations.......................................................................................33
Hiding slides..........................................................................................................................33Custom slide shows..............................................................................................................34
Slide transitions.........................................................................................................................34
Slide advance............................................................................................................................34
Playing sounds..........................................................................................................................35
Animation effects.......................................................................................................................35Applying animation effects....................................................................................................35
Running a slide show........................................................................................................36Presenter Console.....................................................................................................................37
Using Impress Remote control.........................................................................................38Getting Impress Remote............................................................................................................38
Connecting the mobile device to the computer..........................................................................38
Enabling remote control in Impress............................................................................................38
Running a slide show with Impress Remote..............................................................................38
4| Chapter 6 Getting Started with Impress
What is Impress?
Impress is the presentation (slide show) program included in LibreOffice. You can create slides thatcontain many different elements, including text, bulleted and numbered lists, tables, charts, and a wide range of graphic objects such as clipart, drawings, and photographs. Impress also includes a spelling checker, a thesaurus, and styles for drawings, text, and backgrounds.
This chapter includes instructions to guide you through the Impress environment while designing your presentations. Although more difficult designs are mentioned in this chapter, explanations for creating them are in the Impress Guide. If you have a working knowledge of how to create slide shows, we recommend you use the Impress Guide for your source of information.
To use Impress for more than very simple slide shows requires some knowledge of the elements which the slides contain. Slides that contain text use styles to determine the appearance of that text. Creating drawings in Impress is similar to the Draw component of LibreOffice. For this reason,we recommend that you also see Chapter 3, Using Styles and Templates, and Chapter 7, Getting Started with Draw, in this guide. You may also wish to consult the Draw Guide for more details on how to use the drawing tools.
Starting Impress
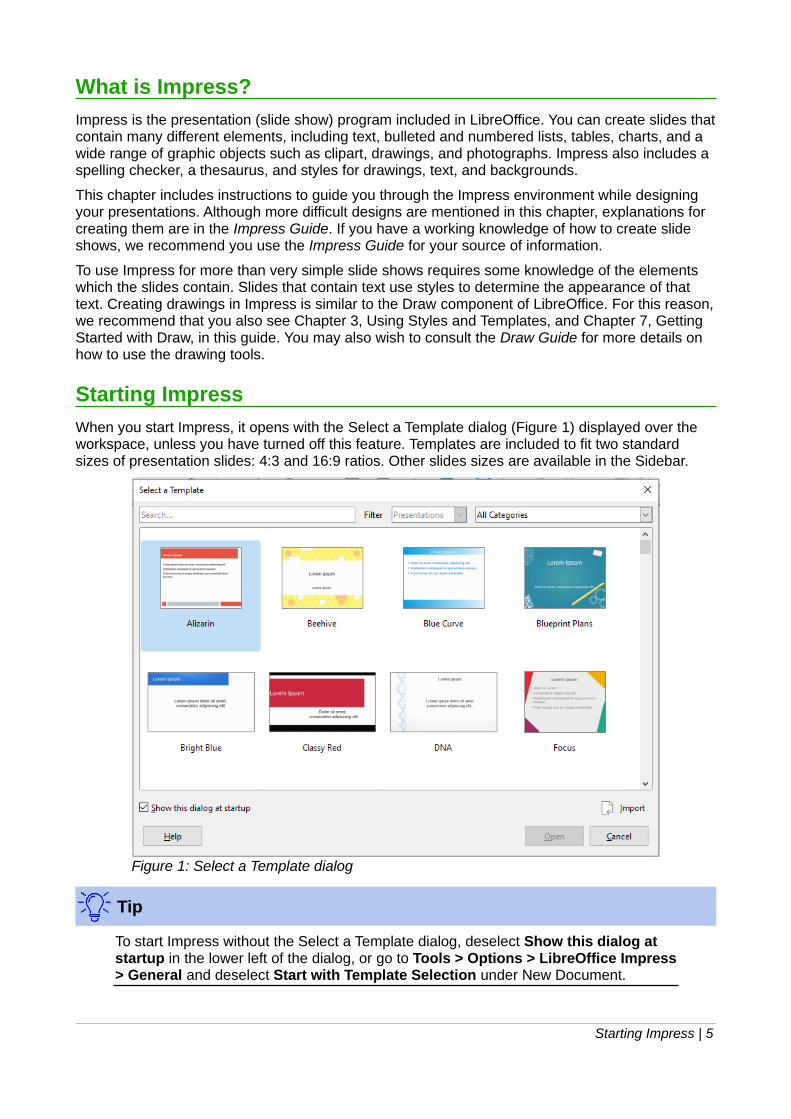
When you start Impress, it opens with the Select a Template dialog (Figure 1) displayed over the workspace, unless you have turned off this feature. Templates are included to fit two standard sizes of presentation slides: 4:3 and 16:9 ratios. Other slides sizes are available in the Sidebar.
Figure 1: Select a Template dialog
Tip
To start Impress without the Select a Template dialog, deselect Show this dialog at startup in the lower left of the dialog, or go to Tools > Options > LibreOffice Impress> General and deselect Start with Template Selection under New Document.
Starting Impress | 5
Main Impress window
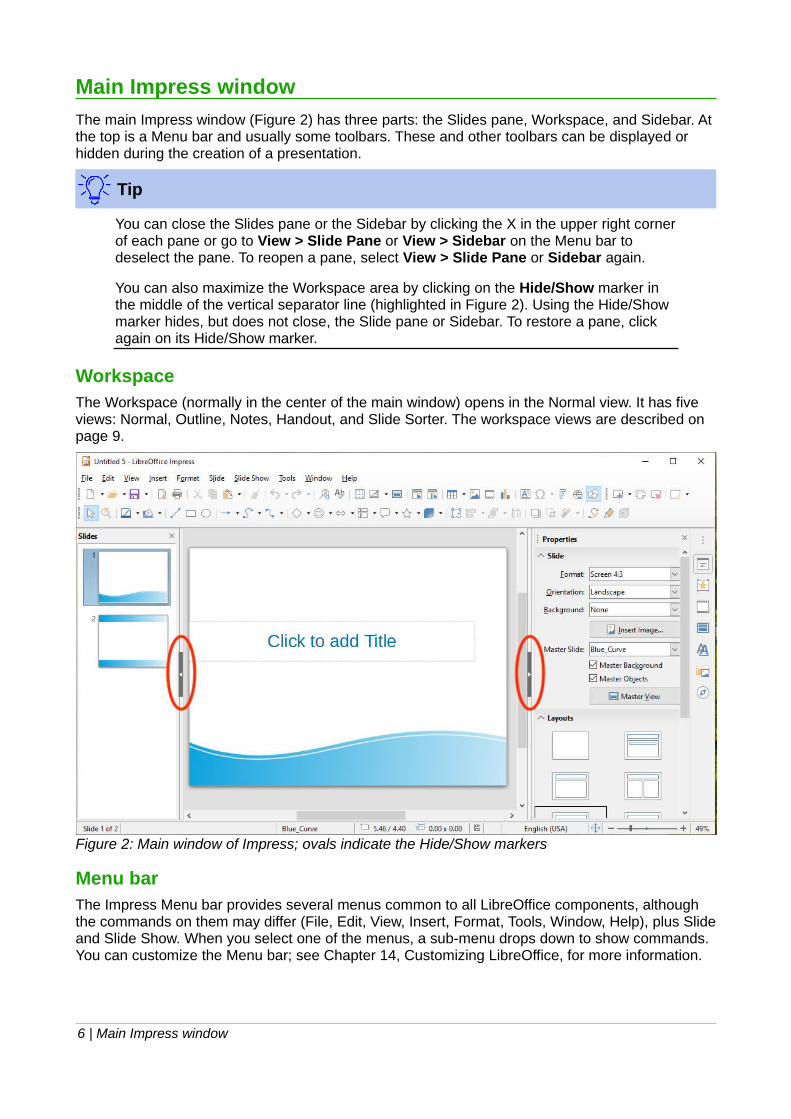
The main Impress window (Figure 2) has three parts: the Slides pane, Workspace, and Sidebar. At the top is a Menu bar and usually some toolbars. These and other toolbars can be displayed or hidden during the creation of a presentation.
Tip
You can close the Slides pane or the Sidebar by clicking the X in the upper right cornerof each pane or go to View > Slide Pane or View > Sidebar on the Menu bar to deselect the pane. To reopen a pane, select View > Slide Pane or Sidebar again.
You can also maximize the Workspace area by clicking on the Hide/Show marker in the middle of the vertical separator line (highlighted in Figure 2). Using the Hide/Show marker hides, but does not close, the Slide pane or Sidebar. To restore a pane, click again on its Hide/Show marker.
WorkspaceThe Workspace (normally in the center of the main window) opens in the Normal view. It has five views: Normal, Outline, Notes, Handout, and Slide Sorter. The workspace views are described on page 9.
Figure 2: Main window of Impress; ovals indicate the Hide/Show markers
Menu barThe Impress Menu bar provides several menus common to all LibreOffice components, although the commands on them may differ (File, Edit, View, Insert, Format, Tools, Window, Help), plus Slideand Slide Show. When you select one of the menus, a sub-menu drops down to show commands. You can customize the Menu bar; see Chapter 14, Customizing LibreOffice, for more information.
6 | Main Impress window
Slides paneThe Slides pane contains thumbnail pictures of the slides in the presentation in the order in which they will be shown, unless you change the slide show order. Clicking a slide in this pane selects it and places it in the Workspace. When a slide is in the Workspace, you can make changes to it.
Several additional operations can be performed on one or more slides in the Slides pane:
• Add new slides to the presentation.
• Mark a slide as hidden so that it will not be shown as part of the presentation.
• Delete a slide from the presentation if it is no longer needed.
• Rename a slide.
• Duplicate a slide (copy and paste).
• Move a slide to another place in the slide stack by dragging and dropping it to the desired position. If the position is not visible in the slide pane, the slide stack will scroll up or down.
You can also perform the following operations, although there are more efficient methods than using the Slides pane:
• Change the slide transition following the selected slide or after each slide in a group.
• Change the sequence of slides in the presentation.
• Change the slide design.
• Change slide layout for a group of slides simultaneously.
SidebarThe Impress Sidebar is usually located on the right side of the window. It is similar to the Sidebar inWriter (shown in Chapter 1 and Chapter 4 of this guide) and consists of seven decks. Each deck has a corresponding icon on the Tab panel to the right of the Sidebar. To display a deck, click on itsicon or click on the Sidebar Settings icon at the top of the Tab panel and select a deck from the drop-down list.
PropertiesThis deck has two panels. The Slide panel shows the characteristics of the selected slide, which you can modify in the panel, and the available slide layouts. You can choose a layout and use it as it is, or modify it to meet your requirements. However, it is not possible to save customized layouts. See “Selecting slide layout” on page 13.
Slide Transition Provides quick selection of slide transition options and transition speed (slow, medium, fast), automatic or manual transition, and how long the selected slide should be shown (automatic transition only). For more information, see “Slide transitions” on page 34.
Animation A variety of animations can be used to emphasize or enhance different elements of each slide. This panel provides an easy way to add, change, or remove animations. See page 35.
Master Slides Here you choose the slide style for your presentation. Impress includes several designs for Master Slide. One of them (Default) is blank; the others have a background and styled text. For more information, see “Working with master slides and styles” on page 23.
Styles Here you can quickly apply drawing (graphic and text) styles and presentation styles, create new drawing styles, and open style dialogs to modify both types of styles. When you save changes to a style, the changes are applied to all of the elements formatted with that style in the presentation. See “Styles” on page 23.
Sidebar | 7
GalleryOpens the Impress gallery where you can insert an object into your presentation either as a copy or as a link. A copy of an object is independent of the original object. Changes to the original object have no effect on the copy. A link remains dependent on the original object. Changes to the original object are also reflected in the link. See the Impress Guide for details.
NavigatorOpens the Impress navigator, in which you can quickly move to another slide or select an object on a slide. It is recommended to give slides and objects in your presentation meaningful names so that you can easily identify them when using the navigator. See the Impress Guide for details.
ToolbarsMany toolbars can be used during slide creation. They can be displayed or hidden by going to View > Toolbars on the Menu bar and selecting from the submenu. For more information, see Chapter 1, Introducing LibreOffice.
Many of the toolbars in Impress are similar to the toolbars in Draw. Refer to the Draw Guide for details on the functions available and how to use them.
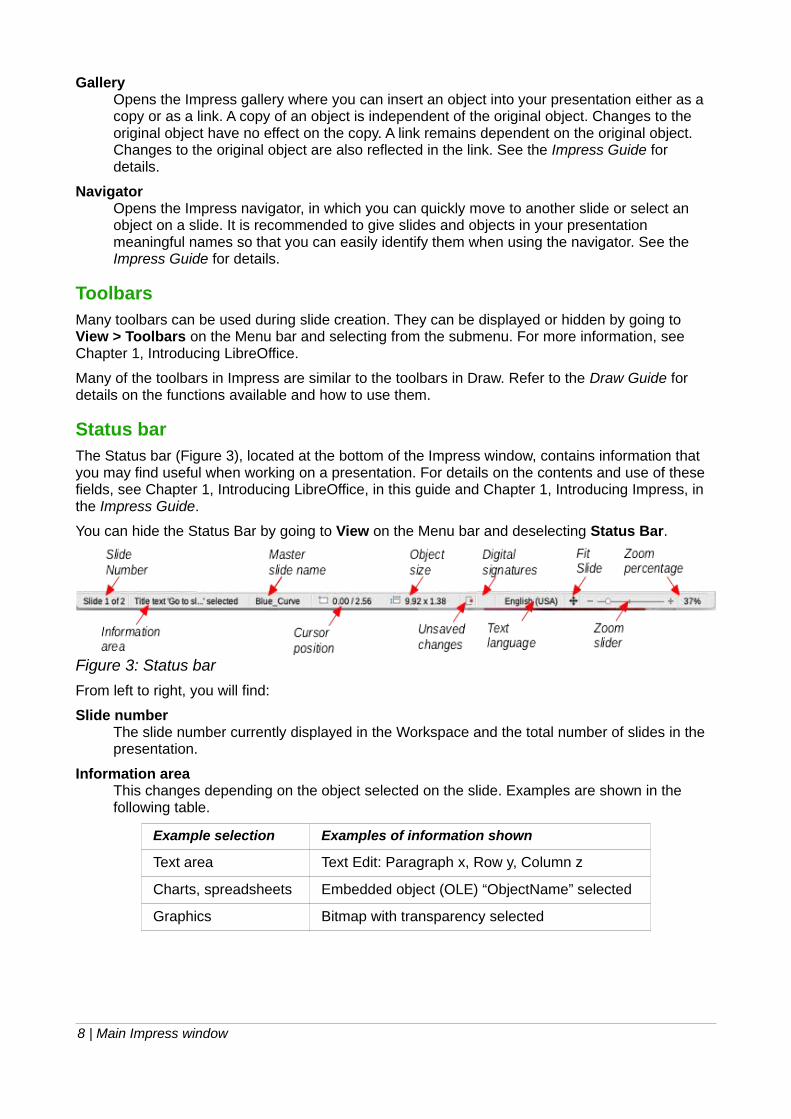
Status barThe Status bar (Figure 3), located at the bottom of the Impress window, contains information that you may find useful when working on a presentation. For details on the contents and use of these fields, see Chapter 1, Introducing LibreOffice, in this guide and Chapter 1, Introducing Impress, in the Impress Guide.
You can hide the Status Bar by going to View on the Menu bar and deselecting Status Bar.
Figure 3: Status bar
From left to right, you will find:
Slide numberThe slide number currently displayed in the Workspace and the total number of slides in the presentation.
Information areaThis changes depending on the object selected on the slide. Examples are shown in the following table.
Example selection Examples of information shown
Text area Text Edit: Paragraph x, Row y, Column z
Charts, spreadsheets Embedded object (OLE) “ObjectName” selected
Graphics Bitmap with transparency selected
8 | Main Impress window
Master slide nameThe style associated with the slide, handout, or notes page currently in the Workspace. Right-click to pop up a list of available master slides; pick one to apply it to the selected slide.Double-click to open the Available Master Slides dialog (see page 26).
Cursor positionThe position of the cursor or of the top left corner of the selection measured from the top left corner of the slide, followed by the width and height of the selection or text box where the cursor is located. The sizes are given in the current measurement unit as defined in Tools > Options > LibreOffice Impress > General.
Object sizeIndicates the size of a selected object on the slide.
Unsaved changesThis icon indicates if there are any unsaved changes in your presentation.
Digital signaturesIndicates if your presentation has a digital signature.
Text languageIndicates the language used for any text on your presentation.
Fit slideWhen this icon is clicked on, the slide in the workspace zooms to fit in the Workspace.
Zoom sliderWhen moved, the slide changes its viewing zoom in the Workspace.
Zoom percentageIndicates the zoom level of the slide displayed in the Workspace.
Workspace views
The Impress workspace has four views: Normal, Outline, Notes, and Slide Sorter. You can display a row of View buttons above the workspace by choosing View > Views Tab Bar from the Menu bar, or you can switch between them using entries on the View menu.
Each of the workspace views is designed to ease the completion of certain tasks. It is therefore useful to familiarize yourself with them in order to accomplish those tasks quickly.
Note
Each workspace view displays a different set of toolbars when selected. These toolbar sets can be customized by going to View > Toolbars on the Menu bar, then check or uncheck the toolbars you want to add or remove.
Normal viewView > Normal is the main view for working with individual slides. Use this view to format and design and to add text, graphics, and animation effects.
To place a slide in the slide design area (Normal view) (Figure 2 on page 6), click the slide thumbnail in the Slides pane or double-click it in the Navigator.
Outline viewView > Outline (Figure 4) contains all the slides of the presentation in their numbered sequence. Itshows topic titles, bulleted lists, and numbered lists for each slide in outline format.
Outline view | 9
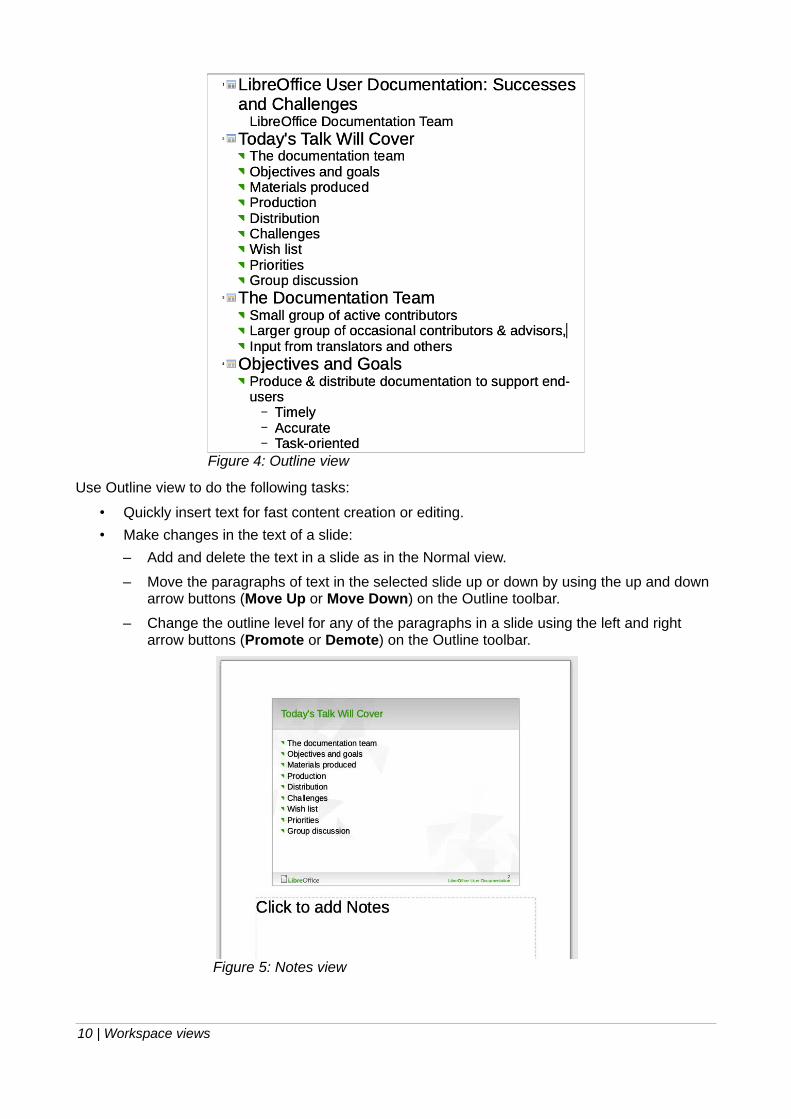
Figure 4: Outline view
Use Outline view to do the following tasks:
• Quickly insert text for fast content creation or editing.
• Make changes in the text of a slide:
– Add and delete the text in a slide as in the Normal view.
– Move the paragraphs of text in the selected slide up or down by using the up and down arrow buttons (Move Up or Move Down) on the Outline toolbar.
– Change the outline level for any of the paragraphs in a slide using the left and right arrow buttons (Promote or Demote) on the Outline toolbar.
Figure 5: Notes view
10 | Workspace views
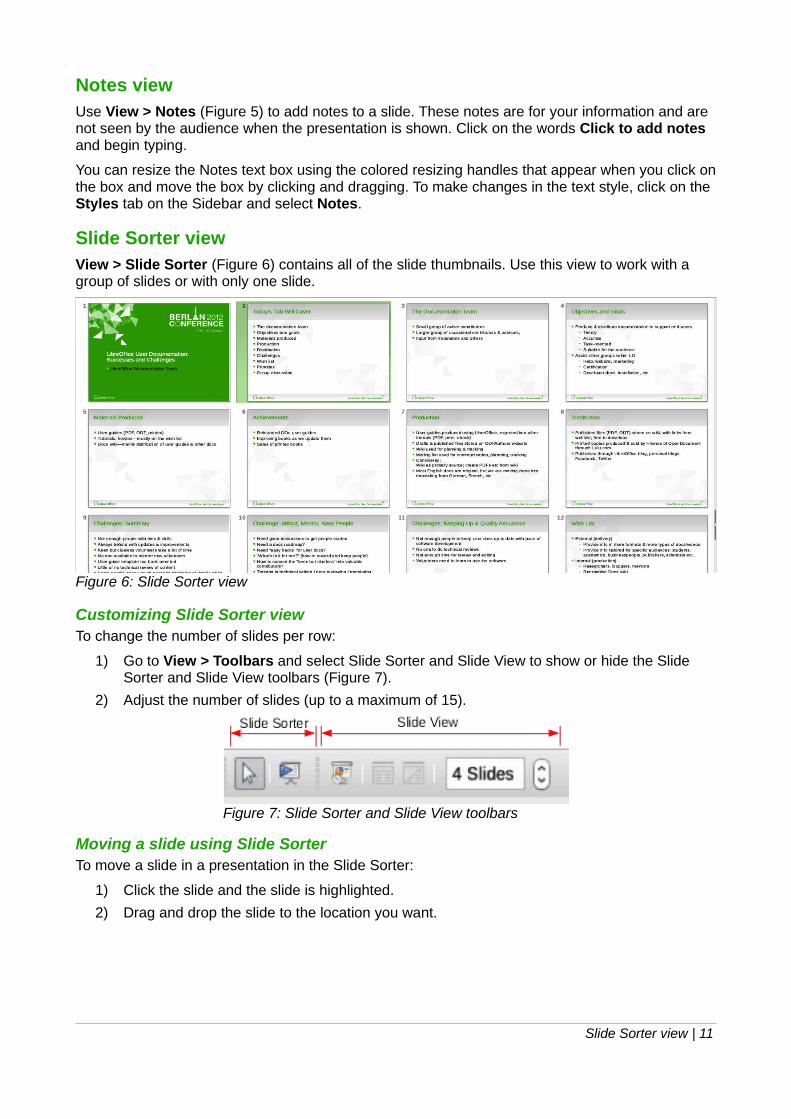
Notes viewUse View > Notes (Figure 5) to add notes to a slide. These notes are for your information and are not seen by the audience when the presentation is shown. Click on the words Click to add notes and begin typing.
You can resize the Notes text box using the colored resizing handles that appear when you click onthe box and move the box by clicking and dragging. To make changes in the text style, click on the Styles tab on the Sidebar and select Notes.
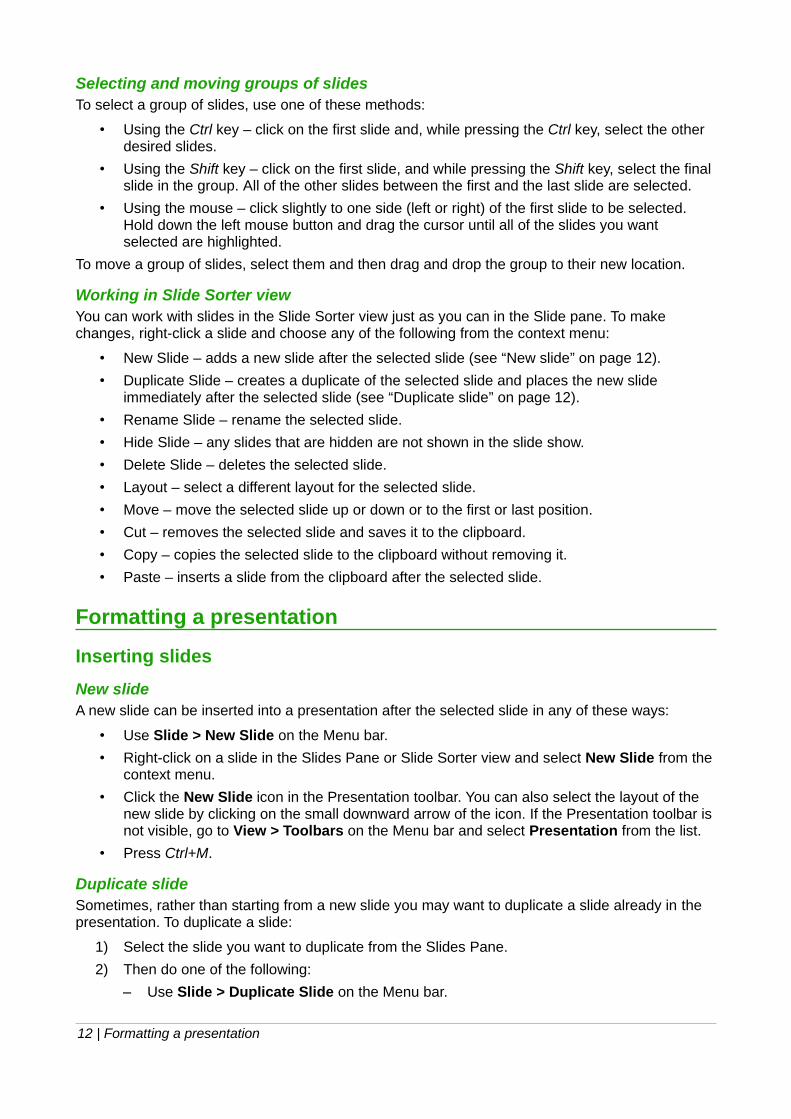
Slide Sorter viewView > Slide Sorter (Figure 6) contains all of the slide thumbnails. Use this view to work with a group of slides or with only one slide.
Figure 6: Slide Sorter view
Customizing Slide Sorter viewTo change the number of slides per row:
1) Go to View > Toolbars and select Slide Sorter and Slide View to show or hide the Slide Sorter and Slide View toolbars (Figure 7).
2) Adjust the number of slides (up to a maximum of 15).
Figure 7: Slide Sorter and Slide View toolbars
Moving a slide using Slide SorterTo move a slide in a presentation in the Slide Sorter:
1) Click the slide and the slide is highlighted.
2) Drag and drop the slide to the location you want.
Slide Sorter view | 11
Selecting and moving groups of slidesTo select a group of slides, use one of these methods:
• Using the Ctrl key – click on the first slide and, while pressing the Ctrl key, select the other desired slides.
• Using the Shift key – click on the first slide, and while pressing the Shift key, select the final slide in the group. All of the other slides between the first and the last slide are selected.
• Using the mouse – click slightly to one side (left or right) of the first slide to be selected. Hold down the left mouse button and drag the cursor until all of the slides you want selected are highlighted.
To move a group of slides, select them and then drag and drop the group to their new location.
Working in Slide Sorter viewYou can work with slides in the Slide Sorter view just as you can in the Slide pane. To make changes, right-click a slide and choose any of the following from the context menu:
• New Slide – adds a new slide after the selected slide (see “New slide” on page 12).
• Duplicate Slide – creates a duplicate of the selected slide and places the new slide immediately after the selected slide (see “Duplicate slide” on page 12).
• Rename Slide – rename the selected slide.
• Hide Slide – any slides that are hidden are not shown in the slide show.
• Delete Slide – deletes the selected slide.
• Layout – select a different layout for the selected slide.
• Move – move the selected slide up or down or to the first or last position.
• Cut – removes the selected slide and saves it to the clipboard.
• Copy – copies the selected slide to the clipboard without removing it.
• Paste – inserts a slide from the clipboard after the selected slide.
Formatting a presentation
Inserting slides
New slideA new slide can be inserted into a presentation after the selected slide in any of these ways:
• Use Slide > New Slide on the Menu bar.
• Right-click on a slide in the Slides Pane or Slide Sorter view and select New Slide from the context menu.
• Click the New Slide icon in the Presentation toolbar. You can also select the layout of the new slide by clicking on the small downward arrow of the icon. If the Presentation toolbar is not visible, go to View > Toolbars on the Menu bar and select Presentation from the list.
• Press Ctrl+M.
Duplicate slideSometimes, rather than starting from a new slide you may want to duplicate a slide already in the presentation. To duplicate a slide:
1) Select the slide you want to duplicate from the Slides Pane.
2) Then do one of the following:
– Use Slide > Duplicate Slide on the Menu bar.
12 | Formatting a presentation
– Right-click on the slide in the Slides Pane or Slide Sorter view and select Duplicate Slide from the context menu.
– Click on the triangle to the right of the Slide icon in the Presentation toolbar and select Duplicate Slide from the submenu.
3) A duplicate slide is inserted after the selected slide in the presentation.
Selecting slide layoutThe first slide of a presentation is usually a title slide. You can use either a blank layout or one of the title layouts as your title slide.
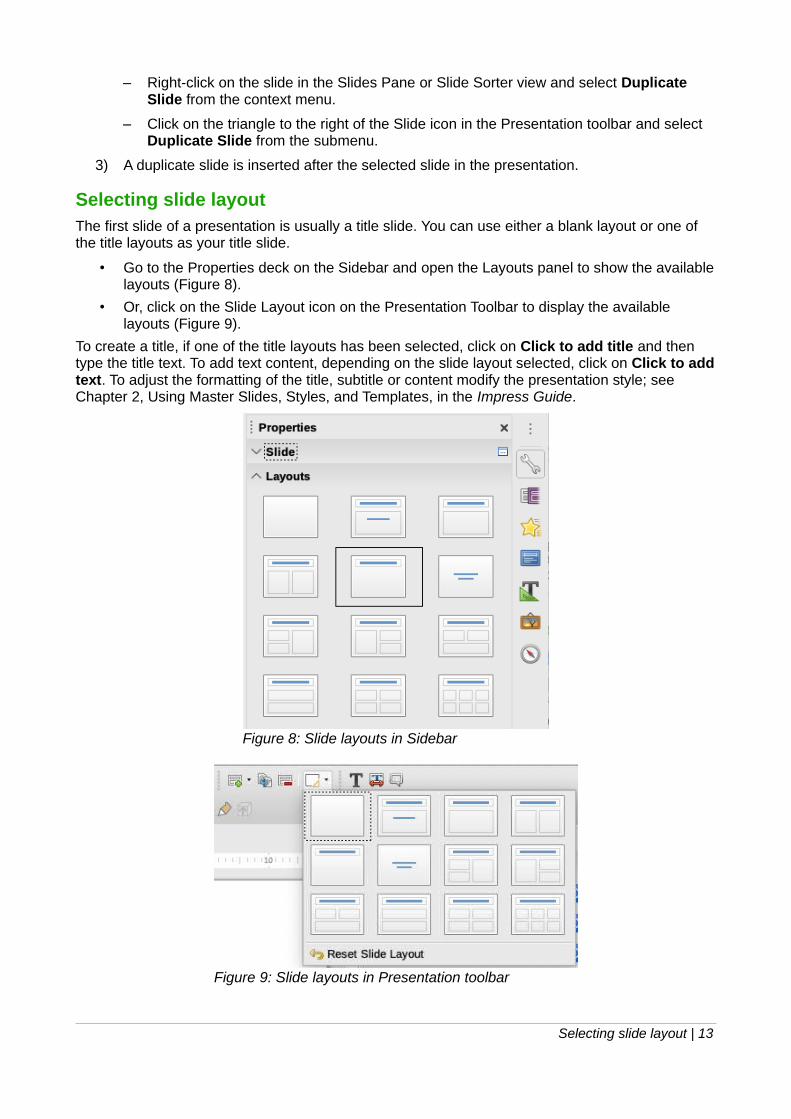
• Go to the Properties deck on the Sidebar and open the Layouts panel to show the availablelayouts (Figure 8).
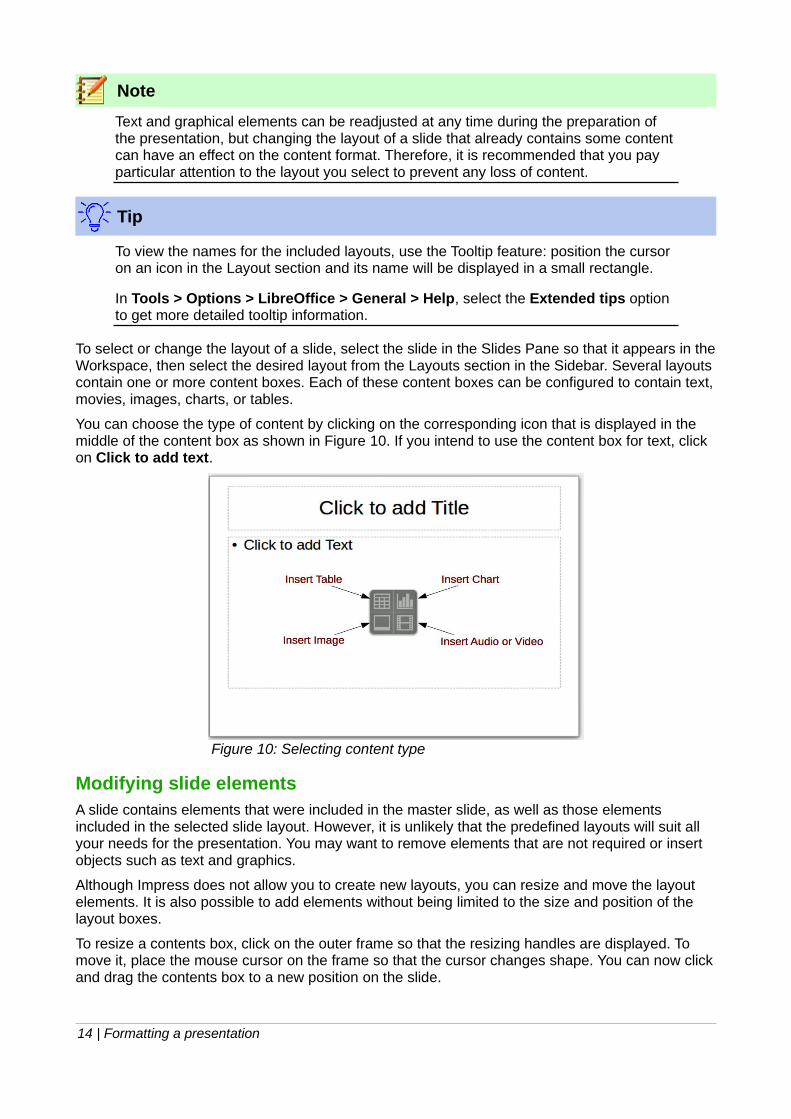
• Or, click on the Slide Layout icon on the Presentation Toolbar to display the available layouts (Figure 9).
To create a title, if one of the title layouts has been selected, click on Click to add title and then type the title text. To add text content, depending on the slide layout selected, click on Click to addtext. To adjust the formatting of the title, subtitle or content modify the presentation style; see Chapter 2, Using Master Slides, Styles, and Templates, in the Impress Guide.
Figure 8: Slide layouts in Sidebar
Figure 9: Slide layouts in Presentation toolbar
Selecting slide layout | 13
Note
Text and graphical elements can be readjusted at any time during the preparation of the presentation, but changing the layout of a slide that already contains some contentcan have an effect on the content format. Therefore, it is recommended that you pay particular attention to the layout you select to prevent any loss of content.
Tip
To view the names for the included layouts, use the Tooltip feature: position the cursor on an icon in the Layout section and its name will be displayed in a small rectangle.
In Tools > Options > LibreOffice > General > Help, select the Extended tips option to get more detailed tooltip information.
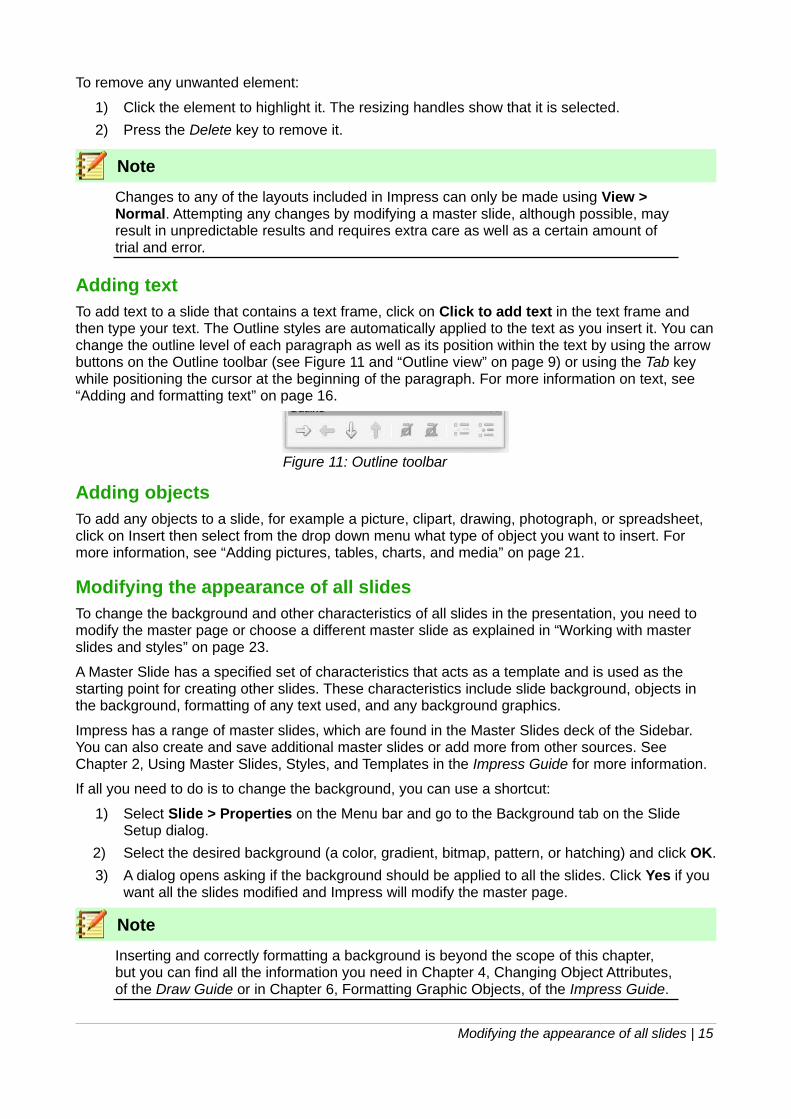
To select or change the layout of a slide, select the slide in the Slides Pane so that it appears in theWorkspace, then select the desired layout from the Layouts section in the Sidebar. Several layouts contain one or more content boxes. Each of these content boxes can be configured to contain text,movies, images, charts, or tables.
You can choose the type of content by clicking on the corresponding icon that is displayed in the middle of the content box as shown in Figure 10. If you intend to use the content box for text, click on Click to add text.
Figure 10: Selecting content type
Modifying slide elementsA slide contains elements that were included in the master slide, as well as those elements included in the selected slide layout. However, it is unlikely that the predefined layouts will suit all your needs for the presentation. You may want to remove elements that are not required or insert objects such as text and graphics.
Although Impress does not allow you to create new layouts, you can resize and move the layout elements. It is also possible to add elements without being limited to the size and position of the layout boxes.
To resize a contents box, click on the outer frame so that the resizing handles are displayed. To move it, place the mouse cursor on the frame so that the cursor changes shape. You can now clickand drag the contents box to a new position on the slide.
14 | Formatting a presentation
To remove any unwanted element:
1) Click the element to highlight it. The resizing handles show that it is selected.
2) Press the Delete key to remove it.
Note
Changes to any of the layouts included in Impress can only be made using View > Normal. Attempting any changes by modifying a master slide, although possible, may result in unpredictable results and requires extra care as well as a certain amount of trial and error.
Adding textTo add text to a slide that contains a text frame, click on Click to add text in the text frame and then type your text. The Outline styles are automatically applied to the text as you insert it. You canchange the outline level of each paragraph as well as its position within the text by using the arrow buttons on the Outline toolbar (see Figure 11 and “Outline view” on page 9) or using the Tab key while positioning the cursor at the beginning of the paragraph. For more information on text, see “Adding and formatting text” on page 16.
Figure 11: Outline toolbar
Adding objectsTo add any objects to a slide, for example a picture, clipart, drawing, photograph, or spreadsheet, click on Insert then select from the drop down menu what type of object you want to insert. For more information, see “Adding pictures, tables, charts, and media” on page 21.
Modifying the appearance of all slidesTo change the background and other characteristics of all slides in the presentation, you need tomodify the master page or choose a different master slide as explained in “Working with master slides and styles” on page 23.
A Master Slide has a specified set of characteristics that acts as a template and is used as the starting point for creating other slides. These characteristics include slide background, objects in the background, formatting of any text used, and any background graphics.
Impress has a range of master slides, which are found in the Master Slides deck of the Sidebar. You can also create and save additional master slides or add more from other sources. See Chapter 2, Using Master Slides, Styles, and Templates in the Impress Guide for more information.
If all you need to do is to change the background, you can use a shortcut:
1) Select Slide > Properties on the Menu bar and go to the Background tab on the Slide Setup dialog.
2) Select the desired background (a color, gradient, bitmap, pattern, or hatching) and click OK.
3) A dialog opens asking if the background should be applied to all the slides. Click Yes if you want all the slides modified and Impress will modify the master page.
Note
Inserting and correctly formatting a background is beyond the scope of this chapter, but you can find all the information you need in Chapter 4, Changing Object Attributes, of the Draw Guide or in Chapter 6, Formatting Graphic Objects, of the Impress Guide.
Modifying the appearance of all slides | 15
Adding and formatting text
Most of your slides are likely to contain some text. This section gives some guidelines on how to add text and change its appearance. Text used in slides is contained in text boxes. For more information on adding and formatting text, see Chapter 3, Adding and Formatting Text in the Impress Guide.
You can use two types of text boxes on a slide:
• Choose a predefined layout from the Layouts section of the Sidebar and do not select any special content type. These text boxes are called AutoLayout text boxes.
• Use the Text toolbar to create text boxes or callouts on a blank slide or a slide with pre-existing text boxes, images, and so on.
You can move, resize, and delete text boxes of both types.
Using AutoLayout text boxes 1) Make sure Normal view is selected.
2) Click in the text box that reads Click to add Text. and type or paste your text.
Figure 12: Standard toolbar
Figure 13: Text toolbar
Using text boxes 1) Make sure Normal view is selected.
2) Click on the Text icon on the Standard (Figure 12) or Text (Figure 13) toolbar or use the keyboard shortcut F2. If the Standard or Text toolbars are not visible, go to View > Toolbars on the Menu bar and select Standard or Text as needed.
3) Click and drag to draw a box for the text on the slide. Do not worry about the vertical size and position as the text box will expand if needed as you type.
4) Release the mouse button when finished. The cursor appears in the text box, which is now in edit mode (a colored border shown in Figure 14).
5) Type or paste your text in the text box, then click outside the text box to deselect it.
Figure 14: Creating and editing text boxes
16 | Adding and formatting text
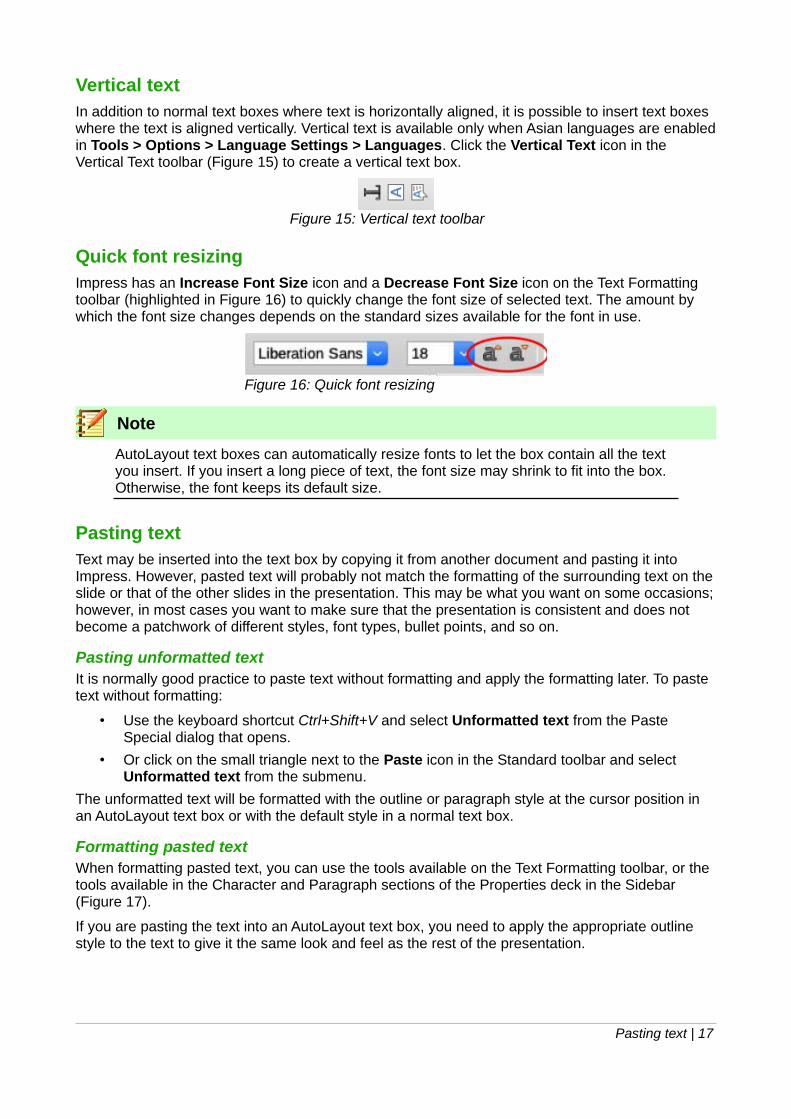
Vertical textIn addition to normal text boxes where text is horizontally aligned, it is possible to insert text boxes where the text is aligned vertically. Vertical text is available only when Asian languages are enabledin Tools > Options > Language Settings > Languages. Click the Vertical Text icon in the Vertical Text toolbar (Figure 15) to create a vertical text box.
Figure 15: Vertical text toolbar
Quick font resizingImpress has an Increase Font Size icon and a Decrease Font Size icon on the Text Formatting toolbar (highlighted in Figure 16) to quickly change the font size of selected text. The amount by which the font size changes depends on the standard sizes available for the font in use.
Figure 16: Quick font resizing
Note
AutoLayout text boxes can automatically resize fonts to let the box contain all the text you insert. If you insert a long piece of text, the font size may shrink to fit into the box. Otherwise, the font keeps its default size.
Pasting textText may be inserted into the text box by copying it from another document and pasting it into Impress. However, pasted text will probably not match the formatting of the surrounding text on theslide or that of the other slides in the presentation. This may be what you want on some occasions;however, in most cases you want to make sure that the presentation is consistent and does not become a patchwork of different styles, font types, bullet points, and so on.
Pasting unformatted textIt is normally good practice to paste text without formatting and apply the formatting later. To paste text without formatting:
• Use the keyboard shortcut Ctrl+Shift+V and select Unformatted text from the Paste Special dialog that opens.
• Or click on the small triangle next to the Paste icon in the Standard toolbar and select Unformatted text from the submenu.
The unformatted text will be formatted with the outline or paragraph style at the cursor position in an AutoLayout text box or with the default style in a normal text box.
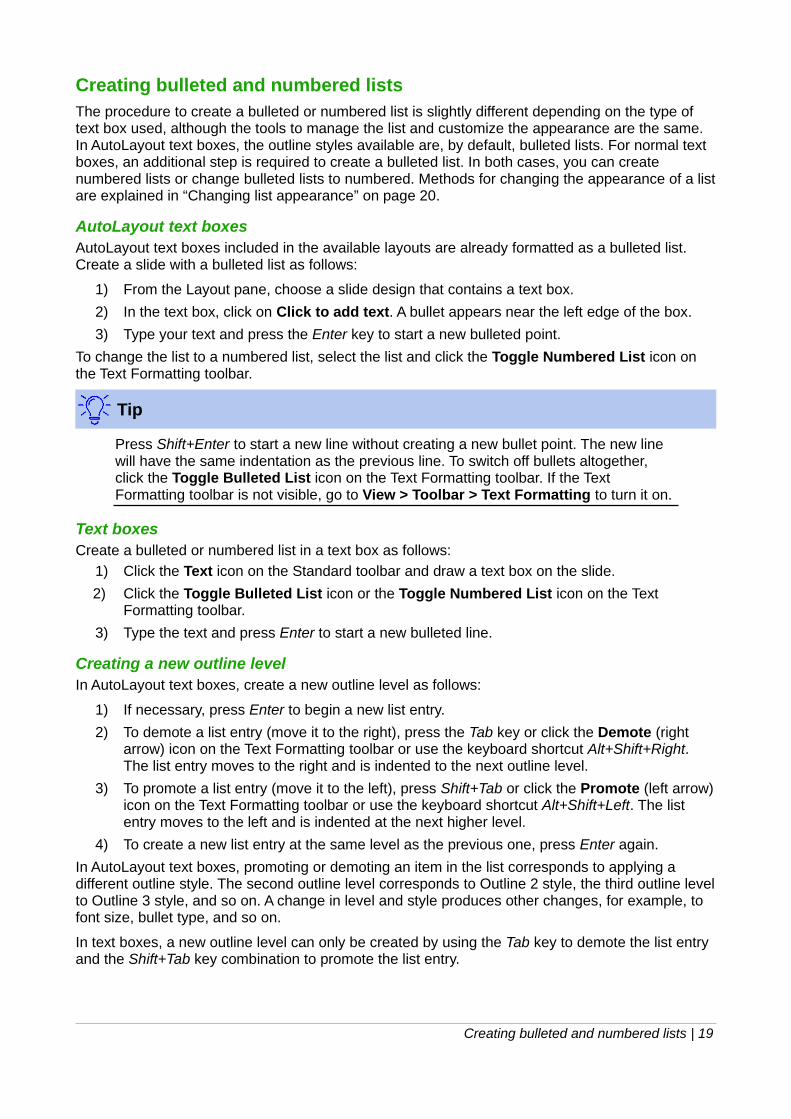
Formatting pasted textWhen formatting pasted text, you can use the tools available on the Text Formatting toolbar, or the tools available in the Character and Paragraph sections of the Properties deck in the Sidebar (Figure 17).
If you are pasting the text into an AutoLayout text box, you need to apply the appropriate outline style to the text to give it the same look and feel as the rest of the presentation.
Pasting text | 17
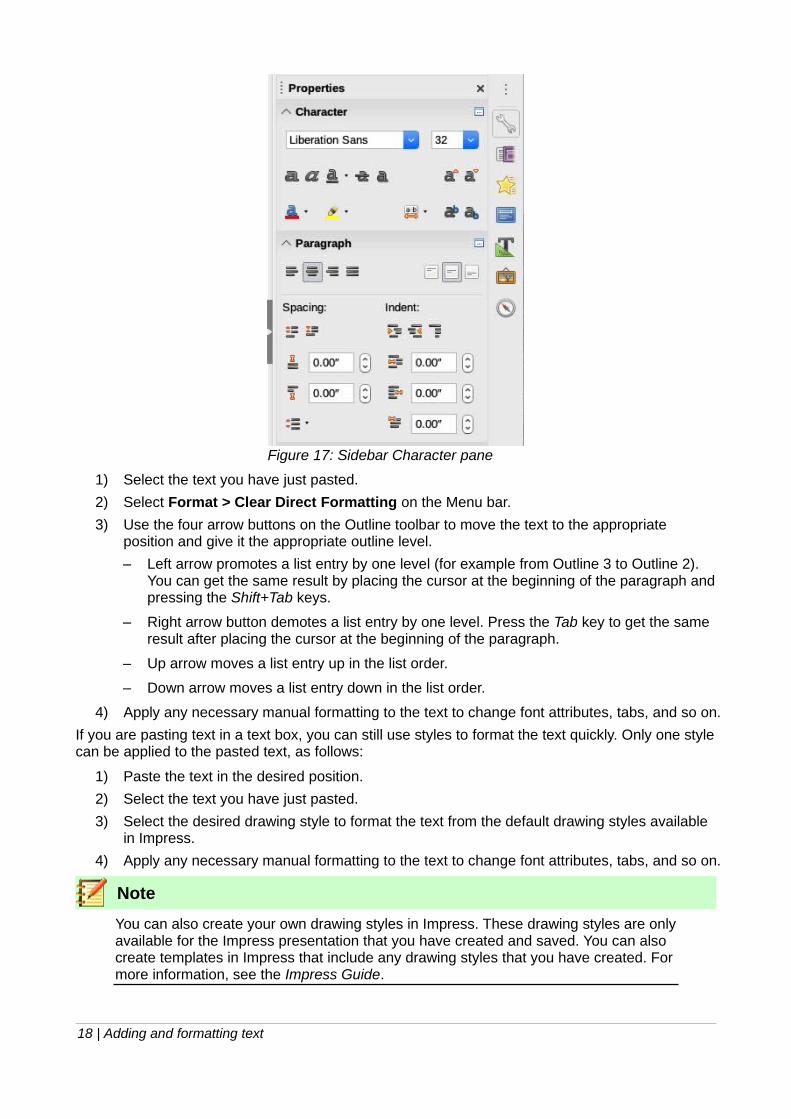
Figure 17: Sidebar Character pane
1) Select the text you have just pasted.
2) Select Format > Clear Direct Formatting on the Menu bar.
3) Use the four arrow buttons on the Outline toolbar to move the text to the appropriate position and give it the appropriate outline level.
– Left arrow promotes a list entry by one level (for example from Outline 3 to Outline 2). You can get the same result by placing the cursor at the beginning of the paragraph andpressing the Shift+Tab keys.
– Right arrow button demotes a list entry by one level. Press the Tab key to get the same result after placing the cursor at the beginning of the paragraph.
– Up arrow moves a list entry up in the list order.
– Down arrow moves a list entry down in the list order.
4) Apply any necessary manual formatting to the text to change font attributes, tabs, and so on.
If you are pasting text in a text box, you can still use styles to format the text quickly. Only one stylecan be applied to the pasted text, as follows:
1) Paste the text in the desired position.
2) Select the text you have just pasted.
3) Select the desired drawing style to format the text from the default drawing styles available in Impress.
4) Apply any necessary manual formatting to the text to change font attributes, tabs, and so on.
Note
You can also create your own drawing styles in Impress. These drawing styles are onlyavailable for the Impress presentation that you have created and saved. You can also create templates in Impress that include any drawing styles that you have created. Formore information, see the Impress Guide.
18 | Adding and formatting text
Creating bulleted and numbered listsThe procedure to create a bulleted or numbered list is slightly different depending on the type of text box used, although the tools to manage the list and customize the appearance are the same. In AutoLayout text boxes, the outline styles available are, by default, bulleted lists. For normal text boxes, an additional step is required to create a bulleted list. In both cases, you can create numbered lists or change bulleted lists to numbered. Methods for changing the appearance of a listare explained in “Changing list appearance” on page 20.
AutoLayout text boxesAutoLayout text boxes included in the available layouts are already formatted as a bulleted list. Create a slide with a bulleted list as follows:
1) From the Layout pane, choose a slide design that contains a text box.
2) In the text box, click on Click to add text. A bullet appears near the left edge of the box.
3) Type your text and press the Enter key to start a new bulleted point.
To change the list to a numbered list, select the list and click the Toggle Numbered List icon on the Text Formatting toolbar.
Tip
Press Shift+Enter to start a new line without creating a new bullet point. The new line will have the same indentation as the previous line. To switch off bullets altogether, click the Toggle Bulleted List icon on the Text Formatting toolbar. If the Text Formatting toolbar is not visible, go to View > Toolbar > Text Formatting to turn it on.
Text boxesCreate a bulleted or numbered list in a text box as follows:
1) Click the Text icon on the Standard toolbar and draw a text box on the slide.
2) Click the Toggle Bulleted List icon or the Toggle Numbered List icon on the Text Formatting toolbar.
3) Type the text and press Enter to start a new bulleted line.
Creating a new outline levelIn AutoLayout text boxes, create a new outline level as follows:
1) If necessary, press Enter to begin a new list entry.
2) To demote a list entry (move it to the right), press the Tab key or click the Demote (right arrow) icon on the Text Formatting toolbar or use the keyboard shortcut Alt+Shift+Right. The list entry moves to the right and is indented to the next outline level.
3) To promote a list entry (move it to the left), press Shift+Tab or click the Promote (left arrow)icon on the Text Formatting toolbar or use the keyboard shortcut Alt+Shift+Left. The list entry moves to the left and is indented at the next higher level.
4) To create a new list entry at the same level as the previous one, press Enter again.
In AutoLayout text boxes, promoting or demoting an item in the list corresponds to applying a different outline style. The second outline level corresponds to Outline 2 style, the third outline levelto Outline 3 style, and so on. A change in level and style produces other changes, for example, to font size, bullet type, and so on.
In text boxes, a new outline level can only be created by using the Tab key to demote the list entry and the Shift+Tab key combination to promote the list entry.
Creating bulleted and numbered lists | 19
Note
Do not try to change the outline level by selecting the text and then clicking the desiredoutline style as you would in Writer. Due to the way that styles work in Impress, it is notpossible to change the level in this way.
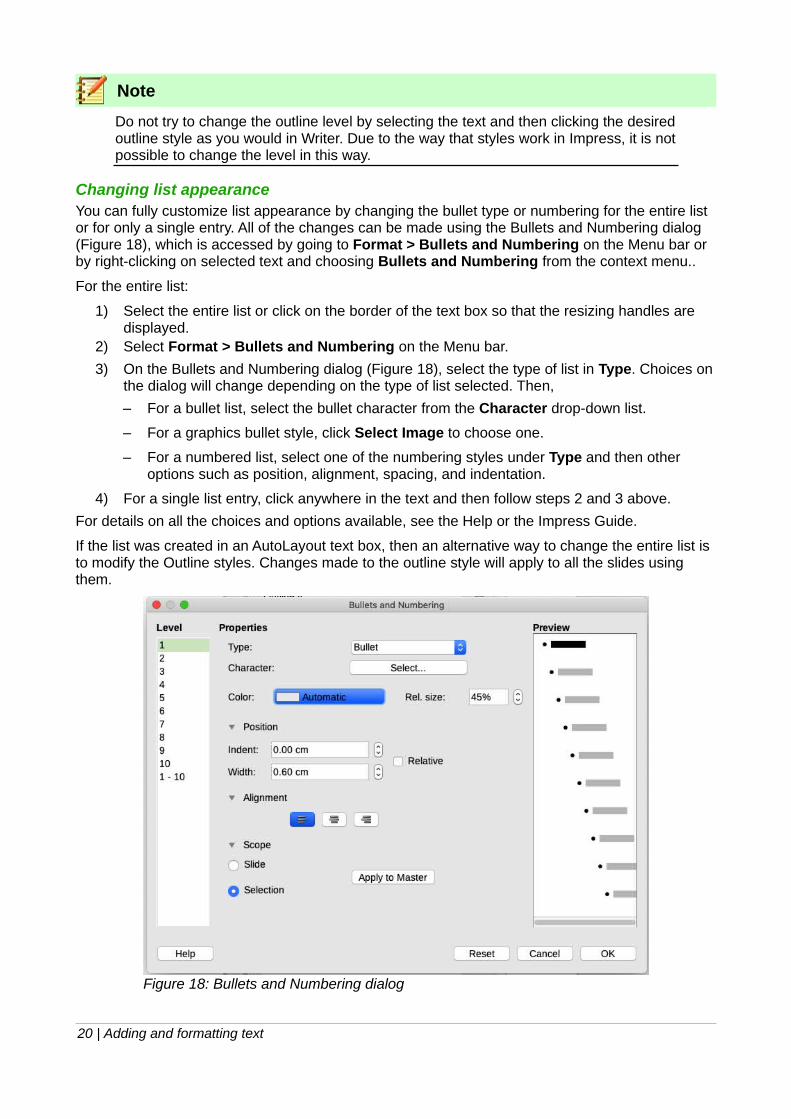
Changing list appearanceYou can fully customize list appearance by changing the bullet type or numbering for the entire list or for only a single entry. All of the changes can be made using the Bullets and Numbering dialog (Figure 18), which is accessed by going to Format > Bullets and Numbering on the Menu bar or by right-clicking on selected text and choosing Bullets and Numbering from the context menu..
For the entire list:
1) Select the entire list or click on the border of the text box so that the resizing handles are displayed.
2) Select Format > Bullets and Numbering on the Menu bar.
3) On the Bullets and Numbering dialog (Figure 18), select the type of list in Type. Choices onthe dialog will change depending on the type of list selected. Then,
– For a bullet list, select the bullet character from the Character drop-down list.
– For a graphics bullet style, click Select Image to choose one.
– For a numbered list, select one of the numbering styles under Type and then other options such as position, alignment, spacing, and indentation.
4) For a single list entry, click anywhere in the text and then follow steps 2 and 3 above.
For details on all the choices and options available, see the Help or the Impress Guide.
If the list was created in an AutoLayout text box, then an alternative way to change the entire list is to modify the Outline styles. Changes made to the outline style will apply to all the slides using them.
Figure 18: Bullets and Numbering dialog
20 | Adding and formatting text
Adding pictures, tables, charts, and media
A contents box can contain pictures, tables, charts, or media as well as text. This section provides a quick overview of how to work with these objects. For more information on adding pictures, tables, charts, or media, please refer to the Impress Guide.
Adding picturesTo add a picture to a contents box:
1) Go to Insert > Image on the Menu bar, or click the Insert Image icon (Figure 10 on page14) on the new slide and select the file from the Insert Image dialog that opens. To see a preview of the picture, select Preview at the bottom of the Insert Image dialog.
2) Move the picture to the desired location.
3) The picture will automatically resize to fill the area of the content box. Follow the directions in the note below when manually resizing a graphic.
Note
When resizing a graphic, right-click the picture. Select Position and Size from the context menu and make sure that Keep ratio is selected. Then adjust the height or width to the size you need. As you adjust one dimension, both dimensions will change to keep the width and height ratio the same, ensuring that the picture will not become distorted. Remember also that resizing a bitmap image will reduce its quality; it is better to create an image of the desired size outside of Impress.
Adding tablesTo add basic tables to a slide:
1) Go to Insert > Table on the Menu bar, or click the Table icon on the new slide, or click the Table icon on the Standard toolbar.
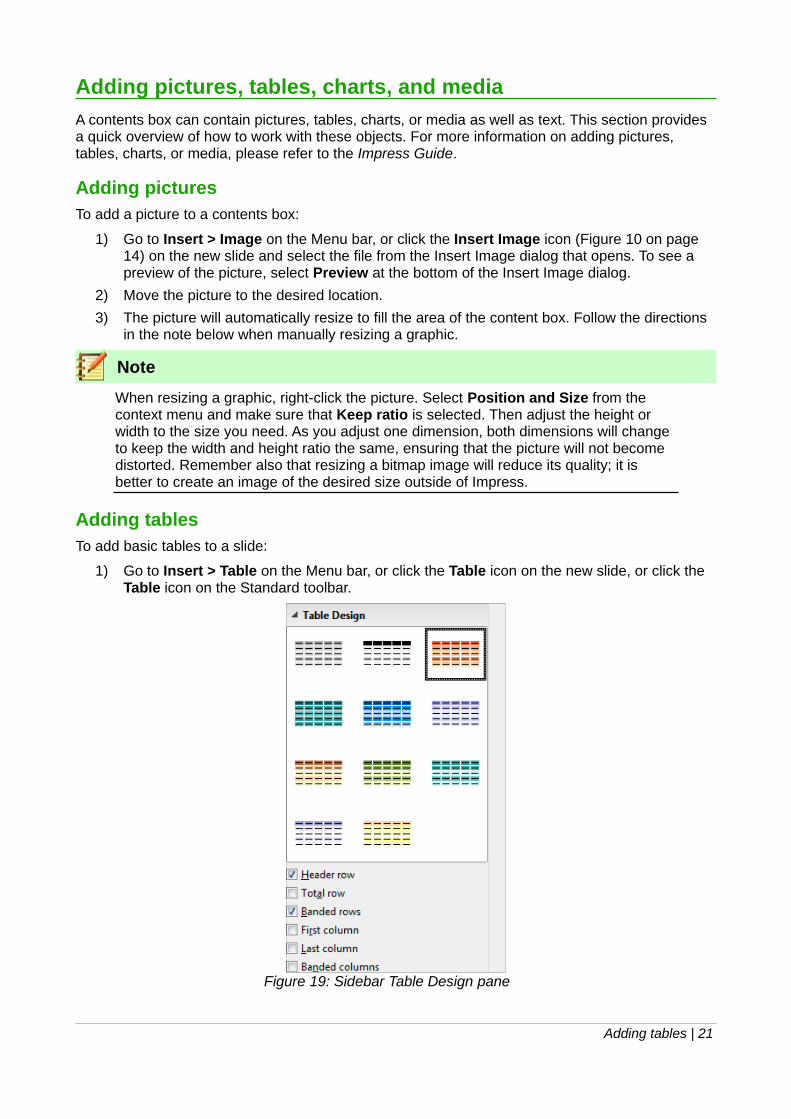
Figure 19: Sidebar Table Design pane
Adding tables | 21
2) If there is a table already on the slide and it is selected, click the Table icon on the Table toolbar. The Table toolbar is only visible after selecting View > Toolbars > Table on the Menu bar and when a table is selected.
3) Select the number of rows and columns required.
4) Select a design style from the available options for your table in the Table Design pane in the Properties deck of the Sidebar (Figure 19). If the Table Design pane does not automatically open after inserting or selecting a table, click on the Properties icon at the side of the Sidebar.
Note
Selecting from any of the styles in the Table Design section in the Sidebar creates a table based on that style. If you create a table by another method, you can still apply a style of your choice later.
The Table toolbar in Impress offers the same functions as the Table toolbar in Writer, with the exception of the calculation functions Sort and Sum. To use Sum and Sort in your presentation, you have to insert a Calc spreadsheet.
After the table is created, you can modify it by adding and deleting rows and columns, adjusting width and spacing, adding borders, background colors and so on. For more information on workingwith tables see Chapter 3, Adding and Formatting Text, in the Impress Guide and Chapter 13, Tables of Data, in the Writer Guide.
Entering data into table cells is similar to working with text box objects. Click in the cell you wish to add data to and begin typing. To move around cells quickly, use the following keyboard options:
• Press the arrow keys to move the cursor to another cell if the cell is empty, or to the next character if the cell already contains text.
• Press the Tab key to move to the next cell on the right and press Shift+Tab to move to the next cell on the left.
Adding chartsTo insert a chart in a slide:
1) Go to Insert > Chart on the Menu bar or click on the Chart icon in the Standard toolbar, or click on the Insert Chart icon on the new slide (Figure 10 on page 14).
2) Impress will insert a default chart and open the Chart dialog. To modify the chart type, insertyour own data, and change the formatting, refer to Chapter 7, Spreadsheets, Charts, and Other Objects in the Impress Guide, or, for more details and examples, Chapter 3, CreatingCharts and Graphs in the Calc Guide.
Adding media filesTo insert media files, such as music and movie clips, in a slide:
1) Go to Insert > Audio or Video on the Menu bar, or click on the Insert Audio or Video iconon the new slide (Figure 10 on page 14).
2) In the file browser that opens, find and select the required file and click Open.
3) A media player will open at the bottom of the screen and you can preview the media.
4) When an audio file is inserted, the contents box will show a loudspeaker image.
22 | Adding pictures, tables, charts, and media
Adding graphics, spreadsheets, and other objectsGraphics, such as shapes, callouts, and arrows, are often useful to complement the text on a slide.These objects are handled much the same way as graphics in Draw. For more information, see Chapter 7, Getting Started with Draw, or the Impress Guide Chapters 4, 5, and 6, or the Draw Guide.
Spreadsheets embedded in Impress include most of the functionality of Calc spreadsheets and arecapable of performing complex calculations and data analysis. If you need to analyze your data or apply formulas, these operations are best performed in a Calc spreadsheet and the results displayed in an embedded Calc spreadsheet or in an Impress table.
Alternatively, go to Insert > Object > OLE Object on the Menu bar. You can select from options that include a LibreOffice Spreadsheet. This opens a spreadsheet in the middle of the slide and themenus and toolbars change to those used in Calc. You can start adding data, though you may have to resize the visible area on the slide. You can also insert an existing spreadsheet and use the viewport to select the data that you want to display on your slide.
You can also insert into a slide various other objects such as Writer documents, Math formulas, Draw drawings, or another presentation. For details on using these objects, refer to Chapter 7, Including Spreadsheets, Charts, and Other Objects, in the Impress Guide.
Working with master slides and styles
A master slide is a slide that is used as the starting point for other slides. It is similar to a page stylein Writer and it controls the basic formatting of all slides based on it. A slide show can have more than one master slide.
A master slide has a defined set of characteristics, including background colors, graphics, gradients; and other objects (such as logos, decorative lines and so on), headers and footers, placement and size of text frames, and text format.
StylesAll of the characteristics of master slides are controlled by styles. New slides that you create using a master slide have styles that are inherited from the master slide which was used. Changing a style in a master slide results in changes to all slides based on that master slide, but you can modify individual slides without affecting the master slide.
Note
Although it is highly recommended to use master slides whenever possible, there are occasions where manual changes are needed for a particular slide, for example to enlarge the chart area when the text and chart layout is used.
Master slides have two types of styles associated with them: presentation styles and drawing styles. The included presentation styles can be modified, but new presentation styles cannot be created. For drawing styles, you can modify the included styles and also create new styles.
Presentation styles affect three elements of a master slide: background, background objects (such as icons, decorative lines, and text frames), and text placed on the slide. Text styles are further divided into Notes, Outline 1 through Outline 9, Subtitle, and Title. The outline styles are used for the different levels of the outline to which they belong. For example, Outline 2 is used for the sub-points of Outline 1, and Outline 3 is used for the sub-points of Outline 2, and so on.
Drawing styles are not restricted and can affect many of the elements of a slide.
Styles | 23
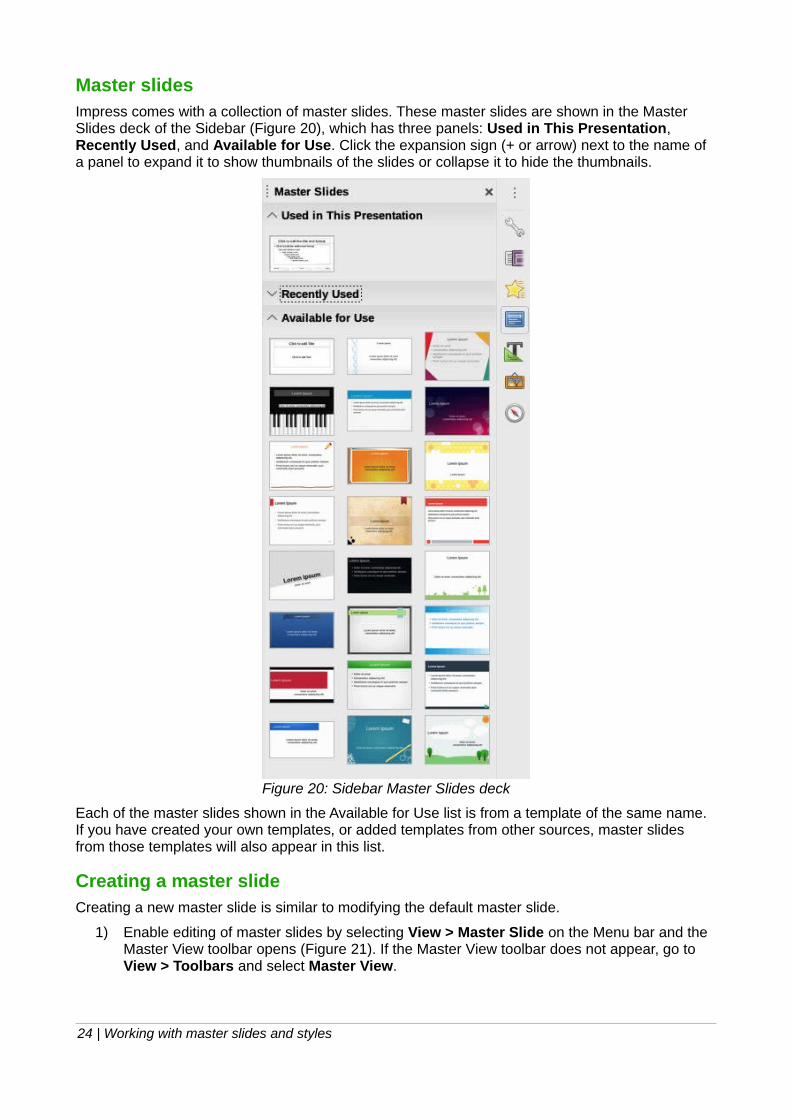
Master slidesImpress comes with a collection of master slides. These master slides are shown in the Master Slides deck of the Sidebar (Figure 20), which has three panels: Used in This Presentation, Recently Used, and Available for Use. Click the expansion sign (+ or arrow) next to the name of a panel to expand it to show thumbnails of the slides or collapse it to hide the thumbnails.
Figure 20: Sidebar Master Slides deck
Each of the master slides shown in the Available for Use list is from a template of the same name. If you have created your own templates, or added templates from other sources, master slides from those templates will also appear in this list.
Creating a master slideCreating a new master slide is similar to modifying the default master slide.
1) Enable editing of master slides by selecting View > Master Slide on the Menu bar and the Master View toolbar opens (Figure 21). If the Master View toolbar does not appear, go to View > Toolbars and select Master View.
24 | Working with master slides and styles
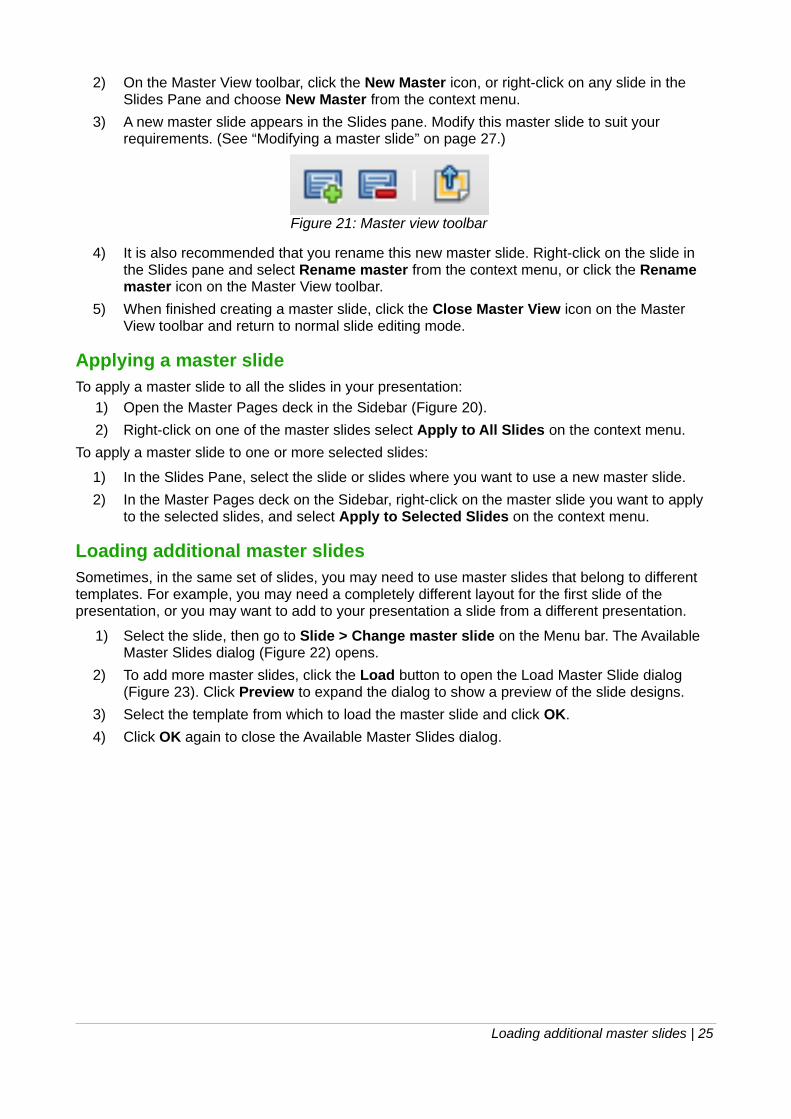
2) On the Master View toolbar, click the New Master icon, or right-click on any slide in the Slides Pane and choose New Master from the context menu.
3) A new master slide appears in the Slides pane. Modify this master slide to suit your requirements. (See “Modifying a master slide” on page 27.)
Figure 21: Master view toolbar
4) It is also recommended that you rename this new master slide. Right-click on the slide in the Slides pane and select Rename master from the context menu, or click the Rename master icon on the Master View toolbar.
5) When finished creating a master slide, click the Close Master View icon on the Master View toolbar and return to normal slide editing mode.
Applying a master slideTo apply a master slide to all the slides in your presentation:
1) Open the Master Pages deck in the Sidebar (Figure 20).
2) Right-click on one of the master slides select Apply to All Slides on the context menu.
To apply a master slide to one or more selected slides:
1) In the Slides Pane, select the slide or slides where you want to use a new master slide.
2) In the Master Pages deck on the Sidebar, right-click on the master slide you want to apply to the selected slides, and select Apply to Selected Slides on the context menu.
Loading additional master slidesSometimes, in the same set of slides, you may need to use master slides that belong to different templates. For example, you may need a completely different layout for the first slide of the presentation, or you may want to add to your presentation a slide from a different presentation.
1) Select the slide, then go to Slide > Change master slide on the Menu bar. The Available Master Slides dialog (Figure 22) opens.
2) To add more master slides, click the Load button to open the Load Master Slide dialog (Figure 23). Click Preview to expand the dialog to show a preview of the slide designs.
3) Select the template from which to load the master slide and click OK.
4) Click OK again to close the Available Master Slides dialog.
Loading additional master slides | 25
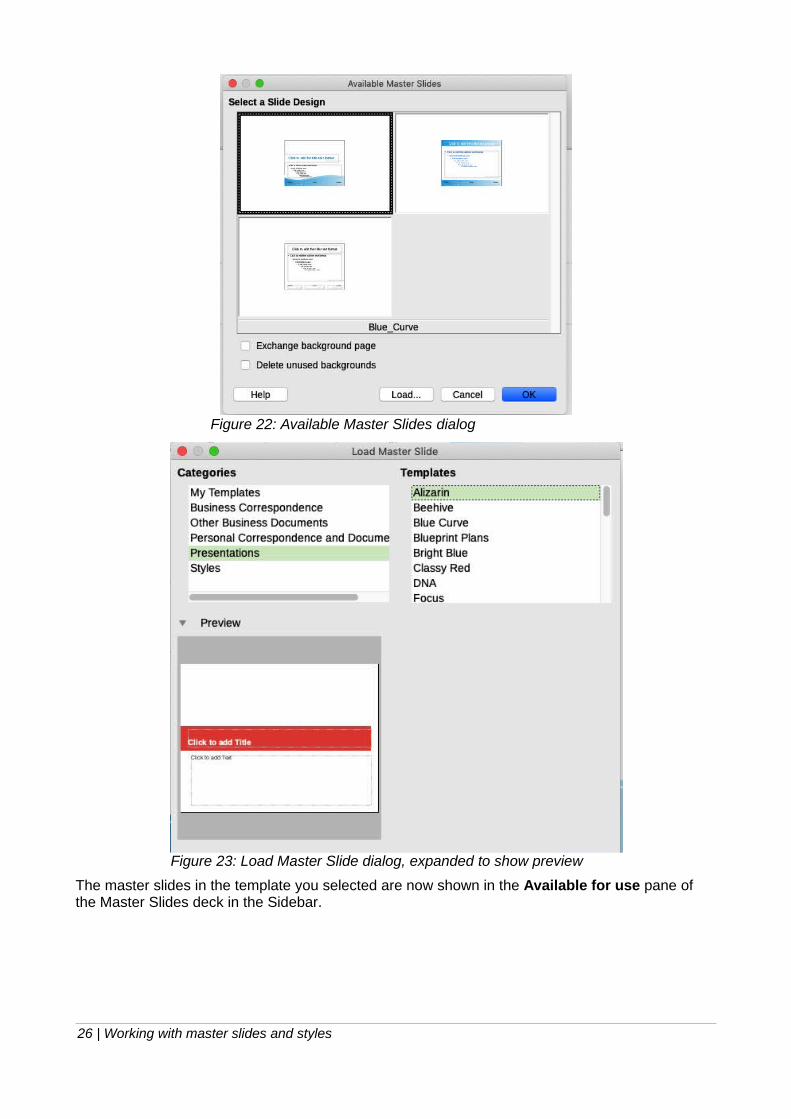
Figure 22: Available Master Slides dialog
Figure 23: Load Master Slide dialog, expanded to show preview
The master slides in the template you selected are now shown in the Available for use pane of the Master Slides deck in the Sidebar.
26 | Working with master slides and styles
Modifying a master slideYou can change the following items on a master slide:
• Background (color, gradient, hatching, pattern, or bitmap)
• Background objects (for example, a logo or decorative graphics)
• Size, placement, and contents of header and footer elements to appear on every slide
• Size and placement of default frames for slide titles and content
For more information on modifying master slides, see Chapter 2, Using Master Slides, Styles, and Templates, in the Impress Guide.
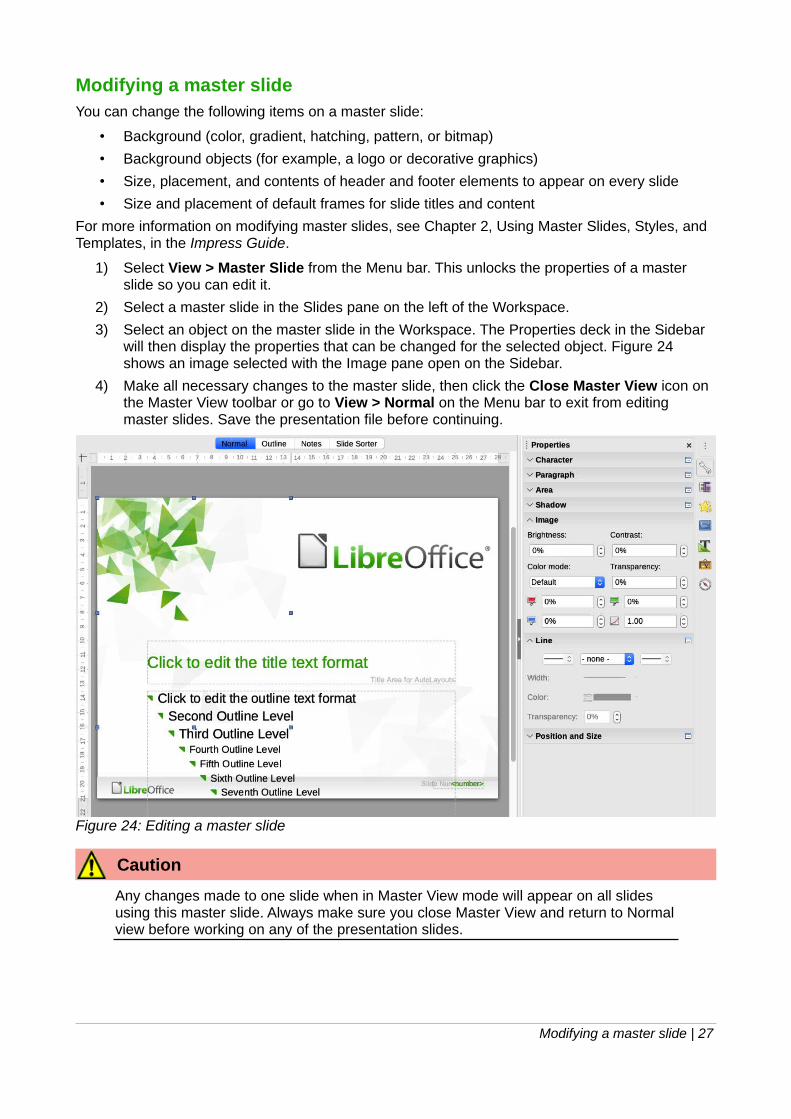
1) Select View > Master Slide from the Menu bar. This unlocks the properties of a master slide so you can edit it.
2) Select a master slide in the Slides pane on the left of the Workspace.
3) Select an object on the master slide in the Workspace. The Properties deck in the Sidebar will then display the properties that can be changed for the selected object. Figure 24 shows an image selected with the Image pane open on the Sidebar.
4) Make all necessary changes to the master slide, then click the Close Master View icon on the Master View toolbar or go to View > Normal on the Menu bar to exit from editing master slides. Save the presentation file before continuing.
Figure 24: Editing a master slide
Caution
Any changes made to one slide when in Master View mode will appear on all slides using this master slide. Always make sure you close Master View and return to Normalview before working on any of the presentation slides.
Modifying a master slide | 27
Note
The changes made to one of the slides in Normal view (for example, changes to the bullet point style, the color of the title area, and so on) will not be overridden by subsequent changes to the master slide. There are cases, however, where it is desirable to revert a manually modified element of the slide to the style defined in the master slide. To revert back to default formatting, select the element and select Format > Clear Direct Formatting from the Menu bar.
Adding text, footers, and fields to all slidesYou can add text, footers, or fields to a master slide so those elements appear on every slide in your presentation. Headers are not normally added to slides.
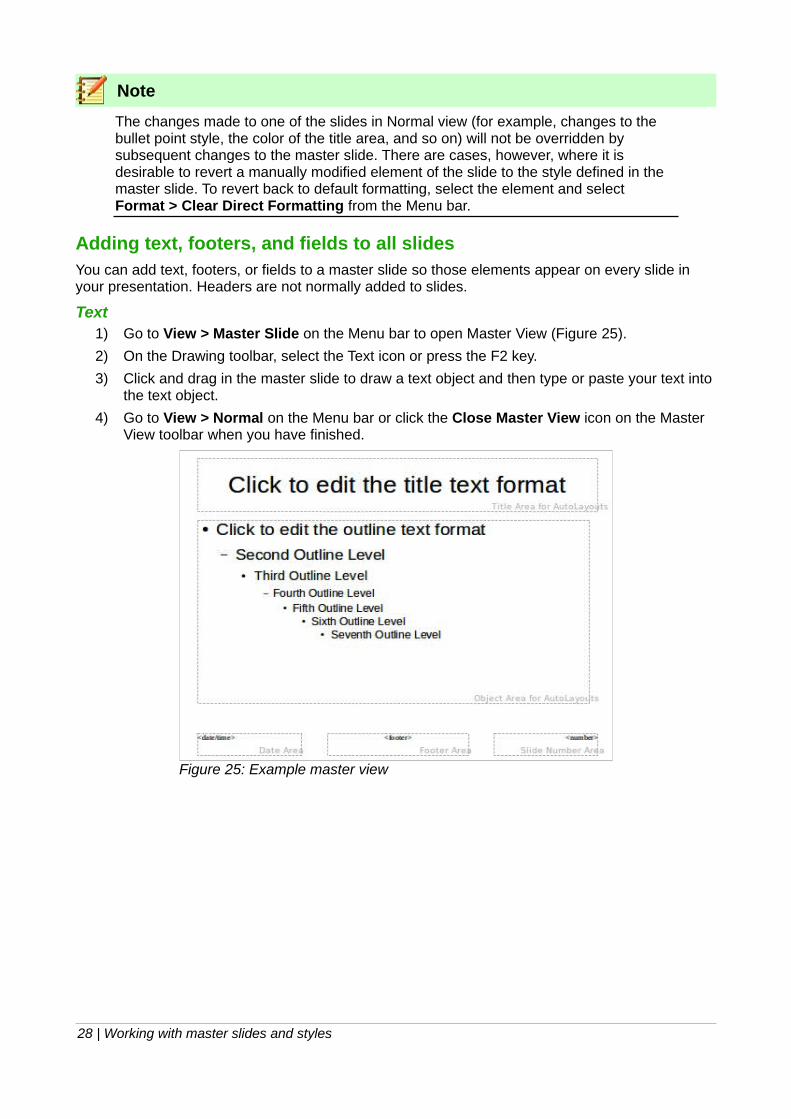
Text 1) Go to View > Master Slide on the Menu bar to open Master View (Figure 25).
2) On the Drawing toolbar, select the Text icon or press the F2 key.
3) Click and drag in the master slide to draw a text object and then type or paste your text into the text object.
4) Go to View > Normal on the Menu bar or click the Close Master View icon on the Master View toolbar when you have finished.
Figure 25: Example master view
28 | Working with master slides and styles
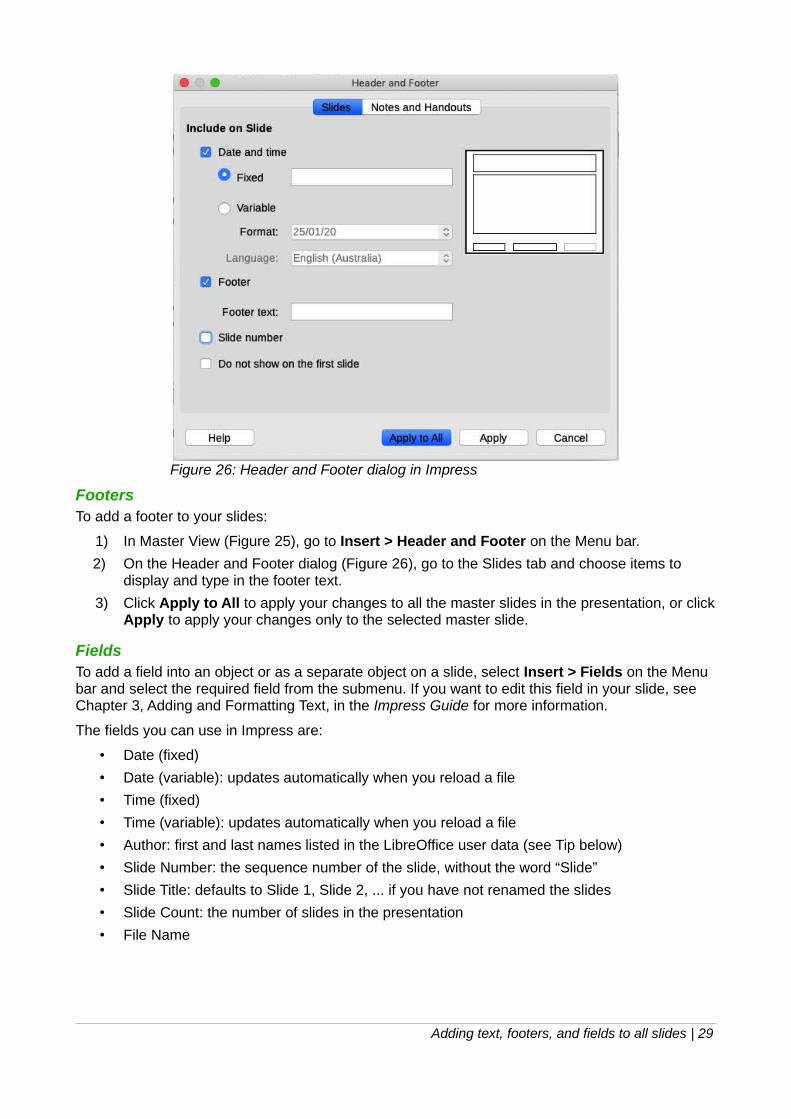
Figure 26: Header and Footer dialog in Impress
FootersTo add a footer to your slides:
1) In Master View (Figure 25), go to Insert > Header and Footer on the Menu bar.
2) On the Header and Footer dialog (Figure 26), go to the Slides tab and choose items to display and type in the footer text.
3) Click Apply to All to apply your changes to all the master slides in the presentation, or clickApply to apply your changes only to the selected master slide.
FieldsTo add a field into an object or as a separate object on a slide, select Insert > Fields on the Menu bar and select the required field from the submenu. If you want to edit this field in your slide, see Chapter 3, Adding and Formatting Text, in the Impress Guide for more information.
The fields you can use in Impress are:
• Date (fixed)
• Date (variable): updates automatically when you reload a file
• Time (fixed)
• Time (variable): updates automatically when you reload a file
• Author: first and last names listed in the LibreOffice user data (see Tip below)
• Slide Number: the sequence number of the slide, without the word “Slide”
• Slide Title: defaults to Slide 1, Slide 2, ... if you have not renamed the slides
• Slide Count: the number of slides in the presentation
• File Name
Adding text, footers, and fields to all slides | 29
Tip
To change the author information, go to Tools > Options > LibreOffice > User Data on the Menu bar.
Note
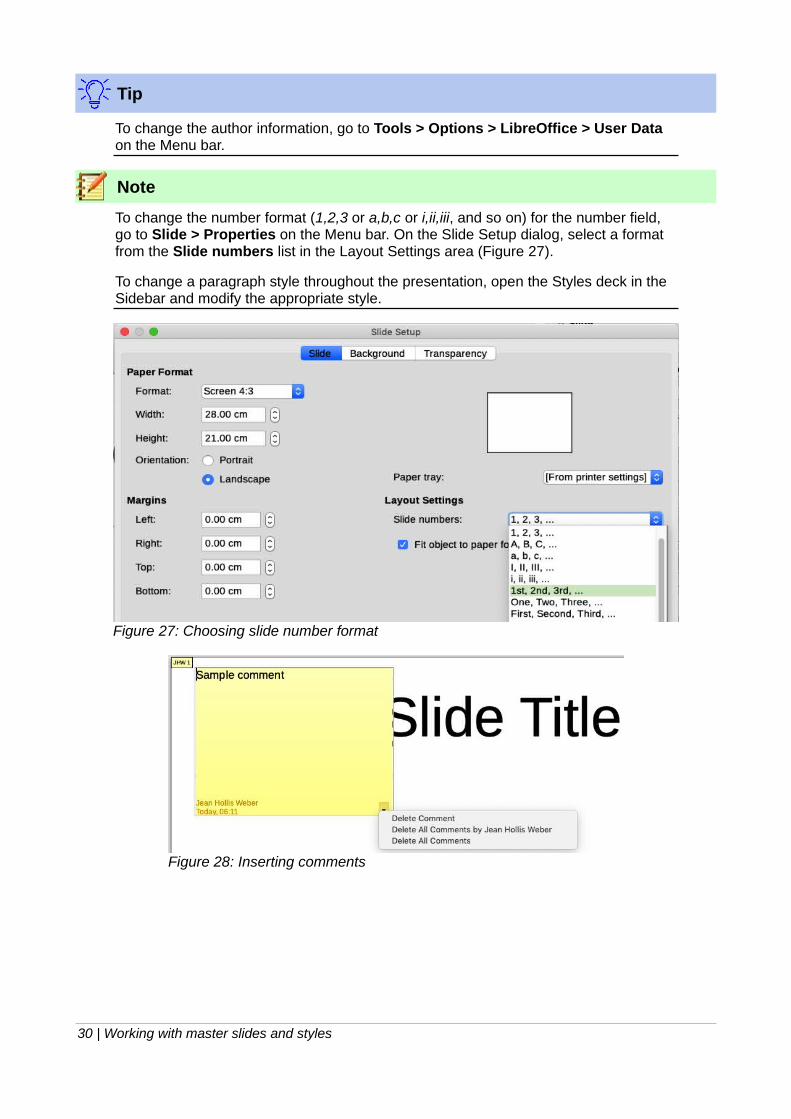
To change the number format (1,2,3 or a,b,c or i,ii,iii, and so on) for the number field, go to Slide > Properties on the Menu bar. On the Slide Setup dialog, select a format from the Slide numbers list in the Layout Settings area (Figure 27).
To change a paragraph style throughout the presentation, open the Styles deck in the Sidebar and modify the appropriate style.
Figure 27: Choosing slide number format
Figure 28: Inserting comments
30 | Working with master slides and styles
Adding comments to a presentation
Impress supports comments similar to those in Writer and Calc.
In Normal View, go to Insert > Comment on the Menu bar to open a blank comment (Figure 28). Asmall box containing your initials appears in the upper left-hand corner of the slide, with a larger text box beside it. Impress automatically adds your name and the current date at the bottom of the text box. Type or paste your comment into the text box.
You can move the small comment markers to anywhere you wish on the slide. Typically you might place it on or near an object you refer to in the comment.
To show or hide the comment markers, choose View > Comments.
Select Tools > Options > User Data to configure the name you want to appear in the comment.
If more than one person edits the document, each person is automatically allocated a different background color.
Creating handouts
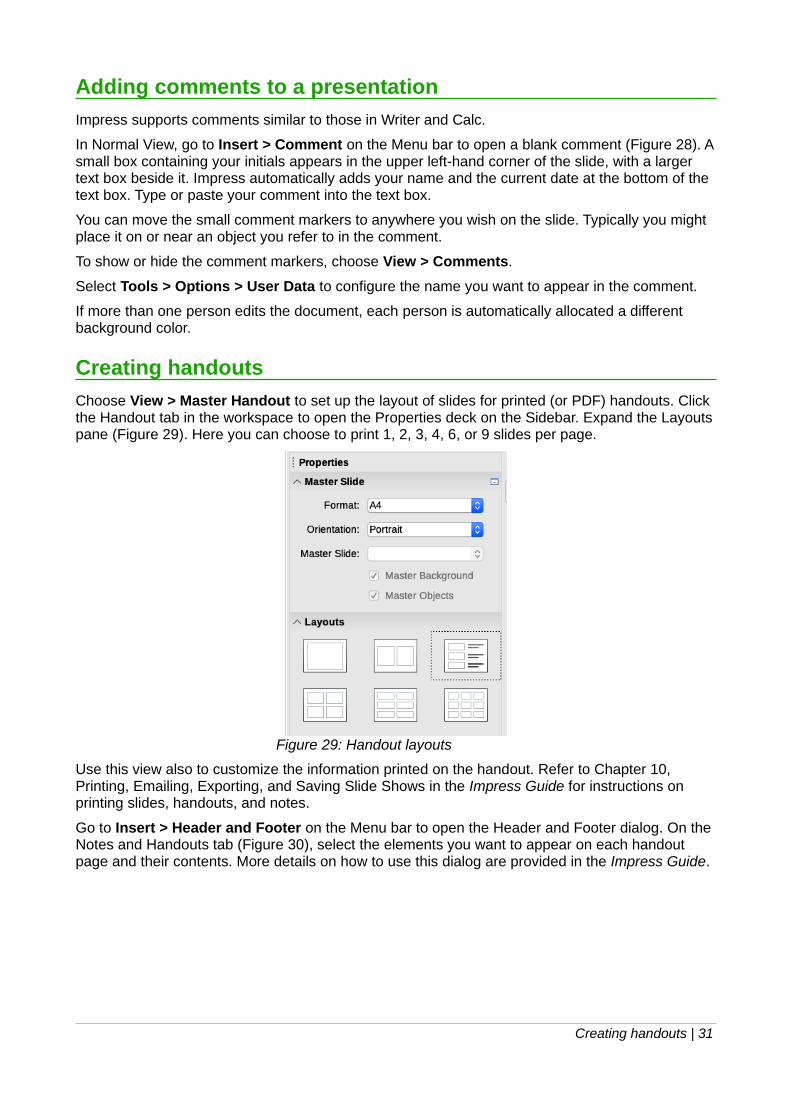
Choose View > Master Handout to set up the layout of slides for printed (or PDF) handouts. Click the Handout tab in the workspace to open the Properties deck on the Sidebar. Expand the Layouts pane (Figure 29). Here you can choose to print 1, 2, 3, 4, 6, or 9 slides per page.
Figure 29: Handout layouts
Use this view also to customize the information printed on the handout. Refer to Chapter 10, Printing, Emailing, Exporting, and Saving Slide Shows in the Impress Guide for instructions on printing slides, handouts, and notes.
Go to Insert > Header and Footer on the Menu bar to open the Header and Footer dialog. On the Notes and Handouts tab (Figure 30), select the elements you want to appear on each handout page and their contents. More details on how to use this dialog are provided in the Impress Guide.
Creating handouts | 31
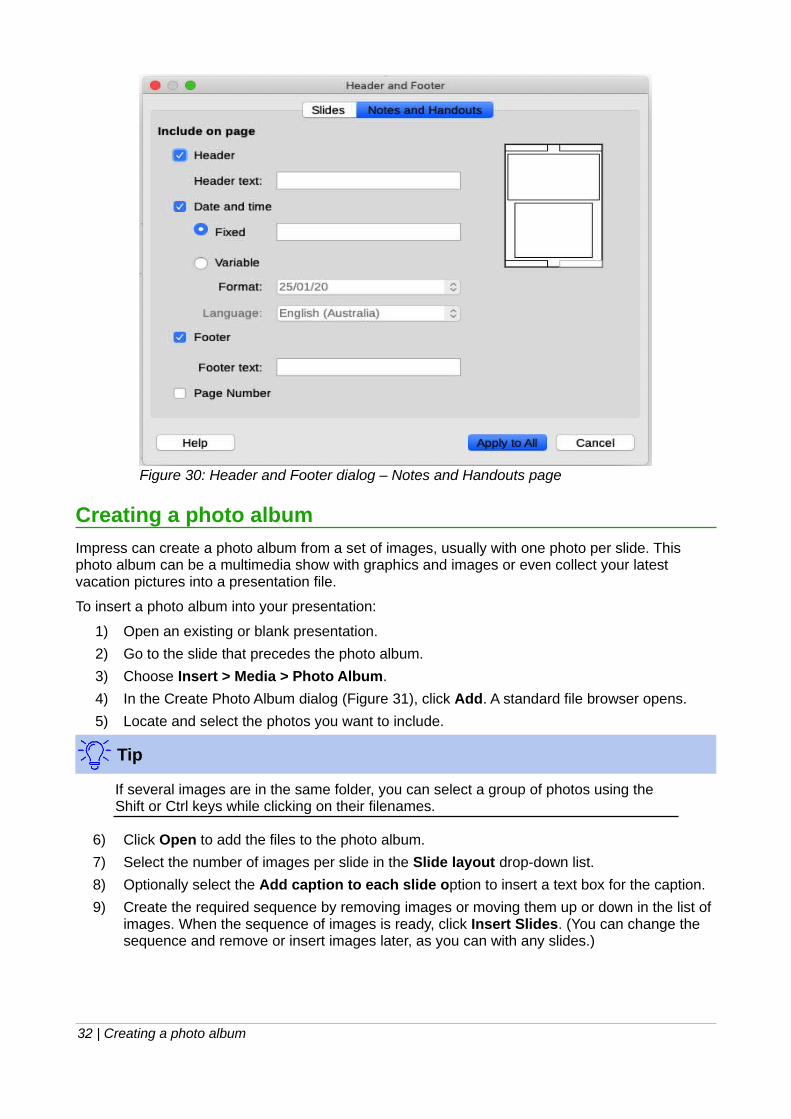
Figure 30: Header and Footer dialog – Notes and Handouts page
Creating a photo album
Impress can create a photo album from a set of images, usually with one photo per slide. This photo album can be a multimedia show with graphics and images or even collect your latest vacation pictures into a presentation file.
To insert a photo album into your presentation:
1) Open an existing or blank presentation.
2) Go to the slide that precedes the photo album.
3) Choose Insert > Media > Photo Album.
4) In the Create Photo Album dialog (Figure 31), click Add. A standard file browser opens.
5) Locate and select the photos you want to include.
Tip
If several images are in the same folder, you can select a group of photos using the Shift or Ctrl keys while clicking on their filenames.
6) Click Open to add the files to the photo album.
7) Select the number of images per slide in the Slide layout drop-down list.
8) Optionally select the Add caption to each slide option to insert a text box for the caption.
9) Create the required sequence by removing images or moving them up or down in the list of images. When the sequence of images is ready, click Insert Slides. (You can change the sequence and remove or insert images later, as you can with any slides.)
32 | Creating a photo album
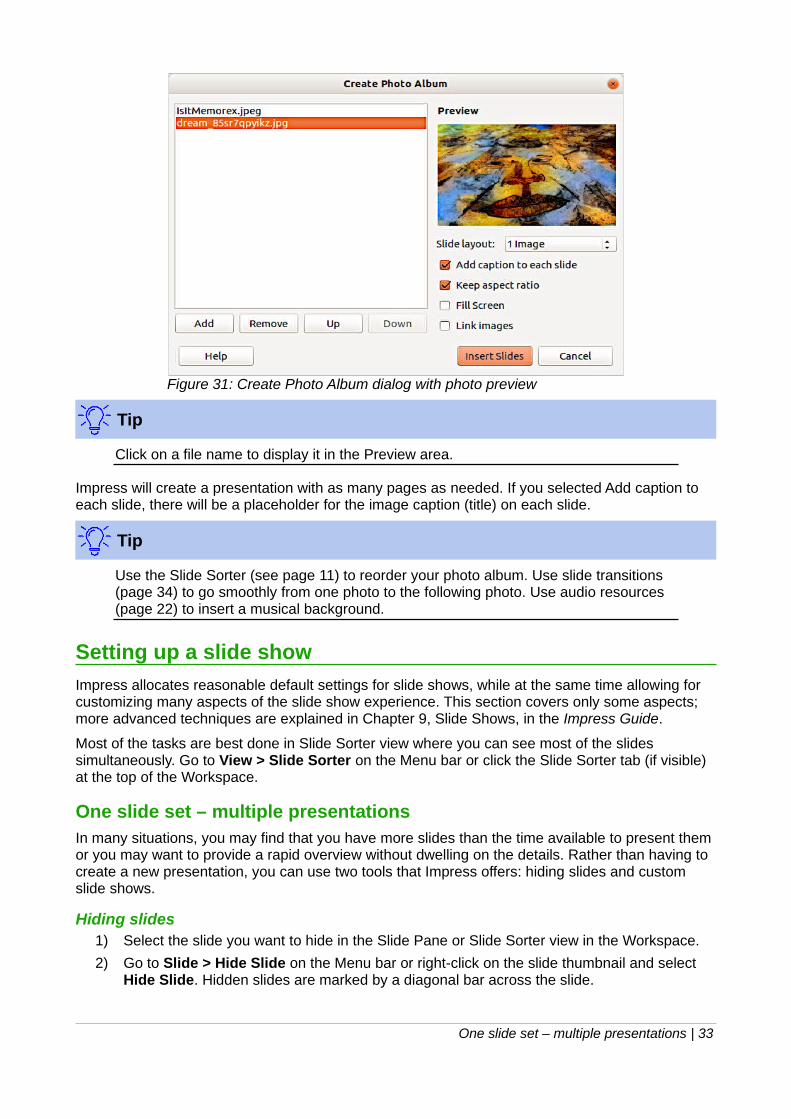
Figure 31: Create Photo Album dialog with photo preview
Tip
Click on a file name to display it in the Preview area.
Impress will create a presentation with as many pages as needed. If you selected Add caption to each slide, there will be a placeholder for the image caption (title) on each slide.
Tip
Use the Slide Sorter (see page 11) to reorder your photo album. Use slide transitions (page 34) to go smoothly from one photo to the following photo. Use audio resources (page 22) to insert a musical background.
Setting up a slide show
Impress allocates reasonable default settings for slide shows, while at the same time allowing for customizing many aspects of the slide show experience. This section covers only some aspects; more advanced techniques are explained in Chapter 9, Slide Shows, in the Impress Guide.
Most of the tasks are best done in Slide Sorter view where you can see most of the slides simultaneously. Go to View > Slide Sorter on the Menu bar or click the Slide Sorter tab (if visible) at the top of the Workspace.
One slide set – multiple presentationsIn many situations, you may find that you have more slides than the time available to present them or you may want to provide a rapid overview without dwelling on the details. Rather than having to create a new presentation, you can use two tools that Impress offers: hiding slides and custom slide shows.
Hiding slides 1) Select the slide you want to hide in the Slide Pane or Slide Sorter view in the Workspace.
2) Go to Slide > Hide Slide on the Menu bar or right-click on the slide thumbnail and select Hide Slide. Hidden slides are marked by a diagonal bar across the slide.
One slide set – multiple presentations | 33
Custom slide showsIf you want to create a custom slide show from the same presentation:
1) Select the slides you want to use in your custom slide show.
2) Go to Slide Show > Custom Slide Show on the Menu bar.
3) Click on the New button to create a new sequence of slides and save it with a different name. You can have as many slide shows as you want from a single presentation.
Slide transitionsA slide transition is the effect that takes place between slides when one slide changes to the next slide in a presentation. To configure the slide transition:
1) Open the Slide Transition deck in the Sidebar to display the transitions available.
2) Select the desired transition, the speed of the animation, and whether the transition should happen when you click the mouse (preferred) or automatically after a certain number of seconds.
3) To apply the transition to all of the slides in your presentation, click Apply Transition to All Slides. Otherwise, select one or more slides in the Slides pane to configure different transitions.
Tip
At the bottom of the Slide Transition deck, select the Automatic preview option. Select its checkbox and when you make any changes in a slide transition, the new slide is previewed in the Workspace, including its transition effect.
Slide advanceYou can set the presentation to advance automatically to the next slide after a set amount of time from the Slide Transition deck in the Sidebar.
1) Go to Advance Slide and select the Automatically after option.
2) Enter the required amount of time in seconds that each slide will be displayed.
3) Click on the Apply Transition to All Slides button.
To apply a different display time to each slide in your presentation:
1) Go to Slide Show > Rehearse Timings on the Menu bar. The slide show begins in full-screen mode and a timer appears in the lower left corner of the display.
2) When you are ready to advance to the next slide, click on the display background or press the right arrow or space bar on your keyboard.
3) Impress will memorize the timings for each slide and will advance to the next slide automatically using these timings when you run the slide show.
To restart a slide show automatically after the last slide has been displayed (kiosk mode):
1) Go to Slide Show > Slide Show Settings on the Menu bar.
2) In the Presentation Mode section, select Loop and repeat after and the timing of the pause between slide shows. Click OK when you have finished.
34 | Setting up a slide show

Playing soundsYou can use the Slide Transition pane to select a sound or song that is played throughout your presentation.
1) Select the slide where you want the sound to start.
2) In the Sidebar, go to the Slide Transition deck.
3) In the Modify transition section, select Other sound from the Sound drop-down list.
4) In the Open dialog, navigate to the sound file, select it, and click Open.
5) On the Slide Transition deck, select Loop until next sound if you want the sound to restartwhen it is finished.
Animation effectsSlide animations are similar to transitions, but they are applied to individual elements (title, chart, shape, or individual bullet point) in a single slide. For example, you may wish each bullet point to appear when you are ready to discuss it, instead of having all of them visible as soon as the slide is opened.
Animation effects are applied from Normal view so that you can select individual objects on a single slide. For details, see Chapter 9, Slide Shows in the Impress Guide.
Tip
You can apply animation effects to the elements on a master slide, so that all slides based on that master slide use the same animation.
Applying animation effects 1) In Normal view, display the desired slide and then select the text or object you want to
animate. An object such as a graphic or an entire text box will have selection handles around it when selected. If you choose only a portion of the text in a text box, you may not see any selection handles.
2) In the Sidebar, open the Animation deck (Figure 32).
3) Select an animation category, then select an effect. More than one type of animation effect can be applied to an object.
Entrance effects apply when an object is placed on the screen.
Emphasis effects apply to an object, for example changing font color.
Exit effects apply when an object leaves the screen.
Motion Paths effects cause an object to move along a line or curve.
4) Select from the Start drop-down list how the animation effect starts.
On click − the animation does not start until you click the mouse.
With previous − the animation runs at the same time as the previous animation.
After previous − the animation runs as soon as the previous animation ends.
5) Select the duration of the animation effect from the Duration drop-down list.
6) If required, select Automatic preview so you can check the animation effect on the object.
7) Click Play to check how the animation effects looks on the slide.
Animation effects | 35
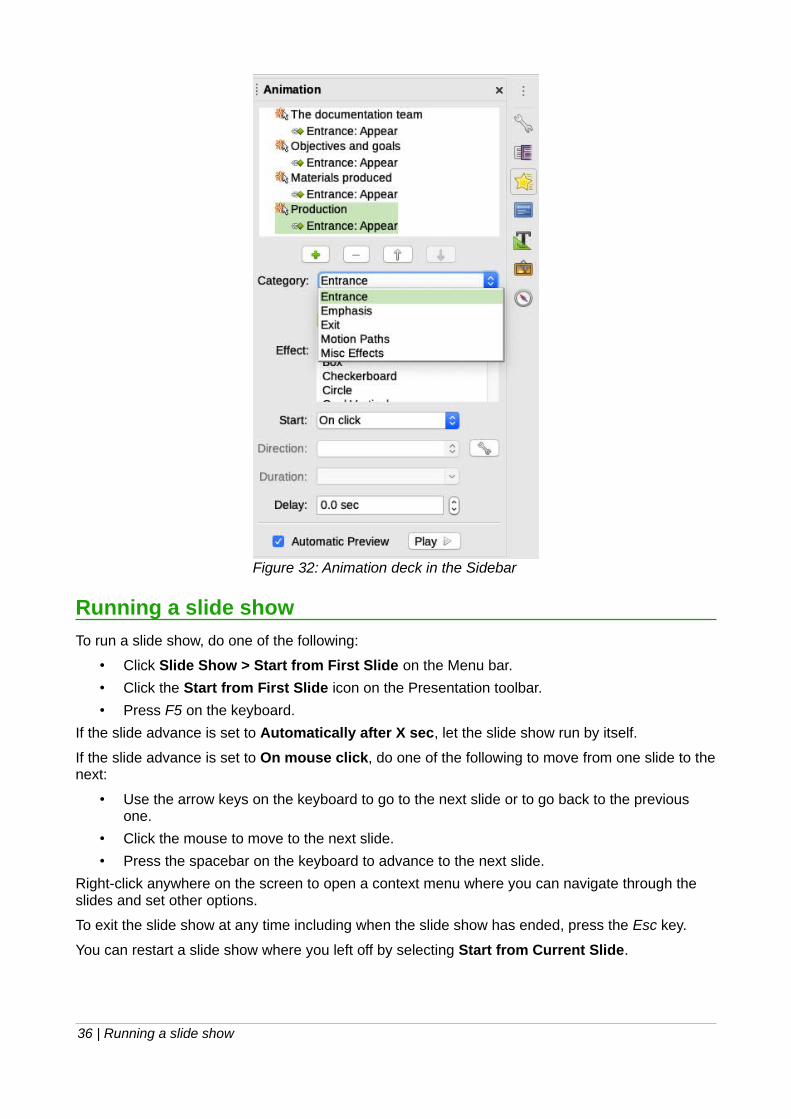
Figure 32: Animation deck in the Sidebar
Running a slide show
To run a slide show, do one of the following:
• Click Slide Show > Start from First Slide on the Menu bar.
• Click the Start from First Slide icon on the Presentation toolbar.
• Press F5 on the keyboard.
If the slide advance is set to Automatically after X sec, let the slide show run by itself.
If the slide advance is set to On mouse click, do one of the following to move from one slide to thenext:
• Use the arrow keys on the keyboard to go to the next slide or to go back to the previous one.
• Click the mouse to move to the next slide.
• Press the spacebar on the keyboard to advance to the next slide.
Right-click anywhere on the screen to open a context menu where you can navigate through the slides and set other options.
To exit the slide show at any time including when the slide show has ended, press the Esc key.
You can restart a slide show where you left off by selecting Start from Current Slide.
36 | Running a slide show
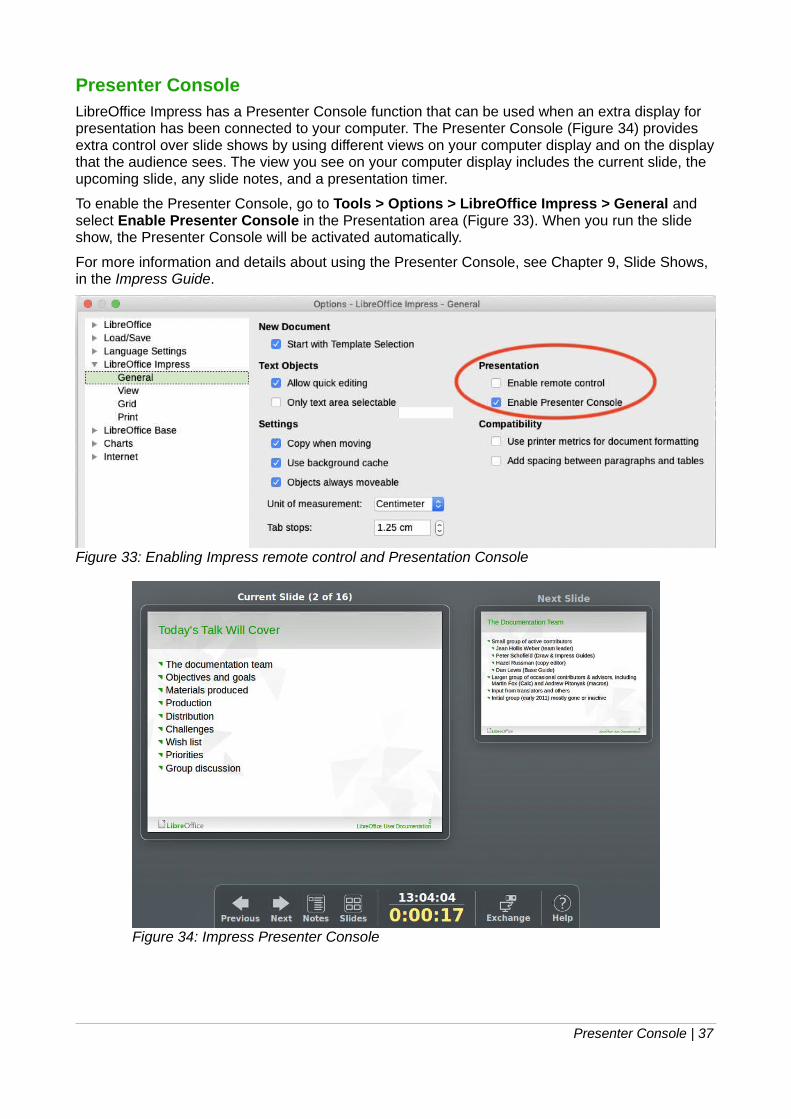
Presenter ConsoleLibreOffice Impress has a Presenter Console function that can be used when an extra display for presentation has been connected to your computer. The Presenter Console (Figure 34) provides extra control over slide shows by using different views on your computer display and on the displaythat the audience sees. The view you see on your computer display includes the current slide, the upcoming slide, any slide notes, and a presentation timer.
To enable the Presenter Console, go to Tools > Options > LibreOffice Impress > General and select Enable Presenter Console in the Presentation area (Figure 33). When you run the slide show, the Presenter Console will be activated automatically.
For more information and details about using the Presenter Console, see Chapter 9, Slide Shows, in the Impress Guide.
Figure 33: Enabling Impress remote control and Presentation Console
Figure 34: Impress Presenter Console
Presenter Console | 37
Using Impress Remote control
Impress Remote is a mobile application developed by the community for Android and iOS systems that allows you to control a live presentation with a mobile device such as a phone or tablet.
The connection between your mobile device and the computer running your presentation is made through a Bluetooth pairing or a local network connection between the two.
Getting Impress RemoteTo get the software, access your mobile device application store, either Google Play Store for Android devices or Apple App Store for iOS devices. Search for “LibreOffice Impress Remote” and select the one that is from The Document Foundation and install it in your device.
Note
The iOS version of Impress Remote does not work with iOS version 11 or later.
Connecting the mobile device to the computerActivate Bluetooth on both devices, then pair the devices. Refer to the manuals for your mobile device and computer operating system for instructions about enabling, setting up a Bluetooth identifier, and pairing.
Once the pairing is established, your mobile device is ready to control your presentation.
Enabling remote control in ImpressAn Impress slide show with remote control is not enabled by default. To enable it, go to Tools > Options > LibreOffice Impress > General and select Enable Remote Control in the Presentation area of the dialog (see Figure 33).
Running a slide show with Impress RemoteTo run a slide show using Impress Remote, follow these steps:
1) On both devices, make sure Bluetooth is already enabled and configured.
2) On your computer, open the presentation you would like to present.
3) On your phone:
a) Open Impress Remote from the Menu bar.
b) To select your computer, tap its name. The presentation opened on the computer begins automatically.
To advance the presentationTap the slide thumbnail or use the phone’s physical volume up button.
To go backwardsDouble-tap the slide thumbnail or use the phone’s physical volume down button.
To skip slide animations and transitionsSwipe left to go to the next slide, or swipe right to go backwards.
To end the presentation, use the Back button of the phone, or open the menu and select Stop slide show.
38 | Using Impress Remote control