canopy to suit isuzu d-max - alu-cab
TRANSCRIPT
Canopy to suit ISUZU D-Max
Model Series: RT50 Spec (2013 - 2020) Double Cab Model Series: RG06 Spec (2020 - Current) Double Cab

1. Canopy Fitment – Tools, Fasteners, Materials & Torquing
The tables below show the equipment, i.e. tools and fasteners required to start the canopy fitment for an Isuzu Double & Extra Cab (RT50 & RG06 Models)
1.1. Tools Required: 1.2. Consumables Required:
1.3. Fasteners Required ( Included With Canopy ) & Torque Settings
TOOLS Torx Screw Driver Rachet 13mm spanner & socket Torque Wrench
ITEM : Grade A2-70 ( Stainless ) HB QTY Max. HB Torque M8 x 30mm Hex Bolts ( HB ) 10 17 Nm M8 x 25mm Hex Bolts ( HB ) 4 17 Nm M8 x 40mm Hex Bolts ( HB ) 2 17 Nm M8 x 20mm Hex Bolts ( HB ) 12 17 Nm M8 Flat Washer 20 N / A
ITEMS Turpentine Cloth Black Sealant, Silicone or SikaFlex Window Cleaner
M8 Nylock Nuts 18 N / A 34 N / A 16 N / A 10 N / A
M8 Plastic Nut Caps M8 Oversized Washer M8 Spring Washer M8 Nut 2 N / A
1.4. Hardware Required : (Included With Canopy)
ITEM DESCRIPTION QTY Isuzu Canopy Mount - IRF Front Right Mounting Bracket 1 Isuzu Canopy Mount - ILF Front Left Mounting Bracket 1
Isuzu Canopy Mount - IRL/IRR Rear Right Mounting Bracket 2 Canopy Shim Canopy Bracket Spacer 20
Universal Canopy Mounting Bracket Canopy Mounting Bracket 4 Centre Mounting Bracket Top Centre Mounting Bracket 2
Centre Mounting Bracket Bottom Hook Type Bracket 2 Canopy Shim Canopy Bracket Spacer 20

Part Identification:

1.2. Mounting the Support Brackets to the Load Bin
a) Step 1 – Removing the Standard Hooks
Remove the front and rear standard hook brackets from the load bin using a Phillips screw driver.
b) Step 2 – Positions of the Front and Rear Support Brackets to the Load Bin
Figures 11 and 12 shows where the mounting brackets are fixed to the load bin. It mounts in the same place as the standard hooks shown above.
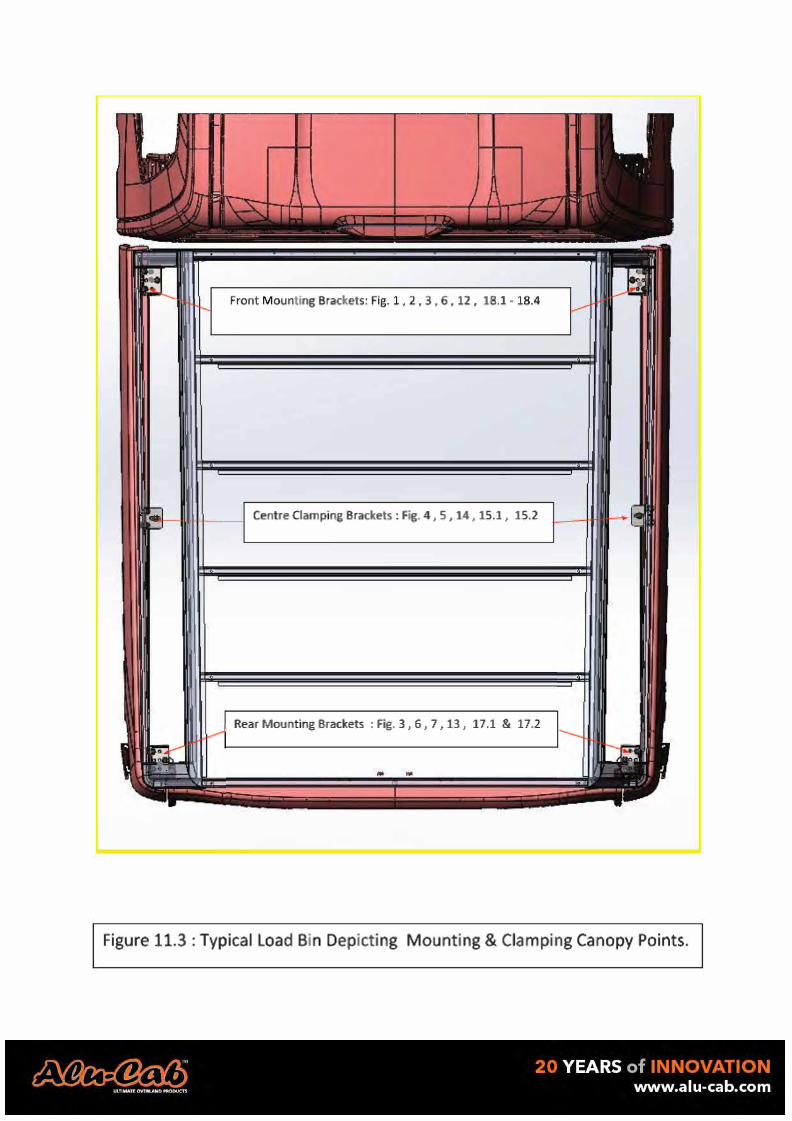
Front M ou11ting Brackets: Fig_ 1 , l . 3 • 6 • 12., 1,8, 1 - 18-4
__ Centre Cl11mpi111g 81r11ck@ts: Fi� 4, 5, 14, 15.1, 15.2
. Rear Mounti111g Brackets : Fig. 3, 6, 7, l3, 17.1 & 17.2
Figure 1.1.3 : Typical Load S.in D•epictmng Mounting & Clllamp,ing Canopy Points.
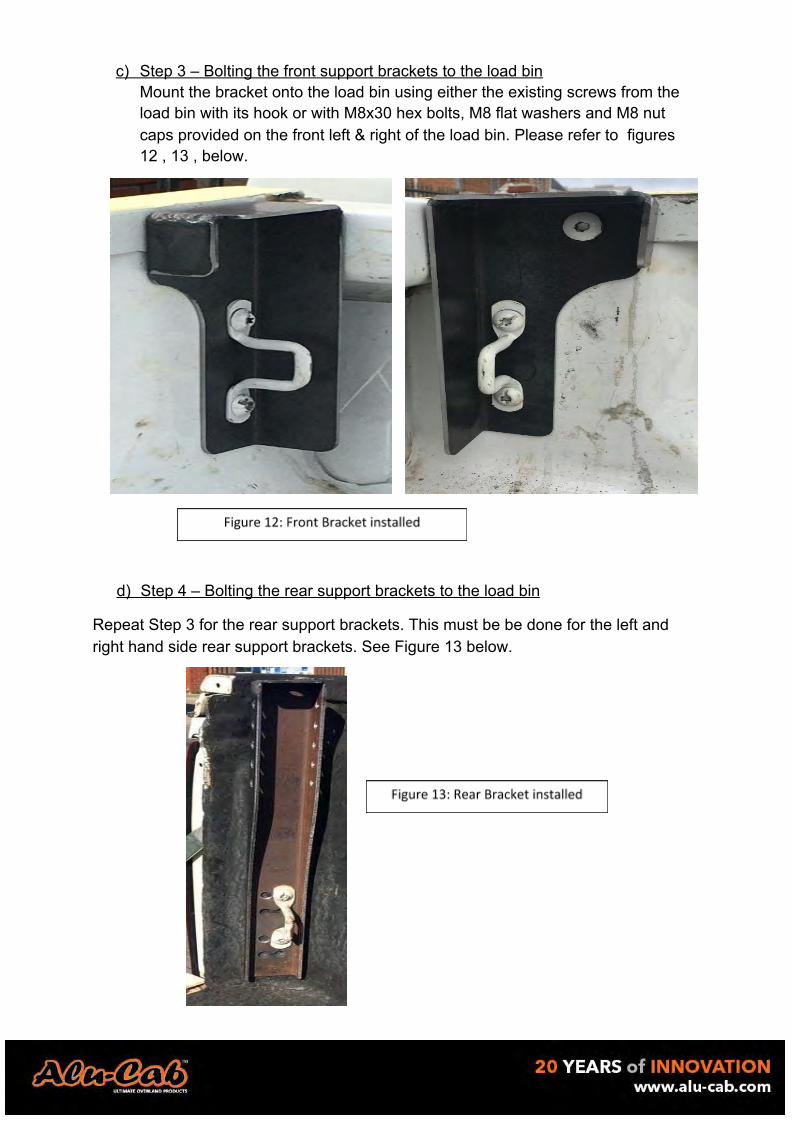
c) Step 3 – Bolting the front support brackets to the load binMount the bracket onto the load bin using either the existing screws from the load bin with its hook or with M8x30 hex bolts, M8 flat washers and M8 nut caps provided on the front left & right of the load bin. Please refer to figures 12 , 13 , below.
d) Step 4 – Bolting the rear support brackets to the load bin
Repeat Step 3 for the rear support brackets. This must be be done for the left and right hand side rear support brackets. See Figure 13 below.

3. Centre Mounting Brackets
3.1. Mounting the Centre Mounting Bracket
Figure 15.1 & 15.2 below is the assembly of the centre mounting brackets.
Figure 14 below shows a section view of how the centre mounting bracket clamps onto the load bin.
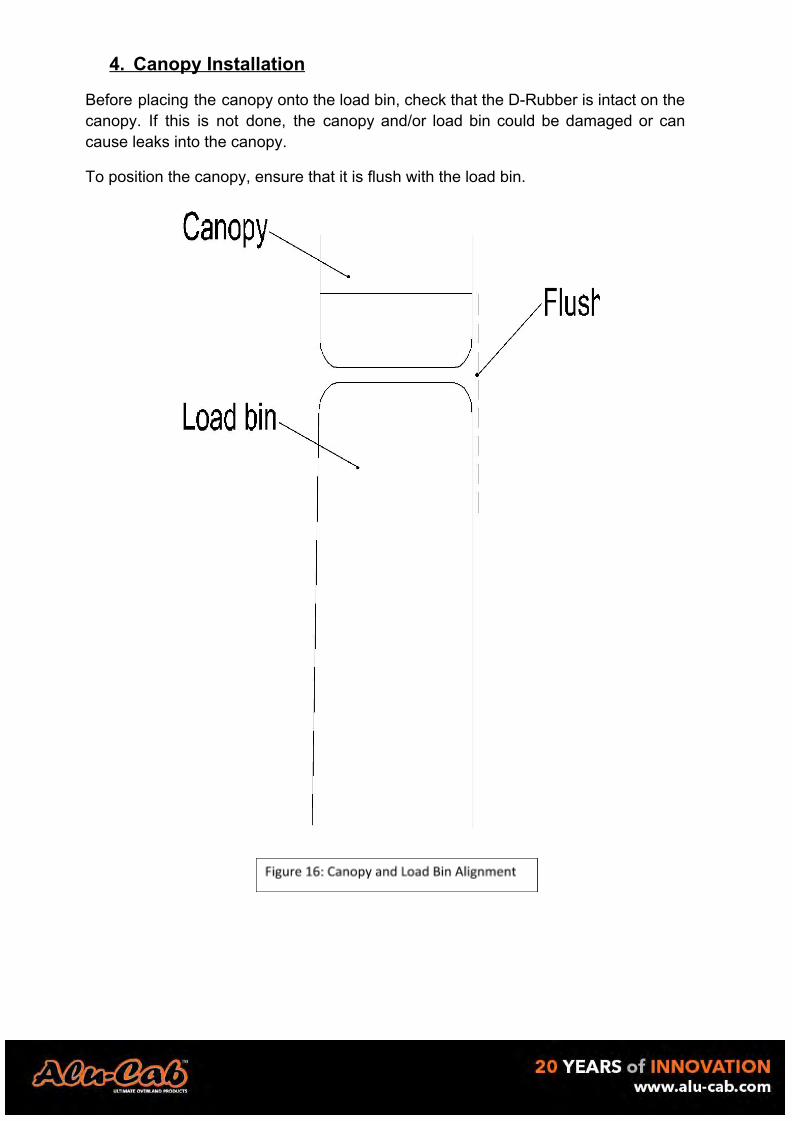
4. Canopy Installation
Before placing the canopy onto the load bin, check that the D-Rubber is intact on the canopy. If this is not done, the canopy and/or load bin could be damaged or can cause leaks into the canopy.
To position the canopy, ensure that it is flush with the load bin.
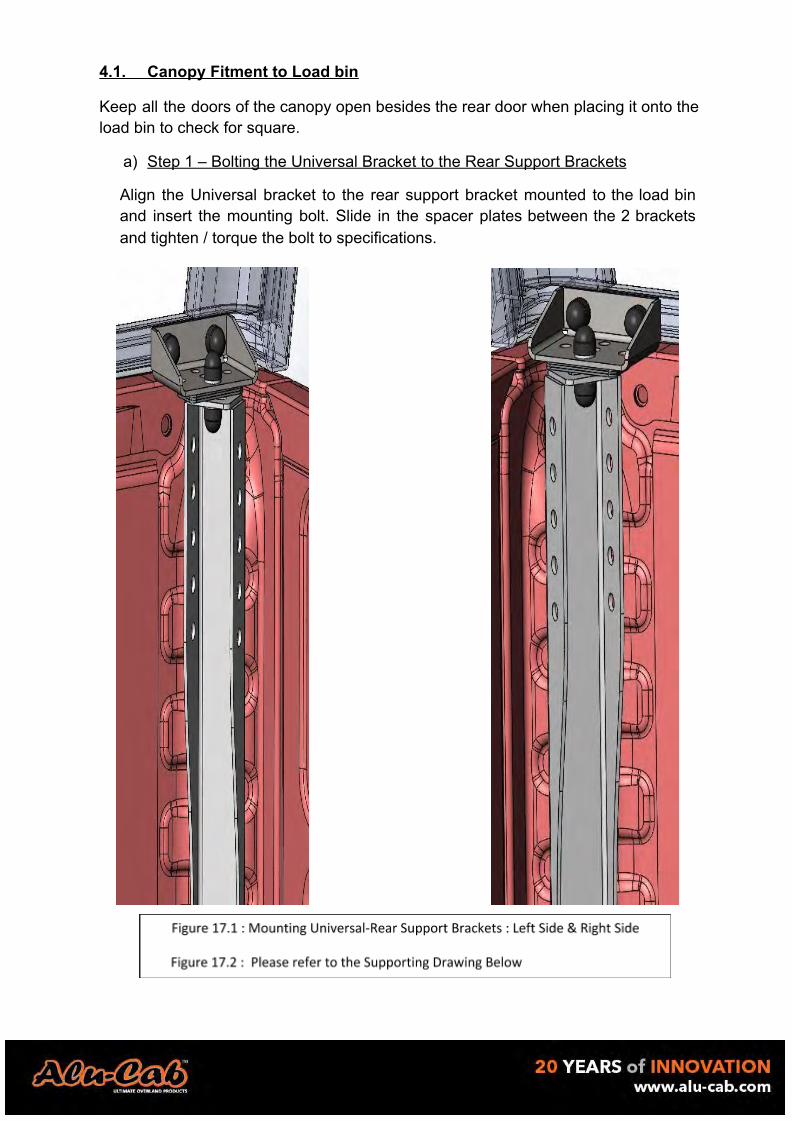
4.1. Canopy Fitment to Load bin
Keep all the doors of the canopy open besides the rear door when placing it onto the load bin to check for square.
a) Step 1 – Bolting the Universal Bracket to the Rear Support Brackets
Align the Universal bracket to the rear support bracket mounted to the load bin and insert the mounting bolt. Slide in the spacer plates between the 2 brackets and tighten / torque the bolt to specifications.

I I
I
I- I-
ce
ce
I-
I I
I I
.�
�
ifl'-
·· • s
✓
@I
���
'
Qi'
0
(] i
Q)
a,
\11\V
1. :1 I, t1
1 P1.
I I
I I
I
�1-;:���
5
fl.ll
■T
CN
CD
· 1 T
�
WII
LD
ICD
: 'f'
�I -�u
:: "
I- I-
:j �
-�
--
--
--
--
--
--
--
-�
�-
--
--
--
--
--
--
--
--
--
�-
--IC
�
Jtt,O
'"'-
,.
11
PA
Jtt·
Mu
M!el!:A:
Z��
fUA
NT
-EIA:
t(T ..a
1
,._t
Cll'tl--C
M-l-M
NT
-EIA:
ICT-0
1
At.
Ci)
l-S
TD
-S
Hlr
il-0
2.
I-IE'
x ..
,B:.�
I)
FW
-1i,e.
IN't'
-"6il
NC
AP-
M!S
FF\N...M
9-
t-te.:.x.
-1.,fWl
!)
1-11
=:x...Mfl.:ii"'.2
�
.SW
-M�
••wi.TJ
·i1iJ�
�g�
iic�Z!
SEI :
::r
�U
N11N
G S
RA
CK
l!.T
LH
ASS
!Jlil
!IL
Y
OU
C,Jt
lP't
lON
ft�
AF:
MO
UN
Tlr-1
1:i B
RA
�K
F:T
<".:Nl
OPY
MO
IJttTI
NG tl
A:AC
t{�T'
SH
rn P
LA-r-lE
:2
.,B:.
20
HIE'
X GO
LT S
tS:
•1�
·1fim
m l!'L
A.T
W.A
SH
�R
Sl':.':i -
CIIN
1:!!!j:
MA-
NYLO
C N
I.IT S
i'S
NU
T C
AP-
M:m
m
.,a;...-2
4mm
o· ...
e�
�-l2:
EOV
i'.a.�
Hl=
FI: S
IS-
OIM
'i0.�1
MA.xl
l) H
IEX
90L T
SIS
l.te.:..:2
S H
IEX
90L T
St.S
l.1B-
-SP
RIN
G W
AS.
HE"
� SIS
SJ.1£
�T
-
..sMl .
.,,.,.,.i:
�•
�lll.l
,-_, ro::
H· ..
�III
�.:!P'"
I
dt
MY
' I-
.4MI_
.Mr"
I-
�
I I
IRl!
Vl!l
lON.S
1.
oa
I I
4.00
T
Gi.1!5
zB
i.
MIOI..JN
flN
Gi te
11·.
ISU
:ZU
:Ml2.'Q
( .A.u
-.)C:
AN
OP
"I' j
, I
lftl!V
. ID
l!�
C-ft
l.Pt
lON
I
CIA
T!
I A
PP
AO
Vl!
D
::
1
: :
n :
:::
e-
1=::
•�11r1
nag
r �
:-,
1-11
CA-,
,..,.:a
. �
1 •n
1 •
I00
1
ftl!
LltAS
�D
F",OR:
Pf t
OD
U :C1
1iOM
1
ZD:?
0•11
•11 1
S�
•tnn_
,,UK]
I
1nnn
T"l
nn
-E]-
1·Hl:_-
.. .-.•-
e.-i
u,n
,.lfM
ohh
•i:11�
-.. ,
2
:9:3
-RE
R•M
NT
-BR
KT
...... H
�As
sv
.01
00
A
dm
1«1Nl,
tr,1;
1o,-
J 1
1M10
I
1M1
0-:
+
%,0
0
r111to
li::M
rt•L.11C:
r ........ ,
_11Ji
r.-c.<
.u.ue
.. 1
.,.r■
1•,1:1
I I
' I
I I
I I
•I
' I
1 •
II
I I

b) Step 2 - Tightening the Universal Bracket to the Canopy
Tighten the nylock nuts and mount the universal bracket to the canopy using a rachet and a 13mm socket. Cover the nuts with M8 nut caps. This is done for the front and rear mountings brackets.
.....
,,. . .•.
Hl -IIOUHJING 1UT • IIUZU anc ....... ,c ... ttO�'f
'""''.,
� -:.:.::�1: !; , ..... , � :: _..,,.,.
� MUIICI>
C<ILCJUI
.......... ,�- . .,, ... , ... e-__ ., .. ~"�-a- � ........... ,., ............ ,,, .. �..._,,.,. .... 2'9J-FNT-.t.lNT-8RKT-RH-ASSY-01
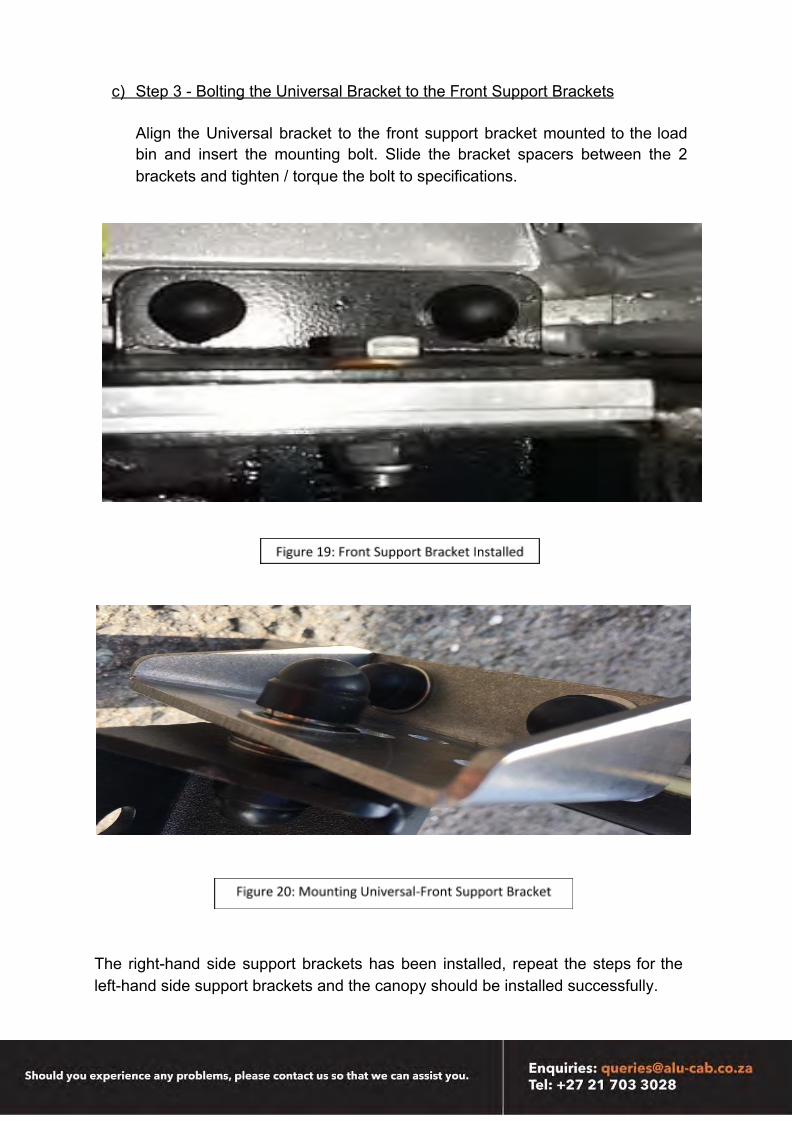
c) Step 3 - Bolting the Universal Bracket to the Front Support Brackets
Align the Universal bracket to the front support bracket mounted to the load bin and insert the mounting bolt. Slide the bracket spacers between the 2 brackets and tighten / torque the bolt to specifications.
The right-hand side support brackets has been installed, repeat the steps for the left-hand side support brackets and the canopy should be installed successfully.