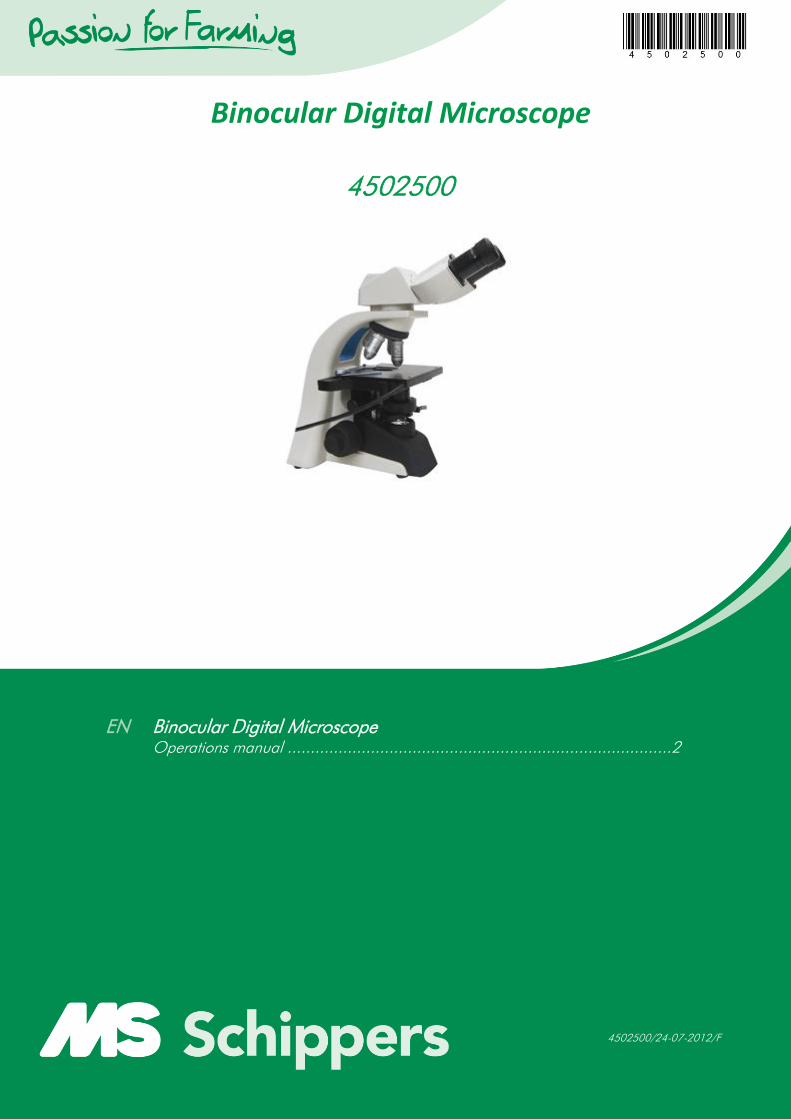
binocular digital microscope
TRANSCRIPT
1
Binocular Digital Microscope
4502500
EN Binocular Digital Microscope
Operations manual ...................................................................................2
4502500/24-07-2012/F

2
Binocular Digital Microscope Index
1. Introduction .................................................................................................................... 3
1.1 What is PHMIAS? ...................................................................................................... 3
1.2 Functions .................................................................................................................. 3
1.3 installations ............................................................................................................... 3
1.4 USB Driver Installation ................................................................................................ 3
2. Creating and Opening an Image ...................................................................................... 4
2.1 Opening image ......................................................................................................... 4
2.2 Duplicating an image ................................................................................................. 4
2.3 Pick up an image from AVI file .................................................................................... 5
2.4 Capturing Images ...................................................................................................... 5
2.5 Acquiring images ....................................................................................................... 5
2.6 Adding voice to an image ........................................................................................... 6
2.7 About MIG file .......................................................................................................... 6
2.8 About SFC file ........................................................................................................... 6
2.9 Printing images ......................................................................................................... 6
3. Image Process ................................................................................................................ 6
3.1 Image Filter .............................................................................................................. 6
3.2 Edge effect ............................................................................................................... 7
3.3 Resizing an Image ..................................................................................................... 8
3.4 Rotating an Image ..................................................................................................... 8
3.5 Operating Images ..................................................................................................... 8
4. Adjusting an image ......................................................................................................... 8
4.1 Adjusting the Brightness /Contrast ............................................................................... 8
4.2 Adjusting Gamma ..................................................................................................... 8
4.3 Adjusting High/Middle/Dark ....................................................................................... 8
4.4 Adjusting the Hue/Saturation ...................................................................................... 8
5. Measuring an image ....................................................................................................... 9
5.1 Calibrating ............................................................................................................... 9
5.2 Measurement Window ............................................................................................... 9
5.3 Change line and point color ....................................................................................... 9
5.4 Auto marking ............................................................................................................ 9
5.5 Measuring distance .................................................................................................... 9
5.6 Measuring Angle ....................................................................................................... 9
5.7 Measuring Outline ..................................................................................................... 9
5.8 Measuring area ....................................................................................................... 10
5.9 Measuring circle ...................................................................................................... 10
5.10 Measuring Rectangle ............................................................................................. 10
5.11 Measuring Hand paint ........................................................................................... 10
5.12 Tagging image ...................................................................................................... 10
5.13 Counting object .................................................................................................... 10
6 Graphics tools ............................................................................................................... 10
6.1 About Graphics bar ................................................................................................. 10
6.2 About Properties dialog ............................................................................................ 10
6.3 Draw graphics and text ............................................................................................. 10
7. Control bar .................................................................................................................. 11
3
1. Introduction
1.1 What is PHMIAS?
PHMIAS (Phenix Micro Image Analysis Software) is a new generation of micro image analysis instrument, which contains
various tools for processing and analysis micro optics image. It includes powerful functions for image capturing, image
adjusting, image operating and image measuring. The development of PHMIAS is basis on our rich experience in
researching micro optics instrument, modern photo-electricity technique, CCD imaging, digital image analysis, and
multimedia technique. PHMIAS concerns the practical needs from biology micro imaging research, the practice of
medicine, higher education, mechanism, electronic, and spin chemistry and so on. So it can be widely used in these
fields.
1.2 Functions
PHMIAS has wide range of recording and taking capabilities that lets you acquire high focus, high differentiation and
high fidelity image easily. PHMIAS supports composite Video, S_Video (optional), and USB signal input. You can grab
still or multi real time images in BMP or JPG file format and add voice to the images or to different parts of the images in
MIG and SFC format. Also you can record active images in AVI video format. PHMIAS provides easy ways for opening,
adjusting, rotating, and enlarging images. By using of precision calibration and micro scale, you can make precise
measurements such as distance between two points, angle, girth and area in images. Tools for tagging and counting
objects in the images are also available to the user.
PHMIAS has capabilities of adding texts and drawing graphics in images. PHMIAS gives powerful digital image process
modules that can make images more suites for your view and analysis. In particular, PHMIAS contains useful tools for
making operation and comparison to various images that can be displayed in same view and print on the same page.
1.3 installations
The system is composed of software and instrument. The software includes PHMIAS 2003 Ver1.3B software and
Password Adapter. Instrument contains high differentiation microscope or optical microscope and an interface for
connecting microscope with CCD, computer, TV and projector.
Installation
Enter catalog of "PHMIAS 2003 V1.3B" in PHMIAS 2003 CD-ROM, double click Setup.exe icon and follow guidance to
complete installation. After installation, you ought to check if PHMIAS menu has been added to program bar and
PHMIAS icon of shortcut has been created on desktop.
Register PHMIAS
You must plug the Password-Adapter parallel port at first and choose "Help"/"Register" command to register PHMIAS.
Under Windows NT/2000 and XP, you should register the software from administrative accounts,
Run PHMIAS
Double click "PHMIAS 2003 V1.3B" icon to run software. All the modules in the software will be available after register of
the software.
1.4 USB Driver Installation
1.4.1 Win ME / 2000 / XP
1. Connect USB Video Adapter to computer.
2. Computer will detect the device, please click “Next”.
3. Search the driver, please click “Next”.
4. Put CD-ROM into CD-ROM drive, and choice the route at “USB Driver / Driver” or “USB Driver / DriverPAL” of
CD-ROM, and please click “OK/Confirm”.
5. Please click “Next”.
6. Please click “Finish”.
7. Connect video input to the USB Video Adapter properly.
8. NOTE: Please check to the Control Panel / System / Hardware / Device Manager / Video Adapter, after
installation of Video Adapter.
1.4.2 Win98 / 98SE
1. Connect USB Video Adapter to computer.
2. Computer will detect the device, please click “Next”.
3. Search the driver, please click “Next”.
4. Put CD-ROM into CD-ROM drive, and choice the route at “USB Driver / Driver” or “USB Driver / DriverPAL” of
CD-ROM, and please click “OK”.
5. Please click “Next”.
6. Please click “Next”.
7. Insert CD-ROM of Windows 98 / 98SE into CD-ROM drive, and please click “Confirm”.
4
8. Please click “Finish”.
9. Please Connect video input to the USB Video Adapter properly.
10. NOTE: Please check to the Control Panel / System / Device Manager / Video Device to see if Video Adapter is
installed rightly.
2. Creating and Opening an Image
PHMIAS provides several ways to create and open images. You can create a new image with only a background, copy
an image from another source, load an image from disk, pick up image from AVI file, and capture image with video
board.
Opening an image
Duplicating an image
Picking up an image from AVI file
Capturing Images
Acquiring Images
Adding voice to an image
About MIG file
About SFC file
Printing images
2.1 Opening image
There are several ways to open an image. You can use the:
Opening the Open Dialog Box
Most-Recently Used list
PHMIAS Browser
2.1.1 Opening the Open Dialog Box
To display the Open dialog box, do one of the following:
Choose File/Open command.
Press <Ctrl> + <O>.
Click the Open button on the toolbar.
To use the Open dialog box
1. In the Look in drop-down box, choose the directory and navigate to the folder containing the image you want
to open. Double click a folder to open it. You can have Paint Shop Pro search for files in all the formats it reads
or limit its search to a single format. Choose a format from the Files of type drop-down box.
2. Click the Move up button to change directory as navigate.
3. To create a new folder, click Make new folder button.
4. Click an image to select it.
5. To open the selected file, click Open button. The dialog box closes and the image is opened in the PHMIAS
workspace.
2.1.2 Using the Most-Recently Used List
In the File menu displays the names of files that you have previously opened. These names are listed above the Exit
command. To open one of these images, click corresponding name in the list.
2.1.3 Using the PHMIAS Browser
PHMIAS Browser can display all thumb of the images in current directory. You can click thumb to preview images, and
double click the thumb to open corresponding image in PHMIAS workspace.
To use PHMIAS image browser, click Open tab on the control box. You can enlarge browser space by placing cursor in
the left edge of the browser window, and moving the cursor left at the time when the cursor becomes double arrow. In
the driver list tree, choose the directory and navigate to the folder containing the images you want to open. Double-click
a folder to load images in the directory into PHMIAS browser space.
2.2 Duplicating an image
To copy an image which is active in the PHMIAS workspace
1. Select all image by clicking arrow icon on the measure bar, or select rectangle area by clicking rectangle icon
on the same bar.
2. Click Copy icon on the toolbar or press <ctrl> + <c>.
3. Click paste button on the toolbar or press <ctrl> + <v>.
4. Create a new image containing the image you selected in the workspace or other program workspace.
5
2.3 Pick up an image from AVI file
PHMIAS can pick up image from AVI file.
1. Click Video Play command in the File menu to play a video in AVI file format.
2. Click play button to play video
3. Click Take button to pick up an image from video while playing.
2.4 Capturing Images
To Start capture image, you can open the File menu and select the USB Capture command, or click on its icon on the
toolbar. A dialog box will appear. In the dialog box there are several buttons.
Preview
Click this button to preview image grabbed from signal input.
Stop
You can freeze the frames by pressing this button.
Capture
After clicking this button a file save dialog box will display. A default file name has been filled in the dialog box. If you
press save button directly, an image file, the name of which is default, will be saved in BMP directory in PHMIAS work
directory. You can rename the file or save the image in other folder.
Auto Take
You can take consecutive images with time intervals by pressing this button. After clicking the button you must fill in the
dialog box total frames of taking, interval time and folder where image files will be saved. You can cancel the task by
pressing the same button at any time you want even if the task is not completed.
Record
You can record a section of video in AVI format. You must name the video file, frames per second and total time of
record before recording. You can cancel the record by pressing record button again at any time even if record is not over
.If you do so, PHMIAS will save the fraction of the video.
V_Format
After you have clicked on this button, a dialog box will appear. The dialog box varies for different devices because
manufacturers design their own user interface. You may refer to the user's manual of the device for details. In the box you
can set numbers of capture parameter such as video format and size.
V_Source
The Video Source button allows you to select a video source for capturing video. A dialog box for setting video source
will appear when you click this button. The dialog box varies for different video boards because manufacturers design
their own user interface.
640X480/Normal
You can press this button to change the window to 640x480 pixels, and click the same button to display the image in the
size that you have selected in video format dialog box.
Return
Pressing of this button will end the capture and close the dialog box
2.5 Acquiring images
2.5.1 Select source
PHMIAS supports the industry standard TWAIN interface for transferring images from digital image hardware. Typically
this hardware is either a scanner or digital camera.
Acquire setup command.
The File/Twain/Select source command is used to select an acquire source and customize acquire settings:
First, select the TWAIN source for your device from the list. If your device does not appear in the list, consult the manual
for your device on whether a TWAIN driver is available and how to install it.
2.5.2 Acquiring images
The File/Twain/Acquire command starts the device's source manager and allows images to be transferred. Images will be
placed in whatever directory was active when invoking the acquire command. You will be able to see them appear in the
File list as each transfer completes.
6
2.6 Adding voice to an image
PHMIAS has the possibility of adding a voice notes to an image or to different parts of the image. The voice could be
saved, together with corresponding image, into file in MIG or SFC format and could be replayed when the image is
displayed or the file with voice and image is opened after words.
You can refer to next paragraphs for the details of adding voice to image.
2.7 About MIG file
2.7.1 Create a MIG file
You can create MIG file from BMP and JPG files using Save As command, On the MIG file, you can record ONE voice
note to the image.
2.7.2 Record Voice Note on MIG file
When open the MIG file, a record tool bar shows up at up-left corner, with 8 functional buttons for recording usage, like:
Hide/Show, Stop, Pause, Play, Forward, Backward, Recorder, Unlock. Voice note can be saved through either the save
icon on the tool bar or File/Save as.
Before recording note, please release the Unlock button on the tool bar.
2.8 About SFC file
2.8.1 Create a SFC file
User can convert BMP and JPG files to SFC format using Save As command. On the SFC file, you can record MULTIPLE
voice notes at any location of the same image.
2.8.2 Record Voice Notes on SFC file
1. Click the Place Record button on the Drawing tool bar, one recording tool bar will appear at the up-left corner
of the image. When moving your mouse in the image, the recording tool bar always follows your mouse. Stop
the mouse at the place you want to record voice note, click-left, then the recording tool bar will stay at the
mouse stop position. Following buttons are on the tool bar: Stop, Play, Record, Delete Record, and Unlock.
2. Before recording notes, please release the Unlock button on the tool bar.
3. A recorded voice note can be deleted by click the Delete Recorder button. Like always, you need to release the
Unlock button before taking this action.
4. By click the Display Recorders button on the Drawing tool bar, you can hide/show all the Recording tool bars
on the image view.
2.9 Printing images
2.9.1 Printing an image
To print an image in the active view, you can select the File / Print command. By default, all graphics and measure
results attach to the image will also be printed. You can choose File/Print setup command to setup print option.
2.9.2 Comparing and Printing all images
To compare various of images and print all images that have been opened in the view, you can choose File/Print all
images command.
In the view and print images dialog box, you can make comparison to various sliders at the same view and print all the
images at the same page. By clicking corresponding buttons in dialog you can zoom in and zoom out all images
displayed in the box.
3. Image Process
PHMIAS contains a variety of image process functions that allow you apply to your image.
If only a part of the image need to be processed, press Region button on the graphics bar to create selection before
applying the filters.
3.1 Image Filter
3.1.1 Blur
The Blur effects are filters that smooth transitions and decrease contrast by averaging the pixels next to hard edges of
defined lines and areas where there are significant color transitions. The Soften filter, which applies a uniform blur to an
image, can be used for photo retouching.
You can apply the Blur and Soften filters to an image to reduce its graininess. If you apply the filters repeatedly, you will
get enhanced effects.
To apply a Blur effect, choose Process/Filter/Blur command.
3.1.2 Add Noise
Noise refers to random patterns of pixels that give an image a grainy or textured appearance.
To apply an effect to a selection, create the selection before choosing the effect.
7
The Add Noise effect is a filter that re-colors pixels randomly throughout the image or selection to increase its graininess.
To open the Noise dialog box, choose Add Noise command in the Process Menu.
3.1.3 Sharpen
The Sharpen effects are filters that produce the opposite effect of the Blur command by increasing the contrast between
adjacent pixels where there are significant color contrasts, usually at the edges of objects. They lighten the light pixels
and darken the dark pixels.
To apply a Sharpen effect, choose Process/Filter/Sharpen
3.1.4 Median
Use this command to remove small, random areas of noise where the noise is distinctly different from the surrounding
area. This feature adjusts the intensity of each pixel in the image to the median intensity of its surrounding pixels. Because
you control how many surrounding pixels are used to determine the median intensity, you can correct different-sized
defects.
To apply the Median effect, choose Process/Filter/Median command.
3.1.5 Equalize and Stretch Image
The Equalize effect distributes the lightness values of the pixels more evenly across the light spectrum from black to white.
It makes the darkest pixel as close to black and the lightest pixel as close to white as possible. It then distributes the
remaining pixels evenly between these two values. This produces an averaging, or tempering, of the brightness in the
image.
Histogram window
The Histogram window displays the number of red, green, and blue pixels and the luminance value at each brightness
level of an image. Use it to analyze your image before starting color corrections.
By examining the graph, you can learn whether the image contains enough detail to be successfully corrected, and if it
does, where the image needs correcting.
If the graph is spread across most of the Histogram, the image contains enough detail to correct it successfully. If the
graph is compressed into a narrow area of the Histogram, the image probably does not contain enough detail.
Stretch Image
If the Histogram does not cover the entire lightness spectrum, the image does not contain very dark or very light areas; it
lacks contrast. The Stretch command stretches the graph closer to both ends so that it covers more of the spectrum.
To equalize or stretch an image, you can choose Process/Filter/Equal command.
In particular, In the Level tab on the control bar, you can move dark and light sliders to stretch the image in the guidance
of histogram window displayed in the level page.
3.1.6 Split
An image stores its color information in channels. The information contained in the channels depends on the color
method being used to define the image. When you separate these channels, PHMIAS creates individual gray scale
images that you can edit. You can use these images to create interesting effects.
To Split an image, you can choose Process/Channel/Split RGB command.
When you split the channels of an image, you create new images. The original image is not affected. Each new image is
named after its channel.
3.2 Edge effect
The Edge effects are filters that accentuate the areas of contrast and edges in an image.
3.2.1 Edge
Edge enhances the contrasts between light and dark in the image by darkening the image and then highlighting the
edges.
To apply an effect to a selection, create the selection before choosing the effect.
To apply an Edge effect, choose Process/Edge/Edge.
3.2.2 Horizontal Edge
Horizontal Edge enhances the horizontal edges in the image.
To apply an effect to a selection, create the selection before choosing the effect.
To apply an Edge effect, choose Process/Edge/Horizontal Edge.
3.2.3 Vertical Edge
Vertical Edge enhances the vertical edges in the image.
To apply an effect to a selection, create the selection before choosing the effect.
To apply an Edge effect, choose Process/Edge/Vertical Edge.

8
3.3 Resizing an Image
Resizing tools are helpful when needing to touch up images.
You can resize the image by clicking Edit/Resize/enlarge command or by pressing Edit/Resize/Arbitrary command to
display Resizing dialog box.
In resize dialog box you can Enter new pixel width or height in edit box or select a size from radio buttons directly.
3.4 Rotating an Image
You are allowed to select Process/Flip vertical and Process/Mirror to rotate the image in 90 degree and 180 degree
respectively. After clicking Process/Canvas/Arbitrary command the dialog box for rotating an image will be displayed. In
the box you can fill out degree in rotate box or drag the scroll bar to get the degree for rotating. Preview button should
be checked, otherwise Rotate button must be pressed to rotate the image.
3.5 Operating Images
You can make various operations between two images. After clicking the Operation button on the tool bar, the operation
dialog box will appear.
Operation images can be load from disk by pressing load first image and load second image buttons or drag the scroll
bar to choose the images from the views directly. You can perform such arithmetic and logical operations between two
images as And, Or, Add Subtract, Maximum, Minimum, and Average.
You can achieve useful results after operations. For examples, you can demonstrate difference between images by using
subtract operation. The intensity of the result is directly proportional to difference between first and second images.
Especially in operation dialog box you can merge two images together that are take in different focal plane to get an
improved image.
NOTE: You must ensure that the size of the images is same, otherwise the operation command can not be executed.
4. Adjusting an image
PHMIAS provides several functions for enhancing your pictures. Use them to make color corrections, improve the results
of faulty lighting, and create special effects. For example, perhaps the photograph has a yellowish cast. Use the Hue and
Saturation function to remove it. Perhaps the shadowed areas are too dark. Use the High, Middle and Dark Bright
functions to bring out the detail. Perhaps the image is too dark and lacks contrast. Use the Gamma Adjustment function
to adjust these two features in unison.
Adjusting the Brightness/Contrast
Adjusting the Image Gamma
Adjusting the High Bright /Middle Bright /Dark Bright
Adjusting the Hue/Saturation
4.1 Adjusting the Brightness /Contrast
The Brightness command lightens or darkens the entire image or selection. It is often used to lighten pictures that are too
dark after capturing.
The Contrast command changes the amount of shading between areas. You can use it to sharpen or blur an image, to
make colors appear more saturated, and make specific areas stand out.
To adjust Brightness and Contrast of an image, you can choose Adjust/Adjust/Brightness and Adjust/Adjust/Contrast
commands.
PHMIAS provide easy way for adjusting brightness and contrast. After you have clicked Adjust tab in control bar, you can
use slider bars to adjust the brightness and contrast of the entire image or selection.
4.2 Adjusting Gamma
The gamma of an image is a measure of its contrast and brightness. By correcting the gamma, you can adjust these two
elements in unison. Because this command can leave an image looking somewhat flat, you may want to increase the
contrast after you have corrected the gamma.
You can choose Adjust/Adjust/Gamma command to implement the operation.
4.3 Adjusting High/Middle/Dark
Use the High, Middle, Dark Bright functions when you want to adjust the dark, middle, and light values of an image
separately. You can emphasize highlights and shadows or lighten or darken an image’s mid-range colors.
You can choose Adjust/Adjust/High Bright and Adjust/Adjust/Middle Bright and Adjust/Adjust/Dark Bright command to
adjust an image respectively.
4.4 Adjusting the Hue/Saturation
PHAMIAS perceive color in terms of its hue, saturation, and luminance. Hue refers to tint, saturation to the purity of the
hue, and luminance to its brightness. Altering these three characteristics changes the color we see.
9
The Hue function shifts all the pixels in an image around the color wheel to a different point. If you change the red pixels
to green, the green pixels will turn to blue and the yellow pixels to cyan. Adjusting the hue is the last step in creating a
duotone image.
The Saturation function alters the amount of gray in a color. The level of gray increase as the saturation decreases.
To adjust Hue/Saturation, you can use Adjust/Adjust/Hue and Adjust/Adjust/ Saturation.
PHMIAS provides an easy way for you to adjust Hue and Saturation of the image. In Adjust tab, you can use Hue and
Saturation sliders to change Hue and Saturation of an image easily.
5. Measuring an image
PHMIAS has precise tools to measure distance, angle, circle and area in an image. PHMIAS also contains tag and count
tools which can be used to make tabs and count objects in an image. After you have registered PHMIAS and have
completed calibration or have selected a calibration data from calibration drop down box on the toolbar, you can
measure any images activated in workspace by using command in measure menu, or by clicking corresponding buttons
on the measure bar. If the measure bar with the measurement buttons is not displayed, select the Measure bar command
from the menu. The measure bar with the measurement icons is then displayed.
5.1 Calibrating
If you want to get a new Calibration data, you can use Measure/Calibrate Spatial Measure command, or press
corresponding icons on the toolbar to make Calibrate dialog box visible. The steps of a calibration are:
1. IMPORTANT: When first use, you have to take a photograph of graduated ruler into the microscope (from
supplied Micron slide). This “image ruler” will become the standard for later measurement.
2. Chose a unit from group buttons of unit, for example, clicking micron button to choose micron unit.
3. Click Calibrate button to start calibrate.
4. Press left key of mouse, hold the mouse to draw a line and release the key in the end.
5. Fill in a real distance of the line in Actual value box and multiple of microscope used in rate box.
6. Press Save button to save calibration data to disk. If you save the file of calibration data in DEM folder in
PHMIAS work directory, you will later find the calibration data in drop down calibration box on the toolbar.
7. Press Test button to check exactitude of the calibration data. You can verify other calibration data by clicking
Load Calibrate button.
5.2 Measurement Window
After you have clicked a measure command, a window for displaying measurement results will appear immediately. You
can click Measure/Measure Window command or Click the Measure window icon on the toolbar to hide or show the
window. The result of measurement data will be filled automatically in the table in Measure window once you complete a
measure.
You can clear, print, save and open the measure data by pressing corresponding button respectively. The file of measure
data can be saved in Microsoft Excel format. When you click open button in Measure window, you will find that Microsoft
Excel program will execute and the measure data will display in Microsoft Excel table, provide that Microsoft Excel
program has been installed in the computer.
5.3 Change line and point color
In course of measuring image, you can change line color and point color by pressing Color button in graphics bar and
selecting color in the palette.
5.4 Auto marking
If you have pressed down Auto mark button on the measure bar, a serial number of the measurement will draw
automatically beside measure line after each of measurements is completed.
5.5 Measuring distance
To measure distance, choose Measure/Measure/Distance command or click Distance button on the measurement tool
bar (left side, vertical). To measure distance, first mark the start and end point of the base line with a single click of the
mouse. You can then define the end point of the measurement line with another single click. The result is then displayed
in window.
5.6 Measuring Angle
To measure Angle, choose Measure/Measure/Angle command or click Angle button on measure bar.
First press left key of mouse to draw a start line of the angle, and then press left key to mark the end of second line. Then
the result of degree appears in measure window.
5.7 Measuring Outline
To measure Outline, choose Measure/Measure/outline command or click Circle button on measure bar.
10
Press left key of the mouse to start measure, move the mouse around the edge of object and release the left key at
inflexion in each. Double click left key to confirm the selection of the outline, and the result of measurement will be
displayed in measure window.
5.8 Measuring area
To measure Area, choose Measure/Measure/Area command or click Area button on measure bar.
Press left key of the mouse to start measure, move the mouse alone the edge of object and release the left key of mouse
at inflexion in each. Double click left key the mouse to end selection of measuring area, and the result of measure will be
filled in the table of measure window.
5.9 Measuring circle
To measure a circle click as displayed on the corresponding icon in the measure bar.
Click on the left-top point of the circle you want to measure, hold the mouse button down and drag the circle outwards.
When you reach the edge of the circle simply double click the left key. You can move and adjust circle to fit the outline of
the measure object before double click the left key.
5.10 Measuring Rectangle
To measure a rectangle object, press corresponding icon in the measure bar.
Click on the up-left point of rectangle you want to measure, hold the mouse button down and drag the rectangle
outwards. When you reach the bottom-right of the reactance simply double click the left-hand mouse button. The
rectangle can be resized and moved by mouse to fit region of the measure object.
5.11 Measuring Hand paint
To measure abnormity object you can choose Hand paint command in the measure bar.
Click left button to start, hold the left button down to draw graphics along the edge or release the left key at inflexion in
each to draw lines to fit the outline of the object. When you reach the start point, double click left-hand mouse button to
end the hand paint.
5.12 Tagging image
To add Tag in image, choose Measure/Tag command or click Tag button on measure bar.
Click left key of mouse to add mark in image. At the same time, X Coordinate and Y Coordinate of the mark will be filled
in result table of measure window.
5.13 Counting object
To count objects in image, choose Measure/Count command or click Count button on measure bar.
Double click left key of the mouse to count object in the image. Measure Window will record your clicking at once.
6 Graphics tools
PHMIAS provides several painting and drawing tools that you can use to draw geometric figures and text on the image
and workspace.
6.1 About Graphics bar
PHMIAS put painting and drawing tools on the Graphics bar. You can draw all kinds of graphics and text after clicking
corresponding button displayed on graphics bar .You can press line color, fill color and text color buttons on the
graphics bar to set color of figures on the condition that the figures is selected. The figures can be moved front and
moved back by pressing corresponding buttons in the left side of the Graphics bar. The styles of line, size of line, and
styles of arrow can be selected from Graphics bar.
6.2 About Properties dialog
You can active Properties dialog of figures by double clicking figures or by pressing Property buttons on graphics bar
when the figure is selected. The Properties dialog boxes display which of properties you are using. You can reset
properties of figure such as font, line color, fill color, line style and line size in the dialog.
6.3 Draw graphics and text
You can draw a graphics after clicking corresponding button on graphics bar. You can resize the graphics by placing the
cursor on small handles of the graphics so long as the graphics is selected.
After clicking Text button on graphics bar, a dialog box for writing text will appear. You can type text in the input box and
set the properties of text in the dialog.
All the figures and text can be copied, cut and pasted.
11
You can merge figures and text into the image by clicking Merge button on graphics bar as well, and PHMIAS will create
a new image, the size of which will be equal to that of the current image. You ought to name file of the new image when
Save dialog box appear.
7. Control bar
PHMIAS provide a Control box to view, open, adjust and process an image for your convenience. It includes six tabs by
now. Open, Adjust, Process and Level tabs have been refered previously.
Palette tab contains a palette that can be used to get color information of the image. Coordinate of the cursor is also
display in this tab. All the thumbs of images opened in PHMIAS workspace are arranged in Thumb tab. You can click a
thumb to view the corresponding image in PHMIAS workspace.

12