billy pegram. posing techniques for photographing model
TRANSCRIPT

POSINGTECHNIQUESfor PhotographingModel Portfolios
Amherst Media®
PUBLISHER OF PHOTOGRAPHY BOOKS
BILLY PEGRAM
Copyright © 2008 by Billy Pegram.All photographs by the author.All rights reserved.
Published by:Amherst Media, Inc.P.O. Box 586Buffalo, N.Y. 14226Fax: 716-874-4508www.AmherstMedia.com
Publisher: Craig AlesseSenior Editor/Production Manager: Michelle PerkinsAssistant Editor: Barbara A. Lynch-JohntEditorial Assistance: John S. Loder, Carey A. Maines, and Artie Vanderpool
ISBN-13: 978-1-58428-220-4Library of Congress Control Number: 2007926868Printed in Korea.10 9 8 7 6 5 4 3 2 1
No part of this publication may be reproduced, stored, or transmitted in any form or by any means, electronic, me-chanical, photocopied, recorded or otherwise, without prior written consent from the publisher.
Notice of Disclaimer: The information contained in this book is based on the author’s experience and opinions. Theauthor and publisher will not be held liable for the use or misuse of the information in this book.
Dedication
I would like to extend my appreciation to Dorothy Pegram, and Tom and Dolly Branski for their encourage-ment, love, and support in helping make this a rewarding career.Additional thanks to Loa Anderson for her special consultation, especially in sections dealing with the CSI
program. I would also like to thank all the demo models: Bethany, Ciana, Iana, Janeen, Kasia, Krissy, Lexie, Lisa,Marisa, Mary, Monique, and Shayn.Special thanks to: Bikini Bay Sportswear and Swimwear designer Bo of Toronto, Canada; Lana Fuchs from
Isis Couture, who provided many of the fashions in the images; hair and fashion stylist Michael Hall of Seat-tle; hair and makeup specialist Wendalynn Nelson of Las Vegas; and makeup artists Nicci Kelly and ChristinaCopeland.Finally, thanks to: Cinch Jeans, Dusk magazine, Headlights and Tailpipes in Las Vegas, Luxury Las Vegas
magazine, and Showbiz magazine.
Introduction . . . . . . . . . . . . . . . . . . . . . . . . .6The Importance of Good Posing . . . . . . . . . . . . .6Helping the Model Look Her Best . . . . . . . . .6Pleasing the Client . . . . . . . . . . . . . . . . . . . . .6
The Challenges of Model Photography . . . . . . . .9Technical Challenges . . . . . . . . . . . . . . . . . .10Styling . . . . . . . . . . . . . . . . . . . . . . . . . . . . .10Working with People . . . . . . . . . . . . . . . . . .12
About This Book . . . . . . . . . . . . . . . . . . . . . . .13
1. Basic Principles . . . . . . . . . . . . . . . . . . .14Previsualization . . . . . . . . . . . . . . . . . . . . . . . . .14Emulate the Success of Others . . . . . . . . . . .14Use Your Imagination . . . . . . . . . . . . . . . . .14Communicate Your Concept . . . . . . . . . . . .15
Objectives . . . . . . . . . . . . . . . . . . . . . . . . . . . . .17Creating Flow . . . . . . . . . . . . . . . . . . . . . . .17Stopping the Gaze . . . . . . . . . . . . . . . . . . . .18
Tools . . . . . . . . . . . . . . . . . . . . . . . . . . . . . . . .20Straight Lines . . . . . . . . . . . . . . . . . . . . . . . .21Curves . . . . . . . . . . . . . . . . . . . . . . . . . . . . .21Composition and Cropping . . . . . . . . . . . . .24Perspective . . . . . . . . . . . . . . . . . . . . . . . . . .27Tone and Color . . . . . . . . . . . . . . . . . . . . . .28Posing . . . . . . . . . . . . . . . . . . . . . . . . . . . . .31
2. Posing the Body . . . . . . . . . . . . . . . . . . .33Three Basic Rules . . . . . . . . . . . . . . . . . . . . . . .33Posture . . . . . . . . . . . . . . . . . . . . . . . . . . . . . . .33
TABLE OF CONTENTS 3
Table of Contents
CSI Program: A Starting Point . . . . . . . . . . . . .34History and Purpose . . . . . . . . . . . . . . . . . . .34Diagramming a Pose . . . . . . . . . . . . . . . . . .35The C, S, and I Poses . . . . . . . . . . . . . . . . . .35Foot Positions . . . . . . . . . . . . . . . . . . . . . . .36The Crossover and Open Poses . . . . . . . . . .36
Feet and Ankles . . . . . . . . . . . . . . . . . . . . . . . . .38Show One Heel . . . . . . . . . . . . . . . . . . . . . .38Cropping . . . . . . . . . . . . . . . . . . . . . . . . . . .39Point the Toes . . . . . . . . . . . . . . . . . . . . . . .40Hide the Bottoms of the Feet . . . . . . . . . . . .42Slimming and Lengthening the Legs . . . . . .42Help for Beginning Models . . . . . . . . . . . . .44
Hips and Derriere . . . . . . . . . . . . . . . . . . . . . . .44Rear View . . . . . . . . . . . . . . . . . . . . . . . . . .44Seated Poses . . . . . . . . . . . . . . . . . . . . . . . . .45Raise One Foot . . . . . . . . . . . . . . . . . . . . . .45
Hands and Wrists . . . . . . . . . . . . . . . . . . . . . . .45
Importance of the Hands . . . . . . . . . . . . . . .45“Bad” Hands . . . . . . . . . . . . . . . . . . . . . . . .47General Guidelines . . . . . . . . . . . . . . . . . . . .47Relaxed Positions . . . . . . . . . . . . . . . . . . . . .48Hands with Props and Products . . . . . . . . . .49Hands Around the Face . . . . . . . . . . . . . . . .51Hands at the Waist . . . . . . . . . . . . . . . . . . . .52Hands in the Waistband/Belt . . . . . . . . . . . .54Hands in Pockets . . . . . . . . . . . . . . . . . . . . .56Hands with Lapels and Zippers . . . . . . . . . . .57Hands on Thighs . . . . . . . . . . . . . . . . . . . . .59Hands in the Lap . . . . . . . . . . . . . . . . . . . . .61Practical Examples . . . . . . . . . . . . . . . . . . . .62
Arms and Shoulders . . . . . . . . . . . . . . . . . . . . .67Separation from the Body . . . . . . . . . . . . . . .67Elbows . . . . . . . . . . . . . . . . . . . . . . . . . . . . .67Framing the Face . . . . . . . . . . . . . . . . . . . . .68Arms Raised . . . . . . . . . . . . . . . . . . . . . . . . .68
POSING TECHNIQUES FOR PHOTOGRAPHING MODEL PORTFOLIOS4
3. Posing the Head and Face . . . . . . . . .69Views of the Face . . . . . . . . . . . . . . . . . . . . . . .69Full Face . . . . . . . . . . . . . . . . . . . . . . . . . . .69Three-Quarter View . . . . . . . . . . . . . . . . . . .69Profile . . . . . . . . . . . . . . . . . . . . . . . . . . . . .71
Tilting the Head . . . . . . . . . . . . . . . . . . . . . . . .71Eyes . . . . . . . . . . . . . . . . . . . . . . . . . . . . . . . . .72Lips . . . . . . . . . . . . . . . . . . . . . . . . . . . . . . . . .76Expression . . . . . . . . . . . . . . . . . . . . . . . . . . . .80
4. Posing for Different Genres . . . . . . . .81Determining the Best Market . . . . . . . . . . . . . .81Age . . . . . . . . . . . . . . . . . . . . . . . . . . . . . . .81Height . . . . . . . . . . . . . . . . . . . . . . . . . . . . .82Overall Appearance . . . . . . . . . . . . . . . . . . . .82
Commercial . . . . . . . . . . . . . . . . . . . . . . . . . . .83Fashion . . . . . . . . . . . . . . . . . . . . . . . . . . . . . . .86Glamour . . . . . . . . . . . . . . . . . . . . . . . . . . . . . .86Lingerie . . . . . . . . . . . . . . . . . . . . . . . . . . . . . .90Plus-Size Models . . . . . . . . . . . . . . . . . . . . . . . .90Editorial . . . . . . . . . . . . . . . . . . . . . . . . . . . . . .93Athletic/Sports . . . . . . . . . . . . . . . . . . . . . . . . .94Catalog . . . . . . . . . . . . . . . . . . . . . . . . . . . . . . .96Swimwear . . . . . . . . . . . . . . . . . . . . . . . . . . . . .97Special Attributes . . . . . . . . . . . . . . . . . . . . . .100
5. Practical Examples . . . . . . . . . . . . . . . .101Bethany: Body Shot . . . . . . . . . . . . . . . . . . . .101Ciana: Symmetry . . . . . . . . . . . . . . . . . . . . . . .103Janeen: Natural Curves . . . . . . . . . . . . . . . . . .106Lexie: Showing Personality . . . . . . . . . . . . . . .109Monique: Girly, Cute, and Fun . . . . . . . . . . . .110
6. Hints and Tips . . . . . . . . . . . . . . . . . . .112Build a Sample Portfolio . . . . . . . . . . . . . . . . .113Quality . . . . . . . . . . . . . . . . . . . . . . . . . . . . . .115Inform the Model . . . . . . . . . . . . . . . . . . . . . .115Begin with Portraiture . . . . . . . . . . . . . . . . . .116Create a Mood . . . . . . . . . . . . . . . . . . . . . . . .118The Model’s Comfort . . . . . . . . . . . . . . . . . . .118
Background Selection . . . . . . . . . . . . . . . . . . .120Clothing . . . . . . . . . . . . . . . . . . . . . . . . . . . . .120Lighting . . . . . . . . . . . . . . . . . . . . . . . . . . . . .121Creating a Portfolio . . . . . . . . . . . . . . . . . . . .122Opening and Closing Shots . . . . . . . . . . . .122Arranging the Interior Images . . . . . . . . . .122Grouping . . . . . . . . . . . . . . . . . . . . . . . . . .122Stuffing . . . . . . . . . . . . . . . . . . . . . . . . . . .122Blank Pages . . . . . . . . . . . . . . . . . . . . . . . .122
Variety . . . . . . . . . . . . . . . . . . . . . . . . . . . . . .123
In Closing . . . . . . . . . . . . . . . . . . . . . . . . . . . .124Index . . . . . . . . . . . . . . . . . . . . . . . . . . . . . . .125
TABLE OF CONTENTS 5
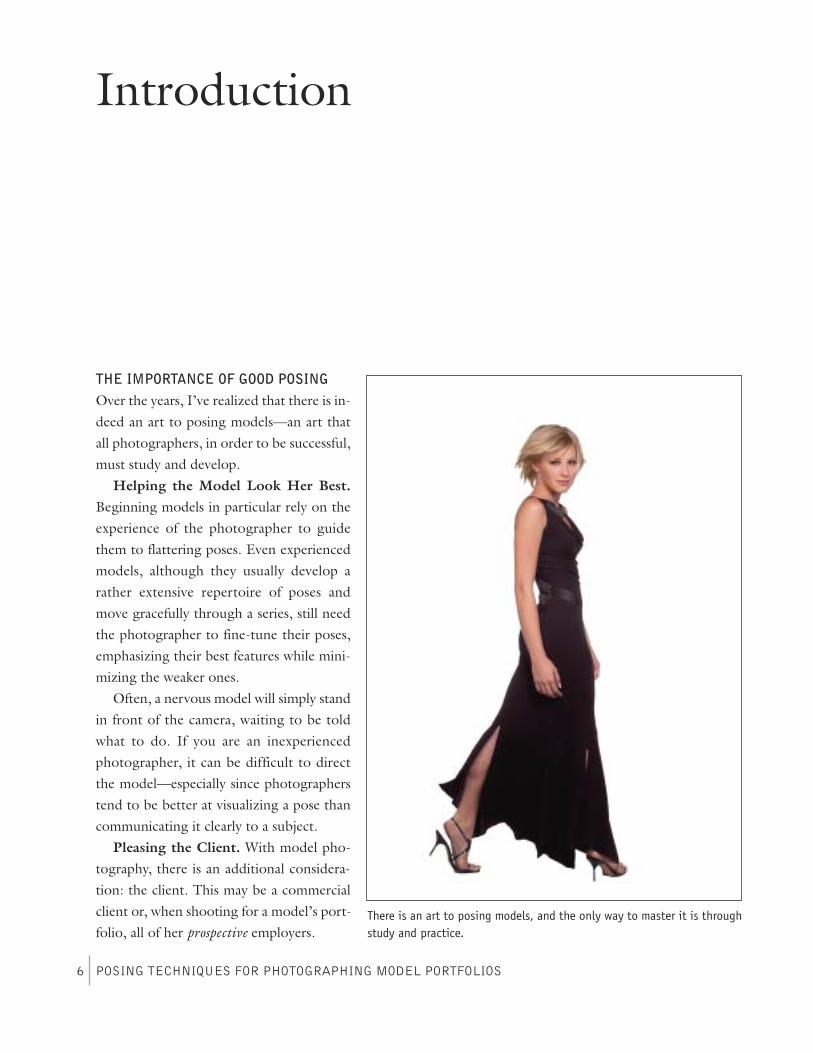
THE IMPORTANCE OF GOOD POSINGOver the years, I’ve realized that there is in-deed an art to posing models—an art thatall photographers, in order to be successful,must study and develop.
Helping the Model Look Her Best.Beginning models in particular rely on theexperience of the photographer to guidethem to flattering poses. Even experiencedmodels, although they usually develop arather extensive repertoire of poses andmove gracefully through a series, still needthe photographer to fine-tune their poses,emphasizing their best features while mini-mizing the weaker ones.Often, a nervous model will simply stand
in front of the camera, waiting to be toldwhat to do. If you are an inexperiencedphotographer, it can be difficult to directthe model—especially since photographerstend to be better at visualizing a pose thancommunicating it clearly to a subject.
Pleasing the Client. With model pho-tography, there is an additional considera-tion: the client. This may be a commercialclient or, when shooting for a model’s port-folio, all of her prospective employers.
POSING TECHNIQUES FOR PHOTOGRAPHING MODEL PORTFOLIOS6
Introduction
There is an art to posing models, and the only way to master it is throughstudy and practice.
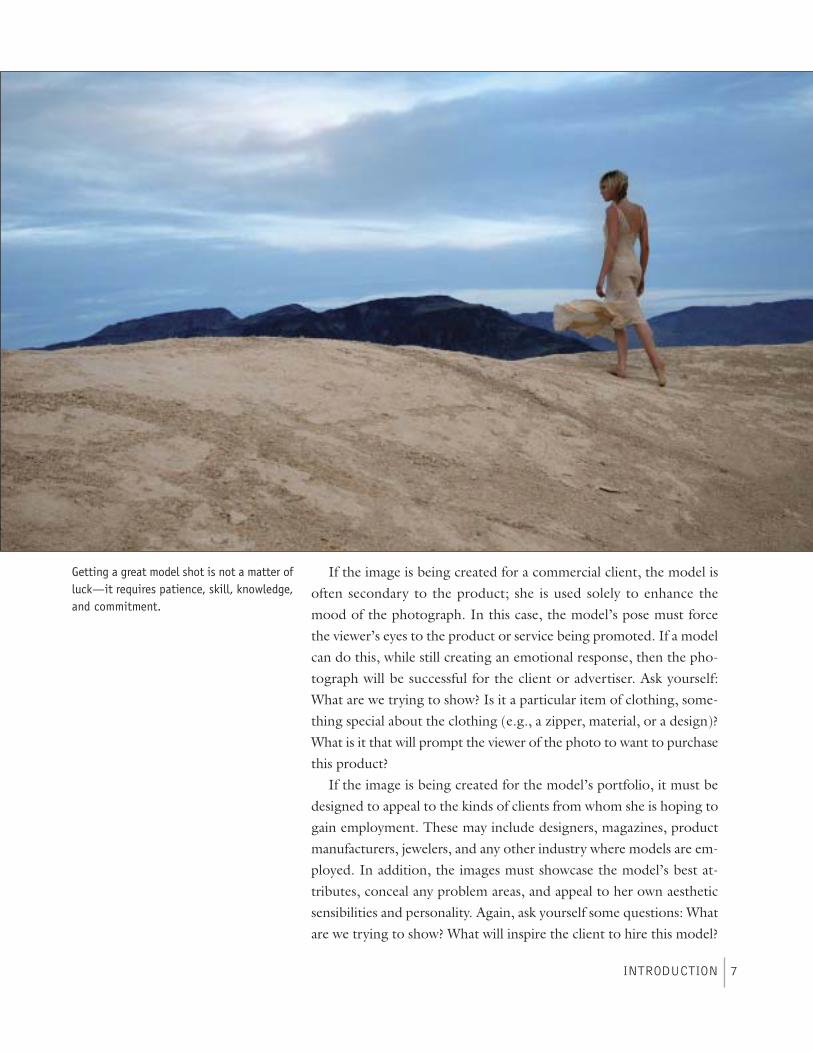
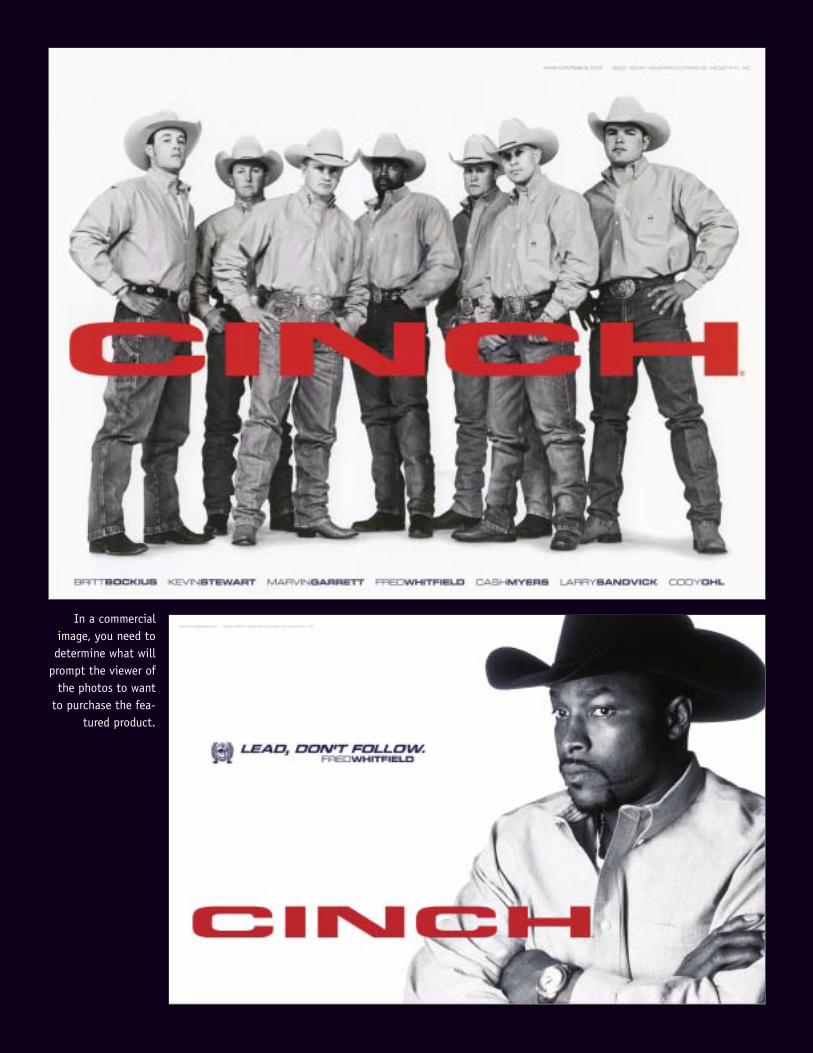
If the image is being created for a commercial client, the model isoften secondary to the product; she is used solely to enhance themood of the photograph. In this case, the model’s pose must forcethe viewer’s eyes to the product or service being promoted. If a modelcan do this, while still creating an emotional response, then the pho-tograph will be successful for the client or advertiser. Ask yourself:What are we trying to show? Is it a particular item of clothing, some-thing special about the clothing (e.g., a zipper, material, or a design)?What is it that will prompt the viewer of the photo to want to purchasethis product?If the image is being created for the model’s portfolio, it must be
designed to appeal to the kinds of clients from whom she is hoping togain employment. These may include designers, magazines, productmanufacturers, jewelers, and any other industry where models are em-ployed. In addition, the images must showcase the model’s best at-tributes, conceal any problem areas, and appeal to her own aestheticsensibilities and personality. Again, ask yourself some questions: Whatare we trying to show? What will inspire the client to hire this model?
INTRODUCTION 7
Getting a great model shot is not a matter ofluck—it requires patience, skill, knowledge,and commitment.
In a commercialimage, you need todetermine what willprompt the viewer ofthe photos to wantto purchase the fea-
tured product.
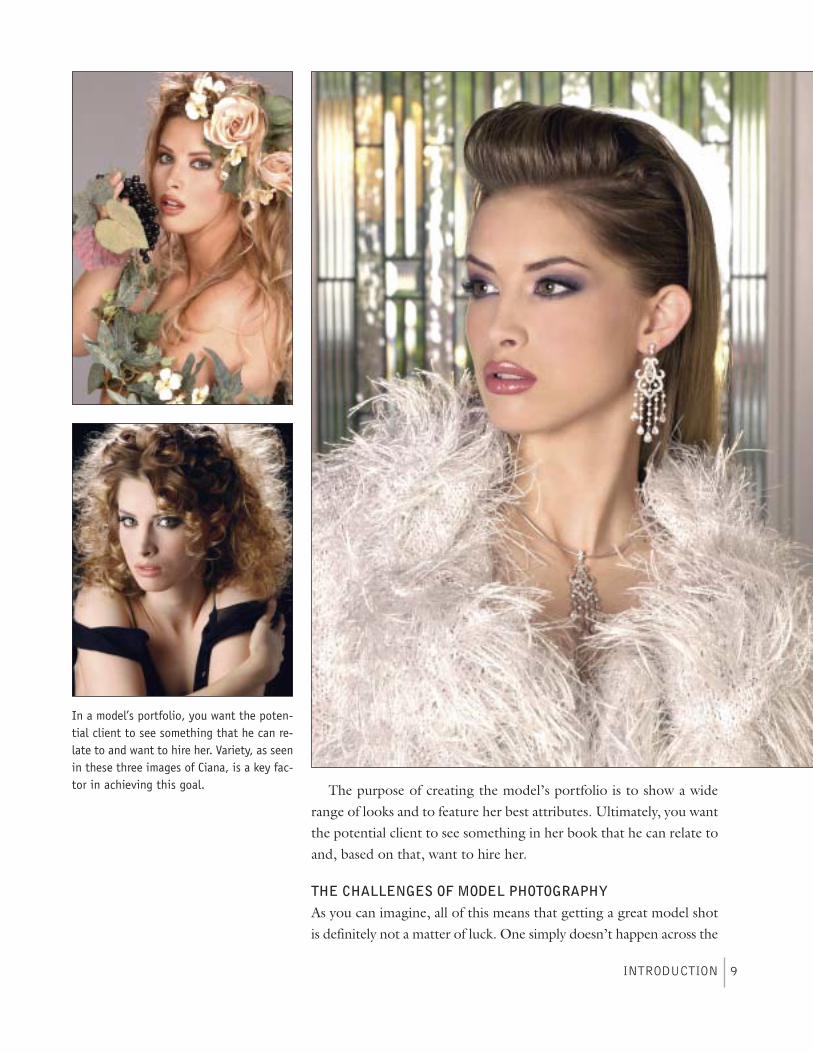
The purpose of creating the model’s portfolio is to show a widerange of looks and to feature her best attributes. Ultimately, you wantthe potential client to see something in her book that he can relate toand, based on that, want to hire her.
THE CHALLENGES OF MODEL PHOTOGRAPHYAs you can imagine, all of this means that getting a great model shotis definitely not a matter of luck. One simply doesn’t happen across the
INTRODUCTION 9
In a model’s portfolio, you want the poten-tial client to see something that he can re-late to and want to hire her. Variety, as seenin these three images of Ciana, is a key fac-tor in achieving this goal.
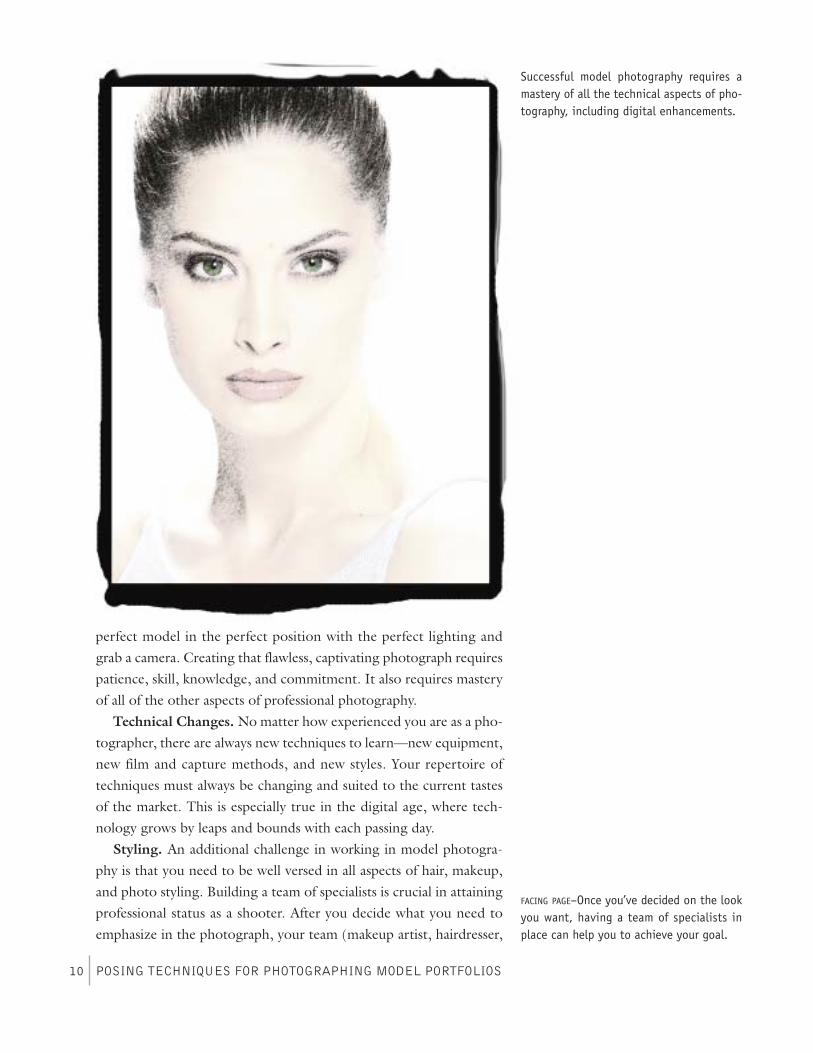
perfect model in the perfect position with the perfect lighting andgrab a camera. Creating that flawless, captivating photograph requirespatience, skill, knowledge, and commitment. It also requires masteryof all of the other aspects of professional photography.
Technical Changes. No matter how experienced you are as a pho-tographer, there are always new techniques to learn—new equipment,new film and capture methods, and new styles. Your repertoire oftechniques must always be changing and suited to the current tastesof the market. This is especially true in the digital age, where tech-nology grows by leaps and bounds with each passing day.
Styling. An additional challenge in working in model photogra-phy is that you need to be well versed in all aspects of hair, makeup,and photo styling. Building a team of specialists is crucial in attainingprofessional status as a shooter. After you decide what you need toemphasize in the photograph, your team (makeup artist, hairdresser,
POSING TECHNIQUES FOR PHOTOGRAPHING MODEL PORTFOLIOS10
Successful model photography requires amastery of all the technical aspects of pho-tography, including digital enhancements.
FACING PAGE–Once you’ve decided on the lookyou want, having a team of specialists inplace can help you to achieve your goal.
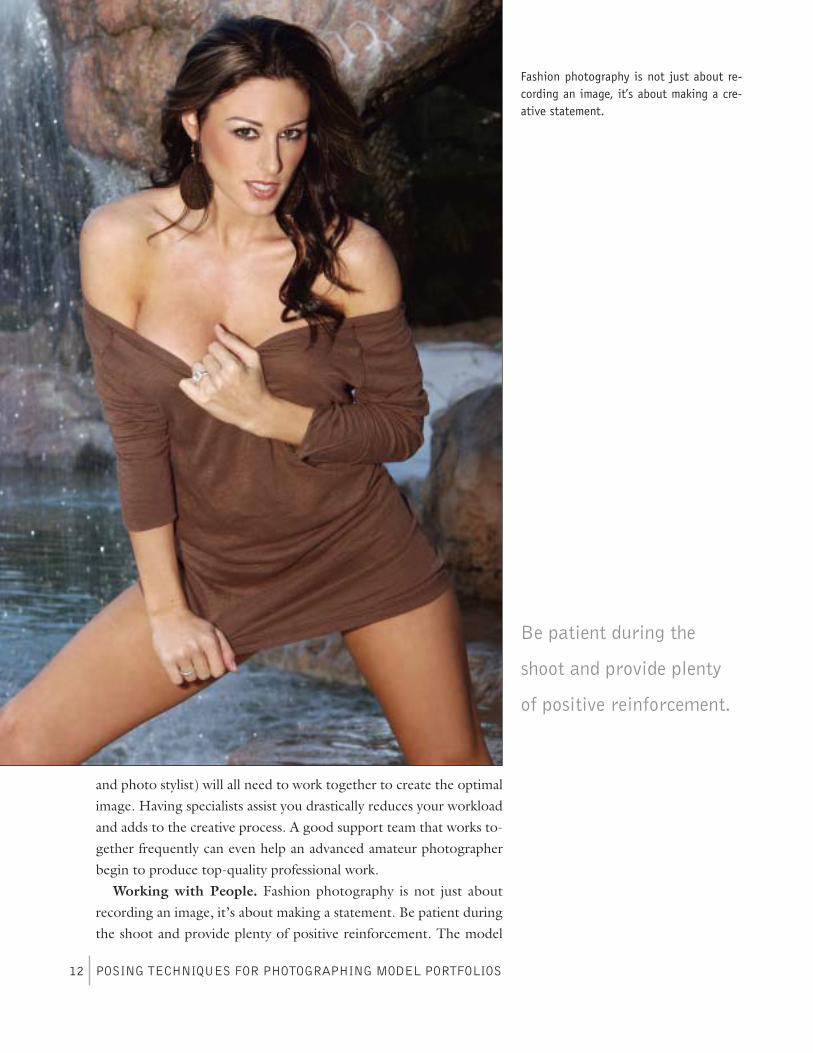
and photo stylist) will all need to work together to create the optimalimage. Having specialists assist you drastically reduces your workloadand adds to the creative process. A good support team that works to-gether frequently can even help an advanced amateur photographerbegin to produce top-quality professional work.
Working with People. Fashion photography is not just aboutrecording an image, it’s about making a statement. Be patient duringthe shoot and provide plenty of positive reinforcement. The model
POSING TECHNIQUES FOR PHOTOGRAPHING MODEL PORTFOLIOS12
Fashion photography is not just about re-cording an image, it’s about making a cre-ative statement.
Be patient during the
shoot and provide plenty
of positive reinforcement.
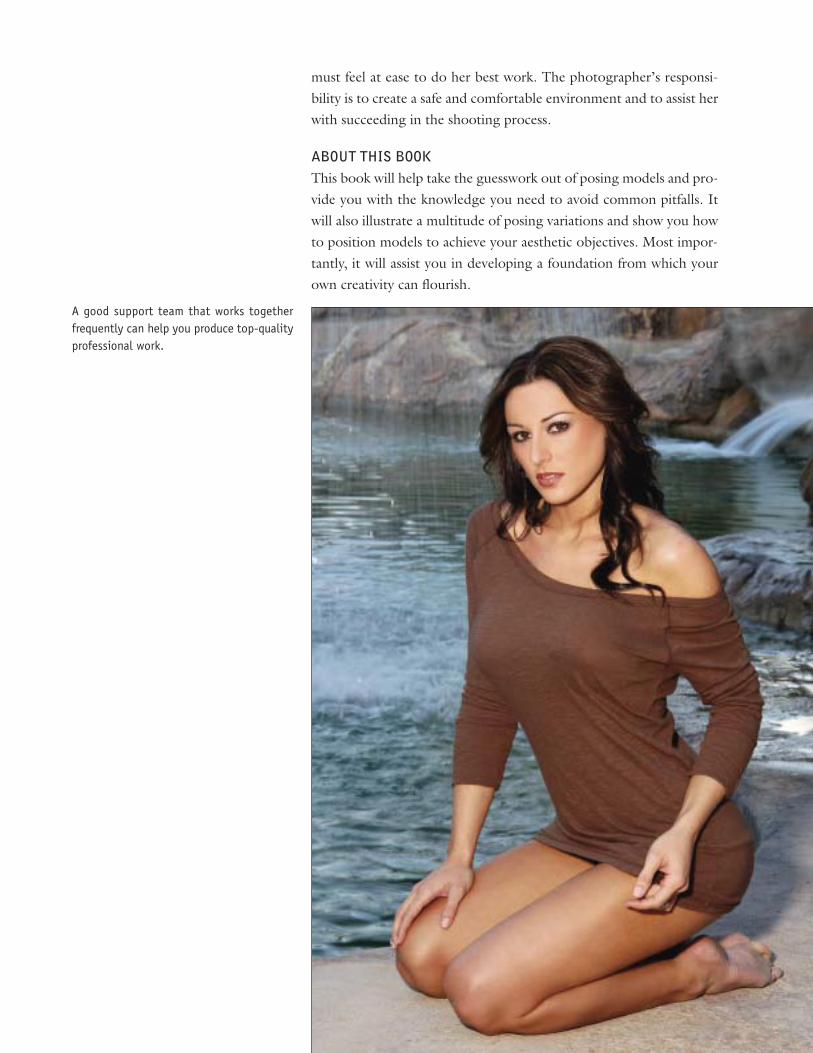
must feel at ease to do her best work. The photographer’s responsi-bility is to create a safe and comfortable environment and to assist herwith succeeding in the shooting process.
ABOUT THIS BOOKThis book will help take the guesswork out of posing models and pro-vide you with the knowledge you need to avoid common pitfalls. Itwill also illustrate a multitude of posing variations and show you howto position models to achieve your aesthetic objectives. Most impor-tantly, it will assist you in developing a foundation from which yourown creativity can flourish.
A good support team that works togetherfrequently can help you produce top-qualityprofessional work.
PREVISUALIZATIONOver the years, I have heard many people refer to the photographer’sor artist’s “eye.” This refers to an individual’s ability to previsualize aphotograph or a piece of art before starting the production process.Previsualization is necessary anytime you work with models. After all,a model is not an inanimate object that can sit there all day. Her jobis to communicate feelings and add emotion to the photograph. Byplanning out your ideas and before the shoot starts, you’ll be bestequipped to capitalize on the model’s abilities.
Emulate the Success of Others. A great source of inspiration isthe work of other photographers you admire. Make a resource col-lection of these samples to help hone your own likes and dislikes. Youdon’t need to copy every detail of another photographer’s images tomake your photographs successful, just emulate the elements thatmesh with your personal vision.
Use Your Imagination.When creating an image, especially whentrying to emulate another photographer’s work, be sure to look forways to integrate your personal feelings—your likes and dislikes, lovesand passions. Imagination is the most powerful tool a photographercan possess. Technical proficiency can be learned through education,experimentation, and practice, but imagination comes from within.Studying the work of current and past artists and photographers willassist in your imaginative process and help you to establish your ownunique style.When photographing people, the photographer must exert more
energy than the model to bring life into the photograph. Ask yourselfa few questions before shooting:
POSING TECHNIQUES FOR PHOTOGRAPHING MODEL PORTFOLIOS14
1. Basic Principles
A great source
of inspiration is the work
of other photographers
you admire.
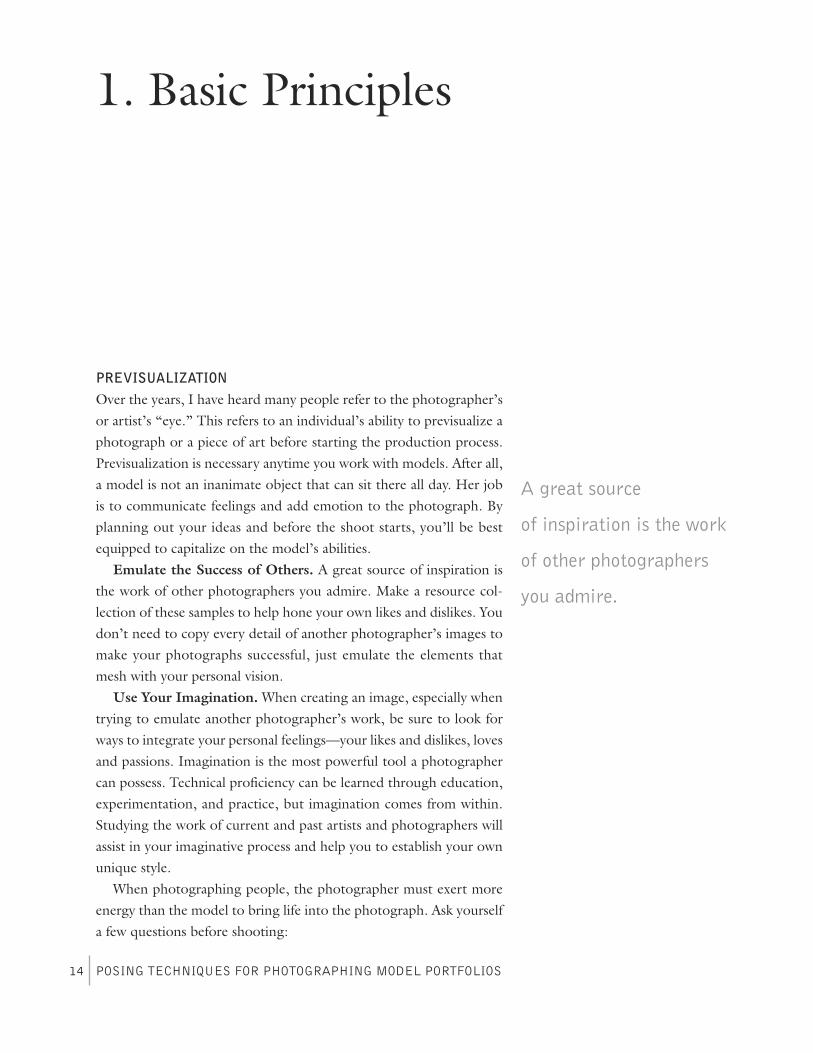
• What are we trying to show/sell?• How do the elements of the pose relate to the background, theclothing, or the product?
• What pose is appropriate for the clothing, product, or thedesired feeling of the photograph?
Communicate Your Concept. After settling on an idea or concept,you must communicate it to the model before you start working. Thiswill establish your credibility with those on the set and allow the wholeteam to work in a unified direction. Keep in mind that being in frontof the camera can make people nervous, so being clear with your in-
BASIC PRINCIPLES 15
Use your imagination. Once you have a basicconcept in mind (like a simple headshot ofa model making a “Shhhh!” hand gesture),try some variations by making slight adjust-ments to the pose or expression.
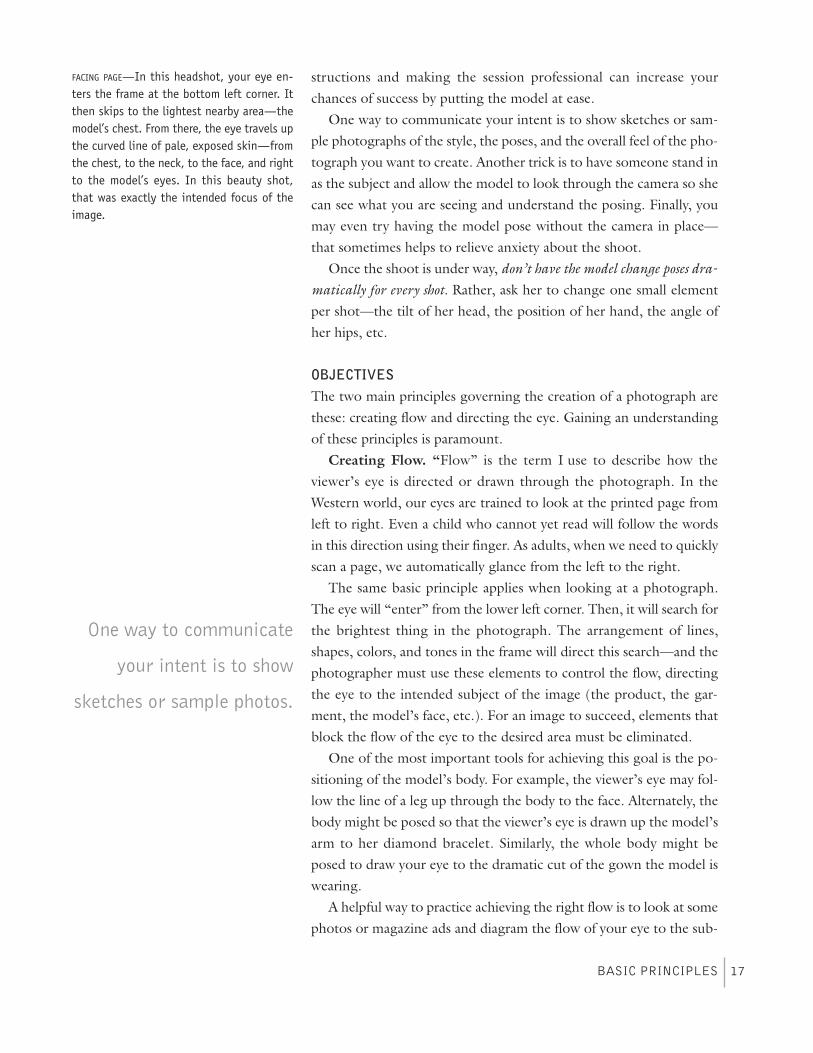
structions and making the session professional can increase yourchances of success by putting the model at ease.One way to communicate your intent is to show sketches or sam-
ple photographs of the style, the poses, and the overall feel of the pho-tograph you want to create. Another trick is to have someone stand inas the subject and allow the model to look through the camera so shecan see what you are seeing and understand the posing. Finally, youmay even try having the model pose without the camera in place—that sometimes helps to relieve anxiety about the shoot.Once the shoot is under way, don’t have the model change poses dra-
matically for every shot. Rather, ask her to change one small elementper shot—the tilt of her head, the position of her hand, the angle ofher hips, etc.
OBJECTIVESThe two main principles governing the creation of a photograph arethese: creating flow and directing the eye. Gaining an understandingof these principles is paramount.
Creating Flow. “Flow” is the term I use to describe how theviewer’s eye is directed or drawn through the photograph. In theWestern world, our eyes are trained to look at the printed page fromleft to right. Even a child who cannot yet read will follow the wordsin this direction using their finger. As adults, when we need to quicklyscan a page, we automatically glance from the left to the right.The same basic principle applies when looking at a photograph.
The eye will “enter” from the lower left corner. Then, it will search forthe brightest thing in the photograph. The arrangement of lines,shapes, colors, and tones in the frame will direct this search—and thephotographer must use these elements to control the flow, directingthe eye to the intended subject of the image (the product, the gar-ment, the model’s face, etc.). For an image to succeed, elements thatblock the flow of the eye to the desired area must be eliminated.One of the most important tools for achieving this goal is the po-
sitioning of the model’s body. For example, the viewer’s eye may fol-low the line of a leg up through the body to the face. Alternately, thebody might be posed so that the viewer’s eye is drawn up the model’sarm to her diamond bracelet. Similarly, the whole body might beposed to draw your eye to the dramatic cut of the gown the model iswearing.A helpful way to practice achieving the right flow is to look at some
photos or magazine ads and diagram the flow of your eye to the sub-
BASIC PRINCIPLES 17
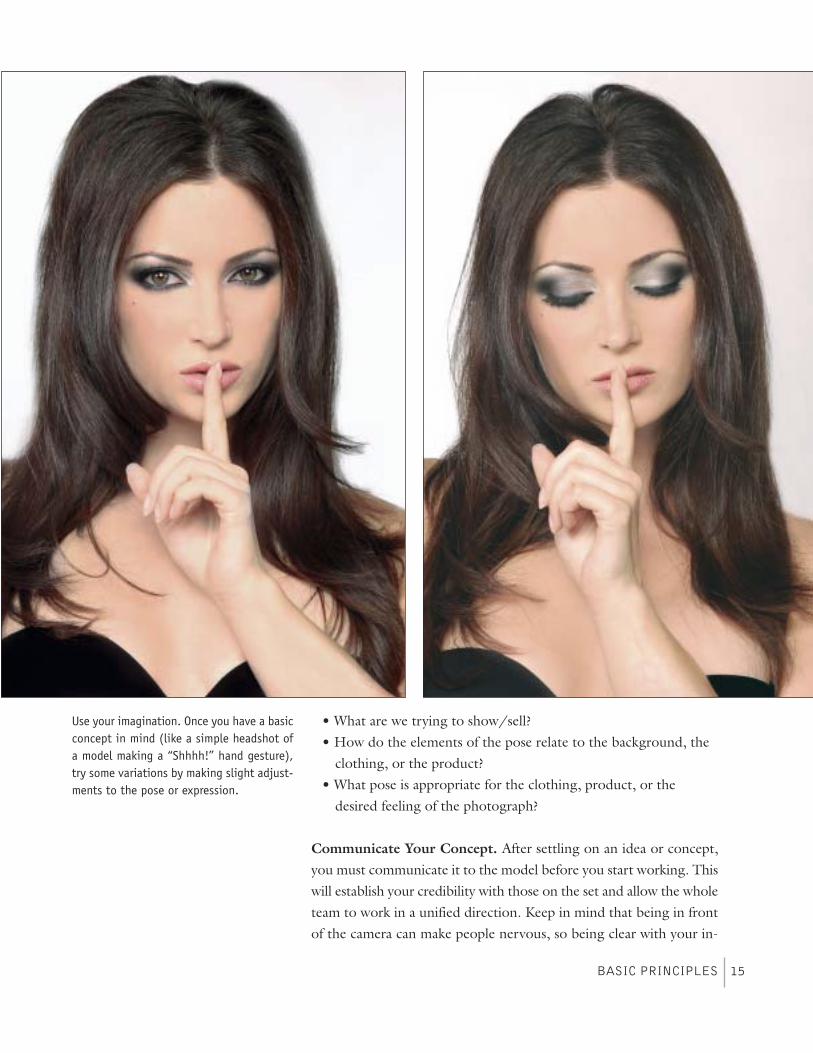
FACING PAGE—In this headshot, your eye en-ters the frame at the bottom left corner. Itthen skips to the lightest nearby area—themodel’s chest. From there, the eye travels upthe curved line of pale, exposed skin—fromthe chest, to the neck, to the face, and rightto the model’s eyes. In this beauty shot,that was exactly the intended focus of theimage.
One way to communicate
your intent is to show
sketches or sample photos.
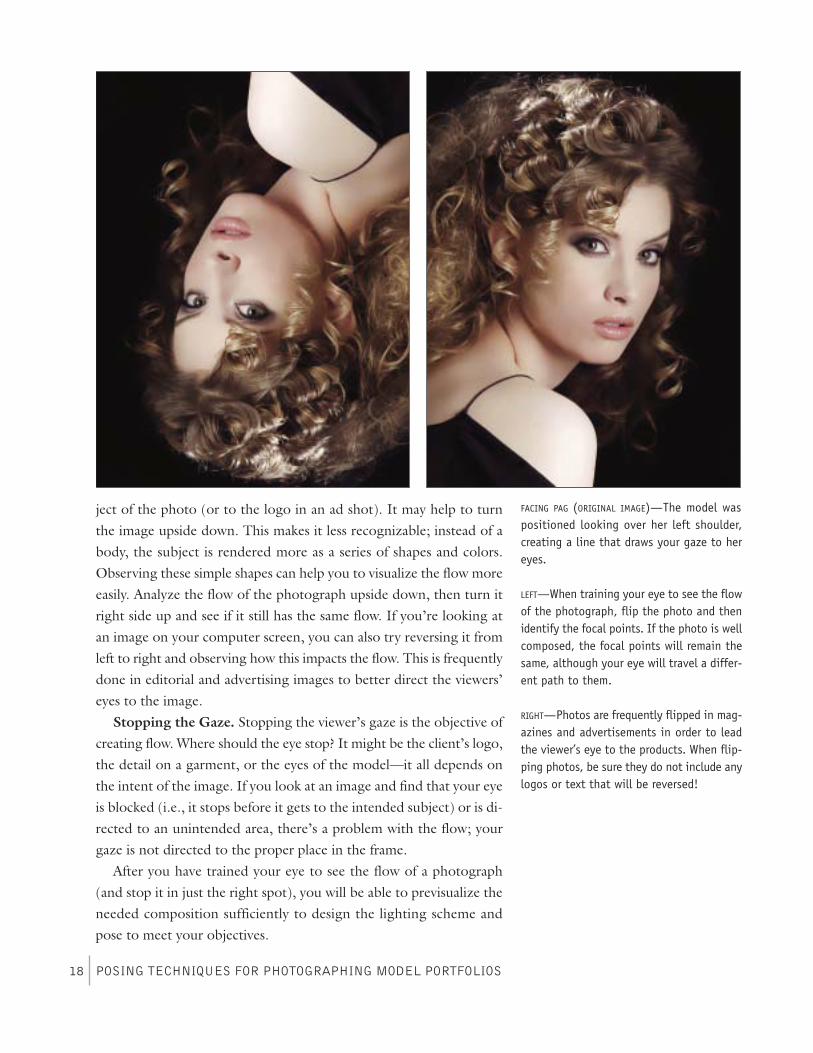
ject of the photo (or to the logo in an ad shot). It may help to turnthe image upside down. This makes it less recognizable; instead of abody, the subject is rendered more as a series of shapes and colors.Observing these simple shapes can help you to visualize the flow moreeasily. Analyze the flow of the photograph upside down, then turn itright side up and see if it still has the same flow. If you’re looking atan image on your computer screen, you can also try reversing it fromleft to right and observing how this impacts the flow. This is frequentlydone in editorial and advertising images to better direct the viewers’eyes to the image.
Stopping the Gaze. Stopping the viewer’s gaze is the objective ofcreating flow. Where should the eye stop? It might be the client’s logo,the detail on a garment, or the eyes of the model—it all depends onthe intent of the image. If you look at an image and find that your eyeis blocked (i.e., it stops before it gets to the intended subject) or is di-rected to an unintended area, there’s a problem with the flow; yourgaze is not directed to the proper place in the frame.After you have trained your eye to see the flow of a photograph
(and stop it in just the right spot), you will be able to previsualize theneeded composition sufficiently to design the lighting scheme andpose to meet your objectives.
POSING TECHNIQUES FOR PHOTOGRAPHING MODEL PORTFOLIOS18
FACING PAG (ORIGINAL IMAGE)—The model waspositioned looking over her left shoulder,creating a line that draws your gaze to hereyes.
LEFT—When training your eye to see the flowof the photograph, flip the photo and thenidentify the focal points. If the photo is wellcomposed, the focal points will remain thesame, although your eye will travel a differ-ent path to them.
RIGHT—Photos are frequently flipped in mag-azines and advertisements in order to leadthe viewer’s eye to the products. When flip-ping photos, be sure they do not include anylogos or text that will be reversed!

TOOLSTo control the flow and emphasize the intended subject, the photog-rapher must understand the basic tools used to manipulate the path ofthe viewer’s gaze. Some basic elements are: lines, curves, compositionand cropping, perspective, and tone/color.
BELOW—The subject of this image is thedress. Notice how your eyes move right tothis area and remain locked on it, taking inthe details of its color, style, and texture.
Straight Lines. Straight lines give the photo a structured ap-pearance, which is most often used when a strong, commandingaura is needed. Among straight lines, diagonal lines are more dy-namic than vertical or horizontal ones. Vertical and horizontallines, however, can be good for grounding an image, providingcontrast to curves, or lending a sense of solidity.
Curves. Curves tend to be more elegant and stylish thanstraight lines. They also create a considerably softer look when usedin posing. There are two varieties of curves: the C and the S. Bothwill be discussed in greater detail in chapter 2, where we will look
BASIC PRINCIPLES 21
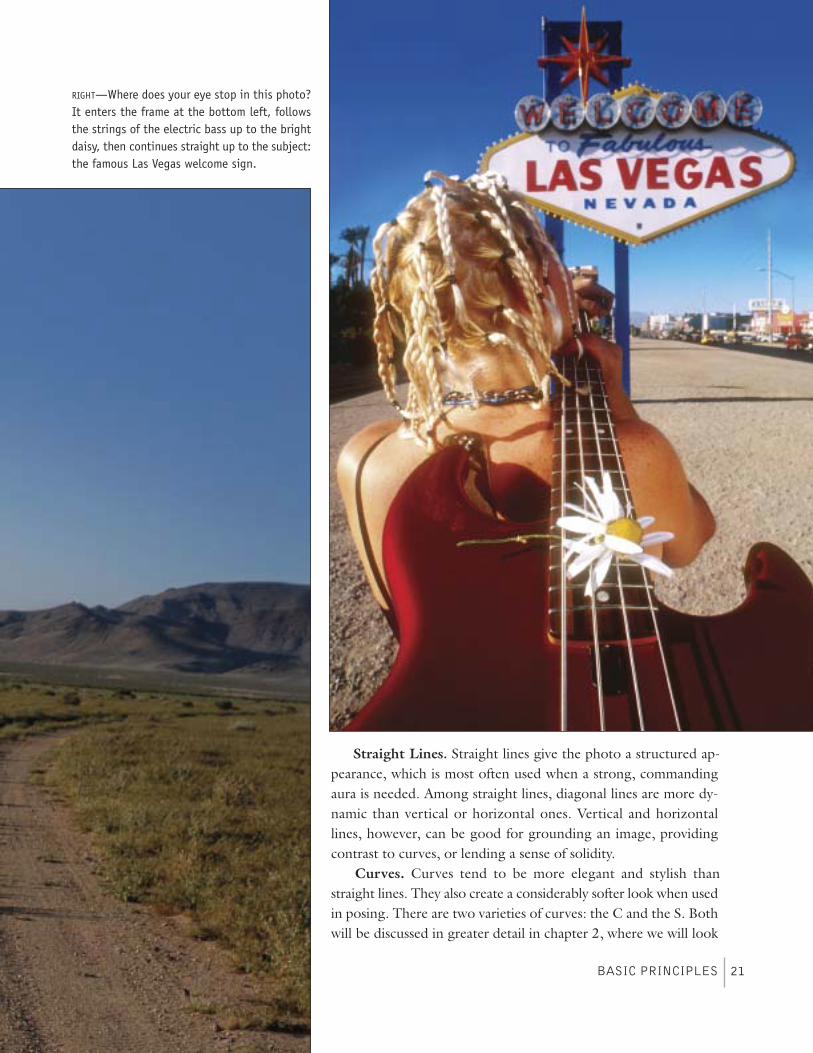
RIGHT—Where does your eye stop in this photo?It enters the frame at the bottom left, followsthe strings of the electric bass up to the brightdaisy, then continues straight up to the subject:the famous Las Vegas welcome sign.

at posing the body. The S curve, in particular, is a beautiful and grace-ful form that is always pleasing to the eye (see below and next page).The Renaissance masters knew this was the most pleasing position forthe female body and used it extensively in their paintings. Its appealhasn’t been lost on today’s advertisers, either—notice, for example,how many automobile commercials are shot with roads that form asweeping S curve across the screen.
FACING PAGE, TOP—Here, the straight line of themodel’s body creates the impression thatshe is a skilled athlete who would be a for-midable opponent.
FACING PAGE, BOTTOM LEFT—The long, straightlines of the model’s legs in this image forma strong, symmetrical frame for the classiccar in the background.
FACING PAGE, BOTTOM RIGHT—Straight lines willusually be introduced automatically whenyou decide to include architecture in yourimage.
BELOW—Notice the use of S curves in boththe model’s body and the road in the back-ground. RIGHT—It’s helpful to pose yourmodel so that your photographs will appealto many potential buyers and offer a numberof potential cropping options.

Composition and Cropping. Composition is the term used to de-scribe the placement of the subject in the frame and the overall visualinterplay of all the elements within the frame.There are many theories about how to compose the most power-
ful image, but one guideline that will serve you particularly well inmodel photography is the Rule of Thirds. According to this rule, theframe is divided up into thirds (imagine a tic-tac-toe grid superim-posed over the frame). These lines indicate good places for a subjectwithin that frame.
POSING TECHNIQUES FOR PHOTOGRAPHING MODEL PORTFOLIOS24
LEFT AND FACING PAGE—Here are two examplesof posing the model’s body to create an Scurve in the frame. We’ll look at this pose ingreater detail when we get to chapter 2.
There are many theories
about how to compose the
most powerful image . . .

The intersections are considered particularly ideal positions for asubject. In most portraits and beauty images, this means that the sub-ject’s face (in a full-length shot) or eyes (in a headshot) will be placedsomewhere along the top one-third line. In other images, the productor logo may be placed along one of these lines to emphasize it.A particularly practical aspect of applying the Rule of Thirds when
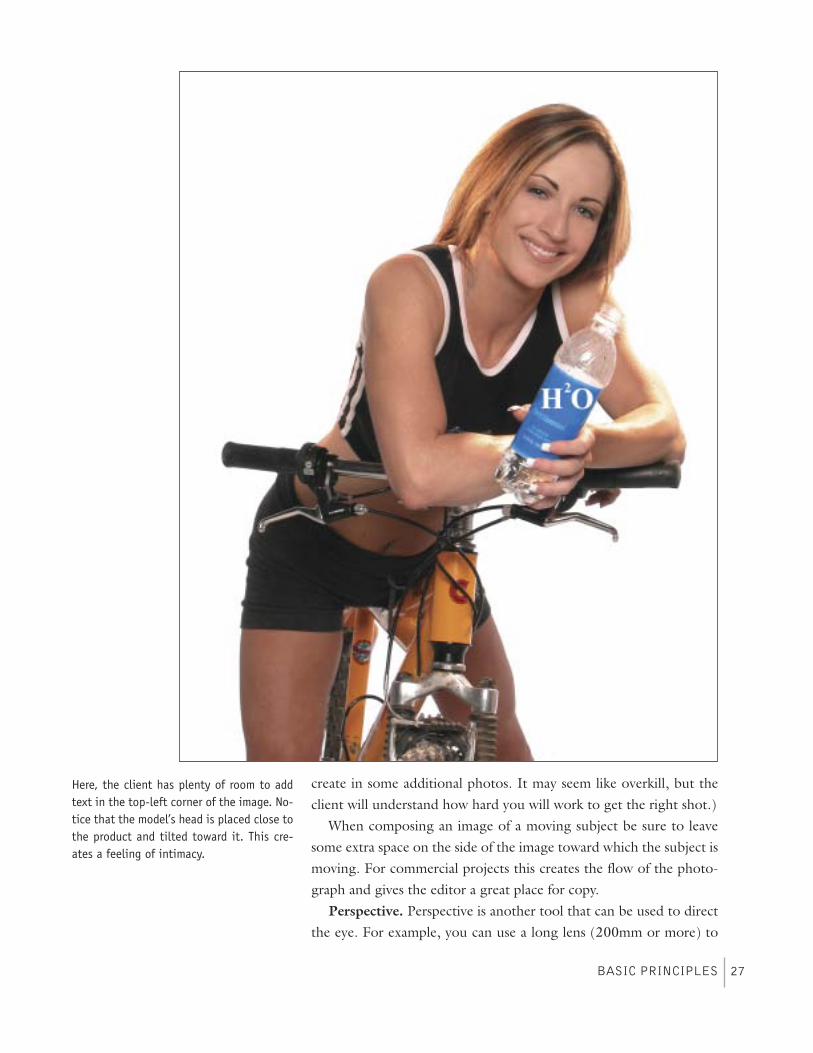
composing your images is that it tends to leave you with an open areathat is suitable for placing ad copy. The model’s body can also beposed to lead the eye directly to this text. (Note:When shooting for acommercial client, the art director will normally give you a sketch ora layout for the ad. I suggest you shoot this exact layout, then re-spectfully make any suggestions you might have for small variations to
POSING TECHNIQUES FOR PHOTOGRAPHING MODEL PORTFOLIOS26
Placing your model according to the Rule of Thirds can create a very pleasingcomposition. Here, the model is posed to direct the flow into the empty spaceto the right. This provides magazine editors and art directors with an area for textand captions. Notice that the image could also be successfully cropped in a num-ber of ways.
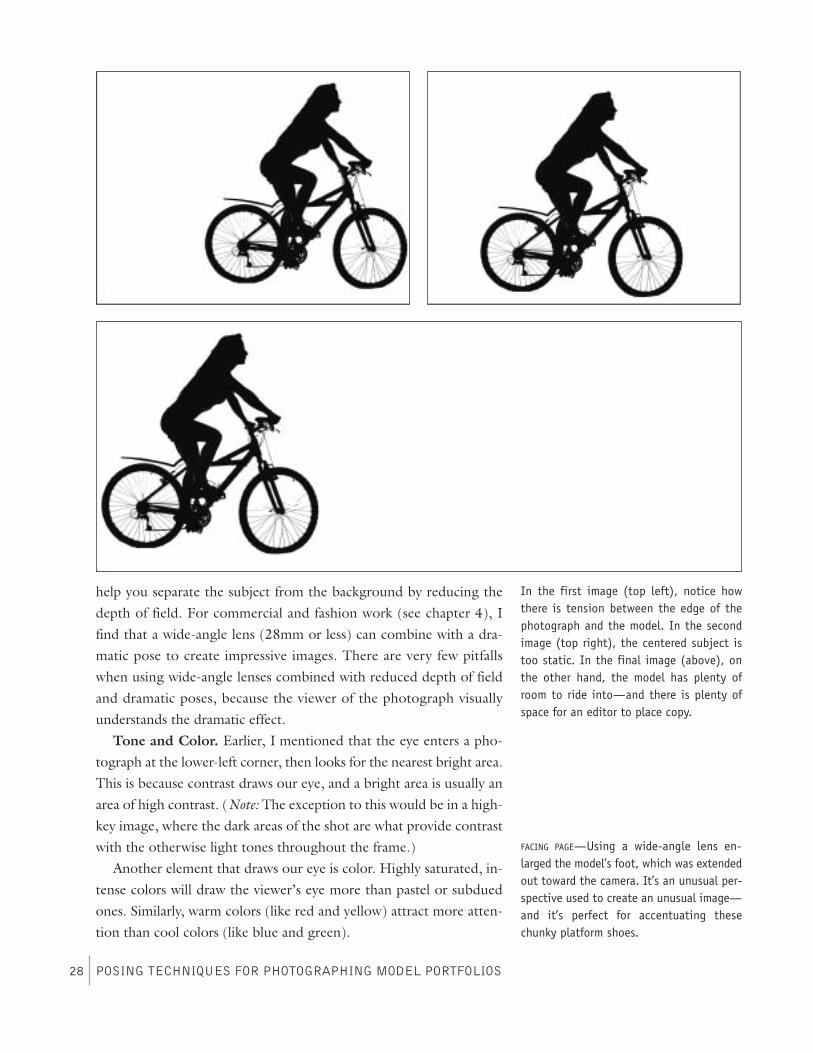
create in some additional photos. It may seem like overkill, but theclient will understand how hard you will work to get the right shot.)When composing an image of a moving subject be sure to leave
some extra space on the side of the image toward which the subject ismoving. For commercial projects this creates the flow of the photo-graph and gives the editor a great place for copy.
Perspective. Perspective is another tool that can be used to directthe eye. For example, you can use a long lens (200mm or more) to
BASIC PRINCIPLES 27
Here, the client has plenty of room to addtext in the top-left corner of the image. No-tice that the model’s head is placed close tothe product and tilted toward it. This cre-ates a feeling of intimacy.
help you separate the subject from the background by reducing thedepth of field. For commercial and fashion work (see chapter 4), Ifind that a wide-angle lens (28mm or less) can combine with a dra-matic pose to create impressive images. There are very few pitfallswhen using wide-angle lenses combined with reduced depth of fieldand dramatic poses, because the viewer of the photograph visuallyunderstands the dramatic effect.
Tone and Color. Earlier, I mentioned that the eye enters a pho-tograph at the lower-left corner, then looks for the nearest bright area.This is because contrast draws our eye, and a bright area is usually anarea of high contrast. (Note: The exception to this would be in a high-key image, where the dark areas of the shot are what provide contrastwith the otherwise light tones throughout the frame.)Another element that draws our eye is color. Highly saturated, in-
tense colors will draw the viewer’s eye more than pastel or subduedones. Similarly, warm colors (like red and yellow) attract more atten-tion than cool colors (like blue and green).
POSING TECHNIQUES FOR PHOTOGRAPHING MODEL PORTFOLIOS28
In the first image (top left), notice howthere is tension between the edge of thephotograph and the model. In the secondimage (top right), the centered subject istoo static. In the final image (above), onthe other hand, the model has plenty ofroom to ride into—and there is plenty ofspace for an editor to place copy.
FACING PAGE—Using a wide-angle lens en-larged the model’s foot, which was extendedout toward the camera. It’s an unusual per-spective used to create an unusual image—and it’s perfect for accentuating thesechunky platform shoes.
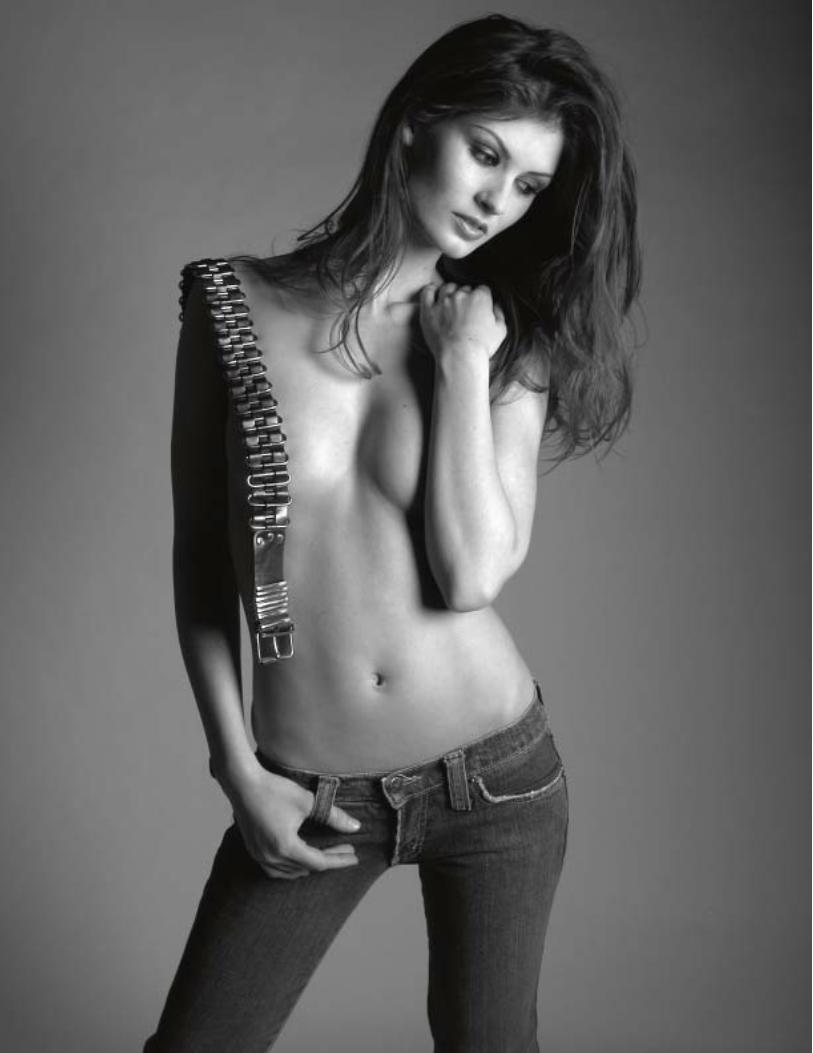
Posing. As you’ve probably guessed by now, the posing of themodel’s body is one of the critical elements in successfully directingthe viewer’s eye. Ensuring that the pose accomplishes this successfullyis the responsibility of the photographer. For example, a well-executedleg pose will draw the viewer’s eye up the leg, through the body, andto the face—which is the ideal. Incorrectly posed, however, it can eas-ily misdirect the eye up the body to a portion of the anatomy not in-tended as a point of focus by the model, client, or photographer.In the following chapters we’ll look at this critical element in detail,
providing ample guidelines for avoiding problems like this.
BASIC PRINCIPLES 31
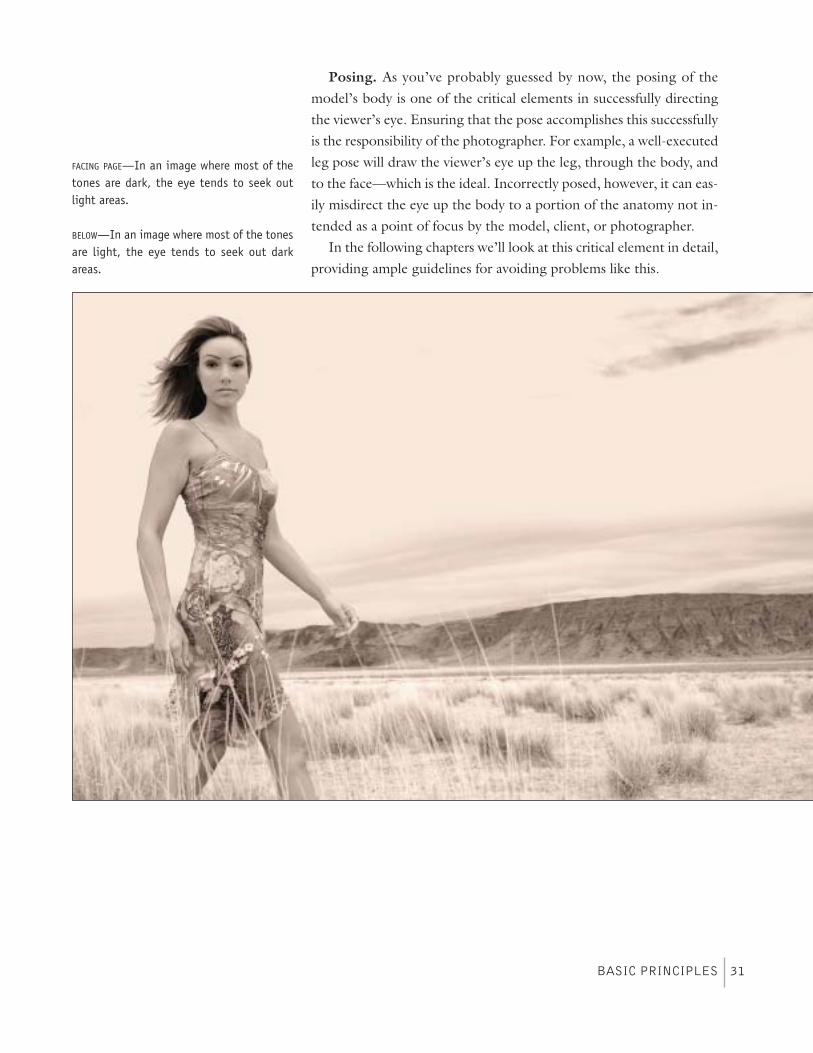
FACING PAGE—In an image where most of thetones are dark, the eye tends to seek outlight areas.
BELOW—In an image where most of the tonesare light, the eye tends to seek out darkareas.
THREE BASIC RULESWhatever type of pose you choose, there are three basic guidelines tokeep in mind:
1. The spine should never form a vertical line2. The shoulders should never form a horizontal line.3. The hips should not be square to the camera.
The reason for the first two rules has to do with lines. As you’ll recallfrom the previous chapter, vertical and horizontal lines produce astatic, rigid feel in an image. That’s why it’s better to use the shoul-ders and spine to create diagonal lines.The reason for the third rule is that the body looks widest when fac-
ing the camera directly. This is not how most female subjects want tosee themselves! Turning the body so that the hips are slightly angledwill make it appear thinner—a much more flattering view.Are there exceptions to these rules? Of course. Sometimes you may
want to show a model with squared shoulders to convey a very direct,intense look. Or, you may have a very thin model whose slim curvesare better rendered when her body is square to the camera. For themajority of images, however, these rules will serve you well.
POSTUREWhen a model slumps, it accentuates the shoulders and leads to the“turtle” effect (where the subject doesn’t appear to have a neck). Italso makes the bustline appear to sag.
POSING THE BODY 33
2. Posing the Body
FACING PAGE—Posing the model so that hershoulders create a diagonal line produces anmore interesting image than if the shoulderswere perfectly horizontal.
The body looks widest
when it is facing the
camera directly.
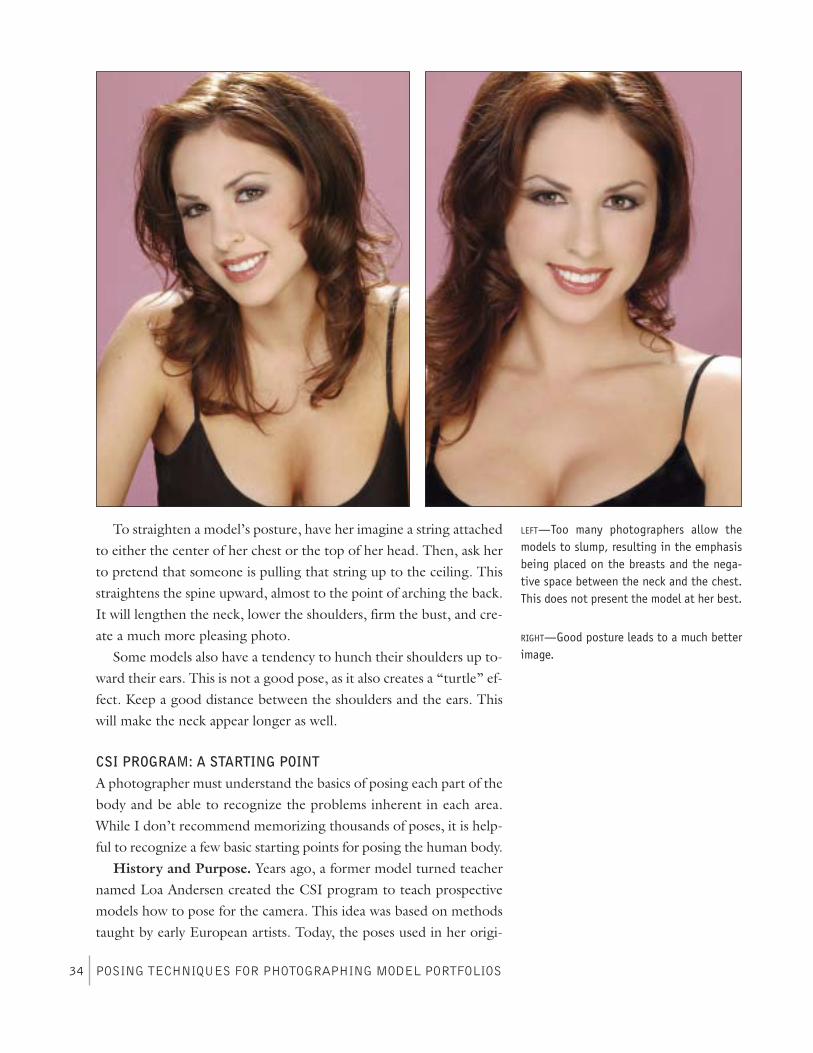
To straighten a model’s posture, have her imagine a string attachedto either the center of her chest or the top of her head. Then, ask herto pretend that someone is pulling that string up to the ceiling. Thisstraightens the spine upward, almost to the point of arching the back.It will lengthen the neck, lower the shoulders, firm the bust, and cre-ate a much more pleasing photo.Some models also have a tendency to hunch their shoulders up to-
ward their ears. This is not a good pose, as it also creates a “turtle” ef-fect. Keep a good distance between the shoulders and the ears. Thiswill make the neck appear longer as well.
CSI PROGRAM: A STARTING POINTA photographer must understand the basics of posing each part of thebody and be able to recognize the problems inherent in each area.While I don’t recommend memorizing thousands of poses, it is help-ful to recognize a few basic starting points for posing the human body.
History and Purpose. Years ago, a former model turned teachernamed Loa Andersen created the CSI program to teach prospectivemodels how to pose for the camera. This idea was based on methodstaught by early European artists. Today, the poses used in her origi-
POSING TECHNIQUES FOR PHOTOGRAPHING MODEL PORTFOLIOS34
LEFT—Too many photographers allow themodels to slump, resulting in the emphasisbeing placed on the breasts and the nega-tive space between the neck and the chest.This does not present the model at her best.
RIGHT—Good posture leads to a much betterimage.
nal photographs are considered stilted, stiff, and old-fashioned. Yet,the basic idea of the CSI program (named for the three major posesit identifies; see below) is still valid for photographers who wish to de-velop their posing skills. The program also enables a beginning modelor photographer to analyze and re-create a pose selected from a mag-azine or catalog. Furthermore, it helps photographers to determinehow the pose affects the focus and overall flow of a photograph.
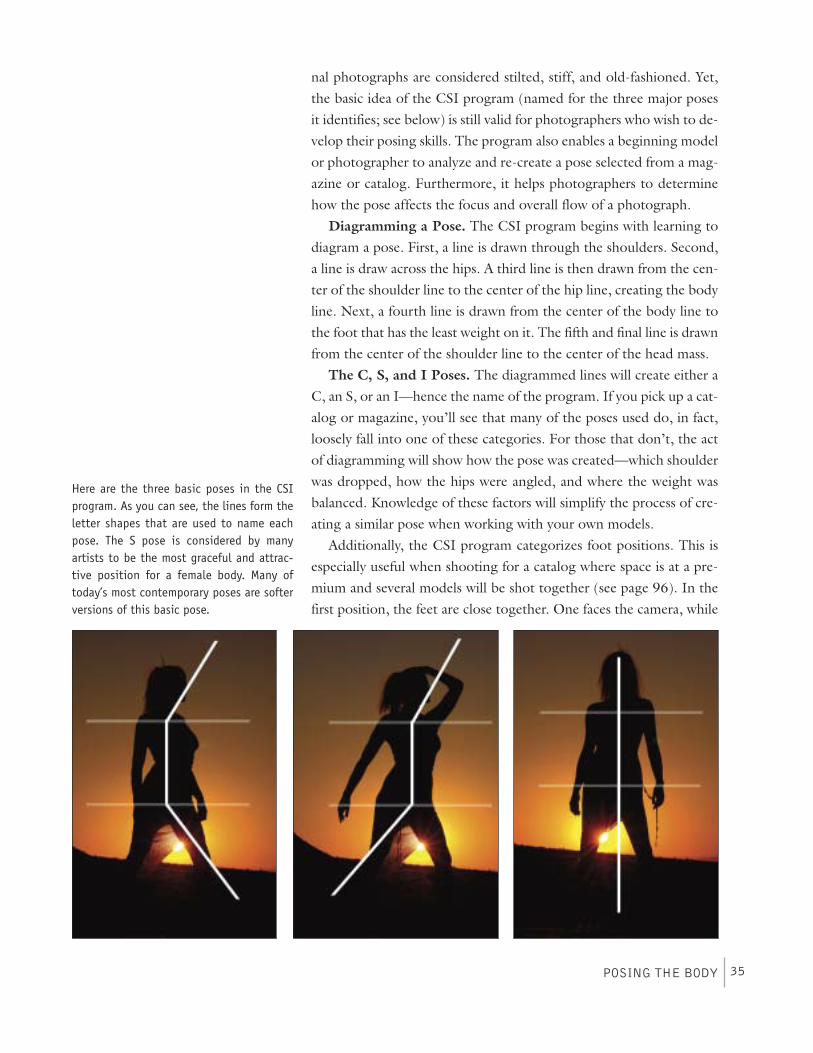
Diagramming a Pose. The CSI program begins with learning todiagram a pose. First, a line is drawn through the shoulders. Second,a line is draw across the hips. A third line is then drawn from the cen-ter of the shoulder line to the center of the hip line, creating the bodyline. Next, a fourth line is drawn from the center of the body line tothe foot that has the least weight on it. The fifth and final line is drawnfrom the center of the shoulder line to the center of the head mass.
The C, S, and I Poses. The diagrammed lines will create either aC, an S, or an I—hence the name of the program. If you pick up a cat-alog or magazine, you’ll see that many of the poses used do, in fact,loosely fall into one of these categories. For those that don’t, the actof diagramming will show how the pose was created—which shoulderwas dropped, how the hips were angled, and where the weight wasbalanced. Knowledge of these factors will simplify the process of cre-ating a similar pose when working with your own models.Additionally, the CSI program categorizes foot positions. This is
especially useful when shooting for a catalog where space is at a pre-mium and several models will be shot together (see page 96). In thefirst position, the feet are close together. One faces the camera, while
POSING THE BODY 35
Here are the three basic poses in the CSIprogram. As you can see, the lines form theletter shapes that are used to name eachpose. The S pose is considered by manyartists to be the most graceful and attrac-tive position for a female body. Many oftoday’s most contemporary poses are softerversions of this basic pose.

the other is angled slightly off camera. In the second position, the an-gled foot is pushed outward from the body. In the third position, thesame foot is extended even farther.
Foot Positions. In all foot positions, the model’s weight is heldback over the base foot and the hips are angled in line with the basefoot. This slims the hips and enhances the waist. The shoulders arenot angled, but are fairly straight to the camera, which also makes thewaistline appear smaller.
The Crossover and Open Poses. Additionally, the CSI notes two“walking” poses that are very useful for showing movement. The first,called the crossover pose, requires that the presentation leg (or theleg closest to the camera) be crossed over the back leg, showing theline of the buttocks. For this pose, the body must be stretched up-right with the back slightly arched. The line of the back arm and theturn of the hand should also follow the line of the buttocks.In the second walking pose, called the open pose, the opposite is
true—the presentation leg is extended out from the torso, leaving thebody more “open.” Add an electric fan, and the feeling of movementis guaranteed!
POSING TECHNIQUES FOR PHOTOGRAPHING MODEL PORTFOLIOS36
In the crossover pose, the presentation leg(or the leg closest to the camera) is crossedover the back leg. In the open pose, thepresentation leg is extended out from thetorso.
Years ago, a model was expected to create a notebook of poses tornfrom fashion magazines, diagram each one, then practice re-creatingthe poses in front of a mirror. Then, she was taught to close her eyesto “feel” the pose so that she could assume it perfectly without thebenefit of the mirror. Finally, when the model had memorized forty orso poses, she would string them together like pearls. The idea was toteach the model to move gracefully and smoothly from one pose toanother.The CSI program may seem to hint at this old-fashioned method,
but the photographer who understands the system will find it a veryuseful tool when faced with a beginning model who just stands infront of the camera like a deer caught in the headlights and says,“What should I do?” Also, if you are trying to help a new model de-velop into a professional, being able to instruct her in the CSI programwill be an asset.
POSING THE BODY 37
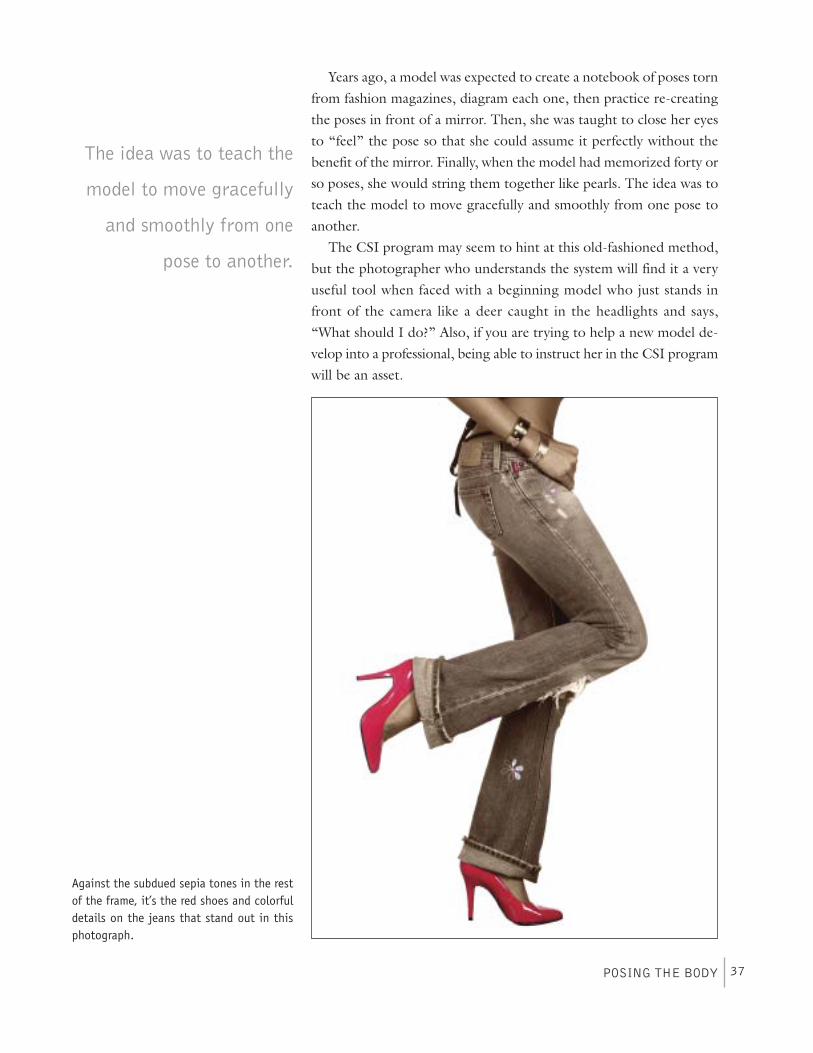
Against the subdued sepia tones in the restof the frame, it’s the red shoes and colorfuldetails on the jeans that stand out in thisphotograph.
The idea was to teach the
model to move gracefully
and smoothly from one
pose to another.
Remember, a photographer is ex-pected to be able to provide helpfulsuggestions! Having a repertoire ofstandard poses in your head allowsyou to guide a model more easily.And that’s what the CSI program is—a starting point. It is not necessary (orwise) to stick to standard poses, norshould you always copy poses devel-oped by others. These building blocksare useful, however, as a means fortraining your eye and assisting the be-ginning model.
FEET AND ANKLESThe feet are rarely shown in a photo-graph except when shooting a partic-ular product, such as shoes. However,selecting a good pose for the legs andfeet is vital when creating a full-lengthshot or a shot where the model is oneelement in a wide image. The feet andlegs contribute so much to the over-all feeling of the photograph—fromthe tilt of the hips, to the positionof the feet, to the casualness of thestance, or the relaxed angle of a seatedmodel.A good way to learn how to pose
the feet and legs is to tear out photo-graphs from magazines that you like, then draw lines on these imagesindicating where the bones are positioned in the model’s legs. (Asnoted above, this is a good exercise for posing the rest of the body,too.) Then, step back and evaluate the feel of the photograph. Doesthe position enhance this feel?
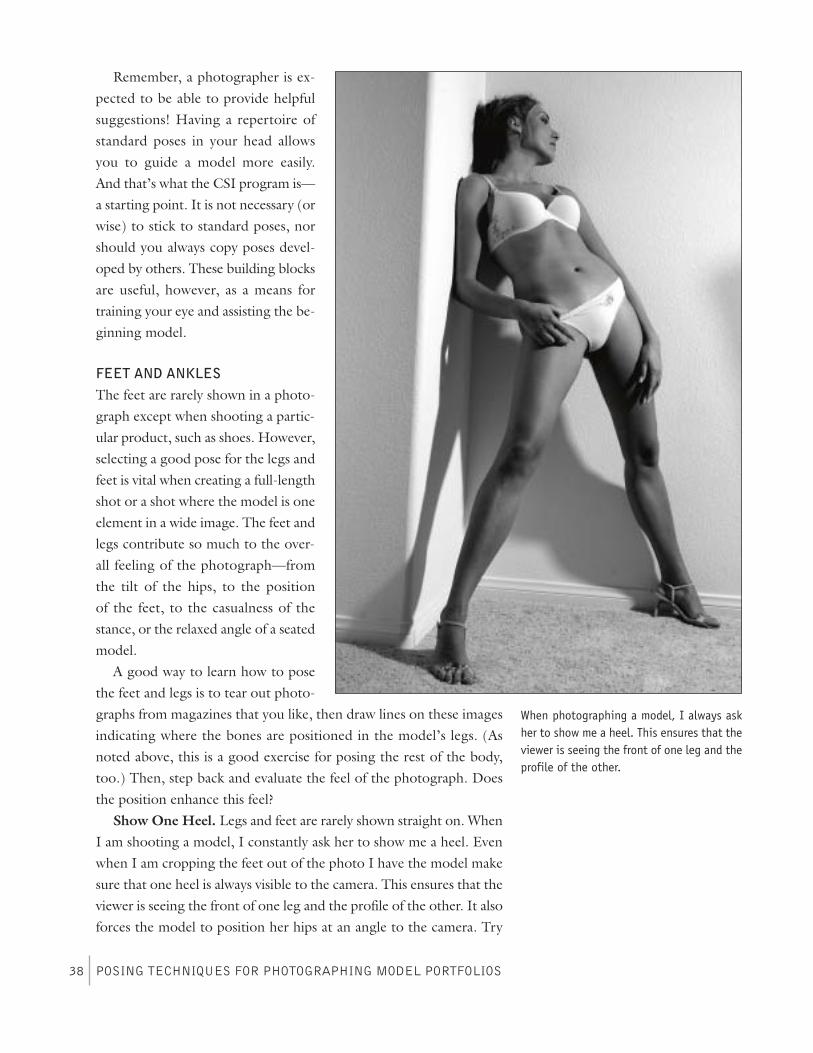
Show One Heel. Legs and feet are rarely shown straight on. WhenI am shooting a model, I constantly ask her to show me a heel. Evenwhen I am cropping the feet out of the photo I have the model makesure that one heel is always visible to the camera. This ensures that theviewer is seeing the front of one leg and the profile of the other. It alsoforces the model to position her hips at an angle to the camera. Try
POSING TECHNIQUES FOR PHOTOGRAPHING MODEL PORTFOLIOS38
When photographing a model, I always askher to show me a heel. This ensures that theviewer is seeing the front of one leg and theprofile of the other.
to avoid shooting the model standing flat footed. Showing the feetwith the heel raised adds height to the model, makes her legs lookmore toned, and creates a more graceful attitude.There are three rules I stress about a model’s feet. One, don’t cut
them off at the ankles. Two, if showing the feet, have the model pointher toes. Three, don’t show the bottom of the foot.
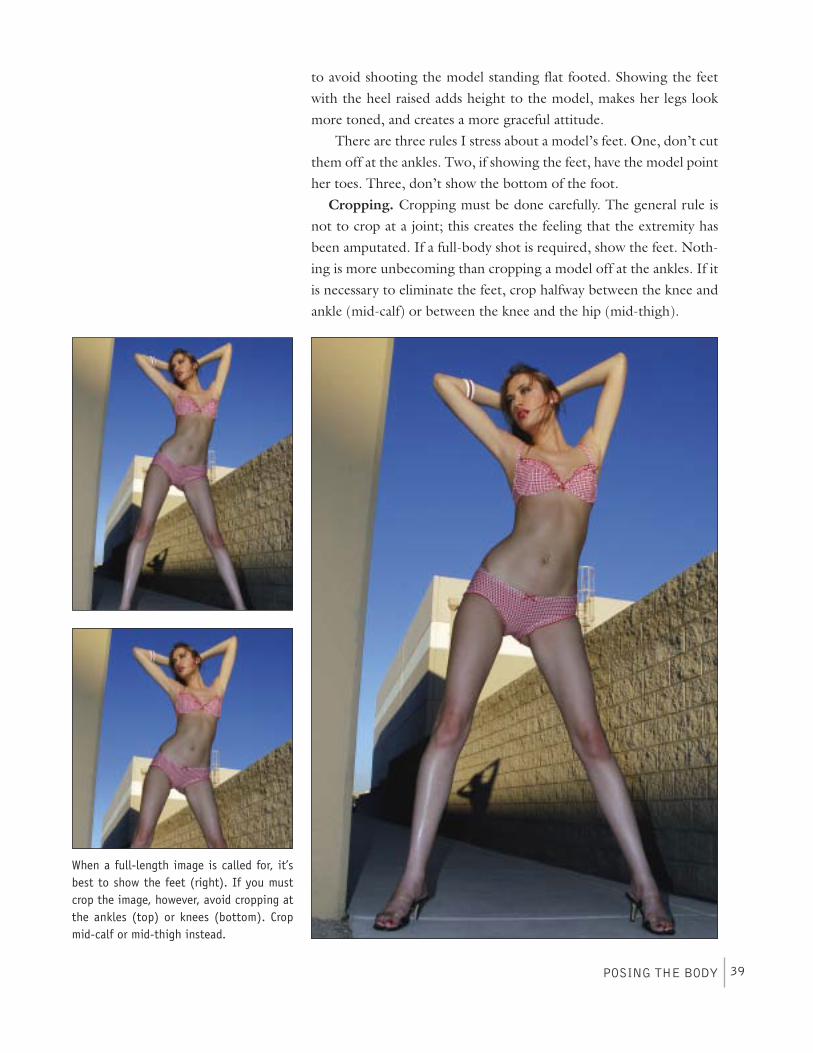
Cropping. Cropping must be done carefully. The general rule isnot to crop at a joint; this creates the feeling that the extremity hasbeen amputated. If a full-body shot is required, show the feet. Noth-ing is more unbecoming than cropping a model off at the ankles. If itis necessary to eliminate the feet, crop halfway between the knee andankle (mid-calf) or between the knee and the hip (mid-thigh).
POSING THE BODY 39
When a full-length image is called for, it’sbest to show the feet (right). If you mustcrop the image, however, avoid cropping atthe ankles (top) or knees (bottom). Cropmid-calf or mid-thigh instead.

Point the Toes. When a model points her toes, the foot instantlyforms an extension of the leg. This makes the legs look longer, slim-mer, and more toned. It also looks much more graceful than a flexedfoot. This rule applies whether the model is standing, sitting, or lay-ing down for the pose.
POSING TECHNIQUES FOR PHOTOGRAPHING MODEL PORTFOLIOS40
When showing the feet in an image, having the model point her toes creates a more toned and graceful appearance.
In the first two photos, the model’s feet are both pointed directly toward the camera. This is not an attractive pose. In the thirdimage, one heel is visible and the extended toe is pointed. This could work depending on the position of the upper body.
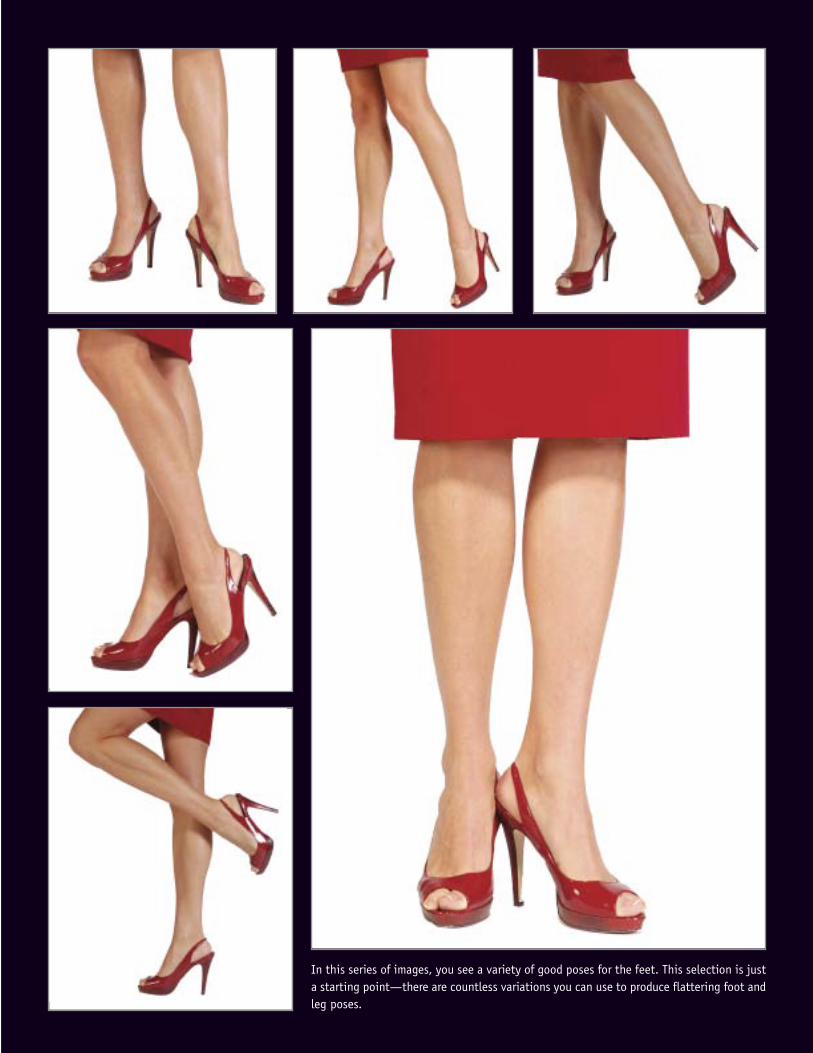
In this series of images, you see a variety of good poses for the feet. This selection is justa starting point—there are countless variations you can use to produce flattering foot andleg poses.

Hide the Bottoms of the Feet. I have yet to see an attractivephoto of the bottom of a model’s foot—whether they are barefoot orin shoes. Often, shoes will show wear and tear on the bottom, andthat’s not attractive. Even with a seated model, try to position her sothat the bottoms of her feet do not show.
Slimming and Lengthening the Legs. Legs appear to be moretoned when the muscles on the outside of the thigh and calf are flexed.This can be achieved by directing the model to stretch the presenta-tion leg out, removing the weight from the toe.To make the legs look longer, you can also put the model on a stage
and shoot from a low position, looking up toward her. In my studio,I always have the models on an 18-inch stage. This gives me the flex-ibility to shoot the model straight on without being on the floor, orto shoot up and create the illusion of a taller model.As noted above, when the legs are photographed straight on, it
makes them appear thicker. Direct the model to show one heel. Thisgives each leg a separate and distinct position, which makes them lookthinner and more graceful.Finally, if the legs are tight together, it makes the body appear as
one solid block and, therefore, thicker. Separating the legs will createa much thinner appearance.
POSING TECHNIQUES FOR PHOTOGRAPHING MODEL PORTFOLIOS42
In these images of Mary, we’ve used a widestance to create a solid base for the pose. Afan adds a little more energy to the shot.
Help for Beginning Models. When a beginning model seems tobe struggling and lacking confidence, have her spread her feet to cre-ate a strong, sturdy base, then rock from side to side. If you place a fanon her, she will look natural and will project high energy. This widestance also will make her hips appear thinner, as it is easier for her torotate her hips away from the camera.A simple variation on this is to have the model turn her back to the
camera, stand in a wide stance, then push off with one foot and swingtoward the camera. The movement will end her struggling. Also, haveher swing her head forward quickly. This is a great opportunity tocatch her hair in motion.Another option for a model who is struggling is to have her adopt
a basic crossover pose (see page 36). In this pose, have the model shifther weight back and forth as if rocking. This will help her break freeof static, stationary posing. It will also distract the model from herawareness of the camera; she can direct her thoughts to the move-ment instead.
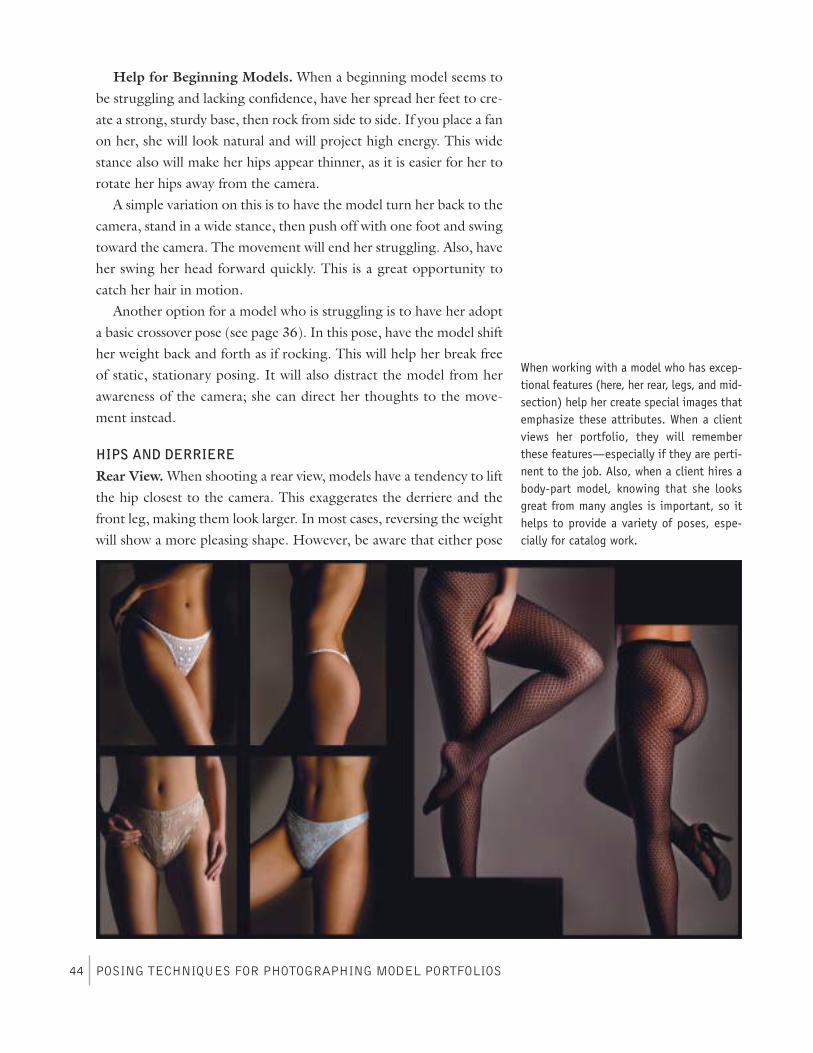
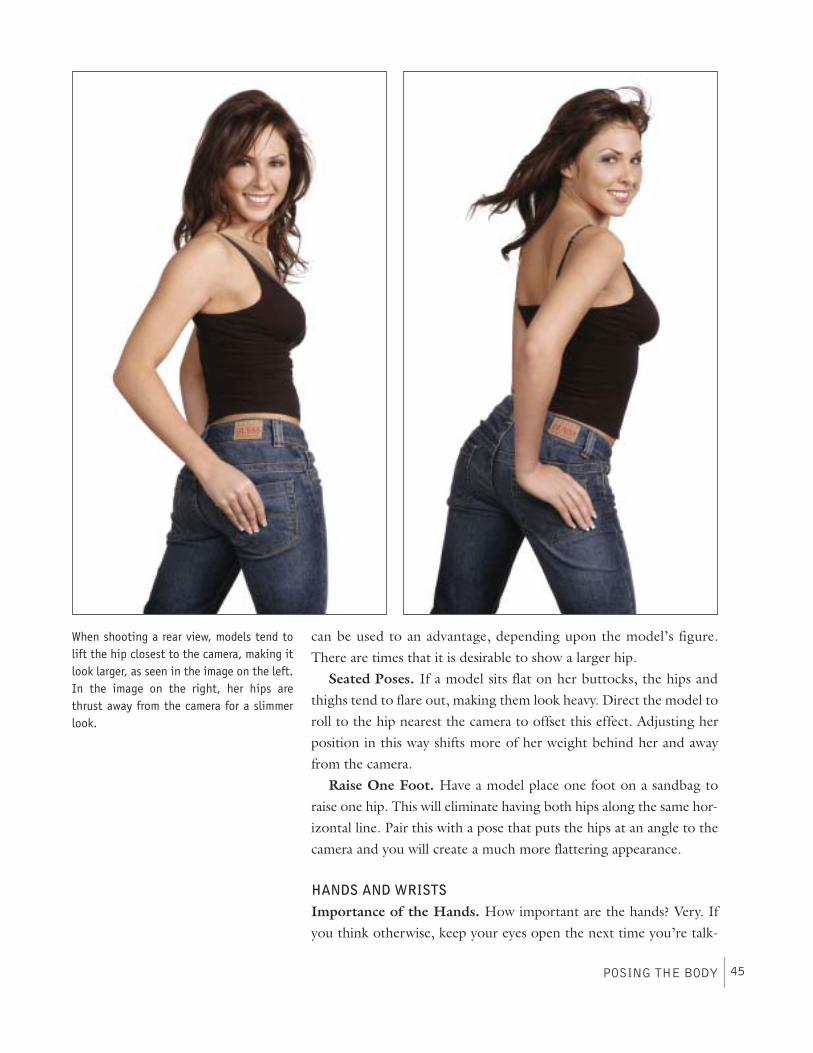
HIPS AND DERRIERERear View.When shooting a rear view, models have a tendency to liftthe hip closest to the camera. This exaggerates the derriere and thefront leg, making them look larger. In most cases, reversing the weightwill show a more pleasing shape. However, be aware that either pose
POSING TECHNIQUES FOR PHOTOGRAPHING MODEL PORTFOLIOS44
When working with a model who has excep-tional features (here, her rear, legs, and mid-section) help her create special images thatemphasize these attributes. When a clientviews her portfolio, they will rememberthese features—especially if they are perti-nent to the job. Also, when a client hires abody-part model, knowing that she looksgreat from many angles is important, so ithelps to provide a variety of poses, espe-cially for catalog work.
can be used to an advantage, depending upon the model’s figure.There are times that it is desirable to show a larger hip.
Seated Poses. If a model sits flat on her buttocks, the hips andthighs tend to flare out, making them look heavy. Direct the model toroll to the hip nearest the camera to offset this effect. Adjusting herposition in this way shifts more of her weight behind her and awayfrom the camera.
Raise One Foot. Have a model place one foot on a sandbag toraise one hip. This will eliminate having both hips along the same hor-izontal line. Pair this with a pose that puts the hips at an angle to thecamera and you will create a much more flattering appearance.
HANDS AND WRISTSImportance of the Hands. How important are the hands? Very. Ifyou think otherwise, keep your eyes open the next time you’re talk-
POSING THE BODY 45
When shooting a rear view, models tend tolift the hip closest to the camera, making itlook larger, as seen in the image on the left.In the image on the right, her hips arethrust away from the camera for a slimmerlook.
ing to a group of people. You’ll quickly see that hands are used ex-tensively to add emotion and interest to the words that are beingspoken. That makes them an important part of the process of com-munication. Because of the importance of hands in our daily lives, aviewer’s eyes will always look at the hands in a photograph to see whatthey are communicating.When teaching a group of beginning models, I have one of the
models cover her face and body so that all the group can see is herhands. Then I ask her to demonstrate anger, love, impatience, fear,reverence, and various other emotions using only her hands. Themodels quickly get a visual understanding of how the hands can en-hance the feeling of a photograph.
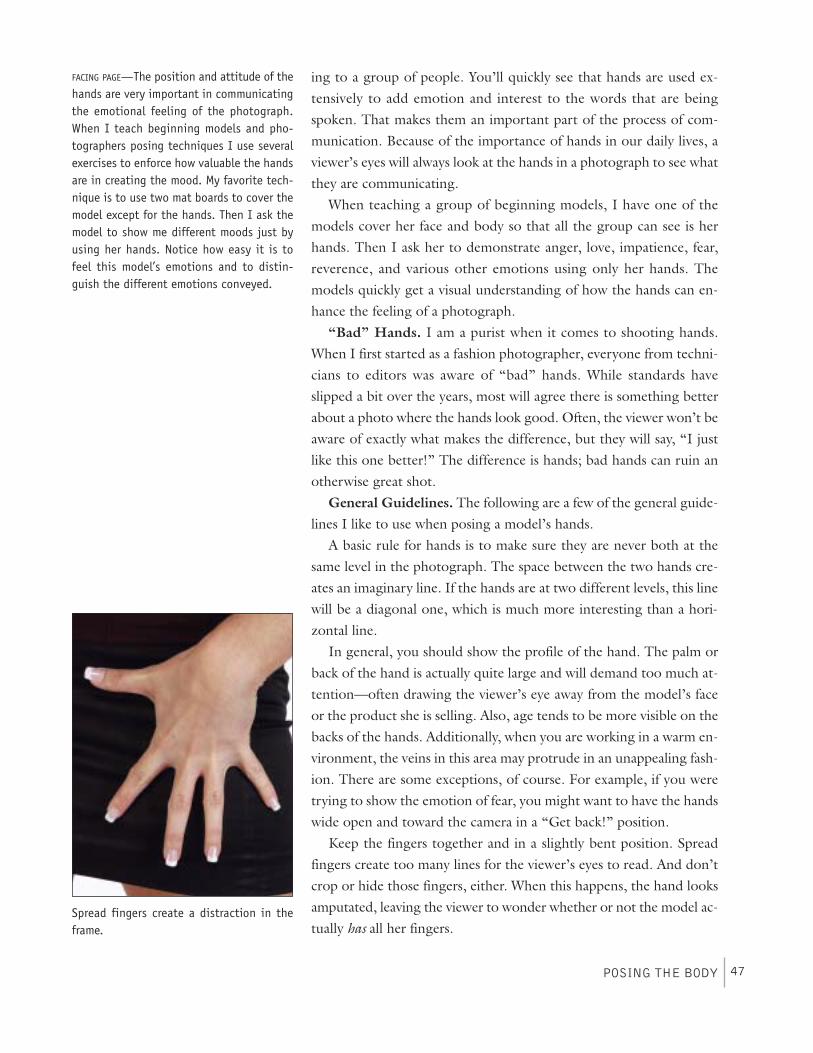
“Bad” Hands. I am a purist when it comes to shooting hands.When I first started as a fashion photographer, everyone from techni-cians to editors was aware of “bad” hands. While standards haveslipped a bit over the years, most will agree there is something betterabout a photo where the hands look good. Often, the viewer won’t beaware of exactly what makes the difference, but they will say, “I justlike this one better!” The difference is hands; bad hands can ruin anotherwise great shot.
General Guidelines. The following are a few of the general guide-lines I like to use when posing a model’s hands.A basic rule for hands is to make sure they are never both at the
same level in the photograph. The space between the two hands cre-ates an imaginary line. If the hands are at two different levels, this linewill be a diagonal one, which is much more interesting than a hori-zontal line.In general, you should show the profile of the hand. The palm or
back of the hand is actually quite large and will demand too much at-tention—often drawing the viewer’s eye away from the model’s faceor the product she is selling. Also, age tends to be more visible on thebacks of the hands. Additionally, when you are working in a warm en-vironment, the veins in this area may protrude in an unappealing fash-ion. There are some exceptions, of course. For example, if you weretrying to show the emotion of fear, you might want to have the handswide open and toward the camera in a “Get back!” position.Keep the fingers together and in a slightly bent position. Spread
fingers create too many lines for the viewer’s eyes to read. And don’tcrop or hide those fingers, either. When this happens, the hand looksamputated, leaving the viewer to wonder whether or not the model ac-tually has all her fingers.
POSING THE BODY 47
FACING PAGE—The position and attitude of thehands are very important in communicatingthe emotional feeling of the photograph.When I teach beginning models and pho-tographers posing techniques I use severalexercises to enforce how valuable the handsare in creating the mood. My favorite tech-nique is to use two mat boards to cover themodel except for the hands. Then I ask themodel to show me different moods just byusing her hands. Notice how easy it is tofeel this model’s emotions and to distin-guish the different emotions conveyed.
Spread fingers create a distraction in theframe.
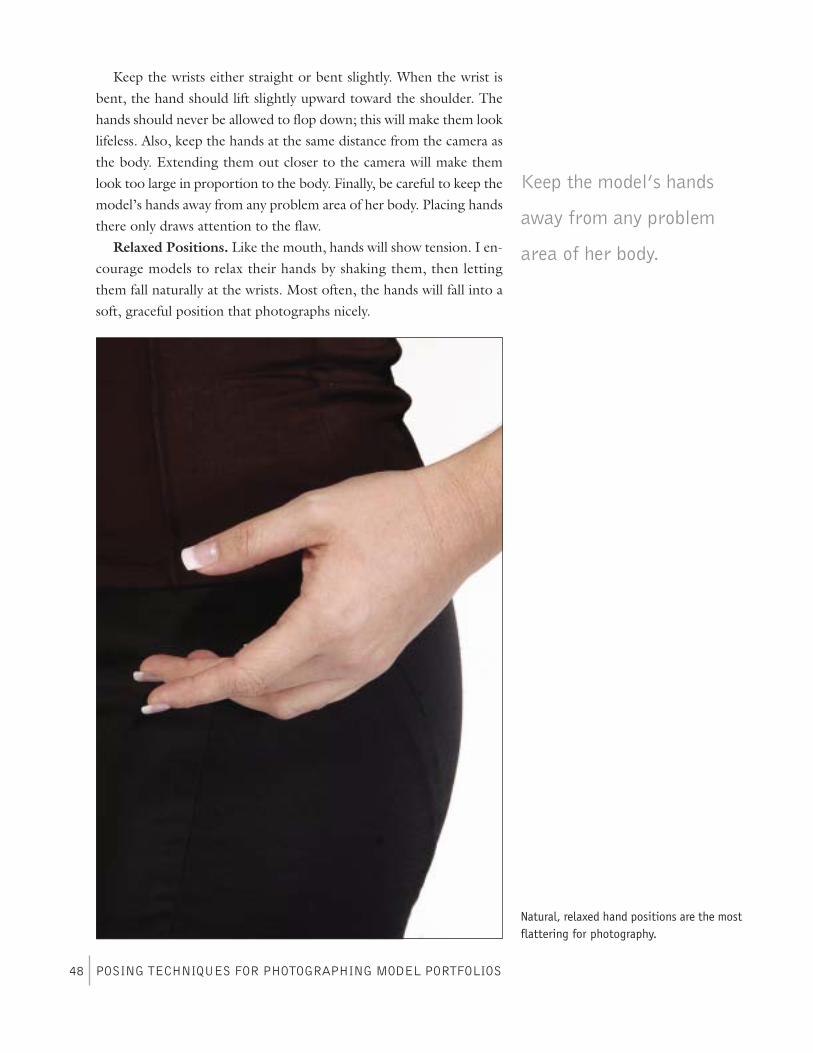
Keep the wrists either straight or bent slightly. When the wrist isbent, the hand should lift slightly upward toward the shoulder. Thehands should never be allowed to flop down; this will make them looklifeless. Also, keep the hands at the same distance from the camera asthe body. Extending them out closer to the camera will make themlook too large in proportion to the body. Finally, be careful to keep themodel’s hands away from any problem area of her body. Placing handsthere only draws attention to the flaw.
Relaxed Positions. Like the mouth, hands will show tension. I en-courage models to relax their hands by shaking them, then lettingthem fall naturally at the wrists. Most often, the hands will fall into asoft, graceful position that photographs nicely.
POSING TECHNIQUES FOR PHOTOGRAPHING MODEL PORTFOLIOS48
Natural, relaxed hand positions are the mostflattering for photography.
Keep the model’s hands
away from any problem
area of her body.
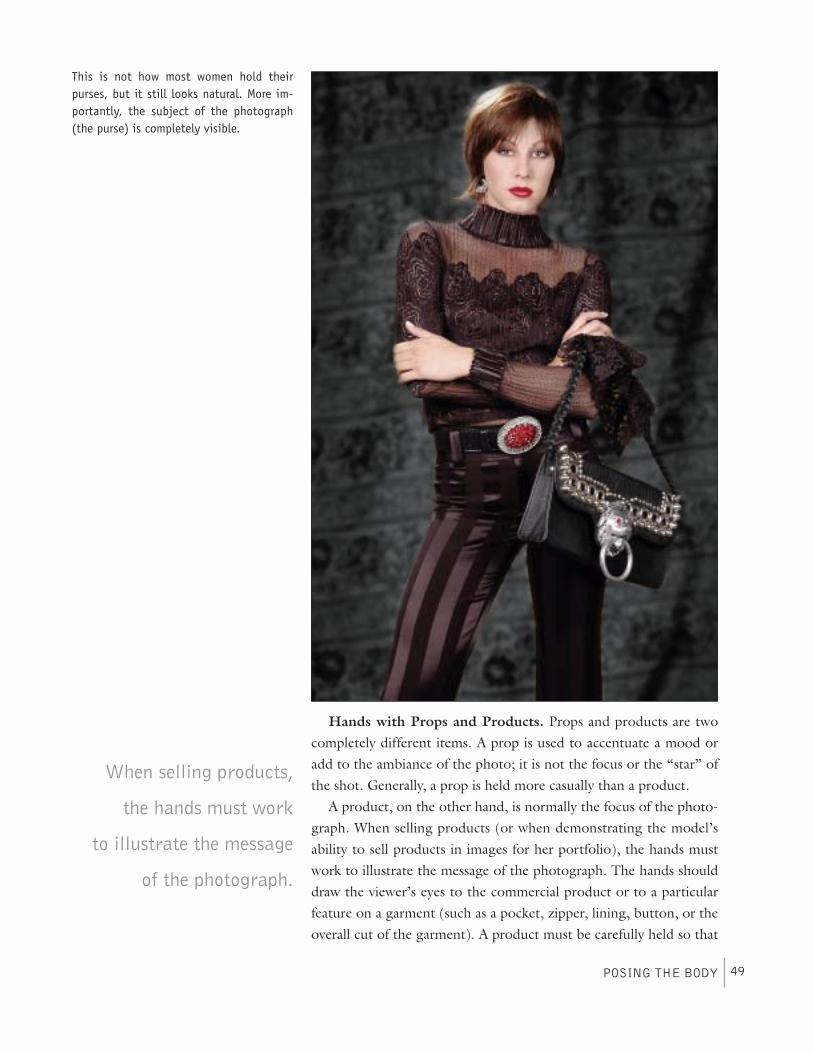
Hands with Props and Products. Props and products are twocompletely different items. A prop is used to accentuate a mood oradd to the ambiance of the photo; it is not the focus or the “star” ofthe shot. Generally, a prop is held more casually than a product.A product, on the other hand, is normally the focus of the photo-
graph. When selling products (or when demonstrating the model’sability to sell products in images for her portfolio), the hands mustwork to illustrate the message of the photograph. The hands shoulddraw the viewer’s eyes to the commercial product or to a particularfeature on a garment (such as a pocket, zipper, lining, button, or theoverall cut of the garment). A product must be carefully held so that
POSING THE BODY 49
This is not how most women hold theirpurses, but it still looks natural. More im-portantly, the subject of the photograph(the purse) is completely visible.
When selling products,
the hands must work
to illustrate the message
of the photograph.
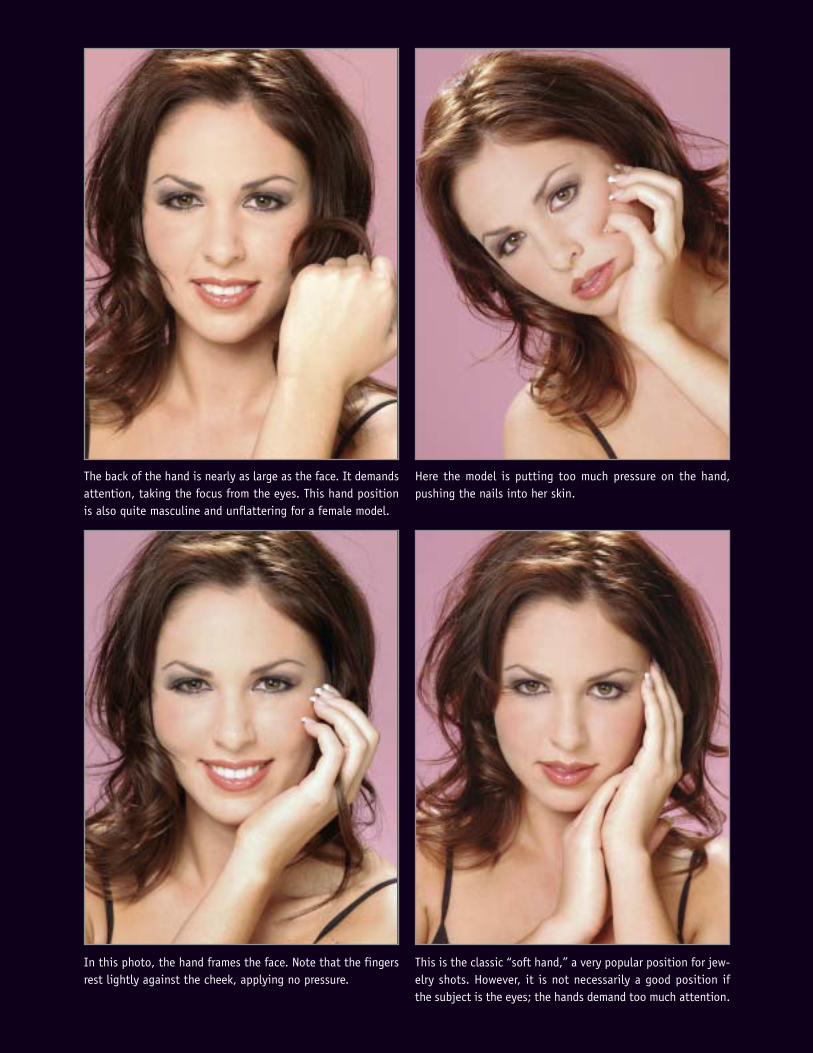
The back of the hand is nearly as large as the face. It demandsattention, taking the focus from the eyes. This hand positionis also quite masculine and unflattering for a female model.
Here the model is putting too much pressure on the hand,pushing the nails into her skin.
In this photo, the hand frames the face. Note that the fingersrest lightly against the cheek, applying no pressure.
This is the classic “soft hand,” a very popular position for jew-elry shots. However, it is not necessarily a good position ifthe subject is the eyes; the hands demand too much attention.

the fingers never cover the logo, name, or other identifying marks. Ittakes a bit of practice for the model to be able to hold a product insuch a way that the client’s needs are met and the shot still looks nat-ural and unposed.
Hands Around the Face. When a hand has splayed fingers or isballed in a fist, it tends to look hard and masculine. A more femininepose has the hand curved gracefully, then gently resting on the bodyor product. Suppose you want to photograph a model with her handunder her chin. If you allow her to have her fist closed, with the flatof the hand facing the camera, it looks aggressive and hard. Also, theeye is drawn to the center of the fist. If, instead, you turn the hand toa profile position, showing the curve of the little finger, the image willbe much more attractive.Around the face, it is also important that the model not actually
rest her face on her hand(s). It is important to avoid pressure that willwrinkle the skin on the face.
POSING THE BODY 51
Again, the hands frame the face. In the first image, the model’s eyes direct the viewer to the adjoining page. In the second photo,the eyes are directed forward, drawing the viewer into the photograph.

Hands at the Waist. When the hands are at the waist, the generalrule is this: hide the thumb, show the fingers. In this pose, the wristswill usually be bent. Make sure that they are not bent out toward thecamera. They should be bent down (i.e., the hand should be liftedslightly up toward the shoulders) and/or away from the camera.Watch out for splayed fingers in a pose like this; they can create a sig-nificant distraction.Another pose to watch out for is the “oh my aching back” hand po-
sition. The popularity of this pose comes and goes, changing as oftenas hemlines. However, if photographed from the wrong angle, it ap-
POSING TECHNIQUES FOR PHOTOGRAPHING MODEL PORTFOLIOS52
If a model places a fist against her waist, it appears as if herfingers have been amputated.
This is slightly better, because the side of the hand is showing.Still, it’s not the best-possible position.
Many refer to this as the “aching back” handpose. Note that the fingers all show. Manyphotographers shoot this hand position hid-ing the fingers, which makes the hand lookdeformed. To improve this photo, you couldslide the hand down and soften it.
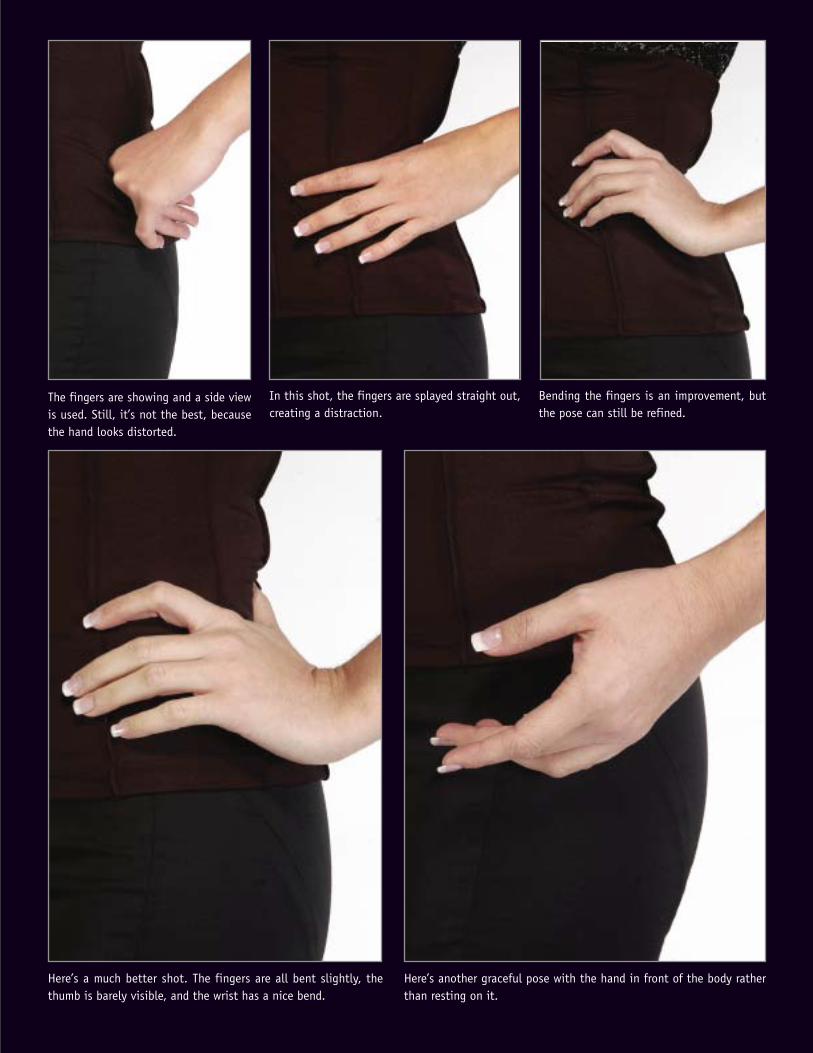
The fingers are showing and a side viewis used. Still, it’s not the best, becausethe hand looks distorted.
Here’s a much better shot. The fingers are all bent slightly, thethumb is barely visible, and the wrist has a nice bend.
Here’s another graceful pose with the hand in front of the body ratherthan resting on it.
In this shot, the fingers are splayed straight out,creating a distraction.
Bending the fingers is an improvement, butthe pose can still be refined.
pears that a thumb is growing out of the model’s waist. If you use thishand position, be sure to photograph it from such an angle that youshow the entire hand—with all the fingers!
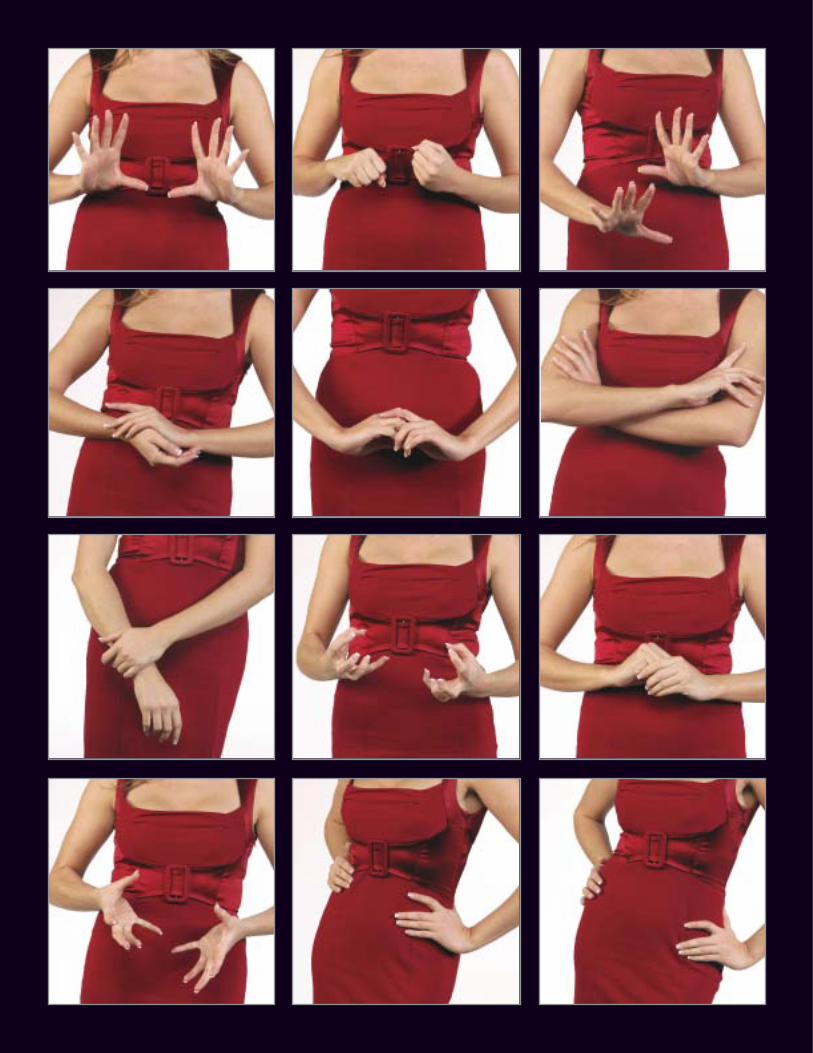
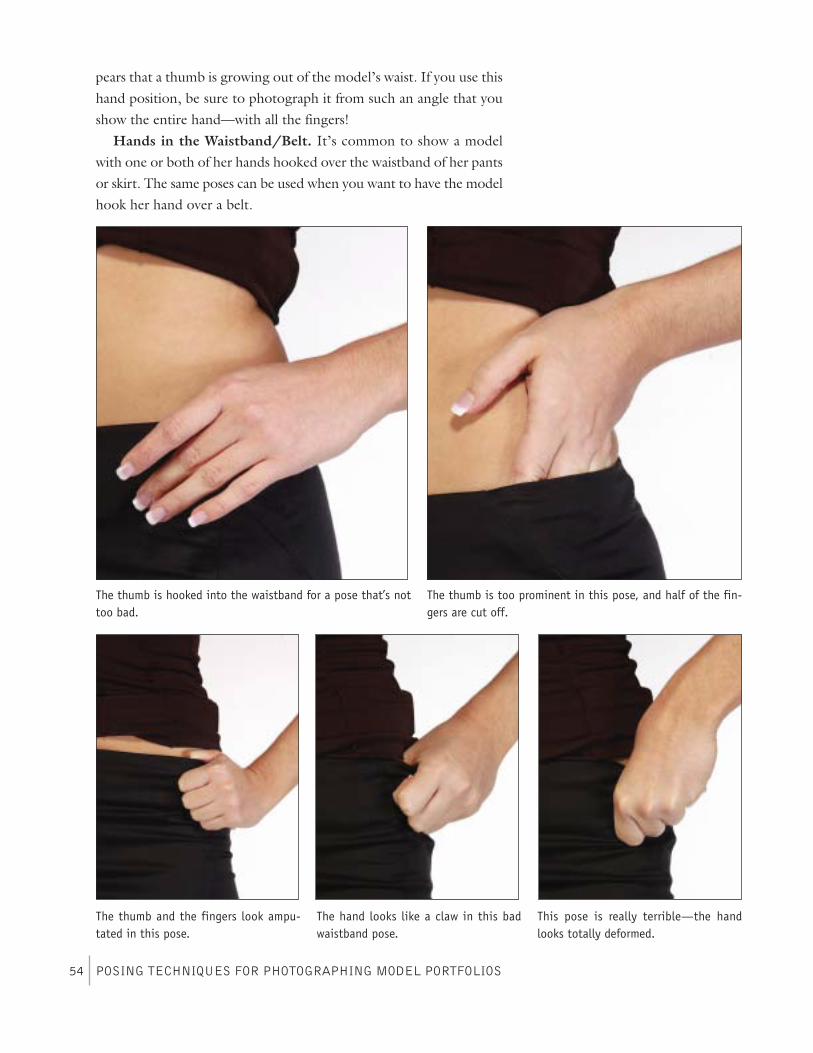
Hands in the Waistband/Belt. It’s common to show a modelwith one or both of her hands hooked over the waistband of her pantsor skirt. The same poses can be used when you want to have the modelhook her hand over a belt.
POSING TECHNIQUES FOR PHOTOGRAPHING MODEL PORTFOLIOS54
The thumb is hooked into the waistband for a pose that’s nottoo bad.
The thumb is too prominent in this pose, and half of the fin-gers are cut off.
The thumb and the fingers look ampu-tated in this pose.
The hand looks like a claw in this badwaistband pose.
This pose is really terrible—the handlooks totally deformed.
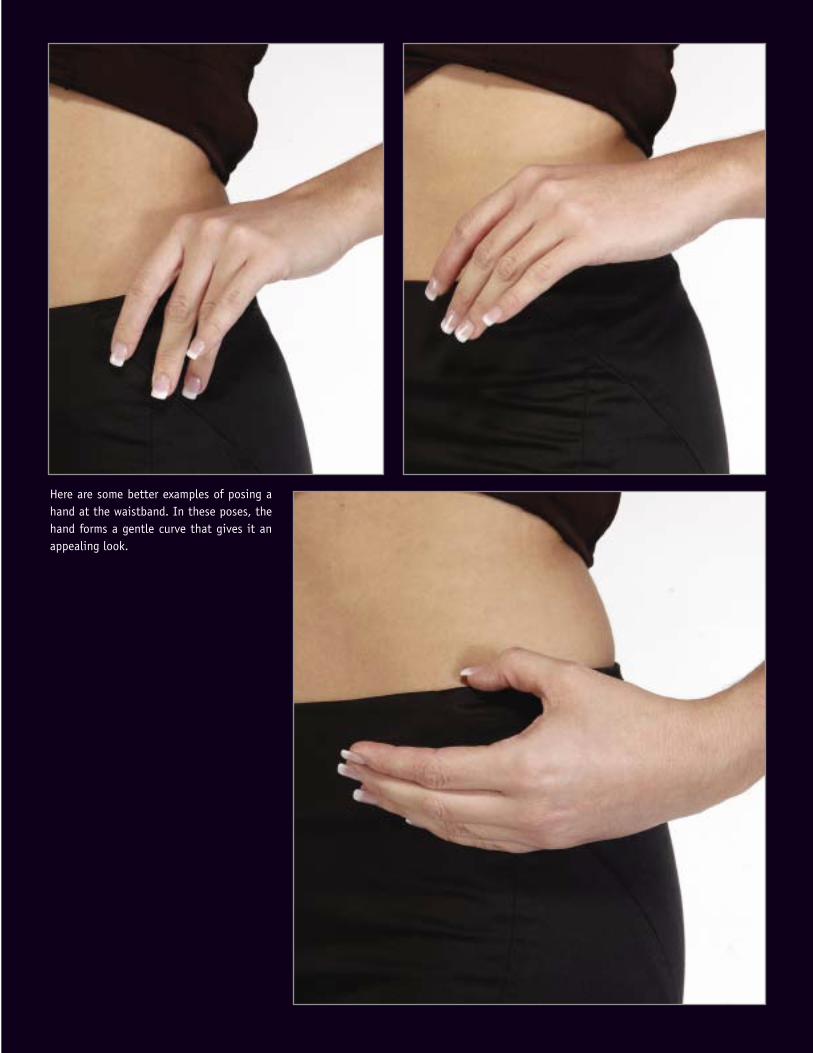
Here are some better examples of posing ahand at the waistband. In these poses, thehand forms a gentle curve that gives it anappealing look.

Hands in Pockets.When showing pockets on a garment, the ruleis still: hide the thumb, show the fingers. Otherwise, the thumb pop-ping out of the pocket looks quite unattractive. The worst of all casesis when a model puts her hands in her pockets and breaks her wriststoward the camera. Instead, direct the model to put her thumb in herpocket, allow fingers to curl slightly on the outside. This also workswell when showing belts.
POSING TECHNIQUES FOR PHOTOGRAPHING MODEL PORTFOLIOS56
The left and center images show a hand position that is not terrible, but it’s also not the best. Depending on the statement re-quired by the pose, it could be a choice to consider. The worst of all cases is shown in the photo on the right. This occurs whena model puts her hands in her pockets and breaks her wrists toward the camera.
The image on the left is not bad; the wrist, hand, and fingers form a gentle curve. The hand doesn’t, however, look as gracefulas it could. In the image on the right, a little refinement results in more appealing final pose.
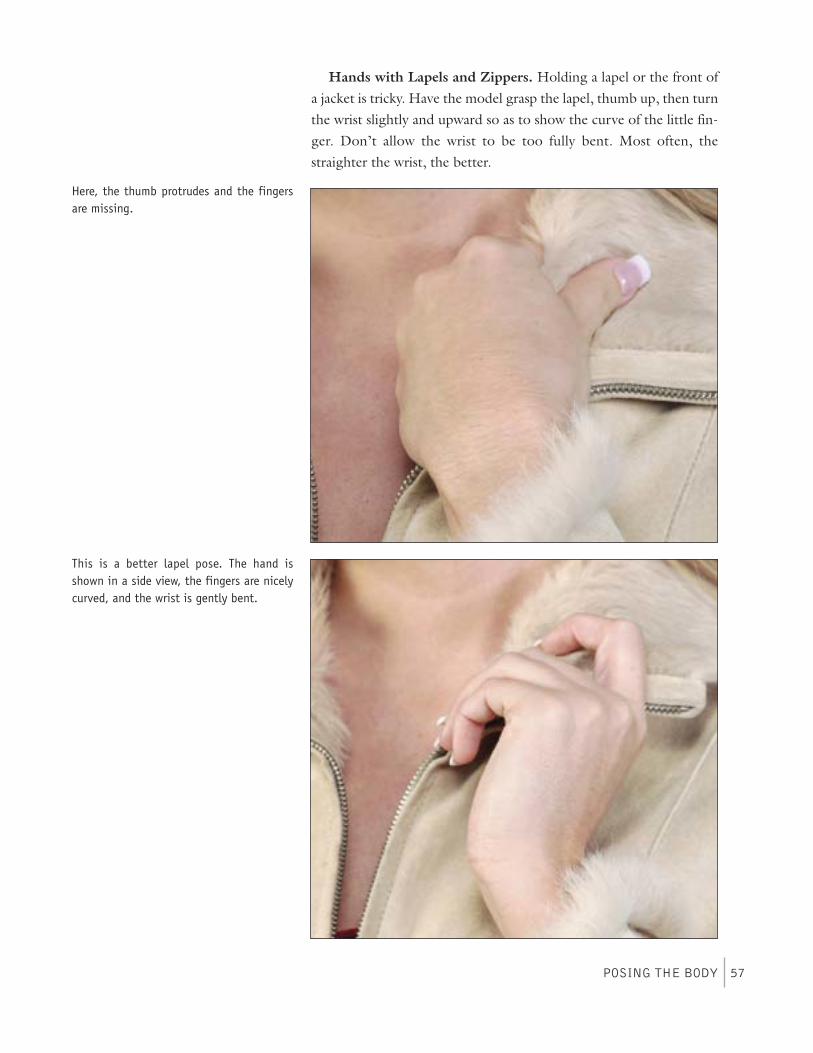
Hands with Lapels and Zippers. Holding a lapel or the front ofa jacket is tricky. Have the model grasp the lapel, thumb up, then turnthe wrist slightly and upward so as to show the curve of the little fin-ger. Don’t allow the wrist to be too fully bent. Most often, thestraighter the wrist, the better.
POSING THE BODY 57
Here, the thumb protrudes and the fingersare missing.
This is a better lapel pose. The hand isshown in a side view, the fingers are nicelycurved, and the wrist is gently bent.
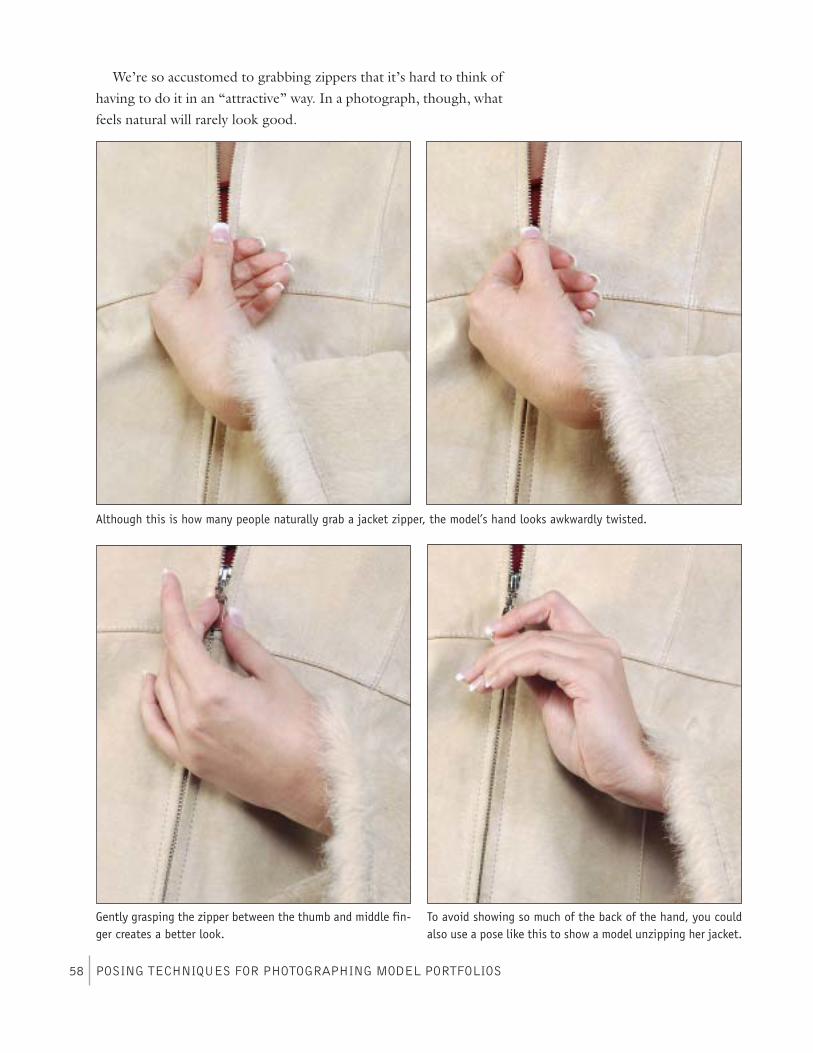
We’re so accustomed to grabbing zippers that it’s hard to think ofhaving to do it in an “attractive” way. In a photograph, though, whatfeels natural will rarely look good.
POSING TECHNIQUES FOR PHOTOGRAPHING MODEL PORTFOLIOS58
Gently grasping the zipper between the thumb and middle fin-ger creates a better look.
To avoid showing so much of the back of the hand, you couldalso use a pose like this to show a model unzipping her jacket.
Although this is how many people naturally grab a jacket zipper, the model’s hand looks awkwardly twisted.
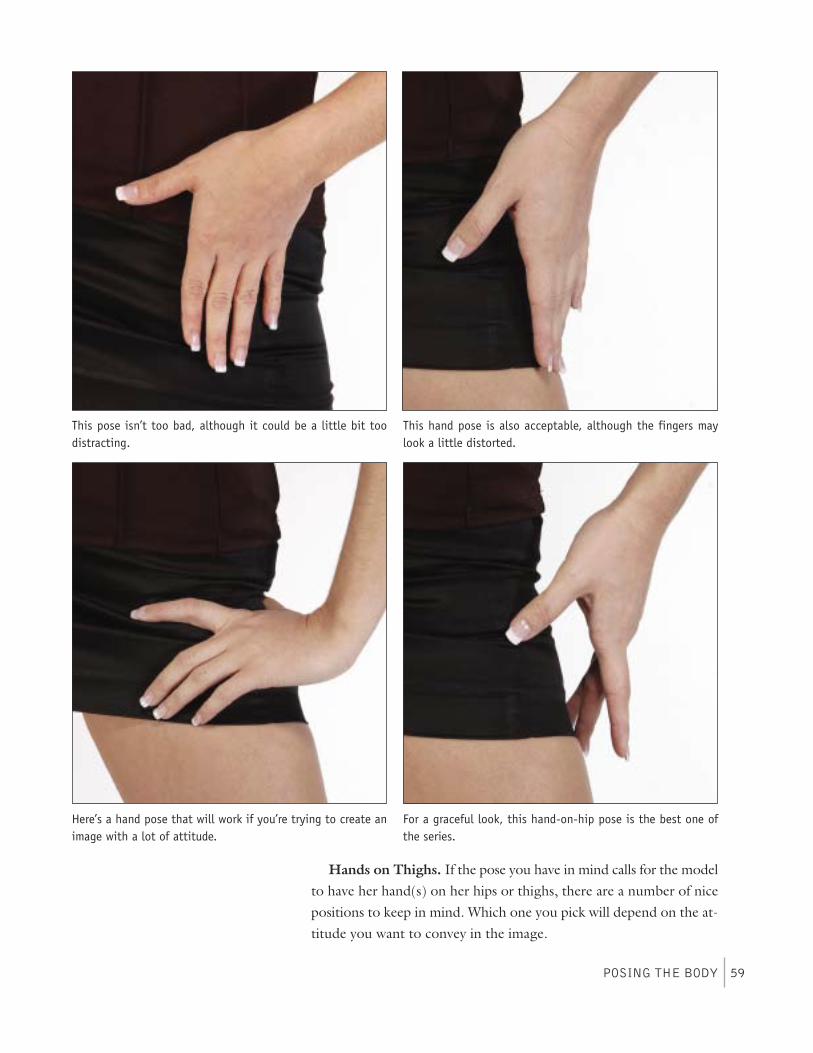
Hands on Thighs. If the pose you have in mind calls for the modelto have her hand(s) on her hips or thighs, there are a number of nicepositions to keep in mind. Which one you pick will depend on the at-titude you want to convey in the image.
POSING THE BODY 59
Here’s a hand pose that will work if you’re trying to create animage with a lot of attitude.
For a graceful look, this hand-on-hip pose is the best one ofthe series.
This pose isn’t too bad, although it could be a little bit toodistracting.
This hand pose is also acceptable, although the fingers maylook a little distorted.
POSING TECHNIQUES FOR PHOTOGRAPHING MODEL PORTFOLIOS60
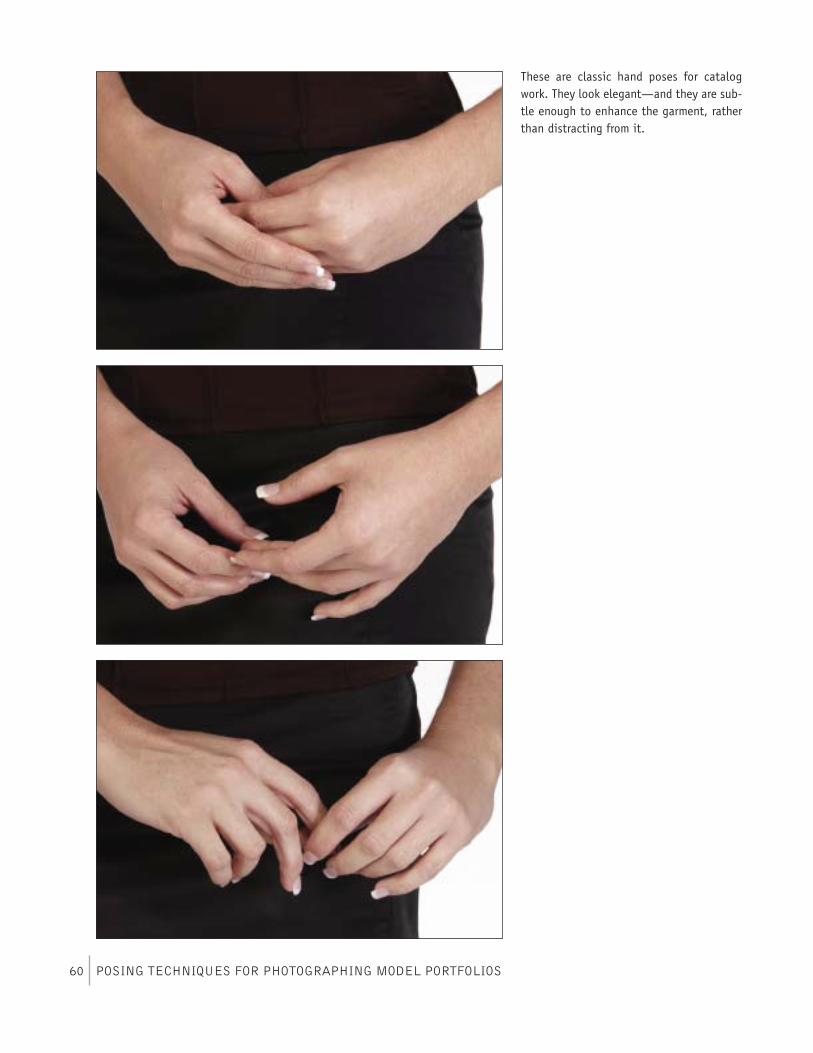
These are classic hand poses for catalogwork. They look elegant—and they are sub-tle enough to enhance the garment, ratherthan distracting from it.
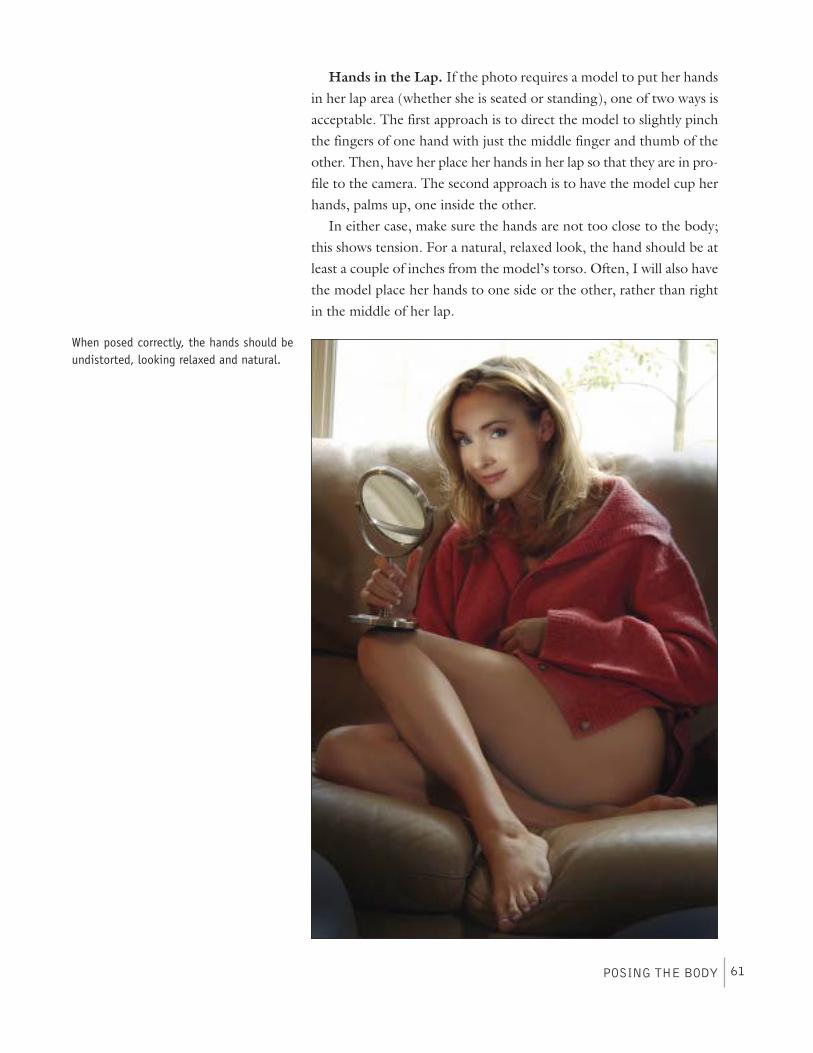
Hands in the Lap. If the photo requires a model to put her handsin her lap area (whether she is seated or standing), one of two ways isacceptable. The first approach is to direct the model to slightly pinchthe fingers of one hand with just the middle finger and thumb of theother. Then, have her place her hands in her lap so that they are in pro-file to the camera. The second approach is to have the model cup herhands, palms up, one inside the other.In either case, make sure the hands are not too close to the body;
this shows tension. For a natural, relaxed look, the hand should be atleast a couple of inches from the model’s torso. Often, I will also havethe model place her hands to one side or the other, rather than rightin the middle of her lap.
POSING THE BODY 61
When posed correctly, the hands should beundistorted, looking relaxed and natural.
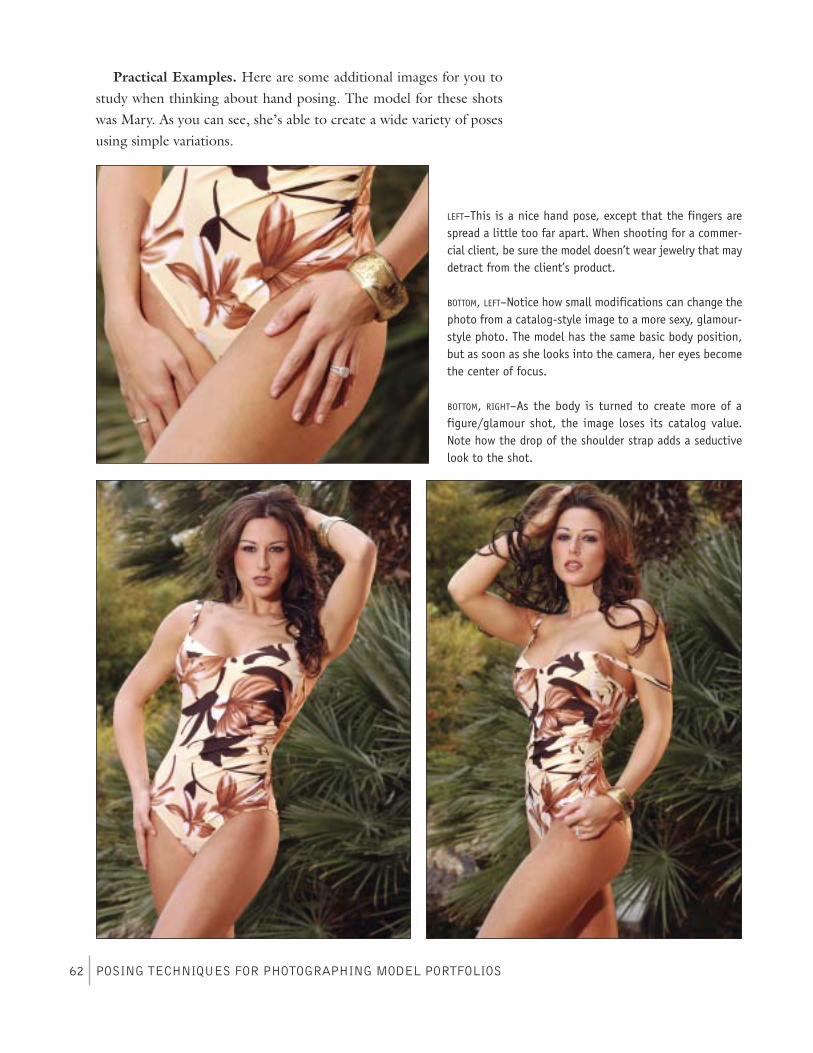
Practical Examples. Here are some additional images for you tostudy when thinking about hand posing. The model for these shotswas Mary. As you can see, she’s able to create a wide variety of posesusing simple variations.
POSING TECHNIQUES FOR PHOTOGRAPHING MODEL PORTFOLIOS62
LEFT–This is a nice hand pose, except that the fingers arespread a little too far apart. When shooting for a commer-cial client, be sure the model doesn’t wear jewelry that maydetract from the client’s product.
BOTTOM, LEFT–Notice how small modifications can change thephoto from a catalog-style image to a more sexy, glamour-style photo. The model has the same basic body position,but as soon as she looks into the camera, her eyes becomethe center of focus.
BOTTOM, RIGHT–As the body is turned to create more of afigure/glamour shot, the image loses its catalog value.Note how the drop of the shoulder strap adds a seductivelook to the shot.
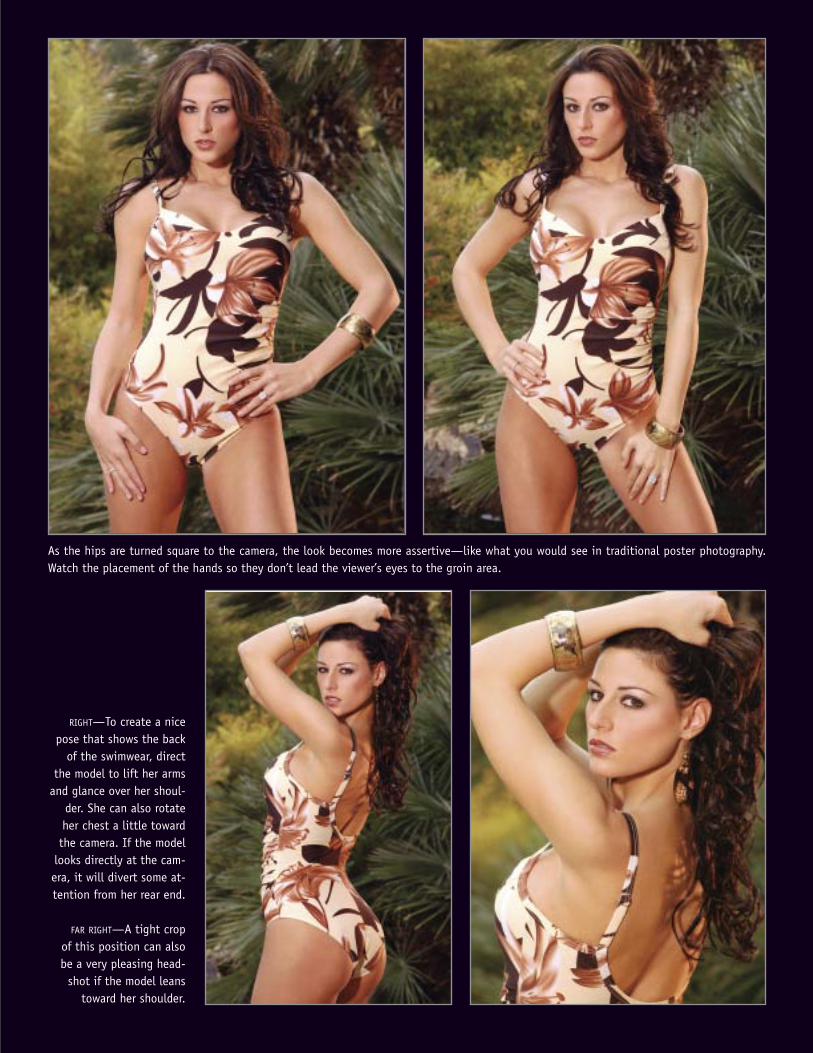
RIGHT—To create a nicepose that shows the backof the swimwear, direct
the model to lift her armsand glance over her shoul-
der. She can also rotateher chest a little towardthe camera. If the modellooks directly at the cam-era, it will divert some at-tention from her rear end.
FAR RIGHT—A tight cropof this position can alsobe a very pleasing head-shot if the model leans
toward her shoulder.
As the hips are turned square to the camera, the look becomes more assertive—like what you would see in traditional poster photography.Watch the placement of the hands so they don’t lead the viewer’s eyes to the groin area.

In this next series of images, created with Marisa, you see an ex-ample of selective coloring. This technique was used to draw your at-tention to the swimwear by reducing the coloration in the back-ground. Again, you can see the variety of poses created.
POSING TECHNIQUES FOR PHOTOGRAPHING MODEL PORTFOLIOS64
LEFT—This is a flattering photograph withsolid posing.
BOTTOM LEFT—Here we see a bad hand pose;the fingers are splayed and the flat of thehand is directly toward the camera.
BOTTOM CENTER—When one or both wrists arebroken toward the camera, it creates a veryugly and awkward hand shot.
BOTTOM RIGHT—This is an example of the “ohmy aching back” hand pose. If this positionis used, it must be shot so that the entirehand shows. Otherwise, you will see the dis-tortion shown here.
POSING THE BODY 65
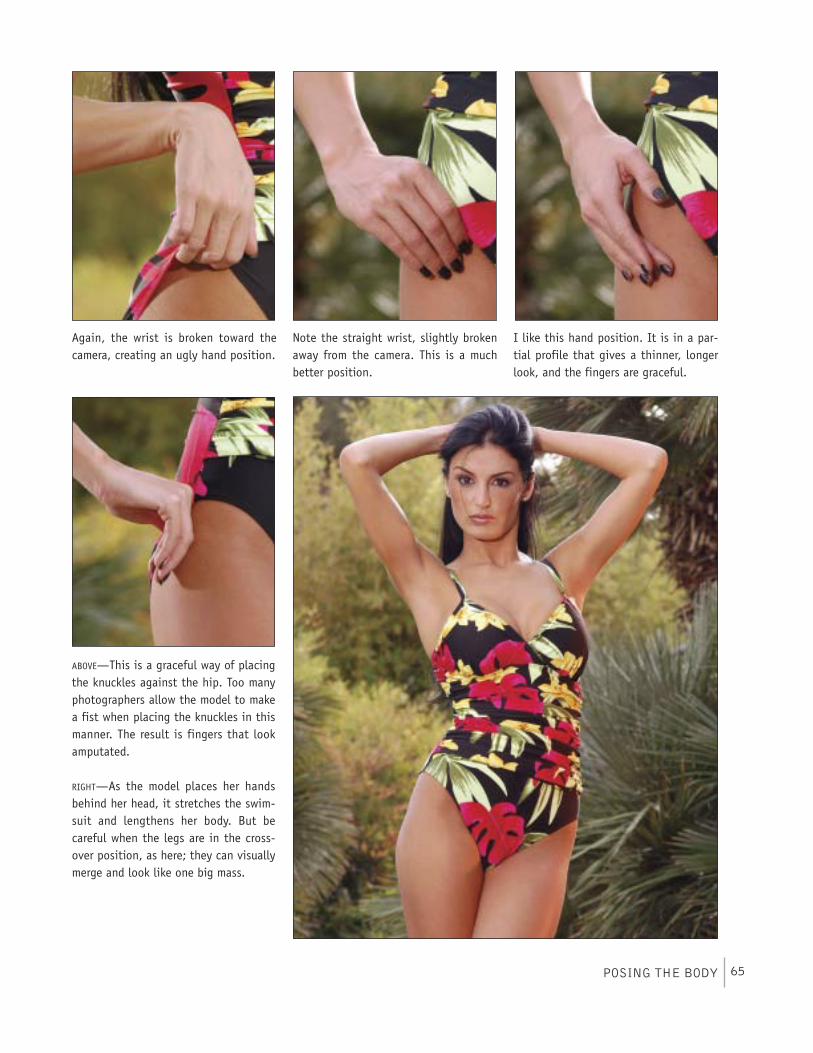
Again, the wrist is broken toward thecamera, creating an ugly hand position.
Note the straight wrist, slightly brokenaway from the camera. This is a muchbetter position.
I like this hand position. It is in a par-tial profile that gives a thinner, longerlook, and the fingers are graceful.
ABOVE—This is a graceful way of placingthe knuckles against the hip. Too manyphotographers allow the model to makea fist when placing the knuckles in thismanner. The result is fingers that lookamputated.
RIGHT—As the model places her handsbehind her head, it stretches the swim-suit and lengthens her body. But becareful when the legs are in the cross-over position, as here; they can visuallymerge and look like one big mass.


ARMS AND SHOULDERSSeparation from the Body. Make sure the arms are never posed incontact with the side of the body. Holding the arms away makes thewaist look slimmer and avoids the appearance of a solid body block.This creates a much more feminine and pleasing line.
Elbows. Be careful never to allow the model to lock her joints.This distorts the arm and creates a very ugly line. You should alsoavoid any pose that places the point of the elbows directly toward thecamera. I once saw a photo where the model had clasped her handsbehind her head with her elbows facing the camera. It looked like shehad two large appendages growing out of her neck!
POSING THE BODY 67
FACING PAGE—For her agent, Iana needed apromo page that showed the many person-alities she is capable of depicting. Note thevariety of arm poses and expressions sheused to communicate this ability. (And, yes,we intentionally placed one of the photosupside down to draw attention to the vari-ety in this promo piece.)
Here, a low camera angle and wide-anglelens were combined with a dramatic poseto produce a dynamic photo. However, themodel’s arm is hyperextended—it almostlooks broken. Fortunately, this is just anouttake from a session with many other per-fectly posed shots.
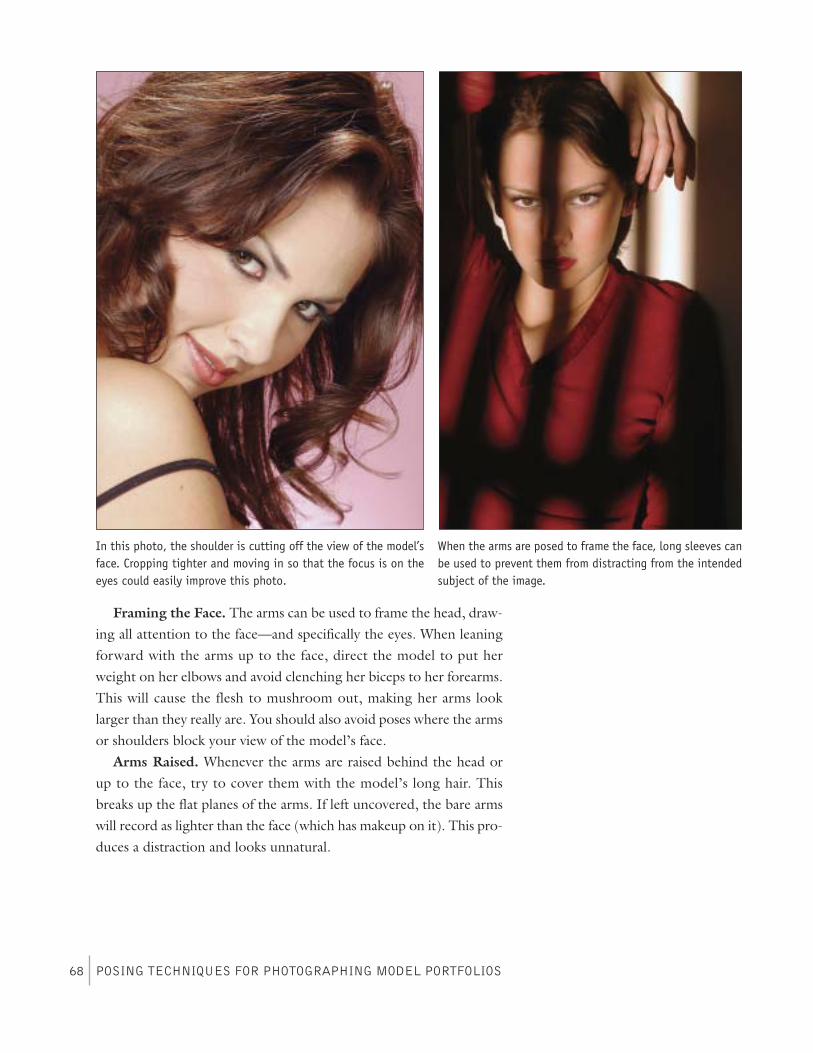
Framing the Face. The arms can be used to frame the head, draw-ing all attention to the face—and specifically the eyes. When leaningforward with the arms up to the face, direct the model to put herweight on her elbows and avoid clenching her biceps to her forearms.This will cause the flesh to mushroom out, making her arms looklarger than they really are. You should also avoid poses where the armsor shoulders block your view of the model’s face.
Arms Raised. Whenever the arms are raised behind the head orup to the face, try to cover them with the model’s long hair. Thisbreaks up the flat planes of the arms. If left uncovered, the bare armswill record as lighter than the face (which has makeup on it). This pro-duces a distraction and looks unnatural.
POSING TECHNIQUES FOR PHOTOGRAPHING MODEL PORTFOLIOS68
In this photo, the shoulder is cutting off the view of the model’sface. Cropping tighter and moving in so that the focus is on theeyes could easily improve this photo.
When the arms are posed to frame the face, long sleeves canbe used to prevent them from distracting from the intendedsubject of the image.
VIEWS OF THE FACEWhen photographing the human face,there are three principle views that youcan produce.
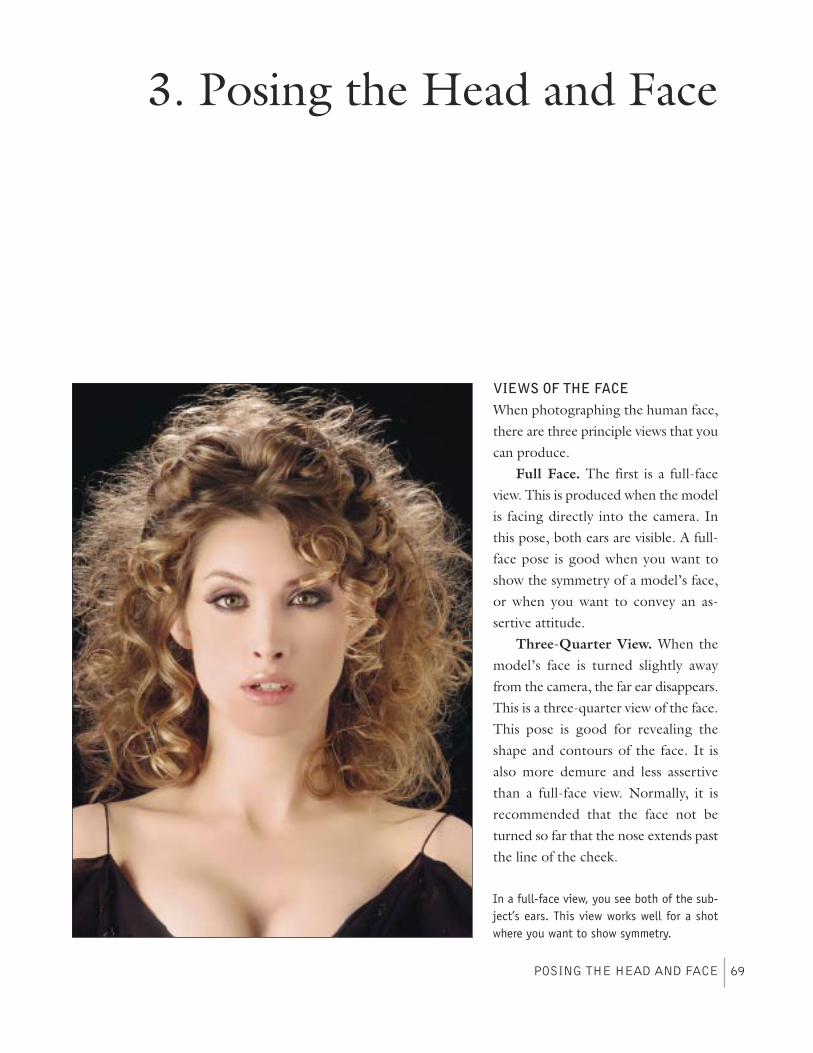
Full Face. The first is a full-faceview. This is produced when the modelis facing directly into the camera. Inthis pose, both ears are visible. A full-face pose is good when you want toshow the symmetry of a model’s face,or when you want to convey an as-sertive attitude.
Three-Quarter View. When themodel’s face is turned slightly awayfrom the camera, the far ear disappears.This is a three-quarter view of the face.This pose is good for revealing theshape and contours of the face. It isalso more demure and less assertivethan a full-face view. Normally, it isrecommended that the face not beturned so far that the nose extends pastthe line of the cheek.
POSING THE HEAD AND FACE 69
3. Posing the Head and Face
In a full-face view, you see both of the sub-ject’s ears. This view works well for a shotwhere you want to show symmetry.
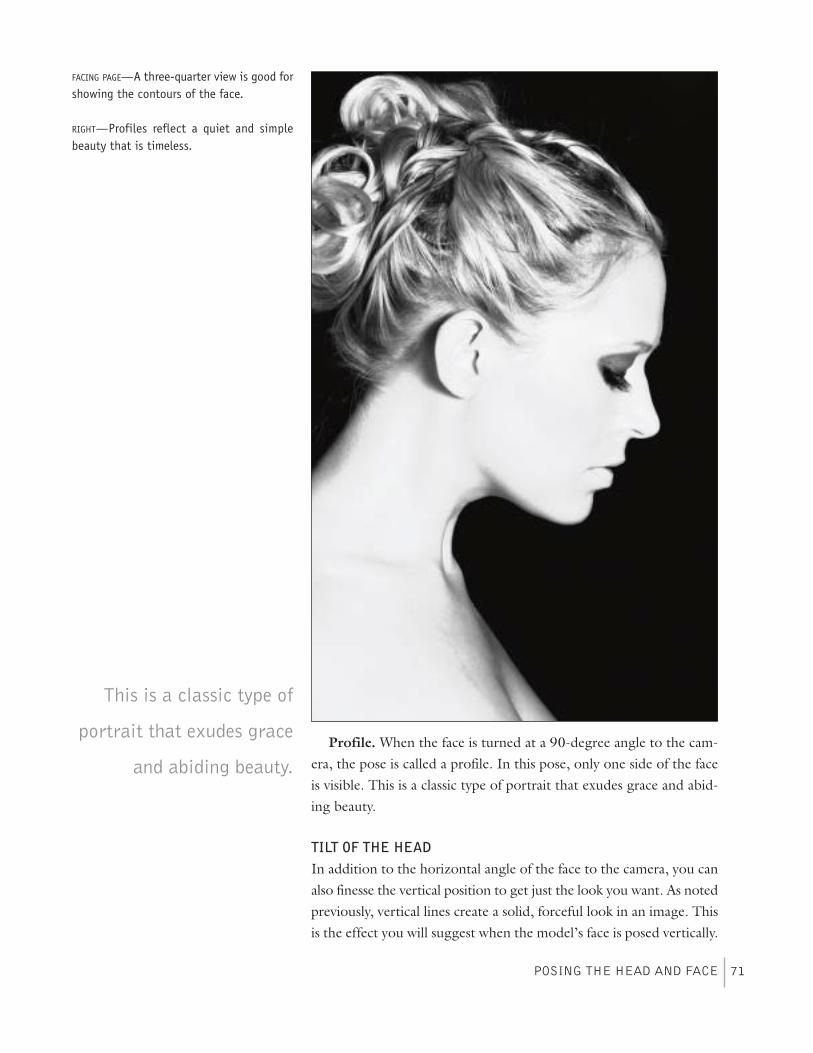
Profile. When the face is turned at a 90-degree angle to the cam-era, the pose is called a profile. In this pose, only one side of the faceis visible. This is a classic type of portrait that exudes grace and abid-ing beauty.
TILT OF THE HEADIn addition to the horizontal angle of the face to the camera, you canalso finesse the vertical position to get just the look you want. As notedpreviously, vertical lines create a solid, forceful look in an image. Thisis the effect you will suggest when the model’s face is posed vertically.
POSING THE HEAD AND FACE 71
FACING PAGE—A three-quarter view is good forshowing the contours of the face.
RIGHT—Profiles reflect a quiet and simplebeauty that is timeless.
This is a classic type of
portrait that exudes grace
and abiding beauty.
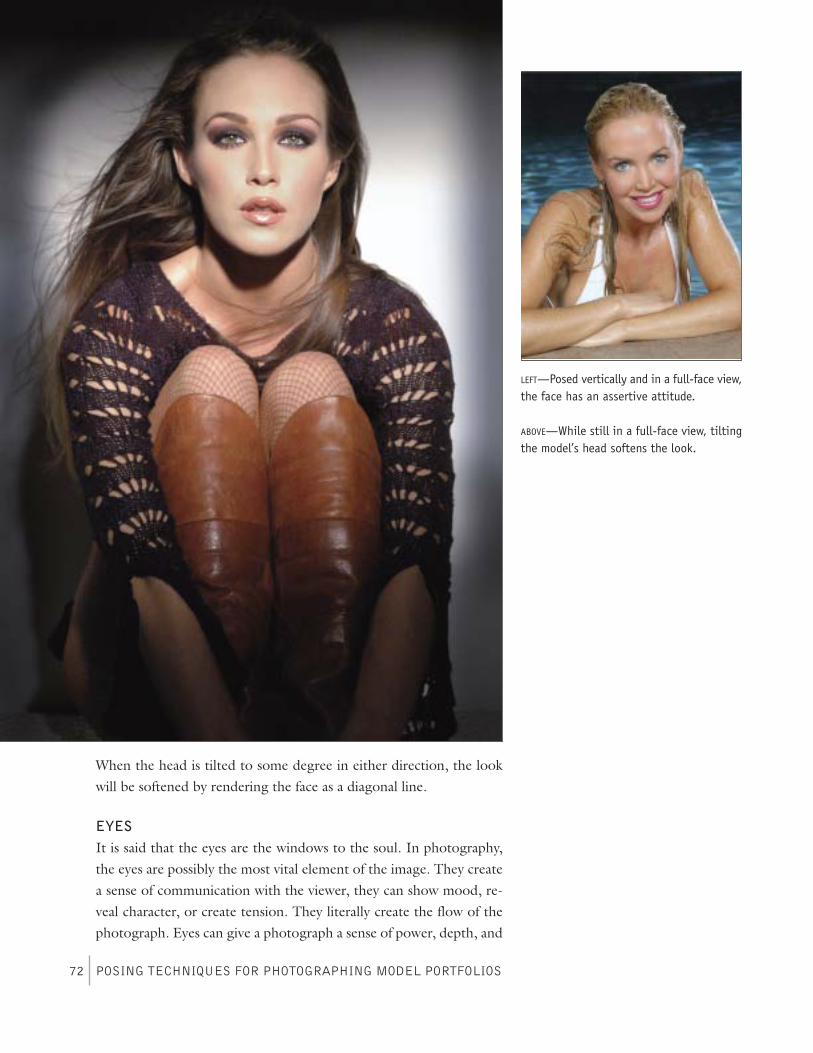
When the head is tilted to some degree in either direction, the lookwill be softened by rendering the face as a diagonal line.
EYESIt is said that the eyes are the windows to the soul. In photography,the eyes are possibly the most vital element of the image. They createa sense of communication with the viewer, they can show mood, re-veal character, or create tension. They literally create the flow of thephotograph. Eyes can give a photograph a sense of power, depth, and
POSING TECHNIQUES FOR PHOTOGRAPHING MODEL PORTFOLIOS72
LEFT—Posed vertically and in a full-face view,the face has an assertive attitude.
ABOVE—While still in a full-face view, tiltingthe model’s head softens the look.

intimacy. If used incorrectly, however, the eyes can also ruin anotherwise great photo.In commercial shots, the model generally will look away from the
camera, since the product takes first billing. For portfolio develop-ment, however, the opposite is true. The model is the product and,therefore, the eyes should be looking at the camera, and the photog-rapher should always focus on the model’s eyes. This is what drawsthe viewer to the image and forms a connection between the modeland the possible client. This connection is vital and can make the dif-ference between success and failure. To establish a connection, I re-mind the model to focus on the lens and “flirt” with the camera. I askthe model to imagine she is placing her face on the film (or, today,the digital image sensor!), and look through the lens to the film.
ABOVE—In a commercial image, the modelusually looks off camera. This allows theviewer to connect with the product themodel is selling rather than the modelherself.
RIGHT—In a portfolio image, the modelherself is the product. Direct eye contactwill help her make a connection with theviewers of the portfolio—her prospectiveemployers.
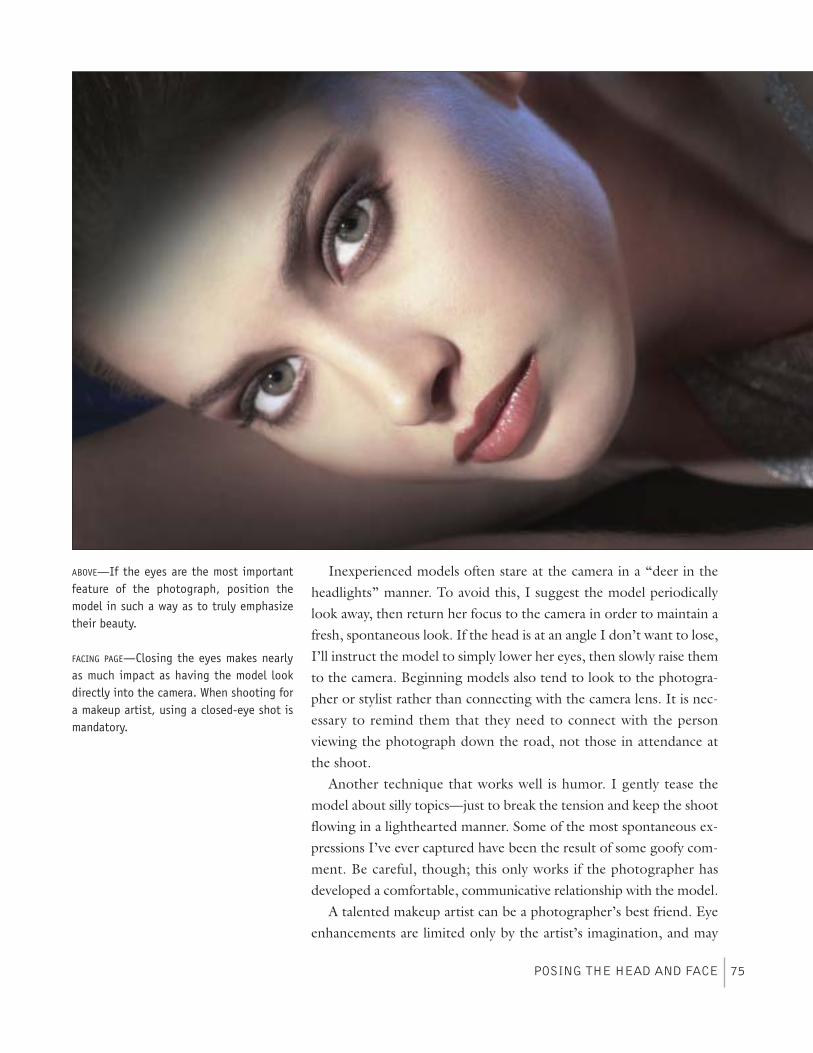
Inexperienced models often stare at the camera in a “deer in theheadlights” manner. To avoid this, I suggest the model periodicallylook away, then return her focus to the camera in order to maintain afresh, spontaneous look. If the head is at an angle I don’t want to lose,I’ll instruct the model to simply lower her eyes, then slowly raise themto the camera. Beginning models also tend to look to the photogra-pher or stylist rather than connecting with the camera lens. It is nec-essary to remind them that they need to connect with the personviewing the photograph down the road, not those in attendance atthe shoot.Another technique that works well is humor. I gently tease the
model about silly topics—just to break the tension and keep the shootflowing in a lighthearted manner. Some of the most spontaneous ex-pressions I’ve ever captured have been the result of some goofy com-ment. Be careful, though; this only works if the photographer hasdeveloped a comfortable, communicative relationship with the model.A talented makeup artist can be a photographer’s best friend. Eye
enhancements are limited only by the artist’s imagination, and may
POSING THE HEAD AND FACE 75
ABOVE—If the eyes are the most importantfeature of the photograph, position themodel in such a way as to truly emphasizetheir beauty.
FACING PAGE—Closing the eyes makes nearlyas much impact as having the model lookdirectly into the camera. When shooting fora makeup artist, using a closed-eye shot ismandatory.
include sunglasses, contacts, eyeshadow and eyeliner, sequins, lace,feathers—the possibilities are endless. Most commercial shoots involvethe use of false eyelashes to enhance the model’s eyes.
LIPSLips are second in importance only to the eyes. For better lips, don’tuse only one lip color. This creates a cartoon-like, flat look. A good
POSING TECHNIQUES FOR PHOTOGRAPHING MODEL PORTFOLIOS76
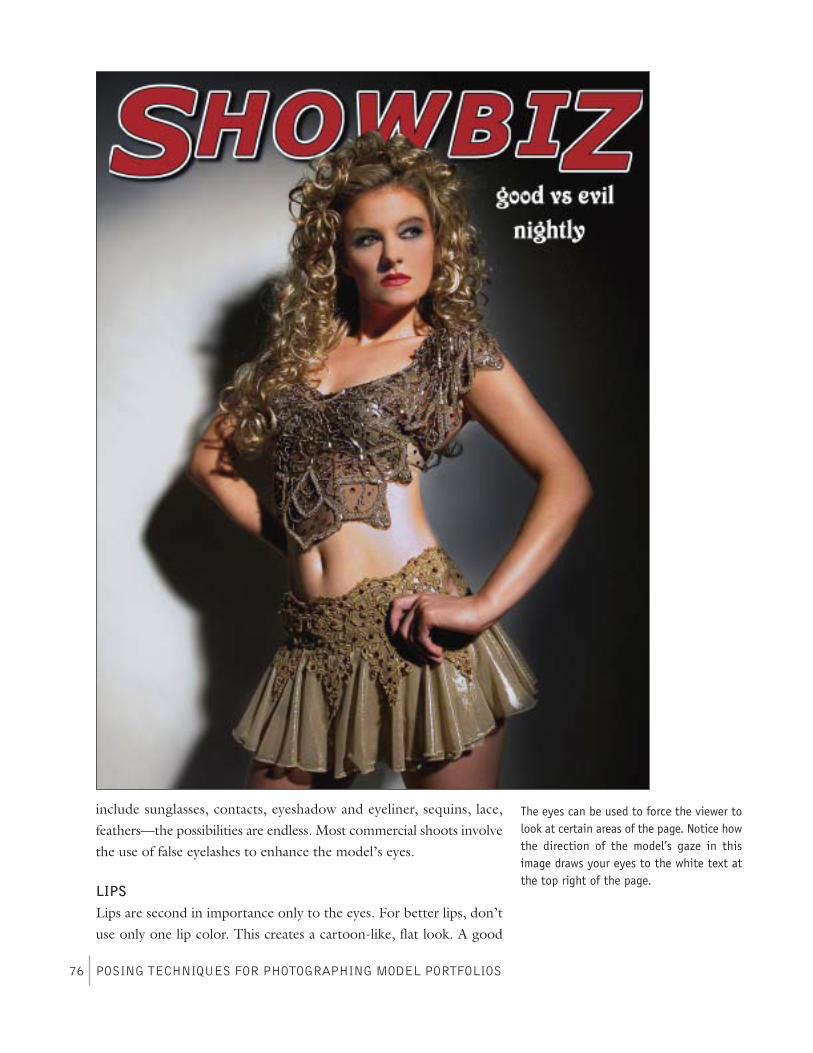
The eyes can be used to force the viewer tolook at certain areas of the page. Notice howthe direction of the model’s gaze in thisimage draws your eyes to the white text atthe top right of the page.
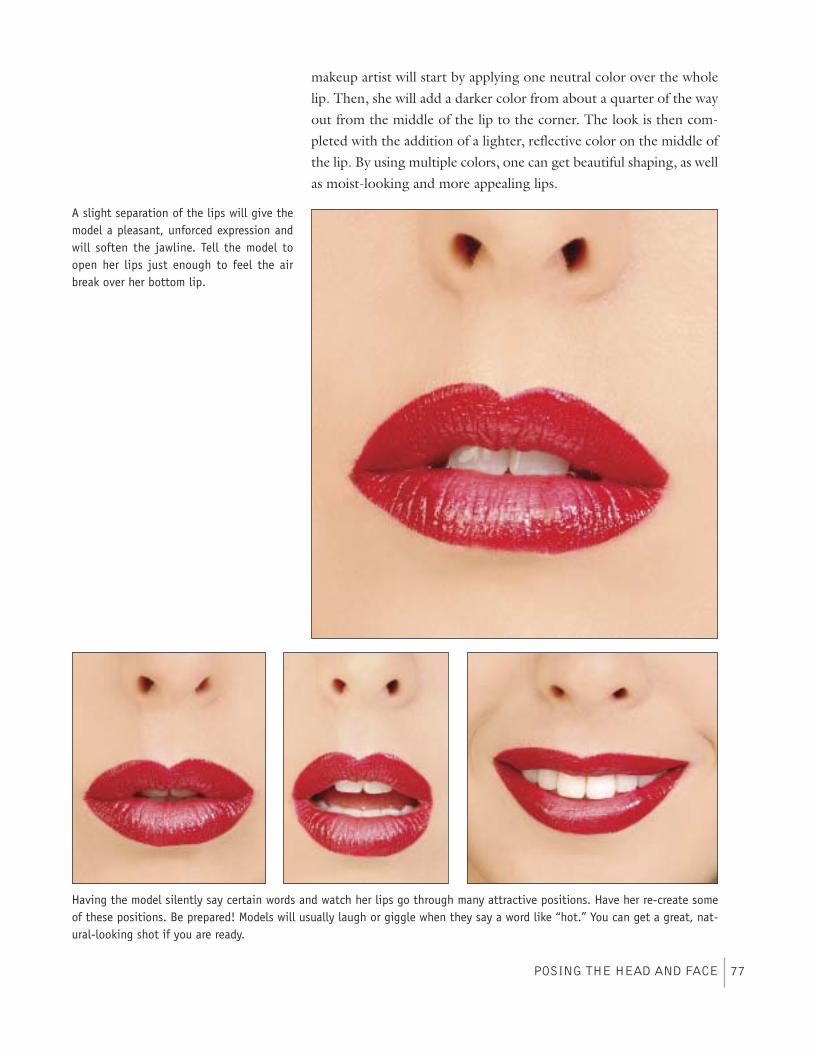
makeup artist will start by applying one neutral color over the wholelip. Then, she will add a darker color from about a quarter of the wayout from the middle of the lip to the corner. The look is then com-pleted with the addition of a lighter, reflective color on the middle ofthe lip. By using multiple colors, one can get beautiful shaping, as wellas moist-looking and more appealing lips.
POSING THE HEAD AND FACE 77
A slight separation of the lips will give themodel a pleasant, unforced expression andwill soften the jawline. Tell the model toopen her lips just enough to feel the airbreak over her bottom lip.
Having the model silently say certain words and watch her lips go through many attractive positions. Have her re-create someof these positions. Be prepared! Models will usually laugh or giggle when they say a word like “hot.” You can get a great, nat-ural-looking shot if you are ready.

When training a beginning model, have them use their hands tocover everything except their lips, then give them words to demon-strate, using only their lips—happiness, anger, pride, softness, etc. Thisway they see the importance and use of lips to create the intendedmood.Direct the model to open her mouth so that she can just slightly
feel the air across her lips. This will make the lips appear larger. It willalso relax the jaw, since she cannot clench her jaw with her lips slightlyopen.
POSING TECHNIQUES FOR PHOTOGRAPHING MODEL PORTFOLIOS78
LEFT—Directing the model to openher mouth until she can just feel theair across her lips will make the lipslook larger.
FACING PAGE—Here, the mood is play-ful. The use of a candy cane helpedthe model pose her lips perfectly forthe shot.

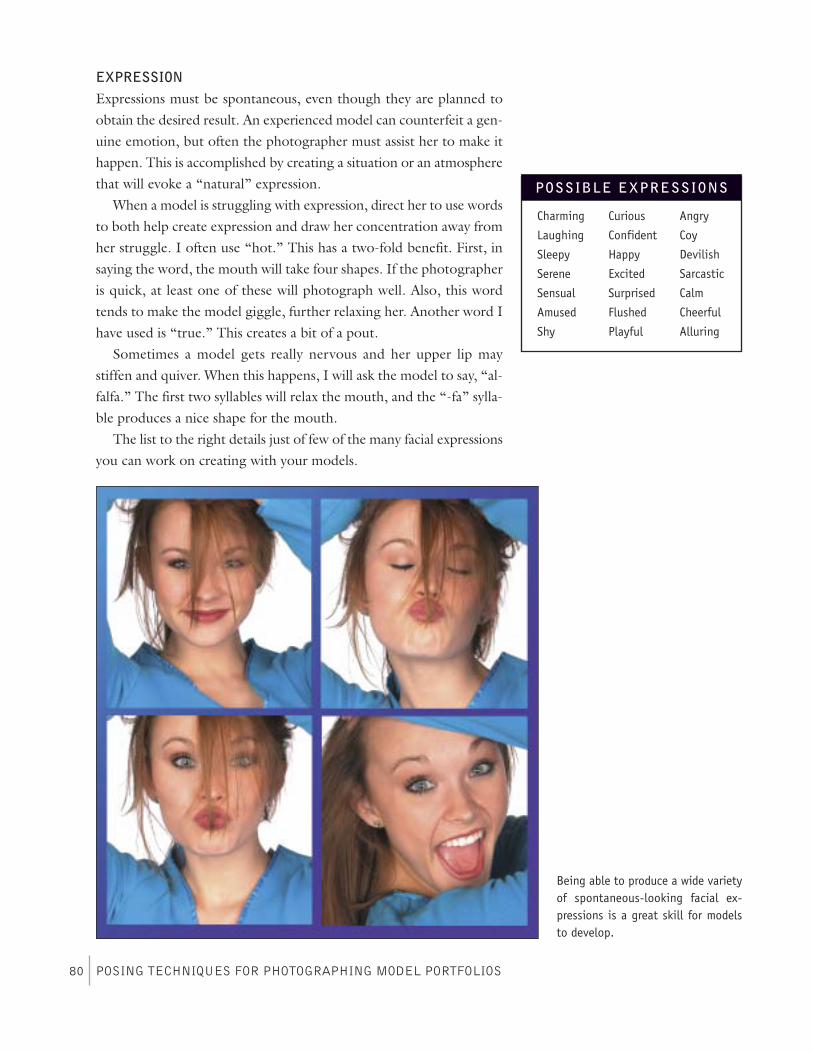
EXPRESSIONExpressions must be spontaneous, even though they are planned toobtain the desired result. An experienced model can counterfeit a gen-uine emotion, but often the photographer must assist her to make ithappen. This is accomplished by creating a situation or an atmospherethat will evoke a “natural” expression.When a model is struggling with expression, direct her to use words
to both help create expression and draw her concentration away fromher struggle. I often use “hot.” This has a two-fold benefit. First, insaying the word, the mouth will take four shapes. If the photographeris quick, at least one of these will photograph well. Also, this wordtends to make the model giggle, further relaxing her. Another word Ihave used is “true.” This creates a bit of a pout.Sometimes a model gets really nervous and her upper lip may
stiffen and quiver. When this happens, I will ask the model to say, “al-falfa.” The first two syllables will relax the mouth, and the “-fa” sylla-ble produces a nice shape for the mouth.The list to the right details just of few of the many facial expressions
you can work on creating with your models.
POSING TECHNIQUES FOR PHOTOGRAPHING MODEL PORTFOLIOS80
Charming
Laughing
Sleepy
Serene
Sensual
Amused
Shy
Curious
Confident
Happy
Excited
Surprised
Flushed
Playful
Angry
Coy
Devilish
Sarcastic
Calm
Cheerful
Alluring
POSSIBLE EXPRESSIONS
Being able to produce a wide varietyof spontaneous-looking facial ex-pressions is a great skill for modelsto develop.
DETERMINING THE BEST MARKETWhen working on a model’s portfolio, there arethree major criteria you need to keep in mind: age,height, and overall appearance. These will help youto determine the markets in which she is most likelyto obtain work and, therefore, the types of images(and poses) you should use in her portfolio.
Age. The model’s age will help you to deter-mine whether her portfolio should be directed to-ward a local, regional, or international market.Generally, models under sixteen are limited to localand regional modeling because of school require-ments, work restrictions, the need for chaperones,etc. While it is true that international agents acceptyounger models, especially in Japan, this is the ex-ception rather than the rule.Models who are over twenty-one also tend to be
limited to local and regional work. This is becausemost major high-fashion agencies are hesitant to in-vest their time, effort, and money in a model who
has a “limited shelf life.” This is harsh but true. Of course, there arecommercial and talent-oriented markets in which over-twenty-onemodels are considered very desirable. (Note: A “talent” is someonewho specializes in acting roles, such as in television commercials or asa spokesmodel for a particular company.) Be prepared to offer thesemarket possibilities as an alternative for the prospective model whohappens to be a bit older.
POSING FOR DIFFERENT GENRES 81
4. Posing for Different Genres
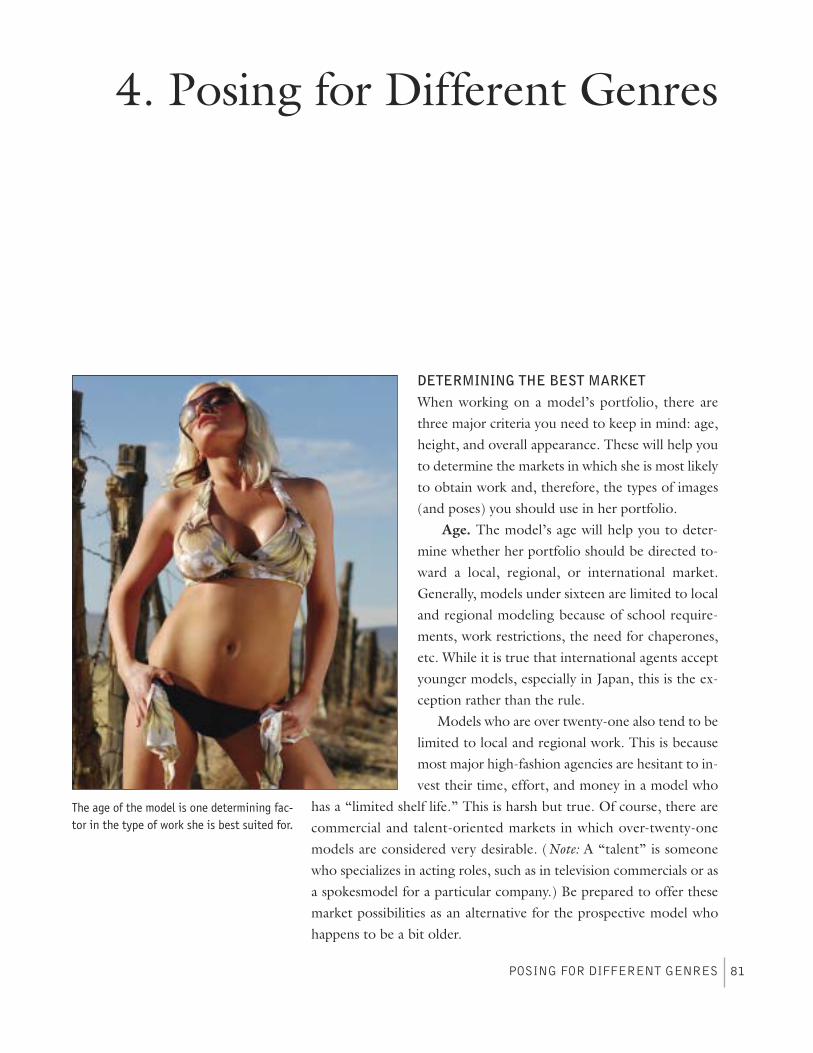
The age of the model is one determining fac-tor in the type of work she is best suited for.

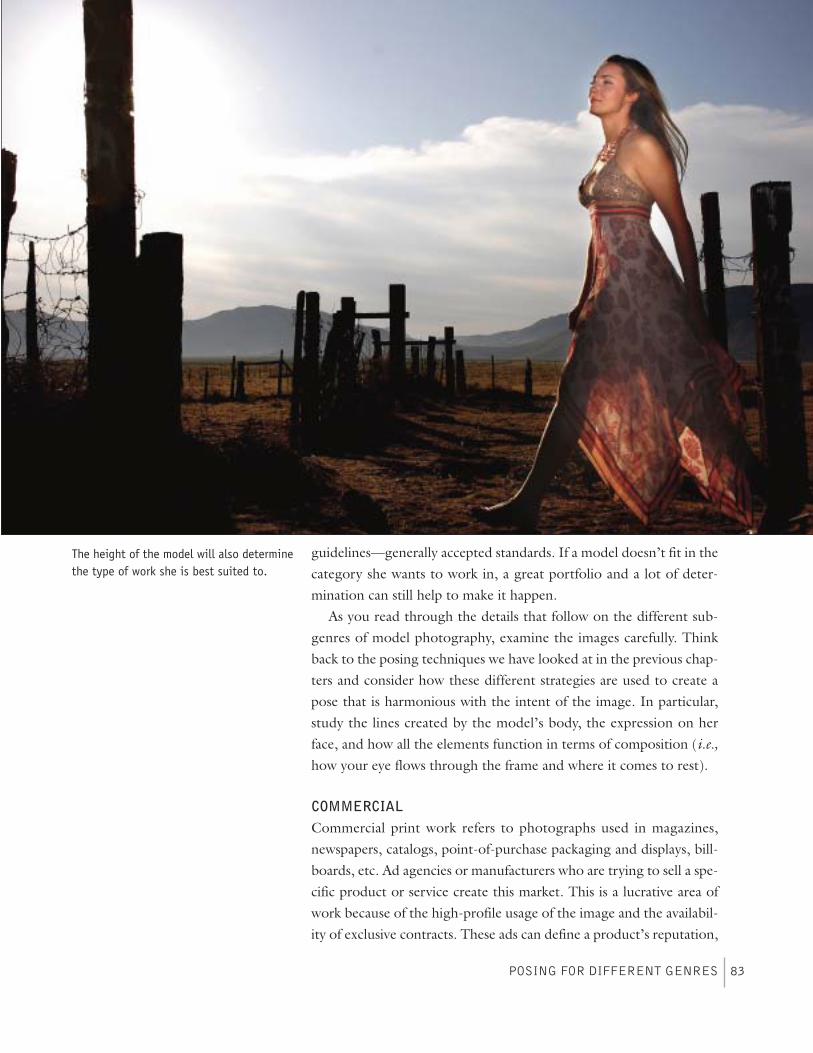
Height.Height is critical. Shorter models are limited to more com-mercially oriented work and specialty modeling, such as hand work, fit(a model that designers hire to fit clothing on during the designprocess), lingerie, swimwear, hair, and beauty (modeling where theproducts [such as makeup, jewelry, or hair care products] require fa-cial beauty). Taller models have a much broader market.
Overall Appearance. Here your own personal “eye” will deter-mine whether or not it is worthwhile to work with the potentialmodel. Styles and preferred looks change as often as hemlines. Whatwas unacceptable two years ago is in demand now. It is the photogra-pher’s responsibility to stay informed of the current “looks.” How-ever, clean skin, straight teeth, and good bone structure are always infashion.Once you have determined the market in which your client wants
to seek work, you can begin thinking about how to create imagesthat will help her reach that goal. Keep in mind that these are only
Tailoring a model’s portfolio images to themarket for which she is best suited will en-hance her chance of finding employment.
guidelines—generally accepted standards. If a model doesn’t fit in thecategory she wants to work in, a great portfolio and a lot of deter-mination can still help to make it happen.As you read through the details that follow on the different sub-
genres of model photography, examine the images carefully. Thinkback to the posing techniques we have looked at in the previous chap-ters and consider how these different strategies are used to create apose that is harmonious with the intent of the image. In particular,study the lines created by the model’s body, the expression on herface, and how all the elements function in terms of composition (i.e.,how your eye flows through the frame and where it comes to rest).
COMMERCIALCommercial print work refers to photographs used in magazines,newspapers, catalogs, point-of-purchase packaging and displays, bill-boards, etc. Ad agencies or manufacturers who are trying to sell a spe-cific product or service create this market. This is a lucrative area ofwork because of the high-profile usage of the image and the availabil-ity of exclusive contracts. These ads can define a product’s reputation,
POSING FOR DIFFERENT GENRES 83
The height of the model will also determinethe type of work she is best suited to.
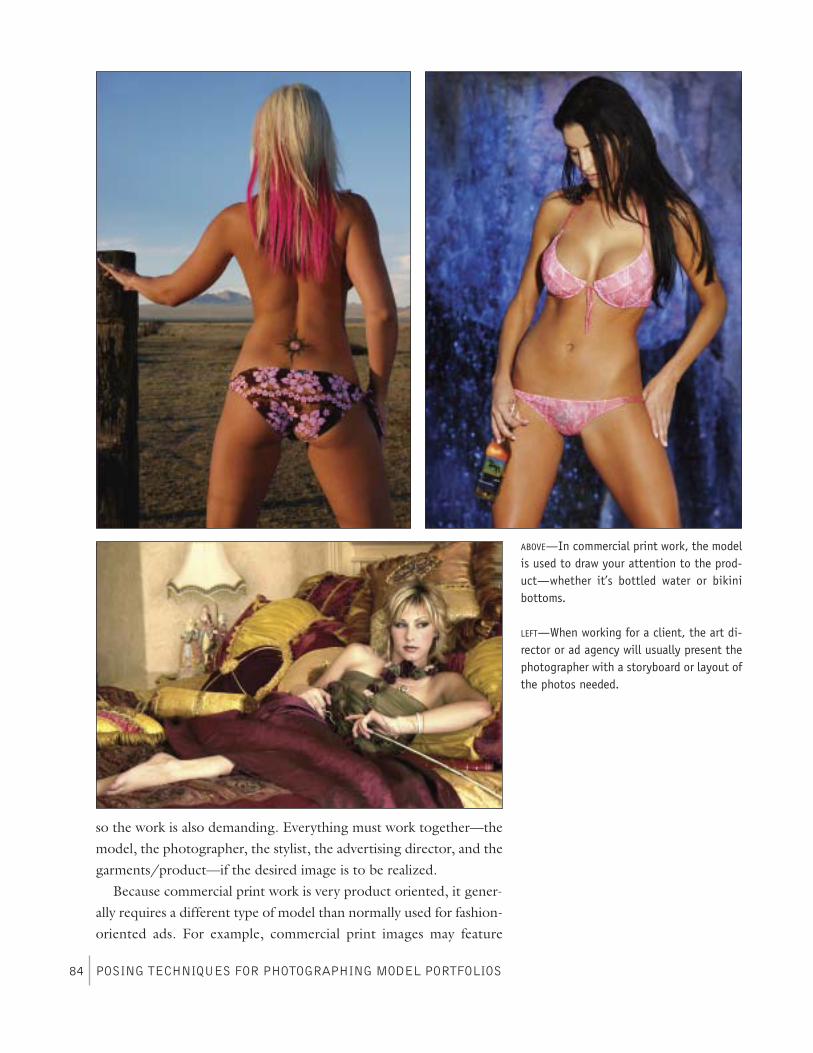
so the work is also demanding. Everything must work together—themodel, the photographer, the stylist, the advertising director, and thegarments/product—if the desired image is to be realized.Because commercial print work is very product oriented, it gener-
ally requires a different type of model than normally used for fashion-oriented ads. For example, commercial print images may feature
POSING TECHNIQUES FOR PHOTOGRAPHING MODEL PORTFOLIOS84
ABOVE—In commercial print work, the modelis used to draw your attention to the prod-uct—whether it’s bottled water or bikinibottoms.
LEFT—When working for a client, the art di-rector or ad agency will usually present thephotographer with a storyboard or layout ofthe photos needed.
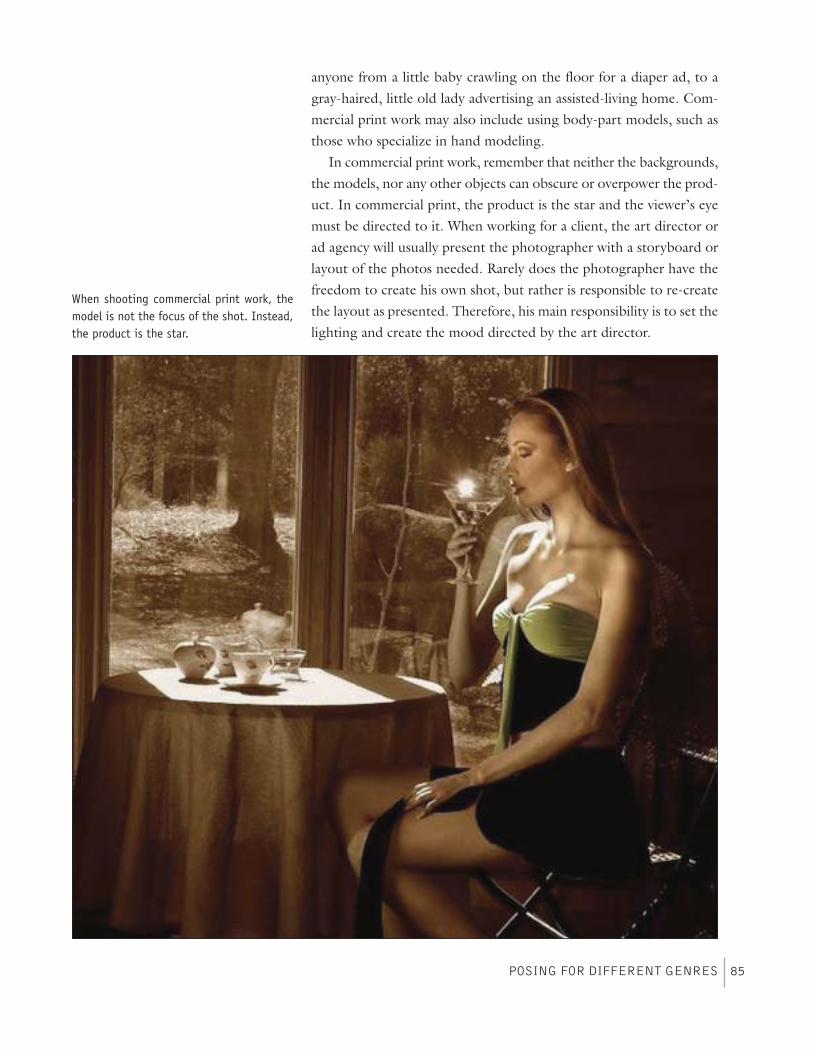
anyone from a little baby crawling on the floor for a diaper ad, to agray-haired, little old lady advertising an assisted-living home. Com-mercial print work may also include using body-part models, such asthose who specialize in hand modeling.In commercial print work, remember that neither the backgrounds,
the models, nor any other objects can obscure or overpower the prod-uct. In commercial print, the product is the star and the viewer’s eyemust be directed to it. When working for a client, the art director orad agency will usually present the photographer with a storyboard orlayout of the photos needed. Rarely does the photographer have thefreedom to create his own shot, but rather is responsible to re-createthe layout as presented. Therefore, his main responsibility is to set thelighting and create the mood directed by the art director.
POSING FOR DIFFERENT GENRES 85
When shooting commercial print work, themodel is not the focus of the shot. Instead,the product is the star.
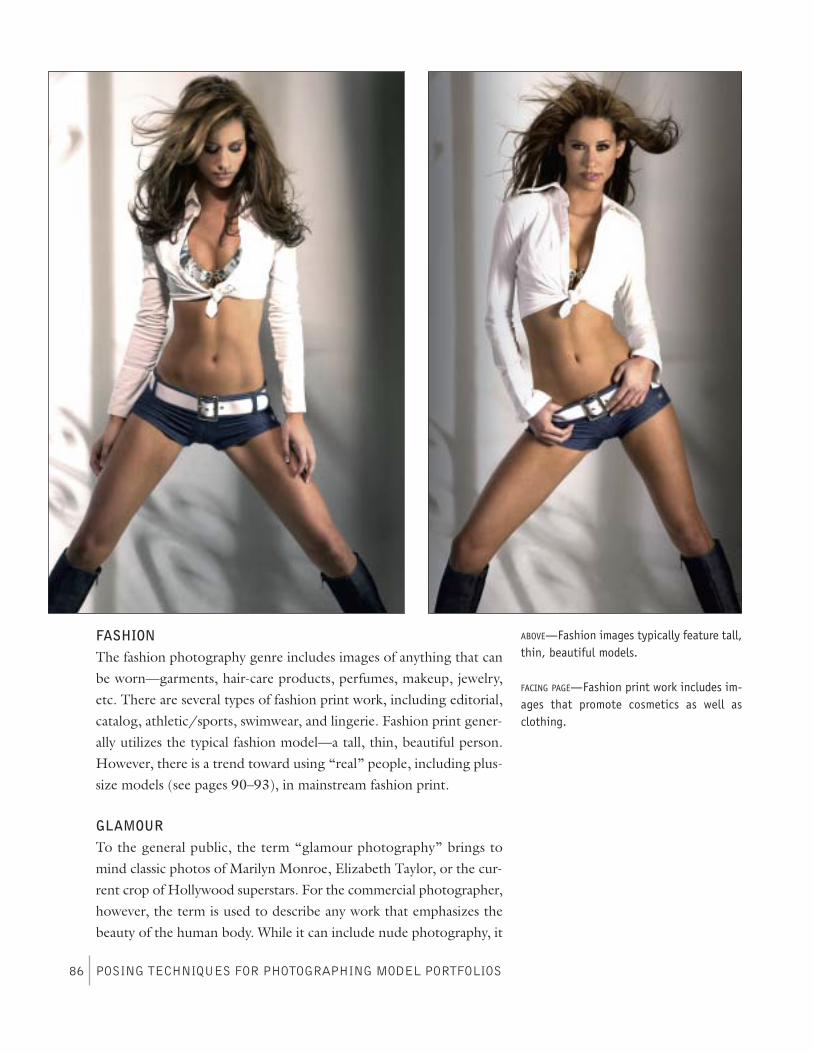
FASHIONThe fashion photography genre includes images of anything that canbe worn—garments, hair-care products, perfumes, makeup, jewelry,etc. There are several types of fashion print work, including editorial,catalog, athletic/sports, swimwear, and lingerie. Fashion print gener-ally utilizes the typical fashion model—a tall, thin, beautiful person.However, there is a trend toward using “real” people, including plus-size models (see pages 90–93), in mainstream fashion print.
GLAMOURTo the general public, the term “glamour photography” brings tomind classic photos of Marilyn Monroe, Elizabeth Taylor, or the cur-rent crop of Hollywood superstars. For the commercial photographer,however, the term is used to describe any work that emphasizes thebeauty of the human body. While it can include nude photography, it
POSING TECHNIQUES FOR PHOTOGRAPHING MODEL PORTFOLIOS86
ABOVE—Fashion images typically feature tall,thin, beautiful models.
FACING PAGE—Fashion print work includes im-ages that promote cosmetics as well asclothing.

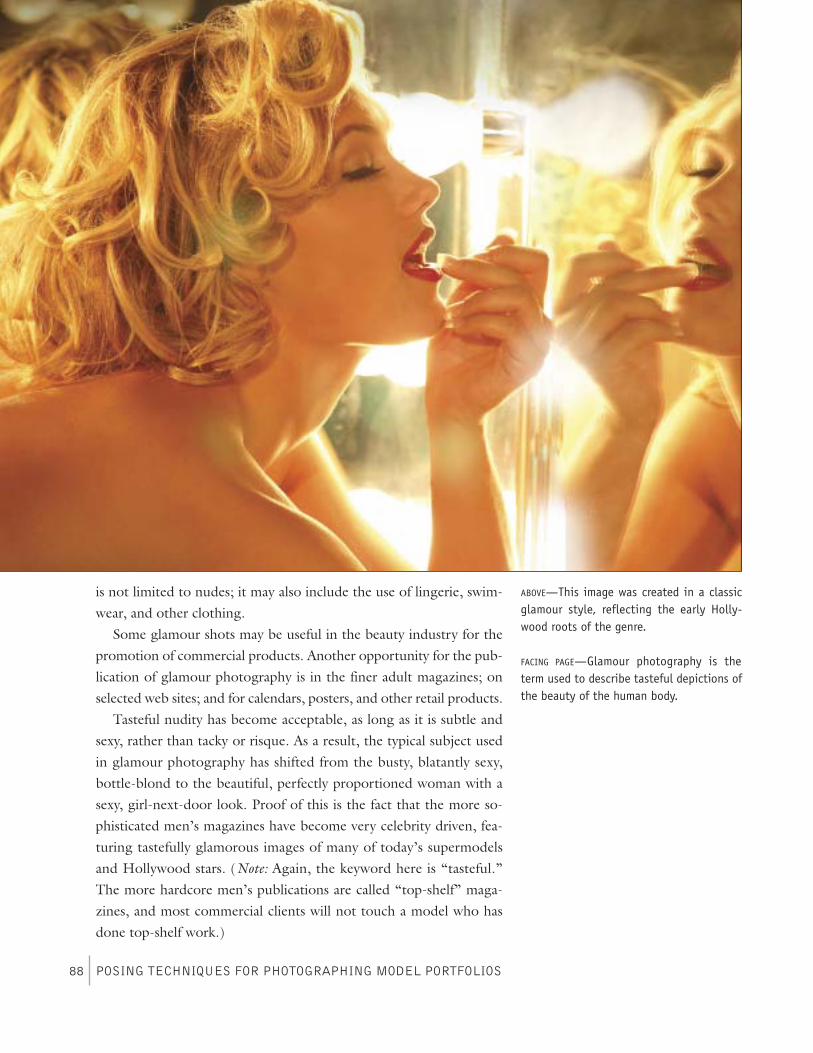
is not limited to nudes; it may also include the use of lingerie, swim-wear, and other clothing.Some glamour shots may be useful in the beauty industry for the
promotion of commercial products. Another opportunity for the pub-lication of glamour photography is in the finer adult magazines; onselected web sites; and for calendars, posters, and other retail products.Tasteful nudity has become acceptable, as long as it is subtle and
sexy, rather than tacky or risque. As a result, the typical subject usedin glamour photography has shifted from the busty, blatantly sexy,bottle-blond to the beautiful, perfectly proportioned woman with asexy, girl-next-door look. Proof of this is the fact that the more so-phisticated men’s magazines have become very celebrity driven, fea-turing tastefully glamorous images of many of today’s supermodelsand Hollywood stars. (Note: Again, the keyword here is “tasteful.”The more hardcore men’s publications are called “top-shelf” maga-zines, and most commercial clients will not touch a model who hasdone top-shelf work.)
POSING TECHNIQUES FOR PHOTOGRAPHING MODEL PORTFOLIOS88
ABOVE—This image was created in a classicglamour style, reflecting the early Holly-wood roots of the genre.
FACING PAGE—Glamour photography is theterm used to describe tasteful depictions ofthe beauty of the human body.
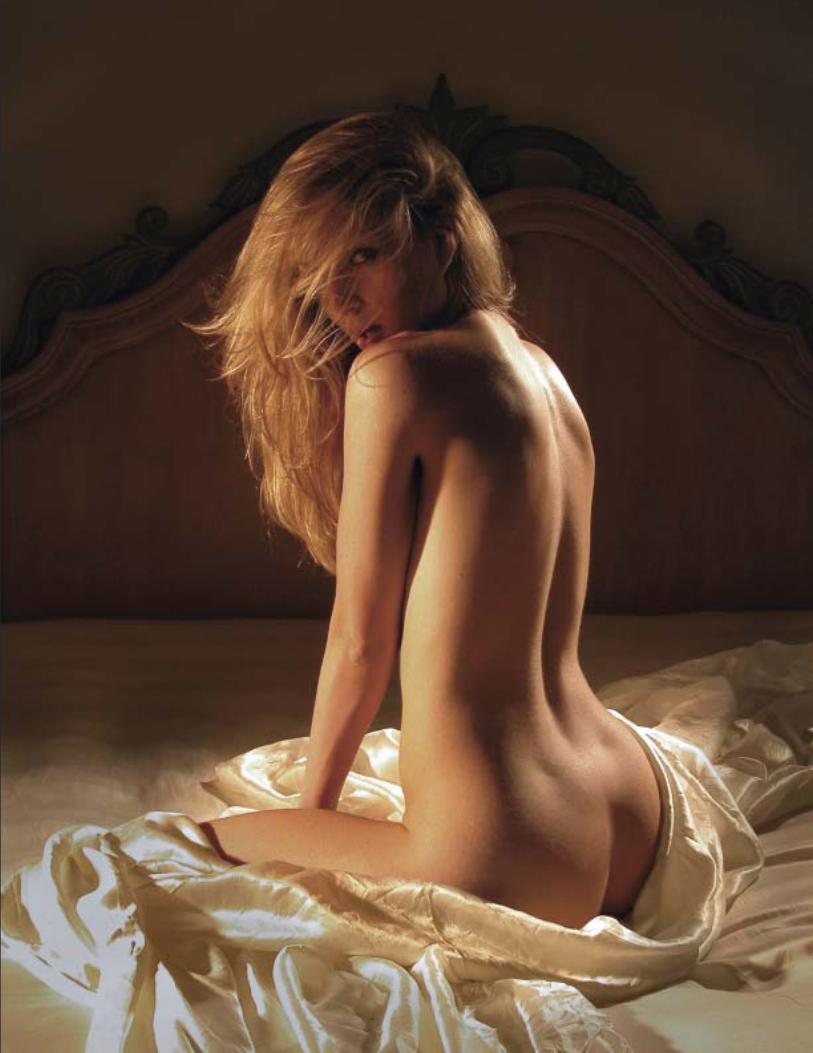
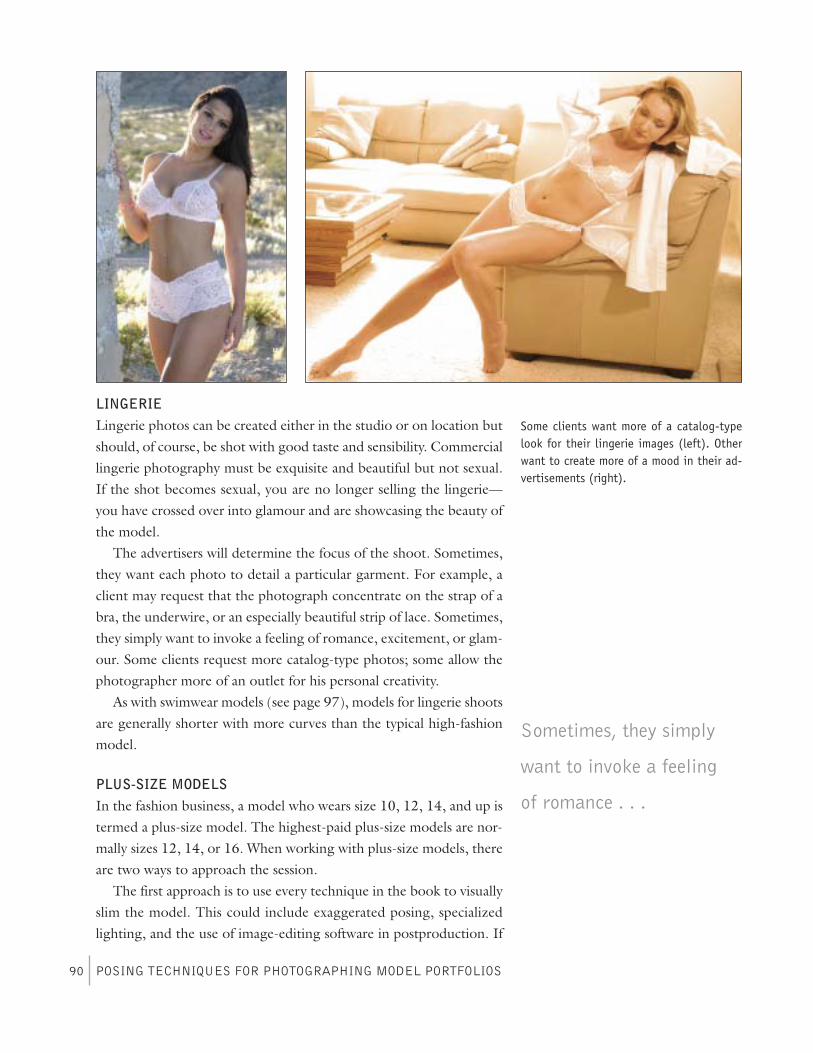
LINGERIELingerie photos can be created either in the studio or on location butshould, of course, be shot with good taste and sensibility. Commerciallingerie photography must be exquisite and beautiful but not sexual.If the shot becomes sexual, you are no longer selling the lingerie—you have crossed over into glamour and are showcasing the beauty ofthe model.The advertisers will determine the focus of the shoot. Sometimes,
they want each photo to detail a particular garment. For example, aclient may request that the photograph concentrate on the strap of abra, the underwire, or an especially beautiful strip of lace. Sometimes,they simply want to invoke a feeling of romance, excitement, or glam-our. Some clients request more catalog-type photos; some allow thephotographer more of an outlet for his personal creativity.As with swimwear models (see page 97), models for lingerie shoots
are generally shorter with more curves than the typical high-fashionmodel.
PLUS-SIZE MODELSIn the fashion business, a model who wears size 10, 12, 14, and up istermed a plus-size model. The highest-paid plus-size models are nor-mally sizes 12, 14, or 16. When working with plus-size models, thereare two ways to approach the session.The first approach is to use every technique in the book to visually
slim the model. This could include exaggerated posing, specializedlighting, and the use of image-editing software in postproduction. If
POSING TECHNIQUES FOR PHOTOGRAPHING MODEL PORTFOLIOS90
Some clients want more of a catalog-typelook for their lingerie images (left). Otherwant to create more of a mood in their ad-vertisements (right).
Sometimes, they simply
want to invoke a feeling
of romance . . .

you decide to take this approach, you can visually extend the model’slegs by having her wear extremely high-heeled shoes. She can evenwear multiple bras to reduce her bust size, or throw her hips dramat-ically off angle to slim this area. Leaving much of the body in shadowor reducing the separation between the subject and the backgroundcan also produce a slimming effect.These exaggerated techniques are normally used only when pho-
tographing portfolio images for a model who is concerned about her
Plus-size models are finding more and morework today, as clients and advertising agen-cies expand the use of “real people” in theirimages.
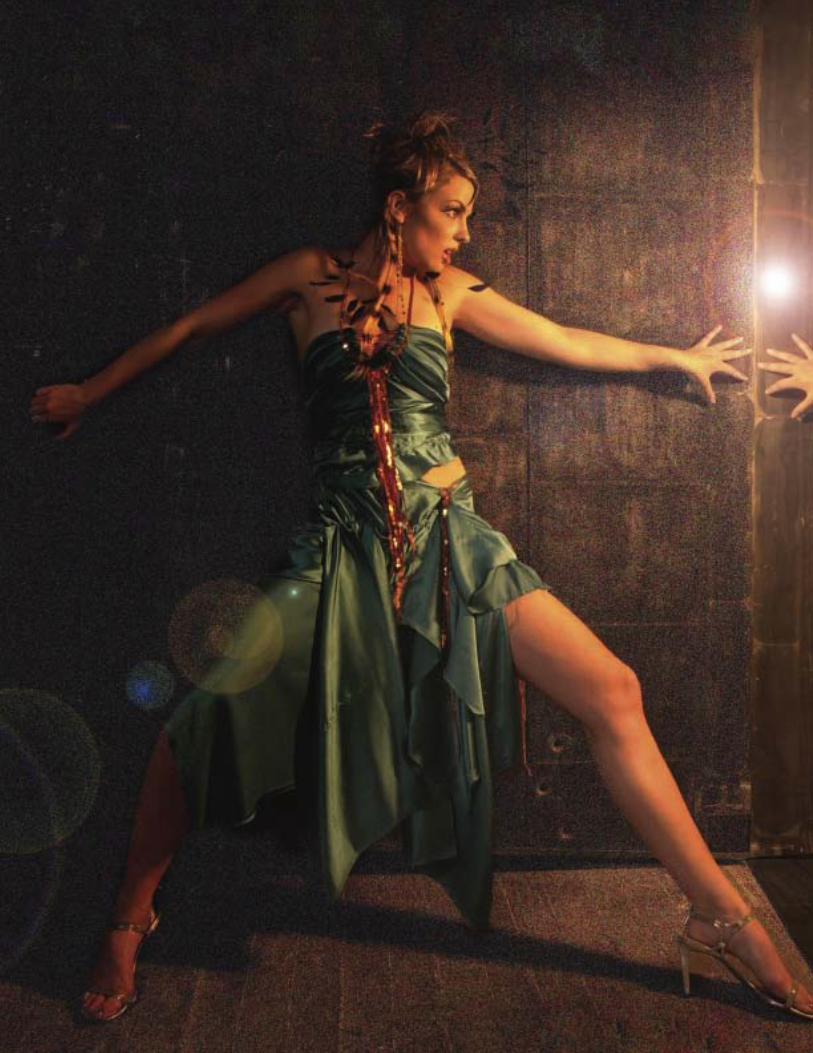
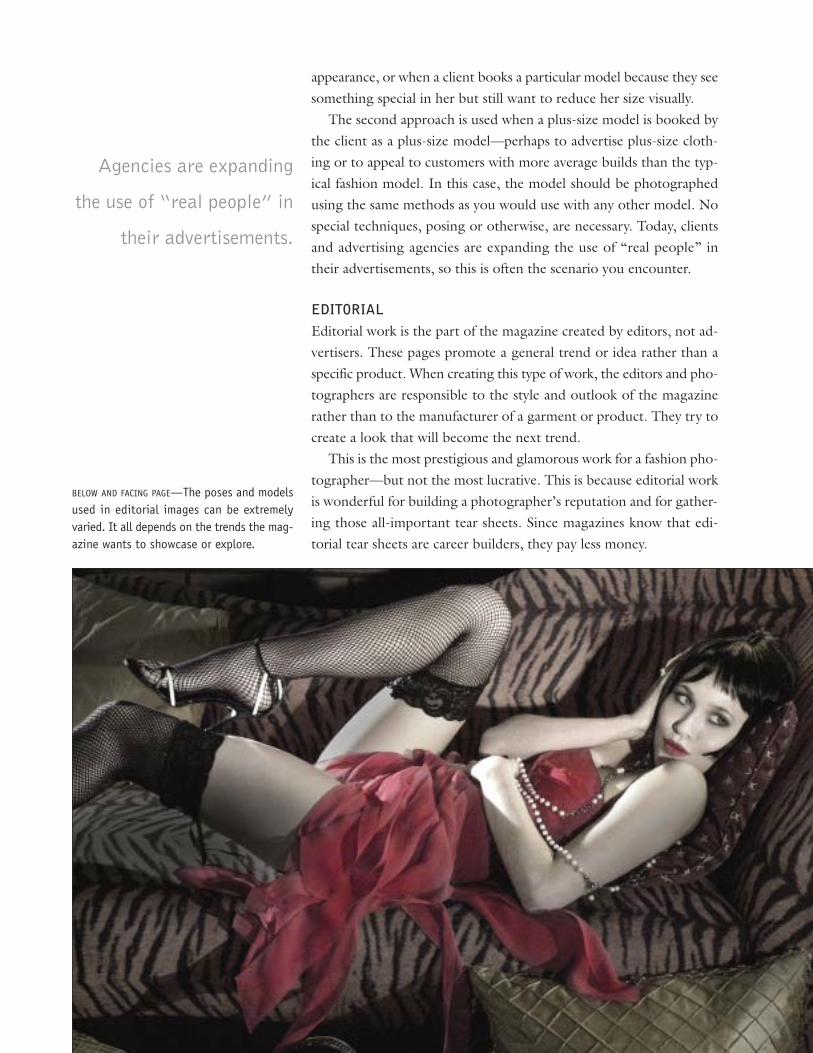
appearance, or when a client books a particular model because they seesomething special in her but still want to reduce her size visually.The second approach is used when a plus-size model is booked by
the client as a plus-size model—perhaps to advertise plus-size cloth-ing or to appeal to customers with more average builds than the typ-ical fashion model. In this case, the model should be photographedusing the same methods as you would use with any other model. Nospecial techniques, posing or otherwise, are necessary. Today, clientsand advertising agencies are expanding the use of “real people” intheir advertisements, so this is often the scenario you encounter.
EDITORIALEditorial work is the part of the magazine created by editors, not ad-vertisers. These pages promote a general trend or idea rather than aspecific product. When creating this type of work, the editors and pho-tographers are responsible to the style and outlook of the magazinerather than to the manufacturer of a garment or product. They try tocreate a look that will become the next trend.This is the most prestigious and glamorous work for a fashion pho-
tographer—but not the most lucrative. This is because editorial workis wonderful for building a photographer’s reputation and for gather-ing those all-important tear sheets. Since magazines know that edi-torial tear sheets are career builders, they pay less money.
BELOW AND FACING PAGE—The poses and modelsused in editorial images can be extremelyvaried. It all depends on the trends the mag-azine wants to showcase or explore.
Agencies are expanding
the use of “real people” in
their advertisements.
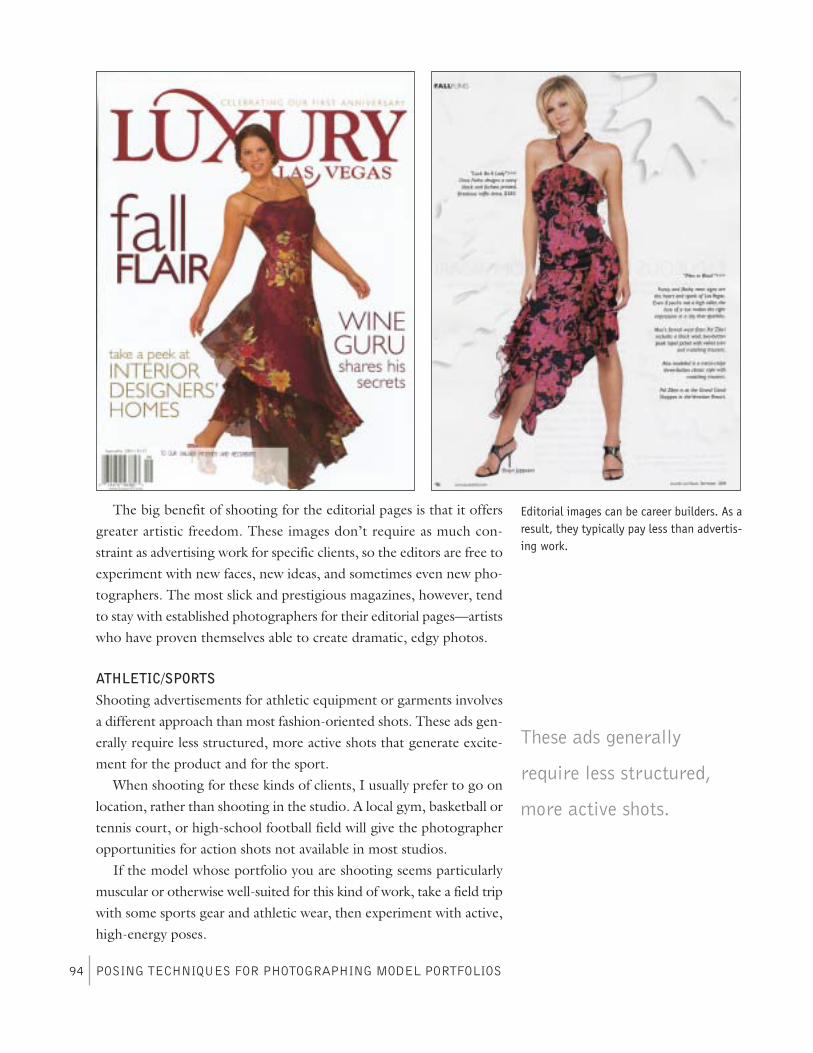
The big benefit of shooting for the editorial pages is that it offersgreater artistic freedom. These images don’t require as much con-straint as advertising work for specific clients, so the editors are free toexperiment with new faces, new ideas, and sometimes even new pho-tographers. The most slick and prestigious magazines, however, tendto stay with established photographers for their editorial pages—artistswho have proven themselves able to create dramatic, edgy photos.
ATHLETIC/SPORTSShooting advertisements for athletic equipment or garments involvesa different approach than most fashion-oriented shots. These ads gen-erally require less structured, more active shots that generate excite-ment for the product and for the sport.When shooting for these kinds of clients, I usually prefer to go on
location, rather than shooting in the studio. A local gym, basketball ortennis court, or high-school football field will give the photographeropportunities for action shots not available in most studios.If the model whose portfolio you are shooting seems particularly
muscular or otherwise well-suited for this kind of work, take a field tripwith some sports gear and athletic wear, then experiment with active,high-energy poses.
POSING TECHNIQUES FOR PHOTOGRAPHING MODEL PORTFOLIOS94
Editorial images can be career builders. As aresult, they typically pay less than advertis-ing work.
These ads generally
require less structured,
more active shots.
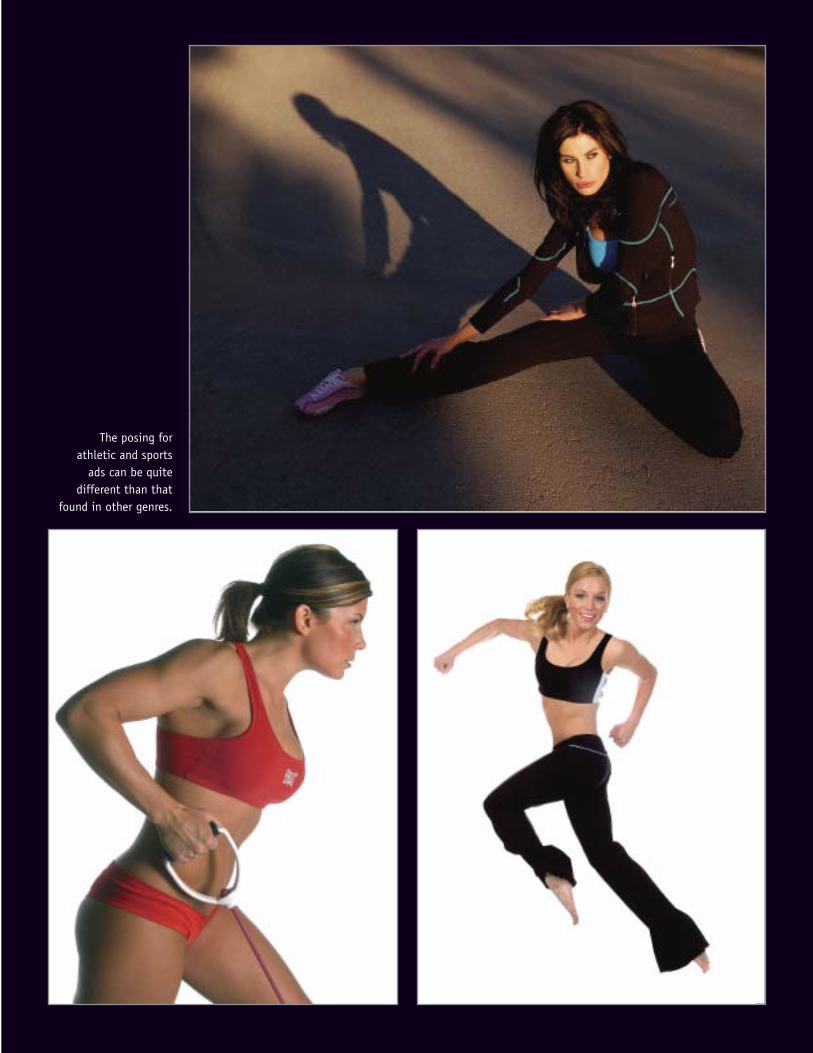
The posing forathletic and sportsads can be quite
different than thatfound in other genres.

CATALOGCatalog work refers to the images used in a retailer’s catalog, mail-order brochures, flyers, and other materials that are used to sell spe-cific merchandise. The main objective of these images is to presentgarments or other merchandise in a straightforward, very detailedmanner. This work doesn’t carry the status of editorial or advertisingprint photography, but it can form the backbone of a photographer’sincome.For this type of work, models are selected based on their look. Gen-
erally, they should represent the ideals of the market segment towardwhich the particular catalog is targeted—whether it’s teenagers, sen-ior citizens, moms, businesspeople, or plus-size women. The idea istransference. “If you buy this outfit, you will look as wonderful as ourmodel does!”Catalog shoots often involve more than one model per shot—and
each model is expected to be able to show the garments to an advan-tage. In the section on feet that appears on pages 38–44, we looked
POSING TECHNIQUES FOR PHOTOGRAPHING MODEL PORTFOLIOS96
Catalog work is designed to display the gar-ments or other products that the retailer isoffering for sale.

at three basic foot positions. These are often used in catalog shots,where you have three models in a shot and each is posed in one of thethree basic foot positions.While catalog shoots don’t carry the status of editorial or maga-
zine ads, the current trend in this genre is actually toward more ex-citing, artistic, and interesting poses. Of course, you must still staywithin the needs of the specific client.
SWIMWEARExotic locations, white sand beaches, soft breezes, and palm trees—these are key ingredients when shooting swimwear. The very nature ofthis market demands exotic beauty. In this genre, the line betweenfashion and glamour softens. As such, the models for this line of worktend to be more curvaceous than those seen in straight fashion pho-tography. Swimwear models can also be shorter than fashion models.The bottom line in this market is transference—the general publicwants to feel that if they buy this swimsuit, they too will be hot, sexy,and beautiful.
Picturesque beach locations are common inswimwear images.
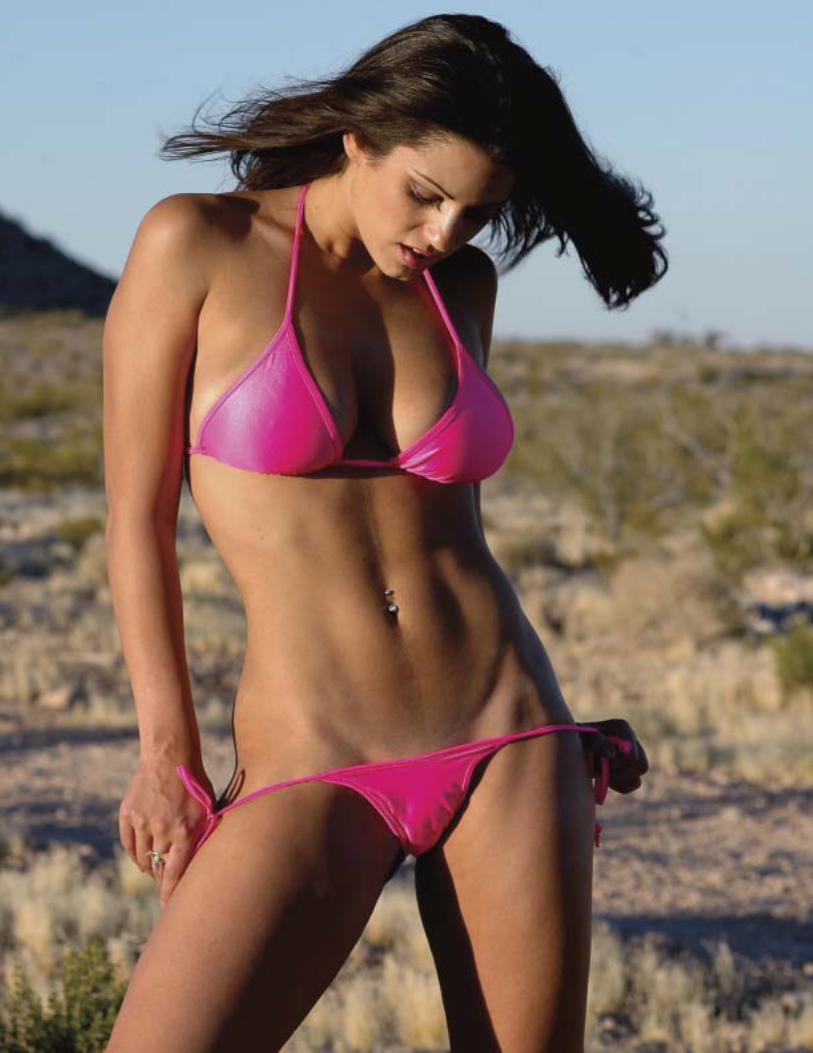
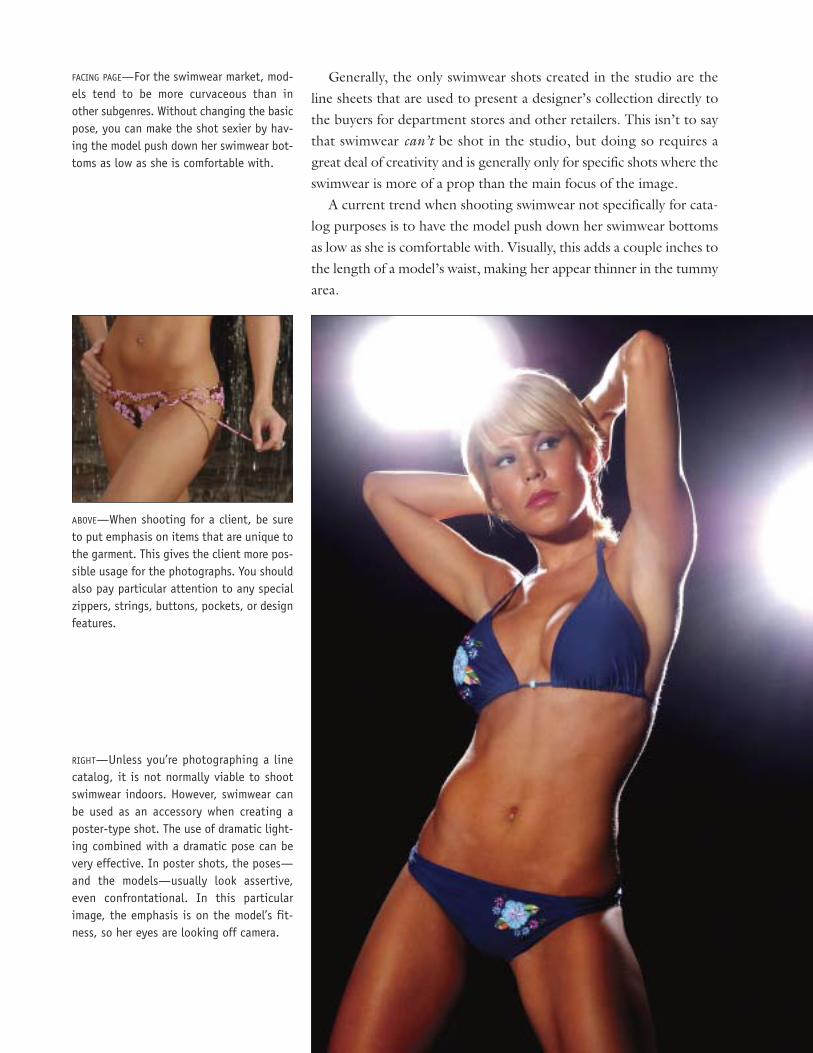
Generally, the only swimwear shots created in the studio are theline sheets that are used to present a designer’s collection directly tothe buyers for department stores and other retailers. This isn’t to saythat swimwear can’t be shot in the studio, but doing so requires agreat deal of creativity and is generally only for specific shots where theswimwear is more of a prop than the main focus of the image.A current trend when shooting swimwear not specifically for cata-
log purposes is to have the model push down her swimwear bottomsas low as she is comfortable with. Visually, this adds a couple inches tothe length of a model’s waist, making her appear thinner in the tummyarea.
FACING PAGE—For the swimwear market, mod-els tend to be more curvaceous than inother subgenres. Without changing the basicpose, you can make the shot sexier by hav-ing the model push down her swimwear bot-toms as low as she is comfortable with.
RIGHT—Unless you’re photographing a linecatalog, it is not normally viable to shootswimwear indoors. However, swimwear canbe used as an accessory when creating aposter-type shot. The use of dramatic light-ing combined with a dramatic pose can bevery effective. In poster shots, the poses—and the models—usually look assertive,even confrontational. In this particularimage, the emphasis is on the model’s fit-ness, so her eyes are looking off camera.
ABOVE—When shooting for a client, be sureto put emphasis on items that are unique tothe garment. This gives the client more pos-sible usage for the photographs. You shouldalso pay particular attention to any specialzippers, strings, buttons, pockets, or designfeatures.
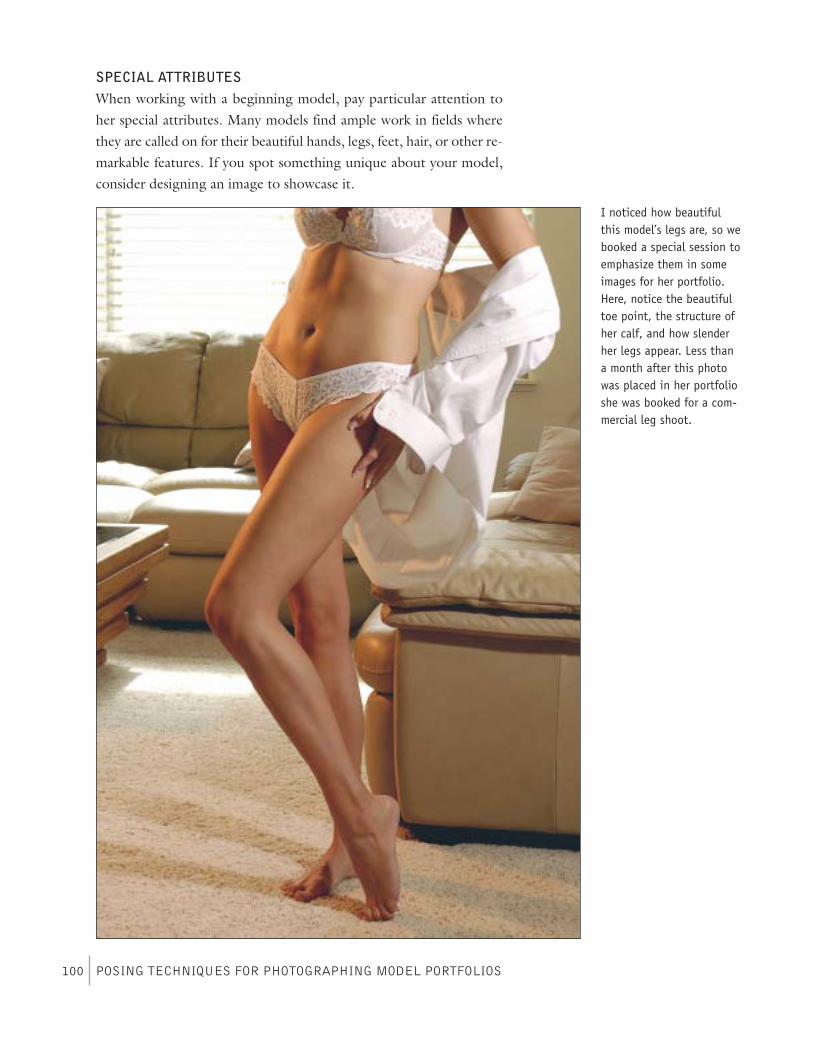
SPECIAL ATTRIBUTESWhen working with a beginning model, pay particular attention toher special attributes. Many models find ample work in fields wherethey are called on for their beautiful hands, legs, feet, hair, or other re-markable features. If you spot something unique about your model,consider designing an image to showcase it.
POSING TECHNIQUES FOR PHOTOGRAPHING MODEL PORTFOLIOS100
I noticed how beautifulthis model’s legs are, so webooked a special session toemphasize them in someimages for her portfolio.Here, notice the beautifultoe point, the structure ofher calf, and how slenderher legs appear. Less thana month after this photowas placed in her portfolioshe was booked for a com-mercial leg shoot.
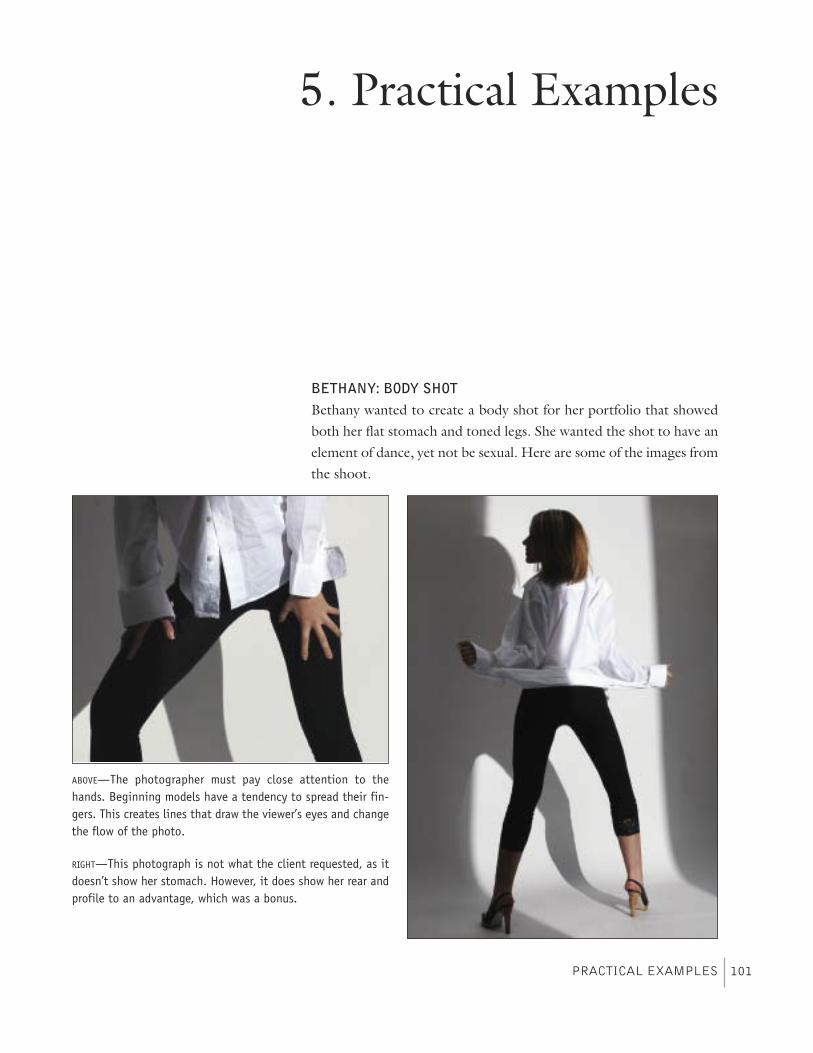
BETHANY: BODY SHOTBethany wanted to create a body shot for her portfolio that showedboth her flat stomach and toned legs. She wanted the shot to have anelement of dance, yet not be sexual. Here are some of the images fromthe shoot.
PRACTICAL EXAMPLES 101
5. Practical Examples
ABOVE—The photographer must pay close attention to thehands. Beginning models have a tendency to spread their fin-gers. This creates lines that draw the viewer’s eyes and changethe flow of the photo.
RIGHT—This photograph is not what the client requested, as itdoesn’t show her stomach. However, it does show her rear andprofile to an advantage, which was a bonus.
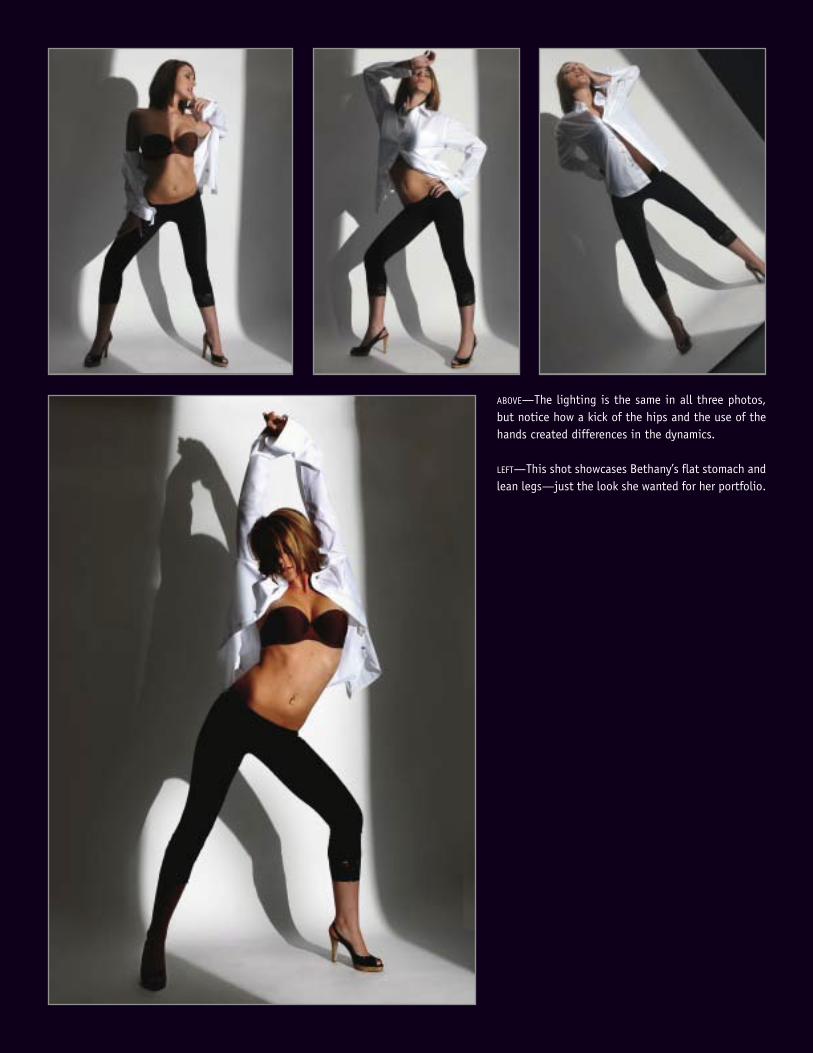
ABOVE—The lighting is the same in all three photos,but notice how a kick of the hips and the use of thehands created differences in the dynamics.
LEFT—This shot showcases Bethany’s flat stomach andlean legs—just the look she wanted for her portfolio.

CIANA: SYMMETRYScientists agree that symmetry is the secret to beauty. When asked toshoot a portrait of Ciana for Wendlynn & Associates Hair DesignTeam, I wanted to show the symmetry of her face. To do this, I couldnot pose her any other way but straight to the camera.The following images show some of the problems you might en-
counter when photographing such a session. Ciana has learned fromexperience to avoid unflattering poses; she photographed these onlyfor the purpose of this demonstration.
PRACTICAL EXAMPLES 103
This photo is not usable; there is too muchtension in the hands and the nails are push-ing wrinkles into the face. The hands shouldframe the face without placing pressure onthe skin.
The placement of the hand in this photo-graph is standard for many portrait photog-raphers. However, it is unacceptable forfashion and beauty clients because it is toomasculine. The hand is nearly as large as theface and commands too much attention.With the weight on the hand, the photo-graph also fails to communicate the graceand elegance of Ciana’s face. This photo would be acceptable in many applications. However, for this particu-
lar client, the shoulder, breasts, and area under the right shoulder strap demandtoo much attention; they draw the viewer’s eye away from the model’s hair.

ABOVE—These are acceptable photosto many, but one must learn to effec-tively show a model’s individualbeauty. Identify what makes herunique, and then enhance those fea-tures. In this case, Ciana’s shouldersand chest draw the viewer’s eyesaway from the symmetry of her beau-tiful face, neckline, and hairstyle.
LEFT—This photo is cropped too tightfor use by the client. Also, it is notthe most flattering crop for Ciana’sface.
FACING PAGE—This photo has the sameelements as the large shot on the pre-vious page. It could be an effectivephotograph if you wanted to draw theviewer’s attention to something onthe facing page.
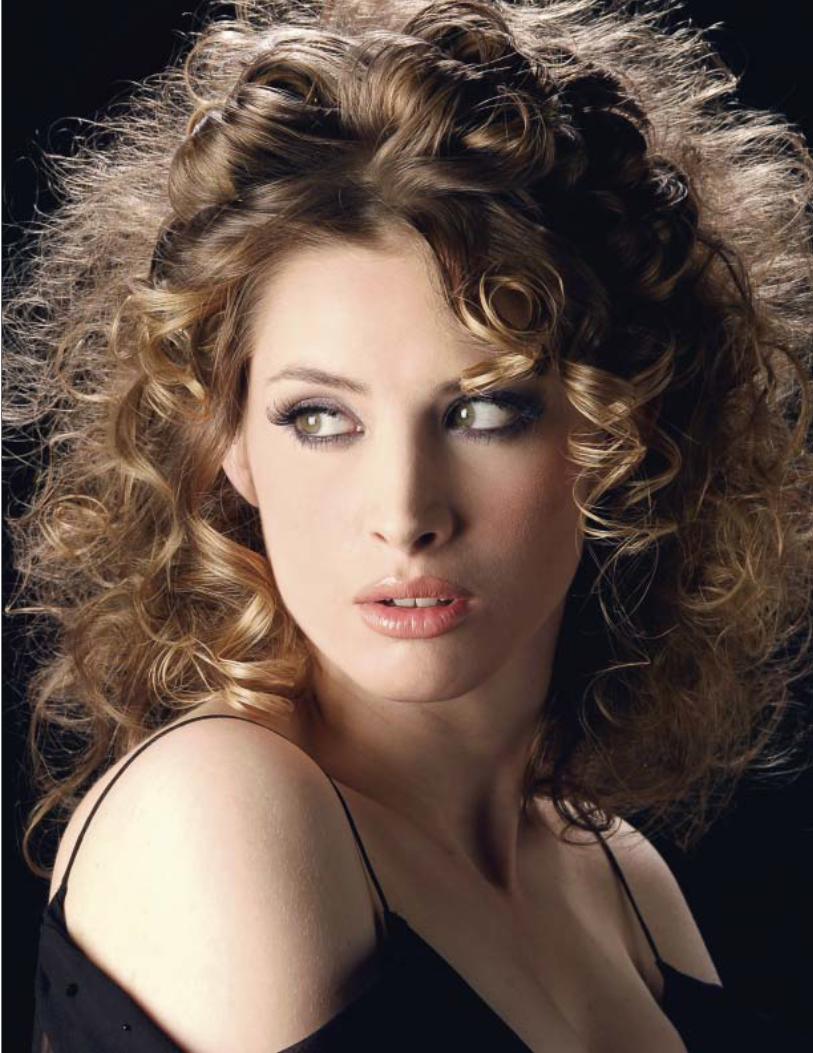
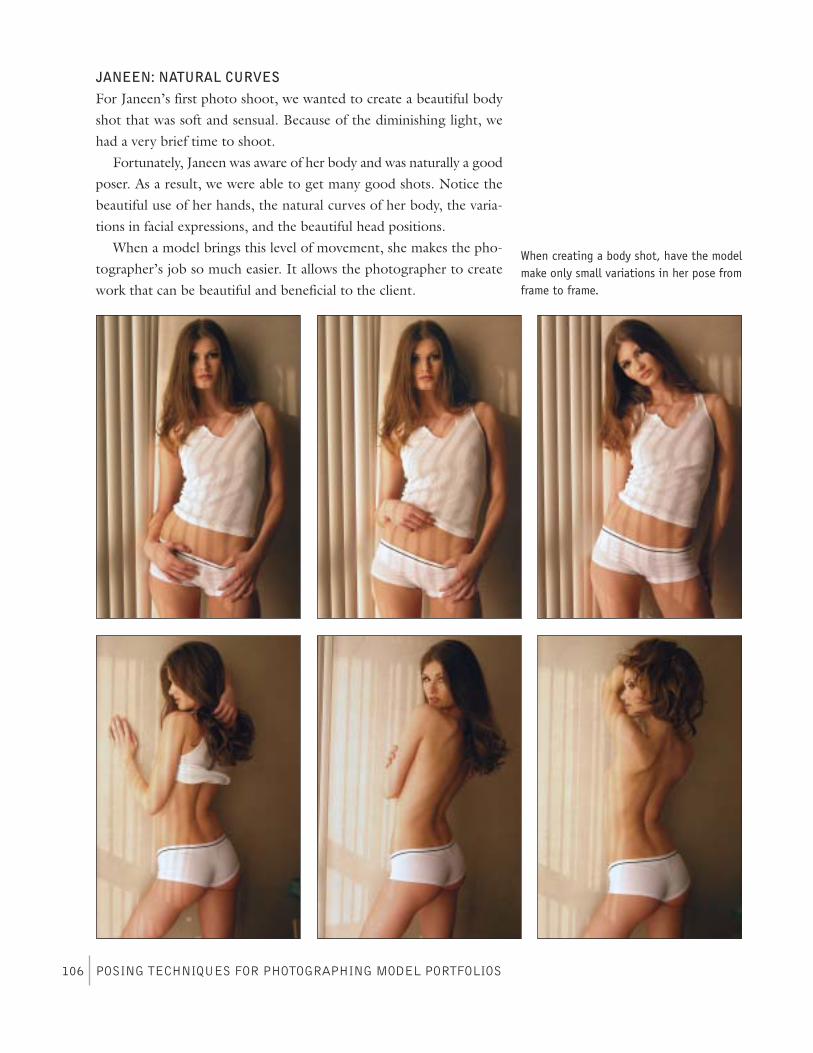
JANEEN: NATURAL CURVESFor Janeen’s first photo shoot, we wanted to create a beautiful bodyshot that was soft and sensual. Because of the diminishing light, wehad a very brief time to shoot.Fortunately, Janeen was aware of her body and was naturally a good
poser. As a result, we were able to get many good shots. Notice thebeautiful use of her hands, the natural curves of her body, the varia-tions in facial expressions, and the beautiful head positions.When a model brings this level of movement, she makes the pho-
tographer’s job so much easier. It allows the photographer to creatework that can be beautiful and beneficial to the client.
POSING TECHNIQUES FOR PHOTOGRAPHING MODEL PORTFOLIOS106
When creating a body shot, have the modelmake only small variations in her pose fromframe to frame.
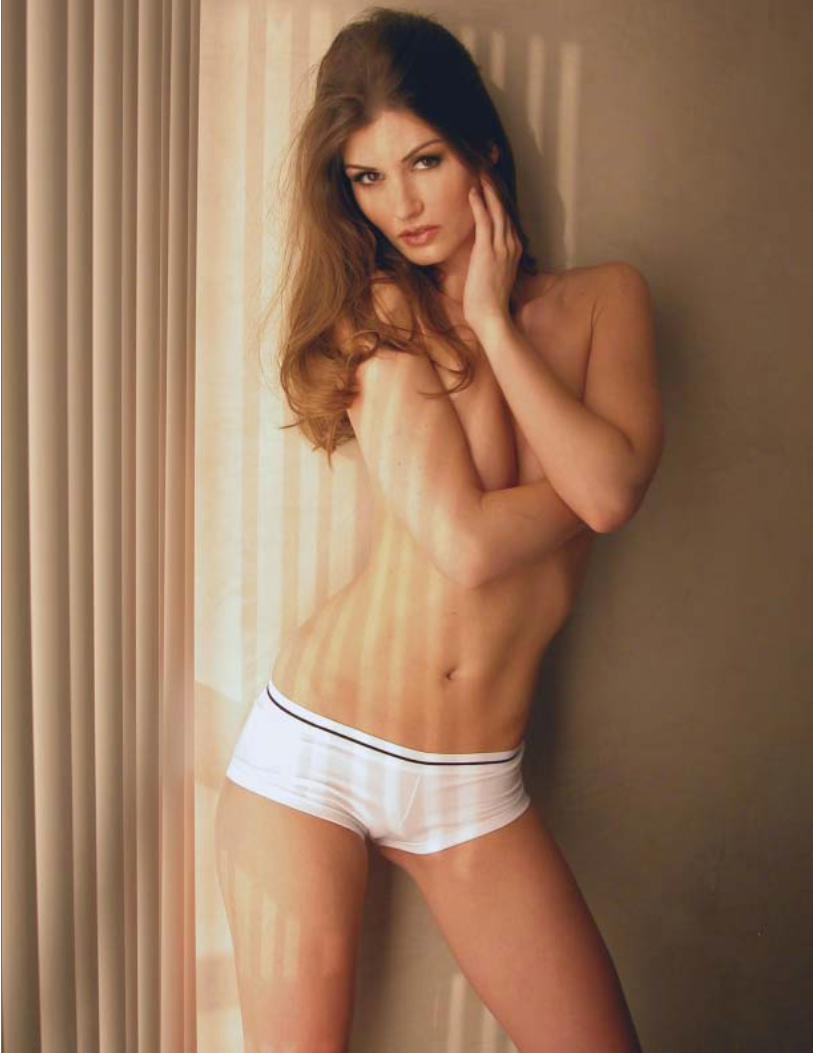
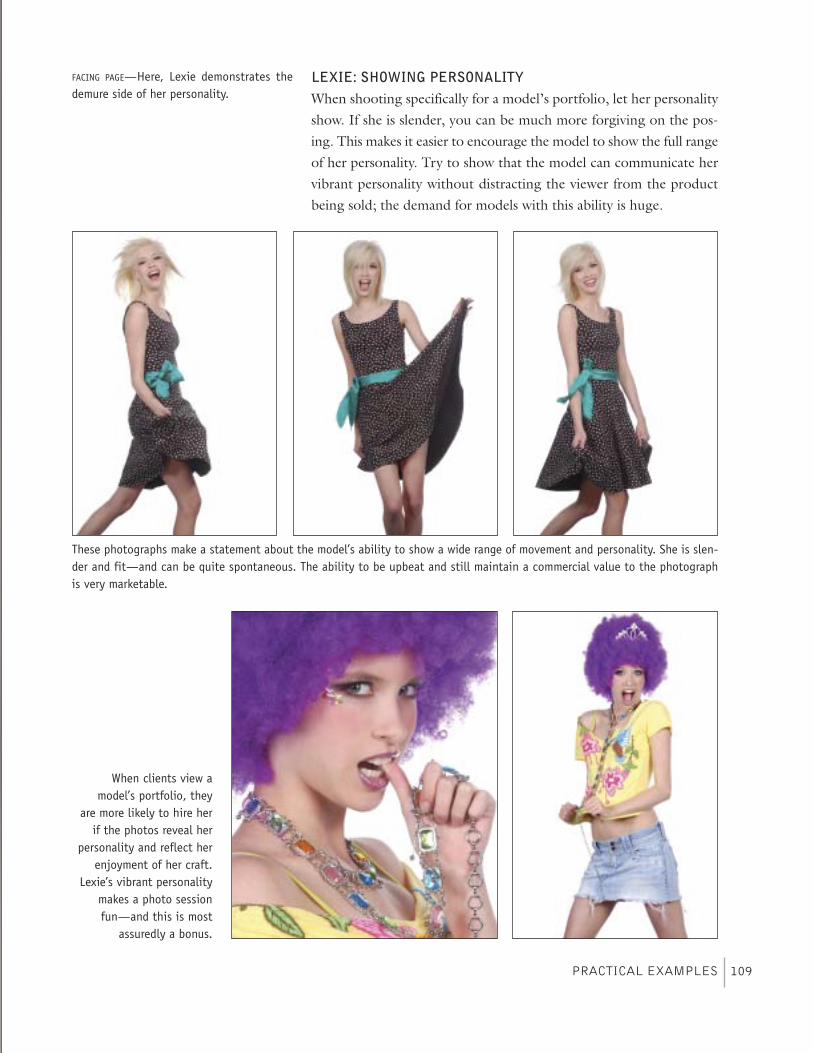
LEXIE: SHOWING PERSONALITYWhen shooting specifically for a model’s portfolio, let her personalityshow. If she is slender, you can be much more forgiving on the pos-ing. This makes it easier to encourage the model to show the full rangeof her personality. Try to show that the model can communicate hervibrant personality without distracting the viewer from the productbeing sold; the demand for models with this ability is huge.
PRACTICAL EXAMPLES 109
FACING PAGE—Here, Lexie demonstrates thedemure side of her personality.
These photographs make a statement about the model’s ability to show a wide range of movement and personality. She is slen-der and fit—and can be quite spontaneous. The ability to be upbeat and still maintain a commercial value to the photographis very marketable.
When clients view amodel’s portfolio, they
are more likely to hire herif the photos reveal her
personality and reflect herenjoyment of her craft.
Lexie’s vibrant personalitymakes a photo sessionfun—and this is most
assuredly a bonus.

MONIQUE: GIRLY, CUTE, AND FUNThe pinup style has returned! Many clients want to create a socially en-tertaining and sexy marketing tool without being overtly sexual. Thephotographs are girly, cute, and fun. When creating this style of image,the model must understand how to pose her body. More importantly,she must have the self-confidence to act silly.
POSING TECHNIQUES FOR PHOTOGRAPHING MODEL PORTFOLIOS110
Monique was asked to jump up, create movement in her hair, point her toes, andtwist her upper body back toward the camera—all at the same time. Most often,it takes many attempts to capture the desired results with a shot like this. Evenif the photograph is not successful at first, though, it creates the mood neces-sary for the model to feel comfortable. If you can get a model preoccupied withmovement, she will normally relax and start posing naturally.
Monique was asked to pose on her knees andlift off with her thighs. This helps create athin thigh. Whenever possible, have themodel’s weight resting on parts of the bodythat are hidden from the camera—in thiscase, her left thigh. She was also asked topresent her chest to the camera.
The model has separated her legs and turnedher hips off camera. This position visuallyslims her thighs. Normally, the model shouldnot have her hand near her face and withsuch a wide profile. However, it works herebecause it looks like a natural placement ofthe hand for a cute, shy position.
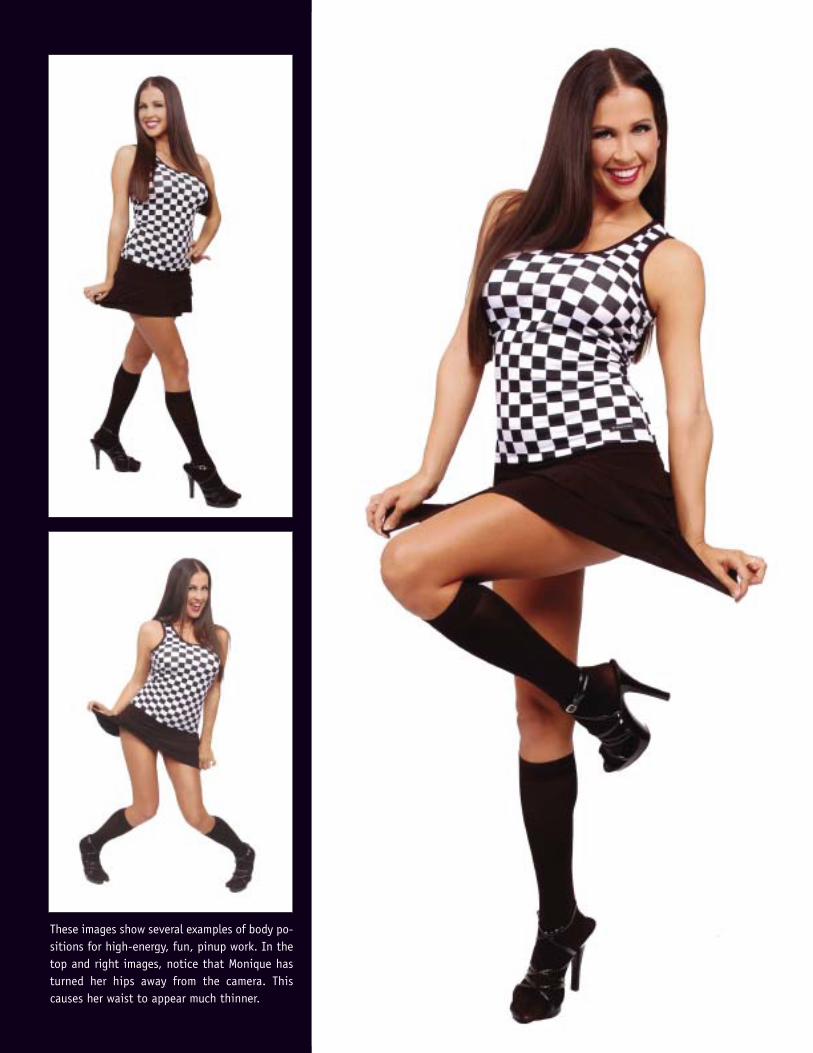
These images show several examples of body po-sitions for high-energy, fun, pinup work. In thetop and right images, notice that Monique hasturned her hips away from the camera. Thiscauses her waist to appear much thinner.
The following are a few additional tips that will be useful to you whenlearning the art of posing your models. They are presented in no par-ticular order, but each will help to facilitate the learning process.
POSING TECHNIQUES FOR PHOTOGRAPHING MODEL PORTFOLIOS112
6. HINTS AND TIPS

BUILD A SAMPLE PORTFOLIOWhen working with a beginning model, have her build a mock port-folio of her favorite poses to bring to the shoot. Using photos frommagazines, ask her to compile a collection of both headshots and full-length images that she would like to see in her portfolio—shots whereshe could see herself replacing the model. This will serve two pur-poses. First, it will show you where the model sees herself and iden-tify her goals. Second, it will provide you a handy reference guidewhen posing the images you create for her real portfolio.
HINTS AND TIPS 113
RIGHT AND FACING PAGE—Have prospective mod-els create a sample portfolio of images (frommagazines or elsewhere) in which they cansee themselves replacing the model. Thiswill help you to determine the kinds of im-ages they are looking for.
This will show you where
the model sees herself
and identify her goals.

The construction of the mock portfolio is rarely a one-step process.I have found that the model’s first grouping is often based on wishfulthinking and media hype. It takes a bit of gentle guidance to teach abeginning model to look at herself realistically and develop a usefulmock portfolio. However, this is absolutely necessary before pro-ceeding with the development of her actual book.When our team (hairstylist, makeup artist, and photographer) goes
over a model’s completed mock portfolio, we narrow down the imagesto a few looks. Then, we start planning her photo session and coordi-nating the clothing for each specific shot. The mock portfolio acts asa reference guide during this process.Once you have been photographing models for a while, you can
also use this mock portfolio to show the model what look you are try-ing to achieve in each shot. A model’s job is to sell a product, article
POSING TECHNIQUES FOR PHOTOGRAPHING MODEL PORTFOLIOS114
In her portfolio, the model is the productyou are selling, so each image must show-case and promote her particular assets.
It takes a bit of guidance
to teach a beginning
model to look at herself
realistically.
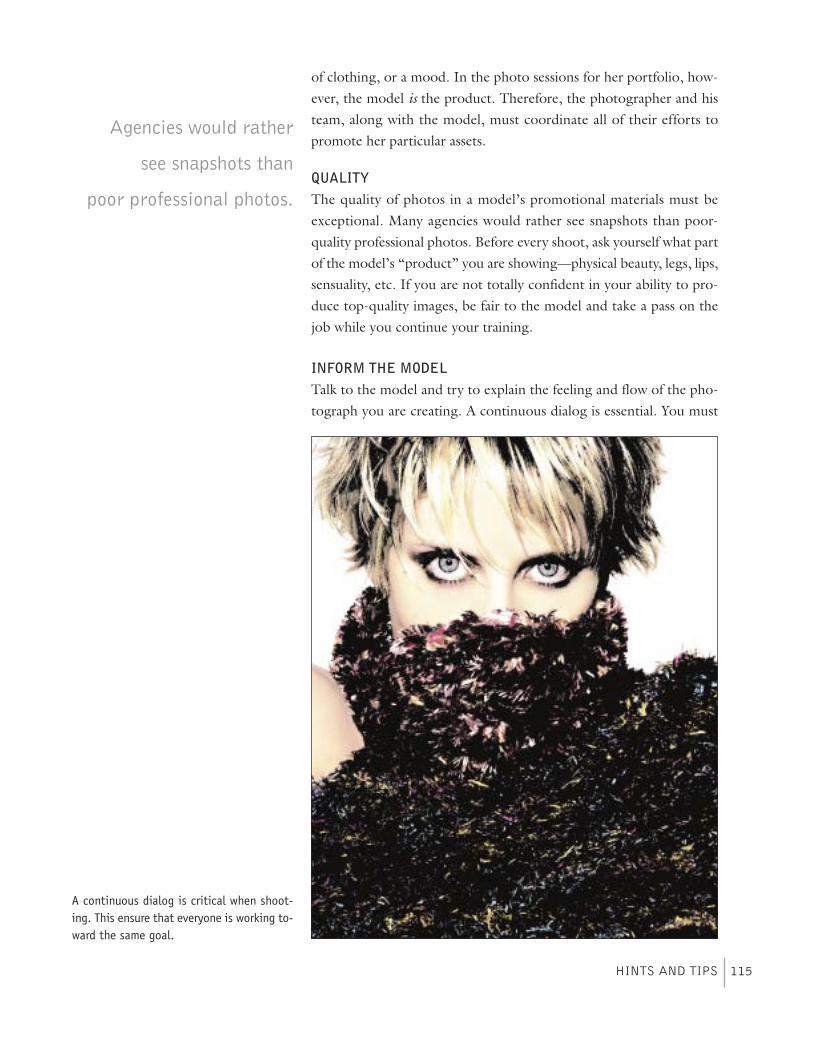
of clothing, or a mood. In the photo sessions for her portfolio, how-ever, the model is the product. Therefore, the photographer and histeam, along with the model, must coordinate all of their efforts topromote her particular assets.
QUALITYThe quality of photos in a model’s promotional materials must beexceptional. Many agencies would rather see snapshots than poor-quality professional photos. Before every shoot, ask yourself what partof the model’s “product” you are showing—physical beauty, legs, lips,sensuality, etc. If you are not totally confident in your ability to pro-duce top-quality images, be fair to the model and take a pass on thejob while you continue your training.
INFORM THE MODELTalk to the model and try to explain the feeling and flow of the pho-tograph you are creating. A continuous dialog is essential. You must
HINTS AND TIPS 115
A continuous dialog is critical when shoot-ing. This ensure that everyone is working to-ward the same goal.
Agencies would rather
see snapshots than
poor professional photos.
make the model feel comfortable, using praise and encouragement toexpand her confidence and help her project the required moods.Be positive in all suggestions you give to your models. If you need
to shift gears, saying something like, “Enough! We need to try some-thing else,” is only going to shatter her confidence. Instead, try say-ing, “That was great. Let’s shoot a few more images like this, thenchange the mood.” By asking the model to try a few more images,you’re letting her know that she was doing what was required, butnow you want to go in a different direction. No negative message wascommunicated, so you’ve left the model feeling positive and ready towork with you on the next look.If your model is struggling, try asking her to imagine herself play-
ing a character. The best models are not just beautiful, they are alsoversatile. The ability to get into a character is a very useful asset for amodel to possess.
BEGIN WITH PORTRAITUREIn this business, it takes a long time to get established, so be preparedto go the distance if you want to achieve success. You will also need agreat deal of photographic knowledge to prepare yourself for all thedemands of lighting, posing, etc. You’ll need to become knowledge-able about makeup, hair, and clothing styles, plus you’ll have to learnto work with and instruct people. All this knowledge needs to begained before starting out as a fashion photographer. If you startshooting as a fashion photographer before you have gained the ex-pertise needed, you can easily blow an assignment and give yourself apoor reputation.Therefore, I recommend that you get started as a portrait photog-
rapher, where you can practice your skills in a controlled lighting en-vironment and learn how to quickly establish a rapport with people.Don’t feel you’ll be limited creatively by the “portrait” genre; the im-ages of many fine portrait photographers are really fashion/commer-cial images, because their clients want creative images that reflect thelooks they see in their favorite magazines.Using lighting, composition, and design, each photographer—
whether portrait or fashion—will create their own style. The portraitspecialist, however, can use the same style, or combination of styles, formany sessions—or even for years. This can be a great asset when youare getting started, since it allows you to become comfortable withthe photography process and working with your subjects without theconstant pressure to produce a totally unique image every time.
POSING TECHNIQUES FOR PHOTOGRAPHING MODEL PORTFOLIOS116
FACING PAGE—Helping a model project the re-quired moods means building her confidenceand always maintaining a positive attitudeon the set.
Practice your skills in
a controlled environment
and learn to establish a
rapport with people.
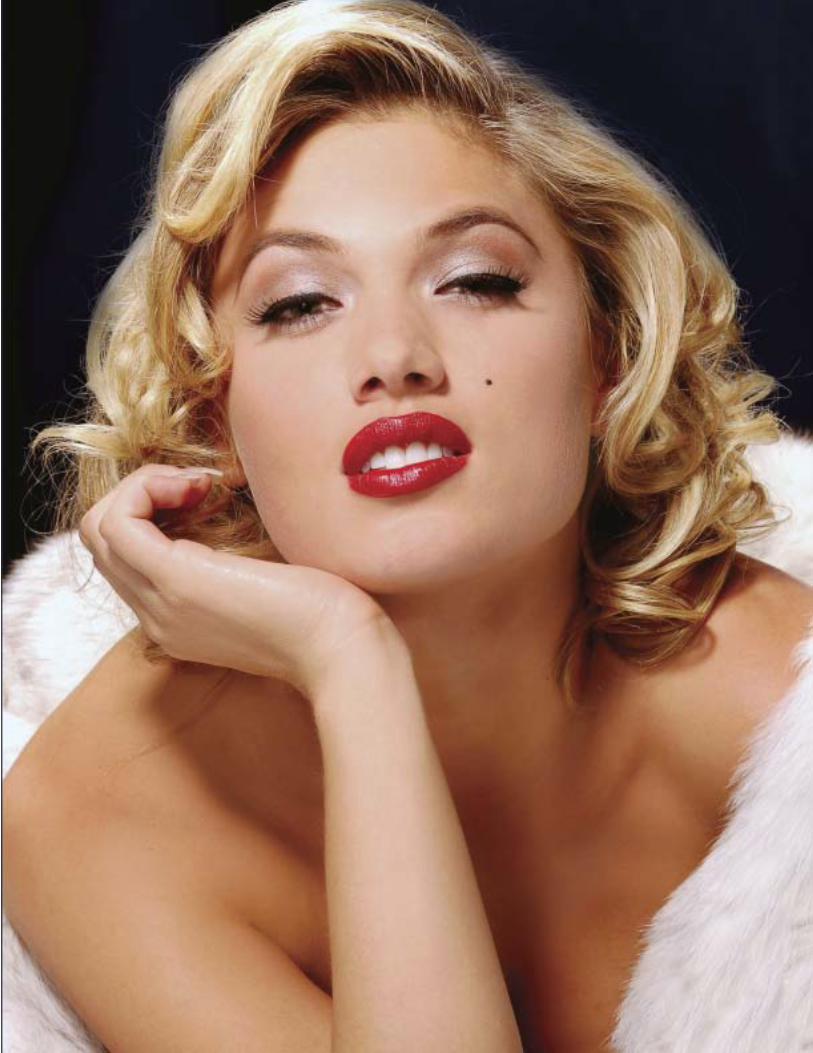
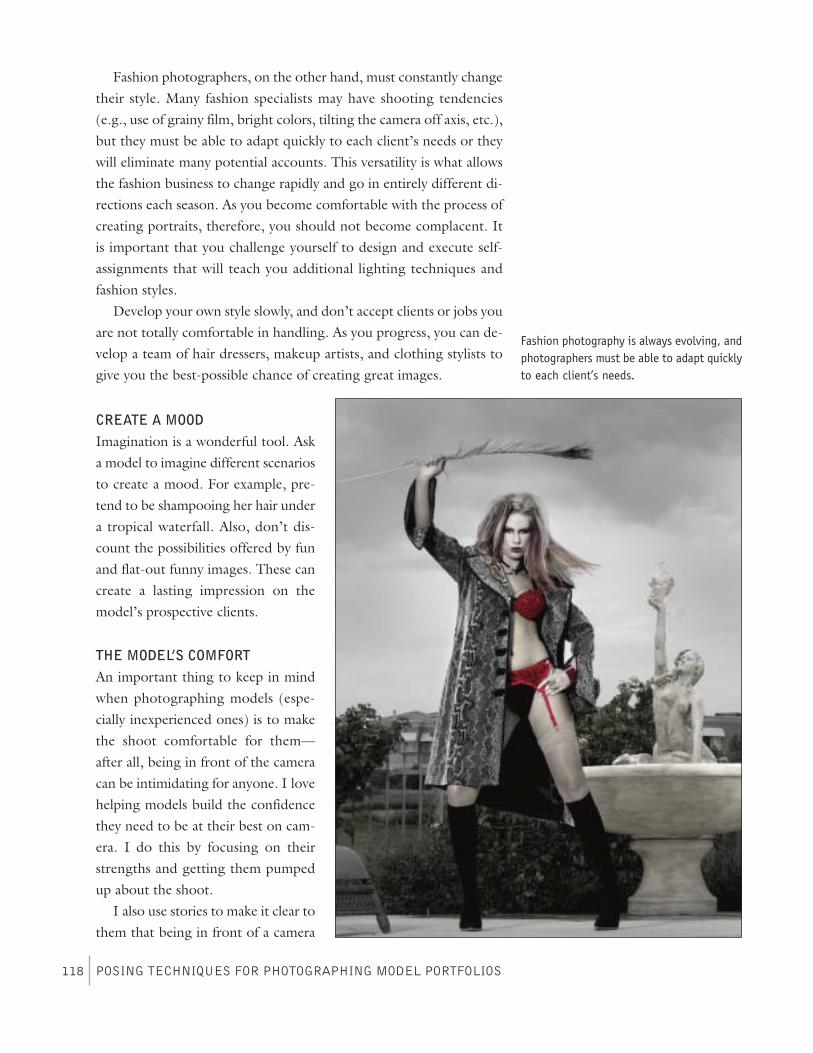
Fashion photographers, on the other hand, must constantly changetheir style. Many fashion specialists may have shooting tendencies(e.g., use of grainy film, bright colors, tilting the camera off axis, etc.),but they must be able to adapt quickly to each client’s needs or theywill eliminate many potential accounts. This versatility is what allowsthe fashion business to change rapidly and go in entirely different di-rections each season. As you become comfortable with the process ofcreating portraits, therefore, you should not become complacent. Itis important that you challenge yourself to design and execute self-assignments that will teach you additional lighting techniques andfashion styles.Develop your own style slowly, and don’t accept clients or jobs you
are not totally comfortable in handling. As you progress, you can de-velop a team of hair dressers, makeup artists, and clothing stylists togive you the best-possible chance of creating great images.
CREATE A MOODImagination is a wonderful tool. Aska model to imagine different scenariosto create a mood. For example, pre-tend to be shampooing her hair undera tropical waterfall. Also, don’t dis-count the possibilities offered by funand flat-out funny images. These cancreate a lasting impression on themodel’s prospective clients.
THE MODEL’S COMFORTAn important thing to keep in mindwhen photographing models (espe-cially inexperienced ones) is to makethe shoot comfortable for them—after all, being in front of the cameracan be intimidating for anyone. I lovehelping models build the confidencethey need to be at their best on cam-era. I do this by focusing on theirstrengths and getting them pumpedup about the shoot.I also use stories to make it clear to
them that being in front of a camera
POSING TECHNIQUES FOR PHOTOGRAPHING MODEL PORTFOLIOS118
Fashion photography is always evolving, andphotographers must be able to adapt quicklyto each client’s needs.
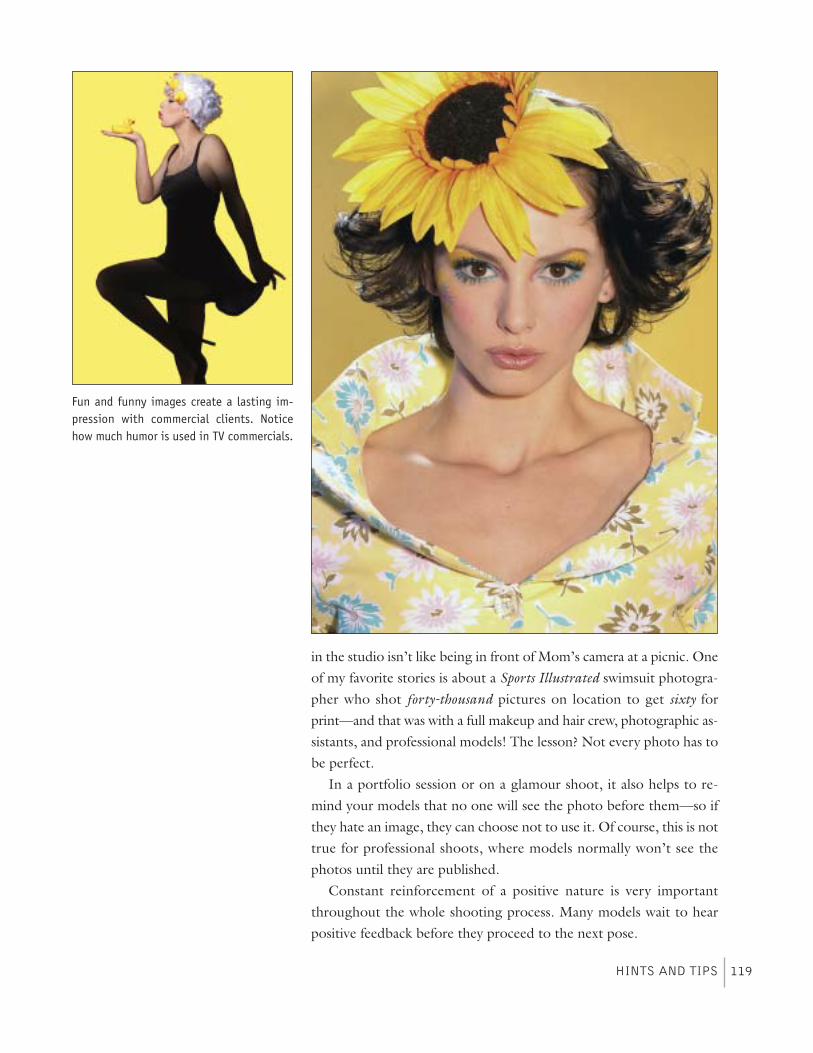
in the studio isn’t like being in front of Mom’s camera at a picnic. Oneof my favorite stories is about a Sports Illustrated swimsuit photogra-pher who shot forty-thousand pictures on location to get sixty forprint—and that was with a full makeup and hair crew, photographic as-sistants, and professional models! The lesson? Not every photo has tobe perfect.In a portfolio session or on a glamour shoot, it also helps to re-
mind your models that no one will see the photo before them—so ifthey hate an image, they can choose not to use it. Of course, this is nottrue for professional shoots, where models normally won’t see thephotos until they are published.Constant reinforcement of a positive nature is very important
throughout the whole shooting process. Many models wait to hearpositive feedback before they proceed to the next pose.
HINTS AND TIPS 119
Fun and funny images create a lasting im-pression with commercial clients. Noticehow much humor is used in TV commercials.

BACKGROUND SELECTIONLook for unique locations that will make your model’s photographsstand out from the rest. For example, if the model is looking for workin Asia or Europe, try to include some photos that couldn’t be madethere because they include features that are unique to your area. Thiscould mean including characteristic architecture or landscapes, or any-thing else you can dream up.Backgrounds can be as simple as white seamless paper or as com-
plex as a crowded city street. They can be classic or contemporary,subtle or bold. But whatever type of background you choose, be sureto use poses and clothing that either match its character (a woman ina stylish suit on a busy city street) or contrast with it wildly (a womanin a formal gown in the desert).Most of all, the background should flatter the model and be used
in such a way that it doesn’t compete with her for attention. If a back-ground seems distracting, try throwing it out of focus by posing themodel farther away from it.
CLOTHINGWhen shooting images for a model’s portfolio, I have her bring a lotof clothes to the studio (better too many than too few!). The clothesyou finally decide on should be ones that are not too trendy. Clotheslike these will look dated quickly and require more photographs betaken. Once a model is well established, she can add more trendy itemsto her portfolio. For the amateur model, try to accomplish a few basicshots: a basic head shot, a glamour head shot, a basic full-body shot,etc. Try to show the model’s beauty with a clean and fresh look insteadof a highly stylized one.
POSING TECHNIQUES FOR PHOTOGRAPHING MODEL PORTFOLIOS120
Athletic images usually make the most sensewhen shot against outdoor backgrounds. Ina studio setting, a plain white background isthe best choice.
If a background seems
distracting, try throwing
it out of focus.
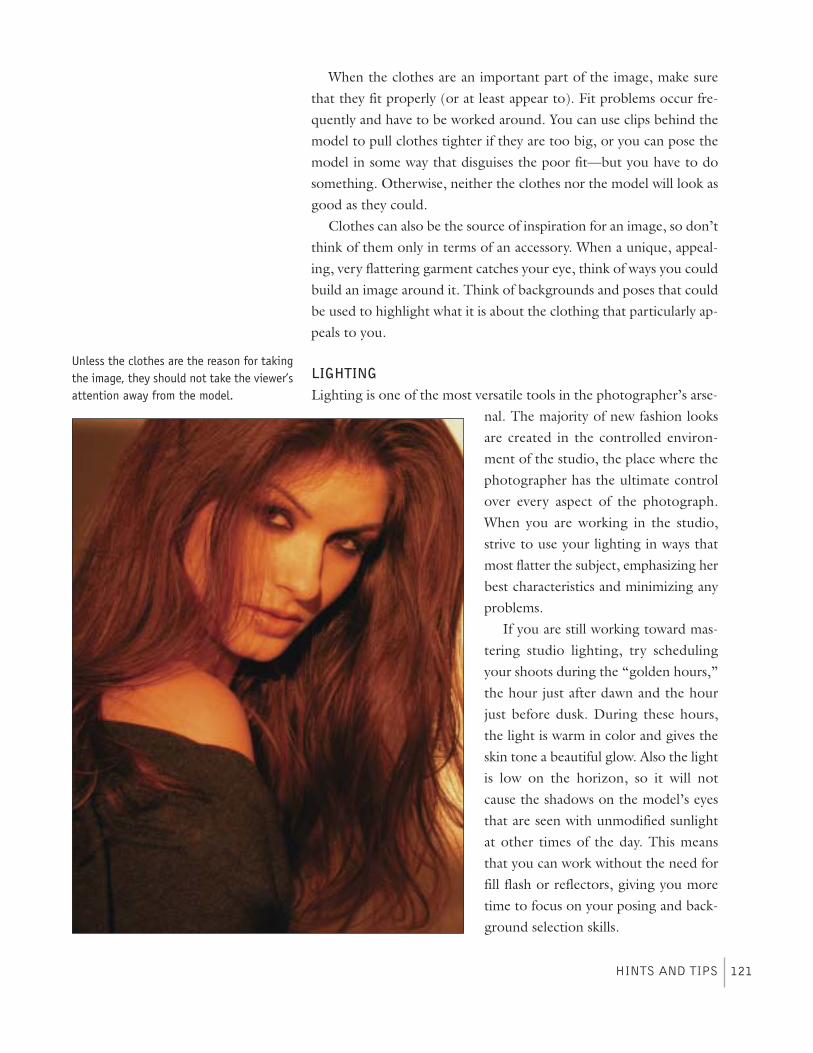
When the clothes are an important part of the image, make surethat they fit properly (or at least appear to). Fit problems occur fre-quently and have to be worked around. You can use clips behind themodel to pull clothes tighter if they are too big, or you can pose themodel in some way that disguises the poor fit—but you have to dosomething. Otherwise, neither the clothes nor the model will look asgood as they could.Clothes can also be the source of inspiration for an image, so don’t
think of them only in terms of an accessory. When a unique, appeal-ing, very flattering garment catches your eye, think of ways you couldbuild an image around it. Think of backgrounds and poses that couldbe used to highlight what it is about the clothing that particularly ap-peals to you.
LIGHTINGLighting is one of the most versatile tools in the photographer’s arse-
nal. The majority of new fashion looksare created in the controlled environ-ment of the studio, the place where thephotographer has the ultimate controlover every aspect of the photograph.When you are working in the studio,strive to use your lighting in ways thatmost flatter the subject, emphasizing herbest characteristics and minimizing anyproblems.If you are still working toward mas-
tering studio lighting, try schedulingyour shoots during the “golden hours,”the hour just after dawn and the hourjust before dusk. During these hours,the light is warm in color and gives theskin tone a beautiful glow. Also the lightis low on the horizon, so it will notcause the shadows on the model’s eyesthat are seen with unmodified sunlightat other times of the day. This meansthat you can work without the need forfill flash or reflectors, giving you moretime to focus on your posing and back-ground selection skills.
HINTS AND TIPS 121
Unless the clothes are the reason for takingthe image, they should not take the viewer’sattention away from the model.

There are countless books on photographic lighting on the marketthat can be of great use as you build your skills. Several of these arelisted in the last pages of this book, but you can find more at yourlocal library or online.
CREATING A PORTFOLIOA model’s portfolio should typically have between twelve and twentyphotographs—enough to show versatility, but not so many that a po-tential client will lose interest. A portfolio should be structured so thatit shows all of the model’s strongest attributes (her legs, hands,swimwear figure, beauty, etc.). It is better to have a few photographsthat really show off the model than to dilute the overall quality of theportfolio with weak pictures. If you include only the model’s strongestimages, you’ll leave viewers with the impression that every time thismodel shoots, she has great photos.
Opening and Closing Shots. Your model’s best shot—or the oneyou want the viewer to remember—should be placed as the openingphoto in the portfolio. If one photo doesn’t seem to dominate, thenuse the model’s best head shot. At the closing of the portfolio, usethe second strongest photo, or one that is similar to the shot you se-lected for the opening.
Arranging the Interior Images. The best way to arrange the in-terior images of the portfolio is to take all of the photographs out ofthe book and lay them on the floor. Then, begin grouping them andarranging them into patterns that seem to flow naturally from onephoto to the next.
Grouping.When you group similar images together, the viewer’seyes will scan for the differences—for example, a different facial ex-pression. Keep in mind that images don’t have to be from the sameshoot to work well together. The photographs could have other qual-ities that link them, such as a similar theme, background, or color.
Stuffing. If you separate photos from the same shoot, it will looklike the model is “stuffing” her book. The viewer will feel disturbed,thinking he has seen an image before. The only time it is appropriateto separate similar images is if you are using one for the front pageand one for the closing page. In this case, the separation lets viewersknow that they have reached the end of the model’s portfolio. It alsoreminds them of the opening image and encourages them to reviewthe images they have just seen.
Blank Pages. If you place two unrelated images next to each other,they may compete and cause the viewer to lose sight of each individ-
POSING TECHNIQUES FOR PHOTOGRAPHING MODEL PORTFOLIOS122
When the viewer is presented with two sim-ilar images, they look back and forth be-tween them to study the differences.
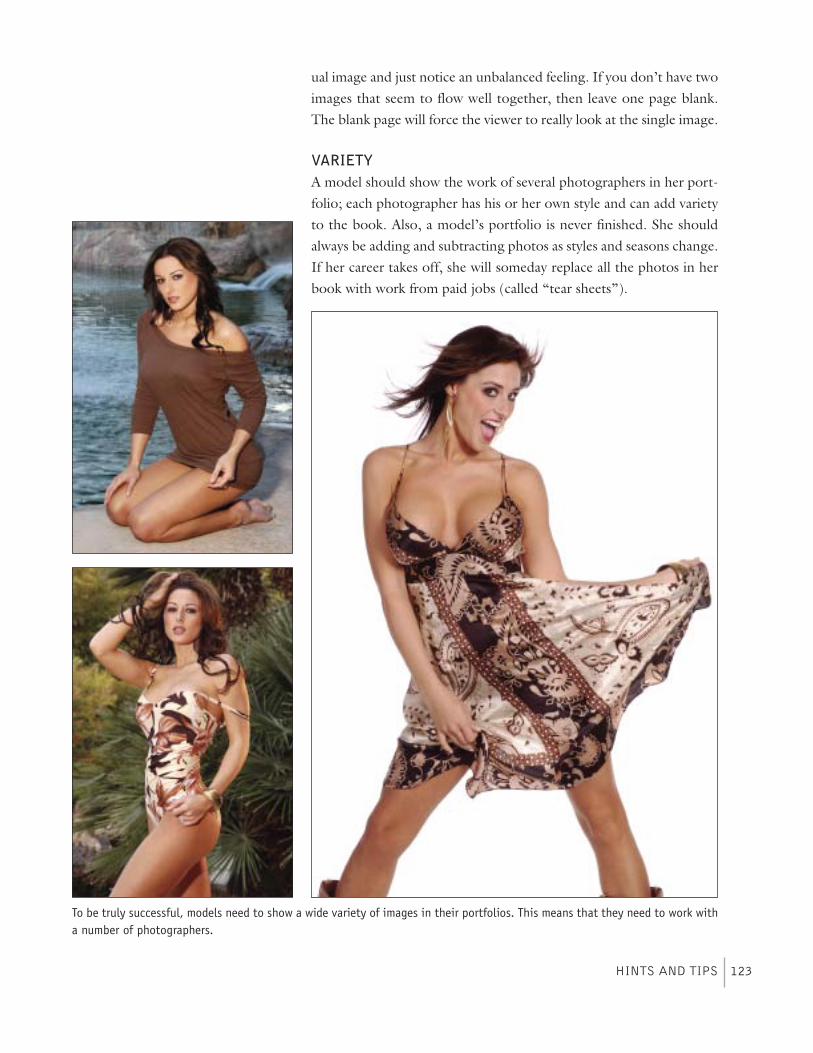
ual image and just notice an unbalanced feeling. If you don’t have twoimages that seem to flow well together, then leave one page blank.The blank page will force the viewer to really look at the single image.
VARIETYA model should show the work of several photographers in her port-folio; each photographer has his or her own style and can add varietyto the book. Also, a model’s portfolio is never finished. She shouldalways be adding and subtracting photos as styles and seasons change.If her career takes off, she will someday replace all the photos in herbook with work from paid jobs (called “tear sheets”).
HINTS AND TIPS 123
To be truly successful, models need to show a wide variety of images in their portfolios. This means that they need to work witha number of photographers.
The career of a fashion model is heavily dependent on the participa-tion of the photographers she works with. Many supermodels evencredit their relationship with a particular photographer as being criti-cal to their career.While there are many skills that will help you to establish your rep-
utation in this field, really understanding how to pose a model to makeher look her best is one of the most critical. Even with the best light-ing, the most gorgeous clothing, and flawless makeup and hairstyling,an image in which the pose looks awkward or unflattering will neverbe a success.In this book, we’ve looked at a variety of posing strategies, tech-
niques for positioning each area of the body to best effect, and howto combine the various elements of a pose into an image that suits themarket in which the model wants to find work. The next step is to putthese techniques into practice. If you have a photogenic friend, tryscheduling a test session in which you’ll focus on honing your posingtechniques. Or if you are already working as a portrait photographer,consider adding a few “fashion” poses to your portrait sessions—ifyou are successful, your clients will undoubtedly like the results!Ultimately, I encourage you to approach model photography as a
learning experience every day—and thank yourself for choosing a jobin which the immeasurable rewards include the opportunity to havefun and be creative.
FOR MORE . . .For more information on Billy Pegram or to see more of his images,please visit www.billypegram.com.
POSING TECHNIQUES FOR PHOTOGRAPHING MODEL PORTFOLIOS124
In Closing
Consider adding a few
“fashion” poses to your
portrait sessions.
AAge of model, 81Appearance of model, 82–83Arms, 67–68elbows, 67framing face with, 68raised, 68separation from body, 67
Athletic work, posing for, 94–95
BBackground selection, 120Beginning models, working
with, 44Body shots, 101–2
CCatalog work, posing for, 96–97Challenges of model
photography, 9–13people skills, 12–13styling, 10–12technical issues, 10
Client expectations, 6–9Clothing selection, 120–21Color, 28
Comfort of model, 118–19Commercial work, posing for,
83–85Composition, 24–27Cropping, 24–27, 39CSI program, 34–38crossover poses, 36–37C, S, and I poses, 35–36diagramming poses, 35foot positions, 36history and purpose, 34–35open poses, 36–37
Curves, 21–24, 106–7
DDerriere, 44–45raise one foot, 45rear view, 44–45seated poses, 45
EEditorial work, posing for, 93–94Elbows, 67Expression, 80Eyes, 72–76
FFace, views of, 69–71full face, 69profile, 71three-quarter view, 69
Fashion work, posing for, 86Feet, 36, 38–44, 45bottoms, hiding, 42cropping, 39CSI program, 36raising one foot, 45show one heel, 38toes, pointing, 40
Fingers, 47
GGenres, posing for different,
81–100athletic, 94–95catalog, 96–97commercial, 83–85editorial, 93–94fashion, 86glamour, 86–89lingerie, 90plus-size, 90–93swimwear, 97–99
INDEX 125
Index
Glamour work, posing for, 86–89
HHairstyle, featuring, 103–5Hands, 45–65around face, 51at different levels, 47at waist, 52–54“bad” poses, 47belt and, 54fingers, 47importance of, 45lapels and, 57–58on lap, 61on thighs, 59pockets and, 56profile of, 47props and, 49–51relaxed positions, 49waistbands and, 54wrists, 48zippers and, 57–58
Head, tilt, 71–72Height of model, 82Hips, 44–45, 59hands on, 59raise one foot, 45rear view, 44–45seated poses, 45
IImage quality, importance of, 115
LLegs, 38–44feet, 38–42lengthening, 42–43
Lighting, 121–22Lines, straight, 21Lingerie work, posing for, 90Lips, 76–79
MMood, creating, 118
OObjectives, 17–18creating “flow,” 17–18stopping the gaze, 18
PPeople skills, developing, 12–13Personality, showing model’s,
108–9Perspective, 27–28Plus-size models, 90–93Portfolio design, 122–23Portraiture, 116–18Posing, basic rules, 33
Posture, 33–34Previsualization, 14–17communicating concepts,15–17
imagination, 14–15inspiration, 14
Props, hands with, 49–51
SSample portfolio, building,
113–15Seated poses, 45Shoulders, 67–68Special attributes of model, 100Sports work, posing for, 94–95Swimwear work, posing for,
97–99
TToes, pointing, 40Tone, 28
VVariety, importance of, 123
WWrists, 48
POSING TECHNIQUES FOR PHOTOGRAPHING MODEL PORTFOLIOS126
PROFESSIONALMODEL PORTFOLIOSA STEP-BY-STEP GUIDE FORPHOTOGRAPHERS
Billy PegramLearn to create portfolios that will get your clientsnoticed—and hired! $34.95 list, 8.5x11, 128p,100 color images, index, order no. 1789.
PROFESSIONAL SECRETS OFNUDE & BEAUTYPHOTOGRAPHY
Bill LemonLearn the technical aspects of composition andposing as well as how to ensure the comfort ofyour nude models. For photographers of all levels.$29.95 list, 8.5x11, 128p, 60 b&w photos, orderno. 1713.
PROFESSIONALPORTRAIT LIGHTINGTECHNIQUES AND IMAGES FROM MASTERPHOTOGRAPHERS
Michelle PerkinsGet a behind-the-scenes look at the lighting tech-niques employed by the world’s top portrait pho-tographers. $34.95 list, 8.5x11, 128p, 200 colorphotos, index, order no. 2000.
SOFTBOX LIGHTINGTECHNIQUESFOR PROFESSIONAL PHOTOGRAPHERS
Stephen A. DantzigLearn to use one of photography’s most popularlighting devices to produce soft and flawless effectsfor portraits, product shots, and more. $34.95 list,8.5x11, 128p, 260 color images, index, order no.1839.
CLASSIC NUDEPHOTOGRAPHY
Peter Gowland and Alice GowlandGowland offers technical and practical advice fromfifty years of experience. Fully illustrated, this bookis a visual tribute to one of the most prolific andhighly regarded photographers in the genre ofnude photography. $29.95 list, 8.5x11, 128p, 60duotone photos, order no. 1710.
GARAGE GLAMOURTM
DIGITAL NUDE AND BEAUTY PHOTOGRAPHYMADE SIMPLE
Rolando GomezGlamour photography is more popular than ever.This book will show you how to produce sultry,creative glamour images with a minimum ofequipment. $34.95 list, 8.5x11, 128p, 150 colorphotos, index, order no. 1820.
DIGITAL PHOTOGRAPHYBOOT CAMP
Kevin KubotaKevin Kubota’s popular workshop is now a book!A down-and-dirty, step-by-step course in buildinga professional photography workflow and creatingdigital images that sell! $34.95 list, 8.5x11, 128p,250 color images, index, order no. 1809.
PROFESSIONAL DIGITAL TECHNIQUES FORNUDE & GLAMOURPHOTOGRAPHY
Bill LemonMaster the skills you need to create beautiful nudeand glamour images—digitally. Includes lighting,posing, and much more. $34.95 list, 8.5x11,128p, 110 color photos, index, order no. 1816.
POSING FOR PORTRAITPHOTOGRAPHYA HEAD-TO-TOE GUIDE
Jeff SmithAuthor Jeff Smith teaches surefire techniques forfine-tuning every aspect of the pose for the mostflattering results. $34.95 list, 8.5x11, 128p, 150color photos, index, order no. 1786.
LIGHTING TECHNIQUES FORFASHION AND GLAMOURPHOTOGRAPHY
Stephen A. Dantzig, PsyD.In fashion and glamour photography, light is thekey to producing images with impact. With thesetechniques, you’ll be primed for success! $29.95list, 8.5x11, 128p, over 200 color images, index,order no. 1795.
OTHER BOOKS FROM
Amherst Media®
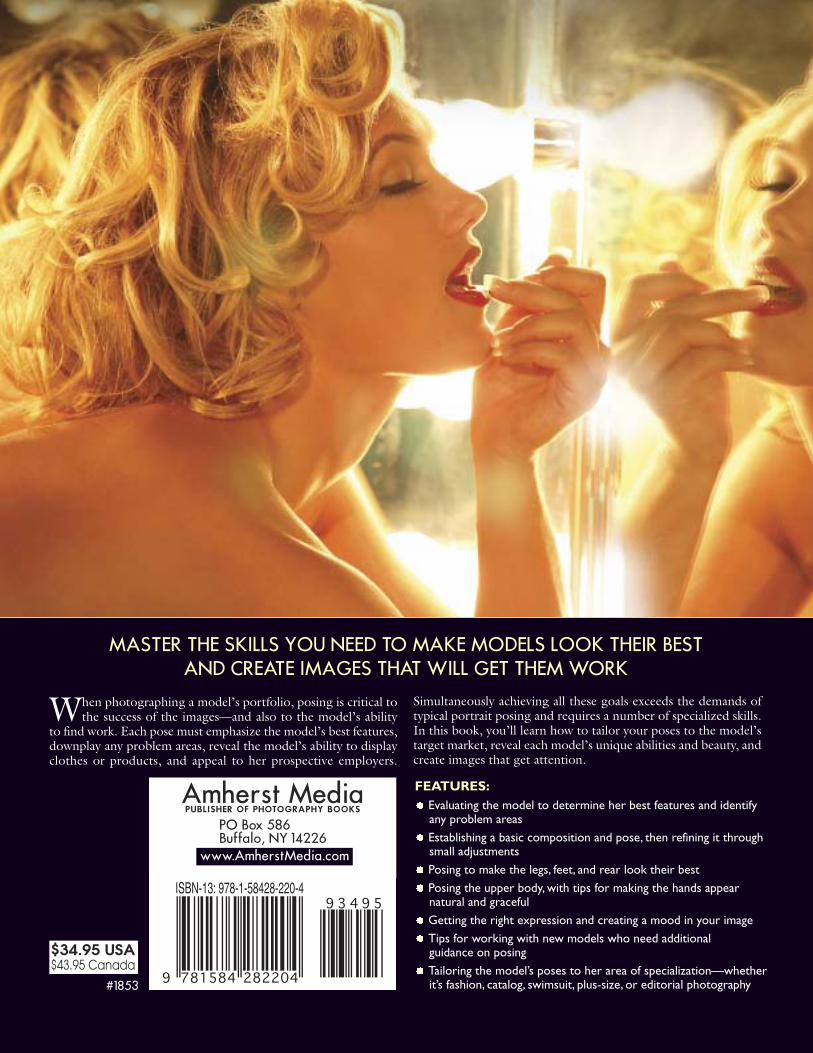
MASTER THE SKILLS YOU NEED TO MAKE MODELS LOOK THEIR BESTAND CREATE IMAGES THAT WILL GET THEM WORK
Amherst MediaPUBLISHER OF PHOTOGRAPHY BOOKS
PO Box 586Buffalo, NY 14226
www.AmherstMedia.com
$34.95 USA$43.95 Canada
#1853
When photographing a model’s portfolio, posing is critical tothe success of the images—and also to the model’s ability
to find work. Each pose must emphasize the model’s best features,downplay any problem areas, reveal the model’s ability to displayclothes or products, and appeal to her prospective employers.
Simultaneously achieving all these goals exceeds the demands oftypical portrait posing and requires a number of specialized skills.In this book, you’ll learn how to tailor your poses to the model’starget market, reveal each model’s unique abilities and beauty, andcreate images that get attention.
FEATURES:Evaluating the model to determine her best features and identifyany problem areasEstablishing a basic composition and pose, then refining it throughsmall adjustmentsPosing to make the legs, feet, and rear look their bestPosing the upper body, with tips for making the hands appearnatural and gracefulGetting the right expression and creating a mood in your imageTips for working with new models who need additionalguidance on posingTailoring the model’s poses to her area of specialization—whetherit’s fashion, catalog, swimsuit, plus-size, or editorial photography