basic first aid manual
TRANSCRIPT
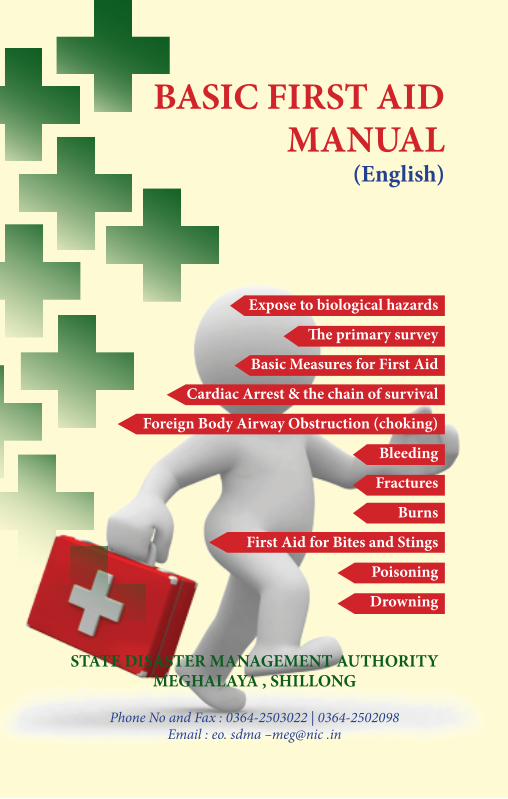
BASIC FIRST AID MANUAL
State Disaster Management Authority A
BASIC FIRST AID MANUAL
STATE DISASTER MANAGEMENT AUTHORITY MEGHALAYA , SHILLONG
Phone No and Fax : 0364-2503022 | 0364-2502098Email : eo. sdma –meg@nic .in
(English)
Expose to biological hazards
The primary survey
Basic Measures for First Aid
Cardiac Arrest & the chain of survival
Foreign Body Airway Obstruction (choking)
Bleeding
Fractures
Burns
First Aid for Bites and Stings
Poisoning
Drowning
BASIC FIRST AID MANUAL BASIC FIRST AID MANUAL
State Disaster Management Authority State Disaster Management AuthorityB C
BASIC FIRST AID MANUAL
STATE DISASTER MANAGEMENT AUTHORITY MEGHALAYA , SHILLONG
Phone No and Fax :0364-2503022 | 0364-2502098Email : eo. sdma –meg@nic .in
BASIC FIRST AID MANUAL BASIC FIRST AID MANUAL
State Disaster Management Authority State Disaster Management AuthorityD E
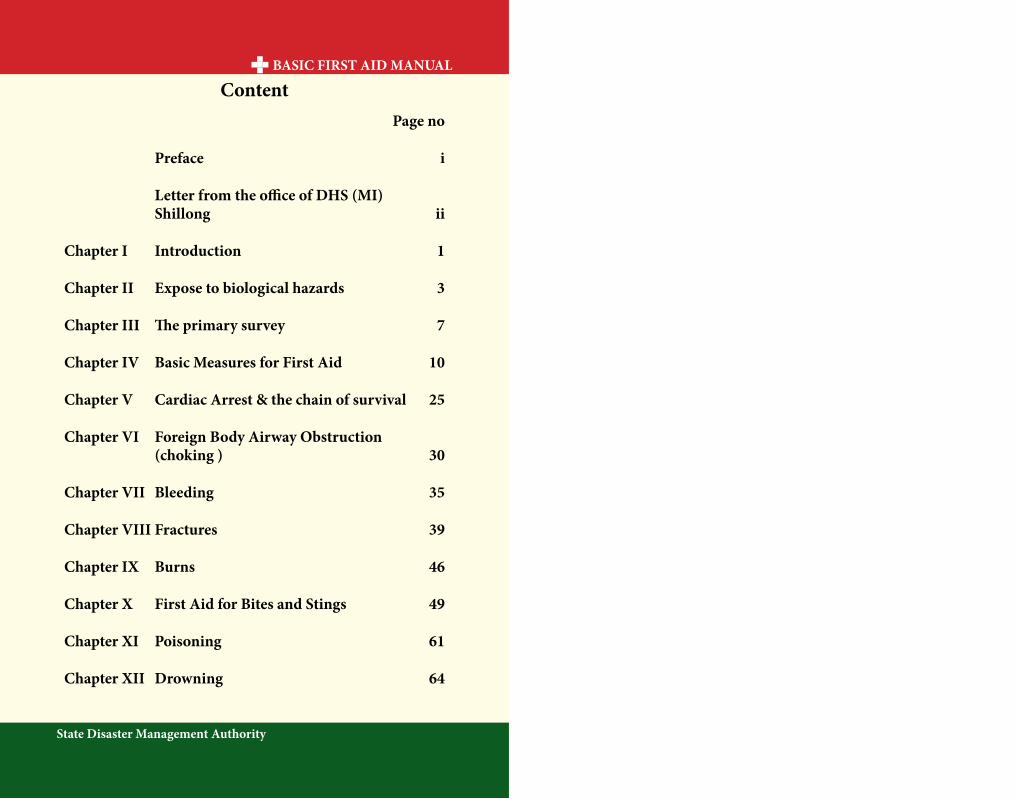
ContentPage no
Preface i
Letter from the office of DHS (MI) Shillong ii
Chapter I Introduction 1
Chapter II Expose to biological hazards 3
Chapter III The primary survey 7
Chapter IV Basic Measures for First Aid 10
Chapter V Cardiac Arrest & the chain of survival 25
Chapter VI Foreign Body Airway Obstruction (choking ) 30
Chapter VII Bleeding 35
Chapter VIII Fractures 39
Chapter IX Burns 46
Chapter X First Aid for Bites and Stings 49
Chapter XI Poisoning 61
Chapter XII Drowning 64
BASIC FIRST AID MANUAL
State Disaster Management Authority i
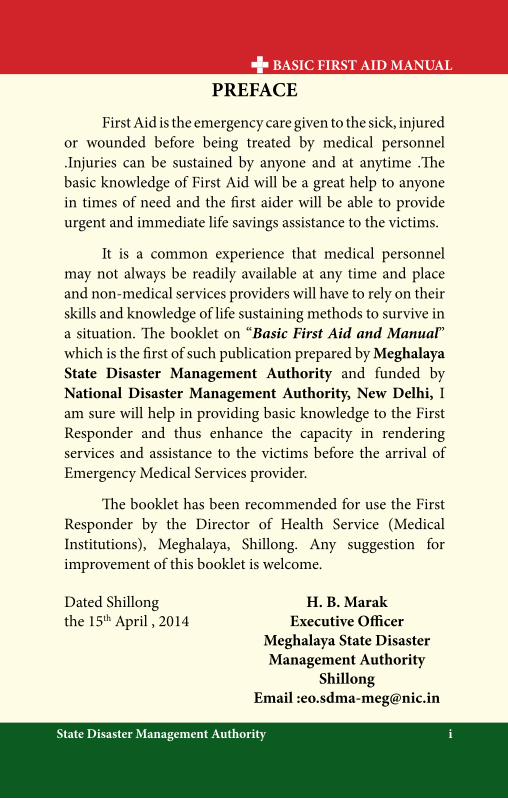
PREFACEFirst Aid is the emergency care given to the sick, injured
or wounded before being treated by medical personnel .Injuries can be sustained by anyone and at anytime .The basic knowledge of First Aid will be a great help to anyone in times of need and the first aider will be able to provide urgent and immediate life savings assistance to the victims.
It is a common experience that medical personnel may not always be readily available at any time and place and non-medical services providers will have to rely on their skills and knowledge of life sustaining methods to survive in a situation. The booklet on “Basic First Aid and Manual” which is the first of such publication prepared by Meghalaya State Disaster Management Authority and funded by National Disaster Management Authority, New Delhi, I am sure will help in providing basic knowledge to the First Responder and thus enhance the capacity in rendering services and assistance to the victims before the arrival of Emergency Medical Services provider.
The booklet has been recommended for use the First Responder by the Director of Health Service (Medical Institutions), Meghalaya, Shillong. Any suggestion for improvement of this booklet is welcome.
Dated Shillong H. B. Marakthe 15th April , 2014 Executive Officer Meghalaya State Disaster Management Authority Shillong Email :[email protected]
BASIC FIRST AID MANUAL BASIC FIRST AID MANUAL
State Disaster Management Authority State Disaster Management Authorityii 1
OFFICE OF THE DIRECTOR OF HEALTH SERVICESMEGHALAYA :: SHILLONG.
NO. HSM/DM/6/11/61/ Dated Shillong the 1/4/14.
To,
The Chief Executive OfficerState Disaster Management Authority SecretariatMeghalaya, Shillong
Sub: Basic First Aid Manual
With reference to the subject cited above, I am to say
that after going through the Basic First Aid Manual, it is
found that the contents are suitable for the purpose.
Joint Director of Health Services (MI), Meghalaya, Shillong.
Chapter I - Introduction
The primary focus of first aid training is to provide
you with the skills and knowledge necessary to minimize the
effects of accidents or illness. First aider provide a primary
response to emergencies within the community and may
sometimes be the first and the only person on the scene,
it is necessary for him/her to remain calm, he should be
able to make the right decision in a situation dominated by
emotional stress and anxiety.
Definition of First Aid :
First Aid is an emergency care and treatment of a sick
or injured person before more advanced medical assistance,
in the form of the emergency medical services (EMS) arrives.
Responsibilities of a first aider :
Preserve life and provide initial emergency care and
treatment to sick or injured people
l Protect the unconscious
l Prevent a casualty’s condition from becoming worse
l Promote the recovery of the casualty.
BASIC FIRST AID MANUAL BASIC FIRST AID MANUAL
State Disaster Management Authority State Disaster Management Authority2 3
Philosophy of First Aid :
In the pre-hospital setting, the key contributors to
survival and recovery from illness and injury are prompt and
effective maintenance of the body’s primary functions:
l Airway
l Breathing
l Circulation
l Bleeding control (life threatening)
Medical research data suggests that effective support
of these basic functions provides the most significant
contributor to positive outcomes for casualties in the pre-
hospital setting.
Chapter II –Exposure to Biological hazards
First aider may be exposed to biological substances
such as blood-borne pathogens and communicable diseases,
whilst dealing with a victim.
These may result from dealing with:
l Trauma related injuries
l Resuscitation
There are many different blood-borne pathogens that
can be transmitted from a penetrating injury or mucous
exposure, in particular, Hepatitis B virus, Hepatitis C
Virus and Human Immune deficiency Virus (HIV). Other
diseases not found in human blood may be carried in fluids
such as saliva (e.g. Hepatitis A and the organism that cause
meningitis) or animal blood and fluid.
Universal Precautions:
First aiders should equip themselves with the use of
personal protective equipment (PPE). This equipment is
used to minimize infection from disease.
BASIC FIRST AID MANUAL BASIC FIRST AID MANUAL
State Disaster Management Authority State Disaster Management Authority4 5
Exposure sources:
The following are common sources of exposure:
l All human body fluids and secretions, especially
any fluid with visible blood
l Any other human material
Exposure Routes:
The following are typically means of exposure:
l Punctures or cuts from sharp objects contaminated
with blood/fluid
l A spill of blood/fluid onto mucous membranes of
the eyes, mouth and/or nose
l A spill of blood/fluid onto skin that may or may not
be intact
l A laceration and contaminated with blood/fluid
from a bite
The expression ‘universal precaution’ refers to the risk
management strategy used of communicable disease, by
reducing contact with blood and other body substances.
Universal Precaution include:
l Wearing appropriate protective equipment for the
task
l Treating all person as if infectious
l Washing following completion of task
l Appropriate disposal of disposal protective items
and/or equipments
l Maintaining good hygiene practices before, during
and after tasks involving contamination risk.
Immediate action at scene following exposure:
For an open wound
l Encourage the wound to bleed, thoroughly wash
with water for 15 minutes and dress
l Do not attempt to use a caustic solution to clean the
wound
l Seek medical advice as soon as possible
For a splash to a mucous membrane
l Flush splashes to nose, mouth or eyes thoroughly
with water for 15 minutes

BASIC FIRST AID MANUAL BASIC FIRST AID MANUAL
State Disaster Management Authority State Disaster Management Authority6 7
l If the splash is in the mouth, spit out and thoroughly
rinse out with water for 15 minutes
l If the splash is in the eyes, irrigate with the eyes
open for 15 minutes
l Seek medical advice as soon as possible
For a splash to the skin
l At the scene, wash thoroughly with soap and water
l Seek medical advice as soon as possible if the
exposure is medium/high risk.
Chapter III- The Primary survey
Basic of First Aid
Most injured or ill service members are able to return
to their units to fight or support primarily because they are
given appropriate and timely first aid followed by the best
medical care possible. Therefore, all services members must
remember the basics.
l Check for BREATHING: Lack of oxygen intake
(through a , brain damage or death in few minutes
l Check for BLEEDING: Life cannot continue
without an adequate volume of blood to carry
oxygen to tissues
l Check for SHOCK: Unless shock is prevented, first
aid performed, and medical treatment provided,
death may result even though the injury would not
otherwise be fatal
EMERGENCY ACTION PRINCIPLES
1. Survey the scene
Once you recognized that an emergency has occurred
and decide to act, you must make sure the scene of the
BASIC FIRST AID MANUAL BASIC FIRST AID MANUAL
State Disaster Management Authority State Disaster Management Authority8 9
emergency is safe for you, the victim/s, and any bystander/s.
Element of the Survey of the Scene
l Scene safely
l Mechanism of injury or nature of illness
l Determine the number of patients and additional
resources.
2. Activate Medical Assistance and Transfer Facility
In some emergencies, you will have enough time to call
for specific medical advice before administering first aid. But
in some situations, you will need to attend to the victim first.
Phone First and Phone Fast
Both trained and untrained bystanders should be
instructed to Activate Medical Assistance as soon as they
have determined that an adult victim requires emergency
care “Phone First”. While for infant and children a “Phone
fast” approach is recommended.
3. Do a Primary of the Victim
In every emergency situation, you must first find out if
there are conditions that are an immediate threat the victim’s
life.
1. Check for consciousness
2. Check for airway
3. Check for breathing
4. Check for circulation
4. Do a Secondary Survey of the Victim
It is a systematic method of gathering additional
information about injuries or conditions that may need care.
l Interview the victim
l Check vital signs
l Perform head-to-toe examination.
BASIC FIRST AID MANUAL BASIC FIRST AID MANUAL
State Disaster Management Authority State Disaster Management Authority10 11
Chapter IV –Basic Measures For First Aid
Lack of breathing and excessive loss of blood
(circulation) . A casualty without a clear airway or who is not
breathing may die from lack of oxygen. Excessive loss of blood
may lead to shock, and shock can lead to death; therefore, you
must act immediately to control the loss of blood. All wounds
are considered to be contaminated, since infection-producing
organism (germs) are always present on the skin and clothing,
and in the soil, water, and air. Any missile or instrument (such
as bullet, shrapnel, knife, or bayonet) causing a wound pushes
or carries germs into that wound. Infection results as these
organism multiply. That a wound is contaminated does not
lessen the importance of protecting it from further as soon as
possible to prevent further contamination
OPEN THE AIRWAY AND RESTORE BREATHING
When a victim is unconscious, all muscles are relaxed.
If the victim is left on the back, the tongue, which is attached
to the back of the jaw, falls against the back wall of the throat
and blocks air from entering the lungs. Other soft tissues
of the airway may worsen this obstruction. The mouth falls
open but this tend to block, rather than open, the airway. The
unconscious victim is further a risk because of being unable
to swallow or cough out foreign material in the airway. This
may cause airway obstruction, or laryngeal irritation and
foreign material may enter the lungs. For this reason the
rescuer should not given an unconscious victim anything by
mouth, and should not attempt to induce vomiting.
Key point:
In an unconscious victim, care of the airway takes
precedence over any injury, including the possibilities of
spinal injury. Airway management is high priority. It is
important to check the airway before the breathing. If air
cannot enter the lungs due to some sort of blockage, the
casualty will not survive for long.
Airway management is required to provide an open
airway when the victim:
l Is unconscious;
l Has an obstructed airway;
l Needs rescue breathing.
Always obstruction:
If during resuscitation the airway becomes
compromised, the victim should be promptly rolled onto
BASIC FIRST AID MANUAL BASIC FIRST AID MANUAL
State Disaster Management Authority State Disaster Management Authority12 13
their side to clear the airway. The victim should then be
reassessed for responsiveness and normal breathing. Most
airway problems are caused by the tongue and/or vomit.
These can often be resolved by simple airway management.
Tongue:
The muscle tone of the upper airway is directly
related to the responsiveness: when sleeping, for example;
minor degree of reduced muscle tone may lead to sufficient
obstruction to cause snoring. When unresponsive, however,
this obstruction can become complete and fatal.
Vomit:
Foot remains in our stomach for hours, so most
victims will have food in their stomachs, and it is possible
for this food to regurgitate up from the stomach into the
lungs. This is called aspiration. The acidity of the stomach
contents and the particles size can block and damage the
airway. Regurgitation is a passive process caused by a rise
in stomach pressure overcoming the sphincter. It is usually
caused by a full gut, obesity, (weight on the stomach) or air.
How to check an Airway:
l Open the mouth and look for foreign objects
l Finger sweep (only if an object can be seen and can
removed with a sweep of a gloved finger)
l Perform a “Head-tilt, chin-lift”.
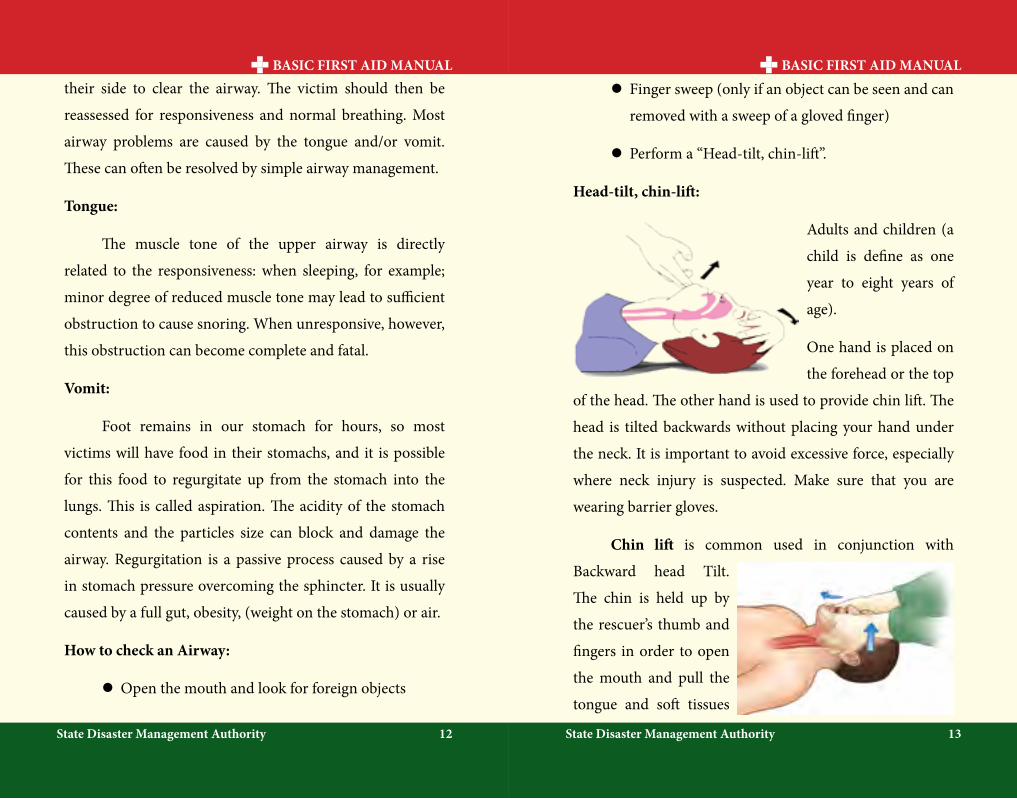
Head-tilt, chin-lift:
Adults and children (a
child is define as one
year to eight years of
age).
One hand is placed on
the forehead or the top
of the head. The other hand is used to provide chin lift. The
head is tilted backwards without placing your hand under
the neck. It is important to avoid excessive force, especially
where neck injury is suspected. Make sure that you are
wearing barrier gloves.
Chin lift is common used in conjunction with
Backward head Tilt.
The chin is held up by
the rescuer’s thumb and
fingers in order to open
the mouth and pull the
tongue and soft tissues

BASIC FIRST AID MANUAL BASIC FIRST AID MANUAL
State Disaster Management Authority State Disaster Management Authority14 15
away from the back of the throat. One technique involves
placing the thumb over the chin below the lip and supporting
the tip of the jaw with the middle finger and the index finger
along the jaw lines. Care is required to prevent the ring finger
from compressing the soft tissues of the neck. The jaw is held
open slightly and pulled away from the chest.
Finger sweep:
The finger is used to clear the mouth of fluid and
debris in the unresponsive casualty. It should only be
performed if you can see something to remove. It should
always be performed with a gloved hand with the casualty
positioned on their side in a stable side position. Insert your
first finger into the high into the side of the casualty’s mouth
and perform a single sweeping motion to the opposite side,
flicking out vomit, blood, and debris.
Infants: An infant is define as younger than one year.
The upper airway in infants is easily to obstructed because
of the narrow nasal passages, the entrance to the windpipe
(vocal cords) and the trachea (windpipe). The trachea is soft
and pliable and may be distorted by excessive head tilt.
Therefore, in infants the head should be kept neutral and
maximum head tilt should not be used. The lower jaw should be
supported at the point of the chin with the mouth maintained
open. There must be no pressure on the soft tissues of the neck.
If these manoeuvres do not provide a clear airway, the head may
be tilted backwards very gently with gentle movement.
Breathing:
Normal breathing is essential for maintaining life.
Victims who are gasping or breathing abnormally and are
unresponsive require resuscitation
Causes of absent or ineffective breathing:
l Direct depression of/or damage to the breathing
control centre of the brain
l Upper airway obstruction
l Paralysis or impairment of the nerves and/or
muscles of breathing
l Problems affecting the lungs
l Drowning
l Suffocation
Signs in effective breathing may include:
l Little or unusual chest movement
BASIC FIRST AID MANUAL BASIC FIRST AID MANUAL
State Disaster Management Authority State Disaster Management Authority16 17
l Weak or abnormal breath sounds (wheezing, etc.)
l Occasionally gasps
l Reduced responsiveness
l Anxiety
l Unusual skin colour (pallor)
l Rapid or slow breathing
l Unusual posture
How to check for breathing:
The rescuer should-
l LOOK for movement of the upper abdomen or
lower chest
l LISTEN for the escape of air from nose and mouth
l FEEL for breath on the side of your face / movement
of the chest and upper abdomen.
l THIS SHOULD TAKE YOU NO LONGER THAN
10 SECONDS.
Rescue breaths:
Kneel beside the victim’s head. Maintained an open
airways. Use resuscitation barrier devise. Take a breath,
open your mouth as widely as possible and place it over the
victim’s slightly open mouth. Whilst maintaining an open
airway pinch the nostril (or seal nostrils with rescuer cheeks)
and blow to inflate the victim’s lungs.
Because the hand supporting the head comes forward
some head tilt may be lost and their airway may be obstructed.
Pulling upwards (with the hand on the chin) helps to
reduce this problem. For mouth to mouth ventilation, it is
reasonable to give each breath in a short time (one second)
with a volume to achieve chest rise regardless of the cause of
collapse. Care should be taken not to over-inflate the chest.
Look for rise of the victim’s chest whilst inflating. If the
chest does not rise, possible causes are:
l Obstruction in the airway (inadequate head tilt,
chin lift, tongue, or foreign body)
l Insufficient air-being blown into the lungs
l Inadequate air seal around mouth and or nose
If the chest does not rise, ensure correct head tilt,
adequate air seal and ventilation. Following inflation of the
lungs, lift your mouth from your victim’s mouth, turn your
head towards the victim’s chest and listen and feel for air
being exhaled from the mouth and nose.

BASIC FIRST AID MANUAL BASIC FIRST AID MANUAL
State Disaster Management Authority State Disaster Management Authority18 19
Mouth and nose:
The mouth to nose method may be used where the
rescuer chooses to, the victim’s jaws are tightly clenched, or
when resuscitating infants and small children. The technique
for mouth to nose is the same as for mouth to mouth except
for sealing the airway. Close the victim’s mouth with the
hand supporting the jaw and push the lips together with the
thumb. Use a resuscitation barrier devise.
Take a breath and place your widely opened mouth
over the victim’s nose (or mouth and nose in infants) and
blow to inflate the victim’s lungs. Lift your mouth from the
victim’s nose and look for the fall of the chest, listen and feel
for the escape of air from the nose and mouth. If the chest
does not move, there is an obstruction, an ineffective seal, or
insufficient air being blown into the lungs.
In mouth to nose resuscitation, a leak may occur if
the rescuer’s mouth is not open sufficiently, or if the victim’s
mouth is not sealed adequately. If this problem persists, use
mouth to mouth resuscitation. It may be found that blockage
of the nose prevents adequate inflation. If this occurs, mouth
to mouth resuscitation should be used.
C-Cardiopulmonary Resuscitation (CPR)
EFFECTIVE CPR-30 compression followed by 2 breathes
CRP is a repetitive cycle of:
1. Airway opening
2. Chest compression
3. Rescue breathing
External chest compression is the most effective way
of artificially circulating blood. Chest compression are
accompanied by rescue breathing which provides oxygen
that the blood delivers around the body to its vital organs.
This is the only way to keep the heart and brain oxygenated
until a defibrillator arrives.
Recognition of the need for chest comparison:
First Aider should use unresponsiveness and absence
of normal breathing to identify the need for resuscitation.
Feeling for a pulse is unreliable and should not be performed
to confirm the need for resuscitation.
When should CPR be performed?
CPR should be performed on casualties who are not
breathing or responsiveness and breathing inadequately.
BASIC FIRST AID MANUAL BASIC FIRST AID MANUAL
State Disaster Management Authority State Disaster Management Authority20 21
Sometimes a casualty suffering a cardiac arrest may
occasionally gasp, but this not constitute breathing.
When not to perform CPR:
You should not perform CPR:
l When it is too dangerous to rescuers
l When there are obvious signs of death, for example
rigor mortis
l When the casualty’s injuries are clearly too severe
for survival
Complications:
Broken ribs are not uncommon during CPR. If
this occurs, check your hand position and continue. You
can reduce the chance of breaking ribs by placing and by
avoiding excessive force during compressions. Broken ribs
will decrease the effectiveness of the chest compression in
generating blood flow, but this cannot always be avoided.
Reassessment:
After every two minutes of CPR, reassess for signs of
life (coughing, breathing, or movement). This should take no
longer than 10 seconds. If the casualty begins to show signs
of life during CPR, reassess the breathing immediately. If the
casualty is breathing, place them into the recovery position
and monitor continuously.
CPR uninterruptedly until one or more of the following
happens:
l The casualty recovers responsiveness and is able to
breathe on their own
l You are placed at significant risk
l You cannot continue due to exhaustion
l Advanced help arrives and takes over the care of the
casualty
Compression only CPR:
If rescuer’s are unwilling or unable to do rescue
breathing they should not do chest compressions only. If
chest compressions only are given, they should be continuous
at a rate of approximately 100 per minute.
Locating the site for chest compressions:
There is insufficient evidence for or against specific hand
position for chest compressions during CPR. For a victim
receiving chest compressions, place your hands on the lower
half of the sternum. Rescuers should place the heel of their
hand in the centre of the chest with the other hand on the top.

BASIC FIRST AID MANUAL BASIC FIRST AID MANUAL
State Disaster Management Authority State Disaster Management Authority22 23
Avoid compressions beyond the lower limit of the
sternum. Compressions applied too high is ineffective and,
if applied too low may cause regurgitating and/or damage to
the internal organs.
Method of compressions:
Children and adults
l Two hand techniques is used for performing chest
compressions in adults
l One hand technique is used to performed chest
compressions on children under 8 yrs old.
Infant:
In infant the two finger technique should be used by
lay rescuers to transfer time from compression to ventilation.
Having obtained the compression point the rescuer places two
finger on this point and compresses the chest. Interruption
to chest compressions must be minimized
Infants requiring chest compressions should be
placed on their back on a firm surfaces (e.g. table or floor)
to optimize the effectiveness of compressions. Compression
should be rhythmic with equal time for compressions and
relaxation. The rescuer must avoid either rocking backwards
or forwards, or using thumps or quick jabs. Rescuer should
allow complete recoil of the chest after each compression.
Depth of compression:
The lower half of the sternum should be depressed
approximately one third of the depth of the chest with each
compression.
This should equate to more than 5cm in adults,
approximately 5cm in children and 4 cm in infants.
Rate of chest compression:
Rescuers should perform chest compressions for all
ages at a rate of approximately 100 compressions per minute
(almost two compressions per second). This does not imply
that 100 compressions will be delivered each minute, since
the number will be reduced by interruptions for breathe
given by rescue breathing.
CPR equality:
When performing compressions, if feasible, change
rescuers at least every two minutes, to prevent rescuer
fatigue and deterioration in chest compressions quality
(particularly depth). Changing rescuers performing chest
compressions should be done with minimal interruptions to
the compressions.
BASIC FIRST AID MANUAL BASIC FIRST AID MANUAL
State Disaster Management Authority State Disaster Management Authority24 25
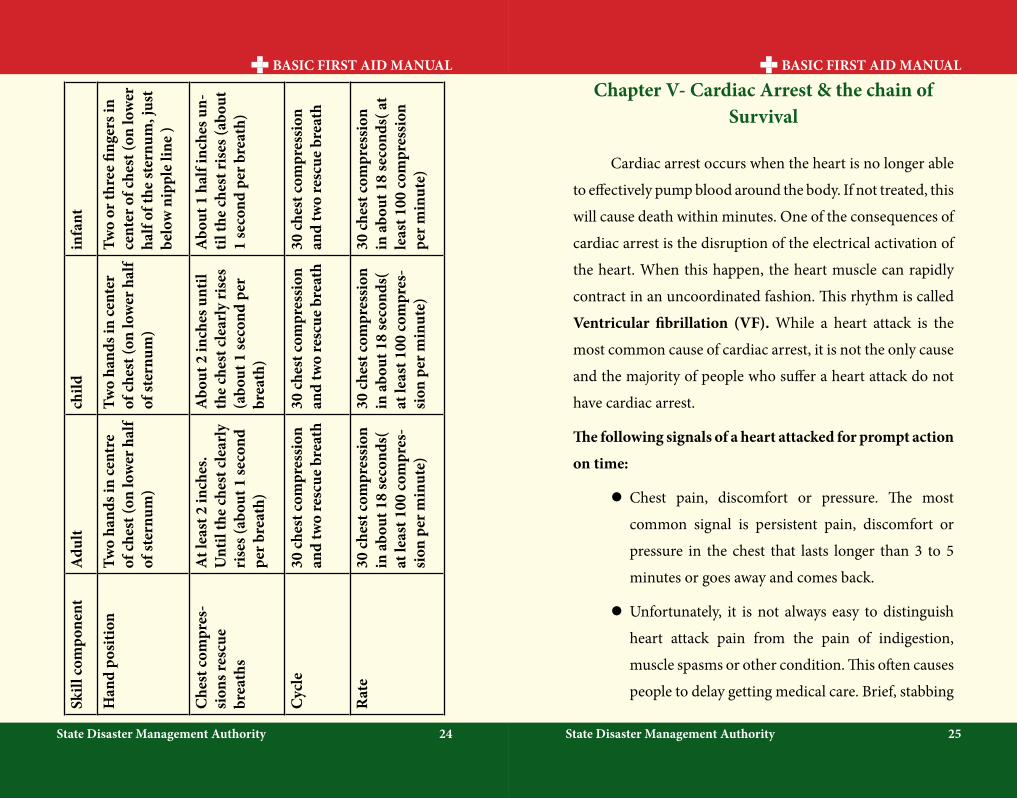
Skill
com
pone
ntA
dult
child
infa
nt
Han
d po
sitio
nTw
o ha
nds i
n ce
ntre
of
ches
t (on
low
er h
alf
of st
ernu
m)
Two
hand
s in
cent
er
of ch
est (
on lo
wer
hal
f of
ster
num
)
Two
or th
ree
finge
rs in
ce
nter
of c
hest
(on
low
er
half
of th
e st
ernu
m, j
ust
belo
w n
ippl
e lin
e )
Che
st co
mpr
es-
sion
s res
cue
brea
ths
At l
east
2 in
ches
. U
ntil
the
ches
t cle
arly
ri
ses (
abou
t 1 se
cond
pe
r bre
ath)
Abo
ut 2
inch
es u
ntil
the
ches
t cle
arly
rise
s (a
bout
1 se
cond
per
br
eath
)
Abo
ut 1
hal
f inc
hes u
n-til
the
ches
t ris
es (a
bout
1
seco
nd p
er b
reat
h)
Cyc
le30
ches
t com
pres
sion
an
d tw
o re
scue
bre
ath
30 ch
est c
ompr
essi
on
and
two
resc
ue b
reat
h30
ches
t com
pres
sion
an
d tw
o re
scue
bre
ath
Rat
e30
ches
t com
pres
sion
in
abo
ut 1
8 se
cond
s(
at le
ast 1
00 co
mpr
es-
sion
per
min
ute)
30 ch
est c
ompr
essi
on
in a
bout
18
seco
nds(
at
leas
t 100
com
pres
-si
on p
er m
inut
e)
30 ch
est c
ompr
essi
on
in a
bout
18
seco
nds(
at
leas
t 100
com
pres
sion
pe
r min
ute)
Chapter V- Cardiac Arrest & the chain of Survival
Cardiac arrest occurs when the heart is no longer able
to effectively pump blood around the body. If not treated, this
will cause death within minutes. One of the consequences of
cardiac arrest is the disruption of the electrical activation of
the heart. When this happen, the heart muscle can rapidly
contract in an uncoordinated fashion. This rhythm is called
Ventricular fibrillation (VF). While a heart attack is the
most common cause of cardiac arrest, it is not the only cause
and the majority of people who suffer a heart attack do not
have cardiac arrest.
The following signals of a heart attacked for prompt action
on time:
l Chest pain, discomfort or pressure. The most
common signal is persistent pain, discomfort or
pressure in the chest that lasts longer than 3 to 5
minutes or goes away and comes back.
l Unfortunately, it is not always easy to distinguish
heart attack pain from the pain of indigestion,
muscle spasms or other condition. This often causes
people to delay getting medical care. Brief, stabbing
BASIC FIRST AID MANUAL BASIC FIRST AID MANUAL
State Disaster Management Authority State Disaster Management Authority26 27
pain or pain that gets worse when you bend or
breathe deeply usually is not caused by a heart
problem the pain associated with a heart attack can
range from discomfort to an unbearable crushing
sensation in the chest.
l The person may describes it as pressure, squeezing,
tightness, aching, or heaviness in the chest.
l Many heart attacks start slowly as mild pain or
discomfort.
l Often the person feels pain or discomfort in the
center of the chest.
l The pain or discomfort becomes constant. It usually
is not relieved by resting, changing, position, or
taking medicine.
l Some individuals may show no signals at all
l Discomforts in other areas of the upper body in
addition to the chest. Discomfort, pain or pressure
may also be felt in or spread to the shoulder, arm,
neck, jaw, stomach, or back
l Trouble breathing- Another signal of a heart attack
is trouble breathing. The person may be breathing
faster than normal because the body tries to get the
much needed oxygen to the heart. The person may
have noisy breathing or shortness of breath
Other signals.
The person’s skin may be pale or ashen (gray),
especially around the face. Some people suffering from a heart
attack may be damp with sweat or may sweat heavily, feel
dizzy, become nauseous or vomit. They may become fatigued,
lightheaded, or lose consciousness. These signals are caused
by the stress put on the body when the heart does not work as
it should. Some individuals may shown no signals at all.
l Differences in signal between men and women.
Both men and women experience the most common
signals for a heart attack: chest pain or discomfort.
However it is important to note that women are
somewhat more likely to experience some of the other
warning signals, particularly shortness of breath,
nausea or vomiting, back or jaw and unexplained
fatigue or malaise. When they do experience chest
pain, women may have a greater tendency to have a
typical chest pain: of the breastbone
l If you suspect that someone might be having a heart
attack, you should:
BASIC FIRST AID MANUAL BASIC FIRST AID MANUAL
State Disaster Management Authority State Disaster Management Authority28 29
l Call 108 or the local emergency no. immediately
l Have the person stop what he/she is doing and
rest comfortably. This will ease the heart’s need of
oxygen. Many people experiencing a heart attack
find it easier to breathe while sitting
l Loosen any tight or uncomfortable clothing
l Closely watch the person until advanced medical
personnel takes over. Notice any changes in the
person’s appearance or behavior. Mentor the
person’s condition.
l Be prepared to perform CPR and use of AED, if
available, if the person loses consciousness and
stops breathing
l Ask the person if he/she has a history of heart disease.
Some people with heart disease take prescribed
medication for chest pain. You can help by getting
the medication for the person and assisting him/
her with taking the prescribed medication.
l Offer aspirin, if medically appropriate and locally
protocols allow,
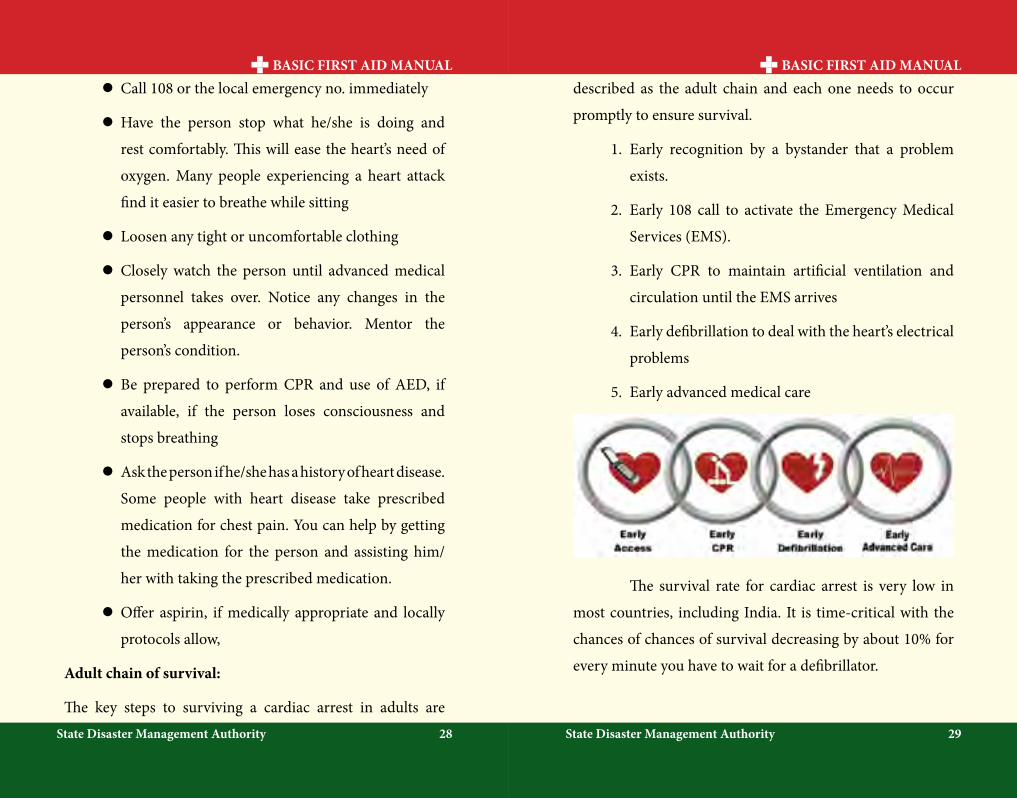
Adult chain of survival:
The key steps to surviving a cardiac arrest in adults are
described as the adult chain and each one needs to occur
promptly to ensure survival.
1. Early recognition by a bystander that a problem
exists.
2. Early 108 call to activate the Emergency Medical
Services (EMS).
3. Early CPR to maintain artificial ventilation and
circulation until the EMS arrives
4. Early defibrillation to deal with the heart’s electrical
problems
5. Early advanced medical care
The survival rate for cardiac arrest is very low in
most countries, including India. It is time-critical with the
chances of chances of survival decreasing by about 10% for
every minute you have to wait for a defibrillator.

BASIC FIRST AID MANUAL BASIC FIRST AID MANUAL
State Disaster Management Authority State Disaster Management Authority30 31
Chapter VI- Foreign Body Airway Obstruction (choking)
Choking is a common breathing emergency. It occurs
when the person’s airway is partially or completely blocked.
If a conscious person is choking, his /her airway has been
blocked by a foreign object, such as a piece of food or a small
toy; by smelling in the mouth or throat; or by fluids; such as
vomiting.
Always obstruction:
There are two types of airway obstruction:
Partial:
l Breathing is labored; Breathing may be noisy; some
escape of air can be felt from the mouth.
Complete:
l There may be effort at breathing; there is no sound
of breathing; there is no escape of air from nose/ or
mouth.
Signs and symptoms:
The indication that someone may be struggling with an
obstruction are:
l Panic
l Grasping the throat
l Inability to speak
l Inability to breathe
l Colour of face (pallor)
l Inability to cough
Treatment for choking adults and children
Effective cough (Partial Airway Obstruction)
l A casualty with an effective cough should be given
reassurance and encouragement to keep coughing
to expel the foreign material
l If the obstruction is not relieved the rescuer should
call an ambulance
Ineffective cough (Severe Airway Obstruction):
Conscious Victim
l If the casualty is conscious, call an
ambulance
l Perform up to five sharp, back
blows with the heel in the middle
of the back between the shoulder
blades. Check to see if each back
BASIC FIRST AID MANUAL BASIC FIRST AID MANUAL
State Disaster Management Authority State Disaster Management Authority32 33
blow has relieved the airway obstruction. The aim
is to relieve the obstruction with each blow rather
than to give all five blows.
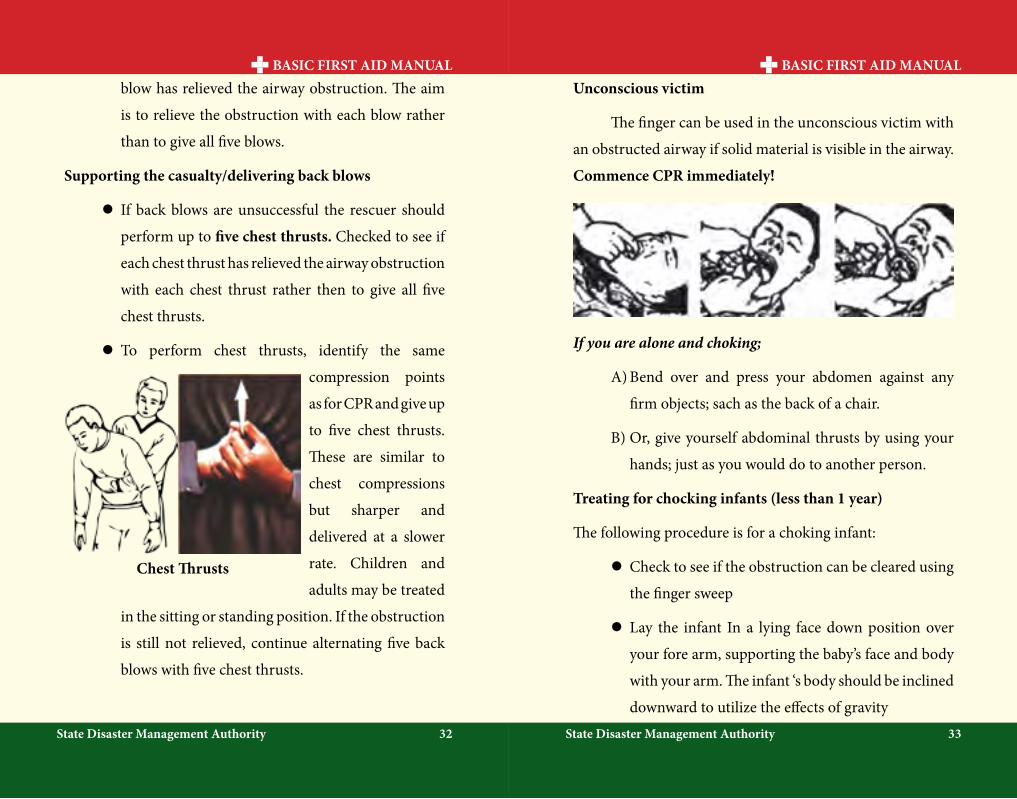
Supporting the casualty/delivering back blows
l If back blows are unsuccessful the rescuer should
perform up to five chest thrusts. Checked to see if
each chest thrust has relieved the airway obstruction
with each chest thrust rather then to give all five
chest thrusts.
l To perform chest thrusts, identify the same
compression points
as for CPR and give up
to five chest thrusts.
These are similar to
chest compressions
but sharper and
delivered at a slower
rate. Children and
adults may be treated
in the sitting or standing position. If the obstruction
is still not relieved, continue alternating five back
blows with five chest thrusts.
Chest Thrusts
Unconscious victim
The finger can be used in the unconscious victim with
an obstructed airway if solid material is visible in the airway.
Commence CPR immediately!
If you are alone and choking;
A) Bend over and press your abdomen against any
firm objects; sach as the back of a chair.
B) Or, give yourself abdominal thrusts by using your
hands; just as you would do to another person.
Treating for chocking infants (less than 1 year)
The following procedure is for a choking infant:
l Check to see if the obstruction can be cleared using
the finger sweep
l Lay the infant In a lying face down position over
your fore arm, supporting the baby’s face and body
with your arm. The infant ‘s body should be inclined
downward to utilize the effects of gravity
BASIC FIRST AID MANUAL BASIC FIRST AID MANUAL
State Disaster Management Authority State Disaster Management Authority34 35
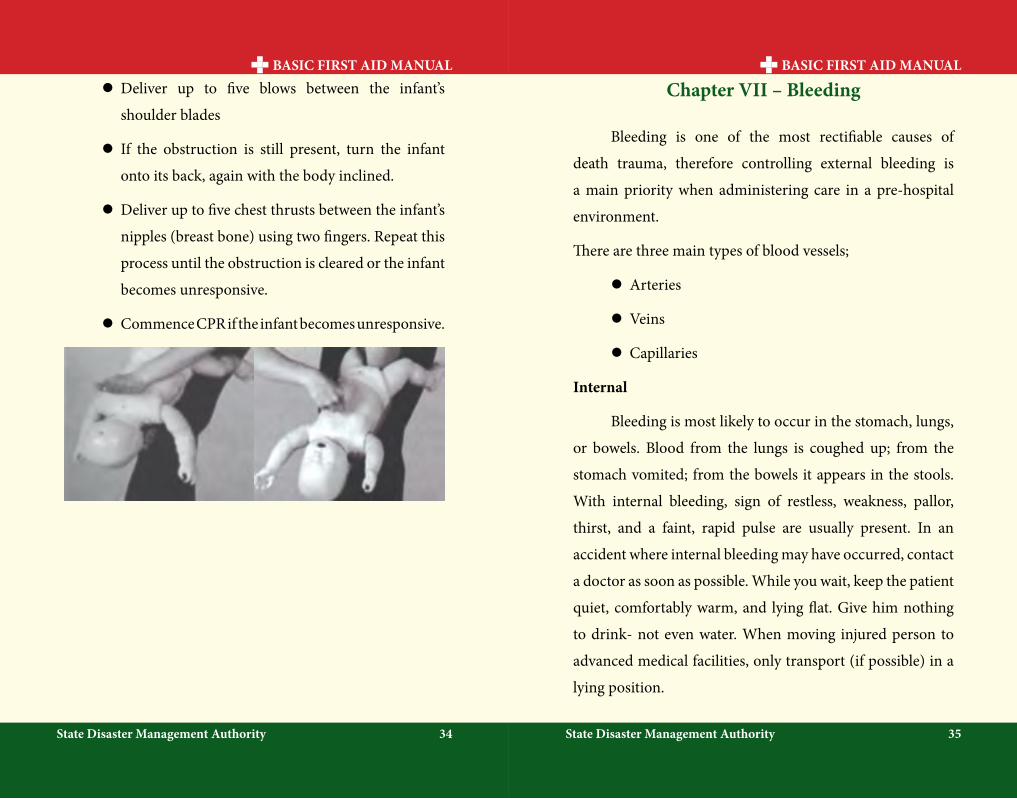
l Deliver up to five blows between the infant’s
shoulder blades
l If the obstruction is still present, turn the infant
onto its back, again with the body inclined.
l Deliver up to five chest thrusts between the infant’s
nipples (breast bone) using two fingers. Repeat this
process until the obstruction is cleared or the infant
becomes unresponsive.
l Commence CPR if the infant becomes unresponsive.
Chapter VII – Bleeding
Bleeding is one of the most rectifiable causes of
death trauma, therefore controlling external bleeding is
a main priority when administering care in a pre-hospital
environment.
There are three main types of blood vessels;
l Arteries
l Veins
l Capillaries
Internal
Bleeding is most likely to occur in the stomach, lungs,
or bowels. Blood from the lungs is coughed up; from the
stomach vomited; from the bowels it appears in the stools.
With internal bleeding, sign of restless, weakness, pallor,
thirst, and a faint, rapid pulse are usually present. In an
accident where internal bleeding may have occurred, contact
a doctor as soon as possible. While you wait, keep the patient
quiet, comfortably warm, and lying flat. Give him nothing
to drink- not even water. When moving injured person to
advanced medical facilities, only transport (if possible) in a
lying position.
BASIC FIRST AID MANUAL BASIC FIRST AID MANUAL
State Disaster Management Authority State Disaster Management Authority36 37
External
Place a pressure dressing (several layers of sterile
gauze) over the wound. Secure it in place firmly enough
to stop the bleeding or hold it in a place with firm hand
pressure. Whenever possible, elevate the wound.
Types of bleeding
Arterial bleeding will be profuse and rapid because
it is under pressure. It will be spurting as the heart beat,
which will make it difficult to control and difficult for clots
to form. This bleeding will be bright red as arterial blood is
compromised of highly oxygenated red blood cells. Arterial
bleeding is a significant and life threatening blood loss.
Venous bleeding is a easier to control because the
blood in the veins is under less pressure, which assists
clotting. Because it carries less oxygen, venous blood is a
much darker red. Dangerous levels of blood loss can occur
from venous bleeding.
Capillary bleeding is the most common and easiest
to control as capillaries are closest to the surface of the skin.
Blood tends to ooze rather than floe or spurt as the pressure
in the capillaries is very low.
Treatment
l Carry out primary assessment, Danger
Response Send for Help, Airway Breathing CPR
(cardiopulmonary Resuscitation ) + control Major
Bleeding Defibrillation (DRSABCD)
l Seek medical attention (make sure EMS are en
route )
l Make sure there isn’t a foreign body in the wound
before applying direct pressure
l Apply direct pressure
l Elevation
l If unresponsive and breathing is adequate, place the
casualty in the recovery position.
l Carry out secondary survey
lSevere bleeding may lead to unconsciousness and
may require life support (CPR)
l Rest and reassure
Direct pressure
Direct pressure is the main treatment eased to manage
bleeding:

BASIC FIRST AID MANUAL BASIC FIRST AID MANUAL
State Disaster Management Authority State Disaster Management Authority38 39
1. After checking for any foreign objects in the wound,
apply firm pressure, directly onto and into wound,
using large sterile trauma dressing
2. If blood soaks through the initial dressing, apply
further dressing as required
Elevation
Elevate the affected area above the level of the heart, if
possible.
Tourniquet :
Chapter VIII – Fracture
A fracture is any break in the continuity of a bone. Fractures
can cause total disability or in some cases death by serving
vital organs and/or arteries.
Causes
l Direct force:- fractures occurs at the site of serve
force is applied. e.g; Bullet injury, fall on projecting
stone, wheel passing over the bone.
l Indirect force :- Fracture occurs away from the site
of application of force. e.g. Collarbone – due to fall
on an out stretched hand.
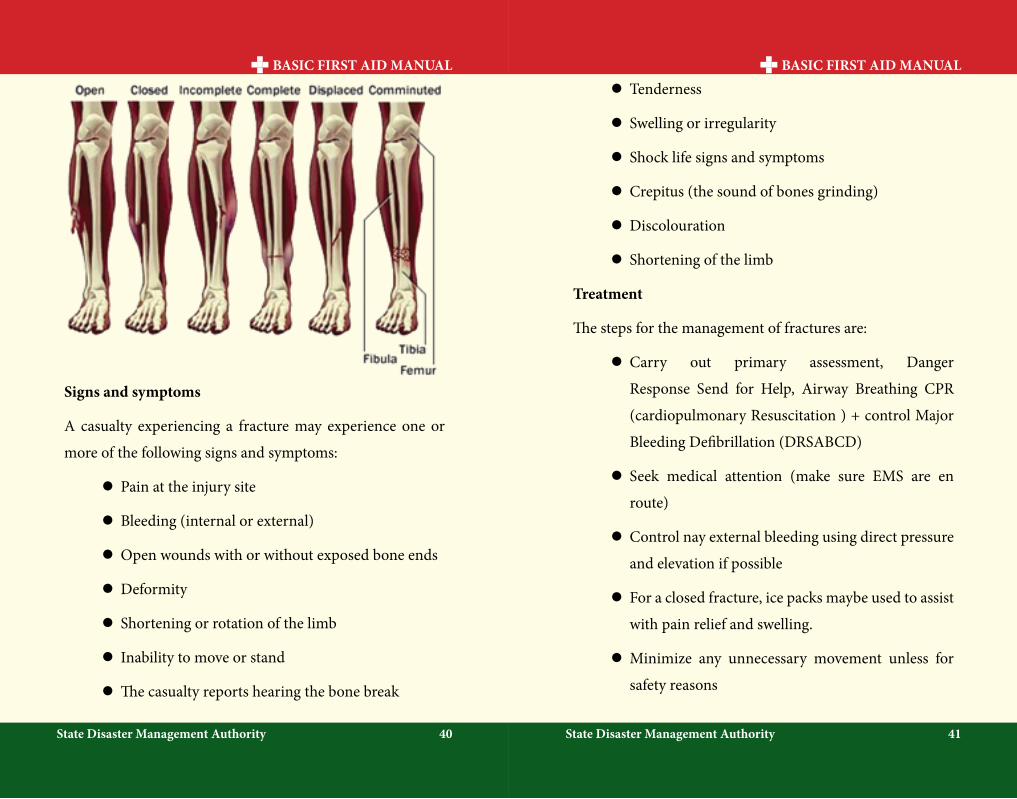
Types of fractures
l Open fracture these are fractures that have
punctured the skin. The bone end may have returned
and not visible, but this is still an open fracture
l Closed fracture these are fractures where the
surrounding skin remains intact.
l Complicated fractures these are fractures that
have caused damage to internal structures, such
as punctured lung, or a fractures that involves
significant bleeding
BASIC FIRST AID MANUAL BASIC FIRST AID MANUAL
State Disaster Management Authority State Disaster Management Authority40 41
Signs and symptoms
A casualty experiencing a fracture may experience one or
more of the following signs and symptoms:
l Pain at the injury site
l Bleeding (internal or external)
l Open wounds with or without exposed bone ends
l Deformity
l Shortening or rotation of the limb
l Inability to move or stand
l The casualty reports hearing the bone break
l Tenderness
l Swelling or irregularity
l Shock life signs and symptoms
l Crepitus (the sound of bones grinding)
l Discolouration
l Shortening of the limb
Treatment
The steps for the management of fractures are:
l Carry out primary assessment, Danger
Response Send for Help, Airway Breathing CPR
(cardiopulmonary Resuscitation ) + control Major
Bleeding Defibrillation (DRSABCD)
l Seek medical attention (make sure EMS are en
route)
l Control nay external bleeding using direct pressure
and elevation if possible
l For a closed fracture, ice packs maybe used to assist
with pain relief and swelling.
l Minimize any unnecessary movement unless for
safety reasons
BASIC FIRST AID MANUAL BASIC FIRST AID MANUAL
State Disaster Management Authority State Disaster Management Authority42 43
l If the injured limb needs to be immobilized, make
use of whatever you have got at hand to do so e.g.
pillows, magazines, or dressing to support limb
l Check the circulation below the fracture site
l Carry out secondary assessment
l Reset and reassure
Immobilizing using splints:
Improvised splints:
l It can be made of card board, rolled newspaper, or
magazines, umbrella, rolled blankets, pillow, etc.
Ideal splints:
l It should be wide & and long to cover joints on both
sides of fracture, well padded, and applied over
clothing.
l STRAIN: Injury involving tendons
l SPRAIN: Injuries involving ligaments
Dislocation: happens when a bone is moved out of its
original position
Note:-
l Never try to put the Dislocated Joint Back Into Place
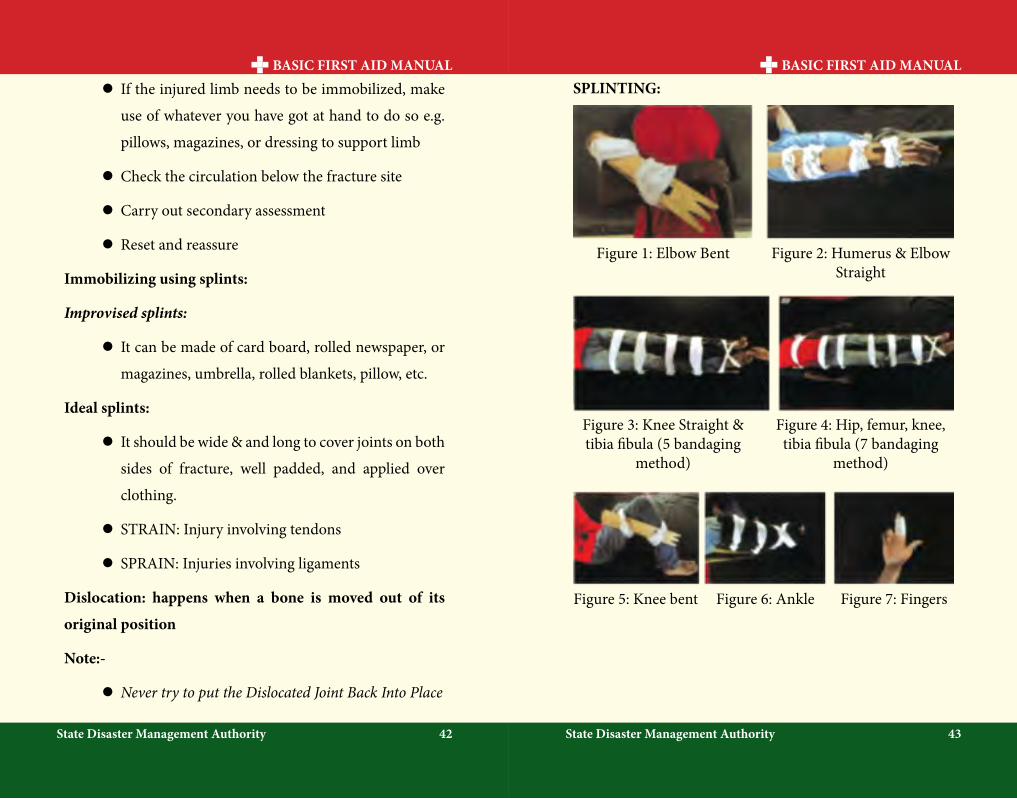
SPLINTING:
Figure 1: Elbow Bent Figure 2: Humerus & Elbow Straight
Figure 3: Knee Straight & tibia fibula (5 bandaging
method)
Figure 4: Hip, femur, knee, tibia fibula (7 bandaging
method)
Figure 5: Knee bent Figure 6: Ankle Figure 7: Fingers
BASIC FIRST AID MANUAL BASIC FIRST AID MANUAL
State Disaster Management Authority State Disaster Management Authority44 45
Fractures and dislocations
l Always check P.M.S. (Pulse Motor ability and
Sensation) before splinting and after splinting
l Pulse is checked by feeling artery (carotid or radial).
l Motor ability is to check if the casualty can moves
his fingers or toes as the case may be.
l Sensation is acquired by pinching or scratching the
palm or the soul of the feet as the case may be.
l When trying a cravat over the chest, always ask the
casualty to hold his breath.(if the casualty is conscious).
If the casualty is conscious, place two fingers below
the cravat, on top of the chest, then tie the cravat.
General rules for splinting
1. Feel for a pulse in all extremities
2. See if feet and toes can move
3. See if hands and fingers can move
4. Touch the toes to assess for sensation
5. Touch the finger for sensation
6. If the patient is unresponsive, see if he/she respond
to painful stimuli
7. Manual stabilization means holding the patient’s
head firmly and steadily in a neutral, in-line
position
8. If allowed, apply a rigid cervical immobilization
device to the patient
BASIC FIRST AID MANUAL BASIC FIRST AID MANUAL
State Disaster Management Authority State Disaster Management Authority46 47
Chapter IX- Burns
Burns can be one of the most traumatic injuries to
deal with. The victims can be in severe pain, there can be
the smell of burnt flesh and depending on the degree of the
burn, and charred clothing can be attached to the victim’s
flesh. The first step in dealing with burns is to determine the
level of the burn. It should be realized that First and second
degree burns can be caused by prolonged exposure to intense
sunlight.
Classification of burn:
l First degree- skin is reddened
l Second degree – skin is blistered
l Third degree – skin is cook or charred, the burn
may extend into the underlying tissue. In severe
cases skin or appendages may be burned off.
Treatment
l First degree and second degree burns, only
covering up to about 1% (like the size of a hand )
body surfaces:
1. Wash/soak burned portions in cold water
2. Wash burned area in soapy water
3. Place sterile gauze over burned area
4. Bandage burned area snugly
l Large burn of any degree
1. If a doctor is available within 30 minutes or less
v Treat victim for shock
v Get victim to advanced medical treatment, attempt
no treatment
2. If advanced medical aid is not readily (like in an
outdoor/camping/backpacking setting):
v Remove clothing from burned area. Cut around
clothing/cloth that stick to burned area
v Apply antiseptic cream to burned area
v Cover burned area with sterile dressing
v Bandage snugly (not too tight however )
v Treat for shock
v If victim is conscious, allow them to drink all the
water they desire. Commercially sport drinks are
even better than water if available
v Get victim as soon as possible to advanced medical
support
BASIC FIRST AID MANUAL BASIC FIRST AID MANUAL
State Disaster Management Authority State Disaster Management Authority48 49
Do not!
l Touch the burned area with fingers
l Breath on the burns
l Break on drain blister
Change any dressing that have been applied. Only
advanced medical support should change or removed any
dressing applied as first aid.
Management (the 3 C’s ):
COOL: use tepid, flowering water for at least 20 minutes. Chemical burns up to an hour
CLEAR: Remove anything that may keep burning (that isn’t sticking). Removed jewellery . Remove clothing that is contaminated by chemicals.
COVER: Preferable with a non-adherent dressing. Cling- film is ideal (if available).
Chapter X- First Aid for Bites and Stings
People are bitten and stung everyday by insects, spiders,
snakes, animals and marine life. Most of the time, these bites
and stings do not cause serious problems. However, in race
circumstances, certain bites and stings can cause serious
illness or even death in people who are sensitive to the
venom. Bites from humans and other animals, such as dogs,
cats, bats, raccoons, and rats, can cause severe bruises and
infection and tears or lecerations of tissues.
General insect stings
1. If a stringer, removes it by scraping away or gently
pulling it out with forceps.
2. Apply paste of baking soda and cold cream or use a
commercially available sting aid for topical relief of
mosquito and other insect bites. Calamine lotion will
also relive itching.
3. If multiple stings, or unusual reaction (i.e. excessive
reddish skin or breathing issues), or a history of severe
reaction, take victim immediately to advanced medical
support.

BASIC FIRST AID MANUAL BASIC FIRST AID MANUAL
State Disaster Management Authority State Disaster Management Authority50 51
Bed bug bites
Description: Bedbug are flat
bodied, oval, reddish brown,
and about ¼ in size. Although
not painful at first, bedbug bites
usually becomes red, swollen,
and itchy. Reaction to bites range
from mild to severe.
Treatment: Apply paste of baking soda and cold cream or
use a commercially available sting aid for topical relief of bed
bug bites.
Bee & Wasp stings
Description: A very
sore area that is red and
swollen. Usually there
is a stinger protruding
from the skin.
Treatment:
1. Scrape the stinger away with the edge of a credit card,
knife blade, or thumbnail. Do not try to squeeze the
stinger out, as this will cause more bee/wasp venom
into the skin.
2. After removing the stringer wash the area with soap
and water.
3. Apply a cool wash cloth or ice pack.
4. Some people have symptoms of severe allergic
reactions are:
l Shortness of breath
l Thickening of the tongue
l Sweating
l An anaphylactic shock
l Seek medical help immediately if you have an
allergic reaction
Chiggers
Description: it is generally visible
only with magnification. Chiggers
are different from mites in that they
feed only in the larval stage. The
chigger larvae get onto the skin and
move around until they meet some
obstacle, for example the waistband
of underwear, the elastic band of
socks, etc. They then attach to the skin and begin feeding.
BASIC FIRST AID MANUAL BASIC FIRST AID MANUAL
State Disaster Management Authority State Disaster Management Authority52 53
The area around where they are feeding usually turns red
with an itching sensation.
Treatment:
1. Wash the affective area with soap and water
2. Apply a local topical hydrocortisone cream;
antihistamine, or local anesthetic cream should be
applied to reduce the itching. Calamine can also be
used
3. The wound must not be scratched
Preventive: spray your feet and ankles with a
quality insect repellent. Dimenthyl phthalate
or flowers of sulphur can also be used in the
socks around the ankles.
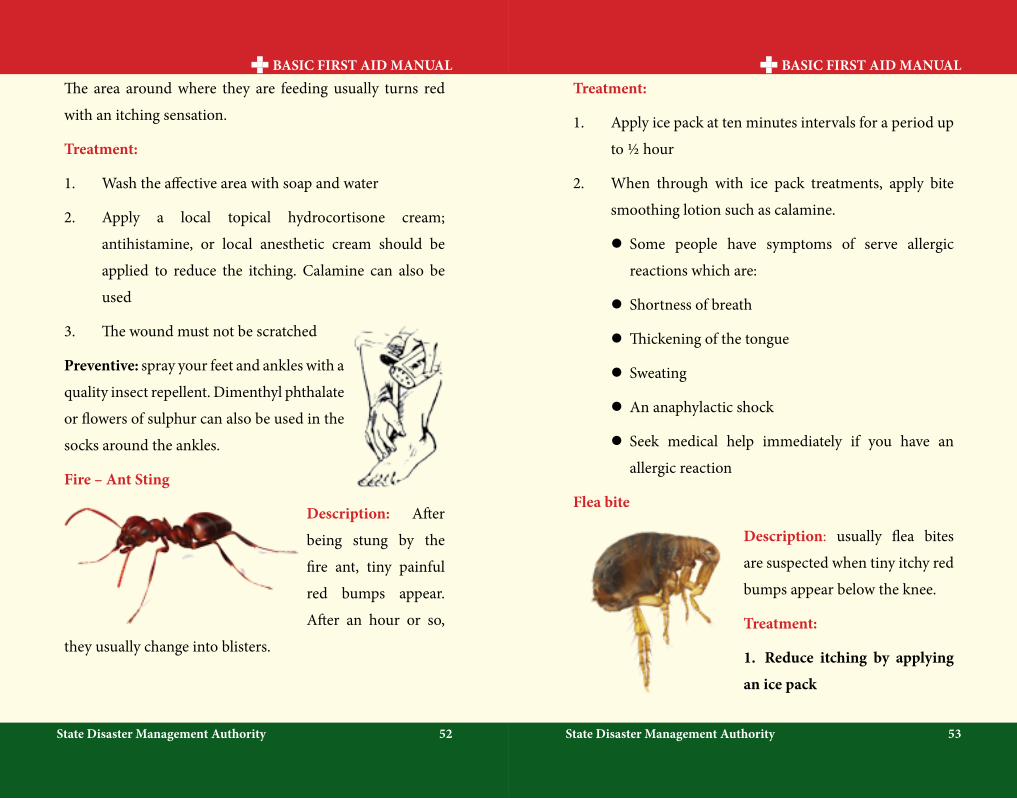
Fire – Ant Sting
Description: After
being stung by the
fire ant, tiny painful
red bumps appear.
After an hour or so,
they usually change into blisters.
Treatment:
1. Apply ice pack at ten minutes intervals for a period up
to ½ hour
2. When through with ice pack treatments, apply bite
smoothing lotion such as calamine.
l Some people have symptoms of serve allergic
reactions which are:
l Shortness of breath
l Thickening of the tongue
l Sweating
l An anaphylactic shock
l Seek medical help immediately if you have an
allergic reaction
Flea bite
Description: usually flea bites
are suspected when tiny itchy red
bumps appear below the knee.
Treatment:
1. Reduce itching by applying
an ice pack
BASIC FIRST AID MANUAL BASIC FIRST AID MANUAL
State Disaster Management Authority State Disaster Management Authority54 55
2. After removing ice pack and drying skin, applying
soothing lotion such as calamine
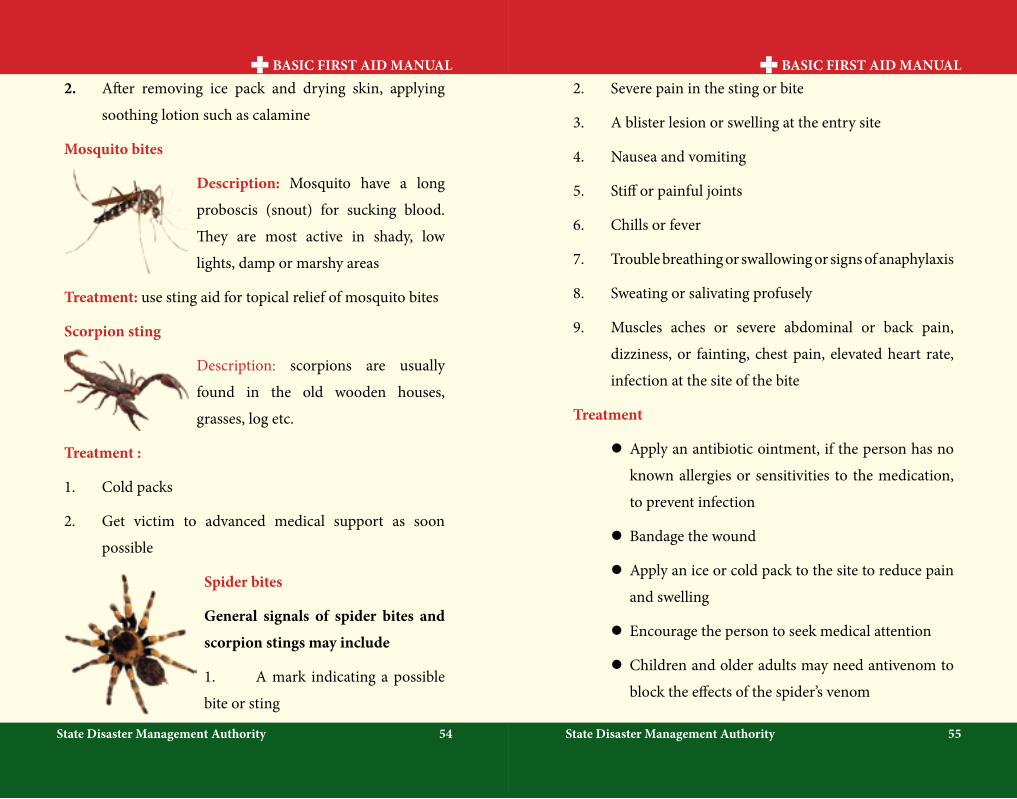
Mosquito bites
Description: Mosquito have a long
proboscis (snout) for sucking blood.
They are most active in shady, low
lights, damp or marshy areas
Treatment: use sting aid for topical relief of mosquito bites
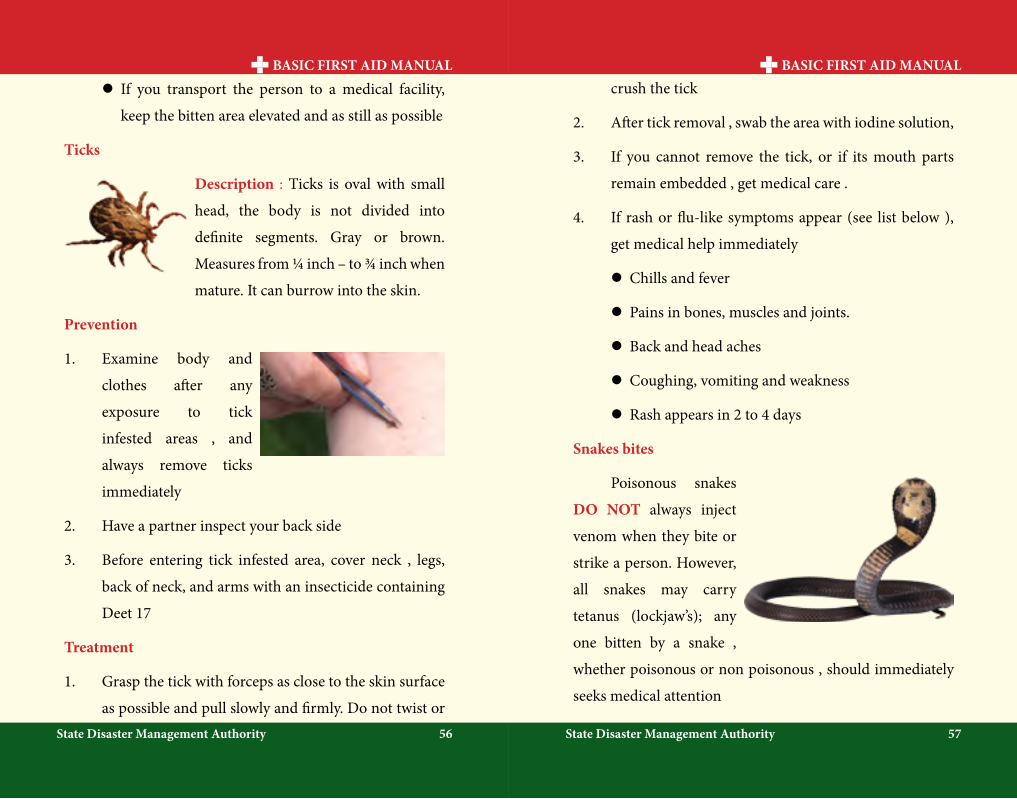
Scorpion sting
Description: scorpions are usually
found in the old wooden houses,
grasses, log etc.
Treatment :
1. Cold packs
2. Get victim to advanced medical support as soon
possible
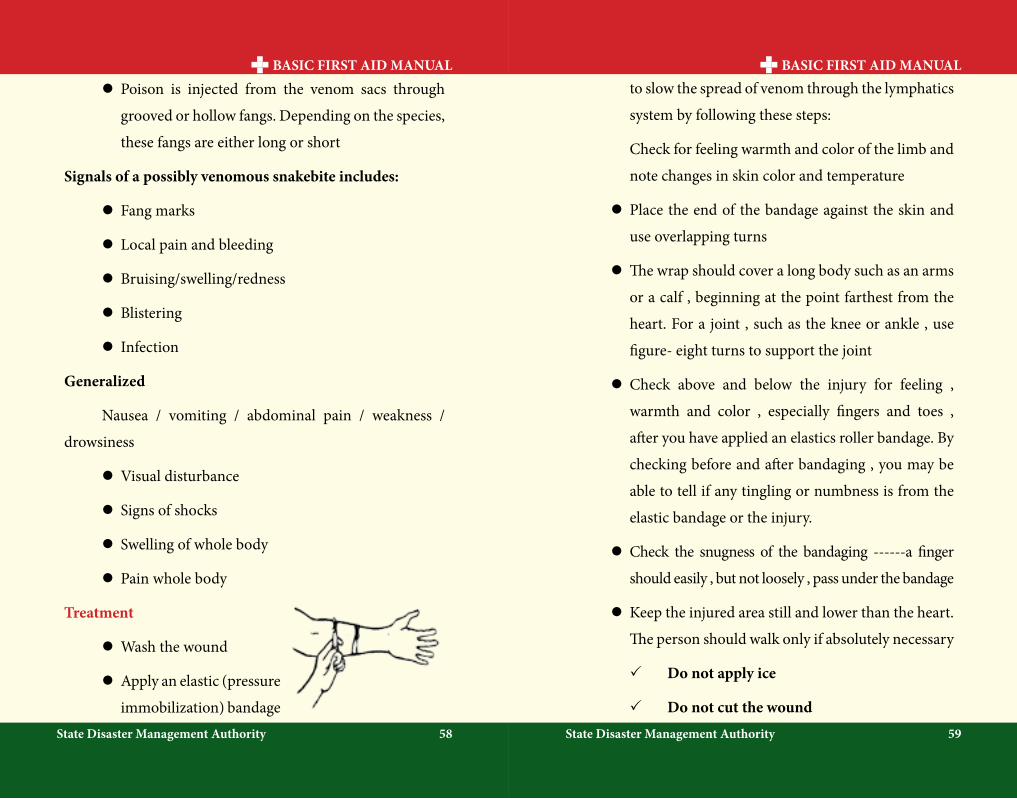
Spider bites
General signals of spider bites and
scorpion stings may include
1. A mark indicating a possible
bite or sting
2. Severe pain in the sting or bite
3. A blister lesion or swelling at the entry site
4. Nausea and vomiting
5. Stiff or painful joints
6. Chills or fever
7. Trouble breathing or swallowing or signs of anaphylaxis
8. Sweating or salivating profusely
9. Muscles aches or severe abdominal or back pain,
dizziness, or fainting, chest pain, elevated heart rate,
infection at the site of the bite
Treatment
l Apply an antibiotic ointment, if the person has no
known allergies or sensitivities to the medication,
to prevent infection
l Bandage the wound
l Apply an ice or cold pack to the site to reduce pain
and swelling
l Encourage the person to seek medical attention
l Children and older adults may need antivenom to
block the effects of the spider’s venom
BASIC FIRST AID MANUAL BASIC FIRST AID MANUAL
State Disaster Management Authority State Disaster Management Authority56 57
l If you transport the person to a medical facility,
keep the bitten area elevated and as still as possible
Ticks
Description : Ticks is oval with small
head, the body is not divided into
definite segments. Gray or brown.
Measures from ¼ inch – to ¾ inch when
mature. It can burrow into the skin.
Prevention
1. Examine body and
clothes after any
exposure to tick
infested areas , and
always remove ticks
immediately
2. Have a partner inspect your back side
3. Before entering tick infested area, cover neck , legs,
back of neck, and arms with an insecticide containing
Deet 17
Treatment
1. Grasp the tick with forceps as close to the skin surface
as possible and pull slowly and firmly. Do not twist or
crush the tick
2. After tick removal , swab the area with iodine solution,
3. If you cannot remove the tick, or if its mouth parts
remain embedded , get medical care .
4. If rash or flu-like symptoms appear (see list below ),
get medical help immediately
l Chills and fever
l Pains in bones, muscles and joints.
l Back and head aches
l Coughing, vomiting and weakness
l Rash appears in 2 to 4 days
Snakes bites
Poisonous snakes
DO NOT always inject
venom when they bite or
strike a person. However,
all snakes may carry
tetanus (lockjaw’s); any
one bitten by a snake ,
whether poisonous or non poisonous , should immediately
seeks medical attention
BASIC FIRST AID MANUAL BASIC FIRST AID MANUAL
State Disaster Management Authority State Disaster Management Authority58 59
l Poison is injected from the venom sacs through
grooved or hollow fangs. Depending on the species,
these fangs are either long or short
Signals of a possibly venomous snakebite includes:
l Fang marks
l Local pain and bleeding
l Bruising/swelling/redness
l Blistering
l Infection
Generalized
Nausea / vomiting / abdominal pain / weakness /
drowsiness
l Visual disturbance
l Signs of shocks
l Swelling of whole body
l Pain whole body
Treatment
l Wash the wound
l Apply an elastic (pressure
immobilization) bandage
to slow the spread of venom through the lymphatics
system by following these steps:
Check for feeling warmth and color of the limb and
note changes in skin color and temperature
l Place the end of the bandage against the skin and
use overlapping turns
l The wrap should cover a long body such as an arms
or a calf , beginning at the point farthest from the
heart. For a joint , such as the knee or ankle , use
figure- eight turns to support the joint
l Check above and below the injury for feeling ,
warmth and color , especially fingers and toes ,
after you have applied an elastics roller bandage. By
checking before and after bandaging , you may be
able to tell if any tingling or numbness is from the
elastic bandage or the injury.
l Check the snugness of the bandaging ------a finger
should easily , but not loosely , pass under the bandage
l Keep the injured area still and lower than the heart.
The person should walk only if absolutely necessary
P Do not apply ice
P Do not cut the wound

BASIC FIRST AID MANUAL BASIC FIRST AID MANUAL
State Disaster Management Authority State Disaster Management Authority60 61
P Do not apply suction……
P Do not apply a tourniquent
P Do not use electric shock, such as from a
car battery
Animal bites
The bite of a domestic or wild animal can cause infection and soft tissue injury. The most serious possible result is rabies. Rabies is transmitted through saliva of diseased animals such
as skunks, bats, raccoons, cats, dogs, cattles, and foxes.
Signal of an animal bite include
l A bite mark,
l Bleeding
Treatment
First aid
(1) Cleanse the wound thoroughly with soap
(2) Flush it well with water
(3) Cover it with a sterile dressing
(4) Immobilize the injured arm or leg , if appropriate
(5) Transport the casualty immediately to a Medical
Treatment Facilities (MTF)
Chapter XI- Poisoning
A poison is any substance that causes injury, illness or
death if it enters the body .
Types of poisoning
A person can be poisoned by swallowing poison,
breathing it absorbing it through the skin and by having it
injected into the body
Swallowed Poisons
Poisons that can be swallowed include foods, such as
certain mushrooms, wild berries, shellfish etc: an overdose
of drugs; medications such as a high quantity of aspirin;
household items, such as cleaning products and pesticides
Inhaled Poisons
A person can be poisoned by breating in (inhaling)
toxic fumes.
Examples of poisons that can be inhaled include:
l Gases, such as:
P Carbon monoxide from an engine or car
exhaust
P Carbon dioxide from wells and sewers.
BASIC FIRST AID MANUAL BASIC FIRST AID MANUAL
State Disaster Management Authority State Disaster Management Authority62 63
P Chlorine, found in many swimming pools.
P Nerve gas.
l Fumes from:
P Household products, such as glues and paints.
Absorbed Poisons
Poisons that can be absorbed throught the skin come
from many sources including plants, such as poison ivy,
poison oak and poison sumac, and fertilizers and pesticides.
Injected Poisons
Injected poisons enter the body through the bites or
stings of insects and animals or through drugs or medications
injected with a hypodermic needle.
The symptoms of poisoning are nausea and vomiting
diarrhea, chest or abdominal pain, trouble breathing,
sweating, changes in consciousness, seizures, headache,
dizziness, weakness,irregular pupil size,burning or tearing
eyes, abnormal skin color, burns around the lips, tongue or
on the skin.
Treatment
l Beware of Danger!
l Consider no action due to nature of poisoning. Stay
back at safe arrival point
l Call for assistance (make sure EMS have been
notified)
l Carry out primary assessment, DRS ABCD
(consider compression only CPR if risk of cross
contamination)
l If unresponsive and breathing is adequate, place the
casualty in a stable side position
l Try to find out what has been taken, how much and
when.
l Keep any containers of chemicals or medication
found to show to the ambulance paramedics
l Carry out secondary assessment
l Do not induce vomiting, unless instructed from EMS.
l Water or milk should only be give to casualties that
have swallowed corrosive substances (always follow
instructions from EMS).
l Rest and reassure
BASIC FIRST AID MANUAL BASIC FIRST AID MANUAL
State Disaster Management Authority State Disaster Management Authority64 65
Chapter XII- Drowning
Saving a drowning person carries risk. Before
swimming out to someone in trouble, be sure you can handle
the situation. Many people drown in the brave effort of trying
to save someone else because they are not well trained and
have not properly thought through the risks of the situation.
l Get the victim out of the water safely.
l If the person is unconscious & is not breathing and
has no pulse. Do CPR.
l If victim is breathing and has a pulse, put him or
her in the recovery position.
l Take cold wet clothes off the victim and cover him or
her with something warm to prevent hypothermia.
Reference
1. Wilderness and Remote First aid accessed on 27th jan
2014
h t t p : / / w w w. r e d c r o s s . o r g / i m a g e s / M E D IA
C u s t o m P r o d u c t C a t a l o g / m 4 2 4 0 1 9 7
WildernessRemoteFirstAid PocketGuide.pdf
2. First Aid Manual: 2013 accessed on 27th jan 2014
http://www.tripleonecare.co.nz/site/tripleonecare/
files/Triple%200ne%20Care%20First%20Aid%20
Manual%20213.pdf
3. Basic life support accessed on 3rd feb 2014
http://r mujer gsj. Tripod.com/Basic%20Life%20
Support.pdf.
4. ASHI Basic First Aid_SG_Sample, accessed on 3rd feb
2014
http://co.grand.co.us/DocumentCentre/View/555
5. First Aid/Cpr/Aed Participant’s Manual accessed on
3rd feb 2014
http://redcross.org/cpr.
6. First Aid Guide , 2002-2007 Dr.michael stachim, PH.D

BASIC FIRST AID MANUAL BASIC FIRST AID MANUAL
State Disaster Management Authority State Disaster Management Authority66 67
7. First Aid –medical First Responder, Published by:
District Disaster Management Authority, East Khasi
hill District , Shillong Meghalaya in consultation with
Central Training Institute, Civil Defence & Home
Guard , Mawdiangdiang.
8. First Responder Maual , GVK Emergency
Management and Research Institute , secunderabad –
500014,AP,India
9. First Aid Pocket Book, GoI-UNDP,DRMProgramme .