comprehensive guide for first aid & cpr - canadian red
TRANSCRIPT
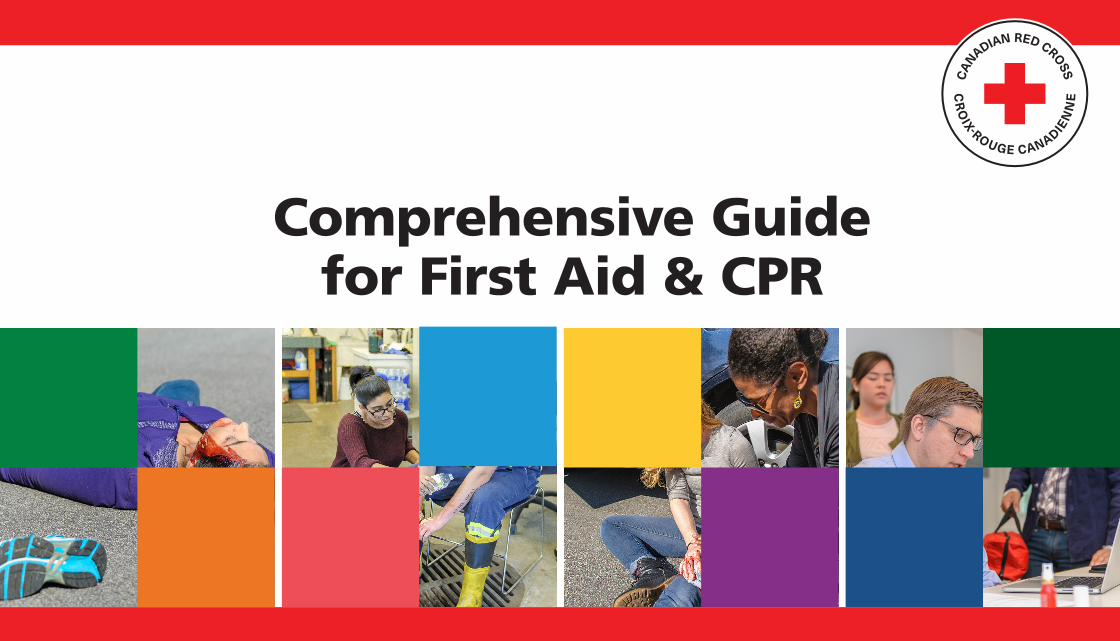
Comprehensive Guide for First Aid & CPR
Table of Contents
Our History.......................................................... 03
25 60
69
7677
80
78
82
74
50
43
48
08
03
28
51
44
094444
61
65
63
66
70
80
67
55
58
58
67
69
67
69
57
67
12
14
1147
62
65
66
74
64
66
73
80
67
12
14
13
15
19
16
22
11
12
15
19
13
16
20
17
04
30
53
05
33
53
05
36
55
37
55
12
14
1718
Check................................................................... Cardiac Arrest.....................................................
Automated External Defibrillation.....................
Working as a Team...............................................
Partial Choking....................................................
Cardiovascular Disease.......................................
Respiratory Distress............................................
Allergic Reactions...............................................
Angina................................................................
Asthma..............................................................
Transient Ischemic Attack (TIA)..........................
The Fundamental Principles................................
Call......................................................................
Red Cross Symbols.............................................
Care.....................................................................
Who We Are........................................................
Secondary Assessment.......................................
How We Help......................................................
Shock..................................................................Providing First Aid for Someone with a Disability
Preparing to Respond.........................................Complete Choking..............................................
Heart Attack.......................................................
Hyperventilation...............................................
Anaphylaxis.......................................................
Stroke..................................................................
Life-Threatening Bleeding..................................
Unresponsive Choking........................................Legal Issues Around First Aid..............................
The Emergency Medical Services System...........
After an Emergency............................................Lowering the Risk of Infection...........................
Preparing for Emergencies at Home.........................Responsive Adult or Child over 12 Months.................If You Are By Yourself and Choking..............................
Cardiac Arrest, Adult (After the Onset of Puberty)...
What to Do if the Rescue Breaths Don’t Go In.........
Cardiac Arrest, Baby (Less Than 12 Months)...............
CPR Compression Depth..............................................
Decreasing Compression Fraction (Off-Chest Time)..
Medical Direction and AEDs.......................................
Using an Inhaler with a Spacer....................................
Cardiac Arrest, Child (1 Year to the Onset of Puberty)
Compression-Only CPR................................................
Chest Recoil..................................................................
Using an AED...............................................................
Using an Inhaler..........................................................
Continue CPR Until… ..................................................
Chest Compression Rates.............................................
Special Considerations................................................
AED Maintenance.......................................................
Life-Threatening External Bleeding...........................
Using Hemostatic Dressings......................................
Good Samaritan Laws.................................................
Chain of Survival Behaviours......................................
How to Prevent Diseases from Spreading.................
Recognizing that an Emergency Exists........................Responsive Baby (Less Than 12 Months).......................
Using a Tourniquet.....................................................
CPR for a Pregnant Woman......................................
Vomiting.....................................................................
Air in the Stomach.....................................................
Mouth-to-Nose Breathing.........................................
Mouth-to-Stoma Breathing.......................................
Life-Threatening Internal Bleeding............................
Workplace First Aiders...............................................
Understanding Your Role as a First Aider.................
Personal Precautions...................................................
Duty to Report Child Abuse or Neglect......................
Activating EMS............................................................
Environmental Precautions.........................................
Poison Control Centres................................................
Willingness to Act.......................................................
Getting Permission to Help.........................................
Understanding Your Role in the EMS System...........
Equipment Precautions...............................................
Responding to Disclosures of Violence......................
When to Call EMS/9-1-1..............................................
Calling EMS/9-1-1 for a Child in Your Care...............
02 responding to emergencies 07
the red cross01 02
The Fundamental Principles of the International Red Cross And Red Crescent Movement
01 check, call, care03 24
40choking04
49circulation emergencies05
59cpr & aed06
breathing emergencies07 75
Bandaging Guidelines.........................................
Bruises................................................................
86
94
108
120
126
137
133
86
95
109
124
127
139
145
152
153
135
129
132
129
140
145
153
140
147
152
150
142
150
151
132
133
91
93
104
93
94
94
105
87
96
112
88
97
101
89
98
103
105
115
88
97
102
90
100
103
106
The Neck and Spine.............................................
Splinting Guidelines............................................
Fainting...............................................................
How Body Temperature is Controlled.................
Childbirth............................................................
Triangular Bandages...........................................
Splinters.............................................................
The Brain.............................................................
Osteoporosis......................................................
Diabetic Emergencies..........................................
Heat-Related Illnesses.........................................
Cold-Related Illnesses.........................................
Drowning...........................................................
Seasickness........................................................
Miscarriage.........................................................
Seizures...............................................................
Mental Health Crisis............................................
Cuts and Scrapes.................................................
Nosebleeds.........................................................
Concussion..........................................................
Puncture Wounds...............................................
Foreign Objects in the Nose................................
Impaled Objects..................................................
Infection............................................................
Eye Injuries..........................................................
Crush Injuries......................................................
Abdominal Wounds............................................
Shaken Baby Syndrome......................................
Scalp Injuries.......................................................
Knocked-Out Teeth.............................................
Amputations......................................................
Burns...................................................................
Ear Injuries..........................................................
Chest Injuries......................................................
Blast Injuries.......................................................
Using a Glucagon Kit....................................................
Heat Cramps................................................................
Frostbite.....................................................................
Unresponsive Drowning Person.................................
Heat Exhaustion..........................................................
Hypothermia.............................................................
Responsive Drowning Person.....................................
Snow Blindness............................................................
Heat Stroke..................................................................
Freezing of Skin to Metal Objects...............................
Cold-Water Immersion................................................
Febrile Seizures............................................................
Self-Inflicted Injuries...................................................
Thermal Burns..............................................................
Electrical Burns............................................................
Penetrating Chest Injuries..........................................
Chemical Burns............................................................
Radiation Burns...........................................................
Special Considerations When Caring for Burns.........
Blunt Chest Injuries.....................................................
156
163
158
164
166
159
160161
167
170
162
168
172
173
159
165
164
166
167
169
172
172
165
Identifying Hazardous Materials........................
Injected Poisons..................................................
Swallowed Poisons.............................................
Poisoning Caused by Alcohol or Drugs..............
Bites and Stings...................................................
Inhaled Poisons...................................................
Absorbed Poisons...............................................Poison Ivy, Sumac, and Oak.........................................
Insect Stings.................................................................
Snakebites................................................................
Giant Hogweed and Wild Parsnip..............................
Tick Bites......................................................................
Spider Bites..................................................................
Stings from Marine Life..............................................
Carbon Monoxide Poisoning.......................................
Opioid Overdose.........................................................
Drug Overdose.............................................................
Animal Bites.................................................................
Rabies.........................................................................
Lyme Disease...............................................................
Black Widow Spiders..................................................
Brown Recluse Spiders...............................................
Alcohol Poisoning........................................................
Table of Contents
wound care08 85 117bone, muscle, and joint injuries10
125sudden medical emergencies11
136environmental illness12
107head, neck, and spinal injuries09
154poisons13
176
192
198
196
197
198
193
194
200
194
200
202
195
177
178
178
188
189
187
189
192 201
199
196
198
193
195
192
199
197
193
190
188
192 200
202
202
198
196
197
193
195
192 201
199
196
198
193
201
200
189
190
190
Protecting Children from Infection and Disease
Toy and Equipment Safety................................
Water Safety.......................................................
Safe Use of Wheeled Equipment.........................
Fire Safety...........................................................
Ice Safety.............................................................
Equipment for Children......................................
Toys for Children and Babies...............................
Teaching Children Safety Awareness.................
Playground Safety..............................................
Child and Youth Protection................................
Childrens’ Hygiene..............................................
Car Safety............................................................
Questions to Ask Yourself if You Think a Child May Be Ill................................................
When to Call the Parent of a Child in Your CareCommon Childhood Conditions: Guidelines for Care.............................................
Childhood Fevers.................................................
Giving Medications.............................................
Comparison Chart for Epiglottitis and Croup.............
Complications Related to Fever..................................
Safe Use of Cribs.......................................................... Neglect....................................................................
Safe Use of Bathtubs..................................................
Choosing a Safe Helmet..............................................
Fire Escape Plan...........................................................
Safe Use of Safety Gates..............................................
Passenger Rules for Children: Safety Education.........
Safe Use of High Chairs................................................
Safe Swimming............................................................
Safe Use of Skateboards and Rollerblades.................
Safe Use of Pacifiers.....................................................
General Rules for Medication.....................................
Taking a Child’s Temperature.....................................
Equipment for Babies................................................. Abuse and Violence....................................................
Diapering....................................................................
Dental Health..............................................................
General Tips for the Prevention of Drowning............
Choosing a Safe Bicycle...............................................
Reducing the Risk of Fire and Burns..........................
Safe Use of Child Bike Trailers.....................................
Safe Use of Car Seats..................................................
Safe Use of Playpens.................................................... Understanding Bullying and Harassment.................
Safe Use of Backyard Pools and Hot Tubs..................
Safe Use of Bicycles......................................................
What to Do in the Case of Fire During the Night......
Safe Use of Baby Strollers............................................
Responding to Disclosures..........................................
Safe Boating................................................................
When to Give Medications.........................................
Medication in the Eye................................................
Medication in the Nose...............................................
Table of Contents
203203
Example of an Emergency Supplies Kit...............Example of an Emergency Car Kit.......................
205
211
205
211
208
216
221
218
222
223
215
220
217
218
219
Body Mechanics..................................................
Body Systems......................................................
How to Move an Ill or Injured Person..................
Interrelationships of Body Systems....................
Stretchers and Lifting Devices...........................
Circulatory System......................................................
Digestive System.........................................................
Musculoskeletal System..............................................
Urinary System............................................................
Reproductive System..................................................
Respiratory System......................................................
Integumentary System...............................................
Nervous System...........................................................
Muscles......................................................................
Skeleton.....................................................................
175childhood illnesses14
191caring for children15
203appendix a – kit contents
204appendix b – moving an ill or injured person
appendix c – anatomy and physiology 211
acknowledgements 228
224glossary
The Fundamental Principles of the International Red Cross and Red Crescent Movement
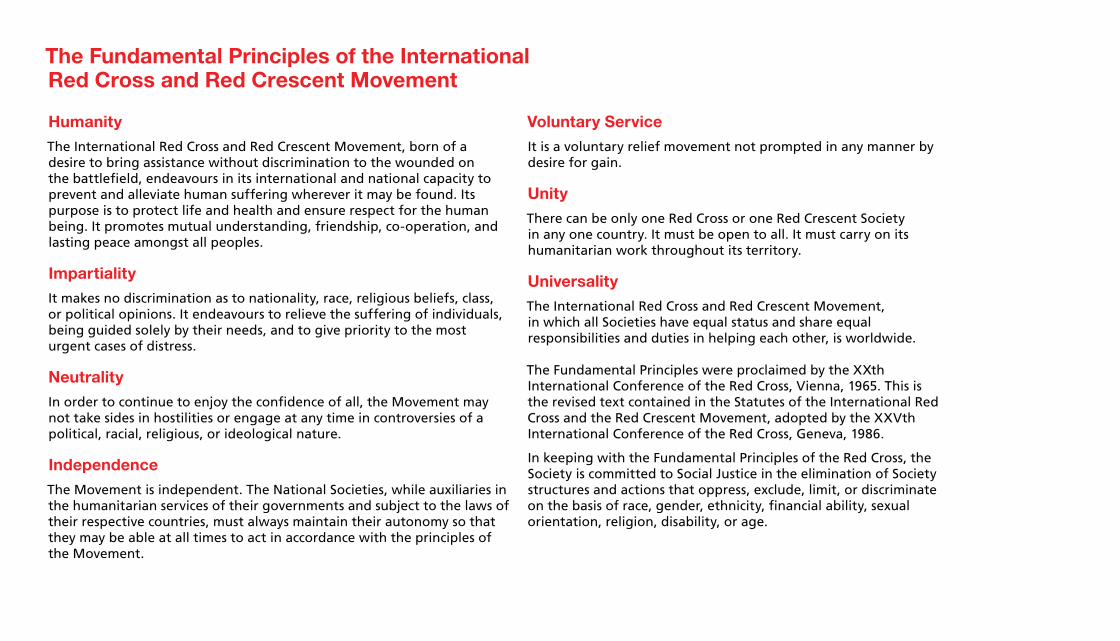
Humanity
The International Red Cross and Red Crescent Movement, born of a desire to bring assistance without discrimination to the wounded on the battlefield, endeavours in its international and national capacity to prevent and alleviate human suffering wherever it may be found. Its purpose is to protect life and health and ensure respect for the human being. It promotes mutual understanding, friendship, co-operation, and lasting peace amongst all peoples.
Impartiality
It makes no discrimination as to nationality, race, religious beliefs, class, or political opinions. It endeavours to relieve the suffering of individuals, being guided solely by their needs, and to give priority to the most urgent cases of distress.
Neutrality
In order to continue to enjoy the confidence of all, the Movement may not take sides in hostilities or engage at any time in controversies of a political, racial, religious, or ideological nature.
Independence
The Movement is independent. The National Societies, while auxiliaries in the humanitarian services of their governments and subject to the laws of their respective countries, must always maintain their autonomy so that they may be able at all times to act in accordance with the principles of the Movement.
Voluntary Service
It is a voluntary relief movement not prompted in any manner by desire for gain.
Unity
There can be only one Red Cross or one Red Crescent Society in any one country. It must be open to all. It must carry on its humanitarian work throughout its territory.
Universality
The International Red Cross and Red Crescent Movement, in which all Societies have equal status and share equal responsibilities and duties in helping each other, is worldwide.
The Fundamental Principles were proclaimed by the XXth International Conference of the Red Cross, Vienna, 1965. This is the revised text contained in the Statutes of the International Red Cross and the Red Crescent Movement, adopted by the XXVth International Conference of the Red Cross, Geneva, 1986.
In keeping with the Fundamental Principles of the Red Cross, the Society is committed to Social Justice in the elimination of Society structures and actions that oppress, exclude, limit, or discriminate on the basis of race, gender, ethnicity, financial ability, sexual orientation, religion, disability, or age.

The Red Cross1

Our History
In June of 1859, Henry Dunant saw an unforgettable scene: 40,000 dead and wounded soldiers left on the field after the Battle of Solferino in Italy. Dunant organized local villagers into first aid teams to help as many of the wounded as possible, saving thousands of lives.
To prevent this horror from happening again, Dunant decided to create a neutral organization to care for wounded soldiers and prisoners—an organization that would be respected and protected by both sides in any conflict. The result was the Red Cross. Dunant spent the rest of his life trying to reduce the suffering caused by war. He lobbied governments, organized Red Cross Societies in different countries, and spoke to the public.
In the spring of 1885, during Louis Riel’s Northwest Rebellion, Dr. George Sterling Ryerson stitched a Red Cross made of cotton onto white material and used this as a flag to distinguish the horse drawn wagon being used to transport the wounded. This was one of the first Red Cross flags ever flown in Canada.
In 1896, Dr. Ryerson founded the first overseas branch of the British Red Cross, which later became the Canadian Red Cross.
In 1901, Dunant won the first Nobel Peace Prize. By founding what is now the International Red Cross and Red Crescent Movement, he has saved the lives of millions of people.
On May 19, 1909, The Canadian Red Cross Society Act was approved by Parliament, and decreed that the Canadian Red Cross would serve as an auxiliary to the Government of Canada for Canadians, which was a measure that was in accordance with the Geneva Conventions. (Prior to 1909, the Canadian Red Cross operated as a branch of the British Red Cross.) As a result, for more than a century, Canadians have had their own national Red Cross Society dedicated to improving the situations of the most vulnerable people in Canada and around the world.
Today, there are Red Cross or Red Crescent Societies in more than 190 countries, all dedicated to the same ideals and fundamental principles.
The Fundamental Principles
In every country, our programs and activities are guided by seven Fundamental Principles. The Tanzanian Red Cross has created a short, simple version of these principles:
Humanity: We serve people, but not systems.
Impartiality: We care for the victims and the aggressors alike.
Neutrality: We take initiatives, but never take sides.
Independence: We bow to needs, but not rulers.
Voluntary Service: We work around the clock, but never for personal gain.
Unity: We have many talents, but a single idea.
Universality: We respect nations, but our work knows no bounds.
Essentially, we provide help to people in need, whatever their race, gender, culture, ethnicity, financial ability, sexual orientation, religion, disability, or age.
33
Th
e R
ed C
ross
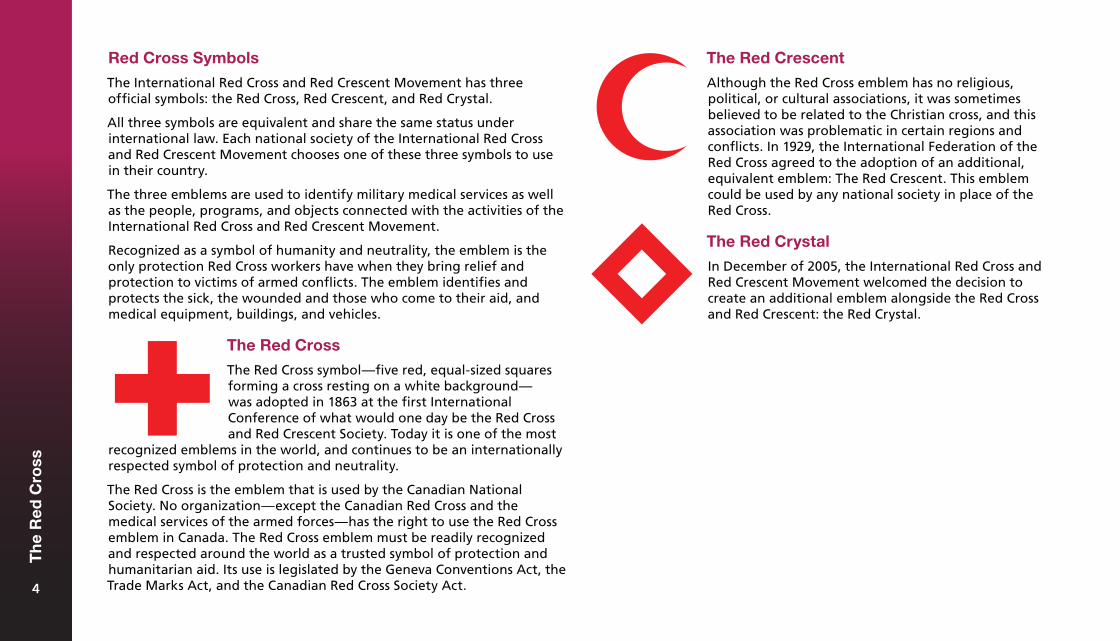
Red Cross Symbols
The International Red Cross and Red Crescent Movement has three official symbols: the Red Cross, Red Crescent, and Red Crystal.
All three symbols are equivalent and share the same status under international law. Each national society of the International Red Cross and Red Crescent Movement chooses one of these three symbols to use in their country.
The three emblems are used to identify military medical services as well as the people, programs, and objects connected with the activities of the International Red Cross and Red Crescent Movement.
Recognized as a symbol of humanity and neutrality, the emblem is the only protection Red Cross workers have when they bring relief and protection to victims of armed conflicts. The emblem identifies and protects the sick, the wounded and those who come to their aid, and medical equipment, buildings, and vehicles.
The Red Crescent
Although the Red Cross emblem has no religious, political, or cultural associations, it was sometimes believed to be related to the Christian cross, and this association was problematic in certain regions and conflicts. In 1929, the International Federation of the Red Cross agreed to the adoption of an additional, equivalent emblem: The Red Crescent. This emblem could be used by any national society in place of the Red Cross.
The Red Crystal
In December of 2005, the International Red Cross and Red Crescent Movement welcomed the decision to create an additional emblem alongside the Red Cross and Red Crescent: the Red Crystal.
The Red Cross
The Red Cross symbol—five red, equal-sized squares forming a cross resting on a white background— was adopted in 1863 at the first International Conference of what would one day be the Red Cross and Red Crescent Society. Today it is one of the most
recognized emblems in the world, and continues to be an internationally respected symbol of protection and neutrality.
The Red Cross is the emblem that is used by the Canadian National Society. No organization—except the Canadian Red Cross and the medical services of the armed forces—has the right to use the Red Cross emblem in Canada. The Red Cross emblem must be readily recognized and respected around the world as a trusted symbol of protection and humanitarian aid. Its use is legislated by the Geneva Conventions Act, the Trade Marks Act, and the Canadian Red Cross Society Act.44
Th
e R
ed C
ross
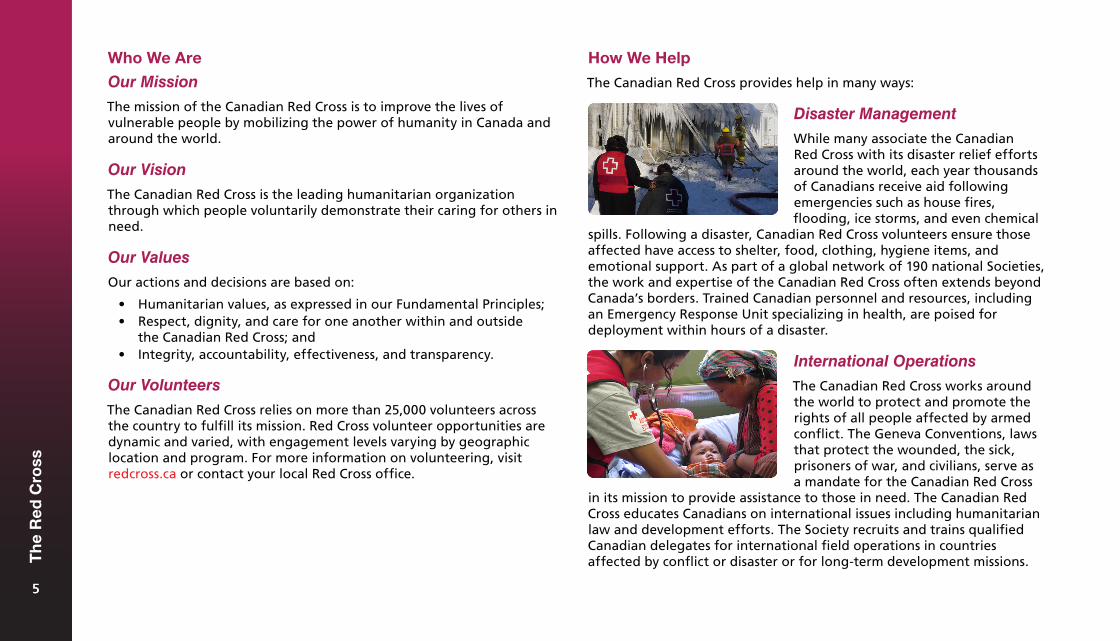
Who We Are
Our Mission
The mission of the Canadian Red Cross is to improve the lives of vulnerable people by mobilizing the power of humanity in Canada and around the world.
Our Vision
The Canadian Red Cross is the leading humanitarian organization through which people voluntarily demonstrate their caring for others in need.
Our Values
Our actions and decisions are based on:
• Humanitarian values, as expressed in our Fundamental Principles;• Respect, dignity, and care for one another within and outside
the Canadian Red Cross; and• Integrity, accountability, effectiveness, and transparency.
Our Volunteers
The Canadian Red Cross relies on more than 25,000 volunteers across the country to fulfill its mission. Red Cross volunteer opportunities are dynamic and varied, with engagement levels varying by geographic location and program. For more information on volunteering, visit redcross.ca or contact your local Red Cross office.
How We Help
The Canadian Red Cross provides help in many ways:
Disaster Management
While many associate the Canadian Red Cross with its disaster relief efforts around the world, each year thousands of Canadians receive aid following emergencies such as house fires, flooding, ice storms, and even chemical
spills. Following a disaster, Canadian Red Cross volunteers ensure those affected have access to shelter, food, clothing, hygiene items, and emotional support. As part of a global network of 190 national Societies, the work and expertise of the Canadian Red Cross often extends beyond Canada’s borders. Trained Canadian personnel and resources, including an Emergency Response Unit specializing in health, are poised for deployment within hours of a disaster.
International Operations
The Canadian Red Cross works around the world to protect and promote the rights of all people affected by armed conflict. The Geneva Conventions, laws that protect the wounded, the sick, prisoners of war, and civilians, serve as a mandate for the Canadian Red Cross
in its mission to provide assistance to those in need. The Canadian Red Cross educates Canadians on international issues including humanitarian law and development efforts. The Society recruits and trains qualified Canadian delegates for international field operations in countries affected by conflict or disaster or for long-term development missions.
55
Th
e R
ed C
ross
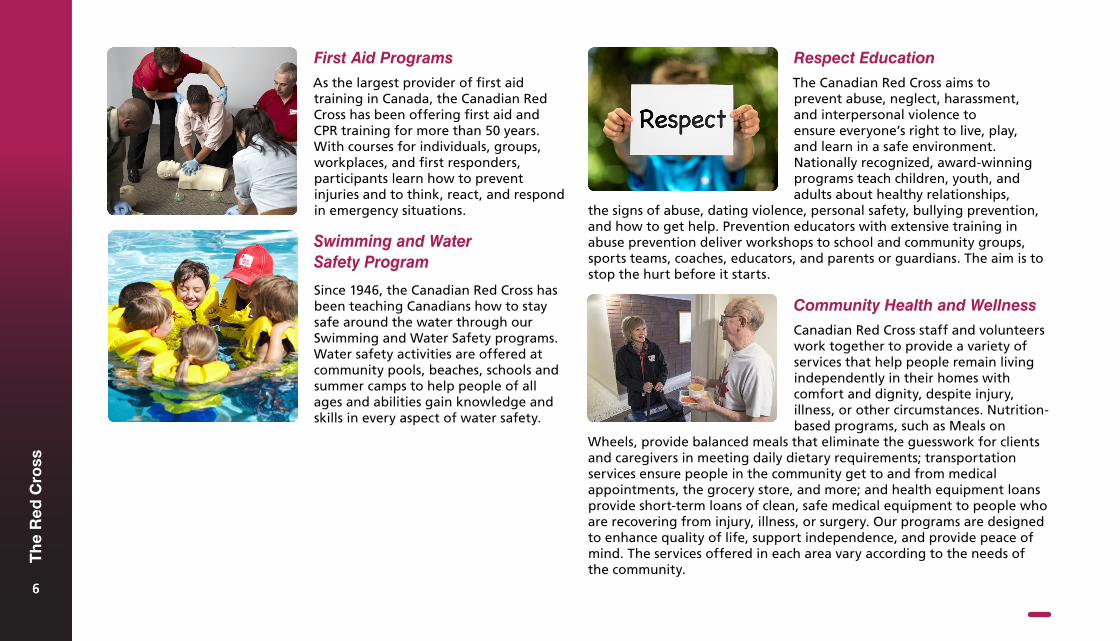
First Aid Programs
As the largest provider of first aid training in Canada, the Canadian Red Cross has been offering first aid and CPR training for more than 50 years. With courses for individuals, groups, workplaces, and first responders, participants learn how to prevent injuries and to think, react, and respond in emergency situations.
Swimming and Water Safety Program
Since 1946, the Canadian Red Cross has been teaching Canadians how to stay safe around the water through our Swimming and Water Safety programs. Water safety activities are offered at community pools, beaches, schools and summer camps to help people of all ages and abilities gain knowledge and skills in every aspect of water safety.
Respect Education
The Canadian Red Cross aims to prevent abuse, neglect, harassment, and interpersonal violence to ensure everyone’s right to live, play, and learn in a safe environment. Nationally recognized, award-winning programs teach children, youth, and adults about healthy relationships,
the signs of abuse, dating violence, personal safety, bullying prevention, and how to get help. Prevention educators with extensive training in abuse prevention deliver workshops to school and community groups, sports teams, coaches, educators, and parents or guardians. The aim is to stop the hurt before it starts.
Community Health and Wellness
Canadian Red Cross staff and volunteers work together to provide a variety of services that help people remain living independently in their homes with comfort and dignity, despite injury, illness, or other circumstances. Nutrition-based programs, such as Meals on
Wheels, provide balanced meals that eliminate the guesswork for clients and caregivers in meeting daily dietary requirements; transportation services ensure people in the community get to and from medical appointments, the grocery store, and more; and health equipment loans provide short-term loans of clean, safe medical equipment to people who are recovering from injury, illness, or surgery. Our programs are designed to enhance quality of life, support independence, and provide peace of mind. The services offered in each area vary according to the needs of the community.
66
Th
e R
ed C
ross
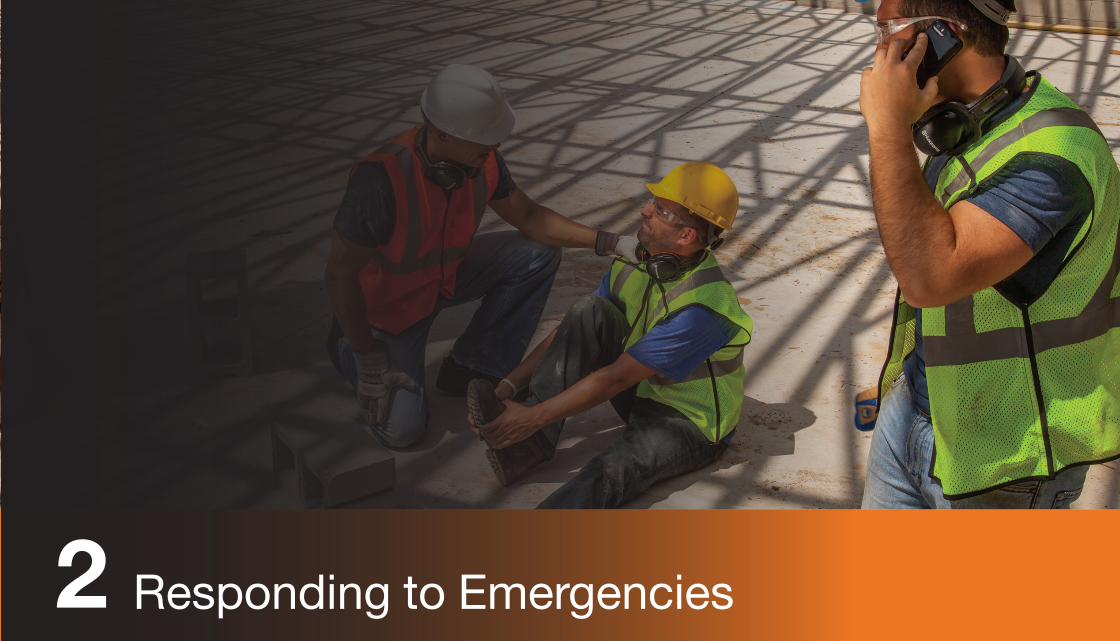
Responding to Emergencies2
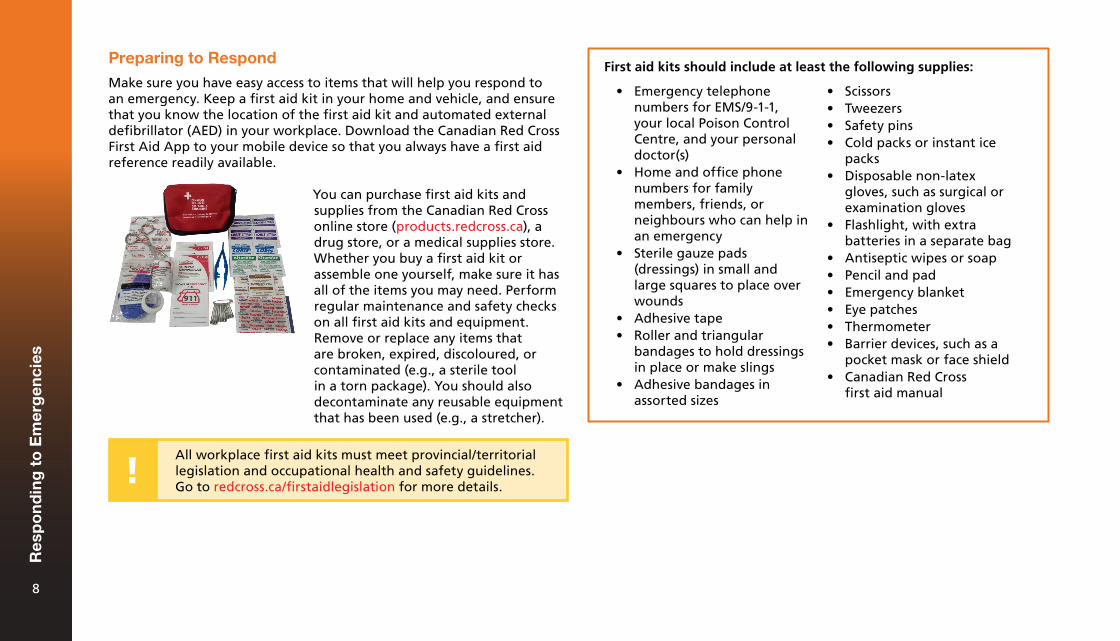
Preparing to Respond
Make sure you have easy access to items that will help you respond to an emergency. Keep a first aid kit in your home and vehicle, and ensure that you know the location of the first aid kit and automated external defibrillator (AED) in your workplace. Download the Canadian Red Cross First Aid App to your mobile device so that you always have a first aid reference readily available.
You can purchase first aid kits and supplies from the Canadian Red Cross online store (products.redcross.ca), a drug store, or a medical supplies store. Whether you buy a first aid kit or assemble one yourself, make sure it has all of the items you may need. Perform regular maintenance and safety checks on all first aid kits and equipment. Remove or replace any items that are broken, expired, discoloured, or contaminated (e.g., a sterile tool in a torn package). You should also decontaminate any reusable equipment that has been used (e.g., a stretcher).
• Emergency telephonenumbers for EMS/9-1-1,your local Poison ControlCentre, and your personaldoctor(s)
• Home and office phonenumbers for familymembers, friends, orneighbours who can help inan emergency
• Sterile gauze pads(dressings) in small andlarge squares to place overwounds
• Adhesive tape• Roller and triangular
bandages to hold dressingsin place or make slings
• Adhesive bandages inassorted sizes
• Scissors• Tweezers• Safety pins• Cold packs or instant ice
packs• Disposable non-latex
gloves, such as surgical orexamination gloves
• Flashlight, with extrabatteries in a separate bag
• Antiseptic wipes or soap• Pencil and pad• Emergency blanket• Eye patches• Thermometer• Barrier devices, such as a
pocket mask or face shield• Canadian Red Cross
first aid manual
First aid kits should include at least the following supplies:
All workplace first aid kits must meet provincial/territorial legislation and occupational health and safety guidelines. Go to redcross.ca/firstaidlegislation for more details.
Res
po
nd
ing
to
Em
erg
enci
es
8
Preparing For Emergencies at Home
To be ready for an emergency at home:
• Keep important information about yourself and your family in ahandy place. Include your address, everyone’s date of birth, healthcard numbers, medical conditions, allergies, and prescriptions anddosages. List the names and phone numbers of your doctors.
• Post the numbers for the police, fire department, emergencymedical services (EMS), and Poison Control Centre near every phonein your home and save these numbers in your mobile phone’scontacts list.
• Teach children how to call for help.• Install smoke and carbon monoxide detectors. Test them regularly.• Keep first aid kits handy in your home and car. Make sure everyone
in the family knows where they are and what is in them.• Review and practice the first aid skills that you learn so that you will
have the confidence and knowledge to respond in an emergency.
Most communities are served by the emergency telephone number 9-1-1. If your community does not operate on a 9-1-1 system, search online or in your local phone directory for the numbers of the police department, fire department, and EMS system. Also include the number for your provincial or territorial Poison Control Centre’s hotline on your list. Teach everyone in your home how and when to use these numbers.
Take steps to make it easier for EMS personnel and others to help you, should an emergency occur:
• Make sure your house or apartment number is large, easy to read,and well-lit at all times. Numerals (e.g., “87”) are easier to see andread than words (e.g., “eighty-seven”).
• Keep relevant medical information, such as a list of the medicationsthat each family member takes, in an accessible place at home andwhen you go out (e.g., on the refrigerator door and in your wallet ormobile phone).
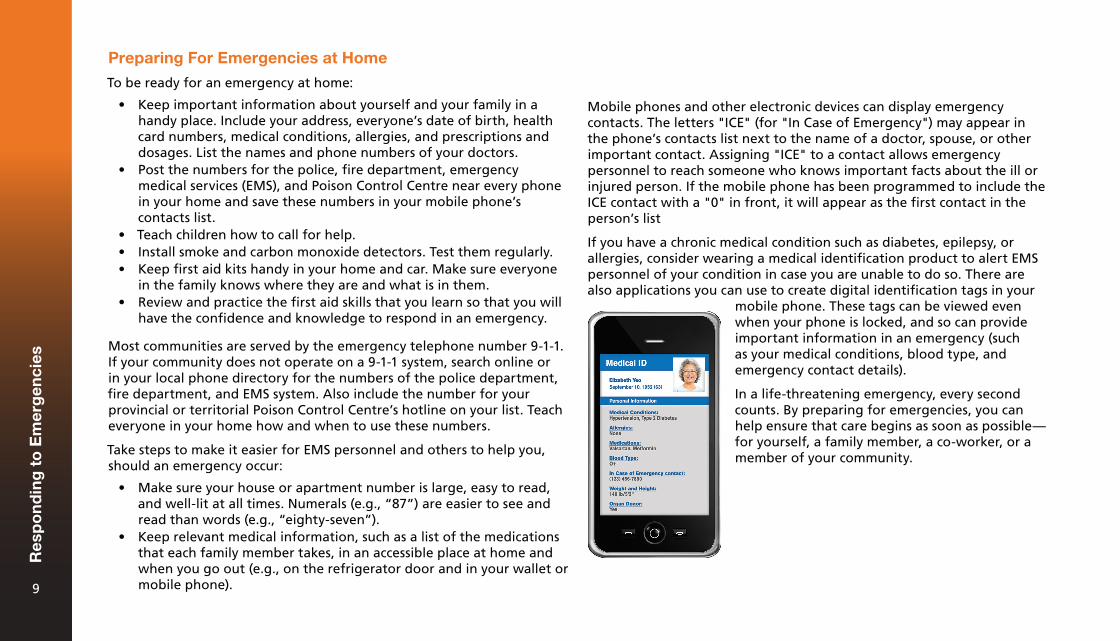
Mobile phones and other electronic devices can display emergency contacts. The letters "ICE" (for "In Case of Emergency") may appear in the phone’s contacts list next to the name of a doctor, spouse, or other important contact. Assigning "ICE" to a contact allows emergency personnel to reach someone who knows important facts about the ill or injured person. If the mobile phone has been programmed to include the ICE contact with a "0" in front, it will appear as the first contact in the person’s list
If you have a chronic medical condition such as diabetes, epilepsy, or allergies, consider wearing a medical identification product to alert EMS personnel of your condition in case you are unable to do so. There are also applications you can use to create digital identification tags in your
mobile phone. These tags can be viewed even when your phone is locked, and so can provide important information in an emergency (such as your medical conditions, blood type, and emergency contact details).
In a life-threatening emergency, every second counts. By preparing for emergencies, you can help ensure that care begins as soon as possible—for yourself, a family member, a co-worker, or a member of your community.
Res
po
nd
ing
to
Em
erg
enci
es
9
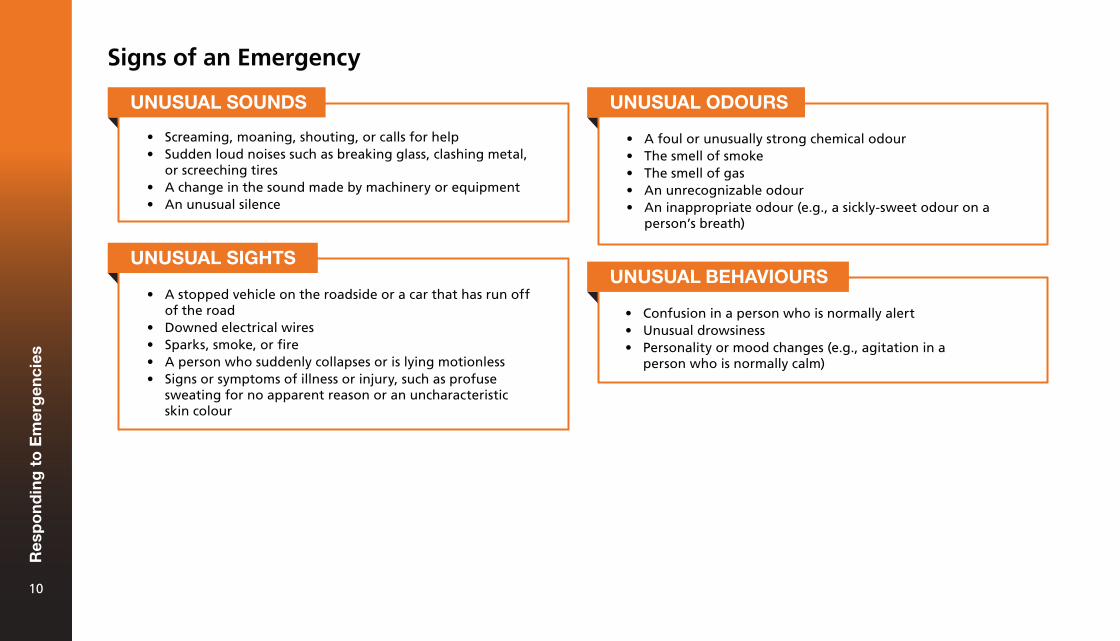
Signs of an Emergency
• Screaming, moaning, shouting, or calls for help• Sudden loud noises such as breaking glass, clashing metal,
or screeching tires• A change in the sound made by machinery or equipment• An unusual silence
• A stopped vehicle on the roadside or a car that has run offof the road
• Downed electrical wires• Sparks, smoke, or fire• A person who suddenly collapses or is lying motionless• Signs or symptoms of illness or injury, such as profuse
sweating for no apparent reason or an uncharacteristicskin colour
• A foul or unusually strong chemical odour• The smell of smoke• The smell of gas• An unrecognizable odour• An inappropriate odour (e.g., a sickly-sweet odour on a
person’s breath)
• Confusion in a person who is normally alert• Unusual drowsiness• Personality or mood changes (e.g., agitation in a
person who is normally calm)
UNUSUAL SOUNDS
UNUSUAL SIGHTS
UNUSUAL ODOURS
UNUSUAL BEHAVIOURS
Res
po
nd
ing
to
Em
erg
enci
es
10
3. Catching a disease: You might be concerned that performing firstaid will put you at risk of infection, but there are many ways toreduce this risk. If you take simple precautions to limit contact withthe ill or injured person—such as wearing gloves and using a CPRbreathing barrier—you can limit the possibility of catching a disease.Remember that EMS personnel provide care for ill and injuredpeople every day without incident.
4. Doing something wrong, or causing more harm: You might beafraid that you will be sued if you make a mistake. As long as youact reasonably, you don’t need to worry. All provinces and territorieshave laws to protect bystanders who give emergency help. Gettingtrained in first aid can give you the confidence, knowledge, andskills you need to respond appropriately to an emergency. Use yourgood judgment and stay within the realm of the skills in which youwere trained. Once you start giving first aid, keep providing helpuntil EMS personnel arrive. If you are unsure of what to do, callEMS/9-1-1 and follow the EMS dispatcher’s instructions. The mostharmful thing you can do is to do nothing at all.
Thinking about these things now and mentally preparing yourself for an emergency will help you overcome your fears.
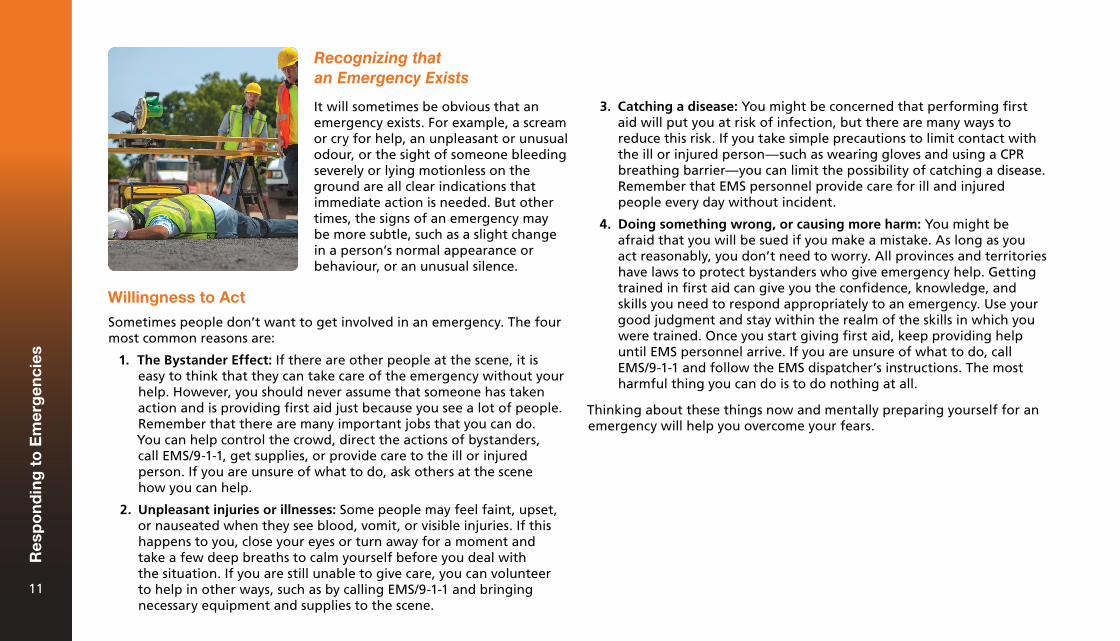
Recognizing that an Emergency Exists
It will sometimes be obvious that an emergency exists. For example, a scream or cry for help, an unpleasant or unusual odour, or the sight of someone bleeding severely or lying motionless on the ground are all clear indications that immediate action is needed. But other times, the signs of an emergency may be more subtle, such as a slight change in a person’s normal appearance or behaviour, or an unusual silence.
Willingness to Act
Sometimes people don’t want to get involved in an emergency. The four most common reasons are:
1. The Bystander Effect: If there are other people at the scene, it iseasy to think that they can take care of the emergency without yourhelp. However, you should never assume that someone has takenaction and is providing first aid just because you see a lot of people.Remember that there are many important jobs that you can do.You can help control the crowd, direct the actions of bystanders,call EMS/9-1-1, get supplies, or provide care to the ill or injuredperson. If you are unsure of what to do, ask others at the scenehow you can help.
2. Unpleasant injuries or illnesses: Some people may feel faint, upset,or nauseated when they see blood, vomit, or visible injuries. If thishappens to you, close your eyes or turn away for a moment andtake a few deep breaths to calm yourself before you deal withthe situation. If you are still unable to give care, you can volunteerto help in other ways, such as by calling EMS/9-1-1 and bringingnecessary equipment and supplies to the scene.
Res
po
nd
ing
to
Em
erg
enci
es
11
Legal Issues Around First Aid
Good Samaritan Laws
Good Samaritan laws, which protect First Aiders from financial liability, were developed to encourage people to help others in emergency situations. These laws assume a First Aider will do his or her best to save a life or prevent further injury. Good Samaritan laws require the First Aider to use common sense and a reasonable level of skill, as well as to give only the type of emergency care that is within his or her training. Good Samaritan laws usually protect First Aiders who act in the same manner as a "reasonable and prudent person" would in the same situation. For example, a reasonable and prudent person would:
• Move a person only if the person’s life was in danger.• Ask a responsive person (or the parent, guardian, or caregiver
of a child or baby) for permission to help (consent) beforegiving care.
• Check a person for life-threatening conditions beforegiving further care.
• Call EMS/9-1-1.• Continue to give care until more highly trained personnel
take over.
If a First Aider’s actions are grossly negligent or reckless, or if the First Aider abandons the person after starting care, Good Samaritan laws may not protect the First Aider.
Workplace First Aiders
First aid in the workplace can be governed by both national and provincial/territorial legislation. A workplace First Aider has additional responsibilities and may be legally required to provide first aid in the workplace if the need arises. He or she may also need to know other information, including:
• Where emergency equipment is located.• How to properly complete documentation following a workplace
incident.• What the workplace-specific emergency procedures are.• How to call for help in an emergency.
Refer to the legislation that governs your workplace for more information.
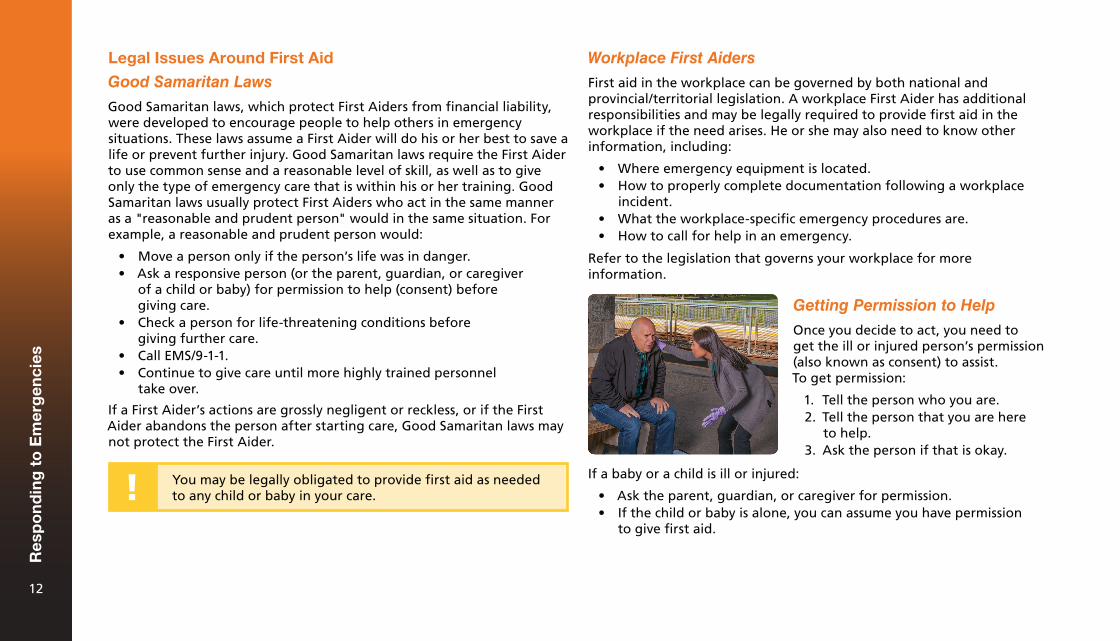
Getting Permission to Help
Once you decide to act, you need to get the ill or injured person’s permission (also known as consent) to assist. To get permission:
1. Tell the person who you are.2. Tell the person that you are here
to help.3. Ask the person if that is okay.
You may be legally obligated to provide first aid as needed to any child or baby in your care.
If a baby or a child is ill or injured:
• Ask the parent, guardian, or caregiver for permission.• If the child or baby is alone, you can assume you have permission
to give first aid.
Res
po
nd
ing
to
Em
erg
enci
es
12
Special Situations
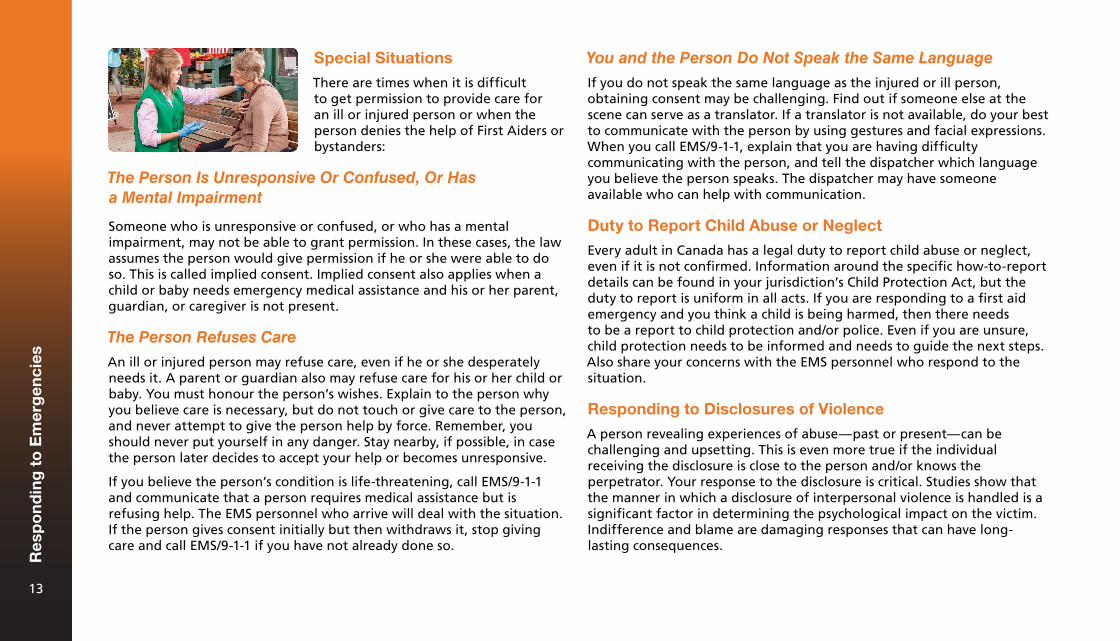
There are times when it is difficult to get permission to provide care for an ill or injured person or when the person denies the help of First Aiders or bystanders:
You and the Person Do Not Speak the Same Language
If you do not speak the same language as the injured or ill person, obtaining consent may be challenging. Find out if someone else at the scene can serve as a translator. If a translator is not available, do your best to communicate with the person by using gestures and facial expressions. When you call EMS/9-1-1, explain that you are having difficulty communicating with the person, and tell the dispatcher which language you believe the person speaks. The dispatcher may have someone available who can help with communication.
Duty to Report Child Abuse or Neglect
Every adult in Canada has a legal duty to report child abuse or neglect, even if it is not confirmed. Information around the specific how-to-report details can be found in your jurisdiction’s Child Protection Act, but the duty to report is uniform in all acts. If you are responding to a first aid emergency and you think a child is being harmed, then there needs to be a report to child protection and/or police. Even if you are unsure, child protection needs to be informed and needs to guide the next steps. Also share your concerns with the EMS personnel who respond to the situation.
Responding to Disclosures of Violence
A person revealing experiences of abuse—past or present—can be challenging and upsetting. This is even more true if the individual receiving the disclosure is close to the person and/or knows the perpetrator. Your response to the disclosure is critical. Studies show that the manner in which a disclosure of interpersonal violence is handled is a significant factor in determining the psychological impact on the victim. Indifference and blame are damaging responses that can have long-lasting consequences.
The Person Is Unresponsive Or Confused, Or Has a Mental Impairment
Someone who is unresponsive or confused, or who has a mental impairment, may not be able to grant permission. In these cases, the law assumes the person would give permission if he or she were able to do so. This is called implied consent. Implied consent also applies when a child or baby needs emergency medical assistance and his or her parent, guardian, or caregiver is not present.
The Person Refuses Care
An ill or injured person may refuse care, even if he or she desperately needs it. A parent or guardian also may refuse care for his or her child or baby. You must honour the person’s wishes. Explain to the person why you believe care is necessary, but do not touch or give care to the person, and never attempt to give the person help by force. Remember, you should never put yourself in any danger. Stay nearby, if possible, in case the person later decides to accept your help or becomes unresponsive.
If you believe the person’s condition is life-threatening, call EMS/9-1-1 and communicate that a person requires medical assistance but is refusing help. The EMS personnel who arrive will deal with the situation. If the person gives consent initially but then withdraws it, stop giving care and call EMS/9-1-1 if you have not already done so.
Res
po
nd
ing
to
Em
erg
enci
es
13
If you receive a complaint of abuse, neglect, harassment, or bullying, you must know what steps need to be taken, when they need to occur, and how they need to be carried out. The complaint cannot be diminished or ignored. There must always be a response. Both verbal and non-verbal disclosures need to be handled sensitively while following specific procedures. If the disclosure is from a young person, your jurisdiction’s Child Protection Act may govern how you respond.
The Emergency Medical Services System
The emergency medical services (EMS) system is a network of community resources and trained personnel, organized to give emergency care in cases of injury or sudden illness. The system begins when someone sees an emergency and decides to take action by calling EMS/9-1-1. This action allows the EMS dispatcher to take down information about the emergency and provide it to the trained EMS personnel who will respond to the scene. Many EMS dispatchers are also trained to provide first aid and CPR instructions over the phone to assist the caller until EMS arrives.
Chain of Survival Behaviours
The Chain of Survival Behaviours is a series of steps that help ensure a positive outcome for an ill or injured person. As a First Aider, your role is to prepare, recognize emergencies, provide first aid and/or access help.
Your role as a First Aider includes four basic steps:
1. Recognize the emergency.2. Protect yourself, the ill or injured
person, and bystanders.3. Access help (e.g., call EMS/9-1-1).4. Act according to your skills,
knowledge, and comfort level.
One of the simplest and most important ways of providing first aid is to call for help (EMS/9-1-1). By making this call, you ensure that the ill or injured person receives care from highly trained medical professionals.
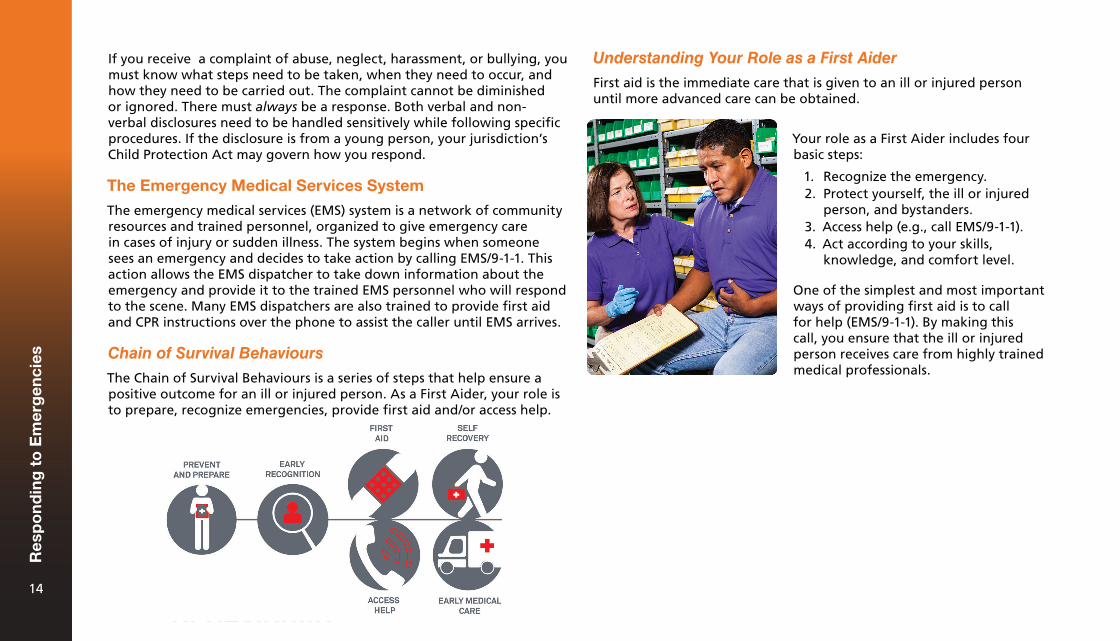
Understanding Your Role as a First Aider
First aid is the immediate care that is given to an ill or injured person until more advanced care can be obtained.
Res
po
nd
ing
to
Em
erg
enci
es
14
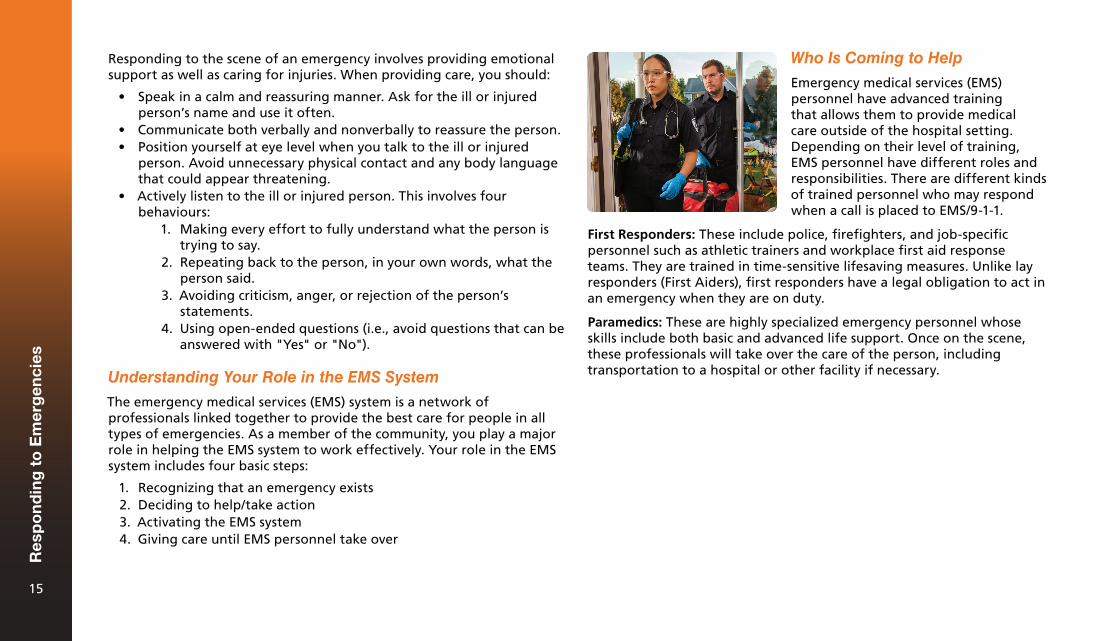
Who Is Coming to Help
Emergency medical services (EMS) personnel have advanced training that allows them to provide medical care outside of the hospital setting. Depending on their level of training, EMS personnel have different roles and responsibilities. There are different kinds of trained personnel who may respond when a call is placed to EMS/9-1-1.
First Responders: These include police, firefighters, and job-specific personnel such as athletic trainers and workplace first aid response teams. They are trained in time-sensitive lifesaving measures. Unlike lay responders (First Aiders), first responders have a legal obligation to act in an emergency when they are on duty.
Paramedics: These are highly specialized emergency personnel whose skills include both basic and advanced life support. Once on the scene, these professionals will take over the care of the person, including transportation to a hospital or other facility if necessary.
Responding to the scene of an emergency involves providing emotional support as well as caring for injuries. When providing care, you should:
• Speak in a calm and reassuring manner. Ask for the ill or injuredperson’s name and use it often.
• Communicate both verbally and nonverbally to reassure the person.• Position yourself at eye level when you talk to the ill or injured
person. Avoid unnecessary physical contact and any body languagethat could appear threatening.
• Actively listen to the ill or injured person. This involves fourbehaviours:
1. Making every effort to fully understand what the person istrying to say.
2. Repeating back to the person, in your own words, what theperson said.
3. Avoiding criticism, anger, or rejection of the person’sstatements.
4. Using open-ended questions (i.e., avoid questions that can beanswered with "Yes" or "No").
Understanding Your Role in the EMS System
The emergency medical services (EMS) system is a network of professionals linked together to provide the best care for people in all types of emergencies. As a member of the community, you play a major role in helping the EMS system to work effectively. Your role in the EMS system includes four basic steps:
1. Recognizing that an emergency exists2. Deciding to help/take action3. Activating the EMS system4. Giving care until EMS personnel take over
Res
po
nd
ing
to
Em
erg
enci
es
15
EMS varies from community to community. Most people in Canada call 9-1-1 for help in emergencies, but in some areas of Canada and in many workplaces you may need to dial a different designated emergency number instead. If you live or work in an area where 9-1-1 is not the number to call in an emergency, make sure you know the designated emergency number to call.
Phone carriers are required to connect any 9-1-1 call made from a mobile phone, even if the phone does not have an active service plan. In most areas, you cannot text 9-1-1. Unless you have confirmed that the 9-1-1 call centre in your area supports texting, you should always call.
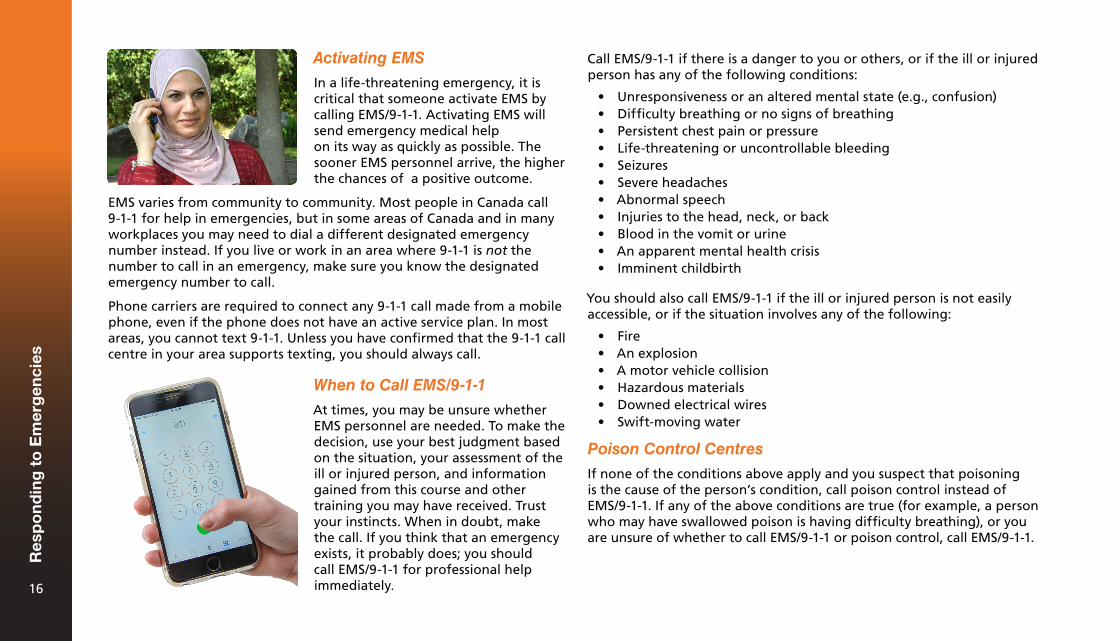
When to Call EMS/9-1-1
At times, you may be unsure whether EMS personnel are needed. To make the decision, use your best judgment based on the situation, your assessment of the ill or injured person, and information gained from this course and other training you may have received. Trust your instincts. When in doubt, make the call. If you think that an emergency exists, it probably does; you should call EMS/9-1-1 for professional help immediately.
Call EMS/9-1-1 if there is a danger to you or others, or if the ill or injured person has any of the following conditions:
• Unresponsiveness or an altered mental state (e.g., confusion)• Difficulty breathing or no signs of breathing• Persistent chest pain or pressure• Life-threatening or uncontrollable bleeding• Seizures• Severe headaches• Abnormal speech• Injuries to the head, neck, or back• Blood in the vomit or urine• An apparent mental health crisis• Imminent childbirth
You should also call EMS/9-1-1 if the ill or injured person is not easily accessible, or if the situation involves any of the following:
• Fire• An explosion• A motor vehicle collision• Hazardous materials• Downed electrical wires• Swift-moving water
Poison Control Centres
If none of the conditions above apply and you suspect that poisoning is the cause of the person’s condition, call poison control instead of EMS/9-1-1. If any of the above conditions are true (for example, a person who may have swallowed poison is having difficulty breathing), or you are unsure of whether to call EMS/9-1-1 or poison control, call EMS/9-1-1.
Activating EMS
In a life-threatening emergency, it is critical that someone activate EMS by calling EMS/9-1-1. Activating EMS will send emergency medical help on its way as quickly as possible. The sooner EMS personnel arrive, the higher the chances of a positive outcome.
Res
po
nd
ing
to
Em
erg
enci
es
16
Calling EMS/9-1-1 for a Child in Your Care
If you are a professional caregiver, you may have additional considerations when calling EMS/9-1-1 for a child in your care.
Once you have activated EMS, call another caregiver to come and stay with any other children while you attend to the ill or injured child. If the child is being taken to the hospital, call his or her parent or guardian and ask the parent or guardian to meet you there. If you are travelling in an ambulance, tell them you will call again when you know the name and location of the hospital and that you may not know this information until after you arrive. If you cannot go with the child in the ambulance, be sure to give the paramedics the child’s medical information and your contact information.
After an Emergency
Being involved in an emergency and providing first aid can be stressful. After the emergency is resolved, you may have lingering feelings such as uneasiness, doubt, anxiety, and fear. After dealing with an emergency, it is often helpful to talk to somebody about the situation.
Everyone reacts to stressful situations differently. It is very difficult to predict who will or will not be affected by abnormal events. Some individuals may feel better in the few days after the event. Others may find that it takes longer for their stress to go away, and that it begins to impact their relationships.
Consider seeking professional help if you experience any of the following for more than two weeks after the emergency:
• Crying fits or uncontrollable anger• Trouble eating• Trouble sleeping• Loss of engagement with former interests• Unusual or unexplained pain (e.g., headaches or stomach aches)
• Fatigue• Feelings of guilt, helplessness, or hopelessness• Staying away from family and friends• Ignoring daily tasks, such as going to work
For help dealing with ongoing stress symptoms, contact your local crisis intervention line. You may also speak to your family doctor or a mental health professional.
Documentation
If an incident occurs in a workplace (including a marine environment), it must be documented properly. The documentation may be paper and/or electronic. The reports you create are official legal documents: paper versions should be filled out in pen (not pencil), with any changes or corrections crossed out and initialed.
Good documentation is:
• Complete and accurate• Legible• Objective• Completed as soon as possible (while your memory of the incident
is fresh)
Res
po
nd
ing
to
Em
erg
enci
es
17
Lowering the Risk of Infection
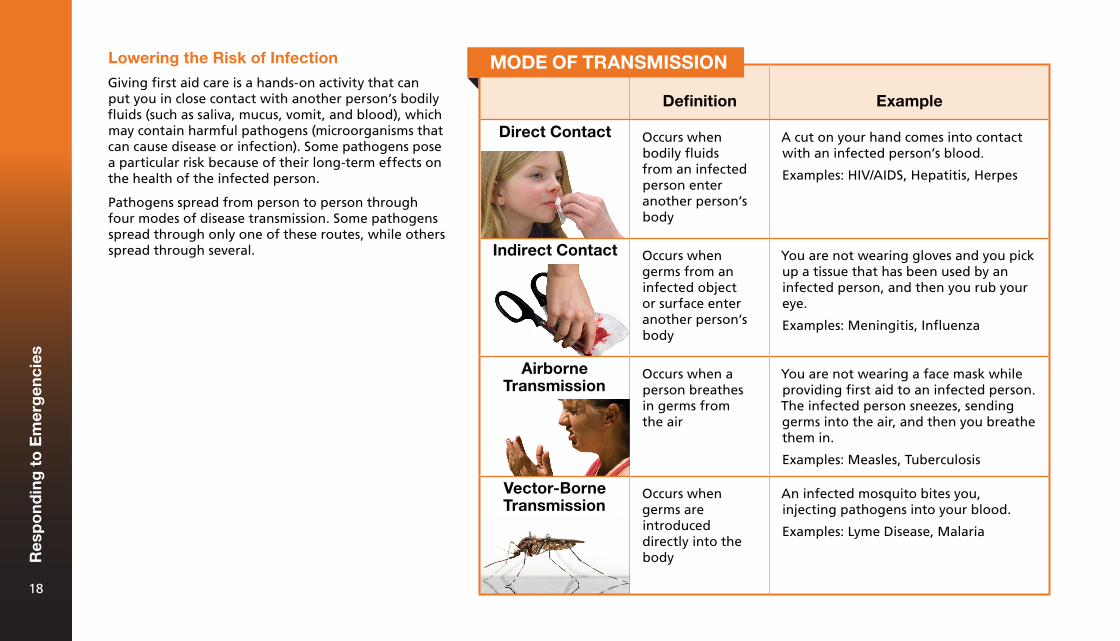
Giving first aid care is a hands-on activity that can put you in close contact with another person’s bodily fluids (such as saliva, mucus, vomit, and blood), which may contain harmful pathogens (microorganisms that can cause disease or infection). Some pathogens pose a particular risk because of their long-term effects on the health of the infected person.
Pathogens spread from person to person through four modes of disease transmission. Some pathogens spread through only one of these routes, while others spread through several.
Definition Example
Direct Contact Occurs when bodily fluids from an infected person enter another person’s body
A cut on your hand comes into contact with an infected person’s blood.
Examples: HIV/AIDS, Hepatitis, Herpes
Indirect Contact Occurs when germs from an infected object or surface enter another person’s body
You are not wearing gloves and you pick up a tissue that has been used by an infected person, and then you rub your eye.
Examples: Meningitis, Influenza
Airborne Transmission
Occurs when a person breathes in germs from the air
You are not wearing a face mask while providing first aid to an infected person. The infected person sneezes, sending germs into the air, and then you breathe them in.
Examples: Measles, Tuberculosis
Vector-Borne Transmission
Occurs when germs are introduced directly into the body
An infected mosquito bites you, injecting pathogens into your blood.
Examples: Lyme Disease, Malaria
MODE OF TRANSMISSION
Res
po
nd
ing
to
Em
erg
enci
es
18
How to Prevent Diseases from Spreading
Personal Precautions
Personal precautions are the actions that individuals can take to reduce the risk of disease transmission. Examples include washing your hands frequently, treating all blood and other bodily fluids as infectious materials, covering your mouth and nose when sneezing, eating well, and getting enough exercise and sleep.
One way to significantly reduce your risk of infection is to inspect your hands regularly and cover even small cuts with adhesive bandages. This reduces the number of points where germs can enter your body.
Handwashing
Proper handwashing is an important precaution for preventing the spread of germs that cause many infectious diseases. Frequent handwashing is important as part of a daily routine, for example, before eating or drinking and after using the washroom.
Wearing gloves helps to protect you from infection, but it does not eliminate the need for proper hygiene. First Aiders should always wash their hands thoroughly when they have finished giving care, even if they wore gloves the entire time.
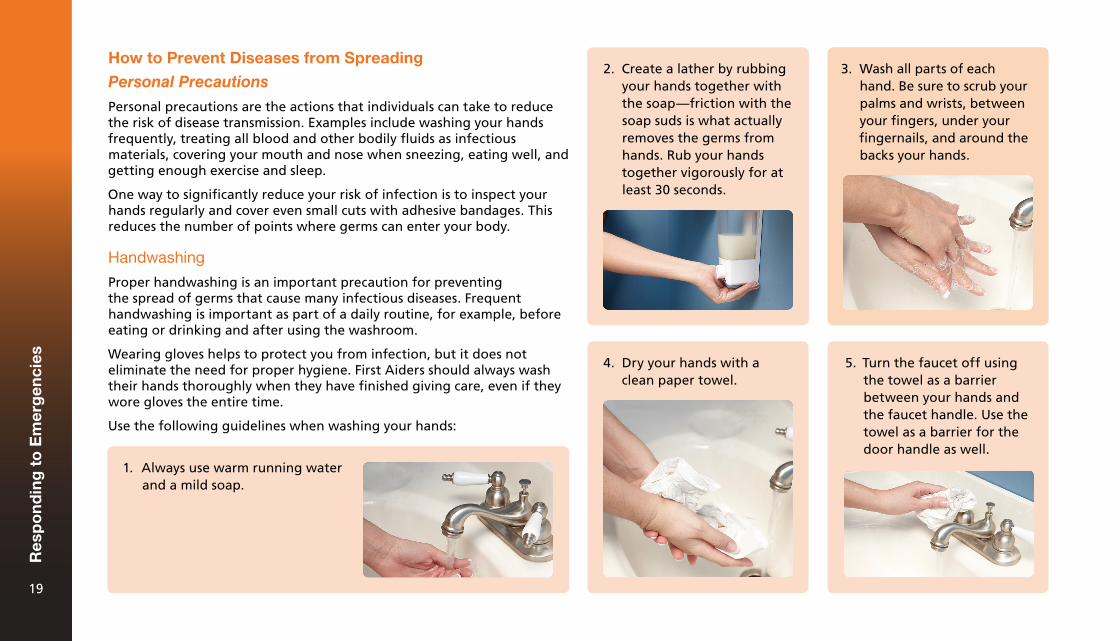
Use the following guidelines when washing your hands:
1. Always use warm running waterand a mild soap.
2. Create a lather by rubbingyour hands together withthe soap—friction with thesoap suds is what actuallyremoves the germs fromhands. Rub your handstogether vigorously for atleast 30 seconds.
3. Wash all parts of eachhand. Be sure to scrub yourpalms and wrists, betweenyour fingers, under yourfingernails, and around thebacks your hands.
4. Dry your hands with aclean paper towel.
5. Turn the faucet off usingthe towel as a barrierbetween your hands andthe faucet handle. Use thetowel as a barrier for thedoor handle as well.
Res
po
nd
ing
to
Em
erg
enci
es
19
When to Wash Your Hands
Wash your hands after touching anything that is likely to carry germs (e.g., after wiping your nose, changing a diaper, or touching a pet), and before touching anything that could carry germs into the body (e.g., before handling food or touching an open cut). It is also a good habit to wash your hands frequently, for example when returning home from a public place.
In a first aid emergency, remember to wash your hands:
• Before and after contact with an ill or injured person.• After handling dirty articles, instruments, or dressings.• Before or after treating wounds.• After removing gloves.
Hand Sanitizers
Hand sanitizers are not a substitute for hand washing, and are not suitable for cleaning visibly soiled hands. They should be used only as a temporary measure in situations where you are unable to wash your hands immediately. If you can see dirt on your hands, you should wash them with soap and water before using hand sanitizer.
When using an alcohol-based hand sanitizer to help decontaminate your hands, use the amount of product recommended by the manufacturer. Rub it thoroughly over all the surfaces of your hands, including your nails and in between your fingers, until the product dries.
Immunization
Most Canadians have been immunized against common diseases such as measles and tetanus. Some vaccine-preventable diseases are serious, and can lead to disability or death. Immunizations protect not only you, but also your family, friends, and co-workers.
Immunization introduces a substance into the body that builds up its resistance to germs that cause a specific disease. Some vaccinations may wear away with time. As a result, it’s possible that your immunity to a particular disease could decline. It is important to keep up with your immunization needs since protection against diseases through immunization is a lifelong process.
Some vaccines require more than one injection and a certain period of time between injections. If you are planning a trip outside the country, find out well before you leave which immunizations are recommended and required in order to safely go to the countries you will be visiting.
Because the risk of disease varies from place to place, this information cannot cover all the hazards that you might face. For specific guidelines on your particular situation, talk to your doctor or your community public health centre.
Equipment Precautions
Personal protective equipment (PPE) is the general term for items that protect you from contact with pathogens and contaminated objects. Examples include barrier devices such as safety glasses, goggles, face masks, CPR breathing barriers, and gloves. You should always use some type of barrier device between yourself and any material that could pose the risk of infection.
Any disposable equipment that you have used (e.g. gloves, breathing barriers) should be immediately disposed of in a labelled leak-proof container with a biohazard symbol.
Res
po
nd
ing
to
Em
erg
enci
es
20
Gloves
Wearing gloves is an important way to protect yourself while giving first aid. Most gloves found in first aid kits are disposable and latex-free, as some people are allergic to latex. Disposable
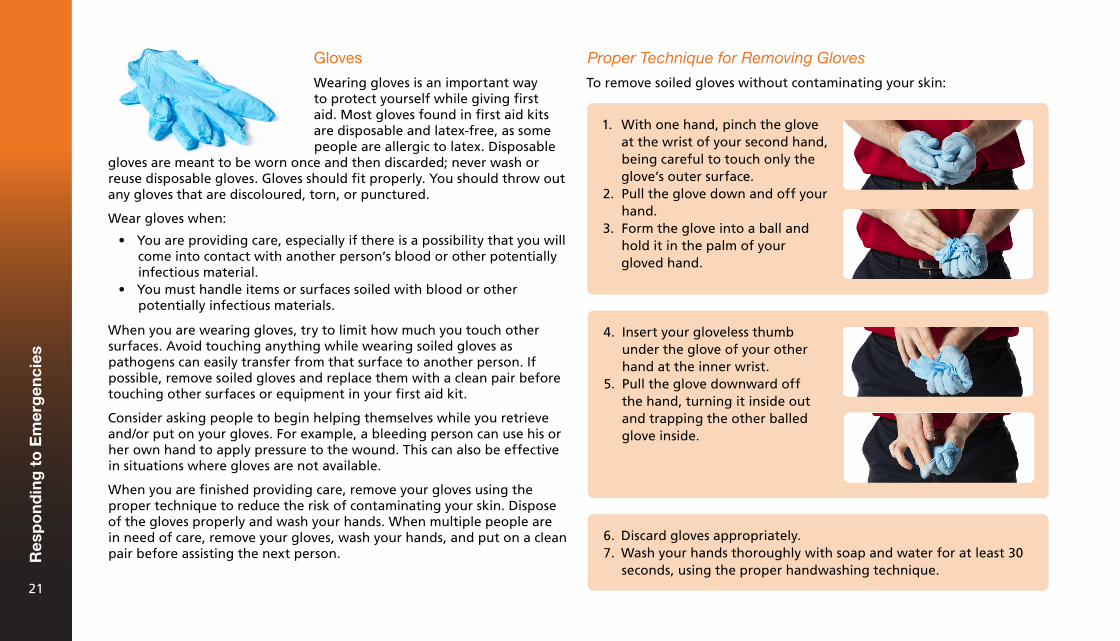
Proper Technique for Removing Gloves
To remove soiled gloves without contaminating your skin:
1. With one hand, pinch the gloveat the wrist of your second hand,being careful to touch only theglove’s outer surface.
2. Pull the glove down and off yourhand.
3. Form the glove into a ball andhold it in the palm of yourgloved hand.
4. Insert your gloveless thumbunder the glove of your otherhand at the inner wrist.
5. Pull the glove downward offthe hand, turning it inside outand trapping the other balledglove inside.
6. Discard gloves appropriately.7. Wash your hands thoroughly with soap and water for at least 30
seconds, using the proper handwashing technique.
gloves are meant to be worn once and then discarded; never wash or reuse disposable gloves. Gloves should fit properly. You should throw out any gloves that are discoloured, torn, or punctured.
Wear gloves when:
• You are providing care, especially if there is a possibility that you willcome into contact with another person’s blood or other potentiallyinfectious material.
• You must handle items or surfaces soiled with blood or otherpotentially infectious materials.
When you are wearing gloves, try to limit how much you touch other surfaces. Avoid touching anything while wearing soiled gloves as pathogens can easily transfer from that surface to another person. If possible, remove soiled gloves and replace them with a clean pair before touching other surfaces or equipment in your first aid kit.
Consider asking people to begin helping themselves while you retrieve and/or put on your gloves. For example, a bleeding person can use his or her own hand to apply pressure to the wound. This can also be effective in situations where gloves are not available.
When you are finished providing care, remove your gloves using the proper technique to reduce the risk of contaminating your skin. Dispose of the gloves properly and wash your hands. When multiple people are in need of care, remove your gloves, wash your hands, and put on a clean pair before assisting the next person.R
esp
on
din
g t
o E
mer
gen
cies
21
CPR Breathing Barriers
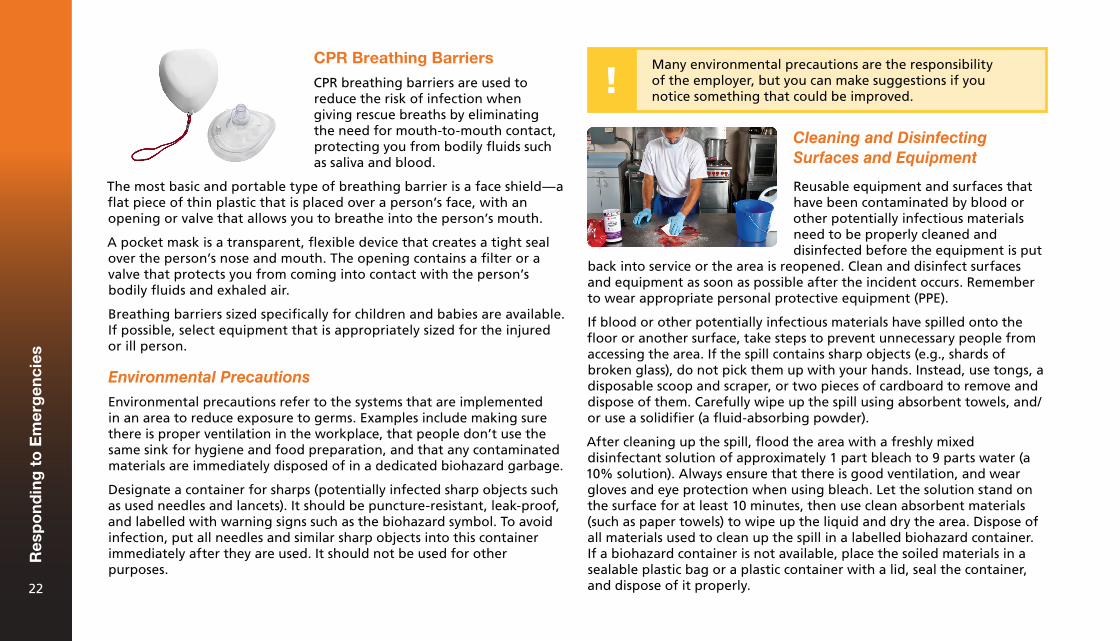
CPR breathing barriers are used to reduce the risk of infection when giving rescue breaths by eliminating the need for mouth-to-mouth contact, protecting you from bodily fluids such as saliva and blood.
The most basic and portable type of breathing barrier is a face shield—a flat piece of thin plastic that is placed over a person’s face, with an opening or valve that allows you to breathe into the person’s mouth.
A pocket mask is a transparent, flexible device that creates a tight seal over the person’s nose and mouth. The opening contains a filter or a valve that protects you from coming into contact with the person’s bodily fluids and exhaled air.
Breathing barriers sized specifically for children and babies are available. If possible, select equipment that is appropriately sized for the injured or ill person.
Environmental Precautions
Environmental precautions refer to the systems that are implemented in an area to reduce exposure to germs. Examples include making sure there is proper ventilation in the workplace, that people don’t use the same sink for hygiene and food preparation, and that any contaminated materials are immediately disposed of in a dedicated biohazard garbage.
Designate a container for sharps (potentially infected sharp objects such as used needles and lancets). It should be puncture-resistant, leak-proof, and labelled with warning signs such as the biohazard symbol. To avoid infection, put all needles and similar sharp objects into this container immediately after they are used. It should not be used for other purposes.
Cleaning and Disinfecting Surfaces and Equipment
Reusable equipment and surfaces that have been contaminated by blood or other potentially infectious materials need to be properly cleaned and disinfected before the equipment is put
back into service or the area is reopened. Clean and disinfect surfaces and equipment as soon as possible after the incident occurs. Remember to wear appropriate personal protective equipment (PPE).
If blood or other potentially infectious materials have spilled onto the floor or another surface, take steps to prevent unnecessary people from accessing the area. If the spill contains sharp objects (e.g., shards of broken glass), do not pick them up with your hands. Instead, use tongs, a disposable scoop and scraper, or two pieces of cardboard to remove and dispose of them. Carefully wipe up the spill using absorbent towels, and/or use a solidifier (a fluid-absorbing powder).
After cleaning up the spill, flood the area with a freshly mixed disinfectant solution of approximately 1 part bleach to 9 parts water (a 10% solution). Always ensure that there is good ventilation, and wear gloves and eye protection when using bleach. Let the solution stand on the surface for at least 10 minutes, then use clean absorbent materials (such as paper towels) to wipe up the liquid and dry the area. Dispose of all materials used to clean up the spill in a labelled biohazard container. If a biohazard container is not available, place the soiled materials in a sealable plastic bag or a plastic container with a lid, seal the container, and dispose of it properly.
Many environmental precautions are the responsibility of the employer, but you can make suggestions if you notice something that could be improved.
Res
po
nd
ing
to
Em
erg
enci
es
22
Soft materials such as clothes and linens that have been contaminated should be washed with soap and the hottest water available, at least 70°C (158°F). Hard-surfaced materials, such as dustpans, should be cleaned with a disinfectant solution. There is no need to dispose of soft materials or instruments as long as they are washed properly.
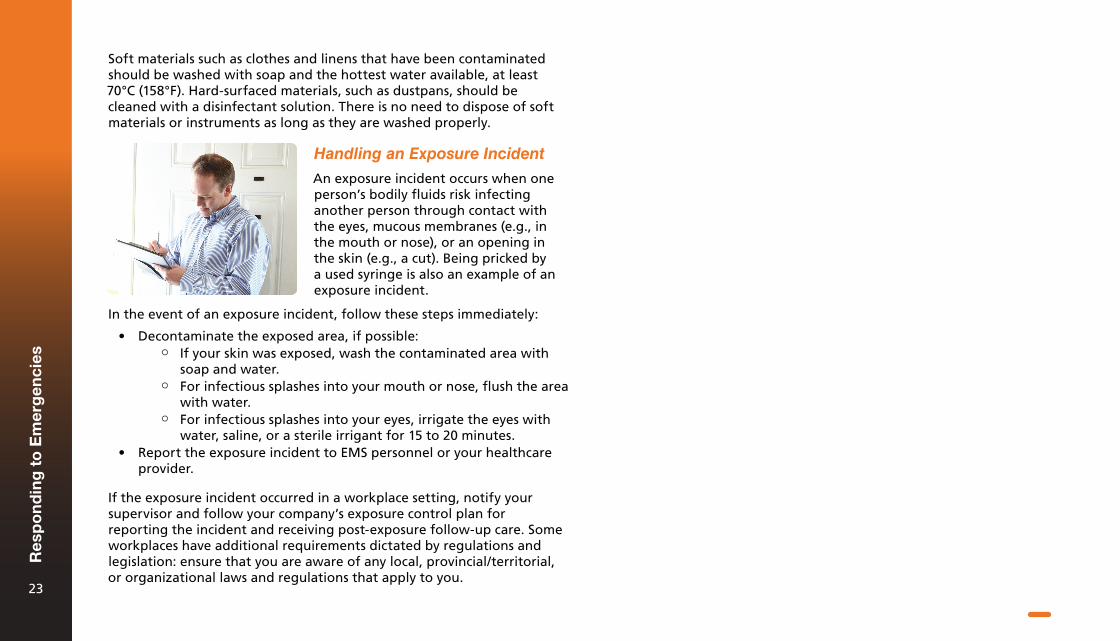
Handling an Exposure Incident
An exposure incident occurs when one person’s bodily fluids risk infecting another person through contact with the eyes, mucous membranes (e.g., in the mouth or nose), or an opening in the skin (e.g., a cut). Being pricked by a used syringe is also an example of an exposure incident.
In the event of an exposure incident, follow these steps immediately:
• Decontaminate the exposed area, if possible: ¶ If your skin was exposed, wash the contaminated area with
soap and water. ¶ For infectious splashes into your mouth or nose, flush the area
with water. ¶ For infectious splashes into your eyes, irrigate the eyes with
water, saline, or a sterile irrigant for 15 to 20 minutes.• Report the exposure incident to EMS personnel or your healthcare
provider.
If the exposure incident occurred in a workplace setting, notify your supervisor and follow your company’s exposure control plan for reporting the incident and receiving post-exposure follow-up care. Some workplaces have additional requirements dictated by regulations and legislation: ensure that you are aware of any local, provincial/territorial, or organizational laws and regulations that apply to you.
Res
po
nd
ing
to
Em
erg
enci
es
23

Check, Call, Care3

If you encounter an ill or injured person, there are three simple steps that you must take:
Check
Once you recognize an emergency you must first check the scene, then check the person.
Check the Scene
Before rushing to help an ill or injured person, stop and take a good look at the scene. This will form an initial impression. Try to answer these questions:
Is the scene safe for you, the ill or injured person, and any bystanders?
Enter a scene only if it is safe to do so. Look for hazards such as spilled chemicals, hostile bystanders, or oncoming traffic. Listen for things such as ringing alarms or leaking gas. Smell for things such as gas or smoke. Avoid entering confined areas with poor ventilation and places where there is a risk of explosion (e.g., from leaking propane or natural gas). Do not enter the scene if the person is hostile or threatening suicide.
If hazards are present, stay at a safe distance and call EMS/9-1-1. Leave dangerous situations for EMS personnel. Once EMS personnel arrive and make the scene safe, you can offer your assistance as appropriate. Remember that conditions at the scene may change, so a safe area could quickly become dangerous. It is important to continuously monitor your surroundings even if your initial assessment revealed a low level of risk.
What happened? How did it happen?
Take note of anything that might reveal the cause of the emergency. If the person is unresponsive and there are no witnesses, your check of the scene may offer the only clues as to what happened. Use your senses to detect anything out of the ordinary, such as broken glass, a spilled bottle of medication, or an unusual smell or sound. Keep in mind that
Recognize and Act
CHECK
CALLCARE
Ch
eck,
Cal
l, C
are
25
the ill or injured person may not be exactly where he or she was when the emergency occurred—someone may have moved the person, or the person may have moved in an attempt to get help.
How many ill or injured people are there?
Look carefully for more than one ill or injured person. A person who is moving or making noise, or who has very visible injuries, will likely attract your attention right away, but there may be a person who is silent and not moving or a person obscured by debris or wreckage who you do not notice at first. It is also easy to overlook a small child or a baby.
Is there someone to help?
Take note of bystanders who can be of assistance. A bystander who was there when the emergency occurred or who knows the person may be able to provide valuable information. Bystanders can also assist in other ways, such as by calling EMS/9-1-1, waiting for EMS personnel and leading them to the site of the emergency, getting needed items (such as an AED and first aid kit), controlling crowds, and reassuring the injured or ill person.
What is your initial impression of the ill or injured person?
Before you reach the person, try to form an initial impression about the person’s condition and what is wrong. For example, does the person seem alert, confused, or sleepy? Look at the person’s skin—does it appear to be its normal colour, or does it seem pale, ashen (grey), or flushed? Is the person moving or motionless? Does the person have any immediately identifiable injuries? Look for signs of a life-threatening illness or injury, such as unresponsiveness, trouble breathing, or life-threatening bleeding.
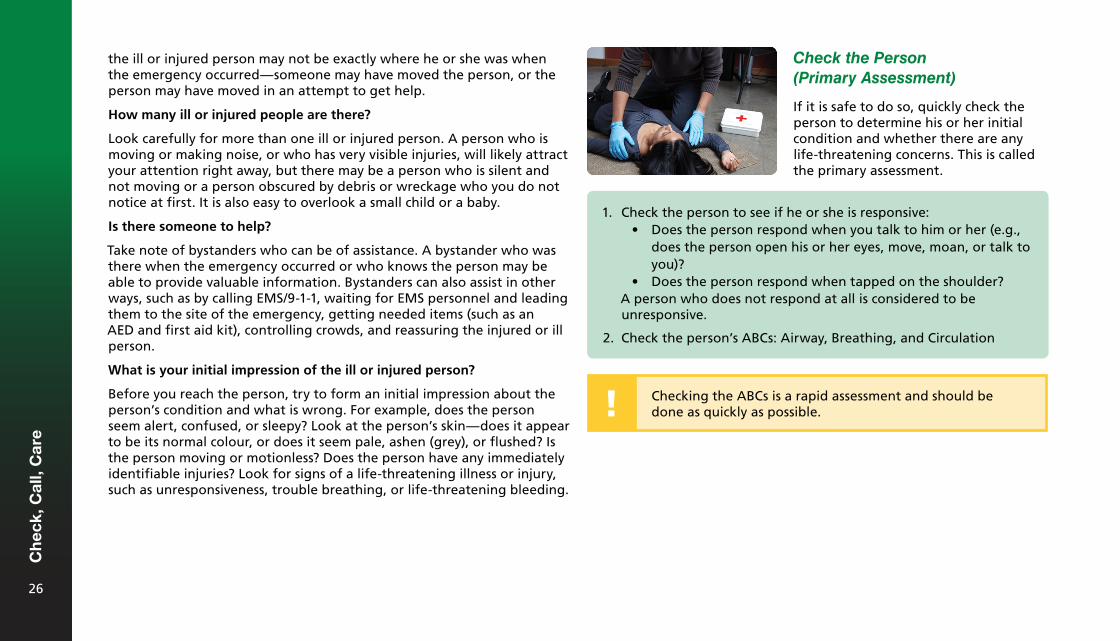
Check the Person (Primary Assessment)
If it is safe to do so, quickly check the person to determine his or her initial condition and whether there are any life-threatening concerns. This is called the primary assessment.
1. Check the person to see if he or she is responsive:• Does the person respond when you talk to him or her (e.g.,
does the person open his or her eyes, move, moan, or talk toyou)?
• Does the person respond when tapped on the shoulder?A person who does not respond at all is considered to be unresponsive.
2. Check the person’s ABCs: Airway, Breathing, and Circulation
Checking the ABCs is a rapid assessment and should be done as quickly as possible.
Ch
eck,
Cal
l, C
are
26
A = Check the Airway
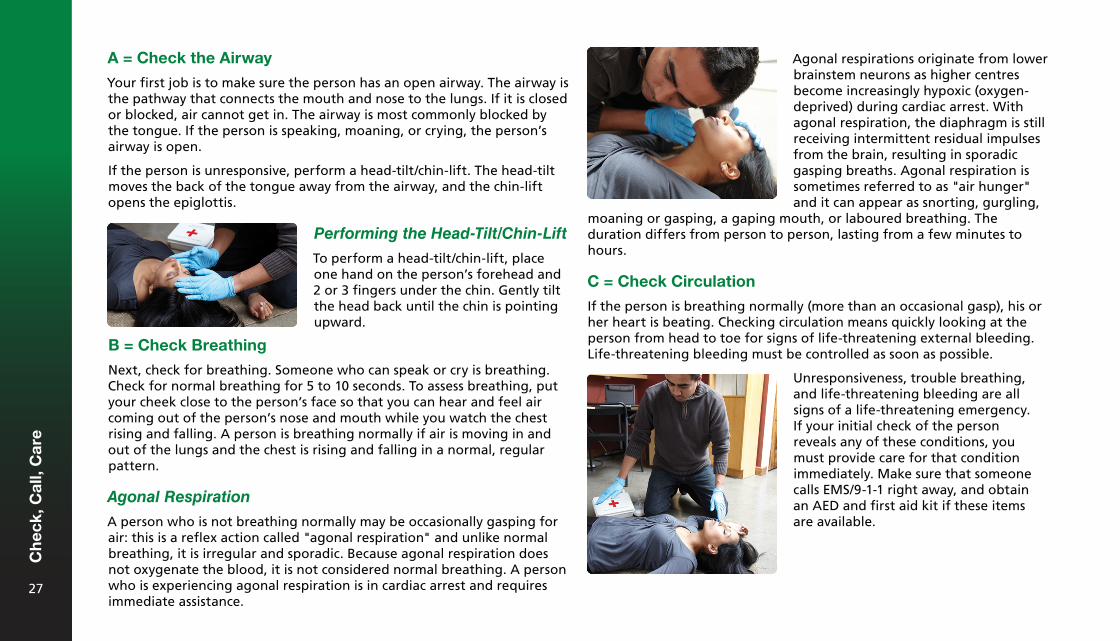
Your first job is to make sure the person has an open airway. The airway is the pathway that connects the mouth and nose to the lungs. If it is closed or blocked, air cannot get in. The airway is most commonly blocked by the tongue. If the person is speaking, moaning, or crying, the person’s airway is open.
If the person is unresponsive, perform a head-tilt/chin-lift. The head-tilt moves the back of the tongue away from the airway, and the chin-lift opens the epiglottis.
Agonal respirations originate from lower brainstem neurons as higher centres become increasingly hypoxic (oxygen-deprived) during cardiac arrest. With agonal respiration, the diaphragm is still receiving intermittent residual impulses from the brain, resulting in sporadic gasping breaths. Agonal respiration is sometimes referred to as "air hunger" and it can appear as snorting, gurgling,
Performing the Head-Tilt/Chin-Lift
To perform a head-tilt/chin-lift, place one hand on the person’s forehead and 2 or 3 fingers under the chin. Gently tilt the head back until the chin is pointing upward.
B = Check Breathing
Next, check for breathing. Someone who can speak or cry is breathing. Check for normal breathing for 5 to 10 seconds. To assess breathing, put your cheek close to the person’s face so that you can hear and feel air coming out of the person’s nose and mouth while you watch the chest rising and falling. A person is breathing normally if air is moving in and out of the lungs and the chest is rising and falling in a normal, regular pattern.
Agonal Respiration
A person who is not breathing normally may be occasionally gasping for air: this is a reflex action called "agonal respiration" and unlike normal breathing, it is irregular and sporadic. Because agonal respiration does not oxygenate the blood, it is not considered normal breathing. A person who is experiencing agonal respiration is in cardiac arrest and requires immediate assistance.
moaning or gasping, a gaping mouth, or laboured breathing. The duration differs from person to person, lasting from a few minutes to hours.
C = Check Circulation
If the person is breathing normally (more than an occasional gasp), his or her heart is beating. Checking circulation means quickly looking at the person from head to toe for signs of life-threatening external bleeding. Life-threatening bleeding must be controlled as soon as possible.
Unresponsiveness, trouble breathing, and life-threatening bleeding are all signs of a life-threatening emergency. If your initial check of the person reveals any of these conditions, you must provide care for that condition immediately. Make sure that someone calls EMS/9-1-1 right away, and obtain an AED and first aid kit if these items are available.
Ch
eck,
Cal
l, C
are
27
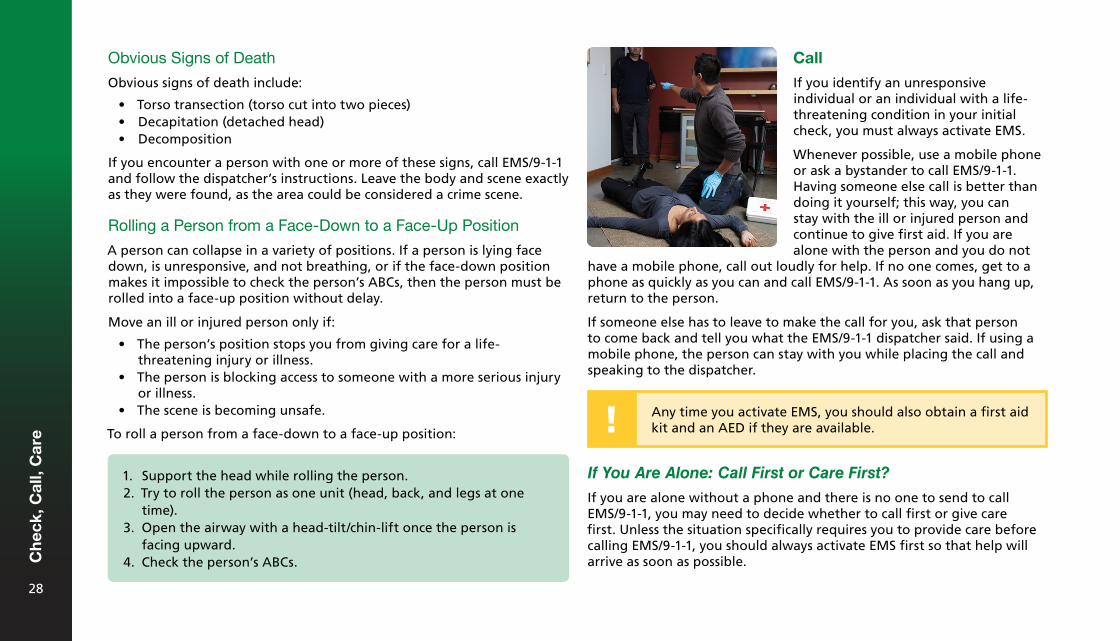
Obvious Signs of Death
Obvious signs of death include:
• Torso transection (torso cut into two pieces)• Decapitation (detached head)• Decomposition
If you encounter a person with one or more of these signs, call EMS/9-1-1 and follow the dispatcher’s instructions. Leave the body and scene exactly as they were found, as the area could be considered a crime scene.
Rolling a Person from a Face-Down to a Face-Up Position
A person can collapse in a variety of positions. If a person is lying face down, is unresponsive, and not breathing, or if the face-down position makes it impossible to check the person’s ABCs, then the person must be rolled into a face-up position without delay.
Move an ill or injured person only if:
• The person’s position stops you from giving care for a life-threatening injury or illness.
• The person is blocking access to someone with a more serious injuryor illness.
• The scene is becoming unsafe.
To roll a person from a face-down to a face-up position:
Call
If you identify an unresponsive individual or an individual with a life-threatening condition in your initial check, you must always activate EMS.
Whenever possible, use a mobile phone or ask a bystander to call EMS/9-1-1. Having someone else call is better than doing it yourself; this way, you can stay with the ill or injured person and continue to give first aid. If you are alone with the person and you do not
1. Support the head while rolling the person.2. Try to roll the person as one unit (head, back, and legs at one
time).3. Open the airway with a head-tilt/chin-lift once the person is
facing upward.4. Check the person’s ABCs.
have a mobile phone, call out loudly for help. If no one comes, get to a phone as quickly as you can and call EMS/9-1-1. As soon as you hang up, return to the person.
If someone else has to leave to make the call for you, ask that person to come back and tell you what the EMS/9-1-1 dispatcher said. If using a mobile phone, the person can stay with you while placing the call and speaking to the dispatcher.
Any time you activate EMS, you should also obtain a first aid kit and an AED if they are available.
If You Are Alone: Call First or Care First?
If you are alone without a phone and there is no one to send to call EMS/9-1-1, you may need to decide whether to call first or give care first. Unless the situation specifically requires you to provide care before calling EMS/9-1-1, you should always activate EMS first so that help will arrive as soon as possible.C
hec
k, C
all,
Car
e
28
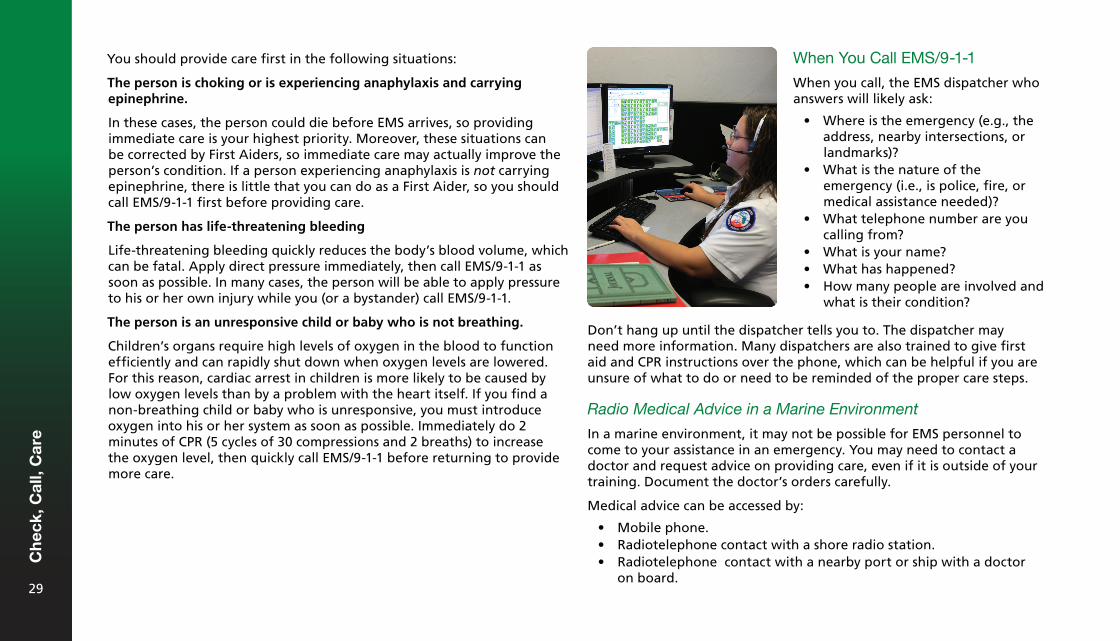
You should provide care first in the following situations:
The person is choking or is experiencing anaphylaxis and carrying epinephrine.
In these cases, the person could die before EMS arrives, so providing immediate care is your highest priority. Moreover, these situations can be corrected by First Aiders, so immediate care may actually improve the person’s condition. If a person experiencing anaphylaxis is not carrying epinephrine, there is little that you can do as a First Aider, so you should call EMS/9-1-1 first before providing care.
The person has life-threatening bleeding
Life-threatening bleeding quickly reduces the body’s blood volume, which can be fatal. Apply direct pressure immediately, then call EMS/9-1-1 as soon as possible. In many cases, the person will be able to apply pressure to his or her own injury while you (or a bystander) call EMS/9-1-1.
The person is an unresponsive child or baby who is not breathing.
Children’s organs require high levels of oxygen in the blood to function efficiently and can rapidly shut down when oxygen levels are lowered. For this reason, cardiac arrest in children is more likely to be caused by low oxygen levels than by a problem with the heart itself. If you find a non-breathing child or baby who is unresponsive, you must introduce oxygen into his or her system as soon as possible. Immediately do 2 minutes of CPR (5 cycles of 30 compressions and 2 breaths) to increase the oxygen level, then quickly call EMS/9-1-1 before returning to provide more care.
When You Call EMS/9-1-1
When you call, the EMS dispatcher who answers will likely ask:
• Where is the emergency (e.g., theaddress, nearby intersections, orlandmarks)?
• What is the nature of theemergency (i.e., is police, fire, ormedical assistance needed)?
• What telephone number are youcalling from?
• What is your name?• What has happened?• How many people are involved and
what is their condition?
Don’t hang up until the dispatcher tells you to. The dispatcher may need more information. Many dispatchers are also trained to give first aid and CPR instructions over the phone, which can be helpful if you are unsure of what to do or need to be reminded of the proper care steps.
Radio Medical Advice in a Marine Environment
In a marine environment, it may not be possible for EMS personnel to come to your assistance in an emergency. You may need to contact a doctor and request advice on providing care, even if it is outside of your training. Document the doctor’s orders carefully.
Medical advice can be accessed by:
• Mobile phone.• Radiotelephone contact with a shore radio station.• Radiotelephone contact with a nearby port or ship with a doctor
on board.
Ch
eck,
Cal
l, C
are
29
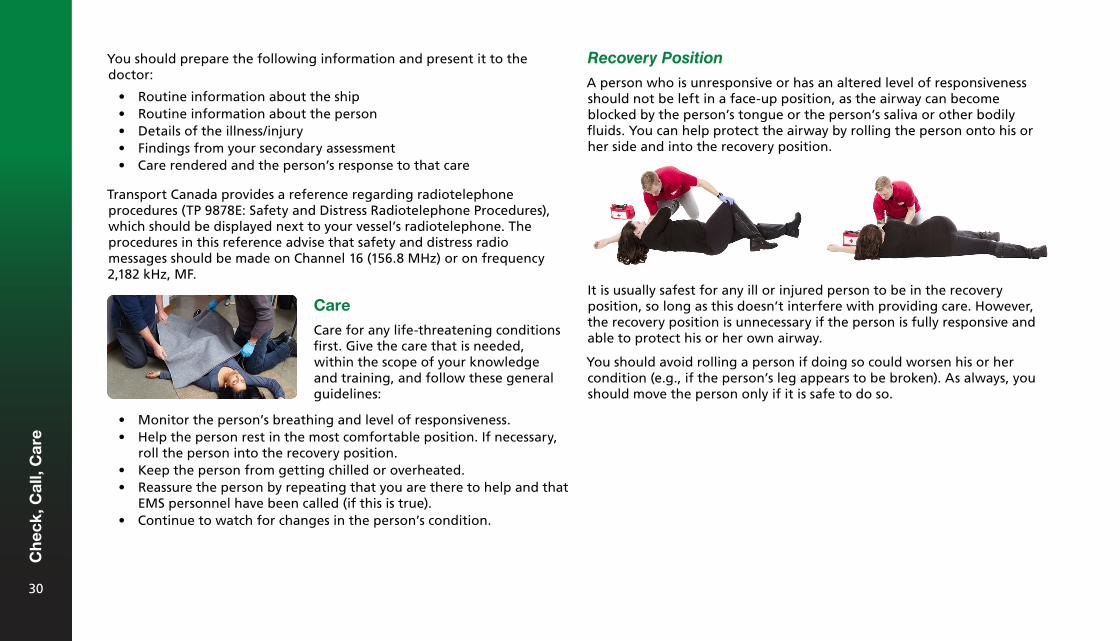
You should prepare the following information and present it to the doctor:
• Routine information about the ship• Routine information about the person• Details of the illness/injury• Findings from your secondary assessment• Care rendered and the person’s response to that care
Transport Canada provides a reference regarding radiotelephone procedures (TP 9878E: Safety and Distress Radiotelephone Procedures), which should be displayed next to your vessel’s radiotelephone. The procedures in this reference advise that safety and distress radio messages should be made on Channel 16 (156.8 MHz) or on frequency 2,182 kHz, MF.
Recovery Position
A person who is unresponsive or has an altered level of responsiveness should not be left in a face-up position, as the airway can become blocked by the person’s tongue or the person’s saliva or other bodily fluids. You can help protect the airway by rolling the person onto his or her side and into the recovery position.
Care
Care for any life-threatening conditions first. Give the care that is needed, within the scope of your knowledge and training, and follow these general guidelines:
It is usually safest for any ill or injured person to be in the recovery position, so long as this doesn’t interfere with providing care. However, the recovery position is unnecessary if the person is fully responsive and able to protect his or her own airway.
You should avoid rolling a person if doing so could worsen his or her condition (e.g., if the person’s leg appears to be broken). As always, you should move the person only if it is safe to do so.
• Monitor the person’s breathing and level of responsiveness.• Help the person rest in the most comfortable position. If necessary,
roll the person into the recovery position.• Keep the person from getting chilled or overheated.• Reassure the person by repeating that you are there to help and that
EMS personnel have been called (if this is true).• Continue to watch for changes in the person’s condition.
Ch
eck,
Cal
l, C
are
30
To roll a person safely into the recovery position: When to Stop Giving Care
Once you begin providing care to an injured or ill person, you must continue to give the appropriate care until:
• Another trained First Aider or EMS personnel takes over.• You are too exhausted to continue.• The scene becomes unsafe.
When More Than One Person Is Ill or Injured
If you are in a situation where there are several ill or injured people, the general principle is to provide care to the people who need it the most urgently. This involves deciding whose illness or injuries pose the greatest risks, as well as deciding who you are most able to help given your level of training. The process of sorting and providing care for multiple ill or injured people according to the severity of their conditions is called triage.
As an example, if one person has minor bleeding and another person has life-threatening bleeding, you should help the person with life-threatening bleeding first. EMS personnel will arrive before the minor bleeding becomes serious.
Guidelines for Helping an Ill or Injured Person with Medication
You should only help a person take his or her medication if:
• It is safe to do so.• The person is responsive and has in some way expressed a need for
help with finding, preparing, and/or taking the medication.
When helping someone with his or her medication, check the label to ensure that it is the correct medication and, if it is a prescription medication, that it was prescribed for the person who will be taking it. You should also carefully read over any instructions or warnings (e.g.,
1. Raise the person’s arm that is closest to you.2. Place the arm farther from you across the person’s chest with
the palm against the cheek.3. Raise the knee of the leg farther from you.4. Roll the person toward you as one unit by pulling the raised
knee and supporting the head and neck with your other hand5. Position the person on his or her side, and slide the bent knee
into a position that prevents the person from rolling onto his orher face.
6. Move the person’s other arm into a position of comfort in frontof the body.
7. Reassess the person’s ABCs.
The steps above are recommended, but there are other effective methods of moving a person into the recovery position. Regardless of how you do it, the important things to remember are as follows:
• Support and protect the head while rolling the person.• Try to roll the person as one unit (head, back, and legs at the
same time).• Roll the person into a position where the body will stay safely on
its side• Position the head so that it keeps the airway open• Check the ABCs after you complete the roll.
Ch
eck,
Cal
l, C
are
31
how much the person should take and when it should be taken). You should read the label at least twice: once when you find the medication, and again before you give it to the person.
If there is no name on the label, confirm with the person that it is the medication he or she wants to take. You must also ask if the person has any allergies or is taking anything that could interfere with or react negatively with the medication. Quickly review these details with the ill or injured person and obtain his or her permission before helping.
Write down what medication was taken, how much of it was taken, and when it was taken. This information will be useful to EMS personnel.
the case of an inhaler or auto-injector, you may have to remove the cover and follow the preparation instructions provided on the package before handing it to the person for self-administration.
Guiding the Person in Taking the Medication
Guiding the person in taking his or her medication also varies depending on the type of medication. For example, with tablets, this may involve telling the person to chew them or place them under the tongue. With an inhaler, this may involve instructing the person to shake the inhaler and exhale before dispensing the medication, or helping the person hold the inhaler to his or her mouth. When simply guiding the person, you do not press on the inhaler’s plunger yourself. With an auto-injector, you may guide the person by showing where on the outer thigh the epinephrine should be injected.
Giving Lifesaving Medication
Giving lifesaving medication involves helping an ill or injured person who has in some way expressed a need for help in taking his or her salbutamol (Ventolin) inhaler or using an epinephrine auto-injector. With an inhaler, you would dispense the correct number of sprays (from a metered-dose inhaler) either into a spacer or directly into the person’s mouth as he or she inhales. With an auto-injector, you would inject the epinephrine directly into the person’s outer thigh.
Giving Ingested Medications
Helping with ingested medications should be limited to finding the medication, preparing the medication, and guiding the person in taking the medication. In cases where the person is physically unable to get the medication into his or her mouth (e.g., the person has injured his or her hands), First Aiders may assist by placing the correct number of pills into the mouth or holding a liquid dispenser up to the person’s mouth, if the person has explicitly asked the First Aider to do so. Otherwise, you should never put anything into a person’s mouth, as this can be a choking hazard.
Finding the Medication
When helping a responsive ill or injured person find his or her medication, listen to instructions from the person on where to find it. If the person cannot speak, look in places where people typically keep their medication (e.g., backpack, purse, or pocket), or look for physical cues from the person (e.g., the person pointing at a bag). If the person cannot speak and you are helping with prescription medication, ask the person to confirm the name on the label by using physical signals (shaking or nodding the head, blinking once or twice, etc.). If the person is unable to do this, you may be able to confirm the person’s identity by asking bystanders, looking for a piece of photo ID, or checking for a medical identification product.
Preparing the Medication
Preparing the person’s medication varies depending on the type of the medication and its instructions. For example, preparing oral medication may simply involve handing the person the correct number of tablets. In
Ch
eck,
Cal
l, C
are
32
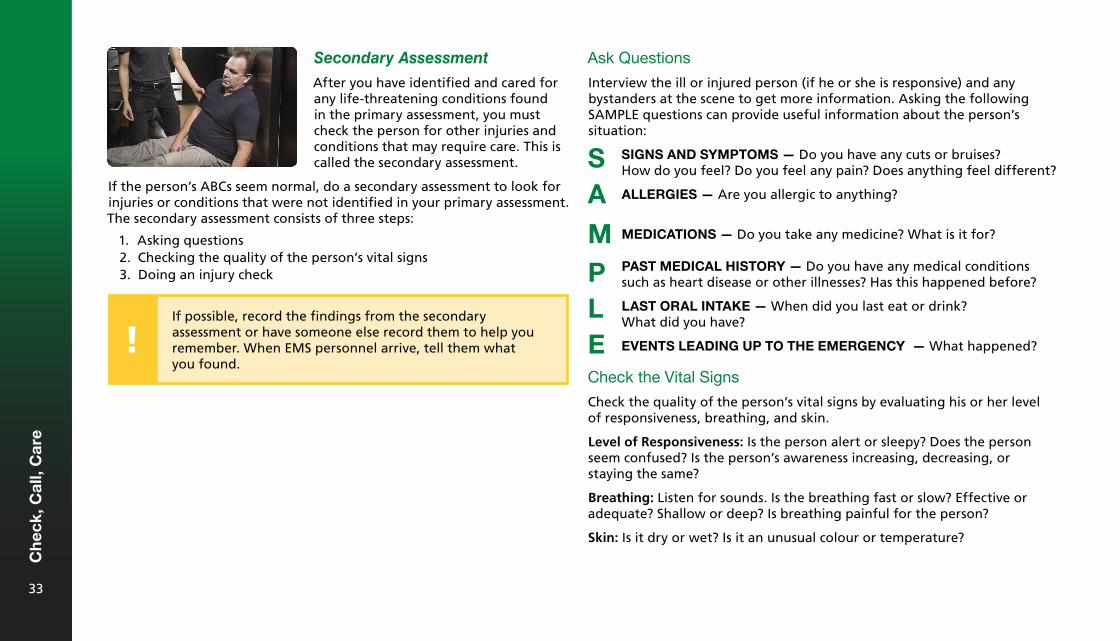
Secondary Assessment
After you have identified and cared for any life-threatening conditions found in the primary assessment, you must check the person for other injuries and conditions that may require care. This is called the secondary assessment.
Check the Vital Signs
Check the quality of the person’s vital signs by evaluating his or her level of responsiveness, breathing, and skin.
Level of Responsiveness: Is the person alert or sleepy? Does the person seem confused? Is the person’s awareness increasing, decreasing, or staying the same?
Breathing: Listen for sounds. Is the breathing fast or slow? Effective or adequate? Shallow or deep? Is breathing painful for the person?
Skin: Is it dry or wet? Is it an unusual colour or temperature?
If the person’s ABCs seem normal, do a secondary assessment to look for injuries or conditions that were not identified in your primary assessment. The secondary assessment consists of three steps:
1. Asking questions2. Checking the quality of the person’s vital signs3. Doing an injury check
If possible, record the findings from the secondary assessment or have someone else record them to help you remember. When EMS personnel arrive, tell them what you found.
SIGNS AND SYMPTOMS — Do you have any cuts or bruises? How do you feel? Do you feel any pain? Does anything feel different?
Ask Questions
Interview the ill or injured person (if he or she is responsive) and any bystanders at the scene to get more information. Asking the following SAMPLE questions can provide useful information about the person’s situation:
S A
M P L E
ALLERGIES — Are you allergic to anything?
MEDICATIONS — Do you take any medicine? What is it for?
PAST MEDICAL HISTORY — Do you have any medical conditions such as heart disease or other illnesses? Has this happened before?
LAST ORAL INTAKE — When did you last eat or drink? What did you have?
EVENTS LEADING UP TO THE EMERGENCY — What happened?
Ch
eck,
Cal
l, C
are
33
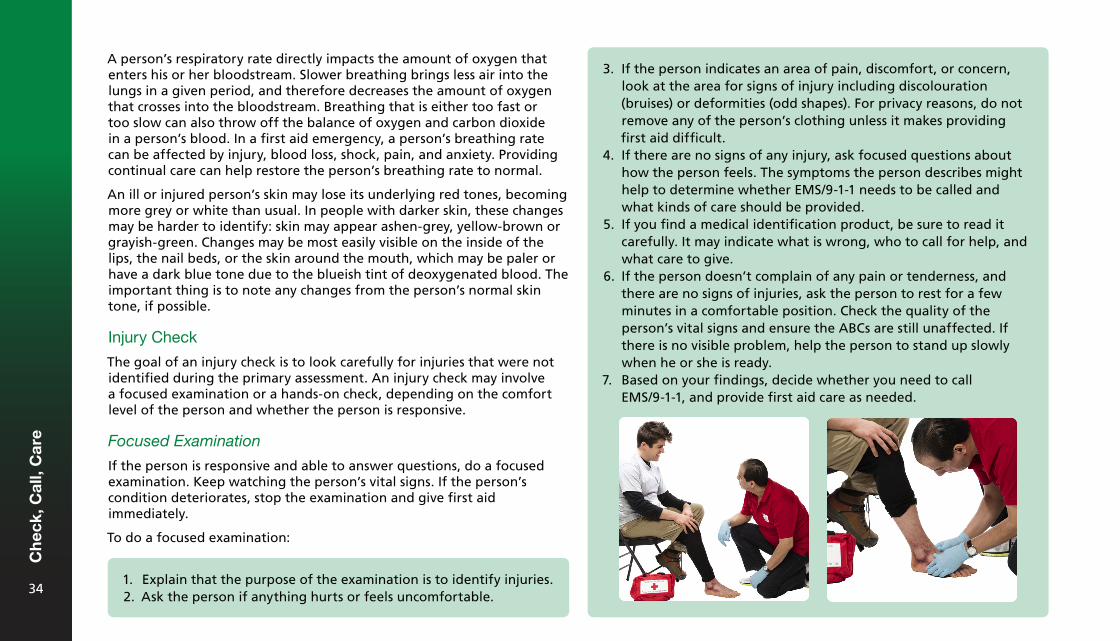
3. If the person indicates an area of pain, discomfort, or concern,look at the area for signs of injury including discolouration(bruises) or deformities (odd shapes). For privacy reasons, do notremove any of the person’s clothing unless it makes providingfirst aid difficult.
4. If there are no signs of any injury, ask focused questions abouthow the person feels. The symptoms the person describes mighthelp to determine whether EMS/9-1-1 needs to be called andwhat kinds of care should be provided.
5. If you find a medical identification product, be sure to read itcarefully. It may indicate what is wrong, who to call for help, andwhat care to give.
6. If the person doesn’t complain of any pain or tenderness, andthere are no signs of injuries, ask the person to rest for a fewminutes in a comfortable position. Check the quality of theperson’s vital signs and ensure the ABCs are still unaffected. Ifthere is no visible problem, help the person to stand up slowlywhen he or she is ready.
7. Based on your findings, decide whether you need to callEMS/9-1-1, and provide first aid care as needed.
A person’s respiratory rate directly impacts the amount of oxygen that enters his or her bloodstream. Slower breathing brings less air into the lungs in a given period, and therefore decreases the amount of oxygen that crosses into the bloodstream. Breathing that is either too fast or too slow can also throw off the balance of oxygen and carbon dioxide in a person’s blood. In a first aid emergency, a person’s breathing rate can be affected by injury, blood loss, shock, pain, and anxiety. Providing continual care can help restore the person’s breathing rate to normal.
An ill or injured person’s skin may lose its underlying red tones, becoming more grey or white than usual. In people with darker skin, these changes may be harder to identify: skin may appear ashen-grey, yellow-brown or grayish-green. Changes may be most easily visible on the inside of the lips, the nail beds, or the skin around the mouth, which may be paler or have a dark blue tone due to the blueish tint of deoxygenated blood. The important thing is to note any changes from the person’s normal skin tone, if possible.
Injury Check
The goal of an injury check is to look carefully for injuries that were not identified during the primary assessment. An injury check may involve a focused examination or a hands-on check, depending on the comfort level of the person and whether the person is responsive.
Focused Examination
If the person is responsive and able to answer questions, do a focused examination. Keep watching the person’s vital signs. If the person’s condition deteriorates, stop the examination and give first aid immediately.
To do a focused examination:
1. Explain that the purpose of the examination is to identify injuries.2. Ask the person if anything hurts or feels uncomfortable.
Ch
eck,
Cal
l, C
are
34
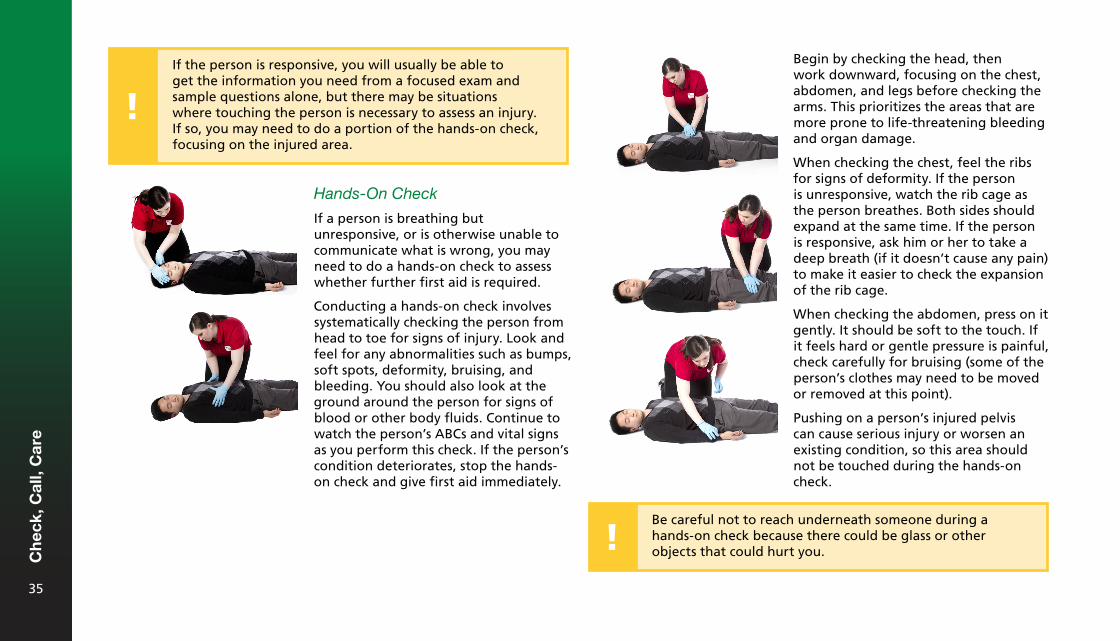
Hands-On Check
If a person is breathing but unresponsive, or is otherwise unable to communicate what is wrong, you may need to do a hands-on check to assess whether further first aid is required.
Conducting a hands-on check involves systematically checking the person from head to toe for signs of injury. Look and feel for any abnormalities such as bumps, soft spots, deformity, bruising, and bleeding. You should also look at the ground around the person for signs of blood or other body fluids. Continue to watch the person’s ABCs and vital signs as you perform this check. If the person’s condition deteriorates, stop the hands-on check and give first aid immediately.
Be careful not to reach underneath someone during a hands-on check because there could be glass or other objects that could hurt you.
Begin by checking the head, then work downward, focusing on the chest, abdomen, and legs before checking the arms. This prioritizes the areas that are more prone to life-threatening bleeding and organ damage.
When checking the chest, feel the ribs for signs of deformity. If the person is unresponsive, watch the rib cage as the person breathes. Both sides should expand at the same time. If the person is responsive, ask him or her to take a deep breath (if it doesn’t cause any pain) to make it easier to check the expansion of the rib cage.
When checking the abdomen, press on it gently. It should be soft to the touch. If it feels hard or gentle pressure is painful, check carefully for bruising (some of the person’s clothes may need to be moved or removed at this point).
Pushing on a person’s injured pelvis can cause serious injury or worsen an existing condition, so this area should not be touched during the hands-on check.
If the person is responsive, you will usually be able to get the information you need from a focused exam and sample questions alone, but there may be situations where touching the person is necessary to assess an injury. If so, you may need to do a portion of the hands-on check, focusing on the injured area.
Ch
eck,
Cal
l, C
are
35
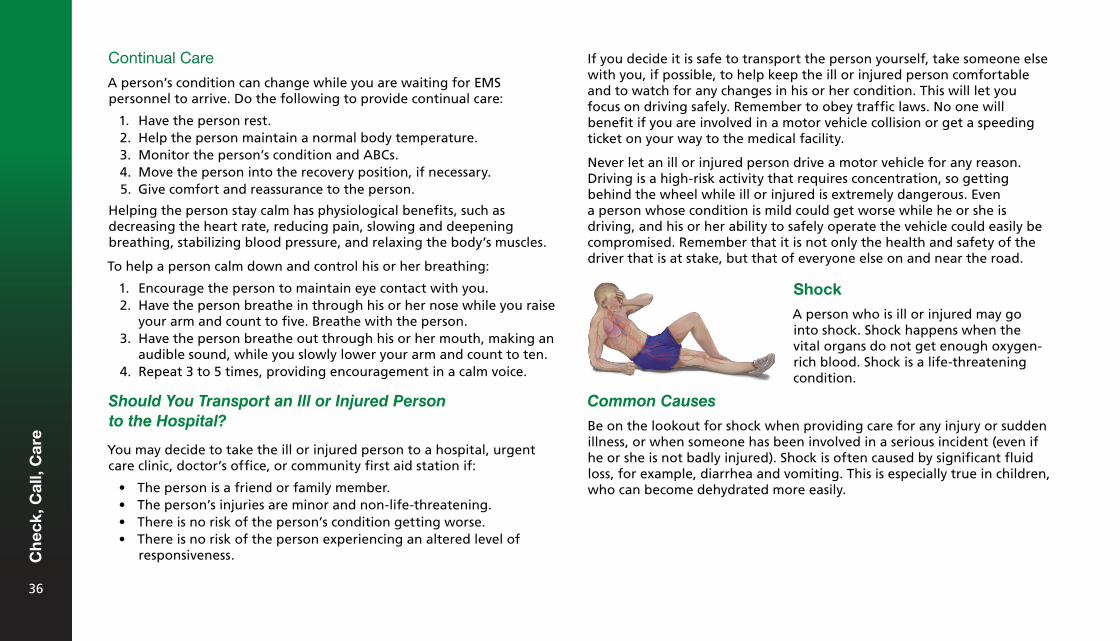
If you decide it is safe to transport the person yourself, take someone else with you, if possible, to help keep the ill or injured person comfortable and to watch for any changes in his or her condition. This will let you focus on driving safely. Remember to obey traffic laws. No one will benefit if you are involved in a motor vehicle collision or get a speeding ticket on your way to the medical facility.
Never let an ill or injured person drive a motor vehicle for any reason. Driving is a high-risk activity that requires concentration, so getting behind the wheel while ill or injured is extremely dangerous. Even a person whose condition is mild could get worse while he or she is driving, and his or her ability to safely operate the vehicle could easily be compromised. Remember that it is not only the health and safety of the driver that is at stake, but that of everyone else on and near the road.
Continual Care
A person’s condition can change while you are waiting for EMS personnel to arrive. Do the following to provide continual care:
1. Have the person rest.2. Help the person maintain a normal body temperature.3. Monitor the person’s condition and ABCs.4. Move the person into the recovery position, if necessary.5. Give comfort and reassurance to the person.
Helping the person stay calm has physiological benefits, such as decreasing the heart rate, reducing pain, slowing and deepening breathing, stabilizing blood pressure, and relaxing the body’s muscles.
To help a person calm down and control his or her breathing:
1. Encourage the person to maintain eye contact with you.2. Have the person breathe in through his or her nose while you raise
your arm and count to five. Breathe with the person.3. Have the person breathe out through his or her mouth, making an
audible sound, while you slowly lower your arm and count to ten.4. Repeat 3 to 5 times, providing encouragement in a calm voice.
Should You Transport an Ill or Injured Person to the Hospital?
You may decide to take the ill or injured person to a hospital, urgent care clinic, doctor’s office, or community first aid station if:
• The person is a friend or family member.• The person’s injuries are minor and non-life-threatening.• There is no risk of the person’s condition getting worse.• There is no risk of the person experiencing an altered level of
responsiveness.
Shock
A person who is ill or injured may go into shock. Shock happens when the vital organs do not get enough oxygen-rich blood. Shock is a life-threatening condition.
Common Causes
Be on the lookout for shock when providing care for any injury or sudden illness, or when someone has been involved in a serious incident (even if he or she is not badly injured). Shock is often caused by significant fluid loss, for example, diarrhea and vomiting. This is especially true in children, who can become dehydrated more easily.
Ch
eck,
Cal
l, C
are
36
Providing First Aid for Someone with a Disability
It is not uncommon to feel intimidated when providing first aid to a person who has different abilities, because there is often uncertainty about how to care for the person. Remember that people are more similar than they are different, both physiologically and psychologically, and most aspects of first aid care do not vary from person to person.
Remember that a person’s particular needs may not be visible, and that the person (or the person’s direct caregiver) is the best source of information about his or her unique situation. If you are unsure, ask what you can do to help. The person is likely to appreciate your consideration.
General Tips for Providing First Aid to a Person with a Disability
Remember the following tips when providing care for a person with any type of disability:
• As with all first aid, you need permission to help and should explainwhat you intend to do. These basic principles do not changebecause the person has different abilities.
• Avoid stereotypes and make no assumptions about what abilitiesthe person has or does not have. Remember that not all disabilitiesare visible.
• Be confident and reassuring.• If you cannot understand what the person is saying, politely ask
him or her to repeat it.• Don’t touch or speak to service animals. They are working and have
to pay attention at all times.• Get permission before touching assistive devices, including
wheelchairs.
Other causes of shock include the following:
• Significant blood loss• Heart damage• Extensive burns• Infection• Anaphylaxis• Severe infection (e.g., septicemia)
What to Look For
The following are signs and symptoms of shock:
• Anxiety• Cool, clammy skin• Skin that is paler than normal• Weakness• Confusion• Excessive thirst• Rapid breathing• Drowsiness or loss of responsiveness• Nausea and vomiting
What to Do
The best thing you can do when a person is in shock is to call EMS/9-1-1. While you are waiting for EMS personnel to arrive, provide care by:
1. Caring for the cause of the shock.2. Having the person rest.3. Keeping the person warm.4. Monitoring the person’s ABCs.5. Providing comfort and reassurance.
Ch
eck,
Cal
l, C
are
37
Providing First Aid for Someone with Vision Loss
Examples of vision loss include tunnel vision (where a person cannot see objects to the side), lack of central vision, and total blindness, in which the person receives no visual information from the world around them. Most people with vision loss still have some degree of sight.
Keep the following in mind when providing first aid to an individual with vision loss:
• If you need to leave the person, let him or her know that you areleaving and will be back.
• Narrate your actions so that the person can follow what you aredoing.
• If you’re unsure about how to provide directions, simply ask theperson how he or she would like you to do so.
Providing First Aid for Someone with Hearing Loss
Keep the following points in mind when providing first aid to an individual with any type of hearing loss:
• Get the person’s attention before speaking. The best way to do thisis usually by lightly touching the person’s shoulder or gently wavingyour hand.
• Ask the person how you can help. Don’t shout.• If communication is difficult, ask if the person prefers to
communicate in another way, such as using a pen and paper.• Be patient if you are using a pen and paper to communicate.
American Sign Language may be the person’s first language and ithas its own grammatical rules and sentence structure.
• If the person uses a hearing aid and you are having troublecommunicating, minimize background noise or move to a quieterarea, if possible.
Providing First Aid for Someone Who Is Deafblind
"Deafblind" describes people who have some degree of both vision and hearing loss. Many people who are deafblind are accompanied by an intervenor (a professional who helps with communication). If an intervenor is accompanying the person, tell him or her who you are, but then speak directly to the ill or injured person. Don’t touch the person abruptly and don’t touch the person without permission.
Providing First Aid for Someone with a Physical Disability
There are many different types of physical disability, and not all of them are visible. The important thing is not to diagnose the person: what matters is determining whether the conditions you encounter are pre-existing or whether they are signs of the injury or illness you are providing care for.
Keep the following tips in mind when providing first aid to an individual with a physical disability:
• Speak naturally to the person (physical and mental disabilities arenot the same thing).
• Adjust your position if necessary so that you can make eye contactwith the person while providing care.
Ch
eck,
Cal
l, C
are
38
Providing First Aid for Someone with an Intellectual or a Developmental Disability
It may not be apparent that a person has an intellectual or developmental disability unless this fact is communicated to you.
Keep the following points in mind when providing first aid to an individual with an intellectual or a developmental disability:
• As much as possible, interact with the person as you would withanyone else in the same situation.
• Use straightforward language when communicating.• Give one piece of information at a time.
Providing First Aid for Someone with a Speech or Language Impairment
Speech and language impairments may affect a person’s ability to communicate verbally, with written language or both. Assistive devices such as communication boards are often used by individuals with severe speech or language impairments.
Keep the following tips in mind when providing first aid to an individual with a speech or language impairment:
• If possible, ask questions that can be answered with "Yes" or "No."• Give the person time to communicate and answer your questions.• Wait for the person to finish speaking and do not try to finish
his or her sentences.
Ch
eck,
Cal
l, C
are
39

Choking4
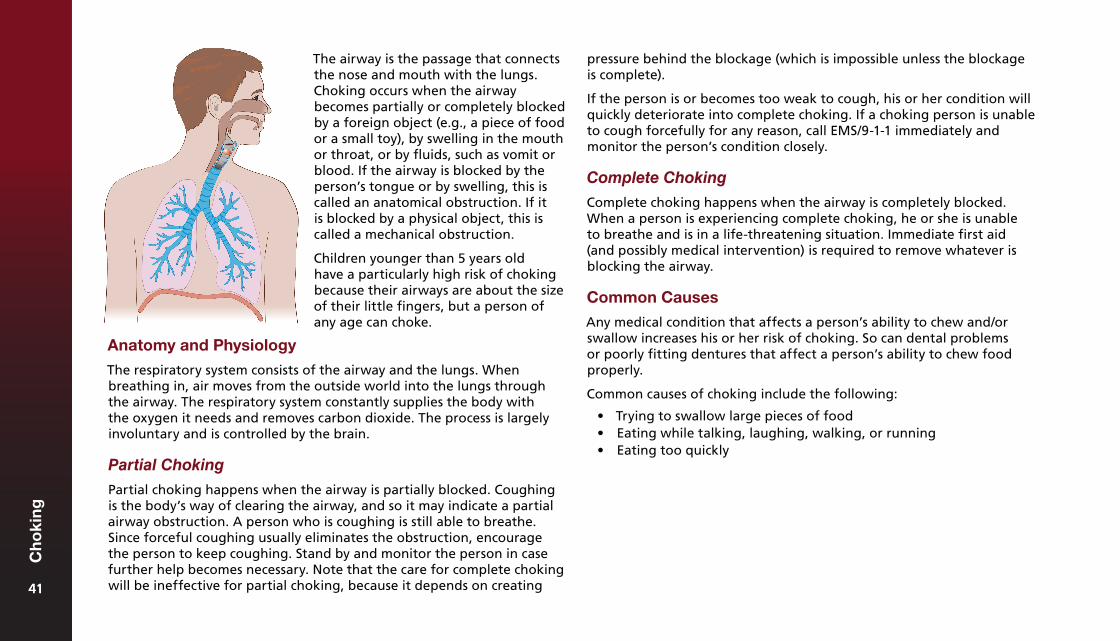
pressure behind the blockage (which is impossible unless the blockage is complete).
If the person is or becomes too weak to cough, his or her condition will quickly deteriorate into complete choking. If a choking person is unable to cough forcefully for any reason, call EMS/9-1-1 immediately and monitor the person’s condition closely.
Complete Choking
Complete choking happens when the airway is completely blocked. When a person is experiencing complete choking, he or she is unable to breathe and is in a life-threatening situation. Immediate first aid (and possibly medical intervention) is required to remove whatever is blocking the airway.
Common Causes
Any medical condition that affects a person’s ability to chew and/or swallow increases his or her risk of choking. So can dental problems or poorly fitting dentures that affect a person’s ability to chew food properly.
Common causes of choking include the following:
• Trying to swallow large pieces of food• Eating while talking, laughing, walking, or running• Eating too quickly
The airway is the passage that connects the nose and mouth with the lungs. Choking occurs when the airway becomes partially or completely blocked by a foreign object (e.g., a piece of food or a small toy), by swelling in the mouth or throat, or by fluids, such as vomit or blood. If the airway is blocked by the person’s tongue or by swelling, this is called an anatomical obstruction. If it is blocked by a physical object, this is called a mechanical obstruction.
Children younger than 5 years old have a particularly high risk of choking because their airways are about the size of their little fingers, but a person of any age can choke.
Anatomy and Physiology
The respiratory system consists of the airway and the lungs. When breathing in, air moves from the outside world into the lungs through the airway. The respiratory system constantly supplies the body with the oxygen it needs and removes carbon dioxide. The process is largely involuntary and is controlled by the brain.
Partial Choking
Partial choking happens when the airway is partially blocked. Coughing is the body’s way of clearing the airway, and so it may indicate a partial airway obstruction. A person who is coughing is still able to breathe. Since forceful coughing usually eliminates the obstruction, encourage the person to keep coughing. Stand by and monitor the person in case further help becomes necessary. Note that the care for complete choking will be ineffective for partial choking, because it depends on creating 4141
Ch
oki
ng
41
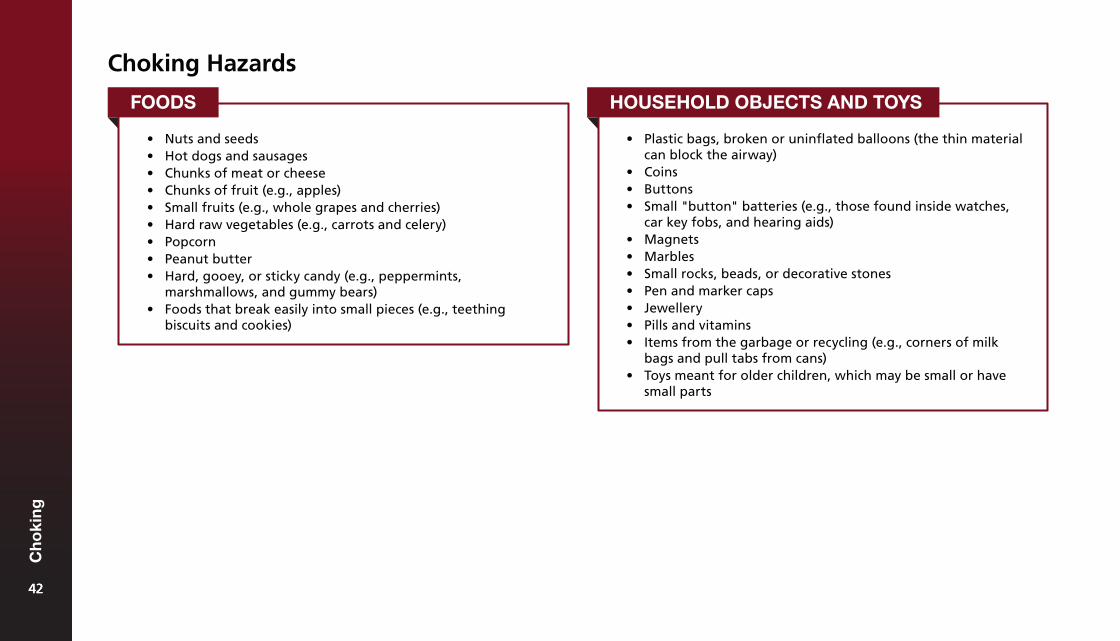
Choking Hazards
• Nuts and seeds• Hot dogs and sausages• Chunks of meat or cheese• Chunks of fruit (e.g., apples)• Small fruits (e.g., whole grapes and cherries)• Hard raw vegetables (e.g., carrots and celery)• Popcorn• Peanut butter• Hard, gooey, or sticky candy (e.g., peppermints,
marshmallows, and gummy bears)• Foods that break easily into small pieces (e.g., teething
biscuits and cookies)
• Plastic bags, broken or uninflated balloons (the thin materialcan block the airway)
• Coins• Buttons• Small "button" batteries (e.g., those found inside watches,
car key fobs, and hearing aids)• Magnets• Marbles• Small rocks, beads, or decorative stones• Pen and marker caps• Jewellery• Pills and vitamins• Items from the garbage or recycling (e.g., corners of milk
bags and pull tabs from cans)• Toys meant for older children, which may be small or have
small parts
FOODS HOUSEHOLD OBJECTS AND TOYS
4242
Ch
oki
ng
42
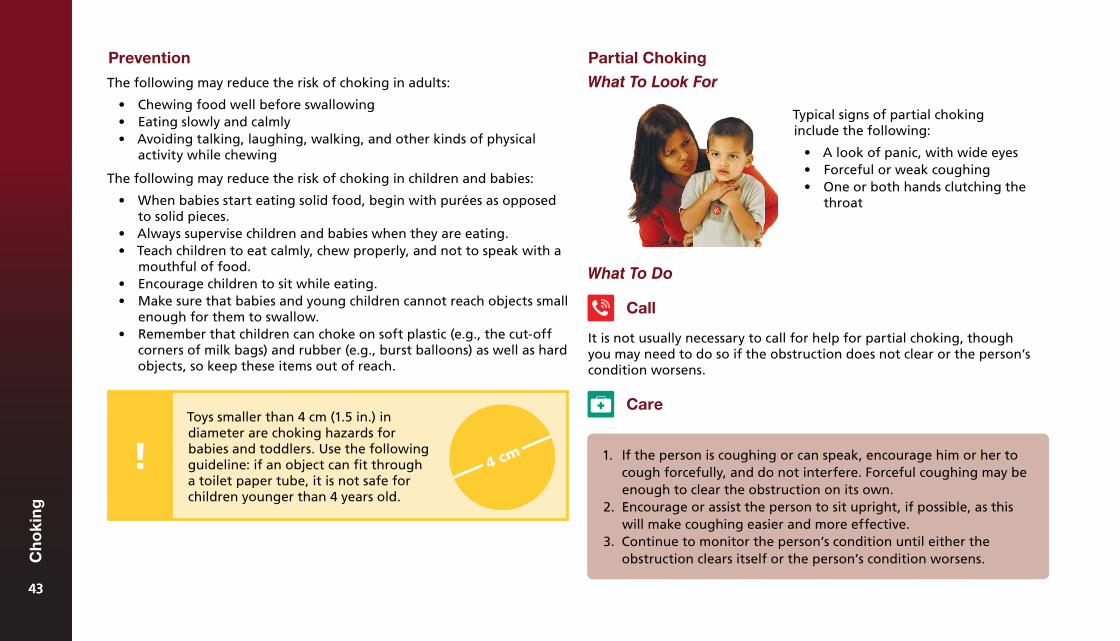
Prevention
The following may reduce the risk of choking in adults:
• Chewing food well before swallowing• Eating slowly and calmly• Avoiding talking, laughing, walking, and other kinds of physical
activity while chewing
The following may reduce the risk of choking in children and babies:
• When babies start eating solid food, begin with purées as opposedto solid pieces.
• Always supervise children and babies when they are eating.• Teach children to eat calmly, chew properly, and not to speak with a
mouthful of food.• Encourage children to sit while eating.• Make sure that babies and young children cannot reach objects small
enough for them to swallow.• Remember that children can choke on soft plastic (e.g., the cut-off
corners of milk bags) and rubber (e.g., burst balloons) as well as hardobjects, so keep these items out of reach.
What To Do
Call
1. If the person is coughing or can speak, encourage him or her tocough forcefully, and do not interfere. Forceful coughing may beenough to clear the obstruction on its own.
2. Encourage or assist the person to sit upright, if possible, as thiswill make coughing easier and more effective.
3. Continue to monitor the person’s condition until either theobstruction clears itself or the person’s condition worsens.
Typical signs of partial choking include the following:
• A look of panic, with wide eyes• Forceful or weak coughing• One or both hands clutching the
throat
Partial Choking
What To Look For
It is not usually necessary to call for help for partial choking, though you may need to do so if the obstruction does not clear or the person’s condition worsens.
CareToys smaller than 4 cm (1.5 in.) in diameter are choking hazards for babies and toddlers. Use the following guideline: if an object can fit through a toilet paper tube, it is not safe for children younger than 4 years old.
4343
Ch
oki
ng
43

Complete Choking
What To Look For
What To Do
Responsive Adult or Child Over 12 Months
Call
• If possible, send someone to call EMS/9-1-1 and get an AED whileyou care for the person.
• If you are alone, immediately begin providing care for completechoking. Shout for help to try to attract the attention of abystander, but do not delay care by calling EMS/9-1-1 yourself.
The signs and symptoms of complete choking include the following:
• An inability to speak, cough,or breathe
• High-pitched squeaking noises• Flushed (red) skin that becomes
bluish or paler than normal• A look of panic with wide eyes• One or both hands clutching the
throat
You may need to adapt which combination of the methods you use depending on the specific circumstances. For example, if the person is pregnant, or you cannot fully reach around the person, you will not be able to provide abdominal thrusts and will therefore have to do a combination of back blows and chest thrusts.
Back Blows
1. Try to dislodge the object by combining any two of the followingthree options: back blows, abdominal thrusts, and chest thrusts.Continue alternating between the two methods until the objectcomes out, the person begins to breathe, or the person becomesunresponsive.
Care
1. Stand behind the person (orkneel, if you are significantlytaller) and wrap one armdiagonally across the person’schest.
2. Bend the person forward at thewaist until the upper airway is atleast parallel to the ground.
3. With the heel of your free hand,deliver up to 5 firm back blowsbetween the shoulder blades.
4444
Ch
oki
ng
44
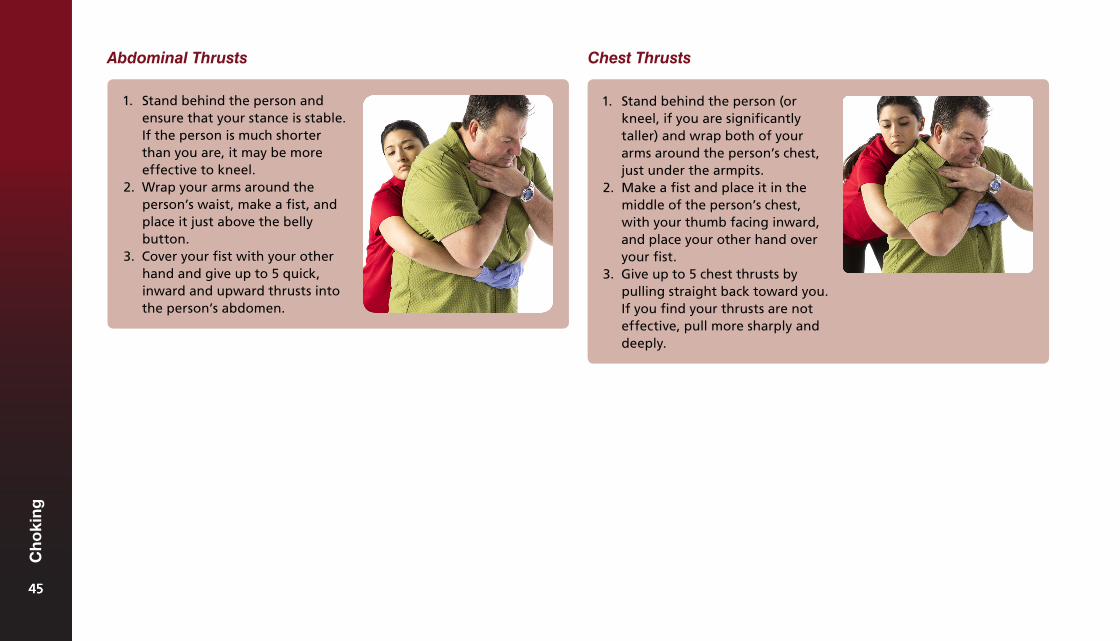
Chest Thrusts
1. Stand behind the person (orkneel, if you are significantlytaller) and wrap both of yourarms around the person’s chest,just under the armpits.
2. Make a fist and place it in themiddle of the person’s chest,with your thumb facing inward,and place your other hand overyour fist.
3. Give up to 5 chest thrusts bypulling straight back toward you.If you find your thrusts are noteffective, pull more sharply anddeeply.
Abdominal Thrusts
1. Stand behind the person andensure that your stance is stable.If the person is much shorterthan you are, it may be moreeffective to kneel.
2. Wrap your arms around theperson’s waist, make a fist, andplace it just above the bellybutton.
3. Cover your fist with your otherhand and give up to 5 quick,inward and upward thrusts intothe person’s abdomen.
4545
Ch
oki
ng
45
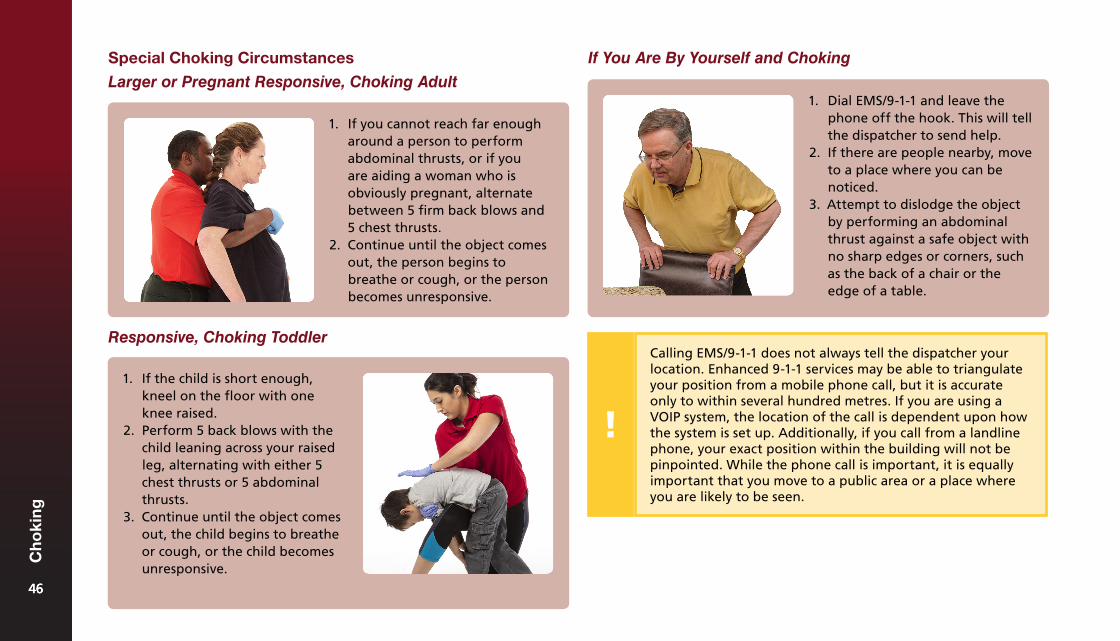
Responsive, Choking Toddler
1. If the child is short enough,kneel on the floor with oneknee raised.
2. Perform 5 back blows with thechild leaning across your raisedleg, alternating with either 5chest thrusts or 5 abdominalthrusts.
3. Continue until the object comesout, the child begins to breatheor cough, or the child becomesunresponsive.
If You Are By Yourself and Choking
1. Dial EMS/9-1-1 and leave thephone off the hook. This will tellthe dispatcher to send help.
2. If there are people nearby, moveto a place where you can benoticed.
3. Attempt to dislodge the objectby performing an abdominalthrust against a safe object withno sharp edges or corners, suchas the back of a chair or theedge of a table.
Special Choking Circumstances
Larger or Pregnant Responsive, Choking Adult
1. If you cannot reach far enougharound a person to performabdominal thrusts, or if youare aiding a woman who isobviously pregnant, alternatebetween 5 firm back blows and5 chest thrusts.
2. Continue until the object comesout, the person begins tobreathe or cough, or the personbecomes unresponsive.
Calling EMS/9-1-1 does not always tell the dispatcher your location. Enhanced 9-1-1 services may be able to triangulate your position from a mobile phone call, but it is accurate only to within several hundred metres. If you are using a VOIP system, the location of the call is dependent upon how the system is set up. Additionally, if you call from a landline phone, your exact position within the building will not be pinpointed. While the phone call is important, it is equally important that you move to a public area or a place where you are likely to be seen.
4646
Ch
oki
ng
46
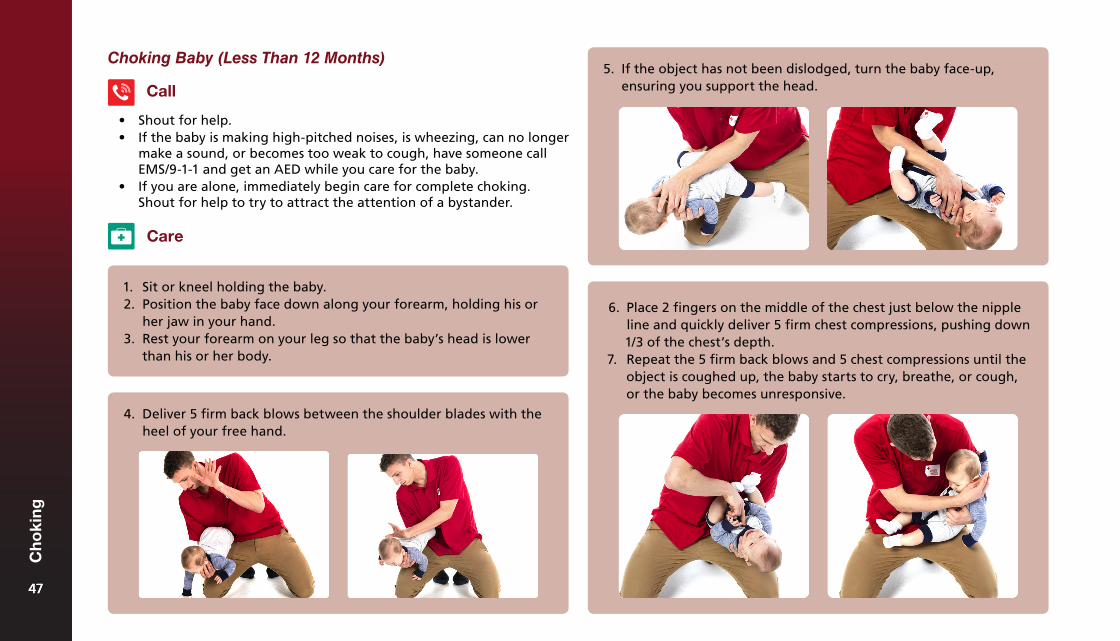
Choking Baby (Less Than 12 Months)5. If the object has not been dislodged, turn the baby face-up,
ensuring you support the head.Call
• Shout for help.• If the baby is making high-pitched noises, is wheezing, can no longer
make a sound, or becomes too weak to cough, have someone callEMS/9-1-1 and get an AED while you care for the baby.
• If you are alone, immediately begin care for complete choking.Shout for help to try to attract the attention of a bystander.
Care
1. Sit or kneel holding the baby.2. Position the baby face down along your forearm, holding his or
her jaw in your hand.3. Rest your forearm on your leg so that the baby’s head is lower
than his or her body.
4. Deliver 5 firm back blows between the shoulder blades with theheel of your free hand.
6. Place 2 fingers on the middle of the chest just below the nippleline and quickly deliver 5 firm chest compressions, pushing down1/3 of the chest’s depth.
7. Repeat the 5 firm back blows and 5 chest compressions until theobject is coughed up, the baby starts to cry, breathe, or cough,or the baby becomes unresponsive.
4747
Ch
oki
ng
47

After the Object Comes Out
An object lodged in the airway can cause damage to the sensitive tissues in the trachea and the back of the throat. This can cause bleeding and swelling.
Any person who has suffered complete choking should always seek medical attention, even if the object comes out. If you have done back blows, abdominal thrusts, or chest thrusts, those procedures may have caused damage (in addition to the damage caused by the choking itself), so any person given this care should be assessed in a hospital.
A person who has experienced partial choking should seek medical attention if he or she experiences any kind of respiratory distress after the incident. The person should be monitored for several hours after the incident to ensure that there is no damage: if there is no sign of injury in the first few hours, the person is probably fine.
Unresponsive Choking
If the choking person becomes unresponsive, lower him or her to the ground as safely as possible and immediately begin CPR, starting with chest compressions.
4848
Ch
oki
ng
48
Circulation Emergencies5
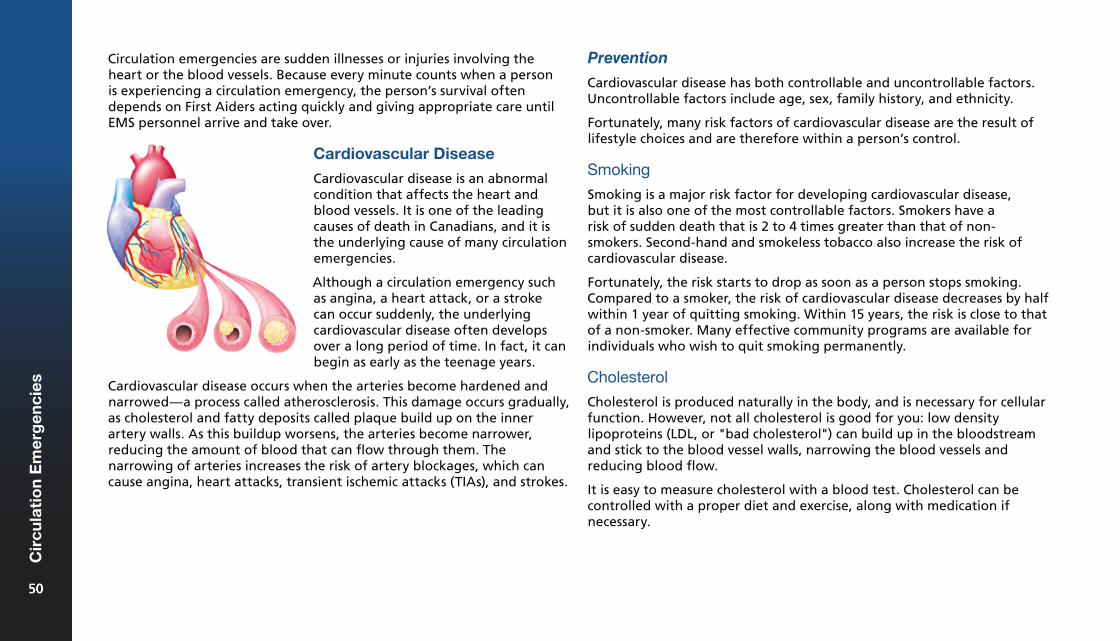
Circulation emergencies are sudden illnesses or injuries involving the heart or the blood vessels. Because every minute counts when a person is experiencing a circulation emergency, the person’s survival often depends on First Aiders acting quickly and giving appropriate care until EMS personnel arrive and take over.
Prevention
Cardiovascular disease has both controllable and uncontrollable factors. Uncontrollable factors include age, sex, family history, and ethnicity.
Fortunately, many risk factors of cardiovascular disease are the result of lifestyle choices and are therefore within a person’s control.
Smoking
Smoking is a major risk factor for developing cardiovascular disease, but it is also one of the most controllable factors. Smokers have a risk of sudden death that is 2 to 4 times greater than that of non-smokers. Second-hand and smokeless tobacco also increase the risk of cardiovascular disease.
Fortunately, the risk starts to drop as soon as a person stops smoking. Compared to a smoker, the risk of cardiovascular disease decreases by half within 1 year of quitting smoking. Within 15 years, the risk is close to that of a non-smoker. Many effective community programs are available for individuals who wish to quit smoking permanently.
Cholesterol
Cholesterol is produced naturally in the body, and is necessary for cellular function. However, not all cholesterol is good for you: low density lipoproteins (LDL, or "bad cholesterol") can build up in the bloodstream and stick to the blood vessel walls, narrowing the blood vessels and reducing blood flow.
It is easy to measure cholesterol with a blood test. Cholesterol can be controlled with a proper diet and exercise, along with medication if necessary.
Cardiovascular Disease
Cardiovascular disease is an abnormal condition that affects the heart and blood vessels. It is one of the leading causes of death in Canadians, and it is the underlying cause of many circulation emergencies.
Although a circulation emergency such as angina, a heart attack, or a stroke can occur suddenly, the underlying cardiovascular disease often develops over a long period of time. In fact, it can begin as early as the teenage years.
Cardiovascular disease occurs when the arteries become hardened and narrowed—a process called atherosclerosis. This damage occurs gradually, as cholesterol and fatty deposits called plaque build up on the inner artery walls. As this buildup worsens, the arteries become narrower, reducing the amount of blood that can flow through them. The narrowing of arteries increases the risk of artery blockages, which can cause angina, heart attacks, transient ischemic attacks (TIAs), and strokes.
5050
Cir
cula
tio
n E
mer
gen
cies
50
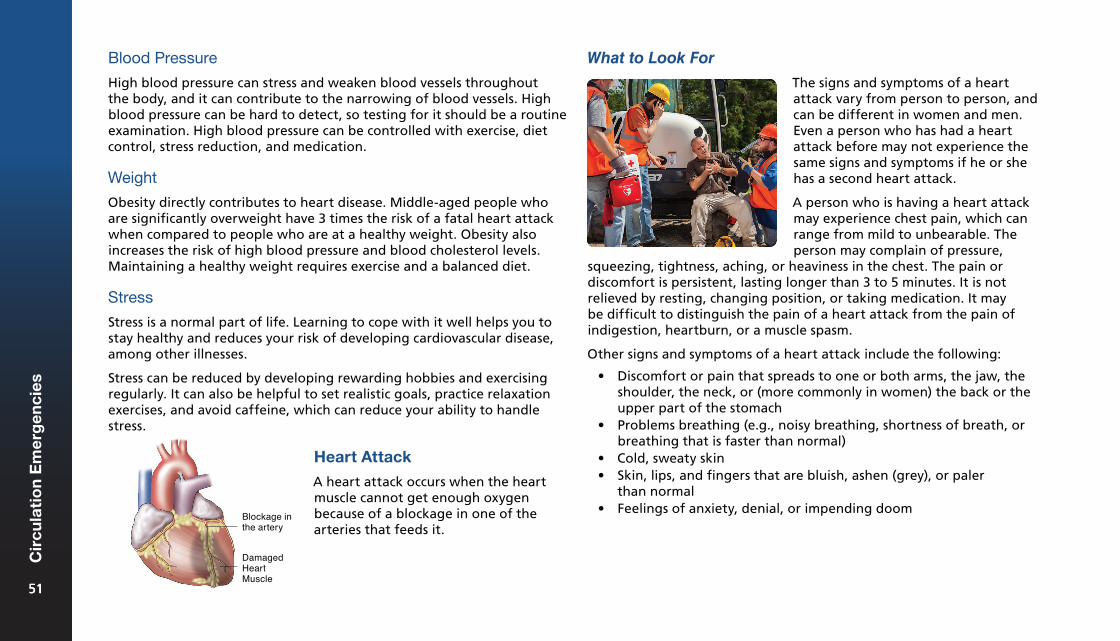
Blood Pressure
High blood pressure can stress and weaken blood vessels throughout the body, and it can contribute to the narrowing of blood vessels. High blood pressure can be hard to detect, so testing for it should be a routine examination. High blood pressure can be controlled with exercise, diet control, stress reduction, and medication.
Weight
Obesity directly contributes to heart disease. Middle-aged people who are significantly overweight have 3 times the risk of a fatal heart attack when compared to people who are at a healthy weight. Obesity also increases the risk of high blood pressure and blood cholesterol levels. Maintaining a healthy weight requires exercise and a balanced diet.
Stress
Stress is a normal part of life. Learning to cope with it well helps you to stay healthy and reduces your risk of developing cardiovascular disease, among other illnesses.
Stress can be reduced by developing rewarding hobbies and exercising regularly. It can also be helpful to set realistic goals, practice relaxation exercises, and avoid caffeine, which can reduce your ability to handle stress.
What to Look For
Heart Attack
A heart attack occurs when the heart muscle cannot get enough oxygen because of a blockage in one of the arteries that feeds it.
The signs and symptoms of a heart attack vary from person to person, and can be different in women and men. Even a person who has had a heart attack before may not experience the same signs and symptoms if he or she has a second heart attack.
A person who is having a heart attack may experience chest pain, which can range from mild to unbearable. The person may complain of pressure,
squeezing, tightness, aching, or heaviness in the chest. The pain or discomfort is persistent, lasting longer than 3 to 5 minutes. It is not relieved by resting, changing position, or taking medication. It may be difficult to distinguish the pain of a heart attack from the pain of indigestion, heartburn, or a muscle spasm.
Other signs and symptoms of a heart attack include the following:
• Discomfort or pain that spreads to one or both arms, the jaw, theshoulder, the neck, or (more commonly in women) the back or theupper part of the stomach
• Problems breathing (e.g., noisy breathing, shortness of breath, orbreathing that is faster than normal)
• Cold, sweaty skin• Skin, lips, and fingers that are bluish, ashen (grey), or paler
than normal• Feelings of anxiety, denial, or impending doom
Blockage inthe artery
Damaged heartmuscle
5151
Cir
cula
tio
n E
mer
gen
cies
51
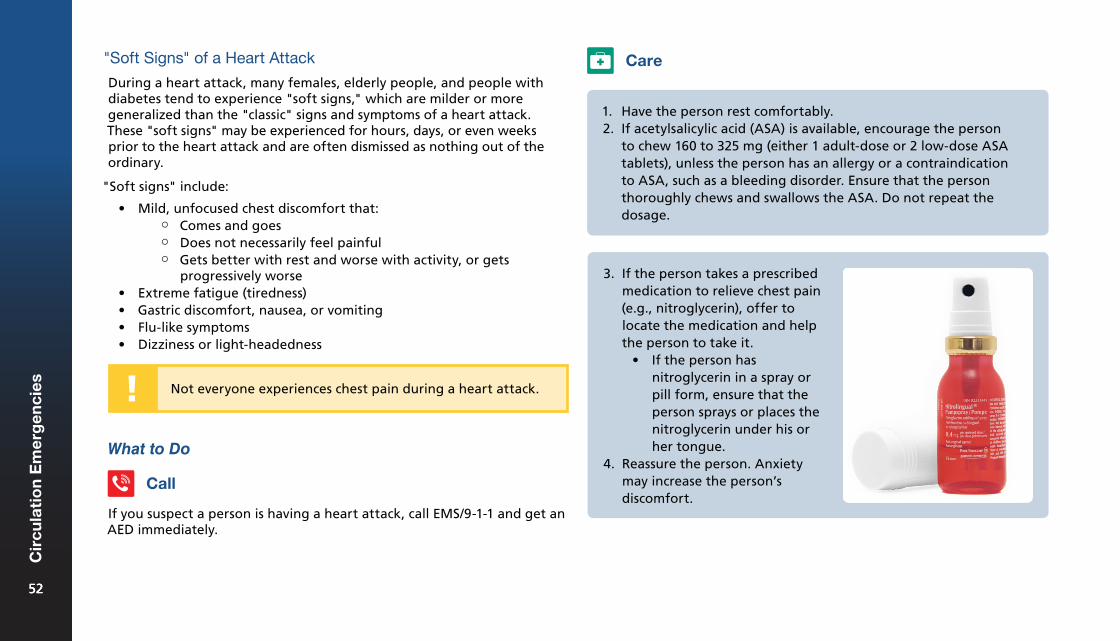
"Soft Signs" of a Heart Attack
During a heart attack, many females, elderly people, and people with diabetes tend to experience "soft signs," which are milder or more generalized than the "classic" signs and symptoms of a heart attack. These "soft signs" may be experienced for hours, days, or even weeks prior to the heart attack and are often dismissed as nothing out of the ordinary.
"Soft signs" include:
• Mild, unfocused chest discomfort that: ¶ Comes and goes ¶ Does not necessarily feel painful ¶ Gets better with rest and worse with activity, or gets
progressively worse• Extreme fatigue (tiredness)• Gastric discomfort, nausea, or vomiting• Flu-like symptoms• Dizziness or light-headedness
What to Do
Call
If you suspect a person is having a heart attack, call EMS/9-1-1 and get an AED immediately.
3. If the person takes a prescribed medication to relieve chest pain (e.g., nitroglycerin), offer to locate the medication and help the person to take it.
• If the person has nitroglycerin in a spray or pill form, ensure that the person sprays or places the nitroglycerin under his or her tongue.
4. Reassure the person. Anxiety may increase the person’s discomfort.
Care
1. Have the person rest comfortably.2. If acetylsalicylic acid (ASA) is available, encourage the person
to chew 160 to 325 mg (either 1 adult-dose or 2 low-dose ASA tablets), unless the person has an allergy or a contraindication to ASA, such as a bleeding disorder. Ensure that the person thoroughly chews and swallows the ASA. Do not repeat the dosage.
Not everyone experiences chest pain during a heart attack.
5252
Cir
cula
tio
n E
mer
gen
cies
52
Angina
Angina occurs when the heart requires more oxygen than it is receiving. This occurs when two factors are combined: 1) the arteries are narrowed by cardiovascular disease, reducing blood flow; and 2) the heart’s oxygen needs are elevated (e.g., during times of physical activity or emotional stress). Angina causes a painful squeezing, suffocating, or burning feeling in the chest.
Uncontrolled high blood pressure, anemia, and certain heart disorders can all contribute to a person’s risk of angina.
The signs and symptoms of angina are similar to the signs and symptoms of a heart attack, but the pain is usually triggered by physical activity or stress, goes away if the person rests, and is often relieved by medication (e.g., nitroglycerin). Because it is not possible for First Aiders to distinguish between angina and a heart attack, you should treat a person with angina as you would treat a person having a heart attack.
Myth-Information
Myth: You should delay calling EMS/9-1-1 for a person if you suspect that he or she is experiencing angina and not a full heart attack.
You should always call EMS/9-1-1 if you have any reason to suspect that a person might be having a heart attack. It is better to have EMS personnel arrive at a scene and not be needed than to have a person who is having a heart attack not receive medical attention.
Many people who are having a heart attack delay seeking care because they hope they are experiencing signs and symptoms of a more minor condition that will go away with time, such as indigestion, heartburn, a muscle strain, or the flu. People often worry about calling EMS/9-1-1 for a
"false alarm." Without immediate medical intervention, heart attacks are often fatal, so the risk of not seeking care outweighs any inconvenience.
Stroke
A stroke happens when the blood flow to part of the brain is interrupted, resulting in the death of brain cells. Strokes can cause permanent brain damage, but with quick action, the damage can sometimes be stopped or reversed. Although strokes are most common in older adults, a person of any age, even a child, can have a stroke.
Other painkilling medications such as acetaminophen (e.g., Tylenol®) or ibuprofen (e.g., Advil®) do not have the same effect as ASA in reducing damage due to heart attacks. Do not substitute ASA with acetaminophen or ibuprofen.
If given in conjunction with nitroglycerin, erectile dysfunction drugs can cause blood pressure to lower to a life-threatening level. If the person has recently taken an erectile dysfunction drug (in the previous 24 to 48 hours), advise the person not to take nitroglycerin.
5353
Cir
cula
tio
n E
mer
gen
cies
53
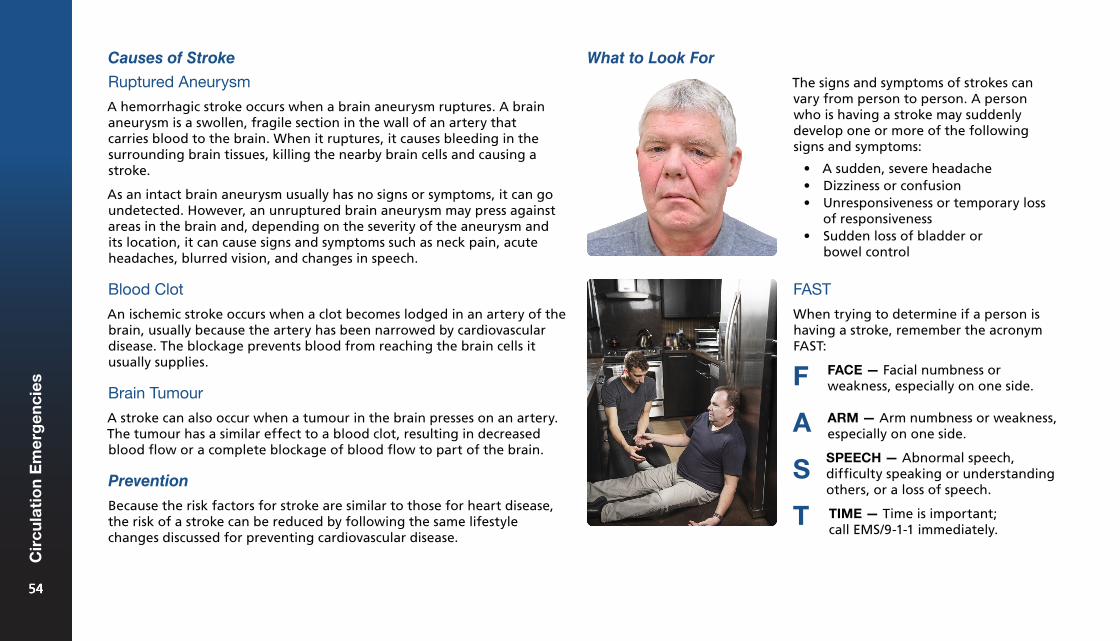
Causes of Stroke
Ruptured Aneurysm
A hemorrhagic stroke occurs when a brain aneurysm ruptures. A brain aneurysm is a swollen, fragile section in the wall of an artery that carries blood to the brain. When it ruptures, it causes bleeding in the surrounding brain tissues, killing the nearby brain cells and causing a stroke.
As an intact brain aneurysm usually has no signs or symptoms, it can go undetected. However, an unruptured brain aneurysm may press against areas in the brain and, depending on the severity of the aneurysm and its location, it can cause signs and symptoms such as neck pain, acute headaches, blurred vision, and changes in speech.
Blood Clot
An ischemic stroke occurs when a clot becomes lodged in an artery of the brain, usually because the artery has been narrowed by cardiovascular disease. The blockage prevents blood from reaching the brain cells it usually supplies.
Brain Tumour
A stroke can also occur when a tumour in the brain presses on an artery. The tumour has a similar effect to a blood clot, resulting in decreased blood flow or a complete blockage of blood flow to part of the brain.
Prevention
Because the risk factors for stroke are similar to those for heart disease, the risk of a stroke can be reduced by following the same lifestyle changes discussed for preventing cardiovascular disease.
What to Look For
The signs and symptoms of strokes can vary from person to person. A person who is having a stroke may suddenly develop one or more of the following signs and symptoms:
• A sudden, severe headache• Dizziness or confusion• Unresponsiveness or temporary loss
of responsiveness• Sudden loss of bladder or
bowel control
FAST
When trying to determine if a person is having a stroke, remember the acronym FAST:
FACE — Facial numbness or weakness, especially on one side.F
A
S
T
ARM — Arm numbness or weakness, especially on one side.
SPEECH — Abnormal speech, difficulty speaking or understanding
others, or a loss of speech.
TIME — Time is important; call EMS/9-1-1 immediately.
5454
Cir
cula
tio
n E
mer
gen
cies
54

Transient Ischemic Attack (TIA)
A transient ischemic attack (TIA) is also referred to as a "mini-stroke" and is caused by a temporary drop in blood flow to part of the brain. A TIA may be caused by a tumour or a clot in an artery in the brain. The signs and symptoms of a TIA are the same as the signs and symptoms of a stroke, but they disappear within a few minutes or hours.
A person who has had a TIA is at a very high risk of having a stroke in the near future. In fact, more than 10% of people who have a TIA will have a stroke within 3 months, with half of these strokes happening within 48 hours of the TIA.
Myth-Information
Myth: A person with a suspected stroke does not need medical attention if his or her signs and symptoms dissipate.
TIA signs and symptoms will disappear within a few hours, but the person still needs to be checked by a medical professional. TIAs are warning signs and are often quickly followed by strokes. Always call EMS/9-1-1 if the person has demonstrated signs and symptoms of a TIA or stroke, even if the signs and symptoms have lessened in severity or disappeared completely.
Life-Threatening Bleeding
Life-threatening bleeding refers to a situation where large amounts of blood loss occur either externally (outside the body) or internally (within the body). Life-threatening bleeding can occur whenever one or more of the body’s blood vessels are broken. It must be controlled immediately.
Bleeding from arteries (arterial bleeding) is often rapid and profuse, and it is always life-threatening. This is because arterial blood is under direct pressure from the heart, so it usually spurts from the wound, making it difficult for clots to form. As a result, arterial bleeding is harder to control than bleeding from veins and capillaries.
What to Do
1. Have the person rest in acomfortable position. If theperson prefers to lie down, oris unresponsive, drooling, orhaving trouble swallowing,place the person in the recoveryposition.
Call
Care
Call EMS/9-1-1 and get an AED.
2. Note when the signs and symptoms first started (or, if you do notknow when the signs and symptoms started, note the last timethe person was known to be well).
3. Monitor the person’s condition and provide reassurance untilEMS personnel arrive; a stroke can be an extremely frighteningexperience.
Some of the medications used to treat strokes can only be administered within a short window of time after the onset of signs and symptoms. It is crucial to note when the person first began to experience the signs and symptoms, or the last time the person was known to be well.
5555
Cir
cula
tio
n E
mer
gen
cies
55
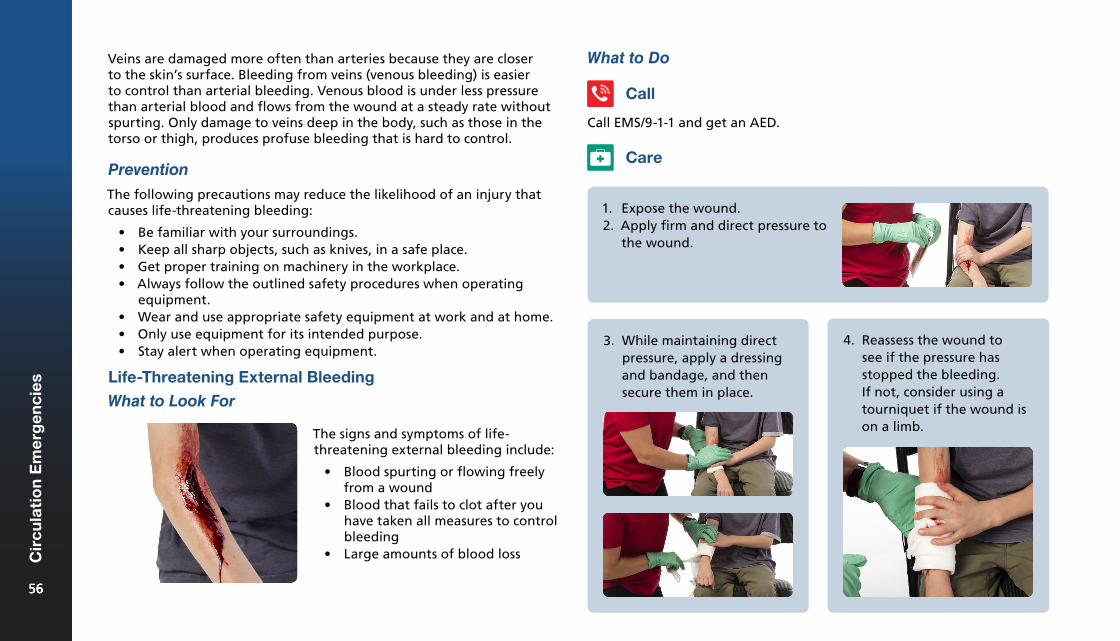
Veins are damaged more often than arteries because they are closer to the skin’s surface. Bleeding from veins (venous bleeding) is easier to control than arterial bleeding. Venous blood is under less pressure than arterial blood and flows from the wound at a steady rate without spurting. Only damage to veins deep in the body, such as those in the torso or thigh, produces profuse bleeding that is hard to control.
Prevention
The following precautions may reduce the likelihood of an injury that causes life-threatening bleeding:
• Be familiar with your surroundings.• Keep all sharp objects, such as knives, in a safe place.• Get proper training on machinery in the workplace.• Always follow the outlined safety procedures when operating
equipment.• Wear and use appropriate safety equipment at work and at home.• Only use equipment for its intended purpose.• Stay alert when operating equipment.
Life-Threatening External Bleeding
What to Look For
The signs and symptoms of life-threatening external bleeding include:
• Blood spurting or flowing freelyfrom a wound
• Blood that fails to clot after youhave taken all measures to controlbleeding
• Large amounts of blood loss
What to Do
Call EMS/9-1-1 and get an AED.
Call
Care
1. Expose the wound.2. Apply firm and direct pressure to
the wound.
3. While maintaining directpressure, apply a dressingand bandage, and thensecure them in place.
4. Reassess the wound tosee if the pressure hasstopped the bleeding.If not, consider using atourniquet if the wound ison a limb.
5656
Cir
cula
tio
n E
mer
gen
cies
56
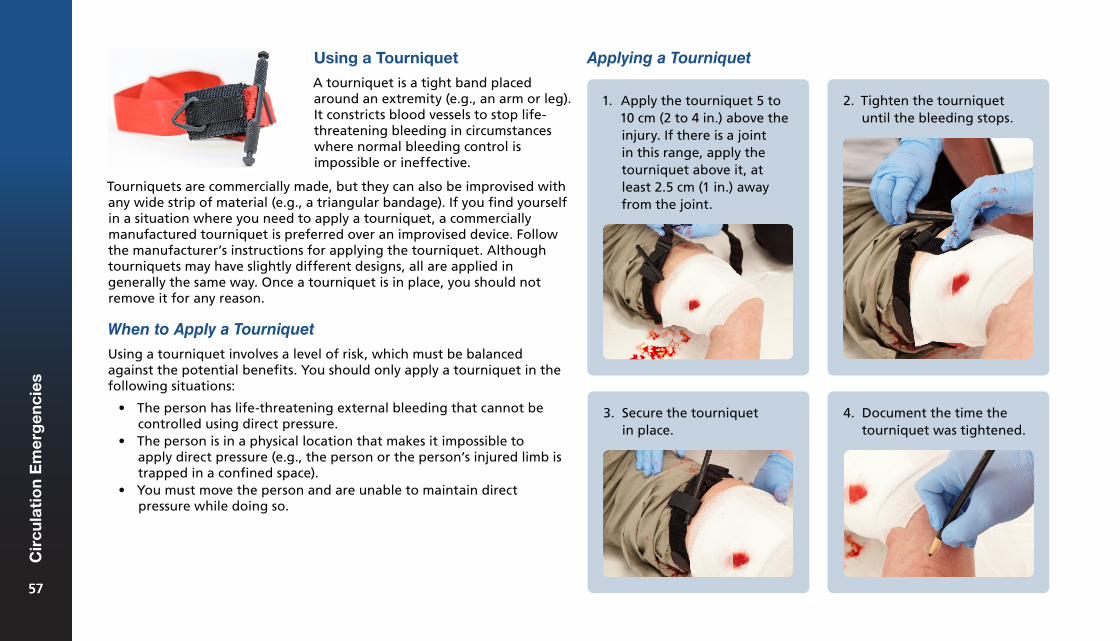
Using a Tourniquet
A tourniquet is a tight band placed around an extremity (e.g., an arm or leg). It constricts blood vessels to stop life-threatening bleeding in circumstances where normal bleeding control is impossible or ineffective.
Tourniquets are commercially made, but they can also be improvised with any wide strip of material (e.g., a triangular bandage). If you find yourself in a situation where you need to apply a tourniquet, a commercially manufactured tourniquet is preferred over an improvised device. Follow the manufacturer’s instructions for applying the tourniquet. Although tourniquets may have slightly different designs, all are applied in generally the same way. Once a tourniquet is in place, you should not remove it for any reason.
When to Apply a Tourniquet
Using a tourniquet involves a level of risk, which must be balanced against the potential benefits. You should only apply a tourniquet in the following situations:
• The person has life-threatening external bleeding that cannot becontrolled using direct pressure.
• The person is in a physical location that makes it impossible toapply direct pressure (e.g., the person or the person’s injured limb istrapped in a confined space).
• You must move the person and are unable to maintain directpressure while doing so.
Applying a Tourniquet
1. Apply the tourniquet 5 to10 cm (2 to 4 in.) above theinjury. If there is a jointin this range, apply thetourniquet above it, atleast 2.5 cm (1 in.) awayfrom the joint.
2. Tighten the tourniquetuntil the bleeding stops.
3. Secure the tourniquetin place.
4. Document the time thetourniquet was tightened.
5757
Cir
cula
tio
n E
mer
gen
cies
57

Using Hemostatic Dressings
A hemostatic dressing is a dressing treated with a substance that speeds clot formation. As is the case with tourniquets, hemostatic dressings
What to Do
Signs and symptoms of life-threatening internal bleeding include the following:
• Bruising in the injured area• Soft tissues (e.g., the abdomen)
that are tender, swollen, or hard• Blood in saliva or vomit• Pain• Severe thirst, nausea, and vomiting• Anxiety
What to Look For
Call EMS/9-1-1 and get an AED. You cannot provide first aid for life-threatening internal bleeding as a First Aider. Life-threatening internal bleeding, especially if it results from damage to an organ, requires in-hospital medical intervention. Help the injured person rest in the most comfortable position and provide continual care while waiting for EMS personnel.
are used in cases of life-threatening bleeding where standard first aid procedures fail or are not practical. Typically, hemostatic dressings are used on parts of the body where a tourniquet cannot be applied, such as the neck or torso. A hemostatic dressing can also be used to control bleeding from an open wound on an arm or a leg if a tourniquet is ineffective. The hemostatic dressing is applied at the site of the bleeding (possibly inside the wound) and is used along with direct pressure.
Life-Threatening Internal Bleeding
Internal bleeding is the escape of blood from arteries, veins, or capillaries into spaces in the body. Life-threatening internal bleeding usually occurs in injuries caused by a violent blunt force, such as when someone falls from a height. You should suspect internal bleeding after any injury that involved a forceful blow to the body. Internal bleeding may also occur when a sharp object, such as a knife, penetrates the skin and damages internal structures.
Call
A person with life-threatening internal bleeding may be very thirsty, but giving anything by mouth (even water) can cause serious complications.
5858
Cir
cula
tio
n E
mer
gen
cies
58
CPR & AED6
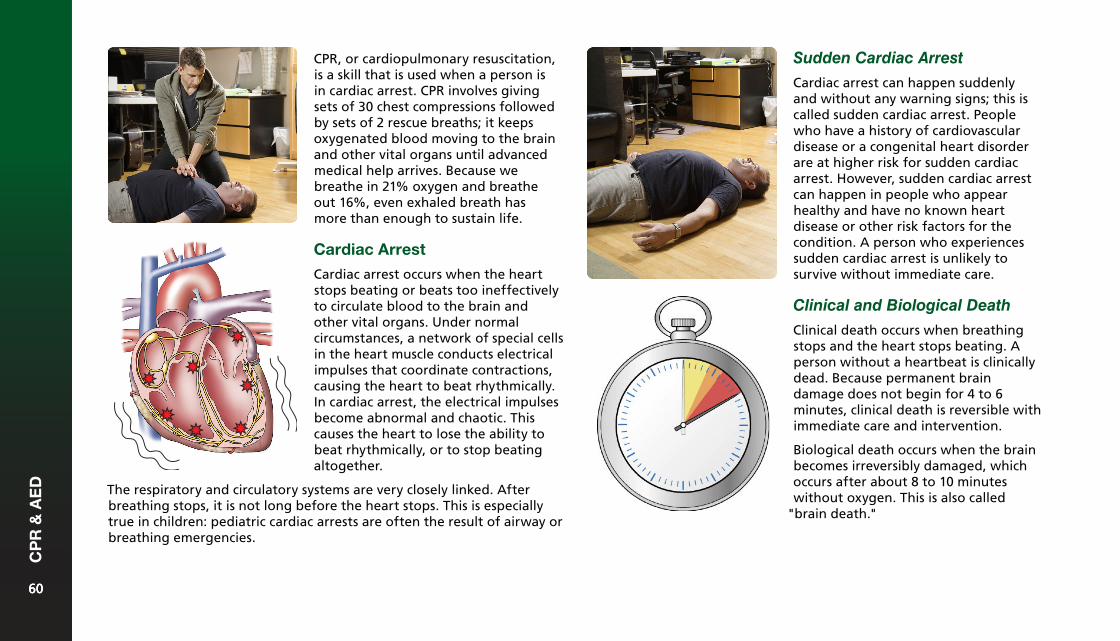
CPR, or cardiopulmonary resuscitation, is a skill that is used when a person is in cardiac arrest. CPR involves giving sets of 30 chest compressions followed by sets of 2 rescue breaths; it keeps oxygenated blood moving to the brain and other vital organs until advanced medical help arrives. Because we breathe in 21% oxygen and breathe out 16%, even exhaled breath has more than enough to sustain life.
Cardiac Arrest
Cardiac arrest occurs when the heart stops beating or beats too ineffectively to circulate blood to the brain and other vital organs. Under normal circumstances, a network of special cells in the heart muscle conducts electrical impulses that coordinate contractions, causing the heart to beat rhythmically. In cardiac arrest, the electrical impulses become abnormal and chaotic. This causes the heart to lose the ability to beat rhythmically, or to stop beating altogether.
Sudden Cardiac Arrest
Cardiac arrest can happen suddenly and without any warning signs; this is called sudden cardiac arrest. People who have a history of cardiovascular disease or a congenital heart disorder are at higher risk for sudden cardiac arrest. However, sudden cardiac arrest can happen in people who appear healthy and have no known heart disease or other risk factors for the condition. A person who experiences sudden cardiac arrest is unlikely to survive without immediate care.
Clinical and Biological Death
Clinical death occurs when breathing stops and the heart stops beating. A person without a heartbeat is clinically dead. Because permanent brain damage does not begin for 4 to 6 minutes, clinical death is reversible with immediate care and intervention.
Biological death occurs when the brain becomes irreversibly damaged, which occurs after about 8 to 10 minutes without oxygen. This is also called
"brain death."
The respiratory and circulatory systems are very closely linked. After breathing stops, it is not long before the heart stops. This is especially true in children: pediatric cardiac arrests are often the result of airway or breathing emergencies.
6060
CP
R &
AE
D
60
What to Look For
When a person experiences cardiac arrest, signs and symptoms may include the following:
• The person suddenly collapses.• The person is unresponsive and not breathing, or is unresponsive
with agonal breaths.
Cardiac Arrest, Adult (After the Onset of Puberty)
What to Do
Common Causes
Cardiovascular disease is the most common cause of cardiac arrest. Other common causes include the following:
• Drowning• Severe blood loss• Suffocation or complete choking• Electrocution• Drug overdose• Severe chest injuries• Commotio cordis• Other heart diseases and abnormalities
Cardiovascular disease and certain congenital heart conditions (i.e., conditions that a person is born with) can increase the risk of cardiac arrest. Breathing emergencies can also lead to cardiac arrest. For example, choking or drowning can interrupt the body’s supply of oxygen, causing the heart to stop beating. Every organ in the body needs a steady supply of oxygen in order to work properly, and the heart is no exception. Severe trauma, electrical shocks, and drug overdoses are other potential causes of cardiac arrest. Although cardiac arrest is more common in adults, it does occur in young people as well. The most common causes of cardiac arrest in children and babies are breathing emergencies, congenital heart disorders, and trauma.
Cardiac arrest is a life-threatening condition, so starting CPR is the top priority. A person in cardiac arrest may have other conditions as well, such as a possible head, neck, or spinal injury, but caring for other injuries is lower priority than starting CPR and getting an AED.
Have someone call EMS/9-1-1 and get an AED. If you are alone with an adult, call EMS/9-1-1 yourself, get an AED, and then return to care for the person.
Call
For each minute that CPR and use of an AED are delayed, the person’s chance of survival is reduced by about 10%.
6161
CP
R &
AE
D
61

1. Place both of your hands on thecentre of the person’s chest.
2. Do 30 compressions:• Push down at least 5 cm
(about 2 in.), pushingdeeplyand steadily.
• Allow the chest tofully recoil after eachcompression (do not leanon the chest).
• The chest compression rateshould be between 100 and120 beats per minute (30compressions in 15 to 18seconds).
3. Give 2 rescue breaths:• Open the airway by doing a
head-tilt/chin-lift.• Place your barrier device
over the person’s mouthand nose.
• If using a plastic face shield,seal your lips tightly overthe person’s mouth andpinch the nose. If using aface mask, ensure it is fittedtightly over the mouth andnose.
Care
If there are two First Aiders present, they should alternate every 5 cycles (about every 2 minutes).
• Give 2 rescue breaths. Each breath should last 1 second, withjust enough volume to make the chest start to rise.
4. If both breaths go in, repeat the cycle of 30 compressions and 2breaths.
Cardiac Arrest, Child (1 Year to the Onset of Puberty)
What to Do
Call
Have someone call EMS/9-1-1 and get an AED. If you are alone with the child and are not in close proximity to a phone, do 5 cycles (2 minutes) of CPR before calling EMS/9-1-1. Take the child with you to call EMS/9-1-1 and get an AED, and then continue to provide care.
6262
CP
R &
AE
D
62

2. Give 2 breaths:• Open the airway by doing a
head-tilt/chin-lift.• Place your barrier device
over the child’s mouth andnose.
• If using a plastic face shield,seal your lips tightly overthe child’s mouth and pinchthe nose. If using a facemask, ensure it is fittedtightly over the mouth andnose.
• Give 2 breaths. Each breathshould last 1 second, withjust enough volume tomake the chest start to rise.
3. If both breaths go in, repeat the cycle of 30 compressions and2 breaths.
Care
1. Do 30 compressions:• Put 2 hands on the centre of the child’s chest.• Push down at least 1/3 of the chest’s depth, pushing deeply
and steadily.• The chest compression rate should be between 100 and 120
beats per minute (30 compressions in 15 to 18 seconds).• Allow the chest to fully recoil after each compression (do not
lean on the chest).
Cardiac Arrest, Baby (Less Than 12 Months)
What to Do
Have someone call EMS/9-1-1 and get an AED. If you are alone with the baby and are not in close proximity to a phone, do 5 cycles (2 minutes) of CPR before calling EMS/9-1-1. Take the baby with you to call EMS/9-1-1 and get an AED, and then continue to provide care.
Call
6363
CP
R &
AE
D
63
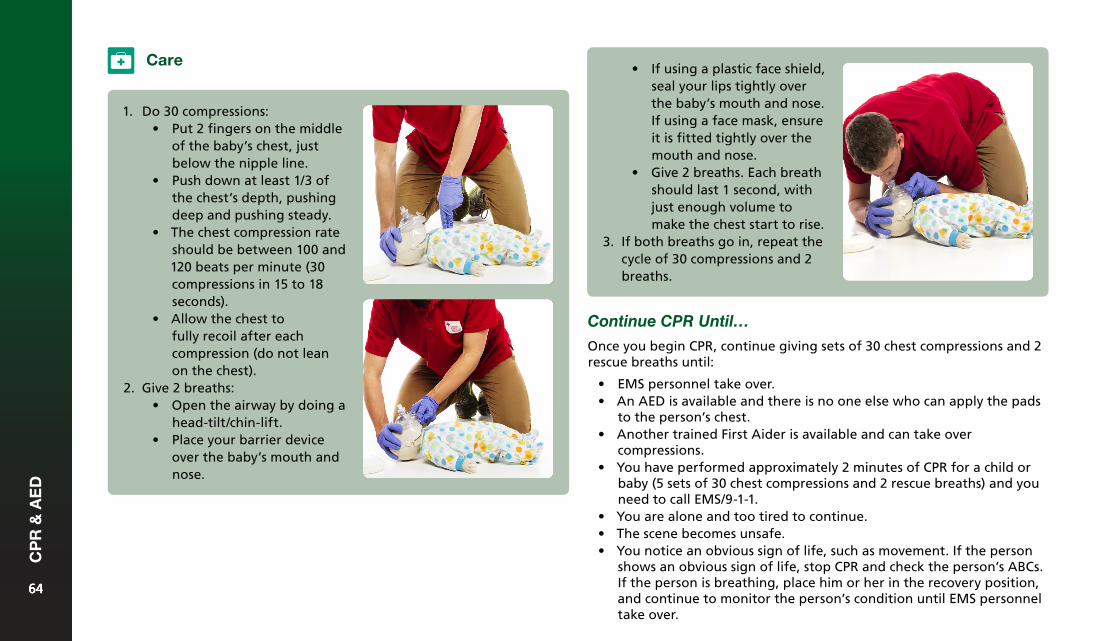
• If using a plastic face shield,seal your lips tightly overthe baby’s mouth and nose.If using a face mask, ensureit is fitted tightly over themouth and nose.
• Give 2 breaths. Each breathshould last 1 second, withjust enough volume tomake the chest start to rise.
3. If both breaths go in, repeat thecycle of 30 compressions and 2breaths.
Continue CPR Until…
Once you begin CPR, continue giving sets of 30 chest compressions and 2 rescue breaths until:
• EMS personnel take over.• An AED is available and there is no one else who can apply the pads
to the person’s chest.• Another trained First Aider is available and can take over
compressions.• You have performed approximately 2 minutes of CPR for a child or
baby (5 sets of 30 chest compressions and 2 rescue breaths) and youneed to call EMS/9-1-1.
• You are alone and too tired to continue.• The scene becomes unsafe.• You notice an obvious sign of life, such as movement. If the person
shows an obvious sign of life, stop CPR and check the person’s ABCs.If the person is breathing, place him or her in the recovery position,and continue to monitor the person’s condition until EMS personneltake over.
Care
1. Do 30 compressions:• Put 2 fingers on the middle
of the baby’s chest, justbelow the nipple line.
• Push down at least 1/3 ofthe chest’s depth, pushingdeep and pushing steady.
• The chest compression rateshould be between 100 and120 beats per minute (30compressions in 15 to 18seconds).
• Allow the chest tofully recoil after eachcompression (do not leanon the chest).
2. Give 2 breaths:• Open the airway by doing a
head-tilt/chin-lift.• Place your barrier device
over the baby’s mouth andnose.
6464
CP
R &
AE
D
64
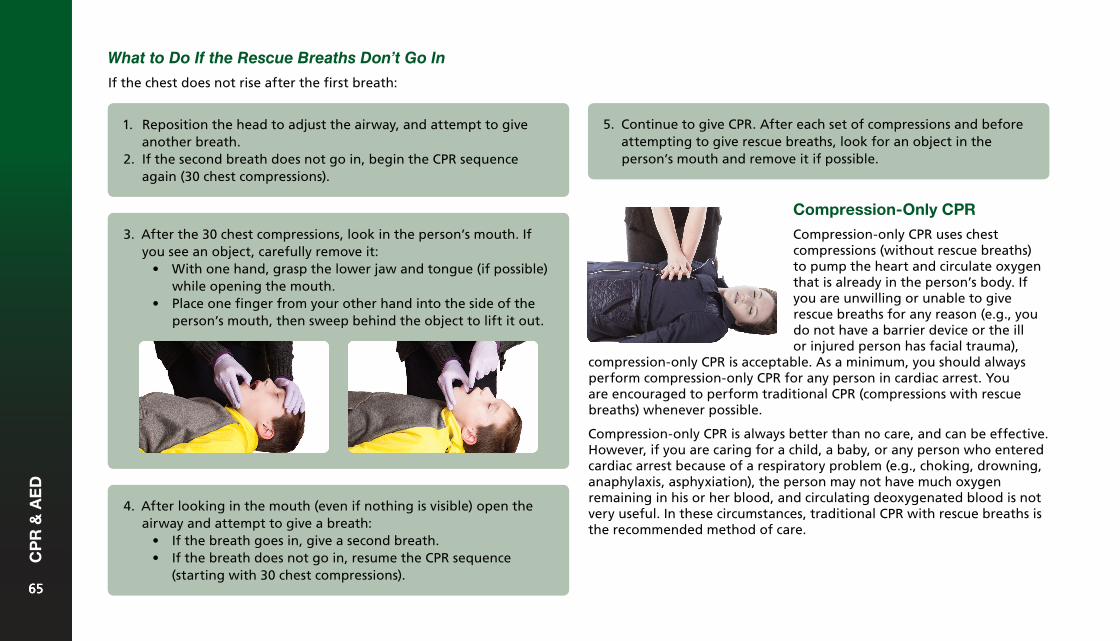
4. After looking in the mouth (even if nothing is visible) open theairway and attempt to give a breath:
• If the breath goes in, give a second breath.• If the breath does not go in, resume the CPR sequence
(starting with 30 chest compressions).
Compression-Only CPR
Compression-only CPR uses chest compressions (without rescue breaths) to pump the heart and circulate oxygen that is already in the person’s body. If you are unwilling or unable to give rescue breaths for any reason (e.g., you do not have a barrier device or the ill or injured person has facial trauma),
What to Do If the Rescue Breaths Don’t Go In
If the chest does not rise after the first breath:
3. After the 30 chest compressions, look in the person’s mouth. Ifyou see an object, carefully remove it:
• With one hand, grasp the lower jaw and tongue (if possible)while opening the mouth.
• Place one finger from your other hand into the side of theperson’s mouth, then sweep behind the object to lift it out.
compression-only CPR is acceptable. As a minimum, you should always perform compression-only CPR for any person in cardiac arrest. You are encouraged to perform traditional CPR (compressions with rescue breaths) whenever possible.
Compression-only CPR is always better than no care, and can be effective. However, if you are caring for a child, a baby, or any person who entered cardiac arrest because of a respiratory problem (e.g., choking, drowning, anaphylaxis, asphyxiation), the person may not have much oxygen remaining in his or her blood, and circulating deoxygenated blood is not very useful. In these circumstances, traditional CPR with rescue breaths is the recommended method of care.
1. Reposition the head to adjust the airway, and attempt to giveanother breath.
2. If the second breath does not go in, begin the CPR sequenceagain (30 chest compressions).
5. Continue to give CPR. After each set of compressions and beforeattempting to give rescue breaths, look for an object in theperson’s mouth and remove it if possible.
6565
CP
R &
AE
D
65
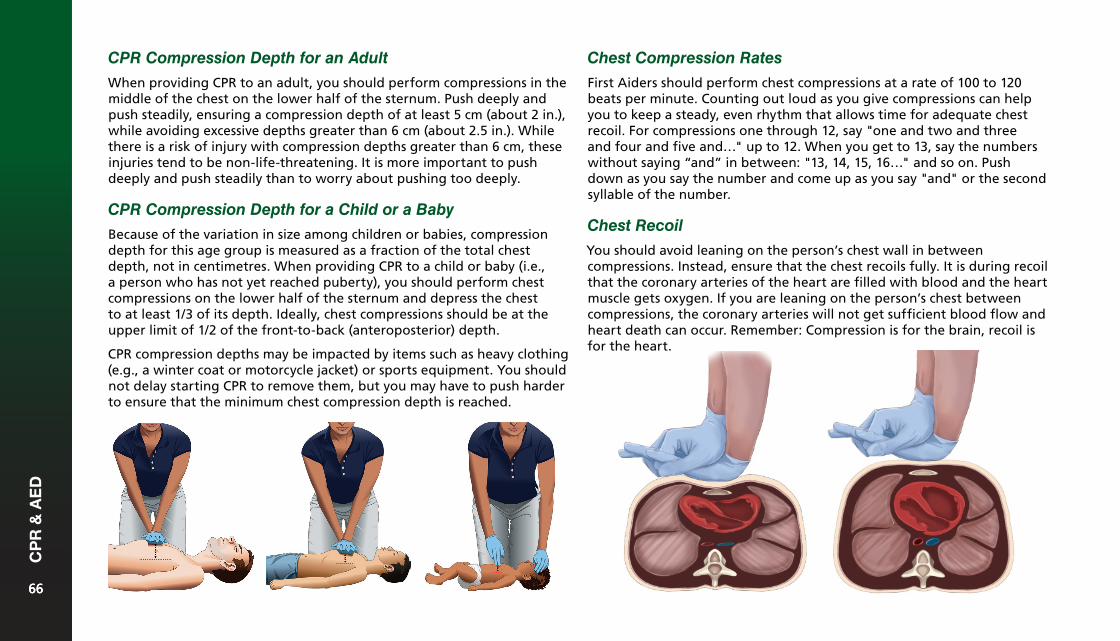
CPR Compression Depth for an Adult
When providing CPR to an adult, you should perform compressions in the middle of the chest on the lower half of the sternum. Push deeply and push steadily, ensuring a compression depth of at least 5 cm (about 2 in.), while avoiding excessive depths greater than 6 cm (about 2.5 in.). While there is a risk of injury with compression depths greater than 6 cm, these injuries tend to be non-life-threatening. It is more important to push deeply and push steadily than to worry about pushing too deeply.
CPR Compression Depth for a Child or a Baby
Because of the variation in size among children or babies, compression depth for this age group is measured as a fraction of the total chest depth, not in centimetres. When providing CPR to a child or baby (i.e., a person who has not yet reached puberty), you should perform chest compressions on the lower half of the sternum and depress the chest to at least 1/3 of its depth. Ideally, chest compressions should be at the upper limit of 1/2 of the front-to-back (anteroposterior) depth.
CPR compression depths may be impacted by items such as heavy clothing (e.g., a winter coat or motorcycle jacket) or sports equipment. You should not delay starting CPR to remove them, but you may have to push harder to ensure that the minimum chest compression depth is reached.
Chest Compression Rates
First Aiders should perform chest compressions at a rate of 100 to 120 beats per minute. Counting out loud as you give compressions can help you to keep a steady, even rhythm that allows time for adequate chest recoil. For compressions one through 12, say "one and two and three and four and five and…" up to 12. When you get to 13, say the numbers without saying “and” in between: "13, 14, 15, 16…" and so on. Push down as you say the number and come up as you say "and" or the second syllable of the number.
Chest Recoil
You should avoid leaning on the person’s chest wall in between compressions. Instead, ensure that the chest recoils fully. It is during recoil that the coronary arteries of the heart are filled with blood and the heart muscle gets oxygen. If you are leaning on the person’s chest between compressions, the coronary arteries will not get sufficient blood flow and heart death can occur. Remember: Compression is for the brain, recoil is for the heart.
6666
CP
R &
AE
D
66
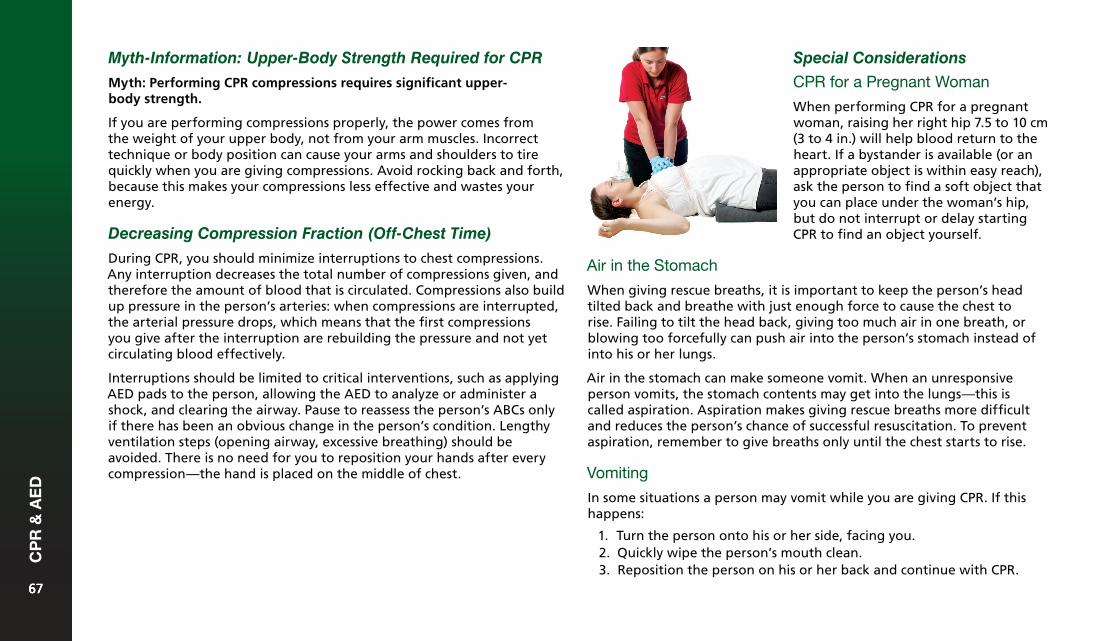
Myth-Information: Upper-Body Strength Required for CPR
Myth: Performing CPR compressions requires significant upper- body strength.
If you are performing compressions properly, the power comes from the weight of your upper body, not from your arm muscles. Incorrect technique or body position can cause your arms and shoulders to tire quickly when you are giving compressions. Avoid rocking back and forth, because this makes your compressions less effective and wastes your energy.
Decreasing Compression Fraction (Off-Chest Time)
During CPR, you should minimize interruptions to chest compressions. Any interruption decreases the total number of compressions given, and therefore the amount of blood that is circulated. Compressions also build up pressure in the person’s arteries: when compressions are interrupted, the arterial pressure drops, which means that the first compressions you give after the interruption are rebuilding the pressure and not yet circulating blood effectively.
Interruptions should be limited to critical interventions, such as applying AED pads to the person, allowing the AED to analyze or administer a shock, and clearing the airway. Pause to reassess the person’s ABCs only if there has been an obvious change in the person’s condition. Lengthy ventilation steps (opening airway, excessive breathing) should be avoided. There is no need for you to reposition your hands after every compression—the hand is placed on the middle of chest.
Special Considerations
CPR for a Pregnant Woman
When performing CPR for a pregnant woman, raising her right hip 7.5 to 10 cm (3 to 4 in.) will help blood return to the heart. If a bystander is available (or an appropriate object is within easy reach), ask the person to find a soft object that you can place under the woman’s hip, but do not interrupt or delay starting CPR to find an object yourself.
Air in the Stomach
When giving rescue breaths, it is important to keep the person’s head tilted back and breathe with just enough force to cause the chest to rise. Failing to tilt the head back, giving too much air in one breath, or blowing too forcefully can push air into the person’s stomach instead of into his or her lungs.
Air in the stomach can make someone vomit. When an unresponsive person vomits, the stomach contents may get into the lungs—this is called aspiration. Aspiration makes giving rescue breaths more difficult and reduces the person’s chance of successful resuscitation. To prevent aspiration, remember to give breaths only until the chest starts to rise.
Vomiting
In some situations a person may vomit while you are giving CPR. If this happens:
1. Turn the person onto his or her side, facing you.2. Quickly wipe the person’s mouth clean.3. Reposition the person on his or her back and continue with CPR.
6767
CP
R &
AE
D
67
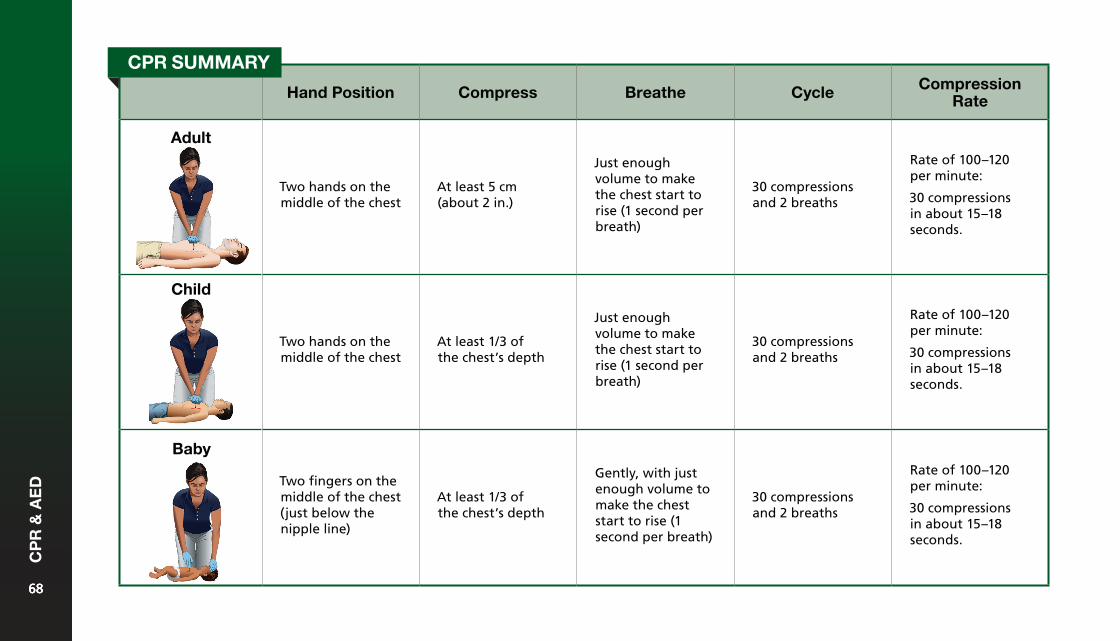
Hand Position Compress Breathe Cycle Compression Rate
Adult
Two hands on the middle of the chest
At least 5 cm (about 2 in.)
Just enough volume to make the chest start to rise (1 second per breath)
30 compressions and 2 breaths
Rate of 100–120 per minute:
30 compressions in about 15–18 seconds.
Child
Two hands on the middle of the chest
At least 1/3 of the chest’s depth
Just enough volume to make the chest start to rise (1 second per breath)
30 compressions and 2 breaths
Rate of 100–120 per minute:
30 compressions in about 15–18 seconds.
Baby
Two fingers on the middle of the chest (just below the nipple line)
At least 1/3 of the chest’s depth
Gently, with just enough volume to make the chest start to rise (1 second per breath)
30 compressions and 2 breaths
Rate of 100–120 per minute:
30 compressions in about 15–18 seconds.
CPR SUMMARY
6868
CP
R &
AE
D
68
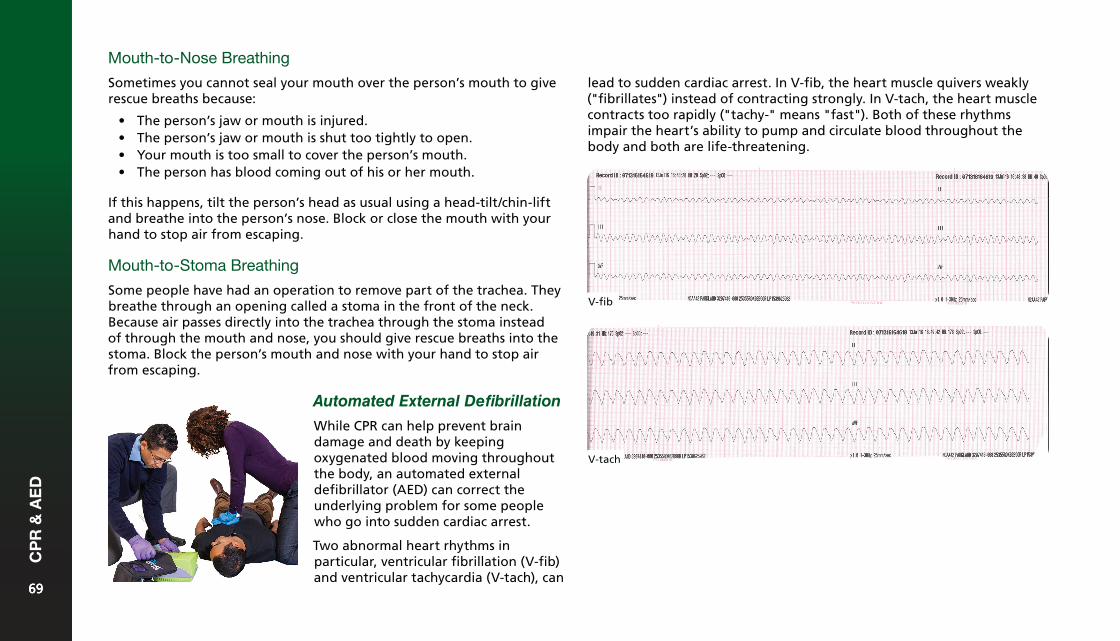
Mouth-to-Nose Breathing
Sometimes you cannot seal your mouth over the person’s mouth to give rescue breaths because:
• The person’s jaw or mouth is injured.• The person’s jaw or mouth is shut too tightly to open.• Your mouth is too small to cover the person’s mouth.• The person has blood coming out of his or her mouth.
If this happens, tilt the person’s head as usual using a head-tilt/chin-lift and breathe into the person’s nose. Block or close the mouth with your hand to stop air from escaping.
Mouth-to-Stoma Breathing
Some people have had an operation to remove part of the trachea. They breathe through an opening called a stoma in the front of the neck. Because air passes directly into the trachea through the stoma instead of through the mouth and nose, you should give rescue breaths into the stoma. Block the person’s mouth and nose with your hand to stop air from escaping.
lead to sudden cardiac arrest. In V-fib, the heart muscle quivers weakly ("fibrillates") instead of contracting strongly. In V-tach, the heart muscle contracts too rapidly ("tachy-" means "fast"). Both of these rhythms impair the heart’s ability to pump and circulate blood throughout the body and both are life-threatening.
V-fib
V-tach
Automated External Defibrillation
While CPR can help prevent brain damage and death by keeping oxygenated blood moving throughout the body, an automated external defibrillator (AED) can correct the underlying problem for some people who go into sudden cardiac arrest.
Two abnormal heart rhythms in particular, ventricular fibrillation (V-fib) and ventricular tachycardia (V-tach), can
6969
CP
R &
AE
D
69
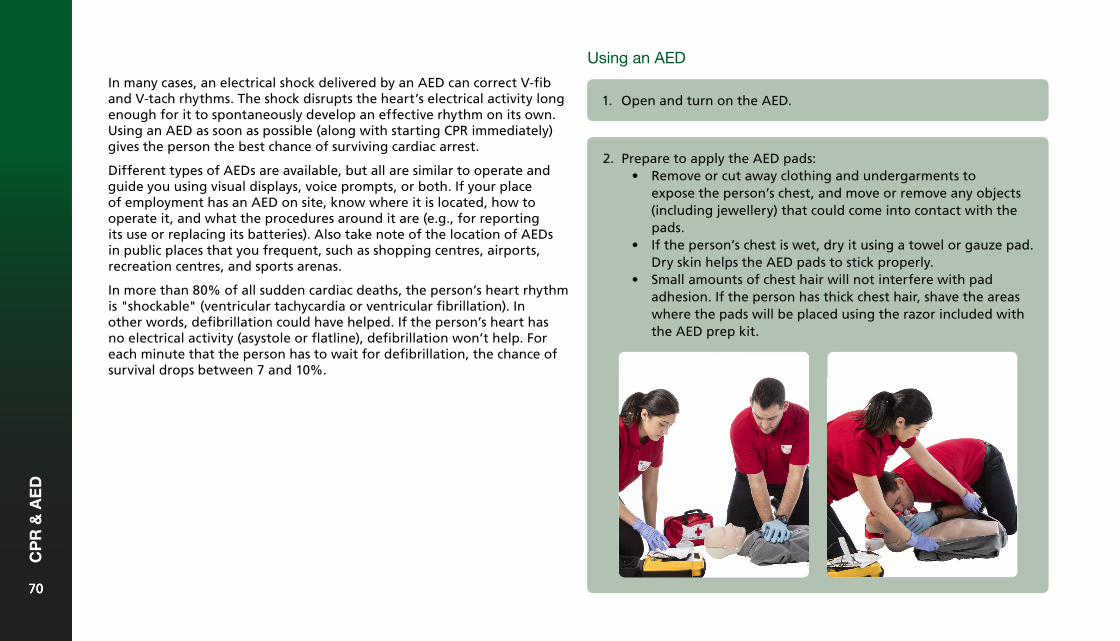
In many cases, an electrical shock delivered by an AED can correct V-fib and V-tach rhythms. The shock disrupts the heart’s electrical activity long enough for it to spontaneously develop an effective rhythm on its own. Using an AED as soon as possible (along with starting CPR immediately) gives the person the best chance of surviving cardiac arrest.
Different types of AEDs are available, but all are similar to operate and guide you using visual displays, voice prompts, or both. If your place of employment has an AED on site, know where it is located, how to operate it, and what the procedures around it are (e.g., for reporting its use or replacing its batteries). Also take note of the location of AEDs in public places that you frequent, such as shopping centres, airports, recreation centres, and sports arenas.
In more than 80% of all sudden cardiac deaths, the person’s heart rhythm is "shockable" (ventricular tachycardia or ventricular fibrillation). In other words, defibrillation could have helped. If the person’s heart has no electrical activity (asystole or flatline), defibrillation won’t help. For each minute that the person has to wait for defibrillation, the chance of survival drops between 7 and 10%.
1. Open and turn on the AED.
2. Prepare to apply the AED pads:• Remove or cut away clothing and undergarments to
expose the person’s chest, and move or remove any objects(including jewellery) that could come into contact with thepads.
• If the person’s chest is wet, dry it using a towel or gauze pad.Dry skin helps the AED pads to stick properly.
• Small amounts of chest hair will not interfere with padadhesion. If the person has thick chest hair, shave the areaswhere the pads will be placed using the razor included withthe AED prep kit.
Using an AED
7070
CP
R &
AE
D
70
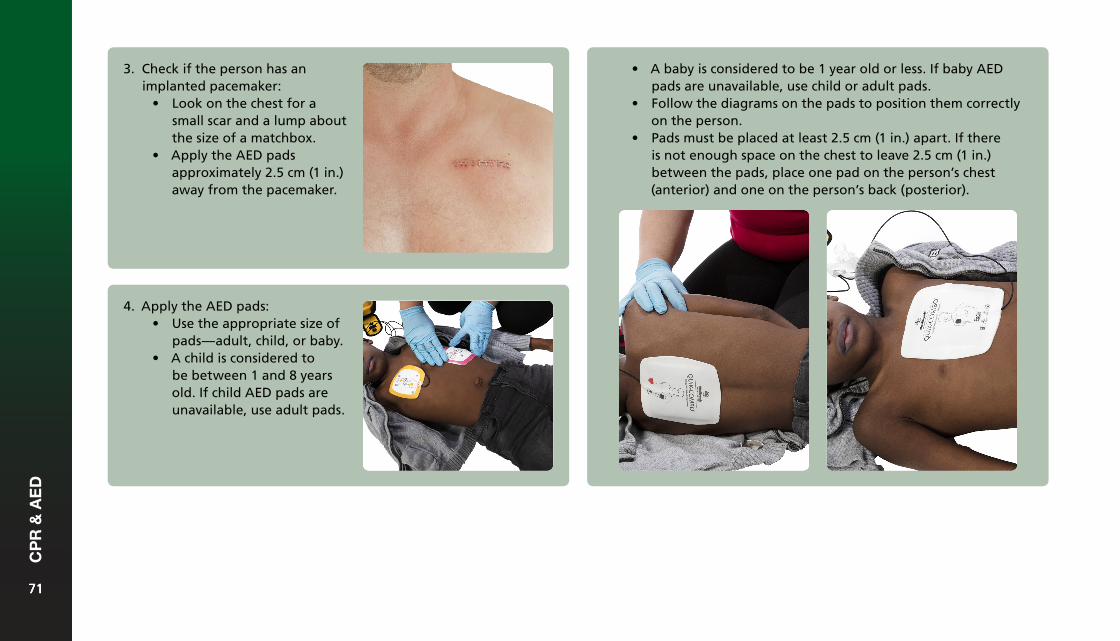
3. Check if the person has animplanted pacemaker:
• Look on the chest for asmall scar and a lump aboutthe size of a matchbox.
• Apply the AED padsapproximately 2.5 cm (1 in.)away from the pacemaker.
• A baby is considered to be 1 year old or less. If baby AEDpads are unavailable, use child or adult pads.
• Follow the diagrams on the pads to position them correctlyon the person.
• Pads must be placed at least 2.5 cm (1 in.) apart. If thereis not enough space on the chest to leave 2.5 cm (1 in.)between the pads, place one pad on the person’s chest(anterior) and one on the person’s back (posterior).
4. Apply the AED pads:• Use the appropriate size of
pads—adult, child, or baby.• A child is considered to
be between 1 and 8 yearsold. If child AED pads areunavailable, use adult pads.
7171
CP
R &
AE
D
71
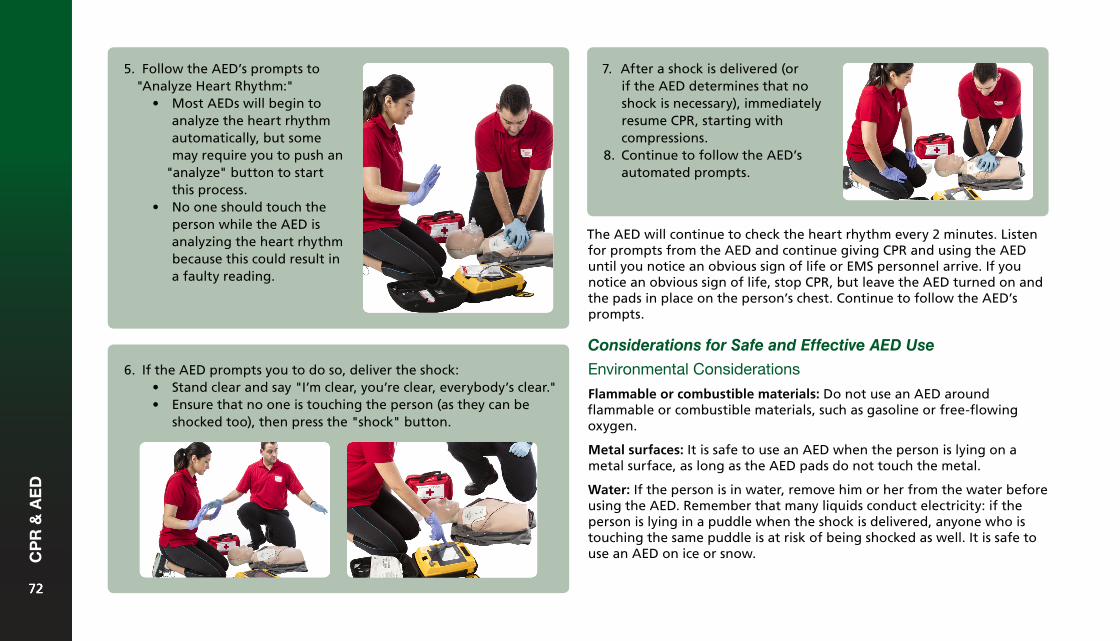
5. Follow the AED’s prompts to"Analyze Heart Rhythm:"
• Most AEDs will begin toanalyze the heart rhythmautomatically, but somemay require you to push an
"analyze" button to startthis process.
• No one should touch theperson while the AED isanalyzing the heart rhythmbecause this could result ina faulty reading.
6. If the AED prompts you to do so, deliver the shock:• Stand clear and say "I’m clear, you’re clear, everybody’s clear."• Ensure that no one is touching the person (as they can be
shocked too), then press the "shock" button.
7. After a shock is delivered (orif the AED determines that noshock is necessary), immediatelyresume CPR, starting withcompressions.
8. Continue to follow the AED’sautomated prompts.
The AED will continue to check the heart rhythm every 2 minutes. Listen for prompts from the AED and continue giving CPR and using the AED until you notice an obvious sign of life or EMS personnel arrive. If you notice an obvious sign of life, stop CPR, but leave the AED turned on and the pads in place on the person’s chest. Continue to follow the AED’s prompts.
Considerations for Safe and Effective AED Use
Environmental Considerations
Flammable or combustible materials: Do not use an AED around flammable or combustible materials, such as gasoline or free-flowing oxygen.
Metal surfaces: It is safe to use an AED when the person is lying on a metal surface, as long as the AED pads do not touch the metal.
Water: If the person is in water, remove him or her from the water before using the AED. Remember that many liquids conduct electricity: if the person is lying in a puddle when the shock is delivered, anyone who is touching the same puddle is at risk of being shocked as well. It is safe to use an AED on ice or snow.
7272
CP
R &
AE
D
72
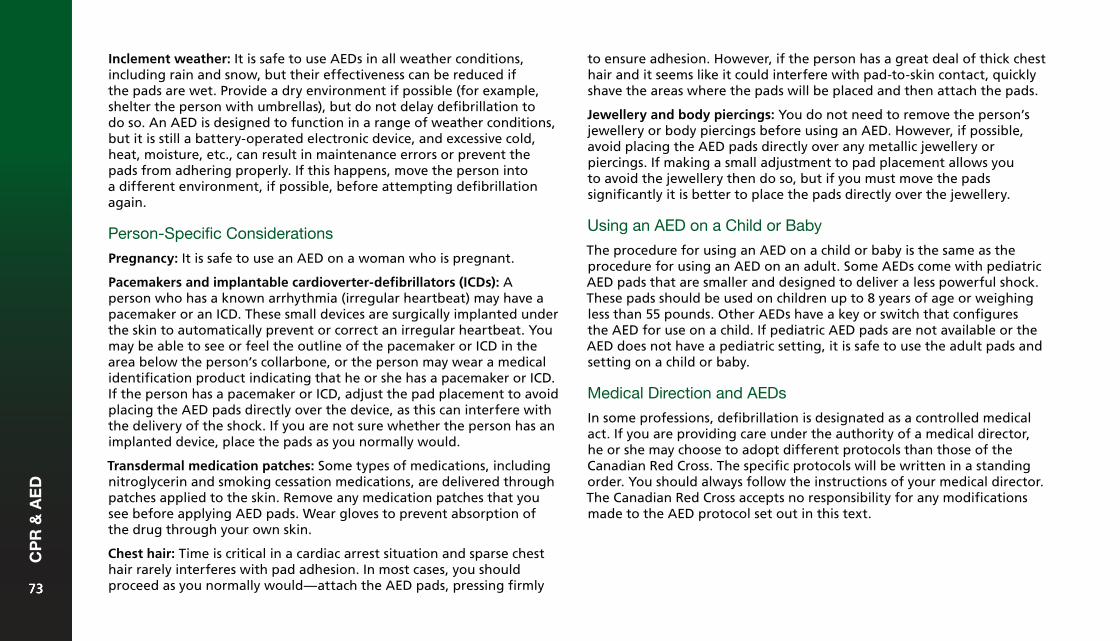
Inclement weather: It is safe to use AEDs in all weather conditions, including rain and snow, but their effectiveness can be reduced if the pads are wet. Provide a dry environment if possible (for example, shelter the person with umbrellas), but do not delay defibrillation to do so. An AED is designed to function in a range of weather conditions, but it is still a battery-operated electronic device, and excessive cold, heat, moisture, etc., can result in maintenance errors or prevent the pads from adhering properly. If this happens, move the person into a different environment, if possible, before attempting defibrillation again.
Person-Specific Considerations
Pregnancy: It is safe to use an AED on a woman who is pregnant.
Pacemakers and implantable cardioverter-defibrillators (ICDs): A person who has a known arrhythmia (irregular heartbeat) may have a pacemaker or an ICD. These small devices are surgically implanted under the skin to automatically prevent or correct an irregular heartbeat. You may be able to see or feel the outline of the pacemaker or ICD in the area below the person’s collarbone, or the person may wear a medical identification product indicating that he or she has a pacemaker or ICD. If the person has a pacemaker or ICD, adjust the pad placement to avoid placing the AED pads directly over the device, as this can interfere with the delivery of the shock. If you are not sure whether the person has an implanted device, place the pads as you normally would.
Transdermal medication patches: Some types of medications, including nitroglycerin and smoking cessation medications, are delivered through patches applied to the skin. Remove any medication patches that you see before applying AED pads. Wear gloves to prevent absorption of the drug through your own skin.
Chest hair: Time is critical in a cardiac arrest situation and sparse chest hair rarely interferes with pad adhesion. In most cases, you should proceed as you normally would—attach the AED pads, pressing firmly
to ensure adhesion. However, if the person has a great deal of thick chest hair and it seems like it could interfere with pad-to-skin contact, quickly shave the areas where the pads will be placed and then attach the pads.
Jewellery and body piercings: You do not need to remove the person’s jewellery or body piercings before using an AED. However, if possible, avoid placing the AED pads directly over any metallic jewellery or piercings. If making a small adjustment to pad placement allows you to avoid the jewellery then do so, but if you must move the pads significantly it is better to place the pads directly over the jewellery.
Using an AED on a Child or Baby
The procedure for using an AED on a child or baby is the same as the procedure for using an AED on an adult. Some AEDs come with pediatric AED pads that are smaller and designed to deliver a less powerful shock. These pads should be used on children up to 8 years of age or weighing less than 55 pounds. Other AEDs have a key or switch that configures the AED for use on a child. If pediatric AED pads are not available or the AED does not have a pediatric setting, it is safe to use the adult pads and setting on a child or baby.
Medical Direction and AEDs
In some professions, defibrillation is designated as a controlled medical act. If you are providing care under the authority of a medical director, he or she may choose to adopt different protocols than those of the Canadian Red Cross. The specific protocols will be written in a standing order. You should always follow the instructions of your medical director. The Canadian Red Cross accepts no responsibility for any modifications made to the AED protocol set out in this text.
7373
CP
R &
AE
D
73
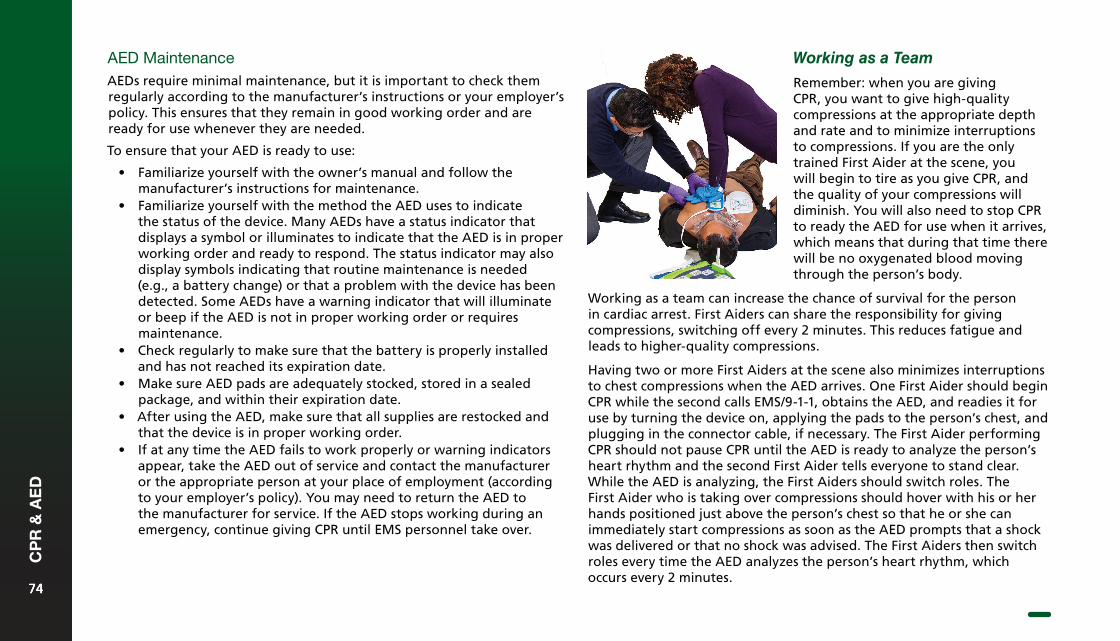
AED MaintenanceAEDs require minimal maintenance, but it is important to check them regularly according to the manufacturer’s instructions or your employer’s policy. This ensures that they remain in good working order and are ready for use whenever they are needed.
To ensure that your AED is ready to use:
• Familiarize yourself with the owner’s manual and follow themanufacturer’s instructions for maintenance.
• Familiarize yourself with the method the AED uses to indicatethe status of the device. Many AEDs have a status indicator thatdisplays a symbol or illuminates to indicate that the AED is in properworking order and ready to respond. The status indicator may alsodisplay symbols indicating that routine maintenance is needed(e.g., a battery change) or that a problem with the device has beendetected. Some AEDs have a warning indicator that will illuminateor beep if the AED is not in proper working order or requiresmaintenance.
• Check regularly to make sure that the battery is properly installedand has not reached its expiration date.
• Make sure AED pads are adequately stocked, stored in a sealedpackage, and within their expiration date.
• After using the AED, make sure that all supplies are restocked andthat the device is in proper working order.
• If at any time the AED fails to work properly or warning indicatorsappear, take the AED out of service and contact the manufactureror the appropriate person at your place of employment (accordingto your employer’s policy). You may need to return the AED tothe manufacturer for service. If the AED stops working during anemergency, continue giving CPR until EMS personnel take over.
Working as a Team
Remember: when you are giving CPR, you want to give high-quality compressions at the appropriate depth and rate and to minimize interruptions to compressions. If you are the only trained First Aider at the scene, you will begin to tire as you give CPR, and the quality of your compressions will diminish. You will also need to stop CPR to ready the AED for use when it arrives, which means that during that time there will be no oxygenated blood moving through the person’s body.
Working as a team can increase the chance of survival for the person in cardiac arrest. First Aiders can share the responsibility for giving compressions, switching off every 2 minutes. This reduces fatigue and leads to higher-quality compressions.
Having two or more First Aiders at the scene also minimizes interruptions to chest compressions when the AED arrives. One First Aider should begin CPR while the second calls EMS/9-1-1, obtains the AED, and readies it for use by turning the device on, applying the pads to the person’s chest, and plugging in the connector cable, if necessary. The First Aider performing CPR should not pause CPR until the AED is ready to analyze the person’s heart rhythm and the second First Aider tells everyone to stand clear. While the AED is analyzing, the First Aiders should switch roles. The First Aider who is taking over compressions should hover with his or her hands positioned just above the person’s chest so that he or she can immediately start compressions as soon as the AED prompts that a shock was delivered or that no shock was advised. The First Aiders then switch roles every time the AED analyzes the person’s heart rhythm, which occurs every 2 minutes.
7474
CP
R &
AE
D
74
Breathing Emergencies7
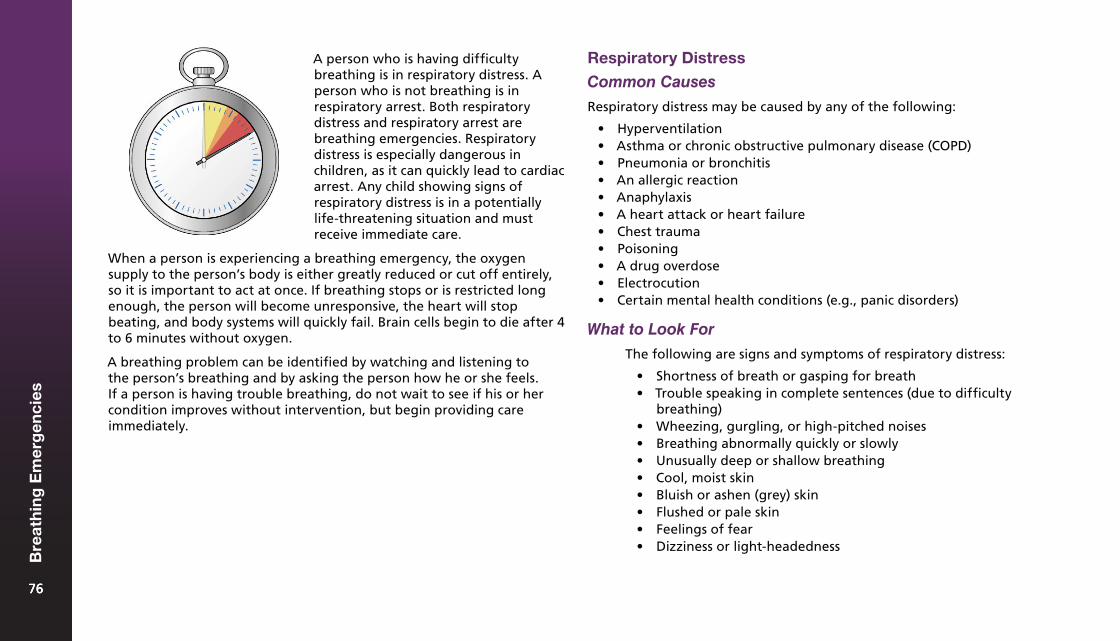
A person who is having difficulty breathing is in respiratory distress. A person who is not breathing is in respiratory arrest. Both respiratory distress and respiratory arrest are breathing emergencies. Respiratory distress is especially dangerous in children, as it can quickly lead to cardiac arrest. Any child showing signs of respiratory distress is in a potentially life-threatening situation and must receive immediate care.
When a person is experiencing a breathing emergency, the oxygen supply to the person’s body is either greatly reduced or cut off entirely, so it is important to act at once. If breathing stops or is restricted long enough, the person will become unresponsive, the heart will stop beating, and body systems will quickly fail. Brain cells begin to die after 4 to 6 minutes without oxygen.
A breathing problem can be identified by watching and listening to the person’s breathing and by asking the person how he or she feels. If a person is having trouble breathing, do not wait to see if his or her condition improves without intervention, but begin providing care immediately.
Respiratory Distress
Common Causes
Respiratory distress may be caused by any of the following:
• Hyperventilation• Asthma or chronic obstructive pulmonary disease (COPD)• Pneumonia or bronchitis• An allergic reaction• Anaphylaxis• A heart attack or heart failure• Chest trauma• Poisoning• A drug overdose• Electrocution• Certain mental health conditions (e.g., panic disorders)
What to Look For
The following are signs and symptoms of respiratory distress:
• Shortness of breath or gasping for breath• Trouble speaking in complete sentences (due to difficulty
breathing)• Wheezing, gurgling, or high-pitched noises• Breathing abnormally quickly or slowly• Unusually deep or shallow breathing• Cool, moist skin• Bluish or ashen (grey) skin• Flushed or pale skin• Feelings of fear• Dizziness or light-headedness
7676
Bre
ath
ing
Em
erg
enci
es
76
What to Do
Hyperventilation
Hyperventilation is a condition in which a person is breathing much more quickly than usual. This upsets the body’s balance of oxygen and carbon dioxide.
Common Causes
The following are common causes of hyperventilation:
• Strong emotions such as excitement, fear, or anxiety• Asthma• Injuries, especially injuries to the head• Exercise• Life-threatening bleeding
Prevention
If you tend to hyperventilate due to anxiety, panic, or stress, relaxation techniques such as breathing exercises may help. If you hyperventilate due to a diagnosed medical condition, speaking to your doctor will help you learn how to treat or control it.
What to Look For
Call
Call EMS/9-1-1.
Care
1. If the person carries medication for respiratory distress, offer tohelp the person take his or her medication.
2. Encourage the person to sit down in a comfortable position(leaning forward may help make breathing easier).
3. Provide reassurance, as this can help reduce anxiety and help theperson control his or her breathing.
4. Monitor the person’s condition and provide continual care untilEMS personnel arrive.
The following are signs and symptoms of hyperventilation:
• Rapid, shallow breathing• A feeling of suffocating or not getting enough air• Fear, anxiety, or confusion• A feeling of dizziness• Numbness or tingling of the fingers and toes• Muscle contractions, usually in the hands, feet, arms, and legs
What to Do
Call
It is not always necessary to call EMS/9-1-1 for a person who is hyperventilating. You should call EMS/9-1-1 and get an AED if the hyperventilation does not stop after a few minutes, the person becomes unresponsive, or you suspect that the person is hyperventilating because of an injury or illness.
Care
1. Encourage the person to take controlled breaths by breathingin slowly, holding his or her breath for a few seconds, and thengradually exhaling.
7777
Bre
ath
ing
Em
erg
enci
es
77
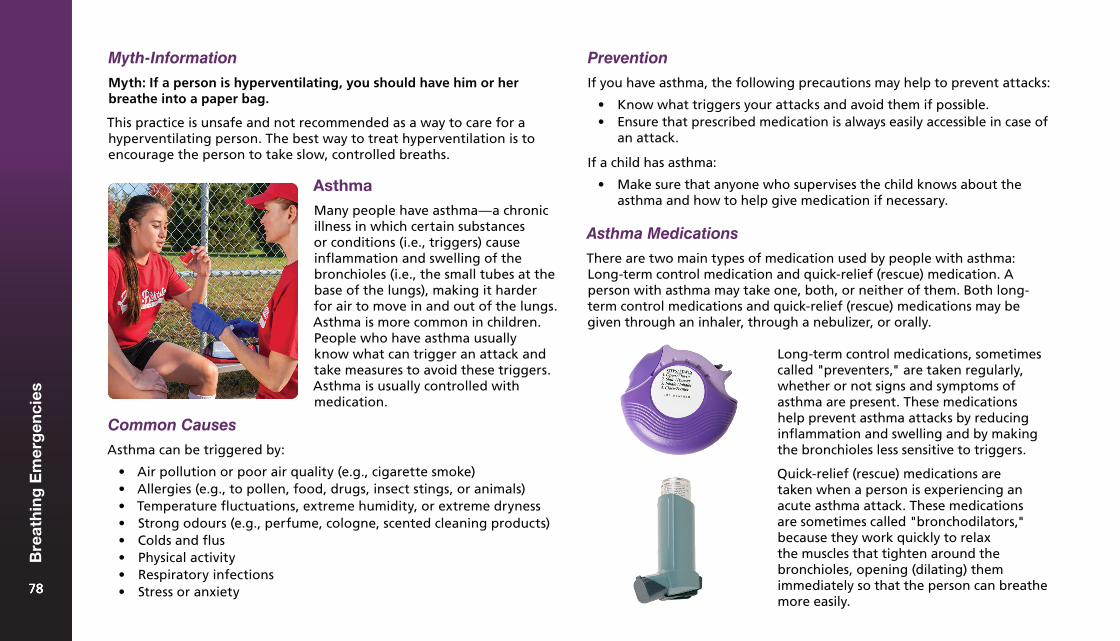
Myth-Information
Myth: If a person is hyperventilating, you should have him or her breathe into a paper bag.
This practice is unsafe and not recommended as a way to care for a hyperventilating person. The best way to treat hyperventilation is to encourage the person to take slow, controlled breaths.
Asthma
Many people have asthma—a chronic illness in which certain substances or conditions (i.e., triggers) cause inflammation and swelling of the bronchioles (i.e., the small tubes at the base of the lungs), making it harder for air to move in and out of the lungs. Asthma is more common in children. People who have asthma usually know what can trigger an attack and take measures to avoid these triggers. Asthma is usually controlled with medication.
Common Causes
Asthma can be triggered by:
• Air pollution or poor air quality (e.g., cigarette smoke)• Allergies (e.g., to pollen, food, drugs, insect stings, or animals)• Temperature fluctuations, extreme humidity, or extreme dryness• Strong odours (e.g., perfume, cologne, scented cleaning products)• Colds and flus• Physical activity• Respiratory infections• Stress or anxiety
Prevention
If you have asthma, the following precautions may help to prevent attacks:
• Know what triggers your attacks and avoid them if possible.• Ensure that prescribed medication is always easily accessible in case of
an attack.
If a child has asthma:
• Make sure that anyone who supervises the child knows about theasthma and how to help give medication if necessary.
Asthma Medications
There are two main types of medication used by people with asthma: Long-term control medication and quick-relief (rescue) medication. A person with asthma may take one, both, or neither of them. Both long-term control medications and quick-relief (rescue) medications may be given through an inhaler, through a nebulizer, or orally.
Long-term control medications, sometimes called "preventers," are taken regularly, whether or not signs and symptoms of asthma are present. These medications help prevent asthma attacks by reducing inflammation and swelling and by making the bronchioles less sensitive to triggers.
Quick-relief (rescue) medications are taken when a person is experiencing an acute asthma attack. These medications are sometimes called "bronchodilators," because they work quickly to relax the muscles that tighten around the bronchioles, opening (dilating) them immediately so that the person can breathe more easily.
7878
Bre
ath
ing
Em
erg
enci
es
78
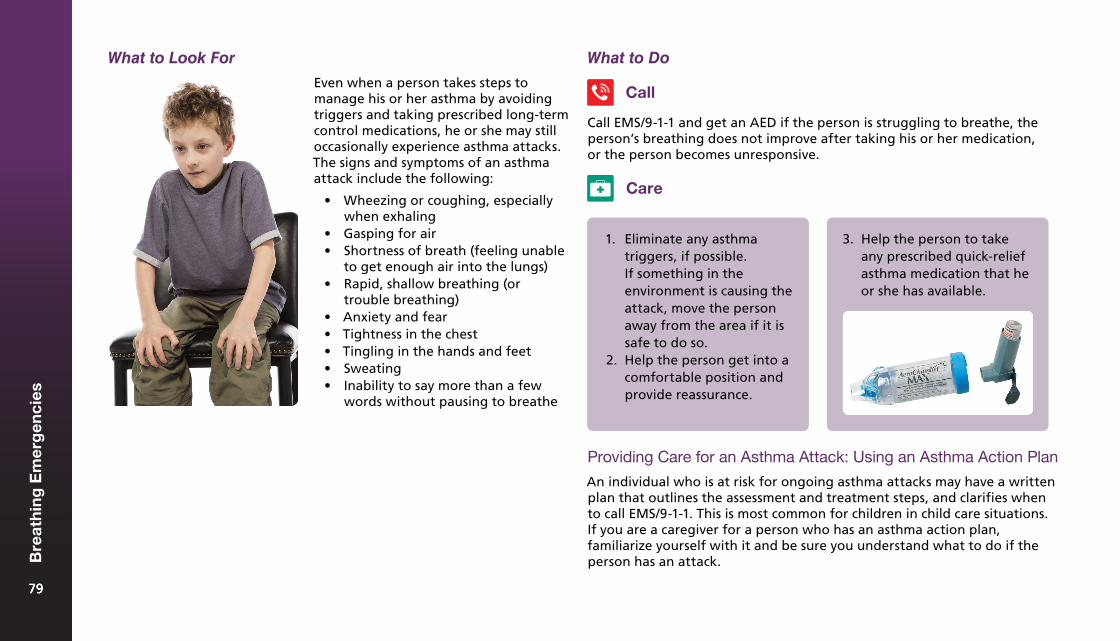
What to Look For What to Do
Even when a person takes steps to manage his or her asthma by avoiding triggers and taking prescribed long-term control medications, he or she may still occasionally experience asthma attacks. The signs and symptoms of an asthma attack include the following:
• Wheezing or coughing, especiallywhen exhaling
• Gasping for air• Shortness of breath (feeling unable
to get enough air into the lungs)• Rapid, shallow breathing (or
trouble breathing)• Anxiety and fear• Tightness in the chest• Tingling in the hands and feet• Sweating• Inability to say more than a few
words without pausing to breathe
Call EMS/9-1-1 and get an AED if the person is struggling to breathe, the person’s breathing does not improve after taking his or her medication, or the person becomes unresponsive.
1. Eliminate any asthmatriggers, if possible.If something in theenvironment is causing theattack, move the personaway from the area if it issafe to do so.
2. Help the person get into acomfortable position andprovide reassurance.
Call
Care
3. Help the person to takeany prescribed quick-reliefasthma medication that heor she has available.
Providing Care for an Asthma Attack: Using an Asthma Action Plan
An individual who is at risk for ongoing asthma attacks may have a written plan that outlines the assessment and treatment steps, and clarifies when to call EMS/9-1-1. This is most common for children in child care situations. If you are a caregiver for a person who has an asthma action plan, familiarize yourself with it and be sure you understand what to do if the person has an attack.
7979
Bre
ath
ing
Em
erg
enci
es
79
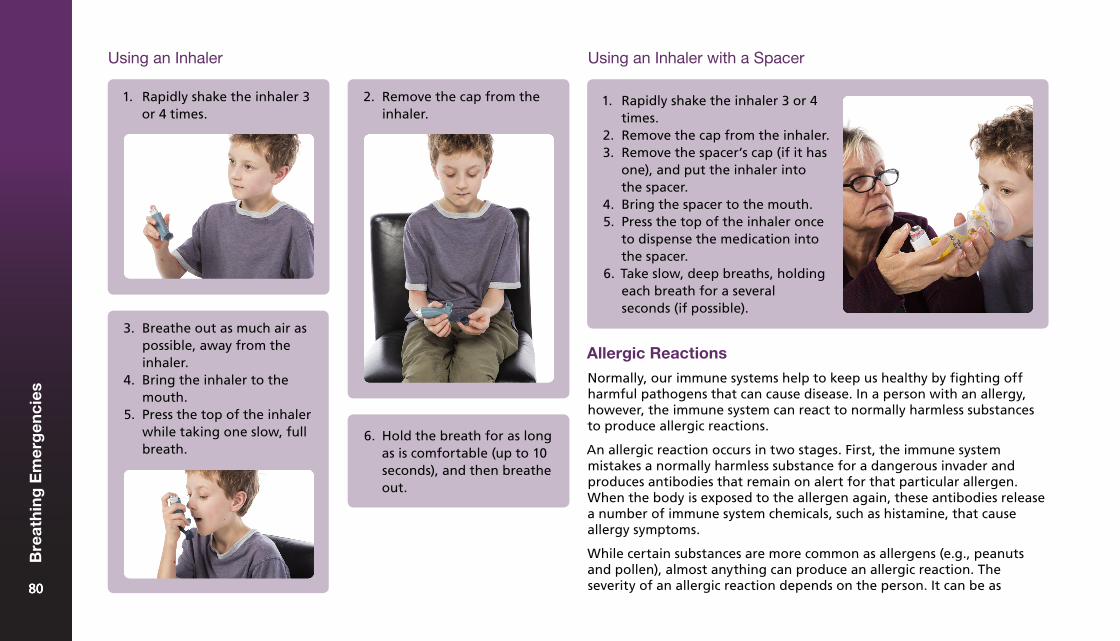
Using an Inhaler
6. Hold the breath for as longas is comfortable (up to 10seconds), and then breatheout.
1. Rapidly shake the inhaler 3or 4 times.
2. Remove the cap from theinhaler.
3. Breathe out as much air aspossible, away from theinhaler.
4. Bring the inhaler to themouth.
5. Press the top of the inhalerwhile taking one slow, fullbreath.
Using an Inhaler with a Spacer
1. Rapidly shake the inhaler 3 or 4times.
2. Remove the cap from the inhaler.3. Remove the spacer’s cap (if it has
one), and put the inhaler intothe spacer.
4. Bring the spacer to the mouth.5. Press the top of the inhaler once
to dispense the medication intothe spacer.
6. Take slow, deep breaths, holdingeach breath for a severalseconds (if possible).
Allergic Reactions
Normally, our immune systems help to keep us healthy by fighting off harmful pathogens that can cause disease. In a person with an allergy, however, the immune system can react to normally harmless substances to produce allergic reactions.
An allergic reaction occurs in two stages. First, the immune system mistakes a normally harmless substance for a dangerous invader and produces antibodies that remain on alert for that particular allergen. When the body is exposed to the allergen again, these antibodies release a number of immune system chemicals, such as histamine, that cause allergy symptoms.
While certain substances are more common as allergens (e.g., peanuts and pollen), almost anything can produce an allergic reaction. The severity of an allergic reaction depends on the person. It can be as 8080
Bre
ath
ing
Em
erg
enci
es
80
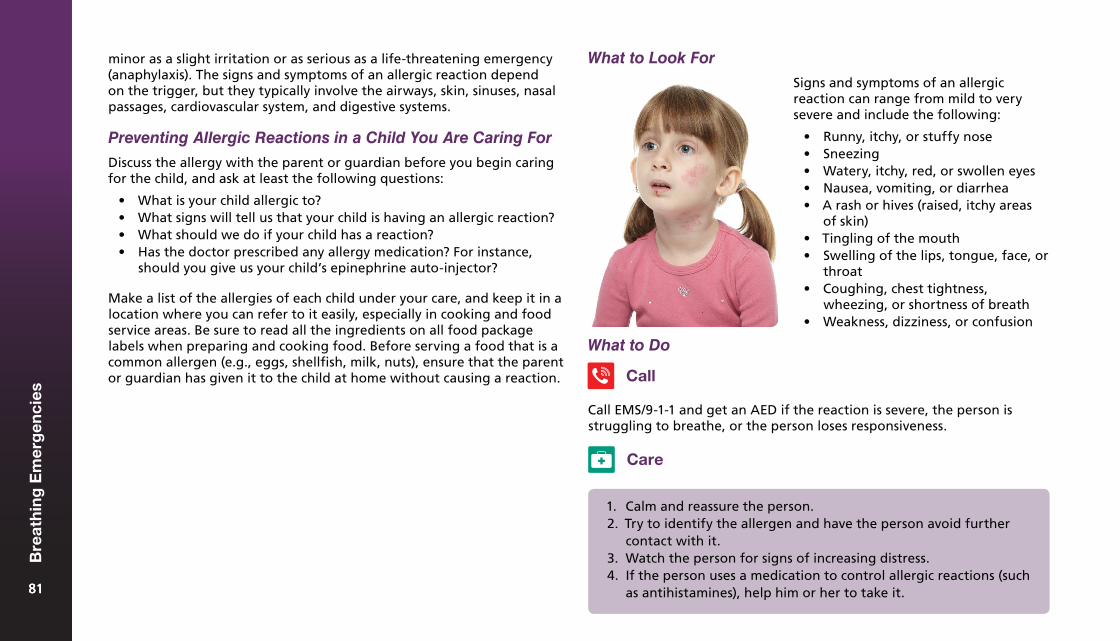
minor as a slight irritation or as serious as a life-threatening emergency (anaphylaxis). The signs and symptoms of an allergic reaction depend on the trigger, but they typically involve the airways, skin, sinuses, nasal passages, cardiovascular system, and digestive systems.
Preventing Allergic Reactions in a Child You Are Caring For
Discuss the allergy with the parent or guardian before you begin caring for the child, and ask at least the following questions:
• What is your child allergic to?• What signs will tell us that your child is having an allergic reaction?• What should we do if your child has a reaction?• Has the doctor prescribed any allergy medication? For instance,
should you give us your child’s epinephrine auto-injector?
Make a list of the allergies of each child under your care, and keep it in a location where you can refer to it easily, especially in cooking and food service areas. Be sure to read all the ingredients on all food package labels when preparing and cooking food. Before serving a food that is a common allergen (e.g., eggs, shellfish, milk, nuts), ensure that the parent or guardian has given it to the child at home without causing a reaction.
Signs and symptoms of an allergic reaction can range from mild to very severe and include the following:
• Runny, itchy, or stuffy nose• Sneezing• Watery, itchy, red, or swollen eyes• Nausea, vomiting, or diarrhea• A rash or hives (raised, itchy areas
of skin)• Tingling of the mouth• Swelling of the lips, tongue, face, or
throat• Coughing, chest tightness,
wheezing, or shortness of breath• Weakness, dizziness, or confusion
What to Do
Call
Call EMS/9-1-1 and get an AED if the reaction is severe, the person is struggling to breathe, or the person loses responsiveness.
1. Calm and reassure the person.2. Try to identify the allergen and have the person avoid further
contact with it.3. Watch the person for signs of increasing distress.4. If the person uses a medication to control allergic reactions (such
as antihistamines), help him or her to take it.
Care
What to Look For
8181
Bre
ath
ing
Em
erg
enci
es
81
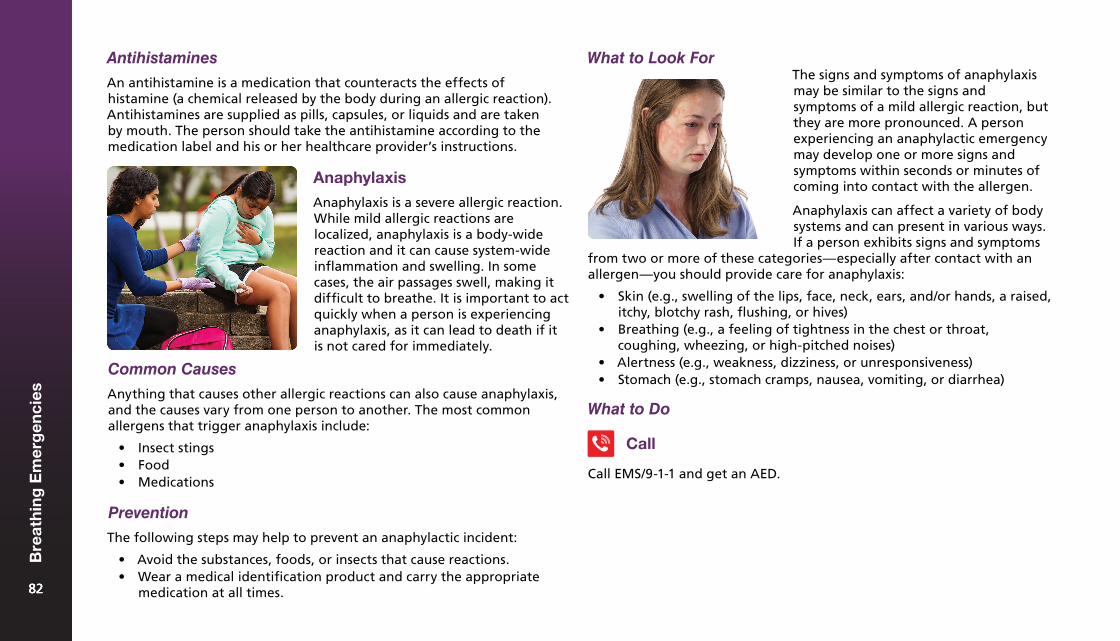
What to Look For
Anaphylaxis
Anaphylaxis is a severe allergic reaction. While mild allergic reactions are localized, anaphylaxis is a body-wide reaction and it can cause system-wide inflammation and swelling. In some cases, the air passages swell, making it difficult to breathe. It is important to act quickly when a person is experiencing anaphylaxis, as it can lead to death if it is not cared for immediately.
The signs and symptoms of anaphylaxis may be similar to the signs and symptoms of a mild allergic reaction, but they are more pronounced. A person experiencing an anaphylactic emergency may develop one or more signs and symptoms within seconds or minutes of coming into contact with the allergen.
Anaphylaxis can affect a variety of body systems and can present in various ways. If a person exhibits signs and symptoms
from two or more of these categories—especially after contact with an allergen—you should provide care for anaphylaxis:
• Skin (e.g., swelling of the lips, face, neck, ears, and/or hands, a raised,itchy, blotchy rash, flushing, or hives)
• Breathing (e.g., a feeling of tightness in the chest or throat,coughing, wheezing, or high-pitched noises)
• Alertness (e.g., weakness, dizziness, or unresponsiveness)• Stomach (e.g., stomach cramps, nausea, vomiting, or diarrhea)
What to Do
Common Causes
Anything that causes other allergic reactions can also cause anaphylaxis, and the causes vary from one person to another. The most common allergens that trigger anaphylaxis include:
• Insect stings• Food• Medications
Prevention
The following steps may help to prevent an anaphylactic incident:
• Avoid the substances, foods, or insects that cause reactions.• Wear a medical identification product and carry the appropriate
medication at all times.
Call
Call EMS/9-1-1 and get an AED.
Antihistamines
An antihistamine is a medication that counteracts the effects of histamine (a chemical released by the body during an allergic reaction). Antihistamines are supplied as pills, capsules, or liquids and are taken by mouth. The person should take the antihistamine according to the medication label and his or her healthcare provider’s instructions.
8282
Bre
ath
ing
Em
erg
enci
es
82
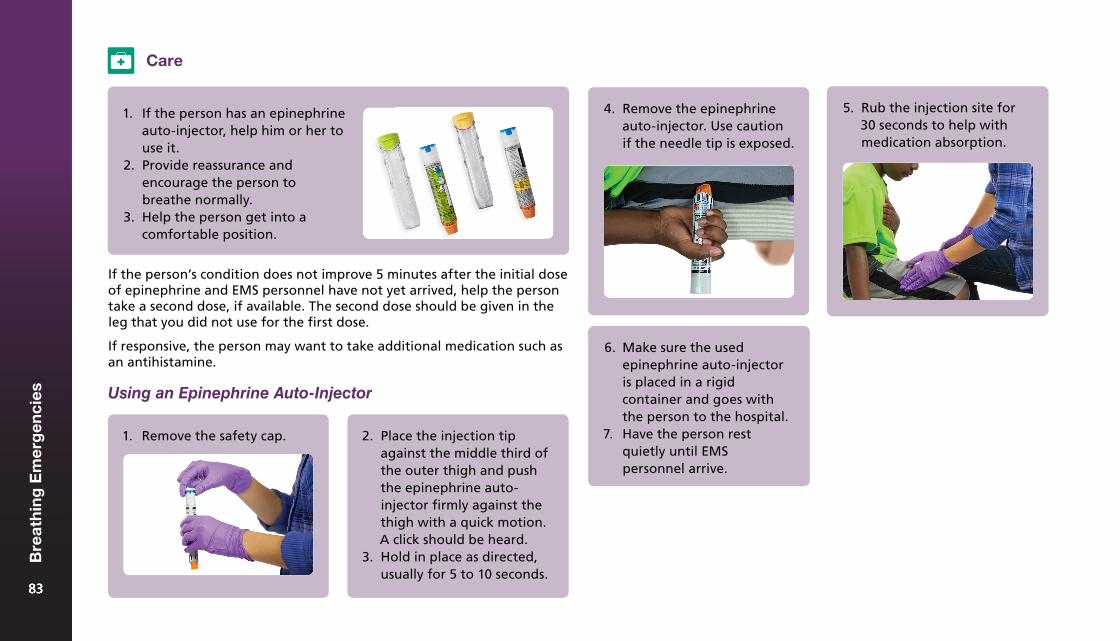
2. Place the injection tipagainst the middle third ofthe outer thigh and pushthe epinephrine auto-injector firmly against thethigh with a quick motion.A click should be heard.
3. Hold in place as directed,usually for 5 to 10 seconds.
Care
1. If the person has an epinephrineauto-injector, help him or her touse it.
2. Provide reassurance andencourage the person tobreathe normally.
3. Help the person get into acomfortable position.
If the person’s condition does not improve 5 minutes after the initial dose of epinephrine and EMS personnel have not yet arrived, help the person take a second dose, if available. The second dose should be given in the leg that you did not use for the first dose.
If responsive, the person may want to take additional medication such as an antihistamine.
Using an Epinephrine Auto-Injector
4. Remove the epinephrineauto-injector. Use cautionif the needle tip is exposed.
5. Rub the injection site for30 seconds to help withmedication absorption.
6. Make sure the usedepinephrine auto-injectoris placed in a rigidcontainer and goes withthe person to the hospital.
7. Have the person restquietly until EMSpersonnel arrive.
1. Remove the safety cap.
8383
Bre
ath
ing
Em
erg
enci
es
83
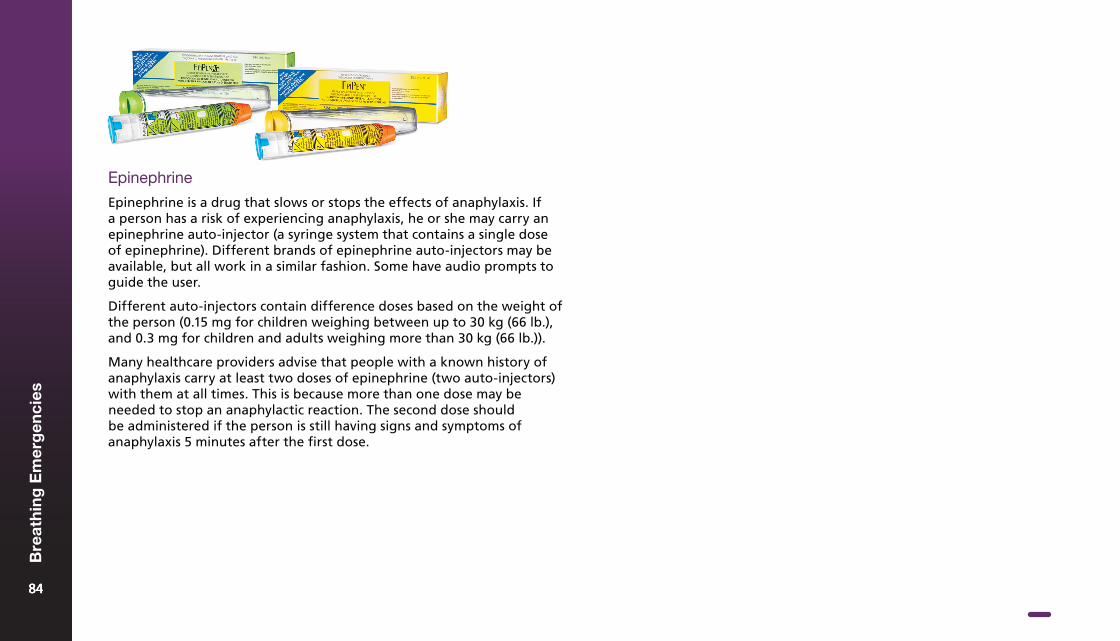
Epinephrine
Epinephrine is a drug that slows or stops the effects of anaphylaxis. If a person has a risk of experiencing anaphylaxis, he or she may carry an epinephrine auto-injector (a syringe system that contains a single dose of epinephrine). Different brands of epinephrine auto-injectors may be available, but all work in a similar fashion. Some have audio prompts to guide the user.
Different auto-injectors contain difference doses based on the weight of the person (0.15 mg for children weighing between up to 30 kg (66 lb.), and 0.3 mg for children and adults weighing more than 30 kg (66 lb.)).
Many healthcare providers advise that people with a known history of anaphylaxis carry at least two doses of epinephrine (two auto-injectors) with them at all times. This is because more than one dose may be needed to stop an anaphylactic reaction. The second dose should be administered if the person is still having signs and symptoms of anaphylaxis 5 minutes after the first dose.
8484
Bre
ath
ing
Em
erg
enci
es
84

Wound Care8
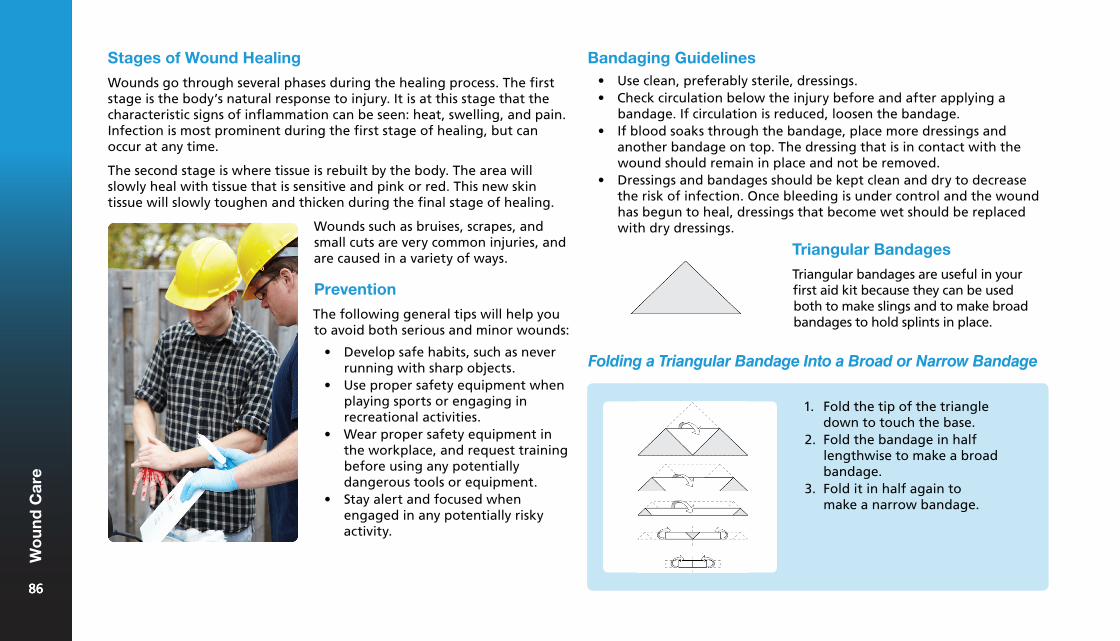
Wounds such as bruises, scrapes, and small cuts are very common injuries, and are caused in a variety of ways.
Prevention
The following general tips will help you to avoid both serious and minor wounds:
• Develop safe habits, such as neverrunning with sharp objects.
• Use proper safety equipment whenplaying sports or engaging inrecreational activities.
• Wear proper safety equipment inthe workplace, and request trainingbefore using any potentiallydangerous tools or equipment.
• Stay alert and focused whenengaged in any potentially riskyactivity.
Bandaging Guidelines• Use clean, preferably sterile, dressings.• Check circulation below the injury before and after applying a
bandage. If circulation is reduced, loosen the bandage.• If blood soaks through the bandage, place more dressings and
another bandage on top. The dressing that is in contact with thewound should remain in place and not be removed.
• Dressings and bandages should be kept clean and dry to decreasethe risk of infection. Once bleeding is under control and the woundhas begun to heal, dressings that become wet should be replacedwith dry dressings.
Stages of Wound Healing
Wounds go through several phases during the healing process. The first stage is the body’s natural response to injury. It is at this stage that the characteristic signs of inflammation can be seen: heat, swelling, and pain. Infection is most prominent during the first stage of healing, but can occur at any time.
The second stage is where tissue is rebuilt by the body. The area will slowly heal with tissue that is sensitive and pink or red. This new skin tissue will slowly toughen and thicken during the final stage of healing.
1. Fold the tip of the triangledown to touch the base.
2. Fold the bandage in halflengthwise to make a broadbandage.
3. Fold it in half again tomake a narrow bandage.
Folding a Triangular Bandage Into a Broad or Narrow Bandage
Triangular Bandages
Triangular bandages are useful in your first aid kit because they can be used both to make slings and to make broad bandages to hold splints in place.
8686
Wo
un
d C
are
86
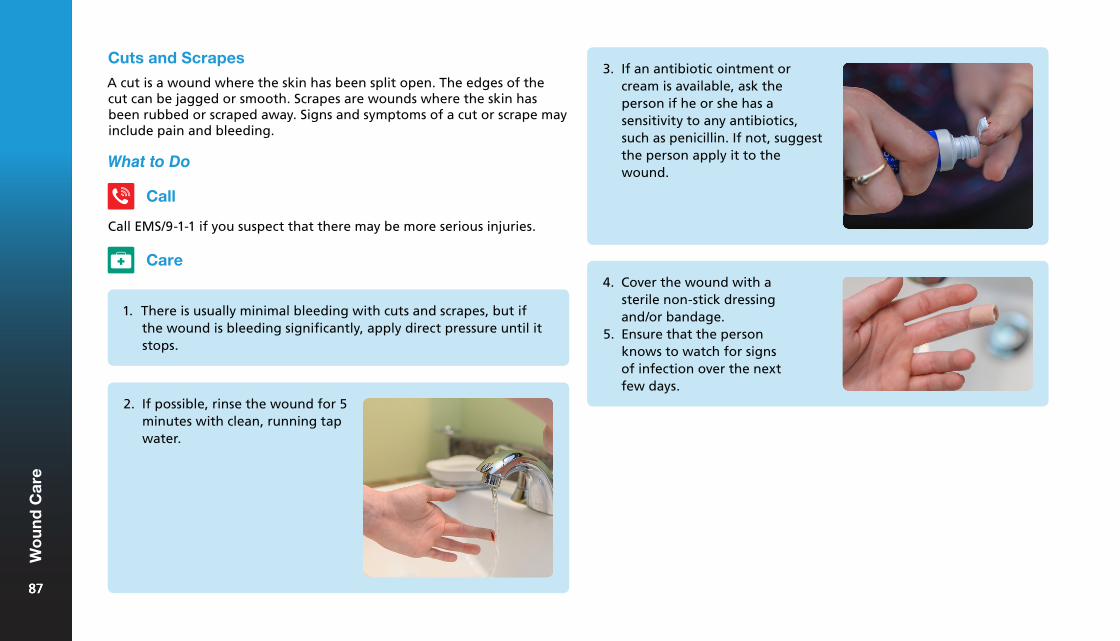
Cuts and Scrapes
A cut is a wound where the skin has been split open. The edges of the cut can be jagged or smooth. Scrapes are wounds where the skin has been rubbed or scraped away. Signs and symptoms of a cut or scrape may include pain and bleeding.
What to Do
Call
Call EMS/9-1-1 if you suspect that there may be more serious injuries.
Care
1. There is usually minimal bleeding with cuts and scrapes, but ifthe wound is bleeding significantly, apply direct pressure until itstops.
2. If possible, rinse the wound for 5minutes with clean, running tapwater.
3. If an antibiotic ointment orcream is available, ask theperson if he or she has asensitivity to any antibiotics,such as penicillin. If not, suggestthe person apply it to thewound.
4. Cover the wound with asterile non-stick dressingand/or bandage.
5. Ensure that the personknows to watch for signsof infection over the nextfew days.
8787
Wo
un
d C
are
87
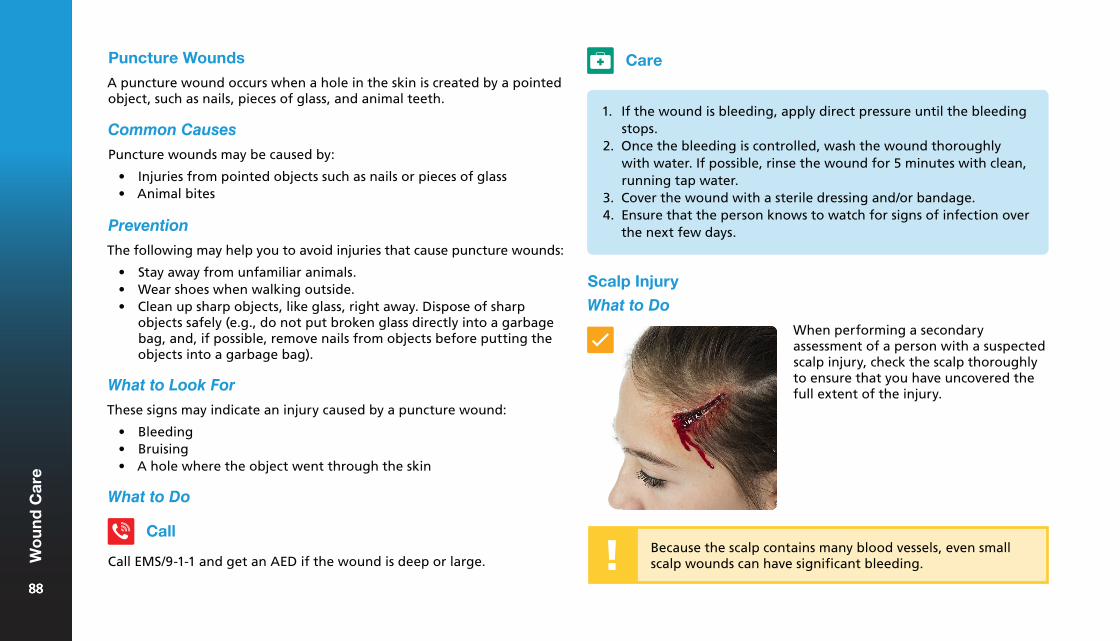
Puncture Wounds
A puncture wound occurs when a hole in the skin is created by a pointed object, such as nails, pieces of glass, and animal teeth.
Common Causes
Puncture wounds may be caused by:
• Injuries from pointed objects such as nails or pieces of glass• Animal bites
Prevention
The following may help you to avoid injuries that cause puncture wounds:
• Stay away from unfamiliar animals.• Wear shoes when walking outside.• Clean up sharp objects, like glass, right away. Dispose of sharp
objects safely (e.g., do not put broken glass directly into a garbagebag, and, if possible, remove nails from objects before putting theobjects into a garbage bag).
What to Look For
1. If the wound is bleeding, apply direct pressure until the bleedingstops.
2. Once the bleeding is controlled, wash the wound thoroughlywith water. If possible, rinse the wound for 5 minutes with clean,running tap water.
3. Cover the wound with a sterile dressing and/or bandage.4. Ensure that the person knows to watch for signs of infection over
the next few days.
These signs may indicate an injury caused by a puncture wound:
• Bleeding• Bruising• A hole where the object went through the skin
What to Do
Call
Call EMS/9-1-1 and get an AED if the wound is deep or large.
Care
Scalp Injury
What to Do
Because the scalp contains many blood vessels, even small scalp wounds can have significant bleeding.
When performing a secondary assessment of a person with a suspected scalp injury, check the scalp thoroughly to ensure that you have uncovered the full extent of the injury.
8888
Wo
un
d C
are
88
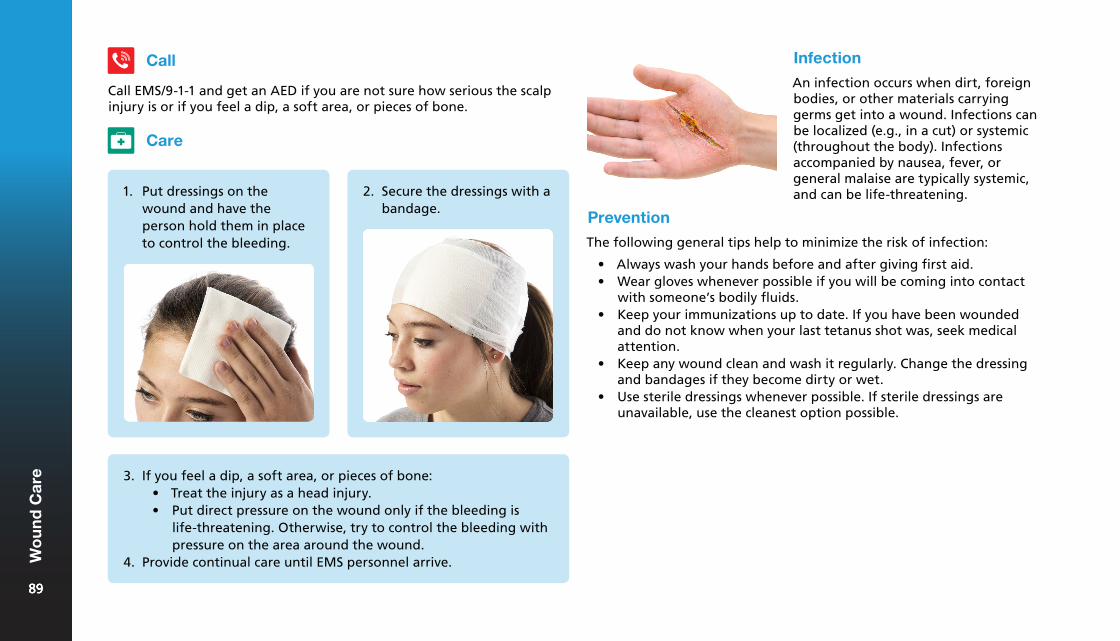
Infection
An infection occurs when dirt, foreign bodies, or other materials carrying germs get into a wound. Infections can be localized (e.g., in a cut) or systemic (throughout the body). Infections accompanied by nausea, fever, or general malaise are typically systemic, and can be life-threatening.
Care
1. Put dressings on thewound and have theperson hold them in placeto control the bleeding.
2. Secure the dressings with abandage.
Call
Call EMS/9-1-1 and get an AED if you are not sure how serious the scalp injury is or if you feel a dip, a soft area, or pieces of bone.
3. If you feel a dip, a soft area, or pieces of bone:• Treat the injury as a head injury.• Put direct pressure on the wound only if the bleeding is
life-threatening. Otherwise, try to control the bleeding withpressure on the area around the wound.
4. Provide continual care until EMS personnel arrive.
Prevention
The following general tips help to minimize the risk of infection:
• Always wash your hands before and after giving first aid.• Wear gloves whenever possible if you will be coming into contact
with someone’s bodily fluids.• Keep your immunizations up to date. If you have been wounded
and do not know when your last tetanus shot was, seek medicalattention.
• Keep any wound clean and wash it regularly. Change the dressingand bandages if they become dirty or wet.
• Use sterile dressings whenever possible. If sterile dressings areunavailable, use the cleanest option possible.
8989
Wo
un
d C
are
89
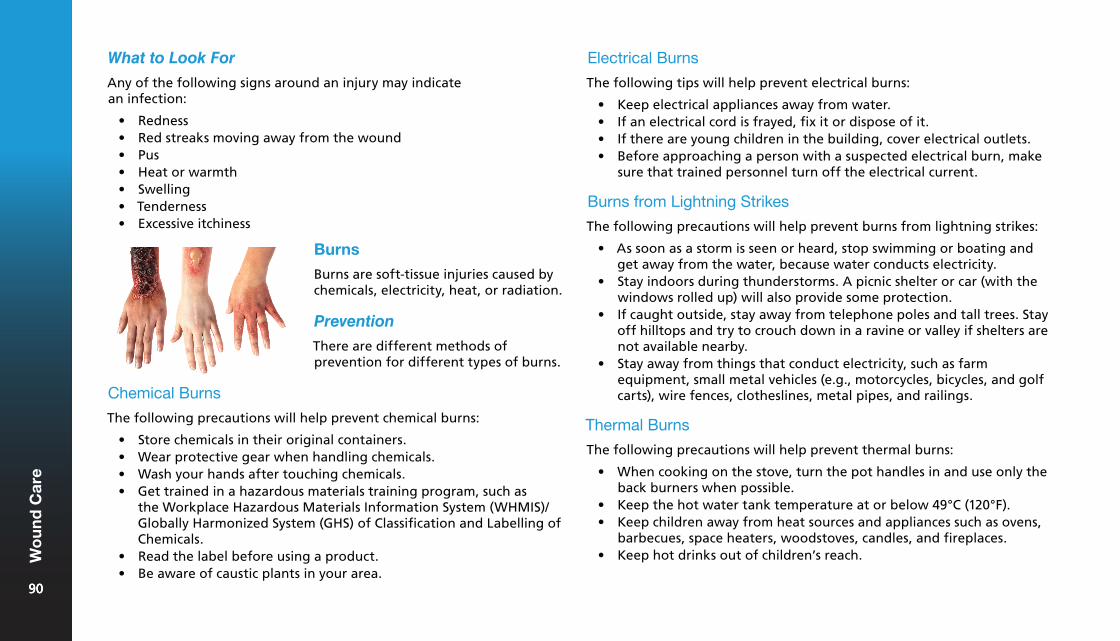
What to Look For Electrical Burns
The following tips will help prevent electrical burns:
• Keep electrical appliances away from water.• If an electrical cord is frayed, fix it or dispose of it.• If there are young children in the building, cover electrical outlets.• Before approaching a person with a suspected electrical burn, make
sure that trained personnel turn off the electrical current.
Burns from Lightning Strikes
The following precautions will help prevent burns from lightning strikes:
• As soon as a storm is seen or heard, stop swimming or boating andget away from the water, because water conducts electricity.
• Stay indoors during thunderstorms. A picnic shelter or car (with thewindows rolled up) will also provide some protection.
• If caught outside, stay away from telephone poles and tall trees. Stayoff hilltops and try to crouch down in a ravine or valley if shelters arenot available nearby.
• Stay away from things that conduct electricity, such as farmequipment, small metal vehicles (e.g., motorcycles, bicycles, and golfcarts), wire fences, clotheslines, metal pipes, and railings.
Thermal Burns
The following precautions will help prevent thermal burns:
• When cooking on the stove, turn the pot handles in and use only theback burners when possible.
• Keep the hot water tank temperature at or below 49°C (120°F).• Keep children away from heat sources and appliances such as ovens,
barbecues, space heaters, woodstoves, candles, and fireplaces.• Keep hot drinks out of children’s reach.
Any of the following signs around an injury may indicate an infection:
• Redness• Red streaks moving away from the wound• Pus• Heat or warmth• Swelling• Tenderness• Excessive itchiness
Burns
Burns are soft-tissue injuries caused by chemicals, electricity, heat, or radiation.
Prevention
There are different methods of prevention for different types of burns.
Chemical Burns
The following precautions will help prevent chemical burns:
• Store chemicals in their original containers.• Wear protective gear when handling chemicals.• Wash your hands after touching chemicals.• Get trained in a hazardous materials training program, such as
the Workplace Hazardous Materials Information System (WHMIS)/Globally Harmonized System (GHS) of Classification and Labelling ofChemicals.
• Read the label before using a product.• Be aware of caustic plants in your area.
9090
Wo
un
d C
are
90
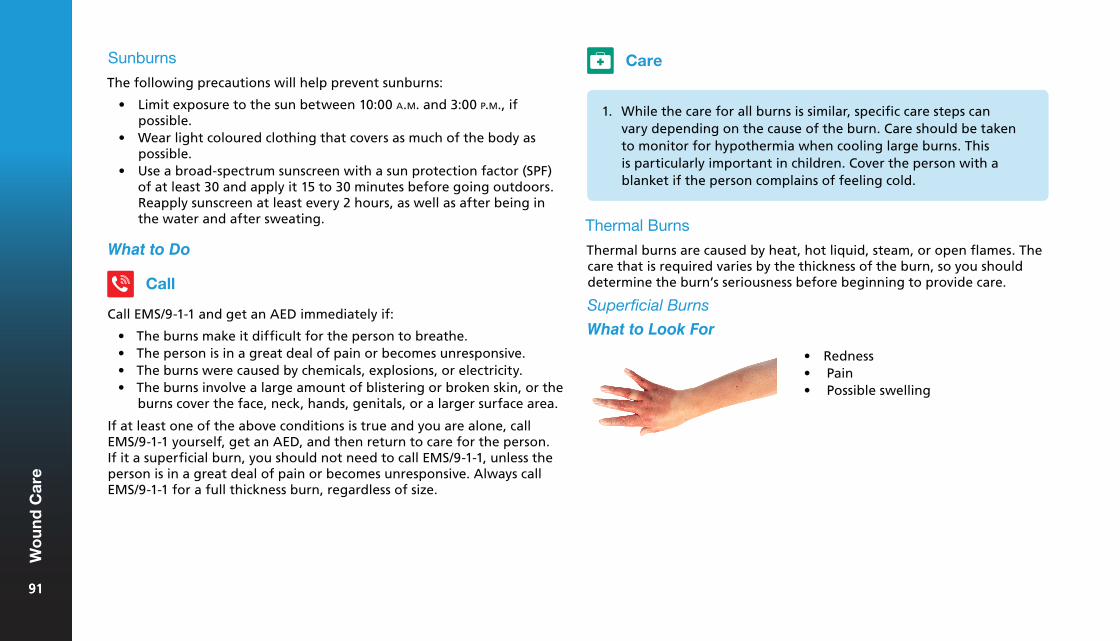
Sunburns
The following precautions will help prevent sunburns:
• Limit exposure to the sun between 10:00 a.m. and 3:00 p.m., ifpossible.
• Wear light coloured clothing that covers as much of the body aspossible.
• Use a broad-spectrum sunscreen with a sun protection factor (SPF)of at least 30 and apply it 15 to 30 minutes before going outdoors.Reapply sunscreen at least every 2 hours, as well as after being inthe water and after sweating.
What to Do
Call
Call EMS/9-1-1 and get an AED immediately if:
• The burns make it difficult for the person to breathe.• The person is in a great deal of pain or becomes unresponsive.• The burns were caused by chemicals, explosions, or electricity.• The burns involve a large amount of blistering or broken skin, or the
burns cover the face, neck, hands, genitals, or a larger surface area.
If at least one of the above conditions is true and you are alone, call EMS/9-1-1 yourself, get an AED, and then return to care for the person. If it a superficial burn, you should not need to call EMS/9-1-1, unless the person is in a great deal of pain or becomes unresponsive. Always call EMS/9-1-1 for a full thickness burn, regardless of size.
Care
1. While the care for all burns is similar, specific care steps canvary depending on the cause of the burn. Care should be takento monitor for hypothermia when cooling large burns. Thisis particularly important in children. Cover the person with ablanket if the person complains of feeling cold.
Thermal Burns
Thermal burns are caused by heat, hot liquid, steam, or open flames. The care that is required varies by the thickness of the burn, so you should determine the burn’s seriousness before beginning to provide care.
Superficial Burns
What to Look For
• Redness• Pain• Possible swelling
9191
Wo
un
d C
are
91
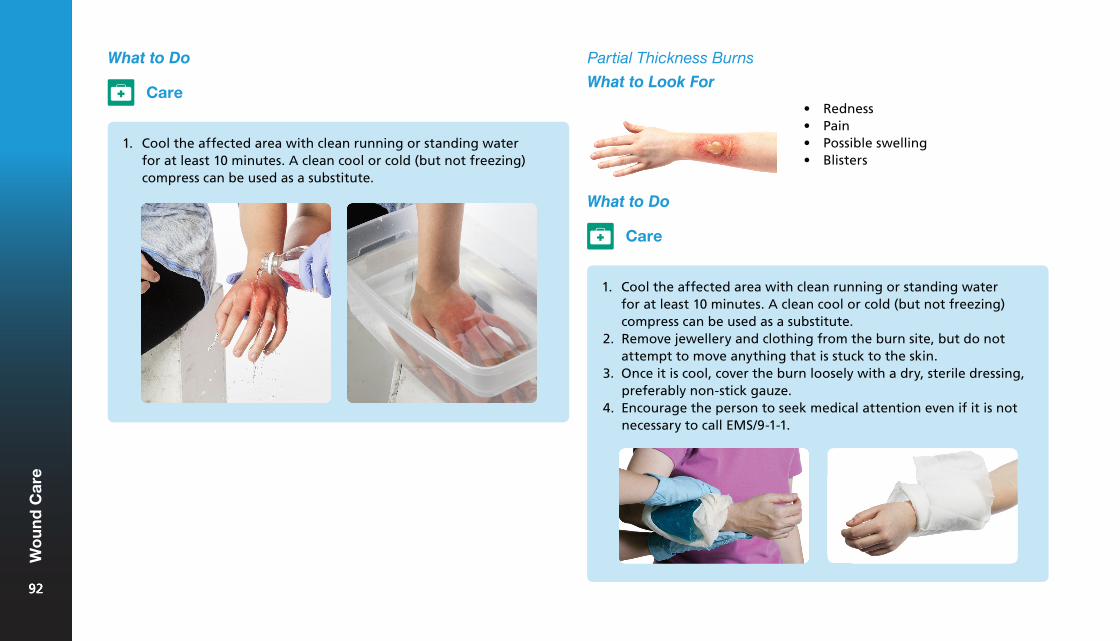
Partial Thickness Burns
What to Look For
What to Do
Care
1. Cool the affected area with clean running or standing waterfor at least 10 minutes. A clean cool or cold (but not freezing)compress can be used as a substitute.
• Redness• Pain• Possible swelling• Blisters
What to Do
Care
1. Cool the affected area with clean running or standing waterfor at least 10 minutes. A clean cool or cold (but not freezing)compress can be used as a substitute.
2. Remove jewellery and clothing from the burn site, but do notattempt to move anything that is stuck to the skin.
3. Once it is cool, cover the burn loosely with a dry, sterile dressing,preferably non-stick gauze.
4. Encourage the person to seek medical attention even if it is notnecessary to call EMS/9-1-1.
9292
Wo
un
d C
are
92
What to Do
Full Thickness Burns
What to Look For• Redness• Pain (may not be present in the
most severely burned areas due tonerve damage)
• Possible swelling• Blisters• Charred or waxy, white flesh
Care
1. Stop the burn from worsening by cooling the affected areawith clean running or standing water for at least 10 minutes. Aclean, cool or cold (but not freezing) compress can be used as asubstitute.
2. Remove jewellery and clothing from the burn site, but do notattempt to move anything that is stuck to the skin.
3. Once it is cool, cover the burn loosely with a dry, sterile dressing,preferably non-stick gauze.
4. Have the person lie down until EMS personnel arrive.
Chemical Burns
Chemical burns can be caused by a wet or dry caustic chemical. Use caution with dry caustic chemicals, as they may spread or react if they become wet.
What to Do
Care
1. Wear protective equipment to avoid being burned yourself.2. If there are dry chemicals present, brush them off the person’s
skin before flushing with water.3. Flush the affected areas with large amounts of cool running
water for at least 15 minutes, or until EMS personnel arrive. Flushthe chemicals away from areas of the body that have not beencontaminated.
4. Remove any clothing that is wet or that has been contaminatedby the chemical.
5. Refer to the appropriate Material Safety Data Sheet (MSDS) foradditional first aid measures, if it is available.
9393
Wo
un
d C
are
93
What to Do
Care
1. Treat the person as if he or she has a head and/or spinal injury.2. Look for two burns (the entry and exit points) and care for them
as you would care for thermal burns.
Radiation Burns
The most common type of radiation burn is a sunburn, but they can also be caused by exposure to radioactive substances.
What to Do
Care
1. If the burn results from exposure to a radioactive substance,consult the appropriate workplace safety system (e.g., WHMIS)for specific first aid steps.
2. Care for radiation burns as you would care for thermal burns.
Special Considerations When Caring for Burns
Remember the following special considerations when providing care for burns:
• Don’t use ointments on partial or full thickness burns.
• Blisters are a natural cooling system. Leave them in place.
• Touch a burn only with sterile or clean dressings.
• Do not use absorbent cotton or pull clothes over any burned area.
Pay close attention to the person’s airway. Look for signs of burn injuries around the face. If you suspect that the airway or the lungs may be burned, monitor the person’s breathing closely.
Bruises
A bruise is a discoloured area of the skin that is created when blood and other fluids seep into nearby tissues.
What to Look For
The following are signs and symptoms of bruising:
• Discoloured skin (red, purple, black, or blue areas)• Swelling• Pain
Electrical Burns
Electrical burns are caused by powerful electrical currents. They are typically caused by a person either touching a live electrical circuit or being struck by lightning. Because electricity and lightning can affect the heart, it is important to monitor the person’s ABCs closely.
9494
Wo
un
d C
are
94
What to Do
Call
If the person is in severe pain or cannot move a body part without pain, or you think the force that caused the injury was great enough to cause serious damage or life-threatening bleeding, call EMS/9-1-1 and get an AED immediately. You may be dealing with internal bleeding, head and/or spinal injuries, or a bone, muscle, or joint injury. Care for the injury accordingly.
Care
1. Using ice or another coldsource, cool the injuredarea to help reduce painand swelling. Place somesort of cloth, towel, or padbetween the cold sourceand the skin to reduce therisk of freezing.
2. Apply the cold source for20 minutes and then takeit off for 20 to 30 minutes.Continue to do this for aslong as the person keepsfeeling pain.
Splinters
A splinter (or "sliver") is a sharp, thin piece of material that is stuck in the surface of the skin. If the splinter is completely below the skin, encourage the person to seek medical attention rather than attempting to remove it yourself.
What to Do
Care
1. Gently grab the exposed end ofthe splinter with tweezers andcarefully pull it out.
2. Wash the area with water andapply a bandage.
9595
Wo
un
d C
are
95
Nosebleeds
Common Causes
Nosebleeds may be caused by the following:
• Forceful nose blowing• High blood pressure• Dry weather conditions• Trauma to the nose or head• Bleeding disorders
If you know that the bleeding is caused by an object in the nose, refer to the care for foreign objects in the nose.
Prevention
To prevent nosebleeds:
• Use a humidifier if the air indoors is dry.• Wear protective athletic equipment when participating in sports
that could cause injuries to the nose.• Practice gentle nose blowing.• Teach children not to pick their noses.
What to Do
Call
Call EMS/9-1-1 if the bleeding continues for more than 15 minutes, the bleeding is the result of a head injury, or the person is losing a large amount of blood.
Care
1. Have the person sit withthe head slightly forward,pinching the nostrils, for10 to 15 minutes. If thenosebleed was caused by asevere head injury, do notpinch the nose.
2. Once you have controlledthe bleeding, tell the personto avoid rubbing, blowing,or picking his or her nosebecause this could start thebleeding again.
3. If the person losesresponsiveness, place him orher in the recovery positionto allow blood to drain fromthe nose.
9696
Wo
un
d C
are
96

What to Do
Care
1. If you can easily see and grasp the object, remove it.2. If the object cannot be dislodged easily, leave it in place for a
medical professional to remove.3. Prevent the person from attempting to remove the object and
from blowing his or her nose.
Knocked-Out Teeth
Common Causes
A tooth can be knocked out by any kind of blow that involves the mouth.
Prevention
The following tips may avoid an injury that results in knocked-out teeth:
• Wear appropriate equipment whenplaying sports, such as a mouthguard or face mask.
• Always wear a seat belt while inthe car and do not eat or drink in amoving car.
What to Look For
Aside from a tooth that is visibly missing, signs and symptoms of knocked-out teeth include the following:
• Bleeding (although this is often very minimal)• Pain in the mouth
What to Do
Call
Call EMS/9-1-1 and get an AED if the knocked-out tooth was caused by a forceful blow to the head, especially if the person is unresponsive, or you suspect that there may be other more serious injuries.
Foreign Objects in the Nose
What to Look For
An object in the nose may be visible, and may also cause the following signs and symptoms:
• Unusual noises when the person breathes through his or her nose• Bleeding• Nose deformity
9797
Wo
un
d C
are
97
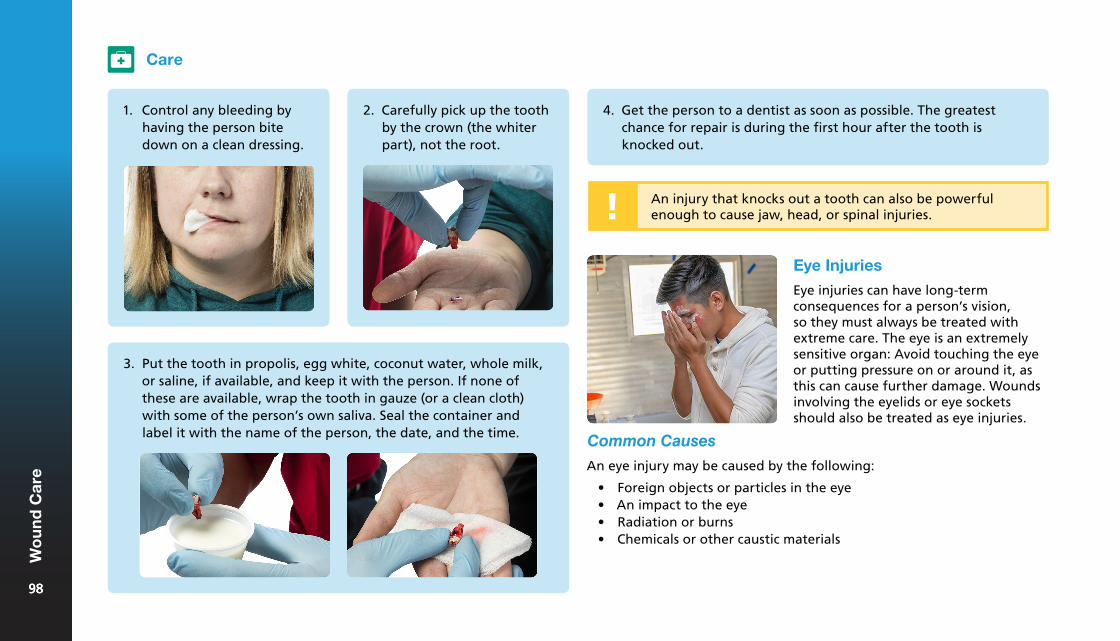
Eye Injuries
Eye injuries can have long-term consequences for a person’s vision, so they must always be treated with extreme care. The eye is an extremely sensitive organ: Avoid touching the eye or putting pressure on or around it, as this can cause further damage. Wounds involving the eyelids or eye sockets should also be treated as eye injuries.
3. Put the tooth in propolis, egg white, coconut water, whole milk,or saline, if available, and keep it with the person. If none ofthese are available, wrap the tooth in gauze (or a clean cloth)with some of the person’s own saliva. Seal the container andlabel it with the name of the person, the date, and the time.
4. Get the person to a dentist as soon as possible. The greatestchance for repair is during the first hour after the tooth isknocked out.
Common Causes
An eye injury may be caused by the following:
• Foreign objects or particles in the eye• An impact to the eye• Radiation or burns• Chemicals or other caustic materials
Care
1. Control any bleeding byhaving the person bitedown on a clean dressing.
2. Carefully pick up the toothby the crown (the whiterpart), not the root.
An injury that knocks out a tooth can also be powerful enough to cause jaw, head, or spinal injuries.
9898
Wo
un
d C
are
98
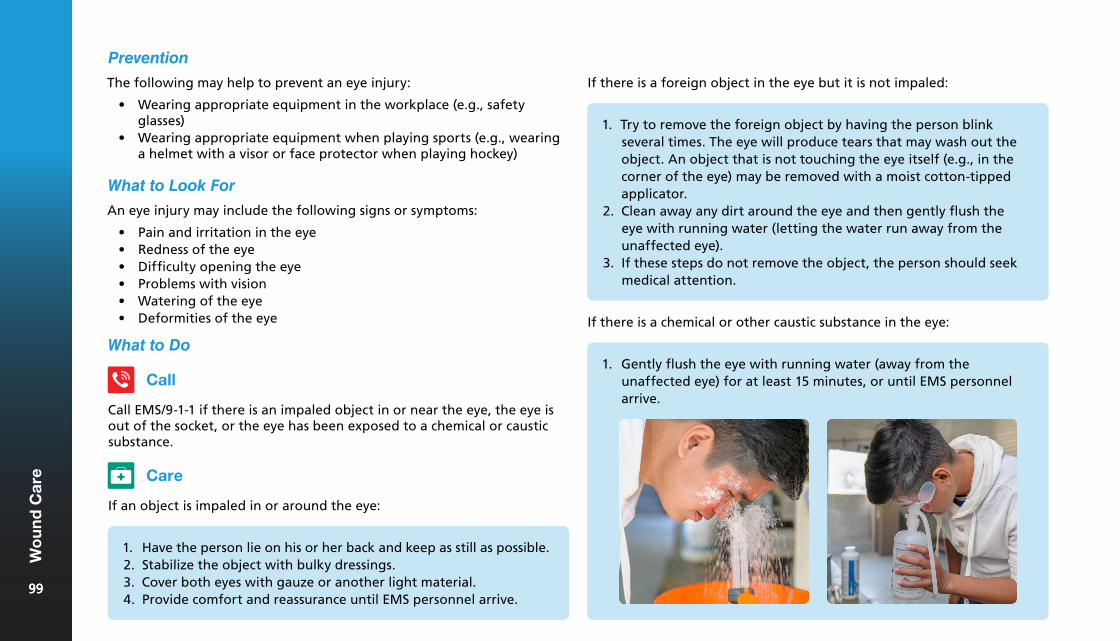
If there is a foreign object in the eye but it is not impaled:
An eye injury may include the following signs or symptoms:
• Pain and irritation in the eye• Redness of the eye• Difficulty opening the eye• Problems with vision• Watering of the eye• Deformities of the eye
What to Do
Call
Call EMS/9-1-1 if there is an impaled object in or near the eye, the eye is out of the socket, or the eye has been exposed to a chemical or caustic substance.
Care
If an object is impaled in or around the eye:
1. Have the person lie on his or her back and keep as still as possible.2. Stabilize the object with bulky dressings.3. Cover both eyes with gauze or another light material.4. Provide comfort and reassurance until EMS personnel arrive.
1. Try to remove the foreign object by having the person blinkseveral times. The eye will produce tears that may wash out theobject. An object that is not touching the eye itself (e.g., in thecorner of the eye) may be removed with a moist cotton-tippedapplicator.
2. Clean away any dirt around the eye and then gently flush theeye with running water (letting the water run away from theunaffected eye).
3. If these steps do not remove the object, the person should seekmedical attention.
If there is a chemical or other caustic substance in the eye:
1. Gently flush the eye with running water (away from theunaffected eye) for at least 15 minutes, or until EMS personnelarrive.
Prevention
The following may help to prevent an eye injury:
• Wearing appropriate equipment in the workplace (e.g., safetyglasses)
• Wearing appropriate equipment when playing sports (e.g., wearinga helmet with a visor or face protector when playing hockey)
What to Look For
9999
Wo
un
d C
are
99
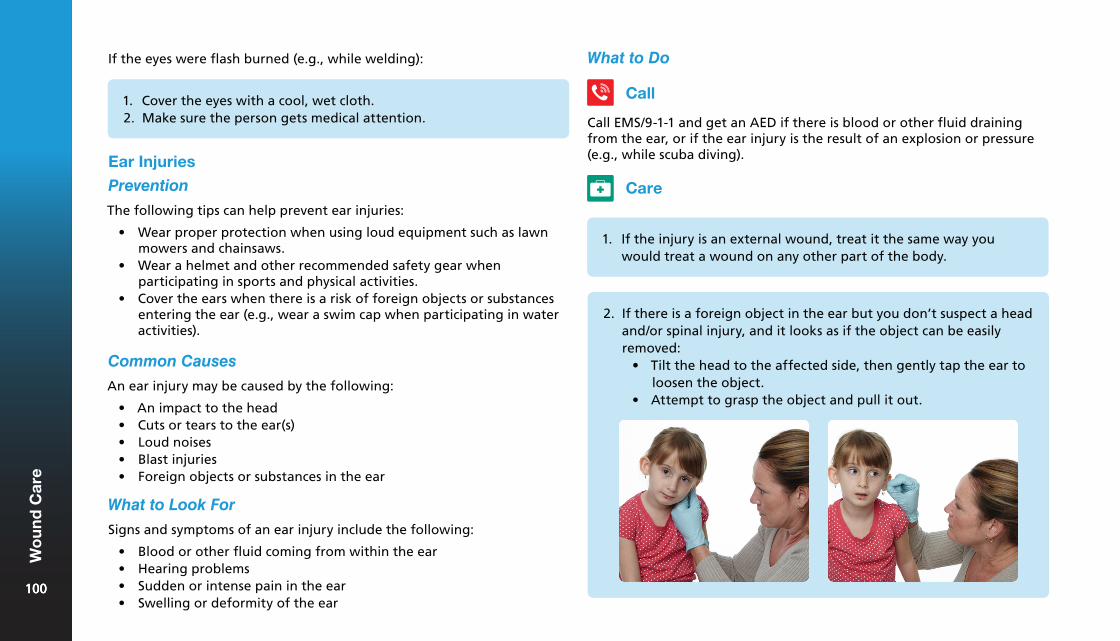
If the eyes were flash burned (e.g., while welding):
1. Cover the eyes with a cool, wet cloth.2. Make sure the person gets medical attention.
Ear Injuries
Prevention
The following tips can help prevent ear injuries:
• Wear proper protection when using loud equipment such as lawnmowers and chainsaws.
• Wear a helmet and other recommended safety gear whenparticipating in sports and physical activities.
• Cover the ears when there is a risk of foreign objects or substancesentering the ear (e.g., wear a swim cap when participating in wateractivities).
Common Causes
An ear injury may be caused by the following:
• An impact to the head• Cuts or tears to the ear(s)• Loud noises• Blast injuries• Foreign objects or substances in the ear
What to Look For
Signs and symptoms of an ear injury include the following:
• Blood or other fluid coming from within the ear• Hearing problems• Sudden or intense pain in the ear• Swelling or deformity of the ear
What to Do
Call
Call EMS/9-1-1 and get an AED if there is blood or other fluid draining from the ear, or if the ear injury is the result of an explosion or pressure (e.g., while scuba diving).
Care
1. If the injury is an external wound, treat it the same way youwould treat a wound on any other part of the body.
2. If there is a foreign object in the ear but you don’t suspect a headand/or spinal injury, and it looks as if the object can be easilyremoved:
• Tilt the head to the affected side, then gently tap the ear toloosen the object.
• Attempt to grasp the object and pull it out.
100100
Wo
un
d C
are
100
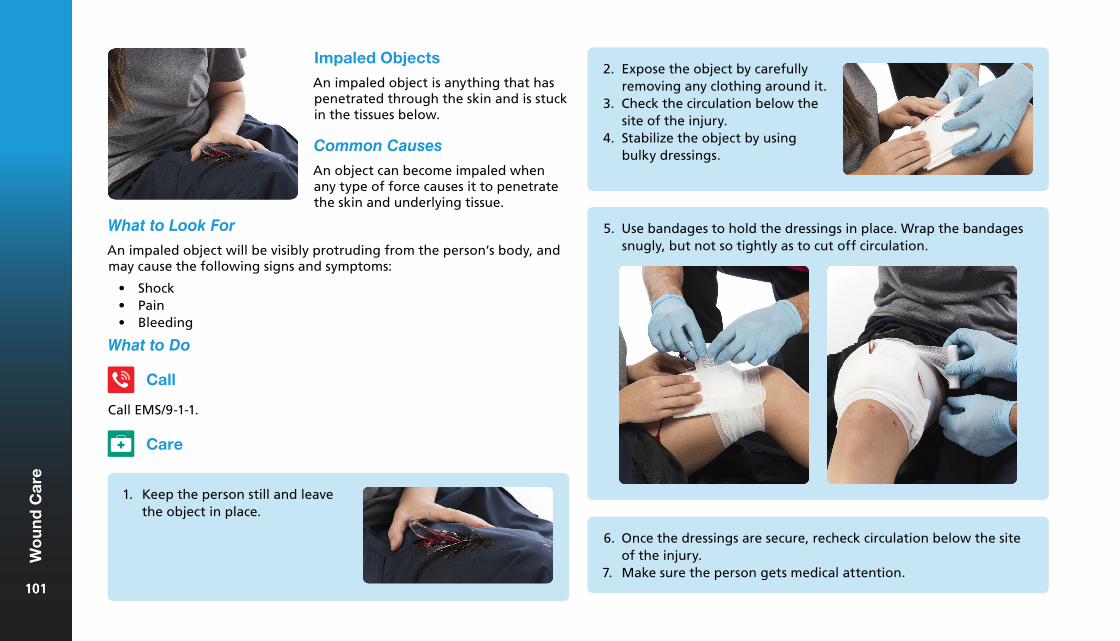
What to Look For
Impaled Objects
An impaled object is anything that has penetrated through the skin and is stuck in the tissues below.
Common Causes
An object can become impaled when any type of force causes it to penetrate the skin and underlying tissue.
An impaled object will be visibly protruding from the person’s body, and may cause the following signs and symptoms:
• Shock• Pain• Bleeding
What to Do
Call
Call EMS/9-1-1.
Care
1. Keep the person still and leavethe object in place.
2. Expose the object by carefullyremoving any clothing around it.
3. Check the circulation below thesite of the injury.
4. Stabilize the object by usingbulky dressings.
5. Use bandages to hold the dressings in place. Wrap the bandagessnugly, but not so tightly as to cut off circulation.
6. Once the dressings are secure, recheck circulation below the siteof the injury.
7. Make sure the person gets medical attention.101101
Wo
un
d C
are
101
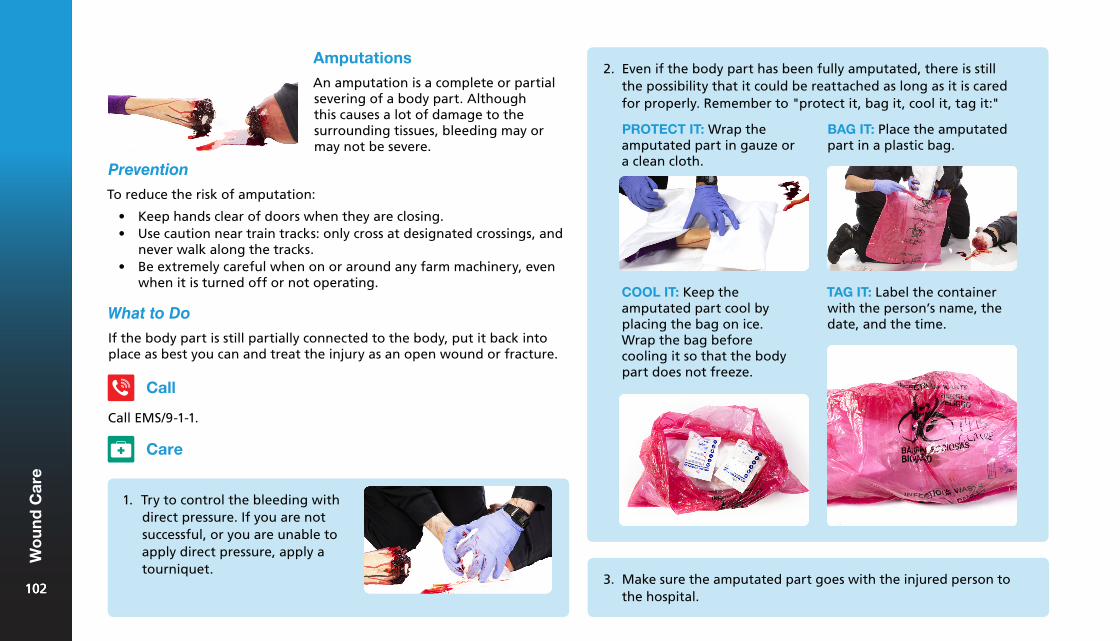
Amputations
An amputation is a complete or partial severing of a body part. Although this causes a lot of damage to the surrounding tissues, bleeding may or may not be severe.
Prevention
To reduce the risk of amputation:
• Keep hands clear of doors when they are closing.• Use caution near train tracks: only cross at designated crossings, and
never walk along the tracks.• Be extremely careful when on or around any farm machinery, even
when it is turned off or not operating.
What to Do
If the body part is still partially connected to the body, put it back into place as best you can and treat the injury as an open wound or fracture.
Call
Call EMS/9-1-1.
Care
1. Try to control the bleeding withdirect pressure. If you are notsuccessful, or you are unable toapply direct pressure, apply atourniquet.
2. Even if the body part has been fully amputated, there is stillthe possibility that it could be reattached as long as it is caredfor properly. Remember to "protect it, bag it, cool it, tag it:"
PROTECT IT: Wrap the amputated part in gauze or a clean cloth.
BAG IT: Place the amputatedpart in a plastic bag.
COOL IT: Keep the amputated part cool by placing the bag on ice. Wrap the bag before cooling it so that the body part does not freeze.
TAG IT: Label the container with the person’s name, the date, and the time.
3. Make sure the amputated part goes with the injured person tothe hospital.
102102
Wo
un
d C
are
102
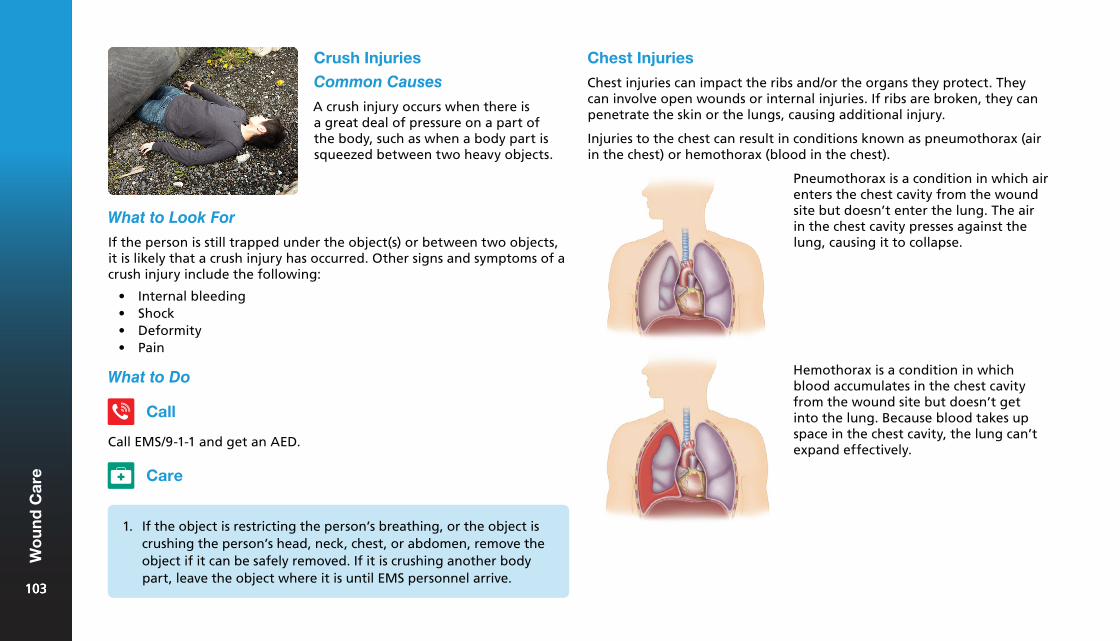
Chest Injuries
Chest injuries can impact the ribs and/or the organs they protect. They can involve open wounds or internal injuries. If ribs are broken, they can penetrate the skin or the lungs, causing additional injury.
Injuries to the chest can result in conditions known as pneumothorax (air in the chest) or hemothorax (blood in the chest).
Crush Injuries
Common Causes
A crush injury occurs when there is a great deal of pressure on a part of the body, such as when a body part is squeezed between two heavy objects.
What to Look For
If the person is still trapped under the object(s) or between two objects, it is likely that a crush injury has occurred. Other signs and symptoms of a crush injury include the following:
• Internal bleeding• Shock• Deformity• Pain
What to Do
Call
Call EMS/9-1-1 and get an AED.
1. If the object is restricting the person’s breathing, or the object iscrushing the person’s head, neck, chest, or abdomen, remove theobject if it can be safely removed. If it is crushing another bodypart, leave the object where it is until EMS personnel arrive.
Care
Pneumothorax is a condition in which air enters the chest cavity from the wound site but doesn’t enter the lung. The air in the chest cavity presses against the lung, causing it to collapse.
Hemothorax is a condition in which blood accumulates in the chest cavity from the wound site but doesn’t get into the lung. Because blood takes up space in the chest cavity, the lung can’t expand effectively.
103103
Wo
un
d C
are
103
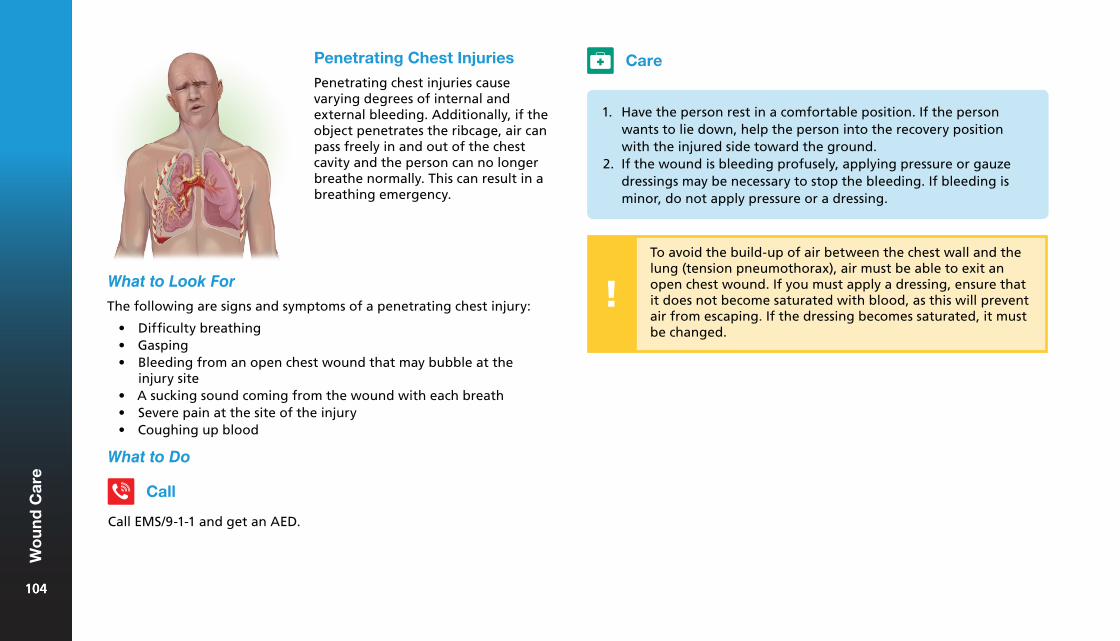
Penetrating Chest Injuries
Penetrating chest injuries cause varying degrees of internal and external bleeding. Additionally, if the object penetrates the ribcage, air can pass freely in and out of the chest cavity and the person can no longer breathe normally. This can result in a breathing emergency.
What to Look For
The following are signs and symptoms of a penetrating chest injury:
• Difficulty breathing• Gasping• Bleeding from an open chest wound that may bubble at the
injury site• A sucking sound coming from the wound with each breath• Severe pain at the site of the injury• Coughing up blood
What to Do
Call EMS/9-1-1 and get an AED.
Call
Care
1. Have the person rest in a comfortable position. If the personwants to lie down, help the person into the recovery positionwith the injured side toward the ground.
2. If the wound is bleeding profusely, applying pressure or gauzedressings may be necessary to stop the bleeding. If bleeding isminor, do not apply pressure or a dressing.
To avoid the build-up of air between the chest wall and the lung (tension pneumothorax), air must be able to exit an open chest wound. If you must apply a dressing, ensure that it does not become saturated with blood, as this will prevent air from escaping. If the dressing becomes saturated, it must be changed.
104104
Wo
un
d C
are
104
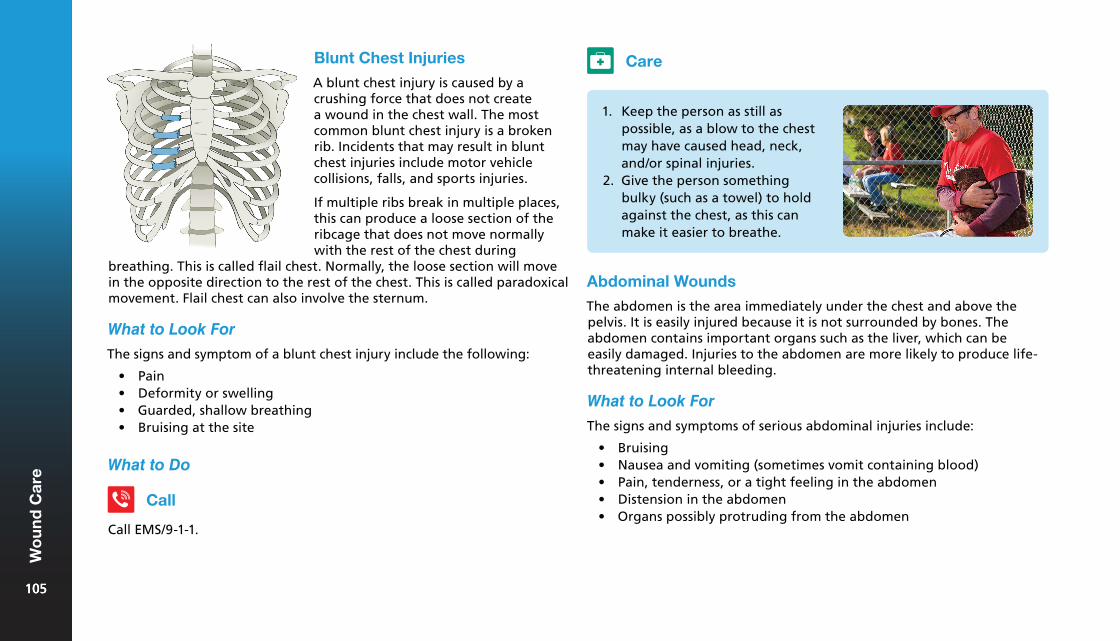
1. Keep the person as still aspossible, as a blow to the chestmay have caused head, neck,and/or spinal injuries.
2. Give the person somethingbulky (such as a towel) to holdagainst the chest, as this canmake it easier to breathe.
Blunt Chest Injuries
A blunt chest injury is caused by a crushing force that does not create a wound in the chest wall. The most common blunt chest injury is a broken rib. Incidents that may result in blunt chest injuries include motor vehicle collisions, falls, and sports injuries.
If multiple ribs break in multiple places, this can produce a loose section of the ribcage that does not move normally with the rest of the chest during
breathing. This is called flail chest. Normally, the loose section will move in the opposite direction to the rest of the chest. This is called paradoxical movement. Flail chest can also involve the sternum.
What to Look For
The signs and symptom of a blunt chest injury include the following:
• Pain• Deformity or swelling• Guarded, shallow breathing• Bruising at the site
What to Do
Call
Call EMS/9-1-1.
Care
Abdominal Wounds
The abdomen is the area immediately under the chest and above the pelvis. It is easily injured because it is not surrounded by bones. The abdomen contains important organs such as the liver, which can be easily damaged. Injuries to the abdomen are more likely to produce life-threatening internal bleeding.
What to Look For
The signs and symptoms of serious abdominal injuries include:
• Bruising• Nausea and vomiting (sometimes vomit containing blood)• Pain, tenderness, or a tight feeling in the abdomen• Distension in the abdomen• Organs possibly protruding from the abdomen
105105
Wo
un
d C
are
105
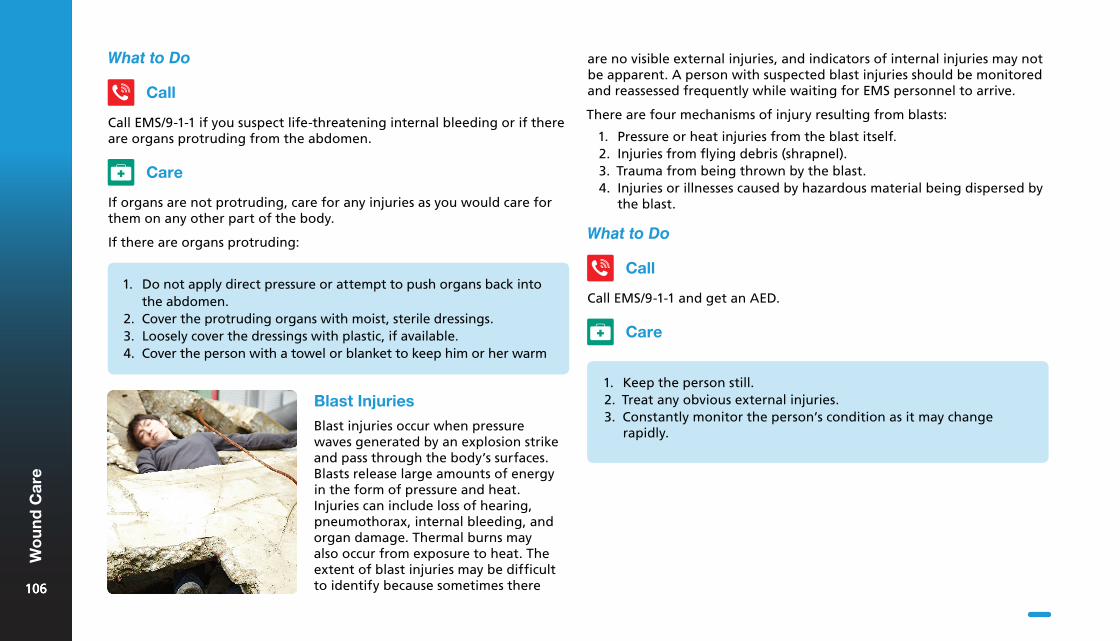
are no visible external injuries, and indicators of internal injuries may not be apparent. A person with suspected blast injuries should be monitored and reassessed frequently while waiting for EMS personnel to arrive.
There are four mechanisms of injury resulting from blasts:
1. Pressure or heat injuries from the blast itself.2. Injuries from flying debris (shrapnel).3. Trauma from being thrown by the blast.4. Injuries or illnesses caused by hazardous material being dispersed by
the blast.
What to Do
What to Do
Call
Call EMS/9-1-1 if you suspect life-threatening internal bleeding or if there are organs protruding from the abdomen.
Care
If organs are not protruding, care for any injuries as you would care for them on any other part of the body.
If there are organs protruding:
1. Do not apply direct pressure or attempt to push organs back intothe abdomen.
2. Cover the protruding organs with moist, sterile dressings.3. Loosely cover the dressings with plastic, if available.4. Cover the person with a towel or blanket to keep him or her warm
Blast Injuries
Blast injuries occur when pressure waves generated by an explosion strike and pass through the body’s surfaces. Blasts release large amounts of energy in the form of pressure and heat. Injuries can include loss of hearing, pneumothorax, internal bleeding, and organ damage. Thermal burns may also occur from exposure to heat. The extent of blast injuries may be difficult to identify because sometimes there
1. Keep the person still.2. Treat any obvious external injuries.3. Constantly monitor the person’s condition as it may change
rapidly.
Care
Call
Call EMS/9-1-1 and get an AED.
106106
Wo
un
d C
are
106
Head, Neck, and Spinal Injuries9
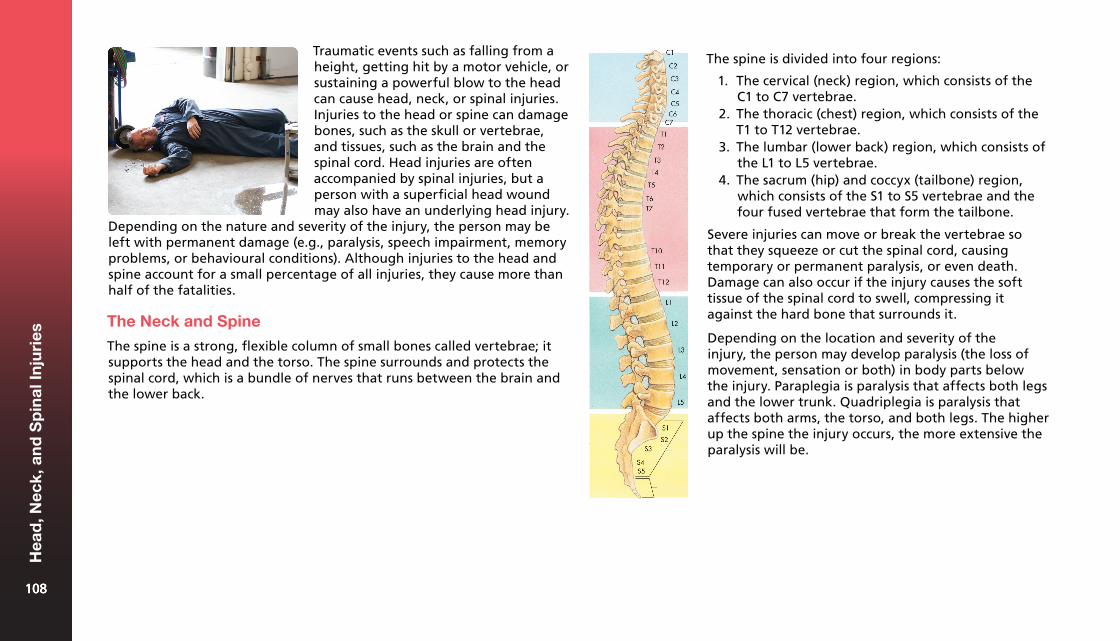
Traumatic events such as falling from a height, getting hit by a motor vehicle, or sustaining a powerful blow to the head can cause head, neck, or spinal injuries. Injuries to the head or spine can damage bones, such as the skull or vertebrae, and tissues, such as the brain and the spinal cord. Head injuries are often accompanied by spinal injuries, but a person with a superficial head wound may also have an underlying head injury.
Depending on the nature and severity of the injury, the person may be left with permanent damage (e.g., paralysis, speech impairment, memory problems, or behavioural conditions). Although injuries to the head and spine account for a small percentage of all injuries, they cause more than half of the fatalities.
The Neck and Spine
The spine is a strong, flexible column of small bones called vertebrae; it supports the head and the torso. The spine surrounds and protects the spinal cord, which is a bundle of nerves that runs between the brain and the lower back.
The spine is divided into four regions:
1. The cervical (neck) region, which consists of theC1 to C7 vertebrae.
2. The thoracic (chest) region, which consists of theT1 to T12 vertebrae.
3. The lumbar (lower back) region, which consists ofthe L1 to L5 vertebrae.
4. The sacrum (hip) and coccyx (tailbone) region,which consists of the S1 to S5 vertebrae and thefour fused vertebrae that form the tailbone.
Severe injuries can move or break the vertebrae so that they squeeze or cut the spinal cord, causing temporary or permanent paralysis, or even death. Damage can also occur if the injury causes the soft tissue of the spinal cord to swell, compressing it against the hard bone that surrounds it.
Depending on the location and severity of the injury, the person may develop paralysis (the loss of movement, sensation or both) in body parts below the injury. Paraplegia is paralysis that affects both legs and the lower trunk. Quadriplegia is paralysis that affects both arms, the torso, and both legs. The higher up the spine the injury occurs, the more extensive the paralysis will be.
108108
Hea
d, N
eck,
an
d S
pin
al In
juri
es
108

• Any injury that causes a wound in the head or torso• A motor vehicle collision or rollover• Any injury in which a person’s helmet is damaged• A person has been struck by lightning• A person has been electrocuted
It might be difficult to determine how much damage has taken place without advanced medical assessment and diagnosis, so always treat the injury as if it is serious. The size of a "goose egg" isn’t necessarily an indication of the severity of a head injury. Watch for other signs of injury. You can put ice on a swollen area to reduce its size.
The Brain
The brain is the centre of the nervous system. It is the master organ that controls all body functions. The brain has the consistency of gelatin, but it is cushioned from everyday bumps and jolts by the cerebrospinal fluid inside the skull. Because the skull is hard, there is not much room for the brain to move or swell.
Brain injuries can occur as a result of a blow to the head, a penetrating injury to the head (such as a bullet wound), or exposure to acceleration-deceleration forces that cause the head to snap forward and then back. A blow to the head can lead to a concussion (a traumatic brain injury that alters the way it functions), a brain contusion (bruising of the brain tissue) or a brain hematoma (bleeding into the space between the brain and the skull, which increases the pressure inside the skull and damages brain tissue).
Common Causes
Many different situations can lead to head, neck, or spinal injuries:
• Motor vehicle collisions• Recreation and sports injuries• Falls• Blow to the head or back• Violent acts, such as assault
You should suspect a head, neck, and/or spinal injury in the following situations:
• A fall from any height greater than the height of the person• Any diving injury (e.g., diving head-first into shallow water)• A person found unresponsive for unknown reasons• Any injury that involves a strong blow to the lower jaw, head, or
torso (e.g., colliding with another participant while playing a sport)
Prevention
The following tips help to prevent head, neck, and spinal injuries:
• Wear safety belts with shoulderrestraints when in a vehicle.
• Children and babies should alwaysride in approved safety seats. Makesure the seat is designed for thechild’s age and weight and makesure it is properly installed.
• Wear all recommended protectiveequipment for the activity you areengaged in (e.g., approved bicyclehelmets).
109109
Hea
d, N
eck,
an
d S
pin
al In
juri
es
109
What to Look For• Never join in a new sport without knowing the rules and risksinvolved.
• Prevent falls around the home and workplace with non-slip floors,non-slip treads on stairs, handrails on staircases, rugs secured withdouble-sided adhesive tape, and handrails by the bathtub and toiletif necessary.
• Make sure that there is good lighting in stairways and hallways.• If there are small children present, put gates at the top and bottom
of the stairways.• Make sure that your workplace is clean and tidy. Keep floors and
aisles uncluttered and make sure that there is nothing blockingstairways, work sites, or exits.
• Drink responsibly. Alcohol is often a factor in serious motor vehiclecollisions and water injuries. Alcohol slows down your reflexes andgives you a false feeling of confidence.
• Prescription drugs and common drugstore medications can makedriving or operating machinery dangerous, so follow the directionson the package carefully.
• Check equipment (such as warehouse forklifts, ladders, andscaffolding) regularly for worn or loose parts.
• Use ladders carefully and correctly.• Always be very careful around water:
¶ Before diving, make sure that the water is deep enough, and check for objects below the surface, such as logs or pilings. Pools at homes, motels, or hotels may not be safe for diving.
¶ Enter unknown water feet first. ¶ Enter above-ground pools feet first. ¶ When bodysurfing, keep your arms out in front of you to
protect your head and neck.
The signs and symptoms of a head, neck, or spinal injury depend on the nature and location of the injury. Bleeding inside the skull can happen slowly, so the signs may take time to appear. The severity of a head, neck, or spinal injury can only be determined through an evaluation by medical personnel: you should always assume that such an injury is serious.
The following signs and symptoms alone do not always indicate a serious head, neck, or spinal injury, but you should call EMS/9-1-1 if any of these are present:
• Changes in level of responsiveness, awareness, and behaviour• Drowsiness, confusion, or disorientation• Severe pain or pressure in the head, neck, or back• Blood or other fluids in the ears or nose• Heavy external bleeding from the head, neck, or back• Unusual bumps, bruises, or depressions on the head, neck, or back• Seizures• Impaired breathing or vision• Nausea or vomiting• Unequal pupil size• Persistent headache• Partial or complete loss of movement of any body part without an
obvious traumatic cause (e.g., inability to move a limb that does notappear to be injured)
• Back pain, weakness, tingling, or loss of sensation in the hands,fingers, feet, or toes
• Unusually positioned neck or back• Dizziness and/or loss of balance• Bruising of the head, especially around the eyes and behind the ears• Loss of bladder or bowel control• Behaviour similar to that of a person under the influence of alcohol
or drugs (e.g., stumbling, memory loss, speech problems)110110
Hea
d, N
eck,
an
d S
pin
al In
juri
es
110
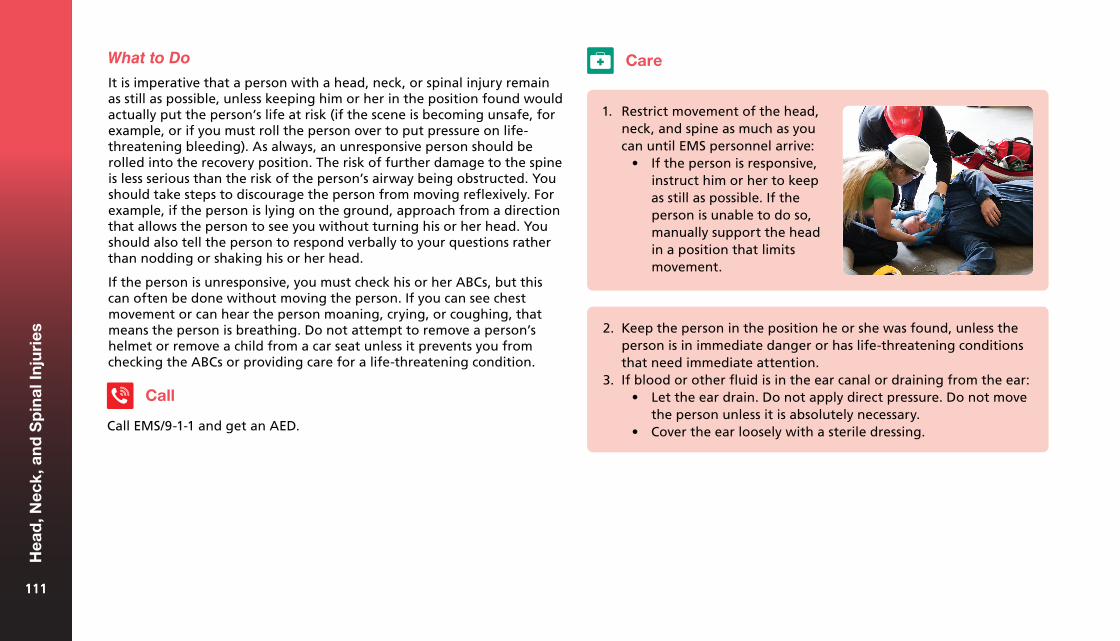
What to Do
It is imperative that a person with a head, neck, or spinal injury remain as still as possible, unless keeping him or her in the position found would actually put the person’s life at risk (if the scene is becoming unsafe, for example, or if you must roll the person over to put pressure on life-threatening bleeding). As always, an unresponsive person should be rolled into the recovery position. The risk of further damage to the spine is less serious than the risk of the person’s airway being obstructed. You should take steps to discourage the person from moving reflexively. For example, if the person is lying on the ground, approach from a direction that allows the person to see you without turning his or her head. You should also tell the person to respond verbally to your questions rather than nodding or shaking his or her head.
If the person is unresponsive, you must check his or her ABCs, but this can often be done without moving the person. If you can see chest movement or can hear the person moaning, crying, or coughing, that means the person is breathing. Do not attempt to remove a person’s helmet or remove a child from a car seat unless it prevents you from checking the ABCs or providing care for a life-threatening condition.
Call
Call EMS/9-1-1 and get an AED.
Care
1. Restrict movement of the head,neck, and spine as much as youcan until EMS personnel arrive:
• If the person is responsive,instruct him or her to keepas still as possible. If theperson is unable to do so,manually support the headin a position that limitsmovement.
2. Keep the person in the position he or she was found, unless theperson is in immediate danger or has life-threatening conditionsthat need immediate attention.
3. If blood or other fluid is in the ear canal or draining from the ear:• Let the ear drain. Do not apply direct pressure. Do not move
the person unless it is absolutely necessary.• Cover the ear loosely with a sterile dressing.
111111
Hea
d, N
eck,
an
d S
pin
al In
juri
es
111
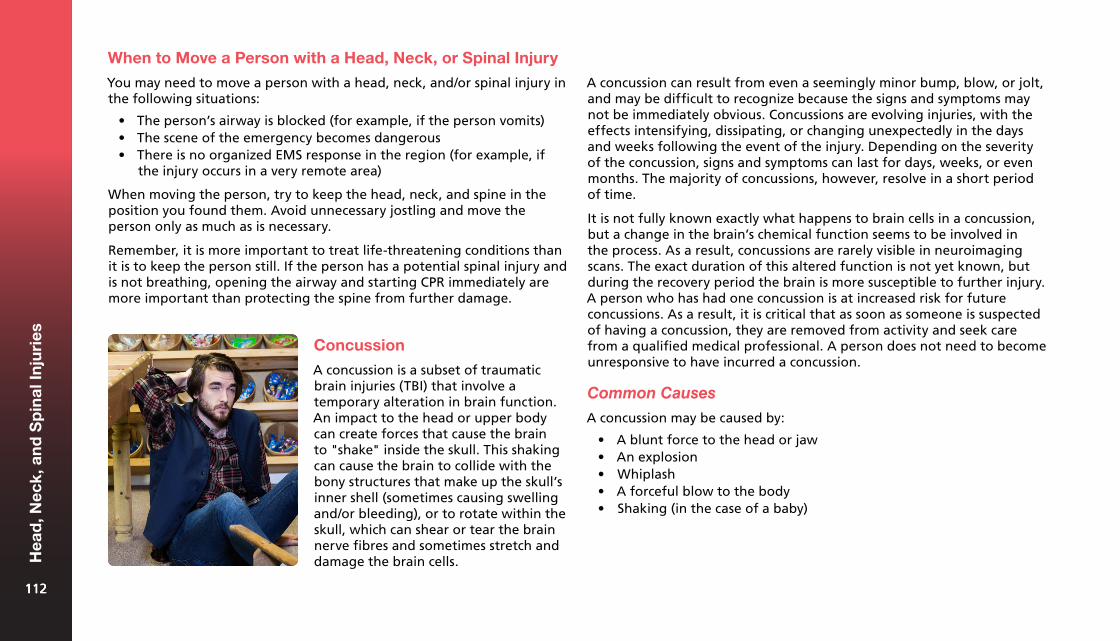
When to Move a Person with a Head, Neck, or Spinal Injury
You may need to move a person with a head, neck, and/or spinal injury in the following situations:
• The person’s airway is blocked (for example, if the person vomits)• The scene of the emergency becomes dangerous• There is no organized EMS response in the region (for example, if
the injury occurs in a very remote area)
When moving the person, try to keep the head, neck, and spine in the position you found them. Avoid unnecessary jostling and move the person only as much as is necessary.
Remember, it is more important to treat life-threatening conditions than it is to keep the person still. If the person has a potential spinal injury and is not breathing, opening the airway and starting CPR immediately are more important than protecting the spine from further damage.
A concussion can result from even a seemingly minor bump, blow, or jolt, and may be difficult to recognize because the signs and symptoms may not be immediately obvious. Concussions are evolving injuries, with the effects intensifying, dissipating, or changing unexpectedly in the days and weeks following the event of the injury. Depending on the severity of the concussion, signs and symptoms can last for days, weeks, or even months. The majority of concussions, however, resolve in a short period of time.
It is not fully known exactly what happens to brain cells in a concussion, but a change in the brain’s chemical function seems to be involved in the process. As a result, concussions are rarely visible in neuroimaging scans. The exact duration of this altered function is not yet known, but during the recovery period the brain is more susceptible to further injury. A person who has had one concussion is at increased risk for future concussions. As a result, it is critical that as soon as someone is suspected of having a concussion, they are removed from activity and seek care from a qualified medical professional. A person does not need to become unresponsive to have incurred a concussion.
Common Causes
A concussion may be caused by:
• A blunt force to the head or jaw• An explosion• Whiplash• A forceful blow to the body• Shaking (in the case of a baby)
Concussion
A concussion is a subset of traumatic brain injuries (TBI) that involve a temporary alteration in brain function. An impact to the head or upper body can create forces that cause the brain to "shake" inside the skull. This shaking can cause the brain to collide with the bony structures that make up the skull’s inner shell (sometimes causing swelling and/or bleeding), or to rotate within the skull, which can shear or tear the brain nerve fibres and sometimes stretch and damage the brain cells.
112112
Hea
d, N
eck,
an
d S
pin
al In
juri
es
112
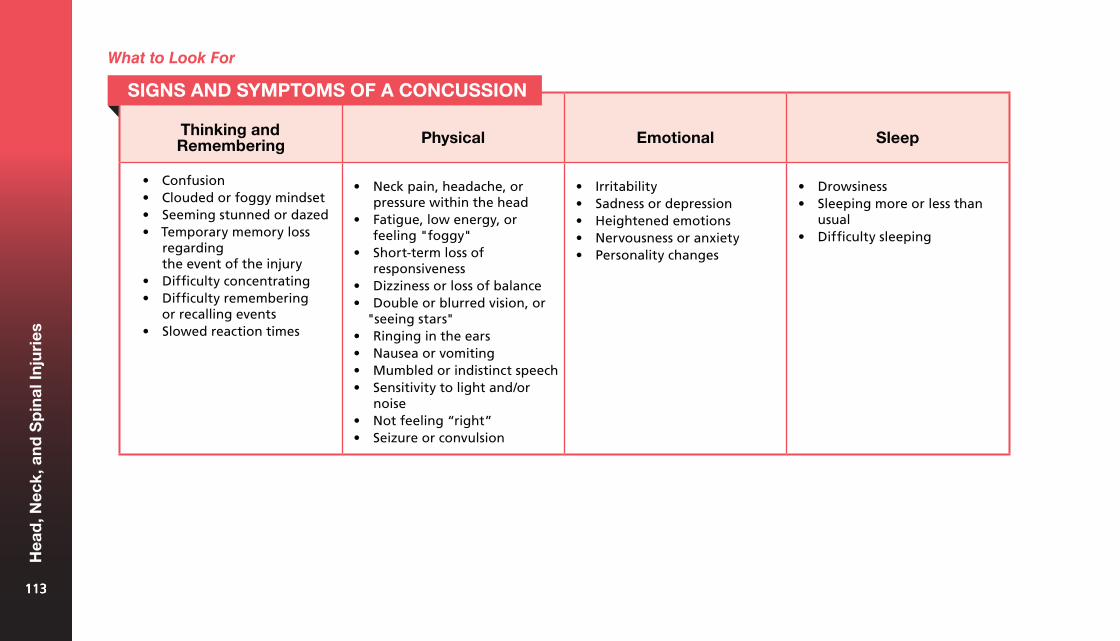
Thinking and Remembering Physical Emotional Sleep
• Confusion• Clouded or foggy mindset• Seeming stunned or dazed• Temporary memory loss
regardingthe event of the injury
• Difficulty concentrating• Difficulty remembering
or recalling events• Slowed reaction times
• Neck pain, headache, orpressure within the head
• Fatigue, low energy, orfeeling "foggy"
• Short-term loss ofresponsiveness
• Dizziness or loss of balance• Double or blurred vision, or
"seeing stars"• Ringing in the ears• Nausea or vomiting• Mumbled or indistinct speech• Sensitivity to light and/or
noise• Not feeling “right”• Seizure or convulsion
• Irritability• Sadness or depression• Heightened emotions• Nervousness or anxiety• Personality changes
• Drowsiness• Sleeping more or less than
usual• Difficulty sleeping
SIGNS AND SYMPTOMS OF A CONCUSSION
What to Look For
113113
Hea
d, N
eck,
an
d S
pin
al In
juri
es
113
Concussions are often left untreated because the symptoms are not always recognized by the person who has been injured, and the signs are not always obvious to others. There may also be personal or external pressures to continue participating in the activity at hand (e.g., workplace requirements, social events, or sporting activities), instead of avoiding such aggravating factors. Continued participation in activities that provoke symptoms during either the acute or the recovery stage can re-aggravate the condition due to raised levels of exertion. To avoid this, it is important that the person seek medical attention following a blow to the head, neck, or upper body with any concussion symptoms. Cessation of physical activity and the promotion of cognitive rest (reducing "screen time" and other activities that require concentration) are critical to the resolution of concussion injuries.
Concussion Signs and Symptoms in Children and Babies
Identifying signs and symptoms of a concussion in a child is more difficult than for an adult. It is particularly difficult for a child or baby, since the child or baby may not be able to speak to describe the symptoms. In addition to the standard signs of a concussion, the child or baby may exhibit the following signs, which are more specific to this age group:
• Disturbed sleeping and eating patterns• Excessive crying• Disinterest in activities or favourite toys
Children may also express simply "feeling off" or "not feeling right" following a physical impact. This is also a possible symptom of a concussion.
What to Do
Call EMS/9-1-1 if the person has the following more severe signs and symptoms of a concussion:
• Repeated or projectile vomiting• Loss of responsiveness of any duration• Lack of physical coordination (e.g., stumbling and unusual clumsiness)• Confusion, disorientation, or memory loss• Changes to normal speech• Seizures• Vision and ocular changes (e.g., double vision, dilated pupils, or
unequal pupil size)• Persistent dizziness or loss of balance• Weakness or tingling in the arms or legs• Severe or increasing headache
Call
Care
If you think a person has sustained a concussion, advise the person to stop the activity he or she was engaged in when the incident occurred. If the person sustains an injury that causes a jolt or blow to the head or body, and then displays any signs and symptoms of a concussion, you should assume that a concussion has occurred. The person should follow up with a qualified healthcare provider as soon as possible for a full evaluation. A healthcare provider is best able to evaluate the severity of the injury and make recommendations about when the person can return to normal activities. While rare, permanent brain damage and death are potential consequences of failing to identify and respond to a concussion in a timely manner. Prompt recognition of when a potential concussion injury has occurred, immediate removal from the activity, and appropriate follow-up care are key elements in preventing catastrophic consequences.
114114
Hea
d, N
eck,
an
d S
pin
al In
juri
es
114
been compromised. These people can also have a positive impact on concussion recovery by supporting the person and encouraging him or her to follow the concussion recovery plan outlined by the doctor.
Proper management of the person’s signs and symptoms by a qualified healthcare provider will help to avoid future problems that may lead to permanent issues and a diminished quality of life. If treated improperly, concussions can cause a wide range of functional long-term changes affecting thinking, sensation, language, and/or emotions. Concussions can also cause long-term neurological conditions, such as seizure disorders, and, in the most severe cases, death.
Shaken Baby Syndrome
Shaken Baby Syndrome (SBS) refers to a variety of injuries that may result when a baby or a young child is violently shaken. This causes the brain to move within the skull, forcing blood vessels to stretch and tear. SBS is most associated with babies and toddlers, but can occur in children up to 5 years old.
SBS is the most common cause of mortality in babies. It is the most frequent cause of long-term disability in babies and young children, and it can cause permanent brain damage. SBS differs from other forms of physical abuse in that it is frequently a single event and there may be no obvious sign of injury.
Often there is no intent to harm the baby. Inconsolable crying is the most common trigger that leads a person to shake a baby. When trying to console a crying baby, never shake the baby, no matter what. Instead, place the baby face-up in a safe place and let the baby cry. Take a few deep breaths and then try again to soothe the baby. Other common triggers are feeding problems and difficulties with toilet training.
Feelings of anger and frustration can be overwhelming. However, shaking a child or baby is never appropriate. If you feel like you might lose control, stop! Take a break, never shake. Place the child in a safe
Anyone who exhibits more concerning signs and symptoms requires immediate medical evaluation. An injury that causes a concussion may also trigger bleeding in or around the brain, leading to symptoms like extended drowsiness and confusion. This type of bleeding can be life-threatening. The person must be monitored in the immediate hours after the injury to ensure that the symptoms do not progress or worsen, as this can indicate additional brain injuries that require emergency care.
Myth-Information
Myth: A person with a concussion who falls asleep could die.
It is generally considered safe for a person with a concussion to go to sleep. However, the person’s healthcare provider may recommend that you wake the person periodically to make sure that his or her condition has not worsened.
Follow-Up Care for Concussions
It is important that the person seek medical advice from a doctor, ideally one who specializes in concussions, since signs and symptoms can escalate in the days or weeks following the injury. A person who has suffered a concussion should not participate in any physical activities until a doctor gives permission to do so. Activities that require concentration (e.g., reading) and visual stimulation, such as working on a computer, texting, etc. should also be reduced to allow the brain the opportunity to recover from cognitive stressors. When given permission from a doctor, it is important to resume all of these activities gradually and be monitored by a medical professional.
A person recovering from a concussion may not be able to effectively monitor his or her own symptoms, and may not make the best decisions about things like rest, sleep, and limiting visual stimulation. It is crucial that the person’s family members, caregivers, friends, or colleagues note any changes in his or her sleep habits or physical, cognitive, or emotional behaviour, as any of these can indicate that the recovery phase has 115115
Hea
d, N
eck,
an
d S
pin
al In
juri
es
115
place and take a time-out for as long as it takes you to feel calm. Talk to someone you trust about your feelings. If you ever feel you may hurt a baby, call for help: a family member, neighbour, or local crisis line can provide emotional support and help you to find a solution.
What to Look For
While there may be no visible physical signs of injury, some signs of SBS include the following:
• Unexplained injuries (e.g., bruising or broken bones, especially skull,rib, and long-bone fractures)
• Bruising, usually in or around the eyes or mid-body area• Bleeding or clear fluid coming from the ears and/or nose• Minor neurological problems (e.g., irritability, lethargy, tremors,
and vomiting)• Major neurological problems (e.g., seizures, unresponsiveness,
and death)
Call
What to Do
If you suspect a baby has SBS, call EMS/9-1-1.
Care
Treat any injuries you find. Avoid accusations and interrogation.
116116
Hea
d, N
eck,
an
d S
pin
al In
juri
es
116
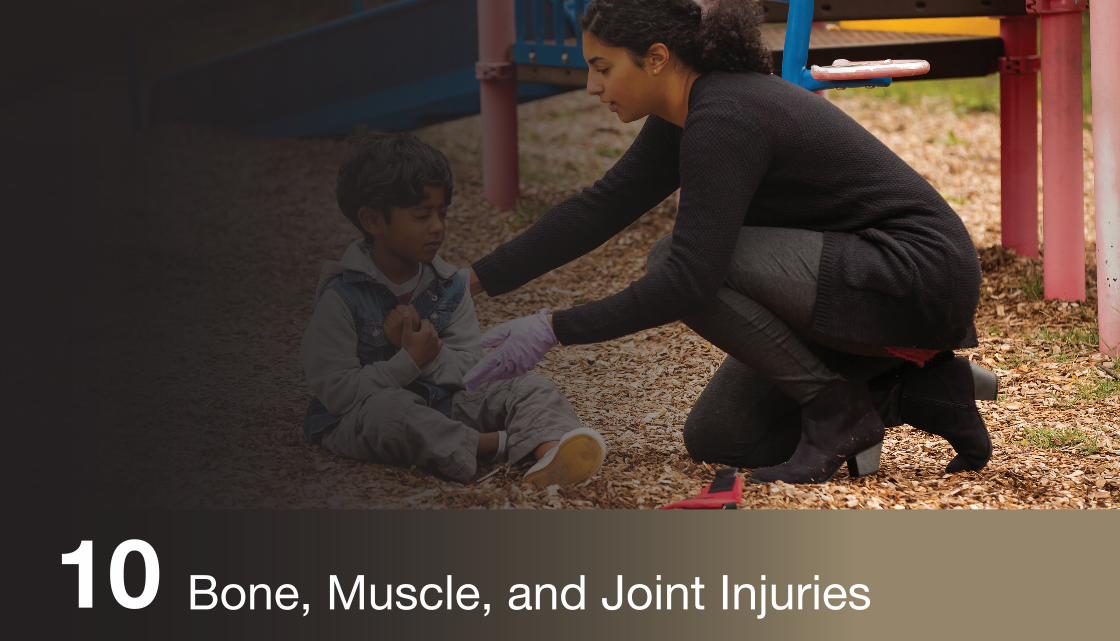
Bone, Muscle, and Joint Injuries10
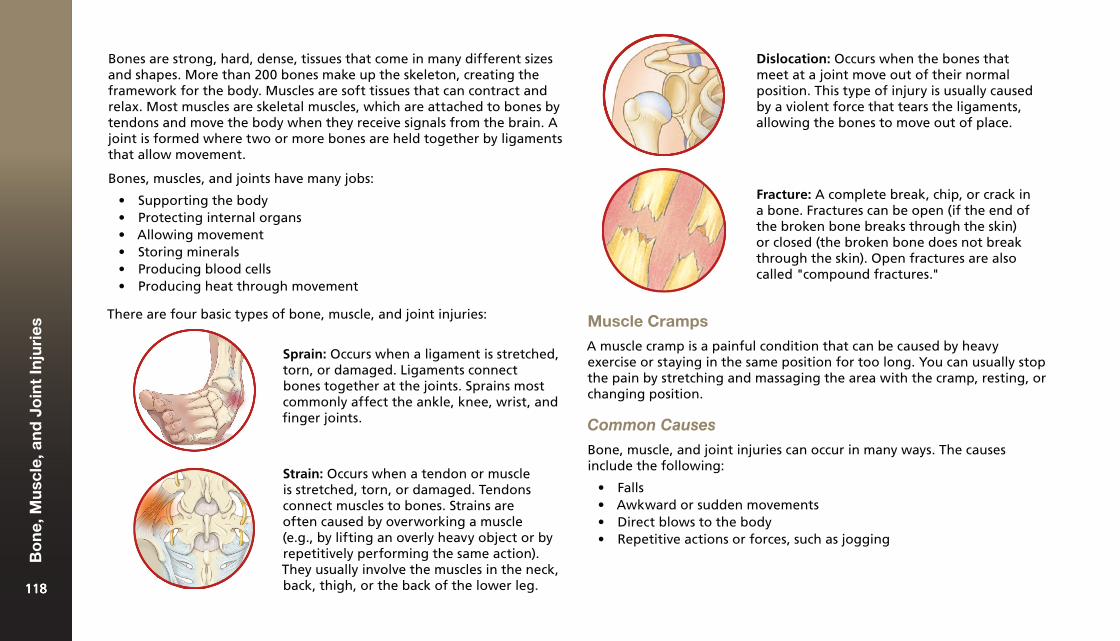
Bones are strong, hard, dense, tissues that come in many different sizes and shapes. More than 200 bones make up the skeleton, creating the framework for the body. Muscles are soft tissues that can contract and relax. Most muscles are skeletal muscles, which are attached to bones by tendons and move the body when they receive signals from the brain. A joint is formed where two or more bones are held together by ligaments that allow movement.
Bones, muscles, and joints have many jobs:
• Supporting the body• Protecting internal organs• Allowing movement• Storing minerals• Producing blood cells• Producing heat through movement
There are four basic types of bone, muscle, and joint injuries:
Dislocation: Occurs when the bones that meet at a joint move out of their normal position. This type of injury is usually caused by a violent force that tears the ligaments, allowing the bones to move out of place.
Sprain: Occurs when a ligament is stretched, torn, or damaged. Ligaments connect bones together at the joints. Sprains most commonly affect the ankle, knee, wrist, and finger joints.
Muscle Cramps
A muscle cramp is a painful condition that can be caused by heavy exercise or staying in the same position for too long. You can usually stop the pain by stretching and massaging the area with the cramp, resting, or changing position.
Common Causes
Bone, muscle, and joint injuries can occur in many ways. The causes include the following:
• Falls• Awkward or sudden movements• Direct blows to the body• Repetitive actions or forces, such as jogging
Strain: Occurs when a tendon or muscle is stretched, torn, or damaged. Tendons connect muscles to bones. Strains are often caused by overworking a muscle (e.g., by lifting an overly heavy object or by repetitively performing the same action). They usually involve the muscles in the neck, back, thigh, or the back of the lower leg.
Fracture: A complete break, chip, or crack in a bone. Fractures can be open (if the end of the broken bone breaks through the skin) or closed (the broken bone does not break through the skin). Open fractures are also called "compound fractures."
118118
Bo
ne,
Mu
scle
, an
d J
oin
t In
juri
es
118
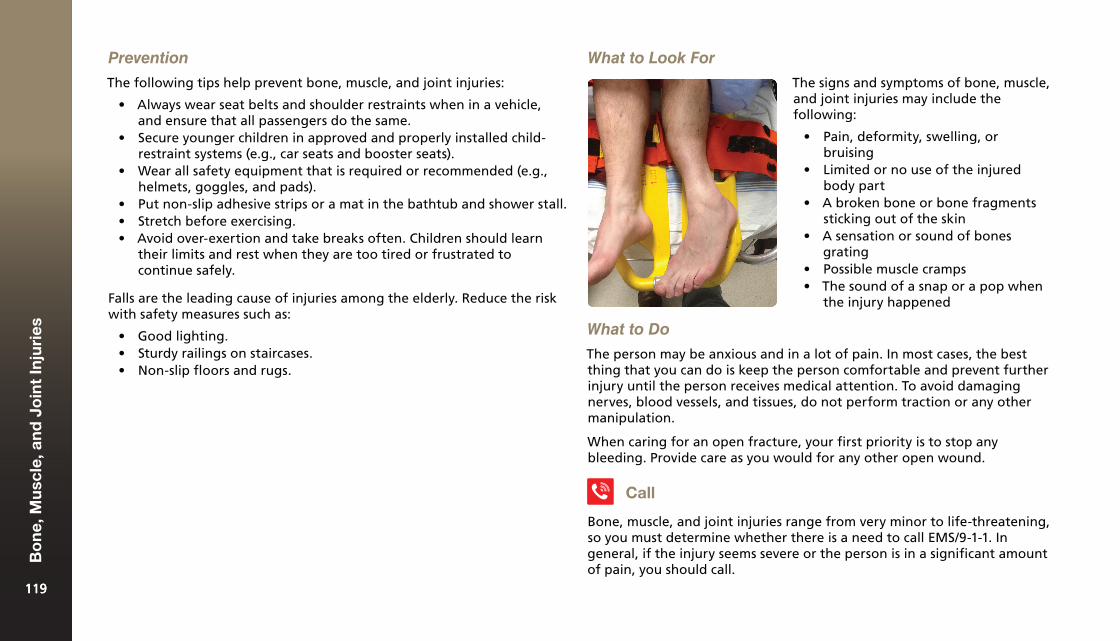
Prevention
The following tips help prevent bone, muscle, and joint injuries:
• Always wear seat belts and shoulder restraints when in a vehicle,and ensure that all passengers do the same.
• Secure younger children in approved and properly installed child-restraint systems (e.g., car seats and booster seats).
• Wear all safety equipment that is required or recommended (e.g.,helmets, goggles, and pads).
• Put non-slip adhesive strips or a mat in the bathtub and shower stall.• Stretch before exercising.• Avoid over-exertion and take breaks often. Children should learn
their limits and rest when they are too tired or frustrated tocontinue safely.
Falls are the leading cause of injuries among the elderly. Reduce the risk with safety measures such as:
• Good lighting.• Sturdy railings on staircases.• Non-slip floors and rugs.
The signs and symptoms of bone, muscle, and joint injuries may include the following:
• Pain, deformity, swelling, orbruising
• Limited or no use of the injuredbody part
• A broken bone or bone fragmentssticking out of the skin
• A sensation or sound of bonesgrating
• Possible muscle cramps• The sound of a snap or a pop when
the injury happened
What to Do
The person may be anxious and in a lot of pain. In most cases, the best thing that you can do is keep the person comfortable and prevent further injury until the person receives medical attention. To avoid damaging nerves, blood vessels, and tissues, do not perform traction or any other manipulation.
When caring for an open fracture, your first priority is to stop any bleeding. Provide care as you would for any other open wound.
Call
Bone, muscle, and joint injuries range from very minor to life-threatening, so you must determine whether there is a need to call EMS/9-1-1. In general, if the injury seems severe or the person is in a significant amount of pain, you should call.
What to Look For
119119
Bo
ne,
Mu
scle
, an
d J
oin
t In
juri
es
119
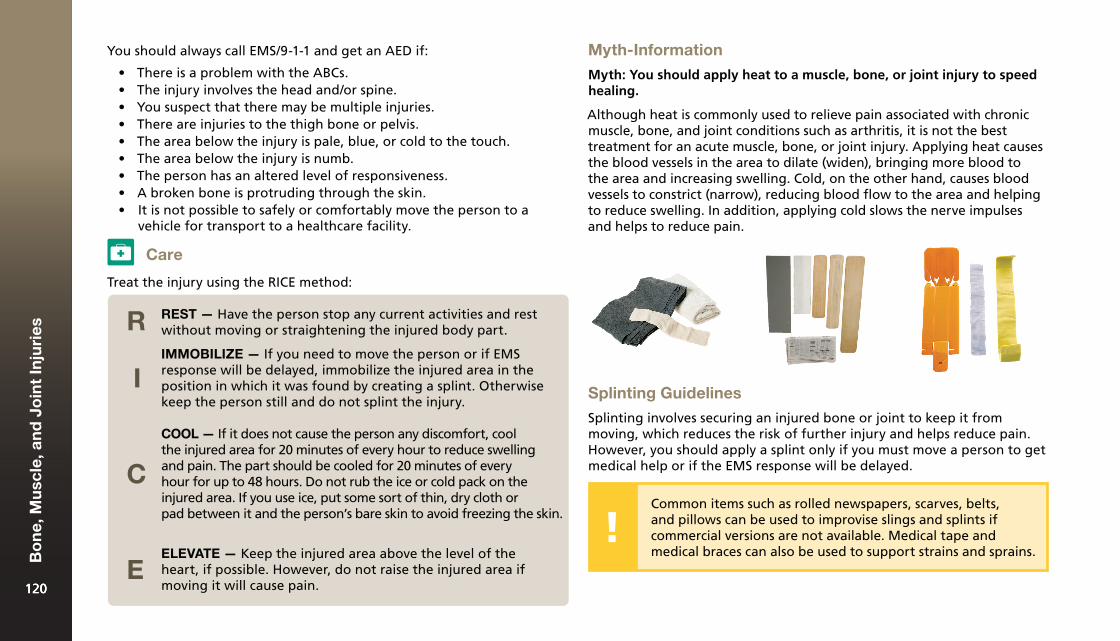
Care
You should always call EMS/9-1-1 and get an AED if:
• There is a problem with the ABCs.• The injury involves the head and/or spine.• You suspect that there may be multiple injuries.• There are injuries to the thigh bone or pelvis.• The area below the injury is pale, blue, or cold to the touch.• The area below the injury is numb.• The person has an altered level of responsiveness.• A broken bone is protruding through the skin.• It is not possible to safely or comfortably move the person to a
vehicle for transport to a healthcare facility.
Myth-Information
Myth: You should apply heat to a muscle, bone, or joint injury to speed healing.
Although heat is commonly used to relieve pain associated with chronic muscle, bone, and joint conditions such as arthritis, it is not the best treatment for an acute muscle, bone, or joint injury. Applying heat causes the blood vessels in the area to dilate (widen), bringing more blood to the area and increasing swelling. Cold, on the other hand, causes blood vessels to constrict (narrow), reducing blood flow to the area and helping to reduce swelling. In addition, applying cold slows the nerve impulses and helps to reduce pain.
Treat the injury using the RICE method:
Splinting Guidelines
Splinting involves securing an injured bone or joint to keep it from moving, which reduces the risk of further injury and helps reduce pain. However, you should apply a splint only if you must move a person to get medical help or if the EMS response will be delayed.
Common items such as rolled newspapers, scarves, belts, and pillows can be used to improvise slings and splints if commercial versions are not available. Medical tape and medical braces can also be used to support strains and sprains.
REST — Have the person stop any current activities and rest without moving or straightening the injured body part.R
I
C
E
IMMOBILIZE — If you need to move the person or if EMS response will be delayed, immobilize the injured area in the position in which it was found by creating a splint. Otherwise
keep the person still and do not splint the injury.
COOL — If it does not cause the person any discomfort, cool the injured area for 20 minutes of every hour to reduce swelling
and pain. The part should be cooled for 20 minutes of every hour for up to 48 hours. Do not rub the ice or cold pack on the
injured area. If you use ice, put some sort of thin, dry cloth or pad between it and the person’s bare skin to avoid freezing the skin.
ELEVATE — Keep the injured area above the level of the heart, if possible. However, do not raise the injured area if
moving it will cause pain.120120
Bo
ne,
Mu
scle
, an
d J
oin
t In
juri
es
120
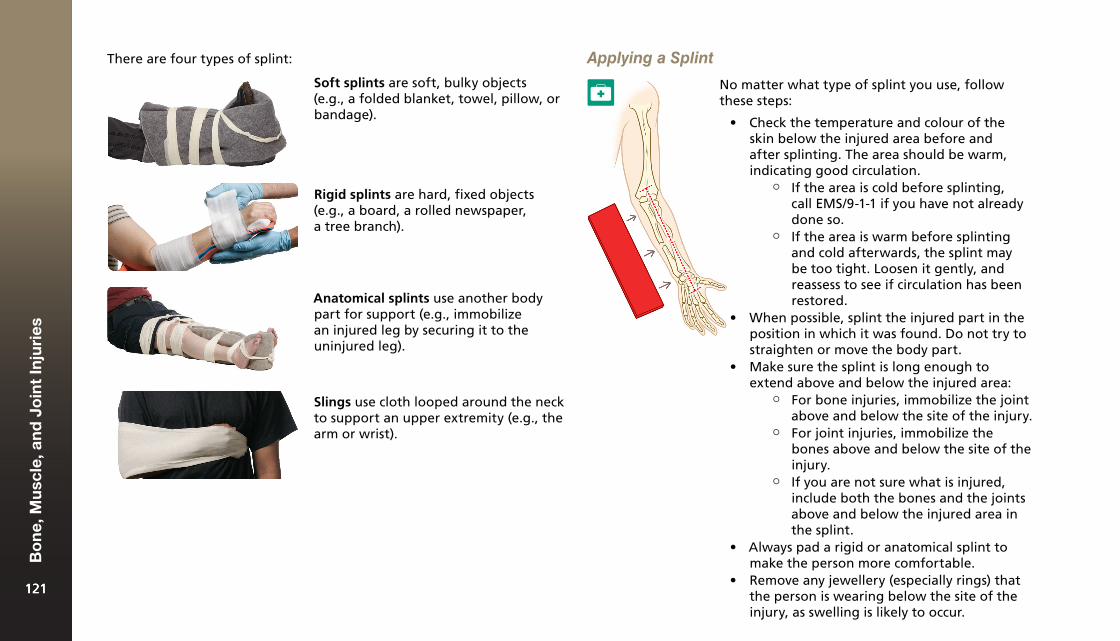
There are four types of splint:
Anatomical splints use another body part for support (e.g., immobilize an injured leg by securing it to the uninjured leg).
Soft splints are soft, bulky objects (e.g., a folded blanket, towel, pillow, or bandage).
Rigid splints are hard, fixed objects (e.g., a board, a rolled newspaper, a tree branch).
Slings use cloth looped around the neck to support an upper extremity (e.g., the arm or wrist).
Applying a Splint
No matter what type of splint you use, follow these steps:
• Check the temperature and colour of theskin below the injured area before andafter splinting. The area should be warm,indicating good circulation.
¶ If the area is cold before splinting, call EMS/9-1-1 if you have not already done so.
¶ If the area is warm before splinting and cold afterwards, the splint may be too tight. Loosen it gently, and reassess to see if circulation has been restored.
• When possible, splint the injured part in theposition in which it was found. Do not try tostraighten or move the body part.
• Make sure the splint is long enough toextend above and below the injured area:
¶ For bone injuries, immobilize the joint above and below the site of the injury.
¶ For joint injuries, immobilize the bones above and below the site of the injury.
¶ If you are not sure what is injured, include both the bones and the joints above and below the injured area in the splint.
• Always pad a rigid or anatomical splint tomake the person more comfortable.
• Remove any jewellery (especially rings) thatthe person is wearing below the site of the injury, as swelling is likely to occur.
121121
Bo
ne,
Mu
scle
, an
d J
oin
t In
juri
es
121
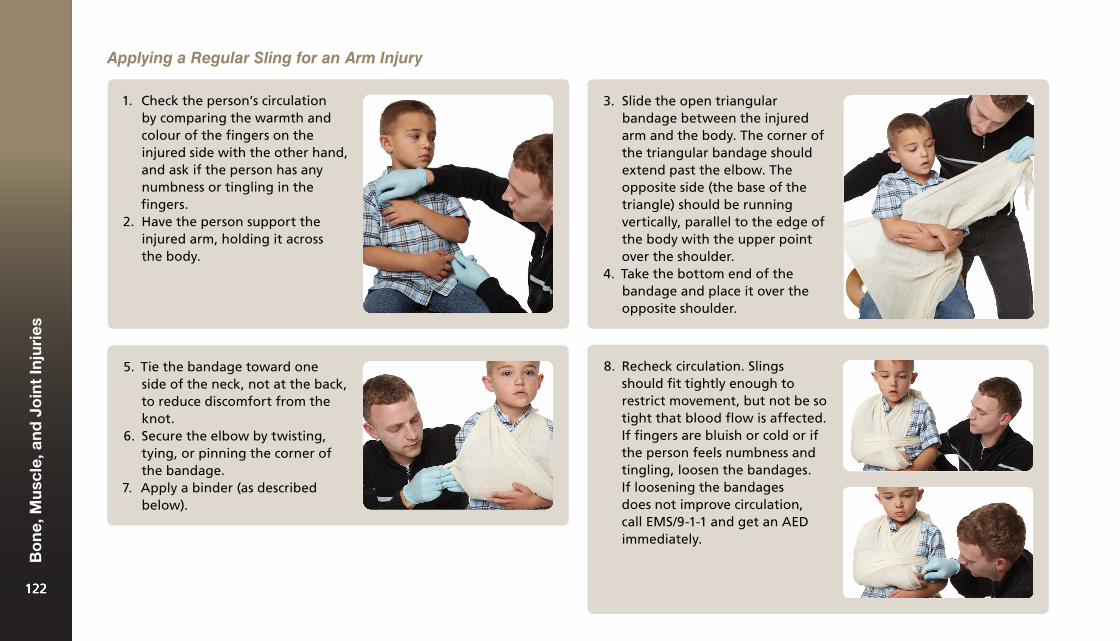
Applying a Regular Sling for an Arm Injury
1. Check the person’s circulationby comparing the warmth andcolour of the fingers on theinjured side with the other hand,and ask if the person has anynumbness or tingling in thefingers.
2. Have the person support theinjured arm, holding it acrossthe body.
3. Slide the open triangularbandage between the injuredarm and the body. The corner ofthe triangular bandage shouldextend past the elbow. Theopposite side (the base of thetriangle) should be runningvertically, parallel to the edge ofthe body with the upper pointover the shoulder.
4. Take the bottom end of thebandage and place it over theopposite shoulder.
5. Tie the bandage toward oneside of the neck, not at the back,to reduce discomfort from theknot.
6. Secure the elbow by twisting,tying, or pinning the corner ofthe bandage.
7. Apply a binder (as describedbelow).
8. Recheck circulation. Slingsshould fit tightly enough torestrict movement, but not be sotight that blood flow is affected.If fingers are bluish or cold or ifthe person feels numbness andtingling, loosen the bandages.If loosening the bandagesdoes not improve circulation,call EMS/9-1-1 and get an AEDimmediately.
122122
Bo
ne,
Mu
scle
, an
d J
oin
t In
juri
es
122

Applying a Tube Sling
1. Check the person’s circulationby comparing the warmth andcolour of the fingers on theinjured side with the other hand,and ask if the person has anynumbness or tingling in thefingers.
2. Have the person hold the arm ofthe injured side across the bodywith the fingers touching theopposite shoulder.
3. Place the open triangularbandage over the forearm andhand with the base parallel tothe body and the opposite pointextending past the elbow.
4. Support the forearm and gentlytuck the lower edge of thebandage under the arm, fromthe hand to the elbow.
5. Twist the end of the bandagehanging below the elbowseveral times to secure the arm,then bring it around and up theback to meet the other end ofthe bandage near the person’sneck.
6. Adjust the height of the sling tomake sure it is supporting thearm.
7. Secure the sling by tying the twoends together in the hollow ofthe neck on the uninjured side.
8. Pad between the arm and thebody, in the natural hollow, withsoft, firm material.
9. Apply a binder (as described onthe following page).
10. Recheck circulation. Slingsshould fit tightly enough torestrict movement, but not be sotight that blood flow is affected.If fingers are bluish or cold or ifthe person feels numbness andtingling, loosen the bandages.If loosening the bandagesdoes not improve circulation,call EMS/9-1-1 and get an AEDimmediately.
123123
Bo
ne,
Mu
scle
, an
d J
oin
t In
juri
es
123
1. Wrap a broad bandage around the injured arm and the body.2. Tie the bandage snugly at the uninjured side.3. Recheck circulation. The binder should fit tightly enough
to restrict movement, but not be so tight that blood flow isaffected. If fingers are bluish or cold or if the person feelsnumbness and tingling, loosen the bandages. If loosening thebandages does not improve circulation, call EMS/9-1-1 and get anAED immediately.
Applying a Binder for an Arm Injury
A binder is used in addition to a sling and secures a slung upper extremity to the body. This provides additional support by creating anatomical support in addition to the sling.
Osteoporosis
Osteoporosis is a degenerative bone disorder that occurs when the amount of calcium in the bones decreases, causing low bone mass and the deterioration of bone tissue. Normally, bones are hard, dense tissues that can endure tremendous stress. Bone-building cells constantly repair damage that occurs as a result of everyday wear and tear, keeping bones strong. When the calcium content of bones decreases, the bones become frail, less dense, and less able to repair themselves after incurring stress and damage.
The loss of density and strength leaves bones more susceptible to fractures (especially of the hips, vertebrae, and wrists). Instead of being caused by tremendous force, fractures may now occur spontaneously, with little or no aggravation, trauma, or force. For example, the person may be taking a walk or washing dishes when the fracture occurs. Some hip fractures thought to be caused by falls are actually spontaneous fractures that cause the person’s fall. Repeated fractures are also a sign of osteoporosis. Osteoporosis is a leading cause of bone and joint injuries in older people. It is much more common in women, affecting one in four.
You can help prevent osteoporosis by:
• Building strong bones at an early age.• Making sure to get enough calcium.• Making sure to get enough vitamin D (the body needs vitamin D so
that it can absorb calcium).• Exercising regularly.
124124
Bo
ne,
Mu
scle
, an
d J
oin
t In
juri
es
124
Sudden Medical Emergencies11
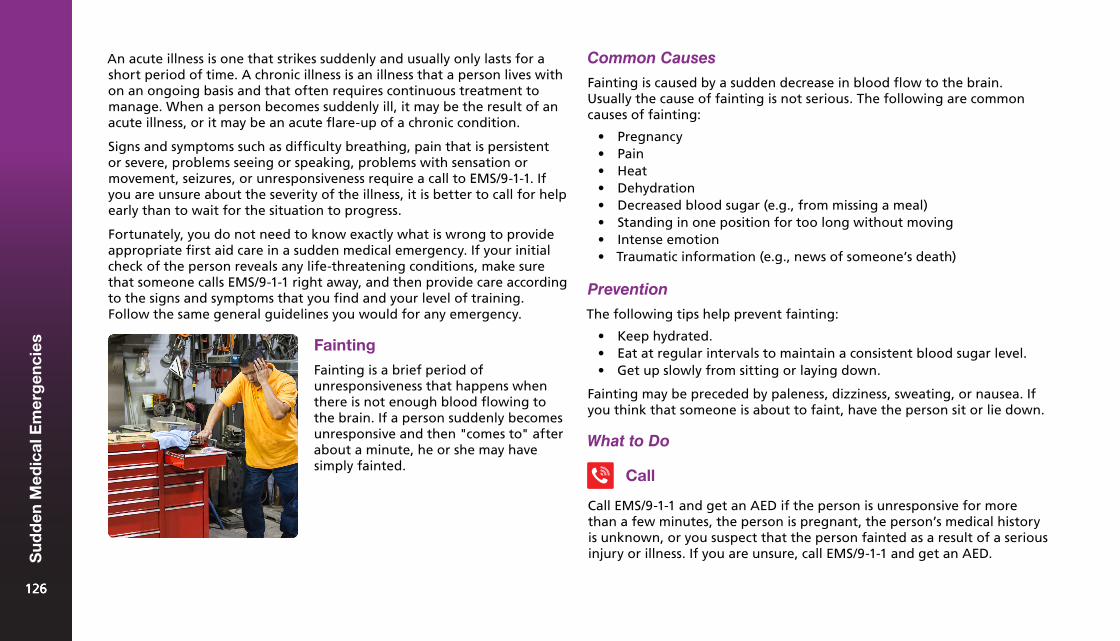
An acute illness is one that strikes suddenly and usually only lasts for a short period of time. A chronic illness is an illness that a person lives with on an ongoing basis and that often requires continuous treatment to manage. When a person becomes suddenly ill, it may be the result of an acute illness, or it may be an acute flare-up of a chronic condition.
Signs and symptoms such as difficulty breathing, pain that is persistent or severe, problems seeing or speaking, problems with sensation or movement, seizures, or unresponsiveness require a call to EMS/9-1-1. If you are unsure about the severity of the illness, it is better to call for help early than to wait for the situation to progress.
Fortunately, you do not need to know exactly what is wrong to provide appropriate first aid care in a sudden medical emergency. If your initial check of the person reveals any life-threatening conditions, make sure that someone calls EMS/9-1-1 right away, and then provide care according to the signs and symptoms that you find and your level of training. Follow the same general guidelines you would for any emergency.
Common Causes
Fainting is caused by a sudden decrease in blood flow to the brain. Usually the cause of fainting is not serious. The following are common causes of fainting:
• Pregnancy• Pain• Heat• Dehydration• Decreased blood sugar (e.g., from missing a meal)• Standing in one position for too long without moving• Intense emotion• Traumatic information (e.g., news of someone’s death)
Prevention
The following tips help prevent fainting:
• Keep hydrated.• Eat at regular intervals to maintain a consistent blood sugar level.• Get up slowly from sitting or laying down.
Fainting may be preceded by paleness, dizziness, sweating, or nausea. If you think that someone is about to faint, have the person sit or lie down.
What to Do
Fainting
Fainting is a brief period of unresponsiveness that happens when there is not enough blood flowing to the brain. If a person suddenly becomes unresponsive and then "comes to" after about a minute, he or she may have simply fainted.
Call
Call EMS/9-1-1 and get an AED if the person is unresponsive for more than a few minutes, the person is pregnant, the person’s medical history is unknown, or you suspect that the person fainted as a result of a serious injury or illness. If you are unsure, call EMS/9-1-1 and get an AED.
126126
Su
dd
en M
edic
al E
mer
gen
cies
126
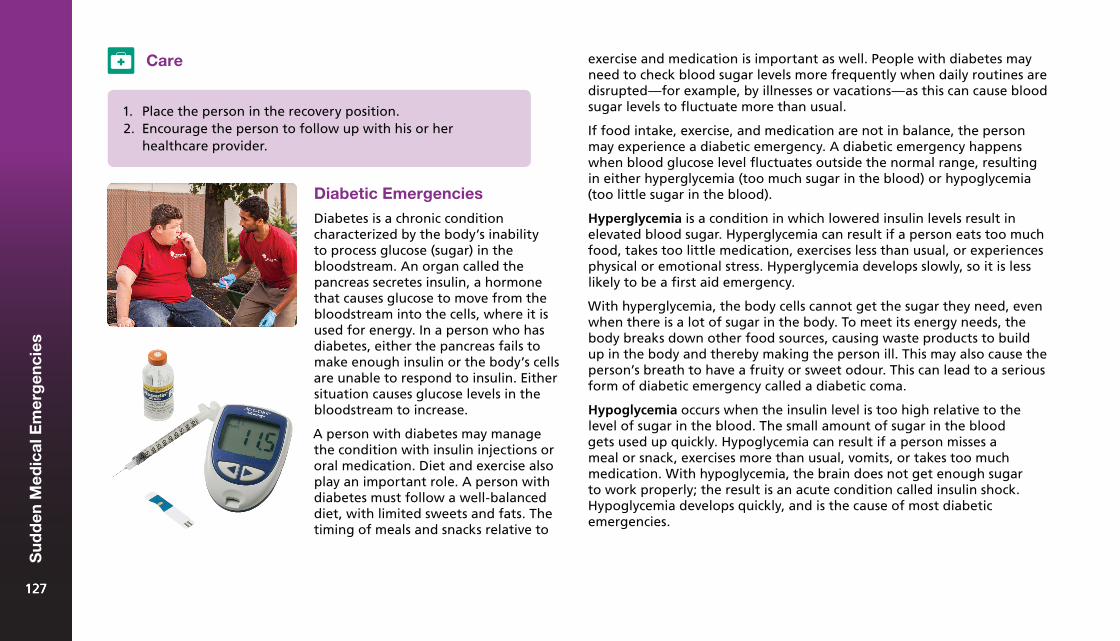
Care
1. Place the person in the recovery position.2. Encourage the person to follow up with his or her
healthcare provider.
Diabetic Emergencies
Diabetes is a chronic condition characterized by the body’s inability to process glucose (sugar) in the bloodstream. An organ called the pancreas secretes insulin, a hormone that causes glucose to move from the bloodstream into the cells, where it is used for energy. In a person who has diabetes, either the pancreas fails to make enough insulin or the body’s cells are unable to respond to insulin. Either situation causes glucose levels in the bloodstream to increase.
A person with diabetes may manage the condition with insulin injections or oral medication. Diet and exercise also play an important role. A person with diabetes must follow a well-balanced diet, with limited sweets and fats. The timing of meals and snacks relative to
exercise and medication is important as well. People with diabetes may need to check blood sugar levels more frequently when daily routines are disrupted—for example, by illnesses or vacations—as this can cause blood sugar levels to fluctuate more than usual.
If food intake, exercise, and medication are not in balance, the person may experience a diabetic emergency. A diabetic emergency happens when blood glucose level fluctuates outside the normal range, resulting in either hyperglycemia (too much sugar in the blood) or hypoglycemia (too little sugar in the blood).
Hyperglycemia is a condition in which lowered insulin levels result in elevated blood sugar. Hyperglycemia can result if a person eats too much food, takes too little medication, exercises less than usual, or experiences physical or emotional stress. Hyperglycemia develops slowly, so it is less likely to be a first aid emergency.
With hyperglycemia, the body cells cannot get the sugar they need, even when there is a lot of sugar in the body. To meet its energy needs, the body breaks down other food sources, causing waste products to build up in the body and thereby making the person ill. This may also cause the person’s breath to have a fruity or sweet odour. This can lead to a serious form of diabetic emergency called a diabetic coma.
Hypoglycemia occurs when the insulin level is too high relative to the level of sugar in the blood. The small amount of sugar in the blood gets used up quickly. Hypoglycemia can result if a person misses a meal or snack, exercises more than usual, vomits, or takes too much medication. With hypoglycemia, the brain does not get enough sugar to work properly; the result is an acute condition called insulin shock. Hypoglycemia develops quickly, and is the cause of most diabetic emergencies.
127127
Su
dd
en M
edic
al E
mer
gen
cies
127
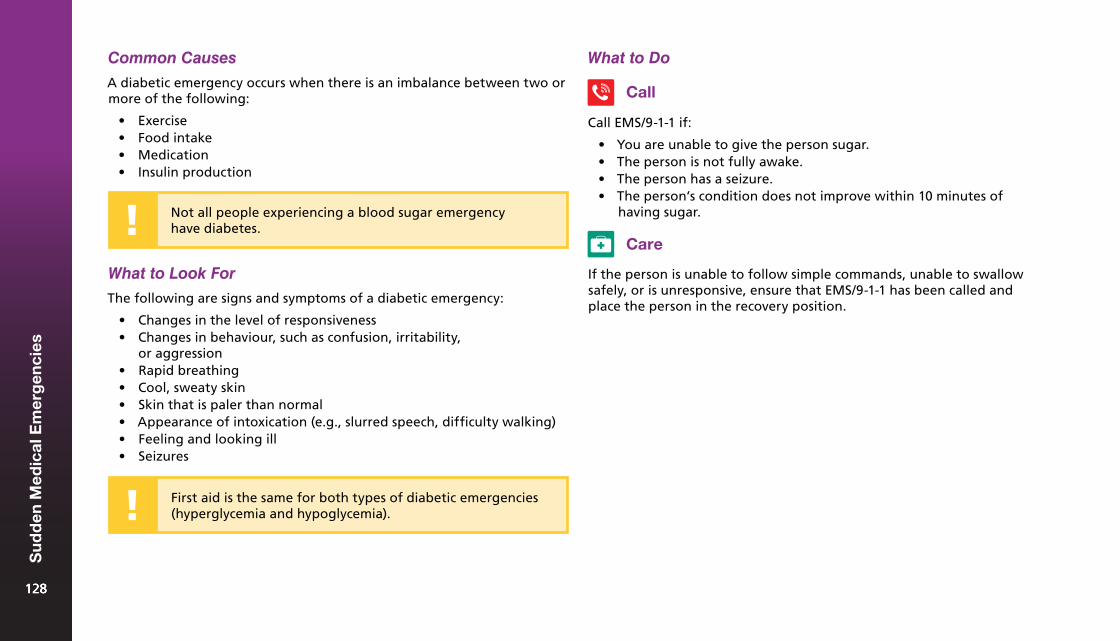
First aid is the same for both types of diabetic emergencies (hyperglycemia and hypoglycemia).
Common Causes
A diabetic emergency occurs when there is an imbalance between two or more of the following:
• Exercise• Food intake• Medication• Insulin production
What to Do
What to Look For
The following are signs and symptoms of a diabetic emergency:
• Changes in the level of responsiveness• Changes in behaviour, such as confusion, irritability,
or aggression• Rapid breathing• Cool, sweaty skin• Skin that is paler than normal• Appearance of intoxication (e.g., slurred speech, difficulty walking)• Feeling and looking ill• Seizures
Call EMS/9-1-1 if:
• You are unable to give the person sugar.• The person is not fully awake.• The person has a seizure.• The person’s condition does not improve within 10 minutes of
having sugar.Not all people experiencing a blood sugar emergency have diabetes.
Call
Care
If the person is unable to follow simple commands, unable to swallow safely, or is unresponsive, ensure that EMS/9-1-1 has been called and place the person in the recovery position.
128128
Su
dd
en M
edic
al E
mer
gen
cies
128
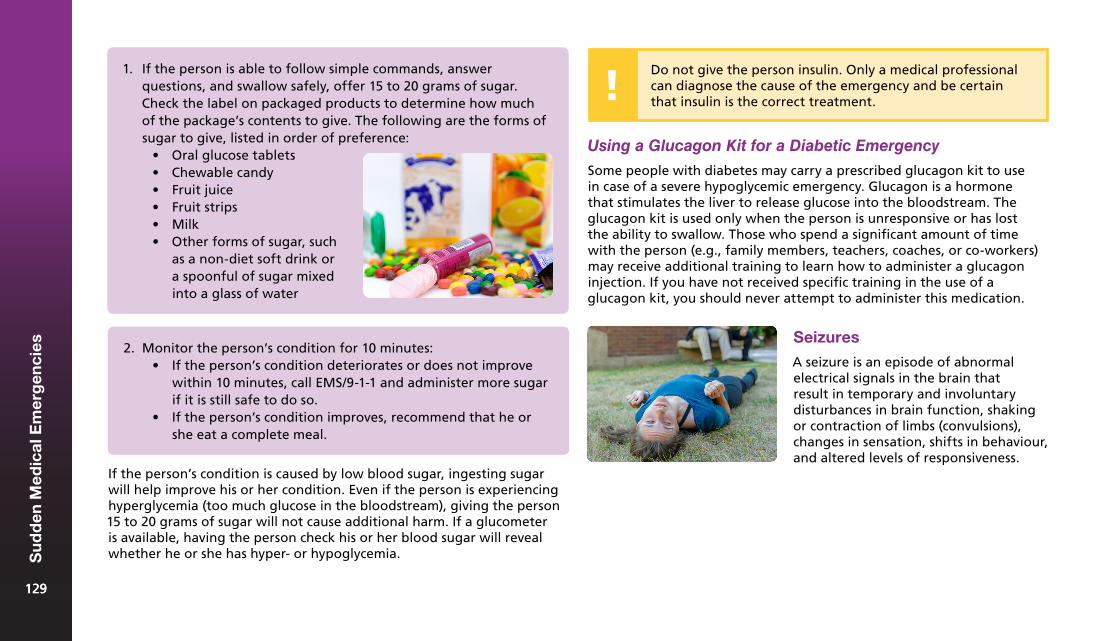
2. Monitor the person’s condition for 10 minutes:• If the person’s condition deteriorates or does not improve
within 10 minutes, call EMS/9-1-1 and administer more sugarif it is still safe to do so.
• If the person’s condition improves, recommend that he orshe eat a complete meal.
Seizures
A seizure is an episode of abnormal electrical signals in the brain that result in temporary and involuntary disturbances in brain function, shaking or contraction of limbs (convulsions), changes in sensation, shifts in behaviour, and altered levels of responsiveness.
If the person’s condition is caused by low blood sugar, ingesting sugar will help improve his or her condition. Even if the person is experiencing hyperglycemia (too much glucose in the bloodstream), giving the person 15 to 20 grams of sugar will not cause additional harm. If a glucometer is available, having the person check his or her blood sugar will reveal whether he or she has hyper- or hypoglycemia.
Using a Glucagon Kit for a Diabetic Emergency
Some people with diabetes may carry a prescribed glucagon kit to use in case of a severe hypoglycemic emergency. Glucagon is a hormone that stimulates the liver to release glucose into the bloodstream. The glucagon kit is used only when the person is unresponsive or has lost the ability to swallow. Those who spend a significant amount of time with the person (e.g., family members, teachers, coaches, or co-workers) may receive additional training to learn how to administer a glucagon injection. If you have not received specific training in the use of a glucagon kit, you should never attempt to administer this medication.
Do not give the person insulin. Only a medical professional can diagnose the cause of the emergency and be certain that insulin is the correct treatment.
1. If the person is able to follow simple commands, answerquestions, and swallow safely, offer 15 to 20 grams of sugar.Check the label on packaged products to determine how muchof the package’s contents to give. The following are the forms ofsugar to give, listed in order of preference:
• Oral glucose tablets• Chewable candy• Fruit juice• Fruit strips• Milk• Other forms of sugar, such
as a non-diet soft drink ora spoonful of sugar mixedinto a glass of water
129129
Su
dd
en M
edic
al E
mer
gen
cies
129
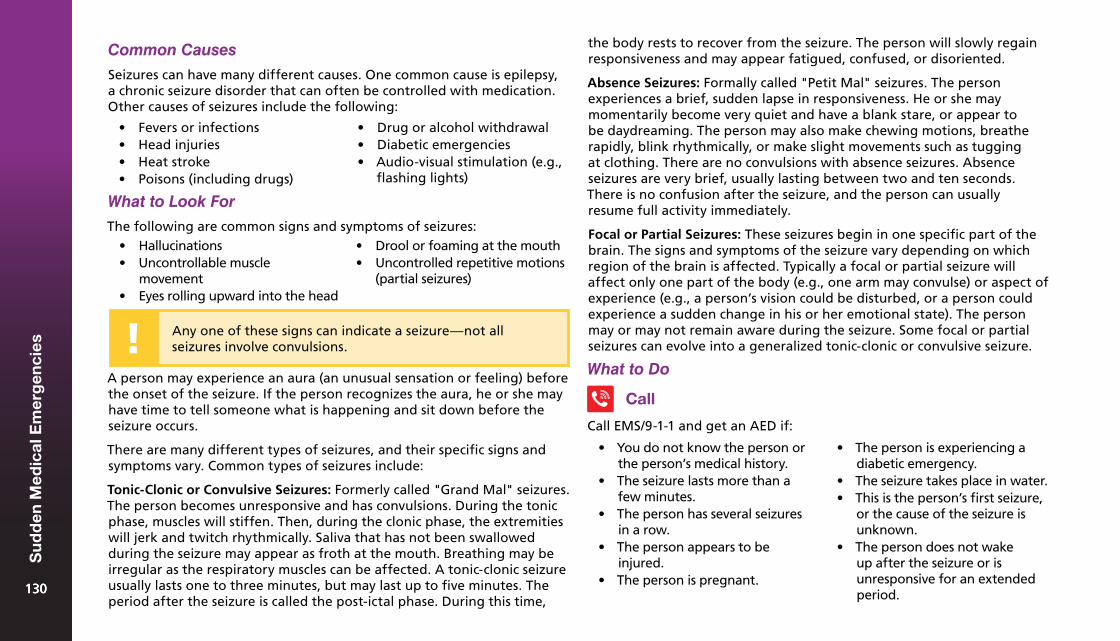
A person may experience an aura (an unusual sensation or feeling) before the onset of the seizure. If the person recognizes the aura, he or she may have time to tell someone what is happening and sit down before the seizure occurs.
There are many different types of seizures, and their specific signs and symptoms vary. Common types of seizures include:
Tonic-Clonic or Convulsive Seizures: Formerly called "Grand Mal" seizures. The person becomes unresponsive and has convulsions. During the tonic phase, muscles will stiffen. Then, during the clonic phase, the extremities will jerk and twitch rhythmically. Saliva that has not been swallowed during the seizure may appear as froth at the mouth. Breathing may be irregular as the respiratory muscles can be affected. A tonic-clonic seizure usually lasts one to three minutes, but may last up to five minutes. The period after the seizure is called the post-ictal phase. During this time,
What to Do
Call
Call EMS/9-1-1 and get an AED if:
What to Look For
The following are common signs and symptoms of seizures:
Common Causes
Seizures can have many different causes. One common cause is epilepsy, a chronic seizure disorder that can often be controlled with medication. Other causes of seizures include the following:
Any one of these signs can indicate a seizure—not all seizures involve convulsions.
the body rests to recover from the seizure. The person will slowly regain responsiveness and may appear fatigued, confused, or disoriented.
Absence Seizures: Formally called "Petit Mal" seizures. The person experiences a brief, sudden lapse in responsiveness. He or she may momentarily become very quiet and have a blank stare, or appear to be daydreaming. The person may also make chewing motions, breathe rapidly, blink rhythmically, or make slight movements such as tugging at clothing. There are no convulsions with absence seizures. Absence seizures are very brief, usually lasting between two and ten seconds. There is no confusion after the seizure, and the person can usually resume full activity immediately.
Focal or Partial Seizures: These seizures begin in one specific part of the brain. The signs and symptoms of the seizure vary depending on which region of the brain is affected. Typically a focal or partial seizure will affect only one part of the body (e.g., one arm may convulse) or aspect of experience (e.g., a person’s vision could be disturbed, or a person could experience a sudden change in his or her emotional state). The person may or may not remain aware during the seizure. Some focal or partial seizures can evolve into a generalized tonic-clonic or convulsive seizure.
• Fevers or infections• Head injuries• Heat stroke• Poisons (including drugs)
• Drug or alcohol withdrawal• Diabetic emergencies• Audio-visual stimulation (e.g.,
flashing lights)
• Hallucinations• Uncontrollable muscle
movement• Eyes rolling upward into the head
• Drool or foaming at the mouth• Uncontrolled repetitive motions
(partial seizures)
• You do not know the person orthe person’s medical history.
• The seizure lasts more than afew minutes.
• The person has several seizuresin a row.
• The person appears to beinjured.
• The person is pregnant.
• The person is experiencing adiabetic emergency.
• The seizure takes place in water.• This is the person’s first seizure,
or the cause of the seizure isunknown.
• The person does not wakeup after the seizure or isunresponsive for an extendedperiod.130130
Su
dd
en M
edic
al E
mer
gen
cies
130
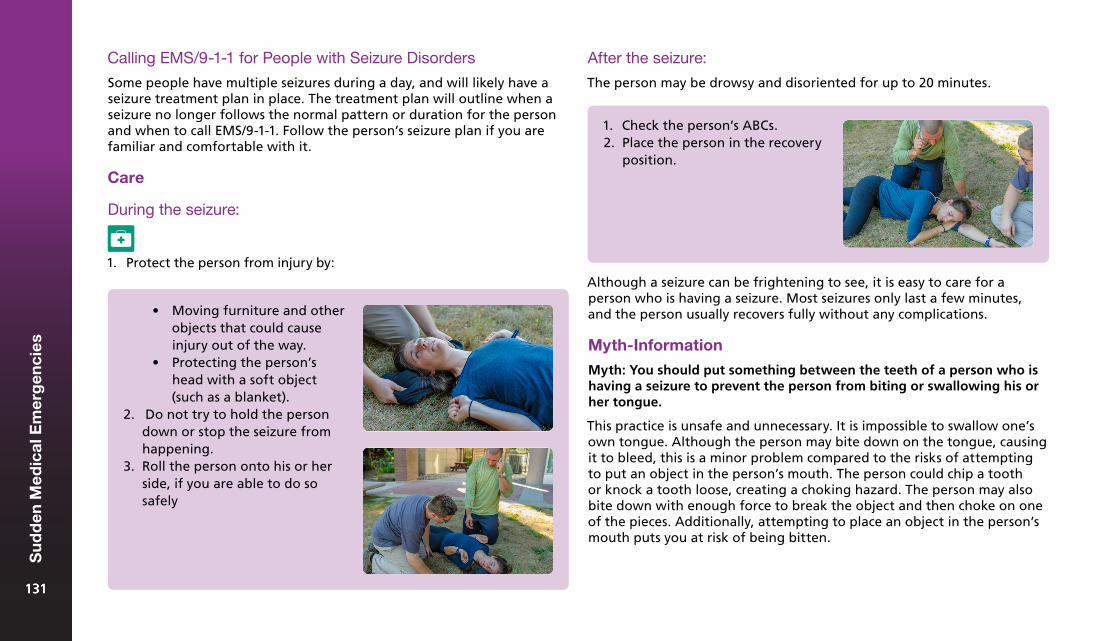
1. Protect the person from injury by:Although a seizure can be frightening to see, it is easy to care for a person who is having a seizure. Most seizures only last a few minutes, and the person usually recovers fully without any complications.
Myth-Information
Myth: You should put something between the teeth of a person who is having a seizure to prevent the person from biting or swallowing his or her tongue.
This practice is unsafe and unnecessary. It is impossible to swallow one’s own tongue. Although the person may bite down on the tongue, causing it to bleed, this is a minor problem compared to the risks of attempting to put an object in the person’s mouth. The person could chip a tooth or knock a tooth loose, creating a choking hazard. The person may also bite down with enough force to break the object and then choke on one of the pieces. Additionally, attempting to place an object in the person’s mouth puts you at risk of being bitten.
• Moving furniture and otherobjects that could causeinjury out of the way.
• Protecting the person’shead with a soft object(such as a blanket).
2. Do not try to hold the persondown or stop the seizure fromhappening.
3. Roll the person onto his or herside, if you are able to do sosafely
After the seizure:
The person may be drowsy and disoriented for up to 20 minutes.
1. Check the person’s ABCs.2. Place the person in the recovery
position.
Calling EMS/9-1-1 for People with Seizure Disorders
Some people have multiple seizures during a day, and will likely have a seizure treatment plan in place. The treatment plan will outline when a seizure no longer follows the normal pattern or duration for the person and when to call EMS/9-1-1. Follow the person’s seizure plan if you are familiar and comfortable with it.
Care
During the seizure:
131131
Su
dd
en M
edic
al E
mer
gen
cies
131
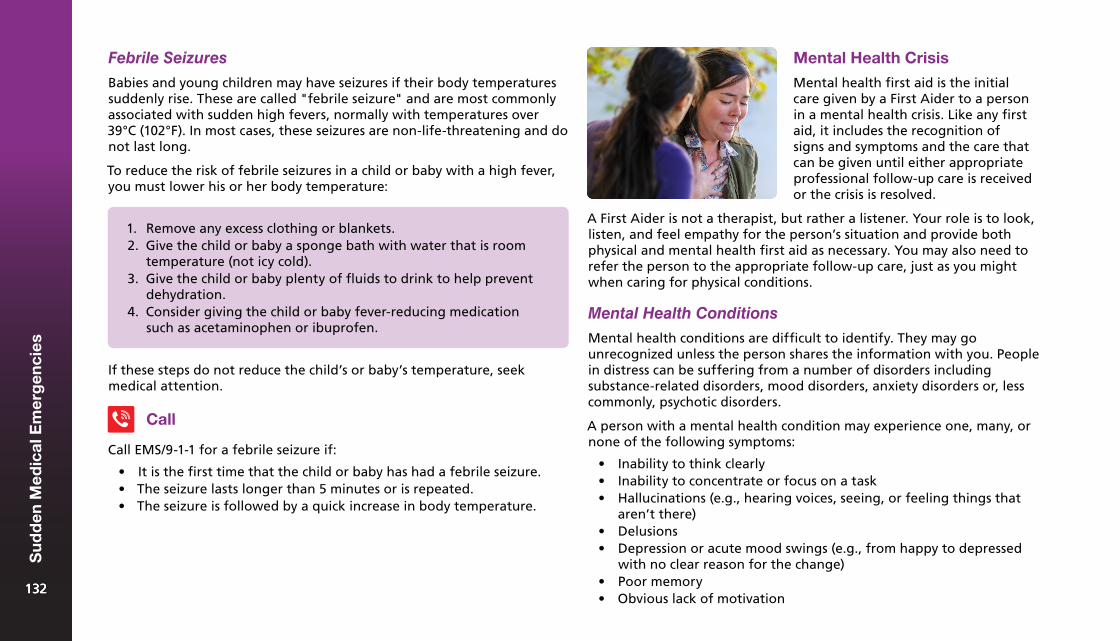
Febrile Seizures
Babies and young children may have seizures if their body temperatures suddenly rise. These are called "febrile seizure" and are most commonly associated with sudden high fevers, normally with temperatures over 39°C (102°F). In most cases, these seizures are non-life-threatening and do not last long.
To reduce the risk of febrile seizures in a child or baby with a high fever, you must lower his or her body temperature:
Mental Health Crisis
Mental health first aid is the initial care given by a First Aider to a person in a mental health crisis. Like any first aid, it includes the recognition of signs and symptoms and the care that can be given until either appropriate professional follow-up care is received or the crisis is resolved.
Call
Call EMS/9-1-1 for a febrile seizure if:
• It is the first time that the child or baby has had a febrile seizure.• The seizure lasts longer than 5 minutes or is repeated.• The seizure is followed by a quick increase in body temperature.
A First Aider is not a therapist, but rather a listener. Your role is to look, listen, and feel empathy for the person’s situation and provide both physical and mental health first aid as necessary. You may also need to refer the person to the appropriate follow-up care, just as you might when caring for physical conditions.
Mental Health Conditions
Mental health conditions are difficult to identify. They may go unrecognized unless the person shares the information with you. People in distress can be suffering from a number of disorders including substance-related disorders, mood disorders, anxiety disorders or, less commonly, psychotic disorders.
A person with a mental health condition may experience one, many, or none of the following symptoms:
• Inability to think clearly• Inability to concentrate or focus on a task• Hallucinations (e.g., hearing voices, seeing, or feeling things that
aren’t there)• Delusions• Depression or acute mood swings (e.g., from happy to depressed
with no clear reason for the change)• Poor memory• Obvious lack of motivation
1. Remove any excess clothing or blankets.2. Give the child or baby a sponge bath with water that is room
temperature (not icy cold).3. Give the child or baby plenty of fluids to drink to help prevent
dehydration.4. Consider giving the child or baby fever-reducing medication
such as acetaminophen or ibuprofen.
If these steps do not reduce the child’s or baby’s temperature, seek medical attention.
132132
Su
dd
en M
edic
al E
mer
gen
cies
132
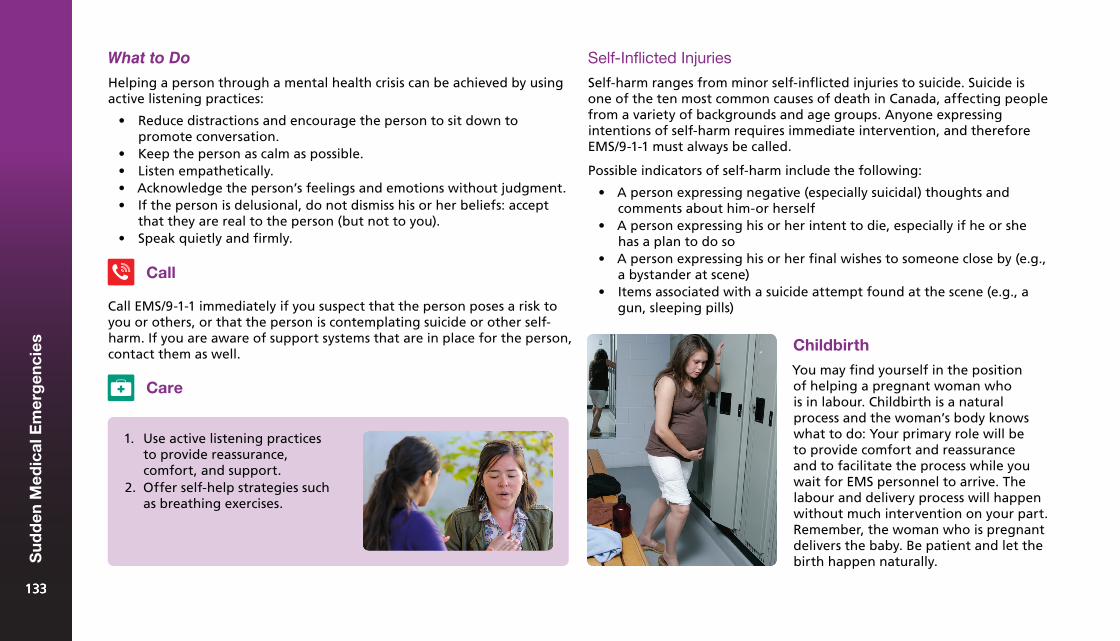
What to Do
Helping a person through a mental health crisis can be achieved by using active listening practices:
• Reduce distractions and encourage the person to sit down topromote conversation.
• Keep the person as calm as possible.• Listen empathetically.• Acknowledge the person’s feelings and emotions without judgment.• If the person is delusional, do not dismiss his or her beliefs: accept
that they are real to the person (but not to you).• Speak quietly and firmly.
1. Use active listening practicesto provide reassurance,comfort, and support.
2. Offer self-help strategies suchas breathing exercises.
Call
Call EMS/9-1-1 immediately if you suspect that the person poses a risk to you or others, or that the person is contemplating suicide or other self-harm. If you are aware of support systems that are in place for the person, contact them as well.
Care
Self-Inflicted Injuries
Self-harm ranges from minor self-inflicted injuries to suicide. Suicide is one of the ten most common causes of death in Canada, affecting people from a variety of backgrounds and age groups. Anyone expressing intentions of self-harm requires immediate intervention, and therefore EMS/9-1-1 must always be called.
Possible indicators of self-harm include the following:
• A person expressing negative (especially suicidal) thoughts andcomments about him-or herself
• A person expressing his or her intent to die, especially if he or shehas a plan to do so
• A person expressing his or her final wishes to someone close by (e.g.,a bystander at scene)
• Items associated with a suicide attempt found at the scene (e.g., agun, sleeping pills)
Childbirth
You may find yourself in the position of helping a pregnant woman who is in labour. Childbirth is a natural process and the woman’s body knows what to do: Your primary role will be to provide comfort and reassurance and to facilitate the process while you wait for EMS personnel to arrive. The labour and delivery process will happen without much intervention on your part. Remember, the woman who is pregnant delivers the baby. Be patient and let the birth happen naturally.
133133
Su
dd
en M
edic
al E
mer
gen
cies
133
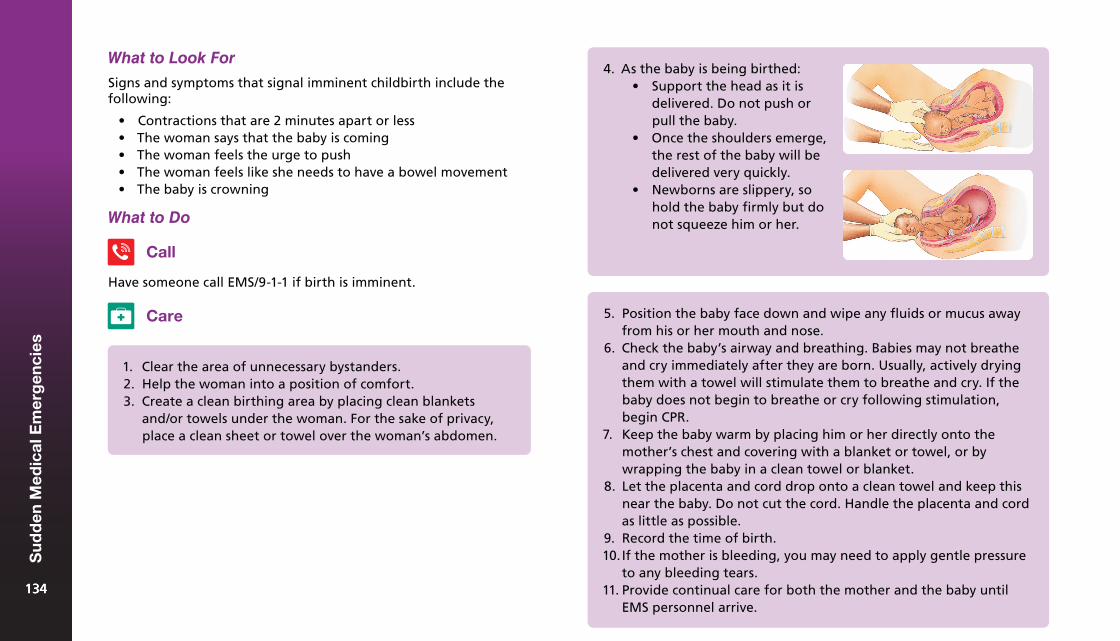
What to Look For
Signs and symptoms that signal imminent childbirth include the following:
• Contractions that are 2 minutes apart or less• The woman says that the baby is coming• The woman feels the urge to push• The woman feels like she needs to have a bowel movement• The baby is crowning
What to Do
Call
Have someone call EMS/9-1-1 if birth is imminent.
Care
1. Clear the area of unnecessary bystanders.2. Help the woman into a position of comfort.3. Create a clean birthing area by placing clean blankets
and/or towels under the woman. For the sake of privacy,place a clean sheet or towel over the woman’s abdomen.
4. As the baby is being birthed:• Support the head as it is
delivered. Do not push orpull the baby.
• Once the shoulders emerge,the rest of the baby will bedelivered very quickly.
• Newborns are slippery, sohold the baby firmly but donot squeeze him or her.
5. Position the baby face down and wipe any fluids or mucus awayfrom his or her mouth and nose.
6. Check the baby’s airway and breathing. Babies may not breatheand cry immediately after they are born. Usually, actively dryingthem with a towel will stimulate them to breathe and cry. If thebaby does not begin to breathe or cry following stimulation,begin CPR.
7. Keep the baby warm by placing him or her directly onto themother’s chest and covering with a blanket or towel, or bywrapping the baby in a clean towel or blanket.
8. Let the placenta and cord drop onto a clean towel and keep thisnear the baby. Do not cut the cord. Handle the placenta and cordas little as possible.
9. Record the time of birth.10. If the mother is bleeding, you may need to apply gentle pressure
to any bleeding tears.11. Provide continual care for both the mother and the baby until
EMS personnel arrive.134134
Su
dd
en M
edic
al E
mer
gen
cies
134
What to Look ForAssisting with Childbirth: What Not to Do
When providing care for a woman during childbirth:
• Do not let the woman leave to use the restroom. (The woman coulddeliver the baby into the toilet, putting the baby at risk for injury.)
• Do not try to physically delay delivery, as this can cause seriousinjuries to both the mother and the baby.
• Do not place your fingers in the woman’s vagina for any reason. Thiscan introduce pathogens that can cause an infection.
• Do not pull on the baby.
Miscarriage
Miscarriage is the spontaneous end of a pregnancy any time during the first 20 weeks after conception. This occurs in about 1 in 10 pregnancies. The risk of miscarriage drops as the pregnancy progresses.
Common Causes
There are a number of causes of miscarriage, including the following:
• Hormonal or genetic complications• Abnormalities in the womb• Infection and certain illnesses• Trauma
What to Do
Have someone call EMS/9-1-1.
The signs and symptoms of a miscarriage include the following:
• Anxiety and apprehensiveness• Vaginal bleeding, which may be minor or profuse• Cramp-like pain that is similar to labour or menstruation
Call
Care
1. If possible, save any tissue from the miscarriage for EMSpersonnel.
2. Provide comfort and continual care until EMS personnel arrive.
135135
Su
dd
en M
edic
al E
mer
gen
cies
135
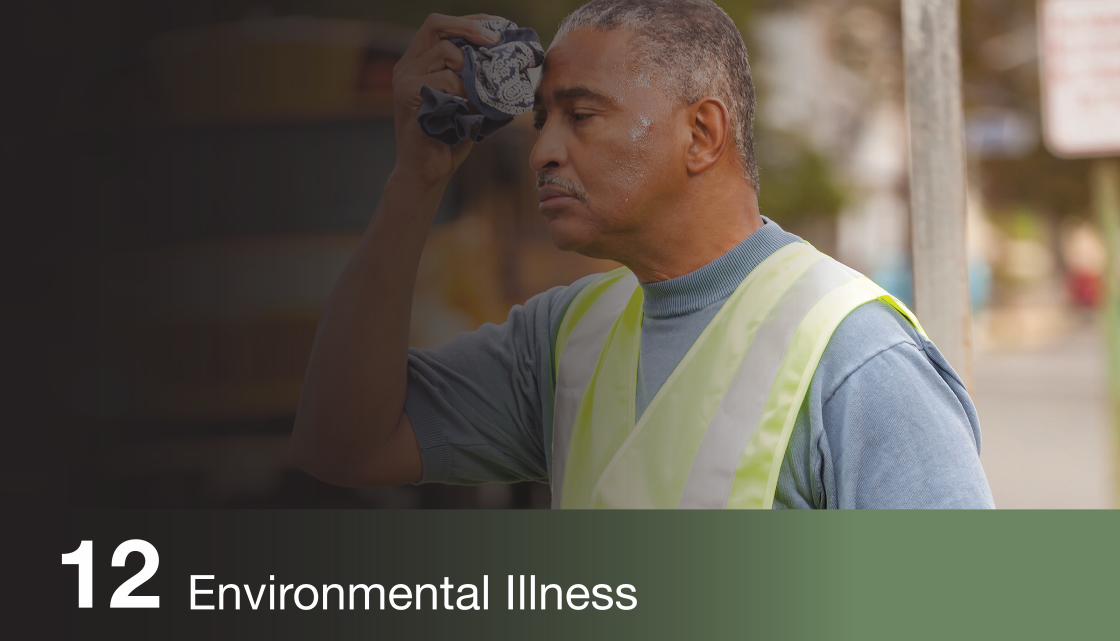
Environmental Illness12
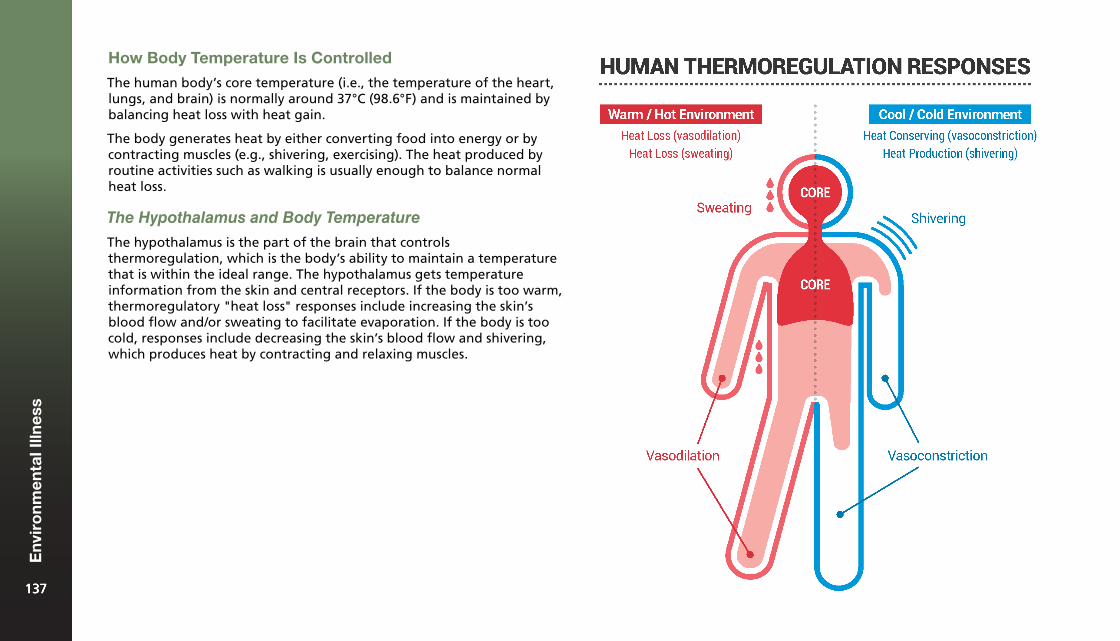
How Body Temperature Is Controlled
The human body’s core temperature (i.e., the temperature of the heart, lungs, and brain) is normally around 37°C (98.6°F) and is maintained by balancing heat loss with heat gain.
The body generates heat by either converting food into energy or by contracting muscles (e.g., shivering, exercising). The heat produced by routine activities such as walking is usually enough to balance normal heat loss.
The Hypothalamus and Body Temperature
The hypothalamus is the part of the brain that controls thermoregulation, which is the body’s ability to maintain a temperature that is within the ideal range. The hypothalamus gets temperature information from the skin and central receptors. If the body is too warm, thermoregulatory "heat loss" responses include increasing the skin’s blood flow and/or sweating to facilitate evaporation. If the body is too cold, responses include decreasing the skin’s blood flow and shivering, which produces heat by contracting and relaxing muscles.
137137
Env
iro
nm
enta
l Illn
ess
137
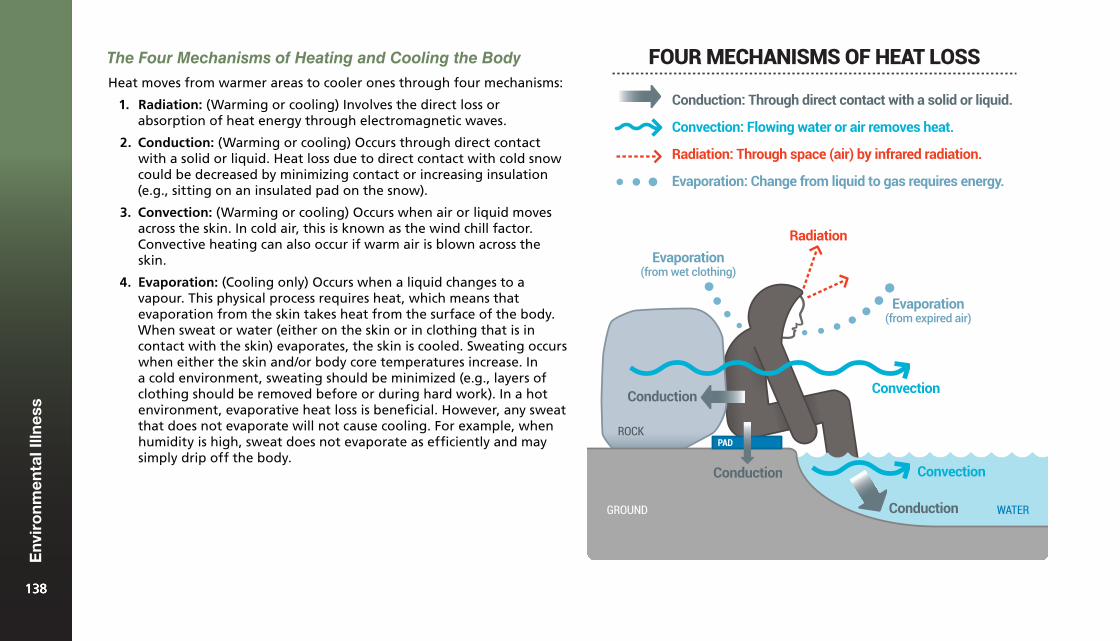
The Four Mechanisms of Heating and Cooling the Body
Heat moves from warmer areas to cooler ones through four mechanisms:
1. Radiation: (Warming or cooling) Involves the direct loss orabsorption of heat energy through electromagnetic waves.
2. Conduction: (Warming or cooling) Occurs through direct contactwith a solid or liquid. Heat loss due to direct contact with cold snowcould be decreased by minimizing contact or increasing insulation(e.g., sitting on an insulated pad on the snow).
3. Convection: (Warming or cooling) Occurs when air or liquid movesacross the skin. In cold air, this is known as the wind chill factor.Convective heating can also occur if warm air is blown across theskin.
4. Evaporation: (Cooling only) Occurs when a liquid changes to avapour. This physical process requires heat, which means thatevaporation from the skin takes heat from the surface of the body.When sweat or water (either on the skin or in clothing that is incontact with the skin) evaporates, the skin is cooled. Sweating occurswhen either the skin and/or body core temperatures increase. Ina cold environment, sweating should be minimized (e.g., layers ofclothing should be removed before or during hard work). In a hotenvironment, evaporative heat loss is beneficial. However, any sweatthat does not evaporate will not cause cooling. For example, whenhumidity is high, sweat does not evaporate as efficiently and maysimply drip off the body.
PADROCK
GROUND
Convection
WATER
Convection
Radiation
Evaporation(from expired air)
Evaporation(from wet clothing)
Conduction
Conduction
Conduction
Radiation: Through space (air) by infrared radiation.
Convection: Flowing water or air removes heat.
Conduction: Through direct contact with a solid or liquid.
Evaporation: Change from liquid to gas requires energy.
FOUR MECHANISMS OF HEAT LOSS
138138
Env
iro
nm
enta
l Illn
ess
138
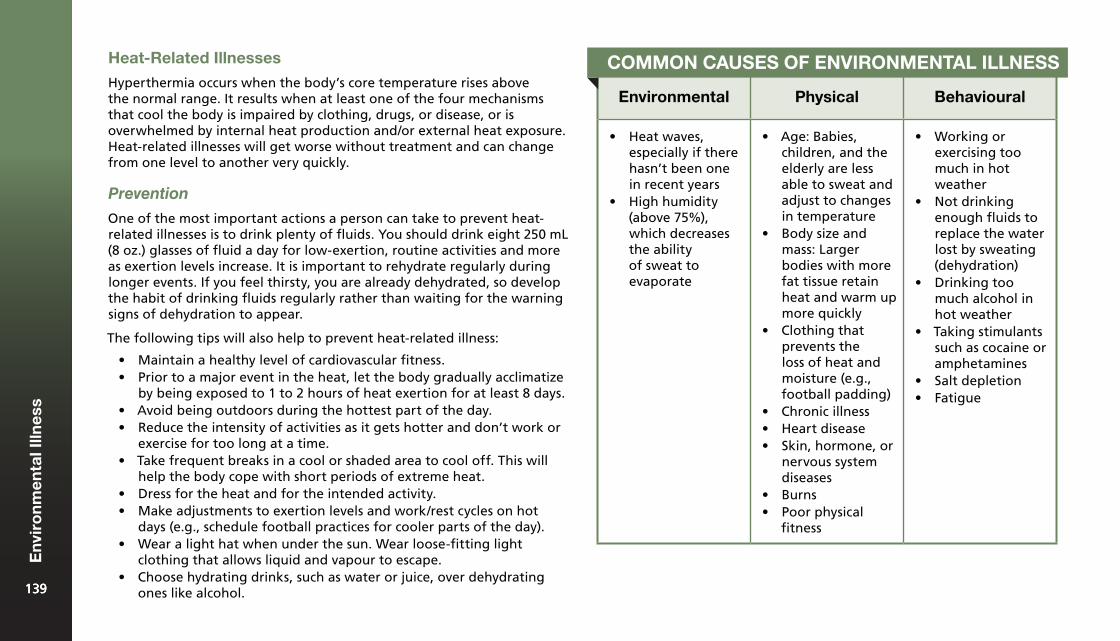
Heat-Related Illnesses
Hyperthermia occurs when the body’s core temperature rises above the normal range. It results when at least one of the four mechanisms that cool the body is impaired by clothing, drugs, or disease, or is overwhelmed by internal heat production and/or external heat exposure. Heat-related illnesses will get worse without treatment and can change from one level to another very quickly.
Prevention
One of the most important actions a person can take to prevent heat-related illnesses is to drink plenty of fluids. You should drink eight 250 mL (8 oz.) glasses of fluid a day for low-exertion, routine activities and more as exertion levels increase. It is important to rehydrate regularly during longer events. If you feel thirsty, you are already dehydrated, so develop the habit of drinking fluids regularly rather than waiting for the warning signs of dehydration to appear.
The following tips will also help to prevent heat-related illness:
• Maintain a healthy level of cardiovascular fitness.• Prior to a major event in the heat, let the body gradually acclimatize
by being exposed to 1 to 2 hours of heat exertion for at least 8 days.• Avoid being outdoors during the hottest part of the day.• Reduce the intensity of activities as it gets hotter and don’t work or
exercise for too long at a time.• Take frequent breaks in a cool or shaded area to cool off. This will
help the body cope with short periods of extreme heat.• Dress for the heat and for the intended activity.• Make adjustments to exertion levels and work/rest cycles on hot
days (e.g., schedule football practices for cooler parts of the day).• Wear a light hat when under the sun. Wear loose-fitting light
clothing that allows liquid and vapour to escape.• Choose hydrating drinks, such as water or juice, over dehydrating
ones like alcohol.
Environmental Physical Behavioural
• Heat waves,especially if therehasn’t been onein recent years
• High humidity(above 75%),which decreasesthe abilityof sweat toevaporate
• Age: Babies,children, and theelderly are lessable to sweat andadjust to changesin temperature
• Body size andmass: Largerbodies with morefat tissue retainheat and warm upmore quickly
• Clothing thatprevents theloss of heat andmoisture (e.g.,football padding)
• Chronic illness• Heart disease• Skin, hormone, or
nervous systemdiseases
• Burns• Poor physical
fitness
• Working orexercising toomuch in hotweather
• Not drinkingenough fluids toreplace the waterlost by sweating(dehydration)
• Drinking toomuch alcohol inhot weather
• Taking stimulantssuch as cocaine oramphetamines
• Salt depletion• Fatigue
COMMON CAUSES OF ENVIRONMENTAL ILLNESS
139139
Env
iro
nm
enta
l Illn
ess
139
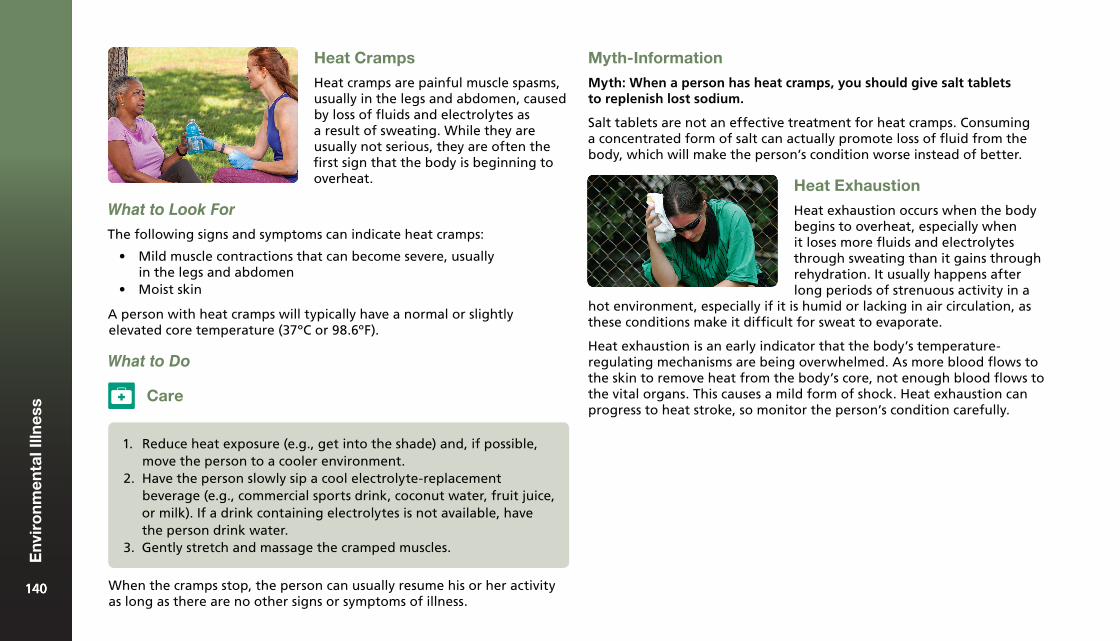
Heat Cramps
Heat cramps are painful muscle spasms, usually in the legs and abdomen, caused by loss of fluids and electrolytes as a result of sweating. While they are usually not serious, they are often the first sign that the body is beginning to overheat.
What to Look For
The following signs and symptoms can indicate heat cramps:
• Mild muscle contractions that can become severe, usuallyin the legs and abdomen
• Moist skin
A person with heat cramps will typically have a normal or slightly elevated core temperature (37ºC or 98.6ºF).
What to Do
Care
1. Reduce heat exposure (e.g., get into the shade) and, if possible,move the person to a cooler environment.
2. Have the person slowly sip a cool electrolyte-replacementbeverage (e.g., commercial sports drink, coconut water, fruit juice,or milk). If a drink containing electrolytes is not available, havethe person drink water.
3. Gently stretch and massage the cramped muscles.
When the cramps stop, the person can usually resume his or her activity as long as there are no other signs or symptoms of illness.
Myth-Information
Myth: When a person has heat cramps, you should give salt tablets to replenish lost sodium.
Salt tablets are not an effective treatment for heat cramps. Consuming a concentrated form of salt can actually promote loss of fluid from the body, which will make the person’s condition worse instead of better.
Heat Exhaustion
Heat exhaustion occurs when the body begins to overheat, especially when it loses more fluids and electrolytes through sweating than it gains through rehydration. It usually happens after long periods of strenuous activity in a
hot environment, especially if it is humid or lacking in air circulation, as these conditions make it difficult for sweat to evaporate.
Heat exhaustion is an early indicator that the body’s temperature-regulating mechanisms are being overwhelmed. As more blood flows to the skin to remove heat from the body’s core, not enough blood flows to the vital organs. This causes a mild form of shock. Heat exhaustion can progress to heat stroke, so monitor the person’s condition carefully.
140140
Env
iro
nm
enta
l Illn
ess
140
What to Look For
The following signs and symptoms can indicate heat exhaustion:
• Normal or slightly raised core temperature (37 to 39°C,or 98.6 to 102.2°F)
• Moist skin that is flushed (red) immediately after exertion, and thenturns pale or ashen (grey)
• Dehydration or intense thirst• Headache, nausea, dizziness or fainting• Weakness or exhaustion
What to Do
Call
Call EMS/9-1-1 if the person is vomiting, has an altered level of responsiveness, or is unable to drink fluids.
1. Reduce heat exposure (e.g., get into the shade) and if possible,move the person to a cooler environment.
2. Loosen any tight clothing and remove any padded clothingor equipment.
3. Pour cool water on the person’s clothing and/or on towels or clothsand place them on the person’s chest. Fan the person toincrease evaporation.
4. Apply ice or cold packs to the armpits and chest.5. If the person is responsive and able to swallow, have him or her
slowly sip a cool electrolyte-replacement beverage (e.g.,commercial sports drink, coconut water, fruit juice, or milk).If a drink with electrolytes is not available, have the person drinkwater.
6. Advise the person not to do any more activities in the heat thatday.
Care
141141
Env
iro
nm
enta
l Illn
ess
141
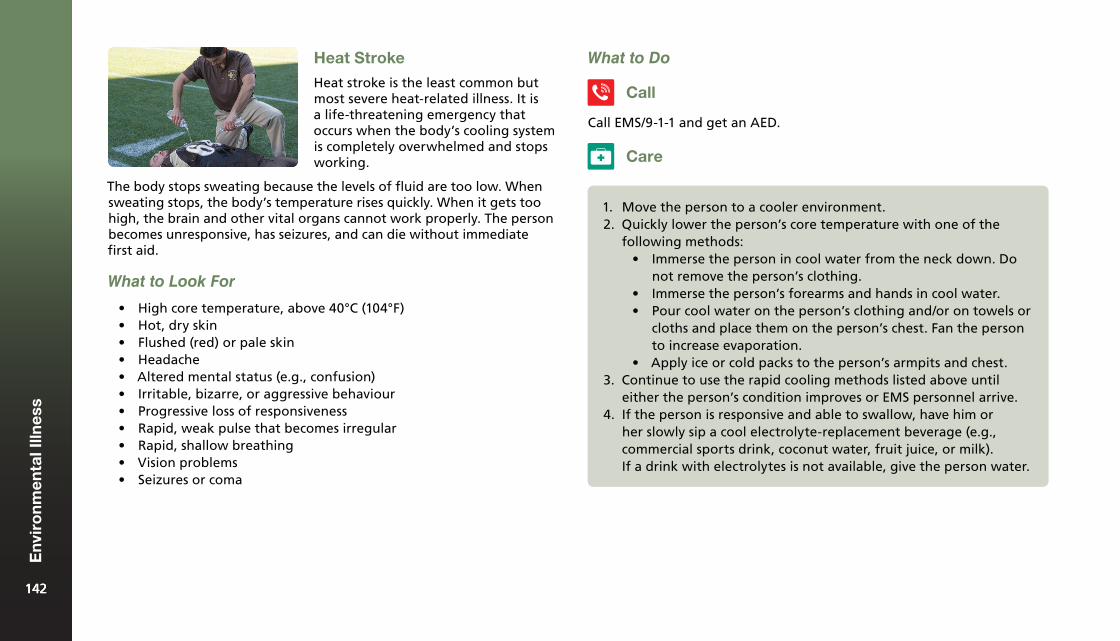
Heat Stroke
Heat stroke is the least common but most severe heat-related illness. It is a life-threatening emergency that occurs when the body’s cooling system is completely overwhelmed and stops working.
The body stops sweating because the levels of fluid are too low. When sweating stops, the body’s temperature rises quickly. When it gets too high, the brain and other vital organs cannot work properly. The person becomes unresponsive, has seizures, and can die without immediate first aid.
What to Look For
• High core temperature, above 40°C (104°F)• Hot, dry skin• Flushed (red) or pale skin• Headache• Altered mental status (e.g., confusion)• Irritable, bizarre, or aggressive behaviour• Progressive loss of responsiveness• Rapid, weak pulse that becomes irregular• Rapid, shallow breathing• Vision problems• Seizures or coma
What to Do
Call
Call EMS/9-1-1 and get an AED.
1. Move the person to a cooler environment.2. Quickly lower the person’s core temperature with one of the
following methods:• Immerse the person in cool water from the neck down. Do
not remove the person’s clothing.• Immerse the person’s forearms and hands in cool water.• Pour cool water on the person’s clothing and/or on towels or
cloths and place them on the person’s chest. Fan the personto increase evaporation.
• Apply ice or cold packs to the person’s armpits and chest.3. Continue to use the rapid cooling methods listed above until
either the person’s condition improves or EMS personnel arrive.4. If the person is responsive and able to swallow, have him or
her slowly sip a cool electrolyte-replacement beverage (e.g.,commercial sports drink, coconut water, fruit juice, or milk).If a drink with electrolytes is not available, give the person water.
Care
142142
Env
iro
nm
enta
l Illn
ess
142
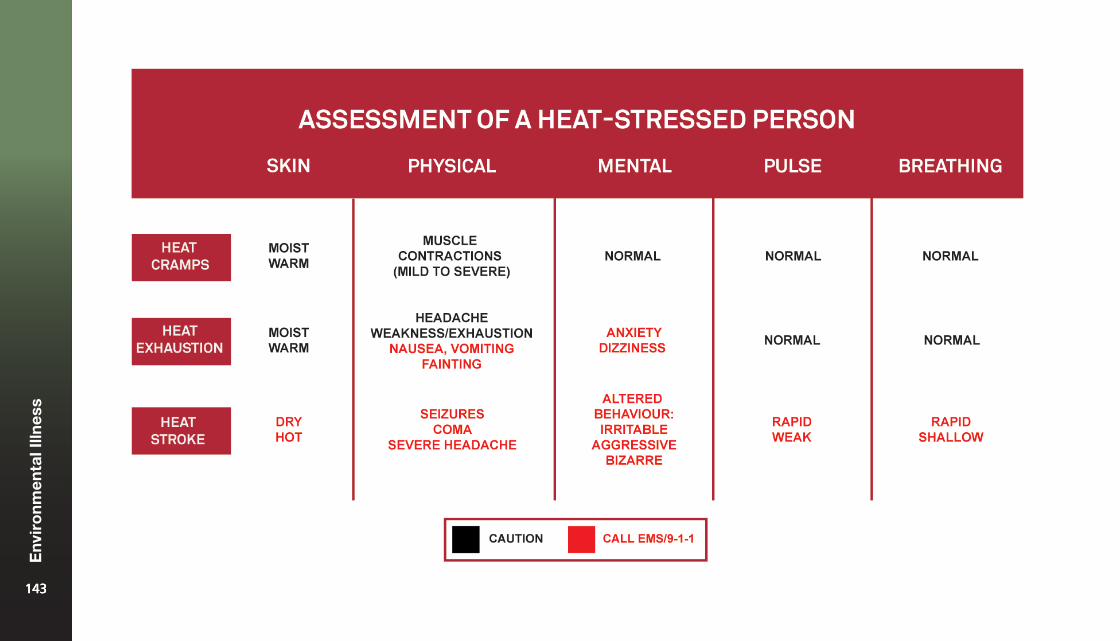
143143
Env
iro
nm
enta
l Illn
ess
143
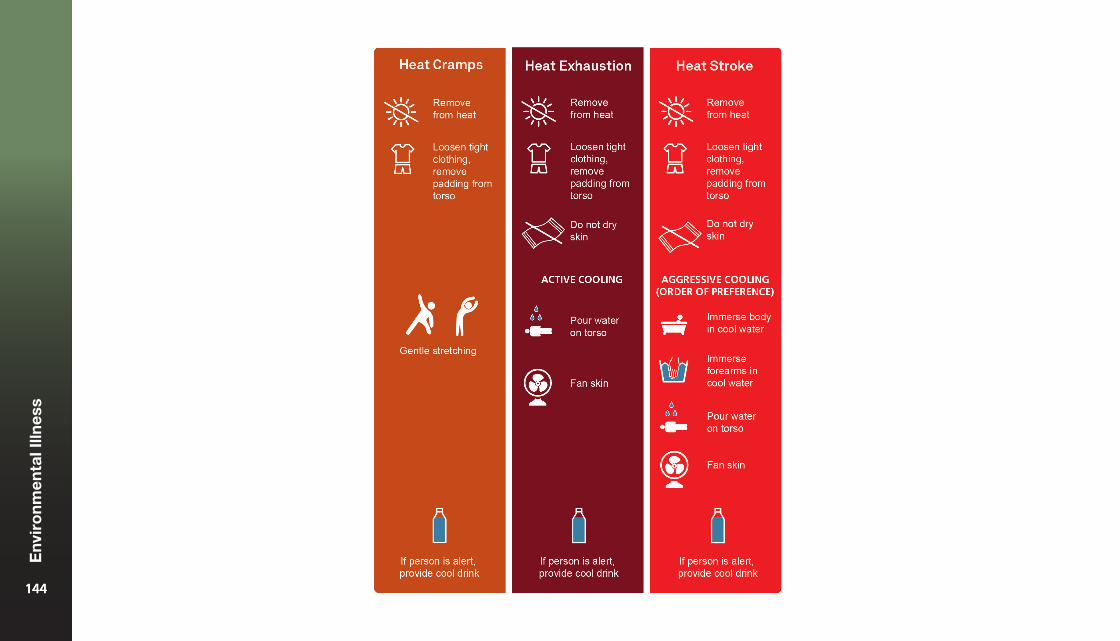
144144
Env
iro
nm
enta
l Illn
ess
144
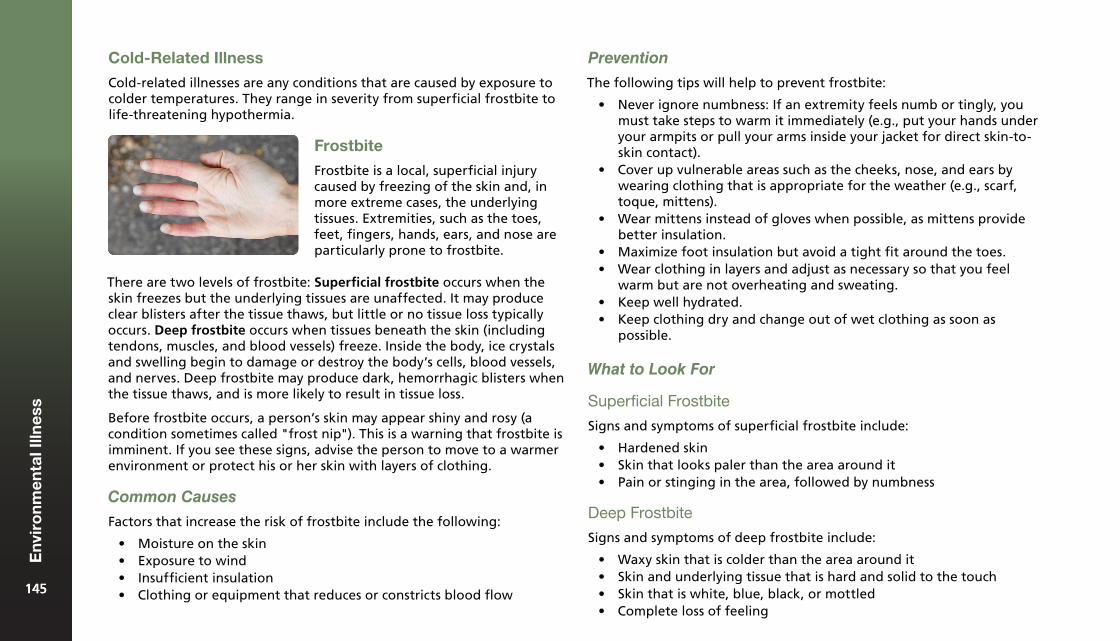
There are two levels of frostbite: Superficial frostbite occurs when the skin freezes but the underlying tissues are unaffected. It may produce clear blisters after the tissue thaws, but little or no tissue loss typically occurs. Deep frostbite occurs when tissues beneath the skin (including tendons, muscles, and blood vessels) freeze. Inside the body, ice crystals and swelling begin to damage or destroy the body’s cells, blood vessels, and nerves. Deep frostbite may produce dark, hemorrhagic blisters when the tissue thaws, and is more likely to result in tissue loss.
Before frostbite occurs, a person’s skin may appear shiny and rosy (a condition sometimes called "frost nip"). This is a warning that frostbite is imminent. If you see these signs, advise the person to move to a warmer environment or protect his or her skin with layers of clothing.
Common Causes
Factors that increase the risk of frostbite include the following:
• Moisture on the skin• Exposure to wind• Insufficient insulation• Clothing or equipment that reduces or constricts blood flow
Prevention
The following tips will help to prevent frostbite:
• Never ignore numbness: If an extremity feels numb or tingly, youmust take steps to warm it immediately (e.g., put your hands underyour armpits or pull your arms inside your jacket for direct skin-to-skin contact).
• Cover up vulnerable areas such as the cheeks, nose, and ears bywearing clothing that is appropriate for the weather (e.g., scarf,toque, mittens).
• Wear mittens instead of gloves when possible, as mittens providebetter insulation.
• Maximize foot insulation but avoid a tight fit around the toes.• Wear clothing in layers and adjust as necessary so that you feel
warm but are not overheating and sweating.• Keep well hydrated.• Keep clothing dry and change out of wet clothing as soon as
possible.
What to Look For
Superficial Frostbite
Signs and symptoms of superficial frostbite include:
• Hardened skin• Skin that looks paler than the area around it• Pain or stinging in the area, followed by numbness
Deep Frostbite
Signs and symptoms of deep frostbite include:
• Waxy skin that is colder than the area around it• Skin and underlying tissue that is hard and solid to the touch• Skin that is white, blue, black, or mottled• Complete loss of feeling
Cold-Related Illness
Cold-related illnesses are any conditions that are caused by exposure to colder temperatures. They range in severity from superficial frostbite to life-threatening hypothermia.
Frostbite
Frostbite is a local, superficial injury caused by freezing of the skin and, in more extreme cases, the underlying tissues. Extremities, such as the toes, feet, fingers, hands, ears, and nose are particularly prone to frostbite.
145145
Env
iro
nm
enta
l Illn
ess
145
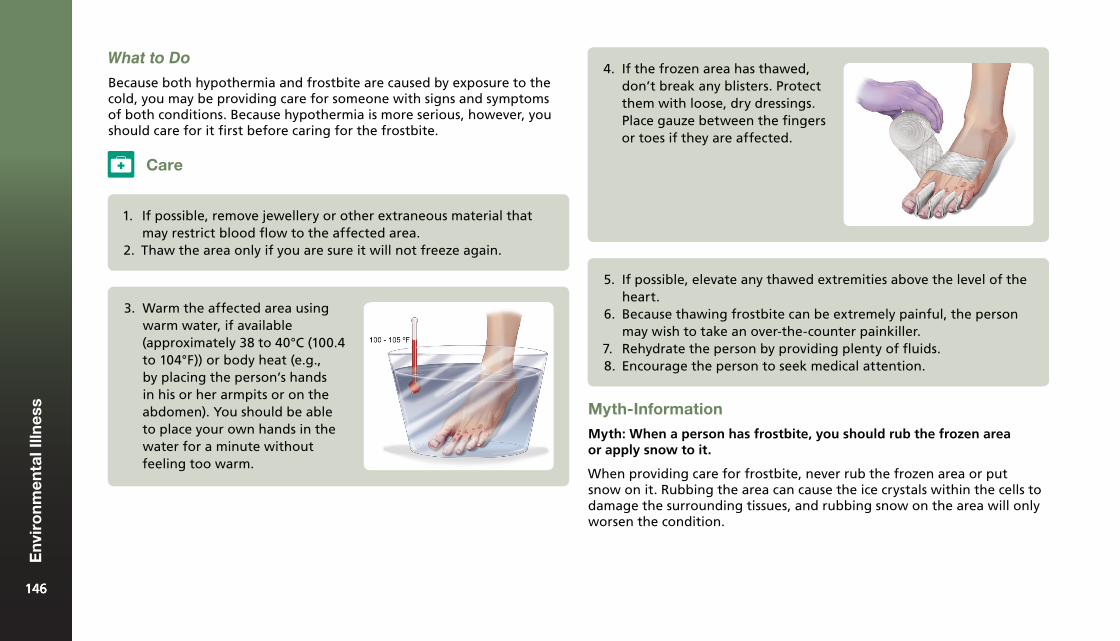
3. Warm the affected area usingwarm water, if available(approximately 38 to 40°C (100.4to 104°F)) or body heat (e.g.,by placing the person’s handsin his or her armpits or on theabdomen). You should be ableto place your own hands in thewater for a minute withoutfeeling too warm.
Care
1. If possible, remove jewellery or other extraneous material thatmay restrict blood flow to the affected area.
2. Thaw the area only if you are sure it will not freeze again.
4. If the frozen area has thawed,don’t break any blisters. Protectthem with loose, dry dressings.Place gauze between the fingersor toes if they are affected.
5. If possible, elevate any thawed extremities above the level of theheart.
6. Because thawing frostbite can be extremely painful, the personmay wish to take an over-the-counter painkiller.
7. Rehydrate the person by providing plenty of fluids.8. Encourage the person to seek medical attention.
Myth-Information
Myth: When a person has frostbite, you should rub the frozen area or apply snow to it.
When providing care for frostbite, never rub the frozen area or put snow on it. Rubbing the area can cause the ice crystals within the cells to damage the surrounding tissues, and rubbing snow on the area will only worsen the condition.
What to Do
Because both hypothermia and frostbite are caused by exposure to the cold, you may be providing care for someone with signs and symptoms of both conditions. Because hypothermia is more serious, however, you should care for it first before caring for the frostbite.
146146
Env
iro
nm
enta
l Illn
ess
146
Hypothermia
Hypothermia occurs when the body’s core temperature (i.e., the temperature of the heart, lungs, and brain) drops to 35°C (95°F) or lower. Hypothermia becomes a life-threatening condition when the core temperature drops below 28°C (82.4°F). People with smaller body types, lower overall body weights, and lower body-fat content are much more likely to experience hypothermia. Hypothermia can occur at any time of year, with young children and the elderly being most at risk.
Common Causes
The following may lead to hypothermia:
• Sweating while outdoors in cold weather• Cold, wet, windy conditions• Cold-water immersion, especially in water below 10°C (50°F)• Dehydration• Taking medications to eliminate water from the body
Prevention
The following tips will help to prevent hypothermia:
• Prepare for activities in cold environments by wearing appropriateclothing:
¶ Wear a hat and clothing made of tightly woven fibres (e.g., wool, fleece), which provide insulation and allow moisture transmission from the skin to the external environment.
¶ Avoid cotton because it soaks up water and stays wet. ¶ Wear clothing in layers so that they can be added or removed
according to the weather conditions and exercise intensity. Remove some clothing before working to reduce the amount of sweat and keep clothing dry.
• Keep clothing dry. If clothing gets wet, change into dry clothing assoon as possible.
• Carry and consume high-energy foods that have a lot of sugar.
• Drink plenty of warm, high-calorie drinks to help fuel heatproduction. If high-calorie drinks are not available, drink plenty ofwater to at least keep from becoming dehydrated.
• Do not drink alcohol.• Take frequent breaks from the cold to let the body warm up.• Increase your activity level, add insulation, add a heat source, or get
out of the cold if shivering occurs.• Be careful around cold water and always wear a personal flotation
device (PFD).
What to Look For
Levels of Cold Stress
Cold Stress (Not Hypothermic)
• Shivering• Normal mental status• Able to care for self
Mild Hypothermia
• Vigorous shivering; complaining of the cold• Decreased physical function• Difficulty taking care of self
Moderate Hypothermia
• Weak and intermittent shivering or shivering that later stops• Sometimes complaining of the cold• Lack of coordination or speech; confused or unusual behaviour• Impaired judgment• Possible unresponsiveness
Severe Hypothermia
• Shivering has stopped• Unresponsiveness; breathing has slowed down or stopped• Body feels stiff• No pulse
147147
Env
iro
nm
enta
l Illn
ess
147
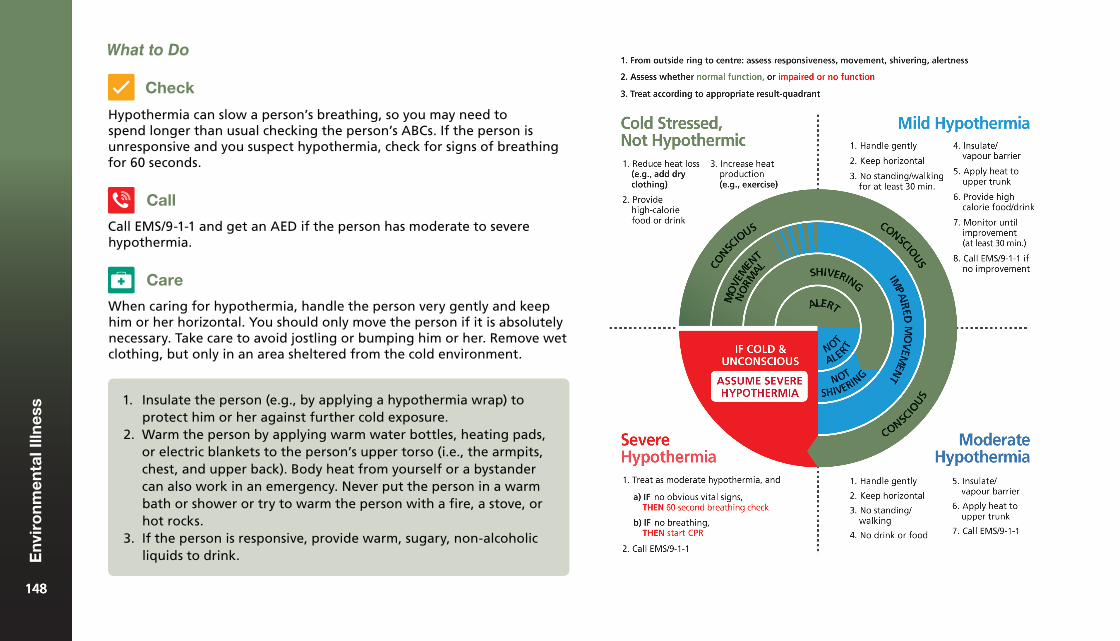
Hypothermia can slow a person’s breathing, so you may need to spend longer than usual checking the person’s ABCs. If the person is unresponsive and you suspect hypothermia, check for signs of breathing for 60 seconds.
Call EMS/9-1-1 and get an AED if the person has moderate to severe hypothermia.
When caring for hypothermia, handle the person very gently and keep him or her horizontal. You should only move the person if it is absolutely necessary. Take care to avoid jostling or bumping him or her. Remove wet clothing, but only in an area sheltered from the cold environment.
1. Insulate the person (e.g., by applying a hypothermia wrap) toprotect him or her against further cold exposure.
2. Warm the person by applying warm water bottles, heating pads,or electric blankets to the person’s upper torso (i.e., the armpits,chest, and upper back). Body heat from yourself or a bystandercan also work in an emergency. Never put the person in a warmbath or shower or try to warm the person with a fire, a stove, orhot rocks.
3. If the person is responsive, provide warm, sugary, non-alcoholicliquids to drink.
Care
Call
Check
What to Do
148148
Env
iro
nm
enta
l Illn
ess
148
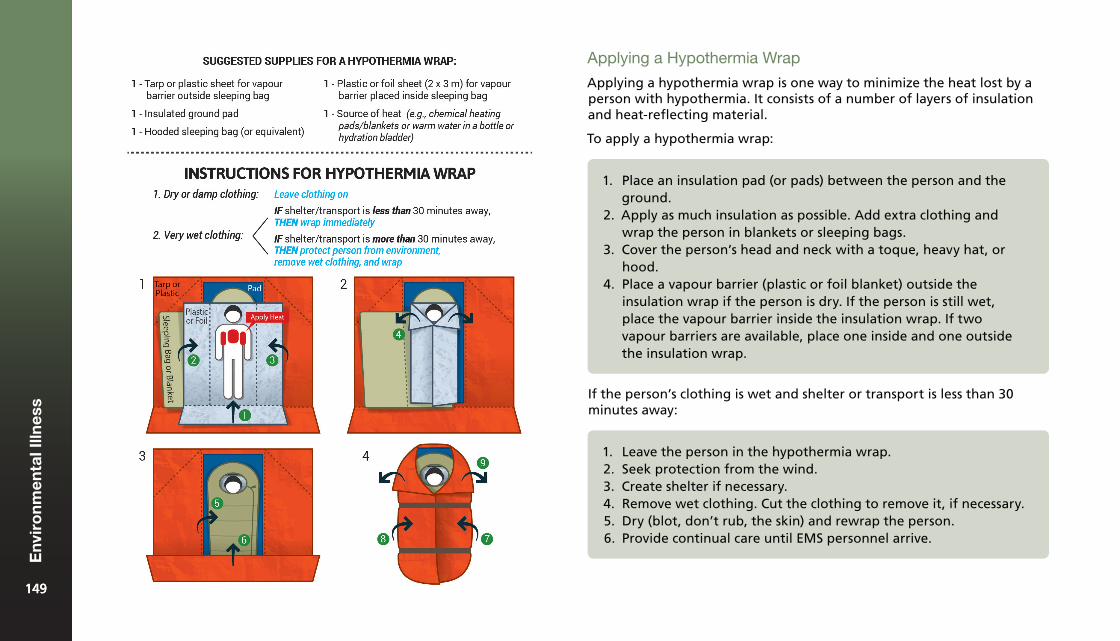
Applying a Hypothermia Wrap
Applying a hypothermia wrap is one way to minimize the heat lost by a person with hypothermia. It consists of a number of layers of insulation and heat-reflecting material.
To apply a hypothermia wrap:
1. Place an insulation pad (or pads) between the person and theground.
2. Apply as much insulation as possible. Add extra clothing andwrap the person in blankets or sleeping bags.
3. Cover the person’s head and neck with a toque, heavy hat, orhood.
4. Place a vapour barrier (plastic or foil blanket) outside theinsulation wrap if the person is dry. If the person is still wet,place the vapour barrier inside the insulation wrap. If twovapour barriers are available, place one inside and one outsidethe insulation wrap.
If the person’s clothing is wet and shelter or transport is less than 30 minutes away:
1. Leave the person in the hypothermia wrap.2. Seek protection from the wind.3. Create shelter if necessary.4. Remove wet clothing. Cut the clothing to remove it, if necessary.5. Dry (blot, don’t rub, the skin) and rewrap the person.6. Provide continual care until EMS personnel arrive.
149149
Env
iro
nm
enta
l Illn
ess
149
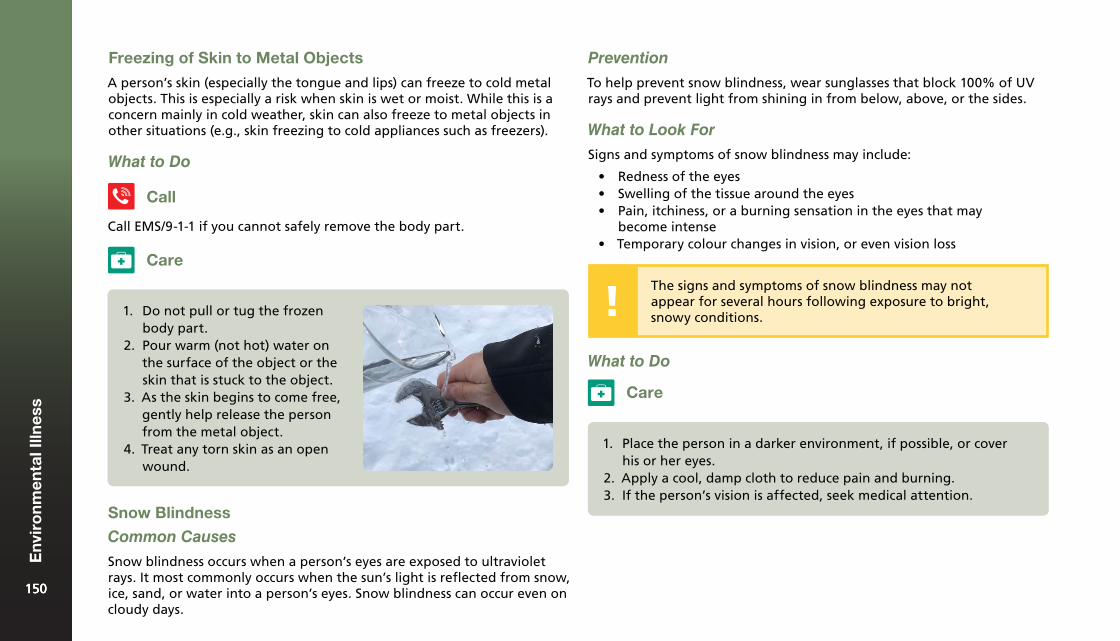
Freezing of Skin to Metal Objects
A person’s skin (especially the tongue and lips) can freeze to cold metal objects. This is especially a risk when skin is wet or moist. While this is a concern mainly in cold weather, skin can also freeze to metal objects in other situations (e.g., skin freezing to cold appliances such as freezers).
What to Do
Call EMS/9-1-1 if you cannot safely remove the body part.
Care
1. Do not pull or tug the frozenbody part.
2. Pour warm (not hot) water onthe surface of the object or theskin that is stuck to the object.
3. As the skin begins to come free,gently help release the personfrom the metal object.
4. Treat any torn skin as an openwound.
Call
Prevention
To help prevent snow blindness, wear sunglasses that block 100% of UV rays and prevent light from shining in from below, above, or the sides.
What to Look For
The signs and symptoms of snow blindness may not appear for several hours following exposure to bright, snowy conditions.
Signs and symptoms of snow blindness may include:
• Redness of the eyes• Swelling of the tissue around the eyes• Pain, itchiness, or a burning sensation in the eyes that may
become intense• Temporary colour changes in vision, or even vision loss
What to Do
Care
1. Place the person in a darker environment, if possible, or coverhis or her eyes.
2. Apply a cool, damp cloth to reduce pain and burning.3. If the person’s vision is affected, seek medical attention.
Snow Blindness
Common Causes
Snow blindness occurs when a person’s eyes are exposed to ultraviolet rays. It most commonly occurs when the sun’s light is reflected from snow, ice, sand, or water into a person’s eyes. Snow blindness can occur even on cloudy days.
150150
Env
iro
nm
enta
l Illn
ess
150
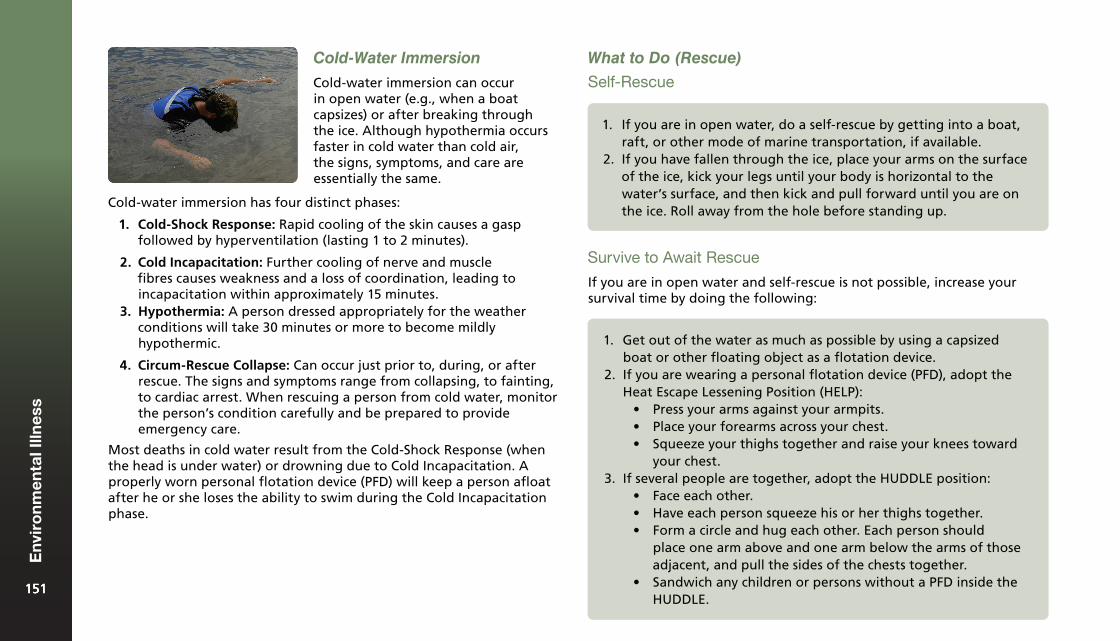
Cold-Water Immersion
Cold-water immersion can occur in open water (e.g., when a boat capsizes) or after breaking through the ice. Although hypothermia occurs faster in cold water than cold air, the signs, symptoms, and care are essentially the same.
Cold-water immersion has four distinct phases:
1. Cold-Shock Response: Rapid cooling of the skin causes a gaspfollowed by hyperventilation (lasting 1 to 2 minutes).
2. Cold Incapacitation: Further cooling of nerve and musclefibres causes weakness and a loss of coordination, leading toincapacitation within approximately 15 minutes.
3. Hypothermia: A person dressed appropriately for the weatherconditions will take 30 minutes or more to become mildlyhypothermic.
4. Circum-Rescue Collapse: Can occur just prior to, during, or afterrescue. The signs and symptoms range from collapsing, to fainting,to cardiac arrest. When rescuing a person from cold water, monitorthe person’s condition carefully and be prepared to provideemergency care.
Most deaths in cold water result from the Cold-Shock Response (when the head is under water) or drowning due to Cold Incapacitation. A properly worn personal flotation device (PFD) will keep a person afloat after he or she loses the ability to swim during the Cold Incapacitation phase.
What to Do (Rescue)
Self-Rescue
1. If you are in open water, do a self-rescue by getting into a boat,raft, or other mode of marine transportation, if available.
2. If you have fallen through the ice, place your arms on the surfaceof the ice, kick your legs until your body is horizontal to thewater’s surface, and then kick and pull forward until you are onthe ice. Roll away from the hole before standing up.
Survive to Await Rescue
If you are in open water and self-rescue is not possible, increase your survival time by doing the following:
1. Get out of the water as much as possible by using a capsizedboat or other floating object as a flotation device.
2. If you are wearing a personal flotation device (PFD), adopt theHeat Escape Lessening Position (HELP):
• Press your arms against your armpits.• Place your forearms across your chest.• Squeeze your thighs together and raise your knees toward
your chest.3. If several people are together, adopt the HUDDLE position:
• Face each other.• Have each person squeeze his or her thighs together.• Form a circle and hug each other. Each person should
place one arm above and one arm below the arms of thoseadjacent, and pull the sides of the chests together.
• Sandwich any children or persons without a PFD inside theHUDDLE.
151151
Env
iro
nm
enta
l Illn
ess
151
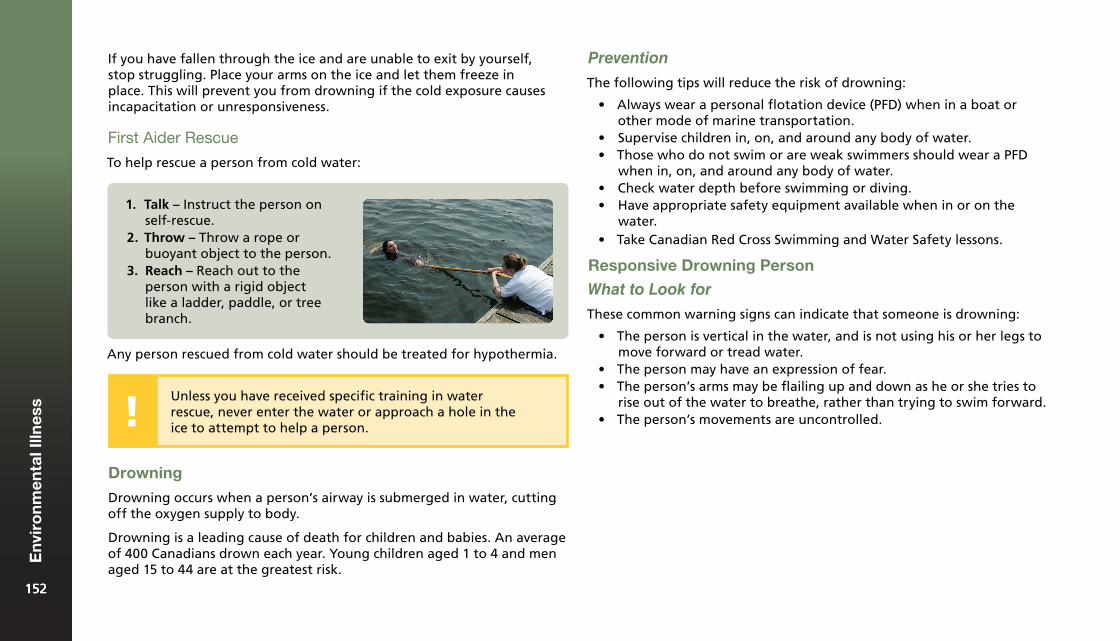
If you have fallen through the ice and are unable to exit by yourself, stop struggling. Place your arms on the ice and let them freeze in place. This will prevent you from drowning if the cold exposure causes incapacitation or unresponsiveness.
First Aider Rescue
To help rescue a person from cold water:
1. Talk – Instruct the person onself-rescue.
2. Throw – Throw a rope orbuoyant object to the person.
3. Reach – Reach out to theperson with a rigid objectlike a ladder, paddle, or treebranch.
Any person rescued from cold water should be treated for hypothermia.
Unless you have received specific training in water rescue, never enter the water or approach a hole in the ice to attempt to help a person.
Prevention
The following tips will reduce the risk of drowning:
• Always wear a personal flotation device (PFD) when in a boat orother mode of marine transportation.
• Supervise children in, on, and around any body of water.• Those who do not swim or are weak swimmers should wear a PFD
when in, on, and around any body of water.• Check water depth before swimming or diving.• Have appropriate safety equipment available when in or on the
water.• Take Canadian Red Cross Swimming and Water Safety lessons.
Responsive Drowning Person
What to Look for
Drowning
Drowning occurs when a person’s airway is submerged in water, cutting off the oxygen supply to body.
Drowning is a leading cause of death for children and babies. An average of 400 Canadians drown each year. Young children aged 1 to 4 and men aged 15 to 44 are at the greatest risk.
These common warning signs can indicate that someone is drowning:
• The person is vertical in the water, and is not using his or her legs tomove forward or tread water.
• The person may have an expression of fear.• The person’s arms may be flailing up and down as he or she tries to
rise out of the water to breathe, rather than trying to swim forward.• The person’s movements are uncontrolled.
152152
Env
iro
nm
enta
l Illn
ess
152
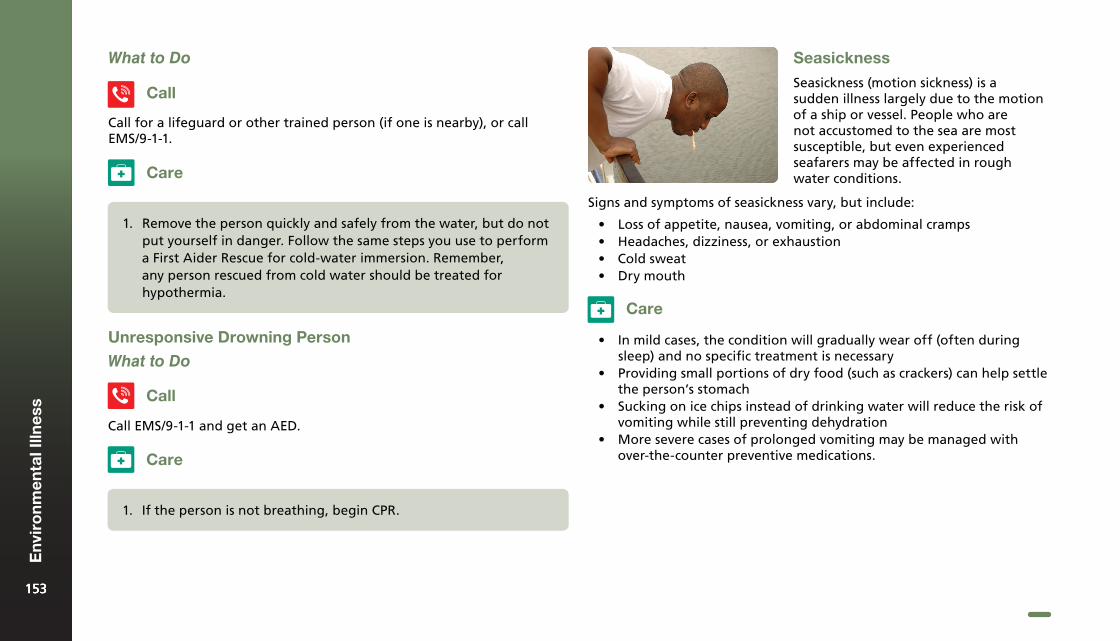
1. If the person is not breathing, begin CPR.
Unresponsive Drowning Person
What to Do
Call
Call EMS/9-1-1 and get an AED.
Care
1. Remove the person quickly and safely from the water, but do notput yourself in danger. Follow the same steps you use to performa First Aider Rescue for cold-water immersion. Remember,any person rescued from cold water should be treated forhypothermia.
Call
Call for a lifeguard or other trained person (if one is nearby), or call EMS/9-1-1.
What to Do
Care
Seasickness
Seasickness (motion sickness) is a sudden illness largely due to the motion of a ship or vessel. People who are not accustomed to the sea are most susceptible, but even experienced seafarers may be affected in rough water conditions.
Signs and symptoms of seasickness vary, but include:
• Loss of appetite, nausea, vomiting, or abdominal cramps• Headaches, dizziness, or exhaustion• Cold sweat• Dry mouth
Care
• In mild cases, the condition will gradually wear off (often duringsleep) and no specific treatment is necessary
• Providing small portions of dry food (such as crackers) can help settlethe person’s stomach
• Sucking on ice chips instead of drinking water will reduce the risk ofvomiting while still preventing dehydration
• More severe cases of prolonged vomiting may be managed withover-the-counter preventive medications.
153153
Env
iro
nm
enta
l Illn
ess
153
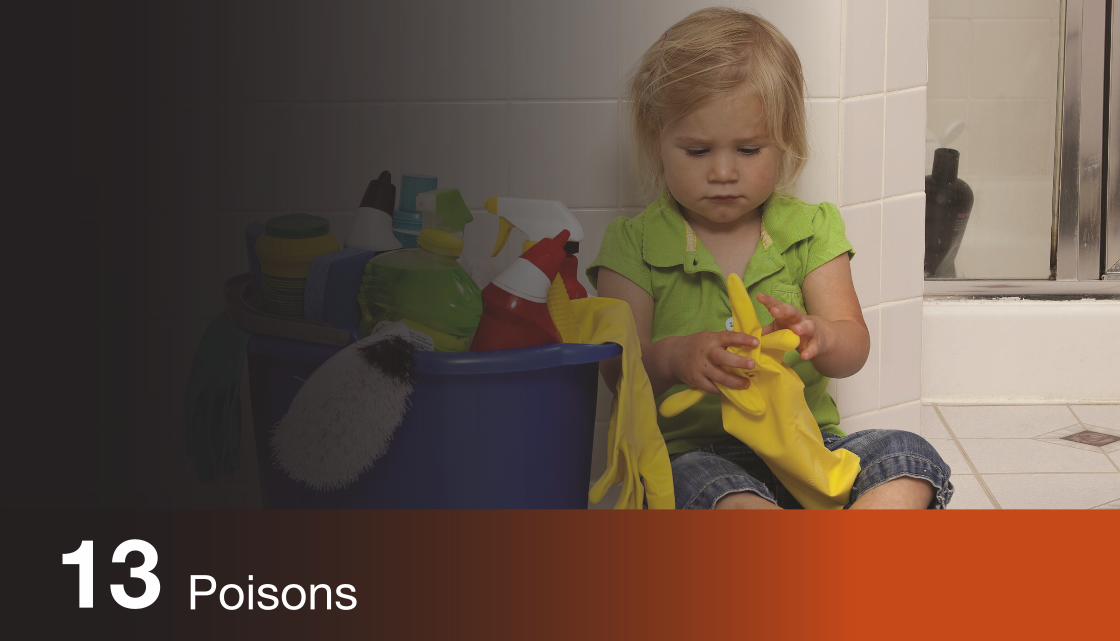
Poisons13

A poison is a substance that has a harmful effect within the body if it is inhaled, swallowed (ingested), absorbed, or injected. Poisons are immediately life-threatening if they affect breathing or circulation. Practically anything can be a poison if it is not meant to be taken into the body. Even some substances that are meant to be taken into the body, such as medications, can be poisonous if they are taken by the wrong person, or if the person takes too much. Combining certain substances can also result in poisoning.
Poisoning can happen anywhere, but most poisonings take place in the home. Children younger than 5 years, especially toddlers, are at the highest risk for poisoning. Children may be attracted to pretty liquids in bottles, sweet-smelling powders, berries on plants that look like they are edible, or medications or vitamins that look like candy. Additionally, very young children explore their world by touching and tasting things around them, so even substances that do not look or smell attractive are poisoning hazards among this age group. Older adults who have medical conditions that cause confusion (such as dementia) or who have impaired vision are also at a higher risk of unintentional poisoning.
When providing first aid for a poisoned person, use caution to avoid contact with the poison.
Your local Poison Control Centre can provide you with specific first aid instructions for a variety of types of poison, but remember that you should always call EMS/9-1-1 if the person has an altered level of responsiveness or is having difficulty breathing. Keep the local Poison Control Centre number by your telephone and save it as a contact in your mobile phone.
Swallowed Poison
Enters the body through the mouth, lips, esophagus, or stomach. Drinking bleach is an example of swallowed poisoning.
Absorbed Poison
Enters the body through the skin. Plants (such as poison ivy) and chemicals can cause absorbed poisoning.
Injected Poison
Enters the body through bites or stings or as drugs injected with a needle.
Inhaled Poison
Is breathed into the body. Breathing in carbon monoxide from a car’s exhaust is an example of inhaled poisoning.
TYPES OF POISONS
155155
Po
iso
ns
155
FlammableThese materials catch fire easily and burn quickly when exposed to any form of ignition (such as fire or heat).
ToxicThese materials can harm the respiratory (breathing) system, nervous system, and other systems if they are absorbed through the skin, inhaled, or ingested.
ExplosiveThese materials can explode when exposed to heat, flame, or pressure.
CorrosiveThese materials can burn the skin and cause permanent blindness.
Identifying Hazardous Materials
The international hazard symbols on product labels make it easier to identify harmful materials.
If you must handle a product that is labelled with any of the international hazard symbols:
• Carefully read the warnings and follow the instructions.• Wear protective equipment (such as eye goggles, a face mask,
and disposable gloves).• Ensure the product is properly sealed and stored after use.
Many everyday household items can be poisonous if they are used incorrectly. Common causes of unintentional poisonings at home include:
• Alcohol (found in many products, including hand sanitizer,mouthwash, perfume, cologne, aftershave, and vanilla extract)
• Medications (over-the-counter and prescription) and vitamins• Cleaning products (detergent "pods" are especially attractive
to children)• Glues and paints (lead paint remains toxic even when it is
applied, and children may put peeling paint into their mouths)• Insect and weed killers• Car products (e.g., antifreeze, windshield washer fluid)• Plants (both houseplants and outdoor plants)• Oils, lubricants, and polishes• Tobacco
HOUSEHOLD POISONS THE INTERNATIONAL HAZARD SYMBOLS
156156
Po
iso
ns
156

Prevention
Prevention at Home
The following tips will help reduce the risk of poisoning:
• Keep all medications, household cleaning products, poisonousplants, and other toxic substances well out of the reach of children.Use locked cupboards or child-resistant latches.
• Use child-resistant safety caps on medications and other potentiallytoxic products.
• Never call medicine "candy" to persuade a child to take it.• Teach children to check with an adult before eating an unknown
substance.• Keep potentially poisonous products in their original containers
with their original labels.• Ensure that prescription medicine is taken only by the person
whose name is on the label.• Carefully dispose of expired medications through your local
hazardous waste process.• Be aware that many cleaning products and aerosol sprays have
toxic fumes. Use potentially poisonous chemicals in a well-ventilated area.
• Wear proper protective clothing any time you are working with oraround a poisonous substance.
• Run gas and other combustion engines only in open, well-ventilated areas.
• Learn about poisonous plants in your area and before going into anew environment.
Prevention in the Workplace
The following tips will reduce the risk of poisoning in the workplace:
• Clearly label all toxic substances and never use a product that is notclearly identified.
• Have a detailed MSDS (Material Safety Data Sheet) available forevery hazardous substance in the workplace.
• Ensure that workers who might be exposed to hazardous materialsreceive the proper training in safety measures and emergencyprocedures.
• Check all warning labels, tags, and posters in the workplace andfollow their instructions carefully.
• Read labels and the MSDS to find out the risks of each hazardousmaterial, the safety measures that must be taken to preventpoisoning, and the first aid required if poisoning occurs.
General Care for Poisoning
Your check of the scene and the person might give clues that point to poisoning as the cause of the person’s illness. For example, you may note an open or spilled container, an unusual odour, burns around the person’s mouth, a strange odour on the person’s breath, or other people in the area who are also ill.
If you think that a person has been poisoned, try to find out the following key points so that you and others can give the most appropriate care:
• The type of poison• The quantity taken• When it was taken
157157
Po
iso
ns
157
Calling EMS/9-1-1 or a Poison Control Centre is the most important thing you can do if a poisoning of any type is suspected. Other general first aid care tips for poisoning include the following:
• Limit further exposure by moving either the person or the source ofthe poison.
• If the poison’s container is found nearby, give the information fromthe label to the Poison Control Centre or EMS/9-1-1 dispatcher.
• Do not give the person anything to eat or drink unless an EMSdispatcher or Poison Control Centre staff member tells you to do so.
• If you do not know what the poison was and the person vomits, savea sample to give to EMS personnel.
Swallowed Poisons
What to Do
What to Look For
The following may indicate that a poisonous substance has been swallowed:
• An open container of poison nearby• Burns around the mouth• Increased production of saliva or
saliva that is an abnormal colour• Abdominal cramps, vomiting,
or diarrhea• Seizures• Dizziness or drowsiness• Unresponsiveness• A burning sensation in the mouth,
throat, or stomach
Call
If the person is responsive and alert and his or her ABCs are unaffected, call the local Poison Control Centre. Call EMS/9-1-1 and get an AED if the person has an altered level of responsiveness or has difficulty breathing.
Care
1. If the person is not breathing, start CPR. Use a barrier device sothat you don’t contaminate yourself with the poison.
2. Check the packaging of the poison, if possible, so that you knowwhat it is.
3. Induce vomiting only if told to do so by the EMS dispatcher orthe Poison Control Centre.
4. If the person needs to go to the hospital, bring a sample of thepoison (or its original container).
Myth-Information: Induce Vomiting in a Poisoned Person
Myth: Inducing vomiting in a poisoned person will remove the harmful substance from the person’s body.
Inducing vomiting in a person who has been poisoned often causes additional harm and is not recommended. Sometimes the person may vomit on his or her own, but you should never give the person anything to make him or her vomit unless you are specifically instructed to do so by an EMS dispatcher or a Poison Control Centre staff member.
158158
Po
iso
ns
158
Inhaled Poisons
What to Look For
Carbon Monoxide Poisoning
Carbon monoxide (CO) is a gas that has no smell, colour, or taste. CO poisoning is often called a "silent killer" because it is not detectable to any of the body’s senses. CO bonds to red blood cells 200 times better than oxygen, preventing oxygen from attaching and therefore starving the body of oxygen.
It releases when fuel is burned in small engines, lanterns, fireplaces, stoves, grills, gas ranges, furnaces, cars, and trucks. When equipment that burns these fuels is properly ventilated, CO poisoning is not a problem. But if the equipment or ventilation system is faulty, or if outdoor equipment is used in an enclosed area, toxic levels of CO can build up quickly, creating the risk of CO poisoning. Concentrated CO is poisonous and life-threatening to those who inhale it.
Prevention
The following tips help prevent carbon monoxide (CO) poisoning:
• Ensure that a battery-operated or battery back-up CO detector isinstalled in the home or workplace where the alarm will be easilyheard.
• Check the CO detector’s batteries twice a year, ideally once in thefall and once in the spring.
• Have all fuel-based appliances and equipment installed and repairedby a qualified technician.
• Have all fuel-based appliances and equipment serviced annually by aqualified professional.
• Use fuel-based appliances and materials as intended (e.g., do not usegenerators or portable flameless chemical heaters indoors, do notuse a gas stove or oven for heating, do not burn charcoal indoors).
• Ensure that chimneys are inspected and cleaned annually by aprofessional.
• Never run a car or truck inside an attached garage. For detachedgarages, always leave the garage door open when running a car ortruck inside.
The following may indicate that a poisonous substance has been inhaled:
• Breathing difficulties• Irritated eyes, nose, or throat• Dizziness• Vomiting• Seizures• Bluish colour around the mouth• Unresponsiveness• An unusual smell in the air
What to Do
Call
If the person is responsive and alert and his or her ABCs are unaffected, call the local Poison Control Centre. Call EMS/9-1-1 and get an AED if the person has an altered level of responsiveness or has difficulty breathing.
Care
1. If the person is not breathing, start CPR. Use a barrier device sothat you don’t contaminate yourself with the poison.
2. Get the person into fresh air but do not enter into a hazardousatmosphere in order to do so.
Inhaled poisons can affect everyone in an area. Stay out of the area if you suspect that the poison may still be in the air.
159159
Po
iso
ns
159
What to Look For Absorbed Poisons
What to Look ForThe signs and symptoms of acute carbon monoxide (CO) poisoning are commonly mistaken for a stomach virus, the flu, or food poisoning. Signs and symptoms include the following:
• Headache• Dizziness or light-headedness• Confusion• Impaired hearing and vision• Weakness or fatigue• Muscle cramps• Nausea and vomiting• Chest pain• Altered level of responsiveness
What to Do
1. Treat the person as you would for any other type of inhaledpoison.
Care
The following signs and symptoms can indicate that a poisonous substance has been absorbed:
• Rash or hives (raised, itchyareas of skin)
• Burning or itching skin• Swelling• Blisters• Burns• Unresponsiveness
What to Do
Call
If the person is responsive and alert, and the person’s ABCs are unaffected, call the local Poison Control Centre. Call EMS/9-1-1 and get an AED if the person has an altered level of responsiveness or has difficulty breathing.
Care
1. If the person is not breathing, start CPR.2. If the poison is a dry powder, brush it off the person’s skin. Be
careful to avoid contaminating yourself.3. Remove any clothing or items covered in the poison.4. Flush the skin with running water for at least 15 minutes. To
prevent any further injury, make sure the water flushes awayfrom any unaffected areas of the body.
160160
Po
iso
ns
160
Rash-Causing Plants
Some plants produce chemicals that can cause absorbed poisoning on contact. These plants vary in appearance depending on the location, species of the plant, and time of year. As prevention is the best strategy, it is a good idea to become familiar with the appearance of rash-causing plants in your area.
Prevention
When there is the potential for exposure to rash-causing plants, follow these guidelines:
• Wear a long-sleeved shirt, long pants, and closed-toed shoes.• Apply a pre-contact barrier cream or lotion before going outside.• Wash skin with a specialized skin cleanser designed to remove plant
oils or a degreasing soap (such as dishwashing liquid) and plentyof water immediately after returning indoors.
• Wash tools, work gloves, and clothing that may have contacted rash-causing plants, as oils can remain on these items and transfer to theskin the next time they are used.
If you suspect that your skin has come into contact with a rash-causing plant, wash the entire area with a degreasing soap immediately.
Poison Ivy, Sumac, and Oak
Plants such as poison ivy, poison sumac, and poison oak are covered with an oil called urushiol, which causes a skin reaction in most people.
What to Look For
Contact with urushiol can cause the following signs and symptoms:
• Itchy skin• Reddening of the skin• Bumps• Blisters
The rash can range from irritating to unbearable, depending on the person’s sensitivity, the amount of skin exposed, and the rash’s location.
Do not burn plants containing urushiol. The oil is carried in the smoke, and inhalation can cause swelling of the throat and irritation of the lungs.
What to Do
Call
Call EMS/9-1-1 only if the person experiences a severe allergic reaction or is having trouble breathing.
Care
1. Encourage the person to apply a cream or ointment designed toreduce itching and blistering (e.g., calamine).
2. Suggest that the person take an oral antihistamine to helprelieve itching.
3. If the rash is severe or on a sensitive part of the body (such as theface or groin), the person should see a healthcare provider.
161161
Po
iso
ns
161
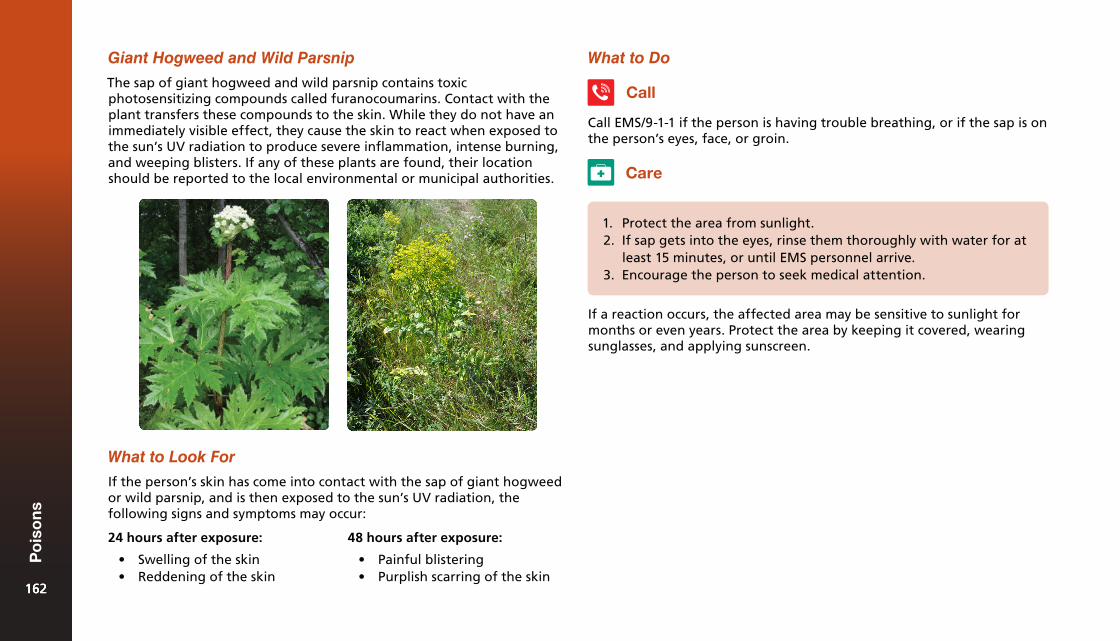
Giant Hogweed and Wild Parsnip
The sap of giant hogweed and wild parsnip contains toxic photosensitizing compounds called furanocoumarins. Contact with the plant transfers these compounds to the skin. While they do not have an immediately visible effect, they cause the skin to react when exposed to the sun’s UV radiation to produce severe inflammation, intense burning, and weeping blisters. If any of these plants are found, their location should be reported to the local environmental or municipal authorities.
What to Look For
If the person’s skin has come into contact with the sap of giant hogweed or wild parsnip, and is then exposed to the sun’s UV radiation, the following signs and symptoms may occur:
What to Do
Call
Call EMS/9-1-1 if the person is having trouble breathing, or if the sap is on the person’s eyes, face, or groin.
Care
1. Protect the area from sunlight.2. If sap gets into the eyes, rinse them thoroughly with water for at
least 15 minutes, or until EMS personnel arrive.3. Encourage the person to seek medical attention.
If a reaction occurs, the affected area may be sensitive to sunlight for months or even years. Protect the area by keeping it covered, wearing sunglasses, and applying sunscreen.
24 hours after exposure:
• Swelling of the skin• Reddening of the skin
48 hours after exposure:
• Painful blistering• Purplish scarring of the skin
162162
Po
iso
ns
162
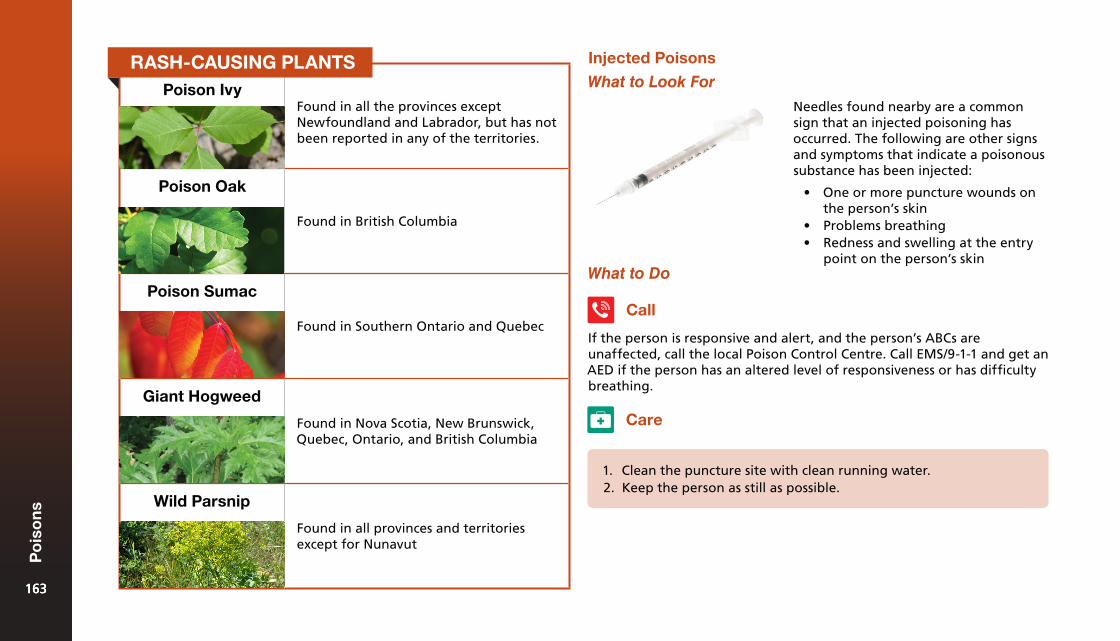
Poison IvyFound in all the provinces except Newfoundland and Labrador, but has not been reported in any of the territories.
Poison Oak
Found in British Columbia
Poison Sumac
Found in Southern Ontario and Quebec
Giant Hogweed
Found in Nova Scotia, New Brunswick, Quebec, Ontario, and British Columbia
Wild Parsnip
Found in all provinces and territories except for Nunavut
Care
1. Clean the puncture site with clean running water.2. Keep the person as still as possible.
Injected Poisons
What to Look For
Needles found nearby are a common sign that an injected poisoning has occurred. The following are other signs and symptoms that indicate a poisonous substance has been injected:
• One or more puncture wounds onthe person’s skin
• Problems breathing• Redness and swelling at the entry
point on the person’s skinWhat to Do
If the person is responsive and alert, and the person’s ABCs are unaffected, call the local Poison Control Centre. Call EMS/9-1-1 and get an AED if the person has an altered level of responsiveness or has difficulty breathing.
Call
RASH-CAUSING PLANTS
163163
Po
iso
ns
163
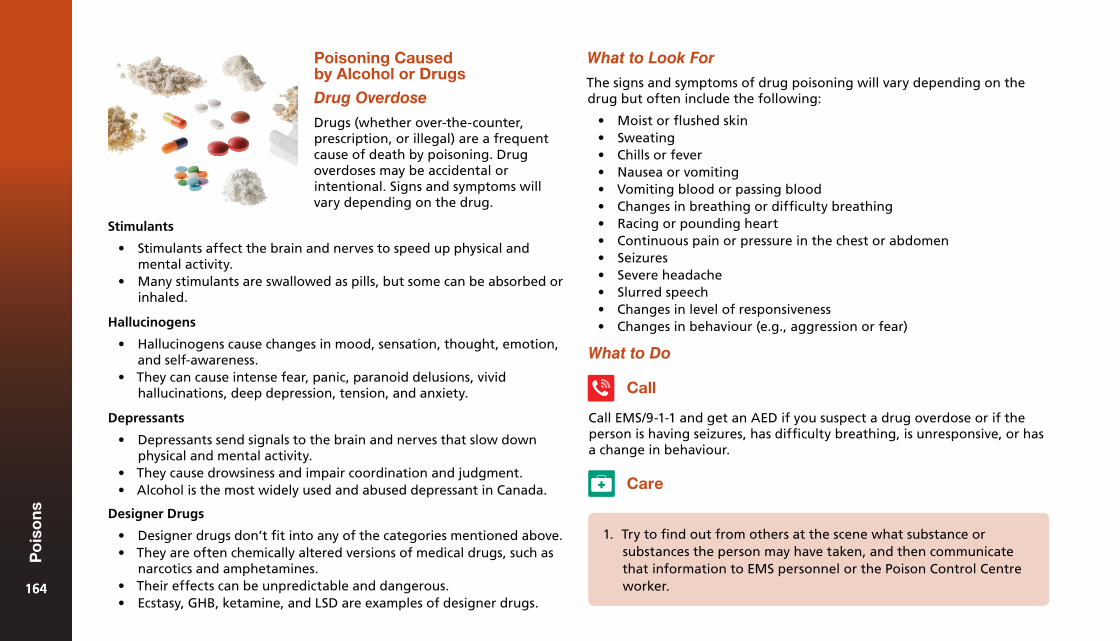
Poisoning Caused by Alcohol or Drugs
Drug Overdose
Drugs (whether over-the-counter, prescription, or illegal) are a frequent cause of death by poisoning. Drug overdoses may be accidental or intentional. Signs and symptoms will vary depending on the drug.
What to Look For
Stimulants
• Stimulants affect the brain and nerves to speed up physical andmental activity.
• Many stimulants are swallowed as pills, but some can be absorbed orinhaled.
Hallucinogens
• Hallucinogens cause changes in mood, sensation, thought, emotion,and self-awareness.
• They can cause intense fear, panic, paranoid delusions, vividhallucinations, deep depression, tension, and anxiety.
Depressants
• Depressants send signals to the brain and nerves that slow downphysical and mental activity.
• They cause drowsiness and impair coordination and judgment.• Alcohol is the most widely used and abused depressant in Canada.
Designer Drugs
• Designer drugs don’t fit into any of the categories mentioned above.• They are often chemically altered versions of medical drugs, such as
narcotics and amphetamines.• Their effects can be unpredictable and dangerous.• Ecstasy, GHB, ketamine, and LSD are examples of designer drugs.
The signs and symptoms of drug poisoning will vary depending on the drug but often include the following:
• Moist or flushed skin• Sweating• Chills or fever• Nausea or vomiting• Vomiting blood or passing blood• Changes in breathing or difficulty breathing• Racing or pounding heart• Continuous pain or pressure in the chest or abdomen• Seizures• Severe headache• Slurred speech• Changes in level of responsiveness• Changes in behaviour (e.g., aggression or fear)
What to Do
Call
Call EMS/9-1-1 and get an AED if you suspect a drug overdose or if the person is having seizures, has difficulty breathing, is unresponsive, or has a change in behaviour.
Care
1. Try to find out from others at the scene what substance orsubstances the person may have taken, and then communicatethat information to EMS personnel or the Poison Control Centreworker.164164
Po
iso
ns
164
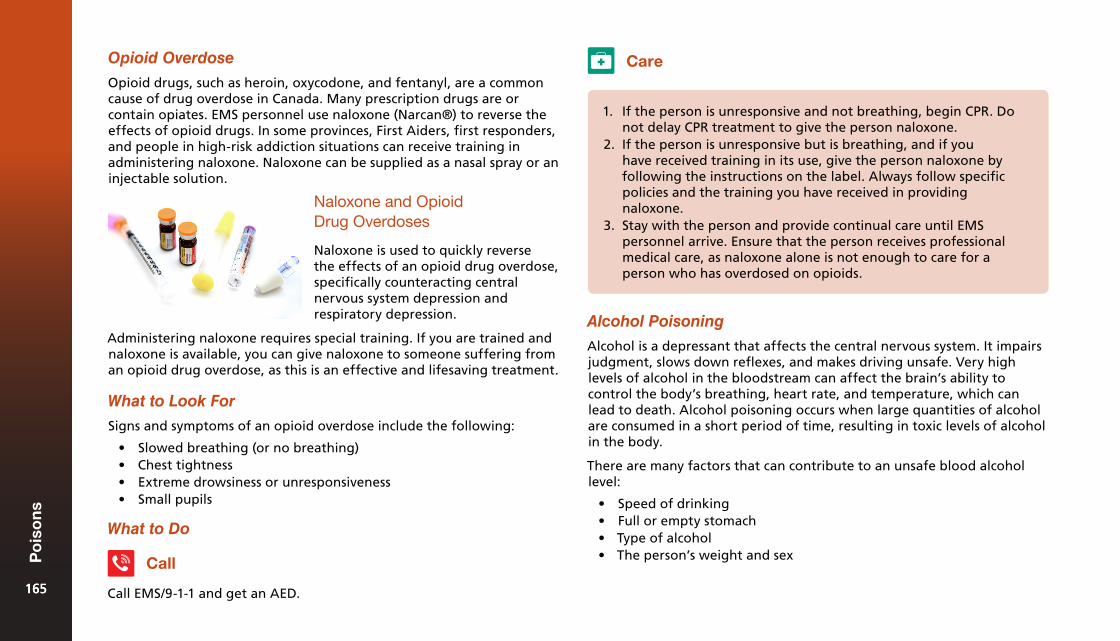
Opioid Overdose
Opioid drugs, such as heroin, oxycodone, and fentanyl, are a common cause of drug overdose in Canada. Many prescription drugs are or contain opiates. EMS personnel use naloxone (Narcan®) to reverse the effects of opioid drugs. In some provinces, First Aiders, first responders, and people in high-risk addiction situations can receive training in administering naloxone. Naloxone can be supplied as a nasal spray or an injectable solution.
Naloxone and Opioid Drug Overdoses
Naloxone is used to quickly reverse the effects of an opioid drug overdose, specifically counteracting central nervous system depression and respiratory depression.
Signs and symptoms of an opioid overdose include the following:
• Slowed breathing (or no breathing)• Chest tightness• Extreme drowsiness or unresponsiveness• Small pupils
1. If the person is unresponsive and not breathing, begin CPR. Donot delay CPR treatment to give the person naloxone.
2. If the person is unresponsive but is breathing, and if youhave received training in its use, give the person naloxone byfollowing the instructions on the label. Always follow specificpolicies and the training you have received in providingnaloxone.
3. Stay with the person and provide continual care until EMSpersonnel arrive. Ensure that the person receives professionalmedical care, as naloxone alone is not enough to care for aperson who has overdosed on opioids.
Administering naloxone requires special training. If you are trained and naloxone is available, you can give naloxone to someone suffering from an opioid drug overdose, as this is an effective and lifesaving treatment.
What to Look For
What to Do
Call
Call EMS/9-1-1 and get an AED.
Care
Alcohol Poisoning
Alcohol is a depressant that affects the central nervous system. It impairs judgment, slows down reflexes, and makes driving unsafe. Very high levels of alcohol in the bloodstream can affect the brain’s ability to control the body’s breathing, heart rate, and temperature, which can lead to death. Alcohol poisoning occurs when large quantities of alcohol are consumed in a short period of time, resulting in toxic levels of alcohol in the body.
There are many factors that can contribute to an unsafe blood alcohol level:
• Speed of drinking• Full or empty stomach• Type of alcohol• The person’s weight and sex
165165
Po
iso
ns
165
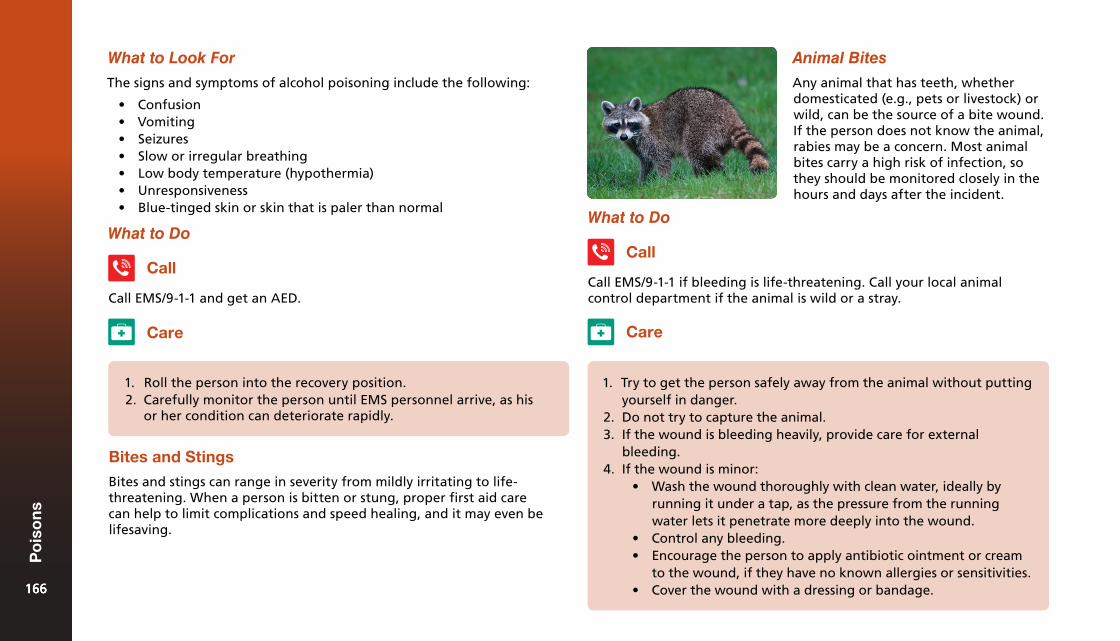
What to Look For
What to Do
The signs and symptoms of alcohol poisoning include the following:
• Confusion• Vomiting• Seizures• Slow or irregular breathing• Low body temperature (hypothermia)• Unresponsiveness• Blue-tinged skin or skin that is paler than normal
Call
Call EMS/9-1-1 and get an AED.
Care
1. Roll the person into the recovery position.2. Carefully monitor the person until EMS personnel arrive, as his
or her condition can deteriorate rapidly.
Bites and Stings
Bites and stings can range in severity from mildly irritating to life-threatening. When a person is bitten or stung, proper first aid care can help to limit complications and speed healing, and it may even be lifesaving.
Animal Bites
Any animal that has teeth, whether domesticated (e.g., pets or livestock) or wild, can be the source of a bite wound. If the person does not know the animal, rabies may be a concern. Most animal bites carry a high risk of infection, so they should be monitored closely in the hours and days after the incident.
What to Do
Call EMS/9-1-1 if bleeding is life-threatening. Call your local animal control department if the animal is wild or a stray.
Call
Care
1. Try to get the person safely away from the animal without puttingyourself in danger.
2. Do not try to capture the animal.3. If the wound is bleeding heavily, provide care for external
bleeding.4. If the wound is minor:
• Wash the wound thoroughly with clean water, ideally byrunning it under a tap, as the pressure from the runningwater lets it penetrate more deeply into the wound.
• Control any bleeding.• Encourage the person to apply antibiotic ointment or cream
to the wound, if they have no known allergies or sensitivities.• Cover the wound with a dressing or bandage.166166
Po
iso
ns
166
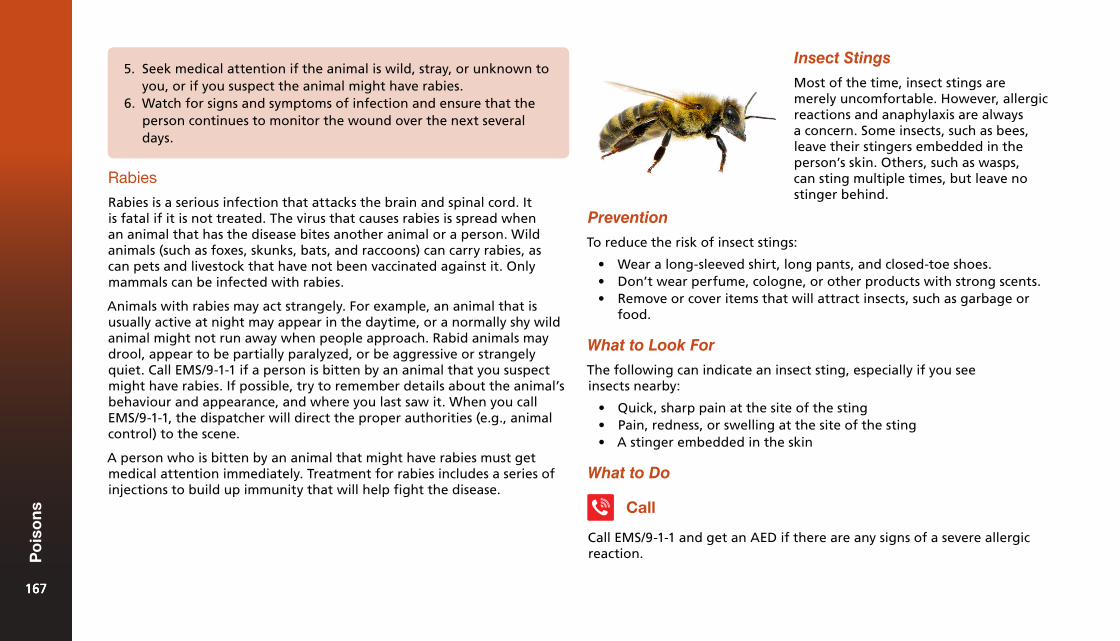
Rabies
Rabies is a serious infection that attacks the brain and spinal cord. It is fatal if it is not treated. The virus that causes rabies is spread when an animal that has the disease bites another animal or a person. Wild animals (such as foxes, skunks, bats, and raccoons) can carry rabies, as can pets and livestock that have not been vaccinated against it. Only mammals can be infected with rabies.
Animals with rabies may act strangely. For example, an animal that is usually active at night may appear in the daytime, or a normally shy wild animal might not run away when people approach. Rabid animals may drool, appear to be partially paralyzed, or be aggressive or strangely quiet. Call EMS/9-1-1 if a person is bitten by an animal that you suspect might have rabies. If possible, try to remember details about the animal’s behaviour and appearance, and where you last saw it. When you call EMS/9-1-1, the dispatcher will direct the proper authorities (e.g., animal control) to the scene.
A person who is bitten by an animal that might have rabies must get medical attention immediately. Treatment for rabies includes a series of injections to build up immunity that will help fight the disease.
Insect Stings
Most of the time, insect stings are merely uncomfortable. However, allergic reactions and anaphylaxis are always a concern. Some insects, such as bees, leave their stingers embedded in the person’s skin. Others, such as wasps, can sting multiple times, but leave no stinger behind.
5. Seek medical attention if the animal is wild, stray, or unknown toyou, or if you suspect the animal might have rabies.
6. Watch for signs and symptoms of infection and ensure that theperson continues to monitor the wound over the next severaldays.
The following can indicate an insect sting, especially if you see insects nearby:
• Quick, sharp pain at the site of the sting• Pain, redness, or swelling at the site of the sting• A stinger embedded in the skin
Prevention
To reduce the risk of insect stings:
• Wear a long-sleeved shirt, long pants, and closed-toe shoes.• Don’t wear perfume, cologne, or other products with strong scents.• Remove or cover items that will attract insects, such as garbage or
food.
What to Look For
What to Do
Call
Call EMS/9-1-1 and get an AED if there are any signs of a severe allergic reaction.
167167
Po
iso
ns
167
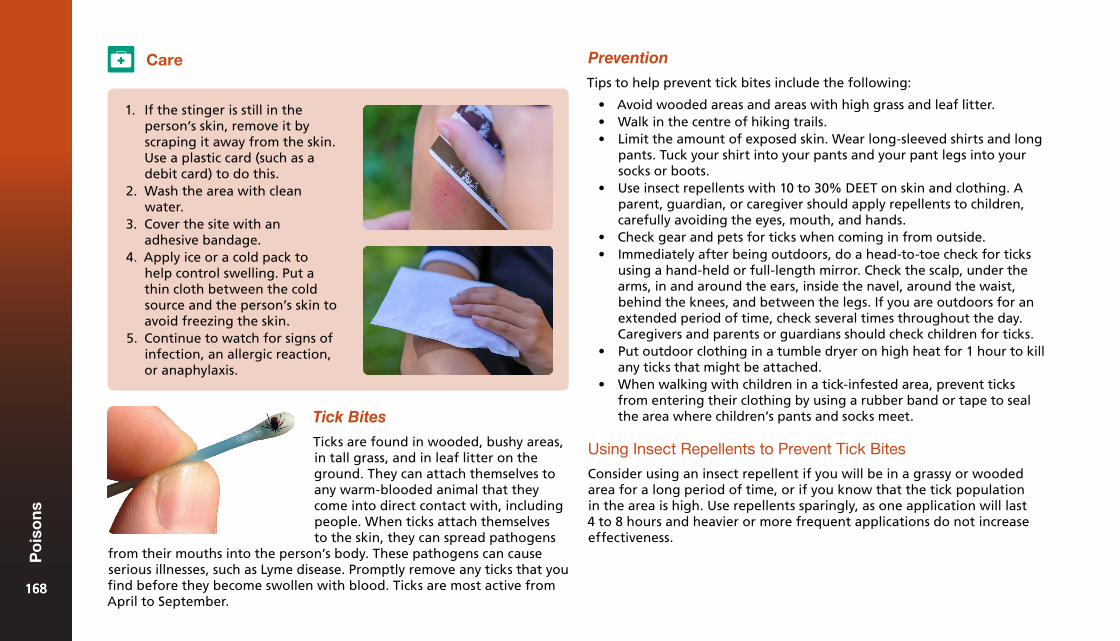
Care
1. If the stinger is still in theperson’s skin, remove it byscraping it away from the skin.Use a plastic card (such as adebit card) to do this.
2. Wash the area with cleanwater.
3. Cover the site with anadhesive bandage.
4. Apply ice or a cold pack tohelp control swelling. Put athin cloth between the coldsource and the person’s skin toavoid freezing the skin.
5. Continue to watch for signs ofinfection, an allergic reaction,or anaphylaxis.
Tick Bites
Ticks are found in wooded, bushy areas, in tall grass, and in leaf litter on the ground. They can attach themselves to any warm-blooded animal that they come into direct contact with, including people. When ticks attach themselves to the skin, they can spread pathogens
Prevention
Tips to help prevent tick bites include the following:
• Avoid wooded areas and areas with high grass and leaf litter.• Walk in the centre of hiking trails.• Limit the amount of exposed skin. Wear long-sleeved shirts and long
pants. Tuck your shirt into your pants and your pant legs into yoursocks or boots.
• Use insect repellents with 10 to 30% DEET on skin and clothing. Aparent, guardian, or caregiver should apply repellents to children,carefully avoiding the eyes, mouth, and hands.
• Check gear and pets for ticks when coming in from outside.• Immediately after being outdoors, do a head-to-toe check for ticks
using a hand-held or full-length mirror. Check the scalp, under thearms, in and around the ears, inside the navel, around the waist,behind the knees, and between the legs. If you are outdoors for anextended period of time, check several times throughout the day.Caregivers and parents or guardians should check children for ticks.
• Put outdoor clothing in a tumble dryer on high heat for 1 hour to killany ticks that might be attached.
• When walking with children in a tick-infested area, prevent ticksfrom entering their clothing by using a rubber band or tape to sealthe area where children’s pants and socks meet.
Using Insect Repellents to Prevent Tick Bites
Consider using an insect repellent if you will be in a grassy or wooded area for a long period of time, or if you know that the tick population in the area is high. Use repellents sparingly, as one application will last 4 to 8 hours and heavier or more frequent applications do not increase effectiveness.
from their mouths into the person’s body. These pathogens can cause serious illnesses, such as Lyme disease. Promptly remove any ticks that you find before they become swollen with blood. Ticks are most active from April to September.
168168
Po
iso
ns
168
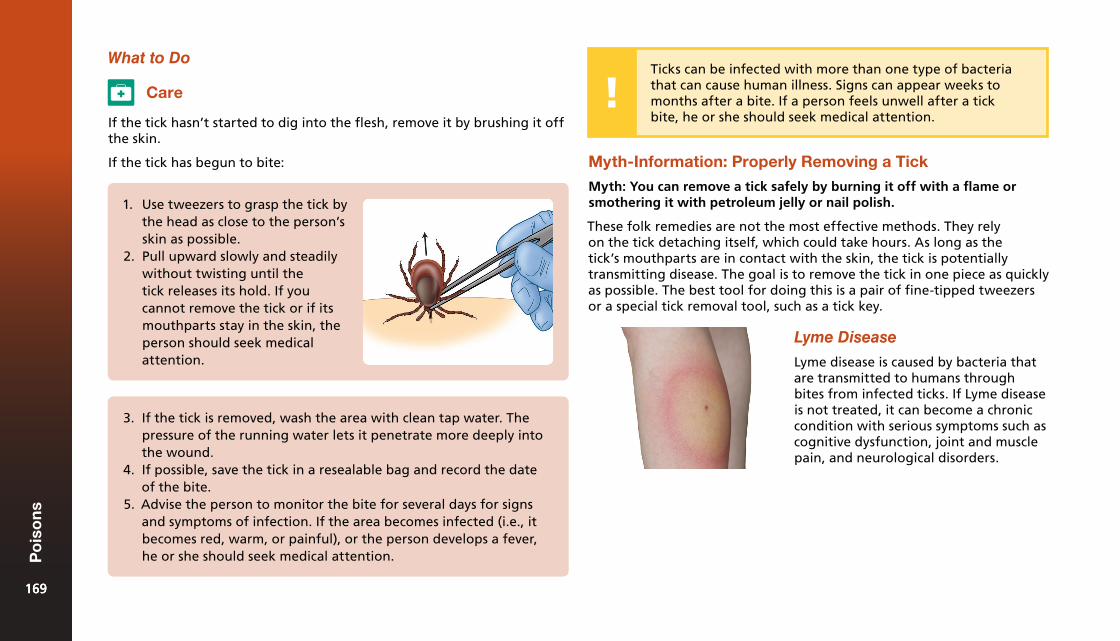
What to Do
Care
1. Use tweezers to grasp the tick bythe head as close to the person’sskin as possible.
2. Pull upward slowly and steadilywithout twisting until thetick releases its hold. If youcannot remove the tick or if itsmouthparts stay in the skin, theperson should seek medicalattention.
If the tick hasn’t started to dig into the flesh, remove it by brushing it off the skin.
If the tick has begun to bite:
3. If the tick is removed, wash the area with clean tap water. Thepressure of the running water lets it penetrate more deeply intothe wound.
4. If possible, save the tick in a resealable bag and record the dateof the bite.
5. Advise the person to monitor the bite for several days for signsand symptoms of infection. If the area becomes infected (i.e., itbecomes red, warm, or painful), or the person develops a fever,he or she should seek medical attention.
Myth-Information: Properly Removing a Tick
Myth: You can remove a tick safely by burning it off with a flame or smothering it with petroleum jelly or nail polish.
These folk remedies are not the most effective methods. They rely on the tick detaching itself, which could take hours. As long as the tick’s mouthparts are in contact with the skin, the tick is potentially transmitting disease. The goal is to remove the tick in one piece as quickly as possible. The best tool for doing this is a pair of fine-tipped tweezers or a special tick removal tool, such as a tick key.
Lyme Disease
Lyme disease is caused by bacteria that are transmitted to humans through bites from infected ticks. If Lyme disease is not treated, it can become a chronic condition with serious symptoms such as cognitive dysfunction, joint and muscle pain, and neurological disorders.
Ticks can be infected with more than one type of bacteria that can cause human illness. Signs can appear weeks to months after a bite. If a person feels unwell after a tick bite, he or she should seek medical attention.
169169
Po
iso
ns
169
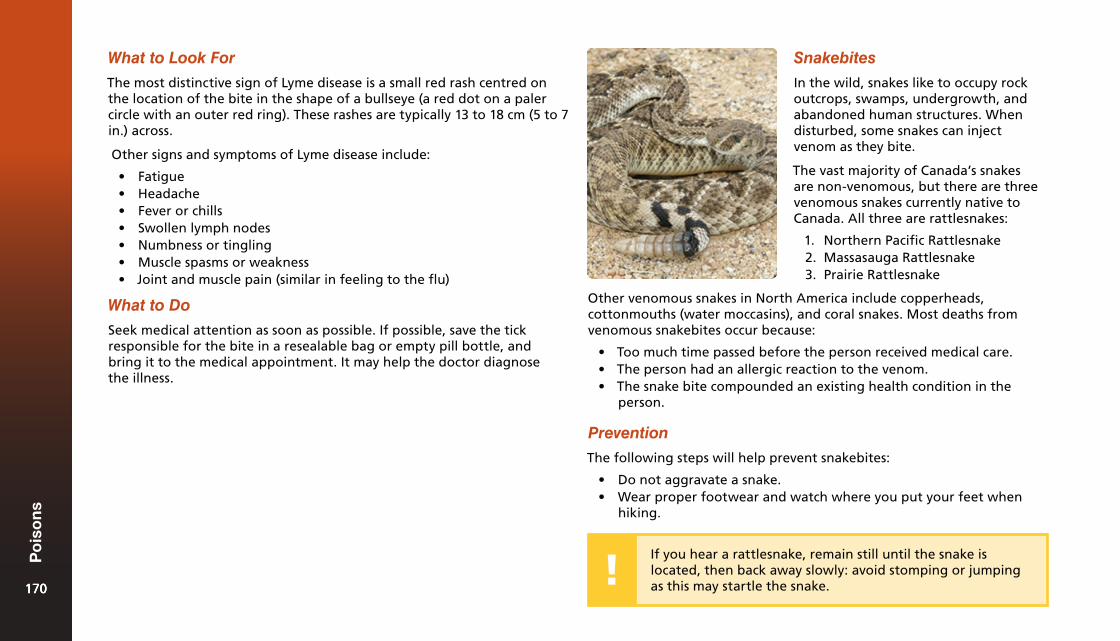
What to Look For
The most distinctive sign of Lyme disease is a small red rash centred on the location of the bite in the shape of a bullseye (a red dot on a paler circle with an outer red ring). These rashes are typically 13 to 18 cm (5 to 7 in.) across.
Other signs and symptoms of Lyme disease include:
• Fatigue• Headache• Fever or chills• Swollen lymph nodes• Numbness or tingling• Muscle spasms or weakness• Joint and muscle pain (similar in feeling to the flu)
What to Do
Seek medical attention as soon as possible. If possible, save the tick responsible for the bite in a resealable bag or empty pill bottle, and bring it to the medical appointment. It may help the doctor diagnose the illness.
Snakebites
In the wild, snakes like to occupy rock outcrops, swamps, undergrowth, and abandoned human structures. When disturbed, some snakes can inject venom as they bite.
The vast majority of Canada’s snakes are non-venomous, but there are three venomous snakes currently native to Canada. All three are rattlesnakes:
1. Northern Pacific Rattlesnake2. Massasauga Rattlesnake3. Prairie Rattlesnake
If you hear a rattlesnake, remain still until the snake is located, then back away slowly: avoid stomping or jumping as this may startle the snake.
Other venomous snakes in North America include copperheads, cottonmouths (water moccasins), and coral snakes. Most deaths from venomous snakebites occur because:
• Too much time passed before the person received medical care.• The person had an allergic reaction to the venom.• The snake bite compounded an existing health condition in the
person.
Prevention
The following steps will help prevent snakebites:
• Do not aggravate a snake.• Wear proper footwear and watch where you put your feet when
hiking.
170170
Po
iso
ns
170

A Snake’s Striking Range
A snake’s striking range is about two-thirds of its length forward and one-third upward. (In water, snakes have a shorter striking range.) If you are within striking distance, slowly back out of range.
What to Look For
Signs and symptoms of a possibly venomous snakebite include:
• A pair of puncture wounds in the skin• Localized redness of the skin• Pain and swelling in the area of the bite
What to Do
Call
Call EMS/9-1-1 and get an AED. If you are not sure whether the snakebite was caused by a venomous snake, call EMS/9-1-1 anyway. Do not wait for life-threatening signs and symptoms of poisoning to appear.
Care
Before providing care, ensure that the snake is no longer present. If you see the snake, remember what it looks like so that you can describe it to EMS personnel. This information will help them provide the most appropriate treatment. Never attempt to capture or handle a potentially venomous snake.
1. Keep the injured site still and level with the heart, if possible.2. If the bite is on a limb, remove any jewellery or tight clothing
from the limb and watch for swelling.3. Wash the wound with water.4. Cover the bite with a clean, dry dressing.
Northern Pacific Rattlesnake
Found in British Columbia
Massasauga Rattlesnake
Found in Ontario
Prairie Rattlesnake
Found in Alberta and Saskatchewan
VENOMOUS SNAKES IN CANADA
171171
Po
iso
ns
171
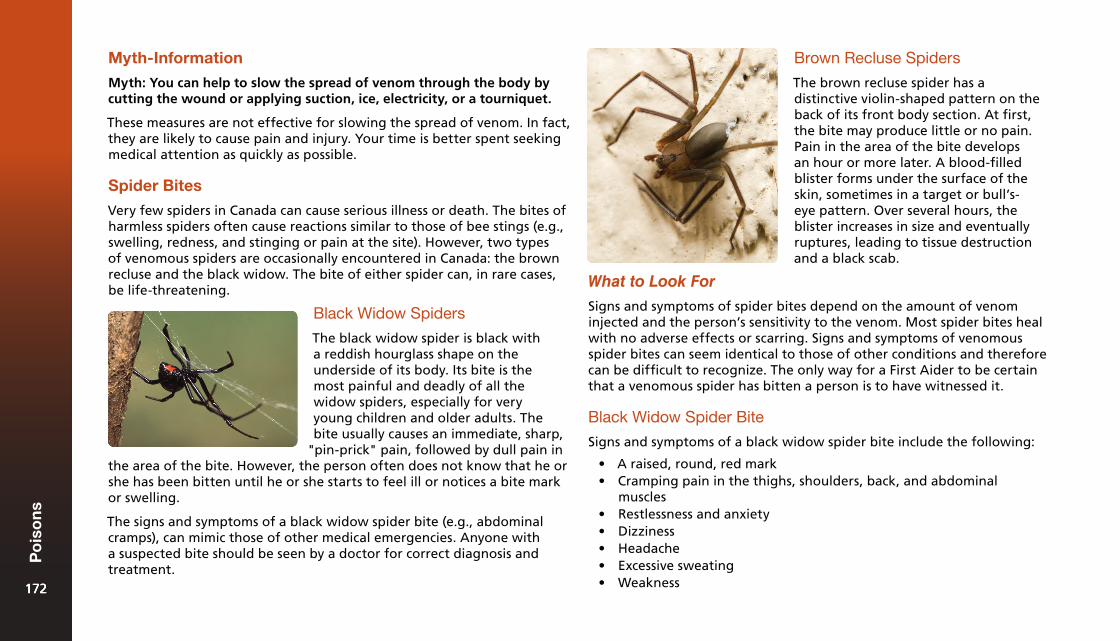
Myth-Information
Myth: You can help to slow the spread of venom through the body by cutting the wound or applying suction, ice, electricity, or a tourniquet.
These measures are not effective for slowing the spread of venom. In fact, they are likely to cause pain and injury. Your time is better spent seeking medical attention as quickly as possible.
Spider Bites
Very few spiders in Canada can cause serious illness or death. The bites of harmless spiders often cause reactions similar to those of bee stings (e.g., swelling, redness, and stinging or pain at the site). However, two types of venomous spiders are occasionally encountered in Canada: the brown recluse and the black widow. The bite of either spider can, in rare cases, be life-threatening.
Black Widow Spiders
The black widow spider is black with a reddish hourglass shape on the underside of its body. Its bite is the most painful and deadly of all the widow spiders, especially for very young children and older adults. The bite usually causes an immediate, sharp,
"pin-prick" pain, followed by dull pain in the area of the bite. However, the person often does not know that he or she has been bitten until he or she starts to feel ill or notices a bite mark or swelling.
The signs and symptoms of a black widow spider bite (e.g., abdominal cramps), can mimic those of other medical emergencies. Anyone with a suspected bite should be seen by a doctor for correct diagnosis and treatment.
Brown Recluse Spiders
The brown recluse spider has a distinctive violin-shaped pattern on the back of its front body section. At first, the bite may produce little or no pain. Pain in the area of the bite develops an hour or more later. A blood-filled blister forms under the surface of the skin, sometimes in a target or bull’s-eye pattern. Over several hours, the blister increases in size and eventually ruptures, leading to tissue destruction and a black scab.
What to Look For
Signs and symptoms of spider bites depend on the amount of venom injected and the person’s sensitivity to the venom. Most spider bites heal with no adverse effects or scarring. Signs and symptoms of venomous spider bites can seem identical to those of other conditions and therefore can be difficult to recognize. The only way for a First Aider to be certain that a venomous spider has bitten a person is to have witnessed it.
Black Widow Spider Bite
Signs and symptoms of a black widow spider bite include the following:
• A raised, round, red mark• Cramping pain in the thighs, shoulders, back, and abdominal
muscles• Restlessness and anxiety• Dizziness• Headache• Excessive sweating• Weakness172172
Po
iso
ns
172
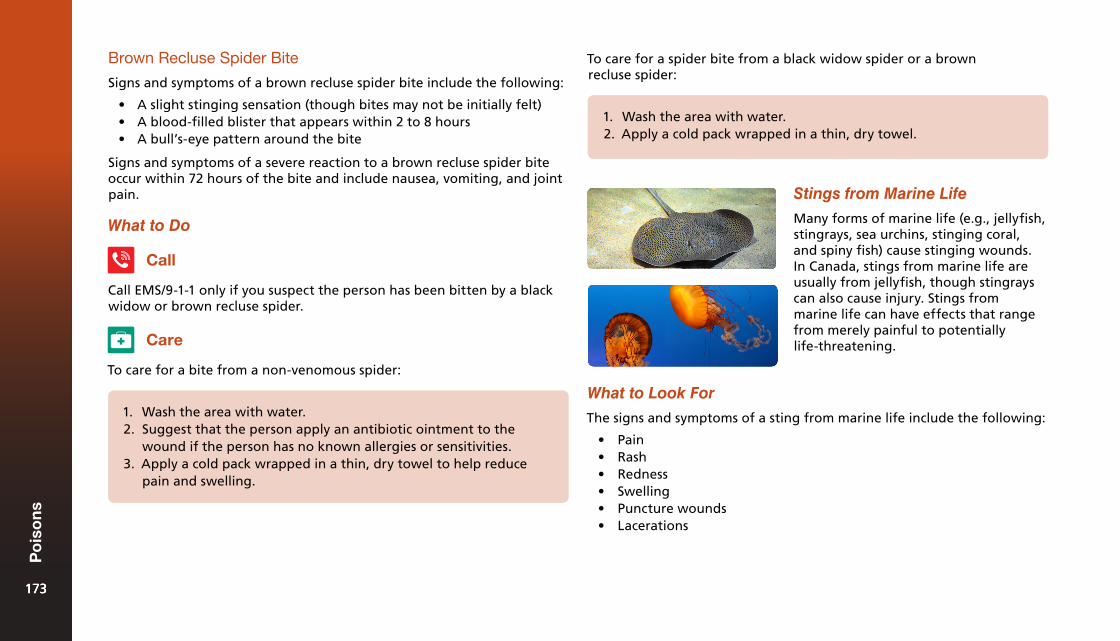
Brown Recluse Spider Bite
Signs and symptoms of a brown recluse spider bite include the following:
• A slight stinging sensation (though bites may not be initially felt)• A blood-filled blister that appears within 2 to 8 hours• A bull’s-eye pattern around the bite
Signs and symptoms of a severe reaction to a brown recluse spider bite occur within 72 hours of the bite and include nausea, vomiting, and joint pain.
What to Do
Call
Call EMS/9-1-1 only if you suspect the person has been bitten by a black widow or brown recluse spider.
Care
To care for a bite from a non-venomous spider:
1. Wash the area with water.2. Suggest that the person apply an antibiotic ointment to the
wound if the person has no known allergies or sensitivities.3. Apply a cold pack wrapped in a thin, dry towel to help reduce
pain and swelling.
To care for a spider bite from a black widow spider or a brown recluse spider:
1. Wash the area with water.2. Apply a cold pack wrapped in a thin, dry towel.
Stings from Marine Life
Many forms of marine life (e.g., jellyfish, stingrays, sea urchins, stinging coral, and spiny fish) cause stinging wounds. In Canada, stings from marine life are usually from jellyfish, though stingrays can also cause injury. Stings from marine life can have effects that range from merely painful to potentially life-threatening.
What to Look For
The signs and symptoms of a sting from marine life include the following:
• Pain• Rash• Redness• Swelling• Puncture wounds• Lacerations
173173
Po
iso
ns
173
What to Do
Call
Call EMS/9-1-1 and get an AED if the person is having airway or breathing problems, the person was stung on the face or neck, or you do not know what caused the sting.
To care for a person who has been stung by a jellyfish:
Care
1. Get the person out of the water as soon as possible.2. Flush the injured area with vinegar for at least 30 seconds to
counteract the toxin. If vinegar is not available, mix baking sodaand water into a paste and leave it on the area for 20 minutes.
3. While wearing gloves or using a towel, carefully remove anystingers, tentacles, or pieces of the animal.
4. Immerse the affected area in water as hot as the person cantolerate (no more than about 45°C (113°F)) for at least 20 minutesor until the pain is relieved.
5. If hot water is not available, use dry hot packs, or, as a secondchoice, dry cold packs to help decrease the pain. Remember towrap the hot or cold packs in a thin, dry towel or cloth to protectthe skin. Do not rub the area or apply a bandage.
If the person has been stung by a Portuguese man-of-war (also called a bluebottle jellyfish), flush the injured areas with ocean water instead of vinegar. Do not flush any jellyfish sting with fresh water, ammonia, or rubbing alcohol because these substances can increase the person’s pain.
To care for a person who has been stung by a stingray, sea urchin, or spiny fish:
1. Get the person out of the water as soon as possible.2. Flush the affected area with tap water. Ocean water may also
be used.3. Keep the injured part still and soak the affected area in water
as hot as the person can tolerate for at least 20 minutes or untilthe pain is relieved.
4. Check with a healthcare provider to determine if a tetanus shotis necessary and monitor the wound for signs and symptoms ofinfection.
174174
Po
iso
ns
174

Childhood Illnesses14
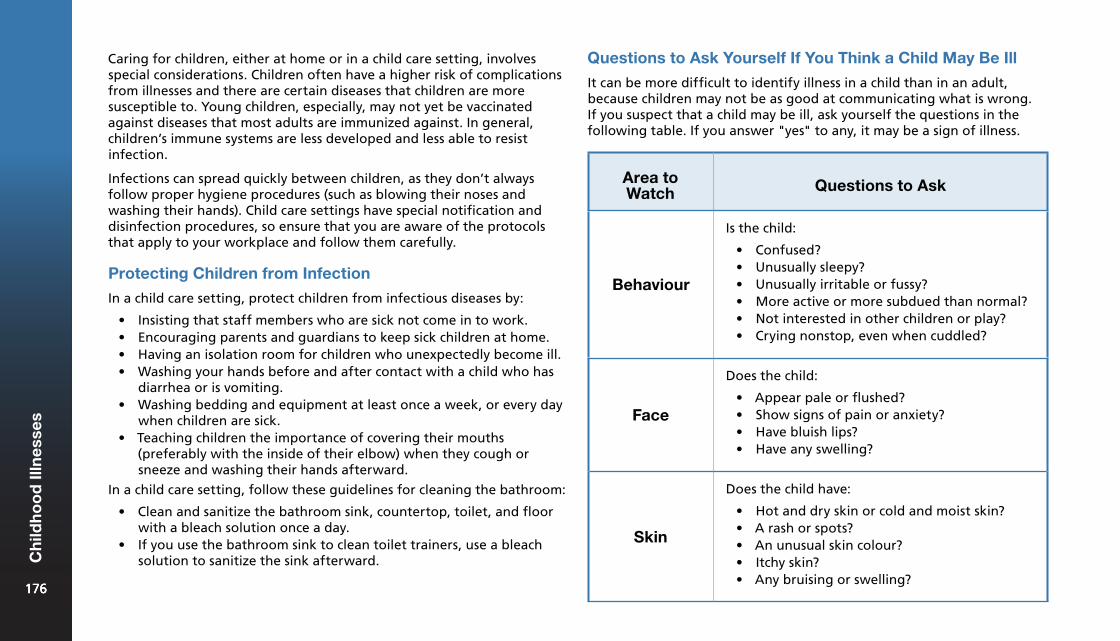
Area to Watch Questions to Ask
Behaviour
Is the child:
• Confused?• Unusually sleepy?• Unusually irritable or fussy?• More active or more subdued than normal?• Not interested in other children or play?• Crying nonstop, even when cuddled?
Face
Does the child:
• Appear pale or flushed?• Show signs of pain or anxiety?• Have bluish lips?• Have any swelling?
Skin
Does the child have:
• Hot and dry skin or cold and moist skin?• A rash or spots?• An unusual skin colour?• Itchy skin?• Any bruising or swelling?
Caring for children, either at home or in a child care setting, involves special considerations. Children often have a higher risk of complications from illnesses and there are certain diseases that children are more susceptible to. Young children, especially, may not yet be vaccinated against diseases that most adults are immunized against. In general, children’s immune systems are less developed and less able to resist infection.
Infections can spread quickly between children, as they don’t always follow proper hygiene procedures (such as blowing their noses and washing their hands). Child care settings have special notification and disinfection procedures, so ensure that you are aware of the protocols that apply to your workplace and follow them carefully.
Protecting Children from Infection
In a child care setting, protect children from infectious diseases by:
• Insisting that staff members who are sick not come in to work.• Encouraging parents and guardians to keep sick children at home.• Having an isolation room for children who unexpectedly become ill.• Washing your hands before and after contact with a child who has
diarrhea or is vomiting.• Washing bedding and equipment at least once a week, or every day
when children are sick.• Teaching children the importance of covering their mouths
(preferably with the inside of their elbow) when they cough orsneeze and washing their hands afterward.
In a child care setting, follow these guidelines for cleaning the bathroom:
• Clean and sanitize the bathroom sink, countertop, toilet, and floorwith a bleach solution once a day.
• If you use the bathroom sink to clean toilet trainers, use a bleachsolution to sanitize the sink afterward.
Questions to Ask Yourself If You Think a Child May Be Ill
It can be more difficult to identify illness in a child than in an adult, because children may not be as good at communicating what is wrong. If you suspect that a child may be ill, ask yourself the questions in the following table. If you answer "yes" to any, it may be a sign of illness.
176176
Ch
ildh
oo
d Il
lnes
ses
176
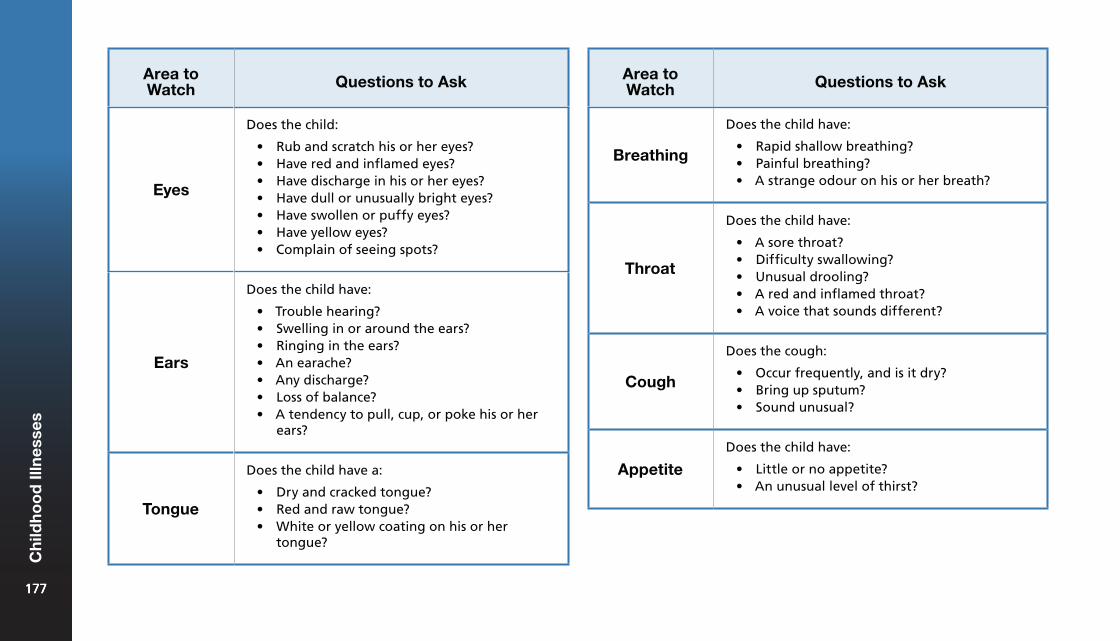
Area to Watch Questions to Ask
Eyes
Does the child:
• Rub and scratch his or her eyes?• Have red and inflamed eyes?• Have discharge in his or her eyes?• Have dull or unusually bright eyes?• Have swollen or puffy eyes?• Have yellow eyes?• Complain of seeing spots?
Ears
Does the child have:
• Trouble hearing?• Swelling in or around the ears?• Ringing in the ears?• An earache?• Any discharge?• Loss of balance?• A tendency to pull, cup, or poke his or her
ears?
Tongue
Does the child have a:
• Dry and cracked tongue?• Red and raw tongue?• White or yellow coating on his or her
tongue?
Area to Watch Questions to Ask
Breathing
Does the child have:
• Rapid shallow breathing?• Painful breathing?• A strange odour on his or her breath?
Throat
Does the child have:
• A sore throat?• Difficulty swallowing?• Unusual drooling?• A red and inflamed throat?• A voice that sounds different?
Cough
Does the cough:
• Occur frequently, and is it dry?• Bring up sputum?• Sound unusual?
AppetiteDoes the child have:
• Little or no appetite?• An unusual level of thirst?
177177
Ch
ildh
oo
d Il
lnes
ses
177
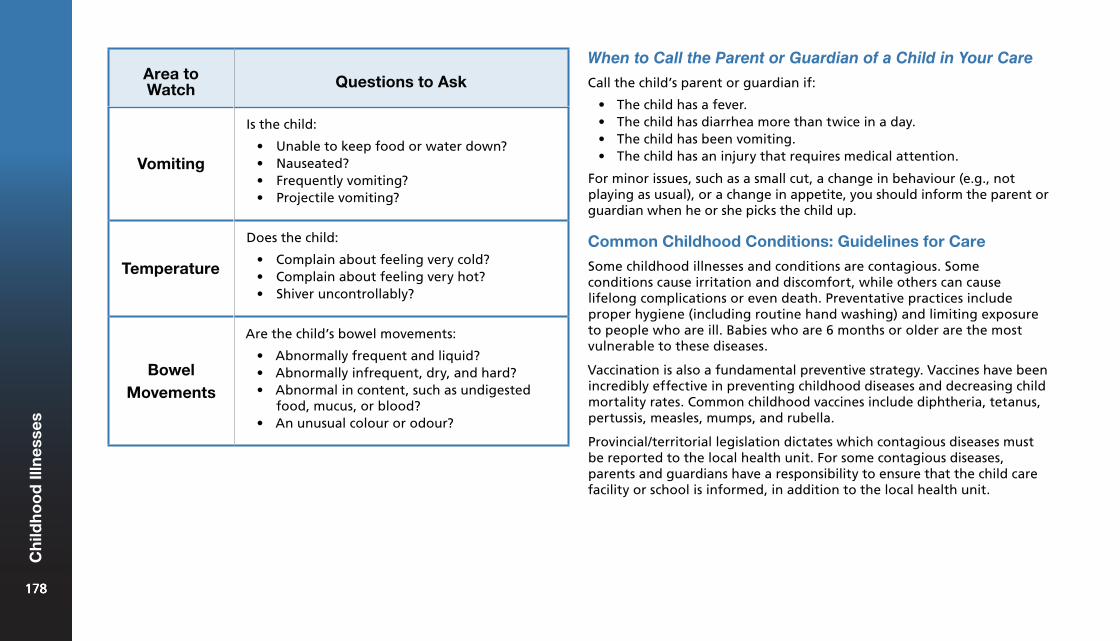
Area to Watch Questions to Ask
Vomiting
Is the child:
• Unable to keep food or water down?• Nauseated?• Frequently vomiting?• Projectile vomiting?
Temperature
Does the child:
• Complain about feeling very cold?• Complain about feeling very hot?• Shiver uncontrollably?
Bowel Movements
Are the child’s bowel movements:
• Abnormally frequent and liquid?• Abnormally infrequent, dry, and hard?• Abnormal in content, such as undigested
food, mucus, or blood?• An unusual colour or odour?
When to Call the Parent or Guardian of a Child in Your Care
Call the child’s parent or guardian if:
• The child has a fever.• The child has diarrhea more than twice in a day.• The child has been vomiting.• The child has an injury that requires medical attention.
For minor issues, such as a small cut, a change in behaviour (e.g., not playing as usual), or a change in appetite, you should inform the parent or guardian when he or she picks the child up.
Common Childhood Conditions: Guidelines for Care
Some childhood illnesses and conditions are contagious. Some conditions cause irritation and discomfort, while others can cause lifelong complications or even death. Preventative practices include proper hygiene (including routine hand washing) and limiting exposure to people who are ill. Babies who are 6 months or older are the most vulnerable to these diseases.
Vaccination is also a fundamental preventive strategy. Vaccines have been incredibly effective in preventing childhood diseases and decreasing child mortality rates. Common childhood vaccines include diphtheria, tetanus, pertussis, measles, mumps, and rubella.
Provincial/territorial legislation dictates which contagious diseases must be reported to the local health unit. For some contagious diseases, parents and guardians have a responsibility to ensure that the child care facility or school is informed, in addition to the local health unit.
178178
Ch
ildh
oo
d Il
lnes
ses
178
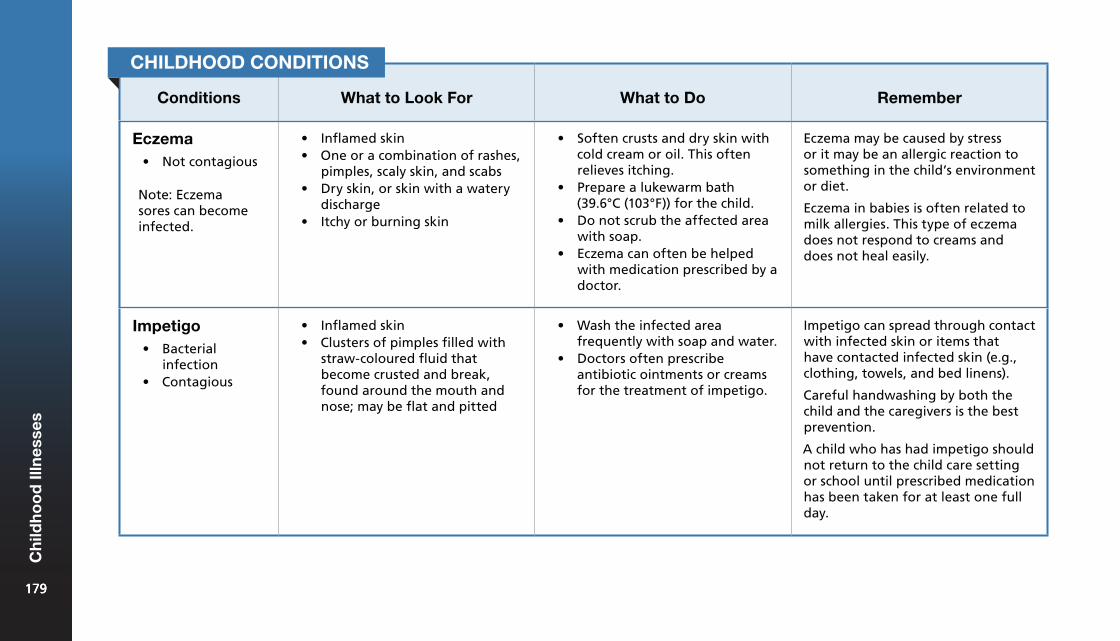
Conditions What to Look For What to Do Remember
Eczema• Not contagious
Note: Eczema sores can become infected.
• Inflamed skin• One or a combination of rashes,
pimples, scaly skin, and scabs• Dry skin, or skin with a watery
discharge• Itchy or burning skin
• Soften crusts and dry skin withcold cream or oil. This oftenrelieves itching.
• Prepare a lukewarm bath(39.6°C (103°F)) for the child.
• Do not scrub the affected areawith soap.
• Eczema can often be helpedwith medication prescribed by adoctor.
Eczema may be caused by stress or it may be an allergic reaction to something in the child’s environment or diet.
Eczema in babies is often related to milk allergies. This type of eczema does not respond to creams and does not heal easily.
Impetigo• Bacterial
infection• Contagious
• Inflamed skin• Clusters of pimples filled with
straw-coloured fluid thatbecome crusted and break,found around the mouth andnose; may be flat and pitted
• Wash the infected areafrequently with soap and water.
• Doctors often prescribeantibiotic ointments or creamsfor the treatment of impetigo.
Impetigo can spread through contact with infected skin or items that have contacted infected skin (e.g., clothing, towels, and bed linens).
Careful handwashing by both the child and the caregivers is the best prevention.
A child who has had impetigo should not return to the child care setting or school until prescribed medication has been taken for at least one full day.
CHILDHOOD CONDITIONS
179179
Ch
ildh
oo
d Il
lnes
ses
179
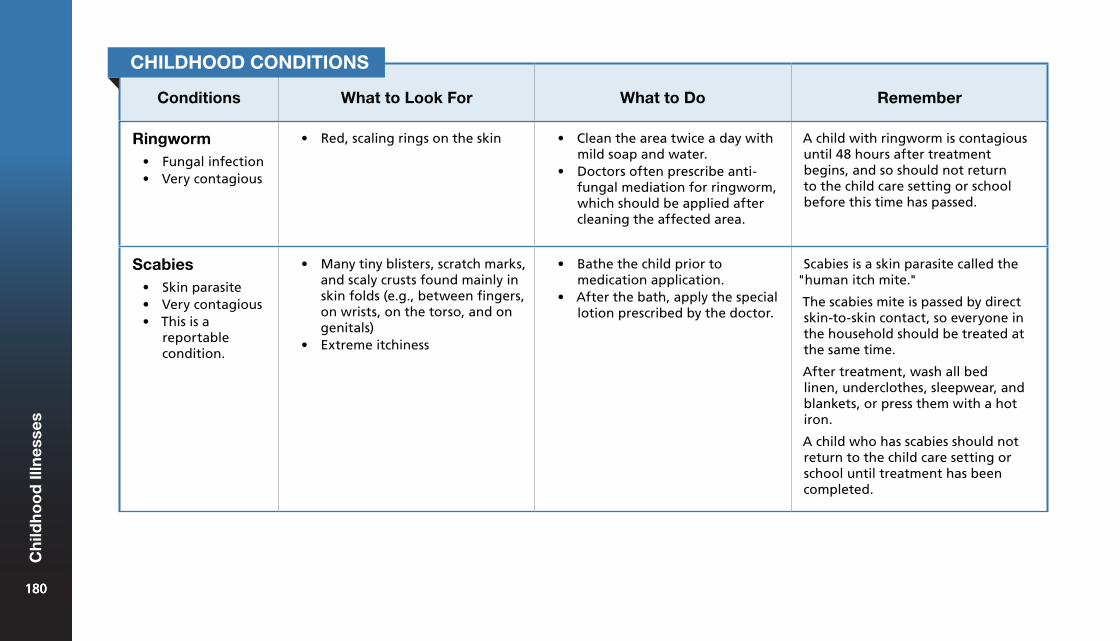
Conditions What to Look For What to Do Remember
Ringworm• Fungal infection• Very contagious
• Red, scaling rings on the skin • Clean the area twice a day withmild soap and water.
• Doctors often prescribe anti-fungal mediation for ringworm,which should be applied aftercleaning the affected area.
A child with ringworm is contagious until 48 hours after treatment begins, and so should not return to the child care setting or school before this time has passed.
Scabies• Skin parasite• Very contagious• This is a
reportablecondition.
• Many tiny blisters, scratch marks,and scaly crusts found mainly inskin folds (e.g., between fingers,on wrists, on the torso, and ongenitals)
• Extreme itchiness
• Bathe the child prior tomedication application.
• After the bath, apply the speciallotion prescribed by the doctor.
Scabies is a skin parasite called the "human itch mite."
The scabies mite is passed by direct skin-to-skin contact, so everyone in the household should be treated at the same time.
After treatment, wash all bed linen, underclothes, sleepwear, and blankets, or press them with a hot iron.
A child who has scabies should not return to the child care setting or school until treatment has been completed.
CHILDHOOD CONDITIONS
180180
Ch
ildh
oo
d Il
lnes
ses
180
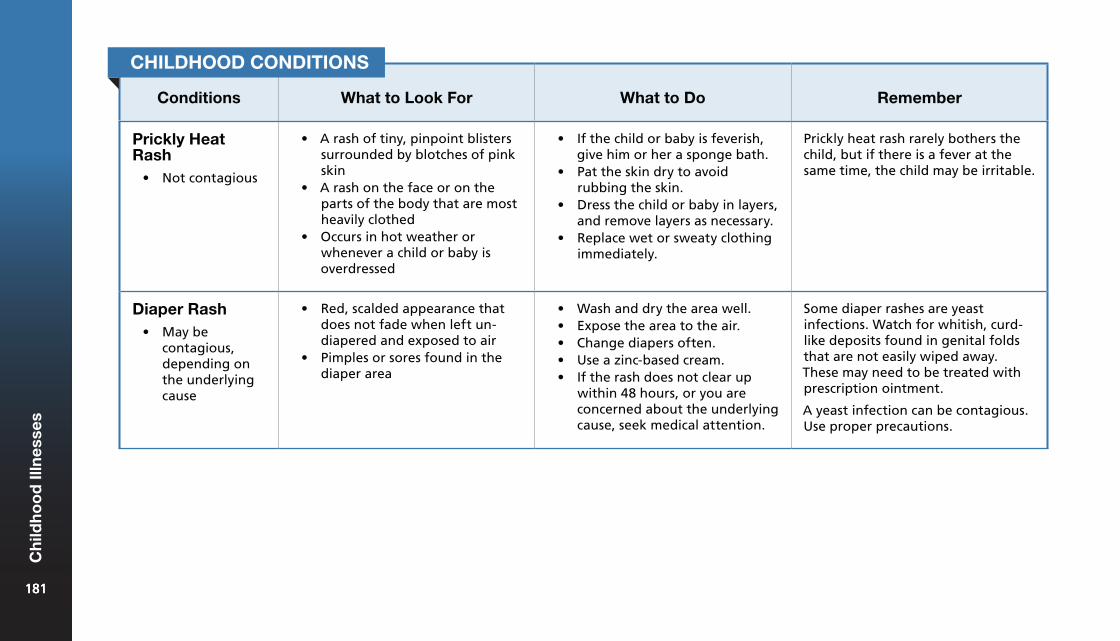
Conditions What to Look For What to Do Remember
Prickly Heat Rash
• Not contagious
• A rash of tiny, pinpoint blisterssurrounded by blotches of pinkskin
• A rash on the face or on theparts of the body that are mostheavily clothed
• Occurs in hot weather orwhenever a child or baby isoverdressed
• If the child or baby is feverish,give him or her a sponge bath.
• Pat the skin dry to avoidrubbing the skin.
• Dress the child or baby in layers,and remove layers as necessary.
• Replace wet or sweaty clothingimmediately.
Prickly heat rash rarely bothers the child, but if there is a fever at the same time, the child may be irritable.
Diaper Rash• May be
contagious,depending onthe underlyingcause
• Red, scalded appearance thatdoes not fade when left un-diapered and exposed to air
• Pimples or sores found in thediaper area
• Wash and dry the area well.• Expose the area to the air.• Change diapers often.• Use a zinc-based cream.• If the rash does not clear up
within 48 hours, or you areconcerned about the underlyingcause, seek medical attention.
Some diaper rashes are yeast infections. Watch for whitish, curd-like deposits found in genital folds that are not easily wiped away. These may need to be treated with prescription ointment.
A yeast infection can be contagious. Use proper precautions.
CHILDHOOD CONDITIONS
181181
Ch
ildh
oo
d Il
lnes
ses
181
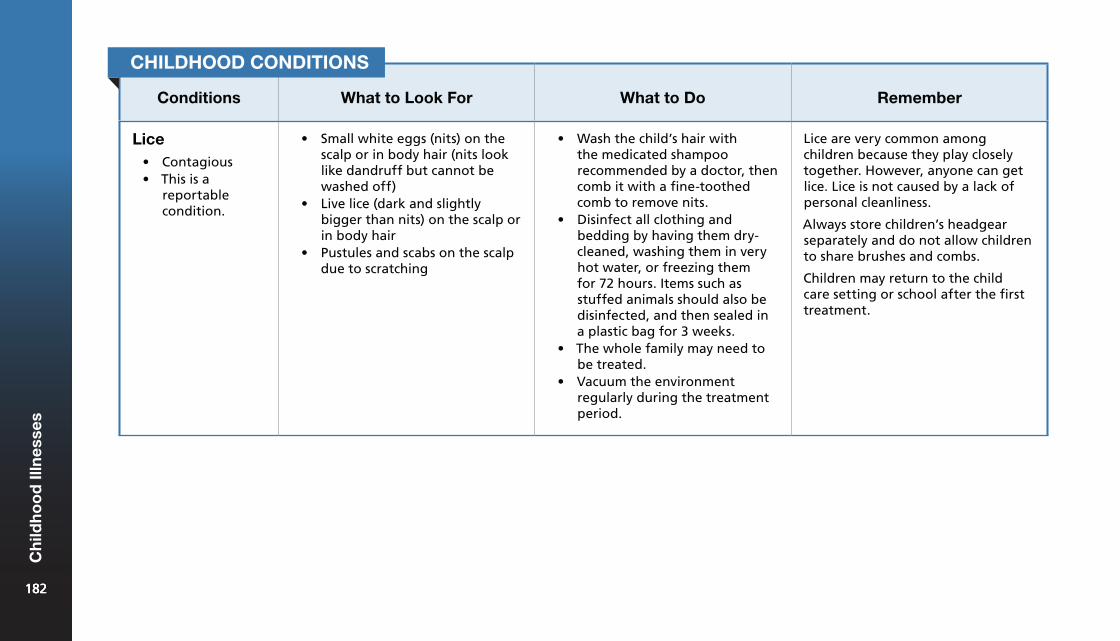
Conditions What to Look For What to Do Remember
Lice• Contagious• This is a
reportablecondition.
• Small white eggs (nits) on thescalp or in body hair (nits looklike dandruff but cannot bewashed off)
• Live lice (dark and slightlybigger than nits) on the scalp orin body hair
• Pustules and scabs on the scalpdue to scratching
• Wash the child’s hair withthe medicated shampoorecommended by a doctor, thencomb it with a fine-toothedcomb to remove nits.
• Disinfect all clothing andbedding by having them dry-cleaned, washing them in veryhot water, or freezing themfor 72 hours. Items such asstuffed animals should also bedisinfected, and then sealed ina plastic bag for 3 weeks.
• The whole family may need tobe treated.
• Vacuum the environmentregularly during the treatmentperiod.
Lice are very common among children because they play closely together. However, anyone can get lice. Lice is not caused by a lack of personal cleanliness.
Always store children’s headgear separately and do not allow children to share brushes and combs.
Children may return to the child care setting or school after the first treatment.
CHILDHOOD CONDITIONS
182182
Ch
ildh
oo
d Il
lnes
ses
182

Conditions What to Look For What to Do Remember
Pink Eye (Conjunctivitis)
• Bacterialinfection
• Contagious
• Pink colouration of the white ofthe eye
• Swollen eyelids• Pus on eyelids• Itchy or sensitive eyes
• Seek medical attention: doctorsoften prescribe antibiotics.
• Protect the eyes from brightlight.
• Do not let children share towelsor washcloths.
• The child should not rub ortouch his or her eyes.
• Use warm water compresses toremove pus.
Pink eye can be bacterial or viral, is transmitted through direct contact, and is very contagious.
If the child’s eyes have pus, keep the child home from the child care setting or school for 24 hours.
Pinworms• Very contagious
• Constant scratching around theanus
• Unusual irritability• Restlessness or inability to sleep
at night
• Wash the child’s hands and nails(using a nail brush).
• Keep the child’s fingernailsshort and discourage nail biting.
• Make sure the child has a dailybath or shower and a dailychange of towels, sheets, andunderwear.
• Doctors often prescribe oralmedication.
• The whole family must betreated.
Pinworms are intestinal parasitic worms. Tiny eggs deposited around the anus by a female worm spread the infection.
Keep the child home from the child care setting or school until after starting medication.
CHILDHOOD CONDITIONS
183183
Ch
ildh
oo
d Il
lnes
ses
183
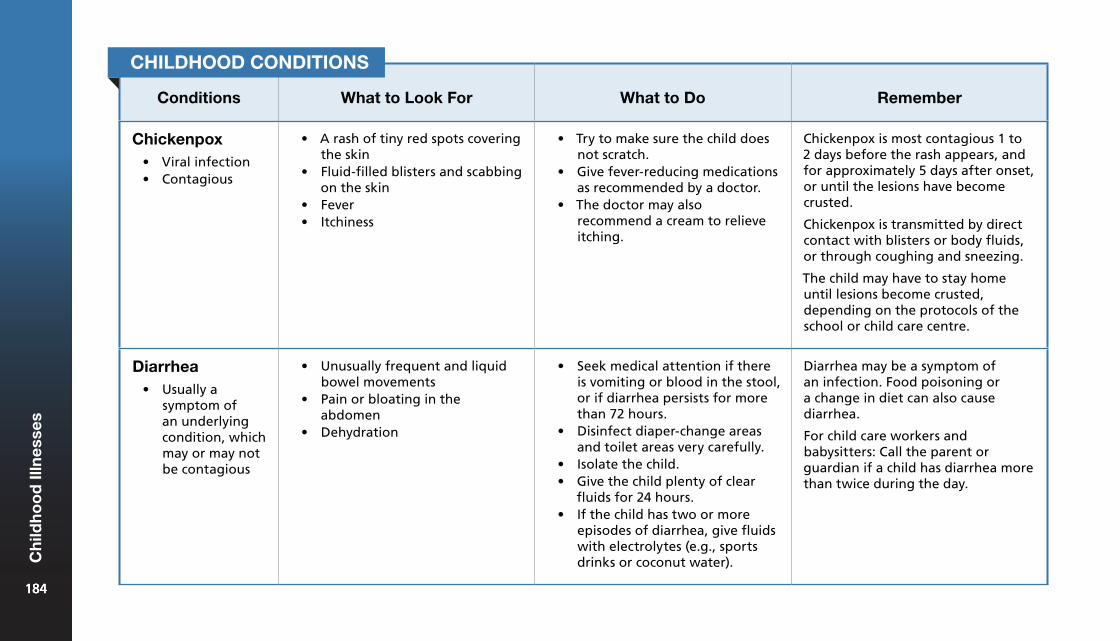
Conditions What to Look For What to Do Remember
Chickenpox• Viral infection• Contagious
• A rash of tiny red spots coveringthe skin
• Fluid-filled blisters and scabbingon the skin
• Fever• Itchiness
• Try to make sure the child doesnot scratch.
• Give fever-reducing medicationsas recommended by a doctor.
• The doctor may alsorecommend a cream to relieveitching.
Chickenpox is most contagious 1 to 2 days before the rash appears, and for approximately 5 days after onset, or until the lesions have become crusted.
Chickenpox is transmitted by direct contact with blisters or body fluids, or through coughing and sneezing.
The child may have to stay home until lesions become crusted, depending on the protocols of the school or child care centre.
Diarrhea• Usually a
symptom ofan underlyingcondition, whichmay or may notbe contagious
• Unusually frequent and liquidbowel movements
• Pain or bloating in theabdomen
• Dehydration
• Seek medical attention if thereis vomiting or blood in the stool,or if diarrhea persists for morethan 72 hours.
• Disinfect diaper-change areasand toilet areas very carefully.
• Isolate the child.• Give the child plenty of clear
fluids for 24 hours.• If the child has two or more
episodes of diarrhea, give fluidswith electrolytes (e.g., sportsdrinks or coconut water).
Diarrhea may be a symptom of an infection. Food poisoning or a change in diet can also cause diarrhea.
For child care workers and babysitters: Call the parent or guardian if a child has diarrhea more than twice during the day.
CHILDHOOD CONDITIONS
184184
Ch
ildh
oo
d Il
lnes
ses
184
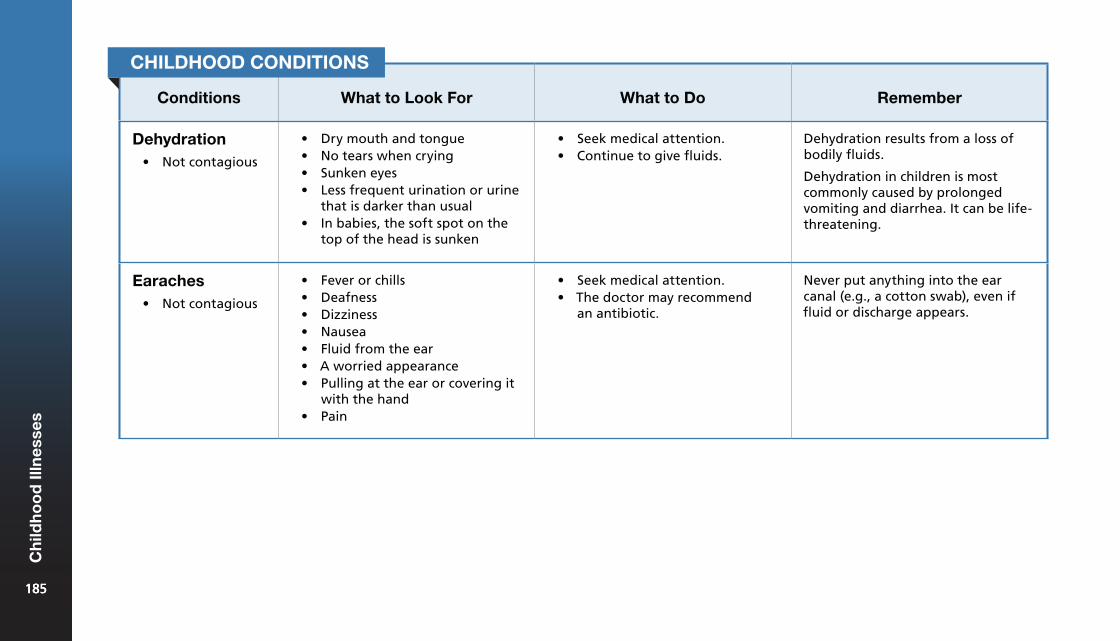
Conditions What to Look For What to Do Remember
Dehydration• Not contagious
• Dry mouth and tongue• No tears when crying• Sunken eyes• Less frequent urination or urine
that is darker than usual• In babies, the soft spot on the
top of the head is sunken
• Seek medical attention.• Continue to give fluids.
Dehydration results from a loss of bodily fluids.
Dehydration in children is most commonly caused by prolonged vomiting and diarrhea. It can be life-threatening.
Earaches • Not contagious
• Fever or chills• Deafness• Dizziness• Nausea• Fluid from the ear• A worried appearance• Pulling at the ear or covering it
with the hand• Pain
• Seek medical attention.• The doctor may recommend
an antibiotic.
Never put anything into the ear canal (e.g., a cotton swab), even if fluid or discharge appears.
CHILDHOOD CONDITIONS
185185
Ch
ildh
oo
d Il
lnes
ses
185
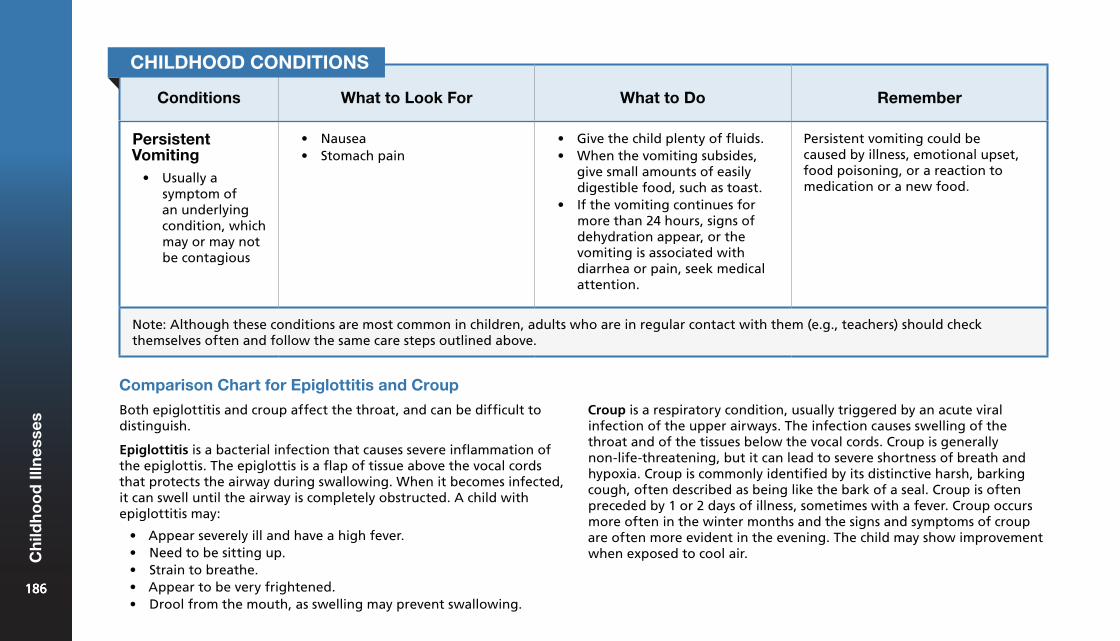
Conditions What to Look For What to Do Remember
Persistent Vomiting
• Usually asymptom ofan underlyingcondition, whichmay or may notbe contagious
• Nausea• Stomach pain
• Give the child plenty of fluids.• When the vomiting subsides,
give small amounts of easilydigestible food, such as toast.
• If the vomiting continues formore than 24 hours, signs ofdehydration appear, or thevomiting is associated withdiarrhea or pain, seek medicalattention.
Persistent vomiting could be caused by illness, emotional upset, food poisoning, or a reaction to medication or a new food.
Note: Although these conditions are most common in children, adults who are in regular contact with them (e.g., teachers) should check themselves often and follow the same care steps outlined above.
CHILDHOOD CONDITIONS
Comparison Chart for Epiglottitis and Croup
Both epiglottitis and croup affect the throat, and can be difficult to distinguish.
Epiglottitis is a bacterial infection that causes severe inflammation of the epiglottis. The epiglottis is a flap of tissue above the vocal cords that protects the airway during swallowing. When it becomes infected, it can swell until the airway is completely obstructed. A child with epiglottitis may:
• Appear severely ill and have a high fever.• Need to be sitting up.• Strain to breathe.• Appear to be very frightened.• Drool from the mouth, as swelling may prevent swallowing.
Croup is a respiratory condition, usually triggered by an acute viral infection of the upper airways. The infection causes swelling of the throat and of the tissues below the vocal cords. Croup is generally non-life-threatening, but it can lead to severe shortness of breath and hypoxia. Croup is commonly identified by its distinctive harsh, barking cough, often described as being like the bark of a seal. Croup is often preceded by 1 or 2 days of illness, sometimes with a fever. Croup occurs more often in the winter months and the signs and symptoms of croup are often more evident in the evening. The child may show improvement when exposed to cool air.
186186
Ch
ildh
oo
d Il
lnes
ses
186
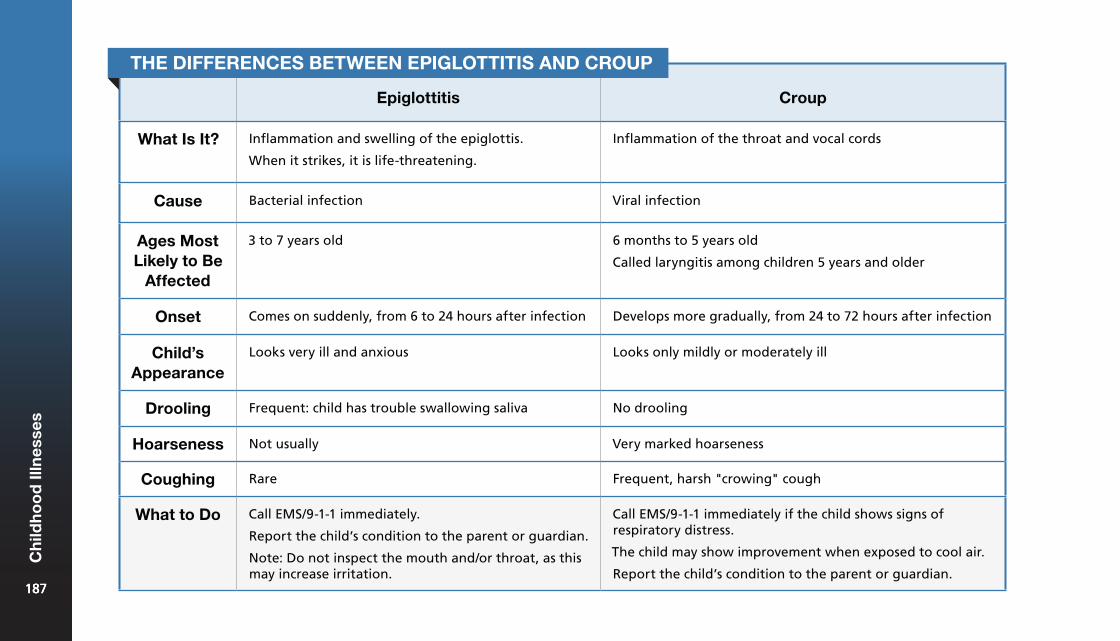
Epiglottitis Croup
What Is It? Inflammation and swelling of the epiglottis.
When it strikes, it is life-threatening.
Inflammation of the throat and vocal cords
Cause Bacterial infection Viral infection
Ages Most Likely to Be
Affected
3 to 7 years old 6 months to 5 years old
Called laryngitis among children 5 years and older
Onset Comes on suddenly, from 6 to 24 hours after infection Develops more gradually, from 24 to 72 hours after infection
Child’s Appearance
Looks very ill and anxious Looks only mildly or moderately ill
Drooling Frequent: child has trouble swallowing saliva No drooling
Hoarseness Not usually Very marked hoarseness
Coughing Rare Frequent, harsh "crowing" cough
What to Do Call EMS/9-1-1 immediately.
Report the child’s condition to the parent or guardian.
Note: Do not inspect the mouth and/or throat, as this may increase irritation.
Call EMS/9-1-1 immediately if the child shows signs of respiratory distress.
The child may show improvement when exposed to cool air.
Report the child’s condition to the parent or guardian.
THE DIFFERENCES BETWEEN EPIGLOTTITIS AND CROUP
187187
Ch
ildh
oo
d Il
lnes
ses
187
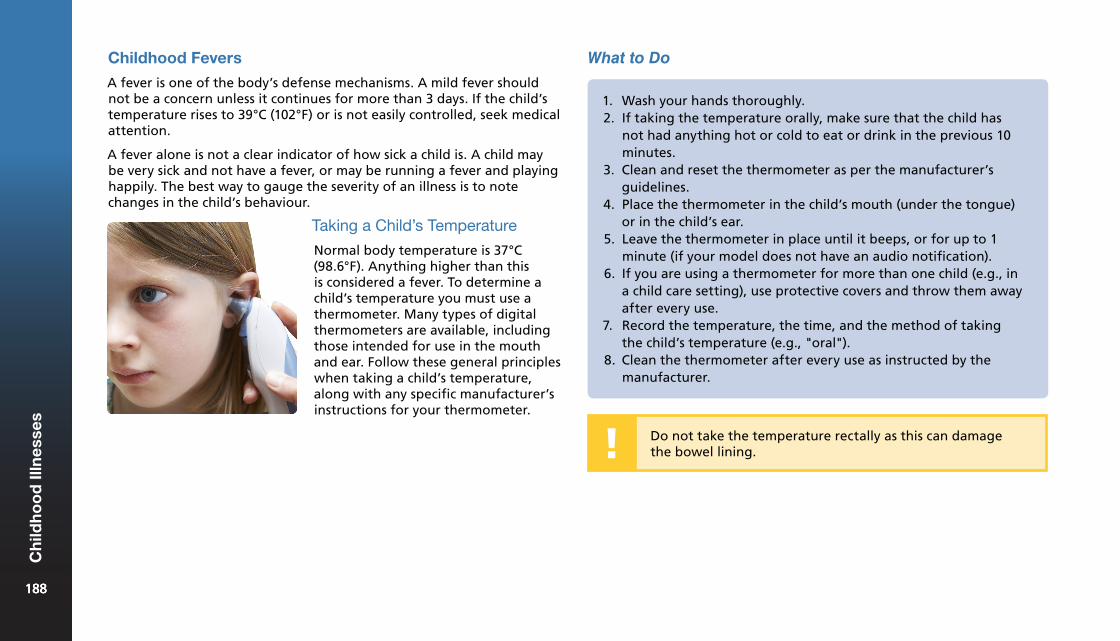
Childhood Fevers
A fever is one of the body’s defense mechanisms. A mild fever should not be a concern unless it continues for more than 3 days. If the child’s temperature rises to 39°C (102°F) or is not easily controlled, seek medical attention.
A fever alone is not a clear indicator of how sick a child is. A child may be very sick and not have a fever, or may be running a fever and playing happily. The best way to gauge the severity of an illness is to note changes in the child’s behaviour.
Taking a Child’s Temperature
Normal body temperature is 37°C (98.6°F). Anything higher than this is considered a fever. To determine a child’s temperature you must use a thermometer. Many types of digital thermometers are available, including those intended for use in the mouth and ear. Follow these general principles when taking a child’s temperature, along with any specific manufacturer’s instructions for your thermometer.
Do not take the temperature rectally as this can damage the bowel lining.
What to Do
1. Wash your hands thoroughly.2. If taking the temperature orally, make sure that the child has
not had anything hot or cold to eat or drink in the previous 10minutes.
3. Clean and reset the thermometer as per the manufacturer’sguidelines.
4. Place the thermometer in the child’s mouth (under the tongue)or in the child’s ear.
5. Leave the thermometer in place until it beeps, or for up to 1minute (if your model does not have an audio notification).
6. If you are using a thermometer for more than one child (e.g., ina child care setting), use protective covers and throw them awayafter every use.
7. Record the temperature, the time, and the method of takingthe child’s temperature (e.g., "oral").
8. Clean the thermometer after every use as instructed by themanufacturer.
188188
Ch
ildh
oo
d Il
lnes
ses
188
Reducing a Child’s Temperature: Giving Medication
When to Give Medications
Give medication to a child or baby in your care:
• Only if you have written permission from a parent or guardian foreach medication that is to be given
• Only when the medication is in the original container with theoriginal label
• Only when the medication is properly labelled with: ¶ The child’s name. ¶ The date the prescription was issued. ¶ The instructions. ¶ The time period during which the medication is to be taken.
If a child is being given non-prescription medication, ensure you have written permission from a parent or guardian for each medication that is to be given.
Parents or guardians should give the first dose of a new medication so that they can watch for any unusual signs, symptoms, reactions, or behaviours in their children or babies.
1. Children with fevers should be dressed lightly because theymay feel warm. If they get too cold or start to shiver, coverthem until the skin feels warm when you touch it.
2. Sponge the child with room temperature water.3. Give the child plenty of fluids to ensure that he or she stays
hydrated.4. If the fever rises above 39°C (102°F) or persists for more than 3
days, seek medical attention.5. Give fever-reducing medications, as discussed with the
healthcare practitioner.
Complications Related to Fever
Reye’s Syndrome
A child or teenager with a viral infection, such as chickenpox or influenza, may develop Reye’s syndrome if given ASA (e.g., Aspirin®). Reye’s syndrome is a disease of the brain and liver that can lead to death. Never give ASA to a child or teenager with a viral infection without first consulting a healthcare practitioner.
Seizure
A child or baby may suffer a seizure during a high fever. If this occurs, follow the care steps for febrile seizures.
189189
Ch
ildh
oo
d Il
lnes
ses
189
General Rules for Medication
To reduce the risk of miscommunication and error, it is a good idea to have just one person in the child care setting who is responsible for giving all medications. Store all medication out of the reach of children.
Some provinces and territories have legislation regarding medication administration in child care settings. Always follow local protocols.
When giving medication:• Wash your hands thoroughly.• Check the medication three times:
¶ When you take the medication out from the cupboard or refrigerator
¶ When you take the medication out of the package ¶ Just before you administer the medication
• Keep a written record of the date and time the medication wasgiven, the name of the child, the name of the medication, theperson who gave the medication, and the amount given. Record allthis information when you give the medication.
• Call the parent or guardian if the child cannot keep the medicationdown.
• Report to the parent, guardian, or doctor any reactions or effectsnot usually experienced by the child.
• At the end of each day, tell the parent or guardian what medicationwas given and at what time.
• Follow any specific directions for the medication (e.g., "do not takewith food").
• When applying topical medication, protect yourself by using anapplicator or by wearing disposable gloves.
• Emergency medicine, such as inhalers or epinephrine auto-injectors,should be accessible at all times but out of the reach of children.
How to Give Specific Medications
Medication in the Eye
1. Have the child look up while in a lying or sitting position.2. Gently pull down the lower eyelid.3. Hold the dropper horizontally about one inch out from the
child’s eye.4. Drop the medication into the little pocket between the lower lid
and the eyeball.5. Ask the child to close the eye then briefly hold a cotton ball
against the inside corner of the eye. Use a separate cotton ballfor each eye.
6. Wipe away any excess medication.
Medication in the Nose
1. Have the child lie on a flat surface with his or her head hangingover one edge. If the child must sit up, have the child tilt his or herhead back as far as possible.
2. Place the exact number of drops indicated in the prescription intoeach nostril.
3. Have the child remain with his or her head back for a few minutes.
190190
Ch
ildh
oo
d Il
lnes
ses
190
Caring for Children15
Children are very vulnerable. Their bodies are more susceptible to injury, and they are typically less aware of risks and hazards in their environments. When caring for children, prevention, preparation, and constant supervision are critical to preventing injury.
Toy and Equipment Safety
Products designed for children have many features to keep them safe, but these products must be selected and used properly.
You should always discard broken equipment and toys immediately, and always follow the manufacturer’s directions for safe use. When considering second-hand equipment or toys, first check the label and contact Health Canada to find out if there has been a recall or safety alert on that specific model.
Equipment for Babies
Safe Use of Cribs• Cribs manufactured before September 1986 do not meet current
safety standards and should be disassembled and either thrownaway or taken to your local recycling centre.
• Manufacturers of cribs are required to include a label showing thedate of manufacture. If there is no label, assume that the crib is notsafe to use.
• Allow only one small toy inside the crib and remove all mobiles oractivity centres as soon as the baby can pull him- or herself up.
• Place the crib well away from potential hazards such as blind cords,windows, pictures, and shelves.
• When a child shows signs of trying to climb out of a crib, it is time tomove the child to a bed or mattress on the floor.
• Keep the wheels on a crib locked whenever it is in use.• Make sure that the crib slats are no more than 6 cm (2 3/8 in.) apart.
• Make sure that the corner posts extend no more than 3 cm (1 1/4 in.)above the headboard and footboard.
• The height from the mattress support to the top rail must be at least66 cm (26 in.) when the support is in its lowest position.
• Make sure the mattress fits snugly inside the crib. Use onlymattresses sold for use in cribs. Any other substitutes, such as foampads, may allow for pockets or spaces in which a child may get stuckor be smothered.
Safe Use of Playpens• Manufacturers of playpens are required to include a Canadian
Standards Association (CSA) label showing that the playpen hasbeen approved by CSA. The label also shows the playpen’s date ofmanufacture. Any playpen manufactured before 1985 has not beenapproved by the CSA. If there is no label, assume that the playpen isnot safe to use.
• If a child shows signs of trying to climb out of a playpen, the playpenis no longer safe for that child.
• Ensure that the playpen’s wheels are locked whenever it is in use.• Make sure that playpen walls are sturdy and at least 48 cm (19 in.)
high.• Inspect the playpen regularly to ensure that there are no hazards
such as rips or exposed sharp edges.
Safe Use of High Chairs• Do not allow older children to climb on the chair, even when it is
unoccupied.• A safe chair is stable and has a wide base to reduce the risk of tipping.• The harness should consist of a strap that fits between the child’s
legs and a waist belt that is easy to fasten and is in good condition.
192192
Car
ing
fo
r C
hild
ren
192
• Ensure that the child’s hands, arms, and legs are clear of any movingparts before making adjustments to the chair or the tray.
• Keep the chair a safe distance away from hazards such as windows,blind cords, and mirrors, or surfaces that a child could push off ofsuch as walls, doors, or furniture.
Safe Use of Baby Strollers• Manufacturers of baby strollers are required to include a Canadian
Standards Association (CSA) label showing that the baby stroller hasbeen approved by CSA. The label also shows the stroller’s date ofmanufacture. Any stroller manufactured before 1985 has not beenapproved by the CSA. If there is no label, assume that the stroller isnot safe to use.
• Do not load heavy parcels on the back or on the handles of thebaby stroller. These could cause the stroller to tip backward.
• Use a stroller with safety straps that go around the child’s waist andbetween the legs.
• Keep children’s fingers away from moving parts.
Safe Use of Pacifiers• When purchasing a pacifier, make sure it is from a reputable
manufacturer.• Check pacifiers regularly for wear and tear. Discard them
immediately if there is any sign of deterioration, such asdiscolouration, hardening, or cracking of the nipple.
• If a doctor diagnoses a child or baby with a yeast infection of themouth, immediately discard any pacifier the baby is using. Give thebaby a new one only after the infection has cleared.
• Use a pacifier clip, as opposed to a cord, to secure the pacifier tothe child.
• A teething ring should be used instead of a pacifier once the baby’steeth start to appear.
Equipment for Children
Safe Use of Child Bike Trailers• Child bike trailers are recommended over child bike carriers because
they reduce the risk of falls, do not cause as many steering andbalance problems, and increase protection from the weather. Theyare also farther from the bicycle wheels, ensuring that the childcannot reach the spokes.
• If possible, choose a bike trailer that has a five-point harness androll bar.
• Attach a tall, bright flag to the trailer.• Connect the trailer with a flexible joint so that it will not tip over,
even if the bike does.• As a bike trailer is wider than a bike, ensure that the wheels do not
go over the road edge.• Ride in low-traffic areas.• Ensure that children wear Canadian Standards Association (CSA)
approved and properly fitting helmets.
Safe Use of Safety Gates• Use only approved safety gates. Avoid makeshift alternatives, such
as pieces of furniture.• Manufacturers of safety gates are required to include a label
showing the date of manufacture. If there is no label, assume that itis not safe to use.
• If you can fit a pop can between the railings, a child could get stuckand the gate is not safe.
• Install safety gates wherever stairs are exposed (at the top andbottom of the staircase). Make sure they are properly fitted andsecure.
• If the gate has a pressure bar, make sure it is on the side away fromchildren.
193193
Car
ing
fo
r C
hild
ren
193
• Always open and close gates to pass through. Climbing over a gate isunsafe and may cause an injury. It also models unsafe behaviour tochildren.
• Safety gates are not a substitute for constant supervision. Alwaysmonitor children closely, even if a safety gate is in place.
Toys for Children and Babies
The following are guidelines to keep children safe when playing with toys:
• Follow the manufacturer’s directions for safe use, includingsuggested age level.
• Choose toys that are appropriate for the children who will be usingthem. The Canadian Toy Testing Council issues a list of guidelines forchoosing toys.
• Toys must be cleaned daily in child care centres. To clean toys andequipment, use a solution of 6 mL (1 tsp.) of bleach to 400 mL (1¾cups) of water. Label the bottle and make a fresh solution every day.
• When there are older children in the same space, their toys mayhave smaller parts: These toys should be separated and stored out ofcommon play areas.
• Avoid toys with sharp edges.• Paints, crayons, and markers must be completely washable and non-
toxic.• Ensure that toys (and all of their detachable pieces) are too big to fit
into the baby’s or child’s mouth, ears, or nose.• Provide only toys without strings because strings may cause
strangulation.• Inspect toys regularly. Discard any pieces that are loose. If the toy
seems unsafe, discard it immediately.• Wooden toys should be glued or screwed together instead of nailed.• Ride-around or ride-on toys must be selected according to the size
of the child.• Children should wear all safety equipment that is recommended
for the activity. “Toy” protective gear (e.g., plastic helmets) is forimaginative play only.
• Electrical toys must bear the Canadian Standards Association (CSA)label.
• Choose costumes that are made of flame-retardant materials. Useface paints instead of face masks to avoid blocking vision.
• Large toy boxes and other containers must have air holes and self-supporting hinges if they have lids. This is necessary in case childrendecide to hide inside.
Playground Safety
Playgrounds are the site of many serious injuries, mainly falls. Some playground equipment can be unsafe or inappropriate for certain age groups. The following points help to keep children safe on the playground:
• Examine park and school playgrounds for hazards such as brokenglass or exposed sharp edges.
• Ensure that children use playground equipment as intended (e.g.,ensure that they do not climb on the outside of a tubular slide).
• Ensure that there are enough adults present to watch all childrencarefully.
• If you see unsafe or broken equipment in a playground, report thisto the managing agency (e.g., community centre, park board, schoolboard).
• If you are installing or maintaining playground equipment, considerthe age and size of the children who will be using it, and follow themanufacturer’s directions.
• Ideally, sandboxes should be fitted with a cover to keep dogs, cats,and other animals from using it as a litter box.
Provincial/territorial legislation specifies regulations for child care centre play equipment.
194194
Car
ing
fo
r C
hild
ren
194
Car Safety
Motor vehicle injuries are the number one cause of death of children in Canada. Follow the guidelines on the safe use of car seats and the passenger rules for children to help ensure children’s safety in and around motor vehicles.
Safe Use of Car Seats
The law requires that all children use appropriate and approved child-restraint systems, such as child or baby seats and booster seats. These must have a label stating that they conform to the Canada Motor Vehicle Safety Standards (CMVSS), administered by Transport Canada.
Use caution when buying or using a pre-owned child car seat. Buy the seat from someone you know, and check it carefully. Make sure the car seat has:
• Instructions and all necessary hardware• Not been in a collision• A CMVSS sticker and is less than 10 years old• No discoloured (stress) marks or cracks• No signs of wear or tears on the harness
Always follow the manufacturer’s instructions for installation and use.
When driving with children who do not require a car seat, remember:
• Children under the age of 13 should ride in the back seat.• If you absolutely must put a child in the front seat of a car that has
an airbag, push the seat back as far as it will go.
Make sure that any child who is no longer in a car seat is secured with a seat belt. Show the child how to wear the belt. The lap belt should be low across the hips, and the shoulder belt should be over the shoulder and across the chest. If the seat belt does not fit properly, a booster seat should be used.
It is against the law to leave a child or baby alone in a car, even for a short time.
Passenger Rules for Children: Safety Education
Teach children the following rules for safety in and around motor vehicles:
• Always enter and exit the car on the curb side.• Remain seated with your seat belt on while the car is moving. Stay
that way until the driver has reached your destination and the car iscompletely turned off or the driver tells you it is safe to remove yourseat belt.
• Remember that the driver needs to be able to concentrate ondriving, so minimize distractions inside the car.
• Keep your head, arms, and feet in the car at all times.• Remember that the car’s controls are for the driver only. They are
not for playing with, even when the car is parked.
As a caregiver, ensure that everyone’s fingers, hands, and feet are clear of doors before the doors are closed. Ensure that any person driving children has adequate insurance coverage.
195195
Car
ing
fo
r C
hild
ren
195
Safe Use of Wheeled Equipment
Choosing a Safe Bicycle
When choosing a bicycle for a child, ensure that it is the proper size:
Choosing a Safe Helmet
Mishaps during sports that require a helmet are the leading cause of head injuries for children in Canada. Wearing helmets can reduce the risk of a serious or fatal head injury by up to 80%.
Keep the following points in mind when choosing a helmet for a child:
• Use helmets approved by the Canadian Standards Association(CSA), Snell Memorial Foundation, or American National StandardsInstitute (ANSI).
• A helmet should fit squarely on the child’s head and have a snugchin strap.
If a helmet is involved in a fall, buy another one. Even if no damage is visible, the helmet may have lost some of its ability to absorb shock.
As a role model and for safety reasons, adults should always wear a helmet while riding a bicycle.
Safe Use of Bicycles
Ensure that children follow these rules when using a bicycle:
• Walk bicycles across roads only at intersections and pedestriancrosswalks.
• Before you cross, make sure that traffic crossing your path is fullystopped at stop signs or traffic signals.
• Ride in a straight line when you go down a road or street. Do notswerve between parked cars or onto driveways. Always look andsignal in plenty of time before turning.
• Wear bright clothes even during the day. When motorists can see acyclist, it is easier for them to co-operate with the cyclist.
• Do not ride a bicycle after dark.
Local legislation may dictate what needs to be on your bike for safety (e.g., bike lights).
1. Have the child stand over the bicycle seat with both feet flat onthe ground.
2. Lift the bicycle up to the child’s body (both tires off the floor).There should be at least 2.5 cm (1 in.) between the tires and thefloor. Adjust the height of the seat as needed.
While on the seat, the child should be able to put the balls of his or her feet on the ground.
Regularly check the following for any bicycle used by a child:
• The brakes must work properly, and the child must be able to usethem safely.
• The tires must be fully inflated.• The wheels must be tightly secured and truly round.• The chain must be oiled and tight.• The spokes must be tight, straight, and unbroken.• The seat post and handlebars must be securely attached.• The bike must have a working bell or horn.• The bicycle must pass the "bounce test:" Bounce the bicycle up and
down on its wheels on a paved surface and listen for shakes andrattles. A safe bike is a quiet bike.
196196
Car
ing
fo
r C
hild
ren
196
Safe Use of Skateboards and Rollerblades
To keep children safe while skateboarding and rollerblading:
• Restrict skateboarding and in-line skating to children over 5 years ofage.
• Allow children to use only playgrounds and paths built forskateboarding and in-line skating.
• Insist that children wear the correct equipment: a bicycle helmetapproved by the Canadian Standards Association (CSA), SnellMemorial Foundation, or American National Standards Institute(ANSI), as well as elbow, wrist, and knee pads.
• Ensure that children wear bright clothing while skateboarding or in-line skating. This will make the children more visible and reduce therisk of collisions.
Fire Safety
Reducing Risk of Fires and Burns
The following tips can reduce the risk of fires and burns:
• Keep children away from heat sources and appliances such as cookingovens, barbecues, space heaters, wood stoves, and fireplaces.
• Make sure all fireplaces and wood stoves are cleaned and inspectedregularly to follow safety codes.
• Keep space heaters at least 1 metre (3 ft.) away from flammableobjects such as curtains and furniture.
• Turn pot handles in toward the centre of the stove.• Keep cooking areas free of clutter. This will reduce the risk of igniting
pot holders, aprons, and other kitchen items.• Snuff out candles immediately after use.• Keep all hot drinks out of children’s reach.• For nightwear, use only clothing designated as sleepwear. Other
materials are sometimes more flammable. The government setsguidelines as to what is classified as sleepwear.
• Contact your local fire department for information on inspectingyour home or workplace (including child care settings) for firehazards and reviewing your fire escape plan.
• Make sure that smoke detectors are placed in all areas required byyour local fire department or whichever agency regulates fire safetyin your area. Change the batteries in all smoke detectors twice a year.
• Keep bedroom and sleeping-area doors closed when children aresleeping. Doors are important barriers to smoke.
• Make sure that all breakers and fuses on the electrical panel in yourhome, workplace, or child care setting are clearly labelled.
• Use only single-cord plugs, as multiple-cord or octopus plugs mayoverheat. Keep loose cords secured and out of the way to preventtripping and to keep children from pulling them out.
• Keep an approved, all-purpose chemical fire extinguisher in thekitchen.
Even the safest cyclist must watch for drivers who aren’t paying attention!
It is important to teach children balancing, turning, hand signalling, and stopping on a bicycle before they go out riding. Practice these skills in the yard, a school yard, a park, or other low-traffic area.
197197
Car
ing
fo
r C
hild
ren
197
Fire Escape Plan
Draw a floor plan. Mark the normal exit from each room. Then mark an emergency exit, such as a window. This exit can be used if fire blocks the doorway.
Identify a location where everyone will meet if they must escape from a fire. Decide who will assist those who cannot get themselves out, such as young children or people with difficulty walking.
In professional settings, legislation may determine how often this escape plan must be practiced.
What to Do in the Case of Fire During the Night
Ice Safety
Safe Skating or Walking on Ice
Teach children these safety rules for skating or walking on ice:
• Ice must be a minimum of 15 cm (6 in.) thick before it can supportone person. Ice must be solid, clear blue, and not covered with snow.
• Always skate with a buddy.• If you cannot be sure how thick a section of ice is, do not walk or
skate on it.
Ensure that children know what to do if they fall through the ice:
• In shallow water, feel for the bottom with your feet. Then walktoward the shore or bank, breaking ice as you go. Keep going untilyou can slide up onto thicker ice.
• In deep water, flutter-kick your feet and extend your hands forwardalong the ice until you can slide up onto it. Slowly crawl to safety.
• After you are out of danger, get to shelter and change into warmclothing. This will help prevent hypothermia.
Water Safety
General Tips for the Prevention of Drowning• Pay constant attention to babies or children when they are in, on, or
around water.• Turn wading pools upside down when not in use.• Empty buckets of water immediately after use.• Keep toilet lids down and keep the bathroom door closed.
1. When you hear the smoke detector, roll out of bed and ontothe floor. Shout “Fire, fire, fire!” Be sure to shout it 3 times.Shout “Get out and stay out!” Teach children to do this as well.
2. Crawl to the door and touch it. If it is warm, do not open it.Unlock the door so that the firefighters can open it. Seal offany cracks with blankets or towels. Wet the blankets or towelsif possible.
3. Escape via the emergency exit.• If you cannot get out, take refuge in a room with a
window. Open it for ventilation. Hang a sheet out thewindow as a signal for help.
4. Join everyone at the special meeting spot.5. After everyone is together, go to a neighbour’s home to call
the fire department.6. Meet the fire trucks and tell the firefighters that everyone has
escaped the burning building.
198198
Car
ing
fo
r C
hild
ren
198
Safe Use of Bathtubs• Always be present when a child or baby is in a bathtub or bathing
basin. Drowning can occur even in a few centimetres of water.• Check bathwater temperature by splashing water on your inner
wrist. If it feels too hot or cold to you, do not place the child or babyin the bath until you have adjusted the temperature.
• If your bathtub is a Jacuzzi-type or is equipped with water jets, donot turn these on with the child or baby in the tub.
• Turn off all water taps tightly.• Place a non-slip mat in the bathtub.
Safe Use of Backyard Pools and Hot Tubs• Keep children under constant supervision when they are playing in
or around a backyard pool or hot tub.• Make sure basic lifesaving equipment is available at all times.
Examples of basic lifesaving equipment are: (1) a strong, lightweightpole with blunt ends; and (2) a ring buoy with a long throwing rope.Be aware of equipment requirements outlined in the legislation thatapplies to your situation.
• Cover hot tubs securely and lock them when they are not in use.• Keep decks around the pool or hot tub clean and free of debris.• Pay close attention to the surface of a diving board. Make sure the
slip-resistant surface is always in good repair. Ensure that the wateris deep in the entire area that divers use (mark the slope of the poolto avoid hitting the upslope).
• Install a rope with buoyant markers across the pool where the deepend slope begins.
• Use only unbreakable cups, dishes, and other utensils at the poolside.• Keep electrical appliances away from backyard pools.• Remove all floating toys and store them in a secure area when pool
time is over.
• Make sure electrical equipment used to operate the pool or hot tubconforms to electrical code requirements.
• Have a phone available on the pool deck. Post a list of emergencynumbers beside it.
• Ensure that an outdoor pool is surrounded by a fence or wall thatchildren cannot get through or over. Gates should have self-closinglatches above the reach of toddlers. They should also includehardware for permanent locking. Obey the fencing requirements ofyour local municipality.
• Make sure all pool chemicals are stored in a secure area.
Safe Swimming• Make sure that children and adults learn to swim. For swimming
lessons, take a Red Cross Swim course.• Ensure children are always supervised by a responsible adult.• Establish sensible safety rules before children do any swimming.
Enforce these rules consistently and firmly.• Supervise even strong swimmers at all times. Sudden cramps can sink
the most accomplished swimmer.• Allow swimming only during daylight hours and in good weather.• Remind non-swimmers and swimming supervisors of the dangers of
relying on inflatable toys (e.g., inner tubes). Inflatable toys can leakand no longer provide support, and they can also create barriers toeffective supervision.
• Ensure children stay within specified boundaries.• When distance swimming at the beach, make sure that children
swim parallel to the shore.• Always know the depth of the water and ensure it is clear of all
obstacles before diving.• Post “No Diving” signs around above-ground pools.• Allow only one person at a time on diving boards and waterslides.• Ensure that swimmers stay away from the area underneath diving
boards.199199
Car
ing
fo
r C
hild
ren
199

Safe Boating• Make sure that all boat occupants are wearing approved lifejackets
or personal flotation devices (PFDs). Look for lifejackets or PFDs withlabels stating that they have been approved by Transport Canada orthe Canada Coast Guard.
• As a parent, guardian, or caregiver of a child, set a good example bywearing your lifejacket or PFD and by following boating safety rules.
• Small crafts can be unstable. Teach children to stay low in the boat.• Teach children how to use a boat radio and fire extinguisher in case
of an emergency.• Discuss and practice survival techniques often.• Choose PFDs or lifejackets carefully to match the wearer’s size and
weight.• Children should use PFDs fitted with crotch straps. The strap must be
used when wearing the PFD.• All pleasure crafts, power vessels, sailing vessels, canoes, kayaks, and
rowboats must carry safety equipment that is in good working order.To find out exactly what is needed for your boat, contact TransportCanada.
• As of September 15, 2009, anyone operating a powerboat onCanadian waters must have a pleasure craft operator card. ContactTransport Canada for more information on where to obtain yourcertification.
Teaching Children Safety Awareness
Teach children how to get help in an emergency:
• Teach them to go to a trusted neighbour if they need help.• Teach them about the Block Parent Program of Canada in your area,
if applicable.
• Make a list of emergency phone numbers and teach children whatto say when they call EMS/9-1-1:
¶ Their name ¶ The address they are calling from ¶ What the problem is ¶ The telephone number they are calling from
• Teach children to “hang up last” when they call EMS/9-1-1. This waythe dispatcher will have all the necessary information.
• Teach children about traffic safety.
Child and Youth Protection
There are different types of abuse. It is important to be able to understand the different situations in which abuse toward children and youth may occur. Many of these situations are preventable, and if you are able to recognize the signs, you may be able to intervene on a child or youth’s behalf.
Vulnerable Children and Youth
All children and youth live with some risk of experiencing abuse, violence, neglect, and bullying or harassment.
Abuse and Violence
Abuse and violence may take different forms: emotional, physical, and sexual.
Emotional abuse is defined as chronic attacks on a child or youth’s self-esteem.
Physical abuse occurs when a person in a position of power or trust purposefully injures or threatens to injure a child or youth.
Sexual abuse occurs when a younger or less powerful child is used by an older or more powerful child, adolescent, or adult for sexual gratification.
200200
Car
ing
fo
r C
hild
ren
200
Violence is the intentional threat or use of physical force or power. It can be directed against oneself, another person, a group, or a community. It usually results in injury, death, psychological harm, abnormal development, or deprivation.
Neglect
Neglect is the chronic inattention to the basic necessities of life, such as clothing, shelter, nutritious diet, education, good hygiene, supervision, medical and dental care, adequate rest, a safe environment, moral guidance and discipline, exercise, and fresh air.
Understanding Bullying and Harassment
Bullying involves a person expressing his or her power through the humiliation of another person.
Types of Bullying• Physical: Hitting or kicking people, or taking or damaging their
property or possessions.• Verbal: Name-calling, insults, negative comments, and constant
teasing.• Relational: Trying to cut targets off from social connection by
convincing peers to exclude or reject them.• Reactive: Engaging in bullying, as well as provoking bullies into
attacking, by taunting.• Cyberbullying: Sending mean, cruel, and/or defamatory messages
or images by electronic means (e.g., email, text messaging, instantmessaging (IM), or personal and social websites).
Harassment
According to the Canadian Human Rights Commission, discrimination is treating people "differently, negatively or adversely" on the basis of a prohibited ground of discrimination under federal, provincial, or territorial human rights legislation.
Types of Harassment• Personal harassment: Based on an individual’s personal
characteristics that are prohibited grounds for discrimination (e.g.,racism).
• Sexual harassment: Unwelcome behaviour of a sexual or gender-based nature that negatively affects the person or the environment.
• Criminal harassment: When the harassing behaviour contravenesCanada’s Criminal Code; also referred to as stalking.
Responding to Disclosures
A disclosure occurs when someone shares something with you in confidence. If someone discloses that they have experienced abuse, violence, neglect, or bullying, you must always act.
How to Respond to Disclosures
If you are responding to a disclosure, you need to ask yourself three basic questions:
1. What do I need to know?2. What do I need to do?3. When do I need to do it?
Your jurisdiction’s Child Protection Act may govern how you must respond to a disclosure.
Abuse is a protection issue.
Bullying is a relationship issue.
Harassment is a human rights issue.
All need intervention and support.
201201
Car
ing
fo
r C
hild
ren
201
When abuse is suspected or disclosed, you have a responsibility to ACT: • Dispose of dirty cloth diapers in a pail with a snug-fitting lid. Diaperpails and garbage cans need to be put out of children’s reach.
• Place disposable diapers into the garbage can immediately.• Avoid washing soiled clothes. Place them in a sealed plastic bag to
be picked up by the parent or guardian at the end of the day.
Dental Health• Encourage children to brush their teeth every day.
¶ A good time to brush is right after lunch. Use a pea-sized amount of toothpaste that contains fluoride.
¶ Rinse the toothbrush well. When you put it away, make sure it is not touching other toothbrushes.
¶ Replace the brush when the bristles become flattened. ¶ Supervise young children when they are brushing.
• Children and babies’ teeth can decay if they nap with a bottlebecause their soft teeth are constantly exposed to liquid with sugar.This is called nursing bottle syndrome, and it can be caused by:
¶ Cow’s milk ¶ Juice ¶ Formula ¶ Sweetened liquids
• When children are between the ages of 1 and 2, encourage them tostart drinking from a cup instead of from a bottle.
• Don’t put honey, sugar, or syrup on soothers.• Serve well-balanced meals. Too much sugary food is not healthy.• Watch for the signs of tooth decay: dull, white or brown spots on
the teeth.
ACKNOWLEDGE the child’s situation and feelings. Access support A
C
T
COMFORT the child and take him or her to a safe place. Carefully listen to what the child says.
TAKE notes and document what the child says and/or what you see. Take action—report the abuse immediately. Depending
on the circumstances of the situation, use your judgment to decide if the child’s parent or guardian should be contacted first
(e.g., if he or she is being bullied or harassed by another child) or the Child Protection Authorities and police in your area (e.g., if the abuse is coming from an adult).
For more information on child and youth protection or to take a Respect Education course, please visit our website at redcross.ca.
REMEMBER: You do not have to be 100% certain that abuse has occurred. If you suspect it, report it. The safety of the child may be at risk. The authorities have the responsibility to determine the facts and evidence, not you.
Children’s Hygiene
Diapering
Follow these steps to ensure that diapers are changed in a sanitary way:
• Use disposable gloves and remove them before sanitizing the area.• Set up your changing area close to running water, away from the
kitchen or eating area.• Ensure that the changing surface and area is cleaned for at least 30
seconds with a bleach solution after each diapering.202202
Car
ing
fo
r C
hild
ren
202
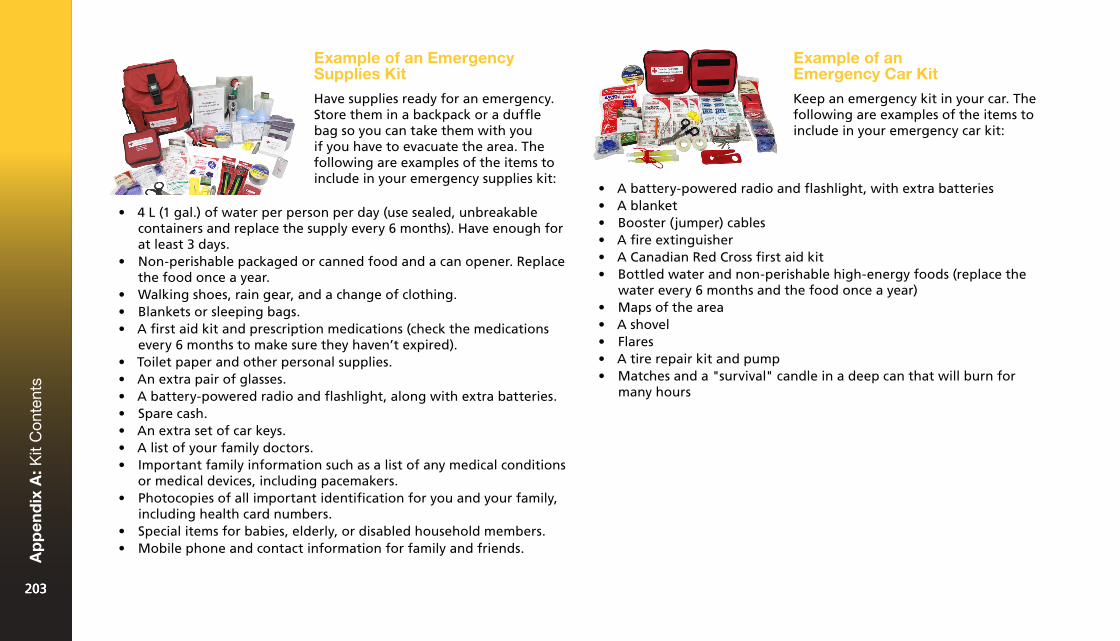
Example of an Emergency Supplies Kit
Have supplies ready for an emergency. Store them in a backpack or a duffle bag so you can take them with you if you have to evacuate the area. The following are examples of the items to include in your emergency supplies kit:
• 4 L (1 gal.) of water per person per day (use sealed, unbreakablecontainers and replace the supply every 6 months). Have enough forat least 3 days.
• Non-perishable packaged or canned food and a can opener. Replacethe food once a year.
• Walking shoes, rain gear, and a change of clothing.• Blankets or sleeping bags.• A first aid kit and prescription medications (check the medications
every 6 months to make sure they haven’t expired).• Toilet paper and other personal supplies.• An extra pair of glasses.• A battery-powered radio and flashlight, along with extra batteries.• Spare cash.• An extra set of car keys.• A list of your family doctors.• Important family information such as a list of any medical conditions
or medical devices, including pacemakers.• Photocopies of all important identification for you and your family,
including health card numbers.• Special items for babies, elderly, or disabled household members.• Mobile phone and contact information for family and friends.
Example of an Emergency Car Kit
Keep an emergency kit in your car. The following are examples of the items to include in your emergency car kit:
• A battery-powered radio and flashlight, with extra batteries• A blanket• Booster (jumper) cables• A fire extinguisher• A Canadian Red Cross first aid kit• Bottled water and non-perishable high-energy foods (replace the
water every 6 months and the food once a year)• Maps of the area• A shovel• Flares• A tire repair kit and pump• Matches and a "survival" candle in a deep can that will burn for
many hours
203203
Ap
pen
dix
A: K
it C
onte
nts
203
Generally speaking, you should avoid moving an injured or ill person to give care. Unnecessary movement can cause additional injury and pain and may complicate the person’s recovery.
Three general situations require you to move a person:
1. There is an immediate danger (either a danger to you or tothe person being rescued) e.g., from fire, a lack of oxygen, riskof drowning, a possible explosion, a collapsing structure, oruncontrolled traffic hazards.
2. You have difficulty accessing ill or injured people. For example, aperson with minor injuries may need to be moved quickly to allowaccess to other people who may have life-threatening conditions.
3. There is a barrier that makes it difficult to provide proper care. Forexample, a person with a medical emergency, such as a cardiacarrest or heat stroke, may need to be moved to provide proper care.For example, a person in cardiac arrest requires CPR, which shouldbe performed on a firm, flat surface. If the person collapses on a bedor in a small bathroom, the surface or space may not be adequate toprovide appropriate care, and the person will need to be moved.
Usually, you will not face hazards that require you to move the person immediately. In most cases, you can give the necessary care wherever you find the person. Needless movement of a person can lead to further injury, and therefore should be avoided. For example, moving someone with a closed fracture of the leg, without taking the time to splint it, could result in an open fracture if the end of the bone tears the skin. This may result in soft-tissue damage, damage to nerves, blood loss, and infection.
Some rescue situations make gaining access to people especially challenging, and as such require first responders who have specialized training and equipment. One such situation is when the ill or injured person is in a confined space. Confined spaces are particularly challenging because they:
• Are not designed or intended to have people in them• Have restricted entrances or exits due to their location, size, or
structure• Can present a risk to the health and safety of anyone who enters
(including first responders), due to one or more of the followingfactors:
¶ Their design, construction, location, or atmosphere ¶ The materials or substances inside ¶ Work activities being carried out inside
Before you act, you must consider the limitations of the situation. Considering the following factors will help you ensure that you move a person quickly and safely:
• Dangerous conditions at the scene• The size of the person• Your own physical ability• Whether others can assist you• The person’s condition
Failing to consider these factors could result in an injury to the First Aider—you. If you become injured, you may be unable to move the person and may risk making the situation worse. Back injuries (and other musculoskeletal injuries) can occur as a result of lifting and carrying a great deal of equipment during an emergency. If this happens at a scene, you will not be able to help and another First Aider will have to provide care for you, in addition to the other ill or injured person/people.
204204
Ap
pen
dix
B: M
ovin
g an
Ill o
r In
jure
d P
erso
n
204

To protect yourself and the ill or injured person, follow these guidelines when moving someone:
• Attempt to move a person only when you are sure you cancomfortably handle the rescue.
• Walk carefully, using short steps.• Walk forward with the person, instead of backward, wherever
possible.• Always take the shortest, most direct route to your destination, as
long as it is safe.• Scan the pathway you want to use before moving so that you can
identify potential hazards (such as slip hazards or poor lighting).
them as a unit. This will reduce twisting forces.• Reduce the height or distance you need to move a weight and lift in
stages, if necessary.• Keep your wrists and knees in normal alignment.
If performed incorrectly, reaching for a person or object can also injure the ligaments of your back. When reaching, keep your back locked (avoid hyperextending it) and never twist your back. You should avoid reaching more than 15 to 20 centimetres (6 to 8 in.) in front of the body as the muscles in your upper back and shoulders can only stay stretched in that position for a matter of seconds before they become fatigued and the risk of injury increases.
How to Move an Ill or Injured Person
There are many different ways to move someone to safety. The move is successful as long as you can move the person without injuring yourself, causing further injury to the person, or taking unnecessary risks.
Assists, carries, and drags are the different ways you can safely move an injured person. The most common of these moves include the following:
• Walking assist• Two-person seat carry• Clothes drag• Blanket drag• Extremity lift
These moves can be performed by one or two people without specialized equipment. This is important because equipment is often not immediately available and time is usually critical when a person must be moved.
There are specific ways to deal with confined spaces (e.g., a grain silo, vat, or pipe). Without appropriate training, you are putting yourself at risk if you enter them. Ensure that the appropriate responders are on the way and manage the scene until they arrive. Only people with specialized training and equipment should enter confined spaces.
Body Mechanics
To reduce the risk of personal injury, everyone involved in a lift or carry should use proper body mechanics (also called “biomechanics”). The basic principles of body mechanics that can be used for all lifts and moves include the following:
• Use your legs, not your back, to lift. When lifting, use the musclesof your legs, hips, buttocks, and abdomen. Never use the muscles ofyour back to move or lift a heavy load.
• Keep the weight as close to you as possible. Reduce the distance youhave to reach.
• Keep your body aligned. Imagine a straight line running from yourshoulders through your hips and down to your feet, and then move205205
Ap
pen
dix
B: M
ovin
g an
Ill o
r In
jure
d P
erso
n
205
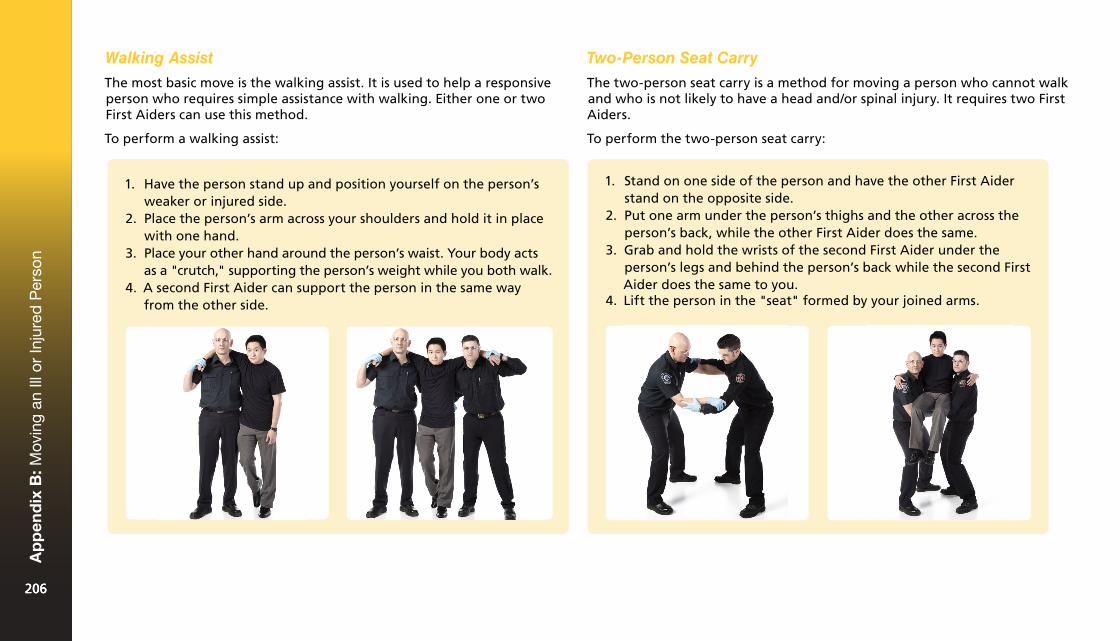
Walking Assist
The most basic move is the walking assist. It is used to help a responsive person who requires simple assistance with walking. Either one or two First Aiders can use this method.
To perform a walking assist:
Two-Person Seat Carry
The two-person seat carry is a method for moving a person who cannot walk and who is not likely to have a head and/or spinal injury. It requires two First Aiders.
To perform the two-person seat carry:
1. Stand on one side of the person and have the other First Aiderstand on the opposite side.
2. Put one arm under the person’s thighs and the other across theperson’s back, while the other First Aider does the same.
3. Grab and hold the wrists of the second First Aider under theperson’s legs and behind the person’s back while the second FirstAider does the same to you.
4. Lift the person in the "seat" formed by your joined arms.
1. Have the person stand up and position yourself on the person’sweaker or injured side.
2. Place the person’s arm across your shoulders and hold it in placewith one hand.
3. Place your other hand around the person’s waist. Your body actsas a "crutch," supporting the person’s weight while you both walk.
4. A second First Aider can support the person in the same wayfrom the other side.
206206
Ap
pen
dix
B: M
ovin
g an
Ill o
r In
jure
d P
erso
n
206
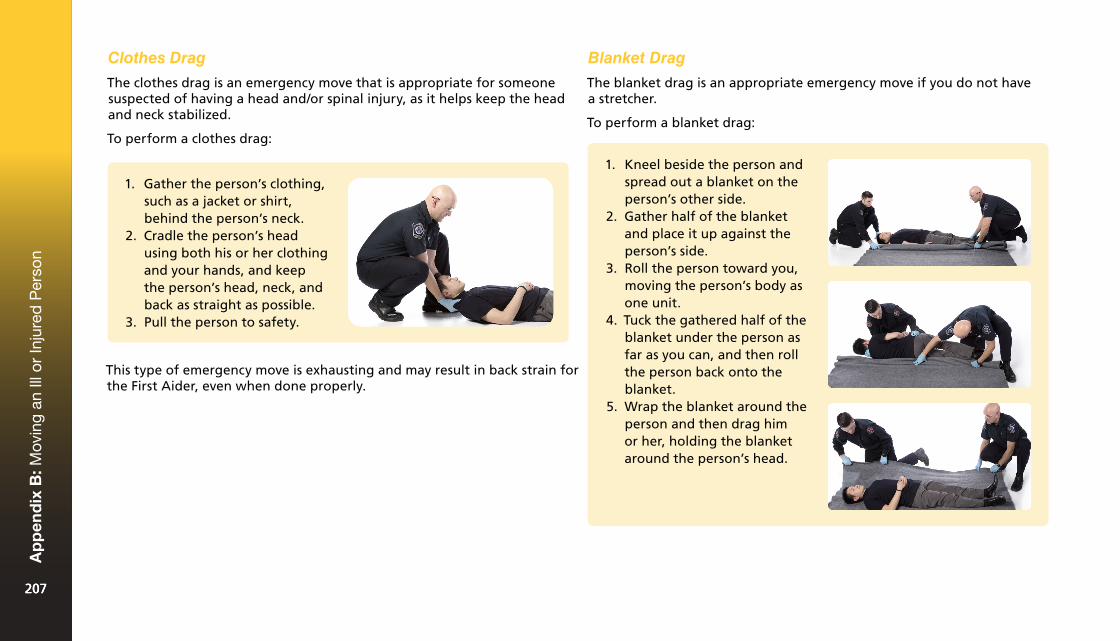
Clothes Drag
The clothes drag is an emergency move that is appropriate for someone suspected of having a head and/or spinal injury, as it helps keep the head and neck stabilized.
To perform a clothes drag:
Blanket Drag
The blanket drag is an appropriate emergency move if you do not have a stretcher.
To perform a blanket drag:
1. Gather the person’s clothing,such as a jacket or shirt,behind the person’s neck.
2. Cradle the person’s headusing both his or her clothingand your hands, and keepthe person’s head, neck, andback as straight as possible.
3. Pull the person to safety.
This type of emergency move is exhausting and may result in back strain for the First Aider, even when done properly.
1. Kneel beside the person andspread out a blanket on theperson’s other side.
2. Gather half of the blanketand place it up against theperson’s side.
3. Roll the person toward you,moving the person’s body asone unit.
4. Tuck the gathered half of theblanket under the person asfar as you can, and then rollthe person back onto theblanket.
5. Wrap the blanket around theperson and then drag himor her, holding the blanketaround the person’s head.
207207
Ap
pen
dix
B: M
ovin
g an
Ill o
r In
jure
d P
erso
n
207
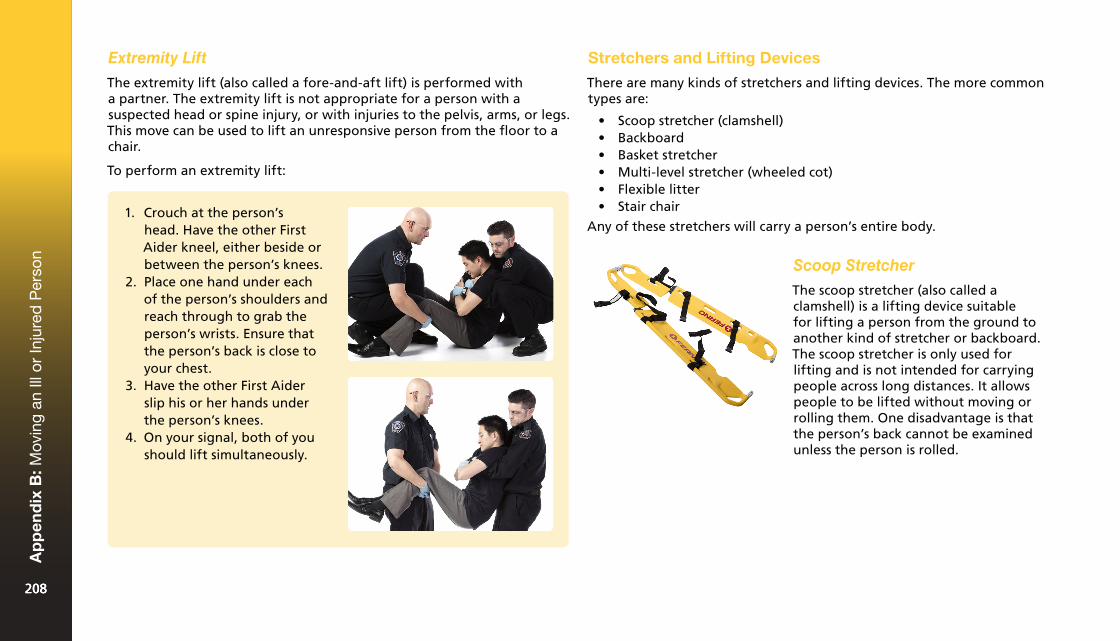
Extremity Lift
The extremity lift (also called a fore-and-aft lift) is performed with a partner. The extremity lift is not appropriate for a person with a suspected head or spine injury, or with injuries to the pelvis, arms, or legs. This move can be used to lift an unresponsive person from the floor to a chair.
To perform an extremity lift:
Stretchers and Lifting Devices
There are many kinds of stretchers and lifting devices. The more common types are:
• Scoop stretcher (clamshell)• Backboard• Basket stretcher• Multi-level stretcher (wheeled cot)• Flexible litter• Stair chair
Any of these stretchers will carry a person’s entire body.
Scoop Stretcher
The scoop stretcher (also called a clamshell) is a lifting device suitable for lifting a person from the ground to another kind of stretcher or backboard. The scoop stretcher is only used for lifting and is not intended for carrying people across long distances. It allows people to be lifted without moving or rolling them. One disadvantage is that the person’s back cannot be examined unless the person is rolled.
1. Crouch at the person’shead. Have the other FirstAider kneel, either beside orbetween the person’s knees.
2. Place one hand under eachof the person’s shoulders andreach through to grab theperson’s wrists. Ensure thatthe person’s back is close toyour chest.
3. Have the other First Aiderslip his or her hands underthe person’s knees.
4. On your signal, both of youshould lift simultaneously.
208208
Ap
pen
dix
B: M
ovin
g an
Ill o
r In
jure
d P
erso
n
208
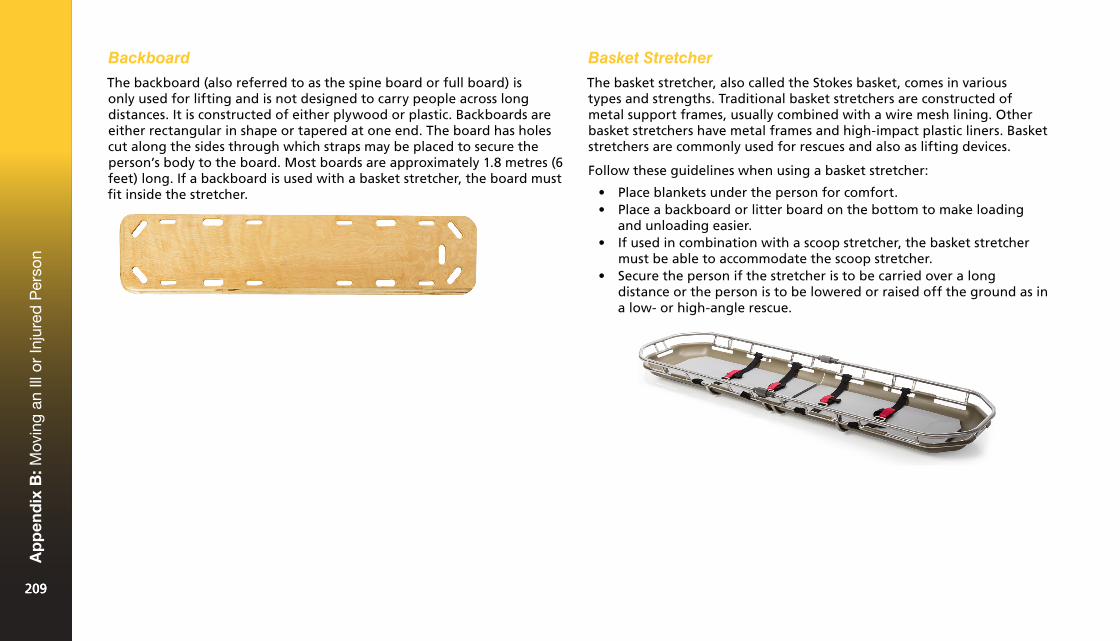
Backboard
The backboard (also referred to as the spine board or full board) is only used for lifting and is not designed to carry people across long distances. It is constructed of either plywood or plastic. Backboards are either rectangular in shape or tapered at one end. The board has holes cut along the sides through which straps may be placed to secure the person’s body to the board. Most boards are approximately 1.8 metres (6 feet) long. If a backboard is used with a basket stretcher, the board must fit inside the stretcher.
Basket Stretcher
The basket stretcher, also called the Stokes basket, comes in various types and strengths. Traditional basket stretchers are constructed of metal support frames, usually combined with a wire mesh lining. Other basket stretchers have metal frames and high-impact plastic liners. Basket stretchers are commonly used for rescues and also as lifting devices.
Follow these guidelines when using a basket stretcher:
• Place blankets under the person for comfort.• Place a backboard or litter board on the bottom to make loading
and unloading easier.• If used in combination with a scoop stretcher, the basket stretcher
must be able to accommodate the scoop stretcher.• Secure the person if the stretcher is to be carried over a long
distance or the person is to be lowered or raised off the ground as ina low- or high-angle rescue.
209209
Ap
pen
dix
B: M
ovin
g an
Ill o
r In
jure
d P
erso
n
209
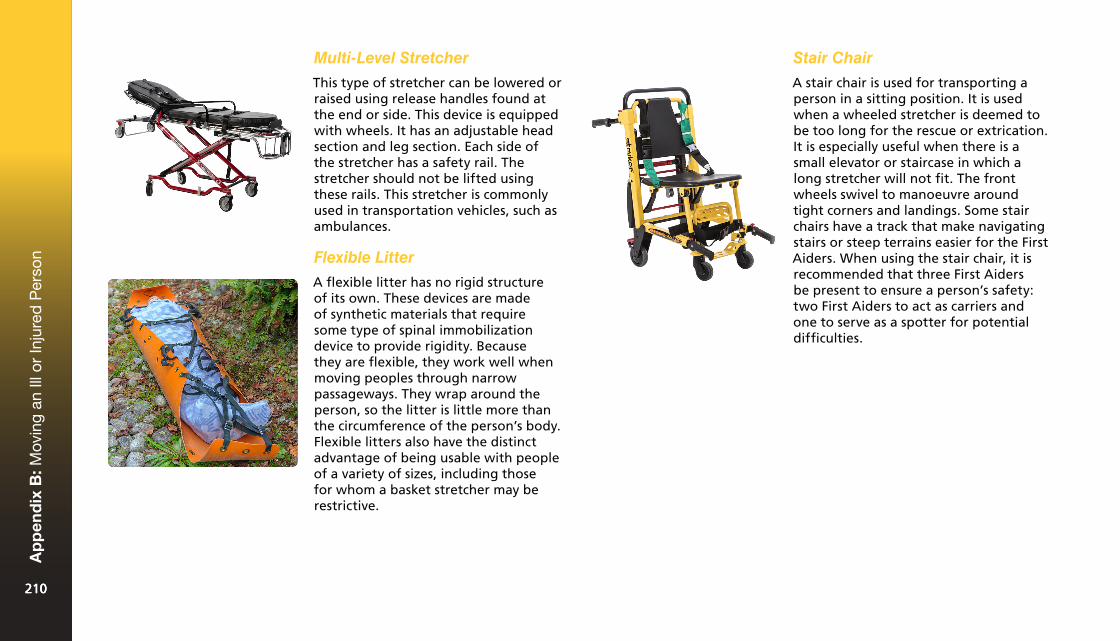
Multi-Level Stretcher
This type of stretcher can be lowered or raised using release handles found at the end or side. This device is equipped with wheels. It has an adjustable head section and leg section. Each side of the stretcher has a safety rail. The stretcher should not be lifted using these rails. This stretcher is commonly used in transportation vehicles, such as ambulances.
Flexible Litter
A flexible litter has no rigid structure of its own. These devices are made of synthetic materials that require some type of spinal immobilization device to provide rigidity. Because they are flexible, they work well when moving peoples through narrow passageways. They wrap around the person, so the litter is little more than the circumference of the person’s body. Flexible litters also have the distinct advantage of being usable with people of a variety of sizes, including those for whom a basket stretcher may be restrictive.
Stair Chair
A stair chair is used for transporting a person in a sitting position. It is used when a wheeled stretcher is deemed to be too long for the rescue or extrication. It is especially useful when there is a small elevator or staircase in which a long stretcher will not fit. The front wheels swivel to manoeuvre around tight corners and landings. Some stair chairs have a track that make navigating stairs or steep terrains easier for the First Aiders. When using the stair chair, it is recommended that three First Aiders be present to ensure a person’s safety: two First Aiders to act as carriers and one to serve as a spotter for potential difficulties.
210210
Ap
pen
dix
B: M
ovin
g an
Ill o
r In
jure
d P
erso
n
210
As a First Aider, you need a basic understanding of normal human structure and function. Knowing the body’s structures and how they work will help you more easily recognize and understand illnesses and injuries. Body systems do not function independently. Each system depends on other systems to function properly. When your body is healthy, your body systems are working well together. But an injury or illness in one body part or system will often cause problems in others. Knowing the location and function of the major organs and structures within each body system will help you to more accurately assess a patient’s condition and provide the best care.
Body Systems
The human body performs many complex functions. Vital organs are organs whose functions are essential for life, such as the brain, heart, and lungs.
A body system is a group of organs and other structures that are especially adapted to perform specific body functions. They work together to carry out a function needed for life. For example, the heart, blood, and blood vessels make up the circulatory system, which keeps all parts of the body supplied with oxygen-rich blood.
For the body to work properly, all of the body’s systems must work well together. When one or more of the body systems does not perform its function properly, illness can occur.
Interrelationships of Body Systems
Each body system plays a vital role in survival. Body systems work together to help the body maintain a constant healthy state. When the environment changes, the body’s systems adapt to the new conditions. For example, because the musculoskeletal system works harder during exercise, the respiratory and circulatory systems must also work harder to meet the body’s increased oxygen demands. Your body systems also react to the stresses caused by illness or injury.
The impact of an injury or a disease is rarely restricted to one body system. For example, a broken bone may result in nerve damage that may impair movement and feeling. Injuries to the ribs can make breathing difficult. If the heart stops beating for any reason, breathing will also stop.
In any significant illness or injury, body systems may be seriously affected. This may result in a progressive failure of multiple body systems. Generally, the more body systems that are involved in an emergency, the more serious the emergency.
211211
Ap
pen
dix
C: A
nato
my
and
Phy
siol
ogy
211
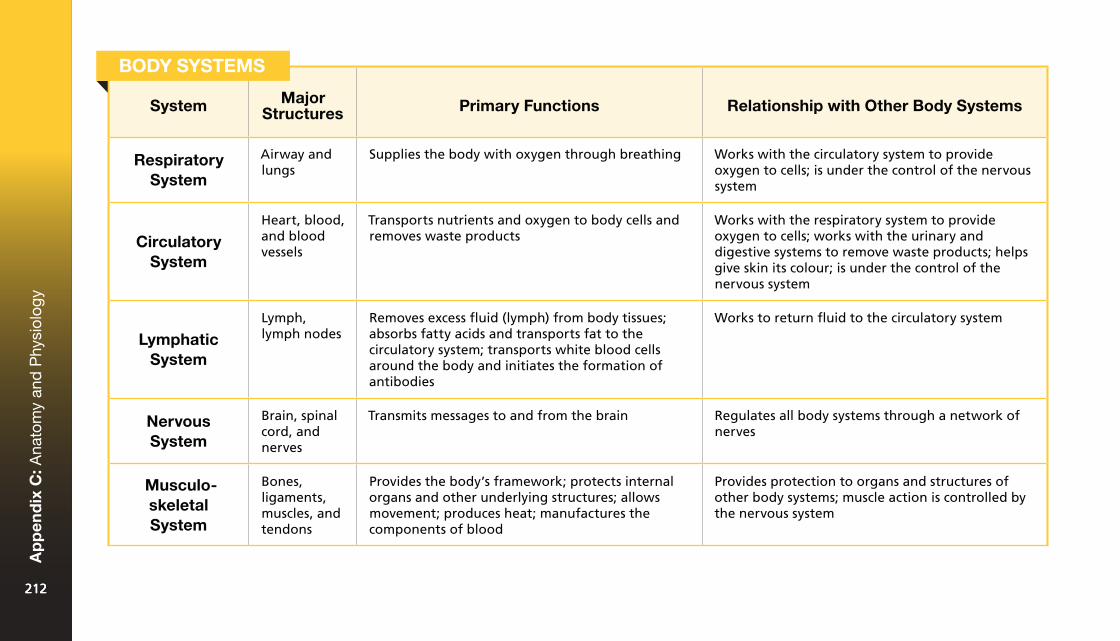
System Major Structures Primary Functions Relationship with Other Body Systems
Respiratory System
Airway and lungs
Supplies the body with oxygen through breathing Works with the circulatory system to provide oxygen to cells; is under the control of the nervous system
Circulatory System
Heart, blood, and blood vessels
Transports nutrients and oxygen to body cells and removes waste products
Works with the respiratory system to provide oxygen to cells; works with the urinary and digestive systems to remove waste products; helps give skin its colour; is under the control of the nervous system
Lymphatic System
Lymph, lymph nodes
Removes excess fluid (lymph) from body tissues; absorbs fatty acids and transports fat to the circulatory system; transports white blood cells around the body and initiates the formation of antibodies
Works to return fluid to the circulatory system
Nervous System
Brain, spinal cord, and nerves
Transmits messages to and from the brain Regulates all body systems through a network of nerves
Musculo-skeletal System
Bones, ligaments, muscles, and tendons
Provides the body’s framework; protects internal organs and other underlying structures; allows movement; produces heat; manufactures the components of blood
Provides protection to organs and structures of other body systems; muscle action is controlled by the nervous system
BODY SYSTEMS
212212
Ap
pen
dix
C: A
nato
my
and
Phy
siol
ogy
212
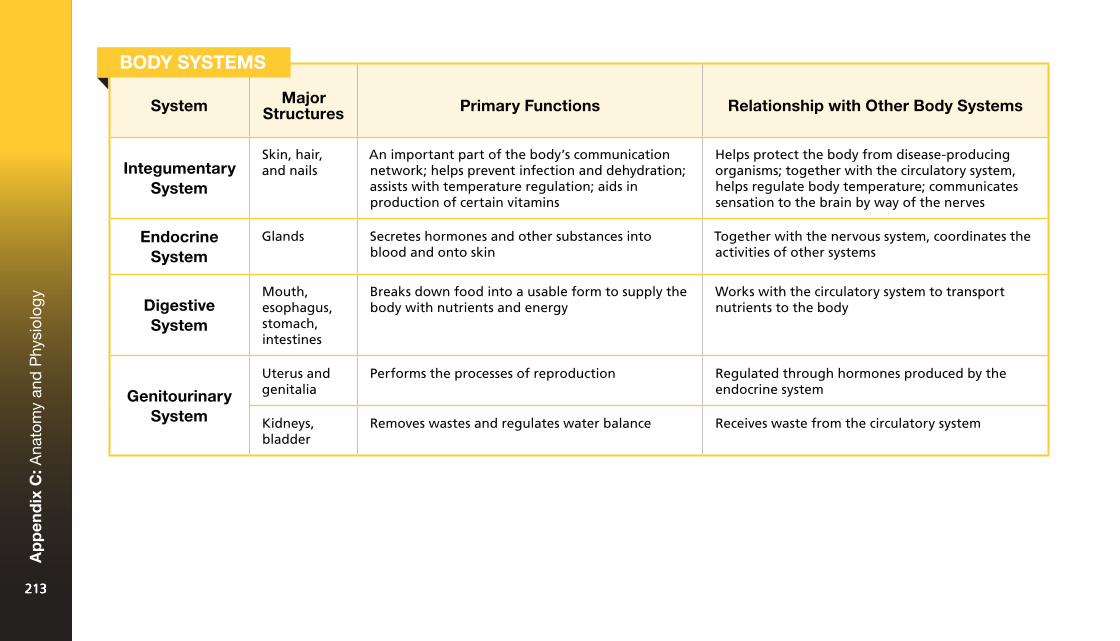
System Major Structures Primary Functions Relationship with Other Body Systems
Integumentary System
Skin, hair, and nails
An important part of the body’s communication network; helps prevent infection and dehydration; assists with temperature regulation; aids in production of certain vitamins
Helps protect the body from disease-producing organisms; together with the circulatory system, helps regulate body temperature; communicates sensation to the brain by way of the nerves
Endocrine System
Glands Secretes hormones and other substances into blood and onto skin
Together with the nervous system, coordinates the activities of other systems
Digestive System
Mouth, esophagus, stomach, intestines
Breaks down food into a usable form to supply the body with nutrients and energy
Works with the circulatory system to transport nutrients to the body
Genitourinary System
Uterus and genitalia
Performs the processes of reproduction Regulated through hormones produced by the endocrine system
Kidneys, bladder
Removes wastes and regulates water balance Receives waste from the circulatory system
BODY SYSTEMS
213213
Ap
pen
dix
C: A
nato
my
and
Phy
siol
ogy
213
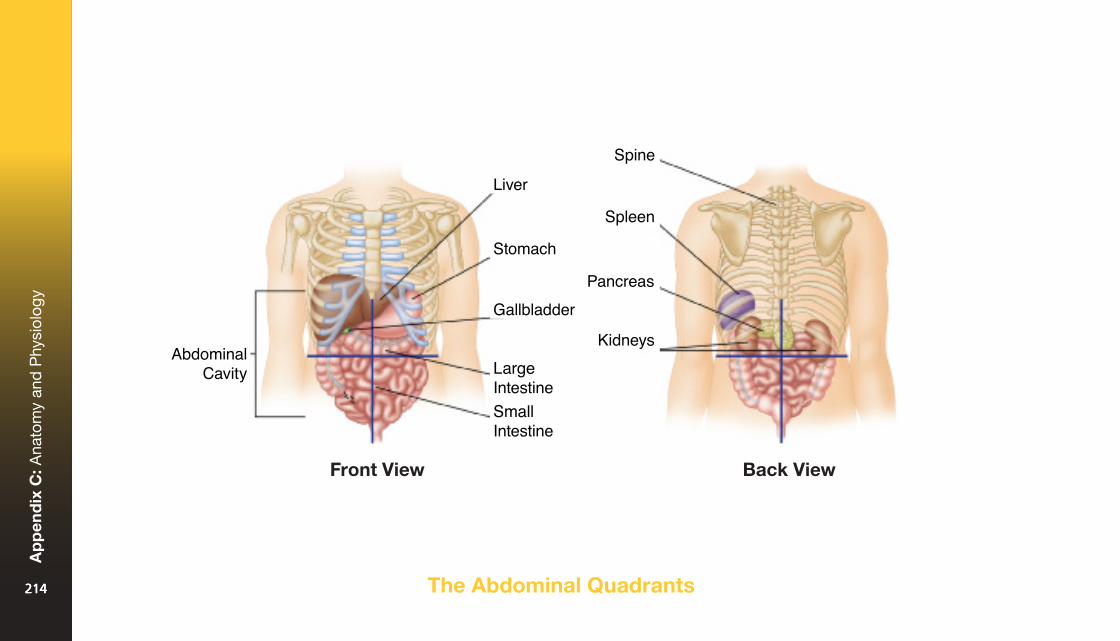
The Abdominal Quadrants
Front View Back View
214214
Ap
pen
dix
C: A
nato
my
and
Phy
siol
ogy
214
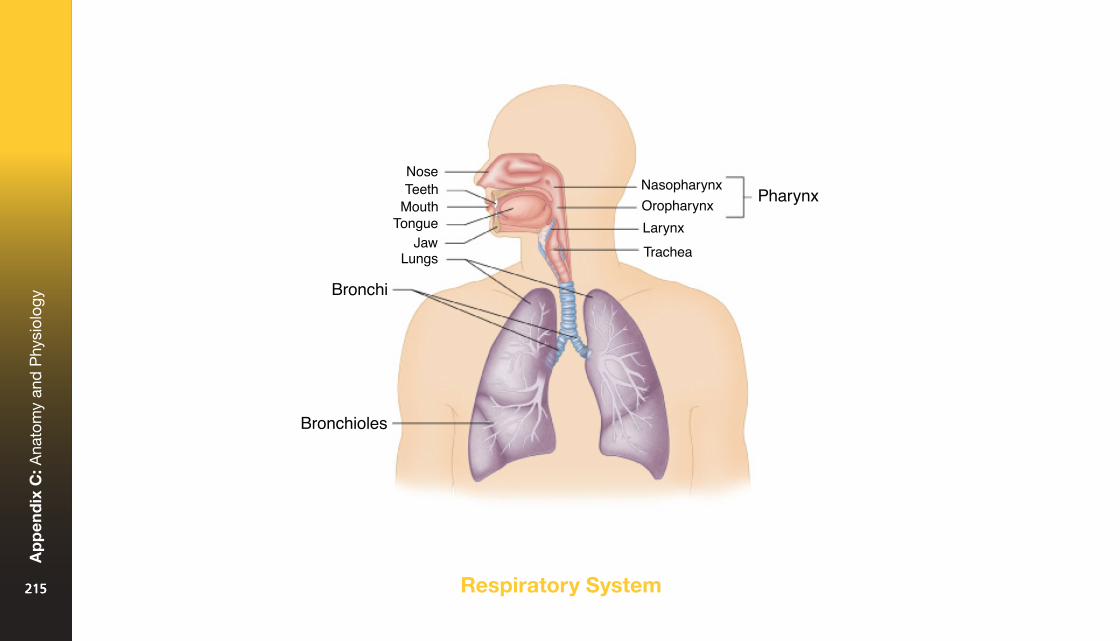
Respiratory System215215
Ap
pen
dix
C: A
nato
my
and
Phy
siol
ogy
215
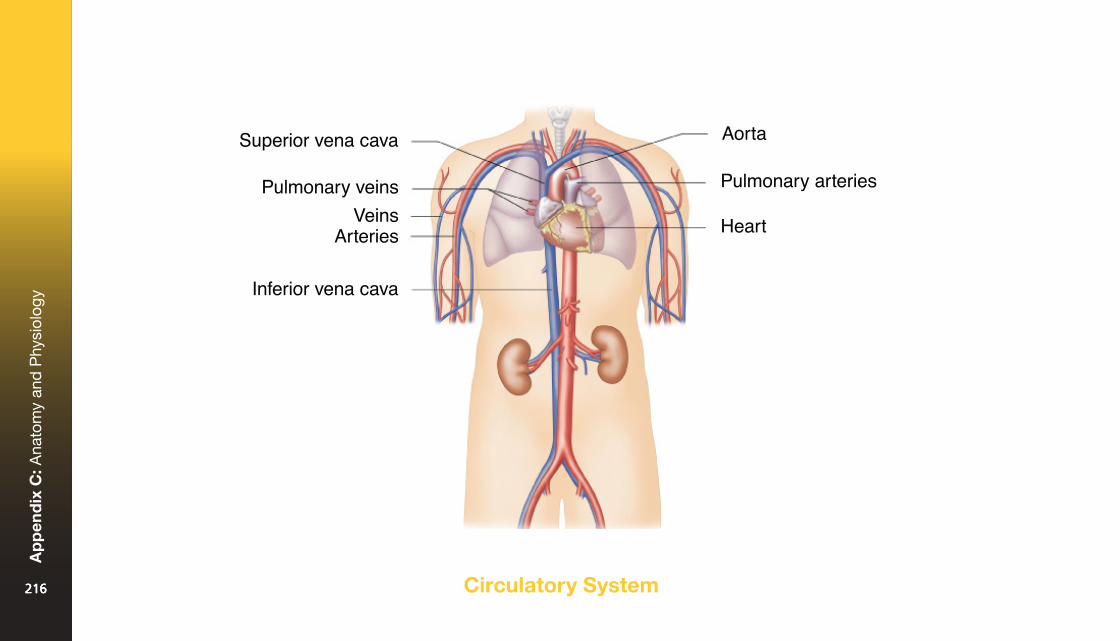
Circulatory System216216
Ap
pen
dix
C: A
nato
my
and
Phy
siol
ogy
216
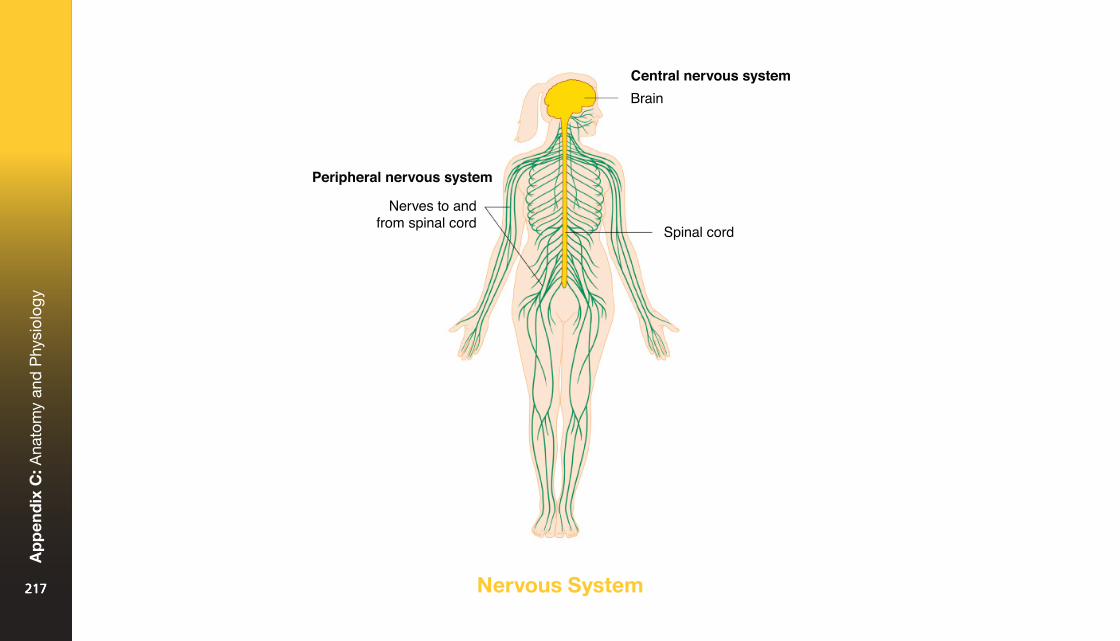
Nervous System217217
Ap
pen
dix
C: A
nato
my
and
Phy
siol
ogy
217
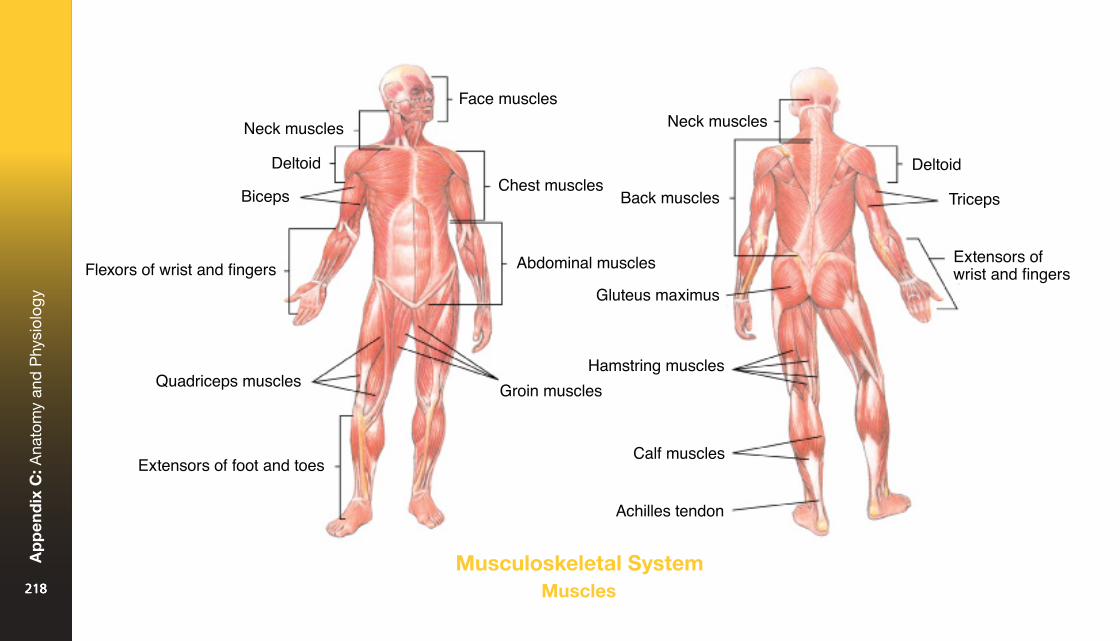
Musculoskeletal SystemMuscles218218
Ap
pen
dix
C: A
nato
my
and
Phy
siol
ogy
218
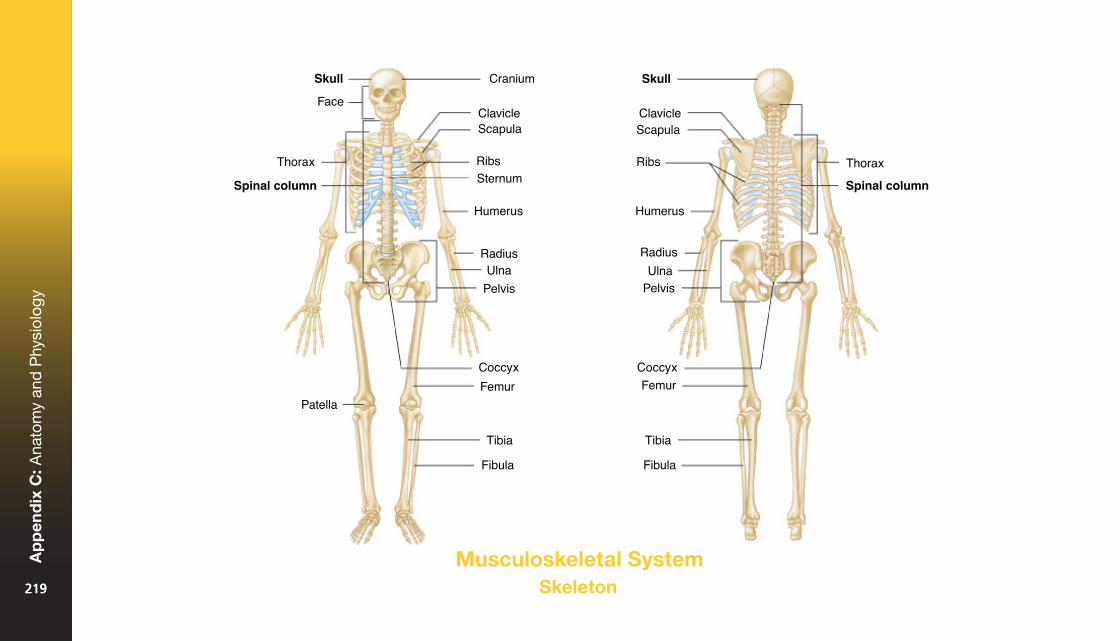
Musculoskeletal SystemSkeleton219219
Ap
pen
dix
C: A
nato
my
and
Phy
siol
ogy
219

Integumentary System220220
Ap
pen
dix
C: A
nato
my
and
Phy
siol
ogy
220
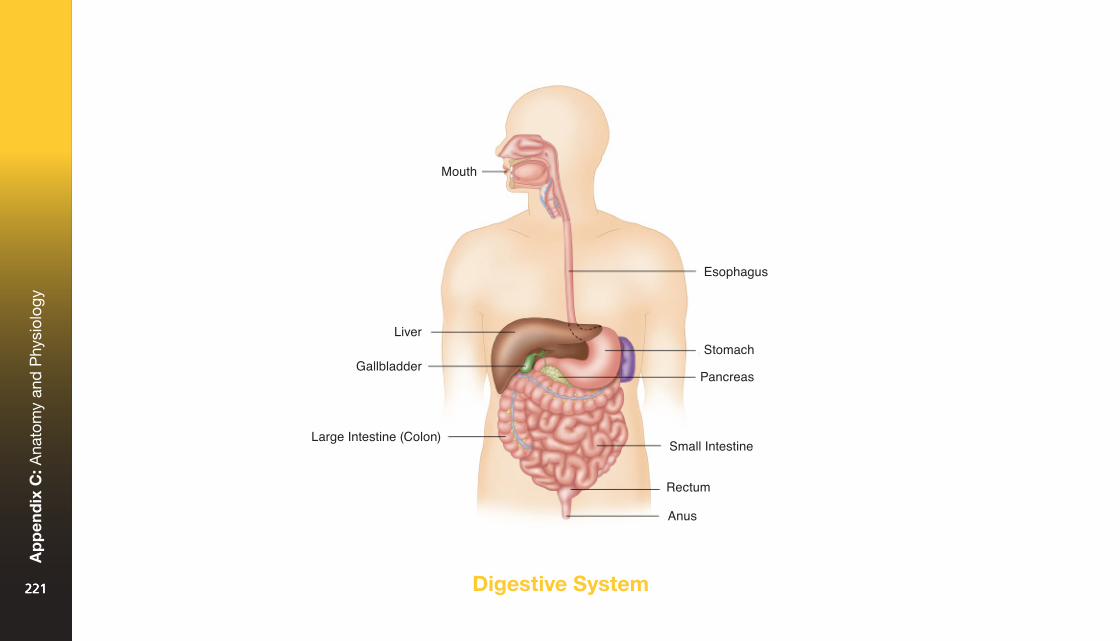
Digestive System221221
Ap
pen
dix
C: A
nato
my
and
Phy
siol
ogy
221
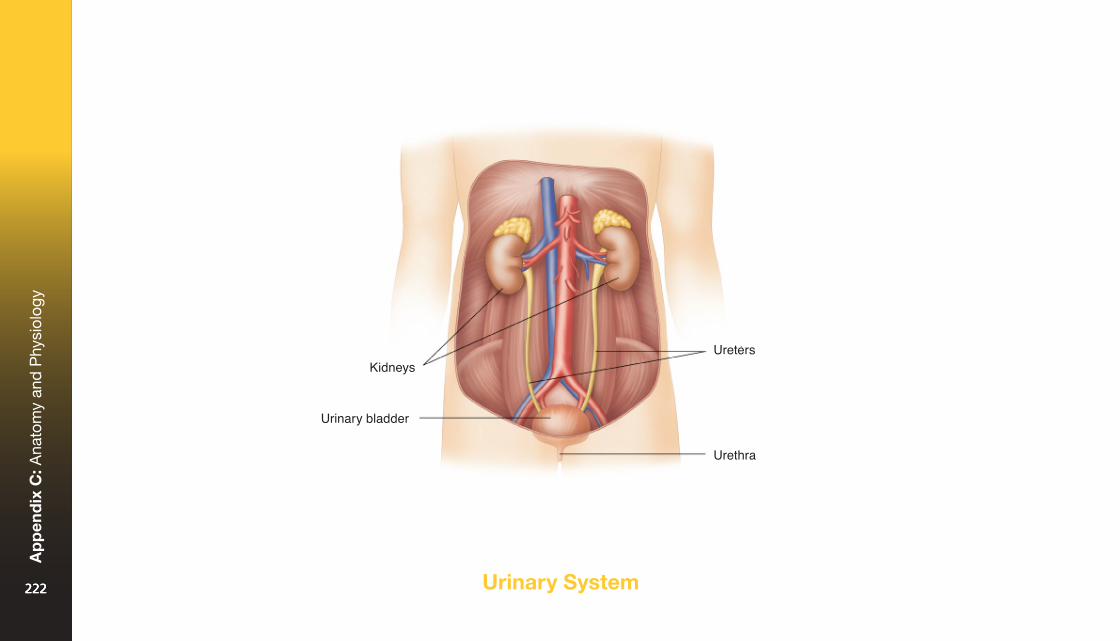
Urinary System222222
Ap
pen
dix
C: A
nato
my
and
Phy
siol
ogy
222
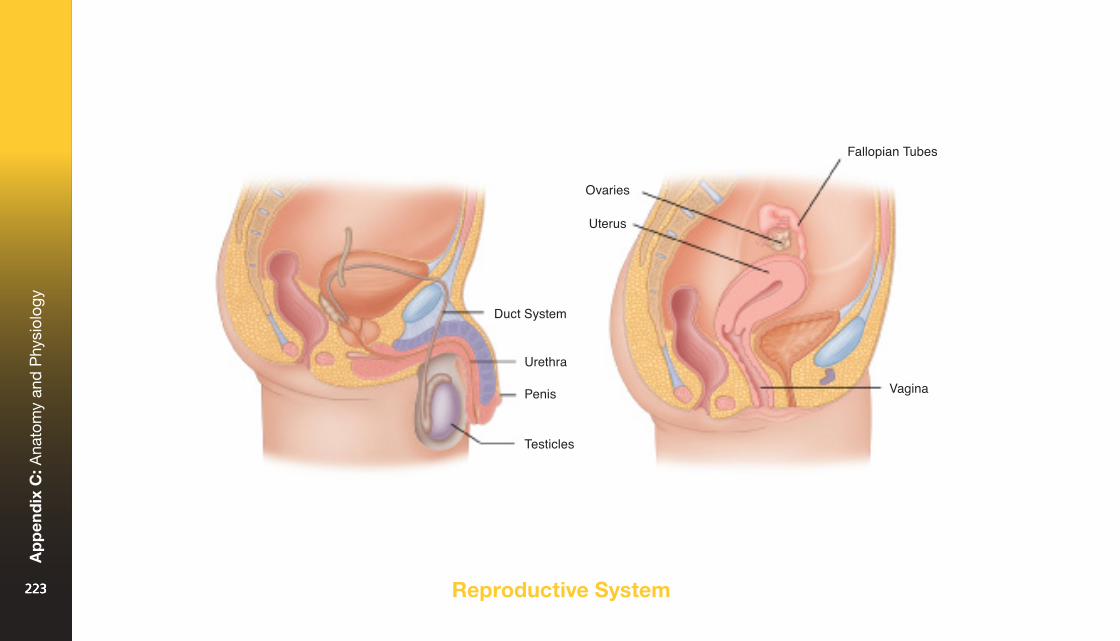
Reproductive System223223
Ap
pen
dix
C: A
nato
my
and
Phy
siol
ogy
223
AAbdomen: The part of the body below the chest and above the pelvis. It contains the stomach, intestines, liver, spleen, and other organs.
Abdominal thrusts: A method to remove a foreign object from the airway.
Airway: The pathway that allows air to travel from the mouth and nose to the lungs.
Airway obstruction: A blockage in the airway that stops air from reaching the lungs.
Allergic reaction: The body’s response to a substance to which it is particularly sensitive. The response can be mild or very severe.
Anemia: A condition caused by a lack of red blood cells.
Arteries: Large blood vessels that carry oxygen-rich blood from the heart to the rest of the body.
Aspiration: Inhaling blood, vomit, saliva, or foreign material into the lungs.
Asthma: A chronic illness in which certain substances or conditions (triggers) cause inflammation and swelling of the bronchioles, making breathing difficult.
Automated external defibrillator (AED): An electronic device that analyzes the heart’s electrical rhythm and, if necessary, tells the user to deliver a shock to a person in cardiac arrest.
BBaby: A child under the age of 12 months.
Bandage: Material used to wrap or cover a part of the body or to hold a dressing or splint in place.
Breathing emergency: A situation in which breathing is so impaired that the person’s life is in danger.
Bronchioles: Small tubes at the base of the lungs where oxygen and carbon dioxide are exchanged.
Burn: An injury caused by heat, chemicals, electricity, or radiation.
Bystander: Someone who is present at the scene of a situation or emergency (other than an ill or injured person).
CCardiac arrest: A condition in which the heart has stopped beating or beats too irregularly or too weakly to pump blood effectively.
Cardiopulmonary resuscitation (CPR): A first aid technique that combines rescue breaths and chest compressions for someone who has stopped breathing and whose heart has stopped beating.
Cardiovascular disease: Any disease of the heart and blood vessels (also called heart disease).
Caustic: Capable of causing chemical burns
Child: Anyone between the ages of 1 and 8 years. (When giving CPR or using an AED, a child is considered to be anyone between 1 year old and the onset of puberty.)
Choking: A condition in which someone’s airway is partly or completely blocked by a foreign object, swelling of the mouth or throat, or fluids such as vomit.
Cholesterol: A fatty substance that can cause build-up on artery walls, making the arteries narrower and restricting blood flow.
224224
Glo
ssar
y
224
Compression: Rhythmic pressure that is put on the chest to dislodge something blocking the airway or to circulate blood when the heart isn’t beating effectively.
Concussion: A temporary impairment of brain function, usually caused by a blow to the head.
Contraction: A squeezing action made by the muscles in the womb during labour.
Crowning: The point in labour when the baby’s head is at the opening of the vagina.
D Defibrillation: An electric shock that is given to correct a life-threatening heart rhythm.
Direct pressure: Pressure that is put on a wound to control bleeding.
Dislocation: An injury in which a bone is moved out of its normal position at a joint.
Dispatcher: The emergency medical services worker who answers the EMS/9-1-1 telephone number and decides which EMS personnel to send to the scene and who may give advice about first aid until EMS personnel arrive.
Dressing: A pad placed directly over a wound to absorb blood and other body fluids and to prevent infection.
EEmergency medical services (EMS) personnel: Trained and equipped people, including police, firefighters, and ambulance personnel, who are dispatched through a local emergency number to give emergency care to ill or injured people.
Epinephrine: A drug that can be injected into the body to counteract a severe allergic reaction.
External bleeding: Bleeding from an open wound in the skin.
F First Aider: A person with training who gives immediate care to someone who is ill or injured until more advanced care can be obtained.
Foreign object: Any item that enters the body from outside.
Fracture: A break, crack, or chip in bone tissue.
H Head-tilt/chin-lift: A technique for opening the airway in an unresponsive adult, child, or baby.
Heart attack: A sudden illness in which an artery that feeds the heart becomes blocked, stopping part of the heart from getting the oxygen-rich blood it needs.
Hypothermia: A life-threatening condition that develops when the body’s temperature drops too low, usually from being exposed to cold temperatures for too long.
I Immobilize: To use a splint or other method to keep an injured body part from moving.
Internal bleeding: Bleeding that occurs inside the body.
225225
Glo
ssar
y
225
J Joint: The point where two or more bones are held together by ligaments that allow movement.
L Ligament: A fibrous band that holds bones together at a joint.
M Medical identification product: A wallet card, bracelet, watch strap, anklet, or necklace with a tag indicating that the person wearing it has a particular medical condition.
P Pelvis: The part of the body between the abdomen and the legs. It contains the intestines, bladder, and reproductive organs.
Poison: Any substance that causes injury, illness, or death if it is inhaled, swallowed (ingested), absorbed, or injected.
Poison Control Centre: A centre staffed by medical professionals who can give information about first aid in cases of poisoning.
Primary assessment: An examination of an ill or injured person to determine his or her initial condition and whether there are any life-threatening concerns.
Pulse: The beat felt in arteries near the skin with each contraction of the heart.
R Recovery position: A position for an unresponsive person that helps to keep the airway open and allows any blood or vomit to drain from the person’s mouth.
Respiratory arrest: A condition in which breathing has stopped or isn’t effective.
Respiratory distress: A condition in which breathing is difficult.
Responsiveness: Awareness of the environment and ability to respond to stimuli.
Risk factors: Conditions or behaviours that increase the chance that a person will develop a particular disease or suffer a particular injury.
S Secondary assessment: A verbal, visual, and/or physical check of an ill or injured person for conditions that were not identified in the primary assessment.
Seizure: An episode of abnormal electrical signals in the brain that results in disturbed brain function, shaking or contraction of limbs, and/or an altered level of responsiveness.
Shock: A serious condition caused when the circulatory system cannot get enough oxygen-rich blood to all parts of the body. Causes include severe blood loss, allergic reactions, and emotional trauma.
Sign: An indicator of injury or illness that a First Aider can see, feel, smell, or hear.
Soft tissue: Skin, fat, muscles, and other soft body structures.
226226
Glo
ssar
y
226
Splint: A device used to stop body parts from moving.
Sprain: The stretching or tearing of ligaments and other soft tissues at a joint.
Strain: The stretching or tearing of muscles and tendons.
Stroke: A disruption of blood flow in the brain, causing weakness and/or speech problems.
Symptom: An indicator of injury or illness that is felt and expressed by the ill or injured person.
T Tendon: A fibrous band that attaches muscle to bone.
Tissue: A group of cells that work together to perform specific functions.
Tuberculosis (TB): A potentially fatal bacterial infection of the lungs that is spread through the air from one person to another. It can also affect the bones, brain, kidneys, and other organs. Treatment is complex and involves taking many different medications over an extended period of time.
U Unresponsive: A state in which a person is unaware of the environment and does not react to stimuli.
V Veins: Blood vessels that carry oxygen-poor blood from all parts of the body back to the heart.
Vertebrae: The 33 bones that make up the spine.
Vital signs: Three key characteristics of a person’s condition (level of responsiveness, breathing, and skin).
W Wound: An injury to soft tissues.
227227
Glo
ssar
y
227
Each time a program is revised, it is built on the great work completed in the previous revisions. The Canadian Red Cross would like to recognize everyone who worked on developing these programs in the past; their work set the foundation for our success.
We would like to thank our Training Partners, Master Instructor Trainers, Instructor Trainers, and Instructors who provided the feedback that helped guide this revision and shape our new programs.
This revision required the hard work and dedication of many teams who put in countless hours to contribute to its success. The Canadian Red Cross extends its thanks to the First Aid Technical Advisory Group (FATAG) for its overall leadership, dedication, and direction. FATAG members include:
Dr. Andrew MacPherson Medical Director
Jason BrinsonRichard CzechBlair DoyleJason DurhamDomenic FilippelliDr. Gordon GiesbrechtDr. Morgan HillierCarolyn HoekstraKevin HolderDr. Loriann HynesLyle KarasiukSioban KennedyShelly Longmore
Illustrations by Allison MacAlisterPhotos by Matt Bork, Tara Hillyer, and Lisa Petrole
94 bruise; © Shutterstock.com/Stephane Bidouze155, 158 child with medication; © Shutterstock.com/ Thomas M Perkins161, 163 poison oak; © iStockphoto.com/Devin Allphin161, 163 poison sumac; © iStockphoto.com/zorani162, 163 Giant Hogweed ©Rob Paxton166 raccoon; © bookguy/iStock/Thinkstock167 bee; © ThinkstockPhotos.ca/Ale-ks<http://www.thinkstockphotos.ca/search/2/image?artist=Ale-ks&family=creative>170, 171 rattlesnake; © iStockphoto.com/Dave Rodriguez171 Massasauga snake; © Reptilia Zoo and Education Centre171 Prairie Rattlesnake; © Reptilia Zoo and Education Centre172 black widow spider; © iStockphoto.com/Mark Kostich172 brown recluse spider; © iStockphoto.com/Clint Spencer173 sting ray; © iStockphoto.com/Niko Guido173 jellyfish; © The Vancouver Aquarium188 taking temperature; © Shutterstock.com/SpeedKingz<https://www.shutterstock.com/g/SpeedKingz>190 checking medication; © Shutterstock.com/ bikeriderlondon<https://www.shutterstock.com/g/bikeriderlondon>
Jodie MarshallRoger MayoKyle MohlerMichael NemethTyrone PowerBob ResideKathy SampsonMike SkinnerDiane StoryHugo SurprenantKristopher TharrisDebbie Van’t KruisDave WooldridgeCharna Young
228228
Ack
now
led
gem
ents
228
Red Cross First Aid. The Experience to Make a Difference.
redcross.ca/firstaid | 1-877-356-3226
ISSN: 978-1-55104-709-6
Stay Connected.myrc.redcross.ca
Log in for program standards, teaching resources and forms, FAQs, contact with technical experts, and much more.
shop.redcross.ca
Visit your online storefront for course materials, training equipment, and gifts or promotional items.
redcross.ca/apps
Download the free First Aid App and get instant access to videos, interactive quizzes, and simple, step-by-step advice.
redcross.ca
Stay tuned for training and volunteer opportunities in the Red Cross community.
Free Red Cross First Aid AppDownload it today!redcross.ca/apps .CA
Copyright © 2017 The Red Cross Society