audio navigation anti-theft.pdf - printing from undefined
TRANSCRIPT
2002-05 ACCESSORIES & EQUIPMENT
Audio, Navigation & Anti-Theft Systems - Repair Instructions - Cooper (1.6L) R50/W10 & Cooper S
MONO RADIO
65 11 030 REMOVING AND INSTALLING/REPLACING RADIO RECEIVER (BUILT-IN UNIT)
Necessary Preliminary Tasks:
Remove cover strips for front center console. Refer to 51 16 198 REMOVING/INSTALLING OR REPLACING TRIM BETWEEN FRONT CENTER CONSOLE AND INSTRUMENT PANEL .
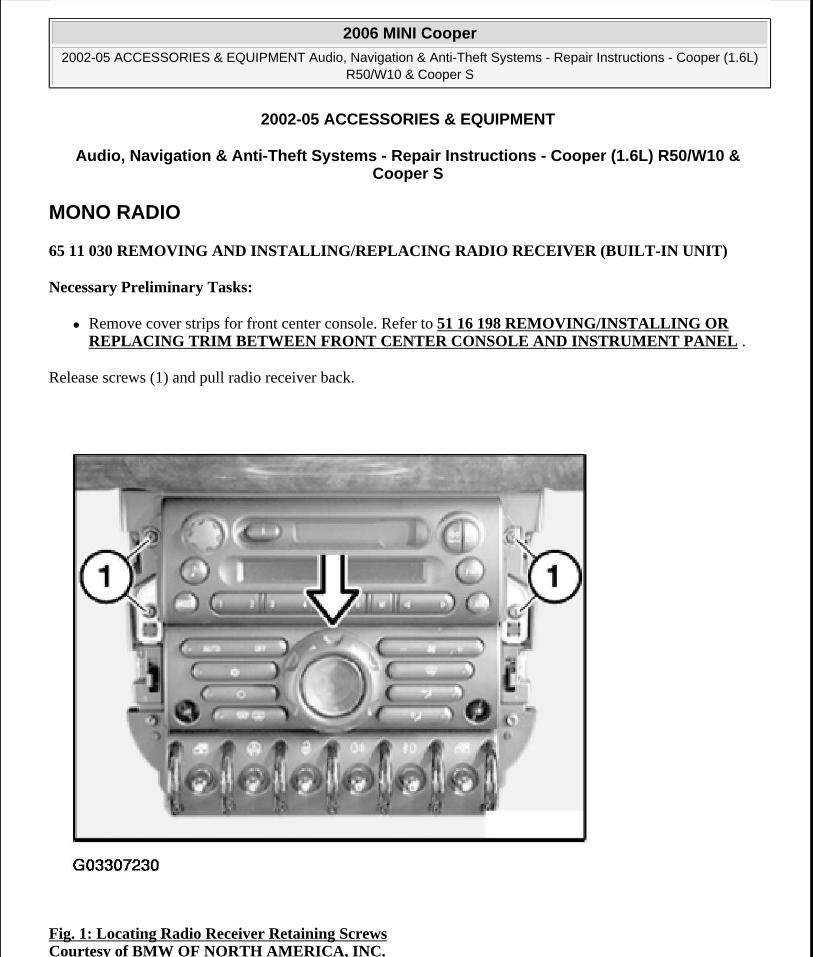
Release screws (1) and pull radio receiver back.
Fig. 1: Locating Radio Receiver Retaining Screws Courtesy of BMW OF NORTH AMERICA, INC.
2006 MINI Cooper
2002-05 ACCESSORIES & EQUIPMENT Audio, Navigation & Anti-Theft Systems - Repair Instructions - Cooper (1.6L) R50/W10 & Cooper S
2006 MINI Cooper
2002-05 ACCESSORIES & EQUIPMENT Audio, Navigation & Anti-Theft Systems - Repair Instructions - Cooper (1.6L) R50/W10 & Cooper S
Microsoft
Tuesday, February 16, 2010 11:16:56 AM Page 1 © 2005 Mitchell Repair Information Company, LLC.
Microsoft
Tuesday, February 16, 2010 11:17:00 AM Page 1 © 2005 Mitchell Repair Information Company, LLC.

Remove holder (1) for radio wiring harness.
Unfasten plug connection (2) and disconnect.
Disconnect antenna plug (3) and remove radio receiver.
Fig. 2: Removing Radio Receiver Courtesy of BMW OF NORTH AMERICA, INC.
65 11 070 REMOVING AND INSTALLING / REPLACING CD CHANGER
Remove screws (1).
Disconnect plug connections (2).
Replacement:
NOTE: The CD changer is located in the luggage compartment on the right hand side.
2006 MINI Cooper
2002-05 ACCESSORIES & EQUIPMENT Audio, Navigation & Anti-Theft Systems - Repair Instructions - Cooper (1.6L) R50/W10 & Cooper S
Microsoft
Tuesday, February 16, 2010 11:16:56 AM Page 2 © 2005 Mitchell Repair Information Company, LLC.
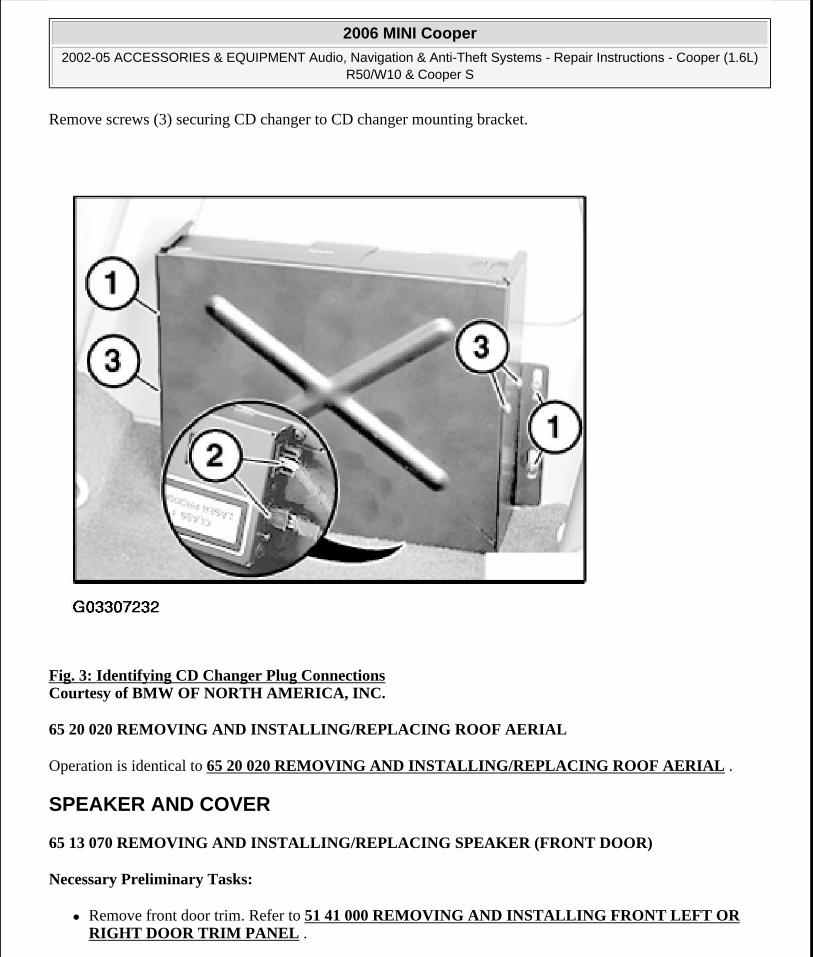
Remove screws (3) securing CD changer to CD changer mounting bracket.
Fig. 3: Identifying CD Changer Plug Connections Courtesy of BMW OF NORTH AMERICA, INC.
65 20 020 REMOVING AND INSTALLING/REPLACING ROOF AERIAL
Operation is identical to 65 20 020 REMOVING AND INSTALLING/REPLACING ROOF AERIAL .
SPEAKER AND COVER
65 13 070 REMOVING AND INSTALLING/REPLACING SPEAKER (FRONT DOOR)
Necessary Preliminary Tasks:
Remove front door trim. Refer to 51 41 000 REMOVING AND INSTALLING FRONT LEFT OR RIGHT DOOR TRIM PANEL .
2006 MINI Cooper
2002-05 ACCESSORIES & EQUIPMENT Audio, Navigation & Anti-Theft Systems - Repair Instructions - Cooper (1.6L) R50/W10 & Cooper S
Microsoft
Tuesday, February 16, 2010 11:16:56 AM Page 3 © 2005 Mitchell Repair Information Company, LLC.
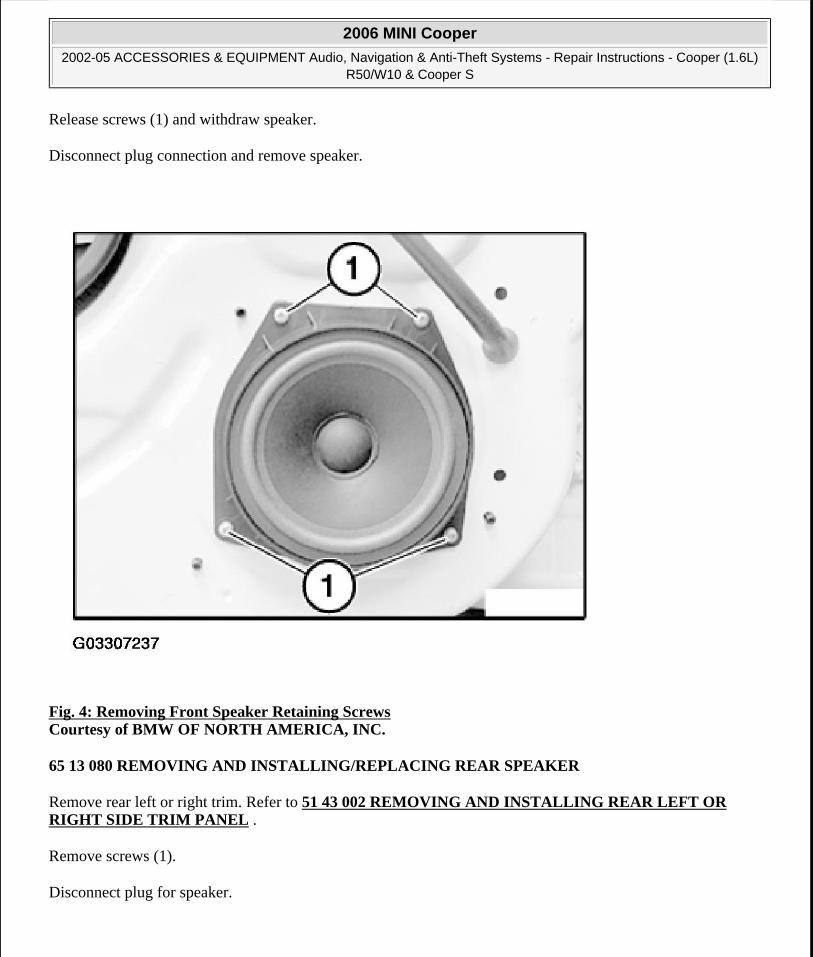
Release screws (1) and withdraw speaker.
Disconnect plug connection and remove speaker.
Fig. 4: Removing Front Speaker Retaining Screws Courtesy of BMW OF NORTH AMERICA, INC.
65 13 080 REMOVING AND INSTALLING/REPLACING REAR SPEAKER
Remove rear left or right trim. Refer to 51 43 002 REMOVING AND INSTALLING REAR LEFT OR RIGHT SIDE TRIM PANEL .
Remove screws (1).
Disconnect plug for speaker.
2006 MINI Cooper
2002-05 ACCESSORIES & EQUIPMENT Audio, Navigation & Anti-Theft Systems - Repair Instructions - Cooper (1.6L) R50/W10 & Cooper S
Microsoft
Tuesday, February 16, 2010 11:16:56 AM Page 4 © 2005 Mitchell Repair Information Company, LLC.
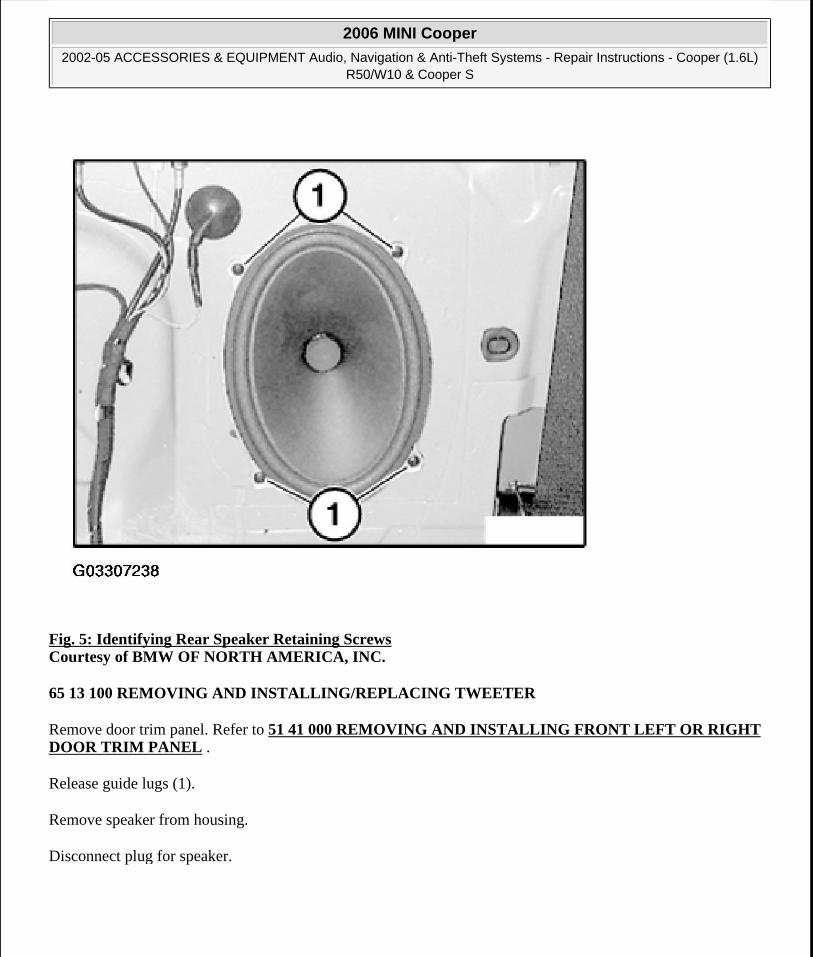
Fig. 5: Identifying Rear Speaker Retaining Screws Courtesy of BMW OF NORTH AMERICA, INC.
65 13 100 REMOVING AND INSTALLING/REPLACING TWEETER
Remove door trim panel. Refer to 51 41 000 REMOVING AND INSTALLING FRONT LEFT OR RIGHT DOOR TRIM PANEL .
Release guide lugs (1).
Remove speaker from housing.
Disconnect plug for speaker.
2006 MINI Cooper
2002-05 ACCESSORIES & EQUIPMENT Audio, Navigation & Anti-Theft Systems - Repair Instructions - Cooper (1.6L) R50/W10 & Cooper S
Microsoft
Tuesday, February 16, 2010 11:16:56 AM Page 5 © 2005 Mitchell Repair Information Company, LLC.
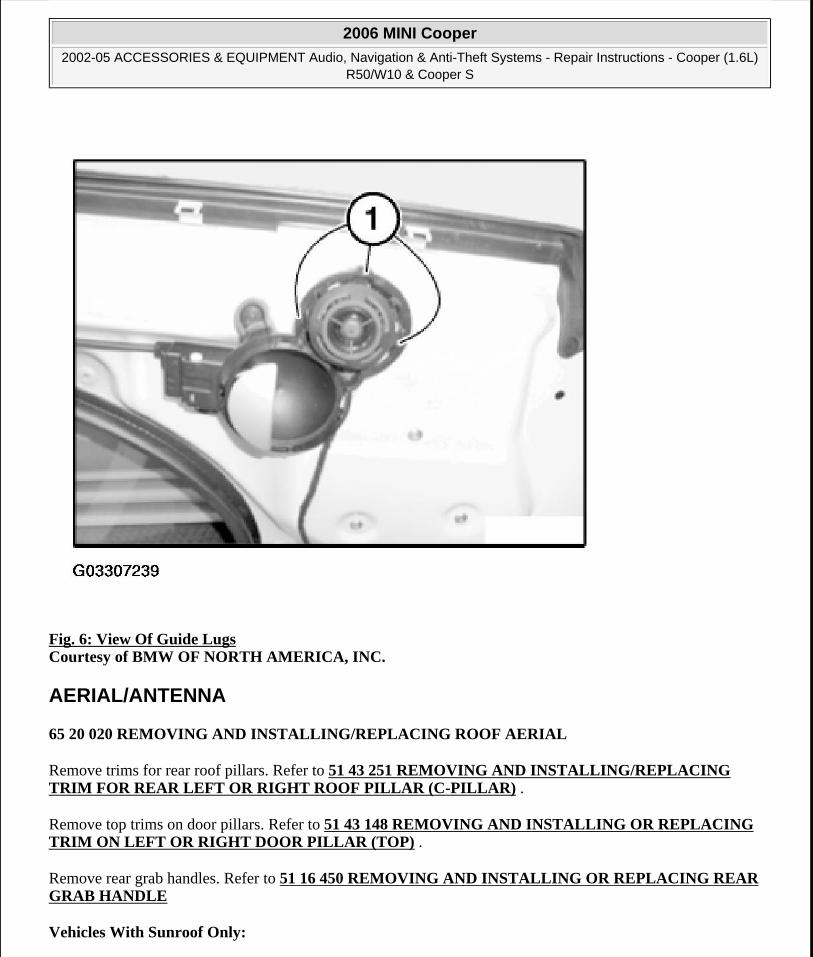
Fig. 6: View Of Guide Lugs Courtesy of BMW OF NORTH AMERICA, INC.
AERIAL/ANTENNA
65 20 020 REMOVING AND INSTALLING/REPLACING ROOF AERIAL
Remove trims for rear roof pillars. Refer to 51 43 251 REMOVING AND INSTALLING/REPLACING TRIM FOR REAR LEFT OR RIGHT ROOF PILLAR (C-PILLAR) .
Remove top trims on door pillars. Refer to 51 43 148 REMOVING AND INSTALLING OR REPLACING TRIM ON LEFT OR RIGHT DOOR PILLAR (TOP) .
Remove rear grab handles. Refer to 51 16 450 REMOVING AND INSTALLING OR REPLACING REAR GRAB HANDLE
Vehicles With Sunroof Only:
2006 MINI Cooper
2002-05 ACCESSORIES & EQUIPMENT Audio, Navigation & Anti-Theft Systems - Repair Instructions - Cooper (1.6L) R50/W10 & Cooper S
Microsoft
Tuesday, February 16, 2010 11:16:56 AM Page 6 © 2005 Mitchell Repair Information Company, LLC.
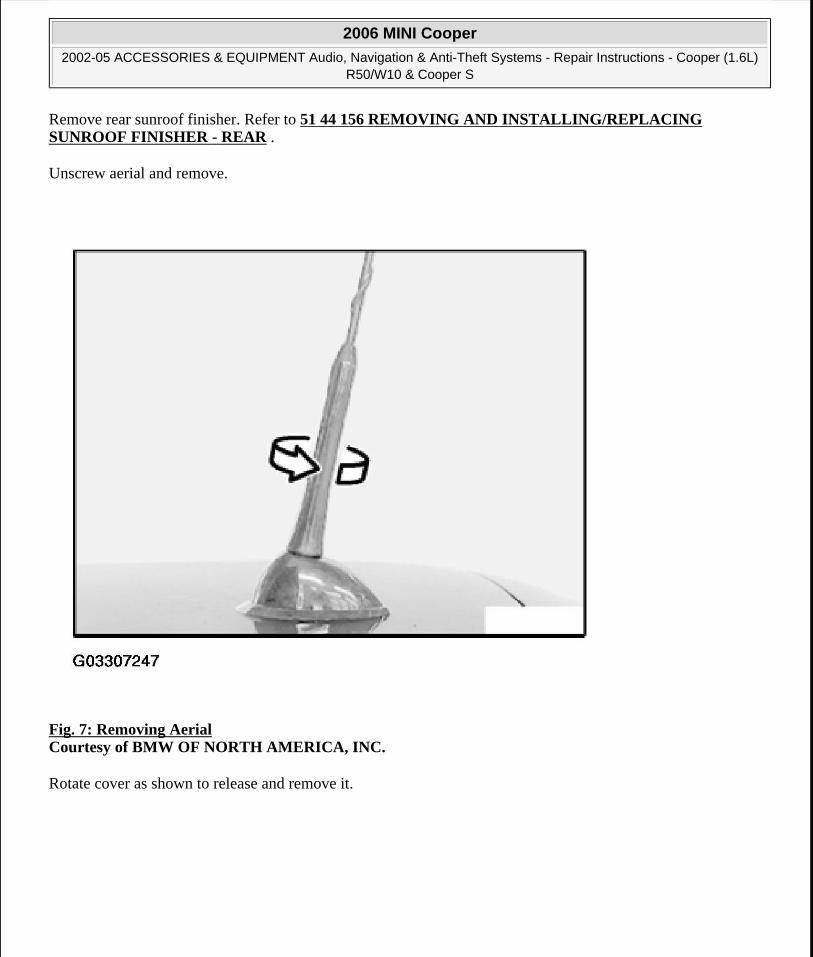
Remove rear sunroof finisher. Refer to 51 44 156 REMOVING AND INSTALLING/REPLACING SUNROOF FINISHER - REAR .
Unscrew aerial and remove.
Fig. 7: Removing Aerial Courtesy of BMW OF NORTH AMERICA, INC.
Rotate cover as shown to release and remove it.
2006 MINI Cooper
2002-05 ACCESSORIES & EQUIPMENT Audio, Navigation & Anti-Theft Systems - Repair Instructions - Cooper (1.6L) R50/W10 & Cooper S
Microsoft
Tuesday, February 16, 2010 11:16:56 AM Page 7 © 2005 Mitchell Repair Information Company, LLC.
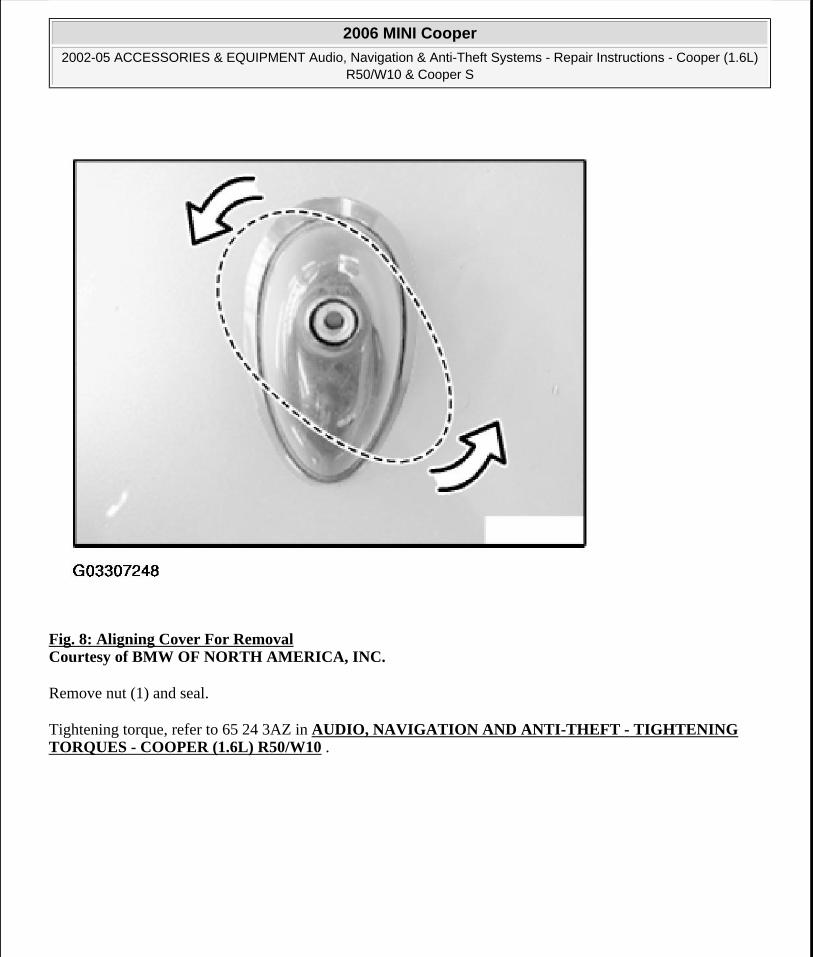
Fig. 8: Aligning Cover For Removal Courtesy of BMW OF NORTH AMERICA, INC.
Remove nut (1) and seal.
Tightening torque, refer to 65 24 3AZ in AUDIO, NAVIGATION AND ANTI-THEFT - TIGHTENING TORQUES - COOPER (1.6L) R50/W10 .
2006 MINI Cooper
2002-05 ACCESSORIES & EQUIPMENT Audio, Navigation & Anti-Theft Systems - Repair Instructions - Cooper (1.6L) R50/W10 & Cooper S
Microsoft
Tuesday, February 16, 2010 11:16:56 AM Page 8 © 2005 Mitchell Repair Information Company, LLC.
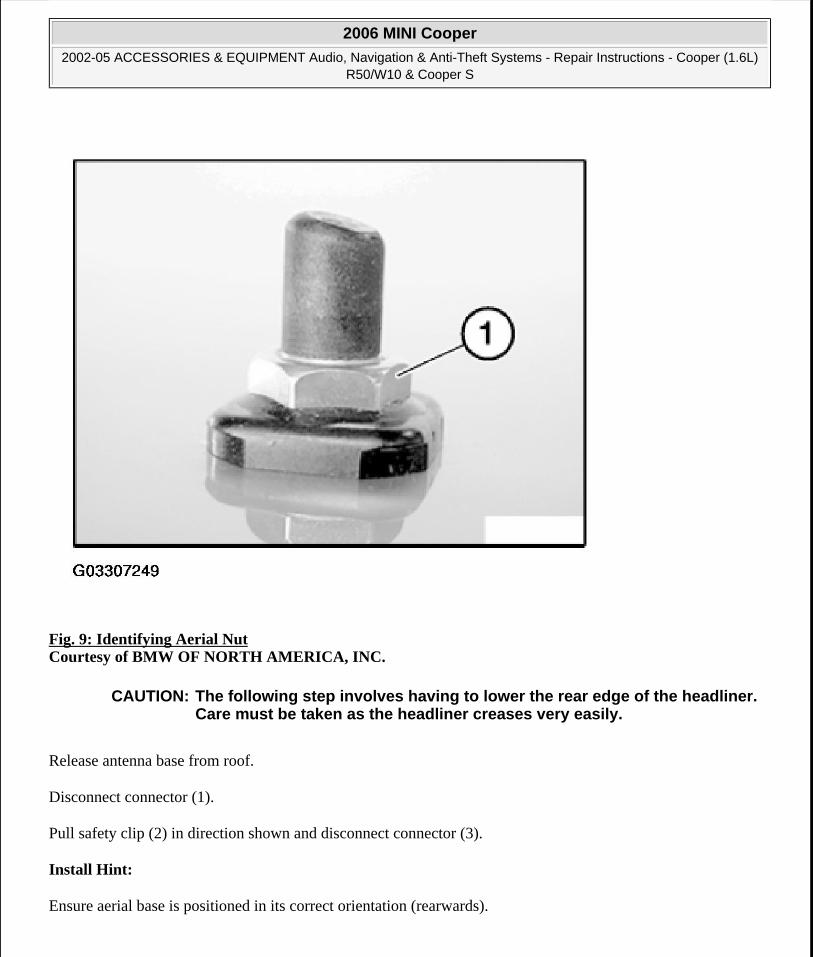
Fig. 9: Identifying Aerial Nut Courtesy of BMW OF NORTH AMERICA, INC.
Release antenna base from roof.
Disconnect connector (1).
Pull safety clip (2) in direction shown and disconnect connector (3).
Install Hint:
Ensure aerial base is positioned in its correct orientation (rearwards).
CAUTION: The following step involves having to lower the rear edge of the headliner. Care must be taken as the headliner creases very easily.
2006 MINI Cooper
2002-05 ACCESSORIES & EQUIPMENT Audio, Navigation & Anti-Theft Systems - Repair Instructions - Cooper (1.6L) R50/W10 & Cooper S
Microsoft
Tuesday, February 16, 2010 11:16:56 AM Page 9 © 2005 Mitchell Repair Information Company, LLC.
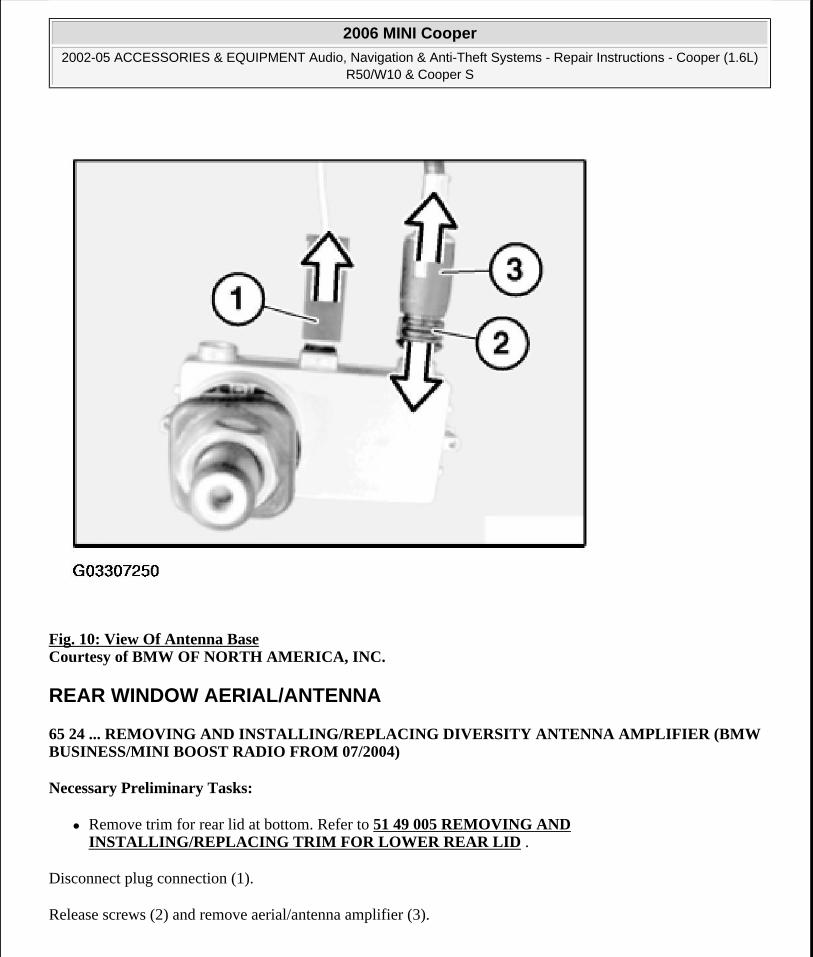
Fig. 10: View Of Antenna Base Courtesy of BMW OF NORTH AMERICA, INC.
REAR WINDOW AERIAL/ANTENNA
65 24 ... REMOVING AND INSTALLING/REPLACING DIVERSITY ANTENNA AMPLIFIER (BMW BUSINESS/MINI BOOST RADIO FROM 07/2004)
Necessary Preliminary Tasks:
Remove trim for rear lid at bottom. Refer to 51 49 005 REMOVING AND INSTALLING/REPLACING TRIM FOR LOWER REAR LID .
Disconnect plug connection (1).
Release screws (2) and remove aerial/antenna amplifier (3).
2006 MINI Cooper
2002-05 ACCESSORIES & EQUIPMENT Audio, Navigation & Anti-Theft Systems - Repair Instructions - Cooper (1.6L) R50/W10 & Cooper S
Microsoft
Tuesday, February 16, 2010 11:16:56 AM Page 10 © 2005 Mitchell Repair Information Company, LLC.

Fig. 11: Locating Amplifier Retaining Screws Courtesy of BMW OF NORTH AMERICA, INC.
65 24 010 REMOVING AND INSTALLING/REPLACING ANTENNA AMPLIFIER
Remove rear right trim. Refer to 51 43 002 REMOVING AND INSTALLING REAR LEFT OR RIGHT SIDE TRIM PANEL .
Disconnect plug connections (1).
Remove Torx screws (2).
Tightening torque, refer to 65 24 1AZ in AUDIO, NAVIGATION AND ANTI-THEFT - TIGHTENING TORQUES - Cooper (1.6L) R50/W10 .
Remove antenna amplifier (3).
2006 MINI Cooper
2002-05 ACCESSORIES & EQUIPMENT Audio, Navigation & Anti-Theft Systems - Repair Instructions - Cooper (1.6L) R50/W10 & Cooper S
Microsoft
Tuesday, February 16, 2010 11:16:56 AM Page 11 © 2005 Mitchell Repair Information Company, LLC.
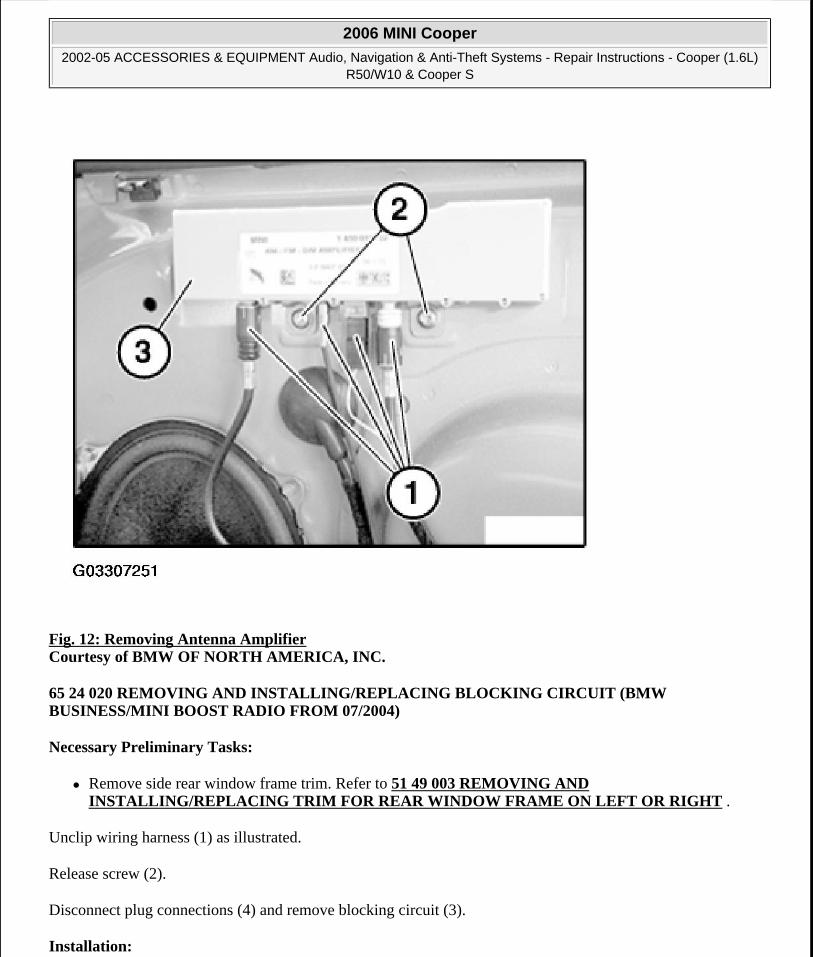
Fig. 12: Removing Antenna Amplifier Courtesy of BMW OF NORTH AMERICA, INC.
65 24 020 REMOVING AND INSTALLING/REPLACING BLOCKING CIRCUIT (BMW BUSINESS/MINI BOOST RADIO FROM 07/2004)
Necessary Preliminary Tasks:
Remove side rear window frame trim. Refer to 51 49 003 REMOVING AND INSTALLING/REPLACING TRIM FOR REAR WINDOW FRAME ON LEFT OR RIGHT .
Unclip wiring harness (1) as illustrated.
Release screw (2).
Disconnect plug connections (4) and remove blocking circuit (3).
Installation:
2006 MINI Cooper
2002-05 ACCESSORIES & EQUIPMENT Audio, Navigation & Anti-Theft Systems - Repair Instructions - Cooper (1.6L) R50/W10 & Cooper S
Microsoft
Tuesday, February 16, 2010 11:16:56 AM Page 12 © 2005 Mitchell Repair Information Company, LLC.
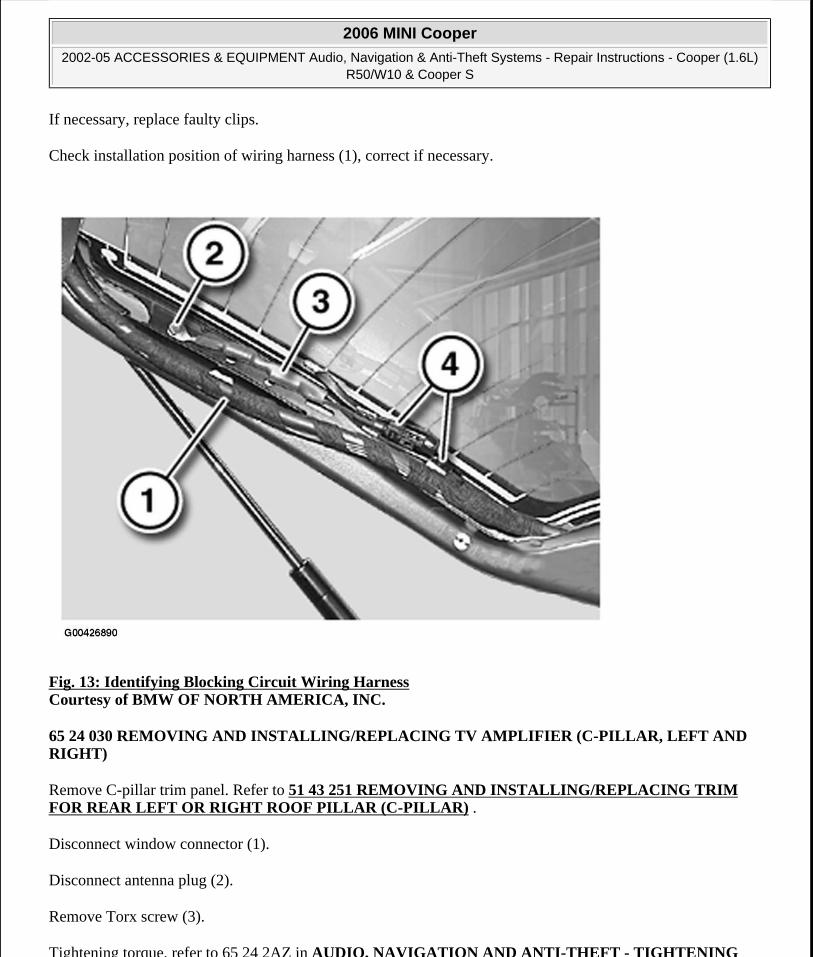
If necessary, replace faulty clips.
Check installation position of wiring harness (1), correct if necessary.
Fig. 13: Identifying Blocking Circuit Wiring Harness Courtesy of BMW OF NORTH AMERICA, INC.
65 24 030 REMOVING AND INSTALLING/REPLACING TV AMPLIFIER (C-PILLAR, LEFT AND RIGHT)
Remove C-pillar trim panel. Refer to 51 43 251 REMOVING AND INSTALLING/REPLACING TRIM FOR REAR LEFT OR RIGHT ROOF PILLAR (C-PILLAR) .
Disconnect window connector (1).
Disconnect antenna plug (2).
Remove Torx screw (3).
Tightening torque, refer to 65 24 2AZ in AUDIO, NAVIGATION AND ANTI-THEFT - TIGHTENING
2006 MINI Cooper
2002-05 ACCESSORIES & EQUIPMENT Audio, Navigation & Anti-Theft Systems - Repair Instructions - Cooper (1.6L) R50/W10 & Cooper S
Microsoft
Tuesday, February 16, 2010 11:16:56 AM Page 13 © 2005 Mitchell Repair Information Company, LLC.
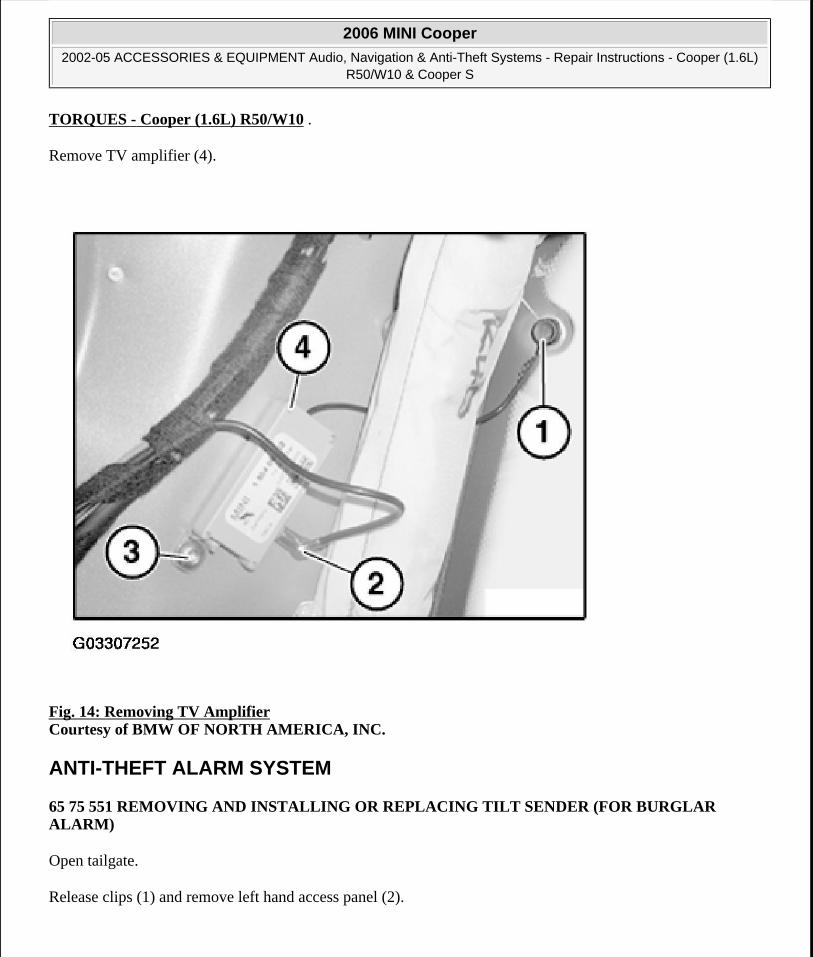
TORQUES - Cooper (1.6L) R50/W10 .
Remove TV amplifier (4).
Fig. 14: Removing TV Amplifier Courtesy of BMW OF NORTH AMERICA, INC.
ANTI-THEFT ALARM SYSTEM
65 75 551 REMOVING AND INSTALLING OR REPLACING TILT SENDER (FOR BURGLAR ALARM)
Open tailgate.
Release clips (1) and remove left hand access panel (2).
2006 MINI Cooper
2002-05 ACCESSORIES & EQUIPMENT Audio, Navigation & Anti-Theft Systems - Repair Instructions - Cooper (1.6L) R50/W10 & Cooper S
Microsoft
Tuesday, February 16, 2010 11:16:56 AM Page 14 © 2005 Mitchell Repair Information Company, LLC.
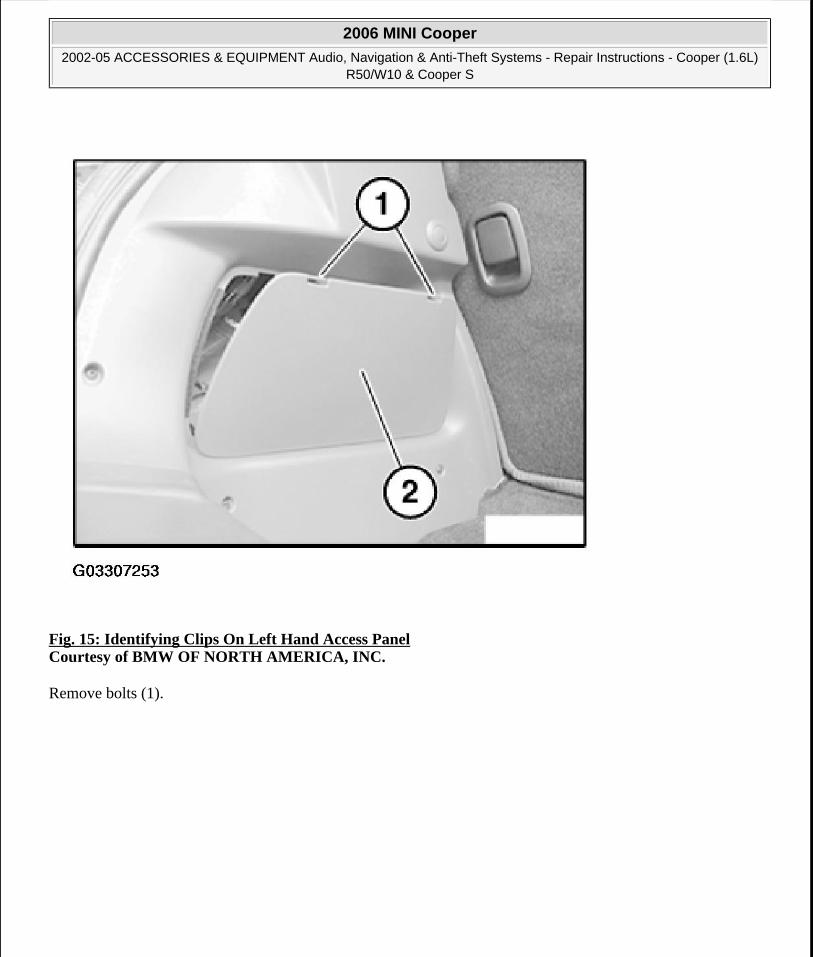
Fig. 15: Identifying Clips On Left Hand Access Panel Courtesy of BMW OF NORTH AMERICA, INC.
Remove bolts (1).
2006 MINI Cooper
2002-05 ACCESSORIES & EQUIPMENT Audio, Navigation & Anti-Theft Systems - Repair Instructions - Cooper (1.6L) R50/W10 & Cooper S
Microsoft
Tuesday, February 16, 2010 11:16:56 AM Page 15 © 2005 Mitchell Repair Information Company, LLC.
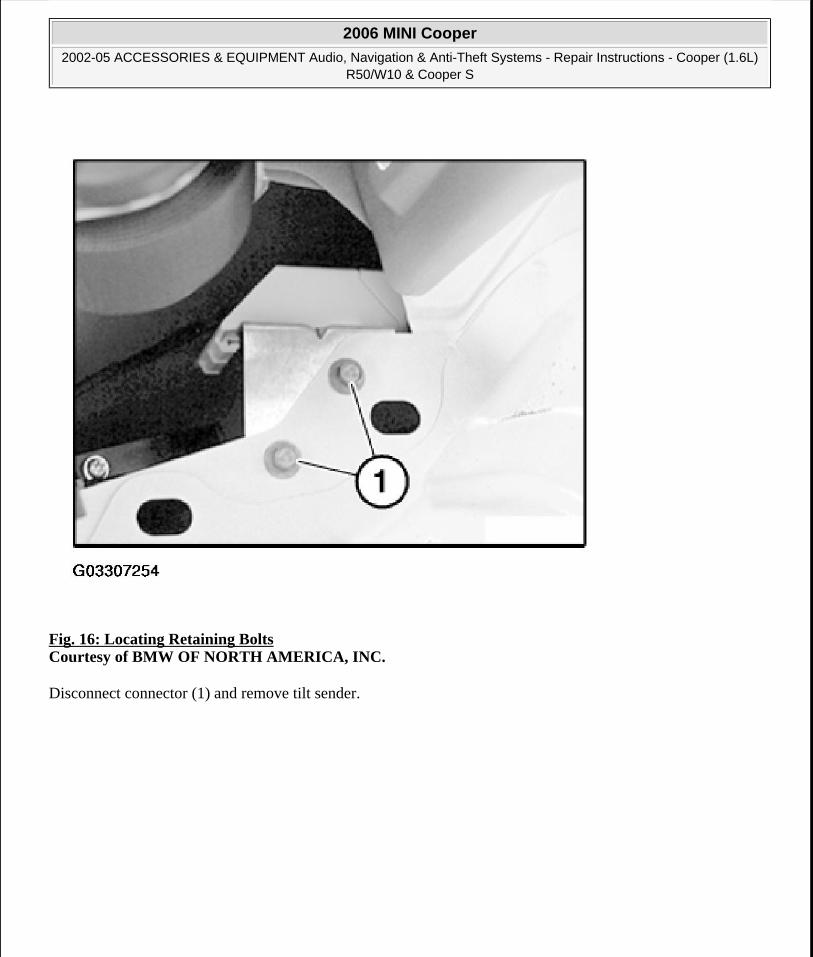
Fig. 16: Locating Retaining Bolts Courtesy of BMW OF NORTH AMERICA, INC.
Disconnect connector (1) and remove tilt sender.
2006 MINI Cooper
2002-05 ACCESSORIES & EQUIPMENT Audio, Navigation & Anti-Theft Systems - Repair Instructions - Cooper (1.6L) R50/W10 & Cooper S
Microsoft
Tuesday, February 16, 2010 11:16:56 AM Page 16 © 2005 Mitchell Repair Information Company, LLC.
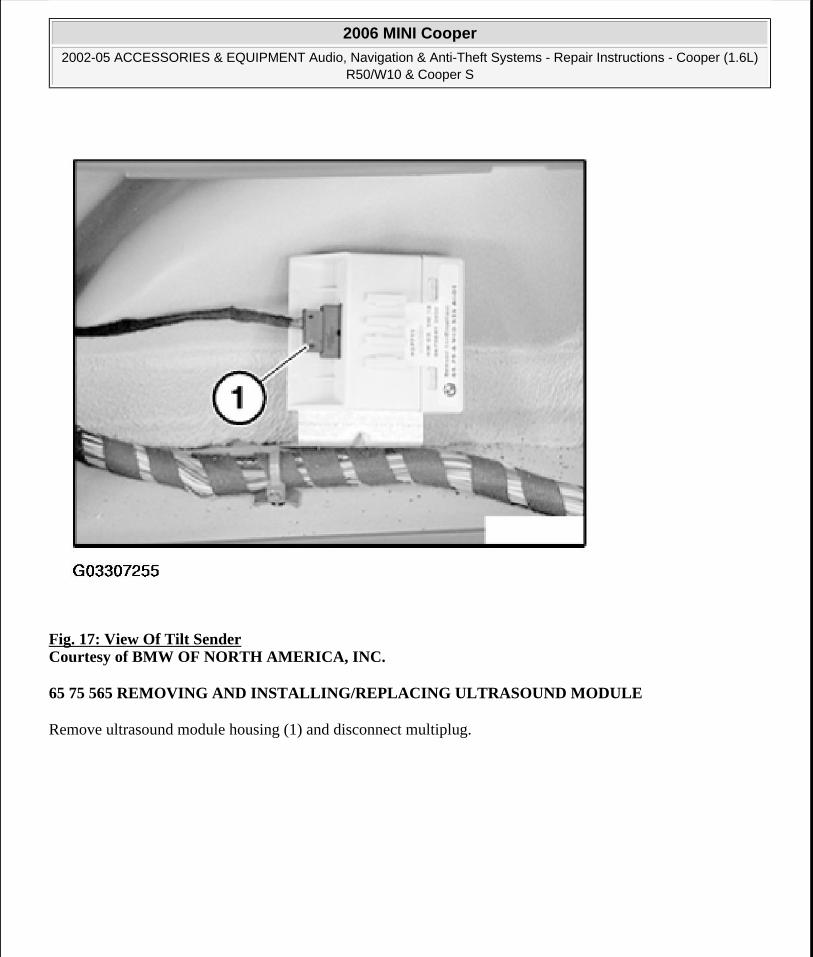
Fig. 17: View Of Tilt Sender Courtesy of BMW OF NORTH AMERICA, INC.
65 75 565 REMOVING AND INSTALLING/REPLACING ULTRASOUND MODULE
Remove ultrasound module housing (1) and disconnect multiplug.
2006 MINI Cooper
2002-05 ACCESSORIES & EQUIPMENT Audio, Navigation & Anti-Theft Systems - Repair Instructions - Cooper (1.6L) R50/W10 & Cooper S
Microsoft
Tuesday, February 16, 2010 11:16:56 AM Page 17 © 2005 Mitchell Repair Information Company, LLC.
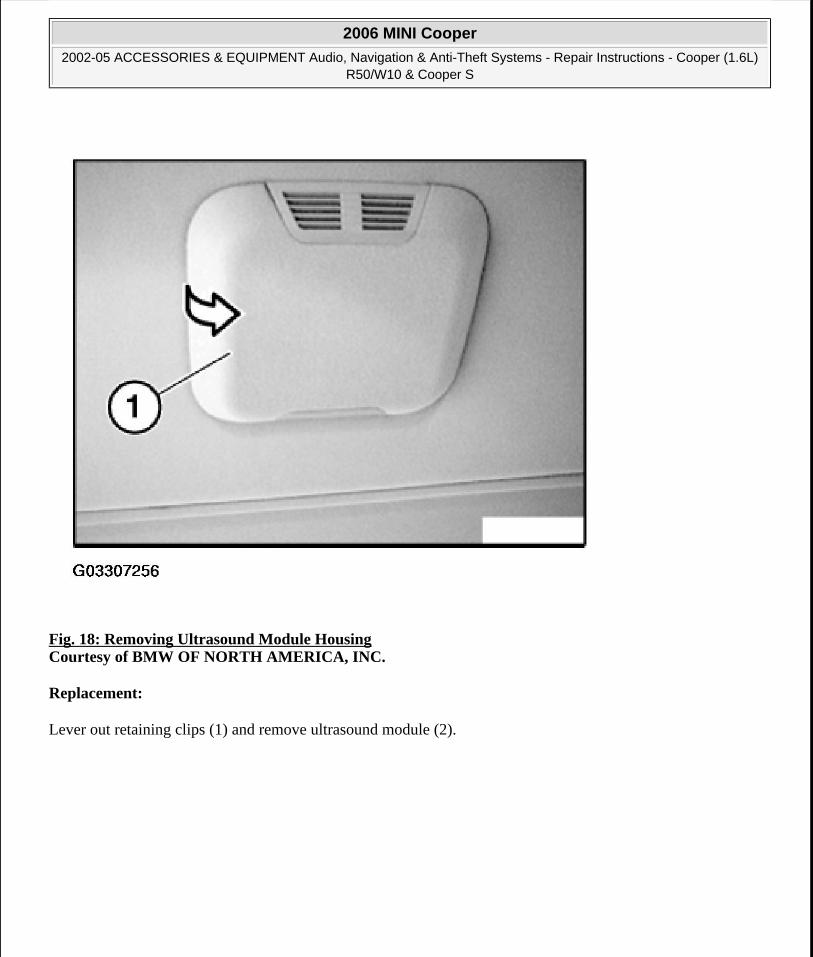
Fig. 18: Removing Ultrasound Module Housing Courtesy of BMW OF NORTH AMERICA, INC.
Replacement:
Lever out retaining clips (1) and remove ultrasound module (2).
2006 MINI Cooper
2002-05 ACCESSORIES & EQUIPMENT Audio, Navigation & Anti-Theft Systems - Repair Instructions - Cooper (1.6L) R50/W10 & Cooper S
Microsoft
Tuesday, February 16, 2010 11:16:56 AM Page 18 © 2005 Mitchell Repair Information Company, LLC.
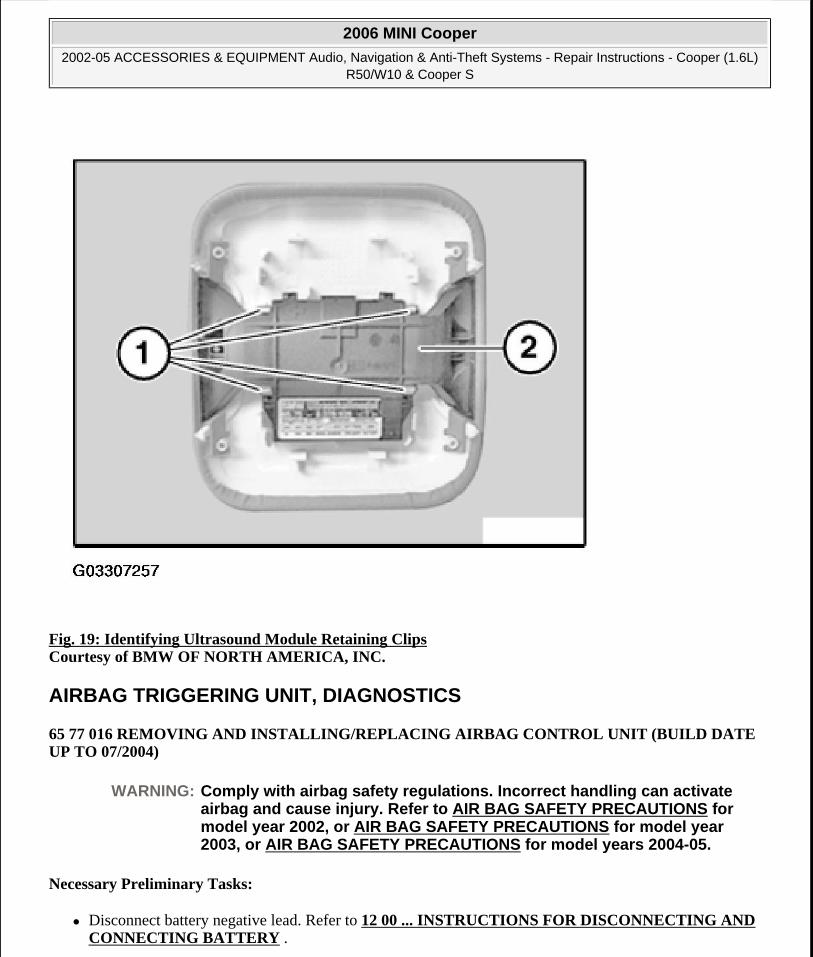
Fig. 19: Identifying Ultrasound Module Retaining Clips Courtesy of BMW OF NORTH AMERICA, INC.
AIRBAG TRIGGERING UNIT, DIAGNOSTICS
65 77 016 REMOVING AND INSTALLING/REPLACING AIRBAG CONTROL UNIT (BUILD DATE UP TO 07/2004)
Necessary Preliminary Tasks:
Disconnect battery negative lead. Refer to 12 00 ... INSTRUCTIONS FOR DISCONNECTING AND CONNECTING BATTERY .
WARNING: Comply with airbag safety regulations. Incorrect handling can activate airbag and cause injury. Refer to AIR BAG SAFETY PRECAUTIONS for model year 2002, or AIR BAG SAFETY PRECAUTIONS for model year 2003, or AIR BAG SAFETY PRECAUTIONS for model years 2004-05.
2006 MINI Cooper
2002-05 ACCESSORIES & EQUIPMENT Audio, Navigation & Anti-Theft Systems - Repair Instructions - Cooper (1.6L) R50/W10 & Cooper S
Microsoft
Tuesday, February 16, 2010 11:16:56 AM Page 19 © 2005 Mitchell Repair Information Company, LLC.
Remove both front entrance cover strips. Refer to 51 47 000 REMOVING AND INSTALLING/REPLACING FRONT LEFT OR RIGHT ENTRANCE COVER STRIP (INSIDE) .
Remove storage compartment. Refer to 51 16 200 REMOVING AND INSTALLING FRONT CENTER CONSOLE .
Remove rear storage compartment holder. Refer to 51 16 218 REMOVING AND INSTALLING / REPLACING REAR STORAGE COMPARTMENT HOLDER .
Remove rear seat. Refer to 52 26 005 REMOVING AND INSTALLING OR REPLACING REAR SEAT
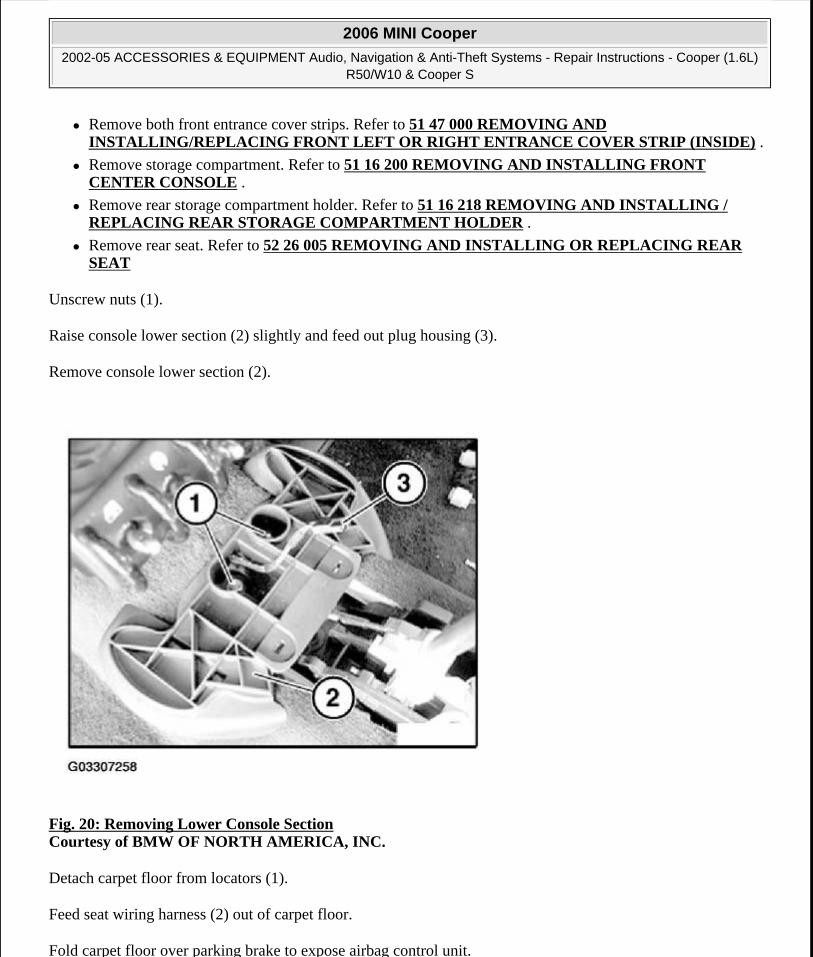
Unscrew nuts (1).
Raise console lower section (2) slightly and feed out plug housing (3).
Remove console lower section (2).
Fig. 20: Removing Lower Console Section Courtesy of BMW OF NORTH AMERICA, INC.
Detach carpet floor from locators (1).
Feed seat wiring harness (2) out of carpet floor.
Fold carpet floor over parking brake to expose airbag control unit.
2006 MINI Cooper
2002-05 ACCESSORIES & EQUIPMENT Audio, Navigation & Anti-Theft Systems - Repair Instructions - Cooper (1.6L) R50/W10 & Cooper S
Microsoft
Tuesday, February 16, 2010 11:16:56 AM Page 20 © 2005 Mitchell Repair Information Company, LLC.
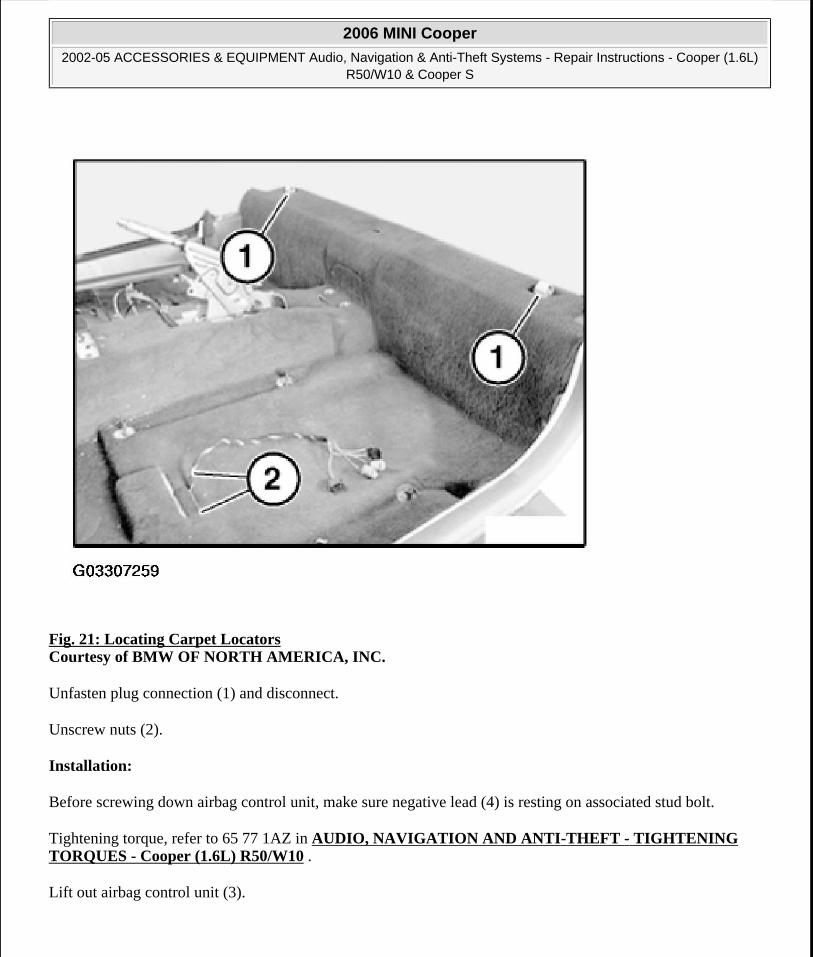
Fig. 21: Locating Carpet Locators Courtesy of BMW OF NORTH AMERICA, INC.
Unfasten plug connection (1) and disconnect.
Unscrew nuts (2).
Installation:
Before screwing down airbag control unit, make sure negative lead (4) is resting on associated stud bolt.
Tightening torque, refer to 65 77 1AZ in AUDIO, NAVIGATION AND ANTI-THEFT - TIGHTENING TORQUES - Cooper (1.6L) R50/W10 .
Lift out airbag control unit (3).
2006 MINI Cooper
2002-05 ACCESSORIES & EQUIPMENT Audio, Navigation & Anti-Theft Systems - Repair Instructions - Cooper (1.6L) R50/W10 & Cooper S
Microsoft
Tuesday, February 16, 2010 11:16:56 AM Page 21 © 2005 Mitchell Repair Information Company, LLC.
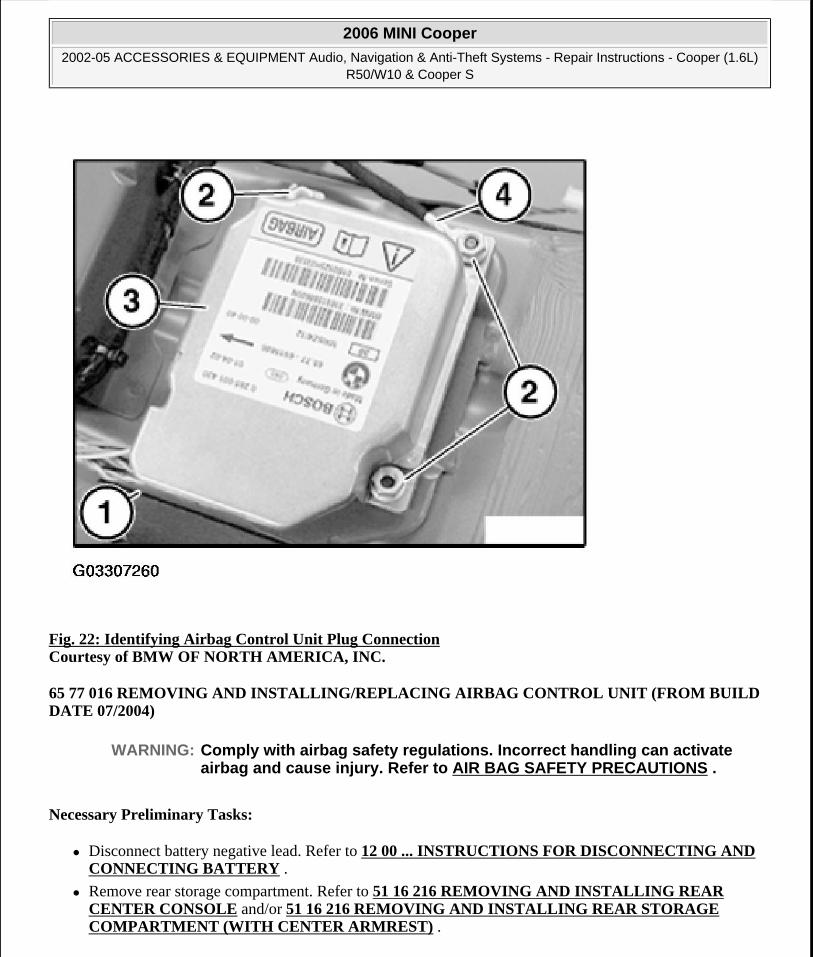
Fig. 22: Identifying Airbag Control Unit Plug Connection Courtesy of BMW OF NORTH AMERICA, INC.
65 77 016 REMOVING AND INSTALLING/REPLACING AIRBAG CONTROL UNIT (FROM BUILD DATE 07/2004)
Necessary Preliminary Tasks:
Disconnect battery negative lead. Refer to 12 00 ... INSTRUCTIONS FOR DISCONNECTING AND CONNECTING BATTERY .
Remove rear storage compartment. Refer to 51 16 216 REMOVING AND INSTALLING REAR CENTER CONSOLE and/or 51 16 216 REMOVING AND INSTALLING REAR STORAGE COMPARTMENT (WITH CENTER ARMREST) .
WARNING: Comply with airbag safety regulations. Incorrect handling can activate airbag and cause injury. Refer to AIR BAG SAFETY PRECAUTIONS .
2006 MINI Cooper
2002-05 ACCESSORIES & EQUIPMENT Audio, Navigation & Anti-Theft Systems - Repair Instructions - Cooper (1.6L) R50/W10 & Cooper S
Microsoft
Tuesday, February 16, 2010 11:16:56 AM Page 22 © 2005 Mitchell Repair Information Company, LLC.
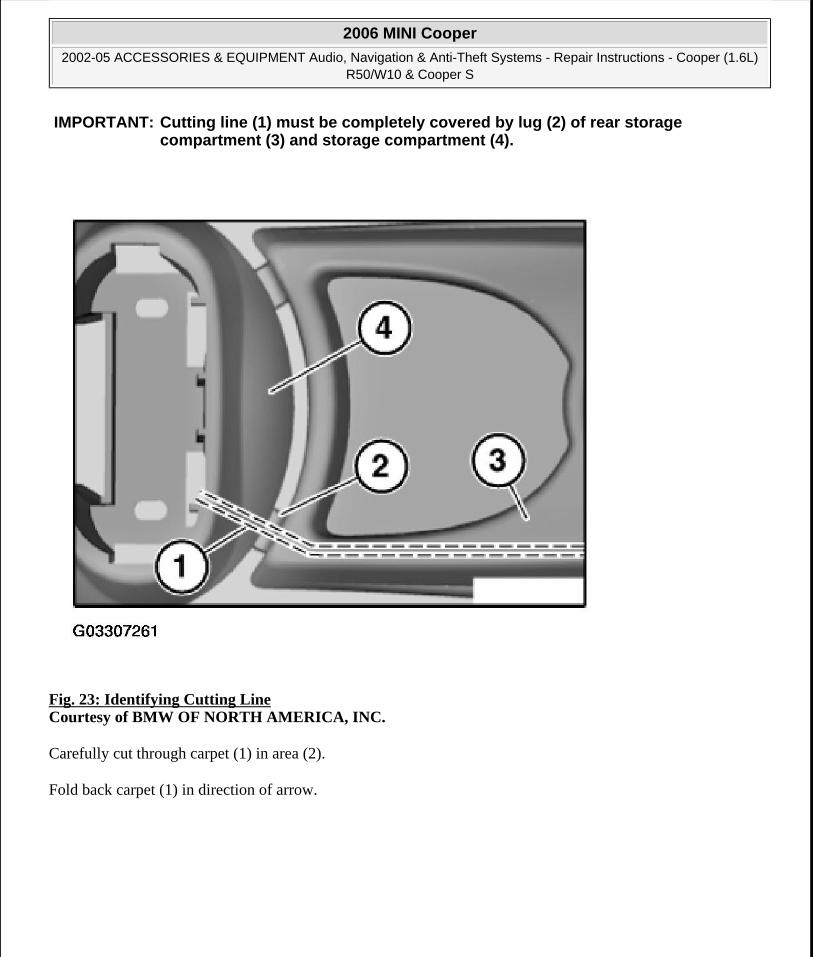
Fig. 23: Identifying Cutting Line Courtesy of BMW OF NORTH AMERICA, INC.
Carefully cut through carpet (1) in area (2).
Fold back carpet (1) in direction of arrow.
IMPORTANT: Cutting line (1) must be completely covered by lug (2) of rear storage compartment (3) and storage compartment (4).
2006 MINI Cooper
2002-05 ACCESSORIES & EQUIPMENT Audio, Navigation & Anti-Theft Systems - Repair Instructions - Cooper (1.6L) R50/W10 & Cooper S
Microsoft
Tuesday, February 16, 2010 11:16:56 AM Page 23 © 2005 Mitchell Repair Information Company, LLC.
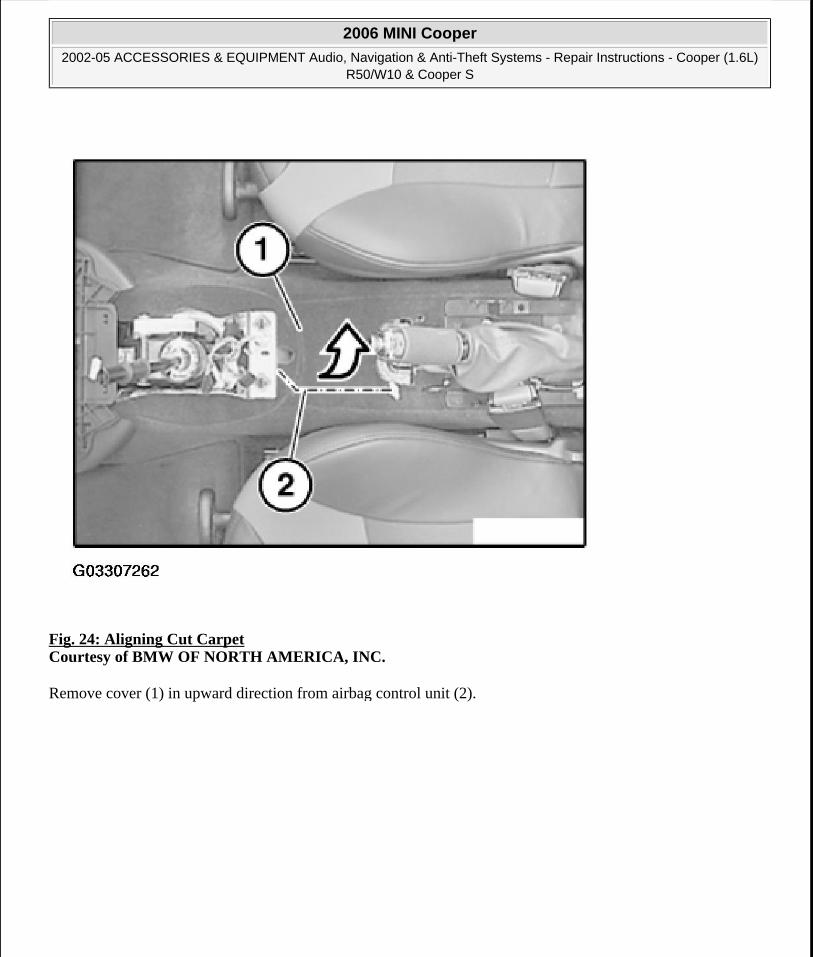
Fig. 24: Aligning Cut Carpet Courtesy of BMW OF NORTH AMERICA, INC.
Remove cover (1) in upward direction from airbag control unit (2).
2006 MINI Cooper
2002-05 ACCESSORIES & EQUIPMENT Audio, Navigation & Anti-Theft Systems - Repair Instructions - Cooper (1.6L) R50/W10 & Cooper S
Microsoft
Tuesday, February 16, 2010 11:16:56 AM Page 24 © 2005 Mitchell Repair Information Company, LLC.
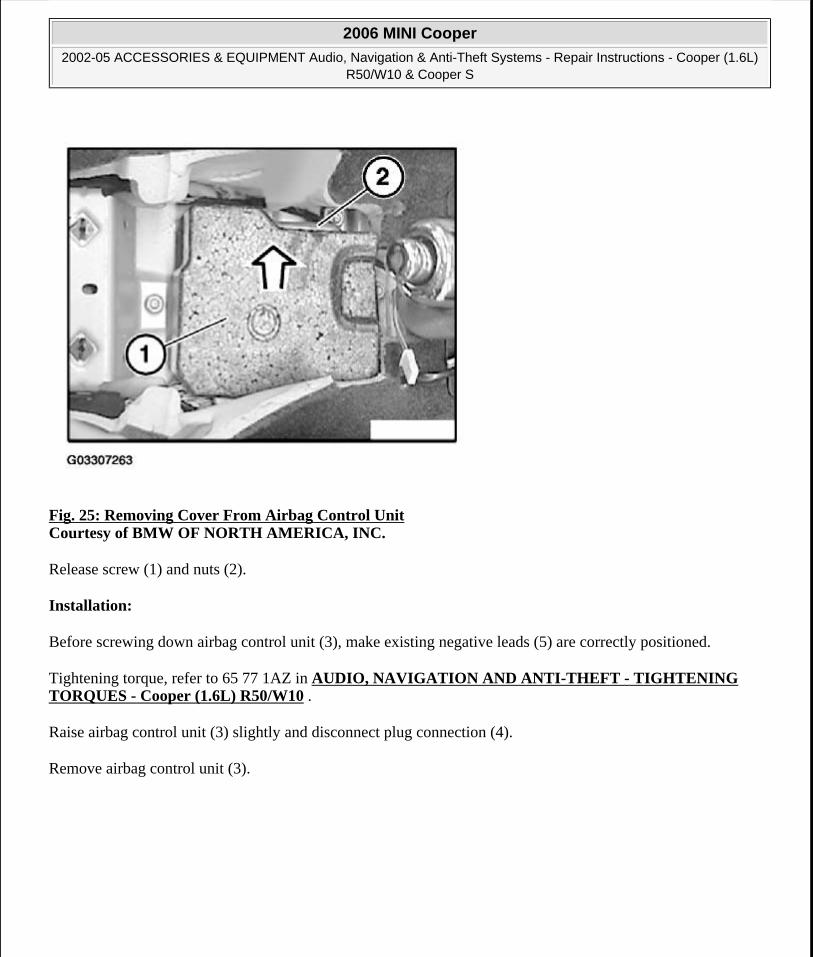
Fig. 25: Removing Cover From Airbag Control Unit Courtesy of BMW OF NORTH AMERICA, INC.
Release screw (1) and nuts (2).
Installation:
Before screwing down airbag control unit (3), make existing negative leads (5) are correctly positioned.
Tightening torque, refer to 65 77 1AZ in AUDIO, NAVIGATION AND ANTI-THEFT - TIGHTENING TORQUES - Cooper (1.6L) R50/W10 .
Raise airbag control unit (3) slightly and disconnect plug connection (4).
Remove airbag control unit (3).
2006 MINI Cooper
2002-05 ACCESSORIES & EQUIPMENT Audio, Navigation & Anti-Theft Systems - Repair Instructions - Cooper (1.6L) R50/W10 & Cooper S
Microsoft
Tuesday, February 16, 2010 11:16:56 AM Page 25 © 2005 Mitchell Repair Information Company, LLC.
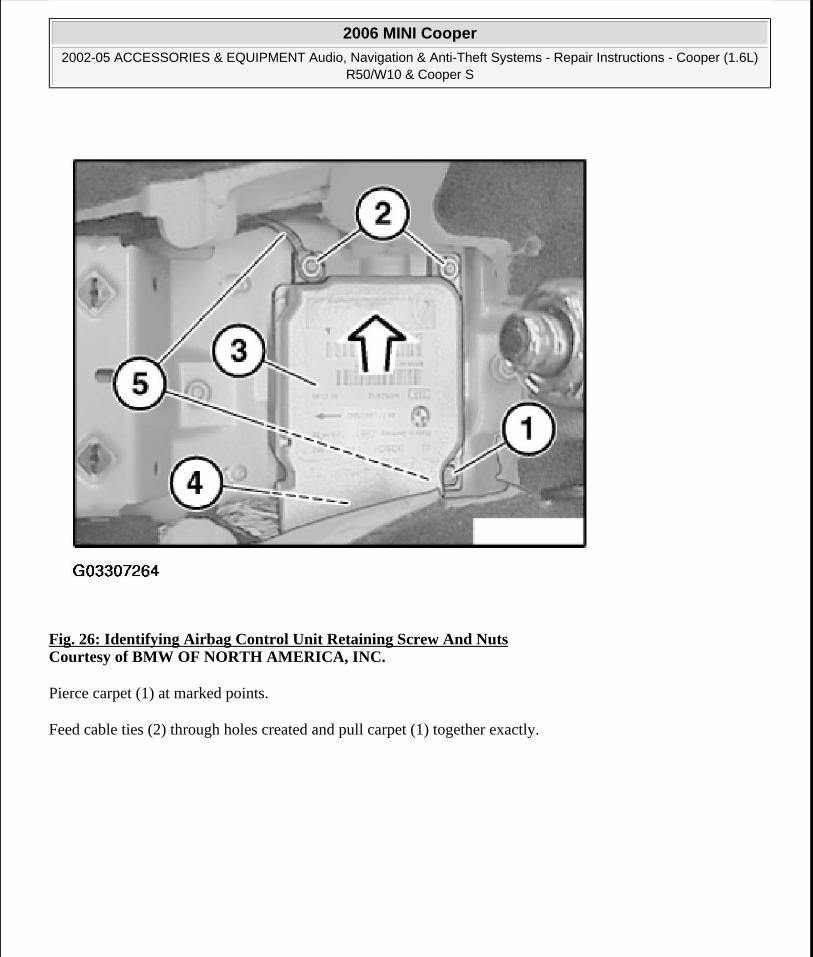
Fig. 26: Identifying Airbag Control Unit Retaining Screw And Nuts Courtesy of BMW OF NORTH AMERICA, INC.
Pierce carpet (1) at marked points.
Feed cable ties (2) through holes created and pull carpet (1) together exactly.
2006 MINI Cooper
2002-05 ACCESSORIES & EQUIPMENT Audio, Navigation & Anti-Theft Systems - Repair Instructions - Cooper (1.6L) R50/W10 & Cooper S
Microsoft
Tuesday, February 16, 2010 11:16:56 AM Page 26 © 2005 Mitchell Repair Information Company, LLC.
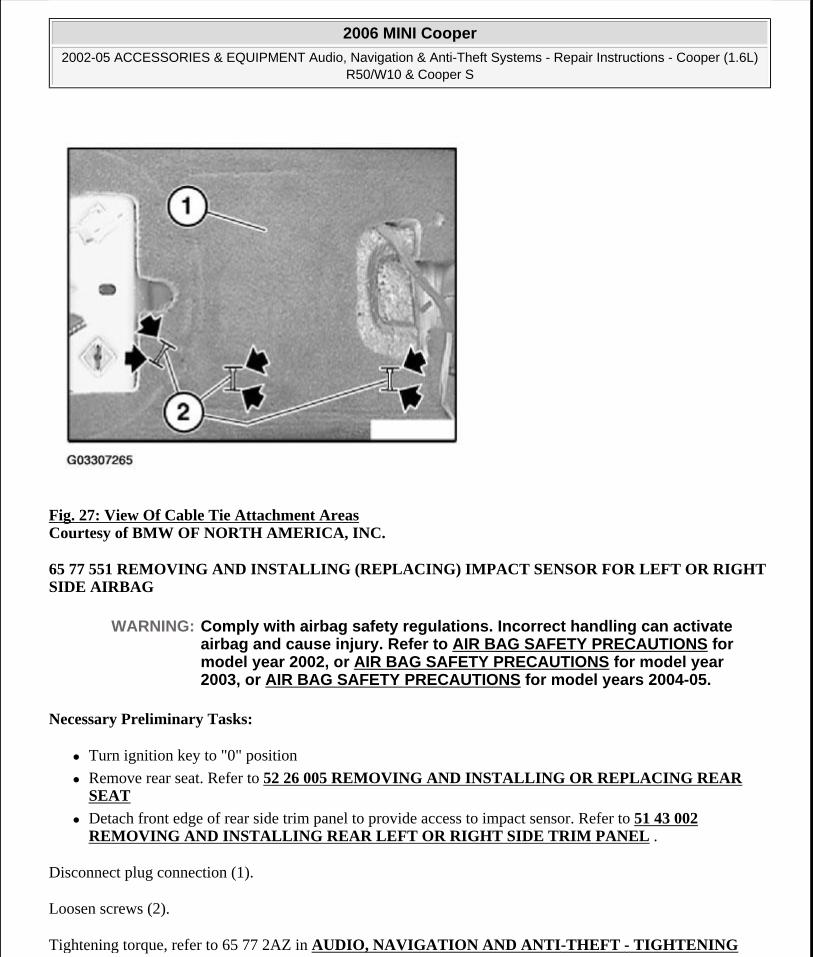
Fig. 27: View Of Cable Tie Attachment Areas Courtesy of BMW OF NORTH AMERICA, INC.
65 77 551 REMOVING AND INSTALLING (REPLACING) IMPACT SENSOR FOR LEFT OR RIGHT SIDE AIRBAG
Necessary Preliminary Tasks:
Turn ignition key to "0" position
Remove rear seat. Refer to 52 26 005 REMOVING AND INSTALLING OR REPLACING REAR SEAT
Detach front edge of rear side trim panel to provide access to impact sensor. Refer to 51 43 002 REMOVING AND INSTALLING REAR LEFT OR RIGHT SIDE TRIM PANEL .
Disconnect plug connection (1).
Loosen screws (2).
Tightening torque, refer to 65 77 2AZ in AUDIO, NAVIGATION AND ANTI-THEFT - TIGHTENING
WARNING: Comply with airbag safety regulations. Incorrect handling can activate airbag and cause injury. Refer to AIR BAG SAFETY PRECAUTIONS for model year 2002, or AIR BAG SAFETY PRECAUTIONS for model year 2003, or AIR BAG SAFETY PRECAUTIONS for model years 2004-05.
2006 MINI Cooper
2002-05 ACCESSORIES & EQUIPMENT Audio, Navigation & Anti-Theft Systems - Repair Instructions - Cooper (1.6L) R50/W10 & Cooper S
Microsoft
Tuesday, February 16, 2010 11:16:56 AM Page 27 © 2005 Mitchell Repair Information Company, LLC.
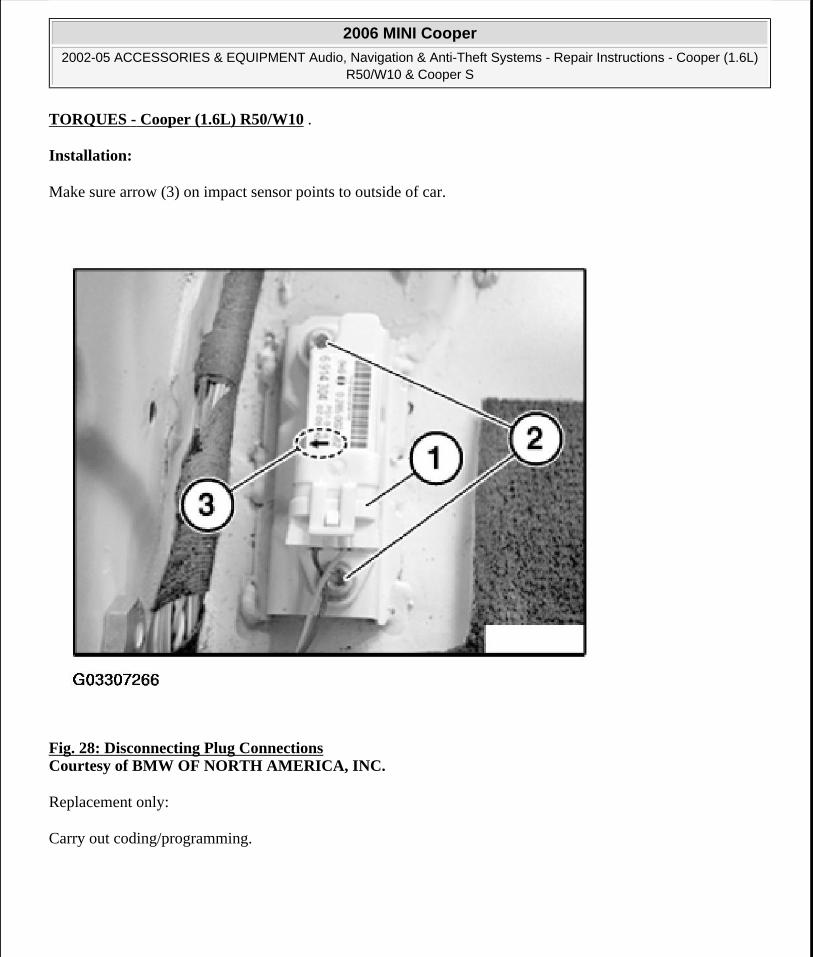
TORQUES - Cooper (1.6L) R50/W10 .
Installation:
Make sure arrow (3) on impact sensor points to outside of car.
Fig. 28: Disconnecting Plug Connections Courtesy of BMW OF NORTH AMERICA, INC.
Replacement only:
Carry out coding/programming.
2006 MINI Cooper
2002-05 ACCESSORIES & EQUIPMENT Audio, Navigation & Anti-Theft Systems - Repair Instructions - Cooper (1.6L) R50/W10 & Cooper S
Microsoft
Tuesday, February 16, 2010 11:16:56 AM Page 28 © 2005 Mitchell Repair Information Company, LLC.
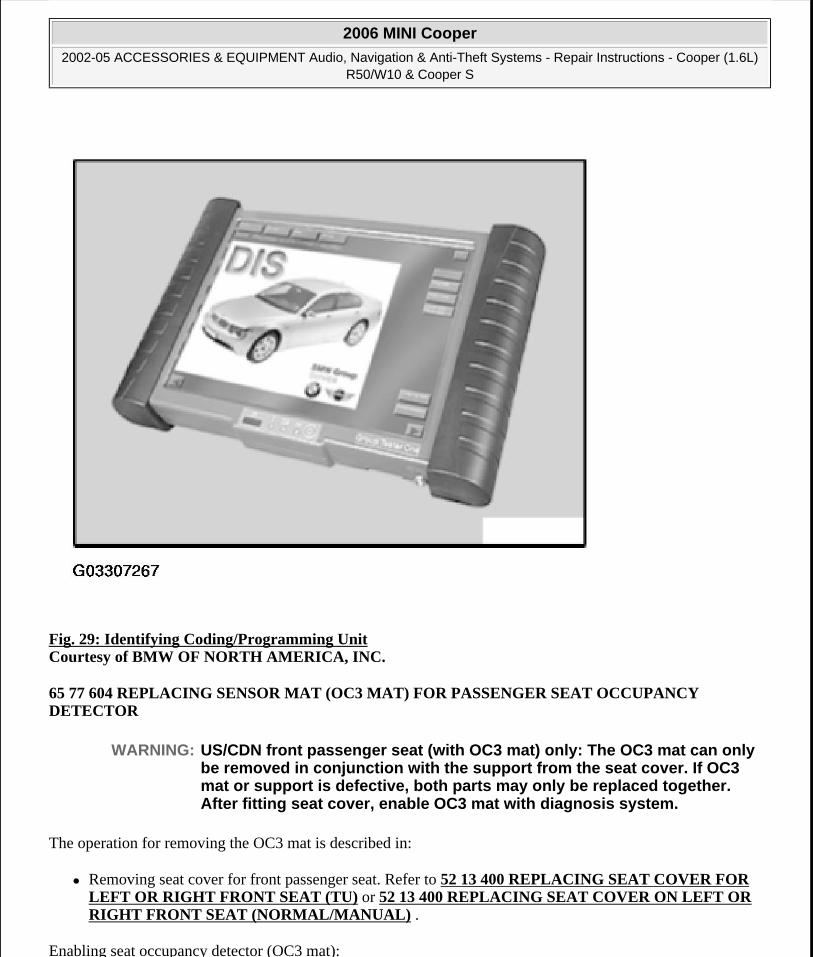
Fig. 29: Identifying Coding/Programming Unit Courtesy of BMW OF NORTH AMERICA, INC.
65 77 604 REPLACING SENSOR MAT (OC3 MAT) FOR PASSENGER SEAT OCCUPANCY DETECTOR
The operation for removing the OC3 mat is described in:
Removing seat cover for front passenger seat. Refer to 52 13 400 REPLACING SEAT COVER FOR LEFT OR RIGHT FRONT SEAT (TU) or 52 13 400 REPLACING SEAT COVER ON LEFT OR RIGHT FRONT SEAT (NORMAL/MANUAL) .
Enabling seat occupancy detector (OC3 mat):
WARNING: US/CDN front passenger seat (with OC3 mat) only: The OC3 mat can only be removed in conjunction with the support from the seat cover. If OC3 mat or support is defective, both parts may only be replaced together. After fitting seat cover, enable OC3 mat with diagnosis system.
2006 MINI Cooper
2002-05 ACCESSORIES & EQUIPMENT Audio, Navigation & Anti-Theft Systems - Repair Instructions - Cooper (1.6L) R50/W10 & Cooper S
Microsoft
Tuesday, February 16, 2010 11:16:56 AM Page 29 © 2005 Mitchell Repair Information Company, LLC.
Connect diagnosis system.
Release seat occupancy detector.
Clear fault memory if necessary.
ON-BOARD COMPUTER
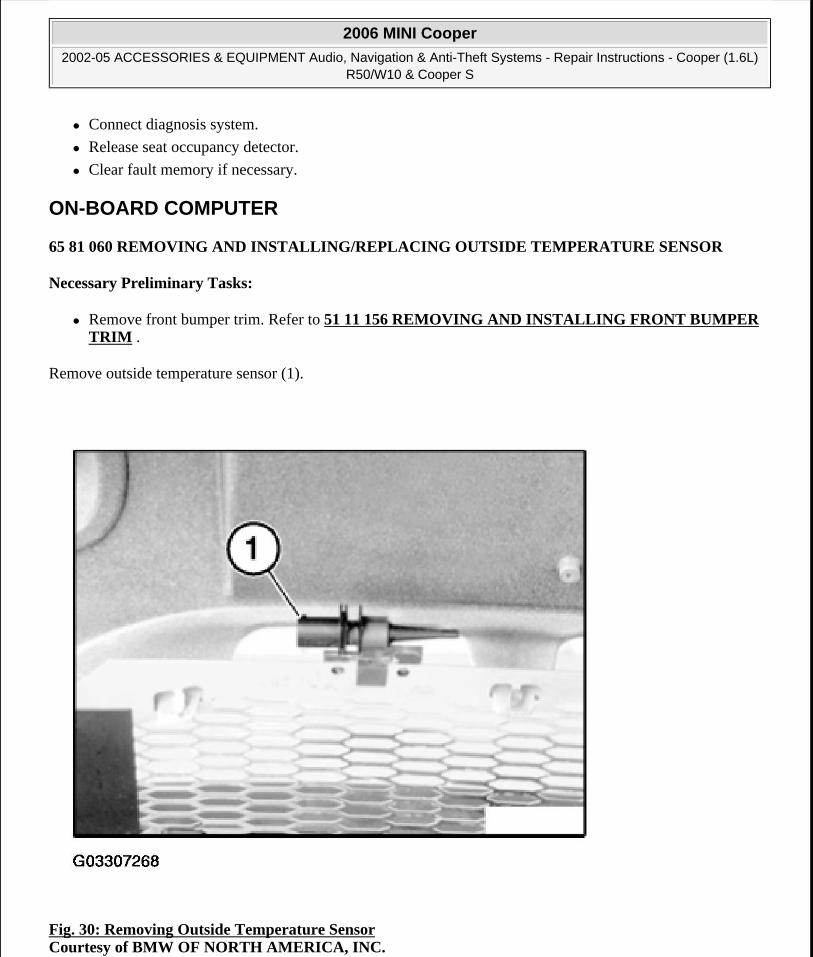
65 81 060 REMOVING AND INSTALLING/REPLACING OUTSIDE TEMPERATURE SENSOR
Necessary Preliminary Tasks:
Remove front bumper trim. Refer to 51 11 156 REMOVING AND INSTALLING FRONT BUMPER TRIM .
Remove outside temperature sensor (1).
Fig. 30: Removing Outside Temperature Sensor Courtesy of BMW OF NORTH AMERICA, INC.
2006 MINI Cooper
2002-05 ACCESSORIES & EQUIPMENT Audio, Navigation & Anti-Theft Systems - Repair Instructions - Cooper (1.6L) R50/W10 & Cooper S
Microsoft
Tuesday, February 16, 2010 11:16:56 AM Page 30 © 2005 Mitchell Repair Information Company, LLC.
NAVIGATION SYSTEMS
65 90 ... NOTES ON HANDLING NAVIGATION COMPUTERS
All Model Series:
Software Installation:
The navigation software must be loaded with terminal 15 activated and the navigation system ready for operation.
Make sure there is a stable power supply. If necessary, connect a battery charger to the vehicle.
The charging operation must not be interrupted (terminal 15 remains activated).
When Replacing Navigation Computer:
From E65/66:
Carry out coding of navigation computer with aid of Diagnosis and Information System via "CIP".
To E65/66:
Carry out coding of navigation computer with aid of Diagnosis and Information System in path "1 Recoding".
E46 (with radio navigation) only:
When Replacing Navigation Computer:
Connect Diagnosis and Information System to vehicle.
Switch on ignition.
Select Coding/Programming.
Select path "3 Coding ZCS".
CAUTION: Risk of damage! The navigation computer must not be disconnected from the power supply while the LED on the computer remains lit (the LED goes out after approx. 1 minute).
NOTE: To ensure full operation of all the communications components, it is necessary in new cars to insert a Road Map CD in the navigation computer. This is absolutely essential as certain functions are disabled for distribution channels. These functions will only be available again after a Road Map CD has been inserted. The mode preset at the factory is automatically reset when this CD is inserted.
2006 MINI Cooper
2002-05 ACCESSORIES & EQUIPMENT Audio, Navigation & Anti-Theft Systems - Repair Instructions - Cooper (1.6L) R50/W10 & Cooper S
Microsoft
Tuesday, February 16, 2010 11:16:56 AM Page 31 © 2005 Mitchell Repair Information Company, LLC.

Select vehicle.
Select path "4 Retrofitting".
Select menu item "3 Instrument cluster".
Select menu item "2 Language".
Select the desired languages following the user prompting.
Start coding of the instrument cluster.
After the prompt from the Diagnosis and Information System "Now follow the instructions on the on-board monitor", insert the operating software CD.
The following note appears from DIS CD 25 software (and higher):
"With radio navigation insert the operating software CD in the computer and wait until it is ejected. Then follow the instructions on the display. This procedure takes several minutes".
Carry out coding of navigation computer with aid of Diagnosis and Information System in path "1 Recoding".
If the software is updated at a later stage, the last step is omitted if the navigation computer is already configured for a navigation system (radio navigation or navigation system).
65 90 510 REMOVING AND INSTALLING/REPLACING NAVIGATION COMPUTER WITH CD-DRIVE
Special Tools Required:
65 5 400
Necessary Preliminary Tasks:
Comply with notes and instructions on handling navigation computers. Refer to 65 90 ... NOTES ON HANDLING NAVIGATION COMPUTERS .
Remove right front seat. Refer to 52 13 000 REMOVING AND INSTALLING DRIVER'S OR FRONT PASSENGER SEAT (NORMAL / MANUAL) .
If necessary, remove rear right foot mat.
Unfasten screws (1 and 2).
Lift housing (3) out of air duct (5) and floor carpet.
NOTE: The ignition must not be turned off and then on again during this procedure. The software is loaded when the operating software CD is ejected.
NOTE: For Special Tool identification, see AUDIO, NAVIGATION AND ANTI-THEFT - TIGHTENING TORQUES - COOPER (1.6L) R50/W10 .
2006 MINI Cooper
2002-05 ACCESSORIES & EQUIPMENT Audio, Navigation & Anti-Theft Systems - Repair Instructions - Cooper (1.6L) R50/W10 & Cooper S
Microsoft
Tuesday, February 16, 2010 11:16:56 AM Page 32 © 2005 Mitchell Repair Information Company, LLC.
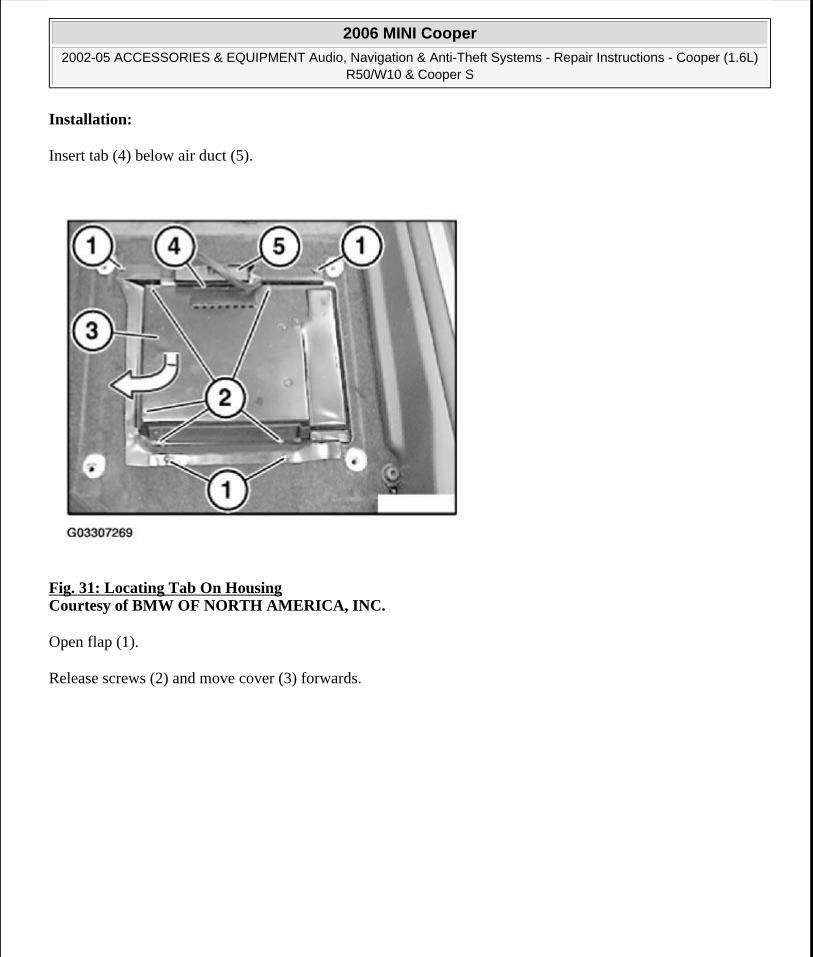
Installation:
Insert tab (4) below air duct (5).
Fig. 31: Locating Tab On Housing Courtesy of BMW OF NORTH AMERICA, INC.
Open flap (1).
Release screws (2) and move cover (3) forwards.
2006 MINI Cooper
2002-05 ACCESSORIES & EQUIPMENT Audio, Navigation & Anti-Theft Systems - Repair Instructions - Cooper (1.6L) R50/W10 & Cooper S
Microsoft
Tuesday, February 16, 2010 11:16:56 AM Page 33 © 2005 Mitchell Repair Information Company, LLC.
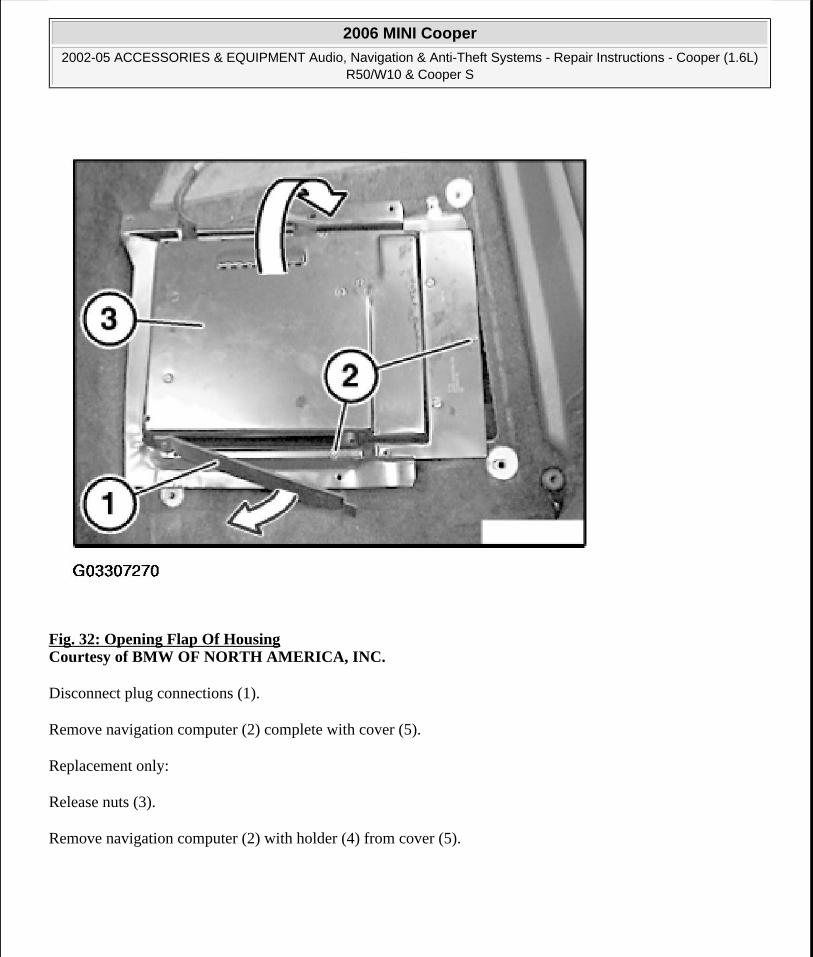
Fig. 32: Opening Flap Of Housing Courtesy of BMW OF NORTH AMERICA, INC.
Disconnect plug connections (1).
Remove navigation computer (2) complete with cover (5).
Replacement only:
Release nuts (3).
Remove navigation computer (2) with holder (4) from cover (5).
2006 MINI Cooper
2002-05 ACCESSORIES & EQUIPMENT Audio, Navigation & Anti-Theft Systems - Repair Instructions - Cooper (1.6L) R50/W10 & Cooper S
Microsoft
Tuesday, February 16, 2010 11:16:56 AM Page 34 © 2005 Mitchell Repair Information Company, LLC.
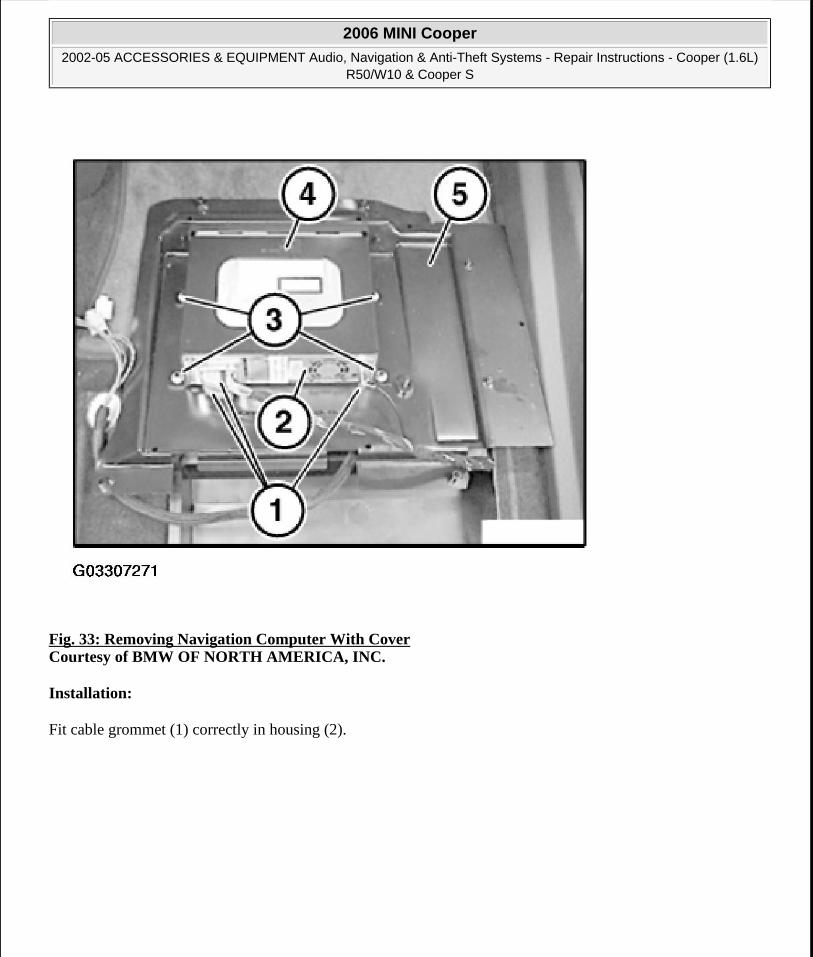
Fig. 33: Removing Navigation Computer With Cover Courtesy of BMW OF NORTH AMERICA, INC.
Installation:
Fit cable grommet (1) correctly in housing (2).
2006 MINI Cooper
2002-05 ACCESSORIES & EQUIPMENT Audio, Navigation & Anti-Theft Systems - Repair Instructions - Cooper (1.6L) R50/W10 & Cooper S
Microsoft
Tuesday, February 16, 2010 11:16:56 AM Page 35 © 2005 Mitchell Repair Information Company, LLC.
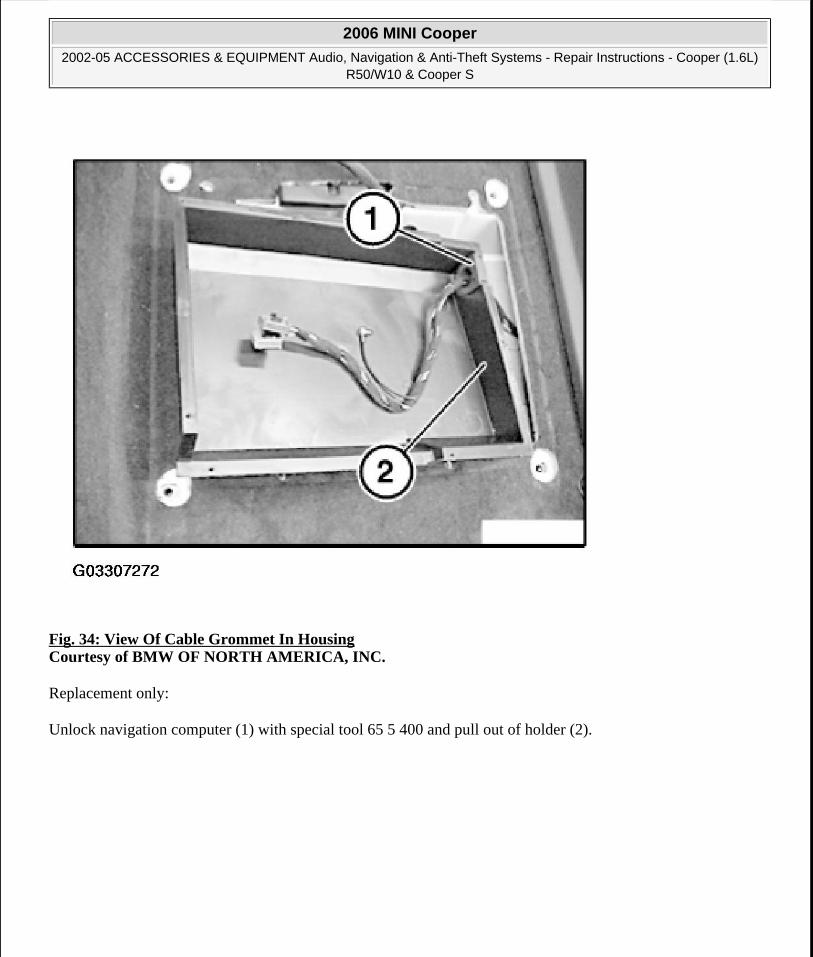
Fig. 34: View Of Cable Grommet In Housing Courtesy of BMW OF NORTH AMERICA, INC.
Replacement only:
Unlock navigation computer (1) with special tool 65 5 400 and pull out of holder (2).
2006 MINI Cooper
2002-05 ACCESSORIES & EQUIPMENT Audio, Navigation & Anti-Theft Systems - Repair Instructions - Cooper (1.6L) R50/W10 & Cooper S
Microsoft
Tuesday, February 16, 2010 11:16:56 AM Page 36 © 2005 Mitchell Repair Information Company, LLC.

Fig. 35: Removing Navigation Computer Courtesy of BMW OF NORTH AMERICA, INC.
Replacement only:
Carry out coding/programming.
2006 MINI Cooper
2002-05 ACCESSORIES & EQUIPMENT Audio, Navigation & Anti-Theft Systems - Repair Instructions - Cooper (1.6L) R50/W10 & Cooper S
Microsoft
Tuesday, February 16, 2010 11:16:56 AM Page 37 © 2005 Mitchell Repair Information Company, LLC.
Fig. 36: Identifying Programming Equipment Courtesy of BMW OF NORTH AMERICA, INC.
2006 MINI Cooper
2002-05 ACCESSORIES & EQUIPMENT Audio, Navigation & Anti-Theft Systems - Repair Instructions - Cooper (1.6L) R50/W10 & Cooper S
Microsoft
Tuesday, February 16, 2010 11:16:56 AM Page 38 © 2005 Mitchell Repair Information Company, LLC.