astro paga - fitre spa
TRANSCRIPT
INSTALLATION
MAINTENANCE
& USER MANUAL
ASTRO
PAGA

Fitre ASTRO / PAGA
914140IUM.PAVA Sheet 2 of 44
Fitre ASTRO / PAGA
914140IUM.PAVA Sheet 3 of 44
1. Introduction .............................................................................................................. 5
1.1 Astro Manager: P.A.V.A. management ................................................................................................ 5
2. Application management ........................................................................................ 6
2.1 Access control ................................................................................................................................. 6
2.2 Main screen ...................................................................................................................................... 8
2.3 Main Menu and toolbar .................................................................................................................... 9
3. Setup ....................................................................................................................... 11
3.1 Setting up Astro Manager ................................................................................................................... 11
3.2 Setting up System Options ................................................................................................................. 12
3.2.1 Options – Diagnostics ...................................................................................................................... 12
3.2.2 Options – General ............................................................................................................................. 13
3.2.3 Options – Astro ................................................................................................................................. 14
3.3 Creating terminals................................................................................................................................ 14
3.3.1 Creation of IP terminals .................................................................................................................... 14
3.4 Autoprovisioning ................................................................................................................................. 18
3.5 Voip setup ............................................................................................................................................. 18
4. Intercom and PA calls............................................................................................ 19
4.1 Management of intercom calls ........................................................................................................... 19
4.1.1 Emergency calls window ................................................................................................................. 20
4.1.2 Emergency with Astro Manager ...................................................................................................... 20
4.1.3 Emergency with PCO and PO .......................................................................................................... 20
4.2 Management of audio recordings ...................................................................................................... 22
4.2.1 Audio History ..................................................................................................................................... 22
4.2.2 Terminal Events History ................................................................................................................... 23
5 Astro PA ........................................................................................................................ 24
5.1 Pa devices: configuration and monitoring ........................................................................................ 24
5.2 Connection to Fire&Gas system ........................................................................................................ 24
5.3 Redundancy of diagnostics and devices PA .................................................................................... 24
5.4 Zone audio and announcements ........................................................................................................ 24
5.4.1 PA live announcements: multi zone dial pattern ........................................................................... 25
5.4.2 PA delayed announcements (antilarsen) ....................................................................................... 25
5.5 Prerecorded audio messages ............................................................................................................. 25
5.6 Wide band PA announces ................................................................................................................... 26
6 Network configuration .................................................................................................. 26
6.1 Network interfaces ............................................................................................................................... 26
6.1.1 NETWORK INTERFACE CARDS ...................................................................................................... 26
6.1.2 NETWORK INTERFACES ................................................................................................................. 26
6.2 Astro IP address configuration .......................................................................................................... 26
6.2.2 Voip LAN configuration .................................................................................................................... 27

Fitre ASTRO / PAGA
914140IUM.PAVA Sheet 4 of 44
7.Redundancy .................................................................................................................. 28
7.1 High-Availability-Cluster (HA) ............................................................................................................. 28
8 Web Server configuration ............................................................................................ 29
8.1 Main Menu ............................................................................................................................................. 29
8.2 System Monitor .................................................................................................................................... 29
8.2.1 Astro System Status ......................................................................................................................... 30
8.2.2 CDR reports ....................................................................................................................................... 31
8.2.3 System monitor ................................................................................................................................. 31
8.2.4 Astro Logs ......................................................................................................................................... 32
8.3 Strumenti di System Administration .................................................................................................. 33
8.3.1 Backup & Restore ............................................................................................................................. 33
8.3.2 Network .............................................................................................................................................. 35
8.3.3 Network interface .............................................................................................................................. 36
8.3.4 Cluster Management ......................................................................................................................... 37
8.3.5 Cts software update .......................................................................................................................... 39
8.3.6 Recording Management ................................................................................................................... 40
9 General Alarm Manager ................................................................................................ 41
9.1 General Alarm Manager ....................................................................................................................... 41
9.1.1 Emergency Alarms Column ............................................................................................................. 41
9.1.2 Emergency Announces Column ...................................................................................................... 41
9.1.3 Emergency Announce Form ............................................................................................................ 42
9.1.4 How to configure a New Emergency Announce ............................................................................ 43
9.1.5 How to remove an Emergency Announce ...................................................................................... 43
9.1.6 How to modify an Emergency Announce ....................................................................................... 43
9.1.7 How to change tool language .......................................................................................................... 43
Fitre ASTRO / PAGA
914140IUM.PAVA Sheet 5 of 44
1. Introduction
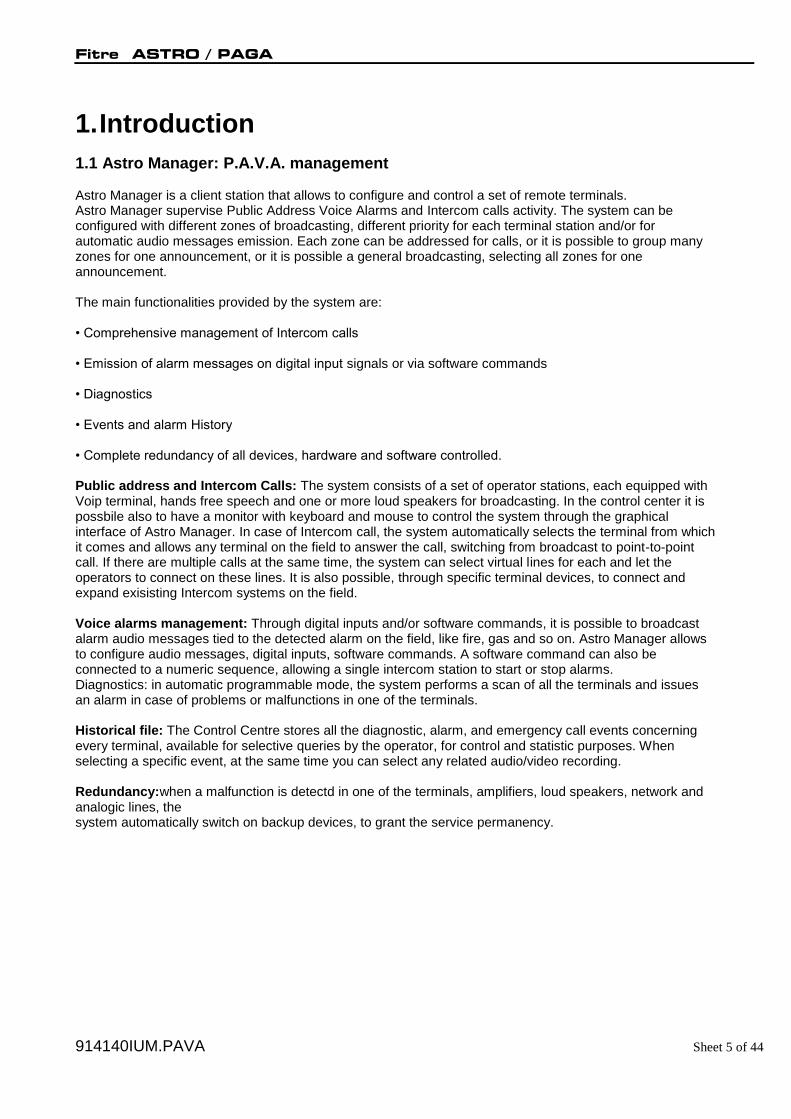
1.1 Astro Manager: P.A.V.A. management Astro Manager is a client station that allows to configure and control a set of remote terminals. Astro Manager supervise Public Address Voice Alarms and Intercom calls activity. The system can be configured with different zones of broadcasting, different priority for each terminal station and/or for automatic audio messages emission. Each zone can be addressed for calls, or it is possible to group many zones for one announcement, or it is possible a general broadcasting, selecting all zones for one announcement. The main functionalities provided by the system are: • Comprehensive management of Intercom calls • Emission of alarm messages on digital input signals or via software commands • Diagnostics • Events and alarm History • Complete redundancy of all devices, hardware and software controlled. Public address and Intercom Calls: The system consists of a set of operator stations, each equipped with Voip terminal, hands free speech and one or more loud speakers for broadcasting. In the control center it is possbile also to have a monitor with keyboard and mouse to control the system through the graphical interface of Astro Manager. In case of Intercom call, the system automatically selects the terminal from which it comes and allows any terminal on the field to answer the call, switching from broadcast to point-to-point call. If there are multiple calls at the same time, the system can select virtual lines for each and let the operators to connect on these lines. It is also possible, through specific terminal devices, to connect and expand exisisting Intercom systems on the field. Voice alarms management: Through digital inputs and/or software commands, it is possible to broadcast alarm audio messages tied to the detected alarm on the field, like fire, gas and so on. Astro Manager allows to configure audio messages, digital inputs, software commands. A software command can also be connected to a numeric sequence, allowing a single intercom station to start or stop alarms. Diagnostics: in automatic programmable mode, the system performs a scan of all the terminals and issues an alarm in case of problems or malfunctions in one of the terminals. Historical file: The Control Centre stores all the diagnostic, alarm, and emergency call events concerning every terminal, available for selective queries by the operator, for control and statistic purposes. When selecting a specific event, at the same time you can select any related audio/video recording. Redundancy:when a malfunction is detectd in one of the terminals, amplifiers, loud speakers, network and analogic lines, the system automatically switch on backup devices, to grant the service permanency.
Fitre ASTRO / PAGA
914140IUM.PAVA Sheet 6 of 44
2. Application management 2.1 Access control
There are three possible ways to enter the Astro Manager application: • Dedicated PC • Access with keyboard, mouse and monitor directly attached to Astro • Remote access with open source VNC software In any case, the desktop access where it’s possible to find the Astro Manager application, is password protected:
• username: astro • password: astrouser If the chosen access method is VNC, it is also necessary to connect to Astro this way:
• > vncviewer <Astro’s IP address>:2 Also the Astro Manager application is password protected. By default, four different user levels are foreseen: viewer, standard, power user and super user.
At least one user for each level is present on the system:
• username: viewer password: viewer
• username: user password: user • username: puser password: puser • username: admin password: admin
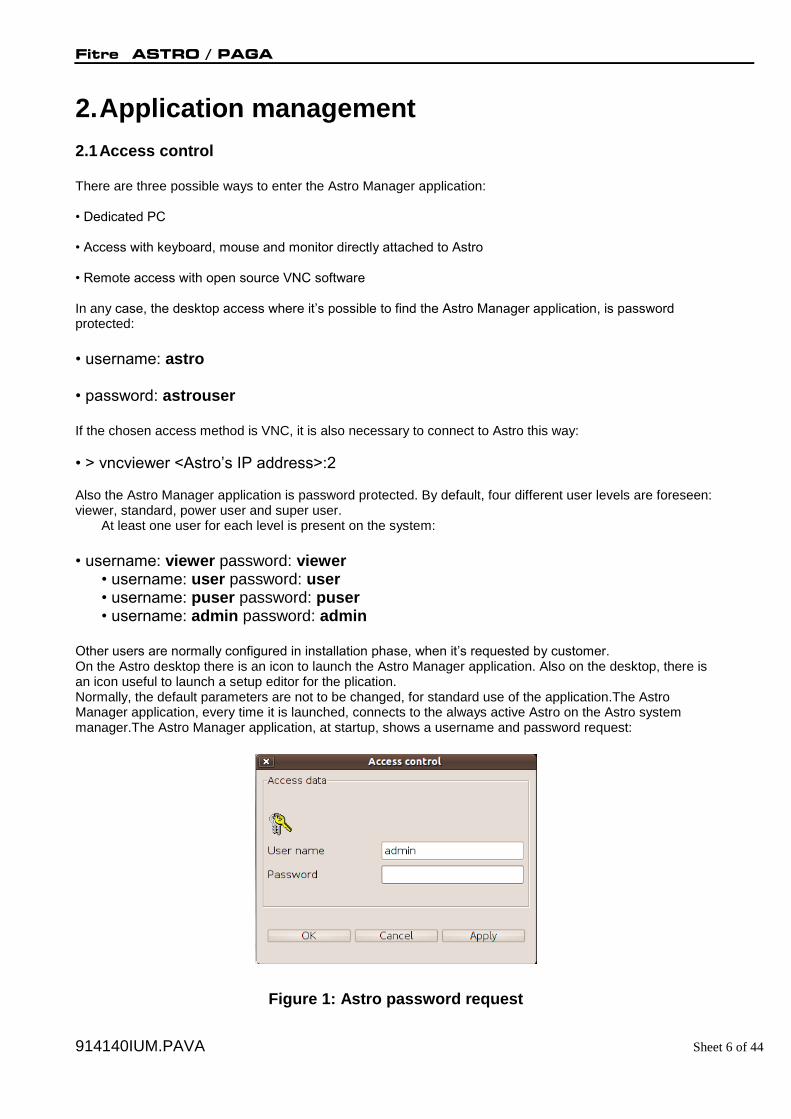
Other users are normally configured in installation phase, when it’s requested by customer. On the Astro desktop there is an icon to launch the Astro Manager application. Also on the desktop, there is an icon useful to launch a setup editor for the plication. Normally, the default parameters are not to be changed, for standard use of the application.The Astro Manager application, every time it is launched, connects to the always active Astro on the Astro system manager.The Astro Manager application, at startup, shows a username and password request:
Figure 1: Astro password request
Fitre ASTRO / PAGA
914140IUM.PAVA Sheet 7 of 44
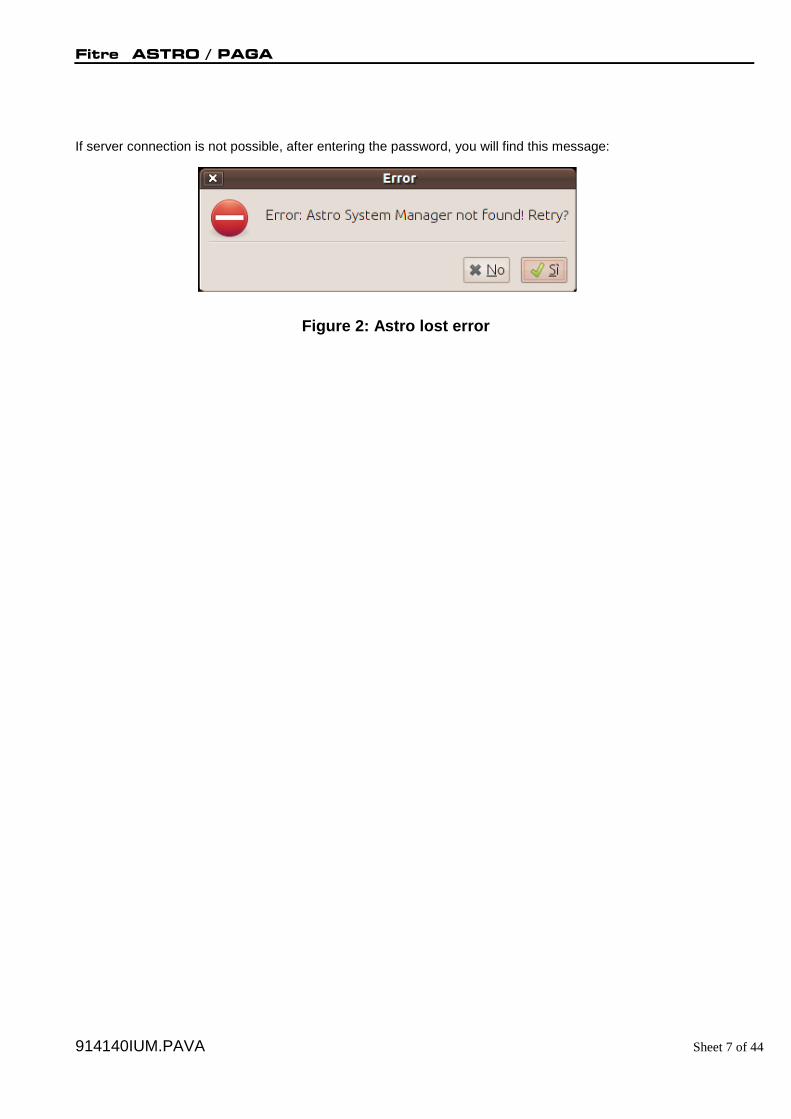
If server connection is not possible, after entering the password, you will find this message:
Figure 2: Astro lost error
Fitre ASTRO / PAGA
914140IUM.PAVA Sheet 8 of 44
2.2 Main screen
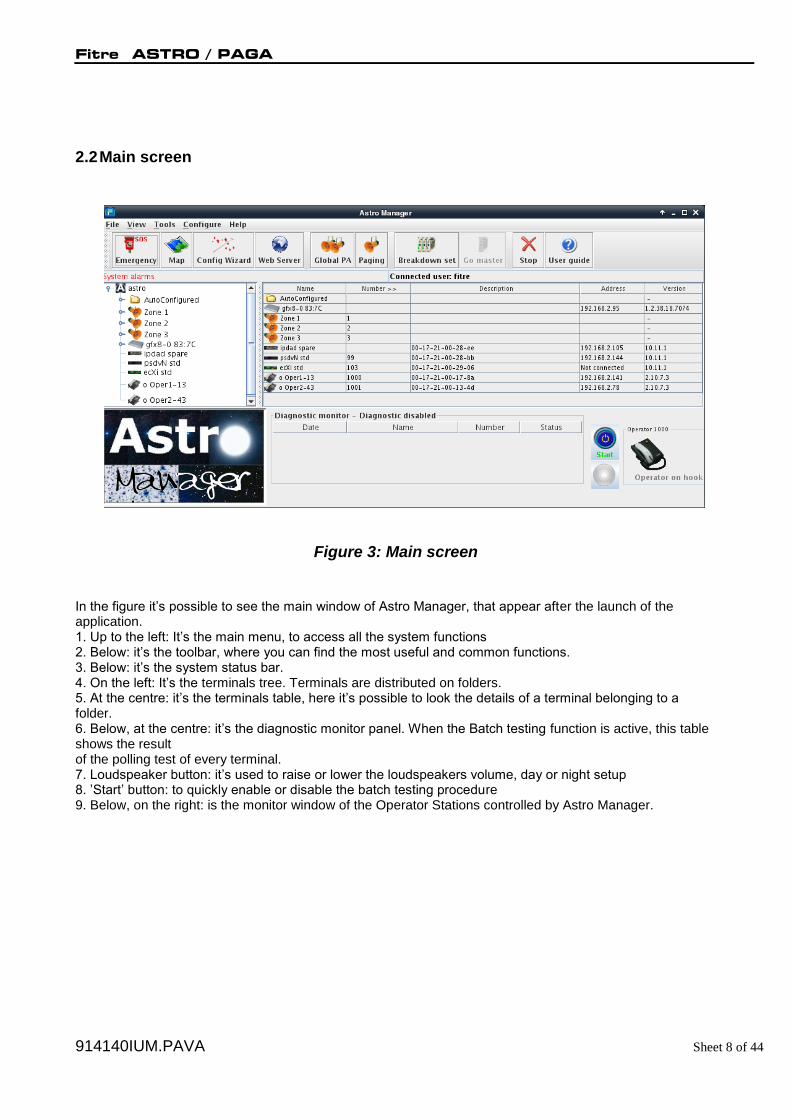
Figure 3: Main screen
In the figure it’s possible to see the main window of Astro Manager, that appear after the launch of the application. 1. Up to the left: It’s the main menu, to access all the system functions 2. Below: it’s the toolbar, where you can find the most useful and common functions. 3. Below: it’s the system status bar. 4. On the left: It’s the terminals tree. Terminals are distributed on folders. 5. At the centre: it’s the terminals table, here it’s possible to look the details of a terminal belonging to a folder. 6. Below, at the centre: it’s the diagnostic monitor panel. When the Batch testing function is active, this table shows the result of the polling test of every terminal. 7. Loudspeaker button: it’s used to raise or lower the loudspeakers volume, day or night setup 8. ’Start’ button: to quickly enable or disable the batch testing procedure 9. Below, on the right: is the monitor window of the Operator Stations controlled by Astro Manager.
Fitre ASTRO / PAGA
914140IUM.PAVA Sheet 9 of 44
2.3 Main Menu and toolbar The system menu allows to perform all expected actions. Let’s see in detail all these menu items.
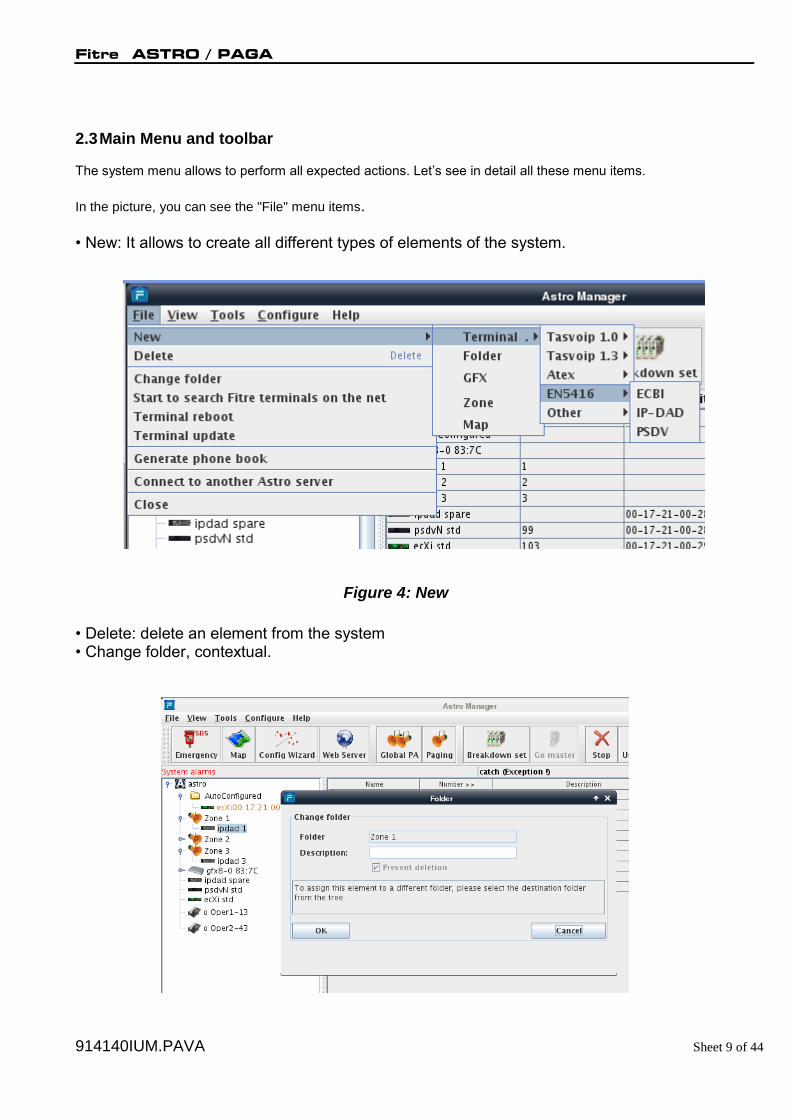
In the picture, you can see the "File" menu items. • New: It allows to create all different types of elements of the system.
Figure 4: New
• Delete: delete an element from the system • Change folder, contextual.
Fitre ASTRO / PAGA
914140IUM.PAVA Sheet 10 of 44
Figure 5: Change folder
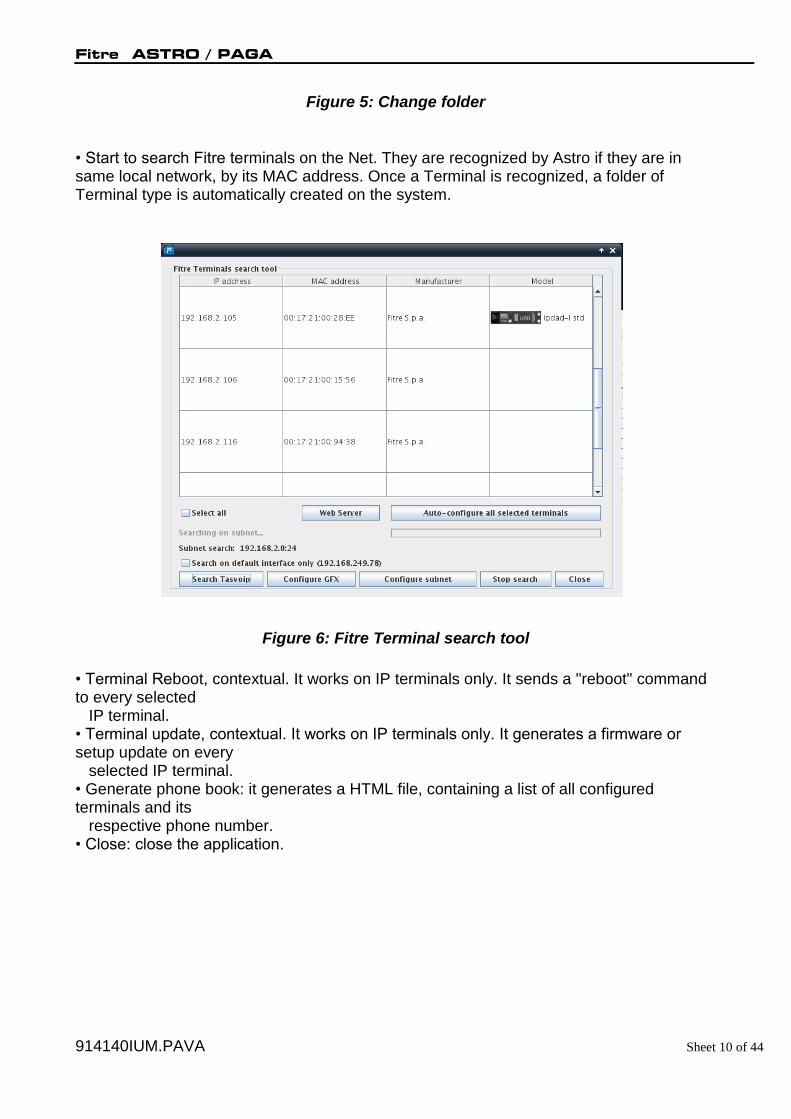
• Start to search Fitre terminals on the Net. They are recognized by Astro if they are in same local network, by its MAC address. Once a Terminal is recognized, a folder of Terminal type is automatically created on the system.
Figure 6: Fitre Terminal search tool
• Terminal Reboot, contextual. It works on IP terminals only. It sends a "reboot" command to every selected IP terminal. • Terminal update, contextual. It works on IP terminals only. It generates a firmware or setup update on every selected IP terminal. • Generate phone book: it generates a HTML file, containing a list of all configured terminals and its respective phone number. • Close: close the application.
Fitre ASTRO / PAGA
914140IUM.PAVA Sheet 11 of 44
3. Setup
3.1 Setting up Astro Manager
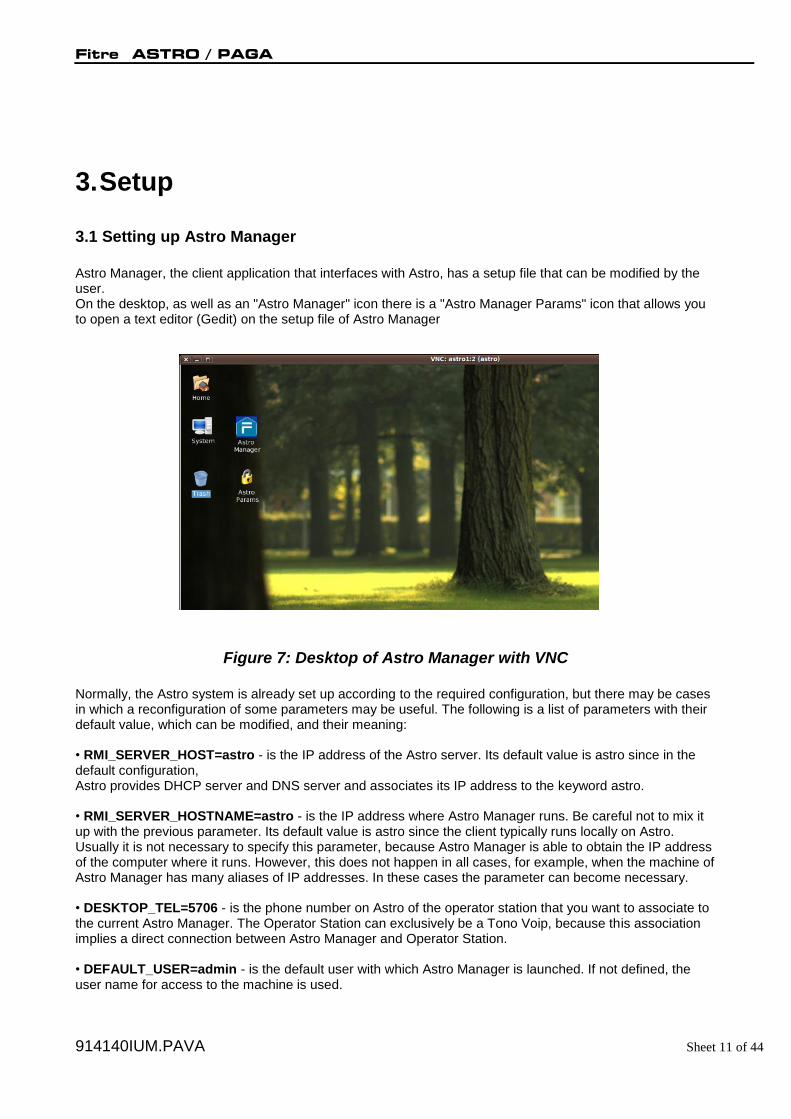
Astro Manager, the client application that interfaces with Astro, has a setup file that can be modified by the user. On the desktop, as well as an "Astro Manager" icon there is a "Astro Manager Params" icon that allows you to open a text editor (Gedit) on the setup file of Astro Manager
Figure 7: Desktop of Astro Manager with VNC
Normally, the Astro system is already set up according to the required configuration, but there may be cases in which a reconfiguration of some parameters may be useful. The following is a list of parameters with their default value, which can be modified, and their meaning: • RMI_SERVER_HOST=astro - is the IP address of the Astro server. Its default value is astro since in the default configuration, Astro provides DHCP server and DNS server and associates its IP address to the keyword astro. • RMI_SERVER_HOSTNAME=astro - is the IP address where Astro Manager runs. Be careful not to mix it up with the previous parameter. Its default value is astro since the client typically runs locally on Astro. Usually it is not necessary to specify this parameter, because Astro Manager is able to obtain the IP address of the computer where it runs. However, this does not happen in all cases, for example, when the machine of Astro Manager has many aliases of IP addresses. In these cases the parameter can become necessary. • DESKTOP_TEL=5706 - is the phone number on Astro of the operator station that you want to associate to the current Astro Manager. The Operator Station can exclusively be a Tono Voip, because this association implies a direct connection between Astro Manager and Operator Station. • DEFAULT_USER=admin - is the default user with which Astro Manager is launched. If not defined, the user name for access to the machine is used.
Fitre ASTRO / PAGA
914140IUM.PAVA Sheet 12 of 44
• Language=it [en], Country=IT [US] - is the language used to launch Astro Manager. The other parameters in this file do not have setup purposes and normally should not be changed.
3.2 Setting up System Options
System setup is performed primarily when the global system is implemented.
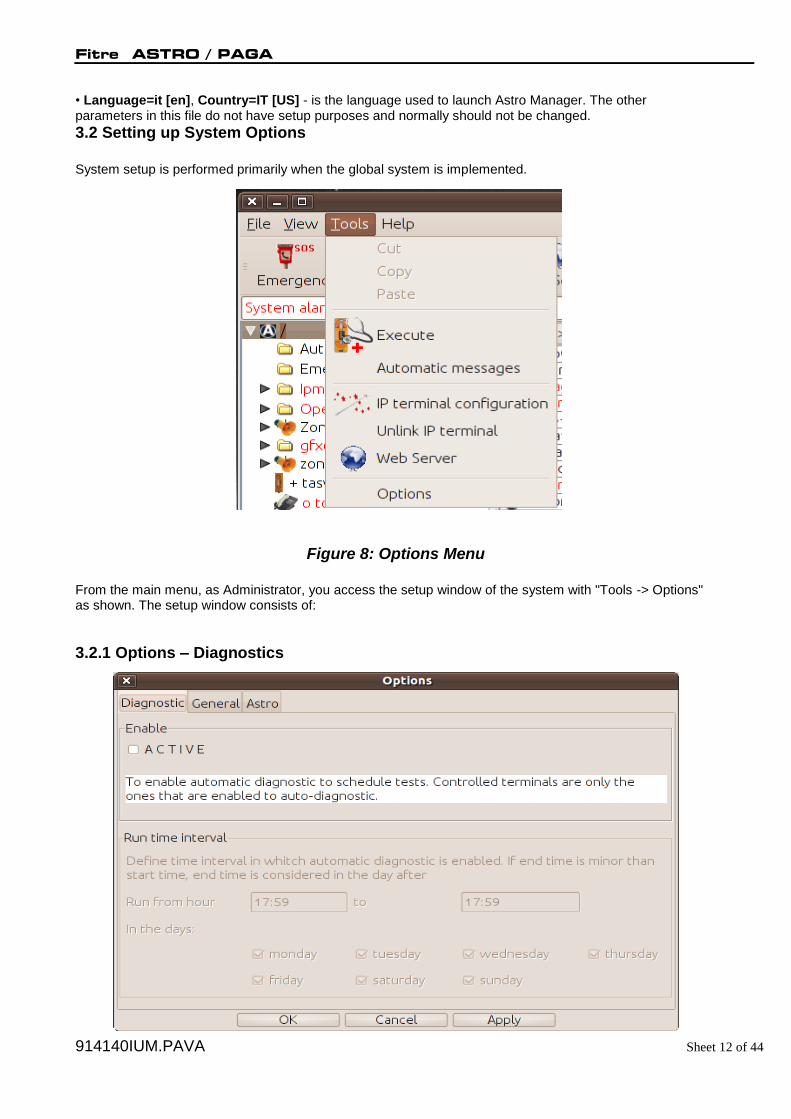
Figure 8: Options Menu
From the main menu, as Administrator, you access the setup window of the system with "Tools -> Options" as shown. The setup window consists of:
3.2.1 Options – Diagnostics
Fitre ASTRO / PAGA
914140IUM.PAVA Sheet 13 of 44
Figure 9: Options – Diagnostics
The first tab is the setup of the automatic diagnostics of the system, or batch test (BT). The BT is a feature of Astro acting contextually to the terminals that are placed under test. To put a terminal under test, it must be properly configured (see section "Configuring the terminal diagnostics"). The BT is launched when its activation is programmed and stops either when all terminals have been placed under test, or when the activation time expires. If the activation time expires before all the terminals have been tested, BT, on next activation, restarts where it left off. The test of Voip terminals takes a few seconds and consists of: • Check for connection and recording • Speech tests on all audio instruments: handset, speakerphone, external speakers, and related microphones • Update of parameters, if necessary (see section "Remote setup" for the parameters which can be updated)
3.2.2 Options – General
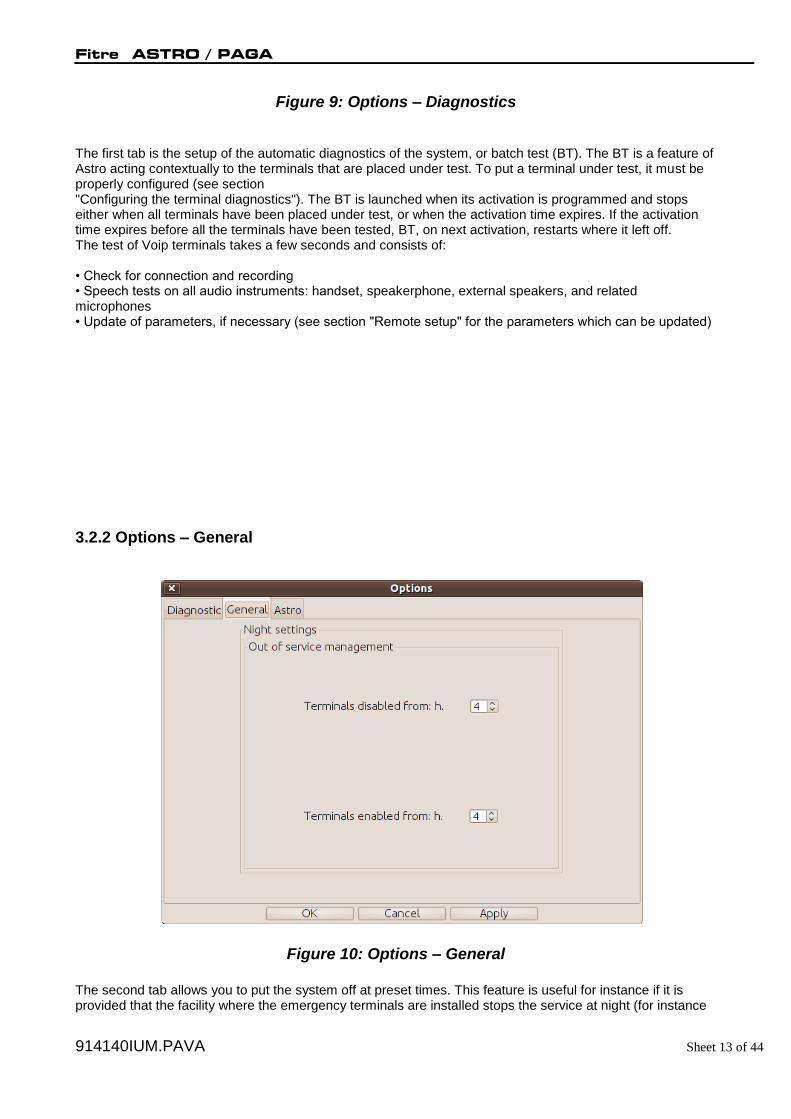
Figure 10: Options – General
The second tab allows you to put the system off at preset times. This feature is useful for instance if it is provided that the facility where the emergency terminals are installed stops the service at night (for instance
Fitre ASTRO / PAGA
914140IUM.PAVA Sheet 14 of 44
a subway). In this case it is possible to stop the emergency call activity in the period when the service is not manned. If the enabling/disabling time is the same (as shown in the picture), there is no service stop.
3.2.3 Options – Astro
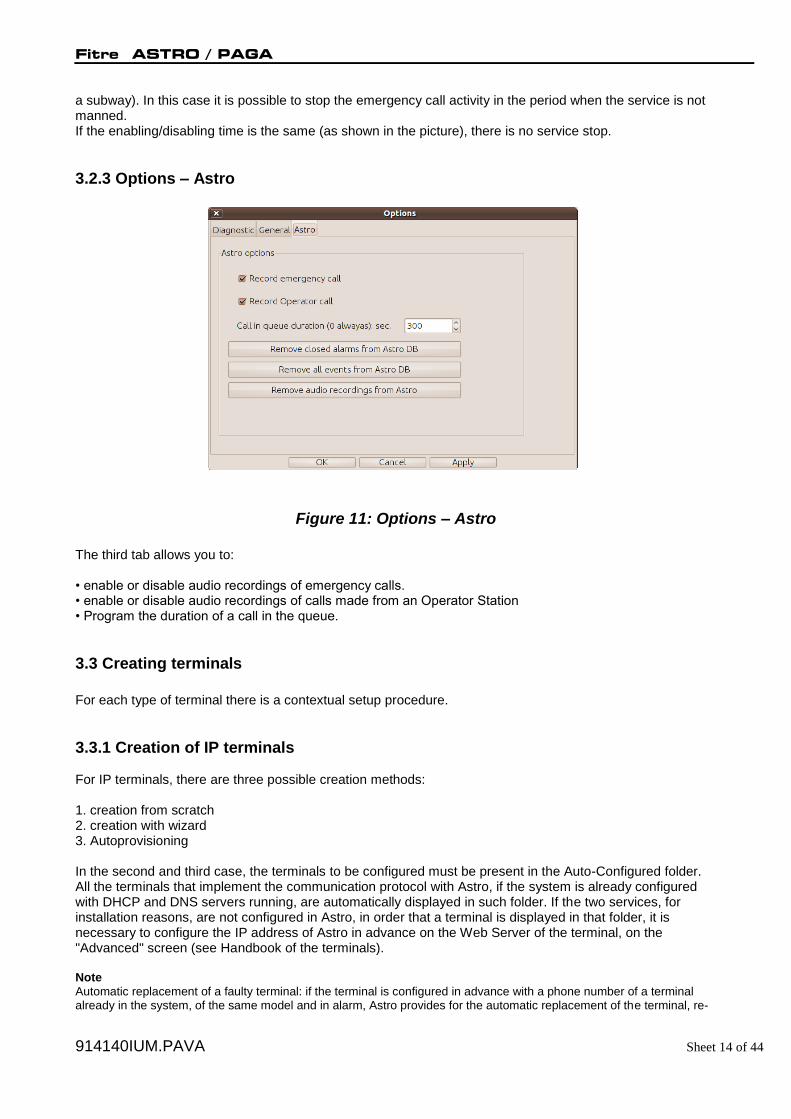
Figure 11: Options – Astro
The third tab allows you to: • enable or disable audio recordings of emergency calls. • enable or disable audio recordings of calls made from an Operator Station • Program the duration of a call in the queue.
3.3 Creating terminals
For each type of terminal there is a contextual setup procedure.
3.3.1 Creation of IP terminals
For IP terminals, there are three possible creation methods: 1. creation from scratch 2. creation with wizard 3. Autoprovisioning In the second and third case, the terminals to be configured must be present in the Auto-Configured folder. All the terminals that implement the communication protocol with Astro, if the system is already configured with DHCP and DNS servers running, are automatically displayed in such folder. If the two services, for installation reasons, are not configured in Astro, in order that a terminal is displayed in that folder, it is necessary to configure the IP address of Astro in advance on the Web Server of the terminal, on the "Advanced" screen (see Handbook of the terminals). Note
Automatic replacement of a faulty terminal: if the terminal is configured in advance with a phone number of a terminal already in the system, of the same model and in alarm, Astro provides for the automatic replacement of the terminal, re-
Fitre ASTRO / PAGA
914140IUM.PAVA Sheet 15 of 44
programming all the other parameters of the new terminal. In this case, it is not necessary to intervene on Astro Manager to set up the terminal.
3.3.1.1 Creation from scratch
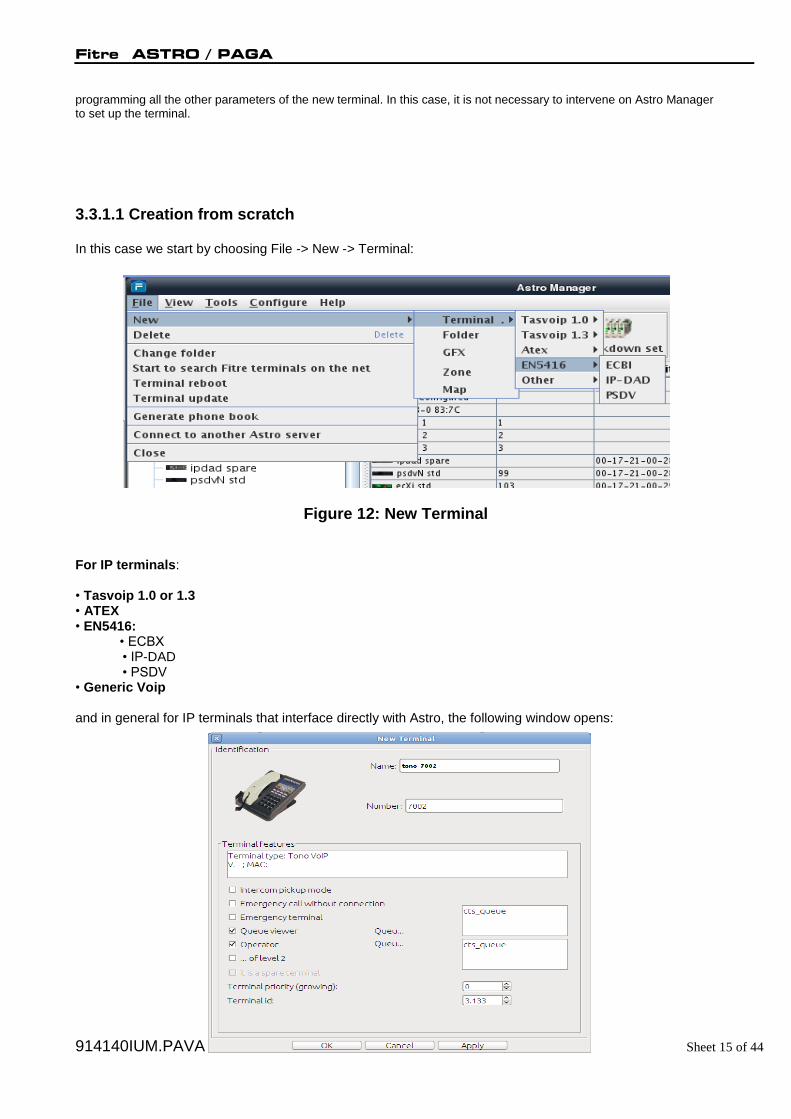
In this case we start by choosing File -> New -> Terminal:
Figure 12: New Terminal
For IP terminals: • Tasvoip 1.0 or 1.3 • ATEX • EN5416: • ECBX
• IP-DAD • PSDV
• Generic Voip and in general for IP terminals that interface directly with Astro, the following window opens:
Fitre ASTRO / PAGA
914140IUM.PAVA Sheet 16 of 44
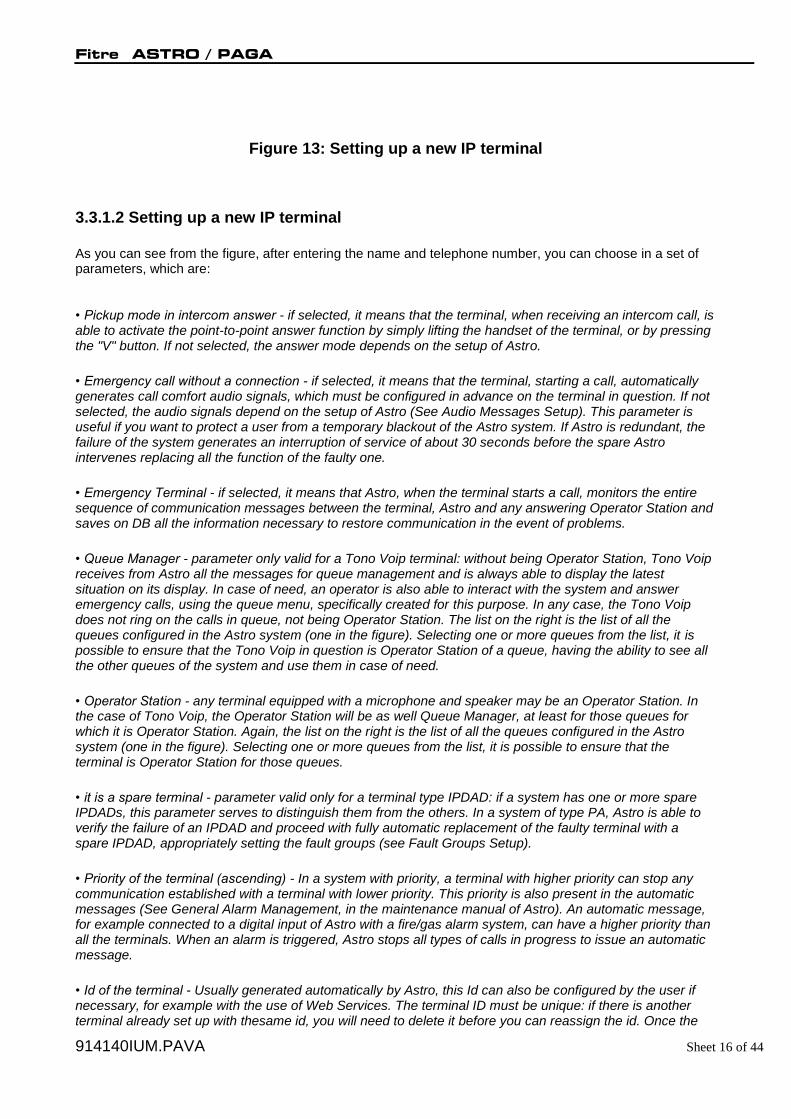
Figure 13: Setting up a new IP terminal
3.3.1.2 Setting up a new IP terminal
As you can see from the figure, after entering the name and telephone number, you can choose in a set of parameters, which are:
• Pickup mode in intercom answer - if selected, it means that the terminal, when receiving an intercom call, is able to activate the point-to-point answer function by simply lifting the handset of the terminal, or by pressing the "V" button. If not selected, the answer mode depends on the setup of Astro.
• Emergency call without a connection - if selected, it means that the terminal, starting a call, automatically generates call comfort audio signals, which must be configured in advance on the terminal in question. If not selected, the audio signals depend on the setup of Astro (See Audio Messages Setup). This parameter is useful if you want to protect a user from a temporary blackout of the Astro system. If Astro is redundant, the failure of the system generates an interruption of service of about 30 seconds before the spare Astro intervenes replacing all the function of the faulty one.
• Emergency Terminal - if selected, it means that Astro, when the terminal starts a call, monitors the entire sequence of communication messages between the terminal, Astro and any answering Operator Station and saves on DB all the information necessary to restore communication in the event of problems.
• Queue Manager - parameter only valid for a Tono Voip terminal: without being Operator Station, Tono Voip receives from Astro all the messages for queue management and is always able to display the latest situation on its display. In case of need, an operator is also able to interact with the system and answer emergency calls, using the queue menu, specifically created for this purpose. In any case, the Tono Voip does not ring on the calls in queue, not being Operator Station. The list on the right is the list of all the queues configured in the Astro system (one in the figure). Selecting one or more queues from the list, it is possible to ensure that the Tono Voip in question is Operator Station of a queue, having the ability to see all the other queues of the system and use them in case of need.
• Operator Station - any terminal equipped with a microphone and speaker may be an Operator Station. In the case of Tono Voip, the Operator Station will be as well Queue Manager, at least for those queues for which it is Operator Station. Again, the list on the right is the list of all the queues configured in the Astro system (one in the figure). Selecting one or more queues from the list, it is possible to ensure that the terminal is Operator Station for those queues.
• it is a spare terminal - parameter valid only for a terminal type IPDAD: if a system has one or more spare IPDADs, this parameter serves to distinguish them from the others. In a system of type PA, Astro is able to verify the failure of an IPDAD and proceed with fully automatic replacement of the faulty terminal with a spare IPDAD, appropriately setting the fault groups (see Fault Groups Setup).
• Priority of the terminal (ascending) - In a system with priority, a terminal with higher priority can stop any communication established with a terminal with lower priority. This priority is also present in the automatic messages (See General Alarm Management, in the maintenance manual of Astro). An automatic message, for example connected to a digital input of Astro with a fire/gas alarm system, can have a higher priority than all the terminals. When an alarm is triggered, Astro stops all types of calls in progress to issue an automatic message.
• Id of the terminal - Usually generated automatically by Astro, this Id can also be configured by the user if necessary, for example with the use of Web Services. The terminal ID must be unique: if there is another terminal already set up with thesame id, you will need to delete it before you can reassign the id. Once the
Fitre ASTRO / PAGA
914140IUM.PAVA Sheet 17 of 44
setup of the terminal is over, by pressing "OK" the terminal will be created if there are no setup errors. It is worth noting that the setup of the new terminal is realized completely automatically both on the terminal itself (with the exception ofthe "generic voip" terminal), and on Astro.
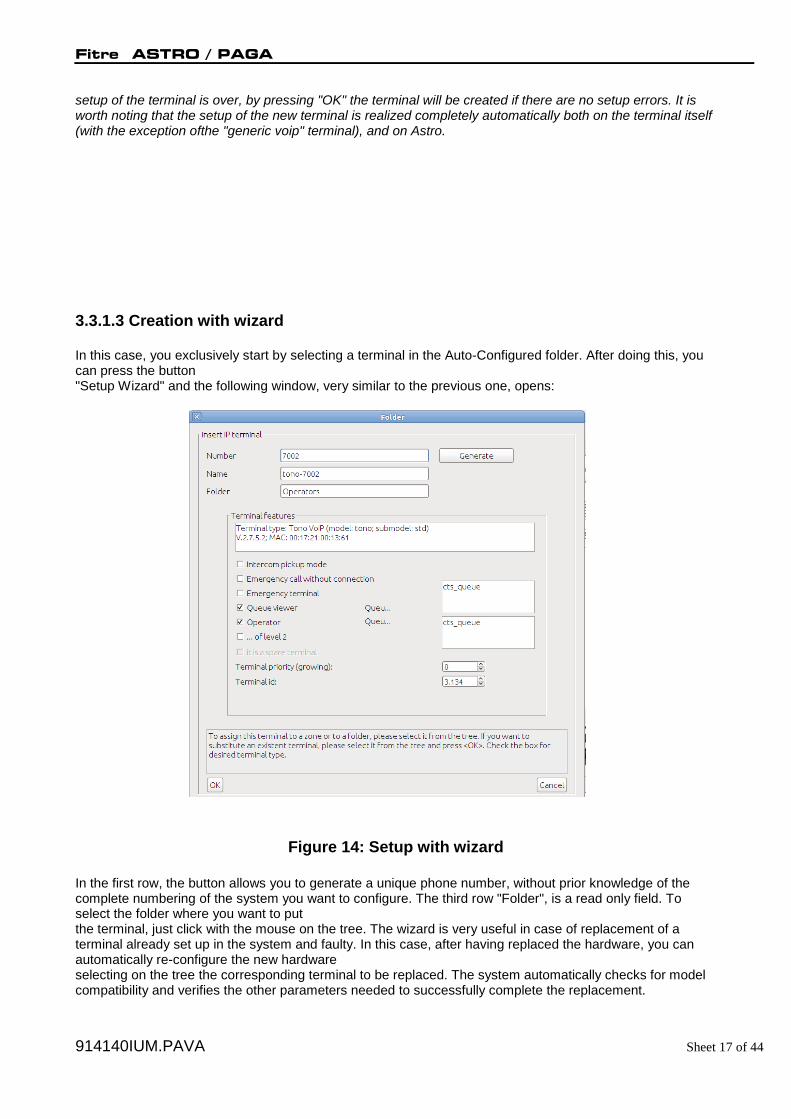
3.3.1.3 Creation with wizard
In this case, you exclusively start by selecting a terminal in the Auto-Configured folder. After doing this, you can press the button "Setup Wizard" and the following window, very similar to the previous one, opens:
Figure 14: Setup with wizard
In the first row, the button allows you to generate a unique phone number, without prior knowledge of the complete numbering of the system you want to configure. The third row "Folder", is a read only field. To select the folder where you want to put the terminal, just click with the mouse on the tree. The wizard is very useful in case of replacement of a terminal already set up in the system and faulty. In this case, after having replaced the hardware, you can automatically re-configure the new hardware selecting on the tree the corresponding terminal to be replaced. The system automatically checks for model compatibility and verifies the other parameters needed to successfully complete the replacement.
Fitre ASTRO / PAGA
914140IUM.PAVA Sheet 18 of 44
Among the features of the terminal you can notice the model and its MAC address. This information is very useful if you want to be able to recognize the terminal and place it in the desired position. It should be stressed that, during physical installation of many terminals at the same time, it is very useful to prepare a table that contains the MAC addresses and the physical location of each terminal. The MAC address is located on a label directly onto the terminal’s hardware board. For all other parameters, see the previous paragraph.
3.4 Autoprovisioning Astro can be setup in such a way to provide an autoprovisioning system (See Maintenance Manual of Astro), it is a system for fully automatic setup of new terminals that are present in the Auto-Configured folder. In this case, each new terminal in the system obtains default parameters, which vary depending on the type of terminal. So the terminal is added to the system and can be used without any manual setup.
3.5 Voip setup
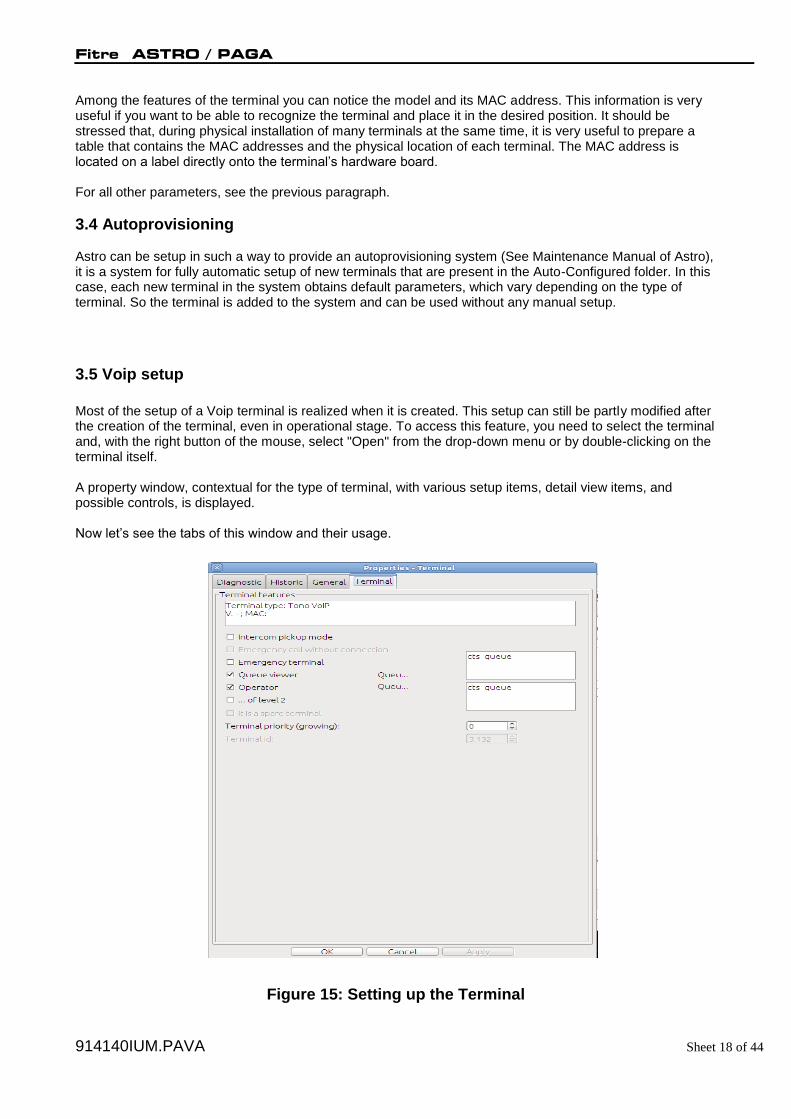
Most of the setup of a Voip terminal is realized when it is created. This setup can still be partly modified after the creation of the terminal, even in operational stage. To access this feature, you need to select the terminal and, with the right button of the mouse, select "Open" from the drop-down menu or by double-clicking on the terminal itself. A property window, contextual for the type of terminal, with various setup items, detail view items, and possible controls, is displayed. Now let’s see the tabs of this window and their usage.
Figure 15: Setting up the Terminal
Fitre ASTRO / PAGA
914140IUM.PAVA Sheet 19 of 44
As you can see, such tab item, "Terminal", is very similar to the dialog for the creation of the Voip terminal. From this tab it is possible to change some of the parameters used for the creation of the terminal. For an explanation of the parameters, see "Creating Voip terminals."
4. Intercom and PA calls
4.1 Management of intercom calls
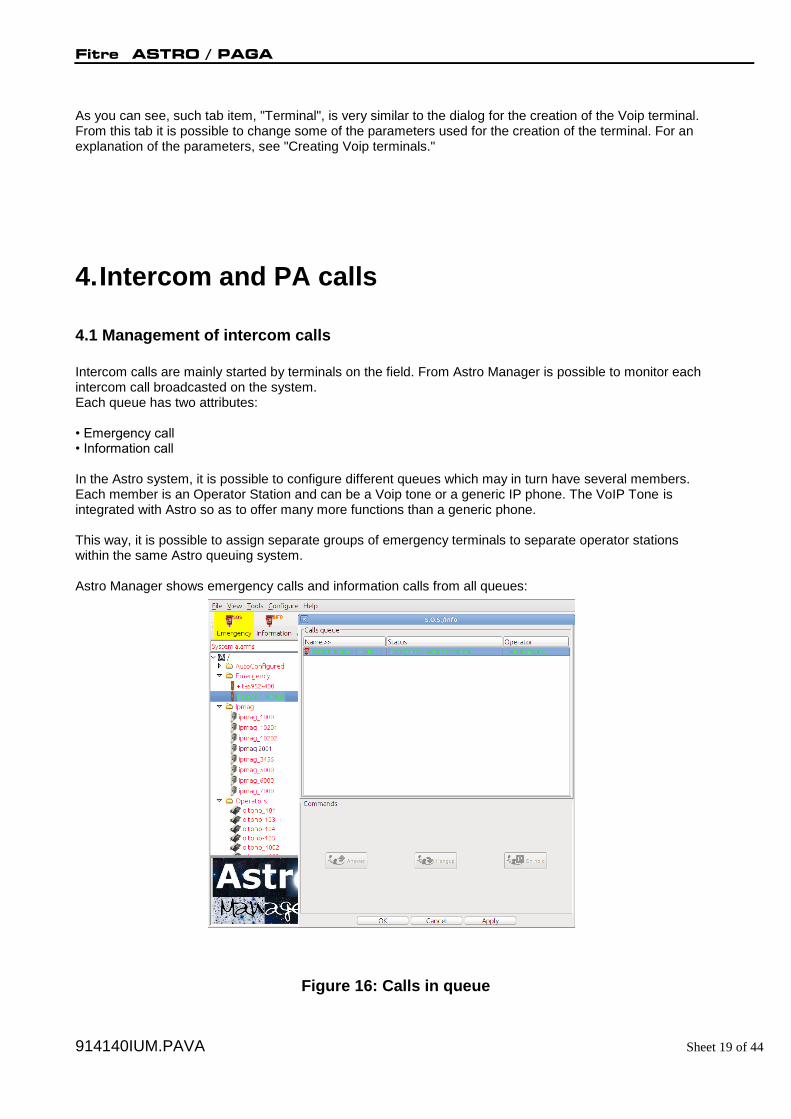
Intercom calls are mainly started by terminals on the field. From Astro Manager is possible to monitor each intercom call broadcasted on the system. Each queue has two attributes: • Emergency call • Information call In the Astro system, it is possible to configure different queues which may in turn have several members. Each member is an Operator Station and can be a Voip tone or a generic IP phone. The VoIP Tone is integrated with Astro so as to offer many more functions than a generic phone. This way, it is possible to assign separate groups of emergency terminals to separate operator stations within the same Astro queuing system. Astro Manager shows emergency calls and information calls from all queues:
Figure 16: Calls in queue
Fitre ASTRO / PAGA
914140IUM.PAVA Sheet 20 of 44
4.1.1 Emergency calls window In case of emergency call, the "Emergency" or the "Information" button of the toolbar starts to flash in yellow, depending on the type of incoming call. The calling terminal is automatically selected on the tree and highlighted in yellow. If the calling terminal is visible also on the table and/or map, the calling terminal is selected and highlighted in yellow. The emergency/info call window automatically opens. In this window you can notice from the figure that the emergency calls are magenta, while the information calls are yellow. This allows an operator to immediately understand the type of call. The buttons that you can use are: • Answer button - to answer the call: the operator station associated with Astro Manager • Hangup button - to close the call with the headphones • On hold button - to put the call on hold In the window you can see as well the list of calls in queue, which can be selected. If there are several calls in queue, you can choose which one to answer, selecting the call by selecting and pressing "Answer". If ambient noise listening is active while an emergency call is arriving, it is automatically deactivated. In the window you can see the table of active calls. The calls are shown on the table in order of arrival: the first call and is the first one come to Astro in chronological order. In this table, you can see: • Colour of the table row: emergency calls are in magenta, while information calls are in yellow • Name: Name of the caller as set in Astro Manager and next, in brackets, the phone number. • State: type of call (emergency or information) and call status, which can be: – Call in queue: waiting to be answered – Call in progress: an operator has taken charge of the call – Call on hold: an operator has put the call on hold. – Call closed – Call waiting to be answered: it is a temporary state which appears only in the presence of Web Service
client. • the operator who is in charge of the call If a call is on hold, any operator, even different from the one who answered, can answer the call.
4.1.2 Emergency with Astro Manager When a call is sent, the Operator Stations in charge of the answer on the activated queue begin to ring. It is possible to answer the call simply by picking up the handset and starting the conversation. The station stops ringing and the LED of the Voip Tone next to the "V" button turns on steadily. If there are multiple calls in queue, all the LEDs of the Tone continue to flash. In this case, after the first conversation, you hang up the handset, the station restarts to ring and you can pick up the handset again and start a new conversation, until all calls are over. If the GUI is active, you can interact with it. Every VoIP Tone shows on its display the list of calls in queue of Astro. The operator can, picking up the handset, answer the first call of the queue, or by selecting the arrow keys, move up a call in the queue, answer that call, picking up the handset or pressing the OK button.
4.1.3 Emergency with PCO and PO The Astro system can be remotely controlled with a Web Services client. In this case, if you use the method disableQueueMembers(), the control of incoming emergency calls is passed to the Web Service client, called OMS (Operator Main Station). From the moment an operator answers the call using the VoiP Tone Operator Station, the flow of possible events and possible actions coincides with what is generated in the absence of remote control. Before this time however, the system is controlled by the OMS. The most important event to be noted, is that no Operator Station rings when calls are received. Warning
Fitre ASTRO / PAGA
914140IUM.PAVA Sheet 21 of 44
The Operator Stations do not ring when receiving an emergency call if a Web Service client which called the method disableQueueMembers() is active. The method disableQueueMembers() also acts as "keep-alive" for the Astro system to detect an active web-service client. In fact, it has a parameter that indicates the number of seconds within which Astro must expect a command
renew. If within that time Astro does not receive the new command, it automatically switches to Astro Manager mode.
4.1.3.1 Response to emergency call using WS
1. Web Service receives an emergency call in queue notification 2. Web service selects the OS which shall answer. 3. Web Service calls the answer() method on the selected OS 4. Astro turns the call in queue to the OS 5. The selected OS connects to the emergency call and begins to ring 6. the operator picks up the handset and answers the emergency call 7. If the operator does not pick up the handset within a certain timeout, the call will automatically return to the queue
4.1.3.2 Call transfer management by WS
1. The operator is answering an emergency call 2. The operator wants to turn the call to another operator 3. The operator calls the startHold() method on WS 4. The operator who wants to take charge of this call calls the stopHold() method on WS and receives the call
4.1.3.3 Call transfer management by OS
1. The operator is answering an emergency call 2. The operator wants to turn the call to another operator 3. The operator presses the "R" key on the keyboard of the OS 4. The operator can hear the selection invitation tone and the display will prompt number selection. 5. The operator enters the number to which he wants to transfer the call. It can be another Voip Tone, a phone accessible from Astro and also a remote phone connected to Astro in the SIP trunk. 6. There are three cases:
(a) The operator performs an unattended call transfer: after entering the number, the operator hangs up the handset. The phone to which the call has been transferred begins to ring, until the operator answers. At that point the call is transferred. (b) The operator performs a semi-attended call transfer: after entering the number, the operator presses the key "V" on Voip Tone and then hangs up the handset. The phone to which the call has been transferred begins to ring, until the operator answers. At that point the call is transferred. (c) The operator performs an attended call transfer: after entering the number, the operator presses the "V" key on Voip Tone and then waits for the answer by the operator. A point-to-point conversation with the called operator starts. After this, the operator hangs up the handset. At that point the call is transferred.
7. In all cases, the transferred call is automatically put back in the queue after a programmable time-out if not picked up by any other operator. In all cases the partner, ie the one whose call is to be transferred, will hear, for all the time needed for transfer, a programmable comfort tone, by default a voice uttering the words "please wait" every 5 seconds. 8. In all cases, it is possible to take back the call on hold, pressing again the button "R" on the Voip Tone on which the call was put on hold. In the event that the Voip Tone has a series of calls on hold, it is also possible to choose which one to transfer, if different from the last call put on hold: just turn on (if not on) the expanded view of the calls, select the one you want to transfer and press the button . This will display the message Transfer?. Pressing the "V" button will connect the call currently underway with the selected one. By pressing the "X" button or otherwise after 3 seconds without making any selection, you will return to the expanded view of the calls.
Fitre ASTRO / PAGA
914140IUM.PAVA Sheet 22 of 44
4.1.3.4 Management of conference calls
It is possible as well to accept a call in conference mode. Conference mode can be enabled only for calls on hold and for incoming calls. In this case, pressing the button will display Conference?. Pressing the ’enter’ button will enable this mode on the selected call involving the currently active calls. Pressing the ’X’ button or the lapse of 3 seconds without having made selections, returns to the expanded view of the calls with no action on the selected call. To end a call in conference mode, you can choose whether to close a call at a time, or close all calls with a single action. Simply pressing the ’X’ button allows you to close only the displayed call, while hanging up the handset will close all active calls (in addition to the outgoing ones).
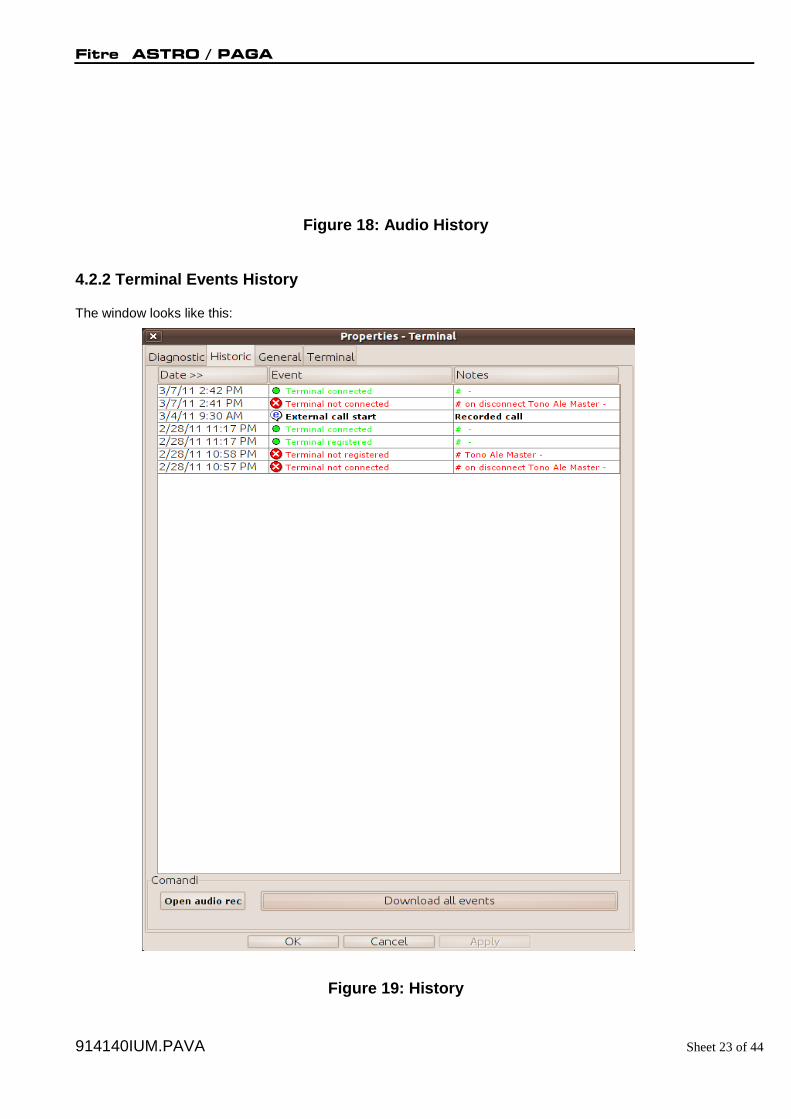
4.2 Management of audio recordings
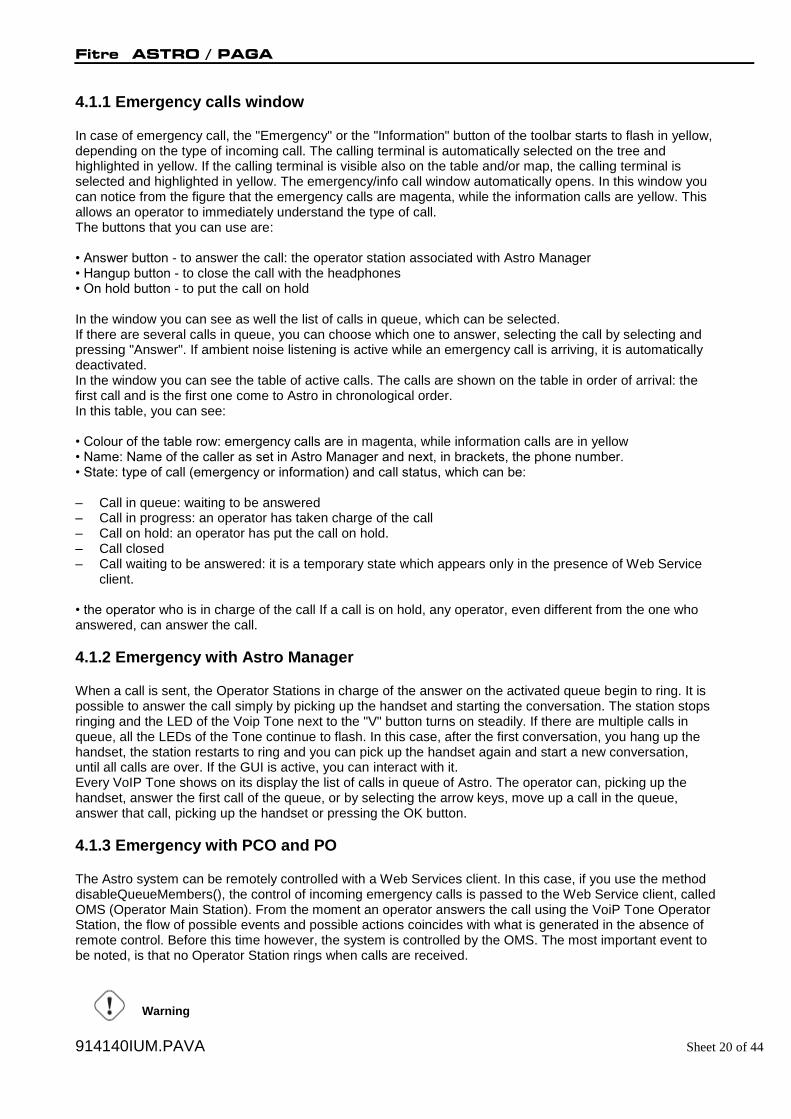
All the calls in the queue and all the calls made by operators can be recorded. To access the audio recordings, Astro Manager provides two methods. The first is a query window to the recording database which is launched from the menu View -> Audio History:
Figure 17: View Audio History
The second, again from the same menu, selecting View -> History, selects the list of events related to a terminal. Among the events there are also call events which can be selected and heard.
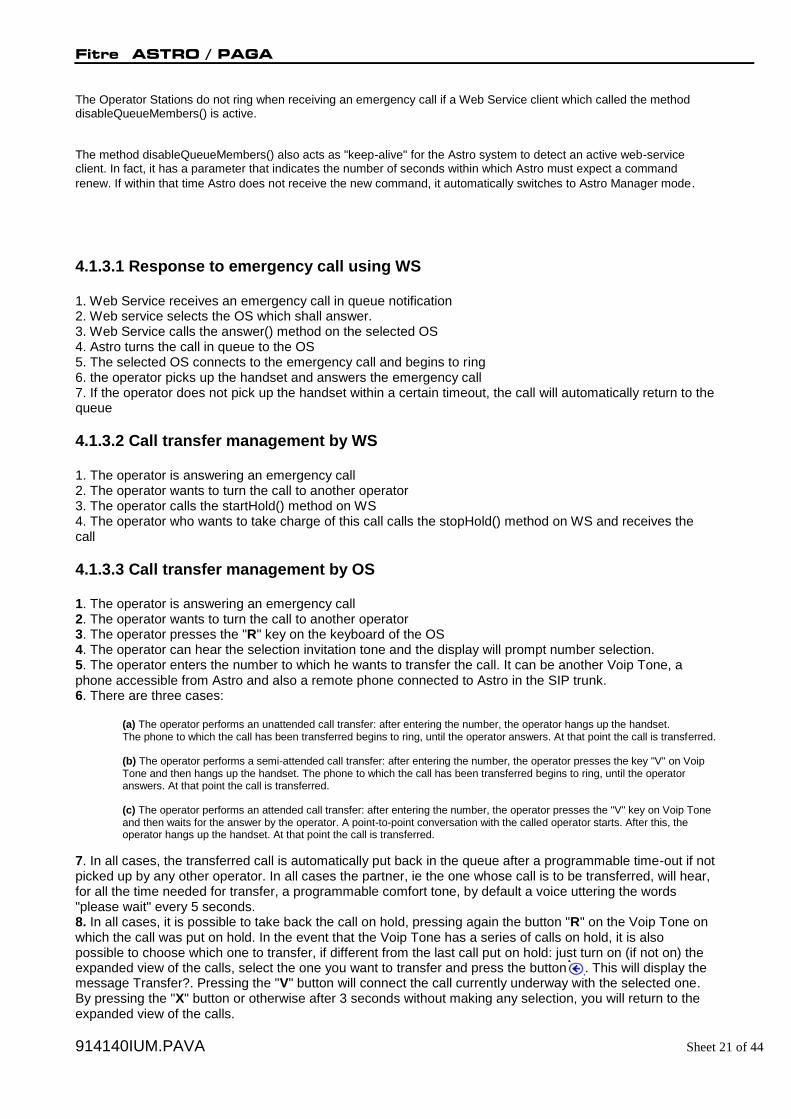
4.2.1 Audio History The window looks like this:
Fitre ASTRO / PAGA
914140IUM.PAVA Sheet 23 of 44
Figure 18: Audio History
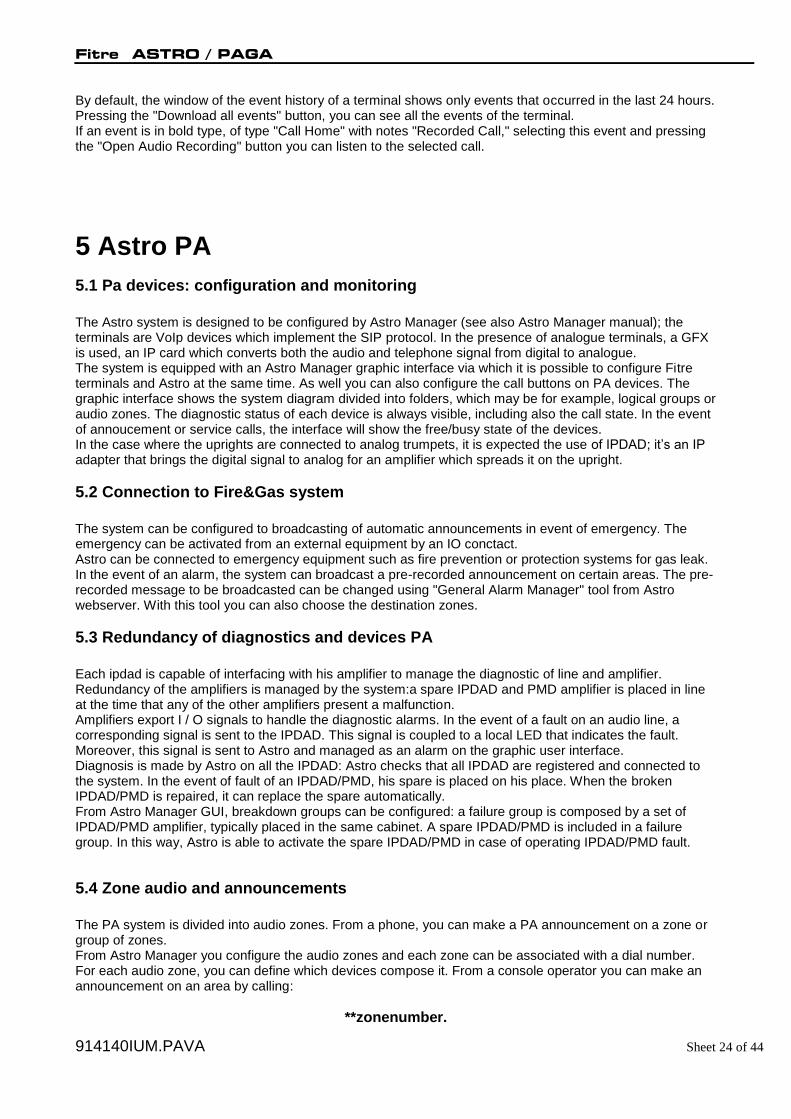
4.2.2 Terminal Events History The window looks like this:
Figure 19: History
Fitre ASTRO / PAGA
914140IUM.PAVA Sheet 24 of 44
By default, the window of the event history of a terminal shows only events that occurred in the last 24 hours. Pressing the "Download all events" button, you can see all the events of the terminal. If an event is in bold type, of type "Call Home" with notes "Recorded Call," selecting this event and pressing the "Open Audio Recording" button you can listen to the selected call.
5 Astro PA
5.1 Pa devices: configuration and monitoring
The Astro system is designed to be configured by Astro Manager (see also Astro Manager manual); the terminals are VoIp devices which implement the SIP protocol. In the presence of analogue terminals, a GFX is used, an IP card which converts both the audio and telephone signal from digital to analogue. The system is equipped with an Astro Manager graphic interface via which it is possible to configure Fitre terminals and Astro at the same time. As well you can also configure the call buttons on PA devices. The graphic interface shows the system diagram divided into folders, which may be for example, logical groups or audio zones. The diagnostic status of each device is always visible, including also the call state. In the event of annoucement or service calls, the interface will show the free/busy state of the devices. In the case where the uprights are connected to analog trumpets, it is expected the use of IPDAD; it’s an IP adapter that brings the digital signal to analog for an amplifier which spreads it on the upright.
5.2 Connection to Fire&Gas system
The system can be configured to broadcasting of automatic announcements in event of emergency. The emergency can be activated from an external equipment by an IO conctact. Astro can be connected to emergency equipment such as fire prevention or protection systems for gas leak. In the event of an alarm, the system can broadcast a pre-recorded announcement on certain areas. The pre-recorded message to be broadcasted can be changed using "General Alarm Manager" tool from Astro webserver. With this tool you can also choose the destination zones.
5.3 Redundancy of diagnostics and devices PA
Each ipdad is capable of interfacing with his amplifier to manage the diagnostic of line and amplifier. Redundancy of the amplifiers is managed by the system:a spare IPDAD and PMD amplifier is placed in line at the time that any of the other amplifiers present a malfunction. Amplifiers export I / O signals to handle the diagnostic alarms. In the event of a fault on an audio line, a corresponding signal is sent to the IPDAD. This signal is coupled to a local LED that indicates the fault. Moreover, this signal is sent to Astro and managed as an alarm on the graphic user interface. Diagnosis is made by Astro on all the IPDAD: Astro checks that all IPDAD are registered and connected to the system. In the event of fault of an IPDAD/PMD, his spare is placed on his place. When the broken IPDAD/PMD is repaired, it can replace the spare automatically. From Astro Manager GUI, breakdown groups can be configured: a failure group is composed by a set of IPDAD/PMD amplifier, typically placed in the same cabinet. A spare IPDAD/PMD is included in a failure group. In this way, Astro is able to activate the spare IPDAD/PMD in case of operating IPDAD/PMD fault.
5.4 Zone audio and announcements
The PA system is divided into audio zones. From a phone, you can make a PA announcement on a zone or group of zones. From Astro Manager you configure the audio zones and each zone can be associated with a dial number. For each audio zone, you can define which devices compose it. From a console operator you can make an announcement on an area by calling:
**zonenumber.
Fitre ASTRO / PAGA
914140IUM.PAVA Sheet 25 of 44
**1 For example, will place a call on zone 1.
The zone number is configurable by the user as well as which IPDADs belonging to the area (see also Astro Manager manual). You can set different levels of priority for PA operators (see also manual Astro Manager) from which the announces are coming.In this way, an announcement of lower priority is interrupted by an announcement made on the same area by an operator of highest priority. You can configure a priority also for automatic announcements using General Alarm Manager gui.
5.4.1 PA live announcements: multi zone dial pattern The operator can also call several areas at once using the following dial number pattern:
** zone1 * zone2 ... * zoneN.
For example **1*3 to call the zone 1 and 3.
You can call all areas by dialing **0.
5.4.2 PA delayed announcements (antilarsen) The anti-Larsen announcement is made broadcasting announces late after a recording: the announce is played only after the end of the recording. In this way you avoid the annoying Larsen effects. To start an announce from a console you can make an delayed announcement on an area by calling:
#*zonenumber. #*1 For example, will place a call on zone 1.
To place an announce on multiple zones simply call the number:
#*zone1*zone2... * zoneN.
For example #*1*3 to call the zone 1 and 3. When you call a number to make an announcement, first you hear a beep to indicate the recording start. You can end the announce in these ways:
– pressing the ’#’ button this is the right way to end announce
– hanging up the phone in this way you can hear some noise at the end of announcement
– pressing the ’#’ followed by ’*’ in this way you can abort the announce
– stop talking registration is also automatically terminated after a pause (silence) of 4 seconds.
5.5 Prerecorded audio messages
A prerecorded audio message can be played on a single ZONE, using a simple telephone call to a predefined number. The number to dial is
***11 + announcenumber.
For example by dialing ***112, an audio message named annuncio2 is played. The phone call is hung at the end af audio message. Announcements can be pre-recorded externally to Astro and imported using the web server of Astro, the important thing is to name composing with: annuncio + announcenumber. See chapter listing "Astro web server" under "System Recordings"to import custom audio messages. Through the web service interface is possible, using the dial operation, to call a phone number corresponding to the message that we want to play on the device. The dial operation allows you to set parameters in order to make an intercom call to the telephone and then redirected to the number for the playback of prerecorded messages (*** 11).
Fitre ASTRO / PAGA
914140IUM.PAVA Sheet 26 of 44
5.6 Wide band PA announces
To make PA announces with wide audio band is possible to configure some extensions to use wide band codecs such as
ulaw16 or g722. Ulaw16 codec is supported by voip Fitre devices. See "Extensions" paragraph in "Astro Web Server"
chapter to configure "Allow" field with preferred codecs.
6 Network configuration
6.1 Network interfaces
6.1.1 NETWORK INTERFACE CARDS Astro uses 2 network interface cards plus the option of a third network card:
ethernet0 network interface card (LAN-A): is the main network interface for connection to the previous device. It is the network outlet closest to the power supply
ethernet1 network interface card(LAN-B): is the secondary network interface for connection to the next device. This is also the card used in redundant configurations to connect Astro 1 and Astro 2.
Ethernet2 network interface card (optional): is the network interface for connection to outside world. è l'interfaccia di rete utilizzata per connettersi al mondo esterno e permettere di accedere al sistema. Il alternativa, per raggiungere il sistema può essere utilizzata una delle porte disponibili di uno switch interposto tra due apparecchi del sistema.
The private network address of the machines ca be detected on the display of Astro.
6.1.2 NETWORK INTERFACES More network interfaces can be configured on the main interface card:
a dhcp client interface for an eventual LAN connection to the client’s network
an interface for the connection to the telephone network
an optional interface for a VLAN (Virtual LAN) connection to the telephone line.
6.2 Astro IP address configuration
6.2.1 How change Astro IP address The default configuration uses a fixed IP address where it is possible to contact Astro: this address is assigned to Astro hostname.This address is for example: 10.24.24.3. The Astro address is important because it’s used by Astro into SIP messages. This address can be modified via web server using various methods, depending on if there is a redundant or simple configuration. To access the web server an authorisation is required using the credentials: • user: astro • password: astrouser Typically the Astro address is set on eth0 while other aliases address can be configured for LAN connection to the customer network. On astro1 is also set up an ip address for maintenance: 192.168.249.1 on eth0:249 and 192.168.8.1 on eth1:8. On astro2 is set up 192.168.249.2 on eth0:249 and 192.168.8.2 on eth1:8. To change Astro ip address when the system has already been configured with its devices, you need to follow these steps:
Update Fitre devices (SIP phones) with the new server IP address, using the webserver on the page "advanced "and also update their new address. Restart them.
Fitre ASTRO / PAGA
914140IUM.PAVA Sheet 27 of 44
Change the IP address of any devices IP-DAD, PSDV, ECXI from Astro Manager
Change the IP address of Astro (see following paragraphs)
Restart Astro.
6.2.1.1 Astro address with redundant configurations With redundant configuration Astro address must be changed from the web server. See "Cluster Management" paragraph from chapter "Astro Web Server". Network configuration, in the case of redundancy, is different and Astro is reachable only by using a fixed TCP-IP address, which is shared by the two machines and assigned to the so called primary machine.
6.2.1.2 Astro address in single (not redundant) configuration
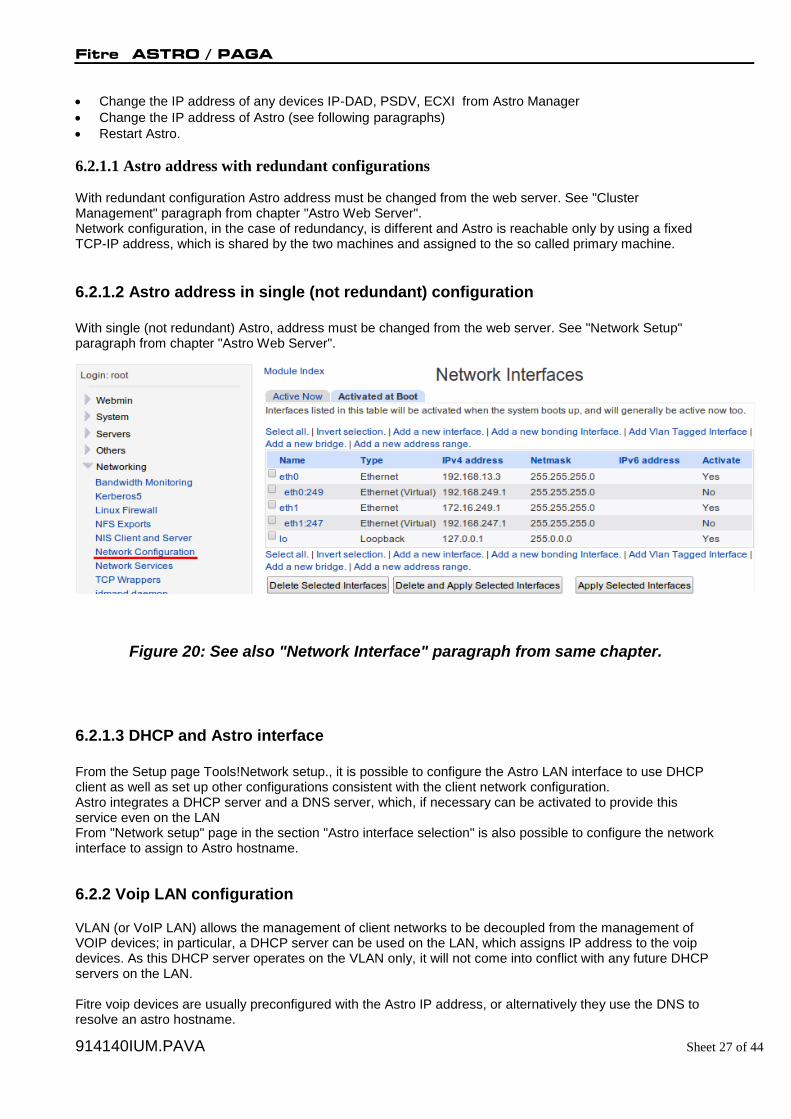
With single (not redundant) Astro, address must be changed from the web server. See "Network Setup" paragraph from chapter "Astro Web Server".
Figure 20: See also "Network Interface" paragraph from same chapter.
6.2.1.3 DHCP and Astro interface
From the Setup page Tools!Network setup., it is possible to configure the Astro LAN interface to use DHCP client as well as set up other configurations consistent with the client network configuration. Astro integrates a DHCP server and a DNS server, which, if necessary can be activated to provide this service even on the LAN From "Network setup" page in the section "Astro interface selection" is also possible to configure the network interface to assign to Astro hostname.
6.2.2 Voip LAN configuration VLAN (or VoIP LAN) allows the management of client networks to be decoupled from the management of VOIP devices; in particular, a DHCP server can be used on the LAN, which assigns IP address to the voip devices. As this DHCP server operates on the VLAN only, it will not come into conflict with any future DHCP servers on the LAN. Fitre voip devices are usually preconfigured with the Astro IP address, or alternatively they use the DNS to resolve an astro hostname.

Fitre ASTRO / PAGA
914140IUM.PAVA Sheet 28 of 44
VLAN can be configured or not on Astro according to customer needs.
7.Redundancy
7.1 High-Availability-Cluster (HA) To minimise the risk of service interruption, a version of Astro has been created where the service is offered by 2 machines in a cluster group: Astro 1 and Astro 2. Astro 1 is the master node or preferred node, whilst Astro 2 is configured as a second system, identical to Astro 1.
Astro 2 replaces the service only in the event that Astro 1 breaks down. In this case, the second system is able to take
its place, providing SIP registrar functions and becoming the primary node.
This system is referred to in IT terms as a High-Availability-Cluster(HA) with a Hot Standby configuration. The main component of the Astro cluster is called a heartbeat. This software generates signals (heartbeats) on an additional network card which then reach the second cluster node and manage the start and stop of redundancy services on each node. Redundancy services are those services which are active only on the primary cluster node. Further, Astro 1 and Astro 2 use DRBD to replicate data, acting as a type of real time backup. DRBD replicates not only data, but also all modifications: it can be seen as a type of RAID1 created on the network. DRBD is an acronym for Distributed Replicated Block Device. When data is modified on the primary node, the modifications are replicated on the other node in real time, and if a node falls, once it becomes active again it realigns itself with the other node. To implement the replication of data, DRBD uses TCP/IP on standard network interfaces: Astro 1 and Astro 2 are connected by an ethernet1 cross-cable. In normal functioning conditions, Astro 1 is the primary cluster node, and all necessary services are running on this node. When Astro 1 breaks down, Astro 2 takes over by providing the TCP/IP address of the HA cluster, and initiates the SIP registrar services. Astro 2 now becomes the primary cluster node. When Astro 1 becomes operative again (for example, after the restoration of a breakdown), it maintains the role of secondary node until the synchronisation of Astro 2 has been completed. Therefore, Astro 1 once again has the role of primary node, as it is configured as the preferred primary cluster node. The cluster status may be checked from the web server (see more) by selecting the "System monitor" option in the main menu, in the "Cluster status" section. In normal functioning conditions, the following status should be seen: • Primary/Secondary Consistent. The GUI Astro Manager also shows an alert if the cluster status is not showing as normal. (see also Astro Manager manual).
Fitre ASTRO / PAGA
914140IUM.PAVA Sheet 29 of 44
8 Web Server configuration
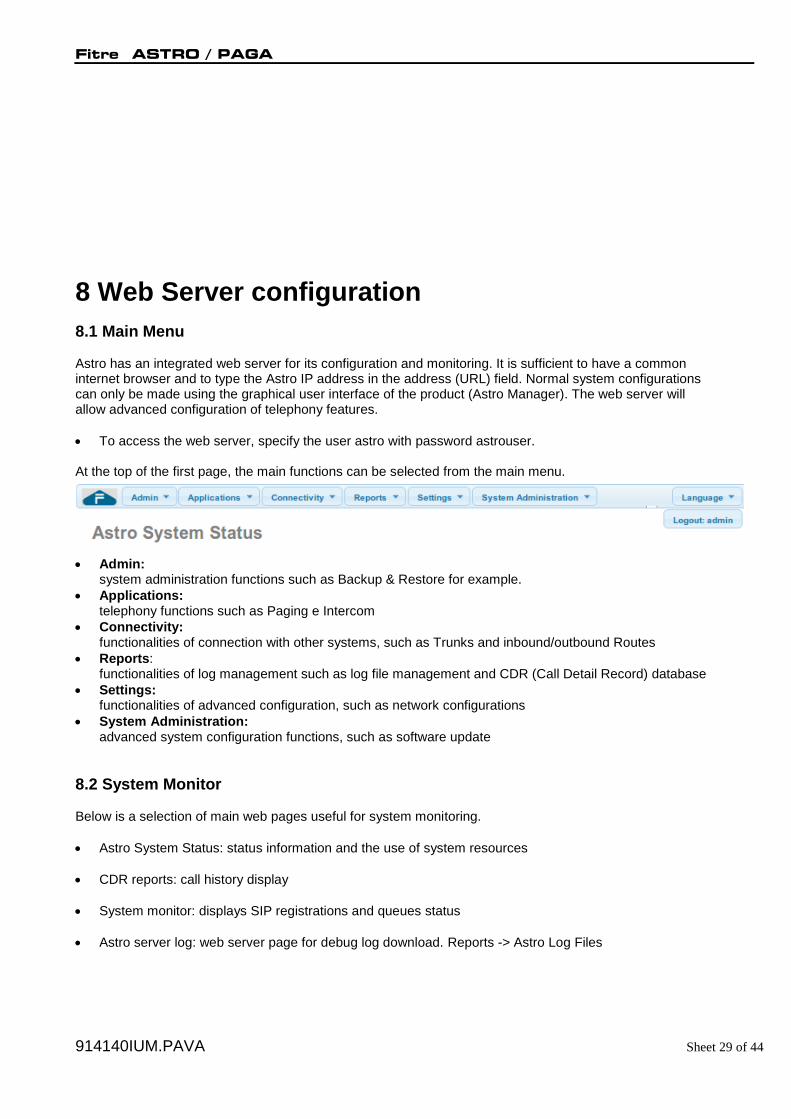
8.1 Main Menu Astro has an integrated web server for its configuration and monitoring. It is sufficient to have a common internet browser and to type the Astro IP address in the address (URL) field. Normal system configurations can only be made using the graphical user interface of the product (Astro Manager). The web server will allow advanced configuration of telephony features.
To access the web server, specify the user astro with password astrouser. At the top of the first page, the main functions can be selected from the main menu.
Admin: system administration functions such as Backup & Restore for example.
Applications: telephony functions such as Paging e Intercom
Connectivity: functionalities of connection with other systems, such as Trunks and inbound/outbound Routes
Reports: functionalities of log management such as log file management and CDR (Call Detail Record) database
Settings: functionalities of advanced configuration, such as network configurations
System Administration: advanced system configuration functions, such as software update
8.2 System Monitor Below is a selection of main web pages useful for system monitoring.
Astro System Status: status information and the use of system resources
CDR reports: call history display
System monitor: displays SIP registrations and queues status
Astro server log: web server page for debug log download. Reports -> Astro Log Files

Fitre ASTRO / PAGA
914140IUM.PAVA Sheet 30 of 44
8.2.1 Astro System Status On this page, various panels will be shown:
Fitre ASTRO / PAGA
914140IUM.PAVA Sheet 31 of 44
Server Status the status of the main applications is shown. Note: none of these applications must show a state of color red. The Web Service shows a state with yellow color if no client is connected, it is just a warning.
Astro Statistics status of voip function
Run-time execution times
System Statistics use of system resources: processor, memory, disk space, network resources. On this page there are also buttons that allow you the restart or shutdown of the Astro. With redundant configuration, both machines are switched off by shutdown button. It is possible to turn Astro off for maintenance purposes (taking care to respect the shutdown times), by pushing and immediately releasing the On/Off button on Astro case. The system will enter the shutdown phase and after approx. 30 seconds the system will stop.
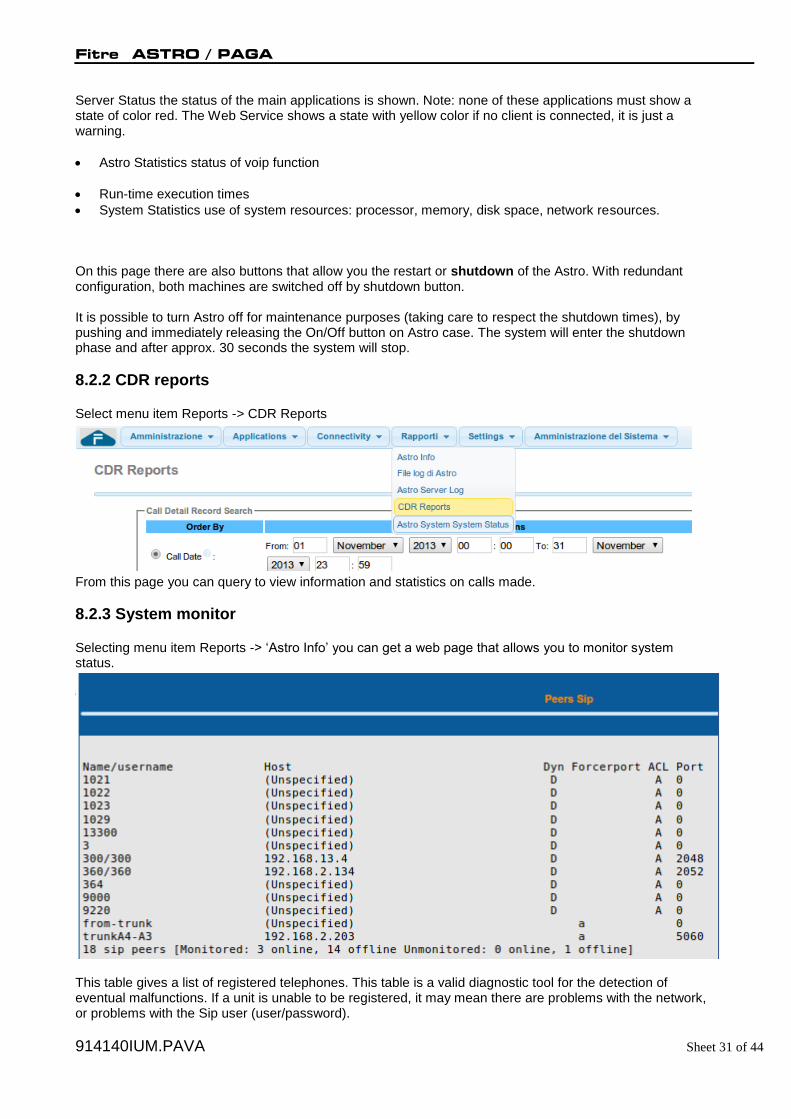
8.2.2 CDR reports Select menu item Reports -> CDR Reports From this page you can query to view information and statistics on calls made.
8.2.3 System monitor Selecting menu item Reports -> ‘Astro Info’ you can get a web page that allows you to monitor system status. 8.2.3.1 SIP registrations status: peers
This table gives a list of registered telephones. This table is a valid diagnostic tool for the detection of eventual malfunctions. If a unit is unable to be registered, it may mean there are problems with the network, or problems with the Sip user (user/password).
Fitre ASTRO / PAGA
914140IUM.PAVA Sheet 32 of 44
From this list you can see the status of any configured trunk.
8.2.3.2 Active audio channels: channels item
Supplies a list of open channels between the telephone units and Astro. These may be voice channels or SIP recording data channels.
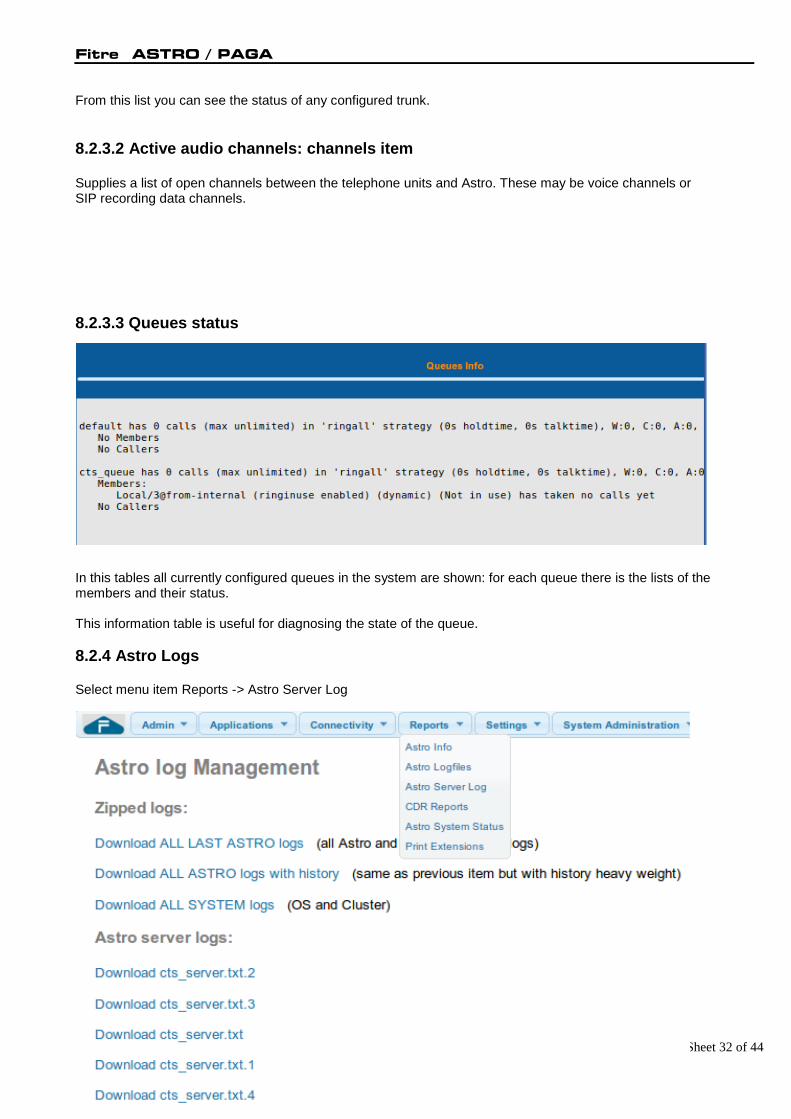
8.2.3.3 Queues status
In this tables all currently configured queues in the system are shown: for each queue there is the lists of the members and their status. This information table is useful for diagnosing the state of the queue.
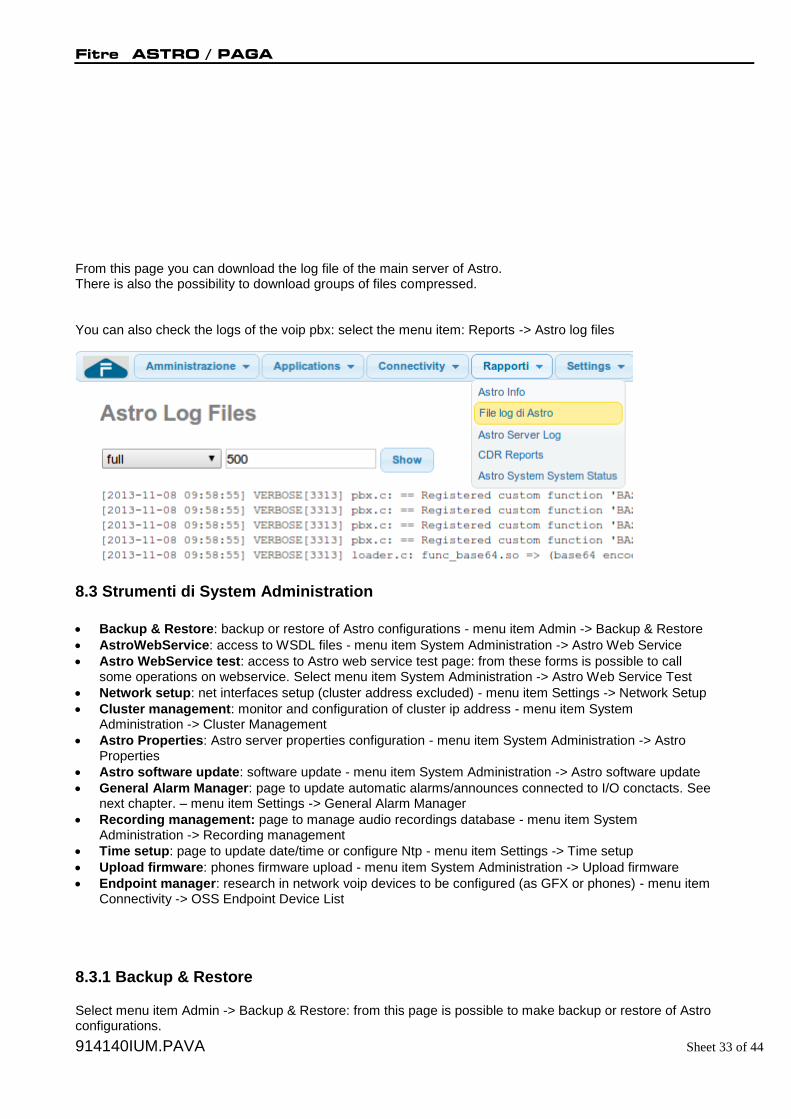
8.2.4 Astro Logs Select menu item Reports -> Astro Server Log
Fitre ASTRO / PAGA
914140IUM.PAVA Sheet 33 of 44
From this page you can download the log file of the main server of Astro. There is also the possibility to download groups of files compressed. You can also check the logs of the voip pbx: select the menu item: Reports -> Astro log files
8.3 Strumenti di System Administration
Backup & Restore: backup or restore of Astro configurations - menu item Admin -> Backup & Restore
AstroWebService: access to WSDL files - menu item System Administration -> Astro Web Service
Astro WebService test: access to Astro web service test page: from these forms is possible to call some operations on webservice. Select menu item System Administration -> Astro Web Service Test
Network setup: net interfaces setup (cluster address excluded) - menu item Settings -> Network Setup
Cluster management: monitor and configuration of cluster ip address - menu item System Administration -> Cluster Management
Astro Properties: Astro server properties configuration - menu item System Administration -> Astro Properties
Astro software update: software update - menu item System Administration -> Astro software update
General Alarm Manager: page to update automatic alarms/announces connected to I/O conctacts. See next chapter. – menu item Settings -> General Alarm Manager
Recording management: page to manage audio recordings database - menu item System Administration -> Recording management
Time setup: page to update date/time or configure Ntp - menu item Settings -> Time setup
Upload firmware: phones firmware upload - menu item System Administration -> Upload firmware
Endpoint manager: research in network voip devices to be configured (as GFX or phones) - menu item Connectivity -> OSS Endpoint Device List
8.3.1 Backup & Restore Select menu item Admin -> Backup & Restore: from this page is possible to make backup or restore of Astro configurations.
Fitre ASTRO / PAGA
914140IUM.PAVA Sheet 34 of 44
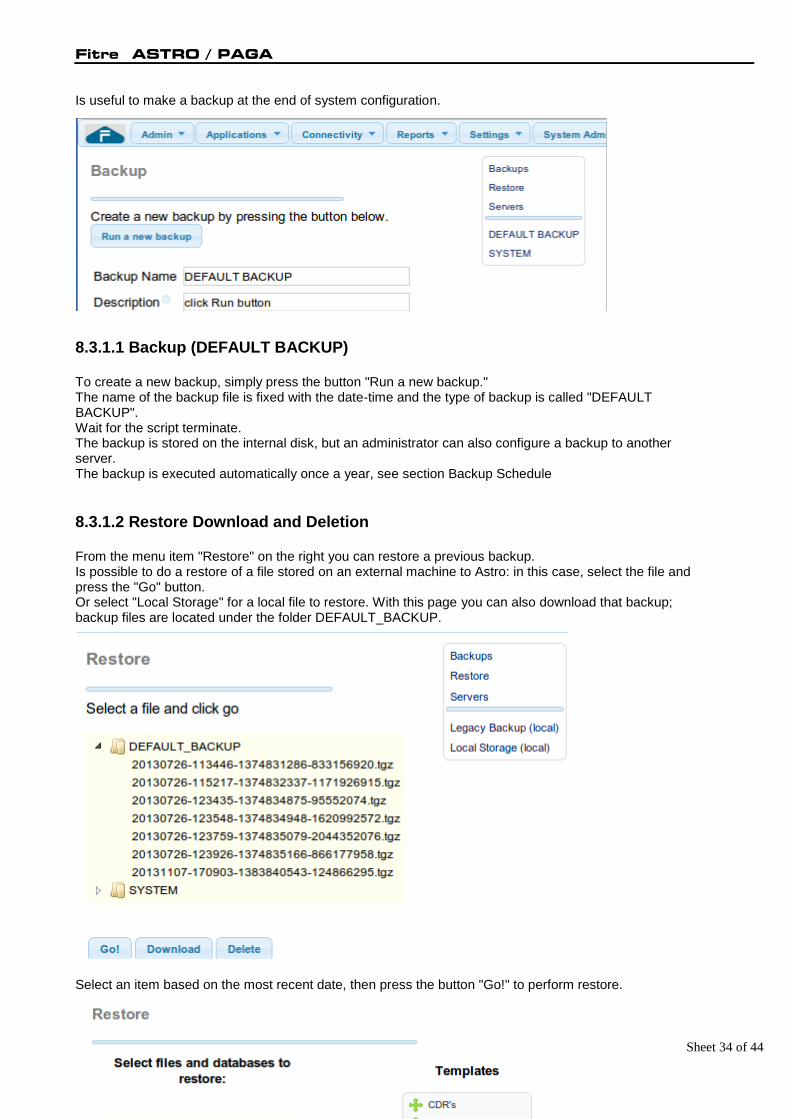
Is useful to make a backup at the end of system configuration.
8.3.1.1 Backup (DEFAULT BACKUP)
To create a new backup, simply press the button "Run a new backup." The name of the backup file is fixed with the date-time and the type of backup is called "DEFAULT BACKUP". Wait for the script terminate. The backup is stored on the internal disk, but an administrator can also configure a backup to another server. The backup is executed automatically once a year, see section Backup Schedule
8.3.1.2 Restore Download and Deletion
From the menu item "Restore" on the right you can restore a previous backup. Is possible to do a restore of a file stored on an external machine to Astro: in this case, select the file and press the "Go" button. Or select "Local Storage" for a local file to restore. With this page you can also download that backup; backup files are located under the folder DEFAULT_BACKUP. Select an item based on the most recent date, then press the button "Go!" to perform restore.
Fitre ASTRO / PAGA
914140IUM.PAVA Sheet 35 of 44
Select "PBX Settings" checkbox , than press "Restore" button.
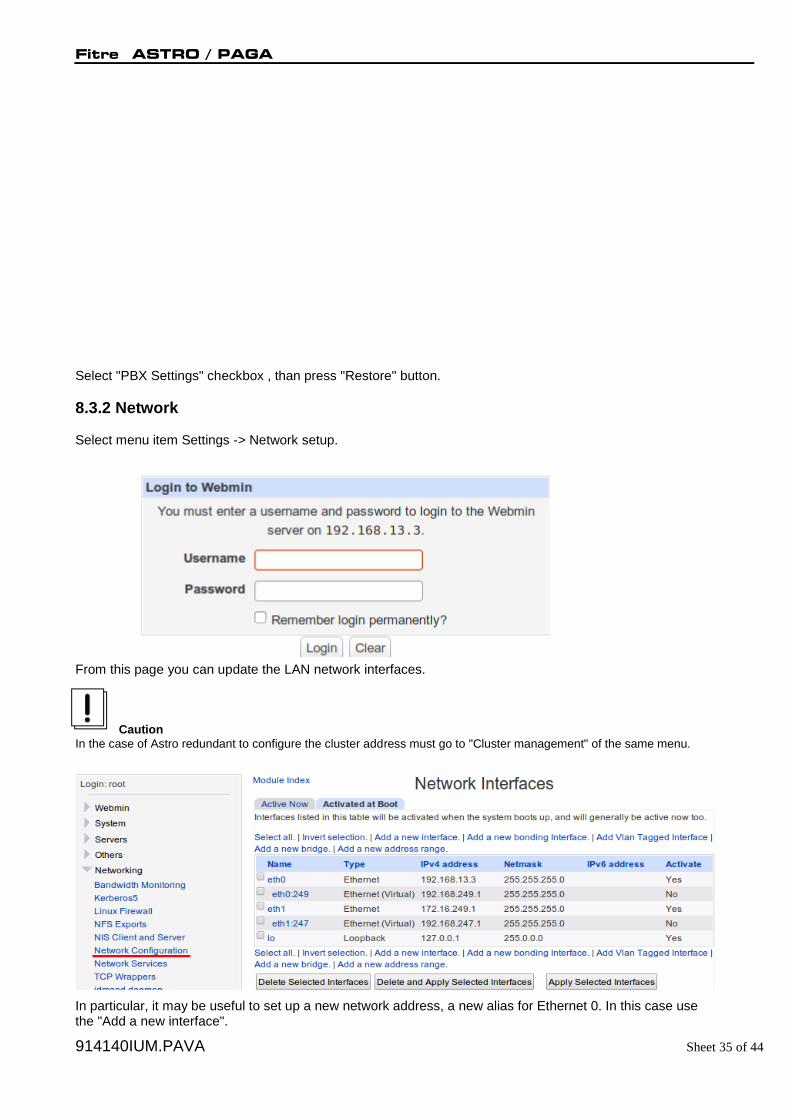
8.3.2 Network Select menu item Settings -> Network setup. From this page you can update the LAN network interfaces. Caution
In the case of Astro redundant to configure the cluster address must go to "Cluster management" of the same menu.
In particular, it may be useful to set up a new network address, a new alias for Ethernet 0. In this case use the "Add a new interface".
Fitre ASTRO / PAGA
914140IUM.PAVA Sheet 36 of 44
For example, to configure Ethernet 0 just click on its entry. Caution To change the main address of Astro, proceed as indicated in the Network Configuration chapter.
Caution
In redundant configuration does not change the hostname of the machine and do not change the configurations of ’interface Ethernet1’
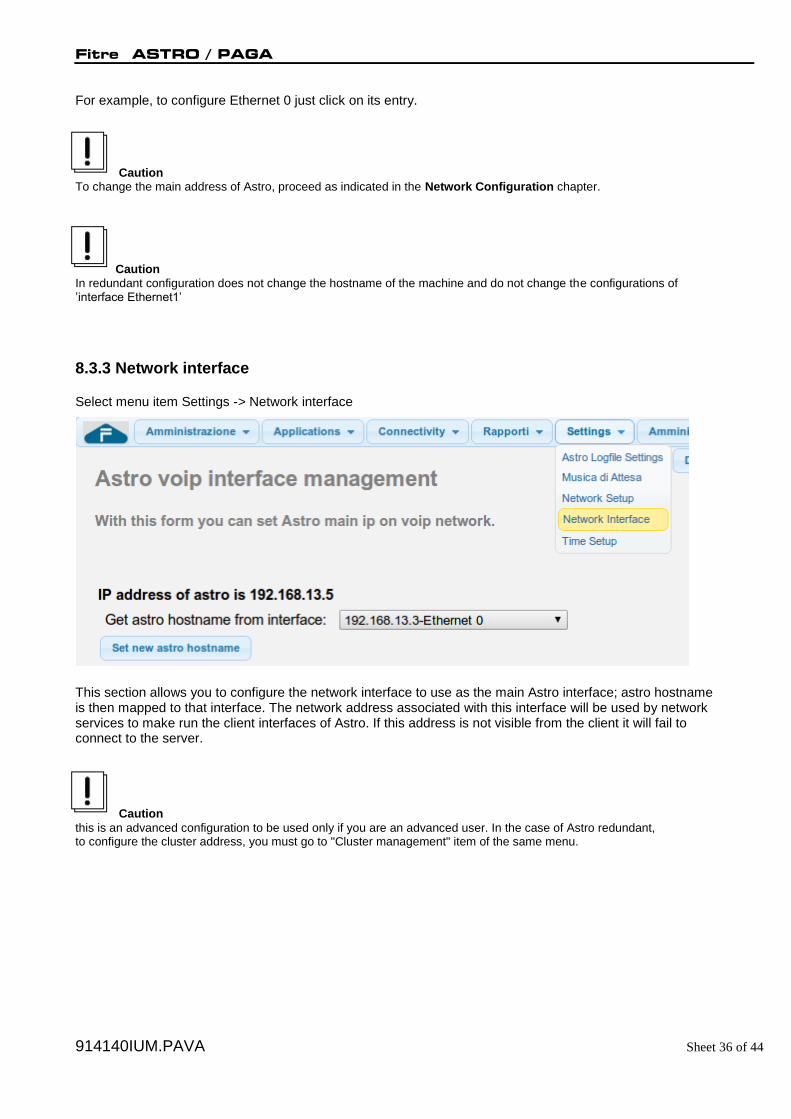
8.3.3 Network interface Select menu item Settings -> Network interface This section allows you to configure the network interface to use as the main Astro interface; astro hostname is then mapped to that interface. The network address associated with this interface will be used by network services to make run the client interfaces of Astro. If this address is not visible from the client it will fail to connect to the server. Caution
this is an advanced configuration to be used only if you are an advanced user. In the case of Astro redundant, to configure the cluster address, you must go to "Cluster management" item of the same menu.
Fitre ASTRO / PAGA
914140IUM.PAVA Sheet 37 of 44
8.3.4 Cluster Management
Fitre ASTRO / PAGA
914140IUM.PAVA Sheet 38 of 44
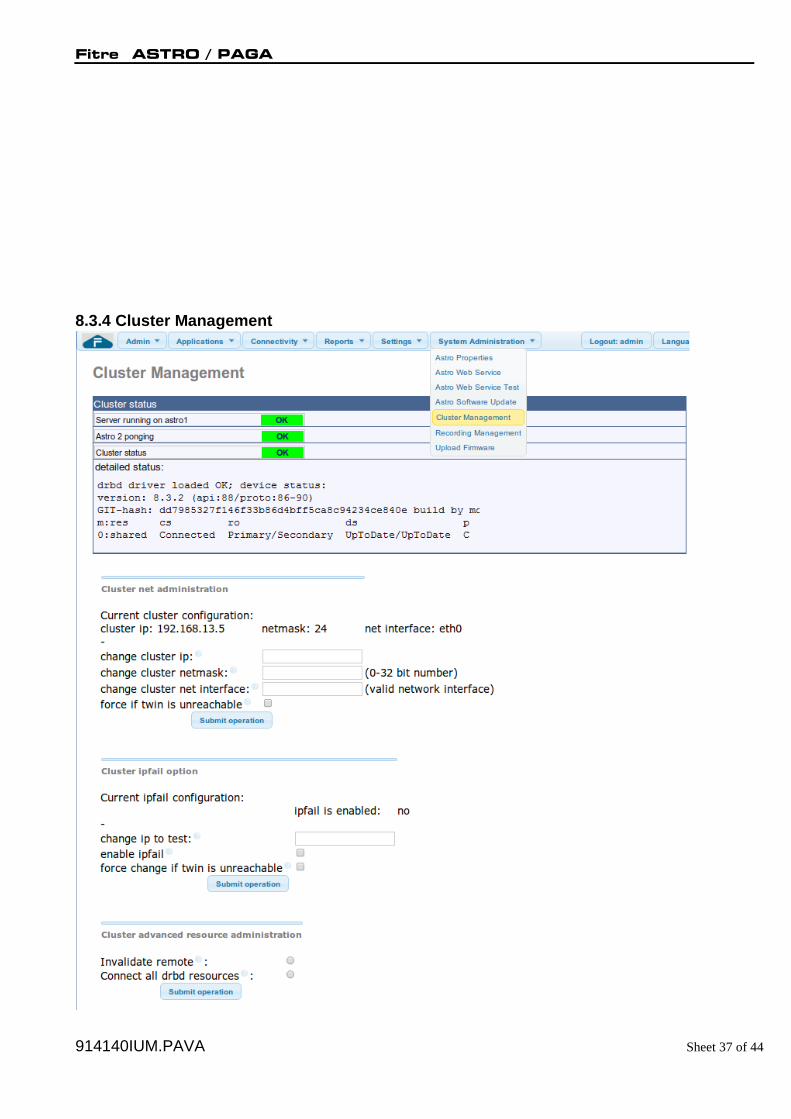
On this page it is possible to monitor and configure the cluster, as well as monitor its status. Caution
IMPORTANT NOTES FOR THE CORRECT MANAGEMENT OF THE CLUSTER FOLLOWS: • Connection between Astro 1 and Astro 2: connection is achieved using a cross-cable. This connection can be made
redundant by using a serial cable. This connection must never be interrupted when the servers are turned on. This connection is considered reliable: travelling on this connection is the information which aligns the two file systems and the synchronisation status messages between the two servers. If this connection is interrupted, then both nodes will attempt to become primaries and they will go into conflict. To restore the situation, it will be necessary to turn off both servers, and reactivate first Astro 1, and then Astro 2. • Managing cluster failure: if there is a conflict between the two servers, Astro 1 and 2, the cluster may not be able
to assign either node as a primary. In this case, the cluster address will not be visible neither on the network nor on the Astro web server. To restore the situation, it will be necessary to turn off both servers, and reactivate first Astro 1, and then Astro 2.
8.3.4.1 "cluster status" section
The cluster status table facilitates the monitoring of the cluster status
The first line shows which is the primary node (the node that runs the cluster), between Astro 1 and Astro 2. In normal conditions, the cluster should run on Astro 1: if the cluster runs on Astro 2, the anomalous condition will be highlighted in red. In anomalous conditions, an attempt can be made to restart Astro 1 to see if it becomes the primary again. For example, Astro 2 may become the primary if ipfail is active and the ipfail node is no longer reachable by Astro 1. This may occur for example, if the Astro 1 network interface card is broken, or if a network node broke along the route connection to the ipfail node.
The second line shows if Astro 2 is reachable by Astro 1
The third line shows a summary of the cluster status
The fourth line shows a detailed cluster status: – cs: cluster status [in normal conditions it must be Connected] – ro: role [in normal conditions it must be Primary/Secondary] – ds: disk status the status of the shared file-system between Astro 1 and Astro 2 [in normal
conditions it must be UpTo-Date/UpToDate].
8.3.4.2 "net administration" section
The net administration section allows you to change the virtual address of the cluster, or rather the address used to view Astro in the LAN. The following fields are present:
– change cluster ip use this field to set a new IP address for the Astro cluster
– change cluster netmask using this field, it is possible to specify a netmask to link to the cluster address. The mask must be indicated as a 1-bit value; for example 24 to indicate 255.255.255.0.
– force if twin is unreachable: by marking this check box it is possible to force the operation even when the twin Astro of the cluster is not connected. In fact, configurations are normally saved on Astro 1, and therefore copied onto Astro 2. If Astro 2 is not connected, a misalignment of the configurations will be produced, causing a cluster malfunction
8.3.4.3 "ipfail option" section
The ipfail option section allows you to add a network resource ping test. It is a verification of the reachability of a network resource. If the ping test fails, ipfail will contact the other member of the cluster to see if it has better network connectivity. If the other cluster member has better network connectivity, then it will become the primary cluster node. The following configuration fields are present:
– change ip to test: allows you to specify an IP address to be used as a reference for the ipfail test
– enable ipfail: enable/disable the ipfail test
Fitre ASTRO / PAGA
914140IUM.PAVA Sheet 39 of 44
– force if twin is unreachable: by marking this check box, it is possible to force the configuration operation even when the twin Astro of the cluster is not connected. In fact, configurations are normally saved on Astro1, and therefore copied onto Astro 2. If Astro 2 is not connected, a misalignment of the configurations will be produced, provoking a cluster malfunction
8.3.4.4 "Cluster advanced resource administration" section
The "Cluster advanced resource administration" section allows you to give emergency commands to restore the cluster if an anomalous situation has been revealed.
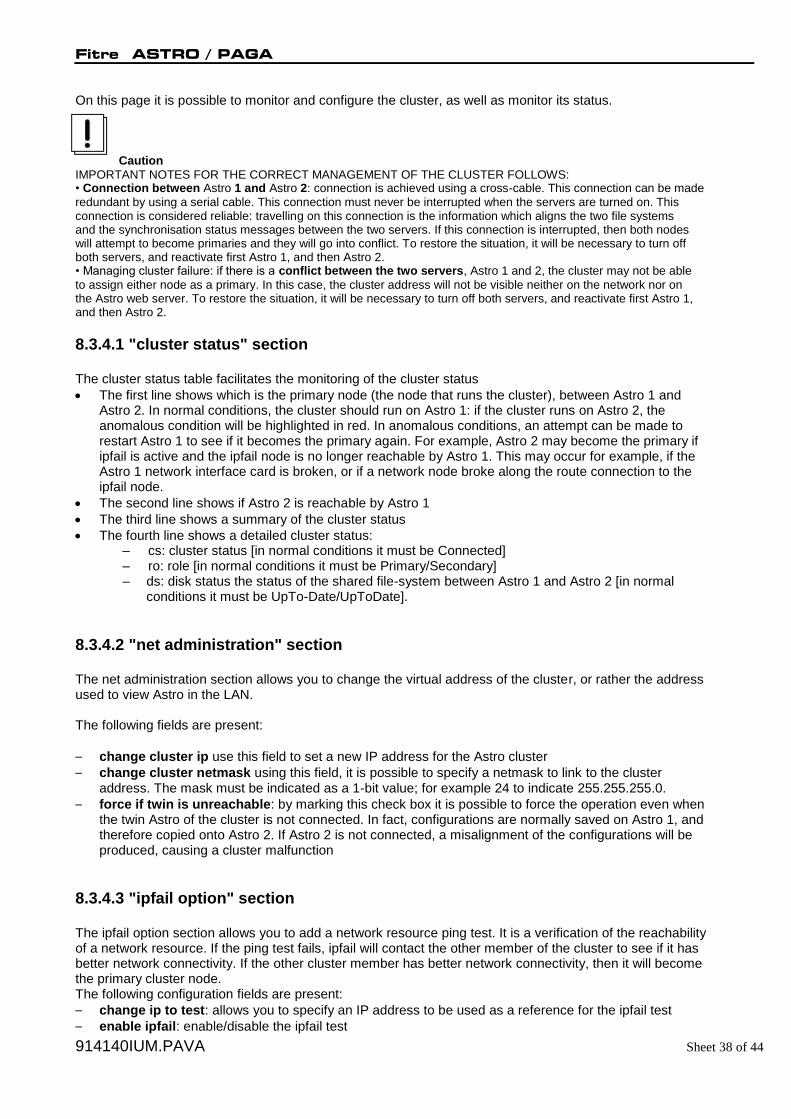
8.3.5 Cts software update
If a new software version is released, it will be possible to install it using this page. The software update package will be supplied by the Fitre software laboratory. Select menu item System Administration -> Astro Software Update From this page is possible to do upload of Astro software package. Once loaded the package press "Install" button and wait installation and Astro restart.
Fitre ASTRO / PAGA
914140IUM.PAVA Sheet 40 of 44
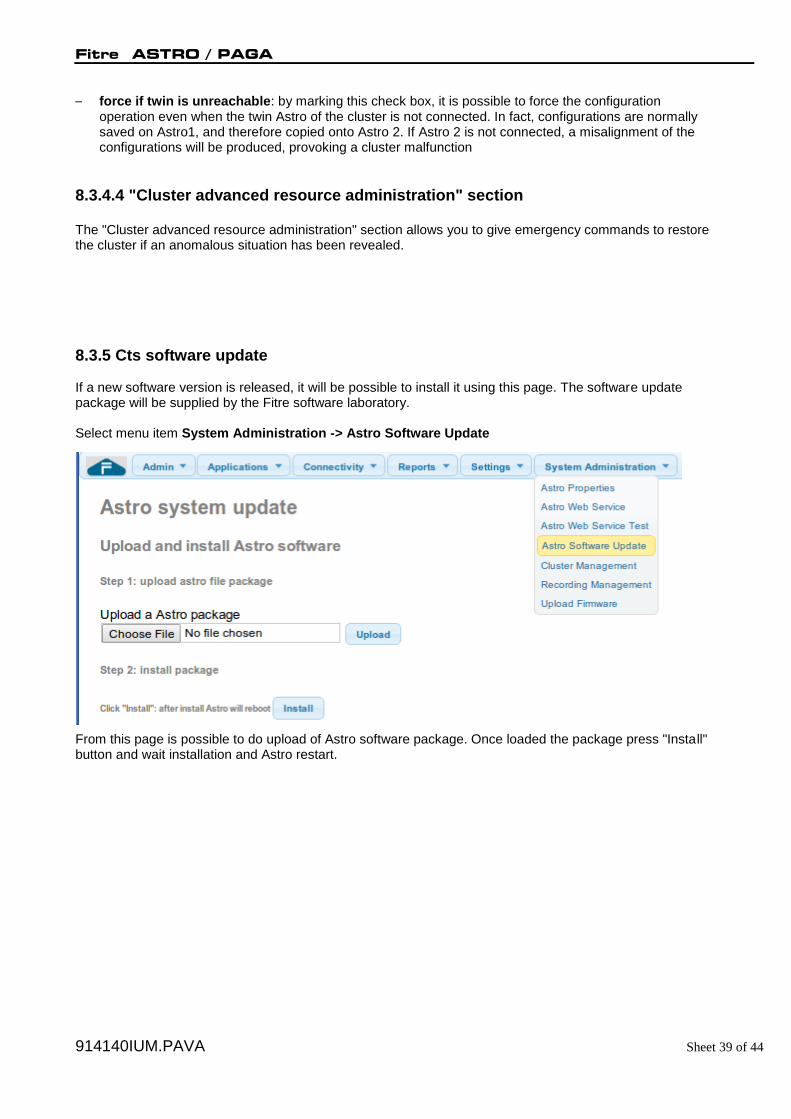
8.3.6 Recording Management Select menu item System Administration -> Recording Management. All Astro Call Centre system calls can be recorded, if the system is so configured (see Astro Manager manual). In this case, audio recordings will be stored into a dedicated partition. In particular, from this page it is possible to manage the recordings.
– RECORDING SIZE INFO: in this section it is possible to monitor occupied space.
– ADMINISTRATION CLEAN: in this section it is possible to remove old recordings. Usually this operation is performed after a backup has been created
– BACKUP ADMINISTRATION: in this section it is possible to create a backup of recordings. If the backup is created on a local disk, the backup will occupy disk space.

Fitre ASTRO / PAGA
914140IUM.PAVA Sheet 41 of 44
Typically, the backup can be created and deleted after download. Another way is to create it on an external storage device connected to Astro with a usb: an HD or usb-key. The mount will be done automatically. At the conclusion of the backup, an unmount instruction must be given to avoid corruption of the external device.
9 General Alarm Manager
9.1 General Alarm Manager
This page allows the setup of emergency announces related to a specific alarm. The first step is the selection of the Emergency Alarm, then it is possible to manage the related Emergency Announces. This PAGA system allows the broadcasting of a different announce on each PA zone when an Emergency Alarm occurs.
9.1.1 Emergency Alarms Column On the left side of the page there is the list of the Emergency Alarms of the system. Clicking on one of this Alarms, it is possible to visualize and configure all the related Emergency Announce.
9.1.2 Emergency Announces Column After the selection of an Emergency Alarms the list of the related Emergency Announces is visible on the right side of the page. For every alarm it is possbile to define many different audio messages as you want. Also, it is possible to broadcast a message on one zone and another message in another zone in the same time. If you choose different audio messages in the same zones for the same alarm, then the system will play these messages in sequence and, with "always" emission type, it will cycle on all defined audio messages, till the end of alarm.
Fitre ASTRO / PAGA
914140IUM.PAVA Sheet 42 of 44
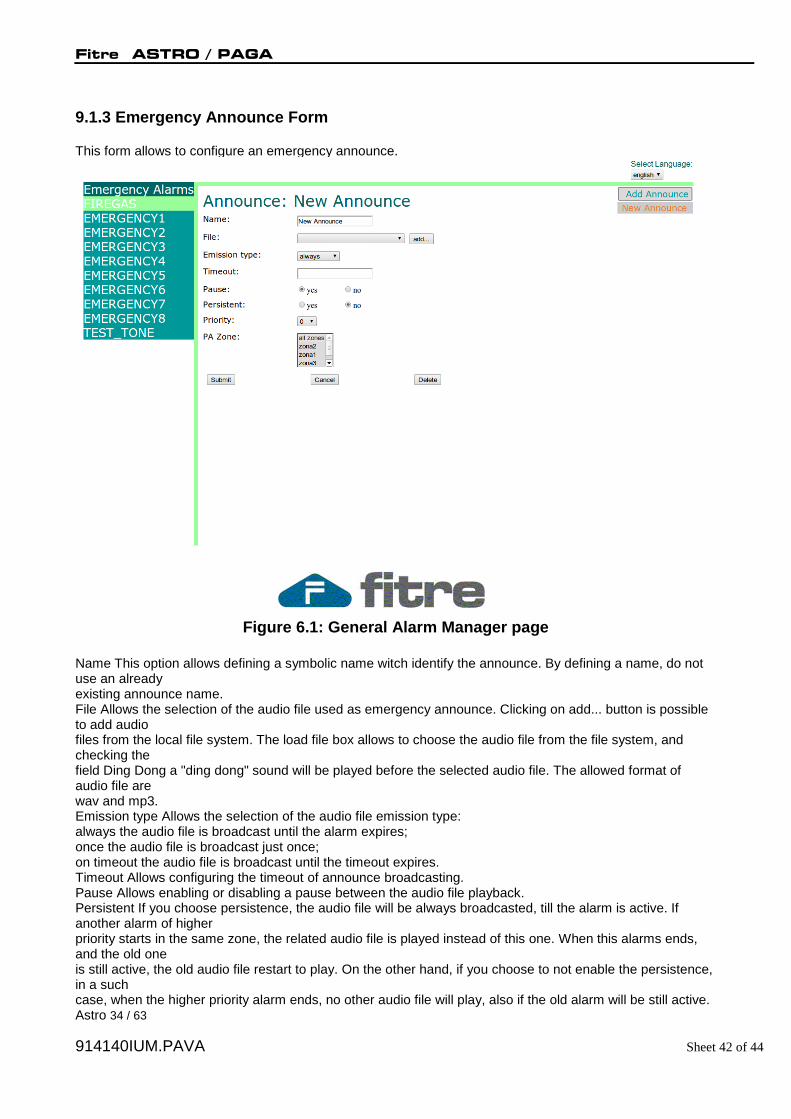
9.1.3 Emergency Announce Form This form allows to configure an emergency announce.
Figure 6.1: General Alarm Manager page
Name This option allows defining a symbolic name witch identify the announce. By defining a name, do not use an already existing announce name. File Allows the selection of the audio file used as emergency announce. Clicking on add... button is possible to add audio files from the local file system. The load file box allows to choose the audio file from the file system, and checking the field Ding Dong a "ding dong" sound will be played before the selected audio file. The allowed format of audio file are wav and mp3. Emission type Allows the selection of the audio file emission type: always the audio file is broadcast until the alarm expires; once the audio file is broadcast just once; on timeout the audio file is broadcast until the timeout expires. Timeout Allows configuring the timeout of announce broadcasting. Pause Allows enabling or disabling a pause between the audio file playback. Persistent If you choose persistence, the audio file will be always broadcasted, till the alarm is active. If another alarm of higher priority starts in the same zone, the related audio file is played instead of this one. When this alarms ends, and the old one is still active, the old audio file restart to play. On the other hand, if you choose to not enable the persistence, in a such case, when the higher priority alarm ends, no other audio file will play, also if the old alarm will be still active. Astro 34 / 63
Fitre ASTRO / PAGA
914140IUM.PAVA Sheet 43 of 44
Priority Allows to select the announce priority. A major number correspond to a major priority. PA Zone Allows to select the PA zones the announce will be broadcast on. You can choose one zone, a set of zones or all zones.
9.1.4 How to configure a New Emergency Announce Select the Emergency Alarm related to the announce you want to create. Then click on Add Announce button, compile the configuration form and save clicking on Submit button. The Cancel removes all the configuration.
9.1.5 How to remove an Emergency Announce Select the Emergency Announce you want to remover. Then click on Delete button, of the related configuration form.
9.1.6 How to modify an Emergency Announce Select the Emergency Announce you want to modify. Compile the configuration form and save clicking on Submit button. The Cancel removes all the configuration.
9.1.7 How to change tool language Choose the language at the top right side of the page.
electronics & telecomunications
F I T R E S.p.A.
FITRE S.p.A. - società con unico socioHead Office and Production Units:20142 Milano (Italy) - via Valsolda, 15phone: (+39) 02.8959.01fax: (+39) 02.8959.0400e-mail: [email protected]
INFORMAZIONE AGLI UTILIZZATORIINFORMATION FOR USERS
Ai sensi dell’art. 26 del Decreto Legislativo 14 marzo 2014,n. 14 “Attuazione della Direttiva 2012/19/UE, sui rifiuti di
apparecchiature elettriche ed elettroniche (RAEE)”
Il simbolo del cassonetto barrato riportato sull’apparecchio indicache il prodotto, alla fine della propria vita utile, deve essere raccoltoseparatamente dagli altri rifiuti.
L’utente dovrà, pertanto, conferire l’apparecchio giunto a fine vitaagli idonei centri di raccolta differenziata dei rifiuti elettronici edelettrotecnici, oppure riconsegnarlo al rivenditore al momentodell’acquisto di un nuovo apparecchio di tipo equivalente, in ragionedi uno a uno.
L’adeguata raccolta differenziata per l’avvio successivodell’apparecchio dismesso al riciclaggio, al trattamento e allosmaltimento ambientalmente compatibile, contribuisce ad evitarepossibili effetti negativi sull’ambiente e sulla salute e favorisce ilriciclo dei materiali di cui è composto l’apparecchio.
Lo smaltimento abusivo del prodotto da parte dell’utente comportal’applicazione delle sanzioni amministrative di cui al D.Lgs. n.22/1997 (articolo 50 e seguenti del D.Lgs. n. 22/1997).
In accordance with the European Directive 2012/19/UEabout "waste of electrical and electronic equipment (WEEE)”
The symbol of the crossed-out wheeled bin on the applianceindicates that the product, at the end of its life, must be collectedseparately from the other waste.
Therefore, the user will have to bring the exhausted appliance to theapposite recycling centers for electronic and electrical waste, orreturn it to the dealer when buying a new appliance of equivalenttype, on a one to one.
An appropriate separate conferral of decommissioned equipmentto the subsequent recycling, treatment and environmentallycompatible disposal, contributes to avoiding possible negativeeffects on the environment and health and facilitate the recycling ofmaterials that composed the appliance.
Illegal dumping of the product by the user entails the application ofadministrative penalties as per egislativel provisions of the memberCountries.