3d animation for the raw beginner using autodesk maya
TRANSCRIPT

3D Animation for the Raw Beginner Using
Autodesk MayaSecond Edition

3D Animation for the Raw Beginner Using
Autodesk MayaSecond Edition
Roger King
CRC PressTaylor & Francis Group6000 Broken Sound Parkway NW, Suite 300Boca Raton, FL 33487-2742
© 2019 by Taylor & Francis Group, LLCCRC Press is an imprint of Taylor & Francis Group, an Informa business
No claim to original U.S. Government works
Printed on acid-free paper
International Standard Book Number-13: 978-0-8153-8878-4 (Paperback)978-0-8153-8879-1 (Hardback)
This book contains information obtained from authentic and highly regarded sources. Reason-able efforts have been made to publish reliable data and information, but the author and pub-lisher cannot assume responsibility for the validity of all materials or the consequences of their use. The authors and publishers have attempted to trace the copyright holders of all material reproduced in this publication and apologize to copyright holders if permission to publish in this form has not been obtained. If any copyright material has not been acknowledged please write and let us know so we may rectify in any future reprint.
Except as permitted under U.S. Copyright Law, no part of this book may be reprinted, repro-duced, transmitted, or utilized in any form by any electronic, mechanical, or other means, now known or hereafter invented, including photocopying, microfilming, and recording, or in any information storage or retrieval system, without written permission from the publishers.
For permission to photocopy or use material electronically from this work, please access www.copyright.com (http://www.copyright.com/) or contact the Copyright Clearance Center, Inc. (CCC), 222 Rosewood Drive, Danvers, MA 01923, 978-750-8400. CCC is a not-for-profit organi-zation that provides licenses and registration for a variety of users. For organizations that have been granted a photocopy license by the CCC, a separate system of payment has been arranged.
Trademark Notice: Product or corporate names may be trademarks or registered trademarks, and are used only for identification and explanation without intent to infringe.
Library of Congress Cataloging-in-Publication Data
Names: King, Roger (Roger Alan), author.Title: 3D animation for the raw beginner using Autodesk Maya 2nd edition / Roger King.Description: Second edition. | Boca Raton, FL : CRC Press/Taylor & Francis Group, 2019.Identifiers: LCCN 2018044705| ISBN 9780815388784 (pbk. : acid-free paper) | ISBN 9780815388791 (hardback : acid-free paper)Subjects: LCSH: Computer animation--Amateurs’ manuals. | Three-dimensionaldisplay systems--Amateurs’ manuals. | Maya (Computer file)--Amateurs’ manuals.Classification: LCC TR897.72.M39 K56 2019 | DDC 777/.7--dc23LC record available at https://lccn.loc.gov/2018044705
Visit the Taylor & Francis Web site athttp://www.taylorandfrancis.com
and the CRC Press Web site athttp://www.crcpress.com

To my family – Wendy, Martina, Isabelle, and Julien – and to Alan Apt, technical book publisher and avid
outdoorsman, who set me on the path of writing this book.

vii
Contents
Preface: Anyone can do this, xiiiAcknowledgments, xvAuthor, xvii
Chapter 1 ◾ An Introduction to 3D Modeling, Animation, and Rendering with a Focus on Autodesk Maya 1
THREE-DIMENSIONAL WORKFLOW OVERVIEW 1
WIREFRAME MODELS AND PIXEL-BASED RENDERING 2
WIREFRAME MODELS 2
A QUICK OVERVIEW OF THE MODELING AND ANIMATION WORKFLOW 4
A QUICK OVERVIEW OF IMAGES, AUDIO, AND VIDEO 6
AN OVERVIEW OF THE MAYA INTERFACE: THE MAIN WINDOW 8
THE HYPERSHADE 10
PUTTING OBJECTS IN HIERARCHIES 13
THE RENDER WINDOW AND RENDER SETTINGS 14
SCRIPTS 19
THE GRAPH EDITOR 20
THE UV EDITOR AND THE 2-SPACE OF MATERIAL PLACEMENT 21
A NOTE ON THE MAYA INTERFACE 22
A NOTE ON NAVIGATING THE MAYA INTERFACE 24
A FOCUS ON POLYGON VERSUS CURVED LINE MODELING 24
viii ◾ Contents
TRANSLATE, ROTATE, AND SCALE 28
LOW-POLY MODELS 31
THE THREE-DIMENSIONAL WORKFLOW 34
SOME ADVICE 36
Chapter 2 ◾ The Gold Standard of Polygon Modeling and the NURBS Alternative 39
THE SIMPLICITY OF POLYGON MODELING 39
COMPONENT DESIGN 42
POLYGON MODELING IN MAYA 43
THE POLYGON MODELING PROCESS IN MAYA 47
ADDING DETAIL ONLY WHEN NEEDED 48
SMOOTHING ONLY WHEN NEEDED 53
DYNAMICS AND CLOTH 55
NONUNIFORM RATIONAL BASIS SPLINE MODELING WITH NONUNIFORM RATIONAL BASIS SPLINE CURVES 58
CREATING NONUNIFORM RATIONAL BASIS SPLINE SURFACES 60
A FOCUS ON CONTROL VERTICES 61
LOFTING 62
EXTRUSION 64
A CLOSER LOOK AT CURVED LINE MATHEMATICS 67
A SWEEP 71
CONNECTING NONUNIFORM RATIONAL BASIS SPLINE SURFACES 72
ISOPARMS 75
ANOTHER EXTRUSION 76
Chapter 3 ◾ A Focus on Simplicity: A Core Set of Modeling Tools in an Overwhelming App 85
THE IMPORTANT POLYGON MODELING MAIN MENU DROPDOWNS 85
ADDING DETAIL TO A MODEL 91
Contents ◾ ix
THE IMPORTANCE OF HAVING A PLAN 94
USING REFERENCE IMAGES 95
SMOOTH SHADING IN THE VIEWPORT AND A BOOLEAN OPERATION 97
USING A BOOLEAN TOOL 98
PUSHING AND PULLING IN POLYGON MODELING: MAKING THE MOAI’S (HUMAN) FACE 100
SMOOTHING, THEN SCULPTING HIS FACE 102
USING THE BRIDGE TOOL TO MAKE AN ARCH 105
THE IMPORTANCE OF BEING PRECISE 110
IMAGE PLANES 115
A FINAL EXTRUSION EXAMPLE 118
Chapter 4 ◾ Using the New(er) Sculpting Toolset in Maya in a Polygon Modeling Workflow 121
ADVANCED SCULPTING IN MAYA 121
USING A LATTICE DEFORMER TO SET UP THE SCULPTING TASK 123
SCULPTING THE MOAI HEAD 126
WORKING WITH AN ARNOLD MATERIAL 135
MAYA MATERIALS AND ARNOLD MATERIALS 136
AN ARNOLD STANDARD MATERIAL 138
BUMP MAPPING AN ARNOLD MATERIAL 141
TEST RENDERING 145
CHANGING THE TILING OF A MATERIAL 145
ANOTHER POLYGON MODELING AND SCULPTING EXAMPLE 149
BOOLEAN DIFFERENCE, THE COMBINE TOOL, AND SMOOTHING 151
SPECIALIZED SCULPTING 156
A STAMPED FACE 159
A ROCK 160
x ◾ Contents
Chapter 5 ◾ Advanced Materials Techniques: Using Arnold Mix Materials and Photoshop 163
PREPPING MATERIALS OUTSIDE OF MAYA AND “GRUNGING” MATERIALS 164
NORMAL VS. BUMP VS. DISPLACEMENT MAPPING 164
CREATING TWO “GRUNGE” MATERIALS USING AN ARNOLD MIX MATERIAL 174
CREATING A “GRUNGE” TEXTURE IN PHOTOSHOP AND ASSIGNING IT TO AN ARNOLD MATERIAL 184
CREATING ANOTHER ARNOLD MIX MATERIAL 199
USING THE UV EDITOR TO UNWRAP A BOX TEXTURE TO CREATE A “BOX” MATERIAL 199
USING THE UV EDITOR TO FIX A UV GRID 204
USING THE UV EDITOR TO REFINE THE LAYOUT OF A MATERIAL ON A BOX PAINTING CANVAS 206
USING THE UV EDITOR TO FIX A LOCALIZED UV MAP PROBLEM 211
THE PAINT UTILITY 216
A NOTE ON TEXTURES 219
SKIN: AN ARNOLD STANDARD MATERIAL PRESET 224
Chapter 6 ◾ Advanced Design Techniques: Modeling, Composition, Lighting, and Materials 227
MODELING A CACTUS WITH “BOX” MODELING AND WITH NURBS 228
Creating a Cactus with Nonuniform Rational Basis Spline Modeling 232
CREATING A MODERNISTIC CATHEDRAL 237
LIGHTING AND RENDERING 238
Lights and Shadows 238
COLOR 242
SCALE 242

Contents ◾ xi
MODELING CONSIDERATIONS 242
The Indoor Courtyard 247
A POOL ROOM 260
A MAILBOX 263
THE GIANT CABANA 275
SOME REPAIR TOOLS 276
VRAY HAIR 283
SUBDIVISION IN FOUNDRY MODO 286
Chapter 7 ◾ Animation: Particle Dynamics, Collisions, Forces, Blend Shape, Key-framing, Skeletons, and Scripting 297
SIMULATING THE PHYSICS OF THE REAL WORLD 297
TWO DYNAMICS ENGINES 299
THE LIVE-ACTION METAPHOR 299
KEYFRAMING 301
BLEND SHAPE 303
AN INTRODUCTION TO SKELETONS 307
A FULL SKELETON 311
CREATING A FULL SKELETON, RIGGING IT WITH IK HANDLES, AND BINDING THE SKIN TO THE SKELETON 315
PARTICLE DYNAMICS 325
USING A SCRIPT TO ANIMATE AN OBJECT 337
RIGID BODY COLLISIONS 341
USING THE SHATTER TOOL TO ANIMATE A SCENE 345
MOTION BLUR 348
ANIMATING VIA ROTATION 348
ADDING SOUND TO A SCENE 348
THE GRAPH EDITOR 349
A CLOSER LOOK AT TRANSLATING, SCALING, AND ROTATING POLYGON OBJECTS 350
ANIMATING WITH A MOTION PATH 358
xii ◾ Contents
VUE 360
MAYA HAIR 365
CINEMA 4D 367
HOUDINI 374
Chapter 8 ◾ Rendering and Lights 389RASTERIZATION AND RAY TRACING 389
A PIECE OF ADVICE 391
THE BUNDLED NATURE OF RENDERERS, LIGHTS, AND MATERIALS 392
CENTRAL PROCESSING UNIT VS. GRAPHICS PROCESSING UNIT RENDERING 392
A QUICK SURVEY OF SOME MAYA-COMPATIBLE RENDERERS 394
A HANDFUL OF NVIDIA-BASED GRAPHICS PROCESSING UNIT RENDERERS 400
A COUPLE OF IMPORTANT MAYA RENDERING SETTINGS 402
A SPECIAL TOON SHADER IN MAYA 404
LIGHTS 405
CAMERAS 410
A LIGHTING EXAMPLE 416
A BETTER TOON SHADER: VRAY 420
AN ENVIRONMENT LIGHT 421
CAMERA SAMPLES 422
A TOONED SUN FACE 424
A STAMPED, TOONED FACE 424
INDEX, 427
xiii
Preface: Anyone can do this
This book is intended for people with very little or no background in 3D modeling, materials, lighting, animation, and rendering.
Every example in this book is doable by a raw beginner. The chapters are organized around the various aspects of a small-scale 3D workflow, with first (1) an introduction to the entire 3D workflow and the Autodesk Maya interface, then (2) an introduction to polygon and NURBS modeling, (3) a focus on core modeling tools, (4) a focus on sculpting, (5) the application of materials to wireframe models, (6) various low-level and high-level design issues, (7) animating a scene, and finally, (8) rendering, with a focus on lights and cameras.
In order to be concrete and to provide numerous structured lessons, this book focuses on one specific 3D app, Autodesk Maya, but there are examples mixed in that use a handful of other 3D applications, along with a number of renderers and a few other utility applications.
This book is not a dump of the Autodesk Maya documentation. I assume that the reader will make aggressive use of that documentation, which is available via the Maya interface by going to Help → Autodesk Maya Help. But you cannot learn to do 3D modeling, animating, and rendering by reading the (excellent) Autodesk documentation out of context. Nor can you learn to do 3D work by studying it only in an abstract fashion. The focus of this book is to introduce basic concepts via step-by-step examples that the reader should be able to easily follow. This tutorial-oriented approach starts in Chapter 2. I strongly advise that you have Maya open and that you step through these lessons as you read. Only by performing the manual tasks associated with doing 3D work will the concepts sink in and the proper way to use a 3D application stick with you.
xiv ◾ Preface: Anyone can do this
Any book that tried to cover Maya exhaustively would either be very, very long or very, very shallow. The goal of this book is to direct you to the parts of Maya you need to master in order to create complete 3D projects. With a sound intuitive understanding of these basics, you should be able to broaden and deepen your knowledge of 3D principles and of Maya.
The website for this book contains links to video tutorials; they parallel the structure of this book and they closely follow the examples used in this book: https://buzzking.com/AnimationTextbook/AnimationTextbook.html.
The images for this book can be found in color at: https://buzzking.smugmug.com/3D-Animation-for-the-Raw-Beginner-Figures/.
To get a completely free copy of Autodesk Maya for either Windows or a Mac, the reader can go to https://www.autodesk.com/education/home and create a personal account. This version of Maya is not hobbled in any way; however, it may not be used for commercial purposes and all Maya scene files will be internally watermarked as having been created with the academic (free) version. It is incredible that Autodesk does this for people who want to learn Maya!
If you are an instructor, a student, or anyone using this book, I would love to hear from you. My email address is [email protected].
A final note: the Maya interface changes from year to year, with colors and icons changing, the menus being modestly rearranged, and new tools being introduced. Occasionally, tools are removed, but only infrequently are substantive changes made to Maya. It is a mature and fairly stable application. The lessons in this book should be readily understandable, even if you are using a version of Maya released at some point after the publication of this book.
xv
Acknowledgments
I have taught animation at the University of Colorado for many years, and I have had the pleasure of teaching computing, engineering, film,
and art students. I have learned a tremendous amount from them and I am still excited every time I enter the classroom.
A few of the models in this book were not made by me. The gold chair in Figures 1.18, 1.19 and 1.26 to 1.28 is adapted from a chair taken from a “country kitchen” scene sold by Daz3D.com, which offers a powerful human figure animation application that is popular among sophisticated hobbyists. The windows in Figures 6.60 to 6.62 are adapted from windows that are sold by suplugins.com, which markets a fabulous renderer and component content system for SketchUp. The human characters and some of the smaller items in the cabana images in Figures 6.85 to 6.87 are also from Daz3D.com. The Vue scene material in Figures 7.93 to 7.100 are from e-onsoftware.com. The flamingo in Chapter 8 is sold by the very popular online 3D model store turbosquid.com; it was created by hariBi. The gold car in Chapter 8 is from turbosquid.com. All of these models were purchased for use.
The car blueprint in Figure 3.47 was taken from drawingdatabase.com. The cactus image in Figure 6.1 is from bonanza.com, which sells plant seeds; and yes, you can buy cactus seeds from them! Figure 7-91 is based on a lesson from my daughter Isabelle King, who tutored me on a high school trigonometry visualization I never learned. The 360° image used in Figure 8.46 is from illuminatedtools.com; they have a nice library of for-sale EXR images that are very inexpensive.
My editor Sean Connelly created the concept for this second edition of 3D Animation for the Raw Beginner, and in particular, I deeply appreciate the visual improvement from the first edition. My project editor,

xvi ◾ Acknowledgments
Robert Sims, along with Paul Beaney and his team at Nova Techset, have been a pleasure to work with. The production of this book has been a rapid and extremely well-coordinated process.
Finally, my wife Wendy spent hundreds of hours editing this book, over and over. I want to thank her for her tremendous support.
xvii
Author
Roger “Buzz” King is a Professor Emeritus at the University of Colorado at Boulder and teaches 3D Animation for the Computer
Science Department and the Alliance for Technology, Learning, and Society (ATLAS), an institute dedicated to the application of technology to the arts. He has trained over a thousand animation students and has no intention of stopping.
Buzz has done research in the management of 3D modeling and anima tion data, and the integration of large volumes of data. He has authored over 60 scientific papers, has been an editor with several major journals, and has served as the program chair for several international conferences. His research has been supported by DARPA, NSF, the Smithsonian, ONR, the US Navy, the DOE, the US Army, Martin Marrietta, IBM, and AT&T.
Buzz has a B.A. in Mathematics from Occidental College, and an M.S. and Ph.D. in Computer Science from the University of Southern California. He also has a Masters of Divinity from the Iliff School of Theology. He currently serves as a pastor and as a hospital chaplain.
Buzz has created a webpage for this book: https://buzzking.com/AnimationTextbook/AnimationTextbook.html. On this webpage are videos that cover many of the lessons in this book, as well as video tutorials that present bonus material not included in this book.

1
C h a p t e r 1
An Introduction to 3D Modeling, Animation, and Rendering with a Focus on Autodesk Maya
In this chapter, we look at the overall workflow of using Autodesk Maya, and the various windows in the Maya interface, along with the
purposes of the tools the interface presents to the user. We also consider the basics of working with the media and applications used in basic 3D projects. An overriding goal is to begin focusing on the aspects of the highly complex Maya interface that will enable a beginner to build complete 3D projects.
THREE-DIMENSIONAL WORKFLOW OVERVIEWAutodesk Maya is arguably the most popular 3D modeling, animation, and rendering application. Its interface is extremely large and complex, but only a small subset of it is needed to create complete 3D single-frame renderings and videos. The central task of this book is to convey that critical core of
With a survey of the Autodesk Maya interface.

2 ◾ 3D Animation for the Raw Beginner Using Autodesk Maya
Maya, that is, to take a deep vertical slice of Maya and present it to the reader. With this slice of Maya, complete projects can be built. This slice also serves as a knowledge platform to which beginners can incrementally add as they master more and more of Maya.
The basic unit of work in this book will be a “scene” file, which includes all the information needed to create a 3D rendering or a 3D video (although Maya itself does not render video). In this book, we will look at the entire 3D workflow, including the creation of vector-based “wireframe” models that make up a 3D scene, the application of materials to the surfaces of these models, the insertion of lights into a 3D scene, the animating of the 3D models in a scene, and the rendering of a scene.
WIREFRAME MODELS AND PIXEL-BASED RENDERINGWhen designing applications, we typically make a sharp distinction between the internal logic of the application, that is, what data it uses and what computations it performs on that data, and the interface of the application, that is, how the user accesses the data and the computational capabilities of the program. In 3D modeling and animation, this distinction is particularly critical to keep in mind: the internal data structures used to represent 3D models inside an application like Maya are very different from the way in which we display these 3D models. The models are stored and manipulated internally as 3D vector data structures, but they must be displayed, that is, rendered, on 2D pixel-based displays. This distinction gets to the heart of what 3D modeling and animation is all about: Autodesk Maya allows the user to create scenes with wireframe models in them, prepare them for rendering by adding materials and lights, and then render them as pixel-based images. Thus, the Maya interface supports the process of creating a scene with wireframe models in it and then translating this scene into an extremely different format, namely a series of digital images that can then be turned into videos by a video editor.
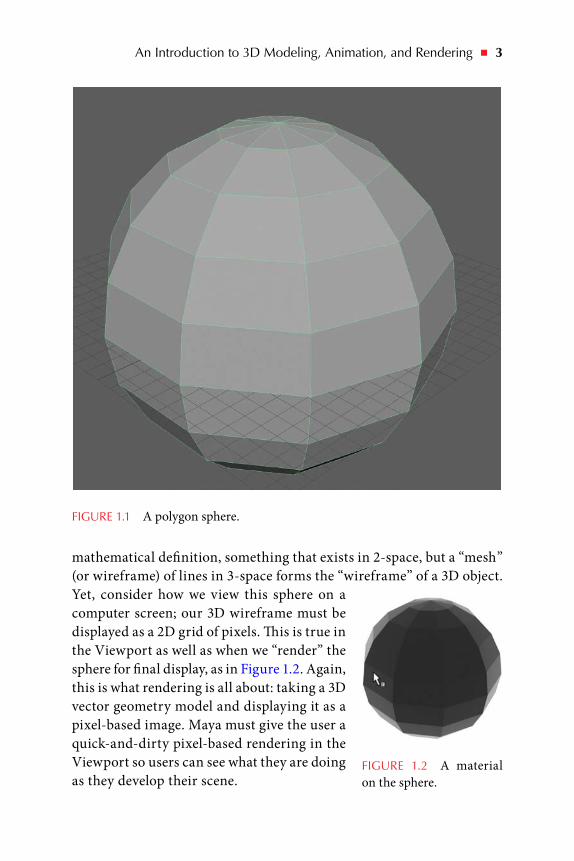
WIREFRAME MODELSConsider Figure 1.1. This image, taken from the “Viewport” of the main Maya window, is of a polygon sphere. (We’ll worry about what this means soon.) The important point is that this is a 3D structure formed of lines. This is what we call 3D vector graphics. A line is, by
An Introduction to 3D Modeling, Animation, and Rendering ◾ 3
mathematical definition, something that exists in 2-space, but a “mesh” (or wireframe) of lines in 3-space forms the “wireframe” of a 3D object. Yet, consider how we view this sphere on a computer screen; our 3D wireframe must be displayed as a 2D grid of pixels. This is true in the Viewport as well as when we “render” the sphere for final display, as in Figure 1.2. Again, this is what rendering is all about: taking a 3D vector geometry model and displaying it as a pixel-based image. Maya must give the user a quick-and-dirty pixel-based rendering in the Viewport so users can see what they are doing as they develop their scene.
FIGURE 1.1 A polygon sphere.
FIGURE 1.2 A material on the sphere.

4 ◾ 3D Animation for the Raw Beginner Using Autodesk Maya
A QUICK OVERVIEW OF THE MODELING AND ANIMATION WORKFLOWHere’s an overview of a typical 3D workflow within an application like Maya. First comes the modeling phase where the wireframe is created. In our case, the model consists of a wireframe sphere, as in Figure 1.3.
Second, a “material” is placed on the outer surface of the wireframe. This is a good place to make a critical distinction. This book is about “surface” modeling, that is, the creation, animation, and rendering of 3D models that consist only of wireframes with what can be thought of as infinitely thin outer surfaces. In other words, there is nothing there except the surface; the model has no interior. This is not the kind of modeling we would use if we were designing, say, a nuclear bomb or a computer
FIGURE 1.3 The wireframe of the sphere.
An Introduction to 3D Modeling, Animation, and Rendering ◾ 5
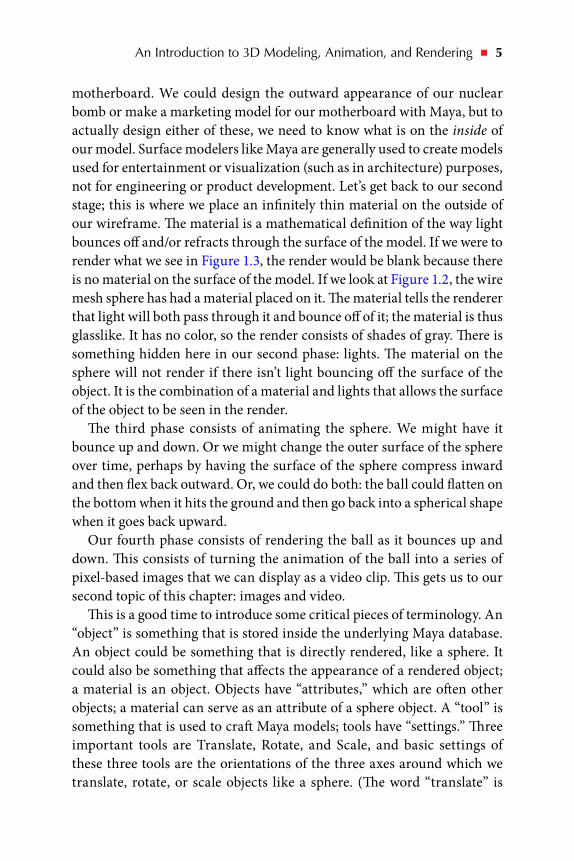
motherboard. We could design the outward appearance of our nuclear bomb or make a marketing model for our motherboard with Maya, but to actually design either of these, we need to know what is on the inside of our model. Surface modelers like Maya are generally used to create models used for entertainment or visualization (such as in architecture) purposes, not for engineering or product development. Let’s get back to our second stage; this is where we place an infinitely thin material on the outside of our wireframe. The material is a mathematical definition of the way light bounces off and/or refracts through the surface of the model. If we were to render what we see in Figure 1.3, the render would be blank because there is no material on the surface of the model. If we look at Figure 1.2, the wire mesh sphere has had a material placed on it. The material tells the renderer that light will both pass through it and bounce off of it; the material is thus glasslike. It has no color, so the render consists of shades of gray. There is something hidden here in our second phase: lights. The material on the sphere will not render if there isn’t light bouncing off the surface of the object. It is the combination of a material and lights that allows the surface of the object to be seen in the render.
The third phase consists of animating the sphere. We might have it bounce up and down. Or we might change the outer surface of the sphere over time, perhaps by having the surface of the sphere compress inward and then flex back outward. Or, we could do both: the ball could flatten on the bottom when it hits the ground and then go back into a spherical shape when it goes back upward.
Our fourth phase consists of rendering the ball as it bounces up and down. This consists of turning the animation of the ball into a series of pixel-based images that we can display as a video clip. This gets us to our second topic of this chapter: images and video.
This is a good time to introduce some critical pieces of terminology. An “object” is something that is stored inside the underlying Maya database. An object could be something that is directly rendered, like a sphere. It could also be something that affects the appearance of a rendered object; a material is an object. Objects have “attributes,” which are often other objects; a material can serve as an attribute of a sphere object. A “tool” is something that is used to craft Maya models; tools have “settings.” Three important tools are Translate, Rotate, and Scale, and basic settings of these three tools are the orientations of the three axes around which we translate, rotate, or scale objects like a sphere. (The word “translate” is
6 ◾ 3D Animation for the Raw Beginner Using Autodesk Maya
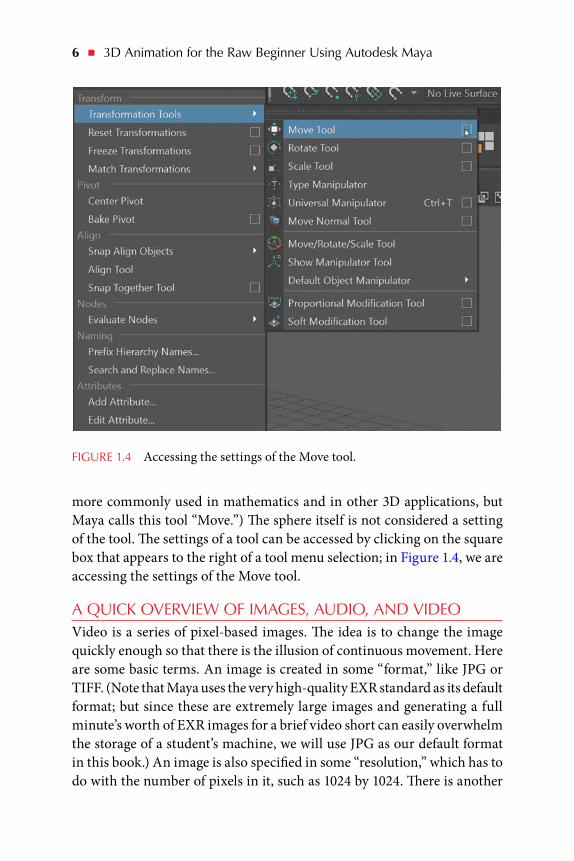
more commonly used in mathematics and in other 3D applications, but Maya calls this tool “Move.”) The sphere itself is not considered a setting of the tool. The settings of a tool can be accessed by clicking on the square box that appears to the right of a tool menu selection; in Figure 1.4, we are accessing the settings of the Move tool.
A QUICK OVERVIEW OF IMAGES, AUDIO, AND VIDEOVideo is a series of pixel-based images. The idea is to change the image quickly enough so that there is the illusion of continuous movement. Here are some basic terms. An image is created in some “format,” like JPG or TIFF. (Note that Maya uses the very high-quality EXR standard as its default format; but since these are extremely large images and generating a full minute’s worth of EXR images for a brief video short can easily overwhelm the storage of a student’s machine, we will use JPG as our default format in this book.) An image is also specified in some “resolution,” which has to do with the number of pixels in it, such as 1024 by 1024. There is another
FIGURE 1.4 Accessing the settings of the Move tool.
An Introduction to 3D Modeling, Animation, and Rendering ◾ 7
use of the word resolution, and it refers to the number of pixels per inch. A common number—the default in Maya—is 72. This is actually fairly low, and later, when we use images to create “textures” for materials (to do things such as give them color or patterns), we will discover that some texture images have a much larger number of pixels per inch.
Sound is also encoded in “formats,” such as MP3, WAV, and AIFF. A series of images, along with sound, are bound together into a video “container” or “container format.” Video is created using some number of images per second; this is known as the “frame rate.” Somewhere in the ballpark of 18 frames per second, we are fooled into thinking we are looking at continuous motion. In Maya, we usually generate at least 24 frames for every second of animation.
Maya exports images, not video. A video editor must be used to turn the images, along with a sound file, into video. If we generated 24 frames for every second of animation in Maya, we would generate video that uses 24 frames per second. The sound file is not output by Maya, but a sound file that is created with some other program, typically an audio editor, can be input into Maya so that it can be used to time the animation in Maya. For example, we might have a sound file of a ball bouncing; we would input this file into Maya so that we can time the movement of the ball upward and downward to coincide with the timing of the thump, thump of the ball bouncing. It is important to remember that this sound file must later be input separately into a video editor in order to blend it together with the series of Maya-rendered images to create a piece of video. Also, when sound is pulled into Maya, it must be in either the WAV or AIFF format, but most video editors can handle other formats, as well, such as the compact MP3 format.
In sum, Maya renders images. It is not a video editor. It is also not an audio editor. Typical programs that are used in the same workflow with Maya are the video editors Adobe Premiere Pro (adobe.com), Apple Final Cut Pro (apple.com), and Vegas Pro (magix.com), and the sound editors Adobe Audition (adobe.com) and Steinberg WaveLab (Steinberg.net). Maya artists use programs like Adobe Photoshop (adobe.com) to process texture image files. A Maya material might be associated with one or more texture image files to make a material look like brick or wall plaster or some other human-made or natural pattern. Texture images are often made from photographs, but they can also be created from scratch with Photoshop or a drawing/painting application like Corel Painter (corel.
8 ◾ 3D Animation for the Raw Beginner Using Autodesk Maya
com). Not all textures are defined by using a texture image; there are also textures that are procedural; that is, their appearance on the surface of an object is computed by software and not derived from texture images. We will make use of a procedural texture when we look at a special Arnold renderer material called “Mix” in Chapter 5. (Arnold is the renderer that ships with Maya.)
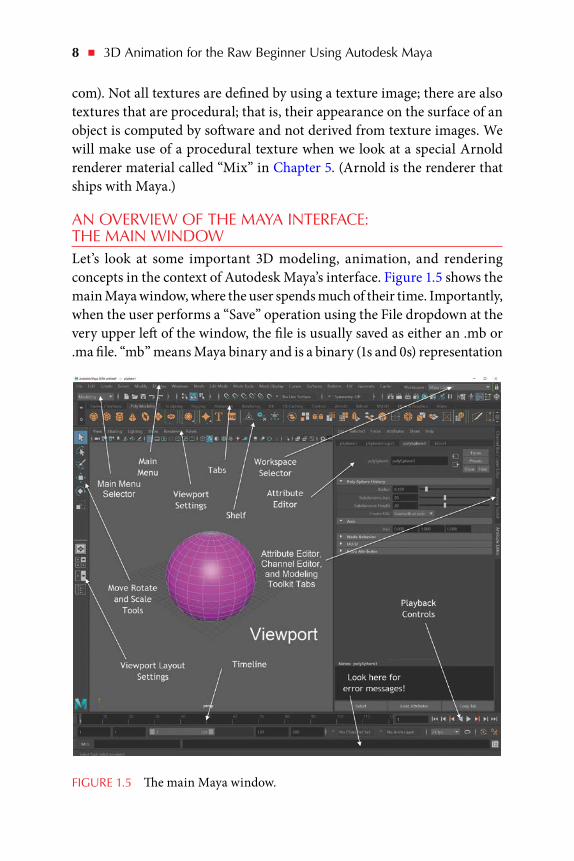
AN OVERVIEW OF THE MAYA INTERFACE: THE MAIN WINDOWLet’s look at some important 3D modeling, animation, and rendering concepts in the context of Autodesk Maya’s interface. Figure 1.5 shows the main Maya window, where the user spends much of their time. Importantly, when the user performs a “Save” operation using the File dropdown at the very upper left of the window, the file is usually saved as either an .mb or .ma file. “mb” means Maya binary and is a binary (1s and 0s) representation
FIGURE 1.5 The main Maya window.
An Introduction to 3D Modeling, Animation, and Rendering ◾ 9
of the scene under development. Our model, the pink sphere, sits at (0,0,0) in the 3D scene. “ma” refers to Maya ASCII and consists mostly of Maya MEL code, where MEL stands for Maya Embedded Language, the Maya scripting language. (As it turns out, you can create entire scenes by writing them in code instead of using the Maya interactive interface.)
About two-thirds of Figure 1.5 consists of a lighter gray area with the pink sphere at the center. This is the modeling area, where Maya provides a nonstop real-time render of the model under development. At the top of this area is a series of dropdown menus beginning with one labeled “View.” These menus, along with the row of icons below them, are where the user can adjust settings that affect the appearance and other localized properties of the design area (as opposed to the actual underlying properties of the scene under development). To the left of the gray work area are four buttons that form the Viewport Layout Settings. In this case, the top button has been selected (it is selected by default); it causes the viewport to consist of a single “perspective,” where the scene is viewed at an angle and not directly along any of the three dimensional axes. Above the Viewport Layout Settings are buttons for a handful of very commonly used tools; the bottom three of which are Move, Rotate, and Scale.
There are two high-level menus that affect the overall layout of the Maya interface. The far upper-right menu, called the Workspace Selector, has been set to “Maya Classic”; this controls the layout of the window as a whole, and the Classic setting makes the interface look the way it appeared in releases of Maya previous to 2017. This Classic setting is very popular, but later in this book, we will work with other settings. At the almost far upper left of the window is something called the Main Menu Selector (MMS). This adjusts the makeup of the Main Menu; the MMS affects the makeup of menu items to the right of the “Windows” dropdown. The Mesh, Edit Mesh, and Mesh Tools menus are used heavily in polygon modeling (and thus we will use them heavily in this book). A bit below the Main Menu is a series of tabs; these are used to populate the “Shelf,” which provides iconic button shortcuts to tools that appear in the individual dropdown menus that make up the Main Menu. In Figure 1.5, tools that are frequently used in polygon modeling populate the Shelf; these include tools that are used to create standard polygon “primitives” like Sphere, Cube, Cylinder, Cone, and Torus, which appear in the left side of the Shelf; clicking on one of these icons (which are actually buttons) will place the appropriate primitive in the Viewport and center it at (0,0,0).
10 ◾ 3D Animation for the Raw Beginner Using Autodesk Maya
To the right of the gray work area is the Attribute Editor. This allows us to adjust the attributes of whatever object is currently selected. In Figure 1.5, the Sphere is selected; we see that its radius is 8.479. Objects typically have many attributes, so they are arranged in tabs; the third tab from the left is currently selected. To the right of the Attribute Editor are three tabs that let us display either the Attribute Editor, the Channel Editor, or the Modeling Toolkit. The Channel Editor displays attributes of an object that can be used to animate it; these include Move, Rotate, and Scale. The Toolkit is another way (besides the Main Menu and the Shelf tabs) to access commonly used tools.
At the bottom of the main window is the Timeline, which provides access to the frame settings that are used to animate the objects in a scene. Currently, this is set to 120 frames. At the bottom right are the Playback Controls, which allow the user to run through the frames to view the animation. (We see here that, as in video editing, frames are in essence used as units of time.)
A final, very important area of the main window is at the very bottom right. This is where, among other things, error messages are displayed. It’s a very good idea to make sure that this area is not blocked by some other window or application on your computer display. Keep an eye out for anything appearing in red.
THE HYPERSHADEThe prefix “hyper” in English is usually interpreted as referring to too much of something or an excessive number of something. Before we get to the relevance of this prefix in the name of the Hypershade window, let’s consider a couple of terms. The first is “material,” and we have already discussed this. Another word is “shader.” This term is used heavily in 3D modeling and is a very general term. It refers to many aspects of a scene that have to do with how objects in the scene render. In the Hypershade, the user can create shader networks, which include such things as materials, textures, and lights. As for the prefix “hyper,” I assume that it means that this is where all the shader networks are created and maintained (as opposed to too many of them).
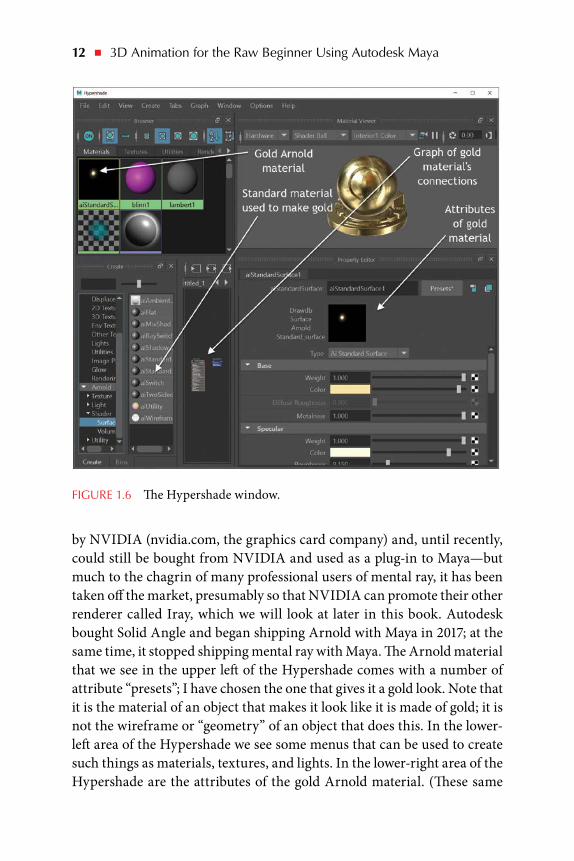
In Figure 1.6, there are roughly four areas. In the upper left are a series of tabs that allow the Maya user to manage various items in the Hypershade. These include Materials, Textures, Lights, and Cameras. This is a good point to pause for a moment and make note of the overriding paradigm of
An Introduction to 3D Modeling, Animation, and Rendering ◾ 11
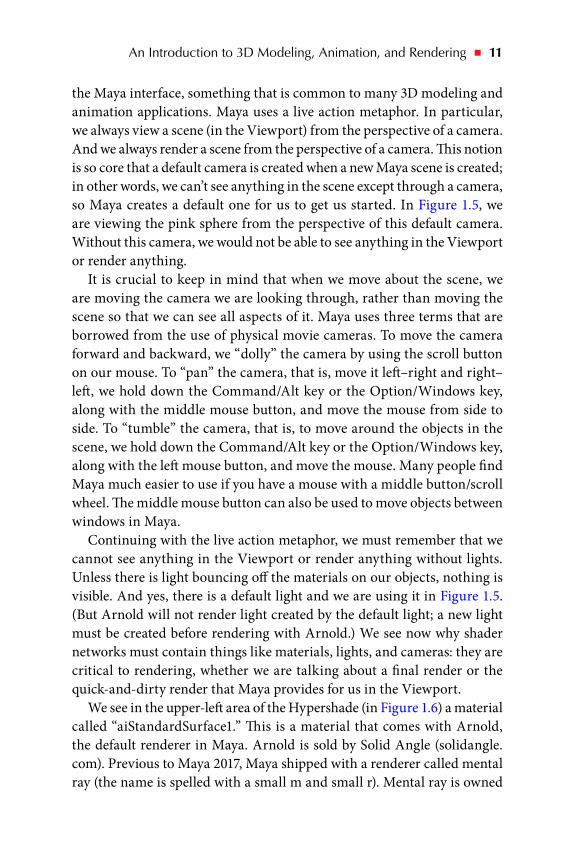
the Maya interface, something that is common to many 3D modeling and animation applications. Maya uses a live action metaphor. In particular, we always view a scene (in the Viewport) from the perspective of a camera. And we always render a scene from the perspective of a camera. This notion is so core that a default camera is created when a new Maya scene is created; in other words, we can’t see anything in the scene except through a camera, so Maya creates a default one for us to get us started. In Figure 1.5, we are viewing the pink sphere from the perspective of this default camera. Without this camera, we would not be able to see anything in the Viewport or render anything.
It is crucial to keep in mind that when we move about the scene, we are moving the camera we are looking through, rather than moving the scene so that we can see all aspects of it. Maya uses three terms that are borrowed from the use of physical movie cameras. To move the camera forward and backward, we “dolly” the camera by using the scroll button on our mouse. To “pan” the camera, that is, move it left–right and right–left, we hold down the Command/Alt key or the Option/Windows key, along with the middle mouse button, and move the mouse from side to side. To “tumble” the camera, that is, to move around the objects in the scene, we hold down the Command/Alt key or the Option/Windows key, along with the left mouse button, and move the mouse. Many people find Maya much easier to use if you have a mouse with a middle button/scroll wheel. The middle mouse button can also be used to move objects between windows in Maya.
Continuing with the live action metaphor, we must remember that we cannot see anything in the Viewport or render anything without lights. Unless there is light bouncing off the materials on our objects, nothing is visible. And yes, there is a default light and we are using it in Figure 1.5. (But Arnold will not render light created by the default light; a new light must be created before rendering with Arnold.) We see now why shader networks must contain things like materials, lights, and cameras: they are critical to rendering, whether we are talking about a final render or the quick-and-dirty render that Maya provides for us in the Viewport.
We see in the upper-left area of the Hypershade (in Figure 1.6) a material called “aiStandardSurface1.” This is a material that comes with Arnold, the default renderer in Maya. Arnold is sold by Solid Angle (solidangle.com). Previous to Maya 2017, Maya shipped with a renderer called mental ray (the name is spelled with a small m and small r). Mental ray is owned
12 ◾ 3D Animation for the Raw Beginner Using Autodesk Maya
by NVIDIA (nvidia.com, the graphics card company) and, until recently, could still be bought from NVIDIA and used as a plug-in to Maya—but much to the chagrin of many professional users of mental ray, it has been taken off the market, presumably so that NVIDIA can promote their other renderer called Iray, which we will look at later in this book. Autodesk bought Solid Angle and began shipping Arnold with Maya in 2017; at the same time, it stopped shipping mental ray with Maya. The Arnold material that we see in the upper left of the Hypershade comes with a number of attribute “presets”; I have chosen the one that gives it a gold look. Note that it is the material of an object that makes it look like it is made of gold; it is not the wireframe or “geometry” of an object that does this. In the lower-left area of the Hypershade we see some menus that can be used to create such things as materials, textures, and lights. In the lower-right area of the Hypershade are the attributes of the gold Arnold material. (These same
FIGURE 1.6 The Hypershade window.
An Introduction to 3D Modeling, Animation, and Rendering ◾ 13
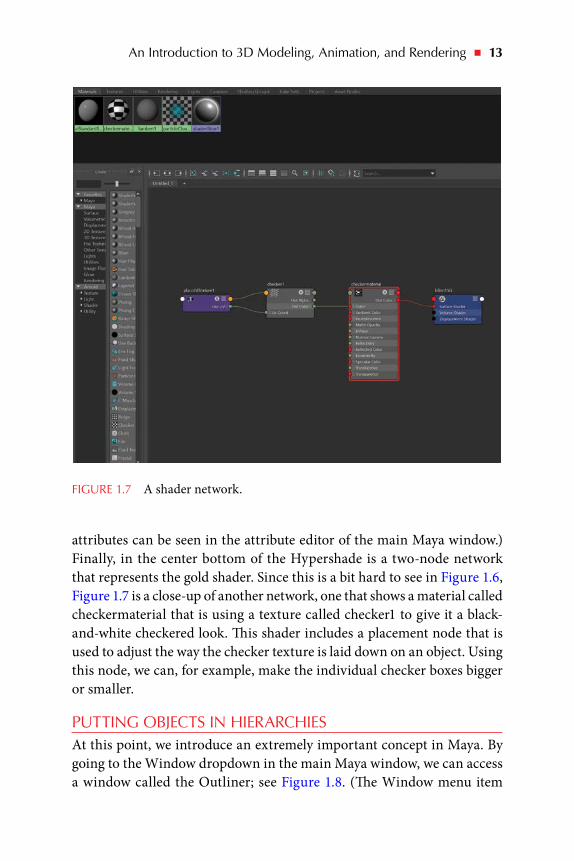
attributes can be seen in the attribute editor of the main Maya window.) Finally, in the center bottom of the Hypershade is a two-node network that represents the gold shader. Since this is a bit hard to see in Figure 1.6, Figure 1.7 is a close-up of another network, one that shows a material called checkermaterial that is using a texture called checker1 to give it a black-and-white checkered look. This shader includes a placement node that is used to adjust the way the checker texture is laid down on an object. Using this node, we can, for example, make the individual checker boxes bigger or smaller.
PUTTING OBJECTS IN HIERARCHIESAt this point, we introduce an extremely important concept in Maya. By going to the Window dropdown in the main Maya window, we can access a window called the Outliner; see Figure 1.8. (The Window menu item
FIGURE 1.7 A shader network.
14 ◾ 3D Animation for the Raw Beginner Using Autodesk Maya
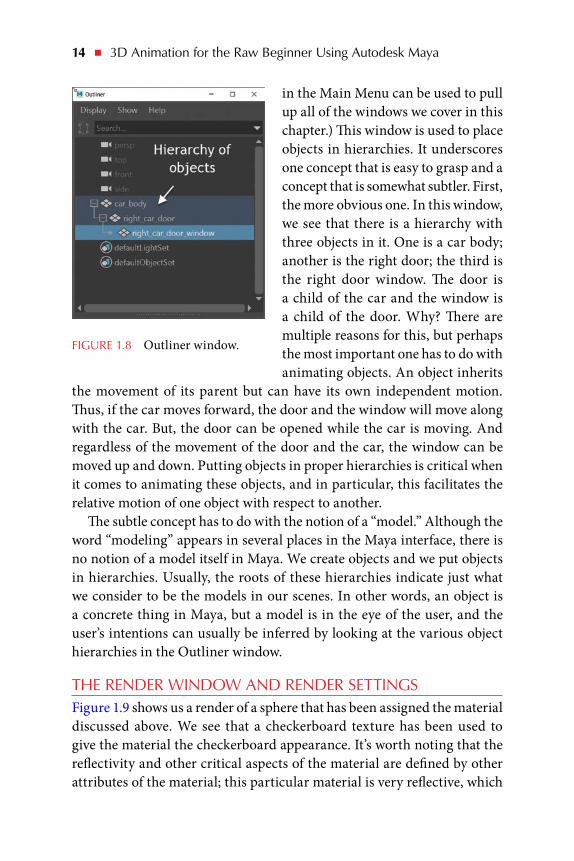
in the Main Menu can be used to pull up all of the windows we cover in this chapter.) This window is used to place objects in hierarchies. It underscores one concept that is easy to grasp and a concept that is somewhat subtler. First, the more obvious one. In this window, we see that there is a hierarchy with three objects in it. One is a car body; another is the right door; the third is the right door window. The door is a child of the car and the window is a child of the door. Why? There are multiple reasons for this, but perhaps the most important one has to do with animating objects. An object inherits
the movement of its parent but can have its own independent motion. Thus, if the car moves forward, the door and the window will move along with the car. But, the door can be opened while the car is moving. And regardless of the movement of the door and the car, the window can be moved up and down. Putting objects in proper hierarchies is critical when it comes to animating these objects, and in particular, this facilitates the relative motion of one object with respect to another.
The subtle concept has to do with the notion of a “model.” Although the word “modeling” appears in several places in the Maya interface, there is no notion of a model itself in Maya. We create objects and we put objects in hierarchies. Usually, the roots of these hierarchies indicate just what we consider to be the models in our scenes. In other words, an object is a concrete thing in Maya, but a model is in the eye of the user, and the user’s intentions can usually be inferred by looking at the various object hierarchies in the Outliner window.
THE RENDER WINDOW AND RENDER SETTINGSFigure 1.9 shows us a render of a sphere that has been assigned the material discussed above. We see that a checkerboard texture has been used to give the material the checkerboard appearance. It’s worth noting that the reflectivity and other critical aspects of the material are defined by other attributes of the material; this particular material is very reflective, which
FIGURE 1.8 Outliner window.

An Introduction to 3D Modeling, Animation, and Rendering ◾ 15
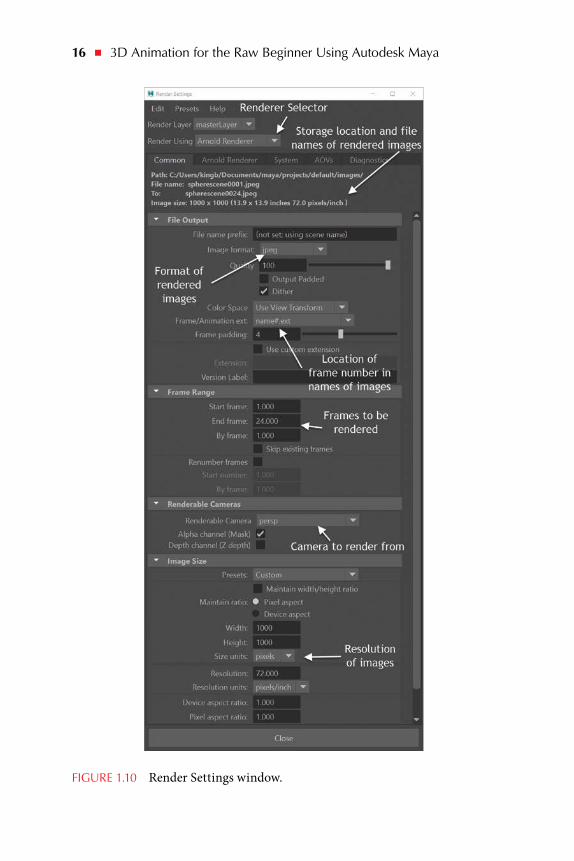
is indicated by the bright spot near the center of the sphere, where light is sharply reflected. See Figure 1.10. The Render window is used to control the process of rendering the final series of images that are output after the models have been constructed and animated in the scene. It can be opened by going to Options → Render Settings in the Render View (as seen in Figure 1.9). Some particularly critical settings are indicated in the figure.
At the top of Figure 1.10 is a selector that can be used to choose the renderer; in this case, Arnold has been chosen. There are tabs below this selector; they organize the many settings involved in the render process. The Common tab (shown) is common to all renderers. The other tabs pertain to the specific renderer chosen. Printed below these tabs is some information supplied by the renderer. In particular, it tells us how the rendered frames will be named and where they will be stored after they are generated.
This is a good time to point out that Maya uses a very specific folder hierarchy. In the documents directory of the user (this is true for Windows and Macs), the Maya installer creates a folder called maya. Within this is a
FIGURE 1.9 Render of checkerboard sphere.
16 ◾ 3D Animation for the Raw Beginner Using Autodesk Maya
FIGURE 1.10 Render Settings window.

An Introduction to 3D Modeling, Animation, and Rendering ◾ 17
projects folder. Within this, the user creates a folder for the given project; each project consists of a number of scenes (each scene stored as an .mb or .ma file). Instead of creating a specific project folder, I used the default project folder created by Maya. Thus, my project is called “default.” The folder called “images” is where the renderer places its rendered images. A new project folder can be created by going to File on the main window and choosing Set Project. This same menu selection can be used to return to an existing project to continue working on it. Importantly, when moving a project between two computers, it is critical that the entire project folder be moved, as scene files (which are in the scenes folder within the project folder) reference files that appear in other folders within the project folder; a common consequence of not moving the entire project folder is to lose the textures assigned to various materials.
Below the tabs is a menu that can be used to choose the format of the rendered images. In the figure, JPEG has been chosen. Further down is a setting that must be set if (and only if) more than one frame is going to be rendered. Specifically, the pound sign (or hash mark) is inserted somewhere in the name of the rendered image. It represents an integer that starts with 1 and is incremented by one for each subsequent frame. Below this, we see that the render will start with frame 1 and stop at frame 24, and the final 1.000 entry means that every single frame will be rendered. If this last setting were, for example, set to 10, only every 10th frame would be rendered. As a note, 24 is a common frame rate chosen in Maya, so these settings likely indicate that one second’s worth of animation will be rendered. Further down is the name of the camera to be used for rendering. The default camera is chosen; its name is persp, which means “perspective” because it points at an angle across the scene and not directly down any of the three axes. We see some resolution settings. The frames will be 1000 by 1000 pixels, with 72 pixels per inch.
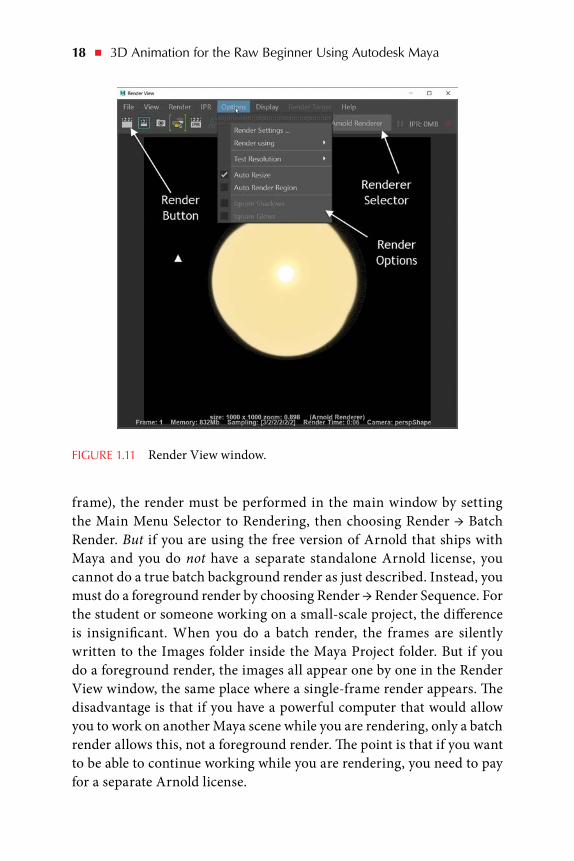
Figure 1.11 shows the Render View again. In this case, we note the location of the Options dropdown that can be used to pull up the Render Settings window. It also shows us the Renderer Selector; thus, the renderer can be selected in both the Render View and Render Settings. Finally, the button at the far left is used to render a single frame. It’s important to note that this window and this button are used only to perform single-frame renders—which are usually test renders and not final renders. If the user has chosen to render multiple frames (by using the Render Settings to set the frame number property of each rendered
18 ◾ 3D Animation for the Raw Beginner Using Autodesk Maya
frame), the render must be performed in the main window by setting the Main Menu Selector to Rendering, then choosing Render → Batch Render. But if you are using the free version of Arnold that ships with Maya and you do not have a separate standalone Arnold license, you cannot do a true batch background render as just described. Instead, you must do a foreground render by choosing Render → Render Sequence. For the student or someone working on a small-scale project, the difference is insignificant. When you do a batch render, the frames are silently written to the Images folder inside the Maya Project folder. But if you do a foreground render, the images all appear one by one in the Render View window, the same place where a single-frame render appears. The disadvantage is that if you have a powerful computer that would allow you to work on another Maya scene while you are rendering, only a batch render allows this, not a foreground render. The point is that if you want to be able to continue working while you are rendering, you need to pay for a separate Arnold license.
FIGURE 1.11 Render View window.
An Introduction to 3D Modeling, Animation, and Rendering ◾ 19
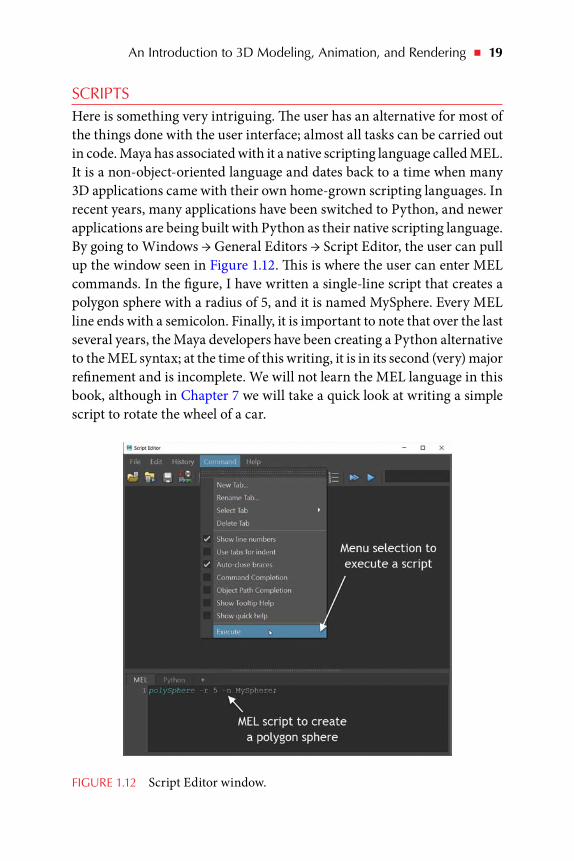
SCRIPTSHere is something very intriguing. The user has an alternative for most of the things done with the user interface; almost all tasks can be carried out in code. Maya has associated with it a native scripting language called MEL. It is a non-object-oriented language and dates back to a time when many 3D applications came with their own home-grown scripting languages. In recent years, many applications have been switched to Python, and newer applications are being built with Python as their native scripting language. By going to Windows → General Editors → Script Editor, the user can pull up the window seen in Figure 1.12. This is where the user can enter MEL commands. In the figure, I have written a single-line script that creates a polygon sphere with a radius of 5, and it is named MySphere. Every MEL line ends with a semicolon. Finally, it is important to note that over the last several years, the Maya developers have been creating a Python alternative to the MEL syntax; at the time of this writing, it is in its second (very) major refinement and is incomplete. We will not learn the MEL language in this book, although in Chapter 7 we will take a quick look at writing a simple script to rotate the wheel of a car.
FIGURE 1.12 Script Editor window.

20 ◾ 3D Animation for the Raw Beginner Using Autodesk Maya
THE GRAPH EDITORBy going to Windows → Animation Editors → Graph Editor, the user can pull up the window seen in Figure 1.13. We won’t talk much about this now, but this window is frequently used to fine-tune animation that is designed in the main window. Importantly, we note that three primary channel attributes are Translate, Rotate, and Scale, and since this is a 3D application, there are actually nine separate attributes. (We note that there are tools that translate, rotate, and scale, and objects can have attributes whose values tell us how they have been translated, rotated, or scaled.) The graphs to the right of the figure track the translation, rotation, and scaling of a given object (the one that is selected in the main window) along the three dimensions over a series of frames. This particular figure shows us what MySphere is doing over the course of 78 frames.
FIGURE 1.13 Graph Editor window.
An Introduction to 3D Modeling, Animation, and Rendering ◾ 21
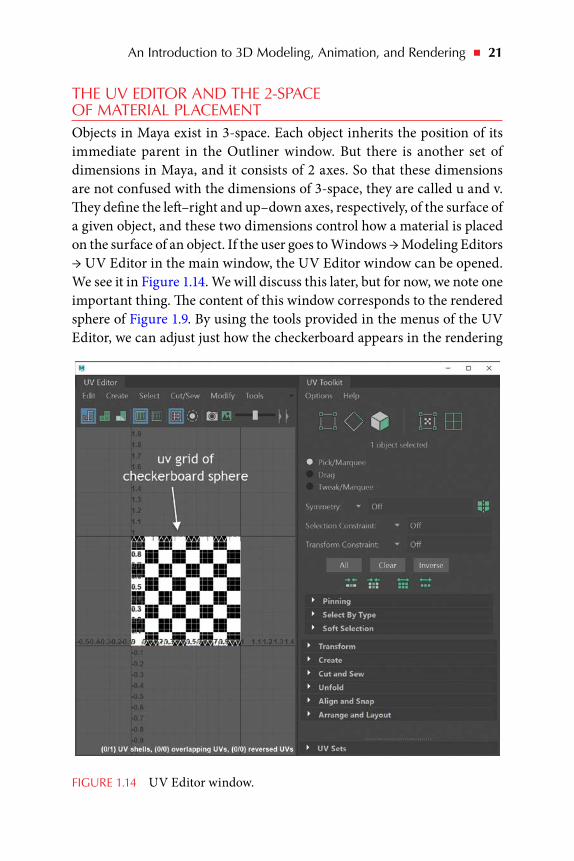
THE UV EDITOR AND THE 2-SPACE OF MATERIAL PLACEMENTObjects in Maya exist in 3-space. Each object inherits the position of its immediate parent in the Outliner window. But there is another set of dimensions in Maya, and it consists of 2 axes. So that these dimensions are not confused with the dimensions of 3-space, they are called u and v. They define the left–right and up–down axes, respectively, of the surface of a given object, and these two dimensions control how a material is placed on the surface of an object. If the user goes to Windows → Modeling Editors → UV Editor in the main window, the UV Editor window can be opened. We see it in Figure 1.14. We will discuss this later, but for now, we note one important thing. The content of this window corresponds to the rendered sphere of Figure 1.9. By using the tools provided in the menus of the UV Editor, we can adjust just how the checkerboard appears in the rendering
FIGURE 1.14 UV Editor window.
22 ◾ 3D Animation for the Raw Beginner Using Autodesk Maya
by adjusting the way the material of the object is laid down on the object. The checkerboard square in Figure 1.14 corresponds to the (u,v) space that wraps around the sphere.
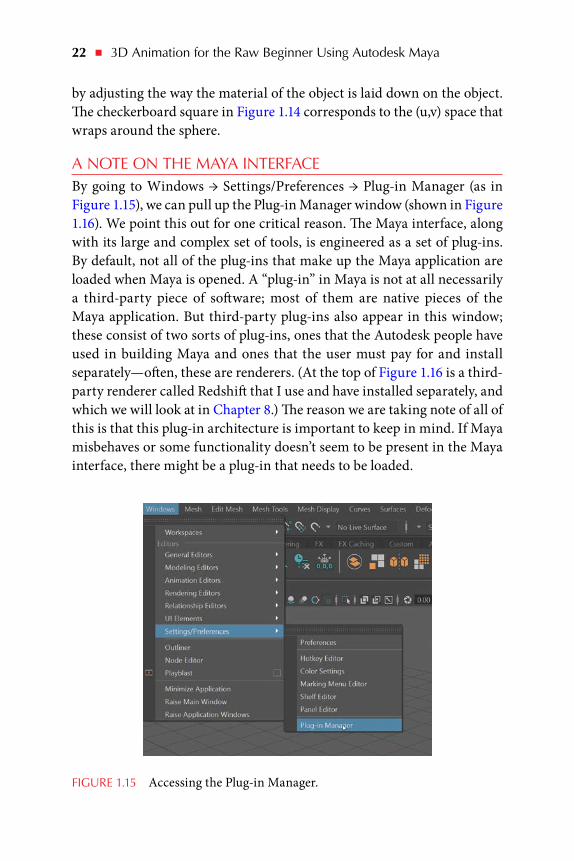
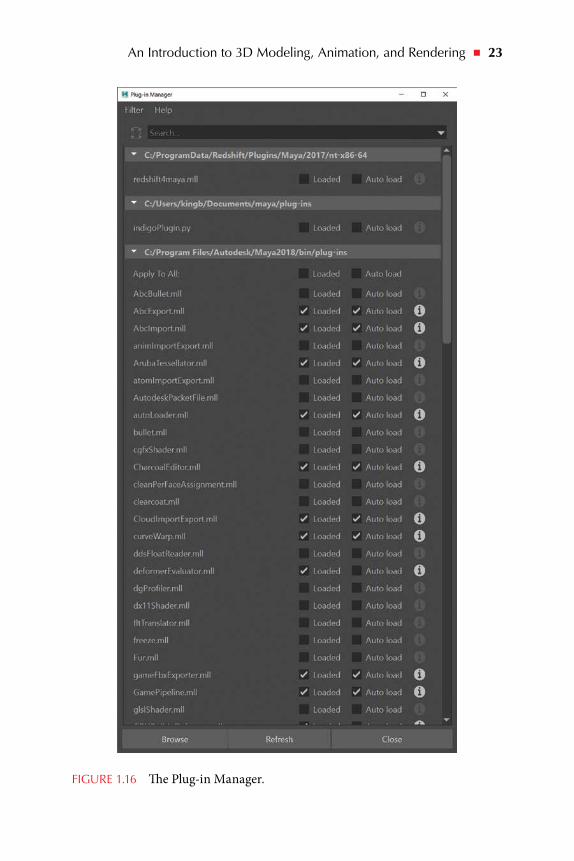
A NOTE ON THE MAYA INTERFACEBy going to Windows → Settings/Preferences → Plug-in Manager (as in Figure 1.15), we can pull up the Plug-in Manager window (shown in Figure 1.16). We point this out for one critical reason. The Maya interface, along with its large and complex set of tools, is engineered as a set of plug-ins. By default, not all of the plug-ins that make up the Maya application are loaded when Maya is opened. A “plug-in” in Maya is not at all necessarily a third-party piece of software; most of them are native pieces of the Maya application. But third-party plug-ins also appear in this window; these consist of two sorts of plug-ins, ones that the Autodesk people have used in building Maya and ones that the user must pay for and install separately—often, these are renderers. (At the top of Figure 1.16 is a third-party renderer called Redshift that I use and have installed separately, and which we will look at in Chapter 8.) The reason we are taking note of all of this is that this plug-in architecture is important to keep in mind. If Maya misbehaves or some functionality doesn’t seem to be present in the Maya interface, there might be a plug-in that needs to be loaded.
FIGURE 1.15 Accessing the Plug-in Manager.
An Introduction to 3D Modeling, Animation, and Rendering ◾ 23
FIGURE 1.16 The Plug-in Manager.
24 ◾ 3D Animation for the Raw Beginner Using Autodesk Maya
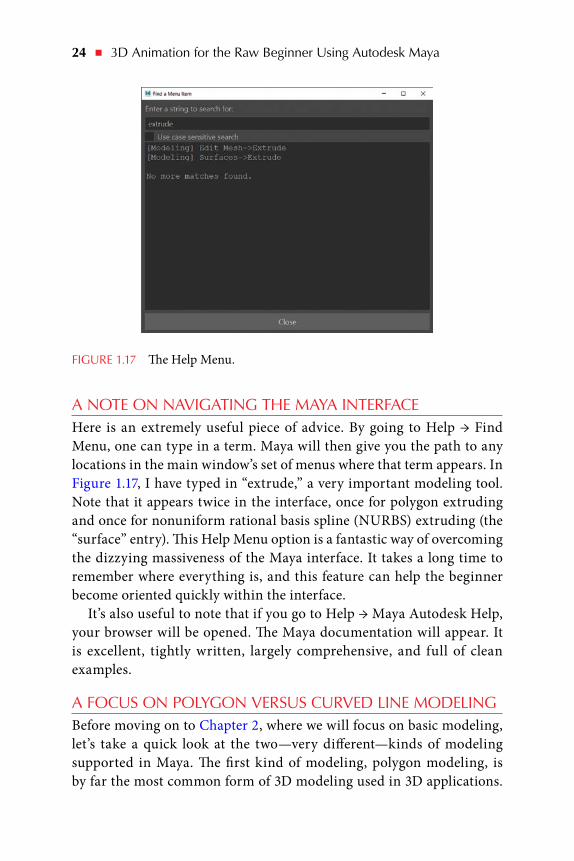
A NOTE ON NAVIGATING THE MAYA INTERFACEHere is an extremely useful piece of advice. By going to Help → Find Menu, one can type in a term. Maya will then give you the path to any locations in the main window’s set of menus where that term appears. In Figure 1.17, I have typed in “extrude,” a very important modeling tool. Note that it appears twice in the interface, once for polygon extruding and once for nonuniform rational basis spline (NURBS) extruding (the “surface” entry). This Help Menu option is a fantastic way of overcoming the dizzying massiveness of the Maya interface. It takes a long time to remember where everything is, and this feature can help the beginner become oriented quickly within the interface.
It’s also useful to note that if you go to Help → Maya Autodesk Help, your browser will be opened. The Maya documentation will appear. It is excellent, tightly written, largely comprehensive, and full of clean examples.
A FOCUS ON POLYGON VERSUS CURVED LINE MODELINGBefore moving on to Chapter 2, where we will focus on basic modeling, let’s take a quick look at the two—very different—kinds of modeling supported in Maya. The first kind of modeling, polygon modeling, is by far the most common form of 3D modeling used in 3D applications.
FIGURE 1.17 The Help Menu.
An Introduction to 3D Modeling, Animation, and Rendering ◾ 25
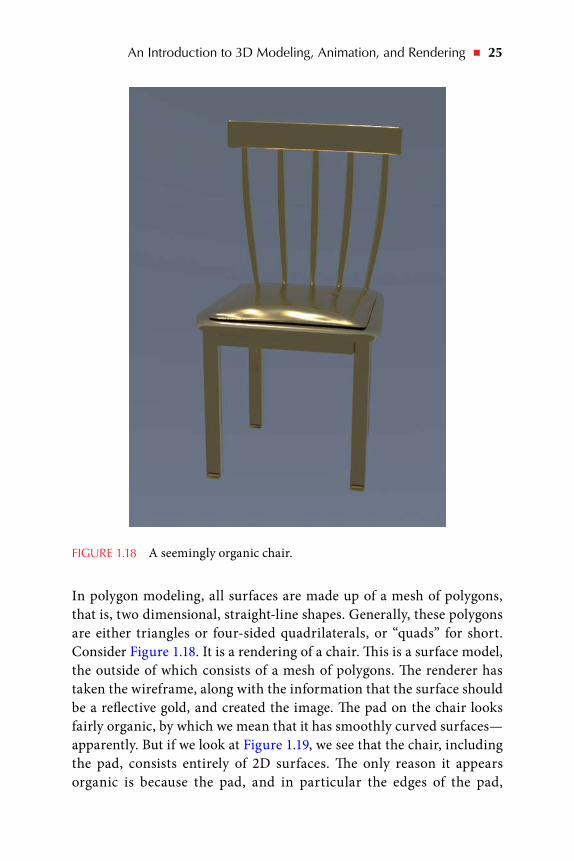
In polygon modeling, all surfaces are made up of a mesh of polygons, that is, two dimensional, straight-line shapes. Generally, these polygons are either triangles or four-sided quadrilaterals, or “quads” for short. Consider Figure 1.18. It is a rendering of a chair. This is a surface model, the outside of which consists of a mesh of polygons. The renderer has taken the wireframe, along with the information that the surface should be a reflective gold, and created the image. The pad on the chair looks fairly organic, by which we mean that it has smoothly curved surfaces—apparently. But if we look at Figure 1.19, we see that the chair, including the pad, consists entirely of 2D surfaces. The only reason it appears organic is because the pad, and in particular the edges of the pad,
FIGURE 1.18 A seemingly organic chair.
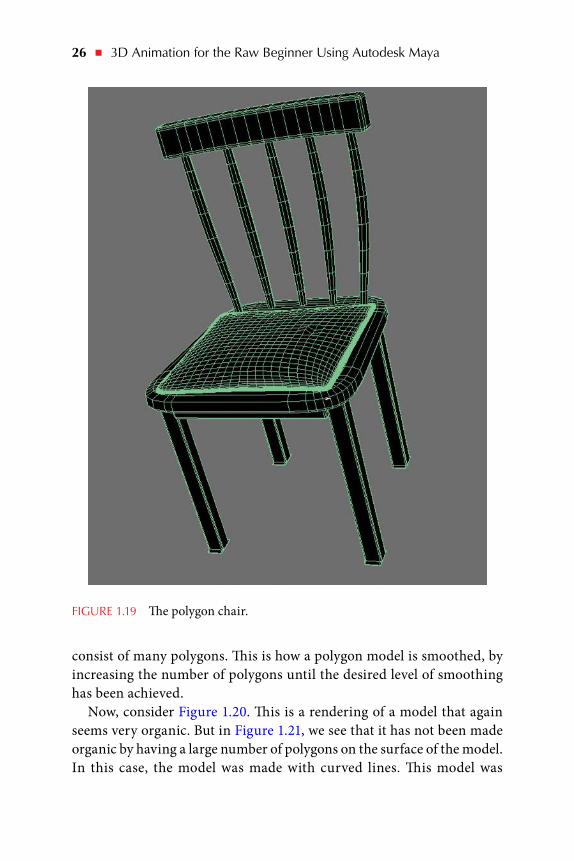
26 ◾ 3D Animation for the Raw Beginner Using Autodesk Maya
consist of many polygons. This is how a polygon model is smoothed, by increasing the number of polygons until the desired level of smoothing has been achieved.
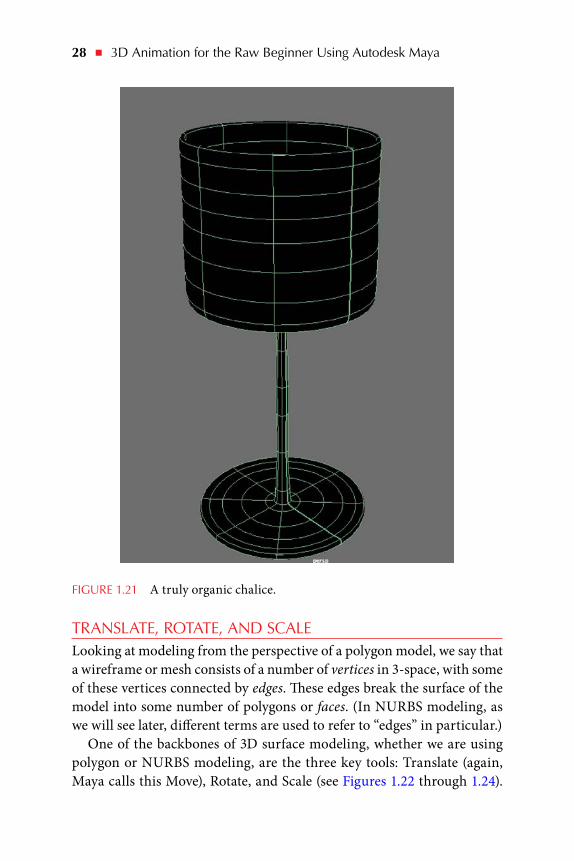
Now, consider Figure 1.20. This is a rendering of a model that again seems very organic. But in Figure 1.21, we see that it has not been made organic by having a large number of polygons on the surface of the model. In this case, the model was made with curved lines. This model was
FIGURE 1.19 The polygon chair.

An Introduction to 3D Modeling, Animation, and Rendering ◾ 27
made with the second kind of modeling that Maya supports—NURBS modeling. We will delve deeper into this in Chapter 2, but for now, we note that curved-line models are created in a very different manner than polygon models; there are specialized polygon modeling tools, and there are specialized NURBS modeling tools, and these two sets of tools only overlap in part.
FIGURE 1.20 A seemingly organic chalice.
28 ◾ 3D Animation for the Raw Beginner Using Autodesk Maya
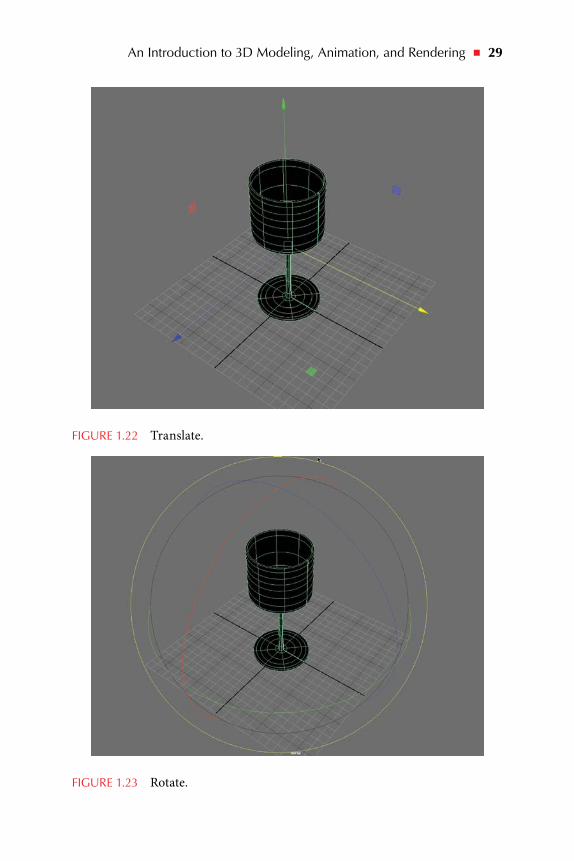
TRANSLATE, ROTATE, AND SCALELooking at modeling from the perspective of a polygon model, we say that a wireframe or mesh consists of a number of vertices in 3-space, with some of these vertices connected by edges. These edges break the surface of the model into some number of polygons or faces. (In NURBS modeling, as we will see later, different terms are used to refer to “edges” in particular.)
One of the backbones of 3D surface modeling, whether we are using polygon or NURBS modeling, are the three key tools: Translate (again, Maya calls this Move), Rotate, and Scale (see Figures 1.22 through 1.24).
FIGURE 1.21 A truly organic chalice.
An Introduction to 3D Modeling, Animation, and Rendering ◾ 29
FIGURE 1.22 Translate.
FIGURE 1.23 Rotate.
30 ◾ 3D Animation for the Raw Beginner Using Autodesk Maya
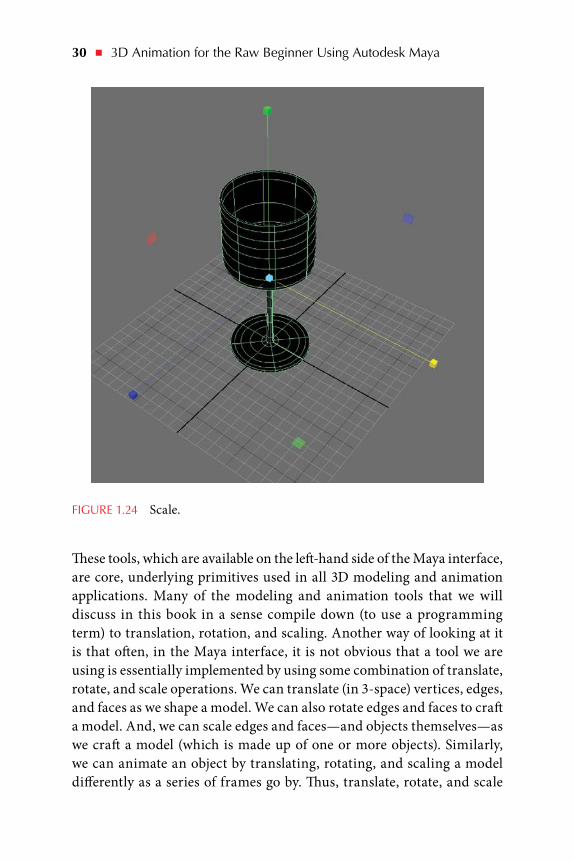
These tools, which are available on the left-hand side of the Maya interface, are core, underlying primitives used in all 3D modeling and animation applications. Many of the modeling and animation tools that we will discuss in this book in a sense compile down (to use a programming term) to translation, rotation, and scaling. Another way of looking at it is that often, in the Maya interface, it is not obvious that a tool we are using is essentially implemented by using some combination of translate, rotate, and scale operations. We can translate (in 3-space) vertices, edges, and faces as we shape a model. We can also rotate edges and faces to craft a model. And, we can scale edges and faces—and objects themselves—as we craft a model (which is made up of one or more objects). Similarly, we can animate an object by translating, rotating, and scaling a model differently as a series of frames go by. Thus, translate, rotate, and scale
FIGURE 1.24 Scale.
An Introduction to 3D Modeling, Animation, and Rendering ◾ 31
are key to animating models, as well. We will see this in Chapter 7. This might seem repetitive, but it is a very critical fact: the Maya tools Move (translate), Rotate, and Scale are fundamental tools that underlie much of what goes on inside Maya, and this is true for all 3D applications. We use these tools heavily as we model and as we animate—but often they are being applied for us by the application as we use some higher-level tool.
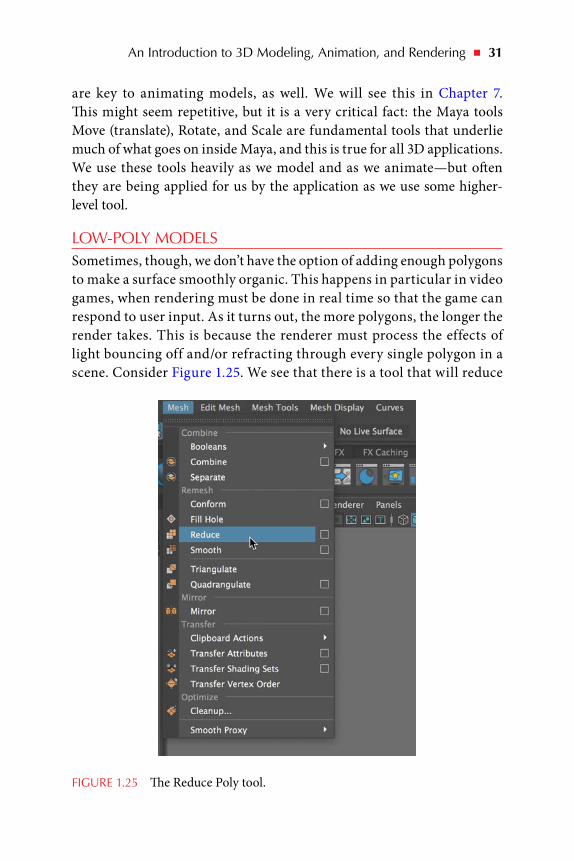
LOW-POLY MODELSSometimes, though, we don’t have the option of adding enough polygons to make a surface smoothly organic. This happens in particular in video games, when rendering must be done in real time so that the game can respond to user input. As it turns out, the more polygons, the longer the render takes. This is because the renderer must process the effects of light bouncing off and/or refracting through every single polygon in a scene. Consider Figure 1.25. We see that there is a tool that will reduce
FIGURE 1.25 The Reduce Poly tool.
32 ◾ 3D Animation for the Raw Beginner Using Autodesk Maya
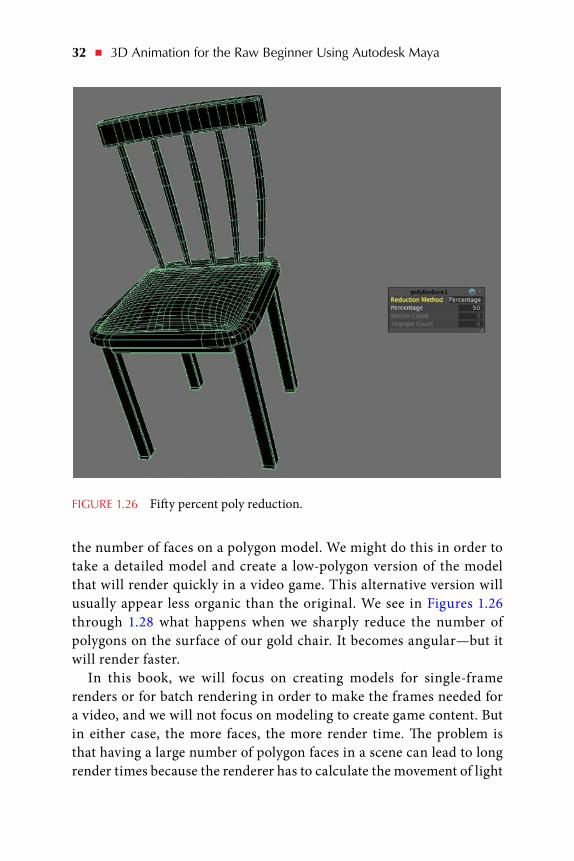
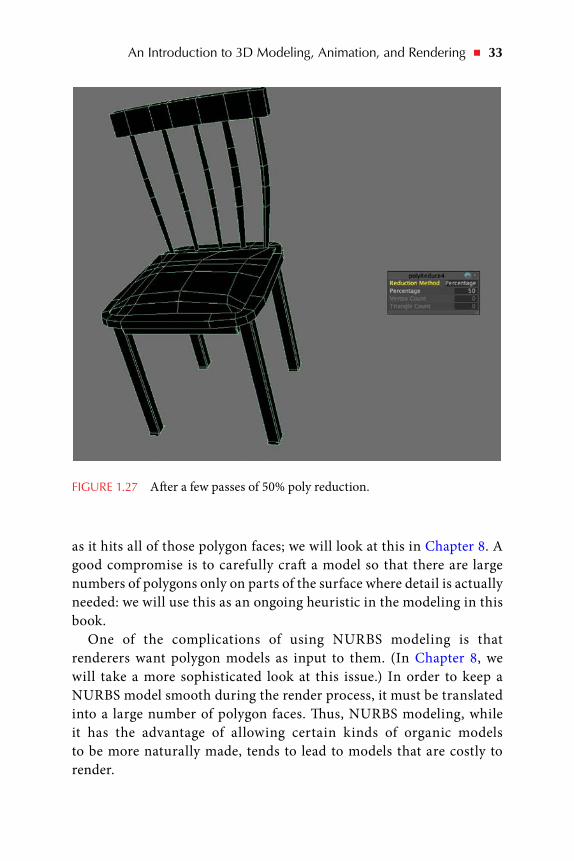
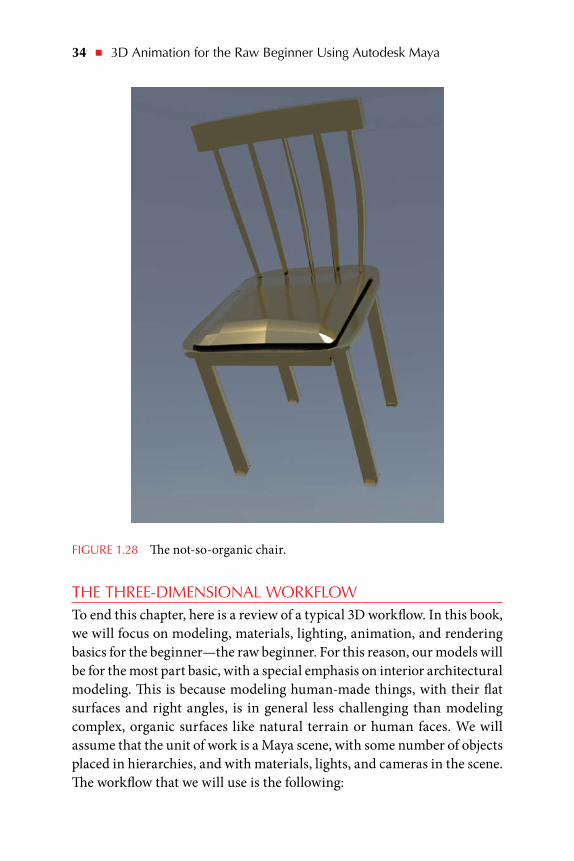
the number of faces on a polygon model. We might do this in order to take a detailed model and create a low-polygon version of the model that will render quickly in a video game. This alternative version will usually appear less organic than the original. We see in Figures 1.26 through 1.28 what happens when we sharply reduce the number of polygons on the surface of our gold chair. It becomes angular—but it will render faster.
In this book, we will focus on creating models for single-frame renders or for batch rendering in order to make the frames needed for a video, and we will not focus on modeling to create game content. But in either case, the more faces, the more render time. The problem is that having a large number of polygon faces in a scene can lead to long render times because the renderer has to calculate the movement of light
FIGURE 1.26 Fifty percent poly reduction.
An Introduction to 3D Modeling, Animation, and Rendering ◾ 33
as it hits all of those polygon faces; we will look at this in Chapter 8. A good compromise is to carefully craft a model so that there are large numbers of polygons only on parts of the surface where detail is actually needed: we will use this as an ongoing heuristic in the modeling in this book.
One of the complications of using NURBS modeling is that renderers want polygon models as input to them. (In Chapter 8, we will take a more sophisticated look at this issue.) In order to keep a NURBS model smooth during the render process, it must be translated into a large number of polygon faces. Thus, NURBS modeling, while it has the advantage of allowing certain kinds of organic models to be more naturally made, tends to lead to models that are costly to render.
FIGURE 1.27 After a few passes of 50% poly reduction.
34 ◾ 3D Animation for the Raw Beginner Using Autodesk Maya
THE THREE-DIMENSIONAL WORKFLOWTo end this chapter, here is a review of a typical 3D workflow. In this book, we will focus on modeling, materials, lighting, animation, and rendering basics for the beginner—the raw beginner. For this reason, our models will be for the most part basic, with a special emphasis on interior architectural modeling. This is because modeling human-made things, with their flat surfaces and right angles, is in general less challenging than modeling complex, organic surfaces like natural terrain or human faces. We will assume that the unit of work is a Maya scene, with some number of objects placed in hierarchies, and with materials, lights, and cameras in the scene. The workflow that we will use is the following:
FIGURE 1.28 The not-so-organic chair.
An Introduction to 3D Modeling, Animation, and Rendering ◾ 35
1. Find something in the real world that you either want to mimic or use as inspiration. It is very important for the beginner to get “reference images” (usually photographs) that will help get proportions correct. It is equally important to use reference images because they contain realistic detail that is necessary for producing what we call “photorealism,” that is, final renderings that could be mistaken for high-definition photographs of the real world. A common mistake by the beginner is to simplify the modeling process by removing detail—but this leads to superficial, unrealistic models and thus nonphotorealistic renderings.
2. Create wireframe models using polygon and/or NURBS modeling. The objects that make up models must be carefully named and placed in hierarchies to ease the application of materials, to facilitate the animation of objects with multiple moving parts (like a car whose windows can be opened while the car is moving, that is, windows that inherit the movement of the car body under which they are children in the hierarchy), and to make it easier to reuse components in future models.
3. Put materials on the models and place lights in the scene. The modeler might use the default light in Maya while creating wireframe models, but it is important to test materials under the lights that will actually appear in the scene. You might also use default materials like Maya lamberts (all objects are created initially with a lambert material on them; this is a nonreflective material), but lights must be tested with the materials that will be on the models in the scene. We see that lights and materials are highly interdependent.
4. Animate the objects in the scene. Models might move with respect to each other. Parts of one model might move with respect to other parts of the objects that make up this model. Models might also be rescaled (or in general, reshaped) in three dimensions or rotated in three dimensions as part of the animation. Models might also collide. Particle effects can be added as a further source of motion. Some 3D artists like to do some or all of their animation before finishing the application of materials.
5. Render the animation as a series of individual frames. In this book, we will assume that Maya will render 24 frames per second. During

36 ◾ 3D Animation for the Raw Beginner Using Autodesk Maya
phases 2–4, you are likely to do many single-frame test renders to judge the quality of your work and to evaluate the materials and lights. All renderings are done through the perspective of some camera. These test renders might be done through the default camera, but that is not the camera that will be used for the final render. Often, new cameras are introduced early in order to more carefully evaluate a developing scene from various angles in 3-space. These cameras may or may not be used for the final rendering.
6. A sound track, if desired, can be created in an audio program, as Maya is not a sound editor. The audio track can be imported into Maya in order to coordinate the animation and the sound.
7. The rendered frames are imported into a video editor, along with the sound track, and the video editor is used to export a final video. Since rendering is done from the perspective of a camera, and multiple cameras might be used to capture the animation, there might be multiple rendering batches that need to be turned into separate video clips that are then edited again in the video editor to create a single, final video.
Finally, many experienced modelers and animators prefer to create their wireframe models completely or almost completely before moving on to materials and lights and animation—as suggested by our seven-stage workflow. But the beginner needs to test wireframe models early on in order to spot modeling errors. This is best done by applying materials that approximate the materials that will be used for the final render; it is also necessary to create a realistic lighting situation by approximating the final lighting for the scene. Thus, the beginner mixes in modeling, applying materials, creating lights, creating cameras, and rendering early on, and therefore does not proceed through phases 1–7 in a strictly linear fashion. The bottom line is that only the experienced 3D artist knows what a wireframe model will eventually look like in a final rendering—a beginner must therefore apply materials and create lights early in the workflow process.
SOME ADVICESince the number of polygons (or “faces”) in a scene is very important when it comes to the time needed for rendering, it is useful to turn on
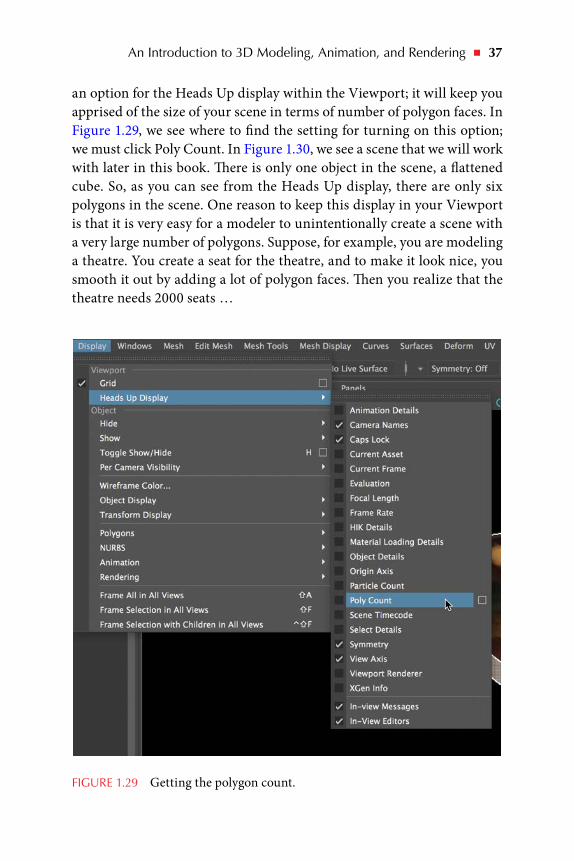
An Introduction to 3D Modeling, Animation, and Rendering ◾ 37
an option for the Heads Up display within the Viewport; it will keep you apprised of the size of your scene in terms of number of polygon faces. In Figure 1.29, we see where to find the setting for turning on this option; we must click Poly Count. In Figure 1.30, we see a scene that we will work with later in this book. There is only one object in the scene, a flattened cube. So, as you can see from the Heads Up display, there are only six polygons in the scene. One reason to keep this display in your Viewport is that it is very easy for a modeler to unintentionally create a scene with a very large number of polygons. Suppose, for example, you are modeling a theatre. You create a seat for the theatre, and to make it look nice, you smooth it out by adding a lot of polygon faces. Then you realize that the theatre needs 2000 seats …
FIGURE 1.29 Getting the polygon count.

38 ◾ 3D Animation for the Raw Beginner Using Autodesk Maya
A developing scene can become cluttered. To toggle the visibility of a set of objects, click on the blue stacks-of-squares icon in the left half of Figure 1.31. Then shift-select the objects and turn them into a visibility layer. Then, as in the right half of Figure 1.31, click the visibility “V” box.
Finally, control-Z is an undo. Set its depth at Windows → Settings/Preferences → Preferences → Undo → Queue size.
FIGURE 1.30 The polygon count.
FIGURE 1.31 Creating a visibility layer.