diy live edge cabinet
TRANSCRIPT

DIY Live Edge Cabinet
Looking for stylish storage for your living space? Replace that boring cabinet top with a live edge slab to create a fun and
functional storage cabinet with adjustable shelves!
Want to see this build in action? Check it out on my YouTube channel (& please subscribe)!: https://youtu.be/McQbastKY14
Difficulty
Moderate
Page 1 of 11

ToolsKreg Tools
Portable Crosscut
Kreg Pocket-Hole Jig® 720
Concealed Hinge Jig
Shelf Pin Jig with 1/4" Bit
Other Tools
Miter Saw
Table Saw
Tape Measure
Clamps
Drill (cordless)
Nail Gun
Sander
Shop Vacuum
Workbench
MaterialsWood Products
Plywood , 3/4" Thick , Full Sheet1
Plywood , 3/4" Thick , Half Sheet1
Plywood , 1/4" Thick , Full Sheet1
Board , 1x2 , 96"1
Board , 1x2 , 72"1
Hardware & Supplies
Shelf Pins8
Inlay Hinges4
Full Overlay Hinges4
1 1/4" Pocket Hole Screws50
Roll Of 3/4" Edgebanding1
Roll Of 1 1/2" Edgebanding1
1/2" Brad Nails50
Cabinet Door Pulls4
2 1/2" Pocket Hole Screws10
Page 2 of 11

Cut List & PartsSides , 3/4 X 12 3/4 X 29"4
Top Shelf , 3/4 X 11 3/4 X 50 3/4"1
Bottom Shelf , 3/4 X 11 3/4 X 50 3/4"1
Bottom Divider , 3/4 X 11 3/4 X 17 3/4"1
Top Divider , 3/4 X 7 1/2 X 11 3/4"1
Shelves , 3/4 X 11 3/4 X 25 1/4"2
Live Edge , Size Varies - Check Measurements Before Starting Build1
Cabinet Door Sides , 1 X 2 X 19 1/4"4
Cabinet Door Small Frame Pieces , 1 X 2 X 9 3/4"4
Door Panels , 1/4 X 10 3/4 X 17 1/4"4
Back Panel , 1/4 X 19 1/4 X 50 3/4"1
Page 3 of 11

DirectionsBulk Up Your LegsBegin the piece by laminating two 3/4" side pieces together to create one beefy leg piece. Repeat this step for the other leg
as well.
Attach The TopAttach your legs to your live edge top using pocket hole screws and wood glue.
1
2
Page 4 of 11

Add The Bottom ShelfAdd your bottom shelf using 1 1/4" pocket hole screws and wood glue. You may want to edge band this shelf piece before
attaching it.
Keep in mind, the size of this piece may be different than mine depending on the size of your live edge slab.
Add Top ShelfAdd the top shelf to the piece with 1 1/4" pocket hole screws and wood glue. Leave 7 1/2" of space between the top shelf and
the live edge slab.
3
4
Page 5 of 11
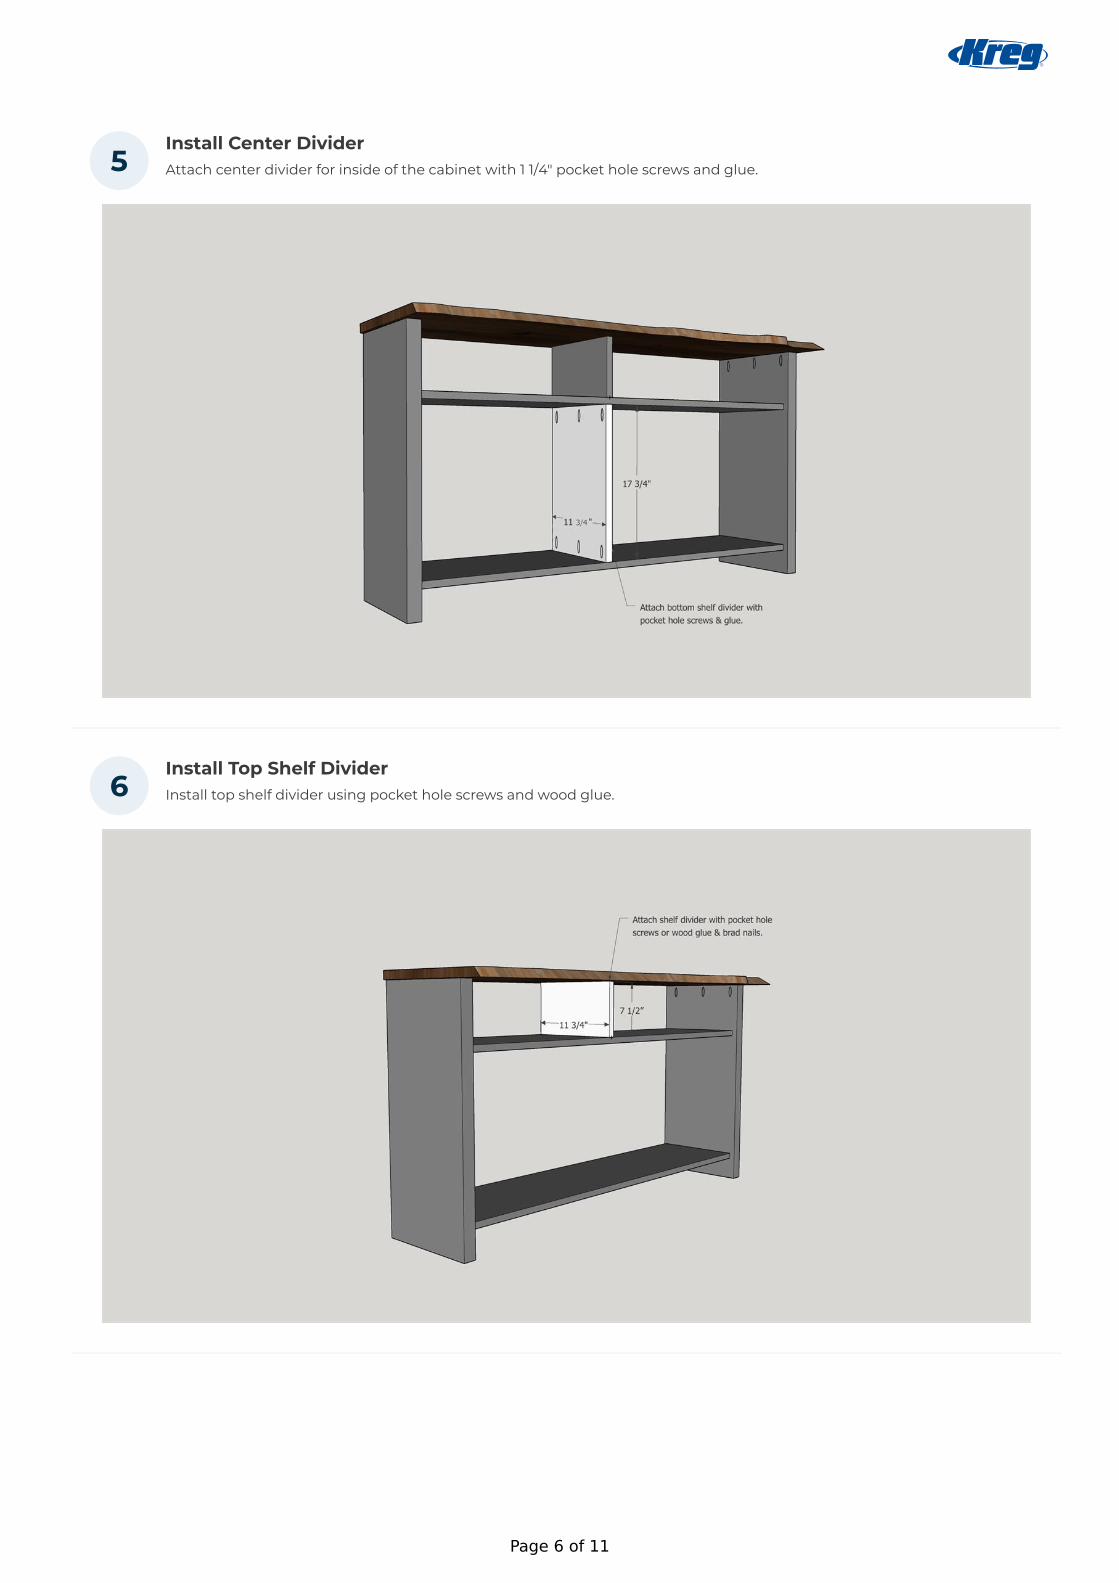
Install Center DividerAttach center divider for inside of the cabinet with 1 1/4" pocket hole screws and glue.
Install Top Shelf DividerInstall top shelf divider using pocket hole screws and wood glue.
5
6
Page 6 of 11
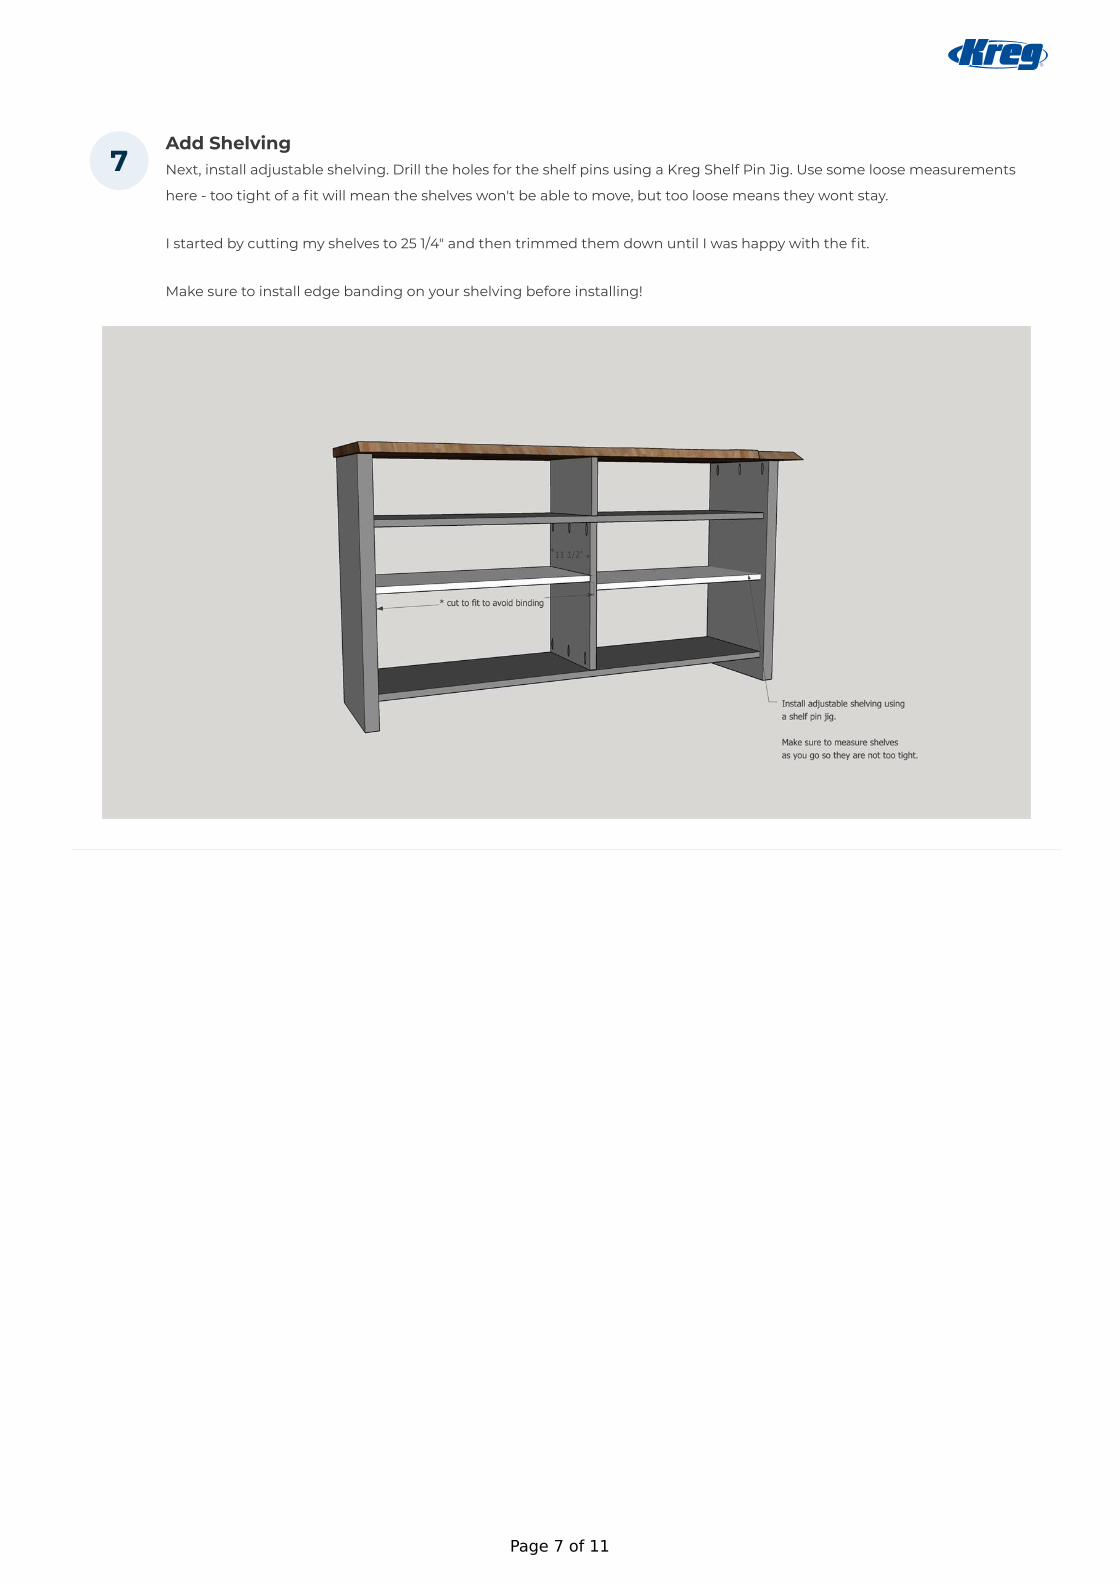
Add ShelvingNext, install adjustable shelving. Drill the holes for the shelf pins using a Kreg Shelf Pin Jig. Use some loose measurements
here - too tight of a fit will mean the shelves won't be able to move, but too loose means they wont stay.
I started by cutting my shelves to 25 1/4" and then trimmed them down until I was happy with the fit.
Make sure to install edge banding on your shelving before installing!
7
Page 7 of 11

Cabinet DoorsNext, begin to build your cabinet doors. Attach the pieces using pocket hole screws and wood glue.*
*Make sure to double check your measurements here as specific brands and types of hinges require different spacing. You
may also need to trim your boards to allow for a minimum of 1/8"clearance between all seams. Run a dry fit before installing
your doors.
**If you are attaching your plywood using grooves, cut the grooves in your door frame pieces with a table saw or router prior
to joining the pieces together.
8
Page 8 of 11

Cabinet Door PanelsNext, add your door panels. This can be done a few different ways.
Method 1: If you are using 1/4" plywood, they can be attached by sliding into grooves made in the wood using a table saw, or
nailed to the door panels from the back using wood glue and brad nails. If you are using grooves, you will have to cut your
plywood longer than the opening (this will depend on how deep your grooves are).
Method 2: Use 1/2" plywood and attach them to the opening using pocket hole screws and glue.
9
Page 9 of 11

Install DoorsInstall your doors using your hinges. You will need inlay hinges for the two outer doors and full overlay hinges for the center
doors.
Add BackingOnce you are happy with your build, add your 1/4" backing to the cabinet using brad nails.
10
11
Page 10 of 11
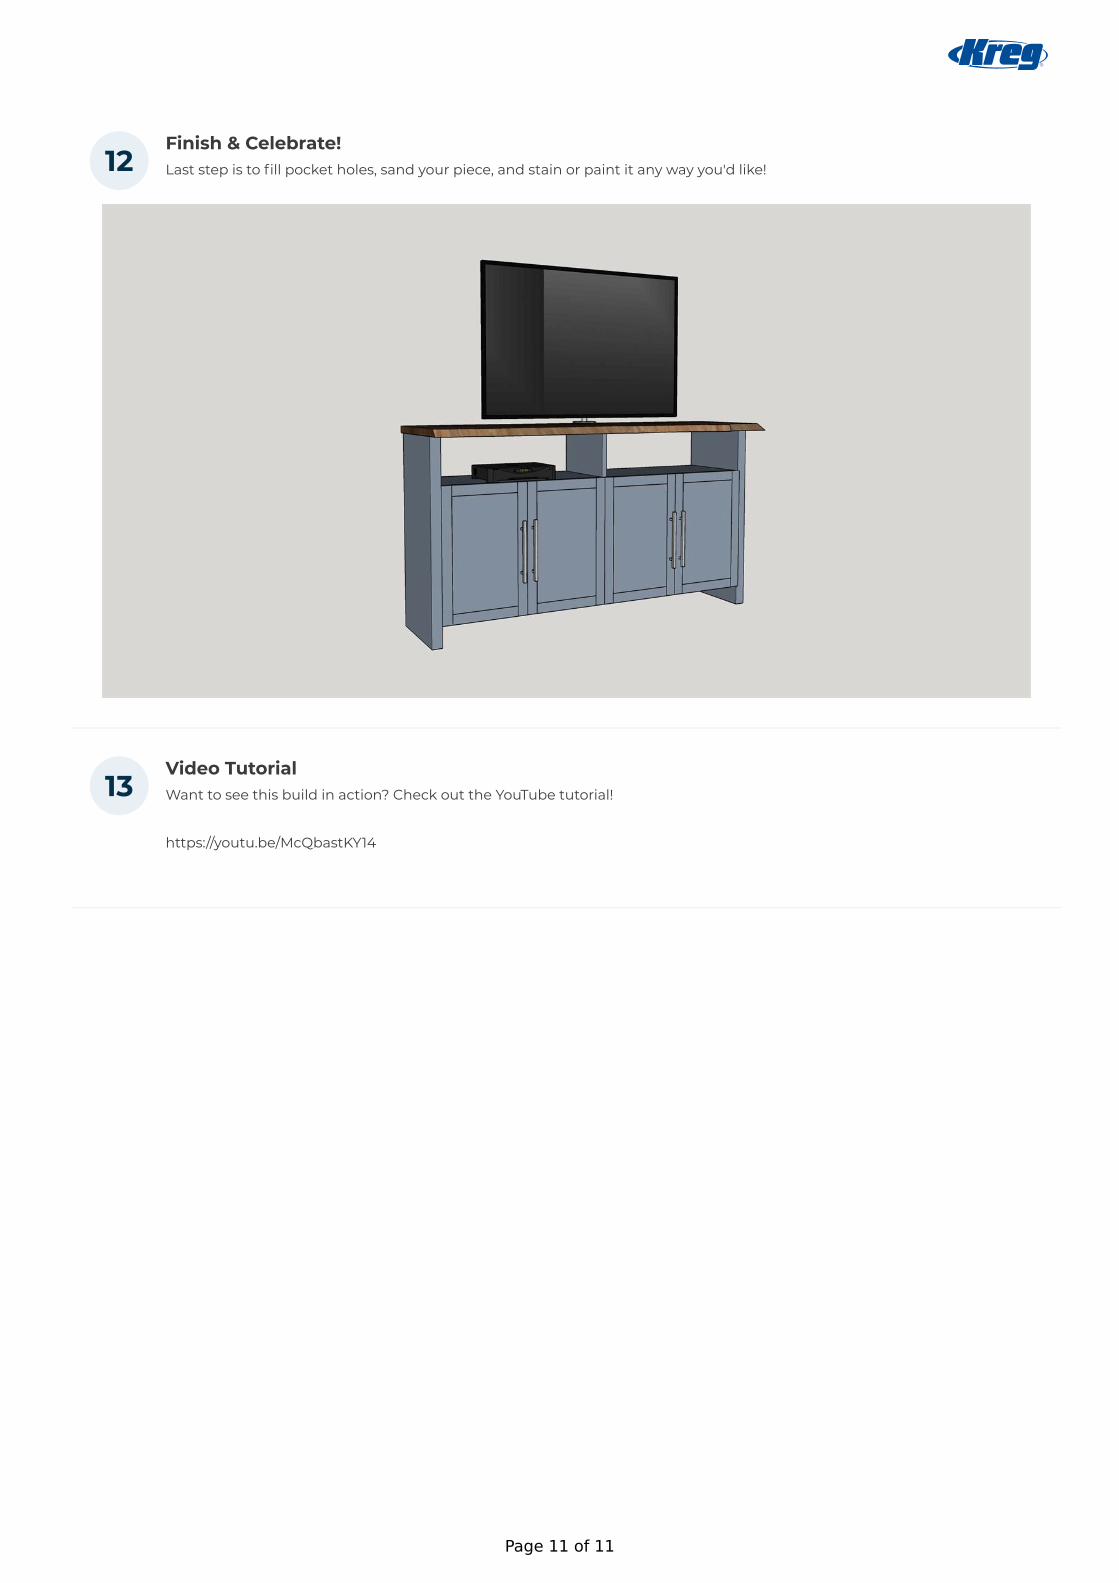
Finish & Celebrate!Last step is to fill pocket holes, sand your piece, and stain or paint it any way you'd like!
Video TutorialWant to see this build in action? Check out the YouTube tutorial!
https://youtu.be/McQbastKY14
12
13
Page 11 of 11