1 a complete dome construction guide - diy · pdf fileadam goss diy planetarium: a complete...
TRANSCRIPT

Adam Goss
DIY PLANETARIUM: A COMPLETE GUIDE
1
PLANETARIUM
A COMPLETE DOME CONSTRUCTION GUIDE BY ADAM GOSS
1913A Water’s Edge, Fort Collins, CO 80526

Adam Goss
DIY PLANETARIUM: A COMPLETE GUIDE
2
For more detailed terms and explanations, see the Glossary in
the back of this text. The Glossary defines terms and lists the
pages they appear on.
Table of Contents
Introduction-------------------------------------------------------------------------------------------------------------3
Materials--------------------------------------------------------------------------------------------------------------3-4
Math-------------------------------------------------------------------------------------------------------------------4-7
Dome Technology---------------------------------------------------------------------------------------------------8-9
Rendering Technology-------------------------------------------------------------------------------------------9-10
Glossary----------------------------------------------------------------------------------------------------------------11
Works Cited-----------------------------------------------------------------------------------------------------------11

Adam Goss
DIY PLANETARIUM: A COMPLETE GUIDE
3
Introduction
This manual is a completely new manual designed from scratch. I am qualified to write this
manual as I have been building planetariums for over four years, almost have a degree in
Computer Science at CSU and have studied math through Calculus II and Combinatorial Theory.
This manual requires that the user knows basic trigonometry and how to manipulate
trigonometric functions on a calculator. Construction methods are simple and require only that
the user is very accurate when measuring dimensions and cutting out pieces.
A planetarium is a hemispherical dome constructed in a variety of geometries used to view
content on a spherical surface as opposed to a flat screen. This surface adds an additional level
of immersion making fulldome planetarium theaters ideal for entertainment, education and
simulation. This technical manual will detail the full construction of a planetarium and its
components from designing a pattern to installing digital hardware for a true fulldome
projection. Great technologies tend to be very expensive as well. A professionally made
planetarium, for example, will cost around twenty-five thousand U.S. dollars. This manual will
detail all the necessary steps to produce a dome of professional quality for a budge less than
twenty-five hundred dollars, or ten percent of that of the same manufactured product.
Materials
To construct a planetarium dome, two fields of materials will be needed. The first section is
dome materials, the second, dome technology. Domes can be built out of many materials such
as plastic, aluminum, cardboard and even fabric. This manual documents plastic dome
construction, however, a skilled craftsman could build a dome out of any pliable material using
the dimensions in this manual. Materials needed are as follows:
Dome Materials
Additional notes: Masking tape 1.5” wide works the best for taping together gore sections. Any
type of plastic may be used that has a width less than two meters and can be unrolled. Dual
sided plastic that is black on one side, white on the other, is the optimal choice of plastic as it
Scissors Masking
Tape Marker
(Sharpie) Tape
Measure Plastic Rolls
Calculator Pencil Paper Box Fan

Adam Goss
DIY PLANETARIUM: A COMPLETE GUIDE
4
has decent contrast for projection inside but primarily, great protection from light on the
outside. This is beneficial for showing films in rooms that can’t be made completely dark such
as a gym as the intimate theater atmosphere is ruined with any light. White plastic will also
work if double sided plastic is too expensive or unavailable. The length of plastic required for a
dome of any size can be calculated using the length calculation in the Math section of this
manual.
Dome Technology
The best mirror to use in a planetarium is a primary surface mirror. These mirrors are optimal
because they don’t have any protection on the reflection surface and thus produce the best
image, however, can easily exceed several thousand dollars in price. A cheaper safety mirror
can be purchased (half-hemisphere) for approximately thirty-eight dollars.
Any 1080p projector will work in a dome, especially when a budget won’t permit a higher end
one. A current manufacturing trend shows that more expensive projectors have both higher
contrast ratios and lumen counts, ideal for the best picture quality.
Anytime a dome is inflated, it is secured to the ground. As floors can be dirty and
uncomfortable, black blankets provide a clean and relaxing way to view a show without
decreasing the contrast ratio. Conversely, white blankets are a poor choice for floor coverage
as they both show dirt easily and reflect projected light in the dome onto the rotunda.
Math
The math portion of this manual is the heart and soul of the dome construction process. The
following information is needed to calculate the planetarium blueprints:
The following equations will generate the planetarium
blueprints based on the input parameters: dome diameter,
width of plastic and the number of lateral divisions. It is
important to note that numbers must be in the form of the
Safety Mirror (18")
Computer (1080p
Capable)
Loud 2.1+ Stero
1080p Projector
Power Cables
Blender Software
(Free)
Black Blankets (Optional for Floor)
Dome Diameter Width of Plastic Lateral Divisions1
1. The number of lateral divisions should be by
default, at least 20. Increasing this number will
increase the accuracy of the dome’s shape.

Adam Goss
DIY PLANETARIUM: A COMPLETE GUIDE
5
same unit. Numbers generate by formulas will be of this same unit. For example, if the chosen
diameter is five meters, the width of the plastic needs to be listed in meters too.
Formula 1| Number of Gore Sections Needed:
(
)
Note: ceil(x) means to round x up to the nearest whole integer.
Formula 2| Total Length of Plastic Needed
((
)
)
Note: the length as calculated in this function is also the total length of plastic needed to build a
dome of the specified diameter.
Formula 3| Calculating the Gore Sections
This formula is the most difficult. It will produce a triangular shaped section called a gore. As
many gores as determined by the value number of sections needs to be made for the dome. A
mathematical principle relating dome size to the number of sections shows that the number of
gores required increases as does the size of the dome. The following calculations and steps will
produce a gore pattern:
Formula 4| Calculating the Gore Sections
Use the following equation to fill in the chart below. Make sure to calculate in degrees, not
radians. If your calculator does not display Degrees or Deg in its settings, pressing the Mode
button on most models will cycle through modes until the calculator is operating in Degrees.
Table A
Formula 3 Formula 4 Value
… …

Adam Goss
DIY PLANETARIUM: A COMPLETE GUIDE
6
Formula 5| Calculating the Gore Sections
Formula 5 needs to be incorporated into Table A to build complete blueprints for a gore
section. This modified table would look as follows, using the values computed in Table A.
Table A1
Width(x) Height(x) …
Using tape as a marker on the ground, make a
straight line a meter longer than the width of
your plastic. Lay down a second piece of tape
perpendicular to the first one meter longer than
the length, positioned in the center of the first
strip. Using a tape measure, mark along the
second piece (strip b) the height(x) values as
they occur in Table A1. At each height marker,
lay a piece of tape corresponding to its table
values’ width (centered). The created pattern
should now look like the picture on the right.
Once this pattern has been created, the dome
will come together quickly. Place some tape
along the contour of the outer tape fingers to
give the gore section a clear edge. A different
color can be helpful as an edge.
Roll the plastic over the pattern on the ground
and trim the excess using scissors slightly open.
This technique slices easily through the plastic.
Books work well to hold the plastic in place. Cut
as many gores as calculated in the number of
sections formula.
The next step is trickiest: taping the sections
together. An optional method to cutting each
gore to the tip is to stop one section before the
width reaches zero and make a circle to fill the

Adam Goss
DIY PLANETARIUM: A COMPLETE GUIDE
7
top with a radius equal to the width closest to zero times the number of sections. Holding two
sections together on a table, tape them in small pieces to ensure the curvature is taped along
evenly. It helps to have a partner for this step.
Taping the top circle. Inflating the dome, notice bottom of dome is taped down.
Tape in the filler circle last if the whole-top method was chosen.
Using remaining plastic, create a tube around the box fan at least ten feet long. Cut a hole in
one gore section and mount the fan chute through this hole using tape. This hole will allow the
dome to be inflated. Tape the dome to the floor and turn on the fan; the dome will inflate. Lift
a flap of tape to crawl under the planetarium to enter it. To “close the door,” an operator
outside the dome must reattach the tape to the floor.
In the photo below, the fan inflation unit is located on the left. Its length reduces noise inside.
Adam Goss
DIY PLANETARIUM: A COMPLETE GUIDE
8
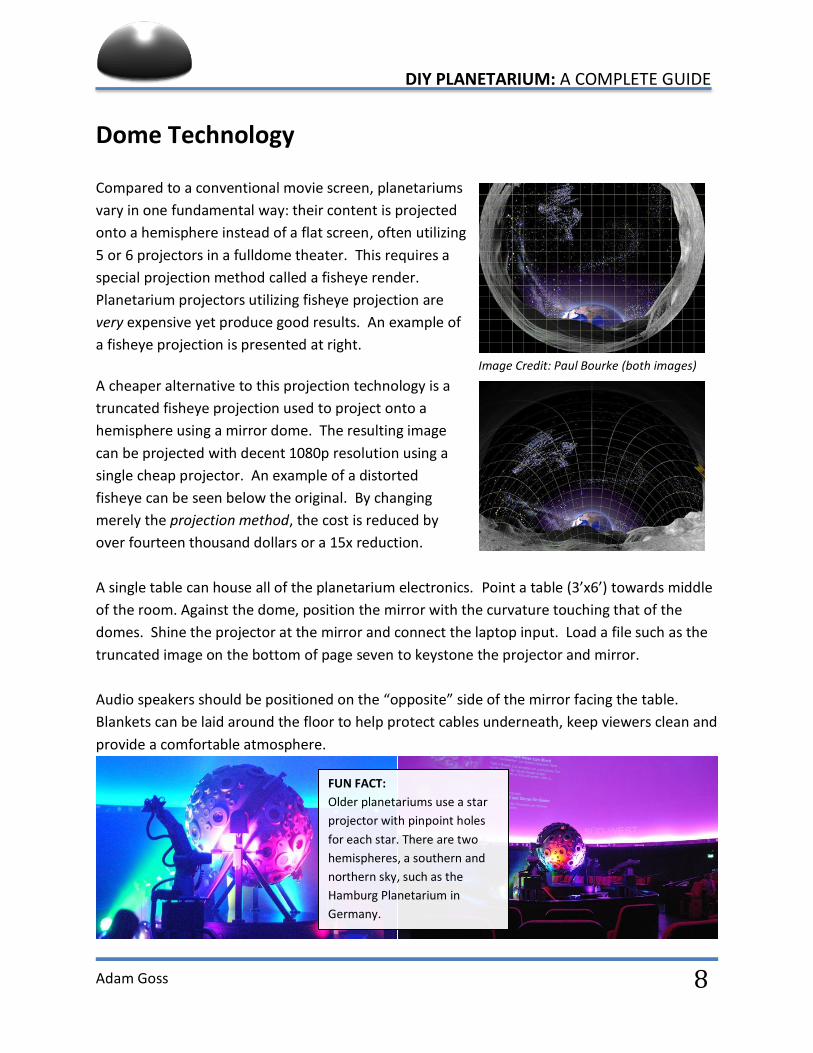
Dome Technology
Compared to a conventional movie screen, planetariums
vary in one fundamental way: their content is projected
onto a hemisphere instead of a flat screen, often utilizing
5 or 6 projectors in a fulldome theater. This requires a
special projection method called a fisheye render.
Planetarium projectors utilizing fisheye projection are
very expensive yet produce good results. An example of
a fisheye projection is presented at right.
Image Credit: Paul Bourke (both images)
A cheaper alternative to this projection technology is a
truncated fisheye projection used to project onto a
hemisphere using a mirror dome. The resulting image
can be projected with decent 1080p resolution using a
single cheap projector. An example of a distorted
fisheye can be seen below the original. By changing
merely the projection method, the cost is reduced by
over fourteen thousand dollars or a 15x reduction.
A single table can house all of the planetarium electronics. Point a table (3’x6’) towards middle
of the room. Against the dome, position the mirror with the curvature touching that of the
domes. Shine the projector at the mirror and connect the laptop input. Load a file such as the
truncated image on the bottom of page seven to keystone the projector and mirror.
Audio speakers should be positioned on the “opposite” side of the mirror facing the table.
Blankets can be laid around the floor to help protect cables underneath, keep viewers clean and
provide a comfortable atmosphere.
FUN FACT:
Older planetariums use a star
projector with pinpoint holes
for each star. There are two
hemispheres, a southern and
northern sky, such as the
Hamburg Planetarium in
Germany.

Adam Goss
DIY PLANETARIUM: A COMPLETE GUIDE
9
Examples of a standard setup can be seen pictured below:
Many shows are extremely expensive, with some annual licenses costing well over twenty
thousand dollars. An alternative to purchasing shows is to create content manually using a
program called Blender. For planetariums with a budget, below is a list of industry leaders in
affordable pricing and quality programming:
Rendering Technologies
As mentioned earlier, the projection method for a planetarium is the use of a fisheye image.
Render clients such as Maya and Studio 3DS Max have fisheye ‘cameras’ but these programs
cost thousands of dollars, many with an annual license fee. Blender is a free open source
alternative that provides fisheye rendering thanks to a rig developed by Ron Proctor at Weber
State University. This camera rig is available upon request from the Weber State University Ott
Planetarium. An image of their rig optimized bench can be found on the next page.
Weber State Planetarium
Loch Ness Productions
Denver Museum of Nature & Science
The above image shows a typical mirror, projector,
computer setup. The right image shows viewers inside.

Adam Goss
DIY PLANETARIUM: A COMPLETE GUIDE
10
Blender is an extremely powerful yet complex tool to learn. Its functionality cannot be shown
documented in this manual, but the Blender Foundation sponsors hours of free lectures and
tutorials available on www.blender.org. Below are some images I have rendered in Blender.

Adam Goss
DIY PLANETARIUM: A COMPLETE GUIDE
11
Glossary
Works Cited All images in this manual are photographed by me, Adam Goss. All digital images and
renderings have been rendered by me in Blender. The exceptions are the fisheye/mirrordome
maps on page eight, created by Paul Bourke of Swinburne University in Australia. These images
were taken from his website, www.paulbourke.net. All other content including the math is my
own original work, illustrated through pictures of created content showing its efficacy.
Dome Technology 1080p •Standard HD resolution. (1920 pixels x 1080 pixels).
Math Ceil •A function that rounds a number up to its nearest integer value.
Dome Technology Contrast Ratio •A property of a display system, defined as the ratio of the luminance of the brightest color (white) to that of teh darkest color
(black) that the system is capable of producing.
Math Gore •A bulging triangular shape that comprises a "side" of the planetarium
Math Half-Hemisphere •A hemisphere in halves, think of a quarter of an orange or an apple.
Math Hemisphere •Half of a sphere.
Dome Technology Lumens •The brightness of a projector.
Dome Technology Keystone •A process in which an image is tilted or distorted to achive a perfect orientation.
Math Primary Surface Mirror •A type of mirror that has no coating on its reflective surface, making it great for optical precision, bad for durability.
Math Rotunda •The dome of a fixture.