deployment preparation, installation and configuration of ... · deployment guide deployment...
TRANSCRIPT

Deployment guide
Deployment preparation, installation and configuration of
the Vectra X-series platform
Traffic requirements
The Vectra X-series platform automatically detects threats in real-
time by passively monitoring network traffic. The Vectra X-series
platform is deployed by connecting to a port on the core network
switch configured as a Switch Port Analyzer (SPAN) port or to a
network Test Access Port (TAP). Since most threats originate from
a compromised host within an enterprise network, the X-series
must see bidirectional traffic flows for accurate threat detection.
The table below outlines the types of network traffic that enable
the X-series to detect phases of an attack in progress.
Tra f f i c t ype Purpose
User to Internet Detect C&C connections, botnet monetization, click fraud, data exfiltration
User to data center Detect reconnaissance, data acquisition, data exfiltration
User to user Detect reconnaissance, lateral movement, data acquisition, data exfiltration
User to authentication servers
Detect brute force login attempts, lateral movement. Also used for host identification
DHCP Identify hosts
Network deployment
Network placement of the Vectra X-series is critical to ensure it
detects all phases of an attack. Different segments of the network
provide access to different types of data traffic. The X-series
should be deployed on the internal side of the network, behind
the firewall and proxy at the core or aggregation layer switch.
This placement enables the X-series to monitor traffic to the
Internet, internal traffic that crosses the switch and traffic to the
data center. The network topology in the next column shows a
sample deployment of the X-series.
Data Center
Core
AccessLayer
Internet
WAN Router
Direction of traffic flow seen by Vectra X-series
Network dep loyment Tra f f i c v i s ib i l i t y
Core switch • User-to-Internet traffic• User-to-user traffic crossing the switch• User-to-server traffic
Access switch • User-to-Internet traffic• User-to-user traffic within the switch• User-to-server traffic
Initial configuration
Before you begin, obtain the following configuration parameters:
• IP address, network mask and default gateway for the Vectra X-series management interface
• DNS server address
• NTP server hostname or IP address
• SMTP server hostname or IP address (optional)
• Syslog server hostname or IP address (optional)
• Any public IP address within your organization to be monitored (optional)
Vectra Networks Deployment Guide 2
Connectivity requirements
The table below outlines the connectivity needed by the
Vectra X-series. You may require modification of firewall rules to
allow access to these services from the Vectra X-series platform.
Source IP address Dest ina t ion hos t Comment
MGT1 IP address
update2.vectranetworks.com: 443
SSL access to Vectra cloud update (required)
MGT1 IP address
api.vectranetworks.com: 443 SSL access to Vectra cloud service (required)
MGT1 IP address
vpn.vectranetworks.comUDP: 9970, TCP: 443
OpenVPN tunnel to the Vectra support operations (required)
MGT1 IP address
DNS Server Domain name resolution (required)
MGT1 IP address
NTP Server Setting time (required)
MGT1 IP address
Syslog Server Syslog messages (required)
MGT1 IP address
Email Server Email notifications (optional)
The Vectra X-series initial configuration requires both CLI and
HTTPS UI access to the X-series.
1) CLI access is required for setting the IP address, network mask and default gateway.
2) UI access is required for setting DNS, NTP server settings and other optional settings such as notifications.
The table below lists the default admin credentials required to
access the X-series:
Username/password Purpose
vectra/youshouldchangethis Default user credentials used for CLI access
admin/youshouldchangethis Default user credentials used for UI access
Connecting to the CLI
Note: The two onboard Ethernet ports on the Vectra X-series are
labeled LAN1 and LAN2. LAN1 corresponds to MGT1 and LAN2
corresponds to MGT2.
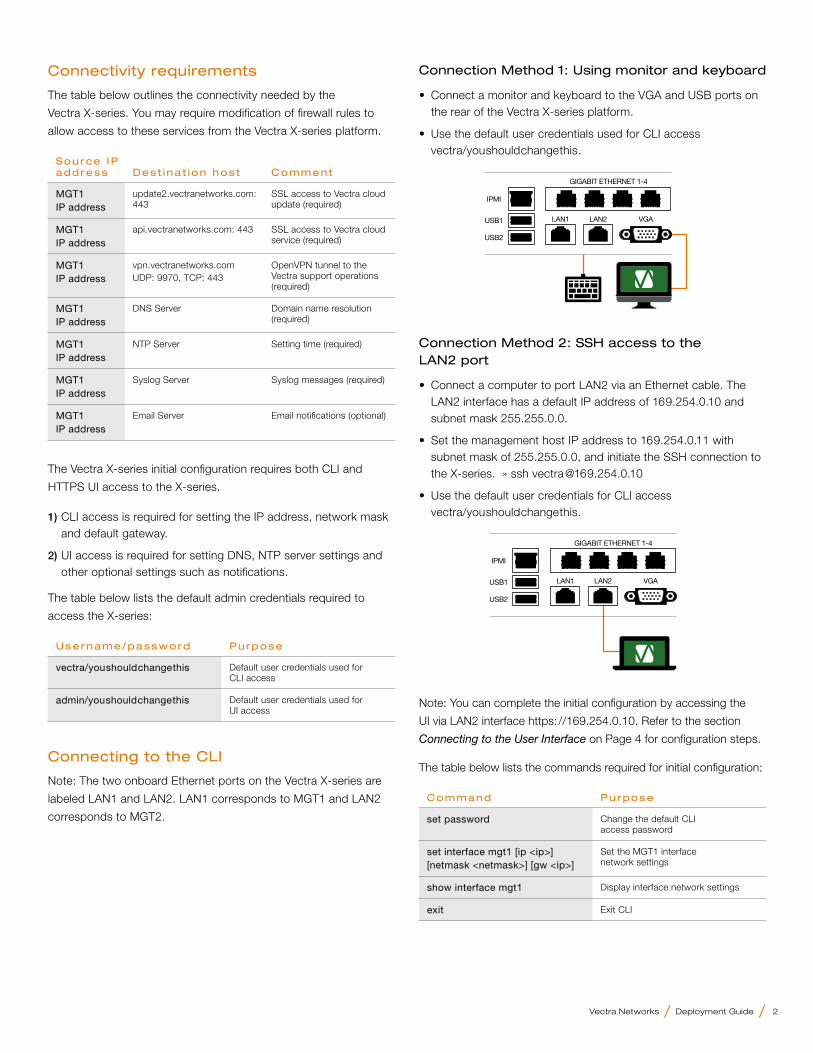
Connection Method 1: Using monitor and keyboard
• Connect a monitor and keyboard to the VGA and USB ports on the rear of the Vectra X-series platform.
• Use the default user credentials used for CLI access vectra/youshouldchangethis.
GIGABIT ETHERNET 1-4
LAN1 LAN2 VGAUSB1
USB2
IPMI
GIGABIT ETHERNET 1-4
LAN1 LAN2 VGAUSB1
USB2
IPMI
GIGABIT ETHERNET 1-4
LAN1 LAN2 VGAUSB1
USB2
IPMI
Connection Method 2: SSH access to the LAN2 port
• Connect a computer to port LAN2 via an Ethernet cable. The LAN2 interface has a default IP address of 169.254.0.10 and subnet mask 255.255.0.0.
• Set the management host IP address to 169.254.0.11 with subnet mask of 255.255.0.0, and initiate the SSH connection to the X-series. » ssh [email protected]
• Use the default user credentials for CLI access vectra/youshouldchangethis.
GIGABIT ETHERNET 1-4
LAN1 LAN2 VGAUSB1
USB2
IPMI
GIGABIT ETHERNET 1-4
LAN1 LAN2 VGAUSB1
USB2
IPMI
GIGABIT ETHERNET 1-4
LAN1 LAN2 VGAUSB1
USB2
IPMI
Note: You can complete the initial configuration by accessing the
UI via LAN2 interface https://169.254.0.10. Refer to the section
Connecting to the User Interface on Page 4 for configuration steps.
The table below lists the commands required for initial configuration:
Command Purpose
set password Change the default CLI access password
set interface mgt1 [ip <ip>] [netmask <netmask>] [gw <ip>]
Set the MGT1 interface network settings
show interface mgt1 Display interface network settings
exit Exit CLI

© 2016 Vectra Networks, Inc. All rights reserved. Vectra, the Vectra Networks logo and Security that thinks are registered trademarks and the Vectra Threat Labs and the Threat Certainty Index are trademarks of Vectra Networks. Other brand, product and service names are trademarks, registered trademarks or service marks of their respective holders.
Email [email protected] Phone +1 408-326-2020 www.vectranetworks.com
Changing the default CLI access password
> set password
(current) password: *******************
Passwords must be at least 8 characters long and contain at least
1) one digit (0-9)
2) one upper case letter (A-Z)
3) one lower case letter (a-z)
4) one symbol (~!@#$%^&*_-+=`| \ ( ){ }[ ]:;”’<>,.?/)
Enter new password: **********
Retype new password: **********
Setting the MGT1 IP address
> set interface mgt1 ip 192.168.254.209 netmask 255.255.255.0 gw
192.168.254.254
Verifying the interface configuration
> show interface mgt1
mgt1 :
dhcp :
ip : 192.168.254.209
netmask : 255.255.255.0
gw : 192.168.254.254
GIGABIT ETHERNET 1-4
LAN1 LAN2 VGAUSB1
USB2
IPMI
GIGABIT ETHERNET 1-4
LAN1 LAN2 VGAUSB1
USB2
IPMI
GIGABIT ETHERNET 1-4
LAN1 LAN2 VGAUSB1
USB2
IPMI
Connecting to the user interface
Note: The default credentials for accessing the UI is
admin/youshouldchangethis.
From a computer attached to the network, connect to the MGT1
interface of Vectra X-series platform with a standard Web browser
(e.g., Firefox, Chrome, Safari, IE version 9 or newer).
1) Enter https://[IP address for MGT1] into the address line of the browser. (e.g., https://192.168.254.209).
2) Login with username admin and password youshouldchangethis.
3) Navigate to the settings icon (a gear icon in the upper right corner) and click on Settings.
4) Change the password for admin user. You can also create additional admin user accounts from the users page.
5) Configure the system settings:
• DNS server IP address. The system default is the Google domain name service.
• NTP server IP address or hostname. The system default is set to the Ubuntu network time protocol servers.
• Custom e-mail alerts to selected recipients for high-severity threats (optional).
• Syslog integration for detected threats and their contextual information (optional).
• Click on Apply Changes at the bottom of the page to apply the changes.
Best practices for configuring SPAN
The Switch Port Analyzer (SPAN) enables a switch to copy traffic
from a port or a VLAN to another port for network monitoring.
While the syntax for configuring switches will differ from vendor to
vendor, best practices and deployment considerations for SPAN
and TAP ports are consistent.
• When planning a port mirroring strategy, consider that many switch vendors have a limit of two SPAN ports per switch.
• It is easy to oversubscribe SPAN ports resulting in dropped packets. Use of TAP may be preferred.
• If only one port is to be mirrored, capture both RX and TX to ensure monitoring of bidirectional traffic.
• If all ports are to be mirrored, capture either RX or TX to prevent duplication of traffic twice and reduce the load on the switch.
• If one or more VLANs are to be mirrored, capture either RX or TX to prevent duplication of traffic twice and reduce the load on the switch.
• If multiple ports are to be mirrored, capture both RX and TX with filters to prevent duplication of traffic. Consider using VLANs if the traffic from the monitored ports can be isolated.
Deployment preparation, installation and configuration of the Vectra X-series platform