creating power point presentations |
TRANSCRIPT
1
Charles Zhu CUC100 Computing
Creating PowerPoint Presentations
Microsoft PowerPoint is a presentation program. It lets you create slides to display as an
electronic slide show on the computer, or project onto a screen using a data beam projector
connected to the computer. The slide show is saved as a PowerPoint file identified by the file
extension (.ppt or .pptx).
Guide to Building an Effective Presentation
An effective presentation keeps your audience focused and interested. The following
are some practical rules to keep in mind when making presentations.
1. Use Key Phrases about Your Topic
A good presenter uses key phrases and includes only essential information.
Choose only the top three or four points about your topic and make them
consistently throughout the delivery. Simplify and limit the number of words
on each screen. Try not to use more than three bullets per slide. The
surrounding space will make it easier to read.
2. Slide Layout is Important
Make your slides easy to follow. Put the title at the top of the slide where your
audience expects to find it. Phrases should read left to right and top to bottom.
Keep important information near the top of the slide. Often the bottom portions
of slides cannot be seen from the back rows because heads are in the way.
3. Avoid All Capital Letters
Avoid using all capital letters – even for headings. The use of all capitals is
considered to be shouting, and the words are more difficult to read.
4. Avoid Fancy Fonts
Choose a font that is simple and easy to read such as Arial, Times New Roman
or Verdana. Avoid script type fonts as they are hard to read on screen. Use no
more than two different fonts – perhaps one for headings and another for
content. Keep all fonts large enough (at least 28 pt and preferably 32 pt) so that
people at the back of the room will be able to easily read what is on the screen.
5. Use Contrasting Colours for Text and Background
Dark text on a light background is best, but avoid white backgrounds --
tone it down by using beige or another light colour that will be easy on
the eyes.
Patterned or textured backgrounds can reduce readability of text.
Keep your colour scheme consistent throughout your presentation.
2
6. Use Slide Design Themes Effectively
When using a design theme, choose one that is appropriate for the audience. A
clean, straightforward layout is best if you are presenting to adult audience.
Select one that is full of colour and contains a variety of shapes if your
presentation is aimed at young children.
7. Limit the Number of Slides
Keep the number of slides to a minimum. It ensures that the presentation will
not become too long and drawn out. It also avoids the problem of continually
changing slides during the presentation that can be a distraction to your
audience.
8. Use Photos, Charts and Graphs
Combining photos, charts and graphs and even embedding digitized videos
with text, will add variety and keep your audience interested in the
presentation. Avoid having text only slides.
9. Avoid Excessive Use of Slide Transitions and Animations
While transitions and animations can heighten your audience’s interest in the
presentation, too much of a good thing can distract them from what you are
saying. Remember, the slide show is meant to be a visual aid, not the focus of
the presentation.
Keep animations consistent in the presentation by using animation schemes
and apply the same transition throughout the presentation.
10. Make Sure Your Presentation Can Run on Any Computer
Use either PowerPoint's Package for CD (PowerPoint 2010, 2007 and 2003) or
the Pack and Go (PowerPoint 2000 and before) feature when you are going to
display your presentation on a different computer, especially if the presentation
contains any multimedia files, such as sound, movie, or flash files.
3
Charles Zhu CUC100 Computing
Getting started with PowerPoint
Activity – PowerPoint 1
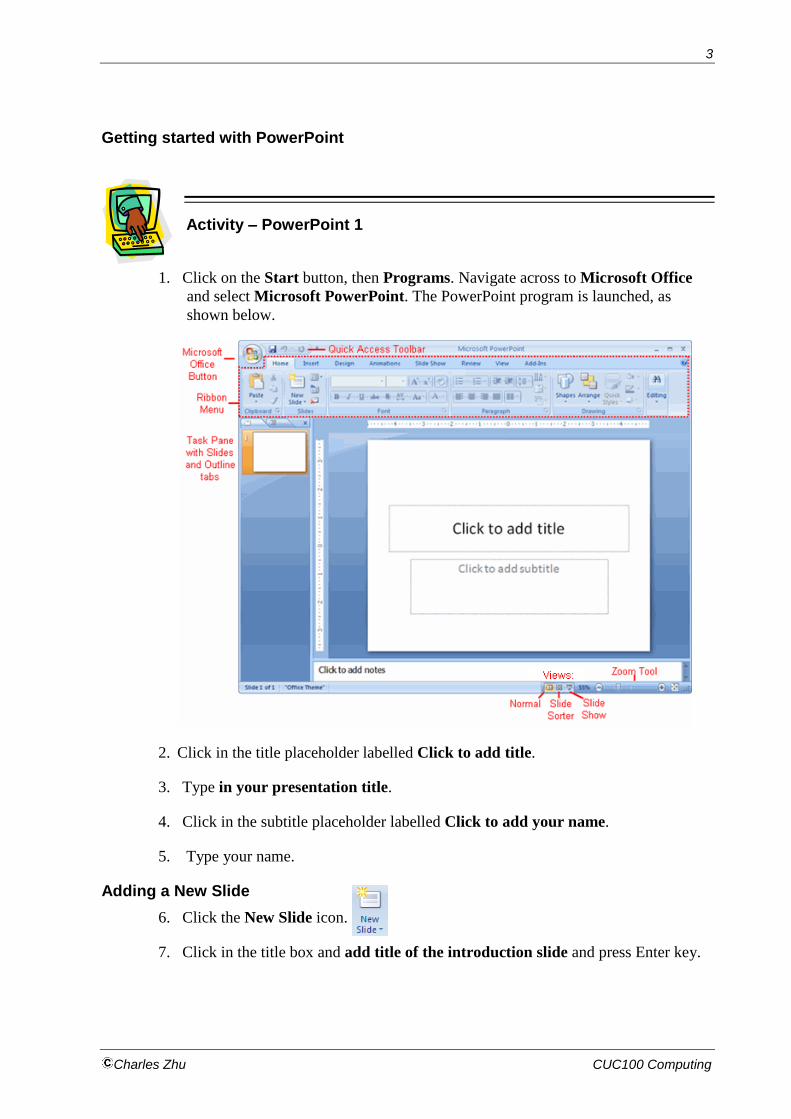
1. Click on the Start button, then Programs. Navigate across to Microsoft Office
and select Microsoft PowerPoint. The PowerPoint program is launched, as
shown below.
2. Click in the title placeholder labelled Click to add title.
3. Type in your presentation title.
4. Click in the subtitle placeholder labelled Click to add your name.
5. Type your name.
Adding a New Slide
6. Click the New Slide icon.
7. Click in the title box and add title of the introduction slide and press Enter key.
4
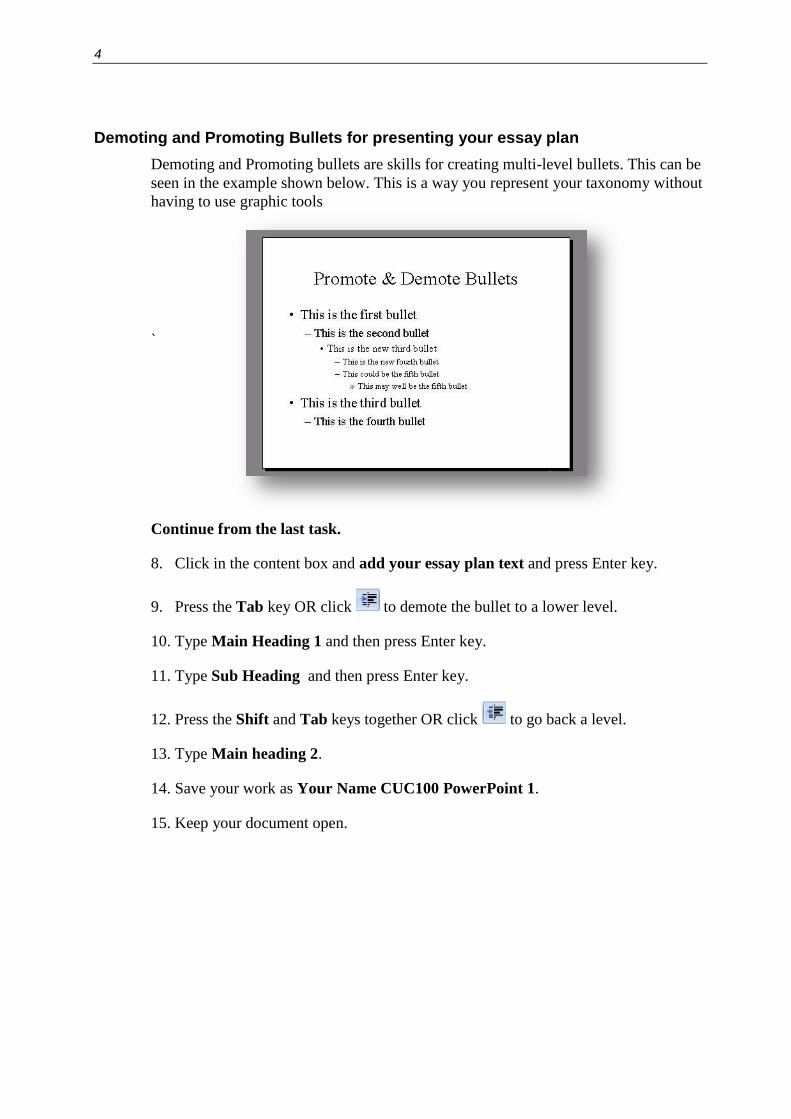
Demoting and Promoting Bullets for presenting your essay plan
Demoting and Promoting bullets are skills for creating multi-level bullets. This can be
seen in the example shown below. This is a way you represent your taxonomy without
having to use graphic tools
`
Continue from the last task.
8. Click in the content box and add your essay plan text and press Enter key.
9. Press the Tab key OR click to demote the bullet to a lower level.
10. Type Main Heading 1 and then press Enter key.
11. Type Sub Heading and then press Enter key.
12. Press the Shift and Tab keys together OR click to go back a level.
13. Type Main heading 2.
14. Save your work as Your Name CUC100 PowerPoint 1.
15. Keep your document open.

5
Charles Zhu CUC100 Computing
Adding Notes
Notes Page allows you to input speaker notes. You can see the notes at the bottom of
your slide in Normal view. It is however better to go into the Notes Page view. To
access the Notes Page,
1. Click on View tab to display the View Ribbon.
2. Click the Notes Page icon to display the Notes Page.
3. Click on the Zoom In icon. Enlarge the Notes
Page to over 70% so that you can see what you
are typing.
4. Click in the Click to add text placeholder.
5. Type in your speaking notes and press Enter key.
6. Click on the Normal icon to return to Normal View.
7. Save your presentation and keep it open.
Continue building your power point
Remember you for this assignment you need nine slides covering the following:
1. Title slide – your name and professional focus
2. Introduction – your essay plan
3. Thesis of your essay
4. Professional context
5. Skill 1 – examples of why and how essential
6. Skill 2 – examples of why and how essential
7. Skill 3 – examples of why and how essential
8. References so far
9. Conclusion to presentation
You have done the first two so now it’s time to create the rest by following the steps
you have just been through:
1. Adding a New Slide
2. Adding Notes
The next steps involve adding some interest to your slides with graphics, animation
and an attractive slide design
6
Adding Graphics to Your Slides
You can add a variety of graphics from a range of sources to your slides to make it
more appealing to the audience.
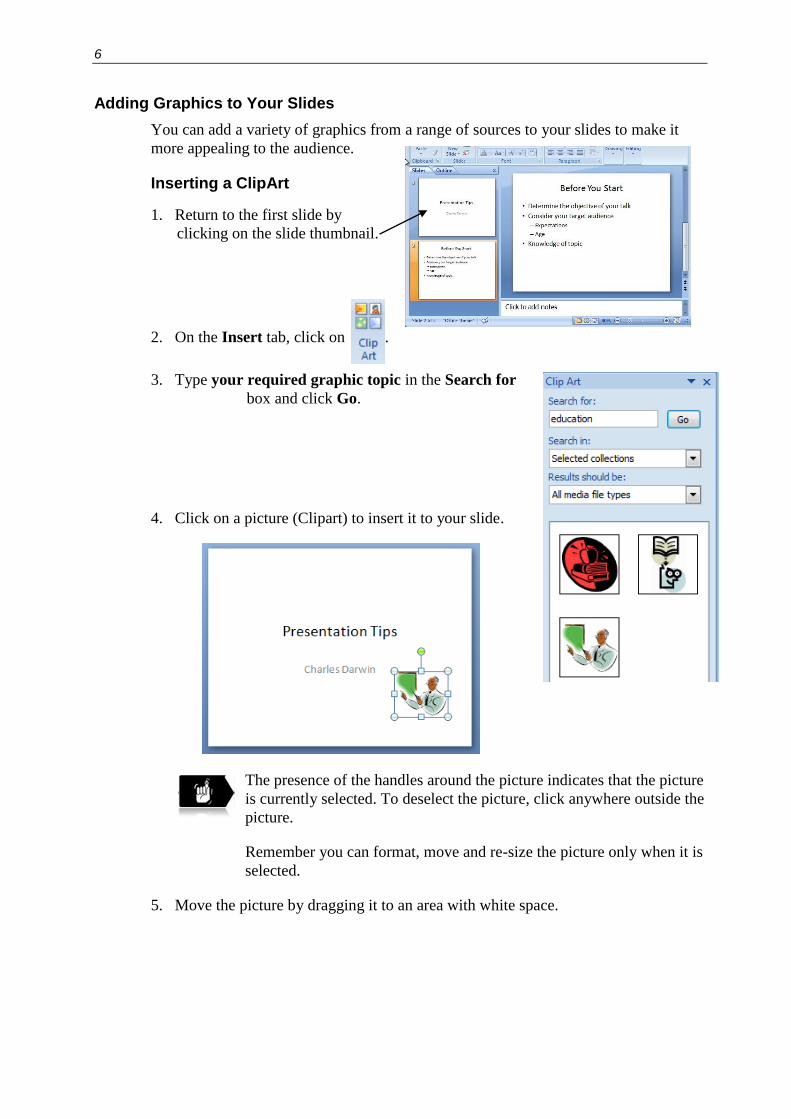
Inserting a ClipArt
1. Return to the first slide by
clicking on the slide thumbnail.
2. On the Insert tab, click on .
3. Type your required graphic topic in the Search for
box and click Go.
4. Click on a picture (Clipart) to insert it to your slide.
The presence of the handles around the picture indicates that the picture
is currently selected. To deselect the picture, click anywhere outside the
picture.
Remember you can format, move and re-size the picture only when it is
selected.
5. Move the picture by dragging it to an area with white space.
7
Charles Zhu CUC100 Computing
Inserting a Picture
You can add to your presentation an image captured with a camera, digital scanner or
downloaded from the Internet. The picture should be saved as a separate file on your
computer. This file may have an extension to its name such as JPG, JPEG, GIF, TIFF,
PNG, etc.
1. Download a picture of your choice from the Internet to your computer.
In order to make the PowerPoint file size small, do not use very big
pictures.
2. Click the Insert tab, then the Picture icon.
3. Navigate to the location where the file was saved.
4. Select the image file and click Insert.
5. Move and resize the picture as required.
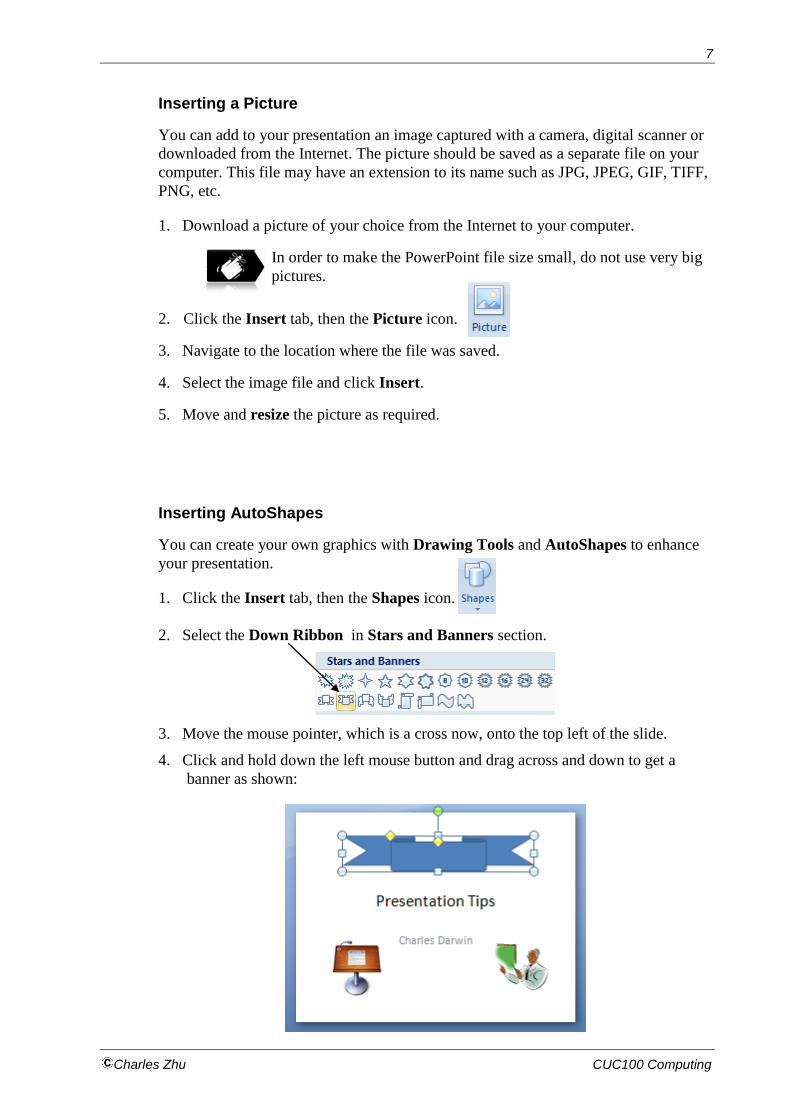
Inserting AutoShapes
You can create your own graphics with Drawing Tools and AutoShapes to enhance
your presentation.
1. Click the Insert tab, then the Shapes icon.
2. Select the Down Ribbon in Stars and Banners section.
3. Move the mouse pointer, which is a cross now, onto the top left of the slide.
4. Click and hold down the left mouse button and drag across and down to get a
banner as shown:
8
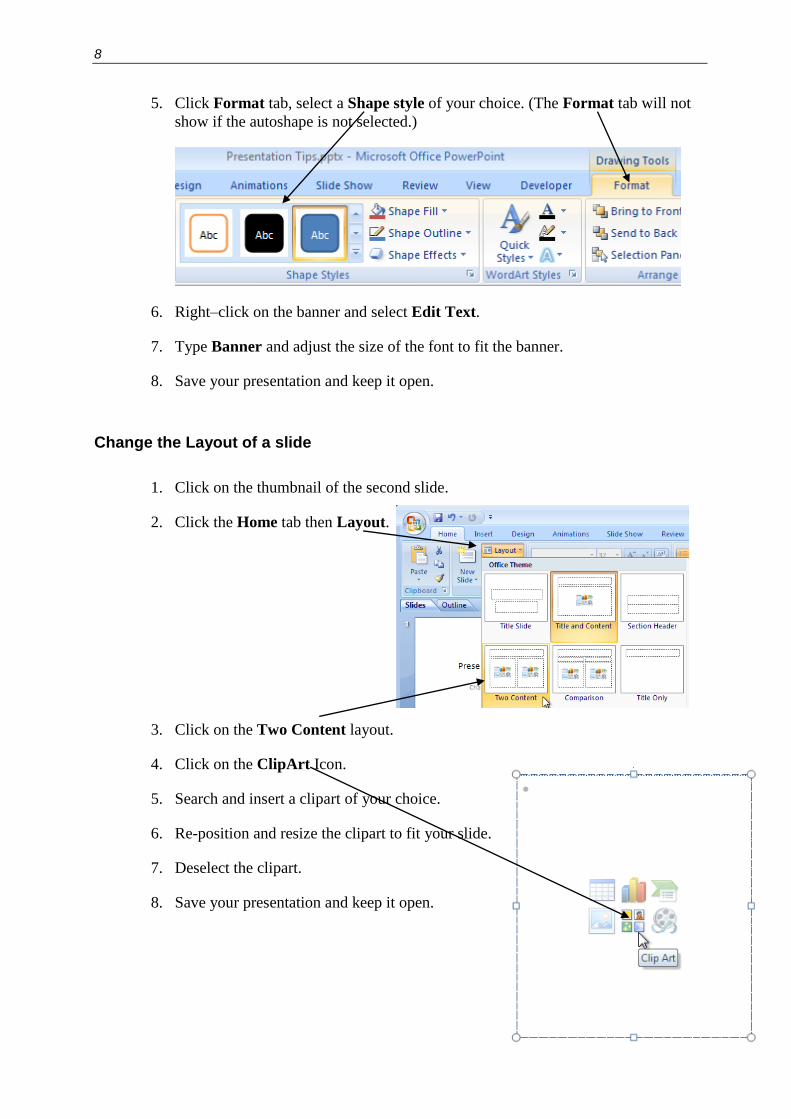
5. Click Format tab, select a Shape style of your choice. (The Format tab will not
show if the autoshape is not selected.)
6. Right–click on the banner and select Edit Text.
7. Type Banner and adjust the size of the font to fit the banner.
8. Save your presentation and keep it open.
Change the Layout of a slide
1. Click on the thumbnail of the second slide.
2. Click the Home tab then Layout.
3. Click on the Two Content layout.
4. Click on the ClipArt Icon.
5. Search and insert a clipart of your choice.
6. Re-position and resize the clipart to fit your slide.
7. Deselect the clipart.
8. Save your presentation and keep it open.

9
Charles Zhu CUC100 Computing
Applying a Theme
You can give a colourful and professional background to your slides by applying a
theme to your presentation.
1. Click the Design tab.
The various themes appear as shown above. Move the cursor on the different themes
to see their effects.
2. Choose one of the themes by clicking on it. This theme will be applied to all the
slides in your presentation.
3. Try a few different themes and apply the one you like most to your presentation.
4. Save your presentation and keep it open.
Printing a Presentation
PowerPoint does more than just print out your slides. It allows you to print out your
speaker notes, slide handouts and an outline of the presentation.
PowerPoint 2007 and PowerPoint 2010 are different in printing operation.
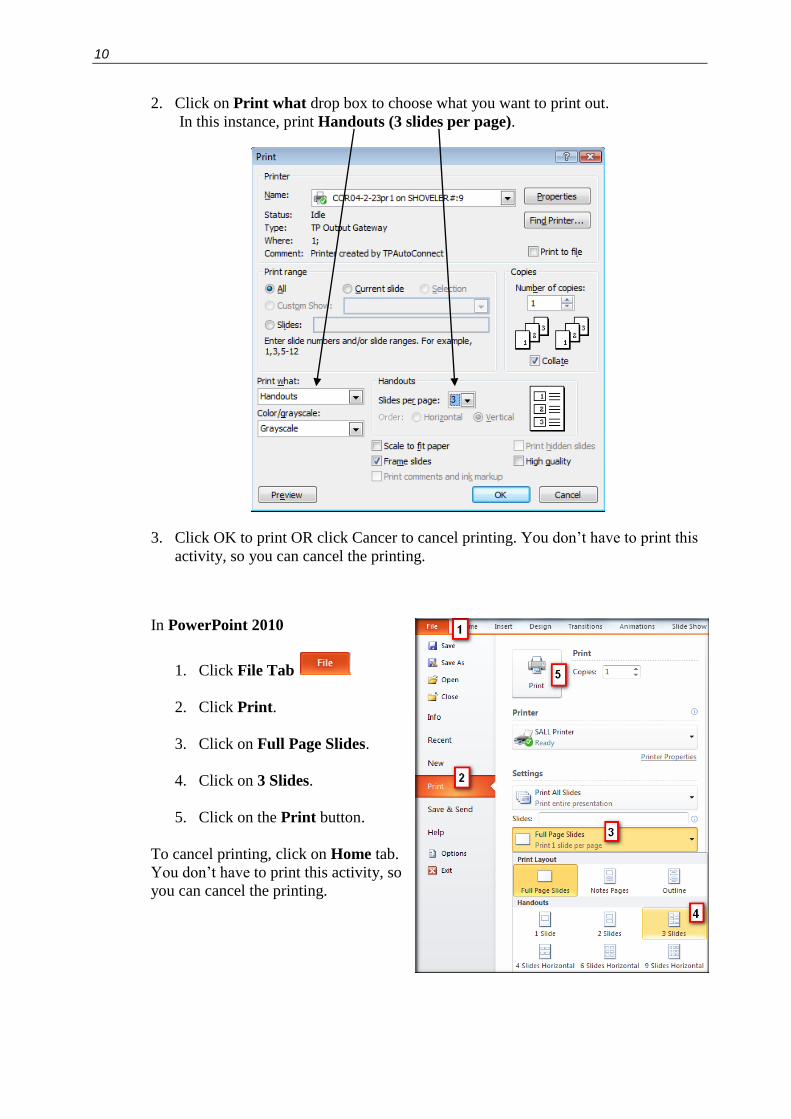
In PowerPoint 2007
1. Click the Office Button then the Print command to display the Print dialogue
box.
10
2. Click on Print what drop box to choose what you want to print out.
In this instance, print Handouts (3 slides per page).
3. Click OK to print OR click Cancer to cancel printing. You don’t have to print this
activity, so you can cancel the printing.
In PowerPoint 2010
1. Click File Tab
2. Click Print.
3. Click on Full Page Slides.
4. Click on 3 Slides.
5. Click on the Print button.
To cancel printing, click on Home tab.
You don’t have to print this activity, so
you can cancel the printing.

11
Charles Zhu CUC100 Computing
Adding Special Effects
You can add special effects to your slides, text and pictures. Special effects include
Transitions and Animations.
Slide Transition
A slide transition makes the slide move from one slide to another on the screen in
different ways. For example, a slide can move from the left to right or emerge as a
checkerboard.
1. In PowerPoint 2007, click on the Animations tab.
In PowerPoint 2010, click on the Transitions tab.
2. Placing the mouse pointer over a transition icon to preview the effect of the
transition on Slide Pane. You can apply different transitions to individual slides or
the same transition to all slides in your presentation.
3. To apply different transitions to individual slides separately, click on the slide
to select it then click a chosen transition. You can change the transition speed by
clicking on Transition Speed box.
4. To apply the same transition to all slides, click on one of the slides, apply your
chosen transition and then click on Apply to All.
5. Now, apply transitions of your choice to all slides in your presentation.
6. Click on the Slide Show tab then From Beginning to see the effects.
7. Press the ESC key to leave your Slide Show.
8. Save your file and keep it open.
12
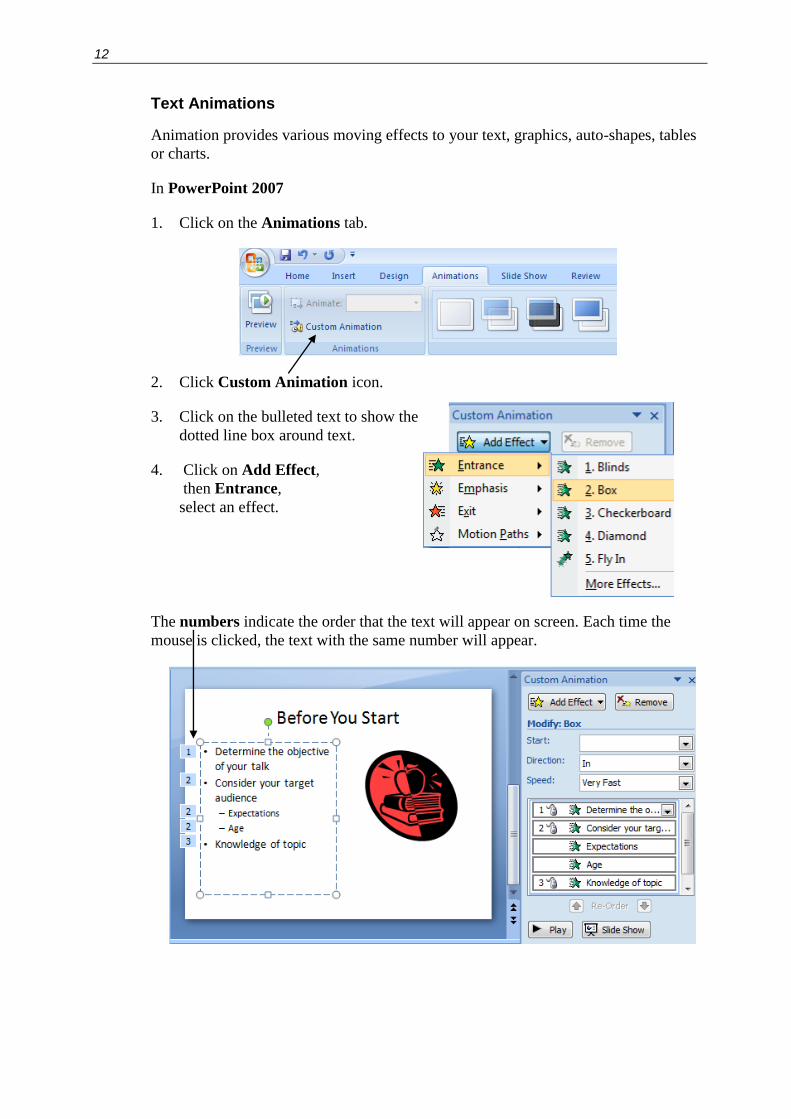
Text Animations
Animation provides various moving effects to your text, graphics, auto-shapes, tables
or charts.
In PowerPoint 2007
1. Click on the Animations tab.
2. Click Custom Animation icon.
3. Click on the bulleted text to show the
dotted line box around text.
4. Click on Add Effect,
then Entrance,
select an effect.
The numbers indicate the order that the text will appear on screen. Each time the
mouse is clicked, the text with the same number will appear.

13
Charles Zhu CUC100 Computing
In PowerPoint 2010
1. Click on the Animations tab.
2. Click on the bulleted text to show the dotted line box around text.
3. Select an Animation effect from the gallery.
The numbers indicate the order that the text will appear on screen. Each time the
mouse is clicked, the text with the same number will appear.
Now, add animations to each bulleted point on all your slides.
Electronic Slide Show
To play your presentation slides,
1. Click on the Slide Show tab and then From Beginning icon.
2. Click the mouse anywhere on the slide OR press the Space Bar to advance to the
next bullets/slide.
3. Save your presentation and keep it open.