creating a new survey - mcgill...
TRANSCRIPT

1
Creating a new survey: Contact [email protected] to request access to LimeSurvey and to have a survey created.
Once you have been granted access, login at
https://surveys.mcgill.ca/limesurvey/admin/admin.php
Select your survey from the “Surveys” drop down menu.
Survey Settings:
You can edit survey settings by clicking the 'Survey properties' icon from the survey
toolbar.
Edit Text Elements:
To edit text element such as the survey title and description, click the Survey properties
icon and select ‘Edit text elements’ from the drop down menu.
Field descriptions
1. Survey Title: This is the brief descriptive name of the survey. This title will be displayed on every page of the survey.
2. Description: This allows you to enter a description of the survey. 3. Welcome message: This allows you to enter a message that will display when a participant
first logs into your survey. (ie: "Thank you for taking the time to participate in this survey.") 4. End message: This allows you to enter a message that will display when a participant
completes your survey. (ie: "Thank you for completing our survey. We will publish results soon.").

2
5. End URL: This URL will be presented as a link at the end of the survey, and allows you to direct your participants back to your home page (or, in fact, anywhere). The End URL has to be entered with "http://" at the beginning, eg. http://www.mcgill.ca.
6. URL description: The description for the link using the End URL.
General Settings:
To edit general settings such as the language of the survey and name of the person who
administers the survey, presentation and navigation, publication and access control and
notification and data management, click the Survey properties icon and select ‘General
settings’ from the drop down menu.
Note: Advanced settings such as Tokens & Resources are not covered in these instructions.
General
Field descriptions
1. Base language: This is set to English as the default. 2. Additional languages: If you wish to have the survey available in an additional language,
select the language(s) here. 3. Administrator: This is the name of the contact person who administers the survey. It will
be included in emails sent out inviting participants to respond. 4. Admin email: This is the email address of the administrator (as above) and is used as the
'reply to:' address on any emails sent. You can also enter several email addresses separated with a semicolon - that way survey administrator notifications are sent to more than one person.
5. Bounce email: This is the email address where a delivery error notification email should be sent. By default, this is the same as the administrator's email address.

3
6. Fax to: This field is used to give a fax number on the "printable survey" - ie: when you want to send someone a hard copy because they cannot use the online survey.
Presentation & navigation
Field descriptions
1. Format: Choose from "Question by question", "Group by group" or "All in one". o Question by Question: Survey will display one question per page. o Group by Group: Survey will display all questions in a group per page. o All in one: Survey will display all questions in one single page.
2. Template: Choose from the installed templates. Default is “DefaultMcGill”. 3. Show welcome screen: Yes/No. If Yes, then the welcome message defined in Text Elements
section will be displayed. Default is Yes. 4. Navigation delay: Number of seconds before Previous and Next buttons are enabled.
Default 0 seconds 5. Show [<< Prev] button: This option defaults to yes, however if you set it to "No" then users
will not have the option of moving to a previous page while completing the survey. 6. Show question index / allow jumping: Yes/No. Default No. When Yes, an index will be
displayed on the right side. Users can jump to any section in the survey. 7. Keyboard-less operation: By activating this setting there will be a virtual keyboard
available for certain question types. 8. Show progress bar: Yes/No. Default Yes. Allow the administrator to turn off the Progress
bar 9. Participants may print answers?: This option defaults to no. When it is set to yes, a
participant can print a summary of responses at submit time. 10. Public statistics: Yes/No. Default No. If set to "Yes" users who have submitted the survey
will be presented a link to statistics of the current survey. 11. Show graphs in public statistics: Determines if public statistics for this survey include
graphs or only show a tabular overview. 12. Automatically load URL when survey complete: Yes/No. Default No. If yes, when the
survey is submitted, it will automatically redirect to the End URL. 13. Show "There are X questions in this survey": Yes/No. Default Yes. If Yes, the message will
be displayed on the Welcome Screen. 14. Show group name and/or group description: Will control the display of Group Names
and Descriptions. Four Options: o Show Both - Default o Show Group Names Only o Show group description Only o Hide Both
15. Show question number and/or code: o Show Both - Default o Show Question Number Only o Show Question Code Only

4
o Hide Both 16. Show "No answer": Set to Off (Forced by system administrator).
Publication & access control
Field descriptions
1. List survey publicly: Yes/No. Default Yes. When it is set to yes, your survey will be listed in the 'available surveys' portal.
2. Start date/time: Set this to a specific date if you want your survey to start on a certain date. The survey will start on midnight of that day and only then will people be able to answer to it. To disable this just clear the date from the input field.
3. Expiry date/time: Set this to a specific date if you want your survey to expire on a special date. This is the last date on which the public survey script will let people participate. To disable this just clear the date from the input field.
4. Set cookie to prevent repeated participation?: This setting allows you to retain control over multiple entries on public surveys. If you set this to 'Yes', a user working on the same computer will only be able to submit the survey once.
5. Use CAPTCHA for: With this option you can decide when you want a CAPTCHA to be used. Default is to enable CAPTCHA only for the public Registration page, but you can also enable it before accessing the survey, and before Load/Saving partial answers.
Notification & data management
Field descriptions
1. Send basic admin notification email to: and Send detailed admin notification email to: These fields allow you to send notifications or survey responses to additional email addresses once the survey is submitted.
2. Date stamp?: This field allows you to determine whether the survey will datestamp all responses. If you choose "Yes", then when a response is submitted, a field will be included in that response indicating the time and date that the response was made.
3. Anonymized responses: This allows you to determine whether responses to your survey are matched up with information from your surveys tokens table, or kept 'anonymous'. The default is yes. If you choose "No" for anonymous, you must also have a tokens table for your survey when you activate it.
4. Date Stamp: This field allows you to determine whether the survey will datestamp all responses. If you choose "Yes", then when a response is submitted, a field will be included in that response indicating the time and date that the response was made.

5
5. Save IP address?: This field allows you to determine whether the survey will save an IP-address for all responses. If you choose "Yes", then when a response is submitted, a field will be included in that response indicating the ip-address of the participant.
6. Save referrer URL?: This field allows you to determine whether the survey will save the referrer URL for all responses. If you choose "Yes", then when a response is submitted, a field will be included in that response where this URL is saved. A referrer URL is the URL from which the user was led to your survey URL.
7. Enable assessment mode?: With this setting you can enable/disable assessments for this survey.
8. Allow editing answers after completion: If you activate this setting the participants may return to his survey by clicking the invitation link, even if he already submitted the survey. This only works with non-anonymized surveys.
9. Save timings: If activated, how long a user stays on one page during taking the survey will be recorded.
10. Participant may save and resume later?: This setting allows a participant to save his responses and resume to answer the survey at a later time.
Question Groups
A survey requires each question to be a member of a group (and only that group). Depending on
the number of questions in the survey, Groups can be used to define logical sections, common
subject themes, or possibly pages on the screen. A group can have questions about a similar subject
or simply be setup as a manageable number of questions.
A question group has a title and an optional description. You must have at least one group in each
survey, even if you do not wish to divide the survey into multiple groups.
Creating a question group
Create a new group by clicking on the Add icon in the Survey Button Bar. You can create as
many groups as you like.
Groups can also include a "description". This field allows you to publish an explanatory note for any
set of questions. If you add a description, then when the public are using the public survey system,
they will be presented with that explanation before commencing any of the questions in that group.
If you do not include any text here, then public participants will simply move on to the first
question in the group with no stop. Use the HTML editor to include images, formatted text, etc. to
your liking.
Reorder groups by clicking on the Change group order icon in the survey toolbar.

6
Adding a question
Questions are the core of your survey. There is no real limit to the number of questions you can have in your survey or in a group. Questions include the actual question text as well as settings that determine what form of answer you will accept. You can also specify a short 'help' explanation for each question and determine whether the question is mandatory or optional.
To add a question:
Create a new question by clicking on the add icon on the right hand side of the "Group" menu
bar.
Field descriptions
Question code: Your ID, or number or code for the question. This field is only for quick identification for a question in export or for evaluation. Try to be consistent with your coding in this field. This field is normally not displayed to people taking the survey.
Question: This is the actual question being asked. There is no real limit to the length of the question.
Help: This is an optional field. It is useful if a question needs some explanation, or you want to explain how it should be answered.
Question type: This determines the type of response the survey allows.
Question types include:
o Array: allows you to display a matrix which columns are represented by subquestions and the same answer options are shown for each row. The text of the question can be either a specific question or a description.
o Mask questions

7
Date File upload Gender Language switch Numerical input Multiple numerical input Ranking Text display Yes/No
Multiple choice questions o Multiple choice o Multiple choice with comments
Single choice questions o 5 point choice o List (Dropdown) o List (Radio) o List with comment

8
Text questions
o Short free text
o Long free text o Huge free text o Multiple short text
Validation: This feature is available on all free text type questions ("Short Free Text", "Long Free Text", "Date" or "Numerical").
Other?: Depending upon your chosen 'question type' this option may appear. It allows you to specify that an "other" option be presented in some of the list question types.
Mandatory?: For all question types, except the text ones, this setting allows you to require users to answer the question, before they can move on to the next question. For ranking question this means all items have to be ranked.
Setting conditions
By default all questions in a survey are displayed. However, it is possible to define a condition or a set of conditions on each question of your survey. This means that you can decide that some questions will be displayed only if some conditions are met like "Show question X if question Y was answered 'Z'".
To set a simple condition for a question:
Select the conditional question from the question drop down. “Conditional” refers to the question that you wish to display or not display depending on the participant’s response to an earlier question.
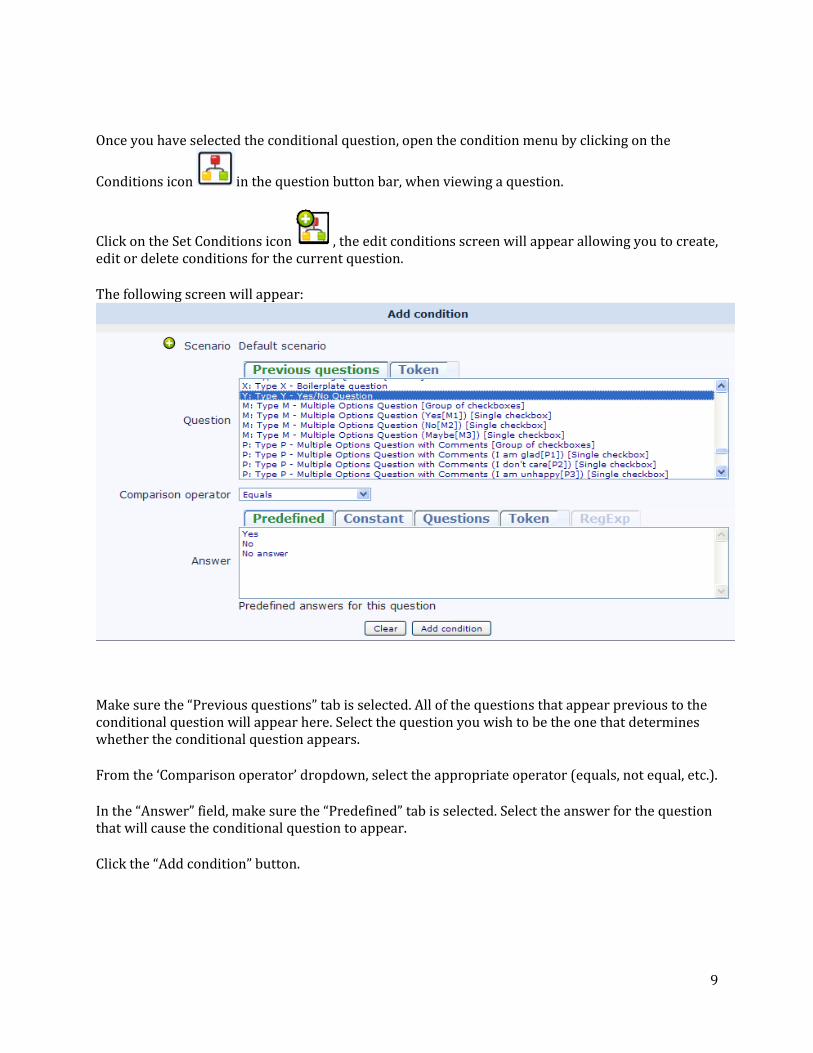
9
Once you have selected the conditional question, open the condition menu by clicking on the
Conditions icon in the question button bar, when viewing a question.
Click on the Set Conditions icon , the edit conditions screen will appear allowing you to create, edit or delete conditions for the current question.
The following screen will appear:
Make sure the “Previous questions” tab is selected. All of the questions that appear previous to the conditional question will appear here. Select the question you wish to be the one that determines whether the conditional question appears.
From the ‘Comparison operator’ dropdown, select the appropriate operator (equals, not equal, etc.).
In the “Answer” field, make sure the “Predefined” tab is selected. Select the answer for the question that will cause the conditional question to appear.
Click the “Add condition” button.

10
Question preview
To preview a question click on the Preview Question icon on the question bar.
Adding answers or sub-questions
Various question types require you to add a list of answer options and/or subquestions. To add
answers to one of these question types click on the "Add/Edit Answers for this Question" icon
.
When adding an answer you will be asked for an "Answer Code", an "Answer" and whether that
answer is the "Default".
1. Answer code: This is the data that will usually be exported to your spreadsheet when compiling results. You may choose whatever code you want (5 character maximum). The code can only contain standard alpha-numeric characters.
2. Answer: The answer that will be displayed. 3. Sort order: This determines the sort-order of the answers. You can use the "Up" and "Dn"
buttons next to each answer to change the position of that answer in the list. 4. Default: One answer from all can be chosen as the default answer (ie: this one will be
chosen and entered into your survey results unless it is changed). Change the Default field to "Y" if you want this answer to be the default answer. If you don't choose any default answer the survey result will record nothing if one of the answers is not specifically chosen.
Managing Surveys
Testing a survey
You can test a survey at any point while you are creating it, by choosing the "Test this Survey"
button in the 'Survey' section of the web page. This allows you to check how the survey looks and feels before you actually initialize it. When testing a survey your responses will not be saved.
Activating a survey
Once you are happy with the structure of your survey you can activate it by clicking on the "Activate
survey" icon.

11
Before you activate a survey you should note the following points:
When the survey is initialized you can change the text for questions, answers, the survey etc, but not the type of question or the type of answer.
You cannot add new questions or delete questions. Nor can you add answers to any of the array or multiple choice questions - however you can add answers to the basic list type questions.
Browsing survey results
When your survey is active, a 'Browse' button will appear in the Survey Information portion
of the main admin screen. Clicking this button will open the "Browse" screen.
The main screen (Survey Summary) gives you just a quantity of responses to this survey so far:
The total number of responses recorded (full response and incomplete responses) The total number of incomplete responses recorded The total number of full responses received (submitted)
View survey results
In order to view individual participant responses click the “Display responses” icon .
A table with all participant responses will be display. You can sort the table by “All responses”,
“incomplete responses only” or “Complete responses only”.
To view an individual participant’s responses, click the “View response details” icon for a given
participant.

12
Closing a survey
General
There are two ways for closing a survey: Expiry or deactivation.
Expiry
When editing the survey details and set an "Expiry Date".
Deactivation
Click on the "Deactivate this survey" icon .
By deactivating the survey, all results will be lost. Therefore, it is critical to export and save your data before deactivating the survey.
Exporting results
Once your survey is active you can browse responses and export them. To export, click on the
Responses icon and the click Responses & Statistics from the drop down menu.

13
Exporting survey data into Excel
To export to Excel, click the “Export Results to application” icon.
The following screen will appear:
Fill it out this screen according to the information you would like to capture in the Excel table:
Range: Select the range of questions you want to appear (the default is all questions)
Completion State: Select from “All responses”, “Completed responses only” or “Incomplete
responses only”
Questions: Select how you would like the questions to display. Choices include:
“Abbreviated headings”, “full headings” or “question codes”.

14
Answers: Select how you would like the answers to display. Choices include: “Answer
codes” or “Full Answers”. If you want answer codes to be displayed you can set whether you
want Y and N answers to appear as 1 and 2.
Format: Select whether the survey is to be exported as a Word, Excel or CSV file.
Choose Columns: Choose the columns you would like to appear in the file. All data is
selected as the default. Use the CTRL key to select specific columns.
Click “Export Data”. Data will export into chosen file format.
A pop-up will appear prompting you to either save or open your file. Make a choice and then click
ok.
Data will now be exported.
Exporting survey data in SPSS
To export using SPSS, “Export results to a SPSS/PASW command file” icon
The following screen will appear:

15
Fill out the following fields:
Data selection: Select from “All responses”, “Completed responses only” or “Incomplete responses only”
SPSS version: Chose whether you are using version” 16 or up” or “Prior to 16” Click “Export Syntax” and “Export Data” to download the data and the syntax file.
Open the syntax file in SPSS in Unicode mode.
Edit the 4th line and complete the filename with a full path to the downloaded data file.
Choose 'Run/All' from the menu to run the import.
Your data will now be imported.