limesurvey - mcgill...
TRANSCRIPT

LimeSurvey User Guide to
Creating Surveys
Created: October 7, 2016
Last updated: April 18, 2018
LimeSurvey User Guide – McGill IT Services 2
Contents Gaining access to LimeSurvey ............................................................................................................................................ 3
Change your LimeSurvey password ........................................................................................................................... 3
Importing an existing survey from the old LimeSurvey .......................................................................................... 4
Accessing your survey ........................................................................................................................................................... 7
Survey Settings ......................................................................................................................................................................... 9
Edit Text Elements ............................................................................................................................................................. 9
General options ................................................................................................................................................................. 10
Presentation & navigation ............................................................................................................................................ 11
Tokens ................................................................................................................................................................................... 14
Organizing the survey with question groups ............................................................................................................. 15
Creating a question group ............................................................................................................................................. 15
Edit or delete a question group................................................................................................................................... 17
Adding questions ................................................................................................................................................................... 18
General options ................................................................................................................................................................. 20
Advanced settings............................................................................................................................................................. 24
Add answer options or sub-questions ..................................................................................................................... 25
Reorder groups or questions within a group ........................................................................................................ 27
Setting conditions ............................................................................................................................................................. 28
Inserting images and links to files and websites ................................................................................................. 31
Managing Surveys ................................................................................................................................................................. 38
Preview the survey, a question group or an individual question ................................................................. 38
Adding participants and initializing tokens ........................................................................................................... 39
Activate a survey ............................................................................................................................................................... 45
Browse survey results .................................................................................................................................................... 46
View survey results .......................................................................................................................................................... 46
View and interact with statistics ................................................................................................................................ 50
Close a survey ..................................................................................................................................................................... 52
Exporting results............................................................................................................................................................... 53
Tips & Tricks ............................................................................................................................................................................ 58
Remove extra space at top of Mandatory questions .......................................................................................... 58
Add more width for sub-questions............................................................................................................................ 59
LimeSurvey User Guide – McGill IT Services 3
Insert line breaks with <BR> tags .............................................................................................................................. 60
Gaining access to LimeSurvey If you have never used McGill’s LimeSurvey tool, you will need to request access.
Contact [email protected] to request access to LimeSurvey and to have a survey created.
Once you have been granted access, you will receive an email with instructions on how to log in.
Go to https://surveys.mcgill.ca/ls/index.php/admin and enter your McGill Username and the
password you were given for the site (note that you can change your password if desired).
Select your survey from the “Surveys” drop down menu.
Change your LimeSurvey password
You are given an initial password to access the LimeSurvey system, but you will likely want to
change it to something that is easier to remember.
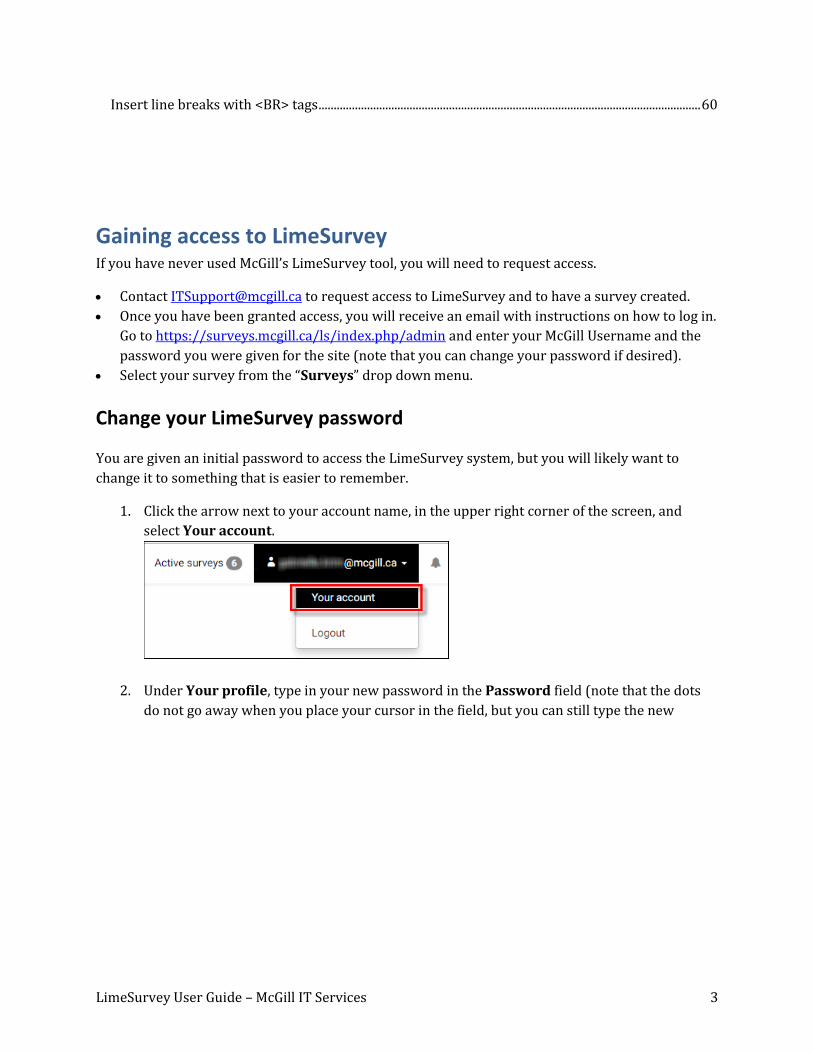
1. Click the arrow next to your account name, in the upper right corner of the screen, and
select Your account.
2. Under Your profile, type in your new password in the Password field (note that the dots
do not go away when you place your cursor in the field, but you can still type the new
LimeSurvey User Guide – McGill IT Services 4
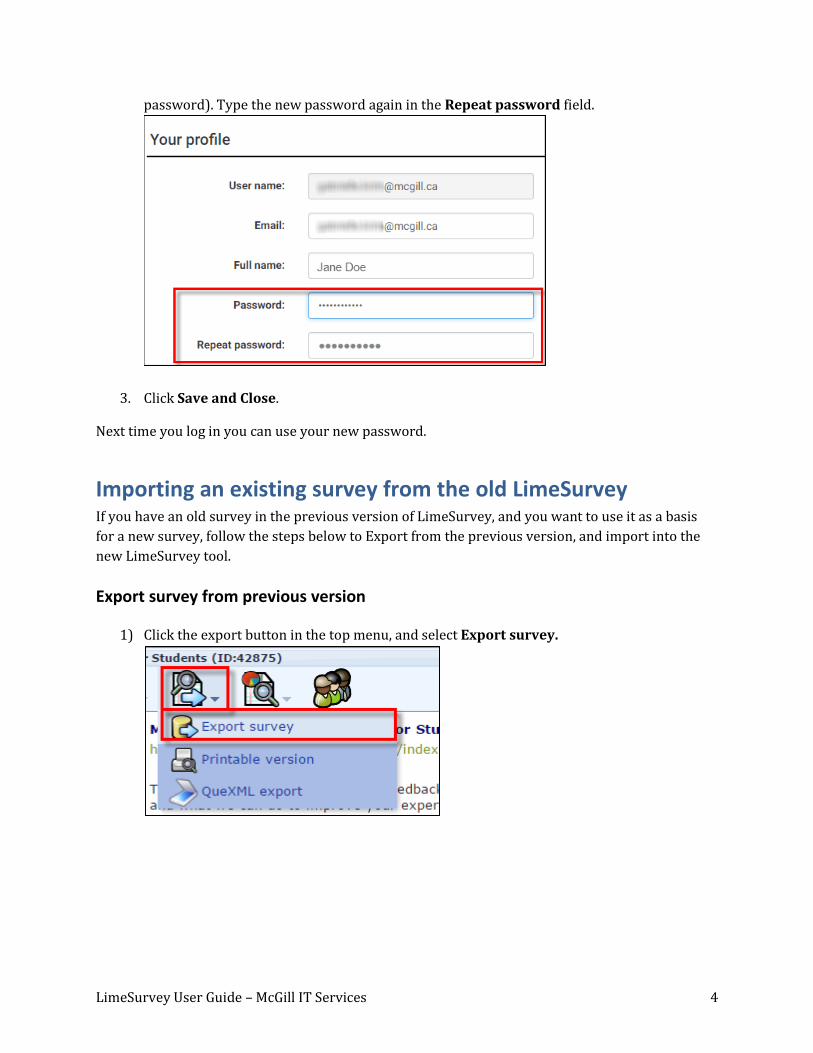
password). Type the new password again in the Repeat password field.
3. Click Save and Close.
Next time you log in you can use your new password.
Importing an existing survey from the old LimeSurvey If you have an old survey in the previous version of LimeSurvey, and you want to use it as a basis
for a new survey, follow the steps below to Export from the previous version, and import into the
new LimeSurvey tool.
Export survey from previous version
1) Click the export button in the top menu, and select Export survey.
LimeSurvey User Guide – McGill IT Services 5
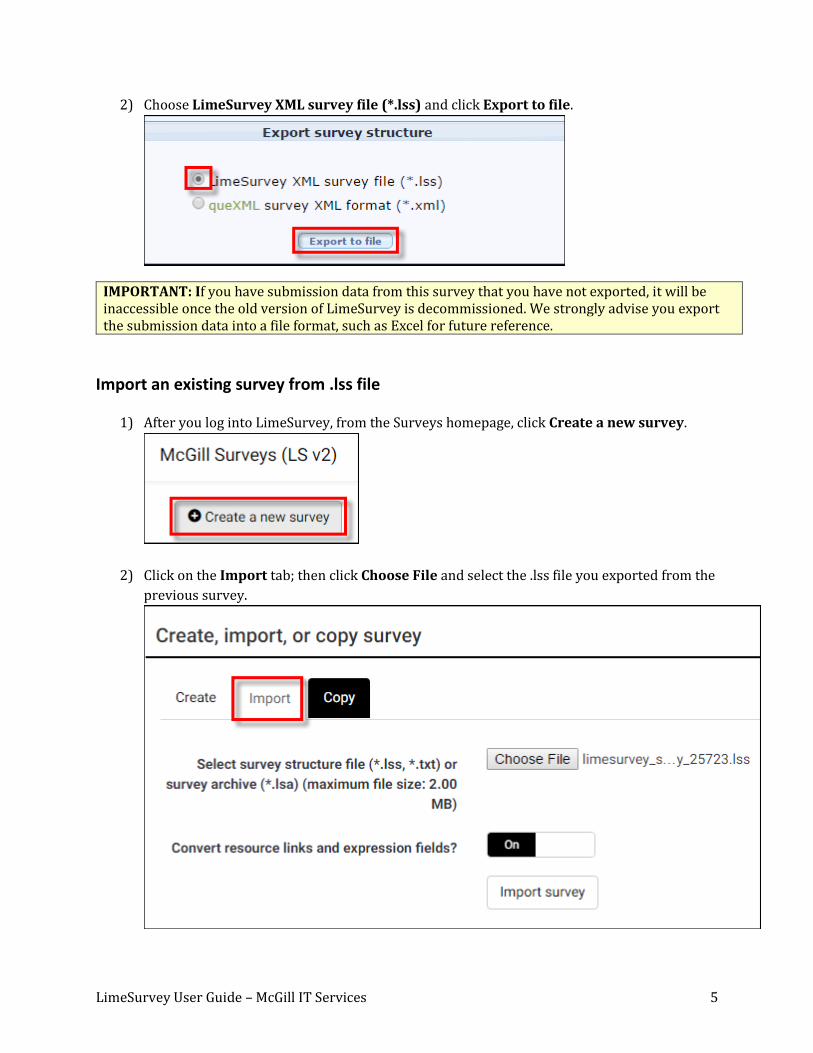
2) Choose LimeSurvey XML survey file (*.lss) and click Export to file.
IMPORTANT: If you have submission data from this survey that you have not exported, it will be inaccessible once the old version of LimeSurvey is decommissioned. We strongly advise you export the submission data into a file format, such as Excel for future reference.
Import an existing survey from .lss file
1) After you log into LimeSurvey, from the Surveys homepage, click Create a new survey.
2) Click on the Import tab; then click Choose File and select the .lss file you exported from the
previous survey.
LimeSurvey User Guide – McGill IT Services 6
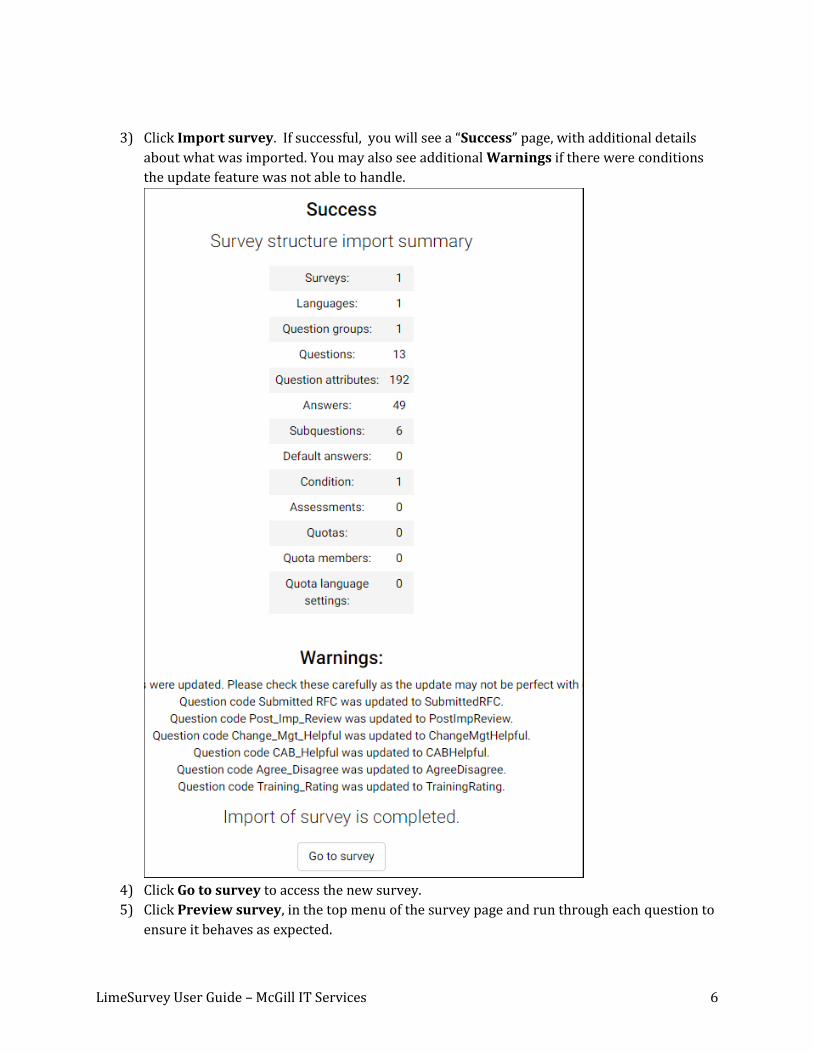
3) Click Import survey. If successful, you will see a “Success” page, with additional details
about what was imported. You may also see additional Warnings if there were conditions
the update feature was not able to handle.
4) Click Go to survey to access the new survey.
5) Click Preview survey, in the top menu of the survey page and run through each question to
ensure it behaves as expected.
LimeSurvey User Guide – McGill IT Services 7
After importing an older survey, you may want to choose a new template, or adjust the display
and navigation settings. See instructions for Survey Settings below.
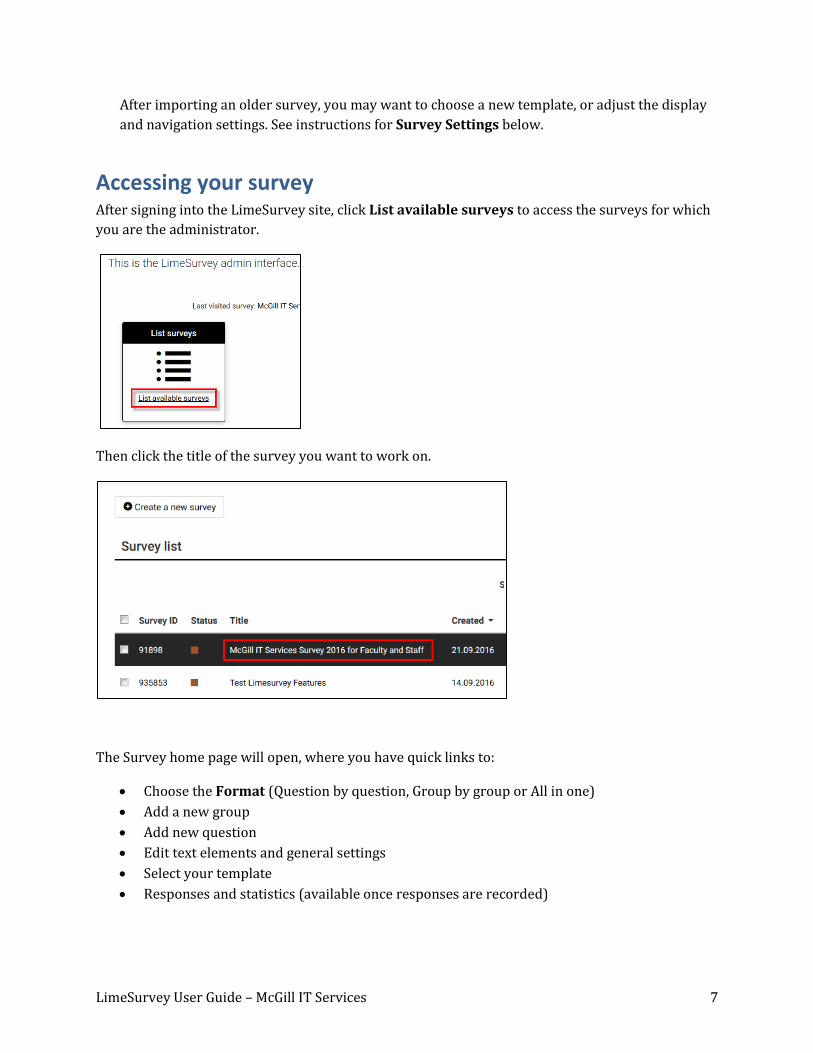
Accessing your survey After signing into the LimeSurvey site, click List available surveys to access the surveys for which
you are the administrator.
Then click the title of the survey you want to work on.
The Survey home page will open, where you have quick links to:
Choose the Format (Question by question, Group by group or All in one)
Add a new group
Add new question
Edit text elements and general settings
Select your template
Responses and statistics (available once responses are recorded)

LimeSurvey User Guide – McGill IT Services 8
To get back to this page at any time, click on the Survey home link in the left side navigation pane:
LimeSurvey User Guide – McGill IT Services 9
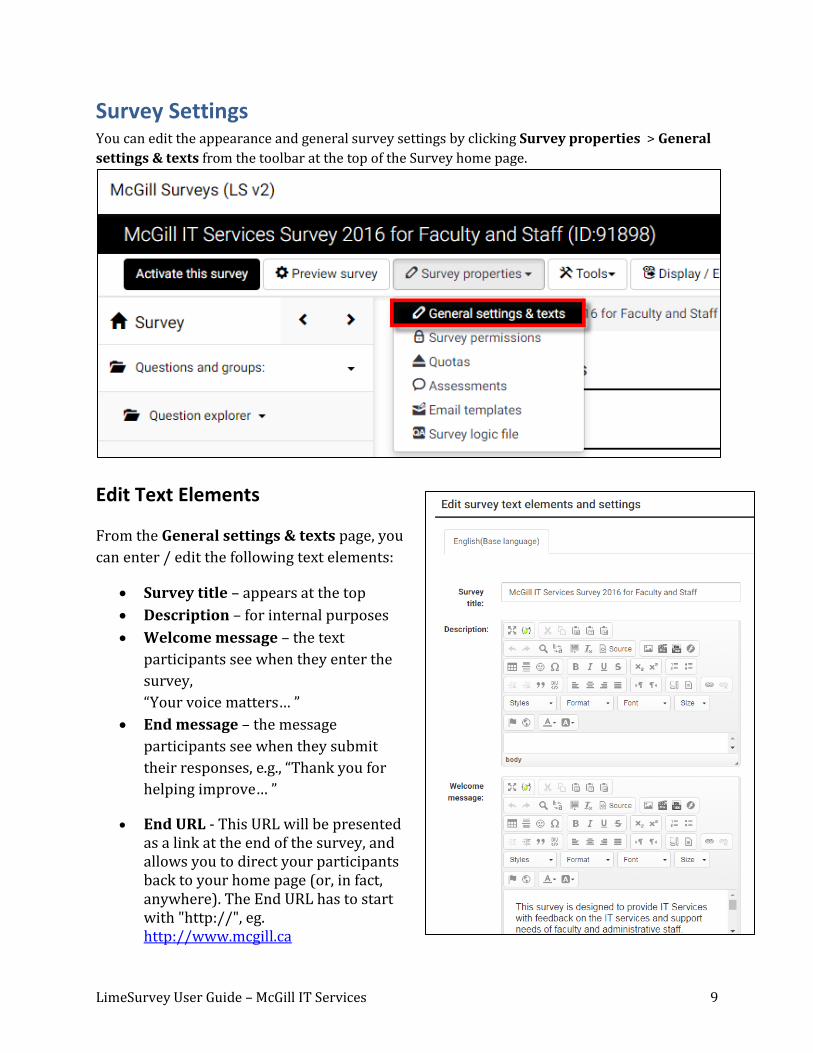
Survey Settings You can edit the appearance and general survey settings by clicking Survey properties > General
settings & texts from the toolbar at the top of the Survey home page.
Edit Text Elements
From the General settings & texts page, you
can enter / edit the following text elements:
Survey title – appears at the top
Description – for internal purposes
Welcome message – the text
participants see when they enter the
survey,
“Your voice matters… ”
End message – the message
participants see when they submit
their responses, e.g., “Thank you for
helping improve… ”
End URL - This URL will be presented as a link at the end of the survey, and allows you to direct your participants back to your home page (or, in fact, anywhere). The End URL has to start with "http://", eg. http://www.mcgill.ca
LimeSurvey User Guide – McGill IT Services 10
URL description: The description for the link using the End URL.
Notice that most of the fields contain WYSIWYG formatting controls to allow flexible text
styling and images.
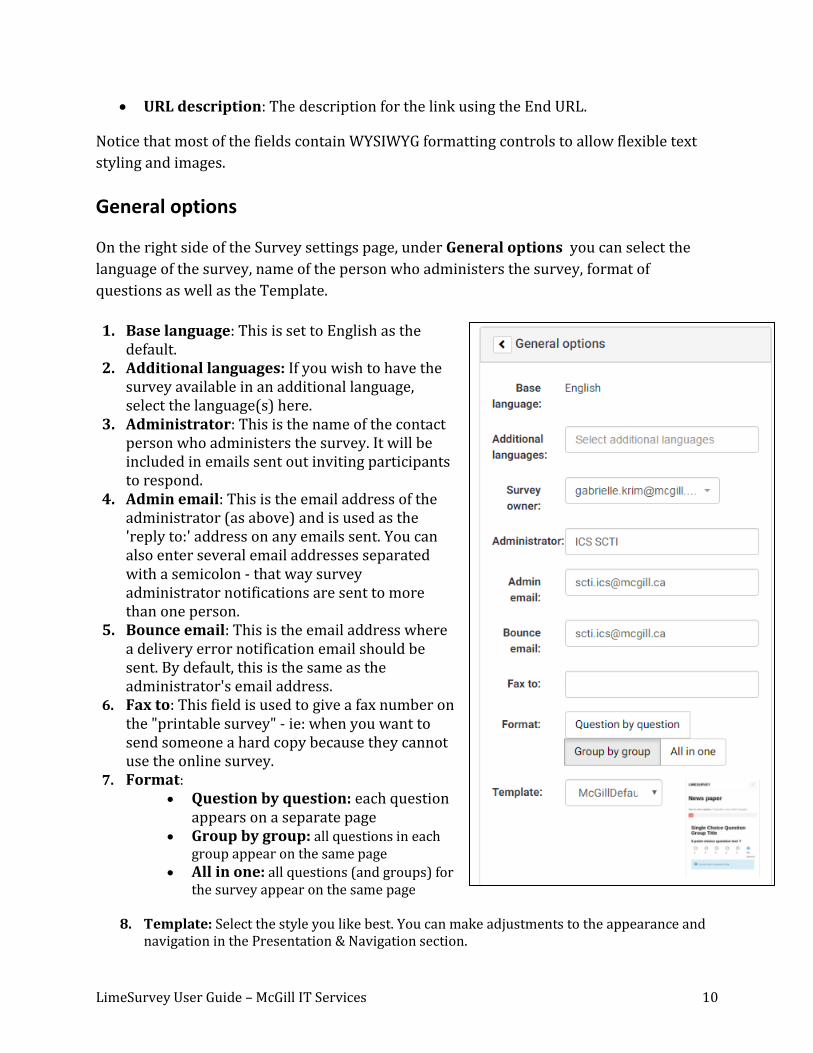
General options
On the right side of the Survey settings page, under General options you can select the
language of the survey, name of the person who administers the survey, format of
questions as well as the Template.
1. Base language: This is set to English as the default.
2. Additional languages: If you wish to have the survey available in an additional language, select the language(s) here.
3. Administrator: This is the name of the contact person who administers the survey. It will be included in emails sent out inviting participants to respond.
4. Admin email: This is the email address of the administrator (as above) and is used as the 'reply to:' address on any emails sent. You can also enter several email addresses separated with a semicolon - that way survey administrator notifications are sent to more than one person.
5. Bounce email: This is the email address where a delivery error notification email should be sent. By default, this is the same as the administrator's email address.
6. Fax to: This field is used to give a fax number on the "printable survey" - ie: when you want to send someone a hard copy because they cannot use the online survey.
7. Format:
Question by question: each question appears on a separate page
Group by group: all questions in each group appear on the same page
All in one: all questions (and groups) for the survey appear on the same page
8. Template: Select the style you like best. You can make adjustments to the appearance and navigation in the Presentation & Navigation section.
LimeSurvey User Guide – McGill IT Services 11
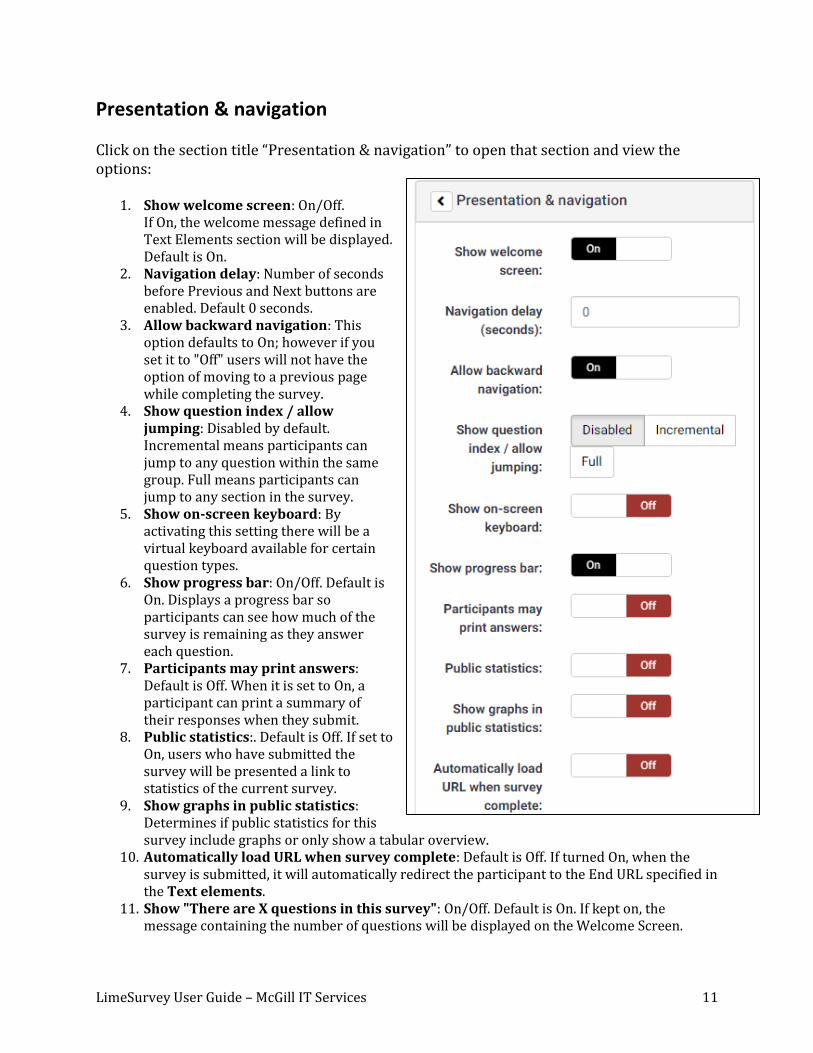
Presentation & navigation
Click on the section title “Presentation & navigation” to open that section and view the options:
1. Show welcome screen: On/Off. If On, the welcome message defined in Text Elements section will be displayed. Default is On.
2. Navigation delay: Number of seconds before Previous and Next buttons are enabled. Default 0 seconds.
3. Allow backward navigation: This option defaults to On; however if you set it to "Off" users will not have the option of moving to a previous page while completing the survey.
4. Show question index / allow jumping: Disabled by default. Incremental means participants can jump to any question within the same group. Full means participants can jump to any section in the survey.
5. Show on-screen keyboard: By activating this setting there will be a virtual keyboard available for certain question types.
6. Show progress bar: On/Off. Default is On. Displays a progress bar so participants can see how much of the survey is remaining as they answer each question.
7. Participants may print answers: Default is Off. When it is set to On, a participant can print a summary of their responses when they submit.
8. Public statistics:. Default is Off. If set to On, users who have submitted the survey will be presented a link to statistics of the current survey.
9. Show graphs in public statistics: Determines if public statistics for this survey include graphs or only show a tabular overview.
10. Automatically load URL when survey complete: Default is Off. If turned On, when the survey is submitted, it will automatically redirect the participant to the End URL specified in the Text elements.
11. Show "There are X questions in this survey": On/Off. Default is On. If kept on, the message containing the number of questions will be displayed on the Welcome Screen.
LimeSurvey User Guide – McGill IT Services 12
12. Show group name and/or group description: Controls the display of Group Names and Descriptions. Four Options:
o Show both (Default) o Show group name only o Show group description only o Hide both
13. Show question number and/or code: o Show both (Default) o Show question number only o Show question code only o Hide both
14. Show "No answer": Set to Off (Forced by system administrator).
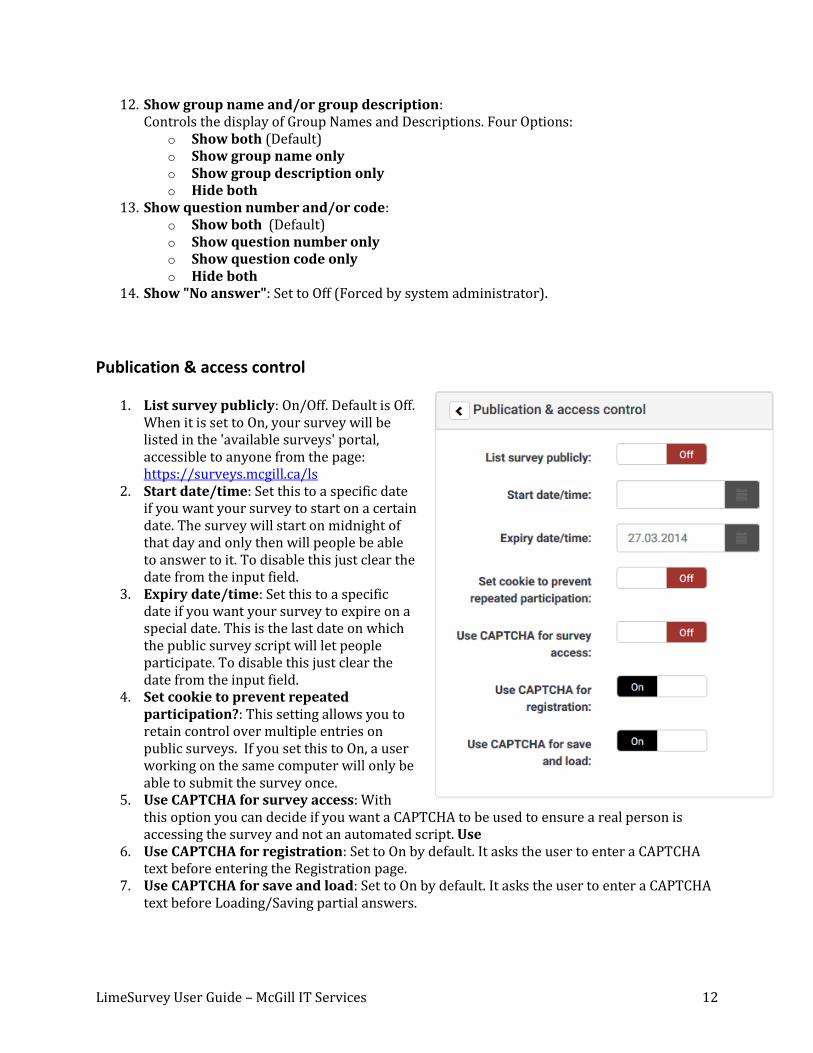
Publication & access control
1. List survey publicly: On/Off. Default is Off. When it is set to On, your survey will be listed in the 'available surveys' portal, accessible to anyone from the page: https://surveys.mcgill.ca/ls
2. Start date/time: Set this to a specific date if you want your survey to start on a certain date. The survey will start on midnight of that day and only then will people be able to answer to it. To disable this just clear the date from the input field.
3. Expiry date/time: Set this to a specific date if you want your survey to expire on a special date. This is the last date on which the public survey script will let people participate. To disable this just clear the date from the input field.
4. Set cookie to prevent repeated participation?: This setting allows you to retain control over multiple entries on public surveys. If you set this to On, a user working on the same computer will only be able to submit the survey once.
5. Use CAPTCHA for survey access: With this option you can decide if you want a CAPTCHA to be used to ensure a real person is accessing the survey and not an automated script. Use
6. Use CAPTCHA for registration: Set to On by default. It asks the user to enter a CAPTCHA text before entering the Registration page.
7. Use CAPTCHA for save and load: Set to On by default. It asks the user to enter a CAPTCHA text before Loading/Saving partial answers.
LimeSurvey User Guide – McGill IT Services 13
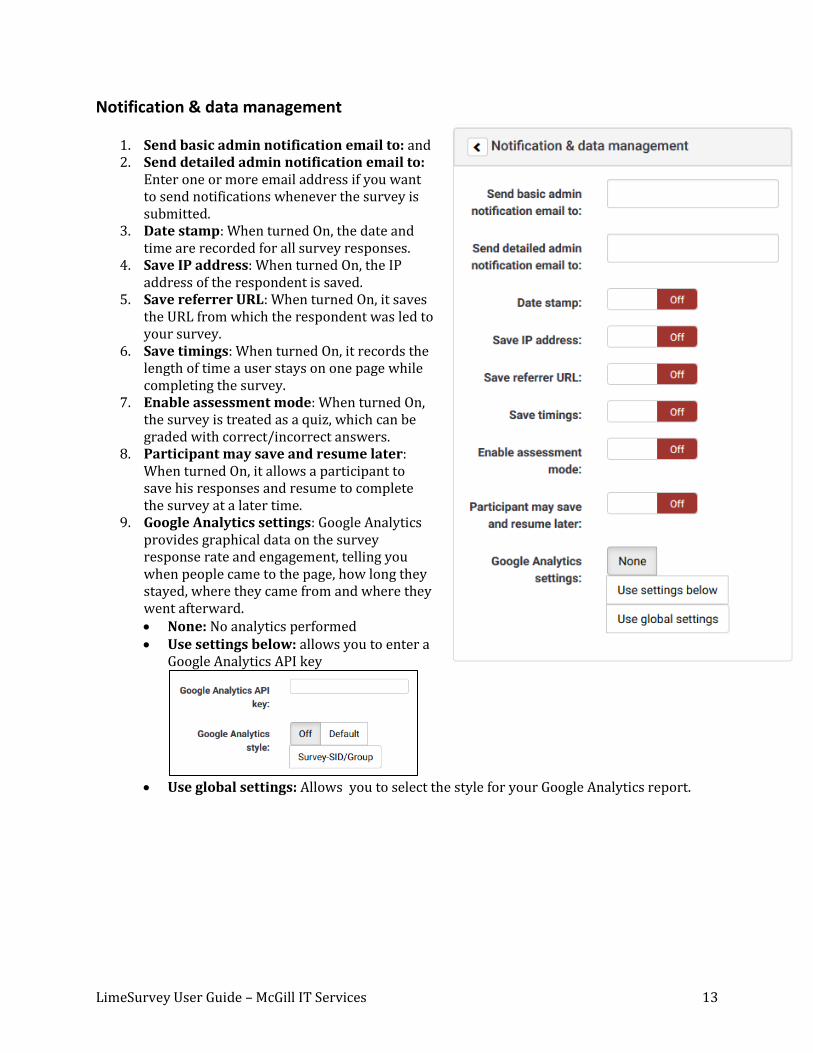
Notification & data management
1. Send basic admin notification email to: and 2. Send detailed admin notification email to:
Enter one or more email address if you want to send notifications whenever the survey is submitted.
3. Date stamp: When turned On, the date and time are recorded for all survey responses.
4. Save IP address: When turned On, the IP address of the respondent is saved.
5. Save referrer URL: When turned On, it saves the URL from which the respondent was led to your survey.
6. Save timings: When turned On, it records the length of time a user stays on one page while completing the survey.
7. Enable assessment mode: When turned On, the survey is treated as a quiz, which can be graded with correct/incorrect answers.
8. Participant may save and resume later: When turned On, it allows a participant to save his responses and resume to complete the survey at a later time.
9. Google Analytics settings: Google Analytics provides graphical data on the survey response rate and engagement, telling you when people came to the page, how long they stayed, where they came from and where they went afterward. None: No analytics performed Use settings below: allows you to enter a
Google Analytics API key
Use global settings: Allows you to select the style for your Google Analytics report.

LimeSurvey User Guide – McGill IT Services 14
Tokens
1. Anonymized responses: When tokens are used to control survey access, this settings allows you to determine whether responses are matched up with information from your survey’s tokens table, or kept anonymous.
2. Enable token-based response persistence: When turned On, it allows the participant to resume after partially completing the survey.
3. Allow multiple responses or update responses with one token: If turned On, participants may return to his survey by clicking the invitation link, even if they have already submitted the survey. This only works when Anonymized responses is set to Off.
4. Allow public registration: When turned On, it allows anyone to complete the survey, while maintaining the use of tokens.
5. Use HTML format for token emails: When turned On, it allows your invitation email to contain HTML formatting.
6. Send confirmation emails: When turned On, a confirmation email is sent to the participant after submitting the survey.
7. Set token length to: Allows you to limit the number of characters for each token. The default length is 15.
LimeSurvey User Guide – McGill IT Services 15
Organizing the survey with question groups Survey questions are organized into groups. Each question must be a member of a group (and only
that group). Depending on the number of questions in the survey, groups can be used to define
logical sections, common subject themes, or pages on the screen. A group can have questions about
a similar subject or simply be set up as a manageable number of questions.
A question group has a Title and an optional Description. You must have at least one group in
each survey, even if you do not wish to divide the survey into multiple groups.
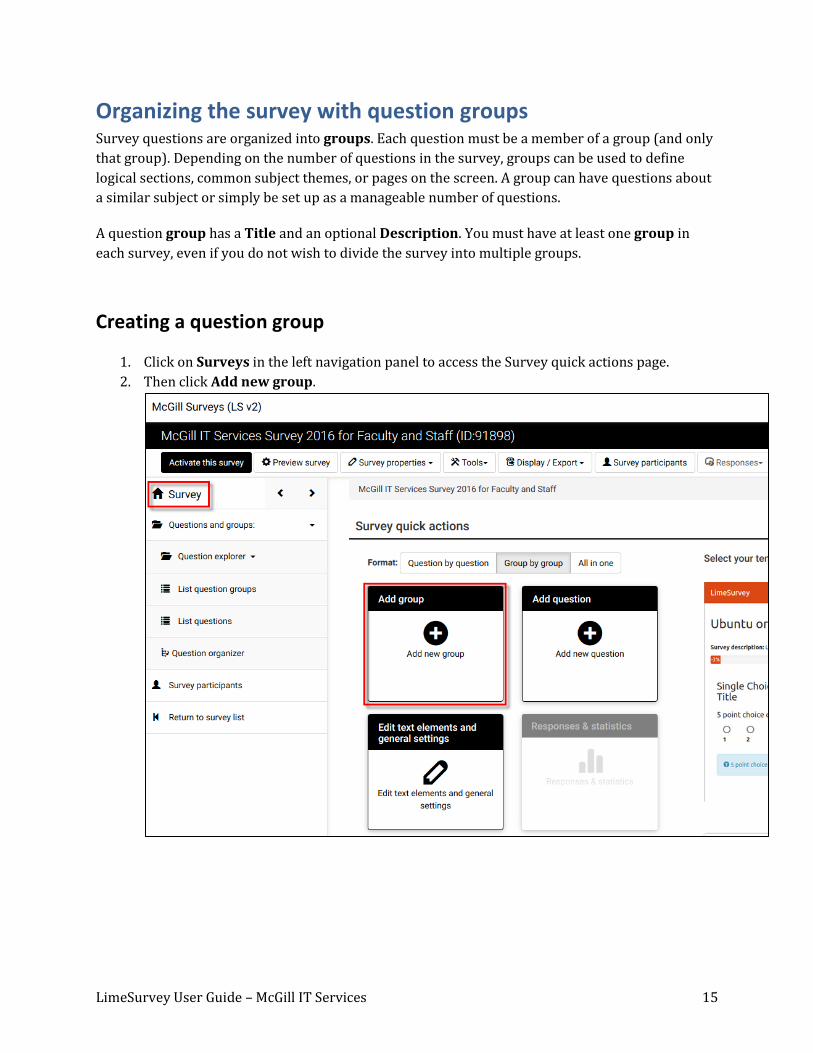
Creating a question group
1. Click on Surveys in the left navigation panel to access the Survey quick actions page.
2. Then click Add new group.
LimeSurvey User Guide – McGill IT Services 16
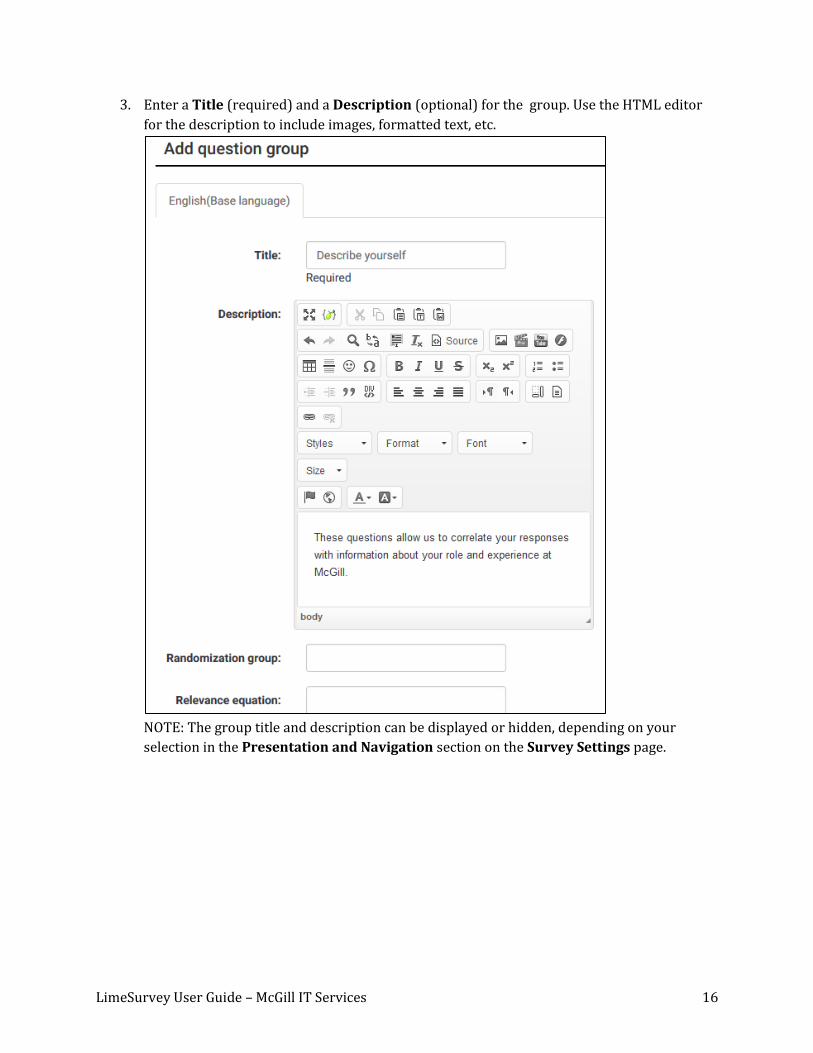
3. Enter a Title (required) and a Description (optional) for the group. Use the HTML editor
for the description to include images, formatted text, etc.
NOTE: The group title and description can be displayed or hidden, depending on your
selection in the Presentation and Navigation section on the Survey Settings page.

LimeSurvey User Guide – McGill IT Services 17
Edit or delete a question group
Follow these steps if you want to change the title or description of a question group:
1. In the left side navigation panel, click Questions and groups.
2. Then click List question groups.
3. From Question groups in this survey page, click on the pencil icon next to the group you
want to edit.
You can also delete a question group from this page by clicking the trash can icon:
LimeSurvey User Guide – McGill IT Services 18
Adding questions
Questions are the core of your survey. There is no limit to the number of questions you can have in your survey or in a group. Questions include the actual question text as well as settings that determine the format of the response. You can also specify a short 'help' explanation for each question and determine whether the question is mandatory or optional.
To add a question:
There are several paths you can take to add a new question.
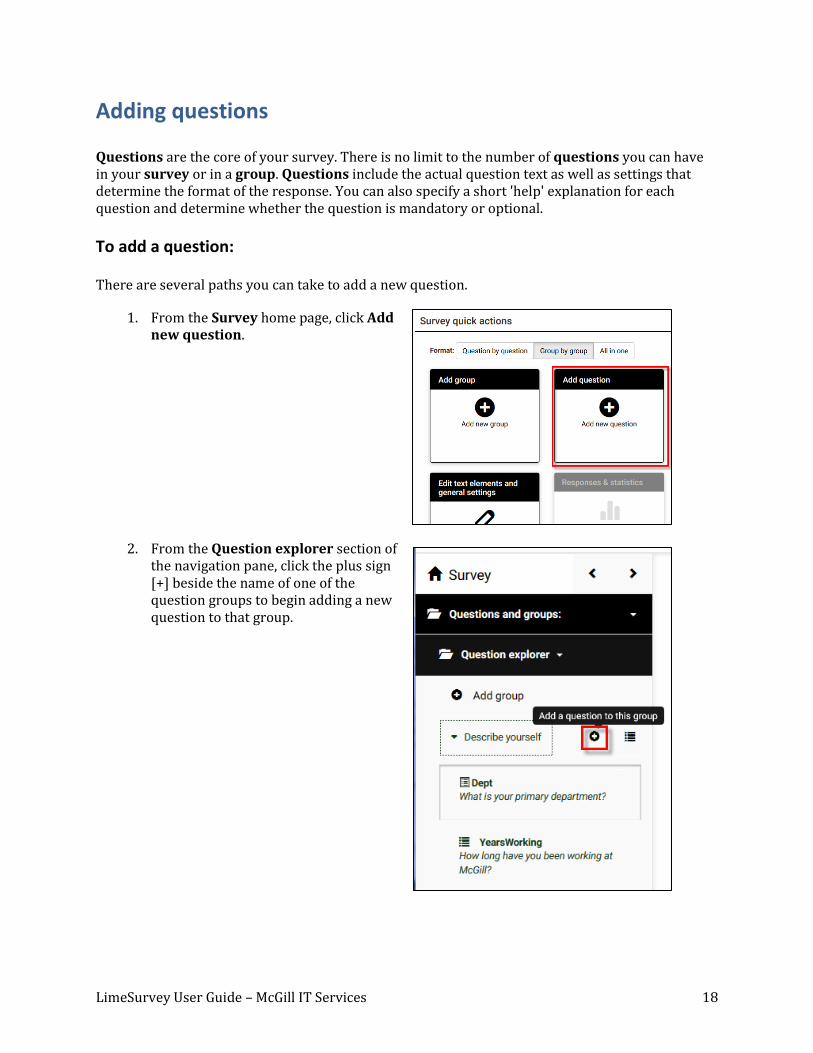
1. From the Survey home page, click Add new question.
2. From the Question explorer section of the navigation pane, click the plus sign [+] beside the name of one of the question groups to begin adding a new question to that group.

LimeSurvey User Guide – McGill IT Services 19
3. If you’ve just added or edited a question, you can simply click the box labeled Add new question to group on the Question summary page.
Question fields:
Code: Enter a number or code for the question. This field is only for quick identification for a question in export or for evaluation. This field is normally not displayed to participants taking the survey.
LimeSurvey User Guide – McGill IT Services 20
Question: This is the actual question being asked. There is no real limit to the length of the question. You can use the WYSIWYG editing controls to change the text styles or add images if needed.
Help: This is an optional field. It is useful if a question needs some explanation, or you want to explain how it should be answered.
General options
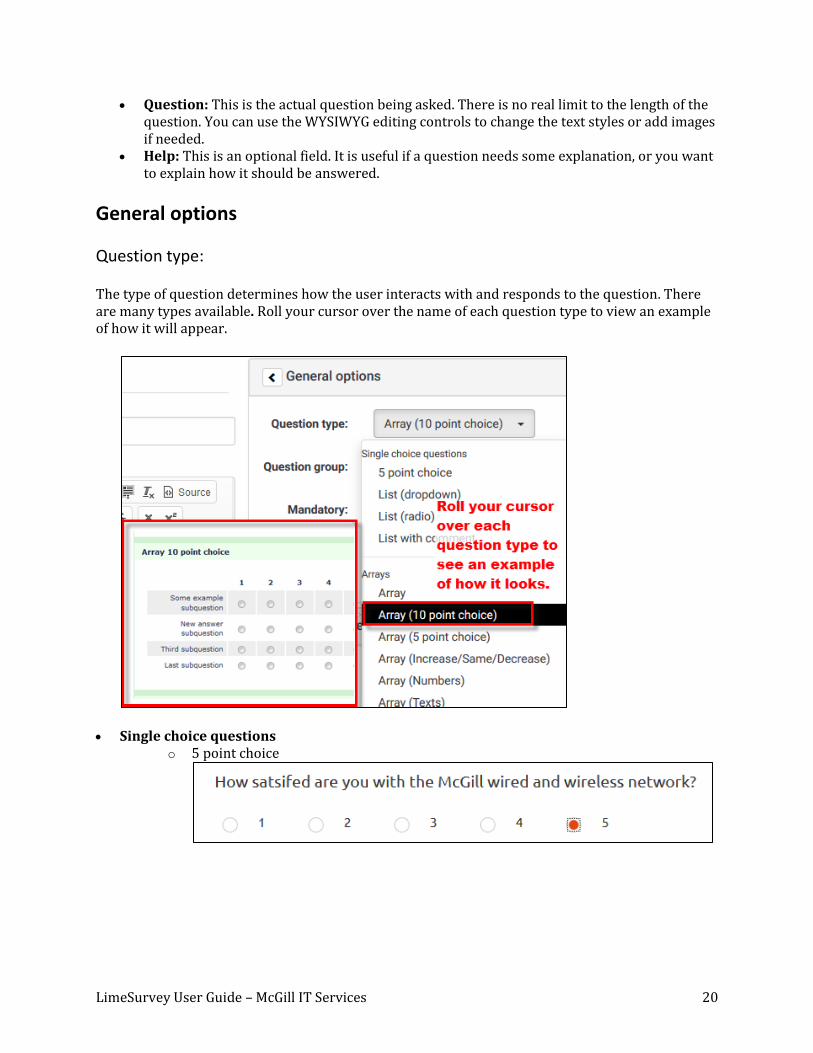
Question type:
The type of question determines how the user interacts with and responds to the question. There are many types available. Roll your cursor over the name of each question type to view an example of how it will appear.
Single choice questions o 5 point choice

LimeSurvey User Guide – McGill IT Services 21
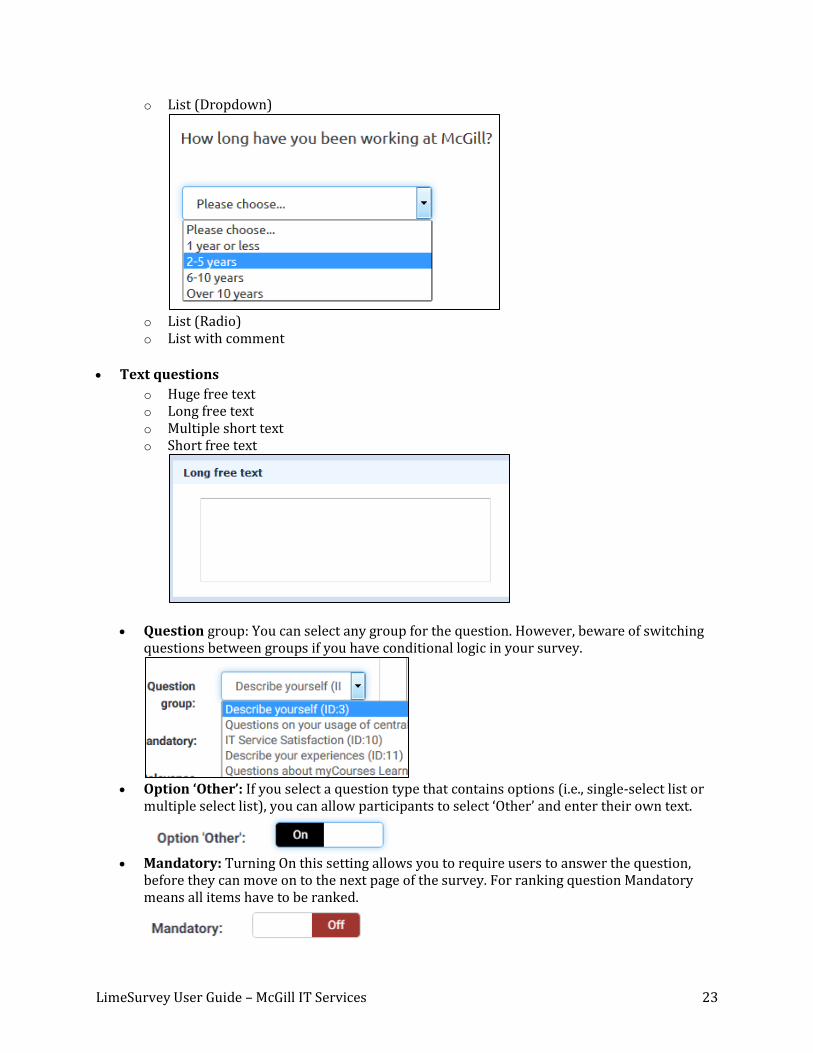
o List (Dropdown)
o List (Radio)
o List with comment
Array: Arrays allow you to display a matrix, in which each row represents a different sub-question or item, and the answer options, labeled at the top, are available for each item.
Mask questions o Date o File upload o Gender o Language switch o Numerical input o Multiple numerical input o Ranking o Text display o Yes/No

LimeSurvey User Guide – McGill IT Services 22
Multiple choice questions o Multiple choice o Multiple choice with comments
Single choice questions o 5 point choice
LimeSurvey User Guide – McGill IT Services 23
o List (Dropdown)
o List (Radio) o List with comment
Text questions
o Huge free text o Long free text o Multiple short text o Short free text
Question group: You can select any group for the question. However, beware of switching questions between groups if you have conditional logic in your survey.
Option ‘Other’: If you select a question type that contains options (i.e., single-select list or
multiple select list), you can allow participants to select ‘Other’ and enter their own text.
Mandatory: Turning On this setting allows you to require users to answer the question,
before they can move on to the next page of the survey. For ranking question Mandatory means all items have to be ranked.
LimeSurvey User Guide – McGill IT Services 24
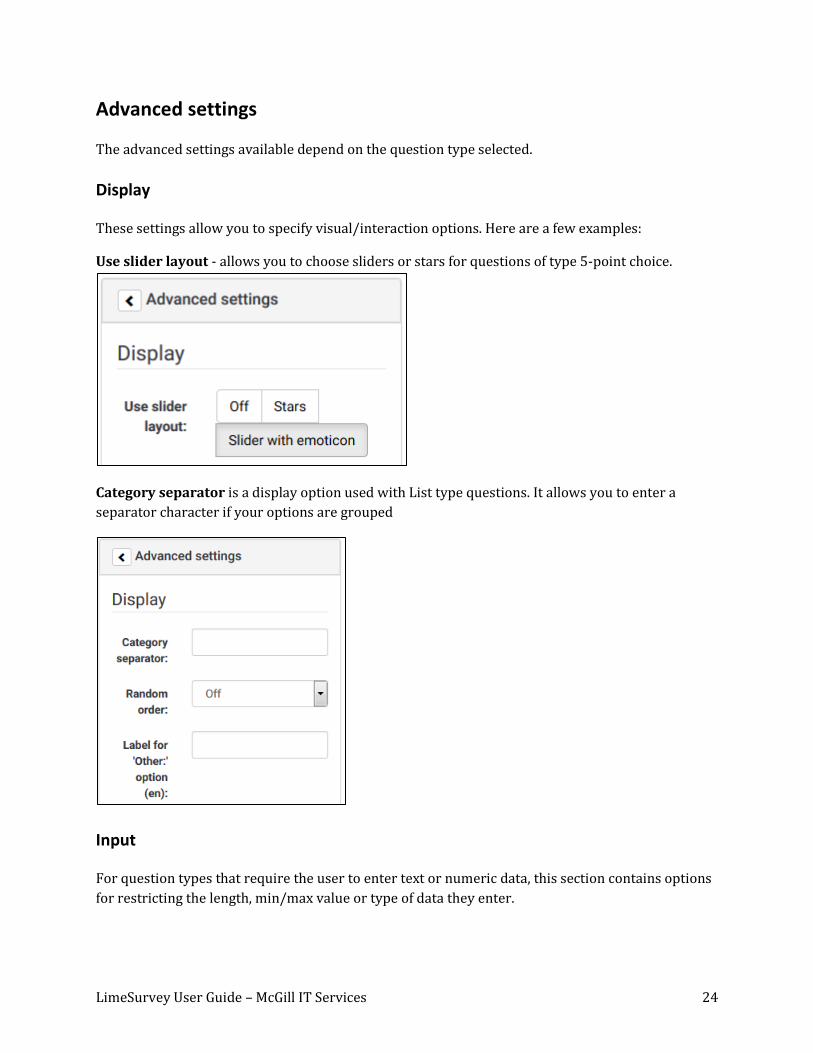
Advanced settings
The advanced settings available depend on the question type selected.
Display
These settings allow you to specify visual/interaction options. Here are a few examples:
Use slider layout - allows you to choose sliders or stars for questions of type 5-point choice.
Category separator is a display option used with List type questions. It allows you to enter a
separator character if your options are grouped
Input
For question types that require the user to enter text or numeric data, this section contains options
for restricting the length, min/max value or type of data they enter.
LimeSurvey User Guide – McGill IT Services 25
Logic
This section contains options for dealing with the response. For example, if you are creating a
survey with assessment questions, you can specify which values correspond to ‘Correct’ answers,
and provide feedback to users depending on what they enter.
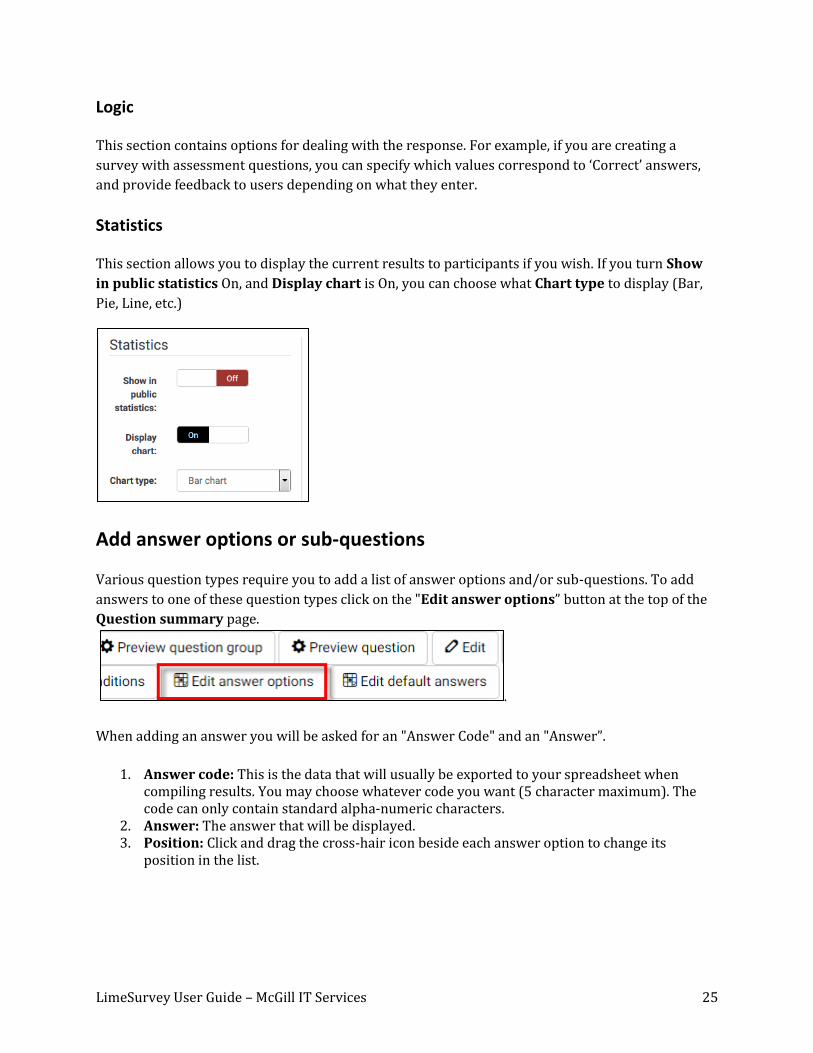
Statistics
This section allows you to display the current results to participants if you wish. If you turn Show
in public statistics On, and Display chart is On, you can choose what Chart type to display (Bar,
Pie, Line, etc.)
Add answer options or sub-questions
Various question types require you to add a list of answer options and/or sub-questions. To add
answers to one of these question types click on the "Edit answer options” button at the top of the
Question summary page.
.
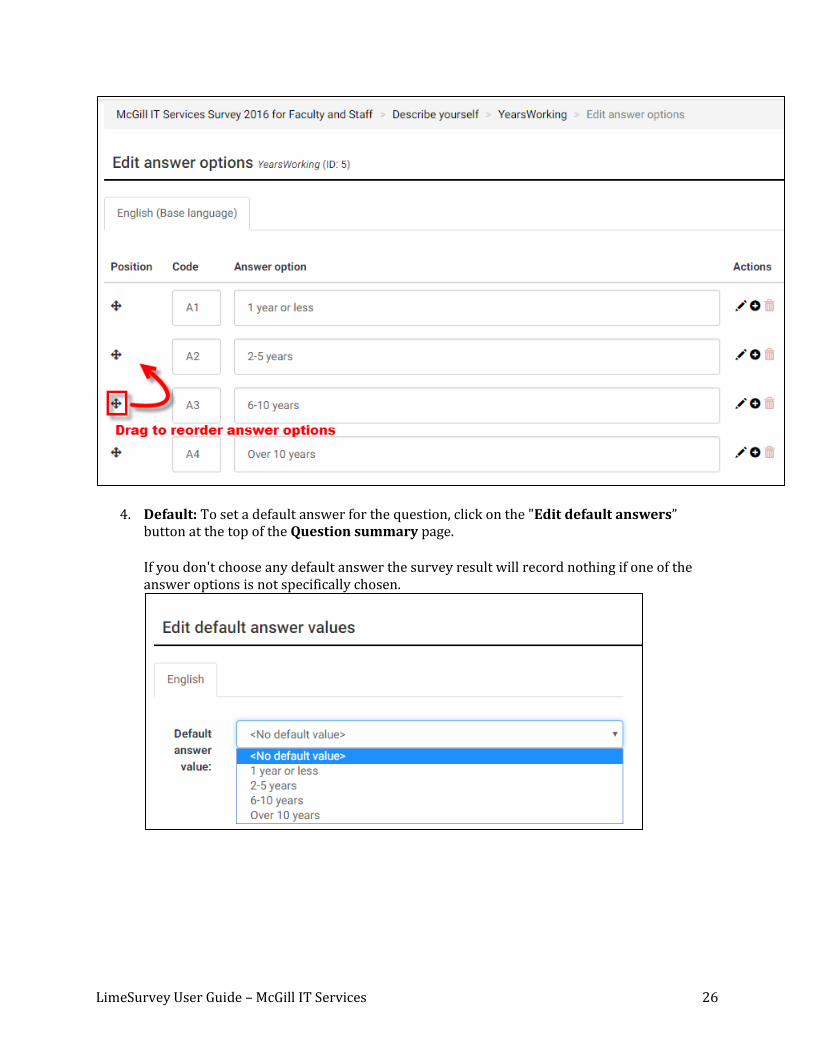
When adding an answer you will be asked for an "Answer Code" and an "Answer”.
1. Answer code: This is the data that will usually be exported to your spreadsheet when compiling results. You may choose whatever code you want (5 character maximum). The code can only contain standard alpha-numeric characters.
2. Answer: The answer that will be displayed. 3. Position: Click and drag the cross-hair icon beside each answer option to change its
position in the list.
LimeSurvey User Guide – McGill IT Services 26
4. Default: To set a default answer for the question, click on the "Edit default answers” button at the top of the Question summary page.
If you don't choose any default answer the survey result will record nothing if one of the answer options is not specifically chosen.
LimeSurvey User Guide – McGill IT Services 27
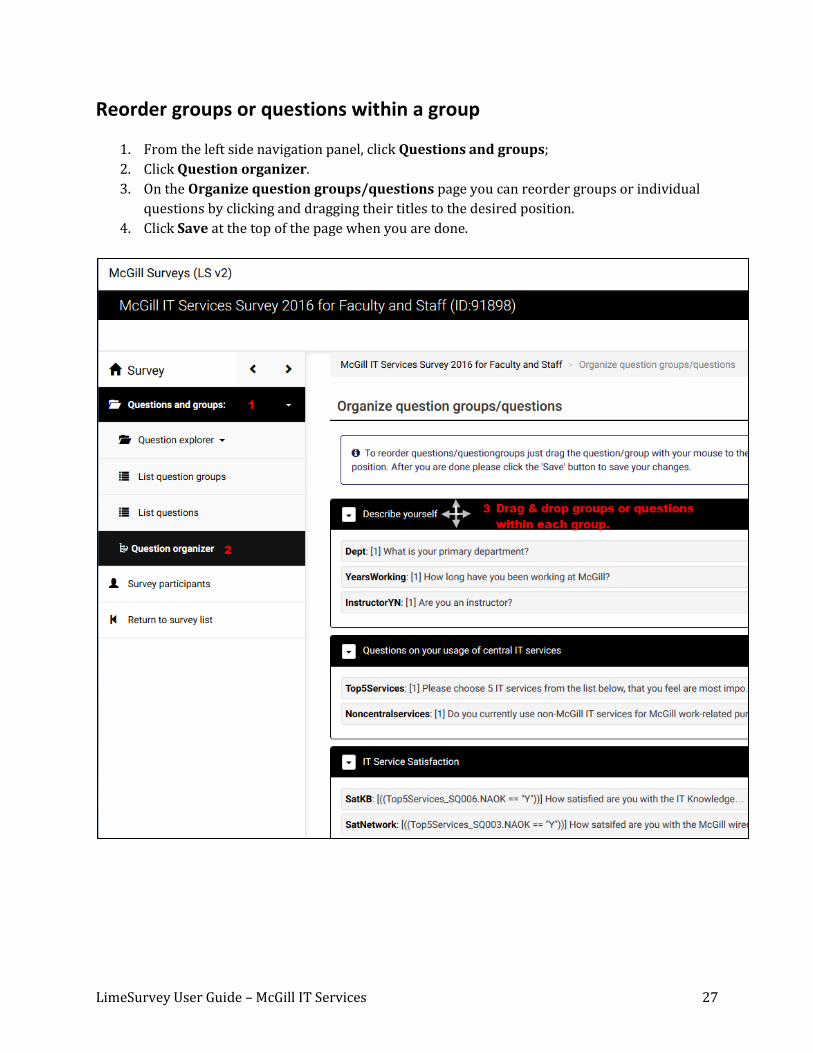
Reorder groups or questions within a group
1. From the left side navigation panel, click Questions and groups;
2. Click Question organizer.
3. On the Organize question groups/questions page you can reorder groups or individual
questions by clicking and dragging their titles to the desired position.
4. Click Save at the top of the page when you are done.
LimeSurvey User Guide – McGill IT Services 28
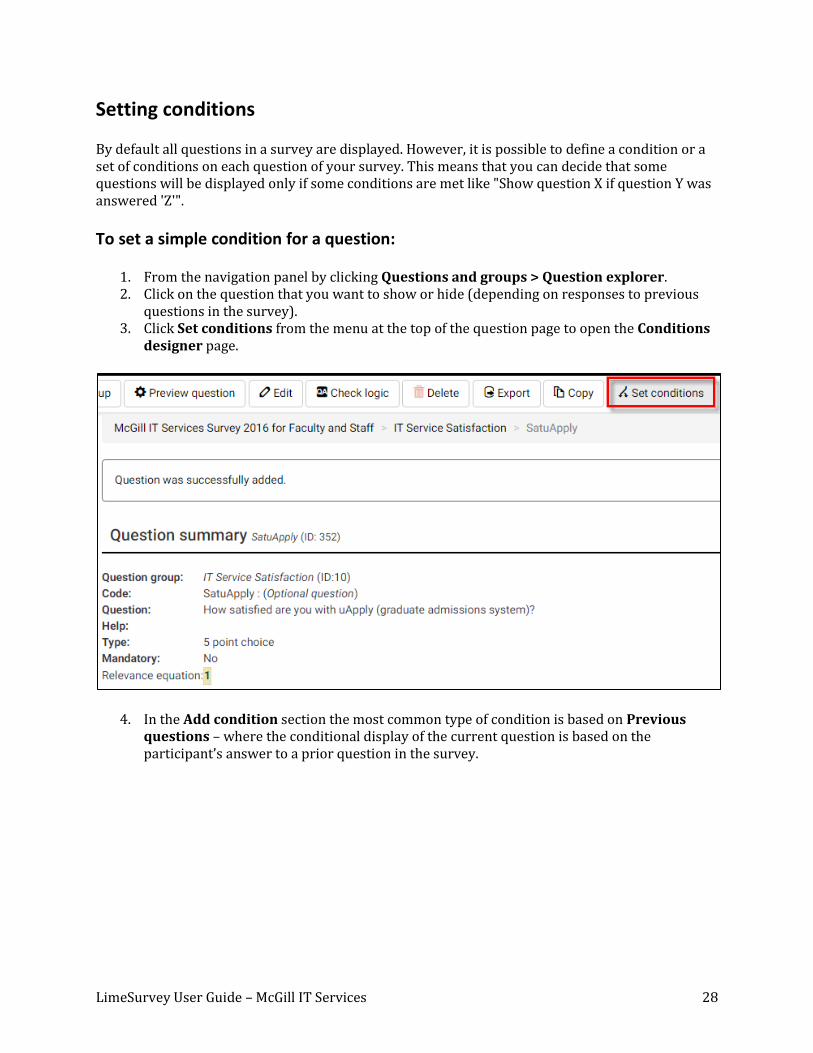
Setting conditions
By default all questions in a survey are displayed. However, it is possible to define a condition or a set of conditions on each question of your survey. This means that you can decide that some questions will be displayed only if some conditions are met like "Show question X if question Y was answered 'Z'".
To set a simple condition for a question:
1. From the navigation panel by clicking Questions and groups > Question explorer. 2. Click on the question that you want to show or hide (depending on responses to previous
questions in the survey). 3. Click Set conditions from the menu at the top of the question page to open the Conditions
designer page.
4. In the Add condition section the most common type of condition is based on Previous questions – where the conditional display of the current question is based on the participant’s answer to a prior question in the survey.

LimeSurvey User Guide – McGill IT Services 29
5. Select the Previous questions tab; then select the question or sub-question that the condition is based on.
6. Choose the Comparison operator (equals, not equal to, etc.).
7. Then choose the Answer option that corresponds to the condition on which the question
will be displayed.
8. Click Add condition, at the bottom to save it. The condition will appear at the top of the page.
LimeSurvey User Guide – McGill IT Services 30
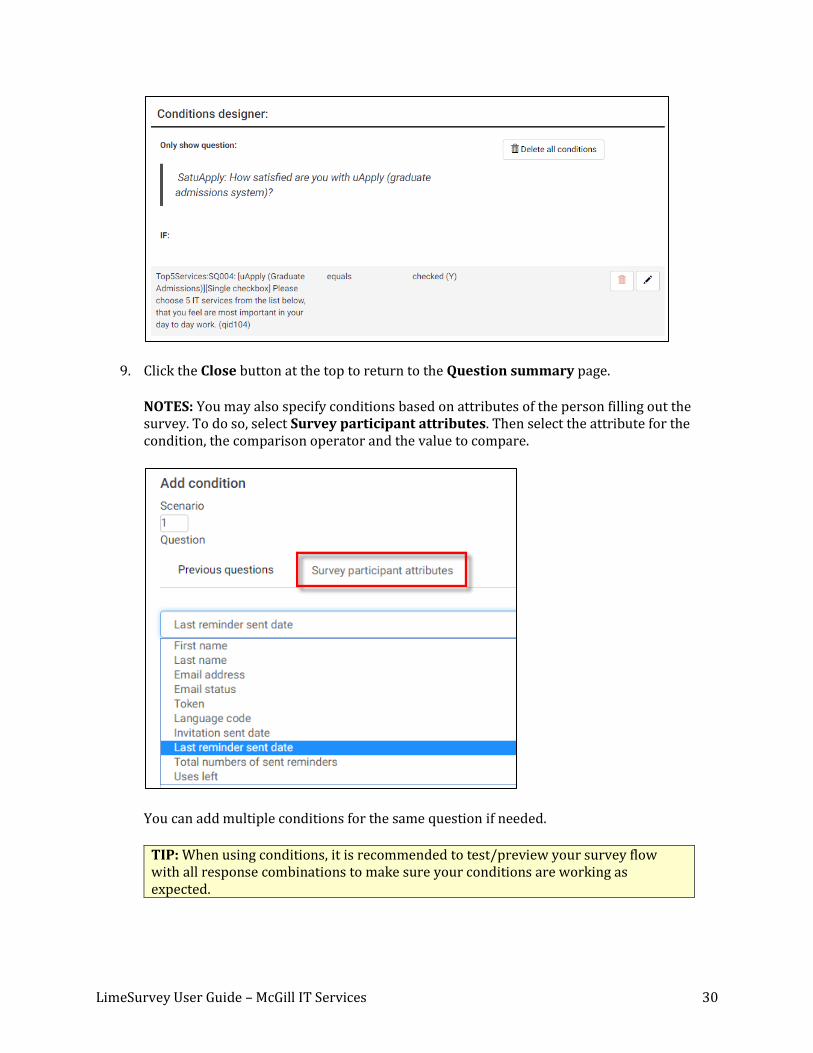
9. Click the Close button at the top to return to the Question summary page.
NOTES: You may also specify conditions based on attributes of the person filling out the survey. To do so, select Survey participant attributes. Then select the attribute for the condition, the comparison operator and the value to compare.
You can add multiple conditions for the same question if needed.
TIP: When using conditions, it is recommended to test/preview your survey flow with all response combinations to make sure your conditions are working as expected.

LimeSurvey User Guide – McGill IT Services 31
Inserting images and links to files and websites
You can insert images and links to files or websites in the survey Welcome message, the Group Description, or within Questions themselves.
To insert an image
1. Click the image button on the WYSIWYG toolbar.
2. Click Browse Server.
3. Click Upload; then browse to locate the image file on your computer and click Open.

LimeSurvey User Guide – McGill IT Services 32
4. Once it’s uploaded, you should see a thumbnail of the image. Double-click on the
thumbnail.
5. The upload window will close and the Image Properties
window will now display a preview and the image URL. You
can adjust properties, such as width, height, border, HSpace
and VSpace (empty pixels surrounding the image
horizontally and vertically), and Alignment.
Click OK to view the image within the body of the
question/description field. If you need to adjust any of the
image properties again, just double-click on the image.
LimeSurvey User Guide – McGill IT Services 33
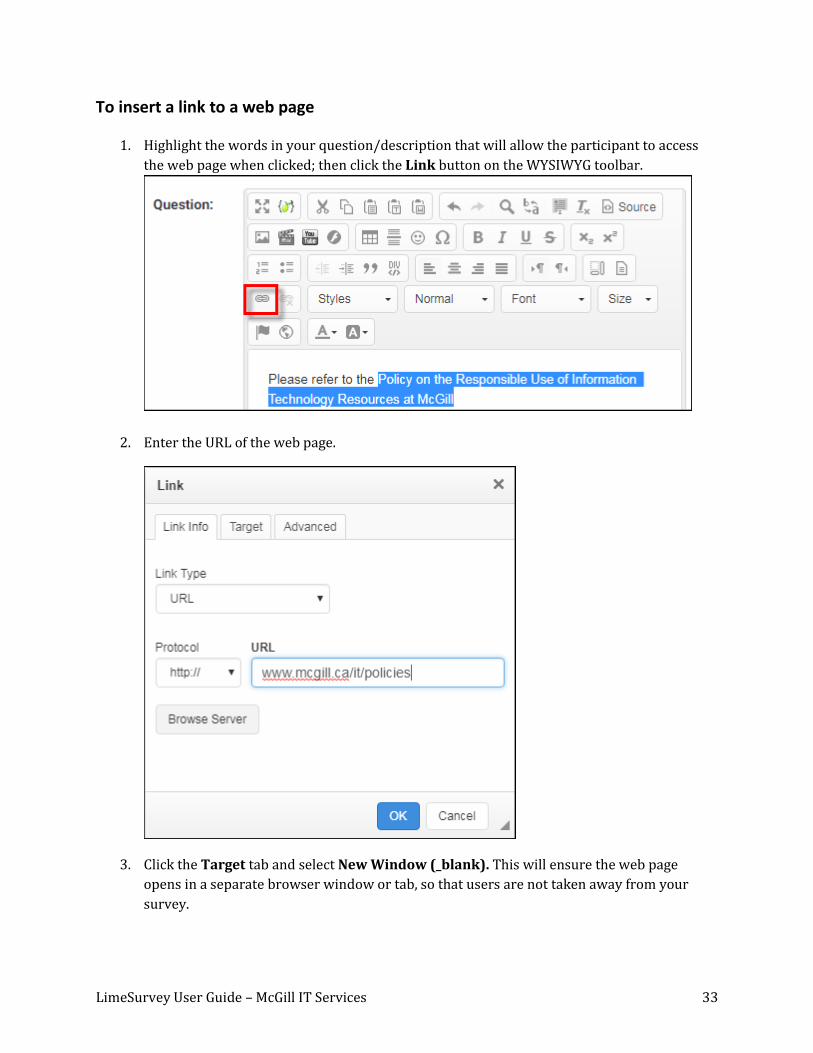
To insert a link to a web page
1. Highlight the words in your question/description that will allow the participant to access
the web page when clicked; then click the Link button on the WYSIWYG toolbar.
2. Enter the URL of the web page.
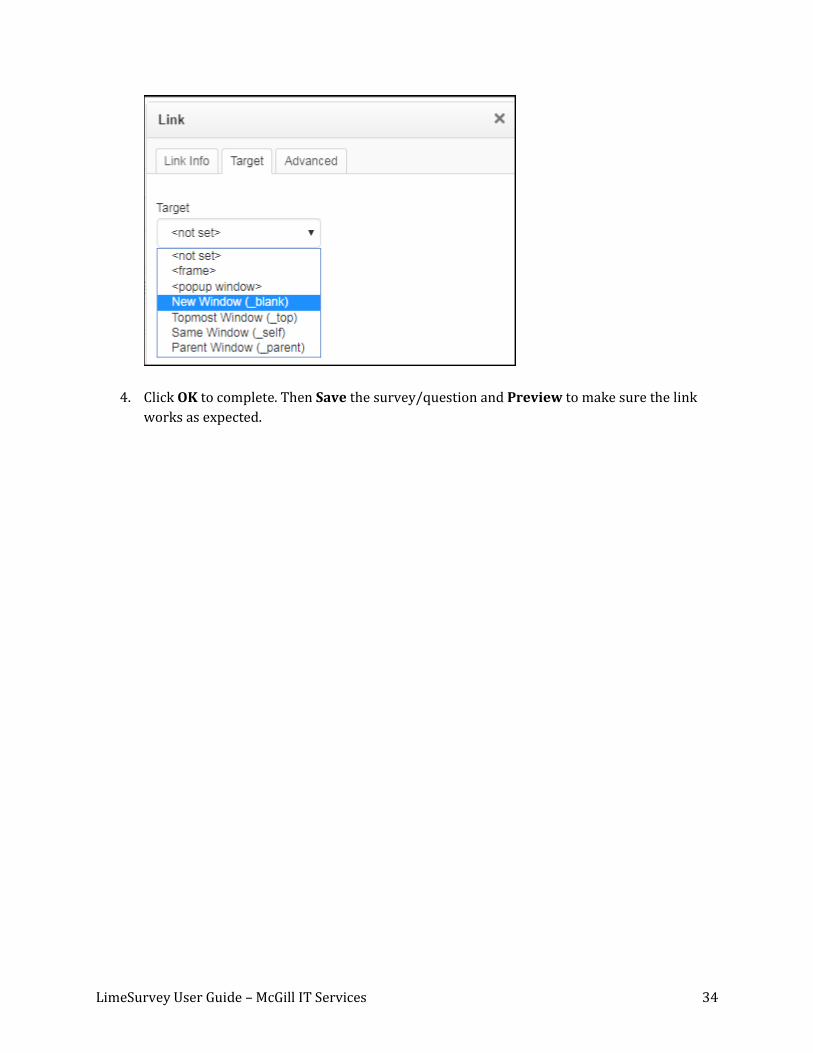
3. Click the Target tab and select New Window (_blank). This will ensure the web page
opens in a separate browser window or tab, so that users are not taken away from your
survey.
LimeSurvey User Guide – McGill IT Services 34
4. Click OK to complete. Then Save the survey/question and Preview to make sure the link
works as expected.
LimeSurvey User Guide – McGill IT Services 35
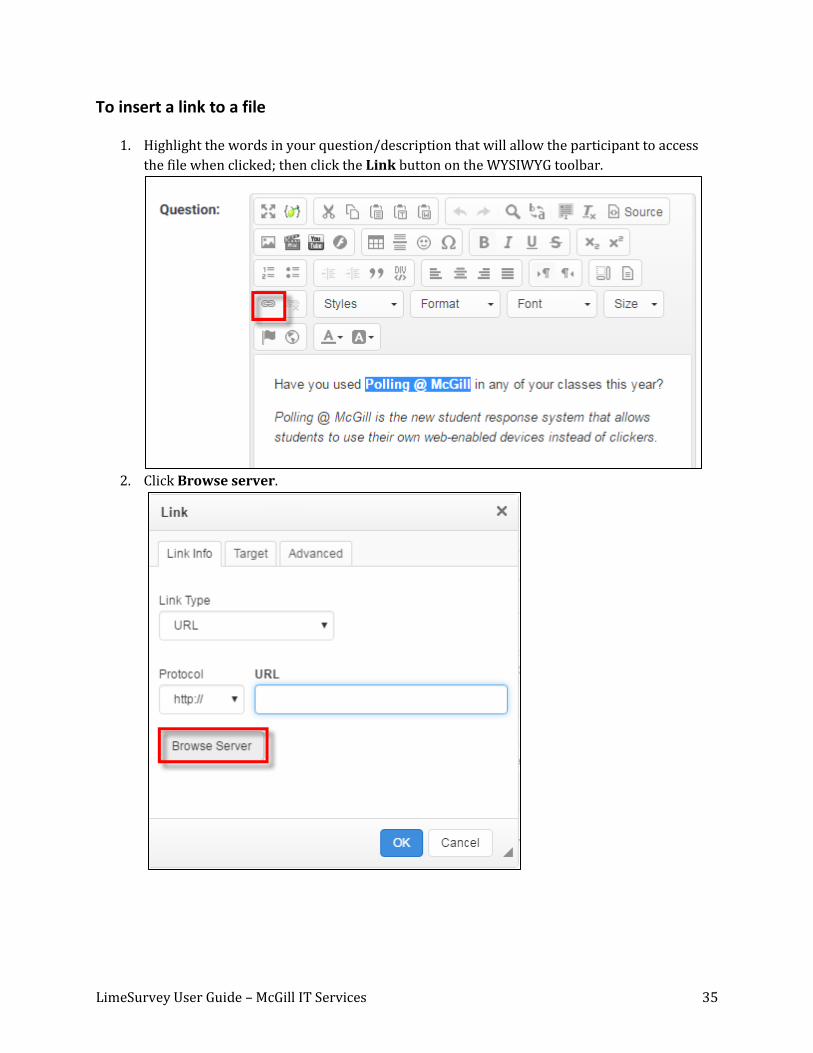
To insert a link to a file
1. Highlight the words in your question/description that will allow the participant to access
the file when clicked; then click the Link button on the WYSIWYG toolbar.
2. Click Browse server.

LimeSurvey User Guide – McGill IT Services 36
3. Click Upload and locate the file on your computer; click Open to upload it.
4. Once uploaded, you will see a thumbnail representing the file. Double-click on that
thumbnail.
5. The Link window will now show the URL of the file. You can select different protocols,
depending on what type of file you have.
LimeSurvey User Guide – McGill IT Services 37
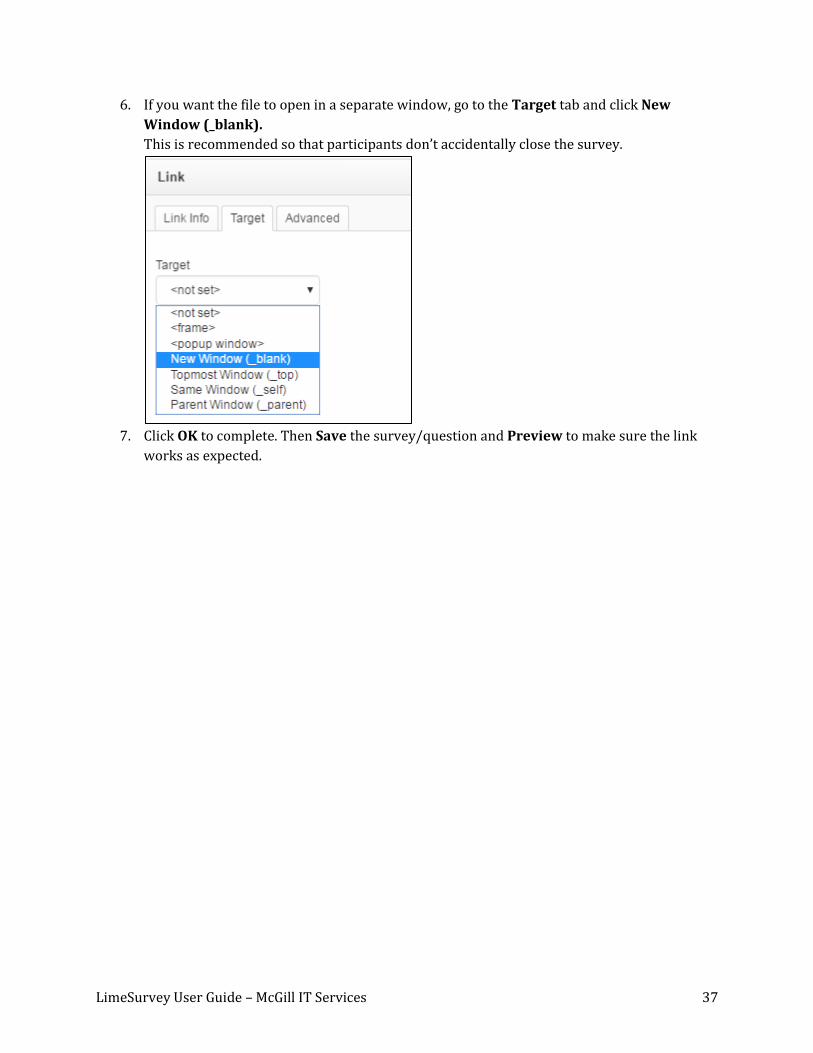
6. If you want the file to open in a separate window, go to the Target tab and click New
Window (_blank).
This is recommended so that participants don’t accidentally close the survey.
7. Click OK to complete. Then Save the survey/question and Preview to make sure the link
works as expected.
LimeSurvey User Guide – McGill IT Services 38
Managing Surveys
Preview the survey, a question group or an individual question
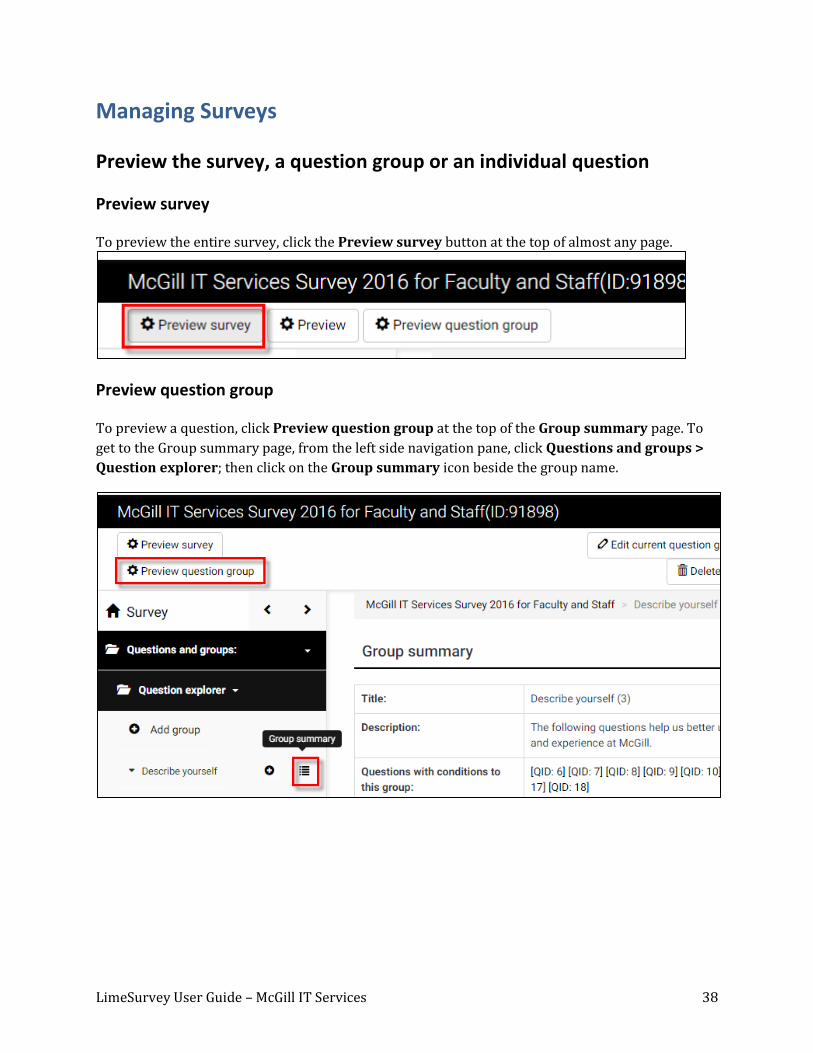
Preview survey
To preview the entire survey, click the Preview survey button at the top of almost any page.
Preview question group
To preview a question, click Preview question group at the top of the Group summary page. To
get to the Group summary page, from the left side navigation pane, click Questions and groups >
Question explorer; then click on the Group summary icon beside the group name.
LimeSurvey User Guide – McGill IT Services 39
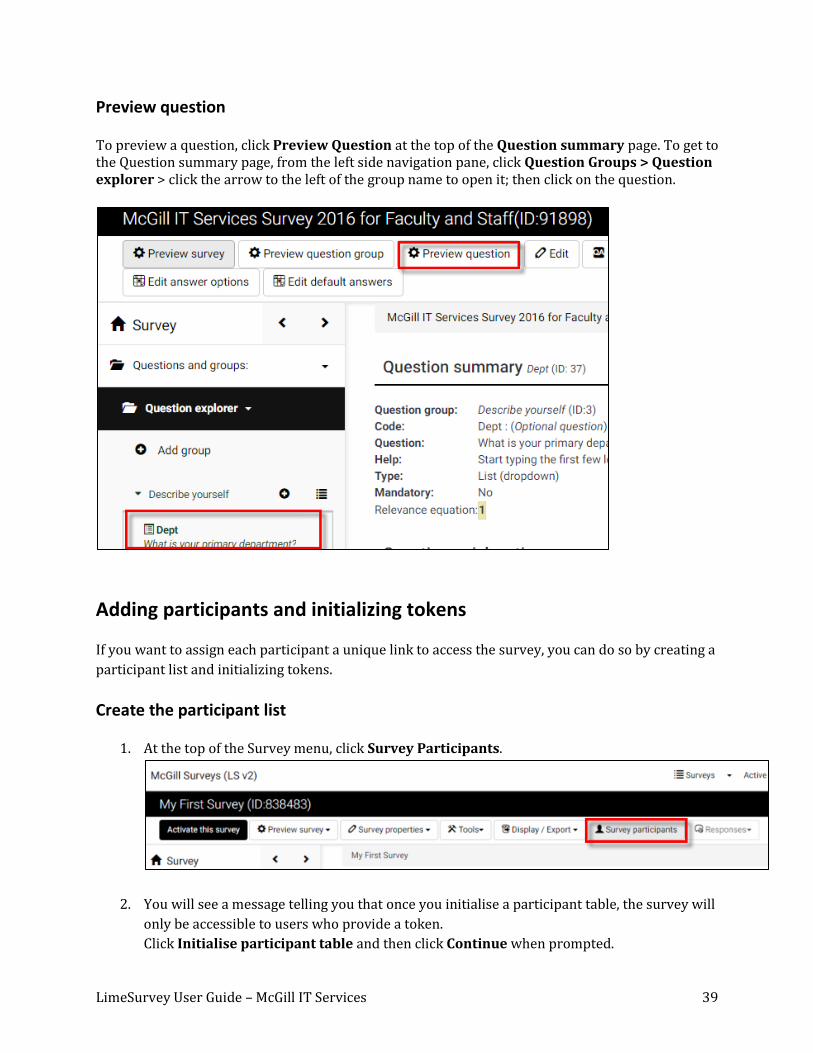
Preview question
To preview a question, click Preview Question at the top of the Question summary page. To get to the Question summary page, from the left side navigation pane, click Question Groups > Question explorer > click the arrow to the left of the group name to open it; then click on the question.
Adding participants and initializing tokens
If you want to assign each participant a unique link to access the survey, you can do so by creating a
participant list and initializing tokens.
Create the participant list
1. At the top of the Survey menu, click Survey Participants.
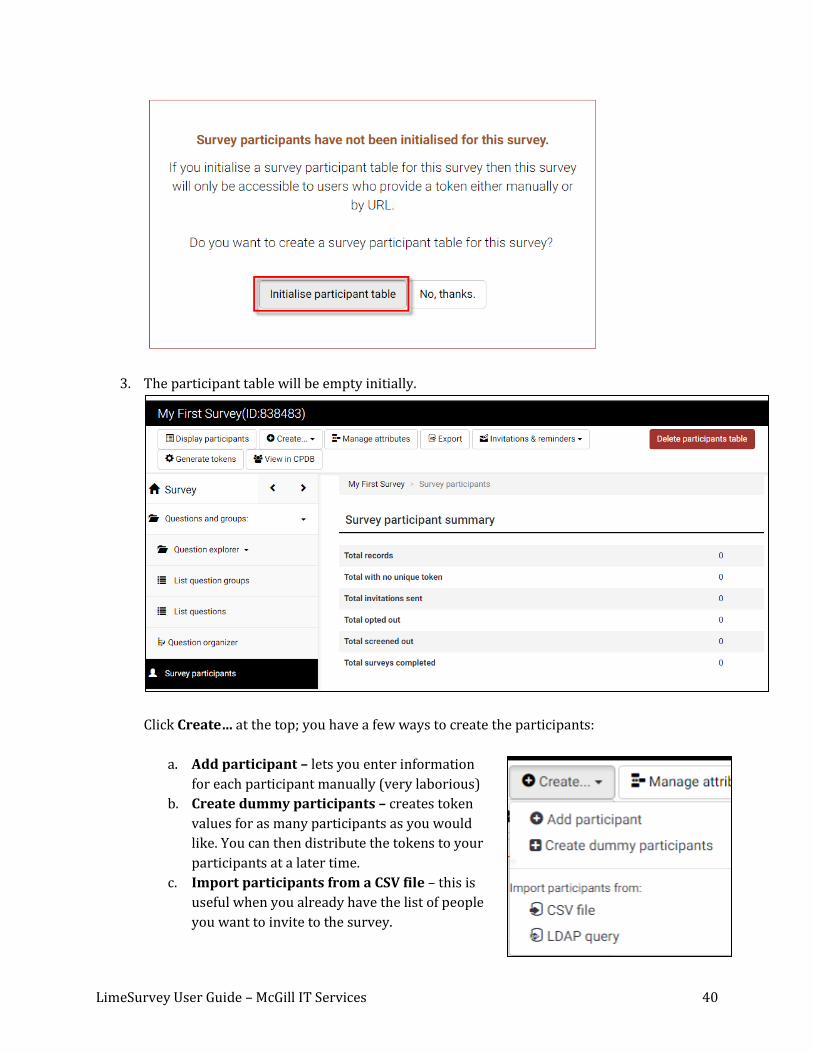
2. You will see a message telling you that once you initialise a participant table, the survey will
only be accessible to users who provide a token.
Click Initialise participant table and then click Continue when prompted.
LimeSurvey User Guide – McGill IT Services 40
3. The participant table will be empty initially.
Click Create… at the top; you have a few ways to create the participants:
a. Add participant – lets you enter information
for each participant manually (very laborious)
b. Create dummy participants – creates token
values for as many participants as you would
like. You can then distribute the tokens to your
participants at a later time.
c. Import participants from a CSV file – this is
useful when you already have the list of people
you want to invite to the survey.
LimeSurvey User Guide – McGill IT Services 41
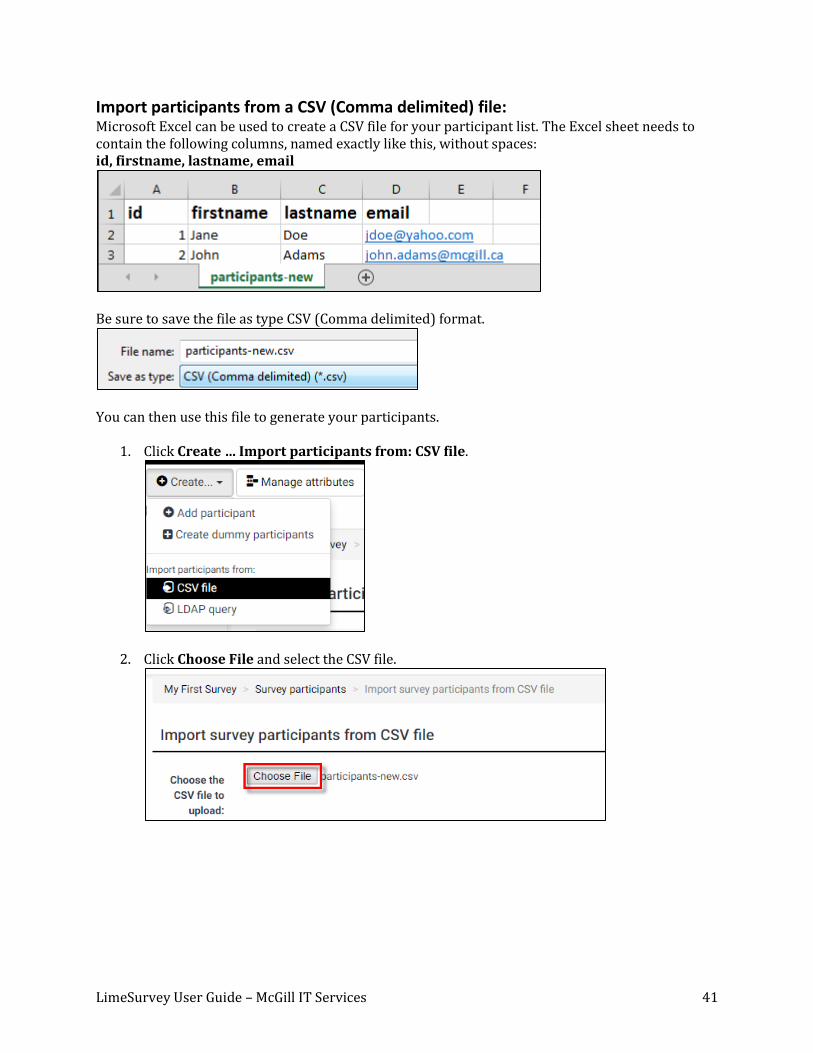
Import participants from a CSV (Comma delimited) file: Microsoft Excel can be used to create a CSV file for your participant list. The Excel sheet needs to contain the following columns, named exactly like this, without spaces: id, firstname, lastname, email
Be sure to save the file as type CSV (Comma delimited) format.
You can then use this file to generate your participants.
1. Click Create … Import participants from: CSV file.
2. Click Choose File and select the CSV file.
LimeSurvey User Guide – McGill IT Services 42
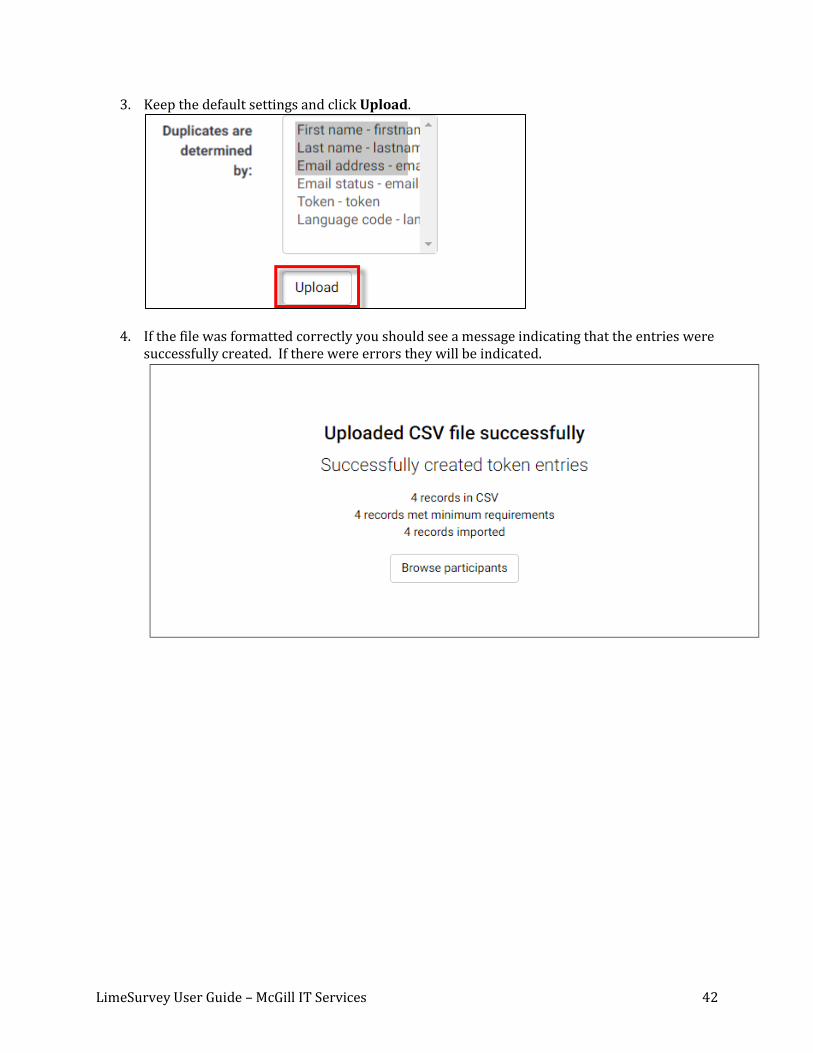
3. Keep the default settings and click Upload.
4. If the file was formatted correctly you should see a message indicating that the entries were successfully created. If there were errors they will be indicated.
LimeSurvey User Guide – McGill IT Services 43
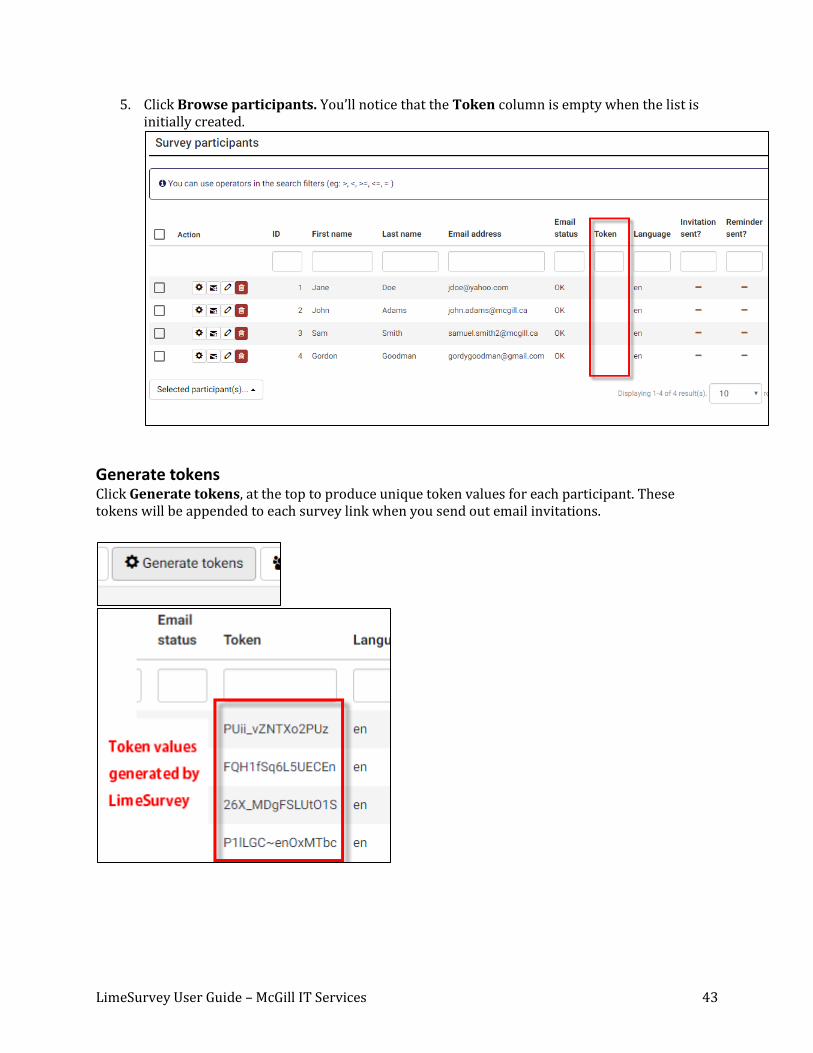
5. Click Browse participants. You’ll notice that the Token column is empty when the list is initially created.
Generate tokens Click Generate tokens, at the top to produce unique token values for each participant. These tokens will be appended to each survey link when you send out email invitations.
LimeSurvey User Guide – McGill IT Services 44
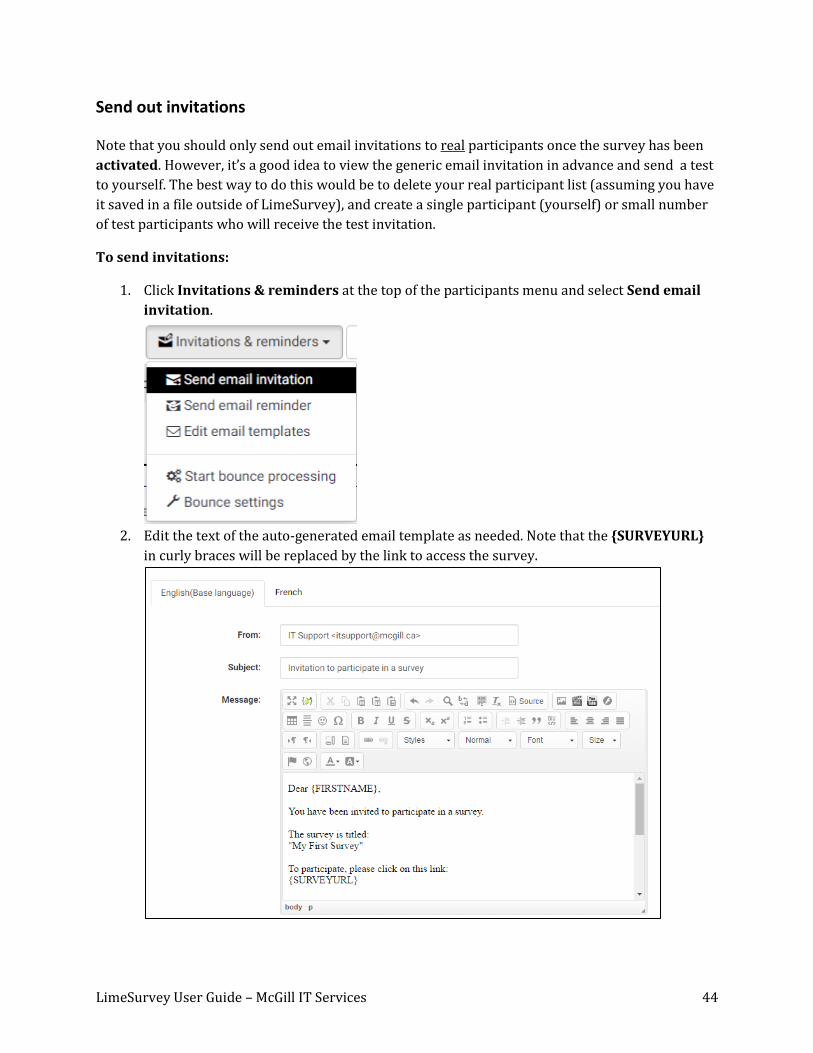
Send out invitations
Note that you should only send out email invitations to real participants once the survey has been
activated. However, it’s a good idea to view the generic email invitation in advance and send a test
to yourself. The best way to do this would be to delete your real participant list (assuming you have
it saved in a file outside of LimeSurvey), and create a single participant (yourself) or small number
of test participants who will receive the test invitation.
To send invitations:
1. Click Invitations & reminders at the top of the participants menu and select Send email
invitation.
2. Edit the text of the auto-generated email template as needed. Note that the {SURVEYURL}
in curly braces will be replaced by the link to access the survey.
LimeSurvey User Guide – McGill IT Services 45
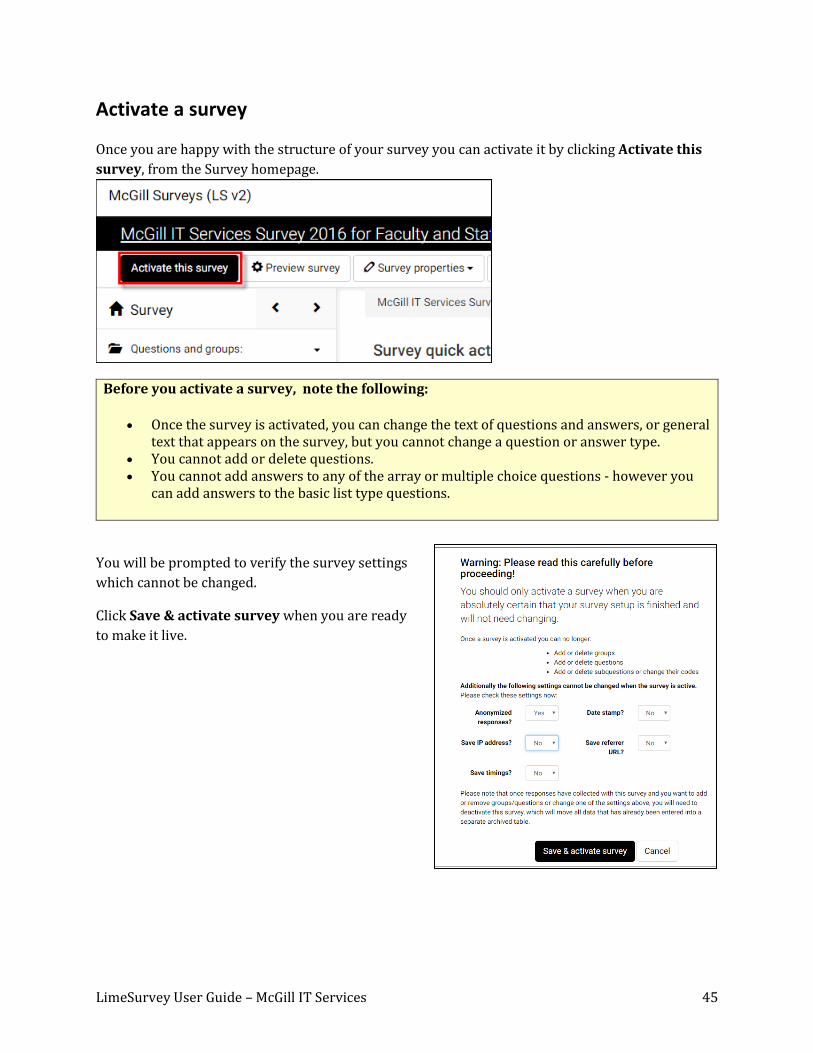
Activate a survey
Once you are happy with the structure of your survey you can activate it by clicking Activate this
survey, from the Survey homepage.
Before you activate a survey, note the following:
Once the survey is activated, you can change the text of questions and answers, or general text that appears on the survey, but you cannot change a question or answer type.
You cannot add or delete questions. You cannot add answers to any of the array or multiple choice questions - however you
can add answers to the basic list type questions.
You will be prompted to verify the survey settings
which cannot be changed.
Click Save & activate survey when you are ready
to make it live.
LimeSurvey User Guide – McGill IT Services 46
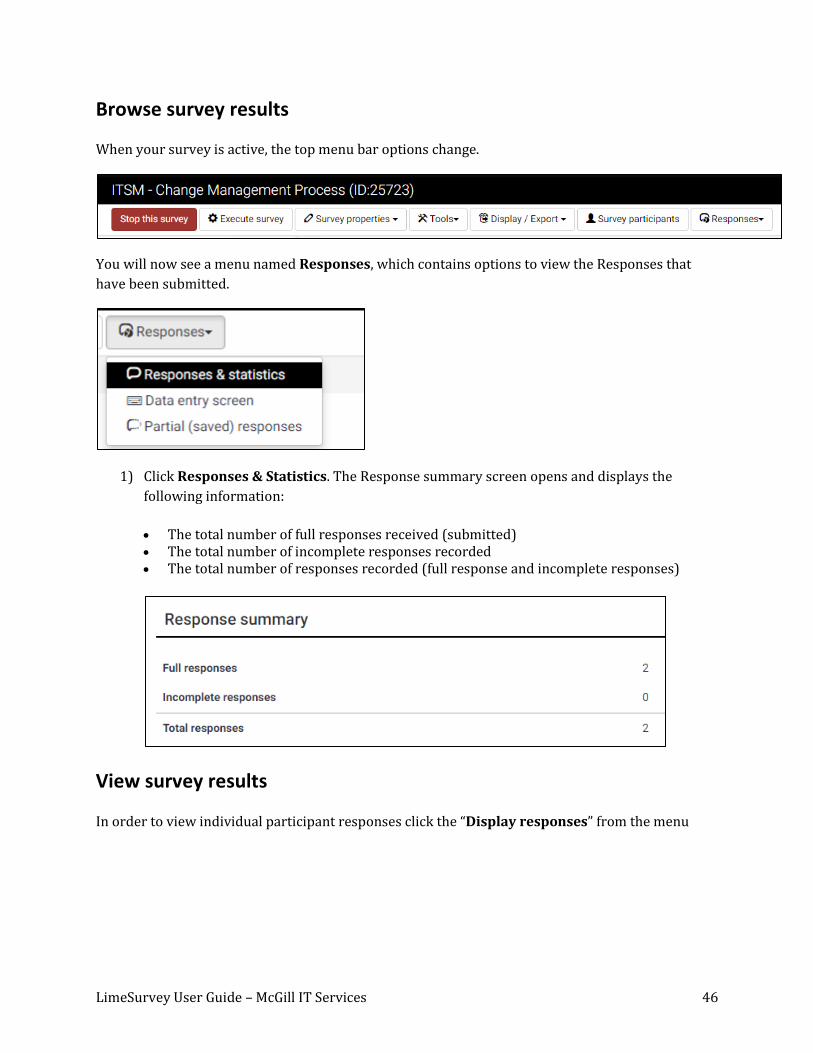
Browse survey results
When your survey is active, the top menu bar options change.
You will now see a menu named Responses, which contains options to view the Responses that
have been submitted.
1) Click Responses & Statistics. The Response summary screen opens and displays the
following information:
The total number of full responses received (submitted) The total number of incomplete responses recorded The total number of responses recorded (full response and incomplete responses)
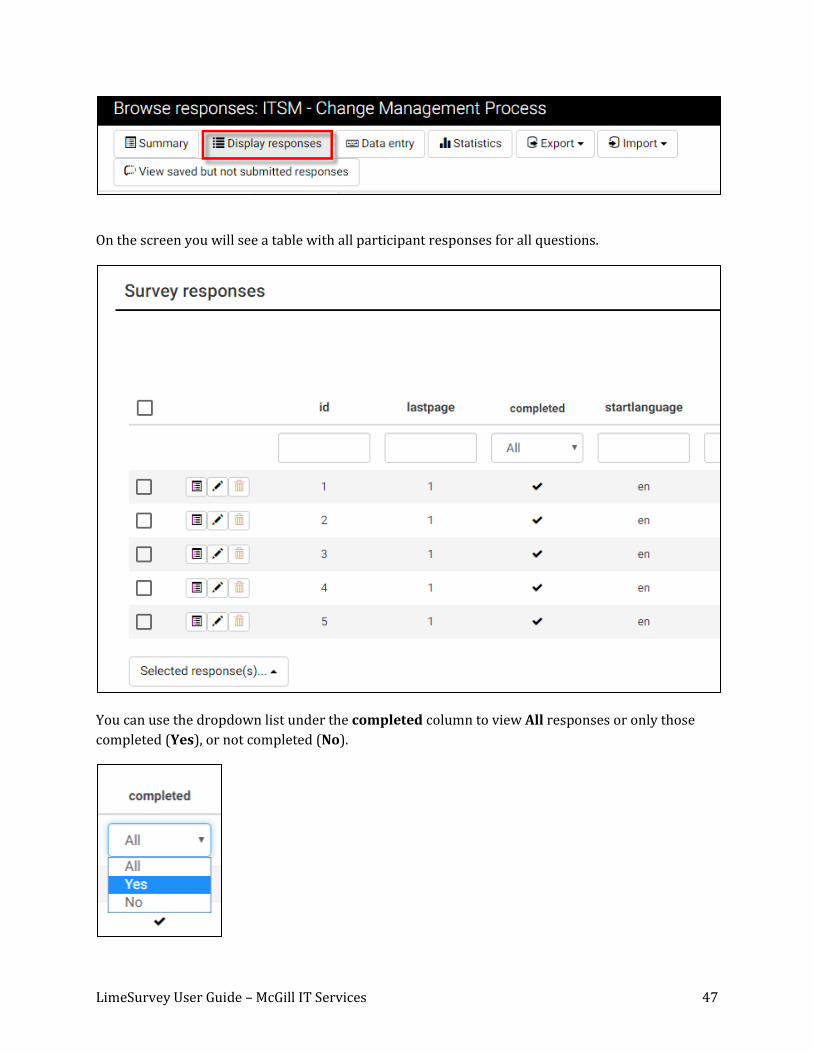
View survey results
In order to view individual participant responses click the “Display responses” from the menu
LimeSurvey User Guide – McGill IT Services 47
On the screen you will see a table with all participant responses for all questions.
You can use the dropdown list under the completed column to view All responses or only those
completed (Yes), or not completed (No).

LimeSurvey User Guide – McGill IT Services 48
To view an individual participant’s responses, click the “View response details” icon on the row
corresponding to the participant.
View Statistics
From the Responses and Statistics page, click Statistics.
By default you enter Expert mode, where you have options to filter the data and display it as you
wish.

LimeSurvey User Guide – McGill IT Services 49
General filters
Under General filters there are many options for displaying the responses.
Data selection: Allows you to filter the data to display based on the completeness of responses,
elect to view a summary of fields subtotals.
Response ID: Allows you to specify a range of IDs to include – only applies if your participants are
given unique IDs.
Output format: HTML, PDF, Excel
Output options: Show text responses inline (as opposed to a separate table), Show graphs
[On/Off], Graph labels (Question code, Question text or Both) Chart type (select from a variety of
styles).
LimeSurvey User Guide – McGill IT Services 50
Response filters
In this section, you can filter which responses to include in your analysis. Hold down the Ctrl key
to select/de-select multiple options in each response list.
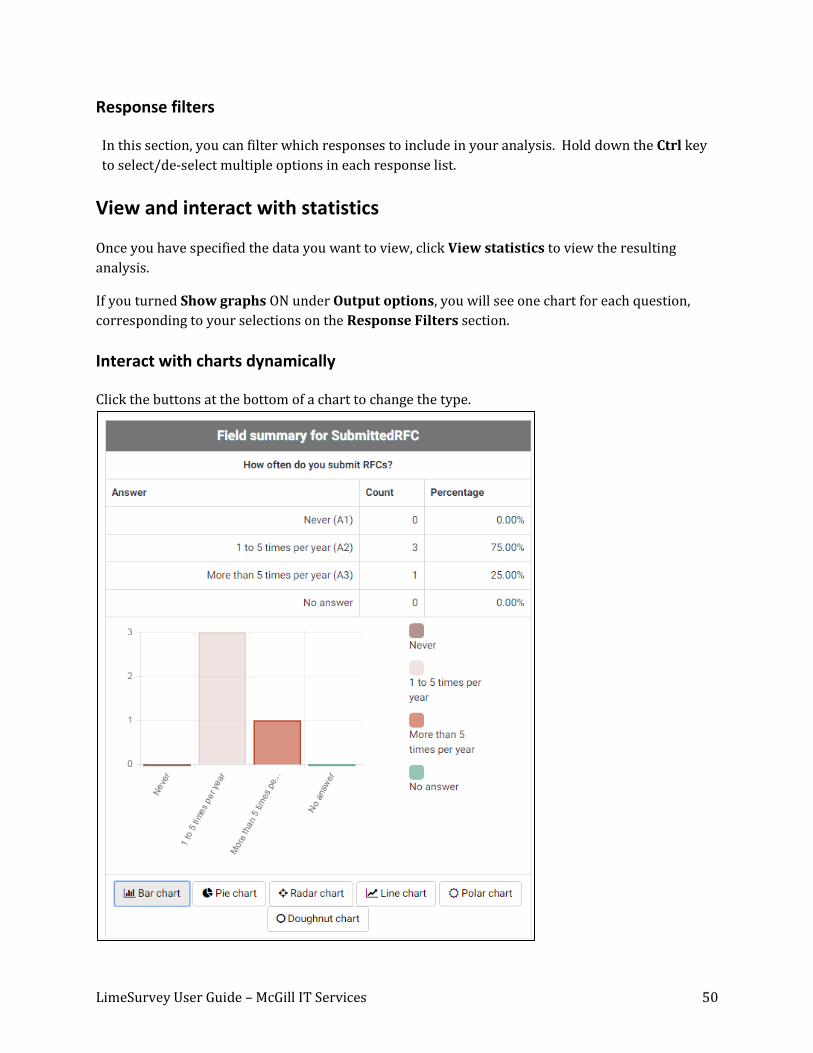
View and interact with statistics
Once you have specified the data you want to view, click View statistics to view the resulting
analysis.
If you turned Show graphs ON under Output options, you will see one chart for each question,
corresponding to your selections on the Response Filters section.
Interact with charts dynamically
Click the buttons at the bottom of a chart to change the type.

LimeSurvey User Guide – McGill IT Services 51
Click on a data point/bar/pie wedge to view details about it.
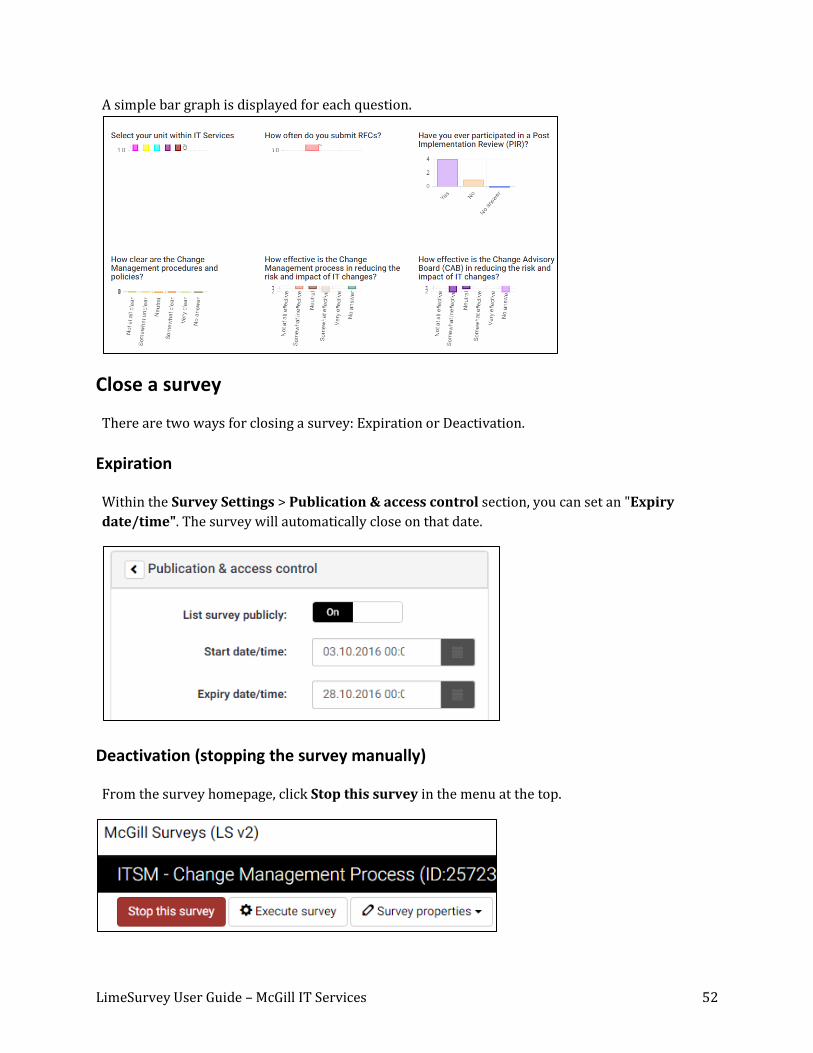
Simple mode
Click Simple mode on the Statistics page to get a quick overview of responses.
LimeSurvey User Guide – McGill IT Services 52
A simple bar graph is displayed for each question.
Close a survey
There are two ways for closing a survey: Expiration or Deactivation.
Expiration
Within the Survey Settings > Publication & access control section, you can set an "Expiry
date/time". The survey will automatically close on that date.
Deactivation (stopping the survey manually)
From the survey homepage, click Stop this survey in the menu at the top.

LimeSurvey User Guide – McGill IT Services 53
After clicking Stop this survey, you will be prompted to choose between Expire survey and
Deactivate survey options.
IMPORTANT: Once the survey is Deactivated, all results are no longer accessible through LimeSurvey, and all participant information is lost. Therefore, it is critical to export and save your data before deactivating the survey.
Exporting results
At any point while your survey is active, or if it is expired, you can view and export the responses.
LimeSurvey User Guide – McGill IT Services 54
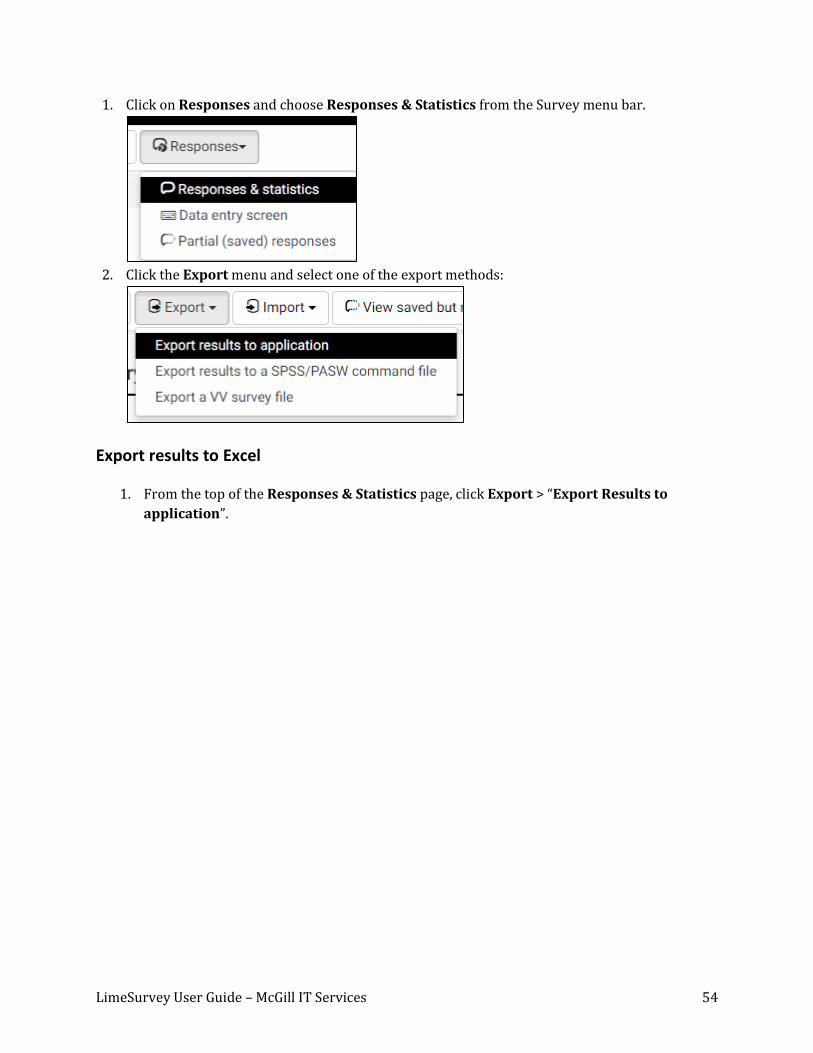
1. Click on Responses and choose Responses & Statistics from the Survey menu bar.
2. Click the Export menu and select one of the export methods:
Export results to Excel
1. From the top of the Responses & Statistics page, click Export > “Export Results to
application”.
LimeSurvey User Guide – McGill IT Services 55
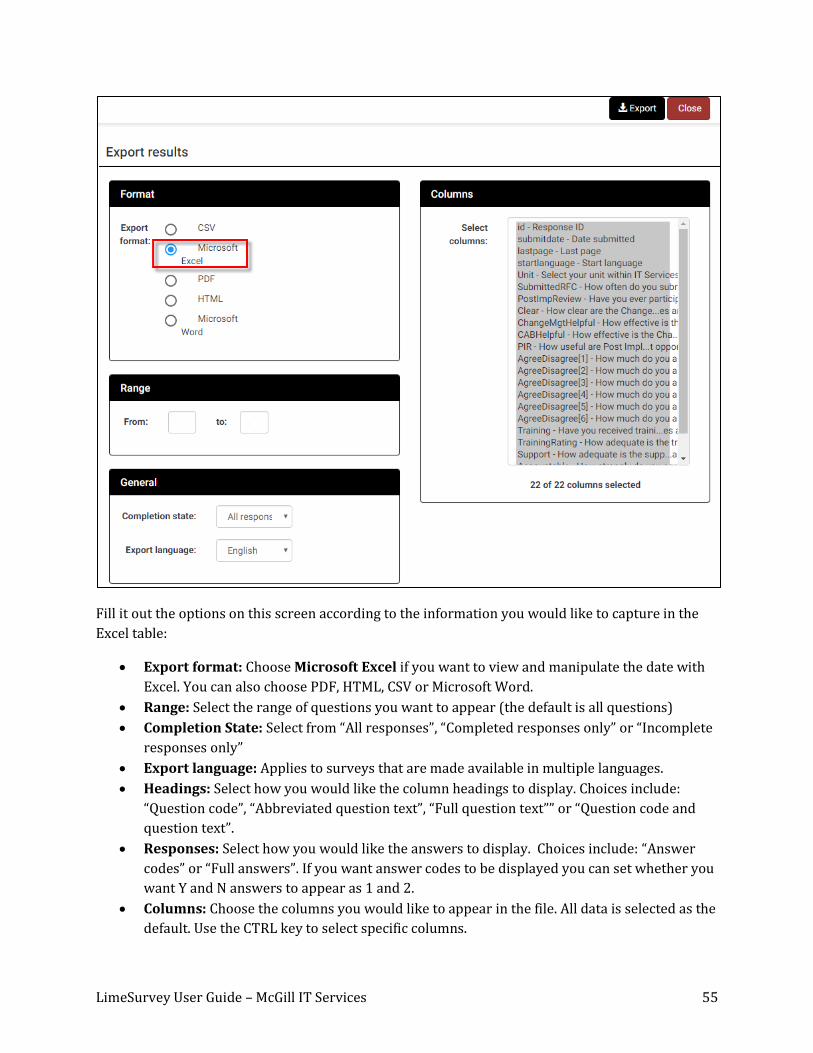
Fill it out the options on this screen according to the information you would like to capture in the
Excel table:
Export format: Choose Microsoft Excel if you want to view and manipulate the date with
Excel. You can also choose PDF, HTML, CSV or Microsoft Word.
Range: Select the range of questions you want to appear (the default is all questions)
Completion State: Select from “All responses”, “Completed responses only” or “Incomplete
responses only”
Export language: Applies to surveys that are made available in multiple languages.
Headings: Select how you would like the column headings to display. Choices include:
“Question code”, “Abbreviated question text”, “Full question text”” or “Question code and
question text”.
Responses: Select how you would like the answers to display. Choices include: “Answer
codes” or “Full answers”. If you want answer codes to be displayed you can set whether you
want Y and N answers to appear as 1 and 2.
Columns: Choose the columns you would like to appear in the file. All data is selected as the
default. Use the CTRL key to select specific columns.
LimeSurvey User Guide – McGill IT Services 56
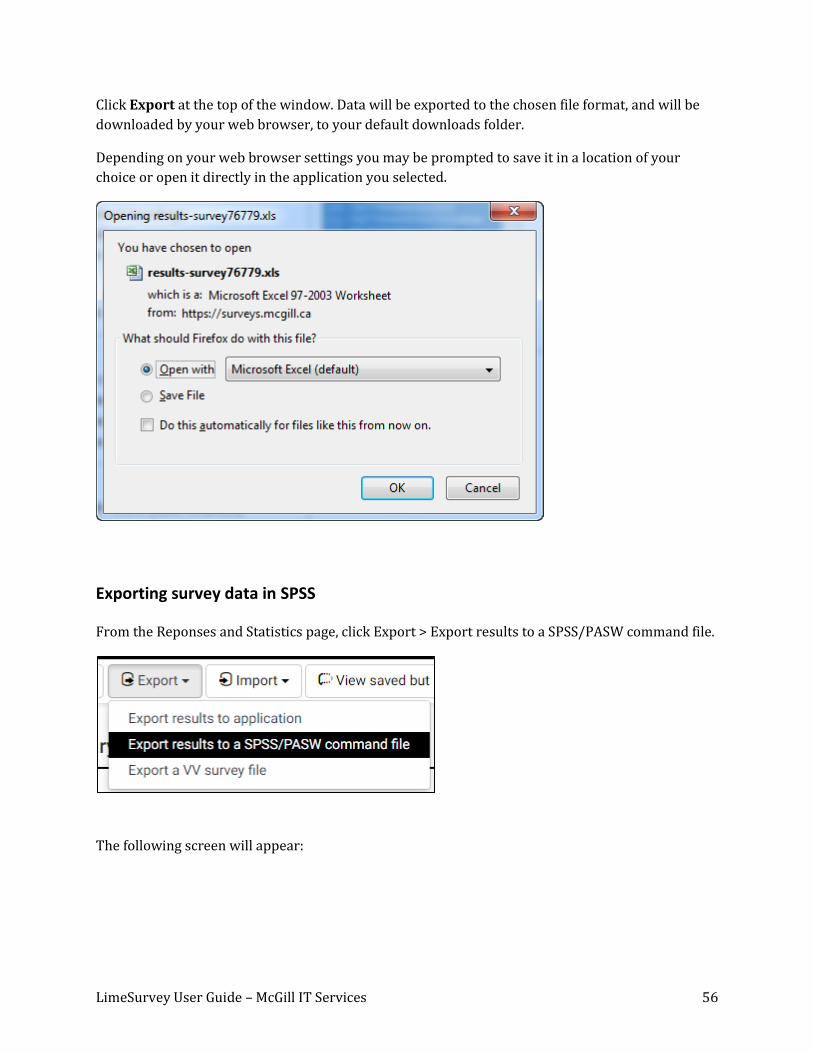
Click Export at the top of the window. Data will be exported to the chosen file format, and will be
downloaded by your web browser, to your default downloads folder.
Depending on your web browser settings you may be prompted to save it in a location of your
choice or open it directly in the application you selected.
Exporting survey data in SPSS
From the Reponses and Statistics page, click Export > Export results to a SPSS/PASW command file.
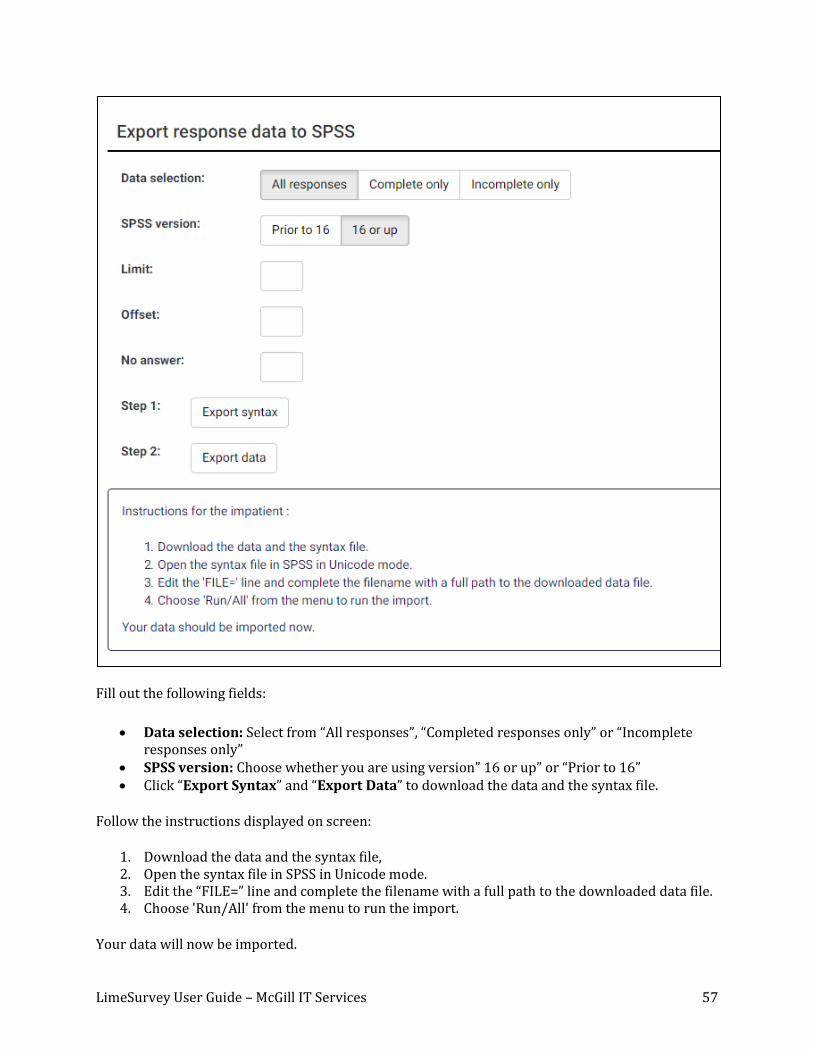
The following screen will appear:
LimeSurvey User Guide – McGill IT Services 57
Fill out the following fields:
Data selection: Select from “All responses”, “Completed responses only” or “Incomplete responses only”
SPSS version: Choose whether you are using version” 16 or up” or “Prior to 16” Click “Export Syntax” and “Export Data” to download the data and the syntax file.
Follow the instructions displayed on screen:
1. Download the data and the syntax file, 2. Open the syntax file in SPSS in Unicode mode. 3. Edit the “FILE=” line and complete the filename with a full path to the downloaded data file. 4. Choose 'Run/All' from the menu to run the import.
Your data will now be imported.

LimeSurvey User Guide – McGill IT Services 58
Tips & Tricks LimseSurvey is a powerful and comprehensive survey tool. With so many features, it’s challenging
to document everything you can do. Here are some of the common formatting issues people have,
and recommended ways to deal with them.
Remove extra space at top of Mandatory questions
When your question is Mandatory, you may sometimes notice that there’s a line break between the
asterisk and the question text.
This means that there is a paragraph <P> tag at the beginning of the question.
On the Edit screen for the question, click the Source button to view the HTML code and remove the
<p> and </p> tags from that first paragraph.
LimeSurvey User Guide – McGill IT Services 59
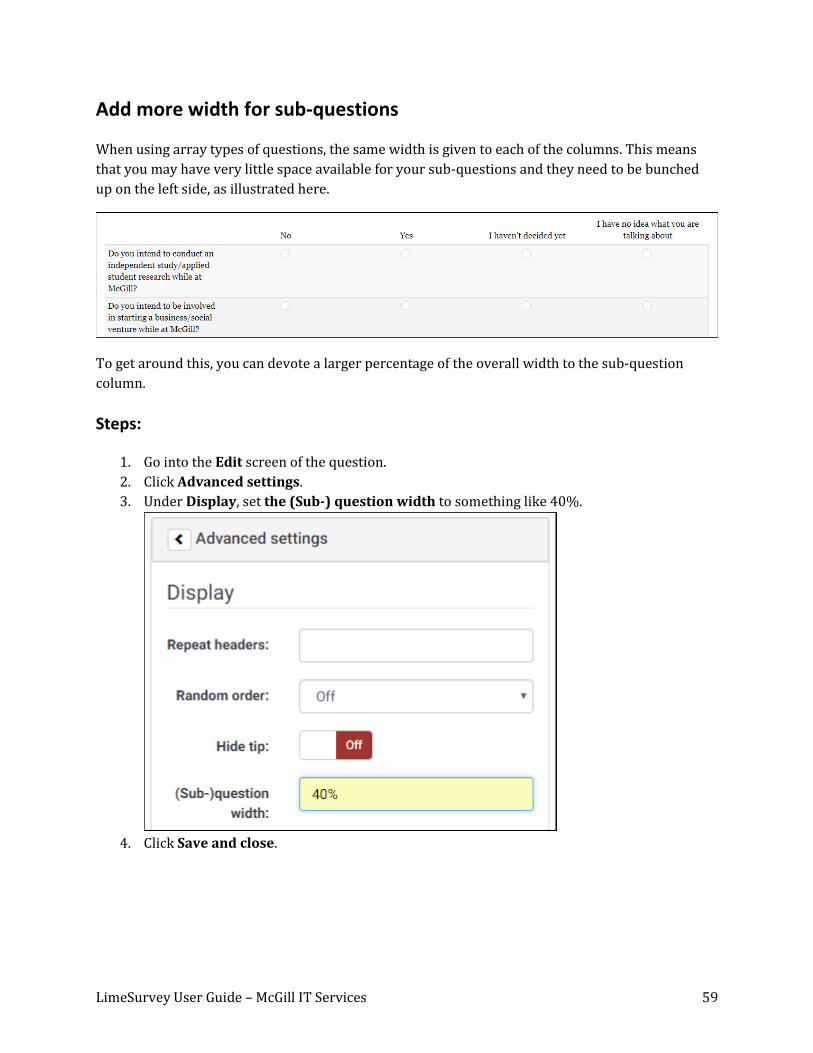
Add more width for sub-questions
When using array types of questions, the same width is given to each of the columns. This means
that you may have very little space available for your sub-questions and they need to be bunched
up on the left side, as illustrated here.
To get around this, you can devote a larger percentage of the overall width to the sub-question
column.
Steps:
1. Go into the Edit screen of the question.
2. Click Advanced settings.
3. Under Display, set the (Sub-) question width to something like 40%.
4. Click Save and close.
LimeSurvey User Guide – McGill IT Services 60
5. Then click Preview question to view the results.
You may have to try different percentages till you find the optimal display.
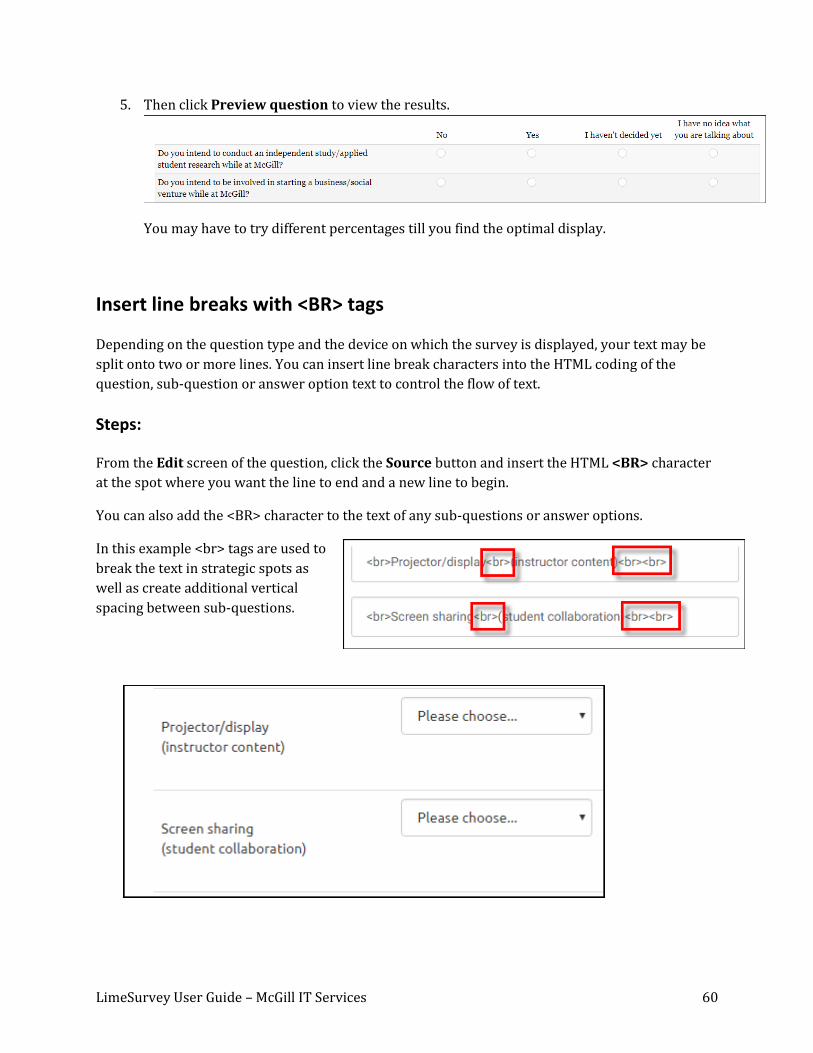
Insert line breaks with <BR> tags
Depending on the question type and the device on which the survey is displayed, your text may be
split onto two or more lines. You can insert line break characters into the HTML coding of the
question, sub-question or answer option text to control the flow of text.
Steps:
From the Edit screen of the question, click the Source button and insert the HTML <BR> character
at the spot where you want the line to end and a new line to begin.
You can also add the <BR> character to the text of any sub-questions or answer options.
In this example <br> tags are used to
break the text in strategic spots as
well as create additional vertical
spacing between sub-questions.