configure ise 2.1 profiling services based on ad probe · ad 2012 r2 the information in this...
TRANSCRIPT
Contents
IntroductionPrerequisitesRequirementsComponents UsedBackground InformationConfigureNetwork DiagramConfigure the WLCConfigure ISEStep 1. Add Network Access DeviceStep 2. Enable Radius and AD ProbesStep 3. Configure Custom Profiling ConditionsStep 4. Configure custom Profiling PolicyStep 5. Join ISE to ADStep 6. Configure Authorization PoliciesVerifyTroubleshootDebugs on ISERelated Information
Introduction
This document describes how to configure Identity Services Engine (ISE) 2.1 Profiling Servicesbased on Active Directory (AD) Probe. Device sensor is a feature of access devices. It collectsinformation about connected endpoints.
Prerequisites
Requirements
Cisco recommends that you have knowledge of these topics:
Radius protocol●
AD●
Cisco ISE●
Components Used
The information in this document is based on these software and hardware versions:
Cisco ISE Version 2.1●
Wireless LAN Controller (WLC) 8.0.133.0●
Windows 7 Service Pack 1●
AD 2012 R2●
The information in this document was created from the devices in a specific lab environment. All ofthe devices used in this document started with a cleared (default) configuration. If your network islive, make sure that you understand the potential impact of any command.
Background Information
The AD probe:
Improves the fidelity of Operating System (OS) information for Windows endpoints. MicrosoftAD tracks detailed OS information for AD-joined computers that includes version and servicepack levels. The AD probe retrieves this information directly and uses the AD Runtimeconnector in order to provide a highly reliable source of client OS information.
●
Helps to distinguish between corporate and non-corporate assets. A basic, but importantattribute available to the AD probe is whether an endpoint exists in AD. This information canbe used to classify an endpoint contained in the AD as a managed device or corporate asset.
●
Configure
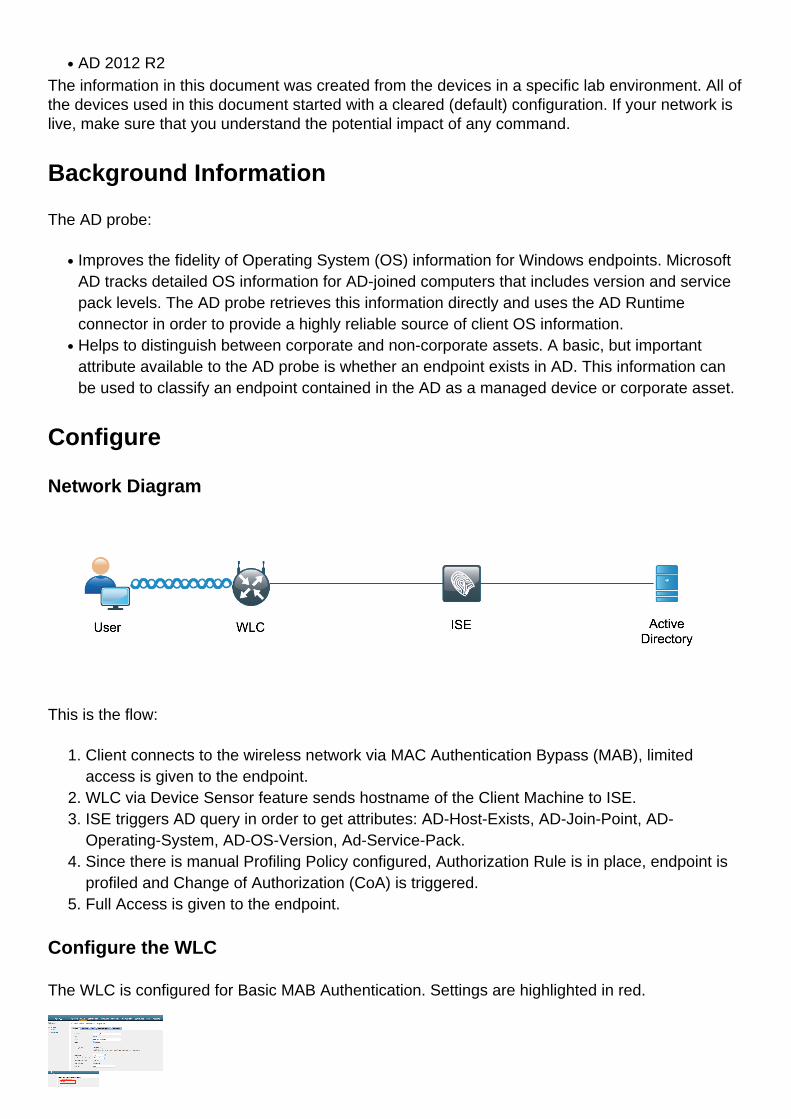
Network Diagram
This is the flow:
Client connects to the wireless network via MAC Authentication Bypass (MAB), limitedaccess is given to the endpoint.
1.
WLC via Device Sensor feature sends hostname of the Client Machine to ISE.2.ISE triggers AD query in order to get attributes: AD-Host-Exists, AD-Join-Point, AD-Operating-System, AD-OS-Version, Ad-Service-Pack.
3.
Since there is manual Profiling Policy configured, Authorization Rule is in place, endpoint isprofiled and Change of Authorization (CoA) is triggered.
4.
Full Access is given to the endpoint.5.
Configure the WLC
The WLC is configured for Basic MAB Authentication. Settings are highlighted in red.
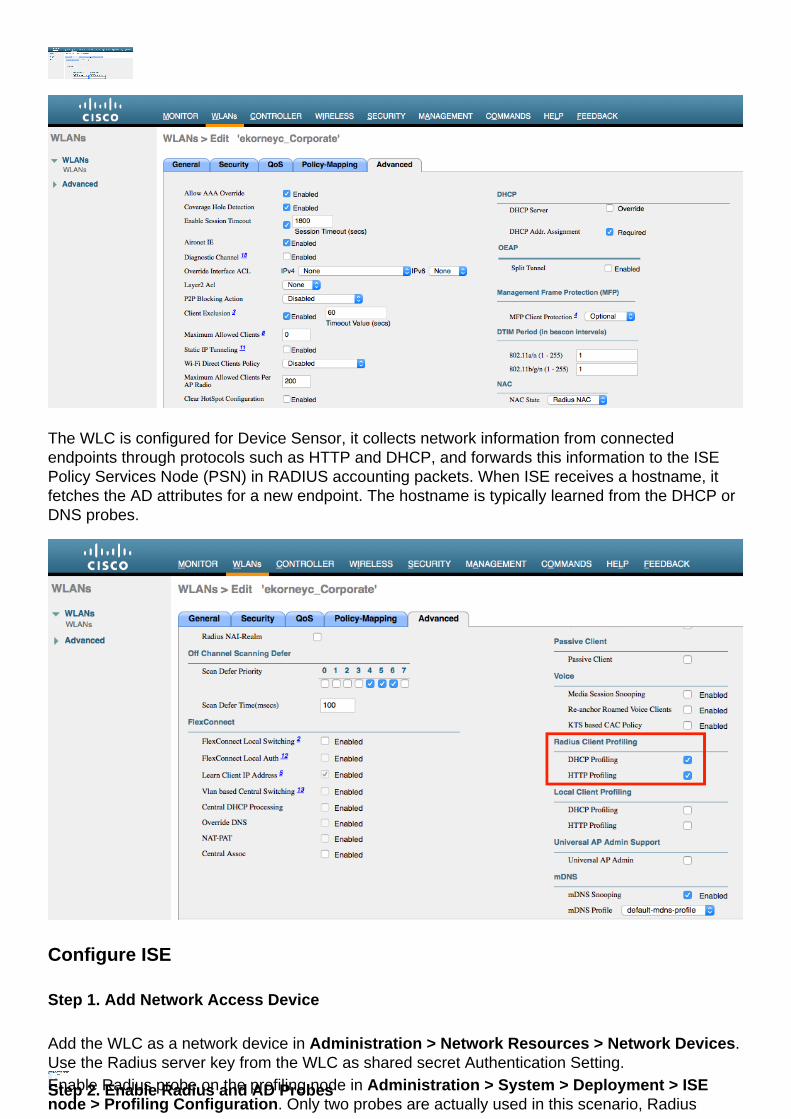
The WLC is configured for Device Sensor, it collects network information from connectedendpoints through protocols such as HTTP and DHCP, and forwards this information to the ISEPolicy Services Node (PSN) in RADIUS accounting packets. When ISE receives a hostname, itfetches the AD attributes for a new endpoint. The hostname is typically learned from the DHCP orDNS probes.
Configure ISE
Step 1. Add Network Access Device
Add the WLC as a network device in Administration > Network Resources > Network Devices.Use the Radius server key from the WLC as shared secret Authentication Setting.
Step 2. Enable Radius and AD ProbesEnable Radius probe on the profiling node in Administration > System > Deployment > ISEnode > Profiling Configuration. Only two probes are actually used in this scenario, Radius

Probe to get the hostname of the endpoint and AD Probe, to retrieve AD attributes.
Once successfully retrieved, ISE does not attempt to query AD again for the same endpoint until athe rescan timer expires. This is to limit the load on AD for attribute queries. The rescan timer isconfigurable in the Days Before Rescan field (Administration > System > Deployment >Profiling Configuration > Active Directory). If there is additional profiling activity on theendpoint, the AD is queried again.
Step 3. Configure Custom Profiling Conditions
Navigate to Work Centers > Profiler > Policy Elements > Profiler Conditions. Verify if JointPoint is EXAMPLE.COM domain.
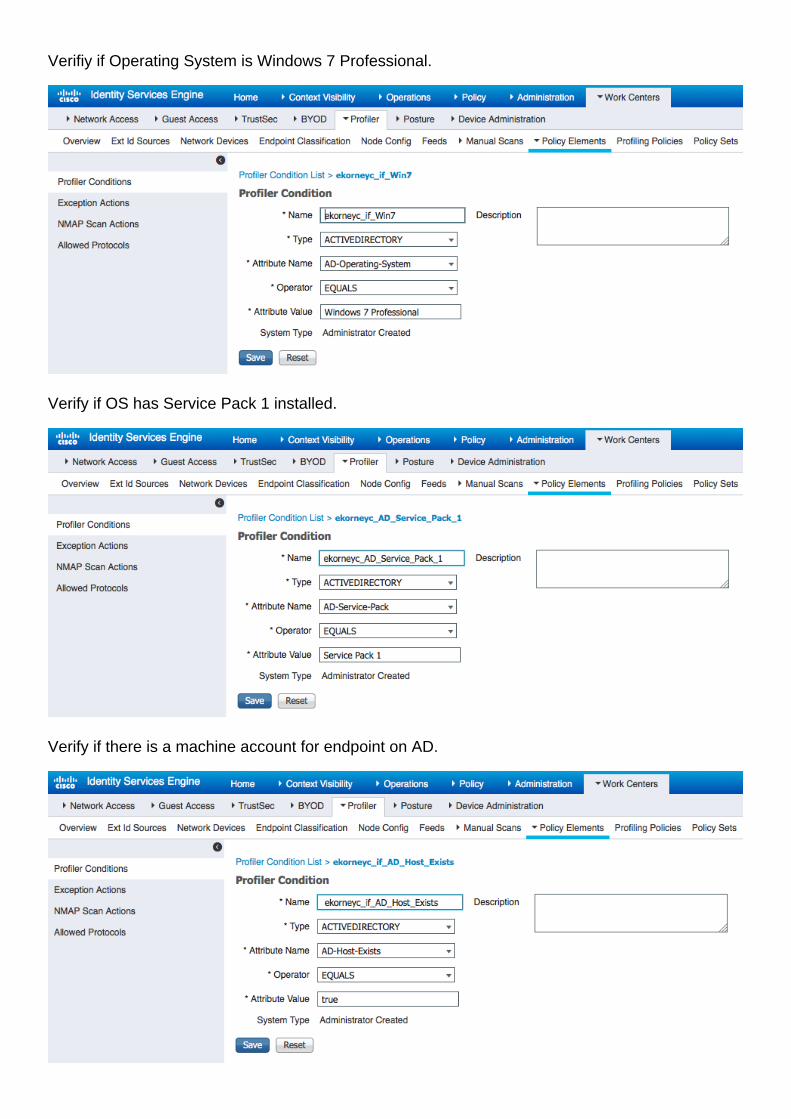
Verifiy if Operating System is Windows 7 Professional.
Verify if OS has Service Pack 1 installed.
Verify if there is a machine account for endpoint on AD.
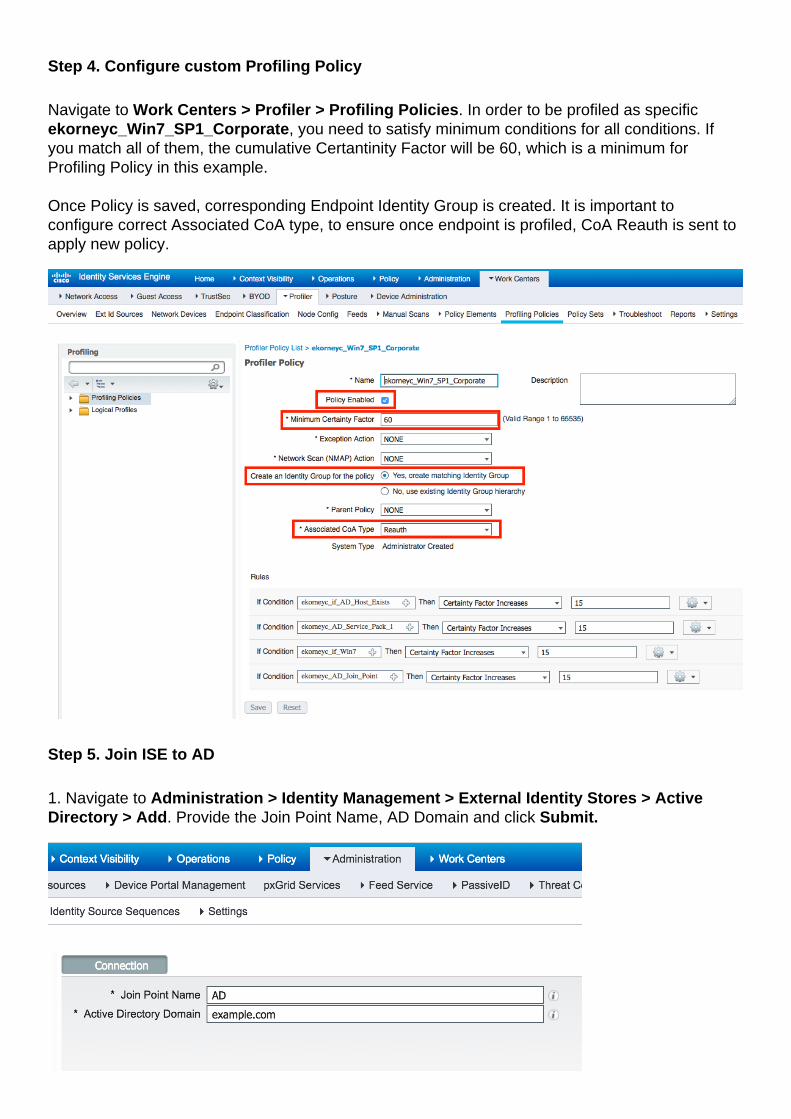
Step 4. Configure custom Profiling Policy
Navigate to Work Centers > Profiler > Profiling Policies. In order to be profiled as specificekorneyc_Win7_SP1_Corporate, you need to satisfy minimum conditions for all conditions. Ifyou match all of them, the cumulative Certantinity Factor will be 60, which is a minimum forProfiling Policy in this example.
Once Policy is saved, corresponding Endpoint Identity Group is created. It is important toconfigure correct Associated CoA type, to ensure once endpoint is profiled, CoA Reauth is sent toapply new policy.
Step 5. Join ISE to AD
1. Navigate to Administration > Identity Management > External Identity Stores > ActiveDirectory > Add. Provide the Join Point Name, AD Domain and click Submit.
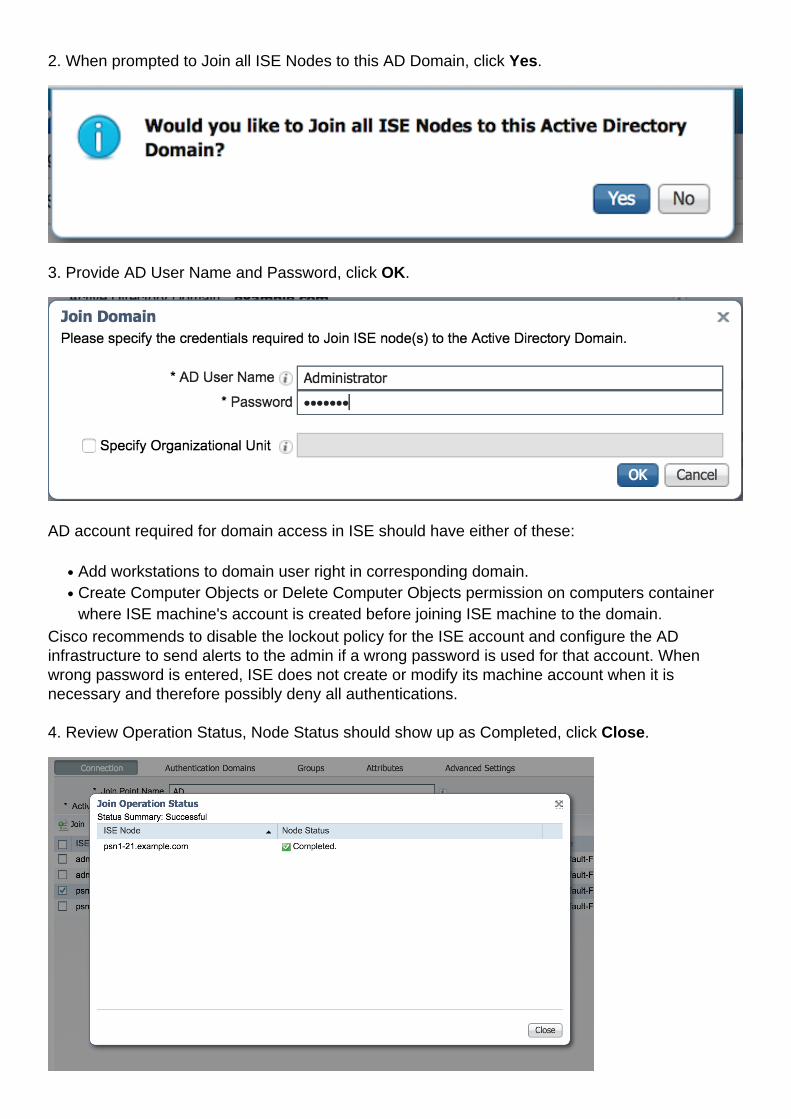
2. When prompted to Join all ISE Nodes to this AD Domain, click Yes.
3. Provide AD User Name and Password, click OK.
AD account required for domain access in ISE should have either of these:
Add workstations to domain user right in corresponding domain.●
Create Computer Objects or Delete Computer Objects permission on computers containerwhere ISE machine's account is created before joining ISE machine to the domain.
●
Cisco recommends to disable the lockout policy for the ISE account and configure the ADinfrastructure to send alerts to the admin if a wrong password is used for that account. Whenwrong password is entered, ISE does not create or modify its machine account when it isnecessary and therefore possibly deny all authentications.
4. Review Operation Status, Node Status should show up as Completed, click Close.
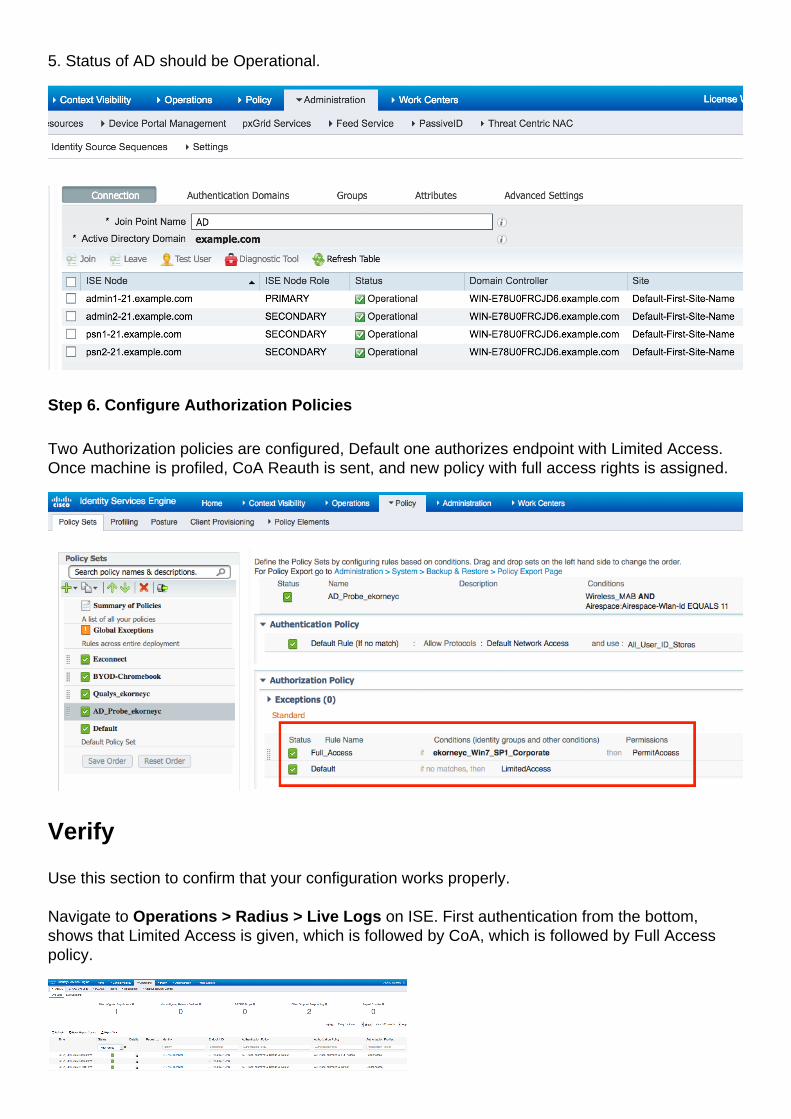
5. Status of AD should be Operational.
Step 6. Configure Authorization Policies
Two Authorization policies are configured, Default one authorizes endpoint with Limited Access.Once machine is profiled, CoA Reauth is sent, and new policy with full access rights is assigned.
Verify
Use this section to confirm that your configuration works properly.
Navigate to Operations > Radius > Live Logs on ISE. First authentication from the bottom,shows that Limited Access is given, which is followed by CoA, which is followed by Full Accesspolicy.
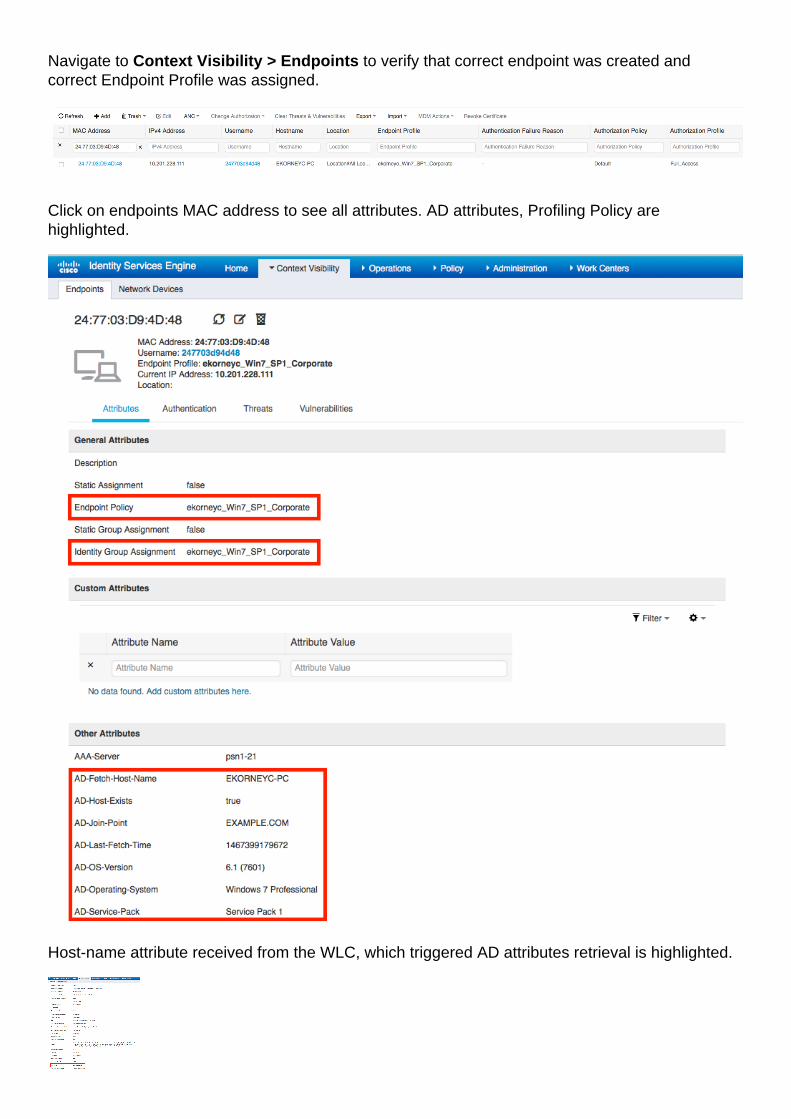
Navigate to Context Visibility > Endpoints to verify that correct endpoint was created andcorrect Endpoint Profile was assigned.
Click on endpoints MAC address to see all attributes. AD attributes, Profiling Policy arehighlighted.
Host-name attribute received from the WLC, which triggered AD attributes retrieval is highlighted.
Troubleshoot
This section provides information you can use to troubleshoot your configuration.
Debugs on ISE
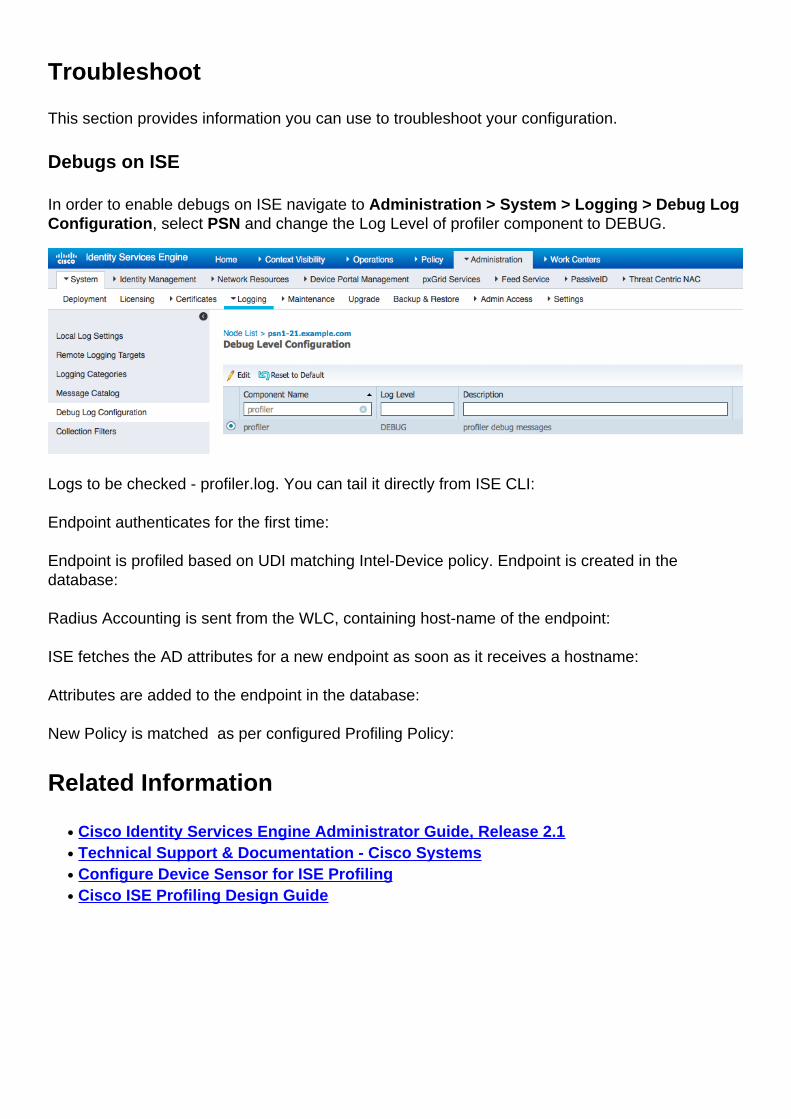
In order to enable debugs on ISE navigate to Administration > System > Logging > Debug LogConfiguration, select PSN and change the Log Level of profiler component to DEBUG.
Logs to be checked - profiler.log. You can tail it directly from ISE CLI:
Endpoint authenticates for the first time:
Endpoint is profiled based on UDI matching Intel-Device policy. Endpoint is created in thedatabase:
Radius Accounting is sent from the WLC, containing host-name of the endpoint:
ISE fetches the AD attributes for a new endpoint as soon as it receives a hostname:
Attributes are added to the endpoint in the database:
New Policy is matched as per configured Profiling Policy:
Related Information
Cisco Identity Services Engine Administrator Guide, Release 2.1●
Technical Support & Documentation - Cisco Systems●
Configure Device Sensor for ISE Profiling●
Cisco ISE Profiling Design Guide●