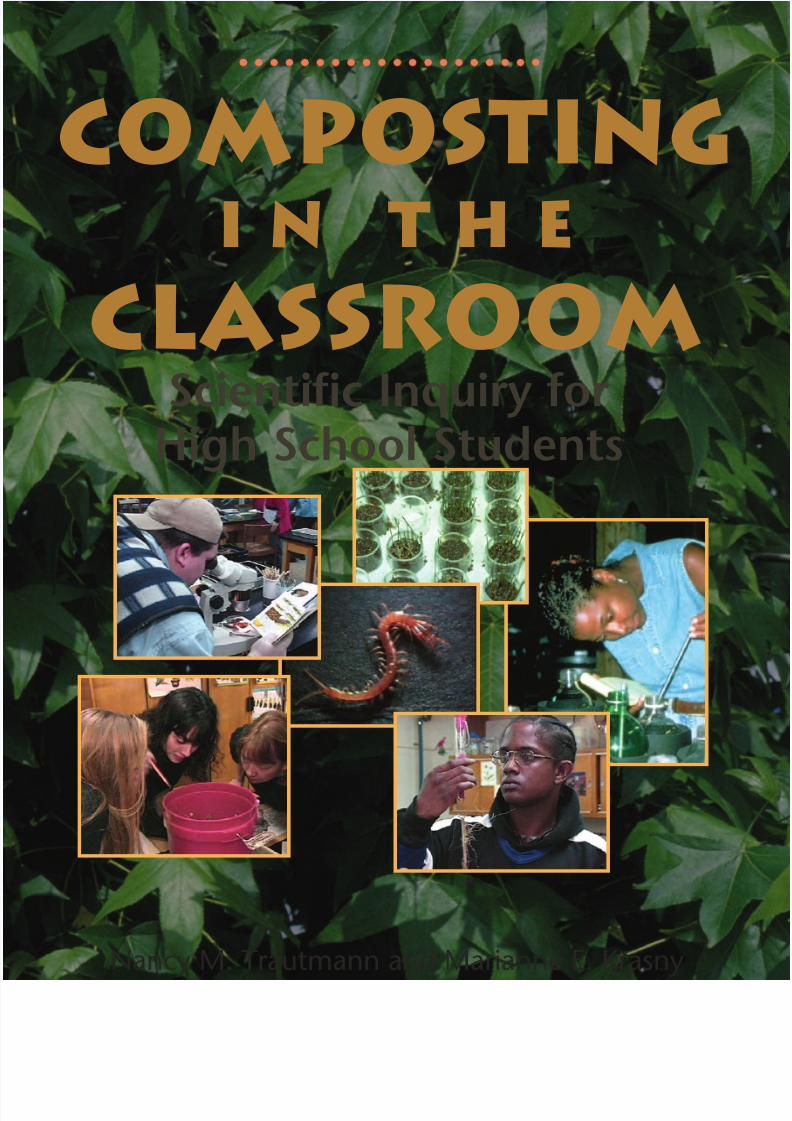
composting in the classroom
TRANSCRIPT
8/9/2019 Composting in the Classroom
http://slidepdf.com/reader/full/composting-in-the-classroom 1/126
CompostingI N T H E
CLASSROOMScientific Inquiry for
High School Students
Nancy M. Trautmann and Marianne E. Krasny

8/9/2019 Composting in the Classroom
http://slidepdf.com/reader/full/composting-in-the-classroom 2/126
Compostingin the
Classroom
Scientific Inquiry
for High School Students
NANCY M. TRAUTMANN
Center for the Environment, Cornell University
MARIANNE E. KRASNY
Department of Natural Resources, Cornell University
S
S

8/9/2019 Composting in the Classroom
http://slidepdf.com/reader/full/composting-in-the-classroom 3/126
About the Authors:
Ms. Nancy Trautmann is an Extension Associate with the Cornell
Center for the Environment. Dr. Marianne Krasny is an Associate
Professor in the Cornell Department of Natural Resources and leader of
the Cornell Program in Environmental Sciences for Educators and Youth.
Together they work with high school teachers, Cornell scientists, and
community educators to create opportunities for students to conductoriginal research in the environmental sciences.
with Contributions by high school teachers:
Patrick Cushing Elaina Olynciw
Stephanie Hyson Barbara Poseluzny
Alpa Khandar Timothy Sandstrom
Richard Northrup
and research scientists:
Erin McDonnell
Tom L. Richard
production:
Cover and Page Design: Jane MacDonald
Illustration: Lucy Gagliardo
Jane MacDonald
Copy Editing: Laura Glenn
Photography: PhotoSynthesis Productions, Inc.
Nancy Trautmann
Elaina Olynciw
Erin McDonnell
funding:
National Science Foundation
Cornell Waste Management Institute
Cornell Center for the Environment
Copyright © 1997 by Nancy M. Trautmann and Marianne E. Krasny
ISBN 0– 000– 0000– 0
All rights reserved. This book may not be reproduced, stored in a retrieval system,or transmitted, in any form or by any means, electronic, mechanical, photocopying,recording, or otherwise, without the prior written permission of the copyrightowners.
 ii

8/9/2019 Composting in the Classroom
http://slidepdf.com/reader/full/composting-in-the-classroom 4/126
jA C K N O W L E D G M E N T Si
For four summers, high school science teachers conducted composting
research at Cornell University and developed plans for using composting
as a topic for scientific inquiry by their students. Composting in the Class-
room evolved from the experiences of these teachers and the Cornell fac-
ulty and staff with whom they worked.We would like to thank the following Cornell scientists for serving as
mentors to teachers in their composting research projects: Eric Nelson,
John Peverly, Joe Regenstein, Larry Walker, Erin McDonnell, and Cheryl
Craft. Without their dedicated assistance, this work would not have been
possible.
Tom Richard and Erin McDonnell provided inspiration and invaluable
technical advice during all phases of preparation of this book. In addi-
tion, we are grateful to the following individuals for technical review of
portions of the manuscript: Patrick Bohlen, Jean Bonhotal, Veet Deha,
Bennett Kottler, Fred Michel, and Eric Nelson. Insights into school com-
posting and student research were provided by Timothy Conner, Mark
Johnson, Maddalena Polletta, and Richard Realmuto. Mark Johnson and
his Ithaca High School students graciously allowed us to photograph
their classroom composting experiments. Thank you to Ellen Harrison for
her invaluable support, both moral and financial, and to Veronique
Organisoff and Denise Weilmeier for their assistance with logistics.
Finally, we wish to thank our families for cheerfully enduring all man-
ner of composting experiments, in our kitchens, gardens, and yards, as
we tested the procedures described in this book.
Funding was provided by the National Science Foundation, the
Cornell Waste Management Institute, and the Cornell Center for the
Environment.
iii

8/9/2019 Composting in the Classroom
http://slidepdf.com/reader/full/composting-in-the-classroom 5/126
jC O N T E N T Si
P R E F A C E . . . . . . . . . . . . . . . . . . . . . . . . . . . . . . . . . . . . . . . . . . . . . . . . . VII
I N T R O D U C T I O N . . . . . . . . . . . . . . . . . . . . . . . . . . . . . . . . . . . . . . . . . . . . IX
Composting Systems . . . . . . . . . . . . . . . . . . . . . . . . . . . . . . . . . . . . . . IX
Composting Health and Safety . . . . . . . . . . . . . . . . . . . . . . . . . . . . . . . X
Wastes or Resources? . . . . . . . . . . . . . . . . . . . . . . . . . . . . . . . . . . . . . . XI
1 T H E S C I E N C E O F C O M P O S T I N G . . . . . . . . . . . . . . . . . . . . . . . . . . . . . . 1
Thermophilic Composting. . . . . . . . . . . . . . . . . . . . . . . . . . . . . . . . . . . 2
Compost Chemistry . . . . . . . . . . . . . . . . . . . . . . . . . . . . . . . . . . . . . . . . 5
Chemical Requirements for Thermophilic Composting. . . . . . . . . . 6
Compost Physics . . . . . . . . . . . . . . . . . . . . . . . . . . . . . . . . . . . . . . . . . . 9
Mechanisms of Heat Loss. . . . . . . . . . . . . . . . . . . . . . . . . . . . . . . . . . 9
Aeration . . . . . . . . . . . . . . . . . . . . . . . . . . . . . . . . . . . . . . . . . . . . . . 10
Moisture . . . . . . . . . . . . . . . . . . . . . . . . . . . . . . . . . . . . . . . . . . . . . . 11
Particle Size . . . . . . . . . . . . . . . . . . . . . . . . . . . . . . . . . . . . . . . . . . . 11
Size of Compost System . . . . . . . . . . . . . . . . . . . . . . . . . . . . . . . . . . 12Compost Biology . . . . . . . . . . . . . . . . . . . . . . . . . . . . . . . . . . . . . . . . . 13
Microorganisms . . . . . . . . . . . . . . . . . . . . . . . . . . . . . . . . . . . . . . . . 14
Invertebrates. . . . . . . . . . . . . . . . . . . . . . . . . . . . . . . . . . . . . . . . . . . 17
Earthworms . . . . . . . . . . . . . . . . . . . . . . . . . . . . . . . . . . . . . . . . . . . 22
2 C O M P O S T I N G B I O R E A C T O R S A N D B I N S . . . . . . . . . . . . . . . . . . . . . 27
Two-Can Bioreactors . . . . . . . . . . . . . . . . . . . . . . . . . . . . . . . . . . . . . . 28
Soda Bottle Bioreactors. . . . . . . . . . . . . . . . . . . . . . . . . . . . . . . . . . . . . 31
Worm Bins . . . . . . . . . . . . . . . . . . . . . . . . . . . . . . . . . . . . . . . . . . . . . . 35
Outdoor Composting . . . . . . . . . . . . . . . . . . . . . . . . . . . . . . . . . . . . . . 41
Holding Units. . . . . . . . . . . . . . . . . . . . . . . . . . . . . . . . . . . . . . . . . . 41Turning Units . . . . . . . . . . . . . . . . . . . . . . . . . . . . . . . . . . . . . . . . . . 42
Enclosed Bins . . . . . . . . . . . . . . . . . . . . . . . . . . . . . . . . . . . . . . . . . . 42
3 G E T T I N G T H E R I G H T M I X . . . . . . . . . . . . . . . . . . . . . . . . . . . . . . . . . 43
Choosing the Ingredients: General Rules of Thumb. . . . . . . . . . . . . . 43
Moisture . . . . . . . . . . . . . . . . . . . . . . . . . . . . . . . . . . . . . . . . . . . . . . 43
Carbon-to-Nitrogen Ratio . . . . . . . . . . . . . . . . . . . . . . . . . . . . . . . . 44
Other Considerations. . . . . . . . . . . . . . . . . . . . . . . . . . . . . . . . . . . . 46
Calculations for Thermophilic Composting . . . . . . . . . . . . . . . . . . . . 47
Moisture . . . . . . . . . . . . . . . . . . . . . . . . . . . . . . . . . . . . . . . . . . . . . . 47
Carbon-to-Nitrogen Ratio . . . . . . . . . . . . . . . . . . . . . . . . . . . . . . . . 484 M O N I T O R I N G T H E C O M P O S T I N G P R O C E S S . . . . . . . . . . . . . . . . . . . 51
Temperature . . . . . . . . . . . . . . . . . . . . . . . . . . . . . . . . . . . . . . . . . . . . . 52
Moisture . . . . . . . . . . . . . . . . . . . . . . . . . . . . . . . . . . . . . . . . . . . . . . . . 52
Odor . . . . . . . . . . . . . . . . . . . . . . . . . . . . . . . . . . . . . . . . . . . . . . . . . . . 53
pH . . . . . . . . . . . . . . . . . . . . . . . . . . . . . . . . . . . . . . . . . . . . . . . . . . . 53
Microorganisms . . . . . . . . . . . . . . . . . . . . . . . . . . . . . . . . . . . . . . . . . . 55
Observing Compost Microorganisms . . . . . . . . . . . . . . . . . . . . . . . 55
Culturing Bacteria . . . . . . . . . . . . . . . . . . . . . . . . . . . . . . . . . . . . . . 57
v

8/9/2019 Composting in the Classroom
http://slidepdf.com/reader/full/composting-in-the-classroom 6/126
Culturing Actinomycetes . . . . . . . . . . . . . . . . . . . . . . . . . . . . . . . . . 60
Culturing Fungi . . . . . . . . . . . . . . . . . . . . . . . . . . . . . . . . . . . . . . . . 62
Measuring Microbial Activity. . . . . . . . . . . . . . . . . . . . . . . . . . . . . . 64
Invertebrates. . . . . . . . . . . . . . . . . . . . . . . . . . . . . . . . . . . . . . . . . . . . . 66
Pick and Sort. . . . . . . . . . . . . . . . . . . . . . . . . . . . . . . . . . . . . . . . . . . 67
Berlese Funnel . . . . . . . . . . . . . . . . . . . . . . . . . . . . . . . . . . . . . . . . . 68
Wet Extraction . . . . . . . . . . . . . . . . . . . . . . . . . . . . . . . . . . . . . . . . . 695 C O M P O S T P R O P E R T I E S . . . . . . . . . . . . . . . . . . . . . . . . . . . . . . . . . . . 71
Compost Stability. . . . . . . . . . . . . . . . . . . . . . . . . . . . . . . . . . . . . . . . . 73
Jar Test . . . . . . . . . . . . . . . . . . . . . . . . . . . . . . . . . . . . . . . . . . . . . . . 73
Self-Heating Test. . . . . . . . . . . . . . . . . . . . . . . . . . . . . . . . . . . . . . . . 74
Respiration Test . . . . . . . . . . . . . . . . . . . . . . . . . . . . . . . . . . . . . . . . 75
Compost Quality . . . . . . . . . . . . . . . . . . . . . . . . . . . . . . . . . . . . . . . . . 79
Phytotoxicity Bioassay . . . . . . . . . . . . . . . . . . . . . . . . . . . . . . . . . . . 79
Effects on Soil Properties . . . . . . . . . . . . . . . . . . . . . . . . . . . . . . . . . . . 83
Porosity. . . . . . . . . . . . . . . . . . . . . . . . . . . . . . . . . . . . . . . . . . . . . . . 83
Water Holding Capacity. . . . . . . . . . . . . . . . . . . . . . . . . . . . . . . . . . 85
Organic Matter Content. . . . . . . . . . . . . . . . . . . . . . . . . . . . . . . . . . 87
Buffering Capacity . . . . . . . . . . . . . . . . . . . . . . . . . . . . . . . . . . . . . . 89
6 C O M P O S T A N D P L A N T G R O W T H E X P E R I M E N T S . . . . . . . . . . . . . . . 91
Plant Growth Experiments. . . . . . . . . . . . . . . . . . . . . . . . . . . . . . . . . . 93
7 C O M P O S T I N G R E S E A R C H . . . . . . . . . . . . . . . . . . . . . . . . . . . . . . . . . . 97
Exploration and Controlled Experiments . . . . . . . . . . . . . . . . . . . . . . 98
Narrowing Down a Research Question . . . . . . . . . . . . . . . . . . . . . . . . 99
Example Research Projects . . . . . . . . . . . . . . . . . . . . . . . . . . . . . . . . . 100
Interpreting Results . . . . . . . . . . . . . . . . . . . . . . . . . . . . . . . . . . . . . . 102
Final Words. . . . . . . . . . . . . . . . . . . . . . . . . . . . . . . . . . . . . . . . . . . . . 103
G L O S S A R Y . . . . . . . . . . . . . . . . . . . . . . . . . . . . . . . . . . . . . . . . . . . . . . . 105
F O R M O R E I N F O R M A T I O N . . . . . . . . . . . . . . . . . . . . . . . . . . . . . . . . . . 111
I N D E X . . . . . . . . . . . . . . . . . . . . . . . . . . . . . . . . . . . . . . . . . . . . . . . . . . 115
 vi
S C O N T E N T S
8/9/2019 Composting in the Classroom
http://slidepdf.com/reader/full/composting-in-the-classroom 7/126
jP R E F A C Ei
The science education reform movement in the United States and
other countries is challenging high school science teachers to rethink the
way in which they guide student learning. New standards call for
students to learn science in a manner similar to the way science is prac-
ticed, including conducting original inquiry and research.The goal of Composting in the Classroom is to provide high school
science teachers with the background needed to engage students in
research focusing on composting. There are a number of reasons why
composting research lends itself well to the classroom setting. First, com-
posting of yard wastes and food scraps presents a partial solution to the
solid waste crisis; thus, composting research addresses practical problems
of concern to students and their communities. Second, nearly all the
equipment and materials are inexpensive and readily available. With
proper maintenance to prevent odor and insect problems, composting
systems can be set up in the classroom, as well as outdoors in the school
yard. Finally, many experiments can be conducted within two weeks or
less, although long-term composting research projects are also possible.
Perhaps more important is the pedagogical rationale for conducting
classroom composting research. To start, students can generate an unlim-
ited number of questions about the composting process, and they can
design their own experiments to answer these questions. Because there is
much about the science of composting that remains unknown, well-
designed student research projects can contribute to the existing body of
knowledge. In order to conduct these investigations, students must draw
on their understanding of scientific concepts from a variety of disciplines.
Conducting composting research requires an understanding of biological,
chemical, and physical processes, such as uptake of carbon and nitrogen
by microorganisms, diffusion of oxygen through air and water, and effect
of moisture on heat production and transfer. Designing compost systems
also provides opportunities to bring technology into the science class-
room, and to discuss the interface between science and society, and sci-
ence and the students’ personal lives.
Composting in the Classroom begins with an overview of composting
science (Chapter 1). Chapters 2 and 3 provide instructions on how to
build and add the right mix of ingredients to compost systems. Chapter 4
outlines how to monitor the composting process, and Chapter 5 describes
how to measure the attributes of the finished compost. Once students
have made and tested their compost, they might want to use it in plant
growth experiments (Chapter 6). Several important points about conduct-
ing research are included in Chapter 6 as well as in Chapter 7. This last
chapter is a discussion of how to help students design meaningful
research projects focusing on composting.
The information included in the following pages reflects what the sci-
entific community knows about composting as of 1997. But scientific
knowledge is constantly changing, as people make new observations and
conduct research to validate or invalidate these observations. Teachers
vii

8/9/2019 Composting in the Classroom
http://slidepdf.com/reader/full/composting-in-the-classroom 8/126
and students using this manual are challenged to use their own observa-
tions to question the information that is presented, and to design and
conduct research to test their observations. At first, that research may be
exploratory in nature, designed to explore in a relatively unsystematic
fashion any number of variables that may affect the composting process.
Based on the results of their exploratory research, students may identify
one or two variables that they would like to test in a controlled experi-ment. Or they may wish to use their knowledge about composting to
create an optimal composting system as a technological design project.
Throughout the manual, we have presented “Research Possibilities” in
italics. These are ideas that students could develop into exploratory and con-
trolled experimental research and technological design projects. They are meant
as suggestions only; students are encouraged to come up with their own original
research and design questions.
Seeing other students conducting composting research may help
inspire your students to engage in similar investigations. You may wish to
obtain a copy of It’s Gotten Rotten, a video that provides an introduction
to the science of composting and shows students performing compostingexperiments (see list of resources on page 111).
School composting is carried out for two distinct purposes: for disposal
of leaves, grass clippings, or food scraps, and as a focus for scientific
exploration by students. The intent of this manual is to provide teachers
and students with the background necessary for using composting as a
focus for scientific inquiry. For information on how to set up composting
systems designed to handle organic wastes for an entire school, refer to
Composting...Because a Rind Is a Terrible Thing to Waste (Bonhotal and
Rollo, 1996) or Scraps to Soil: A How-to Guide for School Composting
(Witten, 1995).
Many of the activities in Composting in the Classroom were developedby a group of high school teachers who spent several summers conduct-
ing research at Cornell University, and then engaged their classroom and
science club students in similar research projects. This manual is dedi-
cated to these and other innovative teachers who have accepted the chal-
lenge to help students learn about science by engaging them in
open-ended inquiry.
Nancy Trautmann
Marianne Krasny
June 1997
 viii
S P R E FA C E

8/9/2019 Composting in the Classroom
http://slidepdf.com/reader/full/composting-in-the-classroom 9/126
j I N T R O D U C T I O Ni
The decomposition of organic materials is as ancient as nature itself.
Without decomposition, nutrients would be locked into existing organic
matter, unavailable for growth of new organisms. Composting, which
refers to the controlled decomposition of organic materials, has been
used by farmers and gardeners since prehistoric times to recycle wastesand make them available for plant growth. However, since World War II,
as U.S. farms have become larger and more mechanized, the use of com-
post and other traditional means of enhancing soil productivity has
declined. In recent years, concern about reducing solid waste and produc-
ing food in an environmentally sound manner has led to a renewed
interest in composting.
Organic material, including food scraps and yard trimmings, consti-
tutes from 20% to 40% of the total waste stream in the U.S. Composting
presents an opportunity to keep these materials out of landfills and incin-
erators. To realize this opportunity, however, composters must find
answers to many questions about the composting process. How can we
balance air flow and moisture to create the ideal conditions for decompo-
sition of any particular mixture of organic materials? What mixtures of
organic materials represent carbon-to-nitrogen ratios that promote the
growth of decomposer microorganisms? How can we tell if compost is
“finished” and ready to be used in greenhouses or gardens? Because there
are so many unanswered questions, students can be part of the process of
obtaining scientific information about composting. The results of the
students’ investigations can be used to design better composting systems
in their own home, school, or community.
COMPOSTING SYSTEMS
Composting can be carried out in many different ways, ranging from
using small, indoor worm bins that process a few pounds of food per
week to huge commercial or industrial operations that process many tons
of organic matter in long, outdoor piles called windrows. Many systems
rely solely on microorganisms, largely bacteria and fungi, to do the work
of decomposition. In these systems, successful composting depends on
creating conditions that are favorable to the growth and activity of
microbial communities. Vermicomposting, or composting with worms,
relies on the action of microorganisms and any of several species of
worms that are known to thrive in environments high in organic matter.
Many outdoor composting systems are invaded by soil invertebrates,
which, similar to worms in vermicomposting, play a role in decomposi-
tion together with bacteria and fungi.
Because a by-product of microbial activity is heat, compost systems
will become hot if they supply adequate aeration, moisture, and nutrients
for rapid microbial growth and are sufficiently large or insulated to retain
the heat produced. For example, the temperature in the middle of an out-
door compost pile may rise to 55°C within the first few days of mixing
the organic materials, even when surrounding air temperatures are below
ix

8/9/2019 Composting in the Classroom
http://slidepdf.com/reader/full/composting-in-the-classroom 10/126
freezing. Hence, the name for this type of composting is thermophilic , or
“heat-loving.”
Composting also occurs at lower temperatures over longer periods of
time. For example, a pile of autumn leaves will gradually decompose over
the course of a year or two without ever getting hot, either because the
nitrogen or moisture level is insufficient or because the pile is too small
to be adequately self-insulating. In this case, decomposition is carried outby mesophilic (moderate temperature) microorganisms and invertebrates.
Similarly, vermicomposting does not produce the high temperatures
found in thermophilic composting, and in fact, such temperatures would
be lethal to the worms. Although the microbes in vermicompost generate
heat, it is rapidly dissipated in the relatively shallow compost bins or
troughs needed to provide optimal conditions for surface-dwelling
worms.
In addition to outdoor piles, composting can be conducted in contain-
ers or vessels called bioreactors. Large-scale bioreactors are used in com-
mercial and industrial composting, whereas small-scale bioreactors are
useful for conducting research within the space available in labs or smalloutdoor research areas. Two types of bioreactors are described in this
manual: the two-can system composed of nested, plastic garbage cans,
and a smaller system built from soda bottles. Bioreactors similar to these
are used by engineers to model the processes of air flow, heat transfer,
and enzymatic degradation that occur during composting.
COMPOSTING HEALTH AND SAFETY
There are two potential hazards in working with compost. The first
relates to the type of organic materials that are being composted, some of
which may contain disease-causing organisms, or pathogens. Plate scrap-
ings, meat and dairy products, and pet wastes should not be used in class-room composting because of their potential to spread disease or attract
pests. To avoid student exposure to pathogens, it is best to use only yard
and garden trimmings and pre-consumer vegetable and fruit scraps. Many
school cafeterias assist classrooms conducting compost investigations by
saving vegetable peels and other materials generated in preparing salads
and vegetable and fruit dishes. Even when using only the recommended
organic materials, students should take normal sanitary measures when
handling compost (wash hands when finished, avoid touching eyes or
mouths).
The second potential composting hazard relates to allergic reactions to
airborne spores. This is not a widespread problem. Studies of workers inlarge-scale compost facilities and of individuals who live near such facili-
ties have failed to find increased incidence of allergic reactions or any
other health problems. However, just as individuals vary in their resis-
tance to disease, a few individuals may be particularly sensitive to some
of the fungi in compost. One of these fungal species, Aspergillus
fumigatus, can infect the respiratory system of a sensitive person who is
heavily exposed to it. (Although this fungus is ubiquitous, it occurs in
relatively high concentrations in compost.) Conditions that may predis-
 x
S I N T R O D U C T I O N

8/9/2019 Composting in the Classroom
http://slidepdf.com/reader/full/composting-in-the-classroom 11/126
pose individuals to infection or an allergic response include: a weakened
immune system, punctured eardrum, allergies, asthma, and use of some
medications such as antibiotics and adrenal cortical hormones. People
with these conditions should avoid mixing and prolonged contact with
compost, and they should consider wearing dust masks.
Flies and odors in compost may be an annoyance, but generally they
do not pose a health problem. With proper maintenance of the compostpile, these annoyances can be avoided (see Chapters 2–4).
WASTES OR RESOURCES?
Are the organic materials that are used to produce compost really
“wastes,” or are they valuable “resources” that should be conserved and
recycled? Some environmentalists object to the use of the term waste,
feeling that it implies that the food scraps and yard trimmings many
people throw in the garbage are useless. Rather, these individuals prefer
to use terms that are neutral (e.g., scraps, trimmings, material) or even
terms that imply these materials are of great value (e.g., resources). We
have tried whenever practical to avoid the use of the term wastes, and topromote the idea of recycling these materials, although the word waste
does appear occasionally throughout the text. You may want to use the
issue of appropriate terminology—wastes or resources— as a starting
point for a classroom discussion on composting.
xi
I N T R O D U C T I O N T

8/9/2019 Composting in the Classroom
http://slidepdf.com/reader/full/composting-in-the-classroom 12/126
1y
THE SCIENCE OF COMPOSTING
If moist food scraps are placed in a container and left to sit for a week
or two, the end product is likely to be a smelly “slop” that attracts flies.
Given the proper conditions, these same food scraps can be composted to
produce a material that looks and smells like rich soil and can be used to
enhance soil texture and productivity. So, what are these conditions that
promote composting?
The physical and chemical conditions that should be maintained in a
compost heap seem logical if you think about what compost really is—a
big pile of food for billions of minute organisms. These microorganisms
have certain chemical requirements, primarily carbon for energy, nitro-
gen to build proteins, and oxygen for respiration. Interacting with these
are physical requirements, such as aeration to maintain optimal oxygen
levels while not depleting the moisture necessary for microbial growth.
This chapter begins with an overview of the chemical, physical, and
biological changes that occur during thermophilic composting, thereby
providing an example of how several sciences can be integrated in the
study of composting. This overview is followed by more detailed, separate
sections on compost chemistry, physics, and biology. Much of the infor-
mation in the chemistry and physics sections focuses on thermophilic
composting. The biology section includes a discussion of the microbes
that are present in all types of composting, and of the diversity of inver-
tebrates that live in outdoor and some worm composting systems.
The information presented here reflects the current body of scientific
knowledge regarding composting. Much remains unknown, leaving a
variety of intriguing questions for future research. Some of these ques-
tions are identified as Research Possibilities, sprinkled in italics through-
out the text. We hope they will provide the inspiration for students to
ask a much wider range of questions, and to design their own original
research.
8/9/2019 Composting in the Classroom
http://slidepdf.com/reader/full/composting-in-the-classroom 13/126
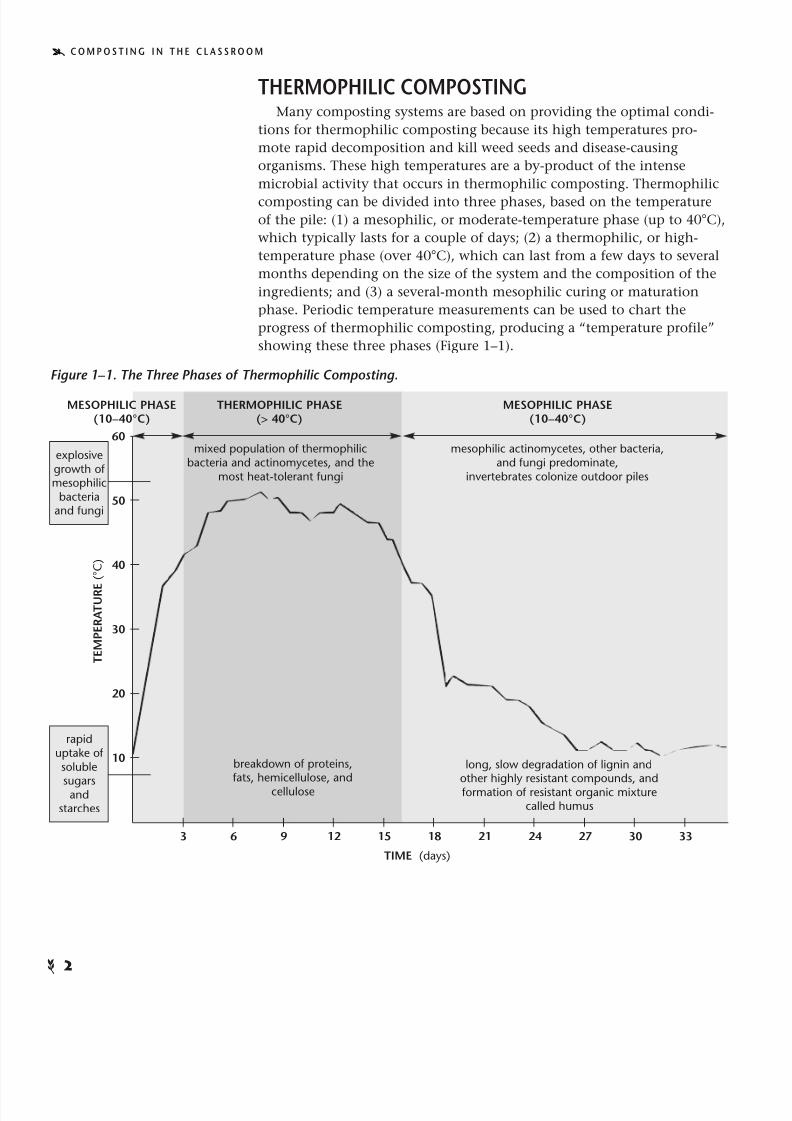
THERMOPHILIC COMPOSTINGMany composting systems are based on providing the optimal condi-
tions for thermophilic composting because its high temperatures pro-
mote rapid decomposition and kill weed seeds and disease-causing
organisms. These high temperatures are a by-product of the intense
microbial activity that occurs in thermophilic composting. Thermophilic
composting can be divided into three phases, based on the temperature
of the pile: (1) a mesophilic, or moderate-temperature phase (up to 40°C),
which typically lasts for a couple of days; (2) a thermophilic, or high-
temperature phase (over 40°C), which can last from a few days to several
months depending on the size of the system and the composition of the
ingredients; and (3) a several-month mesophilic curing or maturation
phase. Periodic temperature measurements can be used to chart the
progress of thermophilic composting, producing a “temperature profile”
showing these three phases (Figure 1–1).
S C O M P O S T I N G I N T H E C L A S S R O O M
 2
60
50
40
30
20
10
3 6 9 12 15 18 21 24 27 30 33
rapiduptake of soluble
sugarsandstarches
explosivegrowth of mesophilic
bacteriaand fungi
TIME (days)
THERMOPHILIC PHASE(> 40°C)
MESOPHILIC PHASE(10–40°C)
MESOPHILIC PHASE(10–40°C)
T E M P E R A T U R E
( ° C )
mixed population of thermophilicbacteria and actinomycetes, and the
most heat-tolerant fungi
mesophilic actinomycetes, other bacteria,and fungi predominate,
invertebrates colonize outdoor piles
breakdown of proteins, fats, hemicellulose, and
cellulose
long, slow degradation of lignin andother highly resistant compounds, and formation of resistant organic mixture
called humus
Figure 1–1. The Three Phases of Thermophilic Composting.

8/9/2019 Composting in the Classroom
http://slidepdf.com/reader/full/composting-in-the-classroom 14/126
Different communities of microorganisms predominate during the
various temperature phases. Initial decomposition is carried out by meso-
philic microorganisms, those that thrive at moderate temperatures. These
microbes rapidly break down the soluble, readily degradable compounds,
and the heat they produce causes the compost temperature to rapidly
rise. Once temperatures exceed 40°C, the mesophilic microorganisms
become less competitive and are replaced by thermophilic, or heat-lovingmicrobes. During the thermophilic stage, high temperatures accelerate
the breakdown of proteins, fats, and complex carbohydrates like cellulose
and hemicellulose, the major structural molecules in plants. As the sup-
ply of these compounds becomes exhausted, the compost temperature
gradually decreases and mesophilic microorganisms once again take over
for the final phase of “curing,” or maturation of the remaining organic
matter. Although the compost temperature is close to ambient during the
curing phase, chemical reactions continue to occur that make the
remaining organic matter more stable and suitable for plant use.
The smaller systems used for indoor composting are not likely to get
as hot as compost in large piles or windrows. A well-designed indoorcompost system, >10 gallons in volume, will heat up to 40–50°C in the
first two or three days. Soda bottle bioreactors, because they are so small,
are more likely to peak at temperatures of 40–45°C. At the other end of
the scale, commercial or municipal-scale compost systems may reach
temperatures above 60°C. Because temperatures above 55°C are lethal to
many microorganisms that cause human or plant diseases, this is the
target temperature that compost managers use for suppression of patho-
gens. However, if the compost temperature goes above 60–65°C, the ben-
eficial microbial populations are also killed.
Humans can control the temperatures during composting by mixing
or turning the organic materials (Figure 1–2). If the pile or windrow isgetting too hot, turning a pile can release heat from the inner core,
which temporarily cools it down (points A and B in Figure 1–2). As the
food available to thermophilic organisms becomes depleted, their rate of
growth slows and the temperature begins to drop. Turning the pile at this
point may produce a new temperature peak (points C and D in Figure
1–2). This is because relatively undecomposed organic matter gets mixed
into the center of the pile, where temperature and moisture conditions
are optimal for rapid decomposition. In addition, mixing loosens up the
compost ingredients, which increases the infiltration of oxygen that is
needed by aerobic microorganisms. After the thermophilic phase is com-
pleted, the compost temperature drops, and it is not restored by turningor mixing (point E).
1 T H E S C I E N C E O F C O M P O S T I N G T
3

8/9/2019 Composting in the Classroom
http://slidepdf.com/reader/full/composting-in-the-classroom 15/126
Figure 1–2. The Effects of Turning on Compost Temperature.(See p.3 for explanation.)
Research Possibility: Garden supply stores and catalogs often sell compost
“starters,” which they claim speed up the composting process. Develop a recipe
for a compost starter and design a research project to test its effect on the com-
post temperature profile. (Hint: You might want to include finished compost or
soil as an inoculant, or nitrogen fertilizer or sugar to trigger fast microbial
growth.)
S C O M P O S T I N G I N T H E C L A S S R O O M
 4
T E M P E R A T U R E ( ° C )
TIME (days)
10
70
60
50
40
30
20
10
A
20 30 40 50 60
B
C
D
E
6
8/9/2019 Composting in the Classroom
http://slidepdf.com/reader/full/composting-in-the-classroom 16/126
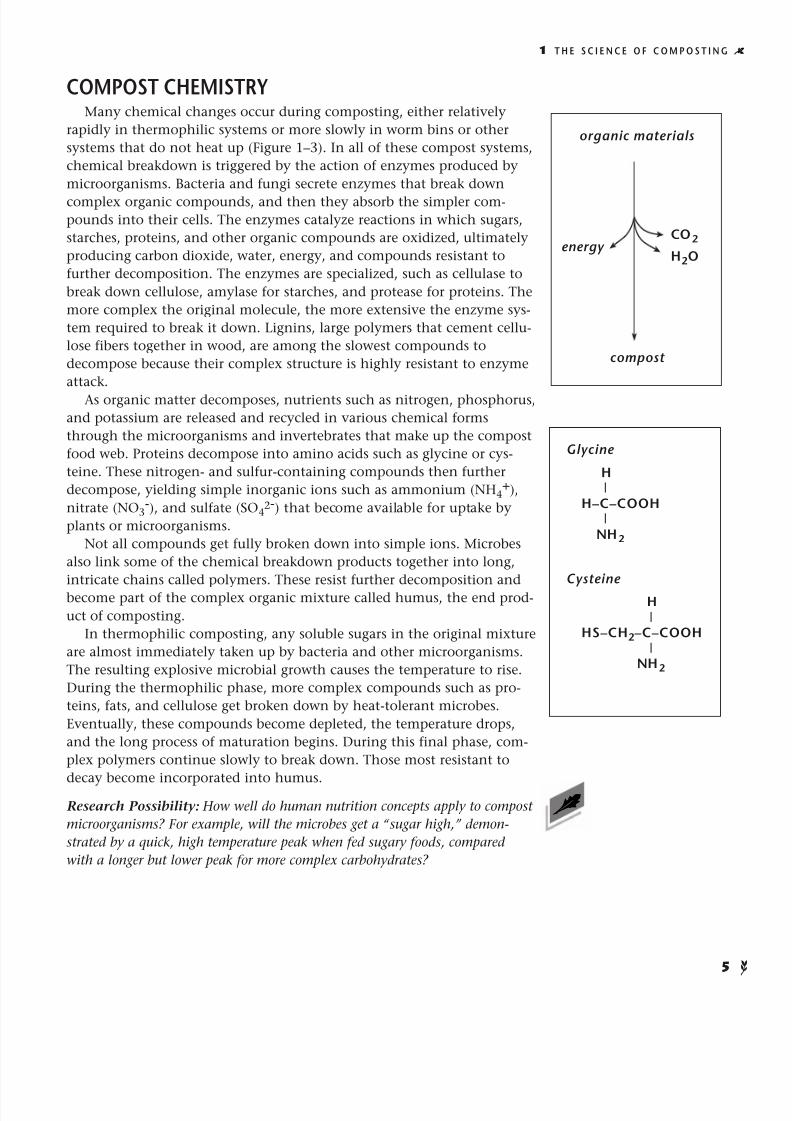
COMPOST CHEMISTRYMany chemical changes occur during composting, either relatively
rapidly in thermophilic systems or more slowly in worm bins or other
systems that do not heat up (Figure 1–3). In all of these compost systems,
chemical breakdown is triggered by the action of enzymes produced by
microorganisms. Bacteria and fungi secrete enzymes that break down
complex organic compounds, and then they absorb the simpler com-
pounds into their cells. The enzymes catalyze reactions in which sugars,
starches, proteins, and other organic compounds are oxidized, ultimately
producing carbon dioxide, water, energy, and compounds resistant to
further decomposition. The enzymes are specialized, such as cellulase to
break down cellulose, amylase for starches, and protease for proteins. The
more complex the original molecule, the more extensive the enzyme sys-
tem required to break it down. Lignins, large polymers that cement cellu-
lose fibers together in wood, are among the slowest compounds to
decompose because their complex structure is highly resistant to enzyme
attack.
As organic matter decomposes, nutrients such as nitrogen, phosphorus,
and potassium are released and recycled in various chemical forms
through the microorganisms and invertebrates that make up the compost
food web. Proteins decompose into amino acids such as glycine or cys-
teine. These nitrogen- and sulfur-containing compounds then further
decompose, yielding simple inorganic ions such as ammonium (NH4+),
nitrate (NO3-), and sulfate (SO4
2-) that become available for uptake by
plants or microorganisms.
Not all compounds get fully broken down into simple ions. Microbes
also link some of the chemical breakdown products together into long,
intricate chains called polymers. These resist further decomposition and
become part of the complex organic mixture called humus, the end prod-
uct of composting.
In thermophilic composting, any soluble sugars in the original mixture
are almost immediately taken up by bacteria and other microorganisms.
The resulting explosive microbial growth causes the temperature to rise.
During the thermophilic phase, more complex compounds such as pro-
teins, fats, and cellulose get broken down by heat-tolerant microbes.
Eventually, these compounds become depleted, the temperature drops,
and the long process of maturation begins. During this final phase, com-
plex polymers continue slowly to break down. Those most resistant to
decay become incorporated into humus.
Research Possibility: How well do human nutrition concepts apply to compost
microorganisms? For example, will the microbes get a “sugar high,” demon-
strated by a quick, high temperature peak when fed sugary foods, compared
with a longer but lower peak for more complex carbohydrates?
1 T H E S C I E N C E O F C O M P O S T I N G T
5
Glycine
H|
H–C–COOH|
NH2
Cysteine
H|
HS–CH2–C–COOH|
NH2
organic materials
compost
CO2energy
H2O
6

8/9/2019 Composting in the Classroom
http://slidepdf.com/reader/full/composting-in-the-classroom 17/126
Figure 1–3. Chemical Decomposition during Thermophilic Composting.
CHEMICAL REQUIREMENTS FOR THERMOPHILICCOMPOSTING
In order for successful thermophilic composting to occur, the proper
conditions need to be created for optimal microbial growth. The key fac-
tors are the relative amounts of carbon and nitrogen, the balance
between oxygen and moisture content, and pH.
C A R B O N - T O - N I T R O G E N R A T I O
Of the many elements required for microbial decomposition, carbon
and nitrogen are the most important and the most commonly limiting.
Carbon is both an energy source (note the root in our word for high-
energy food: carbohydrate), and the basic building block making up
about 50% of the mass of microbial cells. Nitrogen is a crucial compo-
nent of the proteins, amino acids, enzymes, and DNA necessary for cell
growth and function. Bacteria, whose biomass is over 50% protein, need
plenty of nitrogen for rapid growth.
The ideal carbon-to-nitrogen (C:N) ratio for composting is generally
considered to be around 30:1, or 30 parts carbon for each part nitrogen
by weight. Why 30:1? Although the typical microbial cell is made up of
carbon and nitrogen in ratios as low as 6:1, additional carbon is needed
to provide the energy for metabolism and synthesis of new cells. C:N
ratios lower than 30:1 allow rapid microbial growth and speedy decom-
position, but excess nitrogen will be lost as ammonia gas, causing unde-
sirable odors as well as loss of the nutrient. C:N ratios higher than 30:1
do not provide sufficient nitrogen for optimal growth of the microbial
populations. This causes the compost to remain relatively cool and to
degrade slowly, at a rate determined by the availability of nitrogen.
S C O M P O S T I N G I N T H E C L A S S R O O M
 6
SUGAR
END OFTHERMOPHILIC PHASE(TEMPERATURE DROPS)
PROTEIN
FAT
LIGNIN
CELLULOSEHEMICELLULOSE

8/9/2019 Composting in the Classroom
http://slidepdf.com/reader/full/composting-in-the-classroom 18/126
As composting proceeds, the C:N ratio gradually decreases from 30:1
to 10–15:1 for the finished product. This occurs because each time that
organic compounds are consumed by microorganisms, two-thirds of the
carbon is lost to the atmosphere as CO2 gas, while most of the nitrogen
is recycled into new microorganisms. Although finished compost has a
low C:N ratio, this does not result in the odor problems mentioned above
because the organic matter is in a stable form, having already undergoneextensive decomposition.
Attaining a C:N ratio of roughly 30:1 in the mix of compost ingredi-
ents is a useful goal; however, this ratio may need to be adjusted accord-
ing to the bioavailability of the materials in question. Most of the
nitrogen in compostable materials is readily available. Some of the car-
bon, however, may be bound up in compounds that are highly resistant
to biological degradation. Newspaper, for example, decays less readily
than other types of paper because it has not been chemically treated to
remove lignin. Lignin, a highly resistant compound found in wood,
forms sheaths around cellulose fibers, retarding their decomposition. The
result is that it takes almost four times as much newsprint as office paperto provide the same amount of bioavailable carbon in composting.1 Corn
stalks and straw are similarly slow to break down because they are made
up of a resistant form of cellulose. All of these materials can still be com-
posted, but it is best to mix them with other sources containing more
readily biodegradable carbon.
Research Possibility: Newspaper has a higher lignin content than office paper
and therefore should take longer to decompose. Is this true in thermophilic com-
posting? What about in worm bins?
Particle size can also affect the availability of carbon. Whereas the
same amount of carbon is contained in comparable masses of wood chipsand sawdust, the larger surface area in the sawdust makes its carbon more
readily available for microbial use. A larger volume of wood chips than
sawdust would therefore be needed to achieve the same amount of avail-
able carbon.
In addition to carbon and nitrogen, adequate phosphorus, sulfur, cal-
cium, and potassium are essential to microbial metabolism, as are trace
elements such as magnesium, iron, and copper. Normally, these nutrients
are not limiting because the compost ingredients provide sufficient quan-
tities for microbial growth.
O X Y G E N
Oxygen is essential for the metabolism and respiration of aerobic
microorganisms and for oxidizing the various organic molecules present
in the waste material. As microorganisms oxidize organic matter for
energy and nutrition, oxygen is used and carbon dioxide is produced. If
oxygen supplies are depleted, the composting process will become anaer-
obic and produce undesirable odors, including the rotten-egg smell of
hydrogen sulfide gas. Therefore, compost systems need to be designed to
provide adequate air flow using either passive or forced aeration systems.
1 T H E S C I E N C E O F C O M P O S T I N G T
7
6

8/9/2019 Composting in the Classroom
http://slidepdf.com/reader/full/composting-in-the-classroom 19/126
(For information on the balance between aeration and moisture, see pp.
10–11).
p H
During the course of composting, the pH generally varies between 5.5
and 8.5 (Figure 1–4). The initial pH depends on the composition of the
ingredients. In the early stages of composting, organic acids may accu-
mulate as a by-product of the digestion of organic matter by bacteria and
fungi. The resulting drop in pH encourages the growth of fungi, which
are active in the decomposition of lignin and cellulose. Usually, the
organic acids break down further during the composting process, and the
pH rises. This is caused by two processes that occur during the thermo-
philic phase: decomposition and volatilization of organic acids, and
release of ammonia by microbes as they break down proteins and other
organic nitrogen sources. Later in the composting process, the pH tends
to become neutral as the ammonia is either lost to the atmosphere or
incorporated into new microbial growth. Finished compost generally has
a pH between 6 and 8.
If the system becomes anaerobic, it will not follow this trend. Instead,
acid accumulation may lower the pH to 4.5, severely limiting microbial
activity. In such cases, aeration usually is sufficient to return the compost
pH to acceptable ranges.
Figure 1–4. Change in pH during Thermophilic Composting.
Research Possibility: Measure the pH of a number of different compost mixes.
How does the pH of initial ingredients affect the pH of finished compost?
Research Possibility: Some instructions call for adding lime to increase the pH
when compost ingredients are mixed. Other instructions caution to avoid this
because it causes a loss of nitrogen. How does adding various amounts of lime
to the initial ingredients affect the pH of finished compost?
Research Possibility: Does the pH of the initial compost ingredients affect the
populations of microorganisms during composting?
S C O M P O S T I N G I N T H E C L A S S R O O M
 8
0
1
2
3
4
5
6
7
8
9
0 5 10 15 20 25 305 10 15 20 25 30
TIME (days)
9
8
7
6
54
3
2
1
0
p H
6
6
6

8/9/2019 Composting in the Classroom
http://slidepdf.com/reader/full/composting-in-the-classroom 20/126
Conduction
Convection
Radiation
1 T H E S C I E N C E O F C O M P O S T I N G T
9
COMPOST PHYSICSProviding the right conditions for thermophilic organisms involves a
series of balancing acts between various physical properties of the com-
post system and its ingredients. The pile or vessel must be large enough
to retain heat and moisture, yet small enough to allow good air circula-
tion. The compost must be sufficiently moist to support microbial
growth but not so wet that it becomes anaerobic. Also, the particle size of
organic materials must be large enough to maintain a porous mix but not
so large that decomposition is inhibited.
MECHANISMS OF HEAT LOSSThe temperature at any point during composting depends on how
much heat is being produced by microorganisms, balanced by how much
is being lost through conduction, convection, and radiation (Figure 1–5).
Conduction refers to energy that is transferred from atom to atom by
direct contact. At the edges of a compost pile, conduction causes heat
loss to the surrounding air molecules. The smaller the bioreactor or com-
post pile, the greater the surface area-to-volume ratio, and therefore, the
larger the degree of heat loss to conduction. Insulation helps to reduce
this loss in small compost bioreactors.
Figure 1–5. Three Mechanisms of Heat Loss from a Thermophilic Compost Pile.
Research Possibility: Design a thermophilic composting system to provide a
heat exchange system for heating water. Compare the effectiveness of severaldifferent systems.
Convection refers to the transfer of heat by movement of a substance
such as air or water. When compost gets hot, warm air rises within the
system, and the resulting convective currents cause a slow but steady
movement of heated air upward through the compost and out the top.
In addition to this natural convection, some composting systems use
“forced convection” driven by blowers or fans. This forced air, in some
cases triggered by thermostats that indicate when the piles are getting too
6

8/9/2019 Composting in the Classroom
http://slidepdf.com/reader/full/composting-in-the-classroom 21/126
hot, increases the rates of both conductive and convective heat losses.
Much of the energy transfer is in the form of latent heat—the energy
required to evaporate water. You can sometimes see steamy water vapor
rising from hot compost piles or windrows.
The third mechanism for heat loss, radiation, refers to electromagnetic
waves like those that you feel when standing in the sunlight or near a
warm fire. Similarly, the warmth generated in a compost pile radiates outinto the cooler surrounding air. However, radiation is a negligible loss of
heat from compost because of the relatively small difference in tempera-
ture between the outer edges of the compost and the surrounding air.
Research Possibility: What type of insulation works best for soda bottle biore-
actors? Does it help to have a reflective layer? Do different insulative materials
or different thicknesses affect the temperature profile?
Because water has a higher specific heat than most other materials,
drier compost mixtures tend to heat up and cool off more quickly than
wetter mixtures, providing that adequate moisture levels for microbial
growth are maintained. The water acts as a thermal stabilizer, dampingout the changes in temperature as microbial activity ebbs and flows.
AERATIONMaintaining the proper balance between moisture and oxygen is one
of the keys to successful composting. Because oxygen diffuses thousands
of times faster through air than through water, oxygen transfer is
impeded if water fills the pores between compost particles. If the thin
films of water surrounding individual particles dry out, however, the
microorganisms that decompose inorganic matter will become inactive.
Therefore, the key to successful composting is to provide enough water to
maintain the thin films around compost particles, but not so much thatit replaces air in the larger pores.
At the start of the composting process, the oxygen concentration in
the pore spaces is about 15–20% (similar to the normal composition of
air), and the CO2 concentration varies from 0.5–5%. As biological activity
progresses, the O2 concentration decreases and CO2 concentration
increases. If the average O2 concentration in the pile falls below 5%,
regions of anaerobic conditions develop. Providing that the anaerobic
activity is kept to a minimum, the compost pile acts as a biofilter to trap
and degrade the odorous compounds produced as a by-product of anaer-
obic decomposition. However, should the anaerobic activity increase
above a certain threshold, undesirable odors may result.Oxygen concentrations greater than 10% are considered optimal for
aerobic composting. Some systems are able to maintain adequate oxygen
passively, using air holes or aeration tubes. Others require forced aeration
provided by blowers or agitators.
A common misconception in composting is that piles should be
turned or mixed every couple of weeks in order to maintain adequate
oxygen levels. In fact, calculations show that the oxygen introduced by
turning a rapidly degrading compost pile becomes depleted within the
first several hours, indicating that diffusion and convection rather than
S C O M P O S T I N G I N T H E C L A S S R O O M
 10
air flow
particleswater
6

8/9/2019 Composting in the Classroom
http://slidepdf.com/reader/full/composting-in-the-classroom 22/126
turning are the primary mechanisms that keep the compost aerobic.2
Mixing does help to keep the pile aerated, however, by loosening it up
and increasing the pore spaces through which air flow occurs. Another
reason for turning compost is to mix the drier and cooler materials from
the edges into the center of the pile, where the more constant heat and
moisture promote optimal decomposition.
Research Possibility: When constructing compost bins or piles, some people
incorporate perforated pipe, wire mesh, or other systems to increase passive air
flow. What is the effect of different methods of aeration on the temperature
profile of any one compost system?
Research Possibility: How do various means and schedules for turning a pile
affect the temperature profile and the time needed for production of finished
compost?
Research Possibility: What is the effect of forced aeration (with an aquarium
pump or similar apparatus) on the temperature profile in a soda bottle or a
two-can bioreactor?
MOISTUREAn initial moisture content of 50–60% by weight is generally consid-
ered optimum for composting because it provides sufficient water to
maintain microbial growth but not so much that air flow is blocked.
Decomposition by microorganisms occurs most rapidly in the thin films
of water surrounding compost particles. When conditions become drier
than 35–40%, bacterial activity is inhibited because these films begin to
dry up. At the other end of the range, moisture levels above 65% result
in slow decomposition, odor production in anaerobic pockets, and nutri-
ent leaching.
PARTICLE SIZEMost microbial activity occurs on the surface of the organic particles.
Therefore, decreasing particle size, through its effect of increasing surface
area, will encourage microbial activity and increase the rate of decompo-
sition. Decreasing particle size also increases the availability of carbon
and nitrogen. Thus, the carbon in wood shavings or sawdust is more
available than the carbon in large wood chips. However, when particles
are too small and compact, air circulation through the pile is inhibited.
This decreases the oxygen available to microorganisms, and it ultimatelydecreases the rate of microbial activity and decomposition. “Bulking
agents” consisting of large particles such as wood chips, chopped
branches, pine cones, or corn cobs are often added to piles to enhance
aeration. At the end of the composting process, bulking agents that have
not decomposed can be sieved out from the compost and reused.
Research Possibility: Try several bulking agents with different particle sizes.
Is there a difference in the temperature profile and length of time it takes to
produce compost?
1 T H E S C I E N C E O F C O M P O S T I N G T
11
6
6
6
6

8/9/2019 Composting in the Classroom
http://slidepdf.com/reader/full/composting-in-the-classroom 23/126
SIZE OF COMPOST SYSTEMA compost pile must be large enough to prevent rapid dissipation of
heat and moisture, yet small enough to allow good air circulation.
Conventional wisdom for thermophilic composting is that piles should
be at least 1 m 3 in size to ensure sufficient heat and moisture retention.
Smaller systems such as soda bottle bioreactors require insulation for heat
retention. Compost in bioreactors made of nested garbage cans will heatup without insulation if the inner can is at least 10 gallons in size and
the surrounding air temperatures are not too low.
Research Possibility: Try mixing the same ingredients in a large outdoor pile,
a two-can bioreactor, and a soda bottle bioreactor. Which system reaches the
hottest temperatures? Which remains hot the longest? How does this affect the
compost produced?
S C O M P O S T I N G I N T H E C L A S S R O O M
 12
6

8/9/2019 Composting in the Classroom
http://slidepdf.com/reader/full/composting-in-the-classroom 24/126
1 T H E S C I E N C E O F C O M P O S T I N G T
13
COMPOST BIOLOGYNo matter what system is used for composting, biological organisms
play a central role in the decomposition process. The most vital of these
are microorganisms, but worms and other invertebrates are also key play-
ers in some types of composting.
Food webs provide one way of portraying interactions among organ-
isms. When you think of a food web, you may think of the sun’s energy
being converted into food by green plants, which are eaten by herbivores,
who in turn are eaten by an array of predators. The leaves, feathers, and
excrement produced by each of these organisms, as well as the plants and
animals themselves when they die, provide the energy source for another
type of food web—the decomposition food web. Among leaves and logs
on the forest floor, in a steaming pile of hay or manure, or in a compost
pile, many of the same organisms are at work. These microorganisms con-
vert organic debris into a source of energy and nutrients for other organ-
isms, as well as serve as prey for higher level microbes, invertebrates, and
vertebrates (Figure 1–6).
Figure 1–6. Functional Groups of Organisms in a Compost Food Web.
Tertiary Consumers
organisms that eat secondary consumers
centipedes, predatory mites,
rove beetles, pseudoscorpions
Secondary Consumers
organisms that eat primary consumers
springtails, feather-winged beetles,
and some types of mites,
nematodes, and protozoa
Primary Consumers
organisms that feed on organic residues
actinomycetes and other bacteria, fungi,
snails, slugs, millipedes, sowbugs, some types
of mites, nematodes, and protozoa
Organic Residues
leaves, grass clippings, other plant debris, food scraps, fecal matter and animal bodies including
those of soil invertebrates
The organic residues forming the base of the compost food web are
consumed by fungi, actinomycetes and other bacteria, and invertebrates
including millipedes, sowbugs, nematodes, snails, slugs, and earthworms.
These primary consumers serve as food for secondary consumers includ-
ing springtails and some predatory species of nematodes, mites, and bee-

8/9/2019 Composting in the Classroom
http://slidepdf.com/reader/full/composting-in-the-classroom 25/126
tles. Finally, there are higher-level predators such as centipedes, rove bee-
tles, and pseudoscorpions that prey on each other and the secondary-
level compost invertebrates.
The interactions between organic matter, microbes, and invertebrates
in compost are sometimes difficult to portray in a food web (Figure 1–7).
For example, some invertebrates digest only feces, or organic matter that
has already passed through the guts of other organisms. Others feed onfresh organic matter but require microorganisms inhabiting their gut to
break it down into a form they can digest. Worms and some other inver-
tebrates derive nutrition by digesting the microorganisms growing on
organic detritus, as well as the detritus itself.
Figure 1–7. Feeding Interactions among Organisms in Compost.
MICROORGANISMSAll types of composting depend on the work of bacteria and fungi.
These microbes digest organic matter and convert it into chemical forms
that are usable by other microbes, invertebrates, and plants. During
thermophilic composting, the populations of various types of micro-
organisms rise and fall in succession, with each group thriving while
environmental conditions and food sources are favorable, then dying off
and leaving a new set of conditions that favor another group of organ-
isms. Even in vermicomposting and outdoor composting, microorgan-
isms play an active role, within the invertebrates’ digestive systems, on
their excrement, and in layers coating the particles of organic material.
S C O M P O S T I N G I N T H E C L A S S R O O M
 14
6
DEAD INVERTEBRATES
INVERTEBRATES
MICROBES
ORGANIC MATTERe at e n b y
e a t e n
b y
e a t e n
b y
e a c h
o t h e r
e a t e n
b y
e a c h
o t h e r
mi c r o be s
e a t e
n b y
m i c r
o b e s
m i c r o b
e s
e a t e n b y
i n v e
r t e b r a t e s
e a t e n b y
i n v
e r t e b r a t e
s
e a t e n b y
i n v e r t e b r a t e s
eaten byinvertebrates
produced byinvertebrates
CASTINGS OREXCREMENT
l i v e i n
g u t s o f
i n v e r t e b r a t e s

8/9/2019 Composting in the Classroom
http://slidepdf.com/reader/full/composting-in-the-classroom 26/126
B A C T E R I A
Bacteria are responsible for most of the decomposition and heat gener-
ation in compost. They are the most nutritionally diverse group of com-
post organisms, using a broad range of enzymes to chemically break
down a variety of organic materials. Bacteria are single-celled and are
structured as rod-shaped bacilli, sphere-shaped cocci, or spiral-shaped
spirilli. Many are motile, meaning they have the ability to move undertheir own power.
At the beginning of the composting process (up to 40°C), mesophilic
bacteria predominate (Figure 1–8). They include hydrogen-oxidizing, sul-
fur-oxidizing, nitrifying, and nitrogen-fixing bacteria. Most of these can
also be found in topsoil. Their populations increase exponentially during
the initial stages of composting as they take advantage of the readily
available simple compounds such as sugars and starches. Heat is
produced by their metabolic activity, and if conditions are right, the
compost begins to get hot.
Figure 1–8. Temperature Ranges for Compost Microorganisms.
As temperatures rise above 40°C, mesophilic bacteria no longer thrive
and thermophilic species take over. The microbial populations during
this phase are dominated by members of the genus Bacillus. The diversityof bacilli species is fairly high at temperatures from 50–55°C but
decreases dramatically above 60°C. When conditions become unfavor-
able, bacilli form thick-walled endospores that are highly resistant to
heat, cold, and dryness. These spores are ubiquitous in nature and
become active whenever environmental conditions are favorable.
At the highest compost temperatures, bacteria of the genus Thermus
have been isolated. Composters sometimes wonder how microorganisms
evolved in nature that can withstand the high temperatures found in
1 T H E S C I E N C E O F C O M P O S T I N G T
15
no vegetative growth of microorganisms,
but some extracellular enzymes still active
spores of bacteria and actinomycetes remain viable
upper limit for growth of actinomycetes and most other bacteria
upper limit for growth of thermophilic fungi
minimum target temperature for killing pathogens
optimal temperature for compost decomposition
upper limit for growth of mesophilic microbes
supports heterogeneous mixture of bacteria, fungi, actinomycetes,
protozoa, and nematodes
lower limit for growth of mesophilic microbes
80
70
60
50
40
30
20
10
0
°C

8/9/2019 Composting in the Classroom
http://slidepdf.com/reader/full/composting-in-the-classroom 27/126
S C O M P O S T I N G I N T H E C L A S S R O O M
 16
active compost. Thermus bacteria were first found in hot springs in
Yellowstone National Park, and they may have evolved there.3 Other
places where thermophilic conditions exist in nature include deep-sea
thermal vents, manure droppings, and accumulations of decomposing
vegetation.
Eventually, the compounds that are usable by thermophilic bacteria
become depleted. As the activity of the thermophilic bacteria declines,the temperature falls and mesophilic bacteria again predominate. The
numbers and types of mesophilic microbes that recolonize compost as it
matures depend on what spores and organisms are present in the com-
post and the immediate environment. As the curing or maturation phase
progresses, the diversity of the microbial community gradually increases.
Eventually, the available carbon in the compost becomes depleted, and
microbial populations once again drop.
A C T I N O M Y C E T E S
The characteristic earthy smell of soil is caused by actinomycetes, a
type of bacteria that forms chains or filaments. In composting, actino-
mycetes play an important role in degrading complex organic molecules
such as cellulose, lignin, chitin, and proteins. Although they do not com-
pete well for the simple carbohydrates that are plentiful in the initial
stages of composting, their enzymes enable them to chemically break
down resistant debris, such as woody stems, bark, and newspaper, that
are relatively unavailable to most other forms of bacteria and fungi. Some
species of actinomycetes appear during the thermophilic phase, and oth-
ers become important during the cooler curing phase, when only the
most resistant compounds remain. Actinomycetes thrive under warm,
well-aerated conditions and neutral or slightly alkaline pH.
Actinomycetes form long, threadlike branched filaments that look like
gray spider webs stretching through compost. These filaments are most
commonly seen toward the end of the composting process, in the outer
10 to 15 cm of the pile. Sometimes they appear as circular colonies that
gradually expand in diameter.
F U N G I
Fungi include molds and yeasts, and they are responsible for the
decomposition of many complex plant polymers in soil and compost. In
compost, fungi are important because they break down tough debris
including cellulose. They can attack organic residues that are too dry,
acidic, or low in nitrogen for bacterial decomposition. Most fungi secrete
digestive enzymes onto the food, and then they absorb the products of extracellular digestion.
Fungal species are predominantly mesophilic. When temperatures are
high, most are confined to the outer layers of compost. Compost molds
are strict aerobes. They can be microscopic or appear as gray or white
fuzzy colonies that are visible on the compost surface. Some fungi form
chains of cells called hyphae that look like threads weaving through the
organic matter. The mushrooms that you may find growing on compost
are the fruiting bodies of some types of fungi. Each is connected to an

8/9/2019 Composting in the Classroom
http://slidepdf.com/reader/full/composting-in-the-classroom 28/126
extensive network of hyphae that reaches through the compost and aids
in decomposition.
Research Possibility: Composting recipes sometimes call for inoculating the
pile by mixing in a few handfuls of finished compost. Is there any observable
difference in appearance of microbes between systems that have and have not
been so inoculated?
P R O T O Z O A
Protozoa are one-celled microscopic organisms. In compost piles, they
feed on bacteria and fungi. Protozoa make up only a small proportion of
microbial biomass in compost.
INVERTEBRATESComposting can occur either with or without the aid of invertebrates.
In indoor commercial or industrial composting, invertebrates are often
purposely excluded, and the systems are managed to promote
thermophilic composting by microorganisms. Invertebrates are not active
at the high temperatures that occur in thermophilic composting.
In contrast, compost in outdoor piles or bins provides an ideal habitat
for a vast array of invertebrates commonly found in soil and decaying
vegetation. Although most of the decomposition still is carried out by
microorganisms, invertebrates aid in the process by shredding organic
matter and changing its chemical form through digestion. If the compost
heats up, the invertebrates may go into a dormant stage or move to the
periphery of the pile where the temperatures are cooler.
Scientists use a number of systems for categorizing organisms that live
in soil and compost. Different classification schemes provide different
“filters” through which we view complex biological communities. The
food web is one classification system, based on groups of organisms occu-
pying the same trophic level (see Figure 1–6). Another way to classify
compost invertebrates is by size (Figure 1–9). Body length sometimes
is used to divide organisms into microfauna (<0.2 mm), mesofauna
1 T H E S C I E N C E O F C O M P O S T I N G T
17
MICROFAUNA MESOFAUNA MACROFAUNAlive in live in create space
water films air spaces by burrowing
< 0.1 mm 0.1–2 mm 2–60 mm
Nematodes Mites EarwigsProtozoa Pseudoscorpions Sowbugs
Springtails CentipedesPotworms Millipedes
Flies EarthwormsSlugs & Snails
Figure 1–9. Classification of Compost Organisms According to Body Width.
6

8/9/2019 Composting in the Classroom
http://slidepdf.com/reader/full/composting-in-the-classroom 29/126
(0.2–10 mm), and macrofauna (>10 mm). A similar classification scheme
is based on body width. Body width is important because it specifies
which organisms are small enough to live in the film of water surround-
ing compost particles, which live in the air-filled pore spaces, and which
are large enough to create their own spaces by burrowing.
The commonly used taxonomic classification system that divides
organisms into kingdom, phylum, class, order, family, genus, and speciesis based on phylogenic (evolutionary history) relationships among organ-
isms. The following descriptions of common invertebrates found in com-
post are organized roughly in order of increasing size within the broad
phylogenic classifications (Figure 1–10).
S C O M P O S T I N G I N T H E C L A S S R O O M
 18
Figure 1–10. Phylogenic Classifications of Common Compost Organisms.
Kingdom Phylum Class Order Family
Monera (bacteria)
Protista (protozoa)
Fungi
Animalia Annelida Oligochaeta Haplotaxidae Enchytraeidae (potworms)
Lumbricidae (earthworms)
Arthropoda Arachnida Acarina (mites)
Pseudoscorpionida (pseudoscorpions)
Araneae (spiders)
Insecta Collembola (springtails)
Diptera (flies)
Hymenoptera (ants)
Coleoptera (beetles)
Dermaptera (earwigs)
Diplopoda (millipedes)
Chilopoda (centipedes)
Crustacea Isopoda (sowbugs, pillbugs)
Nematoda (nematodes)
Mollusca Gastropoda (slugs, snails)

8/9/2019 Composting in the Classroom
http://slidepdf.com/reader/full/composting-in-the-classroom 30/126
A N N E L I D S
O L I G O C H A E T E S
Potworms (Phylum Annelida, Class Oligochaeta, Order Haplotoxidae,
Family Enchytraeidae): Enchytraeids are small (10–25 mm long) seg-
mented worms also known as white worms or potworms. Because
they lack hemoglobin, they are white and can thus be distinguished
from newly hatched, pink earthworms. Potworms often are found inworm bins and damp compost piles. They feed on mycelia, the
thread-like strands produced by fungi. They also eat decomposing
vegetation along with its accompanying bacterial populations.
Earthworms (Phylum Annelida, Class Oligochaeta): Because earthworms
are key players in vermicomposting, they are described in greater
detail later in this chapter (pp. 22–26).
A R T H R O P O D S
A R A C H N I D S
Mites (Phylum Arthropoda, Class Arachnida, Order Acarina): There are
over 30,000 species of mites worldwide, living in every conceivablehabitat. Some are so specialized that they live only on one other
species of organism. Like spiders, they have eight legs. They range in
size from microscopic to the size of a pin head. Sometimes mites can
be seen holding onto larger invertebrates such as sowbugs, milli-
pedes, or beetles. Mites are extremely numerous in compost, and
they are found at all levels of the compost food web (see Figure 1–6).
Some are primary consumers that eat organic debris such as leaves
and rotten wood. Others are at the secondary level, eating fungi or
bacteria that break down organic matter. Still others are predators,
preying on nematodes, eggs, insect larvae, springtails, and other
mites.Pseudoscorpions (Phylum Arthropoda, Class Arachnida, Order
Pseudoscorpionida): Pseudoscorpions look like tiny scorpions with
large claws relative to their body size, but lacking tails and stingers.
They range from one to several millimeters in size. Their prey
includes nematodes, mites, springtails, and small larvae and worms.
Lacking eyes and ears, pseudoscorpions locate their prey by sensing
odors or vibrations. They seize victims with their front claws, then
inject poison from glands located at the tips of the claws. A good
way to find pseudoscorpions is by peeling apart layers of damp
leaves in a compost pile.
Spiders (Phylum Arthropoda, Class Arachnida, Order Araneae): Spiders
feed on insects and other small invertebrates in compost piles.
I N S E C T S
Springtails (Phylum Arthropoda, Class Insecta, Order Collembola):
Springtails are small, wingless insects that are numerous in compost.
A tiny spring-like lever at the base of the abdomen catapults them
into the air when they are disturbed. If you pull apart layers of
decaying leaves, you are likely to see springtails hopping or scurry-
1 T H E S C I E N C E O F C O M P O S T I N G T
19

8/9/2019 Composting in the Classroom
http://slidepdf.com/reader/full/composting-in-the-classroom 31/126
ing for cover. They feed primarily on fungi, although some species
eat nematodes or detritus.
Flies (Phylum Arthropoda, Class Insecta, Order Diptera): Flies spend their
larval phase in compost as maggots, which do not survive thermo-
philic temperatures. Adults are attracted to fresh or rotting food, and
they can become a nuisance around worm bins or compost piles if
the food scraps are not well covered. Fruit flies and fungus gnats,both of which can become pests in poorly managed compost piles,
are in this order.
Ants (Phylum Arthropoda, Class Insecta, Order Hymenoptera): Ants eat a
wide range of foods, including fungi, food scraps, other insects, and
seeds. Ant colonies often can be found in compost piles during the
curing stage.
Beetles (Phylum Arthropoda, Class Insecta, Order Coleoptera): The most
common beetles in compost are the rove beetle, ground beetle, and
feather-winged beetle. Feather-winged beetles feed on fungal spores,
while the larger rove and ground beetles prey on other insects,
snails, slugs, and other small animals.Earwigs (Phylum Arthropoda, Class Insecta, Order Dermaptera): Earwigs
are distinguished by jaw-like pincers on the tail end. Some species
are predators and others eat detritus. They are usually 2–3 cm long.
O T H E R A R T H R O P O D S
Millipedes (Phylum Arthropoda, Class Diplopoda): Millipedes have long,
cylindrical, segmented bodies, with two pairs of legs per segment.
They are slow moving and feed mainly on decaying vegetation.
Stink glands along the sides of their bodies provide some protection
from predators.
Centipedes (Phylum Arthropoda, Class Chilopoda): Centipedes can be
distinguished from millipedes by their flattened bodies and singlepair of legs per body segment. They are fast-moving predators found
mostly in the surface layers of the compost heap. Their formidable
claws possess poison glands used for paralyzing small worms, insect
larvae, and adult arthropods including insects and spiders.
C R U S T A C E A N S
Sowbugs and Pillbugs (Phylum Arthropoda, Class Crustacea, Order
Isopoda): Sowbugs, also called isopods, potato bugs, or wood lice,
are the only terrestrial crustacean. Because they lack the waxy cuticle
common to most insects, they must remain in damp habitats. They
move slowly, grazing on decaying wood and resistant tissues such asthe veins of leaves. Pillbugs, or rollypolies, are similar to sowbugs,
except they roll into a ball when disturbed, whereas sowbugs remain
flat.
N E M A T O D E S
Nematodes (Phylum Nematoda): Under a magnifying lens, nematodes,
or roundworms, resemble fine human hair. They are cylindrical and
often transparent. Nematodes are the most abundant of the inverte-
brate decomposers—a handful of decaying compost probably con-
S C O M P O S T I N G I N T H E C L A S S R O O M
 20

8/9/2019 Composting in the Classroom
http://slidepdf.com/reader/full/composting-in-the-classroom 32/126
tains several million. They live in water-filled pores and in the thin
films of water surrounding compost particles. Some species scavenge
decaying vegetation, some eat bacteria or fungi, and others prey on
protozoa and other nematodes.
M O L L U S K S
Slugs and Snails (Phylum Mollusca, Class Gastropoda): Some species of
slugs and snails eat living plant material, whereas others feed on
decaying vegetation. Unlike many other invertebrates, some snails
and slugs secrete cellulose-digesting enzymes rather than depending
on bacteria to carry out this digestion for them.
1 T H E S C I E N C E O F C O M P O S T I N G T
21

8/9/2019 Composting in the Classroom
http://slidepdf.com/reader/full/composting-in-the-classroom 33/126
EARTHWORMS4
It may be doubted whether there are many other animals which
have played so important a part in the history of the world, as
have these lowly organized creatures.
Charles Darwin 18815
If your only encounter with earthworms has been those shriveled-up
specimens that didn’t make it back to the grass after a rainstorm, you
may not have the same appreciation for these lowly creatures that
Charles Darwin did. But if you are a backyard or worm composter, you
might have become fascinated by these burrowing invertebrates, and
even have some questions about their role in the compost pile. What are
they actually eating, and what comes out the other end? Are worm cast-
ings finished compost, or do they get broken down further? How do
worms interact with compost microbes during decomposition? Can
worm compost enhance the growth of plants?
To answer these questions, it is important to understand that if you’veseen one worm, you definitely haven’t seen them all. When aquatic
forms are included, there are about 3,000 species of earthworms or mem-
bers of the class Oligochaeta worldwide. Among these species, there is
great variety in size, ranging from 10 mm–1.2 m in length and 10 mg–
600 g in weight. Earthworms also exhibit diverse eating habits and eco-
logical and behavioral characteristics. Thus, the answers to the above
questions are complicated; what is true for one species is not necessarily
true for another. Furthermore, because scientific research has been lim-
ited to only about 5% of the total number of worm species, we do not
know the answers to many questions for most species of worms.
The information presented below is a synthesis based on many scien-tific experiments, though there could be exceptions to some of the gener-
alizations for any one species. We also include information specific to the
Lumbricidae, which is one of the most important earthworm families in
terms of human welfare, and to one of its members, Eisenia fetida, the
species most commonly used in vermicomposting.
E A R T H W O R M F E E D I N G A N D D E C O M P O S I T I O N
Scientists have used several methods to determine the role of worms
and other invertebrates in decomposition. In one experiment, organic
materials of known weight were placed in mesh bags with different-size
holes. The bags were then buried in soil. Several months to a year later,
the scientists dug out the bags and determined the dry weight of the
remaining organic material. It turned out that more decomposition had
occurred in bags with holes large enough for earthworms than in those
that allowed only smaller invertebrates access to the organic materials.
Through these and similar experiments, researchers have determined
that much organic matter, particularly the tougher plant leaves, stems,
and root material, breaks down more readily after being eaten by soil
invertebrates. And, of all the invertebrates who play a role in the initial
S C O M P O S T I N G I N T H E C L A S S R O O M
 22
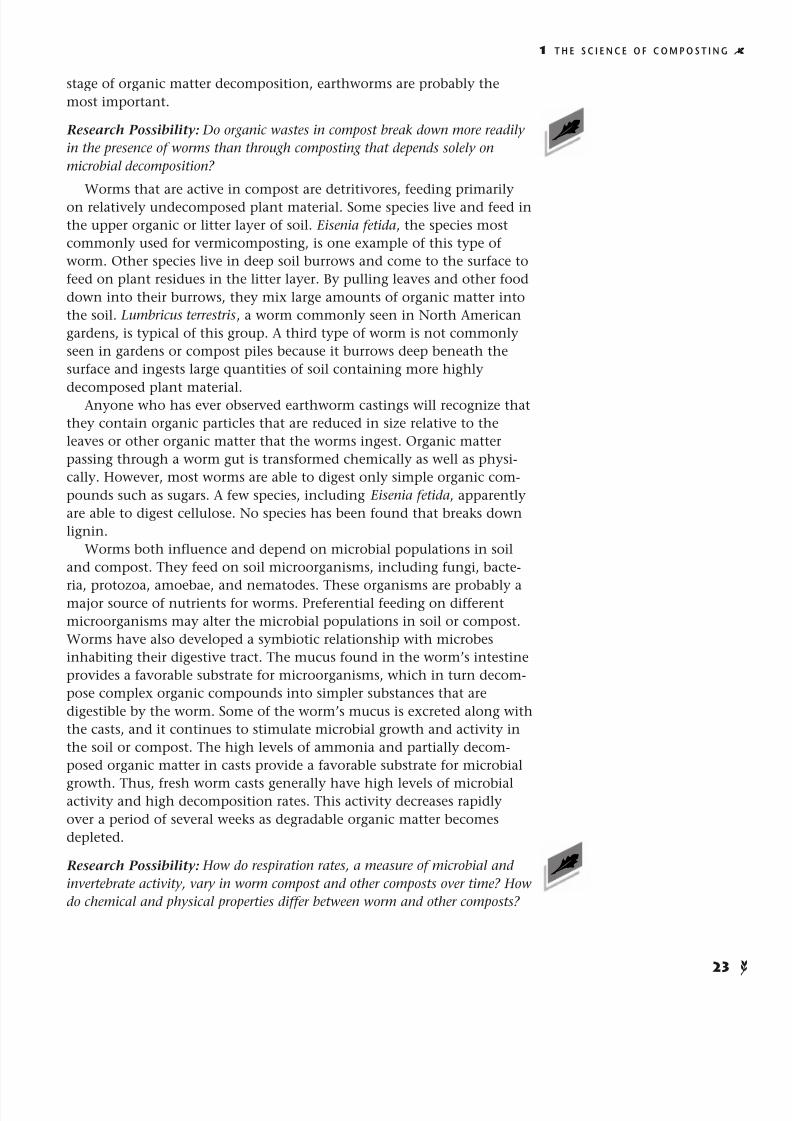
8/9/2019 Composting in the Classroom
http://slidepdf.com/reader/full/composting-in-the-classroom 34/126
stage of organic matter decomposition, earthworms are probably the
most important.
Research Possibility: Do organic wastes in compost break down more readily
in the presence of worms than through composting that depends solely on
microbial decomposition?
Worms that are active in compost are detritivores, feeding primarilyon relatively undecomposed plant material. Some species live and feed in
the upper organic or litter layer of soil. Eisenia fetida, the species most
commonly used for vermicomposting, is one example of this type of
worm. Other species live in deep soil burrows and come to the surface to
feed on plant residues in the litter layer. By pulling leaves and other food
down into their burrows, they mix large amounts of organic matter into
the soil. Lumbricus terrestris, a worm commonly seen in North American
gardens, is typical of this group. A third type of worm is not commonly
seen in gardens or compost piles because it burrows deep beneath the
surface and ingests large quantities of soil containing more highly
decomposed plant material.Anyone who has ever observed earthworm castings will recognize that
they contain organic particles that are reduced in size relative to the
leaves or other organic matter that the worms ingest. Organic matter
passing through a worm gut is transformed chemically as well as physi-
cally. However, most worms are able to digest only simple organic com-
pounds such as sugars. A few species, including Eisenia fetida, apparently
are able to digest cellulose. No species has been found that breaks down
lignin.
Worms both influence and depend on microbial populations in soil
and compost. They feed on soil microorganisms, including fungi, bacte-
ria, protozoa, amoebae, and nematodes. These organisms are probably amajor source of nutrients for worms. Preferential feeding on different
microorganisms may alter the microbial populations in soil or compost.
Worms have also developed a symbiotic relationship with microbes
inhabiting their digestive tract. The mucus found in the worm’s intestine
provides a favorable substrate for microorganisms, which in turn decom-
pose complex organic compounds into simpler substances that are
digestible by the worm. Some of the worm’s mucus is excreted along with
the casts, and it continues to stimulate microbial growth and activity in
the soil or compost. The high levels of ammonia and partially decom-
posed organic matter in casts provide a favorable substrate for microbial
growth. Thus, fresh worm casts generally have high levels of microbialactivity and high decomposition rates. This activity decreases rapidly
over a period of several weeks as degradable organic matter becomes
depleted.
Research Possibility: How do respiration rates, a measure of microbial and
invertebrate activity, vary in worm compost and other composts over time? How
do chemical and physical properties differ between worm and other composts?
1 T H E S C I E N C E O F C O M P O S T I N G T
23
6
6

8/9/2019 Composting in the Classroom
http://slidepdf.com/reader/full/composting-in-the-classroom 35/126
W O R M S A N D P L A N T G R O W T H
Nutrients are transformed during their passage through the worm gut
into forms more readily available to plants, such as nitrate, ammonium,
biologically available phosphorus, and soluble potassium, calcium, and
magnesium. Because of these and other changes in soil and organic mat-
ter chemistry, physical properties, and biology brought about by worms,
plants generally grow faster in soils with worms than in soils withoutthem. Furthermore, studies have shown that extracts from worm tissues
enhance plant growth.
Research Possibility: Much of the research on vermicompost and plant growth
has been conducted with worms grown on sewage sludge. Does worm compost
produced from other organic materials enhance plant growth? How do vermi-
composts produced from various organic materials differ in terms of nutrient
content? How do vermicomposts compare to composts produced by microbial
activity alone? To composts that have a diversity of soil invertebrates?
Vermicompost is a finely divided material that has the appearance and
many of the characteristics of peat. In some studies, it has been shown toenhance soil structure, porosity, aeration, drainage, and moisture-holding
capacity. Its nutrient content varies depending on the original organic
materials. However, when compared with a commercial plant-growth
medium to which inorganic nutrients have been added, vermicompost
usually contains higher levels of most mineral elements, with the excep-
tion of magnesium. It has a pH of about 7.0, and because most plants
prefer slightly acidic conditions, vermicompost should be acidified or
mixed with a more acid material such as peat, prior to use as a growth
medium. Another adjustment sometimes made when using vermicom-
post for plant growth is to add magnesium. Because vermicomposting
does not achieve high temperatures, sometimes a thermophilic stage isused prior to adding worms to kill insects and pathogens.
Research Possibility: In some experiments, plants did not show increased
growth when planted in fresh worm castings. Does aging or “curing” worm
castings increase their ability to enhance plant growth? Are there chemical dif-
ferences between fresh and older worm castings? Should worm compost be
mixed with soil before being used to grow plants?
Research Possibility: In China, farmers dig parallel trenches and fill them
with organic wastes mixed with cocoons of Eisenia fetida. Soybeans planted in
rows between the trenches are highly productive. Can you design and test a
planting system using vermicompost?
E A R T H W O R M S A N D W A T E R
Earthworms require large amounts of water, which they ingest with
food and absorb through their body walls. The water is used to maintain
a moist body surface that aids the worm’s movement through soil and
protects it against toxic substances. A moist body surface is also necessary
because worms obtain oxygen by absorption in solution through their
cuticle. A soil moisture content of 80–90% by weight is considered opti-
S C O M P O S T I N G I N T H E C L A S S R O O M
 24
6
6
6

8/9/2019 Composting in the Classroom
http://slidepdf.com/reader/full/composting-in-the-classroom 36/126
mal for Eisenia fetida. Many worms, including Lumbricus terrestris, can
tolerate poorly ventilated soils because of the high affinity of their hemo-
globin for oxygen. However, under saturated soil conditions, worms will
come to the surface, sometimes migrating considerable distances. It is
unknown whether low oxygen levels or chemicals in soil solution cause
this behavior.
Because most water uptake and loss occurs through the thin perme-able cuticle, worms are at constant risk of dehydration. Although worms
have no shell or waxy cuticle to maintain body moisture, they can sur-
vive low moisture conditions. Some species migrate to deeper soil levels
when surface soil dries out.
L U M B R I C I D A E
The family Lumbricidae is the dominant family of worms in Europe.
As European agricultural practices spread throughout much of the world,
so did Lumbricid worms. These worms were able to successfully colonize
new soils and became dominant, often replacing endemic worm species.
They are now the dominant family in most temperate, crop-growing
regions around the world, including North America.
Lumbricus terrestris is one of the most common earthworms in north-
ern North America. It lives in a wide range of habitats, including grass-
lands, agricultural fields, gardens, and forests. It feeds on leaves and other
plant materials, dragging them into its burrows in the soil.
Eisenia fetida is the favored species for use in vermicomposting. It is
particularly well suited to composting because it is extremely prolific,
thrives in high organic matter habitats, can tolerate a wide range of tem-
peratures and moisture conditions, and can be readily handled. Its nat-
ural habitat is probably under the bark of dead tree trunks, but it is most
commonly found in animal dung, compost, and other accumulations of
decaying plant material. Originally from Europe, it has become
established throughout much of the world.
Just how prolific is Eisenia fetida? When it is given high-energy and
nitrogen-rich food (such as horse manure or activated sewage sludge—
yum!), adequate moisture, and optimum temperatures (25°C), cocoon
production in Eisenia fetida starts 35 days after the worms hatch, and it
reaches its maximum at 70 days. The cocoons, each carrying one to six
eggs, are produced in the clitellum, or swollen region along the worm’s
body. Between three and four cocoons are produced each week. Nineteen
days later, the young worms or hatchlings emerge and the process begins
again. Thus, under “luxury” conditions, a population of Eisenia fetida canhave four generations and produce 100 times its own weight in one year.
Low food quality, overcrowding, or suboptimal temperatures or moisture
levels reduce these reproductive rates. For example, growth is 24 times
faster at 25°C than at 10°C, and temperatures below 0°C and over 35°C
are considered lethal.
Research Possibility: How do different food sources affect reproductive and
growth rates of Eisenia fetida?
1 T H E S C I E N C E O F C O M P O S T I N G T
25
6
Lumbricus terrestris
Eisenia fetida

8/9/2019 Composting in the Classroom
http://slidepdf.com/reader/full/composting-in-the-classroom 37/126
Cocoons of Eisenia fetida may survive dryness and possibly other
adverse conditions for several years and then hatch when favorable con-
ditions return. In compost piles, adults may move from areas of less
favorable conditions to areas with conditions conducive to their growth.
For example, in winter months, they may migrate to the warm center of
a large outdoor pile. Perhaps through these “mini-migrations” or through
cocoon survival, Eisenia fetida are able to survive winters in regions wheretemperatures dip well below those that are lethal in the laboratory.
Research Possibility: Eisenia fetida does best in wastes with pH between 5.0
and 8.0. How sensitive are cocoons to pH? Will they hatch after being exposed
to extreme pH? How sensitive are they to extreme drought or temperatures?
Does the use of Eisenia fetida in composting serve to further spread
this exotic species, possibly interfering with native earthworm popula-
tions? To answer this question, it is useful to consider the fact that popu-
lations of earthworms are already much altered throughout the globe. In
North America, for example, there are 147 species of worms, 45 of which
were probably introduced. In fact, when Europeans first arrived in for-merly glaciated parts of North America, they claimed there were no
earthworms present. (It is assumed that earthworms in northern North
America were wiped out during glaciation.) Thus, the species that are
currently in these regions were either introduced in soil from imported
plants or spread northward from southern regions of North America.
Eisenia fetida is thought to have been introduced to North America in
organic soils brought in with imported plants. Because it is adapted to
compost and other organic substrates, it is unlikely to spread into neigh-
boring soils and compete with soil-inhabiting worms.
1 Kayhanian, M. and G. Tchobanoglous. 1992. Computation of C/N ratios for variousorganic fractions. BioCycle 33(5): 58–60.
2 Michel, F. C., Jr., L. J. Forney, A. J.-F. Huang, S. Drew, M. Czuprenski, J. D. Lindeberg,and C. A. Reddy. 1996. Effects of turning frequency, leaves to grass mix ratio andwindrow vs. pile configuration on the composting of yard trimmings. Compost Science& Utilization 4: 26–43.
3 F. C. Michel, Jr., NSF Center for Microbial Ecology, Michigan State University (per-sonal communication).
4 The information on earthworms was compiled from the following sources:
Edwards, C. A. and P. J. Bohlen. 1996. Biology and Ecology of Earthworms. ChapmanHall. London, U.K.
Edwards, C. A. and E. F. Neuhauser, editors. 1988. Earthworms in Waste and Environmental Management . SPB Academic Publishing. The Hague, The Netherlands.
Hendrix, P. F., editor. 1995. Earthworm Ecology and Biogeography in North America.Lewis Publishers, CRC Press. Boca Raton, FL.
Lee, K. E. 1985. Earthworms: Their Ecology and Relationships with Soils and Land Use.Academic Press, Australia.
5 Darwin, C. 1881. The Formation of Vegetable Mould Through the Action of Worms WithObservations on Their Habits. Currently published by Bookworm Publishing Co.,Ontario, CA.
S C O M P O S T I N G I N T H E C L A S S R O O M
 26
6
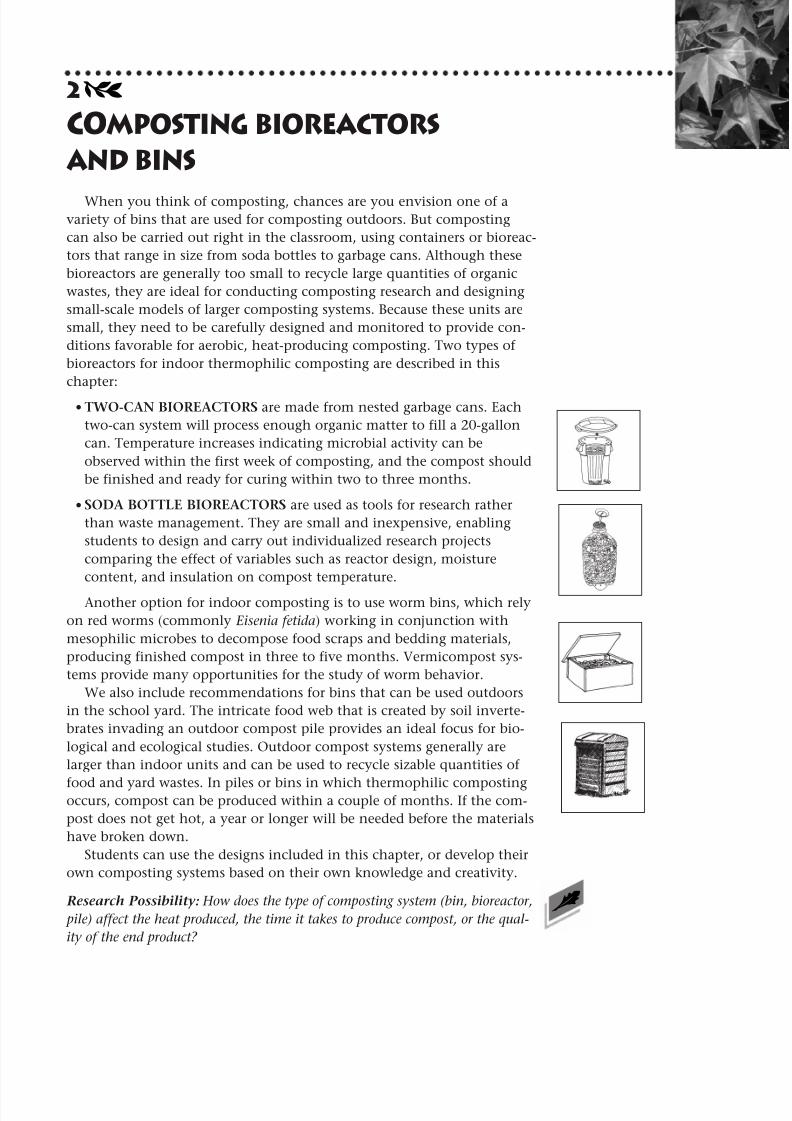
8/9/2019 Composting in the Classroom
http://slidepdf.com/reader/full/composting-in-the-classroom 38/126
2y
COMPOSTING BIOREACTORS
AND BINS
When you think of composting, chances are you envision one of a
variety of bins that are used for composting outdoors. But composting
can also be carried out right in the classroom, using containers or bioreac-
tors that range in size from soda bottles to garbage cans. Although these
bioreactors are generally too small to recycle large quantities of organic
wastes, they are ideal for conducting composting research and designing
small-scale models of larger composting systems. Because these units are
small, they need to be carefully designed and monitored to provide con-
ditions favorable for aerobic, heat-producing composting. Two types of
bioreactors for indoor thermophilic composting are described in this
chapter:
TWO-CAN BIOREACTORS are made from nested garbage cans. Each
two-can system will process enough organic matter to fill a 20-gallon
can. Temperature increases indicating microbial activity can be
observed within the first week of composting, and the compost should
be finished and ready for curing within two to three months.
SODA BOTTLE BIOREACTORS are used as tools for research rather
than waste management. They are small and inexpensive, enabling
students to design and carry out individualized research projects
comparing the effect of variables such as reactor design, moisture
content, and insulation on compost temperature.
Another option for indoor composting is to use worm bins, which rely
on red worms (commonly Eisenia fetida) working in conjunction with
mesophilic microbes to decompose food scraps and bedding materials,
producing finished compost in three to five months. Vermicompost sys-
tems provide many opportunities for the study of worm behavior.
We also include recommendations for bins that can be used outdoors
in the school yard. The intricate food web that is created by soil inverte-
brates invading an outdoor compost pile provides an ideal focus for bio-
logical and ecological studies. Outdoor compost systems generally are
larger than indoor units and can be used to recycle sizable quantities of
food and yard wastes. In piles or bins in which thermophilic compostingoccurs, compost can be produced within a couple of months. If the com-
post does not get hot, a year or longer will be needed before the materials
have broken down.
Students can use the designs included in this chapter, or develop their
own composting systems based on their own knowledge and creativity.
Research Possibility: How does the type of composting system (bin, bioreactor,
pile) affect the heat produced, the time it takes to produce compost, or the qual-
ity of the end product?
•
•
6

8/9/2019 Composting in the Classroom
http://slidepdf.com/reader/full/composting-in-the-classroom 39/126
TWO-CAN BIOREACTORS
PURPOSETwo-can composters consist of a 20-gallon garbage can containing
organic wastes placed inside a 32-gallon garbage can. Although many
classrooms have successfully composted with a single container, placing
the can that holds wastes inside another container helps alleviate any
odor and fly problems that may arise. The outside container can also be
used to collect leachate.
Two-can units are designed to be used for small-scale indoor compost-
ing, and as an educational tool in the classroom. A 20-gallon can holds
only about 10% of the cubic meter volume commonly recommended for
thermophilic composting. Thermophilic composting is possible in these
smaller systems, but careful attention needs to be paid to C:N ratios,
moisture content, and aeration.
A system using a 10-gallon plastic garbage can inside a 20-gallon can
may be substituted if space is a problem. The smaller system may operate
at lower temperatures, thereby lengthening the time for decomposition.
Or students may want to experiment with various aeration and insulation
systems to see if they can come up with a 10-gallon system that achieves
temperatures as high as those in a larger system.
MATERIALS• 32-gal plastic garbage can
• 20-gal plastic garbage can
• drill
• brick
• spigot (optional—see Step 3, below)
• insulation (optional—see Step 5, below)
• duct tape (optional—see Step 5, below)
• 6 pieces of nylon window screen (each about 5 cm2)
• dial thermometer with stem at least 60 cm long
• peat moss or finished compost to make 5-cm layer in outer can
• compost ingredients, including high-carbon materials such as wood
chips and high-nitrogen materials such as food scraps (see Step 8,
below)
CONSTRUCTION1. Using a drill, make 15 to 20 holes (1–2.5 cm diameter) through the
bottom of the 20-gal can.
2. Drill five 1–2.5 cm holes just below the rim of the larger garbage can,
and cover them on the inside with pieces of nylon window screen.
3. Design and build a spigot at the bottom of the larger can for draining
leachate. One way to do this is to fit a piece of pipe into a hole at the
bottom edge of the outer can, sealing around the edges with
waterproof tape or sealant. Close the outer end of the pipe with a
tight-fitting cork or stopper that can be removed to drain the accumu-
S C O M P O S T I N G I N T H E C L A S S R O O M
 28

8/9/2019 Composting in the Classroom
http://slidepdf.com/reader/full/composting-in-the-classroom 40/126
lated leachate, and cover the inner end with a piece of nylon screening
to block the flow of solid particles.
4. Place a brick or some other object in the bottom of the 32-gal can.
This is to separate the two cans, leaving space for leachate to collect.
(Students may want to measure the leachate and add it back into the
compost.)
5. If you are composting in a cold area, you may want to attach insula-
tion to the outer barrel and lid with duct tape, making sure not to
block aeration holes.
6. To reduce potential odors, line the bottom of the outer can with
several centimeters of absorbent material such as peat moss or finished
compost. Periodically drain the leachate to avoid anaerobic conditions
that may cause odors. The leachate can be poured back in the top if
the compost appears to be drying out. Otherwise, dispose of it outside
or down the drain, but do not use it for watering plants. (This leachate
is not the “compost tea” prized by gardeners, and it could harm vege-
tation unless diluted. Compost tea is made by soaking mature com-
post, after decomposition is completed.)
7. Fill the reactor, starting with a 5–10 cm layer of “brown” material such
as wood chips, finished compost, or twigs and branches. Loading can
take place all at once (called “batch composting”) or in periodic incre-
ments. With batch composting, you are more likely to achieve high
temperatures quickly, but you will need to have all organic material
ready to add at one time. If you are going to add layers of materials
over a period of time rather than all at once, the material probably
won’t begin to get hot until the can is at least 1/3 full (Figure 2–1).
Figure 2–1. A Typical Temperature Profile for Two-Can Composting with
Continuous Loading.
2 C O M P O S T I N G B I O R E A C T O R S A N D B I N S T
29
60
50
40
30
20
10
0
C o m p
o s t T e m p e r a t u r e ( ° C )
Compost Temperature
Ambient Temperature
can 2/3 full↓
stopped filling↓
10 20 30 40 50 60 70 80
Day
can1/3 full
↓

8/9/2019 Composting in the Classroom
http://slidepdf.com/reader/full/composting-in-the-classroom 41/126
Whether you fill the reactor all at once or in batches, remember to
keep the ingredients loose and fluffy. Although they will become more
compact during composting, never pack them down yourself because
the air spaces are needed for maintaining aerobic conditions. Another
important rule is to keep the mixture in the inner can covered at all
times with a layer of high-carbon material such as finished compost,
sawdust, straw, or wood shavings. This minimizes the chance of odoror insect problems.
8. To achieve thermophilic composting, you will need to provide the
ingredients within the target ranges for moisture, carbon, and nitro-
gen. For moisture, the ideal mixture is 50–60% water by weight. You
can calculate this by using the procedure described in Chapter 3 (pp.
47–48), or use the rule of thumb that the ingredient mix should feel
about as damp as a wrung-out sponge. For carbon and nitrogen, the
mixture should contain approximately 30 times as much available car-
bon as nitrogen (or a C:N ratio of 30:1). Using a specified quantity of
one ingredient, you can calculate how much of the other you will need
to achieve this ratio (see Chapter 3, pp. 48–50). Or, you can simply
make a mixture of high-carbon and high-nitrogen materials. Organic
materials that are high in carbon include wood chips or shavings,
shredded newspaper, paper egg cartons, and brown leaves. Those high
in nitrogen include food scraps, green grass or yard trimmings, coffee
grounds, and manure. (Do not use feces from cats or meat-eating ani-
mals because of the potential for spreading disease organisms.)
You are now ready to begin monitoring the composting process
using the methods outlined in Chapter 4. The composting process
should take two to three months after the can is filled. At the end of
this period, you can either leave the compost in the can or transfer itinto other containers or an outdoor pile for the curing phase.
S C O M P O S T I N G I N T H E C L A S S R O O M
 30

8/9/2019 Composting in the Classroom
http://slidepdf.com/reader/full/composting-in-the-classroom 42/126
SODA BOTTLE BIOREACTORS
PURPOSESoda bottle bioreactors are designed to be used as tools for composting
research rather than as a means to dispose of organic waste. They are
small and inexpensive, enabling students to design and carry out individ-
ualized research projects comparing the effect of variables such as mois-
ture content or nutrient ratios on compost temperatures.
Use the instructions below as a starting point. Challenge students to
design their own soda bottle reactors and to monitor the temperatures
that their reactors achieve.
MATERIALS• two 2-liter or 3-liter soda bottles
• Styrofoam plate or tray
• one smaller plastic container such as a margarine tub that fits inside
the bottom of the soda bottle (optional—see Step 3, below)
• drill or nail for making holes
• duct tape or clear packaging tape
• utility knife or sharp-pointed scissors
• insulation materials such as sheets of foam rubber or fiberglass
• fine-meshed screen or fabric (such as a piece of nylon stocking) large
enough to cover ventilation holes to keep flies out
• dial thermometer with stem at least 20 cm long
• chopped vegetable scraps such as lettuce leaves, carrot or potato
peelings, and apple cores, or garden wastes such as weeds or grass
clippings
• bulking agent such as wood shavings or 1-cm pieces of paper egg
cartons, cardboard, or wood
• hollow flexible tubing to provide ventilation out the top (optional—
see Step 8, below)
CONSTRUCTION1. Using a utility knife or sharp-pointed scissors, cut the top off one soda
bottle just below the shoulder and the other just above the shoulder.
Using the larger pieces of the two bottles, you will now have a top
from one that fits snugly over the bottom of the other.
2. The next step is to make a Styrofoam circle. Trace a circle the diameter
of the soda bottle on a Styrofoam plate and cut it out, forming a piecethat fits snugly inside the soda bottle. Use a nail to punch holes
through the Styrofoam for aeration. The circle will form a tray to hold
up the compost in the bioreactor. Beneath this tray, there will be air
space for ventilation and leachate collection.
3. If your soda bottle is indented at the bottom, the indentations may
provide sufficient support for the Styrofoam circle. Otherwise, you will
need to fashion a support. One technique is to place a smaller plastic
2 C O M P O S T I N G B I O R E A C T O R S A N D B I N S T
31

8/9/2019 Composting in the Classroom
http://slidepdf.com/reader/full/composting-in-the-classroom 43/126
container upside down into the bottom of the soda bottle. Other pos-
sibilities include wiring or taping the tray in place.
4. Fit the Styrofoam circle into the soda bottle, roughly 4–5 cm from the
bottom. Below this tray, make air holes in the sides of the soda bottle.
This can be done with a drill or by carefully heating a nail and using it
to melt holes through the plastic. If you are using a plastic container
to hold up the Styrofoam tray, you may need to drill holes through
the container as well. The object is to make sure that air will be able to
enter the bioreactor, diffuse through the compost, and exit through
the holes or tubing at the top.
Avoid making holes in the very bottom of the bottle unless you
plan to use a pan underneath it to collect whatever leachate may be
generated during composting.
5. Next, determine what you will compost. A variety of ingredients will
work, but in general you will want a mixture that is 50–60% water by
weight and has approximately 30 times as much available carbon as
nitrogen (a C:N ratio of 30:1). You can estimate moisture by using therule of thumb that the mixture should feel as damp as a wrung-out
sponge, or you can calculate optimal mixtures using the procedures in
Chapter 3 (pp. 47–48).
Similarly, mixtures that will achieve optimal C:N ratios can be
either estimated or calculated. Materials that are high in carbon
include wood chips or shavings, shredded newspaper, and brown
leaves. High-nitrogen materials include food scraps, green grass or yard
trimmings, and coffee grounds. By mixing materials from the high-
carbon and high-nitrogen groups, you can achieve a successful mix-
ture for thermophilic composting. Try to include more than just a
couple of ingredients; mixtures containing a variety of materials aremore likely than homogeneous ones to achieve hot temperatures in
soda bottle bioreactors. To calculate rather than estimate the amounts
needed, use the equations in Chapter 3 (pp. 48–50).
The particle size of compost materials needs to be smaller in soda
bottle bioreactors than in larger composting systems. In soda bottles,
composting will proceed best if the materials are no larger than
1–2 cm.
6. Loosely fill your bioreactor. Remember that you want air to be able to
diffuse through the pores in the compost, so keep your mix light and
fluffy and do not pack it down.
7. Put the top piece of the soda bottle on and seal it in place with tape.
8. Cover the top hole with a piece of screen or nylon stocking held in
place with a rubber band. Alternatively, if you are worried about
potential odors, you can ventilate your bioreactor by running rubber
tubing out the top. In this case, drill a hole through the screw-on soda
bottle lid, insert tubing through the hole, and lead the tubing either
out the window or into a ventilation hood.
S C O M P O S T I N G I N T H E C L A S S R O O M
 32
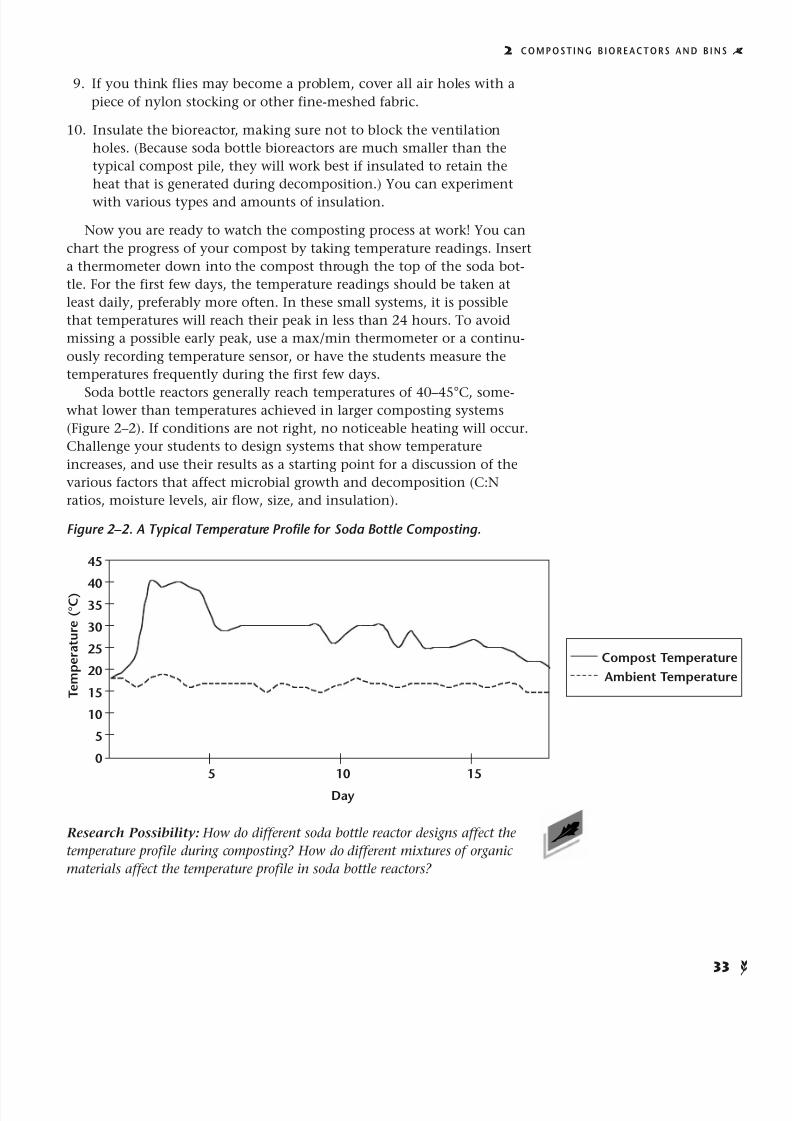
8/9/2019 Composting in the Classroom
http://slidepdf.com/reader/full/composting-in-the-classroom 44/126
9. If you think flies may become a problem, cover all air holes with a
piece of nylon stocking or other fine-meshed fabric.
10. Insulate the bioreactor, making sure not to block the ventilation
holes. (Because soda bottle bioreactors are much smaller than the
typical compost pile, they will work best if insulated to retain the
heat that is generated during decomposition.) You can experiment
with various types and amounts of insulation.
Now you are ready to watch the composting process at work! You can
chart the progress of your compost by taking temperature readings. Insert
a thermometer down into the compost through the top of the soda bot-
tle. For the first few days, the temperature readings should be taken at
least daily, preferably more often. In these small systems, it is possible
that temperatures will reach their peak in less than 24 hours. To avoid
missing a possible early peak, use a max/min thermometer or a continu-
ously recording temperature sensor, or have the students measure the
temperatures frequently during the first few days.
Soda bottle reactors generally reach temperatures of 40–45°C, some-what lower than temperatures achieved in larger composting systems
(Figure 2–2). If conditions are not right, no noticeable heating will occur.
Challenge your students to design systems that show temperature
increases, and use their results as a starting point for a discussion of the
various factors that affect microbial growth and decomposition (C:N
ratios, moisture levels, air flow, size, and insulation).
Figure 2–2. A Typical Temperature Profile for Soda Bottle Composting.
Research Possibility: How do different soda bottle reactor designs affect the
temperature profile during composting? How do different mixtures of organic
materials affect the temperature profile in soda bottle reactors?
2 C O M P O S T I N G B I O R E A C T O R S A N D B I N S T
33
45
4035
30
25
20
15
10
5
05 10 15
Day
T e m p e r a t u r e ( ° C )
Compost Temperature
Ambient Temperature
6

8/9/2019 Composting in the Classroom
http://slidepdf.com/reader/full/composting-in-the-classroom 45/126
Because soda bottles are so small, you may not end up with a product
that looks as finished as the compost from larger piles or bioreactors.
However, you should find that the volume shrinks by one-half to two-
thirds and that the original materials are no longer recognizable. You can
let the compost age in the soda bottles for several months, or transfer it
to other containers or outdoor piles for curing.
S C O M P O S T I N G I N T H E C L A S S R O O M
 34
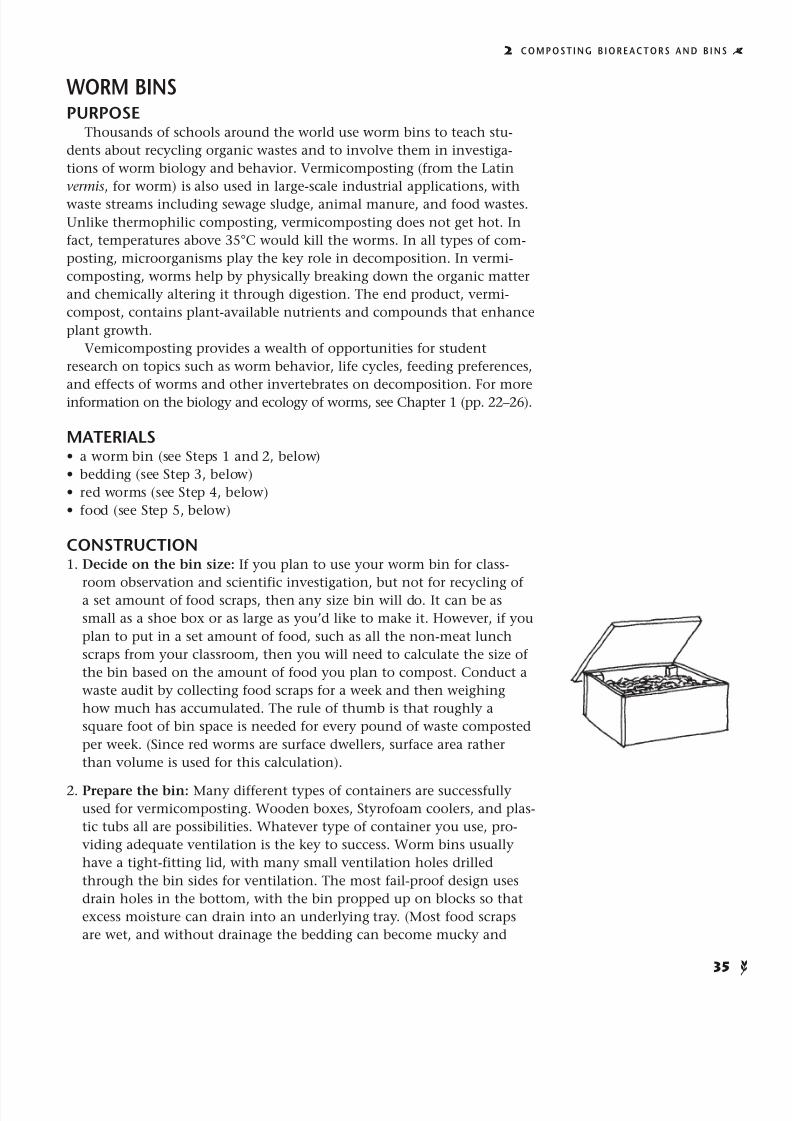
8/9/2019 Composting in the Classroom
http://slidepdf.com/reader/full/composting-in-the-classroom 46/126
WORM BINS
PURPOSEThousands of schools around the world use worm bins to teach stu-
dents about recycling organic wastes and to involve them in investiga-
tions of worm biology and behavior. Vermicomposting (from the Latin
vermis, for worm) is also used in large-scale industrial applications, with
waste streams including sewage sludge, animal manure, and food wastes.
Unlike thermophilic composting, vermicomposting does not get hot. In
fact, temperatures above 35°C would kill the worms. In all types of com-
posting, microorganisms play the key role in decomposition. In vermi-
composting, worms help by physically breaking down the organic matter
and chemically altering it through digestion. The end product, vermi-
compost, contains plant-available nutrients and compounds that enhance
plant growth.
Vemicomposting provides a wealth of opportunities for student
research on topics such as worm behavior, life cycles, feeding preferences,
and effects of worms and other invertebrates on decomposition. For more
information on the biology and ecology of worms, see Chapter 1 (pp. 22–26).
MATERIALS• a worm bin (see Steps 1 and 2, below)
• bedding (see Step 3, below)
• red worms (see Step 4, below)
• food (see Step 5, below)
CONSTRUCTION1. Decide on the bin size: If you plan to use your worm bin for class-
room observation and scientific investigation, but not for recycling of a set amount of food scraps, then any size bin will do. It can be as
small as a shoe box or as large as you’d like to make it. However, if you
plan to put in a set amount of food, such as all the non-meat lunch
scraps from your classroom, then you will need to calculate the size of
the bin based on the amount of food you plan to compost. Conduct a
waste audit by collecting food scraps for a week and then weighing
how much has accumulated. The rule of thumb is that roughly a
square foot of bin space is needed for every pound of waste composted
per week. (Since red worms are surface dwellers, surface area rather
than volume is used for this calculation).
2. Prepare the bin: Many different types of containers are successfully
used for vermicomposting. Wooden boxes, Styrofoam coolers, and plas-
tic tubs all are possibilities. Whatever type of container you use, pro-
viding adequate ventilation is the key to success. Worm bins usually
have a tight-fitting lid, with many small ventilation holes drilled
through the bin sides for ventilation. The most fail-proof design uses
drain holes in the bottom, with the bin propped up on blocks so that
excess moisture can drain into an underlying tray. (Most food scraps
are wet, and without drainage the bedding can become mucky and
2 C O M P O S T I N G B I O R E A C T O R S A N D B I N S T
35

8/9/2019 Composting in the Classroom
http://slidepdf.com/reader/full/composting-in-the-classroom 47/126
anaerobic.) If you want to build a self-contained unit, it is possible to
maintain proper moisture conditions without bottom drainage, as long
as you are willing to keep a watchful eye on the moisture level and
mix in dry bedding whenever the compost mixture begins to look
soggy. (You want the mix to be moist but without puddles.)
Some commercially available worm bins use a tiered system of stack-
ing bins. When the worms have depleted the food in the bottom bin,they crawl upward through holes or mesh into the next higher bin,
where fresh food scraps have been added. Students may want to design
a system such as this, using a stack of mesh-bottomed trays or boxes.
3. Prepare the bedding: The bedding holds moisture and contains air
spaces essential to worms, and it gets eaten along with the food wastes.
Common types of bedding include strips of newspaper, office paper,
corrugated cardboard, or paper egg cartons. Machine-shredded paper or
cardboard is ideal if available. If not, paper or cardboard will need to
be torn into strips 1–3 cm wide. Other popular bedding materials
include leaves, sawdust, peat moss, and shredded coconut fiber, which
is similar in consistency to peat moss and is available from companies
that sell red worms.
Whatever type of bedding you choose, you will need to soak it until
saturated, then drain off any excess water. Place the damp bedding in
the bin, filling it to a depth of about 20 cm. Do not pack the bedding
down—leave it loose to provide air spaces for the worms. You may
wish to add a couple of handfuls of sand or crushed egg shells to pro-
vide the grit that worms use to grind their food.
4. Add the worms: The species most commonly used for vermicompost-
ing is Eisenia fetida, commonly called red worms, red wigglers, manure
worms, or tiger worms. You will need a pound or two (1000–2000worms) to get started, after which the worms will replace themselves as
long as conditions remain suitable for their reproduction and growth.
If you can’t obtain Eisenia fetida from a composter or worm farm in
your community, you can mail-order them.1 Lumbricus terrestris, the
common night crawlers found in gardens, will not thrive in worm bins
because they are adapted to burrowing deep into soil. In contrast,
Eisenia fetida are surface dwellers, adapted to living in organically rich
surface soils and the overlying layers of decomposing leaves and
organic debris.
5. Add food: Bury a few handfuls of fruit and vegetable scraps in the bed-ding. Wait several days for the worms to acclimatize, then gradually
increase the amount of food based on how quickly it is disappearing.
You can add food every day, or you can leave the bin untended for a
week or even up to a month once it has become established.
Any food that humans eat can be fed to worms, but some types are
more suitable than others for indoor worm bins. Vegetable and fruit
scraps are ideal, such as carrot peels, melon rinds, and apple cores.
Coffee grounds, tea bags, bread crusts, and pasta all are suitable. If you
add a large amount of citrus fruits or other acidic foods, it would be a
S C O M P O S T I N G I N T H E C L A S S R O O M
 36

8/9/2019 Composting in the Classroom
http://slidepdf.com/reader/full/composting-in-the-classroom 48/126
good idea to monitor the pH to make sure it does not drop below the
6.5 to 8.5 range that is ideal for worms (see pH, below). It is best to
limit the quantities of foods such as onions and broccoli, which tend
to have strong odors as they decompose. Avoid meats, fats, and dairy
products because these foods decompose slowly and may attract pests.
You may want to cut or break large food scraps into small pieces for
faster decomposition.
6. Cover the bin with a lid made of plastic, wood, or fabric to provide
shade and conserve moisture.
7. Locate the bin in an area where it will not be exposed to extreme heat
or cold. Red worms thrive at room temperature (15–25°C). They can
survive in colder locations, but their rate of feeding will be reduced.
They will die if they freeze or are subjected to temperatures above
about 35°C. Avoid placing bins on surfaces that vibrate, such as the
surface of washing machines, because the vibrations may trigger the
worms to try to leave the bin.
MAINTENANCEMaintaining a worm bin is simple. No mixing or turning is needed. All
you need to do is to keep an eye on the amount of food, the moisture
level, and possibly the pH, and to harvest the worms once the compost-
ing process is completed.
Food: Monitor the bin and add more food once the first scraps have
started to disappear. How much food should you add? Red worms can eat
up to half their weight per day, so a simple calculation based on their
initial weight will provide a guideline for the appropriate amount of
food. But, it is important not to rely on numbers alone—instead, check
once a week or so to see if the food is disappearing, and adjust feedinglevels accordingly.
Research Possibilities: Worm feeding provides many opportunities for experi-
mentation. Which types of food disappear the fastest, and which decompose
slowly? Which foods tend to attract large groups of worms, and which ones do
the worms avoid? Does the initial size of food particles affect how quickly they
disappear?
Moisture: If the bedding appears dry, add moist food scraps or lightly
spray with water. If the bedding becomes soggy, add dry newspaper strips
or other dry bedding material, and avoid adding wet food scraps until the
moisture is back in balance.pH: Although not essential, periodic pH measurements are useful in
monitoring the conditions in your worm bin. Simply insert pH paper
into damp vermicompost, or follow one of the other measurement tech-
niques described on p. 54. Eisenia fetida do best at a pH around neutral or
slightly alkaline, in the range of 6.5 to 8.5. If conditions become acidic,
mix in a sprinkling of crushed egg shells or powdered lime (CaCO3, not
hydrated lime).
2 C O M P O S T I N G B I O R E A C T O R S A N D B I N S T
37
6

8/9/2019 Composting in the Classroom
http://slidepdf.com/reader/full/composting-in-the-classroom 49/126
Bedding: Within several months, most of the original bedding will
have been replaced with brown, soil-like castings. At this point, it is time
to remove the completed vermicompost and harvest the worms to start a
new batch. This can be done all at once or through a gradual process (see
Harvesting the Worms, p. 39).
TROUBLESHOOTINGEscaping Worms: When you first put worms into fresh bedding, they
may initially try to escape. If you keep the lid on, they will gradually get
acclimatized and remain in the bin even when it is uncovered. Once your
vermicomposting is underway, worms attempting to escape is a signal
that conditions in the bin are not favorable. The bedding may be too
moist, which you can solve by mixing in some dry bedding. Or, the con-
ditions may have become too acidic (see pH, p. 37). Another possibility is
that the worms are not getting enough to eat. If all of the food and bed-
ding have decomposed, the remaining castings will not continue to ade-
quately nourish the worms, and it is time to harvest them and begin
again with fresh bedding.Worm Mortality: In a properly maintained worm bin, worms will
continually die and decompose without being noticed, and the popula-
tion will replenish itself through reproduction. If you notice many dead
worms, there is a problem. Either the mixture has become too wet or dry,
too hot or cold, or available food supplies have become depleted (see
remedies listed under Escaping Worms, above).
Fruit Flies: Although fruit flies do not pose any health hazards, they
can be a nuisance. To avoid breeding flies in worm bins, make sure to
bury all food scraps in bedding. Monitor the decomposition of food that
you add, and hold off on adding more if the scraps are sitting longer
than a few days before disappearing. Keep bedding material moist but nottoo wet, since overly wet conditions encourage the proliferation of fruit
flies.
If a fruit fly problem does develop, stop adding food until the worms
have had a chance to catch up with the existing supply, and add dry
newspaper strips if the bedding appears soggy. If the outdoor weather is
suitable, you might want to air out the bin by leaving it uncovered out-
side for a few hours.
You can build a simple but effective fruit fly trap that can be placed
either right in the worm bin or anywhere in the classroom where flies
congregate. Take a soda bottle and remove the lid. Cut the bottle in two,
with the top part slightly shorter than the bottom part. Pour cider vine-gar into the bottom part to a depth of about 2 cm. Then, invert the top
of the bottle into the bottom, forming a funnel leading into the bottle.
Fruit flies will be attracted to the vinegar, and they will drown or get
trapped.
Other Invertebrates: Many types of soil invertebrates can inhabit
worm bins without causing problems. If you use leaves for bedding or if
you add soil for grit, you are likely to introduce into the bin a variety of
invertebrates such as millipedes, sowbugs, slugs, and springtails (see
S C O M P O S T I N G I N T H E C L A S S R O O M
 38

8/9/2019 Composting in the Classroom
http://slidepdf.com/reader/full/composting-in-the-classroom 50/126
pp. 19–21 for a description of common soil invertebrates). These organ-
isms are decomposers and will aid in making compost. You may notice
some tiny white worms in your vermicompost. These often are mistaken
for baby red worms but can be distinguished by their white rather than
pink coloration. They are potworms, or enchytraeids (see p. 19). Pot-
worms will not harm red worms, and they will aid in decomposition, but
if you have many of them in your bin it may indicate that conditionshave become acidic. Mites usually are present in worm bins but rarely
present a problem. However, if your vermicompost becomes too moist or
acidic, it may become infested and appear to be swarming with mites. At
this point, it is a good idea to harvest the worms, rinse them, and start
over with new bedding and food in a clean bin.
Odors: A properly functioning worm bin will not have a noticeable
odor. If unpleasant smells do develop, there are several possible reasons.
The bedding may have become too wet or may not be getting enough air.
Another possible source of odors is food such as onions or broccoli that
are naturally smelly as they decompose, or foods such as dairy products
that turn rancid because they are not eaten rapidly by worms. To correcta problem of this sort, simply remove and dispose of the offending foods.
HARVESTING THE WORMSIf you want to use the compost on plants, and reuse the worms to
make more compost, you will need to harvest the worms. This is gener-
ally done after three or more months, when the bin is filled with com-
post and very little bedding remains. Two methods are commonly used to
separate worms from the castings. In the slower but easier method, you
simply push all of the worm bin contents to one-half of the bin. In the
empty half, start a new batch of compost by providing fresh bedding and
food scraps. Over the next several weeks, the worms will move to the sidewith new food, conveniently leaving their castings behind in the other
section. After this occurs, you can remove the finished compost and
replace it with fresh bedding.
A faster but more labor-intensive method of removing worms involves
dumping the entire contents of the worm bin onto a sheet of plastic or
paper in a sunny or brightly lit location. Shape the compost into several
cone-shaped piles. The worms will burrow downward to avoid light.
Scoop the top layer off each pile, wait a few minutes for the worms to
burrow farther, and then remove the next layer of compost. Repeat this
process until the worms have become concentrated at the bottom of each
pile. Collect the worms, weigh them (to compare with your initial massof worms), and put them back in the bin with fresh bedding.
Research Possibility: Design some experiments to find a better way of separat-
ing worms from compost. Are there any chemical or physical factors that will
cause the worms to migrate, without impairing the beneficial properties of fin-
ished vermicompost?
2 C O M P O S T I N G B I O R E A C T O R S A N D B I N S T
39
6

8/9/2019 Composting in the Classroom
http://slidepdf.com/reader/full/composting-in-the-classroom 51/126
USING VERMICOMPOSTOnce the food and bedding have fully decomposed, vermicompost can
be used in the same way as other types of compost, either mixed into the
soil or added to the surface as a top dressing. By mixing vermicompost
with water, you can make a compost tea solution that enriches plants as
they are watered. Many claims are made about the growth-inducing prop-
erties of vermicompost. See Chapters 6 and 7 for ideas about experimentsto test the effects of various types of compost on plant growth.
Research Possibility : How does vermicompost compare with thermophilic
compost in plant growth experiments?
S C O M P O S T I N G I N T H E C L A S S R O O M
 40
6

8/9/2019 Composting in the Classroom
http://slidepdf.com/reader/full/composting-in-the-classroom 52/126
OUTDOOR COMPOSTING
Outdoor composting systems can be larger than indoor bioreactors,
allowing students to compost greater quantities of food scraps and land-
scaping trimmings. Although slightly less convenient than a system right
in the classroom, students can monitor the temperature, moisture con-
tent, and other aspects of an outdoor system, and they can bring samples
of the compost inside for observation and experimentation. Many
schools have developed outdoor composting systems into demonstration
sites, with signs explaining the composting process.
Unlike indoor systems, outdoor systems are home to a diverse range of
invertebrates such as millipedes, centipedes, earthworms, pseudoscorpi-
ons, beetles, snails, mites, and springtails. These organisms form an
intricate food web, and they can be used for illustrating ecological princi-
ples as well as for investigating topics such as life cycles and feeding
preferences.
In some outdoor systems, the organic materials are periodically mixed
or “turned.” This redistributes materials that were on the outside of the
pile and exposes them to the higher levels of moisture, warmth, and
microbial activity found in the center. It also fluffs up the compost mate-
rials, allowing better air flow through the pile. The net result generally is
to speed up the composting process (see pp. 10–11).
Bins should be located close to a water source in case they become too
dry. Good drainage is also important in order to avoid standing water and
the build-up of anaerobic conditions. Other considerations include avoid-
ing exposure to high winds which may dry and cool the pile, and to
direct sunlight which may also dry out the pile. The pile should not
touch wooden structures or trees because it may cause them to decay.
There should be space nearby for temporary storage of organic wastes.
There is an endless variety of outdoor composting systems. Bins may
be purchased or constructed. Three types of systems are described below.
Refer to Composting: Wastes to Resources (Bonhotal and Krasny, 1990) for
more details on outdoor bin designs, or have the students design their
own outdoor bins using readily available scrap materials.
HOLDING UNITSHolding units provide a low-maintenance form of composting. You
simply build the unit, fill it with organic materials, and then wait for the
materials to decompose. A holding unit can be any container that holds
organic materials while they are breaking down. The unit should be
about a cubic meter in size (1 m x 1 m x 1 m), and it can be built from
wire mesh, snow fence, cinder blocks, wooden pallets, or other materials.
You can fill holding units with high-carbon materials such as autumn
leaves and yard trimmings, realizing that these materials by themselves
will not heat up and will require a year or more to fully decompose. If
your system is dominated by leaves, you may want to avoid adding any
food scraps, which might attract rodents or raccoons during the slow
decomposition process. Alternatively, if you start with a mix that has the
2 C O M P O S T I N G B I O R E A C T O R S A N D B I N S T
41

8/9/2019 Composting in the Classroom
http://slidepdf.com/reader/full/composting-in-the-classroom 53/126
right C:N ratio and moisture level to become thermophilic, food scraps
should break down quickly before any pests become a problem.
TURNING UNITSA turning unit looks like three holding units placed side by side. Each
unit should be a cubic meter (1 m x 1 m x 1 m) in size. Leave one side
open or build a gate along one edge for easy access. Fill one bin at a time,using a mixture of high-nitrogen and high-carbon materials. For rapid
composting, turn the contents into the empty adjoining bin every week
or two, or each time the temperature begins to decline. A pile that is kept
“hot” like this should produce compost within a couple of months,
although an additional period of curing is necessary before the compost
is used for growing plants. The final bin provides the space needed for
curing while a new batch of compost is started in the first bin.
ENCLOSED BINS
For small-scale outdoor composting, enclosed bins are an option. Theycan be purchased from home and garden centers or inexpensively built
from a large garbage can. Simply drill 2-cm aeration holes in rows at
roughly 15-cm intervals around the can. Fill the cans with a mixture of
high-carbon and high-nitrogen materials. Stir the contents occasionally
to avoid anaerobic pockets and to speed up the composting process.
Although no type of bin is rodent-proof, enclosed bins do help to deter
rodents and are popular for food scrap composting.
1Worms are available by mail from sources such as Beaver River Associates, PO Box 94,West Kingston, RI 02892 (401) 782–8747, or Flowerfield Enterprises, 10332 ShaverRd., Kalamazoo, MI 49002 (616) 327–0108.
S C O M P O S T I N G I N T H E C L A S S R O O M
 42

8/9/2019 Composting in the Classroom
http://slidepdf.com/reader/full/composting-in-the-classroom 54/126
3y
GETTING THE RIGHT MIX1
Once the bin or bioreactor is constructed, it is time to add the organic
materials that will form compost. If you have several materials that you
want to compost, how do you figure out the appropriate mix to ensure
the proper balance of carbon, nitrogen, and moisture content? You may
want to do this by simply estimating the right mix of materials that are
wet and rich in nitrogen, such as food scraps, with other materials that
soak up moisture and are high in carbon, such as wood chips. In fact,
many experienced composters develop a “feel” for what works, following
the general rules of thumb described in this chapter for estimating appro-
priate mixtures of compost ingredients.
Other composters, especially compost researchers and operators of
large-scale commercial systems, combine general guidelines with more
precise calculations. For those who prefer to be exact about adding ingre-
dients, the second section of this chapter shows how to calculate a mix-
ture of organic materials that is balanced in terms of carbon, nitrogen,
and moisture content.
CHOOSING THE INGREDIENTS:
GENERAL RULES OF THUMB
MOISTUREOne of the most important considerations for successful composting is
the moisture content of the ingredients. In general, you want to achieve
a balance between materials high in moisture, such as fruit and vegetable
scraps, with dry materials such as wood chips. A common rule of thumb
is that the compost mixture has the right moisture content if it is about
as wet as a wrung-out sponge, with only a drop or two expelled when it
is squeezed.
Composting proceeds best at a moisture content of 50–60% by weight.
Table 3–1 lists typical moisture contents of common compost ingredients.
Table 3–1. Moisture Content of Common Compost Ingredients.2 (These data should be viewed as representative ranges, not as universal values.)
Moisture contentMaterial (% wet weight)
Vegetables and fruits 80–90
Grass clippings 80
Leaves 40
Sawdust 40
Shrub trimmings 15

8/9/2019 Composting in the Classroom
http://slidepdf.com/reader/full/composting-in-the-classroom 55/126
S C O M P O S T I N G I N T H E C L A S S R O O M
 44
MW W
Ww d
w
=−
× 100
MWd=
−×
10
10100 = −( ) ×10 10Wd
Instead of relying on typical figures such as those in Table 3–1, you
may wish to measure the moisture content of your compost. You can use
the following procedure to measure moisture either in the mixture as a
whole or in the individual ingredients prior to mixing.
MEASURING COMPOST MOISTURE
1. Weigh a small container, such as a paper plate or cupcakewrapper.
2. Weigh 10 g of compost into the container.
3. Dry the sample for 24 hours in a 105–110°C oven.
(Using a microwave oven is a possible alternative, but this
requires some experimentation to determine the drying time.
Begin by spreading the compost into a thin layer in a micro-
wave-safe container, then heat for one minute at full power.
Remove the sample and weigh it. Reheat for another minute,
then weigh it again. Repeat this cycle until the weight change
becomes negligible. If the sample becomes burned or charred,start over and use reduced power or shorter heating times.)
4. After drying, reweigh the sample, subtract the weight of the
container, then calculate the percent moisture content using the
following equation:
Equation 1:
in which:
M = moisture content (%) of compost sample
Ww = wet weight of the sample, and
Wd = weight of the sample after drying.
If you have used a 10 g compost sample, this simplifies to:
CARBON-TO-NITROGEN RATIO
The second important consideration for successful composting is thebalance between carbon and nitrogen. High-carbon and high-nitrogen
materials should be mixed to achieve a C:N ratio of roughly 30:1 (Table
3–2). High-carbon materials usually are brown or woody. They include
autumn leaves, wood chips, sawdust, and shredded paper. High-nitrogen
materials generally are characterized as green and include grass clippings,
plant cuttings, and fruit and vegetable scraps.

8/9/2019 Composting in the Classroom
http://slidepdf.com/reader/full/composting-in-the-classroom 56/126
Table 3–2. C:N Ratios of Common Compost Ingredients.3 (These data should be viewed as representative ranges, not as universal values.)
Materials High in Carbon C:N
autumn leaves 40–80:1
sawdust 200–750:1
wood chips or shavings—hardwood 450–800:1
wood chips or shavings—softwood 200–1,300:1
bark—hardwood 100–400:1
bark—softwood 100–1,200:1
straw 50–150:1
mixed paper 100–200:1
newspaper 400–900:1
corrugated cardboard 600:1
Materials High in Nitrogen C:N
vegetable scraps 10–20:1
fruit wastes 20–50:1
coffee grounds 20:1
grass clippings 10–25:1
cottonseed meal 10:1
dried blood 3:1
horse manure 20–50:1
Although tree leaves in general are considered to be high in carbon
and low in nitrogen, this varies considerably according to the species or
genus (Table 3–3).
Table 3–3. C:N Ratios of Common Tree Leaves.4
Tree C:N of Leaves
Alder 15:1
Ash 21:1
Elm 28:1Black elder 22:1
Hornbeam 23:1
Linden 37:1
Maple 52:1
Oak 47:1
3 G E T T I N G T H E R I G H T M I X T
45
Tree C:N of Leaves
Birch 50:1
Aspen 63:1
Spruce 48:1Beech 51:1
Red oak 53:1
Pine 66:1
Douglas fir 77:1
Larch 113:1

8/9/2019 Composting in the Classroom
http://slidepdf.com/reader/full/composting-in-the-classroom 57/126
OTHER CONSIDERATIONSIn addition to moisture content and C:N ratios, several other consider-
ations are important when choosing materials to compost. Prime among
these is the time that the materials will need to break down. Woody
materials, including wood chips, branches, and twigs, can take up to two
years to decompose unless they are finely chipped or shredded. Other
materials that break down slowly include corn cobs and stalks, sawdust,straw, and nut shells. When shredded or chipped, these materials can be
used as bulking agents to increase aeration within the pile.
The organic materials may be placed in the compost pile all at once
(batch composting) or added over time as they become available. If the
materials are added gradually, the pile will not heat up significantly until
it is large enough to be self-insulating. Although in the past composters
often layered various materials, it is probably better to mix the different
ingredients to ensure optimal C:N ratios and moisture contents through-
out the pile. Always cover food scraps with a layer of sawdust, leaves, or
finished compost to trap odors and to avoid attracting flies or other pests.
Research Possibility: What is the effect of layering versus mixing organic
ingredients on the compost pile temperature profile?
Almost all natural organic materials will compost, but not everything
belongs in a classroom or school-yard compost pile. Some organic materi-
als, such as meat and dairy products and oily foods, should be avoided
because they tend to attract rodents, raccoons, and other pests. Cat and
dog manures may contain harmful pathogens that are not killed during
composting. If you plan to use the compost for growing plants, you
should avoid adding pernicious weeds because their seeds or runners
might survive the composting process. Some weeds to avoid include
bindweed, comfrey, and rhizomatous grasses such as Bermuda and crabgrass.
S C O M P O S T I N G I N T H E C L A S S R O O M
 46
6

8/9/2019 Composting in the Classroom
http://slidepdf.com/reader/full/composting-in-the-classroom 58/126
CALCULATIONS FOR THERMOPHILIC COMPOSTING
by Tom Richard and Nancy Trautmann
You can use the algebraic equations below to compute the best combi-
nation of compost ingredients. The calculations are optional, but they
can be useful in a number of situations, such as for figuring out what
quantity of wood chips to mix with a known quantity of food scrapsfrom the cafeteria. These calculations also provide an opportunity to
apply algebra to a real-world problem.
MOISTUREThe following steps outline how to design your initial mix so that it
will have a suitable moisture level for optimal composting.
1. Using the procedure on p. 44, measure the moisture content of each of
the materials that you plan to compost. Suppose, for example, that you
weigh 10 g of grass clippings (Ww) into a 4-g container and that after
drying, the container plus clippings weigh 6.3 g. Subtracting the 4-gcontainer leaves 2.3 g as the dry weight (Wd) of your sample. Using
Equation 1, the percent moisture would be:
= 77% for grass clippings
2. Choose a moisture goal for your compost mixture. Most literature
recommends a moisture content of 50–60% by weight for optimal
composting conditions. Note that the grass clippings exceed this goal.
That is why piles of fresh grass clippings turn into a slimy mess unless
they are mixed with a drier material such as leaves or wood chips.
3. Calculate the relative amounts of materials to combine to achieve your
moisture goal. The general formula for percent moisture is:
Equation 2:
in which:
G = moisture goal (%)
Wn = mass of material n (“as is,” or “wet weight”)
Mn = moisture content (%) of material n
3 G E T T I N G T H E R I G H T M I X T
47
M
W W
Wn
w d
w
=−
× 100
=
−×
10 2 3
10100
.
G
W M W M W M
W W W=
×( ) + ×( ) + ×( ) +
+ + +1 1 2 2 3 3
1 2 3
...
...

8/9/2019 Composting in the Classroom
http://slidepdf.com/reader/full/composting-in-the-classroom 59/126
You can use this formula directly to calculate the moisture content of a
mixture of materials, and then try different combinations until you get
results within a reasonable range. Although this trial and error method
will work to determine suitable compost mixtures, there is a faster way.
For two materials, the general equation can be simplified and solved for
the mass of a second material (W2) required to balance a given mass of
the first material (W1). Note that the moisture goal must be between themoisture contents of the two materials being mixed.
Equation 3:
For example, suppose you wish to compost 10 kg of grass clippings
(moisture content = 77%) mixed with leaves (moisture content = 35%).
You can use Equation 3 to calculate the mass of leaves needed in order to
achieve a moisture goal of 60% for the compost mix:
= 6.8 kg leaves needed
The moisture content and weights for mixtures of three materials can
be derived in a similar way, although the algebra is more complicated.
For an exact solution, you need to specify the amounts of two of the
three materials, and the moisture contents of all three. Then, you can use
Equation 4 to determine the desired quantity of the third ingredient.
Equation 4:
CARBON-TO-NITROGEN RATIOTo calculate the amounts of various materials to add to a compost pile
with a C:N ratio of 30:1, you need to know the nitrogen and carbon con-
tents of the individual ingredients. You can use the typical C:N ratiosshown in Table 3–3 (p. 45) to calculate the carbon content of an ingredi-
ent provided that you know its nitrogen content, or its nitrogen content
provided that you know its carbon content. The carbon content of your
compost ingredients can be estimated using the Organic Matter Content
procedure outlined in Chapter 5 (p. 87). Or, you can have your compost
ingredients tested for nitrogen and carbon at a soil nutrient laboratory or
environmental testing laboratory.
S C O M P O S T I N G I N T H E C L A S S R O O M
 48
W
W G W M
M G2
1 1 1
2
=×( ) − ×( )
−
W
G W G W M W M W
M G3
1 2 1 1 2 2
3
=×( ) + ×( ) − ×( ) − ×( )
−
W2
10 60 10 77
35 60=
×( ) − ×( )−

8/9/2019 Composting in the Classroom
http://slidepdf.com/reader/full/composting-in-the-classroom 60/126
Once you have the percent carbon and nitrogen for the materials you
plan to compost, Equation 5 enables you to figure out the C:N ratio for
the mixture as a whole:
Equation 5:
in which:
R = C:N ratio of compost mixture
Wn = mass of material n (“as is,” or “wet weight”)
Cn = carbon (%) of material n
Nn = nitrogen (%) of material n
Mn = moisture content (%) of material n
This equation can be solved exactly for a mixture of two materials if
you know their carbon, nitrogen, and moisture contents. You specify theC:N ratio goal and the mass of one ingredient, then calculate the mass of
the second ingredient. Equation 6 is derived by limiting Equation 5 to
two ingredients and rearranging the terms to allow you to solve for the
mass of the second ingredient:
Equation 6:
Returning to the previous example of grass and leaves, assume the
nitrogen content of the grass is 2.4% while that of the leaves is 0.75%,
and the carbon contents are 45% and 50% respectively. Simple division
shows that the C:N ratio of the grass is 19:1, and the C:N ratio of the
leaves is 67:1. For the same 10 kg of grass that we had before, if our goal
is a C:N ratio of 30:1, the solution to Equation 6 is:
Note that we need only 3.5 kg leaves to balance the C:N ratio, com-
pared with 6.8 kg leaves needed to achieve the 60% moisture goal accord-
ing to our previous moisture calculation. If the leaves were wetter or had
a higher C:N ratio, the difference would be even greater. Given the dis-
parity between these results, how should you decide how many leaves to
add?
3 G E T T I N G T H E R I G H T M I X T
49
R
W C M W C M W C M
W N M W N M W N M=× −( )
[ ]+ × −( )
[ ]+ × −( )
[ ]+
× −( )[ ] + × −( )[ ] + × −( )[ ] +
1 1 1 2 2 2 3 3 3
1 1 1 2 2 2 3 3 3
100 100 100
100 100 100
...
...
W
W N RC
NM
NC
NR M
2
1 11
1
1
22
2
2
100
100
=× × −
× −( )
× −
× −( )
W2
10 2 4 30 19 100 77
0 75 67 30 100 35=
× × −( ) × −( )× −( ) × −( )
.
.
= 3 5. kg

8/9/2019 Composting in the Classroom
http://slidepdf.com/reader/full/composting-in-the-classroom 61/126
If we solve Equation 5 for the 10 kg of grass and the 6.8 kg of leaves
(determined from the moisture calculation) and use the same values for
percent moisture, C, and N, the resulting C:N ratio is approximately 37:1.
In contrast, if we solve Equation 2 for 10 kg of grass and only 3.5 kg of
leaves, we get a moisture content over 66%. (To gain familiarity with
using the equations, check these results on your own.)
For mixtures toward the wet end of optimum (>60% moisturecontent), moisture is the more critical variable. Thus, for the example
above, it is best to err on the side of a high C:N ratio. This may slow
down the composting process slightly, but it is more likely to avoid
anaerobic conditions. If, on the other hand, your mixture is dry, you
should optimize the C:N ratio and add water as required.
1 Portions of this chapter were adapted from Dickson, N., T. Richard and R. Kozlowski.1991. Composting to Reduce the Waste Stream. Northeast Regional AgriculturalEngineering Service. 152 Riley-Robb Hall, Cornell University, Ithaca NY 14853.
2 Rynk, R., ed. 1992. On-Farm Composting Handbook. Northeast Regional AgriculturalEngineering Service, 152 Riley-Robb Hall, Cornell University, Ithaca NY 14853.
3 Rynk, R., ed. 1992. On-Farm Composting Handbook. Northeast Regional AgriculturalEngineering Service. This manual includes a table of C:N ratios and %N of a widerange of compost materials. Available on-line at:
http://www.cals.cornell.edu/dept/compost/OnFarmHandbook/apa.taba1.html,or in print from: Northeast Regional Agricultural Engineering Service, 152 Riley-RobbHall, Cornell University, Ithaca NY 14853.
4 Schaller, F. 1968. Soil Animals. University of Michigan Press, Ann Arbor.
S C O M P O S T I N G I N T H E C L A S S R O O M
 50

8/9/2019 Composting in the Classroom
http://slidepdf.com/reader/full/composting-in-the-classroom 62/126
4y
MONITORING THE COMPOSTING
PROCESS
As decomposition proceeds, a number of changes occur in the physi-
cal, chemical, and biological characteristics of the compost mix. Monitor-
ing these changes allows you to assess the progress of your compost,
identify potential problems, and compare systems with different initial
conditions or ingredients.
Simple observation of the physical changes that occur during com-
posting is one form of monitoring. It is useful to keep a log book, not
only to record data but also to note daily observations about the appear-
ance of the compost. Does it appear soggy or dry? Is it shrinking in vol-
ume? Is there any odor? Any leachate? At what point do the various
types of ingredients become unrecognizable? Have flies or other pests
become a problem? If problems do develop during the course of compost-
ing, steps can be taken to correct them (Table 4–1).
Another form of monitoring is to take periodic measurements of vari-
ables such as the temperature, moisture content, pH, and biological activ-
ity. This chapter presents techniques for monitoring these physical,
chemical, and biological characteristics of compost. Students can design
and conduct a wide array of experiments using these monitoring
techniques.
Table 4–1. Troubleshooting Compost Problems.
SymptomPile is wet and smells like a mix-ture of rancid butter, vinegar, androtten eggs
Pile does not heat up
Pile is damp and sweet smellingbut will not heat up
Pile is attracting animals
ProblemNot enough air
Or too much nitrogen
Or too wet
Pile is too small
Or pile is too dry
Not enough nitrogen
Meat and other animal productshave been included
Or food scraps are not wellcovered
SolutionTurn pile
Mix in straw, sawdust, or woodchips
Turn pile and add straw, sawdust,or wood chips; provide drainage
Make pile larger or provideinsulation
Add water while turning the pile
Mix in grass clippings, foodscraps, or other sources of nitrogen
Keep meat and other animalproducts out of the pile; enclosepile in 1/4-inch hardware cloth
Cover all food with brownmaterials such as leaves, wood-chips, or finished compost

8/9/2019 Composting in the Classroom
http://slidepdf.com/reader/full/composting-in-the-classroom 63/126
TEMPERATURETemperature is one of the key indicators of changes occurring during
thermophilic composting. If the compost does not heat up, it may be
deficient in moisture or nitrogen (Table 4–1). Once the compost does
heat up, temperature provides the best indicator of when mixing is desir-
able (see Figure 1–2, p. 4).
To take temperature readings, use a probe that reaches deep into the
compost. Leave the probe in place long enough for the reading to stabi-
lize, then move it to a new location. Take readings in several locations,
including various distances from the top and sides. Compost may have
hotter and colder pockets depending on spatial variability in the moisture
content and chemical composition of the ingredients. Can you find tem-
perature gradients with depth? Where do you find the hottest readings?
For systems in which air enters at the bottom, the hottest location tends
to be in the core, about two-thirds of the way up. You might expect it to
be in the exact center, where insulation by surrounding compost is the
greatest, but the core temperatures are affected by the relatively cool air
entering at the bottom and warming as it rises through the compost.
Your students might decide to design compost experiments to look for
variables or combinations of variables that produce the highest tempera-
tures in the shortest amount of time, or perhaps those variables that
maintain hot temperatures for the longest period. One useful way to pre-
sent your data is to plot the maximum temperature and the time to reach
maximum temperature for each compost system as a function of the
experimental variable. For example, you could plot the maximum tem-
perature versus the initial moisture content of the compost ingredients. A
second graph could show the time to reach maximum temperature versus
the initial moisture content.
MOISTUREComposting proceeds best at moisture contents of 50–60% by weight.
During composting, heating and aeration cause moisture loss. That’s
OK—you want finished compost to be drier than the initial ingredients.
Sometimes, however, adding water may be necessary to keep the compost
from drying out before decomposition is complete. If the compost ap-
pears to be dry, water or leachate can be added during turning or mixing.
Below a moisture content of 35–40%, decomposition rates are greatly
reduced; below 30% they virtually stop. Too much moisture, on the other
hand, is one of the most common factors leading to anaerobic conditionsand resulting odor problems.
When you are choosing and mixing your compost ingredients, you
may wish to measure the moisture content using the procedure in
Chapter 3 (p. 44). After composting is underway, you probably don’t
need to repeat this measurement because you can observe whether appro-
priate moisture levels are being maintained. For example, if your compost
appears wetter than a wrung-out sponge and starts to smell bad, mix in
absorbent material such as dry wood chips, cardboard pieces, or newspa-
S C O M P O S T I N G I N T H E C L A S S R O O M
 52

8/9/2019 Composting in the Classroom
http://slidepdf.com/reader/full/composting-in-the-classroom 64/126
per strips to alleviate the problem. If you are composting in a bioreactor
with drainage holes, excess moisture will drain out as leachate. You may
find it useful to record the amount of leachate produced by each system,
for comparison with initial moisture content, temperature curves, or
other variables. If you have a microscope available, try observing a sam-
ple of leachate—you will probably find that it is teeming with microbial
life.If you are blowing air through your compost system, you will need to
be careful not to create conditions that are too dry for microbial growth.
If the temperature drops sooner than expected and the compost feels dry
to the touch, moisture may have become the limiting factor. Try mixing
in some water and see if the temperature rises again.
ODORA well-constructed compost system should not produce offensive
odors, although it will not always be odor-free. You can use your nose to
detect potential problems as your composting progresses. For example, if
you notice an ammonia odor, your mix is probably too rich in nitrogen
(the C:N ratio is too low), and you should mix in a carbon source such as
leaves or wood shavings.
If compost is too wet or compacted, it will become anaerobic and pro-
duce hydrogen sulfide, methane, and other odorous compounds that are
hard to ignore. If this occurs in indoor bioreactors, you may wish to take
them outside or vent them to the outside, then mix in additional
absorbent material such as wood chips or pieces of paper egg cartons.
Make sure that you do not pack down the mixture; you want it to remain
loose and fluffy to allow air infiltration. In an outdoor compost pile,
turning the pile and mixing in additional high-carbon materials such as
wood chips should correct the anaerobic condition, although initially the
mixing may make the odor even more pronounced.
pHWhy is compost pH worth measuring? Primarily because you can use
it to follow the process of decomposition. As composting proceeds, the
pH typically drops initially, then rises to 8 or 9 during the thermophilic
phase, and then levels off near neutral (see Figure 1–4, p. 8).
At any point during composting, you can measure the pH of the mix-
ture. While doing this, keep in mind that your compost is unlikely to be
homogeneous. You may have found that the temperature varied fromlocation to location within your compost, and the pH is likely to vary as
well. Therefore, you should plan to take samples from a variety of spots.
You can mix these together and do a combined pH test, or you can test
each of the samples individually. In either case, make several replicate
tests and report all of your answers. (Since pH is measured on a logarith-
mic scale, it does not make sense mathematically to take a simple average
of your replicates. Instead, either report all of your pH values individu-
ally, or summarize them in terms of ranges rather than averages.)
4 M O N I T O R I N G T H E C O M P O S T I N G P R O C E S S T
53
8/9/2019 Composting in the Classroom
http://slidepdf.com/reader/full/composting-in-the-classroom 65/126
pH can be measured using any of the following methods. Whichever
method you choose, make sure to measure the pH as soon as possible
after sampling so that continuing chemical changes will not affect your
results. Also, be consistent in the method that you use when comparing
different compost mixtures.
p H P A P E R
The least expensive option for measuring compost pH is to use indica-
tor paper. If the compost is moist but not muddy, you can insert a pH
indicator strip into the mixture, let it sit for a few minutes to become
moist, and then read the pH using color comparison. If the compost is
too wet, this technique will not work because the indicator colors will be
masked by the color of the mud.
S O I L T E S T K I T
Test kits for analysis of soil pH can be used without modification for
compost samples. Simply follow the manufacturer’s instructions. These
kits also rely on color comparison, but the color develops in a compost-
water mixture rather than on indicator paper. Soil pH kits are availablefrom garden stores or biological supply catalogs for $5 or more, depend-
ing on the number and accuracy range of the tests.
E L E C T R O N I C M E T E R
The most accurate, but also the most expensive and time consuming
method of measuring compost pH, is with a meter. First, you must cali-
brate the meter by using solutions of known pH. Next, mix the compost
with distilled water to make a suspension. Since the amount of water
affects the pH reading, it is important to be consistent in the ratio of
compost to water and to start with air-dry compost. Finally, place the
electrode into a compost/water solution and take a reading. For a detaileddescription of this method, see Methods of Soil Analysis.1
S C O M P O S T I N G I N T H E C L A S S R O O M
 54

8/9/2019 Composting in the Classroom
http://slidepdf.com/reader/full/composting-in-the-classroom 66/126
MICROORGANISMS2
by Elaina Olynciw
A wide range of bacteria and fungi inhabit compost, with species vary-
ing over time as changes occur in the temperature and the available food
supply. You can simply observe compost microorganisms under a micro-scope, or culture them for more detailed observation. A third possibility is
to measure their metabolic activity, which does not indicate what types
or populations of microbes are present but does give an indication of
their level of enzymatic activity.
OBSERVING COMPOST MICROORGANISMS
U S E : To make simple observations of the microbial communities in com-
post. Comparisons can be made over the course of several weeks or
months as the compost heats up and later returns to ambient tem-
perature.
M A T E R I A L S
• compound microscope
• microscope slides and cover slips
• eye dropper
• 0.85% NaCl (physiological saline)
For bacterial staining (optional)
• 1.6 g methylene blue chloride
• 100 ml 95% ethanol
• 100 ml of 0.01% aqueous solution of KOH
• distilled water
• Bunsen burner
• toothpick
• blotting paper or filter paper
P R O C E D U R E
1. Make a wet mount by putting a drop of water or physiological saline
on a microscope slide and transferring a small amount of compost to
the drop. Make sure that you do not add too much compost, or you
will have insufficient light to observe the organisms.
2. Stir the compost into the water or saline (the preparation should be
watery), and apply a cover slip.
3. Observe under low and high power. You might be able to see manynematodes squirming and thrashing around. Other possibilities include
flatworms, rotifers (notice the rotary motion of cilia at the anterior end
of the rotifer and the contracting motion of the body), mites, spring-
tails, and fast-moving protozoa. Strands of fungal mycelia may be visi-
ble but difficult to recognize (see #5 below). Bacteria appear as very
tiny round particles that seem to be vibrating in the background.
4. If you want to highlight the bacteria and observe them in greater
detail, you can prepare stained slides:
4 M O N I T O R I N G T H E C O M P O S T I N G P R O C E S S T
55

8/9/2019 Composting in the Classroom
http://slidepdf.com/reader/full/composting-in-the-classroom 67/126
a) Prepare methylene blue stain by adding 1.6 g methylene blue
chloride to 100 ml 95% ethanol, then mixing 30 ml of this solu-
tion with 100 ml of 0.01% aqueous solution of KOH.
b) Using a toothpick, mix a small amount of compost with a drop of
physiological saline on a slide, and spread it into a thin layer.
c) Let the mixture air-dry until a white film appears on the slide.
d) Fix the bacteria to the slide by passing the slide through a hotflame several times.
e) Stain the slide by flooding it with the methylene blue stain for
one minute. Rinse the slide with distilled water and gently blot it
dry using blotting or filter paper.
5. Fungi and actinomycetes may be difficult to recognize with the above
technique because the entire organism (including the mycelium,
reproductive bodies, and individual cells) will probably not remain
together. Fungi and actinomycetes will be observed best if you can find
them growing on the surface of the compost heap. The growth looks
fuzzy or powdery. Lift some compost with the sample on top, and pre-
pare a slide with a cover slip to view under the microscope. You shouldbe able to see the fungi well under 100x and 400x. The actinomycetes
can be heat-fixed and Gram-stained to view under oil immersion at
1000x (See procedure under Culturing Bacteria, p. 57–59).
6. To collect nematodes, rotifers, and protozoa for observation, use the
Wet Extraction (p. 69).
S C O M P O S T I N G I N T H E C L A S S R O O M
 56

8/9/2019 Composting in the Classroom
http://slidepdf.com/reader/full/composting-in-the-classroom 68/126
CULTURING BACTERIA
U S E : To culture bacteria, for colony counts or observation of specific
microorganisms.
M A T E R I A L S
Growth media
• 2 g trypticase soy agar (TSA)
• 7.5 g bacto agar
• 500 ml distilled water
For making plates
• 100 ml 0.06M NaHPO4/NaH2PO4 buffer
(approximately 4:1 dibasic:monobasic, pH 7.6)
• 5 test tubes
• 5 1-ml pipettes
• 5 0.1-ml pipettes
• 3 petri dishes
• glass spreader (glass rod bent like a hockey stick)• autoclave
• blender
• compost sample, air-dried
For making and observing slides
• inoculating needle
• 0.85% NaCl (physiological saline)
• Bunsen burner
• microscope and slides
• ethanol
For staining slides:
either:
• a Gram stain kit
or:
• 2 g crystal violet
• 100 ml 95% ethanol
• 80 ml 1% ammonium oxalate
• 1 g iodine crystals
• 3 g potassium iodide
• 500 ml distilled water
• amber-colored bottle
• 2.5 g safranin
P R O C E D U R E
1. Make the TSA media by mixing 2 g TSA, 7.5 g bacto agar, and 500 ml
distilled water. Autoclave for 20 minutes, cool until comfortable to
touch, then pour into sterile petri dishes and allow to solidify.
2. Autoclave 100 ml 0.06M NaHPO4/NaH2PO4 buffer solution in an
Erlenmeyer flask. Also autoclave five test tubes, each containing 9 ml
of buffer solution, five 1-ml pipettes, and five 0.1-ml pipettes.
4 M O N I T O R I N G T H E C O M P O S T I N G P R O C E S S T
57

8/9/2019 Composting in the Classroom
http://slidepdf.com/reader/full/composting-in-the-classroom 69/126
3. Autoclave the blender, or sterilize it by rinsing with ethanol. In the
blender, mix 5 g compost with 45 ml sterilized buffer solution for 40
seconds at high speed.
4. Perform serial dilutions to 10-7:
a) Label the five test tubes containing sterilized buffer solution: 10-2,
10-3, 10-4, 10-5, and 10-6.
b) The mixture in the blender is a 10-1
dilution, since 5 g compostare mixed with 45 ml solution (which is equivalent to 45 g).
Using a sterile pipette, transfer 1 ml of the compost/buffer mix-
ture into the first test tube, labeled 10-2.
c) Mix thoroughly, then use another sterile pipette to transfer 1 ml
of the solution in the 10-2 test tube to the one labeled 10-3. The
solution in each test tube will be ten times more dilute than the
previous solution from which it was made.
d) Continue with this sequence until all five test tubes have been
inoculated.
e) Label three petri dishes with the type of compost, date, and dilu-
tion: 10-5, 10-6, and 10-7.f) Sterilize a glass spreading rod by holding it in the Bunsen burner
flame until heated, then cool thoroughly.
g) Using a sterile pipette, transfer 0.1 ml from the 10-4 test tube onto
the agar in the petri dish labeled 10-5. Spin the dish and spread
the liquid as evenly as possible using the glass spreading rod.
Follow this same procedure using 0.1 ml from the 10-5 test tube
into the dish labeled 10-6, and so forth until all dilutions have
been plated.
5. Cover the petri dishes and turn them upside down so that any water
that condenses will not drip into the cultures. Incubate them at 28°C if
possible. (If you do not have access to an incubator, room temperature
is acceptable.)
S C O M P O S T I N G I N T H E C L A S S R O O M
 58
10-1 10-2 10-3 10-4 10-5 10-6
10-5 10-6 10-7

8/9/2019 Composting in the Classroom
http://slidepdf.com/reader/full/composting-in-the-classroom 70/126
6. After four days, count the colonies and prepare microscope slides. Use
an inoculating needle to add a drop of saline to a clean slide. Take a
sample of a single bacterial colony and mix it into the saline. Let it air-
dry until a white film appears. Heat-fix the slide by passing it through
a flame a few times.
7. To highlight bacteria and actinomycetes on the slides, treat them with
Gram stain (below).Gram Staining
1. Prepare Gram stains (unless using a prepared kit):
Crystal violet:
Dissolve 2 g crystal violet in 20 ml 95% ethanol. Add this solution
to 80 ml of a 1% ammonium oxalate solution. Let the mixture stand
for 24 hours, then filter it.
Gram iodine:
Add 1 g iodine and 3 g potassium iodide to 300 ml distilled water.
Store this solution in an amber bottle.
Decolorizer: 95% ethanol
Safranin:Add 2.5 g safranin to 10 ml 95% ethanol. Add this solution to 100
ml distilled water.
2. Flood slide with crystal violet for 20 seconds.
3. Gently rinse slide by dipping into a beaker of distilled water.
4. Flood slide with Gram iodine for 1 min. Gently rinse as above.
5. Decolorize by tilting slide and applying 95% ethanol one drop at a
time, stopping as soon as no more color is washed out. Gently rinse. At
this point, gram-positive bacteria will be purple colored and gram-neg-
ative bacteria will be colorless.
6. Flood with safranin for 20 seconds, then gently rinse. This step stains
the gram-negative bacteria, and they become pink.7. Air-dry or gently blot dry. Observe under oil-immersion lens.
4 M O N I T O R I N G T H E C O M P O S T I N G P R O C E S S T
59

8/9/2019 Composting in the Classroom
http://slidepdf.com/reader/full/composting-in-the-classroom 71/126
CULTURING ACTINOMYCETES
U S E : To culture actinomycetes, making it possible to count colonies or to
observe individual species.
M A T E R I A L S
Growth media
• 0.4 g typticase soy agar (TSA)
• 10.0 g bacto agar
• 500 ml distilled water
• 10 mg polymixin B in 10 ml 70% ethanol
For making plates
• 100 ml 0.06M NaHPO4/NaH2PO4 buffer
(approximately 4:1 dibasic:monobasic, pH 7.6)
• 500 ml distilled water
• 5 test tubes
• 5 1-ml pipettes
• 5 0.1-ml pipettes• 3 petri dishes
• glass spreader (glass rod bent like a hockey stick)
• autoclave
• blender
• compost sample, air-dried
For making and observing slides
• inoculating needle
• scalpel
• 0.85% NaCl (physiological saline)
• Bunsen burner
• microscope and slides
P R O C E D U R E
1. Mix 0.4 g TSA, 10.0 g bacto agar, and 500 ml distilled water. Autoclave
for 20 minutes, then cool to the touch. Add the polymixin B and pour
into sterile petri dishes.
2. Autoclave 100 ml 0.06M NaHPO4/NaH2PO4 buffer solution.
3. Autoclave the blender, or sterilize it by rinsing with ethanol. In the
blender, mix 5 g compost with 45 ml sterilized buffer solution for 40
seconds at high speed.
4. Perform serial dilutions to 10-7 using Step 4 of the Culturing Bacteria
procedure (p. 58).5. Cover the petri dishes and turn them upside down so that any water
that condenses will not drip into the cultures. Incubate them at 28°C if
possible. (If you do not have access to an incubator, room temperature
is acceptable.)
6. After 14 days, take counts and samples of actinomycetes colonies.
Many of the colonies will look powdery white. However, some may
take on a rough appearance and produce a variety of pigments. Use an
inoculating needle to add a drop of saline to a clean microscope slide.
Lifting with a scalpel is a good way to get an intact portion of an
S C O M P O S T I N G I N T H E C L A S S R O O M
 60

8/9/2019 Composting in the Classroom
http://slidepdf.com/reader/full/composting-in-the-classroom 72/126
actinomycete colony onto a slide. Allow to air-dry until a white film
appears. Heat-fix the slide by passing it through a flame a few times.
7. Observe under a microscope. The actinomycetes probably will be too
thick to observe on most of the slide, but at the edges of the colony
you will be able to see the pattern that the filaments form. Gram stain-
ing can be used to highlight the actinomycetes (see procedure under
Culturing Bacteria, p. 59).
4 M O N I T O R I N G T H E C O M P O S T I N G P R O C E S S T
61

8/9/2019 Composting in the Classroom
http://slidepdf.com/reader/full/composting-in-the-classroom 73/126
CULTURING FUNGI
U S E : To culture fungi, making it possible to count colonies or to observe
individual species.
M A T E R I A L S
Growth media
• 6.5 g potato dextrose agar (PDA)
• 5.0 g bacto agar
• 500 ml distilled water
• 15 mg rifampicin in 10 ml methanol
• 15 mg penicillin G in 10 ml 70% ethanol
For making plates
• 100 ml 0.06M NaHPO4/NaH2PO4 buffer
(approximately 4:1 dibasic:monobasic, pH 7.6)
• 3 test tubes
• 3 1-ml pipettes
• 3 0.1-ml pipettes• 3 petri dishes
• autoclave
• blender
• compost sample, air-dried
For making and observing slides
• scalpel
• microscope, slides, and cover slips
P R O C E D U R E
1. Mix 6.5 g PDA, 5.0 g bacto agar, and 500 ml distilled water. Autoclave
for 20 minutes. Cool until comfortable to handle, then add the anti-biotics rifampicin and penicillin G and pour the mixture into sterile
petri dishes.
2. Autoclave 100 ml 0.06M NaHPO4/NaH2PO4 buffer solution in an
Erlenmeyer flask. Also autoclave three test tubes, each containing 9 ml
of buffer solution, three 1-ml pipettes, and three 0.1-ml pipettes.
3. Autoclave the blender, or sterilize it by rinsing with ethanol. In the
blender, mix 5 g compost with 45 ml sterilized buffer solution for 40
seconds at high speed.
4. Perform serial dilutions to 10-5:
a) Label the three test tubes containing buffer solution: 10-2, 10-3, and
10-4
.b) The mixture in the blender is a 10-1 dilution, since 5 g compost are
mixed with 45 ml solution (which is equivalent to 45 g). Using a
sterile pipette, transfer 1 ml of the compost/buffer mixture into the
first test tube, labeled 10-2.
c) Mix thoroughly, then use another sterile pipette to transfer 1 ml of
the solution from the 10-2 test tube to the one labeled 10-3. The
solution in each test tube will be ten times more dilute than the pre-
vious solution from which it was made.
S C O M P O S T I N G I N T H E C L A S S R O O M
 62

8/9/2019 Composting in the Classroom
http://slidepdf.com/reader/full/composting-in-the-classroom 74/126
d) Continue with this sequence until all three test tubes have been
inoculated.
e) Using a sterile pipette, transfer 0.1 ml from the 10-2 test tube onto
the agar in the petri dish labeled 10-3. Spin the dish and spread the
liquid as evenly as possible using the glass spreading rod. Follow this
same procedure using 0.1 ml from the 10-3 test tube into the dish
labeled 10-4
and so forth until all dilutions have been plated.
5. Cover the petri dishes and turn them upside down so that any water
that condenses will not drip into the cultures. Incubate them at 28°C if
possible. (If you do not have access to an incubator, room temperature
is acceptable.)
6. After three days, take counts and samples of fungal colonies. Lift a por-tion of a fungal colony intact onto a clean slide (it will still be attached
to the agar), add a cover slip, and observe without staining. Look at the
edges of the colony where the sample will be thin enough for light to
pass through.
4 M O N I T O R I N G T H E C O M P O S T I N G P R O C E S S T
63
10-1 10-2 10-3 10-4
10-510-3 10-4
8/9/2019 Composting in the Classroom
http://slidepdf.com/reader/full/composting-in-the-classroom 75/126
MEASURING MICROBIAL ACTIVITYFLUORESCEIN DIACETATE (FDA) HYDROLYSIS AS A MEASURE OF
TOTAL MICROBIAL ACTIVITY IN COMPOSTS AND SOILS 3
U S E : To measure the level of metabolic activity of microbes in a compost
sample.
B A C K G R O U N D
During the course of composting, the size and activity level of microbial
populations will vary. For example, as the temperature drops at the end
of the thermophilic phase, activity levels may be relatively low because
the populations of heat-loving microbes are diminishing and the
mesophilic microorganisms are just beginning to recolonize. Another
time of low activity is at the end of composting, after the curing process
has left little available carbon to support microbial growth.
The FDA test measures microbial activity through color change. As
microorganisms hydrolyze fluorescein diacetate to fluorescein, the solu-
tion changes from colorless to yellow. The amount of yellow pigment
measured by a spectrophotometer will give an indication of how much
hydrolysis has occurred, and, therefore, it will give an indication of the
total metabolic activity of the microbial population.
M A T E R I A L S
• 20 mg fluorescein diacetate (FDA)
• 10 ml acetone ACS grade
• 20 ml 0.06M sodium phosphate buffer solution (pH 7.6)
• 14 125-ml Erlenmeyer flasks
• 14 small test tubes with screw caps
• 4-cm Büchner funnel
• Whatman #1 filter paper• 125-ml side flask for vacuum filter
• shaker (If there are enough students in a group doing this experiment,
they can take turns swirling the flasks for a total of 20 minutes.)
• centrifuge
• small test tubes (to fit in centrifuge)
• spectrophotometer
• drying oven
• 10-g sample of fresh compost
M E T H O D
1. Place 0.5 g compost in a 105°C oven overnight for dry weight determi-nation.
2. Make duplicate samples by placing undried compost equivalent to 0.5
g dry weight in each of two 125-ml flasks.
3. Add 20 ml of phosphate buffer solution to each flask.
4. Make FDA stock solution by mixing 20 mg FDA in 10 ml acetone.
Add 0.2 ml of FDA stock solution to each flask containing compost
and buffer solution.
5. Place flasks on a shaker (90 rpm) at 25°C for 20 minutes.
S C O M P O S T I N G I N T H E C L A S S R O O M
 64

8/9/2019 Composting in the Classroom
http://slidepdf.com/reader/full/composting-in-the-classroom 76/126
6. Using a Büchner funnel, filter through Whatman #1 paper with a light
vacuum.
7. Transfer 2 ml of the filtrate into a small test tube and add 2 ml acetone
to stop the reaction.
8. Centrifuge samples for 5 minutes at 5000 rpm to remove particulates.
9. Using a spectrophotometer, read the absorbance at 500 nm against a
buffer blank.Preparation of a standard curve
1. Make duplicate samples of a range of FDA concentrations by adding 0,
0.02, 0.04, 0.05, 0.08, and 0.1 ml FDA stock solution to 5 ml of PO4
buffer solution in each of 10 capped test tubes.
2. Cap tightly and heat in a boiling water bath for 60 minutes to
hydrolyze the FDA.
3. Cool 10 minutes and add hydrolyzed FDA to flasks containing 0.5 g
compost and 15 ml phosphate buffer. (Note: You will have to set up a
different standard curve for each compost you are analyzing because a
certain percentage of the fluorescein will adhere to the compost and
this will vary from compost to compost.)4. Place on a shaker or swirl fairly rapidly and consistently for 20
minutes.
5. Follow Steps 6-9 in the Methods section above.
6. Record your absorbance data using the table below.
A N A L Y S I S
Make a standard curve by graphing FDA concentrations versus optical
density readings. Then, use the graph to determine the FDA concentra-
tions for your compost samples based on their optical density readings.
By comparing samples from different stages in the composting process,what observations can you make about the relative activity of the micro-
bial populations?
4 M O N I T O R I N G T H E C O M P O S T I N G P R O C E S S T
65
FDA FDA
solution (ug) ABSORBANCE
(ml) Rep. #1 Rep. #2 Mean
0 0
0.02 400.04 80
0.05 100
0.08 160
0.10 200

8/9/2019 Composting in the Classroom
http://slidepdf.com/reader/full/composting-in-the-classroom 77/126
INVERTEBRATESIn outdoor compost piles, a wide range of invertebrates takes part in
the decomposition of organic matter. Try monitoring invertebrate life in
the pile over the course of the compost process. Do invertebrates appear
while the pile is hot, or not until it cools? Do you find different types of
organisms during the various stages of decomposition?
In indoor composting you may find fewer (or no) invertebrates. In
vermicomposting, worms will likely be the only macro-invertebrates
unless leaves or dirt were introduced into the bin for bedding. Worms can
be observed by using the methods for larger invertebrates that are
described in this section.
Three methods are described here for collection of organisms living in
compost. For the larger compost invertebrates, such as earthworms, sow-
bugs, or centipedes, the Pick and Sort method works well. To find
smaller invertebrates, you may wish to try a Berlese Funnel, which con-
centrates creatures by collecting them in a vial placed below a funnel
containing compost. Tiny invertebrates that live in the films of water
surrounding the organic matter or soil particles, including nematodes and
flatworms, are best collected by using the Wet Extraction, a variation of
the Berlese Funnel in which the compost is soaked in water rather than
dried.
S C O M P O S T I N G I N T H E C L A S S R O O M
 66

8/9/2019 Composting in the Classroom
http://slidepdf.com/reader/full/composting-in-the-classroom 78/126
PICK AND SORT
U S E : To collect organisms that are easily visible to the naked eye.
M A T E R I A L S
• light-colored trays or pans
• tweezers or spoons
• jars for temporary sorting and display of organisms• flashlights (optional)
• magnifying lenses or dissecting microscopes
• petri dish or watch glass for use with microscope
• fresh compost sample, preferably from an outdoor compost pile
P R O C E D U R E
1. Take samples of compost from various locations in the heap. Are there
some organisms that you find near the surface and others only at
greater depths? Spread each compost sample in a large tray or pan, or
on a large piece of paper, preferably light in color for maximum con-
trast. When sorting through the compost, students should use softtweezers, plastic spoons, or other instruments that will not hurt the
organisms.
2. Flashlights and magnifying lenses can be used to enhance the observa-
tion. The larger organisms, such as worms, centipedes, millipedes, and
sowbugs, can easily be seen with the naked eye, but they can be
observed more closely under the microscope. Place samples of the com-
post in petri dishes or watch glasses and observe them under a dissect-
ing microscope.
3. In a classroom setting, you can use an overhead projector to show the
outline of the organisms. It can be fun for the students to see the
organisms projected to large sizes, crawling around larger than life onthe screen. Caution: If you are using live organisms, it is best to have
someone standing next to the projector to catch the organisms as they
crawl away from the projection platform.
4 M O N I T O R I N G T H E C O M P O S T I N G P R O C E S S T
67

8/9/2019 Composting in the Classroom
http://slidepdf.com/reader/full/composting-in-the-classroom 79/126
BERLESE FUNNEL
U S E : To concentrate into a vial small organisms not easily collected
through picking and sorting.
M A T E R I A L S
• ring stand and ring
• funnel lined with small piece of window screen, or kitchen sieveenclosed in paper funnel
• beaker or jar
• light source (25 watt)
• fresh compost sample, preferably from an outdoor compost pile
• magnifying glass or dissecting microscope
• petri dish or watch glass
• optional: 100 ml of 90% ethanol/10% glycerol solution (if you wish to
preserve invertebrates)
P R O C E D U R E
1. Assemble a funnel and sieve, either by lining the bottom of a funnelwith a small piece of window screen, or by making a funnel to fit over
a kitchen sieve.
2. Into a beaker or jar, add 100 ml of water if you wish to collect live
organisms or a mixture of 90% ethanol and 10% glycerol if you wish
to preserve them. Place the beaker just below the funnel to collect the
specimens.
3. Position a light source (25 watt) 2–5 cm above the funnel, or place the
collecting apparatus in a sunny location. The light, heat, and drying
will gradually drive the compost organisms downward through the
funnel and into the collecting jar. If you use too strong a light source,
the organisms will dry up and die before making it through the com-post and into the funnel.
4. Place compost in the sieve or funnel, making a layer several centime-
ters deep. Leave for several hours or overnight.
5. Place your collected organisms in a petri dish or watch glass, and
observe them under a dissecting microscope or with a magnifying
glass.
S C O M P O S T I N G I N T H E C L A S S R O O M
 68

8/9/2019 Composting in the Classroom
http://slidepdf.com/reader/full/composting-in-the-classroom 80/126
WET EXTRACTION
U S E : To collect nematodes, rotifers, enchytraeids, and other small organ-
isms that live in aqueous films surrounding compost particles.
M A T E R I A L S
• ring stand and attachments
• funnel• rubber tubing to fit small end of funnel
• pinch clamp
• beaker or jar
• 20-cm2 square of cheesecloth
• 25-cm length of string
• fresh compost sample
• light source (25 watt)
• light microscope
• microscope slides and cover slips
P R O C E D U R E1. Assemble the apparatus as shown in illustration, with the funnel sus-
pended above the beaker and the rubber tubing leading from the bot-
tom of the funnel into the beaker. Close the tubing with a clamp.
2. Make a bag of compost by placing a sample on the cheesecloth, gather-
ing the edges, and tying them tightly together at the top. The amount
of compost you use will depend on the size of your funnel (the fin-
ished bag should be small enough to fit within the funnel with space
for water to flow around the edges).
3. Suspend the bag of compost, locating it so that it hangs inside the fun-
nel with clearance around its edges.
4. Fill the funnel with water, making sure that the compost bag is sub-merged but not sitting on the funnel walls.
5. Place the light above the funnel and turn it on.
6. After 24 hours, open the clamp and allow the water to drain into the
beaker.
7. Observe drops of water from the collected sample under the micro-
scope. What types of organism can you identify? You may wish to
count organisms from a specified amount of compost, comparing
quantities and types of organisms found to those in other types of
compost or soil.
4 M O N I T O R I N G T H E C O M P O S T I N G P R O C E S S T
69
8/9/2019 Composting in the Classroom
http://slidepdf.com/reader/full/composting-in-the-classroom 81/126
1 Page, A. L., R. H. Miller, and D. R. Keeney, eds. 1982. Methods of Soil Analysis, Part 2,2nd ed. American Society of Agronomy, Inc., Soil Science Society of America, Inc.,Madison, WI. pp. 208–209.
2 The activities in the Microorganisms section were written by Elaina Olynciw, biologyteacher at A. Philip Randolph High School in New York City. The descriptions assumea working knowledge of microbiological techniques. For those who have not previ-ously worked with microorganisms, the following laboratory manual provides a good
overview of techniques: Selley, H. W., Jr., P. J. Vandemark, and J. J. Lee. 1991. Microbesin Action, 4th ed. W. H. Freeman & Co., NY.
3 Adapted from Schnurer, R. and T. Rosswall. 1982. Fluorescein diacetate hydrolysis as ameasure of total microbial activity in soil and litter. Applied and Environmental Microbiology 43:1256–1261, andCraft, C. M. and E. B. Nelsen. 1996. Microbial properties of composts that suppressdamping-off and root rot of creeping bentgrass caused by Pythium graminicola. Applied and Environmental Microbiology 62:1550–1557.
S C O M P O S T I N G I N T H E C L A S S R O O M
 70

8/9/2019 Composting in the Classroom
http://slidepdf.com/reader/full/composting-in-the-classroom 82/126
5y
COMPOST PROPERTIES
The properties of compost vary widely, depending on the initial ingre-
dients, the process used, and the age of the compost. What properties are
important and how can we measure them? Because compost is used
primarily in horticulture and agriculture, properties that affect soils and
plant growth are important (Table 5–1). The stability and quality tests
outlined in this chapter can be used to tell whether a compost is finished
and ready to use with plants. We have also included a series of tests that
measure how compost affects specific properties of the soil with which
it is mixed. Although not covered here, you may want to determine the
nutrient status of your compost or compost/soil mix by using standard
soil-nutrient test kits available from garden stores or science supply
catalogs.
Table 5–1. Tests of Compost Properties.
Type of Test Name Properties Tested Page #
Stability Jar Test odor development 73
Self-Heating Test heat production 74
Respiration Test CO2 generation 75
Quality Phytotoxicity effects on seed 79
Bioassay germination and
root growth
Effects on soil Porosity volume of pore space 83
properties Water Holding ability to retain 85
Capacity moisture
Organic Matter percent organic 87
Content matter
Buffering Capacity ability to resist 89
change in pH
One of the questions that arises in composting is how to tell when the
process is finished and the compost is ready for use with plants. Thermo-
philic composting has two end points, one at the end of the rapid decom-
position phase, after which the compost is called “stable,” and the secondafter a several-month period of slower chemical change called “curing.” It
is after this curing stage that compost is “mature” and ready for use as a
soil amendment to enhance plant growth.
To tell if your compost is mature, follow these steps:
1. Monitor the temperature changes. When compost cools and does not
reheat after mixing, the period of rapid decomposition has ended.

8/9/2019 Composting in the Classroom
http://slidepdf.com/reader/full/composting-in-the-classroom 83/126
2. Observe the appearance. Once compost cools, it has probably shrunk
to one-half or less of its original volume. It should look brown and
crumbly, and it should have a pleasant earthy odor and no recogniz-
able chunks of the initial ingredients. (Wood chips might remain
because they are quite slow to break down. They can be screened out
for reuse in another batch of compost.) However, if less resistant ingre-
dients such as leaves or banana peels have not decomposed, the pro-cess has slowed down because of some constraint other than available
food. The moisture level might have become too low, or perhaps the
system was too small for adequate heat retention. You may want to
correct any problems by using the troubleshooting guide (Table 4–1,
p. 51) before performing tests of the various compost properties.
3. Test the stability. If the compost appears to be fully decomposed, you
may wish to test whether it is stable, meaning that the phase of rapid
decomposition has been completed and the organic materials are no
longer rapidly changing. The Jar Test, Self Heating Test, and
Respiration Test provide three different ways to assess compost stabili-
ty. (If used while unstable, compost can impair rather than enhanceplant growth because the continuing decomposition uses nitrate and
oxygen needed by plants.)
Research Possibility: These tests for compost stability were developed for
thermophilic composting. Can you design a research project to determine
whether these tests are useful for vermicompost?
4. Assess the quality. Once compost is stable, it is not necessarily ready to
use with plants. A several-month period of curing allows ammonia,
acetic acid, and other intermediate products of decomposition to trans-
form into compounds that will not suppress seed germination, injure
plant roots, or stunt plant growth. There is no definitive end point,and the degree of curing needed depends on how the compost will be
used. The Phytotoxicity Bioassay provides a means of assessing
whether the compost contains any substances that are likely to be
detrimental to plant growth.
If the compost appears suitable for use with plants, you may want
to test its effects on soil properties, including Porosity, Water Holding
Capacity, Organic Matter Content, and Buffering Capacity,
following the procedures outlined in this chapter. The ultimate test of
the quality of a compost is its effect on plant growth (see Chapter 6).
Research Possibility: How does age of compost affect various compost proper-
ties (e.g., phytotoxicity, water holding capacity)? How does the initial mix of
ingredients affect compost properties?
Research Possibility: What is the relationship of various compost properties to
growth of specific plants?
S C O M P O S T I N G I N T H E C L A S S R O O M
 72
6
6
6

8/9/2019 Composting in the Classroom
http://slidepdf.com/reader/full/composting-in-the-classroom 84/126
COMPOST STABILITY
JAR TEST
U S E : To determine if organic matter is thoroughly decomposed, based on
odor development in an enclosed sample.
B A C K G R O U N D
If compost is not yet fully decomposed, it will smell rotten after being
moistened and enclosed for a few days. This is because anaerobic condi-
tions develop and noxious compounds such as methane or organic acids
are formed. In contrast, stable compost has an insufficient supply of
readily degradable organic matter for significant odors to develop.
M A T E R I A L S
• compost sample
• water
• jar or plastic bag that can be tightly sealed
P R O C E D U R E
Add enough water to a compost sample so that it feels moist but not
soggy. Place it in a jar or plastic bag, seal the container, then let it sit for a
week at room temperature (20–30°C).
A N A L Y S I S
When you open the jar or bag at the end of the week, you will be
greeted by a pleasant earthy odor if the compost is mature. If it is imma-
ture, the smell will be putrid because continued decomposition has
depleted the oxygen and caused anaerobic conditions to develop.
Another sign of instability is any visible growth of mold or other
fungus. If the organic matter is fully broken down into humus, it will not
look fuzzy or slimy after being enclosed for a week.
5 C O M P O S T P R O P E R T I E S T
73

8/9/2019 Composting in the Classroom
http://slidepdf.com/reader/full/composting-in-the-classroom 85/126
SELF-HEATING TEST
U S E : To determine if organic matter is thoroughly decomposed, based on
heat production by microorganisms under optimal conditions.
B A C K G R O U N D
In compost that contains readily degradable organic matter and suffi-
cient moisture, microbial populations will grow rapidly, and their meta-bolic heat will cause the temperature to rise. If the compost heats up, this
is an indication that the organic matter is not yet fully decomposed.
M A T E R I A L S
• compost sample
• gallon-size jar or thermos
• thermometer with 15-cm or longer probe
P R O C E D U R E
1. Fill a gallon-size container with compost at 40–50% moisture content
(see p. 44 for moisture measurement). If your compost is too dry, add
distilled water to achieve 50% moisture. If it is too wet, spread thecompost in a thin layer to air dry.
2. Seal the container and insulate it with a layer of foam or other insulat-
ing material.
A N A L Y S I S
After two or three days, open the container and measure the compost
temperature. If it is more than a few degrees above the ambient air
temperature, the compost is not yet stable, meaning that the available
organic matter is not yet fully decomposed.
Lack of heating is a more ambiguous result; it does not necessarily
indicate that the compost is stable. Perhaps microbial growth was inhib-ited by lack of nitrogen rather than because the phase of rapid decompo-
sition was complete. See the steps listed on pp. 71–72 to more fully
diagnose the meaning of your results.
S C O M P O S T I N G I N T H E C L A S S R O O M
 74

8/9/2019 Composting in the Classroom
http://slidepdf.com/reader/full/composting-in-the-classroom 86/126
RESPIRATION TEST1
U S E : To determine if organic matter is thoroughly decomposed, based on
CO2 production.
B A C K G R O U N D
The CO2 curve during thermophilic composting looks similar to the
temperature curve (p. 2). This makes sense, since both heat and CO2 arereleased by microbes as they decompose organic matter. The highest rates
of CO2 production occur during the thermophilic phase, when decompo-
sition rates are at their peak. As the quantities of readily degradable
organic matter diminish, the rate of CO2 production also drops. The
Respiration Test provides a measure of whether the rate of CO2 produc-
tion has dropped low enough for the compost to be considered stable. It
works by capturing the CO2 gas, which reacts with the NaOH in solution
to produce carbonic acid, as shown in the following equation:
2 NaOH + CO2 → 2H+ + CO32- + 2 Na+ + O2-
gas
The goal of the Respiration Test is to determine whether the readily
degradable organic matter has been depleted, causing microbial respira-
tion rates to be low. However, you might find low CO2 production rates
even in an immature compost if microbial growth has been inhibited by
unfavorable moisture, pH, or oxygen levels during the compost process.
You can avoid this type of false result by also testing your compost with
the Jar Test (p. 73).
M A T E R I A L S
For the incubation:
• balance
• compost sample
• 2 1-gallon jars (plastic or glass), with lids that form tight seals
• 8 100-ml beakers or jars to hold NaOH (each needs to fit inside a
gallon jar)
• tall thin jar, such as a jelly jar, to hold compost sample (needs to fit
inside gallon jar, alongside one of the NaOH jars)
• 250 ml 1M NaOH
• 10-ml pipette
• incubator (optional)
• You may find it useful to run the respiration test using potting soil or
well-aged compost for comparison with your own compost. In this
case, you will need an additional gallon jar with a lid, 4 additional
NaOH jars, and one more tall thin jar.
For the titrations:
• 300 ml 1M HCl
• phenolphthalein
• burette
• magnetic stirring plate and bar (optional)
5 C O M P O S T P R O P E R T I E S T
75
8/9/2019 Composting in the Classroom
http://slidepdf.com/reader/full/composting-in-the-classroom 87/126
P R O C E D U R E
This procedure takes about 1 1/2 weeks.
Wednesday to Friday: Standardize compost moisture content
Measure the moisture content of your compost following the
procedure on p. 44.
Adjust the moisture level of your compost to 50%. This step is impor-tant because moisture content will affect the respiration rate and the
stability rating. If the sample that you measured was drier than 50%, add
water (to your fresh compost, not to the oven-dried sample), stirring in
enough distilled water to bring the moisture level up to 50%.
If the measured sample was wetter than 50%, spread fresh compost
into a thin layer to air-dry until the desired moisture level is achieved.
Take care not to over-dry the compost because this will decrease its
microbial activity.
Friday: Assemble the materials
Assemble the materials needed for the incubation vessels and the titra-
tions. Using a 10-ml pipette, transfer 20 ml of 1M NaOH solution into
each of eight 100-ml beakers or jars. Tightly seal the jars.
Weekend: Allow sample to equilibrate
The equilibration step is optional if your compost was fresh and close
to the 50% moisture level before adjustment. However, if it was frozen or
dried rather than fresh, it will need time for the microbes to adjust to the
new conditions. After adjusting the moisture content, put the compost
into a jar that has ample air space. Close the lid to preserve moisture, and
let it sit over the weekend at room temperature in order to equilibrate.
Monday: Begin incubation
1. Stir compost thoroughly, then transfer 25 g into the tall sample jar.
2. In a 1-gallon jar, place next to each other the compost sample and a jar
containing NaOH.
3. In a second 1-gallon jar, create a blank by using a jar of NaOH but
omitting the jar of compost.
4. Tightly close the lids of the gallon containers. Record the date, time,
and air temperature.
5. Store at room temperature (20–30°C), or warmer if possible. You want
to provide a constant warm temperature. A sunny windowsill probably
is not appropriate because it will get hot during the day but cold at
night. An incubator set at 37°C is ideal. One possibility is to create
your own incubator using a light or heating pad in a box.
6. Over the next four days, you will measure the amount of CO2 absorbed
by each NaOH trap. This is accomplished by titrating with 1M HCl
according to the procedure outlined below.
Tuesday through Friday: Titration
Each day, open the incubation vessel containing compost and remove
the jar of NaOH. Add a fresh jar of NaOH and reseal the incubation
S C O M P O S T I N G I N T H E C L A S S R O O M
 76

8/9/2019 Composting in the Classroom
http://slidepdf.com/reader/full/composting-in-the-classroom 88/126
vessel. At this point, you can either carry out the titration immediately,
or you can save it until Friday if you prefer to carry out all the titrations
at once. In this case, tightly seal each jar of NaOH and label it with the
date and type of sample. Follow the same procedure for the blank jars
containing no compost.
For the titration:
1. Add two to three drops of phenolphthalein indicator to the NaOH
solution.
2. Fill the burette with HCl, and zero it. Titrate with acid until the NaOH
solution begins to become clear. Agitate by hand or use the magnetic
stirrer to mix the solution while adding acid.
3. As the end point gets closer, add acid, one drop at a time, mixing thor-
oughly between drops. The end point has been reached when the solu-
tion turns from pink to clear.
The greater the amount of CO2 that has been released from the
compost sample and absorbed into the solution, the less acid it will
take to reach the titration endpoint. This is because as CO2 is absorbed,the solution becomes increasingly acidic with the formation of
carbonic acid (see equation on p. 75).
4. Record the date and time, the molarity of HCl used, and the volume of
HCl required to reach the end point.
5. Friday: Clean out the incubation vessel and calculate your results.
A N A L Y S I S
Calculate the mass of CO2 generated by your compost sample:
Plot CO2 production over the course of the four days of readings.
Compare your data to a baseline obtained by running the respiration test
on potting soil or fully decomposed, well-aged compost. This baseline
should be a fairly level line close to zero because the microbial activity is
minimal in a fully decomposed sample. Unfinished compost should
support more microbial growth, so CO2 production would be expected to
be higher.
If you have used an incubator, you can compare the peak respiration
rate of your sample to a stability index (Table 5–2). To do this, you will
need to express your results in terms of the organic carbon content of the
sample. Carrying out the Organic Matter Content procedure on p. 87
5 C O M P O S T P R O P E R T I E S T
77
CO C mgHCl HCl
ml lHCl molarity mol l g C mol mg gb s
21000
12 1000• =
−
× × ×( )/
( / ) / /
CO C mg HCl HClb s2 12• = − ×( ) ( )
where:
HClb = ml HCl used in titration of blank
HCls = ml HCl used in titration of sample (from jar containing compost)
CO2•C = mass of CO2-carbon generated (mg)
which simplifies to:

8/9/2019 Composting in the Classroom
http://slidepdf.com/reader/full/composting-in-the-classroom 89/126
will give you the percentage of carbon, which you can use to calculate
the mass of organic carbon in your sample:
organic carbon (g) = (wet weight of sample)(100 – % moisture)(% carbon)
= 25 g x 50% x %C
= 12.5 x %C
To standardize your respiration data, divide the CO2•C values by themass of organic carbon in the compost sample. These standardized respi-
ration rates can then be evaluated using the compost stability ratings in
Table 5–2.
mg CO2•C/g organic carbon/day = mass CO2•C (mg/day)/organic carbon (g)
Table 5–2. Compost Stability Index.*
Respiration Rate Rating Trends(mg CO2•C/
g organic carbon/day)
<2 Very stable
2–5 Stable
5–10 Moderately stable
10–20 Unstable
>20 Extremely unstable
*The values in this table are based on incubation at 37°C. If your incubation is
carried out at a lower temperature, data interpretation using this table may be
misleading.
S C O M P O S T I N G I N T H E C L A S S R O O M
 78
Potential
for odor
generation
Potential
for inhibi-
tion of
seed ger-
mination
Potential
for inhibi-
tion of
plant
growth

8/9/2019 Composting in the Classroom
http://slidepdf.com/reader/full/composting-in-the-classroom 90/126
COMPOST QUALITY
PHYTOTOXICITY BIOASSAY2
U S E : To determine whether a compost contains substances that inhibit
seed germination or growth of the radicle (the embryo root).
B A C K G R O U N DImmature compost may contain substances such as methane,
ammonia, or acetic acid that are detrimental to plant growth. These are
created during composting and later broken down during the curing
phase. Even mature compost may contain substances that inhibit plant
growth, such as heavy metals, salts, pesticide residues, or other toxic
compounds contained in the original compost ingredients.
One way of testing compost quality is to analyze it chemically. The
trouble with this approach is that it is not feasible to test for every
compound that might possibly be present. Bioassays, in which test organ-
isms are grown in a water extract of compost, provide a means of
measuring the combined toxicity of whatever contaminants may bepresent. However, they will not identify what specific contaminants are
causing the observed toxicity.
To provide a useful measure of toxicity, a bioassay must respond
predictably to a range of concentrations of a known compound, as well
as to complex mixtures of contaminants. It should also be sensitive,
rapid, and cost-effective. Garden cress ( Lepidium sativum, L.) is commonly
used for compost bioassays because it meets these criteria.
M A T E R I A L S
• compost sample (roughly 200 g)
• small pan (5–10 cm for drying compost)
• balance
• drying oven (105°C)
• funnel
• ring stand with attachment to hold funnel
• double layer of cheesecloth, large enough to line funnel
• 100-ml graduated cylinder
• 1,000-ml beaker or jar
• 200-ml beaker or jar
• 15 9-cm petri dishes
• 15 7.5-cm paper filter disks
• tweezers• metric ruler or caliper
• cress seeds ( Lepidium sativum, L.)
• 1 liter distilled water
• litmus paper or pH test kit for water
P R O C E D U R E
Prepare a compost extraction:
1. In order to standardize the dilution from one compost sample to
another, you need to correct for the water content of the compost. To
do this, first measure the percent moisture of a compost sample (p. 44).
5 C O M P O S T P R O P E R T I E S T
79
RADICLE

8/9/2019 Composting in the Classroom
http://slidepdf.com/reader/full/composting-in-the-classroom 91/126
2. The next step is to calculate how much of your wet compost would be
equivalent to 100 g dry weight:
3. Moisture content varies from one compost to another, and this needsto be taken into account when determining how much additional
water to use for the extraction:
__ g (or ml) distilled water = 850 g total – __ g wet compost
to be added for extraction from Step 2
Add the amount of distilled water calculated in the above equation to
the amount of wet compost calculated in Step 2. Stir well, then allow
the compost to settle for approximately 20 minutes.
4. Skim off the top 200 ml, and filter it through a double layer of
cheesecloth. The filtrate is your extract.
5. Measure and record the pH of the distilled water. If it is not near neu-
tral, either find a new supply or add a small amount of baking soda tobuffer the solution, then remeasure the pH.
6. Make a 10x dilution by mixing 10 ml of extract with 90 ml of dis-
tilled water.
7. Measure and record the pH of the compost extract and the 10x
dilution.
8. In each of 15 9-cm petri dishes, place a 7.5-cm paper filter. Label five
dishes “control,” another five “10x dilution,” and the remaining five
“full strength.” In addition, you may wish to include information
such as the type of compost and the date.
9. To each petri dish, add 1 ml of the appropriate test solution: distilled
water, diluted extract, or extract at full strength. Evenly space eightcress seeds in each dish, then cover.
10. Enclose the petri dishes in sealed plastic bags for moisture retention.
Incubate for 24 hours in the dark at a steady warm temperature—
27°C is ideal. (If you can’t maintain this warm a temperature, you
may need to lengthen the incubation time.)
11. Open each dish and count how many seeds have germinated. Of
these, measure the length of the radicle, the part that looks like a
root. Fill in Table 5–3.
S C O M P O S T I N G I N T H E C L A S S R O O M
 80
__/
g wet compostg dry compost
W W Ww d w
=
−( )100
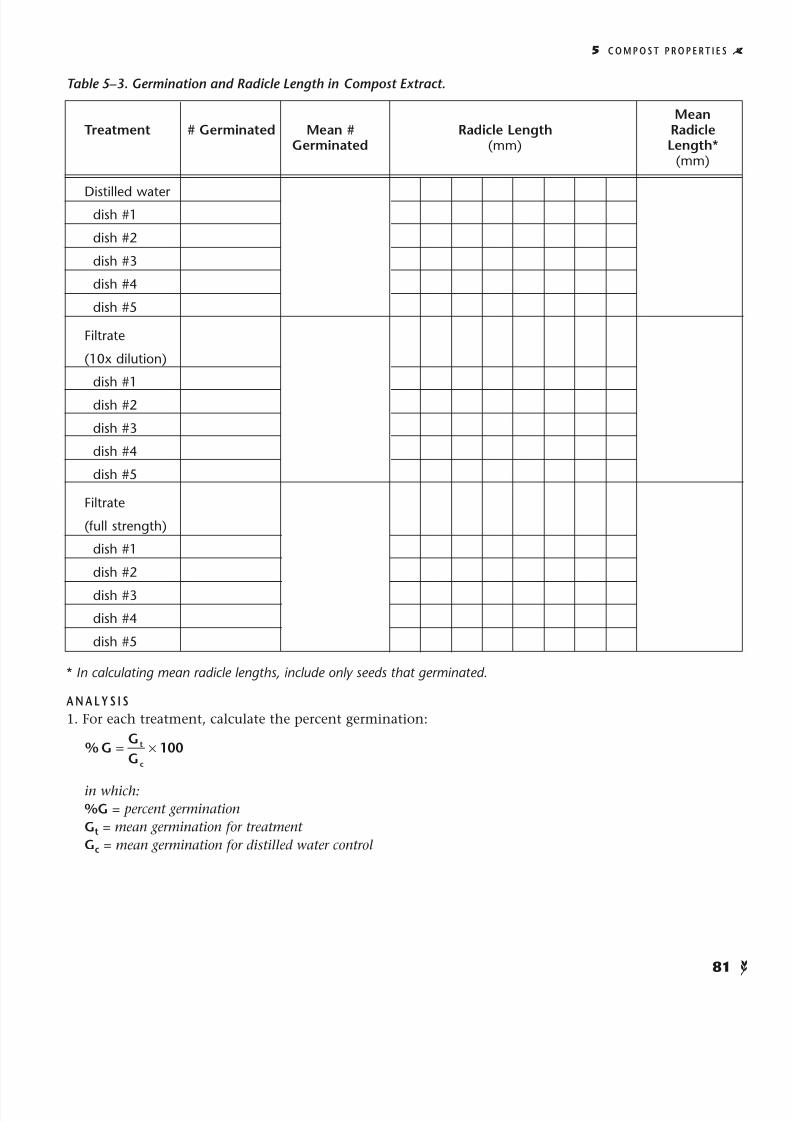
8/9/2019 Composting in the Classroom
http://slidepdf.com/reader/full/composting-in-the-classroom 92/126

8/9/2019 Composting in the Classroom
http://slidepdf.com/reader/full/composting-in-the-classroom 93/126
2. Calculate the percent radicle length for each treatment:
in which:
%L = percent radicle lengthLt = mean radicle length for treatment
Lc = mean radicle length for distilled water control
3. For each treatment, calculate the germination index (GI) and compare
it with the ratings in Table 5–4:
Table 5–4. Garden Cress Germination Index.*
Germination RatingIndex
1.0–0.8 No inhibition of plant growth
0.8–0.6 Mild inhibition
0.6–0.4 Strong inhibition
<0.4 Severe inhibition
* It is possible for the germination index to be greater than one, in which case
the extract enhanced rather than impaired germination and/or radicle growth.
Consider the following questions:• How does radicle length compare with germination? (Does one indica-
tor of phytotoxicity appear more sensitive than the other?) Why do
you think a combination of the two measurements is used?
• What can you conclude about your compost? Is it suitable for use on
sensitive plants?
• What do you think the results would be if you tried this test at various
stages during the composting process?
Research possibility: What types of chemical conditions inhibit cress seed
germination or radicle growth? Is pH important? Can you identify certain types
of compounds, (e.g., salts, nutrients) or conditions (e.g., pH, age of compost)that cause inhibition?
Research possibility: Some leaves, such as those of black walnut or eucalyptus
trees, contain chemicals that inhibit growth of other plants. Are these
compounds broken down by composting?
S C O M P O S T I N G I N T H E C L A S S R O O M
 82
GIG L
=×% %
,10 000
%LL
Lt
c
= × 100
6
6
8/9/2019 Composting in the Classroom
http://slidepdf.com/reader/full/composting-in-the-classroom 94/126
EFFECTS ON SOIL PROPERTIESCompost is referred to as a soil amendment or a substance that is
added to soil to improve its physical or chemical characteristics. Many
claims are made about how compost enhances soil drainage as well as the
ability of soil to hold water so that it is available to microorganisms and
plant roots. Are these claims valid? Does compost make clay soils less
compact and better drained? Do compost amendments make sandy soils
better able to hold water? The tests for Porosity and Water Holding
Capacity will help you to answer questions such as these.
The procedure for measuring Organic Matter Content provides a
means of comparing different types of compost and soil, or compost in
various states of decomposition. Most soils contain less than 20% organic
matter, whereas the percentage in compost is much higher. The final test,
Buffering Capacity, provides a simple measure of one way in which
compost can influence the chemistry of soil and of the water that perco-
lates through it.
POROSITY
U S E : To measure the volume of pore space in a compost or soil sample.
B A C K G R O U N D
Porosity measures the proportion of a given volume of soil occupied
by pores containing air and water. It provides an indication of whether
the soil is loose or compacted, which affects both drainage and aeration.
A sandy soil has large particles and large pore spaces whereas a clayey
or silty soil has smaller pore spaces. What may be surprising, though, is
that the numerous small pores in the clayey or silty soil add up to a
larger total pore volume than in a sandy soil. In general, addition of
organic matter such as compost increases a soil’s porosity.
M A T E R I A L S
• petri dish
• balance with g accuracy
• 100-ml graduated cylinder
• stirring rod slightly longer than graduated cylinder
• sample of compost, soil, or compost/soil mixture
P R O C E D U R E
1. Fill the graduated cylinder about half full with compost, soil, or com-
post/soil mixture.2. Tap the cylinder firmly against your hand several times to settle the
sample, then record the volume after it has settled.
3. Pour the sample out and save it to use in Step 5.
4. Fill the graduated cylinder to the 70-ml level with water.
5. Slowly add the compost, soil, or compost/soil mixture saved from
Step 3.
6. Stir with rod to break up clumps, then let stand for 5 minutes to allow
bubbles to escape.
7. Record the final volume of the compost/water mixture.
5 C O M P O S T P R O P E R T I E S T
83

8/9/2019 Composting in the Classroom
http://slidepdf.com/reader/full/composting-in-the-classroom 95/126
A N A L Y S I S
1. Calculate the volume of solids in your compost or soil:
vol. of solids (ml) = vol. of compost/water mix (ml) – 70 ml water
from Step 7
2. Calculate the total pore space volume:
vol. of pore space (ml) = vol. of packed soil (ml) – vol. of solids (ml)from equation above
3. Determine the porosity:
S C O M P O S T I N G I N T H E C L A S S R O O M
 84
porosity pore spacevol of pore space
vol of packed soil= = ×%
.
.100
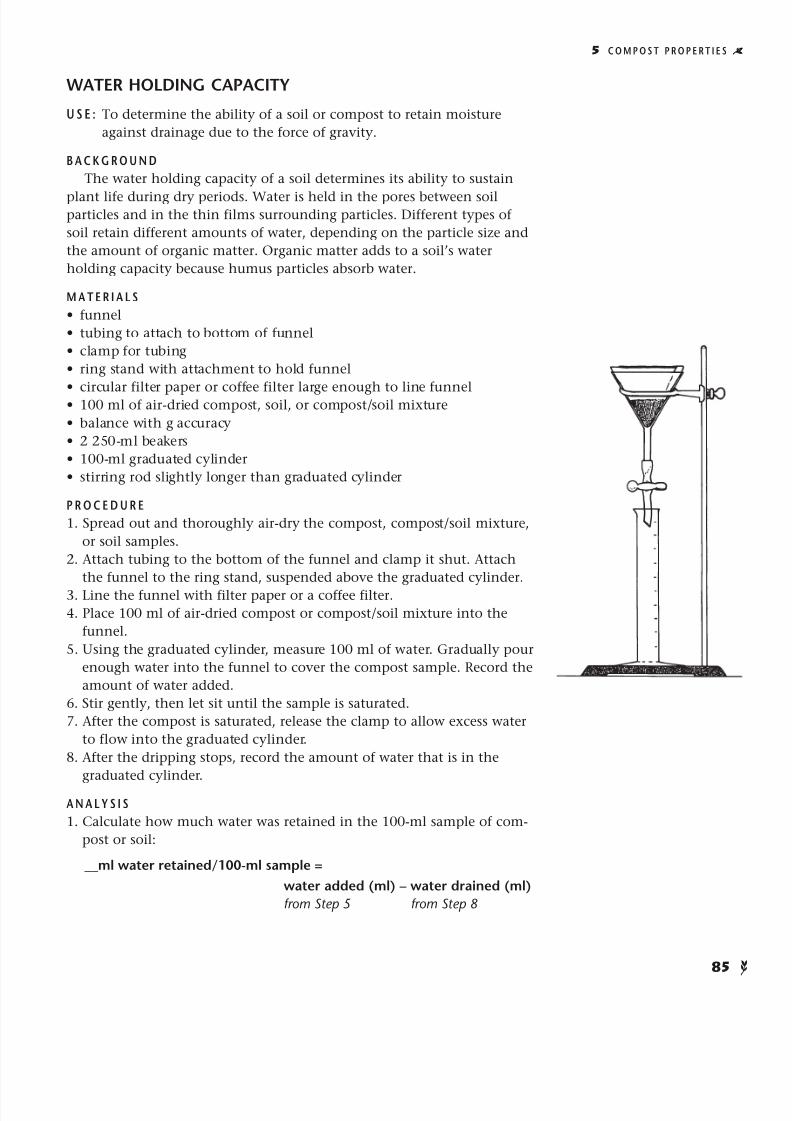
8/9/2019 Composting in the Classroom
http://slidepdf.com/reader/full/composting-in-the-classroom 96/126
WATER HOLDING CAPACITY
U S E : To determine the ability of a soil or compost to retain moisture
against drainage due to the force of gravity.
B A C K G R O U N D
The water holding capacity of a soil determines its ability to sustain
plant life during dry periods. Water is held in the pores between soilparticles and in the thin films surrounding particles. Different types of
soil retain different amounts of water, depending on the particle size and
the amount of organic matter. Organic matter adds to a soil’s water
holding capacity because humus particles absorb water.
M A T E R I A L S
• funnel
• tubing to attach to bottom of funnel
• clamp for tubing
• ring stand with attachment to hold funnel
• circular filter paper or coffee filter large enough to line funnel• 100 ml of air-dried compost, soil, or compost/soil mixture
• balance with g accuracy
• 2 250-ml beakers
• 100-ml graduated cylinder
• stirring rod slightly longer than graduated cylinder
P R O C E D U R E
1. Spread out and thoroughly air-dry the compost, compost/soil mixture,
or soil samples.
2. Attach tubing to the bottom of the funnel and clamp it shut. Attach
the funnel to the ring stand, suspended above the graduated cylinder.
3. Line the funnel with filter paper or a coffee filter.
4. Place 100 ml of air-dried compost or compost/soil mixture into the
funnel.
5. Using the graduated cylinder, measure 100 ml of water. Gradually pour
enough water into the funnel to cover the compost sample. Record the
amount of water added.
6. Stir gently, then let sit until the sample is saturated.
7. After the compost is saturated, release the clamp to allow excess water
to flow into the graduated cylinder.
8. After the dripping stops, record the amount of water that is in the
graduated cylinder.
A N A L Y S I S
1. Calculate how much water was retained in the 100-ml sample of com-
post or soil:
__ml water retained/100-ml sample =
water added (ml) – water drained (ml)
from Step 5 from Step 8
5 C O M P O S T P R O P E R T I E S T
85

8/9/2019 Composting in the Classroom
http://slidepdf.com/reader/full/composting-in-the-classroom 97/126
2. Water holding capacity is expressed as the amount of water retained
per liter of soil, so the next step is to multiply by 10 to convert from
the 100-ml sample to a full liter:
water holding capacity (ml/l) = 10 x (__ml water retained/100 ml sample)
from equation above
3. Compare the water holding capacities of various types of soil, with andwithout compost added.
S C O M P O S T I N G I N T H E C L A S S R O O M
 86

8/9/2019 Composting in the Classroom
http://slidepdf.com/reader/full/composting-in-the-classroom 98/126
ORGANIC MATTER CONTENT
U S E : To determine the organic and mineral fractions of a compost or soil
sample.
B A C K G R O U N D
When an oven-dry sample of soil or compost is heated to 500°C,
organic matter is volatilized. These “volatile solids” make up the organicfraction of soil, including living biomass, decomposing plant and animal
residues, and humus, the relatively stable end product of organic decom-
position. The residue left after combustion is ash, composed of minerals
such as calcium, magnesium, phosphorus, and potassium. In general,
50–80% of the dry weight of a compost represents organic matter that is
lost during combustion.
Organic matter makes up a much lower percentage of the dry weight
of soils. Most are less than 6% organic matter, with higher percentages
occurring in bog soils. Surface soils have higher organic matter contents
than subsoils because humus is formed through decomposition of accu-
mulated residues of crops or natural vegetation. The most productive soilsare rich in organic matter, which enhances their capacity to hold both
water and nutrients in the root zone where they are available to plants.
M A T E R I A L S
• 10-g sample of compost or soil
• porcelain crucible
• tongs
• desiccator (optional)
• laboratory oven, Bunsen burner, or hot plate
If a Bunsen burner or hot plate is used for combustion:
• goggles
• glass stirring rod
• fan or other source of ventilation
P R O C E D U R E
1. Weigh the porcelain crucible, then add about 10 g of compost or soil.
2. Dry the sample for 24 hours in a 105°C oven.
3. Cool in a desiccator (or a nonhumid location), and reweigh.
4. Ignite the sample by placing it in a 500°C oven overnight. Using tongs,
remove the crucible from the oven, and again place it in a desiccator
or nonhumid location for cooling. Weigh the ash. A pottery kiln can
be used if a laboratory oven is not available.
Another option is to ignite the sample using a Bunsen burner or a
hot plate. To avoid breathing the fumes, set up a fan or some other
type of ventilation system. Wearing goggles, heat the sample gently for
a few minutes, then gradually increase the heat until the crucible turns
red. Stir the compost occasionally, and continue the combustion until
the sample becomes light colored and you can no longer see vapors
rising.
5 C O M P O S T P R O P E R T I E S T
87

8/9/2019 Composting in the Classroom
http://slidepdf.com/reader/full/composting-in-the-classroom 99/126
A N A L Y S I S
Calculate the percentage of organic matter using the following
equation:
in which:Wd = dry weight of compost
Wa = weight of ash after combustion
How does the organic matter content of your compost compare with
that of the soils you tested? Does the organic matter content diminish
during the composting process, or does it just change in form and chem-
ical composition?
If you divide the percentage of organic matter by 1.8 (a number
derived through laboratory measurements), you can get an estimate of
the percentage of carbon in your sample:
This may be useful if you know the C:N ratio and you want to figure
out the percentage of nitrogen:
S C O M P O S T I N G I N T H E C L A S S R O O M
 88
organic matterW W
Wd a
d
(%) =
−
× 100
%%
.carbon
organic matter=
1 8
%%
:nitrogen
carbon
C N=

8/9/2019 Composting in the Classroom
http://slidepdf.com/reader/full/composting-in-the-classroom 100/126
BUFFERING CAPACITY
U S E : To determine whether adding compost to soil increases the soil’s
capacity to resist pH change.
B A C K G R O U N D
Finished compost usually has a pH around neutral, in the range of
6–8. It also tends to have a high buffering capacity, meaning that it resistschange in pH. Soils with high buffering capacities do not experience
drastic pH fluctuations that may be detrimental to microbial life and
plant growth. Buffering capacity needs to be taken into account when
determining the amounts of lime, sulfur, or other chemicals that are
applied to soil to alter its pH.
The buffering capacity of soil may be provided by either mineral or
organic components. Quartz sand has almost no buffering capacity, so
even small additions of acid will drop the pH of the sand and its drainage
water. In contrast, a sand made of crushed limestone is highly buffered
because it contains calcium and magnesium carbonates. The addition of
organic matter such as compost tends to increase a soil’s bufferingcapacity.
This procedure provides a way of demonstrating the concept of a
buffer. Students may be surprised to discover that compost with pH near
7 can neutralize an acidic solution. They might think that the compost
would need to be basic to counteract the acidity of the solution, or they
might expect the pH of the compost to drop corresponding to the
increase in solution pH.
M A T E R I A L S
• funnel
• ring stand with attachment to hold funnel• circular filter paper or coffee filter large enough to line funnel
• 125-ml samples of compost and sand
• 250-ml beaker
• acid solution: add 1 ml 1M H2SO4 to 500 ml distilled water
• pH meter, test kit, or litmus paper
P R O C E D U R E
1. Attach the funnel to the ring stand, suspended above one of the
beakers.
2. Line the funnel with filter paper or coffee filter.
3. Measure the pH of the compost (see p. 54).
4. Measure the pH of the H2SO4 solution.
5. Place a 125-ml sample of compost into the funnel.
6. Slowly pour a few milliliters of H2SO4 solution into the compost in the
funnel. Continue adding small amounts of acid, stopping as soon as
the liquid begins to drain into the beaker below.
7. Test the pH of the drainage solution and of the compost sample.
8. Optional: Repeat Steps 4–7, using sand in place of compost, then using
a 50/50 mixture of sand and compost.
5 C O M P O S T P R O P E R T I E S T
89

8/9/2019 Composting in the Classroom
http://slidepdf.com/reader/full/composting-in-the-classroom 101/126
A N A L Y S I S
Did the pH of the compost change after application of the H2SO4
solution? What about the sand? What happened to the pH of the acid as
it filtered through the compost or sand?
What can you conclude about the buffering capacity of the compost
and the sand? Which would be better capable of withstanding the effects
of acid rain? Which would be more resistant to pH change through a soilamendment such as lime?
Research possibility: Finished compost is near neutral pH. Can you design an
experiment to answer one or more of the following questions: Is compost detri-
mental to use on acid-loving plants such as blueberries or azaleas? Does
compost buffer the soil pH, making it harder to provide acidic conditions? How
does it compare to peat moss in this regard?
1 The Respiration Test is adapted from Bartha, R., and D. Pramer. 1965. Features of aflask and methods of measuring the persistence and biological effects of pesticides insoil. Soil Science 100:68–70.
2 The Phytotoxicity Bioassay is adapted from: Zucconi, F., A. Pera, M. Forte, and M. deBetoldi. 1981. Evaluating toxicity of immature compost. BioCycle 22(2):54–57.
S C O M P O S T I N G I N T H E C L A S S R O O M
 90
6

8/9/2019 Composting in the Classroom
http://slidepdf.com/reader/full/composting-in-the-classroom 102/126
6y
COMPOST AND PLANT GROWTH
EXPERIMENTS
Up to this point, we have concentrated primarily on the processes
involved in converting organic wastes to compost. But, in addition to
being an environmentally sound means of reducing wastes, composting
has important applications in agriculture and gardening. For example,
compost can be used as a soil amendment to enhance the physical char-
acteristics and productivity of soil. It can also be used as a mulch around
shrubs, trees, and other plants to reduce soil erosion, evaporation, and
weed growth.
A compost that is mature and relatively free of contaminants, and has
favorable physical and chemical properties, should enhance the growth
of plants. But, there are many questions about the effect of specific
composts on plants. Do different species respond differently to compost?
Does the response of any particular plant species to compost depend on
the type of compost being used? What is the ideal mix of compost and
soil for growing plants?
Plant growth experiments can provide answers to these and other
questions students may devise. The experiments can be performed
indoors in pots or outdoors in gardens and other field situations.
Students also may develop research projects that combine plant growth
experiments with some of the techniques presented in Chapter 5. For
example, they may investigate the relationship of compost stability (as
determined by the Respiration Test, p. 75) to the rate of growth of a
particular species of plant. Or, they may design a research project to
answer questions about how the porosity of a compost/soil mix relates to
plant growth.
Research Possibility: Water in which compost has been soaked (often called
compost tea) is said to be beneficial to plants. Can you design experiments to
test whether different types, concentrations, and amounts of compost tea
enhance plant growth?
The instructions below outline a protocol for conducting plant growth
experiments in the laboratory. Students may want to adapt these proto-
cols for use in greenhouses or outdoors. They can also use this or a
similar protocol for any number of research projects, varying factors such
as the type and maturity of compost, mixture of compost and soil, plant
species, and environmental conditions (e.g., moisture, temperature,
sunlight) under which the plants are grown. It is important to keep in
mind that varying only one factor at a time makes a simpler student
experiment, the results of which can be more readily interpreted. For
example, if a student is interested in the effect of different compost/soil
mixes on plant growth, it would be best to start with only one type of
compost, one type of soil, and one species of plant, varying only the ratio
6

8/9/2019 Composting in the Classroom
http://slidepdf.com/reader/full/composting-in-the-classroom 103/126
of compost to soil. A later experiment or an experiment by another
student could investigate another type of soil or compost, or a different
species of plant.
Suppose a student varied both the ratio of compost to soil and the
type of compost in the same experiment. It would be difficult to
determine whether any differences in plant growth were due to the type
of compost or to the relative amounts of compost and soil used. It ispossible using statistical analyses to interpret experiments with more
than one independent variable (e.g., ratio of compost to soil, type of
compost). However, it is difficult for a beginning researcher to make sense
of such results. Thus, we recommend that high school students stick to
one independent variable at a time when first embarking on controlled
experimental research.
Students should be careful in how they set up their experiments and
how they interpret their results. For example, suppose a student wants to
find out the effect of compost on plant growth. S/he conducts an experi-
ment in which half the plants are grown in compost and the other half
in soil. Reasoning that compost has a higher nutrient content than soil,s/he corrects for this by fertilizing only the plants grown in soil. If these
plants grow faster than those grown in compost, what can s/he conclude?
It would be reasonable to conclude that the soil/fertilizer combination
provides a better growth medium than compost for this type of plant.
But, what about the original question regarding the effect of compost on
plant growth? Do plants grow better in a compost/soil mix than in plain
soil? Did the plants in soil grow better because of the properties of the
soil versus those of the compost, or because of the added fertilizer? A
better experiment would be to grow plants in varying ratios of compost
to soil, with fertilizer supplied either to all or none of the plants. Then,
any differences in plant growth could be attributed to the various combi-nations of compost and soil in the potting mixes.
S C O M P O S T I N G I N T H E C L A S S R O O M
 92
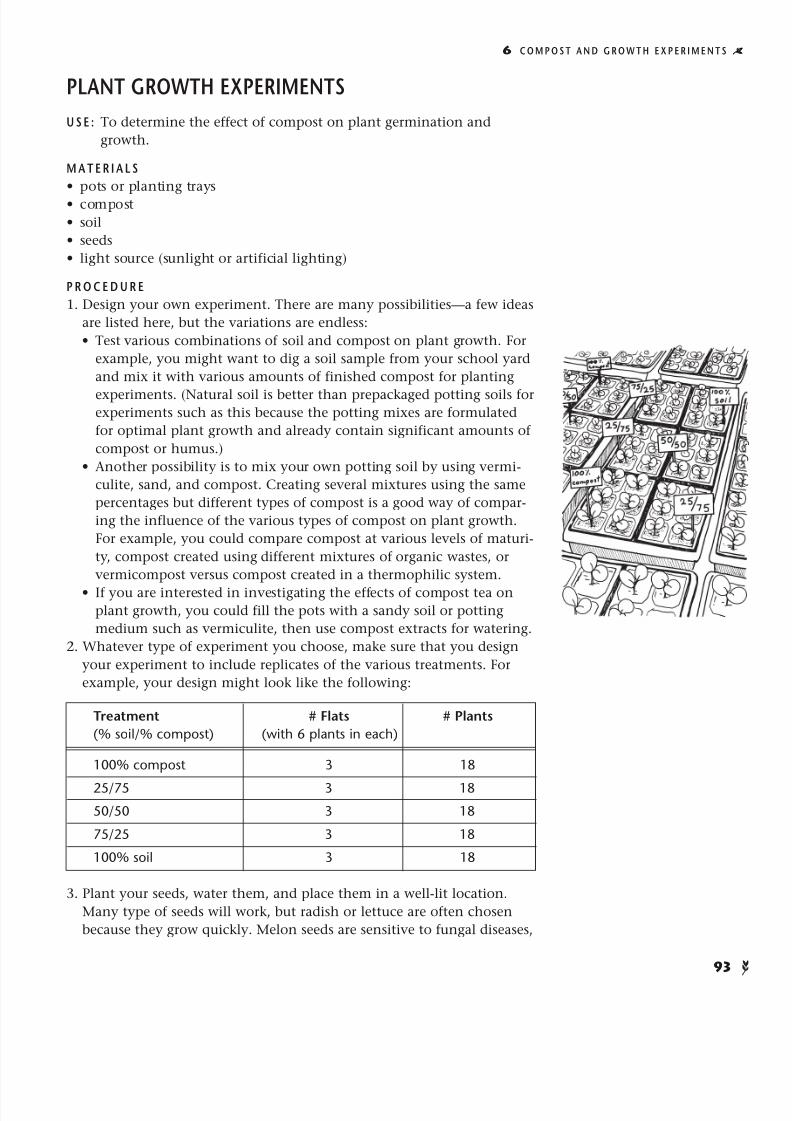
8/9/2019 Composting in the Classroom
http://slidepdf.com/reader/full/composting-in-the-classroom 104/126
PLANT GROWTH EXPERIMENTS
U S E : To determine the effect of compost on plant germination and
growth.
M A T E R I A L S
• pots or planting trays
• compost
• soil
• seeds
• light source (sunlight or artificial lighting)
P R O C E D U R E
1. Design your own experiment. There are many possibilities—a few ideas
are listed here, but the variations are endless:
• Test various combinations of soil and compost on plant growth. For
example, you might want to dig a soil sample from your school yard
and mix it with various amounts of finished compost for planting
experiments. (Natural soil is better than prepackaged potting soils forexperiments such as this because the potting mixes are formulated
for optimal plant growth and already contain significant amounts of
compost or humus.)
• Another possibility is to mix your own potting soil by using vermi-
culite, sand, and compost. Creating several mixtures using the same
percentages but different types of compost is a good way of compar-
ing the influence of the various types of compost on plant growth.
For example, you could compare compost at various levels of maturi-
ty, compost created using different mixtures of organic wastes, or
vermicompost versus compost created in a thermophilic system.
• If you are interested in investigating the effects of compost tea onplant growth, you could fill the pots with a sandy soil or potting
medium such as vermiculite, then use compost extracts for watering.
2. Whatever type of experiment you choose, make sure that you design
your experiment to include replicates of the various treatments. For
example, your design might look like the following:
Treatment # Flats # Plants
(% soil/% compost) (with 6 plants in each)
100% compost 3 18
25/75 3 18
50/50 3 18
75/25 3 18
100% soil 3 18
3. Plant your seeds, water them, and place them in a well-lit location.
Many type of seeds will work, but radish or lettuce are often chosen
because they grow quickly. Melon seeds are sensitive to fungal diseases,
6 C O M P O S T A N D G R O W T H E X P E R I M E N T S T
93

8/9/2019 Composting in the Classroom
http://slidepdf.com/reader/full/composting-in-the-classroom 105/126
and thus they provide a sensitive indicator of whether fungi have been
killed through heating or curing of the compost.
4. Keep all the pots in the same setting to minimize any variation in
temperature, lighting, pests, and other environmental factors. Even
when the environmental conditions are kept as constant as possible, it
is a good idea to randomize the grouping of plants rather than placing
all the plants that are receiving the same treatment together in onegroup. This helps to further minimize the effect of any environmental
differences.
5. Record on a daily basis the number of seeds that have germinated,
plant growth, and observations about plant health such as color, vigor,
or damage due to pests and diseases. You can decide what measure-
ments to use as indicators of plant growth; possibilities include plant
height, number and size of leaves, and dry weight of the entire plant at
the end of the experiment. (For dry weight, weigh the plant after dry-
ing in a 105°C oven for 24 hours.)
A N A L Y S I S A N D I N T E R P R E T A T I O N
1. Graph germination rates and plant growth over time for the different
treatments. Also, determine the mean number of seeds germinated and
mean size or mass of the plants at the end of the experiment. Compare
average germination rates, plant growth, and health for the different
experimental treatments. Based on your experiments, what was the
optimal potting mix for plant germination? For plant growth? For
plant health?
2. Some things may have gone wrong in your experiments. For example,
you may have over-watered your plants, causing them all to die from
fungal infection regardless of the treatment. Or you may have taken
measurements only on plant height, and later decided that measuring
the number of leaves and length of the main stem would have given
better information. These types of problems are normal and can be
used as a basis for redesigning the experiment. How might you change
your experimental design if you were to carry out another set of
growth experiments?
3. You may not find any differences between the treatments. Or, you may
discover that the plants grown without compost did best. If this is the
case, it may be difficult to determine whether the compost had no
effect, or you did something wrong. The tendency is to assume the
compost really has an effect and to attribute insignificant or negative
results to experimental mistakes. However, the interpretation of resultsshould not be biased by your predictions or preconceived ideas about
the way experiments will turn out. Often unexpected results lead to
important insights and questions. Maybe your compost is of poor qual-
ity, or maybe the plant species you chose grows well in poor soils.
Explore all the possibilities for explaining your results with an open
mind, through discussions and new experiments.
4. The conclusions and recommendations that you are able to make
based on your results will depend on how and where you carried out
your experiments. For example, if you used potted plants in a class-
S C O M P O S T I N G I N T H E C L A S S R O O M
 94

8/9/2019 Composting in the Classroom
http://slidepdf.com/reader/full/composting-in-the-classroom 106/126
room or greenhouse, it may be difficult to extrapolate from your
results to what would happen if the same plants were grown outdoors
in a garden. However, your results may give you some ideas about
what would happen, allowing you to make predictions or hypotheses.
You could then use these predictions to design a new experiment on
plant growth in a garden setting.
6 C O M P O S T A N D G R O W T H E X P E R I M E N T S T
95

8/9/2019 Composting in the Classroom
http://slidepdf.com/reader/full/composting-in-the-classroom 107/126
S C O M P O S T I N G I N T H E C L A S S R O O M
 96

8/9/2019 Composting in the Classroom
http://slidepdf.com/reader/full/composting-in-the-classroom 108/126
7y
COMPOSTING RESEARCH
Vermiculturists assert that worm castings are the most valuable commodity
in the garden and that you can take raw pig manure and run it through worms
to totally remove the pathogens and add countless new minerals while
improving texture. Non-worm composters insist that worms lock up nutrients,
destroy microorganisms, and result in a product that is less nutritive… My
bottom line is simple, I am trying to determine what has been proven in order
to arrive at an approach that integrates the best of what we know—without
hype or speculation...
—E-mail message from frustrated compost manager
Welcome to the frontiers of science. I know this can be frustrating, but the
debate and contradictions you experience are not likely to be resolved quickly…
I recommend you approach the field of composting with skepticism as well as
an open mind. An open mind is essential to understand some of the great composting mysteries that are almost certainly out there, perhaps related to the
role of microbes or various unconventional practices. But skepticism is also crit-
ical, especially when listening to those who are certain they already know all
the answers.
Best wishes on your journey!
—Response from compost scientist Tom Richard
Throughout Composting in the Classroom, we not only have presented
information but also have pointed out gaps in our knowledge. And, even
the information we have presented represents only the most current
understanding about composting. As new information is added, ourunderstanding of composting processes will be enhanced, and
recommendations for composting procedures will change.
Maybe your students are intrigued by one of the research possibilities
we have presented. Or, maybe they have questions of their own that
could be developed into a research project. Perhaps their past experiences
with composting caused them to doubt some of the information that has
been presented, and they would like to test the validity of their own
observations.
This final chapter is for those students who have posed questions in
the course of exploring material in this manual and are eager to conduct
research to find answers. Many of the techniques presented in Chapters
3–5, as well as the background information presented in Chapter 1,
should be useful in designing and conducting experiments. The discus-
sion of plant growth experiments in Chapter 6 has already provided an
introduction to some of the issues encountered in conducting research.
This chapter presents a short overview of research as conducted by
scientists, as well as some example research projects. Students can use the
example research possibilities presented throughout this publication as
models for their research, or they may devise entirely new projects.

8/9/2019 Composting in the Classroom
http://slidepdf.com/reader/full/composting-in-the-classroom 109/126
EXPLORATION AND CONTROLLED EXPERIMENTSStudents and scientists working in a new field often start off with
exploratory research (Figure 7–1). In this type of research, students or scien-
tists are exploring or gaining a “feel for” an organism or process by using a
variety of methods. An example of exploratory research would be
students trying various mixtures of compost ingredients, testing their
effects on the peak temperature reached and the length of time the
temperature remained elevated. Another example of exploratory research
would be students comparing the microbial populations in different
composts. Or, students interested in the physical sciences could investi-
gate how different bioreactor designs affect the temperatures achieved
during the composting process. Such explorations would lead to a series
of observations about the variables that could be changed or investigated
in a more controlled manner in order to answer a more defined research
question.
Based on results obtained during their exploratory research, students
might refine their research questions and plans, leading to design and
execution of a controlled scientific experiment. Controlled experiments1 are
carefully designed to include clearly defined objectives and hypotheses,
dependent and independent variables, one or more treatments or levels
of the independent variable, and replicates for each treatment. Based on
their exploratory research, students studying compost microbiology
might hypothesize that composts with high levels of nitrogen support
more microbial activity. The next step would be to design an experiment
to test this hypothesis, by purposefully varying the nitrogen content of
the compost mix while keeping all other variables constant. Similarly, the
students investigating bioreactors might have discovered through their
exploratory research that systems smaller than a certain size lose heat too
quickly to achieve the optimal temperatures for composting. These
students could design a controlled experiment focusing on whether insu-
lation can compensate for the larger surface-to-volume ratio in small
compost systems. Or, they might choose to investigate whether the addi-
tion of an outside energy source enhances thermophilic composting in
small bioreactors. In either case, the students would vary only one inde-
pendent variable (insulation or outside energy source), keeping the size of
the pile, mix of ingredients, ambient temperature, and other factors
constant.
It should be noted that not all exploratory research leads to controlled
experiments. Some students may not be ready to move on to controlled
experiments, and they may be better served by conducting several
exploratory projects. Because it is so open-ended and allows students so
much freedom in designing their projects, exploratory research can serve
to motivate students with differing abilities. Classroom discussions of the
results of students’ research projects can guide the teacher in determining
when to introduce more advanced concepts such as replication and
controls, and when to allow students to conduct further exploratory
research in a more open-ended manner.
S C O M P O S T I N G I N T H E C L A S S R O O M
 98

8/9/2019 Composting in the Classroom
http://slidepdf.com/reader/full/composting-in-the-classroom 110/126
Figure 7–1. Model for Conducting Research.
NARROWING DOWN A RESEARCH QUESTIONOne of the most difficult aspects of conducting research is framing a
research question that can be answered using the means available. In
exploratory research, this is less important, because the goals are for
students to become acquainted with a particular process or organism and
for them to get excited about research. The results of exploratory research
can often be used to identify trends, but they are not expected to yield
solid conclusions. In fact, exploratory research is often used to help
narrow down a question that can be answered by a controlled
experiment.
7 C O M P O S T I N G R E S E A R C H T
99
EXPLORATORY RESEARCH explore several factors innonsystematic fashion
CONTROLLED EXPERIMENTS perform experiments with clearly defined hypotheses, independent
and dependent variables,controls, and replicates based on results and what worked and
didn’t work, revise questions and designnew experiments
based on results and what worked and didn’t work, revise questions and approach
based on results of expoloratory research,refine research questions and develophypotheses
ORIGINAL QUESTION
8/9/2019 Composting in the Classroom
http://slidepdf.com/reader/full/composting-in-the-classroom 111/126
The goal of controlled experimental research is to answer specific ques-
tions. However, the results of a controlled experiment will be difficult to
interpret if the original question is not well defined.
For example, suppose that your students wanted to know whether
compost enhances the growth of plants. They might start off by bringing
in samples of home compost and using it as mulch around their favorite
plants in the school yard. Once their results are in, it may be difficult toconclude why some plants grew faster than others. Was it because of
differences in the species of the plant, or whether they were growing in
the sun or shade? Was plant growth affected by the type of compost
applied, or the amount? Although it will be hard to draw conclusions
with so many variables, the students may notice a particularly interesting
result or trend that stands out. For example, all the plants near the south-
facing wall of the building grew particularly well regardless of the
compost treatment. Could this be due to higher temperatures in that area
of the school yard? You could use the students’ observations to help
them design a new, controlled experiment on the effect of temperature
on plant growth.Alternatively, you could go back to the original question about the
effect of compost on plant growth, and use the results of the experiment
to help the students narrow down a better research question. An example
of a better-defined research question is, “What is the effect of vermicom-
post produced from cafeteria wastes on the growth of kidney beans?”
Students can further narrow this question to: “What is the effect of
adding different amounts of vermicompost to school-yard soil on the
growth of kidney beans in pots?” They have now defined a question that
can be answered in a controlled experiment, by varying the ratio of
vermicompost to soil and growing the kidney beans under the same
watering, light, and temperature regime.
EXAMPLE RESEARCH PROJECTSSome ideas for research projects have been presented throughout this
manual. We encourage students to use these and their own ideas to
develop explorations and experiments. The following is an example of
how the same question might be examined through both exploratory
research and controlled experiments.
How long does it take for different composts to become stable?
Exploratory Research: Students could mix together various organic
materials and measure the compost respiration rates at several-day
intervals after the thermophilic stage has been completed.
Controlled Experimental Research: Students could design an experi-
ment with carefully measured quantities of various ingredients. They
would choose only two ingredients and vary their relative amounts.
The total volume of wastes, ambient temperature, and moisture
content should be kept constant. There would be at least three
replicates of each treatment. From each replicate, respiration would be
measured at each sampling time. The results would be presented as the
S C O M P O S T I N G I N T H E C L A S S R O O M
 100

8/9/2019 Composting in the Classroom
http://slidepdf.com/reader/full/composting-in-the-classroom 112/126
mean (and standard error if students are familiar with this measure) of
the measurements for each treatment at each sampling time. Any
unexpected results should be presented.
The following are two examples of how an exploratory research
project can lead into a controlled experiment.
How does the compost/soil mix affect the growth of lettuce seeds?
Exploratory Research: Students could start off by growing lettuce
seeds in a variety of compost/soil mixes and measuring various proper-
ties of the different mixes (e.g., porosity, water holding capacity, pH).
They might observe that lettuce seeds grow best within a narrow range
of pH, regardless of the porosity or water holding capacity.
Controlled Experimental Research: Students could define a new ques-
tion based on the results of their exploratory research. What is the
effect of the pH of a compost/soil mix on the growth of lettuce seeds?
They could then systematically vary the pH of a single compost/soil
mix by using different amounts of lime or acid, and measure thegrowth of lettuce seeds.
What is the effect of physical factors (e.g., air flow) on peak tempera-
tures achieved in soda bottle composting?
Exploratory Research: Students could build soda bottle bioreactors
with various passive and active aeration systems, moisture conditions,
and insulation, and then measure the temperatures during composting.
Upon comparing their results, they might conclude that the hottest
temperatures were achieved by using 5–cm thick foam insulation and
passive aeration.
Controlled Experimental Research: Students might recognize thatbecause they varied both the insulation and aeration system at the
same time, they could not determine from their exploratory research
which factor was more important in promoting high temperatures.
They could design a new experiment to compare the effect on temper-
ature of several different thicknesses of insulation, keeping aeration
and all other variables constant. Alternatively, they could compare the
effect on temperature of several different aeration systems, keeping
insulation and all other variables constant.
Often, research projects can be readily converted to technological
design projects. In the example discussed above, students researched theeffect on compost temperature of various soda bottle bioreactor designs.
Another possibility would be to turn this into a technological design
project by asking the students to design the most effective or hottest soda
bottle reactor.
7 C O M P O S T I N G R E S E A R C H T
101

8/9/2019 Composting in the Classroom
http://slidepdf.com/reader/full/composting-in-the-classroom 113/126
INTERPRETING RESULTSMany people are under the impression that research always reveals
definitive answers to the questions that are asked. In reality, many
research projects only partially answer the original questions. Sometimes,
as mentioned above, the original question was not defined well enough.
Often, the researchers discover that their methods were inadequate and
need to be refined. For example, in trying to determine the effect of moisture content on compost temperature, it might turn out that the
range of moisture contents was too narrow to show any effect, and a
broader range should be used in a subsequent experiment. Other times,
something goes wrong with the experimental procedure. For example, a
continuously recording temperature device may stop working in the
night, or a custodian might move an experiment.
Even when everything goes according to plan, the results of an experi-
ment may not turn out as expected. A researcher might ask whether
adding sawdust or newspaper to vegetable scraps results in higher temper-
atures in two-can bioreactors. S/he might use five garbage cans with
sawdust and five with newspaper. What if the results come out like this?
Maximum Temperature (°C)
Trial # Compost with Compost with
Sawdust Newspaper
1 21.4 26.3
2 26.0 29.9
3 20.2 25.0
4 25.7 15.2
5 18.6 15.8
Mean 22.4 22.4
Can you draw any conclusions? At first, you might say that there are
not any differences between newspaper and sawdust because the mean
temperatures are the same. This may be true, but by stopping at this
point, you may miss some important possibilities. If you examine your
results more closely, you will notice that in the first three trials, the news-
paper mix produced higher temperatures, and all of them ranged between
25°C and 30°C. But what happened with the last two trials? Was
something different? Was the newspaper mostly glossy and colored
instead of black and white? Was there a difference in the vegetable scrap
mixture? Asking questions about what may have led to discrepant results
is fundamental to conducting research. It can often lead to new
questions, and in turn, new experiments. It can also help you to redesign
an experiment to answer your original question. Carefully examining and
using all your results, whether or not they support your original hypoth-
esis, is an essential part of conducting research.
S C O M P O S T I N G I N T H E C L A S S R O O M
 102

8/9/2019 Composting in the Classroom
http://slidepdf.com/reader/full/composting-in-the-classroom 114/126
FINAL WORDSIn sum, research is both a cumulative and iterative process. Each
experiment builds on what the researcher already knows from reading,
talking with other scientists and carrying out previous investigations.
And, many experiments lead to refining of the original questions and
methods; an experiment may have to be repeated in slightly different
form several times before a question is answered. Finally, the results of an
experiment, even when seemingly ambiguous or contradictory, often lead
to new insights, new questions, and new investigations.
Similar to research, teaching is a process of trying new things and
building on past experiences. And, similar to composting, not all the
answers are known about how best to engage students in inquiry-based
science. We have presented what is currently known about composting
science, as well as the experiences of teachers and scientists involved in
developing composting research projects suitable for high school
students. Continued research and classroom experience will help us to
refine composting methods and to develop new ways for students to
“learn science as science is practiced.” You and your students can be part
of this process.
Best wishes on your journey!
1 For a thorough discussion of student research, including dependent and independentvariables, treatments, and replicates, see Cothron, J. H., R. N. Giese, and R. J. Rezba.1993. Students and Research: Practical Strategies for Science Classrooms and Competitions,2nd ed. Kendall/Hunt, Dubuque, IA.
7 C O M P O S T I N G R E S E A R C H T
103

8/9/2019 Composting in the Classroom
http://slidepdf.com/reader/full/composting-in-the-classroom 115/126
jG L O S S A R Yi
Acid – A substance with pH between 0 and 7.
Actinomycetes – A type of bacteria, distinguished by their branching filaments
called mycelia. Include both mesophilic and thermophilic species. In com-
posting, actinomycetes play an important role in degrading cellulose and
lignin.
Adsorption – The attachment of a particle, ion, or molecule to the surface of a
solid such as soil or compost.
Aeration – The process through which air in compost pores is replaced by
atmospheric air, which generally is higher in oxygen.
Aeration, forced – Addition of air to compost using blowers, fans, or vacuum
pumps.
Aeration, passive – Relying on natural forces, such as convection, diffusion,
wind, and the tendency of warm air to rise, for movement of air through
compost.
Aerobic – (1) Characterized by presence of oxygen, (2) Living or becoming
active in the presence of oxygen, (3) Occurring only in the presence of
oxygen.
Air-dry – (adj) The state of dryness of a compost or soil at equilibrium with
the surrounding atmosphere. (v) To allow to reach equilibrium in moisture
content with the surrounding atmosphere.
Amino acid – An organic compound containing amino (NH2) and carboxyl
(COOH) groups. They combine to form proteins.
Anaerobic – (1) Characterized by absence of oxygen, (2) Living or functioning
in the absence of oxygen, (3) Occurring only in the absence of oxygen.
Annelid – A member of the phylum Annelida, containing segmented worms.
Bacteria – Single–celled microscopic organisms lacking an enclosed nucleus.
Members of the kingdom Monera. Commonly have a spherical, rod, or spiral
shape.
Base – A substance with pH between 7 and 14.
Batch composting – Composting in which all of the ingredients are added at
once rather than continuously over a period of time.
Bedding – A moisture-retaining medium for worm composting, such as shred-
ded paper, leaves, or peat moss.Bioassay – A laboratory procedure using living organisms to test the toxicity of
a substance.
Biodegradable – Capable of being broken down through biochemical processes.
Biofilter – A filter that uses microbial action to reduce odors. Finished compost
commonly is used as a biofilter to reduce potential odors from active compost
systems. This can be as simple as layering finished compost over a pile con-
taining fresh food scraps. In systems using forced aeration, the air commonly
is blown through a biofilter of finished compost before being released to the
environment.105

8/9/2019 Composting in the Classroom
http://slidepdf.com/reader/full/composting-in-the-classroom 116/126
Biomass – The mass of living organisms.
Bioreactor – An enclosed container used for making compost or conducting sci-
entific experiments on the composting process.
Buffer – A substance that resists rapid change in pH.
Buffering capacity – The ability to resist change in pH.
Bulking agent – A material used in composting to maintain air spaces between
particles.
C:N – See Carbon-to-nitrogen ratio.
Carbon-to-nitrogen ratio – The ratio of the weight of organic carbon to the
weight of total nitrogen in soil, compost, or other organic material.
Castings – Worm feces, including undigested organic matter, bacteria, and soil
that have passed through worm digestive systems.
Cellulose – The chief component of plant cell walls, cellulose is a series of
organic compounds containing carbon, hydrogen, and oxygen formed into
chains of 1000-10,000 glucose molecules. Cellulose forms the fibrous andwoody parts of plants and makes up over 50% of the total organic carbon in
the biosphere.
Clay – (1) A soil component consisting of the smallest mineral particles, those
<0.002 mm in diameter, (2) Soil composed of >40% clay, <45% sand, and
< 40% silt.
Compost – (v) To decompose organic materials under controlled conditions, (n)
The humus-like material produced by decomposing organic materials under
controlled conditions.
Compost maturity – See Maturity.
Compost quality – The suitability of a compost for use with plants. Compostthat impairs seed germination or plant growth is of low quality, either
because it is not yet fully decomposed or because the initial ingredients con-
tained contaminants that are phytotoxic.
Compost stability – See Stability.
Compost system – The method used to convert organic wastes into a stable end
product. Examples range from large outdoor windrows or piles to small
indoor bioreactors.
Compost tea – An extract made by soaking finished compost in water.
Compound microscope – A microscope with two sets of lenses, one in the eye-
piece and the other in the objective.
Conduction – The transfer of heat by physical contact between two or more
objects or substances.
Control – In a scientific experiment, the test group used as a standard of com-
parison, to which no experimental factors or treatments have been imposed.
Convection – The transfer of heat through a gas or solution because of molecu-
lar movement.
S C O M P O S T I N G I N T H E C L A S S R O O M
 106

8/9/2019 Composting in the Classroom
http://slidepdf.com/reader/full/composting-in-the-classroom 117/126
Culture – (v) To grow organisms under controlled conditions, (n) The product of
growing organisms under controlled conditions, such as a bacterial culture.
Curing – The final stage of composting, after the period of rapid decomposition
has been completed, in which slow chemical changes occur that make the
compost more suitable for use with plants.
Cyst – A sac surrounding an animal or microorganism in a dormant state.
Debris – Dead organic matter.
Decomposer – An organism that feeds on dead organic matter and aids in its
degradation.
Dependent variable – In a scientific experiment, the variable that changes as a
result of treatment variations. For example, in plant growth experiments, one
dependent variable might be the height of the plants grown in potting mixes
containing various amounts of compost.
Detritus – Dead organic matter.
Endospore – A structure inside some bacterial cells that is highly resistant to
heat and chemical stress and can germinate to grow a new cell when environ-mental conditions become favorable.
Enzyme – An organic substance produced by living cells and capable of acting
as a catalyst for a biochemical reaction.
Feces – Wastes discharged from the intestines of animals.
Food chain – A hierarchical sequence of organisms that feed on each other,
starting with either green plants or organic detritus as the primary energy
source.
Food web – The network of interconnected food chains found in an ecological
community.Forced aeration – See Aeration, forced.
Fungi – Plural of fungus. A kingdom that includes molds, mildews, yeasts, and
mushrooms. Unlike bacteria, fungal cells do have nuclei. Fungi lack chloro-
phyll, and most feed on dead organic matter. In compost, fungi are important
because they break down tough debris like cellulose, and they grow well dur-
ing the curing stage, when moisture and nitrogen levels are low.
Gram negative – A characteristic of bacterial cells that are decolorized by 95%
alcohol during the Gram staining procedure.
Gram positive – A characteristic of bacterial cells that retain Gram stain color
after washing with 95% alcohol during the Gram staining procedure.
Gram staining – A differential staining procedure that provides for separation of
bacteria into gram-positive and gram-negative types, depending on the struc-
ture of their cell walls.
Heavy metals – Metallic elements with high molecular weights. Includes cadmi-
um, lead, copper, mercury, chromium, silver, and zinc. High concentrations
in soil can be toxic to plants or to animals that eat the plants or soil particles.
G L O S S A R Y T
107
8/9/2019 Composting in the Classroom
http://slidepdf.com/reader/full/composting-in-the-classroom 118/126
8/9/2019 Composting in the Classroom
http://slidepdf.com/reader/full/composting-in-the-classroom 119/126
Mesophilic – (1) Organisms that grow best at moderate temperatures (10–40°C),
(2) The phase of composting that takes place at temperatures in the range of
10–40°C, (3) The type of composting that does not reach temperatures
exceeding 40°C.
Microfauna – Soil protozoa and other microscopic fauna that are small enough
to live in the thin film of water surrounding soil or compost particles.
Microbe – A microorganism.
Microorganism – An organism that individually is too small to be observed
without magnification through a microscope.
Mulch – Any material such as compost, bark, wood chips, or straw that is spread
on the soil surface to conserve soil moisture, suppress weed growth, moderate
temperature changes, or prevent soil erosion.
Mycelia – Branching networks of fungal hyphae.
Nitrifying bacteria – Bacteria that transform ammonium (NH4+) to nitrate
(NO2-) and then to nitrate (NO3
-).
Nitrogen-fixing bacteria – Bacteria that transform atmospheric nitrogen (N2) toammonium (NH4
+).
Organic – (1) Pertaining to or derived from living organisms, (2) Chemical com-
pounds containing carbon-to-carbon bonds.
Organic matter – Material that has come from something that is or was once
alive.
Oxidation – A chemical reaction in which an atom loses electrons or increases
in oxidation number.
Passive aeration – See Aeration, passive.
Pathogen – Any organism capable of producing disease or infection in otherorganisms.
Percolation – Downward movement of water through pores in rock, soil, or
compost.
Permeability – The ability of a soil to allow the movement of water through its
pores.
pH – The degree of acidity or alkalinity of a substance, expressed as the negative
logarithm of the hydrogen ion concentration. Expressed on a scale from 0 to
14. pH <7 is acidic, 7 is neutral, and >7 is alkaline or basic.
Phytotoxicity – A measure of the ability of a substance to suppress seed germi-
nation, injure plant roots, or stunt plant growth.
Polymer – A large, chain-like molecule composed of many identical repeating
units.
Pore – An open area between particles of compost or soil, filled by air or water.
Porosity – The percentage of the total soil or compost volume that is occupied
by open spaces rather than solid particles.
G L O S S A R Y T
109

8/9/2019 Composting in the Classroom
http://slidepdf.com/reader/full/composting-in-the-classroom 120/126
Protozoa – Single-celled, animal-like microorganisms belonging to the kingdom
Protista. Many species live in water or aquatic films surrounding soil or com-
post particles.
Radicle – An embryo root that grows when a seed germinates.
Replicate – In a scientific experiment, the experimental units to which the same
treatment has been imposed. For example, in a planting experiment, five
plants would be replicates if they were set up under the same initial condi-tions and received the same treatment throughout the experiment.
Sand – (1) A soil component consisting of mineral particles between 0.05 mm
and 2.0 mm in diameter, (2) Soil composed of >85% sand and < 10% clay.
Screening – The process of passing compost through a screen or sieve to remove
large pieces and improve the consistency and quality of the end product.
Silt – (1) A soil component consisting of mineral particles between 0.002 mm
and 0.05 mm in diameter, (2) Soil composed of >80% silt and < 12% clay.
Soil amendment – Any substance that is used to alter the chemical or physical
properties of a soil, generally to make it more productive. Examples includecompost, lime, sulfur, gypsum, and synthetic conditioners. Usually does not
include chemical fertilizers.
Specific heat – The quantity of heat needed to raise the temperature of 1 g of a
substance by 1°C.
Stability – A measure of whether compost has decomposed to the point at
which it does not reheat, produce offensive odors, or support high rates of
microbial growth when optimal moisture levels are supplied.
Temperature profile – A graph of temperature changes that occur during the
process of thermophilic composting.
Thermophilic – (1) Organisms that grow best at temperatures above 40°C, (2)The phase of composting that takes place at temperatures exceeding 40°C, (3)
The type of composting that includes a stage occurring above 40°C.
Turning – In a compost pile, mixing and agitating the organic material.
Turning unit – Three holding units built next to each other, so that compost
can be turned from one into the next.
Variable – A factor that changes in a scientific experiment.
Vermicompost – (v) To decompose organic matter using worms, (n) The product
obtained through decomposition of organic matter by microorganisms and
worms.
Vermiculite – A mineral material that is used in potting soil to keep the mixture
light and porous.
Windrow – An elongated pile of organic matter in the process of being com-
posted.
Yard and garden wastes – Grass clippings, dead leaves, small branches, weeds,
and plant residues.
S C O M P O S T I N G I N T H E C L A S S R O O M
 110

8/9/2019 Composting in the Classroom
http://slidepdf.com/reader/full/composting-in-the-classroom 121/126
jF O R M O R E
I N F O R M A T I O Ni
COMPOSTING AS A TOPIC FOR HIGH SCHOOL SCIENCE INVESTIGATION
Trautmann, N.M., T. Richard, and M.E. Krasny. 1996. Composting in
Schools. WWW site at:
http://www.cfe.cornell.edu/compost/schools.html
This WWW site includes detailed information on compost science and engineering, as
well as articles about weird and unusual composting, frequently asked questions, a
composting quiz, and bulletin boards for posting messages to other teachers or students.
Krasny, M.E. and N.M. Trautmann, executive producers. 1996. It’s Gotten
Rotten. Produced by Photosynthesis Productions, Inc. Ithaca, NY.
A 20–minute video designed to introduce high school students to the science of
composting, highlighting the biology of the invertebrates and microorganisms that decom-
pose organic matter. Students are shown designing and using both indoor and outdoor
composting systems, observing living organisms, and using finished compost to grow plants. Available from:
Cornell University Resource Center or Bullfrog Films7 Business & Technology Park Box 149Ithaca, NY 14850 Oley, PA 19547Phone (607) 255–2090 Phone (800) 543–FROGFax (607) 255–9946 Fax (610) 370–1978E-mail: [email protected] E-mail: [email protected]
COMPOSTING FOR WASTE MANAGEMENT
Bonhotal, J.F. and K. Rollo. 1996. Composting…Because a Rind Is a
Terrible Thing to Waste. Cornell Waste Management Institute. Ithaca,
NY. A handbook and two videos designed to help institutions such as schools to implement
food scrap composting. Available from Cornell University Resource Center (address above).
Bonhotal, J.F. and M.E. Krasny. 1990. Composting: Wastes to Resources.
Cornell Cooperative Extension. Ithaca, NY.
A guide for educators and volunteers leading youth aged 9–12 in composting and related
activities. Includes plans for eleven types of outdoor composting systems. Available from
Cornell University Resource Center (address above).
Dickson, N., T. Richard, and R. Kozlowski. 1991. Composting to Reduce
the Waste Stream: A Guide to Small Scale Food and Yard Waste
Composting . Explains how to construct and maintain a compost pile. Outlines factors that affect the
composting process including aeration, moisture, and temperature. Illustrations, tables,
diagrams, and step-by-step instructions for constructing compost bins. Available from:
NRAES152 Riley-Robb HallCornell UniversityIthaca NY 14853Phone (607) 255–7654Fax (607) 254–8770E-mail: [email protected]
111

8/9/2019 Composting in the Classroom
http://slidepdf.com/reader/full/composting-in-the-classroom 122/126
Martin, D.L. and G. Gershuny, eds. 1992. The Rodale Book of
Composting . Rodale Press. Emmaus, PA.
An updated version of Rodale’s classic book for small-scale outdoor composting. Includes
composting instructions, as well as the history of composting, relationships between
compost and plant health, and recommendations for applying compost to lawns, gardens,
and house plants.
Witten, M. 1995. Scraps to Soil: A How-To Guide for School Composting.Association of Vermont Recyclers. Montpelier, VT.
A guide for teachers and students in grades 3–6 who are interested in composting their
school’s food and landscaping wastes. Although not aimed at the high school level, the
guide outlines the process for setting up a school-wide food scrap composting program.
Available from:
Association of Vermont RecyclersPO Box 1244Montpelier, VT 05601Phone (802) 229-1833
CHEMISTRY
Golueke, C.G. 1992. Bacteriology of composting. BioCycle 33(1): 55–57.
Kayhanian, M. and G. Tchobanoglous. 1992. Computation of C/N ratios
for various organic fractions. BioCycle 33(5): 58–60.
PHYSICS
Haug, R. 1993. Thermodynamic Fundamentals. pp. 95–120 in The
Practical Handbook of Compost Engineering . Lewis Publishers, Boca
Raton, FL.
MICROBIOLOGY
Alexander, M. 1991. Introduction to Soil Microbiology , 2nd ed. Krieger
Publishing Co., Malabar, FL.
Beffa, T., M. Blanc, and M. Aragno. 1996. Obligately and facultatively
autotrophic, sulfur- and hydrogen-oxidizing thermophilic bacteria iso-
lated from hot composts. Archives of Microbiology 165: 34–40.
Golueke, C.G. 1992. Bacteriology of Composting. BioCycle 33(1): 55–57.
INVERTEBRATES
Coleman, D.C. and D.A. Crossley, Jr. 1996. Fundamentals of Soil Ecology .
Academic Press, San Diego.
Dindal, D.L. 1990. Soil Biology Guide. John Wiley & Sons, New York.
S C O M P O S T I N G I N T H E C L A S S R O O M
 112

8/9/2019 Composting in the Classroom
http://slidepdf.com/reader/full/composting-in-the-classroom 123/126
Dindal, D.L. 1971. Ecology of Compost: A Public Involvement Project .
State University of New York, College of Environmental Science and
Forestry. Syracuse, NY.
The classic reference on food webs in compost piles. Available from:
Office of News and Publications122 Bray Hall
ESF1 Forestry DriveSyracuse, NY 13210Phone (315) 470–6500
Johnson, C.E. 1980. The wild world of compost. National Geographic
157: 273–284.
Mallow, D. 1990. Soil arthropods. The Science Teacher . 57(5): 64–65.
WORMS
Appelhof, M. 1982. Worms Eat My Garbage. Flower Press, MI.
The original book of instructions for setting up and maintaining a worm composting system. Available from:
Flower Press10332 Shaver Rd.Kalamazoo, MI 49002Phone (616) 327–0108
Edwards, C.A. and P.J. Bohlen. 1996. Biology and Ecology of Earthworms.
Chapman Hall. London, UK.
STUDENT RESEARCH
Cothron, J.H., R.N. Giese, and R.J. Rezba. 1993. Students and Research:
Practical Strategies for Science Classrooms and Competitions, 2nd ed.Kendall/Hunt, Dubuque, IA.
CURRENT COMPOSTING RESEARCH
Compost Science & Utilization. The JG Press, Inc. Emmaus, PA.
A quarterly peer-reviewed journal that presents results of research on the science of
compost production, management, and use.
F O R M O R E I N F O R M A T I O N T
113

8/9/2019 Composting in the Classroom
http://slidepdf.com/reader/full/composting-in-the-classroom 124/126
j INDEXi
A
Actinomycetes 13, 16, 60–61
Aeration 10–11
Algebra 47–50
Ammonia 6, 8, 53Anaerobic decomposition 8, 10, 52–53, 73
Annelids 19, 22–26
Ants 20
Arachnids 19
Arthropods 19–20
Aspergillus fumigatus X
B
Bacteria 13, 14–16, 57–61
Bedding for worms 36
Beetles 13, 20
Bins, see:
Enclosed binsHolding units
Turning units
Worm bins
Biology 13–26
Bioreactors 3, 27–40
Buffering capacity 71, 72, 83, 89–90
Bulking agents 11, 31, 46
C
C:N ratio 6–7, 44–45, 48–50
Calculations 48–50
Of common compost ingredients 45
Of tree leaves 45
Calculations for thermophilic composting 47–50
Carbon dioxide 5, 7, 10, 75–78
Cellulose 3, 5–7, 16, 21
Centipedes 13, 17, 20
Chemistry 5–8
Conduction 9
Convection 9
Crustaceans 20
Curing 2, 3, 16, 30, 34, 42, 64, 71
D
Data interpretation 91–92, 94–95, 102
E
Earthworms 17, 19, 22–26
Earwigs 17, 20
Eisenia fetida 22–26, 35–40
Enchytraeids, see Potworms
Enclosed bins 42
Enzymes 5, 15, 16, 21
Experimental design 91–93, 98–101
F
Fats 3, 6, 37
Flies 1, 20, 31, 38, 51
Food web in compost 13–14
Fruit flies 38Fruit scraps X, 36–37, 43, 45
Fungi IX–X, 5, 8, 13, 15, 16–17, 62–63
G
Grass clippings 30, 31, 32, 43, 44, 45, 47–50
H
Heat, see Temperature
Heat loss 9–10
Hemicellulose 3, 6
Holding units 41–42
Hot composting, see Thermophilic composting
Humus 5, 85, 87, 93
I
Insects 19–20
Invertebrates 17–26, 67–69
J
Jar Test 71, 72, 73
L
Leaves X, 19, 30, 32, 41–42, 43, 45, 46, 47–50, 51, 53
Lignin 5–6, 7, 16, 23
Lumbricidae 25–26
Lumbricus terrestris 23, 25
M
Mesophilic composting X, 2, 27
Mesophilic microorganisms 3, 15, 16, 27
Microorganisms 14–17, 55–65, see also:
Actinomycetes
Bacteria
Fungi
Protozoa
Millipedes 13, 17, 20
Mites 13, 17, 19, 39
Mixing, see Turning
Moisture 10–11, 43–44, 47–48Calculations 47–48
Measuring compost moisture 44
Monitoring 52–53
Of common compost ingredients 43
Mollusks 21
N
Nematodes 13, 17, 20–21
Newspaper 7, 16, 30, 32, 36, 45, 52–53, 102

8/9/2019 Composting in the Classroom
http://slidepdf.com/reader/full/composting-in-the-classroom 125/126
O
Odor 51, 53
Oligochaetes, see Earthworms
Organic matter content 71, 72, 83, 87–88
Outdoor composting 41–42
Oxygen 1, 3, 6, 7, 10–11, 73
PParticle size 7, 11
Pathogens X, 3, 24, 46
pH 6, 8, 16, 24, 26, 53–54, 89–90
Physics 9–12
Phytotoxicity bioassay 71, 72, 79–82
Pillbugs, see Sowbugs
Plant growth experiments 91–96
Porosity 71, 72, 83–84
Potworms 17, 19, 39
Proteins 1, 3, 5, 6, 8
Protozoa 13, 17
Pseudoscorpions 13, 17, 19
Q
Quality (compost quality) 71–72
R
Radiation 10
Red worms, see Earthworms
Research VII–VIII, 91–96, 97–103
Respiration test 71, 72, 75–78
S
Sawdust 11, 30, 43, 45, 46, 51, 102
Self-heating test 71, 72, 74
Size of compost system 3, 12Slugs 17, 21
Snails 17, 21
Soda bottle bioreactor 27, 31–34
Soil properties, see:
Buffering capacity
Organic matter content
Porosity
Water holding capacity
Sowbugs 13, 17, 20
Specific heat 10
Spiders 19
Springtails 13, 17, 19–20
Stability 71–72
Starches 5, 15
Sugars 5, 6, 15, 23
T
Temperature IX, 2–4, 9–10, 15, 29, 33, 51–52, 74
Temperature profile 2, 29, 33
Thermophilic composting IX–X, 2–4, 6–12, 15–16
Thermophilic microorganisms 15–16
Troubleshooting 38–39, 51
Turning 3–4, 10–11, 42, 53
Turning units 42
Two-can bioreactors 27–30
V
Vegetable scraps X, 36–37, 43, 45
Vermicomposting 22–26, 35–40
WWater holding capacity 71, 72, 83, 85–86
Weeds 2, 46, 91
White worms, see Potworms
Wood chips 7, 11, 28–30, 32, 43, 45, 46, 51, 52, 53, 72
Worm bins 35–40
Worm composting, see Vermicomposting
Worms, see:
Earthworms
Potworms
S I N D E X
 116

8/9/2019 Composting in the Classroom
http://slidepdf.com/reader/full/composting-in-the-classroom 126/126