clinical training syllabus - carefacts information … syllabus.pdf · open an oasis assessment and...
TRANSCRIPT

CLINICAL TRAINING
SYLLABUS
©CareFacts Information Systems August 2010 Single Group Syllabus – Sessions 1 & 2
- 2 -
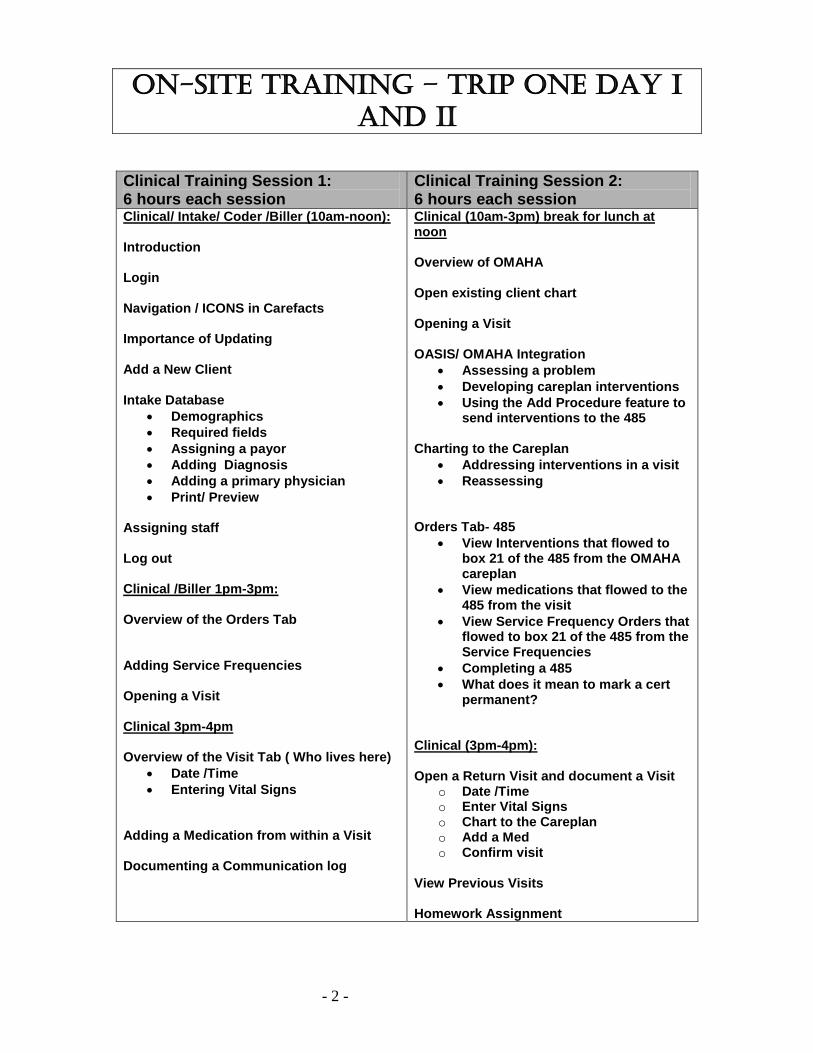
On-site training – trip One Day i anD ii
Clinical Training Session 1: 6 hours each session
Clinical Training Session 2: 6 hours each session
Clinical/ Intake/ Coder /Biller (10am-noon): Introduction Login Navigation / ICONS in Carefacts Importance of Updating Add a New Client Intake Database
• Demographics • Required fields • Assigning a payor • Adding Diagnosis • Adding a primary physician • Print/ Preview
Assigning staff Log out Clinical /Biller 1pm-3pm: Overview of the Orders Tab Adding Service Frequencies Opening a Visit Clinical 3pm-4pm Overview of the Visit Tab ( Who lives here)
• Date /Time • Entering Vital Signs
Adding a Medication from within a Visit Documenting a Communication log
Clinical (10am-3pm) break for lunch at noon Overview of OMAHA Open existing client chart Opening a Visit OASIS/ OMAHA Integration
• Assessing a problem • Developing careplan interventions • Using the Add Procedure feature to
send interventions to the 485 Charting to the Careplan
• Addressing interventions in a visit • Reassessing
Orders Tab- 485
• View Interventions that flowed to box 21 of the 485 from the OMAHA careplan
• View medications that flowed to the 485 from the visit
• View Service Frequency Orders that flowed to box 21 of the 485 from the Service Frequencies
• Completing a 485 • What does it mean to mark a cert
permanent? Clinical (3pm-4pm): Open a Return Visit and document a Visit
o Date /Time o Enter Vital Signs o Chart to the Careplan o Add a Med o Confirm visit
View Previous Visits Homework Assignment
- 3 -
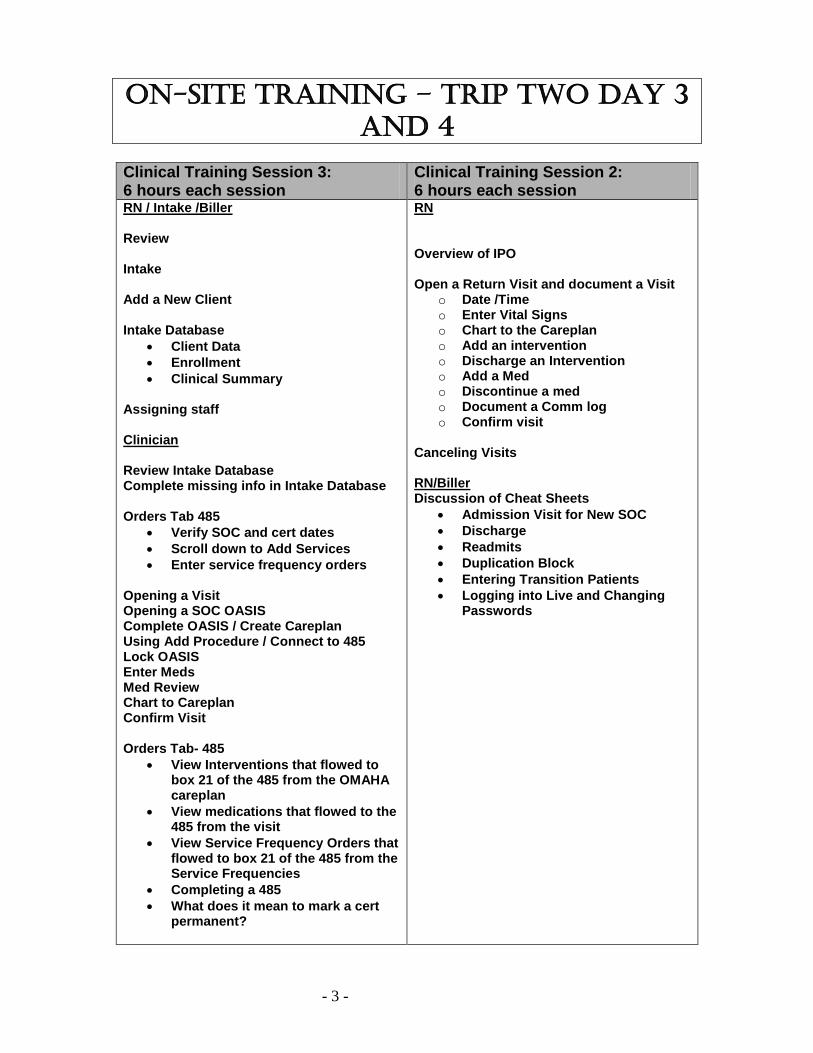
On-site training – trip twO Day 3 anD 4
Clinical Training Session 3: 6 hours each session
Clinical Training Session 2: 6 hours each session
RN / Intake /Biller Review Intake Add a New Client Intake Database
• Client Data • Enrollment • Clinical Summary
Assigning staff Clinician Review Intake Database Complete missing info in Intake Database Orders Tab 485
• Verify SOC and cert dates • Scroll down to Add Services • Enter service frequency orders
Opening a Visit Opening a SOC OASIS Complete OASIS / Create Careplan Using Add Procedure / Connect to 485 Lock OASIS Enter Meds Med Review Chart to Careplan Confirm Visit Orders Tab- 485
• View Interventions that flowed to box 21 of the 485 from the OMAHA careplan
• View medications that flowed to the 485 from the visit
• View Service Frequency Orders that flowed to box 21 of the 485 from the Service Frequencies
• Completing a 485 • What does it mean to mark a cert
permanent?
RN Overview of IPO Open a Return Visit and document a Visit
o Date /Time o Enter Vital Signs o Chart to the Careplan o Add an intervention o Discharge an Intervention o Add a Med o Discontinue a med o Document a Comm log o Confirm visit
Canceling Visits RN/Biller Discussion of Cheat Sheets
• Admission Visit for New SOC • Discharge • Readmits • Duplication Block • Entering Transition Patients • Logging into Live and Changing
Passwords
- 4 -
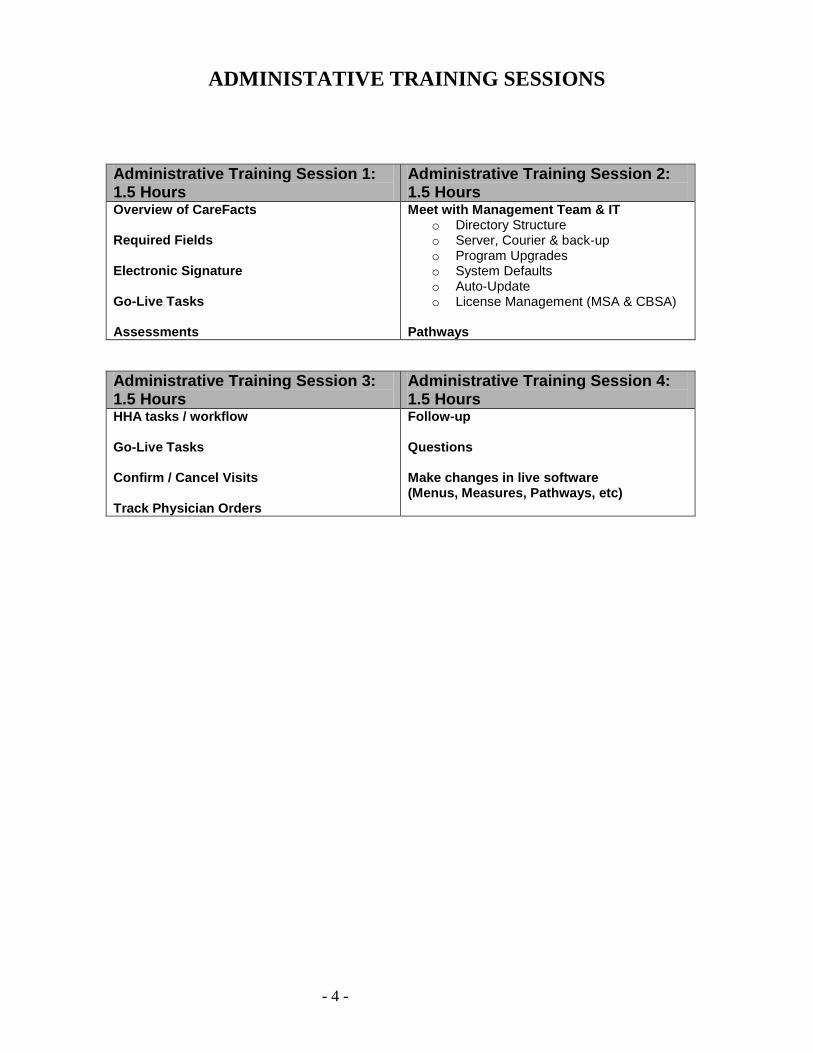
ADMINISTATIVE TRAINING SESSIONS
Administrative Training Session 1: 1.5 Hours
Administrative Training Session 2: 1.5 Hours
Overview of CareFacts Required Fields Electronic Signature Go-Live Tasks Assessments
Meet with Management Team & IT o Directory Structure o Server, Courier & back-up o Program Upgrades o System Defaults o Auto-Update o License Management (MSA & CBSA)
Pathways
Administrative Training Session 3: 1.5 Hours
Administrative Training Session 4: 1.5 Hours
HHA tasks / workflow Go-Live Tasks Confirm / Cancel Visits Track Physician Orders
Follow-up Questions Make changes in live software (Menus, Measures, Pathways, etc)
- 5 -
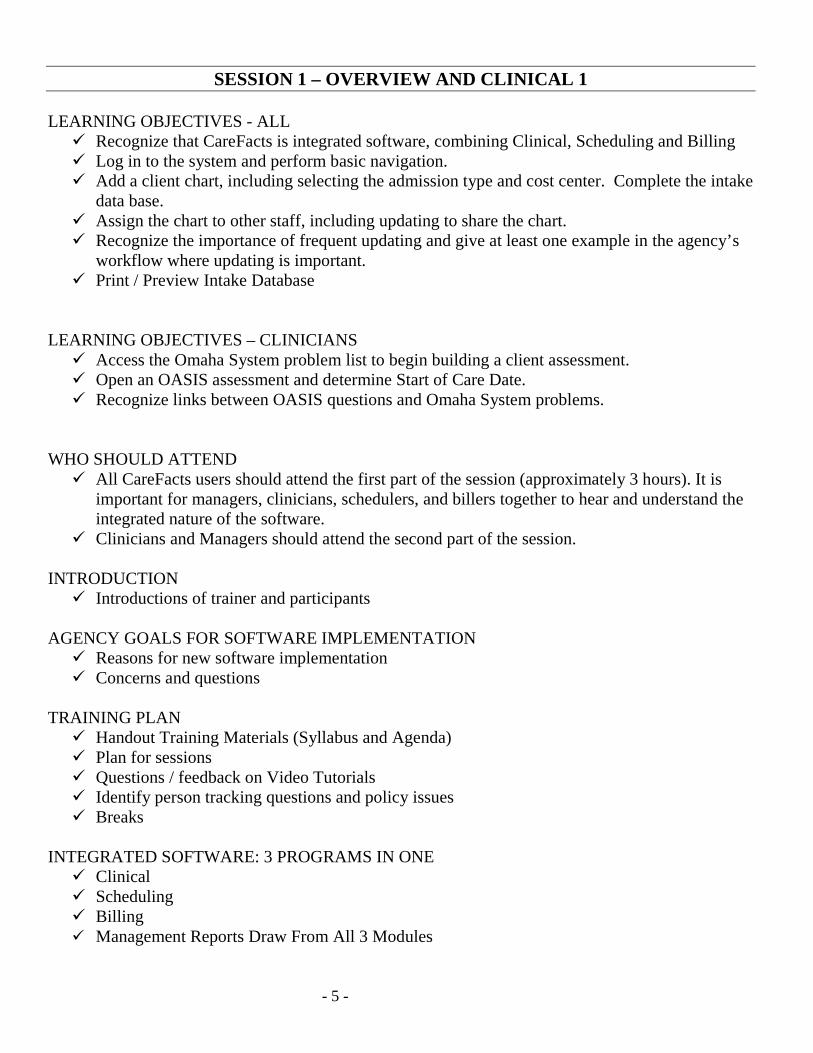
SESSION 1 – OVERVIEW AND CLINICAL 1
LEARNING OBJECTIVES - ALL Recognize that CareFacts is integrated software, combining Clinical, Scheduling and Billing Log in to the system and perform basic navigation. Add a client chart, including selecting the admission type and cost center. Complete the intake
data base. Assign the chart to other staff, including updating to share the chart. Recognize the importance of frequent updating and give at least one example in the agency’s
workflow where updating is important. Print / Preview Intake Database
LEARNING OBJECTIVES – CLINICIANS Access the Omaha System problem list to begin building a client assessment. Open an OASIS assessment and determine Start of Care Date. Recognize links between OASIS questions and Omaha System problems.
WHO SHOULD ATTEND All CareFacts users should attend the first part of the session (approximately 3 hours). It is
important for managers, clinicians, schedulers, and billers together to hear and understand the integrated nature of the software.
Clinicians and Managers should attend the second part of the session. INTRODUCTION Introductions of trainer and participants
AGENCY GOALS FOR SOFTWARE IMPLEMENTATION Reasons for new software implementation Concerns and questions
TRAINING PLAN Handout Training Materials (Syllabus and Agenda) Plan for sessions Questions / feedback on Video Tutorials Identify person tracking questions and policy issues Breaks
INTEGRATED SOFTWARE: 3 PROGRAMS IN ONE Clinical Scheduling Billing Management Reports Draw From All 3 Modules
- 6 -
CareFacts Clinical Training
Session I
Logging In Navigating in CareFacts Entering a New Client
Completing and Previewing the Intake Database Assigning a Chart from the Assignment Tab
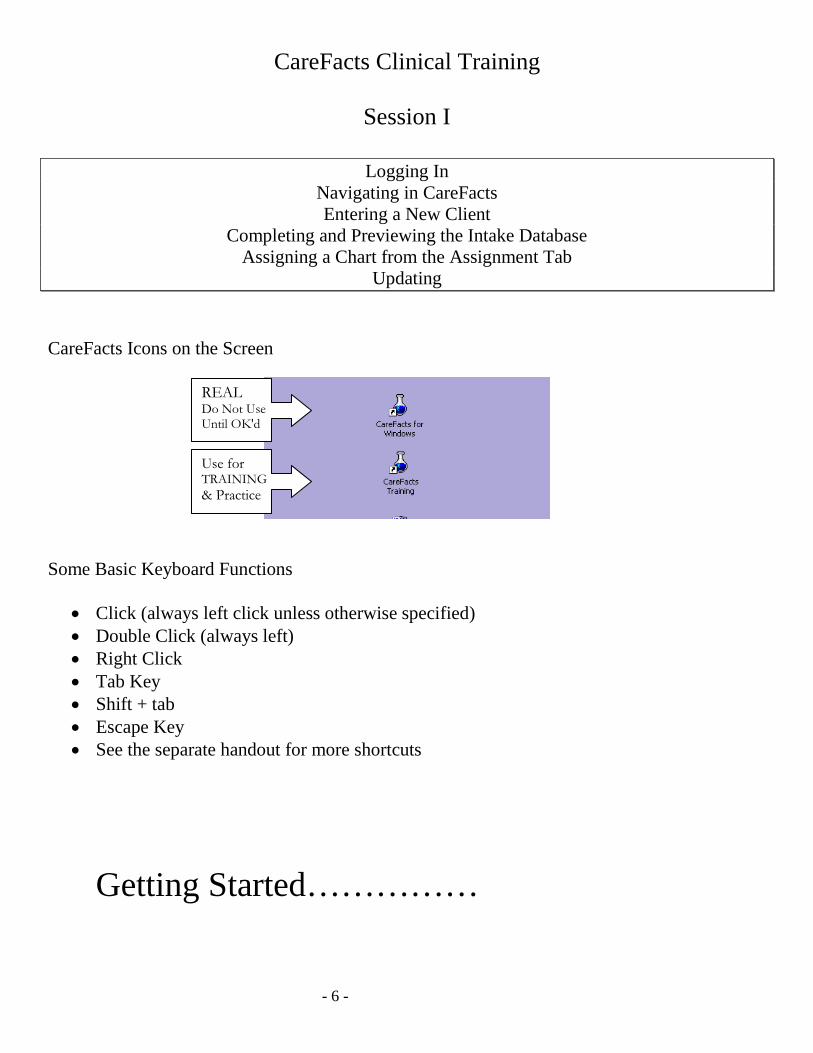
Updating CareFacts Icons on the Screen
Some Basic Keyboard Functions
• Click (always left click unless otherwise specified) • Double Click (always left) • Right Click • Tab Key • Shift + tab • Escape Key • See the separate handout for more shortcuts
Getting Started……………
REAL Do Not Use Until OK'd
Use for TRAINING & Practice
- 7 -
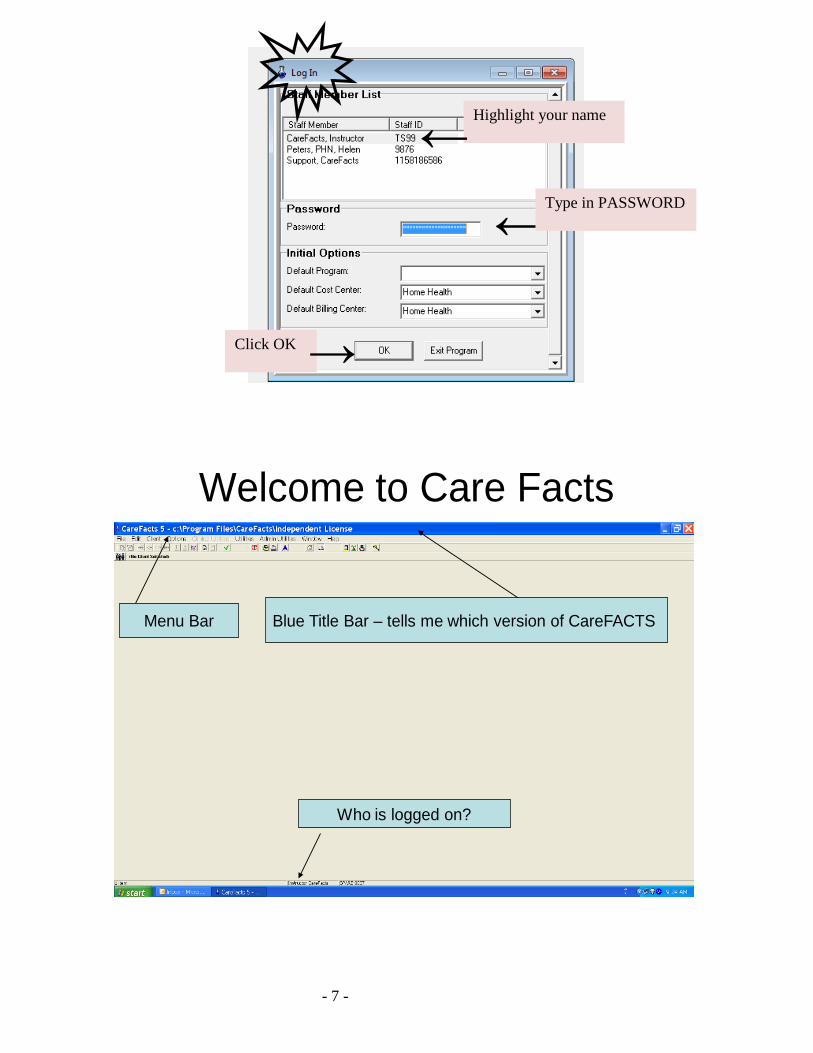
Welcome to Care Facts
Blue Title Bar – tells me which version of CareFACTS Menu Bar
Who is logged on?
Highlight your name
←
← Type in PASSWORD
Click OK
→
- 8 -
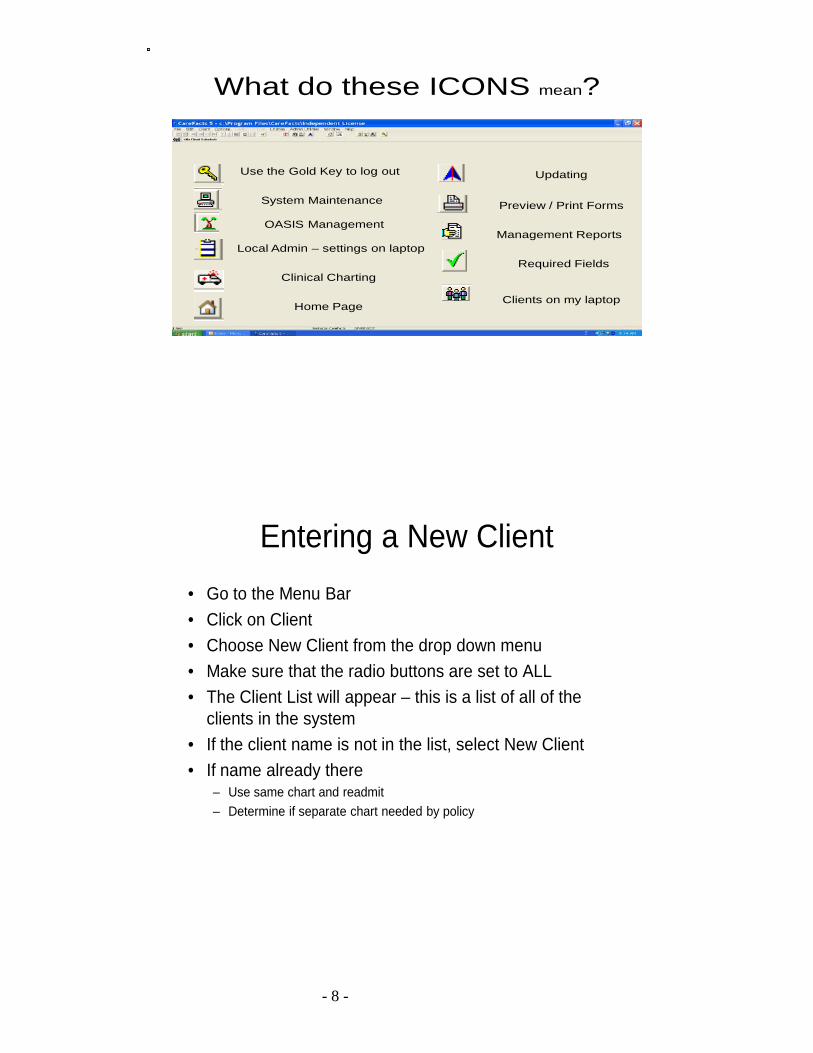
What do these ICONS mean?
Use the Gold Key to log out
System Maintenance
OASIS Management
Local Admin – settings on laptop
Clinical Charting
Home Page
Updating
Preview / Print Forms
Management Reports
Required Fields
Clients on my laptop
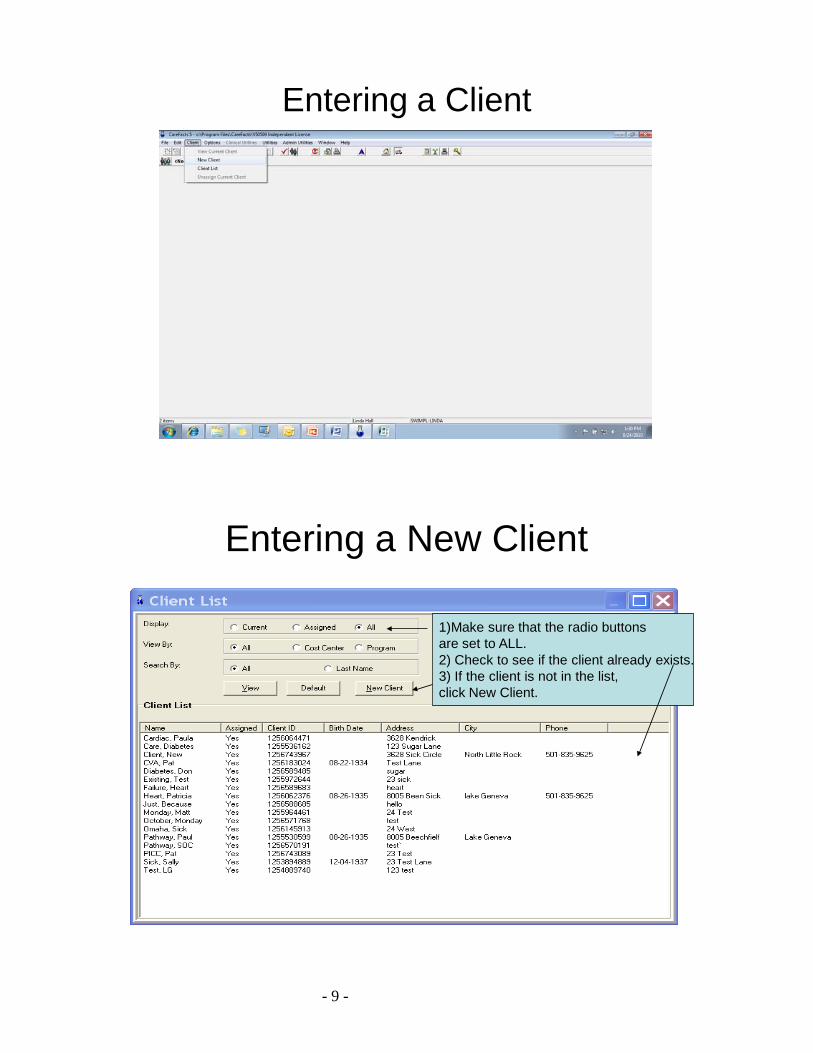
Entering a New Client• Go to the Menu Bar• Click on Client• Choose New Client from the drop down menu• Make sure that the radio buttons are set to ALL• The Client List will appear – this is a list of all of the
clients in the system• If the client name is not in the list, select New Client• If name already there
– Use same chart and readmit– Determine if separate chart needed by policy
- 9 -
Entering a Client
Entering a New Client
1)Make sure that the radio buttonsare set to ALL.2) Check to see if the client already exists. 3) If the client is not in the list, click New Client.
- 10 -
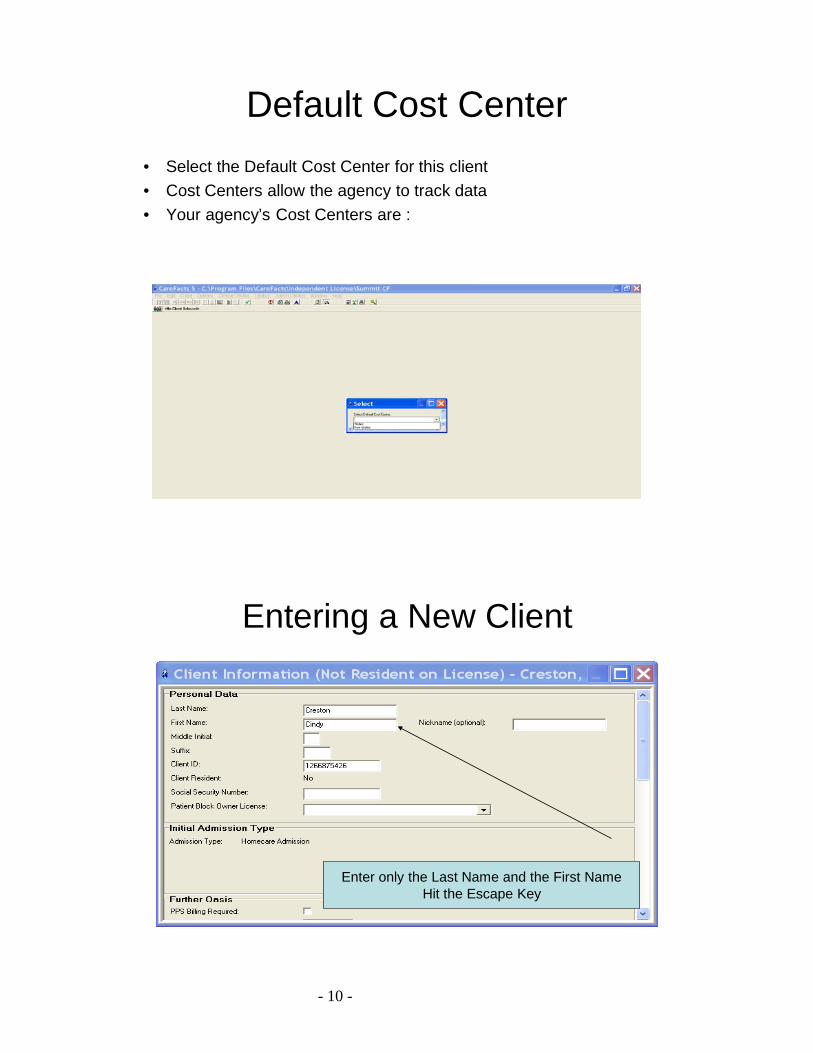
Default Cost Center• Select the Default Cost Center for this client• Cost Centers allow the agency to track data• Your agency’s Cost Centers are :
Entering a New Client
Enter only the Last Name and the First NameHit the Escape Key
- 11 -
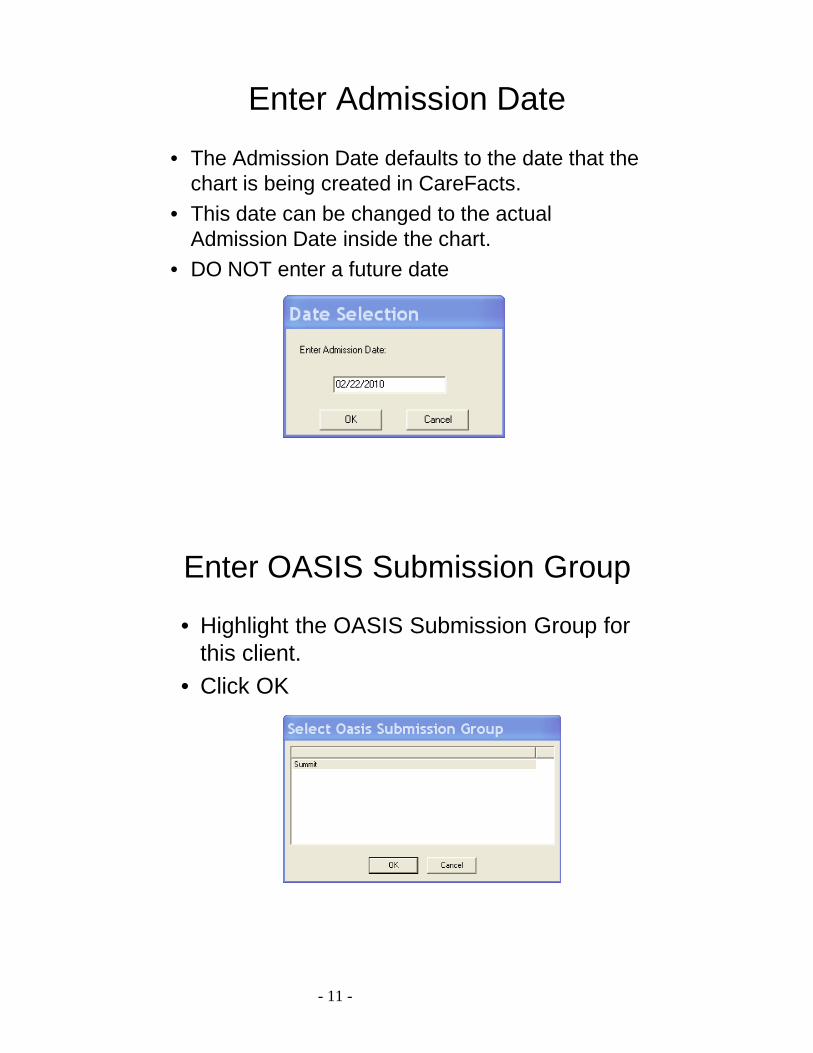
Enter Admission Date
• The Admission Date defaults to the date that the chart is being created in CareFacts.
• This date can be changed to the actual Admission Date inside the chart.
• DO NOT enter a future date
Enter OASIS Submission Group
• Highlight the OASIS Submission Group for this client.
• Click OK
- 12 -
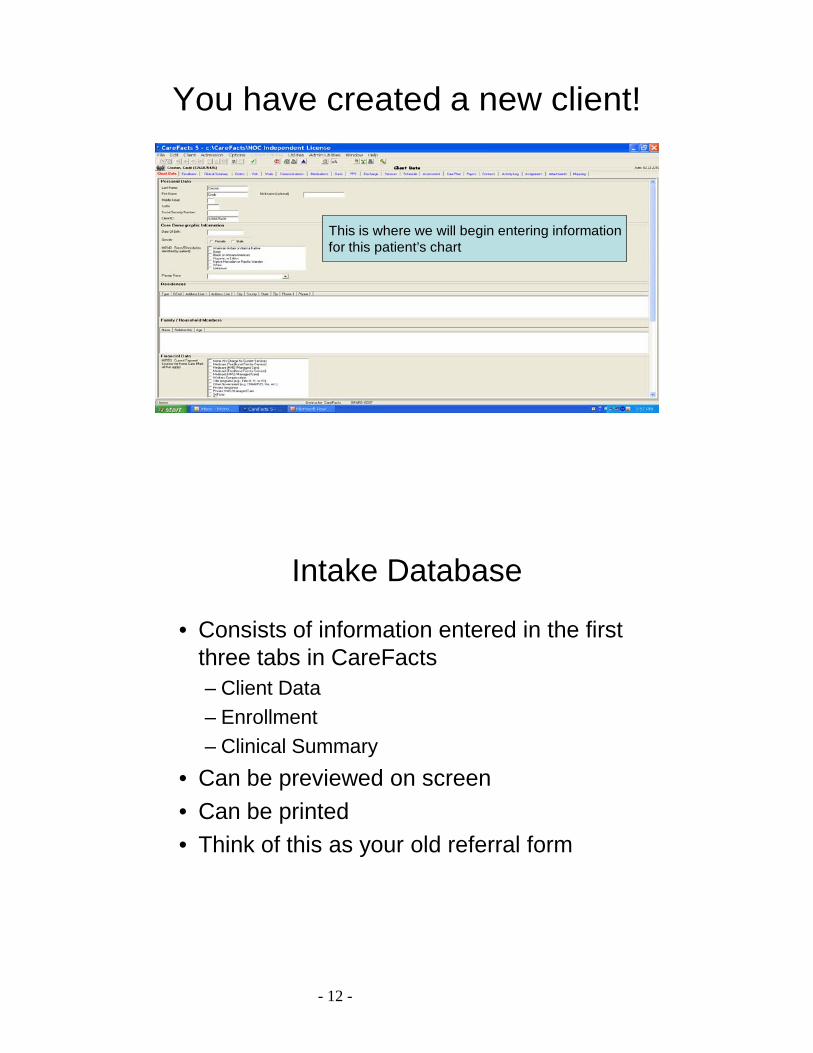
You have created a new client!
This is where we will begin entering informationfor this patient’s chart
Intake Database
• Consists of information entered in the first three tabs in CareFacts– Client Data– Enrollment– Clinical Summary
• Can be previewed on screen• Can be printed• Think of this as your old referral form
- 13 -
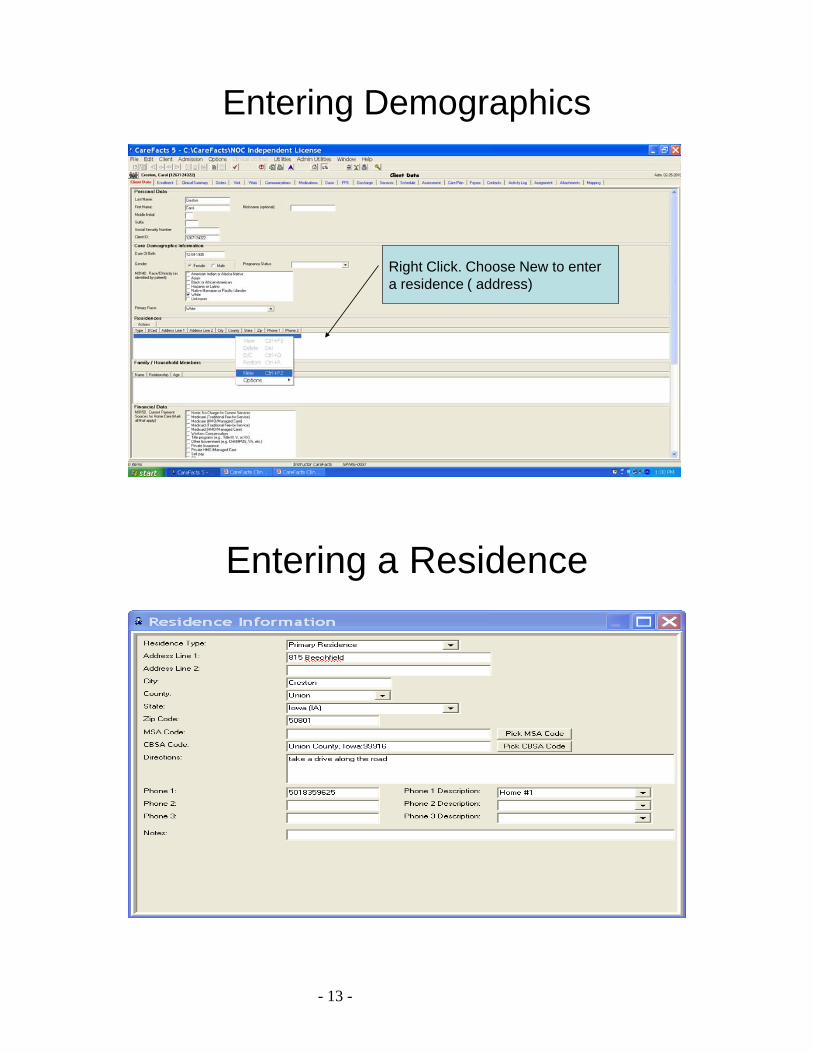
Entering Demographics
Right Click. Choose New to entera residence ( address)
Entering a Residence
- 14 -
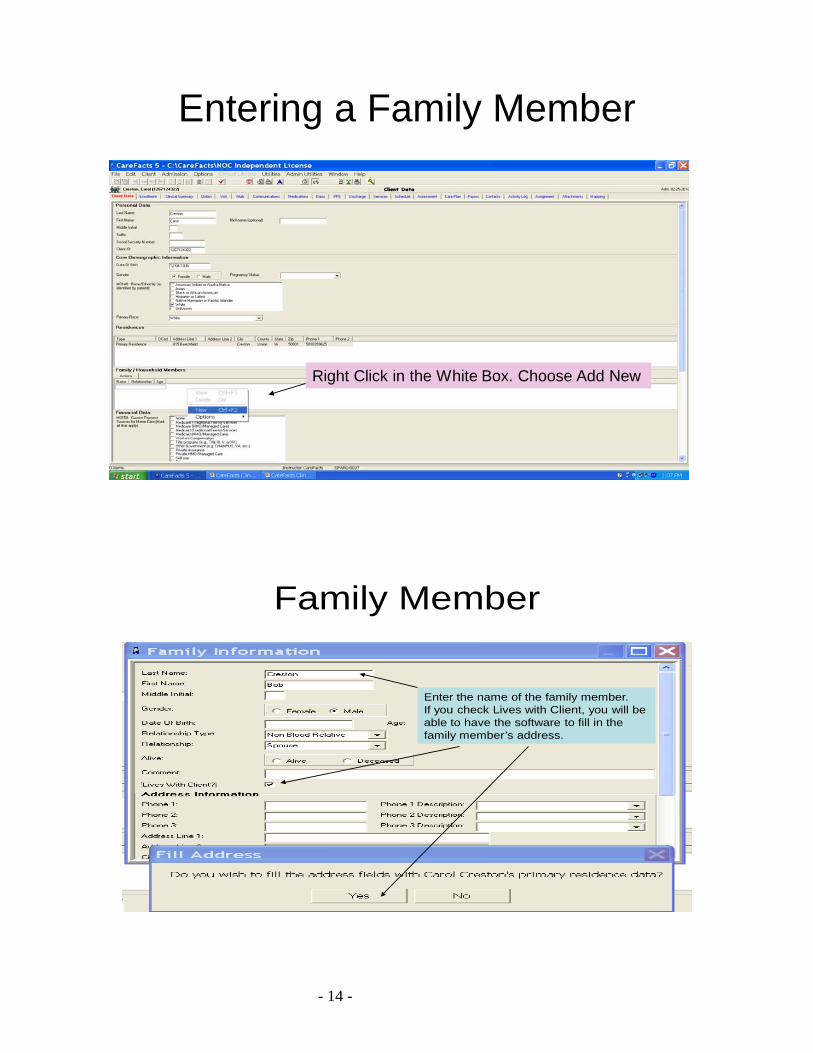
Entering a Family Member
Right Click in the White Box. Choose Add New
Family Member
Enter the name of the family member. If you check Lives with Client, you will beable to have the software to fill in the family member’s address.
- 15 -
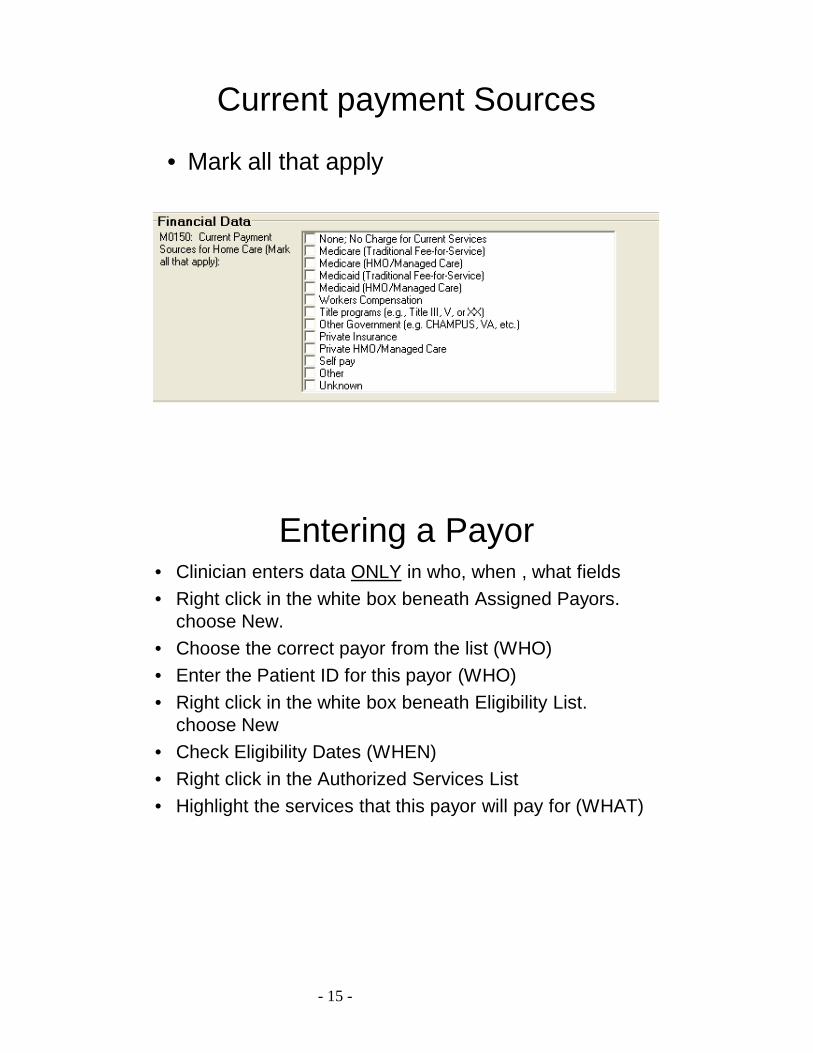
Current payment Sources
• Mark all that apply
Entering a Payor• Clinician enters data ONLY in who, when , what fields• Right click in the white box beneath Assigned Payors.
choose New.• Choose the correct payor from the list (WHO)• Enter the Patient ID for this payor (WHO)• Right click in the white box beneath Eligibility List.
choose New• Check Eligibility Dates (WHEN)• Right click in the Authorized Services List• Highlight the services that this payor will pay for (WHAT)
- 16 -
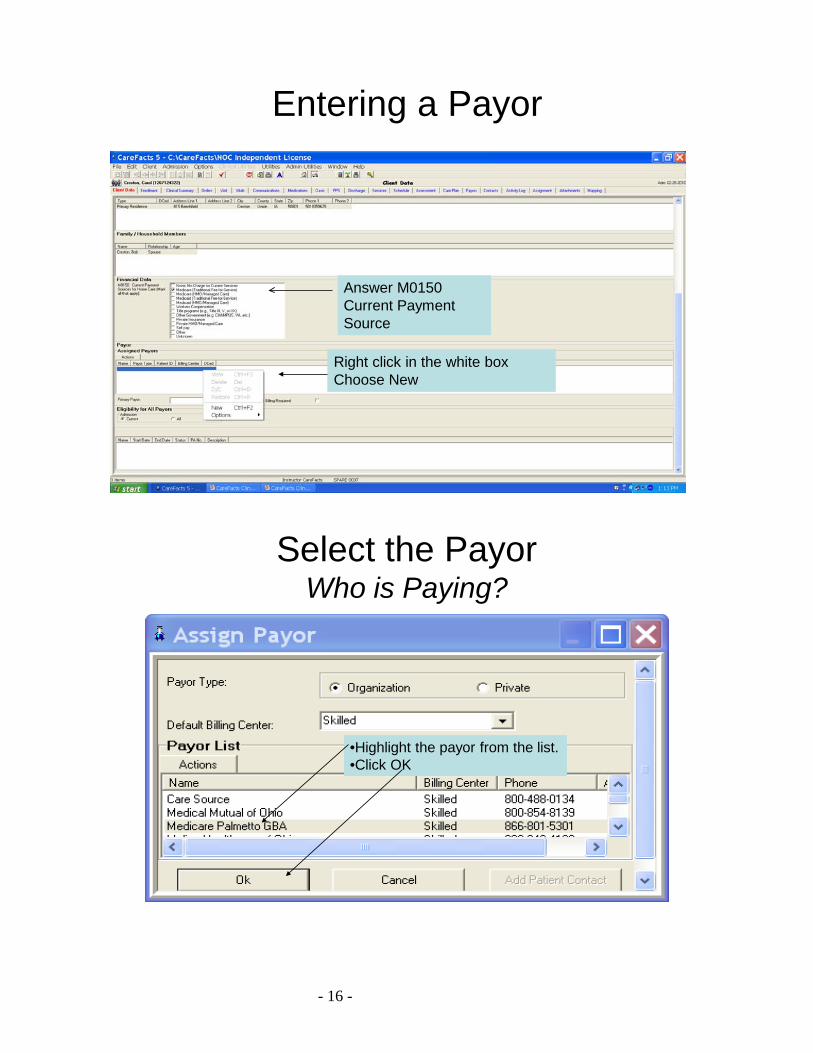
Entering a Payor
Answer M0150 Current Payment Source
Right click in the white boxChoose New
Select the PayorWho is Paying?
•Highlight the payor from the list. •Click OK
- 17 -
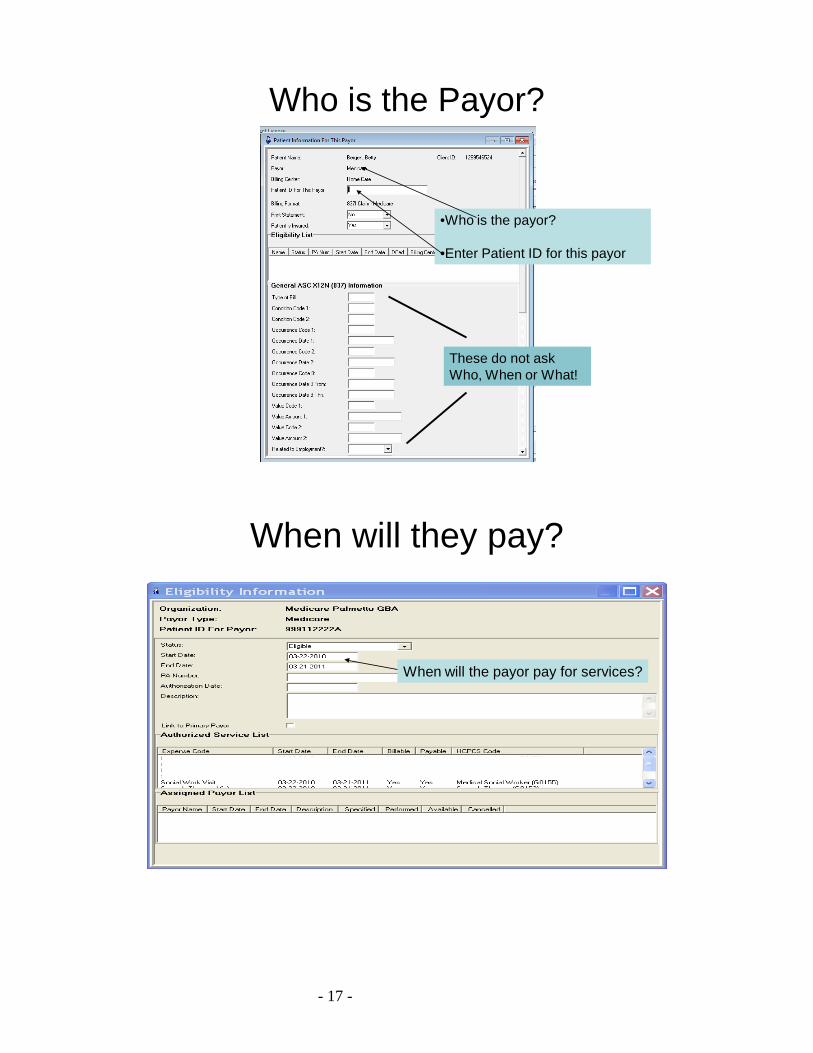
Who is the Payor?
•Who is the payor?
•Enter Patient ID for this payor
These do not ask Who, When or What!
When will they pay?
When will the payor pay for services?

- 18 -
What will they pay for?
What services are covered/paid for?
- 19 -
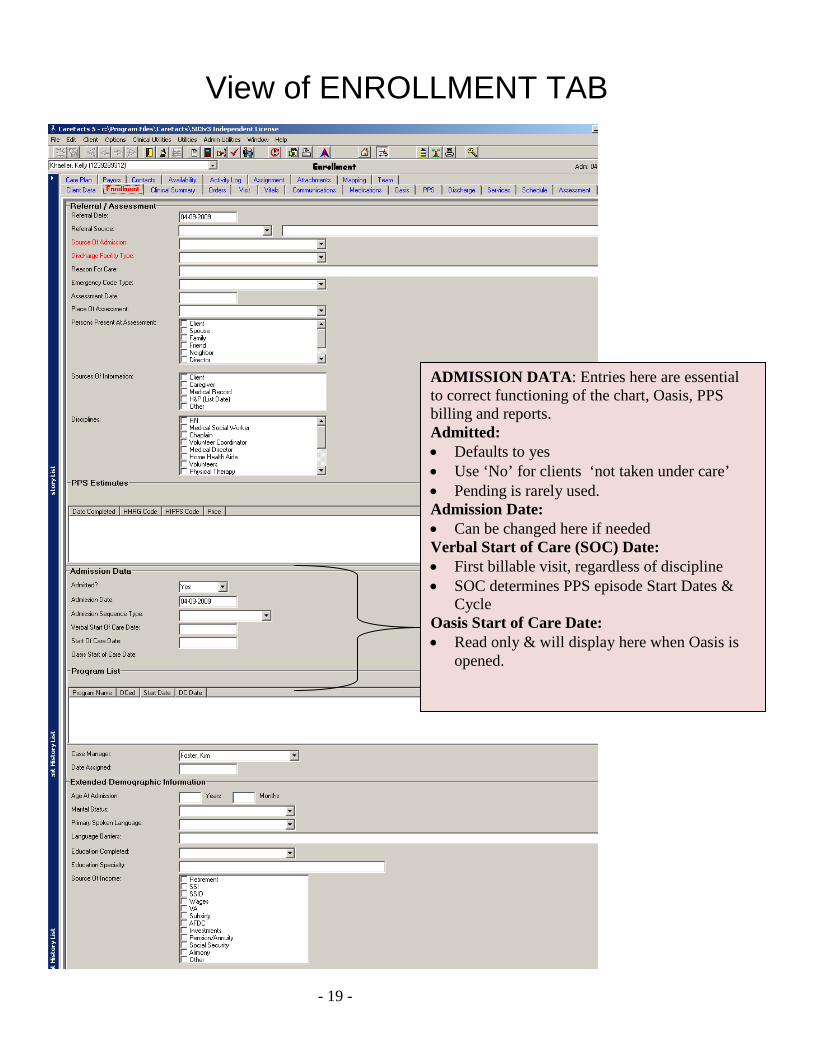
View of ENROLLMENT TAB
ADMISSION DATA: Entries here are essential to correct functioning of the chart, Oasis, PPS billing and reports. Admitted: • Defaults to yes • Use ‘No’ for clients ‘not taken under care’ • Pending is rarely used. Admission Date: • Can be changed here if needed Verbal Start of Care (SOC) Date: • First billable visit, regardless of discipline • SOC determines PPS episode Start Dates &
Cycle Oasis Start of Care Date: • Read only & will display here when Oasis is
opened.
- 20 -
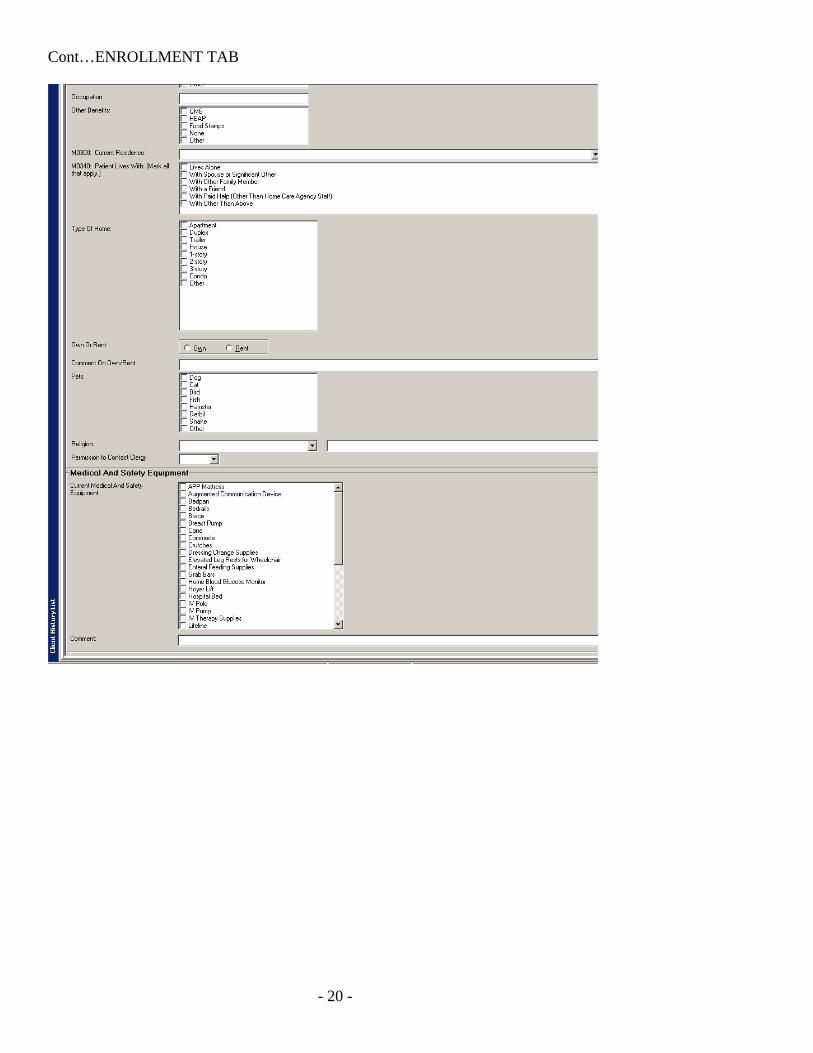
Cont…ENROLLMENT TAB
- 21 -
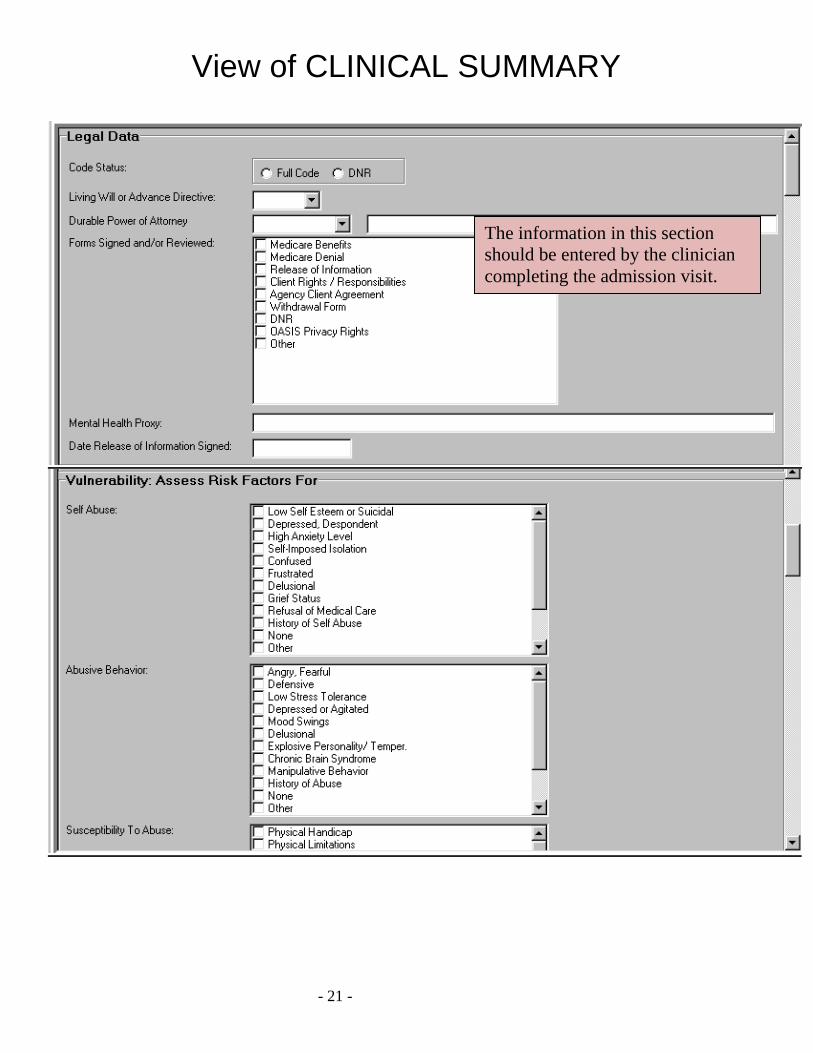
View of CLINICAL SUMMARY
The information in this section should be entered by the clinician completing the admission visit.
- 22 -
- 23 -
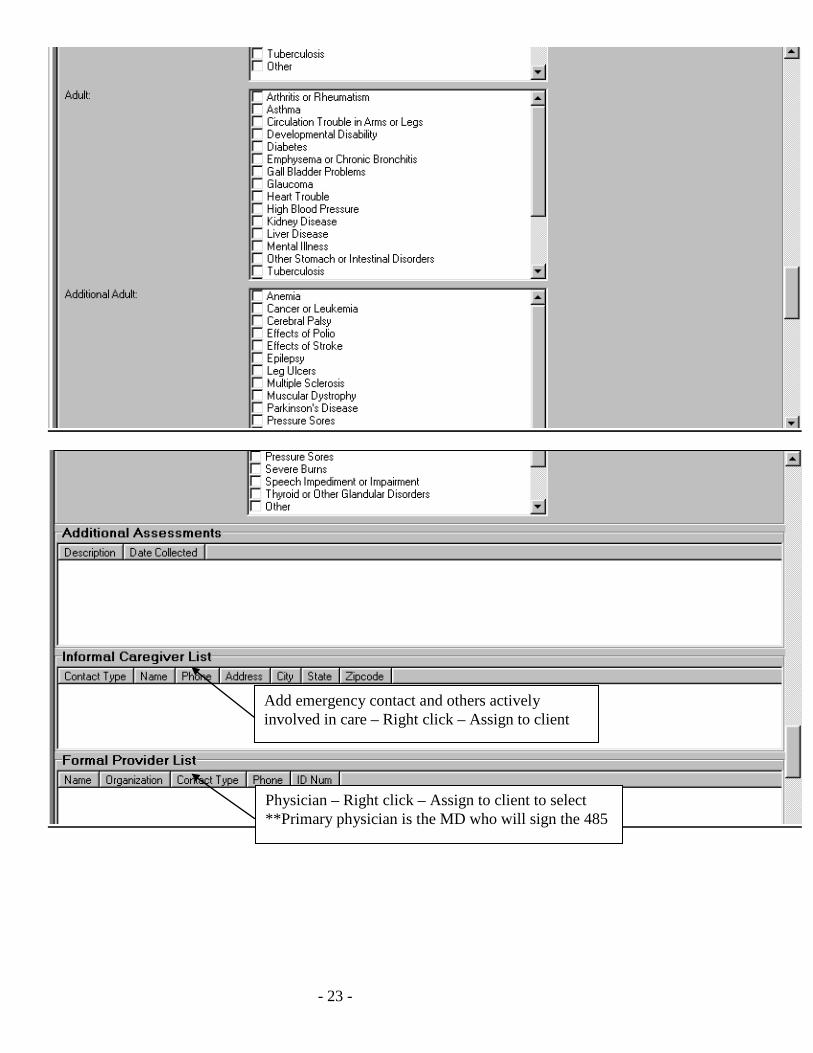
Physician – Right click – Assign to client to select **Primary physician is the MD who will sign the 485
Add emergency contact and others actively involved in care – Right click – Assign to client
- 24 -
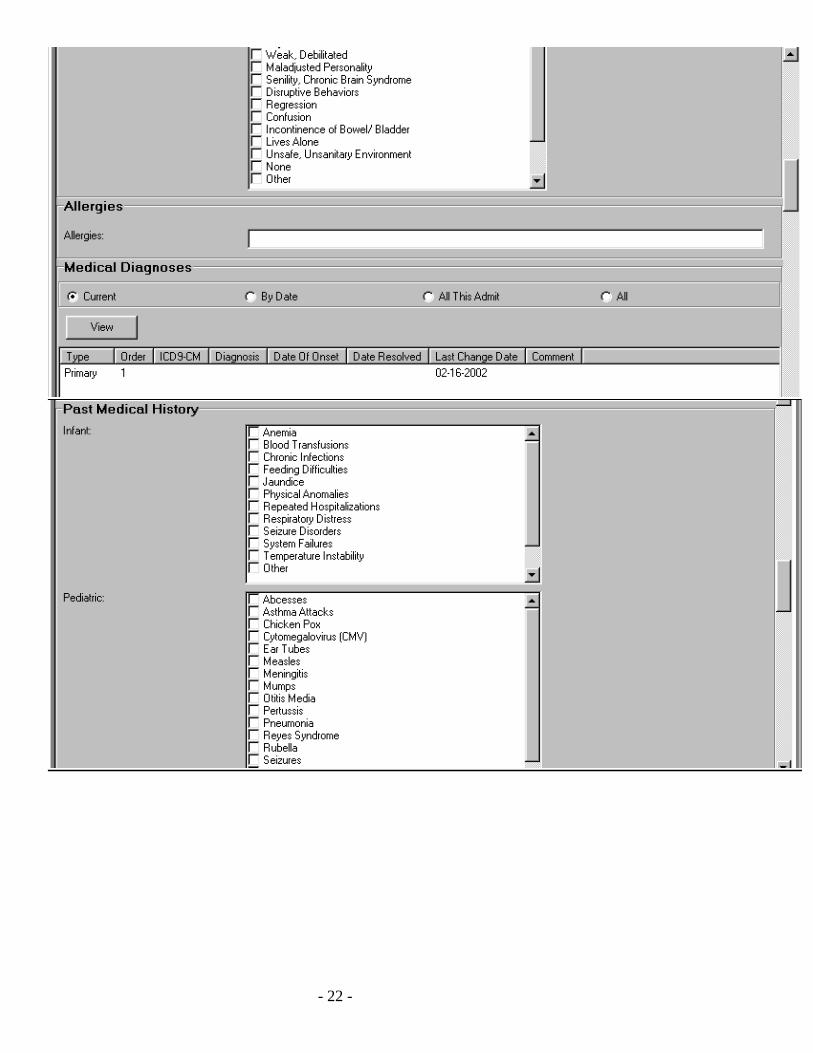
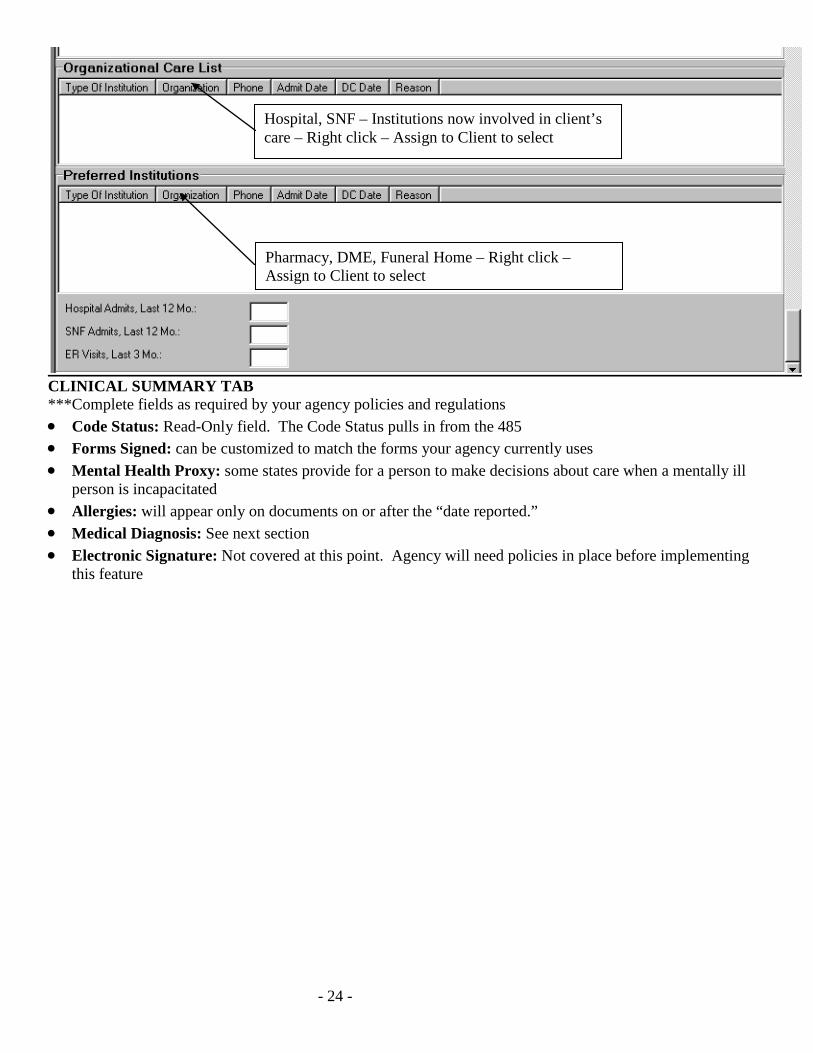
CLINICAL SUMMARY TAB ***Complete fields as required by your agency policies and regulations • Code Status: Read-Only field. The Code Status pulls in from the 485 • Forms Signed: can be customized to match the forms your agency currently uses • Mental Health Proxy: some states provide for a person to make decisions about care when a mentally ill
person is incapacitated • Allergies: will appear only on documents on or after the “date reported.” • Medical Diagnosis: See next section • Electronic Signature: Not covered at this point. Agency will need policies in place before implementing
this feature
Pharmacy, DME, Funeral Home – Right click – Assign to Client to select
Hospital, SNF – Institutions now involved in client’s care – Right click – Assign to Client to select
- 25 -
Allergies
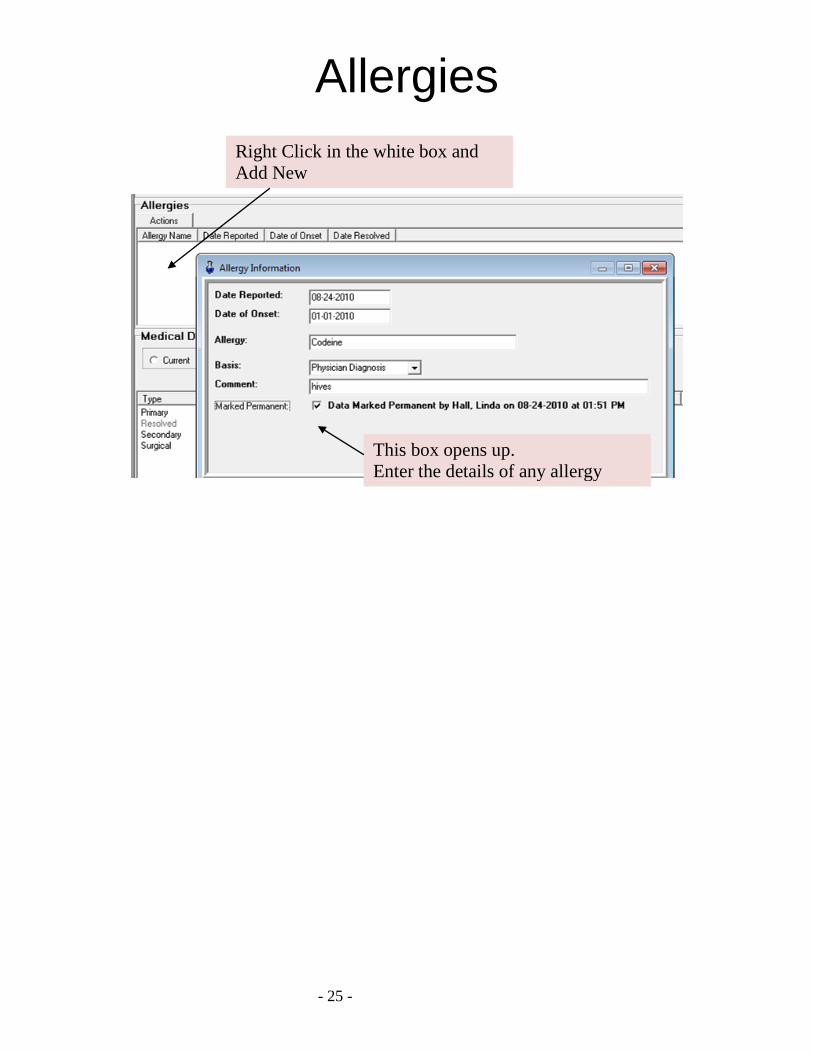
This box opens up. Enter the details of any allergy
Right Click in the white box and Add New
- 26 -
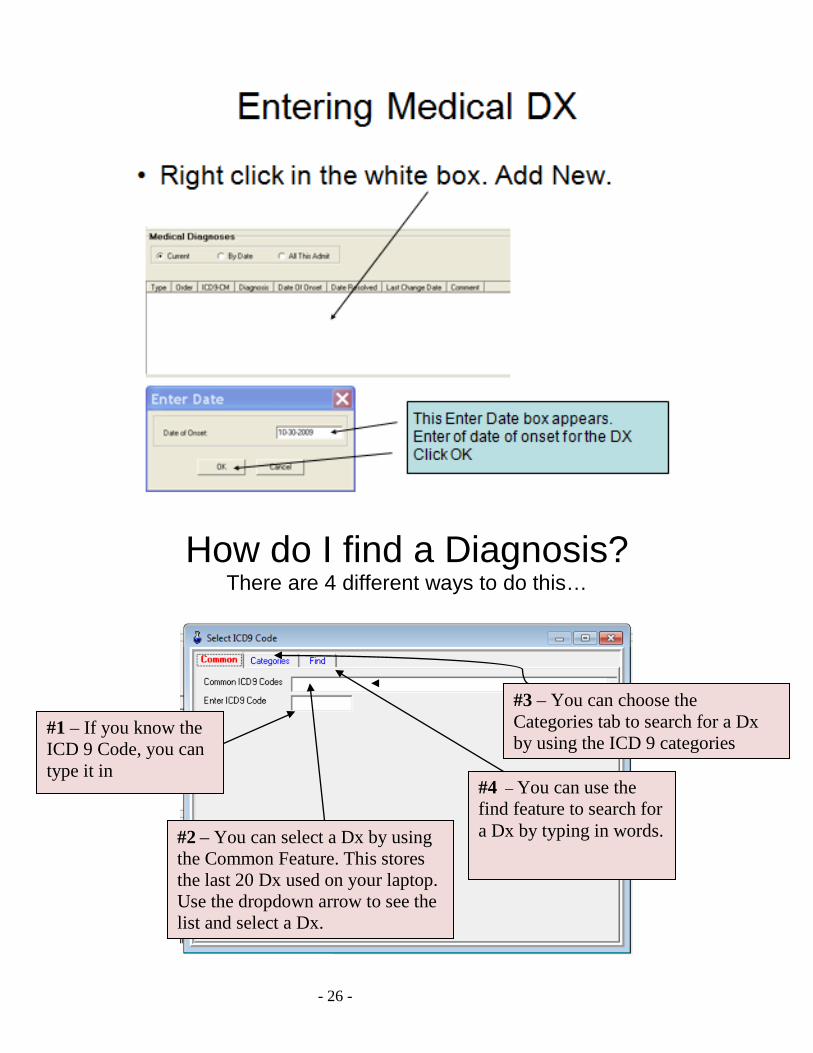
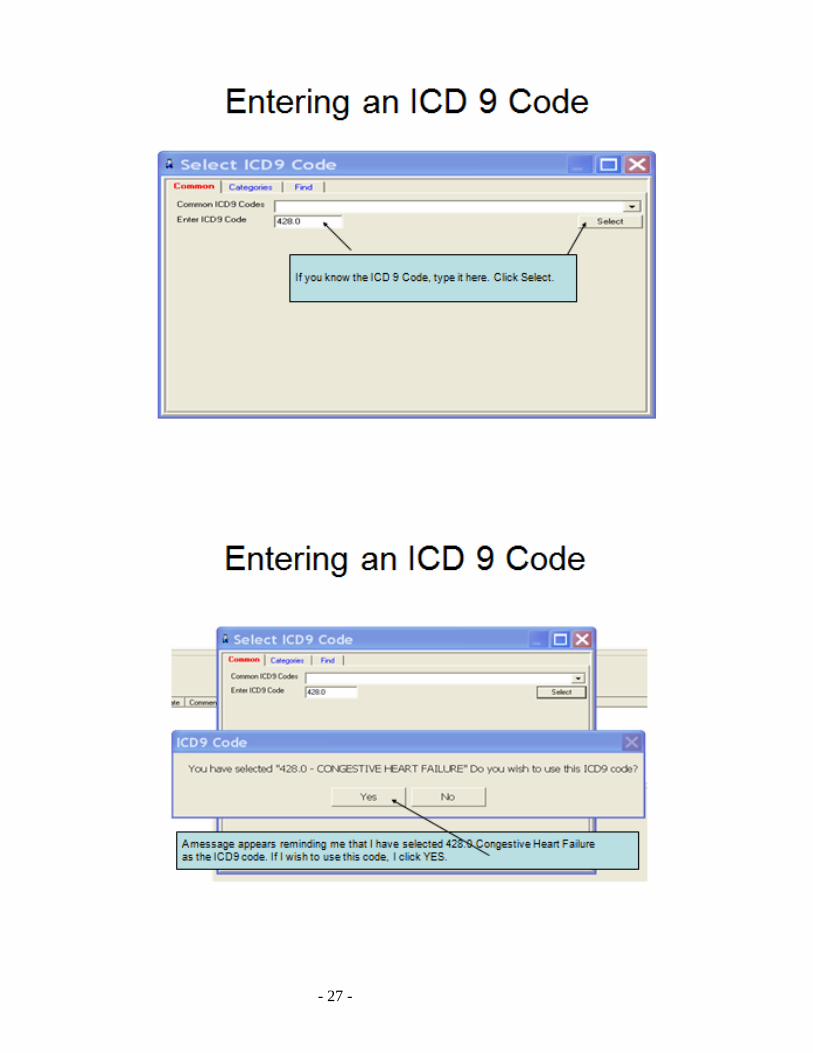
How do I find a Diagnosis? There are 4 different ways to do this…
#1 – If you know the ICD 9 Code, you can type it in
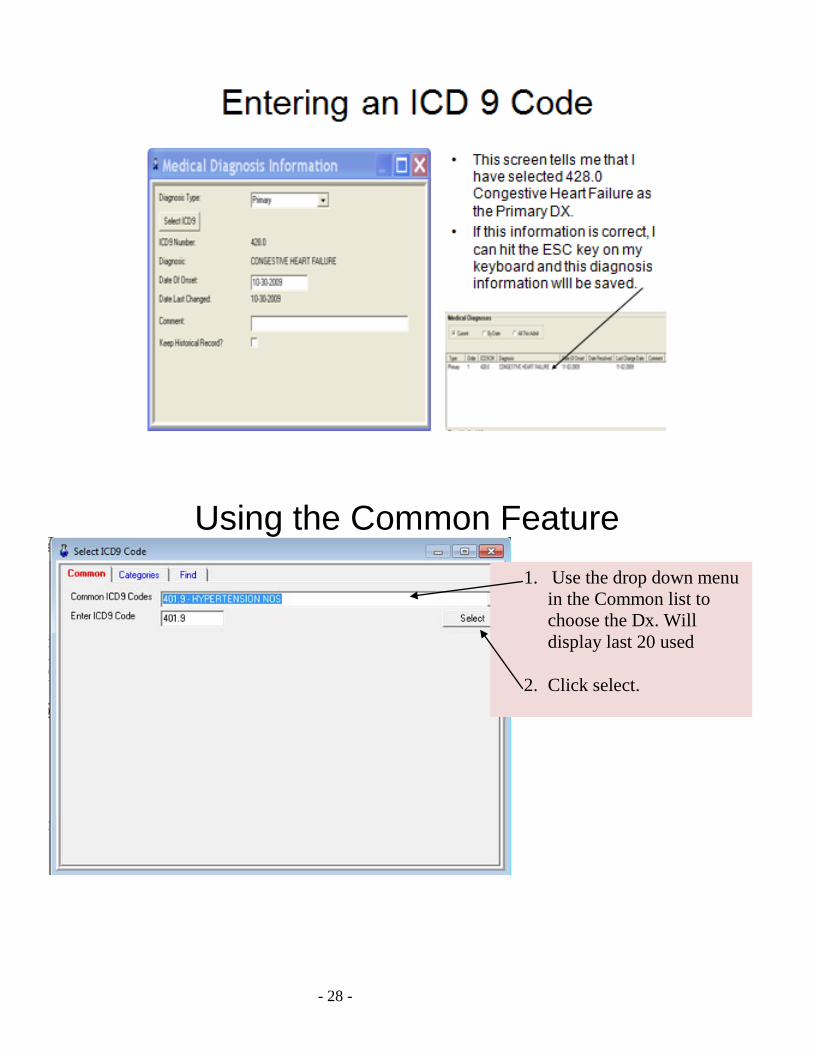
#2 – You can select a Dx by using the Common Feature. This stores the last 20 Dx used on your laptop. Use the dropdown arrow to see the list and select a Dx.
#3 – You can choose the Categories tab to search for a Dx by using the ICD 9 categories
#4 – You can use the find feature to search for a Dx by typing in words.
- 27 -
- 28 -
Using the Common Feature
1. Use the drop down menu in the Common list to choose the Dx. Will display last 20 used
2. Click select.
- 29 -
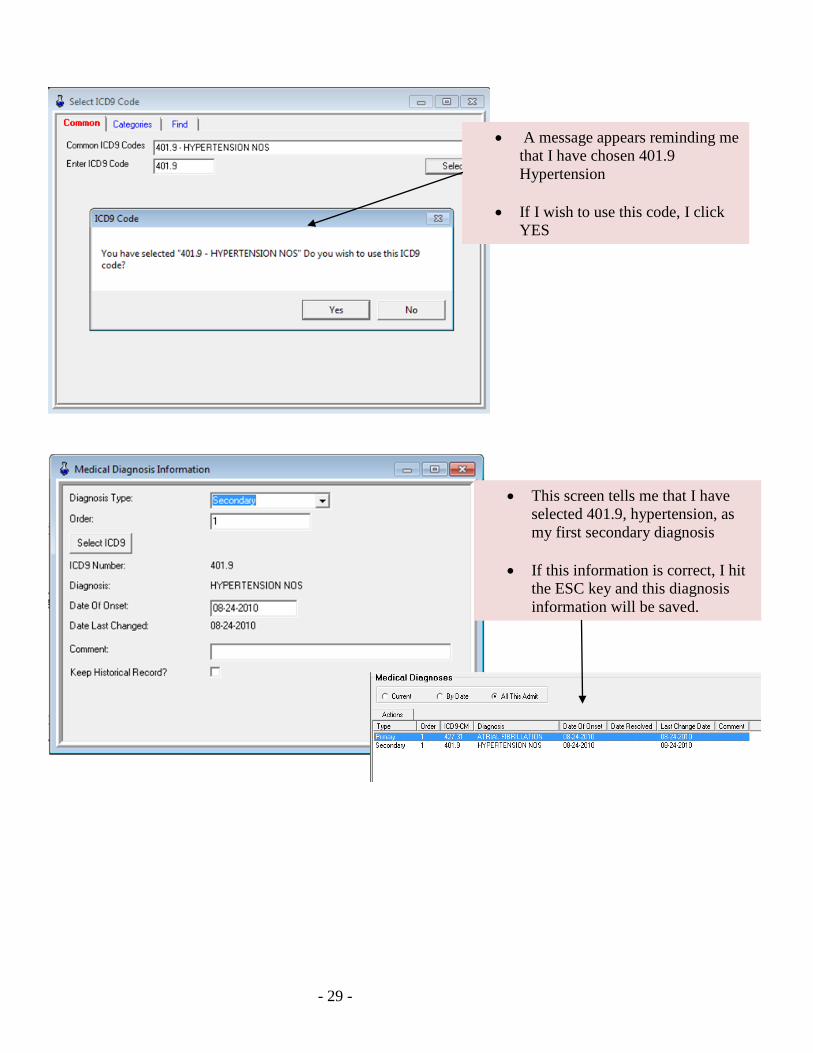
• A message appears reminding me that I have chosen 401.9 Hypertension
• If I wish to use this code, I click YES
• This screen tells me that I have selected 401.9, hypertension, as my first secondary diagnosis
• If this information is correct, I hit
the ESC key and this diagnosis information will be saved.
- 30 -
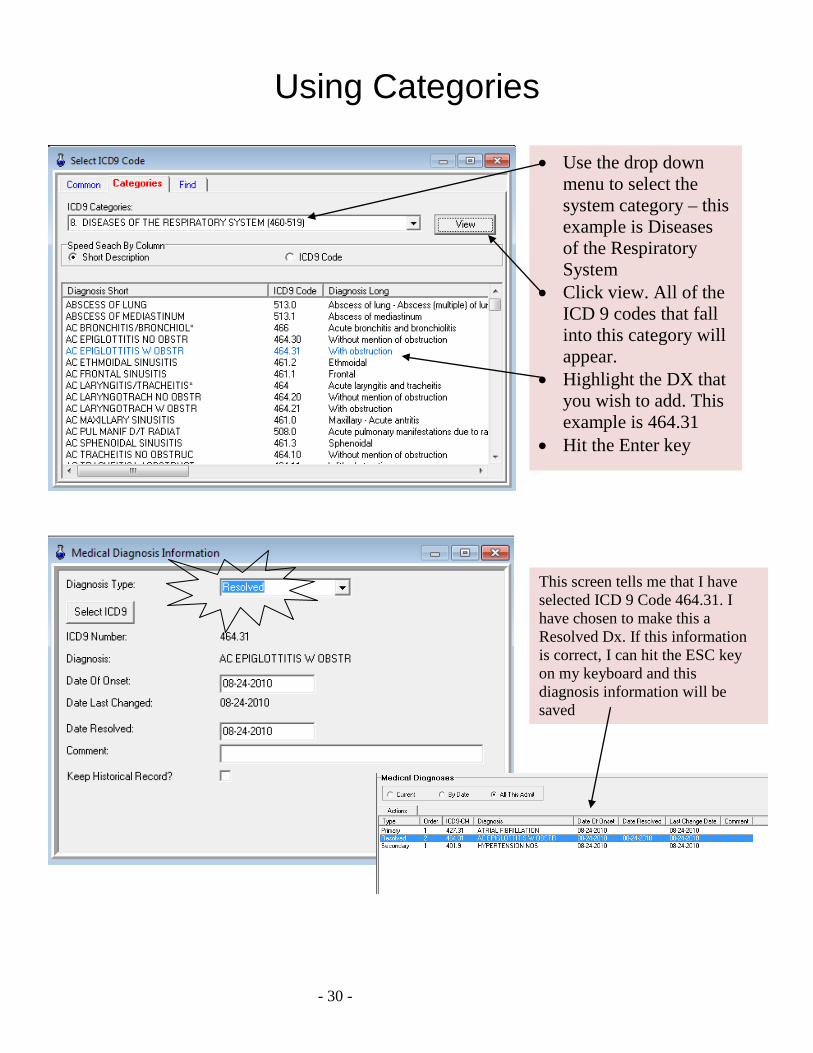
Using Categories
• Use the drop down menu to select the system category – this example is Diseases of the Respiratory System
• Click view. All of the ICD 9 codes that fall into this category will appear.
• Highlight the DX that you wish to add. This example is 464.31
• Hit the Enter key
This screen tells me that I have selected ICD 9 Code 464.31. I have chosen to make this a Resolved Dx. If this information is correct, I can hit the ESC key on my keyboard and this diagnosis information will be saved
- 31 -
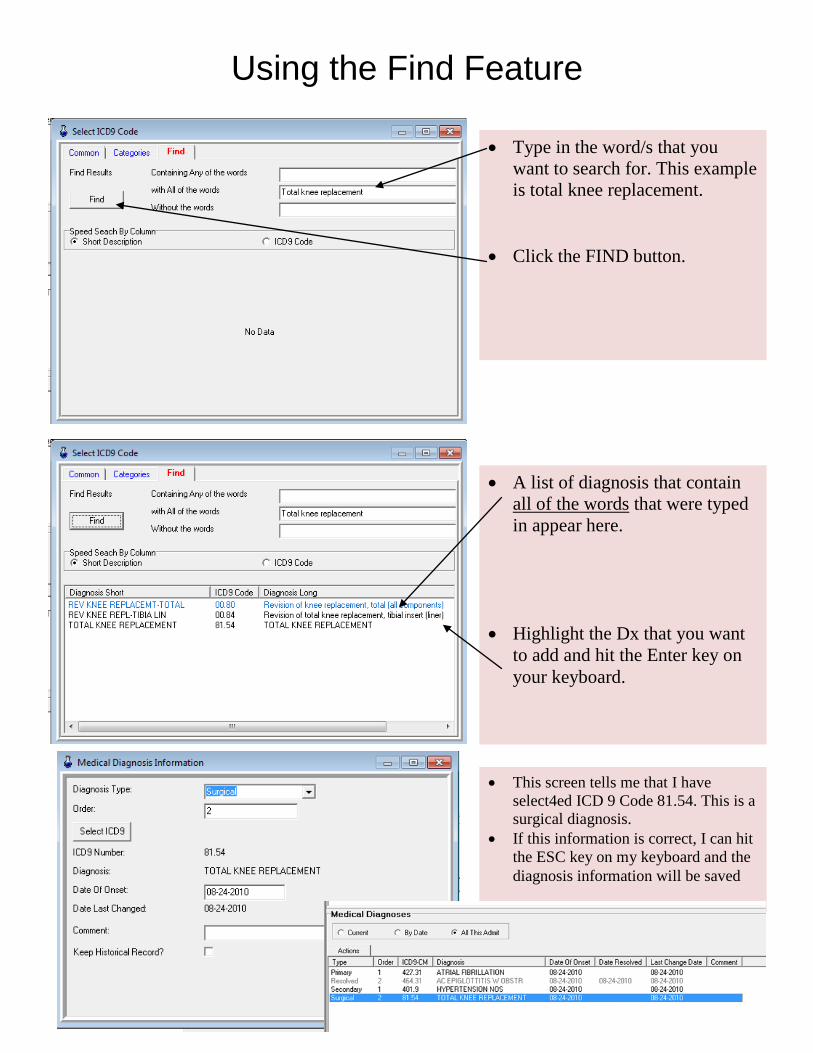
Using the Find Feature
• Type in the word/s that you want to search for. This example is total knee replacement.
• Click the FIND button.
• A list of diagnosis that contain all of the words that were typed in appear here.
• Highlight the Dx that you want to add and hit the Enter key on your keyboard.
• This screen tells me that I have select4ed ICD 9 Code 81.54. This is a surgical diagnosis.
• If this information is correct, I can hit the ESC key on my keyboard and the diagnosis information will be saved
- 32 -
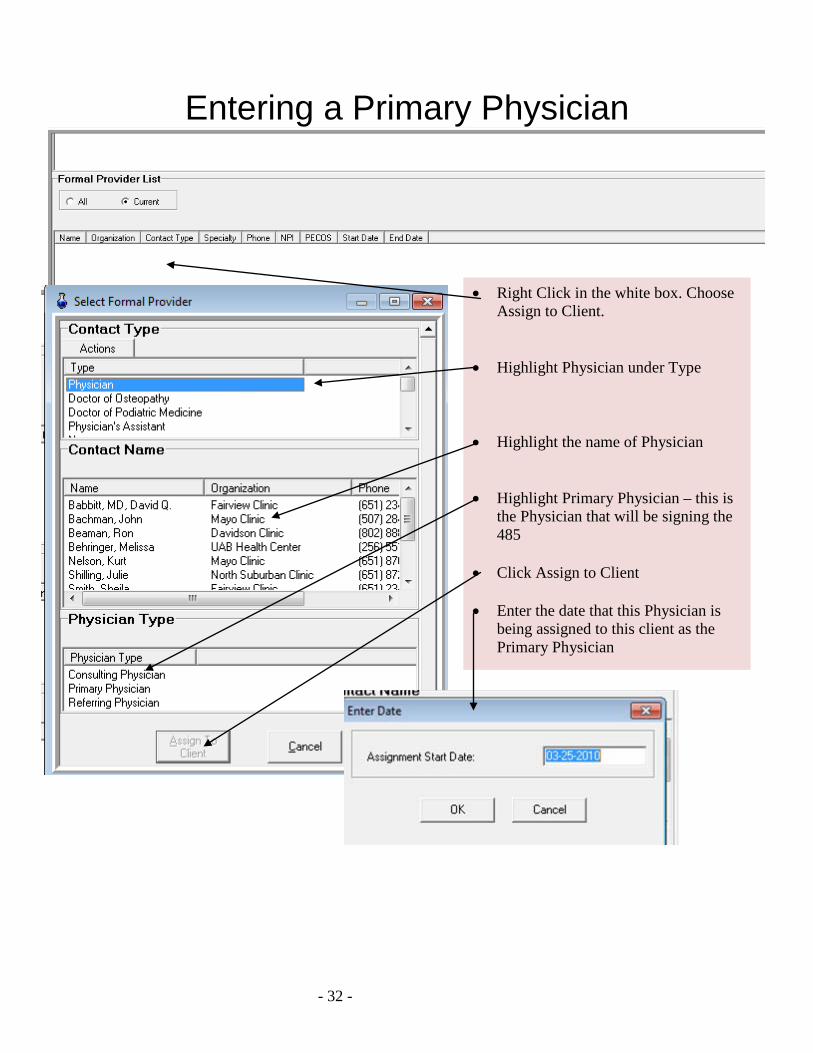
Entering a Primary Physician
• Right Click in the white box. Choose Assign to Client.
• Highlight Physician under Type • Highlight the name of Physician • Highlight Primary Physician – this is
the Physician that will be signing the 485
• Click Assign to Client
• Enter the date that this Physician is
being assigned to this client as the Primary Physician
- 33 -
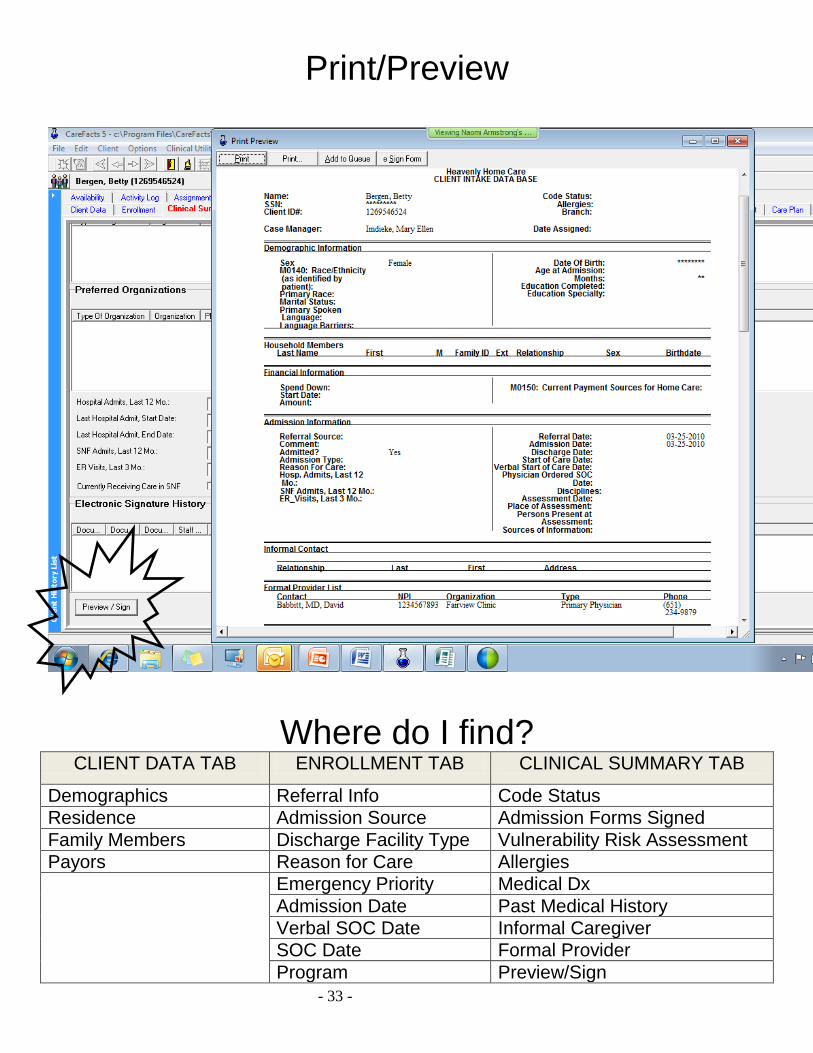
Print/Preview
Where do I find? CLIENT DATA TAB ENROLLMENT TAB CLINICAL SUMMARY TAB
Demographics Referral Info Code Status Residence Admission Source Admission Forms Signed Family Members Discharge Facility Type Vulnerability Risk Assessment Payors Reason for Care Allergies Emergency Priority Medical Dx
Admission Date Past Medical History Verbal SOC Date Informal Caregiver SOC Date Formal Provider Program Preview/Sign
- 34 -
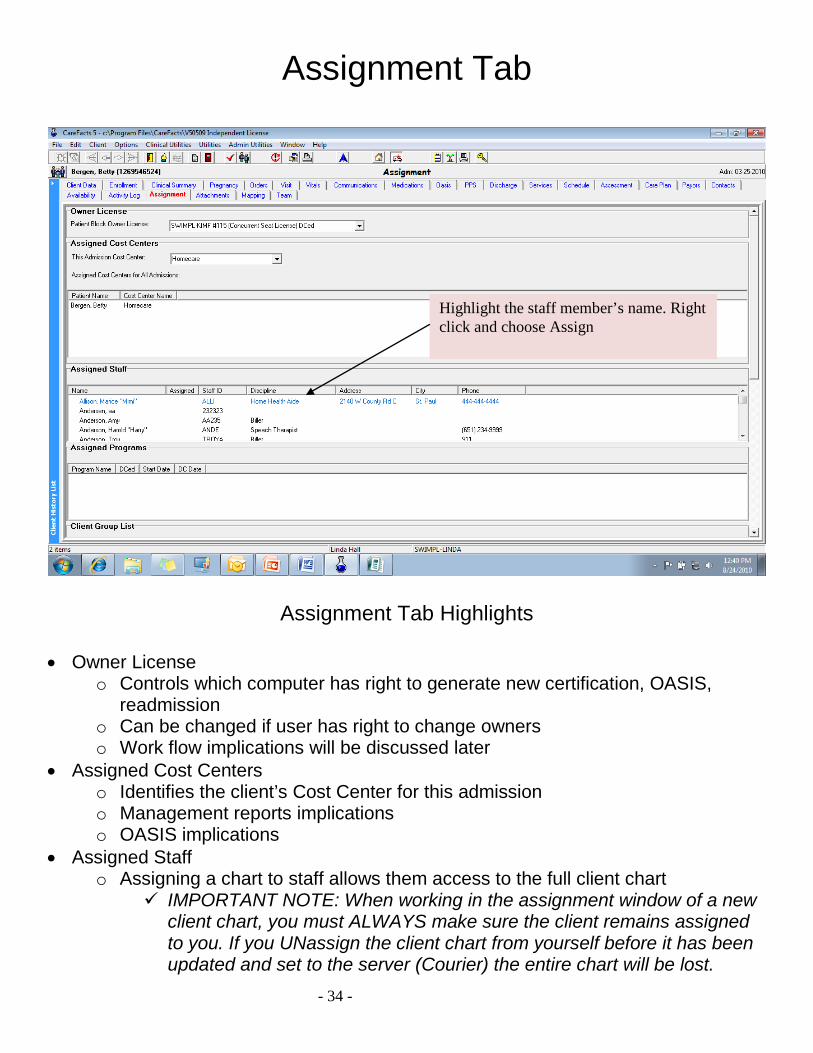
Assignment Tab
Assignment Tab Highlights • Owner License
o Controls which computer has right to generate new certification, OASIS, readmission
o Can be changed if user has right to change owners o Work flow implications will be discussed later
• Assigned Cost Centers o Identifies the client’s Cost Center for this admission o Management reports implications o OASIS implications
• Assigned Staff o Assigning a chart to staff allows them access to the full client chart
IMPORTANT NOTE: When working in the assignment window of a new client chart, you must ALWAYS make sure the client remains assigned to you. If you UNassign the client chart from yourself before it has been updated and set to the server (Courier) the entire chart will be lost.
Highlight the staff member’s name. Right click and choose Assign
- 35 -
Summary
New Client Chart was added Basic demographic information has been entered by Intake Payor has been assigned Diagnosis from the referral source or H&P have been entered Primary physician has been assigned Staff members have been assigned to the chart Assigned field staff on independent licenses will need to update so
that they will have the patient’s chart on their laptop The field staff will review the information that was entered by intake in
the first three clinical tabs The field staff can add additional information, and make corrections as
needed New information entered by the field staff is only on the laptop until the
field staff updates
- 36 -
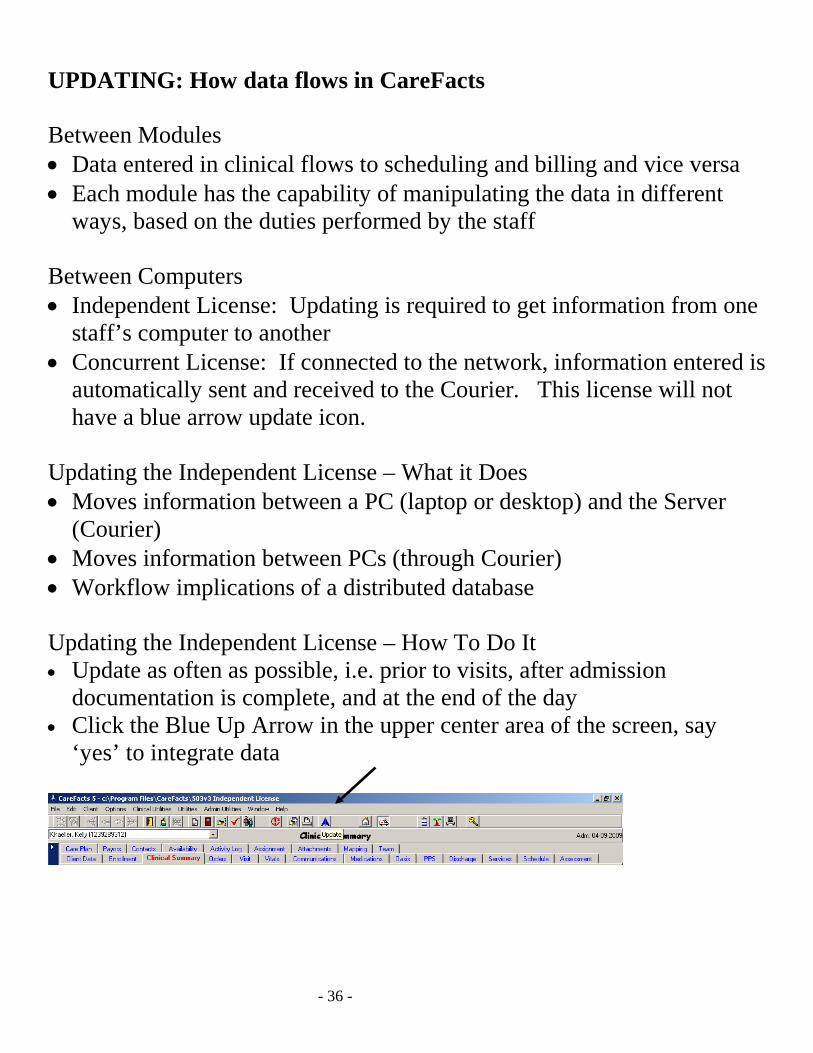
UPDATING: How data flows in CareFacts Between Modules • Data entered in clinical flows to scheduling and billing and vice versa • Each module has the capability of manipulating the data in different
ways, based on the duties performed by the staff Between Computers • Independent License: Updating is required to get information from one
staff’s computer to another • Concurrent License: If connected to the network, information entered is
automatically sent and received to the Courier. This license will not have a blue arrow update icon.
Updating the Independent License – What it Does • Moves information between a PC (laptop or desktop) and the Server
(Courier) • Moves information between PCs (through Courier) • Workflow implications of a distributed database Updating the Independent License – How To Do It • Update as often as possible, i.e. prior to visits, after admission
documentation is complete, and at the end of the day • Click the Blue Up Arrow in the upper center area of the screen, say
‘yes’ to integrate data

- 37 -
- 38 -
CareFacts Clinical Training Session II
Orders/Service frequency
Overview of the Orders Tab Adding Service Frequencies
Opening a Visit
- 39 -
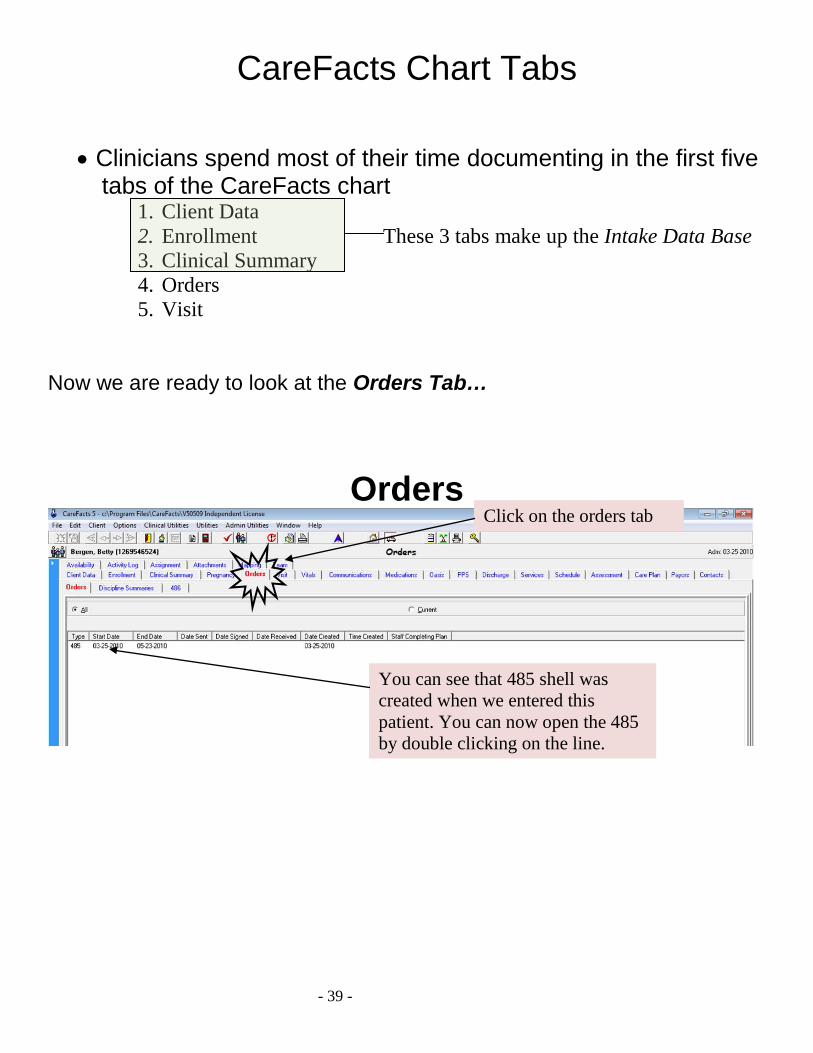
CareFacts Chart Tabs
• Clinicians spend most of their time documenting in the first five tabs of the CareFacts chart
1. Client Data 2. Enrollment These 3 tabs make up the Intake Data Base 3. Clinical Summary 4. Orders 5. Visit
Now we are ready to look at the Orders Tab…
Orders
Click on the orders tab
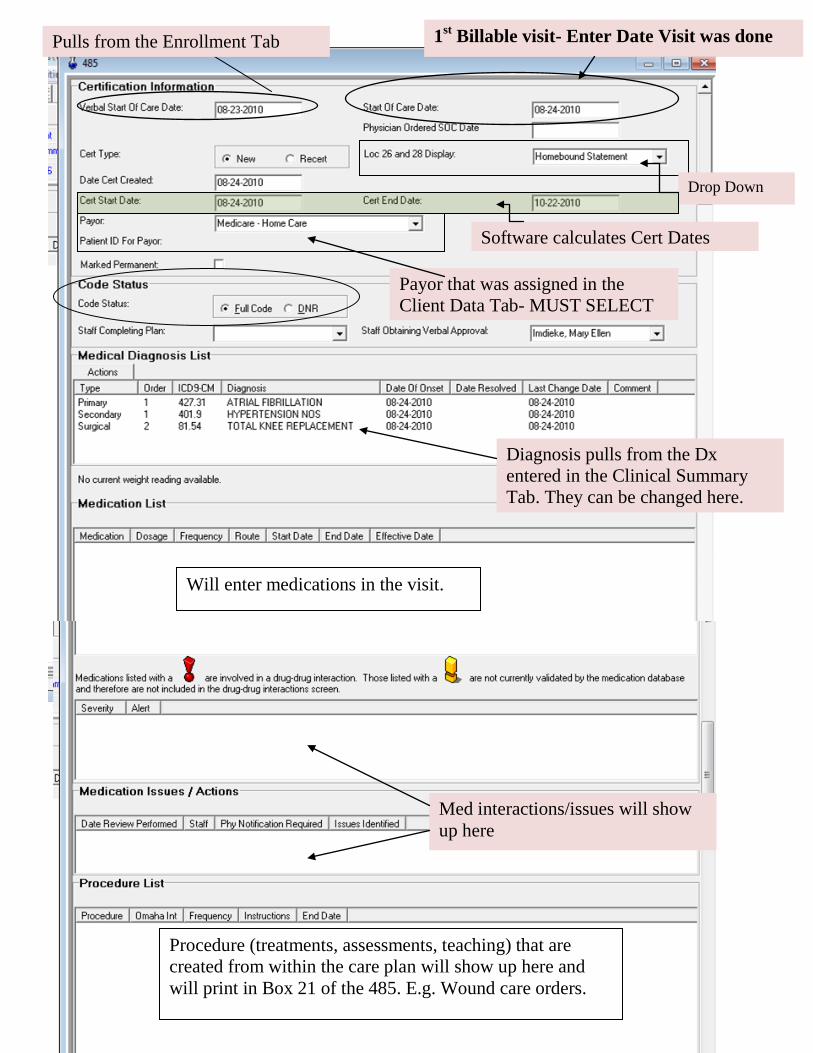
You can see that 485 shell was created when we entered this patient. You can now open the 485 by double clicking on the line.
- 40 -
Pulls from the Enrollment Tab 1st Billable visit- Enter Date Visit was done
Software calculates Cert Dates
Drop Down
Payor that was assigned in the Client Data Tab- MUST SELECT
Diagnosis pulls from the Dx entered in the Clinical Summary Tab. They can be changed here.
Will enter medications in the visit.
Med interactions/issues will show up here
Procedure (treatments, assessments, teaching) that are created from within the care plan will show up here and will print in Box 21 of the 485. E.g. Wound care orders.
- 41 -
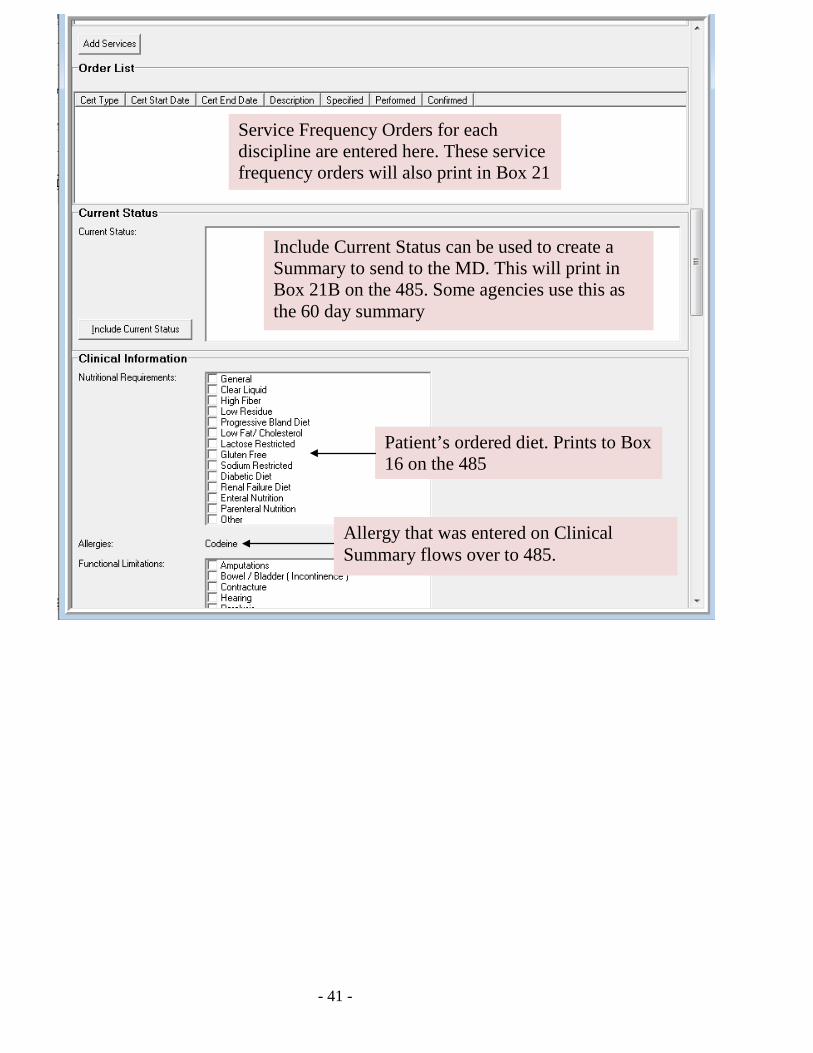
Service Frequency Orders for each discipline are entered here. These service frequency orders will also print in Box 21
Patient’s ordered diet. Prints to Box 16 on the 485
Include Current Status can be used to create a Summary to send to the MD. This will print in Box 21B on the 485. Some agencies use this as the 60 day summary
Allergy that was entered on Clinical Summary flows over to 485.
- 42 -
[Type a quote from the document or the summary of an interesting point. You can position the text box anywhere in the document. Use the Text Box Tools tab to change the formatting of the pull quote text box.]
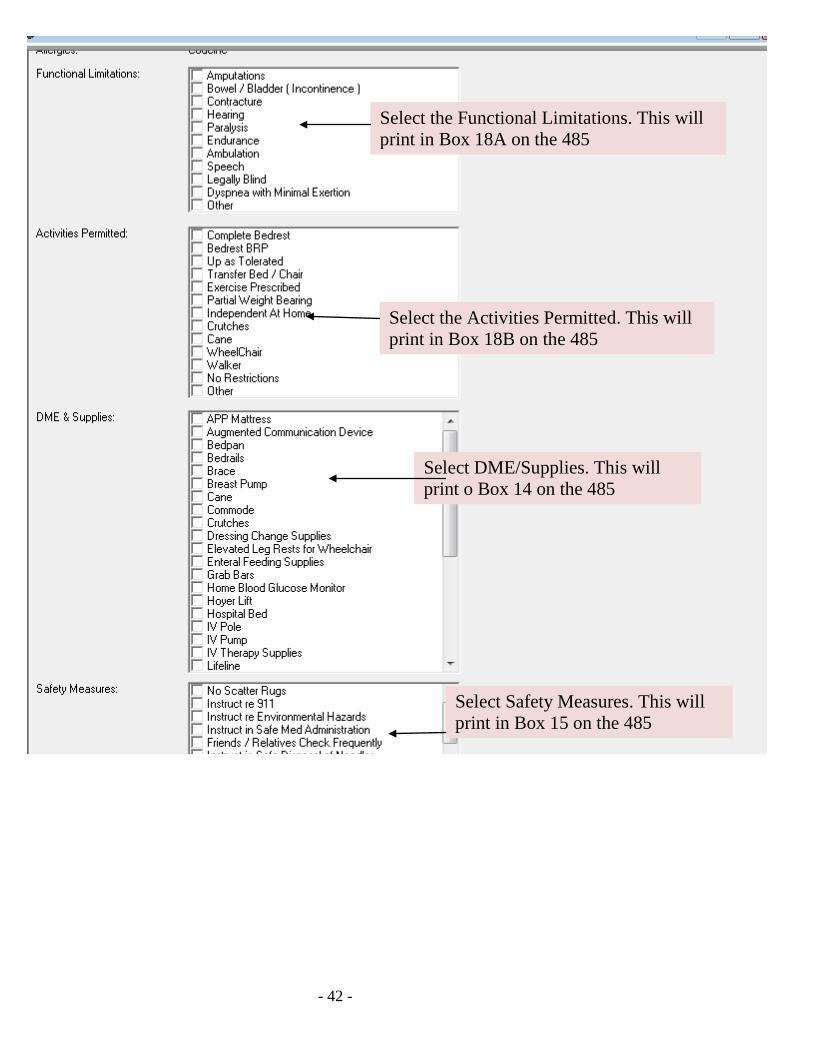
Select the Functional Limitations. This will print in Box 18A on the 485
Select the Activities Permitted. This will print in Box 18B on the 485
Select DME/Supplies. This will print o Box 14 on the 485
Select Safety Measures. This will print in Box 15 on the 485
- 43 -
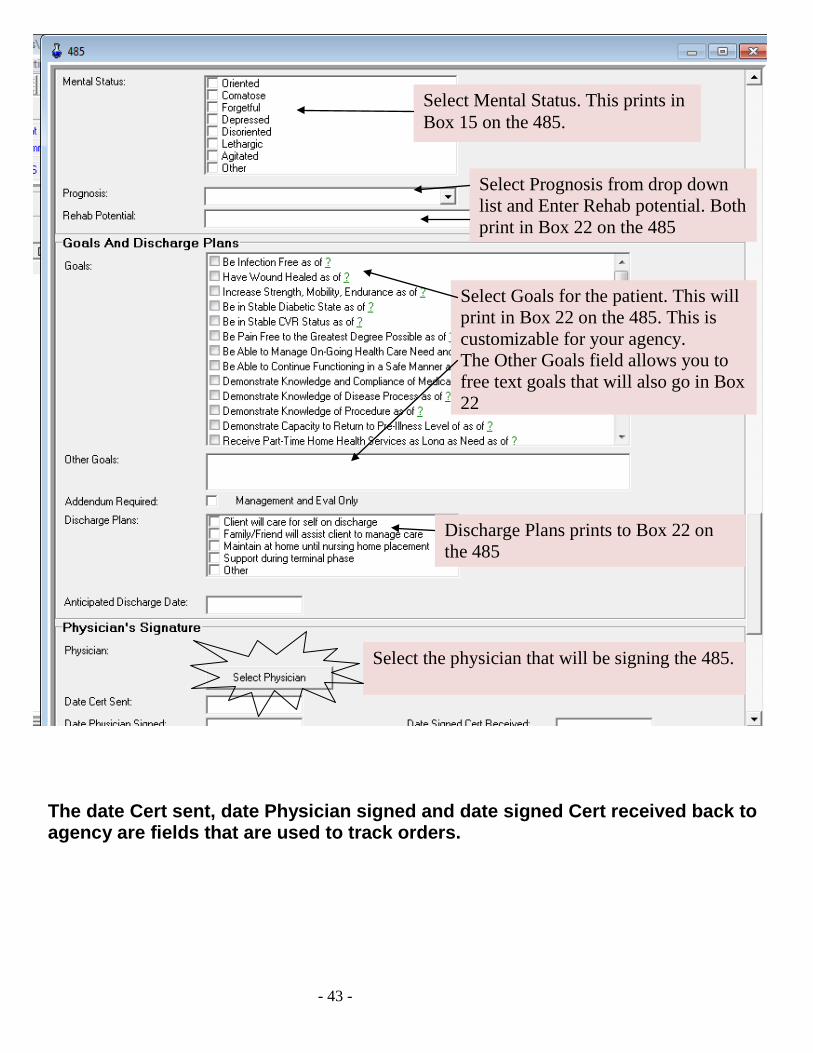
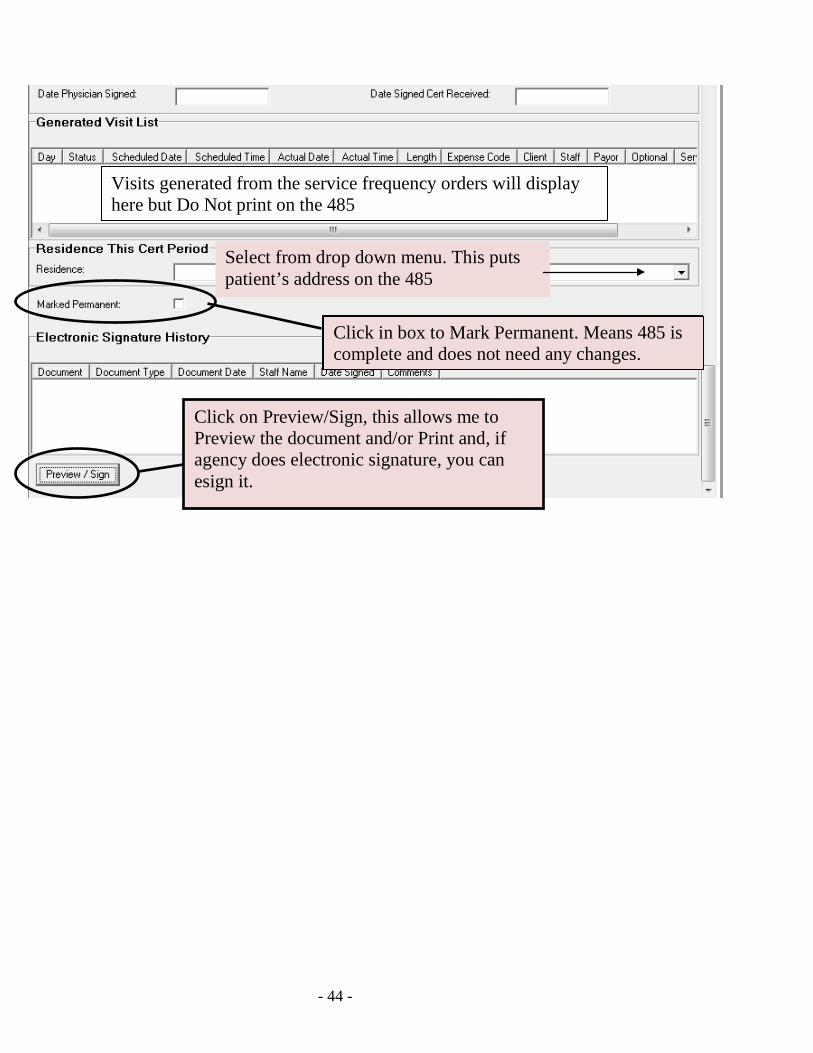
The date Cert sent, date Physician signed and date signed Cert received back to agency are fields that are used to track orders.
Select Mental Status. This prints in Box 15 on the 485.
Select Prognosis from drop down list and Enter Rehab potential. Both print in Box 22 on the 485
Select Goals for the patient. This will print in Box 22 on the 485. This is customizable for your agency. The Other Goals field allows you to free text goals that will also go in Box 22
Discharge Plans prints to Box 22 on the 485
Select the physician that will be signing the 485.
- 44 -
Visits generated from the service frequency orders will display here but Do Not print on the 485
Select from drop down menu. This puts patient’s address on the 485
Click on Preview/Sign, this allows me to Preview the document and/or Print and, if agency does electronic signature, you can esign it.
Click in box to Mark Permanent. Means 485 is complete and does not need any changes. Click in box to Mark Permanent. Means 485 is complete and does not need any changes.
- 45 -
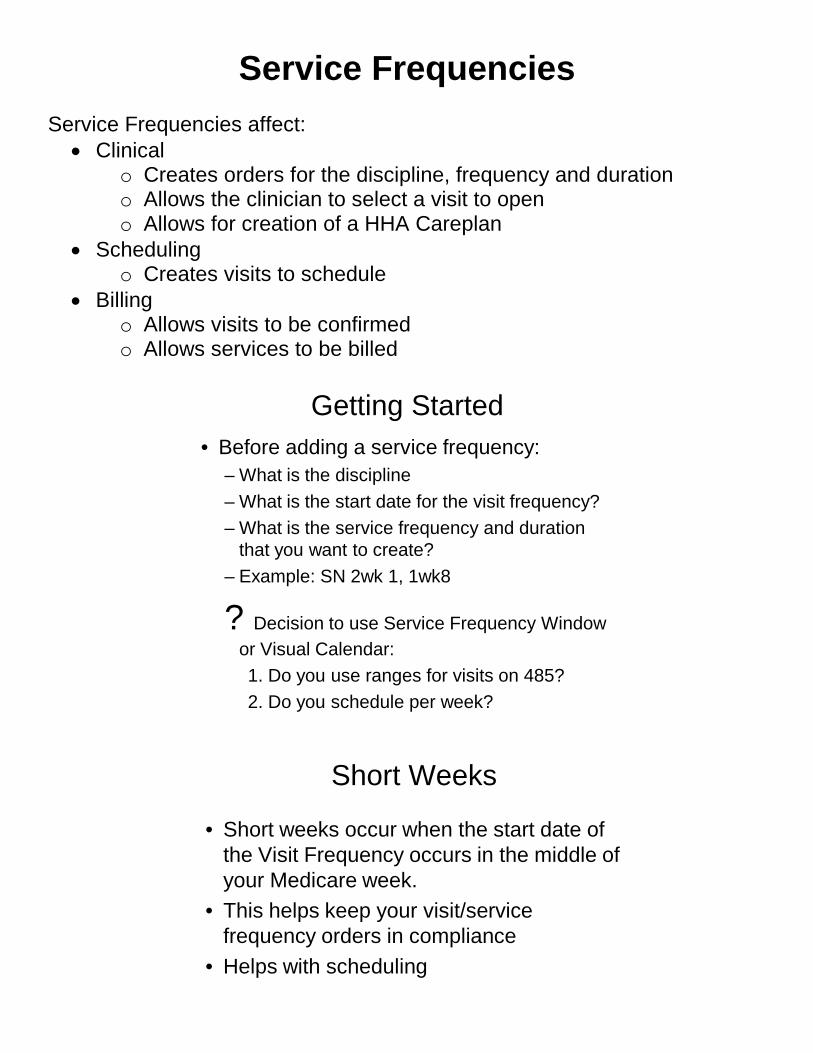
Service Frequencies
Service Frequencies affect: • Clinical
o Creates orders for the discipline, frequency and duration o Allows the clinician to select a visit to open o Allows for creation of a HHA Careplan
• Scheduling o Creates visits to schedule
• Billing o Allows visits to be confirmed o Allows services to be billed
Getting Started• Before adding a service frequency:
– What is the discipline– What is the start date for the visit frequency?– What is the service frequency and duration
that you want to create?– Example: SN 2wk 1, 1wk8
? Decision to use Service Frequency Window or Visual Calendar:1. Do you use ranges for visits on 485?2. Do you schedule per week?
Short Weeks
• Short weeks occur when the start date of the Visit Frequency occurs in the middle of your Medicare week.
• This helps keep your visit/service frequency orders in compliance
• Helps with scheduling

- 46 -
Service Frequency
• Go to the Orders Tab• Double click on the 485 line
Orders Tab Let’s create a Service Frequency
• Go to the Orders Tab• Double click on the current 485• Make sure the dates are correct• Scroll down to Add Services• Enter a Service Frequency
- 47 -
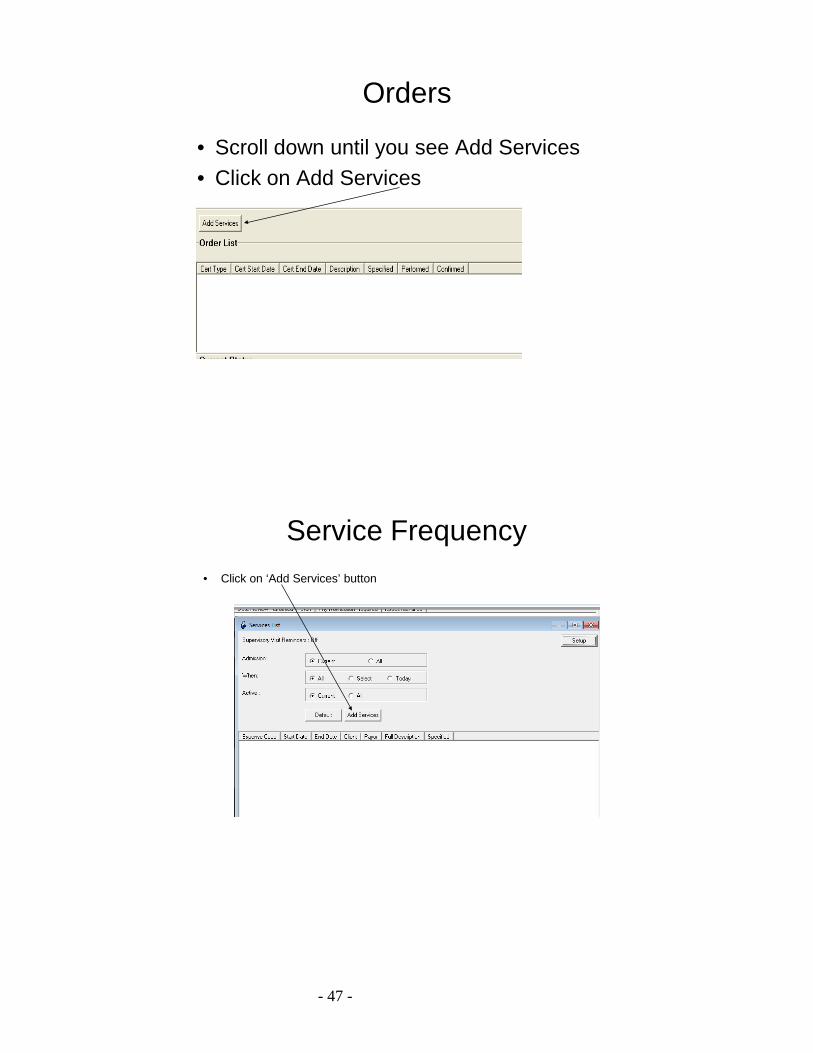
Orders
• Scroll down until you see Add Services• Click on Add Services
Service Frequency• Click on ‘Add Services’ button
- 48 -
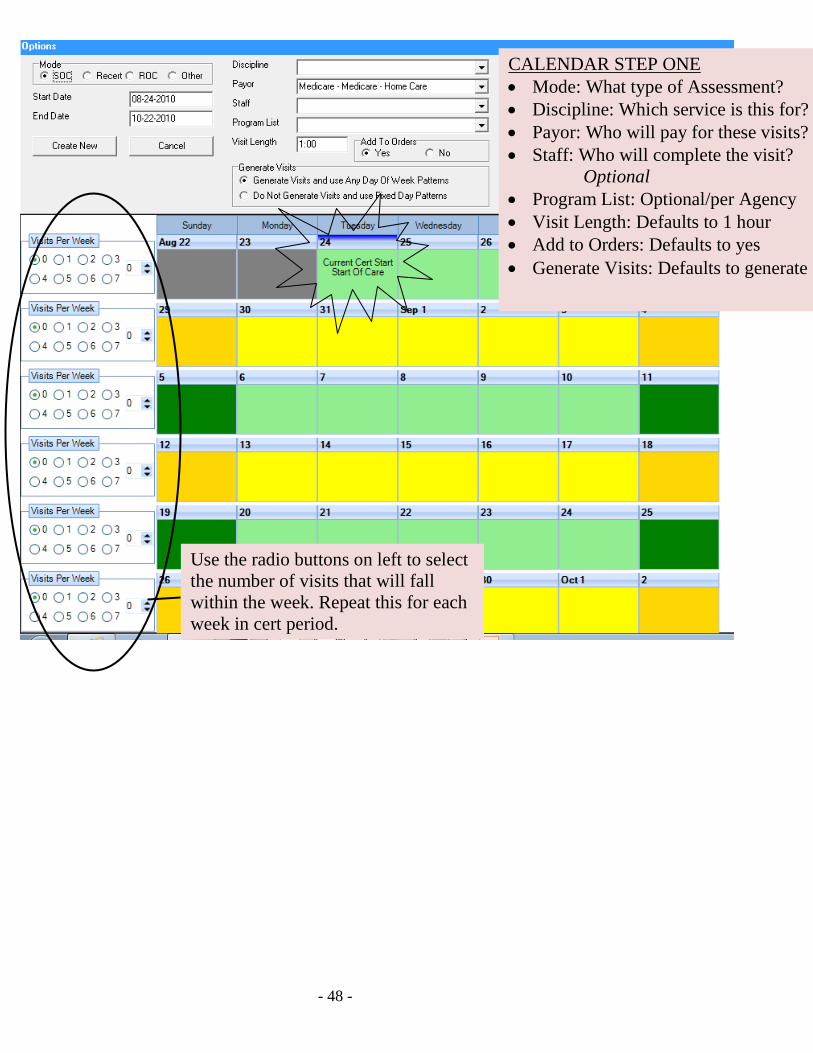
Example of Service Patterns
CALENDAR STEP ONE • Mode: What type of Assessment? • Discipline: Which service is this for? • Payor: Who will pay for these visits? • Staff: Who will complete the visit?
Optional • Program List: Optional/per Agency • Visit Length: Defaults to 1 hour • Add to Orders: Defaults to yes • Generate Visits: Defaults to generate
Use the radio buttons on left to select the number of visits that will fall within the week. Repeat this for each week in cert period.

- 49 -
Example of Service Frequency
• Complete scheduling visits for remainder of cert period. • Calendar identifies when the current Cert period ends as noted next. • If end is short week, the software will create the short week Service
Frequency
• Complete scheduling visits for remainder of cert period. • Calendar identifies when the current cert period ends as noted next. • If last week is a short week, the software will create a short week
Service Frequency.
• 2 visits first week, creates short week.
• 2 visits second
week,default puts them on the first two consecutive days of the week
• Can move the visits
• No visits scheduled/planned for 4th week

- 50 -
Once you are satisfied with the Service Frequency, click “Create New”
Service frequency w/o Use of Calendar
Once you are satisfied with the Service Frequency, click ‘Create New’
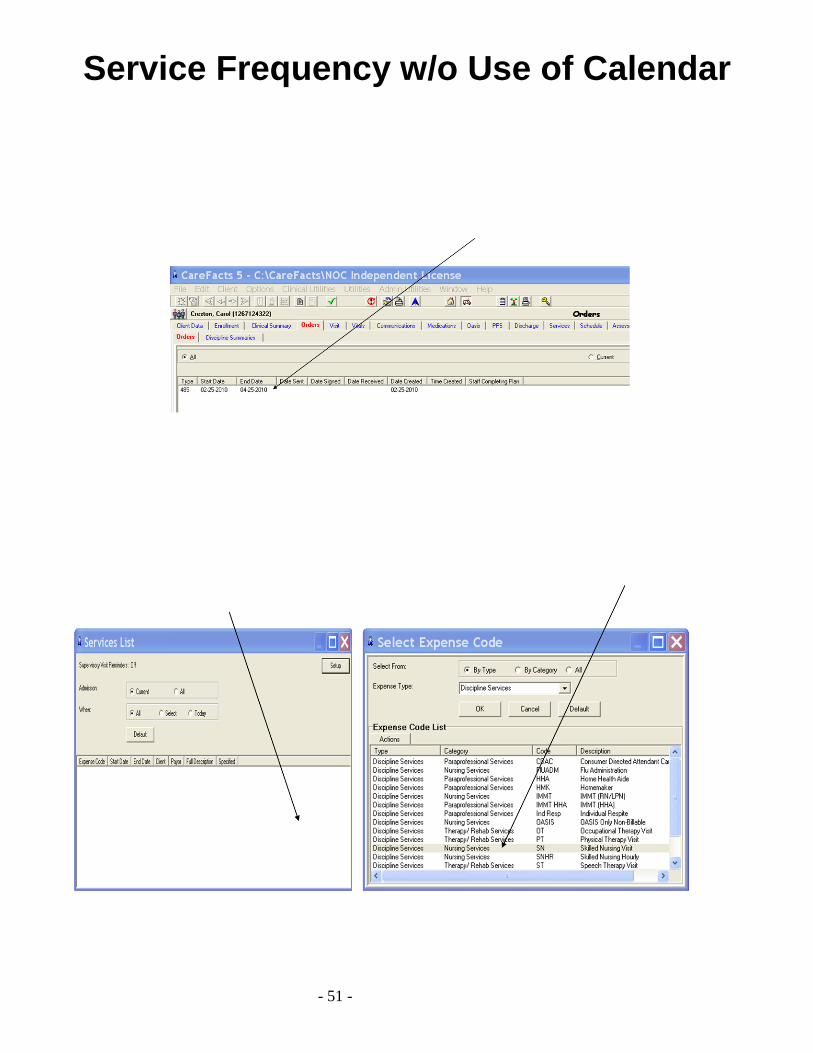
- 51 -
Service Frequency w/o Use of Calendar
- 52 -
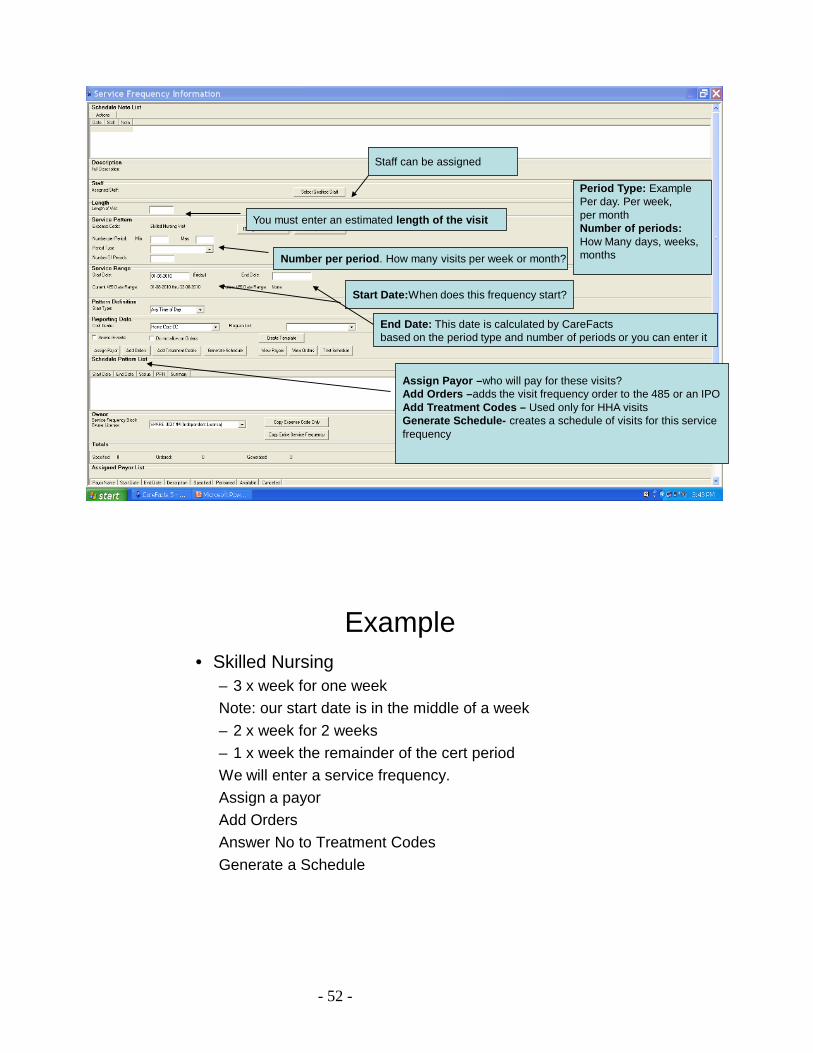
Staff can be assigned
You must enter an estimated length of the visit
Number per period. How many visits per week or month?
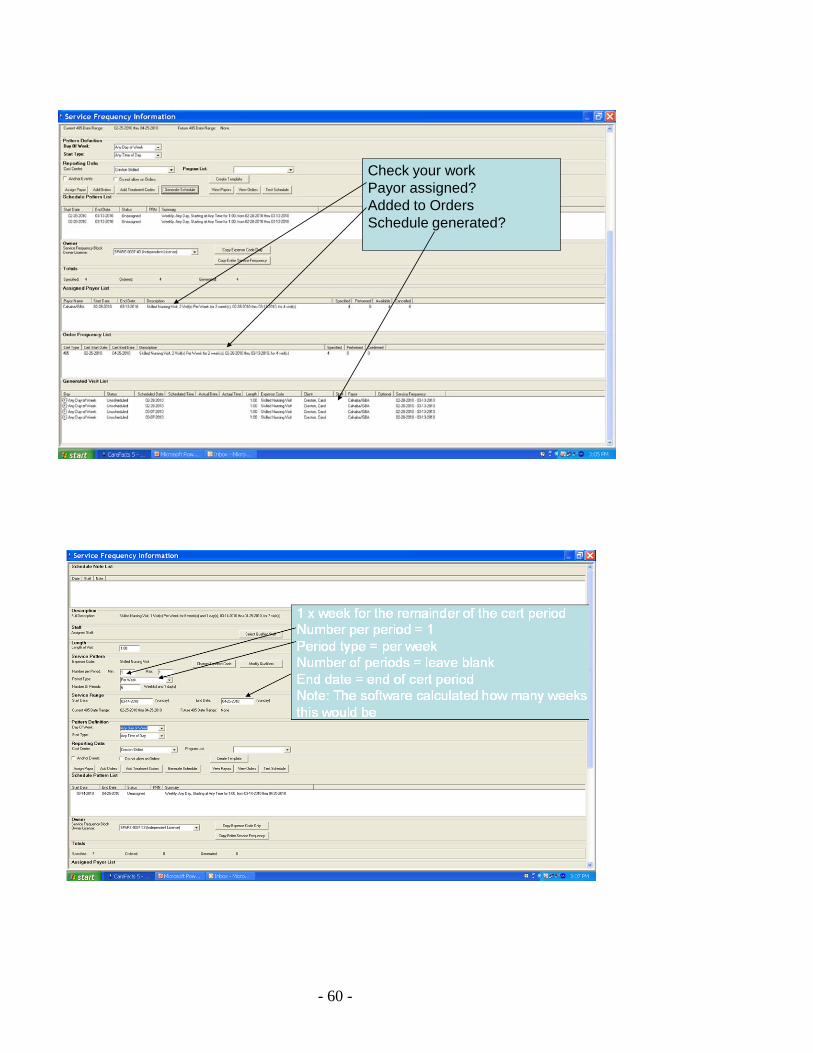
Period Type: Example Per day. Per week, per monthNumber of periods:How Many days, weeks,months
Start Date:When does this frequency start?
Assign Payor –who will pay for these visits?Add Orders –adds the visit frequency order to the 485 or an IPOAdd Treatment Codes – Used only for HHA visitsGenerate Schedule- creates a schedule of visits for this service frequency
End Date: This date is calculated by CareFactsbased on the period type and number of periods or you can enter it
Example• Skilled Nursing
– 3 x week for one weekNote: our start date is in the middle of a week– 2 x week for 2 weeks – 1 x week the remainder of the cert periodWe will enter a service frequency.Assign a payorAdd OrdersAnswer No to Treatment CodesGenerate a Schedule
- 53 -
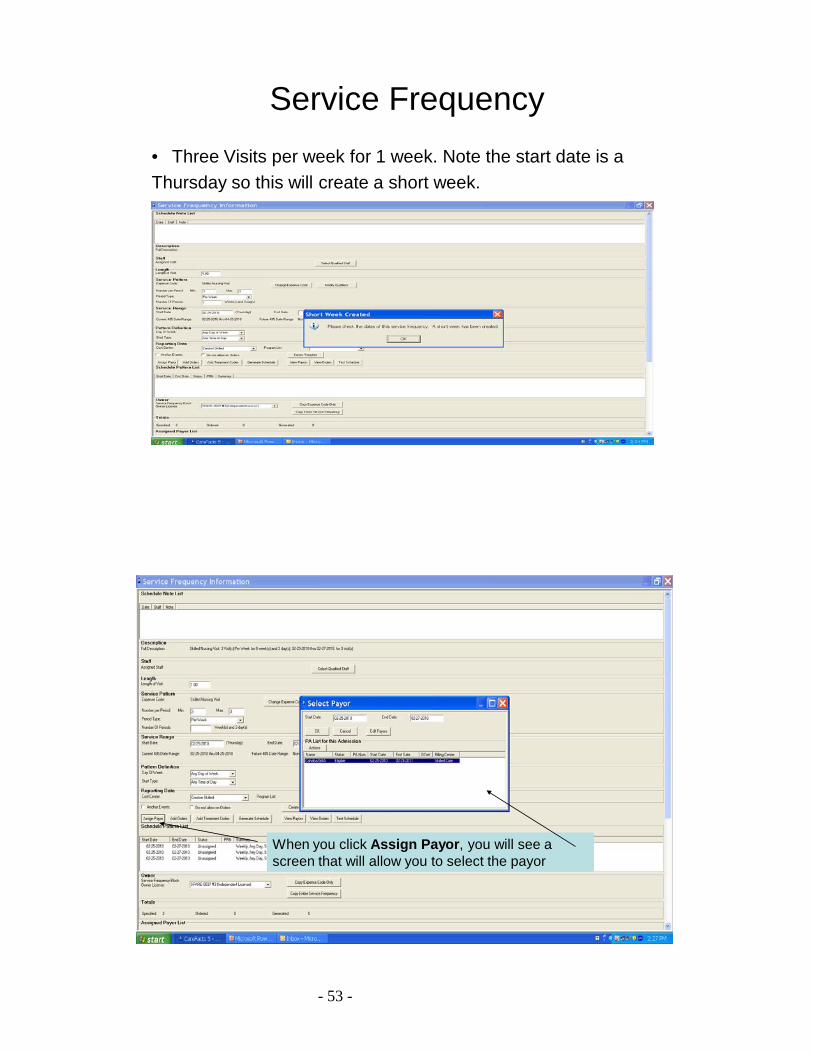
Service Frequency• Three Visits per week for 1 week. Note the start date is aThursday so this will create a short week.
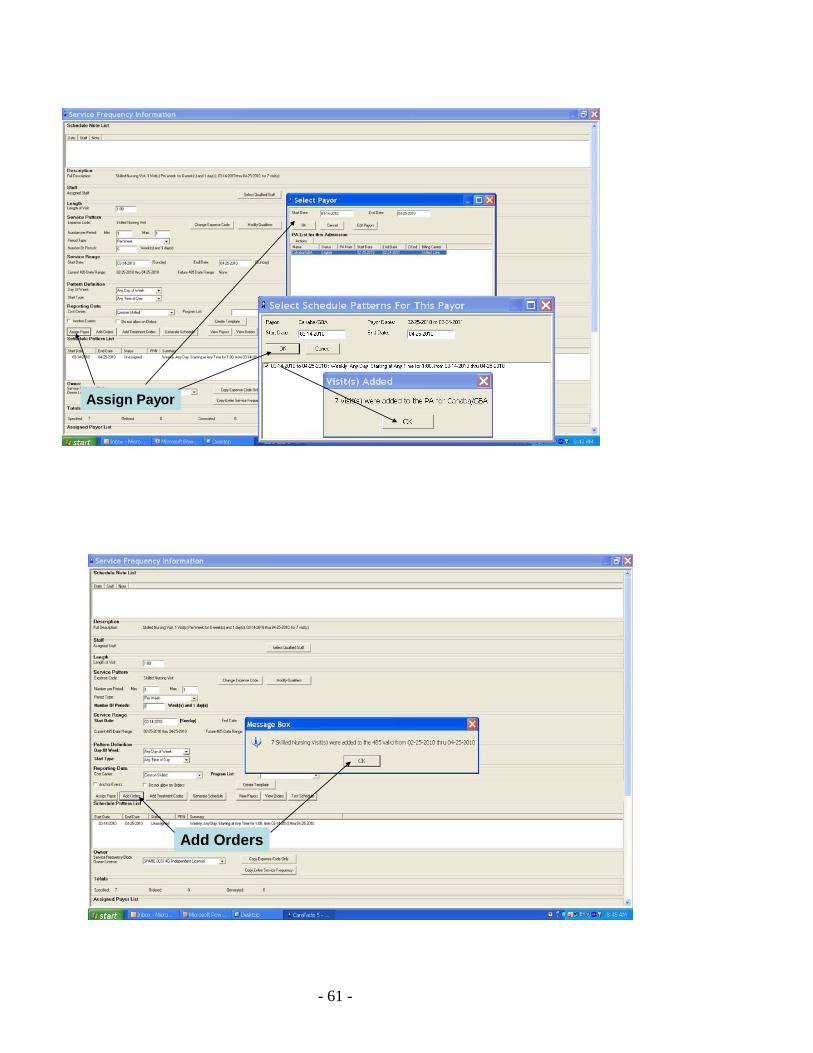
When you click Assign Payor, you will see a screen that will allow you to select the payor
- 54 -
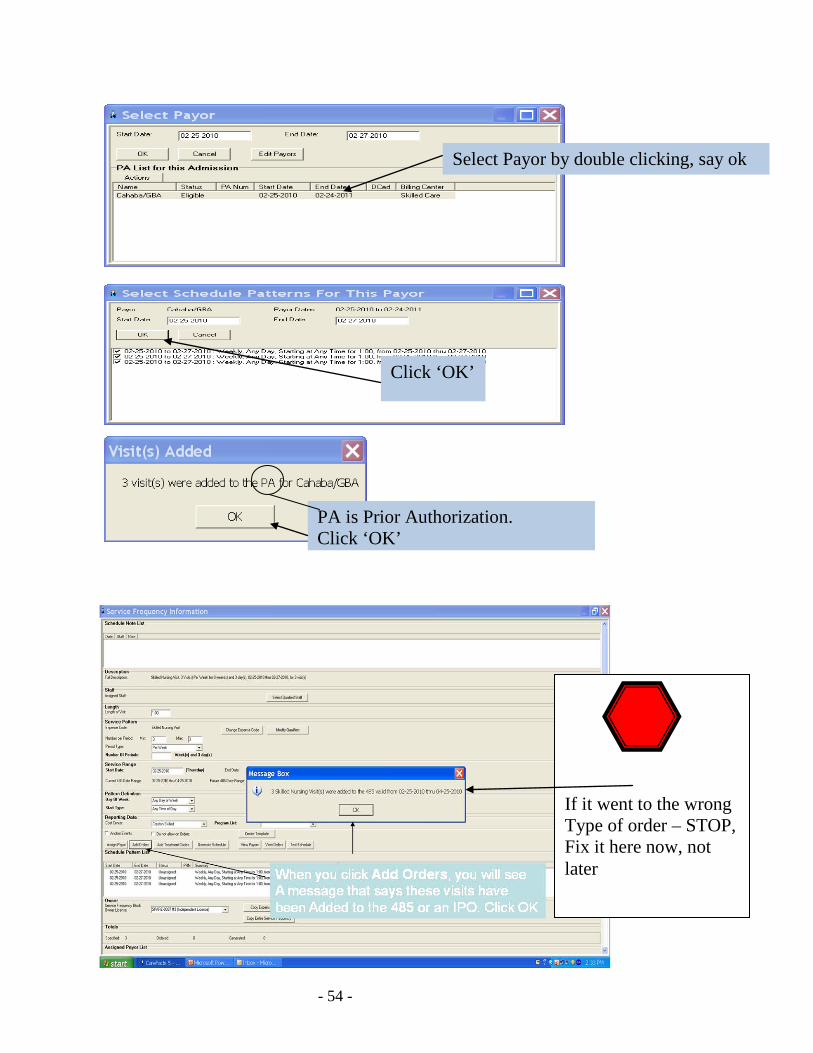
Select Payor by double clicking, say ok Select Payor by double clicking, say ok Select Payor by double clicking, say ok
Click ‘OK’
PA is Prior Authorization. Click ‘OK’
If it went to the wrong Type of order – STOP, Fix it here now, not later
- 55 -
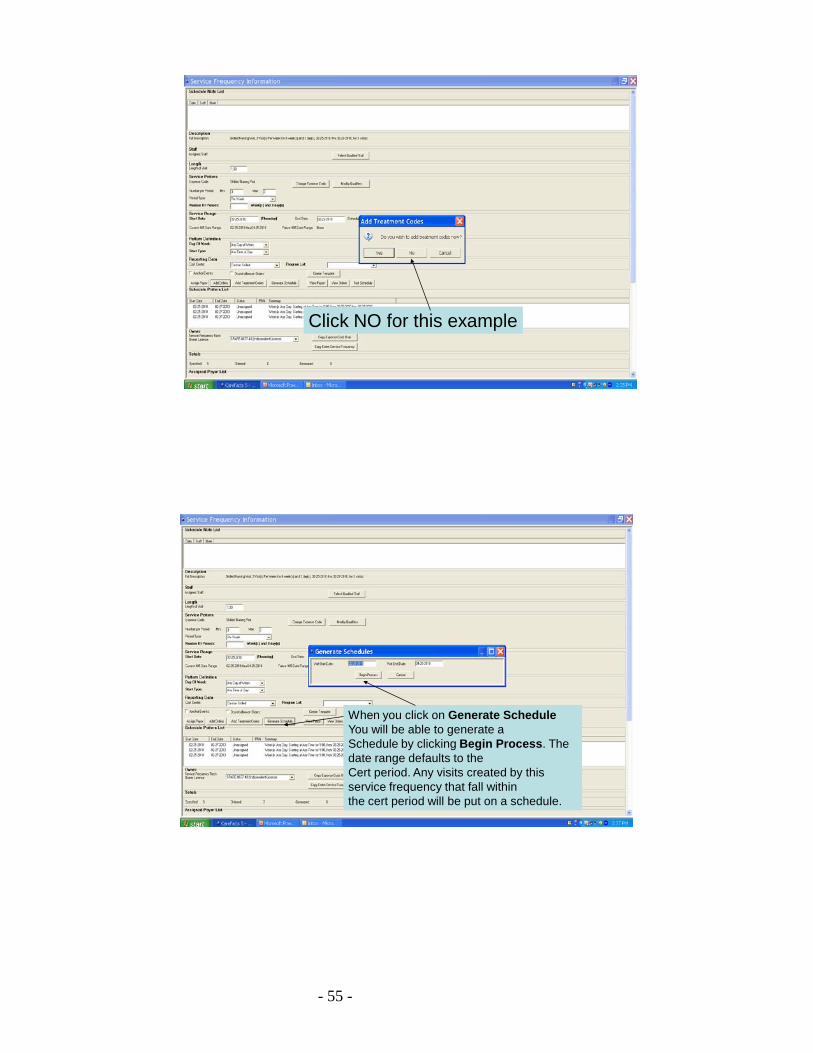
Click NO for this example
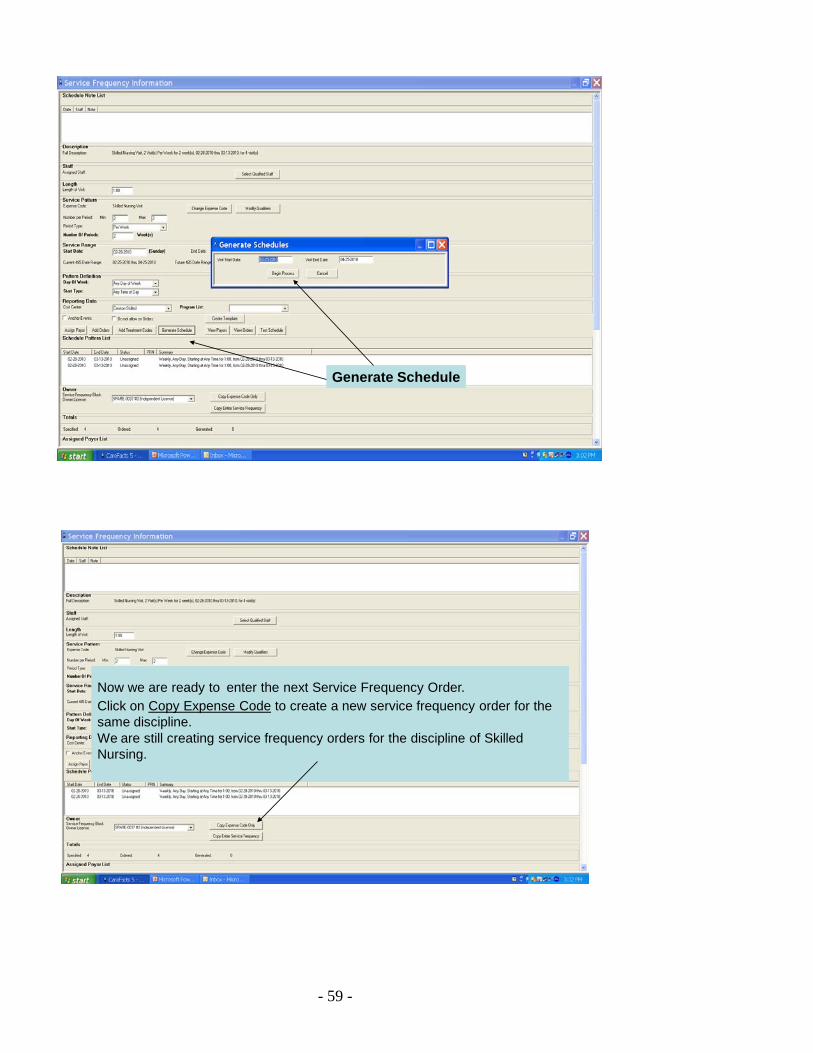
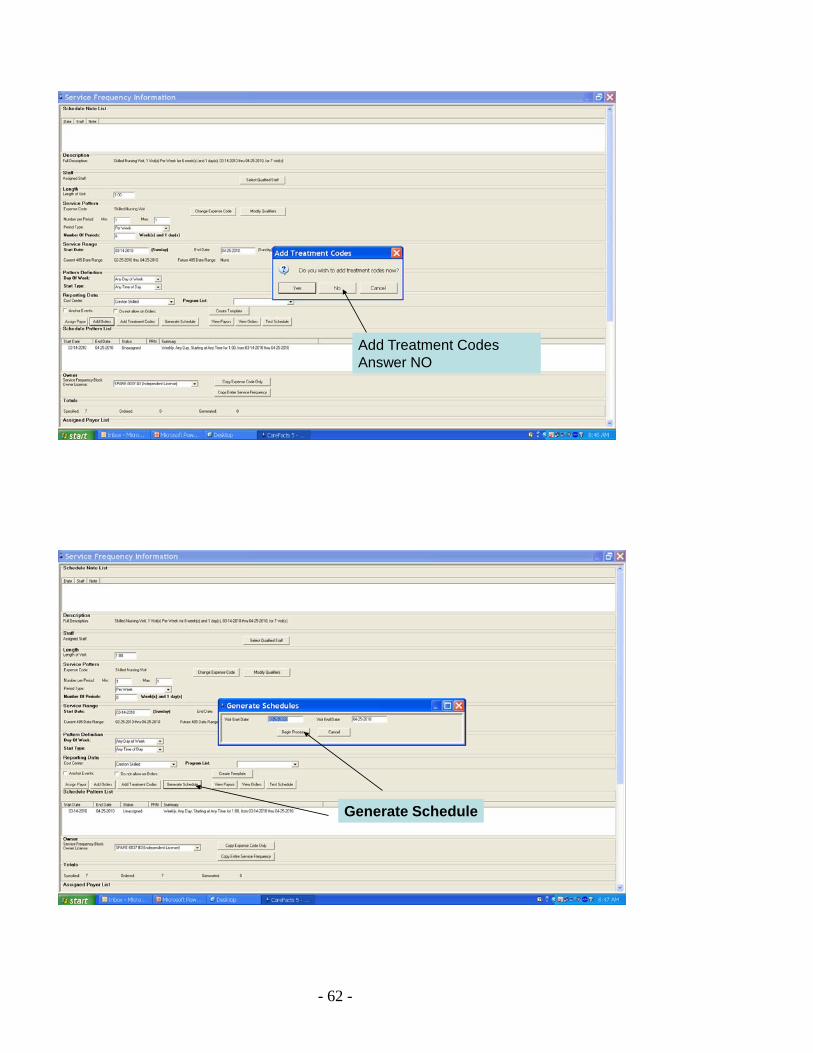
When you click on Generate ScheduleYou will be able to generate a Schedule by clicking Begin Process. The date range defaults to the Cert period. Any visits created by this service frequency that fall withinthe cert period will be put on a schedule.
- 56 -
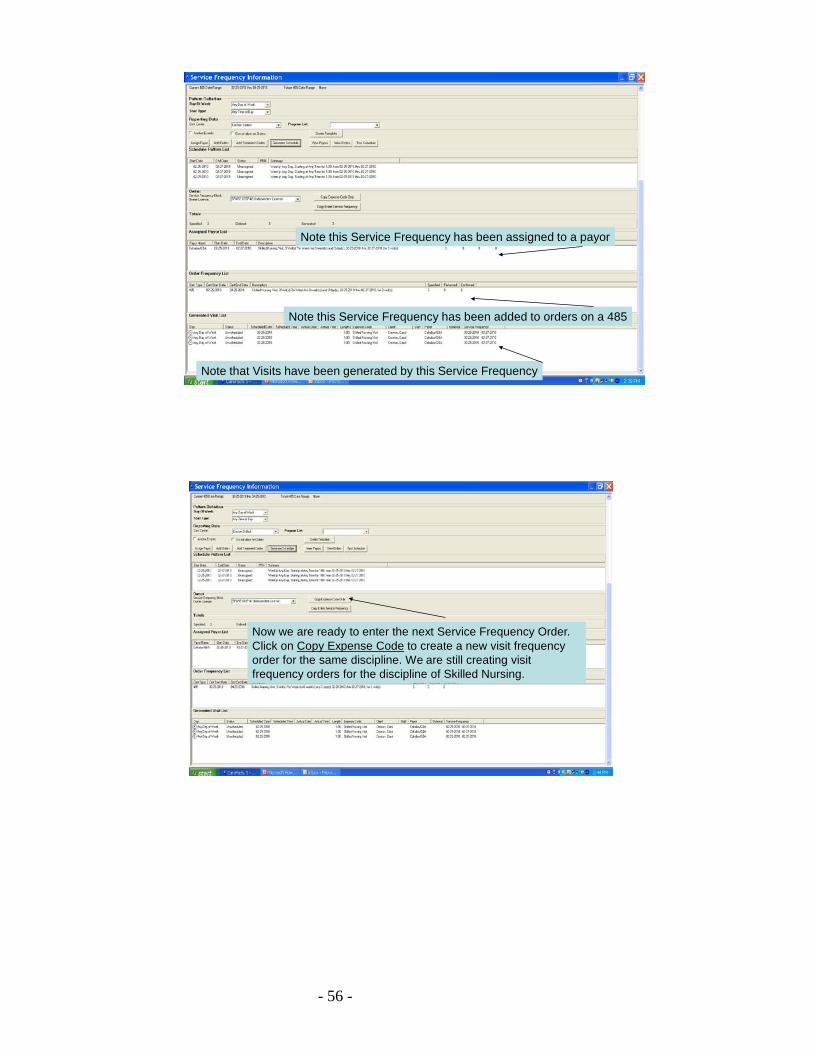
Note this Service Frequency has been assigned to a payor
Note this Service Frequency has been added to orders on a 485
Note that Visits have been generated by this Service Frequency
Now we are ready to enter the next Service Frequency Order.Click on Copy Expense Code to create a new visit frequency order for the same discipline. We are still creating visit frequency orders for the discipline of Skilled Nursing.
- 57 -
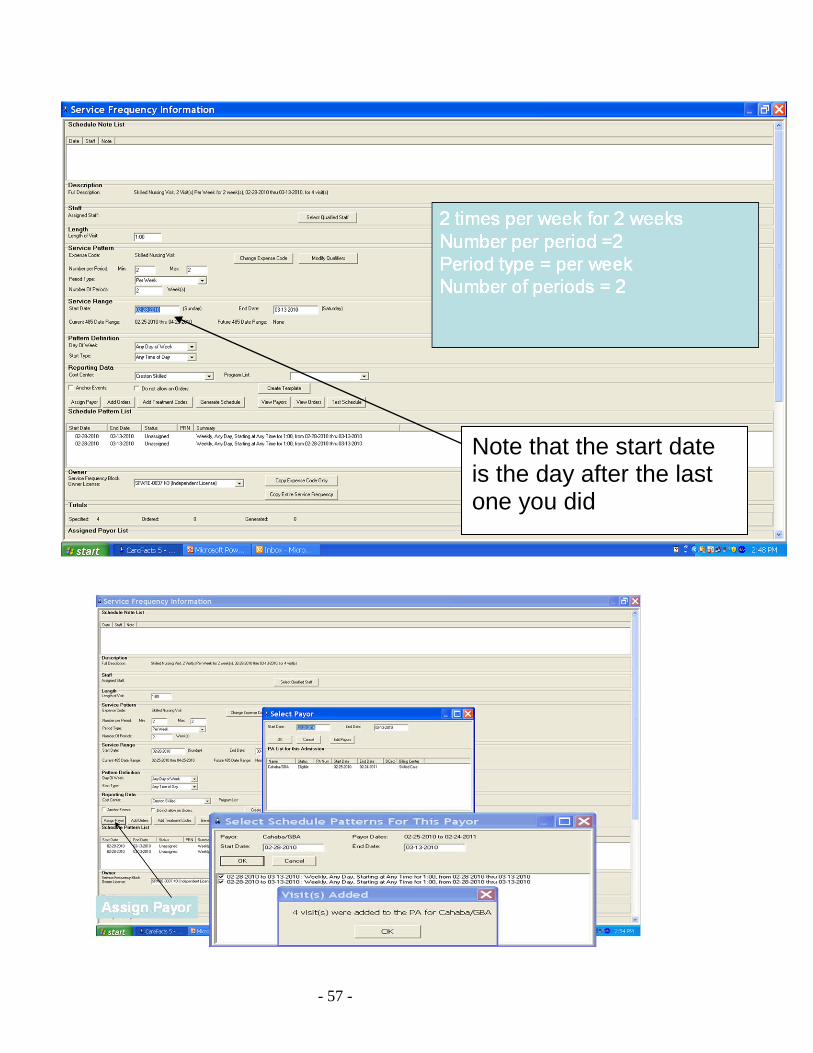
Note that the start date is the day after the last one you did
- 58 -
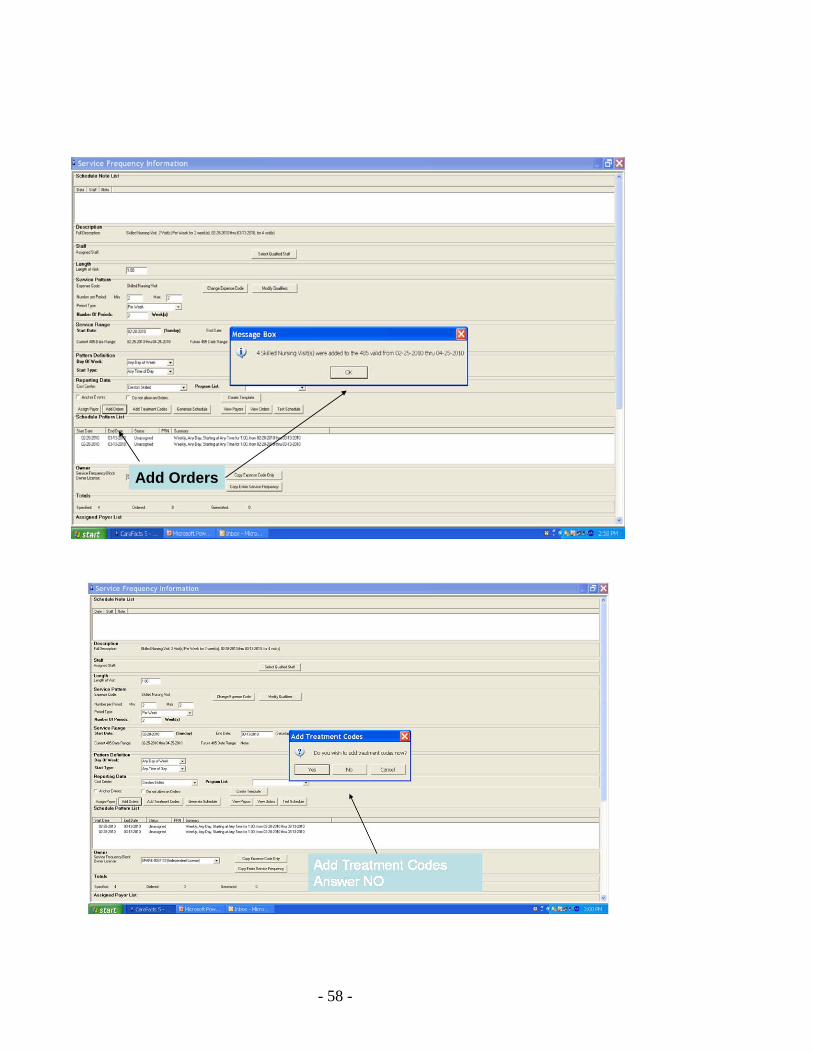
Add Orders
- 59 -
Generate Schedule
Now we are ready to enter the next Service Frequency Order.Click on Copy Expense Code to create a new service frequency order for the same discipline. We are still creating service frequency orders for the discipline of Skilled Nursing.
- 60 -
Check your workPayor assigned?Added to OrdersSchedule generated?
- 61 -
Assign Payor
Add Orders
- 62 -
Add Treatment CodesAnswer NO
Generate Schedule

- 63 -
Check your workPayor assigned?Added to OrdersSchedule generated?

- 64 -
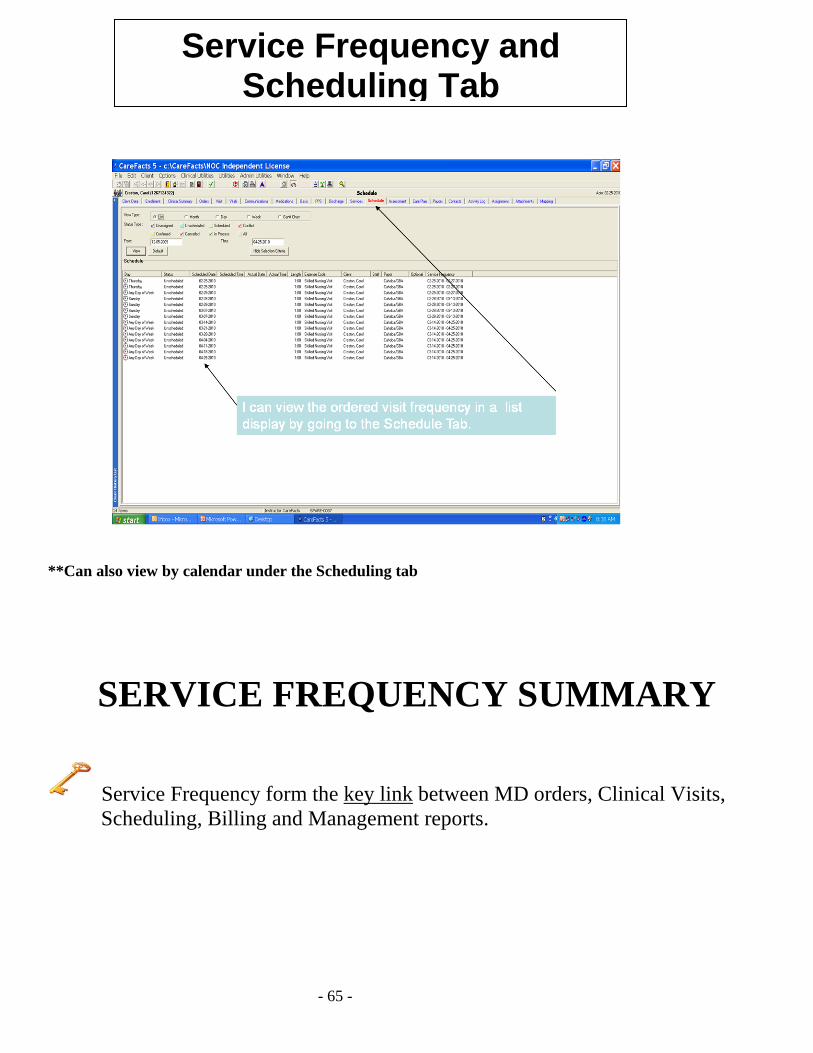
Service Frequency and the 485
• The ordered Visit Frequencies are now visible in box 21 of the 485
• SN 3xweek for 0 weeks and 3 days (short week)• SN 2xweek for 2 weeks• SN 1xweek for 6 weeks and 1 day ( remainder of cert )
Service Frequency and the 485
The Service Frequencies (Visit Frequencies) that we ordered are now visible on the 485
- 65 -
**Can also view by calendar under the Scheduling tab
SERVICE FREQUENCY SUMMARY
Service Frequency form the key link between MD orders, Clinical Visits, Scheduling, Billing and Management reports.
Service Frequency and Scheduling Tab
- 66 -
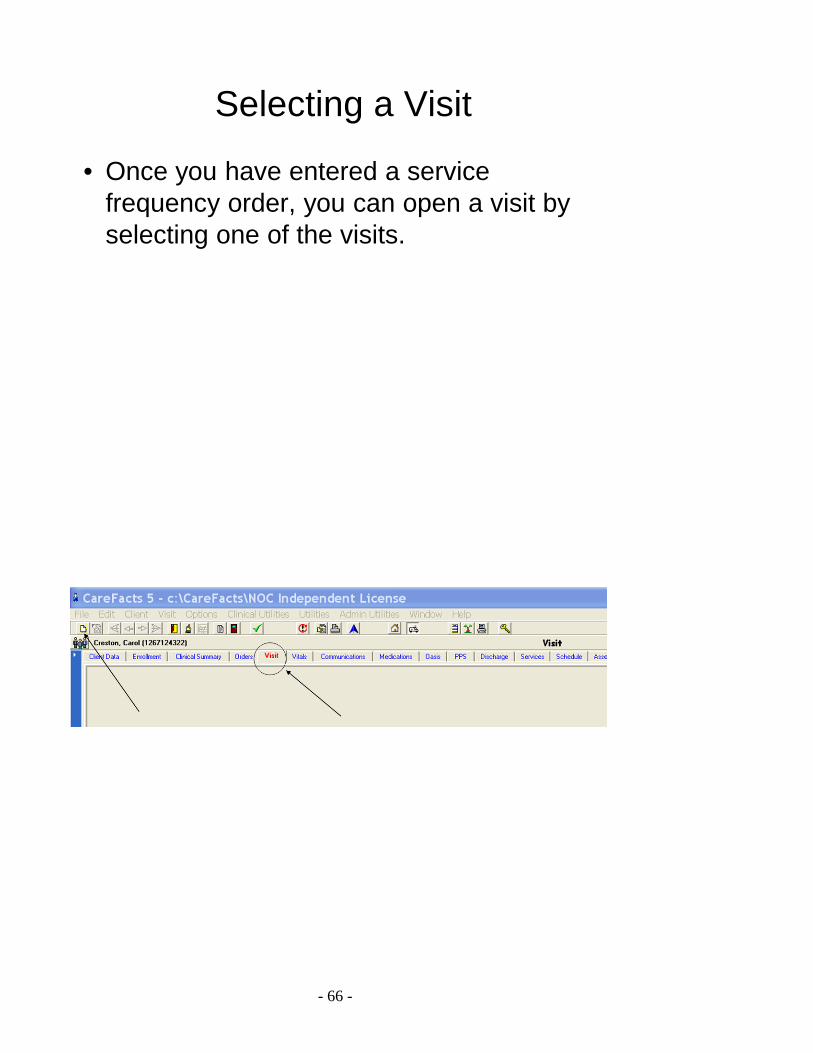
Selecting a Visit
• Once you have entered a service frequency order, you can open a visit by selecting one of the visits.
- 67 -
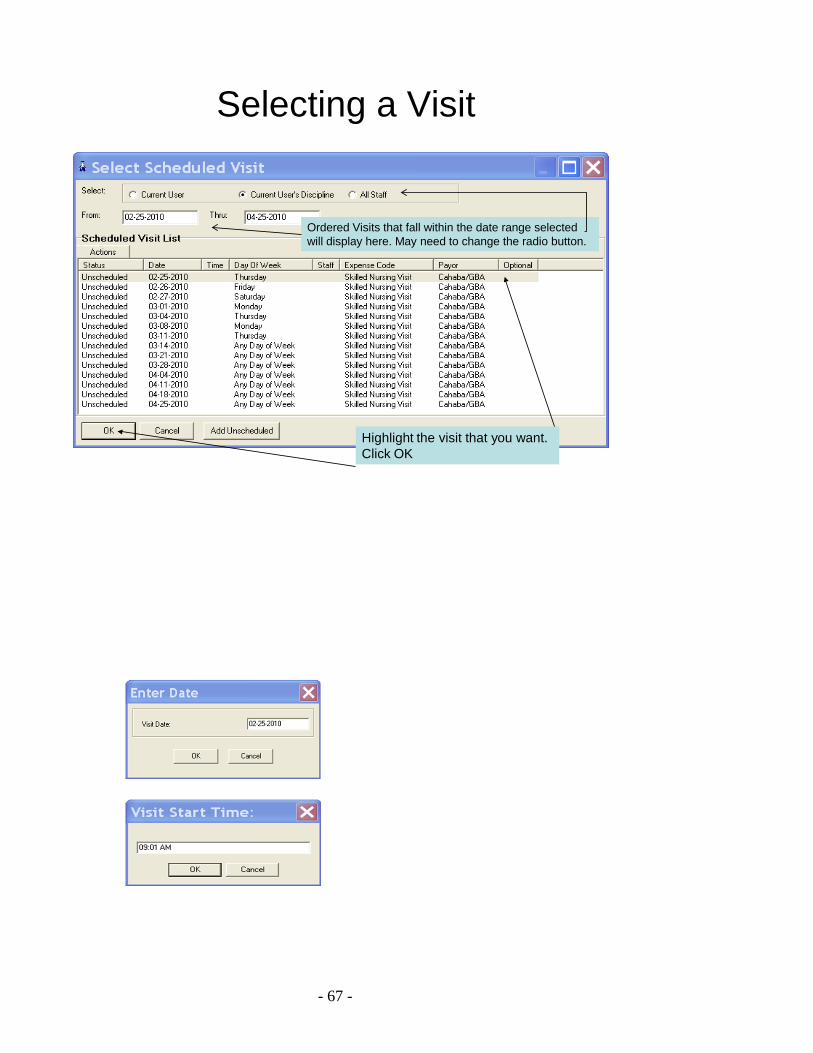
Selecting a Visit
Ordered Visits that fall within the date range selected will display here. May need to change the radio button.
Highlight the visit that you want.Click OK
- 68 -
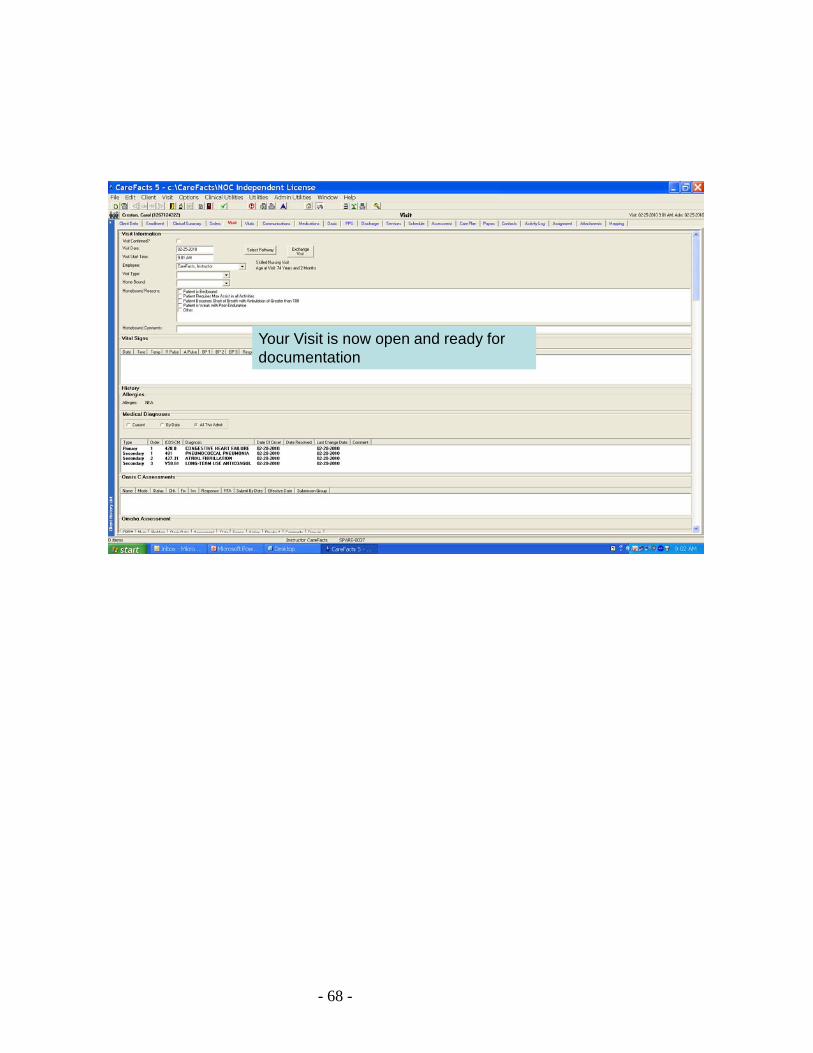
Your Visit is now open and ready for documentation
- 69 -
HOMEWORK
Watch two Service Frequency Tutorials: 1. Using Service Frequencies – 10 minutes 2. Short Weeks in Service Frequencies – 6 minutes
Navigate to CareFacts website:
1. www.carefacts.com 2. Overview of website 3. Download Service Frequency Tutorials
Set-Up client plan for frequency of visits:
1. SN 2x/wk x1 (short week) 2. SN 3x/wk to end of cert 3. HHA 2x/wk x1 (short week) 4. HHA 3x/wk to end of cert
To enter Service Frequencies in the cert (or IPO if telephone orders)
1. Click the ‘add services’ button 2. Calendar View will open and complete the Service Frequency
OR 3. Right Click| New in the services list 4. Double click on the Expense Code (type of visit) 5. The Service Frequency Information window will open
- 70 -
CareFacts Clinical TrainingSession III
Visit
Overview of the Visit TabDocumenting Vital Signs
Adding a Med (Basic)Documenting a Communication LogWhat does it mean to confirm a visit?
- 71 -
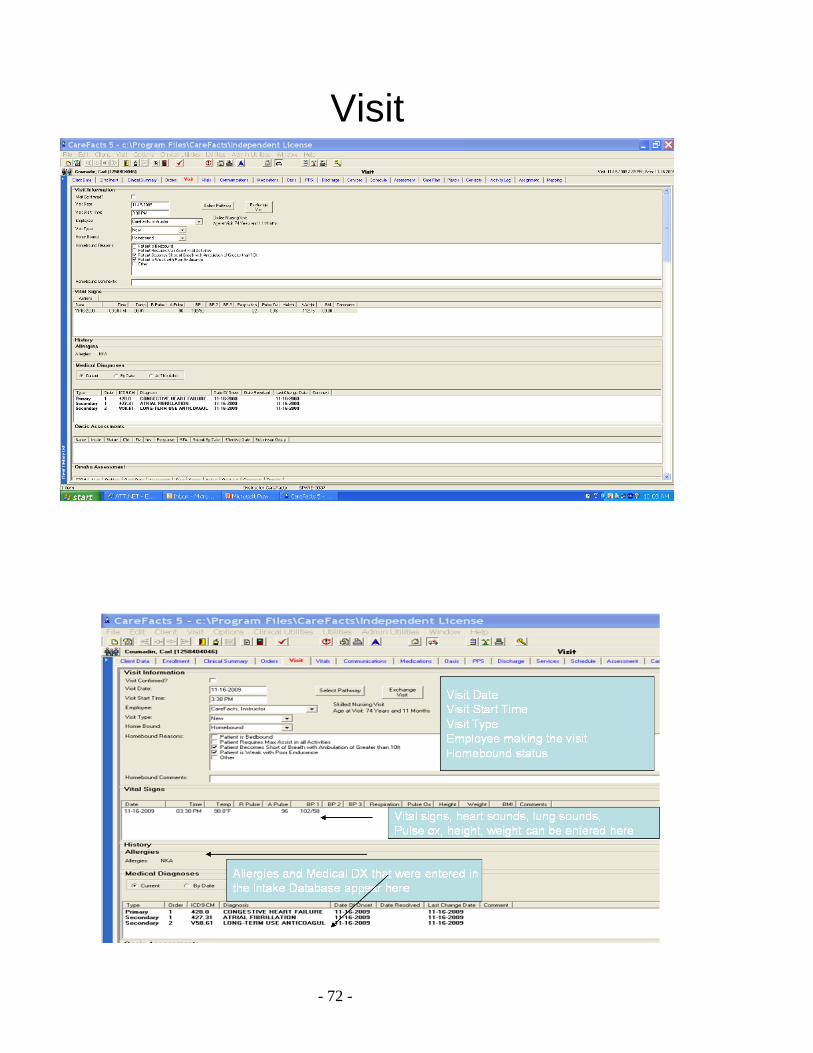
ORGANIZATION OF THE VISIT TAB
• Demographic data • Medical data
o Vital Signs o Diagnosis
• Assessments o OASIS o Omaha o Functional Status o Additional Assessments o Physical Exam o Labs
• Plan of Care • Orders • Medications & Procedures • Communication • Supervision • Billing and Time Card Information • Confirming – may be done at top or bottom of Visit tab
- 72 -
Visit
- 73 -
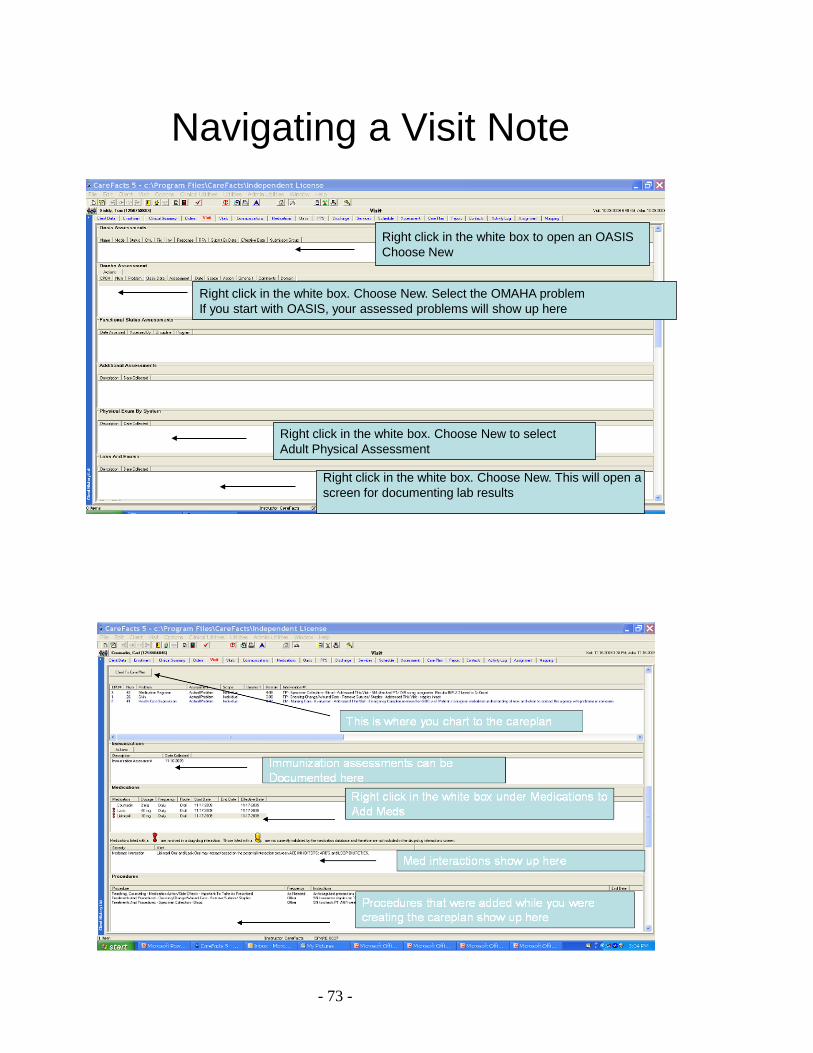
Navigating a Visit Note
Right click in the white box to open an OASISChoose New
Right click in the white box. Choose New. This will open a screen for documenting lab results
Right click in the white box. Choose New to select Adult Physical Assessment
Right click in the white box. Choose New. Select the OMAHA problem If you start with OASIS, your assessed problems will show up here
- 74 -
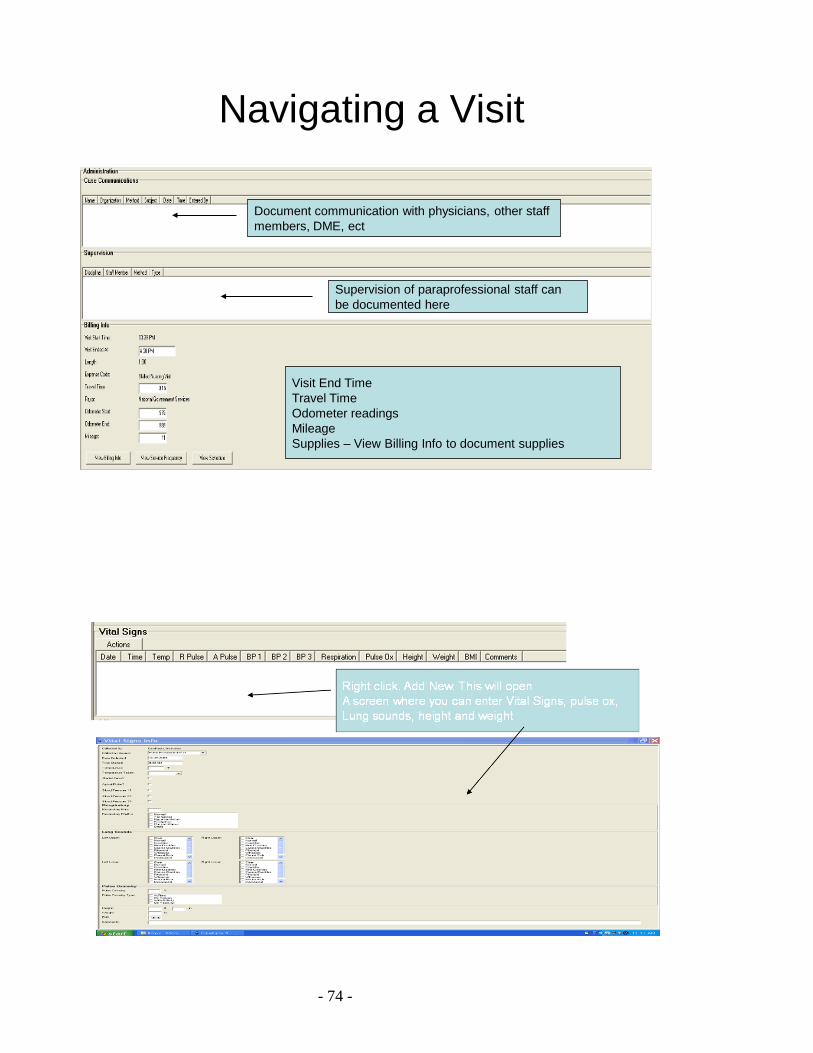
Navigating a Visit
Document communication with physicians, other staff members, DME, ect
Supervision of paraprofessional staff canbe documented here
Visit End TimeTravel TimeOdometer readingsMileageSupplies – View Billing Info to document supplies
- 75 -
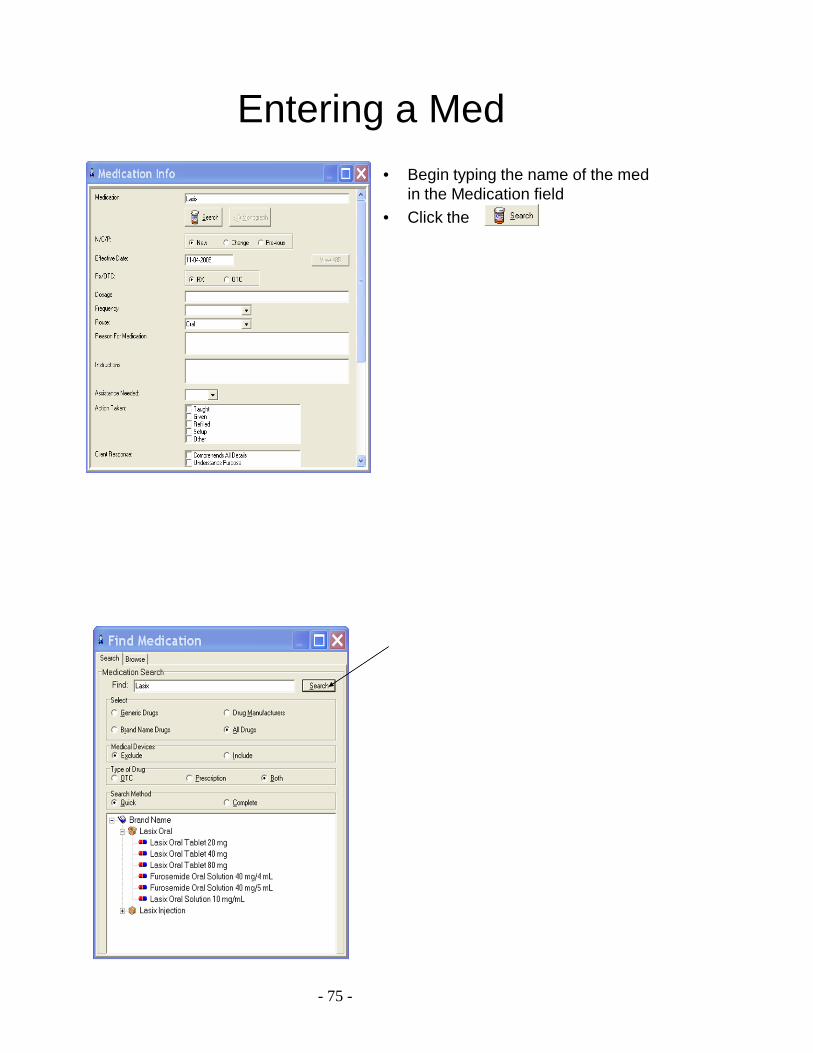
Entering a Med• Begin typing the name of the med
in the Medication field• Click the
- 76 -
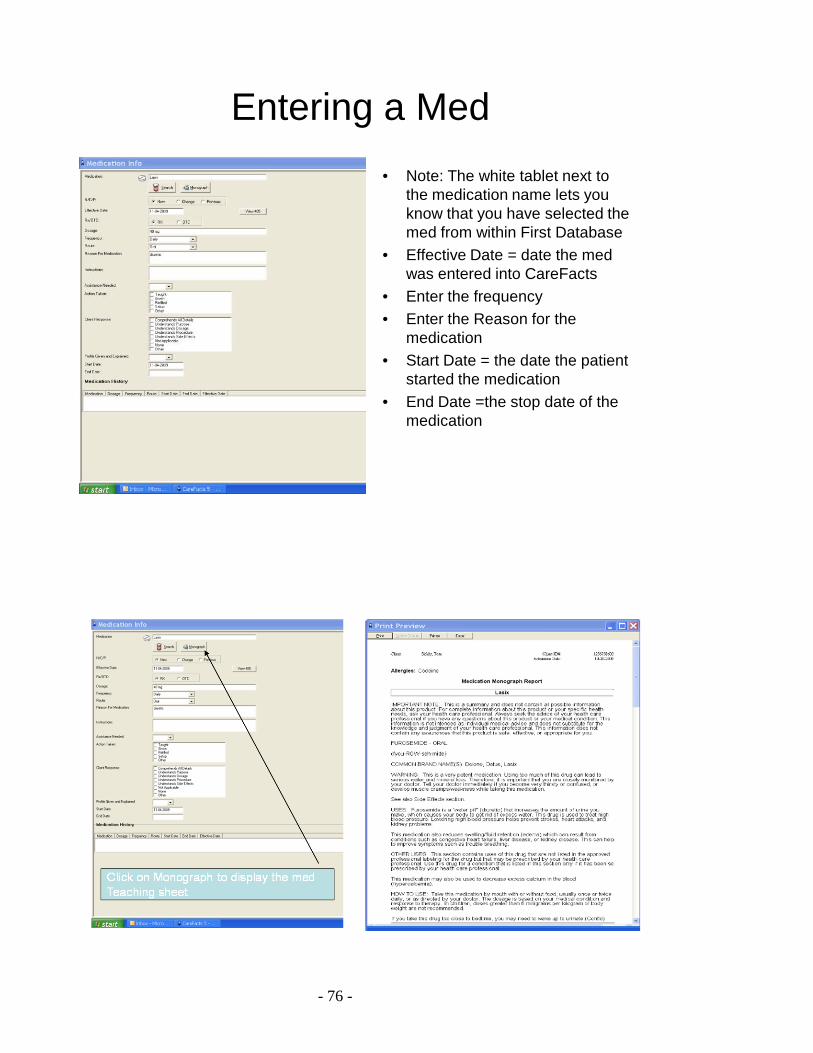
Entering a Med• Note: The white tablet next to
the medication name lets you know that you have selected the med from within First Database
• Effective Date = date the med was entered into CareFacts
• Enter the frequency• Enter the Reason for the
medication• Start Date = the date the patient
started the medication• End Date =the stop date of the
medication
- 77 -
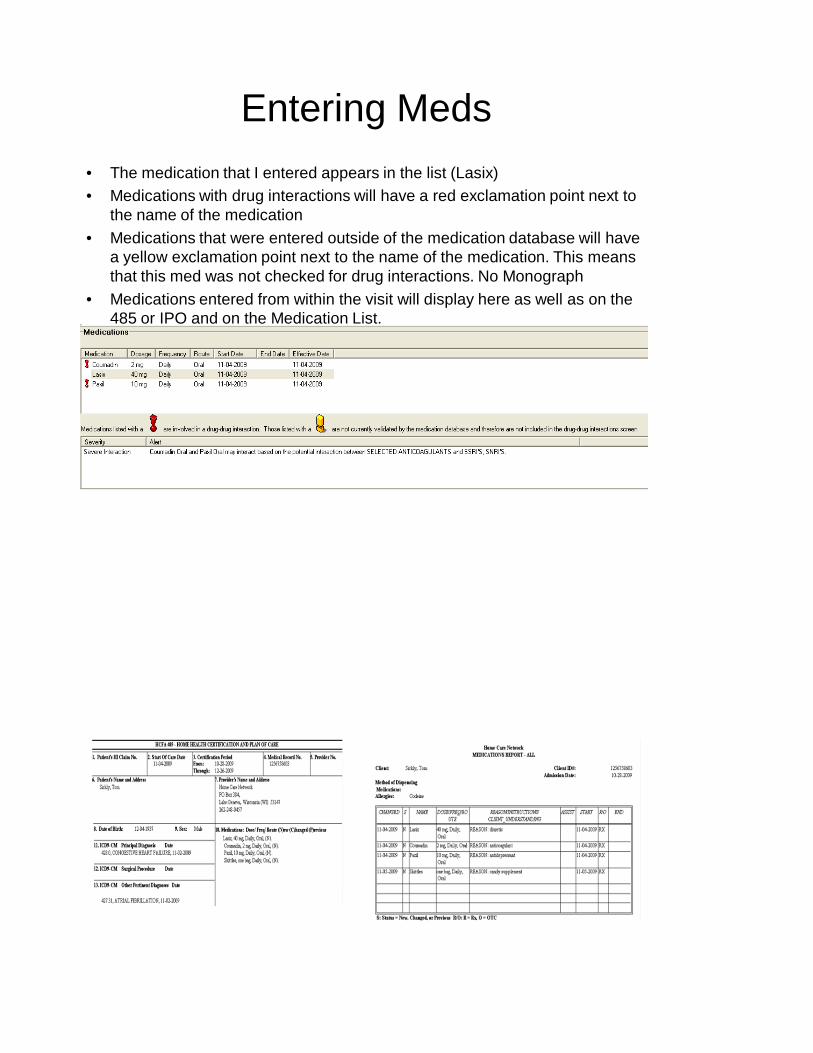
Entering Meds• The medication that I entered appears in the list (Lasix)• Medications with drug interactions will have a red exclamation point next to
the name of the medication• Medications that were entered outside of the medication database will have
a yellow exclamation point next to the name of the medication. This means that this med was not checked for drug interactions. No Monograph
• Medications entered from within the visit will display here as well as on the 485 or IPO and on the Medication List.
- 78 -
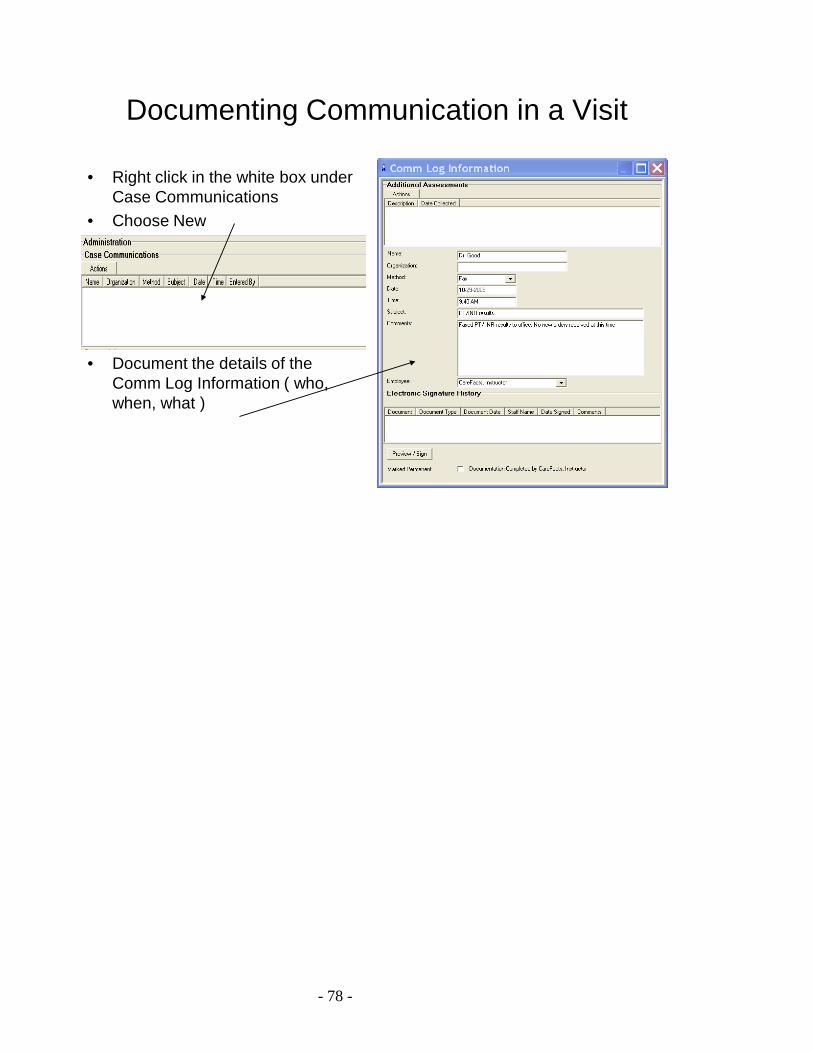
Documenting Communication in a Visit
• Right click in the white box under Case Communications
• Choose New
• Document the details of the Comm Log Information ( who, when, what )
- 79 -
Overview of OMAHAPurpose of OMAHAWhere is OMAHA?
ProblemsSigns and Symptoms
AssessmentScopeAction
KBS ratingsInterventions
ExamplesOMAHA/ Careplan/485
Where is Chart to Careplan?
- 80 -
Purpose of OMAHA
• Assists with documentation of a comprehensive assessment
• Provides a way to measure outcome ratings
• Creates the careplan for documentation of subsequent visits
• Allows interventions to be created and sent to orders
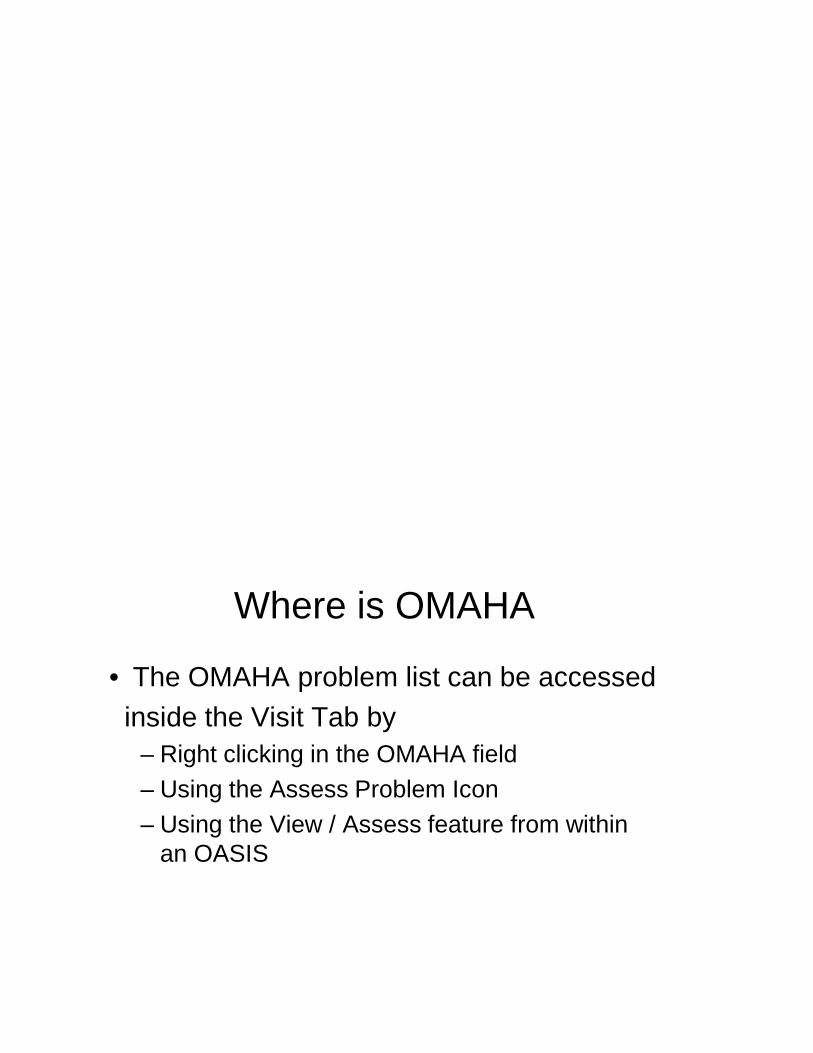
Where is OMAHA
• The OMAHA problem list can be accessedinside the Visit Tab by
– Right clicking in the OMAHA field– Using the Assess Problem Icon– Using the View / Assess feature from within
an OASIS
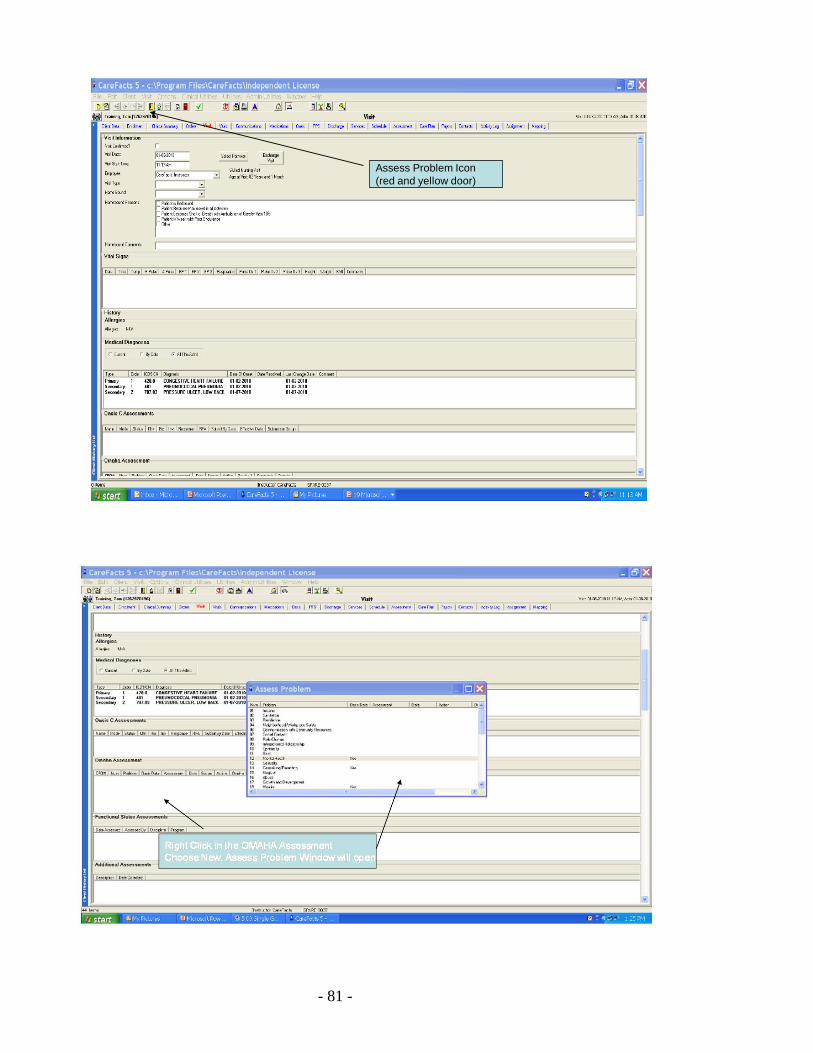
- 81 -
Assess Problem Icon(red and yellow door)
- 82 -
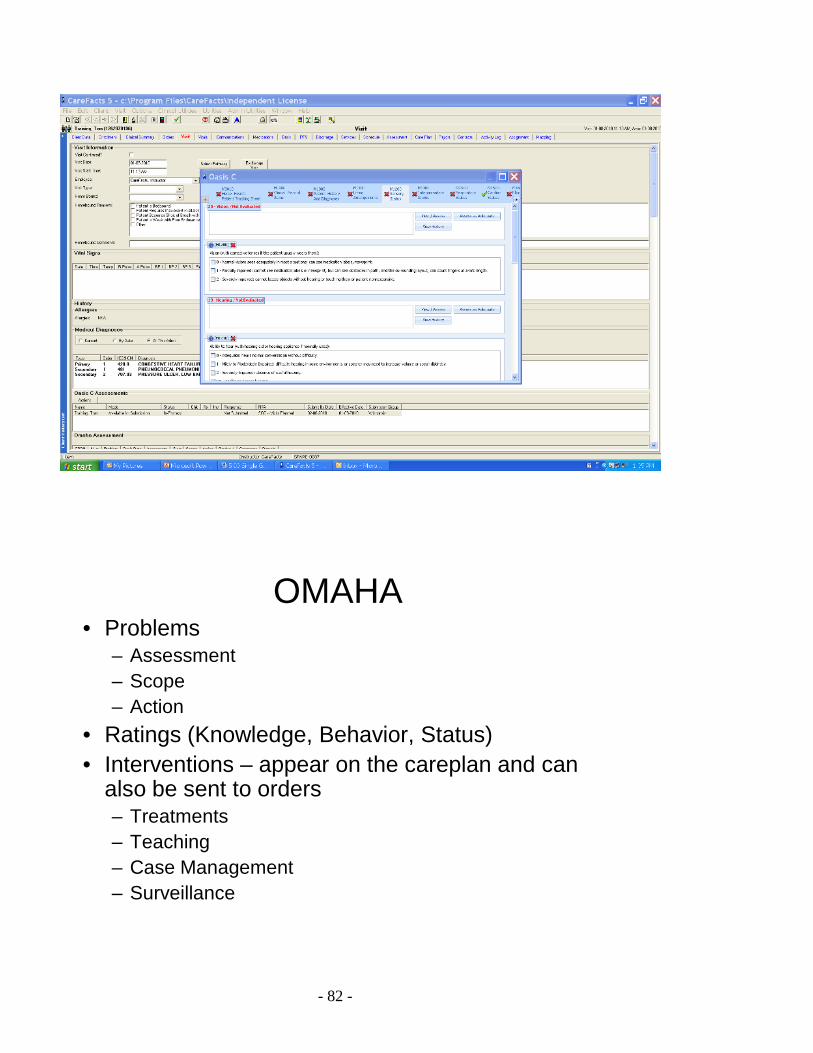
OMAHA• Problems
– Assessment– Scope– Action
• Ratings (Knowledge, Behavior, Status)• Interventions – appear on the careplan and can
also be sent to orders– Treatments– Teaching– Case Management– Surveillance
- 83 -
OMAHA (Assessment)
• Assessment– Actual = s/sx present– Adequate = no need to
address further– Potential = no active
symptoms but there is a potential for s/sx to develop
– Health promotion=no s/sx but teaching is needed
• Examples– Actual = pressure
ulcer present– Adequate = no hearing
impairments /hearing is adequate
– Potential =at risk for skin breakdown
– Health promotion = needs teaching r/t smoking cessation
OMAHA (SCOPE)
• Who does the problem belong to?– Individual– Family– Community

- 84 -
OMAHA (ACTION)
• What are you planning to do about the problem?– CarePlan Entry– Low priority– Self Care– Other Provider
- 85 -
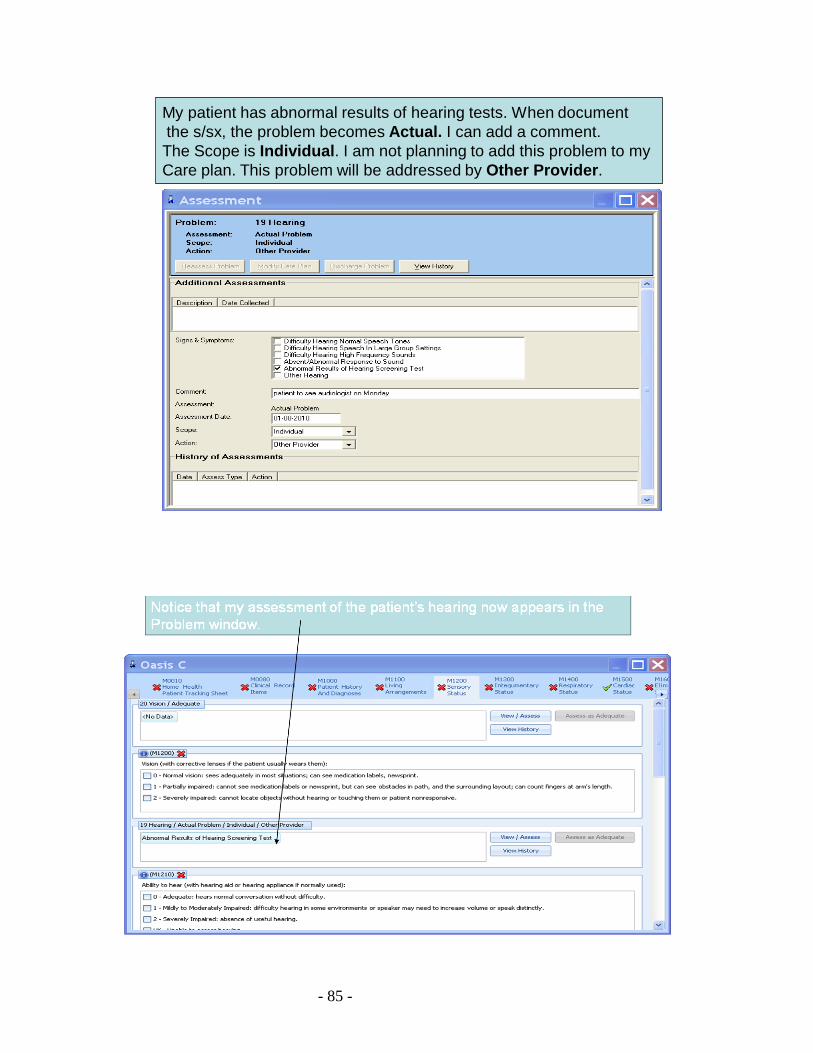
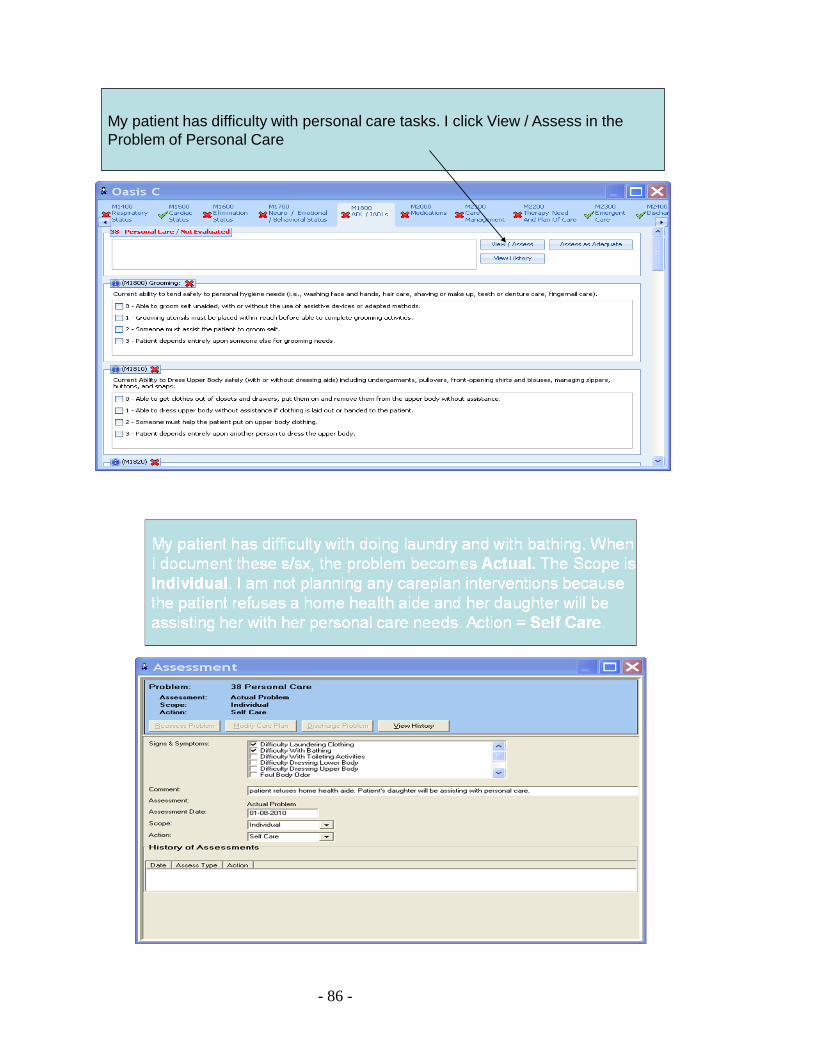
My patient has abnormal results of hearing tests. When document the s/sx, the problem becomes Actual. I can add a comment. The Scope is Individual. I am not planning to add this problem to my Care plan. This problem will be addressed by Other Provider.
- 86 -
My patient has difficulty with personal care tasks. I click View / Assess in theProblem of Personal Care
- 87 -
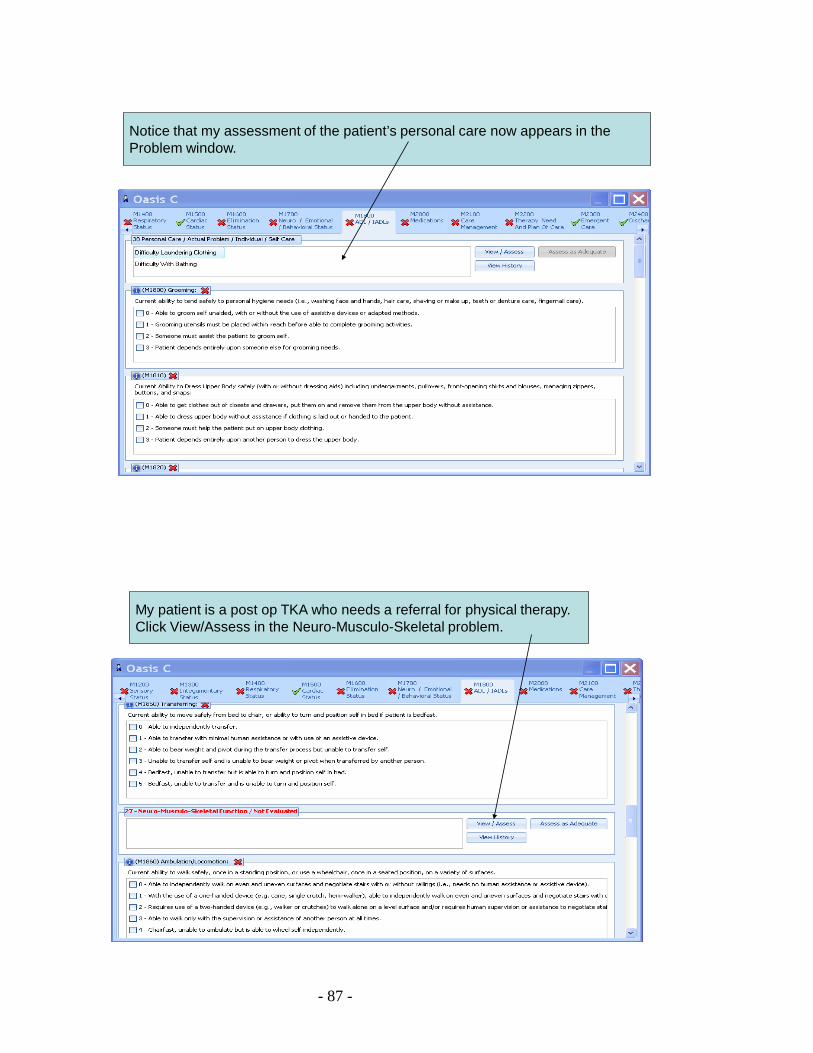
Notice that my assessment of the patient’s personal care now appears in the Problem window.
My patient is a post op TKA who needs a referral for physical therapy.Click View/Assess in the Neuro-Musculo-Skeletal problem.
- 88 -
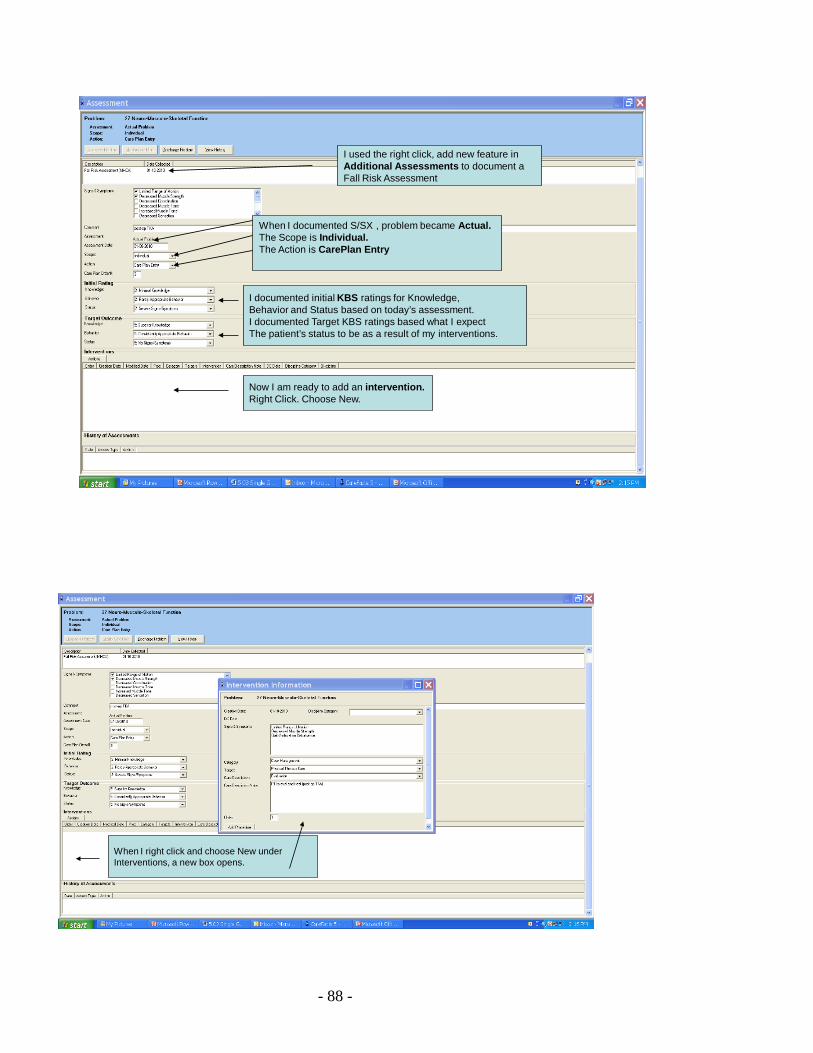
I used the right click, add new feature in Additional Assessments to document a Fall Risk Assessment
When I documented S/SX , problem became Actual.The Scope is Individual. The Action is CarePlan Entry
I documented initial KBS ratings for Knowledge, Behavior and Status based on today’s assessment.I documented Target KBS ratings based what I expectThe patient’s status to be as a result of my interventions.
Now I am ready to add an intervention.Right Click. Choose New.
When I right click and choose New under Interventions, a new box opens.
- 89 -
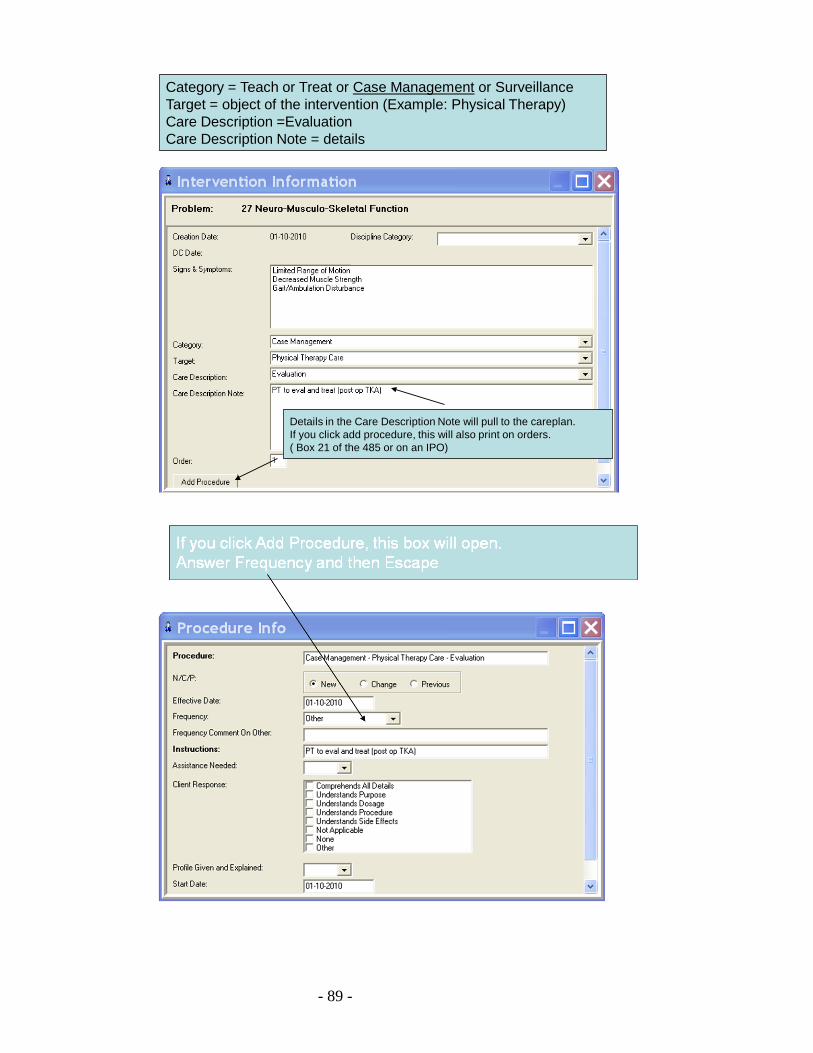
Category = Teach or Treat or Case Management or SurveillanceTarget = object of the intervention (Example: Physical Therapy)Care Description =EvaluationCare Description Note = details
Details in the Care Description Note will pull to the careplan.If you click add procedure, this will also print on orders.( Box 21 of the 485 or on an IPO)
- 90 -
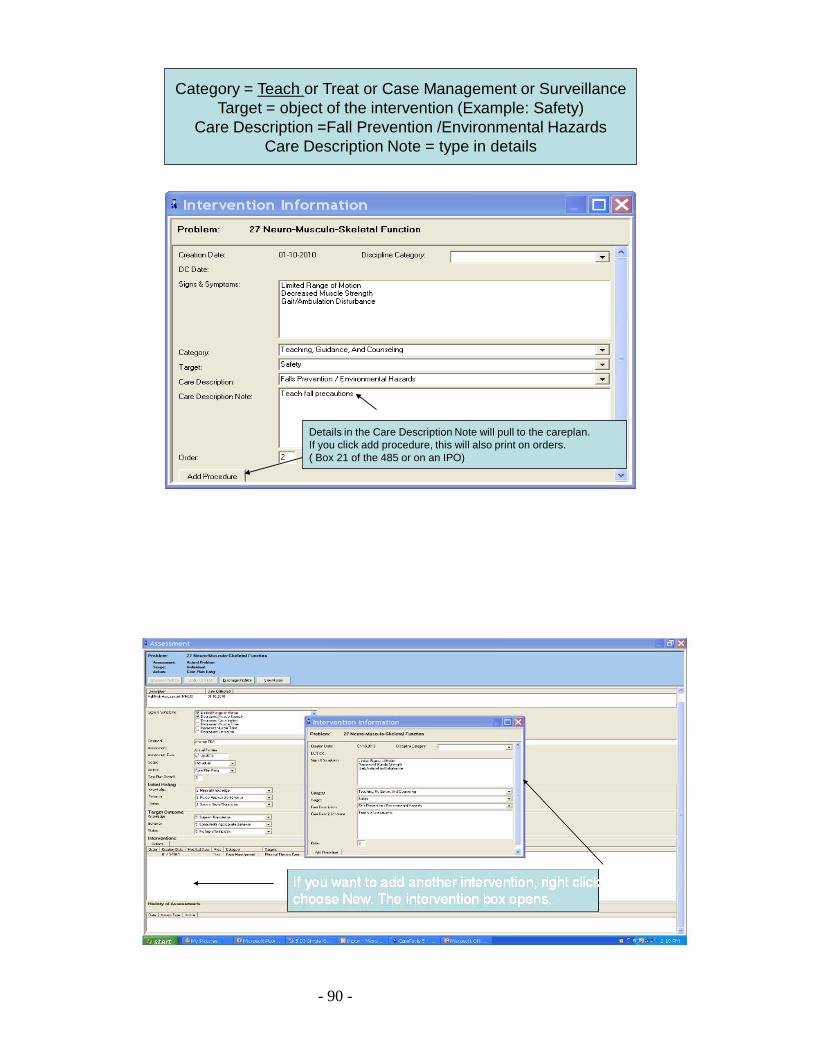
Category = Teach or Treat or Case Management or SurveillanceTarget = object of the intervention (Example: Safety)
Care Description =Fall Prevention /Environmental HazardsCare Description Note = type in details
Details in the Care Description Note will pull to the careplan.If you click add procedure, this will also print on orders.( Box 21 of the 485 or on an IPO)
- 91 -
Intervention/ Care Plan /485
• Pulls to CarePlan and to Box 21 of the 485
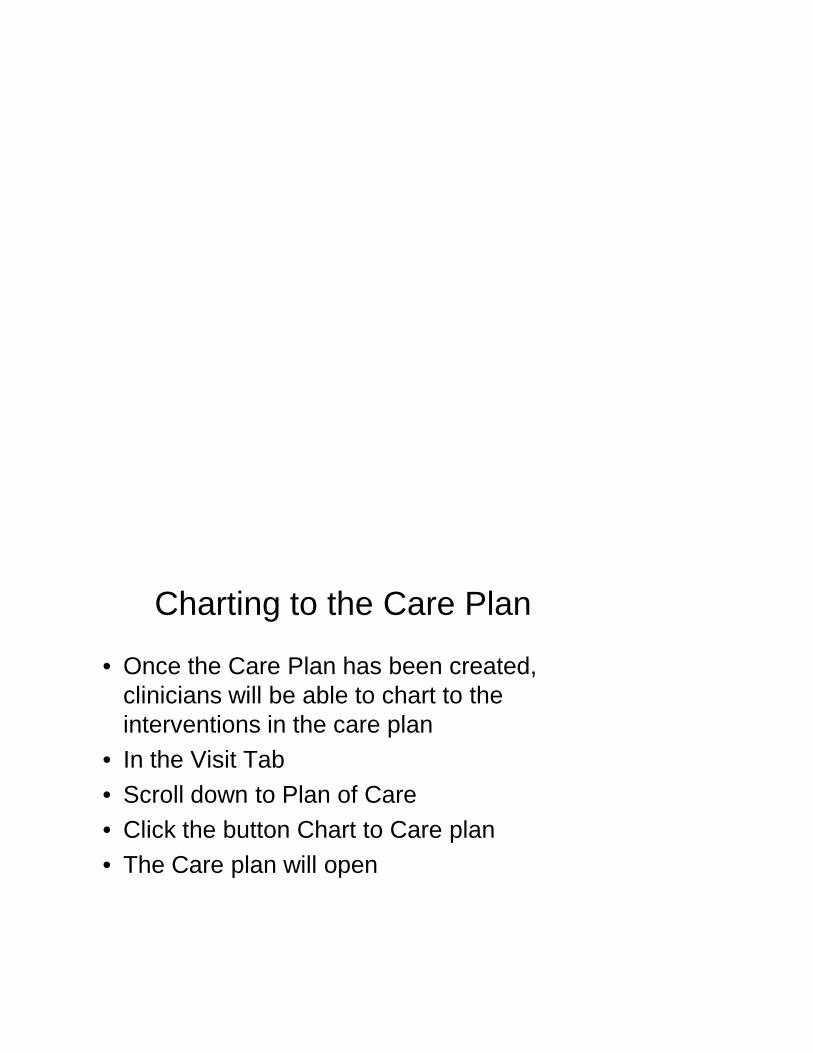
Charting to the Care Plan
• Once the Care Plan has been created, clinicians will be able to chart to the interventions in the care plan
• In the Visit Tab• Scroll down to Plan of Care• Click the button Chart to Care plan• The Care plan will open

- 92 -
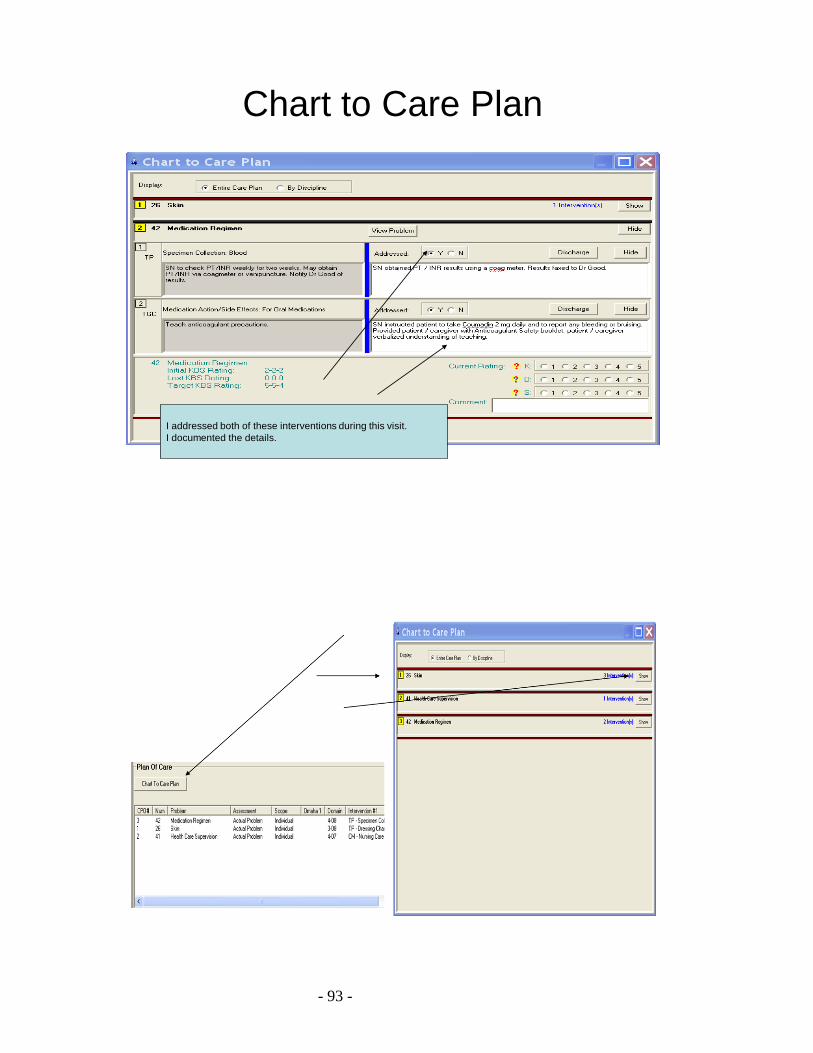
Chart to CarePlan
Click Chart to Care Plan and the Chart to Care Plan window opensClick SHOW to see the interventions under each problem
- 93 -
Chart to Care Plan
I addressed both of these interventions during this visit.I documented the details.

- 94 -
Charting to the CarePlan
• Addressed = Y• Type details in the white box
• Interventions addressed during this visit will print to the Visit Report ( Visit Note )
Updating the Care Plan
• Reassess the Problem– Change in symptoms– Change in assessment status– Change in action– Reassessment at Recert or ROC
• Modify the Care Plan– Adding or changing or discharging interventions
• Discharging the Problem– Removes the entire problem from the Care Plan

- 95 -
My initial assessment was that Sanitation was a Potential problem.Now I see insects and rodents and I want to reassess anddocument this as an Actual problem.Double click on the problem of Sanitation.
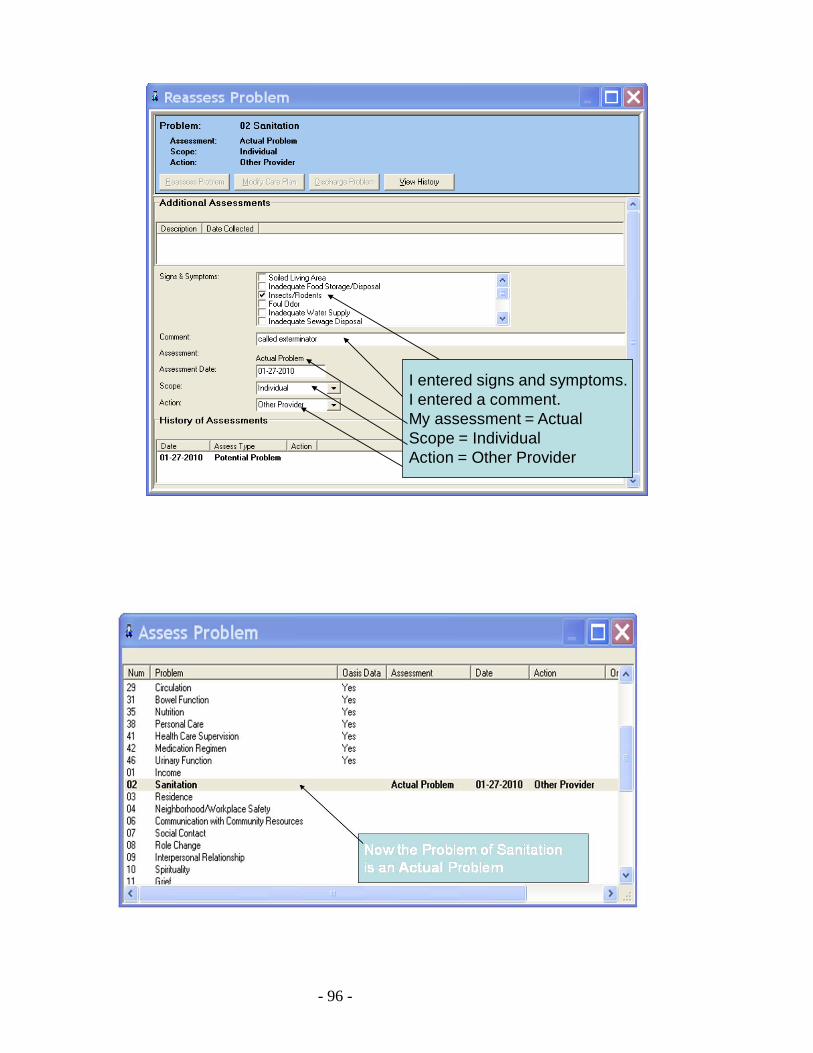
- 96 -
I entered signs and symptoms.I entered a comment.My assessment = ActualScope = IndividualAction = Other Provider
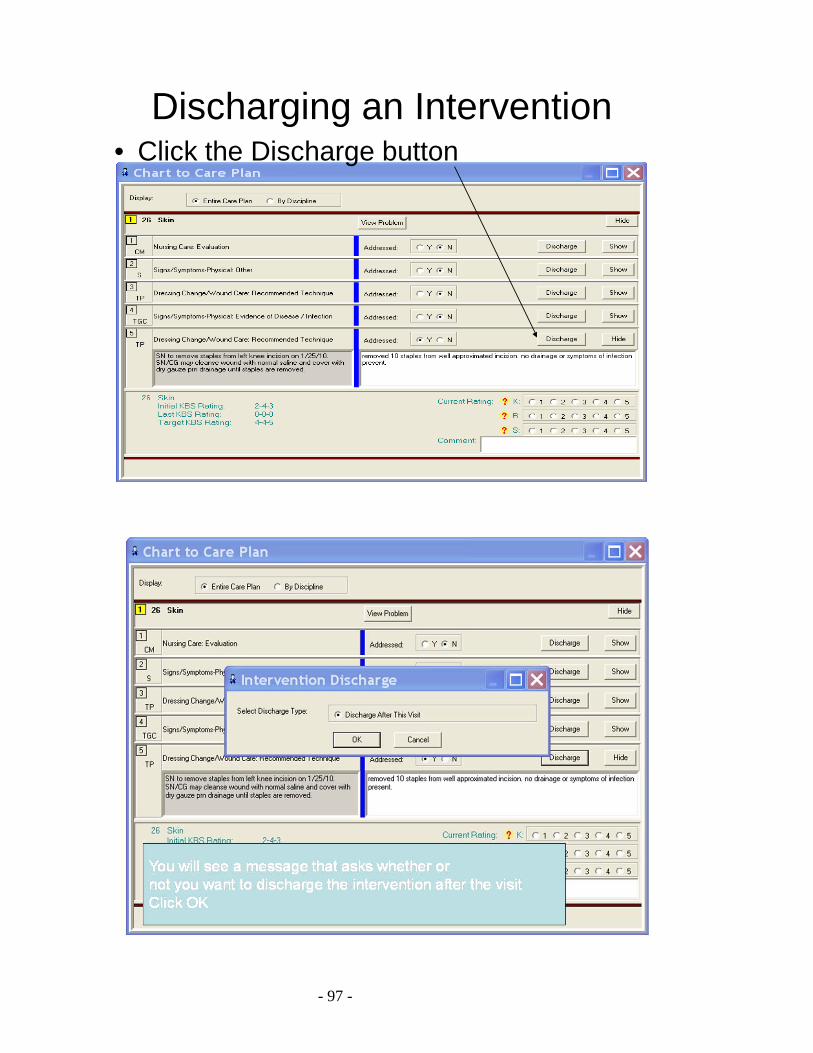
- 97 -
Discharging an Intervention• Click the Discharge button
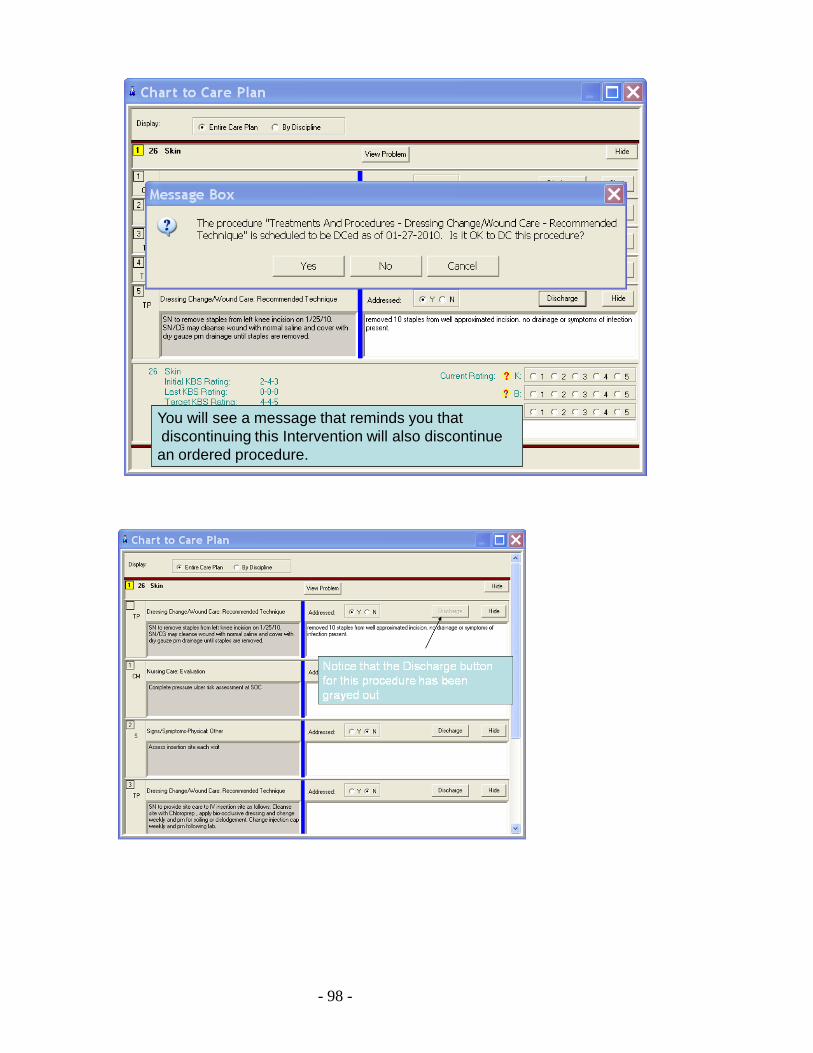
- 98 -
You will see a message that reminds you that discontinuing this Intervention will also discontinuean ordered procedure.

- 99 -
- 100 -
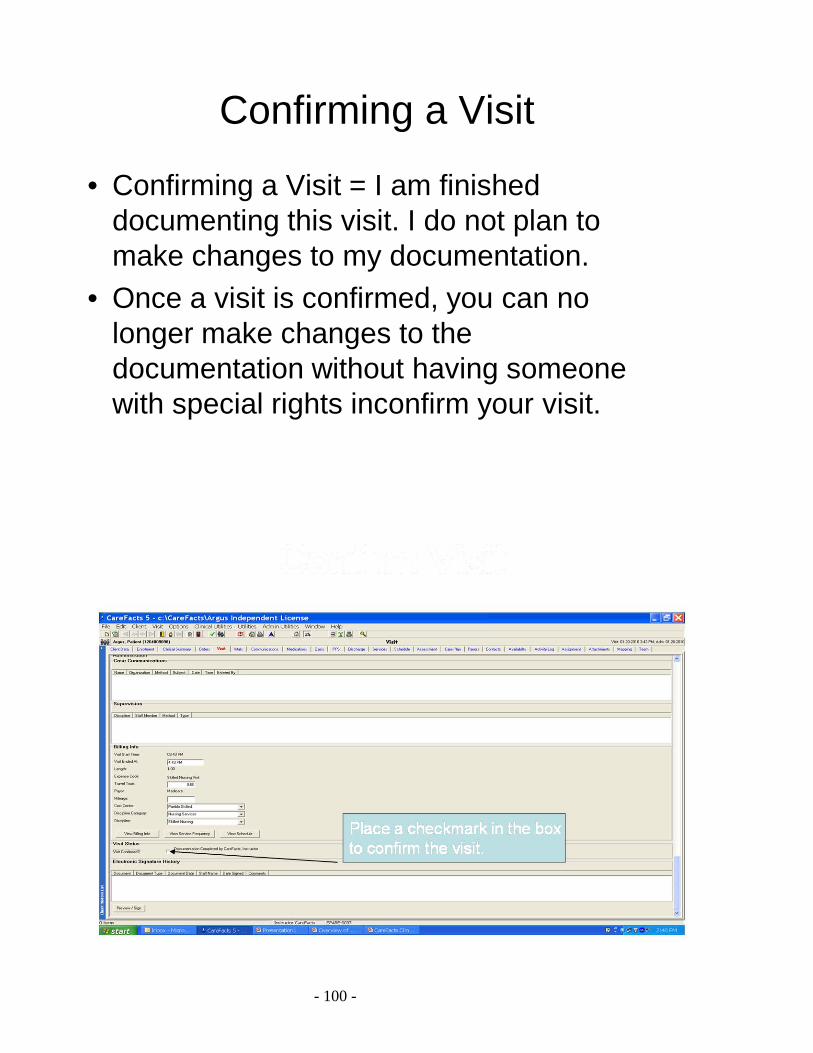
Confirming a Visit
• Confirming a Visit = I am finished documenting this visit. I do not plan to make changes to my documentation.
• Once a visit is confirmed, you can no longer make changes to the documentation without having someone with special rights inconfirm your visit.
- 101 -
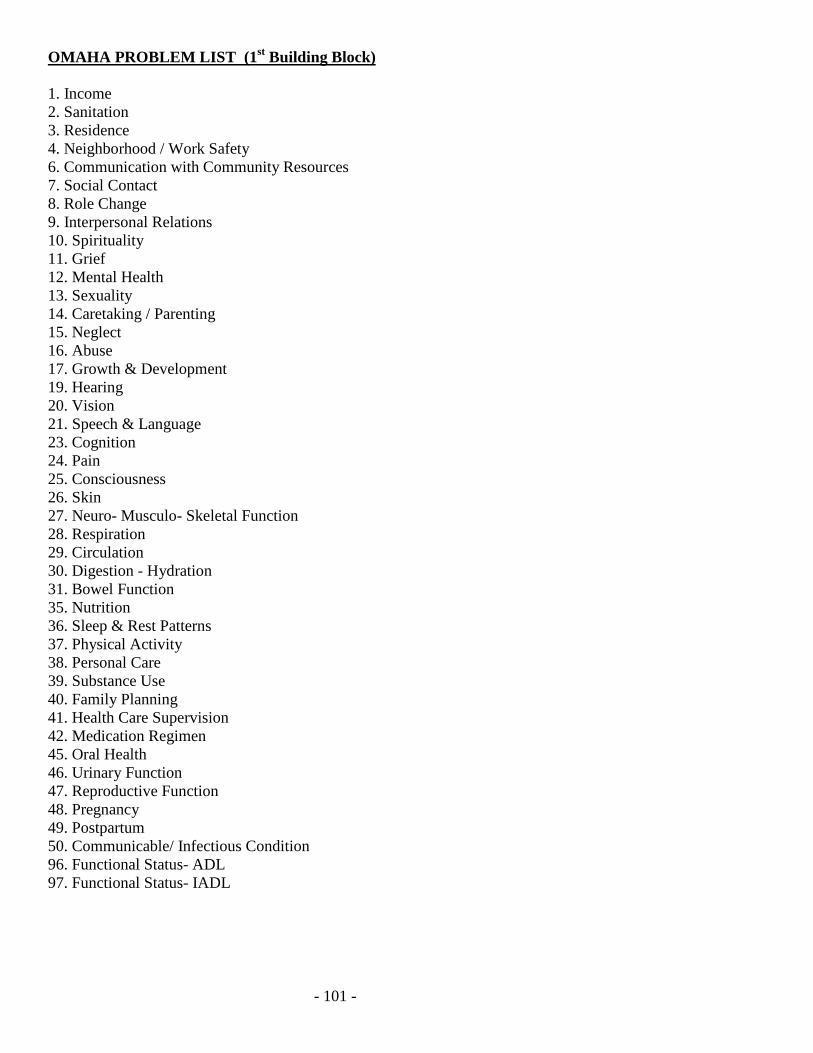
OMAHA PROBLEM LIST (1st Building Block) 1. Income 2. Sanitation 3. Residence 4. Neighborhood / Work Safety 6. Communication with Community Resources 7. Social Contact 8. Role Change 9. Interpersonal Relations 10. Spirituality 11. Grief 12. Mental Health 13. Sexuality 14. Caretaking / Parenting 15. Neglect 16. Abuse 17. Growth & Development 19. Hearing 20. Vision 21. Speech & Language 23. Cognition 24. Pain 25. Consciousness 26. Skin 27. Neuro- Musculo- Skeletal Function 28. Respiration 29. Circulation 30. Digestion - Hydration 31. Bowel Function 35. Nutrition 36. Sleep & Rest Patterns 37. Physical Activity 38. Personal Care 39. Substance Use 40. Family Planning 41. Health Care Supervision 42. Medication Regimen 45. Oral Health 46. Urinary Function 47. Reproductive Function 48. Pregnancy 49. Postpartum 50. Communicable/ Infectious Condition 96. Functional Status- ADL 97. Functional Status- IADL
- 102 -
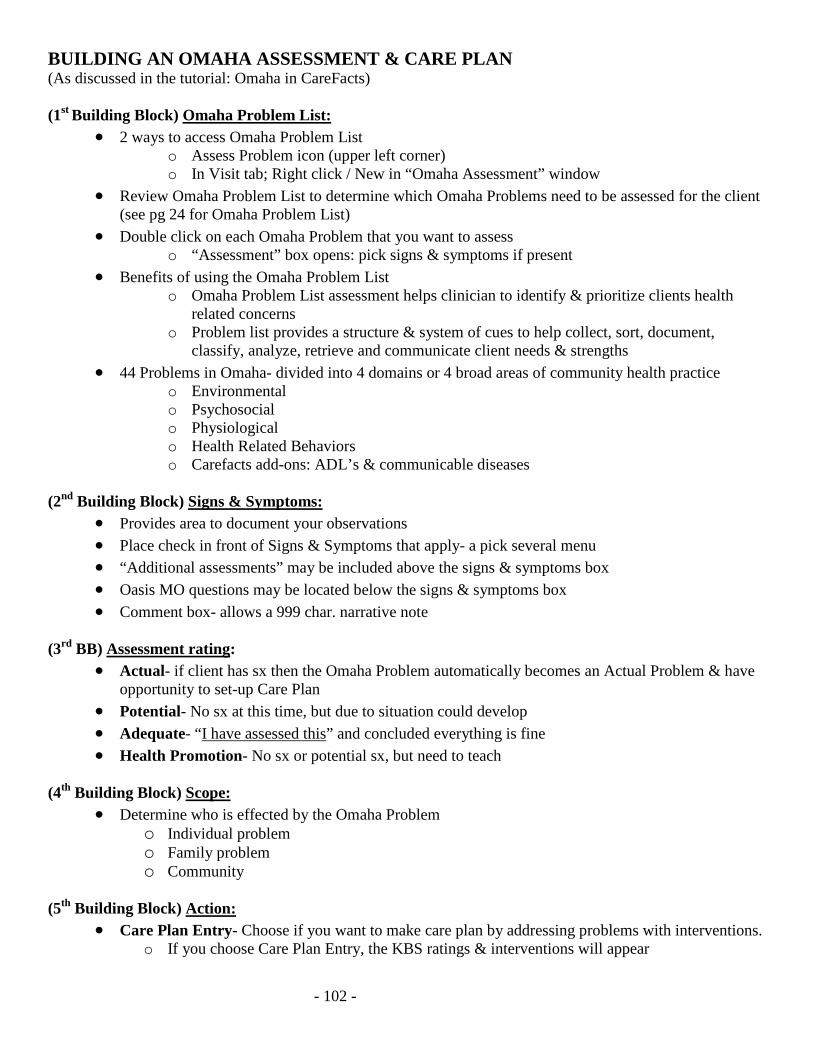
BUILDING AN OMAHA ASSESSMENT & CARE PLAN (As discussed in the tutorial: Omaha in CareFacts) (1st Building Block) Omaha Problem List:
• 2 ways to access Omaha Problem List o Assess Problem icon (upper left corner) o In Visit tab; Right click / New in “Omaha Assessment” window
• Review Omaha Problem List to determine which Omaha Problems need to be assessed for the client (see pg 24 for Omaha Problem List)
• Double click on each Omaha Problem that you want to assess o “Assessment” box opens: pick signs & symptoms if present
• Benefits of using the Omaha Problem List o Omaha Problem List assessment helps clinician to identify & prioritize clients health
related concerns o Problem list provides a structure & system of cues to help collect, sort, document,
classify, analyze, retrieve and communicate client needs & strengths • 44 Problems in Omaha- divided into 4 domains or 4 broad areas of community health practice
o Environmental o Psychosocial o Physiological o Health Related Behaviors o Carefacts add-ons: ADL’s & communicable diseases
(2nd Building Block) Signs & Symptoms:
• Provides area to document your observations • Place check in front of Signs & Symptoms that apply- a pick several menu • “Additional assessments” may be included above the signs & symptoms box • Oasis MO questions may be located below the signs & symptoms box • Comment box- allows a 999 char. narrative note
(3rd BB) Assessment rating: • Actual- if client has sx then the Omaha Problem automatically becomes an Actual Problem & have
opportunity to set-up Care Plan • Potential- No sx at this time, but due to situation could develop • Adequate- “I have assessed this” and concluded everything is fine • Health Promotion- No sx or potential sx, but need to teach
(4th Building Block) Scope: • Determine who is effected by the Omaha Problem
o Individual problem o Family problem o Community
(5th Building Block) Action:
• Care Plan Entry- Choose if you want to make care plan by addressing problems with interventions. o If you choose Care Plan Entry, the KBS ratings & interventions will appear
- 103 -
• Low Priority- You have acknowledged the presence of S&S but will not be addressing the problems with a careplan or interventions. No careplan needed.
• Self Care- Problem, but patient/family taking care of it. No careplan needed. • Other Provider- other healthcare provider dealing with it. No careplan needed.
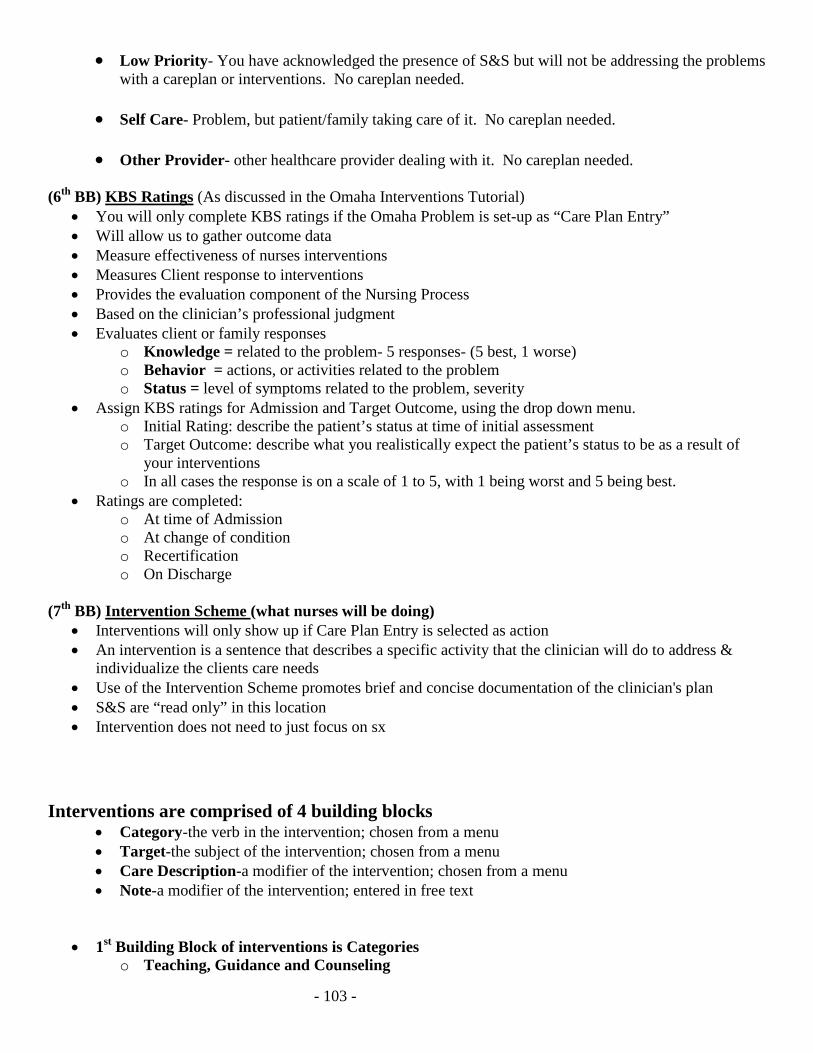
(6th BB) KBS Ratings (As discussed in the Omaha Interventions Tutorial)
• You will only complete KBS ratings if the Omaha Problem is set-up as “Care Plan Entry” • Will allow us to gather outcome data • Measure effectiveness of nurses interventions • Measures Client response to interventions • Provides the evaluation component of the Nursing Process • Based on the clinician’s professional judgment • Evaluates client or family responses
o Knowledge = related to the problem- 5 responses- (5 best, 1 worse) o Behavior = actions, or activities related to the problem o Status = level of symptoms related to the problem, severity
• Assign KBS ratings for Admission and Target Outcome, using the drop down menu. o Initial Rating: describe the patient’s status at time of initial assessment o Target Outcome: describe what you realistically expect the patient’s status to be as a result of
your interventions o In all cases the response is on a scale of 1 to 5, with 1 being worst and 5 being best.
• Ratings are completed: o At time of Admission o At change of condition o Recertification o On Discharge
(7th BB) Intervention Scheme (what nurses will be doing)
• Interventions will only show up if Care Plan Entry is selected as action • An intervention is a sentence that describes a specific activity that the clinician will do to address &
individualize the clients care needs • Use of the Intervention Scheme promotes brief and concise documentation of the clinician's plan • S&S are “read only” in this location • Intervention does not need to just focus on sx
Interventions are comprised of 4 building blocks
• Category-the verb in the intervention; chosen from a menu • Target-the subject of the intervention; chosen from a menu • Care Description-a modifier of the intervention; chosen from a menu • Note-a modifier of the intervention; entered in free text
• 1st Building Block of interventions is Categories
o Teaching, Guidance and Counseling
- 104 -
This reflects clinician activities that include giving information, providing assistance with decision making and problem solving.
o Treatment and Procedures These are the technical clinician activities directed toward preventing or alleviating signs
and symptoms o Case management
Includes clinician activities of coordinating, advocating and referring o Surveillance
Includes clinician activities of detecting, monitoring and critical analysis to determine client status in relation to identified problems
o These 4 categories can be thought of as: Teaching Treating Managing Monitoring
• 2nd Building Block of interventions is Target
o There are 77 Targets used to support a standardized approach to describing the interventions. These help describe the details of your planned Interventions.
o You see only those relevant to this problem, category unless you choose “Other” then all 77 are available
• 3rd Building Block of interventions is Care Description (Adjectives, modifiers)
o Only those relevant to this problem, category & target show up o menus provide standard language based on the combination of problem, category and target
previously selected o No additional choices except “other”
• 4th Building Block of interventions is Note
o allows the clinician to provide client specific information and details of the intervention o keep short, helpful for next nurse o When & what to do at next visit o Free form field to further explain care descriptor
LET’S WORK WITH OMAHA IN CAREFACTS
Brief introduction into opening visits: Most of the time you will open Scheduled Visits that have been created as part of the clients plan of care (frequency and duration). Today we are using an Add-Once Visit for the purpose of learning how to complete a

- 105 -
comprehensive integrated assessment. Generally, Add-Once should only be used in an emergency, or as directed by your agency policy. We will use the Add Once feature today for demonstration purpose only.
- 106 -
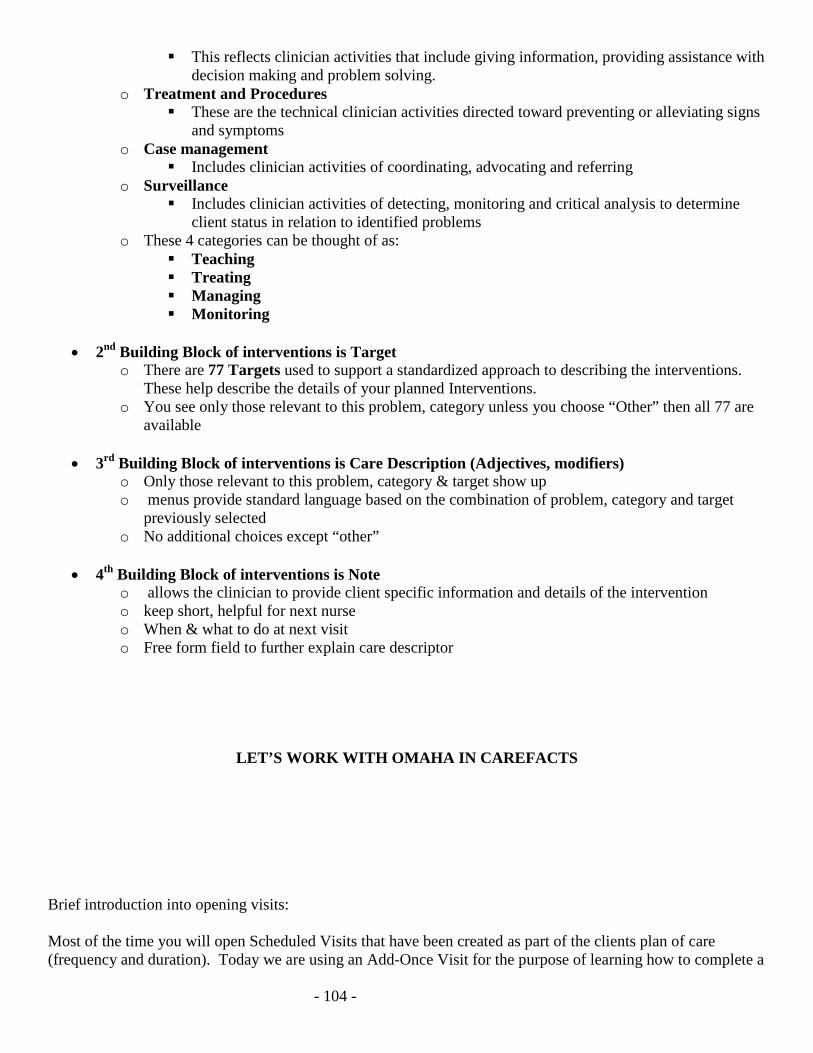
Doing an Omaha Assessment in CareFacts • In Carefacts there are 2 tabs that allow access to the Omaha System.
1. Visit tab – preferred 2. Assessment tab - use for a quick look and special situations; assessments documented there will
NOT flow to the visit. 2 Ways to access the Omaha Assess Problem List (1st Building Block)
• Assess Problem Icon; or • Right Click |New in Omaha window of visit
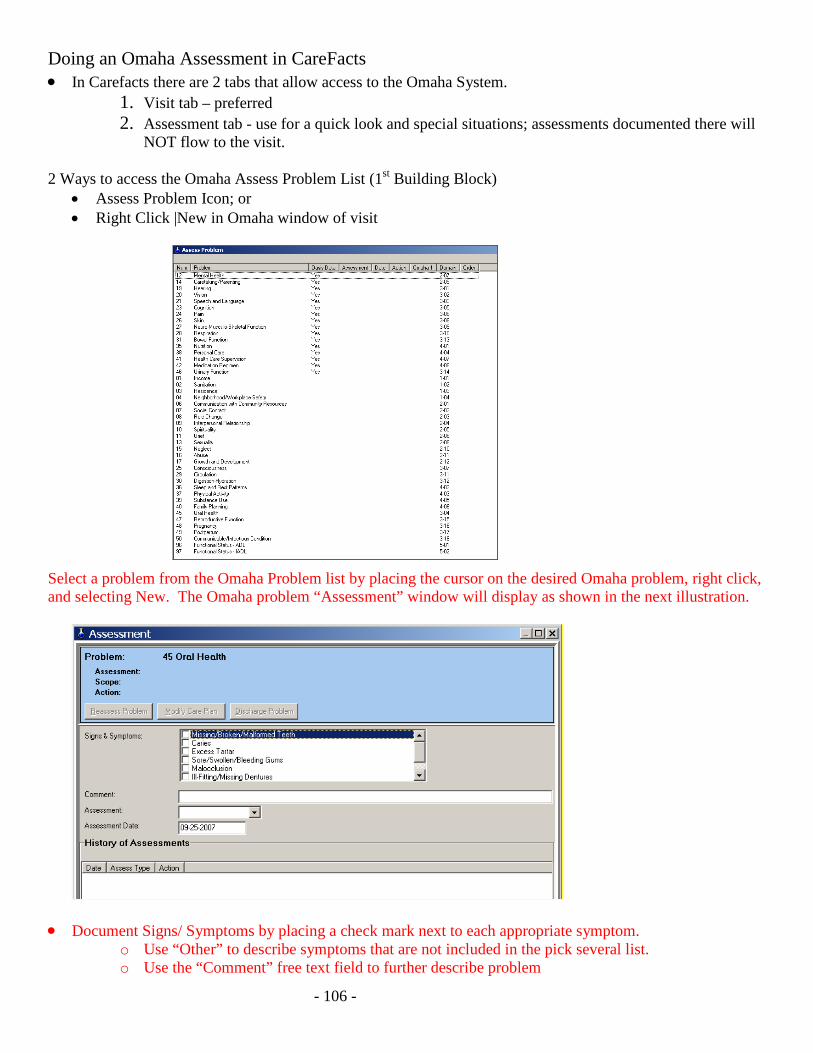
Select a problem from the Omaha Problem list by placing the cursor on the desired Omaha problem, right click, and selecting New. The Omaha problem “Assessment” window will display as shown in the next illustration.
• Document Signs/ Symptoms by placing a check mark next to each appropriate symptom.
o Use “Other” to describe symptoms that are not included in the pick several list. o Use the “Comment” free text field to further describe problem
- 107 -
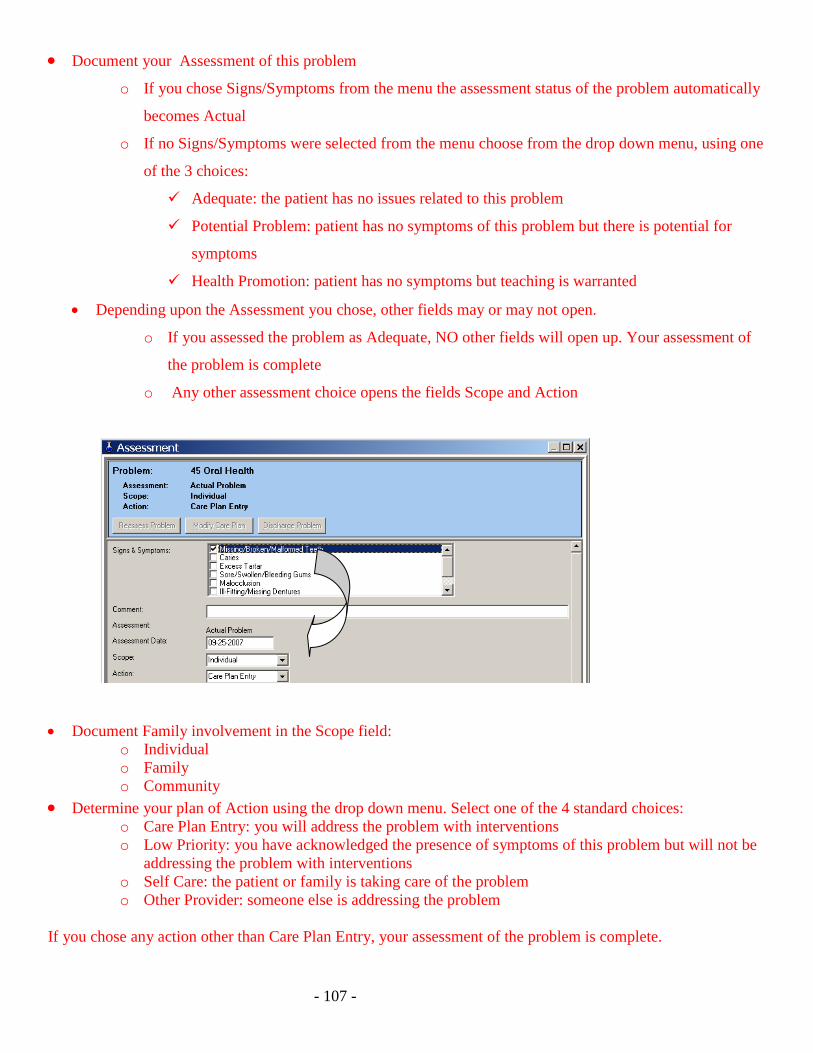
• Document your Assessment of this problem
o If you chose Signs/Symptoms from the menu the assessment status of the problem automatically
becomes Actual
o If no Signs/Symptoms were selected from the menu choose from the drop down menu, using one
of the 3 choices:
Adequate: the patient has no issues related to this problem
Potential Problem: patient has no symptoms of this problem but there is potential for
symptoms
Health Promotion: patient has no symptoms but teaching is warranted
• Depending upon the Assessment you chose, other fields may or may not open.
o If you assessed the problem as Adequate, NO other fields will open up. Your assessment of
the problem is complete
o Any other assessment choice opens the fields Scope and Action
• Document Family involvement in the Scope field: o Individual o Family o Community
• Determine your plan of Action using the drop down menu. Select one of the 4 standard choices: o Care Plan Entry: you will address the problem with interventions o Low Priority: you have acknowledged the presence of symptoms of this problem but will not be
addressing the problem with interventions o Self Care: the patient or family is taking care of the problem o Other Provider: someone else is addressing the problem
If you chose any action other than Care Plan Entry, your assessment of the problem is complete.
- 108 -
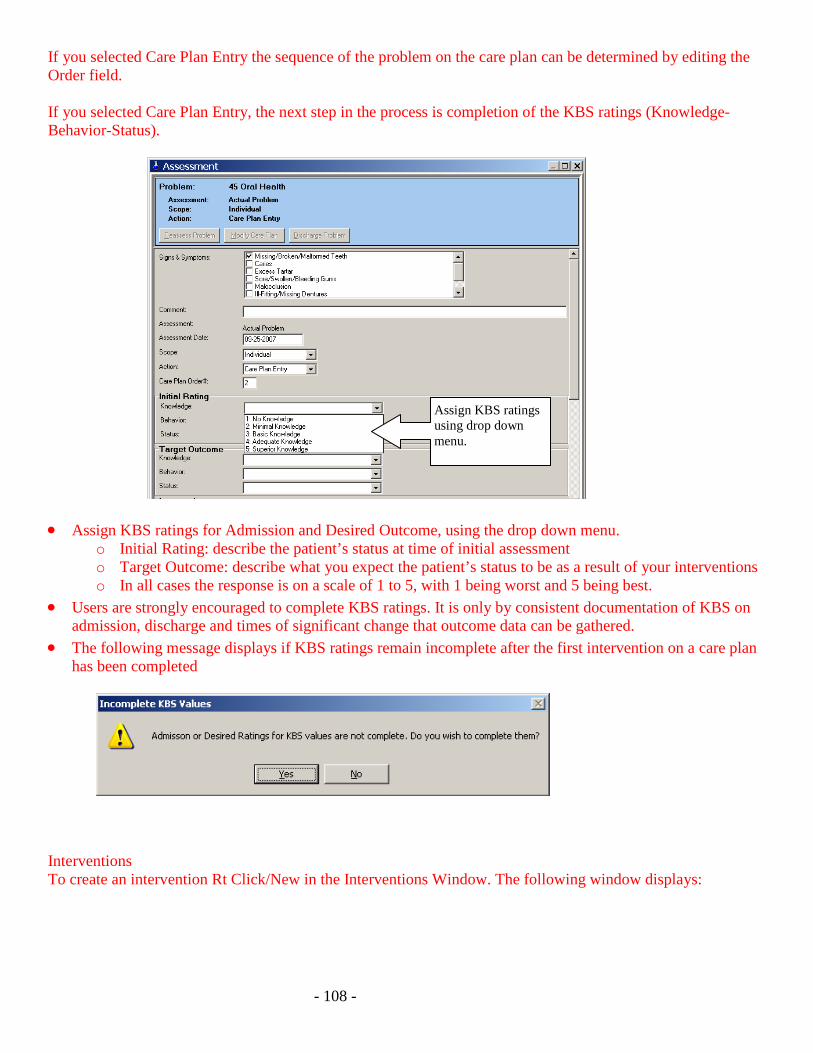
If you selected Care Plan Entry the sequence of the problem on the care plan can be determined by editing the Order field. If you selected Care Plan Entry, the next step in the process is completion of the KBS ratings (Knowledge-Behavior-Status).
• Assign KBS ratings for Admission and Desired Outcome, using the drop down menu. o Initial Rating: describe the patient’s status at time of initial assessment o Target Outcome: describe what you expect the patient’s status to be as a result of your interventions o In all cases the response is on a scale of 1 to 5, with 1 being worst and 5 being best.
• Users are strongly encouraged to complete KBS ratings. It is only by consistent documentation of KBS on admission, discharge and times of significant change that outcome data can be gathered.
• The following message displays if KBS ratings remain incomplete after the first intervention on a care plan has been completed
Interventions To create an intervention Rt Click/New in the Interventions Window. The following window displays:
Assign KBS ratings using drop down menu.
- 109 -
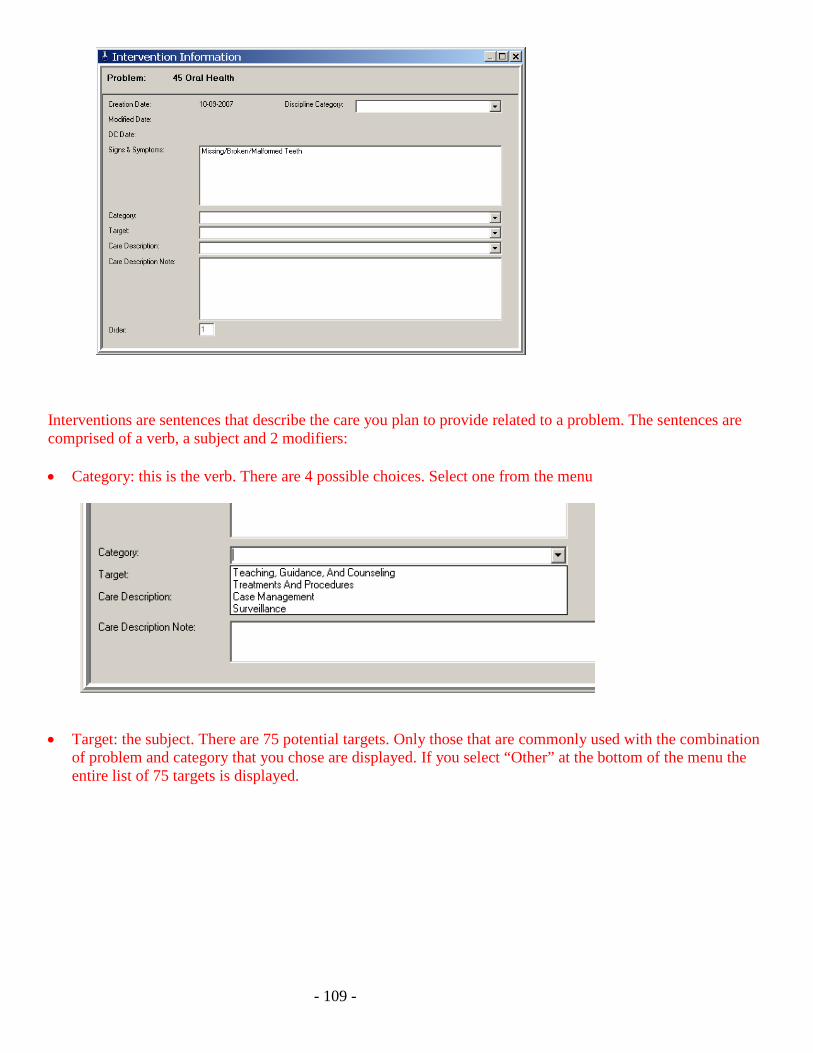
Interventions are sentences that describe the care you plan to provide related to a problem. The sentences are comprised of a verb, a subject and 2 modifiers:
• Category: this is the verb. There are 4 possible choices. Select one from the menu
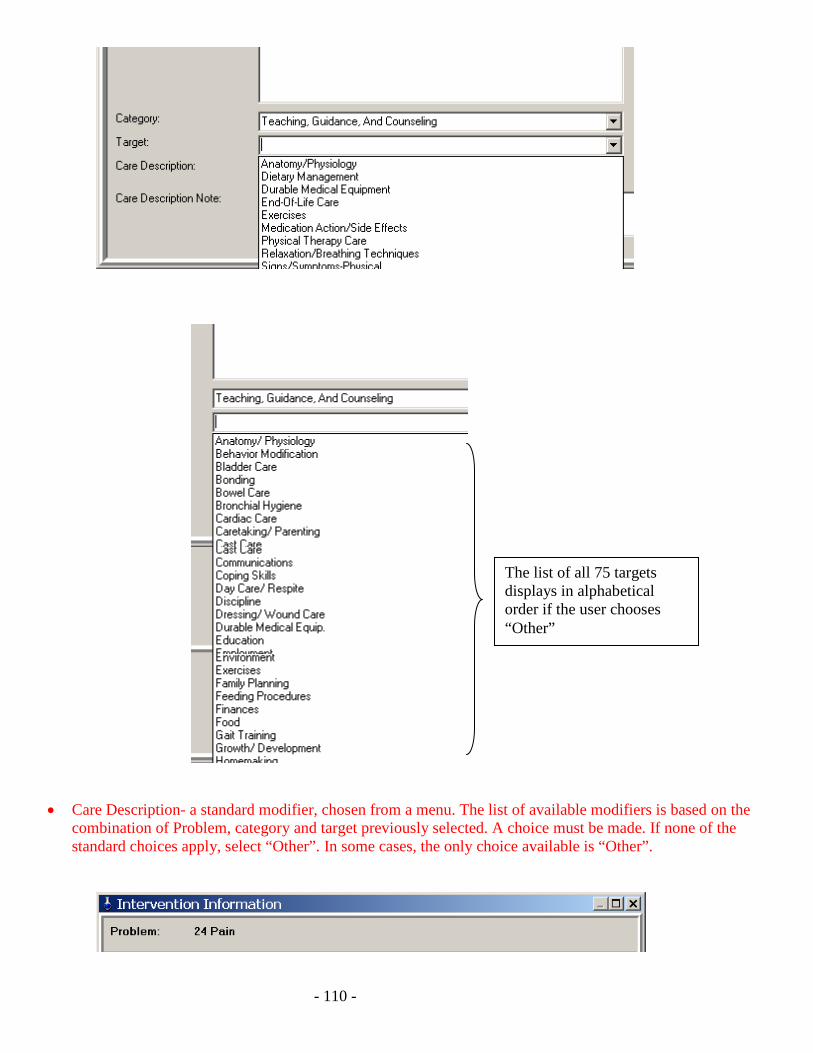
• Target: the subject. There are 75 potential targets. Only those that are commonly used with the combination
of problem and category that you chose are displayed. If you select “Other” at the bottom of the menu the entire list of 75 targets is displayed.
- 110 -
• Care Description- a standard modifier, chosen from a menu. The list of available modifiers is based on the combination of Problem, category and target previously selected. A choice must be made. If none of the standard choices apply, select “Other”. In some cases, the only choice available is “Other”.
The list of all 75 targets displays in alphabetical order if the user chooses “Other”

- 111 -
• Care Description Note- The final field in the intervention window is a free form typing field that allows the
user to modify the intervention for the individual client.
Advanced intervention features: 1) Order- Interventions can be ordered in the sequence desired. Enter the order number in the Order field. 2) Discipline Category: Each intervention can be determined to be discipline specific or apply to all disciplines. This is an advanced feature and should not be used until your agency has made the decision to use it as a whole. Please leave this field blank. A WORD ABOUT THE CARE PLAN TAB NOT a working tab; Intended as a quick view of the care plan. May be used to make a change to the care plan outside of a visit. A WORD ABOUT PATHWAYS After you learn how to use the Omaha System in CareFacts, you will later learn to use Pathways. In CareFacts, Pathways are standardized care plans that are already set up in the software. Agencies can modify the existing pathways and write new ones to meet their needs.
- 112 -
OASIS ASSESSMENT • In CareFacts, OASIS assessments that regulations require to be performed in a visit can be opened only
from the Visit tab. o SOC o Recert o ROC o Other Follow-up
• Open a Start of Care OASIS Assessment Take care to choose correct TYPE of Assessment
o IMPORTANT POINT
Choose the right OASIS Start of Care Date:
o VERY IMPORTANT POINT
• OASIS in CareFacts is divided into tabs; Click each tab and answer the questions
• Integrating OASIS with comprehensive assessment (Omaha)
o links to Omaha System Assessment (see page 37 for Oasis/Omaha links)
• Adding a Diagnosis to an OASIS assessment
o If client has a PPS episode, the Dx automatically pulls in according to how dx are displayed on the
485
o If you need to change or add a diagnosis then go to Clinical Summary tab to complete
• Locking an OASIS
o If the Oasis is complete the Oasis will “lock”
o If Oasis is incomplete & you attempt to “lock” the Oasis, the system will bring you back to the 1st
incomplete Oasis question
• Consistency Checks
o Will show details in session 3
- 113 -
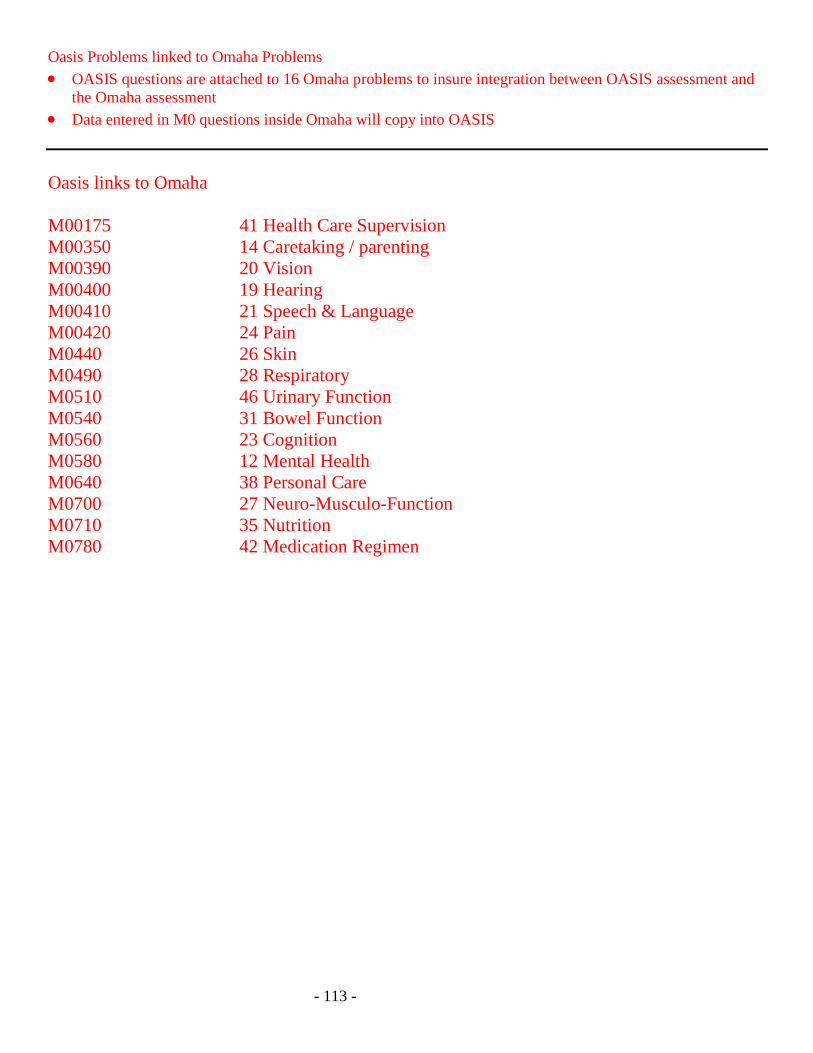
Oasis Problems linked to Omaha Problems • OASIS questions are attached to 16 Omaha problems to insure integration between OASIS assessment and
the Omaha assessment • Data entered in M0 questions inside Omaha will copy into OASIS Oasis links to Omaha M00175 41 Health Care Supervision M00350 14 Caretaking / parenting M00390 20 Vision M00400 19 Hearing M00410 21 Speech & Language M00420 24 Pain M0440 26 Skin M0490 28 Respiratory M0510 46 Urinary Function M0540 31 Bowel Function M0560 23 Cognition M0580 12 Mental Health M0640 38 Personal Care M0700 27 Neuro-Musculo-Function M0710 35 Nutrition M0780 42 Medication Regimen
- 114 -
REVIEW OF SESSION ONE In Session One, ALL learners: • Became familiar with CareFacts as an integrated system, combining Clinical, Scheduling and Billing • Learned to log into the software and perform basic navigation. • Learned the entry of information using keyboard shortcuts. (See Intro Tutorial for more information on
keyboard shortcuts.) • Added a client chart. • Completed the Intake Database (Client Data tab, Enrollment tab, Clinical Summary tab). • Assigned the chart to other staff. • Learned how data flows in CareFacts, and the concept of “updating” in order to share information with the
Courier and other CareFacts users. • Discussed the importance of frequent updating and determined at least one example in the agency’s
workflow where updating is important. In addition, the clinicians: • Opened an Add-Once visit. • Accessed the Omaha System problem list to begin building a client assessment. • Opened an OASIS assessment and determine Start of Care Date. • Learned to recognize links between OASIS questions and Omaha System problems. • Learned the importance of the Start of Care date.
- 115 -
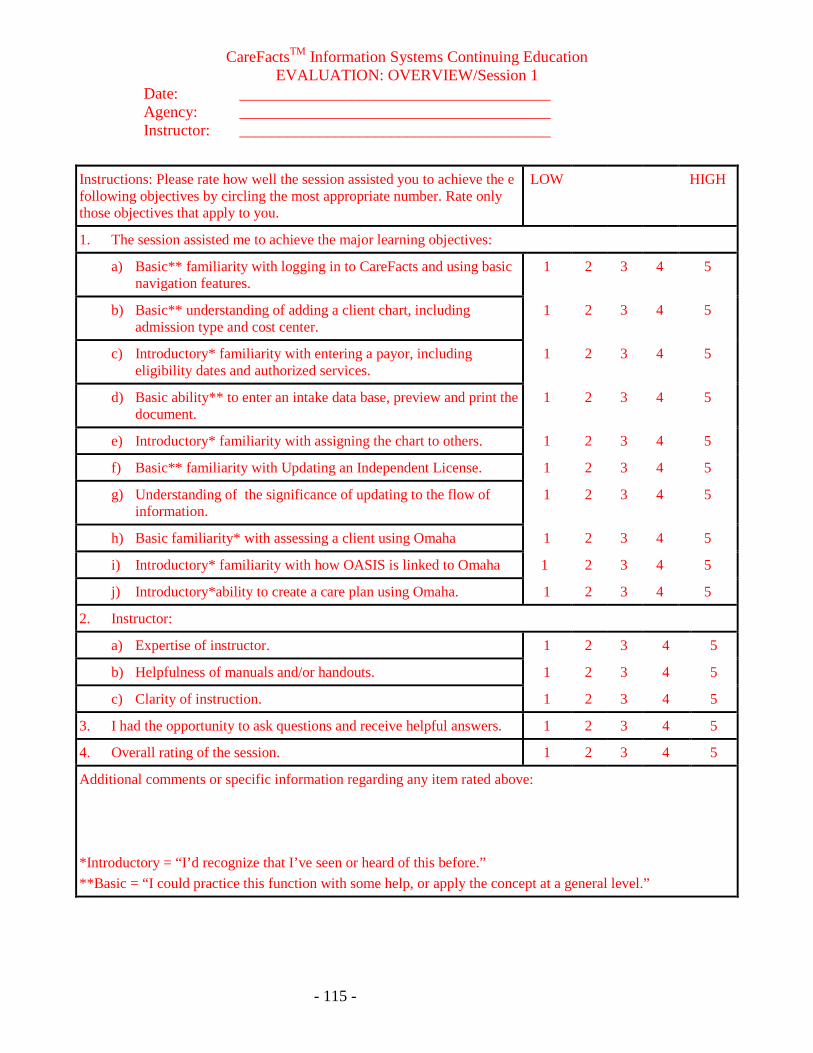
CareFactsTM Information Systems Continuing Education EVALUATION: OVERVIEW/Session 1
Date: _______________________________________ Agency: _______________________________________ Instructor: _______________________________________
Instructions: Please rate how well the session assisted you to achieve the e following objectives by circling the most appropriate number. Rate only those objectives that apply to you.
LOW HIGH
1. The session assisted me to achieve the major learning objectives:
a) Basic** familiarity with logging in to CareFacts and using basic navigation features.
1 2 3 4 5
b) Basic** understanding of adding a client chart, including admission type and cost center.
1 2 3 4 5
c) Introductory* familiarity with entering a payor, including eligibility dates and authorized services.
1 2 3 4 5
d) Basic ability** to enter an intake data base, preview and print the document.
1 2 3 4 5
e) Introductory* familiarity with assigning the chart to others. 1 2 3 4 5
f) Basic** familiarity with Updating an Independent License. 1 2 3 4 5
g) Understanding of the significance of updating to the flow of information.
1 2 3 4 5
h) Basic familiarity* with assessing a client using Omaha 1 2 3 4 5
i) Introductory* familiarity with how OASIS is linked to Omaha 1 2 3 4 5
j) Introductory*ability to create a care plan using Omaha. 1 2 3 4 5
2. Instructor:
a) Expertise of instructor. 1 2 3 4 5
b) Helpfulness of manuals and/or handouts. 1 2 3 4 5
c) Clarity of instruction. 1 2 3 4 5
3. I had the opportunity to ask questions and receive helpful answers. 1 2 3 4 5
4. Overall rating of the session. 1 2 3 4 5
Additional comments or specific information regarding any item rated above: *Introductory = “I’d recognize that I’ve seen or heard of this before.” **Basic = “I could practice this function with some help, or apply the concept at a general level.”

- 116 -
- 117 -
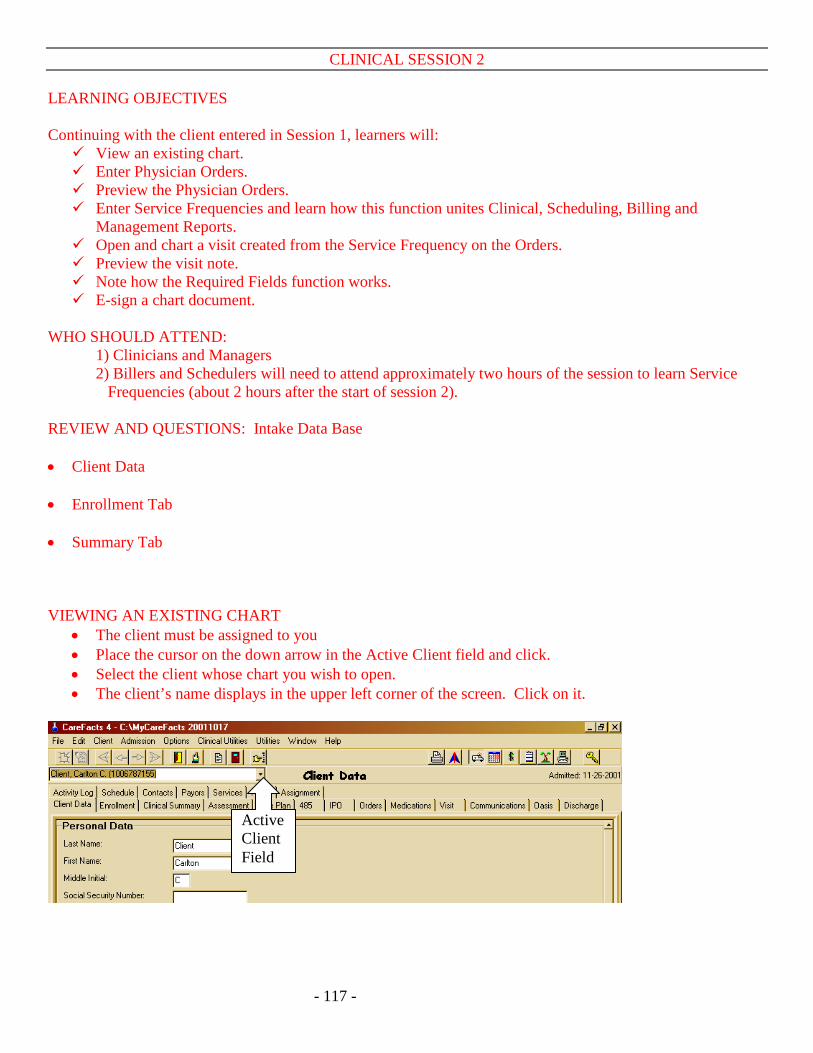
CLINICAL SESSION 2 LEARNING OBJECTIVES Continuing with the client entered in Session 1, learners will: View an existing chart. Enter Physician Orders. Preview the Physician Orders. Enter Service Frequencies and learn how this function unites Clinical, Scheduling, Billing and
Management Reports. Open and chart a visit created from the Service Frequency on the Orders. Preview the visit note. Note how the Required Fields function works. E-sign a chart document.
WHO SHOULD ATTEND:
1) Clinicians and Managers 2) Billers and Schedulers will need to attend approximately two hours of the session to learn Service
Frequencies (about 2 hours after the start of session 2).
REVIEW AND QUESTIONS: Intake Data Base • Client Data • Enrollment Tab • Summary Tab VIEWING AN EXISTING CHART
• The client must be assigned to you • Place the cursor on the down arrow in the Active Client field and click. • Select the client whose chart you wish to open. • The client’s name displays in the upper left corner of the screen. Click on it.
Active Client Field
- 118 -
PHYSICIAN ORDERS (485 or Hospice Certification and Plan of Care) Dates: The asterisked (*) dates are critical to the Oasis and PPS billing cycles.
• Verbal Start of Care- the date the order to provide care was received • *Start of Care- date of the first billable visit, regardless of discipline • Date Cert Created: date chart is created. The chart includes creating the 485 • *Cert Start Date- first day of the cert period • *Cert End Date-last day of the cert period; automatically calculated for 60 or 90 days as appropriate
Cert Type: • In the 485: New or Recertification • In a Hospice Cert: First, Second, or Ongoing Certification
Loc 26 and 28 Display:
• This menu can be used to change the data that appears at the bottom of the 485 in locators 26 and 28 Payor: Must be selected from drop down list. When selected,
• Patient ID for the Payor prints in Box 1 of the cert; and • Agency Provider Number for the Payor prints in Box 5.
Marked Permanent: This box may be checked here or at bottom of cert. Do not mark permanent until you have completed the cert.
• Marking Permanent prevents further data from flowing into the cert. • If a user does not have the right to un-mark a cert, a message will inform you that once marked
permanent the cert cannot be un-marked. Code Status:
• When a choice is made here, the information will display in the Clinical Summary Tab Staff Completing Plan:
• The person responsible for completing the cert • The “owner” of the cert. Other users cannot add or change data in the cert without the user access right
to “change other’s orders.” Staff Obtaining Verbal Order:
• The person who took the order to provide care. PHYSICIAN ORDERS (continued)

- 119 -
Medical Diagnosis (Dx):
• Diagnosis data flows to cert from the Clinical Summary tab • For Medicare PPS clients, the Dx on the 485 must match the Dx on the OASIS. Carefacts does this
automatically. • You can add a new Dx using right click | new. It flows to Clinical Summary tab. • You can attach a Dx that appears in the Clinical Summary by doing right click | attach. • You can remove a diagnosis from the 485 without removing it from the Clinical Summary tab by
placing the cursor on the diagnosis and right click | remove. • Once the cert has been marked permanent (or an OASIS locked) diagnosis data maintains historical
records. Change or deletion of diagnosis is limited by the existence of historical information.
Medications: • Right click | new to add medications. • Medications entered elsewhere in the chart automatically flow into open certs (those not marked
permanent). • Five of the fields in the medication record are required. • Delete medications ONLY if the medication NEVER belonged in the client chart. • Medication will display in all Visits that are opened AFTER the medication is entered.
Medication Data Base:
• Search
• Validation – White Pill Icon or Yellow Exclamation
• Drug Interactions – Red Exclamation
• Monographs
Procedures:
• Right click | new in Procedures listview and enter the same way as medications. • They appear in box 21A of the orders.
“Add Services” button: We will cover later in session 2. (See page 45) Current Status: This is an expandable free-form typing field in which the user can enter a summary of the patient’s status/condition or can use an automated function to pull data into the field. Used to report the 60 day summary, or provide the MD with any other clinical information “Include Current Status” button: By clicking this button you can automatically pull client data into the Current Status field. Example: Admit vitals, Vital Sign ranges, missed visits, Discipline Summaries, etc PHYSICIAN ORDERS (continued)
- 120 -
Clinical Info: • Series of menus to document Nutrition, Activity, DME, Safety Measure and etc
Prognosis field: Required for Medicare billing Other Clinical Information (OASIS questions):
• Display here only for convenience; they do not print on the 485. Goals and Discharge Plans:
• Pick several list • Add date in pick list by clicking on the question mark. • Add goal in free text field. • Can be customized
Physician Signature Select Physician Button:
• Select Physician from drop down menu • Can click on the “Select Physician” button if would like to send to other Physicians
Date Sent, Signed and Received:
• May be entered even if the certification is marked permanent. • Any cert or IPO with these fields blank will appear on report titled Unsigned Physician orders.
Residence:
• Select residence from drop down menu Marked Permanent:
• Do not mark permanent until you have completed the cert. • Prevents further data from flowing into the cert. • If a user does not have the right to un-mark a cert, a message will inform you that once marked
permanent the cert cannot be un-marked. • Marking Permanent generates visits from Service Frequencies IF your computer owns the Service
Frequencies. “Preview/Sign Cert” button
• Can Preview & Print the certification • Electronic Signature is covered later. Agency should have policy in place before using E-sign
Log-out BREAK / Billers & Schedulers will join group for Service Frequencies PHYSICIAN ORDERS (continued)

- 121 -
“ADD SERVICES” button: ORDERS LIST - SERVICE FREQUENCIES
Service Frequencies form the key link between MD orders, Clinical Visits, Scheduling and Billing, and Management Reports. (See the Clinical Manual chapter on Service Frequencies for in-depth description.)
Watch two Service Frequency Tutorials:
1) Using Service Frequencies - 10 mins 2) Short Weeks in Service Frequencies - 6 mins
Navigate to Carefacts website www.carefacts.com
• Overview of website • Download Service Frequency tutorials
Set-up client plan for frequency of visits
• SN 2x/wk x1 (short week) • SN 3x/wk to end of cert • HHA 2x/wk x1 (short week) • HHA 3x/wk to end of cert
To Enter Service Frequencies in the Cert (or IPO if telephone orders)
1. Click the “Add Services” button 2. Right click | New in the Services List 3. Double click on the Expense Code (type of visit) 4. The Service Frequency Information window will open (see page 46)
- 122 -
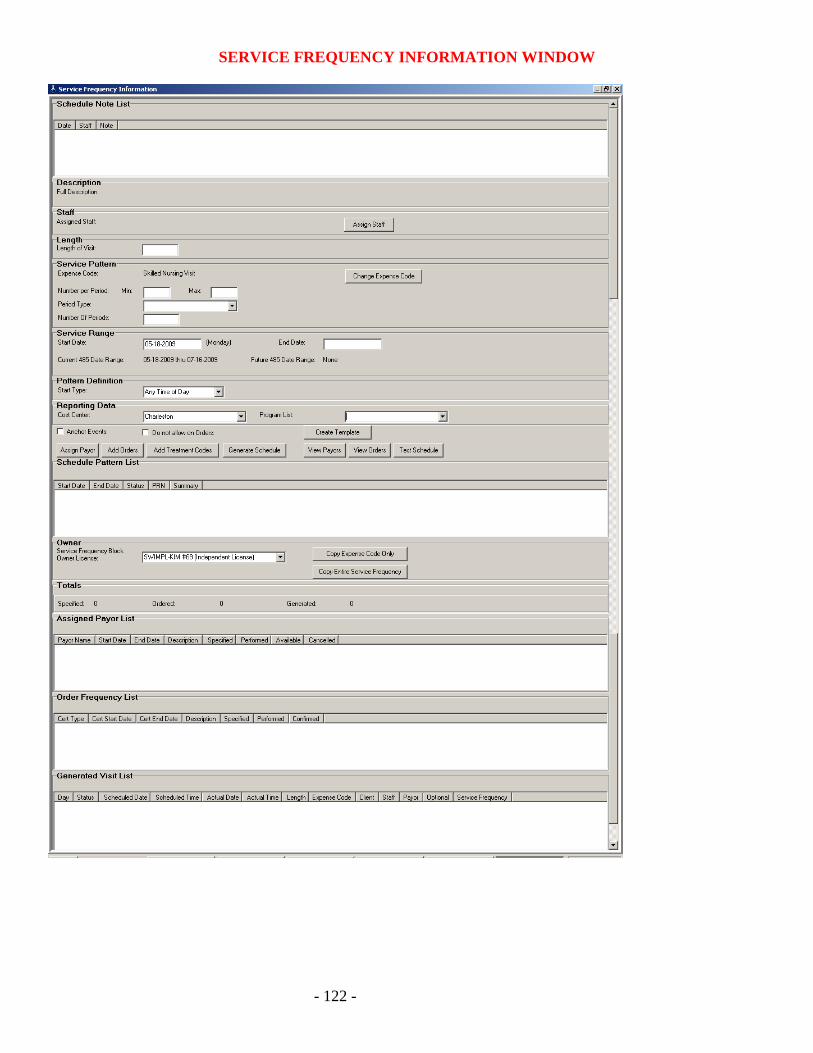
SERVICE FREQUENCY INFORMATION WINDOW
- 123 -
SERVICE FREQUENCY FIELDS Define the Service Frequency by completing these fields:
• Length - an estimate; does NOT lock in a required length.
• Number per Period – the number of visits per day, per week, per month etc.
• Period Type - schedule visits per week, per day, per month, etc.
• Number of Periods – how many days, weeks, months.
• Start Date
• End Date
• Cost Center - for reporting purposes
• Program – for reporting purposes
Short Week assists you to line up with Medicare Week
• Message pops up to inform you that short week was created • When you enter the subsequent service frequency for this discipline, it will automatically start on the
first day of the next week
To complete the set-up of the Service Frequency, you MUST complete 3 functions (Apply the Glue) • Assign Payor
• Add Orders
• Generate Schedule and/or Change Owner
o Agency workflow will dictate whether you do or do not generate visits for a particular type of Service Frequency. If the creator of the Service Frequency is not supposed to generate a schedule s/he must change ownership of the Service Frequency to the computer where that will be performed (generally the scheduler’s computer). To do so, use the drop down menu called “Service Frequency Block Owner License”.
To verify that you have completed the set-up of the Service Frequency, scroll down to the bottom 3 boxes:
Assigned Payor List – if there is no entry, you have not Assigned the Payor Order Frequency List – if blank, you have not put the Service Frequency on a Physician Order.
Click “Add Orders” to put on Physician Order Generated Visit List – unless there are visits showing here, you will not be able to open them in the
Visit Tab. Click on “Generate Schedule”
Remember these points for verifying that you have completed the Service Frequency, and for troubleshooting later on.
- 124 -
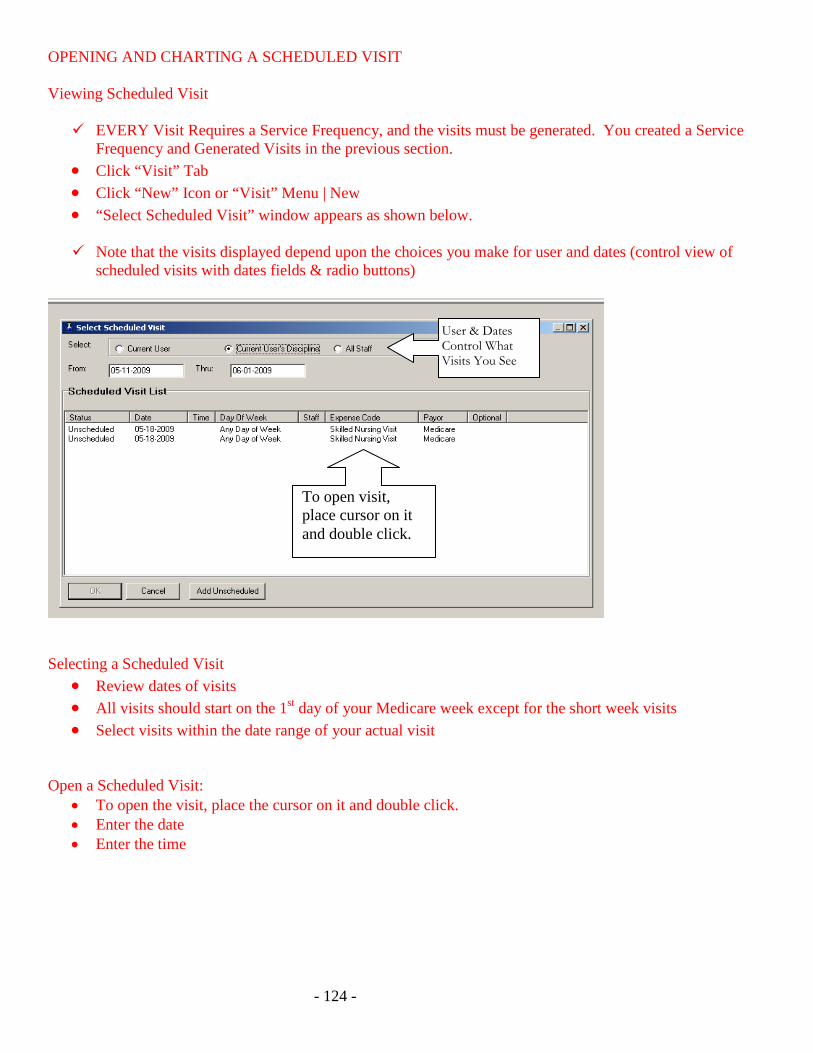
OPENING AND CHARTING A SCHEDULED VISIT Viewing Scheduled Visit EVERY Visit Requires a Service Frequency, and the visits must be generated. You created a Service
Frequency and Generated Visits in the previous section. • Click “Visit” Tab • Click “New” Icon or “Visit” Menu | New • “Select Scheduled Visit” window appears as shown below. Note that the visits displayed depend upon the choices you make for user and dates (control view of
scheduled visits with dates fields & radio buttons)
Selecting a Scheduled Visit
• Review dates of visits • All visits should start on the 1st day of your Medicare week except for the short week visits • Select visits within the date range of your actual visit
Open a Scheduled Visit:
• To open the visit, place the cursor on it and double click. • Enter the date • Enter the time
User & Dates Control What Visits You See
To open visit, place cursor on it and double click.
- 125 -
ORGANIZATION OF THE VISIT TAB • Demographic data • Medical data
o Vital Signs o Diagnosis
• Assessments o OASIS o Omaha o Functional Status o Additional Assessments o Physical Exam o Labs
• Plan of Care • Orders • Medications & Procedures • Communication • Supervision • Billing and Time Card Information • Confirming - may be done at top & bottom of Visit tab ENTERING DATA IN THE VISIT TAB • Date and Time • Employee • Vitals Oasis Assessment: In general home care work flow, you will do this first. Will cover in “take it from the top” session. Omaha Assessment: The Omaha Assessment window is where you document the assessment and create the care plan. If you need to add new Omaha problems to the care plan, you will also do that in this window. Only problems assessed in this visit will show in this window for this particular visit.
Functional Status Assessment:
Additional Assessments:
Physical Exams:
Labs:
VISIT (continued)
PLAN OF CARE INTERVENTIONS: This window is where you chart what you actually did, taught, or observed. • Double-click on a problem to chart the interventions for that problem • Click the Document Interventions Button
- 126 -
o Top of window is read only, it is there to remind you of your intervention details
o Bottom of window is where you chart
Addressed this visit/ Not Addressed this visit - radio button
Note
o Escape key takes you to the next intervention for this problem
Medications:
Procedures:
Summary:
Visit Note:
Communications:
Supervision:
Mark Visit Confirmed:
Once confirmed a visit can be unconfirmed only by the supervisor who has the access right to do so. Required Fields: Electronic Signature: You now have the choice to:
• Print the form • Add to queue • Check Printer Settings • E- Sign the chart form
Print/Preview the Visit
- 127 -
Review of Session Two In Session Two learners: • Opened an existing chart. • Completed the 485. • Entered Service Frequencies and discussed their significance for integrating Clinical, Scheduling, Billing
and Management Reports. • Marked the 485 permanent and developed an understanding of effect of marking the document permanent. • Previewed and printed the MD orders/certification. • Opened a visit created from a Service Frequency. • Documented clinical information in the various fields of the Visit tab. • Experienced how the Required Fields function works. • Previewed and printed the Visit report. • Learned how to E-Sign a visit. HOMEWORK 1. Add client & complete Intake Database
2. Go to existing client & assess 2 new Omaha problems
3. Go into the existing Omaha problem & add a new intervention
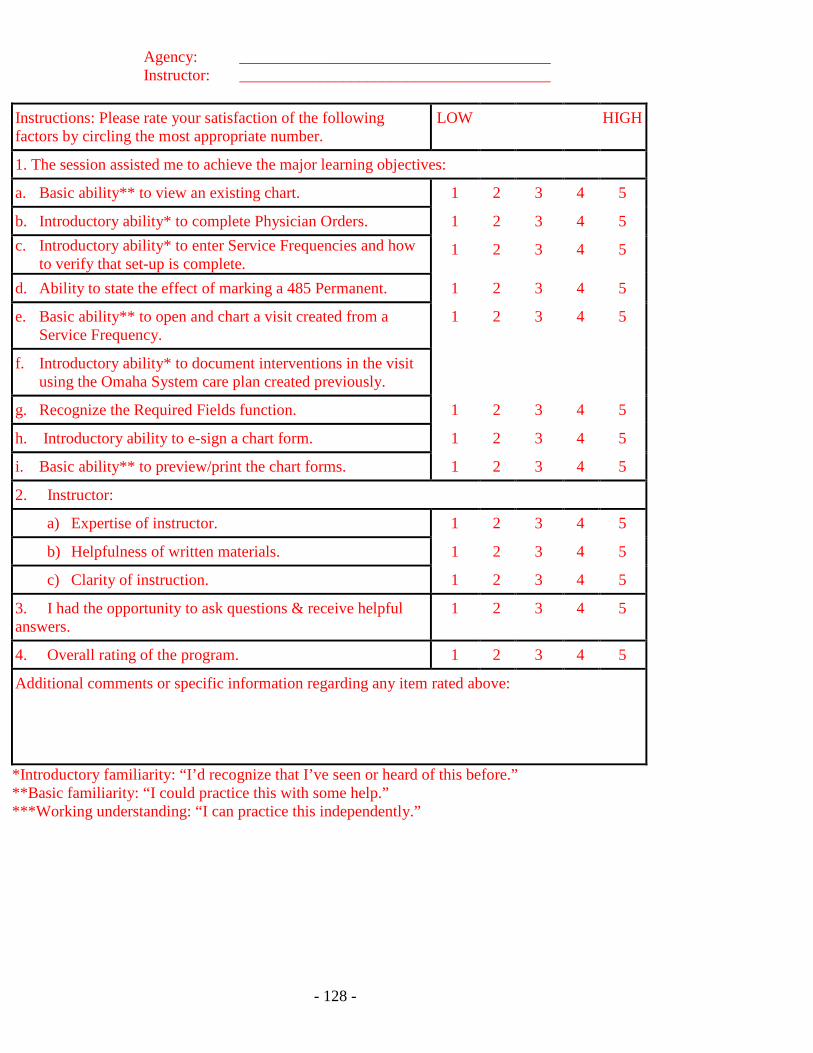
CareFactsTM Information Systems Continuing Education EVALUATION: CLINICAL SESSION 2
Date: _______________________________________
- 128 -
Agency: _______________________________________ Instructor: _______________________________________
Instructions: Please rate your satisfaction of the following factors by circling the most appropriate number.
LOW HIGH
1. The session assisted me to achieve the major learning objectives:
a. Basic ability** to view an existing chart. 1 2 3 4 5
b. Introductory ability* to complete Physician Orders. 1 2 3 4 5 c. Introductory ability* to enter Service Frequencies and how
to verify that set-up is complete. 1 2 3 4 5
d. Ability to state the effect of marking a 485 Permanent. 1 2 3 4 5
e. Basic ability** to open and chart a visit created from a Service Frequency.
1 2 3 4 5
f. Introductory ability* to document interventions in the visit using the Omaha System care plan created previously.
g. Recognize the Required Fields function. 1 2 3 4 5
h. Introductory ability to e-sign a chart form. 1 2 3 4 5
i. Basic ability** to preview/print the chart forms. 1 2 3 4 5
2. Instructor:
a) Expertise of instructor. 1 2 3 4 5
b) Helpfulness of written materials. 1 2 3 4 5
c) Clarity of instruction. 1 2 3 4 5
3. I had the opportunity to ask questions & receive helpful answers.
1 2 3 4 5
4. Overall rating of the program. 1 2 3 4 5
Additional comments or specific information regarding any item rated above: *Introductory familiarity: “I’d recognize that I’ve seen or heard of this before.” **Basic familiarity: “I could practice this with some help.” ***Working understanding: “I can practice this independently.”