children’s centre management information system; ccm ccm ... · the current list of ccm...
TRANSCRIPT

Children’s Centre Management Information
System; CCM
CCM Superuser Guide
Family Services CCM Superuser Guide
2
Family Services Document control
Document title CCM Superuser Guide
Document description Guidance for CCM system superusers and Children’s Centre Managers.
Document author Lauren Burbidge – Data Quality Officer
Document version 1.0
Comments Written for CCM version 2.2.9
Version control
Document production date June 2012
Document currency Annually

Family Services CCM Superuser Guide
3
Contents
1. Introduction .......................................................................................................................... 4
2. Providing training for new CCM users ............................................................................... 5
3. Merging duplicate records .................................................................................................. 6
4. Attendance Review ............................................................................................................ 11
5. Mail Merge / Data Extract .................................................................................................. 26
6. Data Pre Extract Screen .................................................................................................... 34
7. Session Analysis ............................................................................................................... 37
8. Reports ............................................................................................................................... 46
9. Advanced Search ............................................................................................................... 65

Family Services CCM Superuser Guide
4
1. Introduction The CCM superuser guide is aimed at children’s centre managers, and staff that have been granted superuser access level on the system.
This guide is to be used in conjunction with the CCM online help.
Table 1 gives details of additional CCM guidance documents that are available.
Table 1: CCM Guidance documents
Document name Audience
Basic Guide to CCM All CCM users
CCM Framework and Data Guidance All CCM users
CCM guide to recording Casework Children’s centre management team Family support workers CCM superusers
All CCM guidance documents can be downloaded from the CCM Support page: www.barnet.gov.uk/wwcib/ccm-support
1.1. The role of the superuser
CCM superusers:
act as the local system experts in their centres provide initial training to new CCM users in their centres provide the first level of support for CCM users in their centre have additional system access i.e. to merge duplicate records and casework be the main point of contact between CCM Support and the children’s centre in relation
to CCM are required to complete data quality and cleansing exercises run performance data reports.
The current list of CCM superusers can be found in the appendices of the CCM Framework and Data Guidance.
Family Services CCM Superuser Guide
5
2. Providing training for new CCM users
2.1. Training resources
Training for new CCM users should be delivered locally by the CCM superuser using the CCM Portfolio of Documents and the CCM training system. Login details for the training system can be obtained from CCM Support.
For new users that require access to casework on CCM the CCM guide to recording casework should be used.
All of the guidance documentation can be downloaded from the CCM Support page: www.barnet.gov.uk/wwcib/ccm-support
2.2. What to cover
When training new users the following should be covered:
1. The CCM Portfolio of Documents
Inform the new user of the CCM Support service and how to log support calls
Explain your role as the superuser
Ensure that the user is aware if the data monitoring schedule i.e. that casework, registration forms and activity registers will be entered within 3 working days
Explain data protection and security i.e. any information that can identify an individual i.e. name, should never be sent by email. Always use the identifier (ID) number when referring to individuals.
2. The Basic Guide to CCM
Home page – explain what this shows
Individual full details – give an overview of what information is stored on each tab
Searching – performing a family/people search and how to include archived families
Adding a family – train the user how to use the add family wizard
Updating a family record – train the user how to update a record and move a family address
Activities and sessions – ensure the new user is aware of the activity relationship table and knows how to categorise sessions. Show the user how to correctly input sessions and how to add attendees to the sessions
Referrals – show the user how to add a new referral and how to close it and record an outcome.
Family Services CCM Superuser Guide
6
3. CCM Guide to Recording Casework
Adding a case
Overview tab
Linking key workers
Actions
Case attachments
Case administration.

Family Services CCM Superuser Guide
7
3. Merging duplicate records
It is almost inevitable that at some time or other you will find that the same person/family has been entered on to the system twice.
If they both have attendance information recorded against them, then the attendance details relating to the deleted individual would be removed from the system and no longer feature in future reports. The Merge Duplicates option protects against this loss by merging the attendance information and notes information before deleting one of the records.
From the Merge Duplicates option, you can search on name, address, date of birth or identifier as a starting point for identifying duplicate records. Nonetheless, we would recommend you identify and check the individual records involved via the People option under the 'Search' button in the side menu. Then you can view the full details of the individual records before choosing to Merge. This will be useful in confirming that you have identified the correct duplicate records as well as enabling you to decide which of the two records should be considered the master and remain without being deleted.
Please note: only the notes on the Individual / Personal Details tab (not the contents of the Note tab), Attendances, Referral and Requirements information is transferred automatically from the deleted record to the master record. It is essential, therefore, that you transfer manually any additional information you wish to keep from the record to be deleted in to the record that will remain.
After the records have been merged, the remaining record will inherit the oldest start date of the two records.

Family Services CCM Superuser Guide
8
3.1. Identifying the source and destination records
Before performing a merge you must identify which record is the ‘source data’ and which record is the ‘destination data’.
The source data will be the oldest record, which will be merged to the destination data.
The source data will have the oldest start date; this can be identified using the family summary report, or looking in the individual’s full record on the personal tab.
The duplicate record with the most recent start date becomes the destination data as the information held on that record i.e. address and contact details are likely to be more up-to-date than the older record.
Please note: we would advise that you contact the family to double check the current contact details and address before performing the merge
After the records have been merged, the remaining record (destination data) will inherit the oldest start date of the two records.
3.2. Merge duplicate records
From the System Admin menu option in the Side Menu, click Merge Duplicates. You will see a screen similar to this:

Family Services CCM Superuser Guide
9
1. Use the ‘Source Data’ options at the top-left side of the merge duplicates screen and click the 'Search' button to locate your duplicated record.
Please note: You can search on a part or all of a DOB e.g. for everyone born in 'April 2010', type 'Apr 2010' in the box.
If you are merging a family that has been entered at two separate addresses, un-tick the link source and destination search to allow you to search for both addresses at the same time.
In its default setting, the Source and Destination names lists will be generated from the same single search criteria (in the example above, this was Julie B). But you can generate these lists independently of each other by un ticking the ‘Link Source and Destination Searches?’ checkbox at the top of the screen. You could then search for Julia as the Source name and 'Julie' as the Destination name as an example.

Family Services CCM Superuser Guide
10
2. From the resulting lists, click on the duplicated record in the Source block (the one that will be deleted), then the duplicated record in the Destination block (the one into which the Source record will be merged).
The names and addresses of each will appear in the boxes at the bottom left- and right-hand sides of the screen.
3. Click the '>>Perform Merge<<' button, at the bottom of the screen.
4. You will be presented with a merge confirmation box. If you are sure you want to merge the duplicated records then press 'OK'.
5. You will be presented with a ‘Merge Complete’ message confirming that the source name has been deleted from the database. However, the Notes, Attendances and Referrals information from the Source name will have already been transferred automatically to the Destination record.
Please note: If there is an open casework record attached to the source data record the casework record will not be merged to the destination data record. The casework record will not be deleted either, but you will have to re-attach it to the individuals records. Please refer to the CCM guide to recording casework for guidance on how to do this.

Family Services CCM Superuser Guide
11
4. Attendance Review
The Attendance Review screen allows you to monitor and review attendances of specific activities or sessions. You can build your own queries and reports based upon attendances, targets etc., using a selection of built in filters. This screen provides the most flexible attendance review capabilities. You can set very detailed criteria and export the results directly to Excel, create a mailing list or produce an attendance analysis report.
Please remember, that this screen is based on attendances at activities or sessions and uses the status of people i.e. pregnancy status or address particulars, that were applicable at the time the person attended the session or activity.
Compare this with the 'Mail Merge & Data Extract' screen (see section 5), which is not based on attendances but whether a record exists in the database. This functionality uses the current status of people when the report is run.
4.1. Attendance review screen
To see the attendance review screen, click on attendance in the side menu, and then click on the review menu option.
You can choose from a variety of filters (located down the left hand side of the screen), to carry out very precise filtering of records, based on what activities have been attended over a period of time.
You should remember that the filtering that occurs will operate on the status of the individual at the time they attended the activity, not the status of the individual now. For example, you can undertake a search for individuals who were pregnant at the time of the activity although they may not be pregnant now.
Generally speaking, the more filters you apply the smaller your list of results will be. The list of filtered names appears on the right hand side of the screen.
At the top of the screen, there are options for you to choose what to do with the list of names (e.g. create a mailing list from them, create an excel spreadsheet to analyse the data based on many pieces of information contained within each person's record, or create an analysis report that has been programmed in to the database).
Here is a picture of how the Attendance Review screen might look:

Family Services CCM Superuser Guide
12

Family Services CCM Superuser Guide
13
If you double-click on a name in the list, you will be taken to that persons Individual's Full Details screen.
As there are a large number of filters available you can use the scroll bar located on the right hand side of the screen to scroll through the various options.
The topic Filters & Options in the Attendance Review Screen looks at the filtering options in detail.
4.2. Filters and options in the attendance review screen
From the top of the screen, you can decide whether you want to see a list of names of people who attended activities irrespective of how many activities they attended (i.e. no ‘duplicate’ names will be shown in the list), a list of all attendances (with names duplicated for every activity they attend), a list of families who have attended (shown in address format) or a list of people who have not attended.
You should also specify a time period over which attendance information is gathered and by default this is set to include the past 6 months.
Family Services CCM Superuser Guide
14
Note: The list of people returned when using the 'No Attendance' option will only include those individuals who live in those areas assigned to the site you are logged in to.
4.2.1. Filters
There is a comprehensive set of filter options available to enable you to create a very precise query to ensure you only extract the people you need. The filters are located down the left-hand side of the screen.
Please note: the filter options are not multiple select lists i.e. ethnicity, employment, language. To report on multiple selections i.e. families where English is an additional language you will have to use either the advanced search (see section 9) or use a custom report (see section 7).
To use any one of the filters, simply select the criteria from the relevant drop down list, or check box to open the filter, then choose 'Yes' or 'No' for it.
The filters can be applied together so that if you select “Registered – Yes”, “Pregnant – Yes” and “Smoker – Yes”, then you will get a list of all registered people who are pregnant and who smoke.
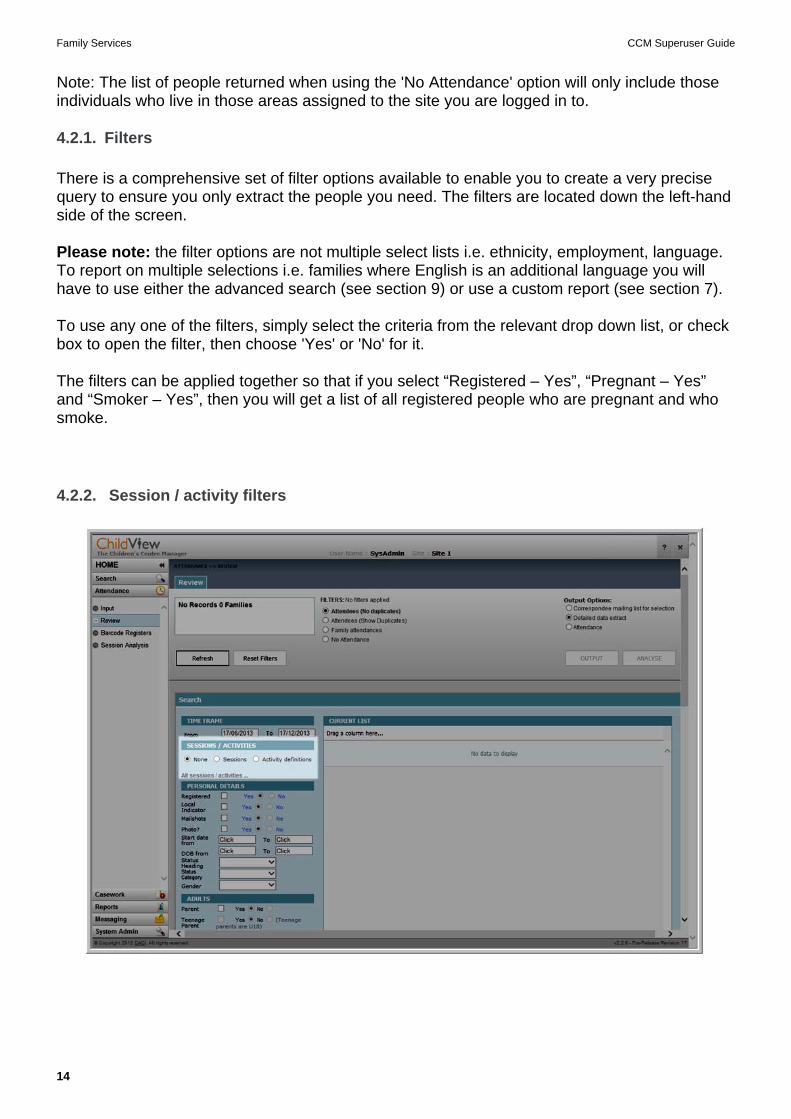
4.2.2. Session / activity filters
Family Services CCM Superuser Guide
15
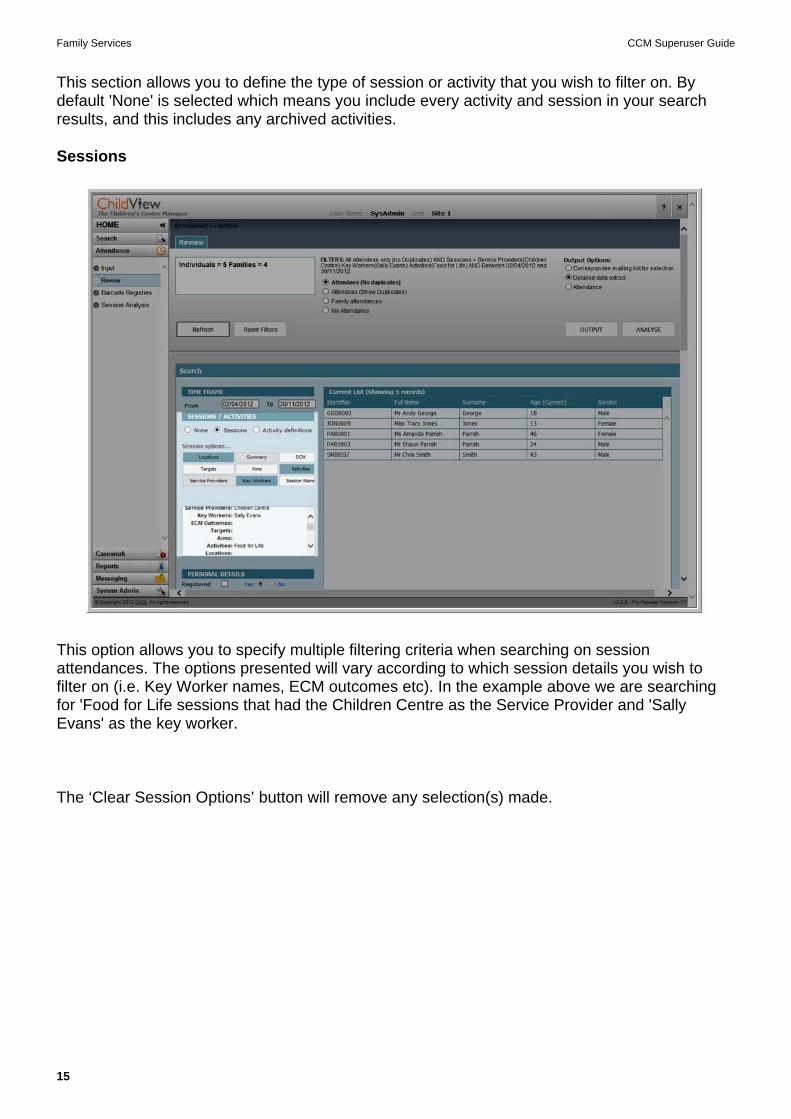
This section allows you to define the type of session or activity that you wish to filter on. By default 'None' is selected which means you include every activity and session in your search results, and this includes any archived activities.
Sessions
This option allows you to specify multiple filtering criteria when searching on session attendances. The options presented will vary according to which session details you wish to filter on (i.e. Key Worker names, ECM outcomes etc). In the example above we are searching for 'Food for Life sessions that had the Children Centre as the Service Provider and 'Sally Evans' as the key worker.
The ‘Clear Session Options’ button will remove any selection(s) made.

Family Services CCM Superuser Guide
16
Activity definitions

Family Services CCM Superuser Guide
17
This option allows you to specify filtering criteria when searching on Activity definitions. The options presented will vary according to which activity definition you wish to filter on (i.e. Key Worker names, ECM outcomes etc). In our example we would be looking for all activities where the Every Child Matters criteria is Be Healthy or Stay Safe.
Using the search capability in sessions or activity definitions
When selecting either the Service Providers, Key Workers, Activities or Locations options you are presented with the ability to search on the selected category. If you know the name or part name of the entry you are looking for then you can enter this in the blank field and press the 'Go' button. Any matching entries will be shown in the list box underneath the 'Go' button. For example:
Pressing the 'Go' button without specifying any text will return all entries in the selected category.
Archived activities
Archived activities can easily be identified in the activities list as they will have the suffix (A) after them. For example:
Family Services CCM Superuser Guide
18
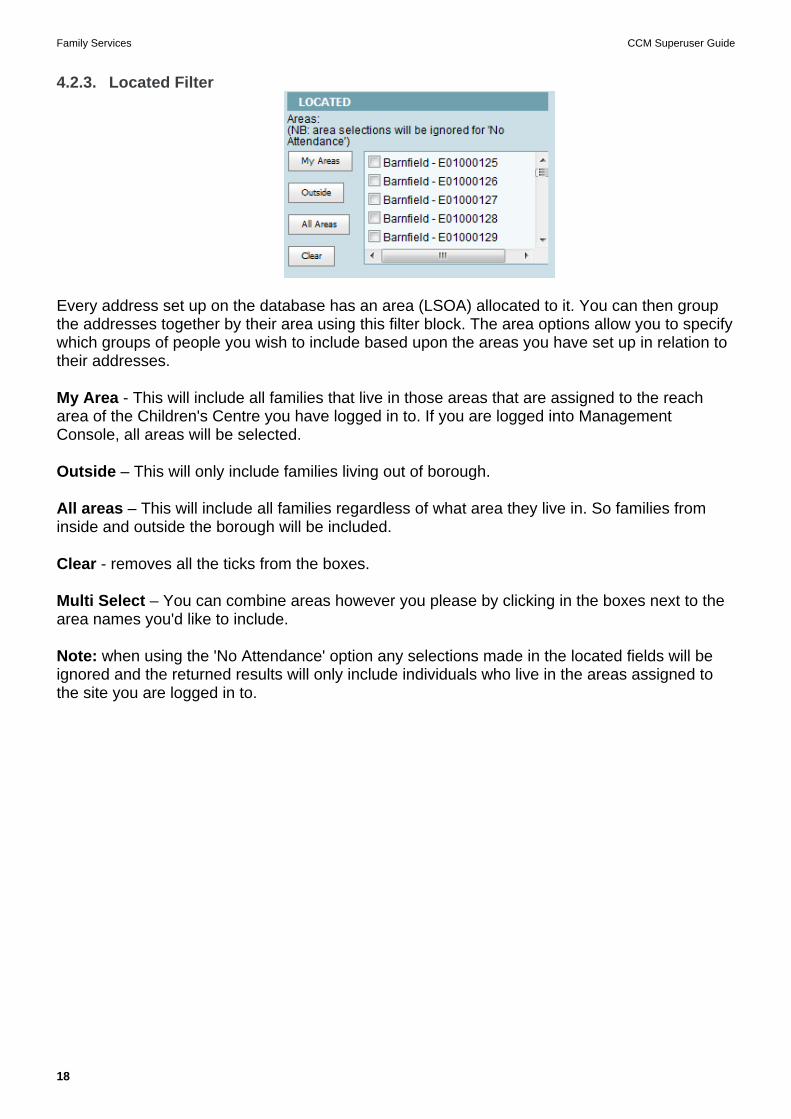
4.2.3. Located Filter
Every address set up on the database has an area (LSOA) allocated to it. You can then group the addresses together by their area using this filter block. The area options allow you to specify which groups of people you wish to include based upon the areas you have set up in relation to their addresses.
My Area - This will include all families that live in those areas that are assigned to the reach area of the Children's Centre you have logged in to. If you are logged into Management Console, all areas will be selected.
Outside – This will only include families living out of borough.
All areas – This will include all families regardless of what area they live in. So families from inside and outside the borough will be included.
Clear - removes all the ticks from the boxes.
Multi Select – You can combine areas however you please by clicking in the boxes next to the area names you'd like to include.
Note: when using the 'No Attendance' option any selections made in the located fields will be ignored and the returned results will only include individuals who live in the areas assigned to the site you are logged in to.

Family Services CCM Superuser Guide
19
4.2.4. Refresh and reset filters button
Once you have specified the filtering criteria you need press the 'Refresh' button to get your list of names shown on the right hand side of the screen.
Every time you change a filter setting, you must click this button or press the Enter key on your keyboard to make the results list on the right-hand side of the screen change to reflect the effect of the newly-selected/de-selected filter(s).
The 'Reset Filters' button will remove any of the filtering criteria you may have selected.
4.3. How to use the results from the attendance review screen
Your filtered list will look similar to the following:
At the top of the screen, there is a panel that gives you a combination of numerical totals that changes depending on the attendee type options selected. The selected filters are also detailed in this area.

Family Services CCM Superuser Guide
20
Each column has a column header (e.g. a Label name, like 'Identifier', Name, etc.), and each row is one person's record.
At the top right of the screen, there are choices about how to extract or analyse the data. This is discussed in the section 4.4: Outputting and analysing the attendance review results.
Column widths
If you click and hold the mouse pointer over the line that divides two column headers, you will be able to drag the mouse to re-size the column width.
Column header sorting
If you click on any of the Column Header buttons, you will sort the list into order based on the information in that column. If you keep clicking the same button, it will sort the data alternately in A-to-Z, then Z-to-A order.

Family Services CCM Superuser Guide
21
Total panel
The numerical totals shown here will vary according to the attendee type option selected from the top of the screen. You get most totals if you have used 'Attendees (Show duplicates)'. An example of those results is:
In this panel:
Records = the number of activities / sessions that were attended.
Individuals = the number of individuals (persons) who attended across those activities / sessions.
Families = the number of 'households' where those individuals live (i.e. the number of different addresses they live at)
Attendances = the total number of visits those individuals made to the activities / sessions (i.e. to the 'Records' above).
In some instances it is possible that you may see different family counts depending upon which of the attendance type options are chosen:
Attendees (No Duplicates)
The family count when using this option is based on the current address of the person as specified in their Individual Full Details.

Family Services CCM Superuser Guide
22
Attendees (Show Duplicates) & Family Attendances
The family count when using either of these options is based on the address(es) the person was living at when the attendance took place. As such is it feasible that a person could have moved with the specified time frame being used and their multiple addresses will be counted in this figure.
4.4. Outputting and analysing the attendance review
The output options panel, at the top right of the screen, lets you decide how to use the results from your filtered lists:
You can export information linked to the records contained within your search results in a format that can be read by Microsoft Excel (.csv), or export in XML format. Alternatively, you can create certain reports by using the Analyse button.
4.4.1. Output button
Click on one of the output options, then click the output button.
The output options are:
1. Corresponding mailing list for the selection:
Use this option to create a list of all the nominated Correspondees that are associated with the people on your list. If your list contains several children from the same family then the Correspondee for that family will only be listed once (assuming only one Correspondee status has been set. If multiple statuses have been set then each of these will be listed). Thus, you will see that the list of names making up the Correspondee list will not be the same as the list shown in the search result section. This list of Correspondee names and addresses can be sent to Excel and used as a mail merge data source for your letters or labels. The extract produced by the Correspondee mailing list for the selection option only includes contact details.
Family Services CCM Superuser Guide
23
2. Detailed data extract The extract produced by the Detailed data extract option includes most tick-boxes and data fields from a person's record. The names on the data list extracted will match those in your filtered list. The following provides an indication as to some of the column headings:
UPN - Unique Pupil Number.
PND ID - Post Natal depression. If this is set to one then that means that the PND check box is ticked in the individual's full details.
UTR - Unique Tax Reference number.
S - This informs you if the individual is a parent (P), a child (C) or pregnant (*).
No Plaster - If this is set to one then that means that the No Plaster check box is ticked in the individual's full details.
Status - This will be set to 1 if the individual is classed as active.
3. Attendances This extract will show only the attendance information attached to the names of the people in your filtered list. Any columns with the prefix AT reefers to data captured at 'Attendance Time'. For reference the ‘AT Parent’ column in the extract refers to status of the parent flag(s) when that individual attended the activity. The ‘AT Parent’ indicators are:
0 = not a parent
1 = is a parent
2 = is a lone parent.
Once the OUTPUT button has been clicked, you are presented with the Data Pre-Extract Screen. Here you can modify the columns that are presented (select the Field Chooser) or export the information in a format that can be read by Microsoft Excel (.csv) or as an XML file by clicking the appropriate button.
For more information about this screen please refer to section 6: Data pre-extract screen.
Security note - if you export data from the database, you must ensure that the destination it is saved in is a secure area in your computer system. This is because that exported data will no longer be protected by the password and user name security measures that are built in to the database.
Family Services CCM Superuser Guide
24
4.4.2. Analyse button
This lets you create an 'Analysis by Individuals Seen' report or an 'Analysis by cost effectiveness' report.
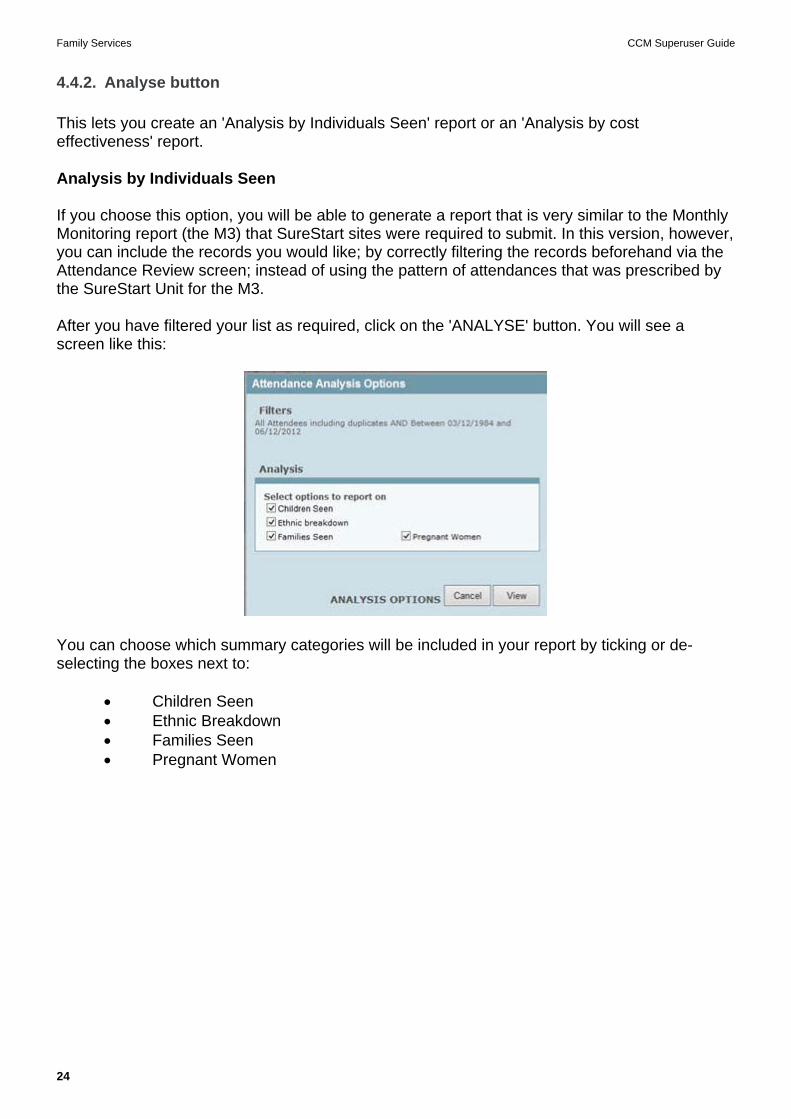
Analysis by Individuals Seen
If you choose this option, you will be able to generate a report that is very similar to the Monthly Monitoring report (the M3) that SureStart sites were required to submit. In this version, however, you can include the records you would like; by correctly filtering the records beforehand via the Attendance Review screen; instead of using the pattern of attendances that was prescribed by the SureStart Unit for the M3.
After you have filtered your list as required, click on the 'ANALYSE' button. You will see a screen like this:
You can choose which summary categories will be included in your report by ticking or de-selecting the boxes next to:
Children Seen Ethnic Breakdown Families Seen Pregnant Women
Family Services CCM Superuser Guide
25
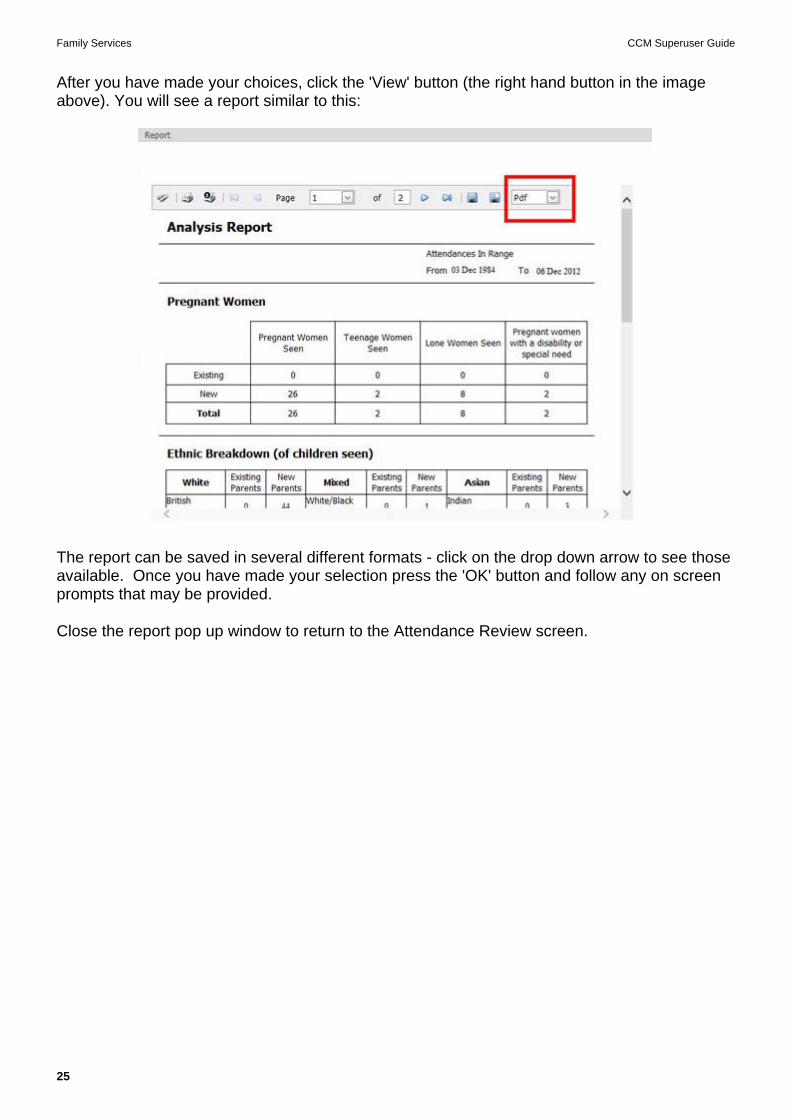
After you have made your choices, click the 'View' button (the right hand button in the image above). You will see a report similar to this:
The report can be saved in several different formats - click on the drop down arrow to see those available. Once you have made your selection press the 'OK' button and follow any on screen prompts that may be provided.
Close the report pop up window to return to the Attendance Review screen.

Family Services CCM Superuser Guide
26
5. Mail Merge / Data Extract
The Mail Merge / Data Extract screen allows you to create very detailed queries that can then be used for data analysis, reporting or mailing lists. It is useful to report on registration numbers.
Click on Search in the side menu, and then click on Mail Merge / Data Extract to access this functionality.
The Mail Merge and Data Extract screen may look something like the following once you have completed a search:

Family Services CCM Superuser Guide
27
You can choose from a variety of filters (located down the left hand side of the screen), to carry out very precise filtering of records, generally based on the information held within each person's record. Generally, the more filters you apply, the smaller your list of results will be. The list of filtered names appears on the right hand side of the screen.
As there are a large number of filters available a scroll bar is provided so that you can view them all.
At the top of the screen, there are options for you to choose what to do with the list of names i.e. create a mailing list from them, create an excel spreadsheet to analyse the data, or create a report detailing attendance information of the people in your list.
The screen is fairly similar to the Attendance Review screen that is discussed section 4. There are, however, some significant differences, and these are covered section 5.1: Filters and Options in the Mail Merge & Data Extract Screen.
Note: The most important difference between this and the Attendance Review screen is that the results generated from this screen are not based around attendance at activities or sessions. They are just based around whether a record exists in the database or not. As such the filters operate on the current status of individuals when the list was created.
If you double-click on a name in the list, that person's Individuals Full Details box will be shown.

Family Services CCM Superuser Guide
28
5.1. Filters and options in the mail merge and data extract screen
Archived or un-archived search and retain search filter
At the top of the screen there are selection items that let you choose whether to search for un-archived (active) families, both un-archived and archived families, or only archived families for your data extract/mail list. The default setting is un-archived families only. Select the option you need.
At the top of the screen, there is a check box called Retain filter option between selections.
This is a very important check box, because it affects the way the filters work.
If the box is not ticked, then each time a list is generated from the filters you have chosen, all the filters will re-set to their default values as soon as the list has been generated. In most cases, that means they are disregarded.
If the box is ticked, then the filters you have chosen will stay in place, regardless of whether you generate a new or amended list of records.
Filter options
There is a comprehensive set of filter options available to enable you to create a very precise query to ensure you only extract the people you need. The filters are located down the left-hand side of the screen.
The filters can be applied together so that if you select “Registered – Yes”, “Pregnant – Yes” and “Smoker – Yes”, then you will get a list of all registered people who are pregnant and who smoke.
Please note: when using the mail merge / data extract for looking at registration number you must always select “Registered – Yes”.
The result of your selection is not shown until you click on the 'New List' button, at the top of the filter column. When you do, your query will be created and run and you will see a list of the people that match your filters.
If you do not choose to retain your filters (see above), you can create a cumulative effect with the filters very easily. If you create a new list with only the ‘Smoker - Yes’ criteria selected, and then choose ‘Pregnant - Yes’ and click on the 'Add To List' button, at the bottom of the filter column, your results will show anyone who is a smoker plus anyone who is pregnant.
You can then add more to the list if you require, using the same method.

Family Services CCM Superuser Guide
29
Located filter
Every address set up on the database has an area (LSOA) allocated to it. You can then group the addresses together by their area using this filter block. The area options allow you to specify which groups of people you wish to include based upon the areas you have set up in relation to their addresses.
My Area - This will include all families that live in those areas that are assigned to the reach area of the Children's Centre you have logged in to. If you are logged into Management Console, all areas will be selected.
Outside – This will only include families living out of borough.
All areas – This will include all families regardless of what area they live in. So families from inside and outside the borough will be included.
Clear - removes all the ticks from the boxes.
Multi Select – You can combine areas however you please by clicking in the boxes next to the area names you'd like to include.
5.2. Generating a list of results
Lists are created using the buttons at the bottom of the filtering column. Your list of results shows on the right-hand side of the screen.
New list button
When you have made your selection you can click on the 'New List' button to create your query. This will create a new list using the filters you have selected. You should use this for the first set of filters you run or if you want to create a new list rather than add to an existing one. When you click on this button the database will run the query you have created and display the results in the panel on the right hand side.
Family Services CCM Superuser Guide
30
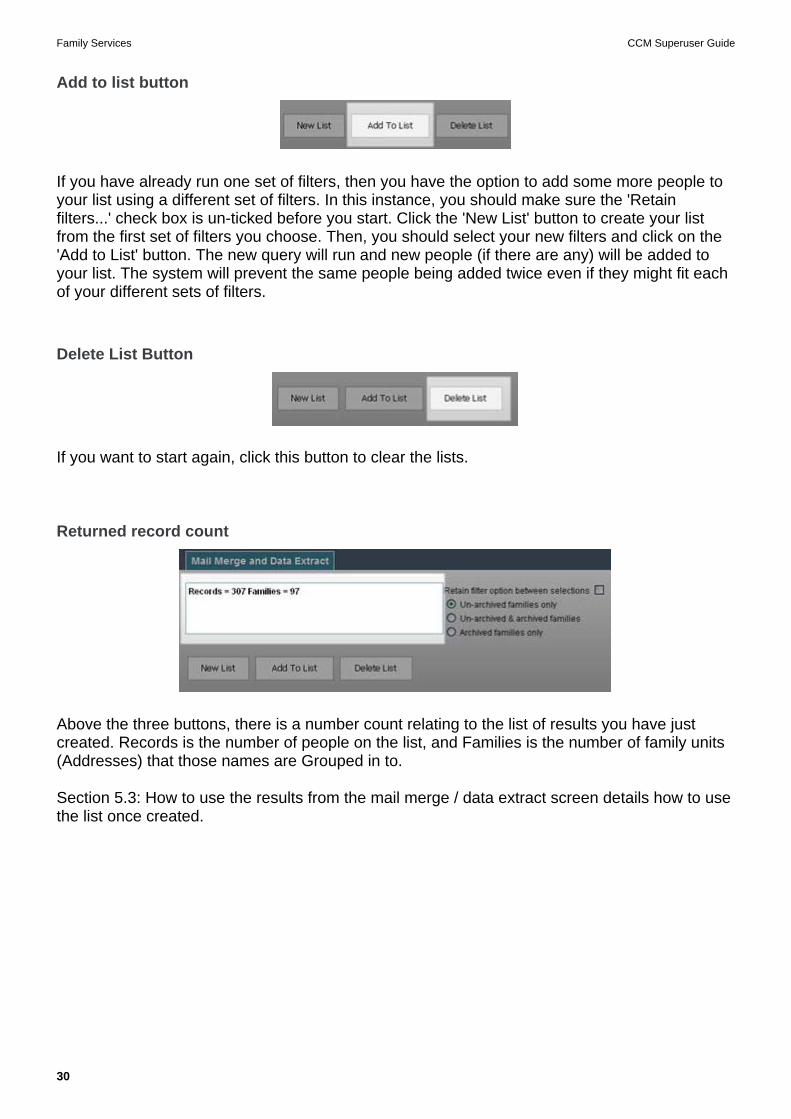
Add to list button
If you have already run one set of filters, then you have the option to add some more people to your list using a different set of filters. In this instance, you should make sure the 'Retain filters...' check box is un-ticked before you start. Click the 'New List' button to create your list from the first set of filters you choose. Then, you should select your new filters and click on the 'Add to List' button. The new query will run and new people (if there are any) will be added to your list. The system will prevent the same people being added twice even if they might fit each of your different sets of filters.
Delete List Button
If you want to start again, click this button to clear the lists.
Returned record count
Above the three buttons, there is a number count relating to the list of results you have just created. Records is the number of people on the list, and Families is the number of family units (Addresses) that those names are Grouped in to.
Section 5.3: How to use the results from the mail merge / data extract screen details how to use the list once created.

Family Services CCM Superuser Guide
31
5.3. How to use the results from the mail merge / data extract screen
Your filtered list will look something similar to the following:
A panel at the top left-hand side gives a number count of people (records) and how many addresses (families) were returned according to your search criteria. Also at the top right of the screen there are choices about how to extract the data. This is discussed in section 5.4: The Output Button – Mail Merge or Data Extract.
A panel at the top of the results grid shows you which filters have been applied to arrive at this result.
Each column has a column header (e.g. a Label name, like 'Identifier', 'Area', etc.), and each row is one person's record.
Column header sorting
If you click on any of the Column Header buttons, you will sort the list into order based on the information in that column. If you keep clicking the same button, it will sort the data alternately in A-to-Z, then Z-to-A order.
Family Services CCM Superuser Guide
32
5.4. The Output Button – Mail Merge or Data Extract
Mailing lists or data extract
An important feature in the Children's Centre Manager database is the Correspondee status box, which is shown in the information presented when you select the Personal menu option in the Individual Full Details screen. The presence, or not, of a tick in this box determines whether a record is included in a Mailing List Extract.
The Correspondee field is used by all the Mail options within the database to indicate which member of each household you would want to write to. You can use the Correspondee Check option in the ‘System Admin’ menu to help find any families without a Correspondee or those where more than one has been set, either intentionally or by mistake.
Note: The Correspondee box is ignored when a Detailed Data Extract is done, rather than a Mailing List.
The output button
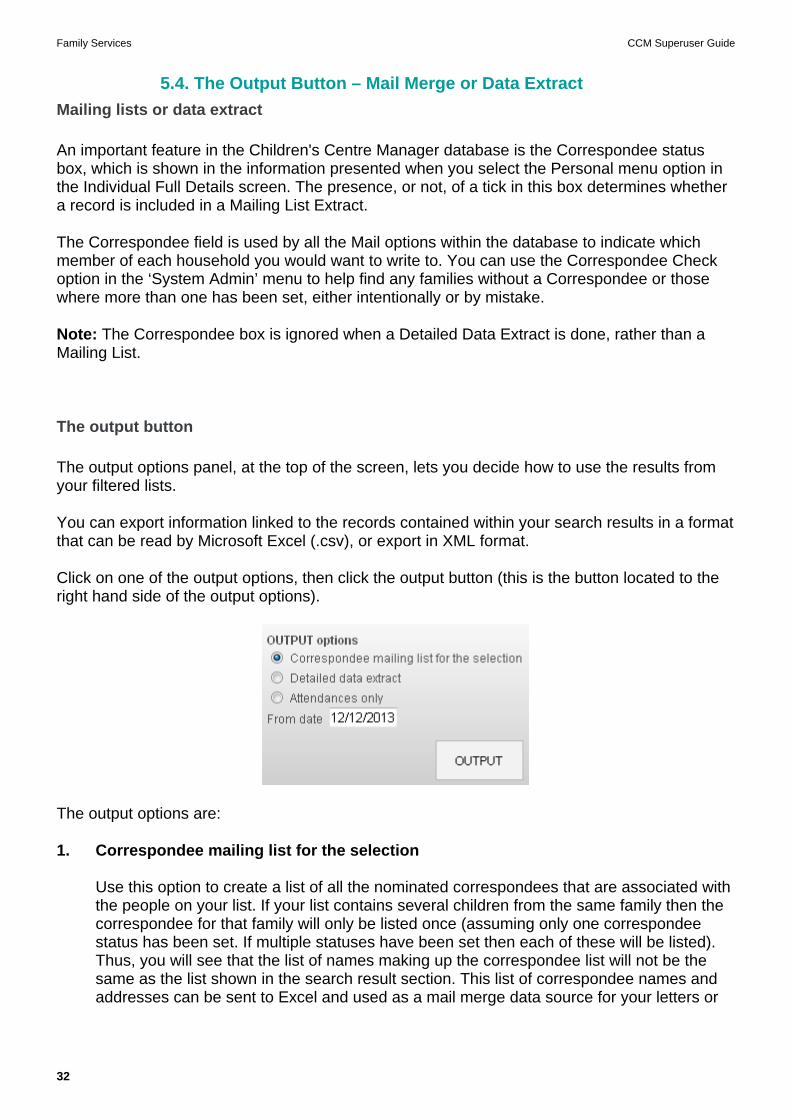
The output options panel, at the top of the screen, lets you decide how to use the results from your filtered lists.
You can export information linked to the records contained within your search results in a format that can be read by Microsoft Excel (.csv), or export in XML format.
Click on one of the output options, then click the output button (this is the button located to the right hand side of the output options).
The output options are:
1. Correspondee mailing list for the selection Use this option to create a list of all the nominated correspondees that are associated with the people on your list. If your list contains several children from the same family then the correspondee for that family will only be listed once (assuming only one correspondee status has been set. If multiple statuses have been set then each of these will be listed). Thus, you will see that the list of names making up the correspondee list will not be the same as the list shown in the search result section. This list of correspondee names and addresses can be sent to Excel and used as a mail merge data source for your letters or
Family Services CCM Superuser Guide
33
labels. The extract produced by the correspondee mailing list for the selection option only includes contact details.
2. Detailed data extract The extract produced by the detailed data extract option includes most tick-boxes and data fields from a person's record. The names on the data list extracted will match those in your filtered list.
3. Attendances only Choose a date from the drop down calendar, to be the starting point from when attendances are checked. This list will show only the attendance information attached to the names of the people in your filtered list – as such it is possible that the flags on an individual may be different at the time of attendance compared with when the list was created. For example the ‘AT Parent’ column in the resulting attendance list refers to status of the parent flag(s) when that individual attended the activity – not the status of the parent flag(s) when the data extract was undertaken. The ‘AT Parent’ indicators are 0 = not a parent. 1 = is a parent. 2 = is a lone parent.
Once the output button has been clicked, you presented with the Data Pre-Extract Screen. Here you can modify the columns that are presented (select the Field Chooser) or export the information in a format that can be read by Microsoft Excel (.csv) or as an XML file by clicking the appropriate button.
For more information about this screen please refer to section 6: Data pre-extract screen.

Family Services CCM Superuser Guide
34
6. Data pre-extract screen
After you click the output button in the Attendance Review or the Mail Merge / Data Extract you will be presented with a Data Pre-Extract screen.
The options available are:
- Field chooser
The field chooser will have a number of fields pre-selected depending on the Output Option chosen (Correspondee Mailing List, Detailed Data Extract or Attendances). This initial selection is aimed at creating a manageable data set that will not use excessive system resources. The selection can be changed by ticking or un-ticking the fields listed.

Family Services CCM Superuser Guide
35
The following example shows some of the fields selected for a Detailed Data Extract:
- Sort order
The order in which the records are output can be determined by clicking the 'Sort Order' button and ticking the fields in the required order. The fields listed are dependent on the Output Option chosen (Correspondee Mailing List, Detailed Data Extract or Attendances). The following example shows the sort order available for an Attendance extract.
Family Services CCM Superuser Guide
36
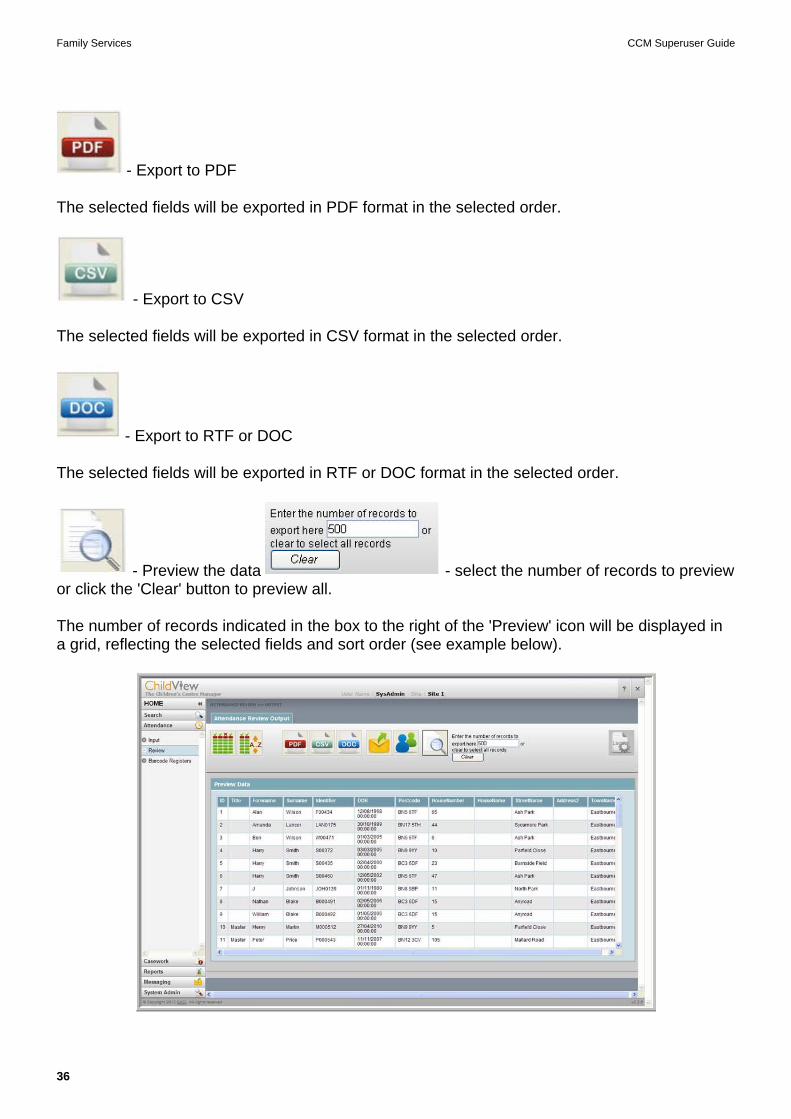
- Export to PDF
The selected fields will be exported in PDF format in the selected order.
- Export to CSV
The selected fields will be exported in CSV format in the selected order.
- Export to RTF or DOC
The selected fields will be exported in RTF or DOC format in the selected order.
- Preview the data - select the number of records to preview or click the 'Clear' button to preview all.
The number of records indicated in the box to the right of the 'Preview' icon will be displayed in a grid, reflecting the selected fields and sort order (see example below).
Family Services CCM Superuser Guide
37
7. Session Analysis Session Analysis functionality allows a user with the appropriate permission to select sessions, view a summary break down then drill down to more detailed data as required.
Search filters are provided to enable the user to define the scope of the analysis and the data returned is then broken down into a number of different areas, as per the following sections.
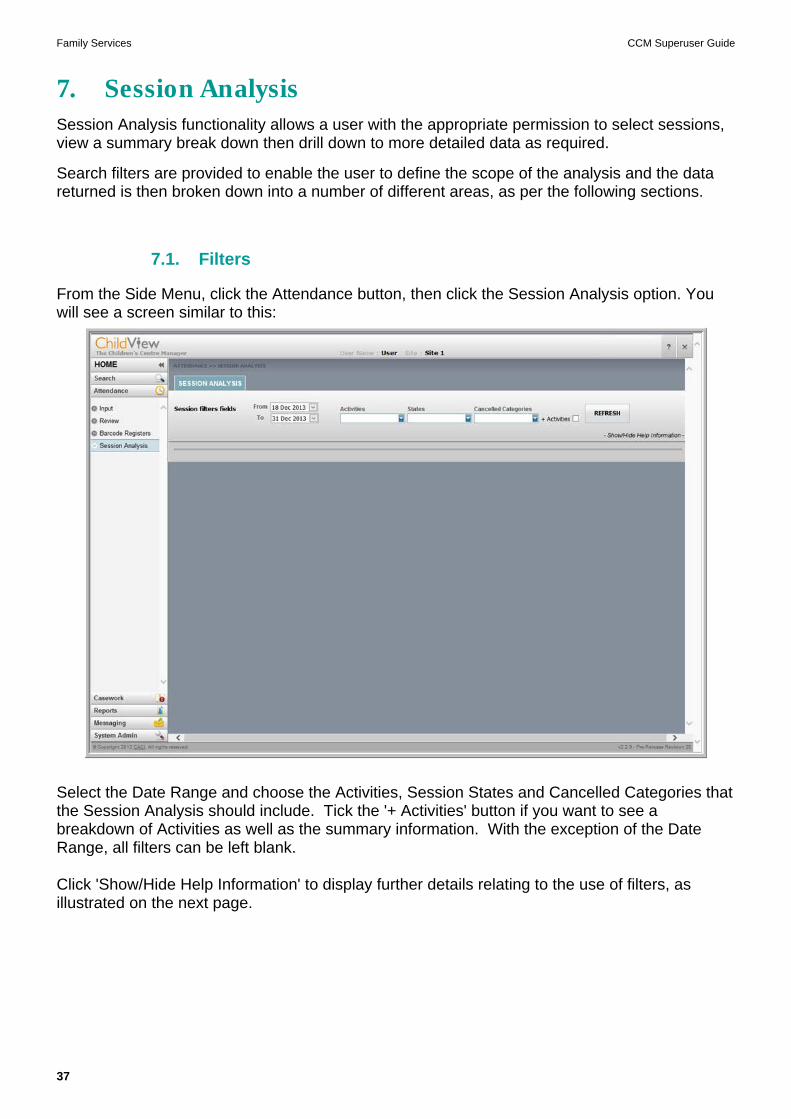
7.1. Filters
From the Side Menu, click the Attendance button, then click the Session Analysis option. You will see a screen similar to this:
Select the Date Range and choose the Activities, Session States and Cancelled Categories that the Session Analysis should include. Tick the '+ Activities' button if you want to see a breakdown of Activities as well as the summary information. With the exception of the Date Range, all filters can be left blank.
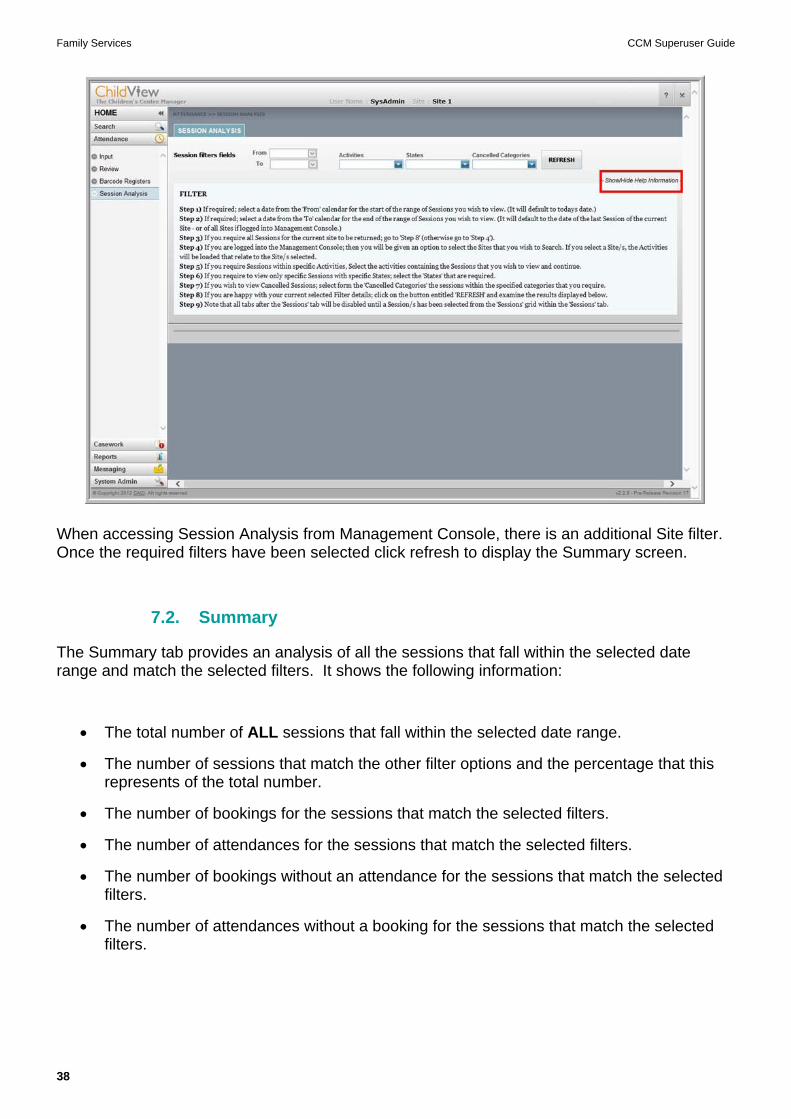
Click 'Show/Hide Help Information' to display further details relating to the use of filters, as illustrated on the next page.
Family Services CCM Superuser Guide
38
When accessing Session Analysis from Management Console, there is an additional Site filter. Once the required filters have been selected click refresh to display the Summary screen.
7.2. Summary
The Summary tab provides an analysis of all the sessions that fall within the selected date range and match the selected filters. It shows the following information:
The total number of ALL sessions that fall within the selected date range.
The number of sessions that match the other filter options and the percentage that this represents of the total number.
The number of bookings for the sessions that match the selected filters.
The number of attendances for the sessions that match the selected filters.
The number of bookings without an attendance for the sessions that match the selected filters.
The number of attendances without a booking for the sessions that match the selected filters.

Family Services CCM Superuser Guide
39
This summary data is then broken down by:
Session Status
Cancelled Categories
Cancelled Reasons
Activity (If '+ Activities' ticked)
An example of the Summary Tab is shown below.
The percentages shown are all calculated against the number of sessions selected (not the total number within the date range), and represented graphically by the yellow bars.
The Summary can be either saved as a .CSV file or printed directly.

Family Services CCM Superuser Guide
40
Clicking 'Show/Hide Help Information' will display further details about the Filters or the Summary Tab.
7.3. Sessions
The Sessions Tab lists all the sessions that match the selected filters.
The Select tick box at the left of each row is used to activate the other tabs for the selected session(s). These tabs will not display any information until one or more sessions are ticked.
Clicking on a row will activate the Session Edit/Attendance Input/Session Cancel buttons at the bottom of the screen. When a row is clicked, it will be shown in blue.
If a cancelled session is selected the Session Cancel button will become Session Activate and the Session Edit button will not be available.
The Attendance Input button links to the Attendance Input session select screen.
An example of the Sessions Tab is shown below:
Further details can be obtained by clicking on the Show/Hide Help Information button.

Family Services CCM Superuser Guide
41
7.4. Bookings
The Bookings Tab lists all bookings for the selected session.
The tick box at the left of each row can be used to select individuals for inclusion in a Message Group or as recipients for a message by clicking the Send Message or Group button.
Clicking on a row will open the Individual Full Details window.
An example of the Bookings Tab is shown below.
Further details can be obtained by clicking on the Show/Hide Help Information button.

Family Services CCM Superuser Guide
42
7.5. Attendances
The Attendances Tab lists all attendances for the selected session.
The tick box at the left of each row can be used to select individuals for inclusion in a Message Group or as recipients for a message by clicking the Send Message or Group button.
Clicking on a row will open the Individual Full Details window.
An example of the Attendances Tab is shown below.
Further details can be obtained by clicking on the Show/Hide Help Information button.
Family Services CCM Superuser Guide
43
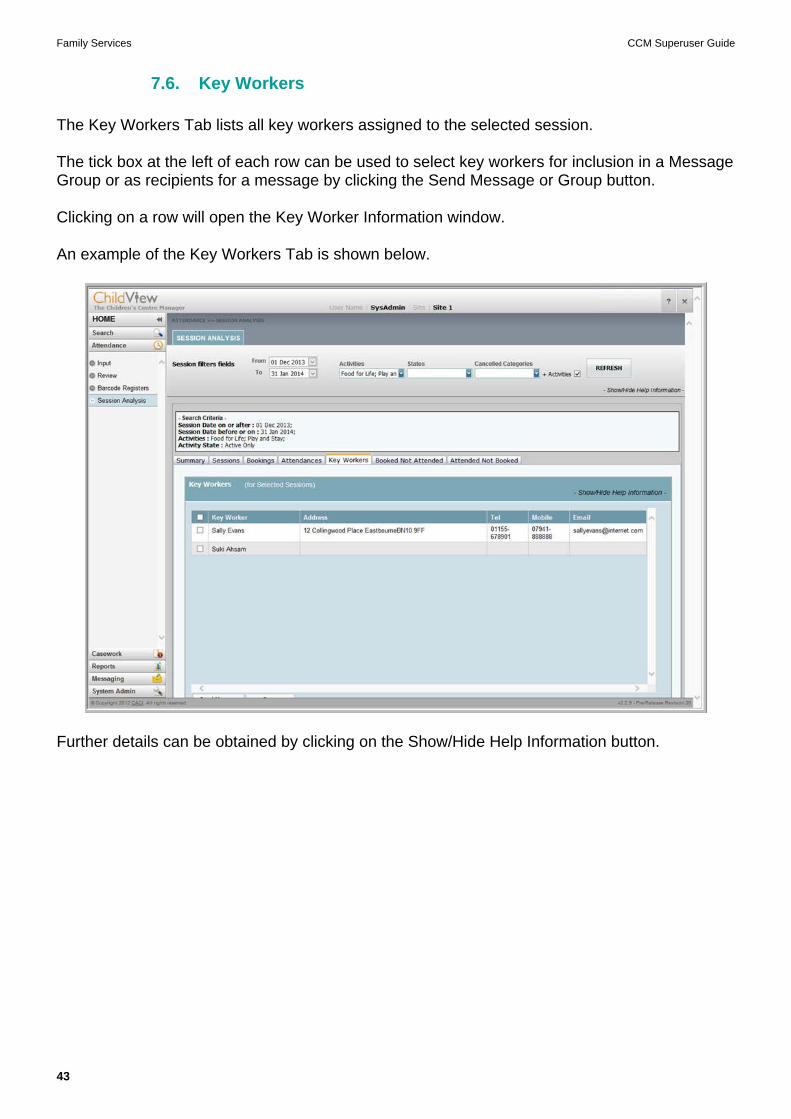
7.6. Key Workers
The Key Workers Tab lists all key workers assigned to the selected session.
The tick box at the left of each row can be used to select key workers for inclusion in a Message Group or as recipients for a message by clicking the Send Message or Group button.
Clicking on a row will open the Key Worker Information window.
An example of the Key Workers Tab is shown below.
Further details can be obtained by clicking on the Show/Hide Help Information button.

Family Services CCM Superuser Guide
44
7.7. Booked not attended
The Booked Not Attended Tab lists all bookings for the selected session which did not result in an attendance.
The tick box at the left of each row can be used to select individuals for inclusion in a Message Group or as recipients for a message by clicking the Send Message or Group button.
The selected session can be edited by clicking the Edit Session button at the bottom right of the screen.
Clicking on a row will open the Individual Full Details window.
An example of the Booked Not Attended Tab is shown below.

Family Services CCM Superuser Guide
45
7.8. Attended not booked
The Attended Not Booked Tab lists all attendances for the selected session which did not have an associated booking.
The tick box at the left of each row can be used to select individuals for inclusion in a Message Group or as recipients for a message by clicking the Send Message or Group button.
The selected session can be edited by clicking the Edit Session button at the bottom right of the screen.
Clicking on a row will open the Individual Full Details window.
An example of the Attended Not Booked Tab is shown below.

Family Services CCM Superuser Guide
46
8. Reports The Reports option allows CCM users to run custom created reports that have been added to the database.
When the screen is first loaded the 'All Reports' tab will show detailing every report the user has the rights to run. Clicking one of the other tabs at the top of the screen will only show those reports assigned to that category.
To order reports alphabetically, click on the word ‘name’ in the reports column header.
8.1. Running a report
1. Click on the relevant tab to view the available reports (all performance data reports are in the ‘Performance Measures’ tab).
2. Click on the graph icon that is relevant to the query you wish to run.
3. If you are required to specify any parameters the query needs, for example site name or date range, then a screen will show where you can input those.
Note: Compare with the past period start will compare the data from the time period specified in the date fields with past data. A number must be entered in this field to represent the number of past months you would like to make the comparison with. For example to compare the previous year’s data enter 12.
4. Once you have entered the required parameters press the 'Produce Report' button.
5. The results of the query will then be shown. For example:
Family Services CCM Superuser Guide
47
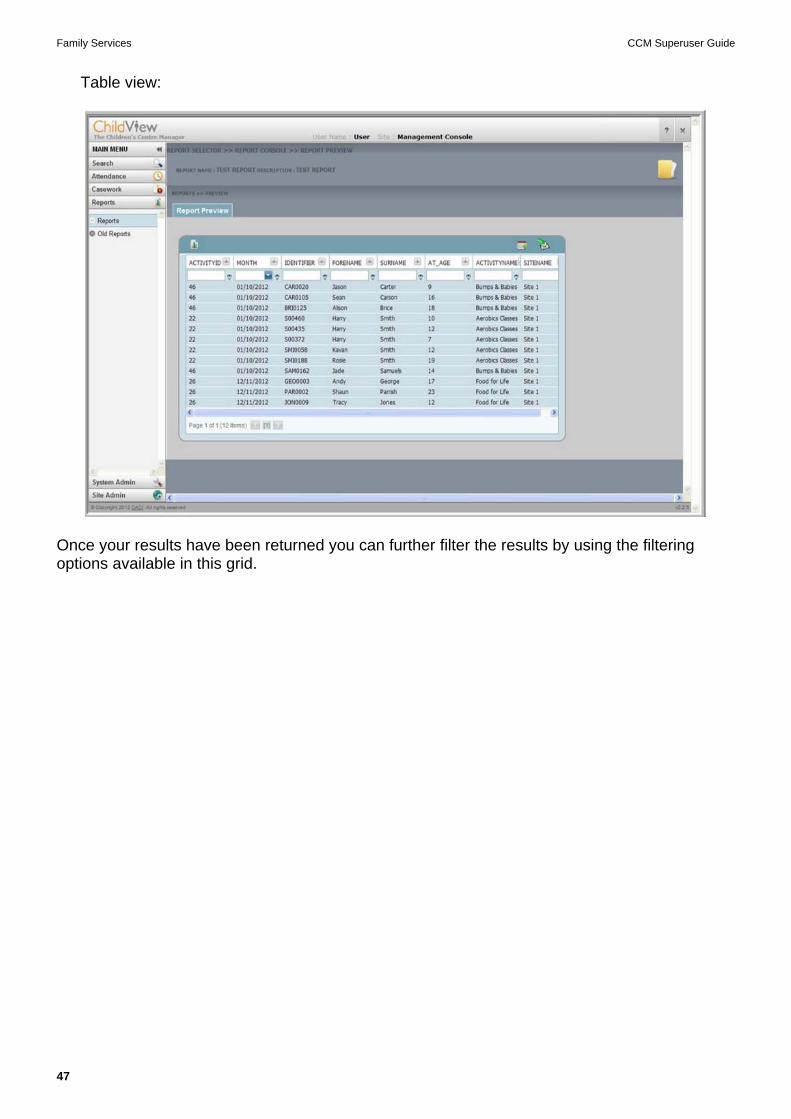
Table view:
Once your results have been returned you can further filter the results by using the filtering options available in this grid.
Family Services CCM Superuser Guide
48
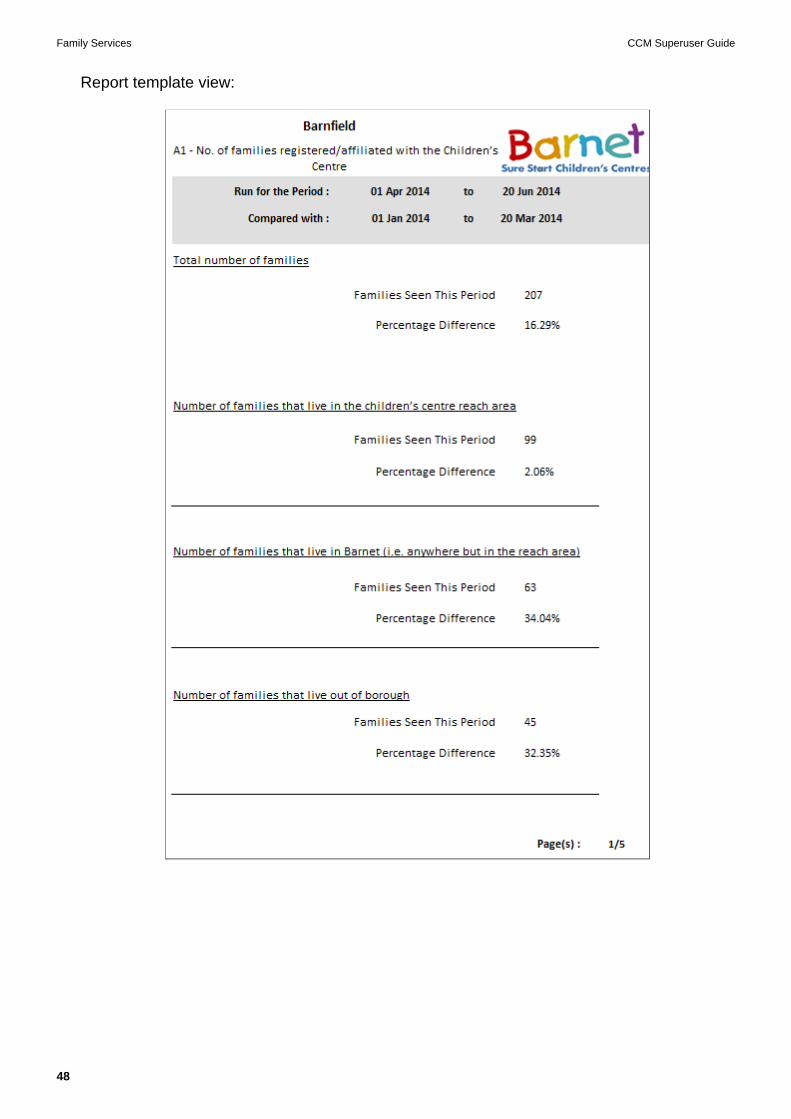
Report template view:

Family Services CCM Superuser Guide
49
Field Chooser
Clicking the' Field Chooser' icon opens a box where you can configure which columns of information are shown on screen and also in any export you undertake. For example:
Tick the fields you want to include and un-tick the fields you don't want. Once you have made
your selection click the icon located at the top right of the box to return to the previous screen.
The result grid will update accordingly.
Exporting the results
Should you wish to export the results of the report, hover over the icon and a list of available options will show:

Family Services CCM Superuser Guide
50
Click the relevant option.
Note: both the CSV and XLS exported files can be opened in Microsoft Excel.

Family Services CCM Superuser Guide
51
9. Advanced Search 9.1. Advanced search overview
The Advanced Search option will allow you to search for individuals (records) in the database and; if required; their associated attendance(s) using a larger number of filtering criteria than available via the Mail Merge / Data Extract Screen or the Attendance Review screen.
Advanced Search works on a 2 step process:
As such attendance information can only be found for those individuals that have been retrieved during the initial individual search phase.
To access Advanced Search, click on the Search menu item on the left hand side of the screen and then click the Advanced Search option. You will be presented with a screen similar to the following:
A large number of filters are available in Advanced Search, and due to this the filters have been gathered into their respective tabs and; in some instances; into different headings within those tabs. The various filters are accessed by clicking on the respective tab at the top of the screen, and where necessary selecting the sub Group heading.
Create a cohort of
individuals
Create a cohort of
individuals
Family Services CCM Superuser Guide
52
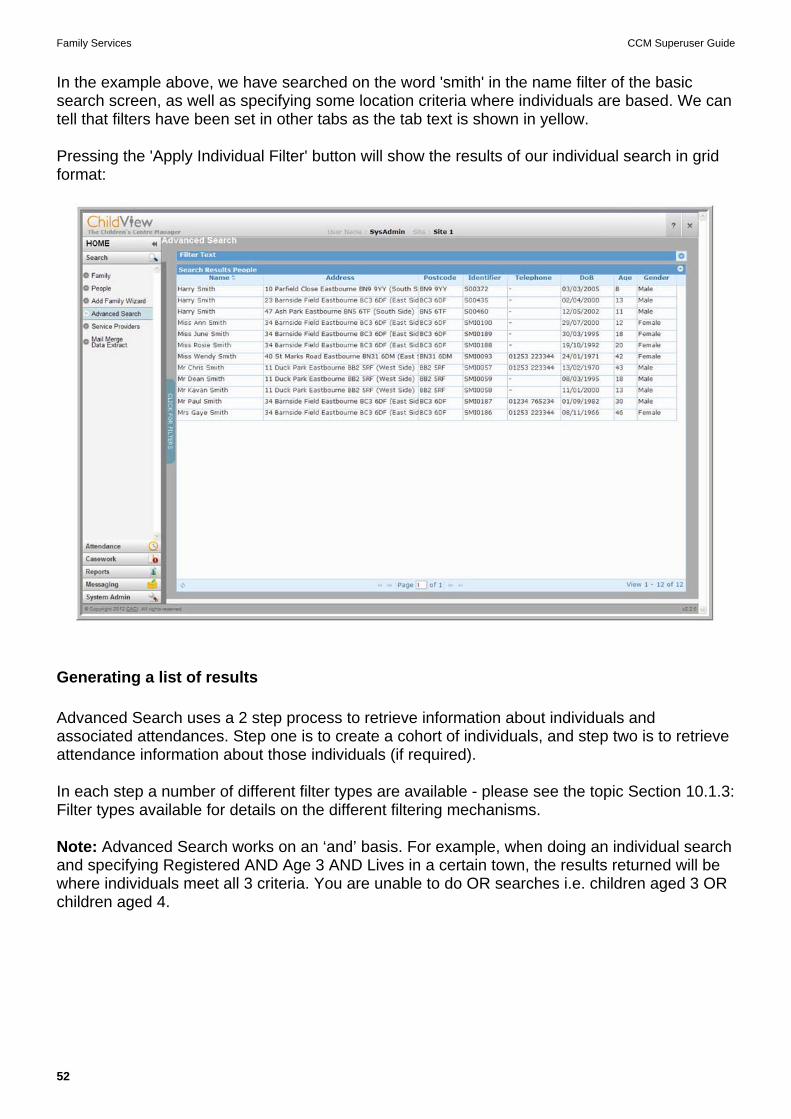
In the example above, we have searched on the word 'smith' in the name filter of the basic search screen, as well as specifying some location criteria where individuals are based. We can tell that filters have been set in other tabs as the tab text is shown in yellow.
Pressing the 'Apply Individual Filter' button will show the results of our individual search in grid format:
Generating a list of results
Advanced Search uses a 2 step process to retrieve information about individuals and associated attendances. Step one is to create a cohort of individuals, and step two is to retrieve attendance information about those individuals (if required).
In each step a number of different filter types are available - please see the topic Section 10.1.3: Filter types available for details on the different filtering mechanisms.
Note: Advanced Search works on an ‘and’ basis. For example, when doing an individual search and specifying Registered AND Age 3 AND Lives in a certain town, the results returned will be where individuals meet all 3 criteria. You are unable to do OR searches i.e. children aged 3 OR children aged 4.

Family Services CCM Superuser Guide
53
Individual Search
1. Select the relevant Individual filter tabs and then select the options appropriate to your search (See Section 10.2: Individual Filter tabs for information about the options available).
2. Press the 'Apply Individual Filter' button to retrieve your search results.
3. Your search results will show in a grid on the screen, and your filter page will 'slide' to the left and be hidden from view. Click on the 'Click For Filters' text to re-display the main filter page. Click again to hide.
Note: by default the individual search will not include any deceased individuals or those who are classified as living at an archived address. Should you wish to include these individuals in your search results you will need to set the respective filters.
Once you have retrieved your cohort of individuals the 3 tabs with filters related to Attendance information will become available as well as the 'Apply Attendance Filter' button:
You can now retrieve attendance information if required.
Attendance Search
1. Select the relevant Attendance filter tabs and then select the options appropriate to your search (See section 10.3: Attendance Filter tabs for information about the options available).
2. Press the 'Apply Attendance Filter' button to retrieve your search results.
3. Your results will show on the screen, and your filters will 'slide' to the left and be hidden from view. Click on the 'Click For Filters' text to shown the main filter page. Click again to hide. Three Grids of information will be populated: - Attendance information for individuals. - No attendance information for individuals i.e. those individuals who have not attended an activity or session. - Family attendance information i.e. address information for those people who have attended an activity or session, along with the correspondee name (if available).
Whilst your search results are being retrieved all the buttons at the top of the Advanced Search screen will be disabled until the three grids are populated.
Family Services CCM Superuser Guide
54
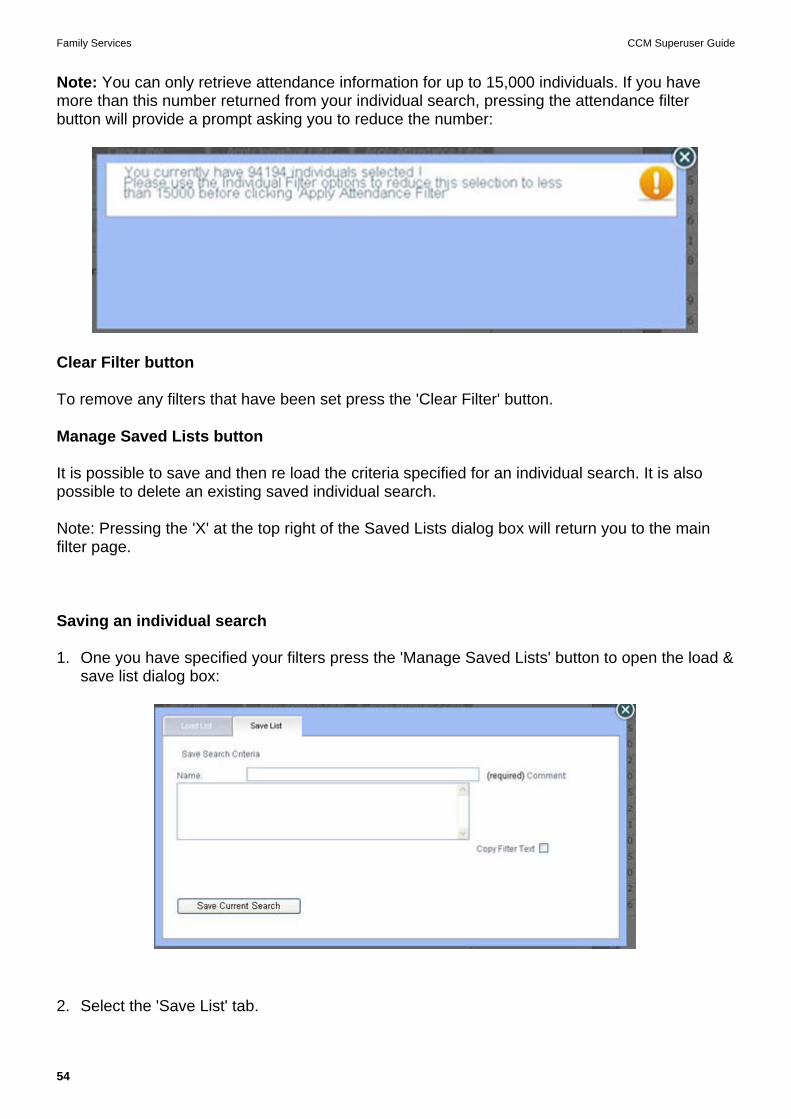
Note: You can only retrieve attendance information for up to 15,000 individuals. If you have more than this number returned from your individual search, pressing the attendance filter button will provide a prompt asking you to reduce the number:
Clear Filter button
To remove any filters that have been set press the 'Clear Filter' button.
Manage Saved Lists button
It is possible to save and then re load the criteria specified for an individual search. It is also possible to delete an existing saved individual search.
Note: Pressing the 'X' at the top right of the Saved Lists dialog box will return you to the main filter page.
Saving an individual search
1. One you have specified your filters press the 'Manage Saved Lists' button to open the load & save list dialog box:
2. Select the 'Save List' tab.

Family Services CCM Superuser Guide
55
3. Enter a suitable name for the search criteria.
4. You can either enter a suitable comment or else copy the filter text by ticking the 'Copy Filter Text' check box (filter text is discussed in section 10.1.2: Search Results).
5. Press the 'Save Current Search' button to save your search criteria.
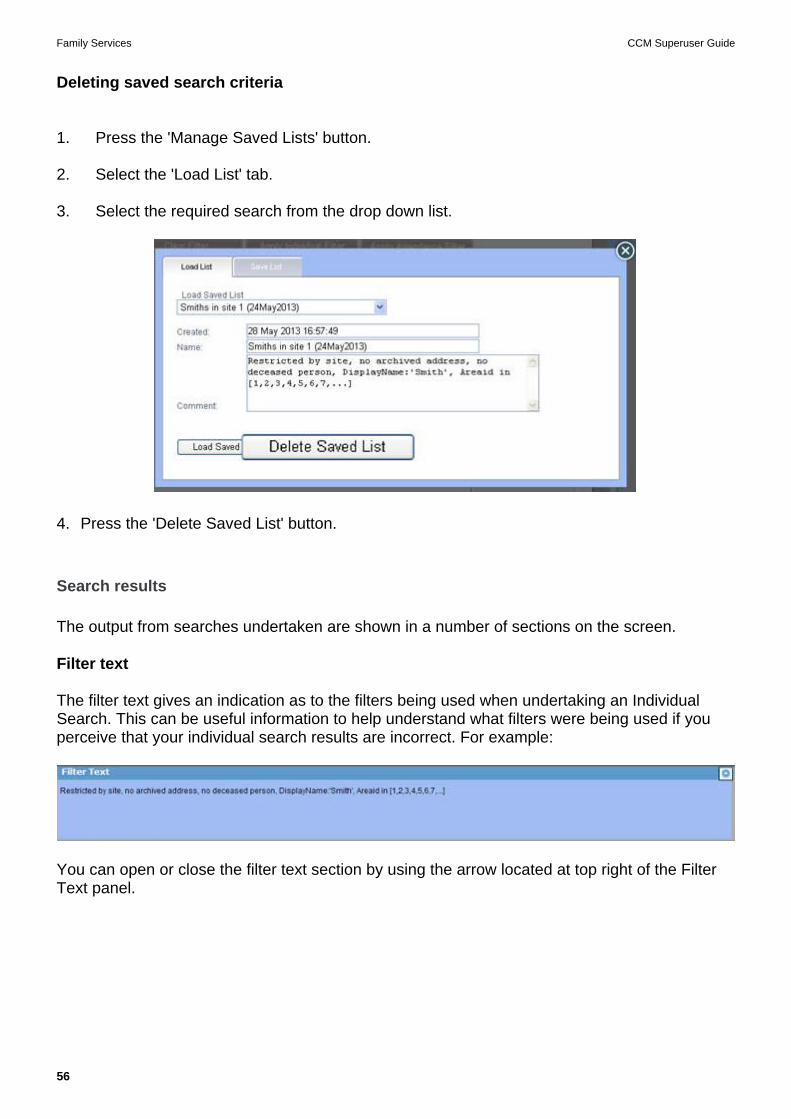
Loading saved search criteria
1. Press the 'Manage Saved Lists' button.
2. Select the 'Load List' tab if this is not shown by default.
3. Select the required search from the drop down list:
4. Press the 'Load Saved List' button.
5. Once your list has been loaded pressing the 'Apply Individual Filter' button will return the list of individuals who meet the set filter criteria.
Family Services CCM Superuser Guide
56
Deleting saved search criteria
1. Press the 'Manage Saved Lists' button.
2. Select the 'Load List' tab.
3. Select the required search from the drop down list.
4. Press the 'Delete Saved List' button.
Search results
The output from searches undertaken are shown in a number of sections on the screen.
Filter text
The filter text gives an indication as to the filters being used when undertaking an Individual Search. This can be useful information to help understand what filters were being used if you perceive that your individual search results are incorrect. For example:
You can open or close the filter text section by using the arrow located at top right of the Filter Text panel.

Family Services CCM Superuser Guide
57
Individual Search results
Undertaking an Individual search will show all those individuals meeting the search criteria in a single grid:
Deceased individuals are excluded from the results by default. Such individuals can be included by using the setting in the Advanced Search Health Tab but they will have a different formatting applied in the search results (all columns except the address column are in grey italics). In the following image Peter Smith is classed as deceased:

Family Services CCM Superuser Guide
58
Filter types available
Any individuals that are registered at an archived address will have a different formatting applied to them in the search results (the address column and the option address archived column is in blue bold). In the following image Bella Smith and Frank Smith both live at archived addresses:
Attendance Search Results
This will show information in 3 separate grids:
1. Attendance information for those individuals returned as part of the individual search. By default no duplicate entries of individuals will be shown in the list e.g. if John Smith attended both a Bumps & babies and also a computer course, his name will only show in the list once. If 'Show Duplicates' was enabled then his name would occur for each separate activity type attended - in this case twice.
Family Services CCM Superuser Guide
59
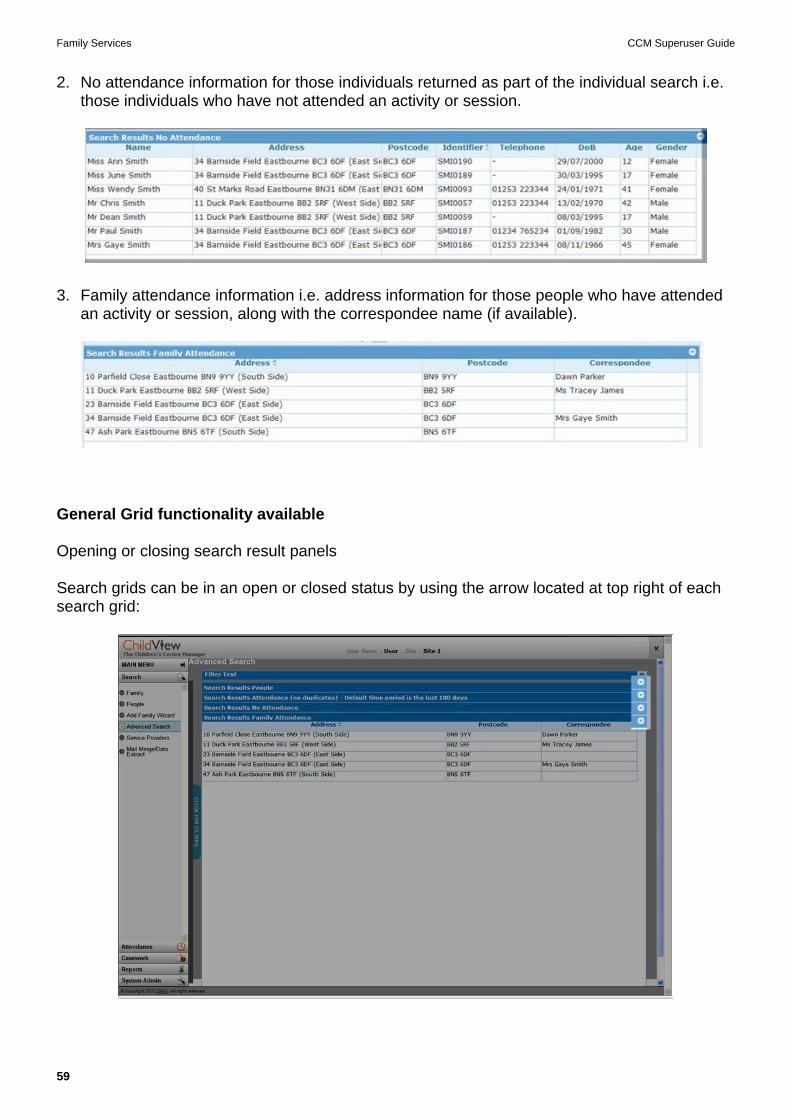
2. No attendance information for those individuals returned as part of the individual search i.e. those individuals who have not attended an activity or session.
3. Family attendance information i.e. address information for those people who have attended an activity or session, along with the correspondee name (if available).
General Grid functionality available
Opening or closing search result panels
Search grids can be in an open or closed status by using the arrow located at top right of each search grid:
Family Services CCM Superuser Guide
60
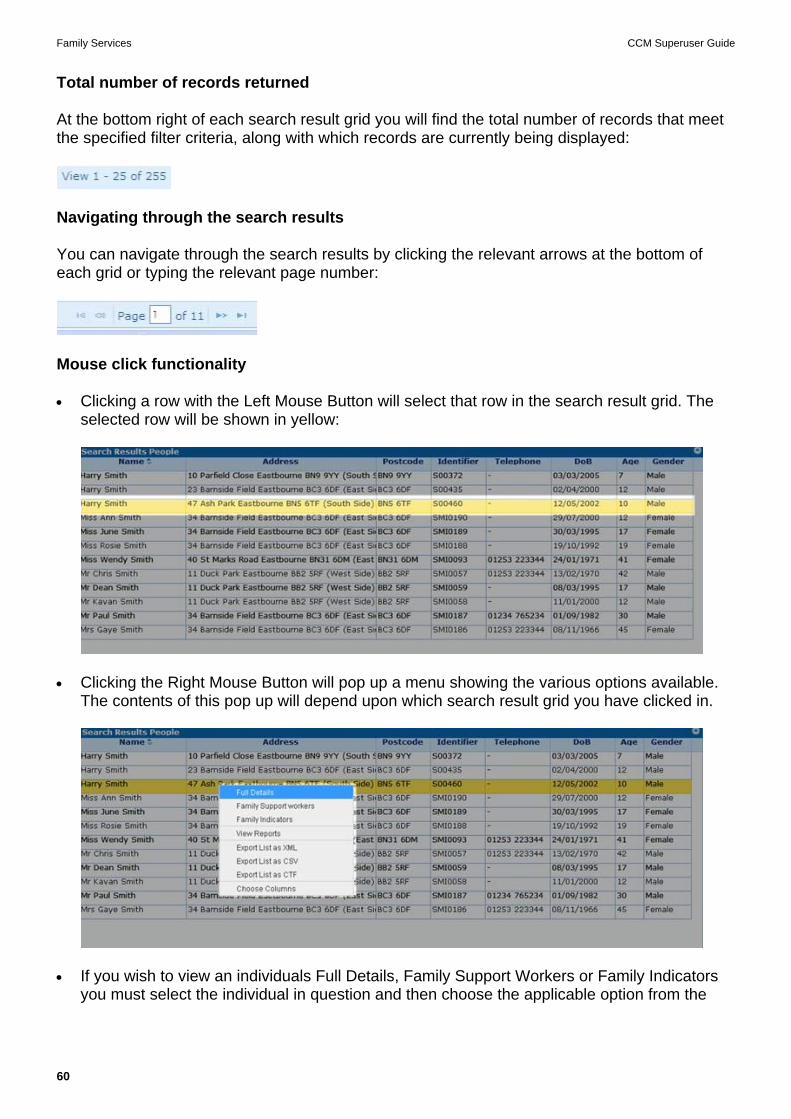
Total number of records returned
At the bottom right of each search result grid you will find the total number of records that meet the specified filter criteria, along with which records are currently being displayed:
Navigating through the search results
You can navigate through the search results by clicking the relevant arrows at the bottom of each grid or typing the relevant page number:
Mouse click functionality
Clicking a row with the Left Mouse Button will select that row in the search result grid. The selected row will be shown in yellow:
Clicking the Right Mouse Button will pop up a menu showing the various options available. The contents of this pop up will depend upon which search result grid you have clicked in.
If you wish to view an individuals Full Details, Family Support Workers or Family Indicators you must select the individual in question and then choose the applicable option from the

Family Services CCM Superuser Guide
61
pop up menu (Note: These options are only available in the pop up menu for the People search results).
It is possible to view additional columns in a search result grid. Right Mouse click in the grid in question, and select the 'Choose Columns' option in the pop up menu. You will then be shown a list of available columns. Tick those that you wish to see, un-tick those that you do not require. For example the individual search result grid has the following options available:
Click the 'X' to close the window once you have made your changes. Note: This option only effects the columns shown in the grid and does not affect the data that can be exported from the database.
Data export
The Search results can be exported out of the database by selecting the applicable option from the pop up menu.
The People Search result screen will allow you to export the list in XML, .csv or CTF format. The data exported contains the majority of the information held in the individuals full details screens.
The Attendance search result screen allows you to export the list in XML or .csv format. The data exported contains information about individual details captured at the time the attendance was recorded e.g. age when they attended the activity or session, the address they were living at, the ID of the Site they attended (AttendanceSID), ...
The No Attendance search result screen allows you to export the list in XML or .csv format. The data exported contains the majority of the information held in the individuals full details screens.
The family Attendance search result screen allows you to export the list in XML or .csv format. The data contains address information and also the name of the correspondee if available, for those individuals shown in the Attendance search result screen.
Column Widths
If you click and hold the mouse pointer over the line that divides two column headers, you will be able to drag the mouse to re-size the column width. You need to ensure that the mouse icon change to that shown in the image below:
Column Header sorting
If you click on any of the Column Header buttons, you will sort the list into order based on the information in that column. If you keep clicking the same button, it will sort the data alternately in A-to-Z, then Z-to-A order.

Family Services CCM Superuser Guide
62
9.2. Filter types available
There are a number of different filter types available in Advanced Search. and each filter that you wish to use needs to be enabled by having a tick in the check box at the left of the applicable panel:
Free Text Filter
Free text filters allow you to search on data that contains the text entered. For example entering the word ‘son’ in the Name filter will return ‘John Simpson’ and ‘Alison Smith’.

Family Services CCM Superuser Guide
63
Yes / No Filters
Yes / No filters also require an applicable setting i.e. tick smoker to search for individuals who smoke, un-tick to search for those who do not smoke:
If the smoker filter was not enabled then the search results would contain all those individuals who do or do not smoke.

Family Services CCM Superuser Guide
64
Numerical filters
Numerical filters allow for different search criteria to be used, and the applicable option can be selected from the drop down list. Enter your numerical value in the left hand box unless you select the 'Between' option in which case you will need to enter a value in both boxes.
Equals - This will return results that equal the value entered in the search box.
Less Than - This will return all results that are less than the value entered in the search box.
Greater Than - This will return all results that are greater than the value entered in the search box.
Between - This will return all results that are between the values entered in both search boxes. Note the results will not include those values specified. e.g. Searching between the values of 1 and 5 will return 2, 3 and 4.

Family Services CCM Superuser Guide
65
Date filters
Date fields provide for a range of search criteria to be used. Select the applicable option from the pop up menu shown when you click in the date field:
Drop down lists
Drop down lists can cater for multiple selections. Tick those entries you wish to use.
9.3. Individual filter tabs
9.3.1 Basic
This tab allows you to specify basic filter information.
Note: The 'Name' filter will search on the individuals forename, middle name, surname and 'known as' fields (as shown in the Individuals Full Details screen).

Family Services CCM Superuser Guide
66
9.3.2 Personal
The personal tab allows you to specify which filters you wish to use around the individuals personal status i.e. Registered Site details, Nationality, correspondee flag etc.
As well as a Personal Grouping, there is also a Nationality Grouping. Clicking this header allows you to use the following options:
Family Services CCM Superuser Guide
67
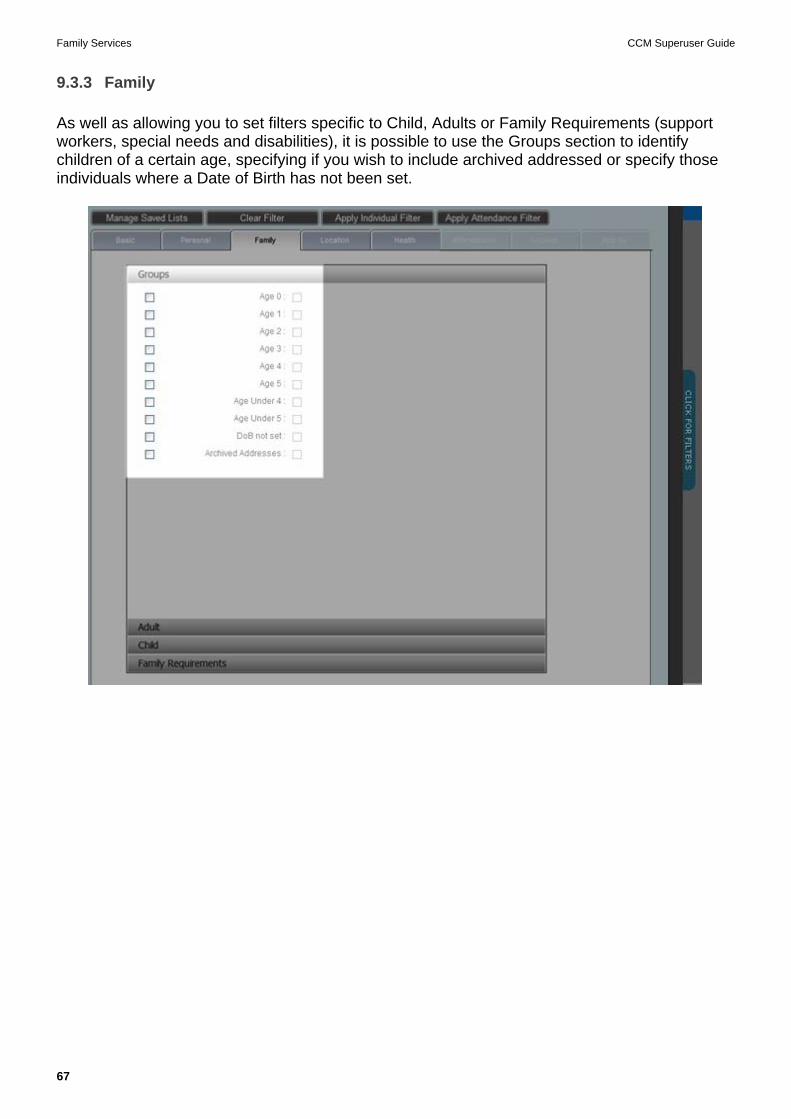
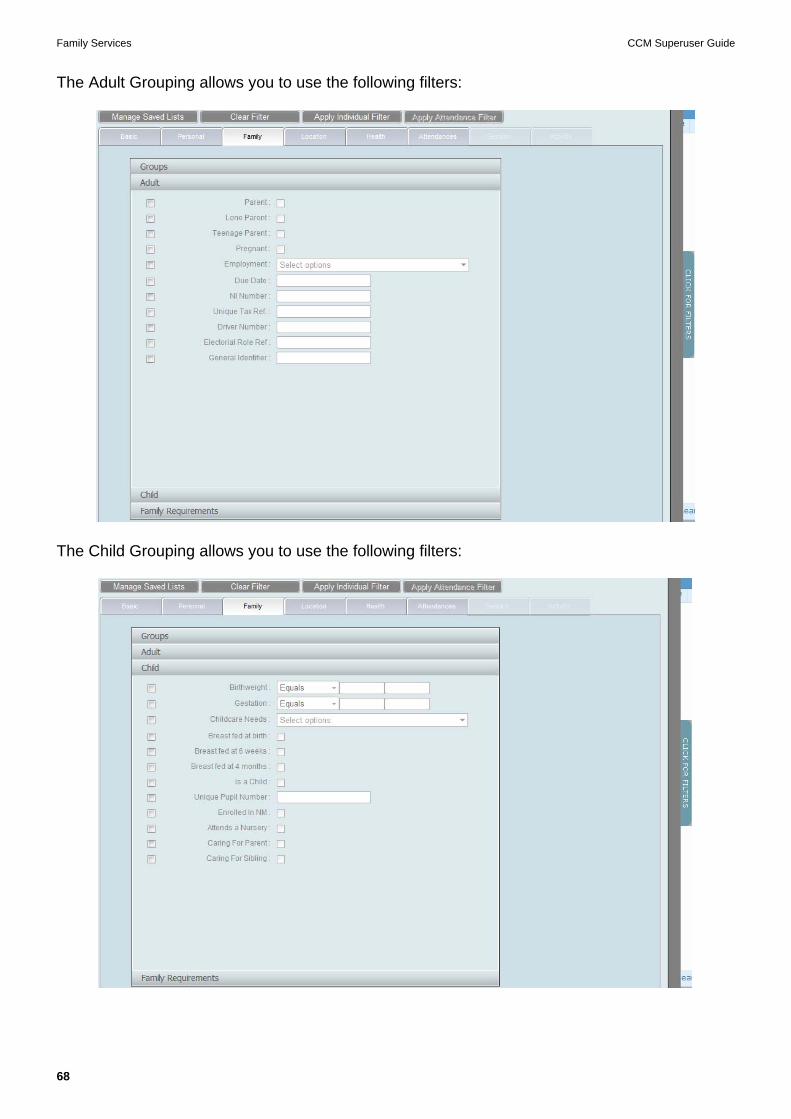
9.3.3 Family
As well as allowing you to set filters specific to Child, Adults or Family Requirements (support workers, special needs and disabilities), it is possible to use the Groups section to identify children of a certain age, specifying if you wish to include archived addressed or specify those individuals where a Date of Birth has not been set.
Family Services CCM Superuser Guide
68
The Adult Grouping allows you to use the following filters:
The Child Grouping allows you to use the following filters:

Family Services CCM Superuser Guide
69
The Family Requirements Grouping allows you to use the following filters:
9.3.4 Location
The location tab allow you to specify specific address information as well as use filters related to how address are grouped in the data base. For example people living in specific areas or those addresses that have a certain deprivation index value.

Family Services CCM Superuser Guide
70
The Area Grouping allows you to use the following filters:
Note: by default ‘site to search’ will be selected when logged in as a children’s centre. You should always un-tick this as it will search all out of borough addresses as well as your reach area addresses.
9.3.5 Health
This tab allows you to specify criteria around an individual’s health:
Family Services CCM Superuser Guide
71
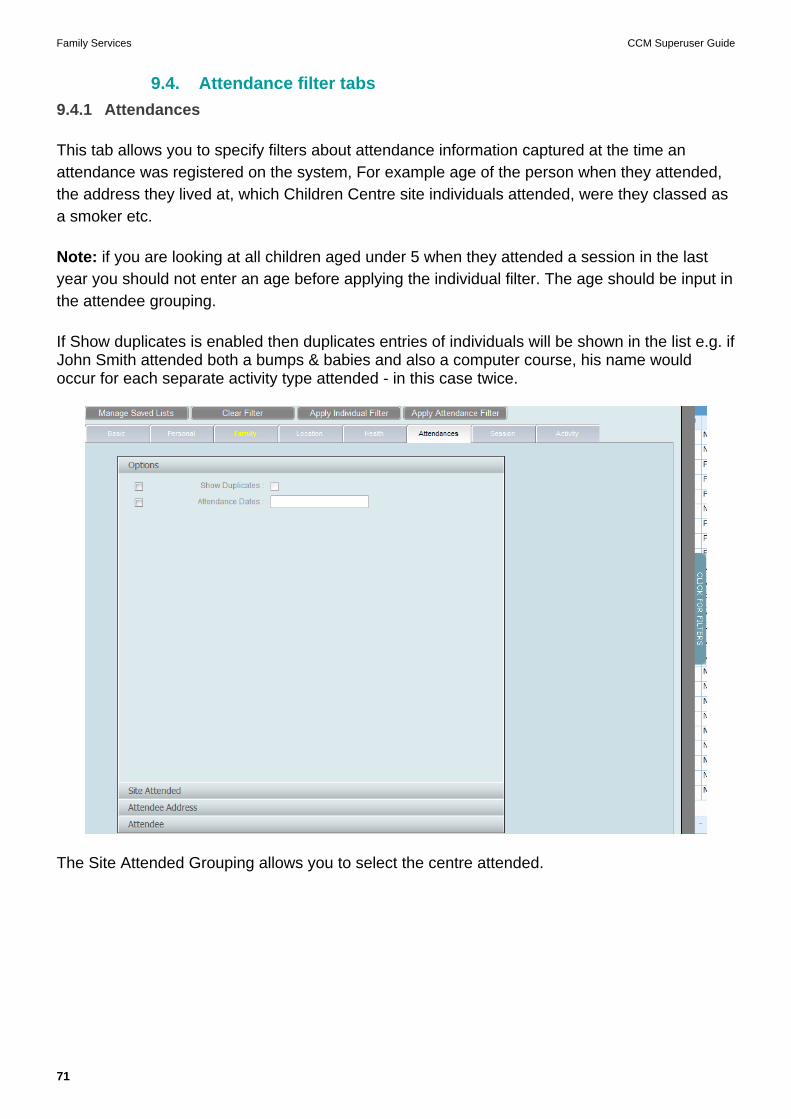
9.4. Attendance filter tabs
9.4.1 Attendances
This tab allows you to specify filters about attendance information captured at the time an attendance was registered on the system, For example age of the person when they attended, the address they lived at, which Children Centre site individuals attended, were they classed as a smoker etc.
Note: if you are looking at all children aged under 5 when they attended a session in the last year you should not enter an age before applying the individual filter. The age should be input in the attendee grouping.
If Show duplicates is enabled then duplicates entries of individuals will be shown in the list e.g. if John Smith attended both a bumps & babies and also a computer course, his name would occur for each separate activity type attended - in this case twice.
The Site Attended Grouping allows you to select the centre attended.

Family Services CCM Superuser Guide
72
The Attendee Address Grouping allows you to use the following filters:
The Attendee Grouping allows you to use the following filters:

Family Services CCM Superuser Guide
73
Note: If you are looking at all children aged under 5 when they attended a session in the last year you should not enter an age before applying the individual filter. The age should be input in the attendee grouping.
9.4.2 Session
This tab will allow you to specify criteria for any sessions that you have recorded in the system.
Note: If you know the activity type for a specific session then you can specify this in the Activity tab.

Family Services CCM Superuser Guide
74
9.4.3 Activity
This tab will allow you to specify criteria for any activities that you have recorded in the system.

9.5. Advanced search examples
Table 1 lists the search parameters that should be used for the example target groups.
Note: after performing every search you should clear filters before performing the next.
Table 1: Advanced Search examples
Data to run Basic tab Personal tab Family tab Location tab
Ap
ply
Ind
ivid
ual
Filt
er
Attendances tab
Ap
ply
Att
end
ance
Filt
er
Registered BAME under 5s living in deprived LSOAs first registered at your CC
Registered
Include Archived
Personal Grouping
Registered site = your CC
Nationality Grouping
Ethnicity – select all except: white English, Irish, other, unknown & did not wish to be recorded
Groups Grouping
Aged under 5
Areas Grouping
Area = your deprived LSOAs
BAME under 5s living in deprived LSOAs accessing numbers
(registered at your CC)
Registered
Include Archived
Personal Grouping
Registered site = your CC
Nationality Grouping
Ethnicity – select all except: white English, Irish, other, unknown & did not wish to be recorded
Areas Grouping
Area = your deprived LSOAs
Options Grouping
Attendance dates: enter date range
Site Attended Grouping
Site = your CC
Attendee Grouping
Age = Less than 5

Family Services CCM Superuser Guide
76
Data to run Basic tab Personal tab Family tab Location tab
Ap
ply
Ind
ivid
ual
Filt
er
Attendances tab
Ap
ply
Att
end
ance
Filt
er
Registered EAL under 5s living in reach
(registered anywhere)
Registered
Include Archived
Nationality Grouping
Language – select all except: English & unknown
Groups Grouping
Aged under 5
Areas Grouping
Area = all of your LSOAs
EAL under 5s living in reach accessing your centre
(registered anywhere)
Registered
Include Archived
Nationality Grouping
Language – select all except: English & unknown
Areas Grouping
Area = all of your LSOAs
Options Grouping
Attendance dates: enter date range
Site Attended Grouping
Site = your CC
Attendee Grouping
Age = Less than 5
Registered lone parents living in reach registered in the locality
Registered
Include Archived
Personal Grouping
Registered site = your CC plus others in locality
Adult Grouping
Lone parent
Areas Grouping
Area = all of your LSOAs
Lone parents living in reach accessing any center in the locality
(registered in locality)
Registered
Include Archived
Personal Grouping
Registered site = your CC plus others in locality
Adult Grouping
Lone parent
Areas Grouping
Area = all of your LSOAs
Options Grouping
Attendance dates: enter date range
Site Attended Grouping
Site = your CC plus others in locality