chapter 15 burn reconstruction with technologically...
TRANSCRIPT

1
Chapter 15
Burn Reconstruction With
Technologically Appropriate Methods Einar Eriksen
Louis Carter
Editor’s Comments:
Special Introduction
Burn deformities exist around the world and especially in Africa where often there is inadequate acute care. This is due to a lack of resources, dermatomes/meshers, physical therapy, and most important doctors interested in burn care. Most of this chapter is written Dr. Einar Eriksen from Addis Ababa, Ethiopia. Dr. Eriksen has worked at the Korean Hospital (Myungsung Christian Medical Center) in Addis for the last four years, and he has been working with burns in Ethiopia for 15 years. His results are remarkable. The keys to Dr. Eriksen’s outstanding results are: 1. His singular interest in burn reconstruction.
2. Complete excision burn scars and full-thickness grafting of deep burns of the face, hand and over joints.
3. He has his own ward, well trained staff and operating room.
4. Long term followup in a nearby rehab facility where patients can stay several months if necessary.
6. Excellent equipment and supplies including the availability of staplers to anchor large grafts in place which saves time.
7. Outside funding for his surgery and followup care (his own foundation).

2
His techniques may be more technologically appropriate for Africa than other methods though they require considerable resources. Certainly all general surgeons know how to skin graft, but not all surgeons possess Dr. Eriksen’s skills, the funds, equipment, time and quality of nursing care to obtain his results. Not every general surgeon knows how to use flaps in burn reconstruction but most know how to do some flaps for wounds, especially lower leg reconstruction. Flaps will be included and described in this chapter in a blue print. Flaps do not require lengthy hospital stays and usually eliminate large grafts, especially large full-thickness skin grafts (FTSG). FTSGs will not heal as well as a well done flap, but these flaps almost double the size of the area needing reconstruction since the flap donor site often requires grafting.
This chapter will give the reader a chance to pick the right operation for their patient while taking into account their skills, facilities and supplies, the patient’s funds and whether or not the family can stay until their child is completely healed.
While Dr. Eriksen’s methods are the “ideal,” the editor realizes that many steps in his care may not be practical for the general surgeon in the district hospital. Flap treatment may also be beyond the experience of many general surgeons.
A. Aspects of Acute Burn Treatment
1. General Thermal injuries are one of the most common mechanisms for emergency admission to hospital facilities across the African continent. The main cause is frequently unprotected fireplaces and ground level cooking. Females and children are often affected. Burn survivors frequently develop various degrees of handicaps and deformities which impose a heavy burden on the families and the society. The main reasons for this tragic outcome after burns are lack of designated hospital facilities, shortage of supplies and surgical equipment, as well as inadequate number of trained and motivated staff. 2. Principles for improved burn care: Successful treatment of burn patients starts with showing interest and motivation to care for the burn victim. Motivation comes with teaching and training. A multidisciplinary approach where doctors, nurses and therapists work as a team is imperative for the successful outcome of burn treatment. 3. Diagnosis of acute burns: A basic understanding of how to diagnose the depth and extent of thermal injuries, will guide the health professional in providing the best possible treatment for his patient.

3
The risk of future scarring and contracture development is closely linked to the depth and location of the burn. Proper assessment of the depth will guide the surgeon to decide whether or not a skin graft is necessary. The depth of a burn is traditionally classified into 3 different levels:
♦ First degree burn: The superficial part of the skin, the epidermis, is affected with mild erythema that may create some pain and discomfort. There is no blister formation. This burn has no clinical importance. Sunburn is the most common cause of first degree burn.
♦ Second degree burn: This burn may be classified as superficial partial thickness or deep partial thickness, depending on how deep the injury penetrates into the dermis of the skin. The main sign and symptom of a second degree burn is blister formation and pain. The more superficial the burn is, the more pain the patient will experience. As the burn gets deeper into the dermis, there is less pain.
♦ Third degree burn: The whole thickness of the skin is destroyed, sometimes even underlying structures like subcutaneous tissue, fascia and tendons and bony structures. The patient does not feel any pain with this burn. This is also known as a full-thickness burn.

4
Superficial wounds tend to heal quicker and will seldom leave any significant scar behind. A second degree burn usually heals within 2 to 3 weeks. If a wound has not healed properly within 3 weeks, the wound is classified as a 3rd degree or full-thickness burn wound. This wound will eventually heal in most instances with scar tissue. One should refer to other textbooks for more details regarding diagnosis of acute burns, assessment of depth and extent of burn wounds, and acute treatment. 4. Scar development – the tragedy for the neglected burn patient: The horrible consequences of neglected burn care are due to scarring in the burn wound and in particular:
♦ the face ♦ joint related areas ♦ hands and feet ♦ groin, perineum, genitals ♦ neck and axilla
Injuries in these areas should make the burn team aware of the possibility of contracture development if wound healing is not completed within 3 weeks. The only and best way of preventing unnecessary scarring and contracture development is to plan and perform skin graft procedures within 3-4 weeks of the initial injury, ideally in the first 2 weeks if the patient is stable. If it is clear the patient has a full thickness burn, I would advise early excision and grafting in the first few days after the injury. Scar and contracture development occur quickly if the wound is left to heal by secondary intention. Even if burn wounds are treated with skin grafts according to the above mentioned advice, significant and often hypertrophic scarring may still occur and create contractures requiring repeated surgery and skin grafting in the future. However, wounds left to scar in by secondary intention without early skin grafting will almost always create a bigger challenge due to the degree of contracture development. An early skin graft procedure is the most important undertaking a surgeon can do to prevent a burn victim from developing disfiguring contractures and deformities.

5
Development of disfigurements and deformities is more pronounced among children compared to adults due to the ongoing growth of children. For this important reason, children are in need of a close follow up program after initial burn treatment and skin grafting. 5. Skin graft procedures during the acute stage: The depth of an acute burn may be difficult to assess during the first couple of days. In case of a small (1-2%) and obvious 3rd degree burn, primary excision and skin graft during the first 2-4 days should be considered the treatment of choice. In general, though, there are many advantages of waiting to perform skin graft procedures until after 14 days following the injury. Most 2nd degree burns have healed by the end of the second week. The surgeon should consider grafting wounds that have not healed by 3 weeks. When there is an isolated deep partial thickness or full thickness upper extremity burn, then an experienced burn surgeon should consider early excision and grafting within the first two weeks. This should only be undertaken if the patient is stable and blood products are available. Tourniquets, if available, should be used on the extremities to minimize blood loss during excision. This will give the best functional result. The use of skin graft meshers enhances graft take considerably and allows for the ability to cover larger areas of wounds. Skin grafts applied to joint areas should preferably not be meshed. Joints should rather be covered with sheet grafts to enhance the functional as well as the aesthetic result. In acute burns, there is seldom an indication to apply full thickness grafts as graft take is more unpredictable. Split thickness skin grafts are almost always used in acute burn surgery. Reference is made to appropriate textbooks for further details regarding acute burn surgery. This advice is for victims with less than 40% total body surface area (TBSA) burn. Patients with larger burns have a significantly higher mortality. The ideal treatment in the West with early excision and grafting is not applicable for Africa as there are few burn specialists and not many burn centers with nurses, sufficient blood and supplies to care for victims who may be severely burned.

6
B. Techniques used in reconstructive surgery Basic Principles
♦ After post burn contracture release, the resultant wound may vary in size and depth. Only occasionally may a wound be covered and closed with adjacent normal skin:
1. Z-plasty: Only applicable in linear scars with normal surrounding skin (do not attempt to raise flaps with previously grafted skin as this will lead to necrosis) 2. Rotation flaps: May be a good solution to cover joint areas like the axilla. 3. Flaps are ideal when tendons and joints /bony structures are exposed with no vascularized tissue covering these structures. Flap coverage is mandatory. 4. For the majority of burn contracture cases, a “simple” skin graft will give a satisfactory result.
5. Split thickness skin grafts (STSG): Common donor sites are the thighs, legs, flanks, and upper arms Avoid harvesting skin grafts from forearms if possible for as this
leads poor aesthetic appearance. Also avoid harvesting from the posterior aspects of lower limbs and
trunk if possible (see donor wound care below). STSGs may vary in thickness, from superficial thin grafts to
thicker grafts (~8 to 20 1000ths/inch). It is the degree of the dermal component of the graft that
determines the result of the skin graft procedure. The thicker the dermal component, the better appearance and functional result (the thicker graft should contract less).
On the other hand, the thinner the dermal component of the STSG, the sooner the donor wound is going to heal, but scar formation at the recipient site may create a new contracture.
The donor wound from a medium, “standard” STSG will heal within 14 days and typically does not leave a noticeable scar.
The donor wound from a deep STSG may take up 3 weeks to heal. STSGs are frequently meshed (meshers = meshing machines) in
order to cover larger areas. Full thickness grafts are not meshed by a machine, but are often
meshed by hand with a scalpel (“pie crusting”) to allow blood and serous fluid to escape into the overlying dressing
Full thickness skin grafts require defatting of the undersurface of the dermis to enhance graft take
Sheet grafts are more functionally and cosmetically appealing compared to mesh grafts.

7
Fig 1 Fig 2
FTSG vs. STSG: primary contracture significant in a FTSG because it contains more dermis, but late contracture is less.
6. Full thickness skin grafts (FTSG): A FTSG consists of the whole layer of skin - epidermis plus the
whole dermal layer. Full thickness grafts are technically more difficult to harvest and
apply on the wound. Meticulous hemostasis of the recipient wound is mandatory.
Hematoma formation underneath the graft will inhibit graft take. FTSGs are preferred to STSGs when reconstructing facial defects
and special joint areas: – eyelids, lips and cheek – anterior neck and axilla – volar aspect of the wrist, hand & finger joints
Smaller grafts may be harvested from the posterior aspect of the ear, supraclavicular area, medial side of the upper arm and groin area. These donor wounds are usually easily closed.
Hair follicles in grafts harvested from the groin will lead to hair growth, an issue that needs to be taken into consideration when planning the surgery. Defatting and depilitating the graft into the dermis is important to minimize hair growth within the graft.
When large FTSGs are required, the grafts may be harvested from the medial side of the upper arm, groin area, flank and abdomen, or from the thigh.
FTSGs from medial aspect of upper arm or thigh will likely need to be closed with a meshed STSG.
When harvesting FTSG from the thigh, the manual dermatome (Watson/Humby) can provide a wide graft.
When harvesting FTSG from the abdomen or flank, a scalpel is used to remove the graft.

8
Fig 3
Defatting FTSG with sharp, curved scissors Basic equipment:
♦ Dermatomes may be electric or manual (Watson /Humby knife). Although an electric dermatome is a great tool when dealing with extensive burns, the author is advising burn surgeons to get familiar with the use of manual dermatomes. There are several reasons for this:
1 Manual dermatomes are inexpensive and may last for years when
handled with care
Fig 4 Humby/Watson Knife Fig 5 Manual Meshing
2 Blades can be re-sterilized several times providing they are handled with care
3 Manual dermatomes can harvest wider grafts than electric dermatomes, - an important point when dealing with reconstructive surgery
4 Regular electric power supply may be an issue in many places 5 Maintenance and repair of electric dermatomes may also be an
issue 6 Electric dermatomes are expensive and hard to find

9
Fig 6
Humby/Watson knife and blades used for excisional debridement as well as harvesting the skin grafts
♦ Meshers or mesh machines are mandatory in order to succeed with
burn surgery, be it acute burn surgery or post burn reconstruction. The graft take is enhanced considerably and larger areas can be covered with grafts when using a mesher.
Fig 7 Brennan Mesher Fig 8 Meshed 3:1 when covering donor site
♦ Skin staplers are highly recommended when dealing with acute or chronic burn patients. Use of skin staplers reduces the operating time considerably. Securing skin grafts with ordinary skin sutures is very time consuming, and probably more expensive when considering increased operating time.
– Skin staplers are particularly recommended when operating on acute burns. Skin staplers are also very useful in many reconstructive procedures.
– After débridement of a burn scar, a graft can be immediately applied with a stapler. The immediate application of a graft will help minimize bleeding due to the hemostatic properties of the fresh graft. Then pressure should be immediately applied to the recipient site for 5 minutes for further control of the bleeding.

10
Fig 9
Staplers save time and money
♦ Tourniquets are highly recommended whenever surgery on the limbs is undertaken. If a tourniquet apparatus is not available, a rubber band/ esmarch can be used. (When using an esmarch, the extremity should be exsanguinated and the esmarch wrapped around the proximal part of the extremity twice and then the end tucked into the previous wrap.) The tourniquet reduces blood loss significantly and also allows the surgeon to do the dissection properly and distinguish between injured tissue and healthy tissue in acute burns.
– Indication for application of tourniquet: – Contracture release in upper and lower extremities – Excision of chronic, fibrotic hyper-granulated wounds – Tangential excision of deep partial and 3rd degree burns
Fig 10
Esmarch is useful as a tourniquet and especially in children when a small tourniquet may not be available
♦ Diathermy machine/electrocautery machine is needed to obtain
meticulous hemostasis before applying a skin graft to the recipient wound area and this cannot be overemphasized. This is of particular importance in dealing with FTSGs and sheet grafts.
– Diathermy machines may not be available. However, hospital administrations should make all efforts to provide this vital piece of equipment.

11
– Adrenaline 1:1000 can be diluted and used topically to control bleeding. Usually 2 ml. are added to 100-200 mL of saline.
Application of skin grafts:
♦ As mentioned above, surgeons should be familiar with the use of a manual dermatome.
♦ The thickness of the graft is determined by observing the gap between the roller of the dermatome and the blade.
♦ When the gap permits a scalpel or razor blade to gently slide in between the roller and the blade of the dermatome, a medium thickness STSG will be harvested—approximately 0.015 inch in thickness.
♦ The gap needs to be adjusted a bit to widen the space between the roller and dermatome blade to get a thicker or even full thickness graft.
♦ To obtain a thick graft, open the space in order to be able to "twist" the scalpel blade a bit between the roller bar and the blade. On the Humby, there are marks indicating the thickness. When the opening is set between marks 2 and 3, I am usually pleased with the thickness. It depends on the way the handle is used, angle to the skin, force applied to the skin, whether the blade is new or used, from where on the body you harvest, and child or adult...
(Editor’s note: The Humby knife has 7 marks or notches along the side to measure the thickness of the graft. At the first mark the knife is closed. The distance between each mark is 0.25 mm or approximately 0.010 inches. When opened all the way the thickness is 1.50 mm or 0.060 inches. This is the average thickness of adult thigh skin. As Dr. Eriksen stated above, he only opens the Humby to mark 2 to 3 (never past 4) and takes his grafts. When he desires a full-thickness graft he uses a sharper angle and more pressure. When he desires a split thickness graft he reduces the angle and pressure. Often after taking a full-thickness graft, Dr. Eriksen continues to harvest the split thickness graft during the same cut by adjusting the angle and pressure. This is used to graft the full-thickness donor site after meshing the split skin. The thickness of the skin varies with age. The harvest of such grafts will take the surgeon considerable practice. Most surgeons have difficulty using the Humby knife. “I can harvest thick and thin graft in the same cut just by adjusting the angle of the Humby.” (Personal communication from Dr. Eriksen)
♦ It appears obvious that this procedure needs experience. Again the following points all determine the thickness of the graft:
– The patients age – child or older adult? – Consider that thickness of the skin varies from one place of
the body to another

12
– The angle between the dermatome and the skin surface – The pressure applied on the dermatome
♦ With experience, the surgeon will adjust his cut to obtain the desired thickness.
♦ When the graft has been harvested, one can easily assess the depth of the cut/the thickness of the graft:
♦ The thicker the graft, the more elastic is the graft, the deeper is the donor wound and the more likely the graft will contract primarily.
♦ The pattern of the bleeding points in the donor wound will also give a good indication of the depth: Tiny numerous bleeding points indicate a superficial cut whereas larger bleeding points indicate a deeper cut.
♦ If subcutaneous tissue and tiny small blood vessels are visible, the cut is close to a full thickness depth.
♦ When a full thickness cut is observed, the wound should ideally be covered with a mesh graft for quick healing to prevent prolonged healing time and hospital stay.
♦ Joint areas should preferably be covered with thick STSG sheet grafts or full thickness grafts after hand meshing the graft in few areas to permit serous fluid and blood to escape into the overlying dressing.
♦ Other less important surfaces may be covered with a mesh graft and this will allow coverage of larger areas.
♦ If a mesh machine is not available, split thickness grafts may still be
meshed by hand through a number of small cuts thereby allowing expansion of the graft.
♦ FTSGs can either be harvested with an ordinary surgical blade or with a
Humby knife. Make sure all fat tissue is trimmed with a sharp scissor. FTSG will not heal properly if fat tissue is left on the graft. Trimming off a thin layer from the undersurface of the dermis enhances graft take.
♦ Large and wide FTSGs can be harvested with a Humby knife from the anterior or lateral side of the thigh.
♦ Before grafting the recipient area, meticulous hemostasis needs to be
obtained. This is particularly important when using FTSG. Small collections of blood underneath the grafts – “tenting it up” – will inhibit graft acceptance.
♦ FTSGs are applied to the recipient wound surface and sutured to the
surrounding skin edge with fine 5-0 or 6-0 skin sutures or small staples.
♦ When applying meshed STSG to larger areas, the need to obtain complete hemostasis is not that important as the meshed skin will allow proper

13
drainage into the overlying dressing. However, bleeding vessels need to be controlled as “tenting of the graft” is still possible.
♦ The application of proper bandage and dressing material is of greatest
importance. Properly applied dressings will prevent hematoma formation and make sure the graft is not moving. This principle is applied to grafts wherever they are applied. A “shear” injury to the graft from sliding around is one of the leading causes of graft failure.
♦ One way of securing FTSG in the face and neck, is to apply tie-over (bolster dressing) sutures. If, however, the dressing is applied properly with elastic bandage supporting the dressing, there may not be a need of apply tie-over sutures.
♦ The surgeon is responsible for the follow up of all patients. The author
advises the surgeon to do the first dressing change and leave for the burn nurses to do the follow up dressings.
♦ The right timing for post-op dressing changes may vary:
– Clean wounds with a sheet graft—check wound at 1-2 days to check for hematoma
– Clean wounds after reconstructive surgery: First dressing change after 5-6 days if the graft has been meshed and bleeding well controlled
– Unclean wounds /chronic hypertrophic granulation wounds: First dressing change after 1 – 3 days
C. Care for donor wounds: Neglecting care for donor wounds may prolong hospital stay considerably! Make all efforts to prevent donor wounds from becoming infected. Infected split thickness donor wounds may sometimes require a skin graft after debridement for the donor wound to heal properly.
♦ If possible, avoid harvesting skin grafts from the posterior aspect of the lower limbs and trunk. Donor wounds from these areas may easily become secondarily infected.
♦ A simple and inexpensive dressing for donor wounds is Vaseline gauze
(non-adherent gauze) covered with several layers of dry surgical gauze followed with a crepe bandage /roll gauze bandage.
♦ Make sure bed clothes and blankets do not touch the dressing. This is important in order to keep the donor wound dressing dry and the best way of preventing donor site infection.

14
♦ Check the donor site dressing every day. If the dressing becomes wet – a
sign of possible infection – the wet part of the dressing needs to be changed without delay.
♦ To prevent donor wound infection, a complete dressing change on the 2nd
or 3rd post-op day may be a good investment (Editor’s note: There are different ways to handle donor wounds. This method described above is excellent for the large donor sites. For smaller ones from the anterior or lateral thigh, the editor takes off the gauze down to the Vaseline the day after surgery and leaves the wound open. In hot climates, this allows for the wound to dry and not become wet and infected.) D. Chronic burn wounds – a Challenge 1. Many patients present with chronic wounds with or without a contracture or deformity. The patients might have waited for months or sometimes even years before seeking help. Many of these patients, children as well as adults, show evidence of malnutrition and often have chronic skin lesions like scabies. These patients are difficult to treat. Before even considering surgical excision and grafting procedures, the patients may need additional nutritional support. Measures need to be taken to address chronic anaemia. Blood transfusions may be necessary. 2. Sooner or later though, surgery has to be planned. The author has adopted the following routine in these cases:
♦ Nutritional support from the day of admission ♦ Routine work-up and treatment (scabies, parasites, HIV, etc.) ♦ Daily wound care with antibiotic cream (Silver Sulfadiazine) ♦ Physiotherapy ♦ Tangential excision of chronic wounds under tourniquet and with
antibiotic cover ♦ Continue daily wound care ♦ Apply meshed skin grafts 2-4 days following wound excision if wounds
are clean. A repeat tangential excision may be necessary ♦ Post-op dressing change every day or every other day until healing of
grafts 3. Chronic wounds may consist of a thick fibrous tissue that needs to be excised before any graft is applied. Skin grafts will be rejected in most instances if applied to fibrotic tissue. The thickness of this fibrous tissue

15
may exceed 1 cm or more. The only way to secure graft take is to undertake a complete excision of the fibrotic wound. Dissection needs to be performed in the layer or plane between the fibrotic tissue and healthy tissue. One should see good punctate bleeding in the subcutaneous tissue. Skin grafts heal readily on healthy vascularized tissue like fat, fascia or paratenon.
Fig 11 Fig 12
Bilateral chronic wound-required several weeks of nutrition and multiple débridements before it was ready for grafting
4. Keep in mind that chronic burn wounds, if left untreated for years, may degenerate into a spinocellular carcinoma (squamous cell carcinoma —Marjolin’s Ulcer)
Fig 13 Fig 14
Chronic wound that turned into Marjolin’s Ulcer requiring amputation
Differential Diagnosis of Burn Contractures Joint contractures are not always caused by burns. One must be aware of the other causes: Snake Bites—often a deeper injury that involves muscles as well as skin.

16
Heterotopic Bone Formation (HO)—need x-rays; especially common at elbow and often without a deep burn. Sometimes occurs at the elbow without an elbow burn but with a burn elsewhere. Trauma around joint with bone and/or joint injury Septic arthritis with scarring of joint capsule Pterygium is a congenital flexion contracture at either elbow or popliteal fossa. This is not a surgical condition. Marjolin’s Ulcer—squamous cell carcinoma in burn that is usually >10 years old
Fig 15 Fig 16 Fig 17 Heterotopic Bone (HO) Marjolin’s ulcer
E Various reconstructive procedures (Unless one excises the entire burn scar as Dr. Eriksen does, one should not release burn scar contracture during the active phase of wound healing when the scar is still immature and highly vascular. It is best if the burn scar matures and becomes soft and supple before surgery is begun. This often takes at least one year after the scar is mature. Surgery before this time causes additional trauma and possibly additional contraction since the scar is highly vascular. Skin grafts, especially FTSG, may not heal as well with significant bleeding from the scarred tissue. During the immature wound healing phase, additional physical/occupational therapy will usually be beneficial. There are exceptions to waiting until the wound is mature: scars that continue to break down and leave continuously open wounds, scars/contractures that interfere with eyesight, eating, and required activities of daily living (ADLs) and scars that will lead to severe joint contractures and progressive, significant tendon deformities if left for additional months.) Eyelids 1. Thermal injuries to the upper part of the face/forehead will frequently affect the eyelids. 2. Second degree facial burns usually heal completely within about 2 weeks.

17
3. Wounds of the eyelids that have not healed properly within 3 weeks may easily contract and retract the eyelids. 4. Early reconstruction of retracted eyelids is of paramount importance in order to protect the cornea and restore normal eyelid function. 5. Technique:
♦ General anesthesia is preferred ♦ Inject Lidocaine with adrenaline in the scar tissue /incision area to
minimize bleeding. Allow 5-7 minutes for hemostasis. ♦ Make an incision about 2-3 mm from the lid margin. Gently dissect the
scar tissue from the underlying normal eyelid tissue. Bleeding points should be controlled with cautery.
♦ Make sure the contracture is completely released into healthy tissue. ♦ Both upper and lower eyelids should be repaired together if affected. ♦ Full thickness grafts harvested from either behind the auricle or from the
supraclavicular region are commonly used for the best color match. ♦ All fat tissue of the graft needs to be trimmed. ♦ Hand mesh the graft with a scalpel blade in order for tissue fluid to
escape into the overlying gauze dressing. ♦ Apply the full thickness graft by stitching the graft to the edge of the
wound using 4-0 or 5-0 skin sutures. ♦ Make sure there is no bleeding from the wound before applying the graft.
Small bleeding vessels need to be arrested. ♦ Tarsorrhaphy is advised before applying the dressing. The dressing
should consist of Vaseline gauze, wet gauze, then dry gauze before securing the dressing with a gentle elastic bandage. (Editor: A stent dressing can be applied with wet cotton balls and tie-over sutures. Place wet cotton balls over the Vaseline gauze to prevent adherence to the graft.)
♦ Remove tarsorrhaphy and stitches within 10 days. Continue to apply dressing support to both eyelids for another 2 weeks.
6. Representative cases
Fig18 Fig 19 Fig 20

18
The above patient required release of contractures and excision of surrounding scar and reconstruction with FTSG from the supraclavicular area with an excellent result.
Fig 21 Fig 22 Fig 23 Fig 24
The above patient waited 20 years for surgery. Some vision remained in her left eye. Release with FTSG from supraclavicular areas was done for all four eyelids in two operations. FTSG from the thigh was used for the lip. The donor sites were covered with split thickness skin
grafts, meshed 3:1.
Fig 25 Fig 26 Fig 27 Fig 28
Facial burn in epileptic that required wide excision and FTSG from medial side of upper arm and donor area covered with meshed STSG.
Fig 29 Fig 30 Fig 31
Same patient with recurrence of ectropion—repeat release and FTSG Nose

19
Deformities of the nose range from alar rim defects to complete loss of the nose. There may be severe scarring of the nose, damage to the nasal cartilages and various degrees of nasal collapse. Unfortunately, the surrounding skin is often burned and not available for reconstruction. If possible a nasolabial flap or variation is used for rim defects. Complete nasal reconstruction requires mucosal replacement, a cartilage framework and skin covering. Often the best results are from a forehead flap if the forehead skin can be used. The framework requires cartilage from the concha of both ears and split calvarial graft or a split rib for the dorsal strut. Mucosa can be replaced with nasolabial flaps, even if previously burned, or a midline forehead flap which is turned down over the cartilage framework or a conventional forehead flap which has been previously lined with skin grafts. If the midline forehead flap is turned over for the lining, then the nasal skin is reconstructed with lateral forehead flap based on a superficial temporal artery.
Nostrils are frequently partially collapsed and cartilage destroyed. In such cases the cartilage framework must be rebuilt and the best reconstruction is with a forehead flap if the skin is acceptable. The mid-line forehead skin does not have to be used if it is scarred. Lateral forehead skin above the eyebrow can be used with a pedicle supplied by the superficial temporal vessels on the contralateral side. These procedures can require multiple stages and considerable operating time. Cartilage grafts can be taken from the conchal cartilage in the ear. If necessary, pedicled radial forearm flaps may be used.
Fig. 32-38

20
Young boy after an epileptic seizure: Complete wide excision off scarred areas with skin grafts to chin, lips, cheek, forehead, eyelids and side of partially destroyed nose. Ready now for nasal
reconstruction with forehead flap
Lips 1. Post burn lip defects are reconstructed using the same technique as eyelid reconstructions. 2. FTSGs are preferred and are harvested from the same places as for eyelids. 3. The dressing can be strapped against the mandible and the maxilla reducing the risk of hematoma formation. 4. There is usually no need to apply tie-over sutures.
Fig 39 Fig 40
Contracture lower lip with FTSG
Cheek, Forehead, Scalp 1. Facial burns often involve various parts of the face. Cheeks, eyelids, forehead and scalp are frequently affected simultaneously. 2. The surgeon may concentrate on dealing with one anatomical part at a time, like doing the eyelids before proceeding to the rest. 3. If the surgeon becomes familiar with a good harvest technique, he should consider grafting all these areas during the same operation. 4. This will require good pre-operative planning:
♦ Blood transfusion might be needed ♦ Diathermy/electrocautery equipment ♦ The Editor uses dilute adrenalin solution: 2-3 ml. of 1:1000
adrenalin (Cardiac adrenaline) in 100-200 ml saline. Gauze is soaked in this solution and applied to the bleeding wound for 5 minutes. Cautery is used to control persistent bleeding
♦ Skin staplers will make the operation more efficient if large areas are grafted
♦ Good manpower assistance

21
5. Scalp and forehead may often be covered with a thick STSG. 6. If possible, plan to graft the cheek with a FTSG as this will give a better cosmetic result and will have a less tendency to contract. 7. A thick STSG can be applied to the cheek. 8. Apply the grafts to the forehead and cheek as sheet grafts. The scalp can be covered with meshed grafts. 9. It is recommended to harvest and prepare the skin grafts before starting to deal with the recipient side. This will make the surgical procedure more efficient and will certainly reduce the bleeding. 10. If a localized defect is planned for reconstruction with a full thickness graft:
♦ One may decide to excise the wound first, ♦ Secure adequate hemostasis with adrenalin/diathermy and ♦ Then harvest a template of the defect from the donor side.
11. Remember reconstruction of the cheek is best covered with a FTSG, if possible – see photo. 12. The donor defect (medial side of the upper arm) is covered with a meshed STSG from the thigh. 13. If the wound is extensive, involving cheek, forehead and scalp, start with the cheek, move to the forehead and graft the debrided areas sequentially in order to reduce the bleeding. 14. Make sure all fibrotic and old granulation tissue have been debrided and removed properly before applying the graft. 15. A good assistant and well trained scrub nurses are mandatory to minimize the degree of bleeding.
♦ Skin grafts have a remarkable hemostatic effect on a clean bleeding wound surface.
♦ Apply the prepared skin graft to the wound surface as soon as the wound has been debrided. (Reason for statement #9 above)
16. Skin staplers reduce the operating time considerably and should be used if possible on the larger wounds 17. Once the cheek and forehead have been grafted, move to the scalp with the application of meshed grafts once the wounds are well debrided. 18. Dressing procedure:
♦ Vaseline gauze ♦ Wet gauze or cotton balls ♦ Dry gauze ♦ Elastic bandage/stent
19. Follow up:
♦ Plan the first dressing change within 2-3 days if the wounds were chronic.

22
♦ Otherwise, the first dressing change may be carried out 4-5 days after the operation (as long as some meshing was done).
Fig 41 Fig 42 Fig 43 Fig 44 The child below presented 4 weeks after burned in open fireplace. Once burns are débrided the left eyelid returned to its normal location. Cheek and forehead grafted with full thickness sheet
grafts and scalp with meshed split thickness grafts.
Fig 45 Fig 46 Fig 47
4 week old face and neck burn—thick STSG
Special case in 15 year old boy below who had flame burn when he was 2 years of age: the scar suppressed skull growth and scar broke down many times. When microsurgery is not available, a pedicle radial forearm flap can be used.
Fig 48 Fig 49 Fig 50 Fig 51
15 year old with deep scalp burn at age 2 years—scar broke down multiple times and reverse radial forearm flap used to give good cover over skull

23
Fig 52 Fig 53 Fig 54
(Same patient as above) Radial forearm flap was released at 16 days. Excellent donor site result left forearm
Scalp Reconstruction: Another approach
Certainly the use of the radial forearm flap above would be an excellent method of achieving good tissue over the skull defects while one waits for skull reconstruction. Also many will not have tissue expanders as discussed here.
Because of excellent blood supply even deep full-thickness scalp burns usually heal primarily without the need for grafting if they are carefully cared for. Alopecia is the most common residual scalp deformity. Where the area of alopecia is small, surrounding hair may be combed over the defect. Sometimes these areas may be excised and closed primarily. At other times serial closure may be carried out in 2-3 stages. Many small defects can be closed by local flaps—rotation, rhomboid, advancement, etc. When a local flap is used, all the surrounding tissue must be freed up to allow the flap and the donor area to be closed. The dissection should be carried out at the subgaleal level. Frequently the galea needs to be scored parallel and also perpendicular to the defect. Cuts should be 1 cm. apart and should go into the subcutaneous tissue while attempting to preserve larger vessels. Orticochea described multiple scalp flaps that not only closed the defect but also permitted the scalp donor areas to close. One may find Orticochea flaps in major texts and these flaps always include scoring of the galea. Large rotation flaps can be used but these may leave open areas that need skin grafting. This will just transfer the area of alopecia. The larger flaps are always based on one of the main arteries to the scalp—supraorbital, anterior temporal, occipital, etc.
A relatively new method of scalp closure is with scalp expansion. This is an excellent method for closing scalp defects and areas of alopecia, but it takes several weeks for adequate expansion. If tissue expanders are available, one or more are used to expand the skin adjacent to the defect over several weeks. Expansion may be necessary a second time. Expanders are available in different shapes and sizes; the most common are rectangular and crescent shapes. Expanders can be expanded to twice the recommended size if one has limited numbers and sizes. The best

24
method to insert the expander is at the edge of the defect and perpendicular to it—not along the edge of the defect or parallel to it. Urethral sounds are used to create the pocket beneath the galea for the expander. The skin is closed with non-absorbable suture and this is usually left in until the expanders are removed. The “port” is placed over a bony prominence on the mastoid so it can be easily felt. Some leave the port hanging just out through the skin and the injections can be done with ease and without complications. About 20-50 mL is initially placed in the expander. Expansion is begun 7-14 days later. The amount injected every 2-3 days depends on the size of the expander. The surgeon usually aims at injecting just enough so that the patient feels some tightness/discomfort. In expanders with a 300-400 mL volume, one may inject 20-30 mL each time. In most cases injection does not require anesthesia since a #23 needle is used for the injection. The defect can be measured and compared to the amount of expanded skin to determine when it is time to remove the expanders and advance the flaps. A week or two extra of expansion will make closure much easier. Expanders can hold different volumes, but most can accept twice the stated volume for the expander. There will be the usual silicone induced pocket after expansion but this can be left alone. One can drain the pocket (s) but most of the time the closure is tight and no drainage is necessary. The galea of the expanded flap(s) may also be scored at 1 cm intervals. It is important to understand that the number of hair follicles remaining after a burn will never increase, so expansion will lead to thinning of the scalp hair. (Keeping the patient in the hospital if he/she lives far away can be costly. One regimen is to bring the patient into the hospital every Friday afternoon for injection and then inject again on Monday AM before discharge.)
Fig 55 Fig 56 Fig 57
Scalp defect (congenital nevus) reconstructed with expanded scalp flaps

25
Fig 58 Fig 59 Fig 60 Fig 61
Larger scalp post-burn defect closed with expanded skin with excellent results
Skull: Partial and Full-thickness loss
Burns of the scalp are common especially in children. Newborns are often left close to the fire in order to keep the child warm and older children fall into fires during a seizure as the first sign of epilepsy. In both of these cases the burn will likely be very deep because of thin skin in children and a comatose condition after a seizure. Some burns in children can destroy the skull and full-thickness skull must be removed and skin graft or a flap placed directly on dura. In others the burn is just down to the outer table and once this is removed, a graft or flap may be placed on bleeding inner table.
Fig 62 Fig 63 Fig 64
Outer table burred down to bleeding inner table which was grafted
In most small children the skull is very thin and a deep scalp burn may destroy both tables of the skull. When there is widespread destruction of the skull and the entire skull must be removed, this is a life threatening condition for the child. Usually the dura is well vascularized and split thickness skin grafts can be placed directly on the dura with a good take. See Figure below. Meningitis is always a fear in these cases. Later brain injury is a concern as only the skin graft separates the brain from the outside. Some sort of “helmet” must be worn. This could be something as simple as plaster of paris “cap” worn over a

26
cloth cap. The plaster can be fitted around the cap for protection. Smaller defects can more easily be cared for.
If the outer table appears viable but the pericranium is missing, then one may either use a burr to remove the outer table to the bleeding inner table or one may make drill holes a few cm apart in the skull and into the diploe between the tables. This is only necessary when there is no surrounding skin to use for skull coverage. If a flap is readily available, then burring or drilling the skull may be unnecessary. Drilling of multiple holes allows granulations to emerge through the holes and slowly cover the exposed skull. The skull must be kept moist during this time. This method takes considerable time.
Fig 65 Fig 66 Fig 67
Entire skull burned when child was placed close to fire to keep warm Attempt was made to save inner table but in a young child, the skull is very thin Graft on dura and child will need protection until old enough for reconstruction
Radial forearm flap would be an excellent choice for better protection—see Fig. 48-54
When viable pericranium remains, it will take a skin graft.
Fig 68 Fig 69 Fig 70 Deep scalp burn with necrotic skull—black arrow, requiring skin graft on dura: Later good
surrounding skin can be expanded and the skull covered with the expanded flap. Then skull reconstruction can be carried out with either bone graft from split skull, rib, iliac crest,
allograft bone or with cranioplast if available.
After the skin grafts on the dura have well healed, skull reconstruction can be carried out. Small defects do not require reconstruction as often they will

27
close. Larger defects must be reconstructed to protect the brain. If the child is older than 4 years of age, then the adjacent good skull may be split and the outer table used for bone grafting the defect. Bone grafting is the ideal reconstruction with the use of calvarium, rib or iliac crest. Split calvarium is best. Titanium mesh may be used but it should be used with cranioplast (methylmethacrylate). Skin grafts can usually be easily peeled off of the dura with minimal bleeding. Often the cranioplasty with methylmethacrylate is sufficient. Local flaps or expanded flaps may be used to cover the skull reconstruction (see below). If the entire scalp has been burned then only a distant flap as the radial forearm flap or a free microvascular flap will cover the skull. Microvascular reconstruction will need to be referred to a center that performs microsurgery.
Fig 71 Fig 72 Fig 73 Fig 74 Patient burned when infant with skin graft on dura. Expanders placed on each side and these
were completely expanded twice with later titanium plate skull reconstruction. Photo on right is after reconstruction with plate. Six years later cranioplasty with methylmethacrylate was
performed. Note that number of hair follicles never increased. .
Radial forearm flap may give exceptional coverage of the skull while waiting for bony reconstruction. The case below is a Marjolin’s ulcer in a 12 year old boy who was burned very early in childhood. After radical excision of the SCC, much of the brain is exposed.
Fig 75 Fig 76 Fig 77 Fig 78

28
Entire forearm skin was taken based on retrograde flow through radial artery. Flap was divided at 20 days. This case demonstrates that the entire scalp may be covered with this flap.
(Editor’s Note: This is a wonderful result in a very severe Marjolin’s ulcer in a very young man and demonstrates the reliability of the forearm flap. This type of aggressive SCC is also seen in albinos, who delay surgical treatment.)
Neck contractures 1. Anterior and lateral neck contractures are among the most difficult post burn reconstructive procedures to perform.
♦ The scar tissue may involve a huge area of the neck. ♦ The chin may be pulled inferiorly towards the sternum making
intubation a huge challenge for the anesthetist. ♦ Most hospitals will not have access to fiberoptic intubation equipment. ♦ If intubation seems to be difficult, a preliminary release of the scar under
local anesthesia must be performed in order to have the patient intubated. Patients can be given ketamine and local anesthesia prior to neck release. Usually the patient can then be intubated. One should prepare for a tracheostomy if it becomes necessary.
Fig 79 Fig 80 Fig 81
The surgeon must anticipate that the anesthetist may not be able to intubate patients with severe neck contracture and must be prepared to quickly prep, drape and release the
contracture under local anesthesia and ketamine. Then the patient may be intubated in most cases. This is followed by re-prepping, draping, and skin grafting.
2. As with other contractures, all the scar tissue should be excised for the best result. 3. Many surgical techniques have been described to reconstruct neck contractures:
♦ Skin graft procedures: STSG or FTSG ♦ Local flaps
Advancement flaps
29
Rotation flaps ♦ Expander techniques ♦ Free flaps
4. Expertise to perform free flaps is not readily available in most African countries. The use of the expander technique (expanding the chest skin) is not feasible either. Free flaps usually require multiple defatting stages. See “Perforator Flap” chapter for supraclavicular perforator flap reconstruction. 5. As underlined above, the scar tissue in neck contractures may be extensive. The surgeon will always be surprised to realize that the wound defect created after removing all contracting scar tissue will be much larger than one might have expected prior to the operation. 6. Another important observation is the fact that there is quite often a healthy layer of subcutaneous tissue underneath the scar tissue. 7. In most instances, resurfacing the wound can be achieved by:
♦ Advancing local flaps ♦ Applying full thickness grafts or thick split thickness skin grafts ♦ A combination of the two
8. Meticulous hemostasis is of greatest importance before applying the FTSG 9. Once the size of the wound has been outlined, the FTSG will be harvested, either from the lateral side of the thigh, from the inside of the upper arm or from the flank/abdomen.
♦ Using a Humby knife to harvest a FTSG is a good choice as the graft will not have any subcutaneous tissue that needs to be trimmed.
♦ A Humby knife can harvest a wide graft which is a great advantage. ♦ When harvesting from upper arm or abdomen, the surgeon still has to
spend quite some time to make sure the FTSG is free of any fat tissue. ♦ The graft has to be hand meshed before applying the graft to the neck. ♦ If the recipient wound is very big, which quite often will be the case, the
surgeon might have to harvest 2 sizeable FTSGs. Remember a FTSG will immediately contract due to the elasticity of the dermis. A FTSG has to be gently stretched across the wound surface to match the size of the graft at the donor site. 10. Avoid linear vertical suture lines by creating Z-lines between skin edges and the FTSGs. 11. A good thick dressing needs to be applied and then supported by an elastic bandage. The author is not using tie-over sutures as a routine. 12. The patient needs to be positioned in his bed postoperatively with slight neck extension and is kept in bed for at least the first 4-5 post-op days.

30
13. When harvesting a FTSG from either the upper arm or thigh, the donor wound needs to be covered with a meshed STSG. This also applies to the abdomen and flank if primary closure is not feasible.
Fig 82 Fig 83 Fig 84 Fig 85
Lateral neck contracture, released with FTSG from thigh
Fig 86 Fig 87
Lip and neck contracture Recurrence after previous release requiring re-release (right)
Fig 88 Fig 89 Fig 90 Fig 91
Severe anterior neck contracture, wide release, donor site and Humby knife, postop view

31
Fig 92 Fig 93
Final result of patient above
Fig 94 Fig 95 Fig 96
Lateral neck and axillary contracture with local flaps and FTSG for neck and face
Fig 97 Fig 98 Fig 99
All neck contractures must be carefully evaluated as above patient had a recurrence of the contracture after two releases. The main problem was with the deformed mandible. The figure
on the right is after mandible reconstruction with removal of first bicuspids bilateral, mandibular osteotomy with removal of wedge on each side, maxillomandibular fixation by
wiring or plating.
(Editor: Lower Lip--One may use a non-absorbable suture to suspend the lower lip. This suture is placed just beneath the lip mucosa and along the vermillion border as a

32
running horizontal suture and is sutured deep in the muscle above the commissure at both ends. A stent dressing is applied for 5-7 days with horizontal tie-over sutures. Neck—it is important to recreate the normal neck crease. If grafting the chin and neck together, three sheets are needed to provide a good contour, one sheet for the chin and two for the neck with one sheet above the normal crease and one below. At the junction of the two neck sheets of skin, an absorbable suture is used to suture the two sheets together with a deep bite to include soft tissue. This helps to recreate the crease. (Monocryl if available) The editor uses large stent dressings over each grafted area. The grafts are hand meshed with small holes. The wounds are inspected at day 5 and if there is no evidence of hematoma, the stents are left another 3-5 days. Once the stents are removed, a bulky dressing is re-applied and a crepe/elastic dressing is wrapped around the dressing and neck for another week. Then a soft collar is used. The editor uses absorbable sutures to anchor the grafts in the neck. Staples may be used. The use of a soft neck collar/splint, similar to the one used for cervical fractures is often used for 3 months and at night time for another 3-6 months. In addition, if available, Silastic sheeting may be used under the splint to soften the scar. The method of using a thick dressing without a splint works well with careful nursing care.) Breast Reconstruction When chests are burned in childhood, breast reconstruction is usually not addressed until breast development begins during puberty. Some recommend early excision of the scar with skin grafts or flap reconstruction in childhood but often the surgeon will not see the patient until faced with a constricted scarred breast in adolescence. Early excision of the burned chest and grafting will limit breast contraction in adolescence, but still there will likely be the need for some reconstruction in adolescence in females. There are three areas of consideration: breast mound, areola and nipple. For the totally constricted breast without a mound, surgery is performed when there is evidence the mound is beginning to develop or the contralateral normal breast has begun to develop. The incision is placed at the level where the inframammary crease is estimated to be and extends from the anterior axillary fold to the sternum. Once the incision is made, tension is placed above and below while the scalpel is pushed against the scar. As the scar is released, the developing breast mound will be seen. The incision is carried down to the muscle fascia. At this point there is usually a defect on the inferior side of the breast and on the chest wall with a crease in the area of the normal inframammary fold. The author has always used thick split thickness skin grafts to reconstruct the defect. Some may use a Latissimus dorsi flap but this will be thick and will not give definition without secondary defatting procedures. The skin grafts are sutured into place in the same way as the panels for neck reconstruction with a continuous suture placed between the sections of skin graft in the inframammary crease and with grasping of the underlying soft tissue. Stents are applied in the same fashion as the neck—Vaseline type gauze directly to the grafts, wet cotton balls in the crevices, wet gauze, dry gauze, and stent sutures

33
for each graft. It is very important to gain complete hemostasis and to leave small holes throughout the grafts as there will be considerable serous drainage. Elastic gauze is typically wrapped around the chest loosely to hold the stents in place. The stents can be removed at 7 days or less. Once the stents are removed the wounds are still dressed with good definition of the inframammary creases and elastic bandages wrapped around the chest until the skin grafts have completely taken and are dry. When healing is complete a bra can be worn to maintain the elevation of the breast tissue. The final result is often very acceptable with the upper panel extending from nipple level to the inframammary fold and the lower panel extending from the fold inferiorly along the chest wall but often hidden from view when by the breast mound when the patient is erect. See Fig. 36 below.
Fig 100 Fig 101 Fig 102 Fig 103 Breast contracture with axilla involved. Contractures released with grafting (2 sections of thick
STSG for breast). Late result with nipple reconstruction using “skate flap” technique
The areola is not easy to reconstruct. In the West, tattooing is performed with excellent results. In Africa, the breast is often discolored from the burn and scarring and an areola reconstruction is not necessary. Where it is desired in light skin individuals with minimal surrounding burn, full thickness grafts can be taken from the inner thigh or even the labia and the donor areas can be closed primarily. The graft is held in place by a stent dressing for a week. Finally, the nipple should be reconstructed from available local tissue. There are several methods described in major plastic texts. The editor has found the “skate flap” technique easy to use—Fig 103.
Breasts reconstructed in the above manner are aesthetically pleasing as the aesthetic units are reconstructed. When the burns are not as severe and the contracture and constriction of the breast is less, then lesser procedures are performed, often with less acceptable results, but still satisfactory under a bra. In cases where the entire breast bud has been destroyed, then breast reconstruction with one of the well-known and acceptable methods - latissimus dorsi or an abdominal flap (TRAM) if the abdominal skin is not burned. Expanders and implants may often be used.
Frequently the breast deformity is associated with an axillary contracture which is usually addressed at the same time as the case above.

34
Upper Limb A. Shoulder & axilla Burns to the upper part of the body frequently affects the upper arm / shoulder /armpit and anterior neck. Several patients will appear with contractures in all places. These patients will need several surgical procedures and weeks in hospital before the contractures are all dealt with. Axillary contractures:
♦ Reconstructed with either a large thick STSG or FTSG. Either graft will provide good functional results.
♦ The best donor site is the lateral thigh from where large grafts may be harvested using a Humby knife.
♦ Another good surgical option for coverage of the armpit is the use of a
rotation flap from either the upper arm or the anterior axillary area. Attached are a few photos from patients treated with both options.
Fig 104 Fig 105 Fig 106
Same patient as Fig 91: Excision of chronic wound, rotation flap from upper arm for axilla, FTSG to face, neck and axilla and STSG to chest wall

35
Fig 107 Fig 108 Fig 109 Fig 110 Another neck and axillary contracture: FTSG to neck and axilla
Fig 111 Fig 112
Same patient at discharge
♦ Axillary burns are kept abducted for 4-6 weeks and until all the grafts are mature.
Axilla Reconstruction using Flaps
The methods described below use flaps to cover the axillary defect after release. There is still a need to graft areas not covered by the flap but once the surrounding grafts have healed the patient can be discharged without the need of followup or splints.
The axis of motion of the axilla is from 0° when the arm is adducted at the side to 180° when the arm is fully abducted over the shoulder. A range of motion from 0° to 135° allows for most activities of daily living, most jobs and for personal hygiene and care of our hair. Some may have good function but an unsightly web when abduction greater than 135° is attempted. The patient, often a female, may request corrective surgery even though function is adequate.
If a linear contracture involves the anterior or posterior axillary fold with normal skin on either side and the contracture is less than 60°, one or more Z-plasties may be performed. The angle of the Z-plasty flaps should be 45-60°. All limbs must be of equal length and wide undermining of surrounding tissue is necessary. Limbs of 45° will give 50% increase in length and 60° will give a 75% increase based on the length of the limbs. All flaps should contain superficial fascia to enhance blood supply.

36
Fig 113 Fig 114
Axillary contracture in young boy with good pliable skin on both sides of the contracture and a large hypertrophic scar: Band excised with Z- plasty reconstruction (markings are for a parascapular flap which was initially planned)
If there is scarring on one side but not the other side of the contracture in either the anterior or posterior fold—usually the scarring is anterior on the chest or posterior on the back with normal skin in the center of the axilla—a Y-V plasty is an excellent reconstruction. Again the contracture should be less than 60°. The limb of the Y is through the scar and the V portion is in the advancement flap in the normal central axillary skin. Actually the V is best incised like a U to give the best possible blood supply to the tip of the advancement flap. Care should be taken in dissecting the advancement flap to keep the superficial fascia with the flap. In contractures of the anterior axillary fold the release should extend up to the coracoid process of the scapula. This will be the mid-axial point of the anterior axilla. It is important to make the V portion long enough to reach. This is done by undermining the entire flap and also releasing all the surrounding tissue, not just the flap. If the flap has been raised but will not reach the tip of the release, then limbs should be extended or a back-cut may be made at the base of one limb of the V. This may give an extra 1-2 cm. of advancement.
Fig 115 Fig 116
Axillary contracture with burned chest wall skin but good central axillary skin: Y-V advancement performed. Note good skin in axilla. Scarred skin does not require removal as
the patient will have excellent function postop. Long term splinting is not necessary.

37
For posterior axillary fold contractures, the incision can be carried up to an imaginary point for the mid-axis. The V advancement flap is taken from the central axilla as in the anterior fold contracture.
For these contractures, books will often describe many other complex Z-plasties and W-plasties. In the significantly scarred axilla, the author has found the techniques described above reliable. With scar tissue on either side of the contracture, multiple small flaps do not advance as one would like or as some textbooks suggest. Also, these local flaps in burned skin will often not survive and there will be tip necrosis. They frequently require débridement and even grafting with necessary long term splinting for a good result. This creates a problem when there is poor patient compliance and follow-up.
If there is scarring in most or all of the axilla, then a parascapular flap must be used. This is an axial fasciocutaneous flap supplied by the descending branch of the circumflex scapular artery and should be long enough to reach the coracoid process anteriorly. This vessel can be found and traced with a Doppler and point of rotation of the flap is where the vessel exits between the teres major and minor muscles. This is found by identifying the posterior apex of the axilla and measuring 2 fingerbreadths superiorly and 2 medially (toward the spine). The flap length can be 3 to 4 x the width of the flap or up to 30 cm. in length. The center of the flap is an imaginary line straight down inferiorly toward the iliac crest from the exit of the vessel. This can be identified with a Doppler. The medial portion of the flap overlies the scapula. If the flap skin is burned and scarred and viability is questioned, it can still be used. The muscle fascia of the latissimus dorsi or even the anterior half of the muscle can be taken with the flap. In young people this muscle is relatively thin and not bulky. In the rare case where there is very thick scarring over the parascapular area with keloids, then all or a portion of the muscle can be used and a STSG placed over the muscle. The axilla should never be reconstructed with just a split thickness skin graft alone. Contraction will always recur due to gravity and the difficulty in maintaining abduction of the axilla with splinting, especially after discharge. Closure of the donor area depends not only on the width of the flap taken but also on the quality of the skin around the flap donor site. If the donor area is only 6-8 cm wide, then it may be closed primarily. If the flap is greater than 8 cm wide or if there is significant scarring in the area, then the donor site must be grafted. A skin graft at the donor site is away from the axilla and will not lead to recurrent contracture. In some cases of severe axillary contracture, the flap, no matter how wide, will not cover the recipient area in the axilla and skin grafts must be placed above on the arm and below on the chest. Again, these grafts are not over the joint and recurrent contracture will not occur even if the grafts are meshed. However, one should not discharge the patient until these grafts have taken well—usually about two weeks.

38
Fig 117 Fig 118 Fig 119 Fig 120 Axillary contracture with deep back burn: Parascapular flap with lateral half of latissimus dorsi
muscle. Tip of flap inserted at coracoid process and STSG above and below flap. Y-V plasty used for reconstruction on right side
Postop a bulky dressing is applied in the axilla and the arm is elevated to an IV pole for 7-10 days. Skin grafts in donor area or above and below flap should be dressed with Vaseline or non-adherent gauze, wet cotton balls, wet and then dry gauze and a stent or bolster dressing. At ten days, unless there are some large areas within the donor site or around the recipient area that has not healed completely, the patient can use the arm normally without the need for a splint. Some children may still have pain at the skin grafted sites and may need elevation for an additional week.
(Editor’s note: The methods above showing the use of flaps do not always remove the entire old scar as the methods described by Dr. Eriksen. Postop the patient will have good range of motion but scarring may still be present with an unacceptable cosmetic appearance. Most of the time these scars will be hidden by clothing.)
Elbow 1. Reconstructive surgery of elbow region, forearm and hand should always be performed with a tourniquet! 2. Longstanding elbow contractures due to burn scar tend to be difficult to release completely as ligaments and joint capsule are involved in the contracture. Care must be taken to avoid injury to major peripheral nerves. 3. When releasing the elbow joint, the transverse incision ends laterally and medially in a Y-shaped incision. Related scar tissue needs to be dissected and removed thereby allowing maximum extension of the contracted joint. 4. The wound needs to be covered with a thick graft, either STSG or FTSG. If conditions permit, a local rotation flap may also provide an excellent cover.

39
5. A Plaster splint to be used for a period of 4-6 weeks is recommended. 6. Once the splint has been removed, the elbow joint may be mobilized gently over weeks and months and regain more and more range of motion.
Fig 121 Fig 122 Fig 123
Axilla and elbow contractures: release and sheet grafts placed over joints and STSG over other areas
Elbow using flaps
The same techniques are used for the elbow contractures. Z-plasties or Y-V advancement will work if the contracture is less than 60°. As in the axilla, one or more Z-plasties may be used if there is good skin on either side of a linear web contracture. A Y-V plasty can be used when there is burned skin on one side of the contracture and normal skin in the antecubital fossa. A back-cut may be used to gain 1-2 cm, but one must be careful since an extensive back-cut may divide needed blood supply.
Fig. 124 Fig 125 Fig 126 Y-V elbow reconstruction Elbow contracture: Y-V plasty with back-cut. When arm was extended preop, contracture was slightly >60° and backcut at red arrow on right to lengthen flap The flap of choice for a contracture greater than 60° is a cubital artery fasciocutaneous flap from one side of the forearm in an unscarred or minimally burned area. In the author’s experience, this flap can be taken from either side of the forearm with the length up to 3X the width. The donor site may need grafting if the width is greater than 6 cm. If all the skin in the cubital fossa and forearm is severely scarred and flap rotation difficult, then skin

40
grafting maybe necessary. Full-thickness grafts are best but a thick STSG may be used with prolonged splinting for at least 12 weeks/3 months to prevent recurrence. Other more complex flaps for the elbow include a proximally based radial forearm flap, distally based lateral arm flap, a brachioradialis flap with skin graft and a pedicled flap from abdomen. The proximally based radial forearm flap may also be used to cover the olecranon.
Fig 127 Fig 128 Fig 129
Snake bite with >90% contracture: Long antecubital artery fasciocutaneous flap reconstruction with step-cut lengthening of biceps and fractional release of the brachialis,
release of anterior joint capsule and STSG donor site Note: muscle fascia remains with muscle and is not part of flap
Heterotopic Ossification (HO)
HO must be ruled out with any unusual elbow contracture and especially in burns where the elbow is not burned or minimally burned. HO can occur in the elbow with distant burns. X-rays need to be taken to rule out HO in these unusual cases. The treatment of HO is controversial. If both elbows are involved, then aggressive release of one side is usually performed early. If only one elbow is affected, then surgery is usually delayed until maturation of the HO with no further progression. If there is also a skin contracture, this will be treated appropriately after the HO is removed. HO is usually removed through a medial mid-axial approach with ulnar nerve decompression and transposition.
(Editor’s note: The above methods do not always remove the entire scar. Some unsightly scars may be left behind. Later these can be removed to give a better postop appearance.)
Hand and wrist—General considerations 1. Hand & wrist contractures are among the most common post burn contractures the surgeon will encounter. 2. Most of these contractures may not be too difficult to manage, like scar contractures involving the palm and the flexor side of the finger joints.

41
♦ One should remember that flexed PIP joints that have been in a hyperflexed position for many years may be difficult to manage due to stiffness of the joint capsule and ligaments.
♦ Other contractures may involve deeper structures like tendons,
ligaments and bone and pose a real challenge for the surgeon. 3. Contractures affecting the dorsum of the hand and wrist frequently affect the MCP joints pulling them in hyperextension.
♦ Once the MCP joints are in a hyperextended position, the PIP joints become flexed.
♦ This combined position of the MCP and PIP joints is the worst possible position for a finger.
♦ When these contractures are present for several years, they are very difficult to correct properly and should be appropriately managed by surgeons with experience in hand surgery.
4. Scar contractures involving the volar or dorsal aspect of the wrist are usually easy to correct unless deeper structures like tendons are involved. All surgical procedures must be carried out under tourniquet! Wrist joint: 1. Care must be exercised not to damage underlying vital structures.
♦ The surgeon must be very careful not to open the thin paratenon over the tendons
♦ As long as paratenon is not damaged, a skin graft will be a good solution for skin coverage.
2. When releasing wrist contractures:
♦ The surgeon should aim at overcorrecting the joint to some extent ♦ Immobilize the joint after surgery with a cast for several weeks in order to
neutralize the pulling force from forearm muscles. ♦ If tendons, ligaments and even wrist joints are affected, a skin graft will
not be of help. ♦ The only solution will be to design a local rotation flap. ♦ A distally based radial forearm flap may provide an excellent cover
whether it is the dorsal or the volar wrist joint that is affected. ♦ This flap, however, should only be used by surgeons with experience and
if the volar forearm skin is acceptable. ♦ If scar tissue prevents a local rotation flap, which often may be the case,
an abdominal or groin flap may be the best solution.

42
Fig 130 Fig 131
Deep burn—Extensor tendons missing Thick STSG with good return of function but unable
to extend fingers. Wrist grafted with FTSG. Palm: 1. Scar contractures in the palm reduce the hand function considerably as the patient is unable to fully extend the fingers thereby preventing the hand to grasp larger objects. 2. The scar has to be completely released and covered with a FTSG. 3. Apply a Plaster cast to keep the graft in position, especially in children.
♦ The cast should be used for 6 weeks before allowing free movements of the hand and fingers.
♦ In adults, the risk of developing stiff fingers must be addressed when deciding how best to care for the volar graft.
Fig 132 Fig 133 Fig 134 Fig 135 Fig 136
Contractures completely released and scarred skin excised with FTSGs

43
Fig 137 Fig 138
Palm and finger burn released in stages with FTSG One additional stage remains
Fingers: 1. Many patients who have suffered a burn to the volar aspect of the hand may experience scar contracture at the finger joints. The fingers are contracted and prevent the patient from extending the finger joints properly. 2. Additionally, the interdigital web spaces are also often affected with scars obliterating the webspace (“web creep”). 3. In the majority of these patients, the best and only way of correcting the contractures is to:
♦ make a proper and complete release ♦ excise significantly scared tissue ♦ reopen the web spaces to anatomical position ♦ application of a FTSG.
4. When several fingers are affected, a number of smaller wounds may be the result after correction of the contractures. All of the wounds need to be grafted with a FTSG. The procedure may take as long as 2.5 – 3 hours. 5. A Z-plasty may be used to correct a finger contracture if there is a linear scar with normal surrounding skin. In most instances, the contracted hand is full of scar tissue and there is a shortage of normal skin. Z-plasty as a reconstructive procedure in these cases is seldom an option. Wrist, hand, and fingers using flaps: (hand surgery techniques) Wrist: both dorsal extension and volar flexion contractures occur.
Flexion Contracture of Wrist
In long standing flexion contractures, full volar release with near normal range of motion may not be possible without division or lengthening of flexor tendons. This is avoided if possible. If after transverse release of skin and scar from mid-axis to mid-axis, the wrist cannot be extended to at least neutral, then a

44
proximal row carpectomy with a dorsal approach will be necessary. A skin graft, usually a FTSG, is used to reconstruct the volar side after release. The wrist should be splinted or pinned for at least 3 months to limit recurrence. A nighttime splint should be used an additional 3 months. Any residual flexion deformity at the wrist will limit function. Every effort should be made not to expose the tendons with the volar release. Flexion contractures at the wrist may be associated with MPJ extension contractures in a Z deformity pattern. In recent years, the author has seen a number of mild recurrent volar wrist contractures with only skin grafting—FTSG or STSG and even with long term splinting. Any volar flexion deformity limits full use of hand. Therefore, a radial or ulnar artery perforator flap or Becker flap has recently been used instead of a skin graft after the volar release. (See “Upper Extremity Reconstruction”
Fig 139 Fig 140 Fig 141 Burn contracture with wrist, MPJs and PIPJs in a Z deformity pattern: required volar wrist
release and proximal row carpectomy, capsulotomies of MPJs, passive stretching of PIPJs with pinning, excision of scarred dorsal skin, and thick skin grafts for the volar wrist and dorsal
hand
Fig 142 Fig 143 Fig 144
Volar wrist contracture previously released without full correction. Proximal rom carpectomy resulted in full correction.
Extension contractures at the wrist may occur if the burns are dorsal and these may be severe with the back of the hand adherent to the forearm. Care must be taken to leave soft tissue and paratenon over the tendons during release. After the release, severely scarred skin may be excised for improved

45
cosmesis. In most cases, split thickness skin grafting—sheet grafts are better than meshed grafts--and splinting for 3 months is sufficient. (The author’s method of FTSGs is best here.) Occasionally after release when the burns are very deep, tendons may be exposed. In these cases, a flap will be necessary. A distally based radial forearm flap, groin flap or superficial inferior epigastric flap are best. These contractures may be associated with MPJ flexion contractures. (See Flap Chapter for description of radial forearm flap.)
Fig 145 Fig 146
Severe extension contracture wrist: careful release with preservation of soft tissue and paratenon allowed for STSG reconstruction. Splinting of wrist for minimum of 3 months
Today editor would use thick STSG sheet graft or FTSG.
(Editor’s note: The dorsum of hand should have been covered by a FTSG in this case as described in the section above.)
Once the wrist contracture is released, any MPJ contractures should be addressed at the same time. Often MPJ extension contractures may be passively corrected in children and pinned in the position of protection—MPJ in 80-90° flexion. In long standing contractures this will not be possible. MPJ extension contractures may be due to the severe scarring on the dorsum of the hand. In such cases, not only should the skin over the MPJs be released from mid-axis to mid-axis (all digits including the thumb are often involved), but significant scar tissue on the dorsum of the hand should also be excised. This allows not only MPJ flexion, but improved cosmesis as well. If extension contractures remain, then capsulotomies must be carried out in the following sequence: 1) release of dorsal joint capsule, 2) release collateral ligaments, 3) release of accessory collateral ligaments, and 4) free the volar plate. These are performed sequentially and from one side to the other as necessary until the joint is released. All structures may not require release. Release until the MPJs can be placed in 80-90° flexion. Attempt is made to preserve the soft tissue over tendons and bone by carefully dissecting down to the joint through soft tissue on one side of each joint. The sagittal bands are retracted distally. The ligaments on both sides of the joint may be released through this one incision along one side of the extensor tendon. In unusual cases the MPJ

46
extension contracture is > 90° and following release the metacarpal head is exposed and the extensor tendons subluxed to one side. In this situation a flap will be required. Rarely the extensor tendons will need to be lengthened. If required, this is best performed in the distal forearm to prevent subluxation at the MPJ. In this situation the MPJs need pinning for 6-8 weeks. The flap of choice is either a distally based radial forearm flap if the proximal volar forearm skin is preserved or most likely a superficial inferior epigastric artery flap which covers the dorsum of the hand well. (See Flap chapter)
Fig 147 Fig 148
Severe MPJ extension contractures: release with mid-axis to mid-axis incision, care to preserve soft tissue and paratenon over tendons, open capsulotomies of MPJs with release of dorsal capsule and collateral ligaments, and pins through flexed MPJ and extended IPJs and
brought out through finger tips. Dorsal skin did not require excision in this case.
Fig 149 Fig 150 Fig 151 PA View Lateral view After wrist/MPJ release

47
Fig 152 Fig 149-152: Severe wrist flexion and MPJ extension contractures that required PRC and
complete capsulotomies of MPJs with resulting subluxation of extensor tendons and exposed MC heads: Pins placed antegrade through MC heads and brought out through fingertips—
above right. Extensor tendons centralized around tips of pins as seen in figure on right. Covered with Superficial Inferior Epigastric Flap
In this Zigzag contracture pattern with wrist flexed and MPJ extended, the PIPJ will often be flexed. These PIPJ flexion contractures are discussed below.
The picture below shows the use of the distally based radial forearm flap for covering the dorsal hand. This looks like a burn, but it was road traffic accident (“road rash”) down to the wrist joint with extensor tendons missing. This patient had a two stage tendon reconstruction. The same flap can be used to cover the wrist and hand in burn reconstruction.
Fig 153 Fig 154
A young 12 year old girl sustained a deep dorsal hand injury from road traffic accident. This was reconstructed with reverse radial forearm and two stage extensor tendon reconstruction.
Flexion contractures of the MPJs often involve all four fingers. Again, it is very important to release from mid-axis on the radial side of the index to the ulnar side of the small. Normal appearing skin in long-standing contractures will also require release. It is important to first incise the skin and then push with the scalpel so one does not injure vessels, nerves and tendons. A FTSG is preferred for reconstruction, but if not available, a thick STSG is used. It is important to mold the wet cotton balls into the crevices, apply a bulky gauze dressing and then splint or pin the MPJs in extension for at least 3 weeks. Continue night time splinting for six additional weeks. (Editor’s note: Palmer burns should be excised completely and covered with a FTSG.)
Flexion Contractures at PIPJ and DIPJ:

48
One should check for co-existing syndactyly with PIPJ contractures as it is best to release both at the same operation. PIPJ contractures also require mid-axis to mid-axis release with care not to injure neurovascular structures. Passive extension while the scalpel is pushed through the scar is important. Once the subcutaneous tissue is reached, any remaining contracture is released through passive extension. If full extension cannot be gained, then one must be certain one has divided the skin to mid-axis on each side. In very rare situations, the check rein ligaments and collateral ligaments may need to be released to gain full extension. (Collateral ligaments will grow back to give a stable finger.) Full-thickness grafts are always used. The PIPJs may be pinned with K-wires. In children, hypodermic needles (18 to 21 gauges) are used as they are cheaper and more likely available in large quantities. At one time the author tied stent or bolster dressings over the wet cotton ball dressings, but now the fingers are just dressed with a wet cotton balls, wet and then dry gauze and splinted in extension for 2-4 weeks according to the severity of the contracture. If, in spite of careful release, the flexor tendon sheath is opened and the tendons exposed, grafting can still be done acutely.
Fig 155 Fig 156 Fig 157 PIPJ contractures: released mid-axis to mid-axis, FTSG and pins for 2-3 weeks. Note: previous
incomplete release of Index PIPJ. Grafts will be darker forever
FTSGs over the finger joints usually do well. In dark skinned individuals, all grafts including FTSGs will be darker than the surrounding skin. This is especially noticeable on the light palm of dark-skinned patients. If only one or two fingers are released, then the final result may be improved by taking a FTSG from the palm (distal wrist area), hypothenar eminence or the instep of the foot—but this is rarely done.
(Editor’s note: The above technique releases the contracture but does not excise all the scar tissue. As seen in the picture above, there are contractures but little actual scarred skin. No scar was excised. Only the joint contracture was released through a transverse incision and the

49
fingers passively and gently extended as the scalpel is pushed against the scarred tissue and down to subcutaneous tissue. )
Burn Syndactyly:
There are numerous flaps for congenital syndactyly. In burn syndactyly, the skin is scarred and is not pliable. Therefore, an hour-glass flap has been found to fit into the defect best. It is important to advance the dorsal flap volarly to the level of the normal web space. The thickness of this flap is down to the level of the extensor tendon paratenon—leaving the paratenon on the tendon. If fingers are badly burned and normal landmarks are difficult to identify, the volar web space is half the distance between the distal palmar crease and the PIPJ crease. FTSGs are always necessary.
Fig 158 Fig 159 Fig 160 Hour-glass release of Syndactyly: Important that dorsal flap reaches web space on volar side. There are no zigzag incisions as in congenital syndactyly—just straight line incisions through
the volar skin (Salisbury and Bevin)
Markings for hour-glass flap:
1-at PIPJ, 2-at MPJ, 3-halfway between 1 and 2, 4-halfway between 2 and 3, 5-halfway between 3 and 4 and narrow point in web, 6-halfway between 1 and 3 and end of flap, 7-width of distal end of flap is from midline to midline on adjacent fingers. The incision is as shown in solid line. Incision stops at 5.
(Editor’s note: The above technique may use scarred dorsal skin in the web space reconstruction, but often there is relatively normal skin as seen in the middle picture above. FTSGs are required on either side.)
When the syndactyly involves a dorsal ridge only and extends only to level 3 above with a normal volar web, then a Y-V advancement alone or combined with Z-plasties on each side, so called “jumping man Z-plasty,” may be the best procedure. These small dorsal flaps do not rotate well if the skin is severely scarred.

50
Fig 161 Fig 162
Dorsal ridge with normal volar skin in the web—may be treated with Y-V or Y-V plus two Z-plasties on either side—“Jumping man Z-plasty”
First Web Space Contracture with Thumb Adduction:
The following techniques have been used for thumb adduction contractures: Z-plasty Four flap plasty—ideal if skin is pliable Index finger flap Dorsal hand transposition flap Reverse radial forearm flap Groin flap FTSG/thick STSG—requires pinning/splinting for 6-12 weeks A flap reconstruction is best. As in the contractures discussed above, the type of reconstruction depends on the availability of good quality skin for transfer. In long standing tight adduction contractures, the adductor pollicis must be released at its insertion at base of proximal phalanx. It may then be recessed and sutured back to the metacarpal proximally to maintain some adduction of the thumb. If most of the surrounding skin is badly scarred, a reverse radial forearm flap gives an excellent reconstruction. Below are the extremes of reconstruction: Four flap Z-plasty and radial forearm flap
Fig 163 Fig 164 Fig 165 Four flap Z-plasty is ideal when good pliable skin available. This is rare with a burned first web.

51
Fig 166 Fig 167
First web contracture: reconstructed with dorsal transposition flap and STSG to donor site. Blue arrow points to flap and green arrow points to donor site.
Fig. 168 Fig 169 Fig 170 Severe burn contracture of first web space: Release of Adductor Pollicis (AddP) from proximal phalanx, recessing the muscle back to the proximal metacarpal and reverse radial forearm flap
LOWER LIMB Groin / hip region 1. Reconstructive principles applied to other regions also apply to the groin area. 2. 3rd degree burns affecting the thigh and /or the abdomen often involve the groin and the hip region with a flexion contracture. 3. What has been underlined regarding children and burns, also applies for this region: Contractures developing in childhood often tend to become more pronounced as the child grows. 4. The basic principle in approaching the groin /hip contracture is as follows:
♦ Release and excise all contracting scar tissue ♦ Plan for a thick STSG or a FTSG to cover the inguinal area ♦ Mesh graft the remaining open wounds

52
Fig 171 Fig 172
Thigh and perineal burn—excised and grafted and splinted for 3-4 weeks
Fig 173 Fig 174 Fig 175 Fig 176 Chronic burn wound: Note wide excision, FTSG directly over hip joint area and split thickness
grafts elsewhere, simple splinting to expedite healing (Editor’s note: this splinting technique is easy to do and very effective. This holds the legs wide apart and much better than an external fixator can.)
Fig 177 Fig 178 Fig 179
Four year old burn contracture, required multiple procedures followed by long term stay at local rehab facility
Lower Extremity—Flaps for Groin Reconstruction

53
These contractures may be flexion and/or adduction contractures. Every previously described technique may be used according to the extent of the contracture and the quality of skin remaining. In severe cases tensor fascia latae flaps may be required. STSGs will usually be needed for the donor area and possibly above and below the flap. Splinting the extremities in extension and abduction can be carried out after skin grafting by Buck’s traction and later with a spica cast if necessary. The method above is excellent. If only skin grafts have been used after the release, then splinting may be needed for 3 months or longer.
Fig 180 Fig 181
Release and Tensor Fascia Latae (TFL) flap reconstruction No splinting or compliance required postop
Fig 182 Fig 183 Fig 184 Severe burn contracture with hip flexion deformity bilaterally and umbilicus at pubis: Release
and TFL flaps over hip joints and skin graft above joints on abdominal wall and over donor areas. Kept in hospital until skin grafts healed and no splinting was necessary
(Editor’s note: sometimes the TFL flap cannot be used because of severe scarring. In such cases wide excision of the scars, FTSG over the hip joint—groin/inguinal area, and splinting as above until the grafts are healed is the best method.) Knee joint /popliteal area 1. Knee joint contractures are more common than contractures in the hip and groin. There are several important issues to remember when planning the knee joint contracture release:

54
♦ Longstanding knee contractures might have damaged the cartilage ♦ The posterior joint capsule is most likely tight ♦ The peroneal nerve running around the neck of the fibular head may be
overstretched. ♦ Great care must be exercised to avoid damage to the common peroneal
nerve. 2. The first procedure is surgical removal of all scar tissue contributing to the contracture. In mild contractures, reconstruction as below can be done in one stage with a FTSG over the joint. 3. This procedure will always extend the knee joint considerably, but be careful never to apply force to extend the joint. 4. The joint may be stabilized with either an external fixator or wooden bars. 5. Once the scar tissue has been excised, the patient is brought to the operating theatre 2-3 times per week for gentle extension of the knee joint under sedation. 6. The joint usually gains full extension within a couple of weeks following this conservative approach. 7. It is of greatest importance to extend the knee joint gradually to prevent overstretching the peroneal nerve. 8. Once the joint is fully extended, skin graft procedures will close the defect by a thick sheet graft (STSG or FTSG) running across the popliteal area. The remaining wounds may be covered with a meshed graft. 9. In longstanding cases when the knee joint is destroyed, arthrodesis is the only way of stabilizing a painful unstable joint. 10. After routine release and FTSGs, the knee, like the elbow, is splinted for 4-6 weeks.
Fig 185 Fig 186 Fig 187
18 year old, pregnant girl, popliteal areas grafted with large thick STSG, Final result 12 months later without recurrence
In cases like this, the wound is dressed but splinting is not used (by the author).

55
Fig 188 Fig 189 Fig 190
21 year old burned at age 6 months, initial release, then external fixator, twice weekly serial extension, required arthrodesis of knee due to destruction
of knee cartilage but able to stand and walk 4 months later
Knee Reconstruction using Flaps:
Popliteal contractures are common and disabling. Skin grafts usually do not do well as the primary method of reconstruction in district hospitals. If skin grafting is performed as above, then postop care must include long term (3-6 months) or long term inpatient care under the supervision of excellent nurses and therapists. The primary author gets excellent results with skin grafting. His success is based on complete scar excision and excellent postoperative care by an experienced nursing team.
On initial exam, it often appears that Z-plasties and Y-V plasties will work and occasionally they will in minimal contractures with good skin. However, in the author’s experience, these local flaps do not work well in the popliteal fossa. The saphenous flap, a fasciocutaneous flap from the medial side of the leg, is an ideal flap to use if the skin of the medial leg is unburned. It is very important to extend the release to the mid-axial line on the lateral side of the knee and the flap must reach this point. The axis of rotation of this flap is at the joint line. If the medial leg skin is badly burned, then a medial gastrocnemius flap can be used. The fascia over the gastrocnemius is scored several times longitudinally to increase its width when it is rotated into the defect. A skin graft covers the muscle. The leg is kept in extension until the grafts are well healed. Long term splinting is not necessary.
Fig 191 Fig 192 Fig 193 Fig 194

56
Severe flexion contracture of knee: Long saphenous flap to reach mid-axis on lateral side and skin grafts where needed, but joint is covered with the flap
With contractures of the popliteal area, other causes of contractures, such as joint injuries, must be ruled out. Occasionally step cut lengthening of the posterior tendons, hamstring tendons, and release of the posterior joint capsule may be necessary. If the distal pulse is lost when the leg is extended, then the reconstruction should be carried out and followed with serial lengthening over several weeks.
Fig 195 Fig 196 Fig 197
Missed diagnosis: This was not a burn contracture, but secondary to septic arthritis. After release, defect reconstructed with medial gastrocnemius muscle flap, STSG and serial
lengthening over two weeks. Same can be done for severe popliteal fossa burn when medial leg skin is severely burned and saphenous flap cannot be used.
(Editor’s note: The methods above using flaps still require some skin grafting but as soon as grafts have healed, usually less than two weeks, the patient can be discharged without the need for followup if there is good range of motion. Further compliance is no longer necessary.)
Ankle & Foot 1. Ankle and foot contractures are quite common and often seem very difficult to correct surgically, especially if the burn accident happened in early childhood. 2. However, one should always try to release the contracture in children and young people even if the contracted foot seems to be very twisted as the possibility of improving the function of the foot is very good. 3. The procedure follows the guidelines underlined in this chapter:
♦ Apply tourniquet ♦ Excise the scar tissue until healthy subcutaneous tissue is reached or
paratenon and ligaments are encountered. ♦ This dissection might be time consuming as the scar and fibrotic tissue
is quite often very thick.

57
♦ Provided the dissection removes all fibrotic scar tissue, it is remarkable to observe how the foot regains its normal look.
♦ Contractures involving the dorsum of the foot and the toes often retract the toes in a dorsal – vertical position.
♦ With meticulous dissection, the toes can be brought back into normal position.
♦ K-wire fixation of the toes is a good option during the time of graft healing.
♦ Thick split thickness sheet grafts are the grafts of choice when resurfacing the ankle, dorsum of the foot and the toes /interdigital web spaces.
Fig 198 Fig 199 Fig 200
Fig 201 Fig 202
The entire process: Debridement with Humby knife, FTSG or thick STSG over ankle joint, STSG over other areas, dressing with fine mesh/non-adherent gauze, final result

58
Fig 203 Fig 204 Fig 205
5 year old with total release of scar tissue, grafting with late normal appearance
(Editor’s Note: Once again the author gets wonderful results because he excises all the burn scar and contracted skin.)
Fig 206 Fig 207 Fig 208 Fig 209 14 year old burned when stepping into burning trash while playing football 7 years previously. Note 90 degree hyperextension of toes; release, pinning with K-wires, thick STSGs, 7 weeks in
hospital

59
Fig 210 Fig 211 Fig 212 Fig 213
Wide excision and grafting, preop knees bent so that heels would touch ground, required 12 months at rehab center after surgery
Fig 214 Fig 215 Fig 216 Fig 217
Deep burn to sole and heel, cross leg reconstruction with tensor fascia lata pedicle flap (TFL) from opposite side at age 16, pedicle released at 3 weeks, good final result without contracture
of knee
(Editor’s note: The excellent methods above cannot be improved on by flaps, though a cross leg flap may be used to cover exposed ankle joint after it is released. See below. With perforator and reverse sural artery flaps now available, there are more alternative reconstructive methods available than before. When there is a severe contracture of the ankle)

60
Fig 218 Fig 219
Severe dorsiflexion contracture of ankle with exposed joint after release: Cross leg (saphenous) flap reconstruction and external fixation for 3-4 weeks. One must graft donor site before inset of flap.
When there is a severe contracture at the ankle as in the case below:
Fig 220 Fig 221 Fig 222 Fig 223
Severe lateral contracture at ankle secondary to burn at 6 months of age-now 3 1/2
Fig 224 Fig 225 Fig 226
Severe medial contracture with illustration of incision from mid-axis to mid-axis
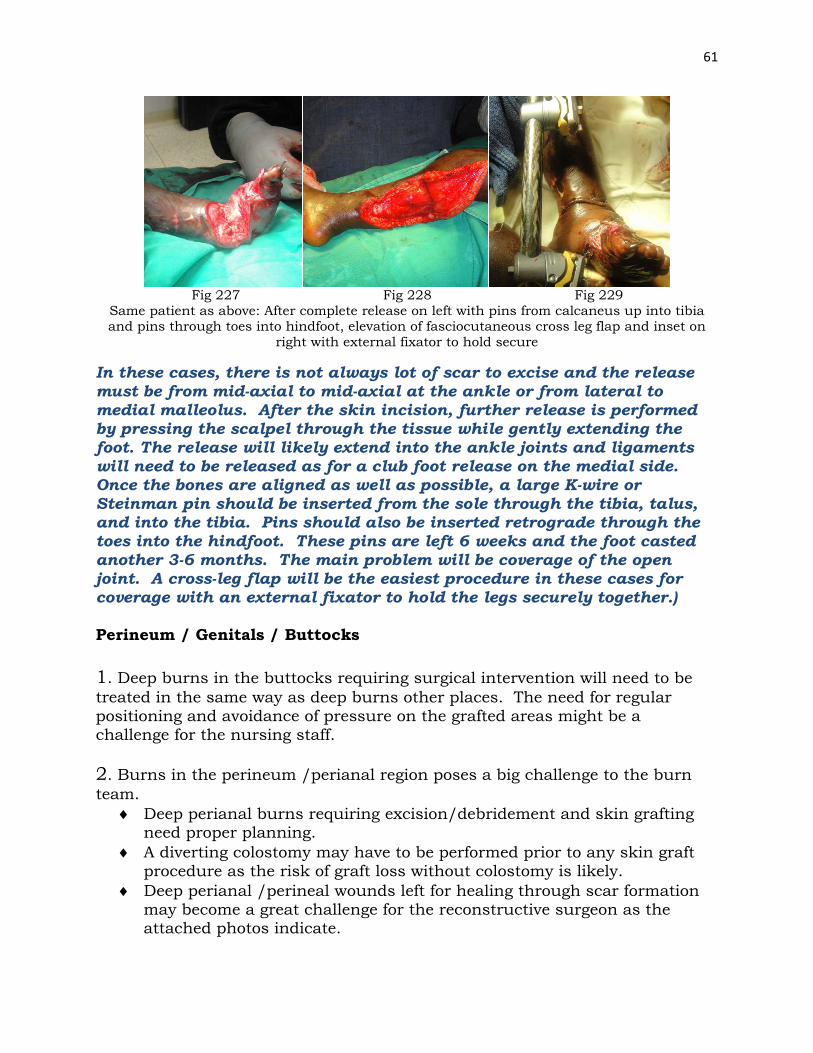
61
Fig 227 Fig 228 Fig 229
Same patient as above: After complete release on left with pins from calcaneus up into tibia and pins through toes into hindfoot, elevation of fasciocutaneous cross leg flap and inset on
right with external fixator to hold secure
In these cases, there is not always lot of scar to excise and the release must be from mid-axial to mid-axial at the ankle or from lateral to medial malleolus. After the skin incision, further release is performed by pressing the scalpel through the tissue while gently extending the foot. The release will likely extend into the ankle joints and ligaments will need to be released as for a club foot release on the medial side. Once the bones are aligned as well as possible, a large K-wire or Steinman pin should be inserted from the sole through the tibia, talus, and into the tibia. Pins should also be inserted retrograde through the toes into the hindfoot. These pins are left 6 weeks and the foot casted another 3-6 months. The main problem will be coverage of the open joint. A cross-leg flap will be the easiest procedure in these cases for coverage with an external fixator to hold the legs securely together.) Perineum / Genitals / Buttocks 1. Deep burns in the buttocks requiring surgical intervention will need to be treated in the same way as deep burns other places. The need for regular positioning and avoidance of pressure on the grafted areas might be a challenge for the nursing staff. 2. Burns in the perineum /perianal region poses a big challenge to the burn team.
♦ Deep perianal burns requiring excision/debridement and skin grafting need proper planning.
♦ A diverting colostomy may have to be performed prior to any skin graft procedure as the risk of graft loss without colostomy is likely.
♦ Deep perianal /perineal wounds left for healing through scar formation may become a great challenge for the reconstructive surgeon as the attached photos indicate.

62
♦ Meticulous nursing care of wounds and grafted areas are of greatest importance for a positive outcome in these difficult burns.
♦ If the burns are deep and sphincter function is found later to be inadequate, a gracilis flap may be used to reconstruct the sphincter (Contact author/editor for details of such procedure)
Fig 230 Fig 231 Fig 232 Fig 233
Required initial colostomy, nutrition for 2 months, thick STSG around anus and STSG other areas, legs elevated for healing
3. 3rd degree burns of the entire penile shaft will need a FTSG skin graft or a thick STSG once the wound has become clean.
♦ The FTSG has to be applied as sheet grafts. Minor, smaller wounds may be left for secondary healing or simply excised and closed directly. (Editor’s note: Thick meshed STSG work well)
♦ These burns are fortunately uncommon. ♦ Technique: A Foley catheter is inserted, the penile shaft extended by
sutures through glans and attached to Foley, grafts applied. Stent sutures inserted at penile base and at corona and tied over a bulky dressing as described previously. If the graft has been meshed, a stent should be left in place for 10-14 days.
Editor’s Conclusion: This chapter has given general surgeons several different options for care of burn deformities. Certainly the techniques of Dr. Eriksen are excellent. Unfortunately, many in district hospitals will not be able to carry out some of his methods. His techniques are excellent but some may require long term hospitalization or closely monitored followup care for long periods of time which may be impossible due to lack of funds, lack of time and lack of specialized nurses to give the dedicated care needed. Is important for you to have a chance to study different methods of management and choose the one best for you in each situation.

63
You are also referred to the book, Primary Surgery, by Maurice King, which contain a lot of important information about burns and skin grafts. Addendum: Burn scars often lead to hypertrophic scars and keloids. These are covered in Chapters 1 and 33. For hypertrophic scars, pressure is the best answer. Vitiligo, depigmentation of the skin, is an unsightly result of deep burns and scarring if on exposed areas. The best treatment for these “white” scars is waiting as over time most of these areas will re-pigment especially in young people. The next best treatment is excision and grafting of these areas. Tattooing with appropriate colors can be used for small areas. Women can use various cosmetics on exposed areas but these measures are temporary. Please see algorithm for hypertrophic scars and keloids at the end of Chapter 1. Einar Eriksen Louis Carter— [email protected]