casablanca - computerarchive.org - computer files … of contents getting started i unpacking the...
TRANSCRIPT

CasablancaNonlinear digital video editor
System Software Version 3Owner’s Manual

Casablanca Owner’s Manual
For System Software Version 3
Copyright © 1999 DraCo Systems, Inc., Boulder, Colorado USAand MS MacroSystem Computer GmbH, Witten, GermanyAll Rights Reserved
Our thanks go out to the many people connected with the creation andproduction of this owner’s manual series for the Casablanca nonlineardigital video editor, starting with Casablanca creators Jörg Sprave,president of MacroSystem, GmbH, and Eric Kloor, president of DraCoSystems, Inc. The original manual was written by Jörg Sprave and EricKloor, and was initially revised for the Version 2 System Software byMr. Sprave before it was translated to English by Rafael Dyll ofMacroSystem.
Further revisions and redesign for the Version 2 manual were providedby Scott Curl and Rick Barron of DraCo Systems, with design work byMary Barron of M Barron Studios and technical help from CoryHodnefield and Matt Olson of DraCo Systems Technical Support.
The revisions for the Version 3 manual were written by Scott Curl andCory Hodnefield and edited by Rick Barron, with technical help fromJörg Sprave and Matt Olson.
Our additional thanks go out to the many Casablanca users who haveprovided us with suggestions for enhancing the Casablanca learningexperience.
Boulder, Colorado 1999
DraCo Systems, Inc.
3380 Mitchell Lane
Suite 102
Boulder, CO 80301
USA
303.440.5311
fax 303.440.5322
email [email protected]
www.draco.com

Table of Contents
Getting Started ............................................................ iUnpacking the box ................................................................................ iSetting up the Casablanca .............................................................. iii
Introduction and General Concepts ......................... 1.1General information .......................................................................... 1.1New features of Version 3 ................................................................. 1.3Philosophy and tools ........................................................................ 1.6External controls ............................................................................... 1.7Interface controls .............................................................................. 1.7
Tutorials ................................................................... 2.1A short video project tutorial ............................................................. 2.1An insert-editing tutorial .................................................................. 2.17An audio-mixing tutorial .................................................................. 2.18A titling tutorial ................................................................................ 2.21A multilayering tutorial ..................................................................... 2.24
Reference ................................................................. 3.1System settings ................................................................................ 3.1Project settings ................................................................................. 3.2Video settings ................................................................................... 3.4Record ............................................................................................. 3.5Edit ................................................................................................... 3.7Finish screen .................................................................................. 3.17Transitions screen ........................................................................... 3.18Image processing screen ................................................................ 3.24Title screen ..................................................................................... 3.29Audio record screen ....................................................................... 3.34Audio mix screen ............................................................................ 3.42
Appendix A Expansion ..............................................A.1Hardware upgrades .......................................................................... A.1Software upgrades ........................................................................... A.2
Appendix B Troubleshooting.................................... B.1
Index.......................................................................... I.1

When you first open up your Casablanca box, you should find:
■ Your Casablanca unit.
■ A hard drive located inside the Casablanca behind a removeableblack face plate.
■ A user’s manual.
■ A set of hard drive keys that will lock your drive in place.
■ A demonstration video tape that will introduce you to theCasablanca and its features.
■ A trackball (shown below) and trackball extension cable.
■ A pair of composite (RCA) plugs (shown below).
■ An SVHS cable.
■ An SVHS to composite conversion cable (shown below).
■ A power cable for the Casablanca.
Getting Started
Unpacking the box
■ A Casablanca System Software Version 3 floppy disk.

ii Getting Started
■ A EuroScart/composite adapter (shown below).
■ A “new owner’s package” that includes your registration card,product information and warranty options.
If you are missing one or more of these items, please contact yourCasablanca dealer.
To operate properly, the Casablanca needs to be:
■ Plugged in to a power source through the power cable.
■ Connected to a video player (a camcorder, VCR or deck). Audioand video will come OUT of your player and IN to theCasablanca through either the FireWire, SVHS or composite(RCA) cables in order to capture video.
■ Connected to a video recorder (a camcorder, VCR or deck).Audio and video will come OUT of the Casablanca and IN to therecorder through either the FireWire, SVHS or composite (RCA)cables in order to save or record your completed video to tape.
■ Connected to a trackball through the serial port
■ Connected to a monitor. Audio and video come OUT of theCasablanca and IN to your monitor through the SVHS orcomposite (RCA) cables.
NOTE: If you are using the same device as both your video playerand your video recorder, you need to make sure you reconnectyour cables after each separate operation (e.g., when you arerecording to tape, disconnect the cables that bring video in to theCasablanca). If you have audio and video coming out of and intothe device at the same time, you will create a “loop” that will causedistortion in your video images.
Setting up the Casablanca

iiiGetting Started
S/N Mini-DV000000EuroScart Out
Video/RGB/Audio Audio Out
L RM/J 00/00
SVHSOut
SVHSIn
Audio In L R
All of the ports, cables and jacks that you need to connect theCasablanca to a player, recorder and monitor are shown below(there are additional front audio and video input jacks as well).
1 2 3 4
5 6 7
1 The Euroscart adapter converts the component Euroscart signalinto composite audio and video out.2 RCA plugs connect to the Audio Out jacks.3 An S-video (or Y/C) cable connects to the SVHS Out port andcarries the S-video signal out of the Casablanca (this can’t beadapted to an RCA composite signal with the RCA adapter).4 The RCA plugs connect to the Audio In jacks to bring soundinto the Casablanca from a camera, deck or a CD player. Monosound should connect to the left jack only.5 The IEEE1394 FireWire cable connects to the Mini DV port andallows you to bring a digital video signal into and back out of theCasablanca.6 The Trackball operates the Casablanca’s interface and connects tothe small serial port.7 An S-video cable connects to the SVHS In port to carry the S-video signal into the Casablanca.8 Female 50-pin SCSI port for connection to external hard drives.9 Male 25-pin serial-cable connection for PC Link.
Euroscart
Audio outS-video out
Audio in
FireWire
Trackball
S-video in
SCSI portSerial port
8 9

iv Getting Started
S/N Mini-DV000000EuroScart Out
Video/RGB/Audio Audio Out
L RM/J 00/00
SVHSOut
SVHSIn
Audio In L R
There are three basic configurations that can be used when settingup your Casablanca, depending upon the type of equipment thatyou are using with your Casablanca.
S/N Mini-DV000000EuroScart Out
Video/RGB/Audio Audio Out
L RM/J 00/00
SVHSOut
SVHSIn
Audio In L R
S/N Mini-DV000000EuroScart Out
Video/RGB/Audio Audio Out
L RM/J 00/00
SVHSOut
SVHSIn
Audio In L R
back front
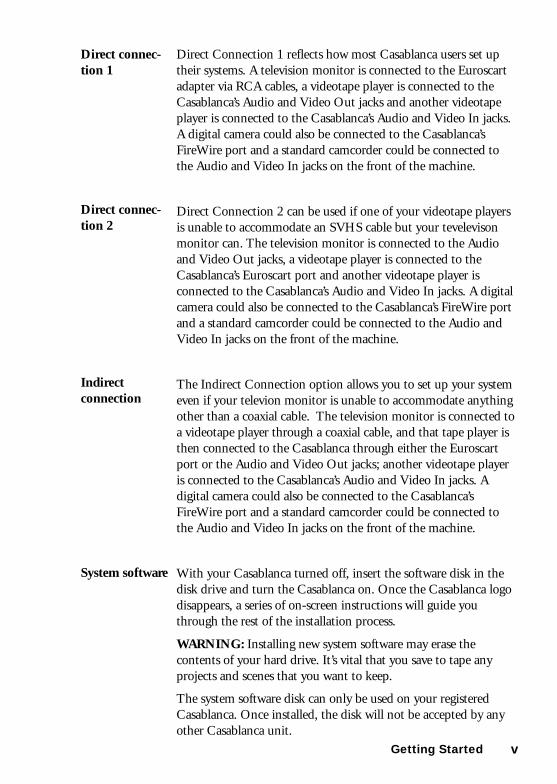
Direct connec-tion 1
Direct connec-tion 2
Indirectconnection
back front
back front
(Optional)
(Optional)
(Optional)
(Optional)
Mini DigitalVideoDV
Mini DVDigitalVideo
Digital
VideoVDMini
(Optional)
(Optional)
vGetting Started
Direct Connection 1 reflects how most Casablanca users set uptheir systems. A television monitor is connected to the Euroscartadapter via RCA cables, a videotape player is connected to theCasablanca’s Audio and Video Out jacks and another videotapeplayer is connected to the Casablanca’s Audio and Video In jacks.A digital camera could also be connected to the Casablanca’sFireWire port and a standard camcorder could be connected tothe Audio and Video In jacks on the front of the machine.
Direct Connection 2 can be used if one of your videotape playersis unable to accommodate an SVHS cable but your tevelevisonmonitor can. The television monitor is connected to the Audioand Video Out jacks, a videotape player is connected to theCasablanca’s Euroscart port and another videotape player isconnected to the Casablanca’s Audio and Video In jacks. A digitalcamera could also be connected to the Casablanca’s FireWire portand a standard camcorder could be connected to the Audio andVideo In jacks on the front of the machine.
The Indirect Connection option allows you to set up your systemeven if your televion monitor is unable to accommodate anythingother than a coaxial cable. The television monitor is connected toa videotape player through a coaxial cable, and that tape player isthen connected to the Casablanca through either the Euroscartport or the Audio and Video Out jacks; another videotape playeris connected to the Casablanca’s Audio and Video In jacks. Adigital camera could also be connected to the Casablanca’sFireWire port and a standard camcorder could be connected tothe Audio and Video In jacks on the front of the machine.
With your Casablanca turned off, insert the software disk in thedisk drive and turn the Casablanca on. Once the Casablanca logodisappears, a series of on-screen instructions will guide youthrough the rest of the installation process.
WARNING: Installing new system software may erase thecontents of your hard drive. It’s vital that you save to tape anyprojects and scenes that you want to keep.
The system software disk can only be used on your registeredCasablanca. Once installed, the disk will not be accepted by anyother Casablanca unit.
Direct connec-tion 2
Direct connec-tion 1
Indirectconnection
System software

Congratulations on your purchase of the DraCo Casablancanonlinear digital video editor! We thank you for the trust youhave placed in our company and our product and we hope you’llsoon discover that the Casablanca meets and exceeds all of yourexpectations.
The Casablanca will revolutionize your work, in part because itfollows a unique philosophy—your ability to create great videoproductions should never be hindered by the process of operating thevideo editor. We have worked hard to simplify every step of theediting process without sacrificing editing features or the qualityof the output. By integrating all of the components you need forhigh quality video editing into a single box, we’ve eliminated theperils of changing configuration settings and the pitfalls ofincompatible cards and programs. And the logical design of ourediting software protects you from the confusion and technicalminutia that can bog down projects.
This manual will help you set up your Casablanca and learn to useyour powerful new editing tool. Following this introduction aretwo main sections:
1. A tutorial section that starts by guiding you through a simpleproject step by step. Succeeding chapters take you throughevery menu item available, so you’ll have a complete under-standing of the entire system.
2. A reference section that covers each and every button andmenu item, so you’ll have fast access to instant information onany aspect of the Casablanca’s operation.
Following the two main sections, an appendix presents technicaland background information as well as some tips and tricks forusing the Casablanca. Finally, a comprehensive index will help youfind the answer to any question.
We also strongly urge you to watch the demonstration andtraining video cassette that came with your unit; you’ll be able towatch a complete demonstration of all of Casabalnca’s features andpick up numerous editing tips.
Chapter 1Introduction and General Concepts
General information

1.2 Chapter 1 Introduction and General Concepts
The Casablanca is a complete system for editing videos in adigital, nonlinear form. Data rates and picture quality surpass DVsystem specifications. All you need to operate the editing softwareis the trackball included with your Casablanca. When you receivenew software, simply insert the disk and restart the Casablanca–installation is automatic.
Here is the basic process of editing a video on the Casablanca:
1. You capture your recorded video and audio by transferring itfrom a VCR or camcorder directly to the Casablanca. Thisdigitizes the footage onto the Casablanca’s hard drive.
2. You “cut” the digitized footage into scenes. You can trim thesescenes frame-specific to the length you need and then placethem onto the storyboard in the order you want them toappear in the final production.
3. You apply various effects to the scenes and transitions betweenthe scenes, insert additional clips into the scenes and addtitling.
4. You add audio to any or all of the three stereo tracks whichsupport audio mixing and dubbing, allowing for the originalaudio, background sounds and commentaries.
5. You output the completed project to a videotape.
Not only can the Casablanca accommodate your analog signals,but its data rate of 3.1 MB/second and DV FireWire option makethe Casablanca ideal for digital video editing. Our IEEE 1394FireWire for DV camcorders and recorders lets you capture, editand store digitally without any quality loss. The DV option alsoallows for machine control of digital cameras and recorders.
Note that you must use both a DV camcorder and a DV recorder(or a DV camcorder capable of recording from another source) toavoid analog loss. You can also go digital from the camcorder forthe input and record Casablanca’s output via YC to your VHS,SVHS or HI8 machine.
There’s another significant benefit that comes with the Casa-blanca: You’ll never need to be involved with plug-in video-capture boards, audio cards or other mix-and-match components.The Casablanca is a completely integrated system built by onemanufacturer; hardware, software and video technology were alldeveloped by DraCo Systems in the U.S. and MacroSystem ofGermany.

1.3Chapter 1 Introduction and General Concepts
Have fun discovering the capabilities of this amazing editing tool.We hope you will be as happy with it as the many thousands ofusers before you have been. And remember: We’d love to hearfrom you about your Casablanca, be it ideas for further develop-ment, notes on how you’re using it, or even criticisms of anyaspect of the Casablanca or our company (although we’ll neverturn away compliments, either).
This section describes new features in the Casablanca softwaresince Version 2.75. If you have just purchased the Casablanca, youcan skip this part and start with the Philosophy and Tools section.
Enhanced audio features are the centerpiece of this Version 3software upgrade. We have received countless ideas and sugges-tions from users like yourself since our initial release and we havetaken great care in determining how to implement the newfunctions into our tried and tested user interface. Some of themain advances are:
In Version 3, the commentary and background audio tracks are“anchored” to a particular scene within your storyboard, not tothe storyboard itself. Therefore, if you have placed an audiosegment in your commentary track, for example, and you decideto later add a three-second empty scene at the beginning of thestoryboard, your audio will no longer be thrown off–it will nowshift with the scene(s) it was originally placed under.
You can now hear a scene’s audio track whenever you split or trimit. This new feature allows you to split scenes “on the fly” (cutyour scenes according to their original audio tracks); once you’veselected a scene to split, left click on the split screen’s play buttonand listen to the audio as your scene plays through, then left clickon “use” to split your scene at every point you choose.
An optional waveform panel can be displayed whenever you usethe split and trim functions by clicking on the small speaker iconin the box in the upper left corner of the control panel. Thewaveform provides you with a visual display of a scene’s audio anda white vertical bar indicates your current position within thescene’s audio.
New features of Version 3
Anchored audio
Waveform
Audio duringsplit and trim
Changes in audio

1.4 Chapter 1 Introduction and General Concepts
The new Sample ->Scene function within the Audio Recordscreen creates a black empty scene that featuring an audio sampleof your choosing as the scene’s source audio. This scene can thenbe used to add video to the underlying audio track.
To create an audio-sample scene, go into the audio record screenand select an audio sample from the list on the right by clickingthe left trackball button and scrolling through the audio samplesuntil your selection is highlighted in blue. Click the left trackballbutton to confirm your choice and then select the “Sample ->Scene” button to the left of the audio sample list. When you exitthe audio record screen and enter the edit screen, you will find thenewly created scene at the end of your scene bin.
You can now use this audio-sample scene to help you edit video toaudio. To do this, you use the split function to cut the scene intodifferent segments by first clicking Play to hear the audio, thenyou click the “use” button to make a video cut to the audio. Whenfinished, your original audio-sample scene will be divided intonumerous scenes. You can then place these new scenes in yourstoryboard sequentially and use the insert button to place videoscenes of your choosing over the empty black video in each of theempty scenes.
In addition to the Sample ->Scene option, the new audio Splitand Special buttons, as well as the newly enhanced Trim featurewithin the Audio Record screen, help make your audio editingexperience faster, easier and more fun as they enable you to edityour sound samples in much the same way as you edit your videoscenes.
By clicking on Split, for example, you can scroll through and cutsegments out of your music or narration clip, or break longsamples up into several smaller pieces.
The audio Trim lets you trim the in and out points of your audiosamples (just as it did in previous versions of the software) butnow it displays your audio piece in a waveform to provide youwith a visual display of what it is that you are editing.
The new Special option allows you to add a variety of effects toyour audio clips, such as “karaoke” (drops the volume of the vocaltrack and raises the backing music) and lets you raise or lower thevolume of the entire piece or just the left or right channels.
Sample ->Scene
Audio split andtrim
Special

1.5Chapter 1 Introduction and General Concepts
Several cosmetic changes have been made to the displays withinthe Audio Mix screen. The rendered/unrendered audio indicatoris now displayed just below the storyboard scenes above the tracksthemselves. This allows the bar to display the exact amount ofaudio that has been rendered (green) or unrendered (red), ratherthan having the entire audio segment appear in green or red.
The names of the different audio tracks have been replaced byicons. The Original Audio track was called “Org.” in earlierversions of the software, but is now represented by an icon of avideo camera on a tripod. The Commentary track, which wascalled “Com.,” now displays a microphone icon, and the Back-ground Music track, formerly “Bkg.,” is now an icon that depictsthree musical notes.
You can now move directly from the Edit Screen to the AudioMix screen by clicking on the Audio Mix icon (two musical notesabove a wrench) in the bottom left of your screen.
Several other important improvements have been made to theCasablanca’s system software that will enhance your editingexperience without complicating the system’s elegant interface.
You can now preview the hard cuts between scenes in yourstoryboard when you play your storyboard in the TransitionsScreen.
Now, in addition to using the familiar real-time preview window,you have the option to preview titles, effects and transitions in asingle-frame, full-screen mode. Within the full-screen preview,you can view a display showing which title or effect is beingapplied, the frame that’s being displayed. With a click of a buttonyou can see: The original scene without the added effect; the scenewith the effect added to it; the effect and the original scenedisplayed simultaneously.
Most of the motion effects within the Special screen (slow motion,still and strobe) can now be applied in one of several new ways.You can add the motion effect to either a single field within aframe (the way motion effects were applied in previous versions ofthe software) or on both fields within a frame. In addition, you
Audio mixdisplay changes
Preview cuts
Audio mixscreen icon
Other changes
Full-screenpreviews
Field, frameand interpola-tion

1.6 Chapter 1 Introduction and General Concepts
can employ an interpolated field (the Casablanca generates anextra field that improves the appearance of the effect by addingimage stability and reducing flicker) or an interpolated frame.
With Version 3, you can now set a range that lets you work onmultiple projects at the same time by recording a selected portionof your storyboard to tape, rather than the entire storyboard.When you enter the Finish Screen, you will notice a Range buttonin the left center section of the screen. Once you click on thisRange button, the first frame of your storyboard will appearbehind a Trim toolbar. Once you set your new In and Out points,click on the videocassette icon in the lower right corner of thetoolbar to return to the Finish screen.
The newly enhanced Insert edit function enables you to vieweither the end of the foreground scene or the beginning of thescene being inserted while you set the range and confirm theinsert.
In the lower right corner of the System Settings screen is anOptions function that allows you to select whether the play panelis visible or hidden when you play your storyboard.
“Simplify. Simplify.” Henry David Thoreau wrote those words150 years ago, yet they perfectly describe today’s DraCo Casa-blanca. We wanted to create a high-quality video editor thatwould be understandable and easy to operate, so we followedThoreau’s lead and simplified the entire editing process.
For example, the Casablanca records onto a hard drive as opposedto video tape. Recordings made on tape are linear and specificscenes can only be reached after time-intensive spooling. TheCasablanca’s hard drive, however, allows you to edit in a nonlinearfashion–any recorded scene can be accessed at any time withoutcumbersome fast-forwarding or rewinding.
The Casablanca also features a very straightforward interface. Ifyou want to record, for example, you press the “record” button. Ifyou want to edit, you press Edit. This minimalist approach canhelp you without limiting the Casablanca’s power; we basicallysimplified the process so you don’t have to simplify your ideas.
In fact, whether you’re editing a wedding video or creating adocumentary, you are likely to follow these basic steps.
Partial story-board play back
Insert-editenhancement
The conceptbehind theCasablanca
Philosophy behind the Casablanca
Field, frameand interpola-tion (cont’d)
Hide play panel

1.7Chapter 1 Introduction and General Concepts
With the Casablanca, the video novice follows the same path asthe experienced editor. Before embarking along on that path,however, let’s stop and take note some of the basic tools that areused to operate the Casablanca.
Selecting screens and buttons is done with the trackball. (Note:Your Casablanca may be equipped with a different style oftrackball than the one illustrated.) Every trackball has at least threekey components:
1. The ball, which moves the on-screen pointer and the sliders.
2. The left (Select) button. Use this to select an option once youhave positioned the pointer over a button on the screen.
3. The right (Cancel) button. This button can either cancel anoperation or return you to the previous screen.
Although a Microsoft-compatible mouse can also be used, thetrackball is easier to use with the Casablanca, particularly fortrimming scenes.
The Casablanca features several types of on-screen interfacecontrols that can be selected by the trackball. They are as follows:
A button is a symbol that you press in order to start a particularoperation. Because we try to keep things as simple as possible, theselection of the “Delete” button, for example, will result in thedeletion of a selected scene.
Trackball
Interface controls
External controls
Buttons

1.8 Chapter 1 Introduction and General Concepts
Buttons withselectablefunctions
Icons
Sliders
On-screenkeyboard
In and outpoints
Clicking on these buttons reveals a list of several additional optionsand/or functions. The current option is always hilighted in blue.Simply click on a particular option to select it or press the righttrackball button to cancel and return to the previous screen.
Many of Casablanca’s screens feature a row of icons that representthe recording, editing, and video-setting screens. Clicking on theseicons will let you quickly “jump” directly from one operation toanother without having to return to the main Casablanca screen.
Sliders are bars that allow you to move quickly through a selectionfor a particular field. Just click on the slider and the pointer willdisappear. Roll the trackball and you’ll scroll through the materialon the screen. Click the left trackball button to accept the changedposition, or the right button to cancel.
You can easily place text (such as scene names and titles) into yourvideo project with the Casablanca’s on-screen keyboard–just movethe trackball pointer over the key you want to type and click the lefttrackball button. If you prefer, you can attach a standard DOSkeyboard to input your text.
These points define the portion of a scene that you want to workwith. You can use them to separate the video material that you wantto keep in a scene, mark the entry and exit points of a special effector indicate where an audio segment will begin and end.

1.9Chapter 1 Introduction and General Concepts
Quick PlayButtons
Single frame
Selection fields
Video-controlbuttons
Quick play buttons help you trim off material from the beginningor end of a scene without having to play through the entire piece.They allow you to play the first five seconds at the beginning of ascene and the three seconds of video prior to the end of a scene.
Press the “<” and “>”buttons to move the in/out points forward orbackward one frame at a time within your video project.
These small squares can be activated by merely clicking onto them.A check mark within the square means that the selection is active.
These buttons on this control panel play, record, pause and stopyour audio and video. The icons we use match those found onmost commercial video recorders.
The color box allows you to create and archive your color selec-tions. You can use these colors for titles, the background in emptyscenes and with Chromakey special effects. The bar at the top ofthe panel represents the main color spectrum. Use the slider at thetop of the box to scroll through the spectrum until you find thegeneral color range that you want to use. You can then use thevertical slider on the left to adjust saturation and the horizontalslider at the bottom to adjust the color intensity (brightness).
Color box

This chapter serves as a tutorial that will guide you through aninitial editing session on the Casablanca and introduce severaladvanced editing techniques. Every step of the editing process willbe covered, however, so if you already have experience with theCasablanca, feel free to skip over the sections you are familiar withand refer back to them as needed.
Select a tape containing at least three minutes of prerecordedvideo. It can be your favorite movie, an event, vacation videos–anything at all that will make the tutorial fun for you to work on.Put this tape into your video player (which can be a VCR, tapedeck or camcorder) and cue up the portion of tape that you wantto work with.
Turn on the Casablanca by pressing the button on the upper leftcorner of the Casablanca’s front panel and wait until the Mainscreen appears (shortly after the Casablanca logo). You’ll noticefour main areas appear within the Main screen:
■ The Settings area (top right)Here you can set the Casablanca’s clock, select a language, andchoose the video-quality level.
■ Record / Edit area (left center)This is where you record the source video onto the Casablanca’shard drive. Once the video is recorded, you can then split it upinto separate scenes that will be ordered in your digital Story-board.
Chapter 2TutorialsA short video project tutorial
Selectyour video
The mainscreen

2.2 Chapter 2 Tutorials
■ Effects/Titling area (right center)Here you add transitions, special effects and titles to your project.
■ Audio area (bottom left)This is where you can add music, a voice-over commentary orsound effects to your project’s original soundtrack.
Before starting a video project, you need to check yourCasablanca’s settings. Use the trackball to move the on-screenpointer to the “System Settings” button and select it by clickingthe left trackball button. The system settings screen is shownabove.
You will now be prompted to set the Casablanca’s front LCDclock display. (You’ll wish your VCR’s clock were as easy to set.)Confirm the message prompt with the left trackball button andthe message window will disappear from your screen.
Next, click the “Hrs” (Hours) strip in the time field. The strip willchange color when selected. Scroll the trackball to select thecorrect hour and confirm it by clicking the left trackball button.
Do the same with “Min” (minutes). The correct time should nowappear on the both the screen and the front LCD display.
You can return to the main screen either by pressing the righttrackball button or by selecting the “Main screen” button in thelower-left corner of the screen.
The settings
TIP: If the LCD clock display does not appear on thefront of your Casablanca, remove the power cablefrom the back of the unit, wait several seconds andreconnect the cable. This will reset your clockmechanism and the LCD will begin flashing.

2.3Chapter 2 Tutorials
Now adjust the project settings (shown below) by clicking the“Project Settings” button.
For the purposes of this project, choose “HiFi (Stereo)” for theaudio-quality and “Large” for the screen size. You can now returnto the main menu either by pressing the right trackball button orby selecting the main screen button in the bottom-right corner.
Press the “Video Settings” button to enter the video settingsscreen (shown below).
Start your source video tape by pressing “Play” on your tapeplayer. Choose the input setting that describes where the video-incables enter your Casablanca (either the front or the rear). You canmodify the front and rear input settings by selecting whether theautomatic gain control (AGC) is on or off. AGC is an optionalsetting that may improve the quality of some video signals, soexperiment with it to see which benefits your video feed. If thevideo signal on your monitor appears in black and white after youhave made your adjustments, check all of the cables to ensure theyare connected properly. You can use the sliders to adjust thebrightness, contrast and color settings, then return to the mainscreen.
TIP: If you are not using a professional video system, tryto avoid a high color saturation level; it could lead topicture disturbances when you record your project tovideo tape.

2.4 Chapter 2 Tutorials
When you click the “Record” screen button, a toolbar appears atthe bottom of your screen. Behind this control panel is the sourcevideo that you cued up while adjusting your video settings. Whenyou see a segment of video that you want to use, press the“Record” button (the red circlular symbol in the lower left corner)on the control panel, and the Casablanca will digitize the sourcevideo to its hard drive. This will continue until you click the black“stop” button. Repeat this step until you have recorded four orfive separate takes from the source video. To play the segment,press the triangular “play” button.
When you are finished recording and viewing your separate takes,stop your source deck and return to the Main screen by pressingthe right trackball button. The Casablanca will now automaticallysave your project, so there may be a slight pause before the screenactually changes.
Recording
TIP: Always stop recording on your Casablanca beforeyou press Stop on your source player (VCR, deck, etc.);otherwise, your recorded scene will lose its audio sync.You may also want to power down your source playeronce you have finished recording material onto theCasablanca’s hard drive in order to eliminate screen“jitter.”
TIP: The forward and rewind buttons at the top of therecord control panel can only be used if you areworking with a DV-equipped Casablanca and sourcedeck. Because the buttons operate the digital videorecorder itself, this process is commonly referred to as“machine control.”

2.5Chapter 2 Tutorials
Click the “Edit” button to enter the edit screen. The top portionof this screen contains the “storyboard” and the bottom halffeatures the “scene bin.” You will see a series of small, framedpictures in the scene bin; these small icons are representations ofyour recorded scenes. Every scene you record on the Casablancawill appear in this area, although you can only see up to 12 scenesat any given time. You can view the other scenes by using thescroll bar to move through the scene bin.
If you want to play your first scene to review its contents, select itand press the arrow-shaped Play button (Play scene) that appearsat the bottom of the screen (shown above).
You can pause the playback (shown above) at any time bypressing the “Pause” button or stop it entirely by pressing “Stop.”
We will now separate the scene into several segments. It isimportant to note that the Casablanca’s editing process is nonde-structive. The original scene will not actually be split into pieces;rather, the “splits” will refer to sections of the original.
Editing
Storyboard
Scene bin
Playstoryboard
Play scene
Splitting
Play

2.6 Chapter 2 Tutorials
The original scene will remain in the scene bin in its entirety,along with the scenes we will create from it.
Click the “Split” button in the mid-left portion of the edit screenand the first frame of your scene will appear along with the splitposition toolbar (shown below).
Click on the “Split Position” button on the control panel andscroll through the scene with the trackball. You can also click the“<” and “>” buttons to move through the scene frame-by-frame.Clicking the waveform icon in the upper left corner of the panelwill bring up a waveform display in the upper left corner of yourscreen. The waveform is a visual representation of the scene’soriginal audio track as you hear it. Click the left trackball buttonto mark the exact point that you want to split out of your scene.
Press the play button to view and hear the material that you haveselected. If you want to keep this material as a separate scene, clickthe “Use” button. If you want to get rid of the split materialentirely, select “Drop” and the segment will be disregarded.Continue until you have created a number of usable segmentsfrom the original scene.
Return to the edit screen by clicking the right trackball button.The scene bin will now contain your newly created scenes inaddition to the originals.
You can play any of the new scenes by selecting it (the active scenewill be marked with a blue frame) and pressing the Play button.The play button appears, along with the name and length of theselected scene, at the bottom left of the screen.
TIP: The scenes that you split out from the originalrecorded footage don’t take up additionalhard drive space.

2.7Chapter 2 Tutorials
If you want a scene’s title to be more descriptive than the generic“S1,” you can easily rename it. Select the scene that you want torename and a blue frame will border the icon. Then click on thescene’s name in the lower-left section of the scene bin and a digitalkeyboard will appear. Type the new title on the keyboard andpress “OK.” Repeat this for all scenes that you want to rename.
Trimming creates crisp, clearly defined start and end points bydenoting what actually appears in the scene. Select a scene thatyou want to trim (for our tutorial, it will be best to pick a scenethat is at least three seconds long) and press “Trim.”
You’re now in the Trim screen. If you click on the waveform iconin the upper-left corner of the toolbar, you’ll see a visual represen-tation of the scene’s audio while you listen to it. You will definethe scene’s beginning (or “In point”) first, so click the “In” buttonon the control panel. The slider at the bottom of the panelchanges from grey to blue. As you move the trackball, you scrollthrough the scene (as indicated by the receding blue slider). Stopscrolling once you reach the frame you want for the start of yournew scene. The time box to the right of the in button indicatesthe amount of material that has been removed from the scene.
The counter in the upper-right corner displays a scene’s runningtime in minutes (the first digits), seconds (the second set of digits)and frames (the last set of digits). The Casablanca records at thirtyframes per second, so the final two digits in the code will startwith 00 and go up to 29 (00:02:01, for example, would indicatethat the scene has been shortened by two seconds and one frame).
Finally, confirm your new In point by pressing the left trackballbutton. To select a new Out point, click on the out button andperform the steps that you followed to adjust the In point.
Renamingscenes
Trimmingscenes

2.8 Chapter 2 Tutorials
When you finish trimming your scene, return to the edit screenand trim the other scenes until you feel comfortable with theprocess. When you are finished, return to the edit screen.
Now that you’ve modified your original scenes, you need toarrange them in a logical order within the storyboard.
One way to conceptualize this stage of editing with the Casa-blanca is to imagine an artist creating a painting. The source videothat we first used can be thought of as “paint.” When that sourcevideo was recorded onto the hard drive, placed within the scenebin and trimmed, it was like an artist placing paint on a paletteand mixing it to form a variety of new colors. Now, just as theartist would take the colors from the palette and arrange them ona canvas to create a painting, we will take our scenes from thescene bin and move them up to our “canvas,” the storyboard, tocreate our video project.
Since the Casablanca is a nonlinear editing machine, you are freeto place your scenes in any sequence. Choose whichever scene youwould like to use first, place the pointer over it, and click the lefttrackball button. Now select the “Add” button on the controlpanel in the top half of the screen and the scene will be placed inthe storyboard, framed by a large grey border called the “work-box.”
Arrangingscenes in thestoryboard
TIP: If you‘re using a keyboard to trim or split scenes,you might find these shortcuts to be helpful:
- Once you press either the In or Out buttons on the Casablanca, the Up and Right arrow keys on the keyboard will advance your scene one frame at a time- Holding the arrow key down will play through your scene with frame by frame with audio playback.- If you press the Left and/or Down arrow keys while holding the control key, your scene will move one second at a time.- If you hold the Control and Shift keys at the same time your scene will move in 10-second increments.-The Home key will jump to the beginning of the clip; the End key will advance to to the end of the clip.- Pressing either the Page Up or Page Down keys stops the playback and starts the loop again.

2.9Chapter 2 Tutorials
When you add a second scene to the storyboard, and only in thisinstance, you will need to indicate whether you want to place it“In Front” (to the left of the first scene), or “Behind” (to theright). For our tutorial, select Behind and your storyboard willconsist of two scenes. The Casablanca will place all additionalscenes behind the workbox. Copy the rest of your scenes to thestoryboard.
Take a moment to view the storyboard and see what your projectlooks like by selecting the first scene in the storyboard. You can dothis in a variety of ways:
a) Move the slider underneath the storyboard until the scene youwant is framed in the grey workbox
b) Press the “<” and “>” buttons on the storyboard control panelto move scene-by-scene through your composition
c) Click on the large yellow arrow in the upper-left corner of thestoryboard
d) Select the scene by clicking on it with the trackball’s pointer.
Once you’ve selected the first scene, press the Play button on thestoryboard’s control panel.
If you’d like to change the storyboard’s sequence, you can easilyrearrange scenes (one of the true joys of nonlinear editing). If youwant to remove a scene from the storyboard, place the pointerover the scene, click the left trackball button and then press the“remove” button.
If you want to replace a storyboard scene with a scene from thescene bin, click on the scene that is to be added (it will be framedby a blue border), then select the storyboard scene that you wantto remove (it should appear within the grey workbox). Press the“Replace” button on the storyboard’s control panel and thestoryboard scene will be replaced with the scene you selected.
Rearrangingscenes in thestoryboard
TIP: Scenes in the scene bin that you have already usedin the storyboard are marked with a small black dot inthe upper right corner of its frame. This helps you scanfor scenes that have been used in your storyboard.

2.10 Chapter 2 Tutorials
You now have most of your video project in place; all you need todo now is smooth out the rough spots. If you press the playbutton on your storyboard, you will notice that many of the cutsbetween individual scenes are jerky. This is due to a lack oftransitions–the “glue” that binds individual scenes together. We’lluse the basic “Crossfade” transition for our tutorial.
In order to add the crossfade transition, you need to return to themain screen and select the yellow “Transitions” button, which willtake you directly to the Transitions screen (shown below).
The storyboard will appear near the top of the screen again, butthis time two scenes will be framed within the workbox (sincetransitions take place between two scenes). On the left of yourscreen is a list of available transitions and their icons. Clickanywhere in the table to make it active and use the trackball toscroll down through the list of transitions until you see Crossfadehighlighted in blue. Click the left trackball button to select it. TheCrossfade symbol will then appear in red between the twoworkbox scenes.
You can get an idea of what the transition will look like byselecting the Preview button. A small window will appear in thecenter of your screen displaying a real-time preview of yourtransition (shown below).
Transitions andeffects

2.11Chapter 2 Tutorials
You can also see the transition as it affects a single-frame withinyour scene in a full-screen preview (shown below) by clicking onthe Full Size button.
In the upper-left corner of the toolbar are the effect’s name andicon. Below the name is a frame indicator and a slider bar thatenables you to select any frame within the scene. Below the frameindicator is a display modifier. This option allows you to previewany frame of your original scene (Original), any frame of theeffect (Effect), or a special split-screen mode (Orig. + Effect) thatdisplays the original scene on the left half of the screen and theapplied effect on the right.
On the right side of the Full Size preview’s toolbar are the contoloptions that allow you to modify the image-processing effectsand transitions. Therefore, you can make adjustments to theeffect or transition immediately after previewing it in full-screenmode.
Click the right trackball button to return to the Transitionsscreen, select “Render” and your transition will be finalized andsaved. A blue time bar will indicate rendering progress (thereceding gray area indicates what remains unrendered). Thetransition’s icon will change from red to green once the renderingis complete–you can then view your transition by pressing theplay button.
Move through your storyboard and choose a place to insertanother transition. Click on the transitions list and select the“Bars” effect. A window containing specific settings for the barstransition will appear on the left side of your screen. Here youcan choose whether the bars are to be “pushed” or “wiped” acrossthe screen, the direction in which they will move and the numberof bars that will appear.

2.12 Chapter 2 Tutorials
You can also change the transition’s length by selecting the “1/2,”“1s” and “2s” buttons, meaning transition durations of one-halfsecond, one second and two seconds. The “X” button will allowyou to define a specific, frame-accurate length (such as twoseconds, 13 frames). When you are finished setting all of theparameters, press the Render button.
Now try adding some image-processing effects. Click the ImageProcessing button (second button from the left at the bottom ofthe screen) to leave Transitions and enter the “Image-Processing”screen (shown below).
Select a different storyboard scene that is at least five seconds longand has no transitions attached to it, then click on the effectstable. Select the “Film” effect with the left trackball button andthe Film icon will appear in red over the storyboard scene. Youcan press either the full-size preview button or the real-timepreview button to see what the effect looks like. Select the Renderbutton to complete the effect and leave the screen once therendering has finished.

2.13Chapter 2 Tutorials
You can enhance your project by adding background music trackor narration to the video. You’ll need a CD player or tape deckthis example.
First, you can connect your music player to the Casablanca byattaching a standard RCA cable from the player’s Audio-Out jacksto the Casablanca’s Audio-In jacks on either the front or the backof the machine (you can refer to the Casablanca diagram on pageiii of the “Getting Started” chapter for more information on thelocation of the Casablanca’s Audio-In jacks). For this example,we’ll use a CD player connected to the front Audio-In jacks.
Cue up the song that you want to use on the CD player and thenclick on the “Audio Record” button on the main screen and theAudio Record screen will appear (shown below).
In the upper-right corner of the screen is the “Input” selection,which is where you indicate whether you have the audio inputcoming into the Casablanca through connections that are in theFront, the Rear, Like Video (which mirrors the settings that youindicated in the Video Settings screen) or through Mini DV(loads audio from a DV source in FireWire-equipped units).
To the left of the Input selector is the decibel-level display andcontrol bar. Before you actually record your audio onto theCasablanca’s hard drive, you play through the audio to check thedecibel display. Make sure that the meter only strays into the redlevels during the loudest portions of your incoming audio. If themeters are constantly within the red levels, you will need to lowerthe incoming volume with the decibel control slider to preventovermodulation.
Recordingaudio
Audio editing

2.14 Chapter 2 Tutorials
Reset your player to the beginning of the song that you want touse, press the “Play” button on the CD player and then press thered Record button at the bottom of the Audio Record screen’scontrol panel. When the song ends, press the square “Stop”button next to the red Record button on the control panel, andthe music sample will now be listed above in the yellow box as“A1” (you can rename the samples just as you rename scenes inthe Edit screen). Press Play to hear what you recorded. You cantrim off portions of the audio sample’s beginning and end withthe in and out buttons in the same way that you trimmed yourvideo scene earlier in the tutorial. When you are satisfied withyour music sample, you can leave the Audio Record screen andenter the Audio Mix screen by pressing the Audio-mix icon at thebottom of your screen.
The top of the Audio Mix screen shown above features a story-board that mirrors the one in your edit screen. The center part ofthis screen is made up of three long strips; each strip representsone of the three Casablanca stereo audio tracks. The top track isthe Original source audio track from your project (this track willbe full when you enter this screen). The middle track is theCommentary track which can be used for voice-overs andnarration. The bottom track is for Background music (typicallyreferred to as a “soundtrack”). The names for the last two tracksare merely references; you can place a narration on the Back-ground track and music on the Commentary track if you wish.
On the lower-left side of your screen is a list of all the audiorecordings. Select the song sample that you just recorded, thenselect a scene from the storyboard.
Audio mixing

2.15Chapter 2 Tutorials
Now click the “Insert” button and a message prompt will appearin the middle of the screen asking you to indicate which audiotrack you want to lay the sample onto. For this tutorial, choosethe background track and the audio sample that you have selectedshould appear on that track within a blue highlight (the trackhighlighted in blue will always be the currently active track).
A red bar will then appear above your original audio trackindicating the length of the combined, unrendered audio tracks.When you press “Render,” the original source audio will be mixedwith the sample and the indicator bar will turn green when theaudio has been rendered. You must render your audio to be ableto hear the combination of all three tracks; otherwise, you willonly hear the particular audio sample that is highlighted in blue.
If you want to change the audio level for a particular scene, selectthe track that you want to alter and move the dB meter to adjustyour sound. (The dB meter registers each audio track’s decibelchange, so all tracks are initially set at 0 dB–no decibel change.)Let’s suppose that your original source audio is drowning out thesample you placed on the Background track. You correct theproblem by first selecting the original source audio track and thenmoving the dB level to -05. When you render the audio, theoriginal Background track will be slightly lower in sound and youshould be able to hear your music more clearly. Once the back-ground audio sample has finished playing, the original sourceaudio will rise in volume to its original level.
You can also adjust the beginning and ending of each audiosample on a particular track by moving the Fade In and Fade Outsliders (represented by the two rectangular black icons just belowthe background audio slider the lower right side of the screen).First, select an audio sample within an audio track and it will behighlighted in blue. Click on the Fade In slider and scroll to theright. The counter to the right of the slider indicates the length ofthe fade. You can fade the sample out in the same manner. Youcan leave the Audio Mix screen once you have completed youraudio modifications and enter the Main screen.
TIP: The Casablanca adds the volumes of all three audiotracks together, which could lead to an overmodulationerror. You can solve this problem by lowering the volumesof each audio track before you render your audio.

2.16 Chapter 2 Tutorials
Your video is nearly complete, so select “Finish” from the mainscreen and you will enter the Finish screen (shown below).
If you rendered all of the audio and effects on the project as youadded them to your storyboard, press the “Record to VCR”button (or “Record to DV” if your unit is FireWire-equipped). Ifyou have any unrendered effects remaining on your storyboard,however, the Casablanca will render all of them for you nowbefore you record to tape when you press “Render Storyboard.” Amessage prompt will indicate the estimated rendering time, whilea blue time bar indicates just how much rendering has taken placeand the receding gray bar indicates the amount of material thatstill needs to be rendered. This is also called a “Batch Render.”
Once you have rendered everything and pressed Record to VCR,the first frame of your project will appear behind a “Start Record-ing” button. Please take a moment to make sure that all of yourvideo-out cables are properly connected. (If you are using onlyone VCR to play and record your video, make sure that all video-in cables are disconnected.) Start recording on your VCR andpress “OK” on the screen.
Stop recording on the VCR once the Casablanca has played theproject through to the end.
Congratulations! You have now successfully completed your firstvideo project. It may not be ready for the film-festival circuit justyet, but with a little practice, you could be well on your way.
Once you have gotten the feel of the editing process, you willwant to try the advanced tutorials for insert editing, audio mixing,refined titling and multilayer editing.
Finishing

2.17Chapter 2 Tutorials
Insert editing can be a great addition to any project. The ideabehind the procedure is simple: You want to insert a scene intoanother, longer scene, yet you want the longer scene’s audio toremain intact. This is a great way to utilize footage from twocameras that have shot the same event. Let’s say, for example, thatyou used two video cameras to film a speech. One camerarecorded the speaker, while the other recorded the audience. Withinsert editing, you can place a scene of the speaker at the podiumon your storyboard and insert a scene of the audience reacting tothe speech while the original audio remains undisturbed.
First, enter the Edit screen and choose a scene from your scene binthat you want to insert into the highlighted–or center–scene inyour storyboard (the background scene should be longer).
Click the Insert button, which takes you to the range screen.Here’s where you can set the starting frame of your video insert byusing the “Start” button for general selection and the Single Frame(< and >) keys for fine tuning. The In and Out buttons in thelower portion of the range screen are for trimming your originalvideo scene.
If you want the insert to start with the first frame of the masterscene, just click on the right trackball button after you’ve clickedon Insert. This brings you back to the Edit screen. The scene that’sbeen inserted into the master scene now has the insert icon over it.
As another example, let’s say that you want to insert a two-secondscene and you want it to start with a frame that’s five seconds intoa 15-second master scene.
In the Range screen, you’ll see the time counter on the top line.For this example, we’ll say that the counter indicates that you’re atframe 24.16:03. Adding five seconds to that time results in a timeof 24.21:03.
Scroll the starting point to 24.21:03 using the start button. Clickthe right trackball button or click on the Edit button to return tothe Edit Screen.
Now you’ll notice the master scene on the storyboard has beenbroken up into three parts. Part one is the first five seconds of themaster scene, which are unaffected. The second part is the two-
Insert-editing tutorial
2.18 Chapter 2 Tutorials
second insert and the last part is the final eight seconds of the 15-second master scene.
You can make multiple inserts and add transitions between aninsert and a master scene (but not between two inserts). If youwish to have transitions between multiple inserts within onemaster scene, you’ll need to create a scene of the inserts along withthe transitions between them and then place that scene on thestoryboard as one insert. (For more information on thisprocedure, see the Multilayering tutorial.)
Once you feel comfortable using the Casablanca, you’ll want to gobeyond the basic audio edits in the general tutorial and do someadvanced audio mixing. We’ll concentrate on perfecting yourproject’s soundtrack, including the correction of the originalsound, adding a full commentary and incorporating backgroundmusic.
First, you’ll need a completed video project with all transitionsand effects rendered. For this example, make sure that the projectis roughly two to four minutes in length. Finally, select a piece ofmusic from a CD or tape that will serve as your backgroundmusic.
Enter the Audio Record screen and record a segment of spokendialogue with a microphone fed through a mixer or yourcamcorder into the Casablanca. If you don’t have a microphone,you can record a segment of spoken dialogue from a CD or tapeinto the Casablanca–the idea is to get a segment of speech ontothe Casablanca’s hard drive. When you have finished, record asegment of music (make sure that your recording is not longerthan your project). You can then name the audio samples just asyou did in the general tutorial.
You can also trim audio segments down in the same way you trimindividual scenes. Select the audio sample that you want to trim,click on either the In or Out point and move the trackball toscroll through the sample. You can also view a visual representa-tion of the audio track in the waveform display just above the Inbutton. If you press the left Quick Play (I>) button you will hearthe first three seconds of the sample and if you select the rightQuick Play button you will hear the last three seconds of your
Preparations
Recording
Audio-mixing tutorial

2.19Chapter 2 Tutorials
sample. After you have recorded, named and trimmed your audio,exit the Audio Record screen and enter the Audio Mix area.
Now you can arrange and mix your audio segments. First, selectthe music sample from the audio-segment list in the lower-leftcorner of the screen. Then click on the first scene in the story-board and press “Insert.” When you are prompted to choose oneof the two available tracks, select “Background.” The musicsample will then be placed on the Background track.
Scroll through the storyboard until you reach the end. If the audiosample is longer than the actual storyboard, you need to shortenthe sample. Select your audio sample, click the “Range” buttonand move the out point back to the left until you reach the lastvideo frame.
If you have a segment of music that is too short to accompany theentire storyboard, select an additional music sample from the list(it can be the same piece of music or a different sample) and clickonto the scene in which the audio sample ends. Select “Insert”and the sound is fitted directly behind the previous sound. Goahead and repeat this procedure until you have filled the entirestoryboard with music.
You add the spoken dialogue in the same way: Select the Com-mentary track (it’s the middle track represented by the micro-phone icon) and scroll to the scene where you want the commen-tary to begin. Choose the commentary sample from the audio listand press “Insert.”
If you would like a more precise placement of an audio sample,just click the “Range” button. You will then see the first frame ofthe scene and a control panel appear on your screen. You can pressthe Waveform button to see a representation of the audio and thePlay button to both watch the scene and hear your audio track asyou originally placed it. To move the audio, press the “Start”button and scroll through the scene with the trackball until youreach precise frame where you would like the audio to begin. Pressthe play button once again to check your new audio placement.Once you have finished, return to the Audio Mix screen.
Now you can render the audio. Click on the sample that youplaced in the Commentary track and select “Render.” All threetracks will be rendered together. You can now play through the
Placing andmixing

2.20 Chapter 2 Tutorials
storyboard to check your work. Listen carefully to the volumes ofall three tracks to ensure that they are proportionally correct(occasionally the commentary may be sound either too soft or tooloud). If this is the case, you can easily adjust the volume byselecting the track you want to correct and then moving the dBmeter. You can also use the “Fade in” and “Fade out” controls toalter the abruptness of an audio change. A one-frame fade outresults in a fast, sudden volume change while one-second fade out(30 frames) creates a much more gradual change.
You can also affect the volume levels of material on the other twotracks for the duration of your highlighted sample. This can bequite useful if you need to either adjust or remove a specificsegment of your audio. Let’s say, for example, that you have a one-minute scene of an audience applauding in your storyboard. Thesound of the applause occupies the original source audio track andyou want to insert a 30-second segment of music into theBackground audio track 15 seconds into the scene. You also wantthe sound of applause to drop slightly while the music is playing(so the music can be heard more clearly) and then rise to itsoriginal level when the music sample has stopped. All you wouldneed to do to accomplish this is to highlight the sample on thebackground track, then use the original source volume slider toreduce the source audio by 10dB. The original track will only beaffected for the duration of the highlighted background track.
You can use this technique to remove unwanted noise as well. Let’ssay that there is the distinct sound of several audience members“booing” for two seconds in the middle of your original sourceaudio and you prefer that they keep their commentary to them-selves. You can adjust the sound level through the commentarytrack (even though you already modified it once to allow themusic sample to be heard).
Go into the audio record screen and click the “Create Sample”button, which will allow you to create a sound segment of“silence.” Next, select the duration for the silence sample (sincethe booing lasted for two seconds, you should set the duration fortwo seconds). Return to the audio mix screen and insert thissegment of silence into the commentary track at the appropriatepoint by using the range button to advance to the two-seconds ofbooing within the scene and click OK. Highlight the two-secondsample, select the Original slider and reduce the volume by 10dB.Since this segment of the source audio was

2.21Chapter 2 Tutorials
already reduced by 10 dB in the previous example, your totalreduction of the two seconds of booing would be by 20db.
Once you are finished adjusting the audio, press Render andcheck the changes that you’ve made.
You can use Casablanca’s titler to create introductions, credits andsubtitles for your project. For this tutorial, you will need acompleted video project; a simple set of three of four scenes thatare each 10 seconds in length will work fine. The more you workwith the titler, the more you’ll find that the process is very similarto applying effects to your scenes.
Choose “Titling” from the main screen and you will enter thetitling screen (shown below).
Select the scene in the storyboard to which you would like to addtitles. For this example, take the first scene and add an introduc-tion that will display the name of the video and the date of therecording. Click on the list of title options and select Text Table.Click on the “Enter/Change Text” button and you will enter ascreen with a keyboard display: This is where you type your text.Press “Choose Font.” The word “Casablanca” appears and willchange according to the font you select. You can click on any fontand point size that you like. For this tutorial, use a point-size of150. Return to the main titling screen by pressing “OK.”
Titling Tutorial
TIP: The “Horizontal Roll” and the “Multicolor Roll” tiakeslightly longer to render than other titles due to theconstantly changing text.

2.22 Chapter 2 Tutorials
You can now manipulate your text even further by choosing (fromleft to right) “Italics,” “Bold,” “Border” or “Shadow” (shownbelow).
Select both Border and Shadow, which will make our text cleareron the video.
Now choose a color by clicking “Color” and a color box willappear (for more information on the color box, see p. 1.9). Forthis tutorial, choose a light shade of red or yellow. Your font, itscolor, and any other attributes will appear in the upper-rightportion of the screen.
You can also position your text by choosing from “Left aligned,”“Right aligned,” “Centered” and “Justified,” and the table modes“Left-> <-Right” and “<- Middle ->.” For our tutorial, select“Centered” and begin typing your text on the keyboard.
If you find that the text is too thin, too wide, or the wrong pointsize, you can select the “Choose Font” button and make anynecessary corrections (shown below).
Please note that only the currently active line of text will appear incolor; the other lines appear in gray on the screen, but yourfinished video will display all of the lines in the proper color.
Your text for the introduction should now be on your screen. Youcan save this text for future projects by first clicking “Archive” andthen “Save.”
Saving text
TIP: Titles that use dark-bordered fonts are the easiestto read.

2.23Chapter 2 Tutorials
A list with the word “Demotext” (a small preloaded demonstra-tion text) will appear. Click on the horizontal yellow box justabove the “OK” and “Cancel” buttons and enter a name for thetext you are saving. Confirm the name by pressing “OK” on thekeyboard. Leave the Archive screen by pressing the OK buttonagain and the name will appear in the list box (along withDemotext). Finally, click on the OK button in the lower-rightcorner and you’ll return to the titling screen. You can now select“Fade In/Out” if you want a gentle fade effect for your text. Youcan also select the “–-” setting to prevent your text from fadingaltogether. You can check to see how your title looks by selectingeither the real-time “Preview” button or the single-frame “FullSize” button.
Now let’s set the range of the text within the scene. This worksjust like defining the range for image processing effects. At themoment, the whole scene is affected by the text. Pressing “Range”will allow you to change the length of time that the text appearson the scene. For our tutorial, trim the title to a length of aboutthree seconds by moving the In and Out points.
Now check the text once again by selecting the preview button.Once you are happy with your title’s appearance, you canrender it.
Now you can add a second title in a different scene that will becalled “Credits.” Choose a scene from the storyboard that doesnot contain text and select the “Vertical Roll” button. This optionwill “pull” your text up from the bottom of the screen like thecredit sequences seen in most motion pictures. Click on “Enter /Change Text” to return to the text input window. You can enterany text that you want, but for the sake of this tutorial let’sreactivate a previously-saved text. Click on Archive and thenLoad. Now choose the text we just created for the last scene andpress OK. The text should now appear in the text window. ClickOK again and you’ll return to the Titling screen. You can checkyour credits by pressing the real-time Preview button or the FullSize preview button. If you’re not satisfied with the roll, you canadjust it by clicking the Range button and adjusting your runningtime (a good running time for this tutorial would be five seconds).Now you can render your credits and play the final scene.
Credits

2.24 Chapter 2 Tutorials
As you have probably already discovered, defining and addingindividual effects is very easy. But what if you wanted severaleffects to overlap one another? What about a picture-in-pictureeffect with more that one picture? What if you wanted to place atitle onto a negative scene?. The answer is multilayering, atechnique that involves making a scene out of your entirestoryboard before additional effects are added.
For this tutorial you’ll need a scene that’s at least three secondslong and an empty storyboard. Select the “Film” effect, which willmake it appear as if the scene was filmed many years ago byadding “jumps,” “scratches” and sepiatones to your video material.
First, you need to place your scene into the storyboard, enter theImage Processing screen and select the “Film” effect from the liston the left. Go into the Full Size full-screen preview (shownbelow) and select “Orig. + Effect” to see what your effect will looklike as you modify it with the controls on the right.
When you’re satisfied with the effect’s appearance, click “OK” andexit the Full Size preview. Go ahead click the “Render” button torender the effect.
Now click the “Scene” button: You now can make a scene of justthe effect (“Effect”), the entire storyboard (“Effect + Scene”) or aparticular range within the storyboard (“Range”) as shown on thetop of the next page.
Preparations
Creating thefirst layer
Multilayering tutorial
Creating thesecond layer

2.25Chapter 2 Tutorials
Choose Effect + Scene and return to the edit screen. A new sceneshould now appear in your scene bin that contains both of yourold scene and the effect.
Remove the original scene from your storyboard by clicking theRemove button. Select the new scene that you just created andadd it to your now-empty storyboard.
Go back into Image Processing and select any effect you like andadd it to your scene. You can click on either the real-time Previewbutton or the Full Size preview button to see the layering as botheffects appear within the scene. Once you are satisfied, you canrender the effect.
You can add additional layers by repeating the procedure as oftenas you like.

1 Select your language of choice. The names of many of thefunctions will change immediately, but you’ll need to restart theCasablanca for all of the language changes to take place.
2 Click and scroll on “Hrs” or “Min” (hours and minutes usingmilitary time) to set the clock on the front LCD display.
3 Choose one of three speed settings to alter your trackball speed.
4 This unlocks the sample “demo” effects that have beenpreinstalled on your Casablanca. If you want to purchase aparticular set of effects, call DraCo at (303) 440-5311 and youwill receive a code to unlock them.
5 The information field displays your unit’s serial number and theversion of system software that you’re running.
6 Clicking the Main screen icon leads you back to the Mainscreen.
7 Options has additional features, such as the ability to hide yourPlay panel and to loop a scene for continuous playback.
Language
Clock
Trackball speed
Code
Hardware/software info
Main screenicon
12
3456
Chapter 3Reference
System settings
7
Options

3.2 Chapter 3 Reference
You may adjust the settings for a specific project, such as thescreen size and the overall quality of your picture and sound. Youcan also see how much material has been recorded, check theavailable space on your hard drive and initiate a project clean up tofree up memory on your hard drive.
1 Select a setting to adjust the quality of your video. If you’vealready started a project, you will only be able to choose from thethree quality settings within your current range, not 12. Generallyspeaking, the higher the quality setting, the more hard-drive spaceis required.
2 Audio quality can be set to one of three levels. You cannotchange the audio quality once a project has been started. Thefrequencies of the three modes are as follows:
VCR Mono 20Hz - 9kHz
HiFi-Stereo Stereo 20Hz - 14kHz
CD-Quality Stereo 20 Hz - 20kHz
Although the highest setting does produce CD-quality sound,most camcorders and VCRs can’t record at that level. Therefore,you can normally use one of the lower settings without anappreciable loss of sound quality. As was the case with the videosettings, higher audio quality means less hard drive space. Soundcan require up to 150 Kbytes/second; using all three audio trackscan multiply this to about 600 Kbytes/second. If you record withthe lowest video quality setting of 500 Kbytes/second, the soundcan take up more space on the hard drive than the video. There-fore, we reccommend using the “Hi Fi (Stereo)” setting.
Picture quality
Audio quality
21
Project Settings

3.3Chapter 3 Reference
1 This determines the size of the recorded video picture. TheCasablanca can record all pixels from any source–the typicallimitations of VHS recorders can be ignored.
Many video sources, however, don’t use the entire signal; this isespecially true for camcorders. The Casablanca can’t tell whetherthe entire incoming signal is at full resolution or only parts of thesignal are at full resolution. As a result, you may see black bordersaround your picture during transitions. Select a smaller image sizeand the borders should vanish.
2 These bars indicate just how much of your Casablanca’s harddrive is occupied by audio and video (red) and how much drivespace is still free (green). The figures next to the bars tell you howmany minutes or seconds you still have in the selected quality.
3 Clean up is a way to physically manage your hard drive spaceby removing deleted audio and video files. (It does not removematerial deleted with the trim function because the trimmed partscan be reactivated at any time.) You should run the clean upfunction regularly, particularly if you have a large number ofdeleted scenes. Otherwise, you may run into audio/video partitionfull errors that can seriously damage your project. The overallclean up time will depend on the structure of your project–itcould take up to 30 minutes or just a few seconds. The estimatedtime will always appear on-screen. Never pull the power plugwhile reorganizing your drive; it could lead to a loss of all videoand audio data. Instead, switch it off using the front on/offbutton, which will save your information before it shuts down.
Projectsettings(cont’d)
Picture size
System capacity
1
23
Clean up

3.4 Chapter 3 Reference
A message prompt will appear over your cleanup progress barstating that your Casablanca will be “Switching off after cleanup.”
1 Clicking this button erases all of the recorded audio and videodata on your hard drive and starts a new project. It does notremove effects, fonts, archived texts and colors or selected settings.
2 This button brings you back to the Main screen. Pressing theright trackball button has the same effect.
1 These settings let you directly influence the video signal as it’srecorded onto the Casablanca’s hard drive. You can make addi-tional corrections to the video once the recording has been donebut if you want to achieve the best results, it’s better to have agood signal from the start. Making corrections afterwards has itslimitations–despite corrections, a picture that’s initially too darkwill never be as crisp and bright as it would if it had been digitizedwithin the right parameters.
2 Here you can change the location of the active audio/videoinput. The Casablanca has two input areas, one at the front(behind the panel) and one at the back of the machine. In mostcases, you’ll use the front input for your camera and the backinput for your video recorder. Many video cameras have difficultyshifting from one scene to the next, particularly if you switch offthe camcorder off between takes. The Casablanca compensates for
Projectsettings(cont’d)
New project
Main screenbutton
Brightness,contrast andcolor
1
2
2
Audio/videoinput
1
Video settings

3.5Chapter 3 Reference
this by using an internal synchronization with the front input.The rear input uses the sync coming from the source (genlocktechnique). If you experience picture “shivers” when recording toyour hard drive, select the front input. When working in a studio,however, you should use the rear input to synchronize the video.The inputs can also be configured with or without AGC.
1
1 If the on-screen control panel obscures a portion of incomingvideo, you can move the entire menu from the bottom of thescreen to the top. Pressing this button a second time returns thecontrol panel to the previous position.
2 The Record icon takes you to the Record screen.
3 The Main screen icon returns you to the Main screen.
Here’s where you record your source video material onto yourhard drive. The screen itself is placed on top of the video signal(just like the video settings control panel). You can see theincoming signal at all times and choose what to record. The DVControls are only available on DV Option-equipped units.
1 Clicking on the scene’s name allows you to change the nameitself. A keyboard will appear next to the scene name, along withthe length of the recorded scene. Type the name and press OK.
Videosettings(cont’d)
Record
Up/down
Record icon
Main screenicon
Scene name andlength
2, 3
1
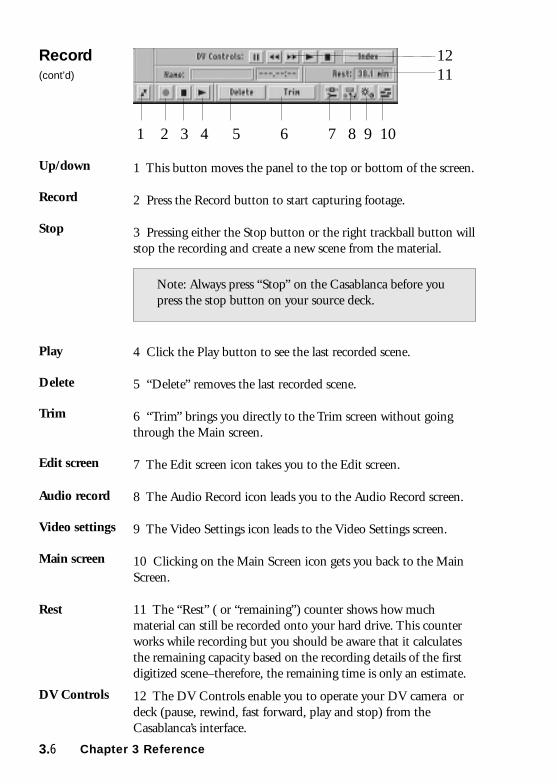
3.6 Chapter 3 Reference
1 2 3 4 5 6 7 8 9 10
1 This button moves the panel to the top or bottom of the screen.
2 Press the Record button to start capturing footage.
3 Pressing either the Stop button or the right trackball button willstop the recording and create a new scene from the material.
4 Click the Play button to see the last recorded scene.
5 “Delete” removes the last recorded scene.
6 “Trim” brings you directly to the Trim screen without goingthrough the Main screen.
7 The Edit screen icon takes you to the Edit screen.
8 The Audio Record icon leads you to the Audio Record screen.
9 The Video Settings icon leads to the Video Settings screen.
10 Clicking on the Main Screen icon gets you back to the MainScreen.
11 The “Rest” ( or “remaining”) counter shows how muchmaterial can still be recorded onto your hard drive. This counterworks while recording but you should be aware that it calculatesthe remaining capacity based on the recording details of the firstdigitized scene–therefore, the remaining time is only an estimate.
12 The DV Controls enable you to operate your DV camera ordeck (pause, rewind, fast forward, play and stop) from theCasablanca’s interface.
Record(cont’d)
Up/down
Record
Delete
Rest
Audio record
Edit screen
Main screen
Trim
1211
Video settings
Stop
Play
Note: Always press “Stop” on the Casablanca before youpress the stop button on your source deck.
DV Controls

3.7Chapter 3 Reference
The Edit screen is where you’re likely to spend most of your timewhen editing a project. It’s where you split the footage intoseparate scenes, trim them, add special effects, name the newscenes and place them into the storyboard.
1 The storyboard is where you put the scenes in the order theywill be viewed. The storyboard itself is found at the top of thescreen. The current scene is always located in the center of thestoryboard within a gray frame (the “workbox”). The scene’s nameand running time are displayed at the top of the workbox (see“The storyboard” on p. 3.13 for more detailed information).
2 Recorded scenes automatically appear in the “Scene bin.” Up totwelve scenes can be viewed in the scene bin at any one time. Ifyou have more than twelve scenes, use the slider (3) or the up anddown arrows (4) to scroll through the bin.
5 To rename a scene, select the scene with the left trackballbutton (the frame of selected scenes change to blue) and thenclick within the box in the lower-left corner of the screen display-ing its name. An on-screen keyboard will appear. If you have anexternal PC keyboard, you may use it to type your text. Other-wise, click on the keyboard buttons with the left trackball buttonto enter the new scene name. To delete the old scene name, usethe backspace arrow that points to the left (located in the upper-right corner of the keyboard). If you want to type in capital lettersor use special characters, press the up-arrow button (the shift key)in the lower-left corner of the keyboard. Clicking on “OK”confirms your changes and closes the keyboard window.
Edit
Scene bin
Storyboard
Renamingscenes
1
2
5
34

3.8 Chapter 3 Reference
1 To play a scene from the scene bin, click on the scene (whichchanges its frame to blue) and press the play button in the lower-left corner of the screen. The scene will play in its entirety. Theactual running time of selected scenes appears between the playbutton and the scene’s name.
2 Selecting the Split button takes you into the Split screen(shown below). The concept behind splitting scenes on theCasablanca is somewhat like that of splicing film reels.
Clicking on the Waveform button on the upper-left corner of thetool bar allows you to hear your scene’s audio while splitting aswell as bringing up a simple waveform display in the top-leftcorner of your screen.This waveform provides a visual representa-tion of the scene’s audio and can be a useful editing tool.
Click on Split Position and scroll through the scene with thetrackball (you can also use the Single Frame buttons to movethrough the scene frame-by-frame). Click the left trackball buttonto mark the exact point that you want to split out of your scene.Press the play button to view what you have selected. The scenebin will now contain the new scenes. If you want to keep this
Edit(cont’d)
Split
Play
23
1

3.9Chapter 3 Reference
material as a separate scene, click the “use” button. If you do notwant to use the split material, select “Drop.”
When you press the Autolog button ( >I), the Casablancaautomatically searches through your scene and determinespotential split positions based on the rate of image changes. Youthen decide if you want the splits to go where the machine hasassigned them (the Casablanca’s automatic search is roughly 85%accurate).
When you return to the Edit screen, you’ll see the split scenes afterthe original source scene. The new scenes can be edited in thesame fashion.
3 Click on the Trim button to get to the Trim screen (shownbelow). You can trim each scene precisely by defining the in-point(first frame, start of the scene) and the Out-point (last frame, endof the scene).
Clicking “In” allows you to scroll through the scene and select anew in-point. The blue bar indicates how much of the scene isselected. The gray portion of the bar shows the amount ofmaterial that will be removed from the scene. Press the lefttrackball button to make your selection. You choose the out-pointin exactly the same way, clicking “Out.” Click the arrow buttonsbelow the out button to move the scene forward and backwardone frame at a time.
Clicking on the Waveform button in the upper-left cornerdisplays a simple waveform display in the top-left corner of yourscreen.This waveform provides a visual representation of thescene’s audio and can be a useful editing tool.
Edit(cont’d)
Trim

3.10 Chapter 3 Reference
1 A scene may be copied as often as you like without using upadditional hard drive space. One benefit of copying is that you canalter the copy as much as you like without affecting the original.To make a copy, select a scene by clicking on it (its frame changesto blue) and press “Copy.”
The Casablanca also makes automatic copies when you split scenesup, place scenes into the storyboard or render effects into a scene,none of which occupy any additional space on your hard drive.
2 Empty scenes are great for introductions, ending-creditbackgrounds and lead-ins for various projects. Click on the EmptyScene button and a screen with various options appears (shownbelow).
Create an empty scene by clicking onto the list and then scrollingthrough it. The “Color Bars” option creates a striped test pictureaccording to the CCIR standard. Most professionals use about 10seconds of color bars before the actual video begins.
Edit(cont’d)
Empty scene
Copy
1 & 2
3 & 45

3.11Chapter 3 Reference
“Color” allows you to create a scene composed of a solid colorfrom the color box. The spectrum at the top of the box is forselecting the color itself. The sliders on the left and bottom of thebox are for adjusting the brightness and the color strength,respectively. You can use the “Archive” option to save your colorand use it again at a later stage.
“Noise” creates either a colored or monochromatic noise patternon the screen. The frequency of the noise can also be adjusted.Note: The preview function can be extremely helpful in creatingthe noise pattern that you want.
“Black” creates a black video scene.
“Random color” generates a scene that continually changes itscolor modulation. “Base color” sets the color for the first frame,while “Mode” selects the amount of random color that will appearwithin the scene. “Solid” produces a single colored block, “4Point” defines four different colors in each corner of the pictureand “5 point” defines the four corners plus a fifth point in themiddle of the picture. “Deviation” determines the amount ofcolor variance (a high deviation setting means more colors), while“Activity” sets the speed of the color change (a high speed settingmeans a faster change of colors). Once these settings have beenmade, you need only to enter the length of the new scene. Justclick on duration and scroll through the choices.
3, 4 You can delete a scene at any time. The current scene(framed in blue) is removed by pressing the “delete” button. Pleasenote that additional hard-drive space is not automatically gainedby deleting a scene; you must delete a scene and then initiate aproject clean up (in the project settings screen) in order tophysically remove the unwanted material and gain room on yourhard drive. Clicking the Undelete button to the right restores thedeleted scenes (up to 10 levels).
5 Special lets you apply special effects (Slow Motion, Fast Motion,Reverse, Still, Strobe, Scene - -> Audio Sample) to copies of yourselected scene.
Some of the motion effects within the Special screen (slowmotion, still and strobe) can also be applied in one of several ways.You can add the motion effect to either a single field within a
Edit(cont’d)
Delete/undelete
Special

3.12 Chapter 3 Reference
frame (the way motion effects were applied in previous versions ofthe software) or on both fields within a frame. In addition, youcan employ an interpolated field (the Casablanca generates anextra field that improves the appearance of the effect by addingimage stability and reducing flicker, etc.) or an interpolated frame.
The right side of the Special screen (shown above) also containsthe access buttons to add-on software, such as PC Link and Akabamotion-paint software (for more information on operating PCLink and Akaba, please refer to their respective manuals).
Slow motion creates a scene copy that is identical to the originalexcept that it runs slower. The “slowness rate” can be set with theslider: A high rate (10) leads to an extremely slow version 10-timesthe length of the original, while the lowest rate (2) creates a scenethat’s only twice as slow as the original. The scene’s original soundis also played in slow motion, but you can mute it in the audiomix screen. Slow motion can be applied both fields within aframe, interpolated fields or interpolated frames. The new slowmotion scene will appear in your scene bin with the suffix “_SM,”indicating that it is a slow motion scene.
Fast motion works just like the slow-motion effect, except thatscenes are played faster. Choose an acceleration factor (two timesas fast, three times as fast and so on) and click OK. We suggestthat you use an even factor as it will allow for complete resolution.Once the scene has rendered, the new scene will appear in yourscene bin bearing the suffix “_QM,” indicating that it is a quick-motion scene.
Edit(cont’d)
Fast Motion
Slow motion

3.13Chapter 3 Reference
Any scene can be made to run backwards. The Casablanca willautomatically begin building your new scene once you select“reverse.” After the scene has been rendered, the new sceneappears with the suffix “_BW,” meaning this scene is a backwardsscene. Just like the slow-motion effect, the sound is affected whenthe reverse effect is applied to the scene. You can switch theoriginal source audio off in the Audio Mix screen.
The Casablanca can create perfectly stable stills without anyinterference stripes. Select a scene and the first frame will becomea still once you click on the “still” button. If you want a still of aframe that’s located further into the scene, you can make a copy ofthe original scene, then trim it down so that the frame that youwant is the starting point. Stills can be be applied to fields withina scene or interpolated frames. A still frame does not have sound.
To create a strobe effect, you need to select a scene, click on thespecial button and choose “Strobe.” You then adjust the slider tochoose just how long the Casablanca should hold each frame. Asetting of 4 means that one frame will stay on the screen for aduration of four frames. A setting of 3 means that the first frameis held for the length of three frames, then frame number fourwould appear for a length of three frames, followed by framenumber seven and so on.
Scene -> Audio Sample creates a new audio sample from a selectedscene, making it possible for you to edit video and sound sepa-rately. Once you select a scene and click this button, the scene’ssound will appear in the list of audio samples in the audio/recordand audio/mix screens. From there, you can work with the sampleas you would with any other audio segment.
Cancel exits the special menu without changing anything.Clicking the right trackball button has the same effect.
The concept behind the storyboard is as old as the film industryitself. Filmmakers have always used a storyboard to help organizethe layout of their project. A good storyboard allows a director to
Edit(cont’d)
Storyboard
Reverse
Still
Strobe
Scene -> Audio
Cancel

3.14 Chapter 3 Reference
quickly review every stage of a project by displaying every scene(usually represented by the scene’s first frame) in order, providingan album of snapshots of the final film. Traditionally, the story-board would actually be a large board composed of hand-drawnpictures that represent every scene. As a result, the storyboardwould often look like a large comic-strip version of the film.
The Casablanca modernizes this time-honored concept with itsown digital storyboard. Within this storyboard, scenes arerepresented by their names and the first frame of the scene; theplaying order is from left to the right.
You can place a scene into the storyboard by selecting the scenethat you want to add (it becomes framed in blue) and pressing the“add” button. The scene will then appear within a gray framecalled the workbox. When you add a scene next to the very firstscene in the storyboard, you will need to indicate whether youwant the new scene to be placed before (to the left) or after (to theright) the scene in the workbox. All other scenes will be automati-cally added after the current workbox scene.
Please note that the scenes in the storyboard are merely representa-tions or “snapshots” of the actual scenes in the scene bin. If youtrim or even delete a scene that’s in your scene bin, it will have noeffect on your storyboard. To incorporate any scene changes, youneed to replace the storyboard scene with the altered scene, sinceyou can’t edit a scene that’s in the storyboard.
1 This button removes the storyboard scene in the gray workbox.An insert-edit scene can also be removed this way, thus making thebackground scene visible again.
2, 3 These two functions are closely related. Press “Replace” toremove the current storyboard scene and place the selected (blue-framed) scene from the scene bin in its spot. “Search” will locatethe original version of the scene in the workbox. Let’s say that you
Edit(cont’d)
Storyboardplacement
Remove
Search andreplace
2
1 3

3.15Chapter 3 Reference
would like to trim a scene that’s in the storyboard. First, place thestoryboard scene within the workbox and press “Search.” TheCasablanca will then locate the scene within the scene bin that hasthe same name (if you haven’t already deleted this scene orrenamed it). Once it’s found, you may trim that scene down,return to the edit screen and press “Replace.”
1, 2 The Insert and Range buttons control insert editing. Toinsert video material into an existing scene, you need to select ascene in the storyboard that will serve as your background scene(this scene will also provide the audio for the insert) and move itinto the gray workbox. Select a scene from your scene bin with theleft trackball button (its frame will turn blue)–this is the materialthat will be inserted into your storyboard scene.
Click the Insert button and the Range screen will appear. Hereyou can set the starting frame of your video insert by clickingeither the start button (for a gross selection) or the < and > keys(for fine tuning). The in and out buttons in the lower portion ofthe range screen are for trimming your original scene.
If you want the insert to start with the first frame of the masterscene, just click the right trackball button after you’ve clicked onInsert. This brings you back to the edit screen. You’ll notice thatthe master scene on the storyboard has been broken into severalparts: The initial portion of the master scene, the inserted sceneand the remainder of the master scene. The scene that has beeninserted into the master scene will have an Insert icon superim-posed on it indicating that the insert has taken place.
You can make multiple inserts within the same scene and addtransitions between an insert and the master scene, but notbetween two inserts. If you wish to have transitions betweenmultiple inserts within one master scene, you need to make asingle scene of the inserts and transitions, then insert that scene.
3 The Play button will play through your storyboard, startingfrom the scene within the gray workbox (which may anywhere inthe storyboard) and ending with the final scene. To start from the
Edit(cont’d)
Insert and range
Play
31, 2

3.16 Chapter 3 Reference
very beginning, scroll through the storyboard until the first scenelies within the workbox. You can stop playing by pressing eitherthe Stop button or the right trackball button.
1 The center scene of the storyboard is framed in the grayworkbox. This is the active scene. The storyboard can hold anunlimited number of scenes, but only five scenes will be visible onthe storyboard. You can scroll through the storyboard to view yourother scenes by clicking on a particular scene. You can also:
2 Move the slider beneath the storyboard (the fastest way ofmoving within the storyboard);
3 Press the Single Scene (< >) buttons to move the storyboardscene-by-scene); or
4 Press the yellow triangle to the left or right of the storyboard tojump to the first or last scene of the storyboard.
Edit(cont’d)
Movingthrough thestoryboard
4
2, 3
1

3.17Chapter 3 Reference
The finish screen is where you go to render all of your audio andvideo at once and then record your final rendered project to tape.
1 You may choose to run a “batch render” to render all audio andvideo changes at once instead of rendering each effect as you goalong. Once you click on Render Storyboard, the Casablanca willindicate which effect is currently being rendered and how manyremain unfinished. The front LCD panel will also display thepercentage of completed rendering. Keep in mind that thispercentage is an estimate and there may be a deviation betweenthe calculation and the actual speed that it’s rendering at.
2 Range lets you record a selected portion of your storyboard totape, rather than the entire storyboard. Once you click on theRange button, the first frame of your storyboard will appearbehind a Trim toolbar (see the section on Trim within this chapterfor more information). Once you set your new In and Out points,click on the videocassette icon in the lower right corner of thetoolbar to return to the Finish screen.
3 These buttons allow you to record your finished video projectto tape. It’s always a good idea to record your finished project totape, but you might even want to make video tape copies of yourunfinished storyboard–particularly with longer projects.
Before you begin to actually record your project to tape, you needto turn on your video recorder and make sure that all of thecabling is correct, then press either the record to VCR or the
Range
Rendering
Record to VCR/DV
123
Finish screen

3.18 Chapter 3 Reference
record to DV button. Once this is done, the first frame of yourvideo project will appear along with the message “Please switchVCR to record.” Press the Record button on your video recorderand then press the on-screen Start button.
It’s a good idea to start your video project off with a few seconds ofblack video (an empty scene) in order to give you enough time tostart recording on your VCR. You could even end the video with afade-out to a blank scene–this allows you to avoid recording theCasablanca screen that appears once you have played through yourentire project.
Once your storyboard is organized, you can add transitionsbetween scenes if you think your project needs them (you could,of course, use simple cuts between scenes and avoid transitionsaltogether, depending on your individual editing style). Transitionsin the traditional sense are known as A/B rolls, but with theCasablanca you can also use gentle crossfades, wipes, page-turns,chroma key superimposition and other effects.
Transitions must be rendered in order to take effect. You shouldalways check out the transition’s appearance in the previewwindow before rendering. You could also leave the rendering forlater and do a batch render in the finish screen. Once you’veplaced a transition, its icon will appear between the two scenes itaffects on the storyboard. As long as the effect is unrendered, theicon’s frame will be red. Once rendered, the icon changes to green.
Finishscreen(cont’d)
3
Transitions screen
1, 2

3.19Chapter 3 Reference
1 This button inserts the active transition effect into the story-board. You can also insert the transition into the storyboard byselecting the transition from the transition list and clicking the lefttrackball button.
2 This button deletes the transition from the workbox scene.
3 Whenever you select a transition or effect, the running time isautomatically set at one second. You can change this by selectingone of these buttons, which will set the length at either one-half ofa second, one second, two seconds or the number of seconds youspecify (this number, however, cannot exceed the length of theshortest scene that the effect is being applied to).
Transitionsscreen(cont’d)
Delete
1/2s, 1s, 2s, xs
Insert
TIP: A transition can only be as long as the shorter of the twoscenes it’s applied to.
A transition effect that is placed between two “normal” scenes thatare not the result of an insert-edit will shorten the total length of thestoryboard by the length of that transition. A transition that isplaced between a normal scene (background) and an “insert”scene (foreground) has no effect on the length of the storyboard.
Transitions shouldn’t overlap. In the case of a five-second scene,for example, the total length of the transitions attached to it cannotexceed five seconds. Transitions placed within insert-edit scenesare limited by the length of the insert.
A scene’s original source audio is automatically crossfadedwhenever a transition is present. This means that the sound fromthe first scene becomes quieter while the sound from the secondscene becomes louder. You should remember to change thevolume of a loud scene BEFORE placing the effect. Should aninsert scene be involved, the sound doesn’t change at all, since theaudio comes from the background scene.

3.20 Chapter 3 Reference
53, 4
6
1 Clicking the Preview button produces a window in the middleof your screen (shown below).
This window displays a real-time preview of what the finishedtransition will look like once it’s rendered, as well as the twoseconds of video before and after the transition. The preview itselfwill not take up any space on your hard drive.
2 Clicking the Full Size button displays a full-size preview of asingle frame from the selected scene or scenes (as shown below).
Transitionsscreen(cont’d) 1
2
In the uppre-left corner of the toolbar are the effect’s name andicon. Below the name is a frame indicator and a slider bar thatenables you to select any frame within the scene. Below the frame
Preview
Full size

3.21Chapter 3 Reference
indicator is a display modifier. This option allows you to previewany frame of your original scene (Original), any frame of the effect(Effect), or a special split-screen mode (Orig. + Effect) thatdisplays the original scene on the left half of the screen and theapplied effect on the other.
On the right side of the Full Size preview’s toolbar are the contoloptions that allow you to modify the image-processing effect ortransition. Therefore, you can make adjustments to the effect ortransition immediately after previewing it in full-screen mode.
3 When you render a transition, the Casablanca reads both framesfrom the source scenes and applies the transition to each of them.When you’re recording footage onto the Casablanca’s hard drive,make sure to leave some free space for the rendered transitioneffects (anywhere from two to ten percent of the drive’s totalcapacity).
4 Clicking this button creates an entire scene from a renderedeffect, the effect and its surrounding scenes or any number ofscenes that you specify; you can even make a scene that’s com-posed of your entire storyboard. This procedure makes it possibleto use more than one transition effect on a particular scene–the so-called multi-layer-effect (or A/B/C/D-Roll). Multilayering can bea powerful tool for experienced Casablanca users; it’s like usingseveral analog video mixers at the one time, but without anyquality loss. See Chapter Two for a tutorial and a more-detailedexplanation of effective multilayering techniques.
5 This button plays the rendered transition effect. The Casablancaalso plays an additional two seconds before and after the effectitself so you can see the effect within the context of the project.
6 The following effects are available on every Casablanca. Therunning times are only recommendations, so don’t hesitate toexperiment with the times to find a setting that’s right for you.
3-D Rotation The scene is rendered onto a plate which rotates inseveral directions and disappears to reveal the new scene. Recom-mended running time: Three seconds.
Transitionsscreen(cont’d)
Rendering
Scene
Play
Types oftransitions

3.22 Chapter 3 Reference
Bars The new scene shoves the old one away in one of six differentdirections (two of which are combined) with the help of up to200 bars. Recommended time: Up to two seconds.
Picture-in-picture This effect is not really a transition, but since itworks with two scenes the Casablanca treats it like a transition.The first scene (to the left) is the background scene and thesecond scene (to the right) will be the small inset picture. Theposition of the smaller picture can be set with the “Position”button. Use the “size” button to select one of three available sizes.You may also add an optional border and border color. Try toavoid using very bright colors, as they tend to “bleed.” The soundfrom both scenes will be crossfaded, although in most cases you’llneed to edit the sound yourself. (Such a crossfade is seldomwanted in conjunction with the Picture-in-Picture effect.) Removethe audio sample from the scene (Scene --> Audio Sample) andplace it into one of the audio tracks (Audio mix). At the sametime, lower the volume of the other scene accordingly. Recom-mended time: Five seconds.
Colorfade This transition fades a scene into a chosen color andthen fades the color into the following scene. Use the color panelto choose your color (the typical colors used with this transitionare usually a basic black or white). Recommended time: Up totwo seconds.
Circlewipe This effect fades the scene within a shrinking orexpanding circle. The direction can be chosen with the “direction”button. You could use this effect in shrink mode together with ablack, empty scene to achieve a cartoonish ending. Recommendedtime: Up to two seconds.
Page turn A scene is turned into another in 3-D. It’s like turning apage in a book. Recommended time: One second.
Crossfade Aside from the hard cut, the classic, gentle fade isprobably the most often-used method directors use to end a scene.It gently fades one scene into another, with the second becomingmore and more visible while the first slowly disappears. As is thecase with all of the Casablanca transitions, both scenes remain inmotion throughout. Recommended time: Up to three seconds.
Collapse The old scene is pulled apart at the sides, ultimatelyresembling a star with five points as it rotates off of your screen.Recommended time: Up to three seconds.
Transitionsscreen(cont’d)

3.23Chapter 3 Reference
Cone The old scene is wrapped around a cone and rotates out ofthe picture in 3-D. Recommended time: Two to three seconds.
Disc A scene is rendered onto a round disc and whirls its way offof the screen. Recommended time: Three seconds.
Explosion A scene “explodes” into small pieces. You can chooseboth the direction and the amount of flying fragments. Recom-mended time: One second.
Funnel A scene turns into a tornado and whirls off of the screen.Recommended time: Three seconds.
Halfsphere A scene turns into an open halfsphere and is cata-pulted off of the screen. Recommended time: Three to fourseconds.
Roll A scene is rolled up or down like a window shade (similar to apage turn). Recommended time: One second.
Sphere A scene turns into a sphere and either rolls off of the screenor shoots away as if it were a bursting balloon. Recommendedtime: Three seconds.
Triangles A scene is split into three triangles which spin out of thescreen according to your mode selection. Recommended time:One second.
Twirl A scene twirls into itself and spins off of the screen. Recom-mended time: One to three seconds.
1 You can use these icons to reach the Edit, Image Processing,Titling and Main screens.
Transitionsscreen(cont’d)
Screen icons
1

3.24 Chapter 3 Reference
3 & 45
The Casablanca offers a wide range of image processing effects.The scene within the gray workbox in center of the storyboardwill always be the active scene for the effect (that is, the scene youare working with), although you can work on a single frame or theentire storyboard if you wish.
1 This button places the effect onto the selected storyboard scene.Double-clicking on the effect within the list accomplishes thesame thing. The effect’s icon now appears in red over the workboxscene. After you render the effect, it will change to green.
2 This deletes the effect from the workbox scene, regardless ofwhether or not it’s been rendered. Deleted image-processing
Insert
Image processing screen
1 & 2
Tips: You may find the following tips to be useful whenapplying image-processing effects
First choose a scene to host the effect.
Then select an effect by clicking on the effects list andclicking on the desired effect with the left trackball button.The operator icon now appears within the chosen scene.
Next, choose the appropriate options for your effect.
If you want the effect to be longer than the host scene,press the range button and choose the first frame (in-point) and last frame (out-point) for your effect.
Click the preview button and check the results. You canthen make any necessary corrections.
Render the effect and play it.
Delete

3.25Chapter 3 Reference
effects are not removed from your hard drive unless you run aclean up.
3 An image-processing effect will always alter the entire workboxscene unless you adjust the effect’s range. To do this, press therange button and you will be able to set the effect’s new in- andout-points. Remember: You can only place one effect on a scene atone time. You may not overlap image processing effects, transi-tions and titles. However, you can use multilayer editing to addmultiple effects to one scene (see the detailed multilayeringtutorial for more instructions).
4 Clicking the Preview button produces a window in the middleof your screen (shown below).
This window displays a real-time preview of what the finishedeffect will look like once it’s rendered, as well as the two seconds ofvideo before and after the effect. The preview itself will not takeup any space on your hard drive.
5 Clicking the Full Size button displays a full-size preview of asingle frame from the selected scene (as shown below).
I
Imageprocessingscreen(cont’d)
Range
Preview
Full size

3.26 Chapter 3 Reference
In the upper-left corner of the toolbar are the effect’s name andicon. Below the name is a frame indicator and a slider bar thatenables you to select any frame within the scene. Below the framendicator is a display modifier. This option allows you to previewany frame of your original scene (Original), any frame of the effect(Effect), or a special split-screen mode (Orig. + Effect) thatdisplays the original scene on the left half of the screen and theapplied effect on the other.
On the right side of the full-screen preview’s toolbar are the contoloptions that allow you to modify the image-processing effect ortransition. Therefore, you can make adjustments to the effect ortransition immediately after previewing it in full-screen mode.
1 The Casablanca renders an effect by reading the source framesfrom the hard drive, applying the selected effect on these framesand saving the result back to the hard drive. This process takestime and requires free space on your hard drive. It’s a good idea tokeep up to 10% of your hard drive capacity free for effectrendering and other operations.
2 This button creates an entire scene from a rendered effect, theeffect and the scenes it alters or any number of scenes that youwant-you can even reduce your entire storyboard to as singlescene. The scene function is what makes so-called multilayerediting (also known as A/B/C/D-Roll) possible. Please see themultilayering tutorial for more information.
3 This button plays a rendered effect. In fact, the Casablanca willalso play an additional two seconds of video both before and afterthe effect so you can see in within the context of your project. You
Imageprocessingscreen(cont’d)
Scene
Play
Render
31 & 2
4

3.27Chapter 3 Reference
can cancel the play function any time by pressing either the righttrackball button or the stop button.
4 The following effects are available on every Casablanca:
Fade in/out You can use this effect to fade from black into thescene or fade from the scene into black. Such an effect is used atthe start or end of a film or whenever two scenes vary in context.The mode button gives you the option of either fading in orfading out. You can get a similar result from the crossfade transi-tion (when used in conjunction with a black empty scene) or eventhe colorfade transition, but the rendering times would be a bitlonger.
Freeze The first frame of a scene is frozen on-screen.
Telescope This effect creates the illusion that your scene is beingviewed through a telescope or binoculars (it’s frequently used intelevision and films). The Casablanca’s version of the effect givesyou three options: A view through two overlapping circles (fieldglasses), a single circle (telescope) or a telescopic gun sight.
Strobe Holds each field for the length indicated on the slider. Asettings of 0:02, for example, holds every second frame for twoframes. At the maximum setting of 1:00 it holds every frame forone second.
Mirror A scene is mirrored either horizontally, vertically or both.
Sharpen You can use this effect to improve your overall picturesharpness if, for example, your archived material needs to berestored. The sharpness grade can be regulated in 8 steps.
Control Image The brightness, contrast, gamma and color aspectsof your image can be changed.
Flashbulb This effect creates the illusion of lightning flashes ornumerous flashbulbs going off at once. You can set the frequencyand brightness of the flash. To simulate a single flash, use thecontol-image effect (raise the scene’s brightness and gammasettings) with a range of just one frame.
Stabilize This effect stabilizes your shaky scenes. There are threedifferent settings to provide you with a perfect transition to therest of your video.
Imageprocessingeffects(cont’d)
Types of imageprocessingeffects

3.28 Chapter 3 Reference
CVBS Filter This effect can be used to reduce a flickering that canoccasionally occur when you are using CVBS connections (asopposed to SVHS connections). The reason for this is that theCVBS signal combines brightness and color, which can lead to aloss of video bandwidth (especially with color).
Solarize This effect alters the scene’s colorization, as black andgray shades change to orange, yellow, green, cyan and blue. Thisprocess is often used in science to demonstrate different levels ofbrightness; the human eye can only recognize about 100 differentlevels of brightness, but it can discern over 100,000 color varia-tions. Hard cuts can lead to flickering edges if you use CVBS, butthe “CVBS filter” and “soften” effects can correct this problem.
Control Color This is for Red/Green/Blue correction.
Color Depth This effect reduces the amount of color in thepicture. Once again, any flickering that might occur can becorrected with the CVBS filter and soften effects.
Line Art This effect turns the scene into a kind of moving line-artdrawing (all edges will seem to have been drawn with a pencil).The contrast slider sets the darkness of the lines according to thecontrast of the original scene.
Negative Similar to an actual photographic negative. Although itis often used to merely alter the scene, you could also apply it inother areas. You could use the macro function of a video camerato record video of a slide or a negative. The Casablanca’s negativeeffect could then be used to turn the negative back into a positiveimage to be used in a video project.
Relief The scene is turned into a three dimensional relief,ultimately resembling an image chiseled in stone. The “light”slider changes the direction of the light source.
Color to gray The original color scene is turned into a monochro-matic black and white one. If you intend on having the entirevideo in black and white, use the video settings to lower thesaturation to zero before recording the material and avoid the longrendering times associated with applying color to gray to yourentire project.
Soften This effect reduces the picture’s sharpness.
Imageprocessingeffects(cont’d)

3.29Chapter 3 Reference
Wave A scene is made into a “wave” with a height and frequencyof your choosing.
Crosswave The same as above but with waves extending in bothdirections.
Rectangle A rectangle is rendered into the scene. You determinethe rectangle’s size, dimension, color and transparency.
Dynamic range This effect reduces the brightness and the range ofcontrast for a scene. Try experimenting with different settings andcheck the preview window before rendering. The “scale” moderetains all of the picture’s information.
NOP This effect has no impact on your editing whatsoever; it’s atool used by DraCo Systems to test software.
The titler works very much like the transition and image-process-ing screens. Instead of adding a crossfade or a filter effect to one ofyour scenes, the Casablanca uses the same process to digitally mixtext into your scene.
The titler is sharp, scrolls gently, features a wide range of fonts andcan display text in any color. The current version offers severalscrolling options, including “Text Table” (fades stationary text inand out of your scene), “Vertical Roll,” “Horizontal Roll,” a“Color Roll” and “Subtitle.” The titler also features the identicalRange, Preview, Render, and Play functions that are used withinthe Transitions and Image-Processing effects screens.
Title screen

3.30 Chapter 3 Reference
Delete
There are, however, several key differences between titling andother effect-generating operations.
Titling consists of two parts: Selecting the title and then inputtingyour text.
1 A title normally runs for the length of the selected scene, butyou can adjust the title’s default running time to let it run for ashorter or longer period. The range of a text is very important. Alonger range results in a slower scrolling speed.
The Range screen is similar to the trim screen. Instead of markingthe active part of a scene, you merely set the effective time for thetext. The text starts at whatever frame you set (In-point) and endsat the last frame (Out-point). Some parts of the storyboard mayappear in red. These scenes can’t be selected for titling since theyare already marked by other effects (the overlapping of image-processing effects, transitions and titles is impossible withoutmultilayer editing. You’ll find information on using this techniquewithin Chapter Four). Return to the titling menu once you havemade your selections and your scene should now bear the titlingicon (if your titles spill over into other scenes, they’ll be markedwith the icon as well).
2 This button places your title onto the selected storyboard scene.
3 This icon represents a placed title. It will appear red if the titleis unrendered, and green if the title has been rendered.
4 This button deletes the title from the scene within the workbox,regardless of whether it has been rendered or not. Deleted titles,transitions and effects may disappear from your screen, butremain on your hard drive until you run a clean up.
Titlescreen(cont’d)
Title icon
Insert
3
2
Range
4 5 & 6 7, 8 & 91

3.31Chapter 3 Reference
5 The Preview button plays the title in a real-time preview. Therunning time will be about as long as that of the final version. Thepreview requires no additional space on your hard drive.
6 The Full-Size button plays a full-screen preview of the titlebeing applied to a single frame of your scene. In the upper-leftcorner of the toolbar are the title’s name and icon. Below the nameis a frame indicator and a slider bar that enables you to select anyframe within the scene for viewing. Below the frame ndicator is adisplay modifier. This option allows you to preview any frame ofyour original scene (Original), any frame of the title (Effect), or aspecial split-screen mode (Orig. + Effect) that displays the originalscene on the left half of the screen and the applied title effect onthe other.
On the right side of the full-screen preview’s toolbar are the contoloptions that allow you to modify the title by entering or changingthe text, color, etc. Therefore, you can make adjustments to thetitle immediately after previewing it in full-screen mode.
7 This button plays the rendered title and an additional twoseconds before and after the title itself. You can stop playing at anytime just by pressing either the stop button or the right trackballbutton.
8 When rendering a title, the Casablanca reads the source framesfrom the hard drive, applies the selected title to these frames andsaves the result back to the hard drive. This process takes time tocomplete and does require some free space on your hard drive.Remember to always keep up to 10% of your hard drive capacityfree for rendering transitions, effects and titles.
9 This button can create a scene from a rendered title, the titleand the scene(s) it appears on or any number of scenes in thestoryboard (you can even make a scene out of the entire story-board). This makes it possible to use the multilayer-editingtechnique (also known as A/B/C/D-Roll) to place more than onetitle on a scene.
Scene
Play
Render
Preview
Full-sizepreview

3.32 Chapter 3 Reference
Once you click on “Enter/Change Text,” you enter a screenwhere you can define the actual text, colors and fonts.
Using the on-screen keyboard to type in text may take somegetting used to, but it works much like a traditional word-processing program. The Casablanca uses line-orientated text,however. This means that you can use any number of fonts, sizesand colors on different lines, but not within a single line.
1 To create a new line, press the return key. A new line is insertedthat automatically takes on the last line’s settings. If you want yourtext to have a consistent size, color and font, type the first line,make your selections and each following line will follow thesesettings. The delete key (arrow to the left) deletes the text to theleft.
2 The arrow keys move the cursor in the text. The system doesn’tautomatically wrap text so you have to press the return key forthat. If you want to halve the line, move the cursor to the pointbefore the word you want to place in the line below and pressreturn. If you go to the start of a line and press delete, the line willjump to the end of the previous line.
3 Seven fonts are available with your standard system package andmany additional fonts are available on separate font disks (seeAppendix A for more information). You can scroll through the listof fonts using the trackball. A sample of the current font isdisplayed below the list.
Titlescreen(cont’d)
Title interface
Keyboard
Return key
Arrow keys
Choose fonts
3
12

3.33Chapter 3 Reference
You can choose any font size that you want. The sample text(“Casablanca”) will reflect your changes. In the case of someextremely large fonts, you might only see parts of the text but theactual version will display in its entirety.
1 Four combinable attributes (represented by variations on theletter “I”) can be selected for each font: “Italic,” “Bold,” “Out-lined” and “Shadow.” To activate an attribute, press its corre-sponding button (the button will turn blue, indicating that it’sactive). You can combine any attributes, so you’ll have no problemcreating that italic, bold, outlined text with a shadow.
The attributes are shown in the text field and in the text previewwindow, but will appear at a lower resolution than the final video.There are some fonts that are not legible in bold.
2 You can also select the font’s color with the Casablanca’s ColorBox. Although you can choose any color you want, you shouldavoid using high saturation levels if you don’t have a professionalvideo recorder since the colors may bleed together.
3 There are a number of different positions available for your text,most of which can be found in typical word-processing programs:“Left aligned,” “right aligned,” “centered,” “justified,”“left -> <- right” and “<-middle->.”
Titlescreen(cont’d)
Font attributes
Color
Text position
23
1

3.34 Chapter 3 Reference
1 The “Del” key just above the return key deletes a single letter tothe right, while the “DeL” key to the right deletes the entire line.
2 Archive allows you to save text and load it back again at a latertime. All settings (the font, size, color and attributes) are savedalong with the text, but project-specific settings like range anddirection of the roll must be redefined. As the video data changeswith each new project, the text must also be rendered.
To archive text, press the Save button. To overwrite archived text,click onto the archived text name and press OK. To load a textarchive, press “Load” and choose the desired text. You can alsodelete a previously saved archive, but once it has been deleted itcan’t be recovered.
Audio editing adheres to the same basic principle as video editing:
Record the raw audio data.
Trim this data.
Place the audio samples into the storyboard.
Choose the volume of the original sound, commentary andbackground tracks and set any fade in/out points.
Render all of the project’s sound (the three stereo tracks willcombine into one stereo track).
The Audio Record screen is where you record and manipulateyour audio. The Split, Trim, Copy and Delete functions are verysimilar to their video counterparts in the Edit screen.
Titlescreen(cont’d)
Del and DeL
21
Archive
Audio record screen

3.35Chapter 3 Reference
Within the Audio Record screen’s interface (shown above), youcan record, trim, split, copy, name and add effects to your audiomaterial. The sound files resulting from a recording, whether theybe music, voiceovers, or sound effects, are called samples and areplaced in the list to the right.
1 The volume meter helps you monitor your incoming audiosignal’s decibel levels. When you record audio to the Casablanca’shard drive, you should ensure that the decibel meters only registerin red (high) during the loudest portions of the audio sample. Ifthe meters are consistantly within the red area, you should lowerthe volume of your incoming audio.
If you intend to work with several tracks at once, don’t use highvolume settings for all of the tracks. The volumes of all threetracks are summed up and this could lead to an over-modulationof the final sound. Each bar on the display represents about 5 dB.This meter disengages once you actually begin recording.
2 The Decibel Control slider allows you to lower and raise thevolume of the incoming audio. The actual change in decibels isdisplayed to the right of the slider.
3 The Audio Input selector is where you indicate the type ofaudio input you are using: Front, Rear, Like Video (the Casa-blanca uses the same settings that you selected in the VideoSettings screen) or Mini DV (which only allows you to load audiofrom a DV source, but without machine control).
Audiorecordscreen(cont’d)
Volume meter
Audio input
Decibel control
12
3

3.36 Chapter 3 Reference
1 This time display indicates the amount of time remaining inyour audio partition.
2 This box displays the names and running times (minutes:seconds: frames) of your audio samples. If you want to select asample, click anywhere within the box and scroll up and downwith the trackball until the sample you want isd highlighted inblue, then click on the left trackball button to confirm it.
3 The Split function allows you to split up your audio samplesjust as you would split up your video samples in the Edit screen.
The Audio Split controls (shown above) are similar to those foundin the video Split window.
1 The Waveform display provides a visual representation of youraudio sample.
Audiorecordscreen(cont’d)
13
2
Split
Free capacity
Sample list
Waveform
1
2 & 3
13
45 & 6
10 9 7 & 8
11 & 12

3.37Chapter 3 Reference
2, 3 The Quick Play button s play the five seconds of audio beforeand after your split. This can be useful when you are trying toensure that you’ve selected all of the audio you want before makingthe actual split.
4 This box displays the name of the clip you are editing.
5 The Play button plays the audio sample that you’ve selected upto the split point.
6 The Stop button stops the sample from playing.
7 The top Time display indicates the length of the sample prior tothe selected split point, counted from the beginning of the sample.
8 The Remaining display indicates the length of the audio sampleafter the split point.
9 The Split Position button allows you to set the split points inyour audio sample. Once you press the button, scroll right withyour trackball. You’ll notice that the sound from your audiosample plays as you scroll in. Once you stop scrolling, the last fewseconds of audio prior to the split point will play in a continuousloop until you click the left trackball button.
10 The Single Frame ( < and > ) buttons move your selected splitpoints backward and foreward one frame at a time.
11 The Use button retains the scrolled through audio segment.
12 The Drop button discards the segment of audio that youscrolled through.
13 OK returns you to the Audio Record screen after saving.
Name display
Play
Stop
Time display
Remainingdisplay
Split Position
Single frame
Use
OK
Quick play
Drop

3.38 Chapter 3 Reference
Audiorecordscreen(cont’d)
1
1 This button takes you into the Trim screen, where you can alterthe In and Out points of your audio samples. The audio Trimcontrols function much like the video Trim controls (the audioTrim screen is shown below).
1 This waveform is a visual representation of your audio samplethat is activated when you select the In and Out points.
2 The Play button plays your audio sample. from the beginning
3 The Stop button stops the sample from playing.
4 This displays the length of your trimmed audio sample from thein point; the length changes as you adjust the In and Out points.
5 Clicking the In button and scrolling the trackball allows you tochange the point at which you sample begins playing. The arrowsbeneath the button move through the scene one frame at a time.
12, 3 & 4610
59
7 & 8
Trim
Waveform
Play
Stop
Time display
In

3.39Chapter 3 Reference
Audiorecordscreen(cont’d)
6 Clicking the Out button and scrolling the trackball allows youto change the point at which the audio sample stops playing. Onceyou stop scrolling to the left, you will hear the last few seconds ofaudio before the Out point. This will continue until you click theleft trackball button to confirm the position. The arrows beneaththe button move through the scene one frame at a time.
7, 8 These buttons to the left of the In counter and to the right ofthe Out counter play the first and last five seconds of your audiosample, respectively.
9 The OK button saves all changes you have made within theTrim screen and returns you to the Audio Record screen.
10 The Cancel button Returns you to the Audio Record screenwithout saving any of your changes.
1 Clicking the Copy button creates a duplicate version of theselected audio sample; it does not occupy any additional space onyour hard drive.
2 The Empty Sample function generates a silent audio samplethat can be used to mask background noise or affect other samplesin other audio tracks. You can select the length of the sample (upto five minutes).
3 The Special button brings up a menu listing a variety of effectsthat can be added to your audio samples. The original audiosample, however, remains intact - the effects are applied to copies
Out
Quick play
OK
Cancel
Copy
Empty sample
Special
13
2

3.40 Chapter 3 Reference
Audiorecordscreen(cont’d)
of your audio sample and are then placed in the sample list. Thespecial effects are modular and will expanded in the future. Note:Most effects involve stero sound and cannont be applied if theaudio quality has been set to “Mono.” The current effects are:
Base width allows you to simulate an increase or decrease in thedistance between your speakers (a setting of zero is “mono”).
Copy allows you to replace either the right or left channel with aduplicate of the other channel. Left -->Right results in the audiodata from the left channel appearing in both left and right chan-nels; Right -->Left results in the audio data from the right channelappearing in both the right and left channels.
Karaoke removes the vocals from any audio sample. Although thiseffect works best with music, it can remove unwanted voices froma spoken sample.
Mono blends the audio data from the left and right channels andplays the combination over both channels.
Mute allows you to mute the audio data on either the left or theright channel.
Swap reverses the data from the left and right channels, so that itplays on the opposite channel (right and left).
Volume raises or lowers the volume of the entire audio sample.
Volume L R allows you to raise or lower the volumes of the left andright channels independently.
Base width
Copy
Karaoke
Mono
Mute
Swap
Volume
Volume L R

3.41Chapter 3 Reference
Audiorecordscreen(cont’d)
1 Sample --> Scene generates a new scene that consists of emptyblack video accompanied by a selected audio sample in the originalaudio track. This new scene will be located within the Edit screen’sscene bin and can be used to help you “edit to the beat.” If youplace the empty scene in your storyboard, you can insert-edit videoclips into the scene while retaining the audio track (for moreinformation on insert editing, see the tutorial on p. 2.17)
2 Delete removes an audio sample from your interface. To removethe sample from your hard drive, you must run a clean up.
3 The Undo button allows you to restore the last ten audiosamples that have been deleted.
4 This box displays the name of the highlighted audio sample.
5 Record begins recording your incoming audio signal.
6 Pressing the Stop button halts the recording.
7 Play will play the highlighted sample from the beginning.
8 These are hot-key icons that can take you directly to the Record,Audio Mix and Main screens.
12
4
35, 6 & 78
Sample
Delete
Undo
Name display
Record
Stop
Play
Hot-key icons

3.42 Chapter 3 Reference
This screen allows you to arrange the recorded samples andregulate their volumes. The Audio Mix screen is quite similar tothe video Edit screen. To the left you’ll find the recorded samplesand at the top is the storyboard. Unlike the video storyboard,however, this one features three horizontal bars representing thethree audio tracks: Original source audio, Commentary andBackground tracks.
1 Your Original audio track (the top track represented by acamera on a tripod) is always occupied with your source audio andcannot be added to. The Commentary (microphone) and Back-ground music (music notes) tracks are available for you to placeaudio samples on. These names are merely designations, however;you could place the background music in the comment track ifyou wish.
These steps are essential for working within the Audio Mix screen:
Select either the Commentary or Background track by choosingthe box to the right of the track itself and choose a sample.
Move the storyboard to where you want the sound to begin andclick Insert. The sample appears in the chosen track at the start ofthe selected scene.
To choose the exact length of the sample, press Range. You’ll thenbe able to move the whole sample (via the start button) or shortenit at the beginning or end (In/Out points). You can also see theappropriate scene and can play your video along with the sample.
After making the adjustments, return to the Audio Mix screen andpress Render.
Available audiotracks
Audio mixingrules of thumb
1
4
Audio mix screen
23

3.43Chapter 3 Reference
Press the play button to the right of the storyboard and the videowill be played along with the audio material you just rendered.
If any sound is too soft or too loud, click on it. The sample turnsblue and you can set the volume again (press the camera, micro-phone or notes icons). ONLY the selected sample is affected bythis; segments before and after this sample are left as they were.
If you need fades for a certain sample, click on it and set thelength of the fade in or fade out. Add additional samples in thesame manner.
Render all material so that no red (unrendered) samples are left.Starting with Casablanca Sysytem Software Version 3, changes inyour video (inserting scenes, deleting effects, etc.) will NOTthrow off your other audio tracks. You will NOT have to manu-ally rearrange parts of the audio all over again.
2 This button inserts the active sample into the storyboard. If youhave not already chosen a track, you will be prompted to do sonow. Initially, audio samples are placed at the start of the scene.You can move the sample using the range function or trim it usingthe in and out buttons.
If a sample is already present, the Casablanca will automaticallyinsert your new audio at the end of the old sample. Audio samplescan’t overlap, so this will only work if you have enough space inthe storyboard after the first sample.
3 The Remove button removes the active sample from thecommentary and background tracks. You can’t remove youroriginal source audio. Remember that if you remove audiosamples you’ll need to re-render the storyboard.
4 This sets the In and Out points of a sound sample. The rangebutton can only be selected once you’ve chosen an audio samplefrom the storyboard (selected samples are shown in blue).
Audio mixscreen(cont’d)
Insert
Remove
Range

3.44 Chapter 3 Reference
Audio mixscreen(cont’d)
2 & 34 & 5
Whenever you place an audio sample into an available track, it isinserted at the very beginning of the scene located within the grayworkbox. There may be time, however, when that type of generalplacement is inadequate. The functions within the Audio Rangescreen (shown above) solve that problem by enabling you to makeframe-precise audio sample placements.
1 Clicking the Waveform button allows you to turn the audioscrub function on (a waveform appears) or off (the waveformdisplay disappears). With the scrub audio turned on, you can hearthe audio sample as you’re attempting to place it - a key feature inprofessional audio placement.
2 The Start button enables you to set the point at which thehighlighted audio sample will begin.
3 Clicking these Single Frame arrows moves the Start pointforwards and backwards one frame at a time.
4 The Play button plays the storyboard for the the duration of theaudio sample.
5 Pressing the Stop button stops the sample from playing.
6 This button moves the toolbar to either the top or bottom ofyour screen.
16
7 & 8 9 11
Waveform
Start
Single frame
Play
Stop
Up/Down
10

3.45Chapter 3 Reference
7 The In button sets the In point for your inserted sample, just asit does in the Audio Record screen.
8 Clicking these Single Frame arrows moves the In pointforwards and backwards one frame at a time.
9 The Out button sets the point within the storyboard scene atwhich your audio sample will stop playing.
10 These Single Frame arrows move the Out point backwardsand forwards one frame at a time.
11 This hot-key button returns you to the Audio Mix screen.
Single frame
Out
Single frame
Audio Mixscreen hot key
When you return to the audio-mix screen, you’ll notice that thesample has moved to the new position.
1 Casablanca can play all three tracks together only if they havebeen rendered (unrendered samples appear in red within a barabove the original track; rendered samples appear in green).Render a sample by clicking on it and pressing the render button.The Casablanca will then render the segment covered by theactive sample. The time needed for rendering depends on thelength of the sample, but note that rendering audio is much fasterthan rendering video.
2 The Play button in the upper-right section of the storyboardplays the selected audio sample and the corresponding video
Render
Play
21
In

3.46 Chapter 3 Reference
Audio mixscreen(cont’d)
Fade in
Fade out
Direct screenicons
segment. Other samples are only played if they’ve been rendered.Video is also played. The Play button in the middle only plays thecurrent audio sample (not video). The name of the sample is shownabove the Play button.
1 Here is where you can change the volume of a scene’s Originalaudio track. You can make it quieter (negative dB values) or louder(positive dB values). Remember that all audio changes must berendered before they take effect.
2 Allows you to change the volume of the Commentary track.Volume changes must be rendered.
3 Allows you to change the volume of the Background track.
4 This slider sets the length of an audio fade in. The set timerepresents the time needed for the sound to reach the previouslyselected volume. If you want a comment to be gently faded in, youcould select 1 second. The fade-in and fade-out times affect theother tracks. A Commentary track fade in results in the Back-ground music being gently turned down at the same time.
5 This slider sets the length of an audio fade out. The set timerepresents the time needed for the sound to be muted. If you wantthe commentary track to fade out gently, you could select 1 second.The fade-in and fade-out times affect the other tracks.
6 Use the icons to reach the Audio Record and Main screens.
Camera icon(originalaudio)
Microphoneicon (commen-tary audio)
Music notesicon (back-ground audio)
1, 2 & 34 & 56

3.47Chapter 3 Reference

Appendix AExpansion
We want the Casablanca to grow along with your needs as youtake on new editing challenges and opportunities, so we’vedesigned it to be as upgradeable as possible. There are several waysthat you can expand your machine’s hardware and software.
Currently, there are several hardware upgrades available for yourCasablanca. Some can be installed by your dealer, while othersneed to be installed by DraCo. Please contact your Casablancadealer for more details.
The FireWire DV Option is a digital module for activating the I-link connector at the back of Casablanca. This option makespossible a fully digital editing process. The result is a pristinedigital copy of your video project, one that suffers no generationalloss from the original source material. DraCo worked in conjunc-tion with Sony to incorporate an IEEE 1394 board into theCasablanca. The result is a DV option that allows you to mixdifferent types of source video within single projects and providesmachine control over all of your DV-compatible camcorders andVCRs. If you have FireWire installed, you must select from eitherDV signal only (for inputting only digital video) or a combinationof signals (if you’re bringing in digital and analog video) withinyour project settings before beginning a project. Machine contolcapability is enabled through additional buttons on your controlpanels for recording video to your hard drive and recording yourproject out to tape.
Currently, additional four-, six-, nine, and 18-gigabyte hard drivesare available for purchase from DraCo Systems or your dealer.New drives, such as the 36-gigabyte model, will become availablethroughout 1999.
The processor chip upgrade modifies your 040 model Casablancainto a render-accelerated 060 version with faster rendering times.
Hardware
Hard drives
DV option(FireWire)
Processorupgrade
A.2 Appendix A Expansion
Most DOS keyboards should work with the Casablanca but therehave been some instances of DOS keyboard incompatibility. Onceyou register your Casablanca with DraCo Systems, you’ll receive afree keyboard that’s guaranteed to be compatible.
The Breakout Box connects to the back of your Casablanca (viathe Euroscart port) and provides component/XLR, Beta and othercabling ports not normally featured on the standard unit.
We are proud to offer regular system software upgrades andadditional transitions, image processing effects, title effects, emptyscenes and fonts that will improve your video projects.
Some transitions and image-processing effects have been includedon your system software disk. We also sell additional sets of fontsand effects disks. You can receive a set of free effects and transi-tions just by sending us your registration card. Sending us thiscard is very important because it allows us to provide you withtechnical support and the latest information and software for yourCasablanca.
Installing new software on the Casablanca is both quick and easy.Turn off your Casablanca, then place the software disk in the diskdrive and turn the Casablanca on. Once the Casablanca logodisappears, on-screen instructions will guide you through the restof the installation process. Installing new system software mayerase the contents of your hard drive. It’s vital that you save anyprojects and scenes that you want to keep over to tape.
You can purchase additional system software upgrades for theCasablanca beginning with version 3.0. The system software diskcan only be used on your personal Casablanca. Once installed, thedisk will not be accepted by any other Casablanca unit since theserial number of the original unit is saved onto the disk.
In addition to routine system software upgrades, DraCo offersCasablanca owners additional effects and fonts software packages.There are also several additional software upgrades manufacturedby third parties.
Software
Installation
System software
Breakout Box
Keyboard
Additionalsoftware

A.3Appendix A Expansion
The following effects-related software add-ons are currentlyavailable from DraCo Systems or your Casablanca dealer:
Effects Disk 1 contains the following effects and transitions:
Bouncer - The second scene “bounces” in over the first scene.Film - Gives your video the appearance of an antique film, with adjustable quality, flicker and movement levels .Fly - The second scene flies across the first scene diagonally.Pcube - The first and second scenes rotate as if they were on opposite sides of a cube.Polar - The second scene appears as a “splatter” in the middle of the first scene and spreads to completely replace it.Raster - The second scene appears as a series of dots that multiply and eventually cover the first scene.Swap 1 - The second scene replaces the first through a series of
staggered lines.Swap 2 - The second scene replaces the first through a series of
uniform lines.Swirl 1 - The first scene is replaced by a swirling second scene that
emerges from several points simultaneously.Swirl 2 - The first scene is replaced by a series of swirling lines
that eventually become the second scene.
Effects Disk 2 contains the following effects and transitions:Flupp - The first scene is stretched until it “snaps” across and
pulls in the second scene..Karo - The first scene is overtaken by a diamond-shaped second scene.Liquid 1 - The second scene flows across the first scene.Liquid 2 - The second scene flows across the first from one side to
the other.Melt - The second scene appears to liquefy and melt down over the first scene from the top of the screen.Radar - The second scene wipes over the first in four sections in either a clockwise or counter clockwise path.Sphere 1 - A circle wipe grows from the center of the screen and
brings up the second scene in a bar pattern while the first scene is wiped by a shrinking circle.
Sphere 2 - A circle wipe grows from the center of the screen and brings up the second scene in a checkerboard pattern while the first scene is wiped by a shrinking circle.
Effects Disk 1
Effects Disk 2

A.4 Appendix A Expansion
Stretch - The first scene compresses while the second scene stretches in behind it.
Turnover - The first scene slides around the second scene.
Effects Disk 3 contains the following effects and transitions:Strange - Builds a scene line-by-line from either the top, bottom,
left or right.Crosszoom - The first scene zooms in to the center while the other
zooms out.Dreamland - The second scene replaces the first through “clouds”
that form inside out.Fly On - The second scene flies in from a corner, centers and grows
to cover the first scene.Megazoom - The first scene zooms out and multiplies to form a
“wallpaper” pattern, then zooms into become the next scene.
Net - The first scene is replaced by a the second scene through a checkerboard pattern.Puzzle - The first scene is replaced by a puzzle-like second scene.Waves - The first scene becomes wavy and dissolves into the second
scene when the waves subside.XTC - The first scene dissolves into a negative, then dissolves into a negative of the second scene and finally dissolves into the second scene itself.Zebra - The second scene replaces the first through a “zebra stripe” pattern.
Effects Disk 4 contains the following effects and transitions:Earthquake - Makes your scene appear as if it’s shaking. You can
determine the parameters of the ‘quake.Power Off - Simulates an old television turning off. The scene
shrinks down to a small dot and then disappears from the screen.
Across - The first scene shrinks toward one corner while the second expands from the other.Fall Down - The scene falls and “dangles” from a corner before
dropping off the screen completely.Paint - The first scene is covered by a paint made up of the second scene.Pixels - The first scene is replaced by a series of pixels that reveal the second scene.Rain - The first scene is washed away by raindrops that contain portions of the next scene.
Effects Disk 3
Effects Disk 4

A.5Appendix A Expansion
Smoke - The second scene emerges from a “smoke” that covers the first scene.
Strip In - The second scene appears in a series of small strips that eventually replace the first scene.
Whirl - The first scene splits into four sections that rotate out and reveal the second scene. The effect can also be reversed so that sections of the second scene come together and cover the first.
Effects Disk 5 contains the following effects and transitions:Split Screen - Two scenes can be placed next or on top of each
other. You can determine the duration of the effect and the sizes of both scenes.
Diag - One scene is pushed diagonally over another.Blinds - This transition creates the illusion of blinds hanging in front of the scene. The second scene is revealed when the
blinds “close.”Fog - The scene is covered by a foggy edge. You determine the fog’s shape and density.Bump - Light and shadow effects make it appear as if one scene bumps the other off of the screen.Streaks - One scene appears over another through a number of
streaks.Shockzoom - Two scenes begin to overlap in the middle of the
screen. One scene either gains size and disappears into the background.
Sunbeams - Rays coming from the center of the screen fade into the next scene.
Ripples - The transition takes the form of half-circular segments, spreading across the picture like waves of water.
The Chroma Key effect appears in your transitions list as “BlueBox” and allows you to superimpose video images over a coloredbackground. You can use this effect to create interesting titles anddesign your own special effects.
Adorage Magic I and II are effects software packages designed byproDAD. Each disk features striking 3-D transitions and effects,including explosions, waves and rotations.
Effects Disk 5
Chroma Key
Adorage MagicI and II

A.6 Appendix A Expansion
Video Spicerack is a third-party effects software package designedby Pixelan Software for the Casablanca. Spicerack features morethan 200 different effect options for your video projects and comescomplete with its own detailed users manual. The effects have beensorted according to type and are available on a total of three disks.
To prevent the list of effects from being unnecessarily long, we havechosen to bring effects with a particular theme together within oneoperator - a very logical and easy-to-manage system.. You won’t haveto worry about your video being overloaded with garish effects,however, because we’ve carefully selected classic effect options thatwill spice up your projects without distracting viewers.
The following character and text-related software add-ons arecurrently available from DraCo Systems or your Casablanca dealer:
The Fonts Disk series features a number of stylish fonts for yourtitles that are not among the seven standard fonts that arepreinstalled on your Casablanca.
Included on this disk are: (clockwise, beginning in the upper-rightcorner): Baskerville, Charles, Bochum, Bodoni, Balloon, Avignon,Bangkok, ArnoldBoecklin, ArchiText, Bodacious, Blocks, BeeBoppand Blippo.
Fonts Disk 1
Font andcharacter-generatingsoftware
VideoSpicerack

A.7Appendix A Expansion
Fonts Disk 3
Font Disk Three includes 14 different fonts, all of which areshown above. They are as follows (clockwise, beginning in theupper-right corner): Ironwood, Isabelle, Jupiter, NewBrunswick,Lombardoc, Braha, PostAntiqua, Lithos, Lyon, Phaedrus, Lintsec,Juniper, Parisian and Mistral.
Fonts Disk 2
Font Disk Two includes 14 different fonts, all of which are shownabove. They are as follows (clockwise, beginning in the upper-rightcorner): Fiorentini, Gonzo, Cunei, FatAmerican, Flintstone,Genoa, Eras, High-School, Fragola, Daniela, Cooper, Circola,Crillee and Cottonwoood.

A.8 Appendix A Expansion
Akaba Akaba is a paint program for the Casablanca that allows you to editboth still video images and complete scenes. You can actually drawon your video, make color changes, touch up faces...the possibilitiesare endless. Although the software revolutionizes editing on theCasablanca, the program’s user interface uses the same philosophyand tools found throughout the Casablanca product line, making itsimple and easy to use.
Fonts Disk 4
Font Disk Four includes 12 different fonts, all of which are shownabove. They are as follows (clockwise, beginning in the upper-rightcorner): Revue, Quantum, Rickshaw, Wistata, Saigon, Reklama,Tribeca, TaranisT1, Saxon, Stuart, SanDiego and Unical.
Monument Titler is a third-party character generator designed byproDAD. Monument enhances the Casablanca’s own powerfultitler by enabling users to create professional, anti-alias 3-D titles.This software add-on also provides high-speed rendering, freelypositionable titles and animated character-motion options, such asspins, zooms, 3-D rotations and distortion effects.
Other software products that can revolutionize how you edit videoinclude:
PC Link enables users to transfer image files and animations froma PC to the Casablanca andexport images from the Casablancainto a PC. The software/serial cable package is compatible withWindows ‘95 and Windows NT Systems.
PC Link
Monument
Other software

A.9Appendix A Expansion
The free registration disk contains the following effects andtransitions:Aquarium - This effect adds tiny bubbles to your scene.Cinemascope - a black border is added to the top and bottom of
scene, making it appear as if your footage is in a widescreen “letterbox” format.
ColorWipe 1 - A background color shifts over a scene from any direction. The color disappears in the direction it came from and reveals a second scene.
ColorWipe 2 - A background color shifts over a scene from any direction. The scene disappears in the same direction and reveals a new scene.
ColorWipe 3 - A background color shifts over a scene from any direction or from the middle of the picture. The screen disappears in the direction from which it came and reveals a new scene.
Split Screen - The screen is split vertically or horizontally. Each half is filled with one of the scenes. You can define the splitting line's width and color.
Shift 1 - One scene is “pulled” over another scene. You can also pullthe first to any side and reveal the second scene (you canadd a split line of any color or width).
Stars - Creates a scene that displays animated stars, simulating spaceflight.Wipe 1 - This effect is a classic wipe. Choose the direction and have
the first scene wiped away by the second. You can add a split line of any color or width.
Wipe 2 - The second scene is wiped over the first from one corner of the screen to another (direction can be defined). You can add a splitting line with any color and width.
Free registra-tion disk

Appendix B Troubleshooting
This collection of troubleshooting solutions will grow over time.We’d love to hear your ideas on improving and expanding thispart of the manual.
Problem I can’t get a video image on my monitor when I’mtrying to record.
Solution Check to see if: you have selected the right video inputin the video settings screen, the source player is connectedcorrectly and the plugs fit properly and that the source player isactually sending a signal
Problem I can’t install the program. The message “Alien disk”appears.
Solution That means that the disk you are using belongs toanother Casablanca unit. When Casablanca-related software isloaded into the Casablanca’s floppy disk drive, the machine writesits own serial number to the diskette, thus linking the twotogether. If that diskette is loaded into another Casablanca afterthat, it will not load. It will give you a red message in the lowerleft corner of the screen saying “Alien disk.” Sometimes adamaged disk will result in this message. If you have a damageddisk, call your Casablanca dealer for a replacement. If you happento get this message, you should contact your dealer immediately.
Problem The installation process begins again every time I startthe Casablanca.
Solution Your installation disk is probably still in the floppydrive. Remove the disk and the system will start directly from thehard drive.
Problem My incoming video signal is either too bright or tooweak. Adjusting the video settings doesn’t seem to help.
Solution Casablanca’s Automatic Gain Control (AGC) may haveproblems reading some video sources. Try deactivating the AGC
Installation
No video image
Incoming videoquality
“Alien disk”errors

B.2 Appendix B Troubleshooting
by going into the video settings menu and selecting an inputwithout AGC.
Problem The incoming video appears to “jump” when I’mrecording.
Solution Try changing your video-input jacks. Each input has adifferent function; the front input is better for video signals with afaulty synchronization (as is the case with some camcorders),while the back video input synchronizes to the video source andmakes the Casablanca suitable for studio-quality machines.
Problem The video picture is impossible to view. I can only get aclear picture by switching the video recorder off.
Solution You’ve probably constructed a video-signal loop. Makesure that the video recorder is not used as play source and recorderat the same time. The “loop” occurs when the video recorder iswaiting for a signal from the Casablanca, while the Casablanca iswaiting for a signal from the recorder. The result is a messypicture. You can avoid this by using a camcorder as your playsource and a VCR as the recorder, or you can simply disconnectwhichever cables (In/Out) you are not using at the time.
Problem The front LCD display doesn’t work. The machine itselfworks fine but the display is off.
Solution Switch the Casablanca off, pull the power cord from thewall socket and wait a few seconds. Put the cord back in, switchthe machine back on and the display should work again.
Problem The Casablanca’s record screen seems to “fall” down-wards to the bottom of my monitor whenever I press pause on myVCR.
Solution The Casablanca requires a full video picture in order tosynchronize the menu and some video sources send half-pictureswhile pausing. The only way to avoid this is to refrain frompausing your VCR; just press Stop.
Record screenproblems
“Jumping”video
Unable to viewincoming video
Front displaymalfunction

B.3Appendix B Troubleshooting
Problem I’m unable to define a transition.
Solution Transitions cannot overlap, so if the scene is already fullyinvolved in another transition (which can happen with very shortscenes), you can’t add another transition to it. You work aroundthis by using the “scene” function.
Problem In the titling menu, only one line appears in color, whilethe rest remains gray.
Solution That’s a function of the system’s display. Regardless of thegray on your titling screen, all rendered titles will appear in theproper color. Simply move the cursor to the other lines when youare titling and check the color for each line.
Problem The titles I create look fine on the monitor but they seemto “bleed” once I record to tape.
Solution Some of the Casablanca’s colors can only be readaccurately by professional recorders. If you’re using a “standard”VCR and you experience a “bleed,” try reducing the saturation andbrightness. You’ll get the same color but it ‘ll be easier to record.
Problem Some title and effects don’t seem to be rendering. Evenafter long periods, the blue bar doesn’t seem to move.
Solution Some 3-D titles and effects can take a while to render,especially thoses that allow you to increase their duration or size.
Problem Where can I connect my microphone?
Solution The Casablanca doesn’t have a microphone socket but itdoes have two AV inputs. You could plug your microphone intoyour camera, VCR or mixer and then connect i to the Casablanca.
Problem I get an “Audio/video partition full” error message when Iattempt to render an effect.
Solution You need to run a project clean up from the finishwindow. Running periodic clean ups will remove deleted scenesand audio remnants from your hard drive and prevent yourpartitions from becoming full.
Renderingtimes
Microphoneinput
“Partition full”errors
Titles appear ingray
Transitions
Color bleedingin titles

B.4 Appendix B Troubleshooting
Problem Running a project clean up doesn’t seem to clear upenough space on my hard drive.
Solution The clean up function only helps to gain space fromdeleted scenes. Scenes in your storyboard or scene bin that aremerely trimmed or split will not take up drive space, so make surethat you have deleted scenes from the Edit screen’s scene bin thatyou will no longer need and then run a clean up.
Problem The message “Video Buffer is Empty” has appeared.What does this mean?
Solution This means that the Casablanca hasn’t been able totransport data to the hard drive fast enough. This could be due toa defective video frame or scene that resulted from a badlysynchronized source-video signal. You should be able to delete thedefective scene and continue working. The corrupt data on thehard drive is simply skipped and the video can be played.
Video bufferempty errors
Problem Why does my video seem to play on its own in the Splitand Trim functions?
Solution If the trackball hasn’t been scrolled and no buttons havebeen pushed, the Casablanca will loop playback from the currentdesignated start point.
Problem I think that the Color Bars may be too “Hot.”
Solution There are two sets of color bars that can be generated bythe Casablanca. The 100/100 color bars are set up for PAL systems,and will appear overdriven on NTSC systems. The 75/100 colorbars are made for NTSC specifications.
Problem I think I hear “beeps” in my audio.
Solution On DV-equipped Casablancas, dropouts from the sourcetape appear as “beeps” after they’re digitized through the DV cable.If your source tape has several dropouts, you’ll have better successusing the “DV+Rear Audio” option in Video Settings screen. Thissetting requires separate audio cabling, which should eliminateyour problem.
Video playingon its own
Color bars toohot
Beeps in audio
Trouble freeingup hard drivespace

B.5Appendix B Troubleshooting
Transition onwrong videoscene
Hard drivemissing/defective error
Problem My transition seems to be applied to the wrong video.
Solution When video inserts are used in your storyboard, it’simportant to remember that there is still a scene “under” the insert.Therefore, if transitions are used on a video insert at the end of theoriginal scene that the insert appears to be “covering,” you will stillbe able to see a portion of that original scene during the transition.To avoid this problem, make a scene of the insert, replace it, andthen apply the transition.
Problem I get an error message that says: “Hard drive missing ordefective,” yet my hard drive is still inside the Casablanca.
Solution Occasionally, when the Casablanca is moved or getsjostled, the hard-drive sled becomes slightly disconnected from thedocking bay inside the machine. To remedy this problem, turn offthe Casablanca and push the drive sled a bit deeper into theCasablanca so that you hear a small “click” and the front of the sledis flush with the sides of the drive bay.
Problem My video input s keep defaulting to the front.
Solution When using a DV-equipped Casablanca, you must select“DV” as your input in the Video Settings screen. “DV” willremain your selected input until you re-enter the Video Settingsscreen. Each time you enter the Video Settings screen, the inputwill revert back to the “Front” setting, but not until then.
Problem I can’t hear the audio that I’ve added in the Audio Mixscreen.
Solution The audio must be rendered after any changes have beenmade.
Problem My audio sample seems to be muted, yet all of it’s dbmeters are set to 0 - not “Mute.”
Solution The audio sample in question is being affected by asample in another audio track. Select each of the other tracks andcheck the db meter for your sample’s track.
Inputs defaultto front
Can’t hearsound in AudioMix
Can’t hearaudio sample

B.6 Appendix B Troubleshooting
Starting a newproject
Storyboardrecords to tapein black andwhite
Problem I can’t find a “Save” button.
Solution To force a project save you can either enter the RecordScreen or the Audio Record screen and then click the righttrackball button to back out or enter. The Casablanca will thenautomatically save your project.
Problem It takes a while for the Casablanca to turn off once I’vepressed the “off ” button.
Solution That’s OK. It’s normal for the machine to do this. TheCasablanca automatically saves your project before shuttingdown.
Shut down
Problem When I record my finished project to tape, it comesout in black and white. Even the menu is monochromatic.
Solution Check to see if you are using an S-video/RCA adaptercable to send your images out of the Casablanca. If so, you needto switch to either an S-video cable or the Euroscart adapter foryour video out.
Problem I have finished my project and want to start a new one.How do I do that?
Solution Select the “new project” option from the projectsettings screen. This will delete all data from the drive (after asafety check) and allow you to start a completely new video.
Please check our website at www.draco.com for the latest FAQs.
Save

B.7Appendix B Troubleshooting
Error codes
Many of the numerically coded “error” messages that appear onscreen are not relevant to the user; rather, they are codes for thesoftware developers. These messages will appear in green and canbe removed from the screen by clicking “OK.” Messages thatappear in red, however, do refer to specific problems. Whenasking your dealer or DraCo technical support about a particularerror message, be sure to describe the context in which the errorappeared. The context is usually more significant than the stringof numbers and letters within the error code itself.
These three errors all mean that there is a defective scene in yourstoryboard. It may be something as simple as a frame that has“dropped” out of the scene or other minor problems that mayhave occurred when the scene was digitized. You may be able toremove the problematic area with the split function, or you canalways re-digitize the scene onto your hard drive. If the errorarises during a project clean up, just press “Continue.”
This error indicates that your Casablanca is not receiving data atthe required speed. This is usually a one-time error. If you playthe scene a second time, you should get a perfect playback.
This message occurs during cleanup if you’ve used a particularscene more than once within your project storyboard. Click“continue” to clear the error and finish your cleanup.
Scene video listdefective
Failed to readvideo dataquick enough
Error 25, error27 and error 30
Green and rederror codes
The disk you are using belongs to another Casablanca unit. WhenCasablanca-related software is loaded into the Casablanca’s floppydisk drive, the machine writes its own serial number to thediskette, thus linking the two together. If that diskette is then putinto another Casablanca, it will not load. It will give you a redmessage in the lower left corner of the screen saying “Alien disk”.Sometimes a damaged disk will result in this message. If you havea damaged disk, call your Casablanca dealer for a replacement. Ifyou happen to get this message, you should contact your dealerimmediately.
Alien disk

Index
A
Adorage Magic I & II A.5
Akaba A.8
Alien disk error B.1, B.7
Anchored audio 1.3
Archive 3.34
Audio/video input
explained 3.4, 3.35
location of iii
short project tutorial 2.3
Audio mix
changes 1.5
explained 3.42-3.46
short project tutorial 2.14-2.16
tutorial 2.18-2.21
Audio quality 3.2
Audio record
audio mix tutorial 2.18
explained 3.34-3.43
short project tutorial 2.13, 2.14
Audio split & trim
audio mix tuorial 2.18
changes 1.4
explained 3.36
short project tuorial 2.14
Automatic gain control (AGC)
defined 2.3
explained within settings 3.5,
troubleshooting B.1
Automatic Split 3.9
B
Background audio track
adjusting volume of 3.46
audio mix tutorial 2.19
location of 3.42
short project tuorial 2.14, 2.15
Base width 3.40
Bars 3.22
Batch render
explained 3.17
short project tutorial 2.16
Breakout box A.2
Brightness 3.4
Buttons 1.7
Buttons with selectable functions 1.8
C
Cancel button 3.13
Chroma key A.5
Circlewipe 3.22
Clean up
explained 3.3
troubleshooting B.3
Clock
setting 3.1
short project tutorial 2.2
troubleshooting B.2
Codes for additional software 3.1
Collapse 3.22
Color bars

I.2 Index
explained 3.10
troubleshooting B.4
Color box
defined 1.9
titling tutorial 2.22
use of within “special” screen 3.11
Color depth 3.28
Color to gray 3.28
Colorfade 3.22
Commentary audio track
Composite (RCA) cables
connected to Casablanca ii-iv
illustration of i
short project tutorial 2.13
Cone 3.23
Connecting the cables iii, iv
Contrast 3.4
Control color 3.28
Control image 3.27
Copy Button
audio effect 3.40
explained 3.10,
within audio record screen 3.39
Crossfade
defined 3.22
short project tutorial 2.10, 2.11
Crosswave 3.29
CVBS filter 3.28
DDecibel/volume control
audio mix tutorial 2.20
explained 3.35
short video project tutorial 2.15
Del and DeL Keys 3.34
Delete button
audio record screen 3.41
explained 3.11
image processing screen 3.24
title screen 3.30
transitions screen 3.19
Demonstration video tape i
Disc 3.23
Drop button
audio split 3.37
explained 3.9
short video project tutorial 2.6
DV editing (also see FireWire)
audio 2.13
advantages of 1.2
connections for iii, iv
recording incoming signal 2.4, 3.5,
3.6
recording out to DV 2.16 3.17,
3.18
troubleshooting B.5
Dynamic range 3.27
adjusting volume of 3.46
audio mix tutorial 2.19
location of 3.42
short video project tuorial 2.14

I.3Index
E
Edit screen
short video project tutorial 2.5-2.9
explained 3.7-3.16
Effects
additional A.3-A.5
free registration A.9
preinstalled 3.27-3.29
Empty sample 3.39
Empty scene 3.10, 3.11
Enter/change text
titling tutorial 2.23
explained 3.32
Error codes
alien disk B.1, B.7
failed to read video data quick
enough B.7
error 25, 27 and 30 B.7
green and red error messages B.7
hard drive defective/missing B.5
partition full B.3
video buffer empty B.4
EuroScart adapter ii, iii
Explosion 3.22
External controls 1.7
F
Face plate i
Fade in/out
audio effect 2.15, 2.20, 3.39
title effect 2.23
visual effect 3.27
Failed to read video data quick enoughB.7
Fast motion 3.12
Field/frame
explained 3.11, 3.12
introduced 1.5, 1.6
Finish screen
explained 3.17
short video project tutorial 2.16
FireWire (also see DV editing)
connections iii, iv
explained 1.2, A.1
Flashbulb effect 3.27
Fonts
additional disks A.6-A.8
titling tutorial 2.21, 2.22
preinstalled 3.32, 3.33
Free Registration Effects Disk A.9
Freeze Effect 3.27
Full size preview (“full screen preview”)
explained 3.20
introduced 1.5
multilayering tutorial 2.25
short project tutorial 2.11
Funnel effect 3.23
G
General information 1.1-1.3
Getting started i-v

I.4 Index
HHalfsphere 3.23
Hard drive
capacity of 3.3
location of i
sizes available A.1
troubleshooting B.4, B.5
Hard drive keys i
Hardware upgrades A.1
Hide play panel 1.6, 3.1
I
Icons
changes 1.5
explained 1.8
Image processing screen
explained 3.24-3.29
multilayering tutorial 2.24
short project tutorial 2.10-2.12
In and out points
audio editing 3.45
defined 1.8
explained 3.9
range 3.20
short project tutorial 2.7
Insert editing
changes 1.6
explained 3.15
short project tutorial 2.17, 2.18
Interface controls 1.7-1.9
Interpolation
explained 3.12
introduced 1.6
K
Karaoke 3.40
Keyboard
compatability A.2
explained 1.8, 3.32
renaming scenes 3.7
shortcuts 2.8
titling tutorial 2.21, 2.22
LLanguage 3.1
LCD display
explained 3.1
setting 2.2
troubleshooting 2.2, B.2
Lineart 3.28
Loops
audio ii
video 3.1
M
Main screen
explained 2.1, 2.2
Mirror 3.27
Monitor ii, iv
Mono 3.40
Monument titler A.8
Multilayering 2.24, 2.25

I.5Index
Mute 3.40
N
Name display 3.41
Negative 3.28
New features of Version 3 1.3-1.7
New project 3.4, B.6
NOP 3.29
O
Original audio track
audio mix tutorial 2.20
changing the volume 3.46
explained 3.42
short video project tutorial 2.14
P
Page turn 3.22
Partition full
clean up 3.3
error B.3
PC Link A.8
Philosophy behind the Casablanca 1.6,1.7
Picture Quality 3.2
Picture Size 3.3
Picture-in-picture 3.22
Play screen 2.5, 3.8
Previewing cuts 1.5
Processor chips A.1
Project settings
explained 3.2-3.4
short video project tutorial 2.3
Q
Quick play buttons 1.9, 3.37, 3.39
R
Range
audio mix 3.43, 3.44
audio mix tutorial 2.19
image processing 3.25
insert editing 3.15
insert editing tutorial 2.17
recording to tape 3.17
titling 3.30
titling tutorial 2.23, 2.24
Real time preview
explained 3.20
short video project tutorial 2.10,
titling 3.31
Record to DV
explained 3.17
short video project tutorial 2.16
troubleshooting B.6
Record to VCR
changes 1.6
explained 3.17
short video project tutorial 2.16
troubleshooting B.6
Recording audio
audio mix tutorial 2.18, 2.20
explained 3.2

I.6 Index
short video project tutorial 2.13,2.14
Recording video
explained 3.5, 3.6
short video project tutorial 2.4
troubleshooting B.2
Rectangle 3.27
Remove
Renaming scenes
explained 3.7
short video project tutorial 2.7
Render
audio mix tutorial 2.19
batch 3.17
explained 3.17, 3.21, 3.31
multilayering tutorial 2.24, 2.25
short video project tutorial 2.12,
troubleshooting B.3
SSample-->scene
explained 3.41
introduced 1.4
Saving your project B.6
Scene bin
explained 3.7
short video project tutorial 2.5, 2.9
Scene function
explained 3.21, 3.26
multilayering tutorial 2.24
Scene video list defective B.7
Scene-->audio sample 3.11, 3.13
SCSI port iii
Search and replace 3.14, 3.15
Selection fields 1.9
Serial port iii
Sharpen 3.27
Shutting down the machine B.6
Single frame advance button 1.9
Sliders 1.8
Slow motion 3.11, 3.12
Soften 3.27
Solarize 3.28
Special motion effects
changes 1.4
explained 3.11, 3.12
Sphere 3.23
Split (video)
explained 3.8, 3.9
short video project tutorial 2.5, 2.6
Stabilize 3.27
Still 3.13
Storyboard
change in recording to tape 1.6
explained 3.7, 3.13-3.17
insert editing tutorial 2.17
short video project tutorial 2.5, 2.8, 2.9
Strobe effect 3.27
SVHS 1.2,
SVHS cables i-iii
Swap 3.40
System capacity 3.3

I.7Index
System settings
explained 3.1
short video project tutorial 2.2
System software
features of version 3 1.3-1.6
installation v
packed with the Casablanca i
troubleshooting B.1
T
Table of contents I
Telescope 3.27
Tips
color saturation 2.3
keyboard shortcuts 2.8
LCD display 2.2
machine control 2.4
overmodulated audio 2.15
recording video 2.4
rendering titles 2.21
splits 2.6
titling styles 2.22
used scenes 2.9
Titling
explained 3.29-3.34
short video project tutorial 2.21-2.23
troubleshooting B.3
Trackball
connecting ii, iii
explained 1.7
packed with the Casablanca i iii
Transitions
additional disks A.3-A.5
explained 3.18-3.21
preinstalled 3.21-3.23
short video project tutorial 2.10, 2.11 troubleshooting B.3, B.5
Triangle 3.23
Trimming scenes
changes 1.4
explained 3.9
short video project tutorial 2.7, 2.8
Troubleshooting B.1-B.7
Twirl 3.23
U
Unpacking the Casablanca box i, ii
V
Video buffer empty B.4
Video control buttons 1.9
Video project tutorial 2.1-2.15
Video settings
explained 3.4, 3.5
short video project tutorial 2.3
Video-control button 1.9
W
Wave effect 3.27
Waveform
audio mix tutorial 2.18, 2.19
explained 3.8, 3.9, 3.36, 3.38
introduced 1.3
short video project tutorial 2.6