by lorenzo cantini (kent’s strapper) and ivan bortolin ... · slic3r user guide by lorenzo...
TRANSCRIPT

Slic3r User Guide
By Lorenzo Cantini (Kent’s Strapper) and Ivan BortolinTranslation by Linda Anticoli
10/08/2012

2

Contents
Overview i
1 Installation and first run 11.1 Installation . . . . . . . . . . . . . . . . . . . . . . . . . . . . . . . . . . . . . . . . 11.2 First run and wizard . . . . . . . . . . . . . . . . . . . . . . . . . . . . . . . . . . . 1
2 Main window 52.1 File, Window and Help menus . . . . . . . . . . . . . . . . . . . . . . . . . . . . . . 52.2 Tabs . . . . . . . . . . . . . . . . . . . . . . . . . . . . . . . . . . . . . . . . . . . . 72.3 Load and export buttons. . . . . . . . . . . . . . . . . . . . . . . . . . . . . . . . . 72.4 File editing buttons. . . . . . . . . . . . . . . . . . . . . . . . . . . . . . . . . . . . 82.5 Print settings buttons. . . . . . . . . . . . . . . . . . . . . . . . . . . . . . . . . . . 8
3 Print Settings 93.1 Save and load settings. . . . . . . . . . . . . . . . . . . . . . . . . . . . . . . . . . . 93.2 Layers and perimeter . . . . . . . . . . . . . . . . . . . . . . . . . . . . . . . . . . . 103.3 Infill . . . . . . . . . . . . . . . . . . . . . . . . . . . . . . . . . . . . . . . . . . . . 113.4 Speed . . . . . . . . . . . . . . . . . . . . . . . . . . . . . . . . . . . . . . . . . . . 133.5 Skirt and brim . . . . . . . . . . . . . . . . . . . . . . . . . . . . . . . . . . . . . . 143.6 Support material . . . . . . . . . . . . . . . . . . . . . . . . . . . . . . . . . . . . . 163.7 Note . . . . . . . . . . . . . . . . . . . . . . . . . . . . . . . . . . . . . . . . . . . . 173.8 Output options . . . . . . . . . . . . . . . . . . . . . . . . . . . . . . . . . . . . . . 183.9 Multiple Extruders . . . . . . . . . . . . . . . . . . . . . . . . . . . . . . . . . . . . 183.10 Advanced . . . . . . . . . . . . . . . . . . . . . . . . . . . . . . . . . . . . . . . . . 19
4 Filament Settings 214.1 Save and load settings . . . . . . . . . . . . . . . . . . . . . . . . . . . . . . . . . . 214.2 Filament . . . . . . . . . . . . . . . . . . . . . . . . . . . . . . . . . . . . . . . . . . 214.3 Cooling . . . . . . . . . . . . . . . . . . . . . . . . . . . . . . . . . . . . . . . . . . 22
5 Print Settings 235.1 General . . . . . . . . . . . . . . . . . . . . . . . . . . . . . . . . . . . . . . . . . . 235.2 Retraction . . . . . . . . . . . . . . . . . . . . . . . . . . . . . . . . . . . . . . . . . 245.3 Custom G-Code . . . . . . . . . . . . . . . . . . . . . . . . . . . . . . . . . . . . . . 255.4 Extruder . . . . . . . . . . . . . . . . . . . . . . . . . . . . . . . . . . . . . . . . . . 25
6 Useful links 27
3

4 CONTENTS
7 License 29

Overview
Premise
This document is user guide for Slic3r, a slicing software for 3D RepRap printers and similar.This software has been made by Alessandro Ranelucci, who we wish to thank; another thank-
you is for RichRap whose guide has been used has hint and starter.This document has been realized by Lorenzo Cantidi (Ken’s Strapper) and by Ivan Bor-
tolin; if you find a errors in this guide, please send the details to [email protected] [email protected].
Transalition is by Linda Anticoli [email protected] authors are not responsible for any error or harm to people, or other problems caused by
the use of this guide.
Introduction
With Slic3r Alessandro Ranellucci gave his contribution to the development of 3D printing. Thisproject, started as an experiment, has in only a few months experienced unexpected success,becoming an international reference for the 3D printing field.
A community with hundreds of active contributors and thousands of users was spontaneuslyborn around this project; a forum dedicated to this project has been activated in the official siteof the RepRap project and an official chatroom is born with about 80 users average in it. Slic3ris mentioned in the official RepRap blog and it is used by some of the main community members,from the univesity of Bath to the producers of printers and kits. Slic3r holds a record for thehighest resolution 3D print (10 micron).
What exactly does Slic3r do? Slic3r transforms a 3D model (i.e. a file representing the objectto print) in a set of instructions which guide the printer and allow it to put down layers throughits engines and its extruder. The software uses a lot of mathematical algorithms working onmodel’s geometry, and selecting the best path for extruding material that will compose singlelayers: perimeters, honeycomb infill to spare material with the same structural resistance, bridges,obliquous sides, temporary supports to sustain overhanging threshold. Morover, Slic3r decides theamount of material to extrude, controls temperature, fans and cooling time. 1
Slic3r is a core software for 3D printing and it’s made in Italy.We are going to analyze version 0.9.0 of the sofware. In this version there are many news like
a better management of multiple extruders, the possibility to import files in .obj and .amf and thepossibility to export files in .svg format.
1http://makerblog.it/post/18788200901/cose-slic3r
i

ii OVERVIEW

Chapter 1
Installation and first run
1.1 Installation
Slic3r is available for Linux, Windows and Mac OS-X.
Please follow the links below to find the correct guide for your environment:
• Linux1.
• Windows
• MacOs
1.2 First run and wizard
On the first run of the program, we can follow a small wizard to insert basic settings to obtaingood G-Code.
These settings are obviously present in the following sections of this guide.
Let’s look the steps of this configuration.
1For versions of Ubuntu before 12.04 you may have dependency issues; we recommend to follow this guide
1

2 CHAPTER 1. INSTALLATION AND FIRST RUN
This is the welcome screen of the Wizard. Following this one, we have the settings screen for thefirmware we have previously loaded on our electronic board.
From the pull-down menu, select the firmware installed into your controller and then click Next.
In this window we have to insert the size of the printer bed.

1.2. FIRST RUN AND WIZARD 3
Here, we have to insert the nozzle diameter mounted on the HotEnd.
Here, we have to insert the filament diameter.
In this window, we have to insert the extrusion temperature for the HotEnd. Usually it’s 230◦ forABS and 190◦ for PLA.

4 CHAPTER 1. INSTALLATION AND FIRST RUN
In this window, we have to insert the HeatedBed temperature. Obviously, if the bed is not heated,you should set this value to 0◦ C. For PLA it’s not necessary to heat the printing bed, althoughit’s recommended to heat it to 60◦ C. For ABS, in the case we are not using Award2 it’s necessaryto heat it at least to 110◦ C.
This is the last window.In the case you need to reset the Wizard, you can click on Help and then on Configuration
Assistant.
2http://reprap.org/wiki/AWARD_BED
Chapter 2
Main window
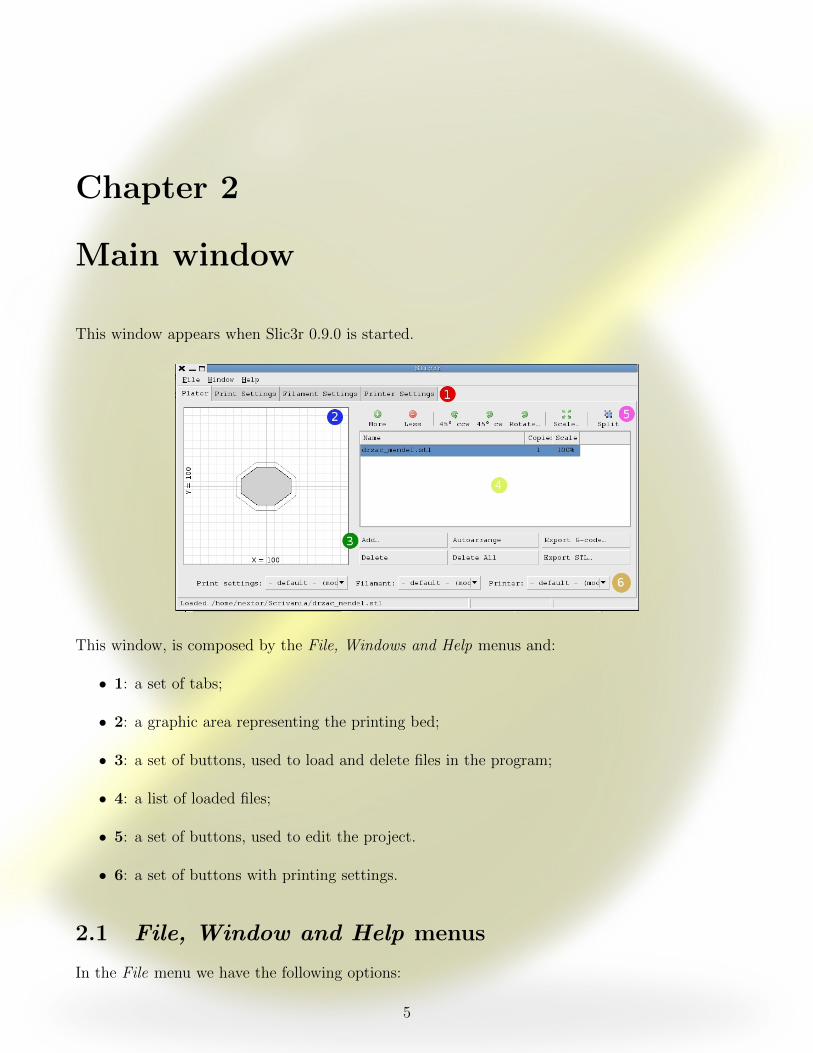
This window appears when Slic3r 0.9.0 is started.
This window, is composed by the File, Windows and Help menus and:
• 1: a set of tabs;
• 2: a graphic area representing the printing bed;
• 3: a set of buttons, used to load and delete files in the program;
• 4: a list of loaded files;
• 5: a set of buttons, used to edit the project.
• 6: a set of buttons with printing settings.
2.1 File, Window and Help menus
In the File menu we have the following options:
5

6 CHAPTER 2. MAIN WINDOW
• Load Config: Loads previously saved configurations of the program, which are stored in a.ini file. In this version and onwards different configurations can be separated, as you cansee in the following chapters.
• Export Config: Saves configuration in a .ini file.
• Quick Slice: Starts a G-Code processing with default settings.
• Quick Slice and Save As: Starts a G-Code processing with default settings and renamesthe file.
• Repeat Last Quick Slice: Repeats the last processing.
• Slice to SVG: Exports the project in a .svg file.
• Quit: Closes Slic3r.
The Window menu allows the selection of working areas, which we are going to analyze in thenext chapters.
In the Help menu we can find:

2.2. TABS 7
• Configuration Assistant: starts the wizard with basic configuration settings.
• Slic3r WebSide: Opens the Slic3r’s web page in your web browser.
• About Slic3r: general information on Slic3r.
2.2 Tabs
The following tabs (1) are available:
• Plater: Main tab.
• Print Settings: Printing settings as perimeter management, layer distance, support mate-rial, engine speed, and so on;
• Filament Settings: Filament parameters, extrusion and heated bed temperature regula-tion, cooling fan settings;
• Printer Settings: Printing area settings, nozzle diameter, G-Code personalization.
2.3 Load and export buttons.
• Add: Loads one or more files in .stl, .obj or .amf format.
• Delete: Deletes selected files from the project.
• Autoarrange: Automatic correction of the file.
• Delete All: Removes all files from the program.
• Export G-Code: Exports the 3D file in G-Code.
• Export STL: Exports the project in a .stl file. Useful when you’ve edited the project.

8 CHAPTER 2. MAIN WINDOW
2.4 File editing buttons.
The button group (5) over the table are automatically activated when you load a file with theAdd button:
• More: Adds another copy of the same file into the project. The copy is visible in the printingarea.
• Less: Deletes a copy of the file from the project.
• 45◦ ccw (counter-clockwise): Rotates the object 45◦ counter clockwise.
• 45◦ cw (clockwise): Rotates the object 45◦ clockwise.
• Rotate: Rotates the object by an user-defined value.
• Scale: Scales the object by an user-defined value.
• Split: Splits the object in different parts. The file must be composed by more than one part.
2.5 Print settings buttons.
With the new pull-down menus (6) it’s possible to load default or personalized settings:
• Printing Settings
• Filament Settings
• Printer Settings

Chapter 3
Print Settings
3.1 Save and load settings.
As we said before, we’re now able to load previously saved configurations. This is very usefulbecause allows us to set up the software more quickly and avoids distraction errors.
These settings can now be saved or loaded faster, while the operation was significantly longerin the previous version.
This simplicity has been obtained by adding two buttons and a pull-down menu.
The buttons highlighted in the blue rectangle are respectively used to save settings (as defaultsettings or customized settings) or to delete settings. The pull-down menu highlighted in the redrectangle allows us to select the settings we want to edit or delete.
9

10 CHAPTER 3. PRINT SETTINGS
3.2 Layers and perimeter
In this section the have the following settings:
• Layer height
– Layer height. The offset over the Z axis between two layers. It’s an important setting,as it must be compatible with the nozzle diameter. You can use a 0.3 mm value fora 0.5 mm nozzle. We recommend not to use values above 0.4 mm; the best quality isobtained with lower values. You can use values down to 0.1 mm.
– First layer height. You can set it in mm or in %. We recommend tusing the same LayerHeight value defined above or adding at most 25% of the Layer Height value.
• Vertical shells
– Perimeters (minimum): Defines the lowest numbers of solid contours for the objectperimeter. For very thin objects, the program may generate only one or two contours.You may want to use less contour and more infill density.
– Randomize starting point: self-explanatory.
– Generate extra perimeters when needed: augments the quality of the 3D print generatingmore perimeters, but decreases speed.
• Horizontal shells
– Solid layers: the quantity of solid layers that are made on the top flat surfaces. A goodvalue for this setting is 3; we recommend not to use values above 6.

3.3. INFILL 11
3.3 Infill
• Infill
– Fill density: Set the infill amount which will be used for the 3D print to fill the internalempty space. For example, a value of 0.4 means a 40% filling. We recommend to use avalue between 0.25 and 0.5.
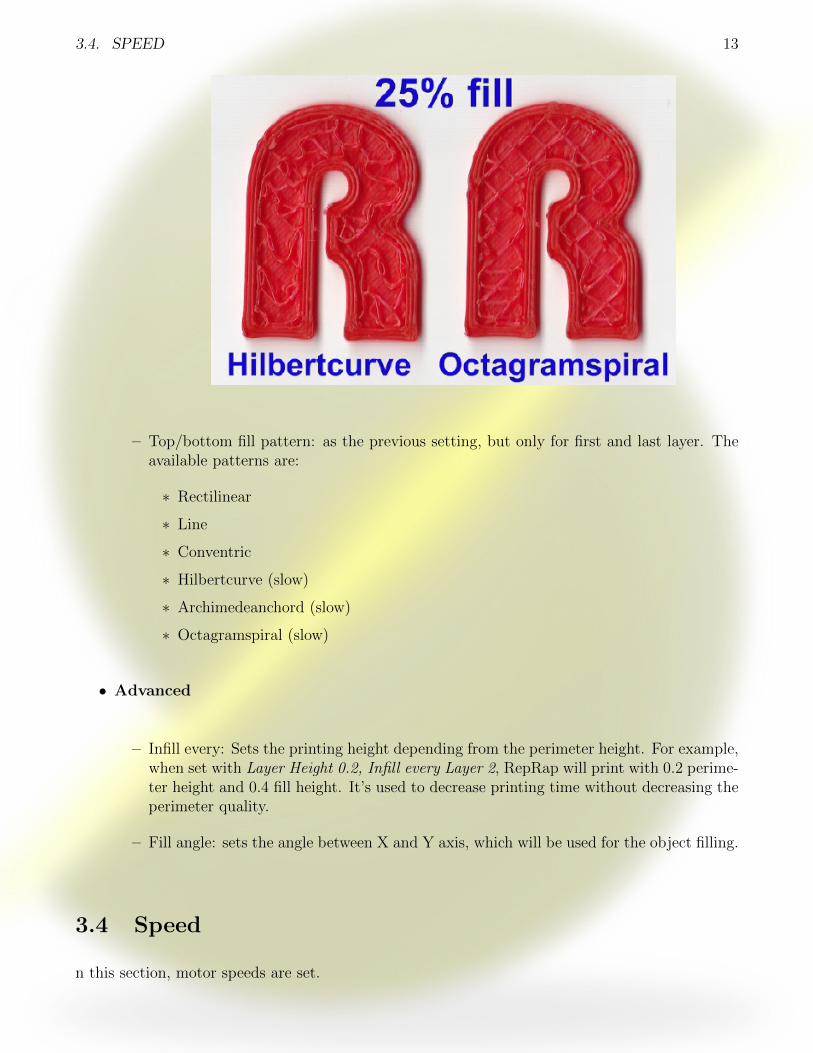
– Fill pattern. These fill patterns are available:
∗ Rectilinear
∗ Line
∗ Conventric
∗ Honeycomb
∗ Hilbertcurve (slow)
∗ Archimedeanchord (slow)
∗ Octagramspiral (slow)
You can see some examples below.

12 CHAPTER 3. PRINT SETTINGS
3.4. SPEED 13
– Top/bottom fill pattern: as the previous setting, but only for first and last layer. Theavailable patterns are:
∗ Rectilinear
∗ Line
∗ Conventric
∗ Hilbertcurve (slow)
∗ Archimedeanchord (slow)
∗ Octagramspiral (slow)
• Advanced
– Infill every: Sets the printing height depending from the perimeter height. For example,when set with Layer Height 0.2, Infill every Layer 2, RepRap will print with 0.2 perime-ter height and 0.4 fill height. It’s used to decrease printing time without decreasing theperimeter quality.
– Fill angle: sets the angle between X and Y axis, which will be used for the object filling.
3.4 Speed
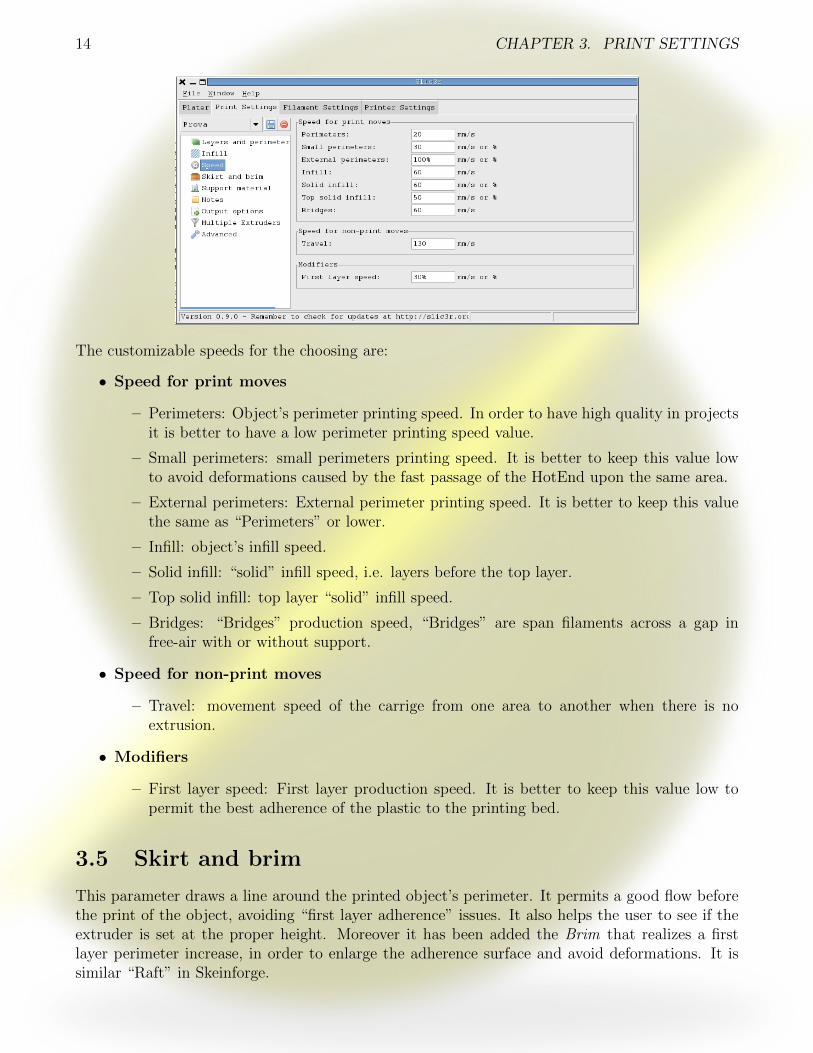
n this section, motor speeds are set.
14 CHAPTER 3. PRINT SETTINGS
The customizable speeds for the choosing are:
• Speed for print moves
– Perimeters: Object’s perimeter printing speed. In order to have high quality in projectsit is better to have a low perimeter printing speed value.
– Small perimeters: small perimeters printing speed. It is better to keep this value lowto avoid deformations caused by the fast passage of the HotEnd upon the same area.
– External perimeters: External perimeter printing speed. It is better to keep this valuethe same as “Perimeters” or lower.
– Infill: object’s infill speed.
– Solid infill: “solid” infill speed, i.e. layers before the top layer.
– Top solid infill: top layer “solid” infill speed.
– Bridges: “Bridges” production speed, “Bridges” are span filaments across a gap infree-air with or without support.
• Speed for non-print moves
– Travel: movement speed of the carrige from one area to another when there is noextrusion.
• Modifiers
– First layer speed: First layer production speed. It is better to keep this value low topermit the best adherence of the plastic to the printing bed.
3.5 Skirt and brim
This parameter draws a line around the printed object’s perimeter. It permits a good flow beforethe print of the object, avoiding “first layer adherence” issues. It also helps the user to see if theextruder is set at the proper height. Moreover it has been added the Brim that realizes a firstlayer perimeter increase, in order to enlarge the adherence surface and avoid deformations. It issimilar “Raft” in Skeinforge.

3.5. SKIRT AND BRIM 15
The parameters are:
• Skirt
– Loops: number of lines we need to realize before our first real print of the object. Forsmall objects it is appropriate to have at least 2 lines.
– Distance from object : distance between the line we want to draw and the object.
– Skirt height: Printing height of the Skirt.
• Brim
– Brim width: Brim dimension setting. It is better to set it up to 3 when we use ABS toprint, or to 6 when we have objects with huge perimeters.

16 CHAPTER 3. PRINT SETTINGS
3.6 Support material
In this section it is possible to enable supports configuration and generation. When you enable ityou will create a layer that will support back draft areas.
• Generate support material: checking it you will enable supports generation.
• Overhang threshold: identifies the back draft angle sustaining the support.
• Pattern: defines support geometry that can be:

3.7. NOTE 17
– rectilinear.
– honeycomb.
• Pattern spacing: identifies the area (in mm) between support layer and the other layer froman horizontal point of view.
• Pattern angle: identifies the support layer production angle.
3.7 Note
Here you can add comments about your settings.

18 CHAPTER 3. PRINT SETTINGS
3.8 Output options
Here you can decide how to print multiple objects and you can add scripts for G-Code processing.
• Sequential printing
– Complete individual object: checking it, when the printer is printing multiple objectsor copies, it completes one single object before carrying on the others, checking possiblecollisions.This option is disabled by default.
– Extruder clearance radius: defines the radius (in mm) within which the extruder won’tcollide with other objects.
– Extruder clearance height: defines (in mm) the height in order to avoid collisions be-tween the extruder and other already printed objects.
• Output file
– Verbose G-Code: near a G-Code line will appear an explanation about the performedcommand.
– Output filename format: here it is possible to rename and change the extension of thefile processed by Slic3r.
Post-processing scripts: generated G-Code will be processed by the “script” inserted inthis box. 1
3.9 Multiple Extruders
Here it is possible to configure multiple extruders.
1For further informationi http://forums.reprap.org/read.php?263,121863

3.10. ADVANCED 19
• Perimeter extruder: selects the extruder for perimeters.
• Infill extruder: selects the extruder for infill.
• Support material extruder: selects the extruder for support.
3.10 Advanced
In this section it is possible to manually set up some parameters, to fine tune your print byselectively increasing or decreasing extrusion widths, adjusting the extrusion rate for bridging, andincrease the slicing speed by use of processing threads (CPU & Memory dependant).
• Extrusion width.
– Default extrusion width: extrusion flow value in mm or %.
– First layer: first layer extrusion flow value in mm or %.
– Perimeters: perimeter extrusion flow value in mm or %.
– Infill: infill extrusion flow value in mm or %.
20 CHAPTER 3. PRINT SETTINGS
• Flow
– Bridge flow ratio: Bridges’ extrusion flow value.
• Other
– Threads: sets up the parallelization value of G-Code generation. By increasing thisvalue the processing time decreases with disadvantage for memory usage. If you do nothave a particularly powerful computer it is better to set up the default value 2.
2wikipedia

Chapter 4
Filament Settings
In this section we can find all the settings related to filament dimension, nozzle diameter andcooling management.
4.1 Save and load settings
As Printing Setting these settings can be customized and saved.
4.2 Filament
Here we have filament diameter and temperature management.
• Filament
– Diameter: sets filament diameter.
– Extrusion multiplier: sets extrusor flow multiplication value.
• Temperature
– Temperature: sets extruder temperature.
– First layer temperature: sets extruder temperature for the first layer.
21

22 CHAPTER 4. FILAMENT SETTINGS
– Bed Temperature: sets HeatedBed temperature.
– First layer bed temperature: sets HeatedBed temperature for the first layer
4.3 Cooling
In this section we can find the cooling system management during the print.
• Enable: by checking this box you will enable the cooling system and its management system.
• Fan setting:
– Min fan speed: sets in % the minimum fan speed.
– Max fan speed: sets in % the maximum fan speed.
– Bridge fan speed: sets in % the minimum fan speed during bridge printing.
– Disable fan for the first: sets the amount of layers before the fan starts.
– Keep fan always on: by checking this box the fan will always be enabled.
• Cooling thresholds:
– Enable fan if layer print time is below: enables fan if printing time is less than thepreviously setted one.
– Slow down if layer print time is below: disables fan if printing time is less than thepreviously setted one.
– Min print speed: sets the minimum printing speed that keeps the fan off.

Chapter 5
Print Settings
In this section we find printing area management, multiple extruders management and G-Codepersonalization.
5.1 General
Here you can manage the size of the printing area, the number of extruders and the firmware.
• Size and coordinates
– Bed size: sets the dimension of the printing area in mm. This settings will affect thegraphic area in the Plater tab view too.
– Printer center: sets the center of the printing area in mm. The object will be positionedaccording to this parameter.
• Firmware
– G-code flavor: with this combo box you can select the firmware to use between:
∗ Marlin-Sprinter.
∗ Teacup.
∗ MakerBot.
23

24 CHAPTER 5. PRINT SETTINGS
∗ Mach3/EMC.
∗ No extrusion
– Use relative E distances: if checked, modifies the extruder movement according to theprevious position instead of absolute position.
• Capabilities
– Extruders: sets the number of extruders. The values in Printer Settings will be auto-matically updated.
5.2 Retraction
The retraction in mm done by the extruder between two printing points. You may have to try afew settings before you find the best setting that guarantees no plastic filament or drop dirt.
• Lenght: sets the amount of filament that will be retracted during movements. Depends fromhot end and pushing mechanism.It’s recommended to use the default value.
• Lift Z: sets the z axis offset used on fast movement in order to not damage already printedmaterial with the hot end.

5.3. CUSTOM G-CODE 25
• Speed: sets the speed of filament retraction. With Marlin, you can use up 30 mm/s value;with Sprinter, 16 mm/s is recommended.
• Extra length on restart: indicates the excess extruded mm while resuming a printing after aretraction affected offset. It is better to keep this value to 0.
• Minimum travel after retraction: it is an important value, it is useful to avoid retraction ifthe point you’re going to print next is near.
5.3 Custom G-Code
In this section we can manually insert G-Code before or after file body.
• Start G-Code: in this box you can write lines of code that will be executed at the beginningof the file .
• End G-Code: in this box you can write lines of code that will be executed at the end of thefile .
• Layer change G-Code: set the execution of a Gcode at each change of layer.
5.4 Extruder
Here we have extruders’ settings.

26 CHAPTER 5. PRINT SETTINGS
• Size
– Nozzle diameter: sets nozzle diameter.
– Extruder offset: sets the position (in mm) of the extruder. It is useful when we usemultiple extruders.

Chapter 6
Useful links
• RepRap: http://www.reprap.org
• Slic3r: http://slic3r.org
• RichRap: http://richrap.blogspot.it
• Printrun: http://reprap.org/wiki/Printrun
• Kent’s Strapper: http://kentstrapper.blogspot.it
• Ivan Bortolin: http://www.ivanbortolin.it
27

28 CHAPTER 6. USEFUL LINKS

Chapter 7
License
This work is licensed under a Creative Commons Attribution-NonCommercial 2.5 License.
29