british army - gcminidocs.comgcminidocs.com/docs/ba_painting/ba-britishpg.pdfcopyright warlord games...
TRANSCRIPT
Copyright Warlord Games Ltd, 2015. Warlord Games, Bolt Action, and the Bolt Action logo are trademarks of Warlord Games Ltd. All rights reserved.� w.warlordgames.com
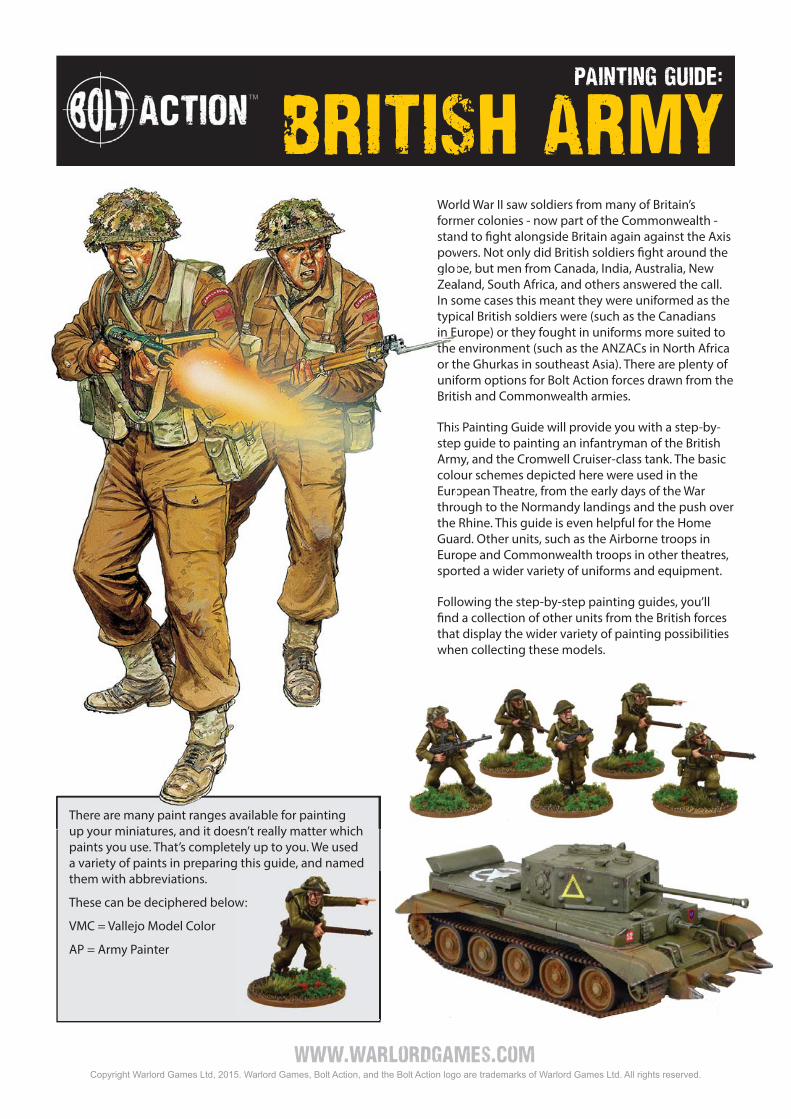
World War II saw soldiers from many of Britain’s former colonies - now part of the Commonwealth - stand to fi ght alongside Britain again against the Axis powers. Not only did British soldiers fi ght around the globe, but men from Canada, India, Australia, New Zealand, South Africa, and others answered the call. In some cases this meant they were uniformed as the typical British soldiers were (such as the Canadians in Europe) or they fought in uniforms more suited to the environment (such as the ANZACs in North Africa or the Ghurkas in southeast Asia). There are plenty of uniform options for Bolt Action forces drawn from the British and Commonwealth armies.
This Painting Guide will provide you with a step-by-step guide to painting an infantryman of the British Army, and the Cromwell Cruiser-class tank. The basic colour schemes depicted here were used in the European Theatre, from the early days of the War through to the Normandy landings and the push over the Rhine. This guide is even helpful for the Home Guard. Other units, such as the Airborne troops in Europe and Commonwealth troops in other theatres, sported a wider variety of uniforms and equipment.
Following the step-by-step painting guides, you’ll fi nd a collection of other units from the British forces that display the wider variety of painting possibilities when collecting these models.
There are many paint ranges available for painting up your miniatures, and it doesn’t really matter which paints you use. That’s completely up to you. We used a variety of paints in preparing this guide, and named them with abbreviations.
These can be deciphered below:
VMC = Vallejo Model Color
AP = Army Painter
w:
PAINTING GUIDE:
BRITISH ARMYWorformstanpowglobZeaIn sotypiin EEEEEEEEEEEEEhhththhhhhttttttttttt e
or tunifBrit
ThisstepArmcoloEurothrothe GuaEurospo
Follfi ndthatwhe
There are many paint ranges available for painting up your miniatures and it doesn’t really matter which
TM

Copyright Warlord Games Ltd, 2015. Warlord Games, Bolt Action, and the Bolt Action logo are trademarks of Warlord Games Ltd. All rights reserved.� w.warlordgames.com
Painting your British Infantry
The fi rst step is always to prepare your models for painting. After assembling a squad of fi ve models, we applied a layer of fi ne basing grit, and let the glue dry.
Many people undercoat their models with black or white sprays. We chose to spray each model with AP Uniform Grey spray as sometimes a black undercoat can mean you have to apply multiple coats of your other paints, and white can leave the colours a bit too bright for the muted uniform colours of WWII.
The next step includes painting the basecoats over the largest areas. We started with VMC English Uniform over the uniform tunic and trousers. This was followed by VMC Russian Uniform for the helmet. We then painted the face and hands with AP Tanned Flesh, a good base colour for Caucasian skin.
The next step was to paint all of the webbing (backpack included) and gaiters with VMC Khaki. The hessian strips on the helmet were painted with VMC Dark Sand. We then painted the rifl e stock and entrenching tool handle with AP Oak Brown. The bedroll in his backpack was painted with VMC German Camo Brown-Black.
If you are painting a lot of models at once and are on a tight timeframe, you might also choose to paint the black and silver areas (covered in Steps 8 & 9).
We followed up Step 3 by painting a layer of AP Strong Tone Wash over the entire model and let it dry thoroughly.
If you are painting a lot of models at once and chose to paint the black and silver areas before the wash, you could fi nish your painting here, although your models would like quite dark and not quite as nice as they could if you decided to push on.
While the wash adds great shadows to your model, to makeit really pop you need to go back and add some highlights.We started by highlighting the uniform tunic and trousers with VMC English Uniform. The skin was highlighted with a 50/50 mix of AP Tanned Flesh/VMC Basic Skintone.
For the next stage of highlighting, we touched up the highlights on the face and hands with VMC Basic Skintone, and highlighted the tunic and trousers with a 70/30 mix of VMC English Uniform/VMC Dark Sand. We highlighted the webbing with VMC Khaki, and the Hessian strips on the helmet with VMC Dark Sand.
1 2
3 4
5 6

Copyright Warlord Games Ltd, 2015. Warlord Games, Bolt Action, and the Bolt Action logo are trademarks of Warlord Games Ltd. All rights reserved.� w.warlordgames.com
If you feel like adding more detail to your British (or Commonwealth) infantry models, we make a range of great waterslide decals covering a variety of the units that were part of the Commonwealth armed forces.
Decals
Basing is the thing that really helps tie your army together. There are many, many ways you can do you basing, depending on where you want your troops to be fi ghting, and what your gaming table looks like. For our purposes, we painted the base completely
with VMC German Camo Brown-Black, drybrushed the grit and painted the edge with VMC Beige Brown, drybrushed again with VMC Dark Sand, and then glued down diff erent fl ocking materials to give a variety of colours and textures.
Basing
Top Tips
While almost all buckles on the British webbing were painted in the same khaki color, we’ve chosen to paint them silver to add a bit of variety to the miniature. The same thing goes for the tea mug, which would typically have been enamelled. Of course, during the course of the war, the paint and enamel could most certainly have chipped off with regular wear and tear.
The uniform was given a fi nal highlight of a 40/60 mix of VMC English Uniform/VMC Dark Sand. The webbing and gaiters wre given a fi nal highlight with a 50/50 mix of VMC Khaki/VMC Pale Sand, and the eyes were painted at this point.
The next step was to paint all the metal areas and boots with AP Matt Black. You can really start to see the fi nished product, as the black helps tidy up all the rough areas left by the previous painting.
The fi nal step for painting this model was to paint the metallic areas. We highlighted the areas with a 50/50 mix of AP Matt Black/AP Gun Metal.
7 8
The Completed British Infantry Section
This completed Regular Infantry Section (using the
squad listing on page 22 of Armies of Great Britain),
has the minimum fi ve men, including an NCO with a
Sten submachine gun and a soldier with the
Bren light machine gun.
Copyright Warlord Games Ltd, 2015. Warlord Games, Bolt Action, and the Bolt Action logo are trademarks of Warlord Games Ltd. All rights reserved.� w.warlordgames.com
VariAnts of British Uniforms
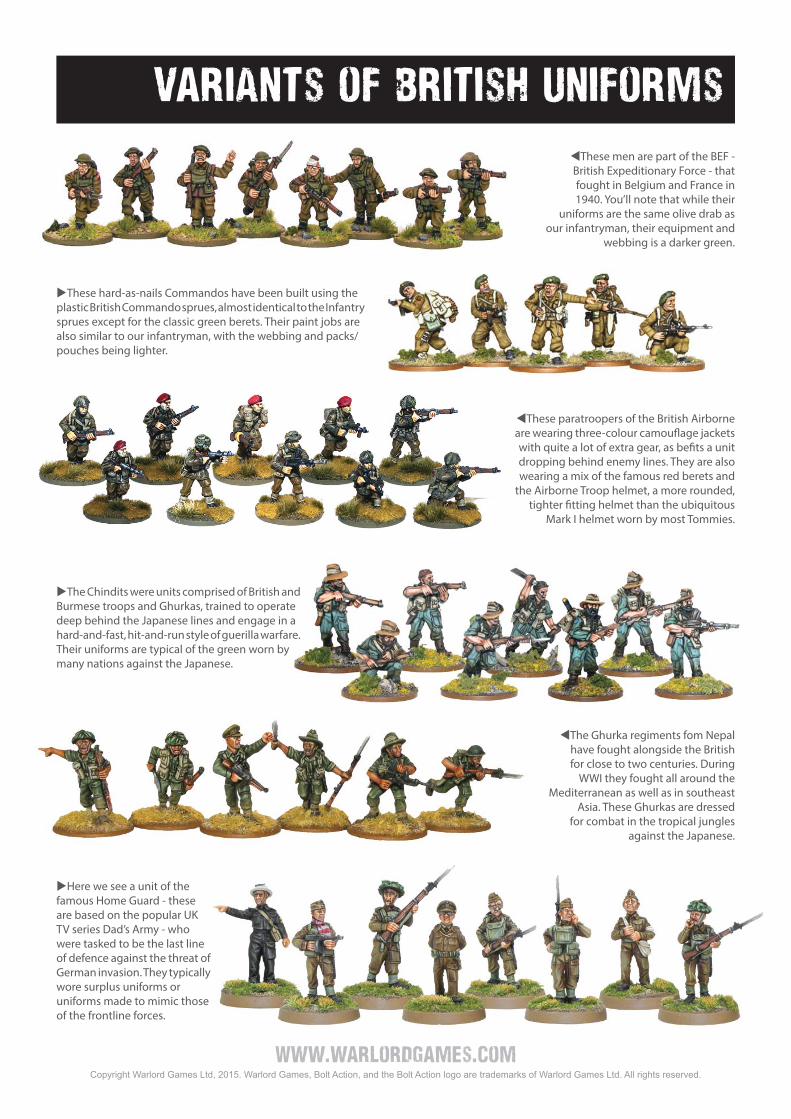
These men are part of the BEF - British Expeditionary Force - that fought in Belgium and France in 1940. You’ll note that while their
uniforms are the same olive drab as our infantryman, their equipment and
webbing is a darker green.
Here we see a unit of the famous Home Guard - these are based on the popular UK TV series Dad’s Army - who were tasked to be the last line of defence against the threat of German invasion. They typically wore surplus uniforms or uniforms made to mimic those of the frontline forces.
These paratroopers of the British Airborne are wearing three-colour camoufl age jackets with quite a lot of extra gear, as befi ts a unit dropping behind enemy lines. They are also wearing a mix of the famous red berets and
the Airborne Troop helmet, a more rounded, tighter fi tting helmet than the ubiquitous
Mark I helmet worn by most Tommies.
The Ghurka regiments fom Nepal have fought alongside the British for close to two centuries. During
WWI they fought all around the Mediterranean as well as in southeast
Asia. These Ghurkas are dressed for combat in the tropical jungles
against the Japanese.
The Chindits were units comprised of British and Burmese troops and Ghurkas, trained to operate deep behind the Japanese lines and engage in a hard-and-fast, hit-and-run style of guerilla warfare. Their uniforms are typical of the green worn by many nations against the Japanese.
These hard-as-nails Commandos have been built using the plastic British Commando sprues, almost identical to the Infantry sprues except for the classic green berets. Their paint jobs are also similar to our infantryman, with the webbing and packs/pouches being lighter.
Copyright Warlord Games Ltd, 2015. Warlord Games, Bolt Action, and the Bolt Action logo are trademarks of Warlord Games Ltd. All rights reserved.� w.warlordgames.com
Painting your British Tanks
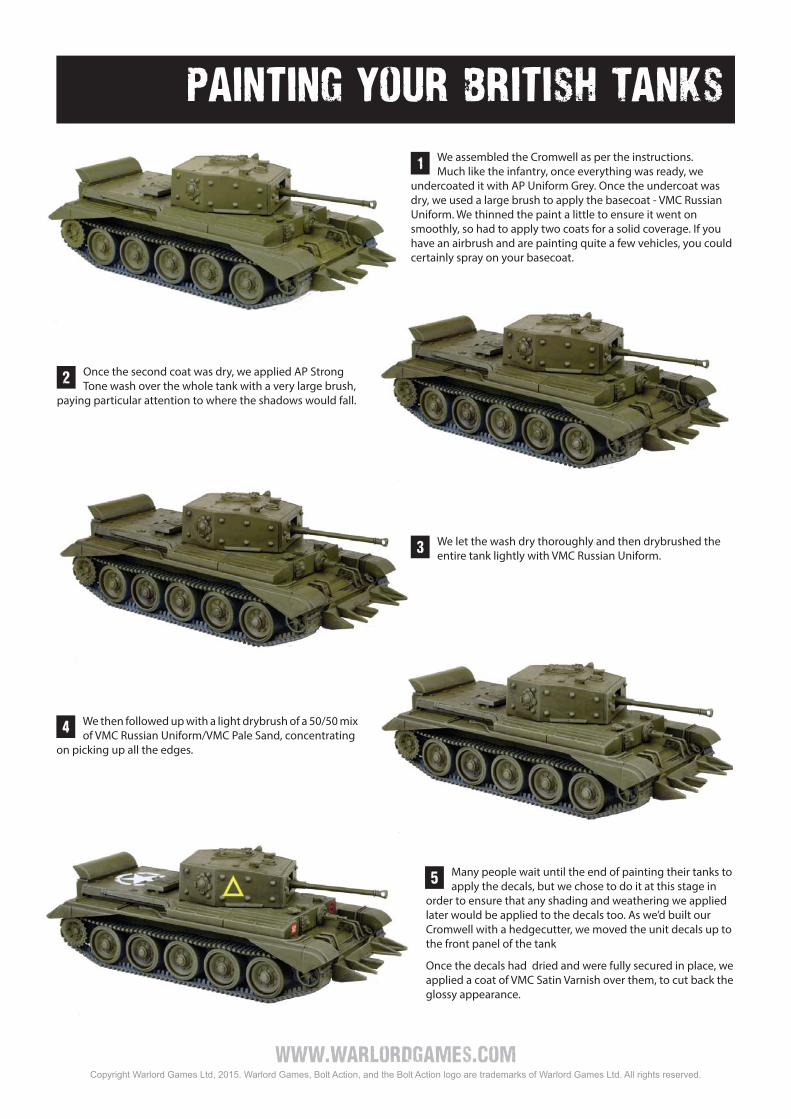
We assembled the Cromwell as per the instructions. Much like the infantry, once everything was ready, we
undercoated it with AP Uniform Grey. Once the undercoat was dry, we used a large brush to apply the basecoat - VMC Russian Uniform. We thinned the paint a little to ensure it went on smoothly, so had to apply two coats for a solid coverage. If you have an airbrush and are painting quite a few vehicles, you could certainly spray on your basecoat.
1
Once the second coat was dry, we applied AP Strong Tone wash over the whole tank with a very large brush,
paying particular attention to where the shadows would fall.
2
We let the wash dry thoroughly and then drybrushed the entire tank lightly with VMC Russian Uniform.3
We then followed up with a light drybrush of a 50/50 mix of VMC Russian Uniform/VMC Pale Sand, concentrating
on picking up all the edges.
4
Many people wait until the end of painting their tanks to apply the decals, but we chose to do it at this stage in
order to ensure that any shading and weathering we applied later would be applied to the decals too. As we’d built our Cromwell with a hedgecutter, we moved the unit decals up to the front panel of the tank
Once the decals had dried and were fully secured in place, we applied a coat of VMC Satin Varnish over them, to cut back the glossy appearance.
5
Copyright Warlord Games Ltd, 2015. Warlord Games, Bolt Action, and the Bolt Action logo are trademarks of Warlord Games Ltd. All rights reserved.� w.warlordgames.com
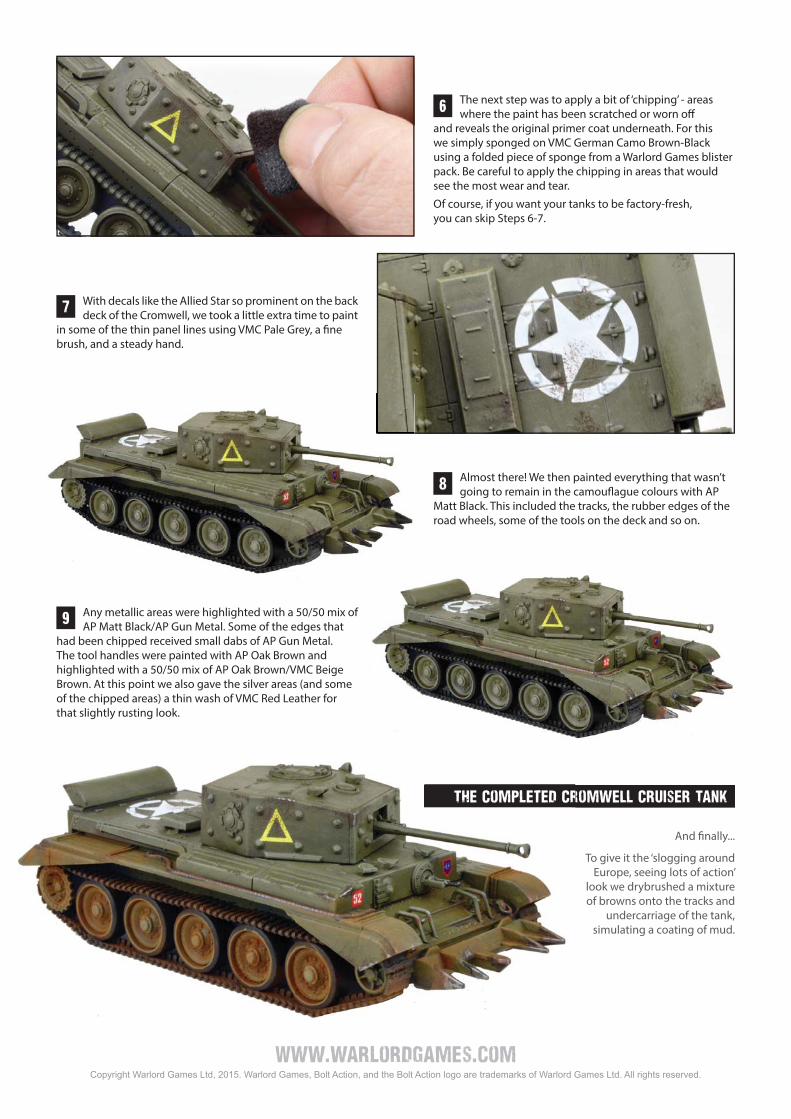
And fi nally...
To give it the ‘slogging around Europe, seeing lots of action’
look we drybrushed a mixture of browns onto the tracks and
undercarriage of the tank, simulating a coating of mud.
The next step was to apply a bit of ‘chipping’ - areas where the paint has been scratched or worn off
and reveals the original primer coat underneath. For this we simply sponged on VMC German Camo Brown-Black using a folded piece of sponge from a Warlord Games blister pack. Be careful to apply the chipping in areas that would see the most wear and tear.
Of course, if you want your tanks to be factory-fresh, you can skip Steps 6-7.
6
With decals like the Allied Star so prominent on the back deck of the Cromwell, we took a little extra time to paint
in some of the thin panel lines using VMC Pale Grey, a fi ne brush, and a steady hand.
7
Almost there! We then painted everything that wasn’t going to remain in the camoufl ague colours with AP
Matt Black. This included the tracks, the rubber edges of the road wheels, some of the tools on the deck and so on.
8
Any metallic areas were highlighted with a 50/50 mix of AP Matt Black/AP Gun Metal. Some of the edges that
had been chipped received small dabs of AP Gun Metal. The tool handles were painted with AP Oak Brown and highlighted with a 50/50 mix of AP Oak Brown/VMC Beige Brown. At this point we also gave the silver areas (and some of the chipped areas) a thin wash of VMC Red Leather for that slightly rusting look.
9
The Completed CromweLL Cruiser TankrThe Completed Cr

Copyright Warlord Games Ltd, 2015. Warlord Games, Bolt Action, and the Bolt Action logo are trademarks of Warlord Games Ltd. All rights reserved.
VariAnts of British Vehicles
� w.warlordgames.com
This Universal Carrier has been adapted to carry a 3” mortar. The colour scheme is a very simple one, much
like our Cromwell tank, and probably matches the vast majority of British vehicles in the later years of the war.
This Matilda II Infantry tank is painted up like those that served with the BEF in Belgium and France in 1940. The three-colour camoufl age scheme is two tones of green plus black.
This Churchill MkVII has obviously seen a lot of action recently with mud and road dust caking its undercarriage. In addition to the standard green, this tank is sporting some soft-edged patches of black camoufl age paint.
This Churchill AVRE has been modifi ed to take out German fortifi cations. The main gun has been replace with a 290mm petard, and the tank has been modelled with a winch on the rear deck to help with recovery. The light coloured road dust suggests this Churchill has been active near the French coast.
This Morris Quad Tractor is also painted in the BEF scheme, with the windows painted up in a blue-grey to simulate the refl ection of glass. This tractor has markings that show it being used by a regiment of the Royal Artillery.
petard, and the tank has been modelled with a winch on the rear deck to help with recovery. The light coloured road dust suggests this Churchill has been active near the French coast.