brief description of the game z-man games, inc. © 2011
TRANSCRIPT

A fun filled flight of feudal folly for 2 to 6 fiefholders by Tom Wham
BRIEF DESCRIPTION OF THE GAME
A long time ago in Europe, ages were pretty Dark. The distribution of wealth back then left a lot to be desired. Greedy people banded together to take things from other people so that the rich could get richer and the poor
could have even less. Twas ever thus. Step into the middle of the normal state of human affairs as a Baron or Baroness somewhere almost in Europe a long time ago. Thanks to your birth you have a lot of little people working to make you richer, and you, in turn, are doing your best to make your king even more prosperous. If you do things right, you might someday be king.
Each player starts with a Fiefdom Management card, divided into 64 squares (49 of which can have tiles played on them. Into four of these
squares you deploy your Keep, in which you will put your fortification of some sort, and your soldiers. Elsewhere in your land you deploy assorted resource gatherers and buildings in an effort to grow, prosper, and score victory points. Along the way there may be wars, invasions, tournaments,
taxes, and a lot of other nonsense. Eventually the game ends and the player with the most victory points will be the winner.
GAME PARTS
Feudality
1 Victory Point Track board
approx. 180 wooden parts
6 double-sided Fiefdom Management Cards
Reference Card Baronial Actions
Reference Card Senior Player Shield
2 eight sided dice
208 normal Tiles
24 Fortifications
6 large Keep Tiles 50 random event cards
12 Pawns
CREDITSGame Design: Tom WhamArt: Tom Wham and Klemens FranzPlaytesting and other Venerable Aid: Kent Baker, Clark Barthel, Bill Bloom, Brian & Vicki Blume, John Brickley, Sean Brown, K.R. Burgoyne, Martin Campion, Brad Champeny, Neal Christiansen, Dave Conant, Bill Corey Jr., Steve & Linda Elliott, Mike Gray, Ernest G. Gygax, Bruce Heard, Craig Johnson, John Kimes, Kent Lewandowski, Erin “Kansas City” Marland, Chris Mazur, Mark Meier, George Miller, Barrat Moy, Scott, Zandra, & Hanson Russell, Julie Truesdell, James M. Ward, Chris Webb, Andrew Zambrzycki.
www.zmangames.com
Z-Man Games, Inc. © 201164 Prince Road, Mahopac, NY 10541
PREPARE FOR PLAY
The very first time you play the game, you must punch out all the cardboard tiles. Most of them are then placed in the cloth bag. Do not put, the large Keep tiles or the grey Fortification tiles in the bag... as these need to be placed in a pool available to all players.
1. Place the Victory Point Track in the center of the table.
2. Determine a starting player and give him the Senior Player Shield (Shield for short). Beginning with that player and proceeding clockwise around the table, each player then chooses a Fiefdom Management Card (FMC for short). Put any unused cards back in the box. Each player then takes a set of colored pawns, placing one on the 1 space on the Victory Point Track and the other next to his/her FMC.
3. Dump out all the resources near the Victory Point Track to form a pool, or bank. Every player then takes three of each resource (cubes) from the bank and places them in the storage area on his/her FMC. During play, resources are collected from or paid into the bank as called for.
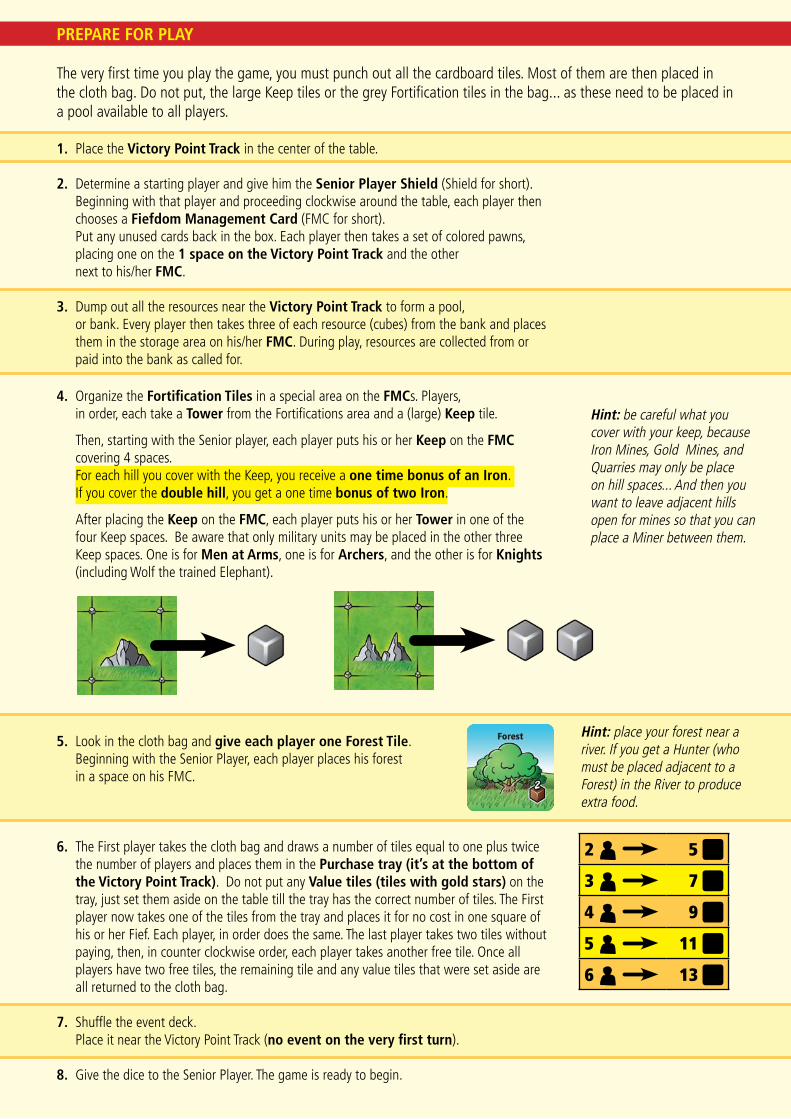
4. Organize the Fortification Tiles in a special area on the FMCs. Players, in order, each take a Tower from the Fortifications area and a (large) Keep tile.
Then, starting with the Senior player, each player puts his or her Keep on the FMC covering 4 spaces. For each hill you cover with the Keep, you receive a one time bonus of an Iron. If you cover the double hill, you get a one time bonus of two Iron.
After placing the Keep on the FMC, each player puts his or her Tower in one of the four Keep spaces. Be aware that only military units may be placed in the other three Keep spaces. One is for Men at Arms, one is for Archers, and the other is for Knights (including Wolf the trained Elephant).
5. Look in the cloth bag and give each player one Forest Tile. Beginning with the Senior Player, each player places his forest in a space on his FMC.
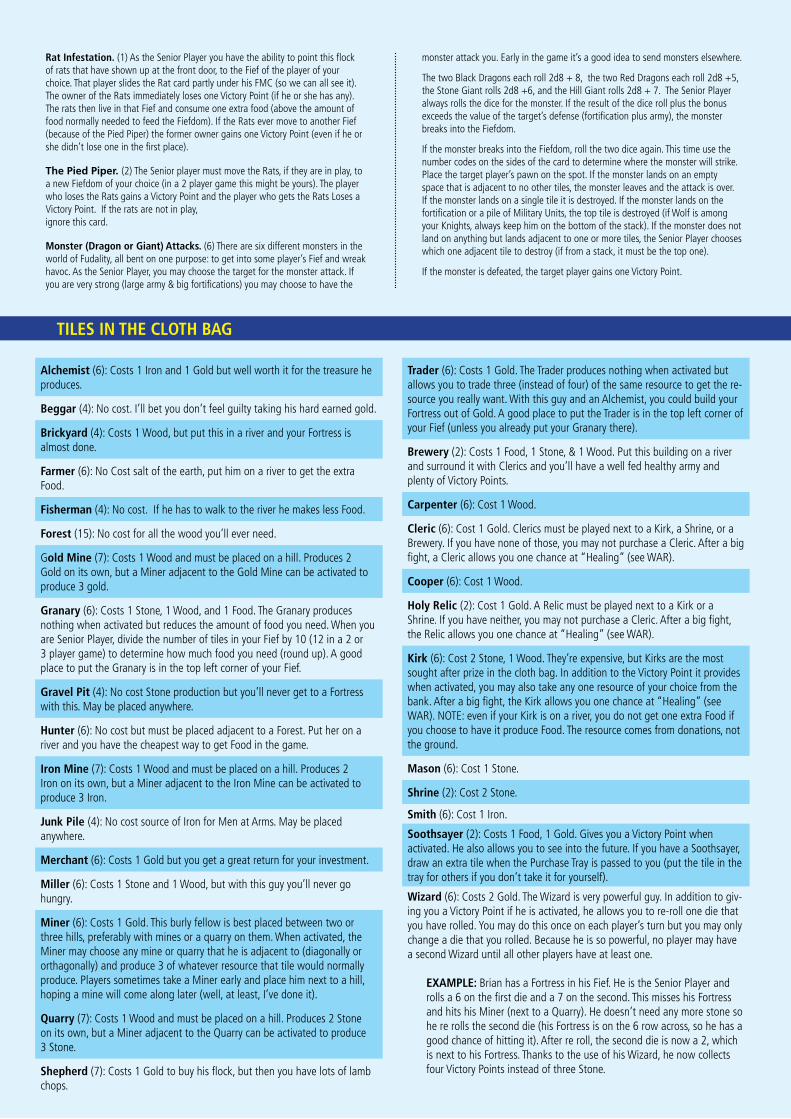
6. The First player takes the cloth bag and draws a number of tiles equal to one plus twice the number of players and places them in the Purchase tray (it’s at the bottom of the Victory Point Track). Do not put any Value tiles (tiles with gold stars) on the tray, just set them aside on the table till the tray has the correct number of tiles. The First player now takes one of the tiles from the tray and places it for no cost in one square of his or her Fief. Each player, in order does the same. The last player takes two tiles without paying, then, in counter clockwise order, each player takes another free tile. Once all players have two free tiles, the remaining tile and any value tiles that were set aside are all returned to the cloth bag.
7. Shuffle the event deck. Place it near the Victory Point Track (no event on the very first turn).
8. Give the dice to the Senior Player. The game is ready to begin.
Hint: be careful what you cover with your keep, because Iron Mines, Gold Mines, and Quarries may only be place on hill spaces... And then you want to leave adjacent hills open for mines so that you can place a Miner between them.
Hint: place your forest near a river. If you get a Hunter (who must be placed adjacent to a Forest) in the River to produce extra food.
2 5
3 7
4 9
5 11
6 13

THE BAG OF PLAYING TILES
The 208 tiles representing the various things you’ll want to accumulate in your Fief, are all placed inside the cloth bag for randomization. Each turn the Senior Player will draw a number of tiles from the bag equal to two times the number of players. Then, players, in turn will have an opportunity to purchase one of these tiles and place it on a square in his or her Fief. Note: Fortification tiles are never placed in the Cloth Bag.
46 of the tiles are Military units (Men at Arms, Archers, or Knights).
126 of the tiles are Resource Tiles that either produce resources or aid in the production or distribution of resources.
42 of the tiles are Value Tiles that do not produce anything, but have gold stars printed on them. These stars produce victory points when activated. Victory points are how you win the game.
MILITARY UNITS
Printed in the lower left corner is the cost to purchase the tile. A man at Arms costs one Iron, an Archer costs 2 Iron, and a Knight costs 3 Iron, and Wolf costs 4 Food. Purchase cost is paid to the bank pool. The number in the upper right corner indicates the power of the unit. Military units are placed in a player’s keep. There is one space for each type of unit. Military units perform several functions in the game. They defend your Fief from attacks by Bandits, other players, or monsters, they may participate in tournaments held by the king, they may be called upon by the king to go to war, and they may be used to attack other player’s Fief’s.
RESOURCE PRODUCTION TILES
More than half of the tiles in the cloth bag produce resources when activated. Printed in the lower left corner is the cost to purchase the tile if any (the Farmer, e.g., is free). Printed in the lower right is what it produces, or what it does. Most Resource Tiles produce resources when activated, such as the Iron Mine shown, which produces 2 iron. The Granary (not shown) reduces your food consumption by half, and Trader (not shown) lets you to trade three of the same resource for one of another.
At the start of each turn, the Senior Player rolls two dice. These are cross indexed with the numbers along the sides of the Fief cards. The pawn is placed on the indicated spot. This is called the Point of Action. Each player may then collect resources from any one of the nine spaces around or under the Point of Action.
VALUE PRODUCTION TILES
Some of the tiles in the bag only produce Victory Points when activated by the Senior Player’s dice roll. Printed in the lower left corner is the cost to purchase the tile. Printed in the lower right is a gold star. A special ability (if any) is printed in the speech-bubble. The gold star represents a Victory Point that will be scored if the tile is activated when under or next to the Locator Pawn. Some tiles have a special ability printed in the speech-bubble of the tile. In addition to the victory point: the Kirk gives the “Healing” ability and “any” one resource of your choice, and the Brewery gives you one food (two if it is on a river), the Wizard allows you re-roll a die (that you rolled) once per player turn, the Cleric gives you the “Healing” ability (see WAR).
FORTIFICATIONS
Fortifications are not placed in the cloth bag, but are described here because they are tiles in your Fief. They are kept in the bank “pool” on the table near the Victory Point Track. A player may have one fortification in his or her Fief and it occupies one space of the Keep. Each fortification level counts as a tile and consumes it’s share of food during feeding. Upgrades are stacked upon the previous level of fortification and also consume food.
2 4
3 6
4 8
5 10
6 12
power of the unit
18 in the bag 14 in the bag 13 in the bag 1 in the bag
cost to purchase
cost
producedresource
cost
producedVPs andresource of choice

Each player starts with a Tower in his Keep. Printed in the lower left corner is the cost to purchase the tile. To purchase a Fort, you must have a Tower. To purchase a Castle you must have a Fort, and to purchase a Fortress you must have a Castle. The number of gold stars on the tile indicates how many victory points it provides if it falls within the 9 squares (the point of action) indicated by the Senior Player Die Roll.
Printed in the bottom right corner of your current fortification is a star with a number in it. That is how many Victory Points you get if you activate the fortification for Victory Points. Any level of fortification may be activated to claim one resource of any type instead of Victory Points. You may not activate your fortification for Victory Points as a Baronial Action.
Printed in the upper right corner of your fortification is a defense value. When Bandits, another player, or a monster attack your Fiefdom, add this defense value to the total value of your army (the total value of all your Knights, Archers, and Men at Arms).
RESOURCES
There are five important resources that are used in the game: Gold (yellow), Food (orange), Wood (brown), Stone (black), and Iron (grey). Resources are produced by Resource Tiles. Resources are used to buy tiles for your Fief and to pay taxes and other demands made by the king. If you don’t have the correct resource mix to pay for something, you may trade four resources of the same type for any one resource of the type you want, and you may do this as much as you want. You may not trade resources with other players.
Each player starts with 3 Gold, 3 Food, 3 Wood, 3 Iron, and 3 Stone (and some bonus Iron for each hill you cover with your keep). Each turn the Senior Player rolls the dice to determine the point of action (where to place the Locator Pawn). The squares under and around the Locator Pawn may be activated. Players may choose one of the tiles in this area to produce 1 or more of the specified good, or victory points.
EXAMPLE #1: The pawn falls near Jim’s Forest and his Kirk. If he activates the Forest, he gets 2 Wood from the pool. If he activates the Kirk, he receives 1 victory point and any one resource of his choice. Jim needs stone badly, so he activates his Kirk, takes one victory point and one stone from the pool.
EXAMPLE #2: The Indicator Pawn falls next to Dave’s fortification (a Castle with three stars), his Miller (located on a river), and a Miner who is adjacent to a Quarry. Dave has plenty of food, so he ignores the Miller. He would love the victory points that he would get from the castle, but needs stone to build the next level of fortification, so he activates the Miner, and takes three stone (2 for the Quarry +1 from the Miner).
THE PURCHASE TRAY
When it is time for the Senior Player to draw tiles from the cloth bag (2 times the number of players) he places them in the Purchase Tray. The Purchase Tray is located at the bottom of the Victory Points Track. The Senior Player may purchase any one tile from the tray. All other players, in clockwise order, may make a purchase from the tray, and so on, until all players have had a chance to purchase a tile. Any player may pass and make no purchase from the tray or upgrade his or her Fortification instead of purchasing from the tray.
Any remaining tiles are then poured into the Tile Discard Pile. Purchase Tray

FIEFDOM MANAGEMENT CARDS
Each player starts with one of these (chose one side). On the card are 49 squares colored in green. All tiles you purchase must be placed in these squares. At the bottom and to the right are 16 more dark green partial squares where the Locator Pawn may be placed. No tiles may ever be placed in either of these rows. A river runs through each Fief. Any Food producing tile placed on a river space produces one extra food when activated. There are also some hills and one double hill. Quarries, Iron, and Gold mines may only be placed on hills.
At the start of the game, you place your Keep so that it covers 4 spaces. Then you place your Tower inside the Keep. It is best not to cover river spaces with your Keep if possible.
Your Fief Card also has an area at the bottom in which you store your accumulated resources and your pawn when it is not in use. When the Senior player rolls the dice to determine the point of action, place your pawn on the indicated square. You may then activate one tile in any of the 9 spaces around or under the pawn. If you activate a resource production tile, you collect the listed resource counters from the bank. If you activate a value tile or your fortification, you collect victory points equal to the number of gold stars on the tile.
river
stoarge for resources
double hill
storage for fortifications
feedingcosts
hill
SEQUENCE OF PLAY
1. Senior Player Rolls the Dice: The Senior Player now rolls both dice. After rolling the dice,
imagine aligning the white die against the column of numbers along the left side of the Fief and the nonwhite die against the column of numbers across the top of the Fief. Cross index these two numbers on the game board. This indicates the Point of Action. All players put their Indicator Pawn on that space and may collect resources from any one of the nine spaces under or adjacent to the pawn. Resources and/or Victory Points are taken in player order
Rolling Doubles: if the Senior Player rolls the same number on both dice, award resources (if any) and then roll again and award more resources (if any). There is no limit to the number of times the senior player may roll doubles.
Rolling an Eight: if the Senior Player rolls an eight on one or both dice, award resources (if any) and then roll again and award more resources (if any). There is no limit to the number of times the senior player may roll again if an eight comes up.
2. Senior Player draws an event card. Act on the event. (NOTE: on the first turn of the game, no event card is
drawn) . See the section “EVENT CARDS EXPLAINED” for more details.
3. Purchase Phase: The Senior Player Draws Chits (equal to twice the number of players) from the Cloth Bag and places them in the Purchase
tray. (NOTE: to speed the game, the player to the left of the Senior Player could be doing this while the Senior Player rolls the dice to determine the Point of Action) and reads the Event aloud. Now, each player, in order, may make one purchase from the tray or improve his or her fort.
Royal Favor: Gain a Victory Point.
Royal Disfavor: Lose a Victory Point (you cannot go below zero).

4. Take Two Baronial Actions. The Senior Player may collect resources (not victory points) from any two of his resource producing tiles (or the same one
twice). NOTE: it is a good idea to figure out how much food you’re going to need at this time, so you can activate a food producing tile to avoid starvation. OR you may collect resources from one of your tiles and take any ONE of the following actions:
I. Secret Amorous Liaison with the Queen or King (depending on your preferences): (You can’t do this if you have no victory points.) Roll 2d8, if the result is 2, 3, or 4 you are caught In flagrante delicto and lose one victory point. If the result is a 9 or better, gain 1 victory point!
II. Sabotage: (You cannot do this if you have no victory points.) You may hire saboteurs. Roll a d8 and pay that amount in gold to recruit the evildoers. If you can’t afford the price, your action is over. If you paid, then send your agents to another player’s fief where they attempt to destroy a tile of your choice (it can be any tile, including the top fortification level or the top military unit in a stack). You and that player each roll 2 dice. If you roll higher, the tile is destroyed. If you tie or roll lower, you lose 1 victory point.
III. Conduct a Private War: (You cannot do this unless you have 3 or more victory points.) You have 2 options:
A - Send your army to attack the nearby country of Santa Paravia with a defense of 14. If you defeat Santa Paravia by rolling a 15 or more (army plus 2d8), you gain 1 victory point (Knights cannot earn you an extra victory point in this case) and then roll to see if your troops survive. If you fail, you lose 1 victory point. and then roll to see if your troops survive.
B - Send your army to attack the nearby country of Fiumaccio with a defense of 19. If you defeat Fiumaccio by rolling a 20 or more (army plus 2d8), you gain 2 victory points and then roll to see if your troops survive. (Knights cannot earn you an extra victory point in this case.) If you fail, you lose 3 victory points, then roll to see if your troops survive... AND you start a general war. Immediately roll 1 die. All players, including you, must send that many points of troops to aid the King in his war vs Fiumaccio. Treat this war like any war called for by the king. Players who can’t send enough troops lose a victory point but must send all they can. Roll 2 dice. If the roll is an 8 or better the war is won, and everyone who sent troops gets 1 victory point (those who sent Knights get an extra point). After this second war, all players roll to see if their troops survive.
IV. Directly attack another player: (You cannot attack a player with fewer victory points than you.) Total your army (Men at Arms, Archers, and Knights) add the roll of 2 dice and match it against that player’s defense (army plus fortification.) If you beat that player by 1, 2, or 3, that player must give you that many resources. If you beat that player by 4 or more points, you may take one victory point from that player (move his or her pawn back and yours forward). Win or lose, it was a war, you must then roll to see if your troops survive (the defender does not have to roll for losses).
5. Feed your Fiefdom The Senior Player only, must pay one food for every 5 tiles (6 if there are three or less
players) in his Fief. This includes your fortification levels, all military and all other tiles in the Fief. For each food not paid to the pool, you must lose one tile from your Fief (your choice). If you have been given the Rats (an event) you may not let them starve unless you have absolutely no tiles in your fief and no resources to pay food with... and then they do not go away, they stay.
6. Pass the Dice and The Senior Player Shield to the player on your left.
WAR!
Usually as a result of an event card, the King may call for a war. At that time all players must send at least enough points worth of Military Units (Men at Arms are 1, Archers are 2, or Knights are 3) to cover the demands of the King. If you do not have enough points worth of Military Units, you lose a Victory Point (if you have any) and still must send all the Military Units you have. The Senior player then rolls two dice. If the result is eight or more, the war is won, and every player who sent any Military Units gains 1 Victory Point. Any player who sent at least one Knight gets an extra Victory Point for a win (the knight becomes an El Cid). If the war is lost, nobody gets any Victory Points. Place units sent to a war beside your FMC.

Rolling For Survival and Healing: After the war, each player must roll a die for every Military Unit sent to war. If the result is an odd number, that unit dies in the war (put it in the discard pile). If the result is an even number the unit lives (put it back in your Keep). For each tile with the “Healing” ability (Kirk, Shrine, Cleric, or Relic) that player may re-roll a die to try to save a soldier. The Wizard may also be used (if you haven’t already used him) to re roll a die to try to save a Military Unit.
An attack against, Santa Paravia, Fiumaccio, or another player (all special Baronial Actions) is considered to be war: after making such an attack your Military Units must roll to see if they survive. A player defending his Fief from an attack by Bandits, a monster, or another player does not have to roll for the survival of his Military units after the conflict.
ENDING THE GAME
The game ends when one or more players have moved their pawn on the Victory Point Track to or beyond the Victory Number listed on the track. Finish the current turn to the point where it is obvious that no more points will change and then determine the winner.
How to Win: The player with the most Victory Points is the winner! If there is a tie, the player with the highest level of fortification in his Fiefdom wins. If there is still a tie, the player with the largest army (points) is the winner. If the game is still tied... the game is, just tied!
EVENT CARDS EXPLAINED
When the Senior Player draws an Event, the Senior Player is the one who rolls for a King’s Champion in a tournament or joust, even though he may then roll for his own champion too. When a Monster attacks, the Senior Player chooses who will be the lucky victim. If Rats appear, the Senior Player chooses where the vermin will go. When the King declares war, the Senior Player rolls the dice to see if we win.
The King Holds a Joust, Archery, or Swordplay Tournament (6 total) (there are two of each in the deck). For a Joust you need a Knight, for an Archery tournament, you need an Archer, and for a Swordplay tournament you need a Man at Arms. Each player who has the called for Military Unit in his or her Keep may participate. First the Senior Player rolls a die for the King’s Champion. That is the number to beat. Then, beginning with the Senior Player, each player, in turn, rolls a die for his or her participating unit. The highest roll that is greater than the number rolled by the King’s Champion wins the event and scores a Victory Point. Re roll ties. If the King’s Champion wins the event... Too bad. NOTE: this is a good time to have a Wizard in your Fief.
The King Declares War. (6) On six different cards, he asks his Barons to send 1, 2, 2, 3, 4, or 5 points worth of Military Units to join him in his military plans. War is not optional, you must send troops if you have any, even if you don’t want to. See the detailed explanation under WAR (earlier in the rules).
The King Declares a New Tax. (6) On six different cards, he demands 1, 2, 2, 3, 3, or 4 resources (of any type) from his nobles. You can send him any combination of surplus resources you have laying around. Failure to comply will result in the loss of a Victory Point. Of course, if you are already at zero Victory Points on the track, you might just consider thumbing your nose at the king and send him nothing.
The King Calls for Famine Relief. (5) On five different cards, he demands 1, 2, 3, 3, and 3 Food from each of his Nobles. There are those who believe that this relief actually ends up in the palace kitchens! Failure to comply will result in the loss of a Victory Point. Again, if you are already at zero Victory Points on the track, you might just consider some appropriate arm gestures in the general direction of the king and send him nothing.
The King Pays his Barons a Visit. (1) HRH is riding around his land looking to see how brown is your nose. All players roll two dice and add their current Victory Points to the result. High roll gains one Victory Point. Re roll ties. NOTE: this is another good time to have a Wizard.
The King is away... (5) Doing one of those things that kings are always doing. It’s good to have him far away from us.
Black Death Strikes the Kingdom. (1) Forward progress goes the other way. All players lose 3 Victory Points (no player may go below zero). Put this card in the box after it strikes so it can’t happen again in this game!
Bandits Attack. (6) On 6 different cards 2d8 + 1, 2, 3, 4, 5, or 6 Bandits attack each Baron in the kingdom. Hey, it is the Dark Ages! Each player in turn rolls his own dice (thus a Wizard can be very helpful). Compare the dice total plus the modifier to the Defense value of your Fief (add the total of all your Military Units and the defense value of your current level of fortification). If the bandits roll higher than your defense by 1, 2, or 3, you lose your choice of that number of resources (if you have less than the number called for, lose all). If they win by 4 or more, you lose your top level of fortification (you can buy back a Tower for 2 stone during any purchase phase). If you have no fortifications at all, due to some previous mishap, the Bandits ignore you and ride on.
The Queen Pays her Barons a Visit. (1) Everyone is glad to see this girl roll up in her carriage. All players roll two dice and add their current Victory Points to the result. Low roll gains one Victory Point. Re roll ties. Long live the Queen! NOTE: this is another good time to have a Wizard in your Fief.
The Queen Tours the Land. (1) She should do this more often! All players take one resource of their choice from the bank.
The Queen Takes Pity on the Less Fortunate. (1) And takes it out on the more fortunate. The player with the least Victory Points gains one Victory Point and the player with the most Victory Points loses one Victory Point. In case of ties all tied players share in this exchange. If all players are tied, nothing happens and the Queen rides off into the distance in her carriage.
EXAMPLE: Tom & Ernie are tied at 7 Victory Points. Poor, miserable, wretched Jim only has 6 Victory Points. The Queen arrives and sees Jim’s pitiful state. When she is finished with things, Tom and Ernie each have 6 Victory Points and Jim has 7.
The Festival of Saint Snoot. (1) Everyone goes crazy once a year when this happens. 1. There’s a lot of hopping around on one foot, some really really bad singing, and all players lose one Victory Point (no one can go below zero). 2. The player with the least resources, takes one resource of his or her choice from the bank. 3. Put all the discarded tiles back into the cloth bag and give it a good shake. 4. All players take one resource of their choice from the bank. 5. Somebody reshuffles the Event Deck and discards... but not this card, throw it in the game box. The festival can happen only once per game (this is the only card that reshuffles the Event Deck).
The Festival of Saint Snydd. (1) This is even worse than the above. The people go crazy again. 1. There’s a lot of hopping around on the other foot, some singing that’s even worse, and all players lose two Victory Points (no one can go below zero). 2. The player with the least resources, takes one resource of his or her choice from the bank. 3. Put all the discarded tiles back into the cloth bag and give it a good shake. 4. All players take one resource of their choice from the bank. Finally, throw this card in the game box. The festival can happen only once per game.
Rat Infestation. (1) As the Senior Player you have the ability to point this flock of rats that have shown up at the front door, to the Fief of the player of your choice. That player slides the Rat card partly under his FMC (so we can all see it). The owner of the Rats immediately loses one Victory Point (if he or she has any). The rats then live in that Fief and consume one extra food (above the amount of food normally needed to feed the Fiefdom). If the Rats ever move to another Fief (because of the Pied Piper) the former owner gains one Victory Point (even if he or she didn’t lose one in the first place).
The Pied Piper. (2) The Senior player must move the Rats, if they are in play, to a new Fiefdom of your choice (in a 2 player game this might be yours). The player who loses the Rats gains a Victory Point and the player who gets the Rats Loses a Victory Point. If the rats are not in play, ignore this card.
Monster (Dragon or Giant) Attacks. (6) There are six different monsters in the world of Fudality, all bent on one purpose: to get into some player’s Fief and wreak havoc. As the Senior Player, you may choose the target for the monster attack. If you are very strong (large army & big fortifications) you may choose to have the
monster attack you. Early in the game it’s a good idea to send monsters elsewhere.
The two Black Dragons each roll 2d8 + 8, the two Red Dragons each roll 2d8 +5, the Stone Giant rolls 2d8 +6, and the Hill Giant rolls 2d8 + 7. The Senior Player always rolls the dice for the monster. If the result of the dice roll plus the bonus exceeds the value of the target’s defense (fortification plus army), the monster breaks into the Fiefdom.
If the monster breaks into the Fiefdom, roll the two dice again. This time use the number codes on the sides of the card to determine where the monster will strike. Place the target player’s pawn on the spot. If the monster lands on an empty space that is adjacent to no other tiles, the monster leaves and the attack is over. If the monster lands on a single tile it is destroyed. If the monster lands on the fortification or a pile of Military Units, the top tile is destroyed (if Wolf is among your Knights, always keep him on the bottom of the stack). If the monster does not land on anything but lands adjacent to one or more tiles, the Senior Player chooses which one adjacent tile to destroy (if from a stack, it must be the top one).
If the monster is defeated, the target player gains one Victory Point.
TILES IN THE CLOTH BAG
Alchemist (6): Costs 1 Iron and 1 Gold but well worth it for the treasure he produces.
Beggar (4): No cost. I’ll bet you don’t feel guilty taking his hard earned gold.
Brickyard (4): Costs 1 Wood, but put this in a river and your Fortress is almost done.
Farmer (6): No Cost salt of the earth, put him on a river to get the extra Food.
Fisherman (4): No cost. If he has to walk to the river he makes less Food.
Forest (15): No cost for all the wood you’ll ever need.
Gold Mine (7): Costs 1 Wood and must be placed on a hill. Produces 2 Gold on its own, but a Miner adjacent to the Gold Mine can be activated to produce 3 gold.
Granary (6): Costs 1 Stone, 1 Wood, and 1 Food. The Granary produces nothing when activated but reduces the amount of food you need. When you are Senior Player, divide the number of tiles in your Fief by 10 (12 in a 2 or 3 player game) to determine how much food you need (round up). A good place to put the Granary is in the top left corner of your Fief.
Gravel Pit (4): No cost Stone production but you’ll never get to a Fortress with this. May be placed anywhere.
Hunter (6): No cost but must be placed adjacent to a Forest. Put her on a river and you have the cheapest way to get Food in the game.
Iron Mine (7): Costs 1 Wood and must be placed on a hill. Produces 2 Iron on its own, but a Miner adjacent to the Iron Mine can be activated to produce 3 Iron.
Junk Pile (4): No cost source of Iron for Men at Arms. May be placed anywhere.
Merchant (6): Costs 1 Gold but you get a great return for your investment.
Miller (6): Costs 1 Stone and 1 Wood, but with this guy you’ll never go hungry.
Miner (6): Costs 1 Gold. This burly fellow is best placed between two or three hills, preferably with mines or a quarry on them. When activated, the Miner may choose any mine or quarry that he is adjacent to (diagonally or orthagonally) and produce 3 of whatever resource that tile would normally produce. Players sometimes take a Miner early and place him next to a hill, hoping a mine will come along later (well, at least, I’ve done it).
Quarry (7): Costs 1 Wood and must be placed on a hill. Produces 2 Stone on its own, but a Miner adjacent to the Quarry can be activated to produce 3 Stone.
Shepherd (7): Costs 1 Gold to buy his flock, but then you have lots of lamb chops.
Trader (6): Costs 1 Gold. The Trader produces nothing when activated but allows you to trade three (instead of four) of the same resource to get the re-source you really want. With this guy and an Alchemist, you could build your Fortress out of Gold. A good place to put the Trader is in the top left corner of your Fief (unless you already put your Granary there).
Brewery (2): Costs 1 Food, 1 Stone, & 1 Wood. Put this building on a river and surround it with Clerics and you’ll have a well fed healthy army and plenty of Victory Points.
Carpenter (6): Cost 1 Wood.
Cleric (6): Cost 1 Gold. Clerics must be played next to a Kirk, a Shrine, or a Brewery. If you have none of those, you may not purchase a Cleric. After a big fight, a Cleric allows you one chance at “Healing” (see WAR).
Cooper (6): Cost 1 Wood.
Holy Relic (2): Cost 1 Gold. A Relic must be played next to a Kirk or a Shrine. If you have neither, you may not purchase a Cleric. After a big fight, the Relic allows you one chance at “Healing” (see WAR).
Kirk (6): Cost 2 Stone, 1 Wood. They’re expensive, but Kirks are the most sought after prize in the cloth bag. In addition to the Victory Point it provides when activated, you may also take any one resource of your choice from the bank. After a big fight, the Kirk allows you one chance at “Healing” (see WAR). NOTE: even if your Kirk is on a river, you do not get one extra Food if you choose to have it produce Food. The resource comes from donations, not the ground.
Mason (6): Cost 1 Stone.
Shrine (2): Cost 2 Stone.
Smith (6): Cost 1 Iron.
Soothsayer (2): Costs 1 Food, 1 Gold. Gives you a Victory Point when activated. He also allows you to see into the future. If you have a Soothsayer, draw an extra tile when the Purchase Tray is passed to you (put the tile in the tray for others if you don’t take it for yourself).
Wizard (6): Costs 2 Gold. The Wizard is very powerful guy. In addition to giv-ing you a Victory Point if he is activated, he allows you to re-roll one die that you have rolled. You may do this once on each player’s turn but you may only change a die that you rolled. Because he is so powerful, no player may have a second Wizard until all other players have at least one.
EXAMPLE: Brian has a Fortress in his Fief. He is the Senior Player and rolls a 6 on the first die and a 7 on the second. This misses his Fortress and hits his Miner (next to a Quarry). He doesn’t need any more stone so he re rolls the second die (his Fortress is on the 6 row across, so he has a good chance of hitting it). After re roll, the second die is now a 2, which is next to his Fortress. Thanks to the use of his Wizard, he now collects four Victory Points instead of three Stone.