beaded cylinder beads gsss - beads baubles & · pdf file4 getting started with seed beads...
TRANSCRIPT

1
Beaded Cyl inder Beads
Each cylinder is worked as a
flat strip that alternates three
colors of 2-bead stitches, with
1-bead stitches of the accent
color between them, then the
ends are “zipped” together to
form a tube. The tubes make
great beaded beads when strung
together on a ribbon, or a single
tube can be used as a beaded
toggle, as seen in the Supple
Tiles Necklace on page 106.
M a t e r i a l s
Size 11° seed beads in 3 shades of one color, plus 1 accent color (A, B, C, D)
Needle and thread
Peyote St i tches
Copyright Interweave Press LLC. Not to be reprinted. All rights reserved.

2
Peyote strip
1. Use 4' (1 m) of thread to string 2D; pass through them again leaving
a 4" (10 cm) tail, then pass through the first bead again. (These beads
will act as a tension bead, but will become part of the work rather than
being removed.)
Rows 1 and 2: String 2A, 1D, 2B, 1D, 2C, 1D, 2A, 1D, 2B, 1D, 2C, and
1D.
Row 3: String 1D and pass back through the last 2C; pull snug so that the
2D sit side by side (Figure 1a). String 1D and pass back through the next
2B. String 1D and pass back through the next 2A. Continue, stitching 1D
between each 2-bead set of the previous row (Figure 1b). After passing
through the last 2 beads, pass through the 2D to exit from the opposite
side of the tail thread (Figure 1c).
Row 4: String 2B and pass through the next 1D. String 2C and pass
through the next 1D. Repeat, stringing 2A, then 2B, then 2C, then 2A.
Secure the end of the row by passing through the 2 edge beads previ-
ously worked (Figure 2).
Figure 1 Figure 2
Gett ing Started with Seed Beads
a
b
c
b
a

3
Row 5: String 1D and pass back through the last 2-bead set (Figure 3a);
repeat for the length of Row 5. To make an odd-count turn, string 1D
and pass through the previous edge bead and the previous 2-bead set;
pull snug, then pass through the last 2-bead set, the previous edge
bead, and the last 1D just strung (Figure 3b).
Row 6: String 2C and pass back through the next 1D. Repeat, stringing
2A, then 2B, then 2C, then 2A, then 2B. Secure the end of the row by
passing through the 2 edge beads.
Row 7: Repeat Row 5.
Row 8: Repeat Row 6, beginning with 2A.
Row 9: Repeat Row 5.
Row 10: Repeat Row 6, beginning with 2B.
Row 11: Repeat Row 5.
Row 12: Repeat Row 6, beginning with 2C.
Rows 13–18: Repeat Rows 7–12.
For the large tubes shown in the sample bracelet, repeat Rows 7–12 again
for a total of 24 rows.
Figure 3
a
b
Peyote St i tches
Gett ing Started with Seed Beads4
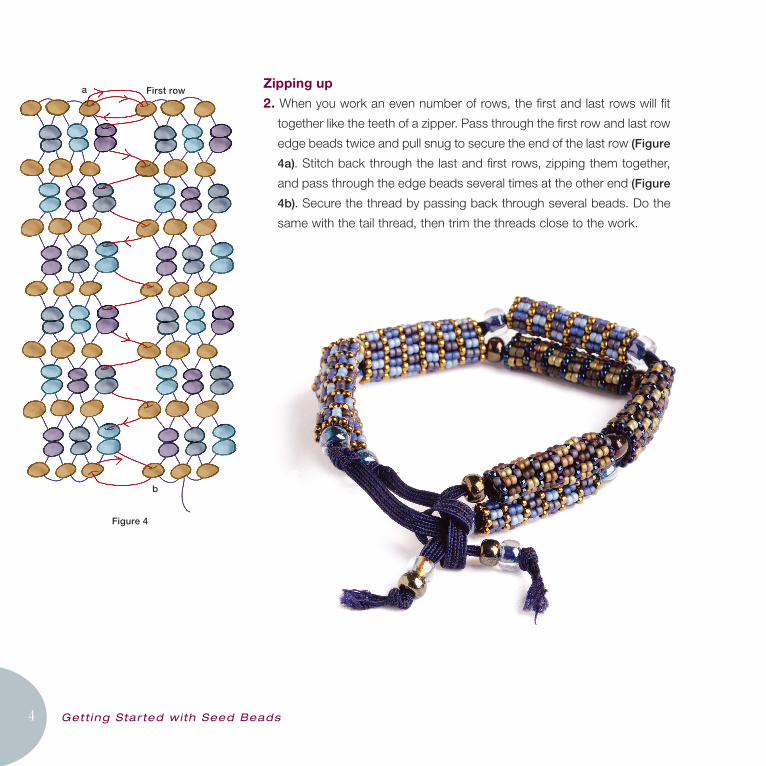
Zipping up
2. When you work an even number of rows, the first and last rows will fit
together like the teeth of a zipper. Pass through the first row and last row
edge beads twice and pull snug to secure the end of the last row (Figure
4a). Stitch back through the last and first rows, zipping them together,
and pass through the edge beads several times at the other end (Figure
4b). Secure the thread by passing back through several beads. Do the
same with the tail thread, then trim the threads close to the work.
Figure 4
a
b
First row