balance ball - m.media-amazon.com
TRANSCRIPT

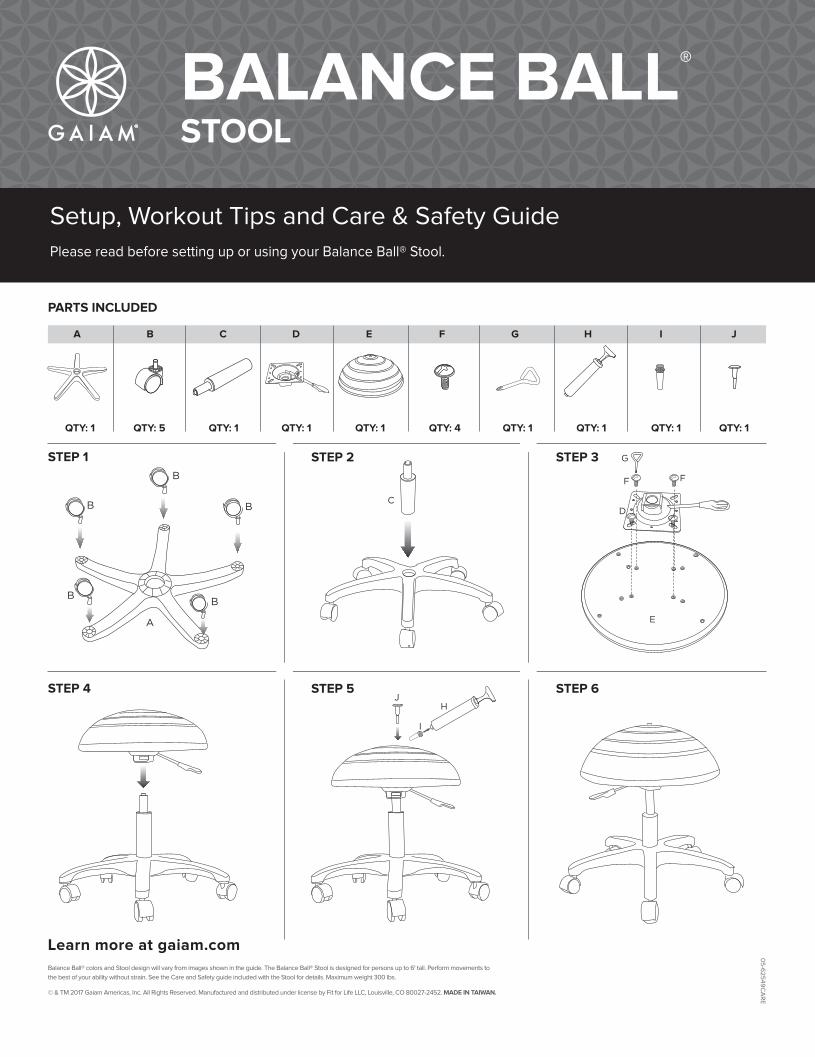
Setup, Workout Tips and Care & Safety Guide
Please read before setting up or using your Balance Ball® Stool.
BALANCE BALL® STOOL
TOOLS NEEDED
Easy inflation pump (you may want to use a
bicycle pump or compressor for initial inflation).
BALANCE BALL® STOOL SEAT INFLATION INSTRUCTIONS
1. Remove the Balance Ball® Stool from the
packaging and inspect for shipping damage.
Follow included Balance Ball® Stool assembly
instructions. Please note: It is normal for the
ball seat to have slight creases when
first inflated.
2. Make sure that the Balance Ball® Stool seat is
at room temperature before inflating.
3. Using the supplied pump, insert it into the
inflation hole in the seat. Inflate the Balance
Ball® Stool seat to the desired height and
firmness. DO NOT overinflate.
4. Remove pump from Balance Ball® Stool seat
and immediately insert plug into hole (so
head is flush with surface of the seat).
CARE
1. Clear workout area of sharp objects that may
puncture the Balance Ball® Stool seat.
2. Slight leakage is normal with your Balance
Ball® Stool seat. Re-inflate when necessary.
3. Hand wash the Balance Ball® Stool with a
soft cloth and warm soapy water. Do not use
harsh or abrasive chemicals or cleaning tools
that may scratch or damage the Balance
Ball® Stool.
4. Always check the Balance Ball® Stool seat
for nicks or scratches before each use. If
damaged in any way, do not use.
5. Avoid placing or rolling the Balance Ball®
Stool seat on newspaper, photocopies or
other materials printed in ink, as ink may
permanently mark ball.
6. Avoid exposing the Balance Ball® Stool seat
to rough, sharp or abrasive surfaces, or to
heat or excessive sunlight.
7. Do not store the seat against painted or wood
surfaces for any prolonged period of time.
IMPORTANT SAFETY CAUTIONS!
Please read before setting up or using the
Balance Ball® Stool.
1. Consult with your doctor before beginning
this or any other exercise program.
2. Use the Balance Ball® Stool seat only on
smooth surfaces. Do not use the Balance
Ball® Stool seat if deep scratches or
gouges exist.
3. Please contact Gaiam for any product
questions or regarding any defects.
Manufacturer and distributor disclaim any
liability, loss or damage caused by its use.
CAUTION: DO NOT place Balance Ball® Stool
seat in contact with woodwork, wood furniture
or painted walls for any period of time. Damage
to finish may occur.
INFLATION NOTICE
• Inflate seat and plug.
• Seat may not inflate to 100% of size
on initial inflation.
• Wait 24 hours.
• Deflate 50% and inflate again.
• Due to the seat’s material, the seat
will increase to proper size with
second inflation.
05-62549_STOOL_BalBall_23in_Granite_CARE.indd 1 1/26/17 9:43 AM
CHAIR ASSEMBLY
A
B
PARTS LIST
C
D
E
F
G
H
K
J
1
5
1
1
1
4
1
1
1
1
STEP 1 STEP 2 STEP 3
STEP 4 STEP 5 FINISH FIGURE
A
B
B B
BB
E
D
H
I
J
F
G
C
F
Setup, Workout Tips and Care & Safety Guide
Please read before setting up or using your Balance Ball® Stool.
PARTS INCLUDED
STEP 1
05
-62
54
9C
AR
E
Learn more at gaiam.com
Balance Ball® colors and Stool design will vary from images shown in the guide. The Balance Ball® Stool is designed for persons up to 6' tall. Perform movements to
the best of your ability without strain. See the Care and Safety guide included with the Stool for details. Maximum weight 300 lbs.
© & TM 2017 Gaiam Americas, Inc. All Rights Reserved. Manufactured and distributed under license by Fit for Life LLC, Louisville, CO 80027-2452. MADE IN TAIWAN.
BALANCE BALL® STOOL
CHAIR ASSEMBLY
A
B
PARTS LIST
C
D
E
F
G
H
K
J
1
5
1
1
1
4
1
1
1
1
STEP 1 STEP 2 STEP 3
STEP 4 STEP 5 FINISH FIGURE
A
B
B B
BB
E
D
H
I
J
F
G
C
F
CHAIR ASSEMBLY
A
B
PARTS LIST
C
D
E
F
G
H
K
J
1
5
1
1
1
4
1
1
1
1
STEP 1 STEP 2 STEP 3
STEP 4 STEP 5 FINISH FIGURE
A
B
B B
BB
E
D
H
I
J
F
G
C
F
CHAIR ASSEMBLY
A
B
PARTS LIST
C
D
E
F
G
H
K
J
1
5
1
1
1
4
1
1
1
1
STEP 1 STEP 2 STEP 3
STEP 4 STEP 5 FINISH FIGURE
A
B
B B
BB
E
D
H
I
J
F
G
C
F
CHAIR ASSEMBLY
A
B
PARTS LIST
C
D
E
F
G
H
K
J
1
5
1
1
1
4
1
1
1
1
STEP 1 STEP 2 STEP 3
STEP 4 STEP 5 FINISH FIGURE
A
B
B B
BB
E
D
H
I
J
F
G
C
F
CHAIR ASSEMBLY
A
B
PARTS LIST
C
D
E
F
G
H
K
J
1
5
1
1
1
4
1
1
1
1
STEP 1 STEP 2 STEP 3
STEP 4 STEP 5 FINISH FIGURE
A
B
B B
BB
E
D
H
I
J
F
G
C
FSTEP 2 STEP 3
STEP 4 STEP 5 STEP 6
CHAIR ASSEMBLY
A
B
PARTS LIST
C
D
E
F
G
H
K
J
1
5
1
1
1
4
1
1
1
1
STEP 1 STEP 2 STEP 3
STEP 4 STEP 5 FINISH FIGURE
A
B
B B
BB
E
D
H
I
J
F
G
C
F
CHAIR ASSEMBLY
A
B
PARTS LIST
C
D
E
F
G
H
K
J
1
5
1
1
1
4
1
1
1
1
STEP 1 STEP 2 STEP 3
STEP 4 STEP 5 FINISH FIGURE
A
B
B B
BB
E
D
H
I
J
F
G
C
F
CHAIR ASSEMBLY
A
B
PARTS LIST
C
D
E
F
G
H
K
J
1
5
1
1
1
4
1
1
1
1
STEP 1 STEP 2 STEP 3
STEP 4 STEP 5 FINISH FIGURE
A
B
B B
BB
E
D
H
I
J
F
G
C
F
CHAIR ASSEMBLY
A
B
PARTS LIST
C
D
E
F
G
H
K
J
1
5
1
1
1
4
1
1
1
1
STEP 1 STEP 2 STEP 3
STEP 4 STEP 5 FINISH FIGURE
A
B
B B
BB
E
D
H
I
J
F
G
C
F
CHAIR ASSEMBLY
A
B
PARTS LIST
C
D
E
F
G
H
K
J
1
5
1
1
1
4
1
1
1
1
STEP 1 STEP 2 STEP 3
STEP 4 STEP 5 FINISH FIGURE
A
B
B B
BB
E
D
H
I
J
F
G
C
F
CHAIR ASSEMBLY
A
B
PARTS LIST
C
D
E
F
G
H
K
J
1
5
1
1
1
4
1
1
1
1
STEP 1 STEP 2 STEP 3
STEP 4 STEP 5 FINISH FIGURE
A
B
B B
BB
E
D
H
I
J
F
G
C
F
CHAIR ASSEMBLY
A
B
PARTS LIST
C
D
E
F
G
H
K
J
1
5
1
1
1
4
1
1
1
1
STEP 1 STEP 2 STEP 3
STEP 4 STEP 5 FINISH FIGURE
A
B
B B
BB
E
D
H
I
J
F
G
C
F
CH
AIR A
SS
EMB
LY
A
B
PAR
TS LIS
T
C
D
E
F
G
H
K
J
1
5
1
1
1
4
1
1
1
1
STEP 1
STEP 2
STEP 3
STEP 4
STEP 5
FINIS
H FIG
UR
E
A
B
B
B
B
B
E
D
H
I J
F
G
C
F
CHAIR ASSEMBLY
A
B
PARTS LIST
C
D
E
F
G
H
K
J
1
5
1
1
1
4
1
1
1
1
STEP 1 STEP 2 STEP 3
STEP 4 STEP 5 FINISH FIGURE
A
B
B B
BB
E
D
H
I
J
F
G
C
F
CHAIR ASSEMBLY
A
B
PARTS LIST
C
D
E
F
G
H
K
J
1
5
1
1
1
4
1
1
1
1
STEP 1 STEP 2 STEP 3
STEP 4 STEP 5 FINISH FIGURE
A
B
B B
BB
E
D
H
I
J
F
G
C
F
QTY: 1 QTY: 1 QTY: 1 QTY: 1 QTY: 1 QTY: 1 QTY: 1 QTY: 1QTY: 4QTY: 5
A B C D E F G H I J
05-62549_STOOL_BalBall_23in_Granite_CARE.indd 2 1/26/17 9:43 AM