aspera desktop client admin guide 3.7 -...
TRANSCRIPT

Aspera Desktop Client Admin Guide 3.7.3
Solaris Revision: 1220 Generated: 05/25/2018 12:31

Contents
Introduction............................................................................................................... 3
Standard Installation................................................................................................3Requirements.........................................................................................................................................................3Before Upgrading or Downgrading......................................................................................................................3Product Setup........................................................................................................................................................4
Upgrade Follow up................................................................................................................................... 5Configuring the Firewall...................................................................................................................................... 5Testing a Transfer................................................................................................................................................. 6Updating the Product License.............................................................................................................................. 6Uninstalling........................................................................................................................................................... 7
Managing Global Transfer Settings from the Command Line............................ 7
ascp: Transferring from the Command Line........................................................ 7Ascp Command Reference................................................................................................................................... 7Ascp General Examples......................................................................................................................................18Ascp File Manipulation Examples..................................................................................................................... 20Ascp Transfers with Object Storage and HDFS................................................................................................ 21Applying Filters to Include and Exclude Files.................................................................................................. 21Creating SSH Keys.............................................................................................................................................27Ascp FAQs.......................................................................................................................................................... 28
Appendix.................................................................................................................. 30Restarting Aspera Services.................................................................................................................................30Testing and Optimizing Transfer Performance.................................................................................................. 30Log Files............................................................................................................................................................. 31Product Limitations.............................................................................................................................................31
Technical Support................................................................................................... 32
Legal Notice............................................................................................................. 32
| Introduction | 3
Introduction
IBM® Aspera® Desktop Client is a file transfer client application that uses FASP® transfer technology to maximizeupload and download speeds. Desktop Client includes the following features:
Feature Description
FASP transport technology The file transfer protocol that maximizes transfer speeds over IP networks byeliminating the fundamental bottlenecks in conventional technologies. FASP featuresbandwidth control, resume, transfer encryption, content protection, and data integrityvalidation.
Ascp The command-line file transfer program.
Standard Installation
RequirementsSystem requirements for IBM Aspera Desktop Client:
• Product-specific Aspera license file.• Solaris x86 versions 10 and 11.• Solaris SPARC versions 9 and 10.• Glibc 2.5 or higher.
Before Upgrading or DowngradingUpgrading
• You cannot upgrade directly between different Aspera transfer products (such as from Point-to-Point to DesktopClient, or from Point-to-Point to Enterprise Server). To upgrade, you need to back up the configuration, uninstallthe product, and perform a fresh install of the new version of the product.
Downgrading
Older installers do not check for newer versions of the application. You must prepare your machine as describedbelow then uninstall the newer version before continuing with your downgrade.
Newer versions of the Redis database are not compatible with older versions of the application. Your downgradeprocess depends on whether a backup of the older Redis DB is available, either as a separate backup file or as part ofyour backup of the var directory from the older version.
• With a backup: Follow the steps below to prepare your machine. Uninstall the application (for instructions, seeUninstalling on page 7). Copy the older Redis DB file into the var directory before installing the older(downgrade) version.
/opt/aspera/var/• Without a backup: Follow the steps below to prepare your machine. Uninstall the application (for instructions,
see Uninstalling on page 7) and delete the var and etc directories from your machine. Then do a freshinstallation of the older version. The configuration files in the etc directory may be compatible with olderversions, but not all configurations may be read.

| Standard Installation | 4
/opt/aspera/var/
/opt/aspera/etc/
Preparing for an Upgrade or Downgrade
1. Verify the version of your existing product.The steps required to prepare for an upgrade may differ depending on your current product version. To view thecurrent product and version, run the following command:
# ascp -A
2. Stop all FASP transfer-related applications, services and connections.
• ascp connections• The Desktop Client application
3. Back up configuration and settings files.These files are found in the etc and var folders.
• /opt/aspera/etc/ (contains server configuration, web configuration, user settings, license info)• /opt/aspera/var/ (contains Pre- and Post-Processing scripts, Connect Server)
4. Remove the existing Aspera package.Run the following command to remove the application without affecting your customizations:
# pkgrm ASPRent
When you install the upgrade, your settings, license, and other configurations are preserved.
Product SetupTo install Desktop Client, log into your computer with root permissions, and follow the steps below.
1. Download the IBM Aspera product installer.Use the credentials provided to your organization by Aspera to access:
http://downloads.asperasoft.com/en/downloads/2
If you need help determining your firm's access credentials, contact your Aspera account manager.2. For product upgrades, ensure you have prepared your machine to upgrade to a newer version.
Although the installer performs your upgrade automatically, Aspera highly recommends completing the tasksdescribed in Before Upgrading or Downgrading on page 3. If you do not follow these steps, you riskinstallation errors or losing your configuration settings.
3. Run the installerTo run the installer, run the following commands with the proper administrative permissions. Replace the productversion accordingly.
# pkgadd -d /filepath/aspera-scp-client-version.pkg
4. For versions 9-11.2, install OpenSSH.Solaris 9 - 11.2 is installed with a version of SunSSH that is not supported by Aspera and you must installOpenSSH. See https://www.openssh.com and your OS manual for instructions.
Solaris 11.3+ SunSSH is supported.5. Install the license.
| Standard Installation | 5
To install the license from the command line, create the following file:
/opt/aspera/etc/aspera-license
Copy and paste your license key string into it, then save and close the file. To verify the license information, runthe following command:
# ascp -A
If you are updating your product license after the installation, see Updating the Product License on page 6.6. Troubleshooting
If the installer freezes during installation, another Aspera product might be running on your computer. To stop allFASP transfer-related applications and connections, see Before Upgrading or Downgrading on page 3.
If you receive the error message, "Current administration requires that a unique instance of the <ASPRent>package be created. However, the maximum number of instances of the package which may be supported at onetime on the same system has already been met" this indicates that you have an Aspera package installed. Removethe exisiting package and install the new one by running the following commands:
# pkgrm ASPRent# pkgadd -d /filepath/aspera-scp-client-version.pkg
Upgrade Follow up
1. If upgrading and the Redis DB is run on another system: Update the KV store keys to the latest format.The local Redis DB schema is automatically updated by the installer, but non-local redis DB must be manuallyupdated by running the following command as root:
2. For all upgrades: Validate aspera.conf.The aspera.conf file is not overwritten during an upgrade and your configurations are preserved. However,the XML formatting, parameters, and acceptable values may have changed between your old version and newversion. Run the following command to check aspera.conf for XML form and valid configuration settings:
# /opt/aspera/bin/asuserdata -v
Configuring the FirewallYour Aspera transfer product requires access through the ports listed below. If you cannot establish the connection,review your local corporate firewall settings and remove the port restrictions accordingly.
Desktop Client
The following is basic information for configuring your firewall to allow Aspera file transfers. The outbound TCPport for SSH may differ depending on your organization's unique network settings. Although TCP/33001 is thedefault setting, refer to your IT Department for questions related to which SSH port(s) are open for file transfer.Consult your operating system's documentation for instructions on configuring your firewall. If your client host isbehind a firewall that does not allow outbound connections, you will need to allow the following ports:
• Outbound TCP/33001: Allow outbound connections from the Aspera client on the TCP port (TCP/33001 bydefault, when connecting to a Windows server, or on another non-default port for other server operating systems).
• Outbound UDP/33001: Allow outbound connections from the Aspera client on the FASP UDP port (33001, bydefault).
• Local firewall: If you have a local firewall on the client (such as iptables), verify that it is not blocking yourSSH and FASP transfer ports (such as TCP/UDP 33001).
| Standard Installation | 6
Testing a TransferTo make sure the software is working properly, follow these steps to set up a simple connection with the AsperaDemo Server and test download and upload transfers.
1. Download test files from the Demo Server.Use the following command to download, press y to accept the server's key, and enter the passworddemoaspera when prompted:
# ascp -T [email protected]:aspera-test-dir-large/100MB /tmp/
The transfer command is based on the following settings:
Item Value
Demo Server address demo.asperasoft.com
Login account aspera
password demoaspera
Test file /aspera-test-dir-large/100MB
Download location /tmp/
Transfer settings Fair transfer policy, target rate 10M, minimum rate1M, encryption disabled.
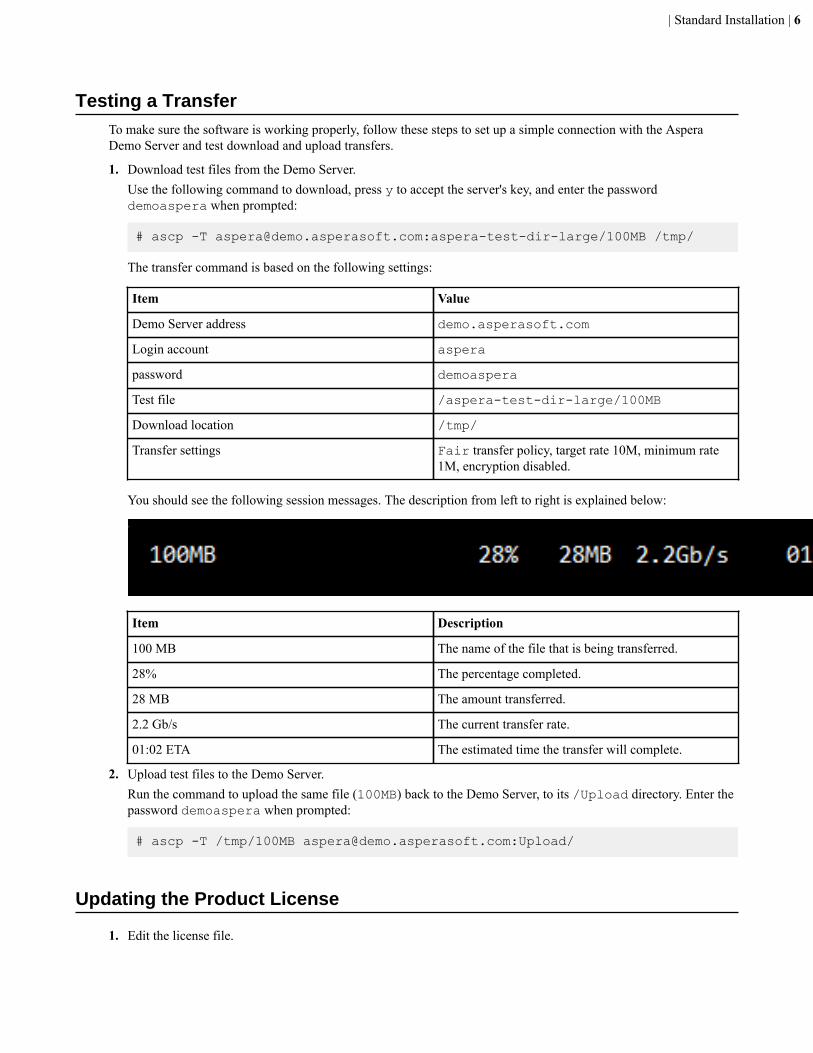
You should see the following session messages. The description from left to right is explained below:
Item Description
100 MB The name of the file that is being transferred.
28% The percentage completed.
28 MB The amount transferred.
2.2 Gb/s The current transfer rate.
01:02 ETA The estimated time the transfer will complete.
2. Upload test files to the Demo Server.Run the command to upload the same file (100MB) back to the Demo Server, to its /Upload directory. Enter thepassword demoaspera when prompted:
# ascp -T /tmp/100MB [email protected]:Upload/
Updating the Product License
1. Edit the license file.

| Managing Global Transfer Settings from the Command Line | 7
Open the following file with write permission:
/opt/aspera/etc/aspera-license
Replace the existing license key string with the new one and save the file.2. Confirm the new license information is correct.
Run the following command to display license information:
# ascp -A
UninstallingTo uninstall Desktop Client, run the following command.
$ pkgrm ASPRclnt
Managing Global Transfer Settings from the CommandLine
ascp: Transferring from the Command Line
Ascp Command ReferenceThe executable ascp (Aspera secure copy) is a command-line FASP transfer program. The tables below describethe complete command usage, including general syntax guidelines, supported environment variables, a synopsis, andcommand options.
General Syntax Guidelines
Item Decription
symbols used in the paths Use single-quote (' ') and forward-slashes (/) on all platforms.
Characters to avoid / \ " : ' ? > < & * |
Environment Variables
If needed, you can set the following environment variables for use with the ascp command:
Item Initiation Command
Password ASPERA_SCP_PASS=password
Token ASPERA_SCP_TOKEN=token
Cookie ASPERA_SCP_COOKIE=cookie
Content Protection Password ASPERA_SCP_FILEPASS=password
Proxy Server Password ASPERA_PROXY_PASS=proxy_server_password
| ascp: Transferring from the Command Line | 8
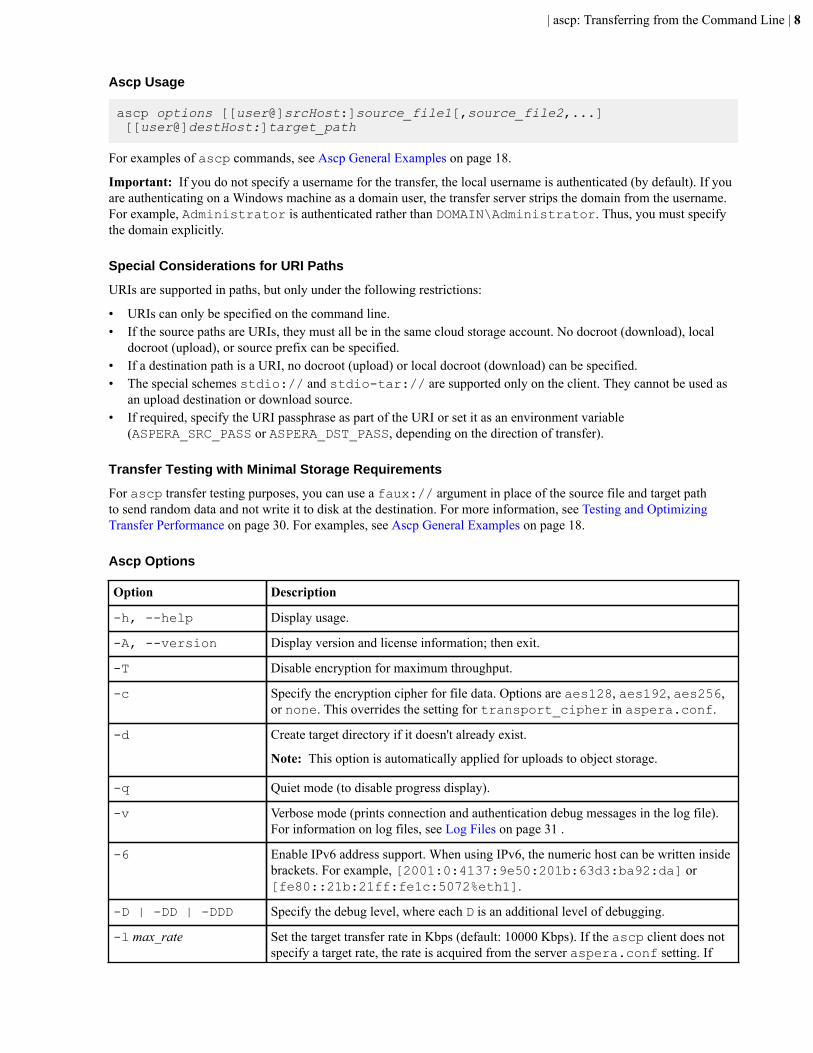
Ascp Usage
ascp options [[user@]srcHost:]source_file1[,source_file2,...] [[user@]destHost:]target_path
For examples of ascp commands, see Ascp General Examples on page 18.
Important: If you do not specify a username for the transfer, the local username is authenticated (by default). If youare authenticating on a Windows machine as a domain user, the transfer server strips the domain from the username.For example, Administrator is authenticated rather than DOMAIN\Administrator. Thus, you must specifythe domain explicitly.
Special Considerations for URI Paths
URIs are supported in paths, but only under the following restrictions:
• URIs can only be specified on the command line.• If the source paths are URIs, they must all be in the same cloud storage account. No docroot (download), local
docroot (upload), or source prefix can be specified.• If a destination path is a URI, no docroot (upload) or local docroot (download) can be specified.• The special schemes stdio:// and stdio-tar:// are supported only on the client. They cannot be used as
an upload destination or download source.• If required, specify the URI passphrase as part of the URI or set it as an environment variable
(ASPERA_SRC_PASS or ASPERA_DST_PASS, depending on the direction of transfer).
Transfer Testing with Minimal Storage Requirements
For ascp transfer testing purposes, you can use a faux:// argument in place of the source file and target pathto send random data and not write it to disk at the destination. For more information, see Testing and OptimizingTransfer Performance on page 30. For examples, see Ascp General Examples on page 18.
Ascp Options
Option Description
-h, --help Display usage.
-A, --version Display version and license information; then exit.
-T Disable encryption for maximum throughput.
-c Specify the encryption cipher for file data. Options are aes128, aes192, aes256,or none. This overrides the setting for transport_cipher in aspera.conf.
-d Create target directory if it doesn't already exist.
Note: This option is automatically applied for uploads to object storage.
-q Quiet mode (to disable progress display).
-v Verbose mode (prints connection and authentication debug messages in the log file).For information on log files, see Log Files on page 31 .
-6 Enable IPv6 address support. When using IPv6, the numeric host can be written insidebrackets. For example, [2001:0:4137:9e50:201b:63d3:ba92:da] or[fe80::21b:21ff:fe1c:5072%eth1].
-D | -DD | -DDD Specify the debug level, where each D is an additional level of debugging.
-l max_rate Set the target transfer rate in Kbps (default: 10000 Kbps). If the ascp client does notspecify a target rate, the rate is acquired from the server aspera.conf setting. If

| ascp: Transferring from the Command Line | 9
Option Descriptionlocal or server aspera.conf rate caps are specified, the "starting" (default) rates isnot higher than the cap.
-m min_rate Set the minimum transfer rate in Kbps (efault: 0. If the ascp client does not specifya minimum rate, the rate is acquired from the server aspera.conf setting. If localor server aspera.conf rate caps are specified, the "starting" (default) rates is nothigher than the cap.
-u user_string Apply a user string, such as variables for pre- and post-processing.
-i private_key_file Use public key authentication and specify the SSH private key file. Typically, theprivate key file is in the directory $HOME/.ssh/id_algorithm. Multiple privatekey files can be specified using multiple -i arguments. The keys are tried in order andthe process ends when a key passes authentication or when all keys have been triedand authentication fails.
-w{r|f} Test bandwidth from server to client (r) or client to server (f). Currently a beta option.
-K probe_rate Set probing rate (Kbps) when measuring bottleneck bandwidth. (Default: 100Kbps)
-k {0|1|2|3} Enable resuming partially transferred files at the specified resume level (default:0). This must be specified for your first transfer; otherwise, it does not work forsubsequent transfers. Resume levels:
• -k 0 – Always retransfer the entire file.• -k 1 – Check file attributes and resume if the current and original attributes
match.• -k 2 – Check file attributes and do a sparse file checksum; resume if the current
and original attributes/checksums match.• -k 3 – Check file attributes and do a full file checksum; resume if the current and
original attributes/checksums match.
When a complete file exists at the destination (no .aspx), the source file size iscompared with the destination file size. When a partial file and a valid .aspx fileexist at the destination, the source file size is compared with the file size recordedinside the .aspx file.
-Z dgram_size Specify the datagram size (MTU) for FASP. By default, the detected path MTU isused. (Range: 296 - 10000 bytes)
Note: As of version 3.3, datagram size can also be enforced by the server using<datagram_size> in aspera.conf. If size is set with both -Z (client side) and<datagram_size> (server side), the <datagram_size> setting is used. If theclient-side is pre-3.3, datagram size is determined by the -Z setting, regardless of theserver-side setting for <datagram_size>. In this case, if there is no -Z setting,datagram size is based on the discovered MTU and the server logs the message "LOGPeer client doesn't support alternative datagram size".
-g read_size Set the read-block size, in bytes. A read_size of 1M is 1 MB. The maximum block sizeis 500 MB. The default of 256K causes the Aspera sender to use its default internalbuffer size.
This is a performance-tuning parameter for an Aspera sender, which takes effect onlyif the sender is a server. It specifies the maximum number of bytes that can be storedwithin a block as the block is transferred from the source disk to the receiver. Thisoption overrides the client's configuration file setting for this feature if set. The serveruses its configuration file setting for this feature if it's set, otherwise it uses read_sizeif set; however, it does not use settings in the client configuration file.

| ascp: Transferring from the Command Line | 10
Option Description
-G write_size Set the write-block size, in bytes. A write_size of 1M is 1 MB. The maximum blocksize is 500 MB. The default of 256K causes the Aspera receiver to use its defaultinternal buffer size.
This is a performance-tuning parameter for an Aspera receiver, which takes effectonly if the receiver is a server. It specifies the maximum number of bytes withina block that an ascp receiver can write to disk. This option overrides the client'sconfiguration file setting for this feature if set. The server uses its configuration filesetting for this feature if it's set, otherwise it uses write_size if set; however, it does notuse settings in the client configuration file.
-L local_log_dir[:size] Specify a logging directory in the local host, instead of using the default directory.Optionally set the size of the log file (default 10 MB).
-R remote_log_dir Specify a logging directory in the remote host, instead of using the default directory.
-S remote_ascp Specify the name of the remote ascp binary (if different).
-e prepost Specify an alternate pre/post command. Use the complete path and file name.
-O fasp_port Set the UDP port to be used by FASP for data transfer. (Default: 33001)
-P ssh-port Set the TCP port to be used for FASP session initiation. (Default: 22)
-C nid:ncount Enable multi-session transfers (also known as parallel transfers) on a multi-node/multi-core system. Specify the node ID (nid) and count (ncount) in the format 1:2, 2:2.The valid range of values for nid and ncount is 1-128, and nid must be less than orequal to ncount. Assign each participant to an independent UDP port. Large files canbe split across sessions, see --multi-session-threshold.
-E pattern
-N pattern
Exclude (-E) or include (-N) files or directories from the transfer using the specifiedpattern. This option can be used multiple times to exclude/include many patterns.Up to 16 -E and -N patterns can be used. The following two symbols can be used inspecifying the pattern:
• A "*" (asterisk) represents zero or more characters in a string. For example *.tmpmatches .tmp and abcde.tmp.
• A "?" (question mark) represents a single character. For example t?p matchestmp but not temp.
Rules are applied in the order in which they are encountered, with the first rule takingprecedence. For details on specifying rules, see Applying Filters to Include andExclude Files on page 21.
--exclude-newer-than=mtime
--exclude-older-than=mtime
Exclude files from the transfer based on when the file was last changed. This featuredoes not include directories.
-f config_file Specify an alternate Aspera configuration file (default is aspera.conf).
-W token_string Specify the token string for the transfer.
-@[range_low:range_high]
Transfer only part of a file. This option only works when downloading a singlefile and does not support resuming. The argument to "-@" may omit either or bothnumbers, and the ":" delimiter. For example, -@3000:6000 transfers bytes fromposition 3000 to position 6000; -@1000: transfers from 1000 to the end of the file;and -@:1000 transfers from beginning to 1000.
| ascp: Transferring from the Command Line | 11
Option Description
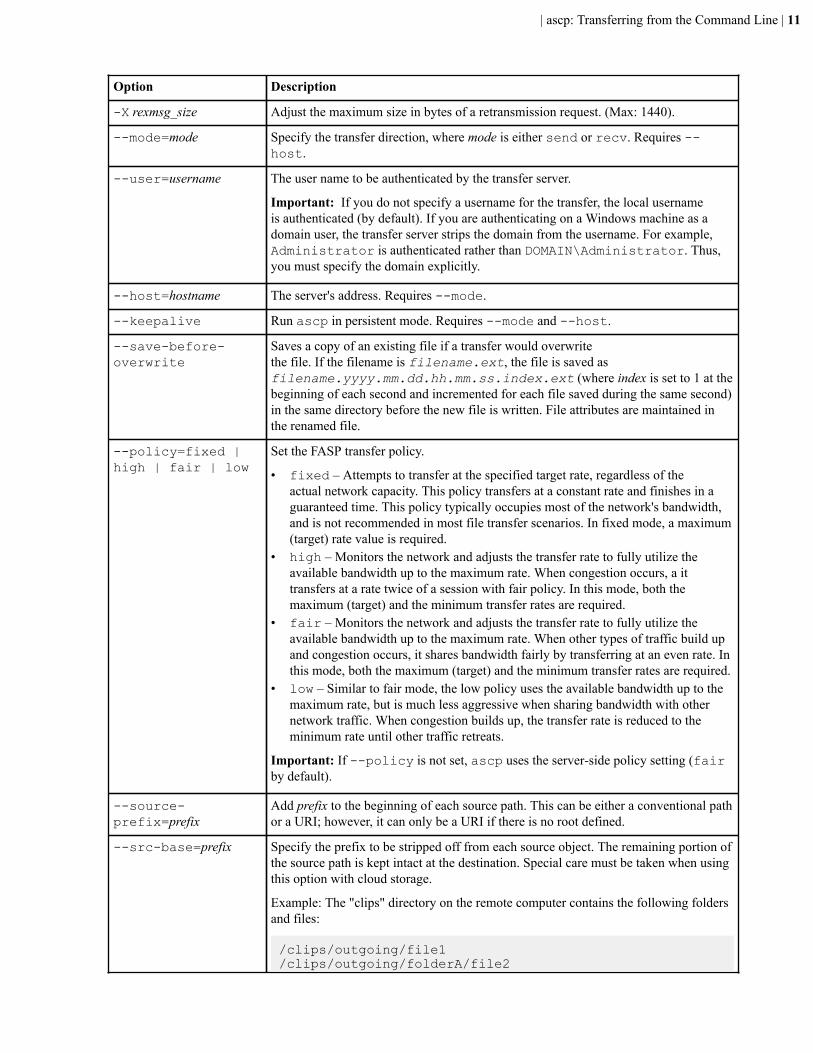
-X rexmsg_size Adjust the maximum size in bytes of a retransmission request. (Max: 1440).
--mode=mode Specify the transfer direction, where mode is either send or recv. Requires --host.
--user=username The user name to be authenticated by the transfer server.
Important: If you do not specify a username for the transfer, the local usernameis authenticated (by default). If you are authenticating on a Windows machine as adomain user, the transfer server strips the domain from the username. For example,Administrator is authenticated rather than DOMAIN\Administrator. Thus,you must specify the domain explicitly.
--host=hostname The server's address. Requires --mode.
--keepalive Run ascp in persistent mode. Requires --mode and --host.
--save-before-overwrite
Saves a copy of an existing file if a transfer would overwritethe file. If the filename is filename.ext, the file is saved asfilename.yyyy.mm.dd.hh.mm.ss.index.ext (where index is set to 1 at thebeginning of each second and incremented for each file saved during the same second)in the same directory before the new file is written. File attributes are maintained inthe renamed file.
--policy=fixed |high | fair | low
Set the FASP transfer policy.
• fixed – Attempts to transfer at the specified target rate, regardless of theactual network capacity. This policy transfers at a constant rate and finishes in aguaranteed time. This policy typically occupies most of the network's bandwidth,and is not recommended in most file transfer scenarios. In fixed mode, a maximum(target) rate value is required.
• high – Monitors the network and adjusts the transfer rate to fully utilize theavailable bandwidth up to the maximum rate. When congestion occurs, a ittransfers at a rate twice of a session with fair policy. In this mode, both themaximum (target) and the minimum transfer rates are required.
• fair – Monitors the network and adjusts the transfer rate to fully utilize theavailable bandwidth up to the maximum rate. When other types of traffic build upand congestion occurs, it shares bandwidth fairly by transferring at an even rate. Inthis mode, both the maximum (target) and the minimum transfer rates are required.
• low – Similar to fair mode, the low policy uses the available bandwidth up to themaximum rate, but is much less aggressive when sharing bandwidth with othernetwork traffic. When congestion builds up, the transfer rate is reduced to theminimum rate until other traffic retreats.
Important: If --policy is not set, ascp uses the server-side policy setting (fairby default).
--source-prefix=prefix
Add prefix to the beginning of each source path. This can be either a conventional pathor a URI; however, it can only be a URI if there is no root defined.
--src-base=prefix Specify the prefix to be stripped off from each source object. The remaining portion ofthe source path is kept intact at the destination. Special care must be taken when usingthis option with cloud storage.
Example: The "clips" directory on the remote computer contains the following foldersand files:
/clips/outgoing/file1/clips/outgoing/folderA/file2
| ascp: Transferring from the Command Line | 12
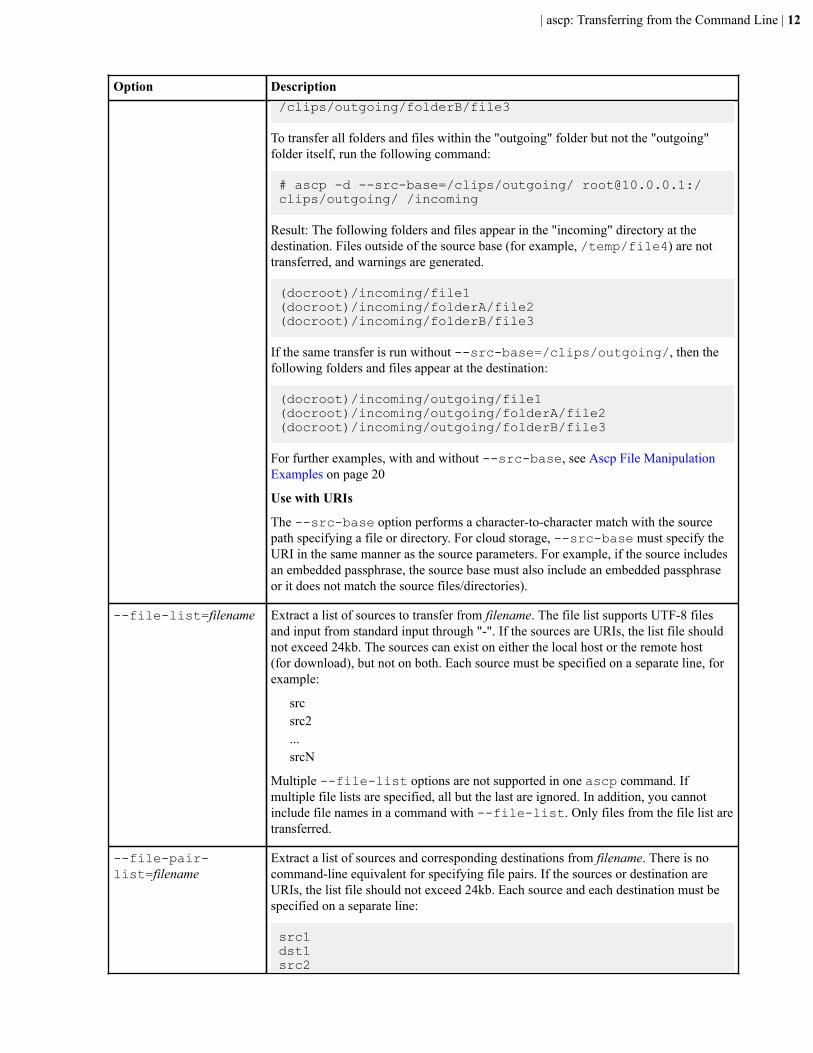
Option Description/clips/outgoing/folderB/file3
To transfer all folders and files within the "outgoing" folder but not the "outgoing"folder itself, run the following command:
# ascp -d --src-base=/clips/outgoing/ [email protected]:/clips/outgoing/ /incoming
Result: The following folders and files appear in the "incoming" directory at thedestination. Files outside of the source base (for example, /temp/file4) are nottransferred, and warnings are generated.
(docroot)/incoming/file1(docroot)/incoming/folderA/file2(docroot)/incoming/folderB/file3
If the same transfer is run without --src-base=/clips/outgoing/, then thefollowing folders and files appear at the destination:
(docroot)/incoming/outgoing/file1(docroot)/incoming/outgoing/folderA/file2(docroot)/incoming/outgoing/folderB/file3
For further examples, with and without --src-base, see Ascp File ManipulationExamples on page 20
Use with URIs
The --src-base option performs a character-to-character match with the sourcepath specifying a file or directory. For cloud storage, --src-base must specify theURI in the same manner as the source parameters. For example, if the source includesan embedded passphrase, the source base must also include an embedded passphraseor it does not match the source files/directories).
--file-list=filename Extract a list of sources to transfer from filename. The file list supports UTF-8 filesand input from standard input through "-". If the sources are URIs, the list file shouldnot exceed 24kb. The sources can exist on either the local host or the remote host(for download), but not on both. Each source must be specified on a separate line, forexample:
srcsrc2...srcN
Multiple --file-list options are not supported in one ascp command. Ifmultiple file lists are specified, all but the last are ignored. In addition, you cannotinclude file names in a command with --file-list. Only files from the file list aretransferred.
--file-pair-list=filename
Extract a list of sources and corresponding destinations from filename. There is nocommand-line equivalent for specifying file pairs. If the sources or destination areURIs, the list file should not exceed 24kb. Each source and each destination must bespecified on a separate line:
src1dst1src2

| ascp: Transferring from the Command Line | 13
Option Descriptiondst2 ... srcN dstN
Source content is specified using the full file or directory path. Destination directoriesare specified relative to the transfer user's docroot, which is specified as a "." at theend of the ascp command. For example,
# ascp --file-pair-list=filepairlist.txt --mode=send --user=username --host=host_ip_address .
Multiple --file-list options are not supported in one ascp command. Ifmultiple file lists are specified, all but the last are ignored. In addition, you cannotinclude file names in a command with --file-list. Only files from the file list aretransferred.
--dest64 Indicate that the destination is base64 encoded.
--source-prefix64=prefix
Indicate that the specified source prefix is base64 encoded. If a non-encoded sourceprefix is also specified on the command line, the later argument takes precedence.
--symbolic-links=method
Specify the rule to handle symbolic links. This option takes following values:(Default: follow) .
• follow – Follow symbolic links and transfer the linked files.• copy – Copy only the alias file. If a file with the same name exists on the
destination, the symbolic link is not copied.• copy+force – Copy only the alias file. If a file with the same name exists on the
destination, the symbolic link replaces the file. If the file of the same name on thedestination is a symbolic link to a directory, it is not replaced.
• skip – Skip the symbolic links.
Important: On Windows, the only option is skip.
--remove-after-transfer
Remove all source files (excluding the source directory) after they are successfullytransferred. Requires write permissions on the source.
--move-after-transfer=archivedir
Move source files and copy source directories to archivedir after they are successfullytransferred. Requires write permissions on the source and the archivedir. Becausedirectories are copied, the original source tree remains in place. The archivedir iscreated if it does not already exist. If the archive directory cannot be created, thetransfer proceeds and the source files remain in their original location.
Example upload:
# ascp --move-after-transfer=C:\Users\Pat\Archive C:\Users\Pat\srcdir\file0012 [email protected]:/
Results:
• file0012 is uploaded to Pat's docroot on 10.0.0.1, the server (destination).• On the current machine (source), file0012 is moved (not copied) to C:\Users
\Pat\Archive
Example download:
# ascp --move-after-transfer=Archive [email protected]:/srcdir C:\Users\Pat

| ascp: Transferring from the Command Line | 14
Option DescriptionResults:
• srcdir is downloaded to C:\Users\Pat on the current machine (destination).• On the server (source), srcdir is moved (not copied) to the archive directory
[email protected]:/Archive.
When the file or directory is moved to the archive, no portion of the path above thetransferred file or directory is included, unless the --src-base option is specified.
The --src-base=prefix option preserves paths in the archive directory thesame way it preserves them with transfers. That is, when --src-base=prefixis specified, files are moved to the archivedir and they include the portion of the paththat remains when prefix is removed.
Example:
# ascp --src-base=C:\Users\Pat --move-after-transfer=C:\Users\Pat\Archive C:\Users\Pat\srcdir\file0012 [email protected]:/
Results:
• file0012 is uploaded to Pat's docroot on 10.0.0.1. The file includes the pathminus the prefix C:\Users\Pat — that is, srcdir/file0012.
• On the current machine (source), file0012 is moved to C:\Users\Pat\Archive. The file includes the path minus the prefix C:\Users\Pat — thatis, C:\Users\Pat\Archive\srcdir\file0012.
Once files have been moved to the archive, the original source directory tree remainsintact. To remove empty source directories that remain after files have been moved,add the flag --remove-empty-directories to the ascp command. Thisremoves empty source directories, except for those that are specified as the source totransfer.
Restrictions:
• archivedir must be on the same file system as the source. If the specified archive ison a separate file system, it is created (if it does not exist), but an error is generatedand files are not moved to it. For cloud storage, archivedir must be in the samecloud storage account.
• archivedir is subject to the same docroot restrictions as the source.• --remove-after-transfer and --move-after-transfer are
mutually exclusive. Including both in the same command generates an error.• Empty directories are not saved to archivedir.
--remove-empty-directories
Remove empty source directories once the transfer has completed (not including adirectory specified as the source to transfer). Do not use if multiple processes (ascpor other) might access the source directory at the same time.
--remove-empty-source-directory
Remove the source directory argument itself (for use with --remove-empty-directories).
--skip-special-files
Skip special files (for example, devices and pipes).
--file-manifest=output
Generate a list of all transferred files, where output is none or text (Default: none)
--file-manifest-path=directory
Specify the path to the file manifest.

| ascp: Transferring from the Command Line | 15
Option DescriptionImportant: File manifests can only be stored locally. Thus, if you are using S3, orother non-local storage, you must specify a local manifest path.
--file-manifest-inprogress-suffix=suffix
Specify the suffix of the file manifest's temporary file. (Default: .aspera-inprogress)
--precalculate-job-size
Calculate total size before transfer. The server side aspera.conf setting overridesthe ascp command-line option.
--overwrite=method Overwrite destination files with source files of the same name. This option takes thefollowing values (Default: diff):
• never – Never overwrite the file. However, if the parent folder is not empty, itsaccess, modify, and change times may still be updated.
• always – Always overwrite the file.• diff – Overwrite the file if it is different from the source. If a complete file at
the destination is the same as the source then it is not overwritten. Partial files areoverwritten or resumed depending on the resume policy.
• diff+older – Overwrite the file if it is older and different than the source.• older – Overwrite the file if its timestamp is older than the source timestamp.
Important: If the overwrite method is diff or diff+older, difference isdetermined by the resume policy (-k{0|1|2|3}). If -k 0 or no -k is specified,the source and destination files are always considered different and the destination fileis always overwritten. If -k 1, the source and destination files are compared basedon file attributes (currently file size). If -k 2, the source and destination files arecompared based on sparse checksum. If -k 3, the source and destination files arecompared based on full checksum.
--file-crypt=crypt Encrypt or decrypt files for client-side encryption-at-rest (EAR). Valid values areencrypt and decrypt. Set the passphrase (required) with the environment variableASPERA_SCP_FILEPASS. Encrypted files have the file extension .aspera-env.If a client-side encrypted file is downloaded with an incorrect password, the downloadis successful but the file is still encrypted and still has the file extension .aspera-env.
--file-checksum=hash
Report checksums for transferred files, where hash is sha1, md5, sha-512,sha-384, sha-256 or none. (Default: none)
--retry-timeout=secs
Specify the timeout duration in seconds for a retry attempt.
--partial-file-suffix=suffix
Filename extension on the destination computer while the file is being transferred.Once the file has been completely transferred, this filename extension is removed.(Default: blank)
Note: This option only takes effect when it is set on the receiver side.
--proxy=proxy_url Specify the address of the Aspera proxy server. proxy_url takes the form of:
dnat[s]://[username]@server:port
The default ports for DNAT and DNATS protocols are 9091 and 9092.
--preserve-file-owner-uid
(OS X and Linux/UNIX systems only.) Preserve transferred files' owner information(uid).
| ascp: Transferring from the Command Line | 16
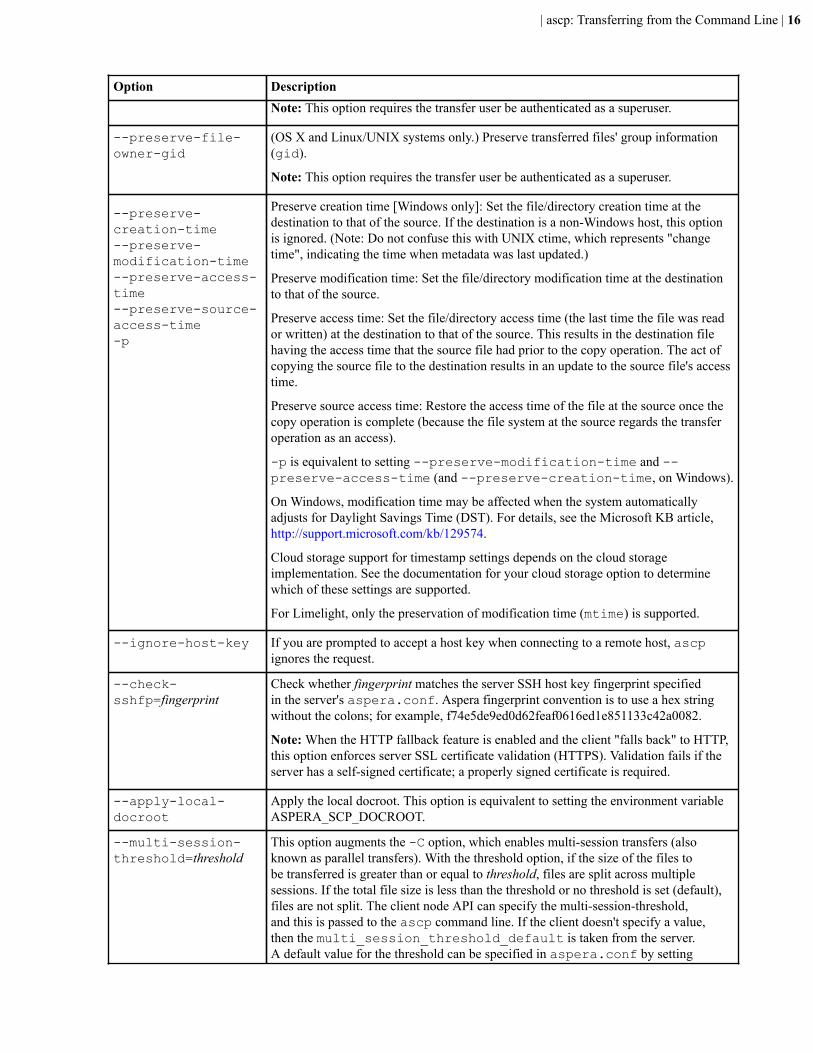
Option DescriptionNote: This option requires the transfer user be authenticated as a superuser.
--preserve-file-owner-gid
(OS X and Linux/UNIX systems only.) Preserve transferred files' group information(gid).
Note: This option requires the transfer user be authenticated as a superuser.
--preserve-creation-time--preserve-modification-time--preserve-access-time--preserve-source-access-time-p
Preserve creation time [Windows only]: Set the file/directory creation time at thedestination to that of the source. If the destination is a non-Windows host, this optionis ignored. (Note: Do not confuse this with UNIX ctime, which represents "changetime", indicating the time when metadata was last updated.)
Preserve modification time: Set the file/directory modification time at the destinationto that of the source.
Preserve access time: Set the file/directory access time (the last time the file was reador written) at the destination to that of the source. This results in the destination filehaving the access time that the source file had prior to the copy operation. The act ofcopying the source file to the destination results in an update to the source file's accesstime.
Preserve source access time: Restore the access time of the file at the source once thecopy operation is complete (because the file system at the source regards the transferoperation as an access).
-p is equivalent to setting --preserve-modification-time and --preserve-access-time (and --preserve-creation-time, on Windows).
On Windows, modification time may be affected when the system automaticallyadjusts for Daylight Savings Time (DST). For details, see the Microsoft KB article,http://support.microsoft.com/kb/129574.
Cloud storage support for timestamp settings depends on the cloud storageimplementation. See the documentation for your cloud storage option to determinewhich of these settings are supported.
For Limelight, only the preservation of modification time (mtime) is supported.
--ignore-host-key If you are prompted to accept a host key when connecting to a remote host, ascpignores the request.
--check-sshfp=fingerprint
Check whether fingerprint matches the server SSH host key fingerprint specifiedin the server's aspera.conf. Aspera fingerprint convention is to use a hex stringwithout the colons; for example, f74e5de9ed0d62feaf0616ed1e851133c42a0082.
Note: When the HTTP fallback feature is enabled and the client "falls back" to HTTP,this option enforces server SSL certificate validation (HTTPS). Validation fails if theserver has a self-signed certificate; a properly signed certificate is required.
--apply-local-docroot
Apply the local docroot. This option is equivalent to setting the environment variableASPERA_SCP_DOCROOT.
--multi-session-threshold=threshold
This option augments the -C option, which enables multi-session transfers (alsoknown as parallel transfers). With the threshold option, if the size of the files tobe transferred is greater than or equal to threshold, files are split across multiplesessions. If the total file size is less than the threshold or no threshold is set (default),files are not split. The client node API can specify the multi-session-threshold,and this is passed to the ascp command line. If the client doesn't specify a value,then the multi_session_threshold_default is taken from the server.A default value for the threshold can be specified in aspera.conf by setting

| ascp: Transferring from the Command Line | 17
Option Descriptionmulti_session_threshold_default. Setting it to 0 (zero) means "do notsplit". The command-line setting overrides the aspera.conf setting.
Note: For cloud transfers, file-splitting is currently (3.6.0) supported for S3 only.
Multi-session uploads to cloud storage:Currently only supported for S3. Unlike non-cloud file splitting, files for transfer to cloud storage are sent in chunks, with the chunksize is specified by <chunk_size> in aspera.conf:
<central_server> . . . <transfer> <protocol_options> <transfer> <chunk_size>0</chunk_size> </transfer> </protocol_options> </transfer></central_server>
File-splitting needs to respect a minimum split size, which for cloud storage is a part,such that each ascp call must deliver full parts. Thus, the chunk size must be equalto the cloud-storage part size. If the file size is greater than the multi-session thresholdbut smaller than the chunk size, then the file is not split. Set chunk size and part size asfollows:
1. In aspera.conf set the chunk size to some value greater than 5 MB (theminimum part size), for example:
<chunk_size>67108864</chunk_size> <!-- 64 MB -->
2. In /opt/aspera/etc/trapd/s3.properties set the upload part size(default 64 MB) to the same value as the chunk size and set a ONE_TO_ONEgathering policy:
aspera.transfer.upload.part-size=64MBaspera.transfer.gathering-policy=ONE_TO_ONE
--delete-before-transfer
Delete files that exist at the destination but not at the source, before any files aretransferred. Requires write permissions on the destination. Do not use with multiplesources, keepalive, URI storage, or HTTP fallback. The utility asdelete providesthe same capability.
--preserve-xattrs=mode--remote-preserve-xattrs=mode--preserve-acls=mode--remote-preserve-acls=mode
Preserve extended attributes (xattrs) and/or access control lists (ACLs) whentransferring files between different types of file systems. mode can be native,metafile, or none (default):native
xattrs and ACLs are preserved using native capabilities of thefile system. However, this storage mode is not supported on allfile systems.
metafile
xattrs and ACLs for a file (say, readme.txt) are preservedin a second file, whose name is composed of the name of theprimary file with .aspera-meta appended to it; for example,readme.txt.aspera-meta. The Aspera metafiles areplatform independent and can be copied between hosts without

| ascp: Transferring from the Command Line | 18
Option Descriptionloss of information. This storage mode is supported on all filesystems.
none
xattrs and ACLs are not preserved. This storage mode issupported on all file systems.
The modes of preserving xattrs and ACLs on each side of the transfer are the same,even if specified differently. The metafile mode silently takes precedence.
The options with the remote- prefix specify the storage mode used on the remotefile system. If not specified, the default behavior is to use the same storage modespecified for the local file system. A remote option with mode set to native may beoverridden by the remote ascp if that mode is not supported there.
Older versions of ascp do not support this feature. Thus, these options maybe overridden by the peer, to none, and ascp stops and reports the problem isincompatible FASP protocol versions.
The amount of xattr/ACL data per file that can be transferred successfully is subject toascp's internal PDPU size limitation.
Ascp Options for HTTP Fallback
Option Description
-y {0|1} Enable HTTP Fallback transfer server when UDP connection fails. Set to 1to enable (default: 0).
-j {0|1} Encode all HTTP transfers as JPEG files. Set to 1 to enable (default: 0).
-Y key_file The HTTPS transfer's key file name.
-I cert_file The HTTPS certificate's file name.
-t port Specify the port for HTTP Fallback Server.
-x proxy_server Specify the proxy server address used by HTTP Fallback.
Ascp General ExamplesThe following are examples of initiating FASP file transfers using the ascp command:
• Fair-policy transfer
Fair-policy transfer with maximum rate 100 Mbps and minimum at 1 Mbps, without encryption, transfer all filesin \local-dir\files to 10.0.0.2:
# ascp -T --policy=fair -l 100m -m 1m /local-dir/files [email protected]:/remote-dir
• Fixed-policy transfer
Fixed-policy transfer with target rate 100 Mbps, without encryption, transfer all files in \local-dir\files to10.0.0.2:
# ascp -T -l 100m /local-dir/files [email protected]:/remote-dir
• Specify UDP port for transfer
| ascp: Transferring from the Command Line | 19
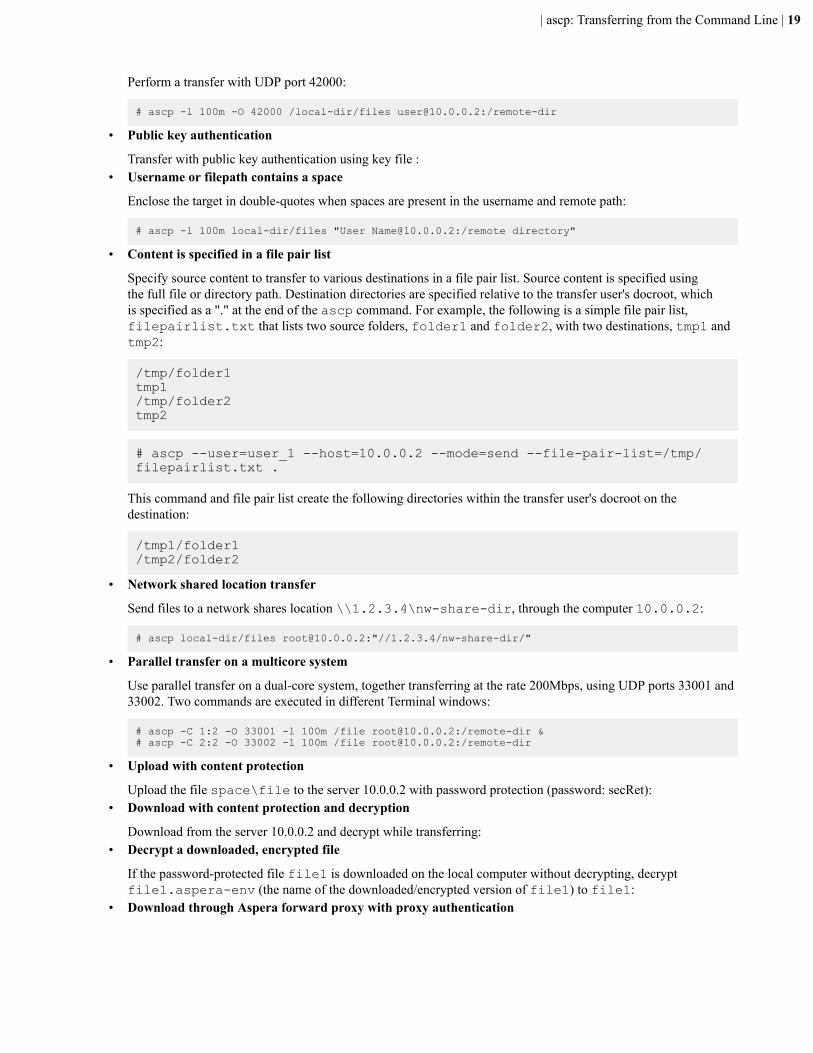
Perform a transfer with UDP port 42000:
# ascp -l 100m -O 42000 /local-dir/files [email protected]:/remote-dir
• Public key authentication
Transfer with public key authentication using key file :• Username or filepath contains a space
Enclose the target in double-quotes when spaces are present in the username and remote path:
# ascp -l 100m local-dir/files "User [email protected]:/remote directory"
• Content is specified in a file pair list
Specify source content to transfer to various destinations in a file pair list. Source content is specified usingthe full file or directory path. Destination directories are specified relative to the transfer user's docroot, whichis specified as a "." at the end of the ascp command. For example, the following is a simple file pair list,filepairlist.txt that lists two source folders, folder1 and folder2, with two destinations, tmp1 andtmp2:
/tmp/folder1tmp1/tmp/folder2tmp2
# ascp --user=user_1 --host=10.0.0.2 --mode=send --file-pair-list=/tmp/filepairlist.txt .
This command and file pair list create the following directories within the transfer user's docroot on thedestination:
/tmp1/folder1/tmp2/folder2
• Network shared location transfer
Send files to a network shares location \\1.2.3.4\nw-share-dir, through the computer 10.0.0.2:
# ascp local-dir/files [email protected]:"//1.2.3.4/nw-share-dir/"
• Parallel transfer on a multicore system
Use parallel transfer on a dual-core system, together transferring at the rate 200Mbps, using UDP ports 33001 and33002. Two commands are executed in different Terminal windows:
# ascp -C 1:2 -O 33001 -l 100m /file [email protected]:/remote-dir &# ascp -C 2:2 -O 33002 -l 100m /file [email protected]:/remote-dir
• Upload with content protection
Upload the file space\file to the server 10.0.0.2 with password protection (password: secRet):• Download with content protection and decryption
Download from the server 10.0.0.2 and decrypt while transferring:• Decrypt a downloaded, encrypted file
If the password-protected file file1 is downloaded on the local computer without decrypting, decryptfile1.aspera-env (the name of the downloaded/encrypted version of file1) to file1:
• Download through Aspera forward proxy with proxy authentication
| ascp: Transferring from the Command Line | 20
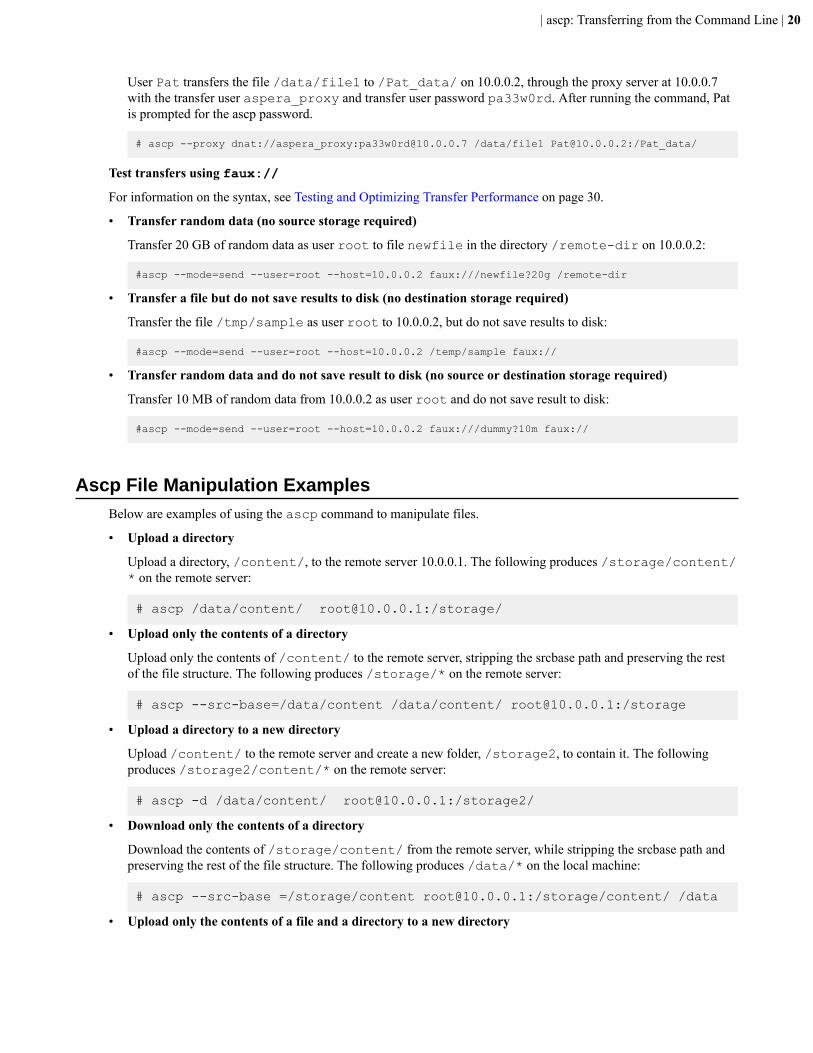
User Pat transfers the file /data/file1 to /Pat_data/ on 10.0.0.2, through the proxy server at 10.0.0.7with the transfer user aspera_proxy and transfer user password pa33w0rd. After running the command, Patis prompted for the ascp password.
# ascp --proxy dnat://aspera_proxy:[email protected] /data/file1 [email protected]:/Pat_data/
Test transfers using faux://
For information on the syntax, see Testing and Optimizing Transfer Performance on page 30.
• Transfer random data (no source storage required)
Transfer 20 GB of random data as user root to file newfile in the directory /remote-dir on 10.0.0.2:
#ascp --mode=send --user=root --host=10.0.0.2 faux:///newfile?20g /remote-dir
• Transfer a file but do not save results to disk (no destination storage required)
Transfer the file /tmp/sample as user root to 10.0.0.2, but do not save results to disk:
#ascp --mode=send --user=root --host=10.0.0.2 /temp/sample faux://
• Transfer random data and do not save result to disk (no source or destination storage required)
Transfer 10 MB of random data from 10.0.0.2 as user root and do not save result to disk:
#ascp --mode=send --user=root --host=10.0.0.2 faux:///dummy?10m faux://
Ascp File Manipulation ExamplesBelow are examples of using the ascp command to manipulate files.
• Upload a directory
Upload a directory, /content/, to the remote server 10.0.0.1. The following produces /storage/content/* on the remote server:
# ascp /data/content/ [email protected]:/storage/
• Upload only the contents of a directory
Upload only the contents of /content/ to the remote server, stripping the srcbase path and preserving the restof the file structure. The following produces /storage/* on the remote server:
# ascp --src-base=/data/content /data/content/ [email protected]:/storage
• Upload a directory to a new directory
Upload /content/ to the remote server and create a new folder, /storage2, to contain it. The followingproduces /storage2/content/* on the remote server:
# ascp -d /data/content/ [email protected]:/storage2/
• Download only the contents of a directory
Download the contents of /storage/content/ from the remote server, while stripping the srcbase path andpreserving the rest of the file structure. The following produces /data/* on the local machine:
# ascp --src-base =/storage/content [email protected]:/storage/content/ /data
• Upload only the contents of a file and a directory to a new directory

| ascp: Transferring from the Command Line | 21
Upload a file, /monday/file1and a directory, /tuesday/*, to the /storage directory on the remoteserver, while stripping the srcbase path and preserving the rest of the file structure. The following produces /storage/monday/file1and /storage/tuesday/* on the remote server:
# ascp --src-base=/data/content /data/content/monday/file1 /data/content/tuesday/ [email protected]:/storage
• Download only the contents of a file and a directory to a new directory
Download a file, /monday/file1, and a directory, /tuesday/*, from the remote server, while stripping thesrcbase path and preserving the rest of the file structure. The following produces /data/monday/file1 and /data/tuesday/* on the local machine:
# ascp --src-base=/storage/content [email protected]:/storage/content/monday/file1 [email protected]:/storage/content/tuesday/ /data
• Delete a local directory once it has been transferred to the remote server
Remove /content/ from the local machine after its contents (excluding partial files) have been transferred tothe remote server. The following produces /storage/content/* on the remote server:
# ascp -k2 -E "*.partial" --remove-after-transfer --remove-empty-directories /data/content [email protected]:/storage
• Delete a local directory once its contents have been transferred to the remote server
Remove /content/ from the local machine after the contents (excluding partial files) have been transferredto the remote server, while stripping the srcbase path and preserving the rest of the file structure. The followingproduces /storage/* on the remote server:
# ascp -k2 -E "*.partial" --src-base=/data/content --remove-after-transfer --remove-empty-directories /data/content [email protected]:/storage
Important: For version 2.7.1, the "-d" option is required when specifying the "--src-base" option if thetarget directory does not exist. As of version 2.7.3+, this constraint has been removed.
Ascp Transfers with Object Storage and HDFS
Applying Filters to Include and Exclude FilesFilters allow you to refine the list of files (or directories) designated for transfer. With filters, you indicate which filesin the transfer list to skip or include. At runtime, ascp looks for filters in two locations: on the ascp command line,and in aspera.conf. Filters can be set in the aspera.conf file either from the GUI, or by modifying it directlywith an editor or asconfigurator. When filtering rules are found in aspera.conf, they are applied beforerules on the command line. If no filtering rules are specified, ascp transfers all source files in the transfer list. Thistopic describes filtering using option flags on the ascp command line.
Note: Filter settings apply only when the server is acting as a client. Servers cannot exclude files or directoriesuploaded or downloaded by remote clients.
Specifying Rules on the Command Line
To specify filtering rules on the ascp command line, use the -E and -N options:
-E pattern Exclude files or directories matching pattern.-N pattern Include files or directories matching pattern.
| ascp: Transferring from the Command Line | 22
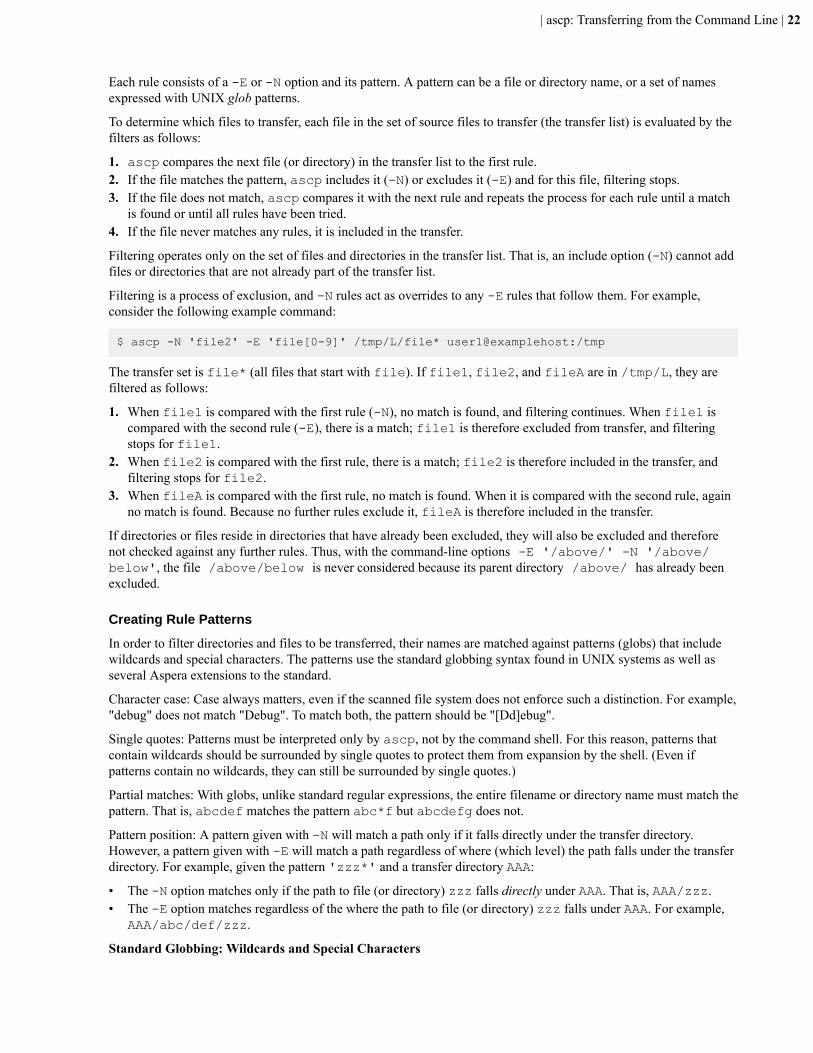
Each rule consists of a -E or -N option and its pattern. A pattern can be a file or directory name, or a set of namesexpressed with UNIX glob patterns.
To determine which files to transfer, each file in the set of source files to transfer (the transfer list) is evaluated by thefilters as follows:
1. ascp compares the next file (or directory) in the transfer list to the first rule.2. If the file matches the pattern, ascp includes it (-N) or excludes it (-E) and for this file, filtering stops.3. If the file does not match, ascp compares it with the next rule and repeats the process for each rule until a match
is found or until all rules have been tried.4. If the file never matches any rules, it is included in the transfer.
Filtering operates only on the set of files and directories in the transfer list. That is, an include option (-N) cannot addfiles or directories that are not already part of the transfer list.
Filtering is a process of exclusion, and -N rules act as overrides to any -E rules that follow them. For example,consider the following example command:
$ ascp -N 'file2' -E 'file[0-9]' /tmp/L/file* user1@examplehost:/tmp
The transfer set is file* (all files that start with file). If file1, file2, and fileA are in /tmp/L, they arefiltered as follows:
1. When file1 is compared with the first rule (-N), no match is found, and filtering continues. When file1 iscompared with the second rule (-E), there is a match; file1 is therefore excluded from transfer, and filteringstops for file1.
2. When file2 is compared with the first rule, there is a match; file2 is therefore included in the transfer, andfiltering stops for file2.
3. When fileA is compared with the first rule, no match is found. When it is compared with the second rule, againno match is found. Because no further rules exclude it, fileA is therefore included in the transfer.
If directories or files reside in directories that have already been excluded, they will also be excluded and thereforenot checked against any further rules. Thus, with the command-line options -E '/above/' -N '/above/below', the file /above/below is never considered because its parent directory /above/ has already beenexcluded.
Creating Rule Patterns
In order to filter directories and files to be transferred, their names are matched against patterns (globs) that includewildcards and special characters. The patterns use the standard globbing syntax found in UNIX systems as well asseveral Aspera extensions to the standard.
Character case: Case always matters, even if the scanned file system does not enforce such a distinction. For example,"debug" does not match "Debug". To match both, the pattern should be "[Dd]ebug".
Single quotes: Patterns must be interpreted only by ascp, not by the command shell. For this reason, patterns thatcontain wildcards should be surrounded by single quotes to protect them from expansion by the shell. (Even ifpatterns contain no wildcards, they can still be surrounded by single quotes.)
Partial matches: With globs, unlike standard regular expressions, the entire filename or directory name must match thepattern. That is, abcdef matches the pattern abc*f but abcdefg does not.
Pattern position: A pattern given with -N will match a path only if it falls directly under the transfer directory.However, a pattern given with -E will match a path regardless of where (which level) the path falls under the transferdirectory. For example, given the pattern 'zzz*' and a transfer directory AAA:
• The -N option matches only if the path to file (or directory) zzz falls directly under AAA. That is, AAA/zzz.• The -E option matches regardless of the where the path to file (or directory) zzz falls under AAA. For example,
AAA/abc/def/zzz.
Standard Globbing: Wildcards and Special Characters
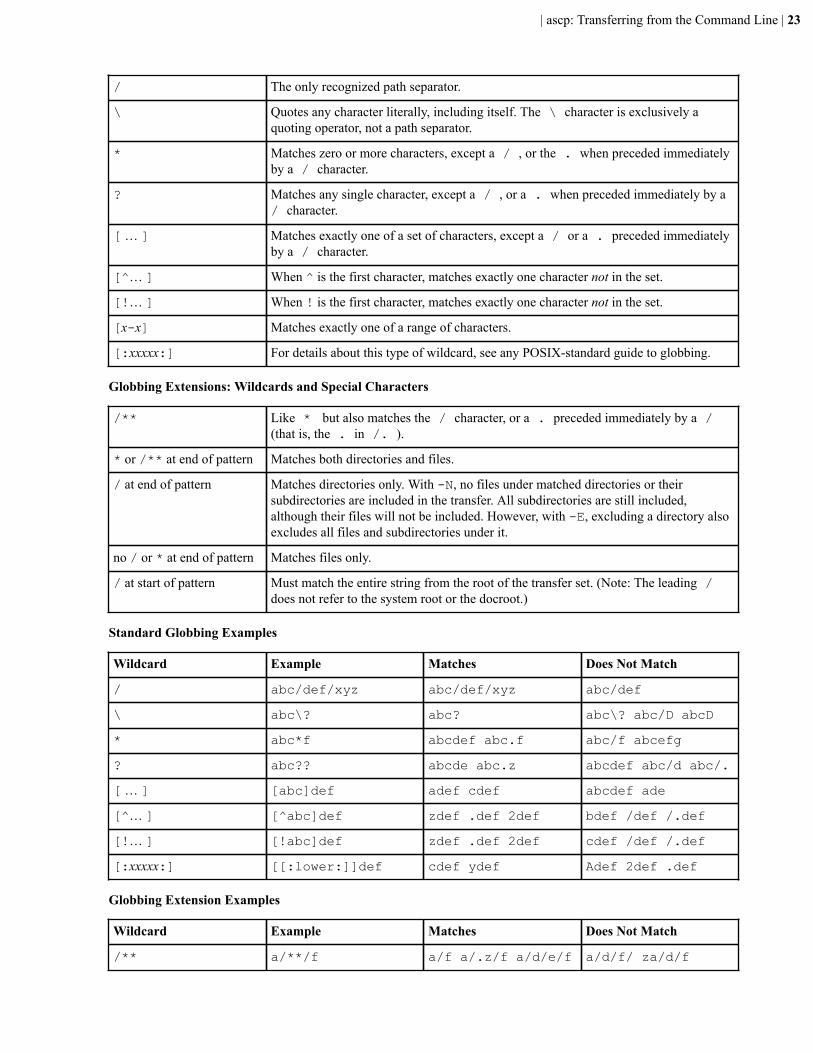
| ascp: Transferring from the Command Line | 23
/ The only recognized path separator.
\ Quotes any character literally, including itself. The \ character is exclusively aquoting operator, not a path separator.
* Matches zero or more characters, except a / , or the . when preceded immediatelyby a / character.
? Matches any single character, except a / , or a . when preceded immediately by a/ character.
[ … ] Matches exactly one of a set of characters, except a / or a . preceded immediatelyby a / character.
[^… ] When ^ is the first character, matches exactly one character not in the set.
[!… ] When ! is the first character, matches exactly one character not in the set.
[x-x] Matches exactly one of a range of characters.
[:xxxxx:] For details about this type of wildcard, see any POSIX-standard guide to globbing.
Globbing Extensions: Wildcards and Special Characters
/** Like * but also matches the / character, or a . preceded immediately by a /(that is, the . in /. ).
* or /** at end of pattern Matches both directories and files.
/ at end of pattern Matches directories only. With -N, no files under matched directories or theirsubdirectories are included in the transfer. All subdirectories are still included,although their files will not be included. However, with -E, excluding a directory alsoexcludes all files and subdirectories under it.
no / or * at end of pattern Matches files only.
/ at start of pattern Must match the entire string from the root of the transfer set. (Note: The leading /does not refer to the system root or the docroot.)
Standard Globbing Examples
Wildcard Example Matches Does Not Match
/ abc/def/xyz abc/def/xyz abc/def
\ abc\? abc? abc\? abc/D abcD
* abc*f abcdef abc.f abc/f abcefg
? abc?? abcde abc.z abcdef abc/d abc/.
[ … ] [abc]def adef cdef abcdef ade
[^… ] [^abc]def zdef .def 2def bdef /def /.def
[!… ] [!abc]def zdef .def 2def cdef /def /.def
[:xxxxx:] [[:lower:]]def cdef ydef Adef 2def .def
Globbing Extension Examples
Wildcard Example Matches Does Not Match
/** a/**/f a/f a/.z/f a/d/e/f a/d/f/ za/d/f

| ascp: Transferring from the Command Line | 24
Wildcard Example Matches Does Not Match
* at end of rule abc* abc/ abcfile
/** at end of rule abc/** abc/.file abc/d/e/ abc/
/ at end of rule abc/*/ abc/dir abc/file
no / at end of rule abc abc (file) abc/
/ at start of rule /abc/def /abc/def xyz/abc/def
Rule Composition
Example Transfer Result
-N rule Includes all files and directories whose names match rule. Because there is no -E, allthe originally specified files and directories are included anyway; in other words, byitself, a -N rule does nothing.
-N rule1 -E rule2 Includes all files and directories whose names match rule1. Excludes all that matchrule2, except those that also matched rule1.
-E rule Excludes all files and directories whose names match rule.
-E rule1 -N rule2 Excludes all files and directories whose names match rule1. Because there is no -Efollowing the -N, all files and directories not already excluded by the preceding -Eare included anyway; in other words, a trailing -N rule does nothing to change theresult.
Testing Your Filter Rules
If you plan to use filtering rules, it's best to test them first. An easy way to test filtering rules, or to learn how theywork, is to set up source and destination directories and use demo.asperasoft.com as the Aspera server:
1. On your computer, create a small set of directories and files that generally matches a file set you typically transfer.Since filenames are all that matter, the files can be small.
2. Place the file set in an accessible location, for example /tmp/src.3. Upload the file set to the Aspera demo server as user "aspera". Specify the demo-server target directory Upload.
You will be prompted for the password, which is "demoaspera":
$ ascp /tmp/src [email protected]:Upload/
4. Create a destination directory on your computer, for example /tmp/dest.5. You can now download your files from the demo server to /tmp/dest, running the ascp commands with -N
and -E to test your filtering rules. For example:
$ ascp -N 'wxy/**' -E 'def' [email protected]:Upload/src/abc/ /tmp/dest
6. Compare the destination directory with the source to determine whether files were filtered as expected.
$ diff -r dest/ src/
The diff output will show the missing (untransferred) files and directories.

| ascp: Transferring from the Command Line | 25
Example Filter Rules
The example rules below are based on running a command such as the following to download a directory AAA fromdemo.asperasoft.com to /tmp/dest:
$ ascp rules [email protected]:Upload/AAA /tmp/dest
The examples below use the following file set:
AAA/abc/defAAA/abc/.defAAA/abc/.wxy/defAAA/abc/wxy/defAAA/abc/wxy/.defAAA/abc/wxy/tuv/defAAA/abc/xyz/def/wxyAAA/wxyfileAAA/wxy/xyx/AAA/wxy/xyxfile
Key for interpreting example results below:
< xxx/yyy = Excludedxxx/yyy = Includedzzz/ = directory namezzz = filename
(1) Transfer everything except files and directories starting with ".":
-N '*' -E 'AAA/**'
Results:
AAA/abc/defAAA/abc/wxy/defAAA/abc/wxy/tuv/defAAA/abc/xyz/def/wxyAAA/wxyfileAAA/wxy/xyx/AAA/wxy/xyxfile< AAA/abc/.def< AAA/abc/.wxy/def< AAA/abc/wxy/.def
(2) Exclude directories and files whose names start with wxy:
-E 'wxy*'
Results:
AAA/abc/defAAA/abc/.defAAA/abc/.wxy/defAAA/abc/xyz/def/< AAA/abc/wxy/def< AAA/abc/wxy/.def< AAA/abc/wxy/tuv/def< AAA/abc/xyz/def/wxy< AAA/wxyfile< AAA/wxy/xyx/
| ascp: Transferring from the Command Line | 26
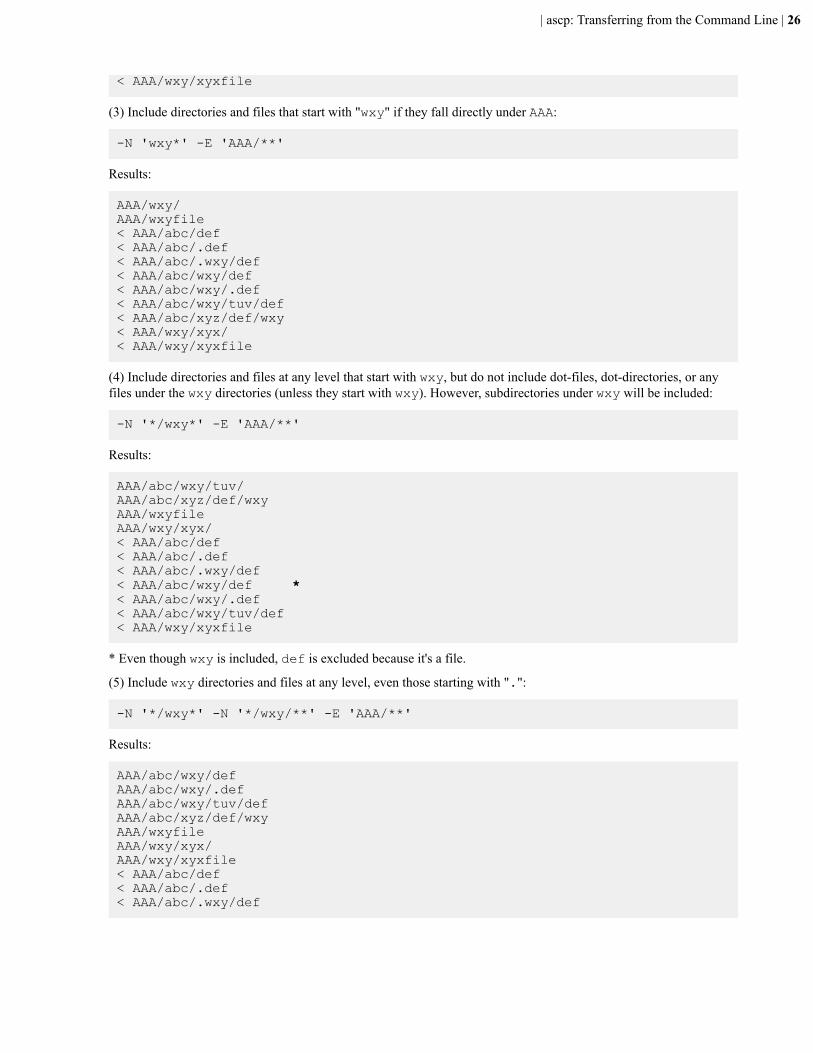
< AAA/wxy/xyxfile
(3) Include directories and files that start with "wxy" if they fall directly under AAA:
-N 'wxy*' -E 'AAA/**'
Results:
AAA/wxy/AAA/wxyfile< AAA/abc/def< AAA/abc/.def< AAA/abc/.wxy/def< AAA/abc/wxy/def< AAA/abc/wxy/.def< AAA/abc/wxy/tuv/def< AAA/abc/xyz/def/wxy< AAA/wxy/xyx/< AAA/wxy/xyxfile
(4) Include directories and files at any level that start with wxy, but do not include dot-files, dot-directories, or anyfiles under the wxy directories (unless they start with wxy). However, subdirectories under wxy will be included:
-N '*/wxy*' -E 'AAA/**'
Results:
AAA/abc/wxy/tuv/AAA/abc/xyz/def/wxyAAA/wxyfile AAA/wxy/xyx/< AAA/abc/def< AAA/abc/.def< AAA/abc/.wxy/def< AAA/abc/wxy/def * < AAA/abc/wxy/.def< AAA/abc/wxy/tuv/def< AAA/wxy/xyxfile
* Even though wxy is included, def is excluded because it's a file.
(5) Include wxy directories and files at any level, even those starting with ".":
-N '*/wxy*' -N '*/wxy/**' -E 'AAA/**'
Results:
AAA/abc/wxy/defAAA/abc/wxy/.defAAA/abc/wxy/tuv/defAAA/abc/xyz/def/wxyAAA/wxyfileAAA/wxy/xyx/AAA/wxy/xyxfile< AAA/abc/def< AAA/abc/.def< AAA/abc/.wxy/def

| ascp: Transferring from the Command Line | 27
(6) Exclude directories and files starting with wxy, but only those found at a specific location in the tree:
-E '/AAA/abc/wxy*'
Results:
AAA/abc/defAAA/abc/.defAAA/abc/.wxy/defAAA/abc/xyz/def/wxyAAA/wxyfileAAA/wxy/xyx/AAA/wxy/xyxfile< AAA/abc/wxy/def< AAA/abc/wxy/.def< AAA/abc/wxy/tuv/def
(7) Include the wxy directory at a specific location, and include all its subdirectories and files, including those startingwith ".":
-N 'AAA/abc/wxy/**' -E 'AAA/**'
Results:
AAA/abc/wxy/defAAA/abc/wxy/.defAAA/abc/wxy/tuv/def< AAA/abc/def< AAA/abc/.def< AAA/abc/.wxy/def< AAA/abc/xyz/def/wxy< AAA/wxyfile< AAA/wxy/xyx/< AAA/wxy/xyxfile
Creating SSH KeysPublic key authentication (SSH Key) is a more secure alternative to password authentication that allows users to avoidentering or storing a password, or sending it over the network. Public key authentication uses the client computerto generate the key-pair (a public key and a private key). The public key is then provided to the remote computer'sadministrator to be installed on that machine.
To log in into other Aspera servers with public key authentication, you need to generate a key-pair for the selecteduser account, as follows:
1. Create a .ssh directory in your home directory if it does not already exist:
$ mkdir /home/username/.ssh
Go to the .ssh folder:
$ cd /home/username/.ssh
2. Run ssh-keygen to generate an SSH key-pair.Run the following command in the .ssh folder to create a key pair. For key_type, specify either RSA (rsa) orED25519 (ed25519). At the prompt for the key-pair's filename, press ENTER to use the default name id_rsa

| ascp: Transferring from the Command Line | 28
or id_ed25519, or enter a different name, such as your username. For a passphrase, you can either enter apassword, or press return twice to leave it blank:
# ssh-keygen -t key_type
Note: When you run ascp in FIPS mode (<fips_enabled> is set to true in aspera.conf), and youuse passphrase-protected SSH keys, you must either (1) use keys generated by running ssh-keygen in a FIPS-enabled system, or (2) convert existing keys to a FIPS-compatible format using a command such as the following:
# openssl pkcs8 -topk8 -v2 aes128 -in id_rsa -out new-id_rsa
3. Retrieve the public key file.The key-pair is generated to your home directory's .ssh folder. For example, assuming you generated the keywith the default name id_rsa:
/home/username/.ssh/id_rsa.pub
Provide the public key file (for example, id_rsa.pub) to your server administrator so that it can be set up foryour server connection.
4. Start a transfer using public key authentication with the ascp command.To transfer files using public key authentication on the command line, use the option -i private_key_file. Forexample:
$ ascp -T -l 10M -m 1M -i ~/.ssh/id_rsa myfile.txt [email protected]:/space
In this example, you are connecting to the server (10.0.0.2, directory /space) with the user account janeand the private key ~/.ssh/id_rsa.
Ascp FAQs1. How do I control the transfer speed?
You can specify a transfer policy that determines how a FASP transfer utilizes the network resource, and you canspecify target and minimum transfer rates where applicable. In an ascp command, use the following flags tospecify transfer policies that are fixed, fair, high, or low:
Policy Command template
Fixed--policy=fixed -l target_rate
Fair--policy=fair -l target_rate -m min_rate
High--policy=high -l target_rate -m min_rate
Low--policy=low -l target_rate -m min_rate
The policies have the following characteristics:
• fixed – Attempts to transfer at the specified target rate, regardless of the actual network capacity. Thispolicy transfers at a constant rate and finishes in a guaranteed time. This policy typically occupies most ofthe network's bandwidth, and is not recommended in most file transfer scenarios. In fixed mode, a maximum(target) rate value is required.

| ascp: Transferring from the Command Line | 29
• high – Monitors the network and adjusts the transfer rate to fully utilize the available bandwidth up to themaximum rate. When congestion occurs, a it transfers at a rate twice of a session with fair policy. In this mode,both the maximum (target) and the minimum transfer rates are required.
• fair – Monitors the network and adjusts the transfer rate to fully utilize the available bandwidth up to themaximum rate. When other types of traffic build up and congestion occurs, it shares bandwidth fairly bytransferring at an even rate. In this mode, both the maximum (target) and the minimum transfer rates arerequired.
• low – Similar to fair mode, the low policy uses the available bandwidth up to the maximum rate, but is muchless aggressive when sharing bandwidth with other network traffic. When congestion builds up, the transferrate is reduced to the minimum rate until other traffic retreats.
2. What transfer speed should I expect? How do I know if something is "wrong" with the speed?Aspera's FASP transport has no theoretical throughput limit. Other than the network capacity, the transfer speedmay be limited by rate settings and resources of the computers. To verify that your system's FASP transfer canfulfill the maximum bandwidth capacity, prepare a client machine to connect to this computer, and test themaximum bandwidth.
Note: This test typically occupies most of a network's bandwidth. Aspera recommends this test be performed on adedicated file transfer line or during a time of low network activity.
On the client machine, start a transfer with fixed bandwidth policy. Start with a lower transfer rate and graduallyincrease the transfer rate toward the network bandwidth (for example, 1 MB, 5 MB, 10 MB, and so on). Monitorthe transfer rate; at its maximum, it should be slighly below your available bandwidth:
$ ascp -l 1m source-file destination
To improve the transfer speed, also consider upgrading the following hardware components:
Component Description
Hard disk The I/O throughput, the disk bus architecture (such as RAID, IDE, SCSI, ATA, and FiberChannel).
Network I/O The interface card, the internal bus of the computer.
CPU Overall CPU performance affects the transfer, especially when encryption is enabled.
3. How do I ensure that if the transfer is interrupted or fails to finish, it will resume without retransferring thefiles?Use the -k flag to enable resume, and specify a resume rule:
• -k 0 – Always retransfer the entire file.• -k 1 – Check file attributes and resume if the current and original attributes match.• -k 2 – Check file attributes and do a sparse file checksum; resume if the current and original attributes/
checksums match.• -k 3 – Check file attributes and do a full file checksum; resume if the current and original attributes/
checksums match.
Corruption or deletion of the .asp-meta file associated with an incomplete transfer will often result in apermanently unusable destination file even if the file transfer resumed and successfully transferred.
4. How does Aspera handle symbolic links?The ascp command follows symbolic links by default. This can be changed using --symbolic-links=method with the following options:
• follow – Follow symbolic links and transfer the linked files.• copy – Copy only the alias file. If a file with the same name exists on the destination, the symbolic link is not
copied.

| Appendix | 30
• copy+force – Copy only the alias file. If a file with the same name exists on the destination, the symboliclink replaces the file. If the file of the same name on the destination is a symbolic link to a directory, it is notreplaced.
• skip – Skip the symbolic links.
Important: On Windows, the only option is skip.5. What are my choices for overwriting files on the destination computer?
In ascp, you can specify the --overwrite=method rule with the following method options:
• never – Never overwrite the file. However, if the parent folder is not empty, its access, modify, and changetimes may still be updated.
• always – Always overwrite the file.• diff – Overwrite the file if it is different from the source. If a complete file at the destination is the same as
the source then it is not overwritten. Partial files are overwritten or resumed depending on the resume policy.• diff+older – Overwrite the file if it is older and different than the source.• older – Overwrite the file if its timestamp is older than the source timestamp.
Important: If the overwrite method is diff or diff+older, difference is determined by the resume policy (-k{0|1|2|3}). If -k 0 or no -k is specified, the source and destination files are always considered differentand the destination file is always overwritten. If -k 1, the source and destination files are compared based onfile attributes (currently file size). If -k 2, the source and destination files are compared based on sparsechecksum. If -k 3, the source and destination files are compared based on full checksum.
Appendix
Restarting Aspera Services
Aspera Central
If Aspera Central is stopped, or if you have modified the <central_server> or <database> sections inaspera.conf, then you need to restart the service.
Run the following command in a Terminal window to restart asperacentral:
# /etc/init.d/asperacentral stop# /etc/init.d/asperacentral start
Aspera NodeD
Restart Aspera NodeD if you have modified any setting in aspera.conf.
Run the following commands to restart asperanoded:
# /etc/init.d/asperanoded restart
Testing and Optimizing Transfer PerformanceTo verify that your system's FASP transfer is reaching the target rate and can use the maximum bandwidth capacity,prepare a client machine to connect to this server. For these tests, you can transfer an existing file or file set, or youcan transfer uninitialized data in place of a source file, which you can have destroyed at the destination, eliminatingthe need to read from or write to disk and saving disk space.

| Appendix | 31
To send random data in place of a source file, run the following command:
# ascp --mode=send --user=username --host=host_ip_address faux:///fname?fsize target_path
where fname is the name assigned to the file on the destination and fsize is the number of bytes to send. fsize can beset with modifiers (k/K, m/M, g/G, t/T, p/P, or e/E) up to 9 EB.
To send a file but not save the results to disk at the destination, run the following command:
# ascp --mode=send --user=username --host=host_ip_address source_file1 faux://
To send random data and not save the results to disk, run the following command:
# ascp --mode=send --user=username --host=host_ip_address faux:///fname?fsize faux://
For usage examples, see Ascp General Examples on page 18. Once you start a transfer from the command line,you can monitor it from the GUI.
1. Start a transfer with Fair transfer policy and compare the transfer rate to the target rate.On the client machine, open the user interface and start a transfer (either from the GUI or command line). ClickDetails to open the Transfer Monitor.
To leave more network resources for other high-priority traffic, use the Fair policy and adjust the target rate andminimum rate by sliding the arrows or entering values.
2. Test the maximum bandwidth.
Note: This test will typically occupy a majority of the network's bandwidth. Aspera recommends performing it ona dedicated file transfer line or during a time of very low network activity.
Use Fixed policy for the maximum transfer speed. Start with a lower transfer rate and increase gradually towardthe network bandwidth.
To improve the transfer speed, you may also upgrade the related hardware components:
Component Description
Hard disk The I/O throughput, the disk bus architecture (e.g. RAID, IDE, SCSI, ATA, and FiberChannel).
Network I/O The interface card, the internal bus of the computer.
CPU Overall CPU performance affects the transfer, especially when encryption is enabled.
Log FilesThe log file includes detailed transfer information and can be useful for review and support requests.
The log file is found in /var/log/aspera.log
Product LimitationsDescribes any limitations that currently exist for Aspera transfer server and client products.
• Path Limit: The maximum number of characters that can be included in any pathname is .

| Technical Support | 32
Technical Support
Support Websites
For an overview of IBM Aspera Support services, go to https://asperasoft.com/company/support/.
To view product announcements, webinars, and knowledgebase articles, as well as access the Aspera SupportCommunity Forum, sign into the IBM Aspera Support site at https://www.ibm.com/mysupport/ using your emailaddress (not your company Aspera credentials), or set up a new account. You can click on a heading then click Followto receive notifications when new knowledgebase articles are available; if you follow RELEASE NOTES under aspecific product, you will be automatically notified of new releases.
Personalized Support
You may contact an Aspera support technician 24 hours a day, 7 days a week, through the following methods, with aguaranteed 4-hour response time.
If you have an emergency, create a ticket using the Support Request Form with as many details as you haveavailable and then call. If you are asked to leave a voice message, include the ticket number.
Email [email protected]
Phone (North America) +1 (510) 849-2386, option 2
Phone (Europe) +44 (0) 207-993-6653 option 2
Phone (Singapore) +81 (0) 3-4578-9357 option 2
Support Request Form https://support.asperasoft.com/anonymous_requests/new/
Legal Notice
© 2005-2018 Aspera, Inc., an IBM Company. All rights reserved.
Licensed Materials - Property of IBM5725-S57© Copyright IBM Corp. , 2005 2018. Used under license.US Government Users Restricted Rights - Use, duplication or disclosure restricted by GSA ADP Schedule Contractwith IBM Corp.
Aspera, the Aspera logo, and FASP transfer technology are trademarks of Aspera, Inc., registered in the UnitedStates. Aspera Connect Server, Aspera Drive, Aspera Enterprise Server, Aspera Point-to-Point, Aspera Client, AsperaConnect, Aspera Cargo, Aspera Console, Aspera Orchestrator, Aspera Crypt, Aspera Shares, the Aspera Add-in forMicrosoft Outlook, Aspera FASPStream and Aspera Faspex are trademarks of Aspera, Inc. All other trademarksmentioned in this document are the property of their respective owners. Mention of third-party products in thisdocument is for informational purposes only. All understandings, agreements, or warranties, if any, take place directlybetween the vendors and the prospective users.