architectural stone cladding system - professional...
TRANSCRIPT

ASK ABOUT OUR OTHER CERTAINTEED® PRODUCTS AND SYSTEMS:
www.certainteed.com http://blog.certainteed.com
Be Certain[ ]. ™
Installation Guidelines
CertainTeed
Architectural Stone Cladding System

NOTE: These instructions describe and
illustrate the steps involved in installing CertainTeed
The purpose is to provide detailed information and
how-to tips that will simplify the installation process.
CertainTeed shall not accept any liability or
responsibility under its written warranty for failure
caused by application that does not meet our
minimum requirements for proper installation.
Building codes and regulations vary
throughout the country. Be sure to check with
your local code official or governing body for
the building requirements in your area.
These requirements are outlined throughout this
guide. Any deviations from these requirements
should be approved in writing by
CertainTeed Corporation.
Top Installation Tips
Read the complete installation guidelines before
beginning your project.
1. Caution: Use gloves when handling stone panels and
accessories. Metal inserts are sharp!
2. Use a wet saw (tile or brick saw with a continuous rim
diamond blade and with a steady circulation of water)
for cutting and an electric angle grinder for shaping.
For cutting, drilling or grinding stone, a NIOSH N95 dust
mask, hearing and eye protection are required to be worn.
3. A flat, level wall surface with either 7/16" OSB or 1/2" plywood
sheathing is required for product installation. Use composite
shims as needed to compensate for wall imperfections.
4. Install using #8 x 1.5" stainless steel wood screws (pan or truss
head). DO NOT USE NAILS.
5. It is very important to keep panels, corners and accessories
level at all times.
a. Place a short level on EVERY panel and accessory during
installation. Use a long level to check if entire course is level.
b. Check level in both directions on each corner piece.
c. If a panel is not level, try:
into place.
6. When starting a new course of panels, stagger the vertical
joints of the panels at least 3" to 5" from the previous course.
7. Vary the use of all three widths of panels within a course and
from course-to-course to give a natural appearance and avoid
8. To face fasten partial panels or panels where the fastening
flange has been removed, pre-drill through a seam between
stones and use #8 x 2.5" stainless steel wood screws (pan or
truss head).
9. Do not stack cartons more than six high or double
stack pallets.
10. Handle the STONEfaçade product cartons with care.
Do not carry cartons by the strapping - hold the cartons
from underneath. Do not drop cartons.
Architectural Stone Cladding System

1
Table of Contents
Section 1 — Introduction ..................................................................................................................................... 2
Section 2 — Estimating Material Needed .......................................................................................................... 3
Section 3 — Tools and Equipment Required ..................................................................................................... 5
Section 4 — Preparing for Installation................................................................................................................ 6
Section 5 — Cutting and Fastening .................................................................................................................... 8
Section 6 — Installing Starter Strip .................................................................................................................. 10
Section 7 — Installing Corners.......................................................................................................................... 11
Outside Corners ............................................................................................................................................. 11
Inside Corners ................................................................................................................................................ 12
Section 8 — Installing Sills, Light Boxes and Electrical Boxes ...................................................................... 13
Section 9 — Installing STONEfaçade over Wood Substrate .......................................................................... 14
Installing the First Course ................................................................................................................................ 14
Installing Subsequent Courses ........................................................................................................................ 15
Installing Around Openings ............................................................................................................................. 15
Installing Partial Panels ................................................................................................................................... 16
Installing Around Penetrations ......................................................................................................................... 16
Finishing the Wall ............................................................................................................................................ 17
Transitioning from STONEfaçade to Another Cladding .................................................................................... 17
Installing Finishing Touches ............................................................................................................................. 17
Section 10 — Installing STONEfaçade over Poured Concrete and Concrete Masonry Units ..................... 18
Tools Required ................................................................................................................................................. 18
Fasteners ........................................................................................................................................................ 18
Examples of Acceptable Fasteners .................................................................................................................. 18
Installation Steps ............................................................................................................................................. 19
Install Panels ................................................................................................................................................... 20
Face Fastening to Poured Concrete and Concrete Masonry Units ................................................................... 20
Section 11 — Installing STONEfaçade over Foam Sheathing ........................................................................ 21
Section 12 — Replacing Damaged Panels ....................................................................................................... 22
Section 13 — Care and Maintenance ............................................................................................................... 23
Easy to Install Colors Low-Maintenance 20-Year Ltd WarrantySmart InvestmentPanelized One-of-a-KindNo Mortar RainscreenSelected by Hand
Flat Panels
2" average thickness and available in four colors and 3 pre-mixed widths:
Each panel features a continuous fastening flange.
Accessories Corners
Left corners and right corners.
Long return dimensions = 8", 10.5" and 12" width x 8" height x 2" average thickness.
Continuous fastening flange with a beveled perimeter.
Sills
24" x 3-3/8" width available in two colors.
Electrical and light boxes
8" width x 16" height color-matched to panels.
Fastening flange, integrated top and bottom courses for easy installation.
Fully-Integrated Rainscreen
STONEfaçade is the only manufactured stone cladding product with this
important feature. The superior drainage it provides prevents moisture
from accumulating in the wall cavity, where it can lead to mold growth
and structural damage.
STONEfaçade panel. In addition to channeling moisture away from the wall,
it strengthens the panel for added reinforcement and protection against the
inevitable bumps and bruises that occur in transit, at the job site
and during installation.
A Complete System

2 3
Section 2 — Estimating Material Needed
Starter Strip
to be installed.
number of pieces of starter strip needed.
Flat Panels
To calculate the number of cartons required:
get the total wall area.
doors, to get the net wall area.
panels required.
higher scrap rate in gable areas based on roof pitch).
Outside Corners
For corners where stone will be applied to only one wall:
feet of corners.
of corners required. (only left or right corners are required,
NOT both).
For corners where the stone will be applied to the adjacent wall
surface (BOTH left and right corners are required):
feet of corners.
number of corners required. Order half of this quantity as left
corners and half as a right corners.
Inside Corners
Inside corners are constructed by mitering or notching flat panels
and do not need to be ordered separately. See instructions for
creating inside corners on page 12.
Sills
number of sills required.
Section 1 — Introduction
Plan Your Work, Then Work Your Plan.
That’s the key to success with any project, and it’s doubly
true when it comes to installing our STONEfaçade™ panels
and accessories. If you use the right materials and the right
tools in the right order, you’ll complete installations in less time,
with less effort, and with far greater satisfaction.
Since you’re using CertainTeed products, you’ve already
premium quality, rugged durability and outstanding appearance.
Quite simply, STONEfaçade is made to look great on the day its
installed and for years after.
The second key to success — using the proper tools,
techniques and procedures — is covered in this booklet.
As you’ll see by scanning the table of contents, this booklet
guides you through every step of the installation process,
and while you’re working — keep in mind the most important
rule of thumb for successful stone installation: Only install
STONEfaçade on a flat, even surface, and stay level:
each subsequent course depends on the previous
course being level.
and again throughout this booklet. This is perhaps the most
important instruction in the booklet.
NOTE: No instruction booklet can anticipate all the questions
we’ve focused on the tools and techniques used to complete
typical installations. Where appropriate, we’ve also included
If you encounter a unique installation problem not covered in this booklet, we suggest you call our Sales Support Group at 1-800-233-8990.
Rectangular Wall Surfaces
Measure height (excluding gables)
Measure width (including doors and windows)
____________ X ____________ = ____________
(height) (width) (surface area)
Repeat for remaining walls.
Triangular Gable and Surfaces
Measure height of center (add 1" to allow for waste)
Measure width and divide by half
____________ X ____________ = ____________
(height) (1/2 width) (surface area)
Repeat for remaining walls.
Note: Lower pitch roofs will produce more waste than higher pitch roofs.

4 5
Section 3 — Tools and Equipment Required
Always follow manufacturers’ power tool safety guidelines and
wear proper safety equipment.
Safety
Hand Tools and Miscellaneous
recirculating pump on a wet saw)
Power Tools
dust production)
— with appropriate continuous rim wet diamond saw blade
— Alternately, a dry saw with a continuous rim diamond blade
or abrasive masonry blade can be used. Caution: When
dry cutting, dust will become airborne. Only cut stone
outdoors or in a well-ventilated place. A respirator or a
NIOSH N95 dust mask is required.
— with OSHA-approved guard
— with a diamond wheel or masonry abrasive
wheel for grinding
— 7/32" x 3" masonry bit for drilling pilot holes
— 3/8" masonry bit for drilling countersinking holes
to damage the face of the panel while driving screws
straight into the wall)
Section 2 — Estimating Material Needed (cont'd)
Electrical and Light Boxes
Electrical boxes and light boxes can be purchased individually.
Screws
NOTE: Screws with a Torx™, square or phillips drive head are
recommended to avoid stripping.
For hanging panels and accessories using #8 x 1.5" stainless
steel wood screws (pan or truss head):
area by 2.7 to get the total number of screws required.
For face fastening panels and accessories using #8 x 2.5"
stainless steel wood screws (pan or truss head):
with stone and multiply by 2.
above the door.
the total number of screws required.
Caulk
Allow for one tube of caulk per 500 square feet of wall surface
for use in hiding any holes left when face fastening panels.
Use color-matched exterior grade sanded caulk.
Mortar
Mortar is not required when installing STONEfaçade. However, a
the stone and the adjacent materials are not completely aligned.
Composite Shims
Composite shims are used to correct any wall surface areas
that are not level. Order as needed based on the condition of the
wall surface to be covered.
Flashing
Occasionally it may be necessary to use a dark colored flashing
to hide the housewrap or underlayment behind the stone. Use a
durable, non-corrosive flashing that is non-reactive with concrete
or stainless steel products.
Component Amount Req’d Unit of Measure
Starter Strip Pieces
Panels Cartons
Corners (right hand) Pieces
Corners (left hand) Pieces
Sills Pieces
Light Boxes Pieces
Electrical Boxes Pieces
#8 1-1/2" Stainless Steel Wood Pieces Screw (Pan or Truss Head)
#8 2-1/2" Stainless Steel Wood Pieces Screw (Pan or Truss Head)
Color-Matched Exterior Tubes Grade Sanded Caulk
Composite Shims Pieces
Flashing Rolls
Recommended Screws SpecificationsStainless Steel Grade (CertainTeed Recommends)
(Acceptable Alternatives)
Screw Specs
Do Not Use Nails. Stainless steel screws provide better
and can be removed more easily during installation
6 7
Section 4 — Preparing for Installation (cont’d)
design professional.
NOTE: If removing siding prior to installing STONEfaçade, remove
any old fasteners that may create uneven conditions on the wall.
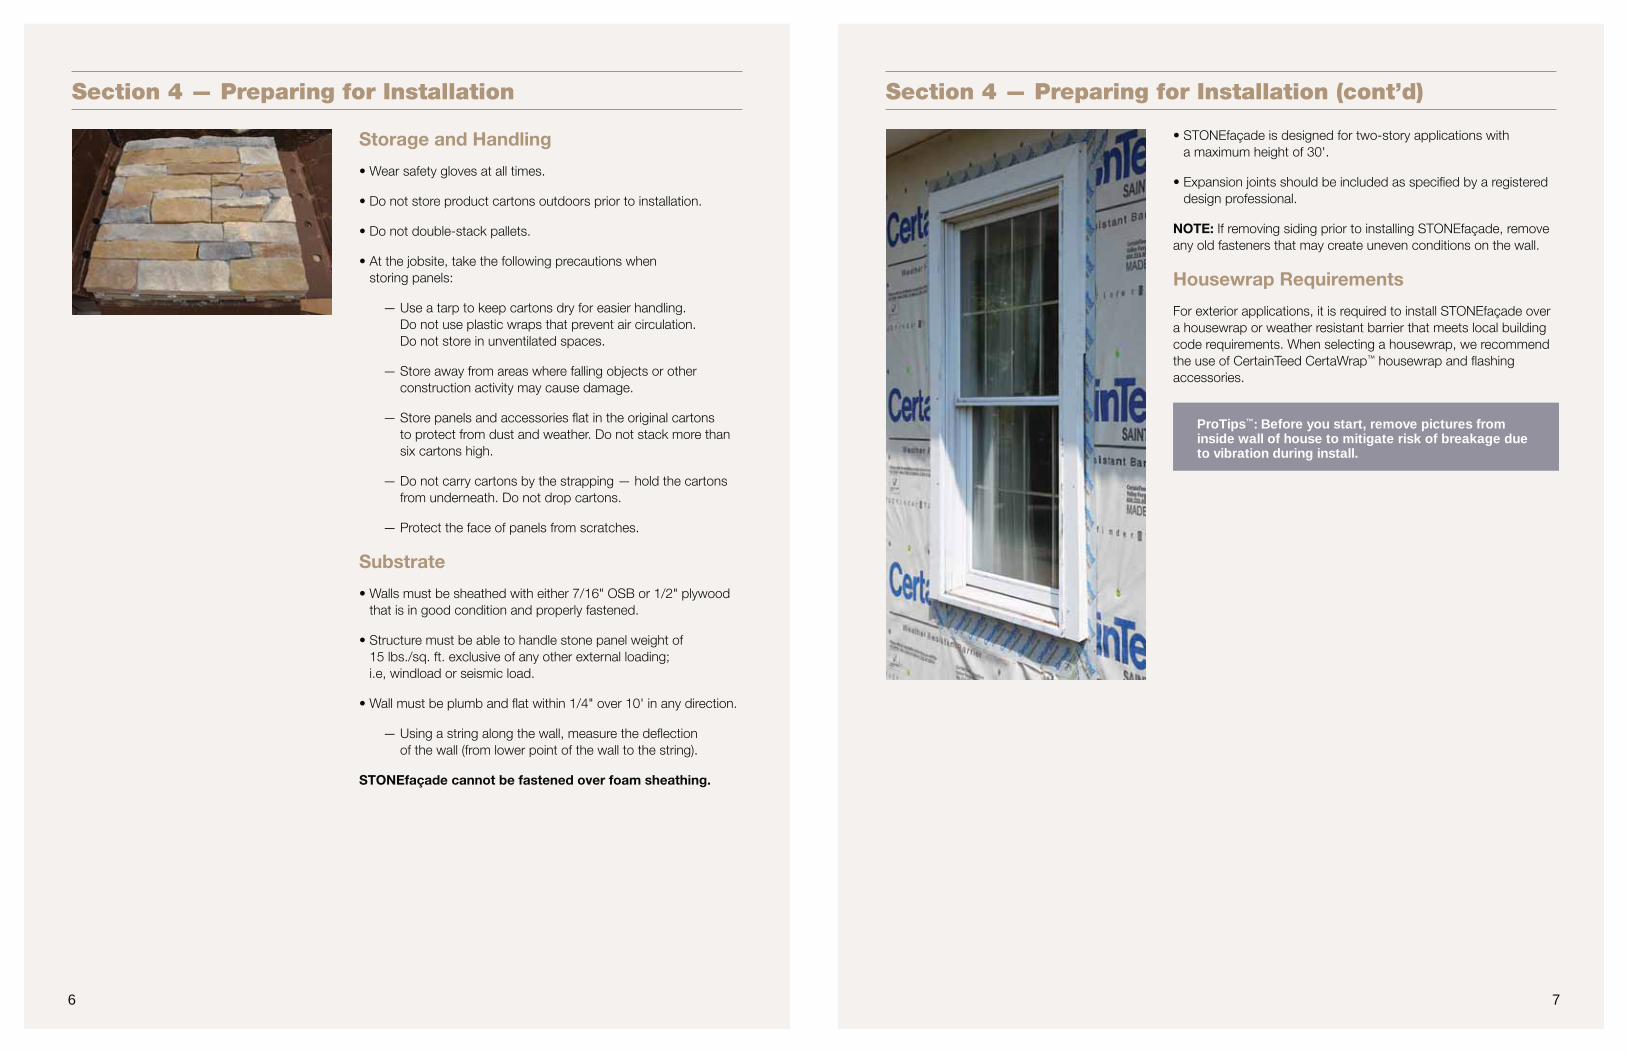
Housewrap Requirements
For exterior applications, it is required to install STONEfaçade over
a housewrap or weather resistant barrier that meets local building
code requirements. When selecting a housewrap, we recommend
the use of CertainTeed CertaWrap™ housewrap and flashing
accessories.
ProTips™: Before you start, remove pictures from inside wall of house to mitigate risk of breakage due to vibration during install.
Section 4 — Preparing for Installation
Storage and Handling
storing panels:
— Use a tarp to keep cartons dry for easier handling.
— Store away from areas where falling objects or other
construction activity may cause damage.
— Store panels and accessories flat in the original cartons
six cartons high.
— Protect the face of panels from scratches.
Substrate
that is in good condition and properly fastened.
15 lbs./sq. ft. exclusive of any other external loading;
i.e, windload or seismic load.
— Using a string along the wall, measure the deflection
of the wall (from lower point of the wall to the string).
STONEfaçade cannot be fastened over foam sheathing.

8 9
Section 5 — Cutting and Fastening (cont’d)
Cutting with a Miter or Chop Saw
While not recommended, a saw with dry diamond blade or
abrasive masonry blade can be used to cut STONEfaçade panels
and accessories. (Consult the saw manufacturer’s owner’s manual
prior to beginning use for instructions on proper operation,
maintenance, and safety.)
Cutting Holes
Holes can be made with drill using a masonry bit or masonry hole
saw, or a grinder with a masonry blade.
Cutting the Metal Insert
Use tin snips or a grinder to cut the metal insert.
Fastening
Use a cordless impact screwdriver or cordless drill. Using an
impact driver is recommended as it makes driving screws easier
and lessens chance of stripping screw heads. When installing
following fastening schedule:
When STONEfaçade panels and/or accessories are cut or
face-fasteners as follows:
bit. If the masonry drill bit runs into the stainless steel insert
(which is integrated throughout the panel), you may not be able
to drill through this seam of the panel. Patch the hole using
color-matched exterior grade sanded caulk, and then try another
location on the panel for drilling your hole.
masonry bit, making sure to leave a minimum of 1/2" of stone
behind the head of the screw. If the screw has minimal or no
engagement into the substrate, remove the screw and re-drill
the countersinking hole deeper.
crack the panel.
screw head.
Section 5 — Cutting and Fastening
Warning: When stone panels are cut, drilled or shaped, it will
create dust. This dust may contain crystalline silica, which
can pose a health risk. For cutting drilling or grinding stone,
a NIOSH N95 dust mask, hearing and eye protection are
required to be worn.
Cutting with a Wet Saw
Warning:
segmented blade for cutting STONEfaçade. Segmented blades
can cause cracking and chipping of panels.
the bottom panel locking tabs because these tabs will vibrate
during cutting and may crack the panel.
owner’s manual prior to beginning use for instructions on proper
operation, maintenance, and safety.)
clean cut edges of panels by dipping or rinsing them in a 5-gallon
bucket of clean water after cutting.
helps keep the panels clean.
Cutting with an Electric Hand Grinder
Trimming and staggered cuts are best made with a hand grinder
with OSHA approved guard and a diamond wheel or masonry
abrasive wheel for grinding. (Consult the hand grinder
manufacturer’s owner’s manual prior to beginning use for
instructions on proper operation, maintenance, and safety.)
ProTip™: Attempt to minimize the number of cuts made to stone panels and accessories. When making a cut, position the cut on the panel or accessory so that it faces away from entrances or walkways to make cuts less noticeable
ProTip™: Try and position panel so when cutting that
steel insert. Having the last path through stone rather than steel helps sharpen the blade.
Panel/Accessory # of Screws
Panels measuring 14" or wider 3
Panels less than 14" wide 2
Corners 2
Light Boxes 4
Electrical Boxes 4
Avoid cutting factory edges in high visability areas. Cut from the less visable side.
Fastening Schedule for Panels
Panels 14" or greater in total length
must have a minimum of three (3) fasteners.
Fastener placement shall be as follows,
Two (2) of the fasteners are to be placed within three
inches (3") of either end of the panel (one on each end).
The third fastener shall be fastened within three inches
(3") of the center point between the other two fasteners.
Additional fasteners can be placed wherever is needed
to properly secure the panel to the wall.
Panels under 14" in total length
must have a minimum of two (2) fasteners.
Fastener placement shall be as follows.
Two (2) of the fasteners are to be placed within three
inches (3") of either end of the panel (one on each end).
Additional fasteners can be placed wherever is needed
to properly secure the panel to the wall.
If a panel has less than 2 holes in the fastening
flange arrangements with mating panels must be
made to accommodate a longer panel length such
that no individual panel on the wall has less than
2 holes in the fastening flange.
Notes: All fasteners are to be place in the holes in the
fastening flange. The length of the panel is considered

Section 7 — Installing Corners
Starting at the bottom of the wall, install corners and any other
accessories (electrical box, etc.) on the course you are working
square. Use composite shims, if needed, to compensate for
uneven walls.
Outside Corners
(stone applied to only one wall)
one type
of corner (left or right), never both.
back side of each corner that will be mating with the starter strip.
applications the long return will always be applied to the surface
where the stone is to be applied.
be sure the corner is level in both directions. If it is not possible
to level in both directions, always make sure that the long return
is level.
the alignment of vertical seams.
Outside Corners
(stone applied to adjacent wall surfaces)
BOTH left and
right corners
back side of each corner that will be mating with the starter strip.
applications, alternate the wall that the long return is applied to
using both left and right hand corners as you work up the wall.
be sure the corner is level in both directions. If it is not possible
to level in both directions, always make sure that the long
return is level.
corner. Alternate both the corner widths and the walls that the
long return is applied to, weaving them up the wall to avoid the
alignment of vertical seams.
10 11
Section 6 — Installing Starter Strip
Warning: Cut edges of starter strip are sharp. Wear gloves when handling.
2" above a paved surface. Check local building codes to verify
proper clearances for your area. We recommend using a dark
™ starter strip every 8" to 10" using
#8 1-1/2" stainless steel wood screws (pan or truss head).
Screw fasteners tight to wall.
strips back 1/2" from the corner on each side to allow for
appropriate alignment of the corner pieces.

12 13
Section 8 — Installing Sills, Light Boxes and Electrical Boxes
Sills
aesthetics. Use the side tab screw flanges whenever possible to
eliminate sill rocking.
butt together.
lying flat on the saw table before cutting.
Light Boxes and Electrical Boxes
Warning: Verify that power has been disconnected. Have a
standard light and electrical boxes as an ornamental covering.
Single Course Design
The single course can be added before or during panel installation.
Surrounding panels will need to be notched around the box.
When installed, multicourse light and electrical boxes are
designed to span two vertical courses.
1. Place the box over the outlet and measure how much is needed
to cut off the bottom of the mounting box.
2. After cutting, place the box back over the outlet and measure
16" (the height of two courses) up from the edge of the cut
you just made and make a mark.
3. Cut off this top section and fasten using two #8 1-1/2"
stainless steel wood screws (pan or truss head) on each
side of the box.
When installing the next course of stone over a light or electrical
box it is necessary to either remove the bevel from the area on the
next course panel where it will mate with the top of the mounting
box or grind away the top of the mounting box to allow the next
course to mate properly.
Section 7 — Installing Corners (cont’d)
Inside Corners
Inside corners are created using regular panels. There is more than
chance of having any housewrap showing through. An attractive
alternative is to weave the federal corner by alternating the
butting panels from side-to-side as you move up the wall.
return using color-matching trim coil and a brake
(shown at left).
stone panels to butt within 1/8" of trim board.
appearance (shown at left).
When Mating Stone Wall
with an Adjacent Vinyl Siding
When one corner is vinyl siding leave 1/8" gap between stone and
vinyl to allow for expansion.
Transitioning Vertically
to Alternate Cladding Materials
If installing corners that will have a vertical transition with another
type of cladding, you will use all of the same type of corner
(left hand or right hand) but use different widths to stagger the
offset as you move up the wall.
ProTip™: Install STONEfaçade prior to installing alternate cladding materials or trim as it is easier to
STONEfaçade.
Three sills required on this window. Center and cut middle sill to avoid cut ends on end (most visible) sills.
Method 1
Method 2
Method 5
Cut
Cut
16"
1. 2.
ProTips™: Color matched sanded caulk can be used if desired to hide screw heads or small gaps like an 1/8" gap between stone and PVC trim around windows or doors.

14 15
Section 9 — Installing STONEfaçade over Wood Substrate
Installing the First Course
back side of each panel that will be mating with the starter strip
using snips or a hand grinder. Make sure you actually cut off the
tabs rather than trying to bend them out of the way, which could
damage the panel.
against the corner or trim.
aligned with the corner or trim. Use a level on EVERY panel or
accessory to ensure that the panels stay level from panel to panel
and course-to-course.
screws (pan or truss head). Position screws evenly across the
fastening flange of the panel. Consult the fastening schedule on
page 9 for required number of fasteners per panel.
randomly), position it into the starter strip and slide to mate
snugly together without leaving an unsightly gap.
with the previous panel.
guidance. Step back from the wall frequently and check
the look of your installation. Avoid repeating pattern
(same staggering and/or same panel width.
ProTip™: Use a hand grinder with diamond tip blade to remove the tabs.
ProTip™: When installing panels, it is sometimes
mating. Install panels of varying widths to avoid alignment of vertical seams (which makes the individual panels more visible and less natural looking).
-fore proceeding, since each subsequent course will only be as level as the previous courses. Unleveled panels can lead to unsightly horizontal gaps between courses.
Poor choice of mating panels.
Creates a random, natural appearance.
Section 9 — Installing over Wood Substrate (cont’d)
Installing Subsequent Courses
3"-5" offset of the vertical panel joints of the previous course by
randomly alternating panel widths.
position. Use a rubber mallet to tap into place. The mating panel
properly.
proceeding with the next panel.
these instructions on pg. 9.
a 1/8" clearance between stone and PVC millwork to allow for
expansion.
box must be done when the measurement from the top of the
course of siding is less than 12" vertically from the center of the
on pg.13.
adjustments to get level can be made by raising the panel with
your installation. Correct any issues before proceeding with
subsequent courses.
Installing Around Openings
Trim installed around openings should project out from the wall
a minimum of 2". Trim out window and door sections using two
layers of 5/4 nominal thickness Restoration Millwork® PVC trim.
Under windows use stone sills or PVC trim. Leave a 1/8" gap
between stone and millwork to allow for expansion. Use a wet
saw to notch panel around a window or door.

16 17
Section 9 — Installing over Wood Substrate (cont’d)
for guidance.
Finishing the Wall
For new two-story home construction it is recommended to
during installation to allow room for the house to settle (band board
shrinkage) and to keep the top course of the stone panels from
can be used to hide the fastening flange of the top course.
manual for guidance.
Transitioning from STONEfaçade
to Another Cladding
Vertical transitions
PVC trim or vinyl accessories such as butted j-channels can be
used to transition between claddings.
J-Channel shown at left used for vertical transition with vinyl.
Horizontal Transitions
When transitioning from stone to other cladding materials, make
sure to properly flash the joint according to applicable building
codes in your area. Use the guiding principle of diverting the water
down, out and away from the structure.
installation instructions.
Installing Finishing Touches
to stone panels provided that the proper hardware for mounting
into masonry is used. Use a masonry bit to drill holes and
avoid drilling in between seams in the stones when possible.
Follow the manufacturer’s instructions for mounting to stone or
masonry products.
Section 9 — Installing over Wood Substrate (cont’d)
Installing Partial Panels
and slide to mate into the previous panel on the course.
snugly together without leaving an unsightly gap.
with the previous panel.
fastening flange at the top or the rainscreen tabs at the bottom
have been removed, install face fasteners as follows:
masonry bit. If the masonry drill bit runs into the stainless
steel insert (which is integrated throughout the panel),
you may not be able to drill through this seam of the
panel. Patch the hole using color-matched exterior grade
sanded caulk, and then try another location on the panel
for drilling your hole.
masonry bit, making sure to leave a minimum of 1/2" of
stone behind the head of the screw. If the screw has
minimal or no engagement into the substrate, remove the
screw and re-drill the countersinking hole deeper.
will crack the panel.
— Use color-matched exterior grade sanded caulk to cover
the screw head.
Installing Around Penetrations
to be cut around onto a piece of cardboard or scrap wood
(shown at left).
stone panel.
out the shape.
ProTip™: A piece of starter strip can be used to lock in the bottom of the panel when going over windows and
prior to placing panels on the starter strip
ProTip™: Consider adding a gutter extension to avoid splashing water on STONEfaçade panels.
18 19
Section 10 — Installing over Poured Concrete and Concrete Masonry Units
Tools Required
removed) a 1/4" masonry bit and a 1/2" masonry bit
Fasteners
fastening hem.
Examples of Acceptable Fasteners Include:
(TTN25134HSS) (used for testing)
(TTN25114HSS)
(SHW4-114)
Section 10 — Installing over Poured Concrete and Concrete Masonry Units (cont’d)
Note: Fastening to cement masonry units will require larger
screws like those listed on page 18. These screws are too large in
diameter to pass through the holes in the fastening flange, so the
holes will need to be enlarged to accommodate the larger screws.
Installation Steps
1. Install starter strip.
b) Locate and level starter strip on wall at least 4" above
building codes.
c) Transfer hole centers to concrete wall with punch.
e) Install starter strip by using stainless masonry fasteners
like those listed on page 18 and screw to the wall using
the impact screw driver.
20 21
Section 10 — Installing over Poured Concrete and Concrete Masonry Units (cont’d)
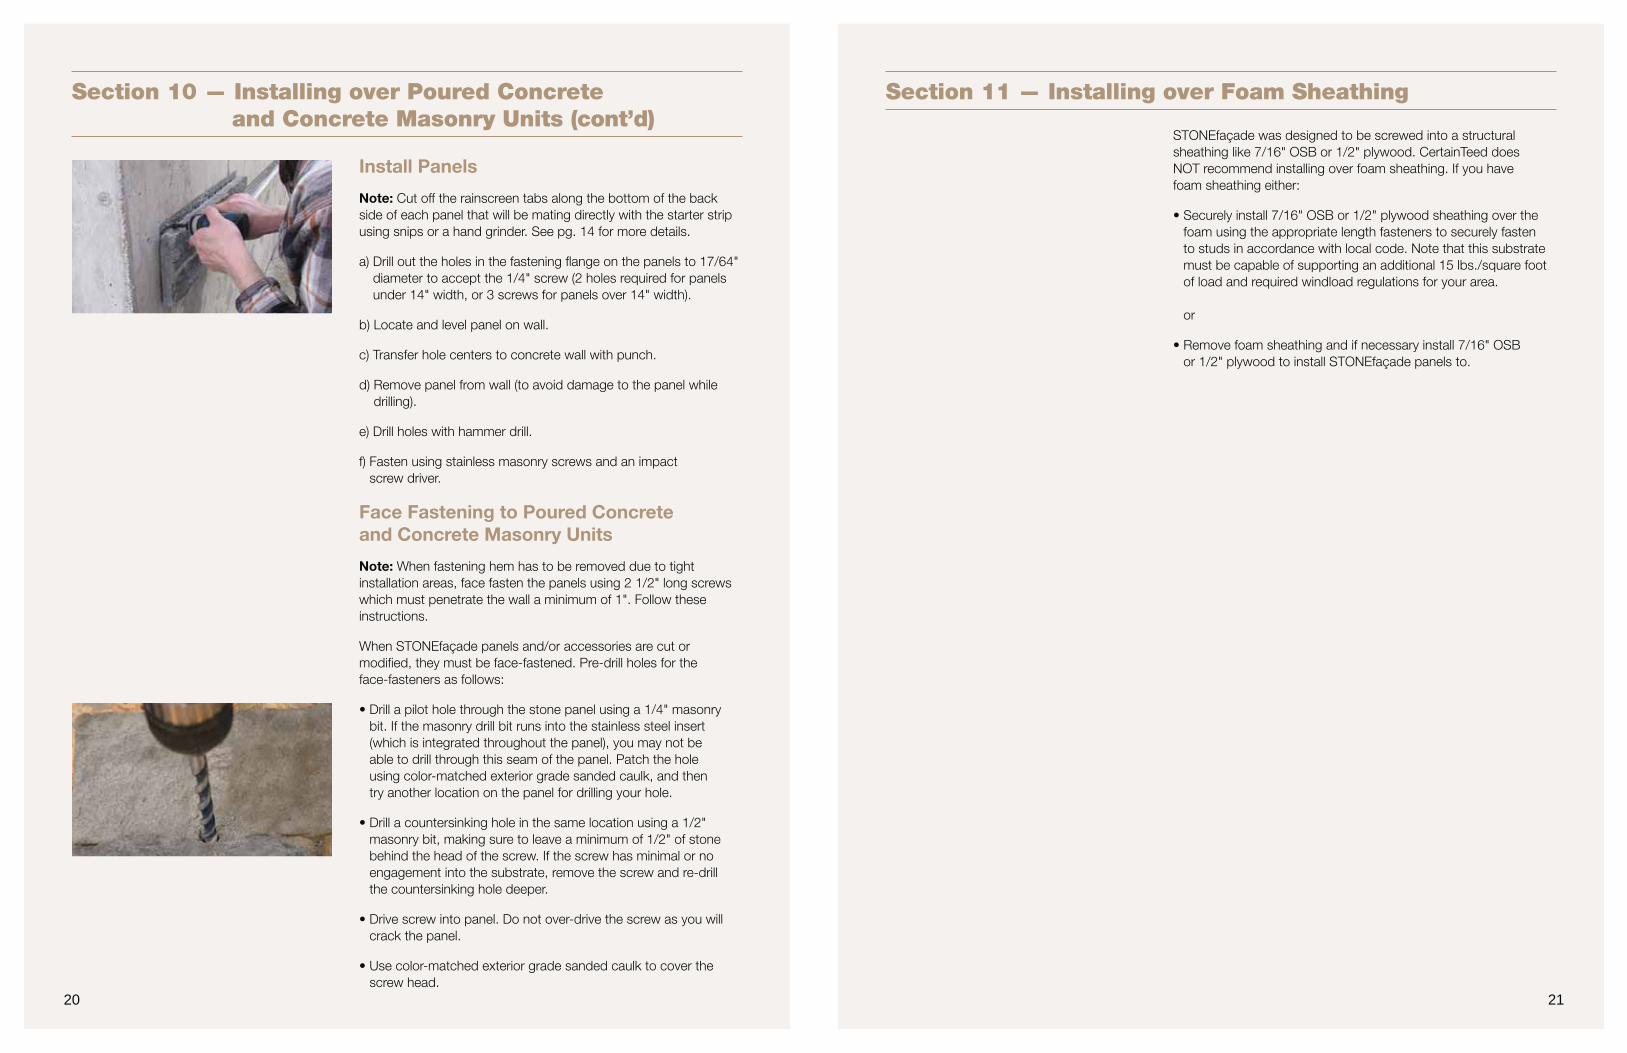
Install Panels
Note: Cut off the rainscreen tabs along the bottom of the back
side of each panel that will be mating directly with the starter strip
using snips or a hand grinder. See pg. 14 for more details.
diameter to accept the 1/4" screw (2 holes required for panels
under 14" width, or 3 screws for panels over 14" width).
b) Locate and level panel on wall.
c) Transfer hole centers to concrete wall with punch.
d) Remove panel from wall (to avoid damage to the panel while
drilling).
f) Fasten using stainless masonry screws and an impact
screw driver.
Face Fastening to Poured Concrete
and Concrete Masonry Units
Note: When fastening hem has to be removed due to tight
installation areas, face fasten the panels using 2 1/2" long screws
which must penetrate the wall a minimum of 1". Follow these
instructions.
When STONEfaçade panels and/or accessories are cut or
face-fasteners as follows:
bit. If the masonry drill bit runs into the stainless steel insert
(which is integrated throughout the panel), you may not be
able to drill through this seam of the panel. Patch the hole
using color-matched exterior grade sanded caulk, and then
try another location on the panel for drilling your hole.
masonry bit, making sure to leave a minimum of 1/2" of stone
behind the head of the screw. If the screw has minimal or no
engagement into the substrate, remove the screw and re-drill
the countersinking hole deeper.
crack the panel.
screw head.
Section 11 — Installing over Foam Sheathing
STONEfaçade was designed to be screwed into a structural
sheathing like 7/16" OSB or 1/2" plywood. CertainTeed does
NOT recommend installing over foam sheathing. If you have
foam sheathing either:
foam using the appropriate length fasteners to securely fasten
to studs in accordance with local code. Note that this substrate
must be capable of supporting an additional 15 lbs./square foot
of load and required windload regulations for your area.
or
or 1/2" plywood to install STONEfaçade panels to.

22 23
Section 12 — Replacing Damaged Panels
1. Using a full face shield and gloves, carefully chip away
with a hammer at the damaged panel area to expose the
metal rainscreen.
2. Using tin snips, snip away the rainscreen. Repeat chipping
the stone and snipping the rainscreen until you have completely
removed the damaged panel. (The fastening flange does not
need to be removed as it is holding the panels above in place.)
a. Important: Make sure you repair any damage to the
housewrap before installing the replacement panel.
3. Flatten out any remaining parts of the existing insert left on the
wall using a hammer. Clean-up debris.
4. Remove the fastening flange of replacement panel.
a. Note: You may have to use an angle grinder to remove
the bevels on the side of the replacement panel to
masonry bit. If the masonry drill bit runs into the stainless
steel insert (which is integrated throughout the panel), you may
not be able to drill through this seam of the panel. Patch the
hole using color-matched exterior grade sanded caulk, and then
try another location on the panel for drilling your hole.
masonry bit, making sure to leave a minimum of 1/2" of stone
behind the head of the screw. If the screw has minimal or no
engagement into the substrate, remove the screw and re-drill
the countersinking hole deeper.
crack the panel.
9. Use color-matched exterior grade sanded caulk to cover the
screw head.
Section 13 — Care and Maintenance
Regular Cleaning
remove the coloring from the stone.
Efflorescence
Efflorescence is a white powdery deposit that can occur on the
stone surface. Avoid regularly wetting the stone panels with lawn
sprinklers since water in many locales contains rust or minerals
that may discolor the stone surface.
Avoid Salt and De-Icing Chemicals
product or in adjacent areas where these substances may splash
onto the product since all concrete and masonry materials are
susceptible to damage from these chemicals.
See Printed Warranty for more Details
Caution:
may cause irritation of the nose, throat and respiratory tract.
Avoid prolonged or repeated inhalation of dust from this product.
product (e.g., sawing, cutting, drilling or similar dust generating
processes). Wear long-sleeved shirt, long pants, gloves and safety
glasses with side shields when handling and installing material.
Wash hands and face with soap and warm water immediately
after handling this product.
1
3
5
2
4
6