appliance installation guide - gwava support
TRANSCRIPT

1
Appliance Installation Guide
GWAVA 5
Copyright ©2009. GWAVA Inc. All rights reserved. Content may not be reproduced without permission. http://www.gwava.com

2
Contents Overview ....................................................................................................................................................... 2
Minimum System Requirements .................................................................................................................. 4
Installation .................................................................................................................................................... 4
Server Activation ......................................................................................................................................... 16
SMTP Scanner, SMTP Proxy Mail Scanner .................................................................................................. 21
Creating a SMTP Scanner ............................................................................... Error! Bookmark not defined.
Overview The GWAVA 5 Appliance is a complete software package for implementing the GWAVA 5 system and is
designed to replace an existing GWAVA 5 server with a standalone GWAVA 5 system running an SMTP
scanner for any mail system. The GWAVA 5 Appliance is ideal for a virtual machine environment.
The GWAVA 5 Appliance is designed to run the SMTP scanner for any email system in the market. The
SMTP scanner, and GWAVA 5 Appliance, are completely independent of any GroupWise system and can
be implemented in any system. The SMTP scanner acts as a proxy for the SMTP Gateway of your mail
system.
The SMTP scanner and GWAVA appliance are meant to be placed in front of the current GWIA or SMTP
Gateway for the mail system. Incoming email sent to your domain will first go to the GWAVA appliance,
which scans then sends clean email to the GWIA or SMTP Gateway. Mail sent from your domain will
pass through the normal system, but the SMTP Gateway will send the mail to the GWAVA appliance,
which sends the email to the internet.

3
If the GWAVA appliance is set behind a firewall, or multiple firewalls, the following ports should be open
for mail flow and GWAVA functions or services:
Inbound and general traffic
53 – UDP (DNS lookups)
25 – TCP Inbound (Used for Mail)
The following should be open to access the GWAVA appliance from outside the network:
49285 – TCP Inbound (QMS message release service) 49282 – TCP Inbound (GWAVA Management Console) 22 – TCP (SSH access. This can be a security concern, but may be necessary to enable for support
access.)
Outbound traffic
80 – TCP Outbound (Updates services for Antivirus, Signature Engine, and GWAVA system.)
21 – FTP Outbound (OS updates)
25 – TCP Outbound (Only if scanning outbound mail)
123 – TCP Outbound (Network Time Protocol (NTP))

4
Minimum System Requirements For a system which processes ~2,000 messages per hour:
2.4 GHz Pentium 4 or equivalent processor
1 GB RAM
36 GB Hard Drive (entire drive will be formatted automatically).
1 Network connection
For a system which processes ~4,000 Messages per hour:
3.2 GHz Pentium 4 or equivalent processor
1.5 GB RAM
40 GB Hard Drive (entire drive will be formatted automatically).
1 Network connection
For a system which processes ~8,000 messages per hour:
3.6 GHz Pentium 4 or equivalent processor
2 GB RAM
60 GB Hard Drive (entire drive will be formatted automatically).
1 Network connection
Download
http://www.gwava.com/solutions/trial-downloads.html
Installation To install the GWAVA 5 appliance, download the ISO and burn the image to a blank CD using your
preferred CD burning program.
Insert the GWAVA 5 Appliance CD into the CD or DVD drive of the target system and boot from the
Appliance CD.

5
On boot, you will be presented with the following menu.
To install the Appliance, choose the install option.
Allow the system to completely boot from the
Appliance CD, and the installation will
automatically start.
You will be warned that running the installation
will delete all data currently on the system. This is
the last chance you have to avoid formatting the
drive in this system.
If you have several hard disks in the system,
GWAVA5 will only install on the first
one,(/dev/hda or /dev/sda), and ignore others. To
ensure you install to the correct drive, physically
disconnect or remove all but the destination drive
from the system before you boot.

6
As soon as you select ‘OK’, the installation will begin.
The setup does not require any user input until after the system reboots.
On system reboot, select boot from hard disk, and the default SLES 10.2 kernel listed.

7
The install will continue.
Allow the automatic configuration to continue.

8
Once the installation has completed, you will be asked to provide connection and security information
for your new system.
To complete the setup, all pertinent network information must be provided for your system. The
defaults detected in parentheses will be set if you simply hit ‘enter’. To change the setting, enter the
appropriate value.
Ensure that you have the ip address configured correctly, this is the only interface to set or change the
network settings.
After the settings have been entered, you are asked to verify that the following information is correct.
Review the information and hit ‘y’ or ‘n’ and ‘enter’ to either re-enter the information or to continue.

9
After you have set the network settings, they will be tested for connectivity.
SSH allows remote console administration on port 22. This can be turned on and off later through the
GWAVA appliance control web interface. When you permanently enable or disable the service, it is
removed from the runlevel and will be enabled or disabled on system startup until the setting is
changed.
10
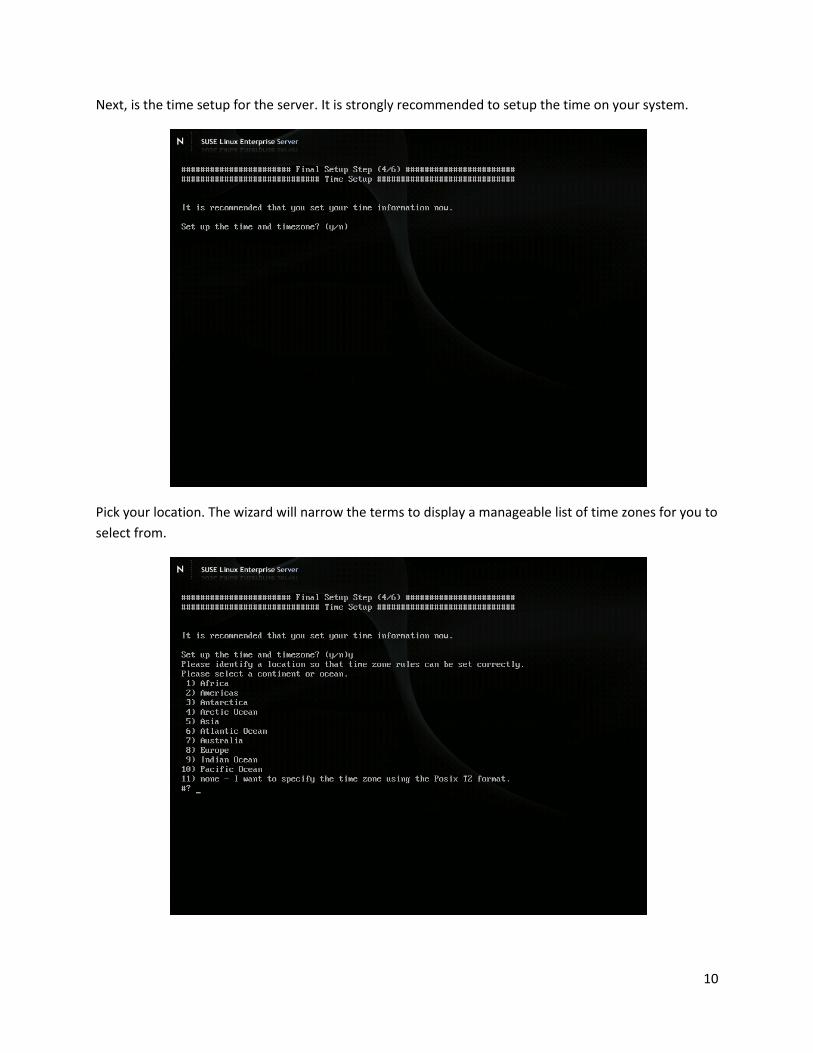
Next, is the time setup for the server. It is strongly recommended to setup the time on your system.
Pick your location. The wizard will narrow the terms to display a manageable list of time zones for you to
select from.

11
Select your resident nation.
Select the appropriate time zone.

12
If you opt to specify a custom time zone, or do not find your time zone listed, you may choose the
custom option: ‘none’.
The time zone must be specified in Time Zone environment Variable. Syntax: <time zone name> <hours
ahead of UTC> The time zone name does not matter, but the hour variable sets the time for the system.
for example:
MST-6
…would be accurate for the Mountain Standard Time zone, U.S. and Canada. The time zone may be any
name you like, as long as it conforms to Posix Time Zone format.

13
After your custom time zone has been created, the information must be verified.
A custom Network Time server may also be specified. If a custom time server is used, provide the DNS
name or IP address of the NTP server. Default, (time.nist.gov), is shown.
After the time server is specified, the system attempts to connect and sync the time.

14
Confirm the time settings for your system to continue.
If you want to migrate an existing NetWare GWAVA5 Quarantine to the GWAVA Appliance, select ‘yes’
here. The wizard uses ncpmount to pull the information over the network connection from the existing
qms to the Appliance.
You will be required to shut down the QMS system on the NetWare machine to complete the
operation. This process can take several hours and should only be performed after-hours. If you wish
to migrate QMS, this is the time to do so. Thought you may invoke the command later, you will have
data loss unless the migration is completed during setup.
15
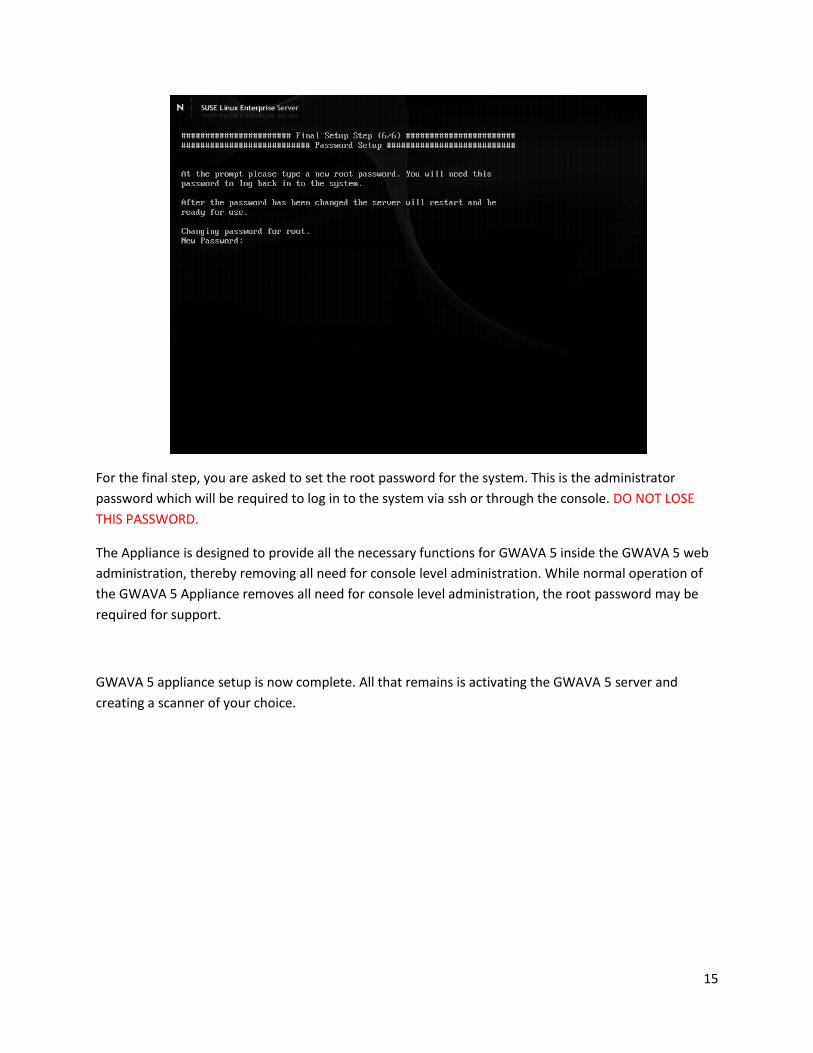
For the final step, you are asked to set the root password for the system. This is the administrator
password which will be required to log in to the system via ssh or through the console. DO NOT LOSE
THIS PASSWORD.
The Appliance is designed to provide all the necessary functions for GWAVA 5 inside the GWAVA 5 web
administration, thereby removing all need for console level administration. While normal operation of
the GWAVA 5 Appliance removes all need for console level administration, the root password may be
required for support.
GWAVA 5 appliance setup is now complete. All that remains is activating the GWAVA 5 server and
creating a scanner of your choice.

16
Server Activation To Activate your server, open a browser and enter the ip address or DNS name of the Appliance, with
port 49282.
http://<your_server_ip>:49282
This is the connection address for the GWAVA 5 management console. When you first connect to the
system, you should be taken to the setup page, shown below.
The GWAVA Appliance is designed to replace existing GWAVA 5 servers, and as such it is recommended
to setup the Appliance as a new GWAVA server.
Select ‘Continue’.

17
The following information is required.
The server name should match the host name you set for the server. The connection address is the
address that GWAVA 5 will use to serve the management console. Both the Server parameters should
be left as default.
The Administrator login name and password are required to connect to, and administer the GWAVA 5
management console. DO NOT LOSE THIS PASSWORD.
The Internet domain is the domain that the GWAVA 5 server will filter mail for. This should be your
company domain. (ie. GWAVA.com)
The administrator name and email address is the name and address which will appear on GWAVA 5
notifications and digests. Any responses to these messages will be sent to the Administrator’s e-mail
address.
The SMTP server address should be the address of your GWIA or SMTP gateway. If you are using an
SMTP scanner, this will be the address which GWAVA 5 will forward the incoming mail to. GWAVA 5
also uses this address for GroupWise authentication for QMS authentication and access.
The SMTP authorization name and password are not required for notifications, but are recommended.
For GroupWise systems, this can be any username and password, and does not have to be an
administrator. (ie. Username: bob Password: c751h )
After you have provided the information, select ‘Continue’.

18
You will be asked for confirmation. Clicking ‘Install’ will activate the GWAVA 5 server, and you will be
required to login using the admin name and password you provided earlier. Click ‘back’ on your
browser if you need to make any changes.
When you click ‘Install’, wait for the activation process to complete. You should be redirected to the
management login screen.
Click on ‘Enter Management Console’ and provide the administrator username and password to login.

19
Once you log in, your new GWAVA 5 server should display the following page.
This page is the home page for the Management Console.
To administer any necessary changes to the GWAVA 5 appliance, open the Appliance Control page
found under Server/Scanner Management | <Server name> | Server Management, as shown below.
20
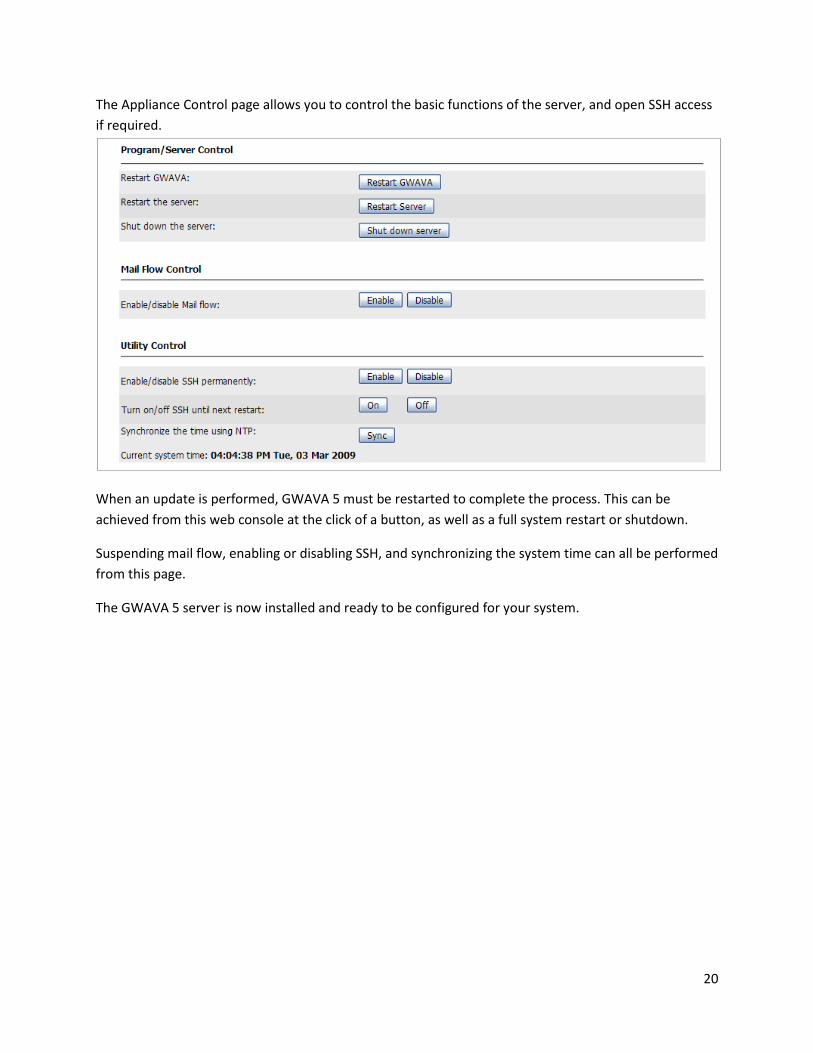
The Appliance Control page allows you to control the basic functions of the server, and open SSH access
if required.
When an update is performed, GWAVA 5 must be restarted to complete the process. This can be
achieved from this web console at the click of a button, as well as a full system restart or shutdown.
Suspending mail flow, enabling or disabling SSH, and synchronizing the system time can all be performed
from this page.
The GWAVA 5 server is now installed and ready to be configured for your system.

21
SMTP Scanner, SMTP Proxy Mail Scanner The SMTP scanners are the most recent options to the GWAVA system, and allow the incoming and, or,
outgoing mail to be intercepted, scanned, and filtered completely independent of the mail system. This
setup has the distinct advantage of relieving the mail system of unnecessary and unwanted traffic,
leaving mail system resources open to function with greater performance and security.
The SMTP interfaces add a layer between the GWIA, or any other mail system’s SMTP sending agent,
and the internet. Sending mail is forwarded through an SMTP proxy, which then sends the filtered, clean
mail to the original recipient. Incoming mail is scanned via the SMTP scanner, which then sends the
filtered and clean mail to your mail system, unaltered. These scanners allow GWAVA to act
independently of your mail system.
The SMTP scanner will only work if your MX record points to the GWAVA SMTP interface for mail
delivery, and if your domain and mail system SMTP are listed correctly in your GWAVA system.
GWAVA SMTP will then forward the clean mail to the SMTP Gateway specified during server activation. To view or change the domain and SMTP for your Mail system, go to Server/Scanner Management | <Server Name> |Server Management | Configure domains.
The default domain specified during Server Activation will be specified. Additional domains may be added through the new domain addition field along the top of the screen. As always, make sure you save all desired changes made to the page before browsing to a different section of the management console.
The Mail relay agent SMTP Server and Default domain MUST be correct for your system. If you have multiple domains, you must list the additional domains. GWAVA will only accept mail for the listed domain(s). Domains can be deleted or removed from the system by selecting the domain, then the red ‘X’ next to the selected domain name.
Select the desired domain to expand and modify the settings for the desired domain. The default domain settings are shown below.

22
When a domain is selected, it is expanded and allows for multiple settings for user mail validation.
GWAVA checks for valid users for each message received, blocking those which are undeliverable due to an incorrect domain or nonexistent user for each domain. GWAVA must have a connection to an active SMTP server for each domain to verify the users. LDAP lookup is also supported. If users or messages are received which do not contain domain information, GWAVA checks these users against the default domain. Be sure to set the default domain for your system.
Multiple SMTP or LDAP servers are supported for failover purposes. If a SMTP server is unavailable GWAVA will send messages to the next available SMTP server listed according to the ‘order’ value. The ‘order’ values lowest numbers first, usually with the default SMTP listed as ‘0’, second as ‘1’, and so on.
If the SMTP server requires authorization then the user name and password must be provided for each SMTP server listed. Generally, the authorization username and password will not be needed unless the SMTP server has been specifically configured to only accept authorized connections.
GWAVA shares the user list for each domain between the GWAVA modules, and specific SMTP servers can be selected to serve in different roles for each system, such as using one to receive mail, digests, and
notifications, while another is used by QMS to authenticate users. Default settings allows SMTP servers to serve in all roles.
If the SMTP server requires encryption such as TLS or SSL, the setting must be correct.
If the GWAVA server is part of a GWAVA system network with multiple GWAVA servers, then the information from the domains can either be shared across the GWAVA network, or it can be made specific to this one server. For most all systems the option of ‘Global’ will work sufficiently.

23
LDAP (optional)
GWAVA supports the option to use LDAP user authentication instead of SMTP authorization for QMS authorization and recipient verification. In general, this will not be required for most systems; LDAP information is only required if you wish to use LDAP for lookup or authentication.
In order to use LDAP for user lists and authorization, the LDAP lookup information must be filled in.
For the LDAP server connection address, place DNS name or IP address of the server
The username and password needs to be a full LDAP username including context. The user should have
administrator rights.
The DN search base can be set to specify the LDAP tree where GWAVA will begin to search for objects.
For eDirectory this field can be left blank, though if set, it specifies a starting point for the search in the
LDAP tree. (For instance: ou=users,o=gwava) If using Active Directory the DN must be set for the user
list to work. (ie. Cn=users,dc=exg,dc=gwava,dc=com)
Search fields are usually not necessary for any system to setup, but can be useful if desired. By default
most LDAP servers (including eDirectory and Active Directory) have an attribute applied to an object of
the type "mail" which contains the object's or user's email address. If you have email addresses for users
stored under an attribute other than mail you can specify the possible attributes by separating them
with commas.
In the example below the LDAP server is set to search for the attributes ‘mail’ and ‘secondarymail’.
Once the Domains have been properly configured for the system, the SMTP scanner, and any other
scanners may be properly created.
The Scanner creation wizards, (found under Server/Scanner Management | <Server name>| Wizards |
Install/create new scanner), walk through the steps and information required to install the different
scanners for your system. Select the SMTP Interface scanner and follow the instructions to install the
scanner.

24
To install a SMTP scanner, select the SMTP scanner option from the wizard and click next.
The SMTP scanner creation wizard informs you of the information you must know to successfully create
the scanner.

25
The Scanner Name is
whatever you wish the
scanner to be named in the
GWAVA server.
The IP listen address is the
address of the GWAVA
Appliance. This should also
be listed on the MX record
for your domain.
Allowed relay addresses
are the source addresses
which are allowed to send mail through the GWAVA SMTP scanner. Your mail system SMTP address
should be listed here, as well as any other mail sending source for your domain. Mail coming from these
addresses will be treated as outbound mail. No source but these listed addresses will be allowed to send
mail through the SMTP interface.
The red ‘X’ removes listed address ranges and the blue ‘add…’ link provides an extra address/range box.
IP Reputation and RBL drop at connection settings are recommended as default. This dumps any
incoming message that fails these initial incoming tests, saving bandwidth and performance.
RBL
The Real-time Blackhole List scanner searches the header of incoming message files to see if their source
address is listed on an RBL. When enabled to drop on connection, a positive RBL event will cause the
SMTP scanner to terminate the connection to the sending server for the offending message as soon as
the event occurs. The RBL scanner utilizes real-time blackhole lists hosted on the servers listed under the
RBL configuration page. RBL servers may be added or removed from the configuration. This is a strict
pass or fail engine, and an offending ip address listed on the RBL will not be allowed to send mail to your
system. Take time to verify that the RBL servers listed in the configuration are the desired list servers.
The default list servers for RBL are, sbl-xbl.spamhaus.org and bl.spamcop.net.
IP Reputation
IP Reputation works much like the RBL scanner does, in that it uses a black list, but also has a white list
for common mail sources. When used with the SMTP scanner, IP Reputation will also temporarily fail
messages from sources not found on either list. The temporary fail will allow the sending SMTP gateway
to retry, and it will eventually get through. This catches one-time spam bursts from sources not found on
the black list, while enabling good mail to still be delivered to the system. The black and white lists are
maintained and updated online, but are cached on the local machine as they are used.
SPF
Sender Policy Framework can be used with the GWIA and SMTP scanners. Sender Policy Framework,
(SPF) attempts to verify the sender of each email message, which can eliminate spoofed email and most

26
backscatter attacks. For SPF to work correctly, the sending domain must have an updated SPF record
set up in DNS. If the sending domain does not have a SPF record set in their DNS, then their mail will not
be blocked. Setting up a correct SPF record will block messages from spammers who are pretending to
be you, to your system.
To use SPF on a GWIA scanner, you must correctly specify which line in the header of mail messages is to
be used. If the mail system is using a relay or proxy which adds a line to the message, then you should
set SPF to use the second line (2), otherwise, the line used should be set to one (1), which is the default.
SPF is not enabled by default, but can be a powerful tool to keep spam from entering your system.
Select your preferences, and click ‘Continue’.
Set the default actions for viruses and spam. These settings can be changed after scanner creation.
Click ‘Continue’.

27
Review and confirm your settings. If you wish to make changes, use the ‘back’ button on your browser,
correct the information, and continue.
Click ‘Install’ to continue.
Wait while the installation completes.
Once installation is complete, refresh the Server/Scanner Management | <Server Name> | Manage
scanners folder to view your new SMTP scanner.
28
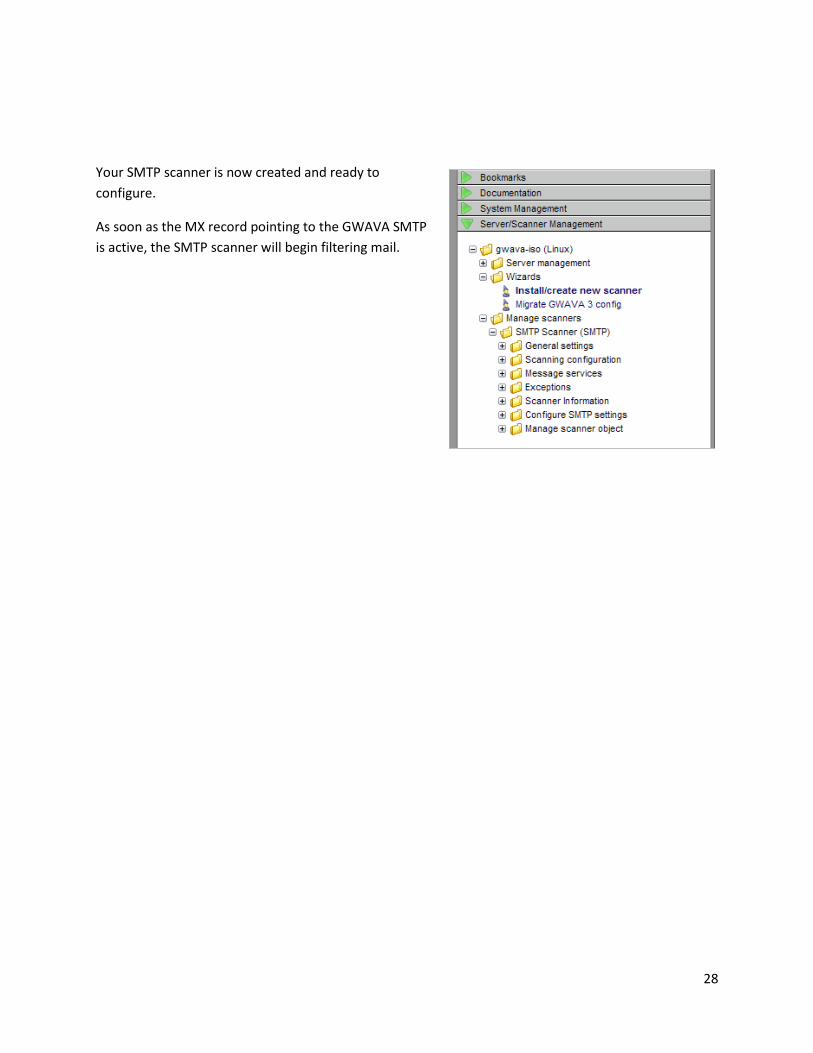
Your SMTP scanner is now created and ready to
configure.
As soon as the MX record pointing to the GWAVA SMTP
is active, the SMTP scanner will begin filtering mail.