ankle achilles tendon repair, operative technique · achilles tendon repair, operative technique...
TRANSCRIPT
Achilles Tendon Repair, Operative Technique
ANKLE TECHNIQUE GUIDE
*smith&nephew
Prepared in Consultation with: C. Niek van Dijk, MD, PhD
KNEE
HIP
SHOULDER
EXTREMITIES

Introduction
This technique provides a description of Achilles tendon reinsertion in the case of traumatic avulsion, as well as insertional tendinopathy, in which the surgeon decides to detach the tendon completely and then reinsert. This technique uses the Smith & Nephew FOOTPRINT™ Ultra PK Suture Anchor, SL, which provides secure fixation of Achilles tendon to the calcaneus. The anchor’s unique design captures suture limbs that are passed through the Achilles tendon and secured within the anchor by an inner plug. The suture tension is set after implantation and is independent of anchor depth. This technique offers the surgeon control over the amount of suture tension, as well as the desired tissue shift without knot tying or a knot stack.
Patient Positioning
Place the patient in a prone position, with support under their lower leg to allow free foot movement. A soft roll or pillow may be placed under the patient’s tibia to achieve the correct position. This position prevents excessive plantar flexion, limiting over-tightening, which results in tendon shortening and loss of motion.
Achilles Tendon Repair, Operative Technique
Prepared in Consultation with:C. Niek van Dijk MD, PhD
Professor and Chief of Service
Department of Orthopedic Surgery and Traumatology
Academic Medical Centre/ University of Amsterdam
Amsterdam, the Netherlands
The following technique guide was prepared under the guidance of Prof. C. Niek van Dijk. Created under close collaboration with the physician, it contains a summary of medical techniques and opinions based upon his training and expertise in the field, along with his knowledge of Smith & Nephew’s Suture Anchors. Smith & Nephew does not provide medical advice and recommends that surgeons exercise their own professional judgment when determining a patient’s course of treatment. This guide is presented for educational purposes only.

3ANKLE TECHNIQUE GUIDE 10601088A
Figure 1 Insertion site
Figure 2
Technique
WARNING: Prior to performing this technique, consult the Instructions for Use documentation provided with the individual components – including indications, contraindications, warnings, cautions, and instructions.
1. Expose the insertion site.
a. Make a 5 – 8 cm incision on the medial side of the Achilles tendon. This location minimizes the risk of injury to the sural nerve or its branches.
Note: If necessary, use a longitudinal posterior incision instead.
b. Locate the frayed tendon end, trace it proximally and distally to the healthy tendon.
c. Run down the incision through the subcutaneous tissue and open the paratenon.
d. Use a retractor to expose the Achilles tendon insertion site.
2. Clean the insertion site.
a. Fully detach medial half of Achilles tendon exposing calcification at insertion site (see Figure 1).
b. Remove calcification at the insertion site, as necessary.
c. Debride the insertion site keeping the contour of the cortex intact.
d. Continue debridement to the area just proximal to insertion site. The amount of debridement required depends on the length of tendon to be re-inserted.
e. Puncture the bone with an osteotome to create a bleeding bed.
3. Suture the tendon; ensure the suture exits from the superficial surface of the tendon.
Partial Detachment
a. Stitch the Achilles tendon utilizing the Triple Bundle Suturing Technique. Start suturing from the proximal end of tendon (see Figure 2) in a counter-clockwise fashion (be sure to start and finish on the superficial side of the tendon).
Note: You can use #2 ULTRABRAID™ suture for this step (SKU: Part 7210914).
b. Cut off the needle after suturing the tendon (maintaining as much suture limb length as possible).
4 ANKLE TECHNIQUE GUIDE 10601088A
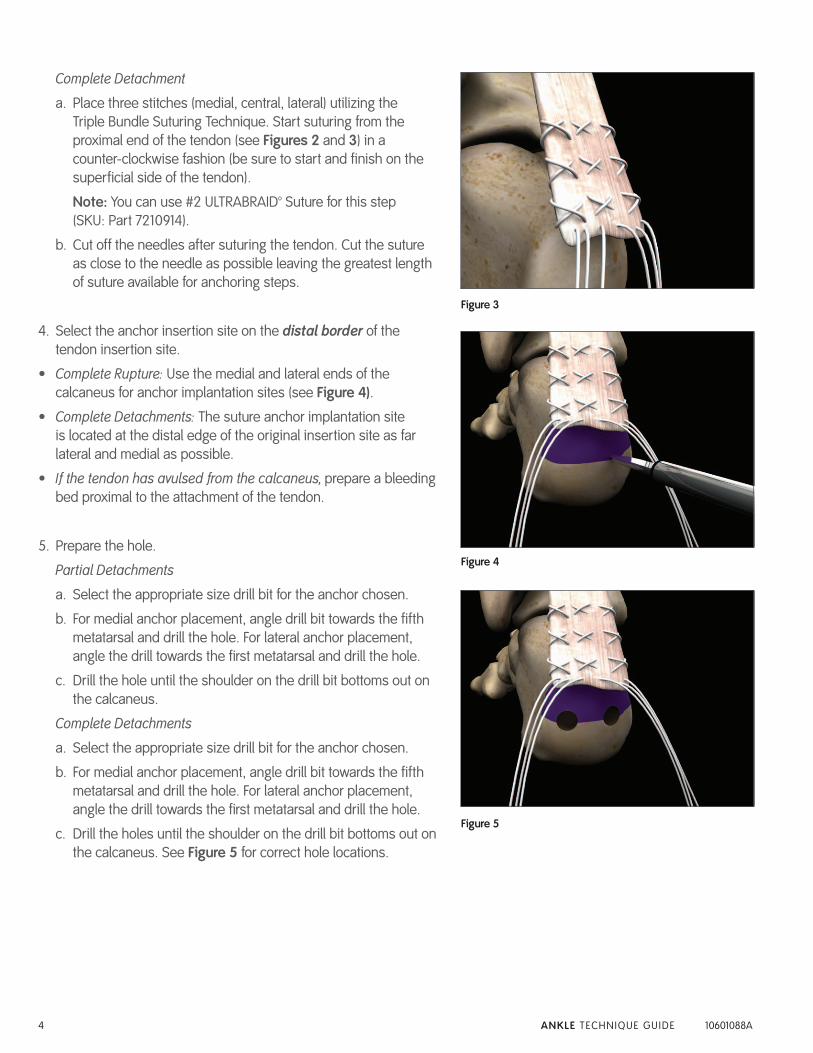
Complete Detachment
a. Place three stitches (medial, central, lateral) utilizing the Triple Bundle Suturing Technique. Start suturing from the proximal end of the tendon (see Figures 2 and 3) in a counter-clockwise fashion (be sure to start and finish on the superficial side of the tendon).
Note: You can use #2 ULTRABRAID™ Suture for this step (SKU: Part 7210914).
b. Cut off the needles after suturing the tendon. Cut the suture as close to the needle as possible leaving the greatest length of suture available for anchoring steps.
4. Select the anchor insertion site on the distal border of the tendon insertion site.
• Complete Rupture: Use the medial and lateral ends of the calcaneus for anchor implantation sites (see Figure 4).
• Complete Detachments: The suture anchor implantation site is located at the distal edge of the original insertion site as far lateral and medial as possible.
• If the tendon has avulsed from the calcaneus, prepare a bleeding bed proximal to the attachment of the tendon.
5. Prepare the hole.
Partial Detachments
a. Select the appropriate size drill bit for the anchor chosen.
b. For medial anchor placement, angle drill bit towards the fifth metatarsal and drill the hole. For lateral anchor placement, angle the drill towards the first metatarsal and drill the hole.
c. Drill the hole until the shoulder on the drill bit bottoms out on the calcaneus.
Complete Detachments
a. Select the appropriate size drill bit for the anchor chosen.
b. For medial anchor placement, angle drill bit towards the fifth metatarsal and drill the hole. For lateral anchor placement, angle the drill towards the first metatarsal and drill the hole.
c. Drill the holes until the shoulder on the drill bit bottoms out on the calcaneus. See Figure 5 for correct hole locations.
Figure 3
Figure 4
Figure 5

5ANKLE TECHNIQUE GUIDE 10601088A
Figure 6
Knotless suture anchor
Suture threader
Suture cleats
Inserter handle
Torque limiter
6. Feed sutures through anchor eyelet (see Figure 6).
a. Remove the suture threader tab from the shaft of the insertion device, and pull the blue tab to feed the ULTRABRAID™ sutures through the anchor eyelet. Mark the sutures with a surgical marker for easy identification if needed.
Note: Depending on surgeon preference, the sutures can be anchored to the calcaneus using 2 or 3 anchors. (Refer to “Ordering Information” section for product numbers.)
b. If using two anchors, pass three strands of sutures (two from the first column of sutures and one from the second column) through the anchor eyelet. Repeat for the second anchor.
c. If using three anchors, pass two strands (two from the first column of sutures) through the eyelet. Repeat for the second and third anchor.

6 ANKLE TECHNIQUE GUIDE 10601088A
7. Insert the anchor.
a. Leaving some suture slack in the suture, advance the anchor to the prepared site. Do not attempt to tension the suture at this time. Equal slack in the suture limbs can be achieved by:
a. Placing the anchor at the drilled hole location and holding sutures taut.
b. Displace the anchor to touch the heel (beyond the insertion site) which will create an appropriate amount of slack in the suture.
c. Move anchor to insertion location.
b. Orient the anchor such that the free limb sutures entering the anchor are in line, NOT perpendicular, to the anchor eyelet. Ensure that the sutures are not twisted around the anchor (see Figures 7 and 8).
c. Establish and maintain axial alignment of the suture anchor with the prepared insertion site.
d. Place the tip of the anchor into the prepared hole.
e. Use a mallet to tap the inserter handle until the laser mark is flush with the cortical bone. This places the suture anchor approximately 1 mm below the bone surface (see Figure 9).
8. Tension the Achilles tendon.
a. Unhook both ends of the green retention suture from the inserter cleats.
b. Pull one end to remove the retention suture from the handle and discard the suture. You must remove the retention suture prior to applying tension.
c. Maintain slight downward pressure on the inserter handle while manually pulling the free suture limb(s) up along the length of the insertion shaft. Pull suture(s) individually to achieve the desired tension. Lock each limb using the cleats on the inserter handle. Apply equal tension to all suture legs. Over tightening can lead to laxity on one side.
d. While maintaining slight downward pressure on the inserter, locate the torque limiter on the proximal end of the inserter handle and rotate it clockwise until three clicks are heard, then rotate back ¼ turn.
e. Unlock sutures from cleats. Slowly disengage the inserter from the suture anchor by pulling the inserter straight back or tapping the distal end with a mallet. Do not wiggle the handle to disengage it from the anchor.
f. Discard the insertion device and cut the excess suture flush with the implant.
g. For complete detachments only: repeat with additional anchors until the repair is completed (see Figure 10).
Figure 7 Correct suture positioning (in line)
Figure 8 Incorrect suture positioning (twisted around anchor)
Figure 9 Anchor Insertion Site

7ANKLE TECHNIQUE GUIDE 10601088A
Post-Operative Care
• Immobilize the patient’s leg in a short leg plaster cast or an ankle brace for 6 weeks. Instruct the patient to avoid any weight bearing exercise during this time.
• The patient should start range of motion exercises 10 to 14 days after the repair.
• Six weeks after the repair, the patient can begin weight-bearing exercise.
Technique Pearls
• Do not wiggle the inserter handle during removal, simply pull it back straight or tap it out with a mallet. The inner driver runs down the entire length of the anchor and wiggling it could compromise anchor security.
Figure 10 Completed repair

www.smith-nephew.com+1 978 749 1000+1 978 749 1108 Fax+1 800 343 5717 U.S. Customer Service
Smith & Nephew, Inc.150 Minuteman RoadAndover, MA 01810USA
Trademark of Smith & Nephew. Certain marks Reg. US Pat. & TM Office. ©2013 Smith & Nephew, Inc. All rights reserved. 01/2013 10601088A Rev. A
Reference # Description
72203783 FOOTPRINT™ Ultra PK Suture Anchor, 4.5 mm, SL
72203776 FOOTPRINT Ultra PK Suture Anchor, 5.5 mm, SL
72203785 4.0 mm Drill for 4.5 mm FOOTPRINT Anchor, SL
72203786 4.5 mm Drill for 5.5 mm FOOTPRINT Anchor, SL
7210914 ULTRABRAID™ #2 Suture, White, 38” length (10 pack)
72203796 Kit (2 FOOTPRINT Ultra PK 4.5 mm Anchors, 1 Drill, 3 ULTRABRAID Size 2 Sutures)
72203798 Kit (2 FOOTPRINT Ultra PK 5.5 mm Anchors, 1 Drill, 3 ULTRABRAID Size 2 Sutures)
CAUTION: U.S. Federal law restricts this device to sale by or on the order of a physician.
Ordering Information
To order the instruments used in this technique, call +1 800 343 5717 in the U.S. or contact an authorized Smith & Nephew representative.
Prior to performing this technique, consult the Instructions for Use documentation provided with individual components – including indications, contraindications, warnings, cautions and instructions.
ALL28™ Foot and Ankle Solutions Exceptional solutions in foot and ankle care
If you are interested in more detailed product information, visit www.ALL28.com. Be among the first to hear about related product launches, surgeon education events, and other important news from Smith & Nephew. To be added to our mailing list, just scan the QR code or send an email to [email protected].