acms implement guide - blue & red book - adizes · 1. adizes change management system (acms)...
TRANSCRIPT

1
ACMS
Adizes Change Management
System
Blue & Red Book
Implementation Guide
Copyright: Adizes Institute - 2011

2
TABLE OF CONTENTS
OVERVIEW ................................................................................. 4
1. Adizes Change Management System (ACMS) ................................................. 4
2. APTAS - Adizes Profitability Tracking and Accountability System ................ 4
3. ACMS Login ..................................................................................................... 4
ACMS Implementation................................................................ 5
Common (Shared) Tables .......................................................................................... 5
1. Company Data ................................................................................................... 5
1.1. Company Data Management ............................................................................. 5
2. Personnel Data ................................................................................................... 5
2.1. Update Personal Profile: .................................................................................... 6
2.2. Personnel Data Management: ............................................................................ 6
3. Structure ............................................................................................................ 6
3.1. Create/Edit the first Structure/View .................................................................. 7
3.1.1. Create additional Structures/Views ............................................................... 7
APTAS Specific Tables .............................................................................................. 8
4. Accountability and Profitability (APTAS) ........................................................ 8
4.1. Blue Book .......................................................................................................... 8
4.1.1. Budget (creation and selection) ......................................................................... 9
4.1.2. Managerial Chart of Accounts ........................................................................... 9
4.1.3. Inflows/Outflows ............................................................................................. 10
4.1.4. Piping ............................................................................................................. 11
4.1.5. Sharing/Taxation ............................................................................................. 13
4.1.6. Generate Blue/Red Books ............................................................................... 13
4.2. Red Book ......................................................................................................... 14
4.2.1. Red Book Accounts Grouping ......................................................................... 14
4.2.2. Units Grouping ................................................................................................ 15
4.2.3. Red Book Data Editing .................................................................................... 16
4.2.4. Import Red Book Data ..................................................................................... 17
5. System Tools (require System Administrator Privileges) ............................... 18
5.1. Permissions ...................................................................................................... 18
5.1.1. Menu ............................................................................................................. 18
Copyright: Adizes Institute - 2011
3
5.1.2. Blue Book Editing ........................................................................................... 19
5.1.3. Report Access .................................................................................................. 20
5.2. Black Book Columns ....................................................................................... 20
5.3. Translation Tool .............................................................................................. 21
5.3.1. Menus ............................................................................................................. 21
5.3.2. System Tables .................................................................................................. 21
5.3.3. Other Forms ..................................................................................................... 22
Additional Information Should any additional information be required to make clear the concepts and facilities described in this manual, please contact the Adizes Institute through the following e-mail address and/or phone number:
• e-mail: [email protected]
• Phone: (+55-11) 3259-2009
Copyright: Adizes Institute - 2011

4
OVERVIEW
1. Adizes Change Management System (ACMS)
ACMS is a system for the management of change, based on the Adizes Method of management. The ACMS architecture encompasses several specifically oriented sub-systems supporting different phases of the Adizes Method. The Adizes Profitability Tracking and Accountability System (APTAS) supports phases IV and VI.
2. APTAS - Adizes Profitability Tracking and Accountability System
APTAS focuses on the accountability for the end-results of an organization and its constituting organizational units. It comprises three managerial modules:
• Black Book: addresses non-financial information; and
• Blue Book: addresses financial budgetary information.
• Red Book: addresses financial actual information.
All the sub-systems of the Adizes Change Management System (ACMS), including APTAS, share a set of common tables of data used throughout the system (such as companies, organizational units, structures, personnel, professional expertise, etc.). The maintenance of such tables is done by functions of the Adizes Change management System (ACMS) other than those of the APTAS.
3. ACMS Login
To log into ACMS, open your Windows Internet Browser (Internet Explorer) and go to the website where the system resides. The System Administrator of your Company will supply the address of this site.
Copyright: Adizes Institute - 2011

5
ACMS Implementation
Common (Shared) Tables
ACMS is shipped for initial installation with just one blank company record (except for the company name field) and one personnel record (that of the System Administrator). The System Administrator must create all other records.
The common tables that are shared by several ACMS functions must be created first, as initial steps of the ACMS implementation process. Before the APTAS functions can become operational (including the creation of the APTAS specific tables), the following common tables must be created:
1. Company Data
2. Personnel Data
3. Structure Views
When first implementing the system, it is advisable to create the shared tables in the sequence they are listed above. This will minimize the need to return to the same screen or function more than once to fill in data that could not be entered on the first pass. This is so because of mandatory consistency checks (data validation) that are automatically performed against tables that must, therefore, be created first.
1. Company Data
ACMS is shipped for initial installation with just one blank company record (except for the company name field) so the System Administrator must enter data for the remaining fields of his company record. This is done using the Company Data Management function.
1.1. Company Data Management
To enter and edit company data, select the Company Data Management function (under Company Data) on the Menu:
When the Company Data Management screen appears, use the online help for each button and data field to edit and save the company data.
2. Personnel Data
Under Personnel Data there are three functions that create and update shared tables. The following two of these functions should be executed next:
Copyright: Adizes Institute - 2011

6
2.1. Update Personal Profile:
Select this function first, to edit the user’s personal data (or profile). Follow the online help instructions for each data field and functional button on the Personal Profile screen.
2.2. Personnel Data Management:
Select this function to edit the personnel table. Personnel records must be previously created before they can be referenced later, on a different screen, as members of any organizational unit or project team.
The following data fields comprise each staff member’s record: Those highlighted in bold font are the ones that must be entered during the initial implementation stage.
• Name • Short Name • Unit • Job Title • E-mail • Telephone • Birth Date • PAEI • Gender • Language (*) • Culture (*) • Login Id and Password • Role (*) • Expertise (** )
(* ) The default value is inherited from an external table, created when the system is configured for shipment.
(** ) To be selected from a list of available Expertise that are registered by the System Administrator, using the Expertise function on the Menu.
Use the online help available on the Personnel Data Management screen for additional information on the personnel data fields, buttons and selection boxes.
Remember to save each edited staff member record, by clicking on the save
3. Structure
ACMS is shipped with no initial structures previously created, so the System or Company Administrator must create the necessary initial structures.
Copyright: Adizes Institute - 2011
button: .
7
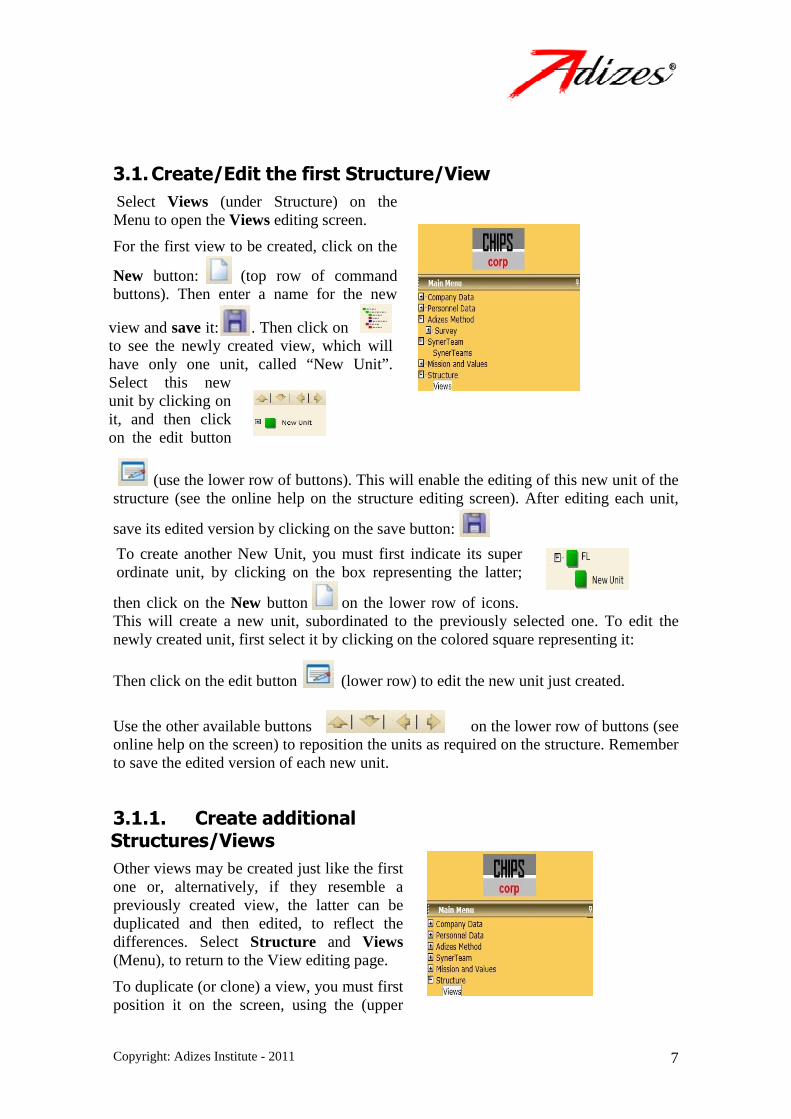
3.1. Create/Edit the first Structure/View
Select Views (under Structure) on the Menu to open the Views editing screen.
For the first view to be created, click on the
New button: (top row of command buttons). Then enter a name for the new
view and save it: . Then click on to see the newly created view, which will have only one unit, called “New Unit” . Select this new unit by clicking on it, and then click on the edit button
(use the lower row of buttons). This will enable the editing of this new unit of the structure (see the online help on the structure editing screen). After editing each unit,
save its edited version by clicking on the save button:
To create another New Unit, you must first indicate its super ordinate unit, by clicking on the box representing the latter;
then click on the New button on the lower row of icons. This will create a new unit, subordinated to the previously selected one. To edit the newly created unit, first select it by clicking on the colored square representing it:
Then click on the edit button (lower row) to edit the new unit just created.
Use the other available buttons on the lower row of buttons (see online help on the screen) to reposition the units as required on the structure. Remember to save the edited version of each new unit.
3.1.1. Create additional Structures/Views
Other views may be created just like the first one or, alternatively, if they resemble a previously created view, the latter can be duplicated and then edited, to reflect the differences. Select Structure and Views (Menu), to return to the View editing page.
To duplicate (or clone) a view, you must first position it on the screen, using the (upper
Copyright: Adizes Institute - 2011

8
To make a previously created structural view the prevailing one for reporting, go to Select View/Budget (under Company Data on the Menu). Then select the new view and click on the confirm button.
The confirmed View name will appear in a window on the upper right part of the screen:
APTAS Specific Tables
4. Accountability and Profitability (APTAS)
The Accountability macro function on the Menu encompasses the Black, Blue and Red Book functions, which indicate personal accountability for the goals and targets, as well as for the operational and financial results of an organization. It further links these elements to the organization’s mission and strategies. Accountability functions are divided into:
• Blue Book • Red Book • Black Book
The functions of these books comprise what is collectively called the Adizes Profitability and Accountability System (APTAS).
4.1. Blue Book
The Blue Book macro function is further decomposable into executable functions, of which the following must be dealt with in an ACMS initial installation:
• Budget • Chart of Accounts • Inflows & Outflows • Piping • Sharing & Taxation • Generate Blue/Red Books
Copyright: Adizes Institute - 2011
row) positioning buttons: . Then click on the clone button: .
Next, edit the clone view to change its name and structure, as required.
9
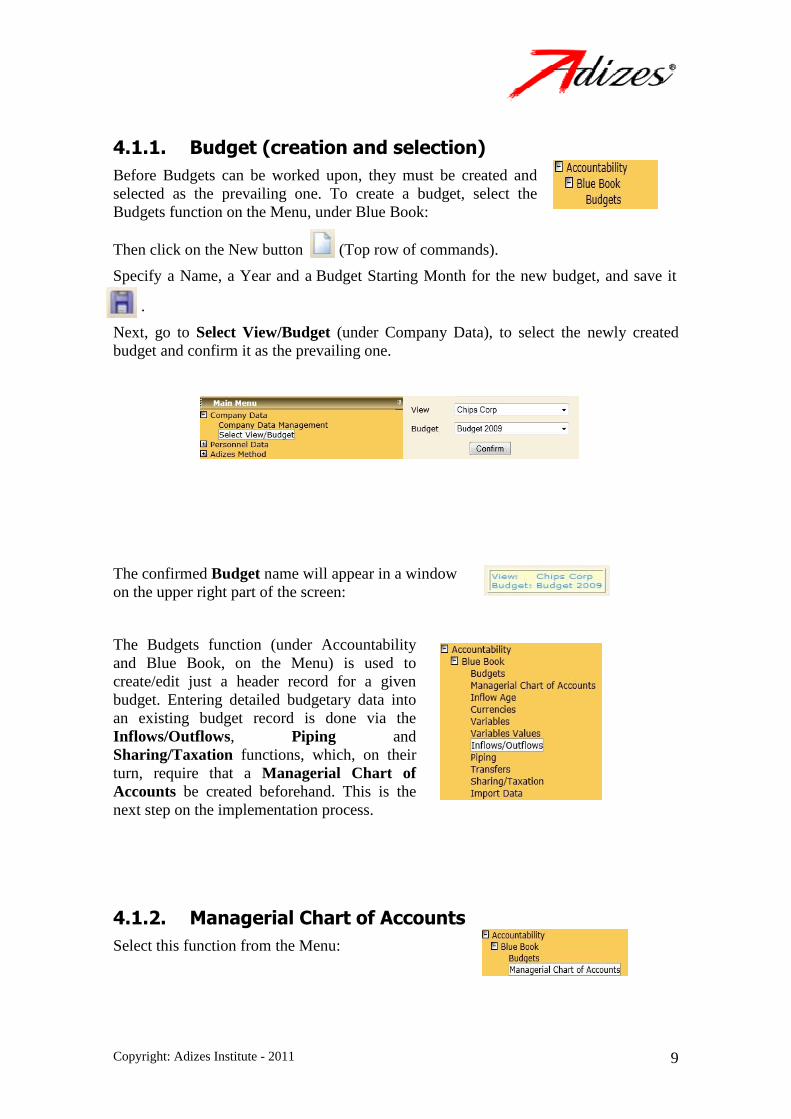
4.1.1. Budget (creation and selection)
Before Budgets can be worked upon, they must be created and selected as the prevailing one. To create a budget, select the Budgets function on the Menu, under Blue Book:
.
Next, go to Select View/Budget (under Company Data), to select the newly created budget and confirm it as the prevailing one.
The confirmed Budget name will appear in a window on the upper right part of the screen:
The Budgets function (under Accountability and Blue Book, on the Menu) is used to create/edit just a header record for a given budget. Entering detailed budgetary data into an existing budget record is done via the Inflows/Outflows, Piping and Sharing/Taxation functions, which, on their turn, require that a Managerial Chart of Accounts be created beforehand. This is the next step on the implementation process.
4.1.2. Managerial Chart of Accounts
Select this function from the Menu:
Copyright: Adizes Institute - 2011
Then click on the New button (Top row of commands).
Specify a Name, a Year and a Budget Starting Month for the new budget, and save it
10
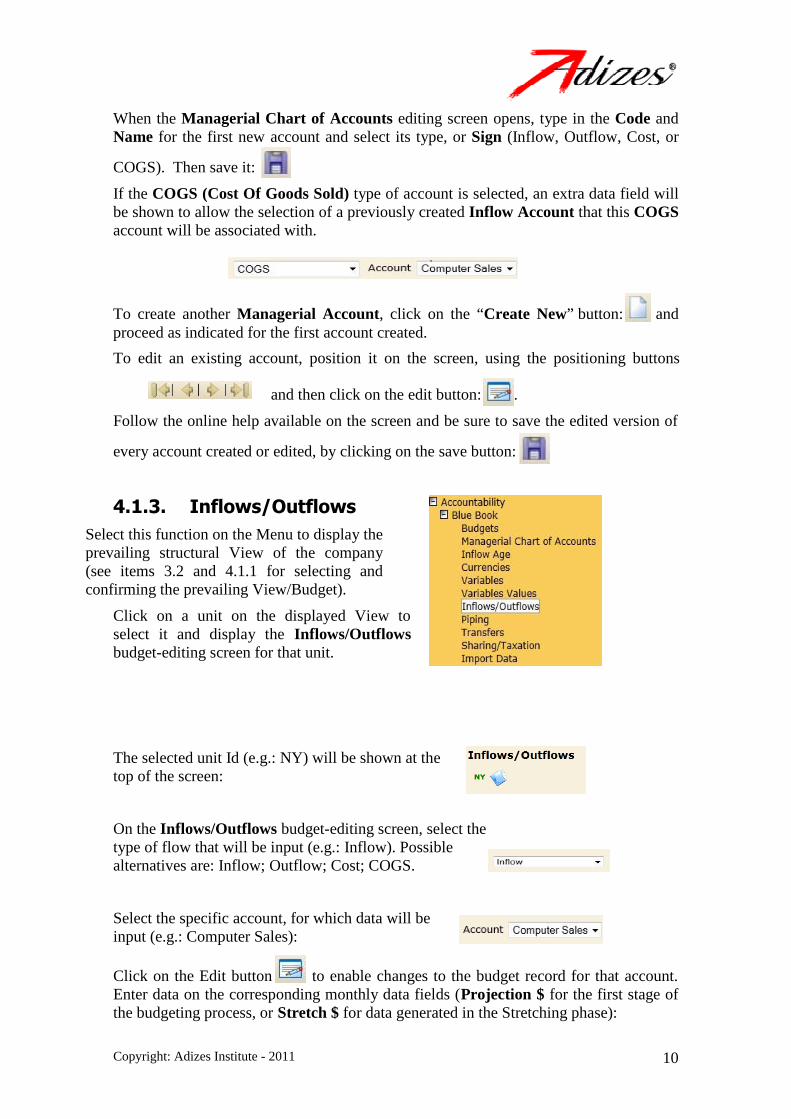
When the Managerial Chart of Accounts editing screen opens, type in the Code and Name for the first new account and select its type, or Sign (Inflow, Outflow, Cost, or
COGS). Then save it:
If the COGS (Cost Of Goods Sold) type of account is selected, an extra data field will be shown to allow the selection of a previously created Inflow Account that this COGS account will be associated with.
To edit an existing account, position it on the screen, using the positioning buttons
and then click on the edit button: .
Follow the online help available on the screen and be sure to save the edited version of
every account created or edited, by clicking on the save button:
4.1.3. Inflows/Outflows
Select this function on the Menu to display the prevailing structural View of the company (see items 3.2 and 4.1.1 for selecting and confirming the prevailing View/Budget).
Click on a unit on the displayed View to select it and display the Inflows/Outflows budget-editing screen for that unit.
The selected unit Id (e.g.: NY) will be shown at the top of the screen:
On the Inflows/Outflows budget-editing screen, select the type of flow that will be input (e.g.: Inflow). Possible alternatives are: Inflow; Outflow; Cost; COGS.
Select the specific account, for which data will be input (e.g.: Computer Sales):
Click on the Edit button to enable changes to the budget record for that account. Enter data on the corresponding monthly data fields (Projection $ for the first stage of the budgeting process, or Stretch $ for data generated in the Stretching phase):
Copyright: Adizes Institute - 2011
To create another Managerial Account, click on the “Create New” button: and proceed as indicated for the first account created.
11
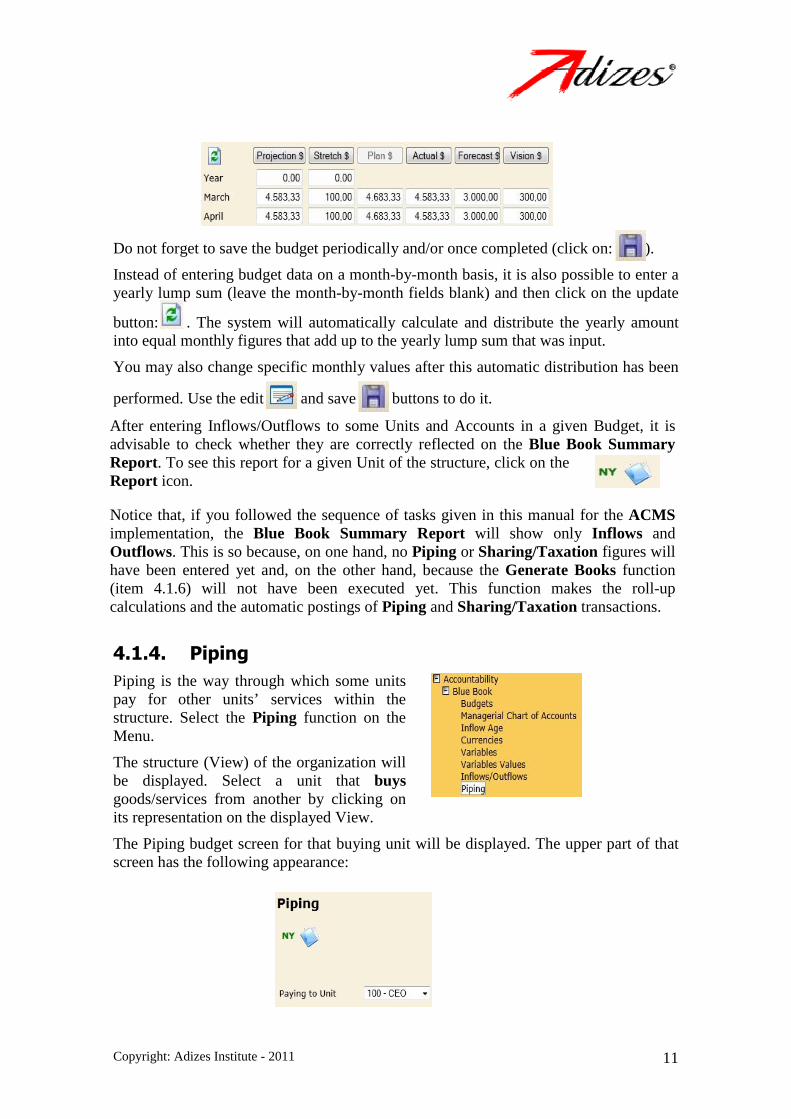
Do not forget to save the budget periodically and/or once completed (click on: ).
Instead of entering budget data on a month-by-month basis, it is also possible to enter a yearly lump sum (leave the month-by-month fields blank) and then click on the update
button: . The system will automatically calculate and distribute the yearly amount into equal monthly figures that add up to the yearly lump sum that was input.
You may also change specific monthly values after this automatic distribution has been
performed. Use the edit and save buttons to do it.
After entering Inflows/Outflows to some Units and Accounts in a given Budget, it is advisable to check whether they are correctly reflected on the Blue Book Summary Report. To see this report for a given Unit of the structure, click on the Report icon.
Notice that, if you followed the sequence of tasks given in this manual for the ACMS implementation, the Blue Book Summary Report will show only Inflows and Outflows. This is so because, on one hand, no Piping or Sharing/Taxation figures will have been entered yet and, on the other hand, because the Generate Books function (item 4.1.6) will not have been executed yet. This function makes the roll-up calculations and the automatic postings of Piping and Sharing/Taxation transactions.
4.1.4. Piping
Piping is the way through which some units pay for other units’ services within the structure. Select the Piping function on the Menu.
The structure (View) of the organization will be displayed. Select a unit that buys goods/services from another by clicking on its representation on the displayed View.
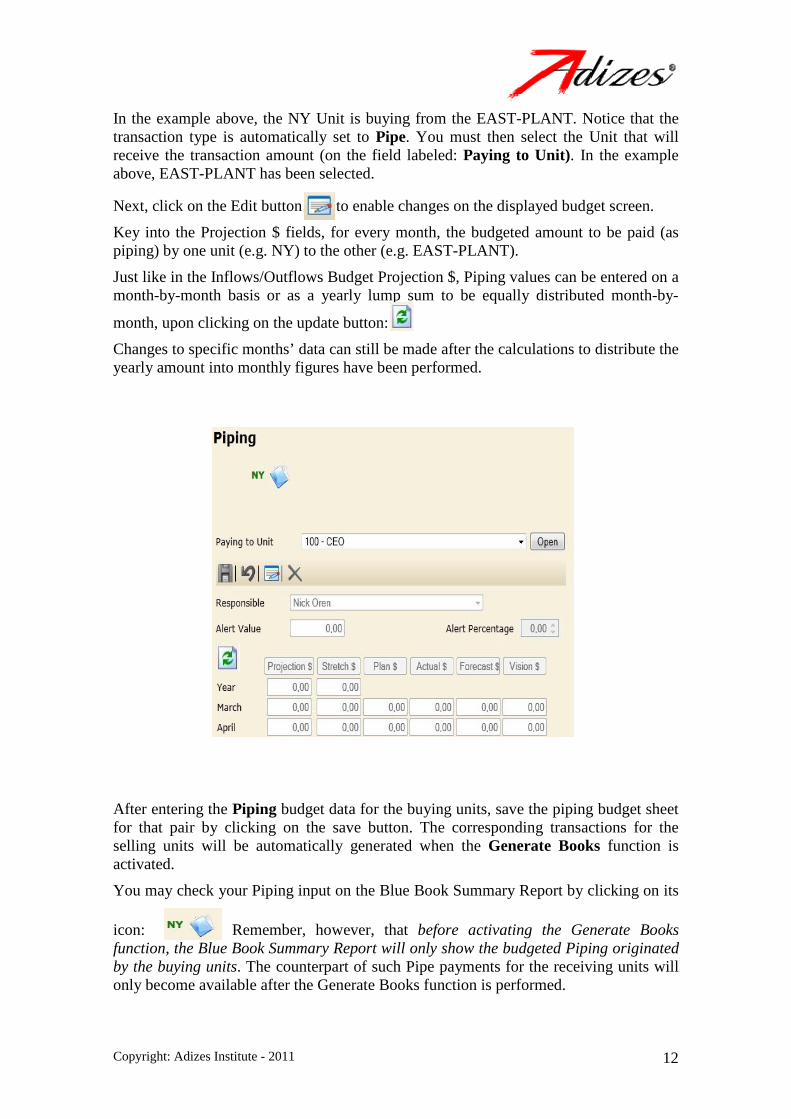
The Piping budget screen for that buying unit will be displayed. The upper part of that screen has the following appearance:
Copyright: Adizes Institute - 2011
12
In the example above, the NY Unit is buying from the EAST-PLANT. Notice that the transaction type is automatically set to Pipe. You must then select the Unit that will receive the transaction amount (on the field labeled: Paying to Unit). In the example above, EAST-PLANT has been selected.
Next, click on the Edit button to enable changes on the displayed budget screen.
Key into the Projection $ fields, for every month, the budgeted amount to be paid (as piping) by one unit (e.g. NY) to the other (e.g. EAST-PLANT).
Just like in the Inflows/Outflows Budget Projection $, Piping values can be entered on a month-by-month basis or as a yearly lump sum to be equally distributed month-by-
month, upon clicking on the update button: .
Changes to specific months’ data can still be made after the calculations to distribute the yearly amount into monthly figures have been performed.
After entering the Piping budget data for the buying units, save the piping budget sheet for that pair by clicking on the save button. The corresponding transactions for the selling units will be automatically generated when the Generate Books function is activated.
You may check your Piping input on the Blue Book Summary Report by clicking on its
icon: Remember, however, that before activating the Generate Books function, the Blue Book Summary Report will only show the budgeted Piping originated by the buying units. The counterpart of such Pipe payments for the receiving units will only become available after the Generate Books function is performed.
Copyright: Adizes Institute - 2011

13
4.1.5. Sharing/Taxation
Select this function on the Menu to display the prevailing structural View of the company. Click on a unit that pays sharing or taxation, to select it and display the Sharing and Taxation budget screen for that unit. The selected unit Id (e.g.: NY) will be shown at the top of the screen:
Indicate whether you want to post Sharing or Taxation data, and the level to which this Sharing or Taxation applies:
Select the unit whose cost is being shared/taxed:
Note that Level 1 Sharing/Taxation must specify the supporting percentages for the costs of not only the Parent Unit, but also of each of the existing Red siblings.
Click on the Edit button to enable changes to the Sharing/Taxation budget record for the shared unit:
Enter data on the corresponding monthly data fields (Plan %), or else enter a total % for the year and click on the
update button to replicate the annual % for each month. It is also possible to use a combination of these two methods: replicate a common % for all months and then change the % for some specific months, as required, if applicable.
4.1.6. Generate Blue/Red Books
Select Generate Blue/Red Books from the Menu to automatically perform book calculations and generate counterpart postings to reflect data entered through the Budgets, Piping, or Sharing/Taxation functions.
Copyright: Adizes Institute - 2011
For example, a budgeted amount of payments from Unit-A to Unit-B must be counterbalanced by an equal amount of charges or bills from Unit-B to Unit-A. This counterbalance of postings is automatically done when you activate the Generate Blue/Red Books function.

14
Select the book you want to generate and then hit the Generate button.
Once the book generation ends, you will be able to display/print reports.
4.2. Red Book
The Red Book has to do with the actual financial data to be compared with the budget.
4.2.1. Red Book Accounts Grouping
The first step to implement the Red Book is to specify the correspondence between the ACMS Managerial Accounts and the Company’s operational control systems, such as the General Ledger Accounting System, the Pay Roll System or other similar systems, which will be the source of data for the Red Book.
Typically, several of the Company’s control systems’ accounts will be grouped into one aggregate Managerial Account. This grouping of accounts is done through the Managerial Chart of Accounts function of the ACMS Menu. This function gives access to the Red Book Accounts Grouping box, where the grouping of control systems’ accounts into managerial accounts is specified, using the syntax explained in the example below.
Select Accountability, Blue Book, and Managerial Chart of Accounts on the Main Menu. Then choose an account to access the Red Book Accounts Grouping window for that account. If you have the adequate permission level (Controller Blue, Company Admin. or System Admin.) you will be able to edit Red Book Accounts Grouping rules, such as those in the example below:
The statements in the above example indicate that the actual monthly balance for the selected Managerial Account will be computed as:
• Balance of the “direct _salaries” account from the Payroll system, multiplied by a social burden factor of 1.456 (45.6% social burden), plus
• The sum of the balances of the accounts 110, 111, 112 and 113 of the Company’s General Ledger System, plus
• The added balances of accounts “ rm1000” and “cm1200”, from the Accounts Payable system, minus
Copyright: Adizes Institute - 2011

15
• The sum of the balances of accounts “dct500” and “rbt800”, from the Accounts Receivable system. A scaling factor of 1,000 shall then divide the final result of all the computations specified in the previous steps.
As shown in the above example, the identifiers of the source accounts may be numeric or alphanumeric. They should always, however, correspond to the actual data field names in their respective source systems. These identifiers shall be provided by the company’s IT Department.
Exceptional grouping rules
As stated in the above example, the accounts grouping rules shall apply to all months.
Should one or more months require a special formula, different from the default one, this should be specified for each exceptional month.
Each exception to the general grouping rule (specified in the “month = [….] “ statement) must be indicated by its own specific statement, which must start with the first three letters of the exceptional month’s name in English (e.g.: sep for September).
For example, if the General Ledger account 200 should replace account 110 for the month of September, the following statements should complement the ones of the previous example:
sep = [direct_salaries, Payroll]*1.456 sep = sep+[ [200, 111, 112, 113, General Ledger] sep = sep+[rm1000, cm1200, Acct_Payable] sep = sep-( [dct500, rbt800, Acct_Receivable] )/1000
The parameters within the square brackets of each grouping statement must be separated by commas, and the last parameter shall always be the name of the source system for the data.
The Red Book macro function further decomposes in the following executable functions:
• Units Grouping • Red Book Data Editing • Import Red Book Data
4.2.2. Units Grouping
This function serves a similar purpose to that of the Red Book Accounts Grouping, except that it relates to the grouping of operational units (cost centers) to be reflected in a single Managerial Unit in the Red Book Reports.
To specify Units Grouping rules, go to the Main Menu and select Accountability, Blue Book, Red Book and Units Grouping. When the organization structure is displayed, select a Unit and edit its grouping rules in the Units Grouping box. In the example below the rules indicate that the operational units TX-S and TX-N are grouped into the Managerial Unit TX, for Red Book purposes.
* Specific for Piping:
• Source System must be Piping and
Copyright: Adizes Institute - 2011

16
• “From/To” Units must be the code of the unit chosen, for example if the Unit code for IAG (ITM-PT) is 1000, then write month=[1000]
4.2.3. Red Book Data Editing
Due to the large volume of available data, this function is executed in two stages:
• Set up filters to restrict the Red Book data to be seen and edited • Actual editing of the Red Book data records
On the first stage (Filter Set Up) the System or Company Administrator, as well as the Controller Blue, can specify the following types of selective filters:
• Date From - To: Upon clicking on the calendar icons of those fields a calendar is displayed for each one to allow the specification of the calendar date span to be browsed through and eventually edited.
• Values From - To: works similarly to the calendar time span filter, except that the specified limits apply to the amounts involved in the imported transactions.
• Description: allows the specification of a character string that must be present in the description field of the transactions to be edited.
• Source Filters:
Depending on which tab is selected (Source Systems Accounts; Source Systems Units or Source Systems), data to be seen and edited may be filtered on the basis of their originating Accounts, Units or Systems. The available Accounts, Units or Systems appear listed on the left bottom box where they can be selected by clicking on each one while holding the Ctrl key pressed. Once selected in the left box, they can be transferred to the right one by clicking on the
button. The reverse operation (bringing Accounts, Units
or Systems back to the left box) is done with the button.
Copyright: Adizes Institute - 2011

17
Once the desired selection criteria for transactions have been specified (by Dates, Values, Descriptions, Accounts, Units, and/or Systems) the desired (filtered)
transactions will be displayed when the button is hit. The displayed data can then
be edited by clicking on the edit button and subsequently saving ( ) the edited
record. To return to the filter specification screen, click on the button.
4.2.4. Import Red Book Data
Selecting this function will open a screen that allows the System or Company Administrator to specify a date span for the transactions to be imported. This is done
using the and boxes.
The same screen allows the specification of a script file that will control the importation of transaction data from the organization’s operational files, into the Red Book. This is an XML script file that must be created by an IT specialist, in accordance with information jointly supplied by the Organization’s Financial Systems main user and the Adizes Consultant assisting the Red Book implementation. The XML script specifies (in XML format) which financial transactions from which financial operational files shall be mapped onto each Red Book transaction in APTAS. This XML script is created once and then used repeatedly to import Red Book data on a monthly basis. The XML
Copyright: Adizes Institute - 2011
18
script only needs to be updated when the desired transactions mapping rules change. A sample XML script and its accompanying “XML Tags and Attributes Format and Description” is appended to this Implementation Guide.
The button will permit the System or Company Administrator to locate the desired XML file (previously prepared by the IT specialist) by browsing over the system server’s file directories.
The button will actually start the data import action, under control of the XML file. Errors that may occur during the transfer of data for the Red Book will be shown on the log of Rejected registers on the Import Red Book Data screen.
The check box, when checked, will repeat the import process, overwriting previously imported records. A date span must necessarily be specified.
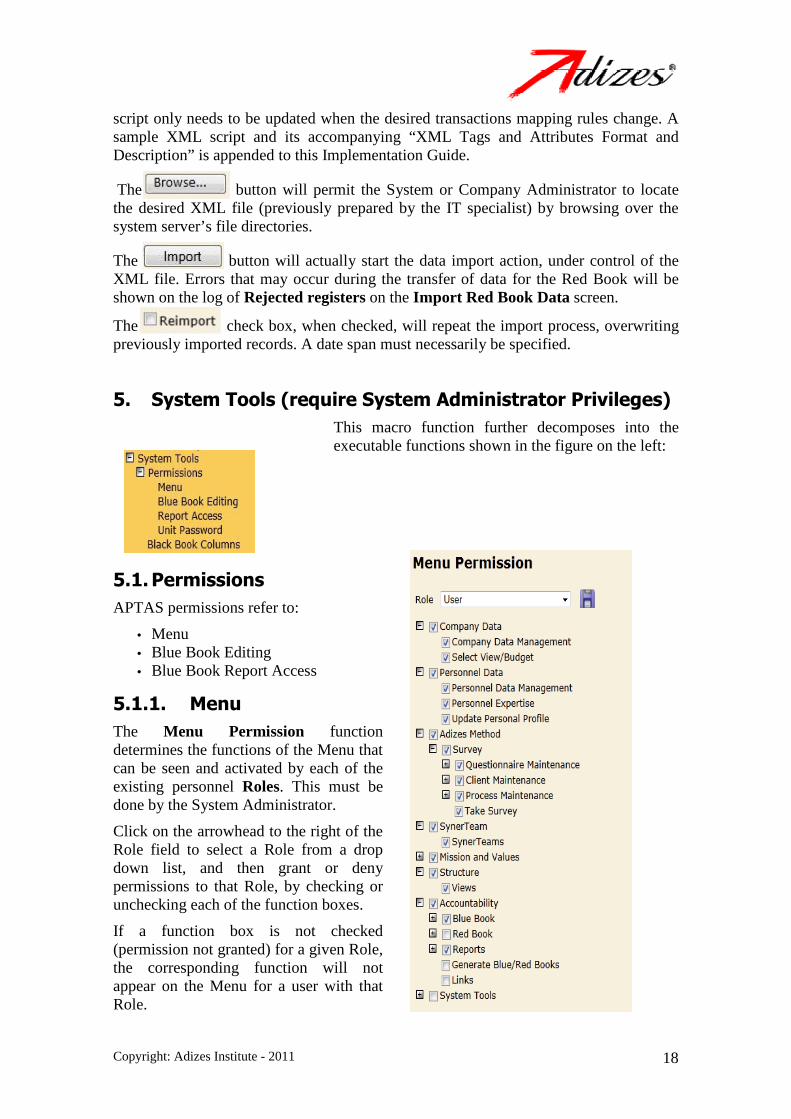
5. System Tools (require System Administrator Privileges)
This macro function further decomposes into the executable functions shown in the figure on the left:
5.1. Permissions
APTAS permissions refer to:
• Menu • Blue Book Editing • Blue Book Report Access
5.1.1. Menu
The Menu Permission function determines the functions of the Menu that can be seen and activated by each of the existing personnel Roles. This must be done by the System Administrator.
Click on the arrowhead to the right of the Role field to select a Role from a drop down list, and then grant or deny permissions to that Role, by checking or unchecking each of the function boxes.
If a function box is not checked (permission not granted) for a given Role, the corresponding function will not appear on the Menu for a user with that Role.
Copyright: Adizes Institute - 2011
19
Notice that the Menu Permission panel completely reproduces the APTAS Menu, and the macro functions can be expanded or collapsed by clicking on the or sign on the left of each macro function.
Permissions may be granted at the macro function level or denied at that level. This permission/restriction will apply to subordinate functions, unless otherwise specified in further detailed assignments made at lower levels of the same macro function.
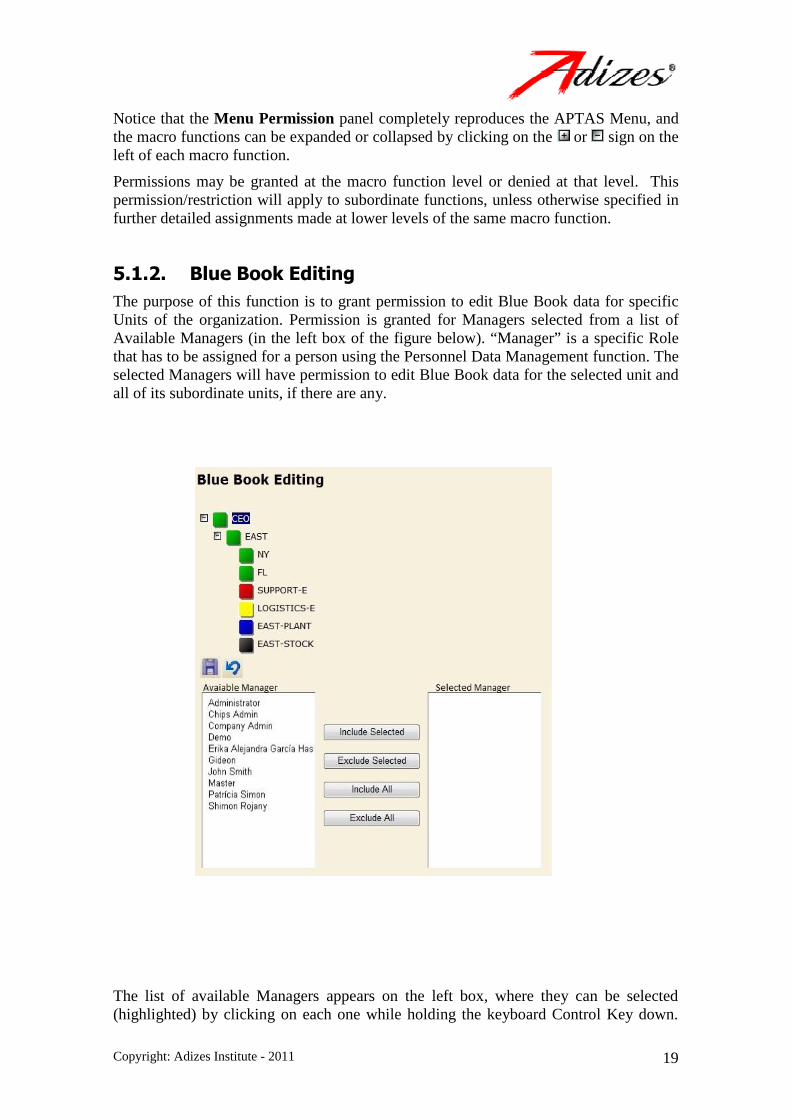
5.1.2. Blue Book Editing
The purpose of this function is to grant permission to edit Blue Book data for specific Units of the organization. Permission is granted for Managers selected from a list of Available Managers (in the left box of the figure below). “Manager” is a specific Role that has to be assigned for a person using the Personnel Data Management function. The selected Managers will have permission to edit Blue Book data for the selected unit and all of its subordinate units, if there are any.
The list of available Managers appears on the left box, where they can be selected (highlighted) by clicking on each one while holding the keyboard Control Key down.
Copyright: Adizes Institute - 2011

20
Once the desired Managers have been indicated in the left box, they can be transferred to the right box (Selected Managers) by clicking on the appropriate button in the column that separates the two boxes. The Include buttons (Selected or All) will transfer some or all the Managers on the left box to the right one. Likewise, the Exclude buttons (Selected or All) will transfer entries from the right box, back to the left one. Once the desired permissions to edit Blue Book data for the selected Unit have been granted, this
5.1.3. Report Access
This function allows the System Administrator to grant permissions to view the Blue/Red Book Reports related to the organizational units of the structure.
If the Report access privilege box is not checked, then only the selected Unit’s Manager will have access to his/her Unit’s reports (besides the System Administrator). Reports from any other units will not be shown.
When the Report access privilege box is checked, then the other boxes are enabled. If the All units box is also checked, then the remaining boxes are disabled and the Unit Manager will be allowed to view the Blue/Red Book reports for all the units in the structure.
When the Report access privilege box is checked, along with the Peer units box, then the Unit’s Manager will have access to the Blue/Red Book reports of his Peer Units and, eventually, also to the units that are “n“ levels up or down in the structure, depending on the numbers chosen for the respective boxes (Levels up and Levels down).
Once the permission settings have been chosen, the System Administrator must save
those settings by clicking on the button.
5.2. Black Book Columns
For each of the Black Book Report types (Standard and All Columns), select on the corresponding list of possible columns those that will actually be included when that type of report is issued.
Check the boxes for the columns you want included in the report and leave unchecked those that are not to be included.
Click on the Update button to make your choices effective.
Copyright: Adizes Institute - 2011
setting may be either saved ( ) or discarded ( ).

21
5.3. Translation Tool The purpose of this macro function is to permit the translation of system menus, data field labels on the system tables and other forms, such as buttons, login screen labels, etc.
5.3.1. Menus
A copy of the Menu is also exhibited to allow the selection of the Menu functions to be translated. Notice that the Menu Translation Tool completely reproduces the APTAS Menu, and the macro functions can be expanded or collapsed by clicking on the or sign on the
edit the contents of the menu entry, substituting the translated function label for the original one.
5.3.2. System Tables
Once a specific System Table is chosen (e.g: Color), a translation table will open, showing the original (English) labels for the chosen System Table entries (on the left side, in blue background), and allowing the Administrator to type in the translated labels on the right side (white background).
Copyright: Adizes Institute - 2011
Selecting System Tables from within the Translation Tool will allow the choice of a Language (from a list that is dropped down when you click on the arrowhead on the right of the Language field) and a System Table from a list of existing tables, also chosen from a drop down list.
left of each macro function. Select the function to be translated by double-clicking on it. You will then be able to
When Menus is selected from within the Translation Tool, a special icon appears on the screen to indicate that the System is in the Translation Mode (Translation Tool On).
22
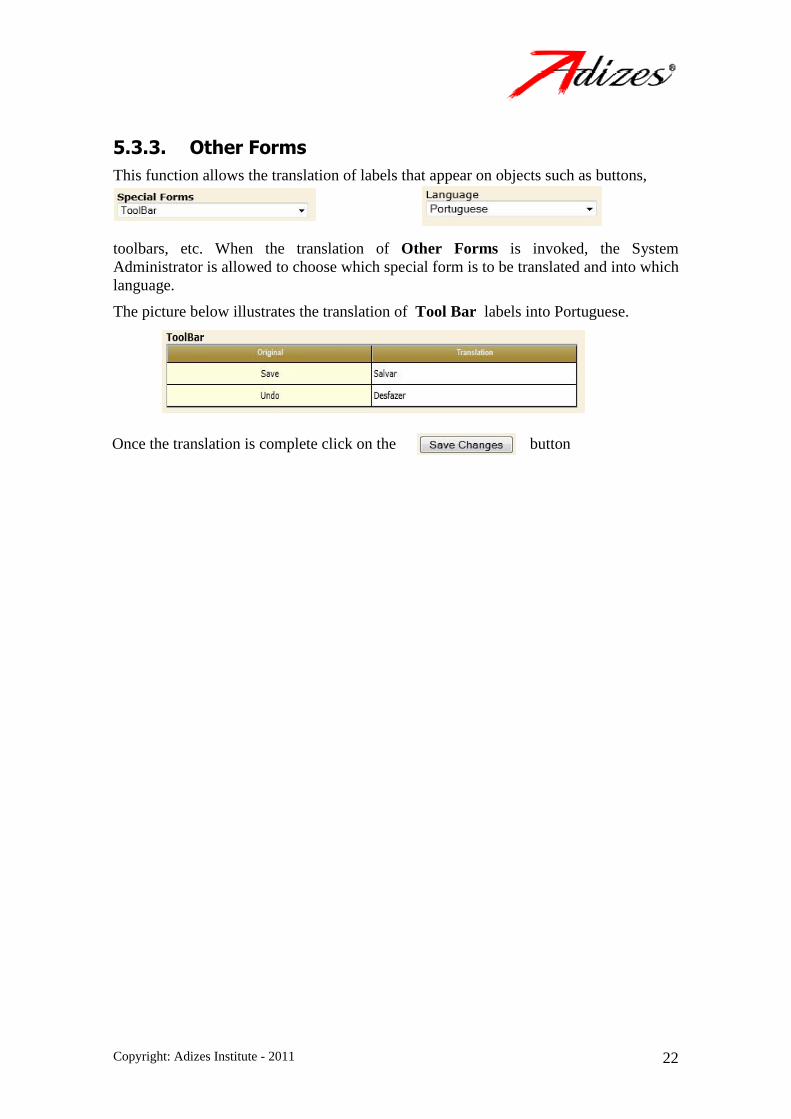
5.3.3. Other Forms
This function allows the translation of labels that appear on objects such as buttons,
toolbars, etc. When the translation of Other Forms is invoked, the System Administrator is allowed to choose which special form is to be translated and into which language.
The picture below illustrates the translation of Tool Bar labels into Portuguese.
Once the translation is complete click on the button
Copyright: Adizes Institute - 2011