a3 / a4 - lamparas de diseño · a3 / a4 stone designs, 2015 ... dimensiones generales de la...
TRANSCRIPT
A3 / A4Stone Designs, 2015
IP20 Clase I
A3: LED 18,6W 2640lm 350mA 3000K 230V 50-60Hz A4: LED 12,4W 1800lm 350mA 3000K 230V 50-60Hz
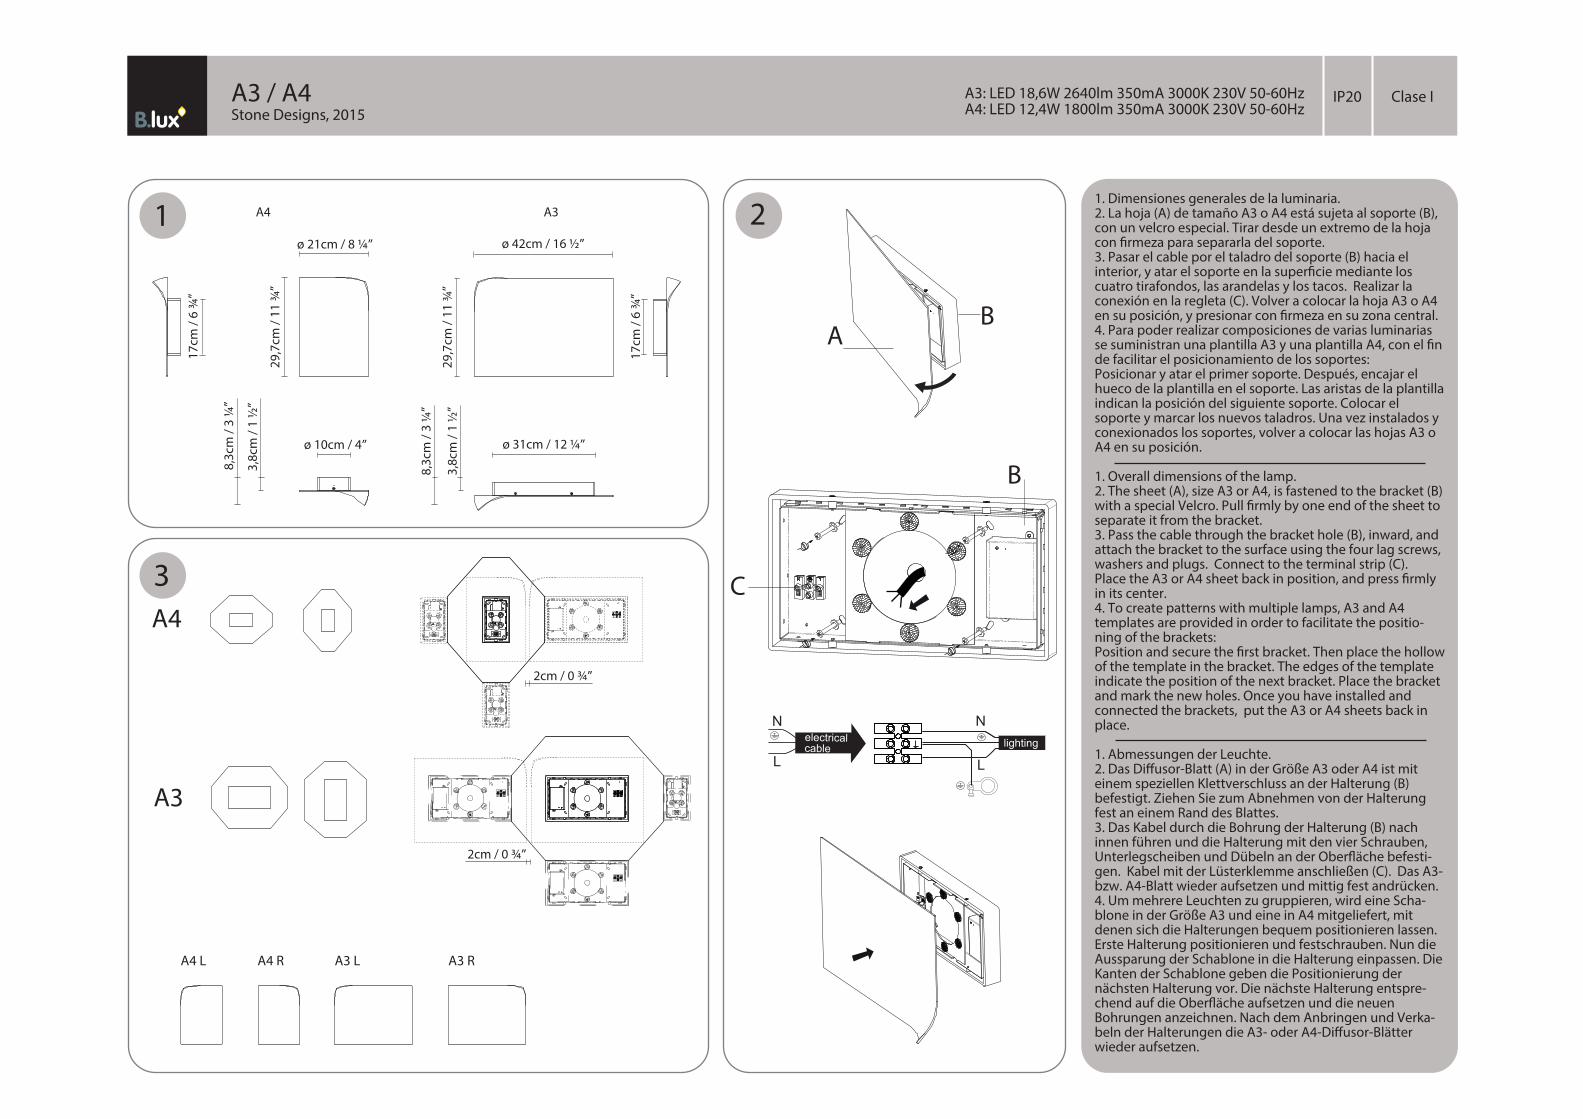
1. Dimensiones generales de la luminaria.2. La hoja (A) de tamaño A3 o A4 está sujeta al soporte (B), con un velcro especial. Tirar desde un extremo de la hoja con �rmeza para separarla del soporte. 3. Pasar el cable por el taladro del soporte (B) hacia el interior, y atar el soporte en la super�cie mediante los cuatro tirafondos, las arandelas y los tacos. Realizar la conexión en la regleta (C). Volver a colocar la hoja A3 o A4 en su posición, y presionar con �rmeza en su zona central.4. Para poder realizar composiciones de varias luminarias se suministran una plantilla A3 y una plantilla A4, con el �n de facilitar el posicionamiento de los soportes:Posicionar y atar el primer soporte. Después, encajar el hueco de la plantilla en el soporte. Las aristas de la plantilla indican la posición del siguiente soporte. Colocar el soporte y marcar los nuevos taladros. Una vez instalados y conexionados los soportes, volver a colocar las hojas A3 o A4 en su posición.
1. Overall dimensions of the lamp.2. The sheet (A), size A3 or A4, is fastened to the bracket (B) with a special Velcro. Pull �rmly by one end of the sheet to separate it from the bracket. 3. Pass the cable through the bracket hole (B), inward, and attach the bracket to the surface using the four lag screws, washers and plugs. Connect to the terminal strip (C). Place the A3 or A4 sheet back in position, and press �rmly in its center.4. To create patterns with multiple lamps, A3 and A4 templates are provided in order to facilitate the positio-ning of the brackets:Position and secure the �rst bracket. Then place the hollow of the template in the bracket. The edges of the template indicate the position of the next bracket. Place the bracket and mark the new holes. Once you have installed and connected the brackets, put the A3 or A4 sheets back in place.
1. Abmessungen der Leuchte.2. Das Di�usor-Blatt (A) in der Größe A3 oder A4 ist mit einem speziellen Klettverschluss an der Halterung (B) befestigt. Ziehen Sie zum Abnehmen von der Halterung fest an einem Rand des Blattes. 3. Das Kabel durch die Bohrung der Halterung (B) nach innen führen und die Halterung mit den vier Schrauben, Unterlegscheiben und Dübeln an der Ober�äche befesti-gen. Kabel mit der Lüsterklemme anschließen (C). Das A3- bzw. A4-Blatt wieder aufsetzen und mittig fest andrücken.4. Um mehrere Leuchten zu gruppieren, wird eine Scha-blone in der Größe A3 und eine in A4 mitgeliefert, mit denen sich die Halterungen bequem positionieren lassen.Erste Halterung positionieren und festschrauben. Nun die Aussparung der Schablone in die Halterung einpassen. Die Kanten der Schablone geben die Positionierung der nächsten Halterung vor. Die nächste Halterung entspre-chend auf die Ober�äche aufsetzen und die neuen Bohrungen anzeichnen. Nach dem Anbringen und Verka-beln der Halterungen die A3- oder A4-Di�usor-Blätter wieder aufsetzen.
1 2A4 A3
17cm
/ 6
¾”
29,
7cm
/ 11
¾”
ø 21cm / 8 ¼” 8,
3cm
/ 3
¼”
3,8c
m /
1 ½
”
ø 10cm / 4”
ø 42cm / 16 ½”
29,
7cm
/ 11
¾”
8,3c
m /
3 ¼
”
3,8c
m /
1 ½
” ø 31cm / 12 ¼”
17cm
/ 6
¾”
3
Nlighting
N
L
electricalcable
L
B
C
BA
A4
2cm / 0 ¾”
A3
2cm / 0 ¾”
A4 L A4 R A3 L A3 R
Instrucciones de montaje
Assembly instructions
Montage - anleitungen
Información al consumidor:
• Las luminarias sin marcado IP se considerarán IP20 y están diseñadas para uso general en interiores, excepto locales húmedos (cuartos de baño, etc.).
• Las luminarias con marcado IP están diseñadas para su uso en exterior y en locales húmedos. (Ej. IP54).
• La protección contra descargas eléctricas sobre personas y animales está asegurada:
• Clase I: por un único aislamiento eléctrico y por el conductor tierra después de su correcta conexión.
• Clase II: por un doble aislamiento eléctrico.
• Clase III: este tipo de luminarias deben ser conectadas a muy baja tensión (12V, generalmente), por lo que no existe este riesgo.
• Las luminarias con este marcado, o sin marcado, son adecuadas para el montaje directo sobre superficies normalmente inflamables.
• Las luminarias con este marcado no son adecuadas para el montaje directo sobre superficies normalmente inflamables.
• La seguridad de esta luminaria está garantizada con una lámpara cuya potencia no exceda de la mencionada de forma visible en la luminaria.
• El producto no puede ser tratado como un residuo doméstico convencional, sino que debe entregarse en el correspondiente punto de recogida de equipos eléctricos y electrónicos.
Consumer information:
• Lamps without the IP mark are classed as IP20 and are designed for general interior use, except wet areas (bathrooms, etc.)
• Lamps with the IP mark are designed for exterior use and in wet areas. (E.g. IP54)
• They o�er guaranteed protection to people and animals against electrical discharge:
• Class I: through single electrical insulation and an earthing conductor once correctly connected.
• Class II: through double electrical insulation.
• Class III: these kinds of lamps should be connected at very low voltage levels (generally 12V); therefore there is no risk.
• Lamps with this symbol, or without any symbols, can be mounted directly onto normally in�ammable surfaces.
• Lamps with this symbol cannot be mounted directly onto normally in�ammable surfaces.
• The safety of this lamp is guaranteed by using a maximum wattage bulb that does not exceed the �gure displayed visibly on the lamp.
• The product cannot be treated like conventional domestic waste; it must be taken to the corresponding recycling point for electrical and electronic equipment.
Verbraucherinformation:
• Die nicht mit einer IB-Auszeichnung versehenen Leuchten gelten als IP20 und sind nur für Innenbereiche unter Ausnahme von Feuchträumen (Bäder usw.) ausgelegt.
• Leuchten mit IP-Auszeichnung sind für den Einsatz in Außenbereichen und Feuchträumen ausgelegt. (z. B. IP54)
- Der Schutz gegen Stromschläge ist für Personen und Tiere gewährleistet:
• Klasse I: durch eine einfache Isolierung und die Erdung nach korrekter Installation.
• Klasse II: durch eine doppelte Isolierung.
• Klasse III: Dieser Typ von Leuchten darf nur an niedrige Spannung (i. d. R. 12 V) angeschlossen werden, daher besteht kein Risiko.
• Leuchten mit dieser Auszeichnung oder ohne Auszeichnung sind auch für die unmittelbare Montage auf normalerweise ent�ammbarem Untergrund geeignet.
• Leuchten mit dieser Auszeichnung sind nicht für die direkte Montage auf normalerweise ent�ammbarem Untergrund geeignet.
• Die Sicherheit dieser Leuchte ist durch eine Lampe als Leuchtmittel garantiert, deren Stärke nicht höher ist als diejenige Wattstärke, die auf der Leuchte sichtbar angegeben ist.
• Dieses Produkt darf nicht wie konventioneller Haushaltsmüll entsorgt werden. Es ist vielmehr an einer entsprechenden Sammelstelle für elektrische und elektronische Geräte abzugeben.
B.LUX S.A.Pol. Ind. Okamika, pab. 1
48289 Gizaburuaga (Bizkaia) Spain
T.(+34) 94 682 72 72
F. (+34) 94 682 49 02
www.grupoblux.com