3 day gym training program - body science · 3 day gym training program ... ensure you perform your...
TRANSCRIPT
3 DAY GYM TRAINING PROGRAMAuthor: Holly Louise #thefitpharmacist @thefitpharmacist_ @bodyscience Expert

3 DAY GYM TRAINING PROGRAM
Your program has been designed to be followed for 8-12 weeks. You will perform full body workouts, allowing 3 training days and 4 rest days per week. This split allows you to target each muscle group 3 times per week which will result in optimal muscle gain/fat loss.The objective at this point is to get the muscles used to the stress of the weight lifting stimulus and to prepare yourself for more advanced programs. Since you are new to lifting weights, your body will respond and progress quickly to even basic exercises. You will be lifting weights in the 8-15 rep range. This means you want to be able to perform at least 8 reps but no more than 15 reps for each set. If you cannot complete 8 reps, then the weight is too heavy and you should select a lighter weight. If you can complete more than 15 reps, then the weight is too light and you need to select a heavier weight.
The next step will be to progress to upper and lower body workouts.
MONDAY
Full bodyworkout 1
TUESDAY
Rest
WEDNESDAY
Full bodyworkout 2
THURSDAY
Rest
FRIDAY
Full bodyworkout 3
SATURDAY
Rest
SUNDAY
Rest
Below is an example of how to plan your workouts for the week. You can plan these workouts for any day of the week but keep in mind that it is strongly recommended that you leave at least one day between each of your full body weightlifting sessions. If you are just starting out and know that you have a slower recovery system, you may need rest for two days.
Proposed weekly training schedule
This refers to continually increasing the demands on the musculoskeletal system in order to continually make gains in muscle size, strength and endurance. If you continued to lift the same amount of weight for the same amount of reps over time, your body would adapt and as a result, no changes would occur. Basically, in order to get bigger and stronger you must continually lift more and more and make your muscles work harder than they are used to.
Ensure you record your weights and reps during/after each session to ensure you are progressing. To commence this program, select a weight that you can perform the required reps with. In order to ensure progression occurs over time, follow the methods outlined in ‘100 Points to Progressing with your Training’. Make sure you do not increase the weight if your form will be compromised. If you cannot increase the weight then keep the weight the same and try to perform extra reps or sets as explained.
Progressive overload

EXERCISE
45 DEGREE LEG PRESS MACHINE 2
Please refer to the Exercise Key for the proper technique of each exercise. Note: Warm up sets are not included as part of your working sets. Ensure you perform your glute activation exercises before you begin your lower body workouts.
Nutrition/Cardio
Workouts
Full body workout 1
1. Decrease the amount of calories you eat per week
2. Increase the amount of calories you burn per week
3. A combination of both
1. Increase the amount of calories you consume per week
2. Decrease/remove cardio from your program
SETS REPS REST COMMENTS
8-12 60-120 secAim to get your knees as close to your chest.
LYING LEG CURL 2 8-12 60-120 secAim to get the pad as close to your bottom as possible.
WIDE GRIP LAT PULL DOWN 2 8-12 60-120 secAim to get the pad to the bottom.
SEATED CABLE ROW 2 8-12 60-120 sec
Pull the V-bar to your lower abdomen and squeeze the back muscles. Focus on keeping the back straight.
CHEST PRESS MACHINE 2 8-12 60-120 sec
DUMBBELL INCLINE CHEST PRESS 2 8-12 60-120 secFocus on controlling the dumbbells throughout the movement.
SEATED SHOULDER PRESS MACHINE 2 8-12 60-120 sec
By following the recommendations/meal plan provided to you, this will ensure you are on track to achieving your goals! Appropriate nutrition is essential with any training program to achieve the best results possible. If your goal is to lose body fat you need to ensure that you are in a calorie deficit. This means that you are consuming less calories than you burn. This can be done in three ways:
If choosing to add cardio to your program, perform immediately after your workouts or on your rest days, and not before your workouts as it can decrease your strength.
If your goal is to purely put on muscle then you need to ensure that you are in a calorie surplus. This means that you are eating more calories than you burn. This can be done in two ways:

EXERCISE
DUMBBELL LATERAL RAISES 2
SETS REPS REST COMMENTS
8-12 60-120 sec
Keep a slight bend in your elbows and raise upper arms until they are in line with the shoulders.
DUMBBELL BICEP CURLS 2 8-12 60-120 sec Focus on keeping your elbows close to your torso.
DUMBBELL TRICEP KICKBACK 2 8-12 60-120 sec Squeeze the tricep at the top of the movement.
WEIGHTED AB CRUNCH 2 8-12 60-120 sec Focus on exhaling as you crunch down.
STANDING CALF RAISES 2 8-12 60-120 sec Hold the top position for 1-2 seconds.
EXERCISE
BARBELL BACK SQUATS 2
SETS REPS REST COMMENTS
8-12 60-120 secEnsure that you are reaching the required depth (upper thighs parallel to floor).
Full body workout 2
SEATED LEG CURL 2 8-12 60-120 sec
ASSISTED PULL UPS 2 Until failure 60-120 secYou can use an assisted pull up machine if available or a power band.
BENT OVER BARBELL ROW 2 8-12 60-120 secBring the bar to your belly button and squeeze the back muscles.
CHEST PRESS MACHINE 2 8-12 60-120 sec
PUSH UPS 2 12-15 or until failure 60-120 sec
Aim to get your chest as close to the floor as possible.
SEATED DUMBBELL SHOULDER PRESS 2 60-120 sec8-12

EXERCISE
PLATE FRONT RAISES 2
SETS REPS REST COMMENTS
8-12 60-120 secYou can use a weight plate or hold a dumbbell with both hands.
EZ-BAR BICEP CURLS 2 8-12 60-120 sec
STANDING CABLE TRICEP PUSHDOWN 2 8-12 60-120 sec
SEATED CALF RAISES 2 8-12 60-120 sec Hold the top position for 1-2 seconds.
LYING LEG RAISES 2 8-12 60-120 sec
EXERCISE
DUMBBELL WALKING LUNGES 2
SETS REPS REST COMMENTS
8-12 each leg 60-120 sec
Ensure that your knee does not go over the toes of your leading foot. Focus on getting your back knee as close to the floor as possible.
Full body workout 3
LEG EXTENSION 2 8-12 60-120 sec Squeeze the muscles at the top of the movement.
WIDE GRIP LAT PULL DOWN 2 8-12 60-120 sec
ONE ARM DUMBBELL ROW 2 8-12 60-120 secEnsure that your back is straight throughout the movement.
CHEST PRESS MACHINE 2 8-12 60-120 sec
DUMBBELL INCLINE PRESS 2 8-12 60-120 secFocus on controlling the dumbbells throughout the movement.
STANDING CABLE UPRIGHT ROW 2 8-12 60-120 secKeep the bar as close to the body as possible throughout the movement.
EXERCISE
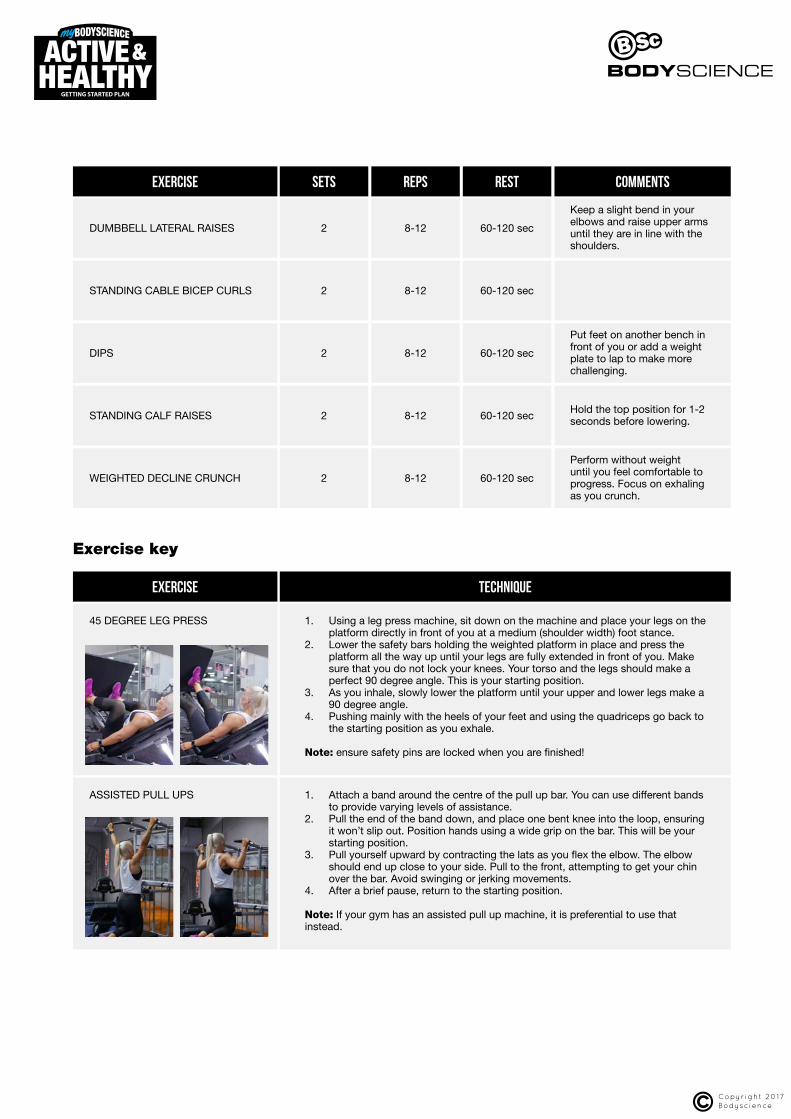
DUMBBELL LATERAL RAISES 2
SETS REPS REST COMMENTS
8-12 60-120 sec
Keep a slight bend in your elbows and raise upper arms until they are in line with the shoulders.
STANDING CABLE BICEP CURLS 2 8-12 60-120 sec
DIPS 2 8-12 60-120 sec
Put feet on another bench in front of you or add a weight plate to lap to make more challenging.
STANDING CALF RAISES 2 8-12 60-120 secHold the top position for 1-2 seconds before lowering.
WEIGHTED DECLINE CRUNCH 2 8-12 60-120 sec
Perform without weight until you feel comfortable to progress. Focus on exhaling as you crunch.
EXERCISE
45 DEGREE LEG PRESS
ASSISTED PULL UPS
TECHNIQUE
1. Using a leg press machine, sit down on the machine and place your legs on the platform directly in front of you at a medium (shoulder width) foot stance.
2. Lower the safety bars holding the weighted platform in place and press the platform all the way up until your legs are fully extended in front of you. Make sure that you do not lock your knees. Your torso and the legs should make a perfect 90 degree angle. This is your starting position.
3. As you inhale, slowly lower the platform until your upper and lower legs make a 90 degree angle.
4. Pushing mainly with the heels of your feet and using the quadriceps go back to the starting position as you exhale.
Note: ensure safety pins are locked when you are finished!
1. Attach a band around the centre of the pull up bar. You can use different bands to provide varying levels of assistance.
2. Pull the end of the band down, and place one bent knee into the loop, ensuring it won’t slip out. Position hands using a wide grip on the bar. This will be your starting position.
3. Pull yourself upward by contracting the lats as you flex the elbow. The elbow should end up close to your side. Pull to the front, attempting to get your chin over the bar. Avoid swinging or jerking movements.
4. After a brief pause, return to the starting position.
Note: If your gym has an assisted pull up machine, it is preferential to use that instead.
Exercise key

EXERCISE
BARBELL BACK SQUAT
BENT OVER BARBELL ROW
TECHNIQUE
1. Perform inside a squat rack for safety purposes. To begin, first set the bar on a rack about shoulder level. Starting with an unloaded bar, step under the bar and place the back of your shoulders (slightly below the neck) across it.
2. Hold on to the bar using both arms at each side and lift it off the rack by first pushing with your legs and at the same time straightening your torso.
3. Step away from the rack and position your legs using a stance that is slightly more than shoulder width with the toes slightly pointed out. Keep your head up at all times and maintain a straight back. This is your starting position.
4. Begin to slowly lower the bar by bending the knees and sitting back with your hips as you maintain a straight posture with the head up. Continue down until your hips are below a parallel position with the floor. Inhale as you perform this portion of the movement.
5. Begin to raise the bar as you exhale by pushing the floor with the heel or middle of your foot as you straighten the legs and extend the hips to go back to the starting position.
1. Holding a barbell with a pronated grip (palms facing down), bend your knees slightly and bring your torso forward, by bending at the waist, while keeping the back straight until it is almost parallel to the floor. The barbell should hang directly in front of you as your arms hang perpendicular to the floor and your torso. This is your starting position.
2. While keeping the torso stationary, breathe out and lift the barbell to you. Keep the elbows close to the body and only use the forearms to hold the weight. At the top contracted position, squeeze the back muscles and hold for a second.
3. Then inhale and slowly lower the barbell back to the starting position.4. Repeat for the recommended amount of repetitions.
Note: If you have back problems – swap this for the seated cable row
CHEST PRESS MACHINE 1. Sit down on the chest press machine and select the weight. Ensure the handles are level with the nipples.
2. Grab the handles with a palms-down grip and lift your elbows so that your upper arms are parallel to the floor to the sides of your torso. Once you bring the handles forward and extend the arms you will be at the starting position.
3. Now bring the handles back towards you as you breathe in.4. Push the handles away from you as you flex your pecs and you breathe out.5. Hold the contraction for a second before going back to the starting position.6. Repeat for the recommended amount of repetitions.
DIPS 1. Sit on a flat bench or chair with it perpendicular to your body. 2. Hold on to the bench/chair on its edge with the hands fully extended,
separated at shoulder width. Extended the legs forward, bent at the waist and perpendicular to your torso. This will be your starting position.
3. Slowly lower your body as you inhale by bending at the elbows until you lower yourself far enough to where there is an angle slightly smaller than 90 degrees between the upper arm and the forearm. Keep the elbows as close as possible to the torso throughout the movement and the forearms pointing down.
4. Use your triceps to lift yourself back to the starting position.5. Repeat for the recommended amount of repetitions.
Variations: Can put feet on another bench in front of you or add a weight plate to lap to make more challenging.

EXERCISE
DUMBBELL BICEP CURLS
TECHNIQUE
1. Stand or sit up straight on a bench with a dumbbell in each hand at arm’s length. Keep your elbows close to your torso and rotate the palms of your hands until they are facing forward. This is your starting position.
2. Exhale and curl the weights while contracting your biceps. Keep your upper arms and elbows stationary. Continue to raise the weights until your biceps are fully contracted and the dumbbells are at shoulder level. Hold the contracted position for a brief pause as you squeeze your biceps.
3. Then, inhale and slowly begin to lower the dumbbells back to the starting position.
4. Repeat for the recommended amount of repetitions.
DUMBBELL INCLINE CHEST PRESS 1. Lie back on an incline bench (30 degrees) with a dumbbell in each hand resting on your thighs. The palms of your hands will be facing each other.
2. Then, using your thighs to help push the dumbbells up, lift the dumbbells one at a time so that you can hold them at shoulder width.
3. Once you have the dumbbells raised to shoulder width, rotate your wrists forward so that the palms of your hands are facing away from you. This will be your starting position.
4. Be sure to keep full control of the dumbbells at all times. Then breathe out and push the dumbbells up with your chest, locking your arms at the top.
5. Start slowly lowering the weight. Ideally, lowering the weights should take about twice as long as raising them.
6. Repeat for the recommended amount of repetitions.
DUMBBELL LATERAL RAISES 1. Stand with your torso upright and a dumbbell on each hand being held at arms length, with palms facing your torso. The elbows should be close to the torso. Your feet should be about shoulder width apart. This will be your starting position.
2. Keeping your arms straight and the torso stationary, lift the weights out to your sides until they are about shoulder level height while exhaling. Keep the palms facing down with the little finger slightly higher while lifting and lowering the weights as it will concentrate the stress on your shoulders mainly.
3. Feel the contraction for a second and begin to lower the weights back down to the starting position while inhaling.
4. Repeat for the recommended amount of repetitions.
DUMBBELL TRICEP KICKBACKS 1. Sit down on the edge of a bench with a dumbbell in each hand and your palms facing your torso. Keep your back straight and bend forward at the waist. Your torso should be almost parallel to the floor. Make sure to keep your head up. Your upper arms should be close to your torso and parallel to the floor. Your forearms should be pointed towards the floor as you hold the weights. This is your starting position.
2. Now, while keeping your upper arms stationary, exhale and use your triceps to lift the weights until the arm is fully extended. Focus on moving the forearm.
3. After a brief pause at the top contraction, inhale and slowly lower the dumbbells back down to the starting position.
4. Repeat for the recommended amount of repetitions.
DUMBBELL/BARBELL WALKING LUNGES
1. Begin standing with your feet shoulder width apart and a dumbbell in both hands or with a loaded barbell across your back.
2. Step forward with one leg, flexing the knees to drop your hips. Descend until your rear knee nearly touches the ground. Your posture should remain upright, and your front knee should stay above the front foot and not over it.
3. Drive through the heel of your lead foot and extend both knees to raise yourself back up.
4. Step forward with your rear foot, repeating the lunge on the opposite leg.5. Repeat for the recommended amount of repetitions.

EXERCISE
EZ-BAR/BARBELL BICEP CURLS
TECHNIQUE
1. Stand up straight while holding an EZ bar at the wide outer handle. The palms of your hands should be facing forward and slightly tilted inward. Keep your elbows close to your torso. This is your starting position.
2. Exhale and curl the weights forward while contracting the biceps. Focus on only moving your forearms. The elbows and upper arms should remain stationary.
3. Continue to raise the weight until your biceps are fully contracted and the bar is at shoulder level. Hold the top contracted position for a moment and squeeze the biceps.
4. Then inhale and slowly lower the bar back to the starting position.5. Repeat for the recommended amount of repetitions.
LEG EXTENSION 1. Select your weight and sit on the machine with your legs under the pad (feet pointed forward) and the hands holding the handles. This will be your starting position.
2. Using your quadriceps, extend your legs as much as possible as you exhale and hold for a second at the top of the movement. Ensure that the rest of the body remains stationary on the seat.
3. Slowly lower the weight back to the original position as you inhale, ensuring that you do not go past a 90-degree angle.
4. Repeat for the recommended amount of repetitions.
LYING LEG CURL 1. Adjust the machine lever to fit your height and lie face down on the leg curl machine with the pad of the lever on the back of your legs, just under the calves. Position your toes straight. This is your starting position.
2. As you exhale, curl your legs up as far as possible without lifting the upper legs from the pad. Once you hit the fully contracted position, hold it for a second.
3. As you inhale, bring the legs back to the initial position.4. Repeat for the recommended amount of repetitions.
ONE-ARM DUMBBELL ROWS 1. Place a dumbbell on the floor beside a flat bench or side of the bed/couch.2. Place the right leg on top of the end of the bench, bend your torso forward
from the waist until your upper body is parallel to the floor, and place your right hand on the other end of the bench/bed/couch for support.
3. Use the left hand to pick up the dumbbell on the floor and hold the weight while keeping your lower back straight. The palm of the hand should be facing your torso. This will be your starting position.
4. Pull the dumbbell straight up to the side of your chest, keeping your upper arm close to your side and keeping the torso stationary. Breathe out as you perform this step. Tip: Concentrate on squeezing the back muscles once you reach the full contracted position. The forearms should do no other work except for holding the dumbbell; therefore do not try to pull the dumbbell up using the forearms.
5. Lower the resistance straight down to the starting position. Breathe in as you perform this step.
6. Repeat the movement for the specified amount of repetitions.7. Switch sides and repeat again with the other arm.
LYING LEG RAISES 1. Lie down on the floor with your back flat and your legs extended in front of you.2. Place your hands either under your glutes with your palms down or by your
sides. This will be your starting position.3. As you keep your legs extended, straight as possible with your knees slightly
bent but locked raise your legs until they make a 90-degree angle with the floor. Exhale as you perform this portion of the movement and hold the contraction at the top for a second.
4. Now, as you inhale, slowly lower your legs back down to the starting position.5. Repeat for the recommended amount of repetitions.

EXERCISE
PUSH UPS
TECHNIQUE
1. Lie on the floor face down and place your hands slightly more than shoulder width apart while holding your torso up at arms length, with knees off the ground. This is your starting position.
2. Next, lower yourself downward until your chest almost touches the floor as you inhale.
3. Now breathe out and press your upper body back up to the starting position while squeezing your chest.
4. After a brief pause at the top contracted position, you can begin to lower yourself downward again for as many repetitions as needed.
Variations: If you do not have the strength to perform a standard push up, you can either bend your legs at the knees to take off some resistance or perform the exercise against the wall instead of the floor.
PLATE FRONT RAISES 1. Standing with feet shoulder width apart, hold a weight plate in front of your hips with your arms extended but with a slight bend in the elbow. This is your starting position.
2. Raise the plate up to shoulder height, keep the arms extended and elbows slightly bent.
3. Hold the top position for a second and then slowly return to the starting position.
4. Repeat for the recommended amount of repetitions.
SEATED CABLE ROW
SEATED CALF RAISE
1. Set the appropriate weight on the weight stack and attach a close grip bar or V-bar to the seated row machine.
2. Grasp the bar with a neutral grip (palms facing in).3. Keeping your legs slightly bent and your back straight, pull the weight up
slightly off the stack. You should be sitting straight upright with your shoulders back. This is the starting position.
4. Keeping your body in position, pull the handle into your stomach.5. Pull your shoulder blades back, squeeze, pause, and then slowly release the
weight back to the starting position.6. Repeat for the recommended amount of repetitions.
1. Sit on the machine and place your toes on the platform provided with toes pointing forward and the heels extending off.
2. Place your lower thighs under the lever pad, which will need to be adjusted accordingly. Now place your hands on top of the lever pad in order to prevent it from slipping forward.
3. Lift the lever by pushing your heels up and release the safety bar. This will be your starting position.
4. Inhale and slowly lower your heels by bending at the ankles until the calves are fully stretched.
5. Raise the heels by extending the ankles as high as possible as you contract the calves and breathe out. Hold the top contraction for a second.
6. Repeat for the recommended amount of repetitions.
SEATED DUMBBELL SHOULDER PRESS
1. Grab a couple of dumbbells and sit on a chair as you place the dumbbells upright on top of your thighs.
2. Press the dumbbells up one at a time by using your thighs to bring the dumbbells up to shoulder height at each side. Your upper arms should be just below parallel with the floor.
3. Rotate the wrists so that the palms of your hands are facing forward. This is your starting position.
4. As you exhale, push the dumbbells up until they almost touch at the top. Do not lock out your elbows.
5. After a second pause, slowly come down back to the starting position as you inhale.
6. Repeat for the recommended amount of repetitions.

EXERCISE TECHNIQUE
SEATED LEG CURL
SEATED SHOULDER PRESS MACHINE
1. Adjust the machine lever to fit your height and sit on the machine with your back against the back support pad.
2. Place the back of lower leg on top of padded lever (just a few inches under the calves) and secure the lap pad against your thighs, just above the knees. Then grasp the side handles on the machine as you point your toes straight and ensure that the legs are fully straight right in front of you. This will be your starting position.
3. As you exhale, pull the machine lever as far as possible to the back of your thighs by flexing at the knees. Keep your torso stationary at all times. Hold the contracted position for a second.
4. Slowly return to the starting position as you breathe in.5. Repeat for the recommended amount of repetitions.
1. Begin the movement by sitting on the machine and adjusting the seat if possible to align the handles with your upper chest. Select an appropriate weight.
2. Grasp the bar or handles with your palms are facing out. Be sure to keep your back straight. This is your starting position.
3. While exhaling, press the bar or weight straight up. Be sure not to lock your elbows at the top.
4. Hold for 1-2 seconds then lower slowly to the starting position while inhaling.5. Repeat for the recommended amount of repetitions.
STANDING CABLE BICEP CURL 1. Stand up with your torso upright while holding a cable curl bar that is attached to a low cable pulley. Your hands should be shoulder width apart with palms facing up and elbows next to the torso. This is your starting position.
2. While holding the upper arms stationary, curl the bar while contracting the biceps as you breathe out. Only the forearms should move. Continue the movement until your biceps are fully contracted and the bar is at shoulder level then hold for a second as you squeeze the muscle.
3. Slowly begin to bring the curl bar back to starting position as you inhale.4. Repeat for the recommended amount of repetitions.
STANDING CABLE TRICEP PUSHDOWN
1. Attach a straight or angled bar to a high pulley and grab with an overhand grip (palms facing down) at shoulder width.
2. Standing upright with the torso straight and a very small inclination forward, bring the upper arms close to your body and perpendicular to the floor. The forearms should be pointing up towards the pulley as they hold the bar. This is your starting position.
3. Using the triceps, bring the bar down until it touches the front of your thighs and the arms are fully extended perpendicular to the floor. The upper arms should always remain stationary next to your torso and only the forearms should move. Exhale as you perform this movement.
4. After a second hold at the contracted position, bring the bar slowly up to the starting point. Breathe in as you perform this step.
5. Repeat for the recommended amount of repetitions.
STANDING CABLE UPRIGHT ROW 1. Hold a straight bar attachment that is attached to a low cable with palms facing your thighs and slightly less than shoulder width. Your arms should be extended with a slight bend at the elbows and your back should be straight. This is your starting position.
2. Use your side shoulders to lift the bar as you exhale. The bar should be as close to the body as possible as you lift it. Continue to lift until it nearly touches your chin. Your elbows should drive the motion and will be higher than your forearms at the top of the movement. Keep your torso stationary and pause for a second at the top.
3. Lower the bar back down slowly to the starting position while inhaling.4. Repeat for the recommended amount of repetitions.
