1 essential worksheet operations applications of spreadsheets
TRANSCRIPT

11
Essential Worksheet Essential Worksheet OperationsOperations
Applications of SpreadsheetsApplications of Spreadsheets
Working with Excel’s WindowWorking with Excel’s Window
►Workbook – Workbook – an Excel filean Excel file contains one or more worksheets or chart contains one or more worksheets or chart
sheetssheets can have multiple workbooks open at can have multiple workbooks open at
onceonce each occupies a separate window which each occupies a separate window which
can be minimized or maximized can be minimized or maximized (restored).(restored).
Moving and Resizing Moving and Resizing WindowsWindows
► To move a windowTo move a window make sure it is not maximizedmake sure it is not maximized click and drag it’s title bar with the mouseclick and drag it’s title bar with the mouse
► To resize a windowTo resize a window click and drag any of its bordersclick and drag any of its borders to resize a window horizontally and vertically at to resize a window horizontally and vertically at
the same time, click and drag any of its cornersthe same time, click and drag any of its corners► To make all workbook windows visibleTo make all workbook windows visible
Select Window Select Window Arrange Arrange 4 window arrangements available: Tiled, 4 window arrangements available: Tiled,
Horizontal, Vertical, CascadeHorizontal, Vertical, Cascade

Switching Among WindowsSwitching Among Windows
►Only one window can be the active Only one window can be the active windowwindow At the top of the stackAt the top of the stack Can accept input and commandsCan accept input and commands Title bar is different colorTitle bar is different color

Switching among WindowsSwitching among Windows
►To make a different window activeTo make a different window active Click another window (if visible)Click another window (if visible) Press Ctrl+Tab (or Ctrl+F6) to cycle Press Ctrl+Tab (or Ctrl+F6) to cycle
through available windows (Shift+Ctrl+Tab through available windows (Shift+Ctrl+Tab or Shift+Ctrl+F6 reverses direction).or Shift+Ctrl+F6 reverses direction).
Click the workbook icon in the Windows Click the workbook icon in the Windows Taskbar (must be set in Options)Taskbar (must be set in Options)
Select Window Select Window select workbook you want select workbook you want (up to 9 can be displayed here)(up to 9 can be displayed here)

Displaying and Closing Displaying and Closing WindowsWindows
►Can display a single workbook in more Can display a single workbook in more than one window by selecting Window than one window by selecting Window New Window New Window
►Close a window by Close a window by using the Close button in the title bar using the Close button in the title bar File File Close Close

Displaying and Closing Displaying and Closing WindowsWindows
►The Excel workbook structure allows The Excel workbook structure allows you to have multiple worksheetsyou to have multiple worksheets Can easily move among worksheetsCan easily move among worksheets Can add and delete worksheetsCan add and delete worksheets Can move worksheets aroundCan move worksheets around Can name each worksheet an identifiable Can name each worksheet an identifiable
namename►Changing the names of worksheets in a Changing the names of worksheets in a
multiple-sheet workbook makes it easier to multiple-sheet workbook makes it easier to understand the purpose of each sheet.understand the purpose of each sheet.

Displaying and Closing Displaying and Closing WindowsWindows
►Excel allows you to copy, link or move Excel allows you to copy, link or move cell contents cell contents between worksheetsbetween worksheets between workbooksbetween workbooks between applicationsbetween applications

The Active WorksheetThe Active Worksheet
►Only one worksheet within the active Only one worksheet within the active workbook is the active worksheet.workbook is the active worksheet.
►To activate a different sheetTo activate a different sheet click on its sheet tabclick on its sheet tab Ctrl+PgUp (activates the previous Ctrl+PgUp (activates the previous
worksheet, if exists)worksheet, if exists) Ctrl+PgDn (activates the next sheet, if Ctrl+PgDn (activates the next sheet, if
exists)exists)

The Active WorksheetThe Active Worksheet

Multiple WorksheetsMultiple Worksheets
►Navigating worksheetsNavigating worksheets use the tab-scrolling buttons to scroll the use the tab-scrolling buttons to scroll the
sheet tabs.sheet tabs. use the tab split box to display more or use the tab split box to display more or
fewer tabs.fewer tabs. right click the tab scrolling buttons to the right click the tab scrolling buttons to the
left of the worksheet tabs to display a list left of the worksheet tabs to display a list of all sheets in the workbook.of all sheets in the workbook.
►Within a workbook you can insert, Within a workbook you can insert, move, rename, and delete worksheets.move, rename, and delete worksheets.

Inserting WorksheetsInserting Worksheets
►Select the Insert Select the Insert Worksheet Worksheet commandcommand
►Press Shift+F11Press Shift+F11►Right-click a sheet tab, choose the Right-click a sheet tab, choose the
Insert command from the shortcut Insert command from the shortcut menu, and select Worksheet from the menu, and select Worksheet from the Insert dialog box. Insert dialog box.

Inserting WorksheetsInserting Worksheets
►Excel positions an inserted worksheet to Excel positions an inserted worksheet to the left of the current worksheet. You the left of the current worksheet. You can easily change its position, however, can easily change its position, however, by clicking its sheet name and dragging by clicking its sheet name and dragging left or right.left or right.
►To insert more than one worksheet at a To insert more than one worksheet at a timetime hold down the Shift keyhold down the Shift key click a range of worksheet tabs equal to the click a range of worksheet tabs equal to the
amount of new worksheets you wish to add.amount of new worksheets you wish to add.

Inserting, Arranging, and Deleting Inserting, Arranging, and Deleting WorksheetsWorksheets

Deleting WorksheetsDeleting Worksheets
►Select the Edit Select the Edit Delete Sheet Delete Sheet command or command or
►Right-click a sheet tab, choose the Right-click a sheet tab, choose the Insert command from the shortcut Insert command from the shortcut menu, and select Worksheet from the menu, and select Worksheet from the Insert dialog box.Insert dialog box.

Deleting WorksheetsDeleting Worksheets
►You cannot use Excel’s Undo feature to You cannot use Excel’s Undo feature to restore a deleted sheet!restore a deleted sheet!
►As a precaution, save a workbook As a precaution, save a workbook immediately before applying any action immediately before applying any action that cannot be undone. that cannot be undone. If you accidentally delete a worksheet, close If you accidentally delete a worksheet, close
the current workbook without saving the the current workbook without saving the most recent change – then open the most recent change – then open the workbook which will still have the deleted workbook which will still have the deleted sheet.sheet.

Inserting, Arranging & Deleting Inserting, Arranging & Deleting WorksheetsWorksheets

Renaming WorksheetsRenaming Worksheets► Choose Format Choose Format Sheet Sheet Rename Rename► Double-click on the sheet tab.Double-click on the sheet tab.► Right-click on the sheet tab and choose Rename.Right-click on the sheet tab and choose Rename.
► Good to provide meaningful names for your Good to provide meaningful names for your worksheets.worksheets.
► If you want to edit rather than entirely rename, best If you want to edit rather than entirely rename, best to choose the second action.to choose the second action.
► Can’t use the following characters in a sheet name:Can’t use the following characters in a sheet name: : colon: colon / slash/ slash \ backslash\ backslash ? question mark? question mark * asterisk* asterisk

Changing the Sheet Tab’s Changing the Sheet Tab’s ColorColor
►Can color-code sheet tabs to quickly Can color-code sheet tabs to quickly identify the contents.identify the contents.
►Right-click the tab, choose Tab Color, Right-click the tab, choose Tab Color, and select the color in the Format Tab and select the color in the Format Tab Color dialog box.Color dialog box.

Rearranging the WorksheetsRearranging the Worksheets
► To move a worksheet: click the worksheet tab and To move a worksheet: click the worksheet tab and drag it to it’s desired location (can be a different drag it to it’s desired location (can be a different workbook that is open).workbook that is open).
► To copy a worksheet: click the worksheet tab, press To copy a worksheet: click the worksheet tab, press Ctrl, and drag the tab to its desired location.Ctrl, and drag the tab to its desired location.
► To move or copy multiple sheets: hold the Ctrl key To move or copy multiple sheets: hold the Ctrl key down when selecting the sheets.down when selecting the sheets.
► To use the Move or Copy Dialog Box: select the Edit To use the Move or Copy Dialog Box: select the Edit Move or Copy Sheet command, or right-click the Move or Copy Sheet command, or right-click the tab, choose the Move or Copy command.tab, choose the Move or Copy command.

Inserting, Arranging & Deleting Inserting, Arranging & Deleting WorksheetsWorksheets
Displaying the Move or Copy Dialog BoxDisplaying the Move or Copy Dialog Box
Specify the target location in another workbook
Specify the target location within the current workbook
Change the operation from a Move to a Copy by selecting this check box

Using Save As to Change Using Save As to Change Filename, File Type, or Storage Filename, File Type, or Storage
LocationLocation► Clicking the Save button on the toolbar Clicking the Save button on the toolbar
immediately saves the current workbook immediately saves the current workbook under its current name and in its current under its current name and in its current storage location.storage location.
► If you want to change the name or storage If you want to change the name or storage location, or save the workbook as another file location, or save the workbook as another file type, use the Save As option on the File type, use the Save As option on the File menu. menu. Before clicking the Save button always check if Before clicking the Save button always check if
you have the desired settings in three areas of the you have the desired settings in three areas of the dialog box:dialog box:
► Save inSave in► File nameFile name► Save as typeSave as type

Hiding Worksheets and Hiding Worksheets and WorkbooksWorkbooks
► You can hide and unhide workbooks and You can hide and unhide workbooks and worksheets within workbooks.worksheets within workbooks. To hide the current worksheet, choose Format To hide the current worksheet, choose Format
Sheet Sheet Hide Hide To unhide a worksheet, choose Format To unhide a worksheet, choose Format Sheet Sheet
Unhide and select it from a list of hidden Unhide and select it from a list of hidden sheets in the Unhide dialog box.sheets in the Unhide dialog box.
To hide a workbook, open it, and choose Window To hide a workbook, open it, and choose Window HideHide
To unhide a workbook, choose Window To unhide a workbook, choose Window Unhide, and select from a list of hidden Unhide, and select from a list of hidden workbooks.workbooks.
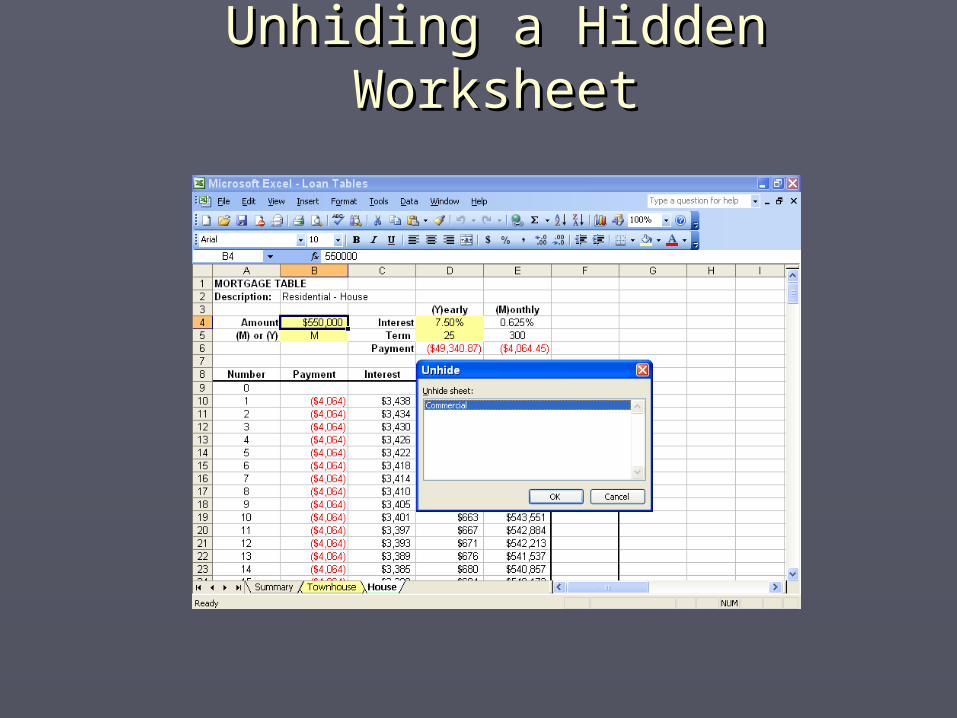
Unhiding a Hidden WorksheetUnhiding a Hidden Worksheet

Viewing and Printing Large Viewing and Printing Large WorksheetsWorksheets
►Workbooks used in industry are Workbooks used in industry are typically quite expansive, containing typically quite expansive, containing multiple worksheets and storing multiple worksheets and storing hundreds of rows of data. hundreds of rows of data.
►Knowing how to efficiently manage Knowing how to efficiently manage and work with large worksheets and work with large worksheets directly impacts your productivity. directly impacts your productivity.
Viewing a Worksheet in Multiple Viewing a Worksheet in Multiple WindowsWindows
►You may need to view two parts of a You may need to view two parts of a worksheet simultaneously.worksheet simultaneously.
►A worksheet can have many views or A worksheet can have many views or separate windows as you want, each separate windows as you want, each being independent of each other (in being independent of each other (in terms of scrolling, not data!)terms of scrolling, not data!)
►To create and display a new view of To create and display a new view of the active workbook:the active workbook: Choose Window Choose Window New Window New Window
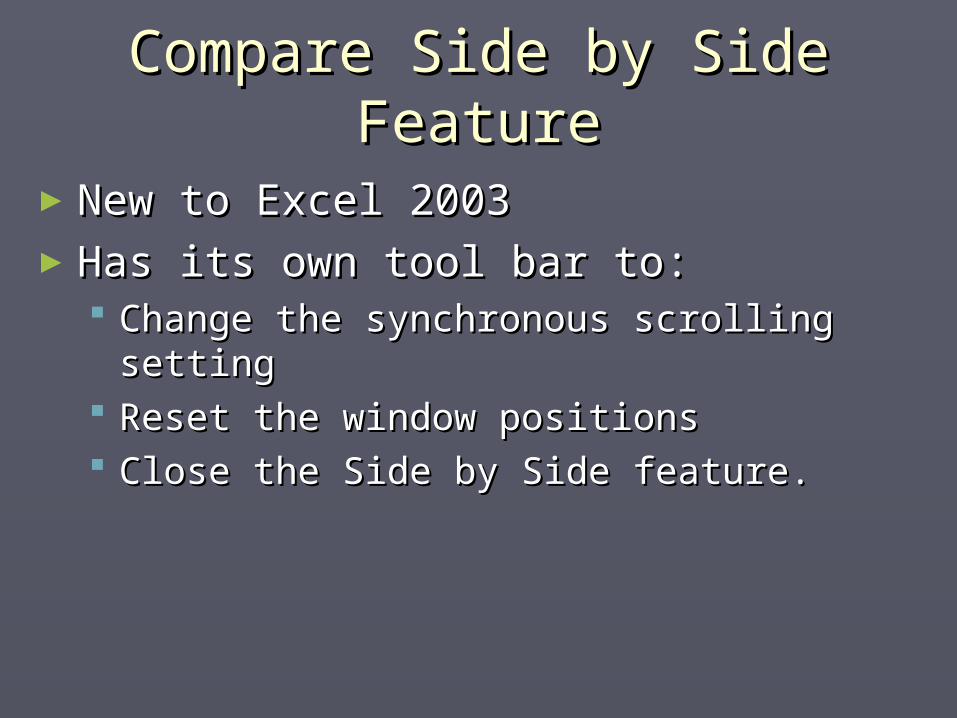
Compare Side by Side Compare Side by Side FeatureFeature
►New to Excel 2003New to Excel 2003►Has its own tool bar to:Has its own tool bar to:
Change the synchronous scrolling settingChange the synchronous scrolling setting Reset the window positionsReset the window positions Close the Side by Side feature.Close the Side by Side feature.

Compare Side by Side Compare Side by Side FeatureFeature
► In a different workbook:In a different workbook: Make sure that the two worksheets are displayed Make sure that the two worksheets are displayed
in separate windows.in separate windows.
► In the same workbook:In the same workbook: Use the Window Use the Window New Window command to New Window command to
create a new window for the active workbook.create a new window for the active workbook. Activate the first windowActivate the first window Choose Window Choose Window Compare Side by Side With. Compare Side by Side With. Select Window Select Window Arrange to modify the window Arrange to modify the window
arrangement.arrangement.

Other Ways to View a Other Ways to View a Worksheet in Multiple WindowsWorksheet in Multiple Windows
► You can split the You can split the worksheet window into worksheet window into two or four panes, and two or four panes, and then scroll to any area of then scroll to any area of the worksheet in any the worksheet in any pane. pane.
► You can also freeze You can also freeze selected rows and/or selected rows and/or columns on the screen.columns on the screen.
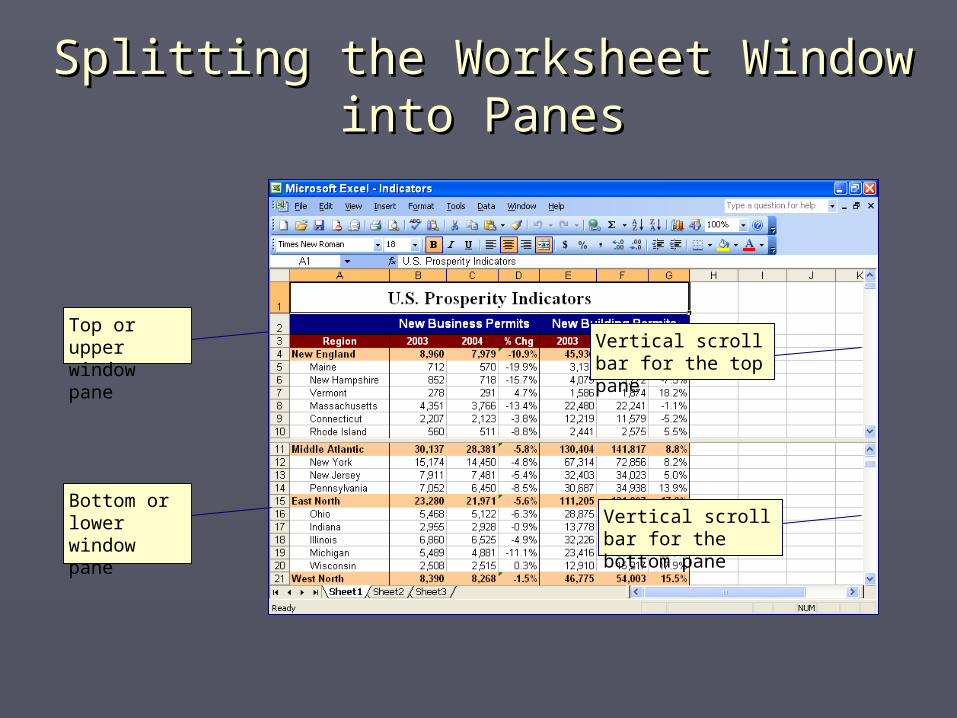
Splitting the Worksheet Window into Splitting the Worksheet Window into PanesPanes
Top or upper window pane
Bottom or lower window pane
Vertical scroll bar for the bottom pane
Vertical scroll bar for the top pane

Freezing and Unfreezing PanesFreezing and Unfreezing Panes

Freezing and Unfreezing PanesFreezing and Unfreezing Panes
The row numbering skips from row 3 to 47

Editing When Split Panes are Editing When Split Panes are ActiveActive
►When a worksheet is split into panes, it When a worksheet is split into panes, it is possible to see the same section of a is possible to see the same section of a worksheet in multiple panes.worksheet in multiple panes. This relates to the screen display only.This relates to the screen display only. The command doesn’t produce duplicate The command doesn’t produce duplicate
cells.cells. You can edit the contents of a cell in one You can edit the contents of a cell in one
pane and the changes appear immediately pane and the changes appear immediately in any other pane that displays the same in any other pane that displays the same cell.cell.

Updating Data in a Multi-paned Updating Data in a Multi-paned WorksheetWorksheet

Zooming In and Out for a Better Zooming In and Out for a Better ViewView
►You don’t want to alter the font sizes You don’t want to alter the font sizes in your worksheets just to view a in your worksheets just to view a larger area of a worksheet because larger area of a worksheet because changes in font size are also reflected changes in font size are also reflected on printed output.on printed output.
► Instead, change the zoom level on the Instead, change the zoom level on the toolbar to decrease or increase your toolbar to decrease or increase your view of one area of a worksheet.view of one area of a worksheet.

Saving Your View SettingsSaving Your View Settings
►Can create a named view that includes Can create a named view that includes settings for window size, window settings for window size, window position, frozen panes, titles, outlining, position, frozen panes, titles, outlining, zoom factor, active cell, print area, etc.zoom factor, active cell, print area, etc. Set up the view settings the way you want Set up the view settings the way you want
them.them. Select View Select View Custom Views Custom Views Click the Add button and provide a name Click the Add button and provide a name
in the Add View dialog box and click OK.in the Add View dialog box and click OK.

Saving Your View SettingsSaving Your View Settings
►To view a worksheet in a custom view, To view a worksheet in a custom view, select the particular view by selecting select the particular view by selecting View View Custom Views to display the Custom Views to display the list, and then click the Show button.list, and then click the Show button.
►To delete a custom view, click the To delete a custom view, click the Delete button.Delete button.

The Watch WindowThe Watch Window
► You may want to keep track of a particular You may want to keep track of a particular value in a particular cell, but it goes out of value in a particular cell, but it goes out of view when you scroll the worksheet.view when you scroll the worksheet.
► Display the Watch Window (a special Display the Watch Window (a special toolbar) bytoolbar) by Selecting View Selecting View Toolbars Toolbars Watch Window Watch Window Click Add WatchClick Add Watch Specify the cell you want to watchSpecify the cell you want to watch
► Can move the Watch window to a convenient Can move the Watch window to a convenient location on your Excel workspace.location on your Excel workspace.
► Can add any number of cells to the Watch Can add any number of cells to the Watch Window.Window.

Working with Rows and Working with Rows and ColumnsColumns
►The number of total rows and columns The number of total rows and columns in an Excel worksheet is fixed.in an Excel worksheet is fixed. Rows: 65,536Rows: 65,536 Columns: IVColumns: IV

Inserting and Deleting Rows Inserting and Deleting Rows and Columnsand Columns
► If you decide to add more data within an If you decide to add more data within an existing worksheet, you can insert rows and existing worksheet, you can insert rows and columns. columns.
► Inserting a row or column is a two-step Inserting a row or column is a two-step process: process: selecting a cell and then choosing Insert, selecting a cell and then choosing Insert,
Columns, or, Insert, Rows. Columns, or, Insert, Rows. ► Excel always inserts a new row above the Excel always inserts a new row above the
row you select, and inserts a new column row you select, and inserts a new column to the left of the column you select.to the left of the column you select.
► Deleting a row or column is done in two Deleting a row or column is done in two steps: steps: select a row heading or a column heading in the select a row heading or a column heading in the
worksheet frame and choose Edit, Delete.worksheet frame and choose Edit, Delete.

Inserting and Deleting Rows and Inserting and Deleting Rows and ColumnsColumns
► If you want to insert more than one row or If you want to insert more than one row or column at a timecolumn at a time select as many adjacent rows or columns as you select as many adjacent rows or columns as you
need blank rows or columnsneed blank rows or columns choose Insert choose Insert Rows or Insert Rows or Insert Columns. Columns.
► if you want to insert five new rows beginning at row 4, if you want to insert five new rows beginning at row 4, select rows 4 through 8, and choose Insert, Rows.select rows 4 through 8, and choose Insert, Rows.
► If you want to delete more than one row or If you want to delete more than one row or column at a timecolumn at a time select the row or column headings in the select the row or column headings in the
worksheet frameworksheet frame choose Edit choose Edit Delete. Delete.

Inserting and Deleting Rows & Inserting and Deleting Rows & ColumnsColumns
Selecting two columns in the Selecting two columns in the worksheetworksheet
Drag the mouse pointer to the right in the column frame area to select multiple columns.
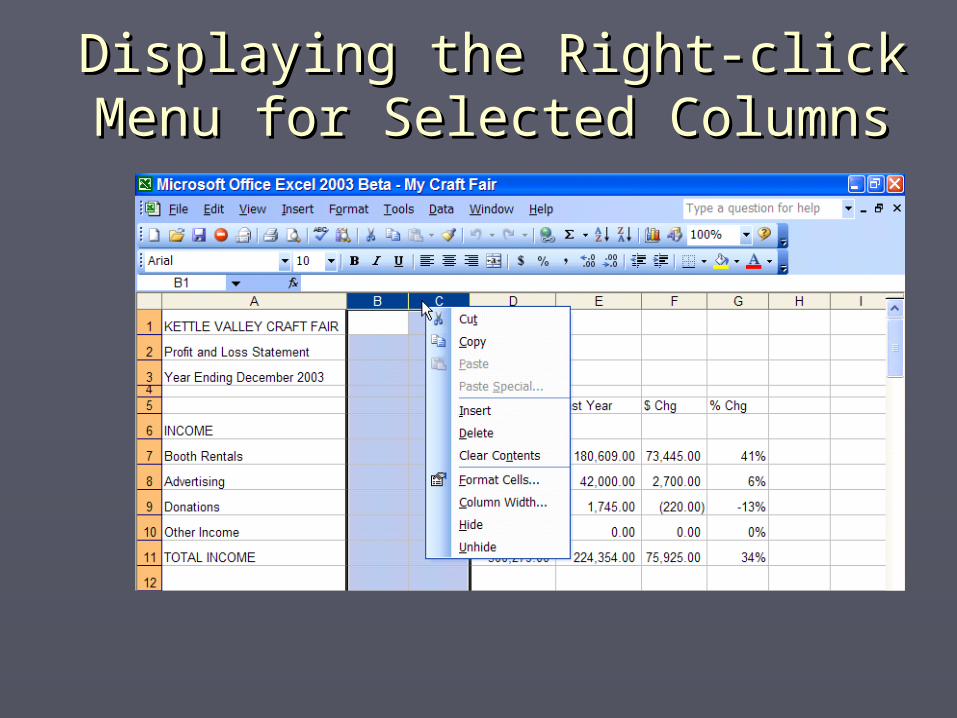
Displaying the Right-click Menu Displaying the Right-click Menu for Selected Columnsfor Selected Columns

Inserting and Deleting Rows and Inserting and Deleting Rows and ColumnsColumns
Entering data and extending formulas into the newly inserted row .

Hiding & Unhiding Rows and Hiding & Unhiding Rows and ColumnsColumns
► For privacy or other reasons, there may be rows or For privacy or other reasons, there may be rows or columns in a worksheet that you do not want to display.columns in a worksheet that you do not want to display.
► Can hide and unhide rows and columns in Excel. Can hide and unhide rows and columns in Excel. When you hide rows or columns in a worksheet, the data in When you hide rows or columns in a worksheet, the data in
those hidden parts are removed from view but not deleted. those hidden parts are removed from view but not deleted. If you print the worksheet, the hidden parts do not print.If you print the worksheet, the hidden parts do not print.

Unhiding Row 1 or Column AUnhiding Row 1 or Column A
► If the first column or row in a worksheet If the first column or row in a worksheet is hidden, you can select it by choosing is hidden, you can select it by choosing Edit, Go To and specifying A1 in the Edit, Go To and specifying A1 in the Reference box.Reference box.
►After clicking OK to exit the Go To After clicking OK to exit the Go To dialog box, point to either Row or dialog box, point to either Row or Column on the Format menu and click Column on the Format menu and click Unhide.Unhide.

Hiding Two Columns in a Hiding Two Columns in a WorksheetWorksheet
Columns D and E are hidden temporarily from view.

Selecting Columns to Unhide Selecting Columns to Unhide ColumnsColumns
Select the two columns on either side of the hidden columns that you want to unhide.
Notice the gap between rows 5 and 12 in the frame area. Rows 6 through 11 are temporarily hidden from view.

Changing Column WidthsChanging Column Widths
► Column width is measured in terms of the number Column width is measured in terms of the number of characters of a fixed pitch font that will fit into of characters of a fixed pitch font that will fit into the cell’s width (8.43 characters)the cell’s width (8.43 characters) Doesn’t really pertain because we use proportional fonts Doesn’t really pertain because we use proportional fonts
most of the time.most of the time.► To change a column’s width:To change a column’s width:
Drag the right column border with the mouse until the Drag the right column border with the mouse until the column is the desired width.column is the desired width.
Choose Format Choose Format Column Column Width and enter a value in Width and enter a value in the Column Width dialog box.the Column Width dialog box.
Choose Format Choose Format Column Column AutoFit Selection. AutoFit Selection. Double-click the right border of a column header to set the Double-click the right border of a column header to set the
column width automatically to the widest entry in the column width automatically to the widest entry in the column.column.

Changing Row HeightsChanging Row Heights
► Row height is measured in points (72 points Row height is measured in points (72 points = 1 inch).= 1 inch). Excel adjusts row heights automatically to Excel adjusts row heights automatically to
accommodate the tallest font in the row.accommodate the tallest font in the row.► To change row heights:To change row heights:
Drag the lower row border with the mouse until Drag the lower row border with the mouse until the row is the desired height.the row is the desired height.
Choose Format Choose Format Row Row Height and enter a Height and enter a value (in points) in the Row Height dialog box.value (in points) in the Row Height dialog box.
Choose Format Choose Format Row Row AutoFit Selection. AutoFit Selection. Double-click the bottom border of a row header Double-click the bottom border of a row header
to set the row height automatically to the tallest to set the row height automatically to the tallest entry in the column.entry in the column.