introductiondownload.clickteam.com/tutorials/en/chocobreak.pdf · clickteam fusion 2.5 –...
TRANSCRIPT

Clickteam Fusion 2.5 – ChocoBreak Tutorial - Guide
INTRODUCTIONWelcome to this step-by-step tutorial!
Follow this tutorial, and in less than one hour, you will have created a complete gamefrom scratch. This game is called ChocoBreak, and is a clone of the classic Breakout
game. Follow this tutorial, and you will understand the basics of Clickteam Fusion 2.5, theinterface, the events, the frame editor. All of it. And you will discover the power of this tool.
This tool will enable you to create any kind of 2D game, presentation, educationalsoftware, CD-ROM without programming, and with ease.
Graphics by Olivier Behr ([email protected])
For more information on how you can download and purchase Clickteam Fusion2.5, check out the website http://www.Clickteam.com
For more information, tutorials, examples and walk-thrus visit the website.
Website: http://www.Clickteam.com – Community: http://community.clickteam.com
The Clickteam Fusion logo and all content copyright (c) 2013 Clickteam LLC. Unless otherwise stated.
Welcome to another guide for Clickteam Fusion 2.5! Some (if not all) of the information in this guide isapplicable for Multimedia Fusion 2.0 also. As with all tutorials and guides written in PDF, feel free to
display it as a PDF or print to paper. You can study and learn these practices at your own pace, in yourown time.
Due to Fusion 2.5's flexible nature of allowing users to accomplish the same result in multiple ways,sometimes there are alternative ways to perform certain routines or functions. These guide(s) will
explicitly target the most common, easiest and most effective route.
These hand-written guides are here to help you target or perform a particular routine in Fusion 2.5enabling you to harness the full potential of what Clickteam Fusion 2.5 can actually do for you as a
developer. Whether it's game design or application development you want to do with Fusion 2.5, theseguides will hopefully guide you from top to bottom in whatever you're looking to achieve.
This guide has been thoroughly checked before deployment. As always, feedback, comments andsuggestions are always welcome on the detail, structure and formatting of these guides. Rather thancreate individual guides for different learning levels, we hope to be able to reach to all entry level,
intermediate and advanced users within the same guide on achieving the same goal.
Clickteam Fusion 2.5 – ChocoBreak Tutorial - Guide
CONTENTS1. Our First Application2. The Frame Editor3. Dropping in the First Objects4. The Ball5. Making the Ball Bounce6. The Player7. The Extra Objects8. Some Sound9. Adding the Bricks10.Score, Lives and Other Objects11.Completing the Game12.A Hi-Score Table13.A Title Screen14.What's Next?
For more information, tutorials, examples and walk-thrus visit the website.
Website: http://www.Clickteam.com – Community: http://community.clickteam.com
The Clickteam Fusion logo and all content copyright (c) 2013 Clickteam LLC. Unless otherwise stated.
Clickteam Fusion 2.5 – ChocoBreak Tutorial - Guide
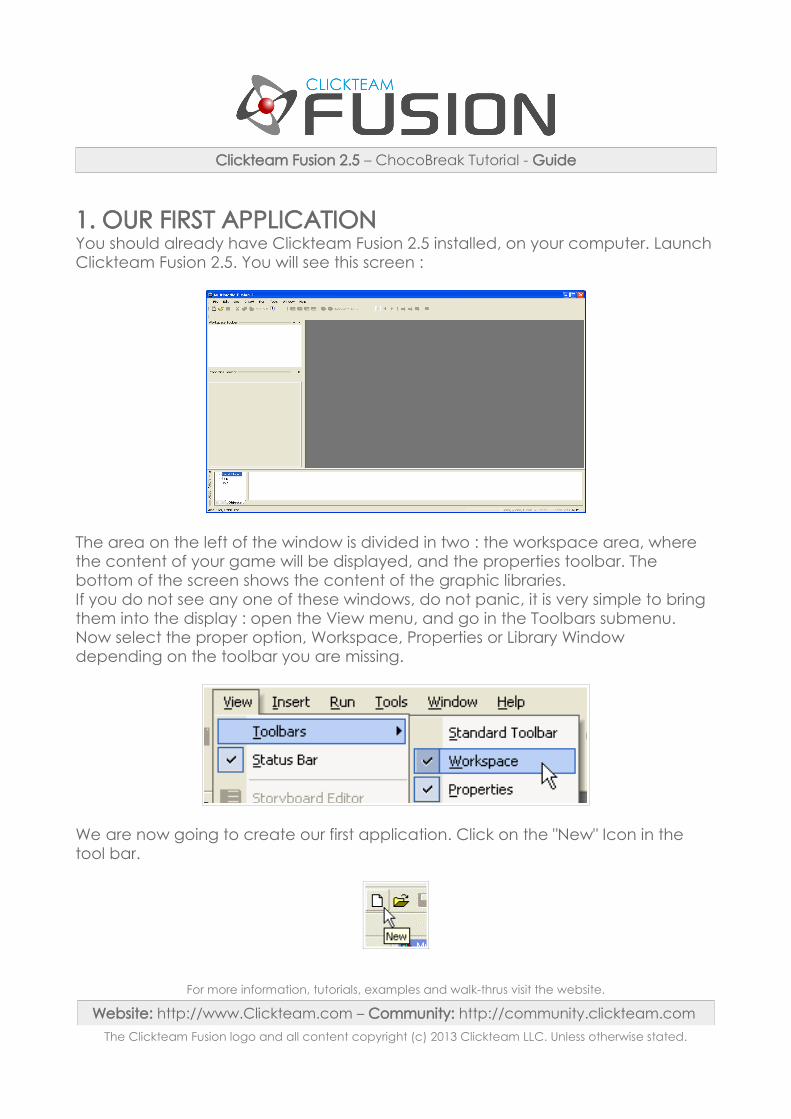
1. OUR FIRST APPLICATIONYou should already have Clickteam Fusion 2.5 installed, on your computer. LaunchClickteam Fusion 2.5. You will see this screen :
The area on the left of the window is divided in two : the workspace area, where the content of your game will be displayed, and the properties toolbar. The bottom of the screen shows the content of the graphic libraries.If you do not see any one of these windows, do not panic, it is very simple to bring them into the display : open the View menu, and go in the Toolbars submenu. Now select the proper option, Workspace, Properties or Library Window depending on the toolbar you are missing.
We are now going to create our first application. Click on the "New" Icon in the tool bar.
For more information, tutorials, examples and walk-thrus visit the website.
Website: http://www.Clickteam.com – Community: http://community.clickteam.com
The Clickteam Fusion logo and all content copyright (c) 2013 Clickteam LLC. Unless otherwise stated.

Clickteam Fusion 2.5 – ChocoBreak Tutorial - Guide
1. OUR FIRST APPLICATIONYou can see in the Workspace toolbar that Clickteam Fusion 2.5 has created a new application. You can also see that Clickteam Fusion 2.5 has automatically created a "Frame" in the application : this frame will contain the first level of our game. Clickteam Fusion 2.5 has also opened automatically a new window in the work area.
This window is called the Storyboard editor, one of the several editors contained in Clickteam Fusion 2.5. We won't be exploring them all right now.. For the moment we are simply going to enlarge the Storyboard editor so that it takes the whole available space in the main window. To do so, simply double click on the title of the window (you do not need to do this if the window takes all the available space already ) :
For more information, tutorials, examples and walk-thrus visit the website.
Website: http://www.Clickteam.com – Community: http://community.clickteam.com
The Clickteam Fusion logo and all content copyright (c) 2013 Clickteam LLC. Unless otherwise stated.

Clickteam Fusion 2.5 – ChocoBreak Tutorial - Guide
1. OUR FIRST APPLICATIONNow the whole display should look like this :
Let's proceed to the next step.
For more information, tutorials, examples and walk-thrus visit the website.
Website: http://www.Clickteam.com – Community: http://community.clickteam.com
The Clickteam Fusion logo and all content copyright (c) 2013 Clickteam LLC. Unless otherwise stated.

Clickteam Fusion 2.5 – ChocoBreak Tutorial - Guide
2. THE FRAME EDITORAs was said before, the window you see on the screen is called the Storyboard editor. It displays a thumbnail of the frames in your application. Frames can be thought of as "playfields", parts or as the levels of you game. You could also say it shows the different slides of your presentation, if that is what you were creating. You will understand how it works at the end of this tutorial. For the moment, I want you to click one button:
Locate you mouse on the big "1" button in the Storyboard window. And click.
This will open the Frame Editor, for editing the first frame of your application. Remember, your game is your "application". This is the first "level" of your game.
Now you see the frame editor. The white area in the middle is the place where we are going to drop the different elements of the game. This is the playfield where allthe actions will take place when the game is run.
For more information, tutorials, examples and walk-thrus visit the website.
Website: http://www.Clickteam.com – Community: http://community.clickteam.com
The Clickteam Fusion logo and all content copyright (c) 2013 Clickteam LLC. Unless otherwise stated.
Clickteam Fusion 2.5 – ChocoBreak Tutorial - Guide
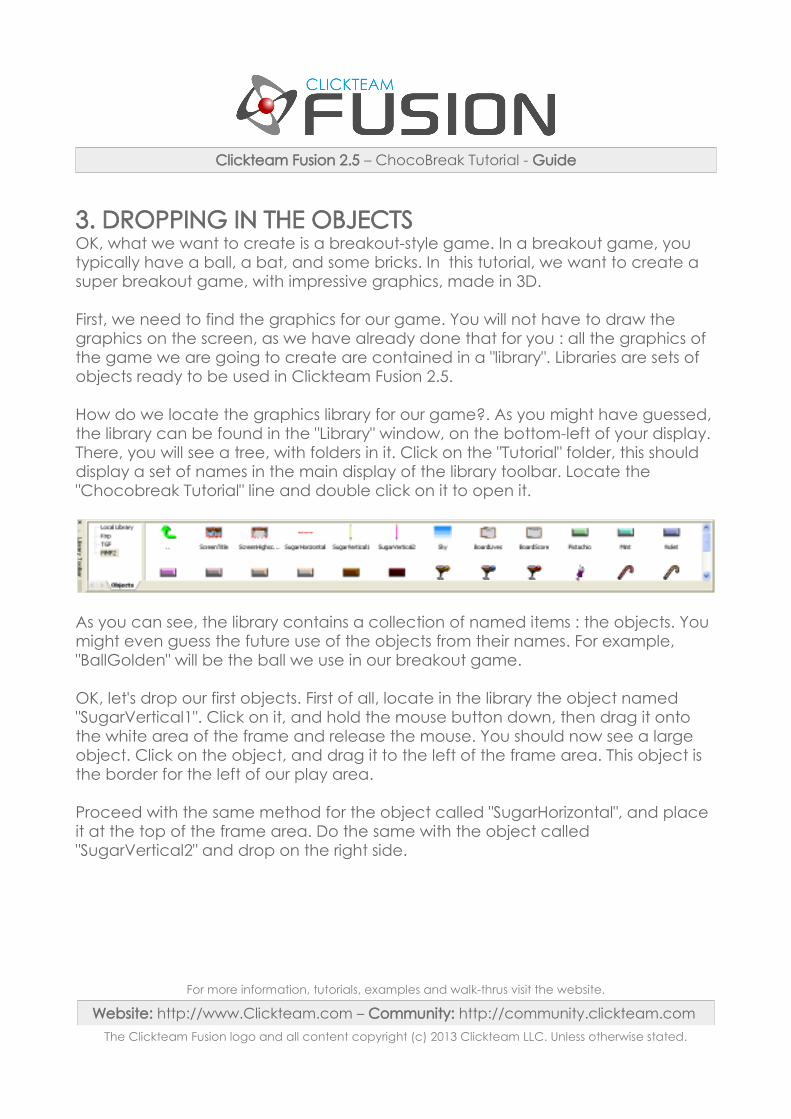
3. DROPPING IN THE OBJECTSOK, what we want to create is a breakout-style game. In a breakout game, you typically have a ball, a bat, and some bricks. In this tutorial, we want to create a super breakout game, with impressive graphics, made in 3D.
First, we need to find the graphics for our game. You will not have to draw the graphics on the screen, as we have already done that for you : all the graphics of the game we are going to create are contained in a "library". Libraries are sets of objects ready to be used in Clickteam Fusion 2.5.
How do we locate the graphics library for our game?. As you might have guessed, the library can be found in the "Library" window, on the bottom-left of your display. There, you will see a tree, with folders in it. Click on the "Tutorial" folder, this should display a set of names in the main display of the library toolbar. Locate the "Chocobreak Tutorial" line and double click on it to open it.
As you can see, the library contains a collection of named items : the objects. You might even guess the future use of the objects from their names. For example, "BallGolden" will be the ball we use in our breakout game.
OK, let's drop our first objects. First of all, locate in the library the object named "SugarVertical1". Click on it, and hold the mouse button down, then drag it onto the white area of the frame and release the mouse. You should now see a large object. Click on the object, and drag it to the left of the frame area. This object is the border for the left of our play area.
Proceed with the same method for the object called "SugarHorizontal", and place it at the top of the frame area. Do the same with the object called "SugarVertical2" and drop on the right side.
For more information, tutorials, examples and walk-thrus visit the website.
Website: http://www.Clickteam.com – Community: http://community.clickteam.com
The Clickteam Fusion logo and all content copyright (c) 2013 Clickteam LLC. Unless otherwise stated.

Clickteam Fusion 2.5 – ChocoBreak Tutorial - Guide
3. DROPPING IN THE OBJECTSAt the end, your display should look like this :
The objects you have just dropped contain more than meets the eye : they are animated. To see the animation, you have to launch the application. To do so, locate the "Run Frame" icon in the icon bar near the top of your display, and click on it.
If you are using the demo version, click on the "Continue" button in the shareware reminder box (this box does not appear in the full product). A window then appears and "runs" the frame you were working on. Notice that only the white area of the frame is visible. You should now see the three spirals animating. They look pretty good, don't they?
When you are done viewing the animation, close the window by clicking on its close button : you are now back in the frame editor.
For more information, tutorials, examples and walk-thrus visit the website.
Website: http://www.Clickteam.com – Community: http://community.clickteam.com
The Clickteam Fusion logo and all content copyright (c) 2013 Clickteam LLC. Unless otherwise stated.

Clickteam Fusion 2.5 – ChocoBreak Tutorial - Guide
4. THE BALLEvery breakout game needs a ball. Now that we know how to add objects, lets drop one on our playfield.
Locate the object called "BallGolden" in the library. Then, using the method described in the previous chapter, drag it and drop it in the middle of the frame.
If you click "Run Frame" now, you will see that the ball does not move. It is static. Why doesn't it move? It won't move until teach our ball how to move, in other words, we are going to assign the ball movement property to our ball and define how that movement will work in our game.
Each object has a number of properties that define its behavior during the game. That is, how it moves, how it is displayed, its animations etc. To access the properties of an object, you just need to open its properties in the property window. This is done by simply clicking on the object in the frame : do it, and you will see the properties in the property toolbar.The properties are sorted by genre, with little tabs in the top of the window. Locatethe one called "Movement" and click on it.
Locate the line "Type", and click on it. This opens a combo box displaying all the different genres of movement. Select the "Bouncing ball" entry.
For more information, tutorials, examples and walk-thrus visit the website.
Website: http://www.Clickteam.com – Community: http://community.clickteam.com
The Clickteam Fusion logo and all content copyright (c) 2013 Clickteam LLC. Unless otherwise stated.

Clickteam Fusion 2.5 – ChocoBreak Tutorial - Guide
4. THE BALL
We have chosen to affect a "Bouncing ball" movement to our object. As you can see, other types of movements are available: we will come back on them later.Once the movement is selected, its properties are available in the property toolbar
For more information, tutorials, examples and walk-thrus visit the website.
Website: http://www.Clickteam.com – Community: http://community.clickteam.com
The Clickteam Fusion logo and all content copyright (c) 2013 Clickteam LLC. Unless otherwise stated.

Clickteam Fusion 2.5 – ChocoBreak Tutorial - Guide
4. THE BALLIf you explore all the different properties, you will notice some that are obvious, like the speed property. Here the speed is set at 60, which is correct for our game. Click the "Try movement" button to see the speed of the ball on the screen.Deceleration makes the ball slow down progressively, like in a football game. For our break out we do not want the ball to stop : leave this property at zero.Moving at start should be checked : we want the ball to move when the game begins.
Number of angles indicates how many angle the ball can have. The different settings are 8, 16 and 32. Leave it to 32, it will make the game more interesting. The Randomizer property, adds some randomness to the bounces : sometimes the ball will not bounce in the correct direction(s) if you set this too high. For this game,you may want to reduce this parameter a little. The Security property is used to prevent a ball from getting stuck in a bouncing pattern loop, ( going back and forth the same way) it defines the number of times the ball will bounce before quitting the loop. Note: After the tutorial, you can learn a lot and have some fun by experimenting with these settings and noting the effects they have.
Now click on the Initial direction property. As its name indicates, it defines the direction the ball will take when the game begins. As a default, the ball goes on the right of the screen. Of course we must modify this as we want the ball to come toward us, or better toward the bricks so that it bounces before coming to us. With your mouse select the arrows as below :
When more than one direction are selected, Clickteam Fusion 2.5 chooses a direction at random within the selected direction.
Congratulations! Great job. You have now taught your ball object how to move and it is ready to be a part of an enjoyable game. Now, let's move on to some more exciting aspects of our creation.
For more information, tutorials, examples and walk-thrus visit the website.
Website: http://www.Clickteam.com – Community: http://community.clickteam.com
The Clickteam Fusion logo and all content copyright (c) 2013 Clickteam LLC. Unless otherwise stated.

Clickteam Fusion 2.5 – ChocoBreak Tutorial - Guide
5. MAKING THE BALL BOUNCEWe have just defined the ball movement of the ball object : you can run the frameagain, by clicking on the "Run Frame" button, as before. You should see the ball move and vanish out of the playfield. It works, but we need the ball to stick aroundfor the game! What is the problem? We can see that the ball does not bounce onthe "sugar" object as it should. We have to instruct Clickteam Fusion 2.5 to make the ball bounce off of objects. To do that, we will now discover the Events editor.
Locate the "Events editor" button in the tool bar, and click on it.
The display should look like this :
For more information, tutorials, examples and walk-thrus visit the website.
Website: http://www.Clickteam.com – Community: http://community.clickteam.com
The Clickteam Fusion logo and all content copyright (c) 2013 Clickteam LLC. Unless otherwise stated.

Clickteam Fusion 2.5 – ChocoBreak Tutorial - Guide
Let's think about what we want to achieve. We want the ball to bounce when it collides with the vertical and horizontal bars. If we use the name of the objects as we saw them in the frame editor, the sentence becomes : "when the object BallGolden collides with object SugarVertical1, then the Object BallGolden should bounce".
For more information, tutorials, examples and walk-thrus visit the website.
Website: http://www.Clickteam.com – Community: http://community.clickteam.com
The Clickteam Fusion logo and all content copyright (c) 2013 Clickteam LLC. Unless otherwise stated.

Clickteam Fusion 2.5 – ChocoBreak Tutorial - Guide
5. MAKING THE BALL BOUNCEThis sentence is in two parts, the first part can be called the condition. A condition is simply a way to determine when something has happened. Here, our condition is "when the object BallGolden collides with object SugarVertical1". The second part is the action to take place when the condition occurs. We call that the action. In life, you see conditions and actions all the time. For instance, if the condition was, "Is it my Birthday?" Then, when your Birthday came, the action might be to "Celebrate!" Here our action is "Object BallGolden bounce". An identical condition/action sentence could be constructed for the other objects SugarVertical2 and SugarHorizontal.
Now, let's create our conditions and actions in Clickteam Fusion 2.5. With you mouse, click on the "New condition" line on the screen:
The New Condition dialog box opens immediately.
For more information, tutorials, examples and walk-thrus visit the website.
Website: http://www.Clickteam.com – Community: http://community.clickteam.com
The Clickteam Fusion logo and all content copyright (c) 2013 Clickteam LLC. Unless otherwise stated.

Clickteam Fusion 2.5 – ChocoBreak Tutorial - Guide
5. MAKING THE BALL BOUNCEThe content of this dialog box is simple : it shows the objects we are using in the game and some standard objects that are always available. Among the objects you see displayed, you will find the objects that you have already dropped on the frame under the frame editor, and some new objects that we will talk more about later. Right now, we will concentrate on the BallGolden object, our game ball.
Now click with the right mouse button on the ball : this opens a new popup menu, the conditions menu.
Explore this menu, and you will discover many entries : this menu contains all the available conditions for the object BallGolden. For example, you can test the position of the object on the screen, its direction, count the number of balls on the screen, etc. Remember that we wanted to test the collision of our ball with the SugarVertical1 object. So, open the "Collisions" submenu, and select the option "Another object".
For more information, tutorials, examples and walk-thrus visit the website.
Website: http://www.Clickteam.com – Community: http://community.clickteam.com
The Clickteam Fusion logo and all content copyright (c) 2013 Clickteam LLC. Unless otherwise stated.

Clickteam Fusion 2.5 – ChocoBreak Tutorial - Guide
5. MAKING THE BALL BOUNCEIt immediately opens another dialog box:
We test the collision of the object BallGolden with another object : Clickteam Fusion 2.5 is asking us to choose which object to detect. If you remember our sentence, we want to test the SugarVertical1 object : double click on the object.The dialog box should immediately vanish, and the event editor should now display a new event line:
We have just defined a new condition! As you can see above, that condition will be true every time BallGolden collides with SugarVertical1.We now have to enter the action that will happen when this condition is met.. Carefully inspect the top bar of the event editor : it contains the objects we have seen in the condition dialog box. Some new objects, and the objects we have dropped in the game.
For more information, tutorials, examples and walk-thrus visit the website.
Website: http://www.Clickteam.com – Community: http://community.clickteam.com
The Clickteam Fusion logo and all content copyright (c) 2013 Clickteam LLC. Unless otherwise stated.

Clickteam Fusion 2.5 – ChocoBreak Tutorial - Guide
5. MAKING THE BALL BOUNCEOK, what we want to do, is to have the BallGolden object bounce. This is our desired action. The first thing to do, is to locate the BallGolden object in the bar, then move the mouse in the empty square under the BallGolden object, and click with the right mouse button. This instantly opens the actions menu of the object BallGolden.
Inspect this menu. It contains a list of possible actions for the object : we can stop it, start it, set its speed, change its position, hide it, show it etc. All these actions are at our disposal when creating a game. But, we want the ball to bounce, remember? Locate the "Bounce" option in the "Movement" submenu, and select this option. The menu will disappear, and now the empty square is filled with a check mark, indicating that an action is now defined. Move your mouse over the checkmark and a popup window will appear stating the action.
For more information, tutorials, examples and walk-thrus visit the website.
Website: http://www.Clickteam.com – Community: http://community.clickteam.com
The Clickteam Fusion logo and all content copyright (c) 2013 Clickteam LLC. Unless otherwise stated.

Clickteam Fusion 2.5 – ChocoBreak Tutorial - Guide
5. MAKING THE BALL BOUNCELike so...
You have defined your first event : one condition plus one action. Bravo!
We still need to define the same type of event for when the ball collides with the SugarHorizontal object, and the SugarVertical2 object. Let's do that.
Click on the "New condition" line, and open the "New condition" dialog box. Locate the BallGolden object, and right click on it to open the Conditions menu. Inthis menu locate the "Collision" / "Another object" entry and select it. In the next dialog, select the SugarHorizontal object (which is the one we want to test). Press OK. A new line appears in the event editor.Now for the action : locate the BallGolden object in the top bar, and get your mouse down in the empty square located at the same level than the new condition we have just entered.
For more information, tutorials, examples and walk-thrus visit the website.
Website: http://www.Clickteam.com – Community: http://community.clickteam.com
The Clickteam Fusion logo and all content copyright (c) 2013 Clickteam LLC. Unless otherwise stated.

Clickteam Fusion 2.5 – ChocoBreak Tutorial - Guide
Right click on the square to open the action menu, and select the "Bounce" action. You have just defined your second event! Its easy, isn't it?
For more information, tutorials, examples and walk-thrus visit the website.
Website: http://www.Clickteam.com – Community: http://community.clickteam.com
The Clickteam Fusion logo and all content copyright (c) 2013 Clickteam LLC. Unless otherwise stated.
Clickteam Fusion 2.5 – ChocoBreak Tutorial - Guide
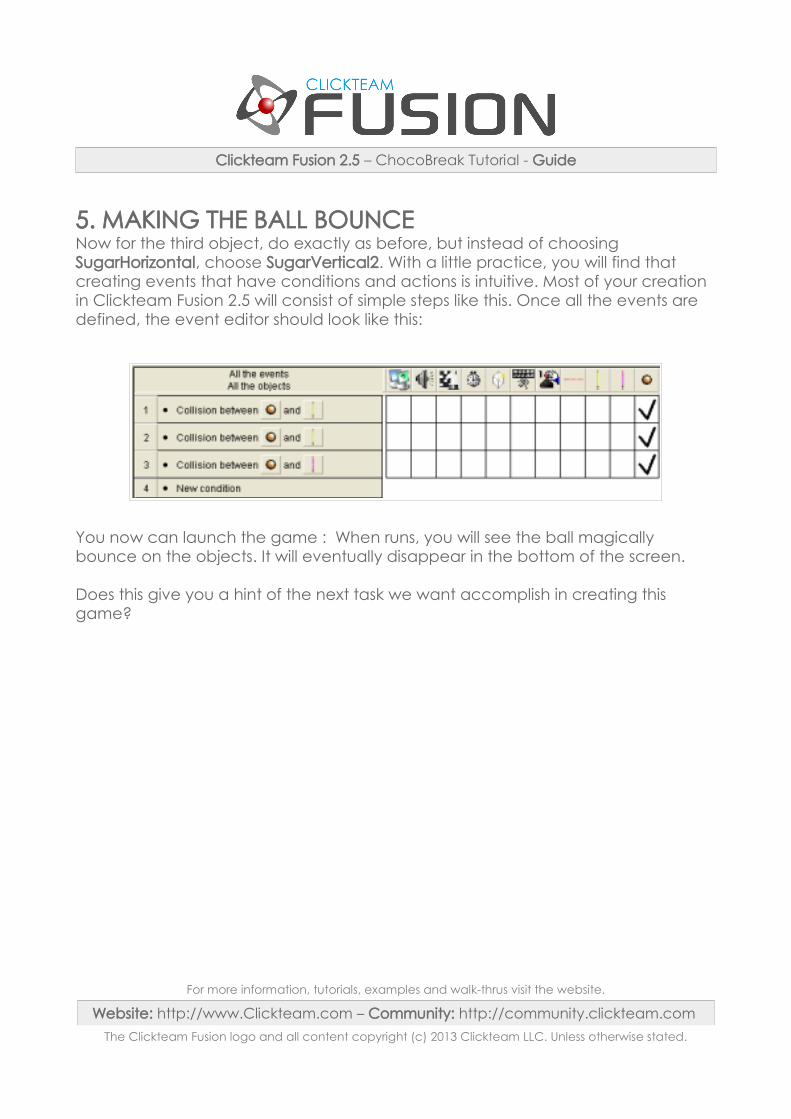
5. MAKING THE BALL BOUNCENow for the third object, do exactly as before, but instead of choosing SugarHorizontal, choose SugarVertical2. With a little practice, you will find that creating events that have conditions and actions is intuitive. Most of your creation in Clickteam Fusion 2.5 will consist of simple steps like this. Once all the events are defined, the event editor should look like this:
You now can launch the game : When runs, you will see the ball magically bounce on the objects. It will eventually disappear in the bottom of the screen.
Does this give you a hint of the next task we want accomplish in creating this game?
For more information, tutorials, examples and walk-thrus visit the website.
Website: http://www.Clickteam.com – Community: http://community.clickteam.com
The Clickteam Fusion logo and all content copyright (c) 2013 Clickteam LLC. Unless otherwise stated.

Clickteam Fusion 2.5 – ChocoBreak Tutorial - Guide
6. THE PLAYERTo complete our game, we now have add the bat, which will be controlled by themouse. Lets go back to the frame editor. Click on the "Frame Editor" icon in the toolbar:
Inspect the "ChocoBreak Tutorial" library, in the bottom of your screen, and find theobject named "Player". Drag and drop it in the bottom of the play area, just in the middle, between the two vertical sugar objects.
Just as for the ball, we have to define the movement property of this object. Click on it, to make the properties appear in the property toolbar. As for the ball, locate the "Movement" tab, and click on it.
Open the "Type" combo box. We want out player to be controlled by the mouse. Select the "Mouse controlled" option in the list.
For more information, tutorials, examples and walk-thrus visit the website.
Website: http://www.Clickteam.com – Community: http://community.clickteam.com
The Clickteam Fusion logo and all content copyright (c) 2013 Clickteam LLC. Unless otherwise stated.
Clickteam Fusion 2.5 – ChocoBreak Tutorial - Guide
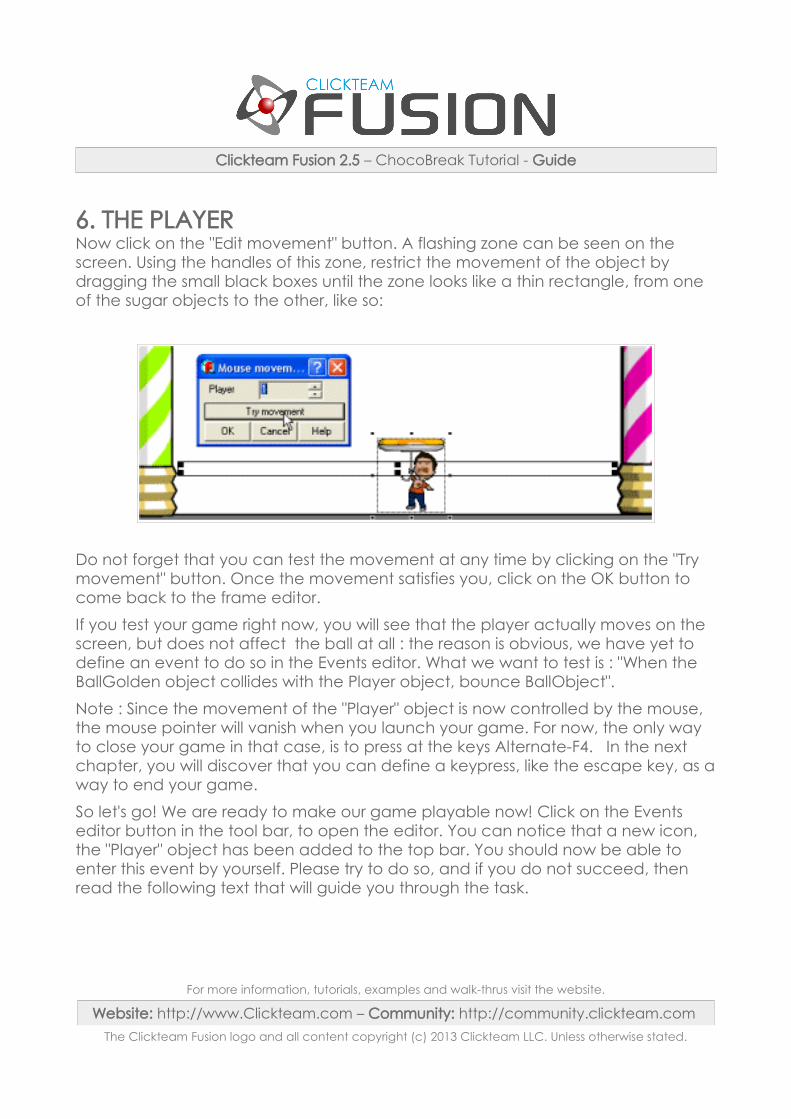
6. THE PLAYERNow click on the "Edit movement" button. A flashing zone can be seen on the screen. Using the handles of this zone, restrict the movement of the object by dragging the small black boxes until the zone looks like a thin rectangle, from one of the sugar objects to the other, like so:
Do not forget that you can test the movement at any time by clicking on the "Try movement" button. Once the movement satisfies you, click on the OK button to come back to the frame editor.
If you test your game right now, you will see that the player actually moves on the screen, but does not affect the ball at all : the reason is obvious, we have yet to define an event to do so in the Events editor. What we want to test is : "When the BallGolden object collides with the Player object, bounce BallObject".
Note : Since the movement of the "Player" object is now controlled by the mouse, the mouse pointer will vanish when you launch your game. For now, the only way to close your game in that case, is to press at the keys Alternate-F4. In the next chapter, you will discover that you can define a keypress, like the escape key, as away to end your game.
So let's go! We are ready to make our game playable now! Click on the Events editor button in the tool bar, to open the editor. You can notice that a new icon, the "Player" object has been added to the top bar. You should now be able to enter this event by yourself. Please try to do so, and if you do not succeed, then read the following text that will guide you through the task.
For more information, tutorials, examples and walk-thrus visit the website.
Website: http://www.Clickteam.com – Community: http://community.clickteam.com
The Clickteam Fusion logo and all content copyright (c) 2013 Clickteam LLC. Unless otherwise stated.

Clickteam Fusion 2.5 – ChocoBreak Tutorial - Guide
6. THE PLAYERClick on the New condition line to open the New condition dialog box, here too, you will see the new "Player" object (do not confuse it with the "Player 1" object!). Right click on the "BallGolden" object to open the Condition menu. In the menu choose the option "Collision" and then choose "Another object". In the next dialog, double click on the "Player" object. A new line is added to the list of events in the event editor.
Now locate the ball object in the top bar, and move your mouse down until you reach the empty square in front of the new condition we have just entered. Then, click with the right mouse button to open the Actions menu. Choose the option "Bounce". A new checkmark will appear in the editor : you new action is defined!
Now click on the "Run Frame" icon in the tool bar : you should be able to play your game. The ball bounces off of the player!
For more information, tutorials, examples and walk-thrus visit the website.
Website: http://www.Clickteam.com – Community: http://community.clickteam.com
The Clickteam Fusion logo and all content copyright (c) 2013 Clickteam LLC. Unless otherwise stated.

Clickteam Fusion 2.5 – ChocoBreak Tutorial - Guide
7. THE EXTRA OBJECTSBeing obliged to press Alt+F4 to quit the game is not very practical. It would be nice, and much easier, if the game would end when we press one key, like ESCAPE. Well, this is very simple to do in Clickteam Fusion 2.5. We can make an event with a condition and an action, which we are now familiar with, to accomplish this.
The event we want to define is "When the user presses ESCAPE then Quit the game". First of all, lets enter the condition. As usual, click on the "New condition" line in the events editor. This opens the New condition dialog. Do you remember that we mentioned we would talk about the extra objects contained in the dialog box? Now is the time. Let's discover what these powerful objects are about.
By moving your mouse over the objects, locate the "The mouse pointer and Keyboard" object.
For more information, tutorials, examples and walk-thrus visit the website.
Website: http://www.Clickteam.com – Community: http://community.clickteam.com
The Clickteam Fusion logo and all content copyright (c) 2013 Clickteam LLC. Unless otherwise stated.

Clickteam Fusion 2.5 – ChocoBreak Tutorial - Guide
7. THE EXTRA OBJECTSAs its name indicates, this object tests everything that touches the mouse and the keyboard. Right click on the object to open the Conditions menu. If you inspect the options, you can see that you have at your disposal many options to test the keyboard and the mouse. Select the option "Keyboard" / "Upon pressing a key".
This should open a small dialog box, asking you to press a key. We want to test a press of the ESCAPE key, so press the ESCAPE key when you are prompted.
You should now see a new line in the event editor with your condition.
Our new condition to test the ESCAPE key is now defined. We have to define the action that will happen when the key is pressed. We want the action to end the game. Inspect the object bar in the top of the events editor, and find the "Storyboard controls" object.
For more information, tutorials, examples and walk-thrus visit the website.
Website: http://www.Clickteam.com – Community: http://community.clickteam.com
The Clickteam Fusion logo and all content copyright (c) 2013 Clickteam LLC. Unless otherwise stated.

Clickteam Fusion 2.5 – ChocoBreak Tutorial - Guide
7. THE EXTRA OBJECTSThe "Storyboard controls" object allow you to control the flow of the application. Locate the empty square below the "Storyboard controls" object in front of our new condition, and click with the right mouse button. This opens the Actions menu for this object. You can see many options to control the flow of the application, but the one you want to choose right now is: "End the application".
Once the action is defined, launch your game, and press ESCAPE : the game quits automatically.
Here is the list of the system objects, and their functions:
The "Special" object. This object contains many actions and conditions to perform complex tasks in Clickteam Fusion 2.5. It will be more important to you as you become an advanced user.The "Speaker" object. Contains actions to play sounds and music, and conditions to know whether this or that sound, or music, is playing.You can also adjust volume, channels and much more.The "Storyboard controls" object contains actions and conditions to regulate the flow of the application. Going from one frame to the other,quitting the application, etc.The "Timer" object contains conditions to perform actions at specific moments in the application.The "New objects" object allows you to create new objects, (duplicates)of objects already in your application, while your application is running. A single monster could become ten or more this way.The "Mouse pointer and Keyboard" object contains all the necessary conditions to test the mouse and the keys pressed.
The "Player 1" object contains actions to change the score and the number of lives of the player. It is used in games.
For more information, tutorials, examples and walk-thrus visit the website.
Website: http://www.Clickteam.com – Community: http://community.clickteam.com
The Clickteam Fusion logo and all content copyright (c) 2013 Clickteam LLC. Unless otherwise stated.

Clickteam Fusion 2.5 – ChocoBreak Tutorial - Guide
8. SOME SOUNDOur game is slowly coming into shape, but it still lacks one thing : sound! Sound adds excitement and feeling to your game. Let's make some sound when the ball bounces.
The events editor should be displayed on your screen. We are going to add new actions to the events we have previously created. First of all, let's make a sound when the ball collides with the player.
Locate the event line "Collision between BallGolden and Player", and move your mouse horizontally to the right until it reaches the position of the Sound object (speaker icon). You mouse should lay on an empty square at the intersection between that condition line, and the Sound object's column. Click with the right mouse button to open the Actions menu for the Sound.
Choose the "Play sample" action. This opens the sound selector.
For more information, tutorials, examples and walk-thrus visit the website.
Website: http://www.Clickteam.com – Community: http://community.clickteam.com
The Clickteam Fusion logo and all content copyright (c) 2013 Clickteam LLC. Unless otherwise stated.

Clickteam Fusion 2.5 – ChocoBreak Tutorial - Guide
8. SOME SOUNDClick on the button "From a file / Browse" , this opens a file selector. With this file selector, locate the directory where your version of Clickteam Fusion 2.5 is installed,and open the "Tutorials\ChocoBreak" folder. Several WAV files should be listed, choose the file "POP04.WAV". You can press "Play" to hear the sound. Click on OK.
We now have a new action added to the event. The event will now display like this
You can see that when the collision condition is true, TWO actions will take place: first bouncing the ball, then playing the sound. But due to the speed of the computer, the actions will be performed simultaneously. You can now start the game. If your volume is turned up and your speakers are connected, you should now "hear" the ball bounce when it hits the player. Sound good?
Lets add some more sound, since it makes the game so much better. Since the ball also collides with the sugar objects, it makes sense to hear that happen, too. We are first going to enter the action for the first object, "SugarVertical1". Locate your mouse at the intersection between the collision condition with "SugarVertical1", and the speaker object. Right click on the empty square, and click browse in the sound selector. Now select the sound "POP1.WAV". A new action is defined for the first line.
The sound should be identical when the ball collides with any of the sugar objects. Instead of manually defining the Play Sound action for each of the lines, we are going to use drag & drop! This makes our creation much easier and faster. Move your mouse over the "Play sample POP1" action, click and hold the mouse key down to drag it. Now move the mouse to the square just below the first one : you are dragging the action with your mouse to another event line.
For more information, tutorials, examples and walk-thrus visit the website.
Website: http://www.Clickteam.com – Community: http://community.clickteam.com
The Clickteam Fusion logo and all content copyright (c) 2013 Clickteam LLC. Unless otherwise stated.

Clickteam Fusion 2.5 – ChocoBreak Tutorial - Guide
8. SOME SOUNDNow release the mouse, the action is now copied into the next line.
Repeat the same procedure and copy the action on the "Collision between BallGolden and SugarVertical2". You can "mouse over" those actions and you will see that they are identical to the original. The will play the same sound.
Now you can launch your game and enjoy the sounds. You are doing great, and look how far you have come. Take a moment to revel in what you have just created, and then we will move on to the next step.
For more information, tutorials, examples and walk-thrus visit the website.
Website: http://www.Clickteam.com – Community: http://community.clickteam.com
The Clickteam Fusion logo and all content copyright (c) 2013 Clickteam LLC. Unless otherwise stated.

Clickteam Fusion 2.5 – ChocoBreak Tutorial - Guide
9. ADDING THE BRICKSIn a breakout game, one usually has bricks to that have be destroyed. We now have to add the bricks to our game, of course! We need a score getting goal for the game, and that is to destroy the bricks with the ball.
Lets go back to the frame editor : click on the "Frame editor" icon in the tool bar.
Once we are in the frame editor, have will want to refer to the library window : locate the object named "Milk" : this is a chocolate brick for our ChocoBreak game! Drag it with the mouse onto the playfield, and drop it somewhere in the toparea of the frame. Drag and drop another "Milk" object from the library, and placeit just under the last one you dropped.
Repeat the same procedure until you have created a column of seven objects. When you finally have seven of them stacked neatly, proceed to the next step.
Tip : once you have selected an object, you can use the keyboard arrows to move, (nudge) the object pixel by pixel.
Now we want to duplicate the column to the right, in order to create a realistic looking chocolate bar. Click on the top-left of the bricks, and drag a selection frame around the bricks:
For more information, tutorials, examples and walk-thrus visit the website.
Website: http://www.Clickteam.com – Community: http://community.clickteam.com
The Clickteam Fusion logo and all content copyright (c) 2013 Clickteam LLC. Unless otherwise stated.

Clickteam Fusion 2.5 – ChocoBreak Tutorial - Guide
9. ADDING THE BRICKSThis action will select all the bricks within the area, as indicated below.
Now open the "Edit" menu in the main menu bar, and select the option "Copy". All the bricks are now copied into the clipboard. Open the "Edit" menu again and choose the option "Paste" : the mouse pointer will indicates that it is "carrying" something. Click in the playfield beside the selected bricks : a new set of bricks then appears, already selected. Now grab the selected bricks with your mouse pointer by clicking and holding. Then position them at the correct position, (see illustration below) so that the new set is nicely lined up with the prvious ones. Remember that you can use the arrow keys for fine positioning, (nudging).
For more information, tutorials, examples and walk-thrus visit the website.
Website: http://www.Clickteam.com – Community: http://community.clickteam.com
The Clickteam Fusion logo and all content copyright (c) 2013 Clickteam LLC. Unless otherwise stated.

Clickteam Fusion 2.5 – ChocoBreak Tutorial - Guide
9. ADDING THE BRICKSOnce your new set of bricks is neatly positioned, you are then ready to paste, once again, and add another column to you growing set of chocolate bricks. At the end you should end up a complete group of bricks that looks just like this :
If the bricks on your screen look like that, it means that they are now setup properlyfor our game. As we said, the bricks are important to our game because the player's goal is to direct the ball skillfully enough to destroy them in order to earn points.
Note : As you can see, Clickteam Fusion 2.5 is similar to most editing tasks you will come across on your computer : you can cut. (or copy) and paste. Cutting, copying, and pasting, saves a lot of time and repetition, so use it whenever you can. What you have not learned yet is that you could have used a special function of the editor to create the entire group of remaining brick objects : by right clicking on the first brick and then selecting Duplicate, the entire grid of brickscould have been created instantly! Be sure to explore this time-saving capability after we finish the tutorial. I think you will find it indispensable in the long-run. Clickteam Fusion 2.5 provides many ways to save time and reduce your effort.
We now have to go on to define the events that take of or each brick as the ball collides with them. From you experience with this tutorial, you probably realise by now that we have to go to the Event editor. So, go ahead, click on the Event editor icon in the toolbar to begin this task.
For more information, tutorials, examples and walk-thrus visit the website.
Website: http://www.Clickteam.com – Community: http://community.clickteam.com
The Clickteam Fusion logo and all content copyright (c) 2013 Clickteam LLC. Unless otherwise stated.

Clickteam Fusion 2.5 – ChocoBreak Tutorial - Guide
9. ADDING THE BRICKSYou will now notice the new object in the object bar on the top of the event editorthe "Milk" object. Now, we will create another condition. With your current skills, you should now know how to do this on your own. If you need some re-enforcement, then feel free to review the previous chapters before continuing. Here is the condition we need to add:
First, we will want to make the ball bounce when it hits a brick. You probably already know how to accomplish this : locate your mouse under the ball on the condition line, and click with the right mouse button. Select the "Bounce" option in the popup menu. Or if you prefer you can drag & drop one of the bounce actions previously entered.
What should happen to the bricks when the ball hits them? When you create your own games, the entire process will often be about asking questions like that and finding the best solution. Clickteam Fusion 2.5 is full of perfect solutions for your games! As you learn more about how Clickteam Fusion 2.5 works with you and for you, you will quickly become more professional when it comes to solving every game's unique problems. Clickteam Fusion 2.5 was designed to help you in every way as you develop game ideas.
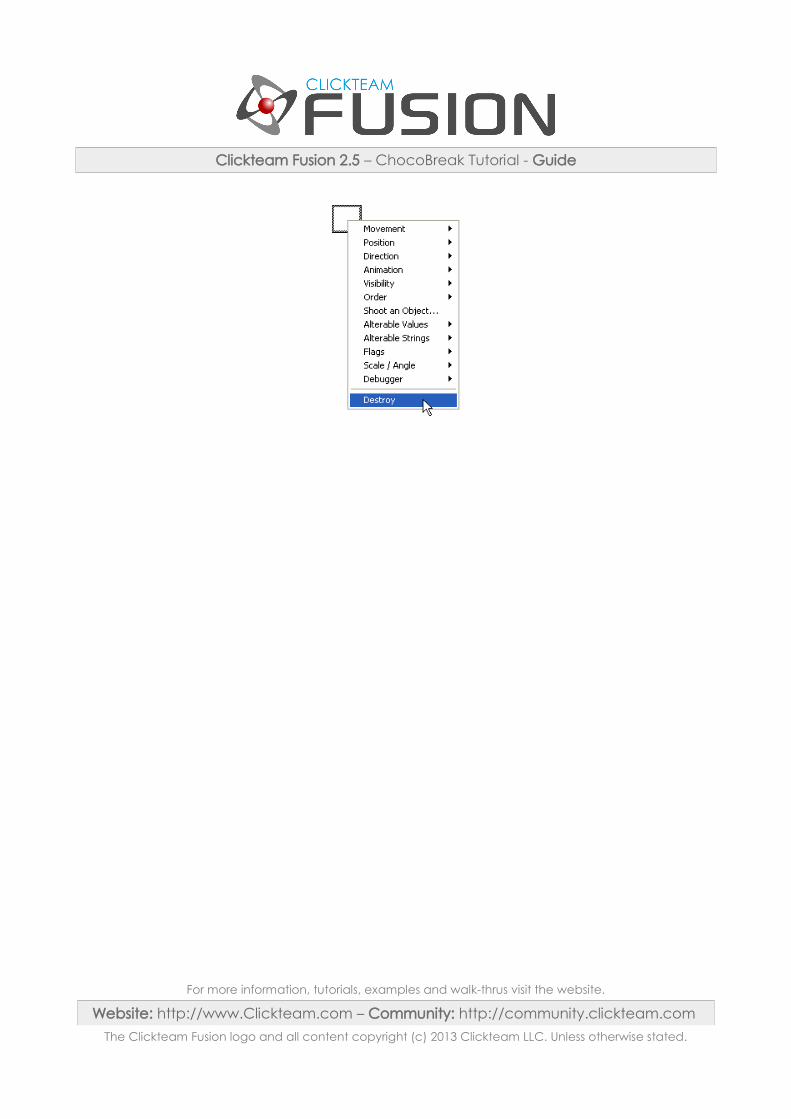
So, what we want to do next is to destroy the "Milk" object when the ball collides with it. When we destroy an object, it is gone for good for that part of the game, orat least, until the game starts again, or we create a new instance of that object. Locate the empty square on the same line of the new condition, under the "Milk" object. Right click to open the Actions menu. Then select the "Destroy" option.
For more information, tutorials, examples and walk-thrus visit the website.
Website: http://www.Clickteam.com – Community: http://community.clickteam.com
The Clickteam Fusion logo and all content copyright (c) 2013 Clickteam LLC. Unless otherwise stated.

Clickteam Fusion 2.5 – ChocoBreak Tutorial - Guide
For more information, tutorials, examples and walk-thrus visit the website.
Website: http://www.Clickteam.com – Community: http://community.clickteam.com
The Clickteam Fusion logo and all content copyright (c) 2013 Clickteam LLC. Unless otherwise stated.

Clickteam Fusion 2.5 – ChocoBreak Tutorial - Guide
9. ADDING THE BRICKSAs with the rest of our game, we will want to make a sound when the "Milk" object is destroyed.. Sound can be just as important as the visual aspects that the player sees. Clickteam Fusion 2.5 is a multimedia tool, so we can use sound to re-enforce the excitement of the game, and add more realism and emotion. Hold your mouse under the Sound object on the same line as before and click with the right mouse button. Choose "Play Sample" and locate the sound directory as before. Select the sound "IMPACT02.WAV".
Good job! Now you have a truly worthy set of bricks to challenge your player with.Along with previous chapters, you have accomplished much in a very short time. You have taught your ball to bounce off the bricks that it hits. You have assured that each brick that is hit by the ball will be destroyed on contact. You have also added some "special effects" by having the appropriate sound play when the ball hits a brick.
If you have followed the tutorial closely, and paid careful attention, you have already mastered many important aspects of game creation! You are well on your way to bigger and better things. With that in mind, let's add some more greatfeatures to our game. I think you are ready now to add some more common game features, and to learn about more of the great, Clickteam Fusion 2.5 tools atyour disposal.
For more information, tutorials, examples and walk-thrus visit the website.
Website: http://www.Clickteam.com – Community: http://community.clickteam.com
The Clickteam Fusion logo and all content copyright (c) 2013 Clickteam LLC. Unless otherwise stated.

Clickteam Fusion 2.5 – ChocoBreak Tutorial - Guide
10. SCORE, LIVES AND OTHER OBJECTSThe score is an important part of any game : it tells how good a player is. Its a reward and a sign of accomplishment. Our breakout-style game should have a score so that the player can earn points for destroying blocks. This is part of making a game fun and challenging.
We also need to display the number of lives the player has. Without limited lives, the game would be far too easy and our player would get bored. In breakout games, the player usually loses a life when they miss the ball. So, that will be our condition for taking away one life.
Part of the fun of creating a game is making decisions. We have to decide how many points to award the player and how many lives the player should start with. Let's add some more fun and challenges to the game now:
Lets go back to the frame editor (click on the icon in the tool bar).
We are going to discover some more new objects. The objects we have been using so far (the ball, the bricks, the sugar bars) are called Active Objects. Active objects are the most used objects in a game : they can move, collide, and they can be animated. There are many more objects available in Clickteam Fusion 2.5, and they have different properties. Clickteam Fusion 2.5 is easy, but that does not mean it's not flexible and powerful. So, let's discover a few new objects and see what they can help us accomplish!
The Quick backdrop object
In the library, locate the object call "Sky". Drag and drop it onto the frame. As you can see, this object is a gradient of blue and looks very nice on our playfield. You also notice that this object goes in the background , behind all other objects automatically : it is called a Quick Backdrop object. Quick backdrop objects are simple colored backgrounds. They do not have many properties, they cannot be moved, and they do not interfere at all with the active objects. They are just here as a backdrop, to enhance the display. They can be set to an ellipse shape or a line, and you can define a colored border for them.
For more information, tutorials, examples and walk-thrus visit the website.
Website: http://www.Clickteam.com – Community: http://community.clickteam.com
The Clickteam Fusion logo and all content copyright (c) 2013 Clickteam LLC. Unless otherwise stated.
Clickteam Fusion 2.5 – ChocoBreak Tutorial - Guide
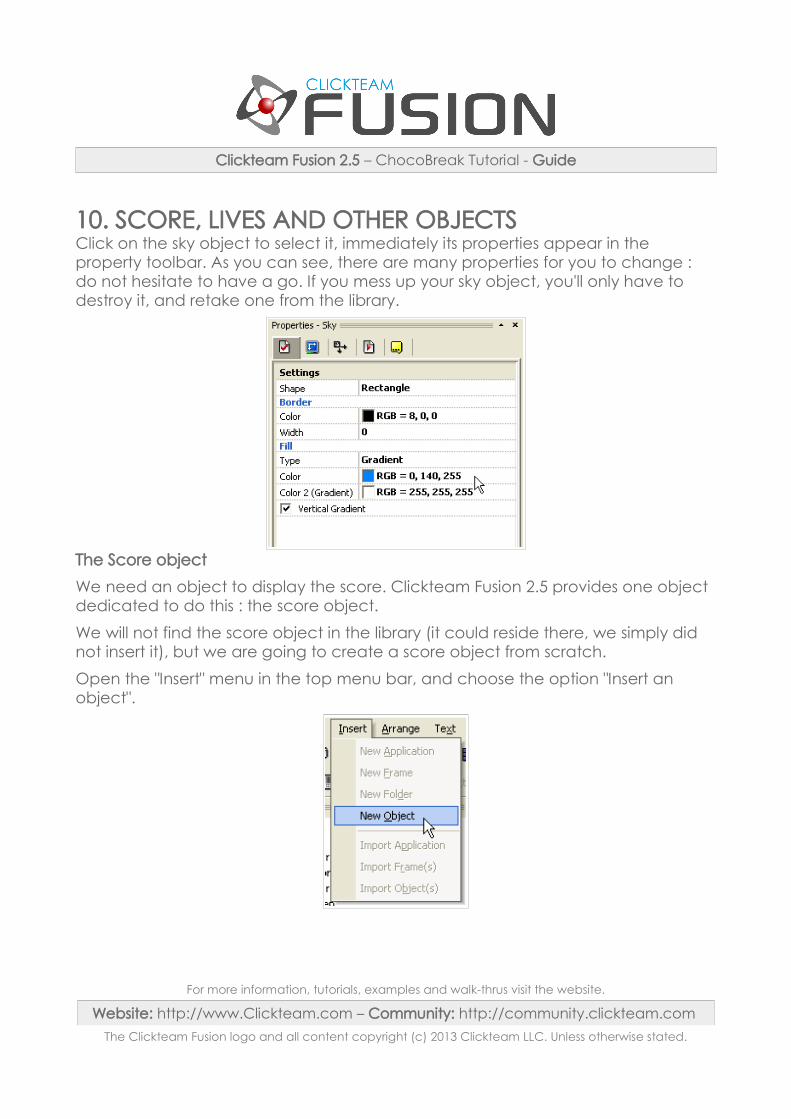
10. SCORE, LIVES AND OTHER OBJECTSClick on the sky object to select it, immediately its properties appear in the property toolbar. As you can see, there are many properties for you to change : do not hesitate to have a go. If you mess up your sky object, you'll only have to destroy it, and retake one from the library.
The Score object
We need an object to display the score. Clickteam Fusion 2.5 provides one object dedicated to do this : the score object.
We will not find the score object in the library (it could reside there, we simply did not insert it), but we are going to create a score object from scratch.
Open the "Insert" menu in the top menu bar, and choose the option "Insert an object".
For more information, tutorials, examples and walk-thrus visit the website.
Website: http://www.Clickteam.com – Community: http://community.clickteam.com
The Clickteam Fusion logo and all content copyright (c) 2013 Clickteam LLC. Unless otherwise stated.

Clickteam Fusion 2.5 – ChocoBreak Tutorial - Guide
10. SCORE, LIVES AND OTHER OBJECTSIt opens a dialog box with a list of objects. These are all the available objects in Clickteam Fusion 2.5 : as you can see, there are many, and they are what give Clickteam Fusion 2.5 the power to do what you want.. In the left pane of the window, click on the name "Game" : this will display only the game objects in the right pane.Locate the Score object in the list, and double click on it.
This closes the box. Your mouse pointer, displayed as a cross, is now carrying the object, click somewhere in the bottom of the play area. Your object is now dropped. If you look in the property toolbar, you can see that the player affected to this score object is player 1.
Now drag the number to a convenient location in the bottom left of the play area : this will display our score.
The lives objects
We need to display the number of lives for the player during the game. For that wewill use a Lives object. As before, we are going to create this object from scratch as it does not exist in the library.
As for the score object, choose the "Insert" / "New object" option in the main menu.Click on "Games" and locate the Lives object in the list. Double click on it in the box, and then click somewhere in the play area. Then dispose your Lives object in the bottom right corner of the play area.
For more information, tutorials, examples and walk-thrus visit the website.
Website: http://www.Clickteam.com – Community: http://community.clickteam.com
The Clickteam Fusion logo and all content copyright (c) 2013 Clickteam LLC. Unless otherwise stated.
Clickteam Fusion 2.5 – ChocoBreak Tutorial - Guide
10. SCORE, LIVES AND OTHER OBJECTSThe Quick Backdrop object : we have used the sky object which is a quick backdrop object. Useful objects to create a color zone that does not interfere with the game. Quick backdrop objects have very little properties, they cannot move.
The Backdrop object : a simple image in the background, that does not interfere with the action. Just like the quick backdrop object, it don't move, and it lies behind all other objects. The difference is that this object can displaya picture of your choosing, rather than a simple color or gradient.
The Active object : certainly the most widely used of all the objects - and very powerful! It can contain pictures, animations, and directions, it can be moved, and reacts to, and interacts with, the other objects. This is the object of choice for your games!
The Counter object : as its name indicates, this object holds numerical values and, at your option, displays it on the frame. The value can be displayed as a number, or as a percentage bar, either horizontal or vertical. This object is very useful for complex applications where you need to store data. You can add to, subtract from, and set a counter.
Tip: In the counter's properties, you can set the starting value, as well as the highest and lowest numbers it will be able to work with. It is very important to use these settings for percentage bars or you may not see them do anything at all when running your application.
The String object : this object holds text, also known as a string, and can displayit on the screen. You can choose the font, and align the text, (left, center, right)as you wish. But more than that, the string object allow you to do some string manipulations and calculations. As you advance you will find this easy to understand and very powerful.
The Score object : we have just created one score object in our game. Indispensable to display the score of the player in a game. Like the counter, you can set, add, and subtract the score.
The Lives object : displays the number of lives remaining for the player. It can display it as individual drawings, or as a number.
The High score object : automatically displays and manages a table of high scores for your game.
The Button object : this object displays a Windows' style button, a checkbox or a radio button. Very useful when you have to create interfaces. Buttons let your user/player control things.
For more information, tutorials, examples and walk-thrus visit the website.
Website: http://www.Clickteam.com – Community: http://community.clickteam.com
The Clickteam Fusion logo and all content copyright (c) 2013 Clickteam LLC. Unless otherwise stated.

Clickteam Fusion 2.5 – ChocoBreak Tutorial - Guide
11. COMPLETING THE GAMEIf you run your game, you will see that the score and lives are now displayed, but they do not change : we have to enter the actions that will modify them.
Go back to the Events editor.
The score.
We want to add points to the score when the ball destroys a brick. As you can imagine, we have to add a new action on the line where the collision between the brick and the ball is handled. Locate this line, and move your mouse horizontally under the Player 1 object. Right click on the empty square located at the intersection. This opens the Player 1 object Actions menu. As you can see, this menu contains options to change both the number of lives, and the score. Select the "Add to score" option.
A new dialog box appears : the expression editor. This dialog box allows us to perform calculations (and even complex ones) in Clickteam Fusion 2.5. For the moment, just enter the number 100 in the white edit zone, and click on OK.
A new action is inserted. If you try your game you will see that the score now increases as the bricks are destroyed.
For more information, tutorials, examples and walk-thrus visit the website.
Website: http://www.Clickteam.com – Community: http://community.clickteam.com
The Clickteam Fusion logo and all content copyright (c) 2013 Clickteam LLC. Unless otherwise stated.

Clickteam Fusion 2.5 – ChocoBreak Tutorial - Guide
11. COMPLETING THE GAMEThe lives.
The Lives object automatically starts with three lives, just the number we want!
Let's think a little. We want to subtract one life when the player misses the ball and it goes out the bottom of the playfield. This gives us the following event : "When theball leaves the area in the bottom / Subtract one life from the player". So we need to enter a new line of event.
You certainly know the procedure by now : click on New condition, and right click on the ball in the New condition dialog box. Now locate the "Test position of BallGolden" option, this is the one we want to use. It immediately opens a new dialog box for you to choose which side of the frame to check. Select the "Leaves in the bottom" only, and click on OK.
For more information, tutorials, examples and walk-thrus visit the website.
Website: http://www.Clickteam.com – Community: http://community.clickteam.com
The Clickteam Fusion logo and all content copyright (c) 2013 Clickteam LLC. Unless otherwise stated.

Clickteam Fusion 2.5 – ChocoBreak Tutorial - Guide
11. COMPLETING THE GAMEWe now have our new line:
We can now enter the action to subtract one from the number of lives. You should be able to do it yourself : locate the square below the "Player 1" object in front of our new condition, and right click. Then choose "Subtract from number of lives", and enter 1 in the Expression editor.
We could also make a "loosing" noise when the player looses one ball : open the Sound object Actions menu, and choose Play sample. Locate the directory where we extracted the sounds before and select the file : "DOWN01.WAV" . Before closing the sound picker, tick the small checkbox in the bottom right of the box "Uninterruptable" : the sound will play fully and will not be interrupted by other sounds.
If you launch your game, you can see that everything works very well, except for one thing : when the ball leave the play area in the bottom, it is lost forever! We should program an action to bring it back! Let's do it. Locate your mouse on the same line than before, under the ball object, and right click. In the Action menu ofthe ball, locate the option "Position" / "Select position". This option automatically displays the frame for you to point to the new position of the object. Position the flashing cross in the middle of the frame, under the bricks, and click on OK.
For more information, tutorials, examples and walk-thrus visit the website.
Website: http://www.Clickteam.com – Community: http://community.clickteam.com
The Clickteam Fusion logo and all content copyright (c) 2013 Clickteam LLC. Unless otherwise stated.

Clickteam Fusion 2.5 – ChocoBreak Tutorial - Guide
11. COMPLETING THE GAMEWe have now entered a new action that re-positions the ball automatically in the center of the screen when it disappears at the bottom. Try your game : it works, but you immediately notice that it is very difficult to grab the ball when it comes back in the play area : it goes toward the bottom at a high speed, and most of the time the player misses it.
What we need to do, is just after repositioning the ball in the play area, is to change its direction to the top. This can be done via a simple action : locate the checkmark with the position action, and right click on it (nothing prevents us from having more than one action per checkmark). In the action menu, select the option "Direction" / "Select direction". This opens a dialog box similar to the one we have found when setting the movement property of the ball. Select only the directions that point upward : one direction will be chosen for the ball to take at random during runtime.
If you test your game, you notice that the gameplay is now very good! Looks like a game, ey? It is!
A little music!
Wouldn't it be nice if there was a little background music? We can add music easily. We are going to add a new event that says : "At the start of the frame / Playmusic IMPACT.MID". Click on New condition, and in the New condition dialog, rightclick on the Storyboard controls object. Select the option "Start of frame". Then right click under the Speaker object and choose the option "Play music". Click on Browse and locate the directory where we found the previous sounds. You are going to select the file "IMPACT.MID" (this file is not a sample sound, it is MIDI music).
For more information, tutorials, examples and walk-thrus visit the website.
Website: http://www.Clickteam.com – Community: http://community.clickteam.com
The Clickteam Fusion logo and all content copyright (c) 2013 Clickteam LLC. Unless otherwise stated.

Clickteam Fusion 2.5 – ChocoBreak Tutorial - Guide
12. A HI-SCORE TABLEOne final thing to do to put some finishing touches on our game : detect when thenumber of lives equals zero, and when it is, end the game. This can be done very simply : click on New condition and in the New condition dialog, right click on the Player 1 object. Choose the option "Compare to player's number of lives".
This opens the expression editor : just click on OK, we want to compare to zero.
Now the action : right click under the Storyboard controls object, and choose the option Next Frame.
You certainly understand that when the number of lives reaches zero, Clickteam Fusion 2.5 will switch automatically to the next frame. Next frame? But there is no next frame yet! Well, we are going to create a new frame with a high score table.
A New Frame
To do so, we need to display the Storyboard editor. You remember, the very first editor that we encountered? Well this is it. Click on the Storyboard Editor icon in the tool bar.
The storyboard editor is the place where you can have a global view on your application : it shows all the frames one after the other. For the moment we only have one frame. We are going to add a new frame. Click on the "2" button:
For more information, tutorials, examples and walk-thrus visit the website.
Website: http://www.Clickteam.com – Community: http://community.clickteam.com
The Clickteam Fusion logo and all content copyright (c) 2013 Clickteam LLC. Unless otherwise stated.

Clickteam Fusion 2.5 – ChocoBreak Tutorial - Guide
12. A HI-SCORE TABLEYou can immediately see that a new frame has been added to our application. We are now going to drop some objects into the frame : click on the "2" button to go to the Frame editor...
First of all, we are going to drop a background object with a nice picture. Locate the object ScreenHighScore in the library window and drag & drop it onto the frame. Position it properly so that it covers the entire white, play area.
First of all, we are going to drop a background object with a nice picture. Locate the object ScreenHighScore in the library window and drag & drop it onto the frame. Position it properly so that it covers the entire white, play area.
Now for the Hi score object. Select the option "Insert" and then "New object" in the main menu, and choose the Hi-score object. Drop it in the middle of the frame. In the property toolbar, you can now see all the properties of the object. Feel free to experiment. Do not forget to change the font of the object by clicking on the "TextOptions" tab in the property toolbar. Personally I chose a Arial Bold font, size 20.
For more information, tutorials, examples and walk-thrus visit the website.
Website: http://www.Clickteam.com – Community: http://community.clickteam.com
The Clickteam Fusion logo and all content copyright (c) 2013 Clickteam LLC. Unless otherwise stated.

Clickteam Fusion 2.5 – ChocoBreak Tutorial - Guide
12. A HI-SCORE TABLEWe now have to program the events of our little high-score frame. Click on the Events editor button in the tool bar. As you can see, the list of events is empty. What we want to do is simple : display the high-score table for 10 seconds, and then, restart the game.
We now have to program the events of our little high-score frame. Click on the Events editor button in the tool bar. As you can see, the list of events is empty. What we want to do is simple : display the high-score table for 10 seconds, and then, restart the game.
You might guess that we are going to use the Timer object to do this. Click on Newcondition and in the New condition dialog box, right click on the timer object. Choose the option "Is the timer equal to a certain value".
And in the following dialog, enter 10 seconds (you can drag the bar or type the number in).
For more information, tutorials, examples and walk-thrus visit the website.
Website: http://www.Clickteam.com – Community: http://community.clickteam.com
The Clickteam Fusion logo and all content copyright (c) 2013 Clickteam LLC. Unless otherwise stated.

Clickteam Fusion 2.5 – ChocoBreak Tutorial - Guide
12. A HI-SCORE TABLENow for the action. Move your mouse under the Storyboard Controls object, and click with the right mouse button. In the Actions menu choose the option "Restart the application".
You can now play your game from the start. To do so, do not click on the Run Frame icon as you are used to do, but click on the Run Application icon.
For more information, tutorials, examples and walk-thrus visit the website.
Website: http://www.Clickteam.com – Community: http://community.clickteam.com
The Clickteam Fusion logo and all content copyright (c) 2013 Clickteam LLC. Unless otherwise stated.

Clickteam Fusion 2.5 – ChocoBreak Tutorial - Guide
13. A TITLE SCREENOur game is nearly complete. We seem to be missing a title page, though.
For the title page we will want to insert a new frame, so click on the Storyboard editor icon.
Then click on the "3" button, and as before choose to create a frame. A new frame is added at the end of the application. Now click on the empty zone besidethe number 3, hold down the mouse key, and drag the frame over the first one.
Release the mouse, the new frame is now the first one in the application.
Let's edit the frame : click on the "1" button to open the Frame editor.
Locate in the library, the object named : ScreenTitle and drop it in the frame. Position it so that it completely covers the white area.
For more information, tutorials, examples and walk-thrus visit the website.
Website: http://www.Clickteam.com – Community: http://community.clickteam.com
The Clickteam Fusion logo and all content copyright (c) 2013 Clickteam LLC. Unless otherwise stated.

Clickteam Fusion 2.5 – ChocoBreak Tutorial - Guide
13. A TITLE SCREENWe are going to drop a Button object in this frame : to start the game, you will have to click on the button. Select the option "Insert" and then "New objects" in themain menu, and click on "Interface" in the left pane. Then choose the Button object in the list of objects displayed. Then drop this object on the frame.
The properties of the new button object are displayed in the property toolbar. We need to change the text of the button : click on the "Text" property, and enter "Play" in the edit zone.
Then resize the button and position it to your heart's desire.
For more information, tutorials, examples and walk-thrus visit the website.
Website: http://www.Clickteam.com – Community: http://community.clickteam.com
The Clickteam Fusion logo and all content copyright (c) 2013 Clickteam LLC. Unless otherwise stated.

Clickteam Fusion 2.5 – ChocoBreak Tutorial - Guide
13. A TITLE SCREENWe now need to define the event for this frame. Click on the Event editor button. This event is simple : when the user clicks on the button, we go to the next frame. You should be able to enter this event yourself without explanation. Please give it atry before reading the following text.
If you forgot how, here is a reminder :
Click on New condition to open the New condition dialog box. Right click on the Button object, and select the option "Button clicked?". This is our condition. Now forthe action : right click in the empty square under the Storyboard Controls and choose the option "Next Frame" in the menu.
Our game is now finished! After you play it a while, see if you can find someone to try it. That's half the fun of making games. It's a good feeling when someone enjoys something you have created.
For more information, tutorials, examples and walk-thrus visit the website.
Website: http://www.Clickteam.com – Community: http://community.clickteam.com
The Clickteam Fusion logo and all content copyright (c) 2013 Clickteam LLC. Unless otherwise stated.

Clickteam Fusion 2.5 – ChocoBreak Tutorial - Guide
14. WHAT'S NEXT?There are many ways to improve our game:
• Add some music to the title page
• Create new levels with different bricks
• Add new sound effects
• Have bonuses fly down at the player
• Make the player launch bullets to destroy the bricks
• Have more than one ball at the same time
• Give bonus lives for certain scores
• Assign different score values for certain bricks or levels etc.
• Where to go next with Clickteam Fusion 2.5?
We hope you had fun creating your first game! Of course, you should be proud of your new found skills.
With this tutorial, we think that you now grasp many important basics of using Clickteam Fusion 2.5. But there is so much more to discover : discover all the objects, all the conditions, all the actions available. Then let your imagination go wild and you will do amazing things.
Of course, Clickteam Fusion 2.5 is not limited to games : you must understand now,that with all the available objects, the thousands of conditions, actions and expressions, Clickteam Fusion 2.5 can create anything from presentation to educative CD-ROMs, and of course games.
Good luck, and we wish you many years of happy creation!
For more information, tutorials, examples and walk-thrus visit the website.
Website: http://www.Clickteam.com – Community: http://community.clickteam.com
The Clickteam Fusion logo and all content copyright (c) 2013 Clickteam LLC. Unless otherwise stated.