xilinx ug038 ml300 user guide virtex-ii pro development system · ml300 user guide virtex-ii pro...
TRANSCRIPT

R
ML300 User Guide
Virtex-II Pro Development System [optional]
UG038 (v1.3.2) January 3, 2008 [optional]
ML300 User Guide
Virtex-II Pro Development System
UG038 (v1.3.2) January 3, 2008
Product Not Recommended for New Designs

ML300 User Guide www.xilinx.com UG038 (v1.3.2) January 3, 2008
Xilinx is disclosing this user guide, manual, release note, and/or specification (the "Documentation") to you solely for use in the development of designs to operate with Xilinx hardware devices. You may not reproduce, distribute, republish, download, display, post, or transmit the Documentation in any form or by any means including, but not limited to, electronic, mechanical, photocopying, recording, or otherwise, without the prior written consent of Xilinx. Xilinx expressly disclaims any liability arising out of your use of the Documentation. Xilinx reserves the right, at its sole discretion, to change the Documentation without notice at any time. Xilinx assumes no obligation to correct any errors contained in the Documentation, or to advise you of any corrections or updates. Xilinx expressly disclaims any liability in connection with technical support or assistance that may be provided to you in connection with the Information.
THE DOCUMENTATION IS DISCLOSED TO YOU “AS-IS” WITH NO WARRANTY OF ANY KIND. XILINX MAKES NO OTHER WARRANTIES, WHETHER EXPRESS, IMPLIED, OR STATUTORY, REGARDING THE DOCUMENTATION, INCLUDING ANY WARRANTIES OF MERCHANTABILITY, FITNESS FOR A PARTICULAR PURPOSE, OR NONINFRINGEMENT OF THIRD-PARTY RIGHTS. IN NO EVENT WILL XILINX BE LIABLE FOR ANY CONSEQUENTIAL, INDIRECT, EXEMPLARY, SPECIAL, OR INCIDENTAL DAMAGES, INCLUDING ANY LOSS OF DATA OR LOST PROFITS, ARISING FROM YOUR USE OF THE DOCUMENTATION.
© 2002–2008 Xilinx, Inc. All rights reserved.
XILINX, the Xilinx logo, the Brand Window, and other designated brands included herein are trademarks of Xilinx, Inc. PowerPC is a trademark of IBM Corp. and is used under license. PCI, PCI-SIG, PCI EXPRESS, PCIE, PCI-X, PCI HOT PLUG, MINI PCI, EXPRESSMODULE, and the PCI, PCI-X, PCI HOT PLUG, and MINI PC design marks are trademarks, registered trademarks, and/or service marks of PCI-SIG. All other trademarks are the property of their respective owners.
Revision HistoryThe following table shows the revision history for this document.
Date Version Revision
12/23/02 1.0 Initial Xilinx release.
01/09/03 1.1 Corrected Preface.
01/29/03 1.2 Added additional cables to Chapter 3, Section 3.2.3.
01/07/04 1.3 V2PDK to EDK conversion.
07/26/04 1.3.1 Removed reference to 2vp125 devices.
01/03/08 1.3.2 Minor typographical edits.
R
Product Not Recommended for New Designs
UG038 (v1.3.2) January 3, 2008 www.xilinx.com ML300 User Guide
Preface: About This GuideGuide Contents . . . . . . . . . . . . . . . . . . . . . . . . . . . . . . . . . . . . . . . . . . . . . . . . . . . . . . . . . . . . . . 7Additional Support Resources . . . . . . . . . . . . . . . . . . . . . . . . . . . . . . . . . . . . . . . . . . . . . . . . 7Typographical Conventions . . . . . . . . . . . . . . . . . . . . . . . . . . . . . . . . . . . . . . . . . . . . . . . . . . 7
Online Document . . . . . . . . . . . . . . . . . . . . . . . . . . . . . . . . . . . . . . . . . . . . . . . . . . . . . . . . . . 8
Chapter 1: Introduction to Virtex-II Pro, ISE, and EDKVirtex-II Pro . . . . . . . . . . . . . . . . . . . . . . . . . . . . . . . . . . . . . . . . . . . . . . . . . . . . . . . . . . . . . . . . . 9
Summary of Virtex-II Pro Features . . . . . . . . . . . . . . . . . . . . . . . . . . . . . . . . . . . . . . . . . . . 9PowerPC™ 405 Core . . . . . . . . . . . . . . . . . . . . . . . . . . . . . . . . . . . . . . . . . . . . . . . . . . . . . . 10RocketIO 3.125 Gb/s Transceivers . . . . . . . . . . . . . . . . . . . . . . . . . . . . . . . . . . . . . . . . . . 10Virtex-II FPGA Fabric . . . . . . . . . . . . . . . . . . . . . . . . . . . . . . . . . . . . . . . . . . . . . . . . . . . . . 11
Foundation ISE . . . . . . . . . . . . . . . . . . . . . . . . . . . . . . . . . . . . . . . . . . . . . . . . . . . . . . . . . . . . . 12Foundation Features . . . . . . . . . . . . . . . . . . . . . . . . . . . . . . . . . . . . . . . . . . . . . . . . . . . . . . 12
Design Entry . . . . . . . . . . . . . . . . . . . . . . . . . . . . . . . . . . . . . . . . . . . . . . . . . . . . . . . . . . 12Synthesis . . . . . . . . . . . . . . . . . . . . . . . . . . . . . . . . . . . . . . . . . . . . . . . . . . . . . . . . . . . . . 13Implementation and Configuration . . . . . . . . . . . . . . . . . . . . . . . . . . . . . . . . . . . . . . . . 13Board Level Integration . . . . . . . . . . . . . . . . . . . . . . . . . . . . . . . . . . . . . . . . . . . . . . . . . 14
Embedded Development Kit . . . . . . . . . . . . . . . . . . . . . . . . . . . . . . . . . . . . . . . . . . . . . . . . 14
Chapter 2: Board HardwareIntroduction to Boards . . . . . . . . . . . . . . . . . . . . . . . . . . . . . . . . . . . . . . . . . . . . . . . . . . . . . . 15
ML300 CPU Board . . . . . . . . . . . . . . . . . . . . . . . . . . . . . . . . . . . . . . . . . . . . . . . . . . . . . . . . 15Introduction to the ML300 CPU Board . . . . . . . . . . . . . . . . . . . . . . . . . . . . . . . . . . . . . . 15ML300 CPU Board Functionality . . . . . . . . . . . . . . . . . . . . . . . . . . . . . . . . . . . . . . . . . . 17
ML300 Power I/O Board . . . . . . . . . . . . . . . . . . . . . . . . . . . . . . . . . . . . . . . . . . . . . . . . . . 18Introduction to the ML300 Power I/O Board . . . . . . . . . . . . . . . . . . . . . . . . . . . . . . . . . 18ML300 Power I/O Board Functionality . . . . . . . . . . . . . . . . . . . . . . . . . . . . . . . . . . . . . 20
Connection Between Boards . . . . . . . . . . . . . . . . . . . . . . . . . . . . . . . . . . . . . . . . . . . . . . . . 21Digital Connector 1 . . . . . . . . . . . . . . . . . . . . . . . . . . . . . . . . . . . . . . . . . . . . . . . . . . . . . 22Digital Connector 2 . . . . . . . . . . . . . . . . . . . . . . . . . . . . . . . . . . . . . . . . . . . . . . . . . . . . . 23Power Connector . . . . . . . . . . . . . . . . . . . . . . . . . . . . . . . . . . . . . . . . . . . . . . . . . . . . . . 23
Virtex-II Pro Platform FPGA . . . . . . . . . . . . . . . . . . . . . . . . . . . . . . . . . . . . . . . . . . . . . . . . 242VP7 Facts . . . . . . . . . . . . . . . . . . . . . . . . . . . . . . . . . . . . . . . . . . . . . . . . . . . . . . . . . . . . . . . 242VP7 Connectivity . . . . . . . . . . . . . . . . . . . . . . . . . . . . . . . . . . . . . . . . . . . . . . . . . . . . . . . . 252VP7 Clocking . . . . . . . . . . . . . . . . . . . . . . . . . . . . . . . . . . . . . . . . . . . . . . . . . . . . . . . . . . . 25
RocketIO Transceivers . . . . . . . . . . . . . . . . . . . . . . . . . . . . . . . . . . . . . . . . . . . . . . . . . . . . . . 27Gigabit Ethernet Fiber . . . . . . . . . . . . . . . . . . . . . . . . . . . . . . . . . . . . . . . . . . . . . . . . . . . . . 28
Gigabit Ethernet Fiber Description . . . . . . . . . . . . . . . . . . . . . . . . . . . . . . . . . . . . . . . . . 28Stratos Lightwave Quad Fiber Transceiver (CPU.P102) . . . . . . . . . . . . . . . . . . . . . . . . . 282VP7 to Transceiver . . . . . . . . . . . . . . . . . . . . . . . . . . . . . . . . . . . . . . . . . . . . . . . . . . . . 28
InfiniBand/HSSCD2 . . . . . . . . . . . . . . . . . . . . . . . . . . . . . . . . . . . . . . . . . . . . . . . . . . . . . . 30InfiniBand/HSSDC2 Description . . . . . . . . . . . . . . . . . . . . . . . . . . . . . . . . . . . . . . . . . . 302VP7 to InfiniBand/HSSDC2 Connector . . . . . . . . . . . . . . . . . . . . . . . . . . . . . . . . . . . . 30
Serial ATA . . . . . . . . . . . . . . . . . . . . . . . . . . . . . . . . . . . . . . . . . . . . . . . . . . . . . . . . . . . . . . . 31Serial ATA Description . . . . . . . . . . . . . . . . . . . . . . . . . . . . . . . . . . . . . . . . . . . . . . . . . . 312VP7 to Serial ATA Connector . . . . . . . . . . . . . . . . . . . . . . . . . . . . . . . . . . . . . . . . . . . . 31
CPU Debug and CPU Trace . . . . . . . . . . . . . . . . . . . . . . . . . . . . . . . . . . . . . . . . . . . . . . . . . 31CPU Debug . . . . . . . . . . . . . . . . . . . . . . . . . . . . . . . . . . . . . . . . . . . . . . . . . . . . . . . . . . . . . . 32
Product Not Recommended for New Designs
UG038 (v1.3.2) January 3, 2008 www.xilinx.com ML300 User Guide
CPU Debug Description . . . . . . . . . . . . . . . . . . . . . . . . . . . . . . . . . . . . . . . . . . . . . . . . . 32CPU Debug Connector Pinout (CPU.P115). . . . . . . . . . . . . . . . . . . . . . . . . . . . . . . . . . . 33CPU Debug Connection to 2VP7 . . . . . . . . . . . . . . . . . . . . . . . . . . . . . . . . . . . . . . . . . . 33
CPU Trace . . . . . . . . . . . . . . . . . . . . . . . . . . . . . . . . . . . . . . . . . . . . . . . . . . . . . . . . . . . . . . . 33CPU Trace Description . . . . . . . . . . . . . . . . . . . . . . . . . . . . . . . . . . . . . . . . . . . . . . . . . . 33CPU Trace Connectivity . . . . . . . . . . . . . . . . . . . . . . . . . . . . . . . . . . . . . . . . . . . . . . . . . 34
Combined CPU Trace and Debug . . . . . . . . . . . . . . . . . . . . . . . . . . . . . . . . . . . . . . . . . . . 34Combined CPU Trace and Debug Description . . . . . . . . . . . . . . . . . . . . . . . . . . . . . . . . 34Combined CPU Trace and Debug Connection to 2VP7 . . . . . . . . . . . . . . . . . . . . . . . . . 35
System ACE and Configuration . . . . . . . . . . . . . . . . . . . . . . . . . . . . . . . . . . . . . . . . . . . . . 35System ACE (CPU.U2) . . . . . . . . . . . . . . . . . . . . . . . . . . . . . . . . . . . . . . . . . . . . . . . . . . . . 35
Introduction to System ACE . . . . . . . . . . . . . . . . . . . . . . . . . . . . . . . . . . . . . . . . . . . . . . 35System ACE for Configuration . . . . . . . . . . . . . . . . . . . . . . . . . . . . . . . . . . . . . . . . . . . . 36System ACE for Non-Volatile Storage . . . . . . . . . . . . . . . . . . . . . . . . . . . . . . . . . . . . . . 36System ACE Connection to 2VP7 . . . . . . . . . . . . . . . . . . . . . . . . . . . . . . . . . . . . . . . . . . 36
JTAG. . . . . . . . . . . . . . . . . . . . . . . . . . . . . . . . . . . . . . . . . . . . . . . . . . . . . . . . . . . . . . . . . . . . 38Introduction to JTAG . . . . . . . . . . . . . . . . . . . . . . . . . . . . . . . . . . . . . . . . . . . . . . . . . . . 38JTAG Connection to 2VP7. . . . . . . . . . . . . . . . . . . . . . . . . . . . . . . . . . . . . . . . . . . . . . . . 38JTAG Connector Pinout . . . . . . . . . . . . . . . . . . . . . . . . . . . . . . . . . . . . . . . . . . . . . . . . . 39Using JTAG. . . . . . . . . . . . . . . . . . . . . . . . . . . . . . . . . . . . . . . . . . . . . . . . . . . . . . . . . . . 40
DDR SDRAM. . . . . . . . . . . . . . . . . . . . . . . . . . . . . . . . . . . . . . . . . . . . . . . . . . . . . . . . . . . . . . . 40DDR SDRAM Introduction/Overview. . . . . . . . . . . . . . . . . . . . . . . . . . . . . . . . . . . . . . . 40
Basics of DDR SDRAM Operation . . . . . . . . . . . . . . . . . . . . . . . . . . . . . . . . . . . . . . . . . 40Overview of DDR SDRAM on ML300 . . . . . . . . . . . . . . . . . . . . . . . . . . . . . . . . . . . . . . 40
DDR SDRAM Memory Components . . . . . . . . . . . . . . . . . . . . . . . . . . . . . . . . . . . . . . . . 41DDR SDRAM Configuration. . . . . . . . . . . . . . . . . . . . . . . . . . . . . . . . . . . . . . . . . . . . . . 41DDR SDRAM Connection to the 2VP7 . . . . . . . . . . . . . . . . . . . . . . . . . . . . . . . . . . . . . . 42
DDR SDRAM Registers . . . . . . . . . . . . . . . . . . . . . . . . . . . . . . . . . . . . . . . . . . . . . . . . . . . . 45Registered vs. Unregistered Operation. . . . . . . . . . . . . . . . . . . . . . . . . . . . . . . . . . . . . . 45Registers Connection to 2VP7 and Comps . . . . . . . . . . . . . . . . . . . . . . . . . . . . . . . . . . . 45Register Component Information . . . . . . . . . . . . . . . . . . . . . . . . . . . . . . . . . . . . . . . . . . 46
DDR SDRAM Clock Replicator . . . . . . . . . . . . . . . . . . . . . . . . . . . . . . . . . . . . . . . . . . . . . 47Introduction to Clocking for DDR SDRAM . . . . . . . . . . . . . . . . . . . . . . . . . . . . . . . . . . 47Clock Replicator Configuration . . . . . . . . . . . . . . . . . . . . . . . . . . . . . . . . . . . . . . . . . . . 47Clock Replicator Component Information . . . . . . . . . . . . . . . . . . . . . . . . . . . . . . . . . . . 47
DDR SDRAM Termination . . . . . . . . . . . . . . . . . . . . . . . . . . . . . . . . . . . . . . . . . . . . . . . . . 49Introduction to Termination for DDR SDRAM. . . . . . . . . . . . . . . . . . . . . . . . . . . . . . . . 49DDR SDRAM Termination Configuration . . . . . . . . . . . . . . . . . . . . . . . . . . . . . . . . . . . 51
Serial Ports (RS-232). . . . . . . . . . . . . . . . . . . . . . . . . . . . . . . . . . . . . . . . . . . . . . . . . . . . . . . . . 52Introduction to Serial Ports . . . . . . . . . . . . . . . . . . . . . . . . . . . . . . . . . . . . . . . . . . . . . . . . . 52
Signaling Standards of RS-232 . . . . . . . . . . . . . . . . . . . . . . . . . . . . . . . . . . . . . . . . . . . . 52RS-232 Modes of Operation . . . . . . . . . . . . . . . . . . . . . . . . . . . . . . . . . . . . . . . . . . . . . . 52
Serial Ports . . . . . . . . . . . . . . . . . . . . . . . . . . . . . . . . . . . . . . . . . . . . . . . . . . . . . . . . . . . . . . 52Serial Port Configuration . . . . . . . . . . . . . . . . . . . . . . . . . . . . . . . . . . . . . . . . . . . . . . . . 52Serial Port Transceivers. . . . . . . . . . . . . . . . . . . . . . . . . . . . . . . . . . . . . . . . . . . . . . . . . . 54
PS/2 Ports . . . . . . . . . . . . . . . . . . . . . . . . . . . . . . . . . . . . . . . . . . . . . . . . . . . . . . . . . . . . . . . . . . . 54Introduction to PS/2 Ports . . . . . . . . . . . . . . . . . . . . . . . . . . . . . . . . . . . . . . . . . . . . . . . . . 54
PS/2 Connector. . . . . . . . . . . . . . . . . . . . . . . . . . . . . . . . . . . . . . . . . . . . . . . . . . . . . . . . 55PS/2 Signaling . . . . . . . . . . . . . . . . . . . . . . . . . . . . . . . . . . . . . . . . . . . . . . . . . . . . . . . . 55
PS/2 Ports on ML300 . . . . . . . . . . . . . . . . . . . . . . . . . . . . . . . . . . . . . . . . . . . . . . . . . . . . . . 55PS/2 Configuration. . . . . . . . . . . . . . . . . . . . . . . . . . . . . . . . . . . . . . . . . . . . . . . . . . . . . 55PS/2 Wiring . . . . . . . . . . . . . . . . . . . . . . . . . . . . . . . . . . . . . . . . . . . . . . . . . . . . . . . . . . 55
Product Not Recommended for New Designs
UG038 (v1.3.2) January 3, 2008 www.xilinx.com ML300 User Guide
Parallel Port . . . . . . . . . . . . . . . . . . . . . . . . . . . . . . . . . . . . . . . . . . . . . . . . . . . . . . . . . . . . . . . . . 56Parallel Ports . . . . . . . . . . . . . . . . . . . . . . . . . . . . . . . . . . . . . . . . . . . . . . . . . . . . . . . . . . . . . 56
Parallel Port Configuration . . . . . . . . . . . . . . . . . . . . . . . . . . . . . . . . . . . . . . . . . . . . . . . 56Parallel Port Transceiver . . . . . . . . . . . . . . . . . . . . . . . . . . . . . . . . . . . . . . . . . . . . . . . . . 56Parallel Port Clamp Diode . . . . . . . . . . . . . . . . . . . . . . . . . . . . . . . . . . . . . . . . . . . . . . . 57Parallel Port LEDs and Driver . . . . . . . . . . . . . . . . . . . . . . . . . . . . . . . . . . . . . . . . . . . . 58
IIC . . . . . . . . . . . . . . . . . . . . . . . . . . . . . . . . . . . . . . . . . . . . . . . . . . . . . . . . . . . . . . . . . . . . . . . . . . 60Introduction to IIC . . . . . . . . . . . . . . . . . . . . . . . . . . . . . . . . . . . . . . . . . . . . . . . . . . . . . . . . 60
IIC Signaling . . . . . . . . . . . . . . . . . . . . . . . . . . . . . . . . . . . . . . . . . . . . . . . . . . . . . . . . . . 60IIC on ML300 CPU Board . . . . . . . . . . . . . . . . . . . . . . . . . . . . . . . . . . . . . . . . . . . . . . . . 60IIC Chip Temp Sensor MAX1617 (CPU.U251) . . . . . . . . . . . . . . . . . . . . . . . . . . . . . . . . 61IIC Ambient Temp Sensor (CPU.U252). . . . . . . . . . . . . . . . . . . . . . . . . . . . . . . . . . . . . . 62IIC EEPROM 24LC32A/SN (CPU.U253) . . . . . . . . . . . . . . . . . . . . . . . . . . . . . . . . . . . . 63IIC Power Monitor #1 (CPU.U255) . . . . . . . . . . . . . . . . . . . . . . . . . . . . . . . . . . . . . . . . . 63IIC Power Monitor #2 (CPU.U256) . . . . . . . . . . . . . . . . . . . . . . . . . . . . . . . . . . . . . . . . . 65IIC Audio Trimpot DS1845E-010 (CPU.U502). . . . . . . . . . . . . . . . . . . . . . . . . . . . . . . . . 66
IIC on ML300 Power I/O Board . . . . . . . . . . . . . . . . . . . . . . . . . . . . . . . . . . . . . . . . . . . . 67IIC TFT Brightness and Touch Screen Sensitivity Trimpot (PIO.U3) . . . . . . . . . . . . . . . 67Power Monitor #1 (PIO.U2) . . . . . . . . . . . . . . . . . . . . . . . . . . . . . . . . . . . . . . . . . . . . . . 68IIC Power Monitor #2 . . . . . . . . . . . . . . . . . . . . . . . . . . . . . . . . . . . . . . . . . . . . . . . . . . . 70IIC Real Time Clock and Battery Backup (PIO.U24) . . . . . . . . . . . . . . . . . . . . . . . . . . . . 71
Serial Peripheral Interface . . . . . . . . . . . . . . . . . . . . . . . . . . . . . . . . . . . . . . . . . . . . . . . . . . . 72Introduction to SPI . . . . . . . . . . . . . . . . . . . . . . . . . . . . . . . . . . . . . . . . . . . . . . . . . . . . . . . . 72
SPI Signaling. . . . . . . . . . . . . . . . . . . . . . . . . . . . . . . . . . . . . . . . . . . . . . . . . . . . . . . . . . 72SPI Addressing . . . . . . . . . . . . . . . . . . . . . . . . . . . . . . . . . . . . . . . . . . . . . . . . . . . . . . . . 73
SPI on ML300 . . . . . . . . . . . . . . . . . . . . . . . . . . . . . . . . . . . . . . . . . . . . . . . . . . . . . . . . . . . . 73SPI EEPROM (CPU.U254). . . . . . . . . . . . . . . . . . . . . . . . . . . . . . . . . . . . . . . . . . . . . . . . 73
10/100 Ethernet . . . . . . . . . . . . . . . . . . . . . . . . . . . . . . . . . . . . . . . . . . . . . . . . . . . . . . . . . . . . . . 7410/100 Ethernet Network Interface . . . . . . . . . . . . . . . . . . . . . . . . . . . . . . . . . . . . . . . . . . 74Components . . . . . . . . . . . . . . . . . . . . . . . . . . . . . . . . . . . . . . . . . . . . . . . . . . . . . . . . . . . . . 74
LXT71A Ethernet PHY (CPU.U26) . . . . . . . . . . . . . . . . . . . . . . . . . . . . . . . . . . . . . . . . . 74TG110-SO50N2 Ethernet Magnetics . . . . . . . . . . . . . . . . . . . . . . . . . . . . . . . . . . . . . . . . 77
10/100 Ethernet Implementation. . . . . . . . . . . . . . . . . . . . . . . . . . . . . . . . . . . . . . . . . . . . 77Connection to 2VP7 . . . . . . . . . . . . . . . . . . . . . . . . . . . . . . . . . . . . . . . . . . . . . . . . . . . . 77Connection between PHY and Magnetics. . . . . . . . . . . . . . . . . . . . . . . . . . . . . . . . . . . . 78
TFT Display and Touch Screen . . . . . . . . . . . . . . . . . . . . . . . . . . . . . . . . . . . . . . . . . . . . . . 78Overview of TFT Display . . . . . . . . . . . . . . . . . . . . . . . . . . . . . . . . . . . . . . . . . . . . . . . . . . 78TFT Display Implementation . . . . . . . . . . . . . . . . . . . . . . . . . . . . . . . . . . . . . . . . . . . . . . . 79
TFT Display Connection to 2VP7 . . . . . . . . . . . . . . . . . . . . . . . . . . . . . . . . . . . . . . . . . . 80Level Shifter (CPU.U27 and CPU.U28) . . . . . . . . . . . . . . . . . . . . . . . . . . . . . . . . . . . . . . 81Inverter . . . . . . . . . . . . . . . . . . . . . . . . . . . . . . . . . . . . . . . . . . . . . . . . . . . . . . . . . . . . . . 81IIC Trimpot for Brightness Control. . . . . . . . . . . . . . . . . . . . . . . . . . . . . . . . . . . . . . . . . 82
Overview of Touch Screen . . . . . . . . . . . . . . . . . . . . . . . . . . . . . . . . . . . . . . . . . . . . . . . . . 82Touch Screen Implementation . . . . . . . . . . . . . . . . . . . . . . . . . . . . . . . . . . . . . . . . . . . . . . 83
Touch Screen Connector . . . . . . . . . . . . . . . . . . . . . . . . . . . . . . . . . . . . . . . . . . . . . . . . . 83Touch Screen AD Converter . . . . . . . . . . . . . . . . . . . . . . . . . . . . . . . . . . . . . . . . . . . . . . 83IIC Trimpot for Sensitivity Control. . . . . . . . . . . . . . . . . . . . . . . . . . . . . . . . . . . . . . . . . 84
Audio System . . . . . . . . . . . . . . . . . . . . . . . . . . . . . . . . . . . . . . . . . . . . . . . . . . . . . . . . . . . . . . . 85Overview of Audio System . . . . . . . . . . . . . . . . . . . . . . . . . . . . . . . . . . . . . . . . . . . . . . . . 85
AD1885 Audio Codec . . . . . . . . . . . . . . . . . . . . . . . . . . . . . . . . . . . . . . . . . . . . . . . . . . . 85Audio Power Amps . . . . . . . . . . . . . . . . . . . . . . . . . . . . . . . . . . . . . . . . . . . . . . . . . . . . 87IIC Trimpot for Volume Control. . . . . . . . . . . . . . . . . . . . . . . . . . . . . . . . . . . . . . . . . . . 89
Product Not Recommended for New Designs
UG038 (v1.3.2) January 3, 2008 www.xilinx.com ML300 User Guide
Audio Codec Connection to 2VP7 . . . . . . . . . . . . . . . . . . . . . . . . . . . . . . . . . . . . . . . . . 90Audio Codec Connection to PCI Mezzanine Connector (PMC) . . . . . . . . . . . . . . . . . . . 90Audio Codec Clamp Diodes . . . . . . . . . . . . . . . . . . . . . . . . . . . . . . . . . . . . . . . . . . . . . . 91
PCI/PMC. . . . . . . . . . . . . . . . . . . . . . . . . . . . . . . . . . . . . . . . . . . . . . . . . . . . . . . . . . . . . . . . . . . . 92PCI Overview . . . . . . . . . . . . . . . . . . . . . . . . . . . . . . . . . . . . . . . . . . . . . . . . . . . . . . . . . . . . 92
PCI Signaling Standards . . . . . . . . . . . . . . . . . . . . . . . . . . . . . . . . . . . . . . . . . . . . . . . . . 92PCI . . . . . . . . . . . . . . . . . . . . . . . . . . . . . . . . . . . . . . . . . . . . . . . . . . . . . . . . . . . . . . . . . . . . . 92
Connection to 2VP7 . . . . . . . . . . . . . . . . . . . . . . . . . . . . . . . . . . . . . . . . . . . . . . . . . . . . 92Clamp Diodes . . . . . . . . . . . . . . . . . . . . . . . . . . . . . . . . . . . . . . . . . . . . . . . . . . . . . . . . . 92PCI VCCO on 2VP7 . . . . . . . . . . . . . . . . . . . . . . . . . . . . . . . . . . . . . . . . . . . . . . . . . . . . 94PCI Mezzanine Connector (PMC). . . . . . . . . . . . . . . . . . . . . . . . . . . . . . . . . . . . . . . . . . 95PC Card to PCI Bridge (CPU.U601) . . . . . . . . . . . . . . . . . . . . . . . . . . . . . . . . . . . . . . . . 99PC Card Power . . . . . . . . . . . . . . . . . . . . . . . . . . . . . . . . . . . . . . . . . . . . . . . . . . . . . . . 100
GPIO . . . . . . . . . . . . . . . . . . . . . . . . . . . . . . . . . . . . . . . . . . . . . . . . . . . . . . . . . . . . . . . . . . . . . . 101GPIO 1 - Multipurpose GPIO . . . . . . . . . . . . . . . . . . . . . . . . . . . . . . . . . . . . . . . . . . . . . . 101
Shared GPIO LEDs . . . . . . . . . . . . . . . . . . . . . . . . . . . . . . . . . . . . . . . . . . . . . . . . . . . . 101GPIO LEDs . . . . . . . . . . . . . . . . . . . . . . . . . . . . . . . . . . . . . . . . . . . . . . . . . . . . . . . . . . 102Shared GPIO Buttons . . . . . . . . . . . . . . . . . . . . . . . . . . . . . . . . . . . . . . . . . . . . . . . . . . 103GPIO 1 External Register . . . . . . . . . . . . . . . . . . . . . . . . . . . . . . . . . . . . . . . . . . . . . . . 104
GPIO 2 - Dedicated GPIO . . . . . . . . . . . . . . . . . . . . . . . . . . . . . . . . . . . . . . . . . . . . . . . . . 106Prototyping Area . . . . . . . . . . . . . . . . . . . . . . . . . . . . . . . . . . . . . . . . . . . . . . . . . . . . . . . . 108
Prototyping Area Layout . . . . . . . . . . . . . . . . . . . . . . . . . . . . . . . . . . . . . . . . . . . . . . . 109Prototyping Area Voltages . . . . . . . . . . . . . . . . . . . . . . . . . . . . . . . . . . . . . . . . . . . . . . 109Prototyping Area I/O Pins . . . . . . . . . . . . . . . . . . . . . . . . . . . . . . . . . . . . . . . . . . . . . . 109
Power System . . . . . . . . . . . . . . . . . . . . . . . . . . . . . . . . . . . . . . . . . . . . . . . . . . . . . . . . . . . . . . 109Overview of Power on ML300 . . . . . . . . . . . . . . . . . . . . . . . . . . . . . . . . . . . . . . . . . . . . . 109
Power Requirements. . . . . . . . . . . . . . . . . . . . . . . . . . . . . . . . . . . . . . . . . . . . . . . . . . . 110Power Distribution . . . . . . . . . . . . . . . . . . . . . . . . . . . . . . . . . . . . . . . . . . . . . . . . . . . . 110
Power Supply . . . . . . . . . . . . . . . . . . . . . . . . . . . . . . . . . . . . . . . . . . . . . . . . . . . . . . . . . . . 110Power Switch . . . . . . . . . . . . . . . . . . . . . . . . . . . . . . . . . . . . . . . . . . . . . . . . . . . . . . . . . . . 110
Primary Power Switch . . . . . . . . . . . . . . . . . . . . . . . . . . . . . . . . . . . . . . . . . . . . . . . . . 111Soft Power Switch . . . . . . . . . . . . . . . . . . . . . . . . . . . . . . . . . . . . . . . . . . . . . . . . . . . . . 111
Standby Power Supplies . . . . . . . . . . . . . . . . . . . . . . . . . . . . . . . . . . . . . . . . . . . . . . . . . . 1123.3V Standby Power Supply . . . . . . . . . . . . . . . . . . . . . . . . . . . . . . . . . . . . . . . . . . . . . 1125V Standby Power Supply . . . . . . . . . . . . . . . . . . . . . . . . . . . . . . . . . . . . . . . . . . . . . . 11315V Standby Power Supply . . . . . . . . . . . . . . . . . . . . . . . . . . . . . . . . . . . . . . . . . . . . . 114
Power Regulators . . . . . . . . . . . . . . . . . . . . . . . . . . . . . . . . . . . . . . . . . . . . . . . . . . . . . . . . 1153.3V/5V Switching Regulator . . . . . . . . . . . . . . . . . . . . . . . . . . . . . . . . . . . . . . . . . . . . 115+12V Regulator . . . . . . . . . . . . . . . . . . . . . . . . . . . . . . . . . . . . . . . . . . . . . . . . . . . . . . . 117-12V Regulator . . . . . . . . . . . . . . . . . . . . . . . . . . . . . . . . . . . . . . . . . . . . . . . . . . . . . . . 1202.5V Regulator . . . . . . . . . . . . . . . . . . . . . . . . . . . . . . . . . . . . . . . . . . . . . . . . . . . . . . . 1212VP7 VCORE Regulator . . . . . . . . . . . . . . . . . . . . . . . . . . . . . . . . . . . . . . . . . . . . . . . . 123MGT VCCA Regulator . . . . . . . . . . . . . . . . . . . . . . . . . . . . . . . . . . . . . . . . . . . . . . . . . 124MGT VTT Regulator . . . . . . . . . . . . . . . . . . . . . . . . . . . . . . . . . . . . . . . . . . . . . . . . . . . 125
Power Monitors . . . . . . . . . . . . . . . . . . . . . . . . . . . . . . . . . . . . . . . . . . . . . . . . . . . . . . . . . 126IIC Power Monitors . . . . . . . . . . . . . . . . . . . . . . . . . . . . . . . . . . . . . . . . . . . . . . . . . . . 126Comparator Based Power Monitors . . . . . . . . . . . . . . . . . . . . . . . . . . . . . . . . . . . . . . . 127
Bus Error LEDs. . . . . . . . . . . . . . . . . . . . . . . . . . . . . . . . . . . . . . . . . . . . . . . . . . . . . . . . . . . . . 128
Product Not Recommended for New Designs
ML300 User Guide www.xilinx.com 7UG038 (v1.3.2) January 3, 2008
R
Preface
About This Guide
This guide accompanies the ML300 Development System and contains information about the ML300 Hardware Platform and software tools.
Guide ContentsThis manual contains the following chapters:
• Chapter 1, “Introduction to Virtex-II Pro, ISE, and EDK,” is an overview of the hardware and software features.
• Chapter 2, “Board Hardware,” details the components of the CPU and Power I/O boards.
Additional Support ResourcesTo search the database of silicon and software questions and answers, or to create a technical support case in WebCase, see the Xilinx website at:http://www.xilinx.com/support.
Typographical ConventionsThis document uses the following typographical conventions. An example illustrates each convention.
Convention Meaning or Use Example
Italic font
References to other documents See the Virtex-5 Configuration Guide for more information.
Emphasis in text The address (F) is asserted after clock event 2.
Underlined Text Indicates a link to a web page. http://www.xilinx.com/virtex5
Product Not Recommended for New Designs
8 www.xilinx.com ML300 User GuideUG038 (v1.3.2) January 3, 2008
Preface: About This GuideR
Online DocumentThe following conventions are used in this document:
Convention Meaning or Use Example
Blue textCross-reference link to a location in the current document
See the section “Additional Documentation” for details.
Red textCross-reference link to a location in another document
See Figure 5 in the Virtex-5 Data Sheet
Blue, underlined text Hyperlink to a website (URL)Go to http://www.xilinx.com for the latest documentation.
Product Not Recommended for New Designs
ML300 User Guide www.xilinx.com 9UG038 (v1.3.2) January 3, 2008
R
Chapter 1
Introduction to Virtex-II Pro, ISE, and EDK
Virtex-II ProThe Virtex-II Pro Platform FPGA solution is the most technically sophisticated silicon and software product development in the history of the programmable logic industry. The goal was to revolutionize system architecture “from the ground up.” To achieve that objective, the best circuit engineers and system architects from IBM, Mindspeed, and Xilinx co-developed the world's most advanced Platform FPGA silicon product. Leading teams from top embedded systems companies worked together with Xilinx software teams to develop the systems software and IP solutions that enabled new system architecture paradigm.
The result is the first Platform FPGA solution capable of implementing high performance system-on-a-chip designs previously the exclusive domain of custom ASICs, yet with the flexibility and low development cost of programmable logic. The Virtex-II Pro family marks the first paradigm change from programmable logic to programmable systems, with profound implications for leading-edge system architectures in networking applications, deeply embedded systems, and digital signal processing systems. It allows custom user-defined system architectures to be synthesized, next-generation connectivity standards to be seamlessly bridged, and complex hardware and software systems to be co-developed rapidly with in-system debug at system speeds. Together, these capabilities usher in the next programmable logic revolution.
Summary of Virtex-II Pro FeaturesThe Virtex-II Pro has an impressive collection of both programmable logic and hard IP that has historically been the domain of the ASICs.
• High-performance Platform FPGA solution including
♦ Up to twenty RocketIO™ embedded multi-gigabit transceiver blocks (based on Mindspeed's SkyRail™ technology)
♦ Up to two IBM® PowerPC™ RISC processor blocks
• Based on Virtex™-II Platform FPGA technology
♦ Flexible logic resources, up to 99,216 Logic Cells
♦ SRAM-based in-system configuration
♦ Active Interconnect™ technology
♦ SelectRAM™ memory hierarchy
♦ Up to 444 dedicated 18-bit x 18-bit multiplier blocks
♦ High-performance clock management circuitry
♦ SelectIO™-Ultra technology
♦ Digitally Controlled Impedance (DCI) I/O
Product Not Recommended for New Designs
10 www.xilinx.com ML300 User GuideUG038 (v1.3.2) January 3, 2008
Chapter 1: Introduction to Virtex-II Pro, ISE, and EDKR
PowerPC™ 405 Core• Embedded 300+ MHz Harvard architecture core
• Low power consumption: 0.9 mW/MHz
• Five-stage data path pipeline
• Hardware multiply/divide unit
• Thirty-two 32-bit general purpose registers
• 16 KB two-way set-associative instruction cache
• 16 KB two-way set-associative data cache
• Memory Management Unit (MMU)
♦ 64-entry unified Translation Look-aside Buffers (TLB)
♦ Variable page sizes (1 KB to 16 MB)
• Dedicated on-chip memory (OCM) interface
• Supports IBM CoreConnect™ bus architecture
• Debug and trace support
• Timer facilities
RocketIO 3.125 Gb/s Transceivers• Full-duplex serial transceiver (SERDES) capable of baud rates from 622 Mb/s
to 3.125 Gb/s
• 80 Gb/s duplex data rate (16 channels)
• Monolithic clock synthesis and clock recovery (CDR)
• Fibre Channel, Gigabit Ethernet, 10 Gb Attachment Unit Interface (XAUI), and Infiniband-compliant transceivers
• 8-, 16-, or 32-bit selectable internal FPGA interface
• 8B /10B encoder and decoder
• 50Ω/75Ω on-chip selectable transmit and receive terminations
• Programmable comma detection
• Channel bonding support (two to sixteen channels)
• Rate matching via insertion/deletion characters
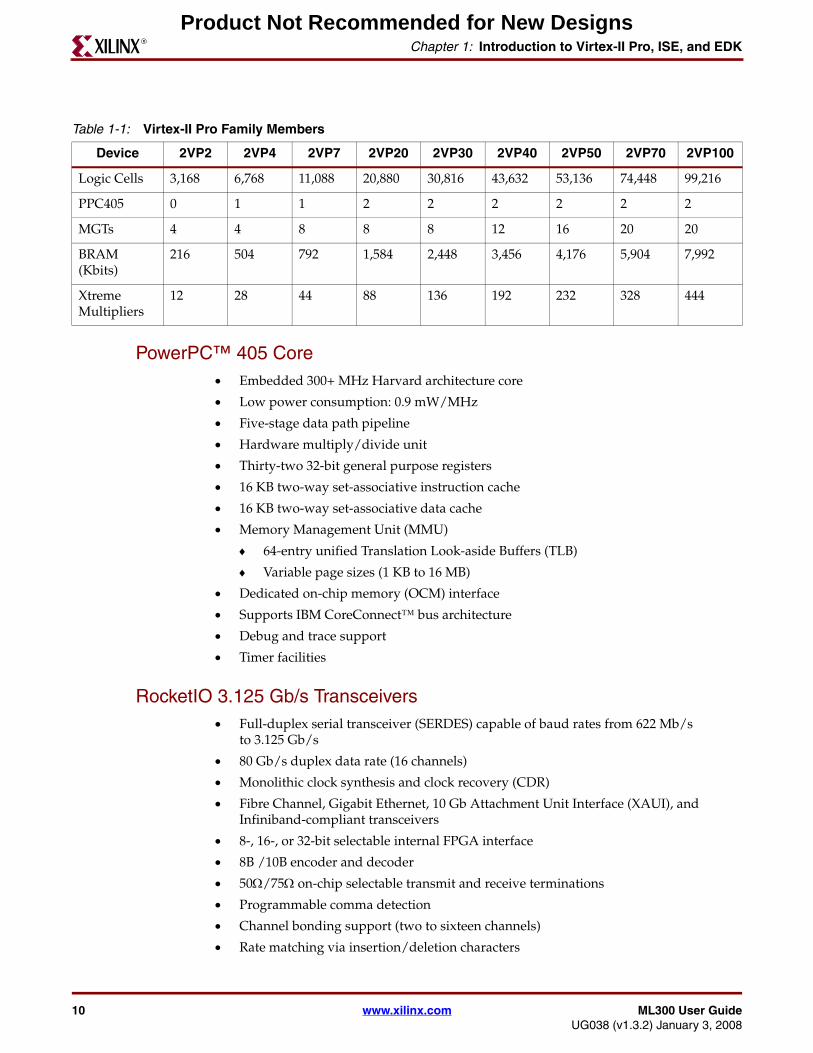
Table 1-1: Virtex-II Pro Family Members
Device 2VP2 2VP4 2VP7 2VP20 2VP30 2VP40 2VP50 2VP70 2VP100
Logic Cells 3,168 6,768 11,088 20,880 30,816 43,632 53,136 74,448 99,216
PPC405 0 1 1 2 2 2 2 2 2
MGTs 4 4 8 8 8 12 16 20 20
BRAM(Kbits)
216 504 792 1,584 2,448 3,456 4,176 5,904 7,992
Xtreme Multipliers
12 28 44 88 136 192 232 328 444
Product Not Recommended for New Designs
ML300 User Guide www.xilinx.com 11UG038 (v1.3.2) January 3, 2008
Virtex-II ProR
• Four levels of selectable pre-emphasis
• Five levels of output differential voltage
• Per-channel internal loopback modes
• 2.5V transceiver supply voltage
Virtex-II FPGA FabricDescription of the Virtex-II Family fabric follows:
• SelectRAM memory hierarchy
♦ Up to 10 Mb of True Dual-Port RAM in 18 Kb block SelectRAM resources
♦ Up to 1.7 Mb of distributed SelectRAM resources
♦ High-performance interfaces to external memory
• Arithmetic functions
♦ Dedicated 18-bit x 18-bit multiplier blocks
♦ Fast look-ahead carry logic chains
• Flexible logic resources
♦ Up to 111,232 internal registers/latches with Clock Enable
♦ Up to 111,232 look-up tables (LUTs) or cascadable variable (1 to 16 bits) shift registers
♦ Wide multiplexers and wide-input function support
♦ Horizontal cascade chain and Sum-of-Products support
♦ Internal 3-state busing
• High-performance clock management circuitry
♦ Up to eight Digital Clock Manager (DCM) modules
- Precise clock de-skew
- Flexible frequency synthesis
- High-resolution phase shifting
♦ 16 global clock multiplexer buffers in all parts
• Active Interconnect technology
♦ Fourth-generation segmented routing structure
♦ Fast, predictable routing delay, independent of fanout
♦ Deep sub-micron noise immunity benefits
• Select I/O-Ultra technology
♦ Up to 852 user I/Os
♦ Twenty two single-ended standards and five differential standards
♦ Programmable LVTTL and LVCMOS sink/source current (2 mA to 24 mA) per I/O
♦ Digitally Controlled Impedance (DCI) I/O: on-chip termination resistors for single-ended I/O standards
♦ PCI support(1)
♦ Differential signaling
Product Not Recommended for New Designs
12 www.xilinx.com ML300 User GuideUG038 (v1.3.2) January 3, 2008
Chapter 1: Introduction to Virtex-II Pro, ISE, and EDKR
- 840 Mb/s Low-Voltage Differential Signaling I/O (LVDS) with current mode drivers
- Bus LVDS I/O
- HyperTransport™ (LDT) I/O with current driver buffers
- Built-in DDR input and output registers
♦ Proprietary high-performance SelectLink technology for communications between Xilinx devices
- High-bandwidth data path
- Double Data Rate (DDR) link
- Web-based HDL generation methodology
• SRAM-based in-system configuration
♦ Fast SelectMAP™ configuration
♦ Triple Data Encryption Standard (DES) security option (bitstream encryption)
♦ IEEE1532 support
♦ Partial reconfiguration
♦ Unlimited reprogrammability
♦ Readback capability
• Supported by Xilinx Foundation™ and Alliance™ series development systems
♦ Integrated VHDL and Verilog design flows
♦ ChipScope™ Pro Integrated Logic Analyzer
• 0.13-µm, nine-layer copper process with 90 nm high-speed transistors
• 1.5V (VCCINT) core power supply, dedicated 2.5V VCCAUX auxiliary and VCCO I/O power supplies
• IEEE 1149.1 compatible boundary-scan logic support
• Flip-Chip and Wire-Bond Ball Grid Array (BGA) packages in standard 1.00 mm pitch
• Each device 100% factory tested
Foundation ISE ISE Foundation is the industry's most complete programmable logic design environment. ISE Foundation includes the industry's most advanced timing driven implementation tools available for programmable logic design, along with design entry, synthesis and verification capabilities. With its ultra-fast runtimes, ProActive Timing Closure technologies, and seamless integration with the industry's most advanced verification products, ISE Foundation offers a great design environment for anyone looking for a complete programmable logic design solution.
Foundation Features
Design Entry
ISE greatly improves your “Time-to-Market”, productivity, and design quality with robust design entry features.
ISE provides support for today's most popular methods for design capture including HDL and schematic entry, integration of IP cores as well as robust support for reuse of your own
Product Not Recommended for New Designs
ML300 User Guide www.xilinx.com 13UG038 (v1.3.2) January 3, 2008
Foundation ISER
IP. ISE even includes technology called IP Builder, which allows you to capture your own IP and reuse it in other designs.
ISE's Architecture Wizards allow easy access to device features like the Digital Clock Manager and Multi-Gigabit I/O technology.
ISE also includes a tool called PACE (Pinout Area Constraint Editor) which includes a front-end pin assignment editor, a design hierarchy browser, and an area constraint editor. By using PACE, designers are able to observe and describe information regarding the connectivity and resource requirements of a design, resource layout of a target FPGA, and the mapping of the design onto the FPGA via location/area.
This rich mixture of design entry capabilities provides the easiest to use design environment available today for your logic design.
Synthesis
Synthesis is one of the most essential steps in your design methodology. It takes your conceptual Hardware Description Language (HDL) design definition and generates the logical or physical representation for the targeted silicon device.
A state of the art synthesis engine is required to produce highly optimized results with a fast compile and turnaround time. To meet this requirement, the synthesis engine needs to be tightly integrated with the physical implementation tool and have the ability to proactively meet the design timing requirements by driving the placement in the physical device. In addition, cross probing between the physical design report and the HDL design code will further enhance the turnaround time.
Xilinx ISE provides the seamless integration with the leading synthesis engines from Mentor Graphics, Synopsys, and Synplicity. You can use the synthesis engine of our choice. In addition, ISE includes Xilinx proprietary synthesis technology, XST. You have options to use multiple synthesis engines to obtain the best-optimized result of your programmable logic design.
Implementation and Configuration
Programmable logic design implementation assigns the logic created during design entry and synthesis into specific physical resources of the target device.
The term “place and route” has historically been used to describe the implementation process for FPGA devices and “fitting” has been used for CPLDs. Implementation is followed by device configuration, where a bitstream is generated from the physical place and route information and downloaded into the target programmable logic device.
To ensure designers get their product to market quickly, Xilinx ISE software provides several key technologies required for design implementation:
• Ultra-fast runtimes enable multiple “turns” per day
• ProActive™ Timing Closure drives high-performance results
• Timing-driven place and route combined with “push-button” ease
• Incremental Design
• Macro Builder
Product Not Recommended for New Designs

14 www.xilinx.com ML300 User GuideUG038 (v1.3.2) January 3, 2008
Chapter 1: Introduction to Virtex-II Pro, ISE, and EDKR
Board Level Integration
Xilinx understands the critical issues such as complex board layout, signal integrity, high-speed bus interface, high-performance I/O bandwidth, and electromagnetic interference for system level designers.
To ease the system level designers' challenge, ISE provides support to all Xilinx leading FPGA technologies:
• System IO
• XCITE
• Digital clock management for system timing
• EMI control management for electromagnetic interference
To really help you ensure your programmable logic design works in context of your entire system, Xilinx provides complete pin configurations, packaging information, tips on signal integration, and various simulation models for your board level verification including:
• IBIS models
• HSPICE models
• STAMP models
Embedded Development KitThe Embedded Development Kit (EDK) is Xilinx's solution for embedded programmable systems design and supports designs using the Virtex-II Pro. EDK hardware and software development tools, combined with the advanced features of Virtex-II Pro FPGA provide you with a new level of system design.
The system design process can be loosely divided into the following tasks:
• Build the software application
• Simulate the hardware description
• Simulate the hardware with the software application
• Simulate the hardware into the FPGA using the software application in on-chip memory
• Run timing simulation
• Configure the bitstream for the FPGA
Product Not Recommended for New Designs
ML300 User Guide www.xilinx.com 15UG038 (v1.3.2) January 3, 2008
R
Chapter 2
Board Hardware
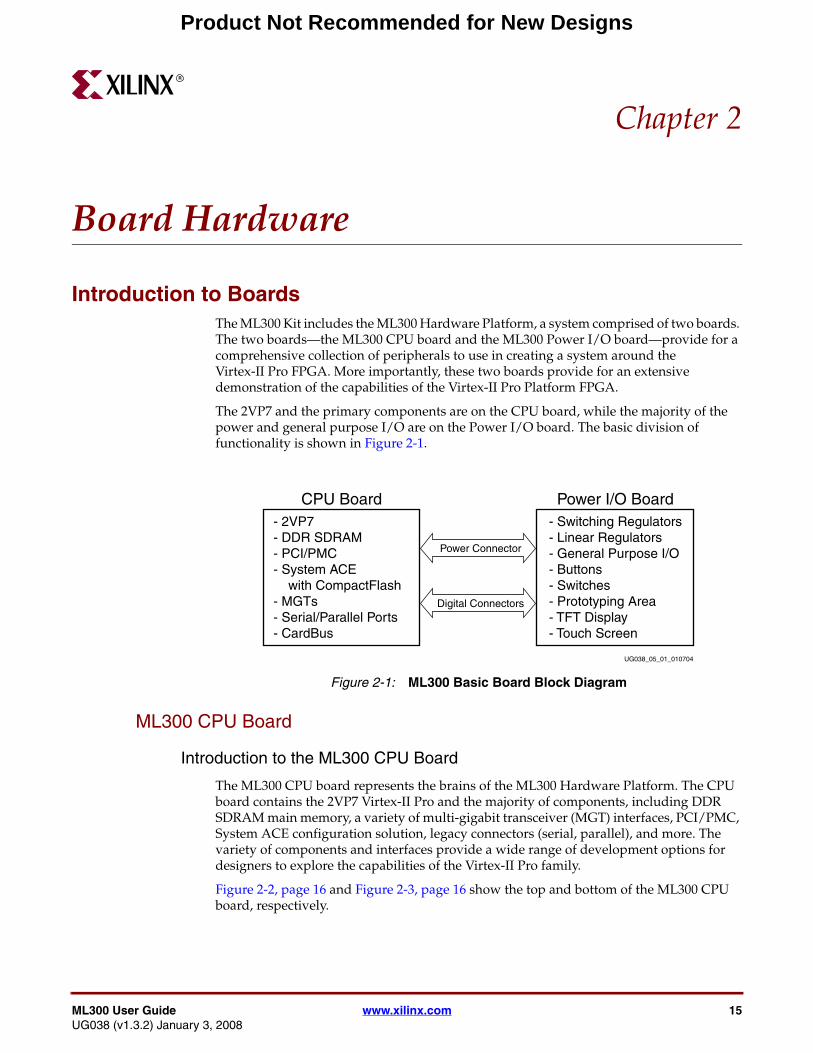
Introduction to BoardsThe ML300 Kit includes the ML300 Hardware Platform, a system comprised of two boards. The two boards—the ML300 CPU board and the ML300 Power I/O board—provide for a comprehensive collection of peripherals to use in creating a system around the Virtex-II Pro FPGA. More importantly, these two boards provide for an extensive demonstration of the capabilities of the Virtex-II Pro Platform FPGA.
The 2VP7 and the primary components are on the CPU board, while the majority of the power and general purpose I/O are on the Power I/O board. The basic division of functionality is shown in Figure 2-1.
ML300 CPU Board
Introduction to the ML300 CPU Board
The ML300 CPU board represents the brains of the ML300 Hardware Platform. The CPU board contains the 2VP7 Virtex-II Pro and the majority of components, including DDR SDRAM main memory, a variety of multi-gigabit transceiver (MGT) interfaces, PCI/PMC, System ACE configuration solution, legacy connectors (serial, parallel), and more. The variety of components and interfaces provide a wide range of development options for designers to explore the capabilities of the Virtex-II Pro family.
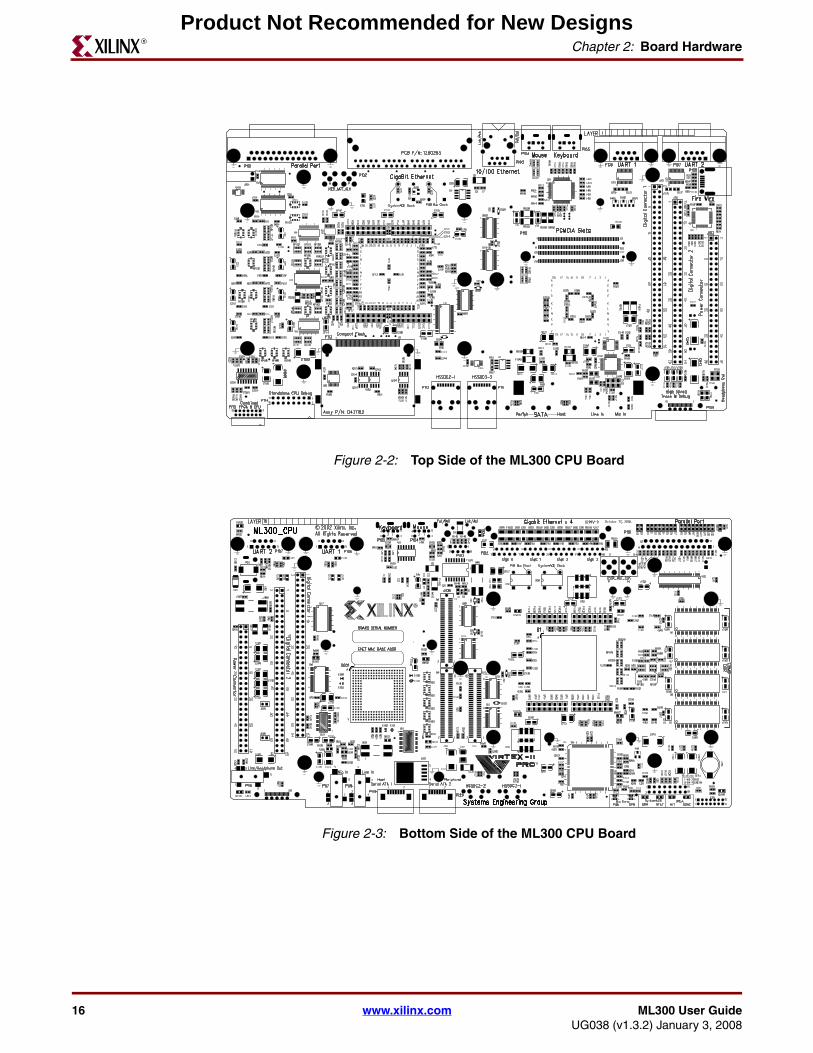
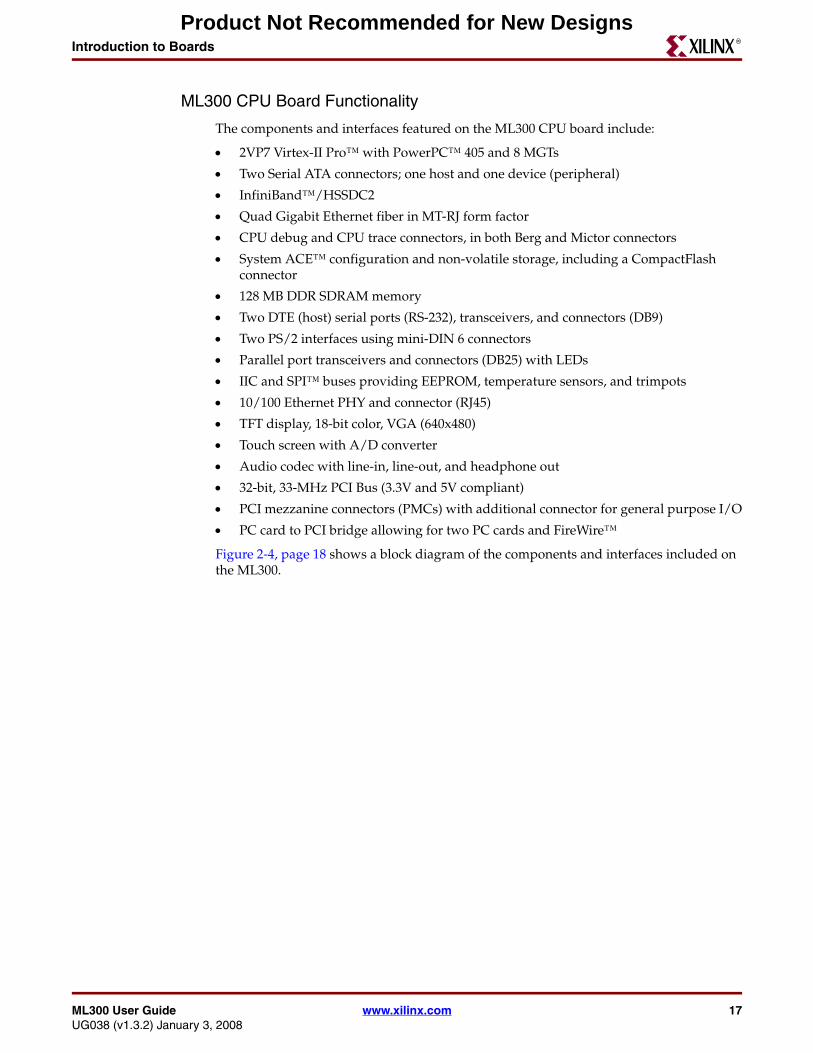
Figure 2-2, page 16 and Figure 2-3, page 16 show the top and bottom of the ML300 CPU board, respectively.
Figure 2-1: ML300 Basic Board Block Diagram
UG038_05_01_010704
- 2VP7- DDR SDRAM- PCI/PMC- System ACE with CompactFlash- MGTs- Serial/Parallel Ports- CardBus
CPU Board- Switching Regulators- Linear Regulators- General Purpose I/O- Buttons- Switches- Prototyping Area- TFT Display- Touch Screen
Power I/O Board
Power Connector
Digital Connectors
Product Not Recommended for New Designs
16 www.xilinx.com ML300 User GuideUG038 (v1.3.2) January 3, 2008
Chapter 2: Board HardwareR
Figure 2-2: Top Side of the ML300 CPU Board
Figure 2-3: Bottom Side of the ML300 CPU Board
Product Not Recommended for New Designs
ML300 User Guide www.xilinx.com 17UG038 (v1.3.2) January 3, 2008
Introduction to BoardsR
ML300 CPU Board Functionality
The components and interfaces featured on the ML300 CPU board include:
• 2VP7 Virtex-II Pro™ with PowerPC™ 405 and 8 MGTs
• Two Serial ATA connectors; one host and one device (peripheral)
• InfiniBand™/HSSDC2
• Quad Gigabit Ethernet fiber in MT-RJ form factor
• CPU debug and CPU trace connectors, in both Berg and Mictor connectors
• System ACE™ configuration and non-volatile storage, including a CompactFlash connector
• 128 MB DDR SDRAM memory
• Two DTE (host) serial ports (RS-232), transceivers, and connectors (DB9)
• Two PS/2 interfaces using mini-DIN 6 connectors
• Parallel port transceivers and connectors (DB25) with LEDs
• IIC and SPI™ buses providing EEPROM, temperature sensors, and trimpots
• 10/100 Ethernet PHY and connector (RJ45)
• TFT display, 18-bit color, VGA (640x480)
• Touch screen with A/D converter
• Audio codec with line-in, line-out, and headphone out
• 32-bit, 33-MHz PCI Bus (3.3V and 5V compliant)
• PCI mezzanine connectors (PMCs) with additional connector for general purpose I/O
• PC card to PCI bridge allowing for two PC cards and FireWire™
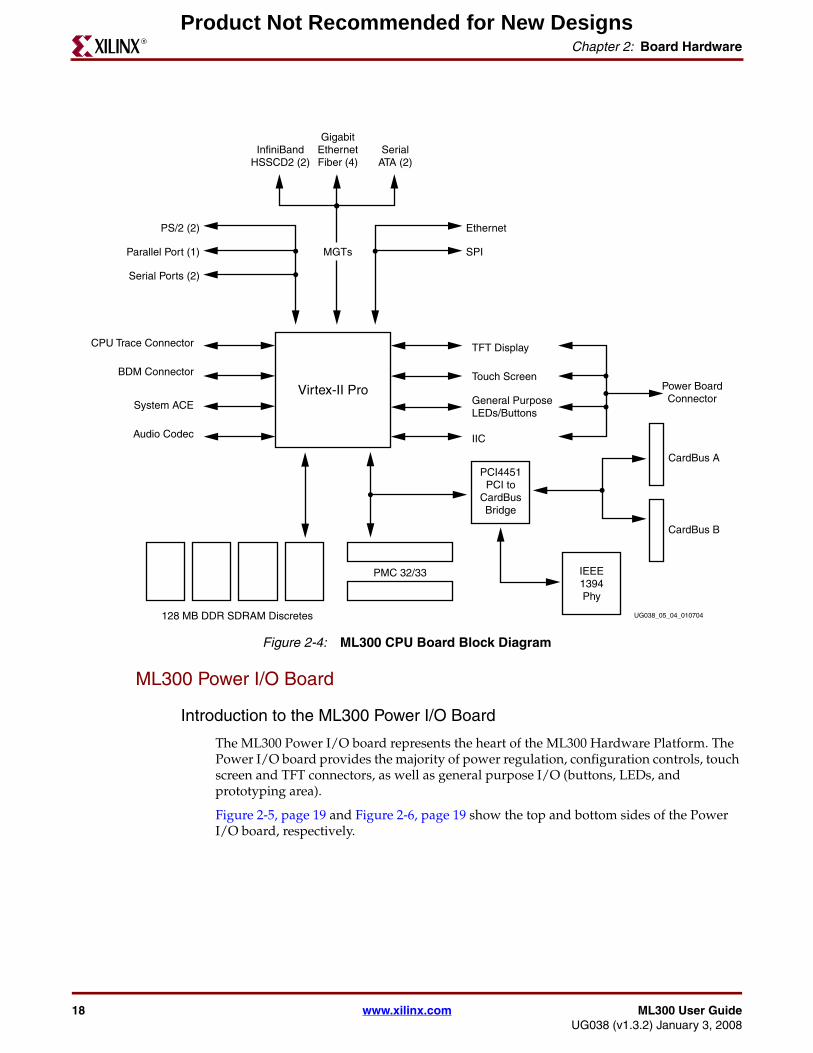
Figure 2-4, page 18 shows a block diagram of the components and interfaces included on the ML300.
Product Not Recommended for New Designs
18 www.xilinx.com ML300 User GuideUG038 (v1.3.2) January 3, 2008
Chapter 2: Board HardwareR
ML300 Power I/O Board
Introduction to the ML300 Power I/O Board
The ML300 Power I/O board represents the heart of the ML300 Hardware Platform. The Power I/O board provides the majority of power regulation, configuration controls, touch screen and TFT connectors, as well as general purpose I/O (buttons, LEDs, and prototyping area).
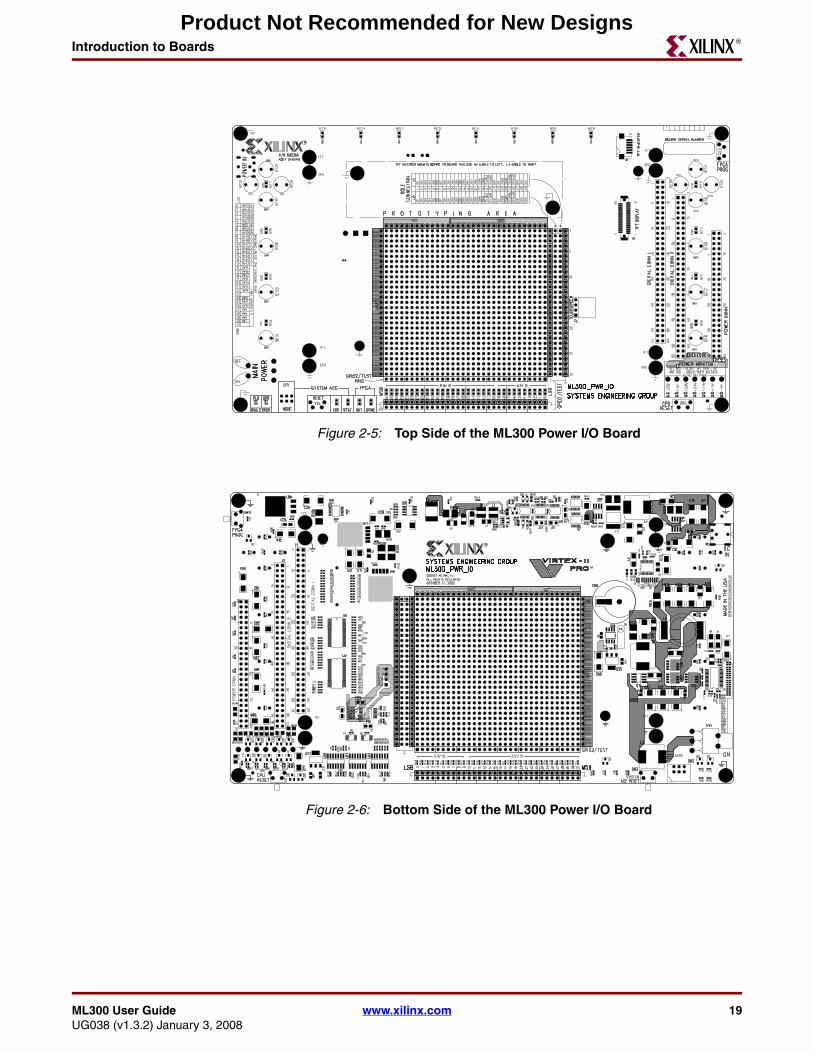
Figure 2-5, page 19 and Figure 2-6, page 19 show the top and bottom sides of the Power I/O board, respectively.
Figure 2-4: ML300 CPU Board Block Diagram
Virtex-II Pro
UG038_05_04_010704128 MB DDR SDRAM Discretes
PMC 32/33
CardBus A
SPI
Ethernet
CardBus B
General PurposeLEDs/Buttons
Touch ScreenPower BoardConnector
TFT Display
MGTs
SerialATA (2)
GigabitEthernetFiber (4)
InfiniBandHSSCD2 (2)
PCI4451PCI to
CardBusBridge
IEEE1394Phy
IIC
Serial Ports (2)
Parallel Port (1)
PS/2 (2)
System ACE
Audio Codec
BDM Connector
CPU Trace Connector
Product Not Recommended for New Designs
ML300 User Guide www.xilinx.com 19UG038 (v1.3.2) January 3, 2008
Introduction to BoardsR
Figure 2-5: Top Side of the ML300 Power I/O Board
Figure 2-6: Bottom Side of the ML300 Power I/O Board
Product Not Recommended for New Designs
20 www.xilinx.com ML300 User GuideUG038 (v1.3.2) January 3, 2008
Chapter 2: Board HardwareR
ML300 Power I/O Board Functionality
The ML300 Power I/O board provides two main functions; power regulation and general purpose I/O. The general purpose I/O includes buttons, LEDs, and various configuration settings.
ML300 Power I/O Board Power Regulation
The power regulation on the board can be divided into three main sections:
1. Power cycling (turning the board on and off)
2. Power regulation using switching regulators for high current, high efficiency applications
3. Power regulation using linear regulators for applications where high stability and accuracy are required
There are two main methods of power cycling the ML300 Hardware Platform:
1. The primary power switch (PIO.SW1) is used to connect and disconnect the board to/from the 20V main power supply. This switch is covered in more detail in “Primary Power Switch,” page 111.
2. A soft power switch (similar to the ATX on|off switch) is used to enable and disable the primary power regulators in the system. This switch is covered in more detail in “Soft Power Switch,” page 111. This soft switch is toggled through three main means:
a. Pressing and holding all eight of the thumb buttons simultaneously
b. Using the FPGA_POWER signal on the Power Connector (CPU.J103, PIO.J3) to toggle this signal (clearly can only be used to turn the power supplies off)
c. Shorting the two pins of PIO.J11 on the Power I/O board
All power on the board is derived from a 20V Dell laptop power supply. This 20V power supply is connected to the Power I/O board using connector J4, labeled as “POWER IN” on the top side, top left corner of the Power I/O board. (The connector is on the bottom side of the Power I/O board, immediately below the label.) As mentioned, this power supply passes through the Primary Power Switch, SW1, labeled as “MAIN POWER” on the top side, lower left corner of the Power I/O board. (The switch is immediately below the label, on the bottom side of the board.) The Primary Power Switch serves as the only connection point of the 20 Volts to the rest of the board. From the Primary Power Switch, the 20V supply passes through a 5.4 Amp, 10 µH inductor to provide some filtering before reaching the ML300 Hardware Platform.
Switching regulators and linear regulators are used to generate the various required voltages from the 20V power supply. The majority of these regulators can be switched off using the soft on|off capability of the Power I/O board. The voltages generated by the switching regulators include +12V, 5V, 3.3V and -12V, while linear regulators are used to derive 2.5V and 1.65V from the 3.3V supply. Additionally, power supplies can be found on the CPU board for local power requirements, such as MGTs and DDR SDRAM.
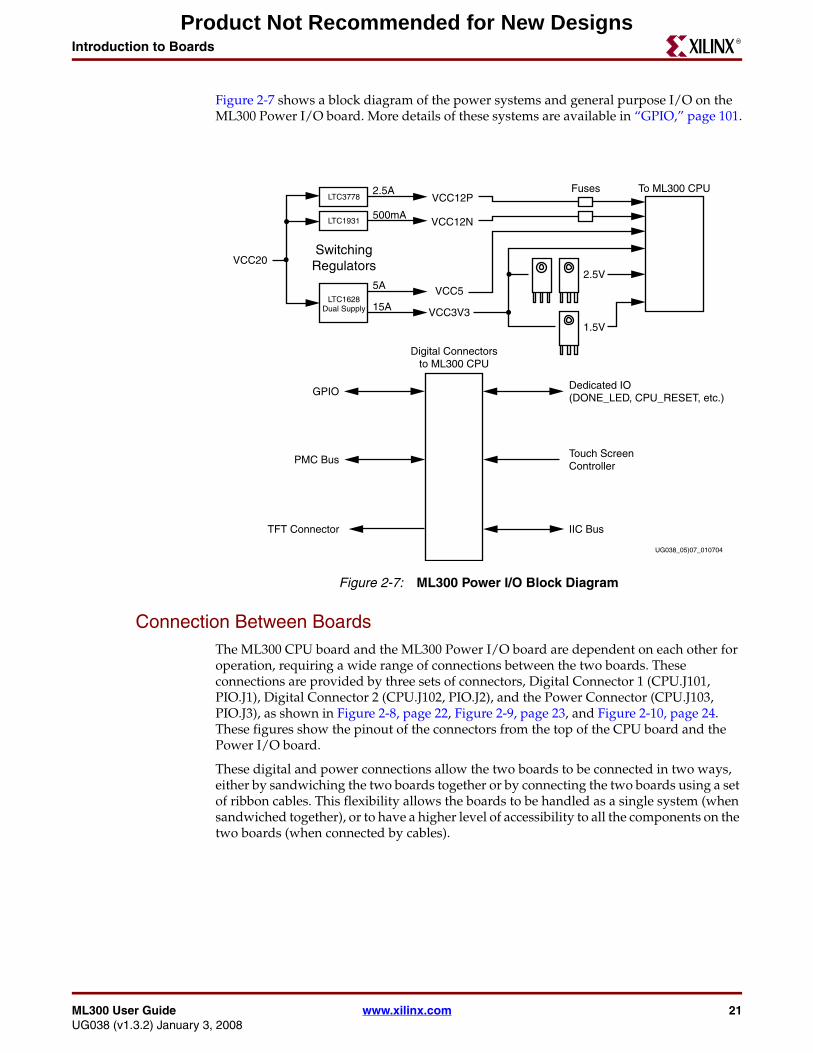
Figure 2-7 shows a block diagram of the power systems on the ML300 Power I/O. See “Power System,” page 109 for more details.
ML300 Power I/O Board General Purpose I/O
The I/O capabilities of the ML300 Power I/O board include switches, LEDs, GPIO headers, prototyping area, touch screen connector and controller, TFT connector, and configuration Settings.
Product Not Recommended for New Designs
ML300 User Guide www.xilinx.com 21UG038 (v1.3.2) January 3, 2008
Introduction to BoardsR
Figure 2-7 shows a block diagram of the power systems and general purpose I/O on the ML300 Power I/O board. More details of these systems are available in “GPIO,” page 101.
Connection Between BoardsThe ML300 CPU board and the ML300 Power I/O board are dependent on each other for operation, requiring a wide range of connections between the two boards. These connections are provided by three sets of connectors, Digital Connector 1 (CPU.J101, PIO.J1), Digital Connector 2 (CPU.J102, PIO.J2), and the Power Connector (CPU.J103, PIO.J3), as shown in Figure 2-8, page 22, Figure 2-9, page 23, and Figure 2-10, page 24. These figures show the pinout of the connectors from the top of the CPU board and the Power I/O board.
These digital and power connections allow the two boards to be connected in two ways, either by sandwiching the two boards together or by connecting the two boards using a set of ribbon cables. This flexibility allows the boards to be handled as a single system (when sandwiched together), or to have a higher level of accessibility to all the components on the two boards (when connected by cables).
Figure 2-7: ML300 Power I/O Block Diagram
UG038_05)07_010704
To ML300 CPU
2.5V
FusesVCC12P
VCC12N
VCC20
GPIO
PMC Bus
TFT Connector
5A
15A
VCC5
VCC3V31.5V
Digital Connectorsto ML300 CPU
LTC1628Dual Supply
2.5A
500mA
SwitchingRegulators
LTC1931
LTC3778
Dedicated IO(DONE_LED, CPU_RESET, etc.)
Touch ScreenController
IIC Bus
Product Not Recommended for New Designs
22 www.xilinx.com ML300 User GuideUG038 (v1.3.2) January 3, 2008
Chapter 2: Board HardwareR
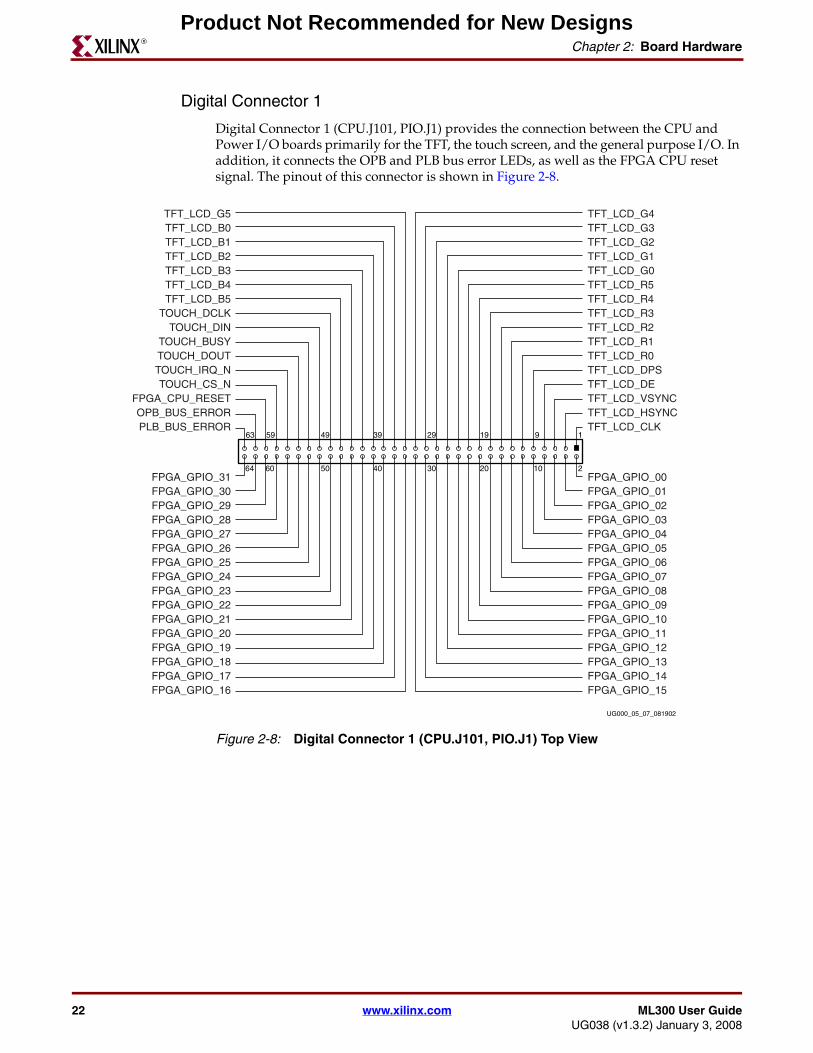
Digital Connector 1
Digital Connector 1 (CPU.J101, PIO.J1) provides the connection between the CPU and Power I/O boards primarily for the TFT, the touch screen, and the general purpose I/O. In addition, it connects the OPB and PLB bus error LEDs, as well as the FPGA CPU reset signal. The pinout of this connector is shown in Figure 2-8.
Figure 2-8: Digital Connector 1 (CPU.J101, PIO.J1) Top View
63 59 1
210203040506064
919293949
UG000_05_07_081902
FPGA_GPIO_16FPGA_GPIO_17FPGA_GPIO_18FPGA_GPIO_19FPGA_GPIO_20FPGA_GPIO_21FPGA_GPIO_22FPGA_GPIO_23FPGA_GPIO_24FPGA_GPIO_25FPGA_GPIO_26FPGA_GPIO_27FPGA_GPIO_28FPGA_GPIO_29FPGA_GPIO_30FPGA_GPIO_31
FPGA_GPIO_15FPGA_GPIO_14FPGA_GPIO_13FPGA_GPIO_12FPGA_GPIO_11FPGA_GPIO_10FPGA_GPIO_09FPGA_GPIO_08FPGA_GPIO_07FPGA_GPIO_06FPGA_GPIO_05FPGA_GPIO_04FPGA_GPIO_03FPGA_GPIO_02FPGA_GPIO_01FPGA_GPIO_00
PLB_BUS_ERROROPB_BUS_ERROR
FPGA_CPU_RESETTOUCH_CS_N
TOUCH_IRQ_NTOUCH_DOUTTOUCH_BUSY
TOUCH_DINTOUCH_DCLK
TFT_LCD_B5TFT_LCD_B4TFT_LCD_B3TFT_LCD_B2TFT_LCD_B1TFT_LCD_B0TFT_LCD_G5
TFT_LCD_CLKTFT_LCD_HSYNCTFT_LCD_VSYNCTFT_LCD_DETFT_LCD_DPSTFT_LCD_R0TFT_LCD_R1TFT_LCD_R2TFT_LCD_R3TFT_LCD_R4TFT_LCD_R5TFT_LCD_G0TFT_LCD_G1TFT_LCD_G2TFT_LCD_G3TFT_LCD_G4
Product Not Recommended for New Designs
ML300 User Guide www.xilinx.com 23UG038 (v1.3.2) January 3, 2008
Introduction to BoardsR
Digital Connector 2
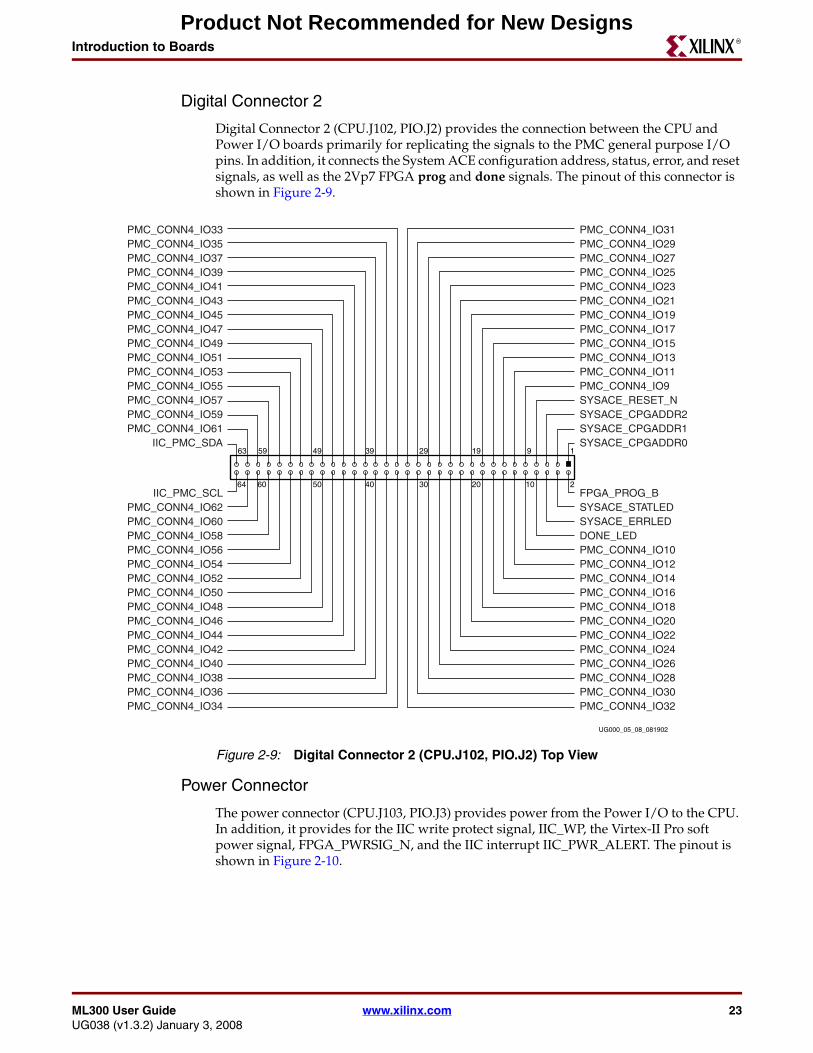
Digital Connector 2 (CPU.J102, PIO.J2) provides the connection between the CPU and Power I/O boards primarily for replicating the signals to the PMC general purpose I/O pins. In addition, it connects the System ACE configuration address, status, error, and reset signals, as well as the 2Vp7 FPGA prog and done signals. The pinout of this connector is shown in Figure 2-9.
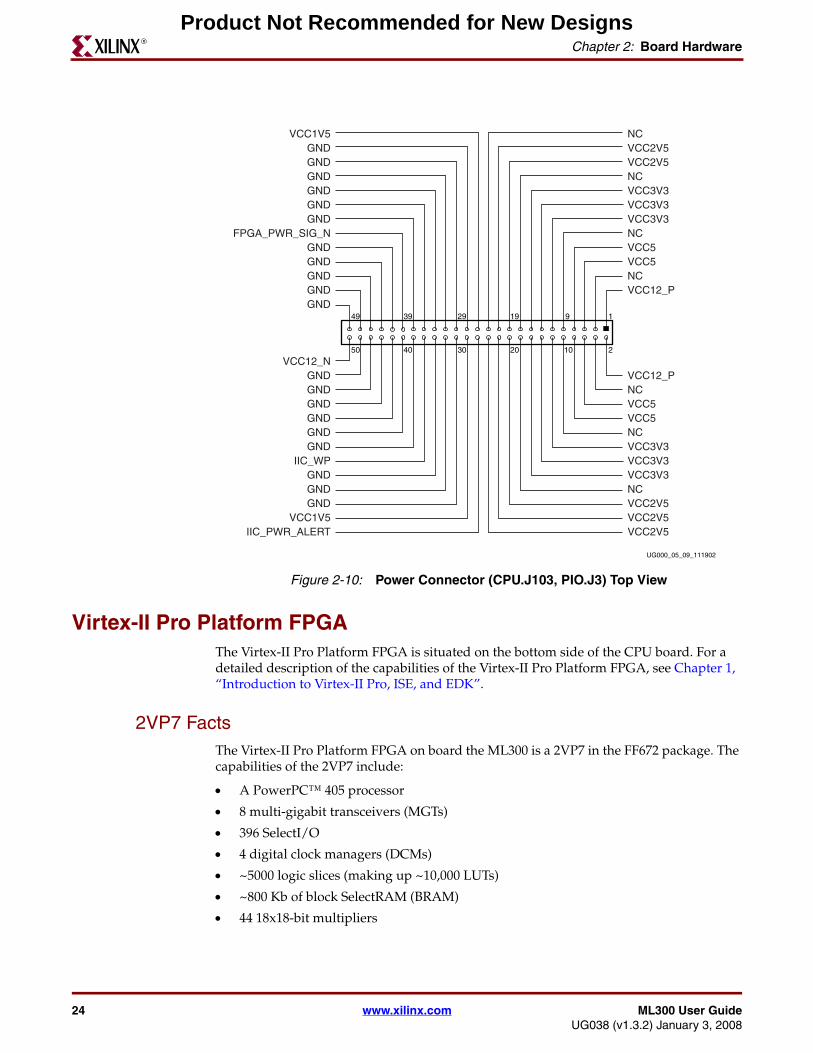
Power Connector
The power connector (CPU.J103, PIO.J3) provides power from the Power I/O to the CPU. In addition, it provides for the IIC write protect signal, IIC_WP, the Virtex-II Pro soft power signal, FPGA_PWRSIG_N, and the IIC interrupt IIC_PWR_ALERT. The pinout is shown in Figure 2-10.
Figure 2-9: Digital Connector 2 (CPU.J102, PIO.J2) Top View
63 59 1
210203040506064
919293949
UG000_05_08_081902
PMC_CONN4_IO34PMC_CONN4_IO36PMC_CONN4_IO38PMC_CONN4_IO40PMC_CONN4_IO42PMC_CONN4_IO44PMC_CONN4_IO46PMC_CONN4_IO48PMC_CONN4_IO50PMC_CONN4_IO52PMC_CONN4_IO54PMC_CONN4_IO56PMC_CONN4_IO58PMC_CONN4_IO60PMC_CONN4_IO62
IIC_PMC_SCL
PMC_CONN4_IO32PMC_CONN4_IO30PMC_CONN4_IO28PMC_CONN4_IO26PMC_CONN4_IO24PMC_CONN4_IO22PMC_CONN4_IO20PMC_CONN4_IO18PMC_CONN4_IO16PMC_CONN4_IO14PMC_CONN4_IO12PMC_CONN4_IO10DONE_LEDSYSACE_ERRLEDSYSACE_STATLEDFPGA_PROG_B
IIC_PMC_SDAPMC_CONN4_IO61PMC_CONN4_IO59PMC_CONN4_IO57PMC_CONN4_IO55PMC_CONN4_IO53PMC_CONN4_IO51PMC_CONN4_IO49PMC_CONN4_IO47PMC_CONN4_IO45PMC_CONN4_IO43PMC_CONN4_IO41PMC_CONN4_IO39PMC_CONN4_IO37PMC_CONN4_IO35PMC_CONN4_IO33
SYSACE_CPGADDR0SYSACE_CPGADDR1SYSACE_CPGADDR2SYSACE_RESET_NPMC_CONN4_IO9PMC_CONN4_IO11PMC_CONN4_IO13PMC_CONN4_IO15PMC_CONN4_IO17PMC_CONN4_IO19PMC_CONN4_IO21PMC_CONN4_IO23PMC_CONN4_IO25PMC_CONN4_IO27PMC_CONN4_IO29PMC_CONN4_IO31
Product Not Recommended for New Designs
24 www.xilinx.com ML300 User GuideUG038 (v1.3.2) January 3, 2008
Chapter 2: Board HardwareR
Virtex-II Pro Platform FPGAThe Virtex-II Pro Platform FPGA is situated on the bottom side of the CPU board. For a detailed description of the capabilities of the Virtex-II Pro Platform FPGA, see Chapter 1, “Introduction to Virtex-II Pro, ISE, and EDK”.
2VP7 FactsThe Virtex-II Pro Platform FPGA on board the ML300 is a 2VP7 in the FF672 package. The capabilities of the 2VP7 include:
• A PowerPC™ 405 processor
• 8 multi-gigabit transceivers (MGTs)
• 396 SelectI/O
• 4 digital clock managers (DCMs)
• ~5000 logic slices (making up ~10,000 LUTs)
• ~800 Kb of block SelectRAM (BRAM)
• 44 18x18-bit multipliers
Figure 2-10: Power Connector (CPU.J103, PIO.J3) Top View
UG000_05_09_111902
1
21020304050
919293949
IIC_PWR_ALERTVCC1V5
GNDGNDGND
IIC_WPGNDGNDGNDGNDGNDGND
VCC12_N
VCC2V5VCC2V5VCC2V5NCVCC3V3VCC3V3VCC3V3NCVCC5VCC5NCVCC12_P
GNDGNDGNDGNDGND
FPGA_PWR_SIG_NGNDGNDGNDGNDGNDGND
VCC1V5
VCC12_PNCVCC5VCC5NCVCC3V3VCC3V3VCC3V3NCVCC2V5VCC2V5NC
Product Not Recommended for New Designs
ML300 User Guide www.xilinx.com 25UG038 (v1.3.2) January 3, 2008
Virtex-II Pro Platform FPGAR
The FF672 package for the 2VP7 that is used on the ML300 is a 1.0mm 26x26 fully populated (with four corner balls removed) flip chip BGA.
The PowerPC™ 405 is capable of operation at 300+ MHz, and is capable of 420+ Dhrystone MIPs. Each of the 8 MGTs are capable of 3.125 Gigabits per second in both directions, for an aggregate bandwidth of 50 Gigabits per second from the MGTs (25 Gb/s transmit and 25 Gb/s receive). The 396 SelectIO are capable of supporting multiple high-speed I/O standards, from LVDS to SSTL2 to PCI. The 8 DCMs are capable of 24 MHz to 420 MHz operation and provide for clock deskew, frequency synthesis, and fine phase shifting.
While the 2VP7 is one of the smaller devices in the Virtex-II Pro family, it is capable of supporting 50 Gigabits per second through its MGTs, as well as supporting a full system including PCI, DDR, parallel and serial ports, audio, Ethernet, and much more.
2VP7 ConnectivityThe 2VP7 is connected, directly or indirectly, to all other devices on the board. Table 2-1 shows the connections to the 2VP7 on a per bank basis.
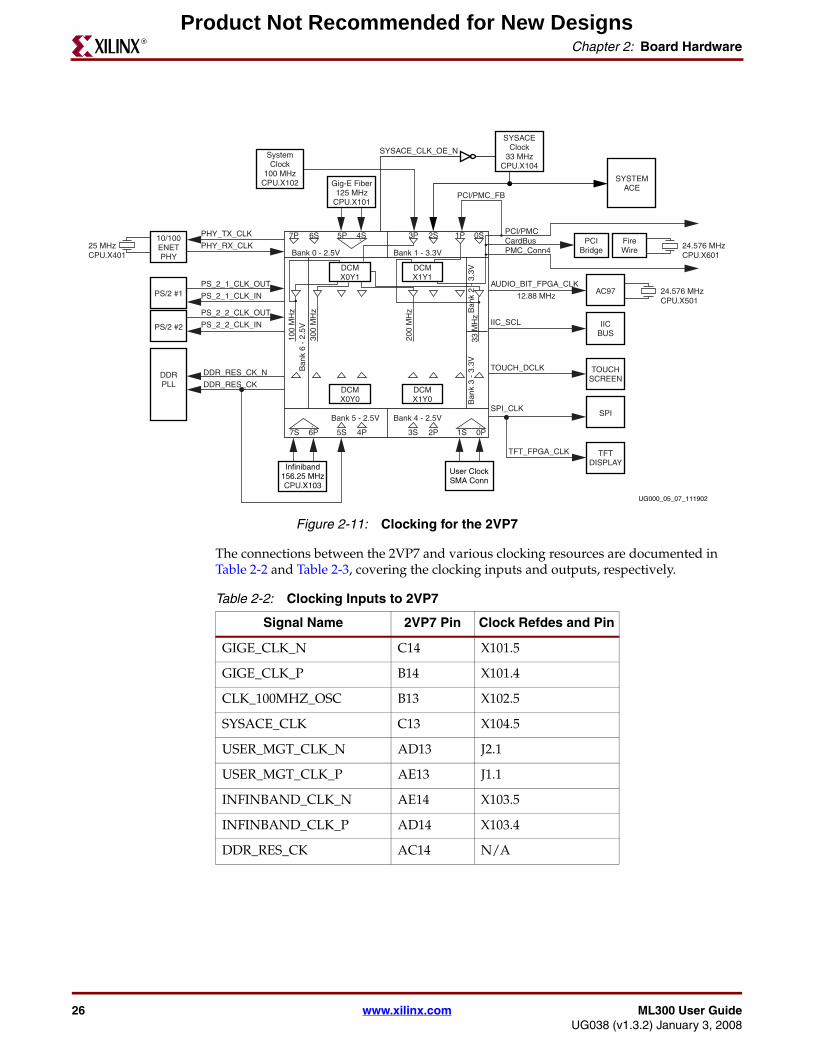
2VP7 ClockingThe Virtex-II Pro Platform FPGA on the CPU board attaches to a wide range of interfaces that have different clocking requirements. Figure 2-11 shows the clocks used on the ML300 Hardware Platform. These include externally and internally generated clocks.
Table 2-1: 2VP7 Interfaces by Bank
Bank Available I/O Interfaces
0 40 PS/2, Ethernet
1 40 PCI
2 59 PCI, PMC GPIO
3 59 Audio, IIC, Touch screen
4 40 TFT, SPI™, RS232
5 40 System ACE, CPU Trace
6 59 CPU Debug, GPIO Buttons, DDR SDRAM
7 59 DDR SDRAM, Parallel Port
Product Not Recommended for New Designs
26 www.xilinx.com ML300 User GuideUG038 (v1.3.2) January 3, 2008
Chapter 2: Board HardwareR
The connections between the 2VP7 and various clocking resources are documented in Table 2-2 and Table 2-3, covering the clocking inputs and outputs, respectively.
Figure 2-11: Clocking for the 2VP7
DCMX0Y1
10/100ENETPHY
PS/2 #1
PS/2 #2
AC97
IICBUS
SPI
TFTDISPLAY
TOUCHSCREENDDR
PLL
DCMX1Y1
DCMX0Y0
Infiniband156.25 MHzCPU.X103
7S 6P
User ClockSMA Conn
DCMX1Y0
UG000_05_07_111902
+-
1S3S 2P 0P5S
Bank 5 - 2.5V Bank 4 - 2.5V
PHY_TX_CLK
PHY_RX_CLK
PS_2_1_CLK_OUT
PS_2_1_CLK_IN
PS_2_2_CLK_OUT
PS_2_2_CLK_IN
DDR_RES_CK_N
DDR_RES_CK
4P+-
5P 4S+- 3P 2S 1P 0S7P
Bank 0 - 2.5V
Ban
k 6
- 2.
5V10
0 M
Hz
300
MH
z
200
MH
z
Ban
k 3
- 3.
3VB
ank
2 -
3.3V
33 M
Hz
AUDIO_BIT_FPGA_CLK
12.88 MHz
IIC_SCL
TOUCH_DCLK
SPI_CLK
TFT_FPGA_CLK
Bank 1 - 3.3V
6S
Gig-E Fiber125 MHz
CPU.X101
PMC_Conn4CardBusPCI/PMC
25 MHzCPU.X401
24.576 MHz
SYSACEClock
33 MHzCPU.X104
SystemClock
100 MHzCPU.X102 SYSTEM
ACE
SYSACE_CLK_OE_N
PCI/PMC_FB
CPU.X501
FireWire
PCIBridge 24.576 MHz
CPU.X601
Table 2-2: Clocking Inputs to 2VP7
Signal Name 2VP7 Pin Clock Refdes and Pin
GIGE_CLK_N C14 X101.5
GIGE_CLK_P B14 X101.4
CLK_100MHZ_OSC B13 X102.5
SYSACE_CLK C13 X104.5
USER_MGT_CLK_N AD13 J2.1
USER_MGT_CLK_P AE13 J1.1
INFINBAND_CLK_N AE14 X103.5
INFINBAND_CLK_P AD14 X103.4
DDR_RES_CK AC14 N/A
Product Not Recommended for New Designs
ML300 User Guide www.xilinx.com 27UG038 (v1.3.2) January 3, 2008
RocketIO TransceiversR
RocketIO TransceiversRocketIO transceivers are an exciting new feature of the Virtex-II Pro family. These multi-gigabit transceivers (MGTs) can transmit data at speeds from 622 Mb/s up to 3.125 Gb/s. MGTs are capable of various high-speed serial standards such as Gigabit Ethernet, FiberChannel, InfiniBand, and XAUI. In addition, the channel-bonding feature aggregates multiple channels, allowing for even higher data transfer rates. For additional information on RocketIO transceivers, see UG024: RocketIO Transceiver User Guide.
The ML300 CPU board has eight RocketIO transceivers available in the 2VP7. These eight transceivers implement three different MGT interfaces on board, including four Gigabit Ethernet Fiber channels, two InfiniBand channels, and two Serial ATA channels, one configured as a Serial ATA Host, the other configured as a Serial ATA Device (peripheral).
Table 2-3: Clocking Outputs from 2VP7
Signal Name 2VP7 Pin
PS2_2_CLK_IN E16
PS2_2_CLK_OUT D16
PS2_1_CLK_IN D15
PS2_1_CLK_OUT C15
PCI_PORT_CLK_PMC G13
PCI_PORT_CLK_CB(CardBus clock)
F13
FPGA_PMC_CONN4_IO61(PMC CONN 4 clock)
E13
AUDIO_BIT_ CLK N6
TOUCH_DCLK W5
TFT_FPGA_CLK AC6
SPI_CLK W12
CPU_TCK AC20
TRC_CLK AD23
DDR_FPGA_CK U21
DDR_FPGA_CK_N U22
Product Not Recommended for New Designs
28 www.xilinx.com ML300 User GuideUG038 (v1.3.2) January 3, 2008
Chapter 2: Board HardwareR
Gigabit Ethernet Fiber
Gigabit Ethernet Fiber Description
Gigabit Ethernet fiber represents a marked evolution over copper Gigabit Ethernet, allowing signals to be transmitted 500 meters (multi-mode) or as much as 10km (single-mode). In addition, it provides for high tolerance of EMI, and, in turn, produces little EMI.
Stratos Lightwave Quad Fiber Transceiver (CPU.P102)
While the Virtex-II Pro can deliver the speeds required by Gigabit Ethernet, it is not capable of transmitting or receiving optical signals directly. This capability is added by the inclusion of Stratos Lightwave R14K-ST11 Quad Gigabit Ethernet Transceivers. The R14K-ST11 is a 4-port multimode transceiver, capable of transmitting approximately 550 meters (about 1/3 of a mile). The R14K-ST11 pinout is shown in Table 2-4.
2VP7 to Transceiver
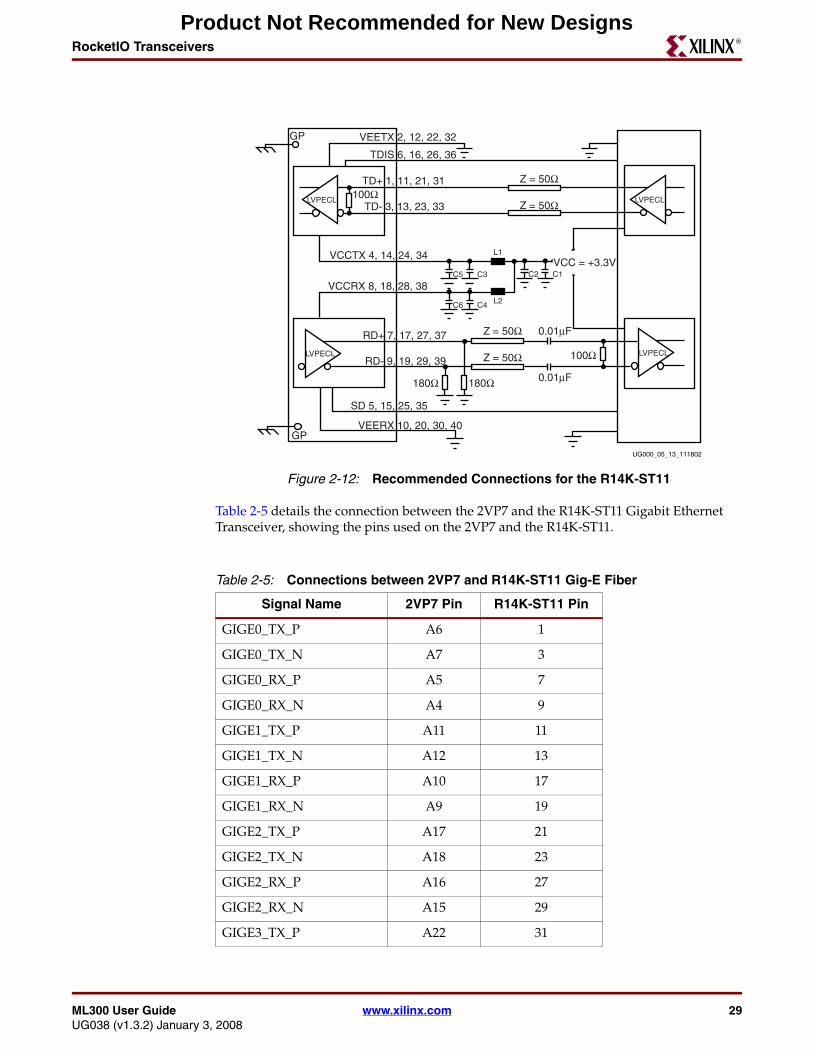
The connections between the transceiver are made using AC-coupling capacitors on the receive paths. In addition, there are 180Ω pull-downs on the receive side to convert from the LVPECL signaling standards used by the fiber transceivers. The Stratos Lightwave recommended connectivity for the T14K-ST11 Gigabit Ethernet Transceiver is shown in Figure 2-12.
The connections from the 2VP7 to the Gigabit Ethernet Fiber transceiver are based on this figure. The AC-coupling capacitor value of 0.1 µF provides for less than 4 ps of pattern-dependent jitter (PDJ) for run-lengths of 72 or less.
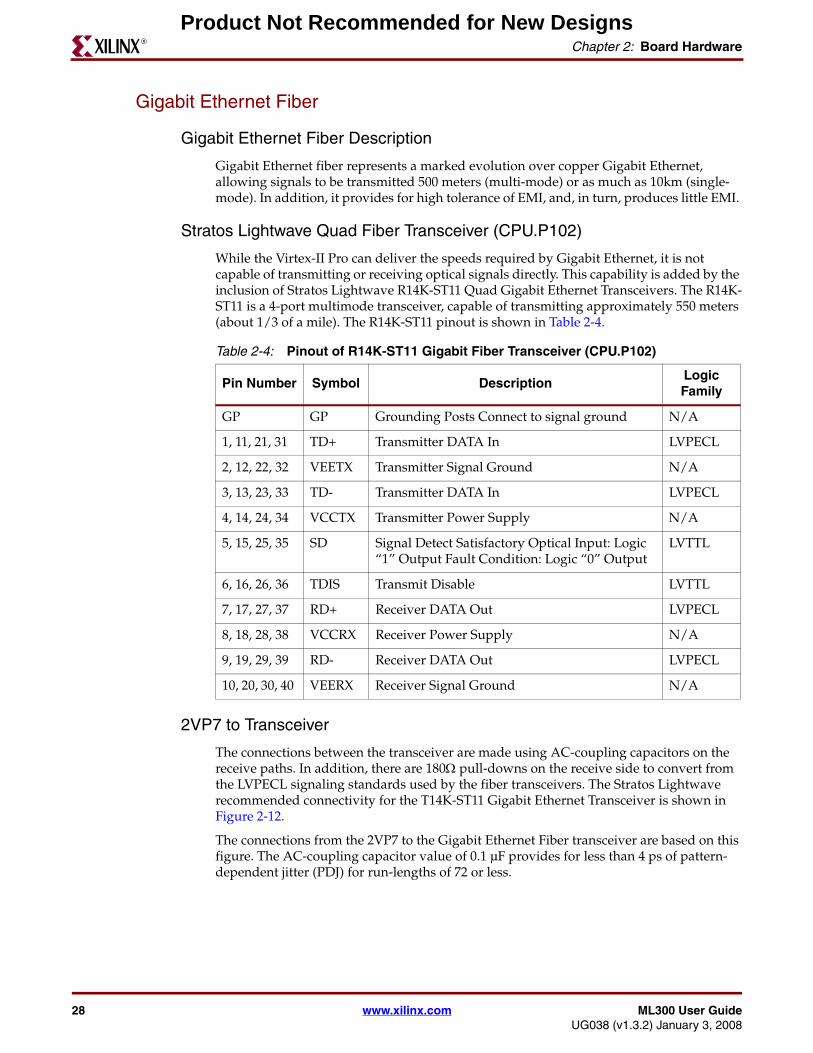
Table 2-4: Pinout of R14K-ST11 Gigabit Fiber Transceiver (CPU.P102)
Pin Number Symbol DescriptionLogic Family
GP GP Grounding Posts Connect to signal ground N/A
1, 11, 21, 31 TD+ Transmitter DATA In LVPECL
2, 12, 22, 32 VEETX Transmitter Signal Ground N/A
3, 13, 23, 33 TD- Transmitter DATA In LVPECL
4, 14, 24, 34 VCCTX Transmitter Power Supply N/A
5, 15, 25, 35 SD Signal Detect Satisfactory Optical Input: Logic “1” Output Fault Condition: Logic “0” Output
LVTTL
6, 16, 26, 36 TDIS Transmit Disable LVTTL
7, 17, 27, 37 RD+ Receiver DATA Out LVPECL
8, 18, 28, 38 VCCRX Receiver Power Supply N/A
9, 19, 29, 39 RD- Receiver DATA Out LVPECL
10, 20, 30, 40 VEERX Receiver Signal Ground N/A
Product Not Recommended for New Designs
ML300 User Guide www.xilinx.com 29UG038 (v1.3.2) January 3, 2008
RocketIO TransceiversR
Table 2-5 details the connection between the 2VP7 and the R14K-ST11 Gigabit Ethernet Transceiver, showing the pins used on the 2VP7 and the R14K-ST11.
Figure 2-12: Recommended Connections for the R14K-ST11
Table 2-5: Connections between 2VP7 and R14K-ST11 Gig-E Fiber
Signal Name 2VP7 Pin R14K-ST11 Pin
GIGE0_TX_P A6 1
GIGE0_TX_N A7 3
GIGE0_RX_P A5 7
GIGE0_RX_N A4 9
GIGE1_TX_P A11 11
GIGE1_TX_N A12 13
GIGE1_RX_P A10 17
GIGE1_RX_N A9 19
GIGE2_TX_P A17 21
GIGE2_TX_N A18 23
GIGE2_RX_P A16 27
GIGE2_RX_N A15 29
GIGE3_TX_P A22 31
UG000_05_13_111802
LVPECLLVPECL
VEETX 2, 12, 22, 32
VEERX 10, 20, 30, 40
VCCTX 4, 14, 24, 34
VCCRX 8, 18, 28, 38
TDIS 6, 16, 26, 36
TD+ 1, 11, 21, 31
TD- 3, 13, 23, 33
RD+ 7, 17, 27, 37
RD- 9, 19, 29, 39
SD 5, 15, 25, 35
LVPECLLVPECL
180Ω
100Ω
180Ω
100Ω
Z = 50Ω
0.01μF
0.01μF
VCC = +3.3V
Z = 50Ω
C5 C3 C2 C1
C6 C4
Z = 50Ω
Z = 50Ω
GP
GP
L2
L1
Product Not Recommended for New Designs
30 www.xilinx.com ML300 User GuideUG038 (v1.3.2) January 3, 2008
Chapter 2: Board HardwareR
InfiniBand/HSSCD2
InfiniBand/HSSDC2 Description
The InfiniBand Architecture is a high-speed point-to-point serial connection standard. These links can operate three levels of link performance - 2.5 Gb/s, 10 Gb/s, and 30 Gb/s. The 2.5 Gb/s connection it within the range of operation of the Virtex-II Pro RocketIO. For more information about InfiniBand, see www.infinibandta.org.
2VP7 to InfiniBand/HSSDC2 Connector
The connection between the 2VP7 and the InfiniBand/HSSDC2 connector is fairly simple, involving only four wires per connector, as well as a few discrete components to provide for AC-coupling of the signals. These connections are shown in Table 2-6.
The InfiniBand connectors have different connections to the 2VP7 for transmit and receive differential pairs. The receive differential pair between the 2VP7 and the InfiniBand/HSSDC2 connector is connected by way of a 0.01 µF capacitor. This capacitor AC-couples the incoming signal to the FPGA. The transmit differential pair between the 2VP7 and the InfiniBand/HSSDC2 connector is connected by way of a 0Ω resistor. The resistor is used as a placeholder to allow for AC-coupling, if desired at a future date.
GIGE3_TX_N A23 33
GIGE3_RX_P A21 37
GIGE3_RX_N A20 39
Table 2-5: Connections between 2VP7 and R14K-ST11 Gig-E Fiber (Cont’d)
Signal Name 2VP7 Pin R14K-ST11 Pin
Table 2-6: Connections Between 2VP7 and HSSDC2 Connectors (CPU.112 and CPU.111)
Signal Name 2VP7 Pin HSSDC2 Pin
IB1_TX_P AF22 P112.6
IB1_TX_N AF23 P112.5
IB1_RX_P AF21 P112.2
IB1_RX_N AF20 P112.3
IB2_TX_P AF17 P111.6
IB2_TX_N AF18 P111.5
IB2_RX_P AF16 P111.2
IB2_RX_N AF15 P111.3
Product Not Recommended for New Designs
ML300 User Guide www.xilinx.com 31UG038 (v1.3.2) January 3, 2008
CPU Debug and CPU TraceR
Serial ATA
Serial ATA Description
Serial ATA is the next generation of the ATA family of interfaces. Providing a higher throughput through a simpler and less expensive cable, Serial ATA maintains software compatibility with older ATA implementations.
2VP7 to Serial ATA Connector
The ML300 CPU board provides for operation as a Serial ATA host or device. The connection between the 2VP7 and the Serial ATA connector is fairly simple, involving only four wires per connector, as well as a few capacitors and resistors to AC-couple the signals. These connections are also shown in Table 2-7.
The Serial ATA connectors have different connections to the 2VP7 for transmit and receive differential pairs. The receive differential pair is connected by way of a 0.01µF capacitor to AC-couple the incoming signal to the FPGA. The transmit differential pair between the 2VP7 and the Serial ATA connector is connected by way of a 0Ω resistor. The resistor is a place holder to allow for AC-coupling if required at a future date. The ML300 provides for operation as a Serial ATA host or device.
CPU Debug and CPU TraceThe CPU board includes two CPU debugging interfaces, the CPU Debug (CPU.P114 is a right angle header) and the Combined CPU Trace and Debug, (CPU.P109 is a right angle mictor connector). In addition, there is a jumper to select the VCC I/O of these connectors. These connectors can be used in conjunction with third party tools, or in some cases the Xilinx Parallel Cable IV, to debug software as it runs on the processor.
The PowerPC™ 405 CPU core includes dedicated debug resources that support a variety of debug modes for debugging during hardware and software development. These debug resources include:
• Internal debug mode for use by ROM monitors and software debuggers
• External debug mode for use by JTAG debuggers
Table 2-7: Connections Between 2VP7 and Serial ATA Connector (CPU.P120 and CPU.P119)
Signal Name 2VP7 Pin Serial ATA Pin
SA1_TX_P AF11 P120.6
SA1_TX_N AF12 P120.5
SA1_RX_P AF10 P120.2
SA1_RX_N AF9 P120.3
SA2_TX_P AF6 P119.2
SA2_TX_N AF7 P119.3
SA2_RX_P AF5 P119.6
SA2_RX_N AF4 P119.5
Product Not Recommended for New Designs
32 www.xilinx.com ML300 User GuideUG038 (v1.3.2) January 3, 2008
Chapter 2: Board HardwareR
• Debug wait mode, which allows the servicing of interrupts while the processor appears to be stopped
• Real-time trace mode, which supports event triggering for real-time tracing
Debug modes and events are controlled using debug registers in the processor. The debug registers are accessed either through software running on the processor or through the JTAG port. The debug modes, events, controls, and interfaces provide a powerful combination of debug resources for hardware and software development tools.
The JTAG port interface supports the attachment of external debug tools, such as the ChipScope™ Integrated Logic Analyzer, a powerful tool providing logic analyzer capabilities for signals inside an FPGA, without the need for expensive external instrumentation. Using the JTAG test access port, a debug tool can single-step the processor and examine the internal processor state to facilitate software debugging. This capability complies with the IEEE 1149.1 specification for vendor-specific extensions and is, therefore, compatible with standard JTAG hardware for boundary-scan system testing.(1)
CPU Debug
CPU Debug Description
External-debug mode can be used to alter normal program execution. It provides the ability to debug system hardware as well as software. The mode supports multiple functions: starting and stopping the processor, single-stepping instruction execution, setting breakpoints, as well as monitoring processor status. Access to processor resources is provided through the CPU Debug port.(2)
The PPC405 JTAG (Joint Test Action Group) Debug port complies with IEEE standard 1149.1-1990, IEEE Standard Test Access Port and Boundary Scan Architecture. This standard describes a method for accessing internal chip resources using a four-signal or five-signal interface. The PPC405 JTAG Debug port supports scan-based board testing and is further enhanced to support the attachment of debug tools. These enhancements comply with the IEEE 1149.1 specifications for vendor-specific extensions and are compatible with standard JTAG hardware for boundary-scan system testing.
The PPC405 JTAG debug port supports the four required JTAG signals: TCK, TMS, TDI, and TDO. It also implements the optional TRST signal. The frequency of the JTAG clock signal can range from 0 MHz (DC) to one-half of the processor clock frequency. The JTAG debug port logic is reset at the same time the system is reset, using TRST. When TRST is asserted, the JTAG TAP controller returns to the test-logic reset state.
Refer to the PPC405 Processor Block Manual for more information on the JTAG debug-port signals. Information on JTAG is found in the IEEE standard 1149.1-1990.(3)
1. http://www.support.xilinx.com/ PowerPC Architecture - Debug (JTAG, Trace), Sept. 12, 2002
2. Virtex-II Pro Platform FPGA Documentation - Volume 2(a): PPC405 User Manual, March 2002 Release, p. 537.
3. Virtex-II Pro Platform FPGA Documentation - Volume 2(a): PPC405 User Manual, March 2002 Release, p. 557.
Product Not Recommended for New Designs
ML300 User Guide www.xilinx.com 33UG038 (v1.3.2) January 3, 2008
CPU Debug and CPU TraceR
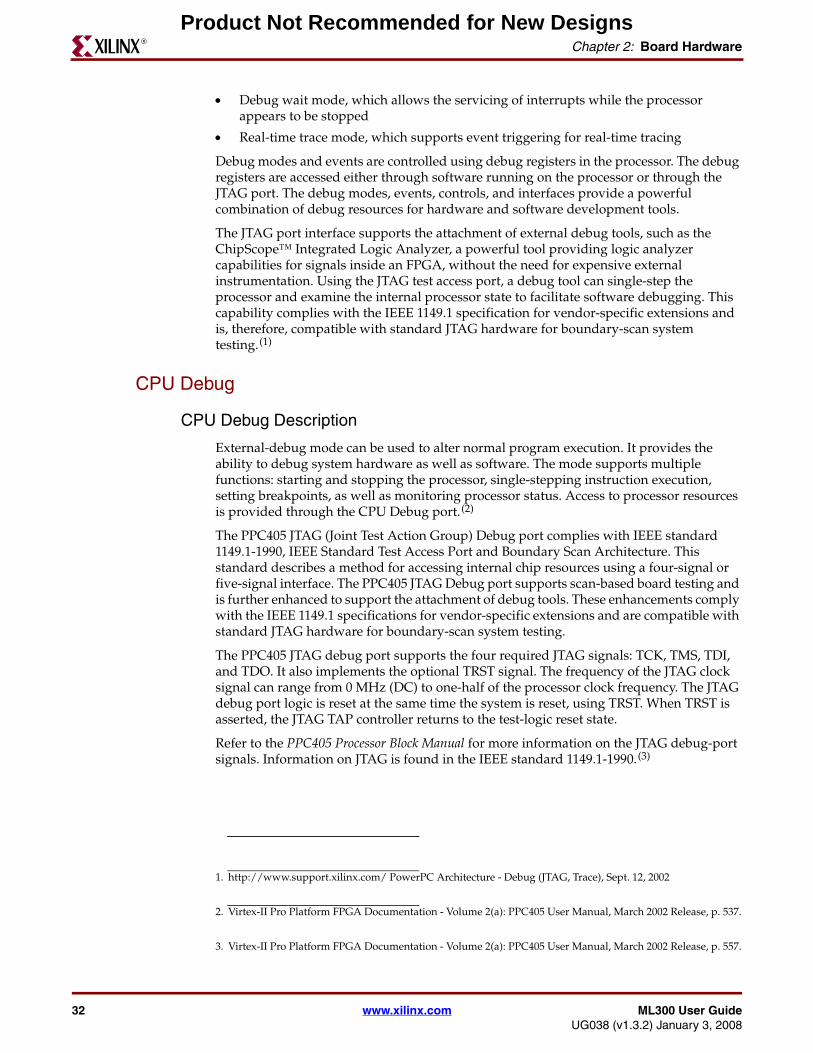
CPU Debug Connector Pinout (CPU.P115)
Figure 2-13 shows CPU.P115, the right angle header used to debug the operation of software in the CPU. This is done using debug tools such as Parallel Cable IV or third party tools.
This jumper can be found on Page 26 of the schematics.
CPU Debug Connection to 2VP7
The connection between the CPU debug connector and the 2VP7 are shown in Table 2-8. These are attached to the PowerPC™ 405 JTAG debug resources using normal FPGA routing resources. The JTAG debug resources are not hard-wired to particular pins, and are available for attachment in the FPGA fabric, making it is possible to route these signals to whichever FPGA pins the user would prefer to use.
CPU Trace
CPU Trace Description
The CPU Trace port accesses the real-time, trace-debug capabilities built into the PowerPC™ 405 CPU core. Real-time trace-debug mode supports real-time tracing of the instruction stream executed by the processor. In this mode, debug events are used to cause external trigger events. An external trace tool uses the trigger events to control the collection of trace information. The broadcast of trace information occurs independently of
Figure 2-13: CPU Debug Connector (CPU.P115)
UG000_05_17_082002
1
216
15
GND
VCCTRST
HALT_NTMS
TDOTDI
TCK
Table 2-8: CPU Debug (CPU.P115) Connection to 2VP7
Pin Name Connector Pin (CPU.P115) 2VP7 Pin
TDO 1 AA19
TDI 3 AA20
TRST 4 AC21
TCK 7 AC20
TMS 9 AB20
HALT_N 11 AD21
Product Not Recommended for New Designs
34 www.xilinx.com ML300 User GuideUG038 (v1.3.2) January 3, 2008
Chapter 2: Board HardwareR
external trigger events (trace information is always supplied by the processor). Real-time trace-debug does not affect processor performance.
Real-time trace-debug mode is always enabled. However, the trigger events occur only when both internal-debug mode and external debug mode are disabled. Most trigger events are blocked when either of those two debug modes is enabled. Information on the trace-debug capabilities, how trace-debug works, and how to connect an external trace tool is available in the RISCWatch Debugger User's Guide.(1)
CPU Trace Connectivity
A dedicated connector for supporting the real-time trace capabilities of the PowerPC™ 405 is not provided. Real-time trace functionality is supported using the combined CPU Trace and Debug connector covered in “Combined CPU Trace and Debug,” page 34.
Combined CPU Trace and Debug
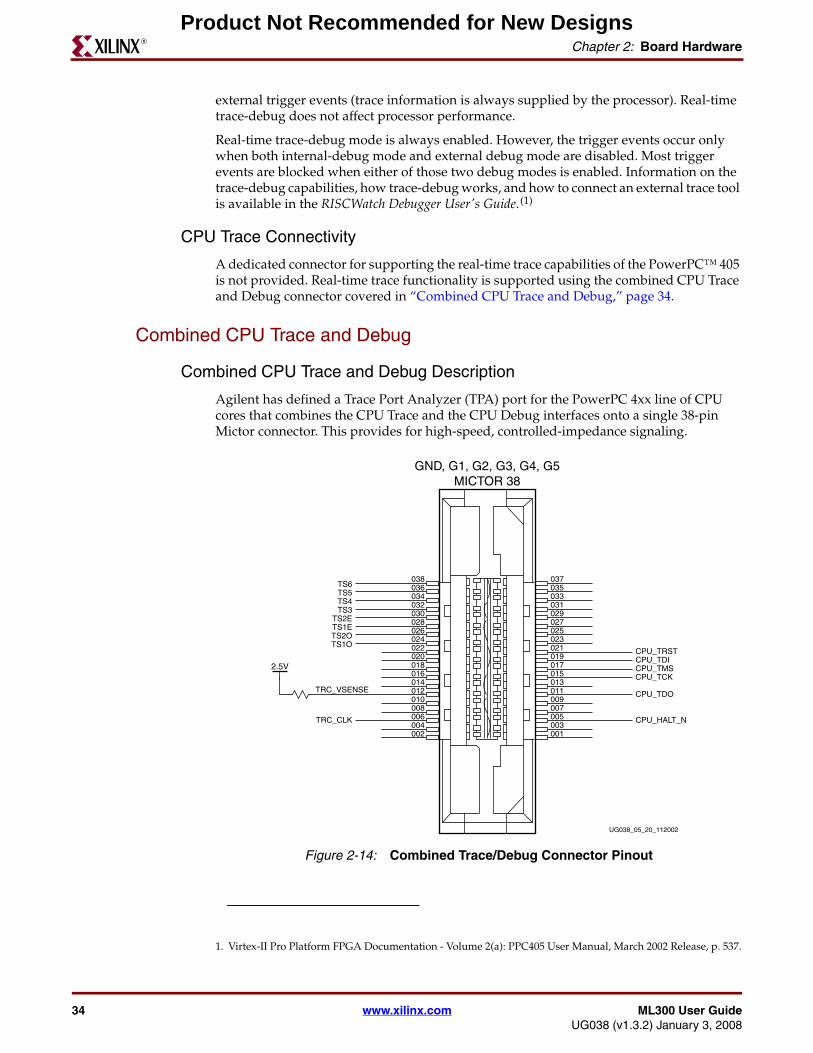
Combined CPU Trace and Debug Description
Agilent has defined a Trace Port Analyzer (TPA) port for the PowerPC 4xx line of CPU cores that combines the CPU Trace and the CPU Debug interfaces onto a single 38-pin Mictor connector. This provides for high-speed, controlled-impedance signaling.
1. Virtex-II Pro Platform FPGA Documentation - Volume 2(a): PPC405 User Manual, March 2002 Release, p. 537.
Figure 2-14: Combined Trace/Debug Connector Pinout
UG038_05_20_112002
037035033031029027025023021019017015013011009007005003001
CPU_TRSTCPU_TDICPU_TMSCPU_TCK
CPU_TDO
CPU_HALT_N
TS6TS5TS4TS3
TS1ETS2E
TS2OTS1O
TRC_CLK
TRC_VSENSE
038036034032030028026024022020018016014012010008006004002
GND, G1, G2, G3, G4, G5MICTOR 38
2.5V
Product Not Recommended for New Designs
ML300 User Guide www.xilinx.com 35UG038 (v1.3.2) January 3, 2008
System ACE and ConfigurationR
Combined CPU Trace and Debug Connection to 2VP7
Table 2-9 shows the connection between the Combined CPU Trace and Debug Port (CPU.P109). The connections to the 2VP7 are shared with the CPU Trace and CPU Debug interfaces discussed in previous sections.
System ACE and Configuration
System ACE (CPU.U2)
Introduction to System ACE
Xilinx developed the System Advanced Configuration Environment (System ACE) family to address the need for a space-efficient, pre-engineered, high-density configuration solution for systems with multiple FPGAs. System ACE technology is a ground-breaking in-system programmable configuration solution that provides substantial savings in development effort and cost per bit over traditional PROM and embedded solutions for high-capacity FPGA systems.
The System ACE family combines Xilinx expertise in configuration control with industry expertise in commodity memories. The first member of the System ACE family uses CompactFlash. The System ACE CompactFlash solution is a chipset, consisting of a controller device (ACE Controller) and a CompactFlash storage device (ACE Flash). In addition to serving as a configuration solution, System ACE can be used for non-volatile (NV) storage using CompactFlash or IBM Microdrives.
Table 2-9: Combined Trace/Debug (CPU.P109) Connection to 2VP7
Pin Name Connector Pin 2VP7 Pin
TDO 11 AA19
TDI 19 AA20
TRST 21 AC21
TCK 15 AC20
TMS 17 AB20
HALT_N 7 AD21
TRC_CLK 6 AD23
TS1O 24 AC24
TS2O 26 AE26
TS1E 28 AD25
TS2E 30 AD26
TS3 32 AC25
TS4 34 AC26
TS5 36 AB23
TS6 38 AB24
Product Not Recommended for New Designs
36 www.xilinx.com ML300 User GuideUG038 (v1.3.2) January 3, 2008
Chapter 2: Board HardwareR
System ACE for Configuration
System ACE is the primary means of configuring the 2VP7 on the ML300 board. Configuration of 2VP7 is accomplished using the JTAG interface. System ACE sits between the JTAG connector and the 2VP7, and passes the JTAG signals back and forth between the two. However, when System ACE is configuring the 2VP7, it takes control of the JTAG signals in order to configure the 2VP7.
System ACE for Non-Volatile Storage
In addition to programming the FPGA and storing bitstreams, System ACE can be used for general use non-volatile storage. System ACE provides an MPU interface for allowing microprocessor to access the CompactFlash, allowing the use of the CompactFlash as a file system.
System ACE Connection to 2VP7
System ACE is connected to the 2VP7 through both the JTAG chain, for configuration, and through the MPU port of the System ACE, for allowing the 2VP7 to control System ACE and access the CompactFlash or IBM Microdrive. Table 2-10, page 37 shows the connection between the System ACE and the 2VP7.
Table 2-10, page 37 lists the connections between System ACE and the 2VP7. It shows the signal names with associated pins on System ACE and the 2VP7 for both the MPU JTAG interfaces.
Product Not Recommended for New Designs
ML300 User Guide www.xilinx.com 37UG038 (v1.3.2) January 3, 2008
System ACE and ConfigurationR
Table 2-10: System ACE (CPU.U2) Connection to 2VP7
Pin NameSystem ACE
(CPU.U2)2VP7 Pin
SYSACE_MPBRDY 39 Y19
SYSACE_MPIRQ 41 AB19
SYSACE_MPCE 42 AB18
SYSACE_MPA06 43 AC19
SYSACE_MPA05 44 AD19
SYSACE_MPA04 45 AE19
SYSACE_MPD15 47 AF19
SYSACE_MPD14 48 Y18
SYSACE_MPD13 49 AA18
SYSACE_MPD12 50 AC18
SYSACE_MPD11 51 AD18
SYSACE_MPD10 52 Y17
SYSACE_MPD09 53 W16
SYSACE_MPD08 56 AA17
SYSACE_MPD07 58 AA16
SYSACE_MPD06 59 AB17
SYSACE_MPD05 60 AC17
SYSACE_MPD04 61 Y16
SYSACE_MPD03 62 Y15
SYSACE_MPD02 63 AB16
SYSACE_MPD01 65 AC16
SYSACE_MPD00 66 AA15
SYSACE_MPA03 67 AB15
SYSACE_MPA02 68 AC15
SYSACE_MPA01 69 AD15
SYSACE_MPA00 70 W15
SYSACE_MPWE 76 W14
SYSACE_MPOE 77 Y14
INIT (TFT_FPGA_HSYNC) 78 AD6
FPGA_PROG_N 79 D22
FPGA_TCK 80 G8
FPGA_TDO 81 H7
FPGA_TDI 82 H20
FPGA_TMS 85 F7
Product Not Recommended for New Designs
38 www.xilinx.com ML300 User GuideUG038 (v1.3.2) January 3, 2008
Chapter 2: Board HardwareR
JTAG
Introduction to JTAG
JTAG is a simple interface that provides for many uses. On the ML300 Hardware Platform, the primary uses include configuration of the 2VP7, debugging software (similar to the CPU debug interface), and debugging hardware using the ChipScope™ Integrated Logic Analyzer (ILA).
The Virtex-II Pro family is fully compliant with the IEEE Standard 1149.1 Test Access Port and Boundary-Scan Architecture. The architecture includes all mandatory elements defined in the IEEE 1149.1 Standard. These elements include the Test Access Port (TAP), the TAP controller, the instruction register, the instruction decoder, the boundary-scan register, and the bypass register. The Virtex-II Pro family also supports some optional instructions; the 32-bit identification register, and a configuration register in full compliance with the standard. Outlined in the following sections are the details of the JTAG architecture for Virtex-II Pro devices.
JTAG Connection to 2VP7
The JTAG connector initially connects to the System ACE chip, which passes the JTAG connections through to the 2VP7. Figure 2-15 is a block diagram showing the connections between the JTAG connector, System ACE, and the 2VP7. This diagram also shows the logic that allows the CPU JTAG Debug connector to be used to access the JTAG interface to program the 2VP7.
Figure 2-15: JTAG Connections to the 2VP7 and System ACE
UG038_5_25_093002
P115System ACE XC2VP7FF672
CPU_TCK
CPU_TMS
CPU_TDI
SYS_TCK
JTAG_SRC_SEL
TCKTMSTDITDO
TCKTMSTDITDO
PROG
2.5V
INIT
CFG_TCKCFG_TMSCFG_TDI
CFG_TDO
CFG_PROGCFG_INIT
SYS_TMS
SYS_TDI
SYS_TDO
2.5V
1
0
3.3V2.5V
1
0
1
0
2.5V
Product Not Recommended for New Designs
ML300 User Guide www.xilinx.com 39UG038 (v1.3.2) January 3, 2008
System ACE and ConfigurationR
JTAG Connector Pinout
The pinout of the JTAG connector is shown in Figure 2-16. This connector is a header in a 2 by 7 configuration, using a 2.0 millimeter spacing for compliance with the PC4 programming cable.
Table 2-11 shows the connections from the JTAG connector (CPU.P115) to System ACE.
Table 2-12 shows the JTAG connections from System ACE to the 2VP7.
Figure 2-16: JTAG Connector Pinout (CPU.P115)
Table 2-11: JTAG Connection from Connector (CPU.P115) to System ACE
Pin Name Connector (CPU.P115) System ACE (CPU.U2)
FPGA_TCK 6 101
FPGA_TDO 8 97
FPGA_TDI 10 102
FPGA_TMS 4 98
Table 2-12: JTAG Connection from System ACE (CPU.U2) to 2VP7
Pin Name System ACE (CPU.U2) 2VP7 (CPU.PU1)
FPGA_TCK 80 G8
FPGA_TDO 81 H7
FPGA_TDI 82 H20
FPGA_TMS 85 F7
UG000_05_21_082802
1
214
13
GNDGND
GND
PC4_TMSPC4_TCK
VCCV3
SYSACE_TSTTDOPC4_TDI
NCNC
GNDGNDGNDGND
Product Not Recommended for New Designs
40 www.xilinx.com ML300 User GuideUG038 (v1.3.2) January 3, 2008
Chapter 2: Board HardwareR
Using JTAG
The JTAG port can be used for multiple purposes, including programming the 2VP7 FPGA, debugging software using the JTAG port to access the PowerPC™ 405 JTAG Debug, and for debugging hardware in the 2VP7 using ChipScope Pro ILA software. All of these functions are dependent upon the PC4 programming cable. Configuration of the 2VP7 is accomplished using iMPACT, the configuration utility included with the Xilinx ISE software suite. Software debug is accomplished using gdb, also known as the GNU debugger, available as both a command line interface and a GUI. Hardware debug is accomplished using the ChipScope Pro ILA suite of tools, which provides for inserting debug cores into an FPGA design, as well as setting triggers and displaying waveforms.
DDR SDRAM
DDR SDRAM Introduction/OverviewDouble Data Rate (DDR) SDRAM represents an enhancement to the traditional SDRAM. Instead of data and control signals operating at the same frequency, data operates at twice the clock frequency, while address and control operate at the base clock frequency. In other words, the data is written or read from the part on every clock transition, or twice per clock cycle. This effectively doubles the throughput of the memory device.
The trade-off for such an improvement in throughput is increased complexity in interface logic to the DDR memory, as well as increased complexity in routing the DDR signals on the printed circuit board. Additionally, this memory has the same latencies as standard SDRAM, so that while the data transfers are twice as fast, the latencies associated with DDR SDRAM are on par with standard SDRAM.
Basics of DDR SDRAM Operation
DDR SDRAM provides data capture at a rate of twice the clock frequency. Therefore, a DDR SDRAM module with a clock frequency of 100 MHz has a peak data transfer rate of 200 MHz or 6.4 Gigabits per second for a 32-bit interface. In order to maintain high-speed signal integrity and stringent timing goals, a bidirectional data strobe is used in conjunction with SSTL_2 signaling standard as well as differential clocks.
DDR SDRAM operates as a source-synchronous system, in which data is captured twice per clock cycle, using a bidirectional data strobe to clock the data. The DDR SDRAM control bus consists of a clock enable, chip select, row and column addresses, bank address, and a write enable. Commands are entered on the positive edges of the clock, and data occurs for both positive and negative edges of the clock. The double data rate memory utilizes a differential pair for the system clock and, therefore, has both a true clock (CK) and complementary clock (CK#) signal.
Overview of DDR SDRAM on ML300
The DDR SDRAM components on the ML300 CPU are arranged as 32 bit wide and 32 million location deep memory, for a total addressable memory of 128 MB (or 1 Gb). This is made up of four discrete parts, each 256 Mb, organized as 32 million deep by 8 bits wide. The manufacturer of the components is Infineon, and the part number is HYB25D256800AT-7.
The connections between the 2VP7 and the DDR SDRAM are not homogeneous. The data signals are point-to-point, with each data pin on the 2VP7 connected to one pin on the DDR SDRAM components. The control signals are registered on their way from the 2VP7 to the
Product Not Recommended for New Designs

ML300 User Guide www.xilinx.com 41UG038 (v1.3.2) January 3, 2008
DDR SDRAMR
DDR SDRAM components. Finally, the clocks pass through a clock replicator that generates a dedicated clock for each of the DDR SDRAM components, including the registers. All of these signals are controlled impedance and are SSTL2 terminated.
DDR SDRAM Memory Components
DDR SDRAM Configuration
The DDR SDRAM memory components on the ML300 CPU are arranged as a 32 bit wide, 32 million deep memory space. Made up of four discrete parts, the components used are 256 Mb parts, organized as 32 million deep by 8 bits wide. This provides for a total capacity of 128 MB for the system. The DDR SDRAM memory components can be found on the bottom side of the ML300 CPU board. The manufacturer of the components is Infineon, and the part number is HYB25D256800AT-7.
Figure 2-17, page 42 shows the pinout of the DDR SDRAM components used on the ML300 Hardware Platform.
Product Not Recommended for New Designs
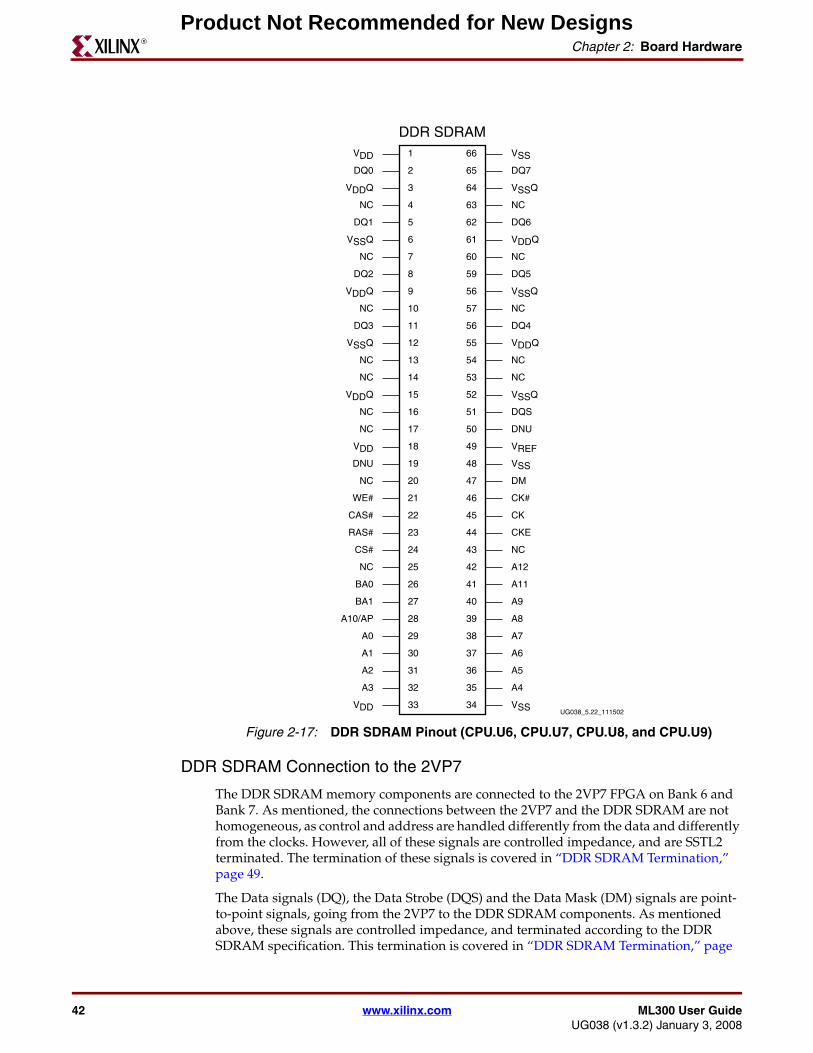
42 www.xilinx.com ML300 User GuideUG038 (v1.3.2) January 3, 2008
Chapter 2: Board HardwareR
DDR SDRAM Connection to the 2VP7
The DDR SDRAM memory components are connected to the 2VP7 FPGA on Bank 6 and Bank 7. As mentioned, the connections between the 2VP7 and the DDR SDRAM are not homogeneous, as control and address are handled differently from the data and differently from the clocks. However, all of these signals are controlled impedance, and are SSTL2 terminated. The termination of these signals is covered in “DDR SDRAM Termination,” page 49.
The Data signals (DQ), the Data Strobe (DQS) and the Data Mask (DM) signals are point-to-point signals, going from the 2VP7 to the DDR SDRAM components. As mentioned above, these signals are controlled impedance, and terminated according to the DDR SDRAM specification. This termination is covered in “DDR SDRAM Termination,” page
Figure 2-17: DDR SDRAM Pinout (CPU.U6, CPU.U7, CPU.U8, and CPU.U9)
DDR SDRAM1
2
3
4
5
6
7
8
9
10
11
12
13
14
15
16
17
18
19
20
21
22
23
24
25
26
27
28
29
30
31
32
33
66
65
64
63
62
61
60
59
56
57
56
55
54
53
52
51
50
49
48
47
46
45
44
43
42
41
40
39
38
37
36
35
34VDD
A3
A2
A1
A0
A10/AP
BA1
BA0
NC
CS#
RAS#
CAS#
WE#
NC
DNU
VDD
NC
NC
VDDQ
NC
NC
VSSQ
DQ3
NC
VDDQ
DQ2
NC
VSSQ
DQ1
NC
VDDQ
DQ0
VDD
VSS
A4
A5
A6
A7
A8
A9
A11
A12
NC
CKE
CK
CK#
DM
VSS
VREF
DNU
DQS
VSSQ
NC
NC
VDDQ
DQ4
NC
VSSQ
DQ5
NC
VDDQ
DQ6
NC
VSSQ
DQ7
VSS
UG038_5.22_111502
Product Not Recommended for New Designs
ML300 User Guide www.xilinx.com 43UG038 (v1.3.2) January 3, 2008
DDR SDRAMR
49. The connection of the Data, the Data Strobe and the Data Mask signals between the 2VP7 and the DDR SDRAM components in covered in Table 2-13.
The data, data strobe, and data mask signals all serve different purposes. The data signals are self-evident, carrying the raw data between the chips, and are bidirectional. The data strobe signals are responsible for actual clocking in the data on rising and falling edges of the clock. Finally, the data mask signals can be used to enable or disable the reading and writing of some of the bytes in a 32-bit word transaction.
Table 2-13: Data Connections from 2VP7 to DDR SDRAM
Signal Name2VP7 Pin
(U1)DDR Pin
(CPU.U6, CPU.U7, CPU.U8 or CPU.U9)
DDR_DQ00 H26 U6.2
DDR_DQ01 J20 U6.5
DDR_DQ02 J21 U6.8
DDR_DQ03 J22 U6.11
DDR_DQ04 J23 U6.56
DDR_DQ05 J24 U6.59
DDR_DQ06 J25 U6.62
DDR_DQ07 K22 U6.65
DDR_DQ08 K20 U7.2
DDR_DQ09 L19 U7.5
DDR_DQ10 L20 U7.8
DDR_DQ11 M20 U7.11
DDR_DQ12 L21 U7.56
DDR_DQ13 L22 U7.59
DDR_DQ14 L26 U7.62
DDR_DQ15 L25 U7.65
DDR_DQ16 R25 U8.2
DDR_DQ17 R24 U8.5
DDR_DQ18 R23 U8.8
DDR_DQ19 R22 U8.11
DDR_DQ20 R21 U8.56
DDR_DQ21 P19 U8.59
DDR_DQ22 R19 U8.62
DDR_DQ23 T21 U8.65
DDR_DQ24 R20 U9.2
DDR_DQ25 T20 U9.5
Product Not Recommended for New Designs
44 www.xilinx.com ML300 User GuideUG038 (v1.3.2) January 3, 2008
Chapter 2: Board HardwareR
The control signals pass through registers, before going onto the DDR SDRAM components. In addition, once they pass through the registers, they are multi-point, each signal going from the registers to each of the DDR components. The control signals include DDR_A00 through DDR_A12, DDR_WE_N, DDR_CS_N, DDR_RAS_N, DDR_CAS_N, DDR_CKE, DDR_BA1 and DDR_BA0. The connectivity of these signals is covered in more detail in “DDR SDRAM Registers”and the pinout is covered in Table 2-14.
DDR_DQ26 T19 U9.8
DDR_DQ27 U20 U9.11
DDR_DQ28 U26 U9.56
DDR_DQ29 V26 U9.59
DDR_DQ30 U24 U9.62
DDR_DQ31 U23 U9.65
DDR_DQS0 K24 U6.51
DDR_DQS1 K23 U7.51
DDR_DQS2 T26 U8.51
DDR_DQS3 T25 U9.51
DDR_DM0 J26 U6.47
DDR_DM1 K26 U7.47
DDR_DM2 T23 U8.47
DDR_DM3 T24 U9.47
Table 2-13: Data Connections from 2VP7 to DDR SDRAM (Cont’d)
Signal Name2VP7 Pin
(U1)DDR Pin
(CPU.U6, CPU.U7, CPU.U8 or CPU.U9)
Product Not Recommended for New Designs
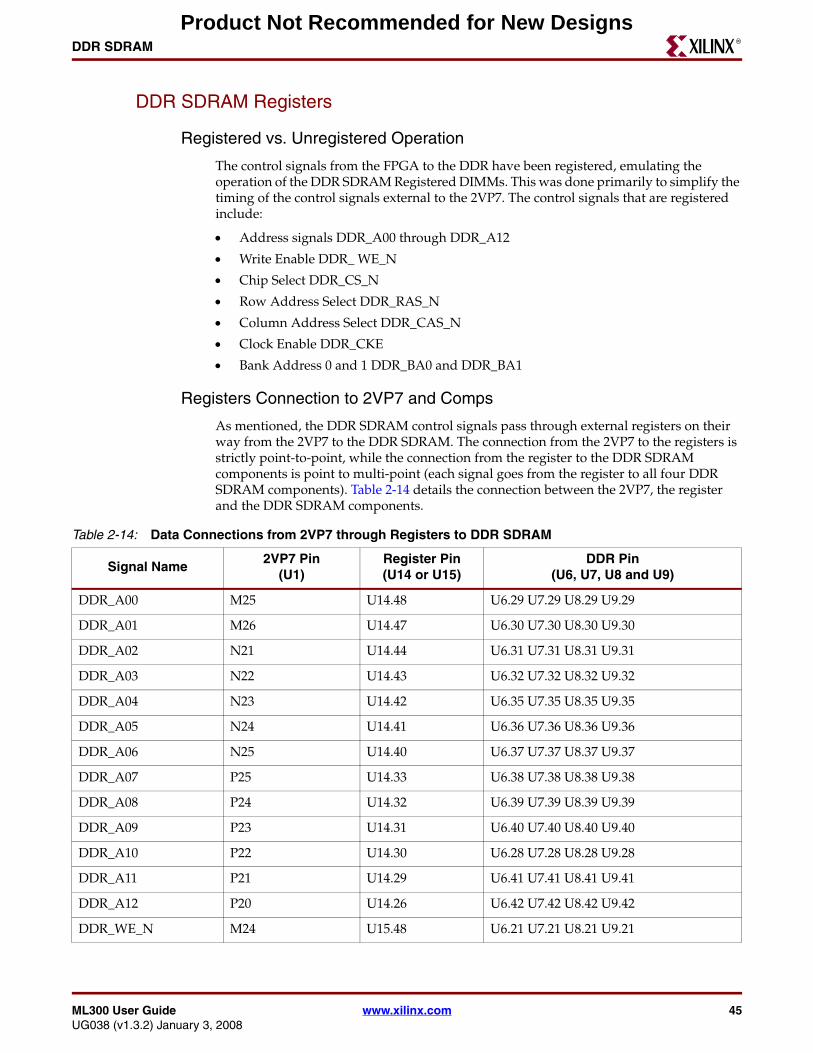
ML300 User Guide www.xilinx.com 45UG038 (v1.3.2) January 3, 2008
DDR SDRAMR
DDR SDRAM Registers
Registered vs. Unregistered Operation
The control signals from the FPGA to the DDR have been registered, emulating the operation of the DDR SDRAM Registered DIMMs. This was done primarily to simplify the timing of the control signals external to the 2VP7. The control signals that are registered include:
• Address signals DDR_A00 through DDR_A12
• Write Enable DDR_ WE_N
• Chip Select DDR_CS_N
• Row Address Select DDR_RAS_N
• Column Address Select DDR_CAS_N
• Clock Enable DDR_CKE
• Bank Address 0 and 1 DDR_BA0 and DDR_BA1
Registers Connection to 2VP7 and Comps
As mentioned, the DDR SDRAM control signals pass through external registers on their way from the 2VP7 to the DDR SDRAM. The connection from the 2VP7 to the registers is strictly point-to-point, while the connection from the register to the DDR SDRAM components is point to multi-point (each signal goes from the register to all four DDR SDRAM components). Table 2-14 details the connection between the 2VP7, the register and the DDR SDRAM components.
Table 2-14: Data Connections from 2VP7 through Registers to DDR SDRAM
Signal Name2VP7 Pin
(U1)Register Pin(U14 or U15)
DDR Pin(U6, U7, U8 and U9)
DDR_A00 M25 U14.48 U6.29 U7.29 U8.29 U9.29
DDR_A01 M26 U14.47 U6.30 U7.30 U8.30 U9.30
DDR_A02 N21 U14.44 U6.31 U7.31 U8.31 U9.31
DDR_A03 N22 U14.43 U6.32 U7.32 U8.32 U9.32
DDR_A04 N23 U14.42 U6.35 U7.35 U8.35 U9.35
DDR_A05 N24 U14.41 U6.36 U7.36 U8.36 U9.36
DDR_A06 N25 U14.40 U6.37 U7.37 U8.37 U9.37
DDR_A07 P25 U14.33 U6.38 U7.38 U8.38 U9.38
DDR_A08 P24 U14.32 U6.39 U7.39 U8.39 U9.39
DDR_A09 P23 U14.31 U6.40 U7.40 U8.40 U9.40
DDR_A10 P22 U14.30 U6.28 U7.28 U8.28 U9.28
DDR_A11 P21 U14.29 U6.41 U7.41 U8.41 U9.41
DDR_A12 P20 U14.26 U6.42 U7.42 U8.42 U9.42
DDR_WE_N M24 U15.48 U6.21 U7.21 U8.21 U9.21
Product Not Recommended for New Designs
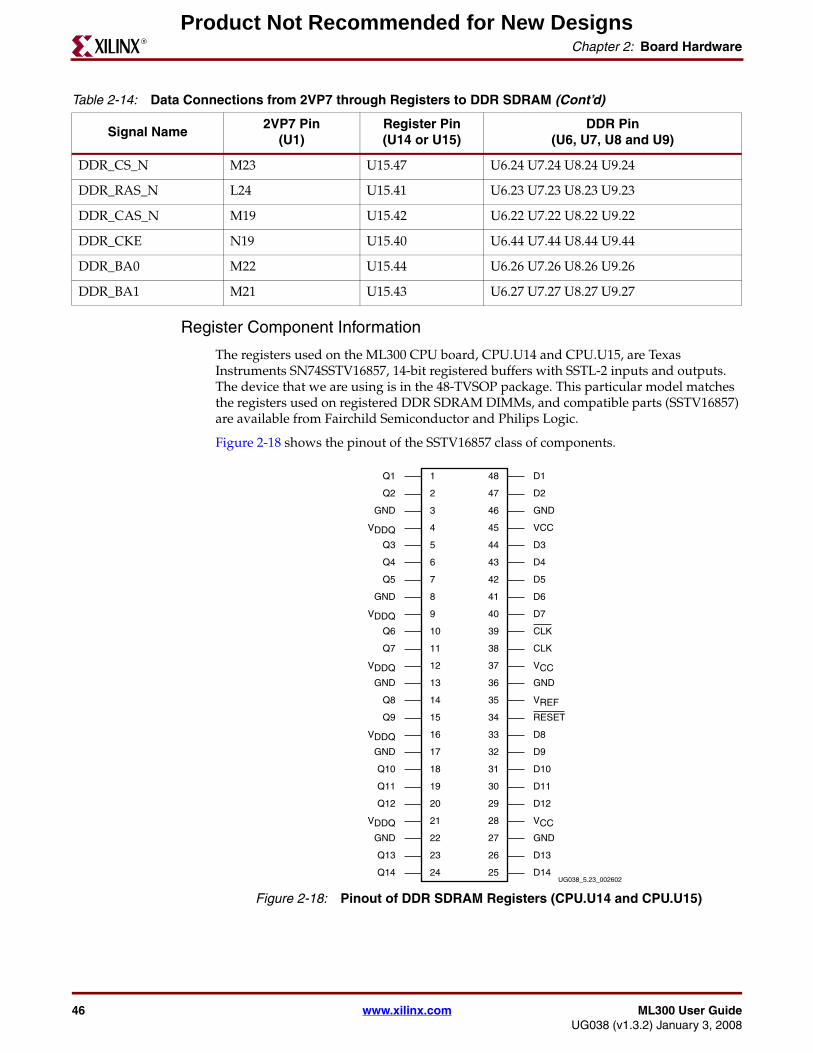
46 www.xilinx.com ML300 User GuideUG038 (v1.3.2) January 3, 2008
Chapter 2: Board HardwareR
Register Component Information
The registers used on the ML300 CPU board, CPU.U14 and CPU.U15, are Texas Instruments SN74SSTV16857, 14-bit registered buffers with SSTL-2 inputs and outputs. The device that we are using is in the 48-TVSOP package. This particular model matches the registers used on registered DDR SDRAM DIMMs, and compatible parts (SSTV16857) are available from Fairchild Semiconductor and Philips Logic.
Figure 2-18 shows the pinout of the SSTV16857 class of components.
DDR_CS_N M23 U15.47 U6.24 U7.24 U8.24 U9.24
DDR_RAS_N L24 U15.41 U6.23 U7.23 U8.23 U9.23
DDR_CAS_N M19 U15.42 U6.22 U7.22 U8.22 U9.22
DDR_CKE N19 U15.40 U6.44 U7.44 U8.44 U9.44
DDR_BA0 M22 U15.44 U6.26 U7.26 U8.26 U9.26
DDR_BA1 M21 U15.43 U6.27 U7.27 U8.27 U9.27
Table 2-14: Data Connections from 2VP7 through Registers to DDR SDRAM (Cont’d)
Signal Name2VP7 Pin
(U1)Register Pin(U14 or U15)
DDR Pin(U6, U7, U8 and U9)
Figure 2-18: Pinout of DDR SDRAM Registers (CPU.U14 and CPU.U15)
UG038_5.23_002602
1
2
3
4
5
6
7
8
9
10
11
12
13
14
15
16
17
18
19
20
21
22
23
24
33
32
31
30
29
28
27
26
25
48
47
46
45
44
43
42
41
40
39
38
37
36
35
34
Q14
Q13
GND
VDDQ
Q12
Q11
Q10
GND
VDDQ
Q9
Q8
GND
VDDQ
Q7
Q6
VDDQ
GND
Q5
Q4
Q3
VDDQ
GND
Q2
Q1
D14
D13
GND
VCC
D12
D11
D10
D9
D8
RESET
VREF
GND
VCC
CLK
CLK
D7
D6
D5
D4
D3
VCC
GND
D2
D1
Product Not Recommended for New Designs
ML300 User Guide www.xilinx.com 47UG038 (v1.3.2) January 3, 2008
DDR SDRAMR
DDR SDRAM Clock Replicator
Introduction to Clocking for DDR SDRAM
Clocking for DDR SDRAM requires the transmission of a two clocks, the positive clock and the negative clock. These two clocks are 180° out of phase from each other, and their phase alignment must be tightly controlled. In order to prevent signal integrity problems and timing differences from becoming an issue, it is preferable for each device, whether memory or register, to have its own clock.
While it is possible for each device to have a positive and negative clock generated by the 2VP7, this unnecessarily consumes pins that could be used elsewhere. To save these pins, an externally DDR SDRAM clock replicator is used. The clock replicator is comparable to those on DDR SDRAM registered DIMMs.
Clock Replicator Configuration
The clock replicator is configured with the primary clock sourced from the 2VP7, and the clock outputs forwarded to the DDR SDRAM memory and registers. In addition, one of the output clocks from the clock replicator is fed back into the device in order to successfully de-skew the clock outputs to match the input clock.
All the of the output clock trace lengths are matched to keep the entire DDR SDRAM system synchronized to the 2VP7 generated clock.
Clock Replicator Component Information
The clock distribution on the ML300 CPU board is handled using a clock replicator, CPU.U16, designed for DDR SDRAM systems; the CDCV857 from Texas Instruments. The CDCV857 is the JEDEC standard for PLL clock drivers for registered DIMM applications.
From the JEDEC Standard:
“The device is a zero delay buffer that distributes a differential clock input pair (CK, CK) to ten differential pair of clock outputs (Y[0:9], Y[0:9]) and one differential pair feedback clock outputs (FBOUT, FBOUT). The clock outputs are controlled by the input clocks (CK, CK), the feedback clocks (FBIN, FBIN), the 2.5-V LVCMOS input (PWRDWN) and the Analog Power input (AVDD). When input PWRDWN is low while power is applied, the receivers are disabled, the PLL is turned off and the differential clock outputs are 3-stated. When AVDD is grounded, the PLL is turned off and bypassed for test purposes.”
Figure 2-19 shows the pinout of the CDCV857. Table 2-15, page 48 shows the function of the pins on the CDCV857.
Product Not Recommended for New Designs
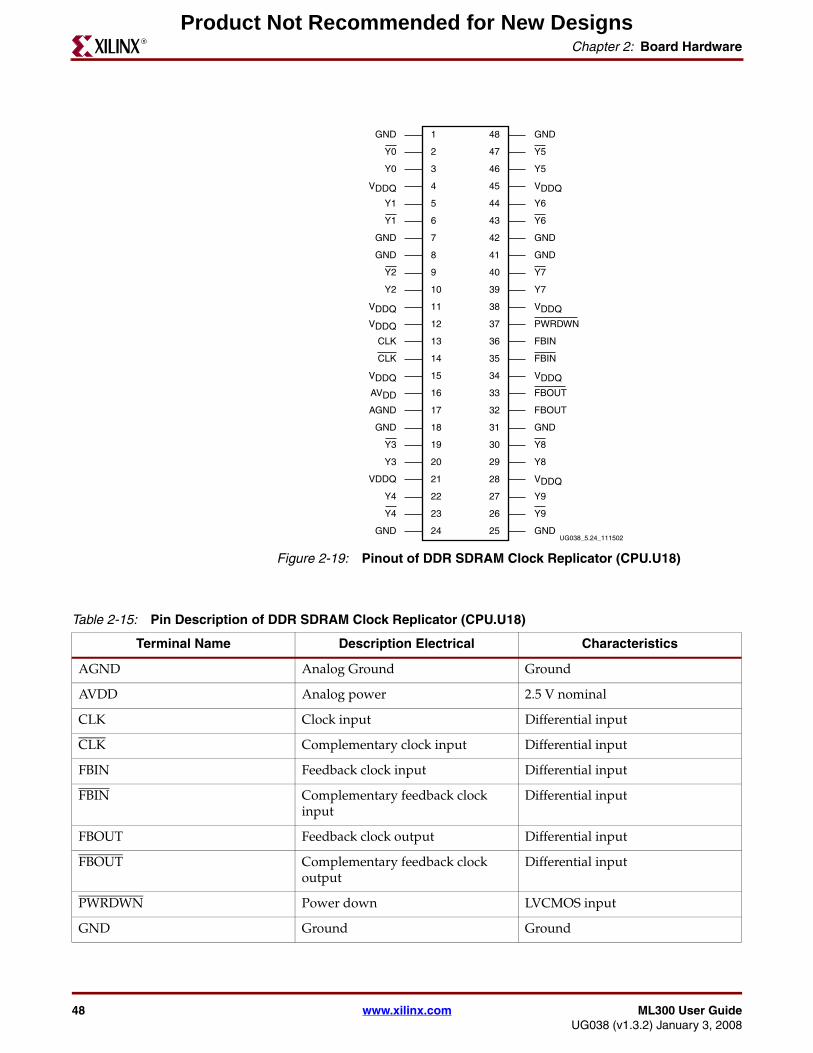
48 www.xilinx.com ML300 User GuideUG038 (v1.3.2) January 3, 2008
Chapter 2: Board HardwareR
Figure 2-19: Pinout of DDR SDRAM Clock Replicator (CPU.U18)
UG038_5.24_111502
1
2
3
4
5
6
7
8
9
10
11
12
13
14
15
16
17
18
19
20
21
22
23
24
33
32
31
30
29
28
27
26
25
48
47
46
45
44
43
42
41
40
39
38
37
36
35
34
GND
VDDQ
GND
AGND
AVDD
VDDQ
CLK
CLK
VDDQ
VDDQ
GND
GND
VDDQ
Y0
Y1
Y0
GND
GND
Y9
Y9
VDDQ
Y8
Y8
GND
FBOUT
FBOUT
VDDQ
FBIN
FBIN
PWRDWN
VDDQ
Y7
Y7
GND
GND
Y6
Y6
VDDQ
Y5
Y5
GND
Y3
Y3
Y4
Y4
Y2
Y2
Y1
Table 2-15: Pin Description of DDR SDRAM Clock Replicator (CPU.U18)
Terminal Name Description Electrical Characteristics
AGND Analog Ground Ground
AVDD Analog power 2.5 V nominal
CLK Clock input Differential input
CLK Complementary clock input Differential input
FBIN Feedback clock input Differential input
FBIN Complementary feedback clock input
Differential input
FBOUT Feedback clock output Differential input
FBOUT Complementary feedback clock output
Differential input
PWRDWN Power down LVCMOS input
GND Ground Ground
Product Not Recommended for New Designs
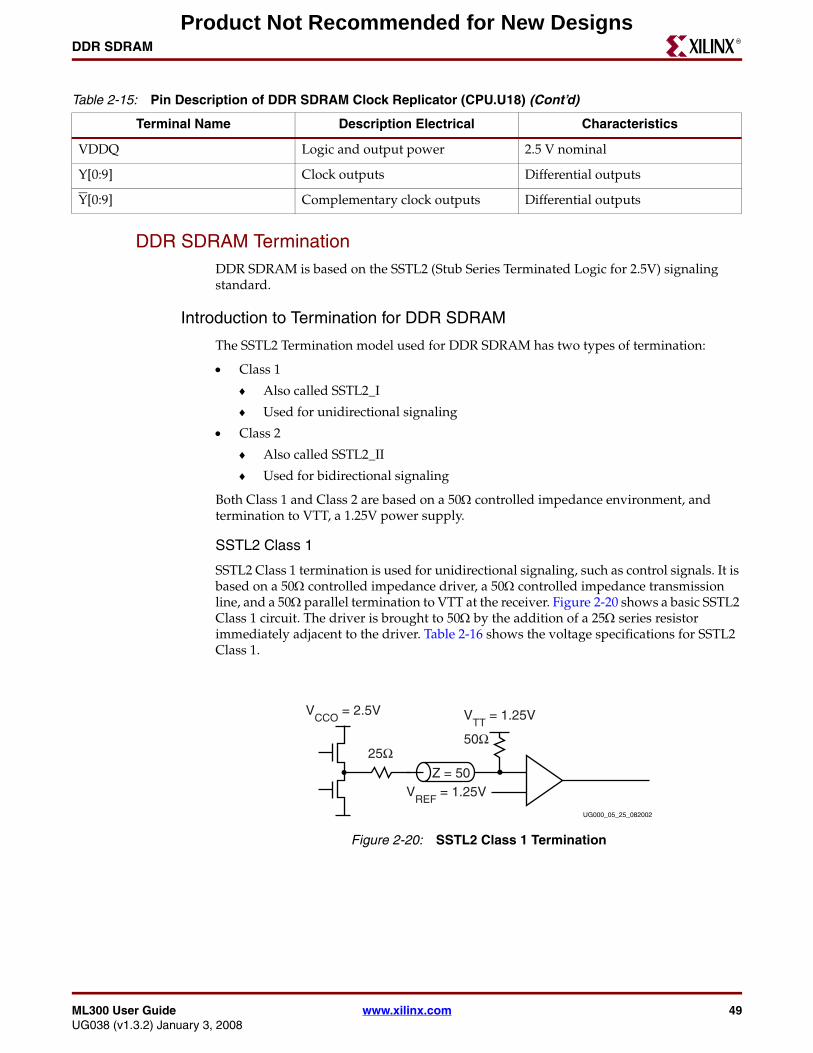
ML300 User Guide www.xilinx.com 49UG038 (v1.3.2) January 3, 2008
DDR SDRAMR
DDR SDRAM TerminationDDR SDRAM is based on the SSTL2 (Stub Series Terminated Logic for 2.5V) signaling standard.
Introduction to Termination for DDR SDRAM
The SSTL2 Termination model used for DDR SDRAM has two types of termination:
• Class 1
♦ Also called SSTL2_I
♦ Used for unidirectional signaling
• Class 2
♦ Also called SSTL2_II
♦ Used for bidirectional signaling
Both Class 1 and Class 2 are based on a 50Ω controlled impedance environment, and termination to VTT, a 1.25V power supply.
SSTL2 Class 1
SSTL2 Class 1 termination is used for unidirectional signaling, such as control signals. It is based on a 50Ω controlled impedance driver, a 50Ω controlled impedance transmission line, and a 50Ω parallel termination to VTT at the receiver. Figure 2-20 shows a basic SSTL2 Class 1 circuit. The driver is brought to 50Ω by the addition of a 25Ω series resistor immediately adjacent to the driver. Table 2-16 shows the voltage specifications for SSTL2 Class 1.
VDDQ Logic and output power 2.5 V nominal
Y[0:9] Clock outputs Differential outputs
Y[0:9] Complementary clock outputs Differential outputs
Table 2-15: Pin Description of DDR SDRAM Clock Replicator (CPU.U18) (Cont’d)
Terminal Name Description Electrical Characteristics
Figure 2-20: SSTL2 Class 1 Termination
Z = 50
VCCO
= 2.5V
25Ω50Ω
VTT
= 1.25V
VREF
= 1.25V
UG000_05_25_082002
Product Not Recommended for New Designs
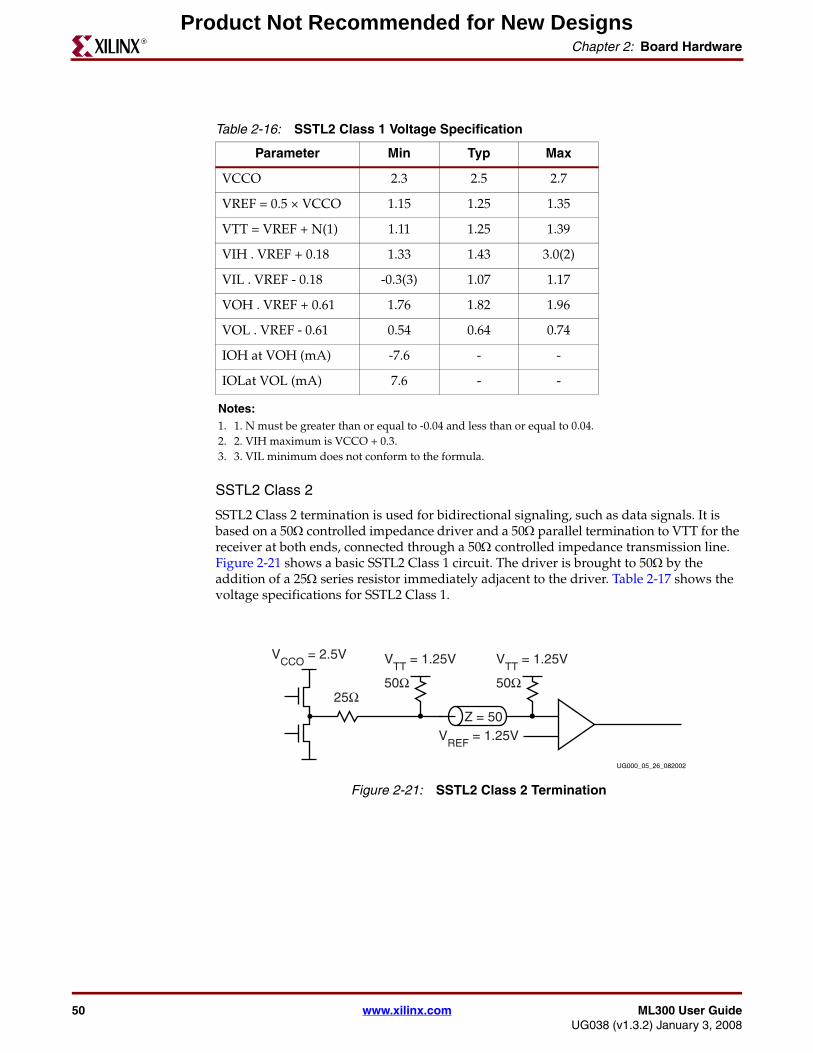
50 www.xilinx.com ML300 User GuideUG038 (v1.3.2) January 3, 2008
Chapter 2: Board HardwareR
SSTL2 Class 2
SSTL2 Class 2 termination is used for bidirectional signaling, such as data signals. It is based on a 50Ω controlled impedance driver and a 50Ω parallel termination to VTT for the receiver at both ends, connected through a 50Ω controlled impedance transmission line. Figure 2-21 shows a basic SSTL2 Class 1 circuit. The driver is brought to 50Ω by the addition of a 25Ω series resistor immediately adjacent to the driver. Table 2-17 shows the voltage specifications for SSTL2 Class 1.
Table 2-16: SSTL2 Class 1 Voltage Specification
Parameter Min Typ Max
VCCO 2.3 2.5 2.7
VREF = 0.5 × VCCO 1.15 1.25 1.35
VTT = VREF + N(1) 1.11 1.25 1.39
VIH . VREF + 0.18 1.33 1.43 3.0(2)
VIL . VREF - 0.18 -0.3(3) 1.07 1.17
VOH . VREF + 0.61 1.76 1.82 1.96
VOL . VREF - 0.61 0.54 0.64 0.74
IOH at VOH (mA) -7.6 - -
IOLat VOL (mA) 7.6 - -
Notes: 1. 1. N must be greater than or equal to -0.04 and less than or equal to 0.04.2. 2. VIH maximum is VCCO + 0.3.3. 3. VIL minimum does not conform to the formula.
Figure 2-21: SSTL2 Class 2 Termination
Z = 50
VCCO
= 2.5V
25Ω
VREF
= 1.25V
UG000_05_26_082002
50Ω
VTT
= 1.25V
50Ω
VTT
= 1.25V
Product Not Recommended for New Designs

ML300 User Guide www.xilinx.com 51UG038 (v1.3.2) January 3, 2008
DDR SDRAMR
DDR SDRAM Termination Configuration
The DDR SDRAM termination is based upon the SSTL2 standard. Loosely, this translates into SSTL2_I on control signals and SSTL2_II on data signals. Specifically, the SSTL2_I control signals include DDR_A[00:12], DDR_WE_N, DDR_CS_N, DDR_RAS_N,,DDR_CAS_N, DDR_CKE, DDR_BA0, DDR_BA1, and DDR_DM[0:3]. The SSTL2_II data signals include DDR_DQ[00:31] and DDR_DQS[0:3].
Table 2-17: SSTL2 Class 2 Voltage Specification
Parameter Min Typ Max
VCCO 2.3 2.5 2.7
VREF = 0.5 × VCCO 1.15 1.25 1.35
VTT = VREF + N(1) 1.11 1.25 1.39
VIH . VREF + 0.18 1.33 1.43 3.0(2)
VIL . VREF - 0.18 -0.3(3) 1.07 1.17
VOH . VREF + 0.8 1.95 2.05 -
VOL . VREF - 0.8 - 0.45 0.55
IOH at VOH (mA) -15.2 - -
IOLat VOL (mA) 15.2 - -
Notes: 1. 1. N must be greater than or equal to .0.04 and less than or equal to 0.04.2. 2. VIH maximum is VCCO + 0.3.3. 3. VIL minimum does not conform to the formula.
Product Not Recommended for New Designs
52 www.xilinx.com ML300 User GuideUG038 (v1.3.2) January 3, 2008
Chapter 2: Board HardwareR
Serial Ports (RS-232)
Introduction to Serial PortsSerial ports are useful as simple, low-speed interfaces. These ports can be from a Host machine to a Peripheral machine, or can be between two peers, in a Host-to-Host connection.
Signaling Standards of RS-232
The RS-232 standard specifies output voltage levels between -5 to -15 Volts for logical 1 and +5 to +15 Volts for logical 0. Input must be compatible with voltages in the range of -3V to -15V for logical 1 and +3V to +15V for logical 0. This ensures data bits are read correctly even at maximum cable lengths between DTE and DCE, specified as 50 feet.
Note: A negative voltage represents a logic level 1 while a positive voltage represents a logic level 0.
As these signaling levels are quite high compared to current signaling levels, transceivers are often used to convert to more manageable levels.
RS-232 Modes of Operation
The RS-232 standard has two primary modes of operation, Data Terminal Equipment (DTE) and Data Communication Equipment (DCE). These can be thought of as host or PC for DTE and as peripheral for DCE. Table 2-18 lists the RX-232 signal names and corresponding direction.
Serial Ports
Serial Port Configuration
There are two Serial Ports on the ML300 CPU board, CPU.P106 and CPU.P107, that are designed as DCE (host) systems. As such, they can either be connected to peripheral devices using a straight-through cable, or they can be attached to another host (such as a PC) using a crossover cable, commonly referred to as a null-modem cable.
Table 2-18: RS-232 Signal Name and Direction
Pin Number Pin Name DTE (Host/PC) DCE (Peripheral) Signal Description
1 DCD ← Data Carrier Detect
2 RX ← Receive Data
3 TX → Transmit Data
4 DTR → Data Terminal Ready
5 SG Signal Ground
6 DSR ← Data Set Ready
7 RTS → Ready to Send
8 CTS ← Clear to Send
9 RI ← Ring Indicator
Product Not Recommended for New Designs

ML300 User Guide www.xilinx.com 53UG038 (v1.3.2) January 3, 2008
Serial Ports (RS-232)R
Figure 2-22 shows the implementation representative of the serial ports on the ML300 CPU board. While the figure shows UART #1, the implementation of UART #2 is identical except for signal names and reference designators. The description of the MAX3388E Transceivers used in this implementation is given in “Serial Port Transceivers,” page 54.
There are four signals attached to the 2VP7 for each of the serial ports:
• Transmit Data (TXD)
• Receive Data (RXD)
• Ready To Send (RTS)
• Clear To Send (CTS)
TXD and RXD provide for bidirectional transmission of transmit and receive data, while the RTS and CTS allow for hardware flow control of the data rate across the serial link. Table 2-19 shows the pins on the 2VP7 to which both serial ports attach.
Figure 2-22: Serial Port Implementation on ML300 CPU
UG038_5_32_111502
MAX3388ETSSOP24
UART 1
C1+ SHDN_N
V+ VCC
NC
NC
NC
NCRTS1_FPGA
TXD1_FPGA
CTS1_FPGA
RXD1_FPGA
C1- GND
C2+ T1OUT
C2- T2OUT
V- T3OUT
T1IN R1IN
T2IN R2IN
T3IN LIN
LOUT SWIN
SWOUT VL
R2OUT
DCD
RXD
TXD
DTR
GND
DSR
RTS
CTS
RIR1OUT
x.xV
VCC2V5
VCC2V5
.22μF
.22μF
.22μF
.22μF
.22μF
Table 2-19: Serial Port Connections to 2VP7
Signal Name
Connection to FPGA
Serial Port 1(CPU.P106)
Serial Port 2(CPU.P107)
TXD AC12 AB11
RXD AD12 AC11
RTS AA12 Y11
CTS AB12 Y12
Product Not Recommended for New Designs
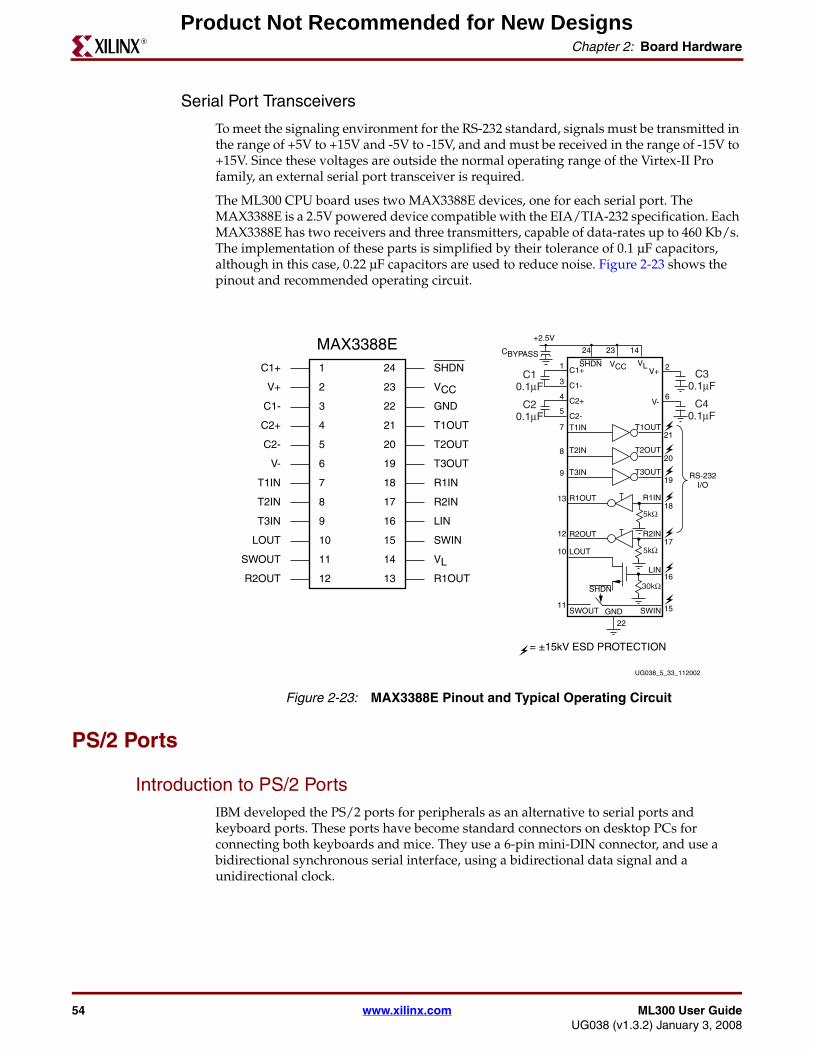
54 www.xilinx.com ML300 User GuideUG038 (v1.3.2) January 3, 2008
Chapter 2: Board HardwareR
Serial Port Transceivers
To meet the signaling environment for the RS-232 standard, signals must be transmitted in the range of +5V to +15V and -5V to -15V, and and must be received in the range of -15V to +15V. Since these voltages are outside the normal operating range of the Virtex-II Pro family, an external serial port transceiver is required.
The ML300 CPU board uses two MAX3388E devices, one for each serial port. The MAX3388E is a 2.5V powered device compatible with the EIA/TIA-232 specification. Each MAX3388E has two receivers and three transmitters, capable of data-rates up to 460 Kb/s. The implementation of these parts is simplified by their tolerance of 0.1 µF capacitors, although in this case, 0.22 µF capacitors are used to reduce noise. Figure 2-23 shows the pinout and recommended operating circuit.
PS/2 Ports
Introduction to PS/2 PortsIBM developed the PS/2 ports for peripherals as an alternative to serial ports and keyboard ports. These ports have become standard connectors on desktop PCs for connecting both keyboards and mice. They use a 6-pin mini-DIN connector, and use a bidirectional synchronous serial interface, using a bidirectional data signal and a unidirectional clock.
Figure 2-23: MAX3388E Pinout and Typical Operating Circuit
UG038_5_33_112002
MAX3388E1
2
3
4
5
6
7
8
9
10
11
12 13
14
15
16
17
18
19
20
21
22
23
24
R2OUT
SWOUT
T2IN
T1IN
C2+
C1-
C2-
V+
C1+
R1OUT
VL
SWIN
LIN
R2IN
R1IN
T3OUT
T2OUT
T1OUT
GND
VCC
SHDN
LOUT
T3IN
V-
15
16
17
18
19
20
21
6
2
142324
1
3
4
5
7
8
9
13
12
10
11
22
= ±15kV ESD PROTECTION
SWOUT
SHDN
GND
T1IN
C1+
C1-
C2+
V+
+2.5V
V-
C2-
SHDN
RS-232I/O
VCC
CBYPASSVL
T2IN
T3IN
R1OUT
R2OUT
LOUT
SWIN
T1OUT
T2OUT
T3OUT
R1IN
R2IN
LIN
C20.1μF
C30.1μF
C40.1μF
C10.1μF
30kΩ
5kΩ
5kΩ
Product Not Recommended for New Designs
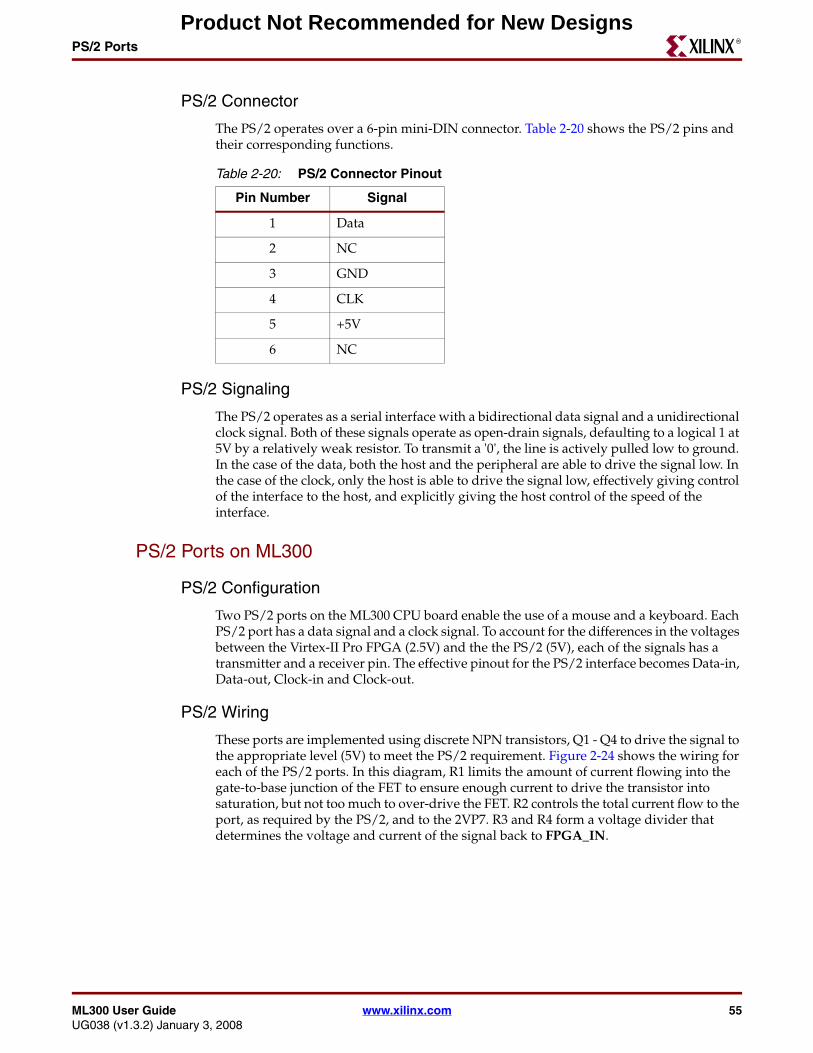
ML300 User Guide www.xilinx.com 55UG038 (v1.3.2) January 3, 2008
PS/2 PortsR
PS/2 Connector
The PS/2 operates over a 6-pin mini-DIN connector. Table 2-20 shows the PS/2 pins and their corresponding functions.
PS/2 Signaling
The PS/2 operates as a serial interface with a bidirectional data signal and a unidirectional clock signal. Both of these signals operate as open-drain signals, defaulting to a logical 1 at 5V by a relatively weak resistor. To transmit a '0', the line is actively pulled low to ground. In the case of the data, both the host and the peripheral are able to drive the signal low. In the case of the clock, only the host is able to drive the signal low, effectively giving control of the interface to the host, and explicitly giving the host control of the speed of the interface.
PS/2 Ports on ML300
PS/2 Configuration
Two PS/2 ports on the ML300 CPU board enable the use of a mouse and a keyboard. Each PS/2 port has a data signal and a clock signal. To account for the differences in the voltages between the Virtex-II Pro FPGA (2.5V) and the the PS/2 (5V), each of the signals has a transmitter and a receiver pin. The effective pinout for the PS/2 interface becomes Data-in, Data-out, Clock-in and Clock-out.
PS/2 Wiring
These ports are implemented using discrete NPN transistors, Q1 - Q4 to drive the signal to the appropriate level (5V) to meet the PS/2 requirement. Figure 2-24 shows the wiring for each of the PS/2 ports. In this diagram, R1 limits the amount of current flowing into the gate-to-base junction of the FET to ensure enough current to drive the transistor into saturation, but not too much to over-drive the FET. R2 controls the total current flow to the port, as required by the PS/2, and to the 2VP7. R3 and R4 form a voltage divider that determines the voltage and current of the signal back to FPGA_IN.
Table 2-20: PS/2 Connector Pinout
Pin Number Signal
1 Data
2 NC
3 GND
4 CLK
5 +5V
6 NC
Product Not Recommended for New Designs
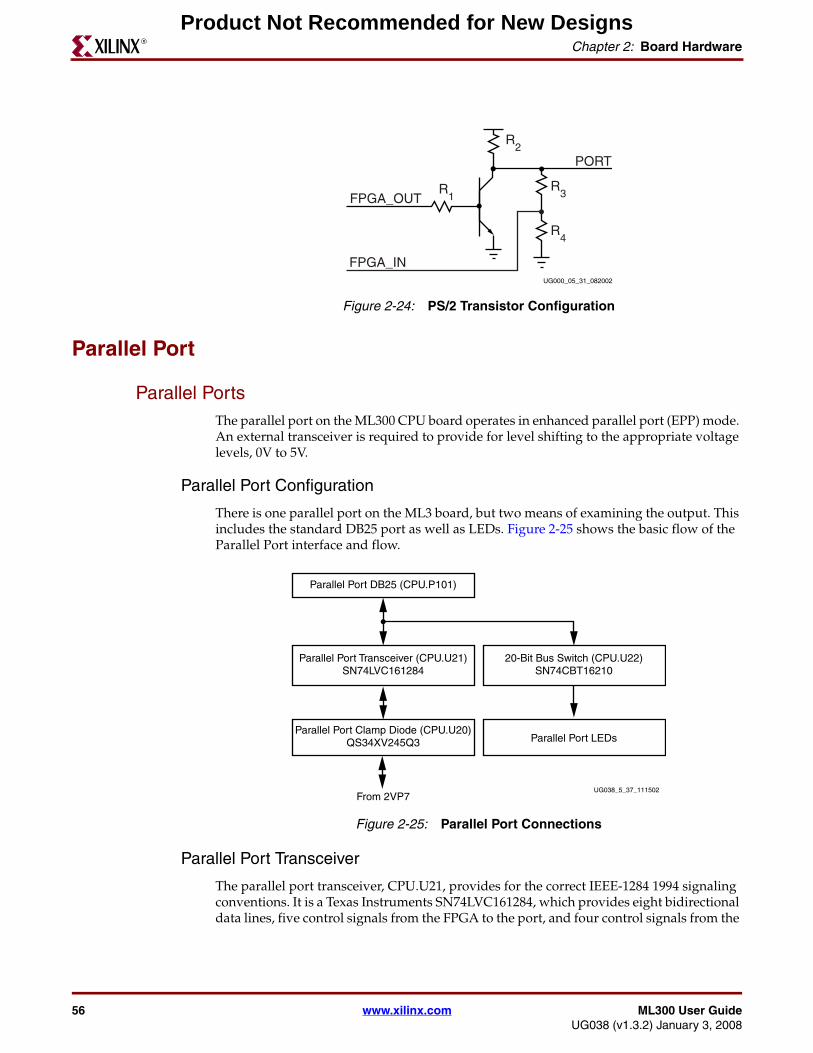
56 www.xilinx.com ML300 User GuideUG038 (v1.3.2) January 3, 2008
Chapter 2: Board HardwareR
Parallel Port
Parallel PortsThe parallel port on the ML300 CPU board operates in enhanced parallel port (EPP) mode. An external transceiver is required to provide for level shifting to the appropriate voltage levels, 0V to 5V.
Parallel Port Configuration
There is one parallel port on the ML3 board, but two means of examining the output. This includes the standard DB25 port as well as LEDs. Figure 2-25 shows the basic flow of the Parallel Port interface and flow.
Parallel Port Transceiver
The parallel port transceiver, CPU.U21, provides for the correct IEEE-1284 1994 signaling conventions. It is a Texas Instruments SN74LVC161284, which provides eight bidirectional data lines, five control signals from the FPGA to the port, and four control signals from the
Figure 2-24: PS/2 Transistor Configuration
FPGA_OUT
FPGA_IN
R2
R1
R3
R4
PORT
UG000_05_31_082002
Figure 2-25: Parallel Port Connections
UG038_5_37_111502
Parallel Port DB25 (CPU.P101)
Parallel Port Transceiver (CPU.U21)SN74LVC161284
20-Bit Bus Switch (CPU.U22)SN74CBT16210
Parallel Port Clamp Diode (CPU.U20)QS34XV245Q3
From 2VP7
Parallel Port LEDs
Product Not Recommended for New Designs
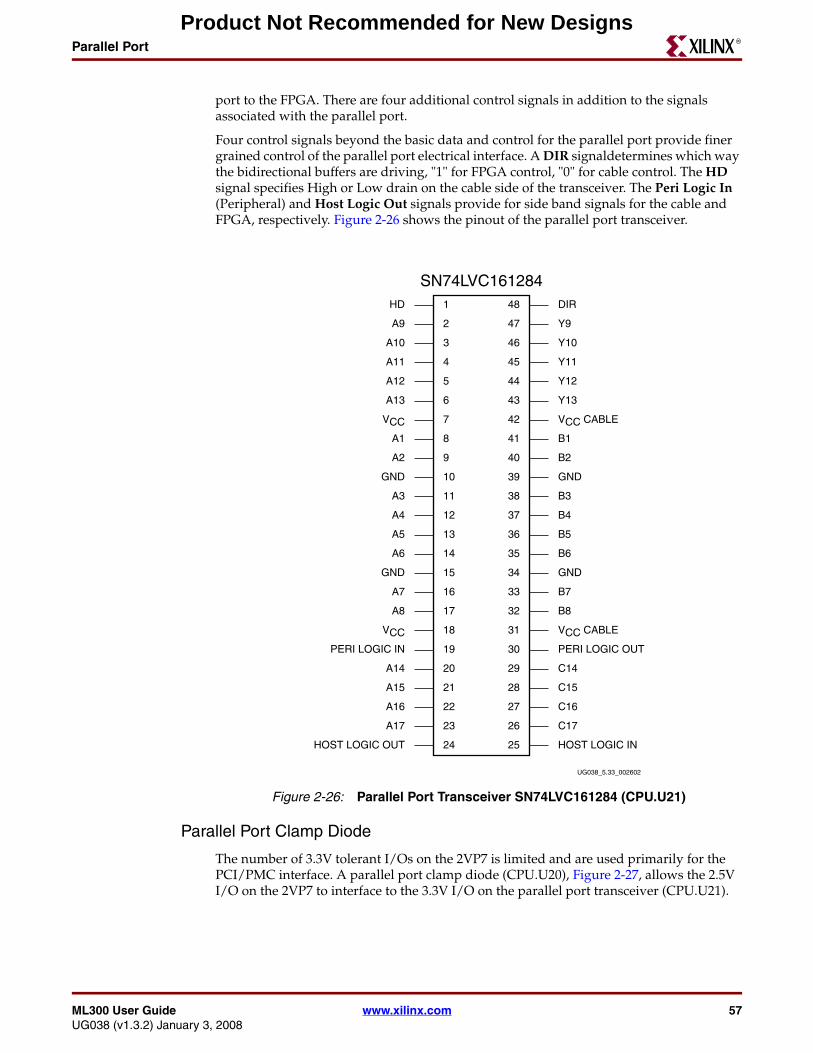
ML300 User Guide www.xilinx.com 57UG038 (v1.3.2) January 3, 2008
Parallel PortR
port to the FPGA. There are four additional control signals in addition to the signals associated with the parallel port.
Four control signals beyond the basic data and control for the parallel port provide finer grained control of the parallel port electrical interface. A DIR signaldetermines which way the bidirectional buffers are driving, "1" for FPGA control, "0" for cable control. The HD signal specifies High or Low drain on the cable side of the transceiver. The Peri Logic In (Peripheral) and Host Logic Out signals provide for side band signals for the cable and FPGA, respectively. Figure 2-26 shows the pinout of the parallel port transceiver.
Parallel Port Clamp Diode
The number of 3.3V tolerant I/Os on the 2VP7 is limited and are used primarily for the PCI/PMC interface. A parallel port clamp diode (CPU.U20), Figure 2-27, allows the 2.5V I/O on the 2VP7 to interface to the 3.3V I/O on the parallel port transceiver (CPU.U21).
Figure 2-26: Parallel Port Transceiver SN74LVC161284 (CPU.U21)
UG038_5.33_002602
SN74LVC1612841
2
3
4
5
6
7
8
9
10
11
12
13
14
15
16
17
18
19
20
21
22
23
24
33
32
31
30
29
28
27
26
25
48
47
46
45
44
43
42
41
40
39
38
37
36
35
34
HOST LOGIC OUT
A15
VCC
A8
A7
GND
A6
A5
A4
A3
A1
VCC
A11
A10
A12
A9
HD
HOST LOGIC IN
C17
C16
C15
C14
PERI LOGIC OUT
VCC CABLE
B8
B7
GND
B6
B5
B4
B3
GND
B2
B1
VCC CABLE
Y13
Y12
Y11
Y10
Y9
DIR
A14
PERI LOGIC IN
A17
A16
GND
A2
A13
Product Not Recommended for New Designs
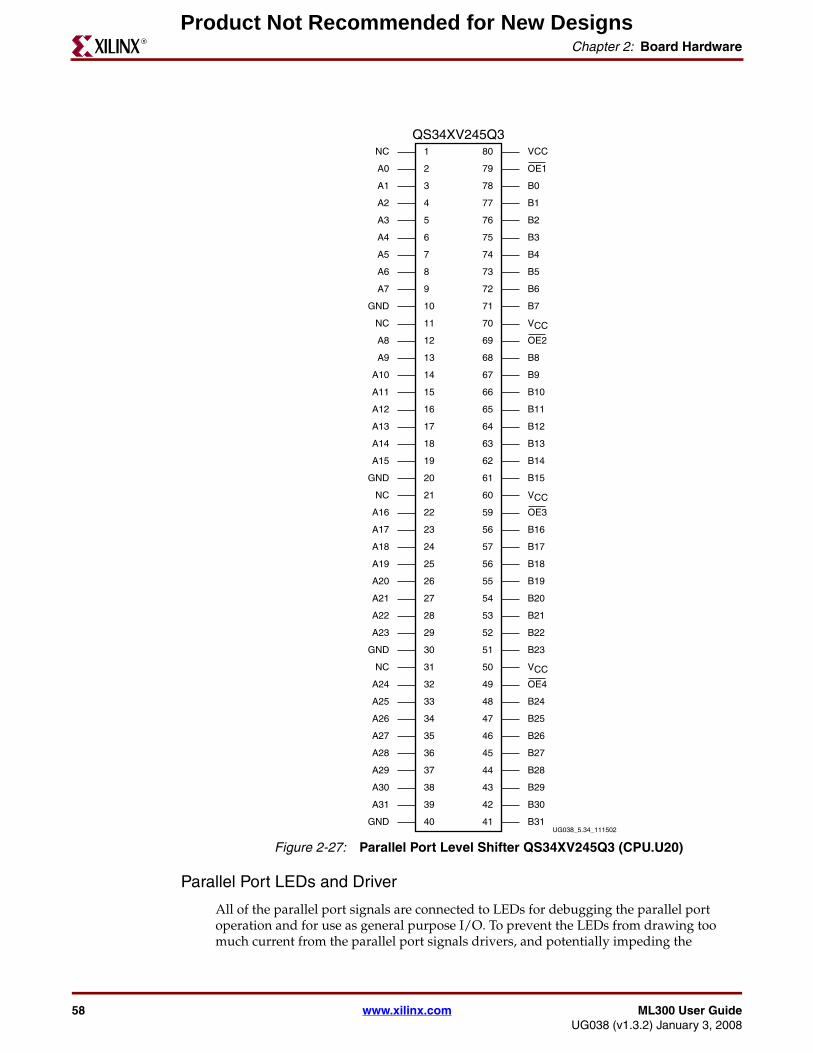
58 www.xilinx.com ML300 User GuideUG038 (v1.3.2) January 3, 2008
Chapter 2: Board HardwareR
Parallel Port LEDs and Driver
All of the parallel port signals are connected to LEDs for debugging the parallel port operation and for use as general purpose I/O. To prevent the LEDs from drawing too much current from the parallel port signals drivers, and potentially impeding the
Figure 2-27: Parallel Port Level Shifter QS34XV245Q3 (CPU.U20)UG038_5.34_111502
QS34XV245Q31
2
3
4
5
6
7
8
9
10
11
12
13
14
15
16
17
18
19
20
21
22
23
24
25
26
27
28
29
30
31
32
33
66
65
64
63
62
61
60
59
56
57
76
75
74
79
80
78
77
73
72
71
70
69
68
67
56
55
54
53
52
51
50
49
48
47
46
45
44
43
42
4140
39
38
37
36
35
34
A27
A26
A25
A24
NC
GND
A23
A22
A21
A20
A19
A18
A17
A16
NC
GND
A13
A12
A15
A14
A11
A10
A9
A8
NC
GND
A7
A6
A5
A4
A3
A2
A1
A0
NC
B24
OE4
VCC
B23
B22
B21
B20
B19
B18
B17
B16
OE3
VCC
B15
B14
B13
B12
B11
B10
B9
B8
OE2
VCC
B7
B6
B5
B4
B3
B2
B1
B0
OE1
VCC
A31
A30
A29
A28
GND B31
B30
B29
B28
B27
B26
B25
Product Not Recommended for New Designs
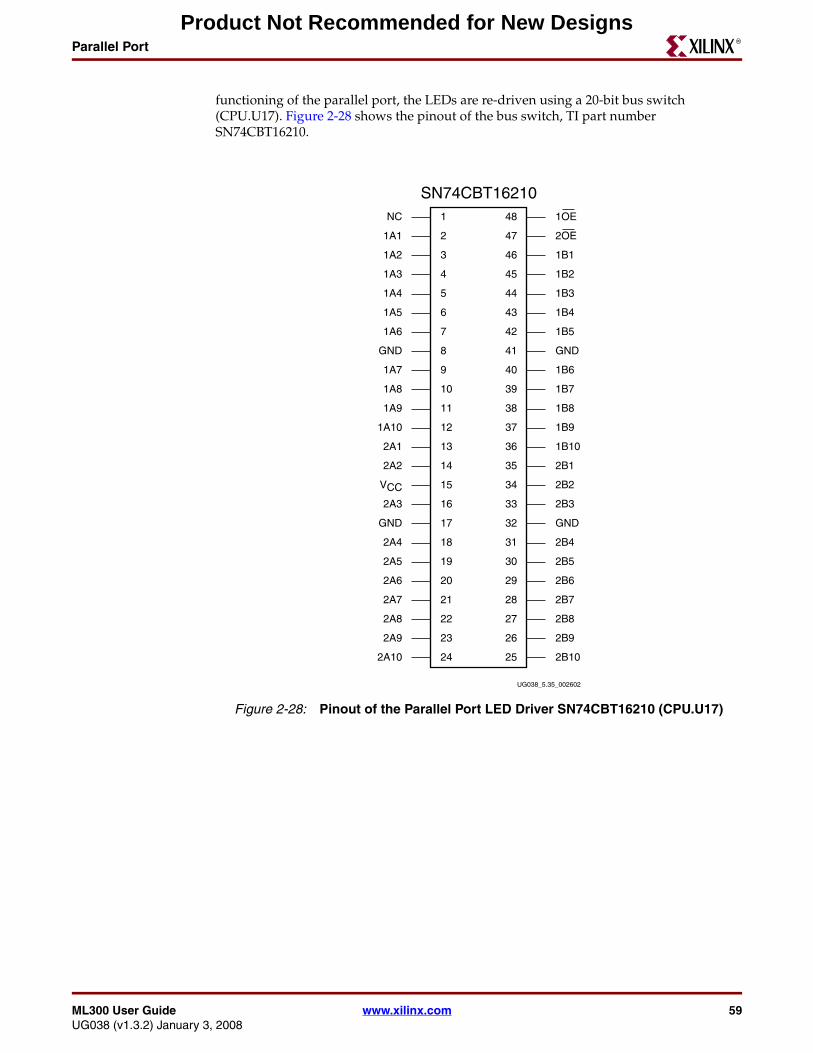
ML300 User Guide www.xilinx.com 59UG038 (v1.3.2) January 3, 2008
Parallel PortR
functioning of the parallel port, the LEDs are re-driven using a 20-bit bus switch (CPU.U17). Figure 2-28 shows the pinout of the bus switch, TI part number SN74CBT16210.
Figure 2-28: Pinout of the Parallel Port LED Driver SN74CBT16210 (CPU.U17)
UG038_5.35_002602
SN74CBT162101
2
3
4
5
6
7
8
9
10
11
12
13
14
15
16
17
18
19
20
21
22
23
24
33
32
31
30
29
28
27
26
25
48
47
46
45
44
43
42
41
40
39
38
37
36
35
34
2A10
2A7
2A4
GND
2A3
VCC
2A2
2A1
1A10
1A9
GND
1A6
1A3
1A2
1A4
1A1
NC
2B10
2B9
2B8
2B7
2B6
2B5
2B4
GND
2B3
2B2
2B1
1B10
1B9
1B8
1B7
1B6
GND
1B5
1B4
1B3
1B2
1B1
2OE
1OE
2A6
2A5
2A9
2A8
1A8
1A7
1A5
Product Not Recommended for New Designs

60 www.xilinx.com ML300 User GuideUG038 (v1.3.2) January 3, 2008
Chapter 2: Board HardwareR
IIC
Introduction to IICThe Inter Integrated Circuit (IIC) bus provides the connection from the CPU to peripherals(1). It is a serial bus with a data signal, SDA, and a clock signal, SCL, both of which are bidirectional. The interface is designed to serve as an interface with multiple different devices, with one master device and multiple slave devices. The interface is designed to operate in the range of 100 KHz to 400 KHz.
IIC Signaling
There are two main signals on the IIC Bus, the data signal and the clock signal. Both of these signals operate as open-drain, by default pulled high to 5 Volts, although some devices support lower voltages. Either the master device or a slave device can drive either of the signals low to transmit data or clock signals.
IIC on ML300 CPU Board
Table 2-21 provides a listing of the function, part number and addresses of the IIC devices on the ML300 Hardware Platform. These devices include EEPROM, temperature sensors, power monitors and trimpots.
1. http://www.epanorama.net/links/serialbus.html#i2c
Table 2-21: IIC Device Information on ML300 Hardware Platform By Board and Ref Des
Board Device Type Device PN Device Ref DesDevice Address
Binary Hexadecimal
CPU Board
On-Chip Temp MAX1617 CPU.U251 0011 000Y 30/31
Ambient Temp LM76CNM-3 CPU.U252 1001 011Y 96/97
EEPROM 24LC32A/SN CPU.U253 1010 000Y A0/A1
PWR Monitor (1.8-5V) MAX6683 CPU.U255 0010 100Y 28/29
PWR Monitor (2.5-12V) MAX6652 CPU.U256 0010 101Y 2A/2B
Audio Trimpot DS1845E-010 CPU.U502 1010 011Y A6/A7
Power I/O Board
PWR Monitor (1.8-5V) MAX6683 PIO.U2 0010 110Y 2C/2D
Brightness Trimpot DS1845E-010 PIO.U3 1010 110Y AC/AD
PWR Monitor (2.5-12V) MAX6652 PIO.U4 0010 111Y 2E/2F
RTC - Clock X1226 PIO.U24 1010 111Y AE/AF
RTC - EEPROM X1226 PIO.U24 1101 111Y DE/DF
Product Not Recommended for New Designs
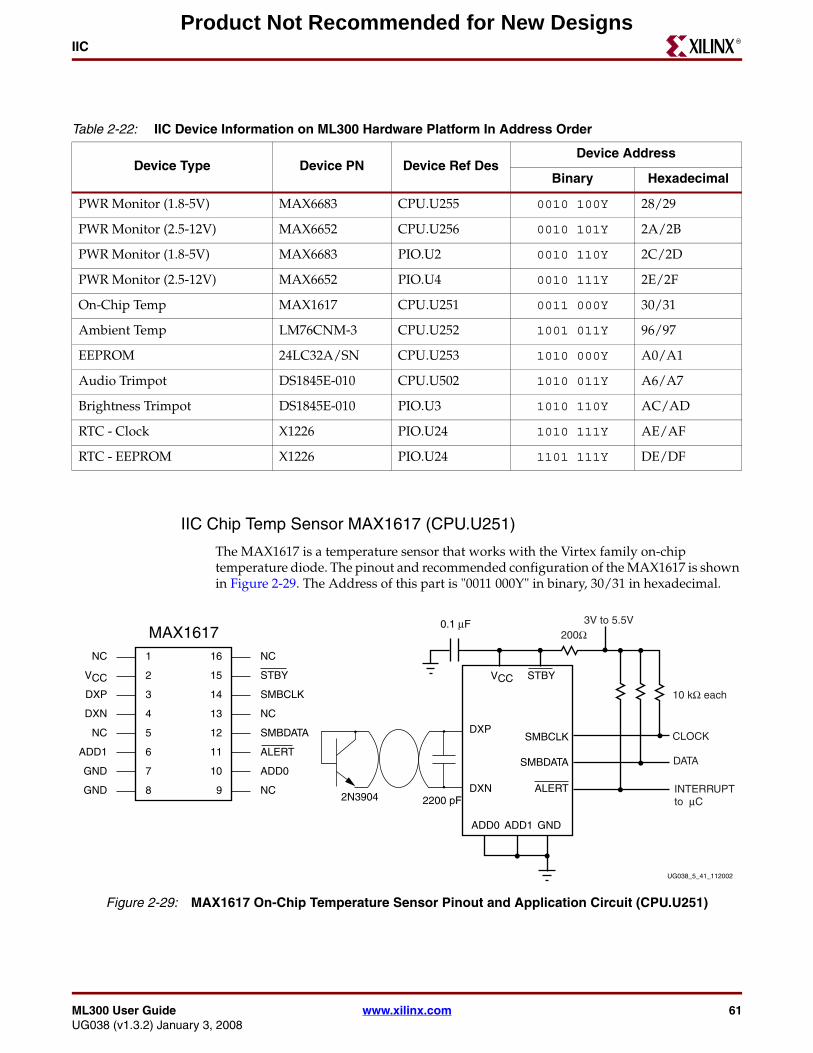
ML300 User Guide www.xilinx.com 61UG038 (v1.3.2) January 3, 2008
IICR
IIC Chip Temp Sensor MAX1617 (CPU.U251)
The MAX1617 is a temperature sensor that works with the Virtex family on-chip temperature diode. The pinout and recommended configuration of the MAX1617 is shown in Figure 2-29. The Address of this part is "0011 000Y" in binary, 30/31 in hexadecimal.
Table 2-22: IIC Device Information on ML300 Hardware Platform In Address Order
Device Type Device PN Device Ref DesDevice Address
Binary Hexadecimal
PWR Monitor (1.8-5V) MAX6683 CPU.U255 0010 100Y 28/29
PWR Monitor (2.5-12V) MAX6652 CPU.U256 0010 101Y 2A/2B
PWR Monitor (1.8-5V) MAX6683 PIO.U2 0010 110Y 2C/2D
PWR Monitor (2.5-12V) MAX6652 PIO.U4 0010 111Y 2E/2F
On-Chip Temp MAX1617 CPU.U251 0011 000Y 30/31
Ambient Temp LM76CNM-3 CPU.U252 1001 011Y 96/97
EEPROM 24LC32A/SN CPU.U253 1010 000Y A0/A1
Audio Trimpot DS1845E-010 CPU.U502 1010 011Y A6/A7
Brightness Trimpot DS1845E-010 PIO.U3 1010 110Y AC/AD
RTC - Clock X1226 PIO.U24 1010 111Y AE/AF
RTC - EEPROM X1226 PIO.U24 1101 111Y DE/DF
Figure 2-29: MAX1617 On-Chip Temperature Sensor Pinout and Application Circuit (CPU.U251)
MAX16171
2
3
4
5
6
7
8 9
10
11
12
13
14
15
16
GND
GND
DXN
DXP
NC
VCC VCC
NC
NC
ADD0
ALERT
SMBDATA
NC
SMBCLK
STBY
NC
ADD1
STBY
GND
DXP
DXN ALERT
SMBDATA
SMBCLK
ADD0 ADD1
UG038_5_41_112002
0.1 μF
2200 pF2N3904
200Ω3V to 5.5V
10 kΩ each
CLOCK
DATA
INTERRUPTto μC
Product Not Recommended for New Designs
62 www.xilinx.com ML300 User GuideUG038 (v1.3.2) January 3, 2008
Chapter 2: Board HardwareR
Due to the analog nature of the signal coming out of the MAX1617, this circuit is very sensitive to EMI . In particular, the DXP and DXN signals attached to temperature diode are relatively low amplitude, and in an area of the board that has a high level of EMI noise. The following methods are used to minimize the effects of EMI noise:
• A 2200 pF filtering capacitor is attached between DXP and DXN
• The MAX1617 is placed close to the diode pins of the FPGAs to minimize trace lengths
• The DXP and DXN signals are routed adjacent to each other to provide for greater common mode noise rejection, minimizing the differences in noise on the two signals
• The DXP and DXN signals are routed between two power planes to minimize the noise reaching the two signals
These methods minimize the EMI noise induced inaccuracies on the temperature readout of the MAX1617. This is of particular importance, as the datasheet for the MAX1617 reports that EMI noise can change the results as much as 10ºC.
IIC Ambient Temp Sensor (CPU.U252)
In addition to the MAX1617 on-chip temperature sensor, an ambient temperature sensor is included on the board to allow measuring the ambient temperature on printed-circuit board. The LM76CNM-3 has a temperature range of 70°C to 100°C, accuracy within 1°C, full-scale reading of over 127°C, and 12-bit resolution with sign output.
In addition, the LM76CNM-3 has two levels of alarm for notification of temperature excursions outside of a programmed range:
• An open-drain interrupt (INT pin), which becomes active when the temperature goes outside a programmable window
• A critical temperature alarm (T_CRIT_A pin), which becomes active when the temperature exceeds a programmable critical limit.
The address for the LM76CNM-3 is set by a base address of 10010 plus two address bits on the part (A0 and A1) that can be set on the PCB. In addition, the least significant bit (LSB) of the address is used to differentiate between reads and writes. On the ML300 CPU board, the two user settable address pins (A0 and A1) are pulled high to set the address of this part as "1001 011Y" in binary, 96/97 in hexadecimal.
Product Not Recommended for New Designs
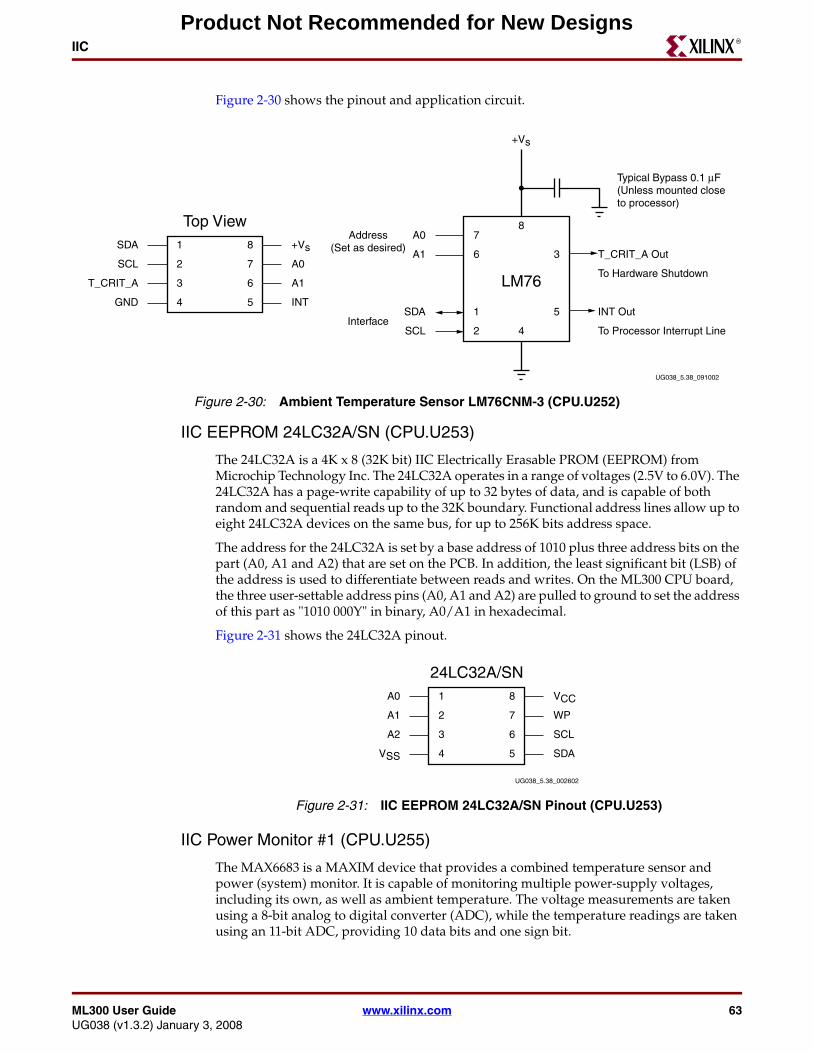
ML300 User Guide www.xilinx.com 63UG038 (v1.3.2) January 3, 2008
IICR
Figure 2-30 shows the pinout and application circuit.
IIC EEPROM 24LC32A/SN (CPU.U253)
The 24LC32A is a 4K x 8 (32K bit) IIC Electrically Erasable PROM (EEPROM) from Microchip Technology Inc. The 24LC32A operates in a range of voltages (2.5V to 6.0V). The 24LC32A has a page-write capability of up to 32 bytes of data, and is capable of both random and sequential reads up to the 32K boundary. Functional address lines allow up to eight 24LC32A devices on the same bus, for up to 256K bits address space.
The address for the 24LC32A is set by a base address of 1010 plus three address bits on the part (A0, A1 and A2) that are set on the PCB. In addition, the least significant bit (LSB) of the address is used to differentiate between reads and writes. On the ML300 CPU board, the three user-settable address pins (A0, A1 and A2) are pulled to ground to set the address of this part as "1010 000Y" in binary, A0/A1 in hexadecimal.
Figure 2-31 shows the 24LC32A pinout.
IIC Power Monitor #1 (CPU.U255)
The MAX6683 is a MAXIM device that provides a combined temperature sensor and power (system) monitor. It is capable of monitoring multiple power-supply voltages, including its own, as well as ambient temperature. The voltage measurements are taken using a 8-bit analog to digital converter (ADC), while the temperature readings are taken using an 11-bit ADC, providing 10 data bits and one sign bit.
Figure 2-30: Ambient Temperature Sensor LM76CNM-3 (CPU.U252)
UG038_5.38_091002
Top View1
2
3
4 5
6
7
8
GND
T_CRIT_A
SCL
SDA
INT
A1
A0
+Vs
+Vs
6
7
A1
Address(Set as desired)
A0
2
1
SCLInterface
INT Out
T_CRIT_A Out
Typical Bypass 0.1 μF(Unless mounted closeto processor)
8
4
3
5
To Hardware Shutdown
To Processor Interrupt Line
SDA
LM76
Figure 2-31: IIC EEPROM 24LC32A/SN Pinout (CPU.U253)
UG038_5.38_002602
24LC32A/SN1
2
3
4 5
6
7
8
VSS
A2
A1
A0
SDA
SCL
WP
VCC
Product Not Recommended for New Designs
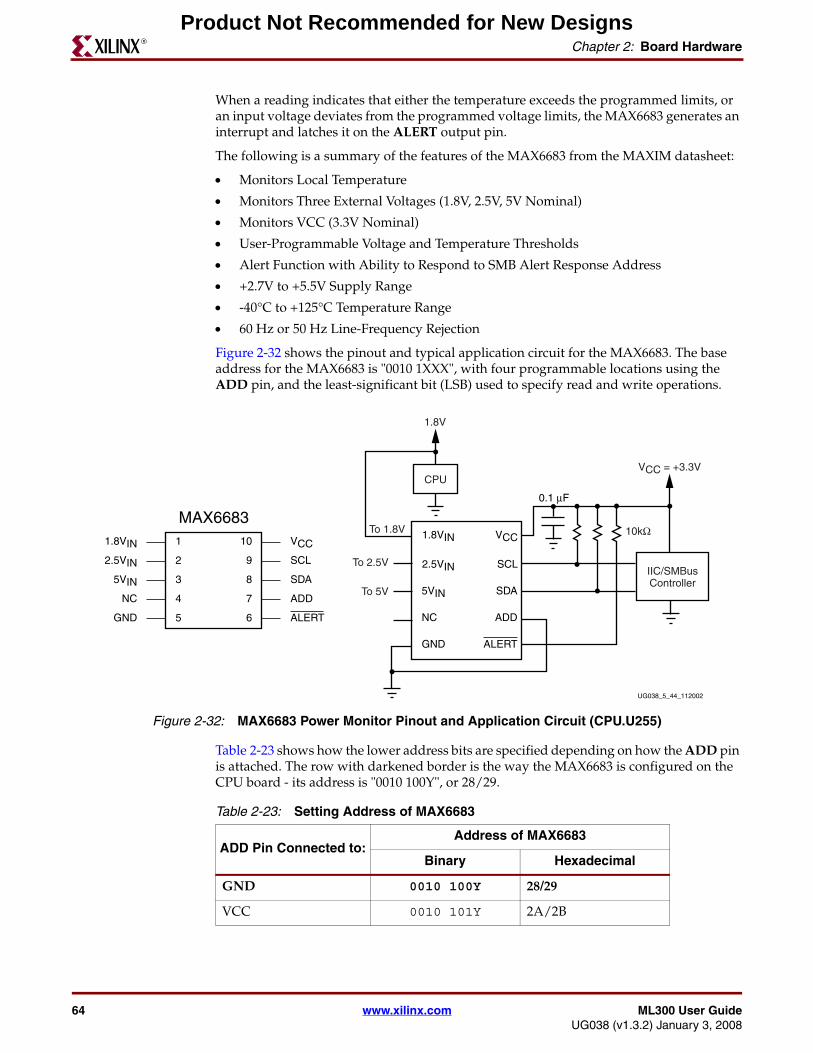
64 www.xilinx.com ML300 User GuideUG038 (v1.3.2) January 3, 2008
Chapter 2: Board HardwareR
When a reading indicates that either the temperature exceeds the programmed limits, or an input voltage deviates from the programmed voltage limits, the MAX6683 generates an interrupt and latches it on the ALERT output pin.
The following is a summary of the features of the MAX6683 from the MAXIM datasheet:
• Monitors Local Temperature
• Monitors Three External Voltages (1.8V, 2.5V, 5V Nominal)
• Monitors VCC (3.3V Nominal)
• User-Programmable Voltage and Temperature Thresholds
• Alert Function with Ability to Respond to SMB Alert Response Address
• +2.7V to +5.5V Supply Range
• -40°C to +125°C Temperature Range
• 60 Hz or 50 Hz Line-Frequency Rejection
Figure 2-32 shows the pinout and typical application circuit for the MAX6683. The base address for the MAX6683 is "0010 1XXX", with four programmable locations using the ADD pin, and the least-significant bit (LSB) used to specify read and write operations.
Table 2-23 shows how the lower address bits are specified depending on how the ADD pin is attached. The row with darkened border is the way the MAX6683 is configured on the CPU board - its address is "0010 100Y", or 28/29.
Figure 2-32: MAX6683 Power Monitor Pinout and Application Circuit (CPU.U255)
UG038_5_44_112002
MAX66831
2
3
4 7
8
9
10
NC
5VIN
2.5VIN
1.8VIN
ADD
SDA
SCL
VCC
5GND 6 ALERT
GND
NC
5VIN
2.5VIN
1.8VIN
0.1 μF
VCC = +3.3V
10kΩ
IIC/SMBusController
ALERT
ADD
SDA
SCL
VCC
1.8V
To 1.8V
CPU
To 2.5V
To 5V
Table 2-23: Setting Address of MAX6683
ADD Pin Connected to:Address of MAX6683
Binary Hexadecimal
GND 0010 100Y 28/29
VCC 0010 101Y 2A/2B
Product Not Recommended for New Designs
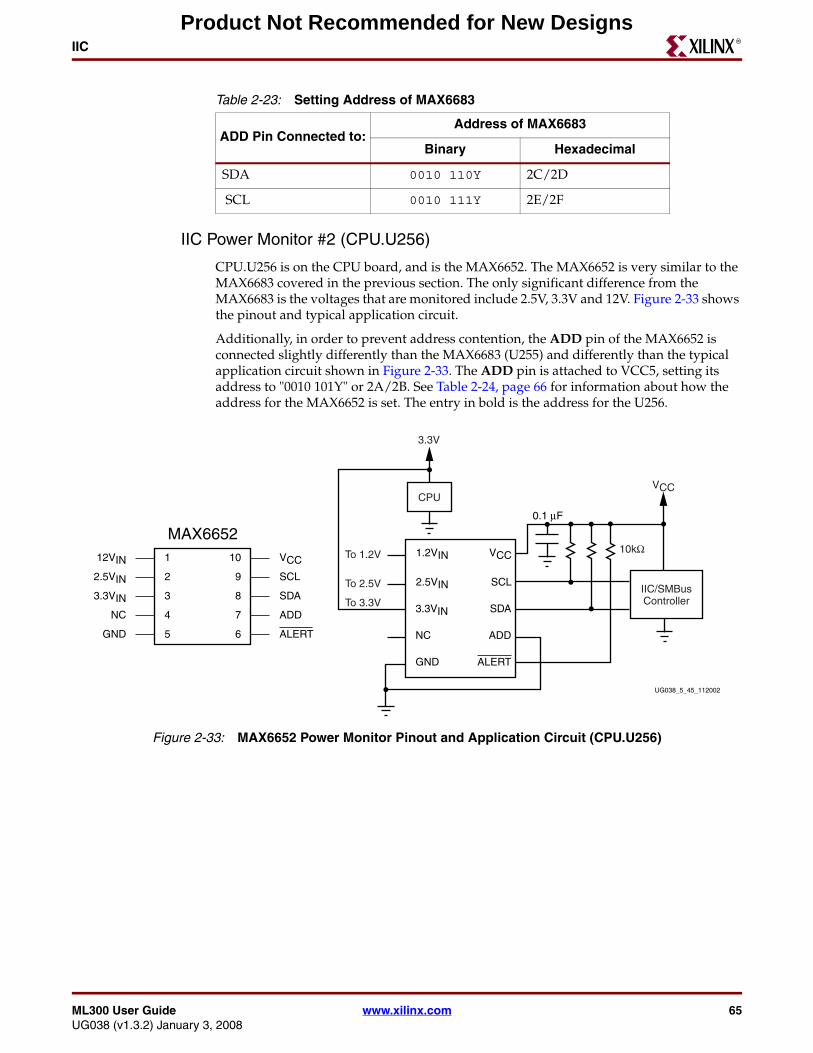
ML300 User Guide www.xilinx.com 65UG038 (v1.3.2) January 3, 2008
IICR
IIC Power Monitor #2 (CPU.U256)
CPU.U256 is on the CPU board, and is the MAX6652. The MAX6652 is very similar to the MAX6683 covered in the previous section. The only significant difference from the MAX6683 is the voltages that are monitored include 2.5V, 3.3V and 12V. Figure 2-33 shows the pinout and typical application circuit.
Additionally, in order to prevent address contention, the ADD pin of the MAX6652 is connected slightly differently than the MAX6683 (U255) and differently than the typical application circuit shown in Figure 2-33. The ADD pin is attached to VCC5, setting its address to "0010 101Y" or 2A/2B. See Table 2-24, page 66 for information about how the address for the MAX6652 is set. The entry in bold is the address for the U256.
SDA 0010 110Y 2C/2D
SCL 0010 111Y 2E/2F
Table 2-23: Setting Address of MAX6683
ADD Pin Connected to:Address of MAX6683
Binary Hexadecimal
Figure 2-33: MAX6652 Power Monitor Pinout and Application Circuit (CPU.U256)
UG038_5_45_112002
MAX66521
2
3
4 7
8
9
10
NC
3.3VIN
2.5VIN
12VIN
ADD
SDA
SCL
VCC
5GND 6 ALERT
GND
NC
3.3VIN
2.5VIN
1.2VIN
0.1 μF
VCC
10kΩ
IIC/SMBusController
ALERT
ADD
SDA
SCL
VCC
3.3V
To 3.3V
CPU
To 1.2V
To 2.5V
Product Not Recommended for New Designs
66 www.xilinx.com ML300 User GuideUG038 (v1.3.2) January 3, 2008
Chapter 2: Board HardwareR
IIC Audio Trimpot DS1845E-010 (CPU.U502)
The DS1845 Dual NV Potentiometer and Memory from MAXIM consists of one 100-position linear taper potentiometer, one 256-position linear taper potentiometer and an EEPROM memory providing 256 bytes of non-volatile memory. The potentiometer wiper position of the DS1845, as well as EEPROM data, can be hardware write-protected using the Write Protect (WP) input pin to prevent unintentional changes. The potentiometers can be valued at 10k, 50k or 100k, which is set by the part number, DS1845E-010, DS1845E-050 or DS1845E-100, respectively. Additionally, the DS1845 can operate between 3V and 5V.
Any type of user information may reside in the first 248 bytes of this memory. The next two addresses of EEPROM memory are for potentiometer settings and the remaining 6 bytes of memory are reserved. These reserved and potentiometer registers should not be used for data storage.
The Audio Trimpot makes use of the 10K (DS1845E-010) part. Figure 2-34, page 67 shows the pinout and application circuit for the DS1845E-010. The actual connections differ from the application circuit, with A0, A1 and A2 pulled high, giving the Audio Volume Trimpot an IIC address of "1010 111Y" binary or AE/AF hexadecimal.
Table 2-24: Setting Address of MAX6652 (CPU.U256)
ADD Pin Connected to:Address of MAX6683
Binary Hexadecimal
GND 0010 100Y 28/29
VCC 0010 101Y 2A/2B
SDA 0010 110Y 2C/2D
SCL 0010 111Y 2E/2F
Product Not Recommended for New Designs

ML300 User Guide www.xilinx.com 67UG038 (v1.3.2) January 3, 2008
IICR
IIC on ML300 Power I/O Board
IIC TFT Brightness and Touch Screen Sensitivity Trimpot (PIO.U3)
The trimpot for controlling the TFT brightness and the touch screen sensitivity is an IIC potentiometer, and matches the one used for the audio volume control discussed in “IIC Audio Trimpot DS1845E-010 (CPU.U502),” page 66. The DS1845E-010 is a dual 10K potentiometer with 256 bytes of EEPROM memory.
Any type of user information may reside in the first 248 bytes of the EEPROM memory. The next two addresses of EEPROM memory are for potentiometer settings and the remaining 6 bytes of memory are reserved. These reserved and potentiometer registers should not be used for data storage.
Figure 2-35 shows the pinout and application circuit for the DS1845E-010. The actual connections differ from the application circuit, with A1 and A2 pulled high, and A0 pulled low, giving the TFT brightness and touch screen sensitivity trimpot an address of "1010 110Y" binary or AC/AD hexadecimal on the IIC Bus.
Figure 2-34: Audio Volume IIC Trimpot Pinout and Application Circuit (CPU.U502)
UG038_5_46_122002
1
2
3
4
5
6
7
14
13
12
11
10
9
8GND
A1
A0
A2
SCL
SDA
L0
W0
L1
H1
W1
H0
VCC
WP
SDA
SCL
A0
A1
A2
WP
GND
VCC
H0
W1
H1
L1
W0
To 2-WireMaster
L0
Multimeter
Multimeter
VCC
VCC
DS1845E-010
Product Not Recommended for New Designs
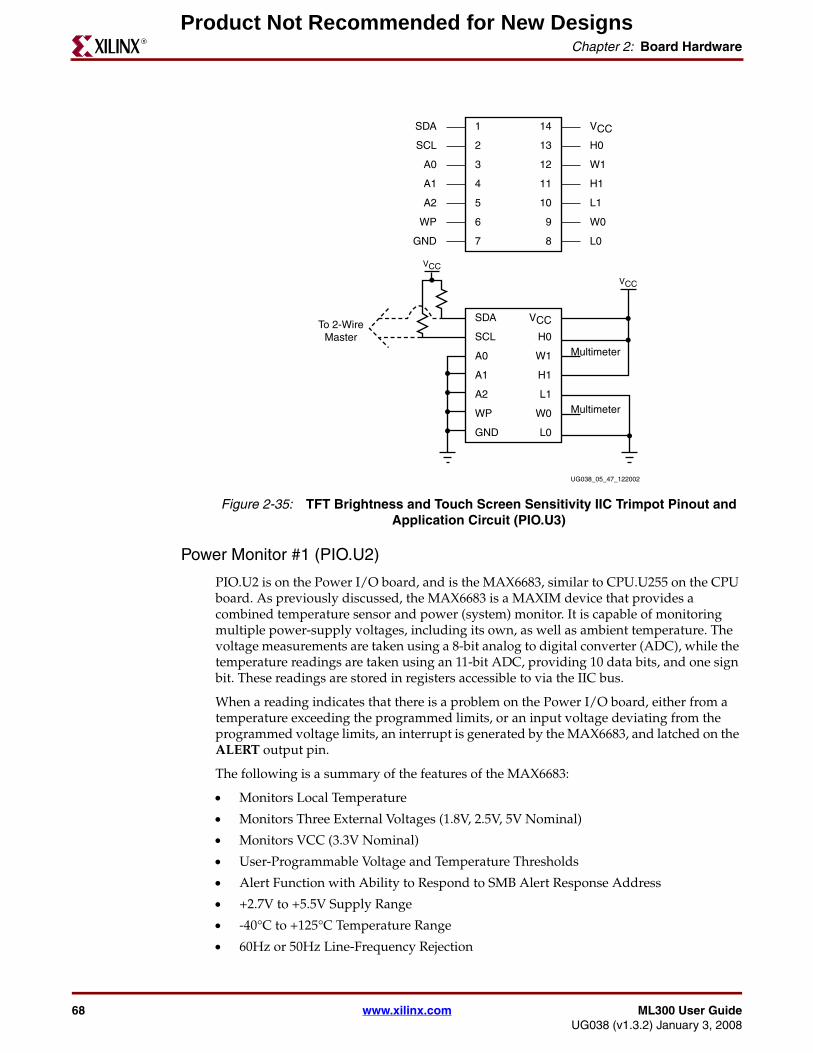
68 www.xilinx.com ML300 User GuideUG038 (v1.3.2) January 3, 2008
Chapter 2: Board HardwareR
Power Monitor #1 (PIO.U2)
PIO.U2 is on the Power I/O board, and is the MAX6683, similar to CPU.U255 on the CPU board. As previously discussed, the MAX6683 is a MAXIM device that provides a combined temperature sensor and power (system) monitor. It is capable of monitoring multiple power-supply voltages, including its own, as well as ambient temperature. The voltage measurements are taken using a 8-bit analog to digital converter (ADC), while the temperature readings are taken using an 11-bit ADC, providing 10 data bits, and one sign bit. These readings are stored in registers accessible to via the IIC bus.
When a reading indicates that there is a problem on the Power I/O board, either from a temperature exceeding the programmed limits, or an input voltage deviating from the programmed voltage limits, an interrupt is generated by the MAX6683, and latched on the ALERT output pin.
The following is a summary of the features of the MAX6683:
• Monitors Local Temperature
• Monitors Three External Voltages (1.8V, 2.5V, 5V Nominal)
• Monitors VCC (3.3V Nominal)
• User-Programmable Voltage and Temperature Thresholds
• Alert Function with Ability to Respond to SMB Alert Response Address
• +2.7V to +5.5V Supply Range
• -40°C to +125°C Temperature Range
• 60Hz or 50Hz Line-Frequency Rejection
Figure 2-35: TFT Brightness and Touch Screen Sensitivity IIC Trimpot Pinout and Application Circuit (PIO.U3)
UG038_05_47_122002
1
2
3
4
5
6
7
14
13
12
11
10
9
8
SDA
SCL
A0
A1
A2
WP
GND
VCC
H0
W1
H1
L1
W0
To 2-WireMaster
L0
GND
A1
A0
A2
SCL
SDA
L0
W0
L1
H1
W1
H0
Multimeter
VCC
WP
Multimeter
VCC
VCC
Product Not Recommended for New Designs
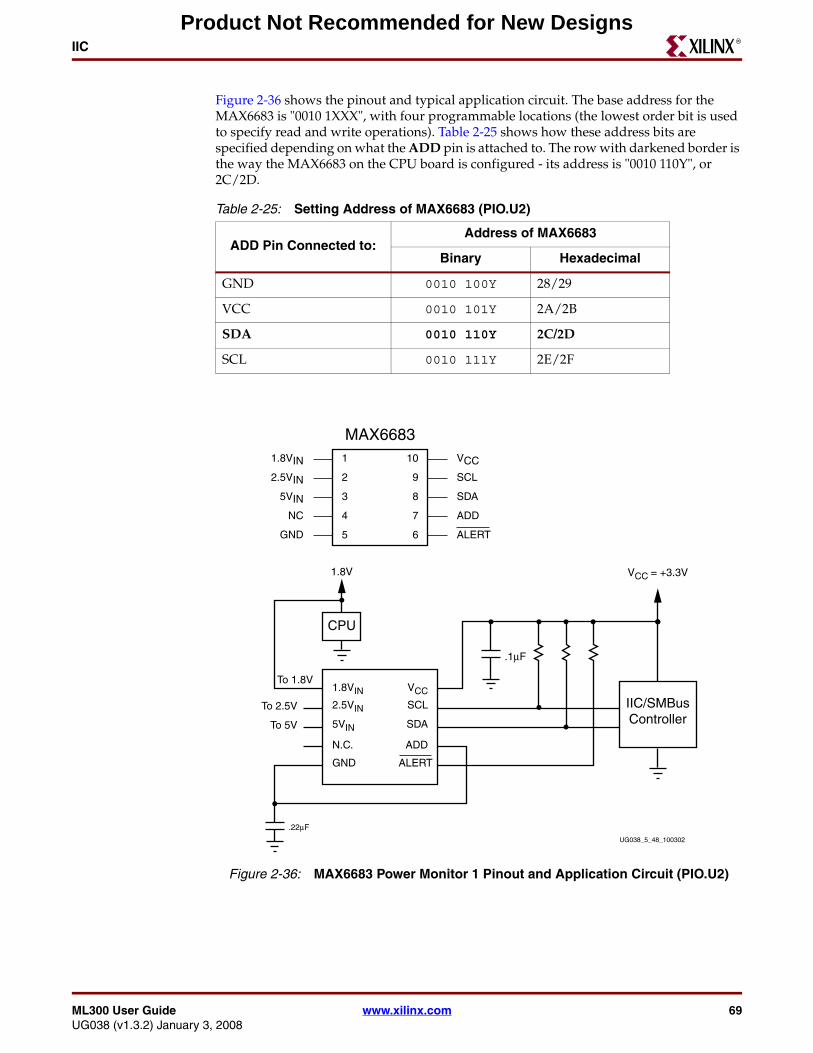
ML300 User Guide www.xilinx.com 69UG038 (v1.3.2) January 3, 2008
IICR
Figure 2-36 shows the pinout and typical application circuit. The base address for the MAX6683 is "0010 1XXX", with four programmable locations (the lowest order bit is used to specify read and write operations). Table 2-25 shows how these address bits are specified depending on what the ADD pin is attached to. The row with darkened border is the way the MAX6683 on the CPU board is configured - its address is "0010 110Y", or 2C/2D.
Table 2-25: Setting Address of MAX6683 (PIO.U2)
ADD Pin Connected to:Address of MAX6683
Binary Hexadecimal
GND 0010 100Y 28/29
VCC 0010 101Y 2A/2B
SDA 0010 110Y 2C/2D
SCL 0010 111Y 2E/2F
Figure 2-36: MAX6683 Power Monitor 1 Pinout and Application Circuit (PIO.U2)
UG038_5_48_100302
MAX66831
2
3
4 7
8
9
10
NC
5VIN
2.5VIN
1.8VIN
ADD
SDA
SCL
VCC
5GND 6 ALERT
ALERT
1.8VIN VCC
VCC = +3.3V
2.5VIN SCLTo 2.5V
To 1.8V
1.8V
To 5V 5VIN SDA
N.C. ADD
GND
.22μF
.1μF
IIC/SMBusController
CPU
Product Not Recommended for New Designs
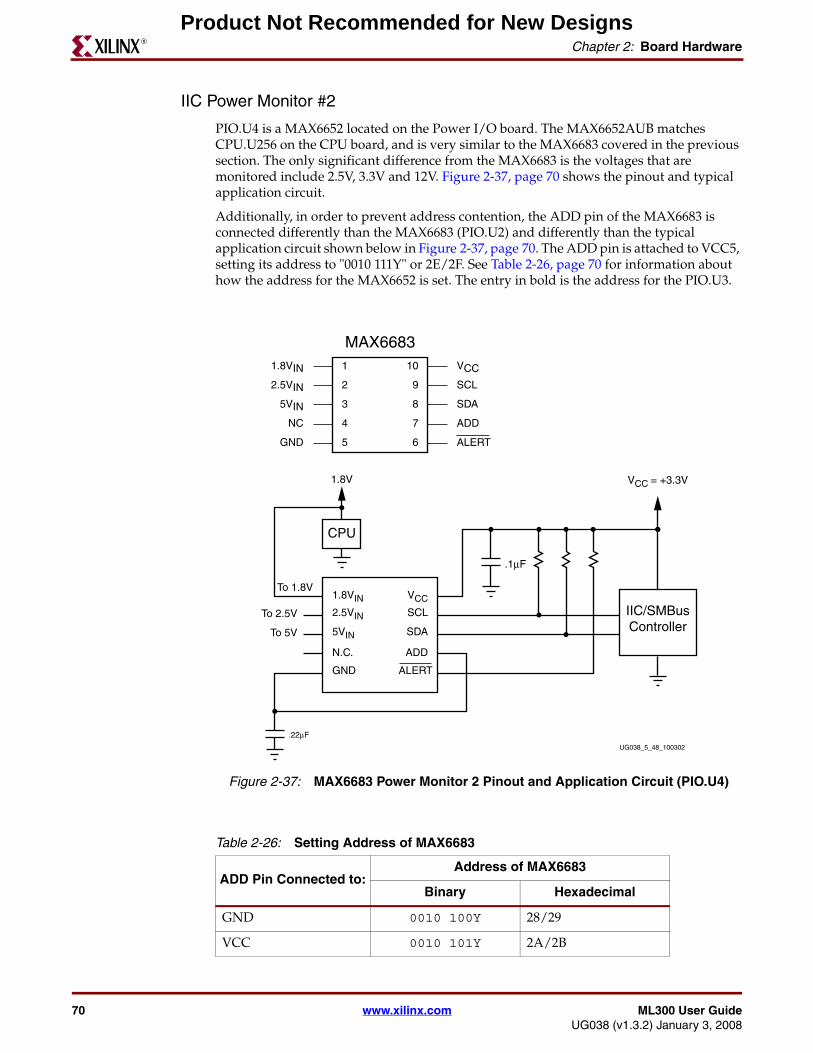
70 www.xilinx.com ML300 User GuideUG038 (v1.3.2) January 3, 2008
Chapter 2: Board HardwareR
IIC Power Monitor #2
PIO.U4 is a MAX6652 located on the Power I/O board. The MAX6652AUB matches CPU.U256 on the CPU board, and is very similar to the MAX6683 covered in the previous section. The only significant difference from the MAX6683 is the voltages that are monitored include 2.5V, 3.3V and 12V. Figure 2-37, page 70 shows the pinout and typical application circuit.
Additionally, in order to prevent address contention, the ADD pin of the MAX6683 is connected differently than the MAX6683 (PIO.U2) and differently than the typical application circuit shown below in Figure 2-37, page 70. The ADD pin is attached to VCC5, setting its address to "0010 111Y" or 2E/2F. See Table 2-26, page 70 for information about how the address for the MAX6652 is set. The entry in bold is the address for the PIO.U3.
Figure 2-37: MAX6683 Power Monitor 2 Pinout and Application Circuit (PIO.U4)
Table 2-26: Setting Address of MAX6683
ADD Pin Connected to:Address of MAX6683
Binary Hexadecimal
GND 0010 100Y 28/29
VCC 0010 101Y 2A/2B
UG038_5_48_100302
MAX66831
2
3
4 7
8
9
10
NC
5VIN
2.5VIN
1.8VIN
ADD
SDA
SCL
VCC
5GND 6 ALERT
ALERT
1.8VIN VCC
VCC = +3.3V
2.5VIN SCLTo 2.5V
To 1.8V
1.8V
To 5V 5VIN SDA
N.C. ADD
GND
.22μF
.1μF
IIC/SMBusController
CPU
Product Not Recommended for New Designs
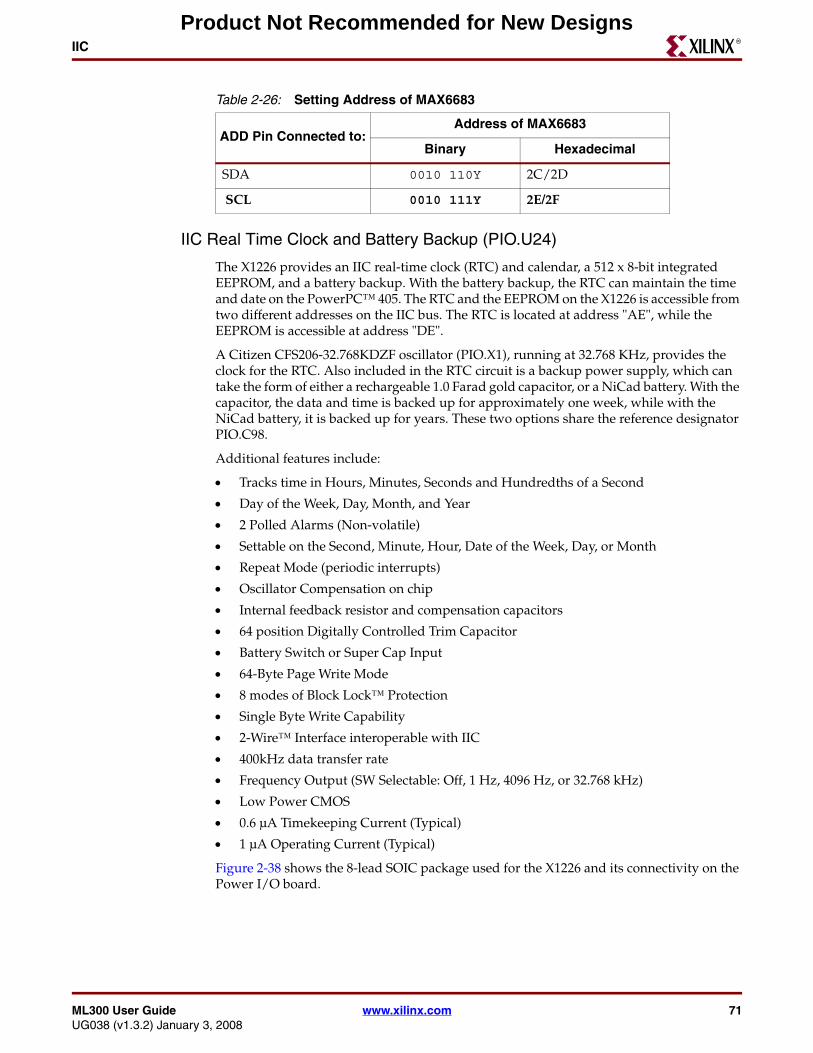
ML300 User Guide www.xilinx.com 71UG038 (v1.3.2) January 3, 2008
IICR
IIC Real Time Clock and Battery Backup (PIO.U24)
The X1226 provides an IIC real-time clock (RTC) and calendar, a 512 x 8-bit integrated EEPROM, and a battery backup. With the battery backup, the RTC can maintain the time and date on the PowerPC™ 405. The RTC and the EEPROM on the X1226 is accessible from two different addresses on the IIC bus. The RTC is located at address "AE", while the EEPROM is accessible at address "DE".
A Citizen CFS206-32.768KDZF oscillator (PIO.X1), running at 32.768 KHz, provides the clock for the RTC. Also included in the RTC circuit is a backup power supply, which can take the form of either a rechargeable 1.0 Farad gold capacitor, or a NiCad battery. With the capacitor, the data and time is backed up for approximately one week, while with the NiCad battery, it is backed up for years. These two options share the reference designator PIO.C98.
Additional features include:
• Tracks time in Hours, Minutes, Seconds and Hundredths of a Second
• Day of the Week, Day, Month, and Year
• 2 Polled Alarms (Non-volatile)
• Settable on the Second, Minute, Hour, Date of the Week, Day, or Month
• Repeat Mode (periodic interrupts)
• Oscillator Compensation on chip
• Internal feedback resistor and compensation capacitors
• 64 position Digitally Controlled Trim Capacitor
• Battery Switch or Super Cap Input
• 64-Byte Page Write Mode
• 8 modes of Block Lock™ Protection
• Single Byte Write Capability
• 2-Wire™ Interface interoperable with IIC
• 400kHz data transfer rate
• Frequency Output (SW Selectable: Off, 1 Hz, 4096 Hz, or 32.768 kHz)
• Low Power CMOS
• 0.6 µA Timekeeping Current (Typical)
• 1 µA Operating Current (Typical)
Figure 2-38 shows the 8-lead SOIC package used for the X1226 and its connectivity on the Power I/O board.
SDA 0010 110Y 2C/2D
SCL 0010 111Y 2E/2F
Table 2-26: Setting Address of MAX6683
ADD Pin Connected to:Address of MAX6683
Binary Hexadecimal
Product Not Recommended for New Designs
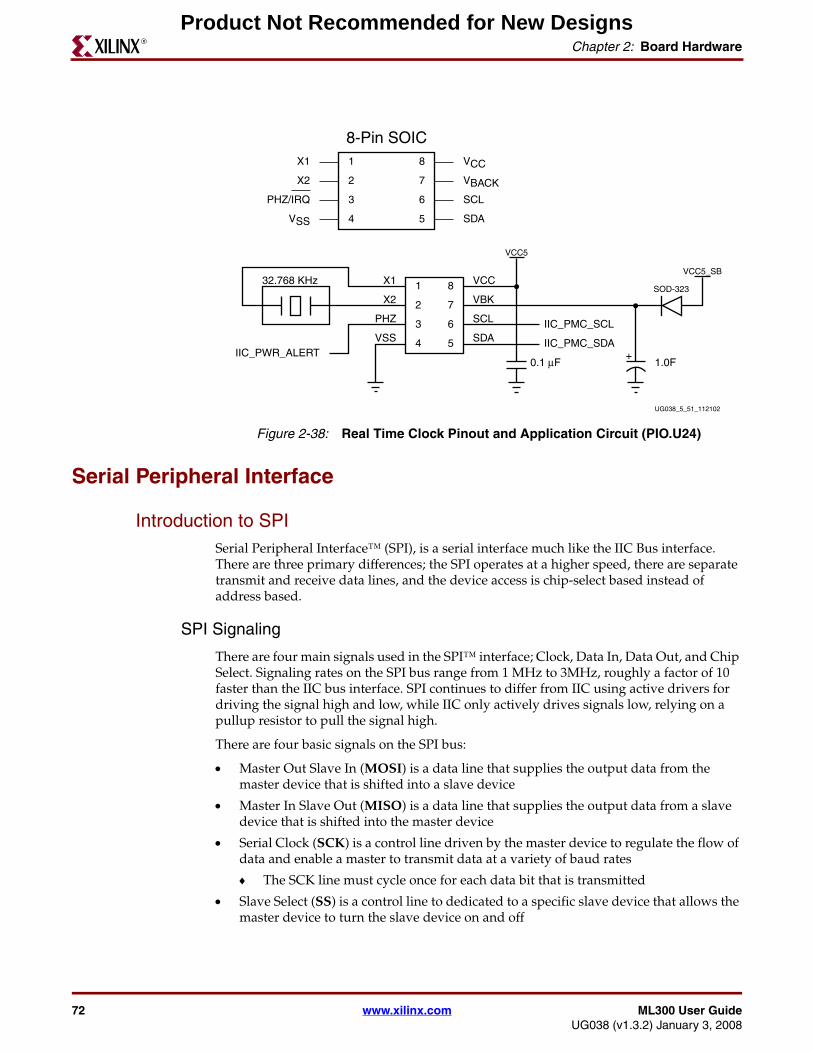
72 www.xilinx.com ML300 User GuideUG038 (v1.3.2) January 3, 2008
Chapter 2: Board HardwareR
Serial Peripheral Interface
Introduction to SPISerial Peripheral Interface™ (SPI), is a serial interface much like the IIC Bus interface. There are three primary differences; the SPI operates at a higher speed, there are separate transmit and receive data lines, and the device access is chip-select based instead of address based.
SPI Signaling
There are four main signals used in the SPI™ interface; Clock, Data In, Data Out, and Chip Select. Signaling rates on the SPI bus range from 1 MHz to 3MHz, roughly a factor of 10 faster than the IIC bus interface. SPI continues to differ from IIC using active drivers for driving the signal high and low, while IIC only actively drives signals low, relying on a pullup resistor to pull the signal high.
There are four basic signals on the SPI bus:
• Master Out Slave In (MOSI) is a data line that supplies the output data from the master device that is shifted into a slave device
• Master In Slave Out (MISO) is a data line that supplies the output data from a slave device that is shifted into the master device
• Serial Clock (SCK) is a control line driven by the master device to regulate the flow of data and enable a master to transmit data at a variety of baud rates
♦ The SCK line must cycle once for each data bit that is transmitted
• Slave Select (SS) is a control line to dedicated to a specific slave device that allows the master device to turn the slave device on and off
Figure 2-38: Real Time Clock Pinout and Application Circuit (PIO.U24)
UG038_5_51_112102
8-Pin SOIC1
2
3
4 5
6
7
8
VSS
VSS
PHZ/IRQ
X2
IIC_PWR_ALERT
X1
X2
32.768 KHz
PHZ
X1
SDA
SCL
VBACK
VCC
SDA
SCL
IIC_PMC_SDA
IIC_PMC_SCL
VBK
VCC1
2
3
4 5
6
7
8
+
VCC5
VCC5_SB
SOD-323
0.1 μF 1.0F
Product Not Recommended for New Designs
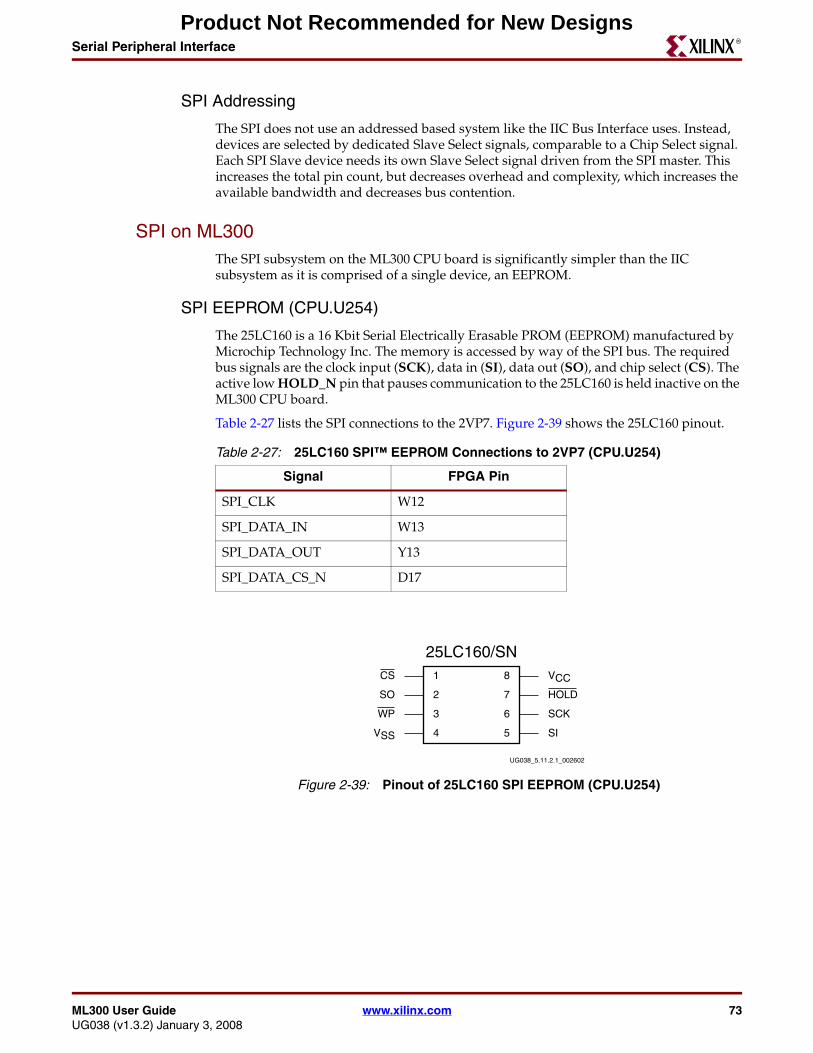
ML300 User Guide www.xilinx.com 73UG038 (v1.3.2) January 3, 2008
Serial Peripheral InterfaceR
SPI Addressing
The SPI does not use an addressed based system like the IIC Bus Interface uses. Instead, devices are selected by dedicated Slave Select signals, comparable to a Chip Select signal. Each SPI Slave device needs its own Slave Select signal driven from the SPI master. This increases the total pin count, but decreases overhead and complexity, which increases the available bandwidth and decreases bus contention.
SPI on ML300 The SPI subsystem on the ML300 CPU board is significantly simpler than the IIC subsystem as it is comprised of a single device, an EEPROM.
SPI EEPROM (CPU.U254)
The 25LC160 is a 16 Kbit Serial Electrically Erasable PROM (EEPROM) manufactured by Microchip Technology Inc. The memory is accessed by way of the SPI bus. The required bus signals are the clock input (SCK), data in (SI), data out (SO), and chip select (CS). The active low HOLD_N pin that pauses communication to the 25LC160 is held inactive on the ML300 CPU board.
Table 2-27 lists the SPI connections to the 2VP7. Figure 2-39 shows the 25LC160 pinout.
Table 2-27: 25LC160 SPI™ EEPROM Connections to 2VP7 (CPU.U254)
Signal FPGA Pin
SPI_CLK W12
SPI_DATA_IN W13
SPI_DATA_OUT Y13
SPI_DATA_CS_N D17
Figure 2-39: Pinout of 25LC160 SPI EEPROM (CPU.U254)
UG038_5.11.2.1_002602
25LC160/SN1
2
3
4 5
6
7
8
VSS
WP
SO
CS
SI
SCK
HOLD
VCC
Product Not Recommended for New Designs
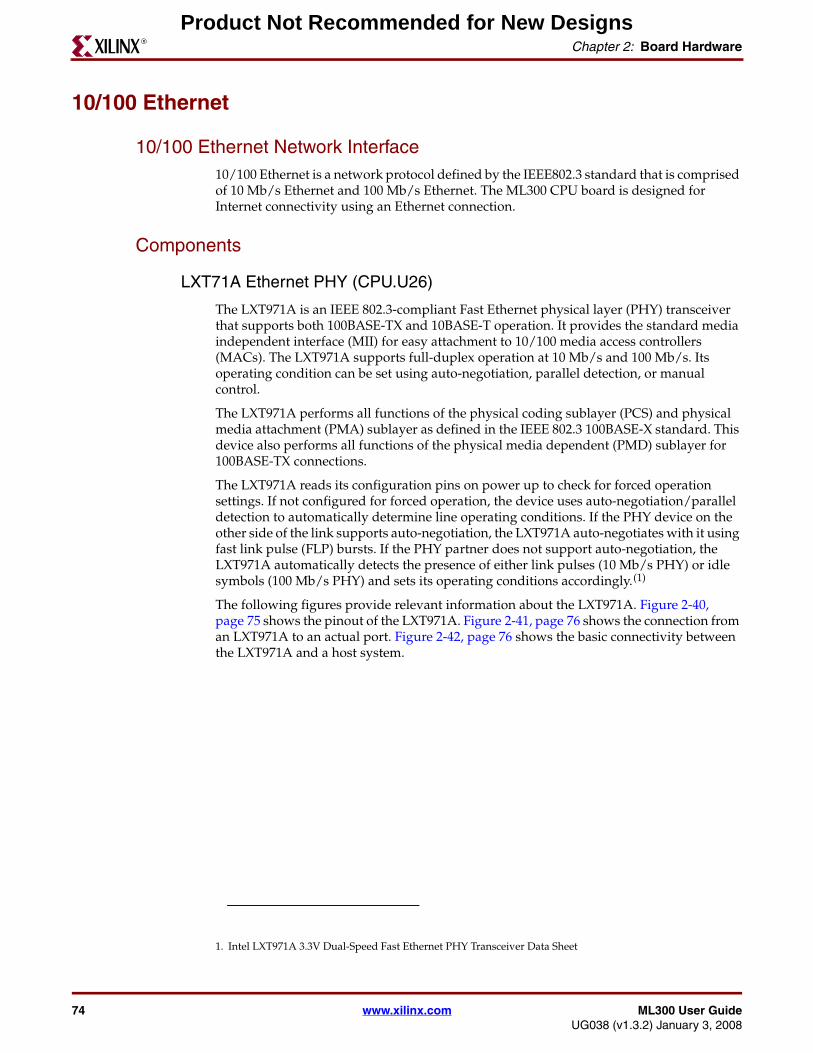
74 www.xilinx.com ML300 User GuideUG038 (v1.3.2) January 3, 2008
Chapter 2: Board HardwareR
10/100 Ethernet
10/100 Ethernet Network Interface10/100 Ethernet is a network protocol defined by the IEEE802.3 standard that is comprised of 10 Mb/s Ethernet and 100 Mb/s Ethernet. The ML300 CPU board is designed for Internet connectivity using an Ethernet connection.
Components
LXT71A Ethernet PHY (CPU.U26)
The LXT971A is an IEEE 802.3-compliant Fast Ethernet physical layer (PHY) transceiver that supports both 100BASE-TX and 10BASE-T operation. It provides the standard media independent interface (MII) for easy attachment to 10/100 media access controllers (MACs). The LXT971A supports full-duplex operation at 10 Mb/s and 100 Mb/s. Its operating condition can be set using auto-negotiation, parallel detection, or manual control.
The LXT971A performs all functions of the physical coding sublayer (PCS) and physical media attachment (PMA) sublayer as defined in the IEEE 802.3 100BASE-X standard. This device also performs all functions of the physical media dependent (PMD) sublayer for 100BASE-TX connections.
The LXT971A reads its configuration pins on power up to check for forced operation settings. If not configured for forced operation, the device uses auto-negotiation/parallel detection to automatically determine line operating conditions. If the PHY device on the other side of the link supports auto-negotiation, the LXT971A auto-negotiates with it using fast link pulse (FLP) bursts. If the PHY partner does not support auto-negotiation, the LXT971A automatically detects the presence of either link pulses (10 Mb/s PHY) or idle symbols (100 Mb/s PHY) and sets its operating conditions accordingly.(1)
The following figures provide relevant information about the LXT971A. Figure 2-40, page 75 shows the pinout of the LXT971A. Figure 2-41, page 76 shows the connection from an LXT971A to an actual port. Figure 2-42, page 76 shows the basic connectivity between the LXT971A and a host system.
1. Intel LXT971A 3.3V Dual-Speed Fast Ethernet PHY Transceiver Data Sheet
Product Not Recommended for New Designs
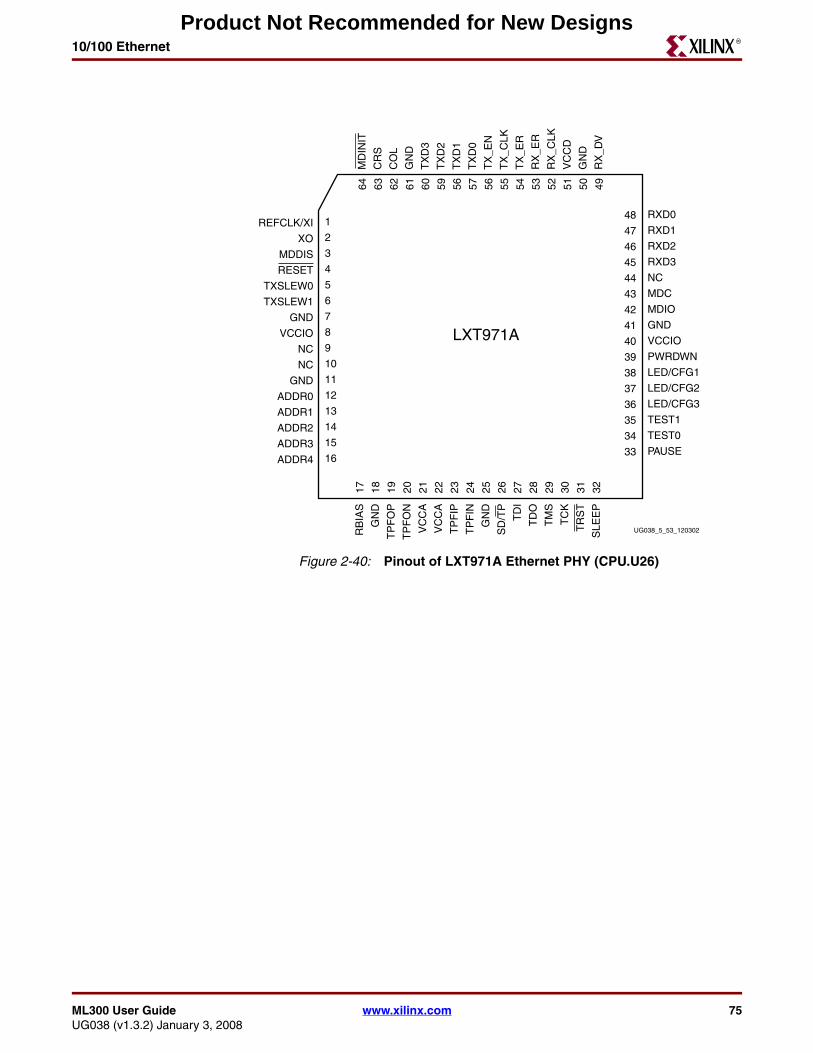
ML300 User Guide www.xilinx.com 75UG038 (v1.3.2) January 3, 2008
10/100 EthernetR
Figure 2-40: Pinout of LXT971A Ethernet PHY (CPU.U26)
UG038_5_53_120302
LXT971A
1
2
3
4
5
6
7
8
9
10
11
12
13
14
15
16
RXD0
RXD1
RXD2
RXD3
NC
MDC
MDIO
GND
VCCIO
PWRDWN
LED/CFG1
LED/CFG2
LED/CFG3
TEST1
TEST0
PAUSE
17 18 19 20 21 22 23 24 25 26 27 28 29 30 31 32
MD
INIT
CR
S
CO
L
GN
D
TX
D3
TX
D2
TX
D1
TX
D0
TX
_EN
TX
_CLK
TX
_ER
RX
_ER
RX
_CLK
VC
CD
GN
D
RX
_DV
64 63 62 61 60 59 56 57 56 55 54 53 52 51 50 49
33
48
47
46
45
44
43
42
41
40
39
38
37
36
35
34
ADDR4
REFCLK/XI
XO
MDDIS
RESET
TXSLEW0
TXSLEW1
GND
VCCIO
NC
NC
GND
ADDR0
ADDR1
ADDR2
ADDR3
RB
IAS
GN
D
TP
FO
P
TP
FO
N
VC
CA
VC
CA
TP
FIP
TP
FIN
GN
D
SD
/TP
TD
I
TD
O
TM
S
TC
K
TR
ST
SLE
EP
Product Not Recommended for New Designs
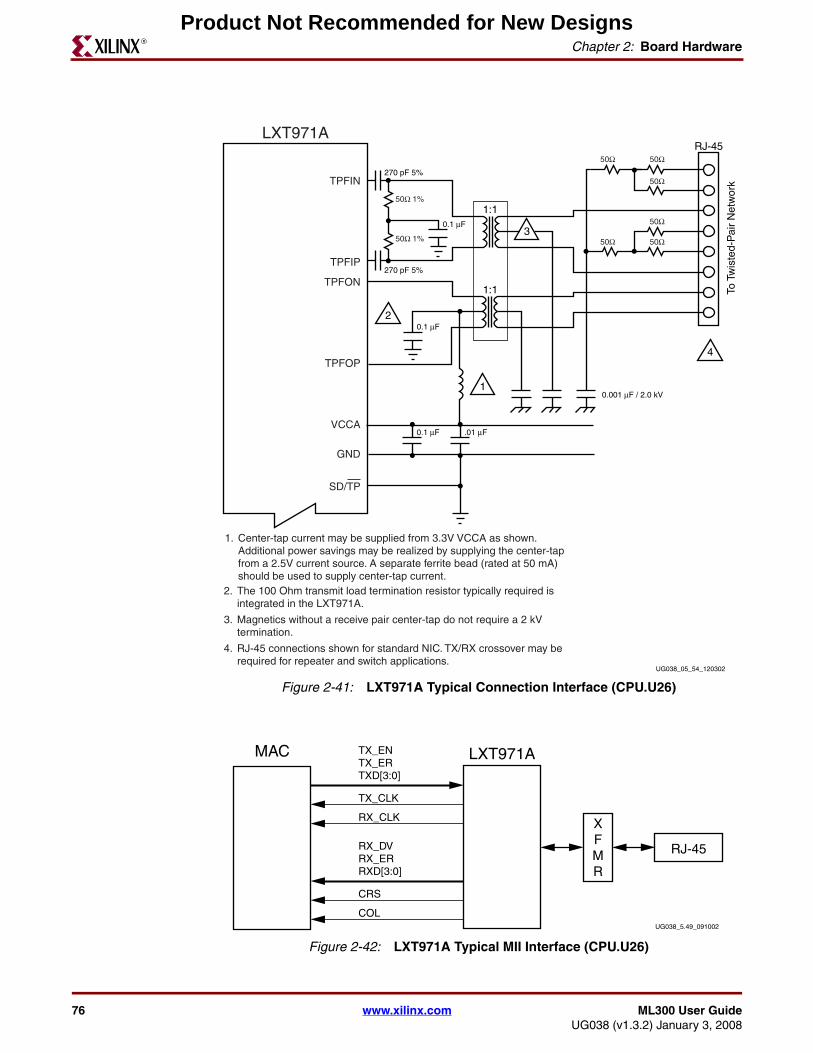
76 www.xilinx.com ML300 User GuideUG038 (v1.3.2) January 3, 2008
Chapter 2: Board HardwareR
Figure 2-41: LXT971A Typical Connection Interface (CPU.U26)
Figure 2-42: LXT971A Typical MII Interface (CPU.U26)
UG038_05_54_120302
TPFIN
TPFIP
TPFON
TPFOP
VCCA
LXT971A
GND
SD/TP
0.1 μF
270 pF 5%
270 pF 5%
0.1 μF
0.1 μF
0.001 μF / 2.0 kV
.01 μF
2
1
3
1:1
1:1
4
RJ-45
To T
wis
ted-
Pai
r N
etw
ork
50Ω
50Ω
50Ω
50Ω
50Ω
50Ω 1%
50Ω 1% 50Ω
Center-tap current may be supplied from 3.3V VCCA as shown.Additional power savings may be realized by supplying the center-tapfrom a 2.5V current source. A separate ferrite bead (rated at 50 mA)should be used to supply center-tap current.
1.
The 100 Ohm transmit load termination resistor typically required isintegrated in the LXT971A.
2.
Magnetics without a receive pair center-tap do not require a 2 kVtermination.
3.
RJ-45 connections shown for standard NIC. TX/RX crossover may berequired for repeater and switch applications.
4.
UG038_5.49_091002
MAC
XFMR
TX_CLK
RX_CLK
TX_ENTX_ERTXD[3:0]
CRS
COL
RX_DVRX_ERRXD[3:0]
LXT971A
RJ-45
Product Not Recommended for New Designs
ML300 User Guide www.xilinx.com 77UG038 (v1.3.2) January 3, 2008
10/100 EthernetR
TG110-SO50N2 Ethernet Magnetics
10/100 Ethernet requires a transformer between the PHY and the connector to provide electrical protection to the system. The TG110-SO50N2 is an Ethernet transformer from Halo Electronics. HALO Electronics developed the ULTRA™ series of 16-pin SOIC isolation modules to meet the requirements of IEEE 802.3 for 10/100BASE-TX and ATM155 applications. These transformers provide a significant real estate reduction at the lowest price.(1)
10/100 Ethernet Implementation
Connection to 2VP7
The 2VP7 on the ML300 CPU board connects to the LXT971A Fast Ethernet PHY transceiver using a standard MII interface of 16 bits and three additional sideband signals. Table 2-28 shows the connections between the 2Vp7 and the LXT971A.
1. Halo Electronic’s “New” ULTRA Series, 16-pin SOIC 10/100BASE-TX Magnetic Modules Data Sheet
Table 2-28: 2VP7 Connection to LXT971A (CPU.U26)
Signal Name 2VP7 Pin LXT971A Pin
PHY_SLW1 B24 6
PHY_SLW0 A24 5
PHY_RESET D21 4
PHY_MDINT C21 64
PHY_CRS E20 63
PHY_COL D20 62
PHY_TXD3 F19 60
PHY_TXD2 E19 59
PHY_TXD1 E18 58
PHY_TXD0 D19 57
PHY_TX_EN C19 56
PHY_TX_CLK B19 55
PHY_TX_ER A19 54
PHY_RX_ER G18 53
PHY_RX_CLK F18 52
PHY_RX_DV D18 49
PHY_RXD0 C18 48
PHY_RXD1 G17 47
PHY_RXD2 H16 46
Product Not Recommended for New Designs
78 www.xilinx.com ML300 User GuideUG038 (v1.3.2) January 3, 2008
Chapter 2: Board HardwareR
Connection between PHY and Magnetics
The connections between the Ethernet PHY LXT971A (CPU.U26) and the Ethernet Magnetics (CPU.T401) are based upon the recommended connectivity as previously shown in Figure 2-41, page 76.
TFT Display and Touch ScreenThe ML300 CPU board has a thin-film transistor (TFT) graphics display, an NEC NL6448BC20-08, 6.5 inch 640x480 18-bit color screen. In addition, a MicroTouch touch Screen on top of the TFT enables more interactive applications.
Overview of TFT DisplayThe NL6448BC20-08 is an active matrix color liquid crystal display (LCD) comprised of amorphous silicon thin-film transistors attached to each signal electrode, a driving circuit, and a built-in backlight. The backlight includes replaceable, long-life lamps. The 17 cm diagonal display dimensions are 640 x 480 pixels and can display 256K (18-bit) colors simultaneously. The TFT display provides variable luminance control, low reflection, and a selectable viewing direction.
Other features include:
• High luminance (300 cd/m2, typical)
• Wide viewing angle with antiglare treatment
• Display reverse-scan function
• 6-bit digital RGB signals (18-bit total)
Figure 2-43 shows a block diagram of the recommended connectivity of the NL6448BC20-08. The NL6448BC20-08 uses a 31 pin connector for the digital interface, based on the Japan Aviation Electronics (JAE) IL-310-T31PB-VF. It is also compatible with a Hirose DF9-31S-1V or DF9M-31S-1R. The pinout of this connection is detailed Table 2-29, page 80.
PHY_RXD3 F17 45
PHY_MDC F16 43
PHY_MDIO E17 42
Table 2-28: 2VP7 Connection to LXT971A (CPU.U26) (Cont’d)
Signal Name 2VP7 Pin LXT971A Pin
Product Not Recommended for New Designs
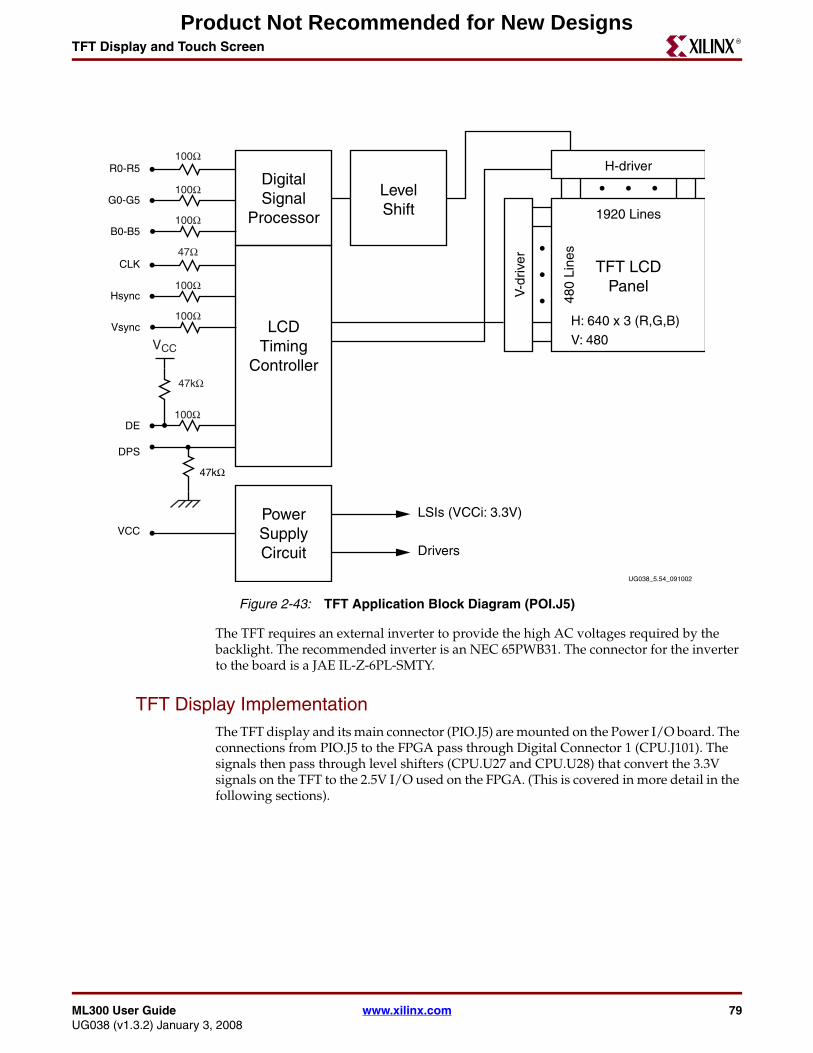
ML300 User Guide www.xilinx.com 79UG038 (v1.3.2) January 3, 2008
TFT Display and Touch ScreenR
The TFT requires an external inverter to provide the high AC voltages required by the backlight. The recommended inverter is an NEC 65PWB31. The connector for the inverter to the board is a JAE IL-Z-6PL-SMTY.
TFT Display ImplementationThe TFT display and its main connector (PIO.J5) are mounted on the Power I/O board. The connections from PIO.J5 to the FPGA pass through Digital Connector 1 (CPU.J101). The signals then pass through level shifters (CPU.U27 and CPU.U28) that convert the 3.3V signals on the TFT to the 2.5V I/O used on the FPGA. (This is covered in more detail in the following sections).
Figure 2-43: TFT Application Block Diagram (POI.J5)
UG038_5.54_091002
PowerSupplyCircuit
DigitalSignal
Processor
R0-R5
G0-G5
B0-B5
LevelShift
H-driver
LSIs (VCCi: 3.3V)
Drivers
1920 Lines
H: 640 x 3 (R,G,B)V: 480
TFT LCDPanelV
-driv
er
480
Line
s
100Ω
100Ω
100Ω
LCDTiming
Controller
CLK
Hsync
Vsync
DE
47Ω
100Ω
100Ω
100Ω
DPS
VCC
47kΩ
VCC
47kΩ
Product Not Recommended for New Designs
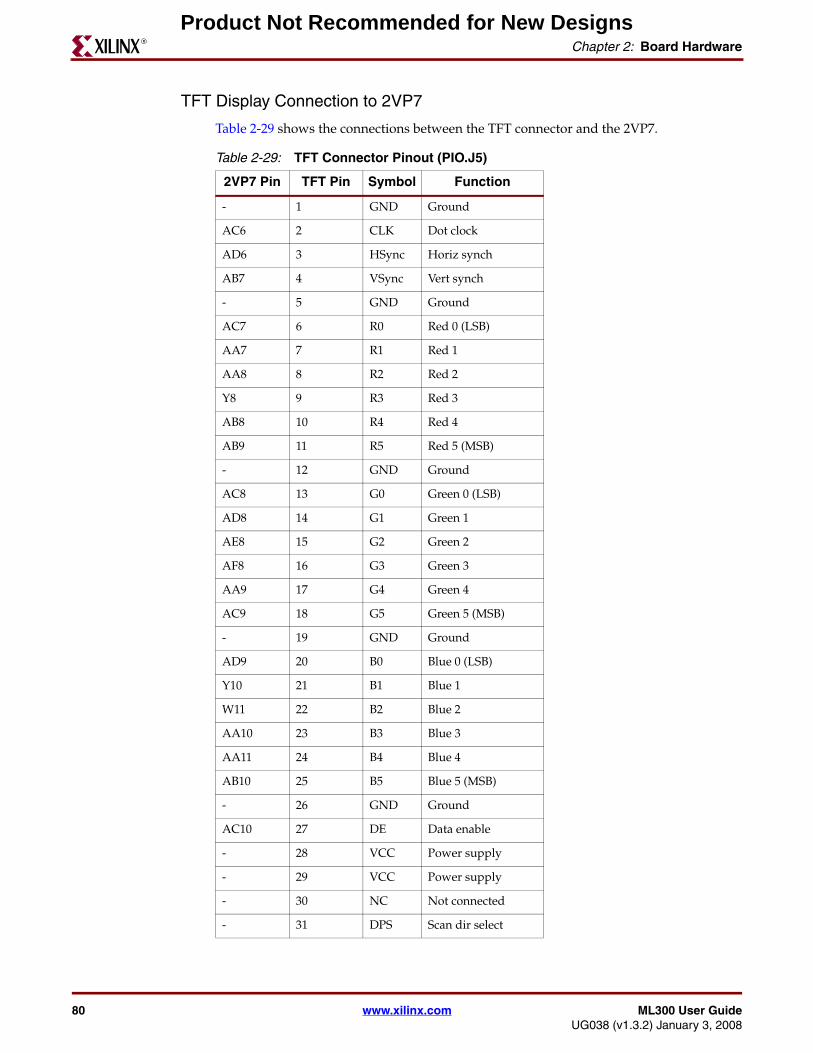
80 www.xilinx.com ML300 User GuideUG038 (v1.3.2) January 3, 2008
Chapter 2: Board HardwareR
TFT Display Connection to 2VP7
Table 2-29 shows the connections between the TFT connector and the 2VP7.
Table 2-29: TFT Connector Pinout (PIO.J5)
2VP7 Pin TFT Pin Symbol Function
- 1 GND Ground
AC6 2 CLK Dot clock
AD6 3 HSync Horiz synch
AB7 4 VSync Vert synch
- 5 GND Ground
AC7 6 R0 Red 0 (LSB)
AA7 7 R1 Red 1
AA8 8 R2 Red 2
Y8 9 R3 Red 3
AB8 10 R4 Red 4
AB9 11 R5 Red 5 (MSB)
- 12 GND Ground
AC8 13 G0 Green 0 (LSB)
AD8 14 G1 Green 1
AE8 15 G2 Green 2
AF8 16 G3 Green 3
AA9 17 G4 Green 4
AC9 18 G5 Green 5 (MSB)
- 19 GND Ground
AD9 20 B0 Blue 0 (LSB)
Y10 21 B1 Blue 1
W11 22 B2 Blue 2
AA10 23 B3 Blue 3
AA11 24 B4 Blue 4
AB10 25 B5 Blue 5 (MSB)
- 26 GND Ground
AC10 27 DE Data enable
- 28 VCC Power supply
- 29 VCC Power supply
- 30 NC Not connected
- 31 DPS Scan dir select
Product Not Recommended for New Designs
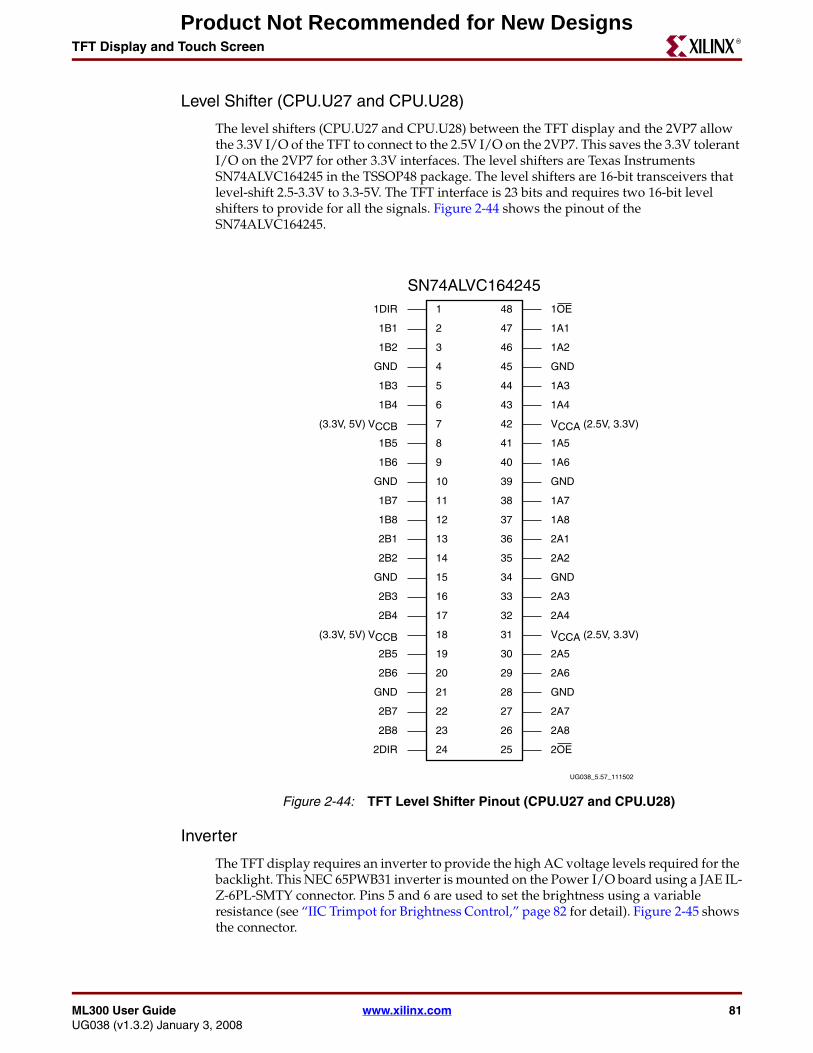
ML300 User Guide www.xilinx.com 81UG038 (v1.3.2) January 3, 2008
TFT Display and Touch ScreenR
Level Shifter (CPU.U27 and CPU.U28)
The level shifters (CPU.U27 and CPU.U28) between the TFT display and the 2VP7 allow the 3.3V I/O of the TFT to connect to the 2.5V I/O on the 2VP7. This saves the 3.3V tolerant I/O on the 2VP7 for other 3.3V interfaces. The level shifters are Texas Instruments SN74ALVC164245 in the TSSOP48 package. The level shifters are 16-bit transceivers that level-shift 2.5-3.3V to 3.3-5V. The TFT interface is 23 bits and requires two 16-bit level shifters to provide for all the signals. Figure 2-44 shows the pinout of the SN74ALVC164245.
Inverter
The TFT display requires an inverter to provide the high AC voltage levels required for the backlight. This NEC 65PWB31 inverter is mounted on the Power I/O board using a JAE IL-Z-6PL-SMTY connector. Pins 5 and 6 are used to set the brightness using a variable resistance (see “IIC Trimpot for Brightness Control,” page 82 for detail). Figure 2-45 shows the connector.
Figure 2-44: TFT Level Shifter Pinout (CPU.U27 and CPU.U28)
UG038_5.57_111502
SN74ALVC1642451
2
3
4
5
6
7
8
9
10
11
12
13
14
15
16
17
18
19
20
21
22
23
24
33
32
31
30
29
28
27
26
25
48
47
46
45
44
43
42
41
40
39
38
37
36
35
34
2DIR
GND
(3.3V, 5V) VCCB
2B4
2B3
GND
2B2
2B1
1B8
1B7
1B5
(3.3V, 5V) VCCB
GND
1B2
1B3
1B1
1DIR
2OE
2A8
2A7
GND
2A6
2A5
VCCA (2.5V, 3.3V)
2A4
2A3
GND
2A2
2A1
1A8
1A7
GND
1A6
1A5
VCCA (2.5V, 3.3V)
1A4
1A3
GND
1A2
1A1
1OE
2B6
2B5
2B8
2B7
GND
1B6
1B4
Product Not Recommended for New Designs
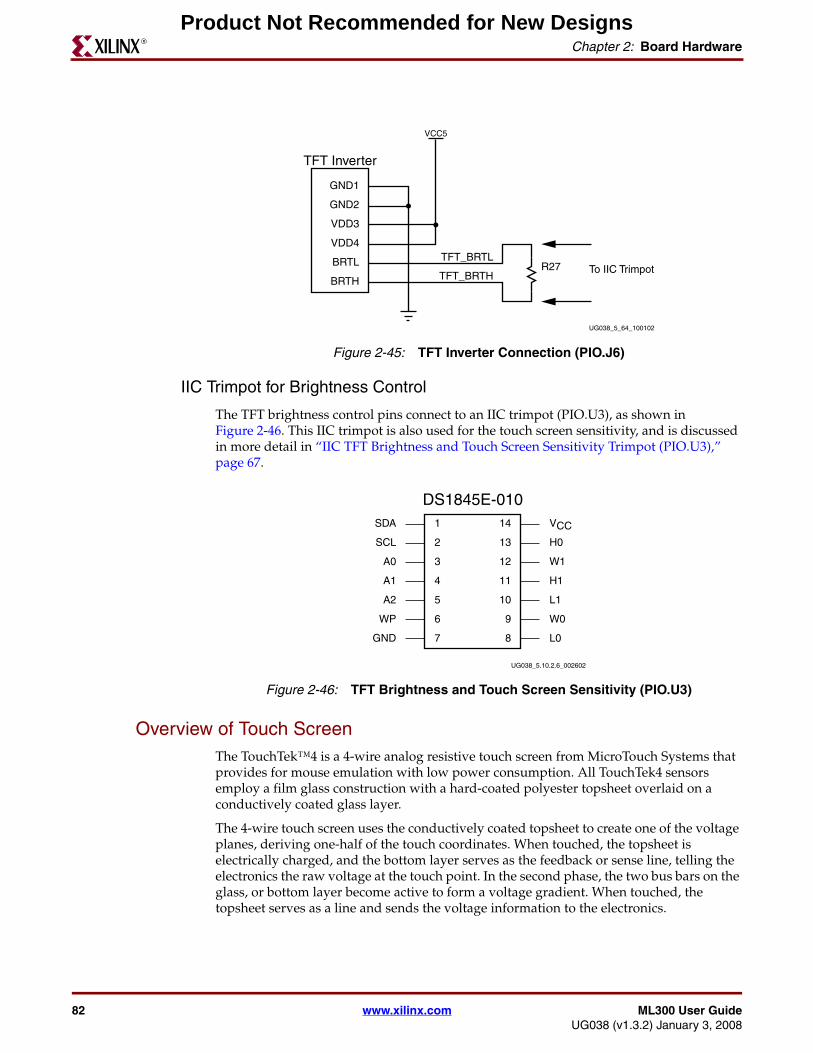
82 www.xilinx.com ML300 User GuideUG038 (v1.3.2) January 3, 2008
Chapter 2: Board HardwareR
IIC Trimpot for Brightness Control
The TFT brightness control pins connect to an IIC trimpot (PIO.U3), as shown in Figure 2-46. This IIC trimpot is also used for the touch screen sensitivity, and is discussed in more detail in “IIC TFT Brightness and Touch Screen Sensitivity Trimpot (PIO.U3),” page 67.
Overview of Touch ScreenThe TouchTek™4 is a 4-wire analog resistive touch screen from MicroTouch Systems that provides for mouse emulation with low power consumption. All TouchTek4 sensors employ a film glass construction with a hard-coated polyester topsheet overlaid on a conductively coated glass layer.
The 4-wire touch screen uses the conductively coated topsheet to create one of the voltage planes, deriving one-half of the touch coordinates. When touched, the topsheet is electrically charged, and the bottom layer serves as the feedback or sense line, telling the electronics the raw voltage at the touch point. In the second phase, the two bus bars on the glass, or bottom layer become active to form a voltage gradient. When touched, the topsheet serves as a line and sends the voltage information to the electronics.
Figure 2-45: TFT Inverter Connection (PIO.J6)
UG038_5_64_100102
TFT Inverter
TFT_BRTLR27 To IIC Trimpot
TFT_BRTH
GND1
GND2
VDD3
VDD4
BRTL
BRTH
VCC5
Figure 2-46: TFT Brightness and Touch Screen Sensitivity (PIO.U3)
UG038_5.10.2.6_002602
DS1845E-0101
2
3
4 11
12
13
14
A1
A0
SCL
SDA
H1
W1
H0
VCC
5A2 10 L1
6 9WP W0
7GND 8 L0
Product Not Recommended for New Designs
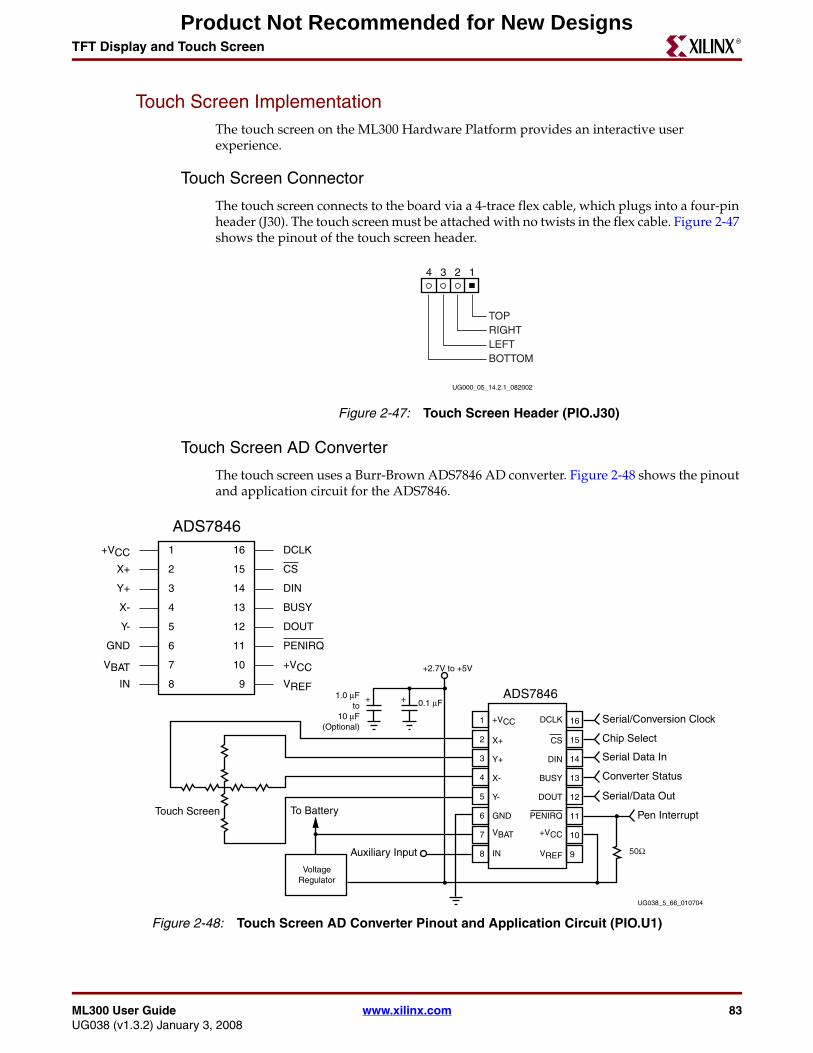
ML300 User Guide www.xilinx.com 83UG038 (v1.3.2) January 3, 2008
TFT Display and Touch ScreenR
Touch Screen ImplementationThe touch screen on the ML300 Hardware Platform provides an interactive user experience.
Touch Screen Connector
The touch screen connects to the board via a 4-trace flex cable, which plugs into a four-pin header (J30). The touch screen must be attached with no twists in the flex cable. Figure 2-47 shows the pinout of the touch screen header.
Touch Screen AD Converter
The touch screen uses a Burr-Brown ADS7846 AD converter. Figure 2-48 shows the pinout and application circuit for the ADS7846.
Figure 2-47: Touch Screen Header (PIO.J30)
UG000_05_14.2.1_082002
1234
BOTTOMLEFT
TOPRIGHT
Figure 2-48: Touch Screen AD Converter Pinout and Application Circuit (PIO.U1)
UG038_5_66_010704
ADS7846
ADS7846
1
2
3
4 13
14
15
16
X-
Y+
X+
+VCC
BUSY
DIN
CS
DCLK
5Y- 12 DOUT
6 11GND PENIRQ
7VBAT
8
1
2
3
4
5
6
7
8
16
15
14
13
12
11
10
9
IN
X-
Y+
X+
+VCC
Y-
GND
VBAT
IN
10 +VCC
9 VREF
BUSY
DIN
DCLK
CS
DOUT
PENIRQ
+VCC
VREF
Serial/Conversion Clock
Auxiliary Input
VoltageRegulator
To BatteryTouch Screen
Chip Select
Serial Data In
Converter Status
Serial/Data Out
Pen Interrupt
1.0 μFto
10 μF(Optional)
0.1 μF
+2.7V to +5V
+ +
50Ω
Product Not Recommended for New Designs
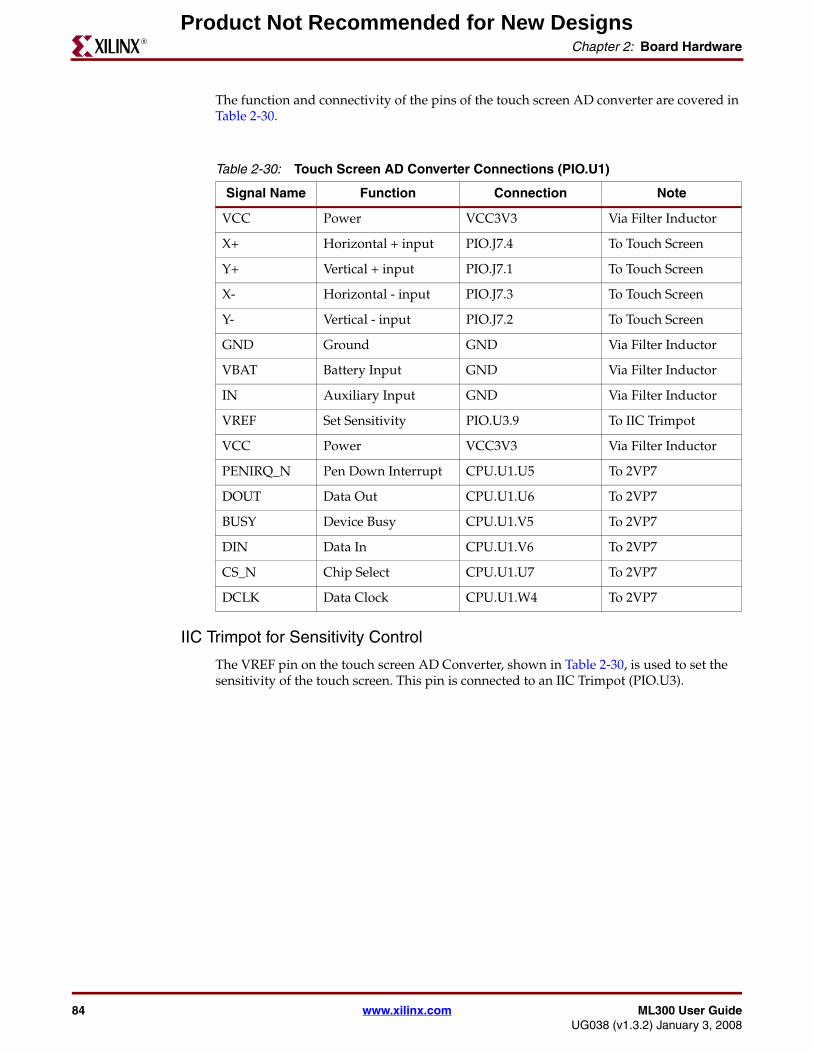
84 www.xilinx.com ML300 User GuideUG038 (v1.3.2) January 3, 2008
Chapter 2: Board HardwareR
The function and connectivity of the pins of the touch screen AD converter are covered in Table 2-30.
IIC Trimpot for Sensitivity Control
The VREF pin on the touch screen AD Converter, shown in Table 2-30, is used to set the sensitivity of the touch screen. This pin is connected to an IIC Trimpot (PIO.U3).
Table 2-30: Touch Screen AD Converter Connections (PIO.U1)
Signal Name Function Connection Note
VCC Power VCC3V3 Via Filter Inductor
X+ Horizontal + input PIO.J7.4 To Touch Screen
Y+ Vertical + input PIO.J7.1 To Touch Screen
X- Horizontal - input PIO.J7.3 To Touch Screen
Y- Vertical - input PIO.J7.2 To Touch Screen
GND Ground GND Via Filter Inductor
VBAT Battery Input GND Via Filter Inductor
IN Auxiliary Input GND Via Filter Inductor
VREF Set Sensitivity PIO.U3.9 To IIC Trimpot
VCC Power VCC3V3 Via Filter Inductor
PENIRQ_N Pen Down Interrupt CPU.U1.U5 To 2VP7
DOUT Data Out CPU.U1.U6 To 2VP7
BUSY Device Busy CPU.U1.V5 To 2VP7
DIN Data In CPU.U1.V6 To 2VP7
CS_N Chip Select CPU.U1.U7 To 2VP7
DCLK Data Clock CPU.U1.W4 To 2VP7
Product Not Recommended for New Designs

ML300 User Guide www.xilinx.com 85UG038 (v1.3.2) January 3, 2008
Audio SystemR
Audio System
Overview of Audio SystemThe audio system on the ML300 CPU board is an Analog Devices AD1885 AC'97 SoundMAX® Codec. AC'97 2.1 compliant audio codec is widely used in the PC industry, ensuring availability of drivers for these chips.
AD1885 Audio Codec
The AD1885 AC'97 SoundMAX® Codec features the following:
• Greater than 90 dB dynamic range
• Stereo headphone amplifier
• Multi-bit ΣΔ converter architecture for improved S/N ratio greater than 90 dB
• 16-bit stereo, full-duplex codec
• Four analog line-level stereo inputs for LINE-IN, CD, VIDEO, and AUX
• Two Analog line-level mono inputs for speaker phone and PC BEEP
• Mono MIC input with built-in 20 dB preamp, switchable from two external sources
• High-quality CD input with ground sense
• Stereo line-level outputs
• Mono output for speaker phone or internal speaker
• Power management support
• Full-duplex variable sample rates from 7,040 Hz to 48 kHz with 1 Hz resolution
• Jack sense pins provide automatic output switching
• Software-enabled VREFOUT output for microphones and external power amp
• Split power supplies (3.3V digital, 5V analog)
• Mobile low-power mixer mode
• Extended 6-bit master volume control
• Extended 6-bit headphone volume control
• Digital-audio mixer mode
• PHAT™ Stereo 3D stereo enhancement
Figure 2-49, page 86 and Figure 2-50, page 87, show the pinout and application circuit, respectively, for the AD1885.
Product Not Recommended for New Designs
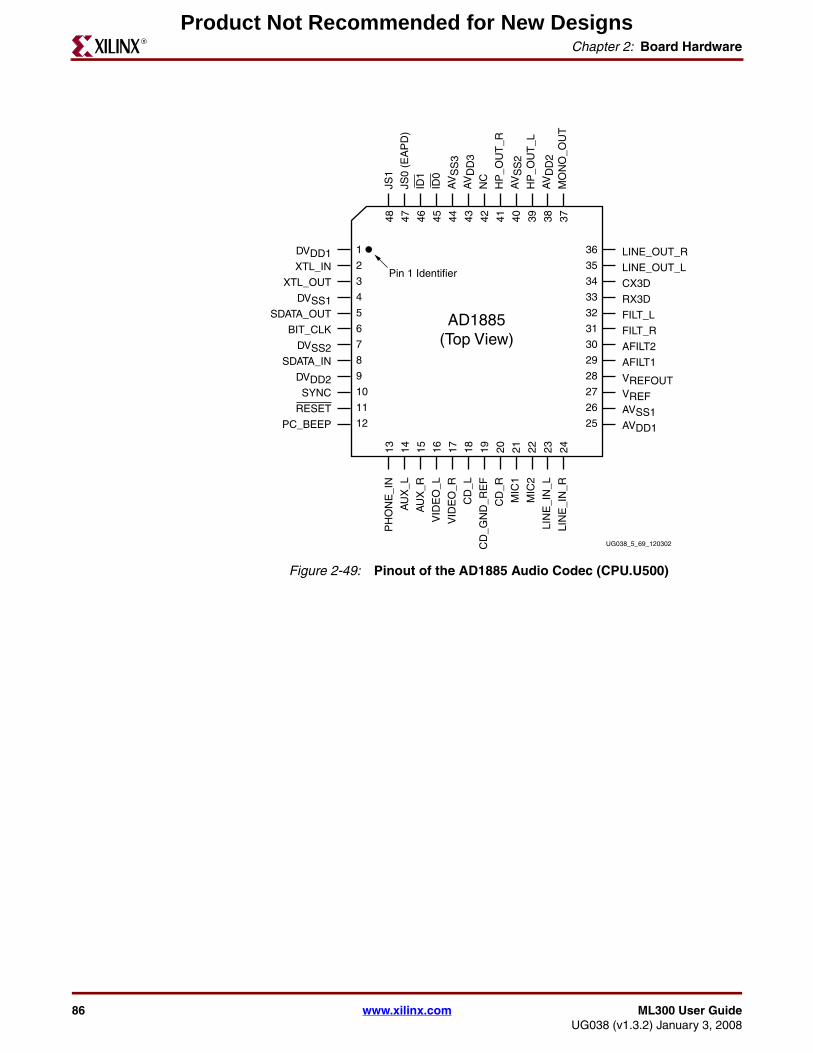
86 www.xilinx.com ML300 User GuideUG038 (v1.3.2) January 3, 2008
Chapter 2: Board HardwareR
Figure 2-49: Pinout of the AD1885 Audio Codec (CPU.U500)
UG038_5_69_120302
AD1885(Top View)
1
2
3Pin 1 Identifier
4
5
6
7
8
9
10
11
12
13 14 15 16 17 18 19 20 21 22 23 24
25
26
27
28
29
30
31
32
33
48 47 46 45 44 43 42 41 40 39 38 37
36
35
34
DVDD1XTL_IN
XTL_OUT
DVSS1SDATA_OUT
BIT_CLK
DVSS2SDATA_IN
DVDD2SYNC
RESET
PC_BEEP
PH
ON
E_I
N
AU
X_L
AU
X_R
VID
EO
_L
VID
EO
_R
CD
_L
CD
_GN
D_R
EF
CD
_R
MIC
1
MIC
2
LIN
E_I
N_L
LIN
E_I
N_R
JS1
JS0
(EA
PD
)
ID1
ID0
AV
SS
3A
VD
D3
NC
HP
_OU
T_R
AV
SS
2H
P_O
UT
_L
AV
DD
2M
ON
O_O
UT
LINE_OUT_R
LINE_OUT_L
CX3D
RX3D
FILT_L
FILT_R
AFILT2
AFILT1
VREFOUTVREFAVSS1AVDD1
Product Not Recommended for New Designs
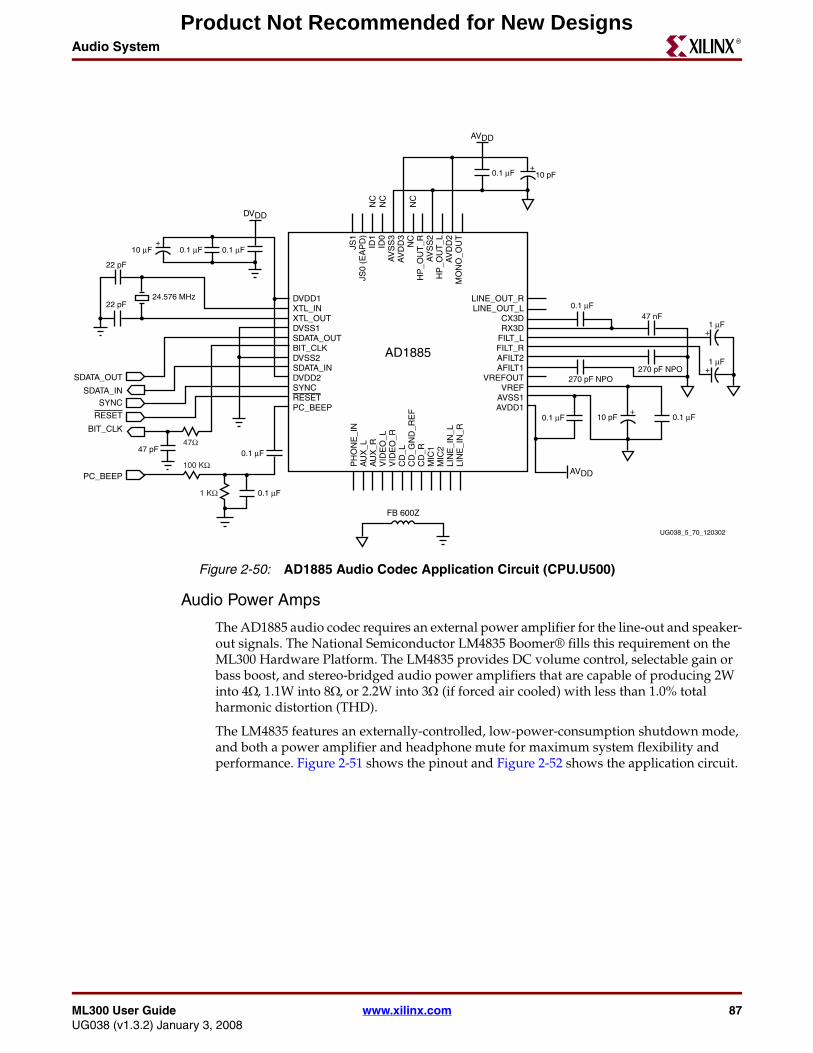
ML300 User Guide www.xilinx.com 87UG038 (v1.3.2) January 3, 2008
Audio SystemR
Audio Power Amps
The AD1885 audio codec requires an external power amplifier for the line-out and speaker-out signals. The National Semiconductor LM4835 Boomer® fills this requirement on the ML300 Hardware Platform. The LM4835 provides DC volume control, selectable gain or bass boost, and stereo-bridged audio power amplifiers that are capable of producing 2W into 4Ω, 1.1W into 8Ω, or 2.2W into 3Ω (if forced air cooled) with less than 1.0% total harmonic distortion (THD).
The LM4835 features an externally-controlled, low-power-consumption shutdown mode, and both a power amplifier and headphone mute for maximum system flexibility and performance. Figure 2-51 shows the pinout and Figure 2-52 shows the application circuit.
Figure 2-50: AD1885 Audio Codec Application Circuit (CPU.U500)
UG038_5_70_120302
DVDD1XTL_INXTL_OUTDVSS1SDATA_OUT
SDATA_OUT
BIT_CLK
BIT_CLK
DVSS2SDATA_IN
SDATA_IN
DVDD2SYNC
SYNCRESETPC_BEEP
PC_BEEP
RESET
LINE_OUT_RLINE_OUT_L
CX3DRX3D
FILT_LFILT_RAFILT2AFILT1
VREFOUTVREF
AVSS1AVDD1
PH
ON
E_I
NA
UX
_LA
UX
_RV
IDE
O_L
VID
EO
_RC
D_L
CD
_GN
D_R
EF
CD
_RM
IC1
MIC
2LI
NE
_IN
_LLI
NE
_IN
_R
JS1
NC
NC
NC
JS0
(EA
PD
)ID
1ID
0A
VS
S3
AV
DD
3N
CH
P_O
UT
_RA
VS
S2
HP
_OU
T_L
AV
DD
2M
ON
O_O
UT
AD1885
DVDD
0.1 μF 0.1 μF10 μF
22 pF
47 pF
24.576 MHz
22 pF
+
47Ω
100 KΩ
1 KΩ
0.1 μF
0.1 μF
FB 600Z
AVDD
0.1 μF 10 pF+
++
+10 pF 0.1 μF
1 μF
1 μF
0.1 μF
270 pF NPO270 pF NPO
47 nF
0.1 μF
AVDD
Product Not Recommended for New Designs
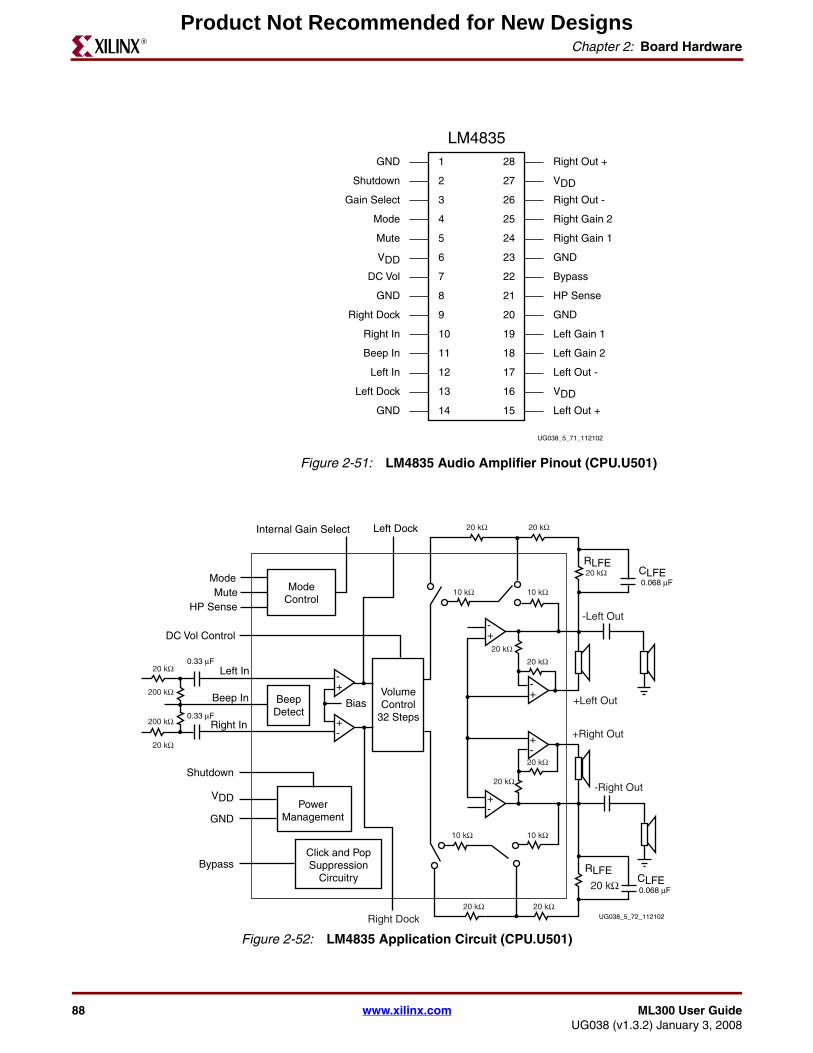
88 www.xilinx.com ML300 User GuideUG038 (v1.3.2) January 3, 2008
Chapter 2: Board HardwareR
Figure 2-51: LM4835 Audio Amplifier Pinout (CPU.U501)
UG038_5_71_112102
LM48351
2
3
4
5
6
7
8
9
10
11
12 17
18
19
20
21
22
23
24
25
26
27
28
Left In
Beep In
GND
DC Vol
Mode
Gain Select
Mute
Shutdown
GND
Left Out -
Left Gain 2
Left Gain 1
GND
HP Sense
Bypass
GND
Right Gain 1
Right Gain 2
Right Out -
VDD
Right Out +
Right In
Right Dock
VDD
13
14 15
16
GND
Left Dock
Left Out +
VDD
Figure 2-52: LM4835 Application Circuit (CPU.U501)
UG038_5_72_112102
ModeControl
BeepDetect
Bias
Left In
Beep In
Shutdown
Bypass
Right In
PowerManagement
Click and PopSuppression
Circuitry
VolumeControl
32 Steps
Left DockInternal Gain Select
ModeMute
HP Sense
DC Vol Control
0.068 μF
0.33 μF
0.33 μF
0.068 μF
+-
+-
+-
+-
+-
+-
10 kΩ
20 kΩ 20 kΩ
20 kΩ
20 kΩ20 kΩ
20 kΩ
20 kΩ
20 kΩ 20 kΩ
+Right Out
-Right Out
20 kΩ
10 kΩ
10 kΩ10 kΩ
CLFERLFE
CLFERLFE
VDD
GND
-Left Out
+Left Out
Right Dock
20 kΩ
200 kΩ
200 kΩ
20 kΩ
Product Not Recommended for New Designs
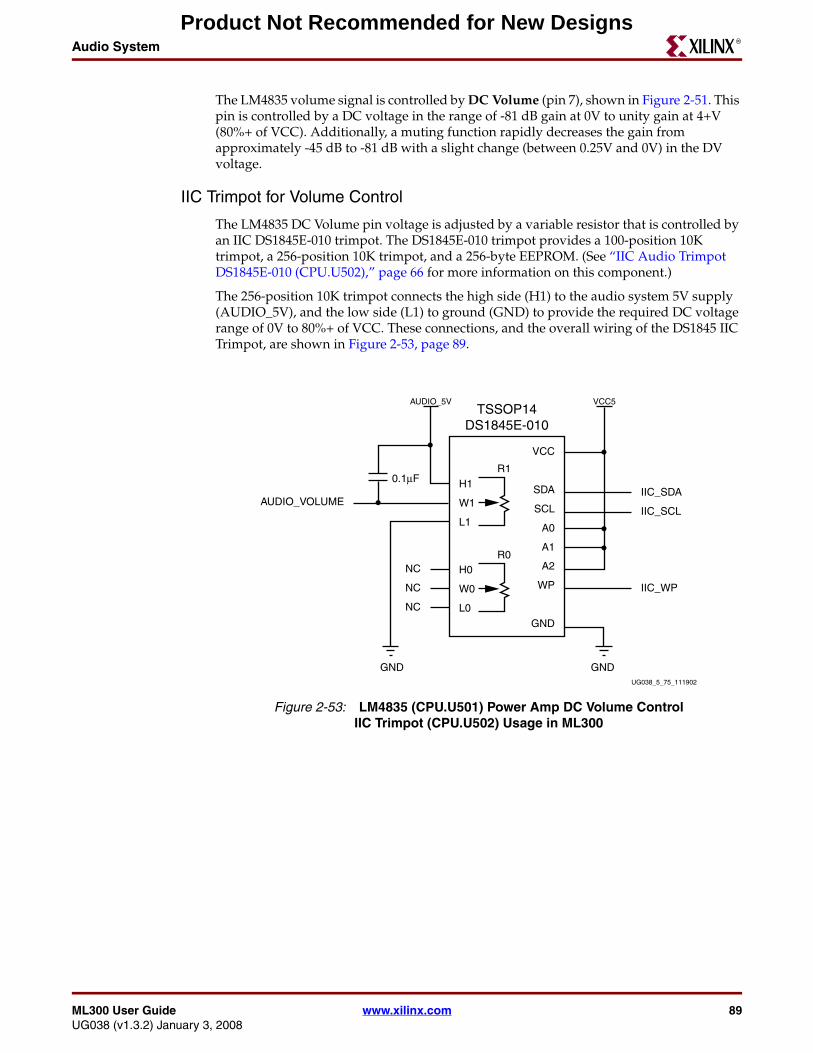
ML300 User Guide www.xilinx.com 89UG038 (v1.3.2) January 3, 2008
Audio SystemR
The LM4835 volume signal is controlled by DC Volume (pin 7), shown in Figure 2-51. This pin is controlled by a DC voltage in the range of -81 dB gain at 0V to unity gain at 4+V (80%+ of VCC). Additionally, a muting function rapidly decreases the gain from approximately -45 dB to -81 dB with a slight change (between 0.25V and 0V) in the DV voltage.
IIC Trimpot for Volume Control
The LM4835 DC Volume pin voltage is adjusted by a variable resistor that is controlled by an IIC DS1845E-010 trimpot. The DS1845E-010 trimpot provides a 100-position 10K trimpot, a 256-position 10K trimpot, and a 256-byte EEPROM. (See “IIC Audio Trimpot DS1845E-010 (CPU.U502),” page 66 for more information on this component.)
The 256-position 10K trimpot connects the high side (H1) to the audio system 5V supply (AUDIO_5V), and the low side (L1) to ground (GND) to provide the required DC voltage range of 0V to 80%+ of VCC. These connections, and the overall wiring of the DS1845 IIC Trimpot, are shown in Figure 2-53, page 89.
Figure 2-53: LM4835 (CPU.U501) Power Amp DC Volume ControlIIC Trimpot (CPU.U502) Usage in ML300
UG038_5_75_111902
TSSOP14DS1845E-010
VCC
SDA
SCL
A0
A1
A2
WP
AUDIO_VOLUME
NC
NC
NC
GND
GND GND
H1R1
W1
L1
H0
W0
IIC_SDA
IIC_SCL
IIC_WP
L0
VCC5AUDIO_5V
R0
0.1μF
Product Not Recommended for New Designs
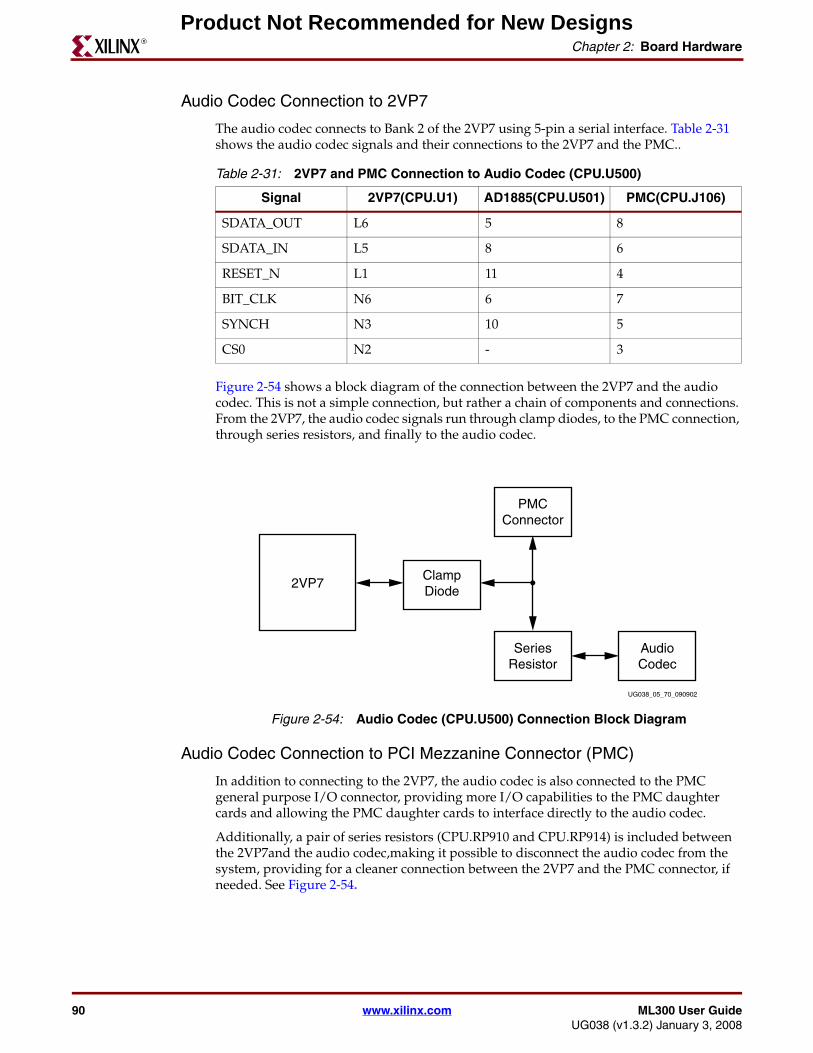
90 www.xilinx.com ML300 User GuideUG038 (v1.3.2) January 3, 2008
Chapter 2: Board HardwareR
Audio Codec Connection to 2VP7
The audio codec connects to Bank 2 of the 2VP7 using 5-pin a serial interface. Table 2-31 shows the audio codec signals and their connections to the 2VP7 and the PMC..
Figure 2-54 shows a block diagram of the connection between the 2VP7 and the audio codec. This is not a simple connection, but rather a chain of components and connections. From the 2VP7, the audio codec signals run through clamp diodes, to the PMC connection, through series resistors, and finally to the audio codec.
Audio Codec Connection to PCI Mezzanine Connector (PMC)
In addition to connecting to the 2VP7, the audio codec is also connected to the PMC general purpose I/O connector, providing more I/O capabilities to the PMC daughter cards and allowing the PMC daughter cards to interface directly to the audio codec.
Additionally, a pair of series resistors (CPU.RP910 and CPU.RP914) is included between the 2VP7and the audio codec,making it possible to disconnect the audio codec from the system, providing for a cleaner connection between the 2VP7 and the PMC connector, if needed. See Figure 2-54.
Table 2-31: 2VP7 and PMC Connection to Audio Codec (CPU.U500)
Signal 2VP7(CPU.U1) AD1885(CPU.U501) PMC(CPU.J106)
SDATA_OUT L6 5 8
SDATA_IN L5 8 6
RESET_N L1 11 4
BIT_CLK N6 6 7
SYNCH N3 10 5
CS0 N2 - 3
Figure 2-54: Audio Codec (CPU.U500) Connection Block Diagram
UG038_05_70_090902
2VP7ClampDiode
AudioCodec
SeriesResistor
PMCConnector
Product Not Recommended for New Designs
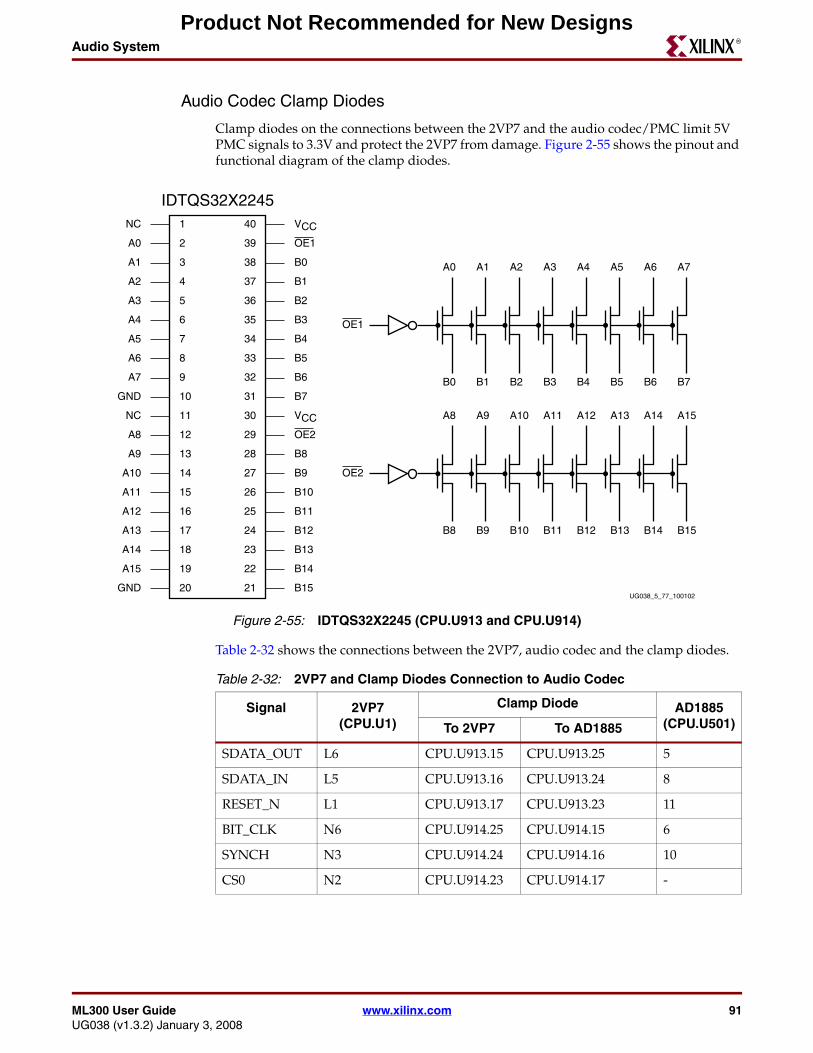
ML300 User Guide www.xilinx.com 91UG038 (v1.3.2) January 3, 2008
Audio SystemR
Audio Codec Clamp Diodes
Clamp diodes on the connections between the 2VP7 and the audio codec/PMC limit 5V PMC signals to 3.3V and protect the 2VP7 from damage. Figure 2-55 shows the pinout and functional diagram of the clamp diodes.
Table 2-32 shows the connections between the 2VP7, audio codec and the clamp diodes.
Figure 2-55: IDTQS32X2245 (CPU.U913 and CPU.U914)
UG038_5_77_100102
IDTQS32X22451
2
3
4
5
6
7
8
9
10
11
12
13
14
15
16
17
18
19
20
33
32
31
30
29
28
27
26
25
24
23
22
21
40
39
38
37
36
35
34
A14
A13
A12
A11
A10
A9
A8
NC
A6
A5
A2
A1
A3
A0
NC
B15
B14
B13
B12
B11
B10
B9
B8
B7B7B6 B6
B5
B5
VCC
VCC
B3
B3
B4
B4
B2
B2
B1
B1
B0
B0
OE1
GND
A15
GND
A7
A4
A6A5A2A1 A3A0 A7A4
OE1
OE2
B15B14B13B11 B12B10B9B8
A14A13A10A9 A11A8 A15A12
OE2
Table 2-32: 2VP7 and Clamp Diodes Connection to Audio Codec
Signal 2VP7(CPU.U1)
Clamp Diode AD1885 (CPU.U501)To 2VP7 To AD1885
SDATA_OUT L6 CPU.U913.15 CPU.U913.25 5
SDATA_IN L5 CPU.U913.16 CPU.U913.24 8
RESET_N L1 CPU.U913.17 CPU.U913.23 11
BIT_CLK N6 CPU.U914.25 CPU.U914.15 6
SYNCH N3 CPU.U914.24 CPU.U914.16 10
CS0 N2 CPU.U914.23 CPU.U914.17 -
Product Not Recommended for New Designs
92 www.xilinx.com ML300 User GuideUG038 (v1.3.2) January 3, 2008
Chapter 2: Board HardwareR
PCI/PMC
PCI OverviewPeripheral Component Interconnect (PCI) Local Bus is a bus standard that is a mainstay of many different computer systems. PCI is a high-performance bus with multiplexed address and data lines. Defined for both 32-bit and 64-bit wide data buses, PCI is intended for use as an interconnect mechanism between highly integrated peripheral controller components, peripheral add-in boards, and processor/memory systems.
PCI Signaling Standards
PCI can operate in both 5V and 3.3V signaling environments.
PCIThe PCI system on the ML300 CPU board includes three main components:
• 2VP7 as the PCI bus master
• PCI mezzanine connector (PMC)
• PCI to PCMCIA bridge
Connection to 2VP7
The 2VP7 connections to the PCI bus consist of 71 signals spread across two banks, Bank 2 and Bank 3. An additional 54 signals that are used as general purpose I/O to the PMC connector are on Bank 1 and Bank 2. A description of these signals can be found are in the following sections.
Clamp Diodes
The PCI signaling environment is defined for both 3.3V and 5V operations. While the Virtex-II Pro family is compatible with 3.3V devices, it is not compatible with 5V devices. To allow the use of 5V PCI devices on the PCI bus, it is necessary to provide for voltage translation from 5V to 3.3V. This is accomplished using QuickSwitch Clamp Diodes from IDT.
QuickSwitch Clamp Diode Usage
Figure 2-56 shows the implementation of a QS32X2245 QuickSwitch component to switch between 5V and 3.3V signaling environments. A diode and a 10K resistor are the only external components required.
Product Not Recommended for New Designs
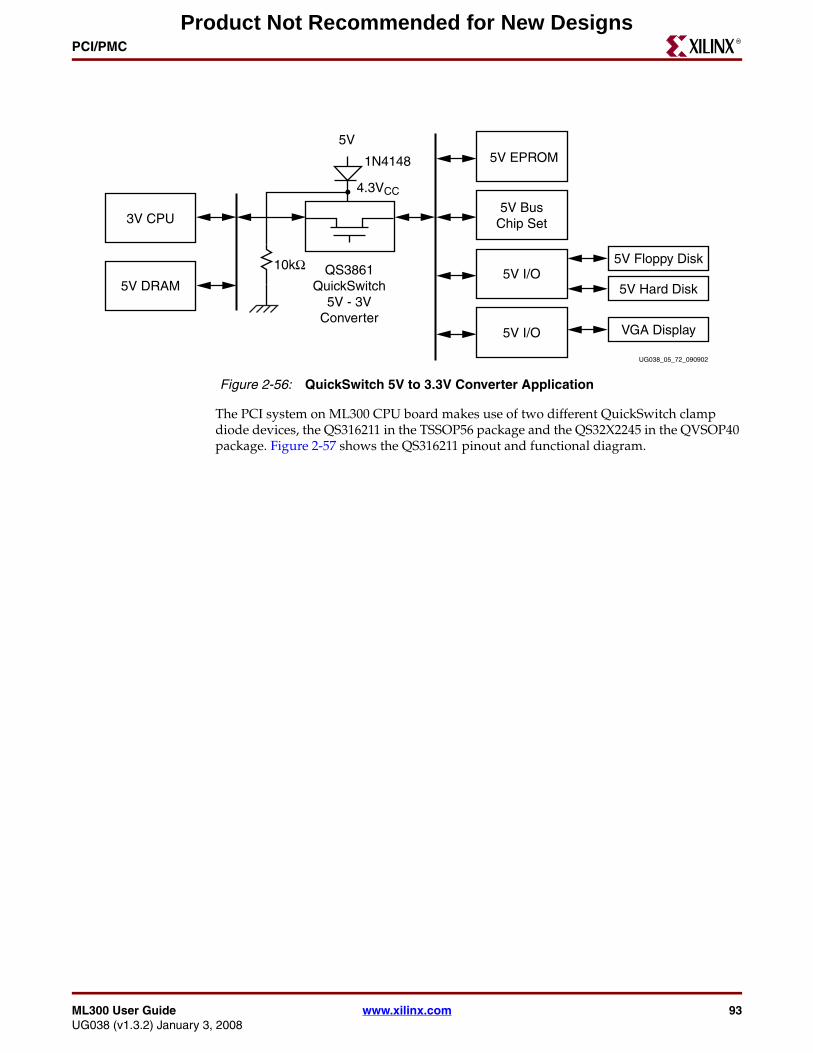
ML300 User Guide www.xilinx.com 93UG038 (v1.3.2) January 3, 2008
PCI/PMCR
The PCI system on ML300 CPU board makes use of two different QuickSwitch clamp diode devices, the QS316211 in the TSSOP56 package and the QS32X2245 in the QVSOP40 package. Figure 2-57 shows the QS316211 pinout and functional diagram.
Figure 2-56: QuickSwitch 5V to 3.3V Converter Application
UG038_05_72_090902
5V EPROM
QS3861QuickSwitch
5V - 3VConverter
5V
1N4148
4.3VCC
5V Floppy Disk
5V Hard Disk
VGA Display
5V BusChip Set3V CPU
5V DRAM5V I/O
5V I/O
10kΩ
Product Not Recommended for New Designs
94 www.xilinx.com ML300 User GuideUG038 (v1.3.2) January 3, 2008
Chapter 2: Board HardwareR
PCI VCCO on 2VP7
A Linear Technology LTC1763 regulator is used to ensure electrical compatibility to PCI and to protect the 2VP7 from over-voltage conditions. It is used for the VCCO of the banks connected to the PCI interface. For more information, see XAPP653: 3.3V PCI Design Guidelines.
Figure 2-57: IDTQS316211 (CPU.U53)
UG038_5_52a_111502
IDTQS3162111
2
3
4
5
6
7
8
9
10
11
12
13
14
15
16
17
18
19
20
33
32
31
30
2928
27
26
25
24
23
22
21
40
39
38
37
36
35
34
45
44
43
42
41
52
51
50
55
56
54
53
49
48
47
46
2A3
VCC
2A2
2A1
1A12
1A11
1A10
1A9
GND
1A6
1A3
1A2
1A4
1A1
NC
2B4
GND
2B3
2B2
2B1
1B12
1B11
1B10
1B7
1B6
GND
1B8
1B9
1B4
1B5
1B3
1B2
1B1
1OE
2A4
GND
1A8
1A7
1A5
2A10
2A9
2A8
2A7
2A6
2A5
2A12
2A11
2B12
2B11
2B10
2B9
2B8
2B7
2B6
2B5
2OE
1B121B1
1A1 1A12
1OE
2A12
2A1
2OE
2B12
2A12
Product Not Recommended for New Designs
ML300 User Guide www.xilinx.com 95UG038 (v1.3.2) January 3, 2008
PCI/PMCR
PCI Mezzanine Connector (PMC)
PMC is a daughter card specification based upon PCI signaling standards, but with a different connection and mechanical specification. The electrical signaling for the PMC is based entirely on the PCI standard, allowing standard PCI devices and PMC devices to coexist on the same bus.
The physical interface of the PMC differs from the standard PCI interface, using up to five 64-pin connectors. Basic PCI signal connectivity is provided by two connectors, JN1 and JN2. The 64-bit PCI extension is achieved using a third connector, JN3. JN4 and JN5 provide for general purpose I/O defined by the user.
On the ML300 Hardware Platform, connector JN1 (CPU.J104), JN2 (CPU.J105) and JN4 (CPU.J106) are provided. This provides for basic 32-bit PCI functionality as well as general purpose I/O. The pinout of these connectors is shown in the following figures:
• Figure 2-59, page 96: PMC Connector JN1 (CPU.J104)
♦ Providing 32-Bit Functionality
• Figure 2-60, page 97: PMC Connector JN2 (CPU.J105)
♦ Providing 32-Bit Functionality
• Figure 2-61, page 98: PMC Connector JN4 (CPU.J106)
♦ Providing general purpose I/O.
The REQ on pin 17 of JN1 (CPU.J104.17) and GNT on pin 16 of JN1 (CPU.J104.16) for PMC are attached to pins R3 and R4, respectively, on the 2VP7. The PMC_IDSEL is tied to AD17.
Figure 2-58: Recommended Virtex-II Pro PCI VCCO Regulator
UG038_05_74_090902
Virtex-II ProPlatform FPGA
3.3V PCI Bus
To Virtex-II Pro VCCO
R226.1Ω
R138.3Ω
LT1763CS88
7
6
5 4
3
2
1
NC
PCI Bank Pins
1%Size: 1206
1%Size: 1206
C13.3μF
TantalumSize: A
VOUT
VIN from 5.0V ± 5%
+
Product Not Recommended for New Designs
96 www.xilinx.com ML300 User GuideUG038 (v1.3.2) January 3, 2008
Chapter 2: Board HardwareR
Figure 2-59: PMC Connector JN1 (CPU.J104) Providing 32-Bit Functionality
UG038_5_81_112102
PMC_CONN4IO1
IO3
IO5
IO7
IO9
IO11
IO13
IO15
IO17
IO19
IO21
IO23
IO25
IO27
IO29
IO31
IO33
IO35
IO37
IO39
IO41
IO43
IO45
IO47
IO49
IO51
IO53
IO55
IO57
IO59
IO61
IO63
IO30
IO32
IO34
IO36
IO38
IO40
IO42
IO44
IO46
IO48
IO10
IO12
IO14
IO4
IO2
IO6
IO8
IO16
IO18
IO20
IO22
IO24
IO26
IO28
IO50
IO52
IO54
IO56
IO58
IO60
IO62
IO64
PCI_PORT_AD00
PCI_PORT_AD02
PCI_PORT_AD04
PCI_PORT_AD06
PCI_PORT_AD09
PCI_PORT_AD12
PCI_PORT_PAR
PCI_PORT_SDONE
PCI_PORT_FRAME
PCI_PORT_DEVSEL
PCI_PORT_AD19
PCI_PORT_AD22
PCI_PORT_AD25
PCI_PORT_AD28
PCI_PORT_PMC_REQ
PCI_PORT_CLK_PMC
PCI_PORT_INTD
PCI_PORT_PRS1
PCI_PORT_INTB
PCI_PORT_PMC_TCK
PCI_VIO
PCI_PORT_REQ64
PCI_PORT_AD01
PCI_PORT_AD03
PCI_PORT_AD05
PCI_PORT_CBE0
PCI_PORT_AD11
PCI_PORT_AD15
PCI_PORT_SBO
PCI_PORT_LOCK
PCI_PORT_IRDY
PCI_PORT_AD17
PCI_PORT_AD21
PCI_PORT_CBE3
PCI_PORT_AD27
PCI_PORT_AD31
PCI_PORT_PMC_GNT
PMC_TP2
PMC_TP1
PCI_PORT_INTC
PCI_PORT_INTA
VCC5VCC12_N
Product Not Recommended for New Designs
ML300 User Guide www.xilinx.com 97UG038 (v1.3.2) January 3, 2008
PCI/PMCR
Figure 2-60: PMC Connector JN2 (CPU.J105) Providing 32-Bit Functionality
UG038_5_82_112102
PMC_CONN4IO1
IO3
IO5
IO7
IO9
IO11
IO13
IO15
IO17
IO19
IO21
IO23
IO25
IO27
IO29
IO31
IO33
IO35
IO37
IO39
IO41
IO43
IO45
IO47
IO49
IO51
IO53
IO55
IO57
IO59
IO61
IO63
IO30
IO32
IO34
IO36
IO38
IO40
IO42
IO44
IO46
IO48
IO10
IO12
IO14
IO4
IO2
IO6
IO8
IO16
IO18
IO20
IO22
IO24
IO26
IO28
IO50
IO52
IO54
IO56
IO58
IO60
IO62
IO64
PMC_CONN4_IO61
PMC_CONN4_IO59
PMC_CONN4_IO55
PMC_CONN4_IO53
PMC_CONN4_IO49
PMC_CONN4_IO47
PMC_CONN4_IO43
PMC_CONN4_IO41
PMC_CONN4_IO33
PMC_CONN4_IO37
PMC_CONN4_IO29
PMC_CONN4_IO27
PMC_CONN4_IO23
PMC_CONN4_IO21
PMC_CONN4_IO17
PMC_CONN4_IO13
PMC_CONN4_IO9
AUDIO_PMC_BIT_CLK
AUDIO_PMC_SYNCH
IIC_PMC_SDA
AUDIO_PMC_CS0
PLB_BUS_ERROR
PPMC_CONN4_IO60
PMC_CONN4_IO58
PMC_CONN4_IO54
PMC_CONN4_IO52
PMC_CONN4_IO48
PMC_CONN4_IO46
PMC_CONN4_IO42
PMC_CONN4_IO40
PMC_CONN4_IO36
PMC_CONN4_IO32
PMC_CONN4_IO28
PMC_CONN4_IO26
PMC_CONN4_IO22
PMC_CONN4_IO20
PMC_CONN4_IO16
PMC_CONN4_IO12
PMC_CONN4_IO10
AUDIO_PMC_SDATA_IN
AUDIO_PMC_RESET_N
PMC_CONN4_IO11
PMC_CONN4_IO15
PMC_CONN4_IO19
PMC_CONN4_IO25
PMC_CONN4_IO31
PMC_CONN4_IO35
PMC_CONN4_IO39
PMC_CONN4_IO45
PMC_CONN4_IO51
PMC_CONN4_IO57
OPB_BUS_ERROR
IIC_PMC_SCL
AUDIO_PMC_SDATA_OUT
PMC_CONN4_IO14
PMC_CONN4_IO18
PMC_CONN4_IO24
PMC_CONN4_IO30
PMC_CONN4_IO34
PMC_CONN4_IO38
PMC_CONN4_IO44
PMC_CONN4_IO50
PMC_CONN4_IO56
PMC_CONN4_IO62
Product Not Recommended for New Designs
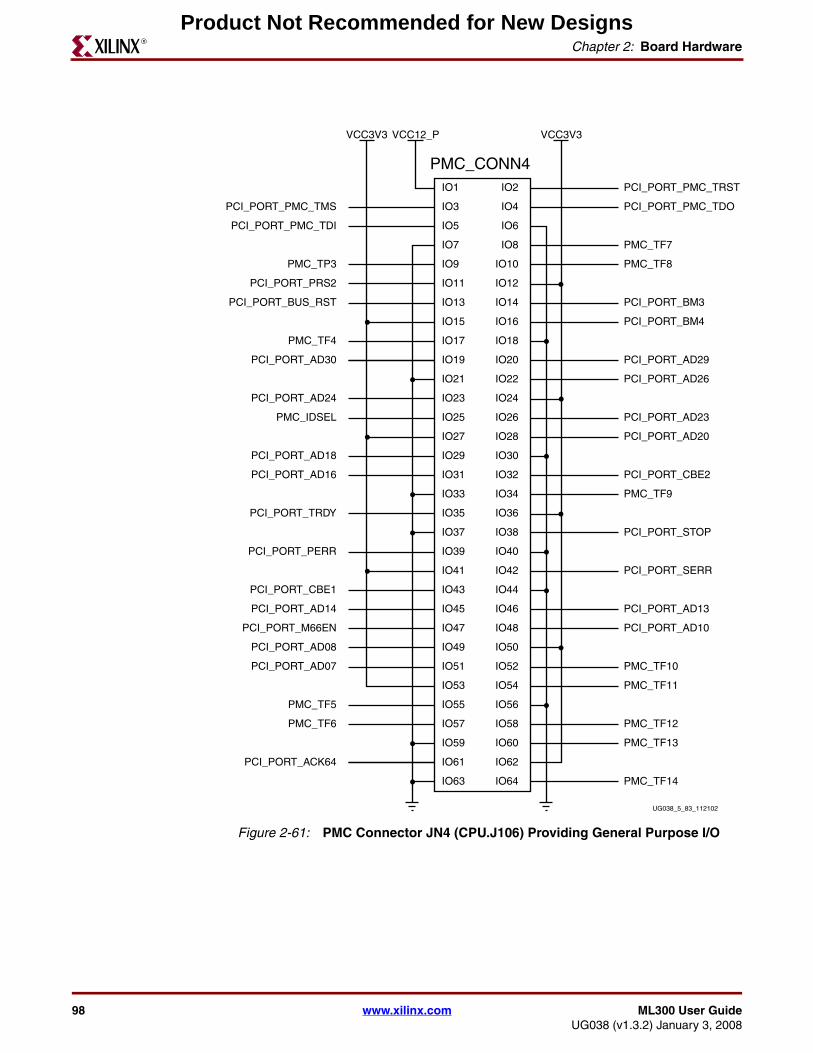
98 www.xilinx.com ML300 User GuideUG038 (v1.3.2) January 3, 2008
Chapter 2: Board HardwareR
Figure 2-61: PMC Connector JN4 (CPU.J106) Providing General Purpose I/O
UG038_5_83_112102
PMC_CONN4IO1
IO3
IO5
IO7
IO9
IO11
IO13
IO15
IO17
IO19
IO21
IO23
IO25
IO27
IO29
IO31
IO33
IO35
IO37
IO39
IO41
IO43
IO45
IO47
IO49
IO51
IO53
IO55
IO57
IO59
IO61
IO63
IO30
IO32
IO34
IO36
IO38
IO40
IO42
IO44
IO46
IO48
IO10
IO12
IO14
IO4
IO2
IO6
IO8
IO16
IO18
IO20
IO22
IO24
IO26
IO28
IO50
IO52
IO54
IO56
IO58
IO60
IO62
IO64
PMC_TF13
PMC_TF11
PCI_PORT_AD10
PCI_PORT_AD13
PCI_PORT_SERR
PCI_PORT_STOP
PCI_PORT_AD20
PCI_PORT_AD26
PCI_PORT_AD29
PCI_PORT_BM3
PMC_TF8
PMC_TF7
PCI_PORT_PMC_TDO
PCI_PORT_PMC_TRST
PCI_PORT_ACK64
PMC_TF6
PMC_TF5
PCI_PORT_AD07
PCI_PORT_AD14
PCI_PORT_CBE1
PCI_PORT_PERR
PCI_PORT_TRDY
PCI_PORT_AD16
PMC_IDSEL
PCI_PORT_AD24
PCI_PORT_AD30
PCI_PORT_PRS2
PMC_TP3
PCI_PORT_PMC_TDI
PCI_PORT_PMC_TMS
PCI_PORT_BM4
PCI_PORT_AD23
PMC_TF9
PCI_PORT_CBE2
PMC_TF10
PMC_TF12
PMC_TF14
PCI_PORT_BUS_RST
PMC_TF4
PCI_PORT_AD18
PCI_PORT_AD08
PCI_PORT_M66EN
VCC3V3 VCC3V3VCC12_P
Product Not Recommended for New Designs
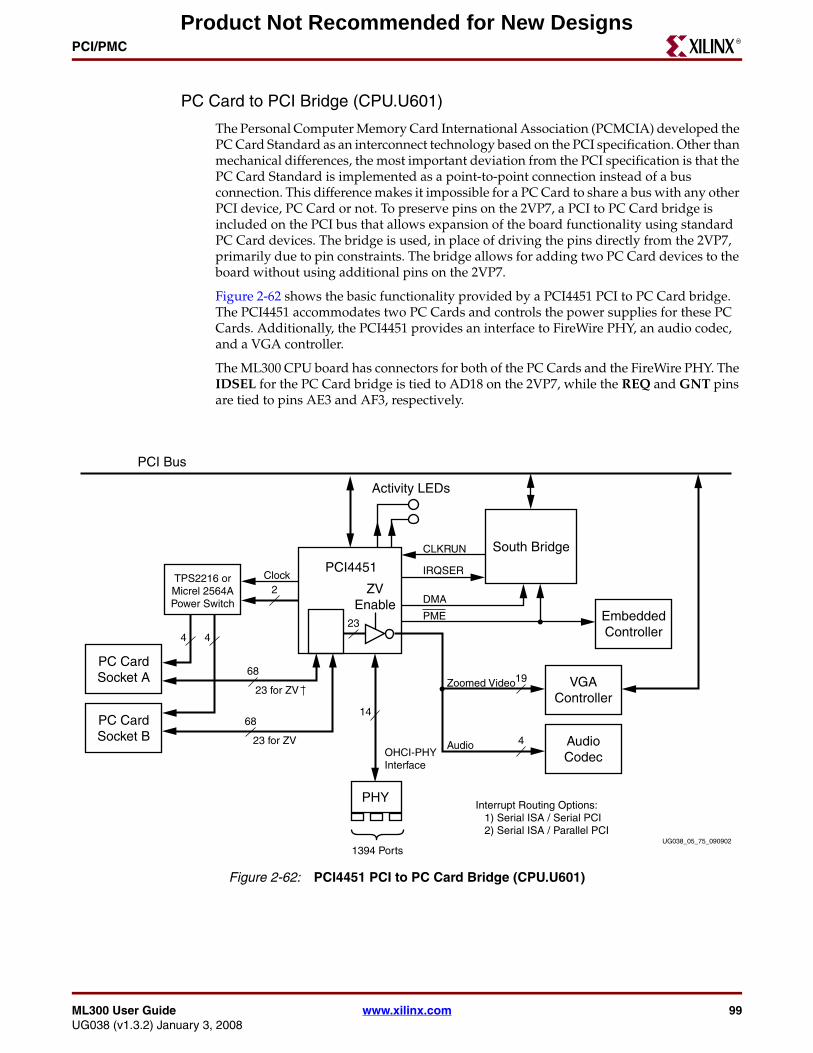
ML300 User Guide www.xilinx.com 99UG038 (v1.3.2) January 3, 2008
PCI/PMCR
PC Card to PCI Bridge (CPU.U601)
The Personal Computer Memory Card International Association (PCMCIA) developed the PC Card Standard as an interconnect technology based on the PCI specification. Other than mechanical differences, the most important deviation from the PCI specification is that the PC Card Standard is implemented as a point-to-point connection instead of a bus connection. This difference makes it impossible for a PC Card to share a bus with any other PCI device, PC Card or not. To preserve pins on the 2VP7, a PCI to PC Card bridge is included on the PCI bus that allows expansion of the board functionality using standard PC Card devices. The bridge is used, in place of driving the pins directly from the 2VP7, primarily due to pin constraints. The bridge allows for adding two PC Card devices to the board without using additional pins on the 2VP7.
Figure 2-62 shows the basic functionality provided by a PCI4451 PCI to PC Card bridge. The PCI4451 accommodates two PC Cards and controls the power supplies for these PC Cards. Additionally, the PCI4451 provides an interface to FireWire PHY, an audio codec, and a VGA controller.
The ML300 CPU board has connectors for both of the PC Cards and the FireWire PHY. The IDSEL for the PC Card bridge is tied to AD18 on the 2VP7, while the REQ and GNT pins are tied to pins AE3 and AF3, respectively.
Figure 2-62: PCI4451 PCI to PC Card Bridge (CPU.U601)
UG038_05_75_090902
PCI Bus
Activity LEDs
1394 Ports
AudioCodec
VGAController
EmbeddedController
PC CardSocket A
PCI4451
ZVEnable
23
South Bridge
PC CardSocket B
TPS2216 orMicrel 2564APower Switch
PHY
4
2Clock
CLKRUN
IRQSER
DMA
PME
68
68
23 for ZV
23 for ZV
4
14
OHCI-PHYInterface
Zoomed Video
Audio
Interrupt Routing Options: 1) Serial ISA / Serial PCI 2) Serial ISA / Parallel PCI
19
4
Product Not Recommended for New Designs
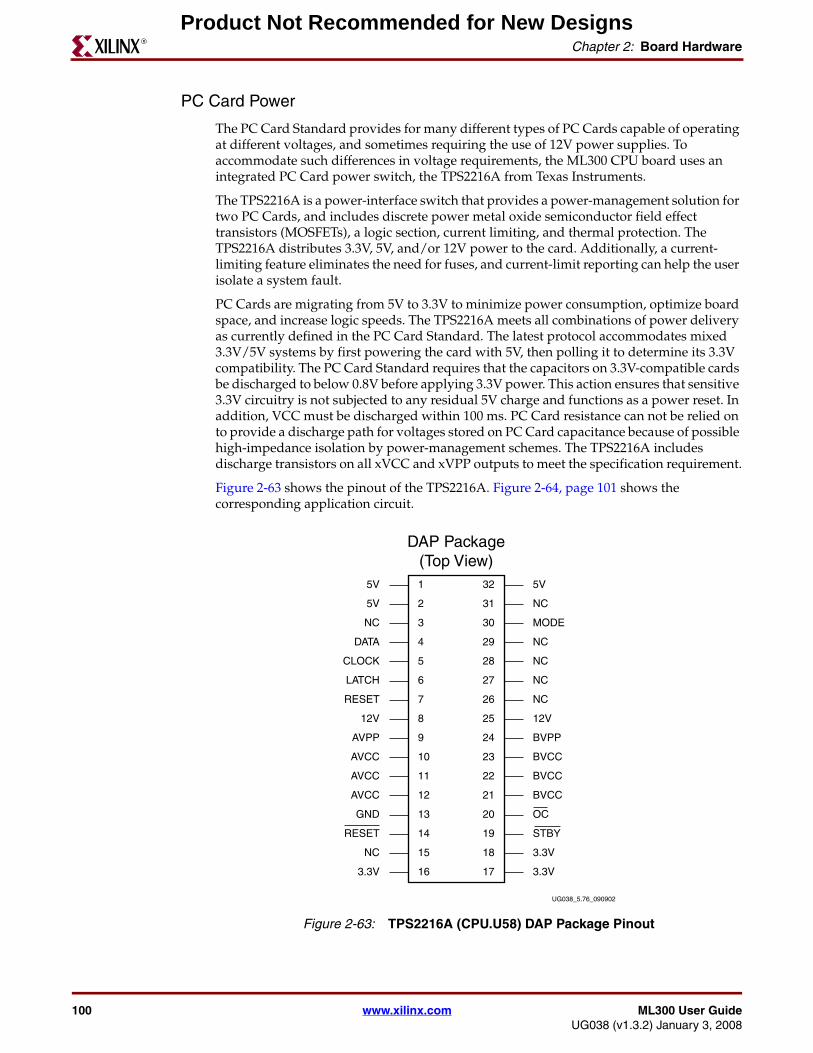
100 www.xilinx.com ML300 User GuideUG038 (v1.3.2) January 3, 2008
Chapter 2: Board HardwareR
PC Card Power
The PC Card Standard provides for many different types of PC Cards capable of operating at different voltages, and sometimes requiring the use of 12V power supplies. To accommodate such differences in voltage requirements, the ML300 CPU board uses an integrated PC Card power switch, the TPS2216A from Texas Instruments.
The TPS2216A is a power-interface switch that provides a power-management solution for two PC Cards, and includes discrete power metal oxide semiconductor field effect transistors (MOSFETs), a logic section, current limiting, and thermal protection. The TPS2216A distributes 3.3V, 5V, and/or 12V power to the card. Additionally, a current-limiting feature eliminates the need for fuses, and current-limit reporting can help the user isolate a system fault.
PC Cards are migrating from 5V to 3.3V to minimize power consumption, optimize board space, and increase logic speeds. The TPS2216A meets all combinations of power delivery as currently defined in the PC Card Standard. The latest protocol accommodates mixed 3.3V/5V systems by first powering the card with 5V, then polling it to determine its 3.3V compatibility. The PC Card Standard requires that the capacitors on 3.3V-compatible cards be discharged to below 0.8V before applying 3.3V power. This action ensures that sensitive 3.3V circuitry is not subjected to any residual 5V charge and functions as a power reset. In addition, VCC must be discharged within 100 ms. PC Card resistance can not be relied on to provide a discharge path for voltages stored on PC Card capacitance because of possible high-impedance isolation by power-management schemes. The TPS2216A includes discharge transistors on all xVCC and xVPP outputs to meet the specification requirement.
Figure 2-63 shows the pinout of the TPS2216A. Figure 2-64, page 101 shows the corresponding application circuit.
Figure 2-63: TPS2216A (CPU.U58) DAP Package Pinout
UG038_5.76_090902
DAP Package(Top View)1
2
3
4
5
6
7
8
9
10
11
12
13
14
15
16
32
31
30
29
28
27
26
25
24
23
22
21
20
19
18
173.3V
NC
RESET
GND
AVCC
AVCC
12V
RESET
DATA
NC
CLOCK
5V
5V
3.3V
3.3V
STBY
OC
BVCC
BVPP
12V
5V
BVCC
NC
NC
NC
NC
MODE
NC
AVCC
AVPP
LATCH
BVCC
Product Not Recommended for New Designs
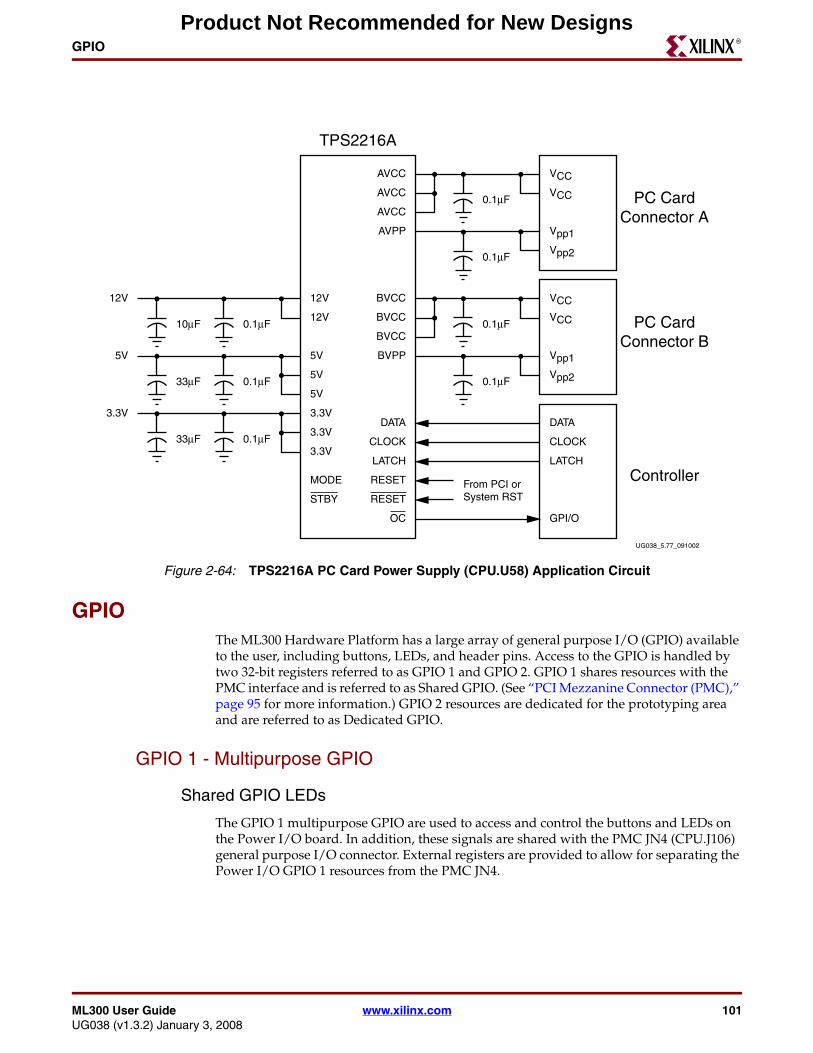
ML300 User Guide www.xilinx.com 101UG038 (v1.3.2) January 3, 2008
GPIOR
GPIOThe ML300 Hardware Platform has a large array of general purpose I/O (GPIO) available to the user, including buttons, LEDs, and header pins. Access to the GPIO is handled by two 32-bit registers referred to as GPIO 1 and GPIO 2. GPIO 1 shares resources with the PMC interface and is referred to as Shared GPIO. (See “PCI Mezzanine Connector (PMC),” page 95 for more information.) GPIO 2 resources are dedicated for the prototyping area and are referred to as Dedicated GPIO.
GPIO 1 - Multipurpose GPIO
Shared GPIO LEDs
The GPIO 1 multipurpose GPIO are used to access and control the buttons and LEDs on the Power I/O board. In addition, these signals are shared with the PMC JN4 (CPU.J106) general purpose I/O connector. External registers are provided to allow for separating the Power I/O GPIO 1 resources from the PMC JN4.
Figure 2-64: TPS2216A PC Card Power Supply (CPU.U58) Application Circuit
UG038_5.77_091002
VCC
VCC
Vpp1
Vpp2
12V
From PCI orSystem RST
PC CardConnector A
VCC
VCC
Vpp1
Vpp2
PC CardConnector B
DATA
0.1μF
0.1μF
0.1μF
0.1μF
CLOCK
LATCH
GPI/O
Controller
TPS2216A
12V
12V
5V
5V
5V
3.3V
3.3V
3.3V
MODE
STBY
DATA
CLOCK
LATCH
RESET
AVCC
AVCC
AVCC
AVPP
BVCC
BVCC
BVCC
BVPP
RESET
OC
0.1μF10μF
5V
0.1μF33μF
3.3V
0.1μF33μF
Product Not Recommended for New Designs
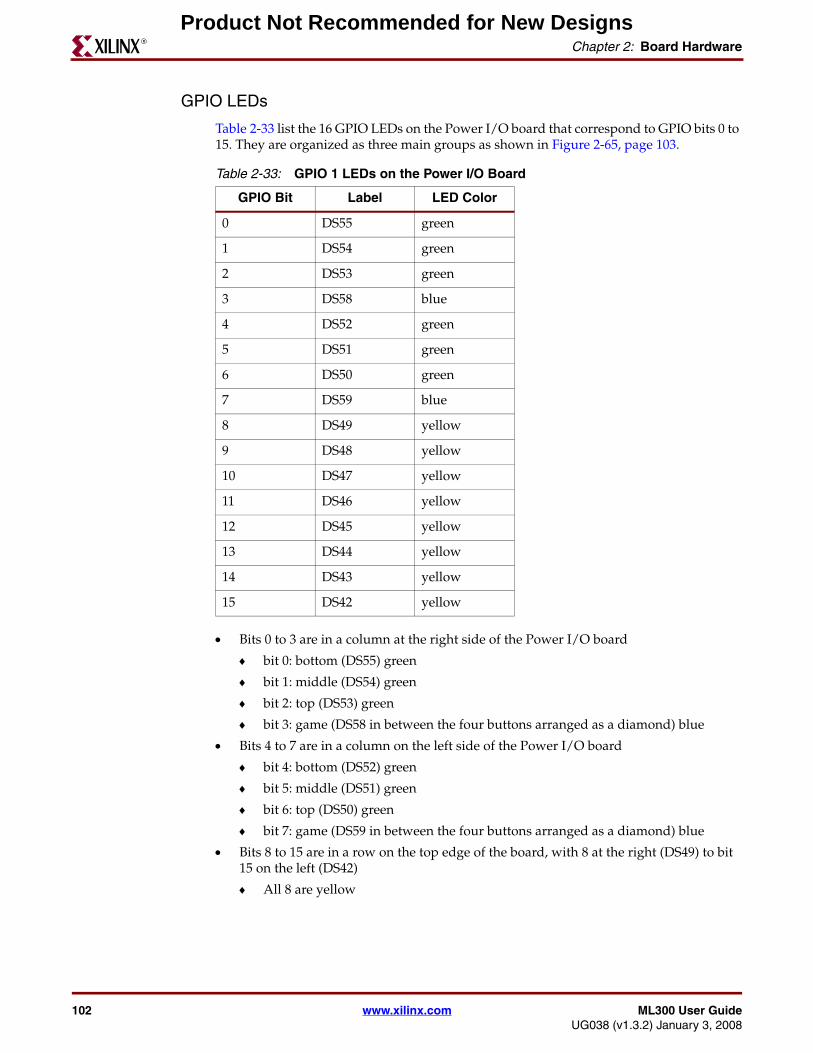
102 www.xilinx.com ML300 User GuideUG038 (v1.3.2) January 3, 2008
Chapter 2: Board HardwareR
GPIO LEDs
Table 2-33 list the 16 GPIO LEDs on the Power I/O board that correspond to GPIO bits 0 to 15. They are organized as three main groups as shown in Figure 2-65, page 103.
• Bits 0 to 3 are in a column at the right side of the Power I/O board
♦ bit 0: bottom (DS55) green
♦ bit 1: middle (DS54) green
♦ bit 2: top (DS53) green
♦ bit 3: game (DS58 in between the four buttons arranged as a diamond) blue
• Bits 4 to 7 are in a column on the left side of the Power I/O board
♦ bit 4: bottom (DS52) green
♦ bit 5: middle (DS51) green
♦ bit 6: top (DS50) green
♦ bit 7: game (DS59 in between the four buttons arranged as a diamond) blue
• Bits 8 to 15 are in a row on the top edge of the board, with 8 at the right (DS49) to bit 15 on the left (DS42)
♦ All 8 are yellow
Table 2-33: GPIO 1 LEDs on the Power I/O Board
GPIO Bit Label LED Color
0 DS55 green
1 DS54 green
2 DS53 green
3 DS58 blue
4 DS52 green
5 DS51 green
6 DS50 green
7 DS59 blue
8 DS49 yellow
9 DS48 yellow
10 DS47 yellow
11 DS46 yellow
12 DS45 yellow
13 DS44 yellow
14 DS43 yellow
15 DS42 yellow
Product Not Recommended for New Designs
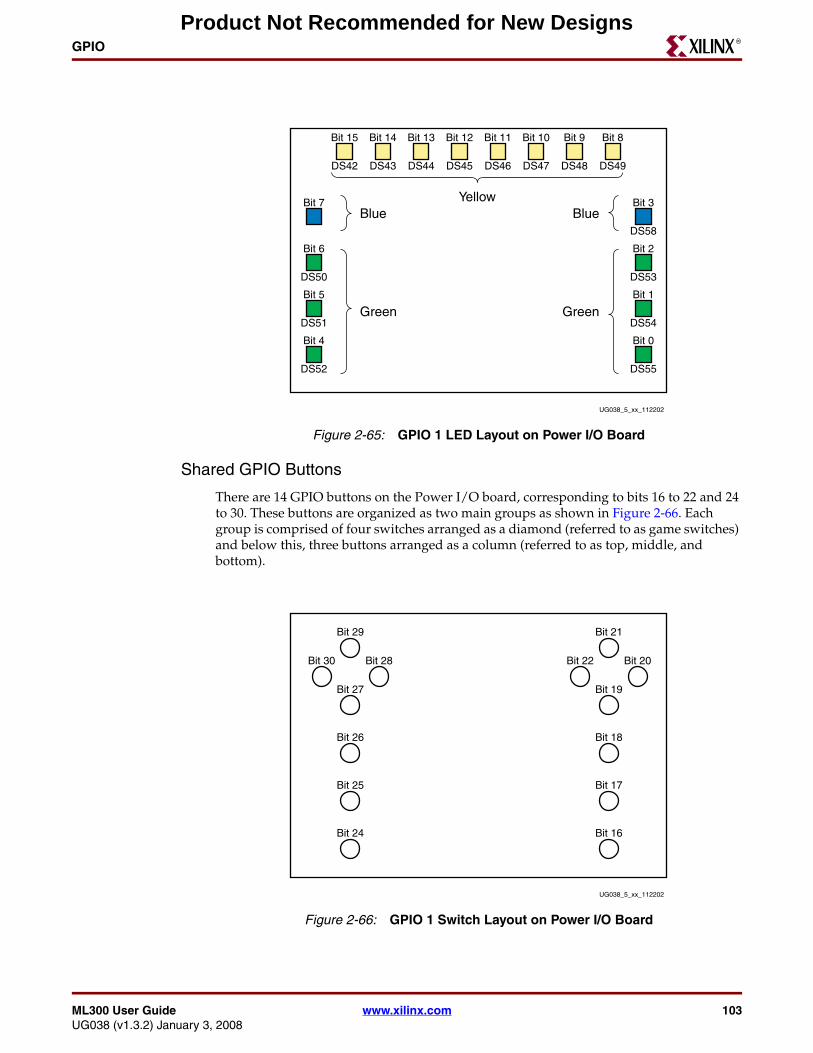
ML300 User Guide www.xilinx.com 103UG038 (v1.3.2) January 3, 2008
GPIOR
Shared GPIO Buttons
There are 14 GPIO buttons on the Power I/O board, corresponding to bits 16 to 22 and 24 to 30. These buttons are organized as two main groups as shown in Figure 2-66. Each group is comprised of four switches arranged as a diamond (referred to as game switches) and below this, three buttons arranged as a column (referred to as top, middle, and bottom).
Figure 2-65: GPIO 1 LED Layout on Power I/O Board
UG038_5_xx_112202
Bit 15 Bit 14 Bit 13 Bit 12 Bit 11 Bit 10 Bit 9 Bit 8
DS42 DS43 DS44 DS45 DS46 DS47 DS48 DS49
Bit 7 Yellow
Green Green
Bit 6
DS50
Bit 5
DS51
Bit 4
DS52
Bit 3
DS58
Bit 2
DS53
Bit 1
DS54
Bit 0
DS55
Blue Blue
Figure 2-66: GPIO 1 Switch Layout on Power I/O Board
UG038_5_xx_112202
Bit 24
Bit 25
Bit 26
Bit 27
Bit 29
Bit 30 Bit 28
Bit 19
Bit 21
Bit 22 Bit 20
Bit 16
Bit 17
Bit 18
Product Not Recommended for New Designs
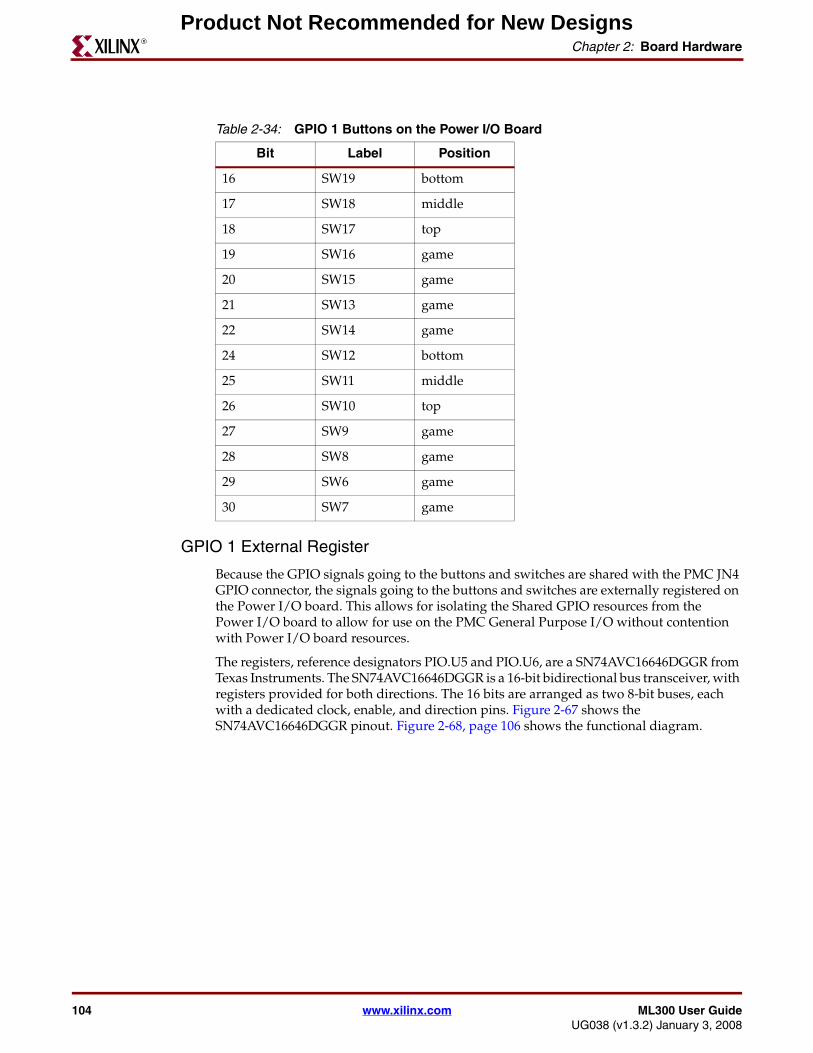
104 www.xilinx.com ML300 User GuideUG038 (v1.3.2) January 3, 2008
Chapter 2: Board HardwareR
GPIO 1 External Register
Because the GPIO signals going to the buttons and switches are shared with the PMC JN4 GPIO connector, the signals going to the buttons and switches are externally registered on the Power I/O board. This allows for isolating the Shared GPIO resources from the Power I/O board to allow for use on the PMC General Purpose I/O without contention with Power I/O board resources.
The registers, reference designators PIO.U5 and PIO.U6, are a SN74AVC16646DGGR from Texas Instruments. The SN74AVC16646DGGR is a 16-bit bidirectional bus transceiver, with registers provided for both directions. The 16 bits are arranged as two 8-bit buses, each with a dedicated clock, enable, and direction pins. Figure 2-67 shows the SN74AVC16646DGGR pinout. Figure 2-68, page 106 shows the functional diagram.
Table 2-34: GPIO 1 Buttons on the Power I/O Board
Bit Label Position
16 SW19 bottom
17 SW18 middle
18 SW17 top
19 SW16 game
20 SW15 game
21 SW13 game
22 SW14 game
24 SW12 bottom
25 SW11 middle
26 SW10 top
27 SW9 game
28 SW8 game
29 SW6 game
30 SW7 game
Product Not Recommended for New Designs
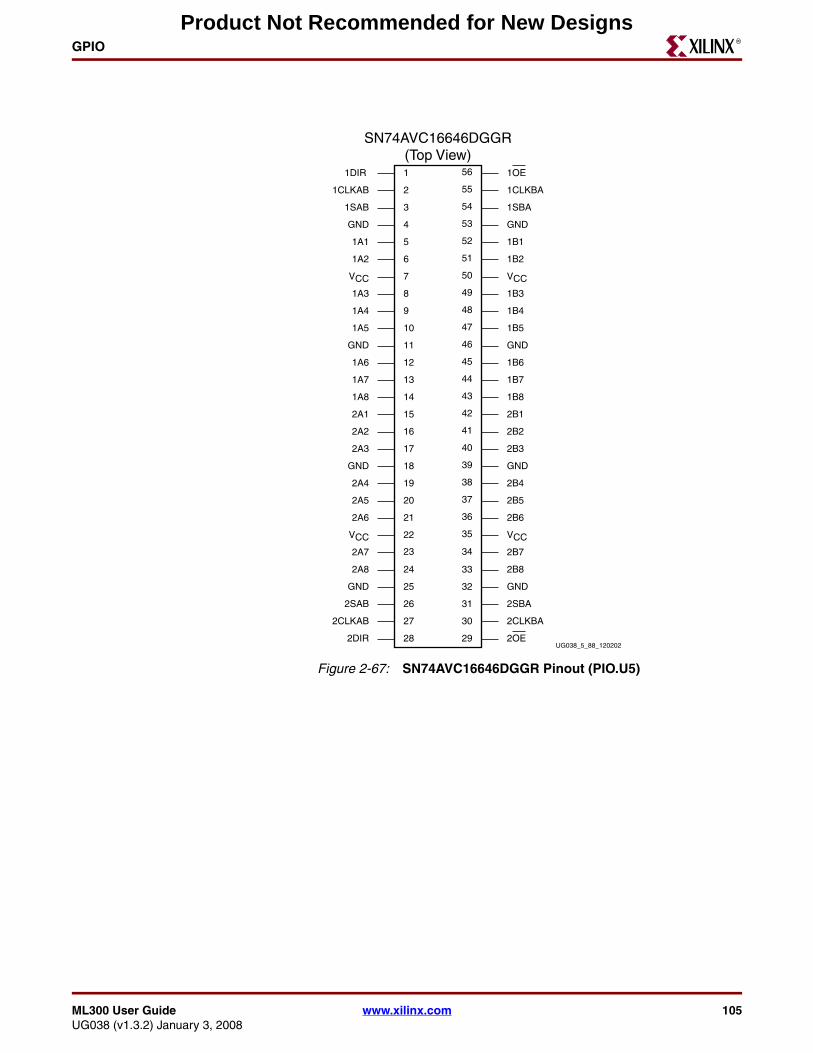
ML300 User Guide www.xilinx.com 105UG038 (v1.3.2) January 3, 2008
GPIOR
Figure 2-67: SN74AVC16646DGGR Pinout (PIO.U5)
SN74AVC16646DGGR(Top View)1
2
3
4
5
6
7
8
9
10
11
12
13
14
15
16
17
18
19
20
21
22
23
24
25
26
27
28 29
30
31
32
33
56
55
54
53
52
51
50
49
48
47
46
45
44
43
42
41
40
39
38
37
36
35
34
2DIR
2CLKAB
2SAB
GND
2A8
2A7
VCC
2A6
2A5
2A4
GND
2A3
2A2
2A1
1A8
1A7
1A6
GND
1A5
1A4
1A3
VCC
1A2
1A1
GND
1SAB
1CLKAB
1DIR
2OE
2CLKBA
2SBA
GND
2B8
2B7
VCC
2B6
2B5
2B4
GND
2B3
2B2
2B1
1B8
1B7
1B6
GND
1B5
1B4
1B3
VCC
1B2
1B1
GND
1SBA
1CLKBA
1OE
UG038_5_88_120202
Product Not Recommended for New Designs
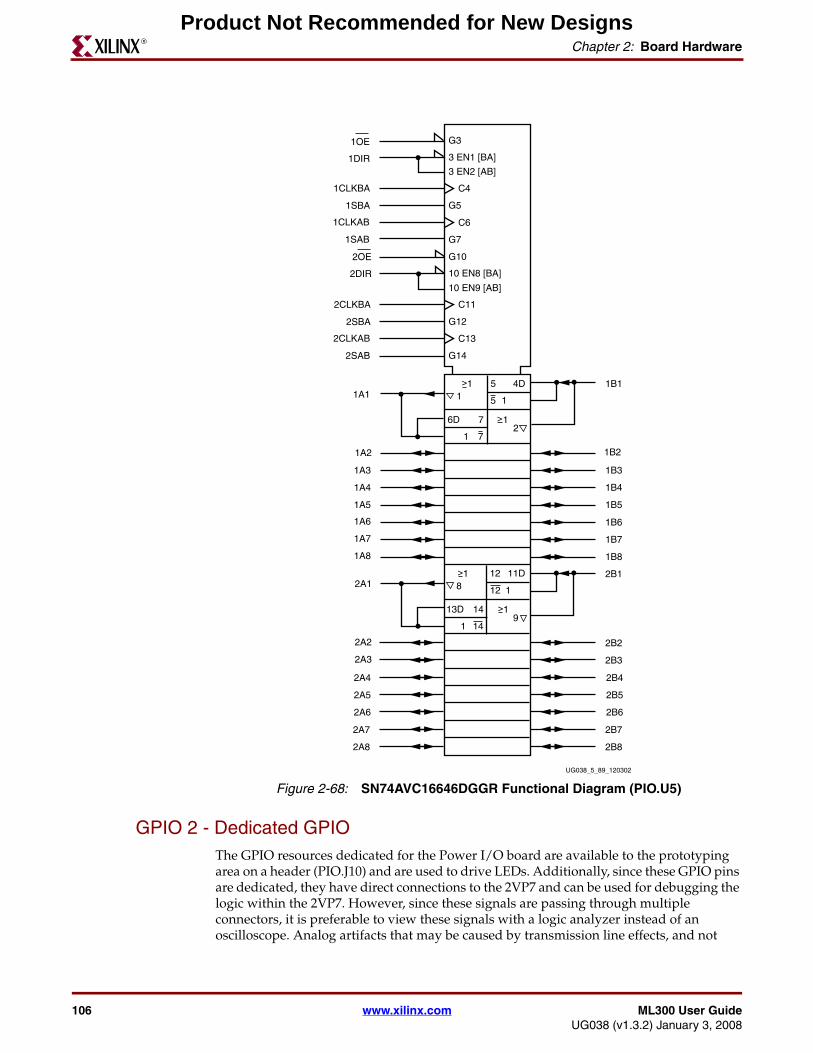
106 www.xilinx.com ML300 User GuideUG038 (v1.3.2) January 3, 2008
Chapter 2: Board HardwareR
GPIO 2 - Dedicated GPIOThe GPIO resources dedicated for the Power I/O board are available to the prototyping area on a header (PIO.J10) and are used to drive LEDs. Additionally, since these GPIO pins are dedicated, they have direct connections to the 2VP7 and can be used for debugging the logic within the 2VP7. However, since these signals are passing through multiple connectors, it is preferable to view these signals with a logic analyzer instead of an oscilloscope. Analog artifacts that may be caused by transmission line effects, and not
Figure 2-68: SN74AVC16646DGGR Functional Diagram (PIO.U5)
UG038_5_89_120302
1OE
1DIR
2OE
2DIR
1SAB
1CLKAB
1SBA
1CLKBA
2SAB
2CLKAB
2SBA
2CLKBA
2A8
2A7
2A6
2A5
2A4
2A3
2A2
2A1
1A8
1A7
1A6
1A5
1A4
1A3
1A2
1A1
2B8
2B7
2B6
2B5
2B4
2B3
2B2
2B1
1B8
1B7
1B6
1B5
1B4
1B3
1B2
1B1
G3
G5
C4
G7
G10
C6
G12
C11
G14
C13
3 EN1 [BA]
3 EN2 [AB]
10 EN8 [BA]
10 EN9 [AB]
11
1
1
1 7
72
4D
6D
5
5
>
>
81
1
12
12 1
>
13D 14
11D
914
1>
Product Not Recommended for New Designs
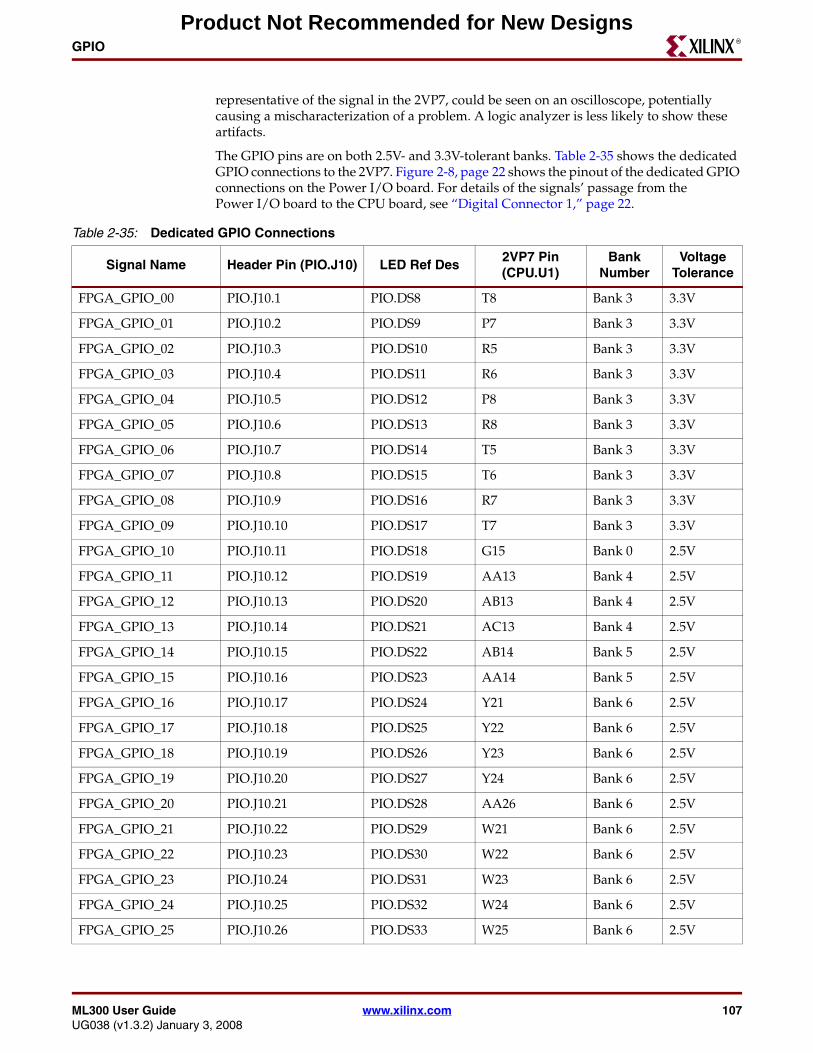
ML300 User Guide www.xilinx.com 107UG038 (v1.3.2) January 3, 2008
GPIOR
representative of the signal in the 2VP7, could be seen on an oscilloscope, potentially causing a mischaracterization of a problem. A logic analyzer is less likely to show these artifacts.
The GPIO pins are on both 2.5V- and 3.3V-tolerant banks. Table 2-35 shows the dedicated GPIO connections to the 2VP7. Figure 2-8, page 22 shows the pinout of the dedicated GPIO connections on the Power I/O board. For details of the signals’ passage from the Power I/O board to the CPU board, see “Digital Connector 1,” page 22.
Table 2-35: Dedicated GPIO Connections
Signal Name Header Pin (PIO.J10) LED Ref Des2VP7 Pin (CPU.U1)
Bank Number
Voltage Tolerance
FPGA_GPIO_00 PIO.J10.1 PIO.DS8 T8 Bank 3 3.3V
FPGA_GPIO_01 PIO.J10.2 PIO.DS9 P7 Bank 3 3.3V
FPGA_GPIO_02 PIO.J10.3 PIO.DS10 R5 Bank 3 3.3V
FPGA_GPIO_03 PIO.J10.4 PIO.DS11 R6 Bank 3 3.3V
FPGA_GPIO_04 PIO.J10.5 PIO.DS12 P8 Bank 3 3.3V
FPGA_GPIO_05 PIO.J10.6 PIO.DS13 R8 Bank 3 3.3V
FPGA_GPIO_06 PIO.J10.7 PIO.DS14 T5 Bank 3 3.3V
FPGA_GPIO_07 PIO.J10.8 PIO.DS15 T6 Bank 3 3.3V
FPGA_GPIO_08 PIO.J10.9 PIO.DS16 R7 Bank 3 3.3V
FPGA_GPIO_09 PIO.J10.10 PIO.DS17 T7 Bank 3 3.3V
FPGA_GPIO_10 PIO.J10.11 PIO.DS18 G15 Bank 0 2.5V
FPGA_GPIO_11 PIO.J10.12 PIO.DS19 AA13 Bank 4 2.5V
FPGA_GPIO_12 PIO.J10.13 PIO.DS20 AB13 Bank 4 2.5V
FPGA_GPIO_13 PIO.J10.14 PIO.DS21 AC13 Bank 4 2.5V
FPGA_GPIO_14 PIO.J10.15 PIO.DS22 AB14 Bank 5 2.5V
FPGA_GPIO_15 PIO.J10.16 PIO.DS23 AA14 Bank 5 2.5V
FPGA_GPIO_16 PIO.J10.17 PIO.DS24 Y21 Bank 6 2.5V
FPGA_GPIO_17 PIO.J10.18 PIO.DS25 Y22 Bank 6 2.5V
FPGA_GPIO_18 PIO.J10.19 PIO.DS26 Y23 Bank 6 2.5V
FPGA_GPIO_19 PIO.J10.20 PIO.DS27 Y24 Bank 6 2.5V
FPGA_GPIO_20 PIO.J10.21 PIO.DS28 AA26 Bank 6 2.5V
FPGA_GPIO_21 PIO.J10.22 PIO.DS29 W21 Bank 6 2.5V
FPGA_GPIO_22 PIO.J10.23 PIO.DS30 W22 Bank 6 2.5V
FPGA_GPIO_23 PIO.J10.24 PIO.DS31 W23 Bank 6 2.5V
FPGA_GPIO_24 PIO.J10.25 PIO.DS32 W24 Bank 6 2.5V
FPGA_GPIO_25 PIO.J10.26 PIO.DS33 W25 Bank 6 2.5V
Product Not Recommended for New Designs
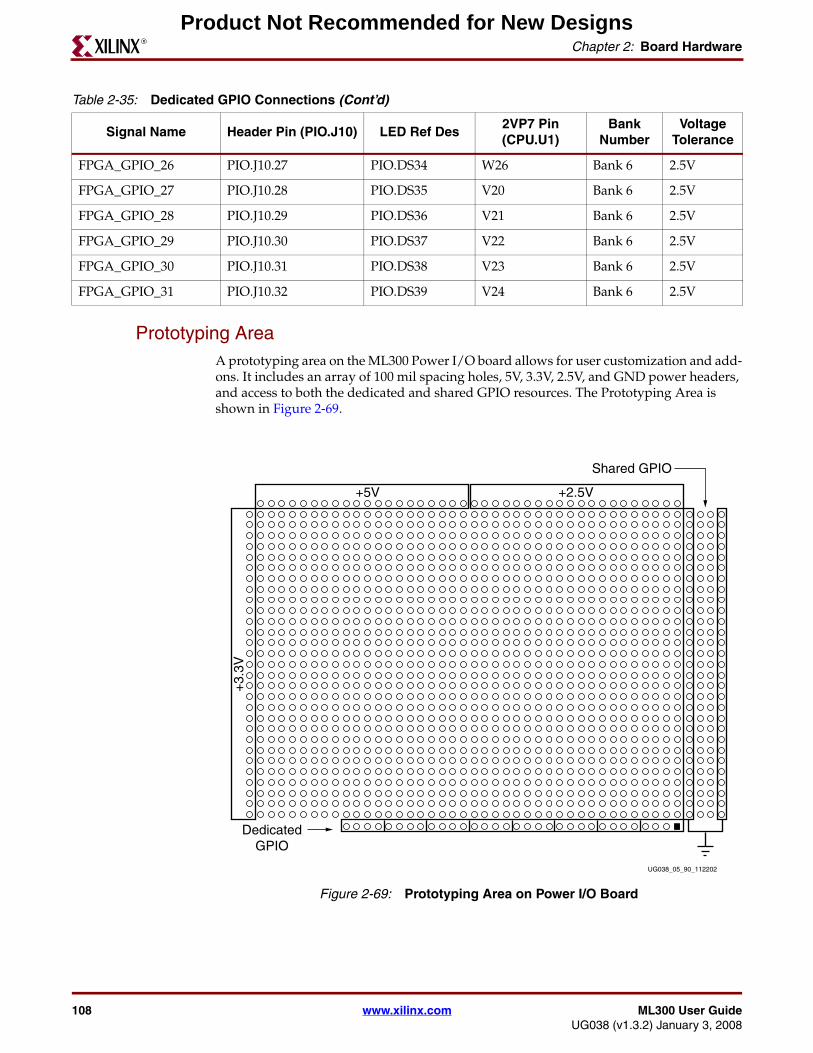
108 www.xilinx.com ML300 User GuideUG038 (v1.3.2) January 3, 2008
Chapter 2: Board HardwareR
Prototyping AreaA prototyping area on the ML300 Power I/O board allows for user customization and add-ons. It includes an array of 100 mil spacing holes, 5V, 3.3V, 2.5V, and GND power headers, and access to both the dedicated and shared GPIO resources. The Prototyping Area is shown in Figure 2-69.
FPGA_GPIO_26 PIO.J10.27 PIO.DS34 W26 Bank 6 2.5V
FPGA_GPIO_27 PIO.J10.28 PIO.DS35 V20 Bank 6 2.5V
FPGA_GPIO_28 PIO.J10.29 PIO.DS36 V21 Bank 6 2.5V
FPGA_GPIO_29 PIO.J10.30 PIO.DS37 V22 Bank 6 2.5V
FPGA_GPIO_30 PIO.J10.31 PIO.DS38 V23 Bank 6 2.5V
FPGA_GPIO_31 PIO.J10.32 PIO.DS39 V24 Bank 6 2.5V
Table 2-35: Dedicated GPIO Connections (Cont’d)
Signal Name Header Pin (PIO.J10) LED Ref Des2VP7 Pin (CPU.U1)
Bank Number
Voltage Tolerance
Figure 2-69: Prototyping Area on Power I/O Board
UG038_05_90_112202
+3.
3V
+5V +2.5V
Shared GPIO
DedicatedGPIO
Product Not Recommended for New Designs
ML300 User Guide www.xilinx.com 109UG038 (v1.3.2) January 3, 2008
Power SystemR
Prototyping Area Layout
Figure 2-69 shows the layout of the Prototyping Area on the Power I/O board. The power headers are located on the top edge (5V, 2.5V), the left edge (3.3V) and on the right edge (GND). The shared GPIO, covered in “GPIO 1 - Multipurpose GPIO,” page 101, is located on the right hand side between the two GND headers, while the Dedicated GPIO, covered in “GPIO 2 - Dedicated GPIO,” page 106, is located on the bottom edge of the Prototyping Area.
Prototyping Area Voltages
Headers for the prototyping area provide power for user applications. The power provided includes 5V on the upper edge of the area on the left side, 3.3V on the left, 2.5V on the upper edge of the area on the right, and GND on the right side. 5V and 3.3V supplies are generated using switching regulators, while the 2.5V supply is generated using linear regulators. See “Power System,” page 109 for more information on how each of these power supplies is generated.
Prototyping Area I/O Pins
The prototyping area provides access to the GPIO 1, GPIO 2, and the IIC Bus, as discussed in “GPIO 1 - Multipurpose GPIO,” page 101, “GPIO 2 - Dedicated GPIO,” page 106, and “IIC,” page 60, respectively. The Dedicated GPIO is located on the bottom edge of prototyping area, while the shared GPIO with external register controls and the IIC Bus are located on the right edge, between the two headers providing GND connections.
Power SystemAs today's systems continue to evolve, different manufacturing technologies and various signaling standards give rise to a wide range of power supplies required on a complex board.
Overview of Power on ML300The ML300 Hardware Platform supports a wide range of technologies, from legacy devices like serial and parallel ports, to DDR SDRAM and RocketIO multi-gigabit transceivers (MGTs). This wide range of technologies requires a wide range of power supplies. These are provided on the ML300 Hardware Platform using a combination of switching and linear power regulators.
The ML300 power system has three main states: off, on, and standby. The off state is when the Power I/O board is electrically disconnected from the Dell power supply, either by unplugging it or turning off the main power switch (PIO.SW1). (See “Primary Power Switch,” page 111 for more information.) The on state is when the entire ML300 Hardware Platform is receiving power, and all the power supplies are running. The standby state is when the Power I/O board is electrically connected to the Dell power supply, but the primary power supplies are turned off using the soft power switch. (See “Soft Power Switch,” page 111 for more information.)
Product Not Recommended for New Designs
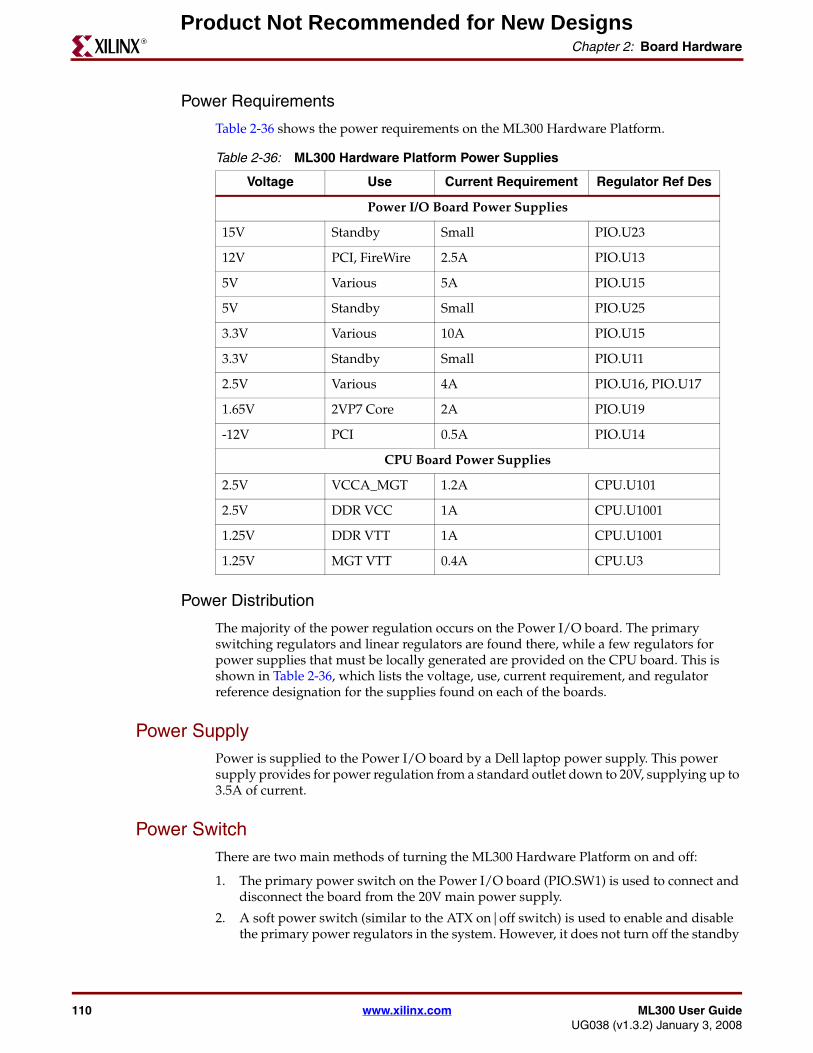
110 www.xilinx.com ML300 User GuideUG038 (v1.3.2) January 3, 2008
Chapter 2: Board HardwareR
Power Requirements
Table 2-36 shows the power requirements on the ML300 Hardware Platform.
Power Distribution
The majority of the power regulation occurs on the Power I/O board. The primary switching regulators and linear regulators are found there, while a few regulators for power supplies that must be locally generated are provided on the CPU board. This is shown in Table 2-36, which lists the voltage, use, current requirement, and regulator reference designation for the supplies found on each of the boards.
Power SupplyPower is supplied to the Power I/O board by a Dell laptop power supply. This power supply provides for power regulation from a standard outlet down to 20V, supplying up to 3.5A of current.
Power SwitchThere are two main methods of turning the ML300 Hardware Platform on and off:
1. The primary power switch on the Power I/O board (PIO.SW1) is used to connect and disconnect the board from the 20V main power supply.
2. A soft power switch (similar to the ATX on|off switch) is used to enable and disable the primary power regulators in the system. However, it does not turn off the standby
Table 2-36: ML300 Hardware Platform Power Supplies
Voltage Use Current Requirement Regulator Ref Des
Power I/O Board Power Supplies
15V Standby Small PIO.U23
12V PCI, FireWire 2.5A PIO.U13
5V Various 5A PIO.U15
5V Standby Small PIO.U25
3.3V Various 10A PIO.U15
3.3V Standby Small PIO.U11
2.5V Various 4A PIO.U16, PIO.U17
1.65V 2VP7 Core 2A PIO.U19
-12V PCI 0.5A PIO.U14
CPU Board Power Supplies
2.5V VCCA_MGT 1.2A CPU.U101
2.5V DDR VCC 1A CPU.U1001
1.25V DDR VTT 1A CPU.U1001
1.25V MGT VTT 0.4A CPU.U3
Product Not Recommended for New Designs
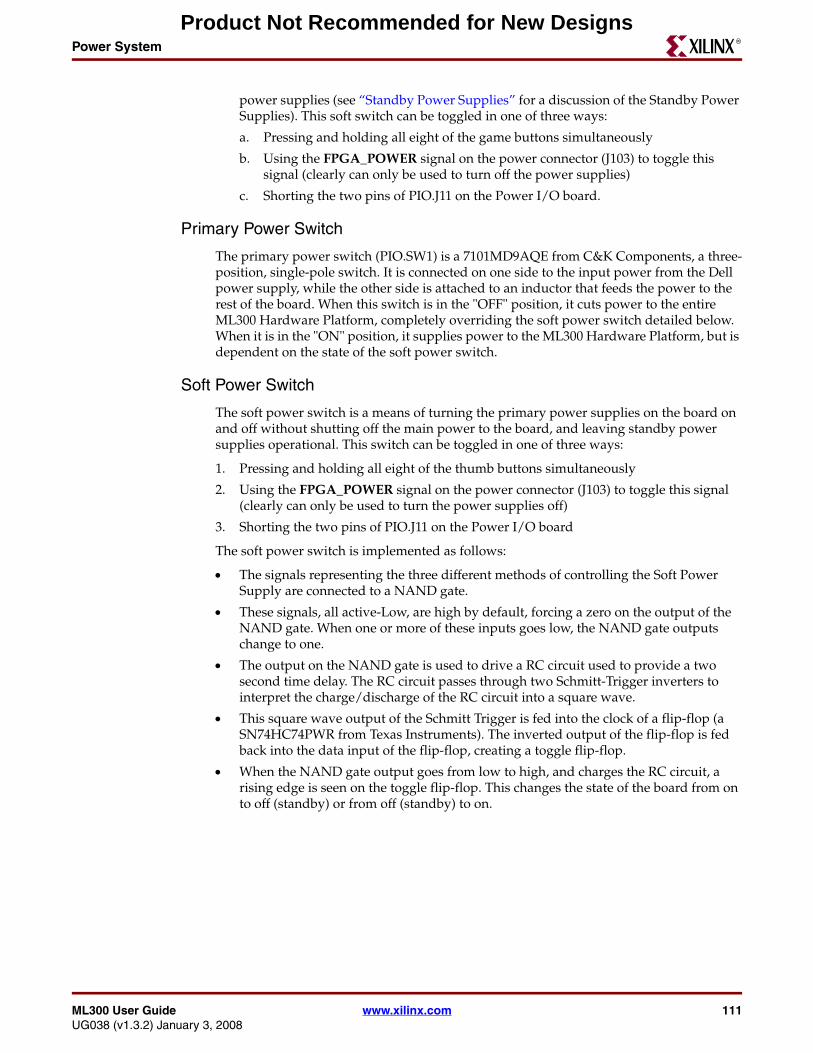
ML300 User Guide www.xilinx.com 111UG038 (v1.3.2) January 3, 2008
Power SystemR
power supplies (see “Standby Power Supplies” for a discussion of the Standby Power Supplies). This soft switch can be toggled in one of three ways:
a. Pressing and holding all eight of the game buttons simultaneously
b. Using the FPGA_POWER signal on the power connector (J103) to toggle this signal (clearly can only be used to turn off the power supplies)
c. Shorting the two pins of PIO.J11 on the Power I/O board.
Primary Power Switch
The primary power switch (PIO.SW1) is a 7101MD9AQE from C&K Components, a three-position, single-pole switch. It is connected on one side to the input power from the Dell power supply, while the other side is attached to an inductor that feeds the power to the rest of the board. When this switch is in the "OFF" position, it cuts power to the entire ML300 Hardware Platform, completely overriding the soft power switch detailed below. When it is in the "ON" position, it supplies power to the ML300 Hardware Platform, but is dependent on the state of the soft power switch.
Soft Power Switch
The soft power switch is a means of turning the primary power supplies on the board on and off without shutting off the main power to the board, and leaving standby power supplies operational. This switch can be toggled in one of three ways:
1. Pressing and holding all eight of the thumb buttons simultaneously
2. Using the FPGA_POWER signal on the power connector (J103) to toggle this signal (clearly can only be used to turn the power supplies off)
3. Shorting the two pins of PIO.J11 on the Power I/O board
The soft power switch is implemented as follows:
• The signals representing the three different methods of controlling the Soft Power Supply are connected to a NAND gate.
• These signals, all active-Low, are high by default, forcing a zero on the output of the NAND gate. When one or more of these inputs goes low, the NAND gate outputs change to one.
• The output on the NAND gate is used to drive a RC circuit used to provide a two second time delay. The RC circuit passes through two Schmitt-Trigger inverters to interpret the charge/discharge of the RC circuit into a square wave.
• This square wave output of the Schmitt Trigger is fed into the clock of a flip-flop (a SN74HC74PWR from Texas Instruments). The inverted output of the flip-flop is fed back into the data input of the flip-flop, creating a toggle flip-flop.
• When the NAND gate output goes from low to high, and charges the RC circuit, a rising edge is seen on the toggle flip-flop. This changes the state of the board from on to off (standby) or from off (standby) to on.
Product Not Recommended for New Designs
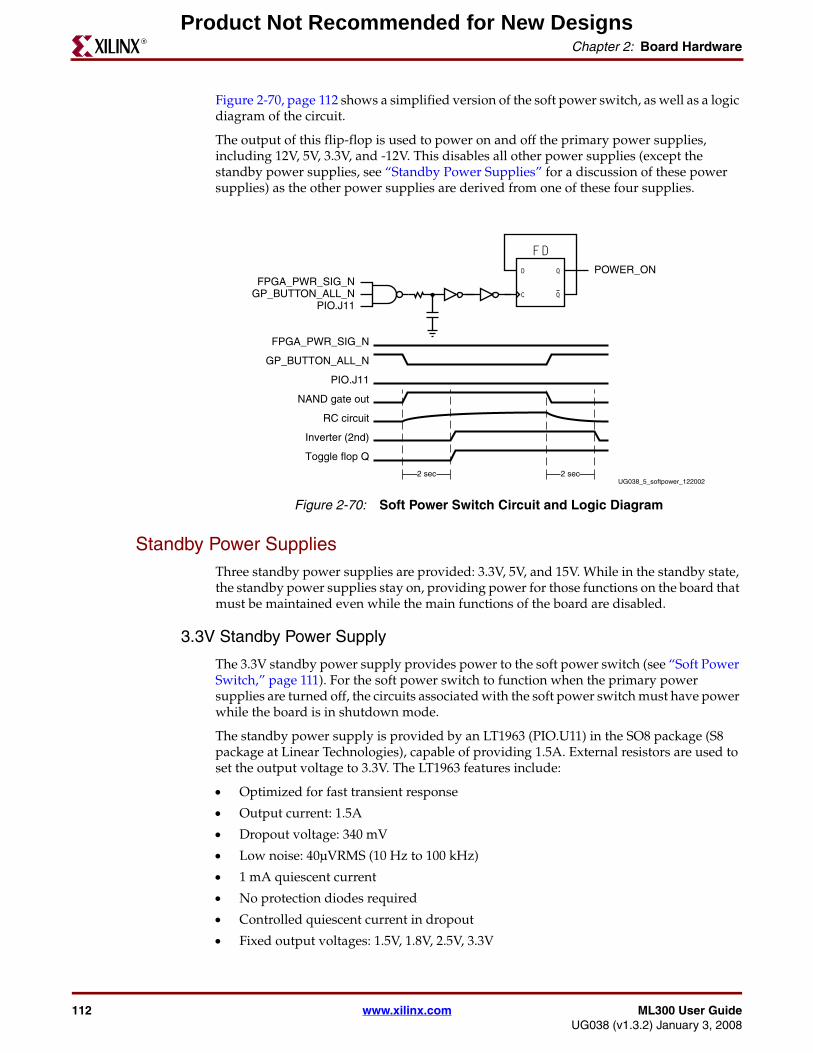
112 www.xilinx.com ML300 User GuideUG038 (v1.3.2) January 3, 2008
Chapter 2: Board HardwareR
Figure 2-70, page 112 shows a simplified version of the soft power switch, as well as a logic diagram of the circuit.
The output of this flip-flop is used to power on and off the primary power supplies, including 12V, 5V, 3.3V, and -12V. This disables all other power supplies (except the standby power supplies, see “Standby Power Supplies” for a discussion of these power supplies) as the other power supplies are derived from one of these four supplies.
Standby Power SuppliesThree standby power supplies are provided: 3.3V, 5V, and 15V. While in the standby state, the standby power supplies stay on, providing power for those functions on the board that must be maintained even while the main functions of the board are disabled.
3.3V Standby Power Supply
The 3.3V standby power supply provides power to the soft power switch (see “Soft Power Switch,” page 111). For the soft power switch to function when the primary power supplies are turned off, the circuits associated with the soft power switch must have power while the board is in shutdown mode.
The standby power supply is provided by an LT1963 (PIO.U11) in the SO8 package (S8 package at Linear Technologies), capable of providing 1.5A. External resistors are used to set the output voltage to 3.3V. The LT1963 features include:
• Optimized for fast transient response
• Output current: 1.5A
• Dropout voltage: 340 mV
• Low noise: 40µVRMS (10 Hz to 100 kHz)
• 1 mA quiescent current
• No protection diodes required
• Controlled quiescent current in dropout
• Fixed output voltages: 1.5V, 1.8V, 2.5V, 3.3V
Figure 2-70: Soft Power Switch Circuit and Logic Diagram
UG038_5_softpower_122002
PIO.J11GP_BUTTON_ALL_NFPGA_PWR_SIG_N
��
�
�
�
�
POWER_ON
GP_BUTTON_ALL_N
RC circuit
FPGA_PWR_SIG_N
Inverter (2nd)
Toggle flop Q
PIO.J11
NAND gate out
2 sec 2 sec
Product Not Recommended for New Designs
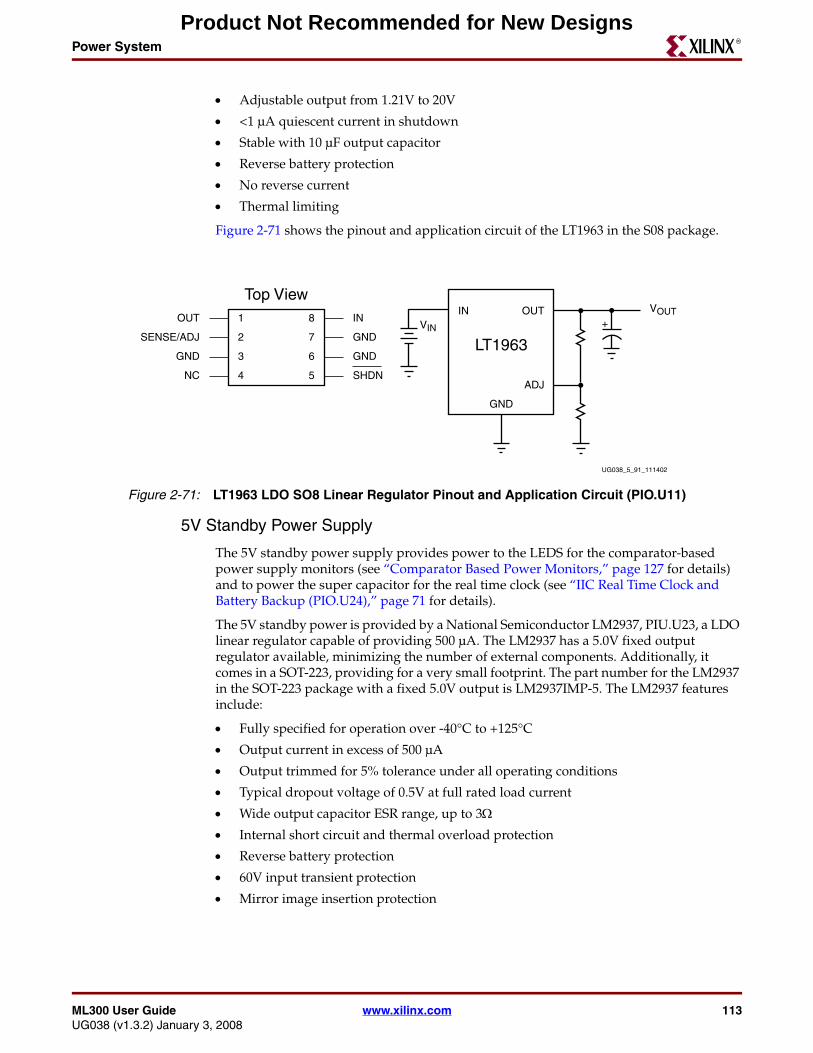
ML300 User Guide www.xilinx.com 113UG038 (v1.3.2) January 3, 2008
Power SystemR
• Adjustable output from 1.21V to 20V
• <1 µA quiescent current in shutdown
• Stable with 10 µF output capacitor
• Reverse battery protection
• No reverse current
• Thermal limiting
Figure 2-71 shows the pinout and application circuit of the LT1963 in the S08 package.
5V Standby Power Supply
The 5V standby power supply provides power to the LEDS for the comparator-based power supply monitors (see “Comparator Based Power Monitors,” page 127 for details) and to power the super capacitor for the real time clock (see “IIC Real Time Clock and Battery Backup (PIO.U24),” page 71 for details).
The 5V standby power is provided by a National Semiconductor LM2937, PIU.U23, a LDO linear regulator capable of providing 500 µA. The LM2937 has a 5.0V fixed output regulator available, minimizing the number of external components. Additionally, it comes in a SOT-223, providing for a very small footprint. The part number for the LM2937 in the SOT-223 package with a fixed 5.0V output is LM2937IMP-5. The LM2937 features include:
• Fully specified for operation over -40°C to +125°C
• Output current in excess of 500 µA
• Output trimmed for 5% tolerance under all operating conditions
• Typical dropout voltage of 0.5V at full rated load current
• Wide output capacitor ESR range, up to 3Ω
• Internal short circuit and thermal overload protection
• Reverse battery protection
• 60V input transient protection
• Mirror image insertion protection
Figure 2-71: LT1963 LDO SO8 Linear Regulator Pinout and Application Circuit (PIO.U11)
UG038_5_91_111402
Top View1
2
3
4 5
6
7
8
NC
GND
SENSE/ADJ
OUT
SHDN
GND
GND
ININ
VIN
VOUT
GND
OUT
ADJ
LT1963
+
Product Not Recommended for New Designs
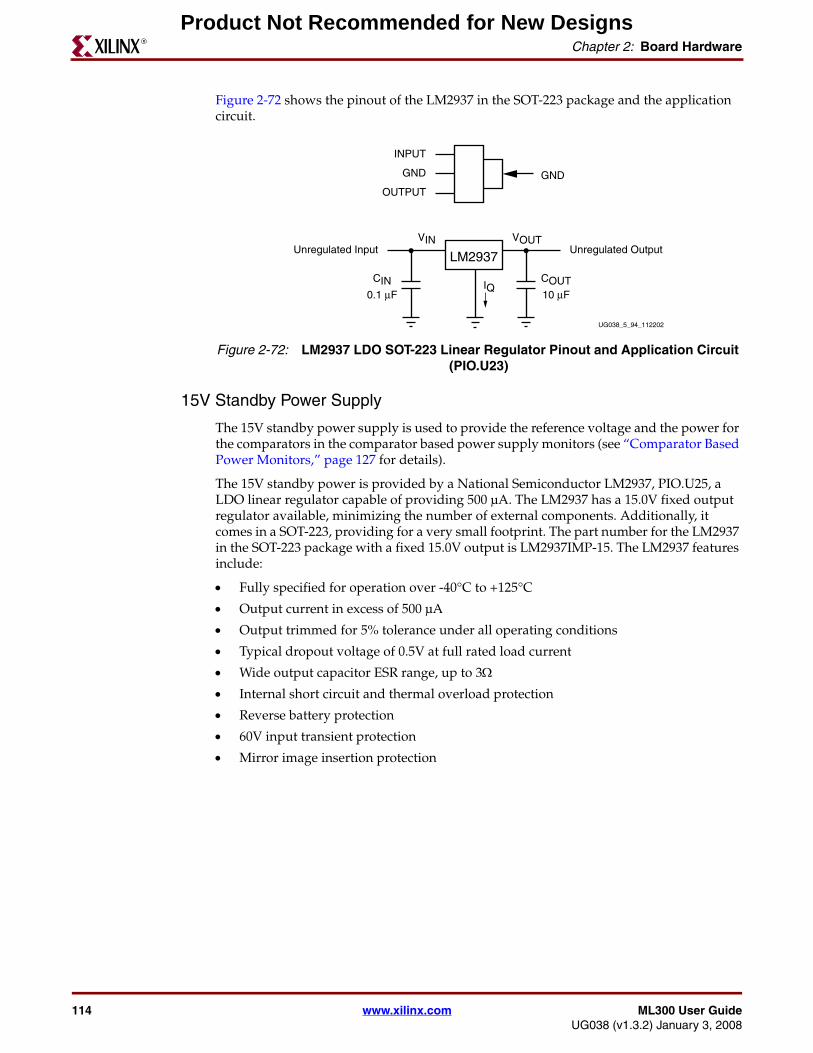
114 www.xilinx.com ML300 User GuideUG038 (v1.3.2) January 3, 2008
Chapter 2: Board HardwareR
Figure 2-72 shows the pinout of the LM2937 in the SOT-223 package and the application circuit.
15V Standby Power Supply
The 15V standby power supply is used to provide the reference voltage and the power for the comparators in the comparator based power supply monitors (see “Comparator Based Power Monitors,” page 127 for details).
The 15V standby power is provided by a National Semiconductor LM2937, PIO.U25, a LDO linear regulator capable of providing 500 µA. The LM2937 has a 15.0V fixed output regulator available, minimizing the number of external components. Additionally, it comes in a SOT-223, providing for a very small footprint. The part number for the LM2937 in the SOT-223 package with a fixed 15.0V output is LM2937IMP-15. The LM2937 features include:
• Fully specified for operation over -40°C to +125°C
• Output current in excess of 500 µA
• Output trimmed for 5% tolerance under all operating conditions
• Typical dropout voltage of 0.5V at full rated load current
• Wide output capacitor ESR range, up to 3Ω
• Internal short circuit and thermal overload protection
• Reverse battery protection
• 60V input transient protection
• Mirror image insertion protection
Figure 2-72: LM2937 LDO SOT-223 Linear Regulator Pinout and Application Circuit (PIO.U23)
UG038_5_94_112202
OUTPUT
LM2937
VINUnregulated Input Unregulated Output
GND
INPUT
GND
VOUT
0.1 μF
CIN IQCOUT10 μF
Product Not Recommended for New Designs
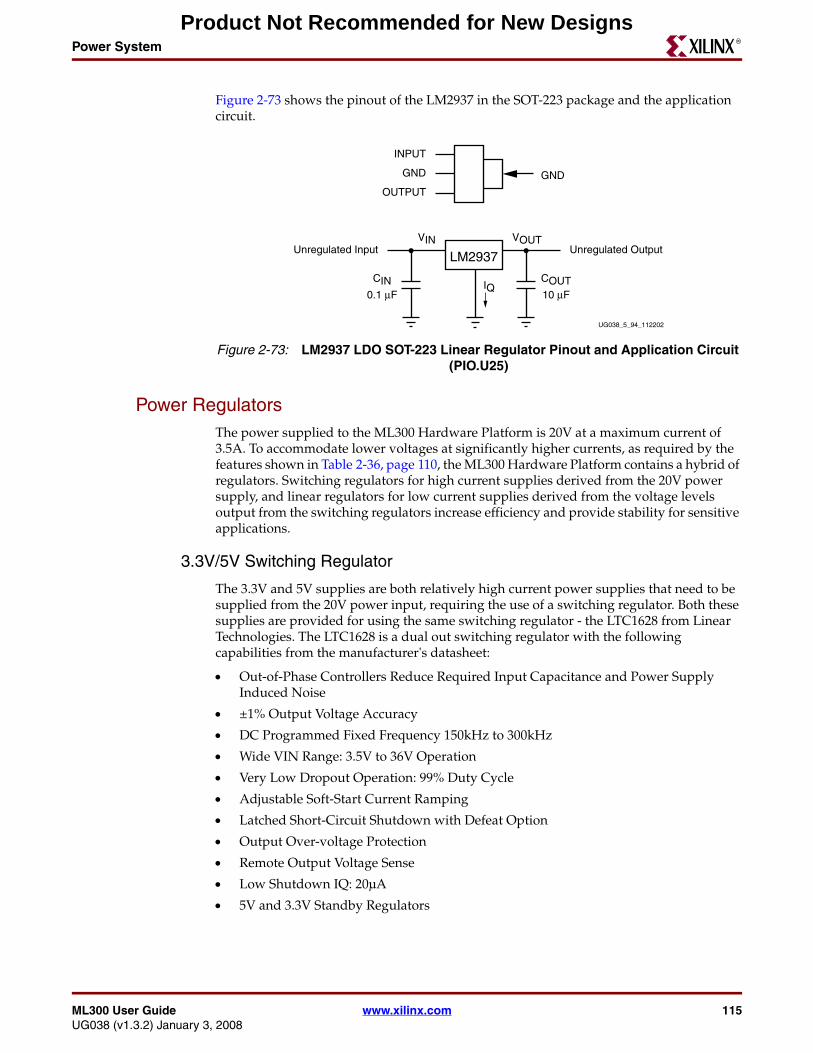
ML300 User Guide www.xilinx.com 115UG038 (v1.3.2) January 3, 2008
Power SystemR
Figure 2-73 shows the pinout of the LM2937 in the SOT-223 package and the application circuit.
Power RegulatorsThe power supplied to the ML300 Hardware Platform is 20V at a maximum current of 3.5A. To accommodate lower voltages at significantly higher currents, as required by the features shown in Table 2-36, page 110, the ML300 Hardware Platform contains a hybrid of regulators. Switching regulators for high current supplies derived from the 20V power supply, and linear regulators for low current supplies derived from the voltage levels output from the switching regulators increase efficiency and provide stability for sensitive applications.
3.3V/5V Switching Regulator
The 3.3V and 5V supplies are both relatively high current power supplies that need to be supplied from the 20V power input, requiring the use of a switching regulator. Both these supplies are provided for using the same switching regulator - the LTC1628 from Linear Technologies. The LTC1628 is a dual out switching regulator with the following capabilities from the manufacturer's datasheet:
• Out-of-Phase Controllers Reduce Required Input Capacitance and Power Supply Induced Noise
• ±1% Output Voltage Accuracy
• DC Programmed Fixed Frequency 150kHz to 300kHz
• Wide VIN Range: 3.5V to 36V Operation
• Very Low Dropout Operation: 99% Duty Cycle
• Adjustable Soft-Start Current Ramping
• Latched Short-Circuit Shutdown with Defeat Option
• Output Over-voltage Protection
• Remote Output Voltage Sense
• Low Shutdown IQ: 20µA
• 5V and 3.3V Standby Regulators
Figure 2-73: LM2937 LDO SOT-223 Linear Regulator Pinout and Application Circuit (PIO.U25)
UG038_5_94_112202
OUTPUT
LM2937
VINUnregulated Input Unregulated Output
GND
INPUT
GND
VOUT
0.1 μF
CIN IQCOUT10 μF
Product Not Recommended for New Designs
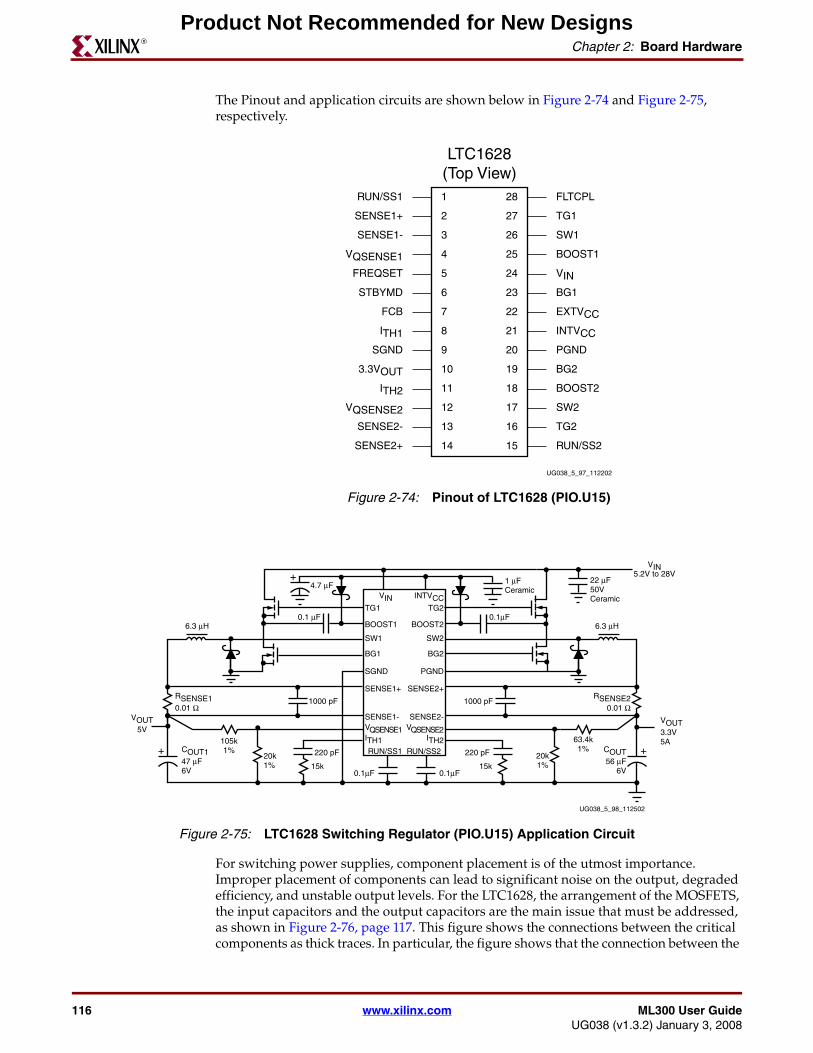
116 www.xilinx.com ML300 User GuideUG038 (v1.3.2) January 3, 2008
Chapter 2: Board HardwareR
The Pinout and application circuits are shown below in Figure 2-74 and Figure 2-75, respectively.
For switching power supplies, component placement is of the utmost importance. Improper placement of components can lead to significant noise on the output, degraded efficiency, and unstable output levels. For the LTC1628, the arrangement of the MOSFETS, the input capacitors and the output capacitors are the main issue that must be addressed, as shown in Figure 2-76, page 117. This figure shows the connections between the critical components as thick traces. In particular, the figure shows that the connection between the
Figure 2-74: Pinout of LTC1628 (PIO.U15)
UG038_5_97_112202
LTC1628(Top View)1
2
3
4
5
6
7
8
9
10
11
12
13
14
28
27
26
25
24
23
22
21
20
19
18
17
16
15
SENSE2-
VQSENSE2
ITH2
ITH1
FCB
VQSENSE1
SENSE1-
FREQSET
SENSE1+
RUN/SS1
TG2
BG2
PGND
INTVCC
FLTCPL
BOOST2
BG1
EXTVCC
VIN
BOOST1
SW1
TG1
3.3VOUT
SGND
STBYMD
SENSE2+ RUN/SS2
SW2
Figure 2-75: LTC1628 Switching Regulator (PIO.U15) Application Circuit
UG038_5_98_112502
SENSE2-VQSENSE2
ITH2ITH1
VQSENSE1
SENSE1-
SENSE1+
RUN/SS1
TG2
BG2
PGND
INTVCC
BOOST2
BG1
VIN
BOOST1
SW1
TG1
SGND
SENSE2+
RUN/SS2
SW2
+
+ +
RSENSE10.01 Ω
RSENSE20.01 Ω
VOUT5V
0.1μF
0.1μF 0.1μF
6.3 μH 6.3 μH0.1 μF
4.7 μF
COUT147 μF6V
COUT56 μF
6V
105k1%
20k1%
1000 pF 1000 pF
220 pF 220 pF
15k 15k
63.4k1%
20k1%
1 μFCeramic
22 μF50VCeramic
VIN5.2V to 28V
VOUT3.3V5A
Product Not Recommended for New Designs
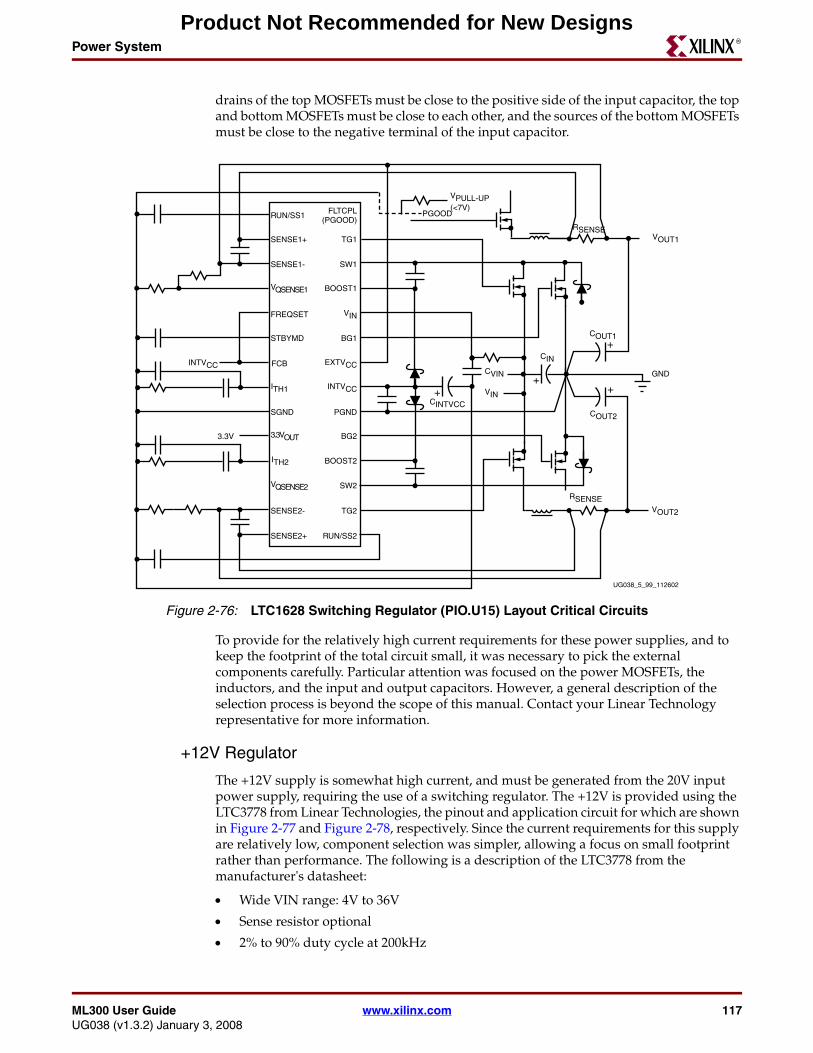
ML300 User Guide www.xilinx.com 117UG038 (v1.3.2) January 3, 2008
Power SystemR
drains of the top MOSFETs must be close to the positive side of the input capacitor, the top and bottom MOSFETs must be close to each other, and the sources of the bottom MOSFETs must be close to the negative terminal of the input capacitor.
To provide for the relatively high current requirements for these power supplies, and to keep the footprint of the total circuit small, it was necessary to pick the external components carefully. Particular attention was focused on the power MOSFETs, the inductors, and the input and output capacitors. However, a general description of the selection process is beyond the scope of this manual. Contact your Linear Technology representative for more information.
+12V Regulator
The +12V supply is somewhat high current, and must be generated from the 20V input power supply, requiring the use of a switching regulator. The +12V is provided using the LTC3778 from Linear Technologies, the pinout and application circuit for which are shown in Figure 2-77 and Figure 2-78, respectively. Since the current requirements for this supply are relatively low, component selection was simpler, allowing a focus on small footprint rather than performance. The following is a description of the LTC3778 from the manufacturer's datasheet:
• Wide VIN range: 4V to 36V
• Sense resistor optional
• 2% to 90% duty cycle at 200kHz
Figure 2-76: LTC1628 Switching Regulator (PIO.U15) Layout Critical Circuits
UG038_5_99_112602
+
+
SENSE2-
VQSENSE2
ITH2
ITH1
VQSENSE1
3.3VOUT
SENSE1-
SENSE1+
RUN/SS1
TG2
STBYMD
FCB
BG2
PGND
INTVCC
EXTVCC
BOOST2
BG1
FREQSET VIN
BOOST1
SW1
TG1
FLTCPL(PGOOD)
SGND
SENSE2+ RUN/SS2
SW2
RSENSE
RSENSE
VOUT1
VPULL-UP(<7V)
VOUT2
INTVCC
CINTVCCCOUT2
COUT1
CIN
CVIN
VIN
GND
PGOOD
3.3V
+
+
Product Not Recommended for New Designs
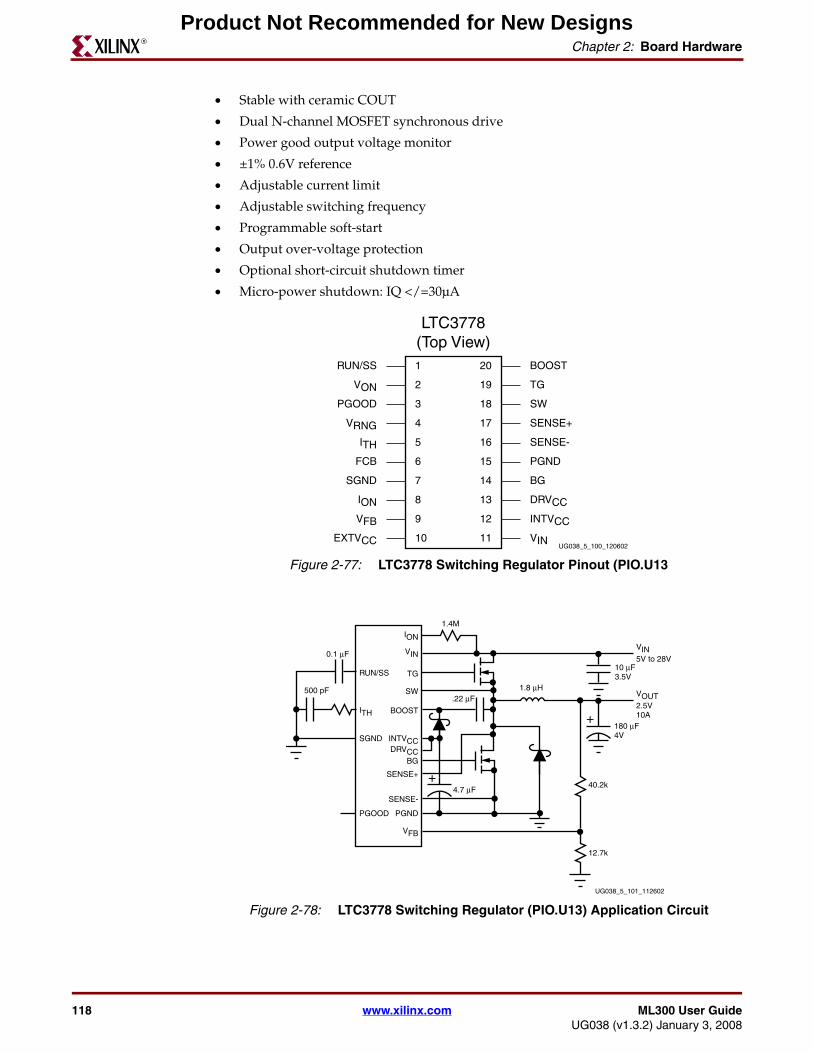
118 www.xilinx.com ML300 User GuideUG038 (v1.3.2) January 3, 2008
Chapter 2: Board HardwareR
• Stable with ceramic COUT
• Dual N-channel MOSFET synchronous drive
• Power good output voltage monitor
• ±1% 0.6V reference
• Adjustable current limit
• Adjustable switching frequency
• Programmable soft-start
• Output over-voltage protection
• Optional short-circuit shutdown timer
• Micro-power shutdown: IQ </=30µA
Figure 2-77: LTC3778 Switching Regulator Pinout (PIO.U13
Figure 2-78: LTC3778 Switching Regulator (PIO.U13) Application Circuit
UG038_5_100_120602
LTC3778(Top View)1
2
3
4
5
6
7
8
9
10 11
12
13
14
20
19
18
17
16
15
SENSE-ITH
ION
VON
VRNG
FCB
VFB
BG
PGND
INTVCC
DRVCC
EXTVCC VIN
BOOST
SW
TG
SGND
PGOOD
SENSE+
RUN/SS
+
1.4M
40.2k
12.7k
0.1 μF
500 pF
180 μF4V
10 μF3.5V
1.8 μH
4.7 μF
.22 μF
+
UG038_5_101_112602
SENSE-
BOOST
RUN/SS
VIN5V to 28V
VOUT2.5V10A
TG
BG
PGND
INTVCC
VFB
VIN
ION
DRVCC
PGOOD
SGND
ITH
SENSE+
SW
Product Not Recommended for New Designs
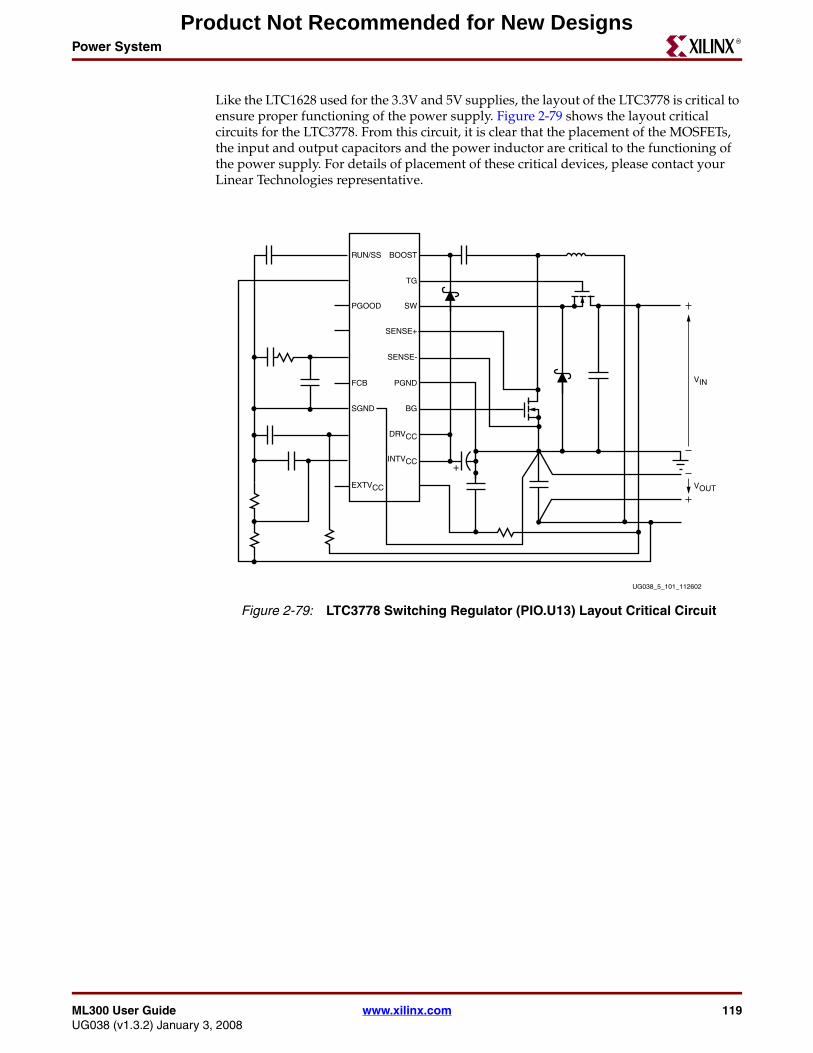
ML300 User Guide www.xilinx.com 119UG038 (v1.3.2) January 3, 2008
Power SystemR
Like the LTC1628 used for the 3.3V and 5V supplies, the layout of the LTC3778 is critical to ensure proper functioning of the power supply. Figure 2-79 shows the layout critical circuits for the LTC3778. From this circuit, it is clear that the placement of the MOSFETs, the input and output capacitors and the power inductor are critical to the functioning of the power supply. For details of placement of these critical devices, please contact your Linear Technologies representative.
Figure 2-79: LTC3778 Switching Regulator (PIO.U13) Layout Critical Circuit
UG038_5_101_112602
SENSE-
BOOSTRUN/SS
TG
BG
PGND
INTVCC
VOUT
VIN
DRVCC
PGOOD
FCB
SGND
EXTVCC
SENSE+
SW
+
Product Not Recommended for New Designs

120 www.xilinx.com ML300 User GuideUG038 (v1.3.2) January 3, 2008
Chapter 2: Board HardwareR
-12V Regulator
While the -12V power supply is low current (500 mA or less), due to its negative polarity, it can only be generated using a inverting switching regulator, in this case the LT1931 from Linear Technologies. Figure 2-80 shows the pinout and application circuit of the LT1931. The LT1931 has some significant advantages, including relatively small external component count, no MOSFET switches required, and high operating frequency, minimizing size of external components. Instead of the standard dual MOSFET switches seen on other switching supplies, the LT1931 makes use of dual inductors with a power diode, helping to minimize board space requirements.
Figure 2-80: LT1931 Inverting Switching Regulator Pinout and Application Circuit (PIO.U14)
UG038_5_103_112602
NFB 3
GND 2
SW 1
LT1931(Top View)
5 VIN
VIN5V
VOUT-5V350 mA
4 SHDN
4.7 μF22 μF
1 μF
220 pF29.4k
10k
10 μH10 μH
NFB
GND
SWVIN
SHDN
Product Not Recommended for New Designs
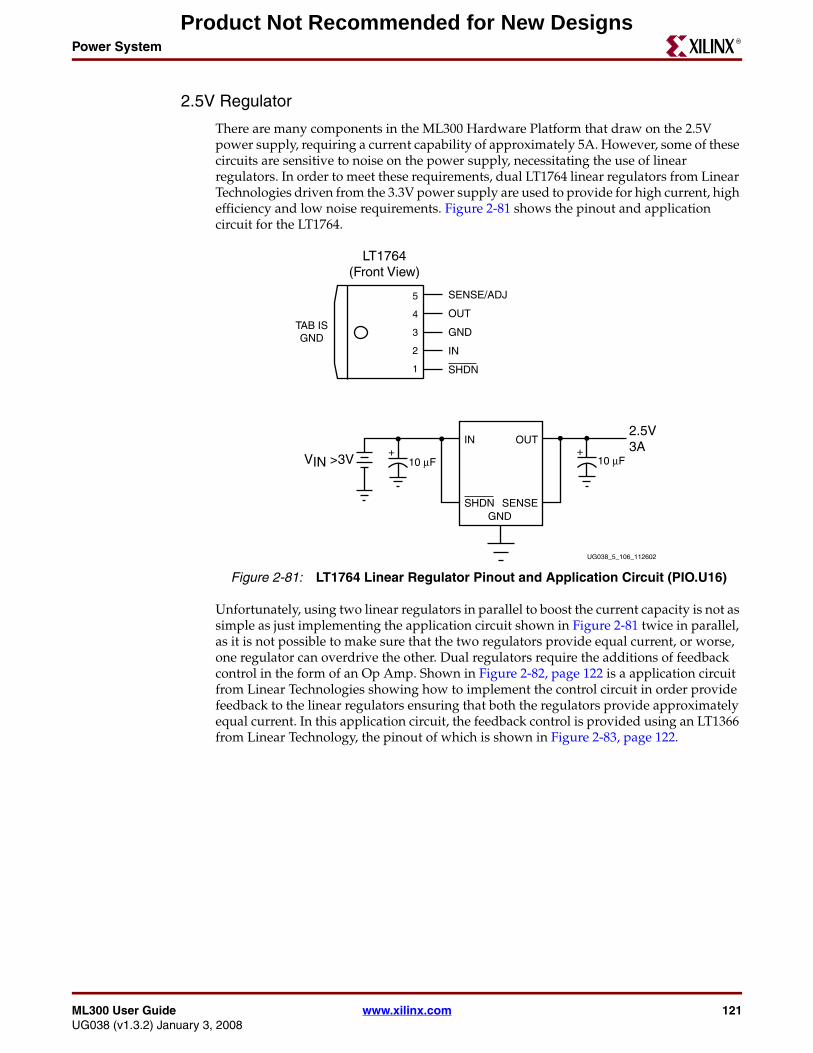
ML300 User Guide www.xilinx.com 121UG038 (v1.3.2) January 3, 2008
Power SystemR
2.5V Regulator
There are many components in the ML300 Hardware Platform that draw on the 2.5V power supply, requiring a current capability of approximately 5A. However, some of these circuits are sensitive to noise on the power supply, necessitating the use of linear regulators. In order to meet these requirements, dual LT1764 linear regulators from Linear Technologies driven from the 3.3V power supply are used to provide for high current, high efficiency and low noise requirements. Figure 2-81 shows the pinout and application circuit for the LT1764.
Unfortunately, using two linear regulators in parallel to boost the current capacity is not as simple as just implementing the application circuit shown in Figure 2-81 twice in parallel, as it is not possible to make sure that the two regulators provide equal current, or worse, one regulator can overdrive the other. Dual regulators require the additions of feedback control in the form of an Op Amp. Shown in Figure 2-82, page 122 is a application circuit from Linear Technologies showing how to implement the control circuit in order provide feedback to the linear regulators ensuring that both the regulators provide approximately equal current. In this application circuit, the feedback control is provided using an LT1366 from Linear Technology, the pinout of which is shown in Figure 2-83, page 122.
Figure 2-81: LT1764 Linear Regulator Pinout and Application Circuit (PIO.U16)
UG038_5_106_112602
LT1764(Front View)
2
3
4
5
IN
GND
OUT
SENSE/ADJ
1 SHDN
IN
GND
OUT
SENSESHDN
VIN >3V
2.5V3A++
10 μF10 μF
TAB ISGND
Product Not Recommended for New Designs
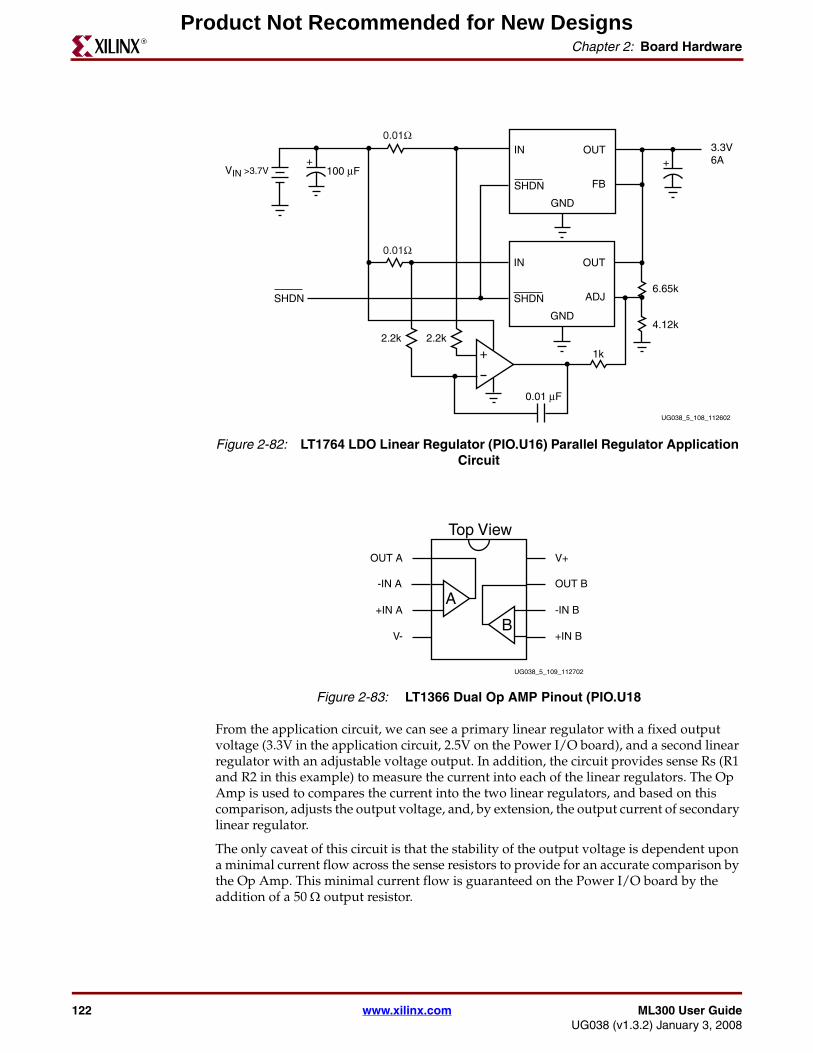
122 www.xilinx.com ML300 User GuideUG038 (v1.3.2) January 3, 2008
Chapter 2: Board HardwareR
From the application circuit, we can see a primary linear regulator with a fixed output voltage (3.3V in the application circuit, 2.5V on the Power I/O board), and a second linear regulator with an adjustable voltage output. In addition, the circuit provides sense Rs (R1 and R2 in this example) to measure the current into each of the linear regulators. The Op Amp is used to compares the current into the two linear regulators, and based on this comparison, adjusts the output voltage, and, by extension, the output current of secondary linear regulator.
The only caveat of this circuit is that the stability of the output voltage is dependent upon a minimal current flow across the sense resistors to provide for an accurate comparison by the Op Amp. This minimal current flow is guaranteed on the Power I/O board by the addition of a 50 Ω output resistor.
Figure 2-82: LT1764 LDO Linear Regulator (PIO.U16) Parallel Regulator Application Circuit
Figure 2-83: LT1366 Dual Op AMP Pinout (PIO.U18
UG038_5_108_112602
SHDN
IN
VIN >3.7V
3.3V6A
GND
OUT
FB
++
SHDN
IN
GND
OUT
ADJSHDN
0.01Ω
0.01Ω
100 μF
0.01 μF
6.65k
4.12k2.2k2.2k
1k+
UG038_5_109_112702
Top View
OUT A
-IN A
+IN A
V-
V+
OUT B
-IN B
+IN B
A
B
Product Not Recommended for New Designs
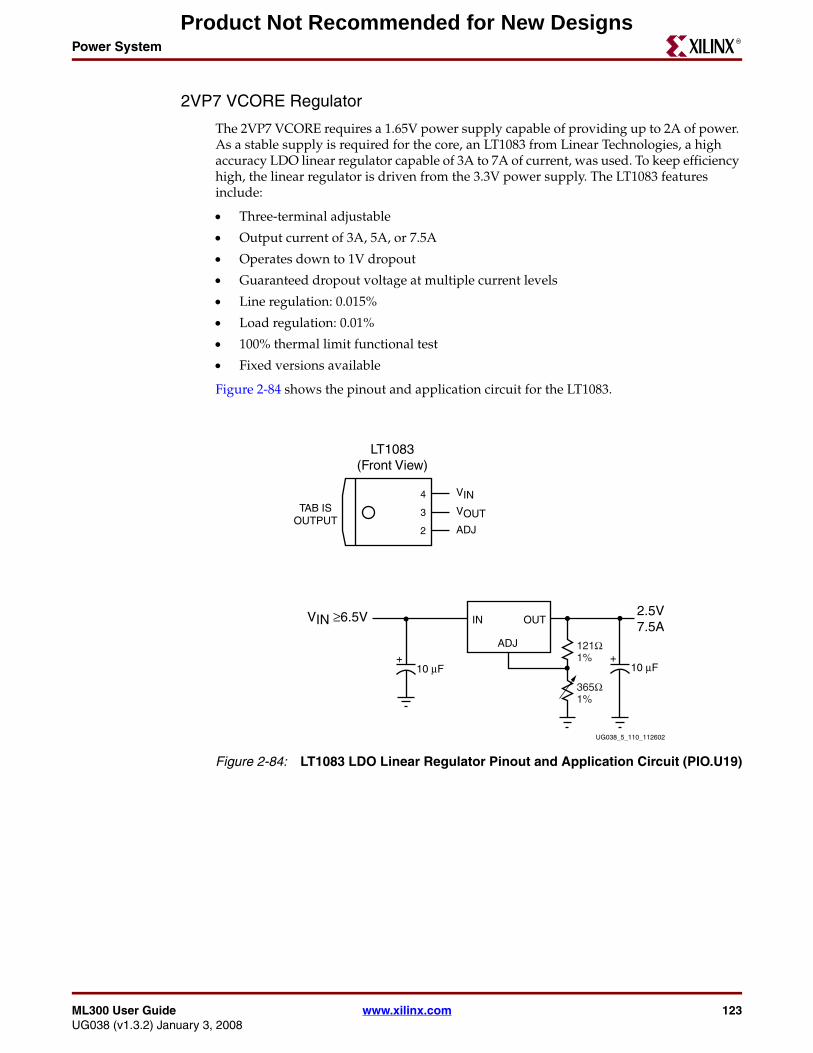
ML300 User Guide www.xilinx.com 123UG038 (v1.3.2) January 3, 2008
Power SystemR
2VP7 VCORE Regulator
The 2VP7 VCORE requires a 1.65V power supply capable of providing up to 2A of power. As a stable supply is required for the core, an LT1083 from Linear Technologies, a high accuracy LDO linear regulator capable of 3A to 7A of current, was used. To keep efficiency high, the linear regulator is driven from the 3.3V power supply. The LT1083 features include:
• Three-terminal adjustable
• Output current of 3A, 5A, or 7.5A
• Operates down to 1V dropout
• Guaranteed dropout voltage at multiple current levels
• Line regulation: 0.015%
• Load regulation: 0.01%
• 100% thermal limit functional test
• Fixed versions available
Figure 2-84 shows the pinout and application circuit for the LT1083.
Figure 2-84: LT1083 LDO Linear Regulator Pinout and Application Circuit (PIO.U19)
UG038_5_110_112602
LT1083(Front View)
2
3
4
ADJ
VOUTTAB ISOUTPUT
VIN
IN
ADJ
OUTVIN ≥6.5V 2.5V7.5A
++10 μF10 μF
121Ω1%
365Ω1%
Product Not Recommended for New Designs

124 www.xilinx.com ML300 User GuideUG038 (v1.3.2) January 3, 2008
Chapter 2: Board HardwareR
MGT VCCA Regulator
The MGT VCCA requires a regulator capable of providing a very stable, very accurate 2.5V at 1.2A. This is most effectively provided using an LT1963 LDO linear regulator from Linear Technologies. A TO263-5 package (Q package at Linear Technologies) LT1963 is used in order to provide the 1.2Amps. Additionally, a 2.5V fixed output devices is available from Linear Technologies, reducing the number of external components required. The features of the LM1963 from the datasheet include:
• Optimized for fast transient response
• Output current: 1.5A
• Dropout voltage: 340 µV
• Low noise: 40 µVRMS (10 Hz to 100 kHz)
• 1 µA quiescent current
• No protection diodes needed
• Controlled quiescent current in dropout
• Fixed output voltages: 1.5V, 1.8V, 2.5V, 3.3V
• Adjustable output from 1.21V to 20V
• <1µA quiescent current in shutdown
• Stable with 10 µF output capacitor
• Reverse battery protection
• No reverse current
• Thermal limiting
Figure 2-85 shows the pinout and application circuit of the LT1963 in the TO263-5 package.
Figure 2-85: LT1963 TO263-5 LDO Linear Regulator Pinout and Application Circuit (CPU.U101)
UG038_5_112_112602
LT1963(Front View)
2
3
4
5
IN
GNDTAB ISGND
OUT
SENSE/ADJ
1 SHDN
IN
GND
OUT
SENSESHDN
VIN >3V
2.5V1.5A++
10 μF10 μF
Product Not Recommended for New Designs
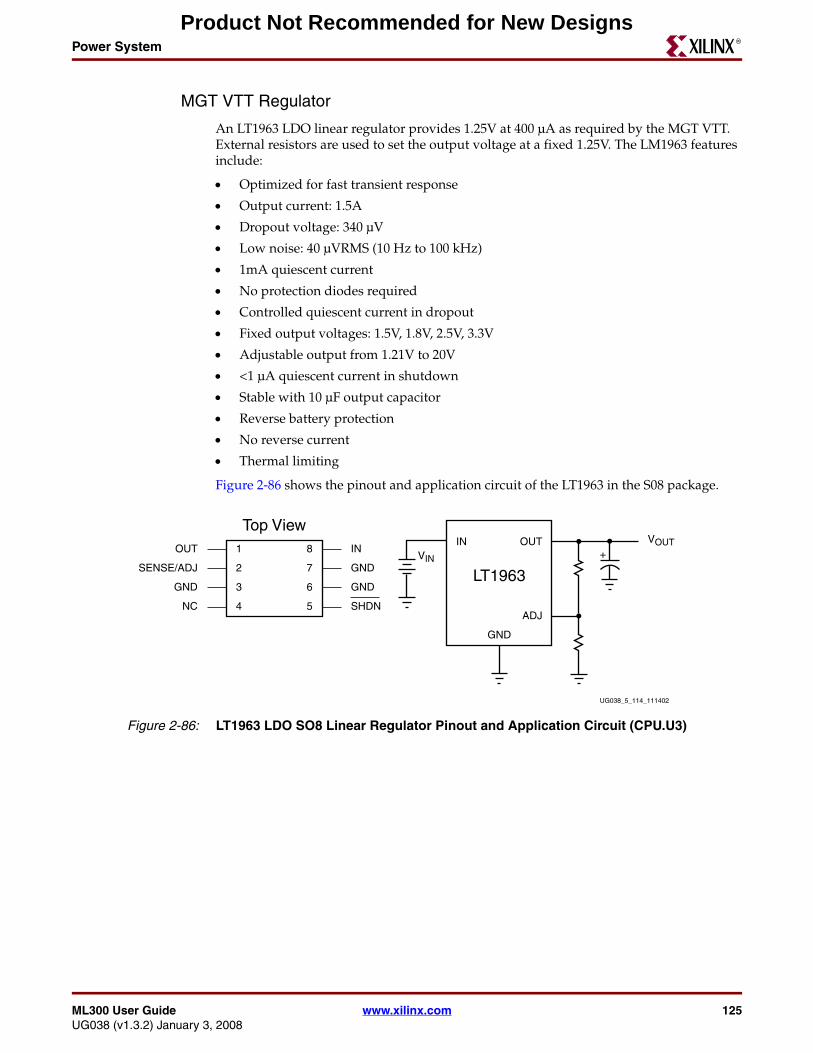
ML300 User Guide www.xilinx.com 125UG038 (v1.3.2) January 3, 2008
Power SystemR
MGT VTT Regulator
An LT1963 LDO linear regulator provides 1.25V at 400 µA as required by the MGT VTT. External resistors are used to set the output voltage at a fixed 1.25V. The LM1963 features include:
• Optimized for fast transient response
• Output current: 1.5A
• Dropout voltage: 340 µV
• Low noise: 40 µVRMS (10 Hz to 100 kHz)
• 1mA quiescent current
• No protection diodes required
• Controlled quiescent current in dropout
• Fixed output voltages: 1.5V, 1.8V, 2.5V, 3.3V
• Adjustable output from 1.21V to 20V
• <1 µA quiescent current in shutdown
• Stable with 10 µF output capacitor
• Reverse battery protection
• No reverse current
• Thermal limiting
Figure 2-86 shows the pinout and application circuit of the LT1963 in the S08 package.
Figure 2-86: LT1963 LDO SO8 Linear Regulator Pinout and Application Circuit (CPU.U3)
UG038_5_114_111402
Top View1
2
3
4 5
6
7
8
NC
GND
SENSE/ADJ
OUT
SHDN
GND
GND
ININ
VIN
VOUT
GND
OUT
ADJ
LT1963
+
Product Not Recommended for New Designs
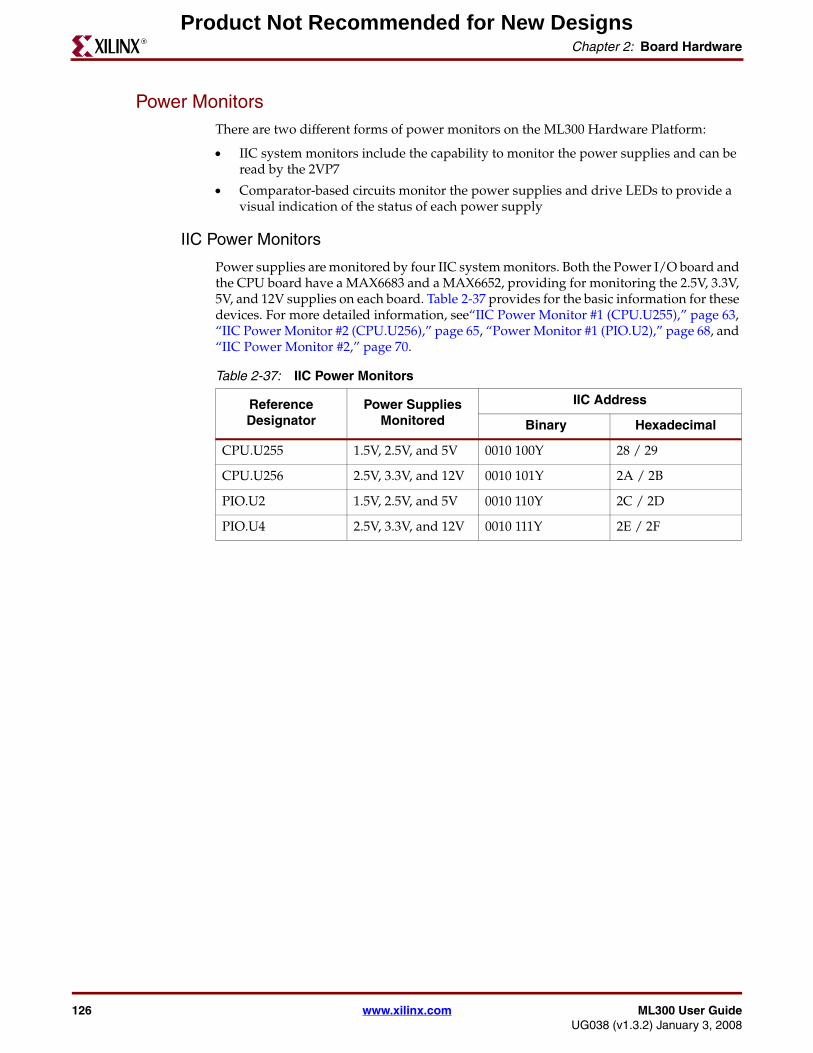
126 www.xilinx.com ML300 User GuideUG038 (v1.3.2) January 3, 2008
Chapter 2: Board HardwareR
Power MonitorsThere are two different forms of power monitors on the ML300 Hardware Platform:
• IIC system monitors include the capability to monitor the power supplies and can be read by the 2VP7
• Comparator-based circuits monitor the power supplies and drive LEDs to provide a visual indication of the status of each power supply
IIC Power Monitors
Power supplies are monitored by four IIC system monitors. Both the Power I/O board and the CPU board have a MAX6683 and a MAX6652, providing for monitoring the 2.5V, 3.3V, 5V, and 12V supplies on each board. Table 2-37 provides for the basic information for these devices. For more detailed information, see“IIC Power Monitor #1 (CPU.U255),” page 63, “IIC Power Monitor #2 (CPU.U256),” page 65, “Power Monitor #1 (PIO.U2),” page 68, and “IIC Power Monitor #2,” page 70.
Table 2-37: IIC Power Monitors
Reference Designator
Power Supplies Monitored
IIC Address
Binary Hexadecimal
CPU.U255 1.5V, 2.5V, and 5V 0010 100Y 28 / 29
CPU.U256 2.5V, 3.3V, and 12V 0010 101Y 2A / 2B
PIO.U2 1.5V, 2.5V, and 5V 0010 110Y 2C / 2D
PIO.U4 2.5V, 3.3V, and 12V 0010 111Y 2E / 2F
Product Not Recommended for New Designs
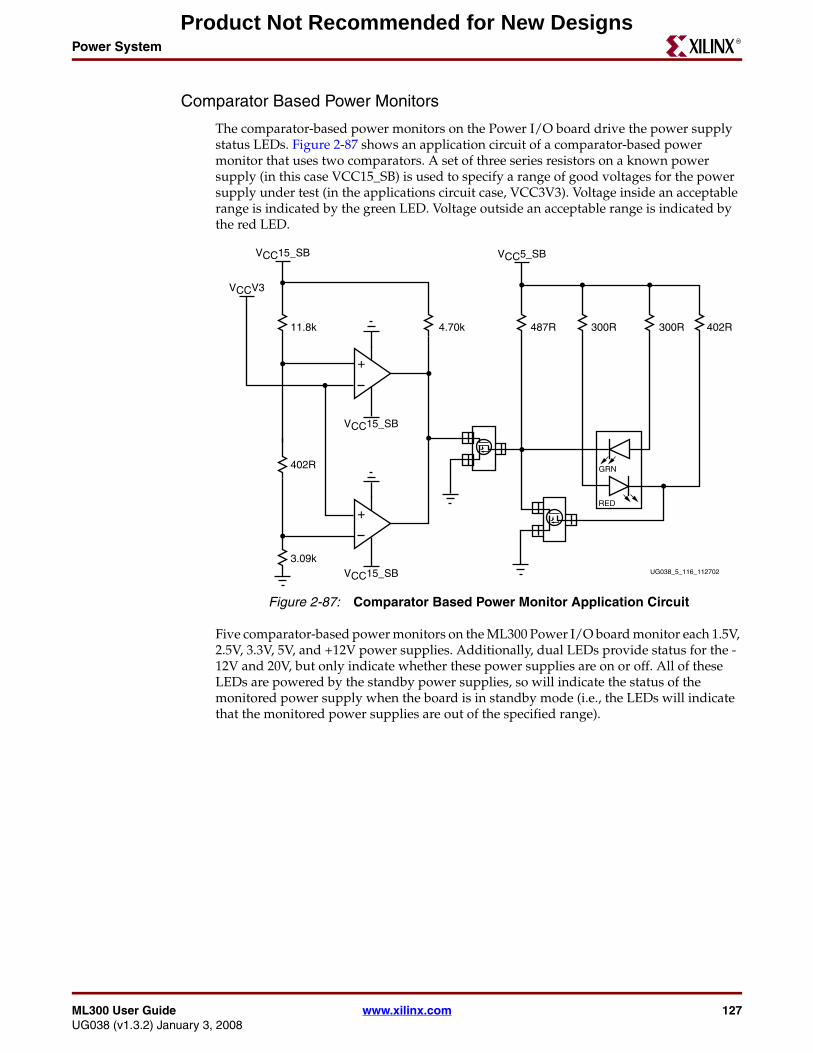
ML300 User Guide www.xilinx.com 127UG038 (v1.3.2) January 3, 2008
Power SystemR
Comparator Based Power Monitors
The comparator-based power monitors on the Power I/O board drive the power supply status LEDs. Figure 2-87 shows an application circuit of a comparator-based power monitor that uses two comparators. A set of three series resistors on a known power supply (in this case VCC15_SB) is used to specify a range of good voltages for the power supply under test (in the applications circuit case, VCC3V3). Voltage inside an acceptable range is indicated by the green LED. Voltage outside an acceptable range is indicated by the red LED.
Five comparator-based power monitors on the ML300 Power I/O board monitor each 1.5V, 2.5V, 3.3V, 5V, and +12V power supplies. Additionally, dual LEDs provide status for the -12V and 20V, but only indicate whether these power supplies are on or off. All of these LEDs are powered by the standby power supplies, so will indicate the status of the monitored power supply when the board is in standby mode (i.e., the LEDs will indicate that the monitored power supplies are out of the specified range).
Figure 2-87: Comparator Based Power Monitor Application Circuit
UG038_5_116_112702
3.09k
402R
487R 300R 300R 402R4.70k11.8k
+
+
VCC5_SBVCC15_SB
VCC15_SB
VCC15_SB
VCCV3
GRN
RED
Product Not Recommended for New Designs
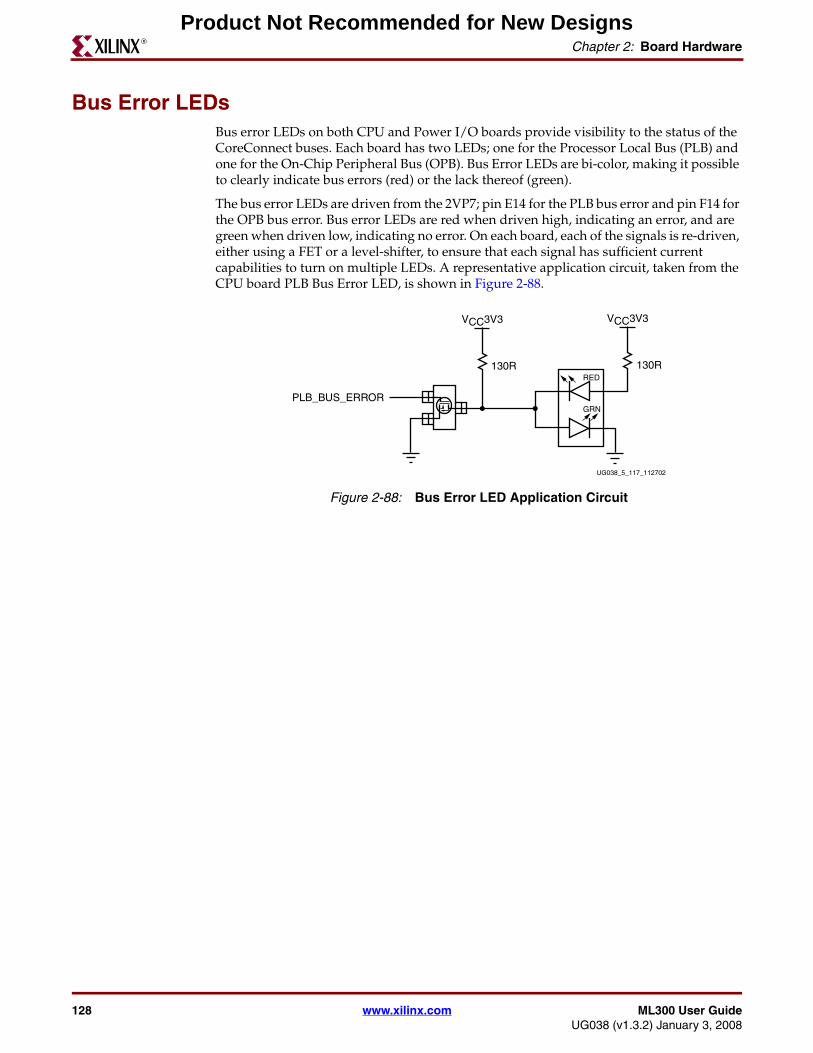
128 www.xilinx.com ML300 User GuideUG038 (v1.3.2) January 3, 2008
Chapter 2: Board HardwareR
Bus Error LEDsBus error LEDs on both CPU and Power I/O boards provide visibility to the status of the CoreConnect buses. Each board has two LEDs; one for the Processor Local Bus (PLB) and one for the On-Chip Peripheral Bus (OPB). Bus Error LEDs are bi-color, making it possible to clearly indicate bus errors (red) or the lack thereof (green).
The bus error LEDs are driven from the 2VP7; pin E14 for the PLB bus error and pin F14 for the OPB bus error. Bus error LEDs are red when driven high, indicating an error, and are green when driven low, indicating no error. On each board, each of the signals is re-driven, either using a FET or a level-shifter, to ensure that each signal has sufficient current capabilities to turn on multiple LEDs. A representative application circuit, taken from the CPU board PLB Bus Error LED, is shown in Figure 2-88.
Figure 2-88: Bus Error LED Application Circuit
UG038_5_117_112702
130R
PLB_BUS_ERROR
VCC3V3
GRN
RED
130R
VCC3V3
Product Not Recommended for New Designs