workshops -...
TRANSCRIPT

IntroductionThe Workshops are all about being creative and thinking outside of the box. These workshops willhelp your right-brain soar, while making your left-brain happy; by explaining why things work theway they do. Exploring possibilities is great fun; however, always stay grounded with knowledge ofhow things work.
Getting and Using the Project Files
Each project in the Workshops includes a start file to help you get started with the project, and afinal file to provide you with the results of the project so you can see how well you accomplishedthe task.
Before you can use the project files, you need to download them from the Web. You can access thefiles at www.perspection.com in the software downloads area. After you download the files fromthe Web, uncompress the files into a folder on your hard drive to which you have easy access fromyour Microsoft Office program.
Project 1: Creating a Drop-Down List
Skills and Tools: Create a drop-down list
Entering data in a worksheet can be tedious and repetitive. To make the job easier and get consis-tent accurate data, you can create a drop-down list of entries you define. To create a drop-downlist, you create a list of valid entries in a single column or row without blanks, define a name, andthen use the List option in the Data Validation dialog box. To enter data using a drop-down list, clickthe cell with the defined drop-down list, click the list arrow, and then click the entry you want.
The Project
In this project, you'll learn how to create a drop-down list from a named range of cells for use inconditional formatting.
The Process
Open Excel 2010, open DropDown_start.xlsm, and then save it as DropDown.xlsm.
Click the Numbers tab.2
1
501
Workshops
w
w
E00EX10.qxp 5/24/2010 1:55 AM Page 501
502 Workshops
w
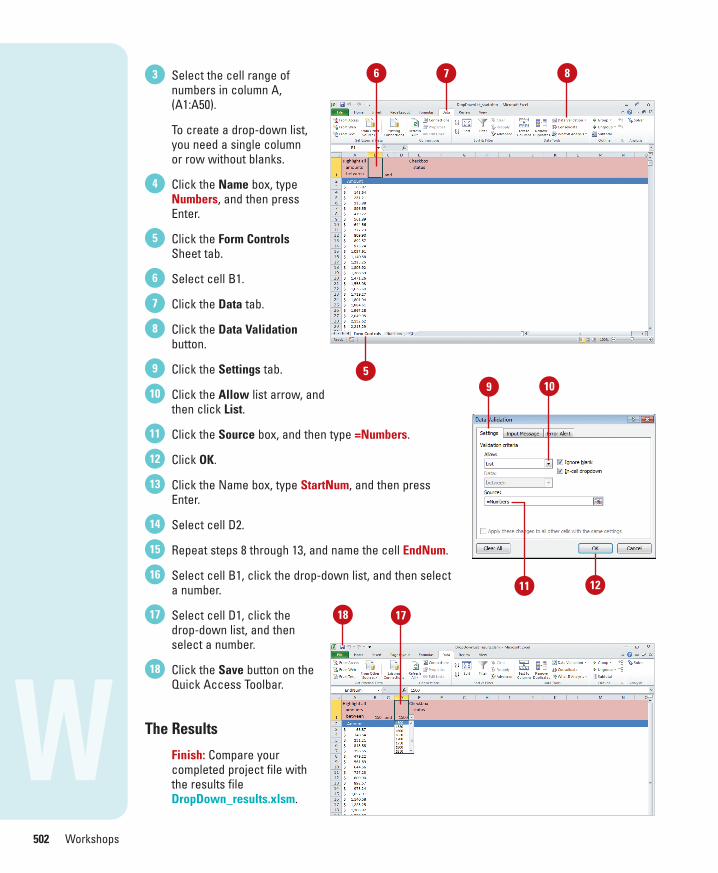
Select the cell range ofnumbers in column A,(A1:A50).
To create a drop-down list,you need a single columnor row without blanks.
Click the Name box, typeNumbers, and then pressEnter.
Click the Form ControlsSheet tab.
Select cell B1.
Click the Data tab.
Click the Data Validationbutton.
Click the Settings tab.
Click the Allow list arrow, and then click List.
Click the Source box, and then type =Numbers.
Click OK.
Click the Name box, type StartNum, and then pressEnter.
Select cell D2.
Repeat steps 8 through 13, and name the cell EndNum.
Select cell B1, click the drop-down list, and then selecta number.
Select cell D1, click thedrop-down list, and thenselect a number.
Click the Save button on theQuick Access Toolbar.
The Results
Finish: Compare yourcompleted project file withthe results fileDropDown_results.xlsm.
18
17
16
15
14
13
12
11
10
9
8
7
6
5
4
3 76
59 10
1211
18 17
8
E00EX10.qxp 5/24/2010 1:56 AM Page 502
wWorkshops 503
Project 2: Adding a Form Control
Skills and Tools: Insert a Form Control
Form controls are objects that users can interact with to enter or manipulate data. A control is acomponent on a worksheet used to display information or accept user input. For example, you canadd a Checkbox control to your worksheet so that users can turn an option on and off. You canselect a control from the Developer tab and drag to create the control directly on your worksheet.
The Project
In this project, you'll learn how to insert a check box form control into a worksheet to control formatting.
The Process
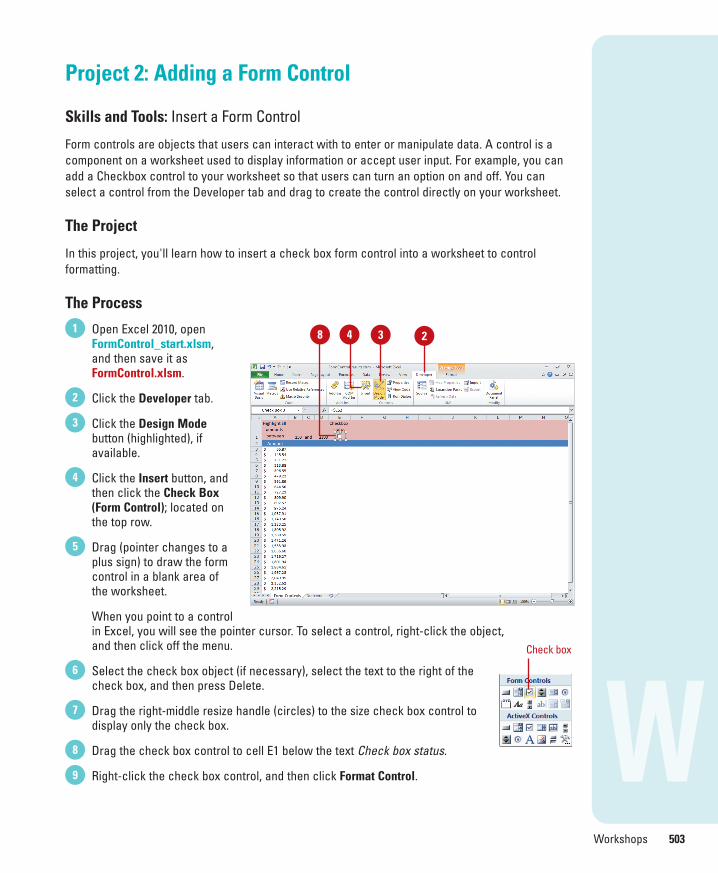
Open Excel 2010, openFormControl_start.xlsm,and then save it asFormControl.xlsm.
Click the Developer tab.
Click the Design Modebutton (highlighted), ifavailable.
Click the Insert button, andthen click the Check Box(Form Control); located onthe top row.
Drag (pointer changes to aplus sign) to draw the formcontrol in a blank area ofthe worksheet.
When you point to a controlin Excel, you will see the pointer cursor. To select a control, right-click the object,and then click off the menu.
Select the check box object (if necessary), select the text to the right of thecheck box, and then press Delete.
Drag the right-middle resize handle (circles) to the size check box control to display only the check box.
Drag the check box control to cell E1 below the text Check box status.
Right-click the check box control, and then click Format Control.9
8
7
6
5
4
3
2
1
Check box
38 4 2
E00EX10.qxp 5/24/2010 1:56 AM Page 503

504 Workshops
w
Click the Control tab.
Click the Checked option.
Click the Collapse Dialog button, click cell E2, and thenclick the Expand Dialog button.
Select the 3-D shading check box.
Click OK.
Select the check box control (if necessary), click theName box, type a CheckBoxSwitch, and then pressEnter.
Click the Design Mode button (not highlighted), andthen click a blank cell to deselect the check boxcontrol.
Click the check box to turn it on and off.
The contents of cell E2 togglesbetween TRUE and FALSE.
Click the Save button on theQuick Access Toolbar.
The Results
Finish: Compare yourcompleted project file withthe results fileFormControl_results.xlsm.
Project 3: Adding Conditional Formatting
Skills and Tools: Conditional Formatting
You can make your worksheets more powerful by setting up conditional formatting, which lets thevalue of a cell determine its formatting. For example, you might want this year’s sales total to be dis-played in red and italics if it’s less than last year’s total, but in green and bold if it’s more. The for-matting is applied to the cell values only if the values meet the condition that you specify.Otherwise, no conditional formatting is applied to the cell values.
The Project
In this project, you'll learn how to add conditional formatting to a named range and include formcontrols.
18
17
16
15
14
13
12
11
10
18 1617
1011
13 12 14
E00EX10.qxp 5/24/2010 1:57 AM Page 504

The Process
Open Excel 2010, open ConditionalFormat_start.xlsm,and then save it as ConditionalFormat.xlsm.
Select the cell range A3:A32.
Click the Home tab.
Click the Conditional Formatting button, and then click New Rules.
Click Use a formula to determine which cells toformat.
Type the formula
=AND($A3>=StartNum,$A3<=EndNum,CheckBoxSwitch)
Click Format.
Click the Fill tab.
Click Fill Effects.
Click the Color 2 list arrow, and then select a color.
Click a gradient option, and then select a gradient.
Click OK to close the Fill Effects dialog box.
Click OK to close the Format dialog box.13
12
11
10
9
8
7
6
5
4
3
2
1
Workshops 505
w12
10
11
8
139
14 7
5
6
E00EX10.qxp 5/24/2010 1:57 AM Page 505

506 Workshops
w
Click OK.
Click the Conditional Formatting button,and then click Manage Rules.
Select the Stop If True check box toprovide compatibility error checking.
Click OK.
The Results
Finish: Compare your completed project file with the results fileConditionalFormat_results.xlsm.
Project 4: Creating a VBA Script
Skills and Tools: Visual Basic for Applications script
Instead of pressing the Caps Lock key every time you want to turn capitalization on and off, you cancreate a VBA script to change cell contents to upper case. This can be useful when you have col-umn data, such as two-letter US state abbreviations, in a worksheet. You can type the state abbre-viation in lower case and let the VBA script change it for you.
The Project
In this project, you'll learn how to create a VBA script to change cell contents in a designatedrange to uppercase.
The Process
Open Excel 2010, openCAPS_start.xlsm, and thensave it as CAPS.xlsm.
Click the Developer tab.
Click the Visual Basicbutton.
Double-click theSheet1(Vendors) object.
The Object windows opens.
Click the Object list arrow,and then click Worksheet.
Click the Properties listarrow, and then clickChange.
6
5
4
3
2
1
17
16
15
14
5 64
17 16Conditional formatting rule
E00EX10.qxp 5/24/2010 1:57 AM Page 506

Workshops 507
w
Type the VBA code that appears in the following illustration:
Click the Save button on theStandard toolbar.
Click the Close button onthe Visual Basic Editorwindow to return to Excel.
Type state abbreviations incolumn E. After you pressEnter, cell contentschanges to uppercase.
Click the Save button on theQuick Access Toolbar.
The Results
Finish: Compare yourcompleted project file with the results file CAPS_results.xlsm.
11
10
9
8
7
11
Reference Example Description
Range(“A1”) Cell A1
Range(“A1:B5”) Cells A1 through B5
Range(“C5:D9,G9:H16”) Cells C5 through D9 and cells G9 through H16
Range(“A:A”), Range(“A:C”) Column A, Columns A through C
Range(“1:1”), Range(“1:5”) Row 1, Rows 1 through 5
Range(“1:1,3:3,8:8”) Rows 1, 3, and 8
Range(“A:A,C:C,F:F) Columns A, C, and F)
10
Common Cell and Range References
E00EX10.qxp 5/24/2010 1:58 AM Page 507
508 Workshops
w
Project 5: Creating a VBA Interface
Skills and Tools: ActiveX Controls and Visual Basic for Applications (VBA) form
An ActiveX control is a software component that adds functionality to an existing program. AnActiveX control supports a customizable, programmatic interface using VBA, which you can use tocreate your own functionality, such as a form. Excel includes several pre-built ActiveX controls—including a label, text box, command button, and check box—to help you create a user interface.
The Project
In this project, you'll learn how to create a form using VBA that allows users to input informationusing a series of dialogs, like a wizard, and use buttons to clear information and save the work-sheet.
The Process
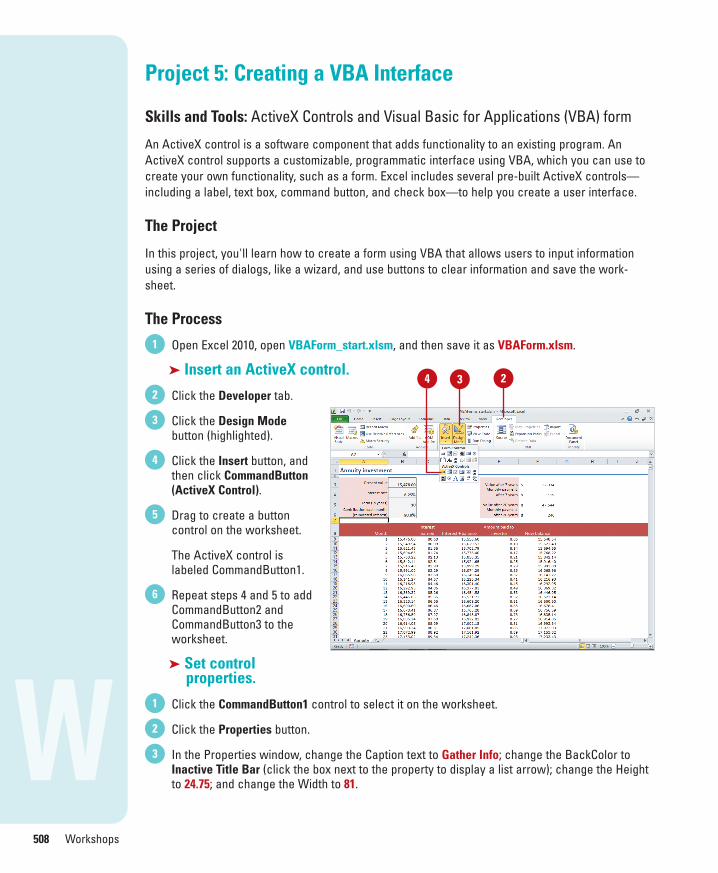
Open Excel 2010, open VBAForm_start.xlsm, and then save it as VBAForm.xlsm.
➤ Insert an ActiveX control.
Click the Developer tab.
Click the Design Modebutton (highlighted).
Click the Insert button, andthen click CommandButton(ActiveX Control).
Drag to create a buttoncontrol on the worksheet.
The ActiveX control islabeled CommandButton1.
Repeat steps 4 and 5 to addCommandButton2 andCommandButton3 to theworksheet.
➤ Set controlproperties.
Click the CommandButton1 control to select it on the worksheet.
Click the Properties button.
In the Properties window, change the Caption text to Gather Info; change the BackColor toInactive Title Bar (click the box next to the property to display a list arrow); change the Heightto 24.75; and change the Width to 81.
3
2
1
6
5
4
3
2
1
234
E00EX10.qxp 5/24/2010 1:58 AM Page 508

Workshops 509
w
Click the CommandButton2 control to select it on the worksheet, change the Caption text toClear Results, and then make the same remaining changes in step 3.
Click the CommandButton3control to select it on theworksheet, change theCaption text to SaveResults, and then make thesame remaining changes instep 3.
Click the Close button in theProperties window.
Click the Page Layout tab.
Click the Align button, andthen click Align Center toalign center the ActiveXcontrol buttons.
Click the Align button, andthen click DistributeVertically to distributevertically the ActiveXcontrol buttons.
Click the Save button on the Quick Access Toolbar.
➤ Add VBA functionality to the control.
Click the Developer tab.
Click the Visual Basic button.
In Project Explorer, double-click the Sheet(Annuity) object, if necessary, to open the CodeWindow.
Click the Object box list arrow at the top of the Code Window, and then clickCommandButton1.
In the Code window, type the VBA code that appears in the following illustration:
This code clears the current contents of cells B3 through B6, moves the selection out of the way tocell A7, and then assigns named cell values, such as Present_Value, the number entered using theInputBox function. The first argument in the InputBox function is the text you want in the dialog box,and the second argument is the dialog box title.
5
4
3
2
1
10
9
8
7
6
5
4
10 7 89
E00EX10.qxp 5/24/2010 1:59 AM Page 509

510 Workshops
w
Repeat steps 4 through 6 to add VBA code for CommandButton2 and CommandButton3 to thecontrol that appears in the following illustration:
This code creates a Save dialog box. The code uses the MsgBox function to display a dialog boxwhen you click the button (CommandButton2). The first argument in the MsgBox function is the textyou want in the dialog box, and the second argument is the type of buttons you want to use (in thiscase, Yes and No), and the third argument is the type of icon you want to use in the dialog box. Seethe table at the end of this project for different types of dialog box buttons and icons.
This code creates a dialog box to clear the current contents of cells B3 through B6.
In Project Explorer, double-click the ThisWorkbook object, if necessary, to open the CodeWindow.
Type the VBA code that appears in the following illustration:
This code creates a dialog box when you open the workbook, displaying text and the username ofthe workbook (in this case Tim Todd). This code is placed in the ThisWorkbook object and uses theprocedure Sub Workbook_Open(), so it gets executed when you open the workbook.
Click the Save button on the Standard toolbar.
Click the Close button on the Visual Basic Editor window to return to Excel.
Click the Design Mode button (not highlighted).
Click the Clear Results button, and then click Yes to clear clientinformation.
12
11
10
9
8
7
6
12
E00EX10.qxp 5/24/2010 1:59 AM Page 510
Workshops 511
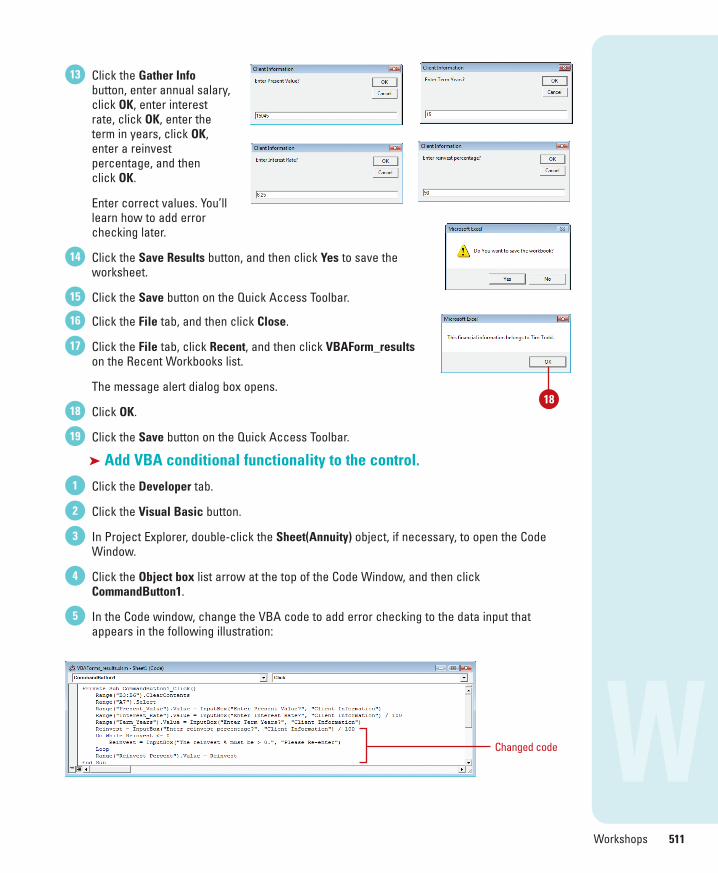
Click the Gather Infobutton, enter annual salary,click OK, enter interestrate, click OK, enter theterm in years, click OK,enter a reinvestpercentage, and then click OK.
Enter correct values. You’lllearn how to add errorchecking later.
Click the Save Results button, and then click Yes to save theworksheet.
Click the Save button on the Quick Access Toolbar.
Click the File tab, and then click Close.
Click the File tab, click Recent, and then click VBAForm_resultson the Recent Workbooks list.
The message alert dialog box opens.
Click OK.
Click the Save button on the Quick Access Toolbar.
➤ Add VBA conditional functionality to the control.
Click the Developer tab.
Click the Visual Basic button.
In Project Explorer, double-click the Sheet(Annuity) object, if necessary, to open the CodeWindow.
Click the Object box list arrow at the top of the Code Window, and then clickCommandButton1.
In the Code window, change the VBA code to add error checking to the data input thatappears in the following illustration:
5
4
3
2
1
19
18
17
16
15
14
13
Changed code w
18
E00EX10.qxp 5/24/2010 1:59 AM Page 511

512 Workshops
w
Click the Save button on the Standard toolbar.
Click the Close button on the Visual Basic Editorwindow to return to Excel.
Click the Gather Info button,enter annual salary, clickOK, enter interest rate, clickOK, enter the term in years,click OK, enter 0 (as areinvest percentage), re-enter a reinvestmentpercentage greater than 0,and then click OK.
Click the Save button on theQuick Access Toolbar.
The Results
Finish: Compare yourcompleted project file withthe presentationVBAForm_results.xlsm.
9
8
7
6
Constant Value Description
vbOKOnly 0 Display OK button only
vbOKCancel 1 Display OK and Cancel buttons
vbAbortRetryIgnore 2 Display Abort, Retry, and Ignore buttons
vbYesNoCancel 3 Display Yes, No, and Cancel buttons
vbYesNo 4 Display Yes and No buttons
vbRetryCancel 5 Display Retry and Cancel buttons
vbCritical 16 Display Critical Message icon
vbQuestion 32 Display Warning Query icon
vbExclamation 48 Display Warning Message icon
vbInformation 64 Display Information Message icon
vbDefaultButton1 0 First button is default
vbDefaultButton2 256 Second button is default
vbDefaultButton3 512 Third button is default
vbDefaultButton4 768 Fourth button is default
8
Common MsgBox Function Arguments
E00EX10.qxp 5/24/2010 1:59 AM Page 512
Workshops 513
w
Want More ProjectsYou can access and download more workshop projects and related files at www.perspection.comin the software downloads area. After you download the files from the Web, uncompress the filesinto a folder on your hard drive to which you have easy access from your Microsoft Office program.
Get Everything on DVD
Instead of downloading everything from the Web, which can take a while depending on your Inter-net connection speed, you can get all the files used in this book and much more on the MicrosoftOffice 2010 On Demand DVD. The DVD contains task and workshop files, tips and tricks, keyboardshortcuts, transition helpers from 2003 or 2007 to 2010, and other goodies from the author.
To get the Microsoft Office 2010 On Demand DVD, go to www.perspection.com.
E00EX10.qxp 5/24/2010 2:00 AM Page 513

E00EX10.qxp 5/24/2010 2:00 AM Page 514