welcome to the next generation of computers
TRANSCRIPT

Welcome to the next generation of computers.
Copyright InformationThe only warranties for Hewlett-Packard products and services are set forth in the express statements accompanying such products and services. Nothing herein should be construed as constituting an additional warranty. HP shall not be liable for technical or editorial errors or omissions contained herein.
HP assumes no responsibility for the use or reliability of its software on equipment that is not furnished by HP.
This document contains proprietary information that is protected by copyright. No part of this document may be photocopied, reproduced, or translated to another language without the prior written consent of HP.
Hewlett-Packard CompanyP.O. Box 4010Cupertino, CA 95015-4010USA
Copyright © 2008 Hewlett-Packard Development Company, L.P.
May be licensed in the United States by one or both of U.S. Patents Nos. 4,930,158 and 4,930,160 until August 28, 2008.
Microsoft and Windows Vista are U.S. registered trademarks of Microsoft Corporation. The Windows logo and Windows Vista are trademarks or registered trademarks of Microsoft Corporation in the United States and/or other countries/regions.
HP supports lawful use of technology and does not endorse or encourage the use of our products for purposes other than those permitted by copyright law. The information in this document is subject to change without notice.
Table of Contents
Finding HP TouchSmart PC Information ........................................................................................... vi
Getting to Know the HP TouchSmart PC ........................................................................1Features of the HP TouchSmart PC...................................................................................................1
Front and right side of the HP TouchSmart PC ..............................................................................2Left side of the HP TouchSmart PC ..............................................................................................4Removing the Connector Cover ..................................................................................................5Back of the HP TouchSmart PC...................................................................................................5Activity LED indicator lights........................................................................................................7
Connecting the power source .........................................................................................................8Cable Management.......................................................................................................................8Adjust the Angle of the Computer Stand.........................................................................................10Using the Wireless Keyboard or Mouse .........................................................................................10
Synchronizing the wireless keyboard or mouse ..........................................................................11Turning the HP TouchSmart PC On and Off ....................................................................................12
Turning on the HP TouchSmart PC ............................................................................................12Turning off the HP TouchSmart PC ............................................................................................13Changing power settings.........................................................................................................13
Connecting to the Internet.............................................................................................................13Setting up a wireless home network ..........................................................................................14Setting up a wired home network .............................................................................................15
Using Bluetooth Devices ...............................................................................................................16Adjusting the Ambient Light ..........................................................................................................16Adding Hardware and Software ...................................................................................................17
Upgrading your HP TouchSmart PC hardware ...........................................................................17Updating your HP TouchSmart software ....................................................................................17
Using the CD/DVD Drive .............................................................................................................17Using the TV Tuner to Watch and Record TV Programs on the HP TouchSmart PC ...............................18
Connecting the TV signal source to the computer........................................................................18Setting up the HP TouchSmart PC with a set-top box ...................................................................20Completing the Windows Media Center setup wizard ................................................................20Using the remote control with Windows Media Center................................................................21
Table of Contents iii
Sound Options............................................................................................................................22Connecting analog speakers ...................................................................................................22Connecting and enabling digital speakers or an audio receiver ...................................................23Adjusting speaker volume........................................................................................................24Configuring sound for Windows Media Center..........................................................................25Using headphones..................................................................................................................25Using the microphone array ....................................................................................................25Using a headset .....................................................................................................................25Connecting MP3 players .........................................................................................................25
Connecting a Printer ....................................................................................................................25Installing a Security Lock ..............................................................................................................26Cleaning the HP TouchSmart PC Screen.........................................................................................27Using the Computer with Safety and Comfort..................................................................................28Recycling Your Old Computer Hardware .......................................................................................28
Using the HP TouchSmart Software.............................................................................29What is HP TouchSmart software? ............................................................................................29Opening the HP TouchSmart software.......................................................................................29Navigating in HP TouchSmart ..................................................................................................30Using the onscreen keyboard...................................................................................................32
Personalizing your HP TouchSmart Software ...................................................................................33Moving tiles around................................................................................................................33Adding a software program shortcut to HP TouchSmart...............................................................33Adding a Web site link to HP TouchSmart .................................................................................34Selecting tiles to view or hide...................................................................................................34Editing or deleting an added tile ..............................................................................................35
Opening HP TouchSmart Faster.....................................................................................................35HP TouchSmart Photo...................................................................................................................35
Adding photos to your photo library .........................................................................................36Viewing your photo collection..................................................................................................36Viewing a photo slideshow......................................................................................................36Uploading your photos to Snapfish...........................................................................................37Printing your photos................................................................................................................37Editing your photos.................................................................................................................38Creating a CD or DVD of your photos.......................................................................................39
HP TouchSmart Music ..................................................................................................................39Selecting a music library .........................................................................................................40Playing your CDs ...................................................................................................................40Media controls.......................................................................................................................41Creating a playlist of your favorite songs ..................................................................................42Playing your playlist ...............................................................................................................42Deleting a playlist...................................................................................................................42Deleting songs from your music library......................................................................................43Creating music CDs................................................................................................................43
iv Getting Started
HP TouchSmart Video ..................................................................................................................44Adding your videos to the computer .........................................................................................44Watching your videos.............................................................................................................44Creating videos with the webcam.............................................................................................45Uploading your videos to YouTube...........................................................................................45Capturing, editing, and recording videos ..................................................................................46Playing your DVDs..................................................................................................................47
Webcam and Microphone ...........................................................................................................47Capturing webcam video and snapshots ...................................................................................48Having a video chat or making conference calls ........................................................................48
HP TouchSmart Calendar .............................................................................................................49Scheduling a calendar event and setting a reminder...................................................................49Viewing calendar events .........................................................................................................50Deleting a calendar event........................................................................................................50Synchronizing your HP TouchSmart Calendar with your Microsoft Windows Vista Calendar ..........................................................................................50
HP TouchSmart Notes ..................................................................................................................50Creating a handwritten or typed note .......................................................................................51Creating a voice note .............................................................................................................52Deleting text and voice notes ...................................................................................................52
HP TouchSmart Weather ..............................................................................................................53Displaying the temperature and forecast for a city ......................................................................53
HP TouchSmart Clock ..................................................................................................................54Displaying the time for up to three places ..................................................................................54
HP TouchSmart RSS Reader ..........................................................................................................55Setting up RSS feeds ...............................................................................................................55Importing a list of RSS feeds ....................................................................................................55
HP TouchSmart Browser ...............................................................................................................56Selecting Items on the Windows Desktop and in Other Software .......................................................58Software Quick Reference Table ...................................................................................................59
Index .........................................................................................................................61
Table of Contents v
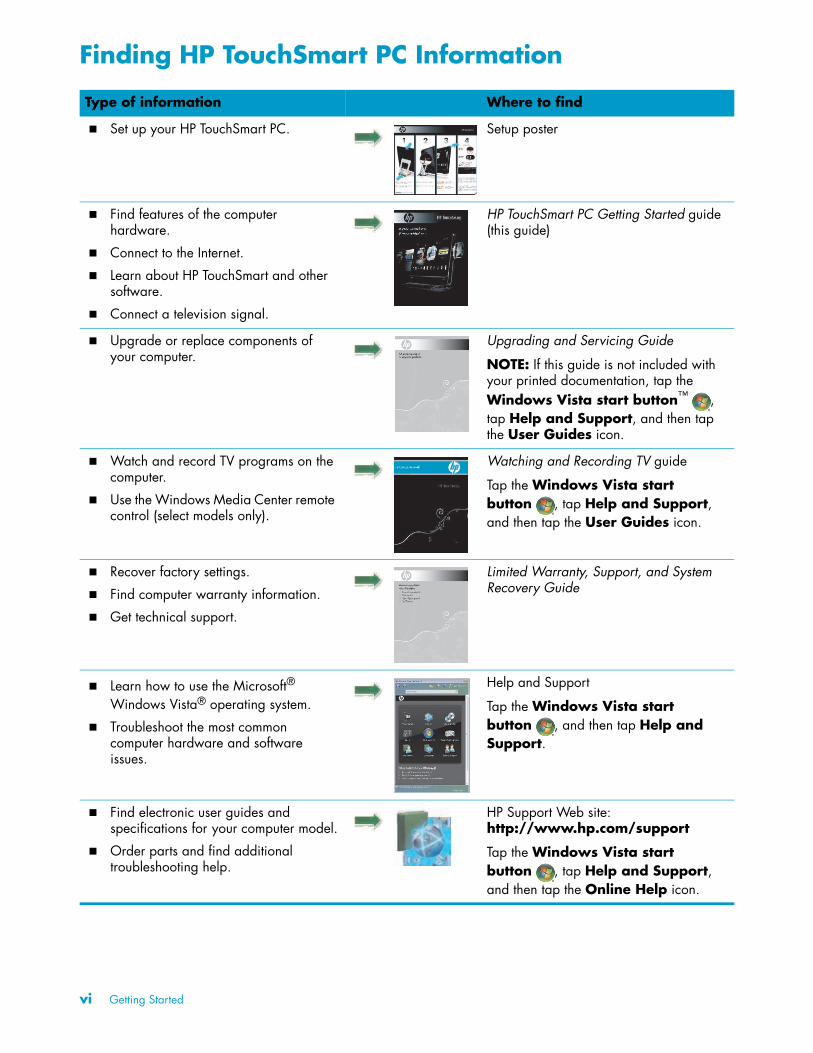
Finding HP TouchSmart PC Information
Type of information Where to find
� Set up your HP TouchSmart PC. Setup poster
� Find features of the computer hardware.
� Connect to the Internet.
� Learn about HP TouchSmart and other software.
� Connect a television signal.
HP TouchSmart PC Getting Started guide (this guide)
� Upgrade or replace components of your computer.
Upgrading and Servicing Guide
NOTE: If this guide is not included with your printed documentation, tap the Windows Vista start button™ , tap Help and Support, and then tap the User Guides icon.
� Watch and record TV programs on the computer.
� Use the Windows Media Center remote control (select models only).
Watching and Recording TV guide
Tap the Windows Vista start button , tap Help and Support, and then tap the User Guides icon.
� Recover factory settings.
� Find computer warranty information.
� Get technical support.
Limited Warranty, Support, and System Recovery Guide
� Learn how to use the Microsoft® Windows Vista® operating system.
� Troubleshoot the most common computer hardware and software issues.
Help and Support
Tap the Windows Vista start button , and then tap Help and Support.
� Find electronic user guides and specifications for your computer model.
� Order parts and find additional troubleshooting help.
HP Support Web site: http://www.hp.com/support
Tap the Windows Vista start button , tap Help and Support, and then tap the Online Help icon.
vi Getting Started
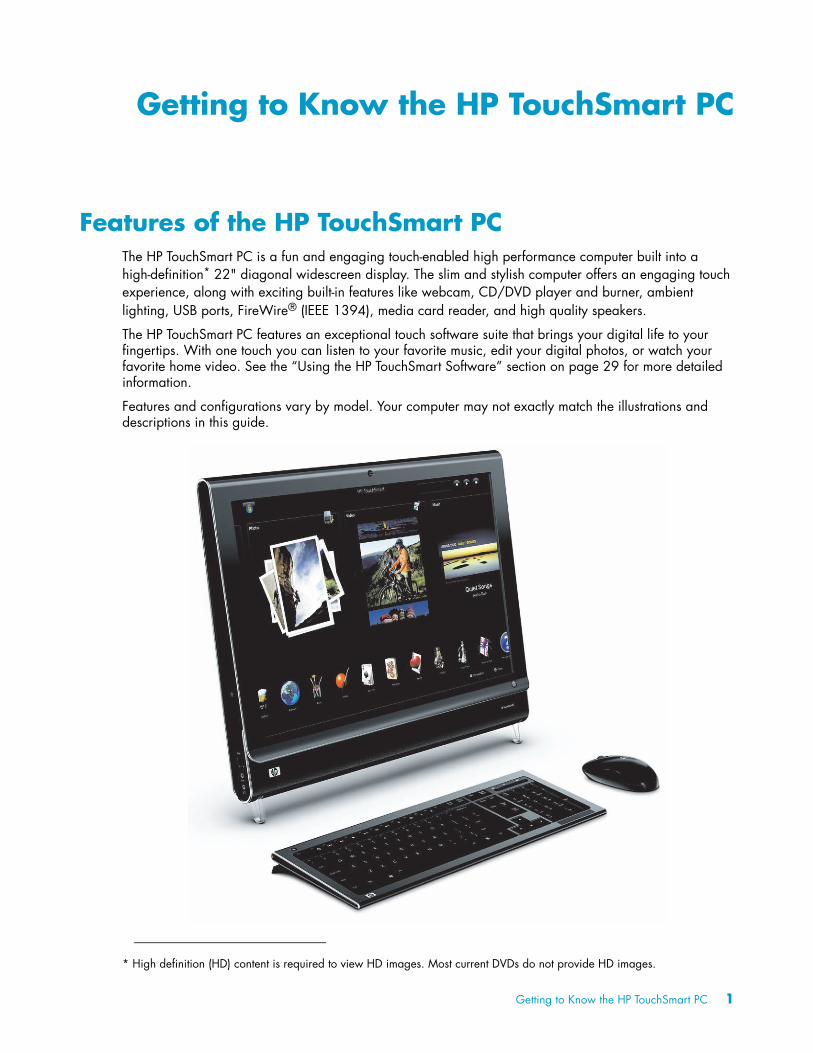
Getting to Know the HP TouchSmart PC
Features of the HP TouchSmart PCThe HP TouchSmart PC is a fun and engaging touch-enabled high performance computer built into a high-definition* 22" diagonal widescreen display. The slim and stylish computer offers an engaging touch experience, along with exciting built-in features like webcam, CD/DVD player and burner, ambient lighting, USB ports, FireWire® (IEEE 1394), media card reader, and high quality speakers.
The HP TouchSmart PC features an exceptional touch software suite that brings your digital life to your fingertips. With one touch you can listen to your favorite music, edit your digital photos, or watch your favorite home video. See the “Using the HP TouchSmart Software” section on page 29 for more detailed information.
Features and configurations vary by model. Your computer may not exactly match the illustrations and descriptions in this guide.
* High definition (HD) content is required to view HD images. Most current DVDs do not provide HD images.
Getting to Know the HP TouchSmart PC 1
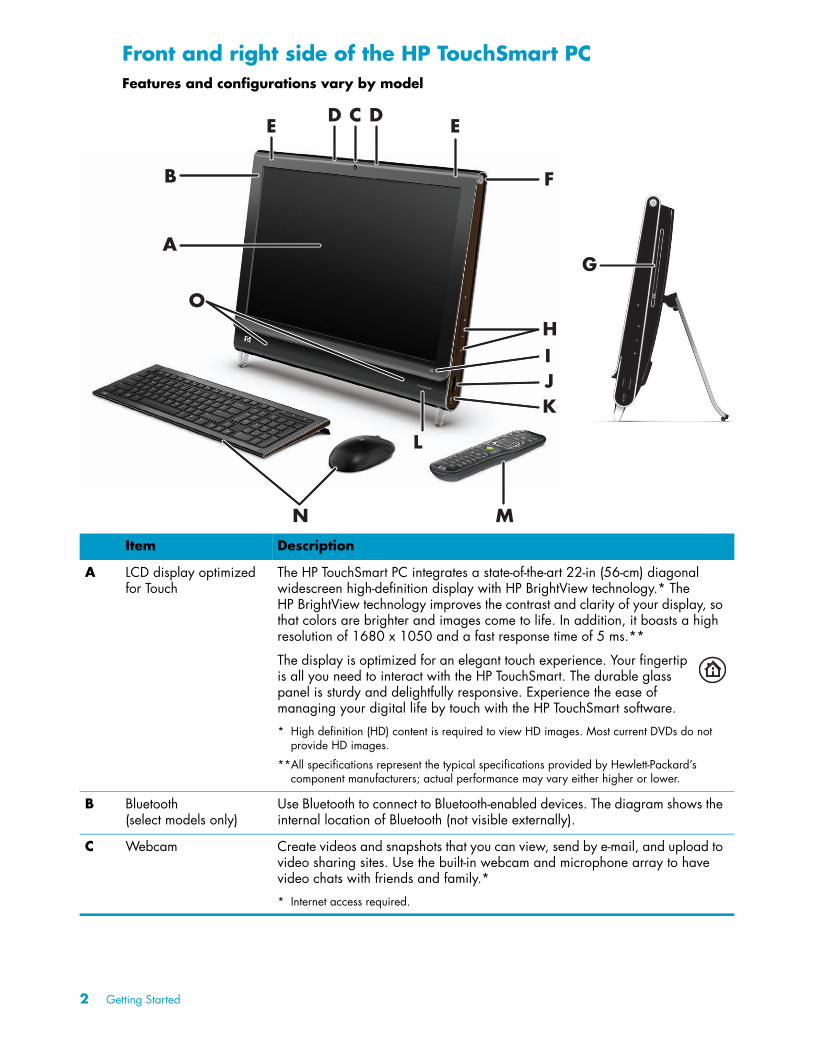
Front and right side of the HP TouchSmart PCFeatures and configurations vary by model
G
C
A
B
E
F
HIJ
O
K
N
L
M
E D D
Item Description
A LCD display optimized for Touch
The HP TouchSmart PC integrates a state-of-the-art 22-in (56-cm) diagonal widescreen high-definition display with HP BrightView technology.* The HP BrightView technology improves the contrast and clarity of your display, so that colors are brighter and images come to life. In addition, it boasts a high resolution of 1680 x 1050 and a fast response time of 5 ms.**
The display is optimized for an elegant touch experience. Your fingertip is all you need to interact with the HP TouchSmart. The durable glass panel is sturdy and delightfully responsive. Experience the ease of managing your digital life by touch with the HP TouchSmart software.
* High definition (HD) content is required to view HD images. Most current DVDs do not provide HD images.
**All specifications represent the typical specifications provided by Hewlett-Packard’s component manufacturers; actual performance may vary either higher or lower.
B Bluetooth (select models only)
Use Bluetooth to connect to Bluetooth-enabled devices. The diagram shows the internal location of Bluetooth (not visible externally).
C Webcam Create videos and snapshots that you can view, send by e-mail, and upload to video sharing sites. Use the built-in webcam and microphone array to have video chats with friends and family.*
* Internet access required.
2 Getting Started
D Microphone array Use the built-in digital microphone array to record sound for your webcam videos, and to use instant messenger or chat software to have video chats online. The microphone is designed to filter out ambient noise in your environment, to provide a cleaner sound. It is designed to record from a distance of up to 2 feet (one-half meter) away from the computer.
E Built-in wireless LAN Use the built-in wireless LAN to connect to the Internet through your existing wireless network. The diagram shows the internal location of the wireless LAN (top left and right, not visible externally).
The wireless LAN supports IEEE 802.11 b/g/n (pre-n).
F Power/Sleep button Press the Power/Sleep button to turn on your HP TouchSmart PC, or put it in Sleep mode. To turn off your computer, tap the Windows Vista start button , tap the Arrow button next to the Lock icon, and then select Shut Down.
G Slot-loading CD/DVD drive(located on back side panel)
Watch your favorite DVD or listen to your CD collection. Burn CDs and DVDs.*
Read and write DVD-RAM, CD-R/RW, and DVD+/-R/RW.
Read and play CD-ROM, DVD-ROM, CD Audio, DVD+/-R dual layer (DL), DVD-Video, and Video CD.
* HP supports the lawful use of technology and does not endorse or encourage the use of our products for purposes other than those permitted by copyright law.
H Volume, and mute controls
Adjust the sound level up or down, or mute.
I HP TouchSmart button Turn your HP TouchSmart PC on and open your HP TouchSmart software. Or, if the computer is already turned on, press the button to open the HP TouchSmart software for quick access to your music, photos, videos, or the Web. The HP TouchSmart button cannot turn the computer off.
J Memory card reader Use the built-in memory card reader to easily access photos and other files directly from a memory card.
Supported formats include xD media (xD), Secure Digital (SD), Secure Digital High Capacity (SDHC), MultiMediaCard (MMC), Memory Stick (MS), and Memory Stick Pro (MS-Pro) memory cards.
Your memory card reader also supports adapters for the following memory cards: Mini SD, RS MMC, Micro SD, MS-Duo, and MS Duo Pro.
K FireWire (IEEE 1394) Transfer videos from your digital video camcorder (4-pin connector).
L IR receiver window Infrared (IR) receiver window, located on the lower-right side of the computer. Works with a remote control and TV tuner (select models only).
M Remote control (select models only)
Point the remote control at the lower right-side of the computer, where the IR receiver is located, and then navigate to all of your Windows Media Center options, such as watching and recording your favorite TV shows. A remote control is included with select models only.
Refer to the Watching and Recording TV guide. Tap the Windows Vista start button , tap Help and Support, and then tap User Guides.
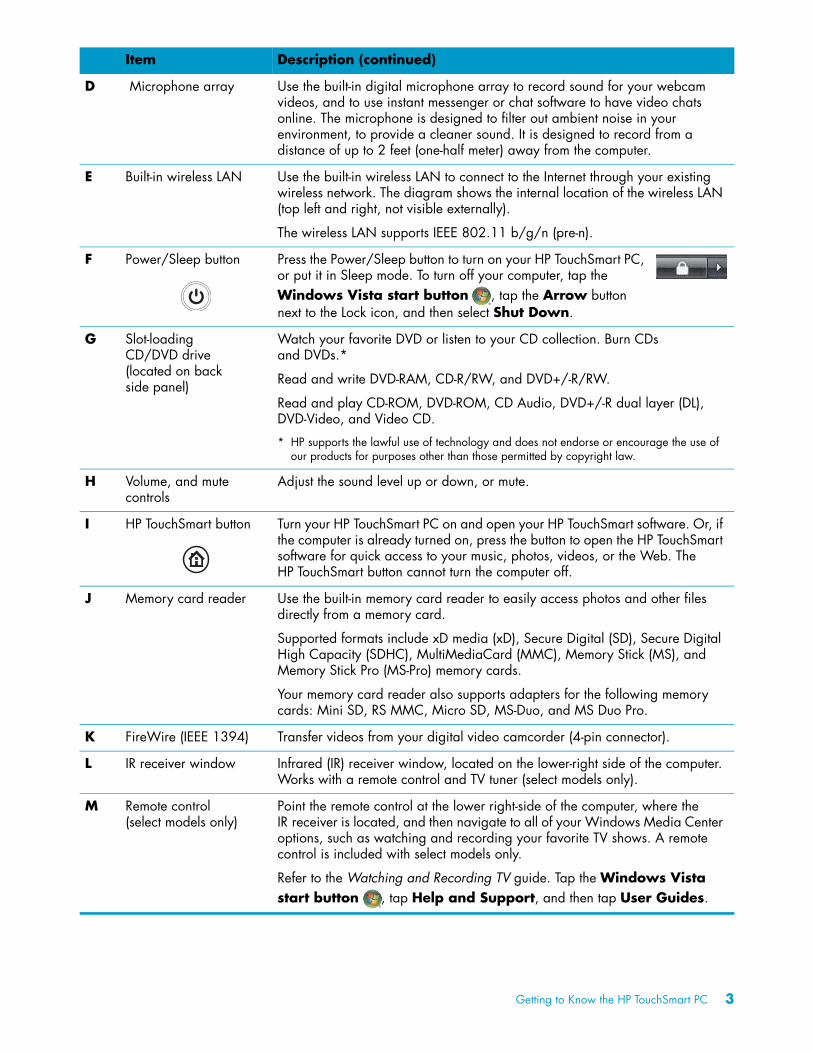
Item Description (continued)
Getting to Know the HP TouchSmart PC 3
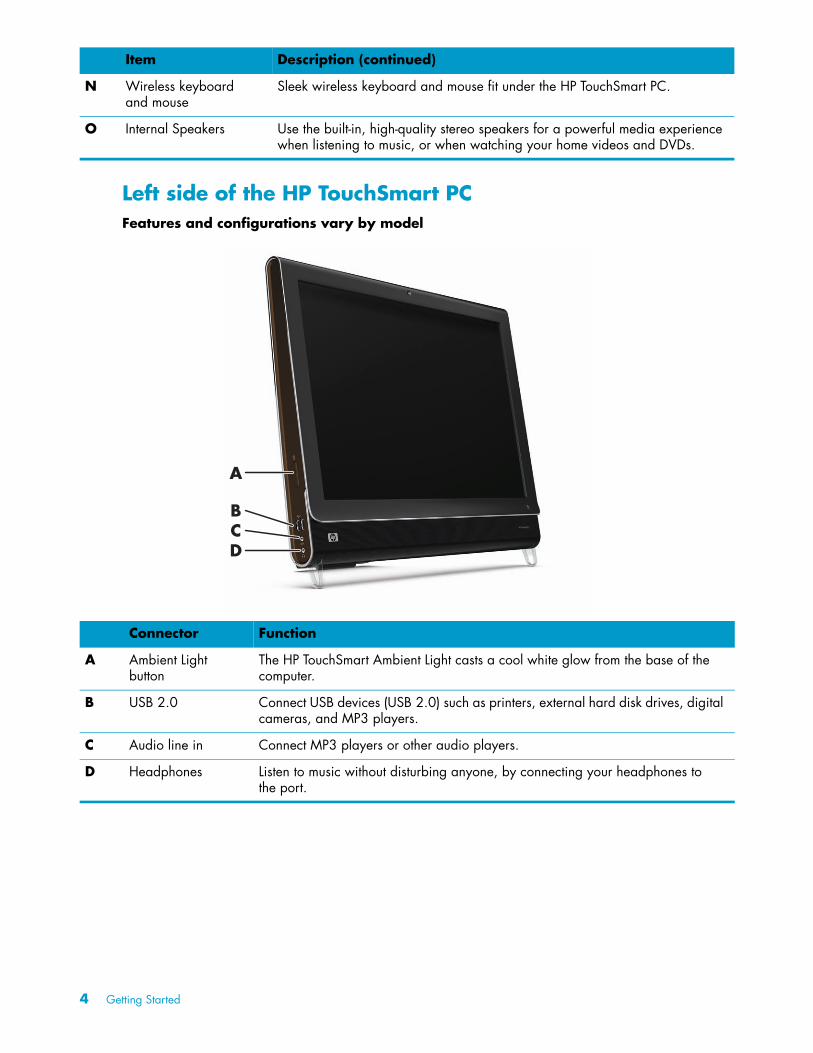
Left side of the HP TouchSmart PCFeatures and configurations vary by model
N Wireless keyboard and mouse
Sleek wireless keyboard and mouse fit under the HP TouchSmart PC.
O Internal Speakers Use the built-in, high-quality stereo speakers for a powerful media experience when listening to music, or when watching your home videos and DVDs.
Item Description (continued)
A
BCD
Connector Function
A Ambient Light button
The HP TouchSmart Ambient Light casts a cool white glow from the base of the computer.
B USB 2.0 Connect USB devices (USB 2.0) such as printers, external hard disk drives, digital cameras, and MP3 players.
C Audio line in Connect MP3 players or other audio players.
D Headphones Listen to music without disturbing anyone, by connecting your headphones to the port.
4 Getting Started
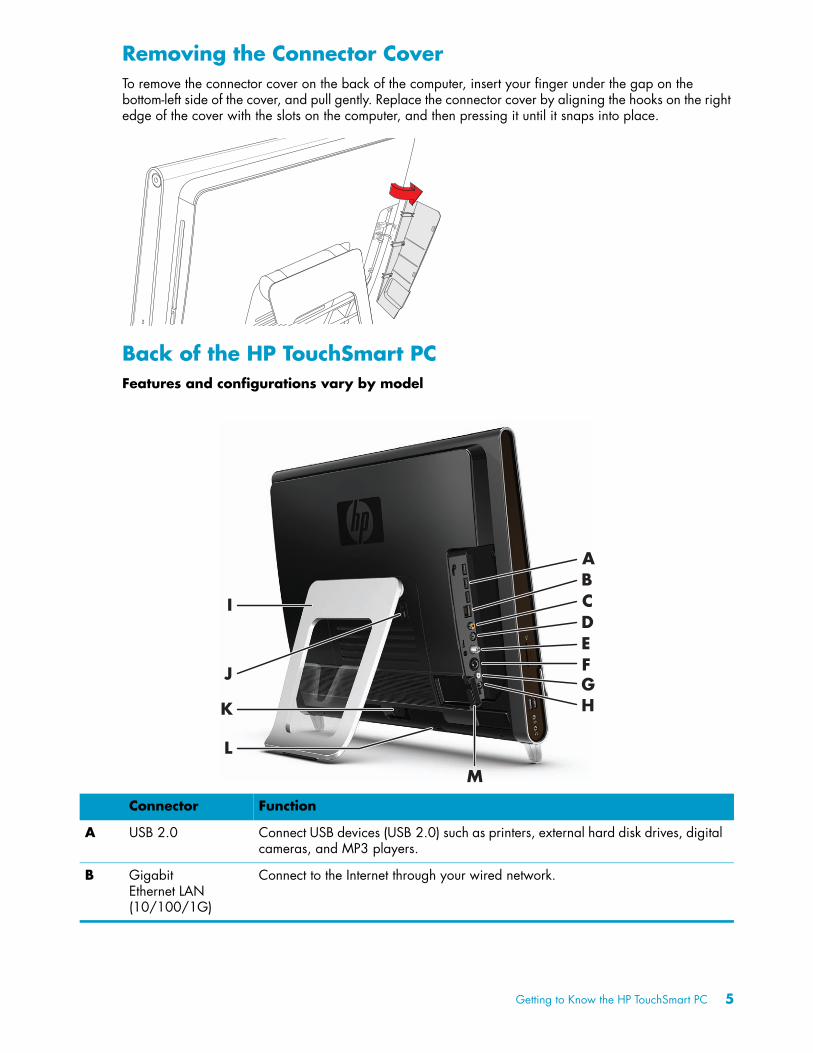
Removing the Connector CoverTo remove the connector cover on the back of the computer, insert your finger under the gap on the bottom-left side of the cover, and pull gently. Replace the connector cover by aligning the hooks on the right edge of the cover with the slots on the computer, and then pressing it until it snaps into place.
Back of the HP TouchSmart PCFeatures and configurations vary by model
J
K
L
I
M
ABCDEFGH
Connector Function
A USB 2.0 Connect USB devices (USB 2.0) such as printers, external hard disk drives, digital cameras, and MP3 players.
B Gigabit Ethernet LAN (10/100/1G)
Connect to the Internet through your wired network.
Getting to Know the HP TouchSmart PC 5
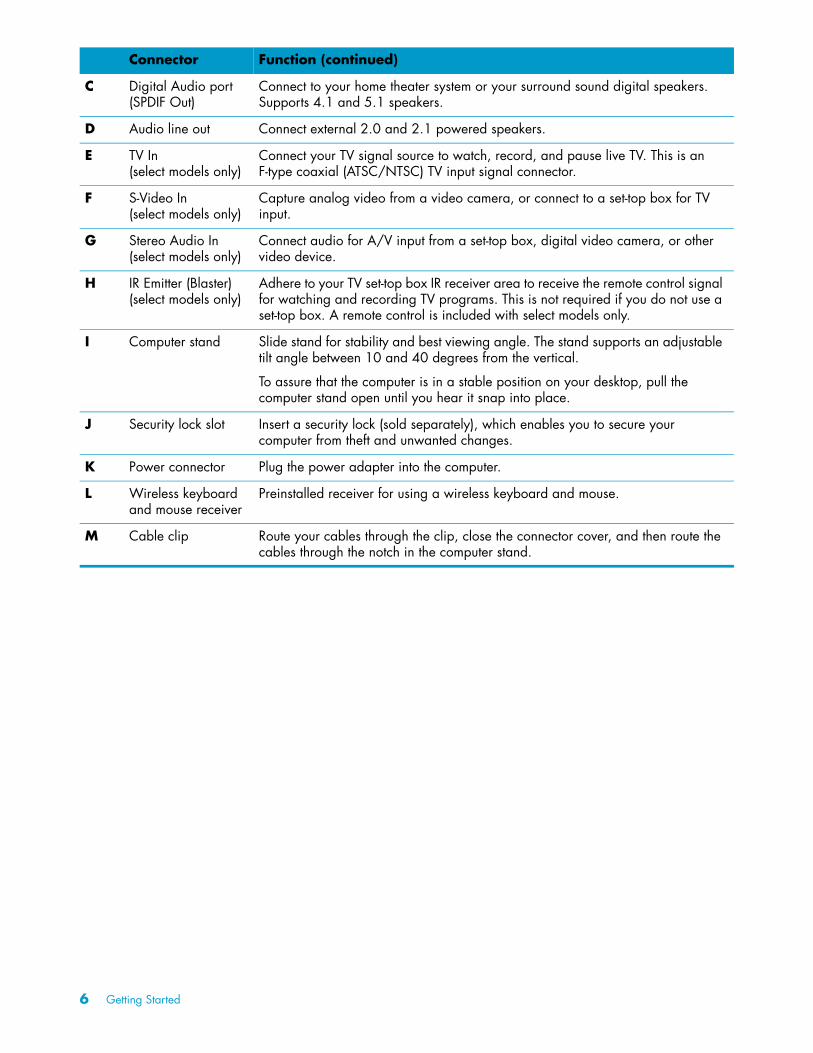
C Digital Audio port (SPDIF Out)
Connect to your home theater system or your surround sound digital speakers. Supports 4.1 and 5.1 speakers.
D Audio line out Connect external 2.0 and 2.1 powered speakers.
E TV In (select models only)
Connect your TV signal source to watch, record, and pause live TV. This is an F-type coaxial (ATSC/NTSC) TV input signal connector.
F S-Video In (select models only)
Capture analog video from a video camera, or connect to a set-top box for TV input.
G Stereo Audio In (select models only)
Connect audio for A/V input from a set-top box, digital video camera, or other video device.
H IR Emitter (Blaster) (select models only)
Adhere to your TV set-top box IR receiver area to receive the remote control signal for watching and recording TV programs. This is not required if you do not use a set-top box. A remote control is included with select models only.
I Computer stand Slide stand for stability and best viewing angle. The stand supports an adjustable tilt angle between 10 and 40 degrees from the vertical.
To assure that the computer is in a stable position on your desktop, pull the computer stand open until you hear it snap into place.
J Security lock slot Insert a security lock (sold separately), which enables you to secure your computer from theft and unwanted changes.
K Power connector Plug the power adapter into the computer.
L Wireless keyboard and mouse receiver
Preinstalled receiver for using a wireless keyboard and mouse.
M Cable clip Route your cables through the clip, close the connector cover, and then route the cables through the notch in the computer stand.
Connector Function (continued)
6 Getting Started

Activity LED indicator lights
The following are the activity indicator light-emitting diodes (LEDs) on your HP TouchSmart PC:
H
G
B C
D
EF
A
LED What it does
A Event Indicates an event reminder notification has been set from a software application. Setting of the event reminder is available in select software applications only.
B Webcam Indicates webcam activity.
C Power Indicates the power state; blue indicates power on, and amber indicates Sleep mode.
D Hard disk drive Indicates hard disk drive activity.
E Memory card reader Indicates memory card reader activity. When the LED is flashing, do not remove your memory card.
When the LED is off, no card is inserted. A solid LED indicates that a card is inserted with no read or write capacity. A flashing LED indicates that there is memory card activity, and that a card has read/write capacity.
F Remote control IR receiver Indicates that your computer is working with your remote control to navigate windows, record TV shows, and perform other activities in Windows Media Center. A remote control is included with select models only.
G Wireless keyboard and mouse receiver
Indicates wireless signals received from the wireless keyboard and mouse. The LED is visible from the back of the computer.
H Optical Disc Drive Activity Indicates Optical Disc Drive is in use.
Getting to Know the HP TouchSmart PC 7
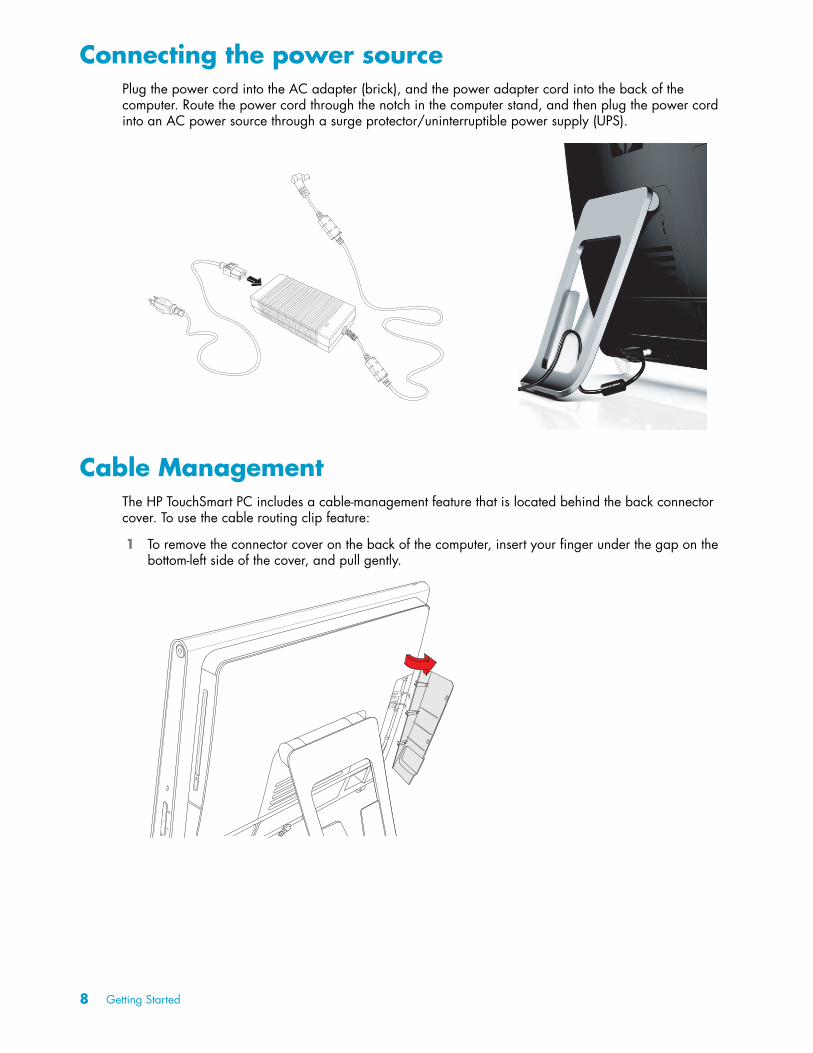
Connecting the power sourcePlug the power cord into the AC adapter (brick), and the power adapter cord into the back of the computer. Route the power cord through the notch in the computer stand, and then plug the power cord into an AC power source through a surge protector/uninterruptible power supply (UPS).
Cable ManagementThe HP TouchSmart PC includes a cable-management feature that is located behind the back connector cover. To use the cable routing clip feature:
1 To remove the connector cover on the back of the computer, insert your finger under the gap on the bottom-left side of the cover, and pull gently.
8 Getting Started
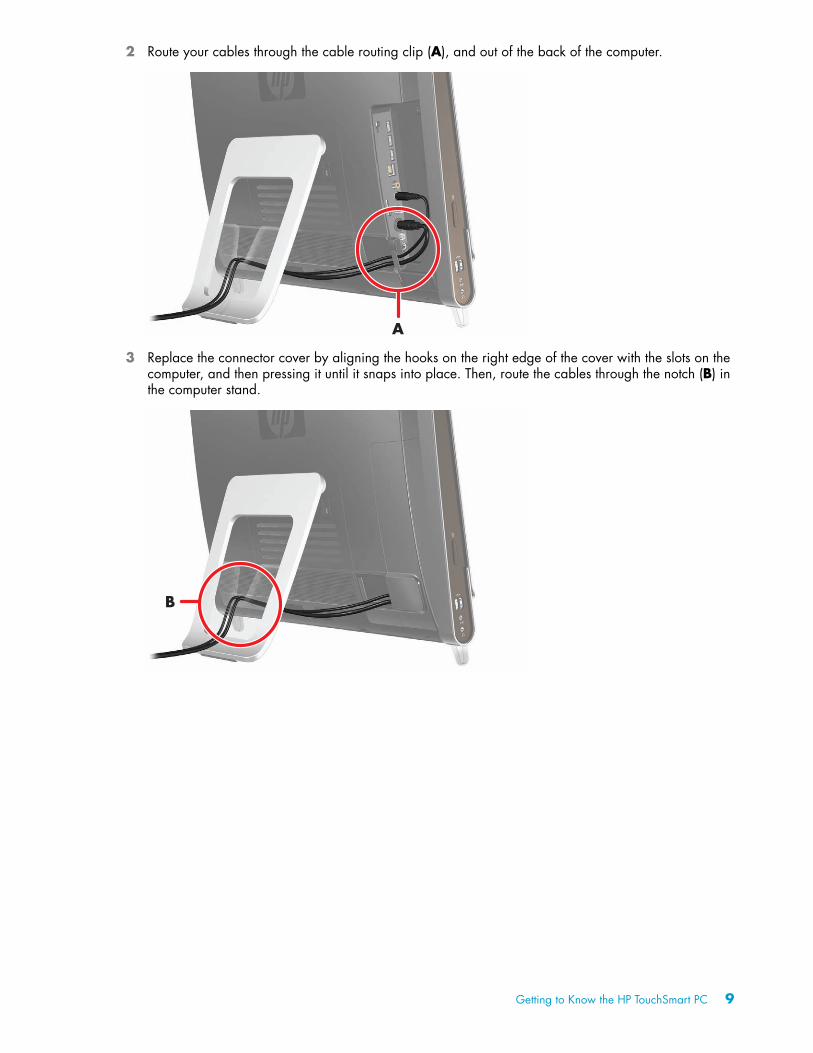
2 Route your cables through the cable routing clip (A), and out of the back of the computer.
3 Replace the connector cover by aligning the hooks on the right edge of the cover with the slots on the computer, and then pressing it until it snaps into place. Then, route the cables through the notch (B) in the computer stand.
A
B
Getting to Know the HP TouchSmart PC 9
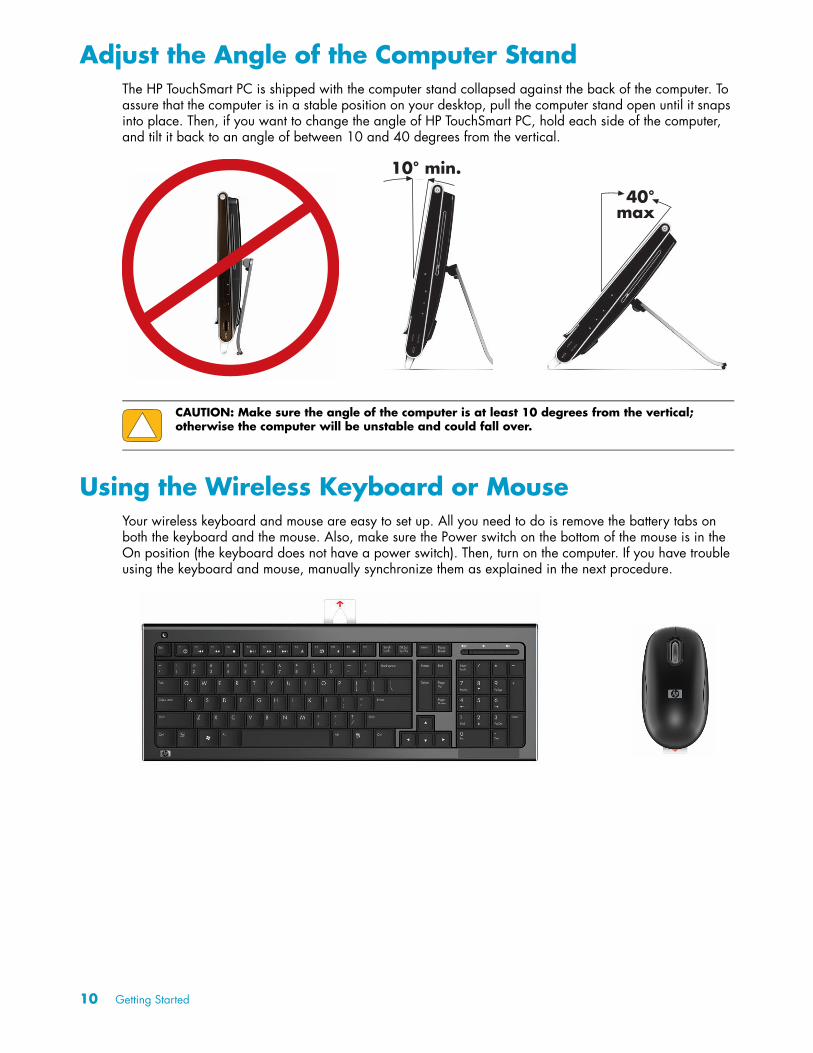
Adjust the Angle of the Computer StandThe HP TouchSmart PC is shipped with the computer stand collapsed against the back of the computer. To assure that the computer is in a stable position on your desktop, pull the computer stand open until it snaps into place. Then, if you want to change the angle of HP TouchSmart PC, hold each side of the computer, and tilt it back to an angle of between 10 and 40 degrees from the vertical.
Using the Wireless Keyboard or MouseYour wireless keyboard and mouse are easy to set up. All you need to do is remove the battery tabs on both the keyboard and the mouse. Also, make sure the Power switch on the bottom of the mouse is in the On position (the keyboard does not have a power switch). Then, turn on the computer. If you have trouble using the keyboard and mouse, manually synchronize them as explained in the next procedure.
CAUTION: Make sure the angle of the computer is at least 10 degrees from the vertical; otherwise the computer will be unstable and could fall over.
40°max
10° min.
10 Getting Started
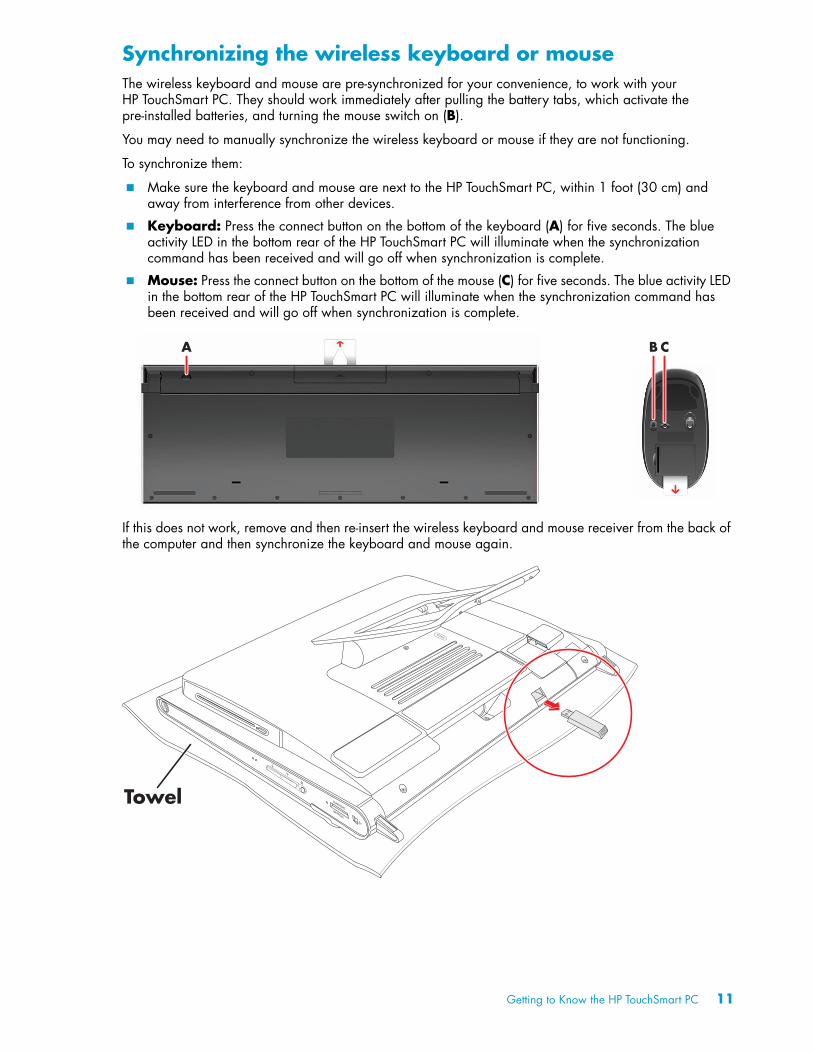
Synchronizing the wireless keyboard or mouseThe wireless keyboard and mouse are pre-synchronized for your convenience, to work with your HP TouchSmart PC. They should work immediately after pulling the battery tabs, which activate the pre-installed batteries, and turning the mouse switch on (B).
You may need to manually synchronize the wireless keyboard or mouse if they are not functioning.
To synchronize them:
� Make sure the keyboard and mouse are next to the HP TouchSmart PC, within 1 foot (30 cm) and away from interference from other devices.
� Keyboard: Press the connect button on the bottom of the keyboard (A) for five seconds. The blue activity LED in the bottom rear of the HP TouchSmart PC will illuminate when the synchronization command has been received and will go off when synchronization is complete.
� Mouse: Press the connect button on the bottom of the mouse (C) for five seconds. The blue activity LED in the bottom rear of the HP TouchSmart PC will illuminate when the synchronization command has been received and will go off when synchronization is complete.
If this does not work, remove and then re-insert the wireless keyboard and mouse receiver from the back of the computer and then synchronize the keyboard and mouse again.
A B C
Towel
Getting to Know the HP TouchSmart PC 11
Turning the HP TouchSmart PC On and Off
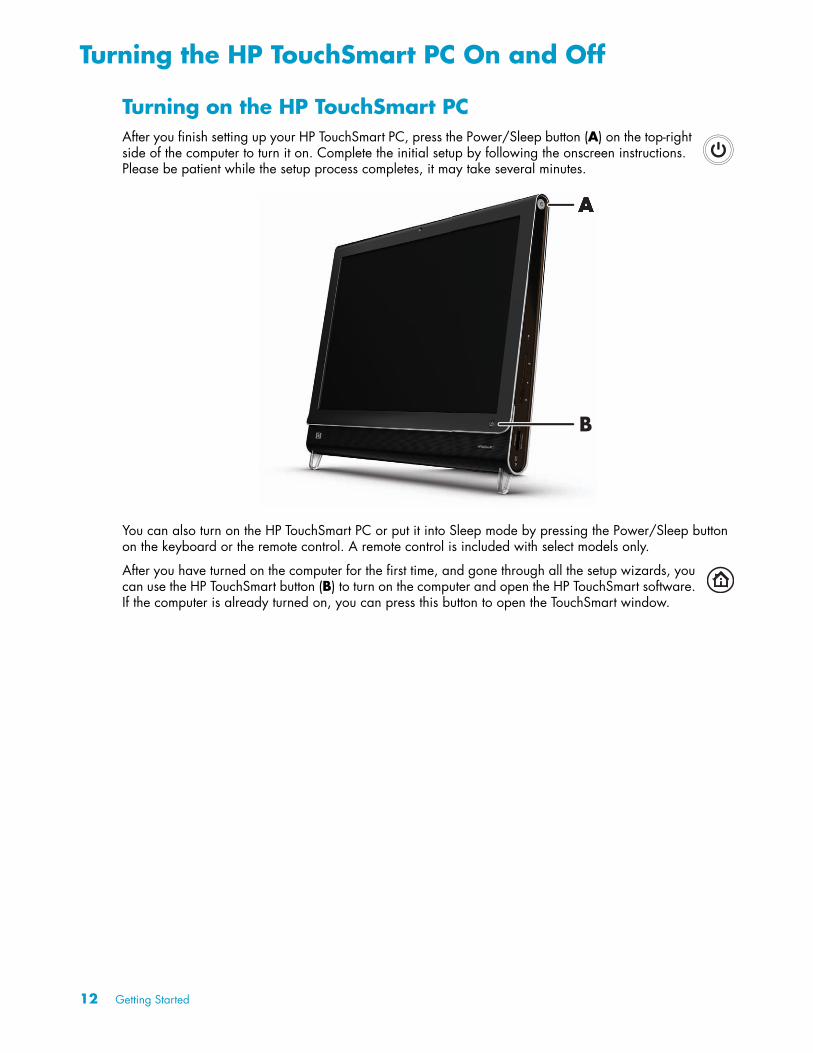
Turning on the HP TouchSmart PCAfter you finish setting up your HP TouchSmart PC, press the Power/Sleep button (A) on the top-right side of the computer to turn it on. Complete the initial setup by following the onscreen instructions. Please be patient while the setup process completes, it may take several minutes.
You can also turn on the HP TouchSmart PC or put it into Sleep mode by pressing the Power/Sleep button on the keyboard or the remote control. A remote control is included with select models only.
After you have turned on the computer for the first time, and gone through all the setup wizards, you can use the HP TouchSmart button (B) to turn on the computer and open the HP TouchSmart software. If the computer is already turned on, you can press this button to open the TouchSmart window.
A
B
12 Getting Started
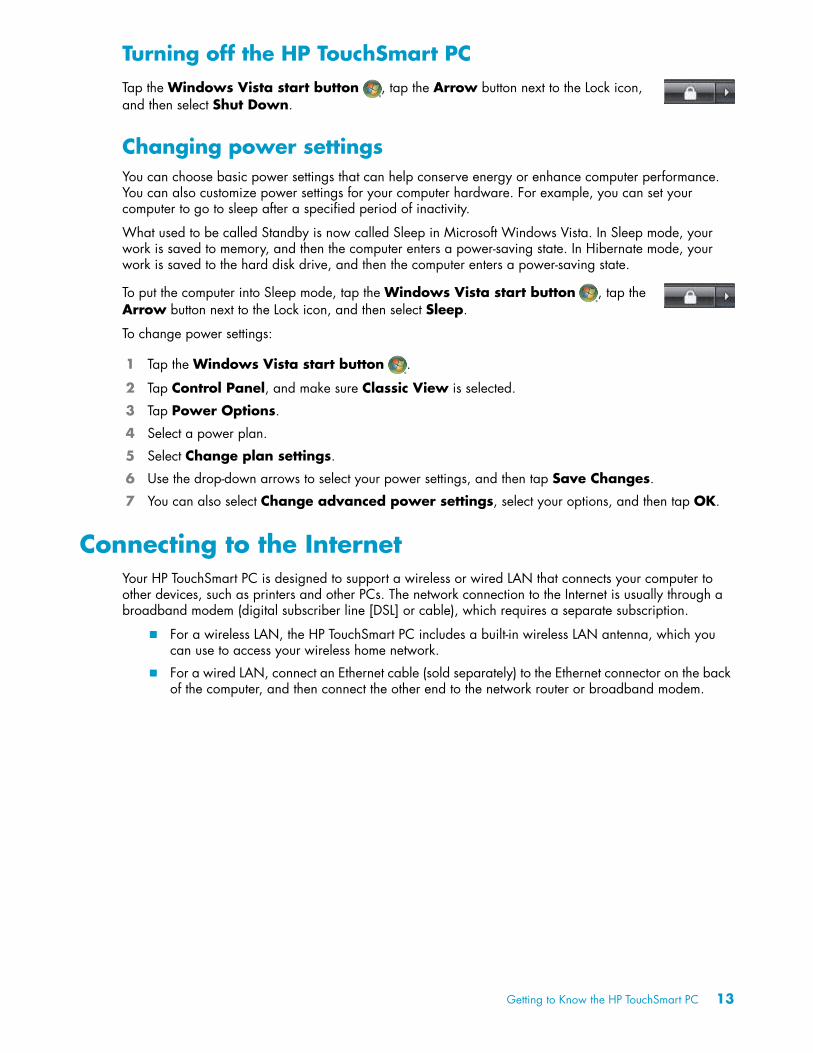
Turning off the HP TouchSmart PCTap the Windows Vista start button , tap the Arrow button next to the Lock icon, and then select Shut Down.
Changing power settingsYou can choose basic power settings that can help conserve energy or enhance computer performance. You can also customize power settings for your computer hardware. For example, you can set your computer to go to sleep after a specified period of inactivity.
What used to be called Standby is now called Sleep in Microsoft Windows Vista. In Sleep mode, your work is saved to memory, and then the computer enters a power-saving state. In Hibernate mode, your work is saved to the hard disk drive, and then the computer enters a power-saving state.
To put the computer into Sleep mode, tap the Windows Vista start button , tap the Arrow button next to the Lock icon, and then select Sleep.
To change power settings:
1 Tap the Windows Vista start button .
2 Tap Control Panel, and make sure Classic View is selected.
3 Tap Power Options.
4 Select a power plan.
5 Select Change plan settings.
6 Use the drop-down arrows to select your power settings, and then tap Save Changes.
7 You can also select Change advanced power settings, select your options, and then tap OK.
Connecting to the InternetYour HP TouchSmart PC is designed to support a wireless or wired LAN that connects your computer to other devices, such as printers and other PCs. The network connection to the Internet is usually through a broadband modem (digital subscriber line [DSL] or cable), which requires a separate subscription.
� For a wireless LAN, the HP TouchSmart PC includes a built-in wireless LAN antenna, which you can use to access your wireless home network.
� For a wired LAN, connect an Ethernet cable (sold separately) to the Ethernet connector on the back of the computer, and then connect the other end to the network router or broadband modem.
Getting to Know the HP TouchSmart PC 13
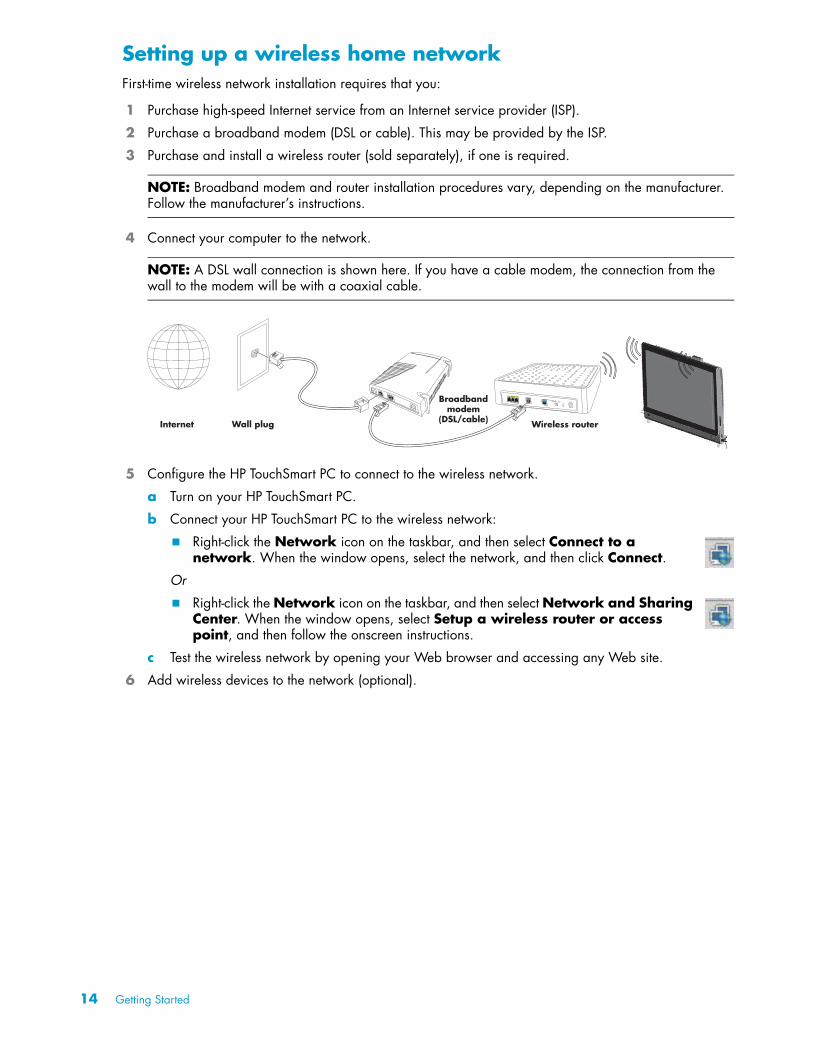
Setting up a wireless home networkFirst-time wireless network installation requires that you:
1 Purchase high-speed Internet service from an Internet service provider (ISP).
2 Purchase a broadband modem (DSL or cable). This may be provided by the ISP.
3 Purchase and install a wireless router (sold separately), if one is required.
4 Connect your computer to the network.
5 Configure the HP TouchSmart PC to connect to the wireless network.
a Turn on your HP TouchSmart PC.
b Connect your HP TouchSmart PC to the wireless network:
� Right-click the Network icon on the taskbar, and then select Connect to a network. When the window opens, select the network, and then click Connect.
Or
� Right-click the Network icon on the taskbar, and then select Network and Sharing Center. When the window opens, select Setup a wireless router or access point, and then follow the onscreen instructions.
c Test the wireless network by opening your Web browser and accessing any Web site.
6 Add wireless devices to the network (optional).
NOTE: Broadband modem and router installation procedures vary, depending on the manufacturer. Follow the manufacturer’s instructions.
NOTE: A DSL wall connection is shown here. If you have a cable modem, the connection from the wall to the modem will be with a coaxial cable.
Internet Wall plug
Broadband modem
(DSL/cable) Wireless router
14 Getting Started
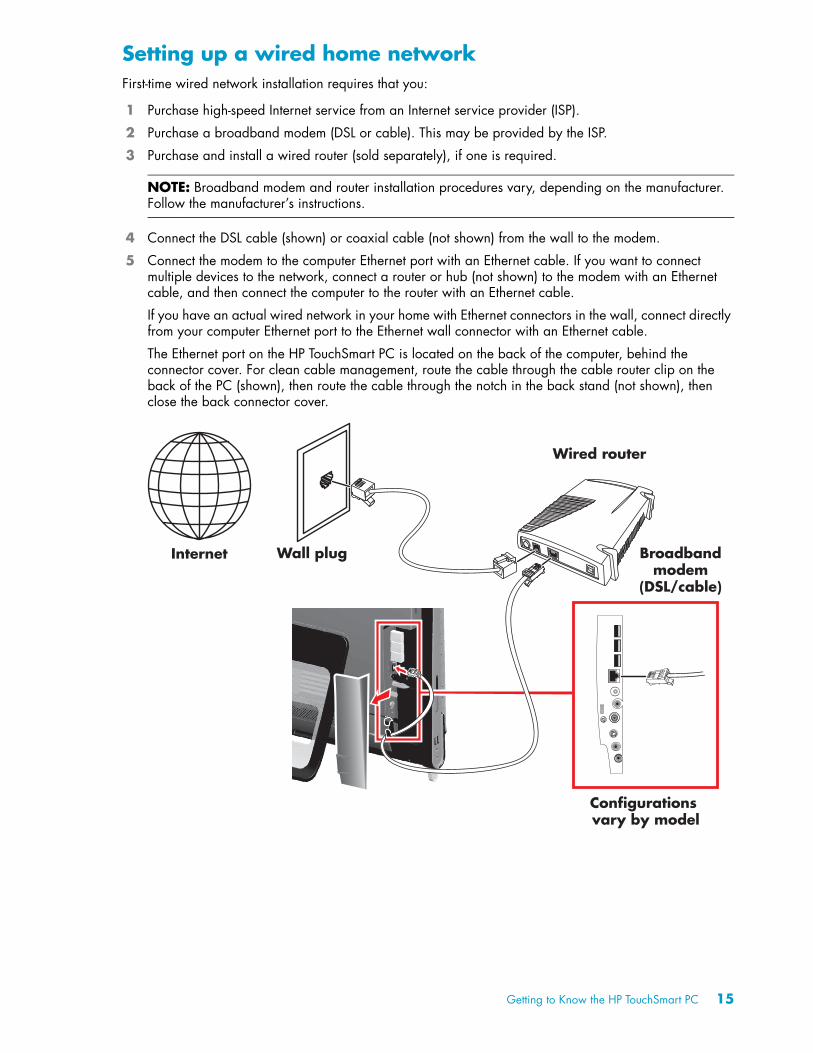
Setting up a wired home networkFirst-time wired network installation requires that you:
1 Purchase high-speed Internet service from an Internet service provider (ISP).
2 Purchase a broadband modem (DSL or cable). This may be provided by the ISP.
3 Purchase and install a wired router (sold separately), if one is required.
4 Connect the DSL cable (shown) or coaxial cable (not shown) from the wall to the modem.
5 Connect the modem to the computer Ethernet port with an Ethernet cable. If you want to connect multiple devices to the network, connect a router or hub (not shown) to the modem with an Ethernet cable, and then connect the computer to the router with an Ethernet cable.
If you have an actual wired network in your home with Ethernet connectors in the wall, connect directly from your computer Ethernet port to the Ethernet wall connector with an Ethernet cable.
The Ethernet port on the HP TouchSmart PC is located on the back of the computer, behind the connector cover. For clean cable management, route the cable through the cable router clip on the back of the PC (shown), then route the cable through the notch in the back stand (not shown), then close the back connector cover.
NOTE: Broadband modem and router installation procedures vary, depending on the manufacturer. Follow the manufacturer’s instructions.
Internet Wall plug
Wired router
Broadband modem
(DSL/cable)
Configurations vary by model
Getting to Know the HP TouchSmart PC 15
6 Add other computers or devices to your wired network:
a Disconnect power from the broadband modem and the router, and then shut down your HP TouchSmart PC and the computers you want to add to your network.
b For each wired computer, connect one end of an Ethernet cable to the LAN connector on the computer, and then connect the other end of the cable to any available Ethernet connector on the router.
c Reconnect power to the modem, and wait until the modem has completed its startup cycle. Reconnect power to the router. Then, turn on the wired computers and your HP TouchSmart PC.
d Test the network connection for each wired computer by opening your Web browser and accessing any Web site.
Using Bluetooth DevicesSelect models only
Some models of the HP TouchSmart PC are Bluetooth-enabled, so that you can connect all kinds of Bluetooth-enabled wireless devices. Bluetooth devices create a personal area network (PAN), which connects other Bluetooth devices, such as computers, phones, printers, headsets, speakers, and cameras. In a PAN, each device communicates directly with the other devices, and the devices must be relatively close together.
To enable a Bluetooth device:
1 Refer to your Bluetooth device’s instructions to make it “discoverable” (sends out a radio signal).
2 Click the Windows Vista start button , Control Panel, and then click Hardware and Sound. Click Bluetooth Devices. Click Add. Follow onscreen instructions.
3 If your Bluetooth device is a printer, click the Windows Vista start button , Control Panel, and then click Hardware and Sound. Click Printers. Click Add a printer.
Adjusting the Ambient LightThe HP TouchSmart Ambient Light casts a cool white glow from the base of the computer. By default, the Ambient Light is turned off when you turn on the computer.
To control the Ambient Light:
� Press the Ambient Light button on the left side of the computer to turn the Ambient Light on.
� Continue pressing the button to cycle through low intensity, medium intensity, high intensity, off, and on.
NOTE: The Ambient Light will dim when the computer goes into sleep mode.
16 Getting Started
Adding Hardware and SoftwareSome HP TouchSmart PCs feature a Windows Vista 64-bit system, and may not be compatible with all of the software you install or all of the hardware you add. Make sure your hardware and software are compatible with the operating system.*
Upgrading your HP TouchSmart PC hardwareTo find detailed instructions on removing and replacing the memory and the hard disk drive for your HP TouchSmart PC, refer to the Upgrading and Servicing Guide that came with your computer.
Updating your HP TouchSmart softwareCheck www.hp.com/go/touchsmart for updated software and new software features.
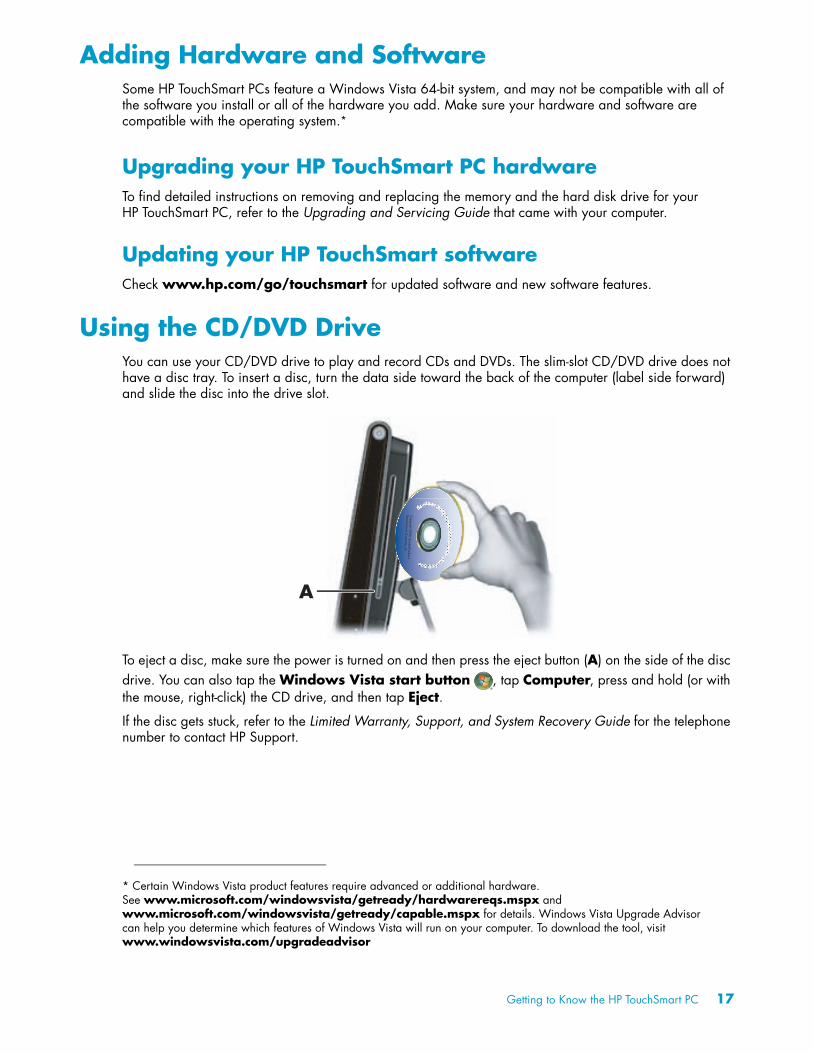
Using the CD/DVD DriveYou can use your CD/DVD drive to play and record CDs and DVDs. The slim-slot CD/DVD drive does not have a disc tray. To insert a disc, turn the data side toward the back of the computer (label side forward) and slide the disc into the drive slot.
To eject a disc, make sure the power is turned on and then press the eject button (A) on the side of the disc drive. You can also tap the Windows Vista start button , tap Computer, press and hold (or with the mouse, right-click) the CD drive, and then tap Eject.
If the disc gets stuck, refer to the Limited Warranty, Support, and System Recovery Guide for the telephone number to contact HP Support.
* Certain Windows Vista product features require advanced or additional hardware. See www.microsoft.com/windowsvista/getready/hardwarereqs.mspx and www.microsoft.com/windowsvista/getready/capable.mspx for details. Windows Vista Upgrade Advisor can help you determine which features of Windows Vista will run on your computer. To download the tool, visit www.windowsvista.com/upgradeadvisor
A
Getting to Know the HP TouchSmart PC 17

Using the TV Tuner to Watch and Record TV Programs on the HP TouchSmart PC
Select models only
You can watch and record your favorite TV programs by using Windows Media Center. All of the menus in Windows Media Center are accessible through touch, as well as your remote control, keyboard, and mouse. TV tuners and remote controls are included in select models only.
To watch and record TV programs on your HP TouchSmart PC:
1 Connect the TV signal source to the TV tuner on the computer. See “Connecting the TV signal source to the computer” on page 18.
2 Set up your computer for use with a set-top box (optional). See “Setting up the HP TouchSmart PC with a set-top box” on page 20.
3 Complete the Windows Media Center setup wizard to configure your TV tuner and your program guide. See “Completing the Windows Media Center setup wizard” on page 20.
4 Point the remote control at the IR receiver on the lower-right side of the HP TouchSmart PC to start Windows Media Center, and navigate through this program to watch and record TV shows. See “Using the remote control with Windows Media Center” on page 21.
For more information about how to watch and record TV programs, refer to the Watching and Recording TV guide included with your computer. Tap the Windows Vista start button , tap Help and Support, and then tap User Guides.
Connecting the TV signal source to the computerSelect models only
To connect a TV signal to the computer, your computer needs a TV tuner, which is included with select models only. You also may need to purchase some cables separately.
Your TV tuner requires that you use a TV tuner isolator (adapter) (purchased separately) with your computer to connect a coaxial cable to the TV signal source. Using the TV tuner adapter helps prevent personal injury and computer damage from surges on the coaxial line caused by lightning.
WARNING: Please read “Additional Safety Information” in the Limited Warranty, Support, and System Recovery Guide before installing and connecting your HP TouchSmart PC to the electrical power system.
18 Getting Started
To connect the TV signal source to your HP TouchSmart PC:
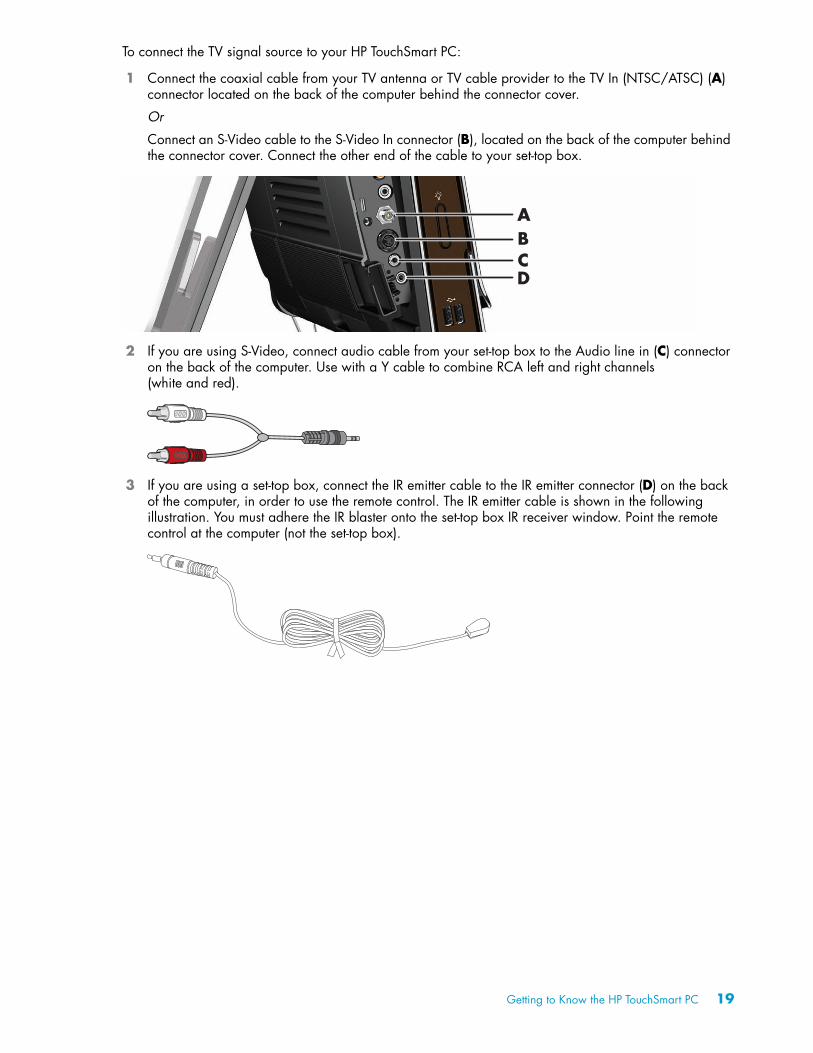
1 Connect the coaxial cable from your TV antenna or TV cable provider to the TV In (NTSC/ATSC) (A) connector located on the back of the computer behind the connector cover.
Or
Connect an S-Video cable to the S-Video In connector (B), located on the back of the computer behind the connector cover. Connect the other end of the cable to your set-top box.
2 If you are using S-Video, connect audio cable from your set-top box to the Audio line in (C) connector on the back of the computer. Use with a Y cable to combine RCA left and right channels (white and red).
3 If you are using a set-top box, connect the IR emitter cable to the IR emitter connector (D) on the back of the computer, in order to use the remote control. The IR emitter cable is shown in the following illustration. You must adhere the IR blaster onto the set-top box IR receiver window. Point the remote control at the computer (not the set-top box).
AB
DC
Getting to Know the HP TouchSmart PC 19
Setting up the HP TouchSmart PC with a set-top boxSelect models only
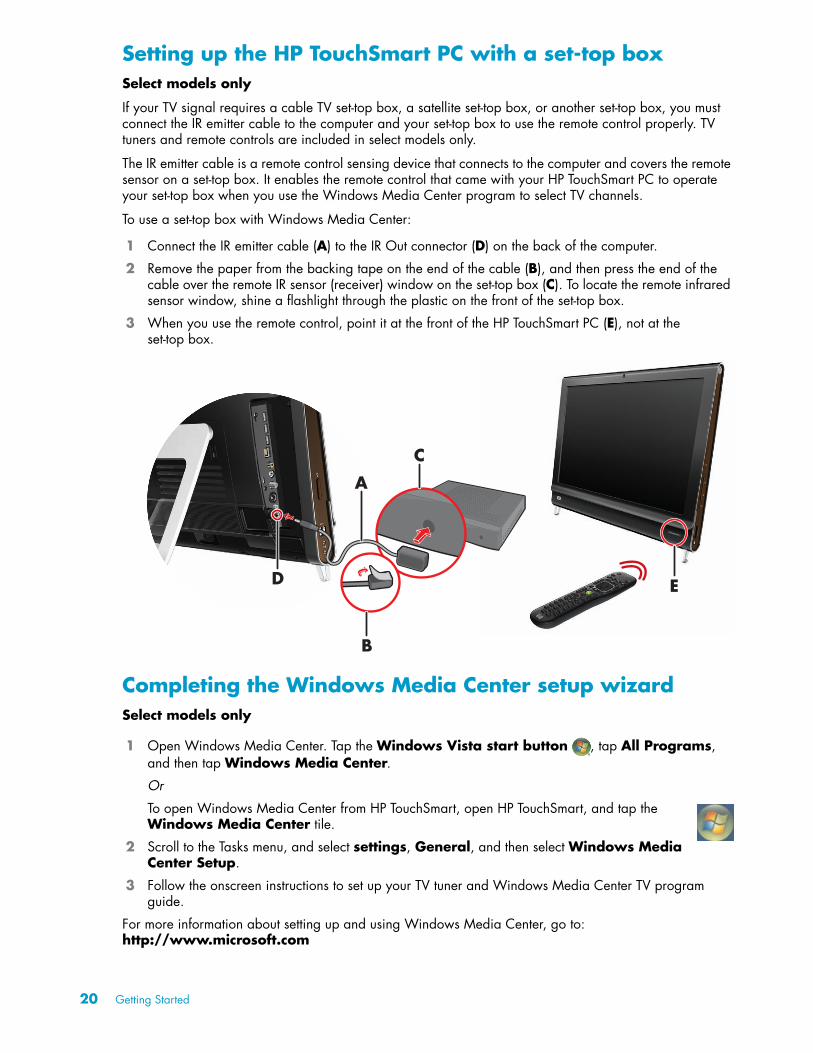
If your TV signal requires a cable TV set-top box, a satellite set-top box, or another set-top box, you must connect the IR emitter cable to the computer and your set-top box to use the remote control properly. TV tuners and remote controls are included in select models only.
The IR emitter cable is a remote control sensing device that connects to the computer and covers the remote sensor on a set-top box. It enables the remote control that came with your HP TouchSmart PC to operate your set-top box when you use the Windows Media Center program to select TV channels.
To use a set-top box with Windows Media Center:
1 Connect the IR emitter cable (A) to the IR Out connector (D) on the back of the computer.
2 Remove the paper from the backing tape on the end of the cable (B), and then press the end of the cable over the remote IR sensor (receiver) window on the set-top box (C). To locate the remote infrared sensor window, shine a flashlight through the plastic on the front of the set-top box.
3 When you use the remote control, point it at the front of the HP TouchSmart PC (E), not at the set-top box.
Completing the Windows Media Center setup wizardSelect models only
1 Open Windows Media Center. Tap the Windows Vista start button , tap All Programs, and then tap Windows Media Center.
Or
To open Windows Media Center from HP TouchSmart, open HP TouchSmart, and tap the Windows Media Center tile.
2 Scroll to the Tasks menu, and select settings, General, and then select Windows Media Center Setup.
3 Follow the onscreen instructions to set up your TV tuner and Windows Media Center TV program guide.
For more information about setting up and using Windows Media Center, go to: http://www.microsoft.com
D
B
A
C
E
20 Getting Started
Using the remote control with Windows Media CenterSelect models only
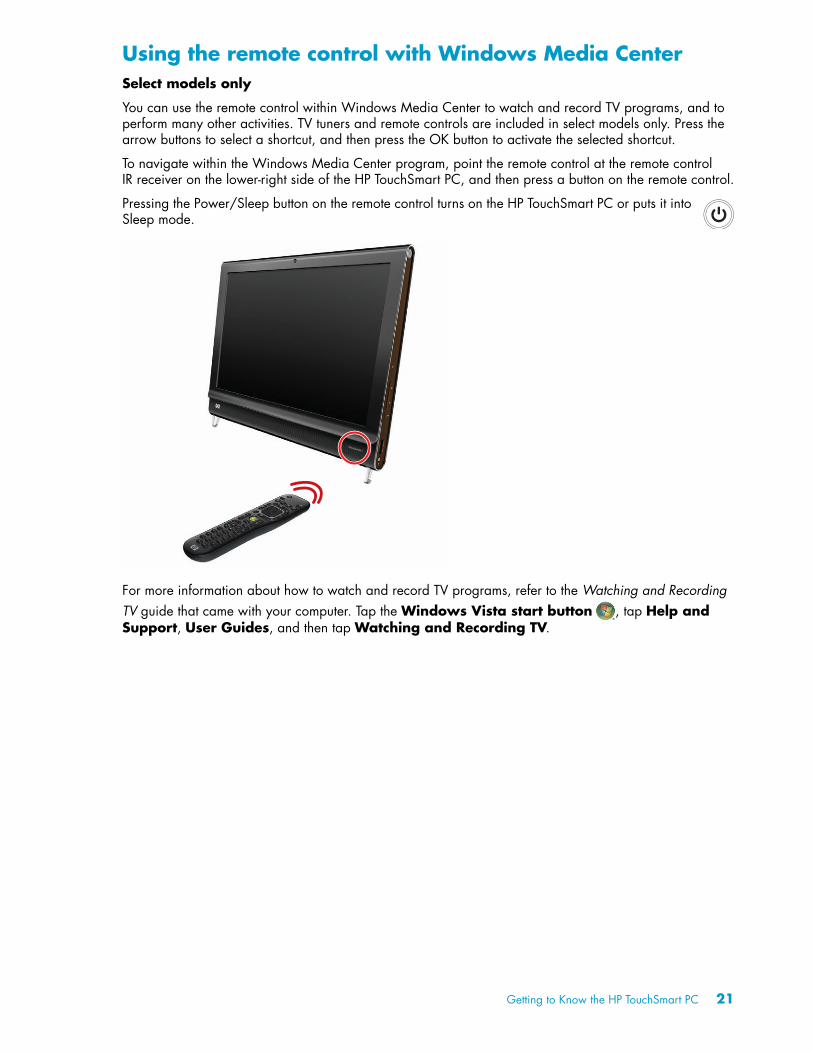
You can use the remote control within Windows Media Center to watch and record TV programs, and to perform many other activities. TV tuners and remote controls are included in select models only. Press the arrow buttons to select a shortcut, and then press the OK button to activate the selected shortcut.
To navigate within the Windows Media Center program, point the remote control at the remote control IR receiver on the lower-right side of the HP TouchSmart PC, and then press a button on the remote control.
Pressing the Power/Sleep button on the remote control turns on the HP TouchSmart PC or puts it into Sleep mode.
For more information about how to watch and record TV programs, refer to the Watching and Recording TV guide that came with your computer. Tap the Windows Vista start button , tap Help and Support, User Guides, and then tap Watching and Recording TV.
Getting to Know the HP TouchSmart PC 21
Sound OptionsYour HP TouchSmart PC supports the following speaker options:
� Built-in analog stereo speakers
� Analog 2.0 or 2.1 powered speakers
� Digital 3.1, 4.1, or 5.1 powered speakers
� Audio receiver
Connecting analog speakersFor 2.0 powered speakers, connect the speaker cable to the Audio line out connector on the back of the computer behind the connector cover.
For 2.1 powered speakers, connect the Audio line out connector on the back of the computer behind the connector cover to the subwoofer, and then connect the left and right speakers to the subwoofer. Turn on the computer and then the speaker system. If necessary, refer to the documentation that came with your speakers.
NOTES:
� The HP TouchSmart PC supports powered speaker systems only. Powered speakers require a separate power supply.
� When the Audio line in connector is being used, the output to the internal speakers, the Audio line out connector, and the headphones connector are affected. For example, if you are playing sound through your internal speakers and then you connect an MP3 device through your Audio line in connector, you will hear both sounds.
� By default, the internal speakers are on, and the digital speakers are off.
NOTE: When an Audio line out connector, such as headphones or external speakers are connected, the internal speakers are muted.
22 Getting Started
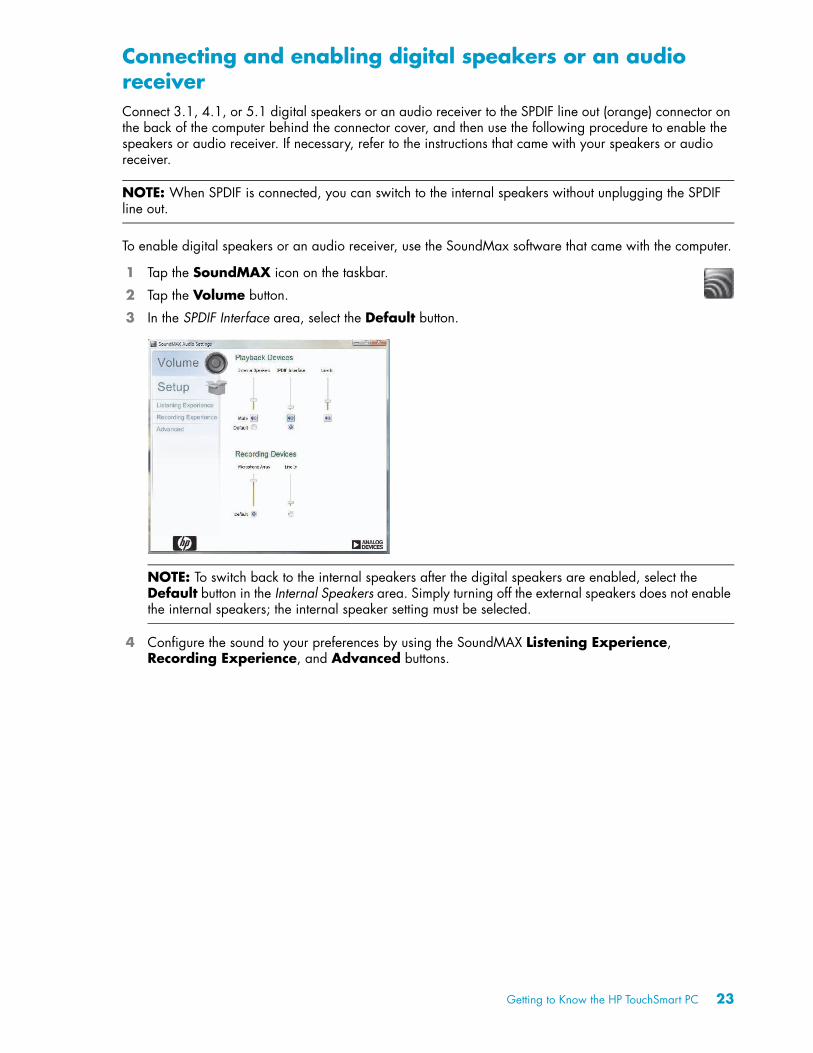
Connecting and enabling digital speakers or an audio receiverConnect 3.1, 4.1, or 5.1 digital speakers or an audio receiver to the SPDIF line out (orange) connector on the back of the computer behind the connector cover, and then use the following procedure to enable the speakers or audio receiver. If necessary, refer to the instructions that came with your speakers or audio receiver.
To enable digital speakers or an audio receiver, use the SoundMax software that came with the computer.
1 Tap the SoundMAX icon on the taskbar.
2 Tap the Volume button.
3 In the SPDIF Interface area, select the Default button.
4 Configure the sound to your preferences by using the SoundMAX Listening Experience, Recording Experience, and Advanced buttons.
NOTE: When SPDIF is connected, you can switch to the internal speakers without unplugging the SPDIF line out.
NOTE: To switch back to the internal speakers after the digital speakers are enabled, select the Default button in the Internal Speakers area. Simply turning off the external speakers does not enable the internal speakers; the internal speaker setting must be selected.
Getting to Know the HP TouchSmart PC 23
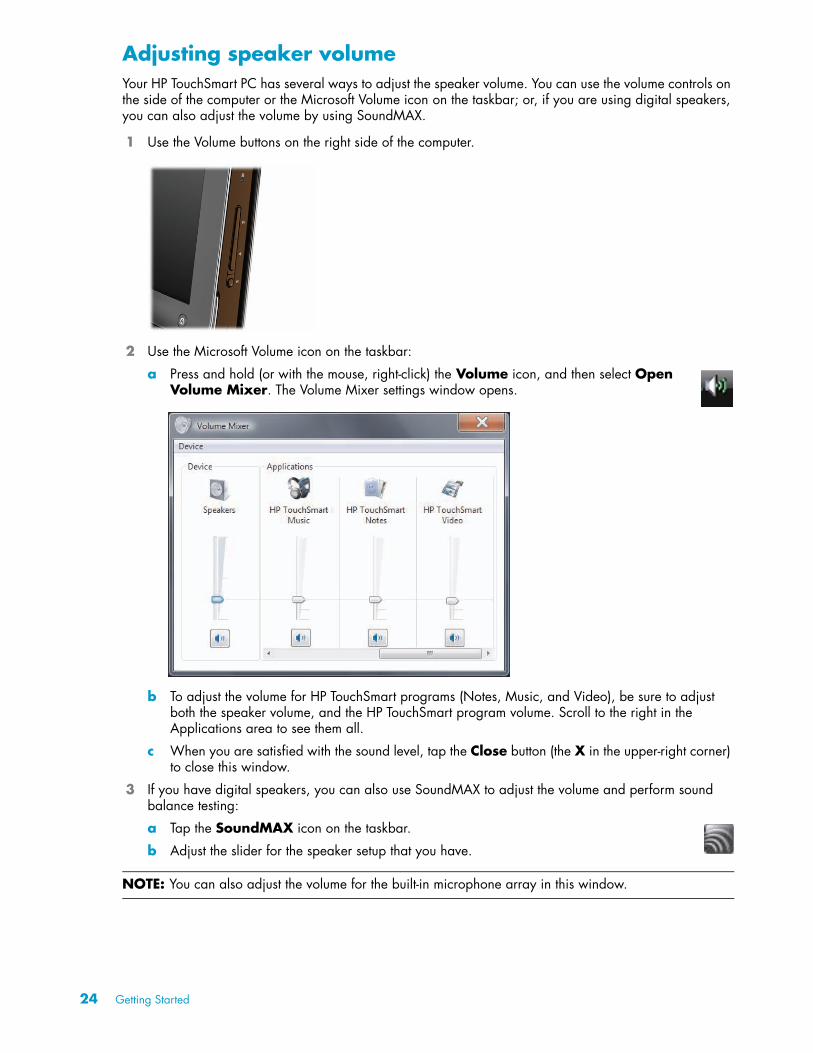
Adjusting speaker volumeYour HP TouchSmart PC has several ways to adjust the speaker volume. You can use the volume controls on the side of the computer or the Microsoft Volume icon on the taskbar; or, if you are using digital speakers, you can also adjust the volume by using SoundMAX.
1 Use the Volume buttons on the right side of the computer.
2 Use the Microsoft Volume icon on the taskbar:
a Press and hold (or with the mouse, right-click) the Volume icon, and then select Open Volume Mixer. The Volume Mixer settings window opens.
b To adjust the volume for HP TouchSmart programs (Notes, Music, and Video), be sure to adjust both the speaker volume, and the HP TouchSmart program volume. Scroll to the right in the Applications area to see them all.
c When you are satisfied with the sound level, tap the Close button (the X in the upper-right corner) to close this window.
3 If you have digital speakers, you can also use SoundMAX to adjust the volume and perform sound balance testing:
a Tap the SoundMAX icon on the taskbar.
b Adjust the slider for the speaker setup that you have.
NOTE: You can also adjust the volume for the built-in microphone array in this window.
24 Getting Started
Configuring sound for Windows Media CenterAfter you have installed, connected, and configured the speakers, use the following procedure to configure audio output for Windows Media Center:
1 Tap the Windows Vista start button .
2 Tap Windows Media Center.
3 Scroll to the Tasks menu, tap settings, General, and then tap Windows Media Center Setup.
4 Tap Set Up Your Speakers, and then tap Next.
5 Select the type of cable that connects your speakers or audio receiver to your computer, and then tap Next.
6 Select the number of speakers, and then tap Next.
7 Tap Test to test the speakers.
8 Tap Next when the test has completed.
9 Tap Finish.
Using headphonesYou can also use your headphones (purchased separately) by connecting them to the headphones connector on the left side of the computer. When the headphones connector is being used, the internal speakers and line out are muted.
Using the microphone arrayYour HP TouchSmart PC comes with a built-in microphone array near the webcam on the front of the computer. The array is designed to filter out ambient noise in your environment to provide a cleaner sound.
You can use the microphone from a distance of up to 2 feet (one-half meter) from the HP TouchSmart PC.
To adjust the volume:
1 Tap the SoundMAX icon on the taskbar.
2 Adjust the slider.
Using a headsetYou cannot use a headset with two connectors (one for headphones and one for microphone). The HP TouchSmart PC does include a built-in microphone array and a headphones connector.
Connecting MP3 playersYou can connect a media player, such as an MP3 player, to the line in connector on the left side of the computer and play it through the internal speakers or added external speakers.
Connecting a PrinterYou can connect a printer by using the USB connectors on the sides or back of the HP TouchSmart PC, or you can use a wireless printer.
NOTE: The HP TouchSmart PC does not support printers that require a parallel printer connector.
Getting to Know the HP TouchSmart PC 25
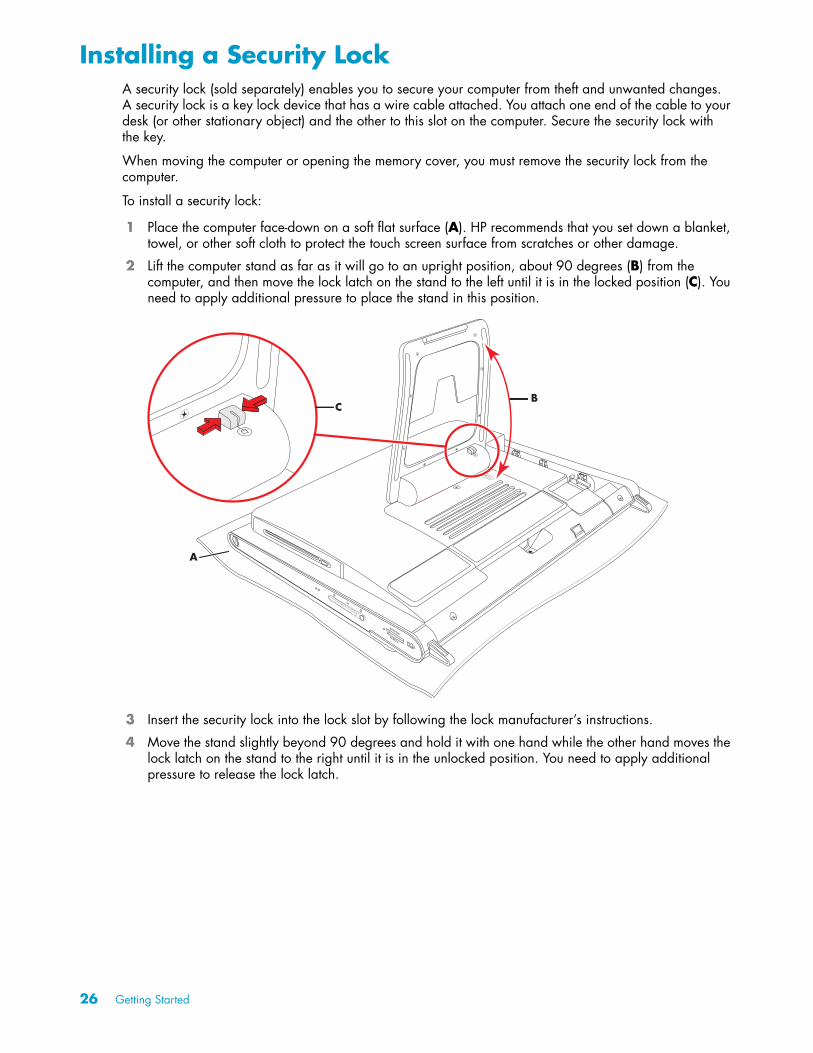
Installing a Security LockA security lock (sold separately) enables you to secure your computer from theft and unwanted changes. A security lock is a key lock device that has a wire cable attached. You attach one end of the cable to your desk (or other stationary object) and the other to this slot on the computer. Secure the security lock with the key.
When moving the computer or opening the memory cover, you must remove the security lock from the computer.
To install a security lock:
1 Place the computer face-down on a soft flat surface (A). HP recommends that you set down a blanket, towel, or other soft cloth to protect the touch screen surface from scratches or other damage.
2 Lift the computer stand as far as it will go to an upright position, about 90 degrees (B) from the computer, and then move the lock latch on the stand to the left until it is in the locked position (C). You need to apply additional pressure to place the stand in this position.
3 Insert the security lock into the lock slot by following the lock manufacturer’s instructions.
4 Move the stand slightly beyond 90 degrees and hold it with one hand while the other hand moves the lock latch on the stand to the right until it is in the unlocked position. You need to apply additional pressure to release the lock latch.
A
BC
26 Getting Started
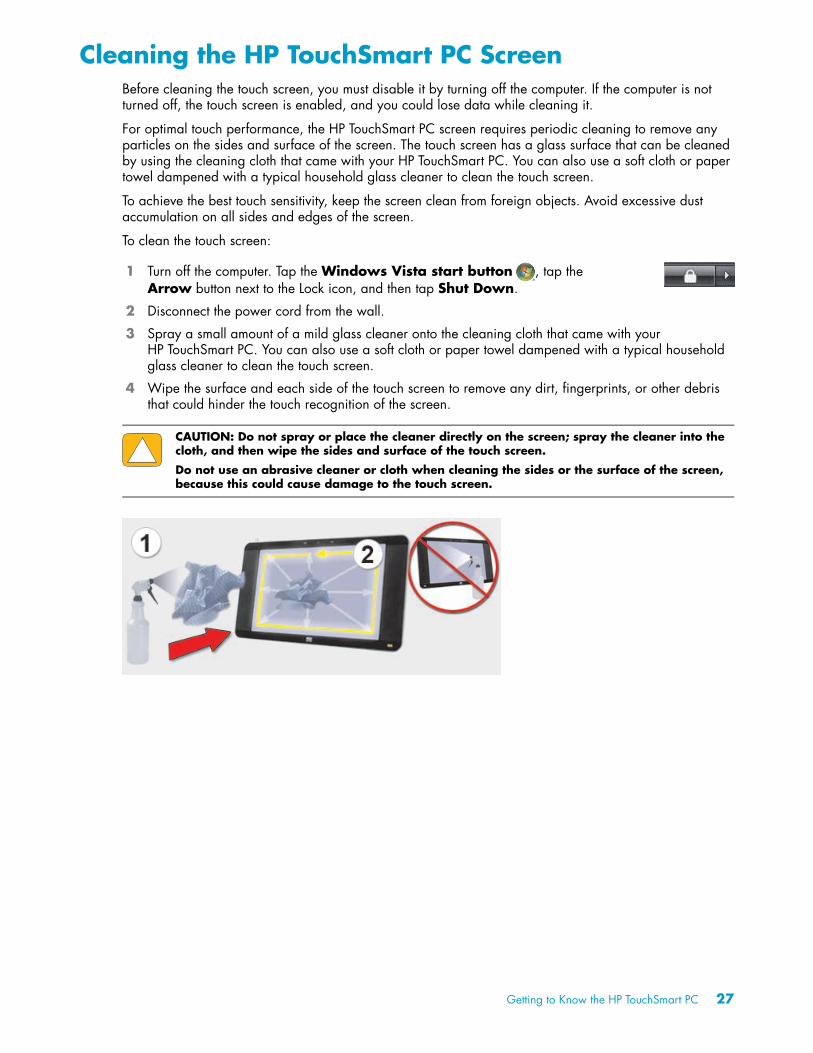
Cleaning the HP TouchSmart PC ScreenBefore cleaning the touch screen, you must disable it by turning off the computer. If the computer is not turned off, the touch screen is enabled, and you could lose data while cleaning it.
For optimal touch performance, the HP TouchSmart PC screen requires periodic cleaning to remove any particles on the sides and surface of the screen. The touch screen has a glass surface that can be cleaned by using the cleaning cloth that came with your HP TouchSmart PC. You can also use a soft cloth or paper towel dampened with a typical household glass cleaner to clean the touch screen.
To achieve the best touch sensitivity, keep the screen clean from foreign objects. Avoid excessive dust accumulation on all sides and edges of the screen.
To clean the touch screen:
1 Turn off the computer. Tap the Windows Vista start button , tap the Arrow button next to the Lock icon, and then tap Shut Down.
2 Disconnect the power cord from the wall.
3 Spray a small amount of a mild glass cleaner onto the cleaning cloth that came with your HP TouchSmart PC. You can also use a soft cloth or paper towel dampened with a typical household glass cleaner to clean the touch screen.
4 Wipe the surface and each side of the touch screen to remove any dirt, fingerprints, or other debris that could hinder the touch recognition of the screen.
.
CAUTION: Do not spray or place the cleaner directly on the screen; spray the cleaner into the cloth, and then wipe the sides and surface of the touch screen.
Do not use an abrasive cleaner or cloth when cleaning the sides or the surface of the screen, because this could cause damage to the touch screen.
Getting to Know the HP TouchSmart PC 27
Using the Computer with Safety and Comfort
Before you begin using the computer, arrange the computer and your work area to maintain your comfort and productivity. Refer to the Safety & Comfort Guide for important ergonomic information:
� Tap the Windows Vista start button , tap Help and Support, User Guides, and then tap Safety & Comfort Guide.
Or
� Type
http://www.hp.com/ergo
into the Web browser address box, and then press the Enter key on the keyboard.
Recycling Your Old Computer HardwareHP offers computer equipment recycling programs in many countries/regions. To learn about the options, go to http://www.hp.com/recycle, and select your country/region in the drop-down list.
There are also computer trade-in and other programs for some countries/regions. Go to the following Web sites:
North America and Asia Pacific English:http://www.hp.com/hpinfo/globalcitizenship/environment/return/index.html
Europe/Middle East/Africa (select your country/region in the drop-down list):http://h41201.www4.hp.com/tradein/welcome.asp
WARNING: To reduce the risk of serious injury, read the Safety & Comfort Guide. It describes proper workstation setup, posture, and health and work habits for computer users. It also provides important electrical and mechanical safety information.
28 Getting Started
Using the HP TouchSmart Software
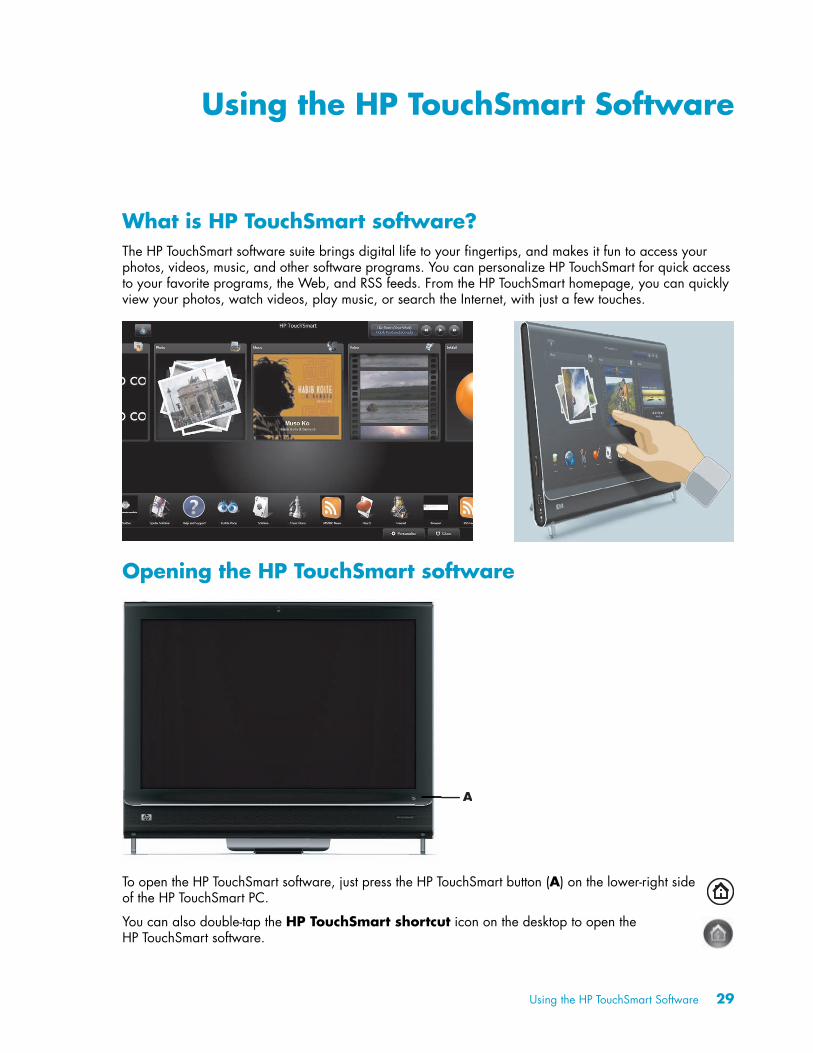
What is HP TouchSmart software?The HP TouchSmart software suite brings digital life to your fingertips, and makes it fun to access your photos, videos, music, and other software programs. You can personalize HP TouchSmart for quick access to your favorite programs, the Web, and RSS feeds. From the HP TouchSmart homepage, you can quickly view your photos, watch videos, play music, or search the Internet, with just a few touches.
Opening the HP TouchSmart software
To open the HP TouchSmart software, just press the HP TouchSmart button (A) on the lower-right side of the HP TouchSmart PC.
You can also double-tap the HP TouchSmart shortcut icon on the desktop to open the HP TouchSmart software.
A
Using the HP TouchSmart Software 29
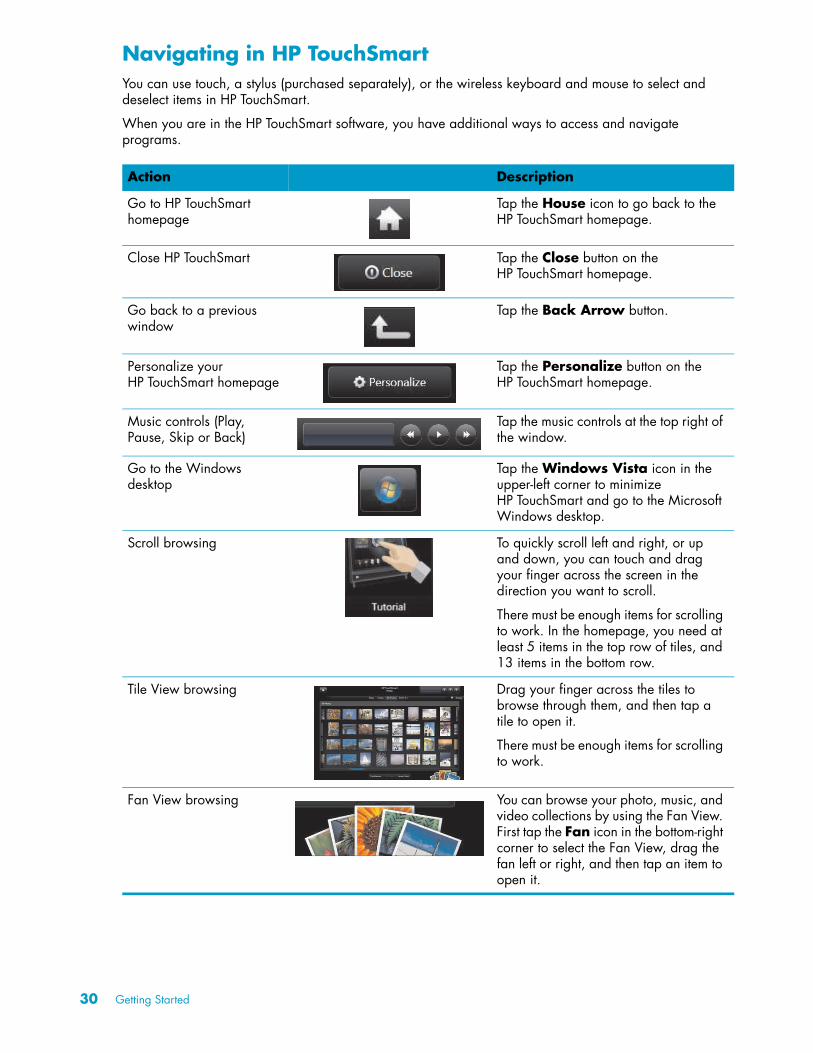
Navigating in HP TouchSmartYou can use touch, a stylus (purchased separately), or the wireless keyboard and mouse to select and deselect items in HP TouchSmart.
When you are in the HP TouchSmart software, you have additional ways to access and navigate programs.
Action Description
Go to HP TouchSmart homepage
Tap the House icon to go back to the HP TouchSmart homepage.
Close HP TouchSmart Tap the Close button on the HP TouchSmart homepage.
Go back to a previous window
Tap the Back Arrow button.
Personalize your HP TouchSmart homepage
Tap the Personalize button on the HP TouchSmart homepage.
Music controls (Play, Pause, Skip or Back)
Tap the music controls at the top right of the window.
Go to the Windows desktop
Tap the Windows Vista icon in the upper-left corner to minimize HP TouchSmart and go to the Microsoft Windows desktop.
Scroll browsing To quickly scroll left and right, or up and down, you can touch and drag your finger across the screen in the direction you want to scroll.
There must be enough items for scrolling to work. In the homepage, you need at least 5 items in the top row of tiles, and 13 items in the bottom row.
Tile View browsing Drag your finger across the tiles to browse through them, and then tap a tile to open it.
There must be enough items for scrolling to work.
Fan View browsing You can browse your photo, music, and video collections by using the Fan View. First tap the Fan icon in the bottom-right corner to select the Fan View, drag the fan left or right, and then tap an item to open it.
30 Getting Started

Because this touch technology is sensitive, HP recommends that you handle the touch screen with care. Please review the following cautions:
Resize tiles in the top row of the HP TouchSmart homepage.
Press and drag the sides of the tile with two fingers.
Move an HP TouchSmart tile to a new location
Press and drag a tile up or down, or left or right, to move it to a new location on the HP TouchSmart window.
Drag and drop songs to create a playlist.
Press and then drag an item slightly up or down at a right angle to move it to the playlist area. When the item is selected, a disc icon appears.
Use the onscreen keyboard or Windows Touch Input Panel
Tap inside a text window and the onscreen keyboard appears. Use it to enter text by using touch.
CAUTION: Because the HP TouchSmart touch screen uses a sensitive touch technology, to avoid damaging the touch screen, do not apply pressure on the front of the display bezel or around the screen borders.
CAUTION: To achieve the best touch sensitivity, keep the screen clean from foreign objects. Avoid excessive dust accumulation on all sides of the screen.
CAUTION: Like any other home electronic products, keep the HP TouchSmart PC away from liquids or a harsh environment that contains excessive dust, heat, or humidity.
Action Description (continued)
Using the HP TouchSmart Software 31
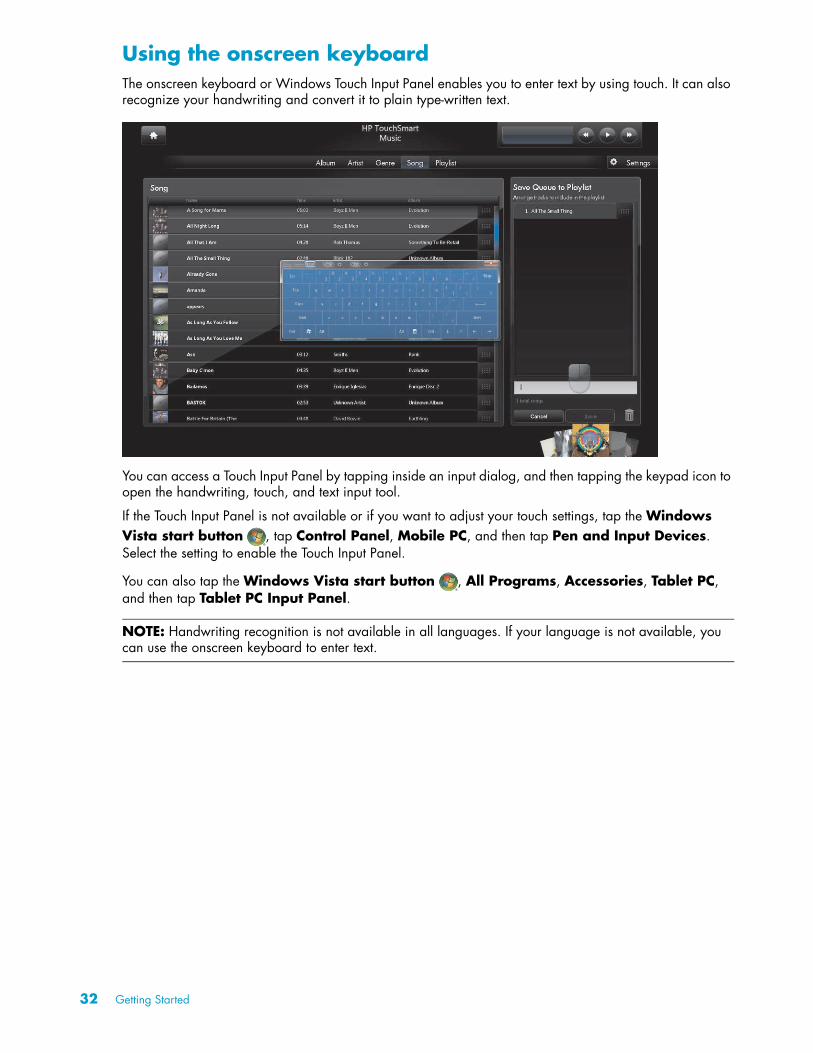
Using the onscreen keyboardThe onscreen keyboard or Windows Touch Input Panel enables you to enter text by using touch. It can also recognize your handwriting and convert it to plain type-written text.
You can access a Touch Input Panel by tapping inside an input dialog, and then tapping the keypad icon to open the handwriting, touch, and text input tool.
If the Touch Input Panel is not available or if you want to adjust your touch settings, tap the Windows Vista start button , tap Control Panel, Mobile PC, and then tap Pen and Input Devices. Select the setting to enable the Touch Input Panel.
You can also tap the Windows Vista start button , All Programs, Accessories, Tablet PC, and then tap Tablet PC Input Panel.
NOTE: Handwriting recognition is not available in all languages. If your language is not available, you can use the onscreen keyboard to enter text.
32 Getting Started

Personalizing your HP TouchSmart Software
Moving tiles aroundWhen you open the HP TouchSmart software, you will see large and small tiles, which are shortcuts to various programs in HP TouchSmart and links to various Web sites. Use the upper, large tile area for programs you use often, and use the lower, small tile area to store the rest of your program shortcuts.
You can easily move these tiles around by pressing a tile and dragging it to a new location in the window. The tile appears as a transparent image while you are moving it. You can move the large tiles down to the small tile area or the small tiles up to the large tile area. You can also move the tiles sideways by dragging a tile out of a row, and then dropping it in a new location.
Adding a software program shortcut to HP TouchSmart1 Open HP TouchSmart, and tap the Personalize button.
2 Select Add a tile.
3 Select Program, and then tap Next.
4 Enter the target address, or select Choose from a list to show a list of all the software programs in your Programs folder.
5 Select the program you want to add and then tap OK.
6 In the Tile Name box enter a name for the tile. Usually, the program name automatically appears.
7 Place a check mark in the Icon check box to display the program icon in the tile, and then tap OK. Your program shortcut appears as a small tile on the bottom of the HP TouchSmart homepage.
8 Tap OK to return to the HP TouchSmart homepage.
Using the HP TouchSmart Software 33
Adding a Web site link to HP TouchSmart1 Open HP TouchSmart, and tap the Personalize button.
2 Select Add a tile.
3 Select Web site, and then tap Next.
4 Type in the entire URL for the Web site of your choice, starting with www or the equivalent (for example, www.hp.com/go/touchsmart). Or select Choose from a list to select a Web site from the list of Internet Explorer favorites.
5 The option to check the box to display the Web icon may be grayed out if one is not available. You can choose an icon from those displayed below the check box instead. Otherwise, it will display a sample Web page. Your Web site link appears as a small tile on the bottom of the HP TouchSmart homepage.
6 Tap OK to return to the HP TouchSmart homepage.
7 You can drag it to the top row, if you want. Some added Web sites display a globe icon.
8 Your Web site link will display in the HP TouchSmart Browser. See “HP TouchSmart Browser” on page 56 for more information.
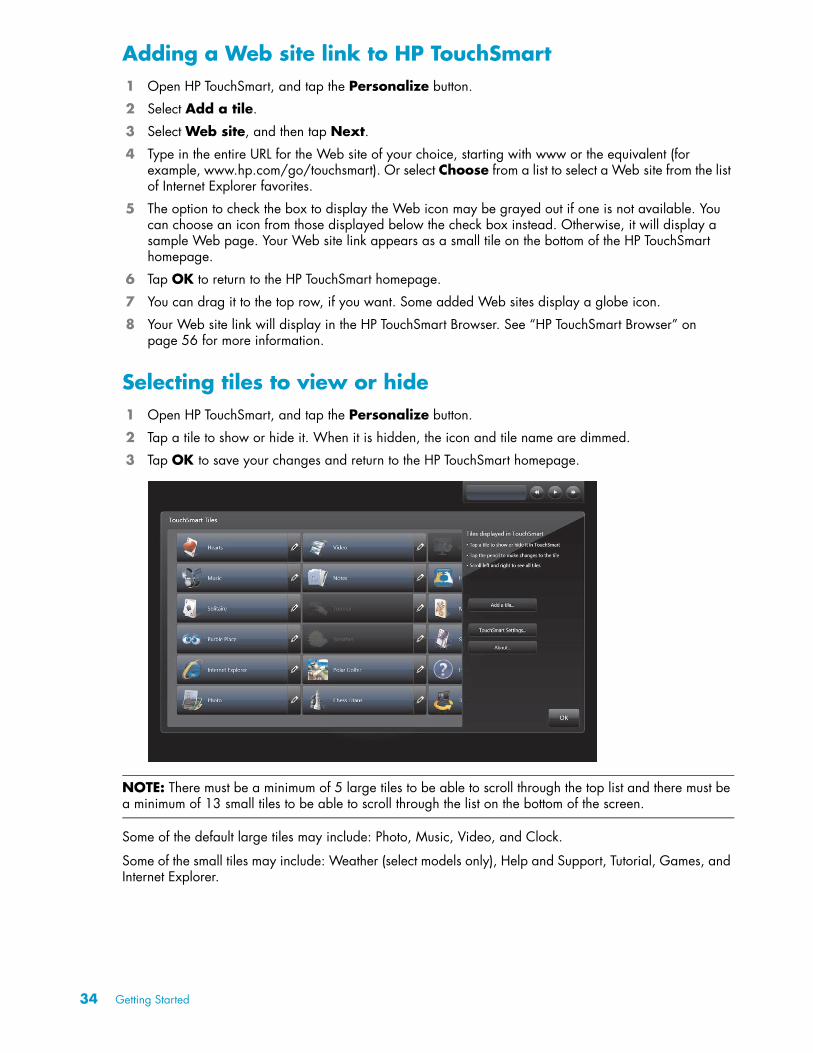
Selecting tiles to view or hide1 Open HP TouchSmart, and tap the Personalize button.
2 Tap a tile to show or hide it. When it is hidden, the icon and tile name are dimmed.
3 Tap OK to save your changes and return to the HP TouchSmart homepage.
Some of the default large tiles may include: Photo, Music, Video, and Clock.
Some of the small tiles may include: Weather (select models only), Help and Support, Tutorial, Games, and Internet Explorer.
NOTE: There must be a minimum of 5 large tiles to be able to scroll through the top list and there must be a minimum of 13 small tiles to be able to scroll through the list on the bottom of the screen.
34 Getting Started
Editing or deleting an added tile1 Open HP TouchSmart, and tap the Personalize button.
2 Select the Pencil icon next to the shortcut you want to change.
3 Enter your changes:
� In the Enter Target Location box, enter the URL or path, and then enter the tile name of the program or Web site by using the touch keyboard or your physical keyboard.
� Select to use the program icon or browse to select another icon.
Or
� Select Delete the tile, and then tap Yes.
4 Tap OK. This does not delete your program, only the shortcut from the Tile View in HP TouchSmart.
Opening HP TouchSmart FasterIf you use the HP TouchSmart program frequently, you may want to set the HP TouchSmart program to open faster. To change this setting, open HP TouchSmart, tap the Personalize button, and then tap the TouchSmart Settings button. Place a check mark next to Auto-Start and Quick-Launch. Auto-Start will start the HP TouchSmart programs when you start your computer, and Quick-Launch will keep them running when you close HP TouchSmart. To free up computer resources for other uses, de-select these options.
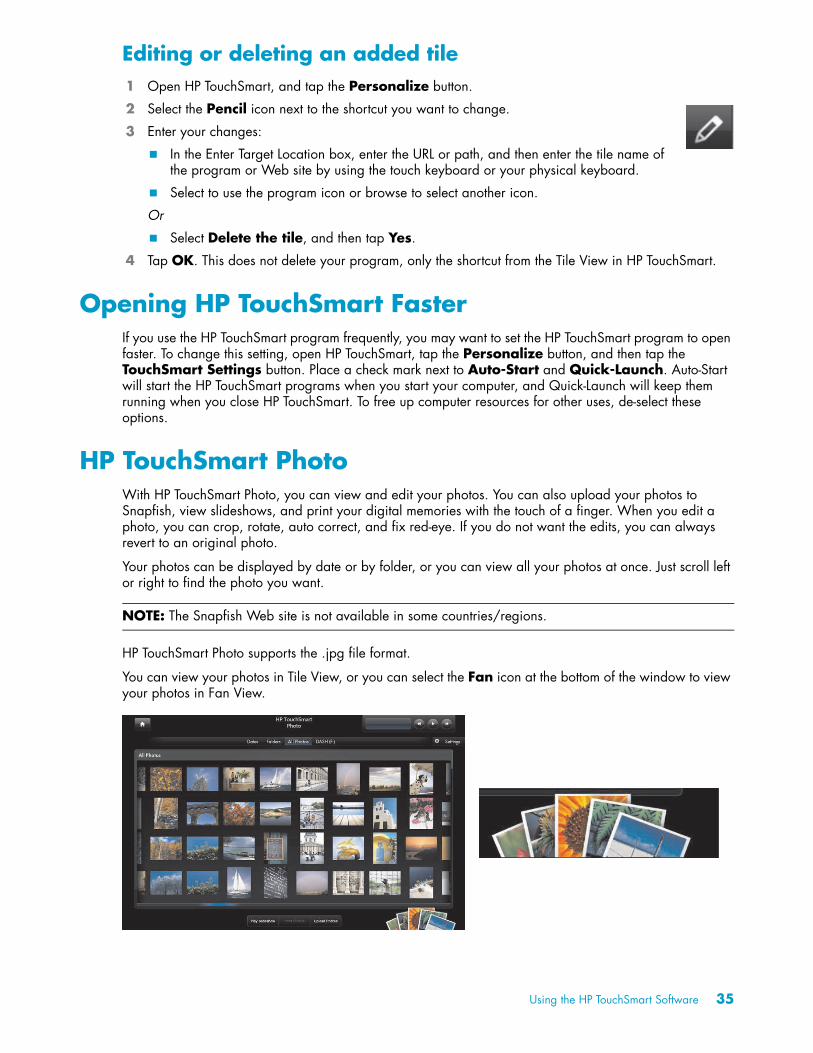
HP TouchSmart PhotoWith HP TouchSmart Photo, you can view and edit your photos. You can also upload your photos to Snapfish, view slideshows, and print your digital memories with the touch of a finger. When you edit a photo, you can crop, rotate, auto correct, and fix red-eye. If you do not want the edits, you can always revert to an original photo.
Your photos can be displayed by date or by folder, or you can view all your photos at once. Just scroll left or right to find the photo you want.
HP TouchSmart Photo supports the .jpg file format.
You can view your photos in Tile View, or you can select the Fan icon at the bottom of the window to view your photos in Fan View.
NOTE: The Snapfish Web site is not available in some countries/regions.
Using the HP TouchSmart Software 35
Adding photos to your photo libraryWhen you connect an external device such as a digital camera, Microsoft Windows Vista detects your external device and displays a message asking if you want to view, copy, or transfer your images to the computer.
You have several ways to add photos to your photo library on the computer. You can:
� Use the memory card reader on the side of the computer to easily transfer photos from your digital camera to the computer. HP TouchSmart can also display photos from the memory card reader.
� Download photos from the Web to your hard disk drive.
� Insert a CD or removable storage drive, and then move photos to the Windows Explorer Picture folder, or any other folder on your hard disk drive.
� Connect a digital camera or digital video camera to the HP TouchSmart PC, by using the transfer cable that came with the device.
Viewing your photo collectionView all of your photos from anywhere on the hard disk drive, a removable drive, or a memory card. HP TouchSmart Photo scans your hard disk drive and all available drives to find photos that you can view in the HP TouchSmart Photo window.
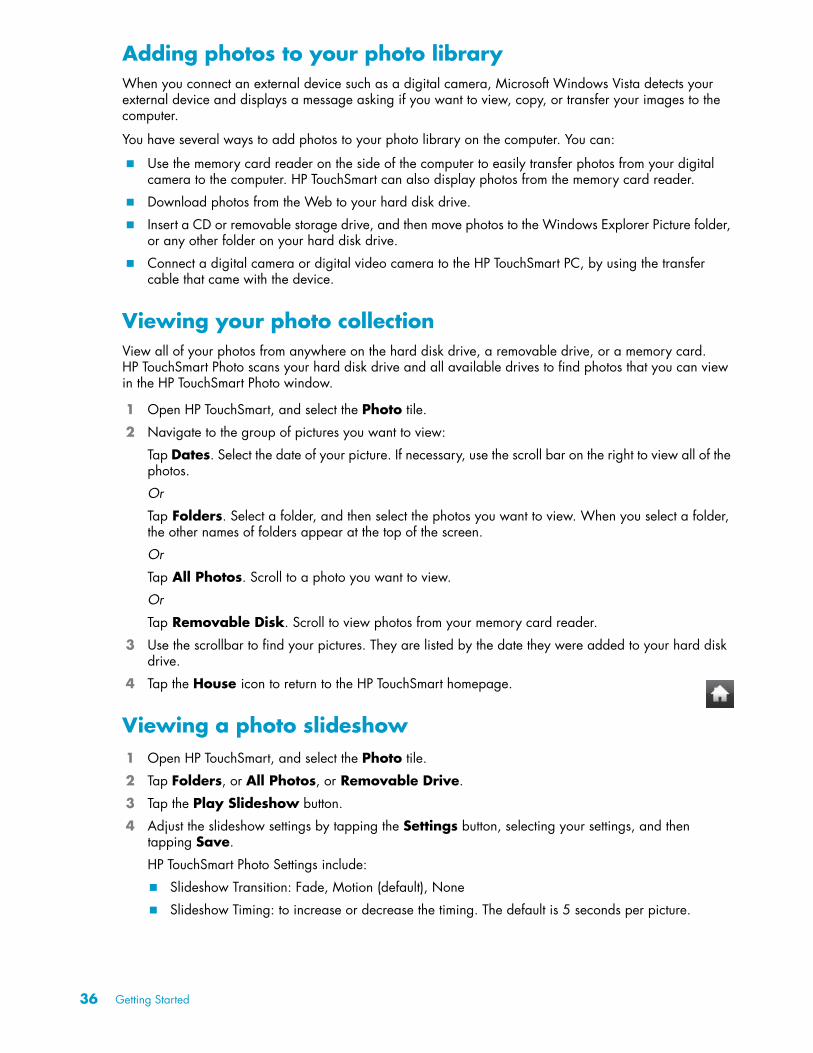
1 Open HP TouchSmart, and select the Photo tile.
2 Navigate to the group of pictures you want to view:
Tap Dates. Select the date of your picture. If necessary, use the scroll bar on the right to view all of the photos.
Or
Tap Folders. Select a folder, and then select the photos you want to view. When you select a folder, the other names of folders appear at the top of the screen.
Or
Tap All Photos. Scroll to a photo you want to view.
Or
Tap Removable Disk. Scroll to view photos from your memory card reader.
3 Use the scrollbar to find your pictures. They are listed by the date they were added to your hard disk drive.
4 Tap the House icon to return to the HP TouchSmart homepage.
Viewing a photo slideshow1 Open HP TouchSmart, and select the Photo tile.
2 Tap Folders, or All Photos, or Removable Drive.
3 Tap the Play Slideshow button.
4 Adjust the slideshow settings by tapping the Settings button, selecting your settings, and then tapping Save.
HP TouchSmart Photo Settings include:
� Slideshow Transition: Fade, Motion (default), None
� Slideshow Timing: to increase or decrease the timing. The default is 5 seconds per picture.
36 Getting Started
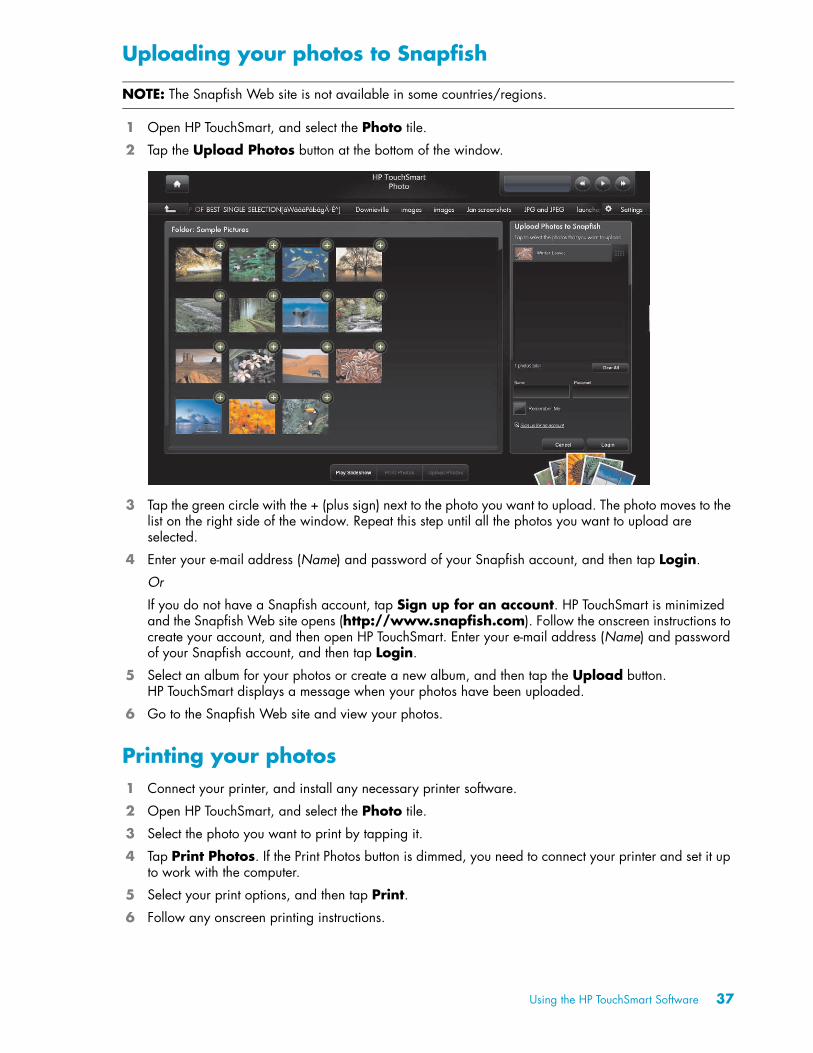
Uploading your photos to Snapfish
1 Open HP TouchSmart, and select the Photo tile.
2 Tap the Upload Photos button at the bottom of the window.
3 Tap the green circle with the + (plus sign) next to the photo you want to upload. The photo moves to the list on the right side of the window. Repeat this step until all the photos you want to upload are selected.
4 Enter your e-mail address (Name) and password of your Snapfish account, and then tap Login.
Or
If you do not have a Snapfish account, tap Sign up for an account. HP TouchSmart is minimized and the Snapfish Web site opens (http://www.snapfish.com). Follow the onscreen instructions to create your account, and then open HP TouchSmart. Enter your e-mail address (Name) and password of your Snapfish account, and then tap Login.
5 Select an album for your photos or create a new album, and then tap the Upload button. HP TouchSmart displays a message when your photos have been uploaded.
6 Go to the Snapfish Web site and view your photos.
Printing your photos1 Connect your printer, and install any necessary printer software.
2 Open HP TouchSmart, and select the Photo tile.
3 Select the photo you want to print by tapping it.
4 Tap Print Photos. If the Print Photos button is dimmed, you need to connect your printer and set it up to work with the computer.
5 Select your print options, and then tap Print.
6 Follow any onscreen printing instructions.
NOTE: The Snapfish Web site is not available in some countries/regions.
Using the HP TouchSmart Software 37
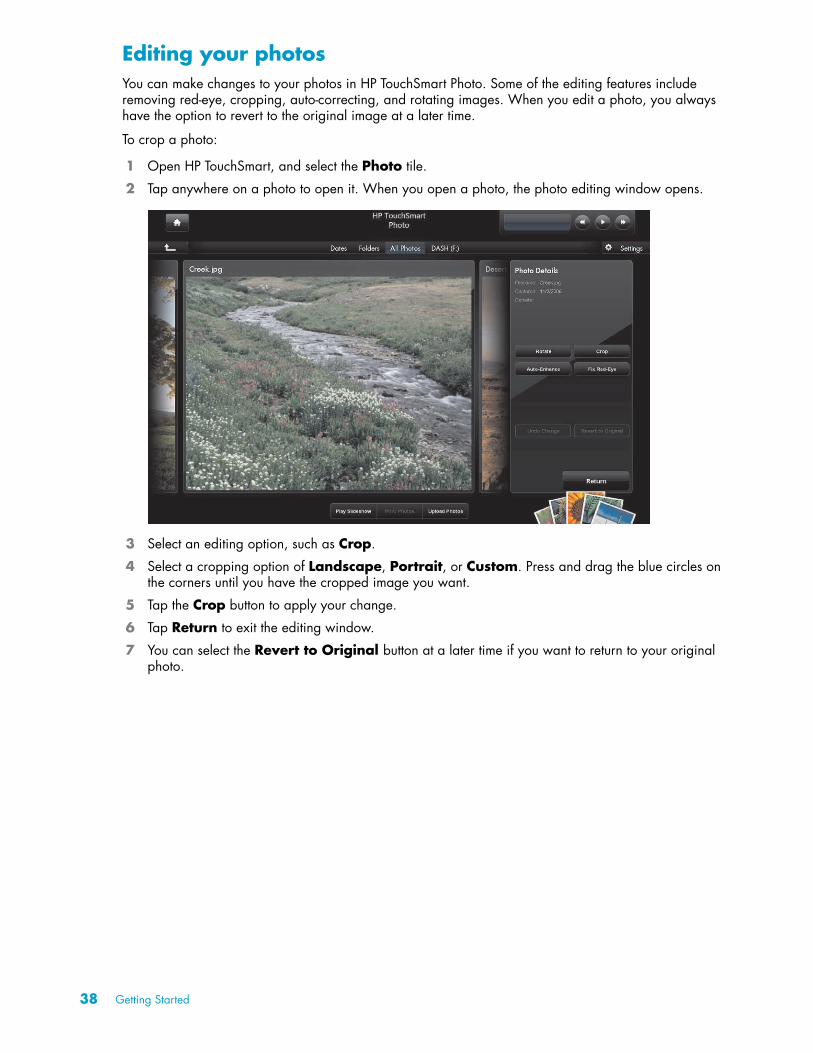
Editing your photosYou can make changes to your photos in HP TouchSmart Photo. Some of the editing features include removing red-eye, cropping, auto-correcting, and rotating images. When you edit a photo, you always have the option to revert to the original image at a later time.
To crop a photo:
1 Open HP TouchSmart, and select the Photo tile.
2 Tap anywhere on a photo to open it. When you open a photo, the photo editing window opens.
3 Select an editing option, such as Crop.
4 Select a cropping option of Landscape, Portrait, or Custom. Press and drag the blue circles on the corners until you have the cropped image you want.
5 Tap the Crop button to apply your change.
6 Tap Return to exit the editing window.
7 You can select the Revert to Original button at a later time if you want to return to your original photo.
38 Getting Started
To adjust red-eye, or to rotate or auto-correct a photo:
1 Open HP TouchSmart, and select the Photo tile.
2 Tap anywhere on a photo to select it. When you select a photo, the photo editing window opens.
3 Select an editing option:
� Auto-Enhance: This option auto-corrects for contrast and brightness.
� Fix Red-Eye: Designed to fix certain types of red-eye.
� Rotate: This option rotates a photo 90 degrees to the right. Tap it again to rotate the photo another 90 degrees.
4 Tap Return to exit the editing window.
5 You can select the Revert to Original button at a later time if you want to return to your original photo.
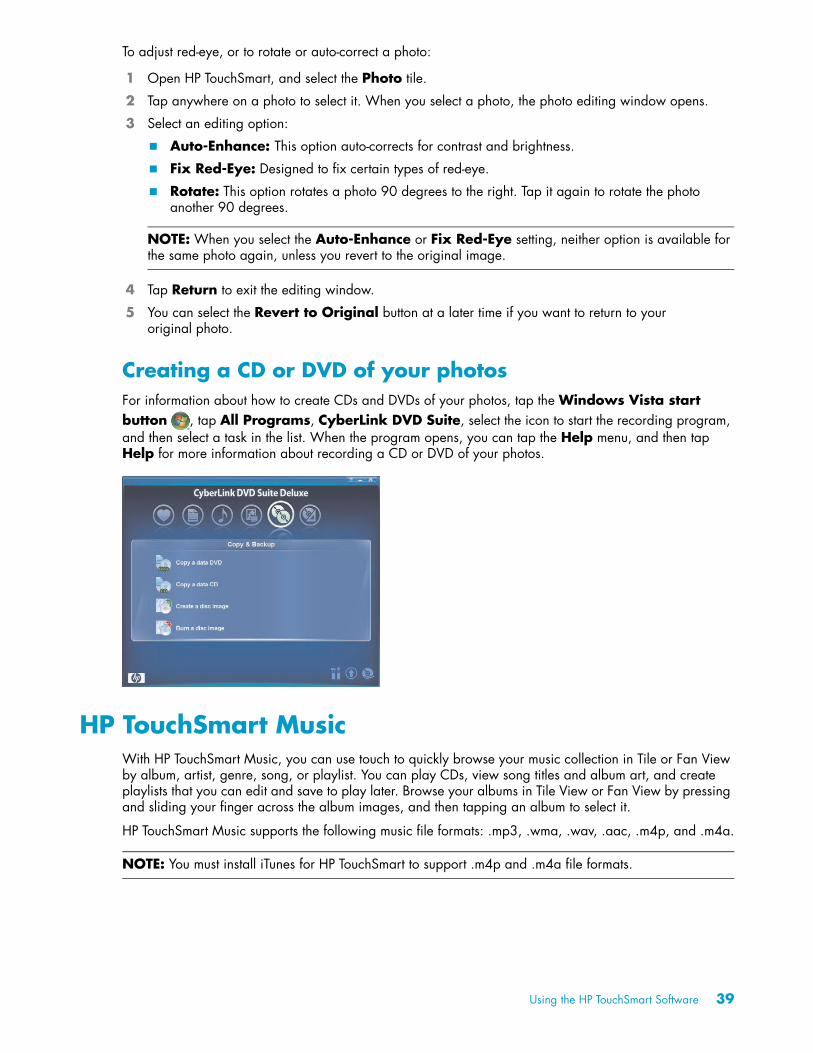
Creating a CD or DVD of your photosFor information about how to create CDs and DVDs of your photos, tap the Windows Vista start button , tap All Programs, CyberLink DVD Suite, select the icon to start the recording program, and then select a task in the list. When the program opens, you can tap the Help menu, and then tap Help for more information about recording a CD or DVD of your photos.
HP TouchSmart MusicWith HP TouchSmart Music, you can use touch to quickly browse your music collection in Tile or Fan View by album, artist, genre, song, or playlist. You can play CDs, view song titles and album art, and create playlists that you can edit and save to play later. Browse your albums in Tile View or Fan View by pressing and sliding your finger across the album images, and then tapping an album to select it.
HP TouchSmart Music supports the following music file formats: .mp3, .wma, .wav, .aac, .m4p, and .m4a.
NOTE: When you select the Auto-Enhance or Fix Red-Eye setting, neither option is available for the same photo again, unless you revert to the original image.
NOTE: You must install iTunes for HP TouchSmart to support .m4p and .m4a file formats.
Using the HP TouchSmart Software 39
Selecting a music libraryYou can use Windows Media Player or iTunes (downloaded separately) to add your songs to your music library. HP TouchSmart can play music from only one music library at a time. The default setting is Windows Media Player. If you want to use your iTunes library, open the TouchSmart Music window, tap Settings, select Use HP TouchSmart Media library or Use my iTunes library, and then select Save.
For more information about adding music files to your music libraries, see the Help menus in the iTunes and Windows Media Player programs.
Playing your CDsTo listen to your music CDs in HP TouchSmart Music:
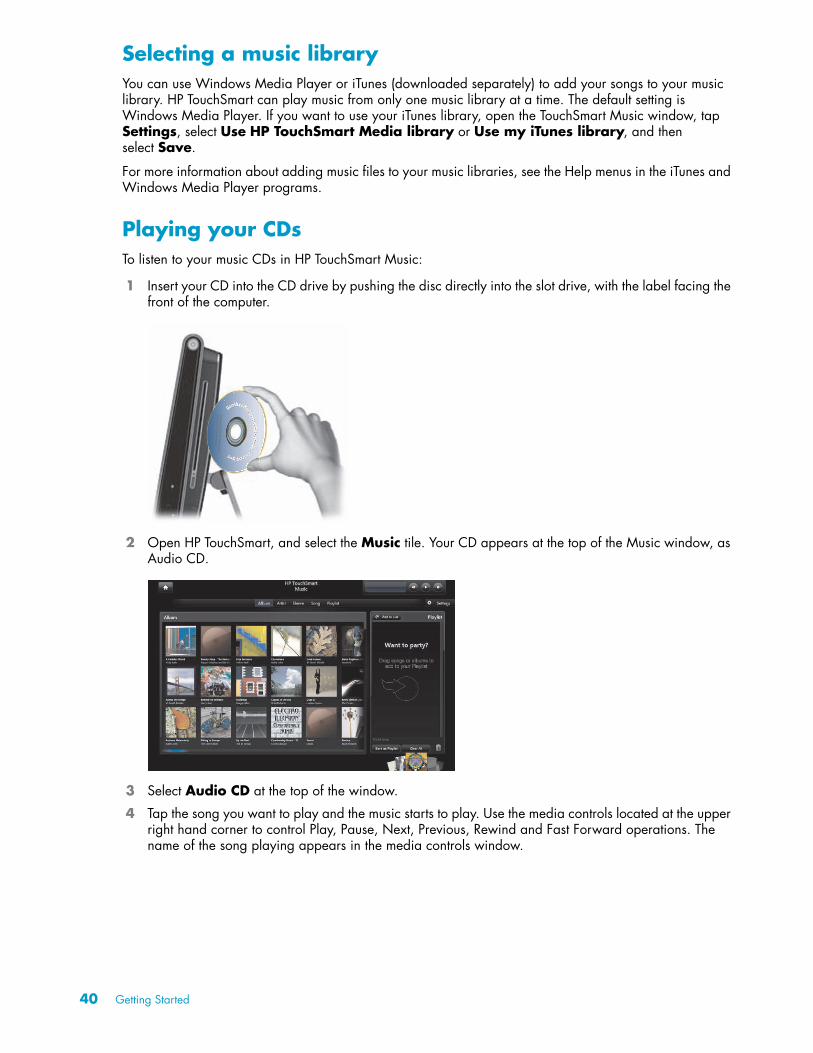
1 Insert your CD into the CD drive by pushing the disc directly into the slot drive, with the label facing the front of the computer.
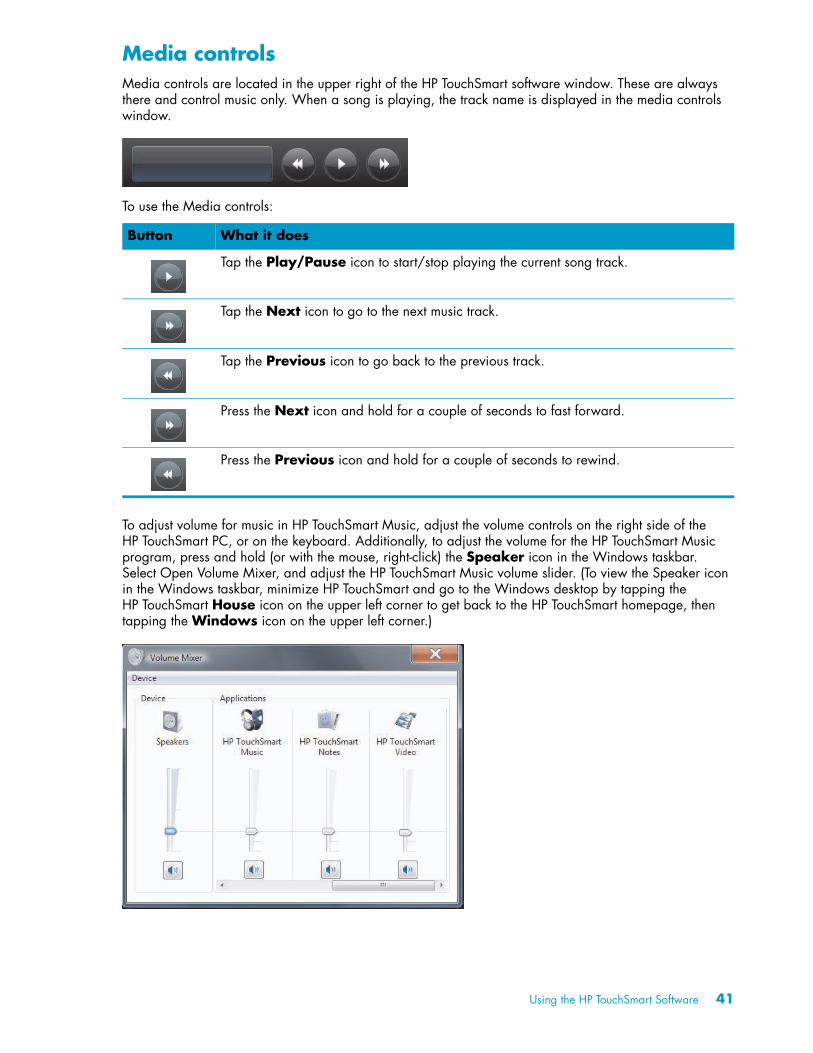
2 Open HP TouchSmart, and select the Music tile. Your CD appears at the top of the Music window, as Audio CD.
3 Select Audio CD at the top of the window.
4 Tap the song you want to play and the music starts to play. Use the media controls located at the upper right hand corner to control Play, Pause, Next, Previous, Rewind and Fast Forward operations. The name of the song playing appears in the media controls window.
Copyright 2008 H
ewlett-Packard
Developm
ent Com
pany, LP
40 Getting Started
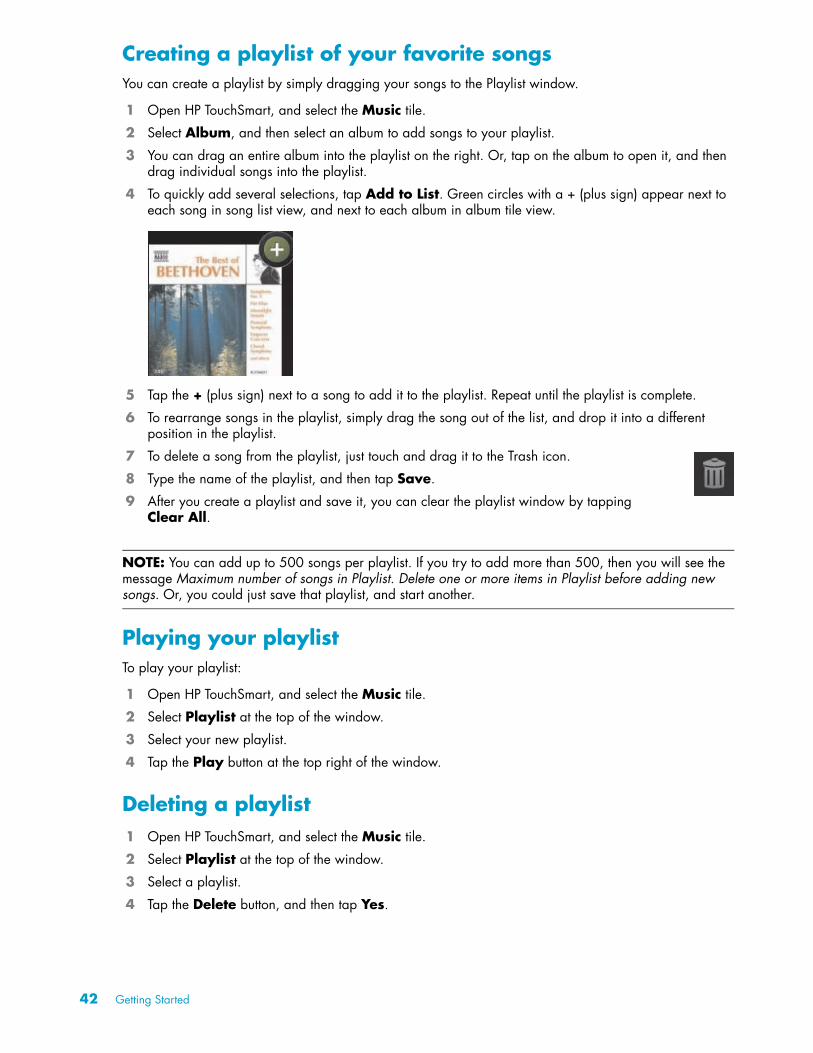
Media controlsMedia controls are located in the upper right of the HP TouchSmart software window. These are always there and control music only. When a song is playing, the track name is displayed in the media controls window.
To use the Media controls:
To adjust volume for music in HP TouchSmart Music, adjust the volume controls on the right side of the HP TouchSmart PC, or on the keyboard. Additionally, to adjust the volume for the HP TouchSmart Music program, press and hold (or with the mouse, right-click) the Speaker icon in the Windows taskbar. Select Open Volume Mixer, and adjust the HP TouchSmart Music volume slider. (To view the Speaker icon in the Windows taskbar, minimize HP TouchSmart and go to the Windows desktop by tapping the HP TouchSmart House icon on the upper left corner to get back to the HP TouchSmart homepage, then tapping the Windows icon on the upper left corner.)
Button What it does
Tap the Play/Pause icon to start/stop playing the current song track.
Tap the Next icon to go to the next music track.
Tap the Previous icon to go back to the previous track.
Press the Next icon and hold for a couple of seconds to fast forward.
Press the Previous icon and hold for a couple of seconds to rewind.
Using the HP TouchSmart Software 41
Creating a playlist of your favorite songsYou can create a playlist by simply dragging your songs to the Playlist window.
1 Open HP TouchSmart, and select the Music tile.
2 Select Album, and then select an album to add songs to your playlist.
3 You can drag an entire album into the playlist on the right. Or, tap on the album to open it, and then drag individual songs into the playlist.
4 To quickly add several selections, tap Add to List. Green circles with a + (plus sign) appear next to each song in song list view, and next to each album in album tile view.
5 Tap the + (plus sign) next to a song to add it to the playlist. Repeat until the playlist is complete.
6 To rearrange songs in the playlist, simply drag the song out of the list, and drop it into a different position in the playlist.
7 To delete a song from the playlist, just touch and drag it to the Trash icon.
8 Type the name of the playlist, and then tap Save.
9 After you create a playlist and save it, you can clear the playlist window by tapping Clear All.
Playing your playlistTo play your playlist:
1 Open HP TouchSmart, and select the Music tile.
2 Select Playlist at the top of the window.
3 Select your new playlist.
4 Tap the Play button at the top right of the window.
Deleting a playlist1 Open HP TouchSmart, and select the Music tile.
2 Select Playlist at the top of the window.
3 Select a playlist.
4 Tap the Delete button, and then tap Yes.
NOTE: You can add up to 500 songs per playlist. If you try to add more than 500, then you will see the message Maximum number of songs in Playlist. Delete one or more items in Playlist before adding new songs. Or, you could just save that playlist, and start another.
42 Getting Started
Deleting songs from your music libraryTo delete a song from your music library, you must open the program where you added your music, such as Windows Media Player or iTunes, and delete it there.
Creating music CDsTo record, or burn*, a CD of your songs, you must use a CD recording program, such as CyberLink Power2Go or Windows Media Player, which are found in the All Programs menu.
For information about how to create CDs and DVDs of your music using CyberLink, tap the Windows Vista start button , tap All Programs, tap CyberLink DVD Suite, select the Music icon to start the recording program, tap the Help menu, and then tap Help.
To learn how to use Windows Media Player, tap the Windows Vista start button , tap All Programs, tap Windows Media Player, and then tap the Help icon.
* HP supports the lawful use of technology and does not endorse or encourage the use of our products for purposes other than those permitted by copyright law.
Using the HP TouchSmart Software 43
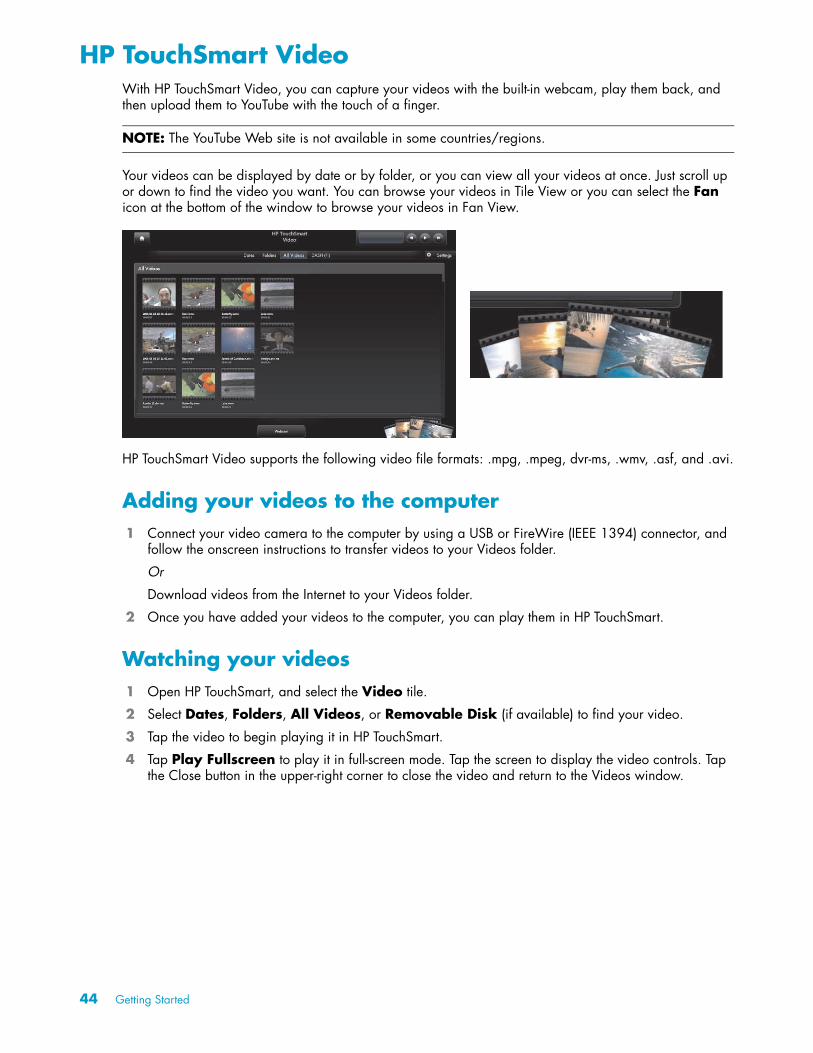
HP TouchSmart VideoWith HP TouchSmart Video, you can capture your videos with the built-in webcam, play them back, and then upload them to YouTube with the touch of a finger.
Your videos can be displayed by date or by folder, or you can view all your videos at once. Just scroll up or down to find the video you want. You can browse your videos in Tile View or you can select the Fan icon at the bottom of the window to browse your videos in Fan View.
HP TouchSmart Video supports the following video file formats: .mpg, .mpeg, dvr-ms, .wmv, .asf, and .avi.
Adding your videos to the computer1 Connect your video camera to the computer by using a USB or FireWire (IEEE 1394) connector, and
follow the onscreen instructions to transfer videos to your Videos folder.
Or
Download videos from the Internet to your Videos folder.
2 Once you have added your videos to the computer, you can play them in HP TouchSmart.
Watching your videos1 Open HP TouchSmart, and select the Video tile.
2 Select Dates, Folders, All Videos, or Removable Disk (if available) to find your video.
3 Tap the video to begin playing it in HP TouchSmart.
4 Tap Play Fullscreen to play it in full-screen mode. Tap the screen to display the video controls. Tap the Close button in the upper-right corner to close the video and return to the Videos window.
NOTE: The YouTube Web site is not available in some countries/regions.
44 Getting Started
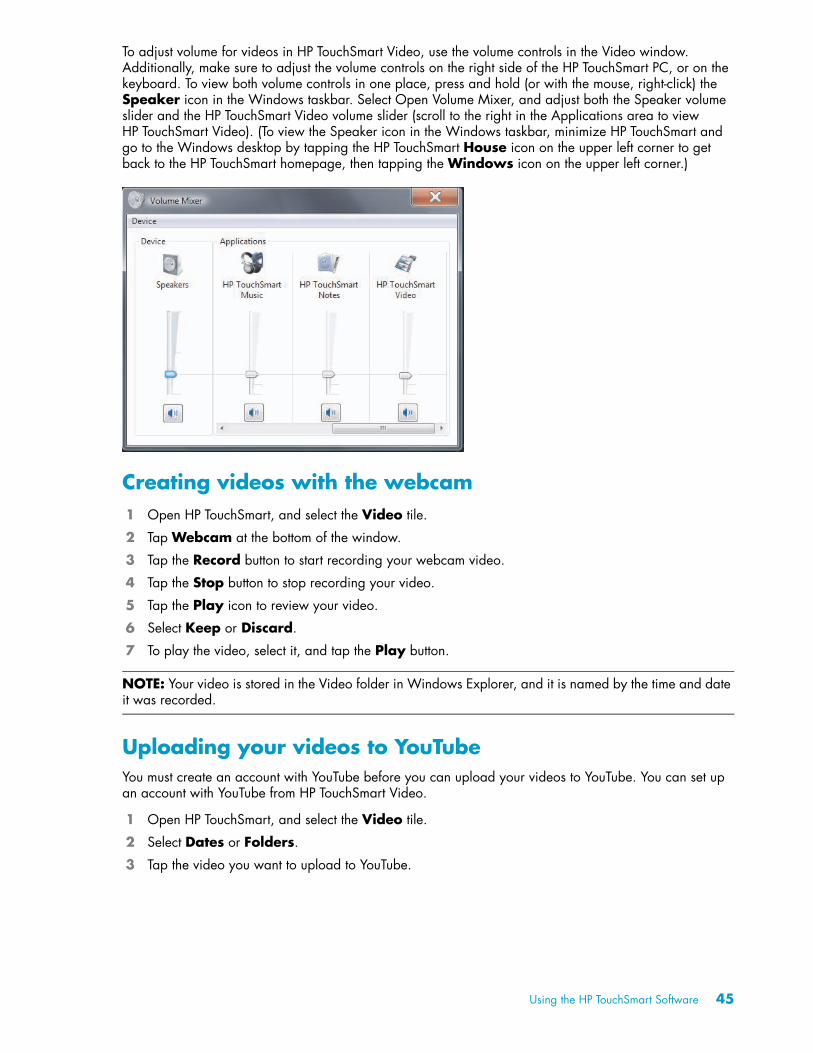
To adjust volume for videos in HP TouchSmart Video, use the volume controls in the Video window. Additionally, make sure to adjust the volume controls on the right side of the HP TouchSmart PC, or on the keyboard. To view both volume controls in one place, press and hold (or with the mouse, right-click) the Speaker icon in the Windows taskbar. Select Open Volume Mixer, and adjust both the Speaker volume slider and the HP TouchSmart Video volume slider (scroll to the right in the Applications area to view HP TouchSmart Video). (To view the Speaker icon in the Windows taskbar, minimize HP TouchSmart and go to the Windows desktop by tapping the HP TouchSmart House icon on the upper left corner to get back to the HP TouchSmart homepage, then tapping the Windows icon on the upper left corner.)
Creating videos with the webcam1 Open HP TouchSmart, and select the Video tile.
2 Tap Webcam at the bottom of the window.
3 Tap the Record button to start recording your webcam video.
4 Tap the Stop button to stop recording your video.
5 Tap the Play icon to review your video.
6 Select Keep or Discard.
7 To play the video, select it, and tap the Play button.
Uploading your videos to YouTubeYou must create an account with YouTube before you can upload your videos to YouTube. You can set up an account with YouTube from HP TouchSmart Video.
1 Open HP TouchSmart, and select the Video tile.
2 Select Dates or Folders.
3 Tap the video you want to upload to YouTube.
NOTE: Your video is stored in the Video folder in Windows Explorer, and it is named by the time and date it was recorded.
Using the HP TouchSmart Software 45
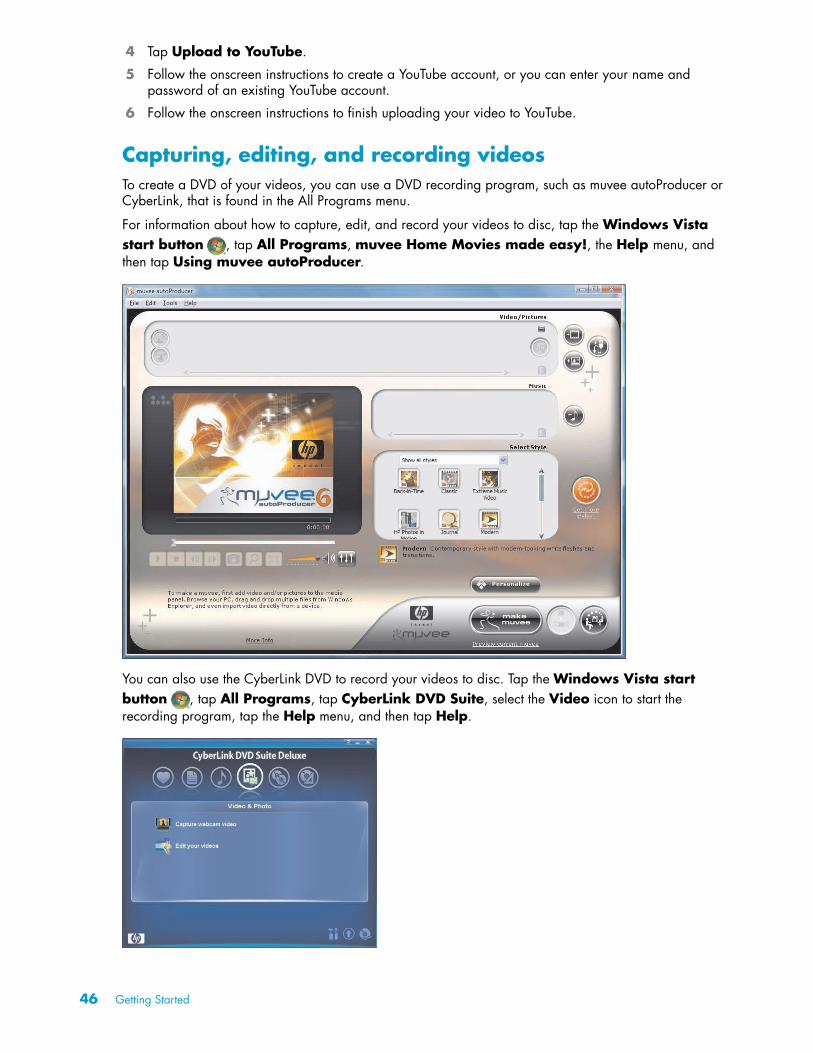
4 Tap Upload to YouTube.
5 Follow the onscreen instructions to create a YouTube account, or you can enter your name and password of an existing YouTube account.
6 Follow the onscreen instructions to finish uploading your video to YouTube.
Capturing, editing, and recording videosTo create a DVD of your videos, you can use a DVD recording program, such as muvee autoProducer or CyberLink, that is found in the All Programs menu.
For information about how to capture, edit, and record your videos to disc, tap the Windows Vista start button , tap All Programs, muvee Home Movies made easy!, the Help menu, and then tap Using muvee autoProducer.
You can also use the CyberLink DVD to record your videos to disc. Tap the Windows Vista start button , tap All Programs, tap CyberLink DVD Suite, select the Video icon to start the recording program, tap the Help menu, and then tap Help.
46 Getting Started
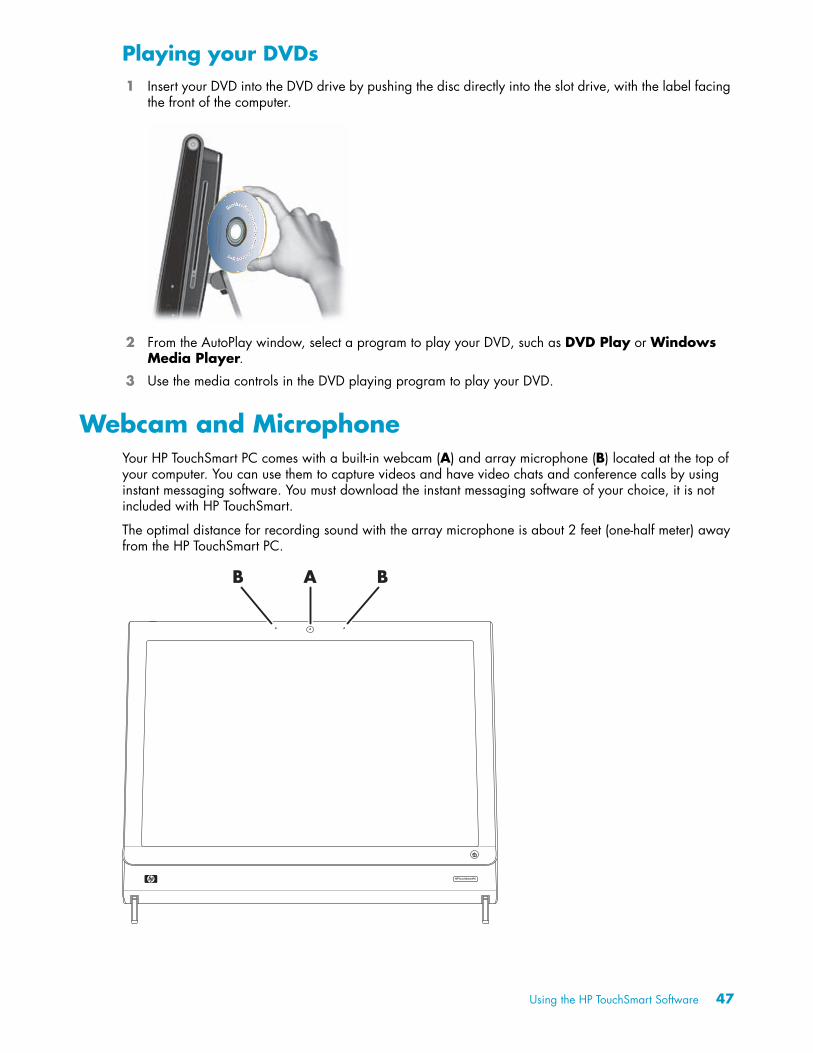
Playing your DVDs1 Insert your DVD into the DVD drive by pushing the disc directly into the slot drive, with the label facing
the front of the computer.
2 From the AutoPlay window, select a program to play your DVD, such as DVD Play or Windows Media Player.
3 Use the media controls in the DVD playing program to play your DVD.
Webcam and MicrophoneYour HP TouchSmart PC comes with a built-in webcam (A) and array microphone (B) located at the top of your computer. You can use them to capture videos and have video chats and conference calls by using instant messaging software. You must download the instant messaging software of your choice, it is not included with HP TouchSmart.
The optimal distance for recording sound with the array microphone is about 2 feet (one-half meter) away from the HP TouchSmart PC.
Copyright 2008 H
ewlett-Packard
Developm
ent Com
pany, LP
AB B
Using the HP TouchSmart Software 47
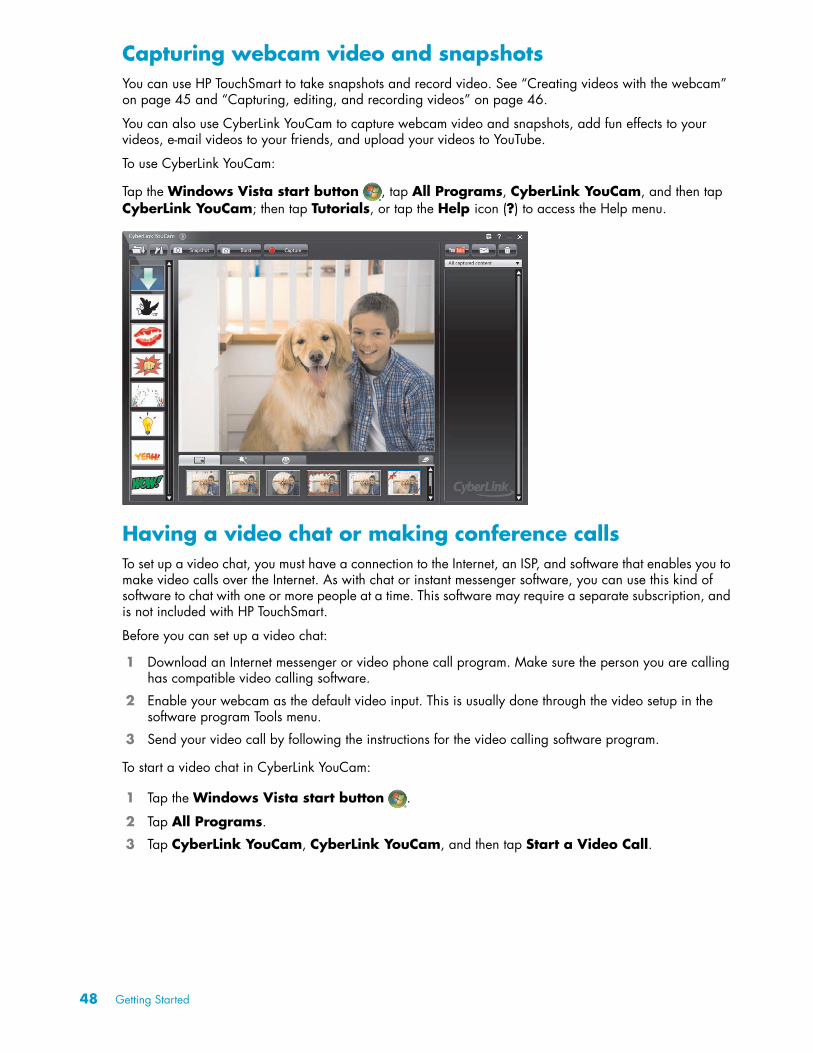
Capturing webcam video and snapshotsYou can use HP TouchSmart to take snapshots and record video. See “Creating videos with the webcam” on page 45 and “Capturing, editing, and recording videos” on page 46.
You can also use CyberLink YouCam to capture webcam video and snapshots, add fun effects to your videos, e-mail videos to your friends, and upload your videos to YouTube.
To use CyberLink YouCam:
Tap the Windows Vista start button , tap All Programs, CyberLink YouCam, and then tap CyberLink YouCam; then tap Tutorials, or tap the Help icon (?) to access the Help menu.
Having a video chat or making conference callsTo set up a video chat, you must have a connection to the Internet, an ISP, and software that enables you to make video calls over the Internet. As with chat or instant messenger software, you can use this kind of software to chat with one or more people at a time. This software may require a separate subscription, and is not included with HP TouchSmart.
Before you can set up a video chat:
1 Download an Internet messenger or video phone call program. Make sure the person you are calling has compatible video calling software.
2 Enable your webcam as the default video input. This is usually done through the video setup in the software program Tools menu.
3 Send your video call by following the instructions for the video calling software program.
To start a video chat in CyberLink YouCam:
1 Tap the Windows Vista start button .
2 Tap All Programs.
3 Tap CyberLink YouCam, CyberLink YouCam, and then tap Start a Video Call.
48 Getting Started
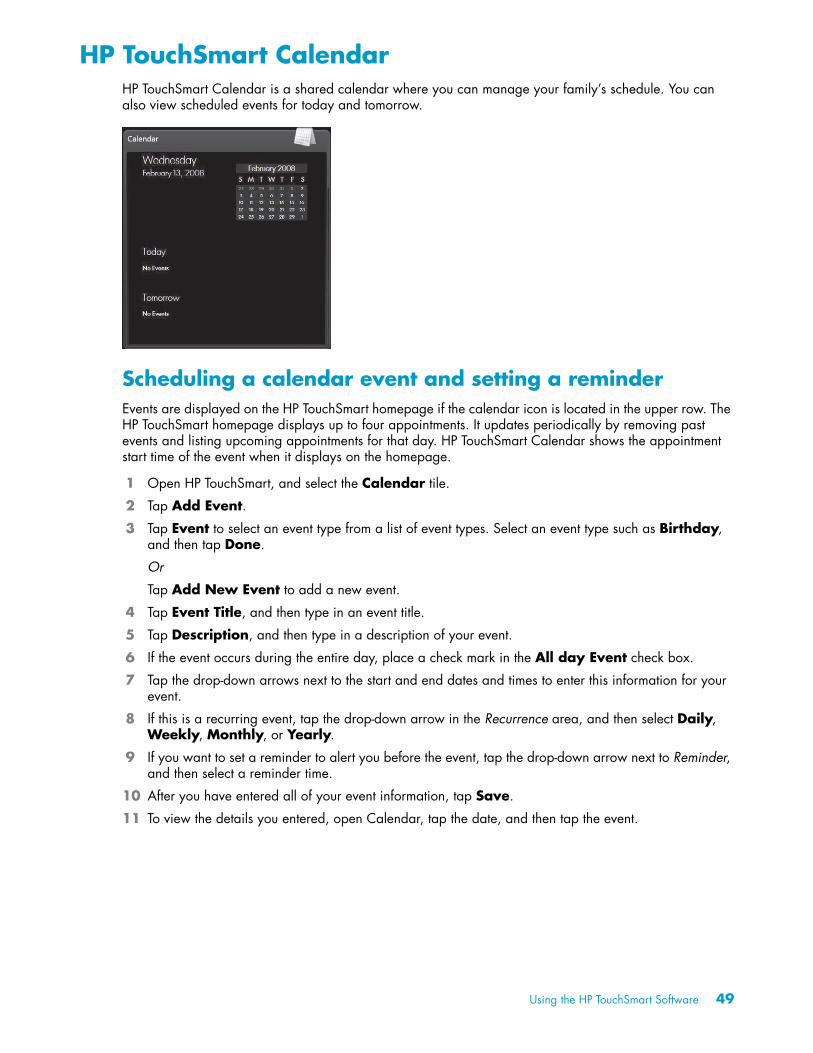
HP TouchSmart CalendarHP TouchSmart Calendar is a shared calendar where you can manage your family’s schedule. You can also view scheduled events for today and tomorrow.
Scheduling a calendar event and setting a reminderEvents are displayed on the HP TouchSmart homepage if the calendar icon is located in the upper row. The HP TouchSmart homepage displays up to four appointments. It updates periodically by removing past events and listing upcoming appointments for that day. HP TouchSmart Calendar shows the appointment start time of the event when it displays on the homepage.
1 Open HP TouchSmart, and select the Calendar tile.
2 Tap Add Event.
3 Tap Event to select an event type from a list of event types. Select an event type such as Birthday, and then tap Done.
Or
Tap Add New Event to add a new event.
4 Tap Event Title, and then type in an event title.
5 Tap Description, and then type in a description of your event.
6 If the event occurs during the entire day, place a check mark in the All day Event check box.
7 Tap the drop-down arrows next to the start and end dates and times to enter this information for your event.
8 If this is a recurring event, tap the drop-down arrow in the Recurrence area, and then select Daily, Weekly, Monthly, or Yearly.
9 If you want to set a reminder to alert you before the event, tap the drop-down arrow next to Reminder, and then select a reminder time.
10 After you have entered all of your event information, tap Save.
11 To view the details you entered, open Calendar, tap the date, and then tap the event.
Using the HP TouchSmart Software 49
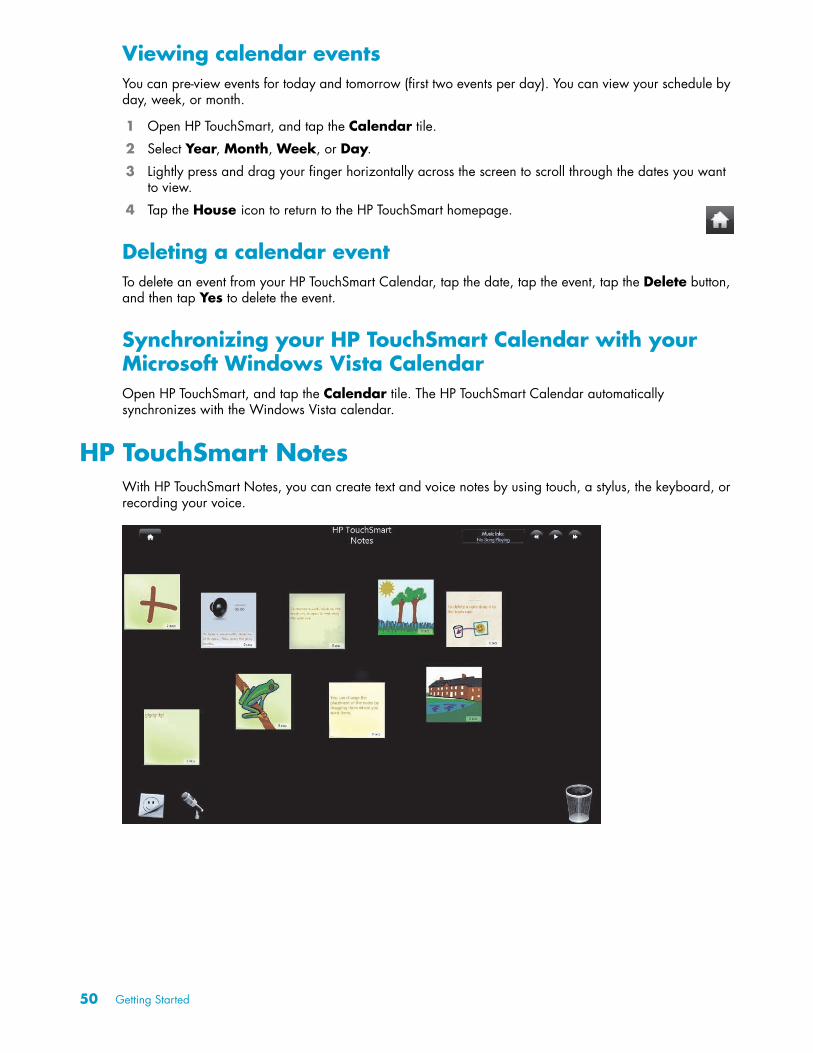
Viewing calendar eventsYou can pre-view events for today and tomorrow (first two events per day). You can view your schedule by day, week, or month.
1 Open HP TouchSmart, and tap the Calendar tile.
2 Select Year, Month, Week, or Day.
3 Lightly press and drag your finger horizontally across the screen to scroll through the dates you want to view.
4 Tap the House icon to return to the HP TouchSmart homepage.
Deleting a calendar eventTo delete an event from your HP TouchSmart Calendar, tap the date, tap the event, tap the Delete button, and then tap Yes to delete the event.
Synchronizing your HP TouchSmart Calendar with your Microsoft Windows Vista CalendarOpen HP TouchSmart, and tap the Calendar tile. The HP TouchSmart Calendar automatically synchronizes with the Windows Vista calendar.
HP TouchSmart NotesWith HP TouchSmart Notes, you can create text and voice notes by using touch, a stylus, the keyboard, or recording your voice.
50 Getting Started
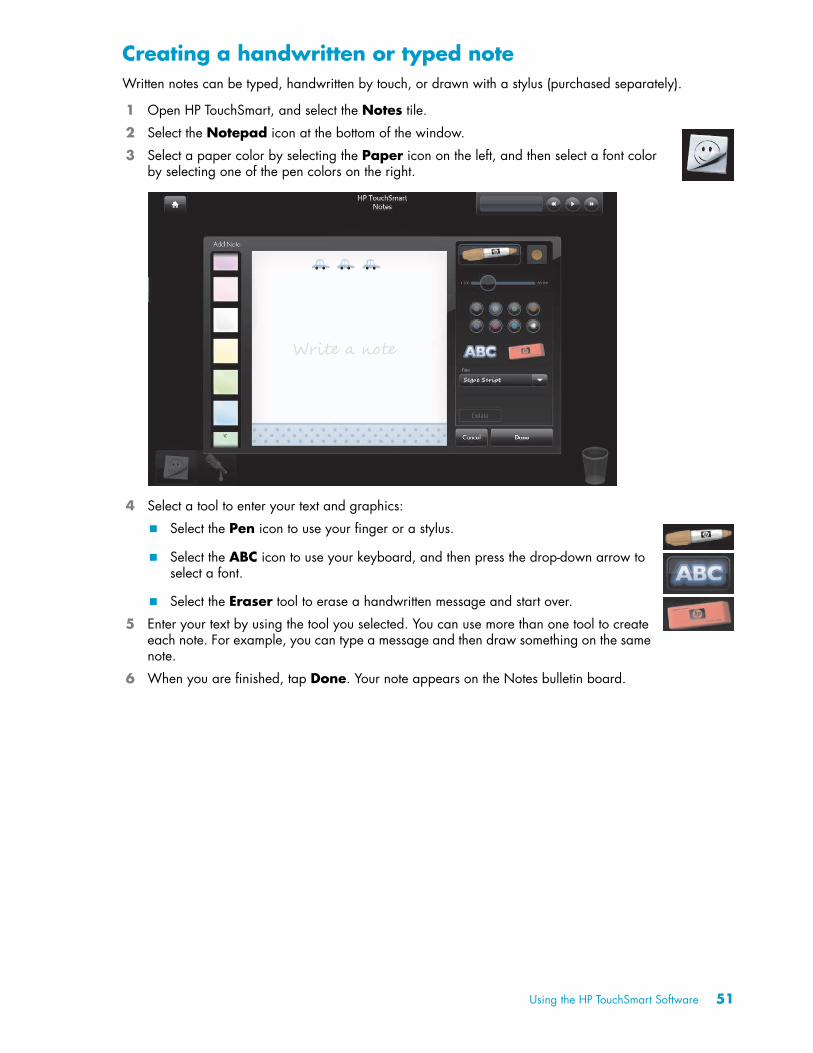
Creating a handwritten or typed noteWritten notes can be typed, handwritten by touch, or drawn with a stylus (purchased separately).
1 Open HP TouchSmart, and select the Notes tile.
2 Select the Notepad icon at the bottom of the window.
3 Select a paper color by selecting the Paper icon on the left, and then select a font color by selecting one of the pen colors on the right.
4 Select a tool to enter your text and graphics:
� Select the Pen icon to use your finger or a stylus.
� Select the ABC icon to use your keyboard, and then press the drop-down arrow to select a font.
� Select the Eraser tool to erase a handwritten message and start over.
5 Enter your text by using the tool you selected. You can use more than one tool to create each note. For example, you can type a message and then draw something on the same note.
6 When you are finished, tap Done. Your note appears on the Notes bulletin board.
Using the HP TouchSmart Software 51

Creating a voice note1 Open HP TouchSmart, and select the Notes tile.
2 Select the Microphone icon at the bottom of the screen.
3 Tap the Record button to record a short message.
4 Tap the Stop button to stop recording your message.
5 Tap the Play button to review your message.
6 Tap Keep or Cancel. Tap Done to save the voice note.
7 Use the Note tools to add a message to the bottom of your voice note, and then click Done to save it to your Note bulletin board. The Speaker icon indicates that a voice message is attached to the note.
8 To play the voice note, tap it, and then tap the Play button.
9 Select Done to return to the Note bulletin board, or select Edit to edit the text in the note.
To adjust volume for voice notes in HP TouchSmart Notes, adjust the volume controls on the right side of the HP TouchSmart PC, or on the keyboard. Additionally, to adjust the volume for the HP TouchSmart Notes program, press and hold (or with the mouse, right-click) the Speaker icon in the Windows taskbar. Select Open Volume Mixer, and adjust the HP TouchSmart Notes volume slider. (To view the Speaker icon in the Windows taskbar, minimize HP TouchSmart and go to the Windows desktop by tapping the HP TouchSmart House icon on the upper left corner to get back to the HP TouchSmart homepage, then tapping the Windows icon on the upper left corner.)
Deleting text and voice notes1 Open HP TouchSmart, and select the Notes tile.
2 Press and drag the note you want to delete into the Trash can in the bottom right corner of the window.
3 Tap the Trash icon to open the trash, tap to select the items you want to delete, and then tap the Delete Selected button.
4 Tap Done.
52 Getting Started
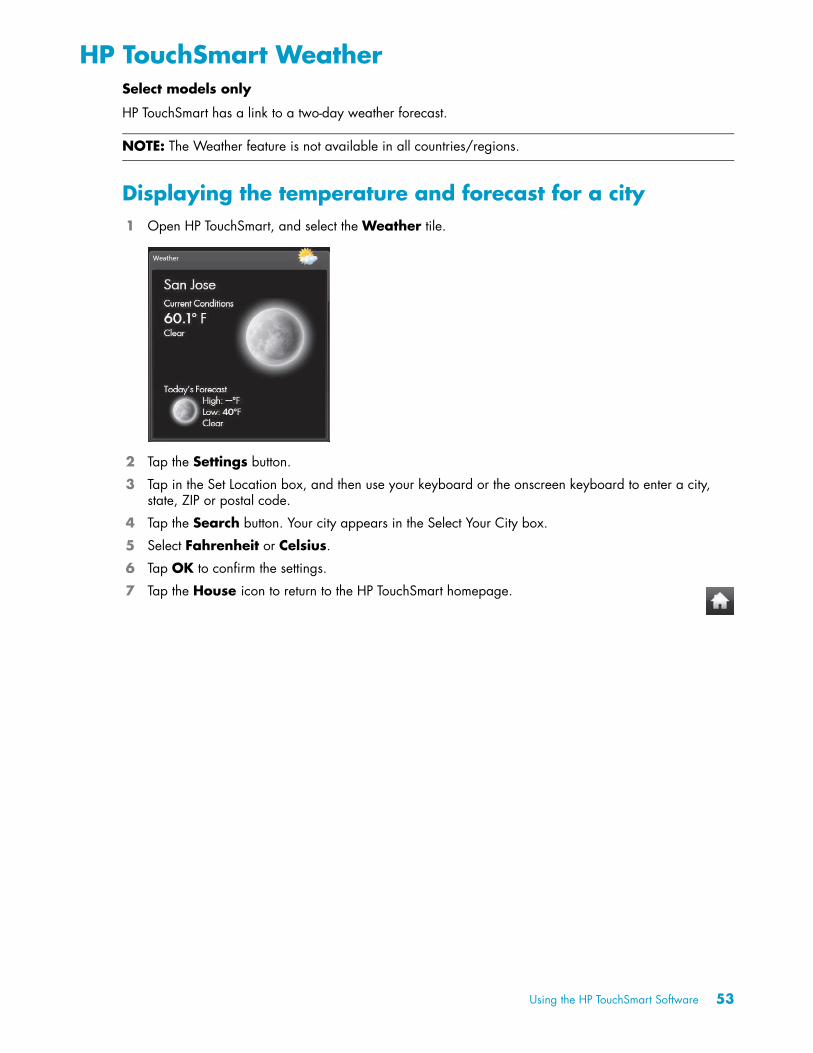
HP TouchSmart WeatherSelect models only
HP TouchSmart has a link to a two-day weather forecast.
Displaying the temperature and forecast for a city1 Open HP TouchSmart, and select the Weather tile.
2 Tap the Settings button.
3 Tap in the Set Location box, and then use your keyboard or the onscreen keyboard to enter a city, state, ZIP or postal code.
4 Tap the Search button. Your city appears in the Select Your City box.
5 Select Fahrenheit or Celsius.
6 Tap OK to confirm the settings.
7 Tap the House icon to return to the HP TouchSmart homepage.
NOTE: The Weather feature is not available in all countries/regions.
Using the HP TouchSmart Software 53
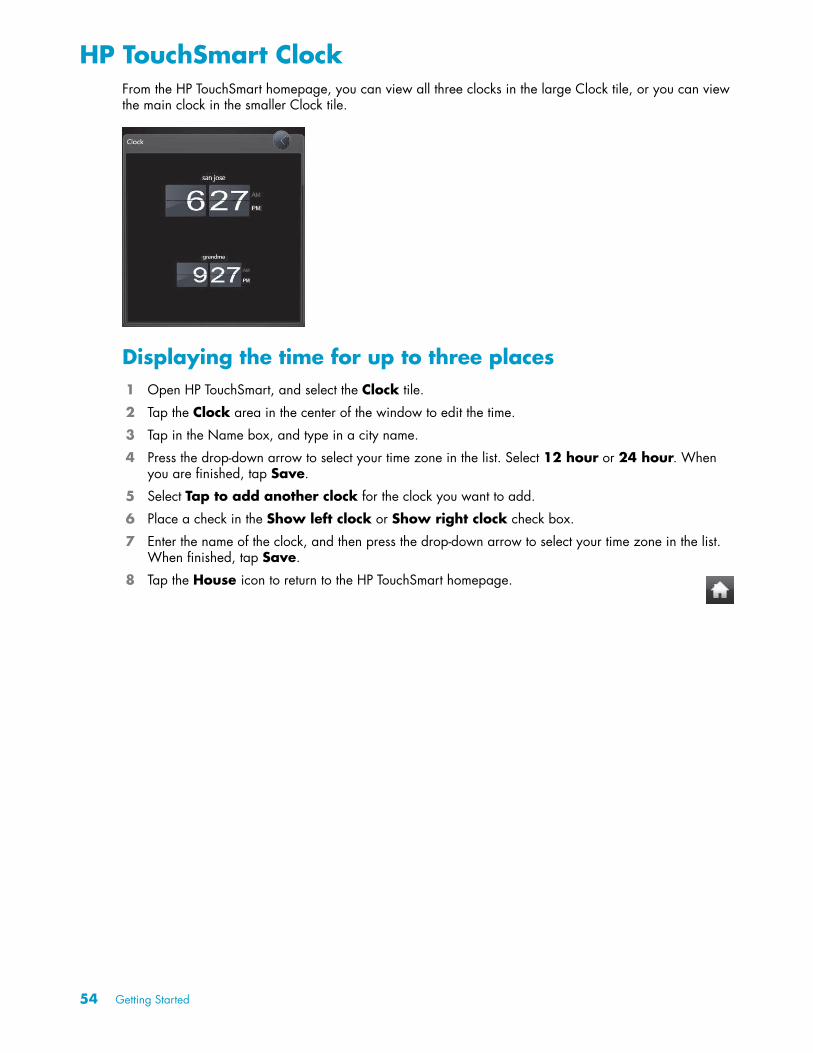
HP TouchSmart ClockFrom the HP TouchSmart homepage, you can view all three clocks in the large Clock tile, or you can view the main clock in the smaller Clock tile.
Displaying the time for up to three places1 Open HP TouchSmart, and select the Clock tile.
2 Tap the Clock area in the center of the window to edit the time.
3 Tap in the Name box, and type in a city name.
4 Press the drop-down arrow to select your time zone in the list. Select 12 hour or 24 hour. When you are finished, tap Save.
5 Select Tap to add another clock for the clock you want to add.
6 Place a check in the Show left clock or Show right clock check box.
7 Enter the name of the clock, and then press the drop-down arrow to select your time zone in the list. When finished, tap Save.
8 Tap the House icon to return to the HP TouchSmart homepage.
54 Getting Started
HP TouchSmart RSS ReaderHP TouchSmart includes an RSS (Really Simple Syndication) Feeds Reader that enables you to subscribe to RSS feeds from Web sites you choose.
RSS feeds contain frequently updated content that is published by a news or blog Web site. Some RSS feeds distribute other types of digital content, including pictures, audio files, videos, or updates that you can view later.
Setting up RSS feedsTo subscribe to an RSS feed in Internet Explorer:
1 Tap the Windows Vista start button , and then tap Internet Explorer.
2 Tap the Feeds button to discover feeds on the Web page.
3 Tap a feed.
4 Tap the Subscribe to this Feed button, and then tap Subscribe to this Feed.
5 Type a name for the feed, and then select the folder where you want to create the feed.
6 Tap Subscribe.
7 Open HP TouchSmart, and tap the RSS feeds tile to view your RSS feeds.
8 Tap the feed title to display it in the RSS reader window. If you tap the arrow button on the feed window, it opens in Internet Explorer outside of HP TouchSmart. When you close the feed, the HP TouchSmart RSS feed window opens.
Importing a list of RSS feedsTo import a list of RSS feeds from another program into Internet Explorer:
1 Tap the Windows Vista start button , and then tap Internet Explorer.
2 Tap the Add to Favorites button, and then tap Import and Export.
3 In the Import/Export Wizard, tap Next.
4 Tap Import Feeds, and then tap Next.
5 By default, Internet Explorer imports from a file called Feeds.opml in your Documents folder, but you can tell it to import feeds that are saved under another name. Tap Browse, and select a file, or type a location and file name to import, or tap Next to accept the default.
6 Select the folder where you want to place the imported feeds, and then tap Next.
7 Tap Finish.
Using the HP TouchSmart Software 55
HP TouchSmart BrowserThe current version of HP TouchSmart Browser is a simple viewer that is intended to display live content in your HP TouchSmart homepage. Use it in a large tile to monitor your favorite Web sites as they change content throughout the day. See “Adding a Web site link to HP TouchSmart” on page 34 for instructions on adding a tile.
Navigation controls in the HP TouchSmart Browser:
Button What it does
The Back arrow button displays the previous page or window.
The Forward arrow displays a Web page or window you had opened earlier.
The Home icon takes you to the HP TouchSmart PC Web page. If you have created a new Web site tile, this button takes you to the original Web address you entered for this tile.
The Favorites icon displays a list of all the favorite Web sites you have added in Internet Explorer and in HP TouchSmart Browser.
The Add to Favorites button allows you to add a Web site to your favorites list.
The pop-up button allows you to view a pop-up window.
The Refresh button reloads a selected Web page.
The Stop Loading button stops the browser from loading a selected Web page.
The panning bars on the bottom and side of the HP TouchSmart Browser window allow you to view the entire Web page. You need to press and drag your finger from this bar to the page for it to pan correctly. You can use either panning bar to pan through this window.
56 Getting Started
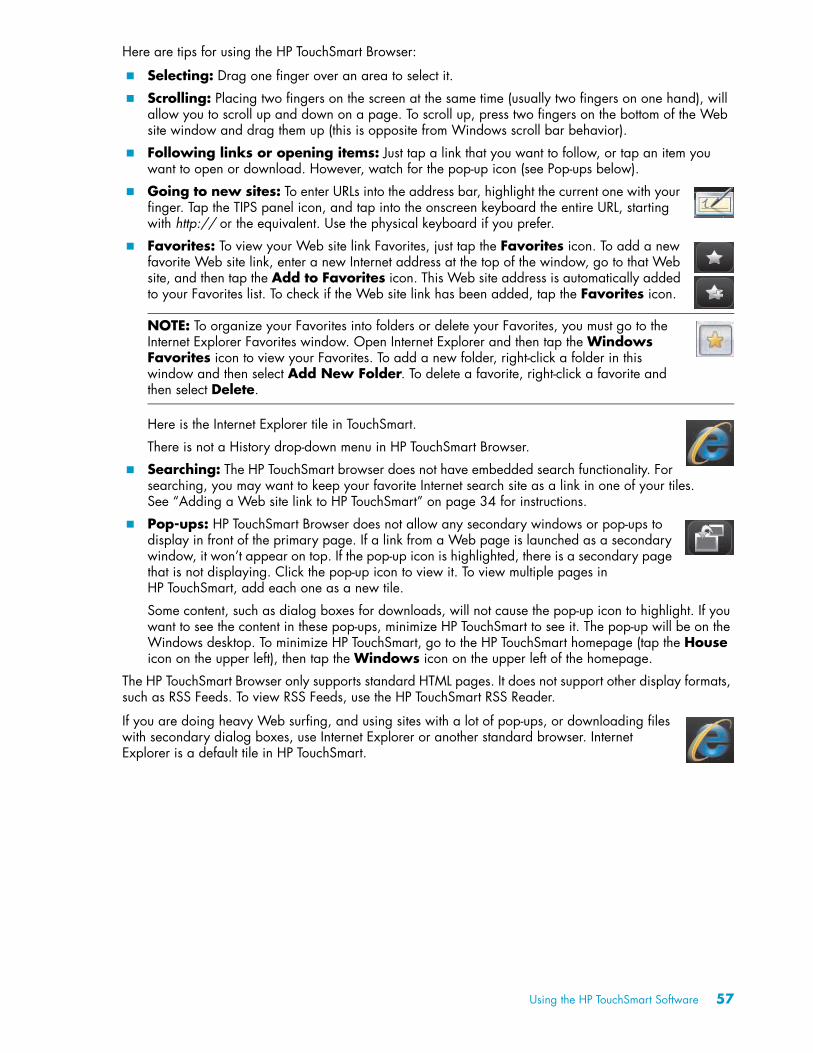
Here are tips for using the HP TouchSmart Browser:
� Selecting: Drag one finger over an area to select it.
� Scrolling: Placing two fingers on the screen at the same time (usually two fingers on one hand), will allow you to scroll up and down on a page. To scroll up, press two fingers on the bottom of the Web site window and drag them up (this is opposite from Windows scroll bar behavior).
� Following links or opening items: Just tap a link that you want to follow, or tap an item you want to open or download. However, watch for the pop-up icon (see Pop-ups below).
� Going to new sites: To enter URLs into the address bar, highlight the current one with your finger. Tap the TIPS panel icon, and tap into the onscreen keyboard the entire URL, starting with http:// or the equivalent. Use the physical keyboard if you prefer.
� Favorites: To view your Web site link Favorites, just tap the Favorites icon. To add a new favorite Web site link, enter a new Internet address at the top of the window, go to that Web site, and then tap the Add to Favorites icon. This Web site address is automatically added to your Favorites list. To check if the Web site link has been added, tap the Favorites icon.
Here is the Internet Explorer tile in TouchSmart.
There is not a History drop-down menu in HP TouchSmart Browser.
� Searching: The HP TouchSmart browser does not have embedded search functionality. For searching, you may want to keep your favorite Internet search site as a link in one of your tiles. See “Adding a Web site link to HP TouchSmart” on page 34 for instructions.
� Pop-ups: HP TouchSmart Browser does not allow any secondary windows or pop-ups to display in front of the primary page. If a link from a Web page is launched as a secondary window, it won’t appear on top. If the pop-up icon is highlighted, there is a secondary page that is not displaying. Click the pop-up icon to view it. To view multiple pages in HP TouchSmart, add each one as a new tile.
Some content, such as dialog boxes for downloads, will not cause the pop-up icon to highlight. If you want to see the content in these pop-ups, minimize HP TouchSmart to see it. The pop-up will be on the Windows desktop. To minimize HP TouchSmart, go to the HP TouchSmart homepage (tap the House icon on the upper left), then tap the Windows icon on the upper left of the homepage.
The HP TouchSmart Browser only supports standard HTML pages. It does not support other display formats, such as RSS Feeds. To view RSS Feeds, use the HP TouchSmart RSS Reader.
If you are doing heavy Web surfing, and using sites with a lot of pop-ups, or downloading files with secondary dialog boxes, use Internet Explorer or another standard browser. Internet Explorer is a default tile in HP TouchSmart.
NOTE: To organize your Favorites into folders or delete your Favorites, you must go to the Internet Explorer Favorites window. Open Internet Explorer and then tap the Windows Favorites icon to view your Favorites. To add a new folder, right-click a folder in this window and then select Add New Folder. To delete a favorite, right-click a favorite and then select Delete.
Using the HP TouchSmart Software 57
Selecting Items on the Windows Desktop and in Other Software
With the HP TouchSmart PC, you always have the flexibility to use various ways to navigate the desktop, search the Web, and work with various programs on your computer. You can use the touch screen, keyboard, mouse, stylus (purchased separately), or remote control (included with select models only).
Some tasks, such as using the HP TouchSmart programs, browsing the Internet, or accessing your favorite programs, are better suited to the touch screen. Other tasks, such as typing search text, are better suited to the keyboard. Other tasks, such as using the Windows Media Center program to watch and record TV programs, are designed to work with the remote control.
Your HP TouchSmart PC is designed to use the touch screen in several ways. When you are in the HP TouchSmart program, you can select and open items with a single tap. On the Windows desktop and in some software programs, you must use double-tap to open shortcuts, programs and other selectable items.
The following table provides desktop and software navigation tips.
NOTE: Software that you purchase and install separately is accessible with the touch screen, but some programs may be easier to use with a keyboard or mouse.
Action Description
Select item Tap once to select an item. This works like a single-click with a mouse.
Open item Tap twice quickly to open an item. This works like a double-click with a mouse.
A taskbar icon is opened with a single tap.
Open secondary menu Press and hold a menu until the secondary menu appears. This works like a right-click with a mouse. After the secondary menu appears, move your finger to select a menu items. When you release your finger, the item is selected.
Move item Press and drag an item to move it.
Scroll menu Press the scrollbar and drag it left and right or up and down to the desired item or setting.
58 Getting Started

Software Quick Reference TableSome of the software listed in the following table is included with select models only. The following table is not a complete list of all the software included with your computer.
To open any of these programs, tap the Windows Vista start button , tap All Programs, select the program folder (for example, DVD Play), and then tap the program name to open the software.
With this program: You can:
HP TouchSmart � View, organize, edit, and print your photos; share your photos with friends and family; and upload your photos to Snapfish.
� Create music playlists and play your CDs.
� Watch your videos and upload them to YouTube.
� View RSS feeds from your favorite news, entertainment, and sports Web sites.
� Check the weather in a city you select (select models only).
� Set reminders for events in HP TouchSmart Calendar.
� Create checklists and audio, handwritten, and typed notes in HP TouchSmart Notes.
DVD Play � Play DVD movies and video CDs (VCDs).
� Use the Zoom and Pan features.
� Create viewing bookmarks.
muvee autoProducer � Add your own style to your movies, with music, pictures, titles, scene transitions, and captions.
� Edit your home movies.
� Save and record multiple movie files to DVD.
� Use the magicSpot feature to control the motion effects applied to your pictures.
CyberLink DVD Suite � Includes various programs, such as: Power2Go, YouCam, LabelPrint, and PowerDirector. See the programs listed in this table for more details about the program features.
CyberLink Power2Go � Record data and music files.
� Record a copy of an existing music or data CD for use on your computer.
� Create customized music CDs from CDs in your collection, or from .wav, .mp3, or .wma files. You can play these CDs on your home or car stereo.
� Copy and share data files.
� Create archive CDs or DVDs from files on your computer.
� Copy video files.
� Verify that the disc has been created without errors.
CyberLink YouCam � Capture and edit webcam video and snapshots.
� Upload your videos to YouTube.
� Start a video chat.
� Send your videos to friends and family.
Using the HP TouchSmart Software 59
CyberLink LabelPrint � Print labels to attach directly to a disc.
� Create song title inserts for your CD cases.
CyberLink PowerDirector � Record movie files to create VCDs and DVDs that you can play on some DVD players.
� Copy and share video files.
� Capture video files.
� Edit video files.
HP Total Care Advisor � Quickly organize the Web links you want to keep available to you on your desktop.
� Comparison-shop by using the convenient shopping search engine.
� Get HP software and driver updates.
� Get important messages from HP.
� Access PC Health and Security and PC Help tools.
Microsoft Windows Movie Maker
� Import audio, video, and other media files from videotape, audiotape, webcams, or television broadcasts.
� Record audio and video files to create a video project that becomes a Microsoft Windows Media source file with a .wmv extension.
� Edit and preview files.
� Send a movie in an e-mail or upload it to a Web server.
� Add music files (.mp3 format).
� Import audio files such as .mp3, .asf, or .wma; video files such as .wmv, .asf, .avi, or .mpg; or image files such as .jpg or .gif.
� Create .avi and .wmv (Windows Media Video) files.
With this program: You can: (continued)
60 Getting Started
Index
AAmbient Light
adjusting 16button 4
Audio line in connector 4Audio line out connector 6Auto-Start 35
BBluetooth
antenna features 2using Bluetooth devices 16
buttonAmbient Light 4computer power/sleep 3DVD control 3HP TouchSmart 3
Ccable management 8cable router clip 6calendar
using HP TouchSmart Calendar 49camera
using the webcam 47carpal tunnel syndrome 28CD
creating music CD 43playing 40using the CD/DVD drive 17
cleaning touch screen 27computer
connecting the IR emitter 20recycling old hardware 28turning on 12
computer stand 6adjusting the angle 10
connectingTV signal 18
CyberLinkLabelPrint, features 60Power2Go, features 59PowerDirector, features 60YouCam, features 59
Ddigital audio connector 6digital camera, using HP TouchSmart Photo 36digital video camera, using HP TouchSmart Photo 36DVD drive, using 17DVD Play, features 59DVDs, playing 47
Eevent
deleting from HP TouchSmart Calendar 50scheduling in HP TouchSmart Calendar 49
FFavorites 57FireWire (IEEE 1394) 3
Hhard disk drive
LED 7Headphones 4HP TouchSmart
adding a shortcut 33adding a Web site link 34cleaning touch screen 27deleting a tile 35finding information vinavigating 30opening 29opening faster 35personalizing 33scheduling an event 49start button 3turning off the computer 13turning on the computer 12updating the computer software 17upgrading the computer hardware 17using the software 29what is HP TouchSmart software 29
HP TouchSmart Browserfavorites 57using 56
Index 61
HP TouchSmart Calendardeleting an event 50scheduling an event 49synchronizing with Microsoft Windows Vista
calendar 50using 49viewing events 50
HP TouchSmart Clock, setting 54HP TouchSmart Music
creating a playlist 42using 39
HP TouchSmart Notesusing 50
HP TouchSmart Photousing 35
HP TouchSmart RSS Readersetting up RSS feeds 55using 55
HP TouchSmart Videosupported file formats 44using 44
HP TouchSmart Weather, viewing 53
Iinstant messenger, making a video call 48Internet Explorer, using with HP TouchSmart Browser 57IR emitter
cable connecting to a set-top box 20cable, connecting 20connector 6
IR receiver, remote control 3iTunes, using with HP TouchSmart 40
Kkeyboard
features 4receiver 6
keyboard and mouse receiverLED function 7
LLAN (local area network) 13
antenna features 3connecting to the Internet 5
local area network (LAN) 13lock
security 6
MMedia controls 41memory card reader
card types 3features 3LED 7transfer photos to photo library 36
microphone array 25adjusting volume 25features 3range 25using with webcam 47
mousefeatures 4receiver 6
Music controls, see Media controlsmuvee autoProducer
features 59
Nnetwork
wired 5wireless 3
notecreating a handwritten or typed note 51creating a voice note 52deleting a note 52
Oonscreen keyboard, using 32
Pphotos
creating CDs 39editing 38editing in HP Photosmart Touch 38printing 37upload to Snapfish 37
playlistcreating 42deleting 42playing 42
power adapter connector 6Power, LED 7Power/Sleep button 3
QQuick-Launch 35
Rreceiver, wireless keyboard and mouse 7recycling old computer hardware 28remote control
features 3IR receiver LED 7Power/Sleep button 21sensor 21using with HP TouchSmart 21
repetitive strain injury (RSI), see Safety & Comfort Guiderouter installation 14, 15RSS feeds
importing a list 55setting up 55
62 Getting Started
SSafety & Comfort Guide 28safety warnings 28security lock slot 6set-top box
connecting to computer 20remote emitter cable for 20using with HP TouchSmart PC 20
slideshow, viewing 36software
updating 17software programs
CyberLink DVD Suite 59CyberLink LabelPrint 60CyberLink Power2Go 59CyberLink PowerDirector 60CyberLink YouCam 59DVD Play 59HP Total Care Advisor 60HP TouchSmart 29muvee autoProducer 59Windows Movie Maker 60
speakers 4adjusting volume 24features 4
Stereo Audio In connector 6S-Video In connector 6synchronize
keyboard and mouse 11
Ttelevision, watch and record TV programs 18touch screen
accessing software, performing tasks, navigating the computer 58
cleaning 27features 2
turning on the computer 12TV In connector 6
UUSB connector 5
Vvideos
creating with the webcam 45editing 46setting up a video chat 48uploading to YouTube 45watching 44
voice message, creating 52volume
adjusting speaker volume 24controls 3Volume Mixer 24
Wweather updates, getting 53webcam
capturing video and snapshots 48features 2LED 7setting up a video call 48using with the microphone 47
Windows Media Centersetup wizard 20using the remote control 21using to watch and record TV programs 18
Windows Media Player, using with HP TouchSmart 40Windows Movie Maker, features 60wired home network
LAN connection 5setting up 15
wireless home networkLAN connection 3setting up 14
working in comfort 28
Index 63

Part number: 466925-002