sundergs4learning.files.wordpress.com … · web viewprerequisites: installing java v1.7. adding...
TRANSCRIPT
Prerequisites:1. Installing Java v1.72. Adding dedicated Hadoop system user.3. Configuring SSH access.4. Disabling IPv6.
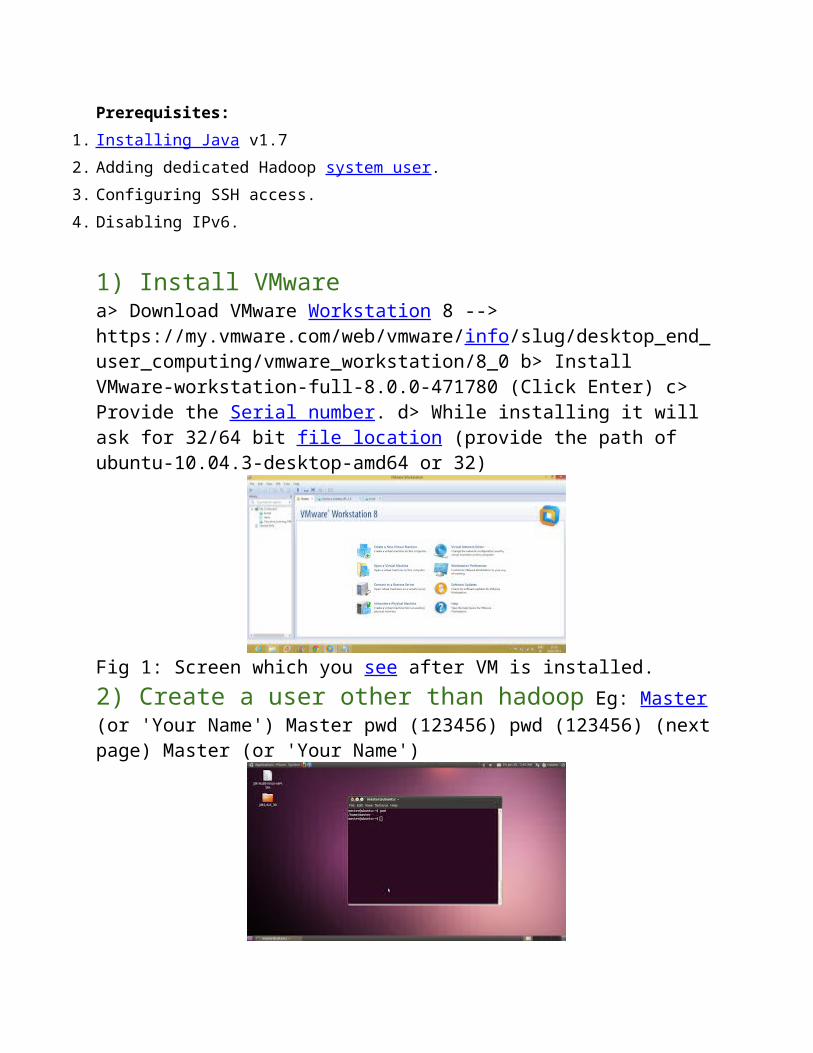
1) Install VMwarea> Download VMware Workstation 8 --> https://my.vmware.com/web/vmware/info/slug/desktop_end_user_computing/vmware_workstation/8_0 b> Install VMware-workstation-full-8.0.0-471780 (Click Enter) c> Provide the Serial number. d> While installing it will ask for 32/64 bit file location (provide the path of ubuntu-10.04.3-desktop-amd64 or 32)
Fig 1: Screen which you see after VM is installed. 2) Create a user other than hadoop Eg: Master (or 'Your Name') Master pwd (123456) pwd (123456) (next page) Master (or 'Your Name')
Fig 2: Ubantu Screen 'Master' Simillarly create the Slave VM

3) Install Java a> Download Java jdk-6u30-linux-x64.bin , save it in your Ubantu Desktop b> Open a terminal (ctrl+alt+t) c> Go to Desktop and copy the file to "/usr/local" d> Extract the java file ( go to /usr/local, you can see the .bin file thr): ./jdk-6u30-linux-x64.bin A new file will generate "jdk1.6.0_3/"
Fig 3: Java Installed
4) Install CDH3 package Go to : https://ccp.cloudera.com/display/CDHDOC/CDH3+Installation Click on - Installing CDH3 on Ubuntu
5) Set Java and Hadoop Home Using command: gedit ~/.bashrc
# Set Hadoop-related environment variables export HADOOP_HOME=/usr/lib/hadoop export PATH=$PATH:/usr/lib/hadoop/bin # Set JAVA_HOME export JAVA_HOME=/usr/local/jdk1.6.0_30 export PATH=$PATH:/usr/local/jdk1.6.0_30/bin
close terminals and open new one and test JAVA HOME and HADOOP HOME

6) Configuration Set Java Home in ./conf/hadoop-env.sh
$ sudo gedit hadoop-env.sh export JAVA_HOME=/usr/local/jdk1.6.0_30
7) test hadoop version and java version
hadoop version
java -version
Hadoop Installation:Go to Apache Downloadsand download Hadoop version 2.2.0 (prefer to download any stable versions)i. Run this following command to download Hadoop version 2.2.0
wget http://apache.mirrors.pair.com/hadoop/common/stable2/hadoop-2.2..tar.gz

ii. Unpack the compressed hadoop file by using this command:
tar –xvzf hadoop-2.2.0.tar.gz
iii. move hadoop-2.2.0 to hadoop directory by using give command
mv hadoop-2.2.0 hadoop
iv. Move hadoop package of your choice, I picked /usr/local for my convenience
sudo mv hadoop /usr/local/
v. Make sure to change the owner of all the files to the hduser user and hadoop group by using this command:
sudo chown -R hduser:hadoop Hadoop
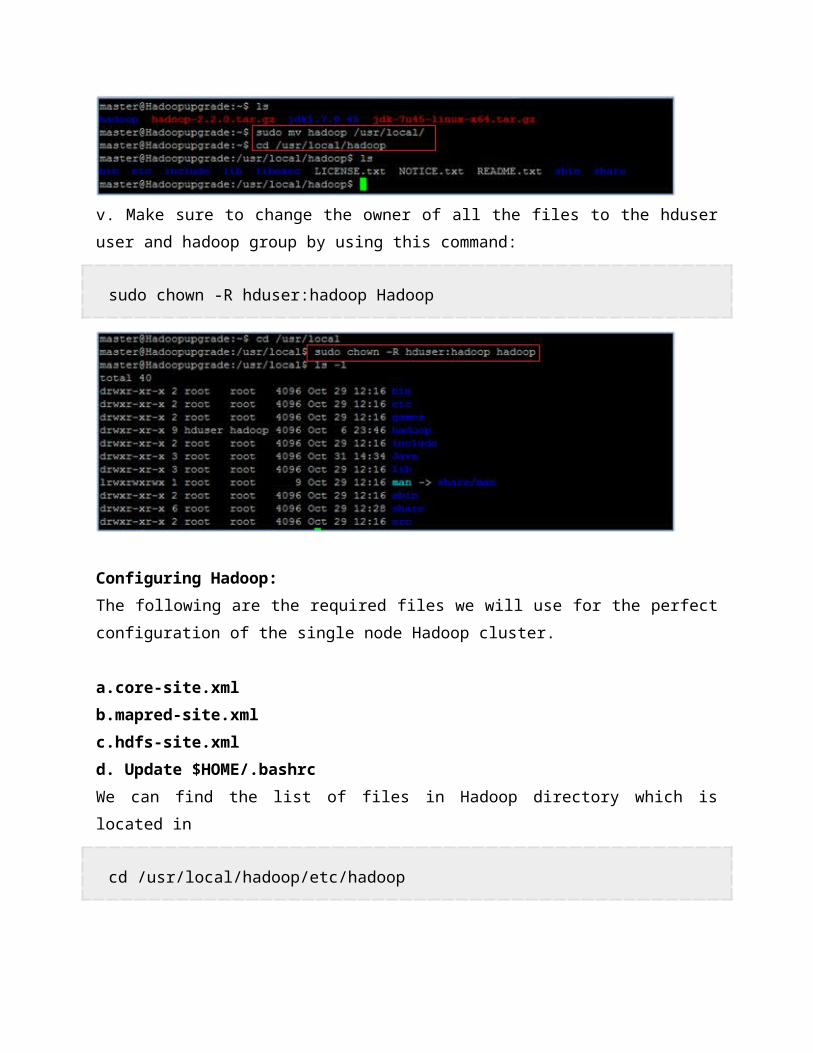
Configuring Hadoop:The following are the required files we will use for the perfect configuration of the single node Hadoop cluster.
a.core-site.xmlb.mapred-site.xmlc.hdfs-site.xmld. Update $HOME/.bashrcWe can find the list of files in Hadoop directory which is located in
cd /usr/local/hadoop/etc/hadoop

b. core-site.xml:i. Change the user to “hduser”. Change the directory to /usr/local/hadoop/conf and edit the core-site.xml file.
vi core-site.xml
ii. Add the following entry to the file and save and quit the file:
<configuration>
<property>
<name>fs.default.name</name>
<value>hdfs://localhost:9000</value>
</property>
</configuration>
c. mapred-site.xml:If this file does not exist, copy mapred-site.xml.template as mapred-site.xmli. Edit the mapred-site.xml file
vi mapred-site.xml
ii. Add the following entry to the file and save and quit the file.
<configuration>
<property>

<name>mapreduce.framework.name</name></property></configuration>
d. hdfs-site.xml:i. Edit the hdfs-site.xml file
vi hdfs-site.xml
iii. Add the following entry to the file and save and quit the file:
<configuration>
<property>
<name>dfs.replication</name>
<value>1</value>
</property>
<property>
<name>dfs.namenode.name.dir</name>
<value>file:/usr/local/hadoop/yarn_data/hdfs/namenode</value>
</property>
<property>
<name>dfs.datanode.data.dir</name>

<value>file:/usr/local/hadoop/yarn_data/hdfs/datanode</value>
</property>
</configuration>
e. Update $HOME/.bashrci. Go back to the root and edit the .bashrc file.
vi .bashrc
ii. Add the following lines to the end of the file.Add below configurations:
# Set Hadoop-related environment variables
export HADOOP_PREFIX=/usr/local/hadoop
export HADOOP_HOME=/usr/local/hadoop
export HADOOP_MAPRED_HOME=${HADOOP_HOME}
export HADOOP_COMMON_HOME=${HADOOP_HOME}
export HADOOP_HDFS_HOME=${HADOOP_HOME}

export YARN_HOME=${HADOOP_HOME}
export HADOOP_CONF_DIR=${HADOOP_HOME}/etc/hadoop
# Native Path
export HADOOP_COMMON_LIB_NATIVE_DIR=${HADOOP_PREFIX}/lib/native
export HADOOP_OPTS="-Djava.library.path=$HADOOP_PREFIX/lib"
#Java path
export JAVA_HOME='/usr/locla/Java/jdk1.7.0_45'
# Add Hadoop bin/ directory to PATH
export PATH=$PATH:$HADOOP_HOME/bin:$JAVA_PATH/bin:$HADOOP_HOME/sbin
Formatting and Starting/Stopping the HDFS filesystem via the NameNode:
i. The first step to starting up your Hadoop installation is formatting the Hadoop filesystem which is implemented on top of the local filesystem of your cluster. You need to do this the first time you set

up a Hadoop cluster. Do not format a running Hadoop filesystem as you will lose all the data currently in the cluster (in HDFS).
ii. To format the filesystem (which simply initializes the directory specified by the dfs.name.dir variable), run the
hadoop namenode -format
ii. Start Hadoop Daemons by running the following commands:Name node:
$ hadoop-dfs.sh
start namenode
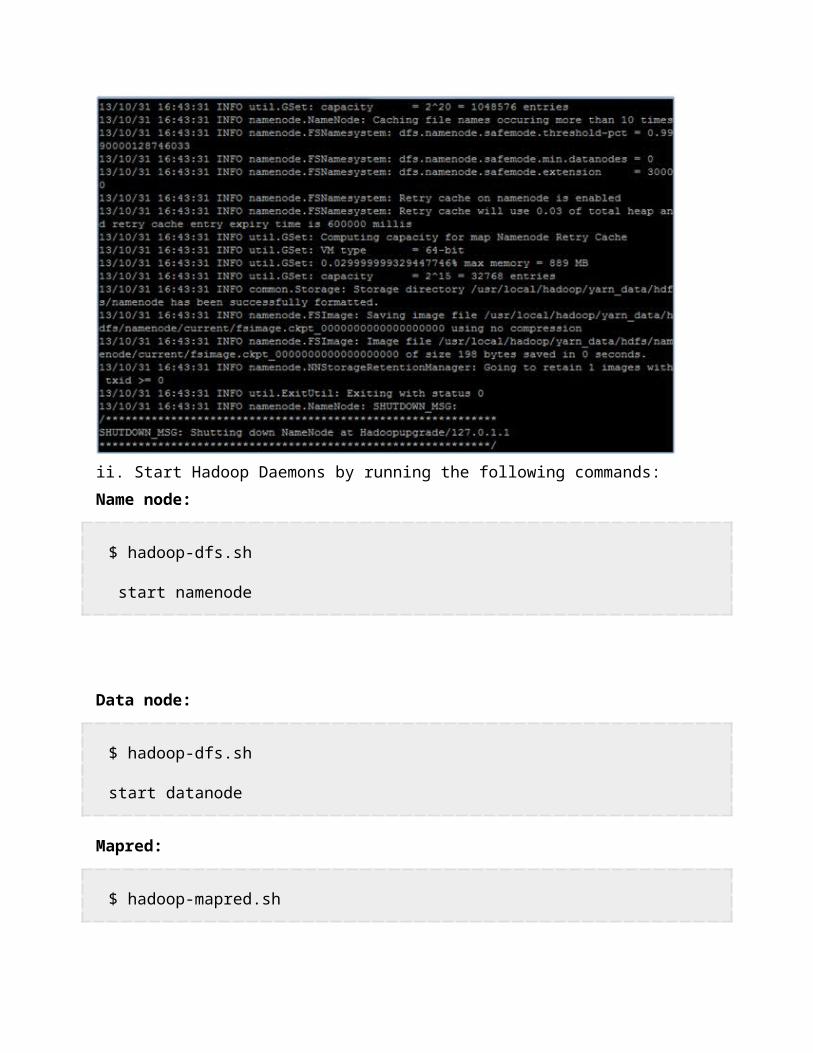
Data node:
$ hadoop-dfs.sh
start datanode
Mapred:
$ hadoop-mapred.sh
start datanode
v. Stop Hadoop by running the following command
stop-dfs.sh
Hadoop Web Interfaces:Hadoop comes with several web interfaces which are by default available at these locations:
HDFS Namenode and check health using http://localhost:50070 HDFS Secondary Namenode status using http://localhost:50090 HDFS Secondary mapred status using http://localhost:50030

HDFS Secondary Namenode status using http://localhost:50090