waterstop-rx - installation instructions
TRANSCRIPT

PRODUCT MANUAL
www.cetco.com
WATERSTOP-RX®
EXPANDING CONCRETE JOINT WATERSTOP

PRODUCT MANUAL
- 2 -North America: +1 847.851.1800 | +1 800.527.9948 | www.cetco.com
WATERSTOP-RX®
EXPANDING CONCRETE JOINT WATERSTOP
WATERSTOP-RX is a flexible strip concrete construction joint waterstop that provides a permanent seal by expanding upon contact with water. WATERSTOP-RX is an active sodium bentonite based waterstop that is designed to replace conventional passive PVC dumbbell waterstops, thus eliminating the requirement of split-forming and product seam welding.
WATERSTOP-RX is manufactured in light weight, flexible coils that can be installed in both hot and cold weather. The product is adhered to concrete, steel, and PVC (pipes) with CETSEAL; at or exceeding the re-quired minimum distance from the exterior concrete surface.
The key to WATERSTOP-RX is sodium bentonite. Sodium bentonite swells when in contact with water, forming an impermeable barrier. This swelling property allows WATERSTOP-RX to form a permanent pressure seal within the concrete joint, thus eliminating water migration over or along the waterstop (see Figure 1.1). In addition to forming a positive pressure seal, the product’s expansion properties allow it to seal small cracks and void areas. WATERSTOP-RX has been successfully tested by independent testing firms to over 60 meters (200 feet) of hydrostatic water pressure, under both continuous emersion and wet/dry cycling.
WATERSTOP-RX is extruded in three sizes and shapes (see Figure 1.2). WATERSTOP-RX 101 is extruded in a rectangular shape measuring 25 mm x 19 mm x 5.03 m (1”x3/4”x16’8”). WATERSTOP-RX 101T is ex-truded in a trapezoidal shape measuring 31 mm x 12 mm x 6 m (1–1/4” x 1/2” x 20’) with a reinforcing plastic scrim embedded in the top sur-face for high tensile strength. The patented trapezoidal shape distrib-utes the expansive force over a greater area. WATERSTOP-RX 102 is
extruded in half-circle (crescent) shape measuring 19 mm x 9 mm x 10 m (3/4” x 3/8” x 33’ 4”). See Table 1.
CETSEAL is a multi-purpose, single component polyether moisture cure adhesive used to secure WATERSTOP-RX into position. Apply a continu-ous bead of CETSEAL to substrate then install WATERSTOP-RX before CETSEAL skins over and cures. Adhesive yeild will vary with use, sub-strate and application.
CONTENTSSection 1: Product Description
Section 2: General Applications
Section 3: General Installation Procedures
Section 4: Penetrations
Section 5: Pile Caps and Grade Beams
Section 6: Property Line Installations
Section 7: Irregular Concrete Surfaces
Section 8: Joining WATERSTOP-RX to PVC Waterstops
SECTION 1 PRODUCT DESCRIPTION
Figure 1.1 – Swelling property of WATERSTOP-RX
Figure 1.2 – Three sizes and shapes of WATERSTOP-RX
RX-101
RX-101TRX-102
Poly scrim reinforcement
Before Hydration
After Hydration

www.cetco.com
WATERSTOP-RX applications include both vertical and horizontal con-crete construction joints, new-to-existing construction, irregular sur-faces, and around throughwall penetrations, such as plumbing and electrical conduit. WATERSTOP-RX is designed for both hydrostatic and non-hydrostatic conditions. WATERSTOP-RX is not designed, nor intend-ed to function as an expansion joint sealant. Contact manufacturer for precast concrete applications, technical information and approval.
WATERSTOP-RX is designed for structural concrete with a minimum of 3000 psi. 101 and 101T, require a minimum 75 mm (3”) of concrete coverage. WATERSTOP-RX 102 requires a minimum concrete coverage of 50 mm (2”).
RX 101 and RX 101T are designed for vertical and horizontal reinforced concrete 200mm (8”) thick or greater, with two rows of reinforcing steel (see Figure 2.1). RX 101T (trapezoidal) is recommended for shotcrete or gunite concrete construction, extreme hot weather and difficult applica-tions. RX 102 is designed for vertical reinforced concrete 125 mm (5”) thick or greater; and horizontal reinforced concrete 100 mm (4”) thick or greater. RX 102 is designed primarily for concrete with one row of reinforcement, concrete curbs, planter walls, and light weight concrete.
SURFACE PREPARATIONSurfaces should be clean and dry. Remove all dirt, rocks, rust or other debris. Do not install WATERSTOP-RX in standing water.
ADHESIVEApply a continuous bead of CETSEAL along the substrate where WATERSTOP-RX will be installed. Assure proper 75 mm (3”) concrete coverage wll be maintained. Keep the nozzle tip pressed against the concrete at a 45o angle during application.
INSTALLATIONAfter applying a continuous bead of CETSEAL, remove release paper, then firmly press the entire length of Watestop-RX onto the adhesive. For vertical and overhead applications, firmly press a minimum of 15 seconds to assure adhesion. Apply WATERSTOP-RX within 30 minutes of adhesive installation; waterstop must be placed into adhesive prior to CETSEAL skinning over and curing. CETSEAL may be applied to damp surfaces, but not in standing water.
WATERSTOP-RX is not a self-adhering product. Use CETSEAL to adhere the product. Mechanical fasteners should not be used to secure prod-uct alone, but may be used in conjunction with CETSEAL.
Tightly butt coil ends together to form a continuous waterstop (do not overlap coil ends). Place in maximum practical lengths to minimize coil end joints. Where required, cut coils with knife or utility blade to fit coil ends together. Pour Concrete.
LIMITATIONSWATERSTOP-RX is not designed, nor intended to function as an expansion joint sealant. RX-101 and RX 101T require a 75 mm (3”) minimum concrete coverage to the exterior concrete surface (see Figure 3.1). RX 102 requires a 50 mm (2”) minimum concrete coverage to the exterior concrete surface (see Figure 3.2).
Concrete work shall use conventional cast-in-place forms that produce a smooth surface. Do not use stay-in-place concrete forming; use re-movable forming products only.
For concrete or other construction techniques not covered herein, con-tact CETCO regarding product use and installation guidelines.
SECTION 2 GENERAL APPLICATIONS
Figure 2.1 – Typical placement of WATERSTOP-RX at concrete construc-tion joint
PRODUCT TABLEPRODUCT SIZE SHAPE LN FT/CARTON MIN CONCRETE COVERAGERX-101 1" X 3/4" X 16'8" Rectangule 100 75 mm (3”)RX-101T 1 1/4" x 1/2" x 20' Trapezoid with poly reinforcement 120 75 mm (3”)
RX-102 3/4" x 3/8" x 33' 4" Half circle 200 50 mm (2”)
SECTION 3 GENERAL INSTALLATION
Footing Joint
Vertical Wall Joint
Concrete
Min 75 mm (3”) to exterior wall surface
Place WATERSTOP-RX inside of outer most dowels
WATERSTOP-RX

PRODUCT MANUAL
- 4 -North America: +1 847.851.1800 | +1 800.527.9948 | www.cetco.com
WATERSTOP-RX®
EXPANDING CONCRETE JOINT WATERSTOP
WATERSTOP-RX should not be prehydrated by submersion or remain in contact with water prior to concrete pour. If the product exhibits consid-erable swell prior to confinement in the joint, it must be replaced with new material. In conditions where severe ground water chemical contamination ex-ists, or is expected, consult with manufacturer for compatibility infor-mation and approval.WATERSTOP-RX is recommended for installation outside of any formed keyway in poured-in-place concrete construction. WATERSTOP-RX can be installed in a formed keyway with the approval of the structural en-gineer. Consult manufacturer for recommendations on conditions not represented herein.
Following the General Installation Procedures in Section 3, install WA-TERSTOP-RX® directly around all applicable single and multiple poured-in-place or sleeved pipe penetrations (see Figure 4.1).
Single Pipe Penetration: Install WATERSTOP-RX around outer diam-eter of the pipe (see Figure 4.2). WATERSTOP-RX 102 shall be installed around all polyvinyl chloride (PVC) pipes.
Multiple Pipe Penetrations: Install WATERSTOP-RX around each pipe, as well as, around any block out box construction joint. WATER-STOP-RX 102 shall be installed around penetrations with less than 100mm (4”) between penetrations (see Figure 4.3).
Sleeved Pipe Penetrations: Install WATERSTOP-RX around the outer diameter of the sleeve. Install another WATERSTOP-RX strip between the sleeve’s inner diameter and the pipe, contacting both surfaces con-tinuously (see Figure 4.4). When there is an excessive gap between the inner diameter of the sleeve and the pipe, it may be necessary to install two separate WATERSTOP-RX strips – one on the inner diameter and the other on the pipe. Then completely fill the void area between the sleeve and the pipe with non-shrink grout (see Figure 4.5). Consult manufacturer for recommedations on conditions not repre-sented herein.
Figure 3.1 – Placement of WATERSTOP-RX 101 & 101T at typical con-struction joints with required 75 mm (3”) concrete coverage
Figure 3.2 – Placement of WATERSTOP-RX 102 at typical construction joints with required 50 mm (2”) concrete coverage
SECTION 4 PENETRATIONS
Figure 4.1 – WATERSTOP-RX installed around all applicable penetrations
Figure 4.2 – Single pipe penetration
WATERSTOP-RX
WATERSTOP-RX in all cold pour joints
Min 75 mm (3”)
Place WATERSTOP-RX inside of outer most reinforcement row
Structural Slab Min 75 mm (3”)WATERSTOP-RX
Rebar
Compacted Substrate
WATERSTOP-RX in all cold pour joints
Min 50 mm (2”)
Structural SlabMin 50 mm (2”)
WATERSTOP-RX 102Rebar
Compacted Substrate
Rebar
WATERSTOP-RX 102
Clean surface and apply CETSEAL
WATERSTOP-RX

www.cetco.com
Figure 4.3 – Multiple pipe penetration
Figure 4.4 – Sleeved Pipe
Figure 4.5 – Sleeved pipe (excessive gap)
Following the General Installation Procedures in Section 3, install WA-TERSTOP-RX in all applicable concrete construction joints around or adjacent to pile caps and grade beams.
Install WATERSTOP-RX around pile caps and grade beams above the layer (not contacting) of exterior waterproofing to establish a separate waterstop layer (see Figure 5.3). Contour all I-beams extending outward from pile caps with WATERSTOP-RX (see Figure 5.1) or encircle all metal reinforcement rods extending out of pile caps (see Figure 5.2).
SECTION 5 PILE CAPS AND GRADE BEAMS
Figure 5.1 – WATERSTOP-RX en-circling pile cap metal I-beam
Figure 5.2 – WATERSTOP-RX encircling pile caps mental rein-forcement
Figure 5.3 – WATERSTOP-RX at grade beams and pile caps
Metal sleeve
Non-shrink grout
Non-shrink grout
Metal sleve
Non-shrink grout
WATERSTOP-RXWATERSTOP-RX
Grade beam
Pile cap
WATERSTOP-RX
Piling
CETCO waterproofing
WATERSTOP-RXI-Beam
Pile
I-Beam
Pile
WATERSTOP-RXWATERSTOP-RX
WATERSTOP-RX
WATERSTOP-RX
WATERSTOP-RX

PRODUCT MANUAL
- 6 -North America: +1 847.851.1800 | +1 800.527.9948 | www.cetco.com
WATERSTOP-RX®
EXPANDING CONCRETE JOINT WATERSTOP
Figure 6.1 – WATERSTOP-RX installed when wood lagging is positioned outside the soldier piles or adjecent to piles outer flange
Following the General Installation Procedures in Section 3, install WATERSTOP-RX® in all applicable horizontal and vertical construction joints within the structural property line wall, including concrete inter-facejoints with soldier piles.
Install WATERSTOP-RX directly to soldier piles when wood lagging is po-sitioned outside the piles toward the retained earth or when the wood agging is positioned adjacent to the pile’s outer flange (see Figure 6.1).
Install WATERSTOP-RX within all applicable concrete construction joints when the wood lagging is positioned adjacent to the soldier piles inside flange (see Figure 6.2).
Install WATERSTOP-RX in all applicable concrete construction joints for metal sheet piling or concrete cassion construction. Install WATER-STOP-RX around all soldier pile tie-back boxes through wall construc-tion joints (see Figure 6.3).
Use WATERSTOP-RX 101T (trapezoidal) for shotcrete or gunite concrete construction. With shotcrete wall construction, a single strip of WATER-STOP-RX shall be installed in all shotcrete lift joints. For hydrostatic con-ditions, two strips of WATERSTOP-RX shall be installed in all shotcrete cold construction joints.
SECTION 6 PROPERTY LINE INSTALLATIONS
Figure 6.2 – WATERSTOP-RX installed when wood lagging is positioned adjacent to soldier piles inside flange
Figure 6.3 – Typical tie-back section de-tail prior to grouting
Earth Wood lagging
CETCO waterproofing
WATERSTOP-RX
Soldier pile
Soldier pile Wood lagging
WATERSTOP-RX
CETCO waterproofingConcrete wall
CETCO waterproofing
WATERSTOP-RX min 3" (75 mm) coverage
Pre-molded TB cover filled with foam
WATERSTOP-RX min 3" (75 mm) coverage
Cast-in-place concrete wall
Wood lagging
Soldier pile
Tie-back rod
www.cetco.com
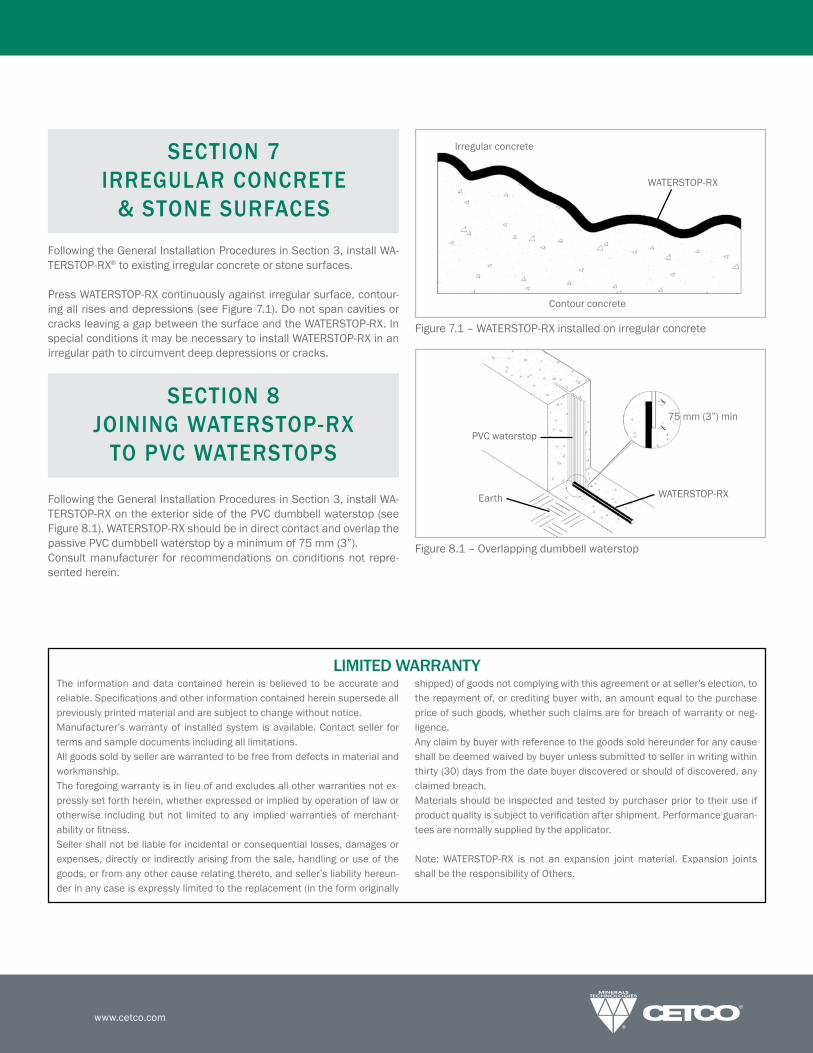
Following the General Installation Procedures in Section 3, install WA-TERSTOP-RX® to existing irregular concrete or stone surfaces.
Press WATERSTOP-RX continuously against irregular surface, contour-ing all rises and depressions (see Figure 7.1). Do not span cavities or cracks leaving a gap between the surface and the WATERSTOP-RX. In special conditions it may be necessary to install WATERSTOP-RX in an irregular path to circumvent deep depressions or cracks.
Following the General Installation Procedures in Section 3, install WA-TERSTOP-RX on the exterior side of the PVC dumbbell waterstop (see Figure 8.1). WATERSTOP-RX should be in direct contact and overlap the passive PVC dumbbell waterstop by a minimum of 75 mm (3”). Consult manufacturer for recommendations on conditions not repre-sented herein.
Figure 7.1 – WATERSTOP-RX installed on irregular concrete
Figure 8.1 – Overlapping dumbbell waterstop
SECTION 7 IRREGULAR CONCRETE
& STONE SURFACES
SECTION 8 JOINING WATERSTOP-RX
TO PVC WATERSTOPS
The information and data contained herein is believed to be accurate and reliable. Specifications and other information contained herein supersede all previously printed material and are subject to change without notice. Manufacturer’s warranty of installed system is available. Contact seller for terms and sample documents including all limitations. All goods sold by seller are warranted to be free from defects in material and workmanship. The foregoing warranty is in lieu of and excludes all other warranties not ex-pressly set forth herein, whether expressed or implied by operation of law or otherwise including but not limited to any implied warranties of merchant-ability or fitness. Seller shall not be liable for incidental or consequential losses, damages or expenses, directly or indirectly arising from the sale, handling or use of the goods, or from any other cause relating thereto, and seller’s liability hereun-der in any case is expressly limited to the replacement (in the form originally
shipped) of goods not complying with this agreement or at seller’s election, to the repayment of, or crediting buyer with, an amount equal to the purchase price of such goods, whether such claims are for breach of warranty or neg-ligence.Any claim by buyer with reference to the goods sold hereunder for any cause shall be deemed waived by buyer unless submitted to seller in writing within thirty (30) days from the date buyer discovered or should of discovered, any claimed breach. Materials should be inspected and tested by purchaser prior to their use if product quality is subject to verification after shipment. Performance guaran-tees are normally supplied by the applicator.
Note: WATERSTOP-RX is not an expansion joint material. Expansion joints shall be the responsibility of Others.
LIMITED WARRANTY
Irregular concrete
WATERSTOP-RX
Contour concrete
75 mm (3”) min
Earth
PVC waterstop
WATERSTOP-RX

www.cetco.com
© 2015 CETCO. IMPORTANT: The information contained herein supersedes all previous printed versions, and is believed to be accurate and reliable. For the most up-to-date information, please visit www.CETCO.com. CETCO accepts no responsibility for the results obtained through application of this product. CETCO reserves the right to update information without notice.
FORM: PM_WATERSTOP-RX_AM_EN_201509_V2
www.cetco.com | [email protected]
UPDATED: SEPTEMBER 2015