vpn tracker for mac os x - welcome to equinux. connecting a vpn tracker host to a netgear firewall...
TRANSCRIPT

VPN Tracker for Mac OS X
How-to:
Interoperability with
NETGEAR
Internet Security Appliances
Rev. 4.0
Copyright © 2005 equinux USA Inc. All rights reserved.

1. Introduction
2
1. Introduction
This document describes how VPN Tracker can be used to establish a connection between a Macintosh running Mac OS X and following NETGEAR Internet Security appliances:
• NETGEAR FVS318
• NETGEAR FVS318v2
• NETGEAR FVS328
• NETGEAR FVL328
The NETGEAR router is configured as a router connecting a company LAN to the Internet.
This paper is only a supplement to, not a replacement for, the instructions that have been included with your NETGEAR appliance. Please be sure to read those instructions and understand them before starting.
All trademarks, product names, company names, logos, screenshots displayed, cited or otherwise indicated on the How-to are the property of their respective owners.
EQUINUX SHALL HAVE ABSOLUTELY NO LIABILITY FOR ANY DIRECT OR INDIRECT, SPECIAL OR OTHER CONSEQUENTIAL DAMAGES IN CONNECTION WITH THE USE OF THE HOW-TO OR ANY CHANGE TO THE ROUTER GENERALLY, INCLUDING WITHOUT LIMITATION, ANY LOST PROFITS, BUSINESS, OR DATA, EVEN IF EQUINUX HAS BEEN ADVISED OF THE POSSIBILITY OF SUCH DAMAGES.

2. Prerequisites
3
2. Prerequisites
First you have to make sure that your NETGEAR router has VPN support built in. Please refer to your NETGEAR manual for details.
Furthermore you should use a recent NETGEAR fimware version. The latest firm-ware release for your NETGEAR appliance can be obtained from
http://www.NETGEAR.com/
When using Pre-shared key authentication you need one VPN Tracker Personal Edition license for each Mac connecting to the NETGEAR router.
We recommend using one VPN Tracker Professional Edition for the administrator’s Mac in order to export configuration files to the clients.
VPN Tracker is compatible with Mac OS X 10.2.5+, 10.3 and 10.4.
NETGEAR offers different types of VPN gateways, the NETGEAR FVL 328 and the FVS 318. The configuration for the FVS 318 is described in chapter 3.1. Please see chapter 3.2 for the FVL 328 configuration using pre-shared key authentication and chapter 4.1 using certificate authentication.
Documentation for other NETGEAR devices such as the NETGEAR FVM318 and the NETGEAR FVS318v3 can be found in a separate how-to on following web page: http://www.vpntracker.com/interop/

3. Connecting a VPN Tracker host to a NETGEAR Firewall using Pre-shared Key
Authentication
4
3. Connecting a VPN Tracker host to a NETGEAR Firewall using Pre-shared Key Authentication In this example the Mac running VPN Tracker is directly connected to the Internet via a dialup or PPP connection.1
The NETGEAR router is configured in NAT mode and has the static WAN IP address 169.1.2.3 and the private LAN IP address 192.168.1.1. The Stations in the LAN behind the NETGEAR router use 192.168.1.1 as their default gateway and should have a working Internet connection.
Figure 1: VPN Tracker – NETGEAR connection diagram
1 Please note that the connection via a router, which uses Network Address Translation (NAT), only works if the NAT router supports „IPsec passthrough“. Please contact your router’s manufacturer for details.
NETGEAR WAN 169.1.2.3
LAN 192.168.1.1 192.168.1.10
192.168.1.20
192.168.1.30
Mac-VPN Tracker dynamic IP
LAN 192.168.1.0/24
New York
Chicago

3. Connecting a VPN Tracker host to a NETGEAR Firewall using Pre-shared Key
Authentication
5
3.1 NETGEAR FVS318 Configuration
The pre-defined VPN Tracker connection type has been created using the default settings for your NETGEAR appliance. If you change any of the settings on the NETGEAR router, you will eventually have to adjust the connection type in VPN Tracker.
Create a new VPN Connection:
• Connection Name: an arbritary name (e.g. vpntracker )
• Local IPsec Identifier: netgear
• Remote IPsec Identifier: vpntracker
• Tunnel can be accessed from: a subnet of local address
• Local LAN start IP Address: your local NETGEAR LAN subnet (e.g. 192.168.1.0)
• Local LAN IP Subnetmask: your local NETGEAR LAN subnetmask (e.g. 255.255.255.0 )
• Tunnel can access: a single remote address
• Remote LAN start IP Address: a virtual IP address assigned to the client (e.g. 10.1.2.3 )2
• Secure Association: Aggressive Mode
• Perfect Forward Secrecy: Disabled
• Encryption Protocol: 3DES
• Key Group: Diff ie-Hellman Group 1
• PreShared Key: an arbritary key (e.g. secretkey)
2 You’ll need to put this IP address in the “Local Address” field in your VPN Tracker configuration.
Step 1

3. Connecting a VPN Tracker host to a NETGEAR Firewall using Pre-shared Key
Authentication
6
Figure 2: NETGEAR FVS318 - VPN Settings

3. Connecting a VPN Tracker host to a NETGEAR Firewall using Pre-shared Key
Authentication
7
3.2 NETGEAR FVS328/FVL328 Configuration
Create an IKE Policy with following settings:
• Policy Name: an arbritary name (e.g. vpntracker)
• Direction/Type: Remote Access
• Exchange Mode: Aggressive
• Local Identity Type: Ful ly Qualif ied Domain Name
• Local Identity Data: an arbritary identifier (e.g. netgear)
• Remote Identity Type: Fully Qualif ied Domain Name
• Remote Identity Data: an arbritary identifier (e.g. vpntracker )
• Authentication Algorithm: MD5
• Pre-shared Key: an arbritary key (e.g secretkey)
Figure 3: NETGEAR FVL 328 - IKE Policy Configuration
Step 1

3. Connecting a VPN Tracker host to a NETGEAR Firewall using Pre-shared Key
Authentication
8
Create a VPN Auto Policy with following settings:
• Policy Name: an arbritary name (e.g. vpntracker auto)
• IKE policy: your previously create IKE policy
• Remote VPN Endpoint: IP Address: 0.0.0.0
• Tunnel can be accessed from: a subnet of local address
• Local IP: your local NETGEAR LAN subnet (e.g. 192.168.1.0 )
• Local LAN IP Subnetmask: your local NETGEAR LAN subnetmask (e.g. 255.255.255.0 )
• Remote IP: a s ingle remote address
• Remote LAN start IP Address: a virtual IP address assigned to the client (e.g. 10.1.2.3 )3
• ESP -> Enable Encryption: 3DES
• ESP -> Enable Authentication: SHA1
Figure 4: NETGEAR FVL328 - VPN - Auto Policy
3 You’ll need to put this IP address in the “Local Address” field in your VPN Tracker configuration.
Step 2

3. Connecting a VPN Tracker host to a NETGEAR Firewall using Pre-shared Key
Authentication
9
3.3 VPN Tracker Configuration
Add a new connection with the following options:
• Vendor: NETGEAR
• Model: your VPN device
Figure 5: VPN Tracker - Connection Settings
Step 1

3. Connecting a VPN Tracker host to a NETGEAR Firewall using Pre-shared Key
Authentication
10
Change your Network Settings:
• VPN Server Address: public IP address of your VPN Gateway (e.g. 169.1.2.3 )
• Local Address: a virtual IP address assigned to the VPN Tracker client (e.g. 10.1.2.3)
• Remote Network/Mask: network address and netmask of the remote network (eg. 192.168.1.0/255.255.255.0 ).
Figure 6: VPN Tracker - Network Settings
Please note: In order to access multiple remote networks simultaneously, just add them by pressing the Plus-button.4
If you are connecting to a NETGEAR FVL 328 router, you could leave the Local Address field blank.
4 For this step VPN Tracker Professional Edition is needed.
Step 2

3. Connecting a VPN Tracker host to a NETGEAR Firewall using Pre-shared Key
Authentication
11
Change your Authentication Settings:
Pre-shared key: the same Pre-shared key as in the NETGEAR router configuration.
Figure 7: VPN Tracker - Authentication Settings
Step 3

3. Connecting a VPN Tracker host to a NETGEAR Firewall using Pre-shared Key
Authentication
12
Identifier Settings:
• Local Identifier: FQDN (e.g. vpntracker ).
• Remote Identifier: FQDN (e.g. netgear)
Figure 8: VPN Tracker - Identifier Settings
Save the connection and Click „Start IPsec“ in the VPN Tracker main window.
You’re done. After 10-20 seconds the red status indicator for the connection should change to green, which means you’re securely connected to the NETGEAR router. After IPsec has been started, you may quit VPN Tracker. The IPsec service will keep running.
Now to test your connection simply ping a host in the NETGEAR router network from the dialed-in Mac in the “Terminal” utility:
ping 192.168.1.10
Step 4
Step 5

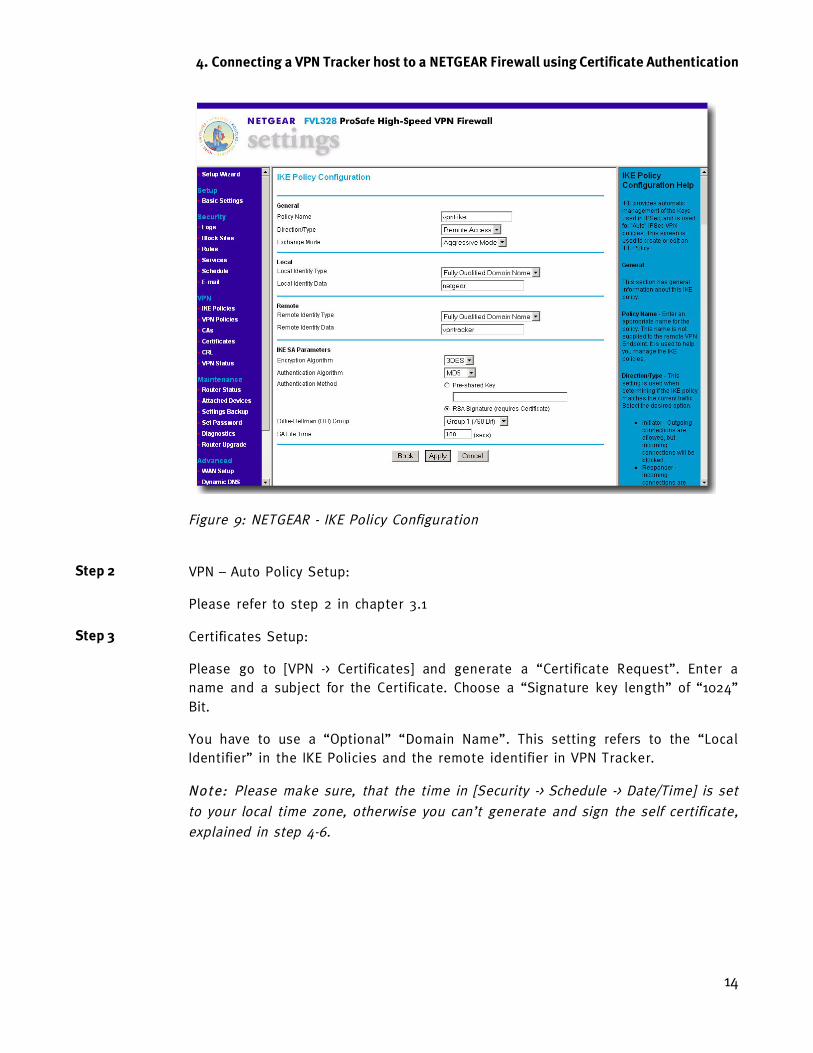
4. Connecting a VPN Tracker host to a NETGEAR Firewall using Certificate Authentication
13
4. Connecting a VPN Tracker host to a NETGEAR Firewall using Certificate Authentication
4.1 NETGEAR FVL328 Configuration
Create an IKE Policy with following settings:
• Policy Name: an arbritary name (e.g. vpntracker)
• Direction/Type: Remote Access
• Exchange Mode: Aggressive
• Local Identity Type: Ful ly Qualif ied Domain Name
• Local Identity Data: an arbritary identifier (e.g. netgear)
• Remote Identity Type: Fully Qualif ied Domain Name
• Remote Identity Data: an arbritary identifier (e.g. vpntracker )
• Authentication Algorithm: MD5
• Authentication Method: RSA Signature
Step 1
4. Connecting a VPN Tracker host to a NETGEAR Firewall using Certificate Authentication
14
Figure 9: NETGEAR - IKE Policy Configuration
VPN – Auto Policy Setup:
Please refer to step 2 in chapter 3.1
Certificates Setup:
Please go to [VPN -> Certificates] and generate a “Certificate Request”. Enter a name and a subject for the Certificate. Choose a “Signature key length” of “1024” Bit.
You have to use a “Optional” “Domain Name”. This setting refers to the “Local Identifier” in the IKE Policies and the remote identifier in VPN Tracker.
Note: Please make sure, that the time in [Security -> Schedule -> Date/Time] is set to your local time zone, otherwise you can’t generate and sign the self certificate, explained in step 4-6.
Step 2
Step 3

4. Connecting a VPN Tracker host to a NETGEAR Firewall using Certificate Authentication
15
Figure 10: Generate Self Certificate Request
Save the certificate request in a text file. Import the Request in the “Request” tab in VPN Tracker. Finally “Sign” the request with a CA. The “Alternative Name” field is pre-defined with the value you entered in the certificate signing request. It should be the same as the “Alternate Subject Name”, defined before.
Please note: This feature requires the VPN Tracker Professional Edition.
Figure 11: VPN Tracker - Sign Certificate
Step 4
Step 5

4. Connecting a VPN Tracker host to a NETGEAR Firewall using Certificate Authentication
16
Go to [VPN -> CAs] and import the CA, which you’ve used for signing into the NETGEAR router. The CA file must be exported in the PEM- format.
Figure 12: Netgear Certficate Authorities window
Export the signed certificate in the PEM- format and “upload the Certificate” in the NETGEAR router.
Please note: The subject name of the certificate must look like this: “FQDN: netgear”
After step 6 the configuration should look like this:
Step 6

4. Connecting a VPN Tracker host to a NETGEAR Firewall using Certificate Authentication
17
Figure 13: Netgear Certificate window

4. Connecting a VPN Tracker host to a NETGEAR Firewall using Certificate Authentication
18
4.2 VPN Tracker Configuration
Create a new “Own certificate” for VPN Tracker.
Go to the VPN Tracker certificate manager ( + “E”) and create and sign a new certificate. Type in your certificate data.
You have to use an “Alternative Name”. Choose DNS from the drop-down box and enter the alternative name. Please note: This name must be the same as the remote identifier in the NETGEAR IKE settings.
Figure 14: VPN Tracker – Certificate Details
Step 1

4. Connecting a VPN Tracker host to a NETGEAR Firewall using Certificate Authentication
19
Add a new connection with the following options:
• Vendor: „NETGEAR“
• Model: your VPN device
Figure 15: VPN Tracker - Connection Settings
Step 2

4. Connecting a VPN Tracker host to a NETGEAR Firewall using Certificate Authentication
20
Change your Network Settings:
• VPN Server Address: public IP address of your VPN Gateway (e.g. 169.1.2.3 )
• Remote Network/Mask: network address and netmask of the remote network (eg. 192.168.1.0/255.255.255.0 ).
Figure 16: VPN Tracker - Network Settings
Please note: In order to access multiple remote networks simultaneously, just add them by pressing the Plus-button.5
5 For this step VPN Tracker Professional Edition is needed.
Step 3

4. Connecting a VPN Tracker host to a NETGEAR Firewall using Certificate Authentication
21
Change your Authentication Settings:
• Authentication Using: Certif icates
• Own Certificate: vpntracker
• Remote Certificate: netgear
Figure 17: VPN Tracker - Authentication Settings
Step 4

4. Connecting a VPN Tracker host to a NETGEAR Firewall using Certificate Authentication
22
Identifier Settings:
• Local Identifier: FQDN (e.g. vpntracker ).
• Remote Identifier: FQDN (e.g. netgear)
Figure 18: VPN Tracker - Identifier Settings
Save the connection and Click „Start IPsec“ in the VPN Tracker main window.
You’re done. After 10-20 seconds the red status indicator for the connection should change to green, which means you’re securely connected to the NETGEAR router. After IPsec has been started, you may quit VPN Tracker. The IPsec service will keep running.
Now to test your connection simply ping a host in the NETGEAR router network from the dialed-in Mac in the “Terminal” utility:
ping 192.168.1.10
Step 5
Step 6