vnc enterprise server user guide - realvnc · enterprise server user guide. 2 introduction...
TRANSCRIPT

VNC 4Enterprise Server
User Guide

indexfurther informationusing vnc server 4introduction installation configuration2page
Contents
Introduction 3What are VNC Server and Viewer? 3
Getting started 3
Installation 4Making a standard installation 4
Service mode registration 4
Configuration 5Customising VNC Server 4 5
Where maximum security is required 5
Where speed is the most important factor 6
Where the server is being demonstrated to a group 6
Using VNC Server 4 7Starting and stopping VNC Server 4 7
Starting and stopping in user-mode 7
Connecting to (and from) VNC Server 4 7
Starting and stopping in service-mode 8
Further information 9Options when installing 10
Using the tray icon 12
Connection management 12
Enabling guest login 12
VNC Server Properties 13
Displaying VNC Server Properties 13
Security 14
Connections 16
Inputs 17
Sharing 18
Desktop 19
Capture Method (Hooks) 20
Legacy 21
VNC Extended authentication 22
NT Logon authentication 23
Two modes of operation 24
User mode 24
Service mode 24
Listening viewer (server-initiated connection) 25
Access control: Allow, deny or query addresses 26
Calculating a range mask for access control 27
Ordering entries in the access control list 28
Dealing with firewalls 29
Changing VNC ports 29
What is an IP address? 30
What is a Subnet mask? 31
How a subnet mask actually works 31
What is a port? 32
VNC authentication and encryption 33
Windows version support 34
Troubleshooting 35
Support 36
Via the web 36
Acknowledgements 36
Index 37

indexfurther informationusing vnc server 4introduction installation configuration3page
Introduction
What are VNC Server and Viewer?VNC offers a deceptively simple service - it allows you to view and control a remote system as though seated next to it, wherever you are.
The compact VNC Server 4 application runs on the system to be controlled. Meanwhile, con-necting systems can either run the VNC Viewer application or, use a standard web browser to download and use a Java viewer from the server system.
VNC adapts itself automatically and dynamically to varying conditions, including differing screen contents and network bandwidths. VNC is also platform-independent and will hap-pily allow a Windows system to control a Linux server, or vice versa.
VNC Server 4 provides main two modes of operation to suit the manner in which the server system will be used and accessed. Please see Two modes of operation for details.
Thanks to a comprehensive update VNC now also offers:
• Full user and server authentication,
• Secure link encryption,
• Server screen scaling to fit any window size.
• Integrated connection management.
• File transfer.
Getting startedThis guide provides information on various aspects of installing, configuring and using VNC Server 4
• Installation Making a standard installation • Service mode registration
• Configuration Tips on customising VNC Server 4 for different situations
• Using VNC Server 4 Connecting to (and from) the server
How to start and stop VNC Server 4
• Further information Options when installing
Using the tray icon VNC Server properties NT Logon authentication Two modes of operation: User and Service Listening viewer Access control: Allow, deny or query addresses Firewalls What is an IP address? What is a subnet mask? What is a port? Windows version support Troubleshooting Support
VNC breaks the Server screen image down into constituent parts and trans-mits them to the Viewer.
Controlling mouse movements and key press inputs from the Viewer are sent to the Server.
indexfurther informationusing vnc server 4introduction installation configuration4page
Installation
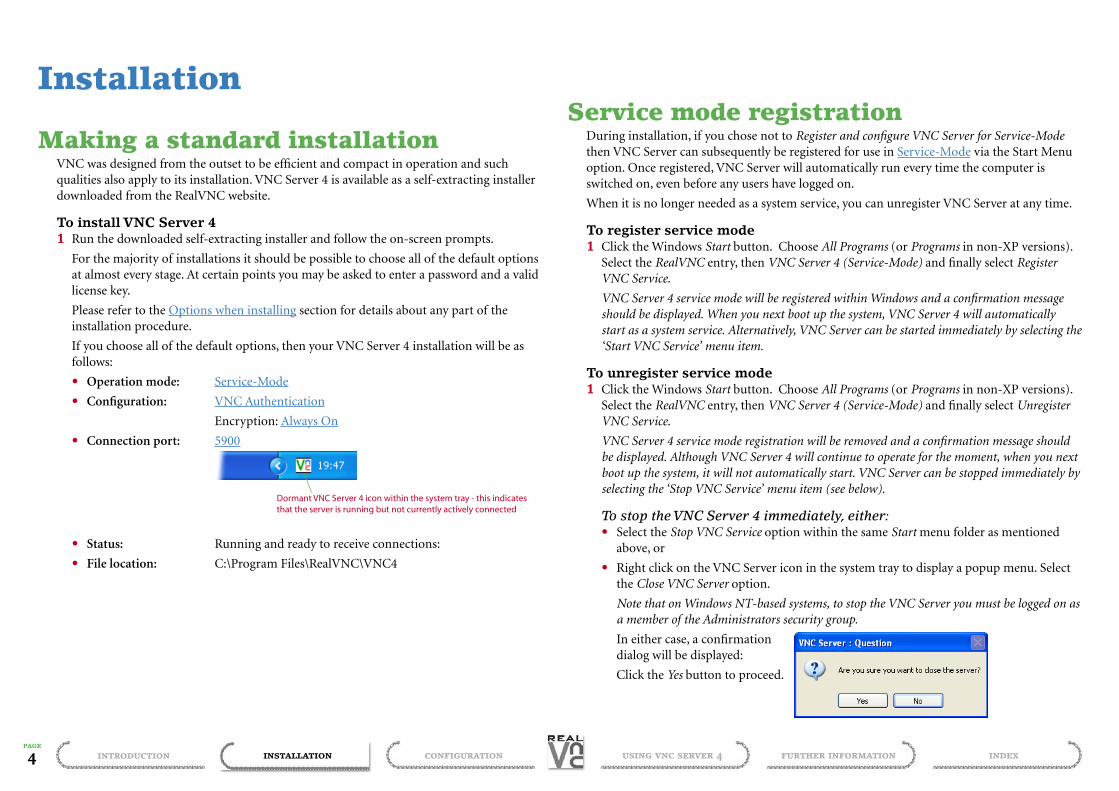
Making a standard installationVNC was designed from the outset to be efficient and compact in operation and such qualities also apply to its installation. VNC Server 4 is available as a self-extracting installer downloaded from the RealVNC website.
To install VNC Server 41 Run the downloaded self-extracting installer and follow the on-screen prompts.
For the majority of installations it should be possible to choose all of the default options at almost every stage. At certain points you may be asked to enter a password and a valid license key.
Please refer to the Options when installing section for details about any part of the installation procedure.
If you choose all of the default options, then your VNC Server 4 installation will be as follows:
• Operation mode: Service-Mode
• Configuration: VNC Authentication
Encryption: Always On
• Connection port: 5900
Dormant VNC Server 4 icon within the system tray - this indicates that the server is running but not currently actively connected
• Status: Running and ready to receive connections:
• File location: C:\Program Files\RealVNC\VNC4
Service mode registrationDuring installation, if you chose not to Register and configure VNC Server for Service-Mode then VNC Server can subsequently be registered for use in Service-Mode via the Start Menu option. Once registered, VNC Server will automatically run every time the computer is switched on, even before any users have logged on.
When it is no longer needed as a system service, you can unregister VNC Server at any time.
To register service mode1 Click the Windows Start button. Choose All Programs (or Programs in non-XP versions).
Select the RealVNC entry, then VNC Server 4 (Service-Mode) and finally select Register VNC Service.
VNC Server 4 service mode will be registered within Windows and a confirmation message should be displayed. When you next boot up the system, VNC Server 4 will automatically start as a system service. Alternatively, VNC Server can be started immediately by selecting the ‘Start VNC Service’ menu item.
To unregister service mode1 Click the Windows Start button. Choose All Programs (or Programs in non-XP versions).
Select the RealVNC entry, then VNC Server 4 (Service-Mode) and finally select Unregister VNC Service.
VNC Server 4 service mode registration will be removed and a confirmation message should be displayed. Although VNC Server 4 will continue to operate for the moment, when you next boot up the system, it will not automatically start. VNC Server can be stopped immediately by selecting the ‘Stop VNC Service’ menu item (see below).
To stop the VNC Server 4 immediately, either:• Select the Stop VNC Service option within the same Start menu folder as mentioned
above, or
• Right click on the VNC Server icon in the system tray to display a popup menu. Select the Close VNC Server option.
Note that on Windows NT-based systems, to stop the VNC Server you must be logged on as a member of the Administrators security group.
In either case, a confirmation dialog will be displayed:
Click the Yes button to proceed.

indexfurther informationusing vnc server 4introduction installation configuration5page
Configuration
Customising VNC Server 4VNC Server 4 operates perfectly well using its default installation options. However, by mak-ing various changes it is possible to optimise VNC Server operation for particular situations. The types of uses covered in this chapter are:
• Where maximum security is required - see below
• Where speed is the most important factor
• Where the server is being demonstrated to a group
All changes are made using the VNC Server Properties page. See Displaying VNC Server Properties for details about how to access it.
Where maximum security is requiredThere are numerous VNC Server 4 settings on various tabs that affect security and it is worth ensuring that they are all configured correctly when security is of particular issue.
Security tab [see Security for all options] In order to create a secure server system, the most crucial settings to consider are Encryption and Authentication. The configurations of these two settings conspire to determine the ro-bustness of your server system and its connections.
• Wherever possible the Encryption setting should be set to Always On. The only real draw-back here is that users with older legacy viewers will be unable to make a connection (the best remedy is to upgrade such users to VNC Viewer 4 or above).
• With Encryption set to Always On, you can choose to use either type of Authentication: VNC Password or NT Logon. The latter is recommended because it uses the native Win-dows security system and allows you to allocate different access rights to users or groups of users. Note: NT Logon Authentication cannot be used with servers on Windows 95, 98 or Me.
• If you must support legacy users, then set Encryption to Prefer On and select VNC Pass-word Authentication. Note that legacy viewers will be authenticated using only the first eight characters of a password. Also, legacy viewers do not support encryption and will not authenticate the server. Consider redressing the balance using Access Control (within the Connections tab) to restrict access to specific IP addresses.
• If a user will be present at the server system, you may wish to manually approve each con-nection. If so, tick the Prompt local user to accept connections. Exceptions may be made for particular privileged users by granting them the Connect without querying local user right in the NT Logon configuration dialog.
• Unless you need it, you can prevent users from enabling the guest login by setting Guest login access to None.
Sharing tab [see Sharing for all options]• If one remote user should not be observable by another, select the Never treat new connec-
tions as shared option.
• If the existing user should retain precedence over new users, untick the Non-shared connec-tions replace existing ones option.
Connections tab [see Connections for all options]• Ports - Consider combining the main access port (Accept connections on port) and the Serve
Java viewer... port to use the same number. This will mean that only one port needs to be opened through a firewall. Combining the ports will cause each initial connection to take up to two seconds longer to complete. See Dealing with firewalls for details.
• Disconnect idle clients - Reduce the idle time to help ensure that abandoned connections are not abused at the users system.
• Access control - Where possible define the IP addresses from which connections will be ac-cepted and deny access to all others. See Access control for details.
• See also Listening viewer for details about how to avoid opening any new firewall ports by using the server to initiate connections to each viewer.
Inputs tab [see Inputs for all options]• Clipboard updates - To prevent sensitive files or data on the local clipboard being accessible
remotely or vice versa, untick the Accept clipboard updates from clients, the Send clipboard updates to clients, the Accept files from clients and the Send files to clients options.
• Allow ... events - In situations where users need to view but not interact with the server, you can untick the pointer and keyboard events options. When using NT Logon authenti-cation, you can also untick various rights within the NT Logon configuration dialog.
Desktop tab [see Desktop for all options]• When last client disconnects - If the system is to be locally unattended and there is a chance
of it being accessed by passers by, select the Lock workstation option to ensure that the system is not left open following a remote session.
Legacy tab [see Legacy for all options]• Ensure that the Only use protocol version 3.3 option is not ticked. This option forces
the server into a compatibility mode that does not support advanced authentication or encryption features.
indexfurther informationusing vnc server 4introduction installation configuration6page
Where speed is the most important factorThe speed of response is affected by several factors.
Security tab [see Security for all options] • Encryption - The use of data encryption imposes small performance overheads. Where
the threat of data interception is not a strong issue, the Encryption option could be set to Prefer Off. VNC Viewers select Let Server Choose as standard for their encryption setting, so the link will be unencrypted unless a viewer explicitly requests an encrypted session.
Connections tab [see Connections for all options]• Ports - Combining the main access port (Accept connections on port) and the Serve Java
viewer... port to use the same number lengthens the initial connection time by up to two seconds. Where possible, ensure that these options are set to use different port numbers.
Desktop tab [see Desktop for all options]• While connected - All three of the options in this section affect response speed. All should
be ticked to reduce the information needed to be sent to the viewer.
Where the server is being demonstrated to a group There are a number of areas where small changes may make VNC Server 4 even more suitable for demonstration purposes.
Connections tab [see Connections for all options]• Disconnect idle clients after - Ensure that the value set here will not affect viewers who are
observing a server demonstration but not necessarily responding to it.
Inputs tab [see Inputs for all options]• Accept events - Depending on the type of demonstration, it may be advantageous to pre-
vent the viewers from controlling the system. If so, untick both the Accept pointer events from clients and the Accept keyboard events from clients options in order to retain control.
Sharing tab [see Sharing for all options]• If multiple viewers must be simultaneously connected, obviously there must be some ele-
ment of sharing. Select the Always treat new connections as shared option and, as a pre-caution against certain viewer configurations, untick the Non-shared connections replace existing ones option.
Desktop tab [see Desktop for all options]• While connected - Deselecting all three of the options within this section can help to im-
prove performance. However, will the loss of the background pattern or wallpaper detract from the demonstration?
Listening viewerIn addition to the above settings, a very useful feature when demonstrating is to use the Listening viewer feature. This allows the server user to initiate connections to one or more viewers, relieving the users of this task. To achieve this, each VNC viewer application must be told to listen for connection attempts. See Listening viewer for more details.

indexfurther informationusing vnc server 4introduction installation configuration7page
2 Select the RealVNC entry, then VNC Server 4 (User-Mode) and finally select Run VNC Server.
To stop VNC Server 41 Right click on the VNC Server icon in the
system tray to display a popup menu. Select the Close VNC Server option.
The VNC Server 4 will remain dormant until an incoming connection request is received, whereupon it will deal with the request. In doing this, it will apply all relevant connection, security and operation options, as determined by the settings within the VNC Server Proper-ties dialog.
Using VNC Server 4In operation, VNC Server 4 remains almost unnoticed in the background, using minimal system resources. Its only visibility is as an icon within the system tray (or notification area) in the lower right corner of the Windows screen.
Dormant VNC Server 4 icon within the system tray - this indicates that the server is running but not currently actively connected
Move the mouse cursor over the VNC Server 4 icon to discover the server’s IP address as well as its current operation mode: Service or User
Active VNC Server 4 icon within the system tray - this indicates that the server is running and has at least one active connection
Starting and stopping VNC Server 4If VNC Server 4 has not been configured to start automatically, then you can start it, in either its User or Service modes, using the Start menu.
Note: See Two modes of operation for more details about User and Service modes.
Starting and stopping in user-mode
To start VNC Server 4 (user-mode)1 Click the Windows Start button and choose All Programs (or Programs in
non-XP versions).
A confirmation dialog will be displayed:
2 Click the Yes button to proceed.
Connecting to (and from) VNC Server 4Once running (in Service- or User- Modes) VNC Server 4 can be accessed either by VNC Viewers or any Java-enabled web browser - see the VNC Viewer 4 user guide for full details.
Additionally, the server system can be made to initiate connections to VNC Viewers that have been set to listen for such approaches - see Listening viewer (server-initiated connection) for details.

indexfurther informationusing vnc server 4introduction installation configuration8page
Starting and stopping in service-modeTo start VNC Server 4 (service-mode)1 Click the Windows Start button and choose All Programs (or Programs in
non-XP versions).
2 Select the RealVNC entry, then VNC Server 4 (Service-Mode) and finally select Start VNC Service.
2 Select the RealVNC entry, then VNC Server 4 (Service-Mode) and finally select Stop VNC Server. A confirmation dialog will be displayed:
3 Click the Yes button to proceed
To stop VNC Server 4 (service-mode)There are two ways to stop the VNC Server 4 when running in service-mode, either:
• Use the VNC Server system tray icon (as per the user-mode instructions), or
• Use the Start menu:
1 Click the Windows Start button and choose All Programs (or Programs in non-XP versions).

indexfurther informationusing vnc server 4introduction installation configuration9page
Further informationThis section provides detailed information on a range of subjects related to VNC Server 4:
• Options when installing An overview of the installation and explanation of the available options.
• Using the tray icon A description of features available via the VNC tray icon.
• VNC Server Properties Displaying VNC Server Properties
Security • Connections • Inputs • Sharing • Desktop • Hooks • Legacy
• NT Logon authentication
• Two modes of operation User mode • Service mode
• Listening viewer (server-initiated connection)
• Access control: Allow, deny or query addresses Calculating a range mask for access control
Ordering the access control list entries
• Dealing with firewalls Changing VNC ports
• What is an IP address?
• What is a subnet mask? How a subnet mask actually works
• What is a port?
• Windows versions and limitations
• Troubleshooting
• Support
indexfurther informationusing vnc server 4introduction installation configuration10page
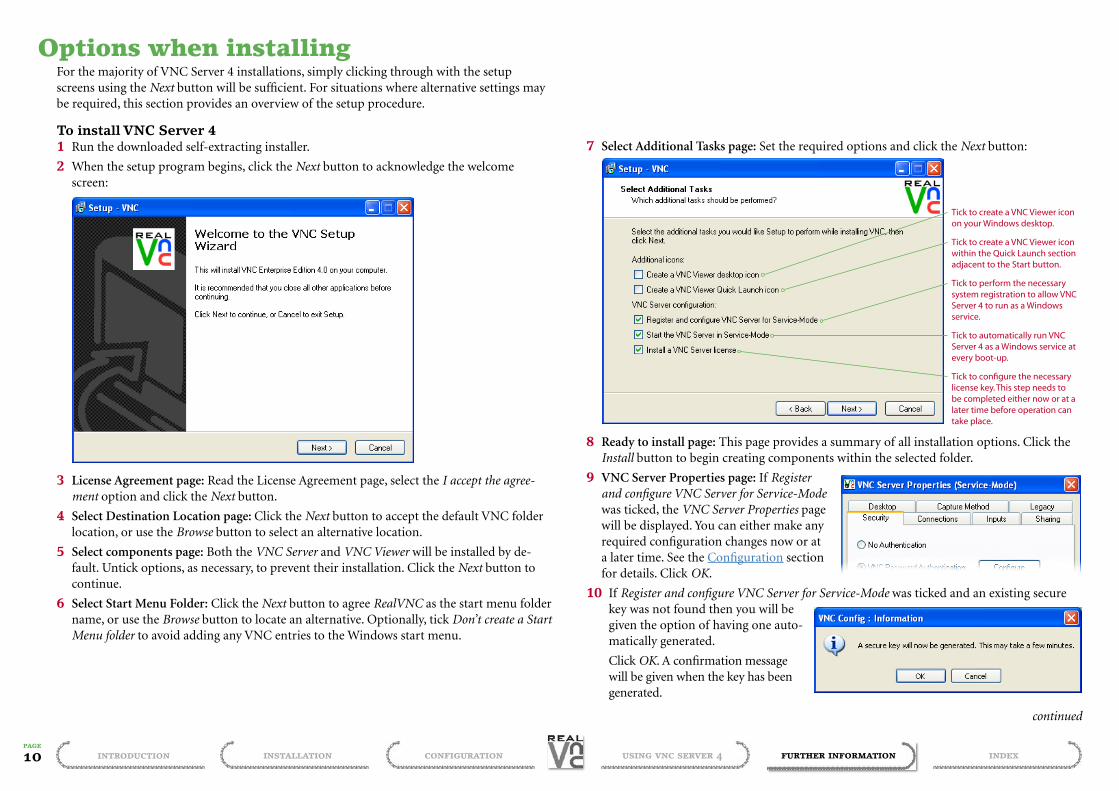
Options when installingFor the majority of VNC Server 4 installations, simply clicking through with the setup screens using the Next button will be sufficient. For situations where alternative settings may be required, this section provides an overview of the setup procedure.
To install VNC Server 41 Run the downloaded self-extracting installer.
2 When the setup program begins, click the Next button to acknowledge the welcome screen:
3 License Agreement page: Read the License Agreement page, select the I accept the agree-ment option and click the Next button.
4 Select Destination Location page: Click the Next button to accept the default VNC folder location, or use the Browse button to select an alternative location.
5 Select components page: Both the VNC Server and VNC Viewer will be installed by de-fault. Untick options, as necessary, to prevent their installation. Click the Next button to continue.
6 Select Start Menu Folder: Click the Next button to agree RealVNC as the start menu folder name, or use the Browse button to locate an alternative. Optionally, tick Don’t create a Start Menu folder to avoid adding any VNC entries to the Windows start menu.
7 Select Additional Tasks page: Set the required options and click the Next button:
8 Ready to install page: This page provides a summary of all installation options. Click the Install button to begin creating components within the selected folder.
9 VNC Server Properties page: If Register and configure VNC Server for Service-Mode was ticked, the VNC Server Properties page will be displayed. You can either make any required configuration changes now or at a later time. See the Configuration section for details. Click OK.
10 If Register and configure VNC Server for Service-Mode was ticked and an existing secure key was not found then you will be given the option of having one auto-matically generated.
Click OK. A confirmation message will be given when the key has been generated.
continued
Tick to create a VNC Viewer icon on your Windows desktop.
Tick to create a VNC Viewer icon within the Quick Launch section adjacent to the Start button.
Tick to perform the necessary system registration to allow VNC Server 4 to run as a Windows service.
Tick to automatically run VNC Server 4 as a Windows service at every boot-up.
Tick to configure the necessary license key. This step needs to be completed either now or at a later time before operation can take place.

indexfurther informationusing vnc server 4introduction installation configuration11page
11 If VNC Authentication (the default) was selected, and no VNC password is currently stored, then you will be prompted to sup-ply one, to be used to authenticate incoming viewer connections. Enter a new password, enter it again to confirm and click OK.
12 If Install a VNC Server licence key was ticked, and a valid licence key is not currently installed, then you will be prompted to supply a licence key. The license key will have been emailed to you when you purchased your VNC Enterprise Edition license. Either copy and paste the supplied license key and click OK or, if you are evaluating VNC Server 4, click the Trial License button.
13 Information page: After installation has taken place, a list of acknowledgements and a re-minder of the end user license agreement will be displayed. Please read through and then click the Next button.
14 In the final page, click the Finish button to conclude the installa-tion procedure.

indexfurther informationusing vnc server 4introduction installation configuration12page
Using the tray iconVNC server installs an icon in the system tray, located on the right-hand side of the task bar. This has several functions:
• If you hover the mouse pointer over the tray icon, it will display the IP address of your computer.
• The background colour of the tray icon indicates whether or not there is anyone con-nected to your computer. A black background indicates at least one connection, whereas a white background indicates no connections.
• Right-clicking on the tray icon will bring up a menu for configuring and interacting with the program:• Options... opens the options dialog. See VNC Server
Properties for details. If the VNC server is running in Service-Mode, then this option will be unavailable un-less you have administrative privileges on the compu-ter.
• Add New Client allows you to make a reverse connec-tion to a listening viewer. See Listening viewer (server-initiated connection) for details.
• Disconnect Clients disconnects anyone currently connected to the VNC server.• Connections... opens the connection management dialog. • Guest Login enables or disables the guest login. • Close VNC Server closes the VNC server. If the VNC server is running in Service-Mode,
then this option will be unavailable unless you have administrative privileges on the computer.
• About... shows program and version information.• Double-clicking on the tray icon is equivalent to the Options... menu item if it is available,
or the About... menu item otherwise.
Connection managementYou can use this dialog to check who is connected to your computer and from where. The current connections are listed, allowing you to see at a glance the IP address and port number of each. Click on a connection to see details of the username that was entered when the connection was made and the current level of access. Click Change... to view or change access permissions. Click Disconnect to disconnect that user; other connected users are unaffected.
Enabling guest loginAt times it may be desirable for a user to temporarily allow access to their desktop on a controlled basis. If VNC Server 4 has been configured to allow it, the user can enable a guest login to temporarily allow restricted access to the local desktop. Anyone logging in as guest must be approved by the local user, even if the server is not otherwise configured to query connection attempts.
The guest login can be enabled or disabled by any user even if the VNC Server is running in Service-Mode. This differs from other VNC Server Properties, which can only be modified by users with administrative privileges on the local computer when VNC Server is running in Service-Mode. If the guest login is enabled when VNC Server is closed, it will not be enabled next time it starts up.

indexfurther informationusing vnc server 4introduction installation configuration13page
VNC Server PropertiesThe VNC Server Properties dialog is where the key aspects of operation are configured via seven tabbed pages which are labelled as follows:
• Security
• Connections
• Inputs
• Sharing
• Desktop
• Capture method (Hooks)
• Legacy
During installation the settings contained within this dialog are configured to meet the general requirements of most common installations. However, for assistance on customising operation for particular tasks, please see the Configuration section.
Displaying VNC Server PropertiesThe VNC Server Properties dialog can be accessed either from the VNC Server 4 system tray icon, or from the Windows Start button.
To display VNC Server Properties (via the system tray icon)1 In the lower right hand corner of the Windows task bar, move the mouse pointer over the
VNC icon.
• If no icon is visible then VNC Server 4 may not be running, see Starting VNC Server 4 for details.
2 Click the right mouse button to reveal a popup menu.
3 Use the left mouse button to select Options…
The VNC Server Properties window will be displayed with the Security tab selected.
To display VNC Server Properties (via the Start menu)1 Click the Windows Start button. Choose All Programs (or Programs in non-XP versions)
and then select the RealVNC entry.
2 Choose the Start menu sub-options that are appropriate to the VNC Server mode that will be used, either:
• Select VNC Server 4 (Service-Mode) and then choose Configure VNC Service, or
• Select VNC Server 4 (User-Mode) and then choose Configure User-Mode Settings.
In either case the appropriate VNC Server Properties window will be displayed with the Security tab selected.

indexfurther informationusing vnc server 4introduction installation configuration14page
SecurityThe security tab is concerned with two important operational areas: User authenti-cation and Encryption.
No AuthenticationWhen selected, this option will allow viewer applications to connect with the VNC Server without the need for username or password. This option can be useful when the server system is operating within a com-pletely secure environment such as a Local Area Network or Virtual Private Network, to remove the requirement for authentica-tion. [Command line equivalent: UserPasswdVerifier=None]
IMPORTANT: Use this option with extreme caution. Do NOT use it unless the host network is known to be completely secure.
Note: Encryption can be used even if ‘No authentication’ is configured.
VNC Password AuthenticationWhen selected, this option will require any viewer application to supply a valid password before granting access to the server system. Use the adjacent Configure button to create up to four pass-words, each of up to 255 characters. Note: If the Encryption option is not set to Always On then legacy viewers will be required to provide only the first eight characters of any password. [Command line equivalent: UserPasswdVerifier=VncAuth]
ConfigureClick this button to create a password of up to 255 characters that you will use to access the VNC Server. There are no imposed minimum requirements for the password, however, you are strongly recommended to use at least six characters and to use a mixture of letters and numerals. When VNC Server is accessed by older VNC viewers, only the first 8 characters will of the password will be checked. It is therefore advisable to set the Encryption level to Always On, to prevent legacy viewers connecting, for maximum security.
VNC Extended AuthenticationStarting with version 4.1.4, the standard VNC Password authentication has been superceded by VNC Extended Authentication. This allows up to four passwords each of up to 255 charac-ters for a standard user, an admin user, a view-only user and an input-only user. To configure the admin, view-only and input-only passwords, click the Extended Configuration button to access the VNC Extended Authentication dialog.
NT Logon AuthenticationThis option (not available on Windows 95, 98 or Me installations) links into the internal security system within Windows NT, 2003 Server and XP. The advantage of this method is that, using the Windows user configurations, you can grant different permissions for different types of users, e.g. administrators, guests, users, etc. [Command line equivalent: UserPasswdVerifier=NtLogon]
ConfigureClick this button to gain access to the Windows permissions for VNC Server dialog. From here you can select existing user groups for the server system and edit their permissions.
Allow Single Sign-On authenticationIf single sign-on is enabled in both the VNC server and the VNC viewer, then the viewer will initially attempt to authenticate the user using his or her login credentials. Only if this fails is the user prompted for a username and password. The advantage of single sign-on is that the user does not have to re-enter his or her password. However, in an environment where workstations are regularly left unattended and unlocked, it can introduce a security risk.
IMPORTANT: Under Windows NT 4, if single sign-on is enabled on the server, then only viewers running under Windows NT 4 will be able to connect using single sign-on. To connect from other viewers you must explicitly disable single sign-on in either the server or the viewer—the viewer will not automatically prompt the user for a username and password in this situation. This is due to a limitation of Windows NT 4.
Note: The authentication and encryption settings are very closely related and the overall effect on security is a product of both settings.

indexfurther informationusing vnc server 4introduction installation configuration15page
Encryption[Command line equivalents: SecurityTypes=see {entries} below]
This option allows you to determine how encryption will be applied to user connections. There are three choices:
Prefer Off: Creates un-encrypted links unless an incoming VNC Viewer has its settings as ‘Prefer On’ or ‘Always On’, in which case the link would be encrypted. {RA2ne,None,RA2}
Prefer On: Creates encrypted links unless an incoming VNC Viewer has its settings as ‘Prefer Off ’, in which case the link would be un-encrypted. {RA2,RA2ne,None}
Always On: Forces all viewer connections to be encrypted. Legacy viewers cannot connect when this setting is used. {RA2}
In addition to the SecurityTypes parameter values given above, if single sign-on is enabled, then RA2 and RA2ne are replaced with SSPI,RA2 and SSPIne,RA2ne, respectively.
Generate KeysClick this button to create new RSA keys that are used as the basis for link encryption. This operation normally needs to be carried out once only during installation.
Guest login access[Command line equivalent: GuestAccess=see below]
When set to None (guest login disabled), {GuestAccess=0} the local user cannot enable the guest login (see Enabling guest login). Otherwise, the user can temporarily allow access to the desktop with either ‘View-only’ {GuestAccess=v} or ‘Interactive’ {GuestAccess=d} permissions. The guest login differs from standard user logins in that all connections must be explicitly approved by the local user, even if the query connect feature is not enabled. This can be over-ridden by editing the GuestAccess value in the registry. For example, setting {GuestAccess=f } will give guest users all access rights, including bypassing the query connect dialog (not recommended).
Prompt local user to accept connections[Command line equivalent: QueryConnect=true/false]
When ticked, when a VNC viewer connects, a confirma-tion dialog is displayed on the server system indicating the user name supplied by the viewer and the IP address from which the connection originates. If no response is given (by the server user) within ten seconds, the connection is rejected. If a second viewer attempts to make access during this time, then it will be immediately rejected.
When querying of connections is enabled, the server user has the option of allowing the viewer user to connect with the permissions they would nor-mally have, refusing the connection completely, or allowing the connection to go ahead with viewer-only access to the desktop.
Only prompt when there is a user logged on[Command line equivalent: QueryOnlyIfLoggedOn=true/false]
When ticked, if a local user is logged on to the server system, they will be prompted to accept or reject incoming connections. With no local user logged on, connections are permitted as normal, subject to the other connection criteria.

indexfurther informationusing vnc server 4introduction installation configuration16page
ConnectionsThis tab determines key connection details relating to the IP ports used, the IP addresses from which viewer connections will be ac-cepted and also the idle disconnection time.
Serving Java separatelyThis is useful in situations where the number of open ports needs to be minimised for security. You can configure a central VNC Server to serve the Java applet to browsers, which (once loaded) can then contact alternative VNC Servers. Thus, only one central port at 5800 is required, rather than one per server. The browsers used must have a Java Virtual Machine (JVM) that supports signed applets. Currently the Opera and Firefox browsers are known to be capable, as is Internet Explorer with Sun’s JVM installed..
Access controlThis area allows you to restrict access from incoming viewers according to their originat-ing/source IP addresses. Addresses can be specifically accepted or rejected on any scale from a single address right up to small or large scale ‘subnets’ of addresses.
Only accept connections from the local machine When ticked, this option will cause the access control settings (if any) to be ignored and make the VNC Server 4 system inaccessible via all network interfaces except the local loop-back interface. [Command line equivalent: LocalHost=true/false]
Access address areaThe access address area is where specific addresses or ranges of addresses are declared and set to be Allowed (denoted by a + prefix), Denied (denoted by a – prefix) or Queried (denoted by a ? prefix).
Each entry in the list comprises an action (+, -, ?), followed by an address pattern. Address patterns consist of an IP address or address prefix, followed by a subnet-style mask. The mask is used to determine how much of the IP address prefix must match the originating address of an incoming connection for the rule to apply to that connection. As standard, the list is empty except for a single “Allow All” entry (“+0.0.0.0/0.0.0.0”), which matches all possible IP addresses of connections and Allows them. If none of the specified rules apply to an incom-ing connection then the connection will be automatically rejected, for security.
Consider the following example entries:
Accept connections on portThis option indicates the port through which viewer clients will be served. The standard setting of 5900 is expected by VNC viewer applications; however, if this port clashes with another local network service, then it can be changed to use any other vacant port number. Please note, however, if you alter this number, then the viewer user(s) will need to specify the non-standard port number as part of the network address when logging-in. Please see VNC Viewer documentation - Making a connection for more details. [Command line equivalent: PortNumber=(port number)]
Disconnect idle clients after (seconds)This option is similar to a screen-saver timeout, with the difference that when the specified number of seconds has elapsed without any input from a particular viewer, the viewer’s con-nection will be closed. After the set period of time has elapsed since the last user interaction, VNC Server 4 will terminate the connection in order to conserve resources. As standard this option is set to 3600 seconds, or 1 hour. To prevent any connection timeouts, set this option to 0 (zero). [Command line equivalent: IdleTimeout=(seconds)]
Serve Java viewer via HTTP on port This option determines the port through which VNC Server 4 will provide the Java viewer applet to Java-enabled browsers, when requested. As standard, the port number presented here is 100 lower than the current main port address and will change accordingly whenever the main port is changed. If necessary, you can manually alter the Java viewer port number. You may wish, for example, to have the Java viewer served on the same port through which the server accepts VNC connections in order to simplify firewall configuration (connections can take up to 2 seconds longer when this is done). The Java Viewer can be disabled by unticking the check box, if it is not required or if the Java Viewer is to be provided by a separate server. [Command line equivalent: HTTPPortNumber=(port number)]
The first entry includes access from a single specific address of 192.168.0.1
The second entry causes an access from the specific address 192.168.0.3 to be queried (the local user of the server system will need to approve the connection within ten seconds, otherwise it is refused).
The third entry provides access from any machine situated in the 192.168.4 subnet.
The fourth entry denies access from any other IP address.
Note the original ‘+’ (include all) entry has been removed.
Please see Ordering entries in the access control list for details about editing Access Control entries. To exclude a particular address or range of addresses, create a Deny rule and place it before any Allow rules.
[Command line equivalent: Hosts=[<pattern>[,<pattern> [...]]]]
indexfurther informationusing vnc server 4introduction installation configuration17page
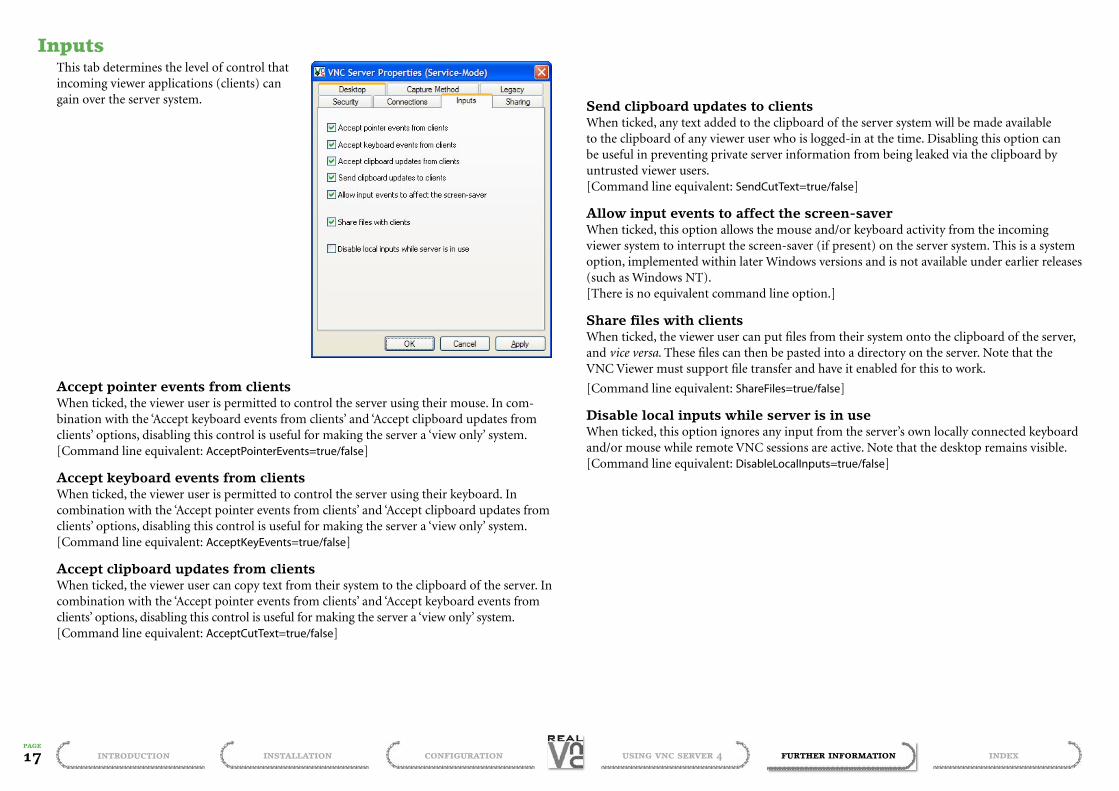
Send clipboard updates to clientsWhen ticked, any text added to the clipboard of the server system will be made available to the clipboard of any viewer user who is logged-in at the time. Disabling this option can be useful in preventing private server information from being leaked via the clipboard by untrusted viewer users. [Command line equivalent: SendCutText=true/false]
Allow input events to affect the screen-saverWhen ticked, this option allows the mouse and/or keyboard activity from the incoming viewer system to interrupt the screen-saver (if present) on the server system. This is a system option, implemented within later Windows versions and is not available under earlier releases (such as Windows NT). [There is no equivalent command line option.]
Share files with clientsWhen ticked, the viewer user can put files from their system onto the clipboard of the server, and vice versa. These files can then be pasted into a directory on the server. Note that the VNC Viewer must support file transfer and have it enabled for this to work.
[Command line equivalent: ShareFiles=true/false]
Disable local inputs while server is in useWhen ticked, this option ignores any input from the server’s own locally connected keyboard and/or mouse while remote VNC sessions are active. Note that the desktop remains visible. [Command line equivalent: DisableLocalInputs=true/false]
InputsThis tab determines the level of control that incoming viewer applications (clients) can gain over the server system.
Accept pointer events from clientsWhen ticked, the viewer user is permitted to control the server using their mouse. In com-bination with the ‘Accept keyboard events from clients’ and ‘Accept clipboard updates from clients’ options, disabling this control is useful for making the server a ‘view only’ system. [Command line equivalent: AcceptPointerEvents=true/false]
Accept keyboard events from clientsWhen ticked, the viewer user is permitted to control the server using their keyboard. In combination with the ‘Accept pointer events from clients’ and ‘Accept clipboard updates from clients’ options, disabling this control is useful for making the server a ‘view only’ system. [Command line equivalent: AcceptKeyEvents=true/false]
Accept clipboard updates from clientsWhen ticked, the viewer user can copy text from their system to the clipboard of the server. In combination with the ‘Accept pointer events from clients’ and ‘Accept keyboard events from clients’ options, disabling this control is useful for making the server a ‘view only’ system. [Command line equivalent: AcceptCutText=true/false]

indexfurther informationusing vnc server 4introduction installation configuration18page
SharingThe options within this tab determine exactly how VNC Server 4 should behave when two or more viewers are connected to the server system.
When viewers connect, they request either shared or non-shared connections to the server. Such requests come into effect when another user is also viewing the same server. The settings within this tab determine ex-actly how the server should respond to such requests.
Use client’s preferred sharing settingWhen selected, VNC Server 4 will defer to the ‘Shared connection’ setting of the second incoming viewer. If the second viewer is set to share, then it will be permitted to make the connection, if not it will either be rejected or will replace the existing viewer, depending upon the setting of the ‘Non-shared connections replace existing ones’ option.. [Command line equivalent: AlwaysShared=false, NeverShared=false]
Non-shared connections replace existing onesThis option will determine the outcome when a connection is non-shared, either by viewer choice or when the ‘Never treat new connections as shared’ option is selected. In such cases, if this option is ticked, then the existing user is disconnected. If this option is unticked, then the new user is rejected. [Command line equivalent: DisconnectClients=true/false]
Always treat new connections as sharedWhen selected, all incoming connections are treated as shared and so no existing users will be disconnected nor will new users be turned away. [Command line equivalent: AlwaysShared=true,NeverShared=false]
Never treat new connections as sharedWhen selected, all incoming connections will treated as non-shared. When a second incom-ing connection attempt is made, it will either be rejected or the existing user will be discon-nected, depending upon the setting of the ‘Non-shared connections replace existing ones’ option. [Command line equivalent: NeverShared=true, AlwaysShared=false]

indexfurther informationusing vnc server 4introduction installation configuration19page
DesktopThis tab provides opportunities to fine tune performance by reducing unnecessary desk-top effects and also allows you to determine how the server system should be left after it has been accessed.
When last client disconnects
Do nothingWhen selected, there will be no change to the operation of the server once there are no more VNC viewers connected to it. [Command line equivalent: DisconnectAction=None]
Lock workstationWhen selected, after the last VNC viewer has disconnected, the server system will be tempo-rarily locked and returned to its log-in screen. This option can help to avoid un-authorised access where the system is left unattended and other people are in its vicinity. [Command line equivalent: DisconnectAction=Lock]
Logoff userWhen selected, after the last VNC viewer has disconnected, the current user session of the server system will be ended and the system returned to its initial log-in screen. This option is useful to ensure that the server system never remains logged-on after a VNC session. This option can help to avoid un-authorised access where the system is left unattended and other people are in its vicinity. [Command line equivalent: DisconnectAction=Logoff]
While connected
Remove wallpaperWhen ticked, the wallpaper image (if used) on the server system will be removed and re-placed with a plain background whenever a VNC viewer is connected. This option will also attempt to disable Windows Active Desktop, if it is use. This can help to reduce transmitted data and hence improve overall performance. [Command line equivalent: RemoveWallpaper=true/false]
Remove background patternWhen ticked, the background pattern (if used) on the server system will be removed and replaced with a plain background whenever a VNC viewer is connected. This can help to reduce transmitted data and hence improve overall performance. [Command line equivalent: RemovePattern=true/false]
Disable user interface effectsWhen ticked, any visual user interface effects, such as animated drop-down boxes, will be disabled whenever a VNC viewer is connected. This can help to reduce transmitted data and hence improve overall performance. [Command line equivalent: DisableEffects=true/false]

indexfurther informationusing vnc server 4introduction installation configuration20page
Capture Method (Hooks)This tab concerns the various methods that VNC Server 4 can employ to keep track of changes to the desktop so that they may be transmitted to the current VNC viewer(s).
Poll for changes to the desktopWhen selected, this option polls the Windows display system for changes to the entire desktop. This method is slower than the ‘Use VNC Hooks...’ and ‘Use VNC Mirror...’ options. However, it can be useful in cases where the other two methods encounter timing/compat-ibility problems or cannot track an application that interfaces directly with the graphics card, such as with some DirectX applications. [Command line equivalent: CaptureMethod=poll] [Command line equivalent (prior to v4.1): UseHooks=false]
Use VNC hooks to track graphical updatesWhen selected, this option employs the standard VNC hooks technique to monitor changes to the local desktop. VNC hooks allow VNC Server 4 to monitor the messages sent to on-screen windows in order to ascertain when their content may have changed. This method is very successful; however, it can miss certain types of update or conversely can also mistakenly report areas as having changed when in fact they have not. For these reasons, you are recom-mended to use this method in conjunction with ‘Poll console windows for updates’ option. [Command line equivalent: CaptureMethod==hooks] [Command line equivalent (prior to v4.1): UseHooks=true]
Poll console windows for updatesWhen ticked, this option will track the visible parts of console windows and poll those areas for changes. This option is best used in close combination with the ‘Use VNC hooks to track graphical changes’ option because the rate of polling can be reduced, which helps to increase performance. [Command line equivalent: PollConsoleWindows=true/false]
Use VNC Mirror driver to track changesWhen selected, this option takes advantage of a Windows facility that mirrors all primary dis-play graphical updates to a secondary driver, such as VNC. This produces a fast and accurate update method, however, it operates at a low system level and could encounter problems on some systems. This option is disabled unless you have the VNC Mirror Driver installed. [Command line equivalent: CaptureMethod=mirror]
Capture alpha-blended windowsWhen ticked, this option tracks newer semi-transparent windows, as well as standard win-dows, including certain menus and tool tips. This method places higher requirements on the server and can induce cursor flicker. [Command line equivalent: UseCaptureBlt=true/false]
Note: This tab is titled Hooks within VNC versions prior to v4.1.
indexfurther informationusing vnc server 4introduction installation configuration21page
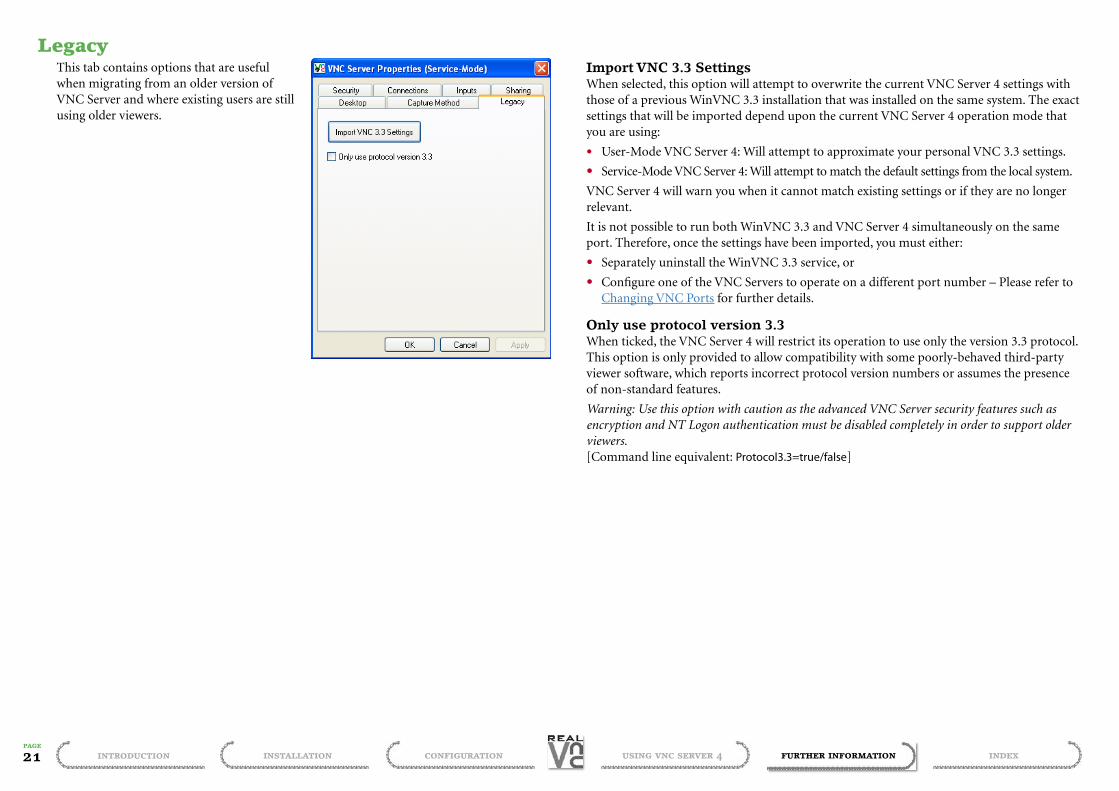
LegacyThis tab contains options that are useful when migrating from an older version of VNC Server and where existing users are still using older viewers.
Import VNC 3.3 SettingsWhen selected, this option will attempt to overwrite the current VNC Server 4 settings with those of a previous WinVNC 3.3 installation that was installed on the same system. The exact settings that will be imported depend upon the current VNC Server 4 operation mode that you are using:
• User-Mode VNC Server 4: Will attempt to approximate your personal VNC 3.3 settings.
• Service-Mode VNC Server 4: Will attempt to match the default settings from the local system.
VNC Server 4 will warn you when it cannot match existing settings or if they are no longer relevant.
It is not possible to run both WinVNC 3.3 and VNC Server 4 simultaneously on the same port. Therefore, once the settings have been imported, you must either:
• Separately uninstall the WinVNC 3.3 service, or
• Configure one of the VNC Servers to operate on a different port number – Please refer to Changing VNC Ports for further details.
Only use protocol version 3.3When ticked, the VNC Server 4 will restrict its operation to use only the version 3.3 protocol. This option is only provided to allow compatibility with some poorly-behaved third-party viewer software, which reports incorrect protocol version numbers or assumes the presence of non-standard features.
Warning: Use this option with caution as the advanced VNC Server security features such as encryption and NT Logon authentication must be disabled completely in order to support older viewers. [Command line equivalent: Protocol3.3=true/false]

indexfurther informationusing vnc server 4introduction installation configuration22page
VNC Extended authenticationOlder versions of VNC support VNC Password authentication, which has a single password to control access to the desktop. Current versions still support this method of authentication, but it has been extended to provide four different virtual users, each with a distinct pass-word. Access to the desktop can be granted in a more controlled way using the following user names:
• user has default access, meaning that anyone connecting as user can view and interact with the desktop using the keyboard and the mouse and can access the remote clip-board. However, if the QueryConnect feature is enabled, the local user can refuse the connection. If no username is specified when a connection is made, user is substituted as the default.
• admin has full access, meaning that anyone connecting as admin has all access rights described above, but the local user is not queried to approve the connection, even if the QueryConnect feature is enabled.
• viewonly has permission to view the desktop, but cannot interact with it. Mouse and keyboard input is disabled, and access to the remote clipboard is denied. As with user, the local user can refuse the connection if QueryConnect is enabled.
• inputonly has permission to interact with the desktop, but cannot view it. Mouse and keyboard input and access to the remote clipboard is enabled, but the VNC Viewer win-dow will remain blank. As with user and viewonly, the local user can refuse the connec-tion if QueryConnect is enabled. The inputonly user is included mostly for complete-ness; in most situations it is not useful.
Each password can be up to 255 characters in length. There are no imposed minimum requirements for the passwords, however, you are strongly recommended to use at least six characters and to use a mixture of letters and numerals.
Legacy viewersVNC Enterprise Edition provides support for legacy VNC viewers if VNC Extended authen-tication is enabled. Legacy viewers do not allow a username to be entered, so they can only authenticate as user. It is important to note that legacy viewers do not support passwords longer than 8 characters. If the user password is longer than this, only the first 8 characters will be checked. For maximum security, you can prevent legacy viewers from connecting by setting the encryption level to Always On.
Enabling VNC Extended authenticationTo enable VNC Extended authentication, set the authentication mechanism to VNC Pass-word Authentication and then click the Configure button. This allows you to set the user password. To set the admin, viewonly or inputonly passwords, click the Extended Configuration button. Select the users you want to enable and click the corresponding Set Password button to set the password.

indexfurther informationusing vnc server 4introduction installation configuration23page
NT Logon authenticationVNC Server 4 offers the ability to authenticate users via the native security system of Win-dows (not 95, 98 or Me) and allows you to grant different access rights to particular users or groups.
Two main steps need to be completed via the Security tab:
• Select the NT Logon Authentication option, and
• Click the Access Control button to configure suitable user/group rights.
To configure NT Logon user/group permissions1 Display the Security tab within the VNC Server properties dialog.
2 Click the Access Control button to display the permissions dialog:
The available access rights for users or groups via incoming VNC Viewer connections are as follows:
• View display contents Allow the remote user to see the contents of the VNC Server desktop.
• Send pointer events / Send keyboard events Allow the remote user to interact with applications running in the VNC Server desktop.
• Send and receive clipboard contents Allow the clipboard contents to be synchronised between the viewer and server.
• Send and receive files Allow file transfer (via clipboard copy and paste) between the viewer and server.
• Default access Allow the default level of access (View display contents, Send pointer & keyboard events, Send and receive clipboard contents, Send and receive files). When new access rights which are enabled by default become available, users and groups previously configured with Default access will automatically have access to them.
• Connect without accept/reject prompt Allow the remote user to connect without a local user having manually accepted the connection. This allows the QueryConnect feature to be bypassed by particular users or groups, for emergency access to servers.
• Full access Grant all available access rights. When new access rights become available, users with Full access will automatically have access to them, regardless of whether they are granted by default.
The default access rights granted to users and groups are as follows:
• Full access Members of the local Administrators group. Members of the local or domain VNC Admins group, if available.
• Default access Members of the local or domain VNC Users group, if available.
• View display contents Members of the local or domain VNC View-only group, if avail-able.
NT Logon Session LoggingIn addition to the default logging of connection attempts by VNC Server, the NtLogon authentication method independently logs successfully authenticated sessions. Sessions’ log events are stored in the Application Event Log of the machine that authenticated the session.
• If a VNC connection is made using local user account credentials then the session will be logged in the host computer’s event log.
• If a VNC connection is made using domain-based credentials then the session will be logged with one of the domain’s controllers.
Existing user or group names are displayed within the dialog. New users or groups can be added to the list using the Add... button. The procedure for adding new users/groups is a standard Windows function and is beyond the scope of this user guide.

indexfurther informationusing vnc server 4introduction installation configuration24page
Two modes of operationVNC Server 4 offers two levels of operation so that you can match it to suit your needs. The two levels are: User mode and Service mode. When you install VNC Server 4, both modes will be available and you can choose which one to use. The differences between the two modes are as follows:
User mode• Runs as a normal application, according to the current users’ rights on the system.
• Is not available when the user logs out or when the system is locked.
• VNC Server can be configured independently by each system user who wishes to run it.
• The NT logon authentication method is not supported in User mode under operating systems older than Windows XP.
• Best used when:
• You are a single user who requires occasional help from a remote third party, need to infrequently share work or need to control your system from elsewhere.
Service mode • Is available as soon as the system has finished starting up, and continues to be available
even when you have logged out or the system is locked.
• Configured with a single set of system-wide options that apply regardless of which user (if any) is logged in at the time.
• Best used when:
• Multiple local users of a system need to regularly offer remote access to their machine.
• The system needs to be accessed by a central administrator.
• System sharing/control is required out of hours when local users are normally logged off.

indexfurther informationusing vnc server 4introduction installation configuration25page
Listening viewer (server-initiated connection)In certain circumstances it can be preferable for the VNC server to initiate connections to one or more viewers, rather than the other way round. For instance:
• Firewalls can often cause problems for incoming connections to server systems. When the server initiates the connection to a viewer, this problem is overcome. The firewall must, however, allow outgoing connections through port 5500. Also, if the viewer system is behind its own firewall, then that must allow incoming connections, also at port 5500.
• Where VNC is used in a classroom or presentation environment, the tutor/presenter can make his server initiate connections to each of the viewer systems. In this way greater overall control is retained and this method obviates the need to provide server connection information to each user.
To create a listening viewer connectionTwo main stages need to occur:
1 Set the VNC Viewer on each user’s system to listen.
On each VNC Viewer system:
i Click the Windows Start button.
ii Choose All Programs (or Programs in non-XP versions). Select the RealVNC entry, then VNC Viewer 4 and finally select Run Listening VNC Viewer.
(Alternatively, if starting VNC Viewer from a command line, add the switch ‘-listen’)
2 Prompt the VNC Server 4 to add a new client and enter the viewer’s IP address.
On the VNC Server 4 system:
i Right click on the VNC icon in the system tray.
ii From the popup menu, click the Add New Client option.
iii In the resulting popup dialog, enter the IP address of the viewer system and click OK. No username or password are required.
Providing the correct address is entered and there are no firewall issues with the viewer system, the VNC Viewer will display the server’s screen exactly as if it had initiated the connection in the usual manner.
To end a listening viewer connectionListening viewer connections can be terminated by either party, either:
• From the viewer: Close the viewer window.
• From the server: Right click on the VNC Server 4 icon in the system tray and select the Disconnect Clients option.

indexfurther informationusing vnc server 4introduction installation configuration26page
Access control: Allow, deny or query addresses
5 Select the Allow, Deny or Query options, as necessary.
Note: The order of entries within the access control list is critical to the correct operation of VNC Server 4. See Ordering the access control list entries for details.
6 Click the OK button to add the selected address to the list within the Connections tab.
7 Click the Apply button in the lower right corner of the VNC Server Properties window.
Note: The ‘+’ entry in the Access Control list means ‘accept all addresses’. If you wish to allow only those addresses that you specify, then you must remove the ‘+’ from the list. You should also add the entry -0.0.0.0/0.0.0.0 (usually at the end of the list) to ensure that no other ad-dresses can gain access.
You can now:
• Add another address
• Use the Move Up and Move Down buttons to adjust the order
• Delete an unwanted entry The Host IP address pattern dialog will be displayed.
4 In the edit area, enter or edit the required IP address followed by a ‘/’ and then the range mask – see Calculating a range mask for access control for details.
Note: If you do not enter a range mask after the IP address, VNC Server 4 will assume that you intend to define a single address and automatically insert the necessary 255.255.255.255 for you.
VNC Server 4 provides the opportunity to specifically control connection requests from par-ticular IP addresses, or ranges of addresses. For each specified IP address or range, you can:
• Allow – connection attempts from such addresses will be accepted (with the correct pass-word, if set),
• Deny – connection attempts from such an address will be rejected immediately.
• Query – connection attempts will be announced to the local server user, who will need to confirm acceptance (within ten seconds), otherwise the connection will be rejected.
Each entry requires an action (Allow, Deny, Query) and a pattern. Patterns consist of an IP address or prefix, and a range mask (similar in form and function to a Subnet Mask) describ-ing which parts of the supplied IP address must match and these are entered via the Connec-tions tab within the VNC Server Properties dialog.
To add or edit IP address ranges 1 Display the VNC Server Properties dialog (see To display VNC Server Properties).
2 Select the Connections tab
3 Either add or edit an entry:
• Add a new entry: Click the Add button.
• Edit an existing entry: Highlight the entry in the Access Control list and click the Edit button.

indexfurther informationusing vnc server 4introduction installation configuration27page
Calculating a range mask for access controlA range mask is used to define the number of IP addresses that will be given special treat-ment (either to be: allowed, denied or queried) when attempting to connect with the VNC Server 4. The range mask operates in a similar manner to a standard subnet mask because it informs the system (in this case the VNC Server 4) which sections of an IP address are significant, and which are not.
To understand the range mask, you need to view it in binary form. Thus, a typical range mask of 255.255.255.224 looks like this when converted to binary:
11111111.11111111.11111111.11100000
The ones indicate the parts of a corresponding IP address that will be examined, whereas the zeroes mark the parts of the IP address that form the range and will be ignored. Hence, the more zeroes there are (and accordingly, the fewer ones), the larger the address range that will be encompassed.
Note: A range mask of 255.255.255.255 examines the whole of the IP address and so defines a single location.
Consider the IP address 192.168.8.22 combined with a range mask of 255.255.255.252. Once applied, the result is as follows:
11000000.10101000.00001000.00010110 IP address (decimal equivalent: 192.168.8.22)
11111111.11111111.11111111.11111100 Range mask (decimal equivalent: 255.255.255.252)
11000000.10101000.00001000.000101xx Result (xx values will be ignored)
11000000.10101000.00001000.00010100 lowest address in the range: 192.168.8.20
11000000.10101000.00001000.00010111 highest address in the range: 192.168.8.23
Thus, due to the two zeroes on the right hand side of the range mask, the values of the equiv-alent bits in the IP address are ignored. This means that addresses running from 192.168.8.20 (where these two bits are both zero) through to 192.168.8.23 (where these two bits are both one) will all be treated in the same manner. This is the range that VNC Server 4 would allow, deny or query, as instructed.
If the range mask (for the same IP address) was changed to 255.255.248.0, then the third octet would also be affected, as follows:
11000000.10101000.00001000.00010110 IP address (decimal equivalent: 192.168.8.22)
11111111.11111111.11111000.00000000 Range mask (decimal equivalent: 255.255.248.0)
11000000.10101000.00001xxx.xxxxxxxx Result (xx values will be ignored)
11000000.10101000.00001000.00000000 lowest address in the range: 192.168.8.0
11000000.10101000.00001111.11111111 highest address in the range: 192.168.15.255
The following is a list of all valid octet numbers that can be used within a range mask. These values can be used at any of the four positions in the mask. However, if there is a zero at any position (in binary) of any octet, then everything to the right of that zero, must also be a zero.
Mask value Binary Addresses encompassed
255 11111111 1 address
254 11111110 2 addresses
252 11111100 4 addresses
248 11111000 8 addresses
240 11110000 16 addresses
224 11100000 32 addresses
192 11000000 64 addresses
128 10000000 128 addresses
0 00000000 256 addresses
In reality, the range that needs to be defined may not align itself neatly with even binary boundaries. In such cases it may be necessary to use two or more entries, each with smaller ranges to accomplish the task accurately. For example, to allow the range 192.168.8.19 to 192.168.8.37, you would need the following entries:
IP address/Range mask
+192.168.8.19/255.255.255.255 defines 1 address
+192.168.8.20/255.255.255.252 defines 4 addresses
+192.168.8.24/255.255.255.248 defines 8 addresses
+192.168.8.32/255.255.255.252 defines 4 addresses
+192.168.8.36/255.255.255.254 defines 2 addresses
General tips• There should be no zeroes to the left of a one – while it is technically possible to mix ones
and zeroes in a mask, it produces erratic results and should be avoided.
• The stated IP address for each range can be from anywhere within the range, i.e. the stated IP address does not have to be the first one; it could be the last or be from the middle of the range.

indexfurther informationusing vnc server 4introduction installation configuration28page
Ordering entries in the access control listWhen there are multiple entries within the Access Control list, the order of those entries becomes important due to the manner in which VNC Server 4 checks the list:
• As a new access request is received from a viewer, VNC Server 4 will compare the incoming IP address with the Access Control list. Starting at the top of the list, it proceeds down-wards until the IP address of the incoming system matches an entry.
• When a match is found, the action for that entry (+ Allow, – Deny or ? Query) is carried out.
• Checks for this IP address will then cease, regardless of other matches further down the list.
Therefore, it is vital to order the list correctly, particularly where an address might be cov-ered twice, for instance:
-192.168.1.0/255.255.255.0 Deny subnet 192.168.1.*
+192.168.1.24/255.255.255.255 Allow host 192.168.1.24
In this instance, a request to connect from a VNC viewer at 192.168.1.24 would be de-nied, even though it is specifically allowed in the second line in the list. This is because it matches the criteria of the first line where the whole of the 192.168.1.* subnet is denied. Swapping the order of the two lines would solve this particular problem.
To adjust the order of access control list entries1 Display the VNC Server Properties window (see Displaying VNC Server Properties)
2 Select the Connections tab.
3 Click the required entry in the Access Control list to highlight it.
4 As appropriate, click either the Move Up or Move Down buttons to adjust its position within the list.
5 Click the Apply button in the lower right corner of the VNC Server Properties window.
To delete an access control list entry1 Display the VNC Server Properties window (see Displaying VNC Server Properties)
2 Select the Connections tab.
3 Click the required entry in the Access Control list to highlight it.
4 Click the Remove button.
5 Click the Apply button in the lower right corner of the VNC Server Properties window.

indexfurther informationusing vnc server 4introduction installation configuration29page
Dealing with firewallsA common cause of VNC operational failures are related to firewalls. One of the key func-tions of a network firewall is to block the use of most port numbers by incoming network traffic in order to prevent access by unauthorised or malicious users. Therefore, unless an ex-ception is made for the specific ports used by VNC, any attempt to connect to a VNC Server situated behind a firewall will be denied. There are a number of options available to you in these situations:
• Adjust the firewall rules to allow incoming traffic via the ports required by VNC, i.e. Port 5900 and port 5800.
IMPORTANT: Firewall rule changes should be carried out only by an experienced operator. Incorrect configuration could leave a network open to attack. The exact details for changing rules alter between differing firewall types and are beyond the scope of this guide.
• Place the VNC Server system outside the firewall and use its security to allow only au-thorised users.
IMPORTANT: When placing the VNC Server externally to a firewall, i.e. with open access to an outer network, such as the Internet, it is vital that full security features are employed, both within VNC Server 4 and also for the operating system upon which the server is running. See the Configuration section more details.
• Set VNC viewers to ‘listen’ and initiate connections from the VNC Server 4.
This removes the need to make the server accessible from outside the firewall. See Listening viewer for details.
• Use Windows Firewall (Windows XP Service-Pack 2 and newer)
Recent versions of Windows XP include a built-in firewall. From Service Pack 2 onwards, the firewall can be easily configured to allow particular applications to open whichever ports they require. By adding an ‘Application Exception’ to the Windows Firewall for the VNC Server, both User- and Service- mode servers can be made accessible remotely without the need for port numbers to be specified explicitly. The VNC server is able to detect Windows Firewall and configure it automatically when the VNC Server Properties dialog is dismissed.
Changing VNC ports• The VNC port – Default setting: 5900 – This is the main port through which the VNC con-
nection is channelled. This port is set as standard to 5900, which is where the VNC Viewer applications will expect to find it.
• The Java Viewer port – Default setting: 5800 – This port is used to serve the Java viewer applet to requesting Web browsers. This port number is automatically set to be 100 less than the main VNC port. However, you can adjust it to use any vacant port number, or even to use the same port as is used for VNC connections.
To change port numbers1 Display the VNC Server Properties window (see To display VNC Server Properties).
2 Select the Connections tab.
3 Edit the required port number:
Edit this value to determine the main port used for viewer connections. Remember, if this is set to any value other than 5900, incoming viewers will need to specify the new number. See VNC Viewer documentation - Making a con-nection for details.
When you change the ‘Accept connections on port:’ entry, the ‘Serve Java viewer via HTTP on port:’ option will adjust itself to retain the same spacing, as currently exists, between it and the main port number. For instance, if the main port is changed from 5900 to 5950, then the Java port will ac-cordingly change from 5800 to 5850.
Note: To reduce the number of ports that are open within a firewall, it is possible to set the ‘Accept connections on port:’ and ‘Serve Java viewer via HTTP on port:’ to use the same port number. The disadvantage of doing this is that it will add a slight delay when con-necting to the VNC Server 4. The perfor-mance of VNC Server 4 will not otherwise be affected.
4 Click the Apply button in the lower right corner of the VNC Server Properties window.
Edit this value to select the port used to send the Java viewer to browsers. Ensure that the check-box is also ticked.

indexfurther informationusing vnc server 4introduction installation configuration30page
What is an IP address?An IP address is a unique identity given to every device connected to a network of any size: from a two system link up at home, to every system on the Internet.
IP addresses are written as four decimal numbers separated by full stops, such as 192.168.0.4 This is called dotted decimal notation and is used as a means of concealing the equivalent real address that is actually used by computers and networking equipment. The bare truth is that every IP address is really a pattern of 32 ones and zeroes.
At the inception of the Internet in the 1960s and 1970s, even by wildest estimates, no one ever expected they would need more than the seemingly inexhaustible 4.2 billion unique address patterns that are afforded by 32 ones and zeroes. However, two factors conspired to prove this to be wrong: Firstly, the amazing proliferation and expansion of the Internet; and secondly, the rather inefficient way in which those addresses were originally handed out to organisa-tions and companies. The result was that by the early 1990s, it was already apparent that at the projected growth rates, the reserve of 4.2 billion addresses would soon all be gone.
In order to prolong the current stocks of numbers, the allocation of addresses was greatly tightened and the idea of public and private addresses was introduced. In the opening sen-tence here, it was stated that an IP address is a unique identity - this no longer strictly true.
Of the 4.2 billion possible addresses, almost all of them are still used as unique public ad-dresses. However, in the revised plan, three groups of addresses were held aside for use as private addresses:
• 10.0.0.0 to 10.255.255.255
• 172.16.0.0 to 172.31.255.255
• 192.168.0.0 to 192.168.255.255
To avoid confusion, these ranges are never used as public addresses.
Now, when xyz company needs to connect their many internal computers to the Internet, they might only be given a single public address, say 80.42.0.252. They would then connect a Gateway system to the Internet and give it that unique public address. Situated on the other side of that gateway would be the company’s local network and every system in that local net-work would receive a private IP address. For small local networks, the most common private address range is that which starts at 192.168.0.0.
Every computer in the local network (or subnet) will use their number that is unique to them within the local network. However, the public identity for all of those local systems, as they pass information out across the Internet, will always be that of the gateway: 80.42.0.252. It is the job of the gateway to translate addresses between the local and wider networks. The gateway must ensure that messages and data are sent through to the correct locations without the private addresses ever leaking out. Assisting with this task are the subnet mask and port numbers. In this way, there are now many systems using similar private IP addresses, how-ever, because those numbers only ever exist in local domains, there is never any confusion.
Of course, most people never see an IP address. To make network addresses even more mem-orable than the dotted decimal notations (which in turn are used to the hide the true binary values), they are usually converted into named addresses. Such conversions are handled by the Domain Name System and your browser uses it every time you visit a web site.
No two devices on the Internet are permitted to have the same identity, how-ever, IP addresses are running out. Hence, public and private addresses were introduced to alleviate the problem.
The systems in the xyz company appear to have the same private addresses as those in the abc limited local network. However, there is no ambiguity because to the outside world, they use the public addresses of their gateways. Their gateways handle all of the address translation and ensure that the private addresses never leak out onto the wider Internet.

indexfurther informationusing vnc server 4introduction installation configuration31page
What is a Subnet mask?The very short answer is: A subnet mask helps to determine whether another device is within the same part of the network or elsewhere.
For the longer answer you need to consider, in basic terms, a typical local network consisting of several, or several hundred, systems connected together. Messages and data flow around every part of the local network and are then picked up by the systems to which they are ad-dressed. Because all this information needs to go around the whole local network, there are great performance (and security) advantages to splitting local networks into smaller collec-tions of systems, which are called subnets. A key part of making different subnets cooperate efficiently is the subnet mask that is given to every device along with their unique IP address. A subnet mask is expressed in the same way as an IP address in that it has four decimal num-bers separated by dots. A common subnet mask is 255.255.255.0
When System A (IP address 192.168.2.122 and subnet mask 255.255.255.0) wants to send information to System B (IP address 192.168.2.235), it must first check whether they are both in the same part of the network (in the same subnet). To do this System A first performs a comparison between its own IP address and its own subnet mask:
How a subnet mask actually worksIn the subnet mask explanation opposite, the example given is 255.255.255.0. This is a com-monly used subnet mask and is useful as an example because it helps to simplify matters. However, in reality a subnet mask might look like this:
255.255.255.224
This only starts to make sense when you look at the subnet mask in its binary form:
11111111.11111111.11111111.11100000
The portions covered from left to right by ones mark the Network ID (the location of the whole subnet), while the zeroes on the right show that just the last four bits of the device’s IP address are used as the Host ID (the device’s position within the subnet).
The calculation that the devices carry out is known as a bitwise AND. Basically, when you stack up the IP Address and the subnet mask (both in binary), wherever the equivalent posi-tions in both rows have a one, the end result is one. Where either of them have a zero, the result is zero. If you take the previous Device A example, but now use the new subnet mask mentioned above, the results are as follows:
11000000.10101000.10000000.01100110 IP address (decimal equivalent: 192.168.128.102)
11111111.11111111.11111111.11100000 Subnet mask (decimal equivalent: 255.255.255.224
11000000.10101000.10000000.01100000 Result (decimal equivalent: 192.168.128.96)
Using this method you can see that only the last four bits are affected and this means that any of the other IP addresses from the same subnet: 192.168.128.96 through to 192.168.2.127 would produce the same result.
Using the new subnet mask on the Device B address from the previous example would pro-duce the following result:
11000000.10101000.10000000.11011011 IP address (decimal equivalent: 192.168.128.219)
11111111.11111111.11111111.11100000 Subnet mask (decimal equivalent: 255.255.255.224
11000000.10101000.10000000.11000000 Result (decimal equivalent: 192.168.128.192)
192.168.128.96 = 192.168.128.192 ? Hence, the two devices now lie in different subnets and the information would need to travel via a gateway/router.
The parts corresponding to 255’s in the subnet mask indicate the Network ID (which defines the identity of the subnet).
The part corresponding to 0 in the mask shows the Host ID (which defines a system’s position within the subnet). Only the Network ID parts are required when determin-ing whether the two addresses belong to the same subnet. Therefore, the Host ID portion is reduced to zero because it is not needed for this calculation.
The sending system then repeats the subnet mask comparison, but this time with the destina-tion address:
192.168.128.102 System A address
255.255.255.000 Subnet mask
192.168.128.000 Result
192.168.128.219 System B address
255.255.255.000 Subnet mask
192.168.128.000 Result
The results of the two subnet mask calculations can then themselves be compared:
192.168.128.0 = 192.168.128.0 ? • If the two results are equal, then the two addresses lie within the same subnet.
• If the two results are not equal, then the destination device is within a different subnet, in which case, the sender will mark the information to go via the gateway system onto a dif-ferent network or subnet.

indexfurther informationusing vnc server 4introduction installation configuration32page
What is a port?Not to be confused with a physical port (such as a USB port or a printer port) to which you connect devices, a Port in this context could be more accurately described as a ‘service contact point’. It provides an indication of where to locate an appropriate known service that can deal with the kind of data being transmitted.
Imagine the problem that exists for networking equipment. A disparate mixture of messages and information are continually flowing from system to system, via gateways and routers, and each needs to find the correct destination. In this process, the IP address plays a critical role in making sure that the right items arrive at the right places, however, the unsung hero is defi-nitely the port number. While the IP address directs the postman to the correct building, it’s the port number that gets the package through the door of the correct apartment. Without the port number, there would be piles of unclaimed packages filling the foyer.
Every application that sends or receives information across a network uses a port number. In many cases they are fixed numbers that are always used by particular applications, and because they are not often changed, they are not normally mentioned. For instance, if you send an email (via the most common method), then your message will be marked with port number 25. Whenever you browse the Web, the information will always be denoted with port number 80 and VNC applications almost always send and receive using port number 5900. The systems at the receiving end then know to route messages marked as port 25 to the email server, port 80 to the web server, port 5900 to the VNC server and so on.
You should not normally need to change the VNC port number within VNC Server 4, how-ever, if you do then all viewers must declare the new port number when addressing the server system. For instance, if the port number was changed to 5950, then to reach a server at IP address 192.168.0.2, the VNC Viewer user would need to enter:
192.168.0.2::5950 (note the double colons)
Port numbers can range from 0 to 65,535 and are generally divided into three ranges:
• 0 to 1023 are well known ports
• 1024 to 49151 are registered ports
• 49152 to 65535 are dynamic and/or private ports
A list of valid port numbers and their uses is maintained by the Internet Assigned Numbers Authority and can be viewed at http://www.iana.org/assignments/port-numbers.

indexfurther informationusing vnc server 4introduction installation configuration33page
VNC authentication and encryptionVNC user and server authenticationOpen network connections pose a number of security challenges and the VNC system has now been updated to provide robust solutions. In addition to the possibility of attackers attempting to gain server access, there is also the chance that false servers can be spoofed to mimic real ones and lure users into disclosing important information. To defend against server attackers, VNC provides secure password protection. To defeat server spoofers, VNC Servers are now required to prove their authenticity by providing a unique identity code be-fore any viewer details are declared. These features are combined with the new high strength link encryption to present a sizeable barrier to attackers.
VNC link encryptionNetwork links in general, and the Internet in particular, pose an ever present threat of system spoofing and eavesdropping on connections between systems. The VNC user and server authentication system defeats the former threat, while strong data encryption of the type used by VNC presents a significant barrier to eavesdroppers.
When either the VNC viewer or VNC server enable encryption, both parties exchange codes called public keys. From that moment, all information is encrypted prior to transmission, using the other party’s public key. As encrypted information is received, the receiving party then uses its matching private key to restore the sent information to its original form.
Any eavesdropper who manages to intercept the information flowing between the VNC viewer and server (called a man-the-middle attack) will be presented with an unintelligible mess. Even if they were able to capture the public keys, they would still be unable to decode and make sense of the encrypted information.
Due to the calculations that must be performed to codify transmitted information, the use of encryption does impose a slight overhead on performance, estimated to be around 10%.

indexfurther informationusing vnc server 4introduction installation configuration34page
Windows version supportMost releases of Windows are supported by VNC Server 4. Some versions, however, lack certain functionality or cause known problems.
Older Windows versions VNC Server 4 is not designed to operate with older versions of Windows including 3.1, 3.11,
NT 3.1 or NT 3.51.
Windows 95 VNC Server 4 will operate with Windows 95 systems that have the Windows Socket 2 Update
(Winsock 2.0) or higher installed – Available from Microsoft at:
http://www.microsoft.com/windows95/downloads/contents/wuadmintools/s_wunetwork-ingtools/w95sockets2/
Due to limitations within Windows 95, it is not possible for the VNC Server settings to be secured in the system registry.
Windows 98 / Windows Me Under Windows 98 and Windows ME it is not possible for the VNC settings (including the
server’s password) to be properly secured in the registry - this is an intrinsic limitation of these platforms. NT Logon authentication is not supported on these platforms. Public-key based Server authentication and 128-bit session encryption are supported on these platforms, with the caveat that server private keys cannot be secured in the registry, since they do not support registry security.
Windows NT 4.0 VNC Server 4 will not run in Service Mode unless Windows NT Service Pack 3 or later has
been installed. VNC Server 4 can be operated in User Mode. Note that Windows NT 4.0 does not support the NT Logon authentication configuration dialog at this time.
Windows XP VNC Server 4 is fully compatible with Windows XP. However, please see the Troubleshoot-
ing section for information regarding problems you may encounter using VNC in conjuction with Fast User Switching or Remote Desktop.

indexfurther informationusing vnc server 4introduction installation configuration35page
TroubleshootingVNC disconnects during Fast User Switching When switching users, viewers will be disconnected and must reconnect in order to access
the newly logged on user session. The viewer will normally be presented with the Welcome screen again, when reconnecting to a switched session, whereupon logging on again to the required user account will provide access to their session.
VNC causes my Windows NT/2000/XP machine to blue screen Windows NT Version 4 has bugs in certain operating system interfaces which are used by
VNC. You must have service pack 3 or higher installed to avoid problems.
On Windows 2000/XP there are reports that blue screens occur as a result of having Microsoft Hotfixes installed, with or without VNC installed.
VNC does not install any system level hooks or driver software. Consequently it cannot cause machines to crash except by exposing bugs in the underlying operating system and device drivers. If it appears that VNC causes your machine to crash, check that you have the latest service packs, graphics drivers and network drivers installed for your system.
My computer uses roaming profiles, and with VNC installed the profiles are sometimes not saved back to the server. It can take a very long time to log out. Versions of VNC prior to 3.3.6 have a bug that can cause this behaviour. Additionally we
have had reports Windows 2000 machines with Hotfix Q329170 installed exhibit the same behaviour, with or without VNC installed.
indexfurther informationusing vnc server 4introduction installation configuration36page
SupportIf you are unable to solve your problem after checking through the Troubleshooting section in this guide, please take a look at our on-line FAQ page and also the Known Bugs & Features sec-tion of the RealVNC website.
If you still cannot find a solution, then please contact us for further assistance:
Via the webThe www.realvnc.com website offers a number ways to gain assistance regarding VNC products:
Search indexesProvides an opportunity to search through the various VNC databases for solutions
www.realvnc.com/swish-e/search
Mailing listsReal VNC provide discussion forums for important announcements and many other VNC-re-lated subjects. You can browse or search previous discussion entries, or alternatively subscribe to one or more forums.
www.realvnc.com/lists.html
Product support requestThis section lets you to send queries directly to a VNC support representative.
www.realvnc.com/support.html
Please include as much information as possible regarding the problem, including the exact text of any error messages you see (including the error number) and what you’re doing when you see them. Please also include the version of VNC server and VNC viewer that you are using, and what operating system you are running at both ends of the connection.
AcknowledgementsVNC Enterprise Edition contains software from more than one source. For full details of this software and the terms under which it is distributed, see the RealVNC website.
www.realvnc.com/products/enterprise/4.2/acknowledgements.html
www.ctxd.com Documentation by:

indexfurther informationusing vnc server 4introduction installation configuration37page
Index
A
Accept clipboard updates 17Accept keyboard events 17Accept pointer events 17Access control 16, 26
ordering entries 28range mask 27
Allow access 26Allow input events 17Attack
man-in-the-middle 33Authentication
user and server 33
C
Capture alpha-blended windows 20Changing VNC ports 29Close VNC Server 7Configure
as a service 4, 10Connections tab
settings 16Customising
for security 5for speed 6
D
Demo systemsoptimal settings 6
Deny access 26Desktop tab
settings 19Disconnect idle clients 16
E
Encryption 15, 33
F
FAQ 36Firewalls
dealing with 29
H
Hooks tabsettings 20
I
Import VNC 3.3 Settings 21Inputs tab
settings 17Installing 4, 10IP address
what is it? 30
L
Legacy tabsettings 21
Listening viewer 25
N
Notification area icon 7NT Logon Authentication 14
O
Operation modes 24Optimising
for demo systems 6
P
Passwordsetting 14
Poll console windows 20Port
what is it? 32Port numbers
changing 29
Q
Query access 26
R
Range maskcalculating 27
Registerservice mode 4
S
Securityoptimal settings 5
Security tabsettings 14
Send clipboard updates 17Server’s IP address
discovering 7Service mode 24
unregister 4Sharing tab
settings 18Speed
optimal settings 6
Starting VNC Server 7Stopping VNC Server 8Subnet mask
what is it? 31Support
getting assistance 36System tray icon 4, 7
T
Troubleshooting 35
U
Unregisterservice mode 4
User mode 24Use VNC hooks 20
V
VNC Server iconin system tray 7
VNC Server Propertiesdisplaying 13
W
When last client disconnects 19While connected 19Windows
versions and limitations 34