visual land prestige pro 7d lcd display replacement€¦ · visual land prestige pro 7d lcd display...
TRANSCRIPT
Visual Land Prestige Pro 7D LCD DisplayReplacement
Follow this guide to replace the LCD Display on your Prestige Pro 7D.
Escrito por: Matt Ferrari
Visual Land Prestige Pro 7D LCD Display Replacement Borrador: 2018-12-01ID de guía: 31571 -
Este documento fue generado el 2019-09-22 11:18:10 AM (MST).
© iFixit — CC BY-NC-SA es.iFixit.com Página 1 de 10

INTRODUCCIÓN
This guide will show you how to replace the LCD display if the screen breaks. Soldering and de-soldering will be necessary.
HERRAMIENTAS:Tweezers (1)iFixit Opening Tools (1)Phillips #00 Screwdriver (1)Soldering Workstation (1)
Visual Land Prestige Pro 7D LCD Display Replacement Borrador: 2018-12-01ID de guía: 31571 -
Este documento fue generado el 2019-09-22 11:18:10 AM (MST).
© iFixit — CC BY-NC-SA es.iFixit.com Página 2 de 10

Paso 1 — Back Panel
Unscrew the two 4.0mm Phillipshead screws found near the ports atthe bottom of the device using a PH#00 screwdriver.
Visual Land Prestige Pro 7D LCD Display Replacement Borrador: 2018-12-01ID de guía: 31571 -
Este documento fue generado el 2019-09-22 11:18:10 AM (MST).
© iFixit — CC BY-NC-SA es.iFixit.com Página 3 de 10

Paso 2
Be careful when taking the backpanel off. The speaker is connectedto both the front and back panels,and may get pulled out if you are notgentle when lifting the back panelaway.
Slide the plastic prying tool inbetween the front and back paneland pry them apart on all 4 sides.
It may be easiest to start on oneof the sides, and work your wayaround the device. The bottom,with the ports, is the most difficultside and can be saved for last.
There are small latches that makethis difficult. Moderate force maybe required to separate the twopanels.
Visual Land Prestige Pro 7D LCD Display Replacement Borrador: 2018-12-01ID de guía: 31571 -
Este documento fue generado el 2019-09-22 11:18:10 AM (MST).
© iFixit — CC BY-NC-SA es.iFixit.com Página 4 de 10
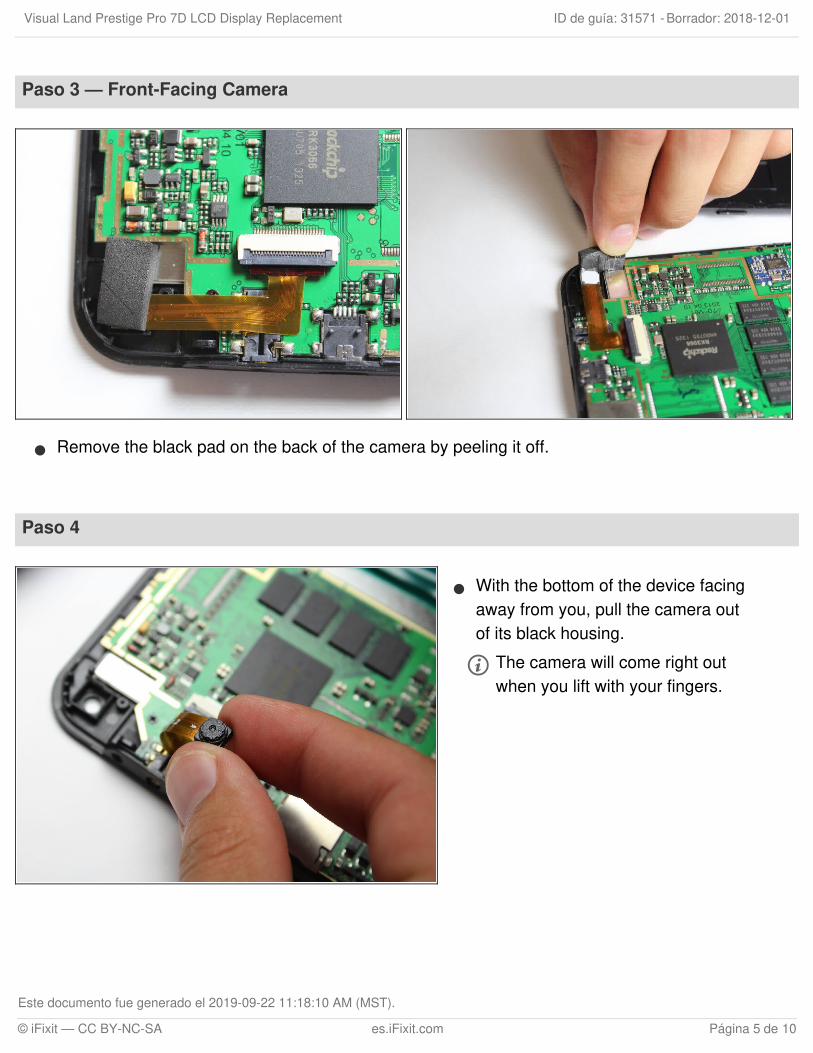
Paso 3 — Front-Facing Camera
Remove the black pad on the back of the camera by peeling it off.
Paso 4
With the bottom of the device facingaway from you, pull the camera outof its black housing.
The camera will come right outwhen you lift with your fingers.
Visual Land Prestige Pro 7D LCD Display Replacement Borrador: 2018-12-01ID de guía: 31571 -
Este documento fue generado el 2019-09-22 11:18:10 AM (MST).
© iFixit — CC BY-NC-SA es.iFixit.com Página 5 de 10

Paso 5
Use the tweezers to lift the greyconnector, connecting the cameraribbon to the circuit board, up fromthe beige housing. It should rotateup, and allow you to slide the ribbonout from under the connector.
Paso 6 — Display
Remove the three 4.0mm screwsholding down the circuit board withthe Phillips #00 screwdriver.
Visual Land Prestige Pro 7D LCD Display Replacement Borrador: 2018-12-01ID de guía: 31571 -
Este documento fue generado el 2019-09-22 11:18:10 AM (MST).
© iFixit — CC BY-NC-SA es.iFixit.com Página 6 de 10
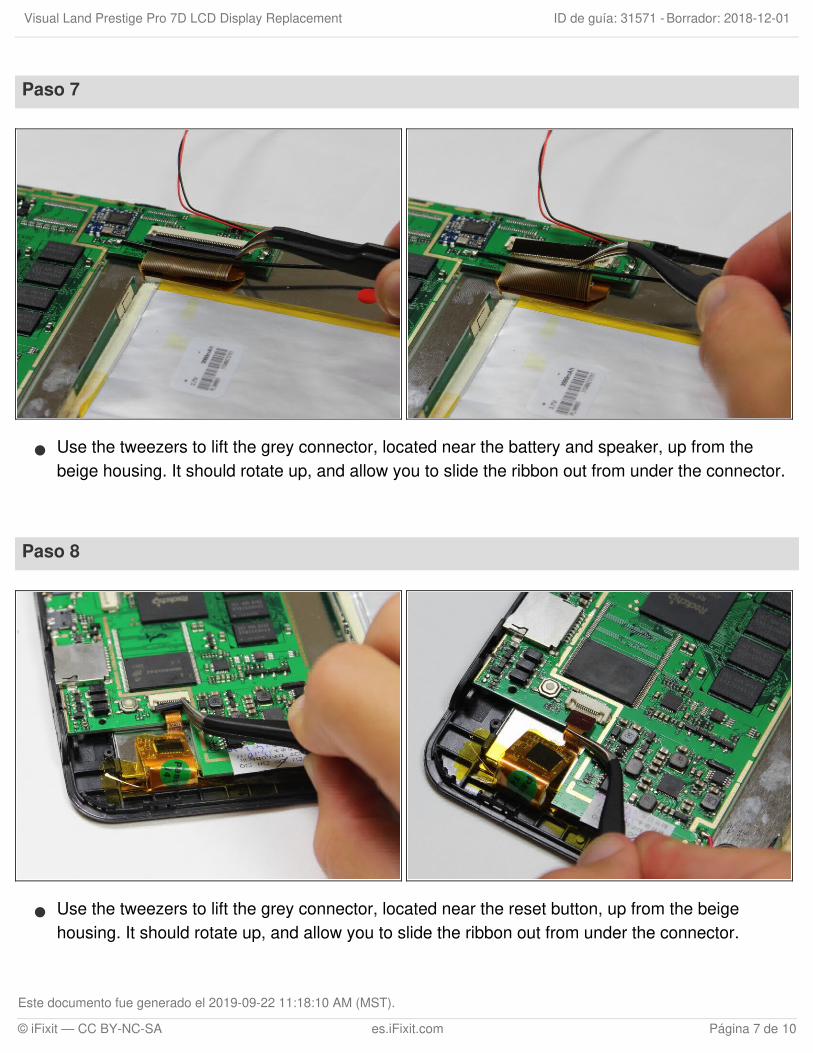
Paso 7
Use the tweezers to lift the grey connector, located near the battery and speaker, up from thebeige housing. It should rotate up, and allow you to slide the ribbon out from under the connector.
Paso 8
Use the tweezers to lift the grey connector, located near the reset button, up from the beigehousing. It should rotate up, and allow you to slide the ribbon out from under the connector.
Visual Land Prestige Pro 7D LCD Display Replacement Borrador: 2018-12-01ID de guía: 31571 -
Este documento fue generado el 2019-09-22 11:18:10 AM (MST).
© iFixit — CC BY-NC-SA es.iFixit.com Página 7 de 10

Paso 9
Turn the device around, and use thelarge plastic opening tool to pry thebattery off of the back of the silverLCD.
Do not worry if the battery bendswhile you are removing it. It isflexible, and you did not just breakit.
Some of the glue holding thebattery in place may stick to theback of the LCD.
Paso 10
Lift the circuit board and the batteryoff of the front panel.
Visual Land Prestige Pro 7D LCD Display Replacement Borrador: 2018-12-01ID de guía: 31571 -
Este documento fue generado el 2019-09-22 11:18:10 AM (MST).
© iFixit — CC BY-NC-SA es.iFixit.com Página 8 de 10
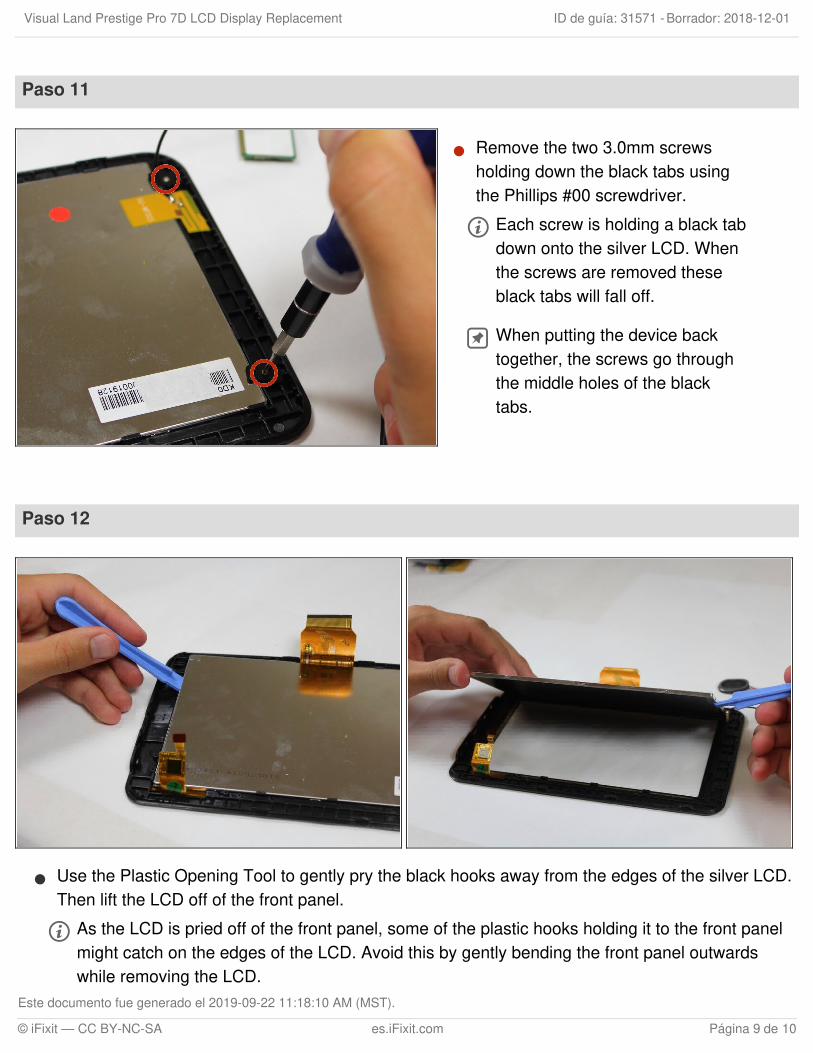
Paso 11
Remove the two 3.0mm screwsholding down the black tabs usingthe Phillips #00 screwdriver.
Each screw is holding a black tabdown onto the silver LCD. Whenthe screws are removed theseblack tabs will fall off.
When putting the device backtogether, the screws go throughthe middle holes of the blacktabs.
Paso 12
Use the Plastic Opening Tool to gently pry the black hooks away from the edges of the silver LCD.Then lift the LCD off of the front panel.
As the LCD is pried off of the front panel, some of the plastic hooks holding it to the front panelmight catch on the edges of the LCD. Avoid this by gently bending the front panel outwardswhile removing the LCD.
Visual Land Prestige Pro 7D LCD Display Replacement Borrador: 2018-12-01ID de guía: 31571 -
Este documento fue generado el 2019-09-22 11:18:10 AM (MST).
© iFixit — CC BY-NC-SA es.iFixit.com Página 9 de 10

To reassemble your device, follow these instructions in reverse order.
Paso 13
Soldering guns are hot and caneasily damage you or the device.
Desolder the black wire from theLCD.
For soldering information, see ourguide: Cómo soldar y desoldarconexiones.
Visual Land Prestige Pro 7D LCD Display Replacement Borrador: 2018-12-01ID de guía: 31571 -
Este documento fue generado el 2019-09-22 11:18:10 AM (MST).
© iFixit — CC BY-NC-SA es.iFixit.com Página 10 de 10