version 1.6 - teamexpandteamexpand.com/files/downloads/tx chrono installation guide.pdf · with tfs...
TRANSCRIPT
1
Version 1.6.0
Copyright TeamExpand 23/03/2016
2
1. TX Chrono Overview
Table of Contents
1. TX Chrono Overview .......................................................................................................................... 3
1.1 Supported Deployment Options .......................................................................................................... 3
1.2 TX Chrono Hardware Requirements .................................................................................................. 6
1.3 TX Chrono Software Requirements ................................................................................................... 7
2. Before You Install ............................................................................................................................... 8
2.1 Step 1 – All Requirements Are Met .................................................................................................... 8
2.2 Step 2 – People Assigned to Corresponding Project Roles ........................................................... 8
2.3 Step 3 – Review Your Time Reports .................................................................................................. 8
2.4 Step 4 – You Have Permissions to Install TX Chrono ..................................................................... 8
2.5 Step 5 – Uninstall Previous Version of TX Chrono .......................................................................... 9
2.6 Step 6 – Check Your IIS Configuration .............................................................................................. 9
2.7 Step 7 – Check if Basic Web Server Components are installed .................................................. 11
3. TX Chrono Installation .................................................................................................................... 13
3.1 Install Web Site .................................................................................................................................... 13
3.2 Installation Completion ....................................................................................................................... 15
4. TX Chrono Configuration ............................................................................................................... 17
5. TX Chrono License Retrieval ...................................................................................................... 18
5.1 How does TX License work ............................................................................................................... 18
5.2 Configure TX Chrono to use Integrated License Service ............................................................. 18
5.3 Upload a License to TX Chrono ........................................................................................................ 19
5.4 Check License state ........................................................................................................................... 19
6. TX Chrono Removal .......................................................................................................................... 20
6.1 Web Site Removal .............................................................................................................................. 20
6.2 Database Removal ............................................................................................................................. 20
7. Troubleshooting ................................................................................................................................. 21
7.1 TX Chrono Reports LSE:008 Error when try to save time reports .............................................. 21
7.2 Login is not presented in the list of logins attached ....................................................................... 22
7.3 Authentication Failed .......................................................................................................................... 22
7.4 Fractional Hours Cannot Be Saved .................................................................................................. 24
7.5 Time synchronization from TFS to TX Chrono is slow .................................................................. 25
7.6 TFS to TX Chrono sync doesn’t work for a single changed field ................................................. 25
7.7 TFS to TX Chrono sync doesn’t work (date time parse error) ..................................................... 25
7.9 Login as Different User ....................................................................................................................... 29
7.10 TX Chrono Works Incorrectly ....................................................................................................... 30
3
1. TX Chrono Overview
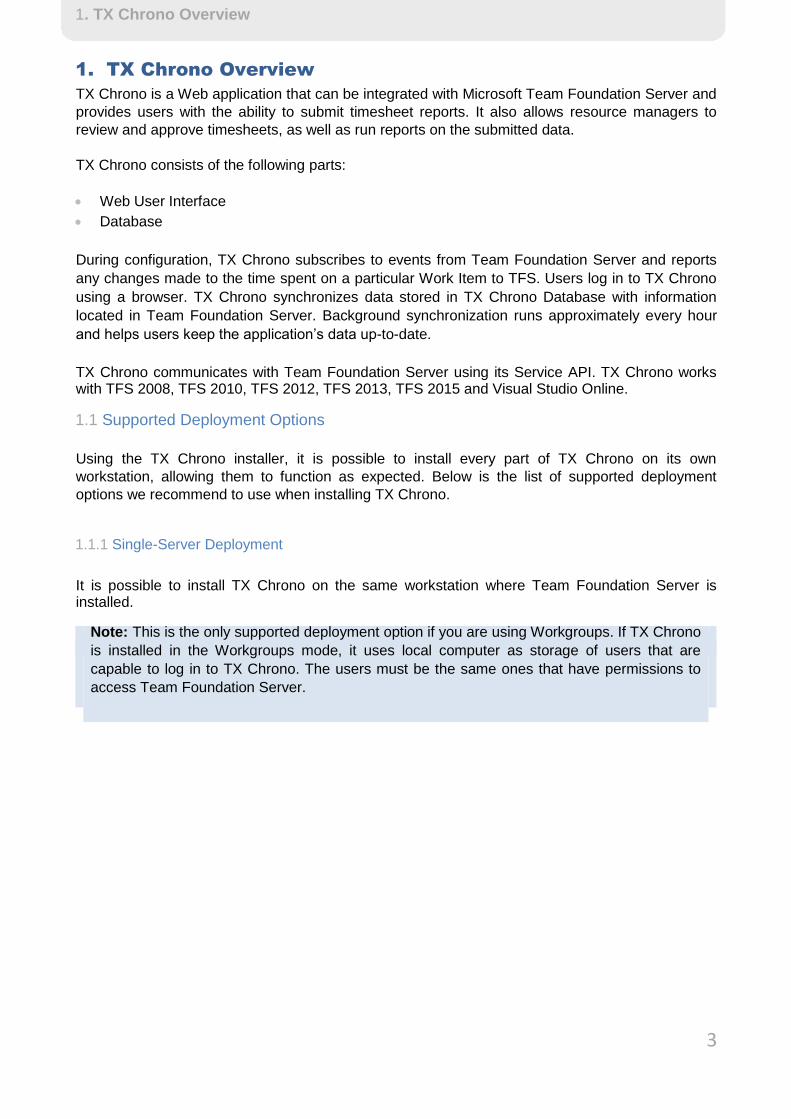
1. TX Chrono Overview
TX Chrono is a Web application that can be integrated with Microsoft Team Foundation Server and
provides users with the ability to submit timesheet reports. It also allows resource managers to
review and approve timesheets, as well as run reports on the submitted data.
TX Chrono consists of the following parts:
Web User Interface Database
During configuration, TX Chrono subscribes to events from Team Foundation Server and reports
any changes made to the time spent on a particular Work Item to TFS. Users log in to TX Chrono
using a browser. TX Chrono synchronizes data stored in TX Chrono Database with information
located in Team Foundation Server. Background synchronization runs approximately every hour
and helps users keep the application’s data up-to-date.
TX Chrono communicates with Team Foundation Server using its Service API. TX Chrono works with TFS 2008, TFS 2010, TFS 2012, TFS 2013, TFS 2015 and Visual Studio Online.
1.1 Supported Deployment Options
Using the TX Chrono installer, it is possible to install every part of TX Chrono on its own
workstation, allowing them to function as expected. Below is the list of supported deployment
options we recommend to use when installing TX Chrono.
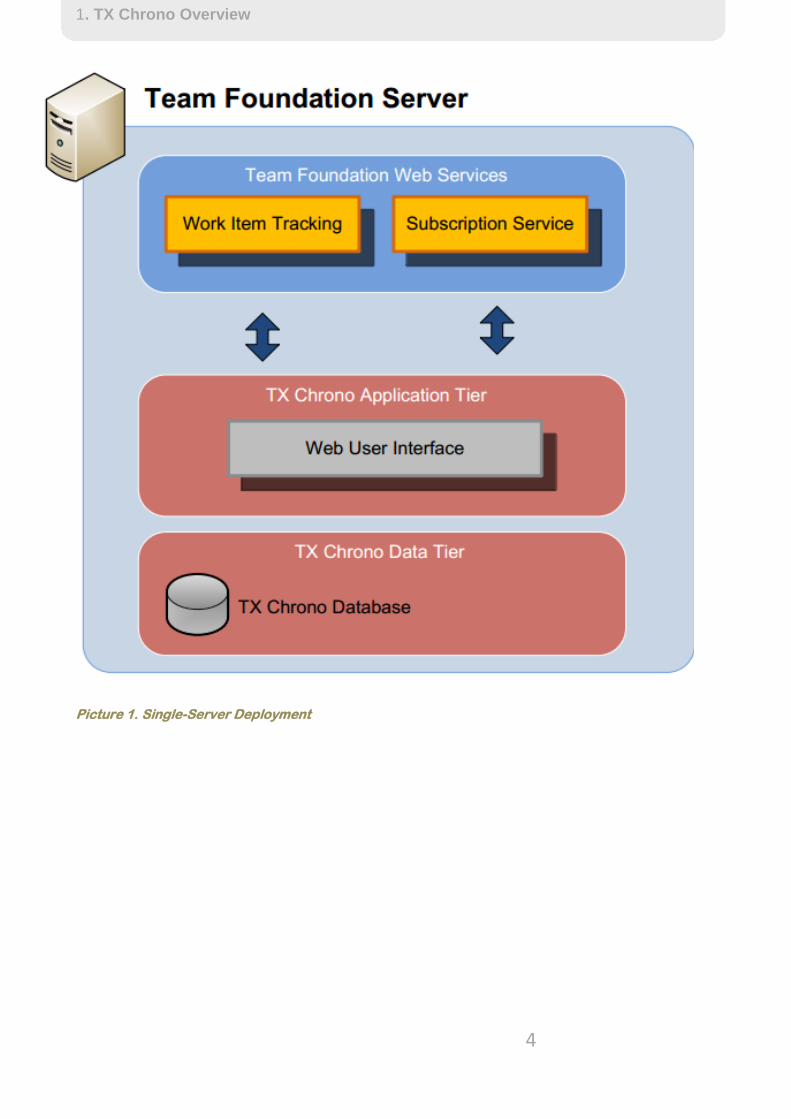
1.1.1 Single-Server Deployment
It is possible to install TX Chrono on the same workstation where Team Foundation Server is installed.
Note: This is the only supported deployment option if you are using Workgroups. If TX Chrono
is installed in the Workgroups mode, it uses local computer as storage of users that are
capable to log in to TX Chrono. The users must be the same ones that have permissions to
access Team Foundation Server.
4
1. TX Chrono Overview
Picture 1. Single-Server Deployment
5
1. TX Chrono Overview
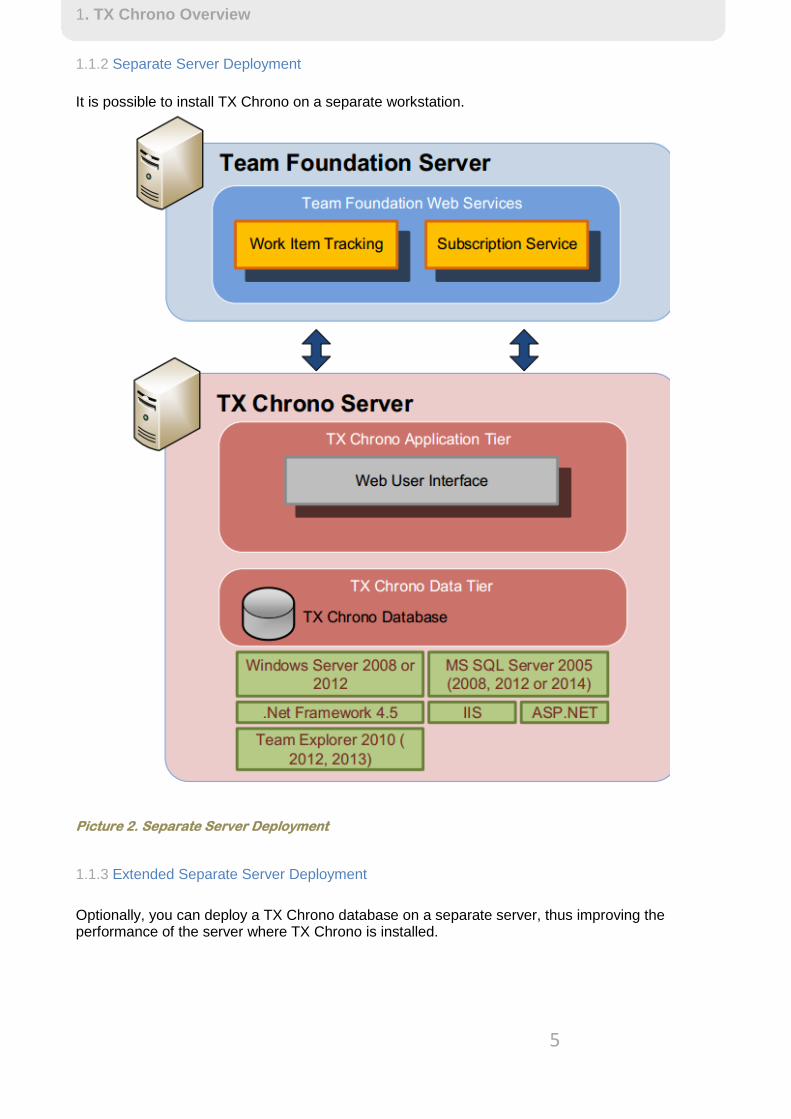
1.1.2 Separate Server Deployment
It is possible to install TX Chrono on a separate workstation.
Picture 2. Separate Server Deployment
1.1.3 Extended Separate Server Deployment
Optionally, you can deploy a TX Chrono database on a separate server, thus improving the performance of the server where TX Chrono is installed.

6
1. TX Chrono Overview
Picture 3. Extended Separate Server Deployment
1.2 TX Chrono Hardware Requirements
TX Chrono runs best on workstations that have a 1.8+ GHz processor, with 1+ GB of RAM. Since
TX Chrono stores temporary information received from Team Foundation Server, there must be
from 500MB to 2GB of free space on each of the logical drives.
7
1. TX Chrono Overview
1.3 TX Chrono Software Requirements
The following software is required to have TX Chrono installed and function correctly:
Windows Server 2008, 2012 IIS 7, IIS8 or higher (with IIS6 compatibility components) Team Foundation Server 2010, 2012, 2013. 2015 or Visual Studio Online Team Explorer 2010 to work with TFS 2010 Team Explorer 2012 to work with TFS 2012 Team Explorer 2013 to work with TFS 2013 or Visual Studio Online .NET Framework 4.5 SQL Server Express 2005, 2008, 2012 or 2014
We recommend you to install the latest service packs on your operating system.
To access TX Chrono, users can utilize the following browsers:
Internet Explorer 9.0 – 11.0 Firefox Google Chrome
The browser must support JavaScript and Cookies, as well as have them enabled.
1.3.1 Adding TX Chrono Web Site to the Trusted Sites Security Zone
When using Internet Explorer, for security reasons, JavaScript and Cookies might be disabled by
default. Therefore, one may be required to add TX Chrono Web Site to the Trusted Sites Security
Zone.
To do that, try the following: 1. Locate the browser Window > go to the Tools menu > click Internet Options > 2. Then, choose Security tab > choose Local Intranet > click the Sites button > 3. Click the Advanced button. 4. As a result, you will see the Local Intranet window. 5. In the Add this Web site to the zone text box, enter the TX Chrono User Interface URL
(http://<TX Chrono Web Site Address>), making sure the Require server verification (https:)
for all web sites in this zone check-box is unchecked, and click the Add button.
8
2. Before You Install
2. Before You Install
Before you start installing TX Chrono, please make sure that everything is set up and configured correctly. Below are the steps we recommend you to walk through before installing TX Chrono.
2.1 Step 1 – All Requirements Are Met
Please make sure that the servers you are going to deploy TX Chrono to comply with the Hardware and Software Requirements described in the following sections:
Hardware Requirements Software Requirements
2.2 Step 2 – People Assigned to Corresponding Project Roles
Please make sure that all persons who participate in projects (and report working time for it) are
included in corresponding project roles. This is required by TX Chrono in order to build role
hierarchy and grant permissions to view reports and approve/decline working time.
2.3 Step 3 – Review Your Time Reports
TX Chrono executes bi-directional working time synchronization with Team Foundation Server. It
means that each action involved in adding or subtracting the time reported for a particular Work
Item (by editing the “Completed work” field) will be synchronized with the current week time report
in TX Chrono. On the other hand, each change in TX Chrono will be synchronized with the
“Completed work” field for a particular Work Item.
Before you install TX Chrono, you need to make sure that all Work Items have their Completed
Work values up-to-date. The reason is that after TX Chrono is installed, it will start controlling every
operation that involves changes in time reported to a particular Work Item in Team Foundation
Server.
2.4 Step 4 – You Have Permissions to Install TX Chrono
It is required that the installation is performed by the computer administrator. In other words, on
every computer where TX Chrono components will be installed, the user responsible for the
installation must be included into the group of local Administrators.
Use the following steps to accomplish this:
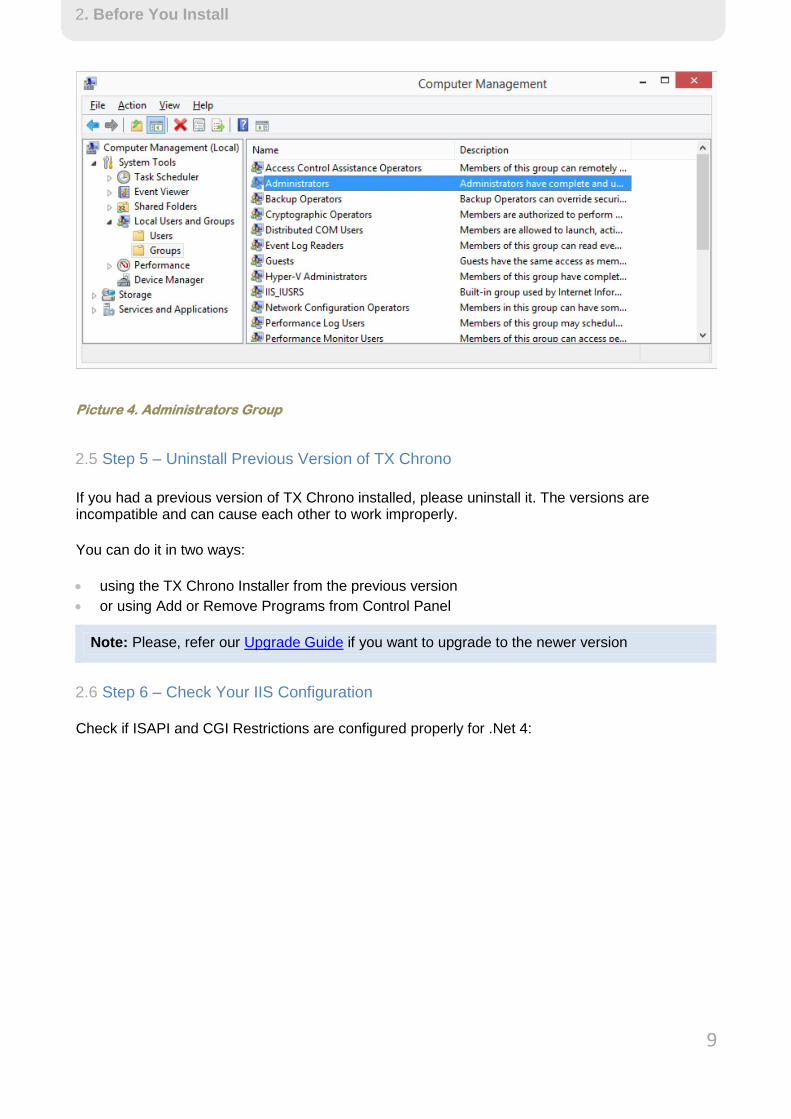
Go to Start > Control Panel > Administrative tools > Computer Management. In the console tree, expand the ‘Local Users and Groups’ group and select Groups from the list.
9
2. Before You Install
Picture 4. Administrators Group
2.5 Step 5 – Uninstall Previous Version of TX Chrono
If you had a previous version of TX Chrono installed, please uninstall it. The versions are incompatible and can cause each other to work improperly.
You can do it in two ways:
using the TX Chrono Installer from the previous version or using Add or Remove Programs from Control Panel
Note: Please, refer our Upgrade Guide if you want to upgrade to the newer version
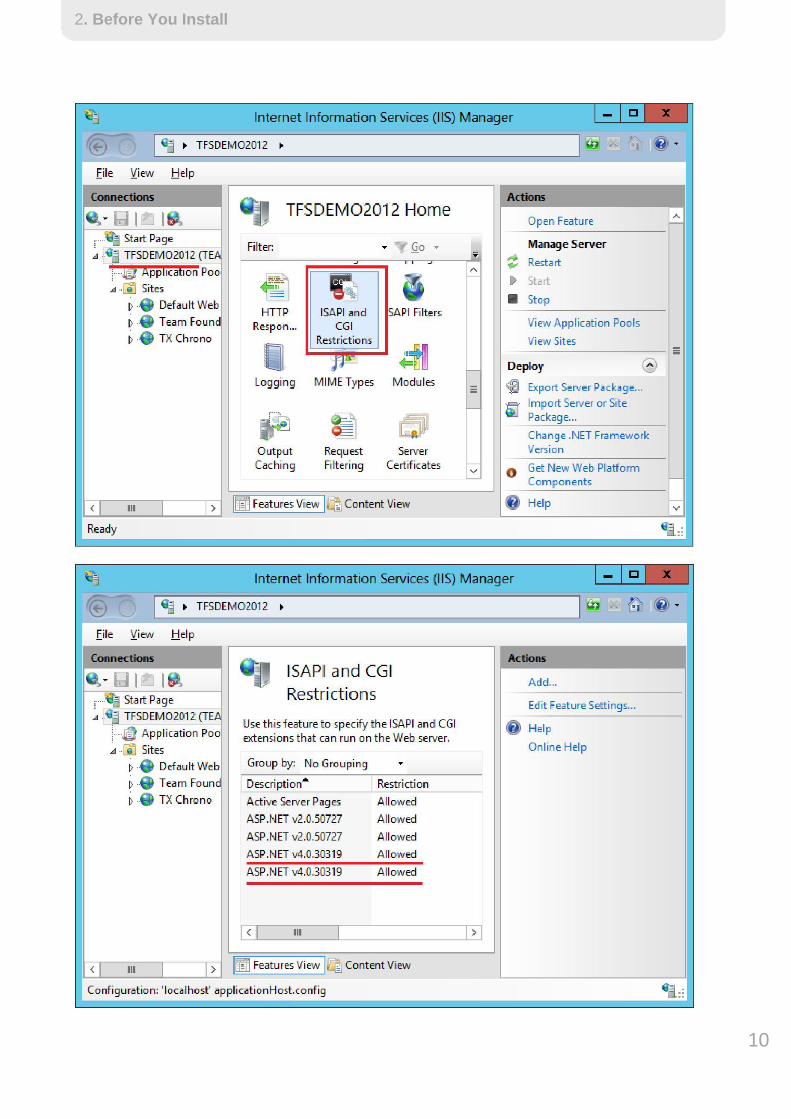
2.6 Step 6 – Check Your IIS Configuration
Check if ISAPI and CGI Restrictions are configured properly for .Net 4:
10
2. Before You Install
11
2. Before You Install
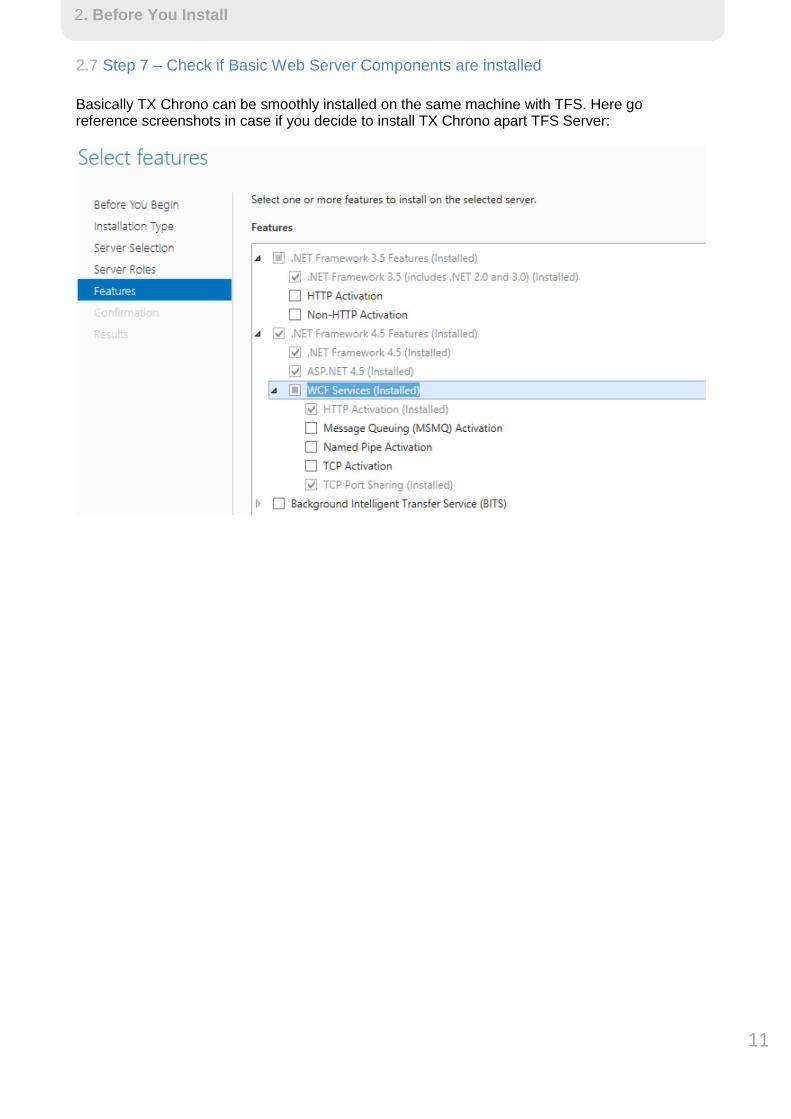
2.7 Step 7 – Check if Basic Web Server Components are installed
Basically TX Chrono can be smoothly installed on the same machine with TFS. Here go reference screenshots in case if you decide to install TX Chrono apart TFS Server:

12
2. Before You Install
13
3. TX Chrono Installation
3. TX Chrono Installation
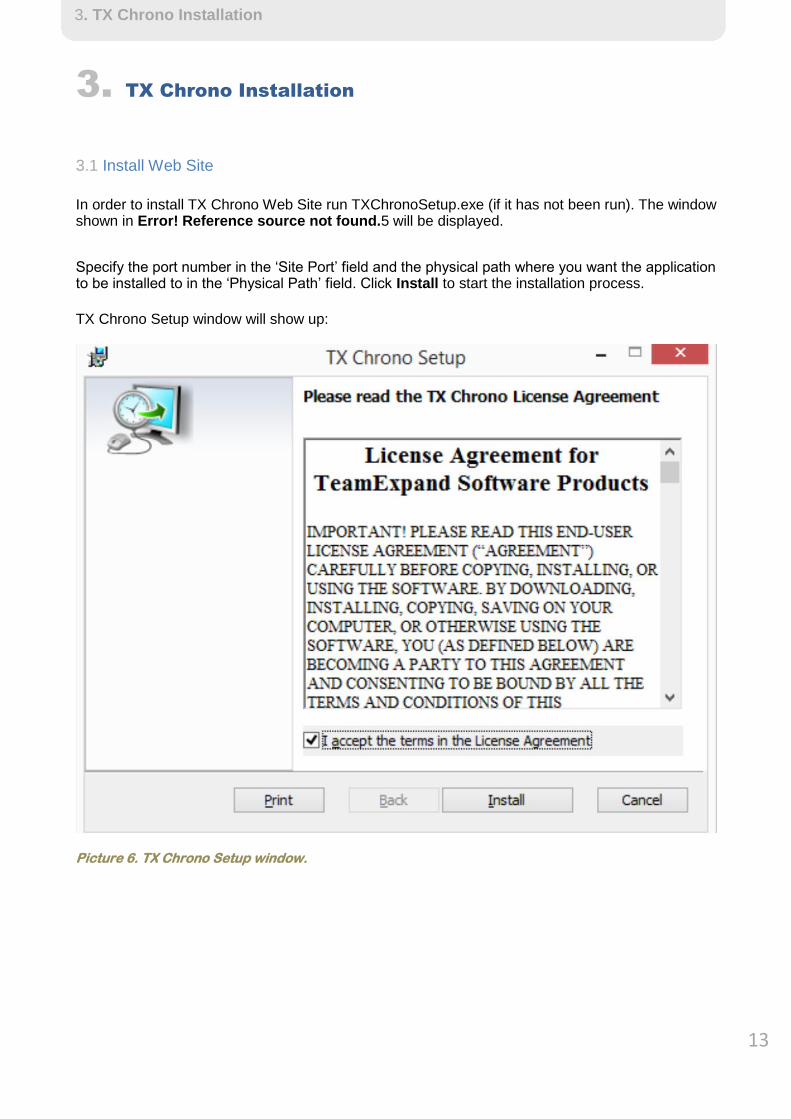
3.1 Install Web Site
In order to install TX Chrono Web Site run TXChronoSetup.exe (if it has not been run). The window shown in Error! Reference source not found.5 will be displayed. Specify the port number in the ‘Site Port’ field and the physical path where you want the application to be installed to in the ‘Physical Path’ field. Click Install to start the installation process.
TX Chrono Setup window will show up:
Picture 6. TX Chrono Setup window.
14
3. TX Chrono Installation
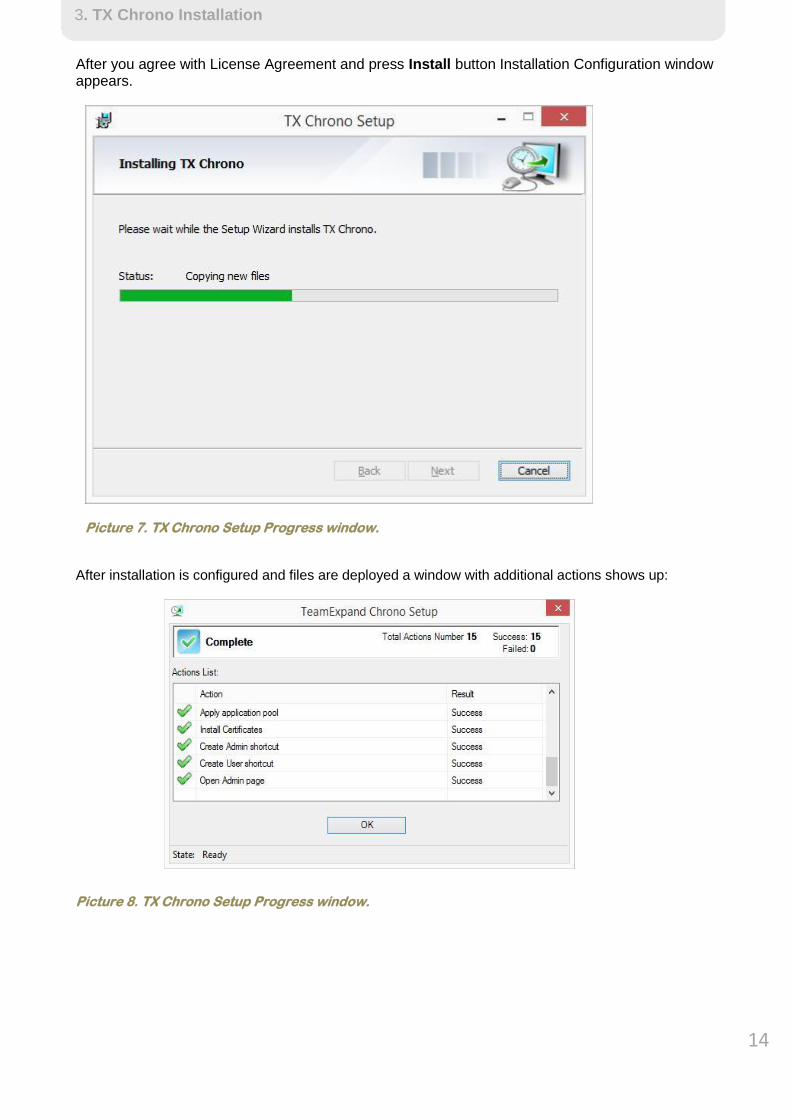
After you agree with License Agreement and press Install button Installation Configuration window appears.
Picture 7. TX Chrono Setup Progress window.
After installation is configured and files are deployed a window with additional actions shows up:
Picture 8. TX Chrono Setup Progress window.

15
3. TX Chrono Installation
3.2 Installation Completion
Just after application installation browser window with Admin Login page is automatically opened:
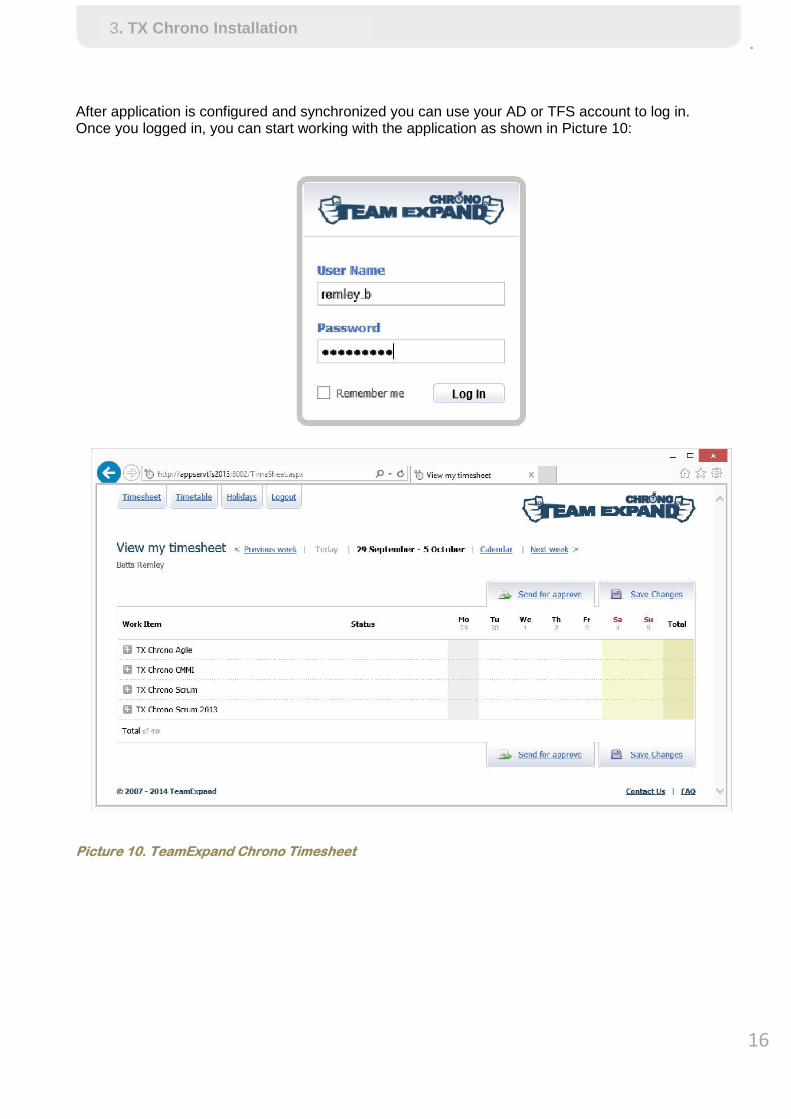
Picture 9. Log in form
After Admin Login you need to configure connection to TFS, select Project Collections to
synchronize with and choose & configure your User Environment Type. You can find detailed
instructions in the Configuration Guide.
16
.
After application is configured and synchronized you can use your AD or TFS account to log in. Once you logged in, you can start working with the application as shown in Picture 10:
Picture 10. TeamExpand Chrono Timesheet
3. TX Chrono Installation
17
4. TX Chrono Configuration
4. TX Chrono Configuration
After you installed TX Chrono, you need to configure it as described in the TX Chrono Configuration Guide in any of the following cases:
TFS permissions configuration does not include the following project user groups: Project
Administrators, Contributors, Readers or intended users are members of user groups other
than the ones listed above.
Timesheets need to be synchronized with work items other than Tasks. E.g., your workflow may include Bugs, Sprint Backlog Task, Product Backlog Item, etc.
You need work items to be available in timesheets as the work items get into state other than Active and In Progress. E.g. your team members start working on tasks, as the tasks get into
the New or In Testing states.
You need tasks that are not to be synchronized with any TFS work items. E.g., your team members may need to be able to submit time to the Sickness, Vacation, or Holiday tasks.
Refer to the TX Chrono Configuration Guide to learn how to set up Virtual Projects.
You need time reported in timesheets to be synchronized with work item fields other than Completed Work, e.g. for that you may have a field called Actual Effort.
You want TX Chrono to display some additional information for each work item, e.g. Iteration Path or Estimate.
You want to customize Default Timetable
You want to setup Mail Notifications for such user actions as Send Time for Approve, Approve or Decline time
You want to adjust Background Synchronization interval or forcibly trigger sync
You want to change User Authentication type
Note: For full configuration reference you can apply to our Configuration Guide
18
5. TX Chrono License Retrieval
5. TX Chrono License Retrieval
After TX Chrono is installed and up-and-running, you have a 30-day trial period. After it ends, you will have to request a license.
After purchase, you will receive two license files: license.lic and license_chrono.lic. To apply your license you need to accomplish the steps below.
5.1 How does TX License work
License Service validates most TX Chrono operations. There are three types of License Service:
Web-based, Integrated and Portable. We recommend using Integrated version of License service
because it is more secure, reliable and fast. Just after installation, TX Chrono by default is
configured to use Web-based License Service. If you are going to keep using Web-based License
Service, you can skip step 4.2.
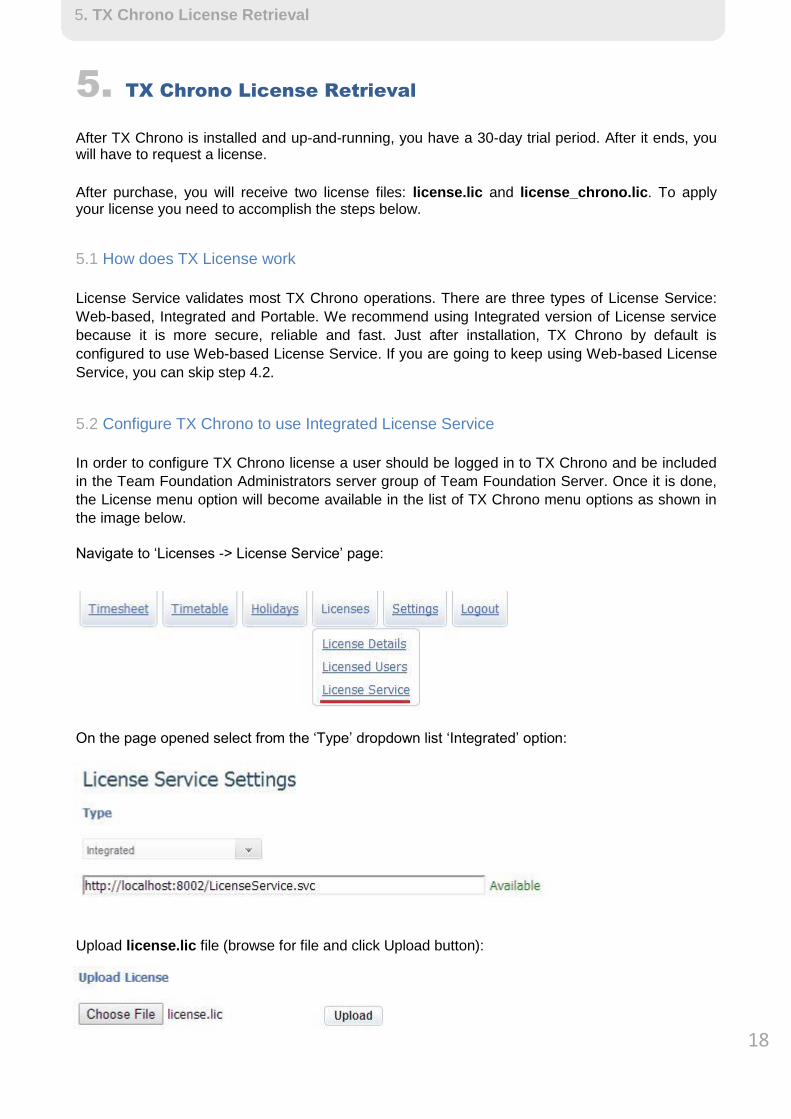
5.2 Configure TX Chrono to use Integrated License Service
In order to configure TX Chrono license a user should be logged in to TX Chrono and be included
in the Team Foundation Administrators server group of Team Foundation Server. Once it is done,
the License menu option will become available in the list of TX Chrono menu options as shown in
the image below.
Navigate to ‘Licenses -> License Service’ page:
On the page opened select from the ‘Type’ dropdown list ‘Integrated’ option:
Upload license.lic file (browse for file and click Upload button):
19
5. TX Chrono License Retrieval
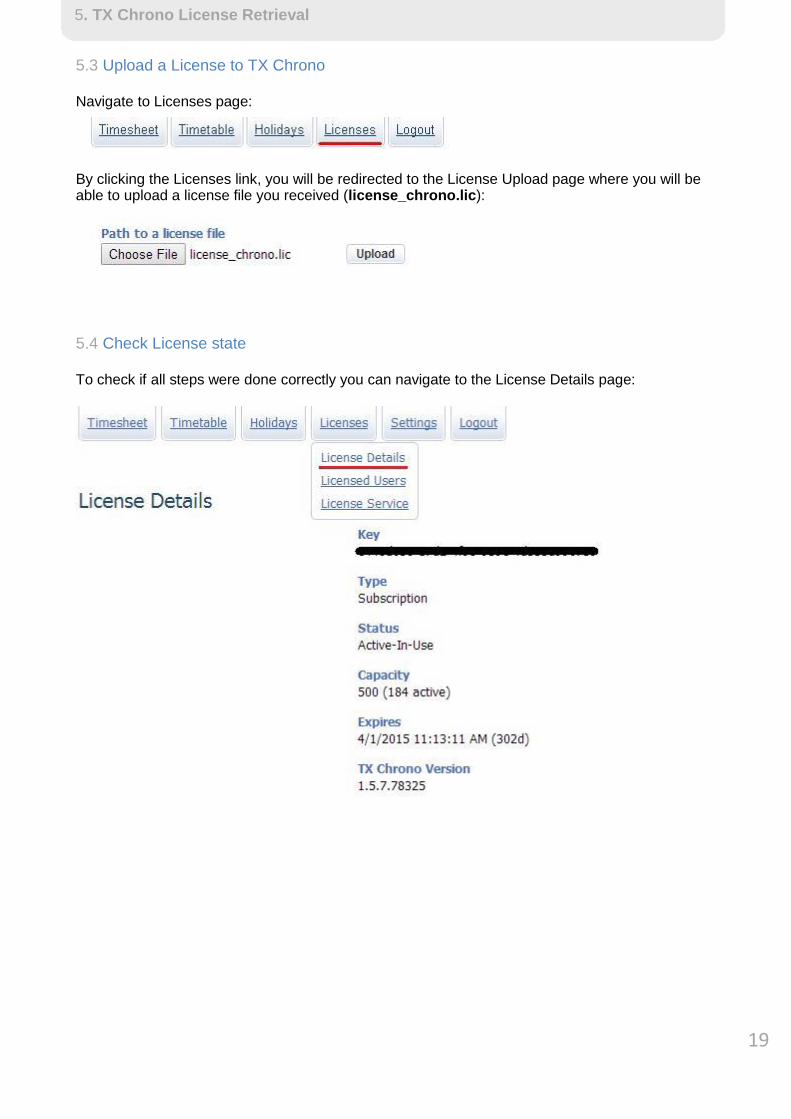
5.3 Upload a License to TX Chrono
Navigate to Licenses page:
By clicking the Licenses link, you will be redirected to the License Upload page where you will be able to upload a license file you received (license_chrono.lic):
5.4 Check License state
To check if all steps were done correctly you can navigate to the License Details page:
20
6. TX Chrono Removal
6. TX Chrono Removal
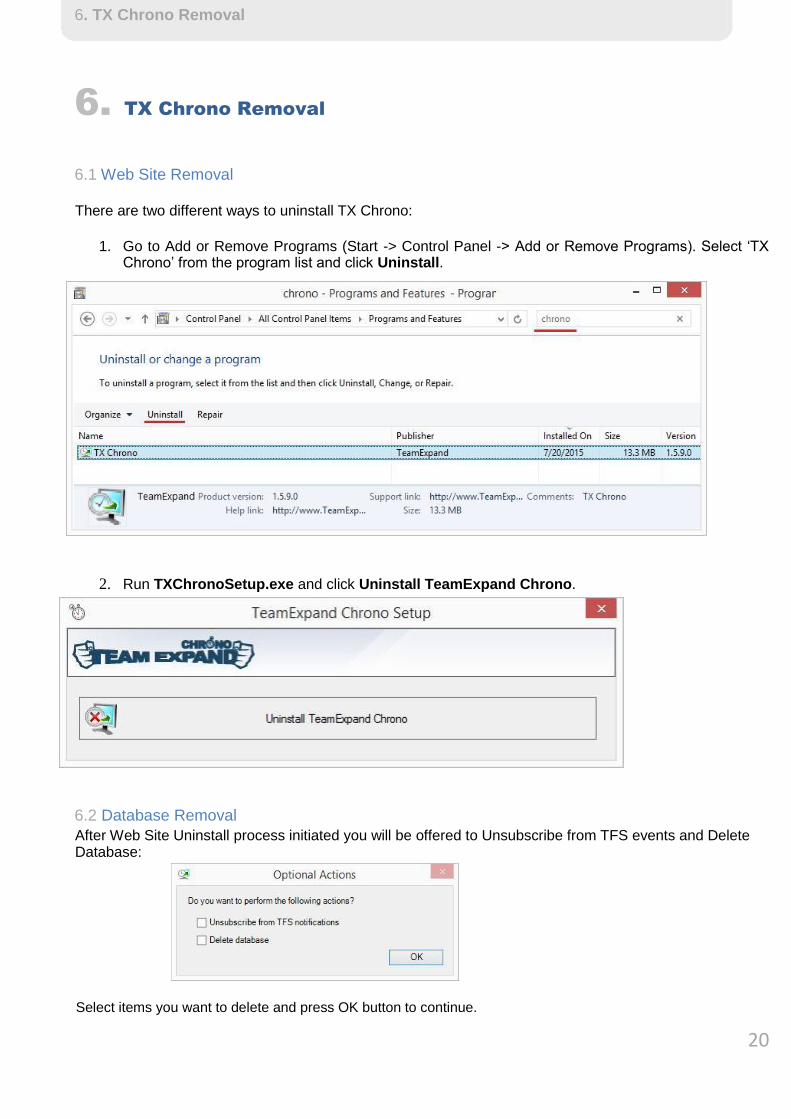
6.1 Web Site Removal
There are two different ways to uninstall TX Chrono:
1. Go to Add or Remove Programs (Start -> Control Panel -> Add or Remove Programs). Select ‘TX
Chrono’ from the program list and click Uninstall.
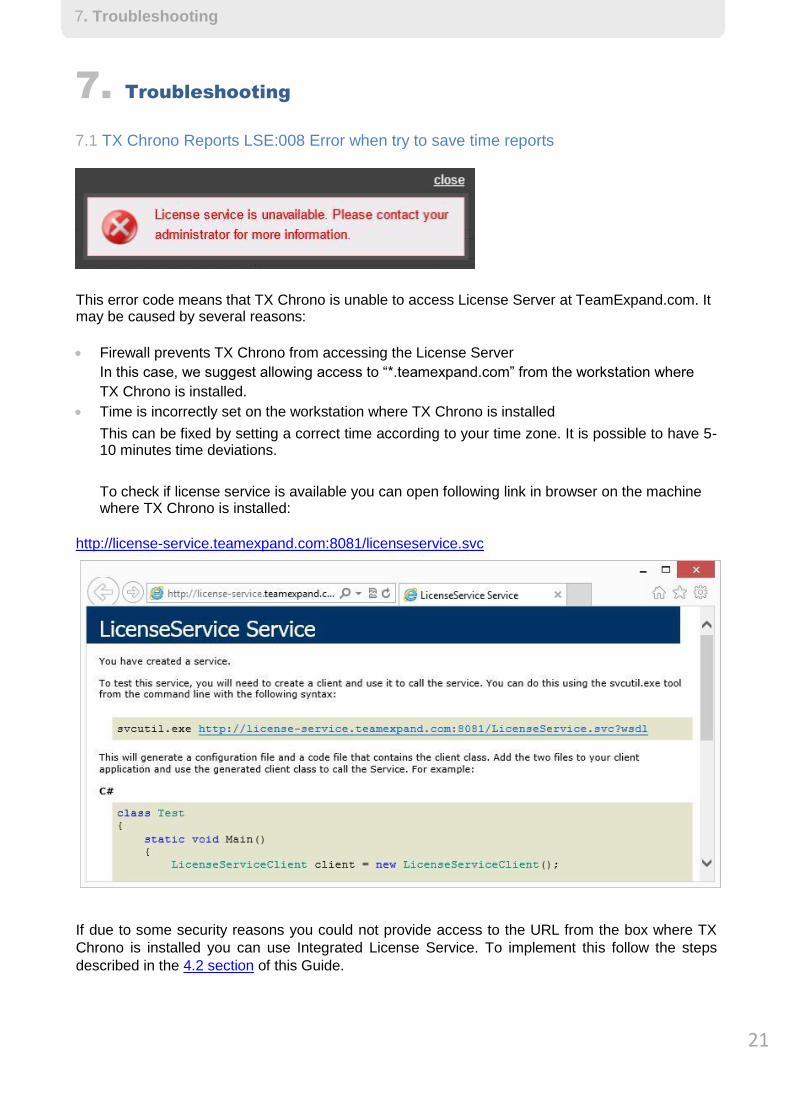
2. Run TXChronoSetup.exe and click Uninstall TeamExpand Chrono.
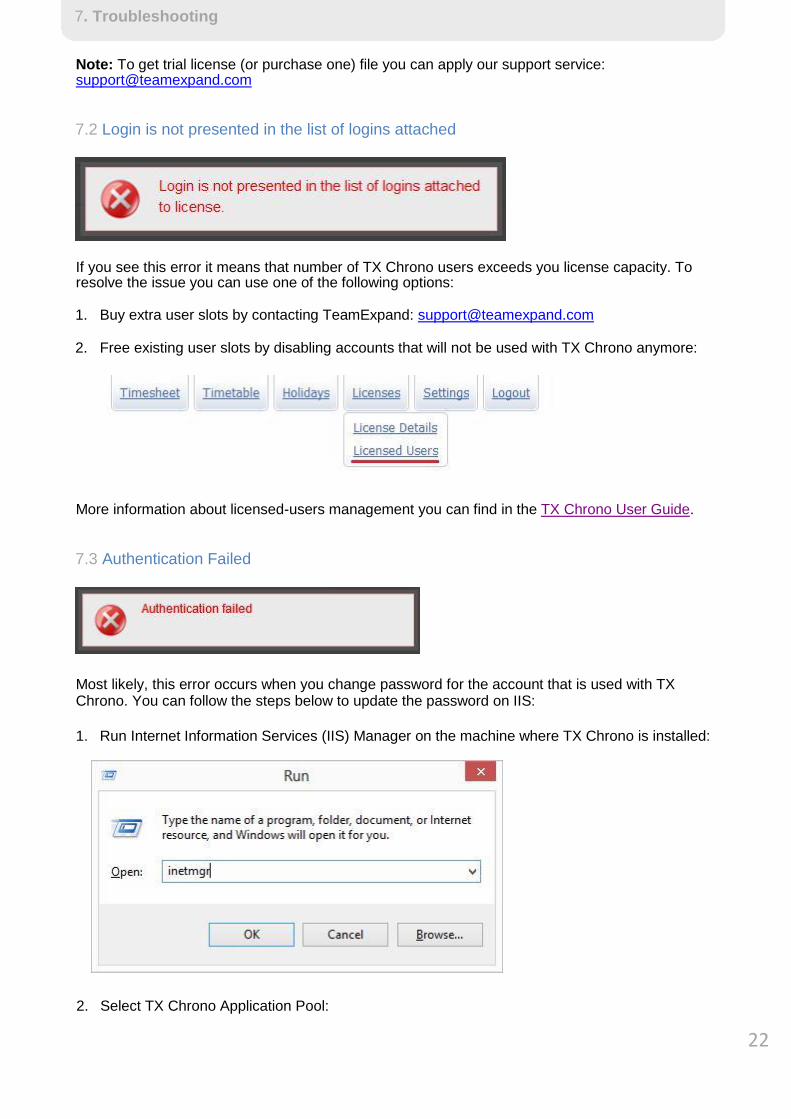
6.2 Database Removal
After Web Site Uninstall process initiated you will be offered to Unsubscribe from TFS events and Delete Database:
Select items you want to delete and press OK button to continue.
21
7. Troubleshooting 2
7. Troubleshooting
7.1 TX Chrono Reports LSE:008 Error when try to save time reports
This error code means that TX Chrono is unable to access License Server at TeamExpand.com. It may be caused by several reasons:
Firewall prevents TX Chrono from accessing the License Server In this case, we suggest allowing access to “*.teamexpand.com” from the workstation where TX Chrono is installed.
Time is incorrectly set on the workstation where TX Chrono is installed
This can be fixed by setting a correct time according to your time zone. It is possible to have 5-10 minutes time deviations.
To check if license service is available you can open following link in browser on the machine where TX Chrono is installed:
http://license-service.teamexpand.com:8081/licenseservice.svc
If due to some security reasons you could not provide access to the URL from the box where TX
Chrono is installed you can use Integrated License Service. To implement this follow the steps
described in the 4.2 section of this Guide.
22
7. Troubleshooting 23
Note: To get trial license (or purchase one) file you can apply our support service: [email protected]
7.2 Login is not presented in the list of logins attached
If you see this error it means that number of TX Chrono users exceeds you license capacity. To resolve the issue you can use one of the following options: 1. Buy extra user slots by contacting TeamExpand: [email protected]
2. Free existing user slots by disabling accounts that will not be used with TX Chrono anymore:
More information about licensed-users management you can find in the TX Chrono User Guide.
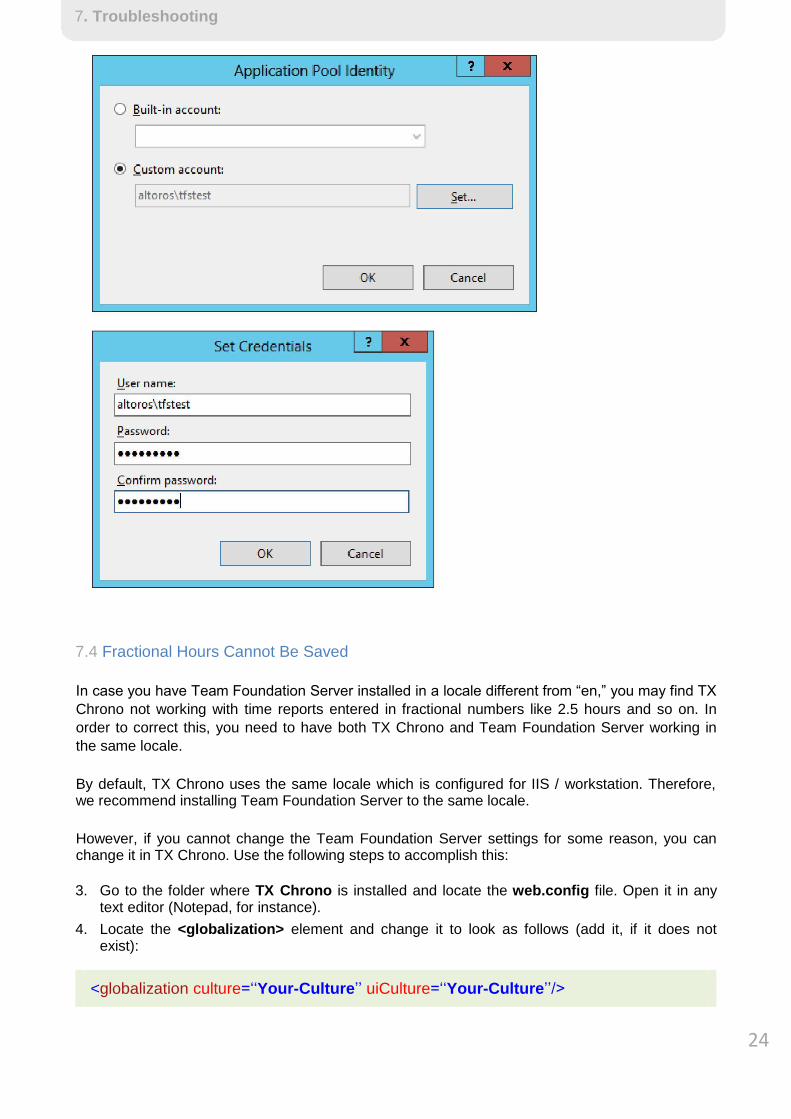
7.3 Authentication Failed
Most likely, this error occurs when you change password for the account that is used with TX Chrono. You can follow the steps below to update the password on IIS: 1. Run Internet Information Services (IIS) Manager on the machine where TX Chrono is installed:
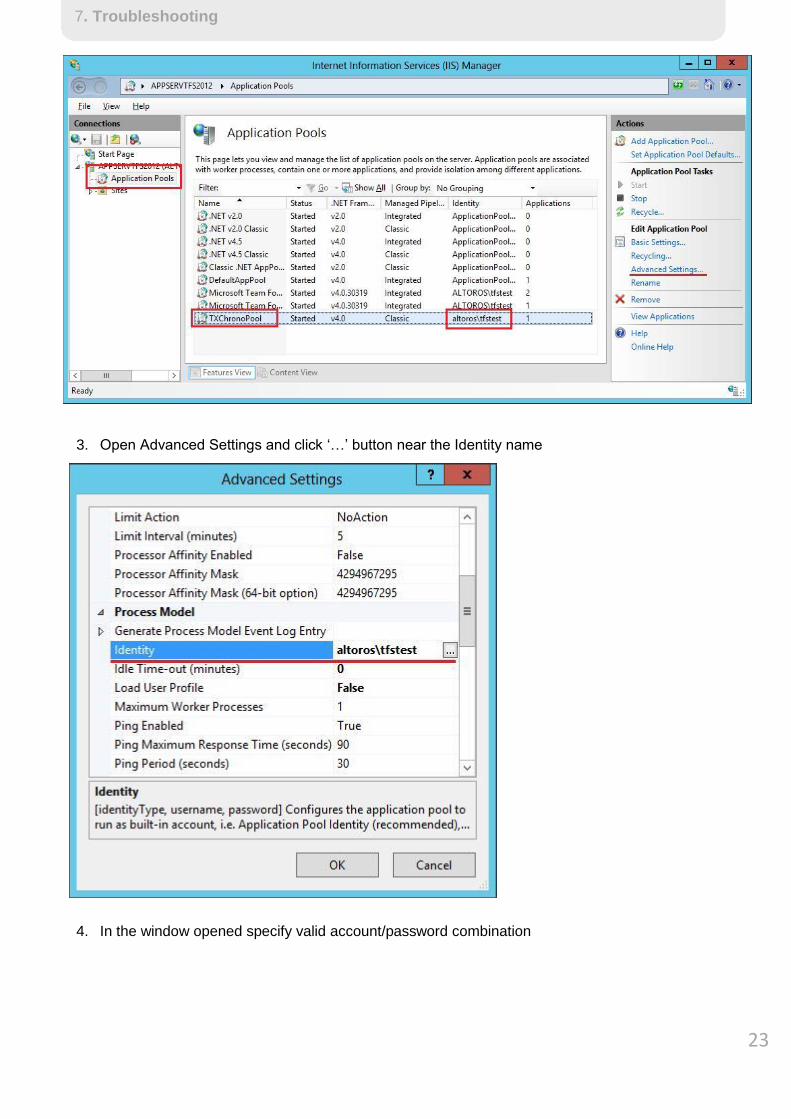
2. Select TX Chrono Application Pool:
23
7. Troubleshooting 24
3. Open Advanced Settings and click ‘…’ button near the Identity name
4. In the window opened specify valid account/password combination
24
7. Troubleshooting 25
7.4 Fractional Hours Cannot Be Saved
In case you have Team Foundation Server installed in a locale different from “en,” you may find TX
Chrono not working with time reports entered in fractional numbers like 2.5 hours and so on. In
order to correct this, you need to have both TX Chrono and Team Foundation Server working in
the same locale.
By default, TX Chrono uses the same locale which is configured for IIS / workstation. Therefore, we recommend installing Team Foundation Server to the same locale.
However, if you cannot change the Team Foundation Server settings for some reason, you can change it in TX Chrono. Use the following steps to accomplish this:
3. Go to the folder where TX Chrono is installed and locate the web.config file. Open it in any
text editor (Notepad, for instance). 4. Locate the <globalization> element and change it to look as follows (add it, if it does not
exist):
<globalization culture=‘‘Your-Culture’’ uiCulture=‘‘Your-Culture’’/>
25
7. Troubleshooting
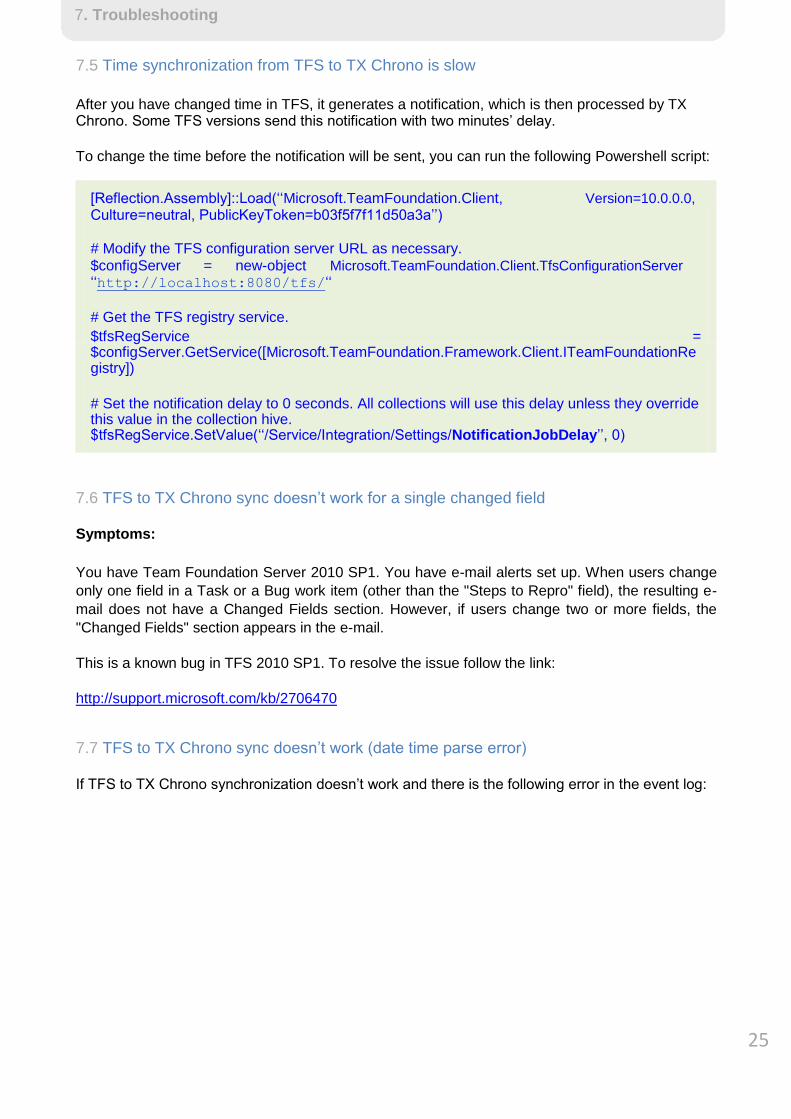
7.5 Time synchronization from TFS to TX Chrono is slow
After you have changed time in TFS, it generates a notification, which is then processed by TX Chrono. Some TFS versions send this notification with two minutes’ delay.
To change the time before the notification will be sent, you can run the following Powershell script:
[Reflection.Assembly]::Load(‘‘Microsoft.TeamFoundation.Client, Version=10.0.0.0, Culture=neutral, PublicKeyToken=b03f5f7f11d50a3a’’)
# Modify the TFS configuration server URL as necessary. $configServer = new-object Microsoft.TeamFoundation.Client.TfsConfigurationServer ‘‘http://localhost:8080/tfs/‘‘
# Get the TFS registry service. $tfsRegService = $configServer.GetService([Microsoft.TeamFoundation.Framework.Client.ITeamFoundationRe gistry])
# Set the notification delay to 0 seconds. All collections will use this delay unless they override this value in the collection hive. $tfsRegService.SetValue(‘‘/Service/Integration/Settings/NotificationJobDelay’’, 0)
7.6 TFS to TX Chrono sync doesn’t work for a single changed field
Symptoms:
You have Team Foundation Server 2010 SP1. You have e-mail alerts set up. When users change
only one field in a Task or a Bug work item (other than the "Steps to Repro" field), the resulting e-
mail does not have a Changed Fields section. However, if users change two or more fields, the
"Changed Fields" section appears in the e-mail.
This is a known bug in TFS 2010 SP1. To resolve the issue follow the link: http://support.microsoft.com/kb/2706470
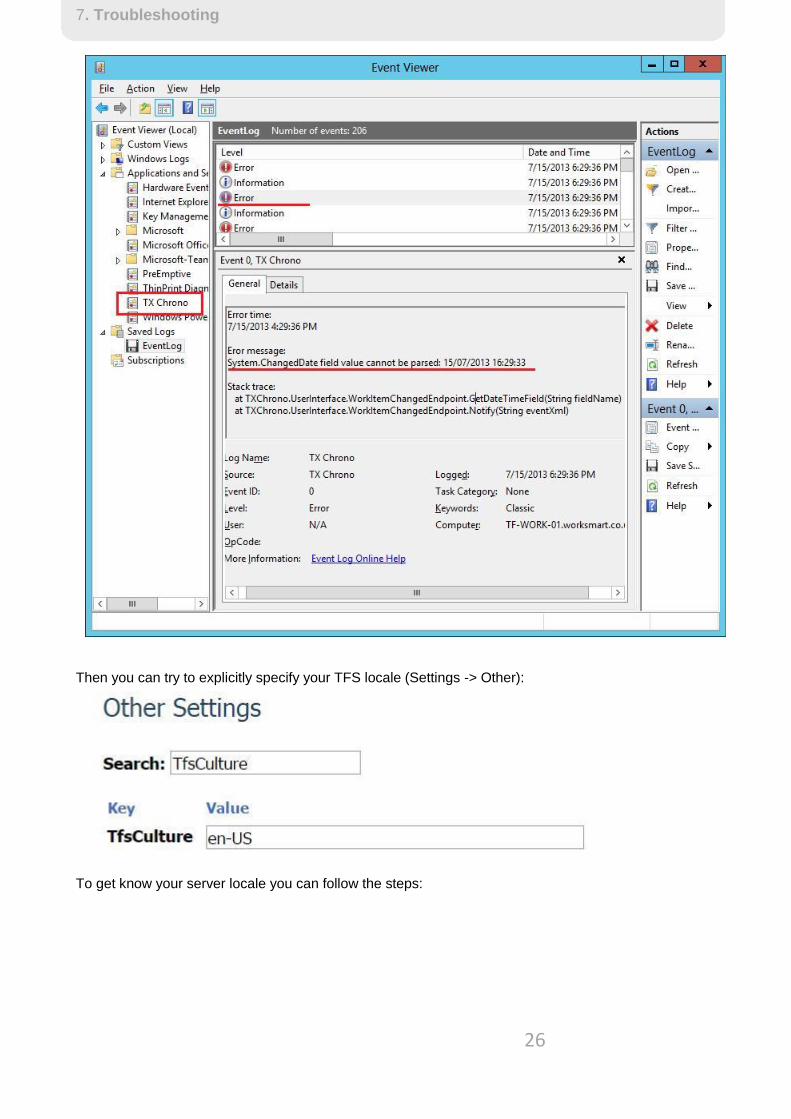
7.7 TFS to TX Chrono sync doesn’t work (date time parse error)
If TFS to TX Chrono synchronization doesn’t work and there is the following error in the event log:
26
7. Troubleshooting
Then you can try to explicitly specify your TFS locale (Settings -> Other):
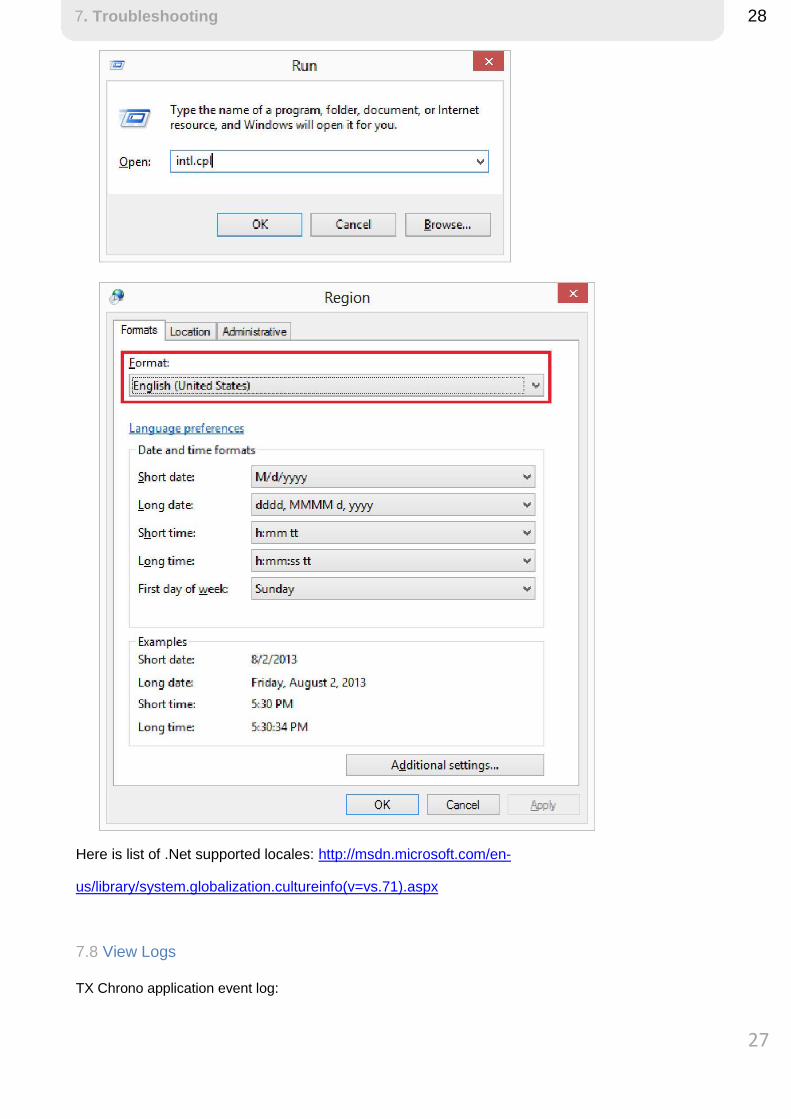
To get know your server locale you can follow the steps:
27
7. Troubleshooting 28
Here is list of .Net supported locales: http://msdn.microsoft.com/en-
us/library/system.globalization.cultureinfo(v=vs.71).aspx
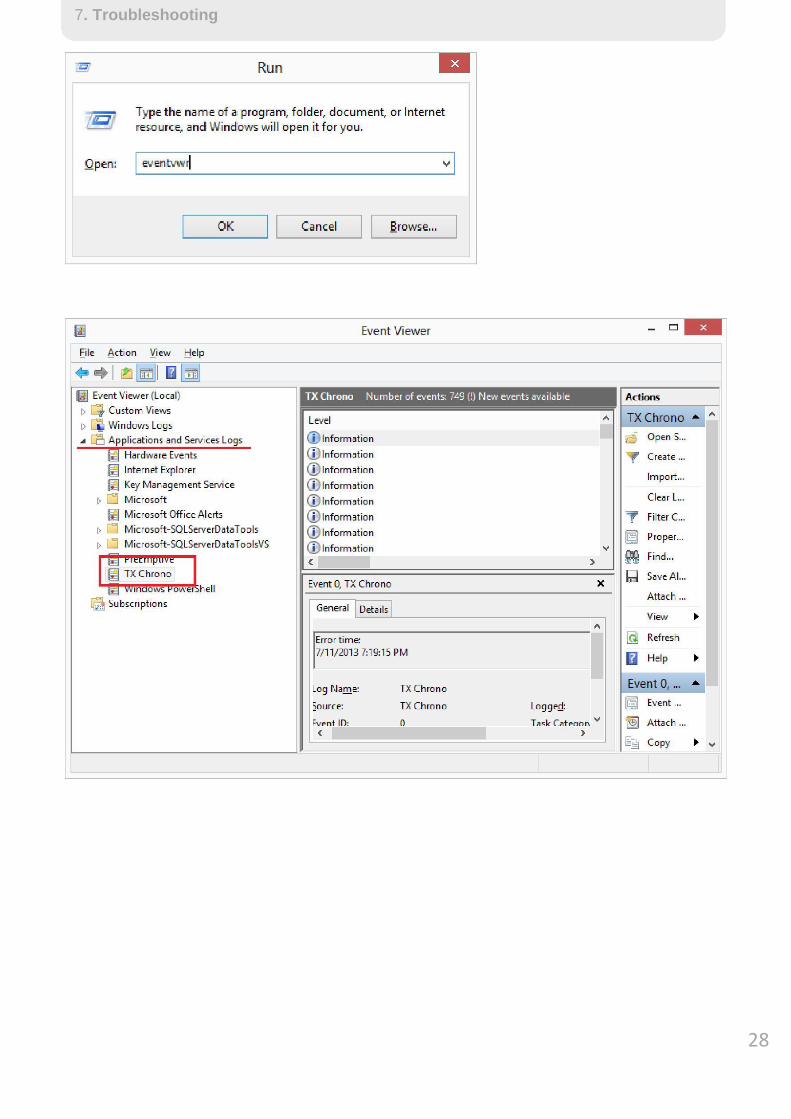
7.8 View Logs
TX Chrono application event log:
28
7. Troubleshooting
29
7. Troubleshooting
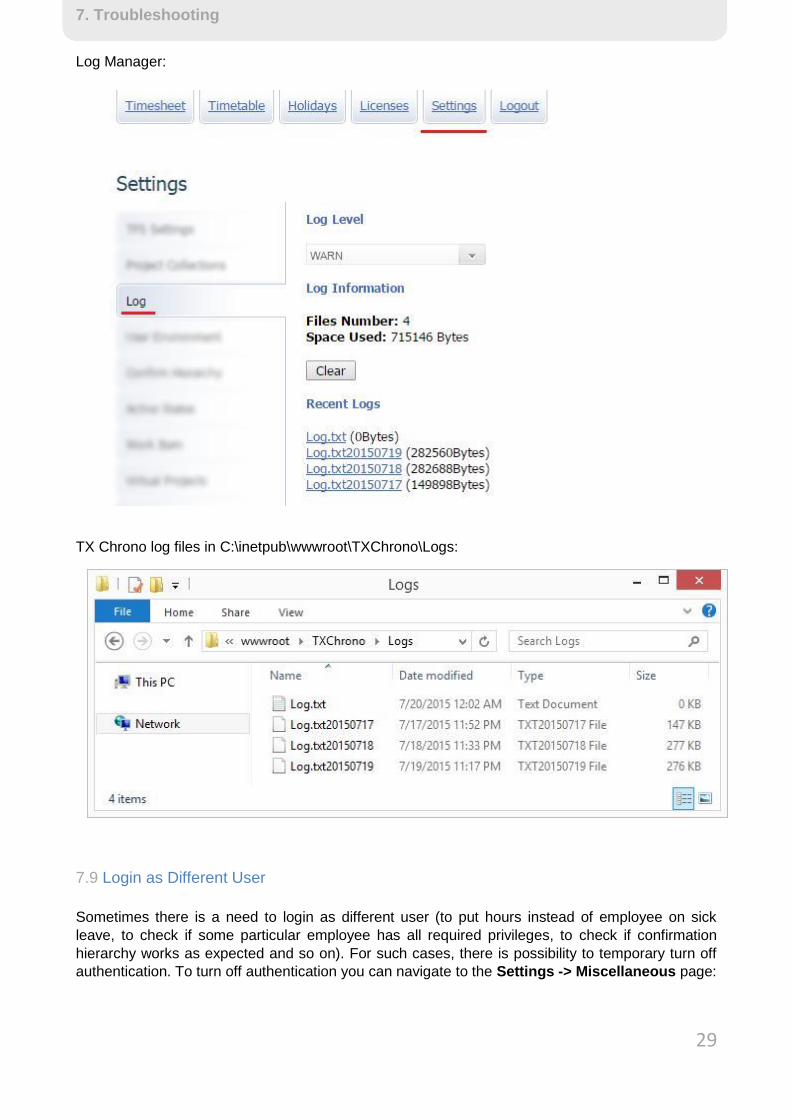
Log Manager:
TX Chrono log files in C:\inetpub\wwwroot\TXChrono\Logs:
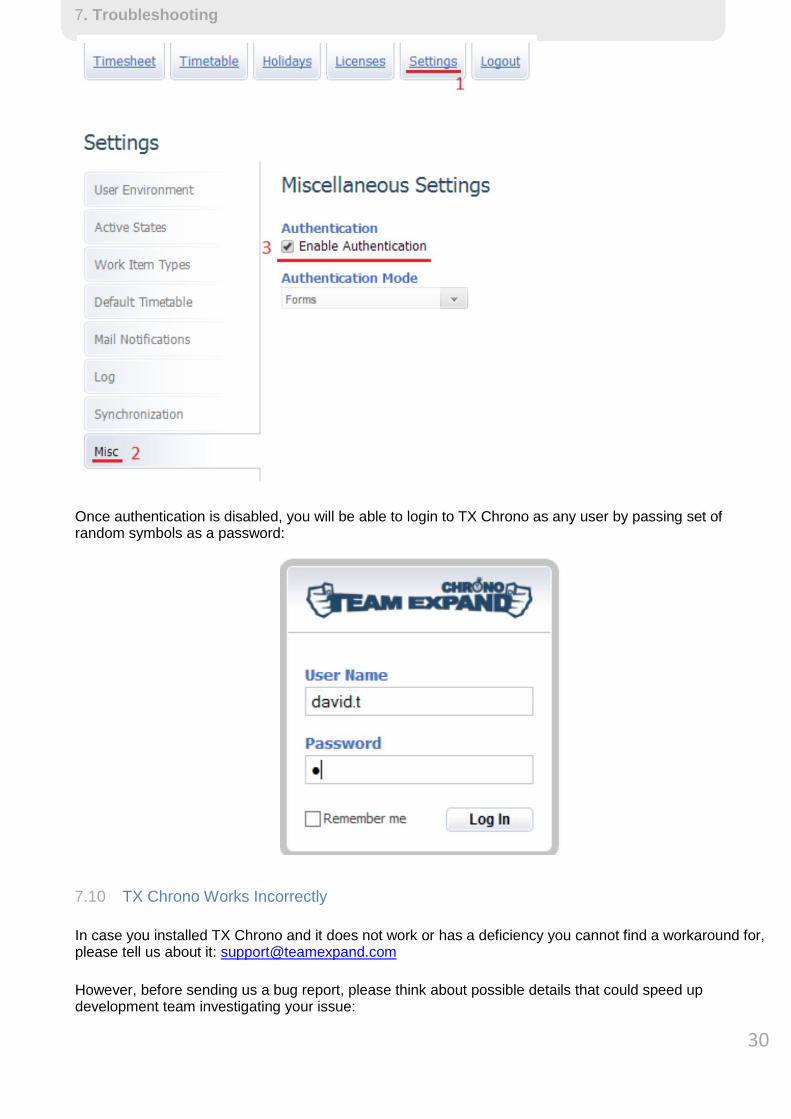
7.9 Login as Different User
Sometimes there is a need to login as different user (to put hours instead of employee on sick
leave, to check if some particular employee has all required privileges, to check if confirmation
hierarchy works as expected and so on). For such cases, there is possibility to temporary turn off
authentication. To turn off authentication you can navigate to the Settings -> Miscellaneous page:
30
7. Troubleshooting
Once authentication is disabled, you will be able to login to TX Chrono as any user by passing set of random symbols as a password:
7.10 TX Chrono Works Incorrectly
In case you installed TX Chrono and it does not work or has a deficiency you cannot find a workaround for, please tell us about it: [email protected]
However, before sending us a bug report, please think about possible details that could speed up development team investigating your issue:

31
7. Troubleshooting
Why do you think it is a deficiency? What is the expected result?
What is the version of TFS you use? What is the project template? Were there any modifications in the template?
How to reproduce the bug? Are there any steps to reproduce that always lead to the bug? What errors were reported to the event logs? Try looking at the TX Chrono event log. Any other relevant information: browser version, project, work item, etc. Give us a screen shot: a picture is worth a thousand words.
Together, we will build a better product!