vaquita user manual - diveboutik.com
TRANSCRIPT
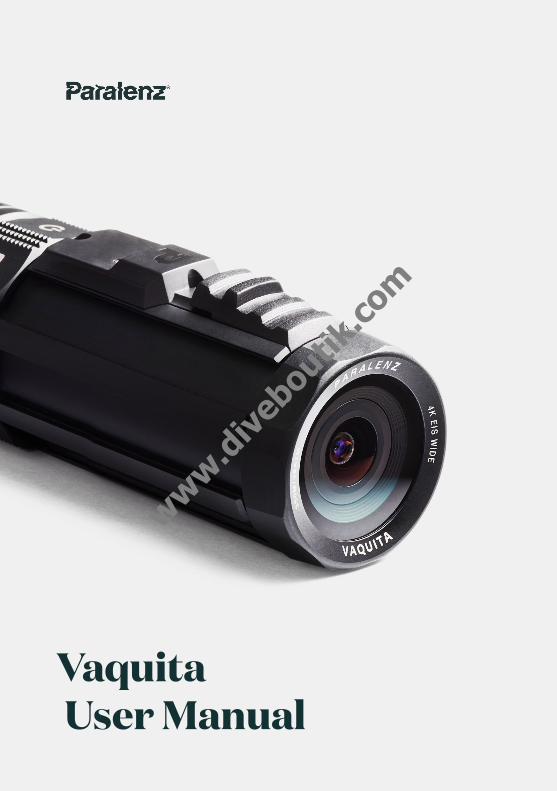
Vaquita User Manual
www.divebou
tik.co
m
Table Of Contents
The Paralenz Vaquita 4
The Camera 6
Getting Started 8
Photos & Videos 11
Download Content 12
Maintanance 13
Camera Modes 14
Software Updates 26
Battery 27
Troubleshooting 28
Warranty 29
Precautions 30
Regulatory Information 32
FCC Statement 34
IC Statement 36
SAR 37
Support 38
www.divebou
tik.co
m
4 5
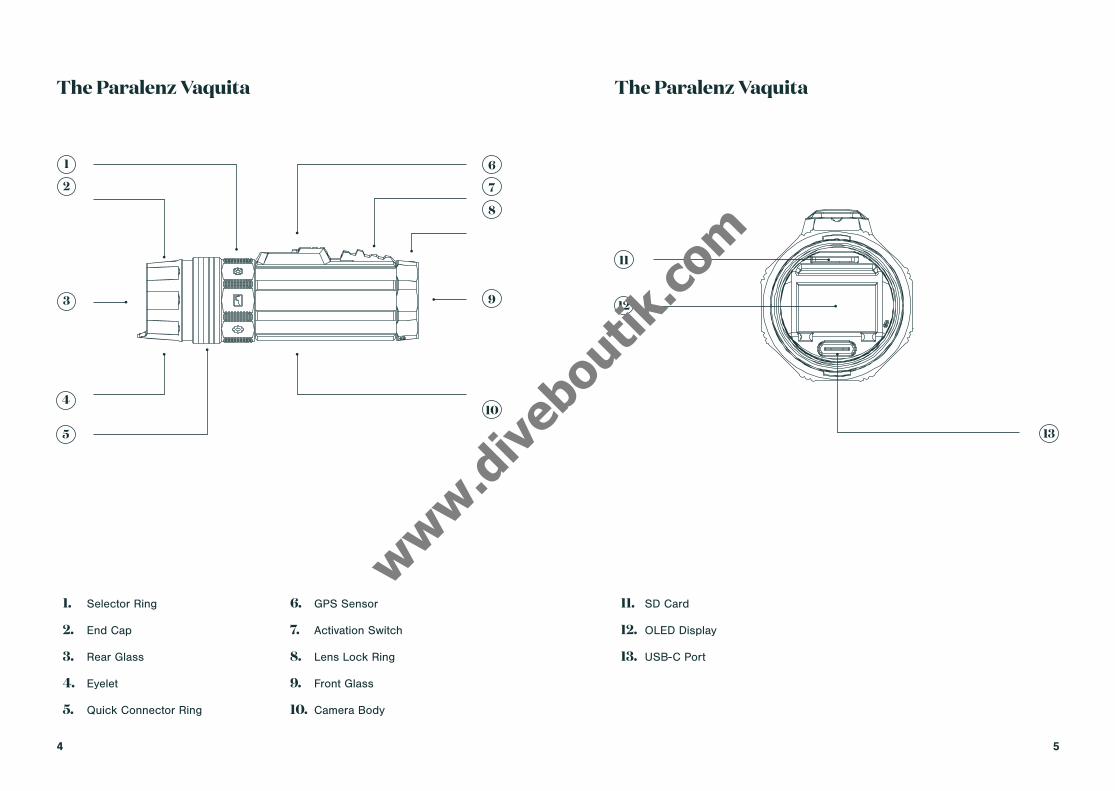
The Paralenz Vaquita The Paralenz Vaquita
1
2
3
4
5
9
8
7
6
1. Selector Ring
2. End Cap
3. Rear Glass
4. Eyelet
5. Quick Connector Ring
11. SD Card
12. OLED Display
13. USB-C Port
6. GPS Sensor
7. Activation Switch
8. Lens Lock Ring
9. Front Glass
10. Camera Body
10
11
12
13
www.divebou
tik.co
m
6 7
The Camera The Camera
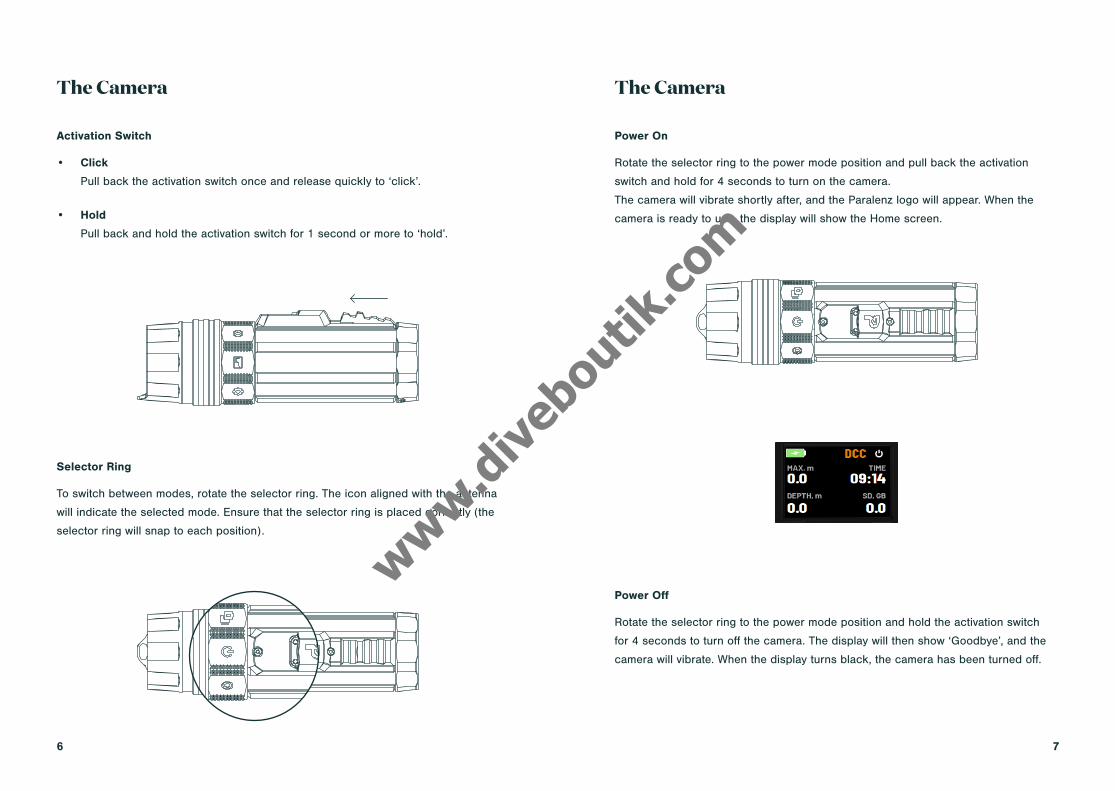
Activation Switch
• Click
Pull back the activation switch once and release quickly to ‘click’.
• Hold
Pull back and hold the activation switch for 1 second or more to ‘hold’.
Selector Ring
To switch between modes, rotate the selector ring. The icon aligned with the antenna
will indicate the selected mode. Ensure that the selector ring is placed correctly (the
selector ring will snap to each position).
Power On
Rotate the selector ring to the power mode position and pull back the activation
switch and hold for 4 seconds to turn on the camera.
The camera will vibrate shortly after, and the Paralenz logo will appear. When the
camera is ready to use, the display will show the Home screen.
Power Off
Rotate the selector ring to the power mode position and hold the activation switch
for 4 seconds to turn off the camera. The display will then show ‘Goodbye’, and the
camera will vibrate. When the display turns black, the camera has been turned off.
www.divebou
tik.co
m
8 9
Getting Started Getting Started
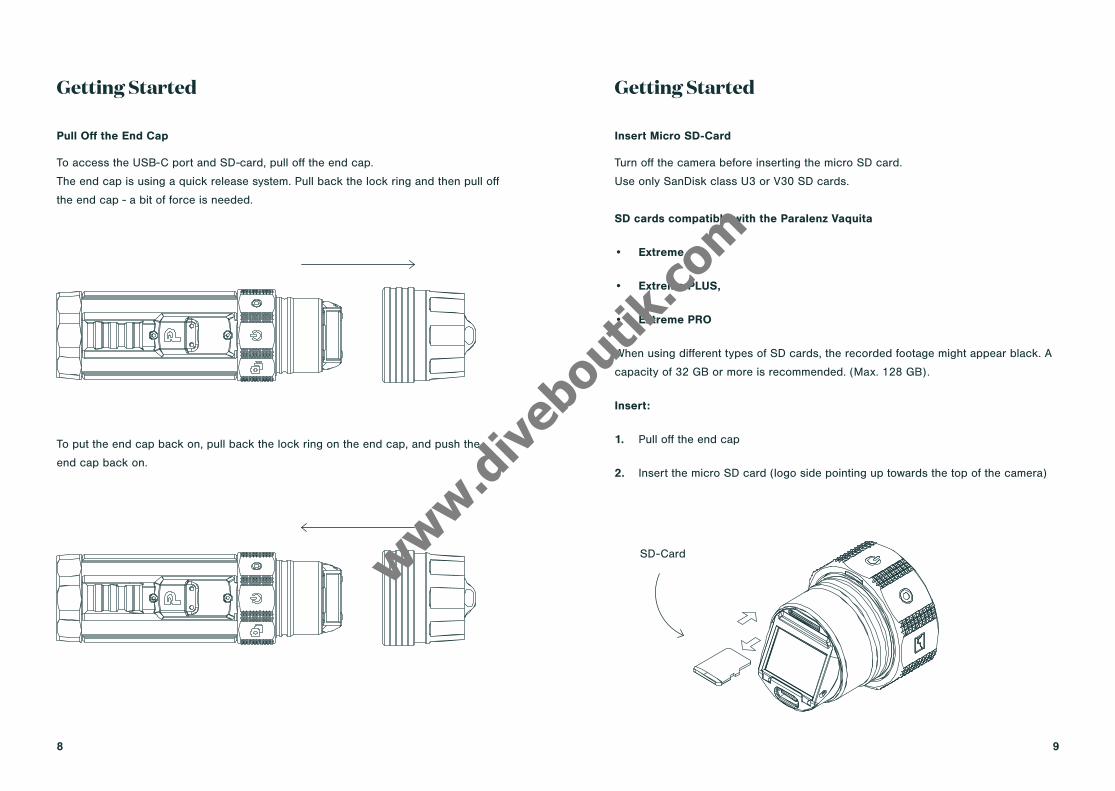
Pull Off the End Cap
To access the USB-C port and SD-card, pull off the end cap.
The end cap is using a quick release system. Pull back the lock ring and then pull off
the end cap - a bit of force is needed.
To put the end cap back on, pull back the lock ring on the end cap, and push the
end cap back on.
Insert Micro SD-Card
Turn off the camera before inserting the micro SD card.
Use only SanDisk class U3 or V30 SD cards.
SD cards compatible with the Paralenz Vaquita
• Extreme
• Extreme PLUS,
• Extreme PRO
When using different types of SD cards, the recorded footage might appear black. A
capacity of 32 GB or more is recommended. (Max. 128 GB).
Insert:
1. Pull off the end cap
2. Insert the micro SD card (logo side pointing up towards the top of the camera)
SD-Cardwww.divebou
tik.co
m
10 11
Remove Micro SD-Card
Make sure any recording is stopped when removing the SD-card.
Remove:
1. Pull off the end cap
2. Push in the micro SD card, then release it and the card will automatically pop
out
3. Press the end cap back on - If the red ring is visible, the end cap is not at-
tached correctly
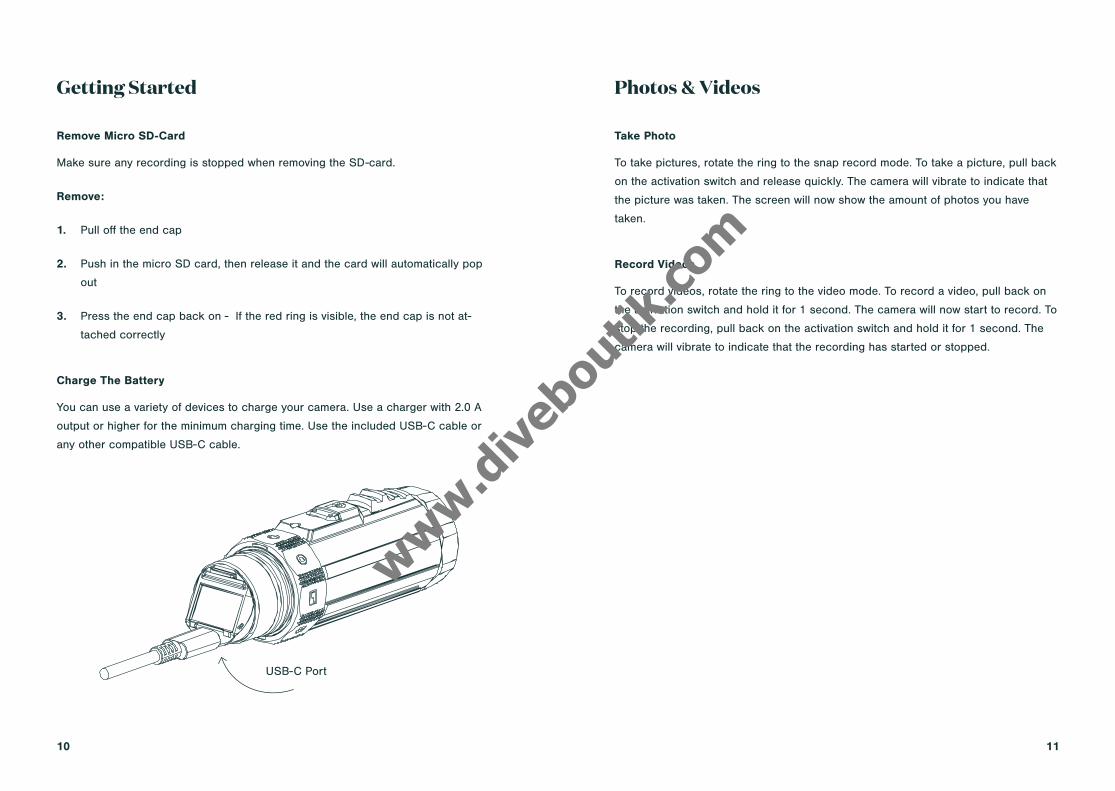
Charge The Battery
You can use a variety of devices to charge your camera. Use a charger with 2.0 A
output or higher for the minimum charging time. Use the included USB-C cable or
any other compatible USB-C cable.
USB-C Port
Getting Started
Take Photo
To take pictures, rotate the ring to the snap record mode. To take a picture, pull back
on the activation switch and release quickly. The camera will vibrate to indicate that
the picture was taken. The screen will now show the amount of photos you have
taken.
Record Videos
To record videos, rotate the ring to the video mode. To record a video, pull back on
the activation switch and hold it for 1 second. The camera will now start to record. To
stop the recording, pull back on the activation switch and hold it for 1 second. The
camera will vibrate to indicate that the recording has started or stopped.
Photos & Videos
www.divebou
tik.co
m
12 13
The Paralenz App
The free Paralenz App makes downloading, sharing, and viewing your photos and
recordings easy.
Download the app via App Store/Google Play. The app will guide you through the
connection process.
Micro SD-Card
You can transfer your data from your micro SD-card by inserting the card into a card
reader.
Use USB-C Cable
By connecting your camera to a computer via the USB-C cable, you can access your
footage on the camera from the computer.
Download Content
Note that you can also update the camera firmware through the app. The app will
notify you if there is a new firmware update available.
Always Clean The Camera In Fresh Water After Use
Leaving the Paralenz Vaquita covered in salt water after usage can damage your
product. It is important to wash the Paralenz Vaquita with fresh water after usage to
ensure the functionality of the product.
Cleaning The O-Rings
Check that the O-rings placed inside the end cap have not been stretched and do
not show any visible cuts or tears. To lubricate the O-rings, apply the included grease
and run the O-rings through your fingers while gently rubbing the grease onto them.
Do not use spray lubricant or petroleum-based grease.
Maintanance
Prevent The Camera From Flooding
The triple O-rings in the end cap keep the camera from flooding. They have been
tested to a max depth of 350 m/1148 ft./36 ATM. To ensure their functionality, prop-
erly maintain the O-rings and don’t open the camera below the water. Remember
to press the end cap on and make sure the red ring, located on the end cap, is not
visible when using the camera underwater.
Cleaning The Lens
To clean the lens, wipe with a soft, lint-free cloth. You can use Eyeglass Cleaning
Fluid – but do not use strong liquids such as petrol or alcohol.www.divebou
tik.co
m
14 15
Camera Modes
Custom 1 & 2
The vaquita camera has two custom modes. You can assign different
functions to these two modes. You choose which modes to assign in the
camera settings.
The Possible Functions Are:
• Video - different resolution and frame rate from the normal video mode
• Photo log - take pictures in an interval of your choice (1, 2, 5, 10, 60, or
120 sec.)
• Media viewer - view the pictures you have taken on the camera
To Change The Settings
1. Rotate the ring to the settings icon
2. Navigate through the menu to custom mode you want to change
settings for
3. Enter to the desired mode
4. Hold the activation which on ‘enable’ to select this setting
Further adjustments can be set in this settings menu.
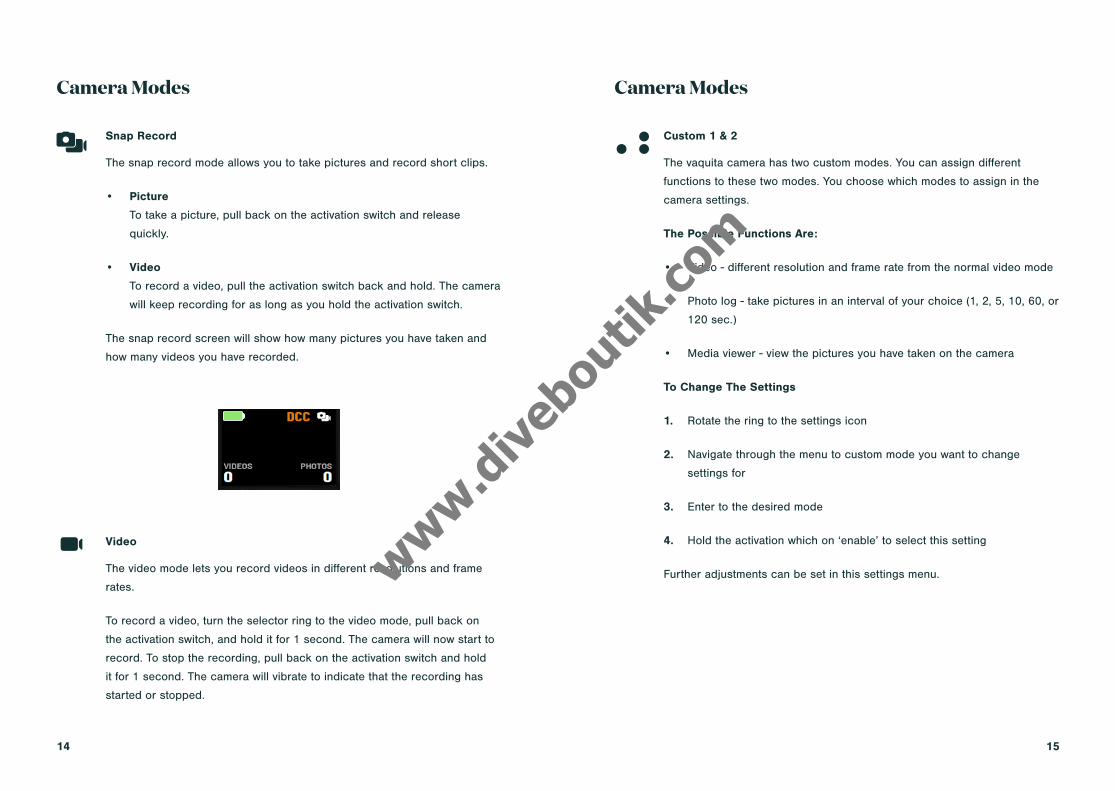
Snap Record
The snap record mode allows you to take pictures and record short clips.
• Picture
To take a picture, pull back on the activation switch and release
quickly.
• Video
To record a video, pull the activation switch back and hold. The camera
will keep recording for as long as you hold the activation switch.
The snap record screen will show how many pictures you have taken and
how many videos you have recorded.
Camera Modes
Video
The video mode lets you record videos in different resolutions and frame
rates.
To record a video, turn the selector ring to the video mode, pull back on
the activation switch, and hold it for 1 second. The camera will now start to
record. To stop the recording, pull back on the activation switch and hold
it for 1 second. The camera will vibrate to indicate that the recording has
started or stopped.
www.divebou
tik.co
m
16 17
Camera Modes
the camera tab to connect to the camera.
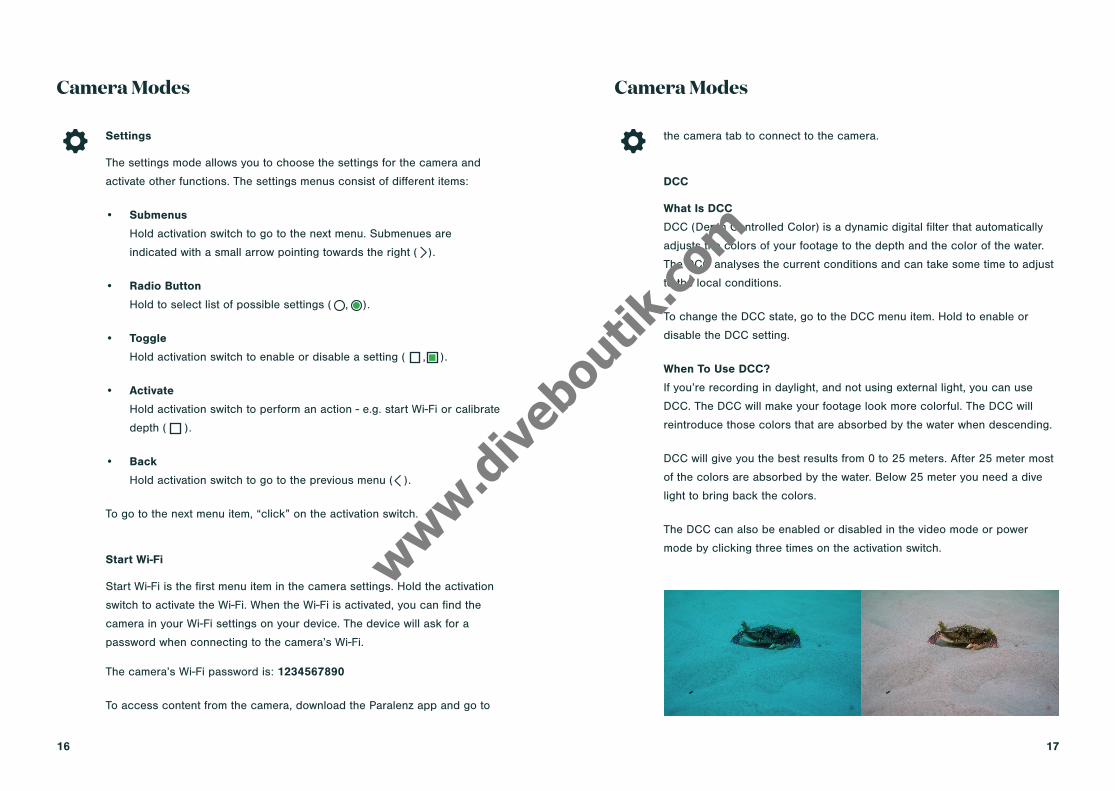
What Is DCC
DCC (Depth Controlled Color) is a dynamic digital filter that automatically
adjusts the colors of your footage to the depth and the color of the water.
The DCC analyses the current conditions and can take some time to adjust
to the local conditions.
To change the DCC state, go to the DCC menu item. Hold to enable or
disable the DCC setting.
When To Use DCC?
If you’re recording in daylight, and not using external light, you can use
DCC. The DCC will make your footage look more colorful. The DCC will
reintroduce those colors that are absorbed by the water when descending.
DCC will give you the best results from 0 to 25 meters. After 25 meter most
of the colors are absorbed by the water. Below 25 meter you need a dive
light to bring back the colors.
The DCC can also be enabled or disabled in the video mode or power
mode by clicking three times on the activation switch.
DCC
Camera Modes
Settings
The settings mode allows you to choose the settings for the camera and
activate other functions. The settings menus consist of different items:
• Submenus
Hold activation switch to go to the next menu. Submenues are
indicated with a small arrow pointing towards the right ( ).
• Radio Button
Hold to select list of possible settings ( , ).
• Toggle
Hold activation switch to enable or disable a setting ( , ).
• Activate
Hold activation switch to perform an action - e.g. start Wi-Fi or calibrate
depth ( ).
• Back
Hold activation switch to go to the previous menu ( ).
To go to the next menu item, “click” on the activation switch.
Start Wi-Fi
Start Wi-Fi is the first menu item in the camera settings. Hold the activation
switch to activate the Wi-Fi. When the Wi-Fi is activated, you can find the
camera in your Wi-Fi settings on your device. The device will ask for a
password when connecting to the camera’s Wi-Fi.
The camera’s Wi-Fi password is: 1234567890
To access content from the camera, download the Paralenz app and go to
www.divebou
tik.co
m
18 19
Custom 1 & 2
There are two custom submenus - one for each of the custom icons on the
ring.
Example:
To change the settings in custom 1 or 2, do the following.
In the submenu, three modes are presented:
• Video
• Photo Log
• Media Viewer
By entering the mode, and enabling it, the mode is assigned to the ring
position -
Camera Modes
Custom Video
The custom video menu works like the normal video settings - see the video
settings section for more information.
Custom Photo Log
The photo log setting, when activated, will take pictures in an interval. The
possible intervals are:
• 1 second
• 2 seconds
• 5 seconds
Camera Modes
This menu allows you to change the settings for the video mode. You can
select at which resolution and frame rate you want to record in.
Available resolutions and frame rates:
• 4K (3840 x 2160) at 30 FPS
• 4K (3840 x 2160) at 60 FPS
• 2.7K (2720 x 1530) at 30 FPS
• 2.7K (2720 x 1530) at 60 FPS
• 1080P (1920 x 1080) at 30 FPS
• 1080P (1920 x 1080) at 60 FPS
• 1080P (1920 x 1080) at 120 FPS
• 1080P (1920 x 1080) at 240 FPS
• 720P (1280 x 720) at 30 FPS
• 720P (1280 x 720) at 60 FPS
• 720P (1280 x 720) at 120 FPS
• 720P (1280 x 720) at 240 FPS
Video Settings
www.divebou
tik.co
m
20 21
Advanced
The advanced submenu contains items that are less commonly used.
Reset All Settings
To restore the factory setting, activate this mode.
Calibrate Depth Sensor
If the depth is not showing exactly 0.0 on the surface, it’s a good idea to
calibrate the sensor. By activating the depth sensor calibration. The sensor
will show 0.0 at the current pressure level.
Time/Date
The time/date submenu allows you to switch between 24H clock and 12H
clock. The time is set by the GPS signal, so it is important that the right time
zone is selected.
Units
In the units submenu, you can choose between meters and feet, Celsius
and Fahrenheit.
Idle Off (Auto Power Off)
In the idle off submenu, you can choose if the camera should turn off after
a given time, if the camera is not submerged, recording, or connected to
Wi-Fi. You can choose between:
• Never
Camera Modes
Custom Media Viewer
The media viewer allows you to look through the pictures that were taken.
Click on the activation switch to navigate through the pictures. The newest
pictures are shown first. By holding, a menu will appear. This menu allows
you to reverse the direction or go back to the first photo.
Auto Record
The camera can start a video recording at a certain depth when the auto-
record is activated. The video mode is the only mode that supports auto-
record.
The depths at which the camera can start a recording by itself are:
• 0.5 meter / 2 feet
• 1.5 meters / 5 feet
• 3 meters / 10 feet
• 6 meters / 20 feet
Camera Modes
• 10 seconds
• 60 seconds
• 120 seconds
To start the photo log, go to the custom mode that has the photo log
assigned. Hold the activation switch for 1 second to start the photo log. To
stop the photo log, hold the activation switch for 1 second.
www.divebou
tik.co
m
22 23
• 1/60
• 1/120
• 1/240
• 1/500
• 1/1000
• 1/2000
• 1/4000
• 1/8000
The options for ISO are:
• 100
• 200
• 400
• 800
• 1600
• 3200
• 6400
Camera Modes
Manual Settings
The manual settings submenu gives you further adjustment possibilities for
the image quality.
Reset Manual Settings
By resetting the manual settings, all manual options will be set to auto.
White Balance
You can select to have a fixed white balance at a certain Kelvin. The options
are:
• 3500K
• 5000K
• 5600K
• 6500K
The values above will make the image appear neutral when using lights with
the same color temperature as the value.
Exposure
The exposure submenu lets you set the shutter speed and ISO.
The options for exposure are:
• 1/30
• 10 min
• 20 min
Camera Modes
www.divebou
tik.co
m

24 25
Location
The position mode lets you see your current location. The camera gets the
current location based on the GPS antenna on top of the camera. To get the
best signal, the camera needs to be outside and above water.
The camera will not immediately get a position. It can take some time for the
camera to find nearby satellites.
The current position can be displayed in two different ways: Decimal De-
grees (DD) and Degrees/Minutes/Seconds (DMS). To switch between the
modes, click once on the activation switch.
Camera Modes
Power
The power screen is the first screen you see when you turn on the camera.
You can see the current depth, max depth, time, and remaining space on
the SD-card on the power screen.
Camera Modes
Dive Log
The dive logs mode lets you see your dive graph live.
The graph will take shape as you dive.
If you have dived with the camera before, you can see your previous dive
logs by clicking on the activation switch.
The number in the right bottom corner indicates the number of dive logs
and the current position.
The max depth for the specific dive is also displayed in the bottom left
corner.
www.divebou
tik.co
m
26 27
Battery
The Paralenz Vaquita comes with an integrated LiPo 2000 mAh battery.
Use the included USB-C cable for charging. Charge the camera through your com-
puter or use a wall charger – preferably a 2.1 A USB power adapter. See section 2.4
for information about how to charge the battery.
WARNING: Do not use the camera or the battery if it has been damaged – for exam-
ple, if cracked or punctured. Disassembling or puncturing the battery can cause an
explosion or fire. Do not store the camera where prolonged exposure to extreme tem-
peratures can occur because it can cause permanent damage. Do not dry the cam-
era or battery with an external heat source such as a microwave oven or hairdryer.
Do not store your battery with metal objects. If the battery terminals come in contact
with metal objects, the battery may “short out” and cause a fire. Do not attempt to
remove or change the battery.
Charging The Battery
Software Updates
Software updates of the camera can be done through the app or by placing a
firmware file on the SD-card.
To update through the app, download our Paralenz app, and go through the app’s
instructions.
To update the software manually, follow the following steps:
1. Download the latest firmware for your camera from www.paralenz.com.
2. Copy the file ending with .plf onto the root of an empty SD-card (Not in a folder).
3. Make sure the battery has at least 50% power left or is connected to power. This
is essential. You risk breaking your camera if this is not followed.
4. Insert the SD-card into the slot when the camera is on, or turn the camera on
while the SD-card with the firmware is inserted.
5. The camera will display “Updating.. Camera will restart”. The camera will restart.
Do NOT turn the camera on. This will happen automatically.
6. The camera is now ready to be turned on, with the new firmware installed.
www.divebou
tik.co
m
28 29
Troubleshooting
If The Camera Freezes Or Won’t Turn On
In the case of the camera freezing and not responding, you can always do a hard
reset:
1. Turn the selector ring to the power position.
2. Plug in the charger.
3. Hold the activation switch for 10 seconds.
- The camera will now reboot.
If The SD-card Needs To Be Reformatted
When formatting the memory card on a PC/MAC, it needs to be formatted with the
FAT32 format (32kb) for up to 32 GB and ex-FAT for 64 GB cards.
The SD-card can also be formatted through the camera.
Formatting the SD-card will delete all data, so make sure to save the footage you
want to keep on your computer before formatting the card.
Warranty
The warranty covers all manufacturing defects and faults in design. During the war-
ranty period, Paralenz will replace any defective units with a new or refurbished unit
at our discretion.
The warranty does not cover depletion of the battery or results from normal wear
and tear. It also does not cover unauthorized repairs, negligence, improper use or
accidents.
The warranty period begins from the date of purchase.
The warranty does not cover commercial or rental use.
In case you experience any fault with the Paralenz Dive Camera in the warranty peri-
od, please go to www.paralenz.com/support and fill in a warranty claim, to start the
replacement process.
For further information on how the warranty applies to your country please visit
www.paralenz.com/support.
www.divebou
tik.co
m
30 31
Precautions
The battery should be used in a temperature range from 14° to 104° F (-10° to 40°
C). Use of the battery in an environment above 104° F (40° C) can lead to a fire or
explosion. Use of the battery below 14° F (-10° C) can lead to permanent damage.
DO NOT charge the battery until it cools down to near room temperature. Charging
the battery outside of the temperature range of 41° to 104° F (5 to 40° C) may lead
to leakage, overheating, or battery damage.
Precautions
General
The Vaquita camera is primarily made for underwater use. If the camera is used
above water there is a risk of it overheating which will result in the camera shutting
down until the temperature is stabilized.
To Avoid Malfunction, Explosion, Or Fire
Do not microwave, open, drop, puncture, take apart, bend, crush, paint, or incinerate
the camera.
Do not solder or glue parts onto the camera and do not insert foreign objects into
any open-ings, such as the Micro USB port.
Do not use the camera if it is damaged, this includes a puncture, missing O-ring, or
water inside and do not attempt to remove or change the battery.
Do not dry the camera in an oven, with a hairdryer or any other external heat source,
espe-cially open fire.
Do not use the Paralenz Dive Camera for dives deeper than 250M/820F/26 ATM.
When opening and charging the camera, make sure that your hands are not wet, and
that water from other sources cannot enter the camera or charger. This may cause
electrical shock.
The Paralenz Dive Camera should not in any way be used as a dive computer, or as a
sup-plement to a dive computer.
When charging, make sure the charger is a USB type charger, of max 5V, or use a
USB plug on a computer.
If the front lens on the Paralenz Dive Camera should break, take care to avoid injury.
Keep out of reach of children.
www.divebou
tik.co
m
32 33
Regulatory Information
CE mark indicates that this product complies with the European requirements for
safety, health, environment and customer protection.
The RCM is the compliance mark for all applicable Australian Communications and
Media Authority (ACMA) regulatory arrangements, including all technical and re-
cord-keeping requirements.
This device is certified pursuant to two different Part 15 rules sections.
The Bluetooth® word mark and logos are registered trademarks owned by Bluetooth
SIG, Inc. and any use of such marks by Paralenz is under license.
This symbol indicates separate collection of waste batteries in the EU countries.
Please do not throw the batteries into domestic refuse. Please use the return and
collection systems available in your country for the disposal of waste batteries.
Regulatory Information
The Wi-Fi CERTIFIED logo is a registered trademark of the Wi-Fi Alliance.
iOS and App Store are registered trademarks of Apple Inc.
Android and Google Play are registered trademarks of Google Inc.
www.divebou
tik.co
m
34 35
FCC Statement
WARNING: Changes or modifications to this unit not expressly approved by the party
responsible for compliance could void the user’s authority to operate the equipment.
NOTE: This equipment has been tested and found to comply with the limits for a
Class B digital device, pursuant to Part 15 of the FCC Rules. These limits are de-
signed to provide reasonable protection against harmful interference in a residential
installation. This equipment generates, uses and can radiate radio frequency energy
and, if not installed and used in accordance with the instructions, may cause harmful
interference to radio communications.
However, there is no guarantee that interference will not occur in a particular in-
stallation. If this equipment does cause harmful interference to radio or television
reception, which can be determined by turning the equipment off and on, the user is
encouraged to try to correct the
interference by one or more of the following measures:
• Reorient or relocate the receiving antenna.
• Increase the separation between the equipment and receiver.
• Connect the equipment into an outlet on a circuit different from that to which the
receiver is connected.
• Consult the dealer or an experienced radio/TV technician for help
The device must not be co-located or operating in conjunction with any other antenna
or transmitter.
This device complies with Part 15 of the FCC Rules. Operation is subject to the
following two conditions : (1) this device may not cause harmful interference, and (2)
this device must accept any interference received, including interference that may
cause undesired operation.
FCC Statement
This device complies with FCC’s radiation exposure limits set forth for an uncon-
trolled environment.
www.divebou
tik.co
m

36 37
IC Statement
This device complies with RSS247 of Industry Canada. Cet appareil se conforme à
RSS247 de Canada d’Industrie. This device complies with Industry Canada li-
cense-exempt RSS standard(s). Operation is subject to the following two conditions:
(1) this device may not cause interference, and (2) this device must accept any in-
terference, including interference that may cause undesired operation of the device.
appareils radio exempts de licence. Son fonctionnement est sujet aux deux condi-
tions suivantes: (1) le dispositif ne doit pas produire de brouillage prejudiciable, et (2
ce dispositif doit accepter tout brouillage recu, y compris un brouillage susceptible
de provoquer un fonctionnement indesirable.
The device must not be co-located or operating in conjunction with any other antenna
or transmitter.
Radiation Exposure Statement: The product comply with the Canada portableRF
exposure limit set forth for an uncontrolled environment and are safe for intended
operation as described in this manual.
Déclaration d’exposition aux radiations : Le produit est conforme aux limites d’expos-
sition pour les appareils portableRF pour les Etats-Unis et le Canada établies pour
un environnement non contrôlé.
This device complies with FCC and ICradiation exposure limits set forth for an uncon-
trolled environment.
Cet appareil est conforme aux limites d’exposition aux rayonnements de la FCC et de
l’ICétablies pour un incontrôlé environnement.
SAR
This device meets the government’s requirements for exposure to radio waves. This
device is designed and manufactured not to exceed the
emission limits for exposure to radio frequency (RF) energy set by the Federal Com-
munications Commission of the U.S. Government.
The exposure standard for wireless devices employs a unit of measurement known as
the Specific Absorption Rate, or SAR. The SAR limit set by the FCC is 1.6 W/kg. Tests
for SAR are conducted using standard operating positions accepted by the FCC
with the device transmitting at its highest certified power level in all tested frequency
bands.
Although the SAR is determined at the highest certified power level, the actual SAR
level of the device while operating can be well below the
maximum value. This is because the device is designed to operate at multiple power
levels so as to use only the poser required to reach the network.
In general, the closer you are to a wireless base station antenna, the lower the power
output. While there may be differences between the SAR levels of various devices
and at various positions, they all meet the
government requirement.
www.divebou
tik.co
m
38
Support
Paralenz is dedicated to providing the beZst possible service. To reach our Customer
Support, visit paralenz.com/support or contact [email protected]
www.divebou
tik.co
m
www.divebou
tik.co
m